CorobTECH 2.0 User Manual - English
78
User's Manual CorobTECH Version 2.0 Corob S.p.A.
-
Upload
prizaias-soares -
Category
Documents
-
view
501 -
download
37
Transcript of CorobTECH 2.0 User Manual - English

User's Manual
CorobTECHVersion 2.0
Corob S.p.A.
Code: PU006C020014000
© 2003 COROB S.p.A.
CorobTECHUser's ManualVersion 2.0© COPYRIGHT 2003, Corob ® S.p.A.All right reserved
No part of this manual may be reproduced in any form, or by anymeans, electronic or mechanical, including photocopying and recording, withoutprior written permission of Corob ® S.p.A.
Information in this manual is subject to change without notice and does notrepresent a commitment on the part of Corob ® S.p.A. Any reference to companies,names, dates and addresses used in the screens and/or examples is purelyaccidental, unless otherwise stated, and is intended solely to clarify use of theCorob product.
Corob ® S.p.A. shall not be liable for technical or editorial errors or omissions madeherein; nor for incidental or consequential damages resulting from the performanceor use of this material.
The names of the products used in this manual might be trademarks or registeredtrademarks of their respective companies.
If you require additional copies of this manual or further technical information aboutit, please write to:
COROB ® S.p.A.
Via Agricoltura 103 •••• 41038 San Felice s/P •••• Modena •••• Italy
Phone: + 39-0535-6633 •••• Fax: + 39-0535-663400
Printed in Italy

CorobTECH User's Manual Contents •••• i
Contents
Introduction 5Information about CorobTECH ...............................................................................5Minimum system requirements ...............................................................................5Conventions ............................................................................................................6
Parts of a window.......................................................................................6Use of the mouse.......................................................................................7Use of the keyboard...................................................................................7
Terminology ............................................................................................................8
Installation 9Installing CorobTECH .............................................................................................9
Installing the data structure........................................................................9Uninstalling CorobTECH..........................................................................10
Starting CorobTECH 11How to start CorobTECH ......................................................................................11The screen of CorobTECH ...................................................................................11
Menus ......................................................................................................13Shortcut menu..........................................................................................14Toolbars ...................................................................................................15
Exiting CorobTECH...............................................................................................15
Using CorobTECH 17Workspace and information bar ............................................................................17Creating a new dispenser .....................................................................................18Selecting the current dispenser ............................................................................19
Changing the description or extended information ..................................19Changing the default dispenser ...............................................................20
Deleting a dispenser .............................................................................................20Properties of the current dispenser.......................................................................20
Automatic shelf ........................................................................................21Shelf reference plane...............................................................................22Automatic puncher ...................................................................................22Manual puncher .......................................................................................22Autocap ....................................................................................................22Automatic plugger ....................................................................................23Door .........................................................................................................23Splitting formula .......................................................................................23Automatic washing...................................................................................24Background dispensing............................................................................24Motors running during calibration.............................................................24
Configuring the current dispenser.........................................................................25Dispenser type .........................................................................................25Serial number...........................................................................................26Serial port.................................................................................................26Dispenser address ...................................................................................26Simultaneous dispensing threshold .........................................................26

ii •••• Contents CorobTECH User's Manual
Monimatic unit ......................................................................................... 26Pump releasing time................................................................................ 26Recirculation time.................................................................................... 27Recirculation pause ................................................................................. 27Stirring time ............................................................................................. 27Stirring pause .......................................................................................... 28Dispensing waiting time........................................................................... 28Dispensing test quotient / Dispensing test remainder ............................. 28Dispensing test pause ............................................................................. 28
Colorant assignment............................................................................................. 28How to associate colorants with circuits.................................................. 30How to delete the association between colorants and circuits................ 30
Edit levels ............................................................................................................. 30How to edit levels .................................................................................... 32
Add/Delete circuits................................................................................................ 32Dispenser commands........................................................................................... 34
General commands ................................................................................. 35Reset 35Initialization 35Recirculation 35Stirring 35Test 36Hardware errors 36
Purge commands .................................................................................... 37Parallel 37Sequential 38
Autocap commands................................................................................. 38Open 38Close 38Plugging position 38Punch/Plug 38
Shelf commands...................................................................................... 38Up 39Down 39Move to 39
Bellows commands.................................................................................. 39Commands for the automatic washing .................................................... 40
Manual dispensing................................................................................................ 40Multiple circuits ..................................................................................................... 41
Colorant in more than one cistern ........................................................... 42Simultaneous dispensing 43
Colorant in a single cistern ...................................................................... 43Editing thresholds .................................................................................... 44
Pump settings....................................................................................................... 44Modifying the pump type ......................................................................... 45Modifying the Change value.................................................................... 46Modifying Constants ................................................................................ 47
Create/Modify pumps ........................................................................................... 47Creating a custom pump type ................................................................. 48Modifying and saving data for a custom pump type................................ 48Deleting a custom pump type.................................................................. 49Backup and restore of pump types.......................................................... 49How to operate in the dialog box Edit Speeds and Changes.................. 49Calibration file for a pump type................................................................ 50
Calibration............................................................................................................. 52Purpose of calibration.............................................................................. 53Preparing for calibration .......................................................................... 54
Balance 55Can 56Purge 56

CorobTECH User's Manual Contents •••• iii
Levels 56Calibration procedure...............................................................................56
Aborting and pausing calibration 59Details 59
Dispensing test......................................................................................................60Dispensing test reports .........................................................................................62Single recirculation and Single stirring..................................................................62
Single stirring ...........................................................................................63Single recirculation...................................................................................64
Models...................................................................................................................65Creating a new model ..............................................................................65Deleting a model ......................................................................................66
Multiple tinting systems.........................................................................................66
Configuration 67Language ..............................................................................................................67Database management.........................................................................................67
Backup .....................................................................................................67Restore.....................................................................................................68
Specific weight settings.........................................................................................69Standard specific weights ........................................................................70Real specific weights ...............................................................................70
Cansize settings....................................................................................................71Tolerance on cansize height ....................................................................72Shelf reset ................................................................................................72Reference position ...................................................................................72
Preferences...........................................................................................................73Close Autocap after dispensing ...............................................................73Hardware errors .......................................................................................73Data paths................................................................................................74
Appendix 75Use of the shortcut keys .......................................................................................75

iv •••• Contents CorobTECH User's Manual

CorobTECH User's Manual Introduction •••• 5
Introduction
Information about CorobTECHCorobTECH is the program for configuration and calibration of all Corob automaticdispensers.
It operates in Microsoft Windows 95/98/ME/XP and Microsoft Windows NT/2000environments.
It is supplied as a support for all Corob programs dedicated to operating anautomatic dispenser (e.g.: CorobSHOP, CorobCARD, CorobCARD Plus,CorobWORLD).
The purpose of CorobTECH is to configure any type of Corob dispenser foroptimum management by the dispensing program.
CorobTECH offers functions for accurate calibration of the dispenser and to verifythe accuracy of the amounts dispensed.
Commands may be sent directly from CorobTECH to check the dispenser operationand configure all of the automatic accessories that equip the dispenser.
Furthermore, CorobTECH controls, to all effects, the actual settings of thedispenser it is connected to: any devices and/or functions on the dispenser that arenot properly set up via CorobTECH will not work.
CorobTECH can back up and subsequently restore all configuration and calibrationdata; this ensures immediate restoration of the machine configuration in the eventof a breakdown that interferes with the data saved on the hard disk of thecomputer.
This document supplies all the information you need on how to learn and to workwith the program. We suggest you to read this document carefully and in all itsparts before starting to use the program.
First of all, learn how to use Windows operating system. Do not attempt to install oruse Corob software until you are comfortable using Windows environment.
Minimum system requirementsCorobTECH is a program to be used on the Personal Computer that equips aCorob automatic dispenser.
If the Personal Computer is supplied by Corob, both the hardware features andoperating system are pre-configured to ensure optimum performance of thesoftware package.

6 •••• Introduction CorobTECH User's Manual
For Personal Computers purchased directly by the customer and, in any case, notsupplied by Corob, it is advisable to select models with medium-high performancecapabilities available on the market at the time of purchase.
In any case, it is important to respect the following minimum requirements:
• IBM® PC and compatibles
• Intel® Pentium III Processor 400 Mhz, 600 Mhzrecommended
• Windows® 95/98/ME/XP, Windows® NT® Workstation orWindows® 2000
• 64 MB RAM or more recommended
• Hard disk 5 Gb
• SVGA compatible display with minimum 4 MB RAM
• Mouse or Trackball
• CD-ROM drive 24X
• 2 serial communication ports (COM1, COM2), additionalserial ports required if used with Color matching or labelprinting
• 1 parallel port (LPT1)
ConventionsBelow are a few general conventions regarding the use of a program in theWindows environment, and conventions used in this document. For a more detaileddescription of the Windows dialog boxes, see the Microsoft Windows Help Guide.
Parts of a windowThis section describes the main elements of Windows dialog boxes.
The Minimize button in the title bar of a windowallows you to minimize the window, or reduce themain window to a button in the Windows taskbar.The Close button in the title bar of a window allowsyou to close the window or exit the program.The Maximize button in the title bar of a window,allows you to enlarge the window so that it coversthe entire desktop, the taskbar excluded.The Restore button in the title bar of a window,allows to return the window to its former size.The OK button carries out the choices made withina dialog box.The CANCEL button tells the program to ignore anychanges made to that point in the dialog box, andreturns the user to the previous situation.The control buttons and function buttonsproduce an action.The option buttons offer two or more mutuallyexclusive choices. To select one of the possiblechoices, click the corresponding button. Contrary tocheck boxes, you may select only one of the optionsin the group.

CorobTECH User's Manual Introduction •••• 7
A check box is enabled if the corresponding optionis activated, or when a check mark appears inside it;it is inactive if the corresponding option is disabled,thus when the check box is empty. Contrary tooption buttons, you may check all of the optionscontained in a group of check boxes.The drop-down list boxes offer a list of options;scroll through the list by clicking the arrow next tothe box, and select an item by double-clicking it, orselect it and click OK. If the list is too long, the boxwill have a scroll bar; in this case you may scrollthrough the list by clicking the arrows or draggingthe bar with the mouse.
In the numerical boxes it is possible to either typevalues via the keyboard or use the correspondingselection boxes (arrows) that allow you to changethe values using the mouse; the upper arrowincreases the value shown, while the lower arrowdecreases it. You may click an arrow to change thevalue by a single increment, or hold the mousebutton down on the arrow to change the value bymultiple increments. In the text boxes you musttype text using the keyboard.
Use of the mouseTo work with CorobTECH it is advisable to use a mouse. Here below you will findsome conventions concerning the use of the mouse.
• The mouse left button is assumed as the main button.
• When the use of the secondary button is required, this buttonwill be referred to as the mouse right button.
• “Point” means to position the mouse pointer on the desiredobject.
• “Click” means to point to the desired object and then pressand release the main mouse button in quick succession.
• “Double-click” means to point to the desired object andthen press and release the main mouse button twice in quicksuccession.
• “Drag the mouse” means to point to the desired object,press the main mouse button, and while continuing to holdthe button down, move the item in the desired position. Whenthe action is completed you release the mouse button.
Use of the keyboardAs for all Windows programs, CorobTECH can also operate with the keyboardalone. To learn how to work with a Windows application using the keyboard, refer tothe Windows User’s Guide and to the appendix "Use of the shortcut keys" on page75.
Here below you will find some conventions concerning the use of the keyboard.
• “Arrow keys” or “Cursor keys” indicate the up, down, leftand right arrow keys.

8 •••• Introduction CorobTECH User's Manual
• To execute some actions or procedures with the keyboard, itis often required to press more than one keystroke at thesame time or in succession. For instance, Ctrl+F4 means topress and hold down the CTRL control key and F4 at thesame time; Alt, C means to press the ALT key and thenrelease it before pressing C.
• Press TAB to cycle through the options inside a window.
• Use the ALT+SPACEBAR keyboard shortcut to open thecontrol menu.
• Use the ENTER key instead of the OK button and the ESCkey instead of the Cancel button.
TerminologyBelow is an explanation of the terminology used in the program and manual.
Calibration Procedure for determining the parameters needed to regulate thedispensing process.
Can Can, canister or drum, pre-filled with base product used fordispensing.
Cansize Can of specific sizes. The cansize may normally be selected fromamong those available in the current system in relation to theproduct and base selected.
Catalog Unique data structure (tinting system) identification system thatallows you to record information (custom formulas, statistical data,etc.) about various data structures. The saved data are filteredbased on the tinting system to which they refer. Users with severaltinting systems on the same machine benefit from this system.
Data structure orDatabase
A database organization of all information about a tinting systemsuch as colorants, bases, cansizes, formulas, etc. needed to runthe program.
Default The predefined setting of a parameter, if not otherwise stated.Hardware error Fault or malfunction detected on the machine mechanical or
electronical components.

CorobTECH User's Manual Installation •••• 9
Installation
Installing CorobTECHThe installation program decompresses the files on the disks so that they may beopened and used on your hard disk.
Important - To avoid problems during installation, disable any virus protectionprograms installed on the computer; these may be re-activated when installation iscomplete.
To install CorobTECH:
1. Place the “Software & Colormatching” CD on your computerCD-ROM drive.
If your CD-ROM drive has AutoPlay enabled, the setup will start automatically, inthis case skip to step 3. If the setup does not start automatically continue with step2.
2. Open My Computer and double click the CD-ROM icon.
The “Corob software menu” appears on the screen.
3. Choose the desired category and then click the button withthe name of the software you want to install. Follow the on-screen instructions to finish installing the selected software.
When installation of a software is complete, the “Corob software menu” will appearagain.
4. Repeat the previous steps to install other programs or clickthe Exit button to quit the installing procedure.
The CorobTECH icon will appear on the desktop when installation is complete. Tostart CorobTECH follow the instructions given in chapter "How to start CorobTECH"on page 11.
Technical note: To simulate the machine, add the following setting to theAUTOEXEC.BAT system file: SET DSPDEBUG=256.
Installing the data structureIn order to configure the Corob automatic dispenser, you must also install the datastructure (or database) for the tinting system used, generally provided by themanufacturer of the tinting system and usually available on floppy disks.

10 •••• Installation CorobTECH User's Manual
1. Insert the first floppy disk labeled “Database - InstallationDisk” into the computer floppy disk drive.
2. Click the Start button and choose Run.
3. Type a:\install or a:\setup (if a:\ is the unit associated to thefloppy disk drive) and click OK. Installation will take placeautomatically; simply insert the disks in the drive whenrequested by the program.
Data structures created and maintained with ColorLAB (version 3.5 or later) aremarked by an univocal identification number (ID) that allows management of datathrough the Catalog.
The installation program of the data structure includes correctly the database in theCatalog. The data structure must be installed only by following the proceduredescribed above. Do not transfer databases by copying data from one disk toanother.
It is possible to install several data structures.
If the program must manage multiple dispensers, you may associate eachdispenser with the relevant data structure (thus, the data structure with thecolorants present on the machine).
As soon as a formula is chosen from a data structure in the dispensing program,the program will control the dispenser the data structure is associated with.
If the program controls a single dispenser, the data structures must have the samecolorant list (chapter "Multiple tinting systems" on page 66).
The CorobTECH program may run even without a data structure installed.
The dispenser may be configured and calibrated even without the data structure,which can be installed afterwards.
In order for Corob programs to operate, it is instead essential that the data structurebe installed and the canisters configured properly, including the associationbetween colorants and canisters, which cannot be done from CorobTECH without adata structure (chapter "Colorant assignment" on page 28).
Uninstalling CorobTECHTo uninstall CorobTECH from the computer:
1. Close the program.
2. On the taskbar, click the Start button to open the start menu.
3. Choose Settings > Control panel. The Control Panel opens.
4. Double-click Add/Remove Programs. The dialog boxProperties - Add/Remove Programs opens.
5. If necessary, click the Add/Remove tab to bring it to front,then scroll the list and select CorobTECH.
6. Click the Add/Remove button. The uninstall program isstarted.
7. Follow the on-screen instructions.

CorobTECH User's Manual Starting CorobTECH •••• 11
Starting CorobTECH
How to start CorobTECHTo start CorobTECH carry out the following procedure:
• Click the Start button, then choose Programs.
• Choose the Corob Windows Software folder then click theprogram CorobTECH.
or
• Double click the corresponding icon on the desktop.
The screen of CorobTECHWhen the program is started, the screen displays the configuration of the currentdispenser, if present. Otherwise the program displays the empty workspace.
The following is a description of the areas of the CorobTECH screen.
Title bar Shows the name of the program and the control icon to accessthe controls menu.
Menu bar Open the menus on the bar to display the CorobTECHcommands.
Toolbars Display the buttons for many of the menu commands. To executea command, click the corresponding toolbar button. If a commandis not available, the button will be disabled.
Workspace Shows a table containing general information about the circuits ofthe current dispenser.
Information bar Located at the bottom of the CorobTECH window, displaysinformation about the current data structure and the position ofthe configuration files.

12 •••• Starting CorobTECH CorobTECH User's Manual
Figure 1
As many CorobTECH windows, the main window (Figure 1) may be:
• enlarged so that it covers the entire desktop (taskbarexcluded), by clicking the button in the upper right cornerof the screen, or by clicking the control icon in the upper leftcorner on the title bar and choosing Maximize.
• restored to its former size, by clicking the button in theupper right corner of the screen, or by clicking the controlicon in the upper left corner on the title bar and choosingRestore.
• minimized to a button in the Windows taskbar, by clicking the button in the upper right corner of the screen, or by
clicking the control icon in the upper left corner on the titlebar and choosing Minimize.
• to change its size, drag the window’s borders or corners, orclick the control icon in the upper left corner on the title barand choose Resize; the mouse pointer will change to adouble-headed arrow , use the arrow keys to enlarge orshrink the window and confirm with the Enter key of thekeyboard.
• to move the window drag its title bar, or click the control iconin the upper left corner on the title bar and choose Move; themouse pointer will change to a double-headed arrow , usethe arrow keys to move the window and confirm with theEnter key of the keyboard.
Title bar
Menu bar
Information bar
Toolbars
Workspace

CorobTECH User's Manual Starting CorobTECH •••• 13
MenusEach menu has a set of commands or operations to be carried out. To select acommand, open a menu by clicking its title, then click the desired menu item.
Alternatively, you can press at once the Alt key and the underlined letter in themenu (e.g., F for the File menu). Once you have opened the menu, press the keycorresponding to the underlined letter in the item, or move the cursor bar with thearrow keys and press OK to confirm item selection.
Note - Menu items that appear dimmed do not apply or are unavailable.
The menu bar contains the following menus, which allow you to access the variousfunctions:
File
New dispenser... to create a new dispenser
Printer setup... to select the printer from among those installed on thecomputer or to change the printing options
Print to printer... not implementedPrint to file... not implementedExit to quit the program
Dispensers
Select dispenser... to select the current dispenser
Properties... to change the properties for the current dispenser
Configuration...to change the configuration parameters for the currentdispenser
Dispenser commands... commands to control dispenser operation
Manual dispensing... to check the operation of the dispenser by dispensinga formula created on the spot
Delete current dispenser to delete an existing dispenser
Models
Save dispenser as... to create a new model based on the settings of thecurrent dispenser
Delete model... to delete a model
Canisters
Edit levels... to determine canister capacities and filling levels
Multiple tinting systems... to associate a data structure with each dispenser
Circuits
Colorant assignment... to assign colorants to the dispenser circuits
Calibration...to start the automatic calibration procedure of thedispenser
Dispensing test... to start the calibration test procedure
Dispensing testreports...
to print in PDF format the dispensing tests you havecarried out
Add circuits... to add new circuits
Delete circuits... to delete existing circuits
14 •••• Starting CorobTECH CorobTECH User's Manual
Multiple circuits...to configure the circuits which were associated with asame colorant
Pump settings...to configure the pump types installed on the dispenserand set the speed changes for each circuit
Create/Modify pumps...to create new pump types, by setting the pump motorspeeds according to the amount to be dispensed
Single recirculation to start the single recirculation processSingle stirring to start the single stirring process
OptionsSet font... to change the font used in the workspaceDefault font to restore the default font used in the workspace
Language… to change the program operating language
Specific weight settings... to change the standard and real specific weights forcolorants
Cansize settings...to change the settings for the automatic shelf basedon the type of cansize used
Databasemanagement...
data backup and restore functions
Preferences... to change the general preferences for many programfunctions
HelpContents... to open Help onlineAbout... to display program version
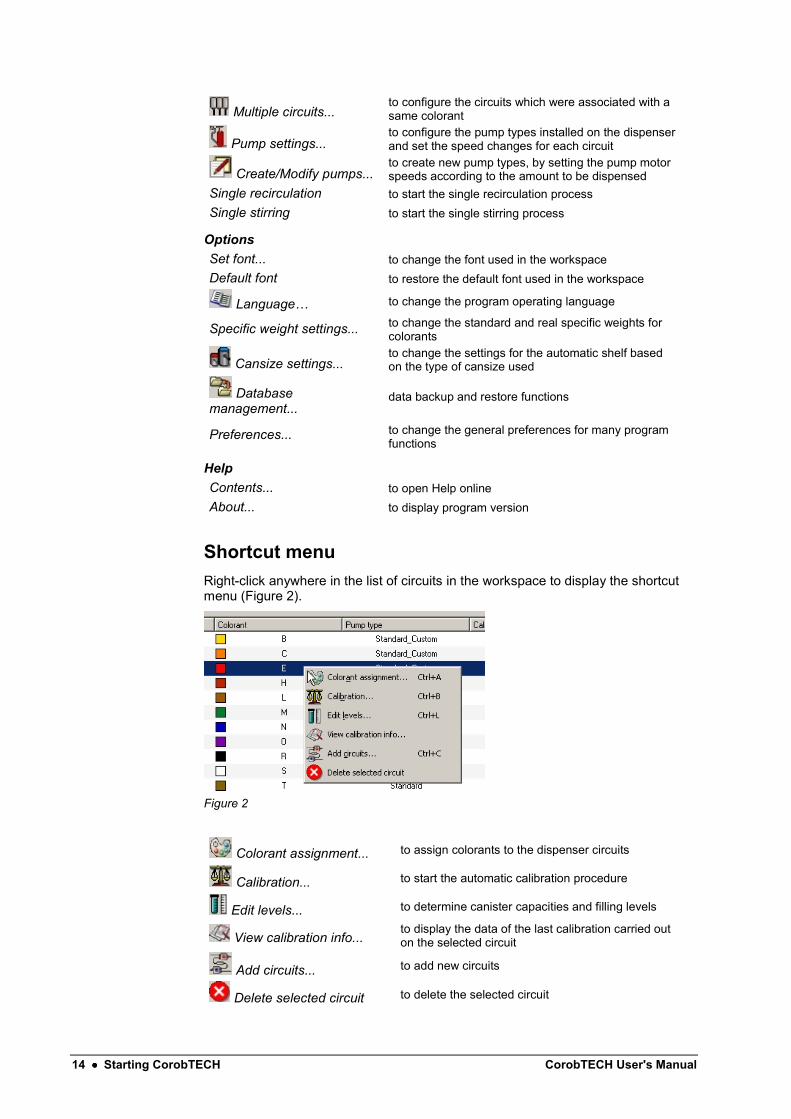
Shortcut menuRight-click anywhere in the list of circuits in the workspace to display the shortcutmenu (Figure 2).
Figure 2
Colorant assignment... to assign colorants to the dispenser circuits
Calibration... to start the automatic calibration procedure
Edit levels... to determine canister capacities and filling levels
View calibration info...to display the data of the last calibration carried outon the selected circuit
Add circuits... to add new circuits
Delete selected circuit to delete the selected circuit
CorobTECH User's Manual Starting CorobTECH •••• 15
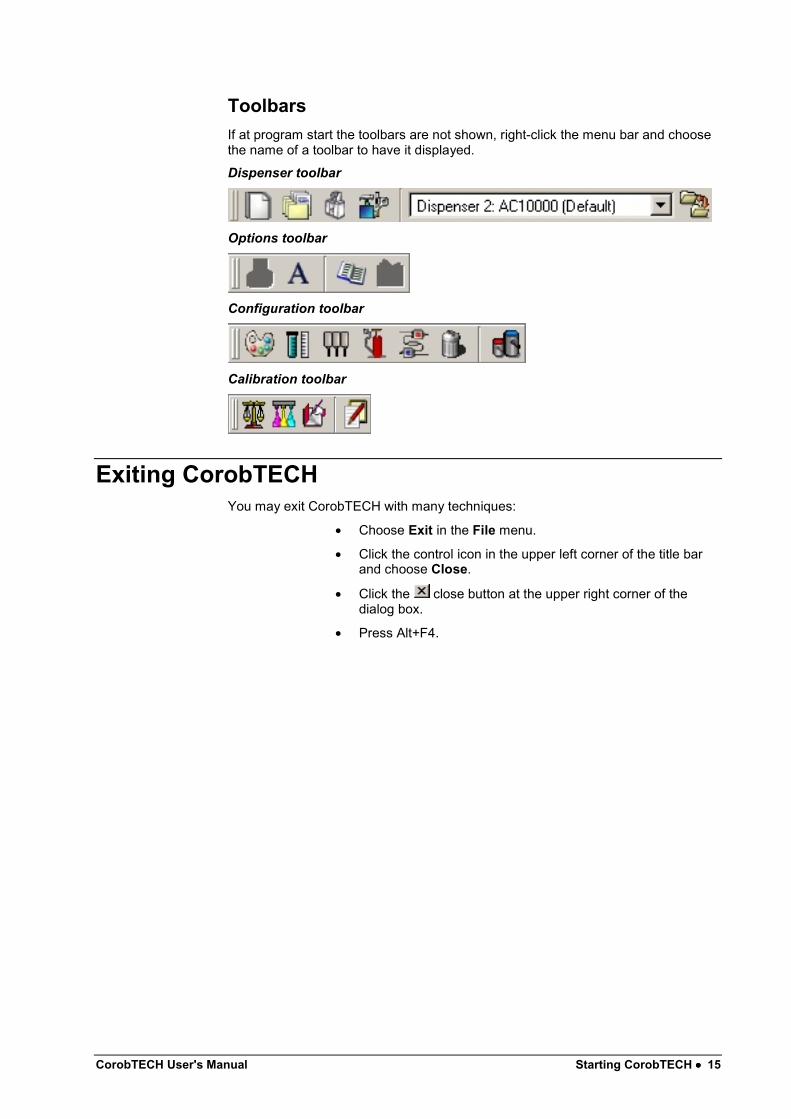
ToolbarsIf at program start the toolbars are not shown, right-click the menu bar and choosethe name of a toolbar to have it displayed.
Dispenser toolbar
Options toolbar
Configuration toolbar
Calibration toolbar
Exiting CorobTECHYou may exit CorobTECH with many techniques:
• Choose Exit in the File menu.
• Click the control icon in the upper left corner of the title barand choose Close.
• Click the close button at the upper right corner of thedialog box.
• Press Alt+F4.

16 •••• Starting CorobTECH CorobTECH User's Manual

CorobTECH User's Manual Using CorobTECH •••• 17
Using CorobTECH
Workspace and information barWhen a dispenser is already available (chapter "Creating a new dispenser" on page18), the workspace displays the list of circuits in tabular form (Figure 3).
Figure 3
The name of the current dispenser, to which the data displayed in the workspacerefer, is shown in the list box present in the toolbar (Figure 4).
Figure 4
The workspace displays the characteristics of each circuit:
• circuit pump type (standard, bellow, Lab, etc.)
• information about calibration
• canister maximum level (capacity)
• current level of colorant contained in the canister
• colorant critical level
The current level of colorant is automatically updated following dispensing carriedout with either CorobTECH or dispensing programs.
The Colorant column also shows the name of the colorant associated with thecircuit and thus contained in the corresponding canister. If nothing appears in theColorant column, this means that colorants have not yet been assigned to the

18 •••• Using CorobTECH CorobTECH User's Manual
circuits (chapter "Colorant assignment" on page 28); in this case the information barwill read No tinting system selected.
The default data vary based on the dispenser model selected when created. Thedefault data may in any case be subsequently edited.
The information bar at the bottom of the window (Figure 5) displays, on the rightand in the center, the directories in which the dispenser configuration files reside,while on the left is information about the tinting system used by the currentdispenser (description and directory in which it resides).
Figure 5
While the program is in use, the name of the current dispenser will be shown in thetitle bar of the various dialog boxes, alongside the name of the window itself (Figure6). In any window it is thus always possible to determine to which dispenser thedata displayed refer.
Figure 6
Creating a new dispenserTo create a new dispenser, carry out one of the following operations:
• click the button in the toolbar
• choose New dispenser... in the File menu
• press Ctrl+N
Figure 7
In the Create a new dispenser dialog box (Figure 7), proceed as follows:
1. In the Dispenser model box, choose the desired model fromamong the different types of predefined dispensers; everypredefined dispenser model is designed to automaticallyconfigure the main features of the type of dispenser that youwish to create. Custom models will also be made available(chapter "Models" on page 65).
2. In the Description box, type the name for the new dispenserin the program, or leave the default text.
CorobTECH User's Manual Using CorobTECH •••• 19
3. In the Extended information box, enter a more accuratedescription of the type of machine being configured, or leavethe default text.
4. Enable the Default dispenser check box if you want theconfiguration of the newly created dispenser to be the oneused by the dispensing program. If only a single dispenser iscreated, it will become the default dispenser even if theDefault dispenser check box is not enabled.
5. Click OK to close the dialog box and create the newdispenser.
The workspace displays the default configuration for the dispenser model chosen.
Selecting the current dispenserTo select the current dispenser from the list of those available, carry out one of thefollowing operations:
• click the button in the toolbar
• choose Select dispenser... in the Dispensers menu
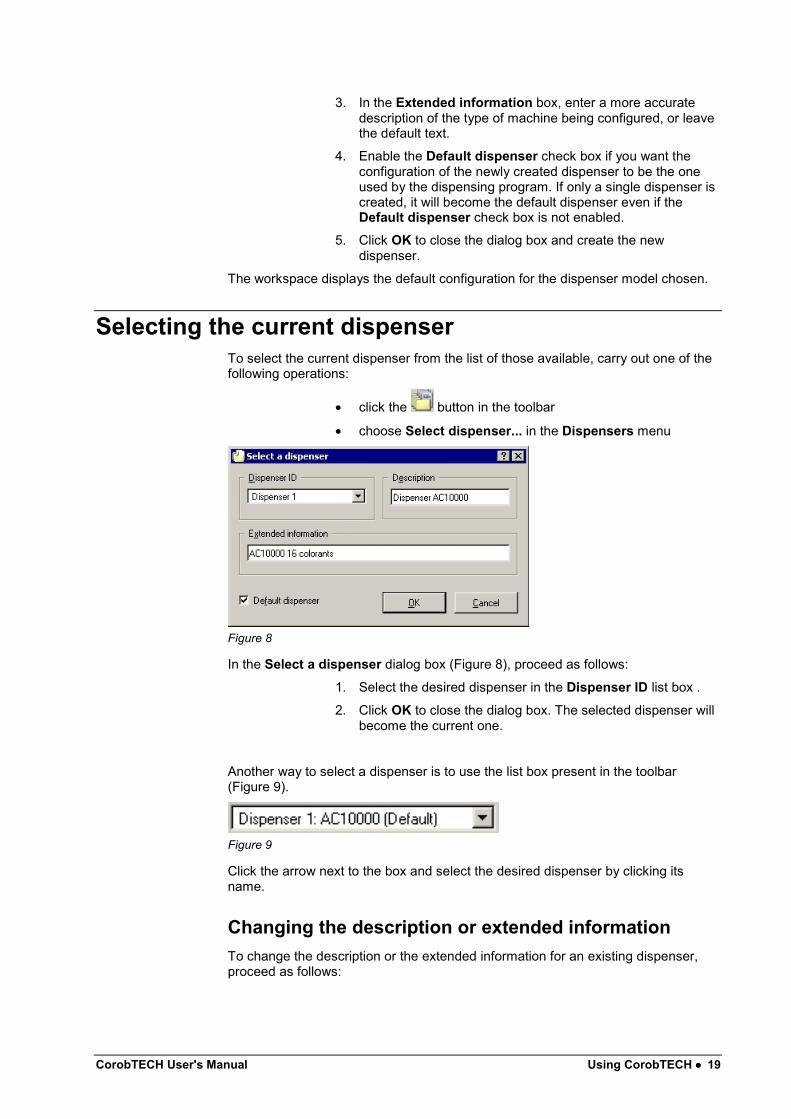
Figure 8
In the Select a dispenser dialog box (Figure 8), proceed as follows:
1. Select the desired dispenser in the Dispenser ID list box .
2. Click OK to close the dialog box. The selected dispenser willbecome the current one.
Another way to select a dispenser is to use the list box present in the toolbar(Figure 9).
Figure 9
Click the arrow next to the box and select the desired dispenser by clicking itsname.
Changing the description or extended informationTo change the description or the extended information for an existing dispenser,proceed as follows:

20 •••• Using CorobTECH CorobTECH User's Manual
1. Click the button in the toolbar or choose Selectdispenser... in the Dispensers menu.
2. Select the desired dispenser in the Dispenser ID list box.
3. Change the text displayed in the Description or Extendedinformation boxes.
4. Click OK to close the dialog box.
Changing the default dispenserTo change the default dispenser, proceed as follows
1. Click the button in the toolbar or choose Selectdispenser... in the Dispensers menu.
2. Select the desired dispenser in the Dispenser ID list box.
3. Enable the Default dispenser check box.
4. Click OK to close the dialog box.
Deleting a dispenserAttention - Deleting a dispenser will cause the configuration information --including all calibration data -- to be lost.
To delete a dispenser, proceed as follows:
1. Select the dispenser to be deleted (chapter "Selecting thecurrent dispenser" on page 19).
2. Choose Delete current dispenser in the Dispensers menu.
3. Click OK to confirm deletion.
Properties of the current dispenserTo change the dispenser properties, carry out one of the following operations:
• click the button in the toolbar
• choose Properties... in the Dispensers menu

CorobTECH User's Manual Using CorobTECH •••• 21
Figure 10
The Properties dialog box (Figure 10) displays the properties of the currentdispenser and allows you to edit them.
It is possible to configure the automatic accessories with which the dispenser isequipped (e.g. autocap or automatic puncher), as well as the dispensing andcalibration processes.
Important - After changing the dispenser properties, you must initialize themachine (chapter "Dispenser commands" on page 34).
The default data set in the Properties dialog box vary based on the dispensermodel selected when created. The default data may in any case be subsequentlyedited.
Automatic shelfThe Automatic shelf is a device that allows you to automatically position the cansunder the dispensing nozzles. If the dispenser is equipped with automatic shelf, thisaccessory must be enabled.
Since many types of shelves are available, only the automatic shelf managed viathe commands sent by the program to the dispenser, must be enabled.
The Photocell height box indicates the height (in millimeters) calculated betweenthe shelf surface in its lowest position and the point where the photocell that detectsthe can presence is located. As a reference point in determining the height,consider the highest part of the photocell lens. All calculations that determine thecorrect automatic position for the automatic shelf are based on this measurement.
22 •••• Using CorobTECH CorobTECH User's Manual
The Impulse box shows the displacement of the automatic shelf, both up anddown, for every impulse indicated by the rotation of the shaft of the actuator devicethat moves the shelf.
Shelf reference planeEnabling the Reference plane allows you to elicit a particular behavior by theautomatic shelf, even for just a few cans. The shelf always moves to a particularreference height, regardless of the selected can dimensions.
This function also makes it possible to have the shelf at the same height as a roll-conveyor, for example, to make it easier to move large cans under the dispensingnozzle center.
The shelf may be configured for positioning at the reference plane for each can inthe tinting system (chapter "Cansize settings" on page 71).
When dispensing the same formula into different cans, the shelf remains at thereference plane if the preferential shelf position has been configured for these cans,and if shelf resetting before positioning has been disabled.
To achieve this type of operation, the automatic shelf must be equipped with acontrol sensor on the can support surface.
The Height box indicates the height at which to position the shelf when a can isselected for which the reference plane is enabled. This height is expressed inmillimeters and must be calculated from the lowest shelf position.
If the value is 0 mm, the reference plane corresponds to the lowest shelf position.
Automatic puncherThis function allows you to configure the program to manage the automaticpuncher. The automatic puncher is a device that operates together with theautomatic shelf and allows you to perforate the can lid.
The Height box indicates the displacement (in millimeters) that the automatic shelfmust complete from the lowest position in order to punch the can. This height mustbe calculated between the surface of the shelf in its lowest position and the canholding plate of the puncher.
Manual puncherThe RONDO and JAZZO machines are equipped with a manual puncher with asensor capable of detecting the position of the puncher lever. This sensor makes itpossible to manage manual punching by means of the dispensing program. Thisaccessory must be enabled in order to enable manual punching management onthe RONDO and JAZZO dispensers.
AutocapThe Autocap, or automatic humidifier cap, is a device that keeps the dispensingnozzle center at a moisture level to prevent the colorant from drying out; this devicecontains a moistened sponge.
The autocap automatically opens before dispensing and closes immediatelythereafter, thanks to the commands coming from the program. If the dispenser isequipped with autocap, this accessory must be enabled.
Since many models of automatic caps are available, only the model managed viathe open and close commands sent by the program, must be enabled.

CorobTECH User's Manual Using CorobTECH •••• 23
The Opening time box indicates the time (in seconds) for which the autocap willopen before dispensing and close after dispensing. It is basically the cap maximummovement time.
Automatic pluggerThe Automatic plugger is a device allowing you to automatically insert a plasticplug in the punched can lid thanks to a rising movement by the automatic shelf. Theautomatic plugger may only be installed on dispensers already equipped withautomatic shelf and automatic puncher.
If the dispenser is equipped with the automatic plugger, this accessory must beenabled.
DoorThe protection door is a plastic panel that protects the user during perforation,autocap movement, dispensing and insertion of the plastic plug by the plugger.
To do so, it has a safety sensor that checks the protection door status. The controlsensor is only present if the dispenser is equipped with puncher or plugger; if thesensor is present, the protection door accessory must be enabled.
Otherwise, the dispenser may have only the plastic panel without the safety sensor.If the sensor is not present, the protection door accessory must not be enabled.
Splitting formulaThis function is only relevant to the Corob programs developed in Windowsenvironment (CorobSHOP, CorobWORLD, etc.).
To split a formula means to divide up the large amounts making up a formula, andto dispense them in two times.
Normally, dispensing of a formula provides for first the dispensing of "small"amounts (low speed), then the dispensing of "large" amounts (high speed). Theseprocedure is ideal for dispensing into cans pre-filled with base product (dispensingof colorant only), since "small" amounts are dispensed for first on the base product,followed by "large" ones.
When dispensing finished product (dispensing of base and colorant) into an emptycan, the above said procedure causes the "small" amounts (colorants) to bedispensed on the bottom of the empty can, and the "large" amounts (base) ontothem; unfortunately, this makes homogenization more difficult, during the mixingstage.
Particularly when dealing with resin, filler or inks, it might be useful to split into twoparts the "large" amounts, so that "small" ones are dispensed after distribution ofthe first half of large volumes.
Splitting formula is normally disabled. Click the check box to enable this function.
The concept of formula splitting is based on the definition of two parameters:Percentage and Threshold.
In the Percent box, enter the percent volume starting from which the splittingshould take place, with respect to the total amount of product to be dispensed.
The Threshold box shows the minimum amount (in cc) that can be divided,according to the following calculus:

24 •••• Using CorobTECH CorobTECH User's Manual
threshold2amount large ≥
The following is an example, to make the concept of formula splitting easier tounderstand.
Let's suppose the formula is made up of:
Colorant A = 1 cc = 1,88%Colorant B = 2 cc = 3,77%Base C = 50 cc = 94,33%and the percent and threshold values are:
Percent: 20 %Threshold: 20 ccThe amounts of colorants A and B are "small", while the amount of base C is"large", since it is greater than 20% (percent).
By halving the amount of base C, this results to be greater than the thresholddefined (20 cc), therefore the original formula will be split as follows:
1st dispensing: first half of "large" amount (C=25 cc)
2nd dispensing: "small" amounts (A=1 cc, B=2 cc) and second half of "large"amount (C=25 cc)
If, instead, halving the amount of base C, this results to be lower than the thresholddefined (20 cc), the original formula will not be split, but dispensed in reversedorder, with respect to normal dispensing.
Exploiting the Splitting formula function, thus setting a suitable threshold value, itwill be possible to always dispense the amounts in reversed order, with respect tonormal dispensing. When the threshold value "-1" is set, first the "large" amountthen the "small" amounts will be dispensed.
The Splitting formula function divides the dispensing of a formula into two differentdispensing processes; even so, the autocap (if present) opens automatically beforethe 1st dispensing and closes at the end of the 2nd one.
Automatic washingFunction not yet implemented.
Background dispensingThis function involves the background running mode of the dispensing processlaunched by the program, and is only relevant to the Corob programs developed inWindows environment (CorobSHOP, CorobWORLD, etc.).
Enabling the background dispensing, it will allow you to work with the program (forexample, to select the next formula to be dispensed) while dispensing is running inbackground. Trying to send another command to the dispenser will produce anerror.
Motors running during calibrationThis function only applies to the Corob automatic dispensers equipped withTRIGEN electronics or to industrial type dispensers.
This function allows to enable calibration with the pump motor continuouslyrunning, thus speeding up the whole calibration procedure.

CorobTECH User's Manual Using CorobTECH •••• 25
Configuring the current dispenserTo change the configuration of the dispenser, carry out one of the followingoperations:
• click the button in the toolbar
• choose Configuration... in the Dispensers menu
Figure 11
The Configuration dialog box (Figure 11) shows the parameters for thecommunication between computer and machine. Here it is also possible toconfigure the data concerning dispensing, the timing of automatic processes suchas stirring and recirculation, etc.
The default data set in the Configuration dialog box vary based on the dispensermodel chosen when created. The default data may in any case be edited.
Dispenser typeIn the Dispenser type list box you may select the type of machine created. Forexample, if a new dispenser has been created based on the Banco model, the typeof dispenser will automatically be set by "Corob".
The list allows the user to select from among Corob, Rondo, Jazzo and Monimatic.
If the RONDO or JAZZO items are marked as disabled, this means that the ControlMate program needed in order to configure them has not been previously installed.
Selecting Rondo, Jazzo or Monimatic disables all of the commands in theCorobTECH program that are unnecessary for these dispenser models.
26 •••• Using CorobTECH CorobTECH User's Manual
Serial numberThe serial number of the machine may be noted in this text box.
Serial portDefines the number of the computer serial port used to connect to the dispenser.The default serial port is COM1. To change the port settings, click the "..." buttonnext to the Serial port box. If you are not certain which values to set, consult thehardware documentation or use the default values.
The default serial communication port is COM1, since the COM2 serial port isnormally used to communicate with any color measurement instrument. If youselect a serial port different from the default, make sure there are no conflicts withthe serial ports used by other devices.
Dispenser addressThis box shows the address number of the dispenser. This number must match thenumber saved in the low-level dispenser software, and allows the computer anddispenser to communicate. CorobTECH automatically assigns a progressiveaddress number to new dispensers, which may be modified if necessary.
It is recommended not to change this value.
Simultaneous dispensing thresholdIf a colorant is associated with more canisters, there is a minimum limit below whichsimultaneous dispensing does not take place, even if enabled (chapter "Multiplecircuits" on page 41). This default value is 50 cc.
Monimatic unitThis parameter applies to Monimatic dispensers and defines the dispensing unit.
Pump releasing timeThis is the parameter defining the duration, in seconds, of the pump releaseprocess. This parameter is sent by the program to the dispenser duringinitialization, together with the execution command of the process itself. The defaultvalue is 10 seconds.
The pump release process consists of rotating all pumps in the dispenser at lowspeed. It is especially important in those cases when the machine is temporarilyshut down, or in colder seasons when the viscosity of the colorants increases,because it allows the pumps to be started less traumatically and thus increasestheir life-span.
To activate changes on this parameter, you must initialize the machine (chapter"Dispenser commands" on page 34).
CorobTECH User's Manual Using CorobTECH •••• 27
Recirculation timeThis is the first parameter that regulates the timed recirculation process and is sentto the dispenser during initialization by the program, together with the executioncommand of the process itself.
Colorant recirculation is an automatic, timed process that consists of activating thepumps at high speed to circulate colorant through the dispensing circuits; thecolorant leaves the canister through a hole in the bottom, and returns through therecirculation ninety-degree connection without leaving the nozzles.
This process circulates the colorant in the dispensing circuits, preventing pigmentsedimentation, thus keeping the colorants always homogeneous, for precisedispensing.
The recirculation time defines how many seconds the colorant remains incirculation in the dispensing circuits during the automatic recirculation process. Thedefault value is 30 seconds.
To activate changes on this parameter, you must initialize the machine (chapter"Dispenser commands" on page 34).
Recirculation pauseThis is the second parameter that regulates the timed recirculation process and issent to the dispenser during initialization by the program, together with theexecution command of the process itself.
It defines the time, in minutes, that must pass between subsequent recirculationprocesses. The next recirculation process automatically starts when the setrecirculation pause interval has passed.
The default value is 60 minutes.
To activate changes on this parameter, you must initialize the machine (chapter"Dispenser commands" on page 34).
Stirring timeThis is the first parameter that regulates the timed stirring process and is sent to thedispenser during initialization by the program, together with the executioncommand of the process itself.
The first stirring cycle starts after a few seconds of inactivity since the dispenserwas initialized and consists of activating the stirrers located inside the canisters,one after another, beginning with the one inside the first canister; the stirringprocess ends when the last canister has been stirred.
The movement of the stirrers keeps the colorant in the canisters homogeneous.
Stirring also serves to prevent the precipitation of pigments, flocculation andsedimentation of the colorants in the canisters.
The stirring time defines the time, in seconds, that the stirring motors operate; thetotal duration of a stirring cycle will be the stirring time multiplied by the number ofcanisters.
The default value is 30 seconds.
To activate changes on this parameter, you must initialize the machine (chapter"Dispenser commands" on page 34).
28 •••• Using CorobTECH CorobTECH User's Manual
Stirring pauseThis is the second parameter that regulates the timed stirring process and is sent tothe dispenser during initialization by the program, together with the executioncommand of the process itself.
It defines the time interval, in minutes, that must pass between subsequent stirringcycles; the next stirring cycle automatically starts when the set stirring pause timehas passed.
The default value is 60 minutes.
To activate changes on this parameter, you must initialize the machine (chapter"Dispenser commands" on page 34).
Dispensing waiting timeThis is a parameter for the dispensing process.
It defines the delay time, in seconds, for opening the electrovalves duringdispensing. It is basically the time interval between when the motor rotation reachesits operating speed and colorant dispensing begins. The motor rotation must get upto speed before dispensing to ensure that the latter is constant and precise.
The default value is 1 second.
To activate changes on this parameter, you must initialize the machine (chapter"Dispenser commands" on page 34).
Dispensing test quotient / Dispensing test remainderThese two parameters make it possible to define the amount of colorant dispensedby each circuit when the Test command is sent (chapter "Dispenser commands" onpage 34).
It is recommended not to change the default values.
Dispensing test pauseThis is the time, in seconds, that passes between when the electrovalve of adispensing circuit closes and the electrovalve of the next circuit opens when theTest command is sent (chapter "Dispenser commands" on page 34).
The default value is 2 seconds.
Colorant assignmentThe canisters corresponding to the various machine circuits contain the colorants inthe tinting system.
It is essential to assign colorants to the canisters in order for the machine tooperate correctly.
The colorants in the tinting system will be available only if the data structure hasbeen installed (chapter "Installing the data structure" on page 9).
Important - The colorants assigned to the canisters must exactly match theactual arrangement of the colorants in the canisters on the dispenser.

CorobTECH User's Manual Using CorobTECH •••• 29
To assign colorants to the dispenser circuits, carry out one of the followingoperations:
• click the button in the toolbar
• choose Colorant assignment... in the Circuits menu
• press Ctrl+A
• right-click anywhere in the list of circuits in the workspaceand choose Colorant assignment... in the shortcut menu
Figure 12
In the Colorant assignment dialog box (Figure 12) you may associate each circuitwith a colorant, or change previously made associations.
In the Select tinting system list box, at the top of the window, you may select thetinting system to be used from among all of those installed on the computer andincluded in the Catalog.
If a single data structure is installed, or if the Catalog includes a single datastructure, only the name of the tinting system available is displayed.
The left section displays the list of available colorants, where graphical preview,code and description are also given.
The right section displays the list of circuits.
It is possible to assign the same colorant to different circuits (chapter "Multiplecircuits" on page 41). Circuits in the list to which the same colorant has beenassociated are marked with a symbol as shown in the following table:
indicates that the circuits are connected to canisters containing the samecolorant
indicates that the circuits have the same colorant because they are connectedto the same cistern

30 •••• Using CorobTECH CorobTECH User's Manual
After working in the Colorant assignment dialog box, you may click OK to closethe window and apply the changes to the list of circuits in the workspace, or clickCancel to close the window without saving the changes.
How to associate colorants with circuitsTo associate colorants with circuits, proceed as follows:
1. Click the desired circuit in the right section.
2. Double-click the name of the colorant you want to associate.
3. Repeat for all the circuits.
With the keyboard:
1. Use the right arrow key to move to the circuit list.
2. Use the up/down arrow keys to place the cursor bar over thedesired circuit.
3. Use the left arrow key to move to the colorant list.
4. Use the up/down arrow keys to place the cursor bar over thedesired colorant.
5. Press the spacebar to assign the colorant to the circuit.
6. Repeat for all the circuits.
How to delete the association between colorants andcircuitsIt may be necessary to delete the association between colorant and circuit in orderto temporarily suspend the use of a colorant, or when a canister is emptied of thecolorant it contained and is no longer re-used.
In the dispensing program, the circuit without colorant will be an "Empty canister",and will therefore never be involved in dispensing formulas.
Deleting the association between canister and colorant does not lead to any loss ofdata.
To remove the association between a colorant and a circuit, proceed as follows:
1. Click the desired circuit in the right section.
2. Right-click with the mouse.
With the keyboard:
1. Use the right arrow key to move to the circuit list.
2. Use the up/down arrow keys to place the cursor bar over thedesired circuit.
3. Press the Del key.
To simultaneously delete all colorants from all circuits, click Remove all.
Edit levelsThis function allows you to configure the capacity of the canisters with which thedispenser is equipped, and to define how much colorant is contained, the warninglevel and the reserve level for each canister.
To edit the canister levels, carry out one of the following operations:
CorobTECH User's Manual Using CorobTECH •••• 31
• click the button in the toolbar
• choose Edit levels... in the Canisters menu
• press Ctrl+L
• right-click anywhere in the list of circuits in the workspaceand choose Edit levels... in the shortcut menu
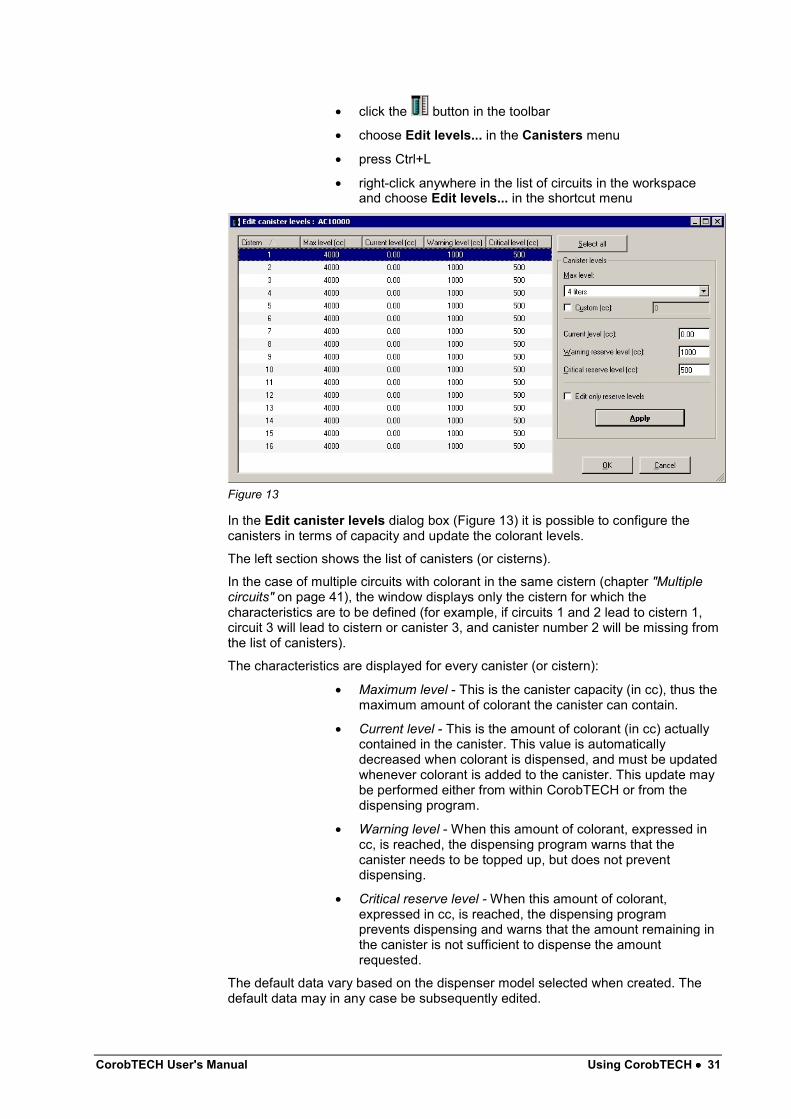
Figure 13
In the Edit canister levels dialog box (Figure 13) it is possible to configure thecanisters in terms of capacity and update the colorant levels.
The left section shows the list of canisters (or cisterns).
In the case of multiple circuits with colorant in the same cistern (chapter "Multiplecircuits" on page 41), the window displays only the cistern for which thecharacteristics are to be defined (for example, if circuits 1 and 2 lead to cistern 1,circuit 3 will lead to cistern or canister 3, and canister number 2 will be missing fromthe list of canisters).
The characteristics are displayed for every canister (or cistern):
• Maximum level - This is the canister capacity (in cc), thus themaximum amount of colorant the canister can contain.
• Current level - This is the amount of colorant (in cc) actuallycontained in the canister. This value is automaticallydecreased when colorant is dispensed, and must be updatedwhenever colorant is added to the canister. This update maybe performed either from within CorobTECH or from thedispensing program.
• Warning level - When this amount of colorant, expressed incc, is reached, the dispensing program warns that thecanister needs to be topped up, but does not preventdispensing.
• Critical reserve level - When this amount of colorant,expressed in cc, is reached, the dispensing programprevents dispensing and warns that the amount remaining inthe canister is not sufficient to dispense the amountrequested.
The default data vary based on the dispenser model selected when created. Thedefault data may in any case be subsequently edited.
32 •••• Using CorobTECH CorobTECH User's Manual
How to edit levelsTo edit the colorant levels, proceed as follows:
1. Click the desired circuit in the left section or, if you wish toedit the data for all canisters simultaneously, click Select all.
2. In the Canister levels section, in the Max level list box, selectthe canister capacity from among the predefined values orselect the Custom check box and enter the colorant level (incc).
3. To change the current level, type the desired value into thecorresponding numerical box.
4. To change the warning level, type the desired value into thecorresponding numerical box.
5. To change the critical reserve level, type the desired valueinto the corresponding numerical box.
6. If you wish to change only the warning level and criticalreserve level without altering the other information, select theEdit only reserve levels check box.
7. Click Apply to apply the new level values to the selectedcanisters.
8. Repeat the above steps for all the canisters you want toupdate.
9. When you have finished, click OK to close the dialog box andupdate the levels in the workspace.
10. Click Cancel to close the dialog box without saving thechanges made.
Add/Delete circuitsTo add circuits to the list, carry out one of the following operations:
• click the button in the toolbar
• choose Add circuits... in the Circuits menu
• press Ctrl+C
• right-click anywhere in the list of circuits in the workspaceand choose Add circuits... in the shortcut menu
Important - The numbering of the circuits in the list must correspond exactlyto the numbering present on the dispenser.
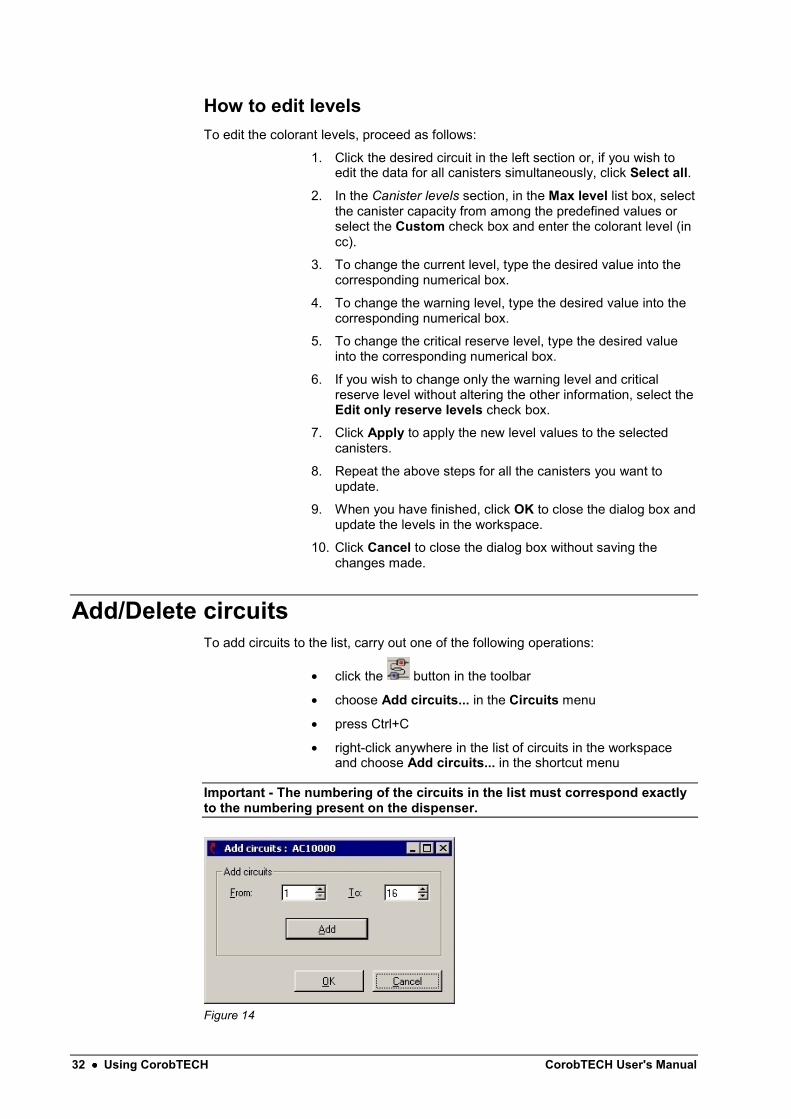
Figure 14

CorobTECH User's Manual Using CorobTECH •••• 33
In the Add circuits dialog box (Figure 14), proceed as follows:
1. In the box on the left enter the number of the first circuit to beadded, and in the box on the right the number of the lastcircuit (if the specified interval includes circuits alreadypresent in the list, only the missing ones will be added).
2. Click Add.
3. Click OK to close the dialog box and return to the workspace.
4. Click Cancel to close the dialog box without saving thechanges made.
Continue assigning colorants and changing levels for the new circuits (chapter"Colorant assignment" on page 28 and chapter "Edit levels" on page 30).
To delete circuits from the list, choose Delete circuits... in the Circuits menu.
Figure 15
Attention - Deleting a circuit will cause you to lose all data associated,including calibration data.
In the Delete circuits dialog box (Figure 15), proceed as follows:
1. Select the numbers of the circuits you want to delete byclicking them.
2. Click Delete.
3. Click OK to close the dialog box and return to the workspace.
4. Click Cancel to close the dialog box without saving thechanges made.

34 •••• Using CorobTECH CorobTECH User's Manual
To delete only the circuit you have selected in the list, right-click with the mouseand choose Delete selected circuit in the shortcut menu.
Deleting a circuit does not cause the remaining circuits to be renumbered. Thus,after deleting circuit number 4 and number 6, the list of circuits will be numbered1,2,3,5,7,8 etc.
Dispenser commandsThe program allows you to carry out an accurate test of your Corob dispenser. It ispossible for instance to carry out dispenser initialization, colorant recirculation, andso on.
To send commands to the dispenser, carry out one of the following operations:
• click the button in the toolbar
• choose Dispenser commands... in the Dispensers menu
Figure 16
The window displayed (Figure 16) provides access to the dispenser commands.
When the Dispenser commands function is activated, it is possible to continue touse all program functions and call up the Dispenser commands window wheneveryou need to control the machine, for example while calibrating or in manualdispensing mode.
Click the button displayed in the window. The dialog box Dispenser commandsopens (Figure 17).
Figure 17
The window closes automatically when the mouse pointer is positioned outside the
window itself. If you want to keep the window visible at all times, click the button in the upper left corner.
Alternatively, you may display the Dispenser commands window by pressing F2on the keyboard; in this case the window may be closed by pressing F2 on thekeyboard again.

CorobTECH User's Manual Using CorobTECH •••• 35
In any case, clicking the Exit button in the Dispenser commands window will alsoclose the dispenser commands access window.
In the Dispenser commands dialog box (Figure 17) the commands are dividedinto tabs:
• General commands
• Purge commands
• Autocap commands
• Commands for the automatic shelf
• Commands for the bellow pumps
• Commands for the automatic washing (not implemented yet)
There will be available all commands relevant to the accessories present on themachine and enabled through the Properties dialog box (chapter "Properties of thecurrent dispenser" on page 20).
If, for instance, the dispenser is not equipped with an automatic shelf, the relevantfunctions will appear dimmed and it will not be possible to select them.
The window contains a bar showing messages from the machine regarding theexecution of the command and any errors detected.
The firmware version detected on the machine by the program appears at thebottom of the window.
General commandsIn the Dispenser commands dialog box click the General commands tab (Figure17). To send a command to the machine, click the relevant button.
ResetThis is an overall dispenser reset. This command interrupts any process inprogress and returns the dispenser to its initial status; if the shelf is present andpositioned at a certain height, it moves to its lowest position while the autocap, ifpresent and open, will close.
InitializationThe initialization procedure is divided into two phases:
1. pump releasing; the pumps run at low speed to allow a slowcirculation of colorant in the circuits
2. colorant recirculation
During initialization the times and parameters controlling the timer-controlledprocesses of colorant stirring and recirculation are also sent to the dispenser, aswell as the parameters controlling the working of the accessories and optionaldevices the dispenser is supplied with.
RecirculationThis command allows you to start colorant recirculation. The pumps run at a highspeed to allow a complete recirculation in the machine circuits to keep the colorantas much homogeneous as possible.
StirringThis command allows you to stir colorant in the canisters so as to keep it as muchhomogeneous and fluid as possible.

36 •••• Using CorobTECH CorobTECH User's Manual
TestThis command allows you to check the efficiency of the machine circuits bydispensing the same amount of colorant from all the circuits, one at a time.
The amount to be dispensed may be set using the Configuration function (chapter"Configuring the current dispenser" on page 25).
The test begins only if a can is present and correctly positioned on the shelf, intowhich the formula may be dispensed. If the automatic puncher is present,dispensing will take place only if the protection door is closed.
If the dispenser is equipped with autocap, the command will automatically open theautocap before dispensing and close it afterwards.
If the autocap was already open and thus disabled, it will not close againautomatically after dispensing. You must therefore send the close command(chapter "Autocap commands" on page 38).
If the automatic plugger is present, the autocap will open automatically beforedispensing and close afterwards, even if the cap itself had been previouslydisabled; in this case it is no longer necessary to send the close command.
Hardware errorsAn hardware error is a fault or malfunction detected on the machine mechanical orelectronical components.
Hardware error management is implemented only in dispensers equipped withCorob TRIGEN/BANCO electronics, and in industrial dispensers.
When hardware errors occur on the dispenser, the corresponding codes are writtenin a dedicated buffer (memory area) on the CPU board.
The error codes thus recorded by the electronics are read at regular intervals by thedispenser management program.
CorobTECH reads the error buffer when one of the available commands is carriedout, before beginning calibration and through the Errors command.
If hardware errors are found on the machine, the program displays a dialog boxwith the list of errors detected (Figure 18).
Figure 18
CorobTECH User's Manual Using CorobTECH •••• 37
The Hardware errors dialog box shows the code and description of every errordetected; it also indicates on which device the breakdown occurred, for example"valve number 5 disconnected".
Click OK to close the Hardware errors dialog box.
The program will continue to detect the hardware errors until the breakdowns arerepaired or the error situations eliminated.
It is possible to disable the display of an error that has occurred on a device notinvolved in machine activities (for example on a valve of a circuit not involved indispensing):
1. In the Hardware errors dialog box, select the error to bedisabled by clicking the corresponding line.
2. Repeat for any other errors you want to disable.
3. Click the Disable selected button; the errors disabled will bemarked with a tick.
Click the Enable all button to restore the initial situation.
It is also possible to disable the display of all errors by enabling the Disabledisplay of errors check box.
The errors present on the machine and detected by the program will no longer bedisplayed.
See chapter "Preferences" on page 73 for instructions on how to re-enable thedisplay of hardware errors.
Disabling the display of hardware errors is effective only during the CorobTECHsession. The display of hardware errors will be re-enabled the next time theprogram is started.
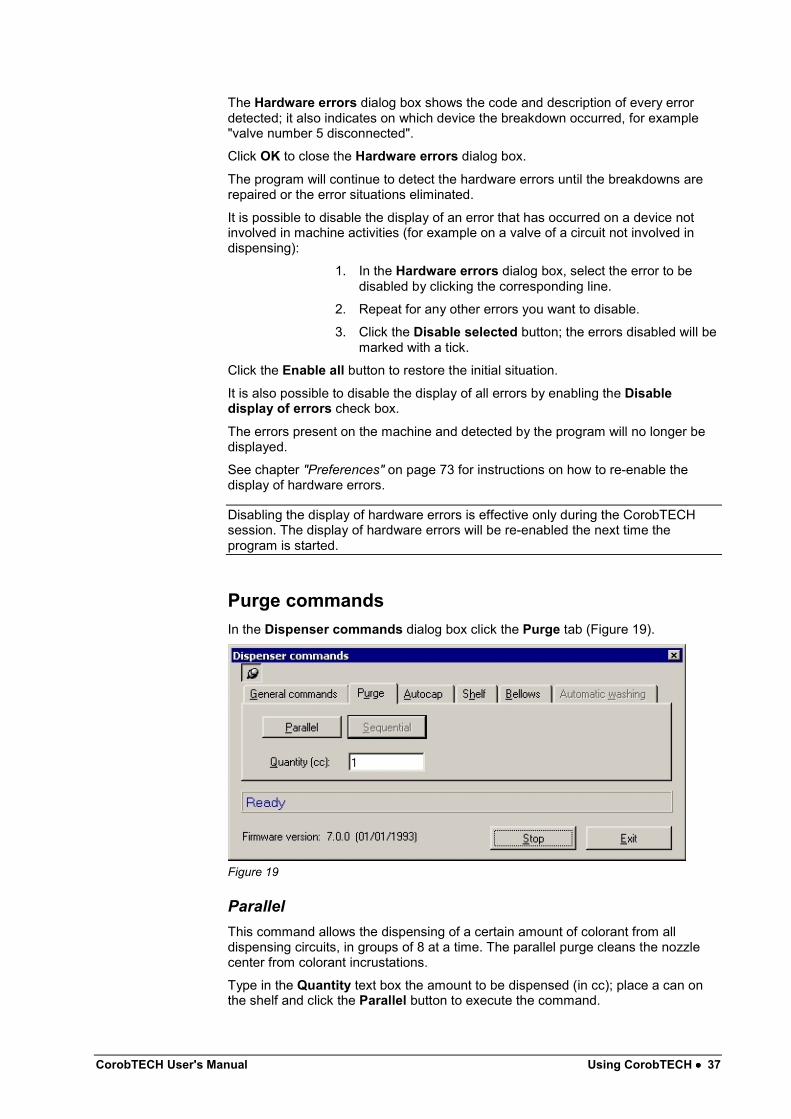
Purge commandsIn the Dispenser commands dialog box click the Purge tab (Figure 19).
Figure 19
ParallelThis command allows the dispensing of a certain amount of colorant from alldispensing circuits, in groups of 8 at a time. The parallel purge cleans the nozzlecenter from colorant incrustations.
Type in the Quantity text box the amount to be dispensed (in cc); place a can onthe shelf and click the Parallel button to execute the command.
38 •••• Using CorobTECH CorobTECH User's Manual
SequentialFunction not yet implemented.
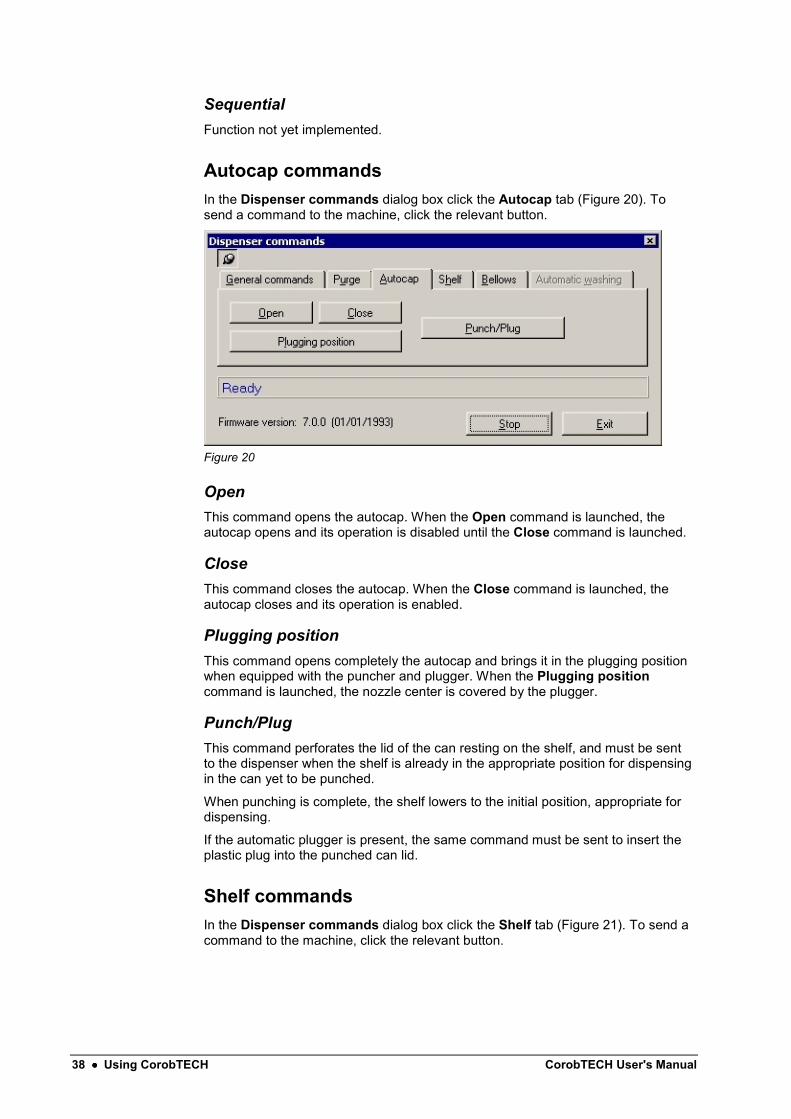
Autocap commandsIn the Dispenser commands dialog box click the Autocap tab (Figure 20). Tosend a command to the machine, click the relevant button.
Figure 20
OpenThis command opens the autocap. When the Open command is launched, theautocap opens and its operation is disabled until the Close command is launched.
CloseThis command closes the autocap. When the Close command is launched, theautocap closes and its operation is enabled.
Plugging positionThis command opens completely the autocap and brings it in the plugging positionwhen equipped with the puncher and plugger. When the Plugging positioncommand is launched, the nozzle center is covered by the plugger.
Punch/PlugThis command perforates the lid of the can resting on the shelf, and must be sentto the dispenser when the shelf is already in the appropriate position for dispensingin the can yet to be punched.
When punching is complete, the shelf lowers to the initial position, appropriate fordispensing.
If the automatic plugger is present, the same command must be sent to insert theplastic plug into the punched can lid.
Shelf commandsIn the Dispenser commands dialog box click the Shelf tab (Figure 21). To send acommand to the machine, click the relevant button.

CorobTECH User's Manual Using CorobTECH •••• 39
Figure 21
UpThis command moves the shelf upward, stopping it as soon as the can it is carryingis detected by the photocell; if no can is resting on the shelf, then the latter will stopat the end of its stroke.
DownThis command moves the shelf downward, stopping it at the lowest position.
Move toThis command allows you to position cans of different heights to dispense aparticular formula.
Enter in the text box the height of the can to be positioned, expressed inmillimeters; rest the can on the shelf and click the Move to button execute thecommand; the shelf will rise if the height you have entered is less than the height atwhich it was positioned before the command was sent, or lower if the height youhave entered is greater than the height at which it was positioned before thecommand was sent.
Bellows commandsIn the Dispenser commands dialog box click the Bellows tab (Figure 22). To senda command to the machine, click the relevant button.
Figure 22

40 •••• Using CorobTECH CorobTECH User's Manual
If the dispenser configured is the BANCO type, it is possible to use the commandsfor the bellows pumps; these commands are essential the first time the canistersare filled upon installing the machine.
To send a command regarding the bellows to the machine:
• if you wish to command the bellows of a single circuit, set thenumber in the Circuit box before carrying out the command;if the value is 0, all of the machine circuits will be activated.
• click Up if you want to completely compress the bellows ofthe machine's pumping units, before filling the canisters.
• click Down if you want to completely extend the bellows ofthe machine's pumping units, after filling the canisters withcolorant.
Commands for the automatic washingFunction not yet implemented on the dispensers.
Manual dispensingThe program allows you to dispense a formula created on the fly to check thecondition of the dispensing circuits (electrovalves, pumps, pipes, etc.).
We recommend activating the Dispenser commands function before displaying theManual dispensing window, to have the commands available to manage theaccessories (autocap, automatic shelf, etc.) (chapter "Dispenser commands" onpage 34).
Choose Manual dispensing... in the Dispensers menu.
Figure 23
The Manual dispensing dialog box (Figure 23) displays the list of dispensingcircuits. The colorant contained, current level and the calibration information isindicated for each circuit.

CorobTECH User's Manual Using CorobTECH •••• 41
Under the list of circuits there is a bar showing messages regarding the executionof the commands and any errors messages.
Proceed as follows to manually dispense a formula:
1. If a formula has already been dispensed, click Reset allquantities to delete all values entered in the Quantitycolumn, and proceed with preparing a new formula.
2. In the column Quantity, click the box corresponding to thecolorant to be dispensed.
3. Enter the quantity (in cc).
4. Confirm the value entered with the Enter key of the keyboardor by clicking in another point in the table.
5. Repeat for all the colorants you want to dispense.
6. Once you have created the formula, click Tint andCorobTECH will send the dispensing command for the setformula to the dispenser.
If the dispenser is equipped with autocap, the command will automatically open theautocap before dispensing and close it afterwards.
Dispensing begins only if a can is present and correctly positioned on the shelf, intowhich the formula may be dispensed.
Use the function Dispenser commands to move the automatic shelf and bring it tothe right position (chapter "Dispenser commands" on page 34).
The current level of the canisters containing the colorants dispensed is updatedafter dispensing.
Multiple circuitsMultiple circuit management is possible when the same colorant is assigned tomultiple canisters (chapter "Colorant assignment" on page 28).
Various results are possible if multiple circuits are properly organized, dependingon the configuration of the dispenser in use.
To configure multiple circuits, carry out one of the following operations:
• click the button in the toolbar
• choose Multiple circuits... in the Circuits menu
• press Ctrl+M
42 •••• Using CorobTECH CorobTECH User's Manual
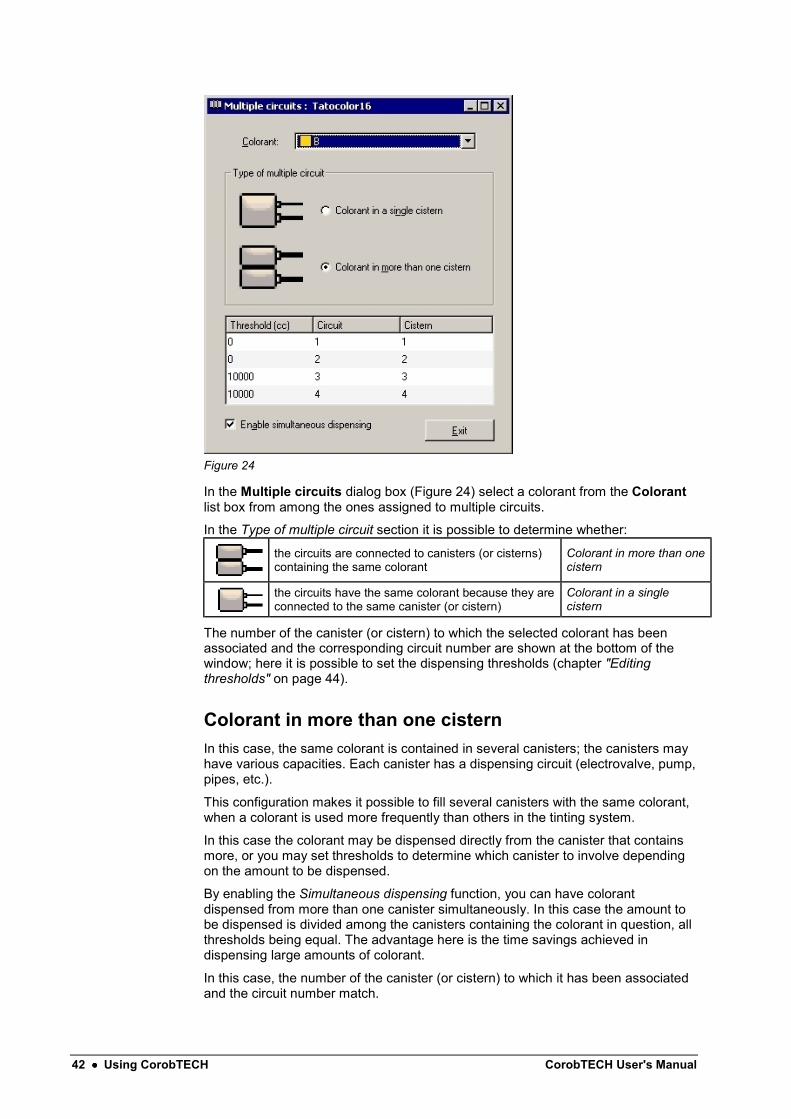
Figure 24
In the Multiple circuits dialog box (Figure 24) select a colorant from the Colorantlist box from among the ones assigned to multiple circuits.
In the Type of multiple circuit section it is possible to determine whether:
the circuits are connected to canisters (or cisterns)containing the same colorant
Colorant in more than onecistern
the circuits have the same colorant because they areconnected to the same canister (or cistern)
Colorant in a singlecistern
The number of the canister (or cistern) to which the selected colorant has beenassociated and the corresponding circuit number are shown at the bottom of thewindow; here it is possible to set the dispensing thresholds (chapter "Editingthresholds" on page 44).
Colorant in more than one cisternIn this case, the same colorant is contained in several canisters; the canisters mayhave various capacities. Each canister has a dispensing circuit (electrovalve, pump,pipes, etc.).
This configuration makes it possible to fill several canisters with the same colorant,when a colorant is used more frequently than others in the tinting system.
In this case the colorant may be dispensed directly from the canister that containsmore, or you may set thresholds to determine which canister to involve dependingon the amount to be dispensed.
By enabling the Simultaneous dispensing function, you can have colorantdispensed from more than one canister simultaneously. In this case the amount tobe dispensed is divided among the canisters containing the colorant in question, allthresholds being equal. The advantage here is the time savings achieved indispensing large amounts of colorant.
In this case, the number of the canister (or cistern) to which it has been associatedand the circuit number match.

CorobTECH User's Manual Using CorobTECH •••• 43
Simultaneous dispensingVarious behaviors may be achieved from the dispenser using the Simultaneousdispensing function and setting the dispensing threshold, as shown in the tablebelow.
Sim. Disp.enabled
Thresholdsenabled
Dispenser behavior
NO NO The colorant is taken from the canister that contains themost.
YES NO The amount of colorant is divided among all canisterscontaining the colorant in question.
NO YES
The canister from which the colorant is taken depends onthe amount of colorant that must be dispensed; if severalcanisters have the same threshold, the colorant is takenfrom the one that contains the most.
YES YES
The amount of colorant is divided among all canisters forwhich the same threshold has been set, and which containthe same colorant. The group of canisters having the samethreshold is selected based on the amount to be dispensed,and dispensing is simultaneous from all canisters in thegroup.
Figure 24 shows the example of a dispenser with the first four canisters containingthe same colorant B. We can identify two groups of two canisters each. The firstgroup has a threshold of 0 cc and consists of two canisters: number 1 and number2; the second group has a threshold of 10000 cc and consists of two canisters:number 3 and number 4.
Simultaneous dispensing will take place from canisters 1 and 2 for amounts up to10000 cc (the box Enable simultaneous dispensing is checked), while for largeramounts above this threshold simultaneous dispensing will take place fromcanisters 3 and 4, which have the same threshold, as long as the level of colorantin the individual canisters allows.
Dispensing fails if the amount to be dispensed is greater than the sum of theamounts in the canisters involved.
Colorant in a single cisternIn this case, a canister has several multiple dispensing circuits; for example, twodifferent size pumps driven by two different motors lead to the canister.
In this case you may set a threshold so that the activated pump is the one mostsuited to dispensing the desired amount.
In this case, which circuits lead to the cistern containing the colorant is indicated atthe bottom of the Multiple circuits dialog box.

44 •••• Using CorobTECH CorobTECH User's Manual
Figure 25
Figure 25 shows the example of a dispenser with an external cistern containingcolorant B, served by two circuits of different sizes. In this case one or the othermust operate based on the amount to be dispensed.
For amounts up to 20000 cc the colorant will be dispensed by circuit number 1,while circuit number 2 will dispense amounts above the threshold, levels permitting.
Note that in this case the number of canisters does not match the number ofdispensing circuits. The list displayed in the multiple circuit management window isnot the list of canisters, but of circuits.
Editing thresholdsTo set the thresholds, proceed as follows:
1. In the column Threshold, click the box corresponding to thedesired circuit.
2. Enter the threshold value (cc).
3. Confirm the value entered with the Enter key of thekeyboard.
Pump settingsThe default pump type assigned to the circuits depends on the dispenser modelchosen at the time of creation (chapter "Creating a new dispenser" on page 18).
You may change the pump type by selecting from among the predefined typesavailable, or you may apply a custom pump type (chapter "Create/Modify pumps"on page 47).
To change the pump settings for the current dispenser, carry out one of thefollowing operations:
• click the button in the toolbar

CorobTECH User's Manual Using CorobTECH •••• 45
• choose pump settings... in the Circuits menu
• press Ctrl+P
Figure 26
The Pump types dialog box (Figure 26) displays the list of dispensing circuits. Thetype of pump used and the characteristics of the pump type are indicated for eachcircuit:
• Dispensing speed levels
• Change applied
• Automatic recalculation of the Change value after calibration
Pump types with different speed numbers or values cannot be applied to thedispenser circuits.
The Pump types dialog box also provides access to the default values of theconstants, should it be necessary to change them.
Modifying the pump typeTo change the pump type associated with a circuit, proceed as follows:
1. Click the desired circuit in the right section or, if you wish tochange the data for all circuits simultaneously, click Selectall.
2. In the Modify selected circuits section, in the Pump type listbox, select the pump to assign to the circuit from among thelist of predefined and any custom pumps available; thespeeds and change applied are displayed in the sectionChanges.
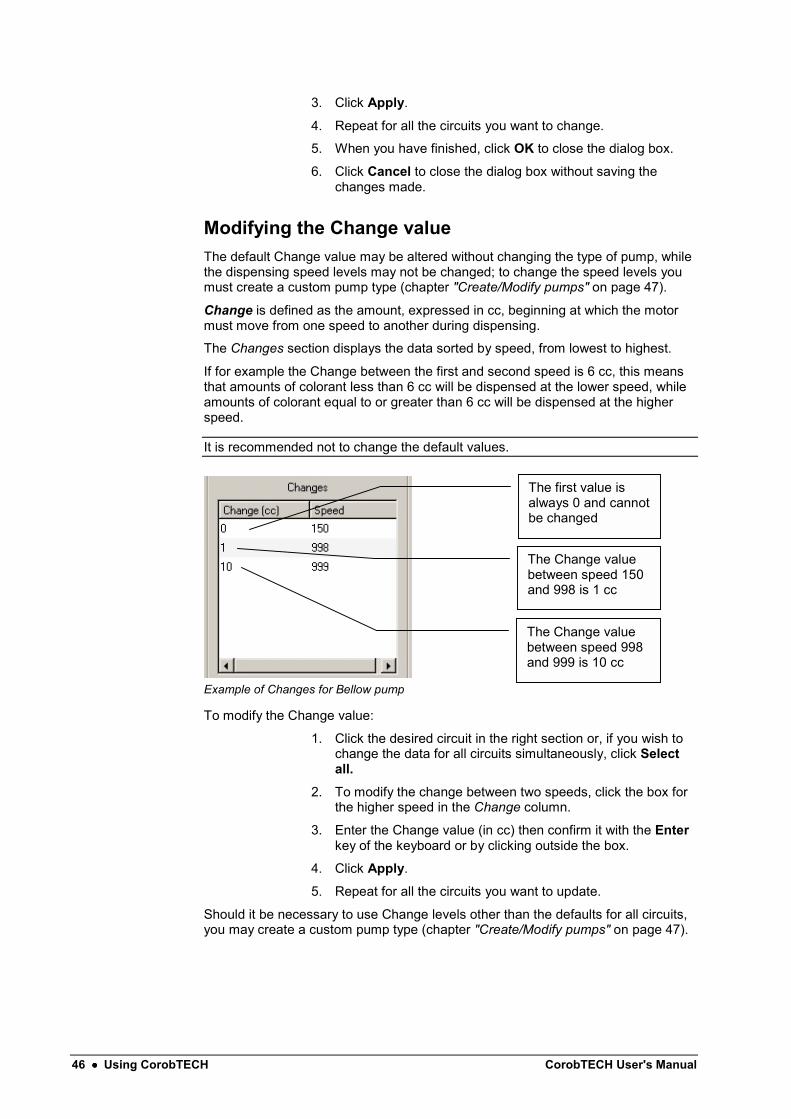
46 •••• Using CorobTECH CorobTECH User's Manual
3. Click Apply.
4. Repeat for all the circuits you want to change.
5. When you have finished, click OK to close the dialog box.
6. Click Cancel to close the dialog box without saving thechanges made.
Modifying the Change valueThe default Change value may be altered without changing the type of pump, whilethe dispensing speed levels may not be changed; to change the speed levels youmust create a custom pump type (chapter "Create/Modify pumps" on page 47).
Change is defined as the amount, expressed in cc, beginning at which the motormust move from one speed to another during dispensing.
The Changes section displays the data sorted by speed, from lowest to highest.
If for example the Change between the first and second speed is 6 cc, this meansthat amounts of colorant less than 6 cc will be dispensed at the lower speed, whileamounts of colorant equal to or greater than 6 cc will be dispensed at the higherspeed.
It is recommended not to change the default values.
Example of Changes for Bellow pump
To modify the Change value:
1. Click the desired circuit in the right section or, if you wish tochange the data for all circuits simultaneously, click Selectall.
2. To modify the change between two speeds, click the box forthe higher speed in the Change column.
3. Enter the Change value (in cc) then confirm it with the Enterkey of the keyboard or by clicking outside the box.
4. Click Apply.
5. Repeat for all the circuits you want to update.
Should it be necessary to use Change levels other than the defaults for all circuits,you may create a custom pump type (chapter "Create/Modify pumps" on page 47).
The Change valuebetween speed 998and 999 is 10 cc
The Change valuebetween speed 150and 998 is 1 cc
The first value isalways 0 and cannotbe changed

CorobTECH User's Manual Using CorobTECH •••• 47
Modifying ConstantsConstant is defined as the parameter that intervenes when counting the number ofpulses by the encoder (pump step counter) needed to dispense the desiredamount.
The value is identified as:
Constant = 6 for speed with Value = 150
Constant = 30 for speed with Value = 999
If you intend to use intermediate dispensing speeds, the constant will varyproportionately.
Attention - Do not set a value less than 5.
To change the constants, proceed as follows:
1. In the Pump types dialog box click Constants.
2. To modify the constant for a specify speed, click the box forthat speed in the Constant column.
3. Enter the value then confirm it with the Enter key of thekeyboard or by clicking outside the box.
4. Repeat to change the constant of other speeds then click OKto close the dialog box.
5. Click Cancel to close the dialog box without saving thechanges made.
Create/Modify pumpsTo create new custom pump types and/or change existing ones, carry out one ofthe following operations:
• click the button in the toolbar
• choose Create/Modify pumps... in the Circuits menu
Figure 27
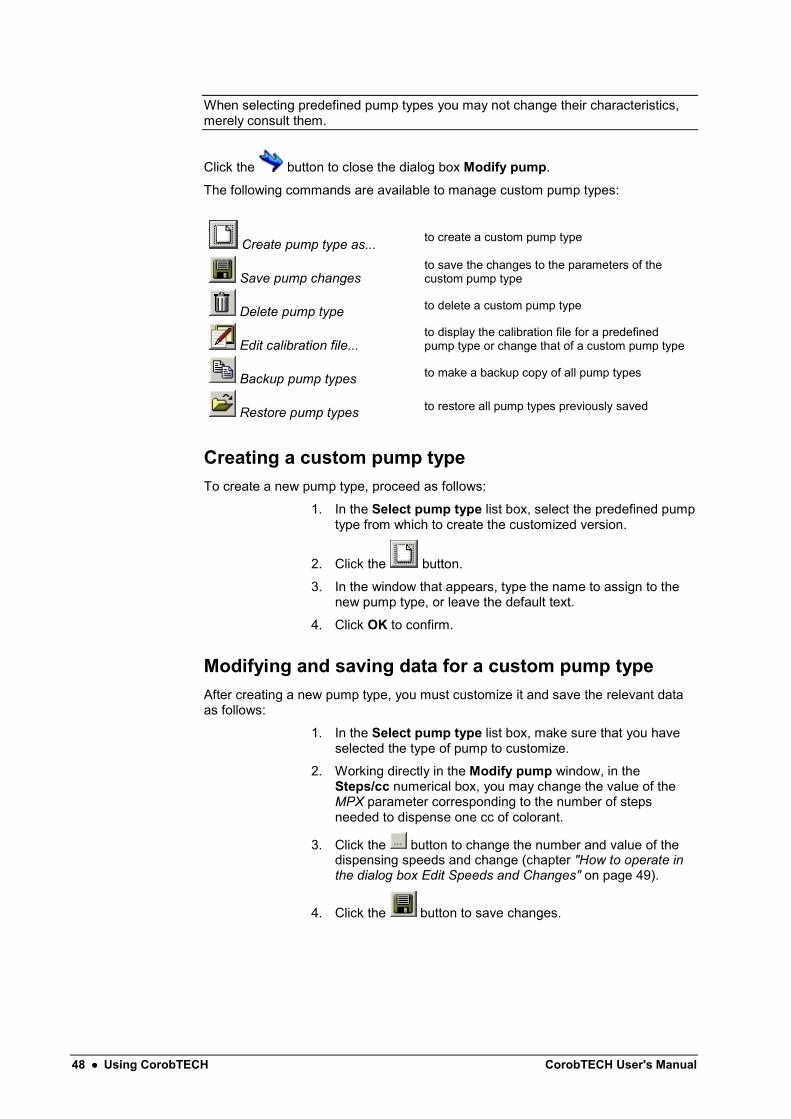
48 •••• Using CorobTECH CorobTECH User's Manual
When selecting predefined pump types you may not change their characteristics,merely consult them.
Click the button to close the dialog box Modify pump.
The following commands are available to manage custom pump types:
Create pump type as... to create a custom pump type
Save pump changesto save the changes to the parameters of thecustom pump type
Delete pump type to delete a custom pump type
Edit calibration file...to display the calibration file for a predefinedpump type or change that of a custom pump type
Backup pump types to make a backup copy of all pump types
Restore pump types to restore all pump types previously saved
Creating a custom pump typeTo create a new pump type, proceed as follows:
1. In the Select pump type list box, select the predefined pumptype from which to create the customized version.
2. Click the button.
3. In the window that appears, type the name to assign to thenew pump type, or leave the default text.
4. Click OK to confirm.
Modifying and saving data for a custom pump typeAfter creating a new pump type, you must customize it and save the relevant dataas follows:
1. In the Select pump type list box, make sure that you haveselected the type of pump to customize.
2. Working directly in the Modify pump window, in theSteps/cc numerical box, you may change the value of theMPX parameter corresponding to the number of stepsneeded to dispense one cc of colorant.
3. Click the button to change the number and value of thedispensing speeds and change (chapter "How to operate inthe dialog box Edit Speeds and Changes" on page 49).
4. Click the button to save changes.

CorobTECH User's Manual Using CorobTECH •••• 49
Deleting a custom pump typeTo delete a custom pump type, proceed as follows:
1. In the list box Select pump type select the type of pump tobe deleted.
2. Click the button.
You may not delete a predefined pump type.
Backup and restore of pump typesTo make a backup copy on floppy disks of all pump types, proceed as follows:
1. Click the button.
2. Follow the instructions on saving data, chapter "Databasemanagement" on page 67.
To restore pump types from a backup copy on floppy disks, proceed as follows:
1. Click the button.2. Follow the instructions on restoring data, chapter "Database
management" on page 67.
How to operate in the dialog box Edit Speeds andChangesAfter creating a custom pump type, it is possible to edit its speeds and changes.Click the button in the Modify pump dialog box.
Figure 28
To change the data displayed in the Edit Speeds and Changes dialog box,proceed as follows:
1. Click the desired box.
2. Enter the new value.

50 •••• Using CorobTECH CorobTECH User's Manual
3. Confirm the value entered with the Enter key of the keyboardor by clicking in another point in the table.
To add a speed, click Add.
To delete a speed, click the line corresponding to the speed to be deleted and thenclick Remove.
Calibration file for a pump typeAfter creating a custom pump type, it is possible to change its calibration file. Click
the button in the Modify pump dialog box.
Figure 29
The Edit calibration dialog box displays the calibration file regarding the pumptype to be customized.
The calibration file has been designed to allow the user to create his owncustomized calibration procedure, best suited to needs that arise in the field.
This file is a simple text file similar to the CSV format exported from Excel, whichuses the pipe character ('|') as a list separator.
The file may be edited directly using any text editor, but we recommend usingCorobTECH, which provides a tool designed specifically to facilitate editing andminimize the number of possible errors.
The calibration file primarily represents a sequence of dispensing and weighingoperations for a specific type of pump. It allows the program to calibrate any kind ofCorob dispenser easily and automatically.
The calibration file for the standard pump is used as an example below.

CorobTECH User's Manual Using CorobTECH •••• 51
Figure 30
The file used as an example (Figure 30) is the one displayed in the Edit calibrationdialog box of Figure 29. The calibration file structure is the default proposed byCorobTECH:
• column 1 - line number.
• column 2 - indicates the order in which to start the sequencewhen launching a calibration. The order functions based onthe value of the number expressed between brackets. In thewindow, this corresponds to the order displayed in the Setinitial order section.
• column 3 - indicates what type of point must be processed.This may be an amount expressed in Volume (Vol) ordefined by specifying the number of pump steps needed todispense such amount (Step) (in the window, thiscorresponds to the Steps/Volume column).
• column 4 - indicates the requested amount of cc to bedispensed if expressed in volume, or the number of steps toperform (in the window, this corresponds to the Valuecolumn).
• column 5 - indicates what speed to use for that specific point(in the window, this corresponds to the Speed column).
• column 6 - indicates how many times the point must berepeated (in the window, this corresponds to the Repeatcolumn).
• column 7 - indicates which points to use to determine thenumber of steps to have the pump perform in order todispense the requested amount; this parameter may be usedonly with points in volume (in the window, this corresponds tothe Use point... columns).
• column 8 - indicates the percentage tolerance within whichthe margin of error of the calibrated point must remain, inrelation to the requested volume (in the window, thiscorresponds to the Tolerance % column).
The calibration file shown as an example works as follows:
1. First, the point for line 80 is carried out because [10] is thelowest starting number.
2. An amount of colorant is dispensed equivalent to 25000steps of the pump at speed 2.

52 •••• Using CorobTECH CorobTECH User's Manual
3. The amount of colorant dispensed is weighed.
4. The point regarding line 70 is carried out.
5. An amount of colorant is dispensed equivalent to 5000 stepsof the pump at speed 2.
6. The amount of colorant dispensed is weighed.
7. The point regarding line 60 is carried out.
8. Points 80 and 70 are used to compute the probable numberof steps needed to dispense 6.1 cc of colorant.
9. An amount of colorant is dispensed corresponding to thenumber of steps computed previously, at speed 2.
10. The amount of colorant dispensed is weighed, then checkedto determine whether the margin of error falls within the 10%tolerance of the amount of 6.1 cc.
11. If the amount is outside tolerance, the calculated number ofsteps is adjusted, and another attempt is made atdispensing, for a maximum of five attempts.
12. The subsequent points are processed according to the sameprocedure; the points are repeated several times as specifiedby the parameter Rep.
Figure 31
In the Edit calibration dialog box it is possible to change the starting order of thefirst execution of the file, via the option Set initial order, by dragging the smallbuttons representing the order of execution and moving them to the desiredposition (Figure 31). This changes the first column of the calibration file as specifiedabove.
To add a line to the calibration file, enter the line number and click Add.
To delete a line from the calibration file, enter the line number and click Remove.
To save changes made to the calibration file, click the button.
CalibrationCalibration calculates the calibration parameters and must be carried out for eachcolorant in the dispenser.
We recommend activating the Dispenser commands function before displaying theCalibration dialog box, to have the accessories management commands available(chapter "Dispenser commands" on page 34).
To launch calibration, carry out one of the following operations:
• click the button in the toolbar
• choose Calibration... in the Circuits menu
• press Ctrl+B

CorobTECH User's Manual Using CorobTECH •••• 53
Figure 32
The Calibration dialog box (Figure 32) displays, at the top, the list of dispensingcircuits. The colorant contained, pump type used, and information about the lastcalibration are indicated for every circuit.
At the bottom of the dialog box is a status bar that shows messages about theexecution of the commands as well as any error messages.
The dialog box displays a table containing the calibration file data for the pump typeassociated with the circuit selected in the list of circuits; this table will be updatedduring calibration.
Click Exit to close the Calibration dialog box.
Purpose of calibrationBelow is a simplified explanation of a few of the theoretical concepts regarding thecalibration of an automatic dispenser with gear pumps and encoder.
The Resolution of a circuit is defined as the volume of product associated with thestep of the pump encoder or stepper:
(cc/steps) Resolution stepsof Number
volume(cc) Dispensed =
In carrying out this function in regard to the variable Number of steps, the result is:
List of circuits
Calibration filedata tableStatus bar

54 •••• Using CorobTECH CorobTECH User's Manual
stepsof Number(cc/steps) Resolution
volume(cc) Dispensed =
The MPX is defined as the inverse of the resolution:
(steps/cc) MPX(cc/steps) Resolution
1 =
therefore:
stepsof Number(cc) volume Dispensed(steps/cc) MPX =∗
At a certain speed, the number of steps required to dispense a volume N ofcolorant is calculated by multiplying the volume N by the MPX for that speed.
In other words, for an ideal circuit, given a volume of 1 cc to be dispensed, thenumber of steps to carry out is equal to the MPX.
In a real circuit, you must take into account that it is not ideal, and thus:
[ ] stepsof NumberOFFSETvolume(cc) Dispensed(steps/cc) MPX =+∗
where Offset is a value, expressed in number of steps, that takes into account thedelays that may occur during dispensing throughout the dispensing circuit. Thisvalue is added or subtracted, if negative.
For the 0.5-liter/min pumps, the pump must theoretically complete 476.19 steps todispense 1 cc of colorant; each pump step corresponds to 1/2000th of a completerotation of the pump rotor.
The characteristics of the colorant and of the dispensing circuit involved incalibration, as well as the environmental working conditions of the machine mayaffect the result of calibration.
If, during the dispenser working life, should the characteristics of the colorantchange or should some modifications/replacements of a component of the circuitbe carried out, it is advisable to recalibrate the machine or the modified circuit (formore information, refer to the dispenser user’s manual).
We recommend to calibrate the dispenser in its final working place (refer to thedispenser user’s manual).
Preparing for calibrationBefore beginning calibration, make sure you have assigned the correct pump typeto each dispenser circuit.
Then make sure that the calibration options are correct as follows: click theOptions... button in the Calibration dialog box.
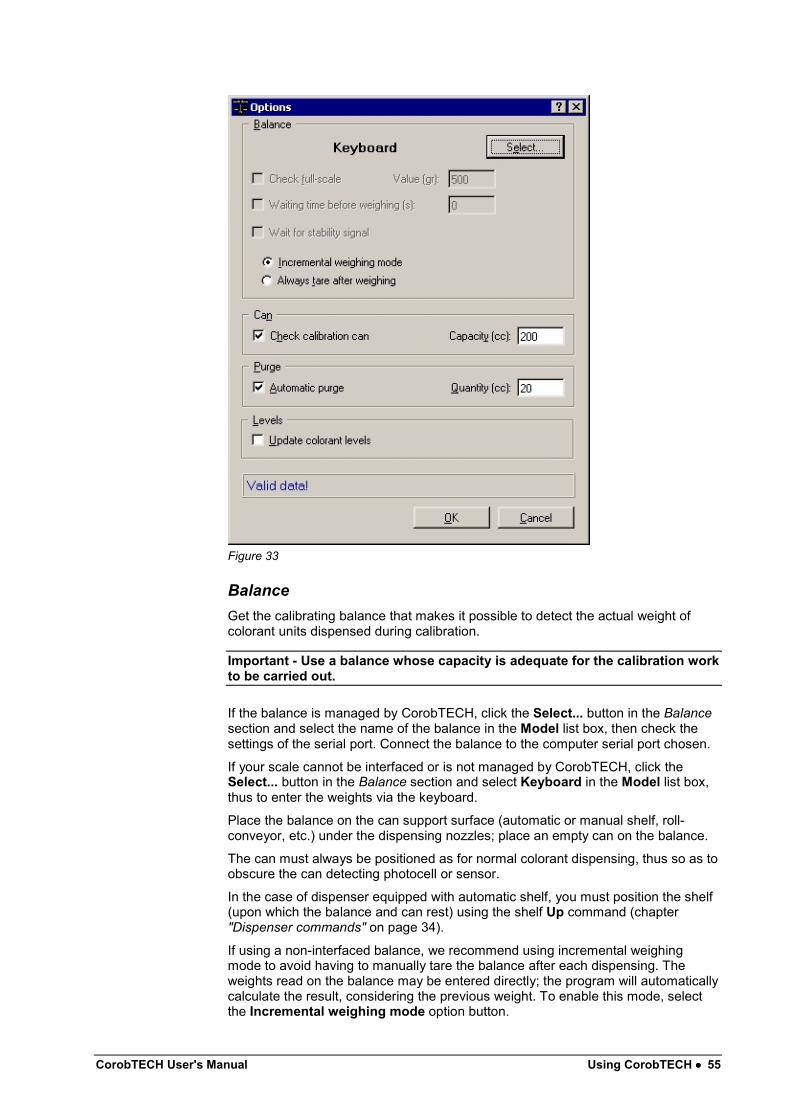
CorobTECH User's Manual Using CorobTECH •••• 55
Figure 33
BalanceGet the calibrating balance that makes it possible to detect the actual weight ofcolorant units dispensed during calibration.
Important - Use a balance whose capacity is adequate for the calibration workto be carried out.
If the balance is managed by CorobTECH, click the Select... button in the Balancesection and select the name of the balance in the Model list box, then check thesettings of the serial port. Connect the balance to the computer serial port chosen.
If your scale cannot be interfaced or is not managed by CorobTECH, click theSelect... button in the Balance section and select Keyboard in the Model list box,thus to enter the weights via the keyboard.
Place the balance on the can support surface (automatic or manual shelf, roll-conveyor, etc.) under the dispensing nozzles; place an empty can on the balance.
The can must always be positioned as for normal colorant dispensing, thus so as toobscure the can detecting photocell or sensor.
In the case of dispenser equipped with automatic shelf, you must position the shelf(upon which the balance and can rest) using the shelf Up command (chapter"Dispenser commands" on page 34).
If using a non-interfaced balance, we recommend using incremental weighingmode to avoid having to manually tare the balance after each dispensing. Theweights read on the balance may be entered directly; the program will automaticallycalculate the result, considering the previous weight. To enable this mode, selectthe Incremental weighing mode option button.

56 •••• Using CorobTECH CorobTECH User's Manual
Select the Always tare after weighing option button if instead you prefer tomanually tare the balance after each dispensing.
The following controls are available for balances that can be interfaced withCorobTECH:
Check full-scaleEnable the Check full-scale check box if you want the program to indicate whenthe full-scale of the balance has been reached; enter the full-scale value of thebalance used in the Value box.
Waiting time before weighingEnable the Waiting time before weighing check box if you intend to set a delaybetween when dispensing ends and balance reading begins. This delay allows theprogram to read the weight only when the reading has been actually beencompleted by the balance. This function is useful if the machine is calibrated inenvironmental conditions that may cause instabilities in weight readings.
Wait for stability signalEnable the Wait for stability signal check box if you intend to use the stabilitysignal of the balance before reading the weight. We recommend using this functionif the machine is calibrated in ideal environmental conditions.
CanThe choice of can capacity depends on the type of calibration to be carried out.
The program is able to check the amounts dispensed throughout the calibration,and indicate when it is time to change or empty the can to avoid spilling colorant.
Click the Check calibration can check box and enter the capacity of the can usedfor calibration.
PurgeWhen the Automatic purge check box is enabled, the program purges the circuitto be calibrated before beginning the calibration procedure; this cleans the nozzleto eliminate any colorant residues that may interfere with calibration.
In the Quantity box enter the amount to be dispensed while purging, expressed incc.
LevelsIf the colorant dispensed during calibration is not reused, click the Update colorantlevels check box so that the levels of colorants in the canisters are updated, alsobased on the amounts dispensed during calibration
If instead the colorant dispensed by a circuit is poured back into the correspondingcanister, then disable this check box.
Calibration procedureIt is now possible to start calibration of a circuit of your dispenser. Calibration mustbe repeated for all dispensing circuits.
1. In the Calibration dialog box, select from the list ofdispensing circuits the one to be calibrated.
The section Specific weight displays the standard specific weight stored in the datastructure and any real specific weight stored in CorobTECH, for the colorantassociated with the circuit selected from the list (chapter "Specific weight settings"on page 69).

CorobTECH User's Manual Using CorobTECH •••• 57
2. Choose whether to calibrate using the standard or realspecific weight.
3. Make sure that the balance and can are positioned correctly,then start calibration by clicking the Start button.
At this point, all operations are automatic unless you are using a balance thatcannot be interfaced with the computer; in this case, you must enter the weightsread on the balance display in a window that appears when necessary, and tare thebalance if needed when requested by the program.
Follow all of the instructions that are displayed on the screen during the variouscalibration steps. The status bar shows messages about command execution.
The data table is updated during calibration. It shows the dispensing tests that arecarried out to calibrate the machine. The table is constructed by reading thecalibration file associated with the pump type of the selected circuit (chapter"Calibration file for a pump type" on page 50).
Every line of the table represents a calibration test.
A blue bar shows the calibration test in progress. The order of the first run of testsis set in the calibration file.
Based on the calibration file, for each test it may be necessary to:
• have the pump carry out a number of steps
• reach a certain volume
Figure 34
When calibration begins, there is normally a test with a set number of steps (Figure34). While this test is being carried out, the pump is asked to perform a specificnumber of steps (25000 in the example), and the amount of colorant dispensed isweighed and measured.
Figure 35
Tests are subsequently carried out attempting to reach a preset volume (Figure 35).This type of test is performed as follows.

58 •••• Using CorobTECH CorobTECH User's Manual
The number of steps needed to obtain the requested volume is calculated (in theexample 6.1 cc). The number of steps is extrapolated from the theoreticalthroughput of the pump, or may be calculated using the tests already performedwhile calibrating the circuit (the points to be used for this calculation are specified inthe calibration file, as well as the degree of accuracy desired for the referencevolume).
The number of steps obtained making it possible to reproduce the referencevolume is saved, and will be used for the later repetitions of the test.
Each individual test may indeed be repeated several times, and the final number ofsteps used will be a mean of all values measured.
The tests are performed in sequence; a test is repeated only after all of thescheduled tests have been completed.
The order of execution is as follows:
• the first sequence is established in the calibration file
• the next sequences are carried out from the test with thefewest steps to that with the most, and vice-versa.
The Speed column indicates the rotation speed of the pump that will be used forthe test.
The Last weight and Last volume columns show the data concerning, respectively,the last weight measured by the balance and the last volume calculated using thespecific weight, measured during the latest repetition.
The Steps/cc and Offset columns indicate the actual pump throughput, while theStd. dev. column shows the standard deviation calculated from among allrepetitions of the same test. The data contained in these columns are indicative ofany malfunctions in the circuit being calibrated.
When calibration is complete, the data are stored to be used later by the dispensingprograms.
Figure 36

CorobTECH User's Manual Using CorobTECH •••• 59
When the procedure is finished, the calibration data table shows the datacalculated by the program (Figure 36). The Calibration information section reportsthe date and result of the calibration.
If some speeds are not calibrated, the program displays a warning message in thesame section indicating said speeds.
When calibration is complete, every speed has a maximum calibrated volumecorresponding to the test performed with the highest volume (in the example, themaximum volume at speed 150 is 6 cc, while at speed 999 it corresponds to 25000steps). If automatic change recalculation has been enabled for the circuit calibrated(chapter "Pump settings" on page 44), the Change value between two speeds setbased on the pump type is changed (chapter "Modifying the Change value" onpage 46) taking the maximum volume, obviously at the lowest speed.
If you wish to consult the calibration file used, click the button in the lower left(chapter "Calibration file for a pump type" on page 50).
Aborting and pausing calibrationThe calibration procedure may be aborted at any time by clicking Stop; theprocedure will be cancelled.
If you wish to momentarily suspend the calibration, click Pause; the procedure willbe blocked, but the calibration dialog box cannot be closed. To restart theprocedure click Start.
DetailsClick the Details button in the Calibration information section if you wish to displaythe calibration data calculated.
Figure 37
Click the Chart tab to display the calibration data in the form of a graph, or the Datatab to display the calibration data in tabular form.
The graph may be constructed based on a linear or logarithmic scale; click Changescale to toggle between modes.

60 •••• Using CorobTECH CorobTECH User's Manual
Dispensing testThis function makes it possible to effectively check the calibration performed,allowing the user to check its validity.
The dialog box (Figure 38) appears similar to the one for calibration, and retains thesame main functions.
Figure 38
Before proceeding with the dispensing tests, it is best to prepare the balance toweigh the dispensed amounts; click the Options... button in the Dispensing testdialog box to check the balance configuration (chapter "Preparing for calibration" onpage 54).
In the upper right of the Dispensing test dialog box it is possible to select the typeof test to be carried out on the dispenser by clicking the corresponding tab.
The Single test makes it possible to check the validity of the calibration, dispensinga certain amount of colorant from the specified circuit, expressed in weight, volumeor number of pump steps.
Once the type of single test has been selected and the amount to be dispensedspecified in volume, weight, or number of steps and speed of the pump, theprogram will perform the test and produce some information in the central table,including the standard deviation and error rate in relation to the amount requested.
The Multiple test allows you to perform several tests consecutively so as to havemore information about the circuit analyzed (Figure 39).

CorobTECH User's Manual Using CorobTECH •••• 61
Figure 39
The multiple test uses a text file available in the following directory:"c:\wuser\CorobTECH\tests\". The file may be edited or created using any texteditor.
To open the file click the Open file... button; the name of the current file isdisplayed at the bottom of the Dispensing test dialog box.
Figure 40
The example (Figure 40) shows the default structure of a file that may be used toperform a multiple test.
The header contains the explanation of the syntax used in the file.
In the Execution order section, in the Dispensing test dialog box, it is possible toselect whether the tests are to be carried out from first to last then first to last, orfrom first to last then last to first.

62 •••• Using CorobTECH CorobTECH User's Manual
After completing the test, the data table shows the data calculated by the program.
If you wish to convert the dispensing tests to PDF format, click the button in thelower left (chapter "Dispensing test reports" on page 62).
Dispensing test reportsThe dispensing tests carried out (chapter "Dispensing test" on page 60) may beconverted into PDF format for consultation and/or printing.
Choose Dispensing test reports... in the Circuits menu.
Figure 41
In the Select test section, specify the circuit number on which the tests wereperformed, selecting it from the Circuit list box.
The tests performed are listed in the section below. For each test, the date and timeof execution are indicated, as well as whether it is a single or multiple test.
If you wish for the PDF file to contain a reference name, enter it into the User textbox.
In the list of tests, select those to be converted into PDF.
Enable the Open with Acrobat Reader check box if you want the PDF filegenerated to be opened immediately in Acrobat Reader.
Click the button to select the folder in which to save the PDF file, then clickExport to PDF.
Click Exit to close the dialog box.
Note - Tests may be converted into PDF format only if you have also chosen toinstall Adobe Acrobat Reader during the CorobTECH installation.
Single recirculation and Single stirringThese are commands dedicated solely to dispensers equipped with the CorobTRIGEN/BANCO new-generation electronics or to industrial type dispensers, whereexternal tanks are powered by dedicated motorized pump units.

CorobTECH User's Manual Using CorobTECH •••• 63
Single stirringThe Single stirring function allows you to execute the stirring of a colorant for a timedifferent than that of the timed stirring. It is very important to carry out colorantstirring, particularly when refilling colorant inside a canister or an external tank.
To send a single stirring command to the machine, carry out one of the followingoperations:
• choose Single stirring in the Circuits menu
• press Ctrl+S
Figure 42
In the Single stirring dialog box (Figure 42), it is possible to select the circuit forwhich to activate stirring and set the duration of the process.
At the bottom of the dialog box is a status bar that shows messages about theexecution of the commands as well as any error messages.
To start a single stirring process, proceed as follows:
1. In the Circuit box, set the number of the circuit for which youwish to activate stirring.
2. In the Duration box, set the stirring time expressed inhours/minutes/seconds.
3. Click Start.4. Repeat the above steps to start single stirring for other
circuits.
The window will display the list of circuits in which stirring is in progress (Figure 43);this displays the time remaining until the end of the process for each circuit.
Figure 43
To stop a single stirring in progress, proceed as follows:

64 •••• Using CorobTECH CorobTECH User's Manual
1. Select the circuit to be aborted from the list of those in whichstirring is in progress.
2. Click Stop.
3. Repeat the above steps to stop single stirring for othercircuits.
If you attempt to close the window while single circuit stirring is in progress, amessage will ask whether you wish to abort all current processes.
Single recirculationThe Single recirculation function allows you to execute recirculation activating onesingle motor, using times and speeds different than those of the timed recirculation.It is very important to carry out recirculation, particularly when refilling colorantinside a canister or an external tank.
To send a single recirculation command to the machine, carry out one of thefollowing operations:
• choose Single recirculation in the Circuits menu
• press Ctrl+R
Figure 44
Recirculation may be activated in more than one circuit simultaneously.
Note that in a dispenser equipped with external circuits, the numbering of motorsdoes not correspond to the numbering of circuits.
In the Single recirculation dialog box (Figure 44) it is possible to select thenumber of the motor to be activated, set the duration of the process and the motorrotation speed.
At the bottom of the dialog box is a status bar that shows messages about theexecution of the commands as well as any error messages.
To start a single recirculation process, proceed as follows:
1. In the Motor box set the number of the motor to activate inorder to recirculate in a given circuit.
2. In the Duration box set the recirculation time expressed inhours/min/sec.
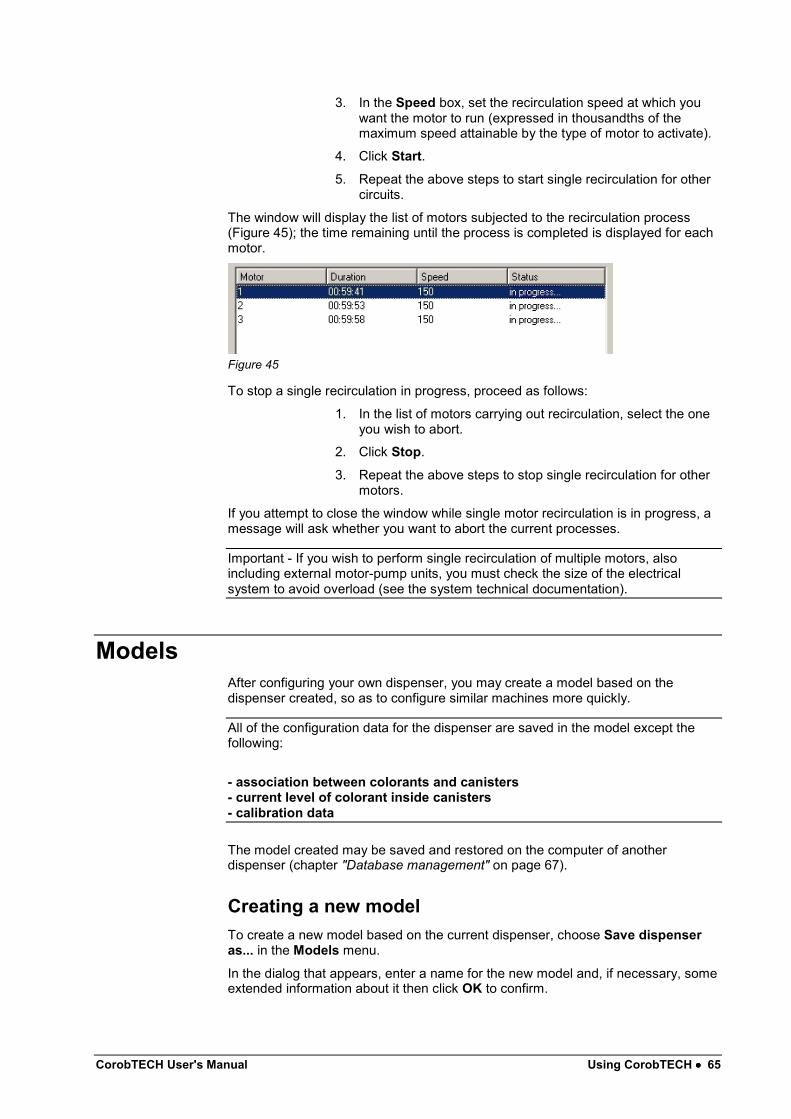
CorobTECH User's Manual Using CorobTECH •••• 65
3. In the Speed box, set the recirculation speed at which youwant the motor to run (expressed in thousandths of themaximum speed attainable by the type of motor to activate).
4. Click Start.5. Repeat the above steps to start single recirculation for other
circuits.
The window will display the list of motors subjected to the recirculation process(Figure 45); the time remaining until the process is completed is displayed for eachmotor.
Figure 45
To stop a single recirculation in progress, proceed as follows:
1. In the list of motors carrying out recirculation, select the oneyou wish to abort.
2. Click Stop.
3. Repeat the above steps to stop single recirculation for othermotors.
If you attempt to close the window while single motor recirculation is in progress, amessage will ask whether you want to abort the current processes.
Important - If you wish to perform single recirculation of multiple motors, alsoincluding external motor-pump units, you must check the size of the electricalsystem to avoid overload (see the system technical documentation).
ModelsAfter configuring your own dispenser, you may create a model based on thedispenser created, so as to configure similar machines more quickly.
All of the configuration data for the dispenser are saved in the model except thefollowing:
- association between colorants and canisters- current level of colorant inside canisters- calibration data
The model created may be saved and restored on the computer of anotherdispenser (chapter "Database management" on page 67).
Creating a new modelTo create a new model based on the current dispenser, choose Save dispenseras... in the Models menu.
In the dialog that appears, enter a name for the new model and, if necessary, someextended information about it then click OK to confirm.

66 •••• Using CorobTECH CorobTECH User's Manual
The model created will be available in the list of models in the window to create anew dispenser (chapter "Creating a new dispenser" on page 18).
Deleting a modelTo delete a model, choose Delete model... in the Models menu.
In the dialog that appears, select the model to be deleted then click OK to confirmdeletion.
It is possible to delete a model even if a dispenser based on that model has alreadybeen created.
Multiple tinting systemsIt is possible to associate one or more data structures with the current dispenser;the data structures must be correctly installed on the computer and included in theCatalog.
It is important to remember that, if several databases are associated with adispenser, they all must have the same list of colorants.
To manage multiple dispensers, it is possible to associate each dispenser with thecorresponding data structure (thus the one with the colorants present on themachine). When a formula is selected from a data structure in the dispensingprogram, the associated dispenser will automatically be controlled.
The first step is to select the dispenser with which you wish to associate the tintingsystems (chapter "Selecting the current dispenser" on page 19).
Choose Multiple tinting systems... in the Canisters menu.
The dialog box Multiple tinting system selection displays all the tinting systemsinstalled in the computer and included in the Catalog.
Double-click the name in the tinting system to be associated, and it will be markedwith a check mark.
Repeat if you wish to associate the same dispenser with other tinting systems.
Close the dialog box by clicking OK.

CorobTECH User's Manual Configuration •••• 67
Configuration
LanguageIf the translation is available, the program uses automatically the system language,(Windows control panel, Regional settings), otherwise the default language isEnglish.
If you wish to change the program language, choose Language... in the Optionsmenu.
Figure 46
In the Language dialog box, select the new language in the list then click OK toconfirm.
You must restart the program to activate the language change.
Database managementA single dialog box combines backup and restore functions for all the data used bythe program.
BackupYou may save all data used by the program to floppy disk:
• dispenser models
• pump types
• dispenser settings
• complete backup of dispenser models, pump types anddispenser settings
• complete backup of dispenser models, pump types anddispenser settings, plus minimal tinting systems

68 •••• Configuration CorobTECH User's Manual
We recommend that you protect your data by saving periodically. You can recoveryour data from the backup in case the computer is damaged or the original datalost.
To save data, choose Database management... in the Options menu, then clickthe Backup tab.
Figure 47
1. Label a floppy disk so that it will be clearly identifiable whendata need to be restored.
2. Select the type of data to save from the Select backup datalist box.
3. Insert a 1.44 Mb floppy disk in the computer's floppy diskdrive and click the Start button.
A message will appear on the screen to indicate the number of floppy disksnecessary to make the requested backup.
Use only formatted, blank disks that are not write-protected; any data stored on thedisks will be erased.
4. Follow the instructions displayed by the program to finishbacking up your data.
RestoreYou may restore the data used by the program from a backup floppy disk.
The disks must contain a previous save made using the Backup function ofCorobTECH; no other format will be accepted.
To restore data, choose Database management... in the Options menu, then clickthe Restore tab.

CorobTECH User's Manual Configuration •••• 69
Figure 48
1. If you want the data to be restored without overwriting anyexisting data, you may select an alternative folder where thedata will be copied: select the Another folder option buttonand specify the complete pathname of the folder that youwish to use, or click Browse to select the path from the list offolders.
2. Insert the first floppy disk containing the backup data in thecomputer's floppy disk drive and click the Start button.
3. Follow the instructions displayed by the program to finishrestoring your data.
Specific weight settingsThe variations in the specific weights of colorants in the dispenser affect the resultsof dispenser calibration.
Thus, before calibrating it is advisable to measure the real specific weight of thecolorants, which may vary from the standard specific weight indicated by the paintmanufacturer and saved in the data structure.
When calibrating you may choose whether to calibrate a colorant using thestandard or real specific weight.
It is also possible to change the standard specific weights stored in the datastructure, directly from CorobTECH.
Choose Specific weight settings... in the Options menu.
Two tabs are available in the Specific weight settings dialog box to display orchange the standard specific weights of the colorants, or to enter the real specificweights of the colorants.
The values of the specific weights may be changed even if they have been used forcalibration.
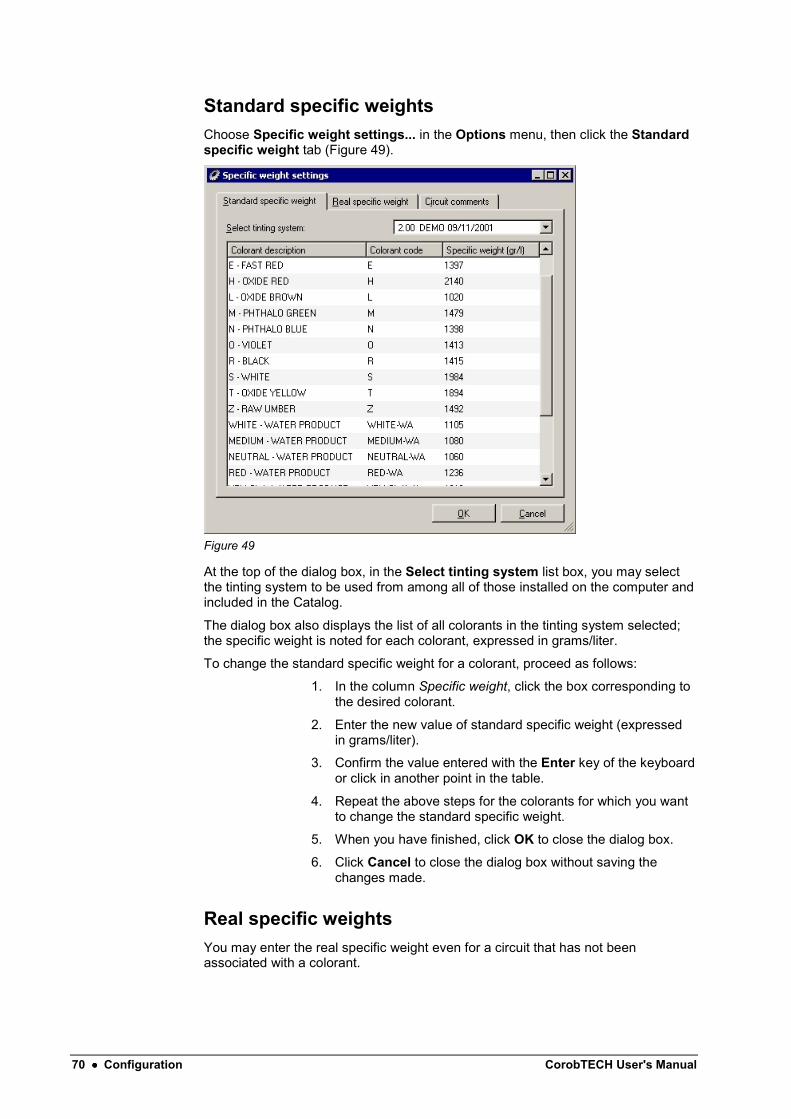
70 •••• Configuration CorobTECH User's Manual
Standard specific weightsChoose Specific weight settings... in the Options menu, then click the Standardspecific weight tab (Figure 49).
Figure 49
At the top of the dialog box, in the Select tinting system list box, you may selectthe tinting system to be used from among all of those installed on the computer andincluded in the Catalog.
The dialog box also displays the list of all colorants in the tinting system selected;the specific weight is noted for each colorant, expressed in grams/liter.
To change the standard specific weight for a colorant, proceed as follows:
1. In the column Specific weight, click the box corresponding tothe desired colorant.
2. Enter the new value of standard specific weight (expressedin grams/liter).
3. Confirm the value entered with the Enter key of the keyboardor click in another point in the table.
4. Repeat the above steps for the colorants for which you wantto change the standard specific weight.
5. When you have finished, click OK to close the dialog box.
6. Click Cancel to close the dialog box without saving thechanges made.
Real specific weightsYou may enter the real specific weight even for a circuit that has not beenassociated with a colorant.
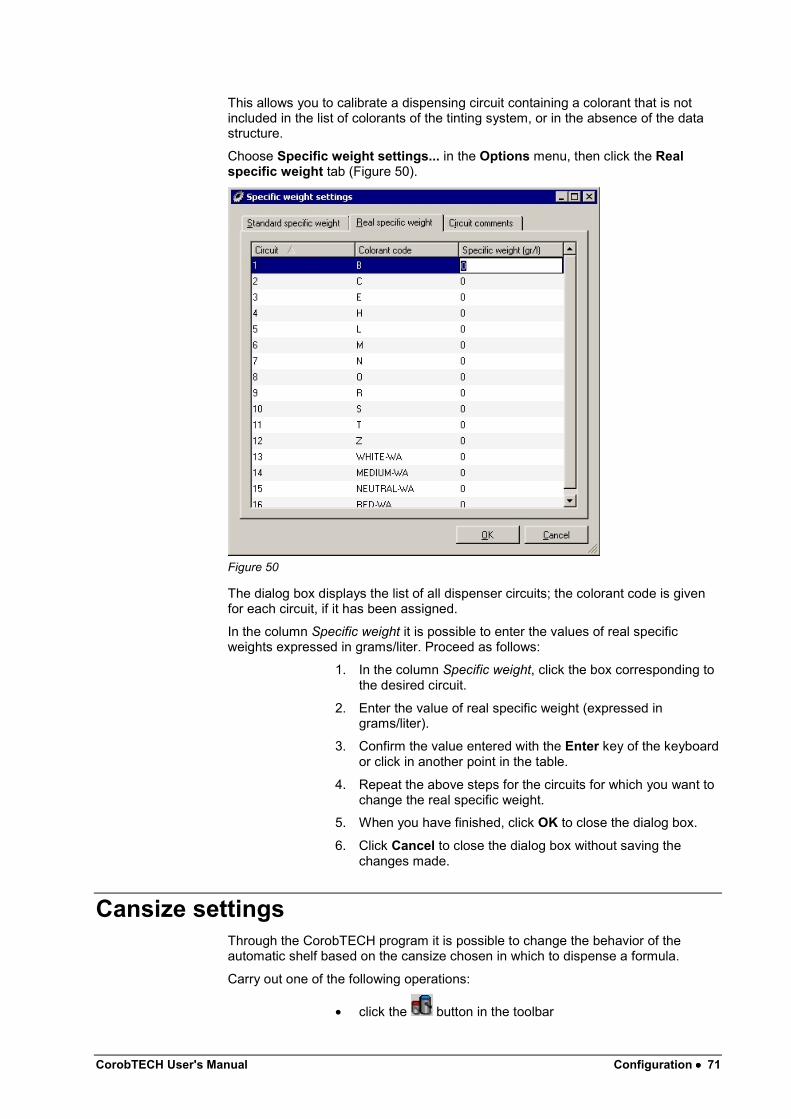
CorobTECH User's Manual Configuration •••• 71
This allows you to calibrate a dispensing circuit containing a colorant that is notincluded in the list of colorants of the tinting system, or in the absence of the datastructure.
Choose Specific weight settings... in the Options menu, then click the Realspecific weight tab (Figure 50).
Figure 50
The dialog box displays the list of all dispenser circuits; the colorant code is givenfor each circuit, if it has been assigned.
In the column Specific weight it is possible to enter the values of real specificweights expressed in grams/liter. Proceed as follows:
1. In the column Specific weight, click the box corresponding tothe desired circuit.
2. Enter the value of real specific weight (expressed ingrams/liter).
3. Confirm the value entered with the Enter key of the keyboardor click in another point in the table.
4. Repeat the above steps for the circuits for which you want tochange the real specific weight.
5. When you have finished, click OK to close the dialog box.
6. Click Cancel to close the dialog box without saving thechanges made.
Cansize settingsThrough the CorobTECH program it is possible to change the behavior of theautomatic shelf based on the cansize chosen in which to dispense a formula.
Carry out one of the following operations:
• click the button in the toolbar

72 •••• Configuration CorobTECH User's Manual
• choose Cansize settings... in the Options menu
Figure 51
In the Cansize settings dialog box, using the Select tinting system list box, selectthe data structure for which you intend to change the cansize settings; the windowthus displays the list of all the cans in the chosen tinting system.
Important - It is not possible to add or delete cans with CorobTECH.
Tolerance on cansize heightThe minimum and maximum tolerance values will be available if included in thedata structure; these data are necessary for positioning the automatic shelf.
In the Cansize settings dialog box it is possible to set a tolerance range on theMAXIMUM can height for proper positioning of the automatic shelf.
We recommend entering the actual can height minus 5 mm as the minimumtolerance, and the actual can height plus 5 mm as the maximum tolerance.
To change the tolerance values:
1. In the column Minimum tolerance or Maximum tolerance,click the box corresponding to the can to be modified.
2. Enter the height (expressed in mm).
3. Confirm the value entered with the Enter key of the keyboardor click in another point in the table.
Shelf resetIf the Always lower the shelf check box is enabled for a can, when this can isused to dispense a formula from the dispensing program, the shelf will be reset(thus will be positioned at the minimum height), and then move to the heightappropriate to the can; after dispensing it will once again be reset.
Reference positionIf the Reference position check box is enabled for a can, when this can is used todispense a formula from the dispensing program, the shelf will be positioned at thereference height regardless of the actual height of the can (only if the referenceplane is enabled as described in chapter "Shelf reference plane" on page 22). If you

CorobTECH User's Manual Configuration •••• 73
wish to enable the reference position of the shelf for a can, we recommend that younot also implement resetting the shelf to zero.
PreferencesThe Preferences dialog box contains a few of the configuration functions of theCorobTECH program. It also allows you to re-enable the display of hardware errors.
Choose Preferences... in the Options menu.
Figure 52
Close Autocap after dispensingWhen CorobTECH sends the dispenser a command that involves dispensingcolorant, the autocap is automatically managed and the cap first automaticallyopens then automatically closes after dispensing the colorant.
In some cases, such as for example during calibration, or when numerousconsecutive dispensing operations take place, it is possible to save time bypreventing the autocap from always closing after every dispensing.
You may configure autocap closing in the Close Autocap after dispensing section.
Select the Never option button to prevent the autocap from closing afterdispensing; the first dispensing will open the autocap, while you must send theclosing command when finished (chapter "Autocap commands" on page 38).
Select the Ask before option button to display the window asking to close theautocap; you may decide each time whether to close the autocap or leave it openfor the next dispensing. Again in this case, if the autocap remains open, you mustuse the closing command when finished (chapter "Autocap commands" on page38).
Select the Always option button to retain automatic autocap management.
Hardware errorsThe Hardware errors section includes the button to re-enable the display ofhardware errors.
The button is enabled only if you have previously disabled the display of hardwareerrors (chapter "Dispenser commands" on page 34).
74 •••• Configuration CorobTECH User's Manual
Data pathsIn the Data paths section it is possible to set the directories containing the files anddatabases needed for CorobTECH to function.
In the "Local" path box you may indicate the source (directory) of the data for thedispenser that you wish to configure or analyze.
The validity of this setting is local to CorobTECH, thus any other program willconsider the data saved in the default directory to be relevant to the dispenser.
It is also possible to set an alternative source for the dispenser data by enabling theDispenser data path check box and specifying the directory in the correspondingtext box.
In this manner CorobTECH will use the "Local path" as the source for dataregarding the tinting system, and "Dispenser data path" as the source of dispenserdata.

CorobTECH User's Manual Appendix •••• 75
Appendix
Use of the shortcut keys
In a dialog box, to pressCancel the command and close the dialog box ESCClick the selected button ENTERClick a button if the current control is a button- or -Select or clear the check box if the current control is a check box- or -Click the option if the current control is an option button
Spacebar
Cycle through the options of the drop-down list box selected- or -Cycle through the single options of a group
Arrow keys
Move forward through options TABMove backward through options SHIFT+TAB
Move forward through tabsCTRL+TABCTRL+PGDN
Move backward through tabsCTRL+SHIFT+TABCTRL+PGUP
Open a drop-down list boxALT+DOWN arrow (if adrop-down list box isselected)
Close a drop-down list box ESC (if a drop-downlist box is selected)
Carry out the corresponding command in the menu ALT+underlined letterin the menu
To pressCreate a new dispenser CTRL+NEdit colorant level CTRL+LConfigure multiple tinting systems CTRL+MAssign colorants to circuits CTRL+AStart the calibration procedure CTRL+BCarry out the dispensing test CTRL+T

76 •••• Appendix CorobTECH User's Manual
Add circuits CTRL+CManage multiple circuits CTRL+MChange pump settings CTRL+PCarry out single recirculation CTRL+RCarry out single stirring CTRL+S