Copy/Scan Operation Manualdownloads.kyoceradocumentsolutions.com.au/...KM-4800w Copy/Scan Operation...
67
KM-4800w Copy/Scan Operation Manual
Transcript of Copy/Scan Operation Manualdownloads.kyoceradocumentsolutions.com.au/...KM-4800w Copy/Scan Operation...
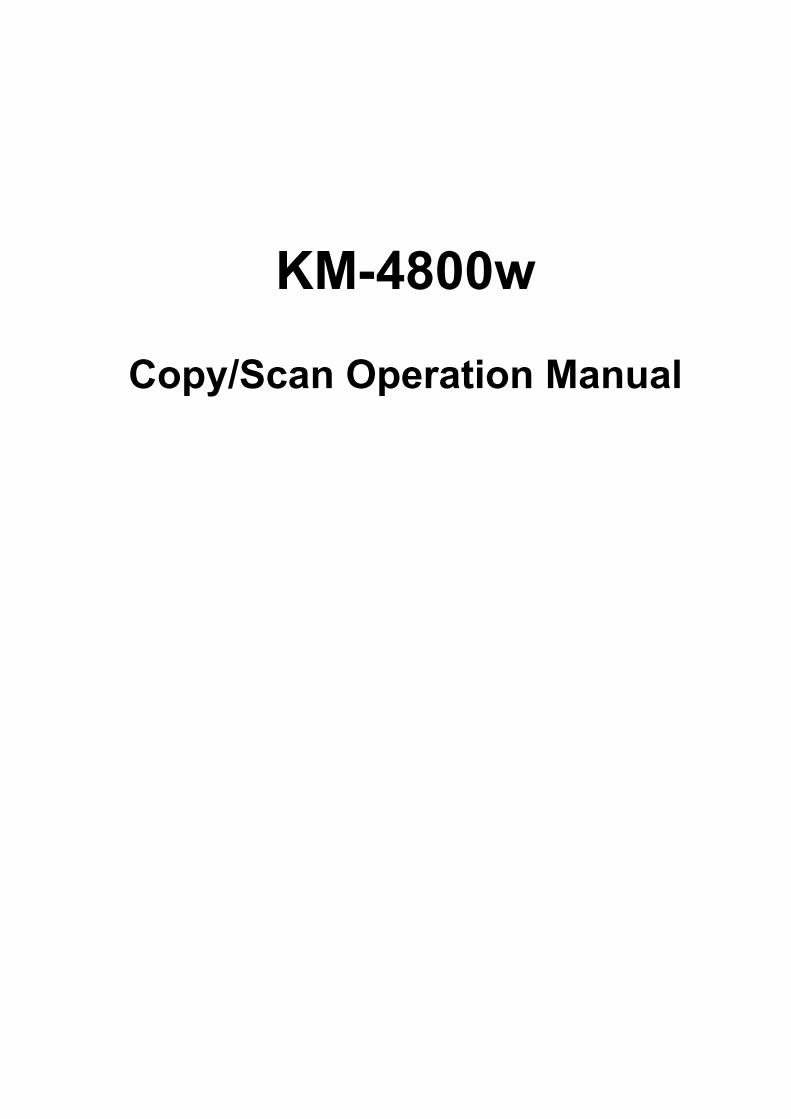
KM-4800w
Copy/Scan Operation Manual

1
NOTE: This Operation Manual contains information that corresponds to using both the metric and inch versions of these machines. The metric versions of these machines are shown in the screens in this Manual. If you are using the inch version, use the messages provided for the metric version as reference only. In the body text, only the metric messages are given if these versions differ only in capitalization. When there is even a slight difference in the message, we have listed the information for the metric version followed, in brackets, by the corresponding information for the inch version.
2
Table of Contents 1. APPEARANCE................................................................................................................................ 4 2. KEY FUNCTIONS............................................................................................................................ 5
2.1 COPY KEY .................................................................................................................................................5 2.2 SCAN KEY .................................................................................................................................................5 2.3 MENU KEY................................................................................................................................................6 2.4 ENTER KEY...............................................................................................................................................6 2.5 BACK KEY.................................................................................................................................................6 2.6 POWER SAVE KEY .....................................................................................................................................6 2.7 INTERRUPT KEY........................................................................................................................................7 2.8 RECOPY KEY ............................................................................................................................................7 2.9 RESCAN KEY ............................................................................................................................................8 2.10 RESET KEY ...............................................................................................................................................8 2.11 STOP KEY..................................................................................................................................................9 2.12 START KEY................................................................................................................................................9 2.13 NUMERIC KEYS.........................................................................................................................................9 2.14 CLEAR KEY ...............................................................................................................................................9 2.15 L1, L2, L3, L4, R1, R2, R3 AND R4 ........................................................................................................10
3. COPY..............................................................................................................................................11 3.1 COPY MODE SCREEN ..............................................................................................................................11 3.2 COPY OPERATION ...................................................................................................................................13
3.2.1 Basic Copy ...................................................................................................................... 13 3.2.2 Set Copy.......................................................................................................................... 13
3.3 COPY SETTINGS ......................................................................................................................................14 3.3.1 Size ................................................................................................................................. 14 3.3.2 Image Type .....................................................................................................................15 3.3.3 Density ............................................................................................................................ 15 3.3.4 Media Source .................................................................................................................. 16 3.3.5 Zoom ............................................................................................................................... 16 3.3.6 Set (Copy Count or Set Copy Count) .............................................................................. 18 3.3.7 Advanced settings ........................................................................................................... 19
3.4 ABOUT TONER EMPTY ............................................................................................................................32 3.5 ABOUT MAINTENANCE MESSAGE ...........................................................................................................33
4. SCAN..............................................................................................................................................34 4.1 SCAN MODE SCREEN ..............................................................................................................................34 4.2 SCAN OPERATION ...................................................................................................................................36
4.2.1 Basic Scan ...................................................................................................................... 36 4.2.2 Multi Scan........................................................................................................................ 36 4.2.3 Rescan ............................................................................................................................ 36 4.2.4 Password......................................................................................................................... 37 4.2.5 Downloading image files ................................................................................................. 38
4.3 SCAN SETTINGS ......................................................................................................................................39 4.3.1 Original Width.................................................................................................................. 39 4.3.2 Original Length ................................................................................................................40 4.3.3 Original Orientation ......................................................................................................... 40 4.3.4 Image Type .....................................................................................................................41 4.3.5 Density ............................................................................................................................ 41 4.3.6 Contrast........................................................................................................................... 41 4.3.7 Sharpness ....................................................................................................................... 42 4.3.8 Scan Zoom......................................................................................................................43 4.3.9 Advanced Settings .......................................................................................................... 44
5. MENU .............................................................................................................................................49 5.1 MENU MODE SCREEN.............................................................................................................................49 5.2 GENERAL SETTINGS................................................................................................................................49
5.2.1 Trim Cut........................................................................................................................... 49 5.2.2 Image data Delete Memory ............................................................................................. 49

3
5.2.3 Basic Configuration ......................................................................................................... 50 5.2.4 Test Mode ....................................................................................................................... 59 5.2.5 Information ...................................................................................................................... 61 5.2.6 User Mode....................................................................................................................... 61 5.2.7 Date/Time........................................................................................................................ 65 5.2.8 Service Mode .................................................................................................................. 65
4
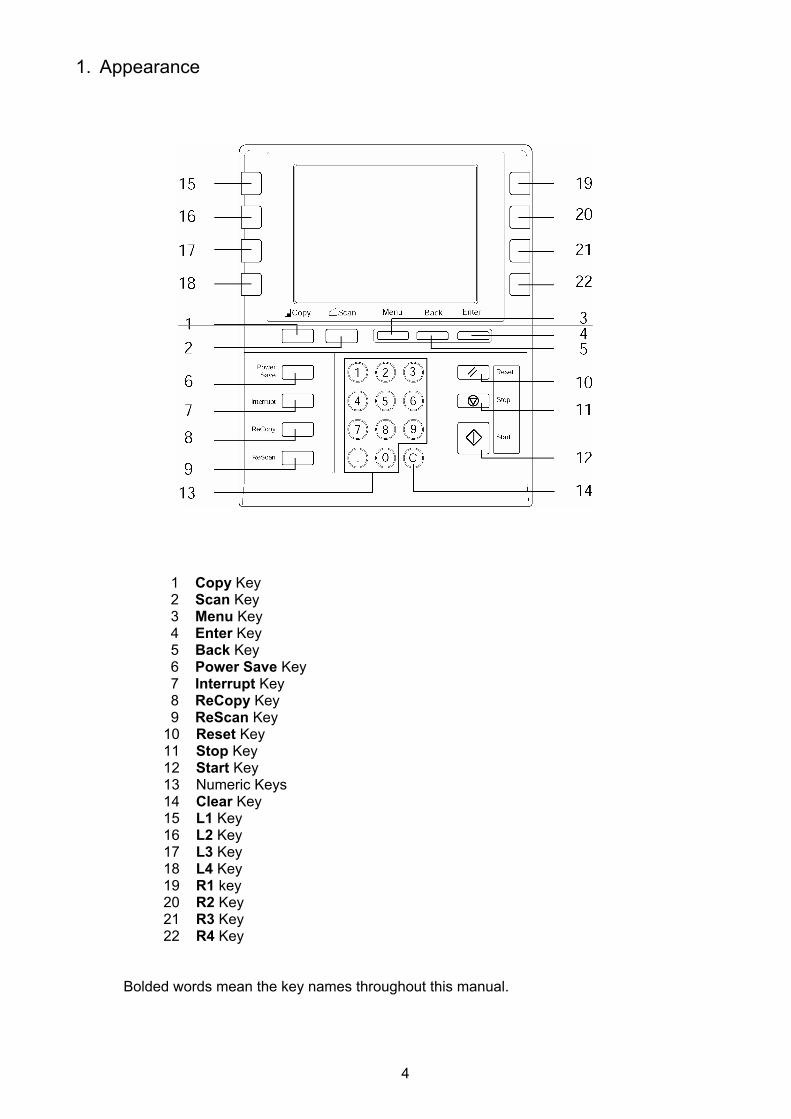
1. Appearance
1 Copy Key 2 Scan Key 3 Menu Key 4 Enter Key 5 Back Key 6 Power Save Key 7 Interrupt Key 8 ReCopy Key 9 ReScan Key
10 Reset Key 11 Stop Key 12 Start Key 13 Numeric Keys 14 Clear Key 15 L1 Key 16 L2 Key 17 L3 Key 18 L4 Key 19 R1 key 20 R2 Key 21 R3 Key 22 R4 Key
Bolded words mean the key names throughout this manual.
5
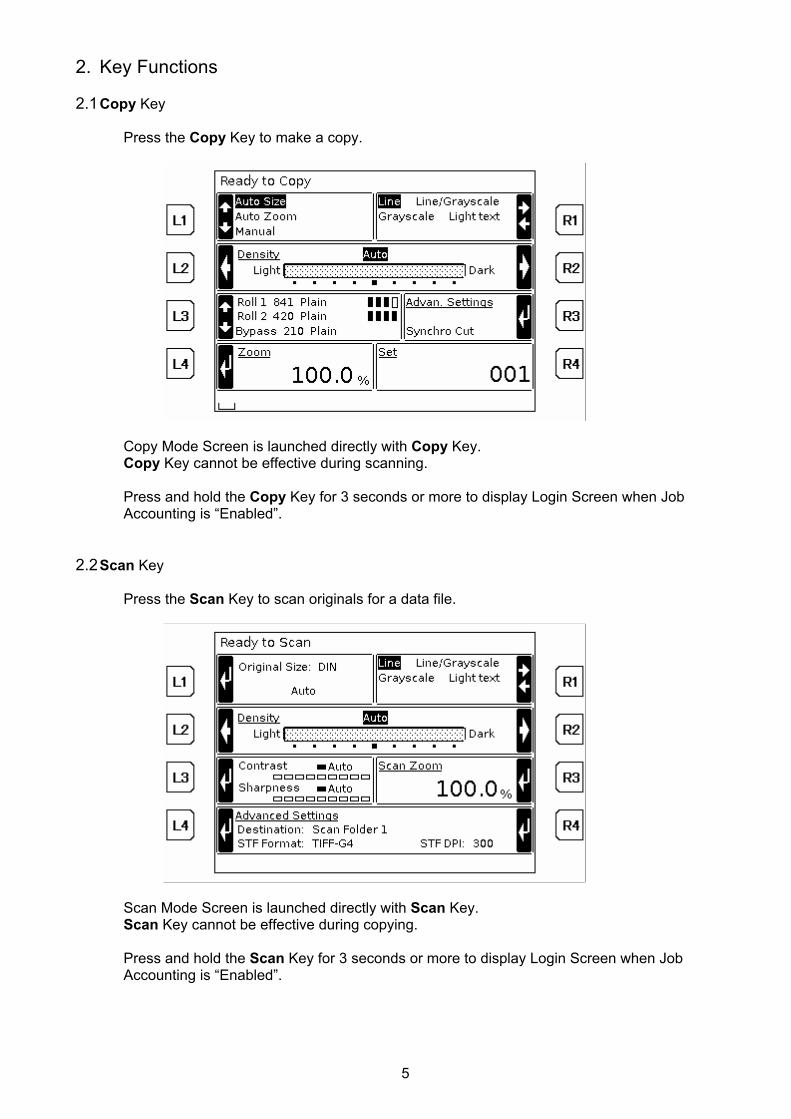
2. Key Functions 2.1 Copy Key
Press the Copy Key to make a copy.
Copy Mode Screen is launched directly with Copy Key. Copy Key cannot be effective during scanning. Press and hold the Copy Key for 3 seconds or more to display Login Screen when Job Accounting is “Enabled”.
2.2 Scan Key
Press the Scan Key to scan originals for a data file.
Scan Mode Screen is launched directly with Scan Key. Scan Key cannot be effective during copying. Press and hold the Scan Key for 3 seconds or more to display Login Screen when Job Accounting is “Enabled”.
6
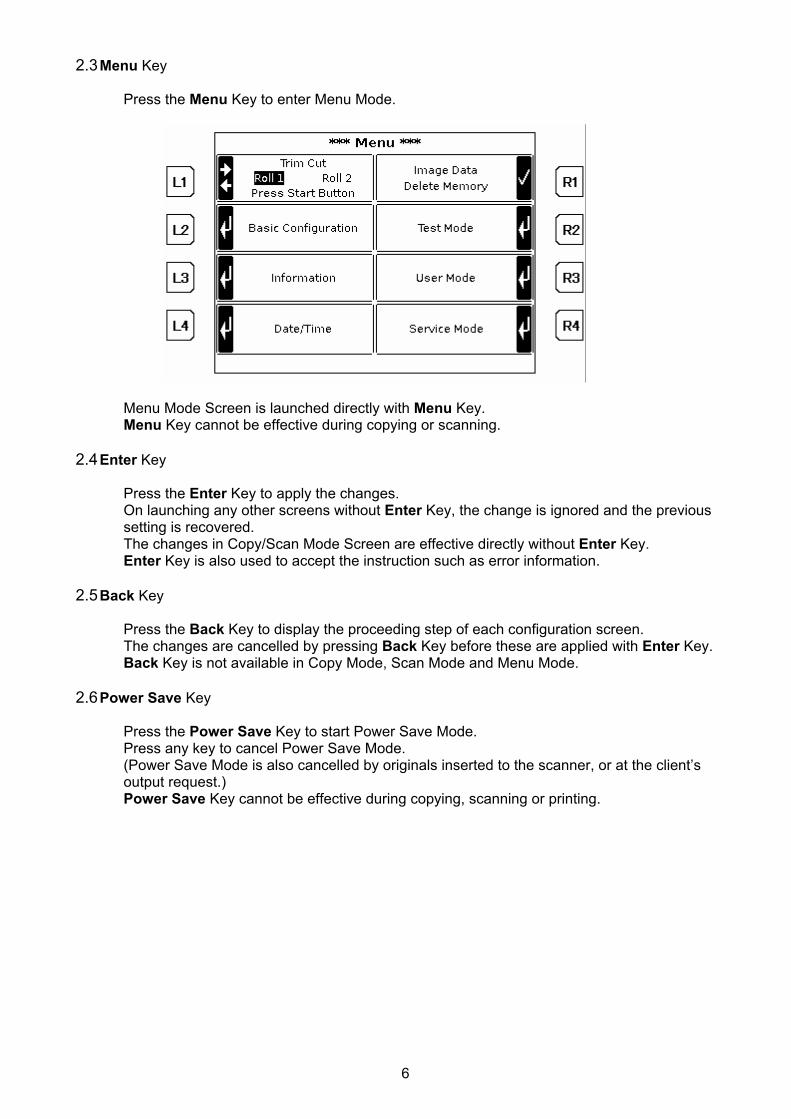
2.3 Menu Key Press the Menu Key to enter Menu Mode.
Menu Mode Screen is launched directly with Menu Key. Menu Key cannot be effective during copying or scanning.
2.4 Enter Key
Press the Enter Key to apply the changes. On launching any other screens without Enter Key, the change is ignored and the previous setting is recovered. The changes in Copy/Scan Mode Screen are effective directly without Enter Key. Enter Key is also used to accept the instruction such as error information.
2.5 Back Key
Press the Back Key to display the proceeding step of each configuration screen. The changes are cancelled by pressing Back Key before these are applied with Enter Key. Back Key is not available in Copy Mode, Scan Mode and Menu Mode.
2.6 Power Save Key
Press the Power Save Key to start Power Save Mode. Press any key to cancel Power Save Mode. (Power Save Mode is also cancelled by originals inserted to the scanner, or at the client’s output request.) Power Save Key cannot be effective during copying, scanning or printing.

7
2.7 Interrupt Key Press the Interrupt Key to pause the current copy for an urgent copy.
The sign “Interrupt” is indicated in the upper right of the screen under Interrupt Mode. Interrupt Key is used in Copy Mode except during printing a set copy. Copy Key and ReCopy Key are available in Interrupt Mode. Press the Interrupt Key again to cancel Interrupt Mode. Interrupt Mode is not cancelled when finished copying automatically. On canceling Interrupt Mode, the changes in Interrupt Mode are cancelled and the paused jobs are carried out.
2.8 ReCopy Key
Press the ReCopy Key to make a copy of the previous copy/set copy job. ReCopy Key cannot be effective during printing. Recopy is disabled in case no image exists for recopy Recopy is disabled, or requires a password entry with Recopy setting in Basic Configuration.
is indicated on the bottom left when recopy is available. is indicated when no recopy data exists or when recopy is not allowed.
Recopy permits to change the following settings.
• Zoom • Paper Media • Copy Count
Set copy only permits to change the set copy count.
8
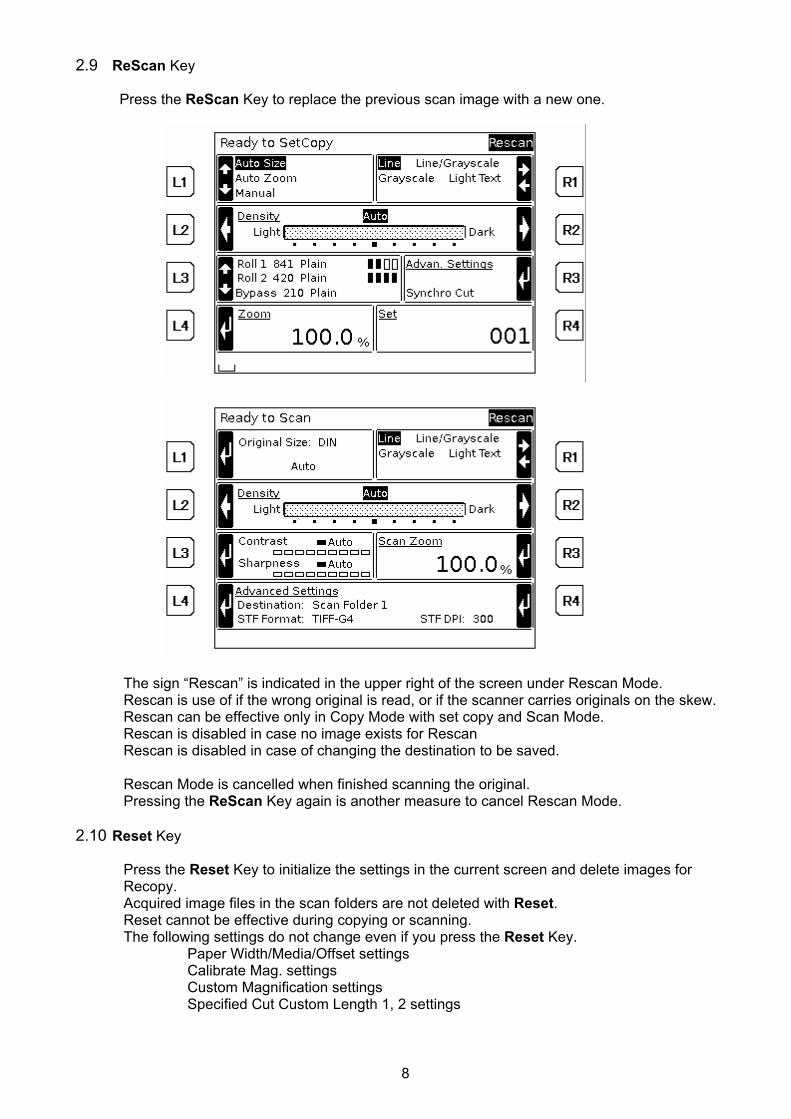
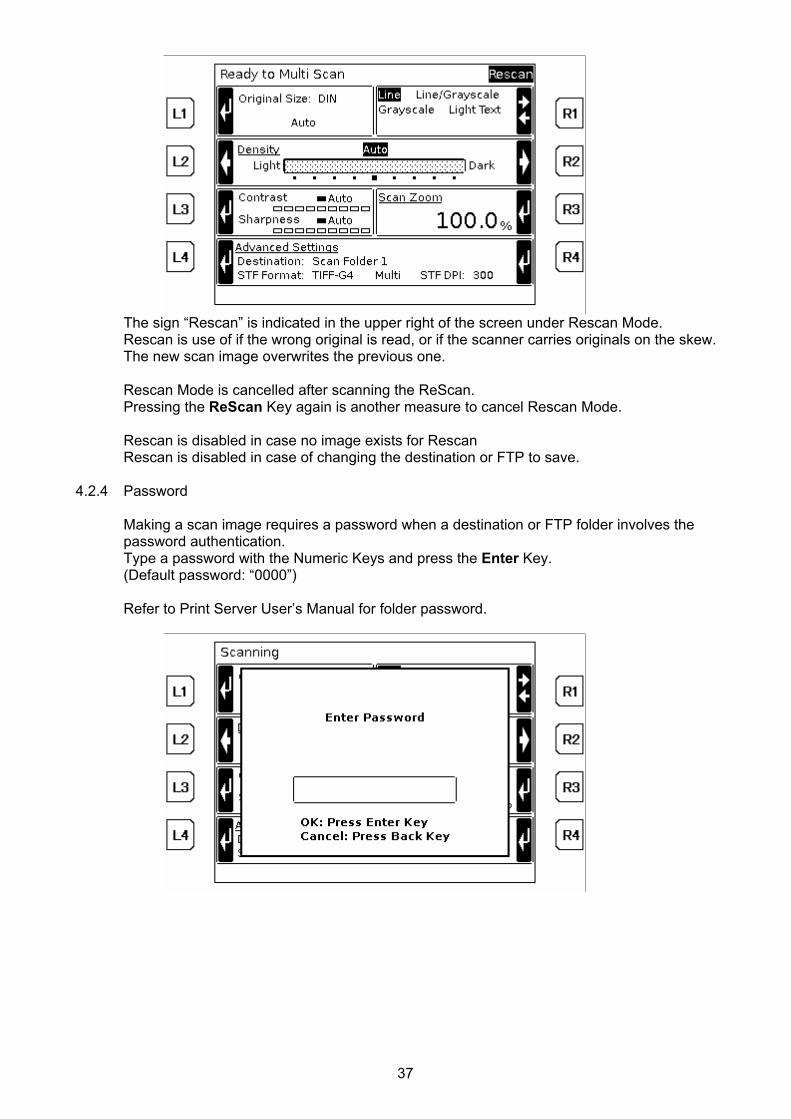
2.9 ReScan Key Press the ReScan Key to replace the previous scan image with a new one.
The sign “Rescan” is indicated in the upper right of the screen under Rescan Mode. Rescan is use of if the wrong original is read, or if the scanner carries originals on the skew. Rescan can be effective only in Copy Mode with set copy and Scan Mode. Rescan is disabled in case no image exists for Rescan Rescan is disabled in case of changing the destination to be saved. Rescan Mode is cancelled when finished scanning the original. Pressing the ReScan Key again is another measure to cancel Rescan Mode.
2.10 Reset Key
Press the Reset Key to initialize the settings in the current screen and delete images for Recopy. Acquired image files in the scan folders are not deleted with Reset. Reset cannot be effective during copying or scanning. The following settings do not change even if you press the Reset Key.
Paper Width/Media/Offset settings Calibrate Mag. settings Custom Magnification settings Specified Cut Custom Length 1, 2 settings
9
2.11 Stop Key Stop Key is only available during printing or scanning. Press the Stop Key to cancel the current printing, eject the paper and delete the job concerned. Press and hold Stop Key for 3 seconds or more to cancel the current printing, eject the paper, delete all the jobs in queue and delete images for Recopy. Press the Stop Key to cancel the current scanning and stop carrying the original. (You should remove it by hand with the upper scanner unit open.)
2.12 Start Key
Press the Start Key each time to start copy/scan when Auto Start is “OFF”. Press the Start Key to start a set copy.
2.13 Numeric Keys
The Numeric Keys are used to enter numeric data such as set copy count or magnification value.
2.14 Clear Key
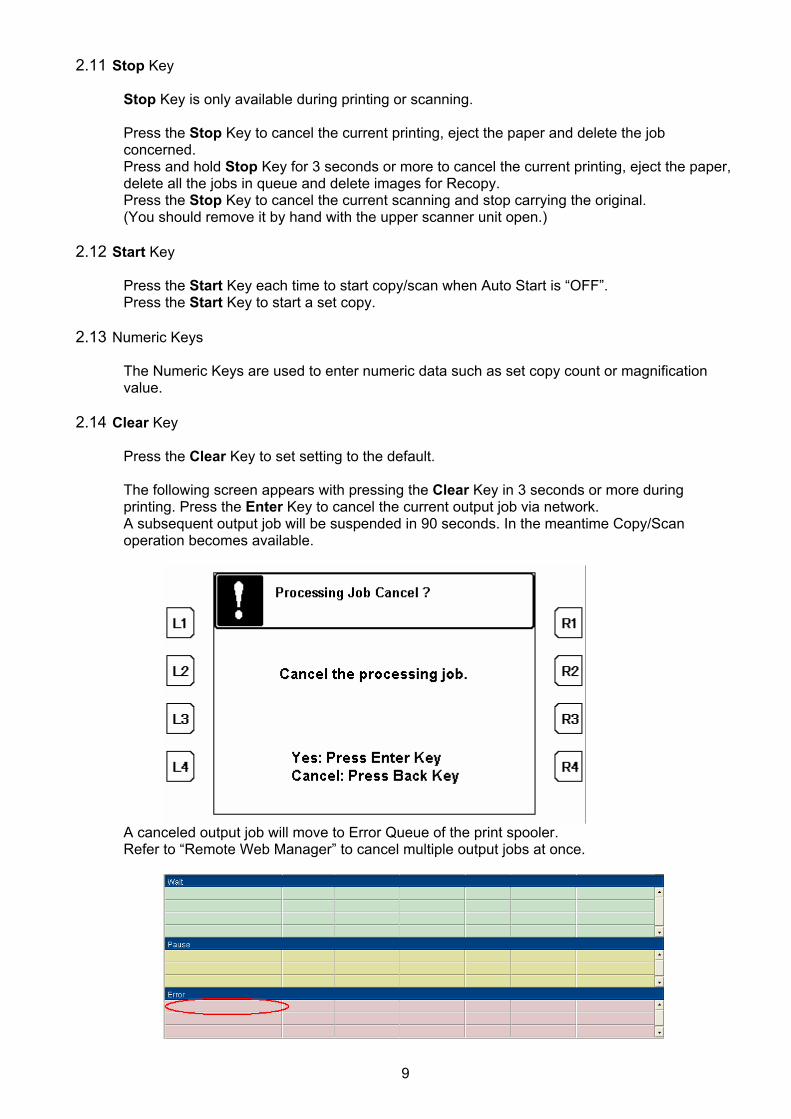
Press the Clear Key to set setting to the default. The following screen appears with pressing the Clear Key in 3 seconds or more during printing. Press the Enter Key to cancel the current output job via network. A subsequent output job will be suspended in 90 seconds. In the meantime Copy/Scan operation becomes available.
A canceled output job will move to Error Queue of the print spooler. Refer to “Remote Web Manager” to cancel multiple output jobs at once.
10
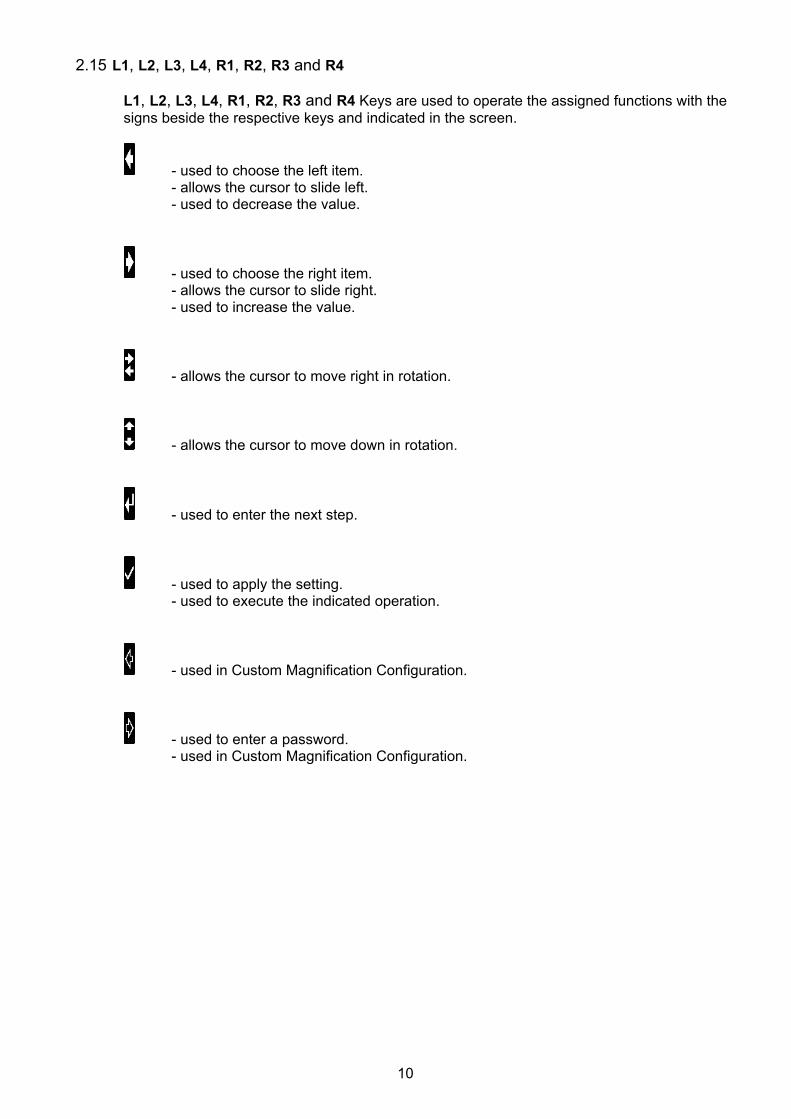
2.15 L1, L2, L3, L4, R1, R2, R3 and R4 L1, L2, L3, L4, R1, R2, R3 and R4 Keys are used to operate the assigned functions with the signs beside the respective keys and indicated in the screen.
- used to choose the left item. - allows the cursor to slide left. - used to decrease the value.
- used to choose the right item. - allows the cursor to slide right. - used to increase the value.
- allows the cursor to move right in rotation.
- allows the cursor to move down in rotation.
- used to enter the next step.
- used to apply the setting. - used to execute the indicated operation.
- used in Custom Magnification Configuration.
- used to enter a password. - used in Custom Magnification Configuration.
11
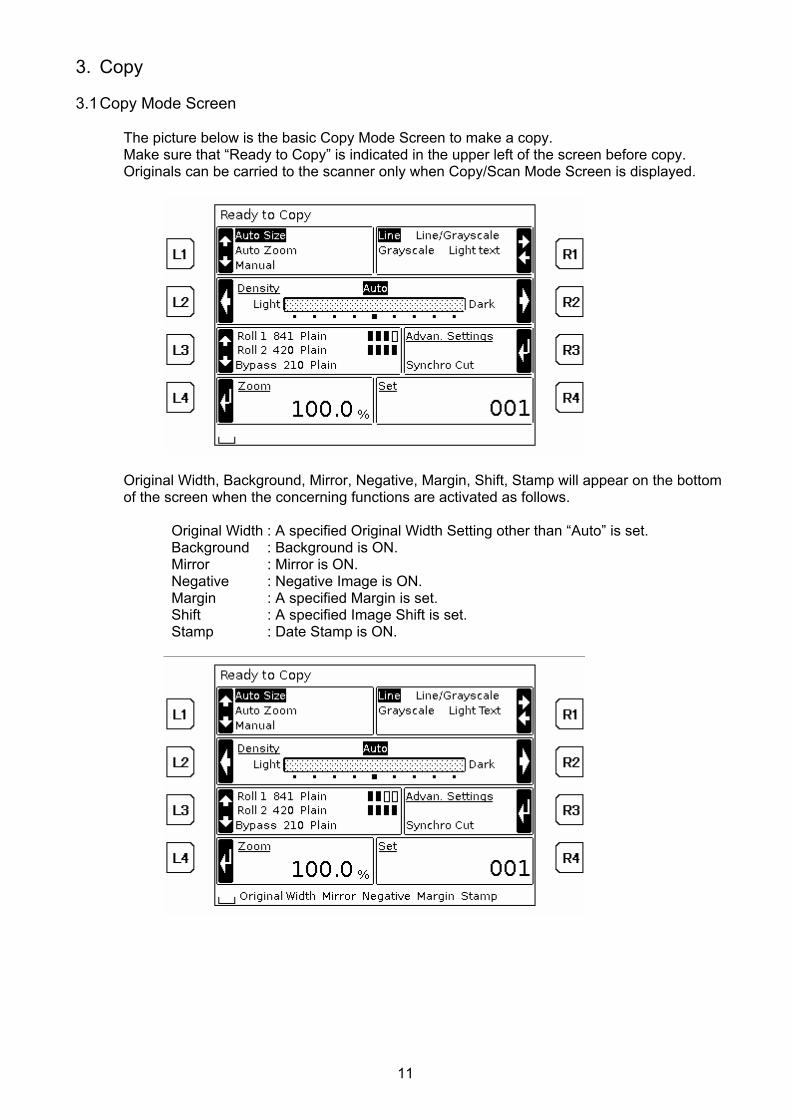
3. Copy 3.1 Copy Mode Screen
The picture below is the basic Copy Mode Screen to make a copy. Make sure that “Ready to Copy” is indicated in the upper left of the screen before copy. Originals can be carried to the scanner only when Copy/Scan Mode Screen is displayed.
Original Width, Background, Mirror, Negative, Margin, Shift, Stamp will appear on the bottom of the screen when the concerning functions are activated as follows. Original Width : A specified Original Width Setting other than “Auto” is set. Background : Background is ON. Mirror : Mirror is ON. Negative : Negative Image is ON. Margin : A specified Margin is set. Shift : A specified Image Shift is set. Stamp : Date Stamp is ON.

12
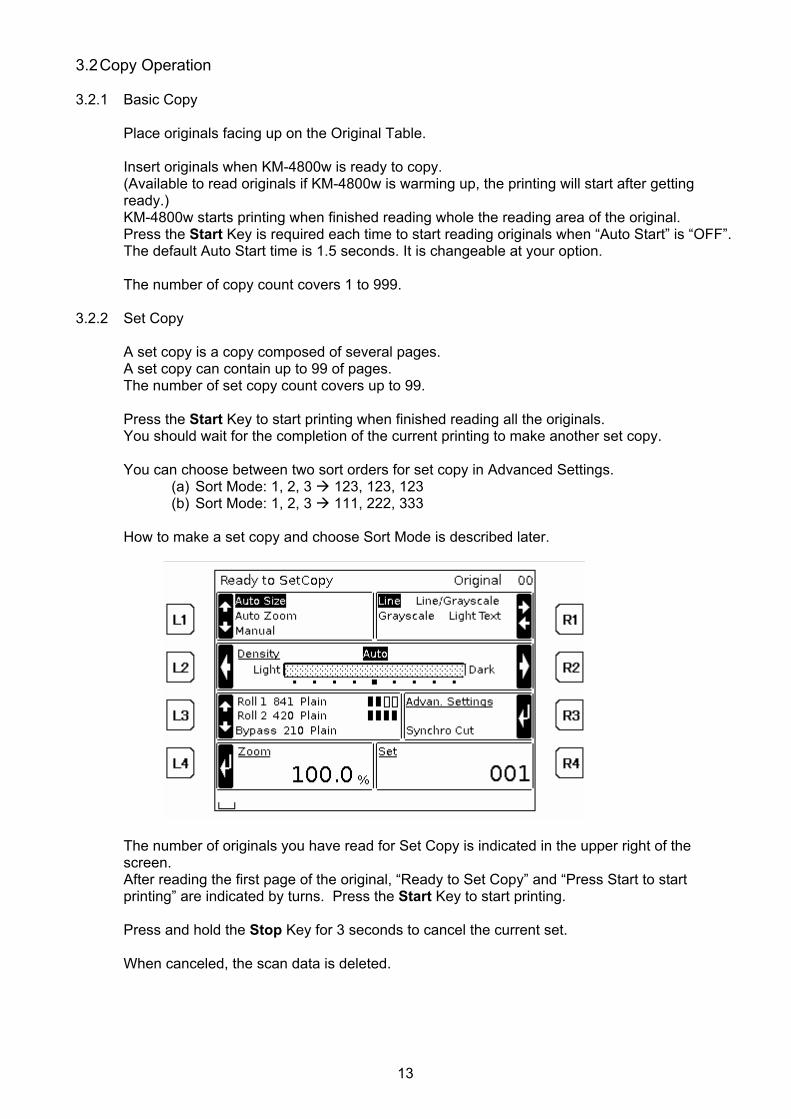
Make sure that “Ready to Set Copy” is indicated in the upper left of the screen before set copy. How to launch or cancel “Ready to Set Copy” is described later.
After reading the first page of the original, “Ready to Set Copy” and “Press Start to start printing” are indicated by turns. The number of the scan originals is indicated in upper right of the screen. The other settings you should check before copy are as following.
• Size • Image Type • Density • Cut Mode • Zoom
The above settings are described later.
13
3.2 Copy Operation 3.2.1 Basic Copy
Place originals facing up on the Original Table. Insert originals when KM-4800w is ready to copy. (Available to read originals if KM-4800w is warming up, the printing will start after getting ready.) KM-4800w starts printing when finished reading whole the reading area of the original. Press the Start Key is required each time to start reading originals when “Auto Start” is “OFF”. The default Auto Start time is 1.5 seconds. It is changeable at your option. The number of copy count covers 1 to 999.
3.2.2 Set Copy
A set copy is a copy composed of several pages. A set copy can contain up to 99 of pages. The number of set copy count covers up to 99. Press the Start Key to start printing when finished reading all the originals. You should wait for the completion of the current printing to make another set copy. You can choose between two sort orders for set copy in Advanced Settings.
(a) Sort Mode: 1, 2, 3 123, 123, 123 (b) Sort Mode: 1, 2, 3 111, 222, 333
How to make a set copy and choose Sort Mode is described later.
The number of originals you have read for Set Copy is indicated in the upper right of the screen. After reading the first page of the original, “Ready to Set Copy” and “Press Start to start printing” are indicated by turns. Press the Start Key to start printing. Press and hold the Stop Key for 3 seconds to cancel the current set. When canceled, the scan data is deleted.
14
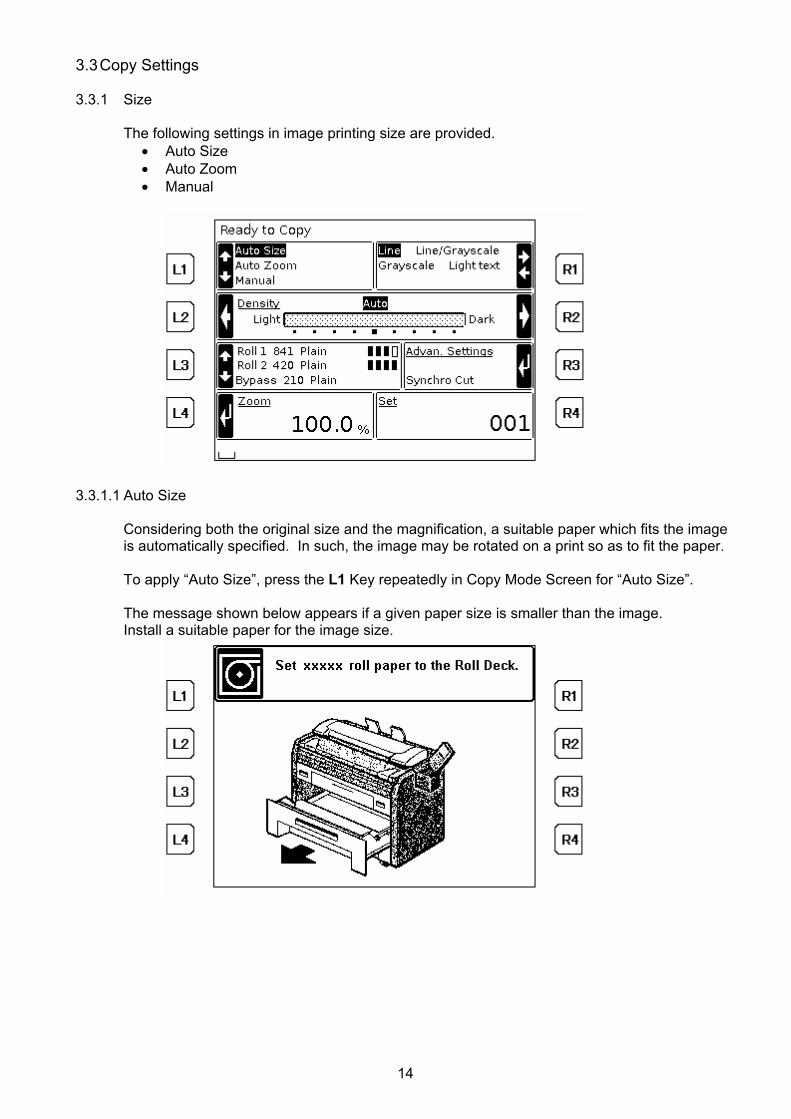
3.3 Copy Settings 3.3.1 Size
The following settings in image printing size are provided.
• Auto Size • Auto Zoom • Manual
3.3.1.1 Auto Size
Considering both the original size and the magnification, a suitable paper which fits the image is automatically specified. In such, the image may be rotated on a print so as to fit the paper. To apply “Auto Size”, press the L1 Key repeatedly in Copy Mode Screen for “Auto Size”. The message shown below appears if a given paper size is smaller than the image. Install a suitable paper for the image size.
15
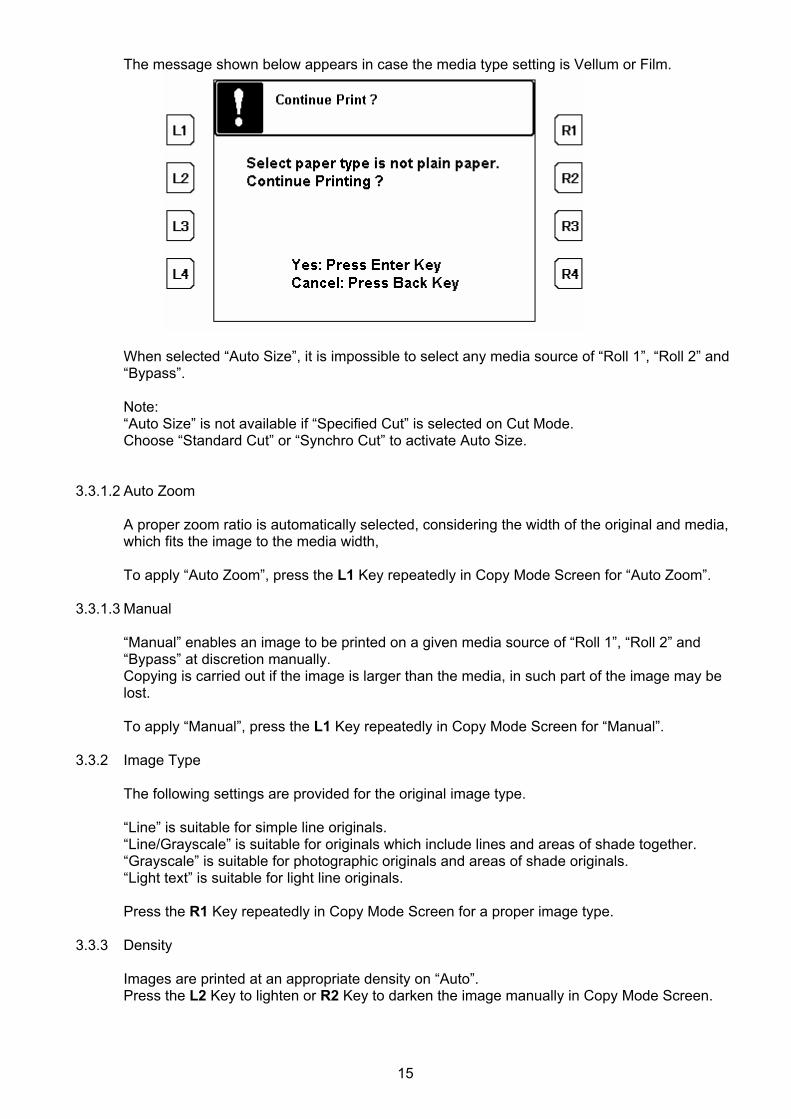
The message shown below appears in case the media type setting is Vellum or Film.
When selected “Auto Size”, it is impossible to select any media source of “Roll 1”, “Roll 2” and “Bypass”. Note: “Auto Size” is not available if “Specified Cut” is selected on Cut Mode. Choose “Standard Cut” or “Synchro Cut” to activate Auto Size.
3.3.1.2 Auto Zoom
A proper zoom ratio is automatically selected, considering the width of the original and media, which fits the image to the media width, To apply “Auto Zoom”, press the L1 Key repeatedly in Copy Mode Screen for “Auto Zoom”.
3.3.1.3 Manual
“Manual” enables an image to be printed on a given media source of “Roll 1”, “Roll 2” and “Bypass” at discretion manually. Copying is carried out if the image is larger than the media, in such part of the image may be lost. To apply “Manual”, press the L1 Key repeatedly in Copy Mode Screen for “Manual”.
3.3.2 Image Type
The following settings are provided for the original image type. “Line” is suitable for simple line originals. “Line/Grayscale” is suitable for originals which include lines and areas of shade together. “Grayscale” is suitable for photographic originals and areas of shade originals. “Light text” is suitable for light line originals. Press the R1 Key repeatedly in Copy Mode Screen for a proper image type.
3.3.3 Density
Images are printed at an appropriate density on “Auto”. Press the L2 Key to lighten or R2 Key to darken the image manually in Copy Mode Screen.
16
3.3.4 Media Source Images are printed on a specified media source of “Roll 1”, “Roll 2” and “Bypass”. Press the L3 Key repeatedly in Copy Mode Screen for a proper media source. Media Source settings cannot be effective when Size is “Auto Size”. Both the media width and type are displayed for each media source. The thickness level for “Roll 1” and “Roll 2” are displayed respectively. Each media type and width can be specified in Advanced Settings 1.
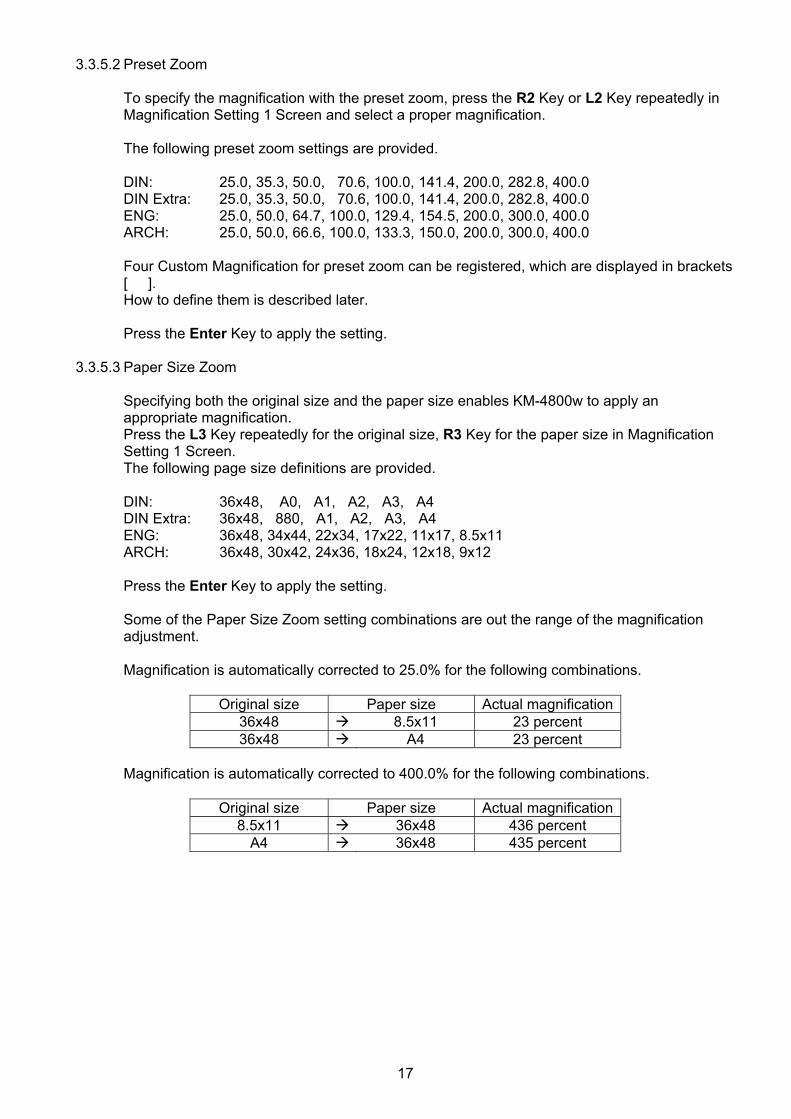
3.3.5 Zoom
The following settings are provided to reduce/enlarge the image.
• Manual • Preset Zoom • Paper Size Zoom • Width and Length Separate Zoom
Press the L4 Key in Copy Mode Screen to adjust the magnification. The magnification adjustment covers 25.0 to 400.0 percent in increments of 0.1 percent.
How to adjust the magnification is described later. 3.3.5.1 Manual
To specify the magnification manually, use the Numeric Keys to enter the value directly. Press the L1 Key to decrease the value, press the R1 Key to increase in Magnification Setting 1 Screen. Press the Enter Key to apply the setting.
17
3.3.5.2 Preset Zoom To specify the magnification with the preset zoom, press the R2 Key or L2 Key repeatedly in Magnification Setting 1 Screen and select a proper magnification. The following preset zoom settings are provided. DIN: 25.0, 35.3, 50.0, 70.6, 100.0, 141.4, 200.0, 282.8, 400.0 DIN Extra: 25.0, 35.3, 50.0, 70.6, 100.0, 141.4, 200.0, 282.8, 400.0 ENG: 25.0, 50.0, 64.7, 100.0, 129.4, 154.5, 200.0, 300.0, 400.0 ARCH: 25.0, 50.0, 66.6, 100.0, 133.3, 150.0, 200.0, 300.0, 400.0 Four Custom Magnification for preset zoom can be registered, which are displayed in brackets [ ]. How to define them is described later. Press the Enter Key to apply the setting.
3.3.5.3 Paper Size Zoom
Specifying both the original size and the paper size enables KM-4800w to apply an appropriate magnification. Press the L3 Key repeatedly for the original size, R3 Key for the paper size in Magnification Setting 1 Screen. The following page size definitions are provided. DIN: 36x48, A0, A1, A2, A3, A4 DIN Extra: 36x48, 880, A1, A2, A3, A4 ENG: 36x48, 34x44, 22x34, 17x22, 11x17, 8.5x11 ARCH: 36x48, 30x42, 24x36, 18x24, 12x18, 9x12 Press the Enter Key to apply the setting. Some of the Paper Size Zoom setting combinations are out the range of the magnification adjustment. Magnification is automatically corrected to 25.0% for the following combinations.
Original size Paper size Actual magnification
36x48 8.5x11 23 percent 36x48 A4 23 percent
Magnification is automatically corrected to 400.0% for the following combinations.
Original size Paper size Actual magnification
8.5x11 36x48 436 percent A4 36x48 435 percent
18
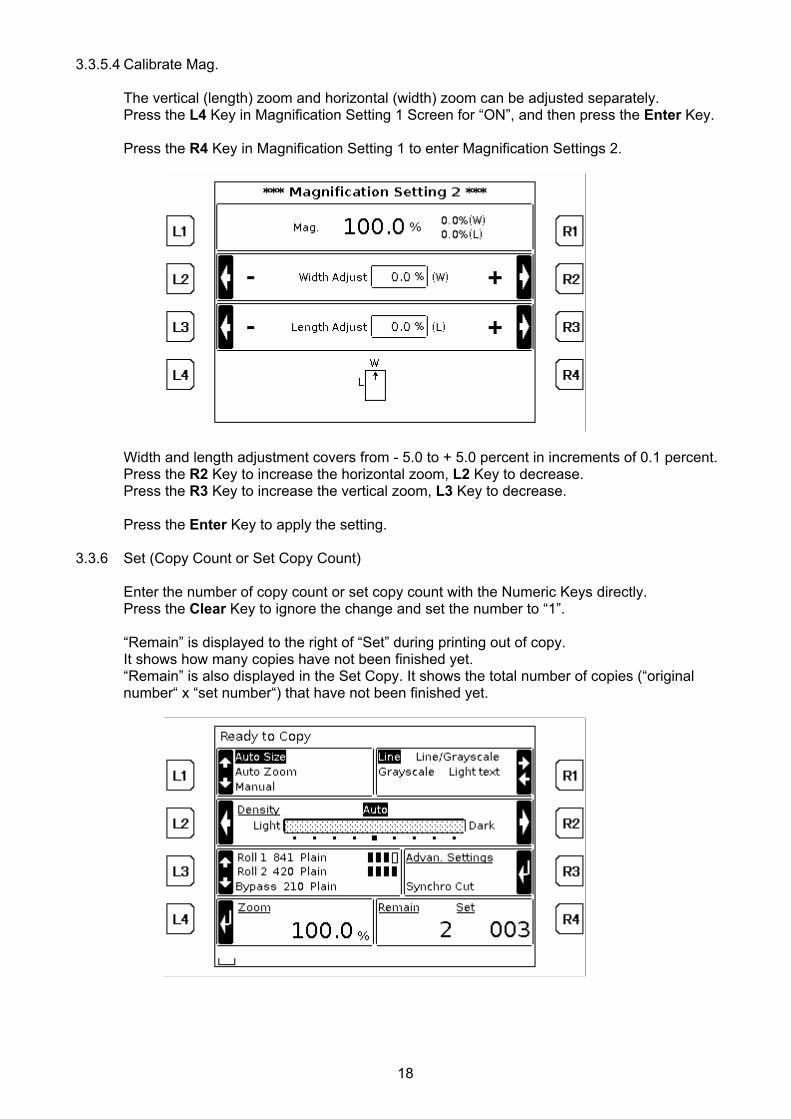
3.3.5.4 Calibrate Mag. The vertical (length) zoom and horizontal (width) zoom can be adjusted separately. Press the L4 Key in Magnification Setting 1 Screen for “ON”, and then press the Enter Key. Press the R4 Key in Magnification Setting 1 to enter Magnification Settings 2.
Width and length adjustment covers from - 5.0 to + 5.0 percent in increments of 0.1 percent. Press the R2 Key to increase the horizontal zoom, L2 Key to decrease. Press the R3 Key to increase the vertical zoom, L3 Key to decrease. Press the Enter Key to apply the setting.
3.3.6 Set (Copy Count or Set Copy Count) Enter the number of copy count or set copy count with the Numeric Keys directly. Press the Clear Key to ignore the change and set the number to “1”. “Remain” is displayed to the right of “Set” during printing out of copy. It shows how many copies have not been finished yet. “Remain” is also displayed in the Set Copy. It shows the total number of copies (“original number“ x “set number“) that have not been finished yet.
19
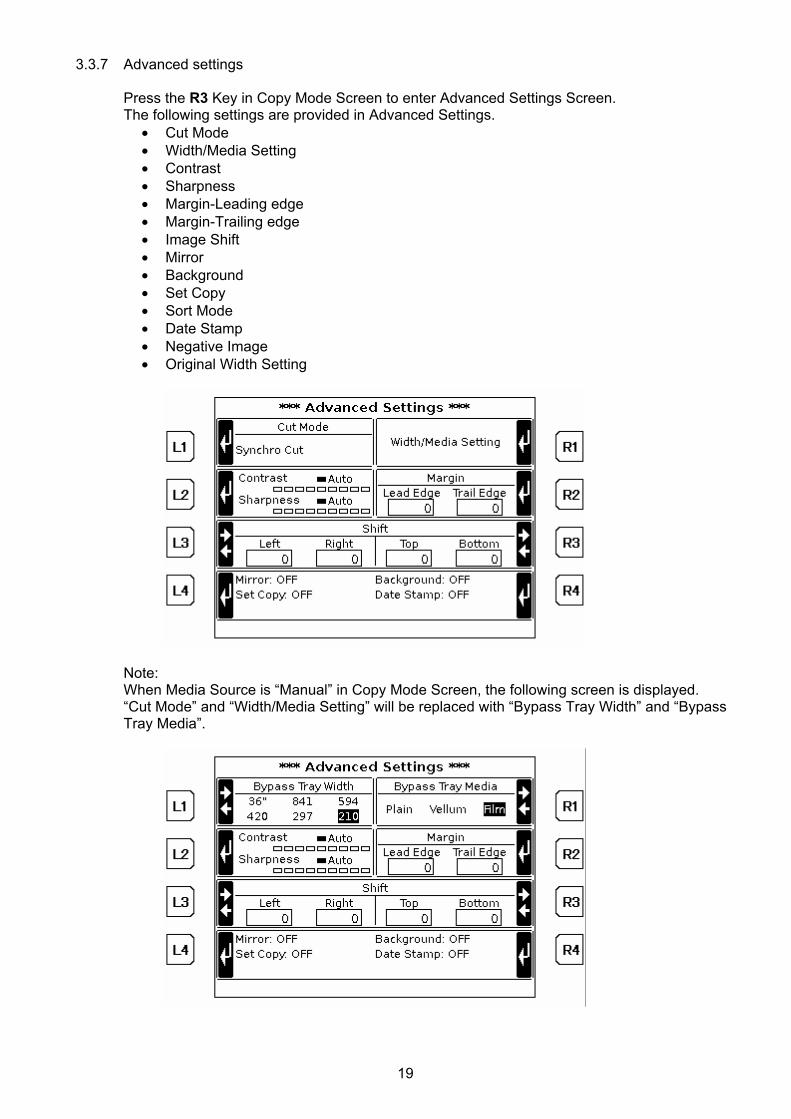
3.3.7 Advanced settings Press the R3 Key in Copy Mode Screen to enter Advanced Settings Screen. The following settings are provided in Advanced Settings.
• Cut Mode • Width/Media Setting • Contrast • Sharpness • Margin-Leading edge • Margin-Trailing edge • Image Shift • Mirror • Background • Set Copy • Sort Mode • Date Stamp • Negative Image • Original Width Setting
Note: When Media Source is “Manual” in Copy Mode Screen, the following screen is displayed. “Cut Mode” and “Width/Media Setting” will be replaced with “Bypass Tray Width” and “Bypass Tray Media”.
20
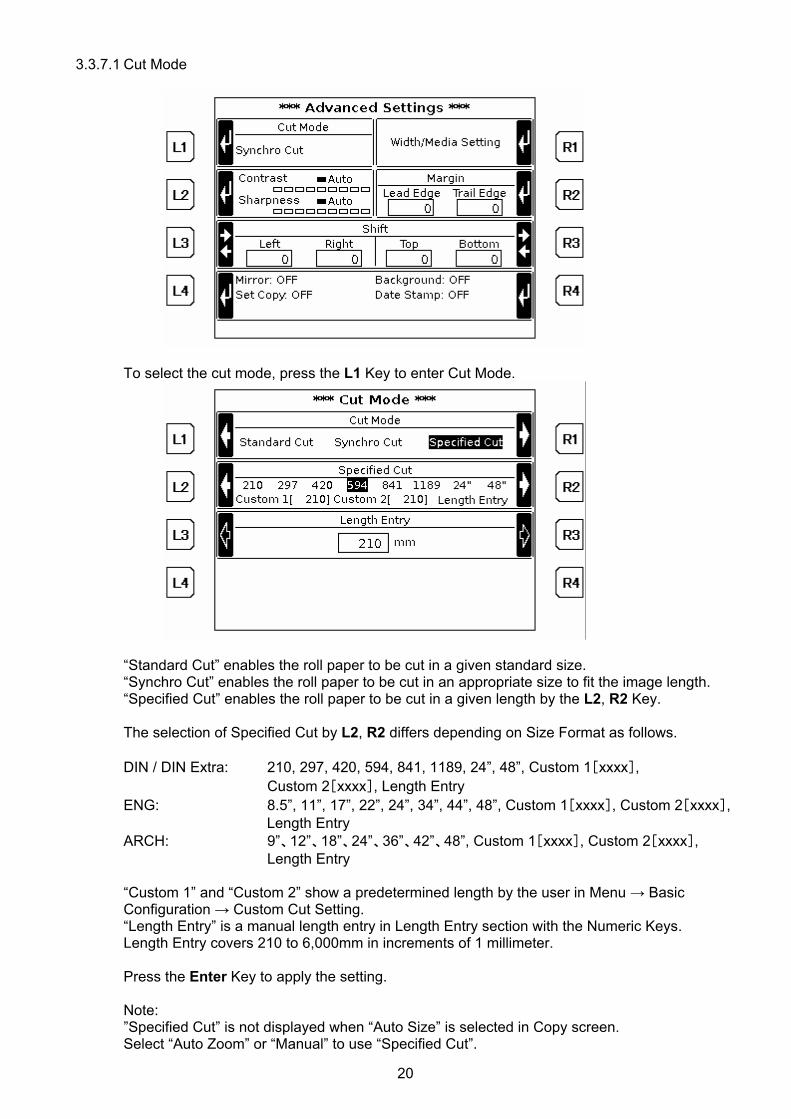
3.3.7.1 Cut Mode
To select the cut mode, press the L1 Key to enter Cut Mode.
“Standard Cut” enables the roll paper to be cut in a given standard size. “Synchro Cut” enables the roll paper to be cut in an appropriate size to fit the image length. “Specified Cut” enables the roll paper to be cut in a given length by the L2, R2 Key. The selection of Specified Cut by L2, R2 differs depending on Size Format as follows. DIN / DIN Extra: 210, 297, 420, 594, 841, 1189, 24”, 48”, Custom 1[xxxx],
Custom 2[xxxx], Length Entry ENG: 8.5”, 11”, 17”, 22”, 24”, 34”, 44”, 48”, Custom 1[xxxx], Custom 2[xxxx],
Length Entry ARCH: 9”、12”、18”、24”、36”、42”、48”, Custom 1[xxxx], Custom 2[xxxx], Length Entry “Custom 1” and “Custom 2” show a predetermined length by the user in Menu → Basic Configuration → Custom Cut Setting. “Length Entry” is a manual length entry in Length Entry section with the Numeric Keys. Length Entry covers 210 to 6,000mm in increments of 1 millimeter. Press the Enter Key to apply the setting. Note: ”Specified Cut” is not displayed when “Auto Size” is selected in Copy screen. Select “Auto Zoom” or “Manual” to use “Specified Cut”.
21
3.3.7.2 Paper Width/Media Setting
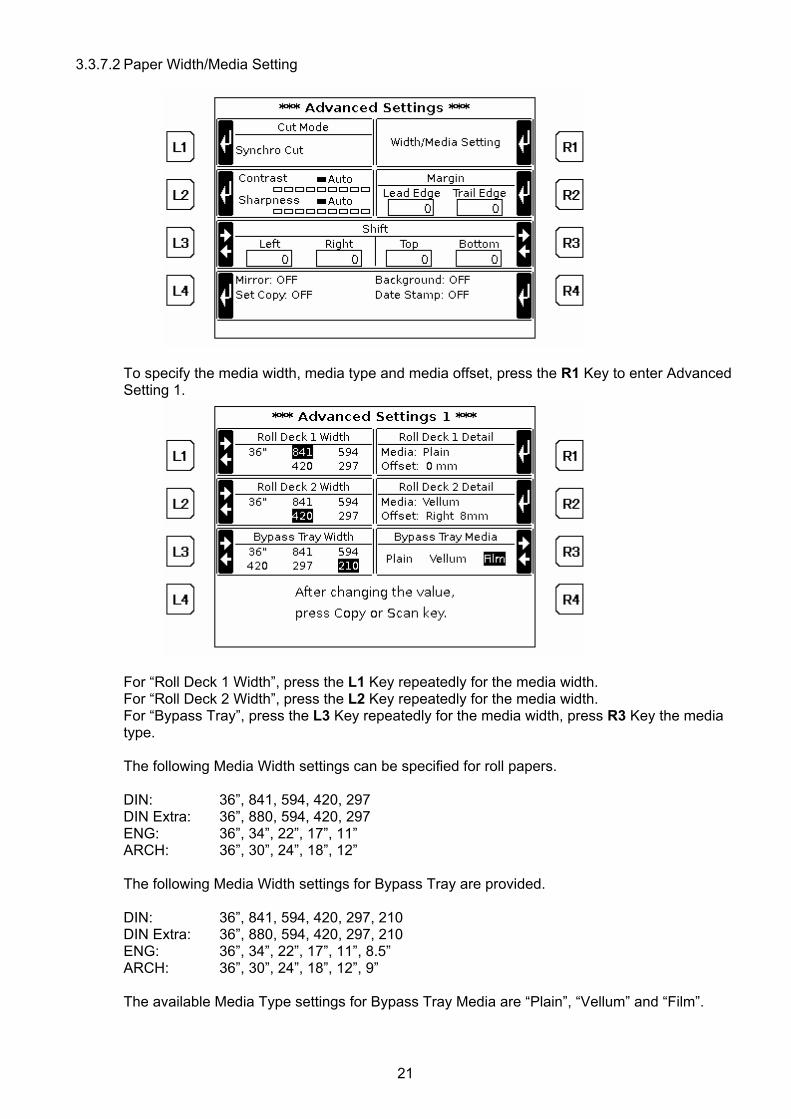
To specify the media width, media type and media offset, press the R1 Key to enter Advanced Setting 1.
For “Roll Deck 1 Width”, press the L1 Key repeatedly for the media width. For “Roll Deck 2 Width”, press the L2 Key repeatedly for the media width. For “Bypass Tray”, press the L3 Key repeatedly for the media width, press R3 Key the media type. The following Media Width settings can be specified for roll papers. DIN: 36”, 841, 594, 420, 297 DIN Extra: 36”, 880, 594, 420, 297 ENG: 36”, 34”, 22”, 17”, 11” ARCH: 36”, 30”, 24”, 18”, 12” The following Media Width settings for Bypass Tray are provided. DIN: 36”, 841, 594, 420, 297, 210 DIN Extra: 36”, 880, 594, 420, 297, 210 ENG: 36”, 34”, 22”, 17”, 11”, 8.5” ARCH: 36”, 30”, 24”, 18”, 12”, 9” The available Media Type settings for Bypass Tray Media are “Plain”, “Vellum” and “Film”.

22
For “Roll Deck 1 Detail” and “Roll Deck 2 Detail” press the R1 Key or R2 Key to enter Roll Deck Settings.
On this screen the following settings can be changed. For “Roll Deck 1 Media”, press the L1 Key repeatedly for the media type. For “Roll Deck 2 Media”, press the L2 Key repeatedly for the media type. For “Roll Deck 1 Offset”, press the R1 Key repeatedly for the media offset. For “Roll Deck 2 Offset”, press the R2 Key repeatedly for the media offset. The available Media Type settings are “Plain”, “Vellum” and “Film”. “Media Offset” will adjust horizontal shift of the print area. “Media Offset” can obtain a precise centering of the print area even if it is impossible for a roll media to be loaded to the center for some reason. For example: The print area will be moved 8mm to the right with setting “Roll Deck 2 Offset” to “8 to the right”. To specify “Roll Deck 1 Offset”, press the R1 Key to choose Left or Right and enter a value with the Numeric Keys. To specify “Roll Deck 2 Offset”, press the R2 Key to choose Left or Right and enter a value with the Numeric Keys. “Media Offset” covers 0 to 20mm in increments of 1 millimeter. Press the Enter Key to apply the setting. Note: All the setting in Paper Width/Media/Offset settings will not be reset with the Reset Key or power off.
23
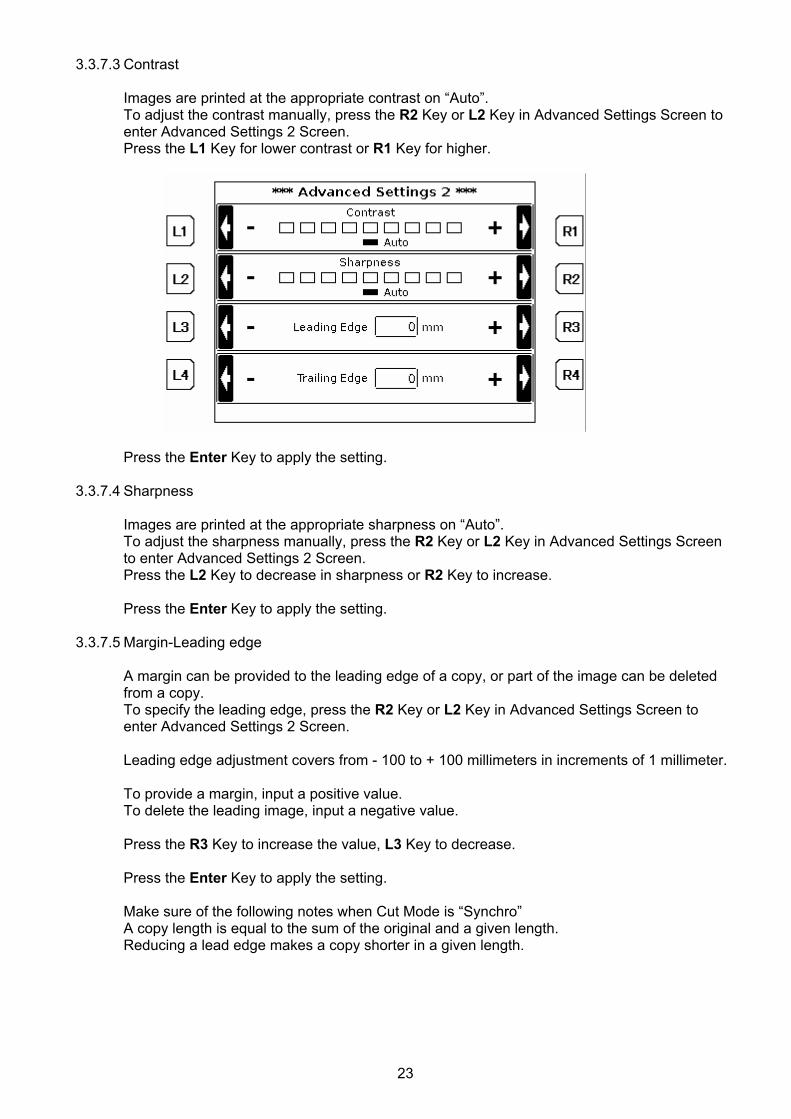
3.3.7.3 Contrast Images are printed at the appropriate contrast on “Auto”. To adjust the contrast manually, press the R2 Key or L2 Key in Advanced Settings Screen to enter Advanced Settings 2 Screen. Press the L1 Key for lower contrast or R1 Key for higher.
Press the Enter Key to apply the setting.
3.3.7.4 Sharpness Images are printed at the appropriate sharpness on “Auto”. To adjust the sharpness manually, press the R2 Key or L2 Key in Advanced Settings Screen to enter Advanced Settings 2 Screen. Press the L2 Key to decrease in sharpness or R2 Key to increase. Press the Enter Key to apply the setting.
3.3.7.5 Margin-Leading edge
A margin can be provided to the leading edge of a copy, or part of the image can be deleted from a copy. To specify the leading edge, press the R2 Key or L2 Key in Advanced Settings Screen to enter Advanced Settings 2 Screen. Leading edge adjustment covers from - 100 to + 100 millimeters in increments of 1 millimeter. To provide a margin, input a positive value. To delete the leading image, input a negative value. Press the R3 Key to increase the value, L3 Key to decrease. Press the Enter Key to apply the setting. Make sure of the following notes when Cut Mode is “Synchro” A copy length is equal to the sum of the original and a given length. Reducing a lead edge makes a copy shorter in a given length.
24
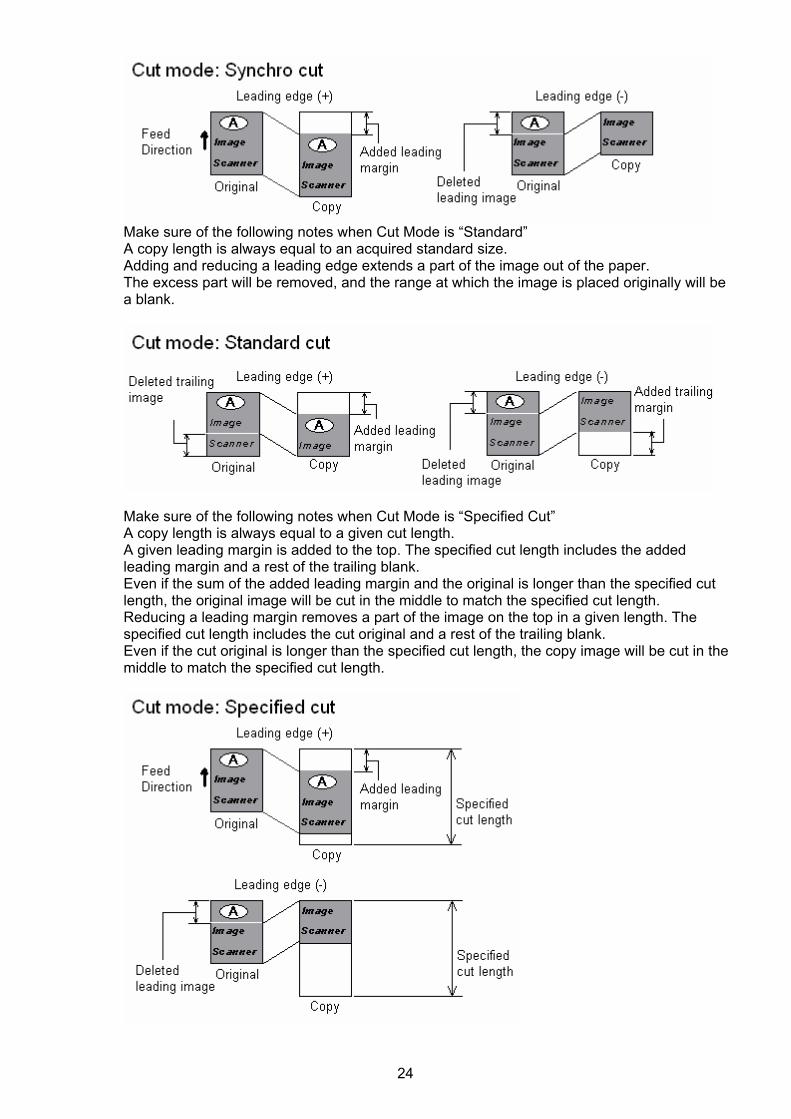
Make sure of the following notes when Cut Mode is “Standard” A copy length is always equal to an acquired standard size. Adding and reducing a leading edge extends a part of the image out of the paper. The excess part will be removed, and the range at which the image is placed originally will be a blank.
Make sure of the following notes when Cut Mode is “Specified Cut” A copy length is always equal to a given cut length. A given leading margin is added to the top. The specified cut length includes the added leading margin and a rest of the trailing blank. Even if the sum of the added leading margin and the original is longer than the specified cut length, the original image will be cut in the middle to match the specified cut length. Reducing a leading margin removes a part of the image on the top in a given length. The specified cut length includes the cut original and a rest of the trailing blank. Even if the cut original is longer than the specified cut length, the copy image will be cut in the middle to match the specified cut length.
25
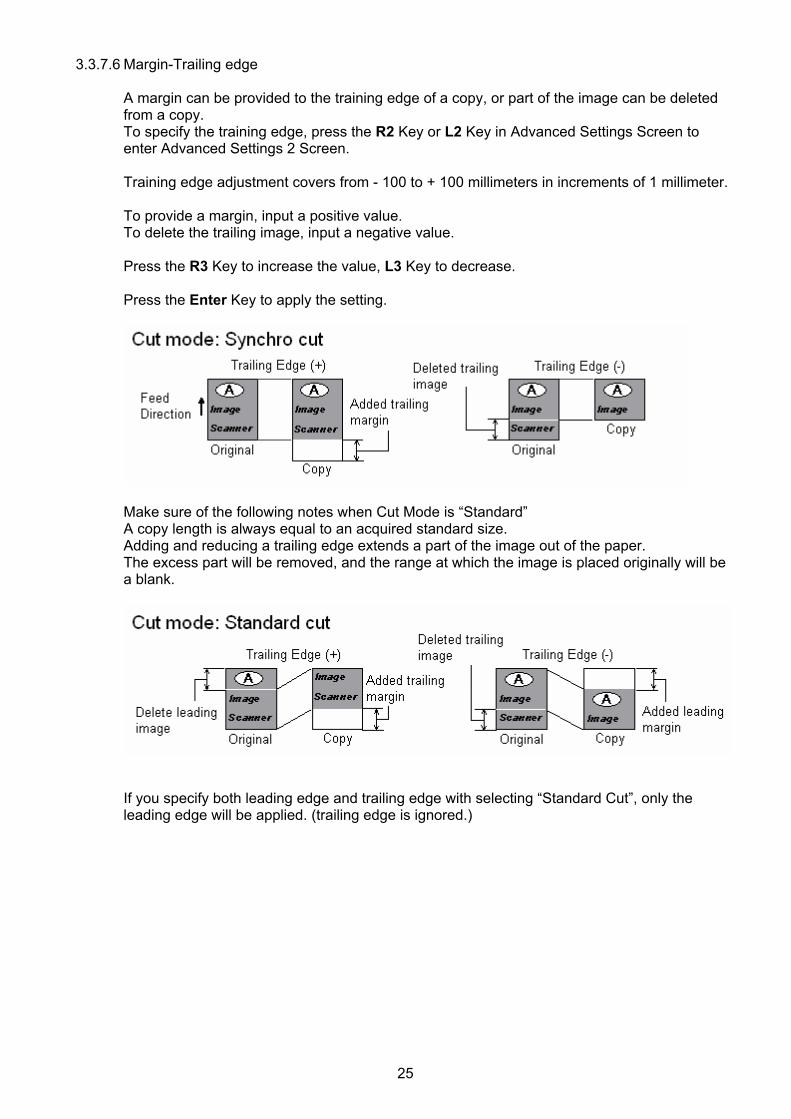
3.3.7.6 Margin-Trailing edge A margin can be provided to the training edge of a copy, or part of the image can be deleted from a copy. To specify the training edge, press the R2 Key or L2 Key in Advanced Settings Screen to enter Advanced Settings 2 Screen. Training edge adjustment covers from - 100 to + 100 millimeters in increments of 1 millimeter. To provide a margin, input a positive value. To delete the trailing image, input a negative value. Press the R3 Key to increase the value, L3 Key to decrease. Press the Enter Key to apply the setting.
Make sure of the following notes when Cut Mode is “Standard” A copy length is always equal to an acquired standard size. Adding and reducing a trailing edge extends a part of the image out of the paper. The excess part will be removed, and the range at which the image is placed originally will be a blank.
If you specify both leading edge and trailing edge with selecting “Standard Cut”, only the leading edge will be applied. (trailing edge is ignored.)
26
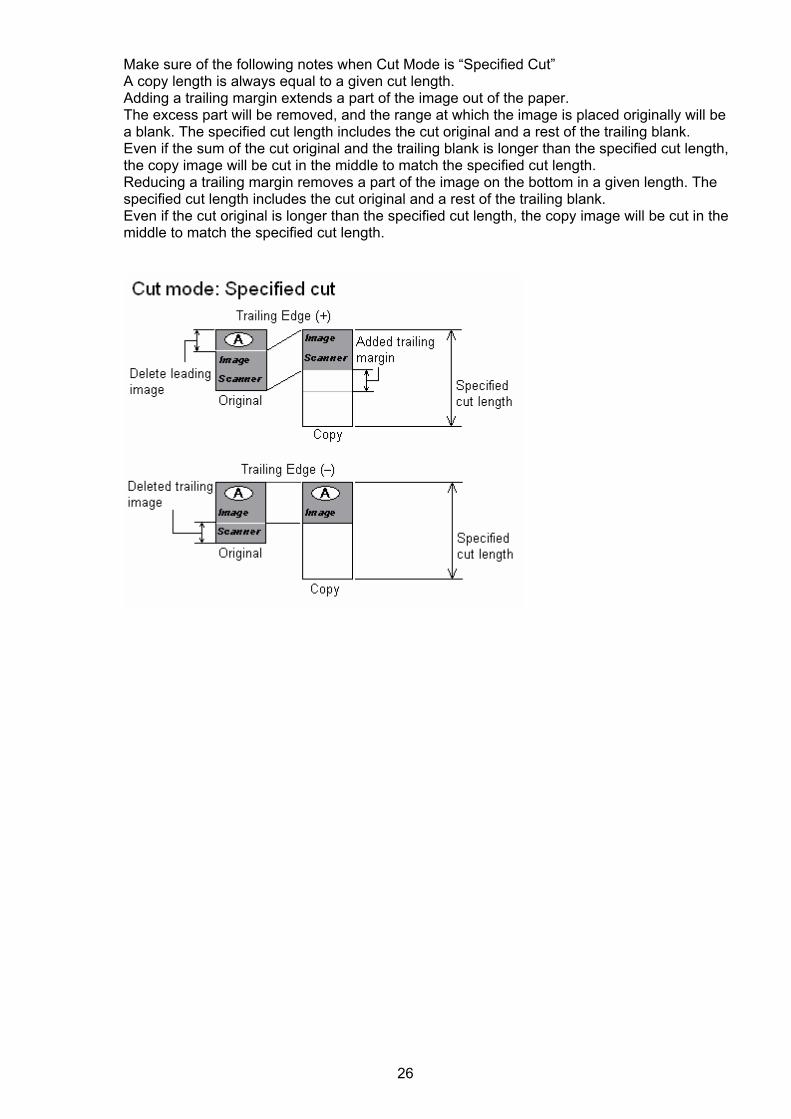
Make sure of the following notes when Cut Mode is “Specified Cut” A copy length is always equal to a given cut length. Adding a trailing margin extends a part of the image out of the paper. The excess part will be removed, and the range at which the image is placed originally will be a blank. The specified cut length includes the cut original and a rest of the trailing blank. Even if the sum of the cut original and the trailing blank is longer than the specified cut length, the copy image will be cut in the middle to match the specified cut length. Reducing a trailing margin removes a part of the image on the bottom in a given length. The specified cut length includes the cut original and a rest of the trailing blank. Even if the cut original is longer than the specified cut length, the copy image will be cut in the middle to match the specified cut length.
27
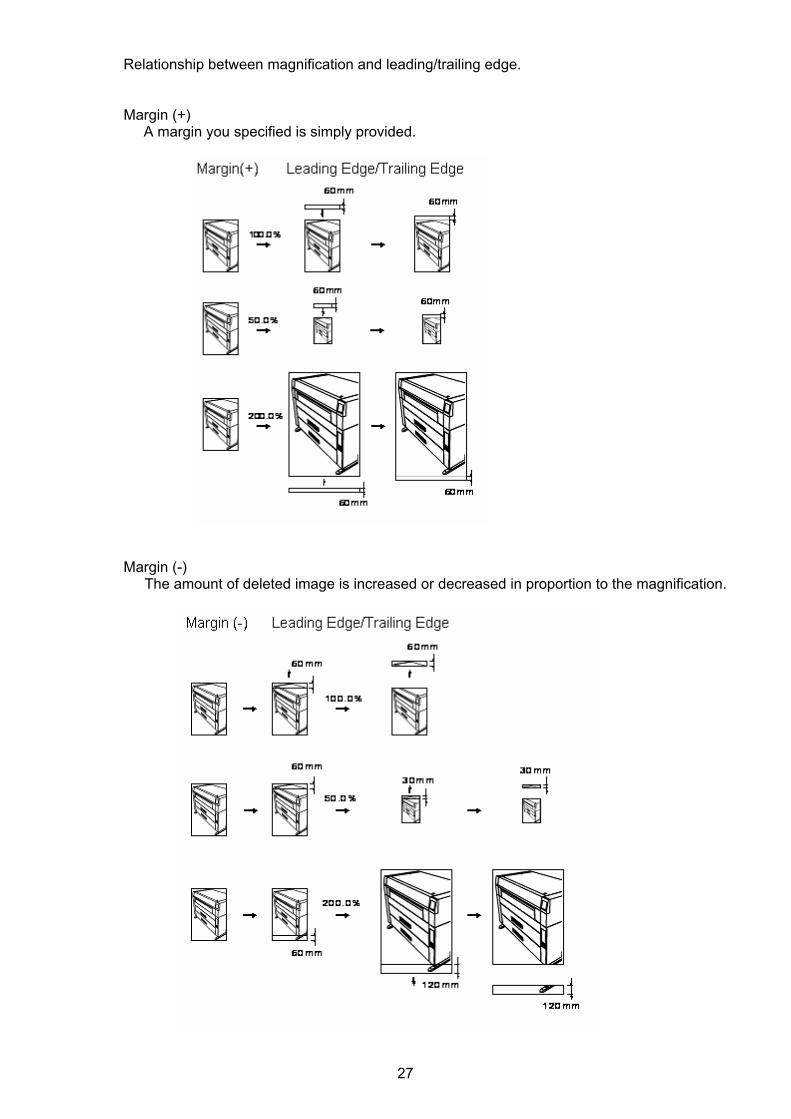
Relationship between magnification and leading/trailing edge. Margin (+)
A margin you specified is simply provided.
Margin (-)
The amount of deleted image is increased or decreased in proportion to the magnification.
28
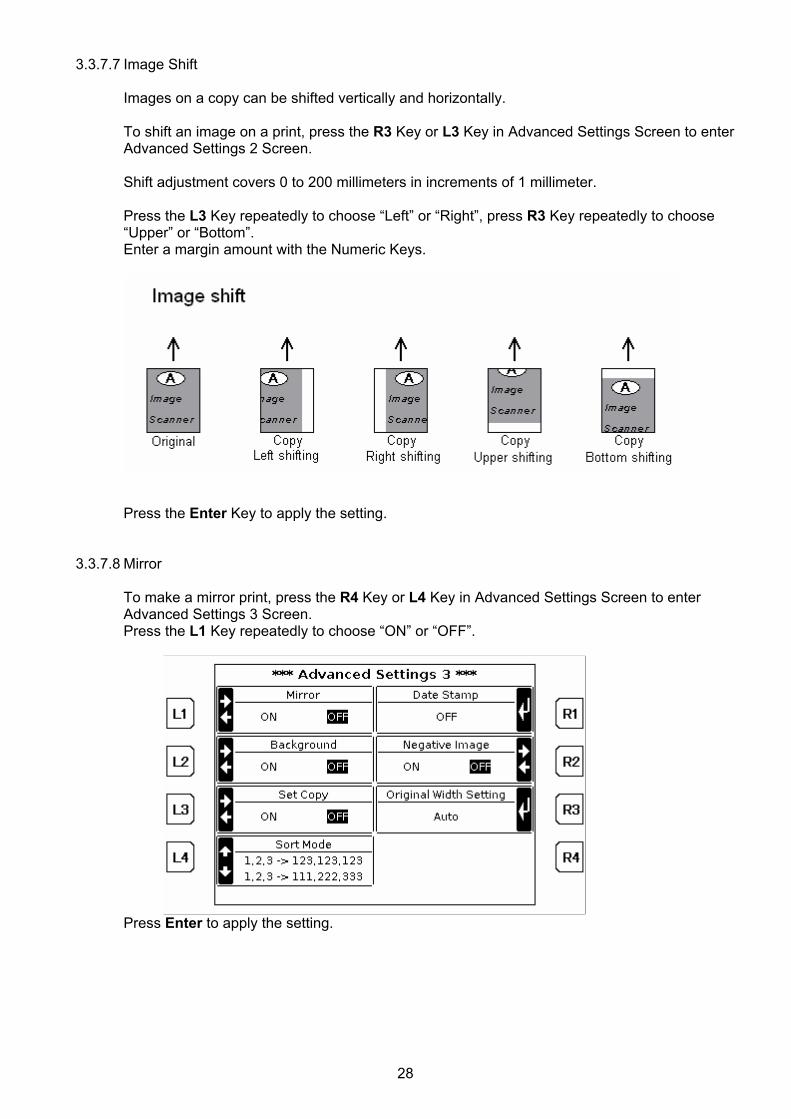
3.3.7.7 Image Shift Images on a copy can be shifted vertically and horizontally. To shift an image on a print, press the R3 Key or L3 Key in Advanced Settings Screen to enter Advanced Settings 2 Screen. Shift adjustment covers 0 to 200 millimeters in increments of 1 millimeter. Press the L3 Key repeatedly to choose “Left” or “Right”, press R3 Key repeatedly to choose “Upper” or “Bottom”. Enter a margin amount with the Numeric Keys.
Press the Enter Key to apply the setting.
3.3.7.8 Mirror
To make a mirror print, press the R4 Key or L4 Key in Advanced Settings Screen to enter Advanced Settings 3 Screen. Press the L1 Key repeatedly to choose “ON” or “OFF”.
Press Enter to apply the setting.
29
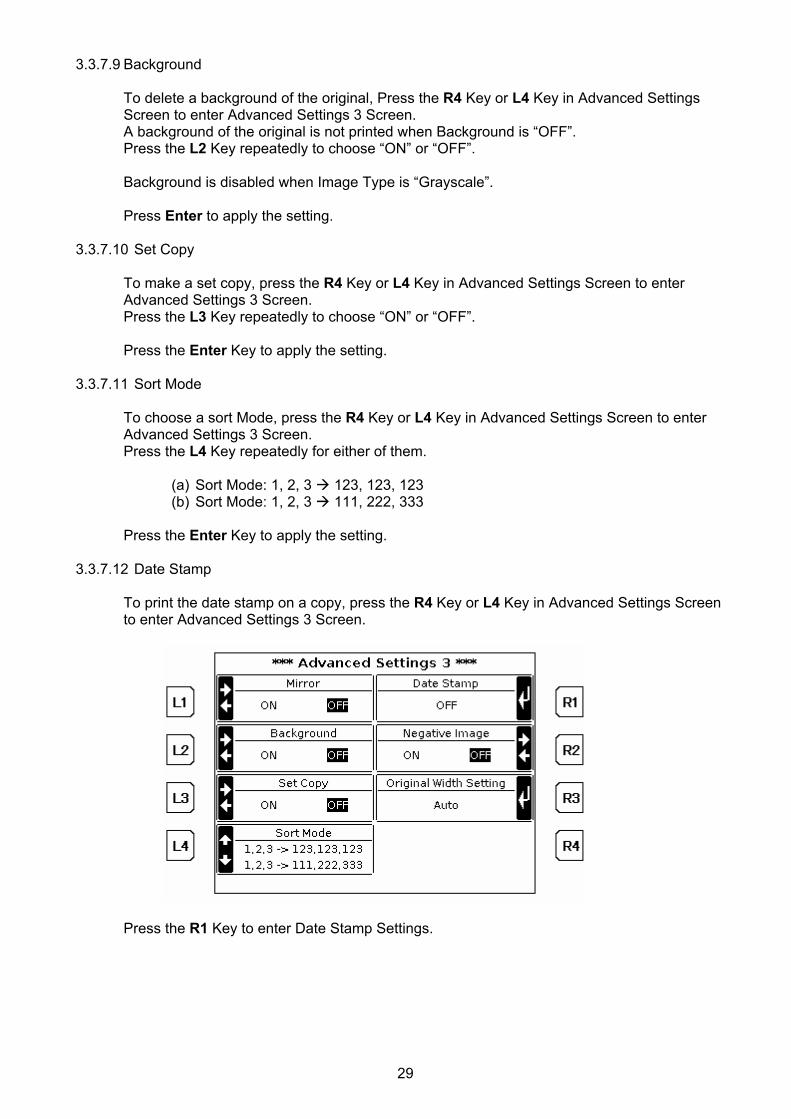
3.3.7.9 Background To delete a background of the original, Press the R4 Key or L4 Key in Advanced Settings Screen to enter Advanced Settings 3 Screen. A background of the original is not printed when Background is “OFF”. Press the L2 Key repeatedly to choose “ON” or “OFF”. Background is disabled when Image Type is “Grayscale”. Press Enter to apply the setting.
3.3.7.10 Set Copy
To make a set copy, press the R4 Key or L4 Key in Advanced Settings Screen to enter Advanced Settings 3 Screen. Press the L3 Key repeatedly to choose “ON” or “OFF”. Press the Enter Key to apply the setting.
3.3.7.11 Sort Mode
To choose a sort Mode, press the R4 Key or L4 Key in Advanced Settings Screen to enter Advanced Settings 3 Screen. Press the L4 Key repeatedly for either of them.
(a) Sort Mode: 1, 2, 3 123, 123, 123 (b) Sort Mode: 1, 2, 3 111, 222, 333
Press the Enter Key to apply the setting.
3.3.7.12 Date Stamp
To print the date stamp on a copy, press the R4 Key or L4 Key in Advanced Settings Screen to enter Advanced Settings 3 Screen.
Press the R1 Key to enter Date Stamp Settings.
30
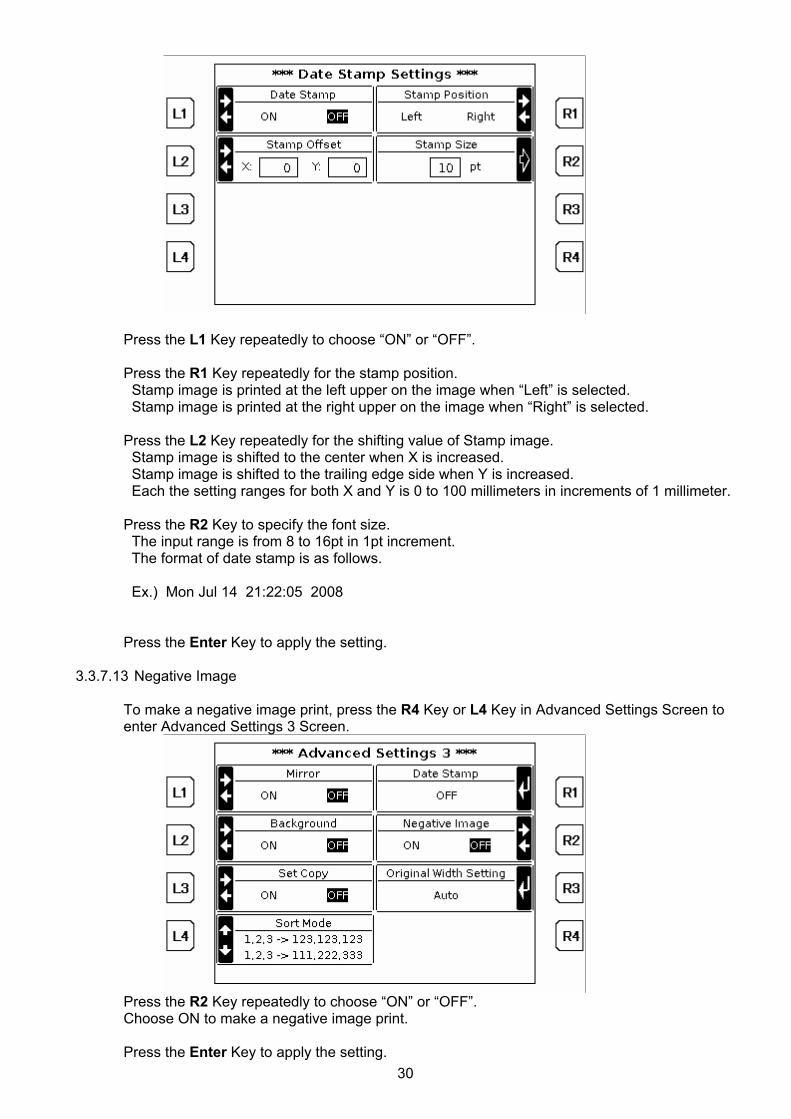
Press the L1 Key repeatedly to choose “ON” or “OFF”. Press the R1 Key repeatedly for the stamp position. Stamp image is printed at the left upper on the image when “Left” is selected. Stamp image is printed at the right upper on the image when “Right” is selected. Press the L2 Key repeatedly for the shifting value of Stamp image. Stamp image is shifted to the center when X is increased. Stamp image is shifted to the trailing edge side when Y is increased. Each the setting ranges for both X and Y is 0 to 100 millimeters in increments of 1 millimeter. Press the R2 Key to specify the font size. The input range is from 8 to 16pt in 1pt increment. The format of date stamp is as follows. Ex.) Mon Jul 14 21:22:05 2008
Press the Enter Key to apply the setting.
3.3.7.13 Negative Image To make a negative image print, press the R4 Key or L4 Key in Advanced Settings Screen to enter Advanced Settings 3 Screen.
Press the R2 Key repeatedly to choose “ON” or “OFF”. Choose ON to make a negative image print. Press the Enter Key to apply the setting.

31
3.3.7.14 Original Width Setting To specify the original width to be scanned, press the R4 Key or L4 Key in Advanced Settings Screen to enter Advanced Settings 3 Screen. Press the R3 Key to enter Original Width Setting.
“Auto” can be used in most cases. Press the L1 Key and R1 Key to select the original width from preset width Press the L2, R2 Key to enter a given width manually in “Width Entry” with the Numeric Keys. Width Entry covers 279 to 914mm in increments of 1 millimeter. The selection of “Original Width” differs depending on the current Size Format.
DIN: Auto, 297mm, 420mm, 594mm, 841mm, 36”, Width Entry DIN Extra: Auto, 297mm, 420mm, 594mm, 880mm, 36”, Width Entry ENG: Auto, 11”, 17”, 22”, 34”, 36”, Width Entry ARCH: Auto, 12”, 18”, 24”, 30”, 36”, Width Entry
Press the Enter Key to apply the setting.
32
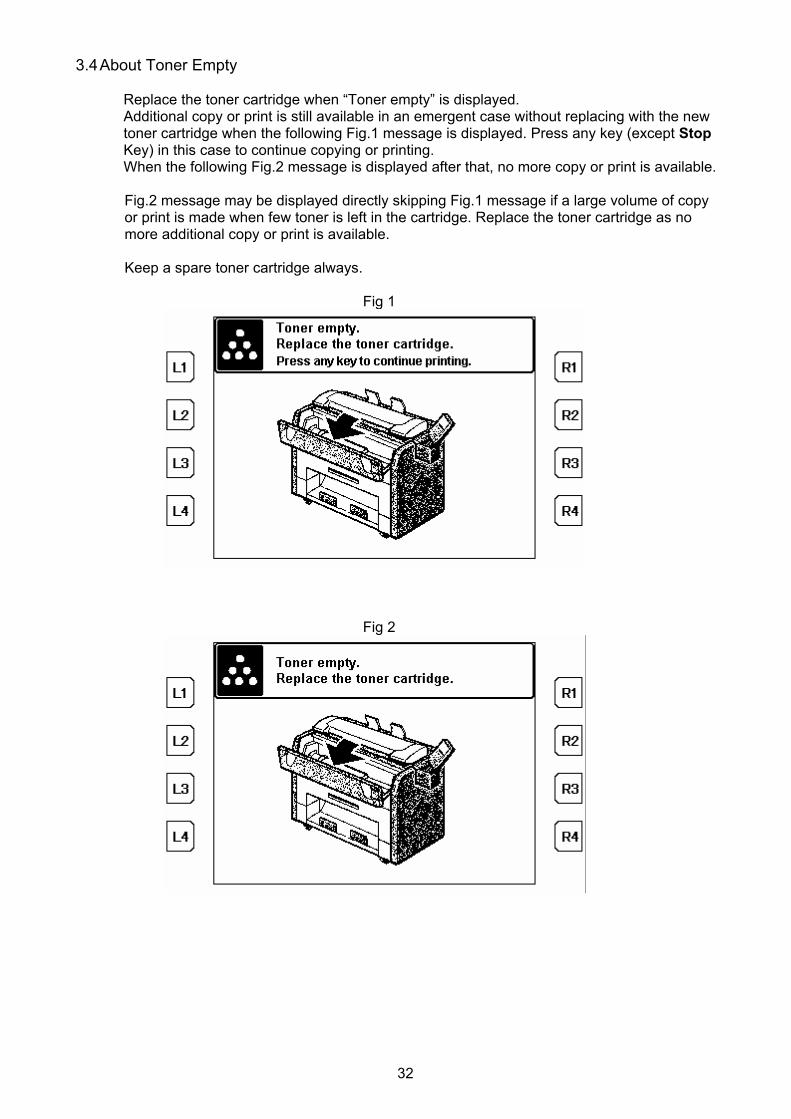
3.4 About Toner Empty Replace the toner cartridge when “Toner empty” is displayed. Additional copy or print is still available in an emergent case without replacing with the new toner cartridge when the following Fig.1 message is displayed. Press any key (except Stop Key) in this case to continue copying or printing. When the following Fig.2 message is displayed after that, no more copy or print is available.
Fig.2 message may be displayed directly skipping Fig.1 message if a large volume of copy or print is made when few toner is left in the cartridge. Replace the toner cartridge as no more additional copy or print is available. Keep a spare toner cartridge always.
Fig 1
Fig 2
33
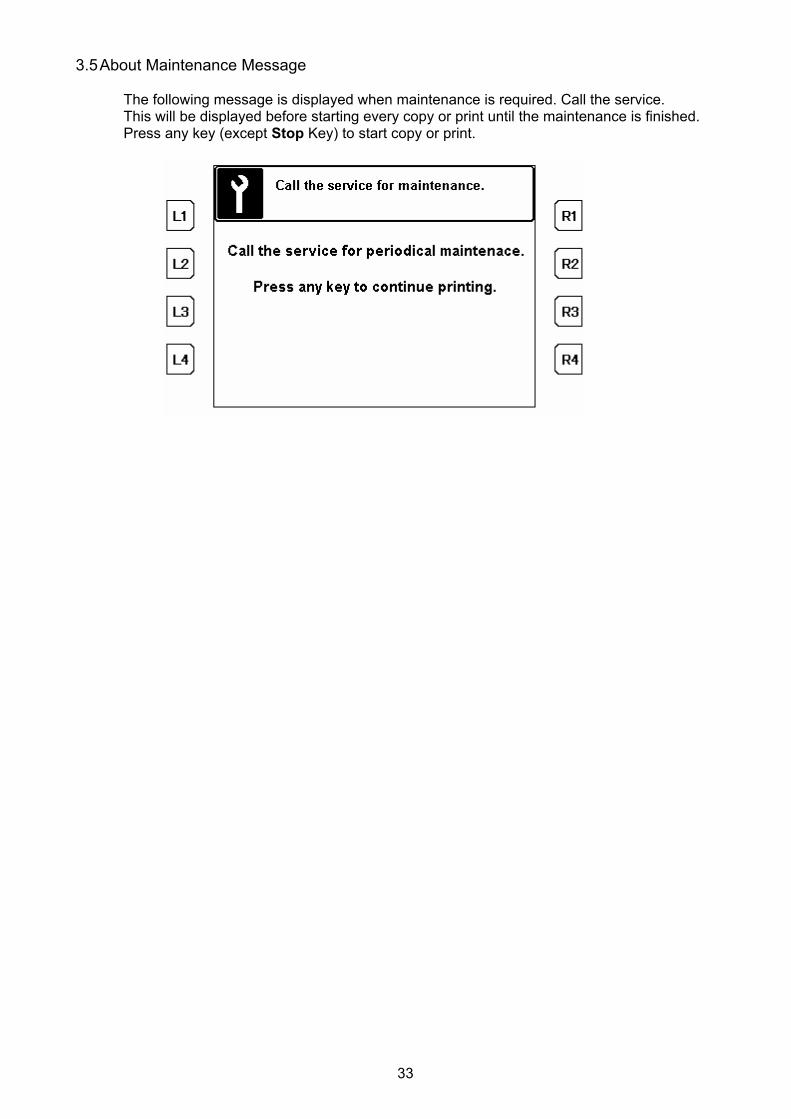
3.5 About Maintenance Message The following message is displayed when maintenance is required. Call the service. This will be displayed before starting every copy or print until the maintenance is finished. Press any key (except Stop Key) to start copy or print.

34
4. Scan 4.1 Scan Mode Screen
The picture below is the basic Scan Mode Screen to make a scan. Make sure that “Ready to Scan” is indicated in the upper left of the screen before scan. Originals can be carried to the scanner only when Copy/Scan Mode Screen is displayed.
Original Background, Mirror, Negative, Print Out, Image Cut will appear on the bottom of the screen when the concerning functions are activated as follows. Background : Background is ON. Mirror : Mirror is ON. Negative : Negative Image is ON. Print Out : Print Out is ON. Image Cut : A specified Image Cut is set.
35
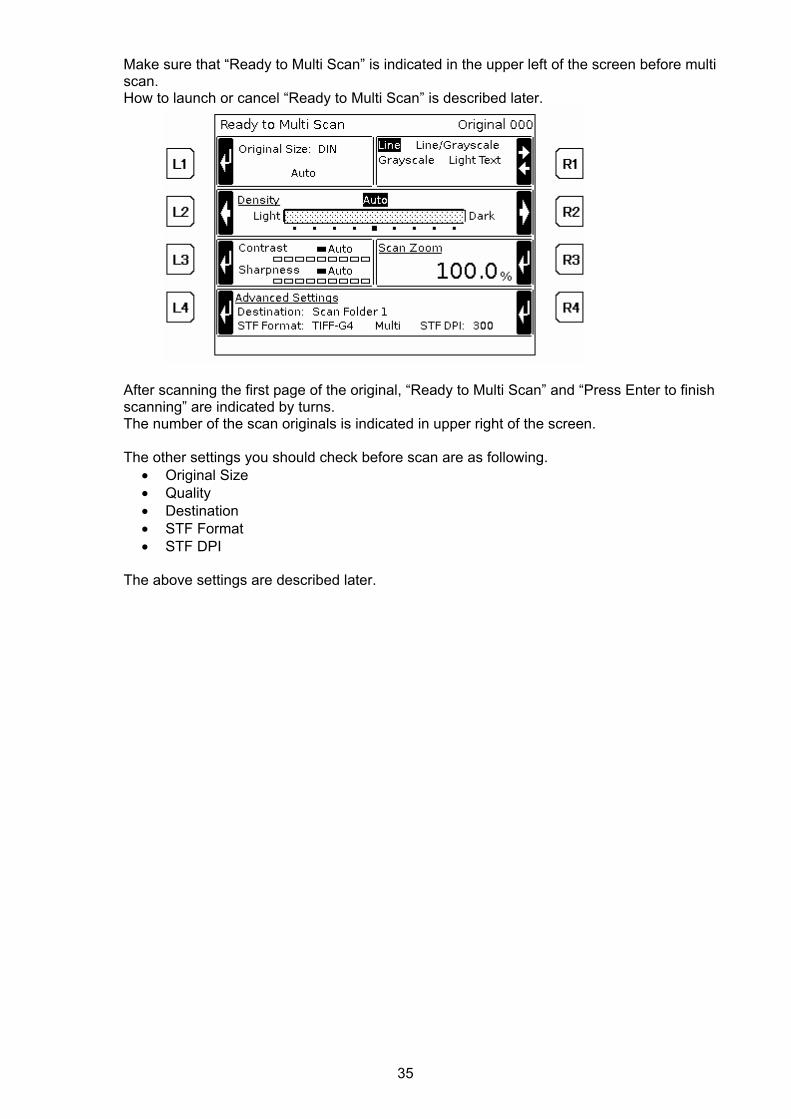
Make sure that “Ready to Multi Scan” is indicated in the upper left of the screen before multi scan. How to launch or cancel “Ready to Multi Scan” is described later.
After scanning the first page of the original, “Ready to Multi Scan” and “Press Enter to finish scanning” are indicated by turns. The number of the scan originals is indicated in upper right of the screen. The other settings you should check before scan are as following.
• Original Size • Quality • Destination • STF Format • STF DPI
The above settings are described later.
36
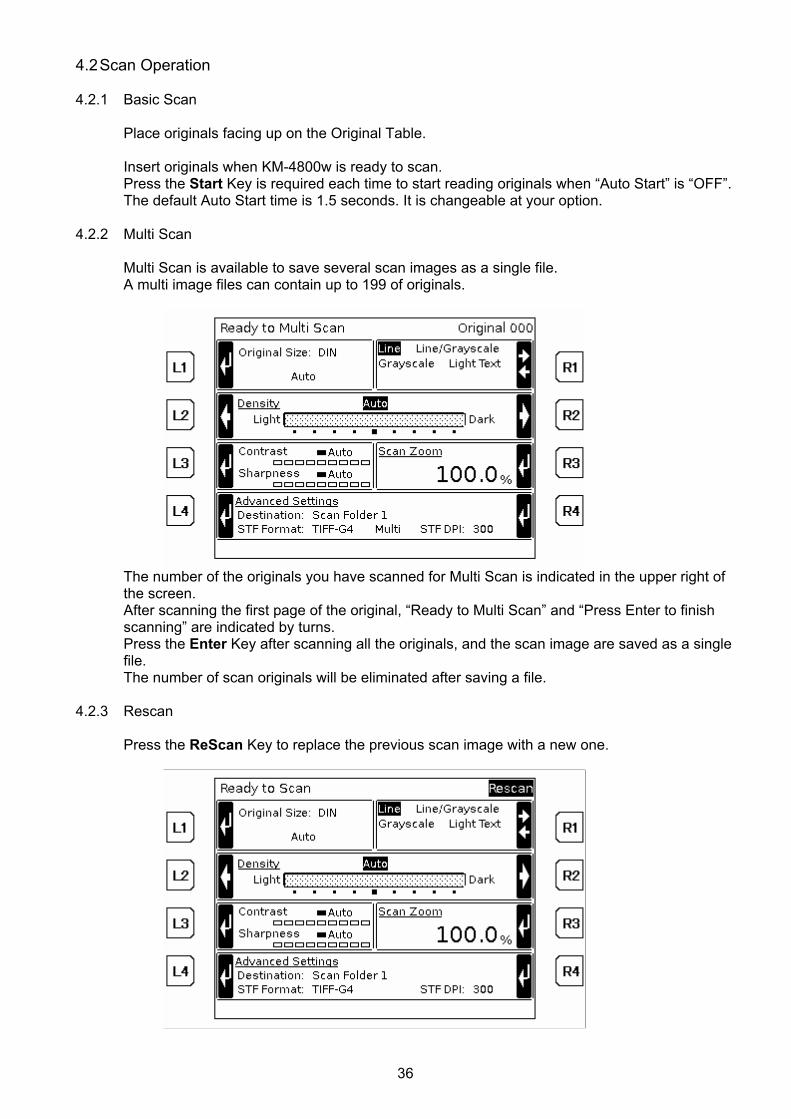
4.2 Scan Operation 4.2.1 Basic Scan
Place originals facing up on the Original Table. Insert originals when KM-4800w is ready to scan. Press the Start Key is required each time to start reading originals when “Auto Start” is “OFF”. The default Auto Start time is 1.5 seconds. It is changeable at your option.
4.2.2 Multi Scan
Multi Scan is available to save several scan images as a single file. A multi image files can contain up to 199 of originals.
The number of the originals you have scanned for Multi Scan is indicated in the upper right of the screen. After scanning the first page of the original, “Ready to Multi Scan” and “Press Enter to finish scanning” are indicated by turns. Press the Enter Key after scanning all the originals, and the scan image are saved as a single file. The number of scan originals will be eliminated after saving a file.
4.2.3 Rescan Press the ReScan Key to replace the previous scan image with a new one.
37
The sign “Rescan” is indicated in the upper right of the screen under Rescan Mode. Rescan is use of if the wrong original is read, or if the scanner carries originals on the skew. The new scan image overwrites the previous one. Rescan Mode is cancelled after scanning the ReScan. Pressing the ReScan Key again is another measure to cancel Rescan Mode. Rescan is disabled in case no image exists for Rescan Rescan is disabled in case of changing the destination or FTP to save.
4.2.4 Password
Making a scan image requires a password when a destination or FTP folder involves the password authentication. Type a password with the Numeric Keys and press the Enter Key. (Default password: “0000”) Refer to Print Server User’s Manual for folder password.
38
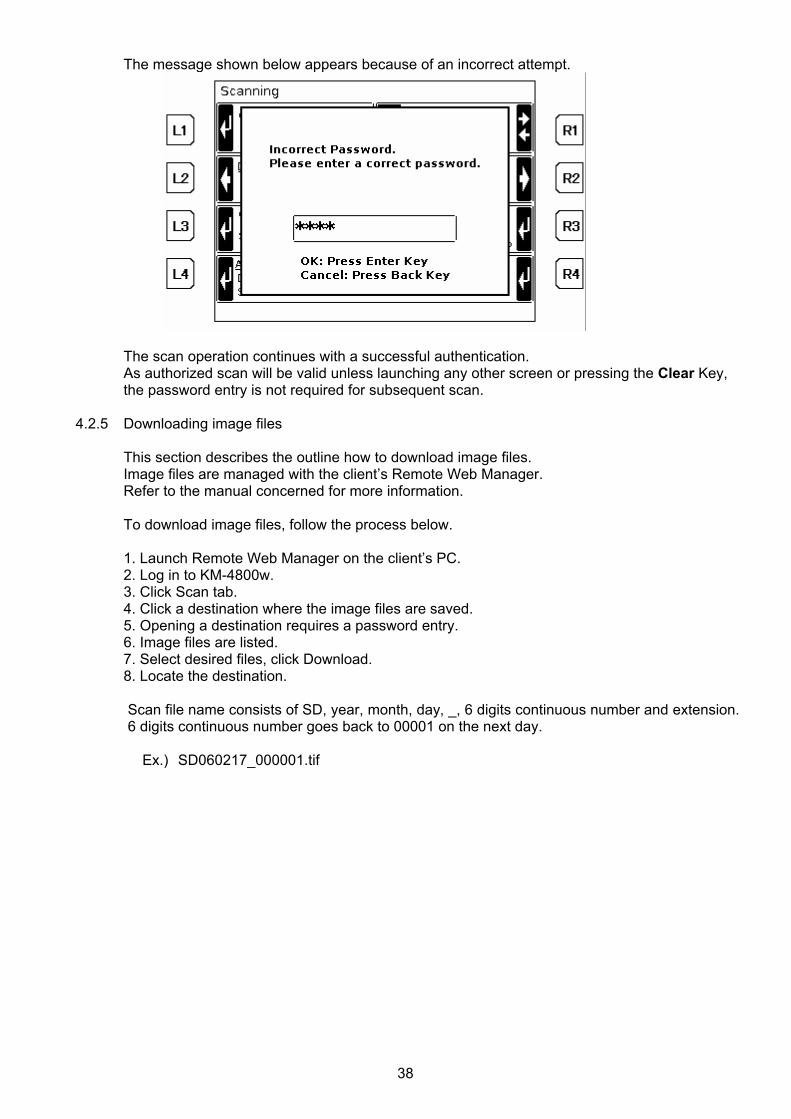
The message shown below appears because of an incorrect attempt.
The scan operation continues with a successful authentication. As authorized scan will be valid unless launching any other screen or pressing the Clear Key, the password entry is not required for subsequent scan.
4.2.5 Downloading image files
This section describes the outline how to download image files. Image files are managed with the client’s Remote Web Manager. Refer to the manual concerned for more information. To download image files, follow the process below. 1. Launch Remote Web Manager on the client’s PC. 2. Log in to KM-4800w. 3. Click Scan tab. 4. Click a destination where the image files are saved. 5. Opening a destination requires a password entry. 6. Image files are listed. 7. Select desired files, click Download. 8. Locate the destination.
Scan file name consists of SD, year, month, day, _, 6 digits continuous number and extension. 6 digits continuous number goes back to 00001 on the next day.
Ex.) SD060217_000001.tif
39
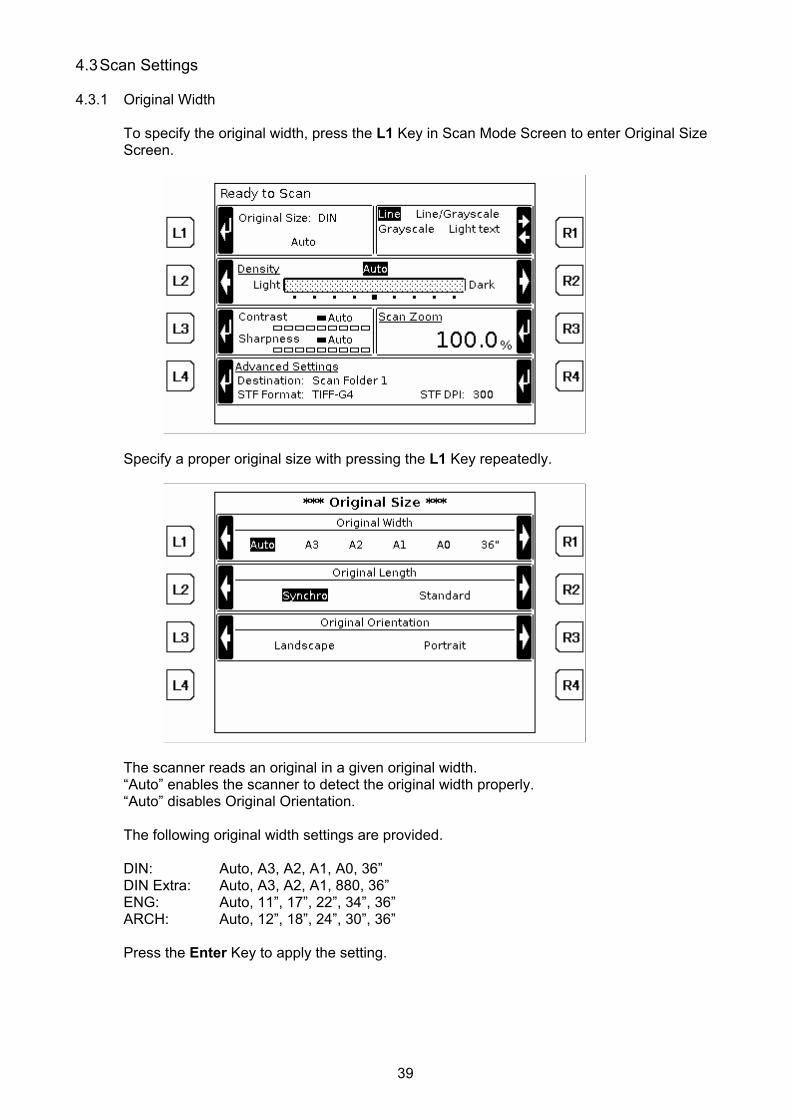
4.3 Scan Settings 4.3.1 Original Width
To specify the original width, press the L1 Key in Scan Mode Screen to enter Original Size Screen.
Specify a proper original size with pressing the L1 Key repeatedly.
The scanner reads an original in a given original width. “Auto” enables the scanner to detect the original width properly. “Auto” disables Original Orientation. The following original width settings are provided. DIN: Auto, A3, A2, A1, A0, 36” DIN Extra: Auto, A3, A2, A1, 880, 36” ENG: Auto, 11”, 17”, 22”, 34”, 36” ARCH: Auto, 12”, 18”, 24”, 30”, 36” Press the Enter Key to apply the setting.
40
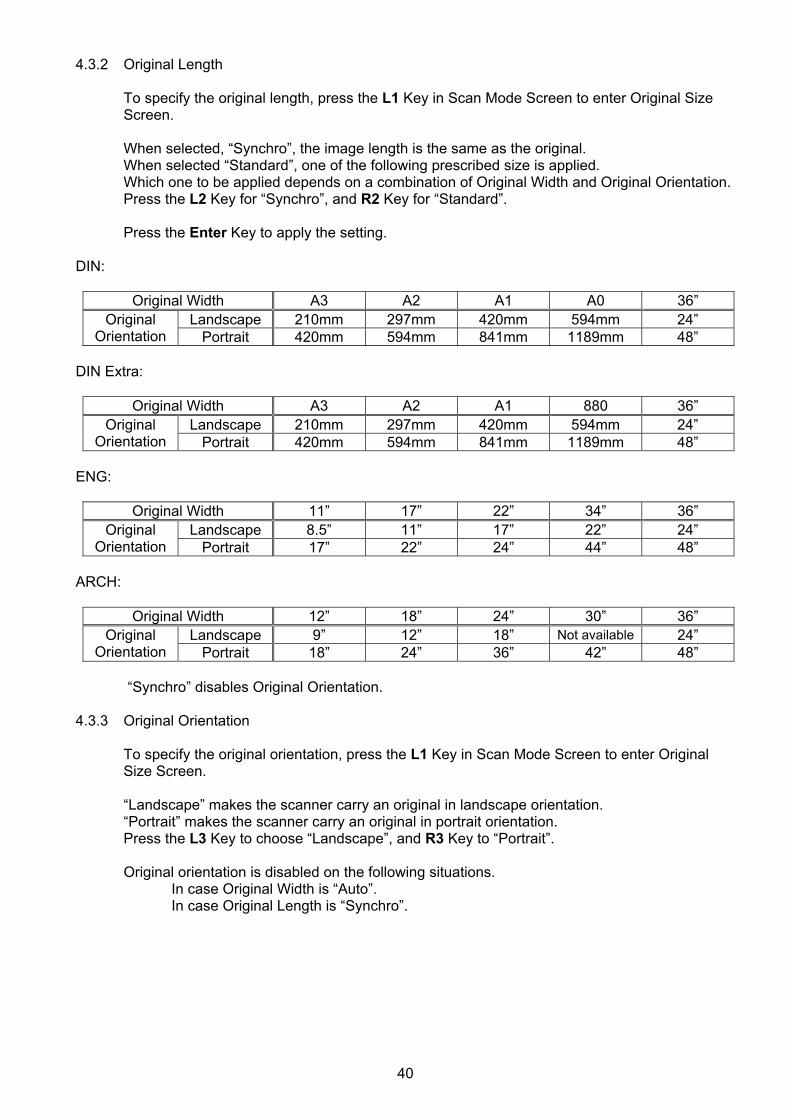
4.3.2 Original Length To specify the original length, press the L1 Key in Scan Mode Screen to enter Original Size Screen. When selected, “Synchro”, the image length is the same as the original. When selected “Standard”, one of the following prescribed size is applied. Which one to be applied depends on a combination of Original Width and Original Orientation. Press the L2 Key for “Synchro”, and R2 Key for “Standard”. Press the Enter Key to apply the setting.
DIN:
Original Width A3 A2 A1 A0 36” Landscape 210mm 297mm 420mm 594mm 24” Original
Orientation Portrait 420mm 594mm 841mm 1189mm 48” DIN Extra:
Original Width A3 A2 A1 880 36” Landscape 210mm 297mm 420mm 594mm 24” Original
Orientation Portrait 420mm 594mm 841mm 1189mm 48” ENG:
Original Width 11” 17” 22” 34” 36” Landscape 8.5” 11” 17” 22” 24” Original
Orientation Portrait 17” 22” 24” 44” 48” ARCH:
Original Width 12” 18” 24” 30” 36” Landscape 9” 12” 18” Not available 24” Original
Orientation Portrait 18” 24” 36” 42” 48”
“Synchro” disables Original Orientation. 4.3.3 Original Orientation
To specify the original orientation, press the L1 Key in Scan Mode Screen to enter Original Size Screen. “Landscape” makes the scanner carry an original in landscape orientation. “Portrait” makes the scanner carry an original in portrait orientation. Press the L3 Key to choose “Landscape”, and R3 Key to “Portrait”. Original orientation is disabled on the following situations. In case Original Width is “Auto”. In case Original Length is “Synchro”.
41
4.3.4 Image Type The following settings are provided for the original image type. “Line” is suitable for simple line originals. “Line/Grayscale” is suitable for originals which include lines and areas of shade together. “Grayscale” is suitable for photographic originals and areas of shade originals. “Light text” is suitable for light line originals. Press the R1 Key repeatedly in Scan Mode Screen for a proper image type.
4.3.5 Density
Images are scanned at the appropriate density on “Auto”. Press the L2 Key to lighten or R2 Key to darken the density on an image at discretion in Scan Mode Screen.
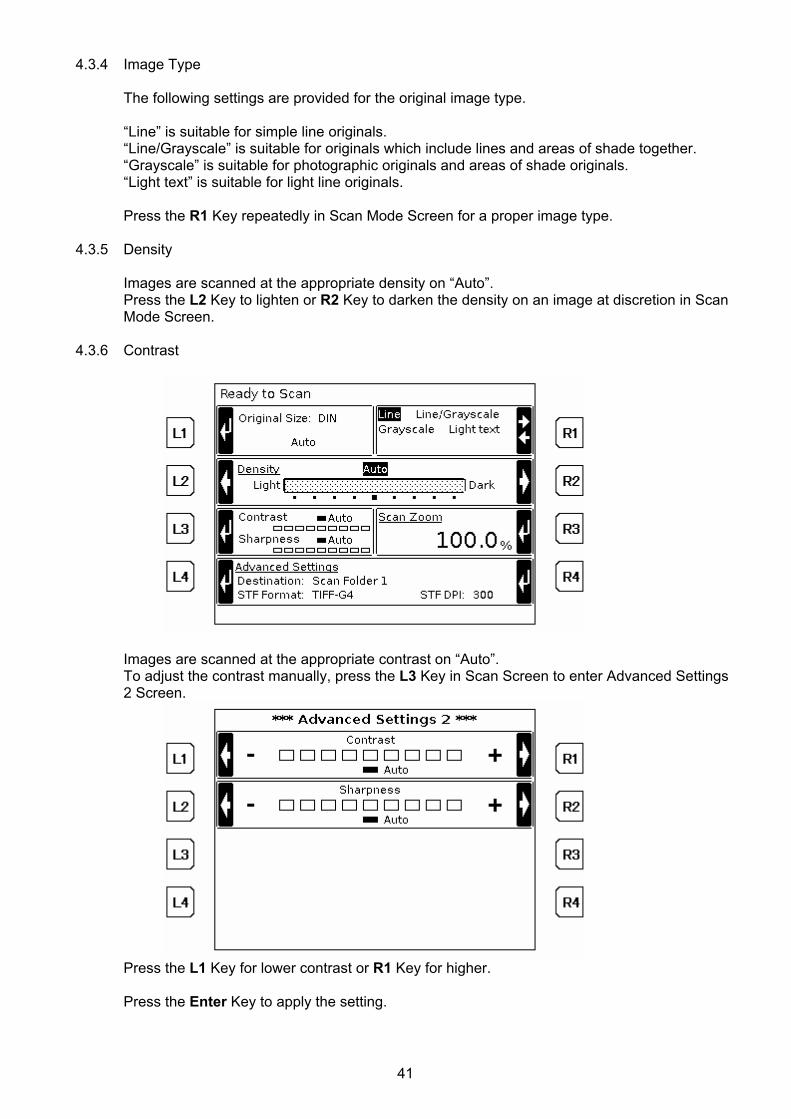
4.3.6 Contrast
Images are scanned at the appropriate contrast on “Auto”. To adjust the contrast manually, press the L3 Key in Scan Screen to enter Advanced Settings 2 Screen.
Press the L1 Key for lower contrast or R1 Key for higher. Press the Enter Key to apply the setting.
42
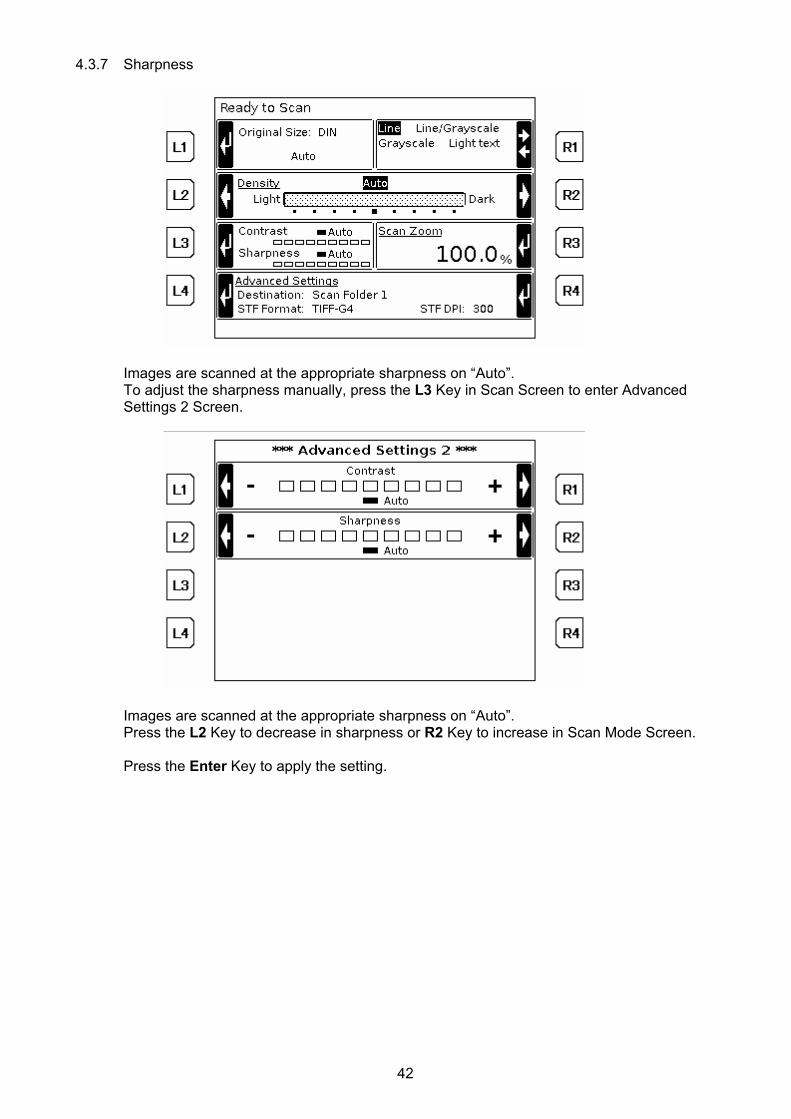
4.3.7 Sharpness
Images are scanned at the appropriate sharpness on “Auto”. To adjust the sharpness manually, press the L3 Key in Scan Screen to enter Advanced Settings 2 Screen.
Images are scanned at the appropriate sharpness on “Auto”. Press the L2 Key to decrease in sharpness or R2 Key to increase in Scan Mode Screen. Press the Enter Key to apply the setting.
43
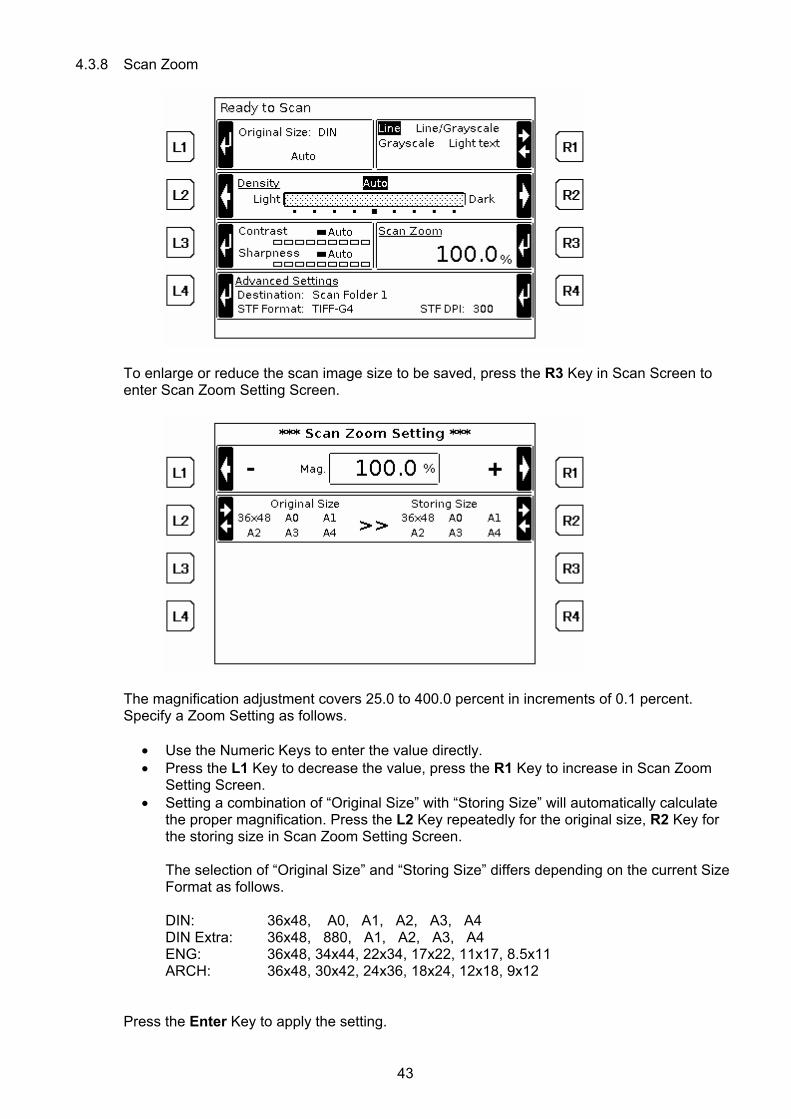
4.3.8 Scan Zoom
To enlarge or reduce the scan image size to be saved, press the R3 Key in Scan Screen to enter Scan Zoom Setting Screen.
The magnification adjustment covers 25.0 to 400.0 percent in increments of 0.1 percent. Specify a Zoom Setting as follows.
• Use the Numeric Keys to enter the value directly. • Press the L1 Key to decrease the value, press the R1 Key to increase in Scan Zoom
Setting Screen. • Setting a combination of “Original Size” with “Storing Size” will automatically calculate
the proper magnification. Press the L2 Key repeatedly for the original size, R2 Key for the storing size in Scan Zoom Setting Screen. The selection of “Original Size” and “Storing Size” differs depending on the current Size Format as follows. DIN: 36x48, A0, A1, A2, A3, A4 DIN Extra: 36x48, 880, A1, A2, A3, A4 ENG: 36x48, 34x44, 22x34, 17x22, 11x17, 8.5x11 ARCH: 36x48, 30x42, 24x36, 18x24, 12x18, 9x12
Press the Enter Key to apply the setting.
44
Some combinations of “Original Size” with “Storing Size” are out of range of the magnification adjustment from 25.0 to 400.0%. Magnification is automatically corrected to 25.0% for the following combinations.
Original size Image size Actual magnification
36x48 8.5x11 23 percent 36x48 A4 23 percent
Magnification is automatically corrected to 400.0% for the following combinations.
Original size Image size Actual magnification
8.5x11 36x48 436 percent A4 36x48 435 percent
Note: A saved scan image in more than 1,310mm width will be partly cut off in approximately 1,310mm width.
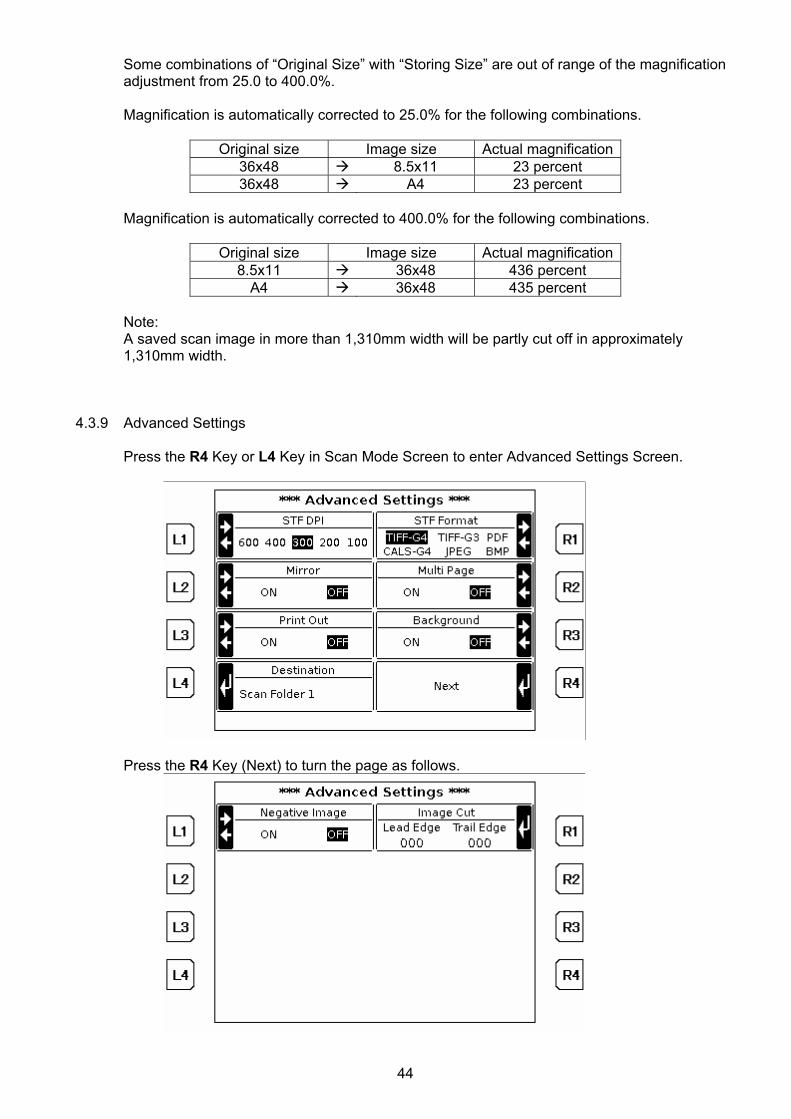
4.3.9 Advanced Settings
Press the R4 Key or L4 Key in Scan Mode Screen to enter Advanced Settings Screen.
Press the R4 Key (Next) to turn the page as follows.
45
The following settings are provided in Advanced Settings. • STF DPI • Mirror • Print Out • Destination • STF Format • Multi Page • Background • Negative Image • Image Cut Leading edge • Image Cut Trailing edge
4.3.9.1 STF DPI
Press the L1 Key repeatedly in Advanced Settings Screen for a desired resolution. Press the Enter Key to apply the setting.
4.3.9.2 Mirror
To make a mirror image, press the L2 Key repeatedly in Advanced Settings Screen to choose “ON” or “OFF”. Press the Enter Key to apply the setting.
4.3.9.3 Print Out
Print Out enables to scan an original and make its copy at a time. Press the L3 Key repeatedly in Advanced Settings Screen to choose “ON” or “OFF”. Press the Enter Key to apply the setting.
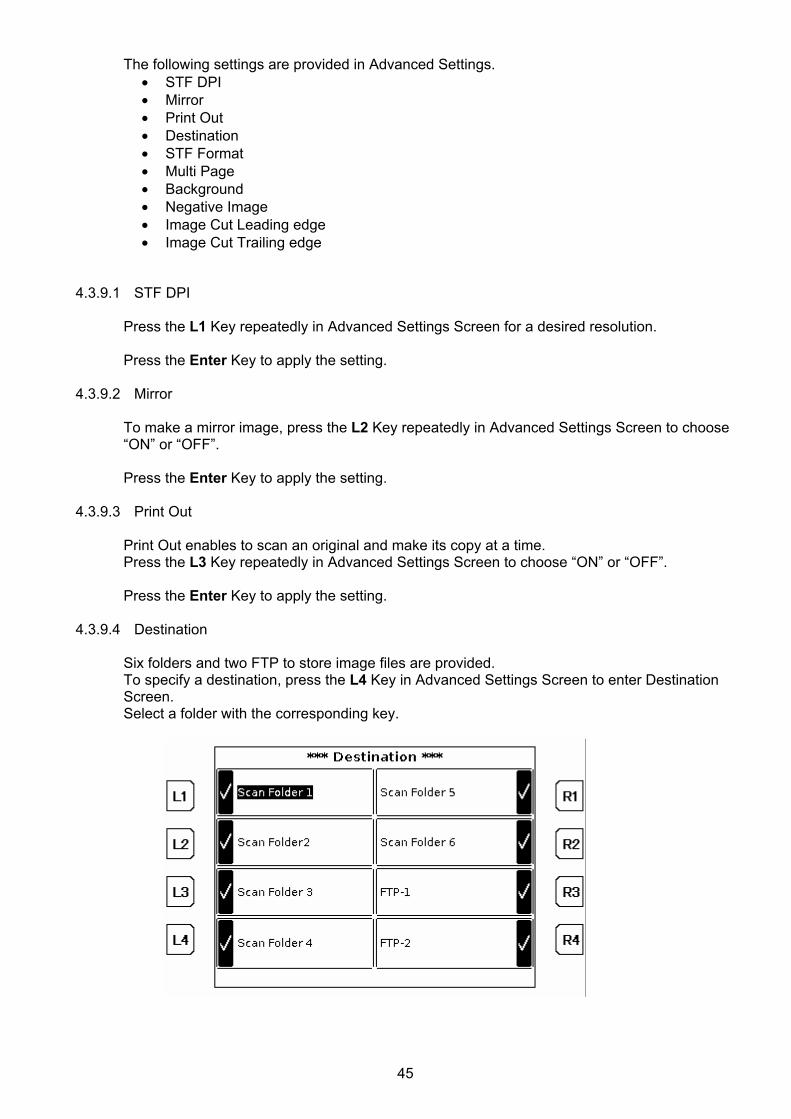
4.3.9.4 Destination
Six folders and two FTP to store image files are provided. To specify a destination, press the L4 Key in Advanced Settings Screen to enter Destination Screen. Select a folder with the corresponding key.
46
Image files are managed with a client’s Remote Web Manager. Image files are stored in KM-4800w for 72 hours, and are subsequently deleted. Press the Enter Key to apply the setting. Refer to the manual concerned for more information about Remote Web Manager.
4.3.9.5 STF Format
The following File Formats for scan images are provided.
• TIFF-G4 • TIFF-G3 • PDF • CALS-G4 • JPEG • BMP
Press the R1 Key repeatedly in Advanced Settings Screen for a desired format. Press the Enter Key to apply the setting.
4.3.9.6 Multi Page Multi Page “ON” enables several originals to be saved as a single file. Press the R2 Key repeatedly in Advanced Settings Screen to choose “ON” or “OFF”. Multi Page “ON” is only enabled when File Format is “TIFF-G4”, “TIFF-G3”, or “PDF”. Press the Enter Key to apply the setting.
4.3.9.7 Background
Background “OFF” removes a background of the originals. Press the R3 Key repeatedly in Advanced Settings Screen to choose “ON” or “OFF”. Background is disabled when Image Type is “Grayscale”. Press the Enter Key to apply the setting.
4.3.9.8 Negative Image
Press the R3 Key repeatedly in Advanced Settings Screen to choose “ON” or “OFF”. Set Negative Image to ON to make a negative image scan. Press the Enter Key to apply the setting.
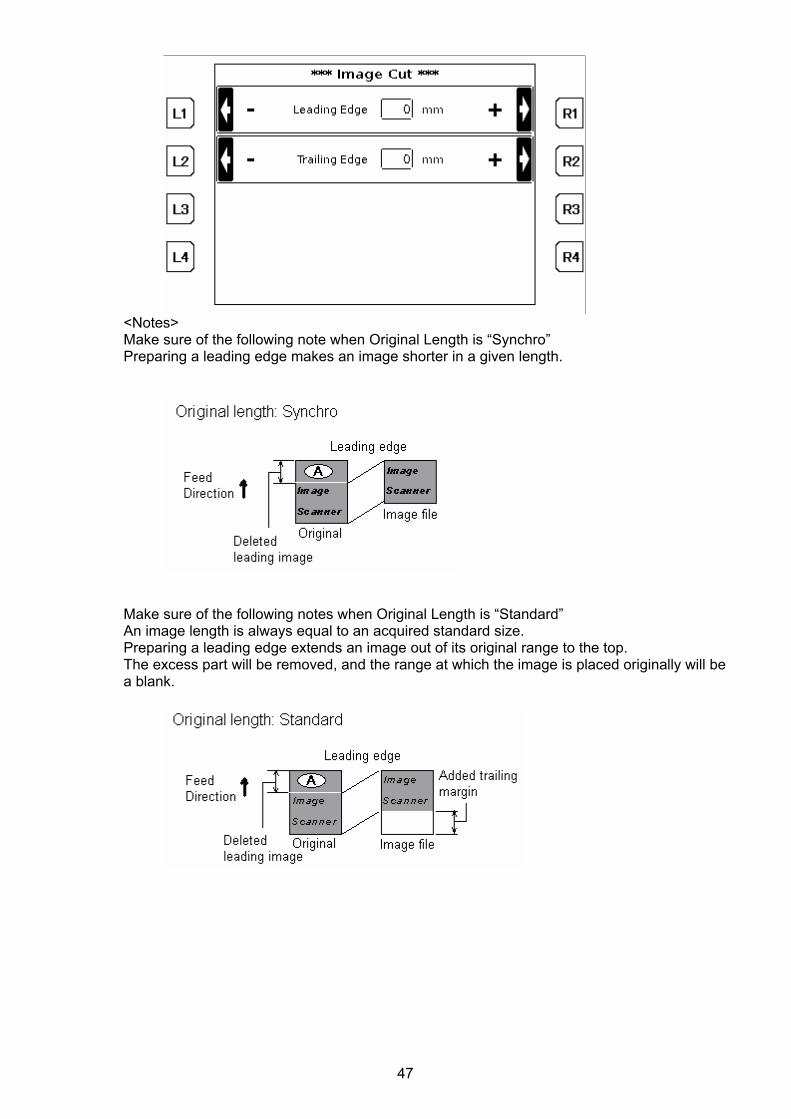
4.3.9.9 Image Cut Leading edge
A given range of the leading image can be deleted from the image. To delete a leading image, press the R4 Key in Advanced Settings Screen to enter Image Cut Screen. Leading edge adjustment covers from 0 to 300 millimeters in increments of 1 millimeter. Press the R1 Key to increase the value, L1 Key to decrease. Press the Enter Key to apply the setting.
47
<Notes> Make sure of the following note when Original Length is “Synchro” Preparing a leading edge makes an image shorter in a given length.
Make sure of the following notes when Original Length is “Standard” An image length is always equal to an acquired standard size. Preparing a leading edge extends an image out of its original range to the top. The excess part will be removed, and the range at which the image is placed originally will be a blank.
48
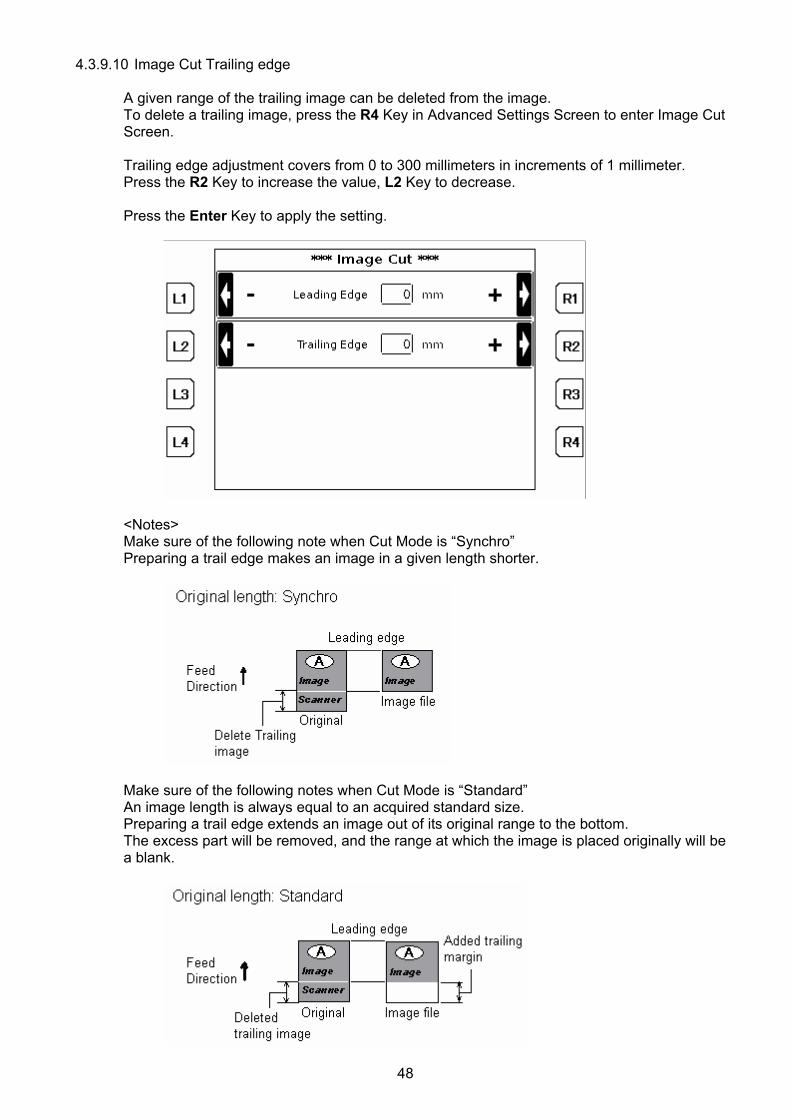
4.3.9.10 Image Cut Trailing edge A given range of the trailing image can be deleted from the image. To delete a trailing image, press the R4 Key in Advanced Settings Screen to enter Image Cut Screen. Trailing edge adjustment covers from 0 to 300 millimeters in increments of 1 millimeter. Press the R2 Key to increase the value, L2 Key to decrease. Press the Enter Key to apply the setting.
<Notes> Make sure of the following note when Cut Mode is “Synchro” Preparing a trail edge makes an image in a given length shorter.
Make sure of the following notes when Cut Mode is “Standard” An image length is always equal to an acquired standard size. Preparing a trail edge extends an image out of its original range to the bottom. The excess part will be removed, and the range at which the image is placed originally will be a blank.
49
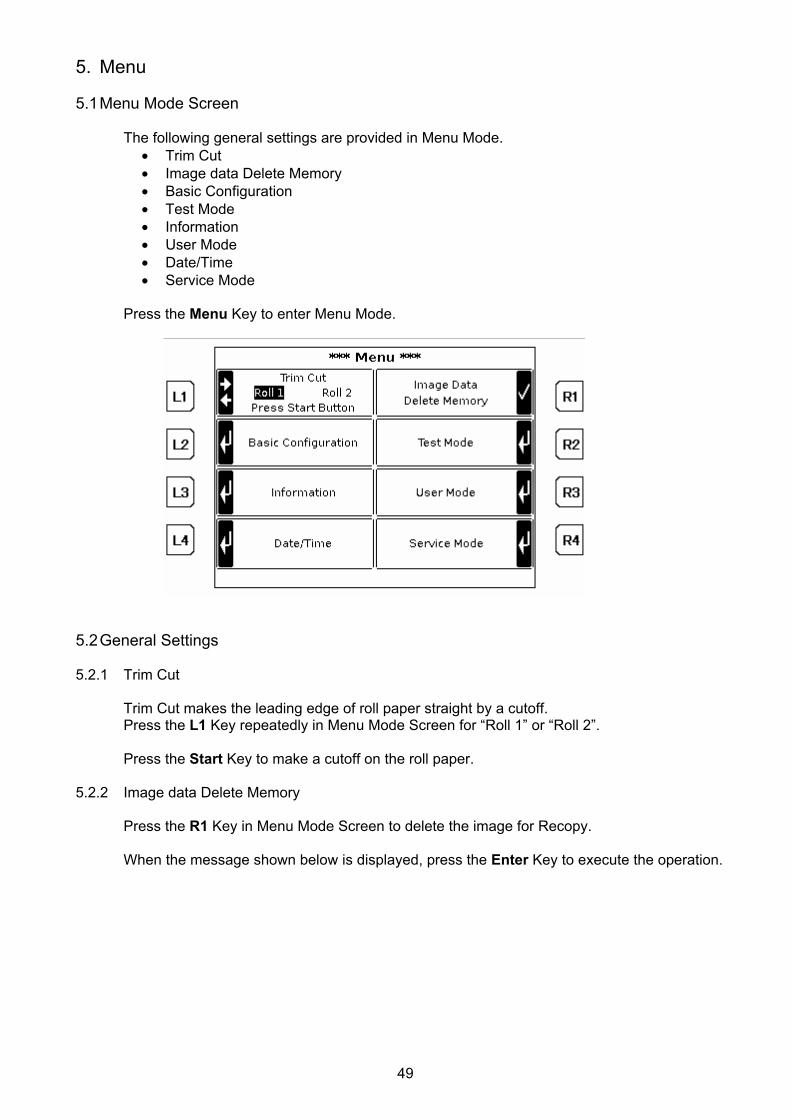
5. Menu 5.1 Menu Mode Screen
The following general settings are provided in Menu Mode.
• Trim Cut • Image data Delete Memory • Basic Configuration • Test Mode • Information • User Mode • Date/Time • Service Mode
Press the Menu Key to enter Menu Mode.
5.2 General Settings 5.2.1 Trim Cut
Trim Cut makes the leading edge of roll paper straight by a cutoff. Press the L1 Key repeatedly in Menu Mode Screen for “Roll 1” or “Roll 2”. Press the Start Key to make a cutoff on the roll paper.
5.2.2 Image data Delete Memory
Press the R1 Key in Menu Mode Screen to delete the image for Recopy. When the message shown below is displayed, press the Enter Key to execute the operation.
50
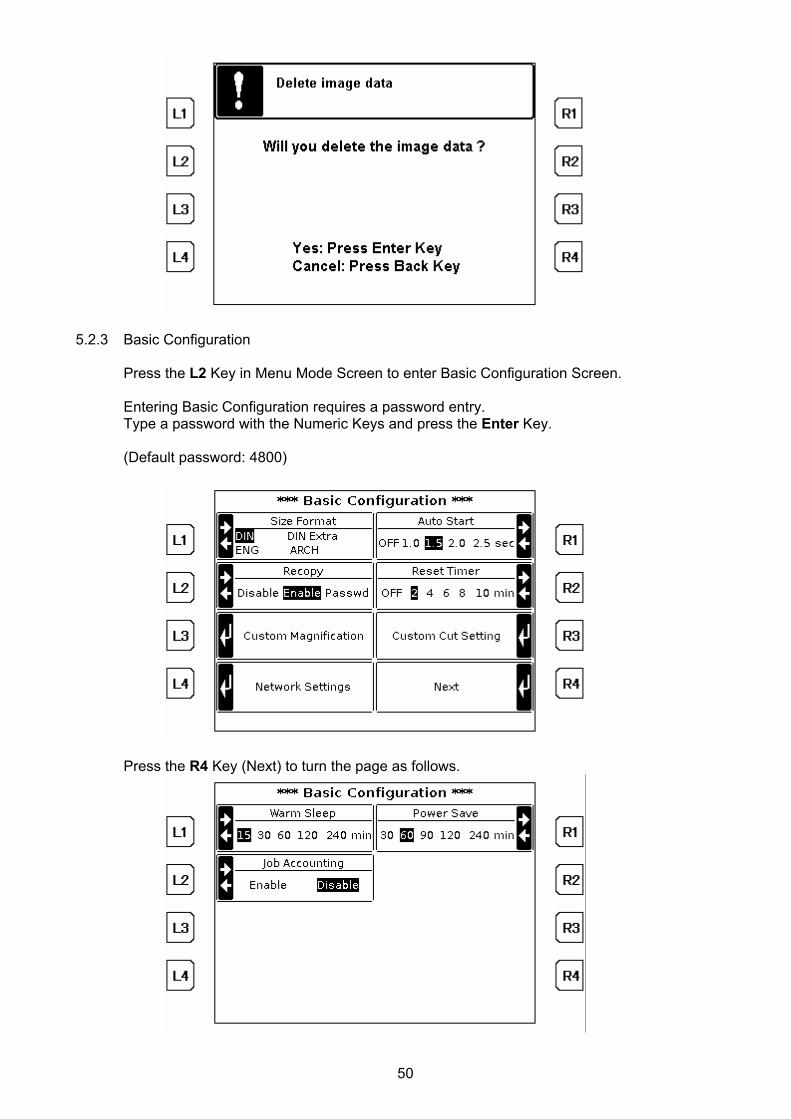
5.2.3 Basic Configuration
Press the L2 Key in Menu Mode Screen to enter Basic Configuration Screen. Entering Basic Configuration requires a password entry. Type a password with the Numeric Keys and press the Enter Key. (Default password: 4800)
Press the R4 Key (Next) to turn the page as follows.
51
The following settings are provided in Basic Configuration. • Size Format • Recopy • Custom magnification • Network Settings • Auto Start • Reset Timer • Custom Cut Setting • Warm Sleep • Power Save • Job Accounting
5.2.3.1 Size Format
Press the L1 Key repeatedly in Basic Configuration Screen for a size format of “DIN”, “DIN Extra”, “ENG” or “ARCH”. Press the Enter Key to apply the setting.
5.2.3.2 Recopy
The permission for Recopy can be specified. Press the L2 Key repeatedly in Basic Configuration Screen for a desired setting. “Disable” forbids Recopy completely. “Enable” permits Recopy. “Passwd” requires a password entry for Recopy. Press the Enter Key to apply the setting.
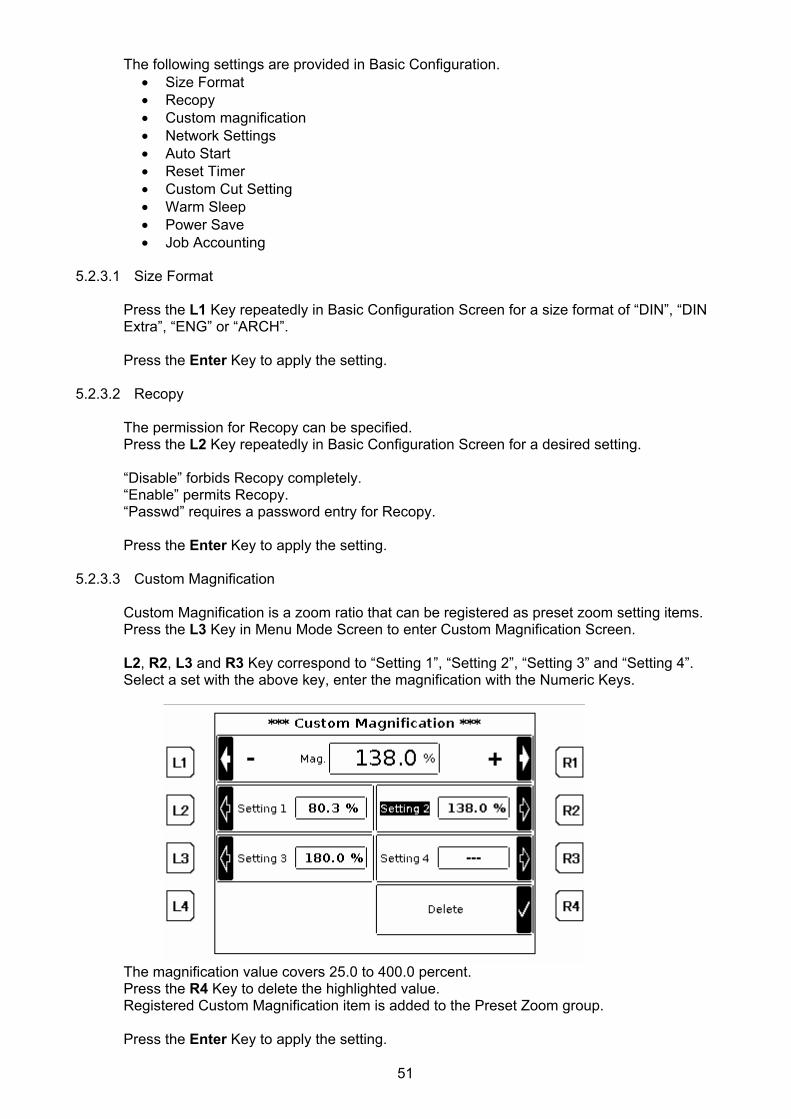
5.2.3.3 Custom Magnification
Custom Magnification is a zoom ratio that can be registered as preset zoom setting items. Press the L3 Key in Menu Mode Screen to enter Custom Magnification Screen. L2, R2, L3 and R3 Key correspond to “Setting 1”, “Setting 2”, “Setting 3” and “Setting 4”. Select a set with the above key, enter the magnification with the Numeric Keys.
The magnification value covers 25.0 to 400.0 percent. Press the R4 Key to delete the highlighted value. Registered Custom Magnification item is added to the Preset Zoom group. Press the Enter Key to apply the setting.
52
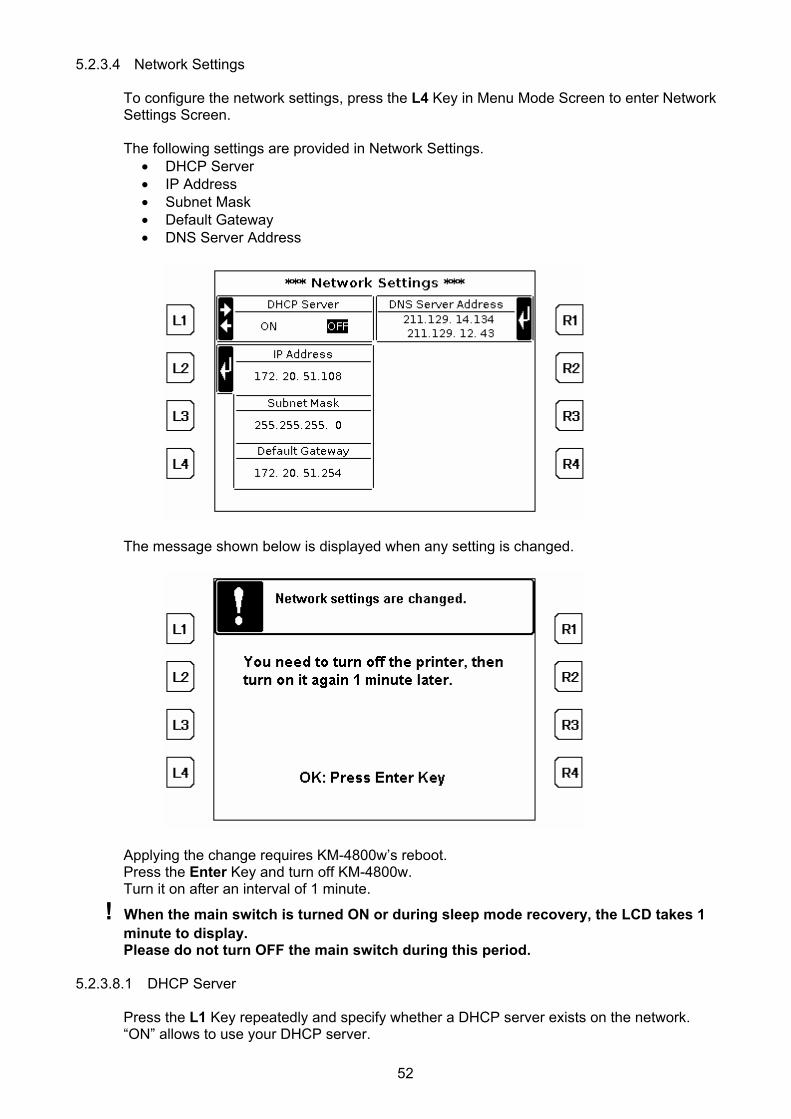
5.2.3.4 Network Settings To configure the network settings, press the L4 Key in Menu Mode Screen to enter Network Settings Screen. The following settings are provided in Network Settings.
• DHCP Server • IP Address • Subnet Mask • Default Gateway • DNS Server Address
The message shown below is displayed when any setting is changed.
Applying the change requires KM-4800w’s reboot. Press the Enter Key and turn off KM-4800w. Turn it on after an interval of 1 minute.
! When the main switch is turned ON or during sleep mode recovery, the LCD takes 1 minute to display. Please do not turn OFF the main switch during this period.
5.2.3.8.1 DHCP Server
Press the L1 Key repeatedly and specify whether a DHCP server exists on the network. “ON” allows to use your DHCP server.
53
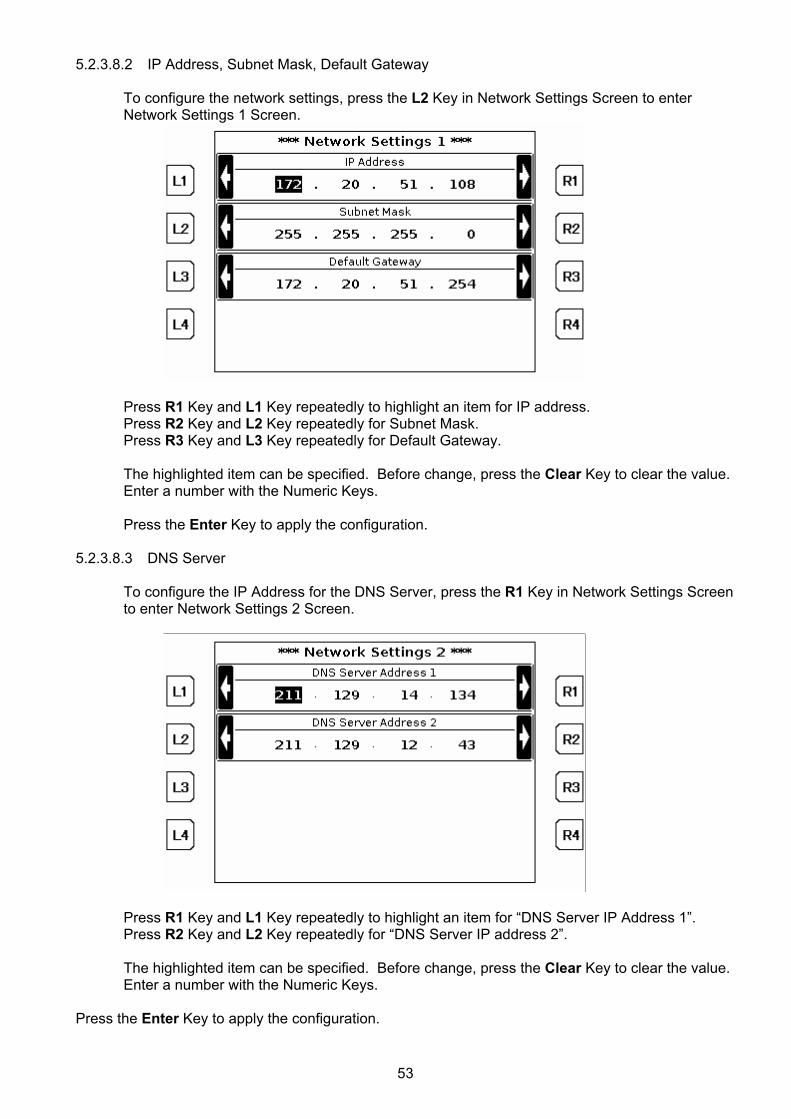
5.2.3.8.2 IP Address, Subnet Mask, Default Gateway To configure the network settings, press the L2 Key in Network Settings Screen to enter Network Settings 1 Screen.
Press R1 Key and L1 Key repeatedly to highlight an item for IP address. Press R2 Key and L2 Key repeatedly for Subnet Mask. Press R3 Key and L3 Key repeatedly for Default Gateway. The highlighted item can be specified. Before change, press the Clear Key to clear the value. Enter a number with the Numeric Keys. Press the Enter Key to apply the configuration.
5.2.3.8.3 DNS Server
To configure the IP Address for the DNS Server, press the R1 Key in Network Settings Screen to enter Network Settings 2 Screen.
Press R1 Key and L1 Key repeatedly to highlight an item for “DNS Server IP Address 1”. Press R2 Key and L2 Key repeatedly for “DNS Server IP address 2”. The highlighted item can be specified. Before change, press the Clear Key to clear the value. Enter a number with the Numeric Keys.
Press the Enter Key to apply the configuration.
54
5.2.3.5 Auto Start The scanner starts carrying an original after a slight interval. To adjust the interval, press the R1 Key repeatedly in Basic Configuration Screen for a desired setting. The interval for Auto Start can be specified “OFF”, “1”, “1.5”, “2” and “2.5” seconds. “OFF” requires pressing the Start Key each time to start carrying originals. Press the Enter Key to apply the setting.
5.2.3.6 Reset Timer
KM-4800w clears all the settings in the screen when a specified period has been passed without any operation. To adjust the period, press the R2 Key repeatedly in Basic Configuration Screen for a desired setting. The period for Reset Timer can be specified “OFF”, “2”, “4”, “6”, “8” and “10” minutes. “OFF” disables KM-4800w from clearing the settings. Press the Enter Key to apply the setting.
5.2.3.7 Custom Cut Setting
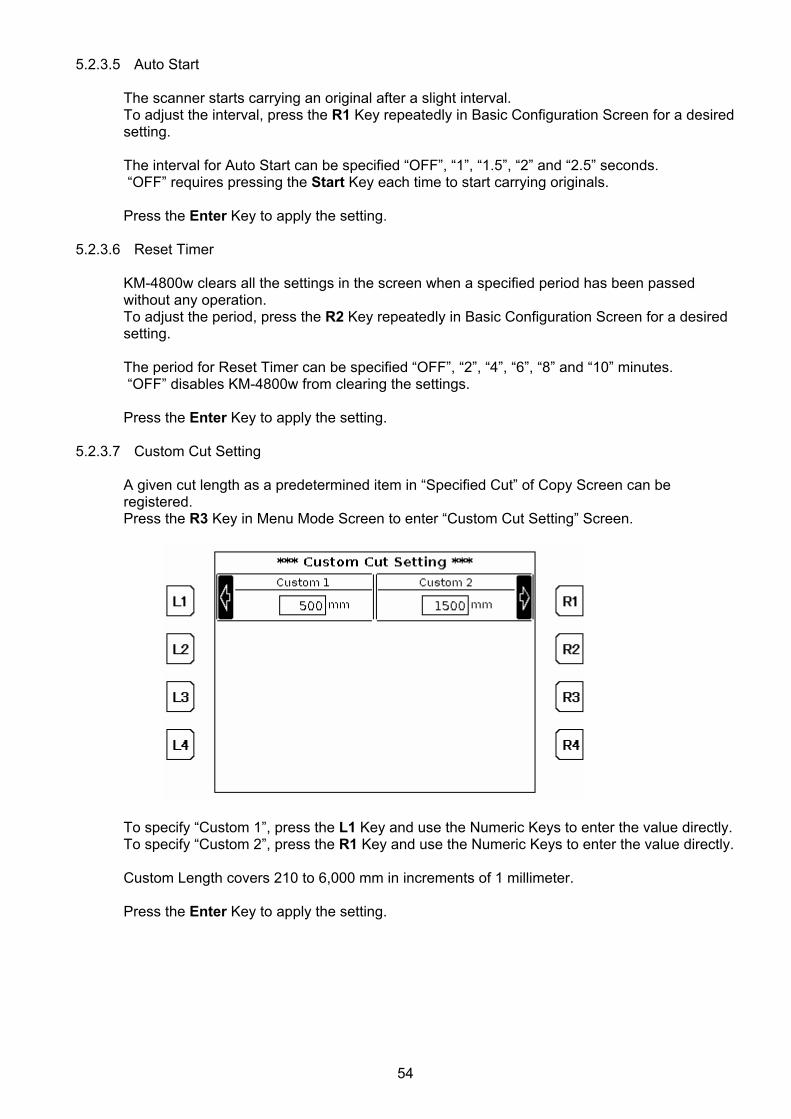
A given cut length as a predetermined item in “Specified Cut” of Copy Screen can be registered. Press the R3 Key in Menu Mode Screen to enter “Custom Cut Setting” Screen.
To specify “Custom 1”, press the L1 Key and use the Numeric Keys to enter the value directly. To specify “Custom 2”, press the R1 Key and use the Numeric Keys to enter the value directly. Custom Length covers 210 to 6,000 mm in increments of 1 millimeter. Press the Enter Key to apply the setting.
55
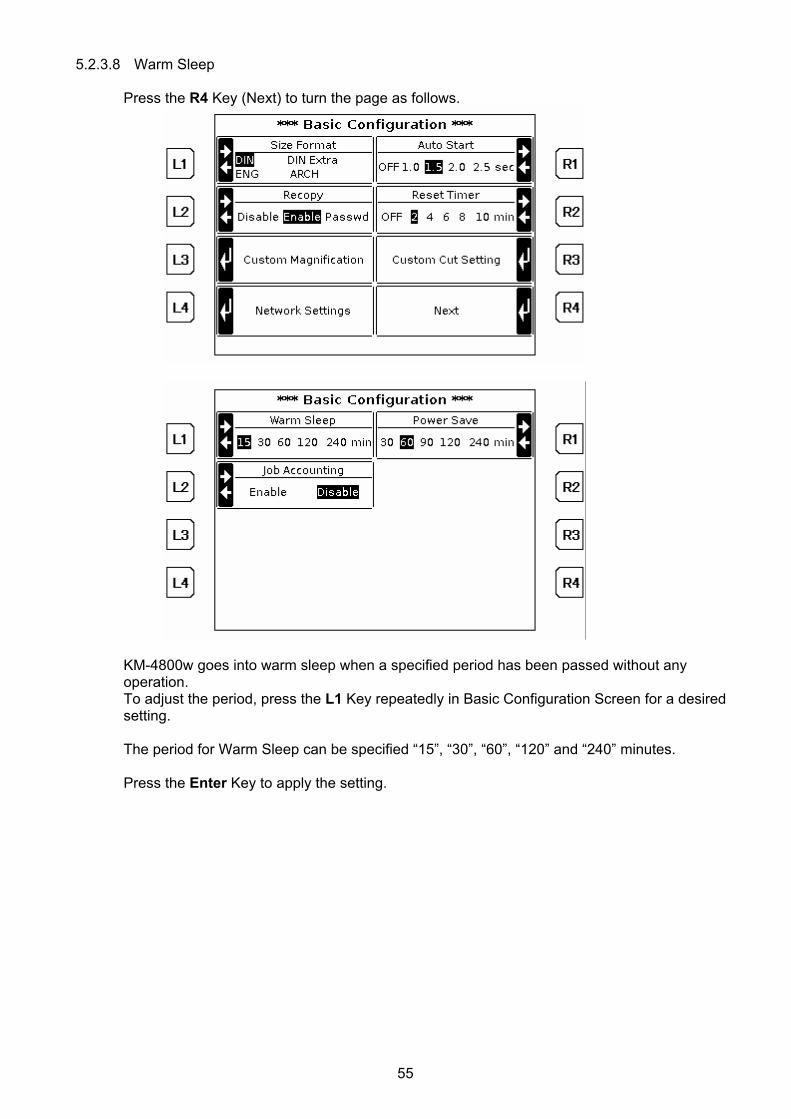
5.2.3.8 Warm Sleep Press the R4 Key (Next) to turn the page as follows.
KM-4800w goes into warm sleep when a specified period has been passed without any operation. To adjust the period, press the L1 Key repeatedly in Basic Configuration Screen for a desired setting. The period for Warm Sleep can be specified “15”, “30”, “60”, “120” and “240” minutes. Press the Enter Key to apply the setting.
56
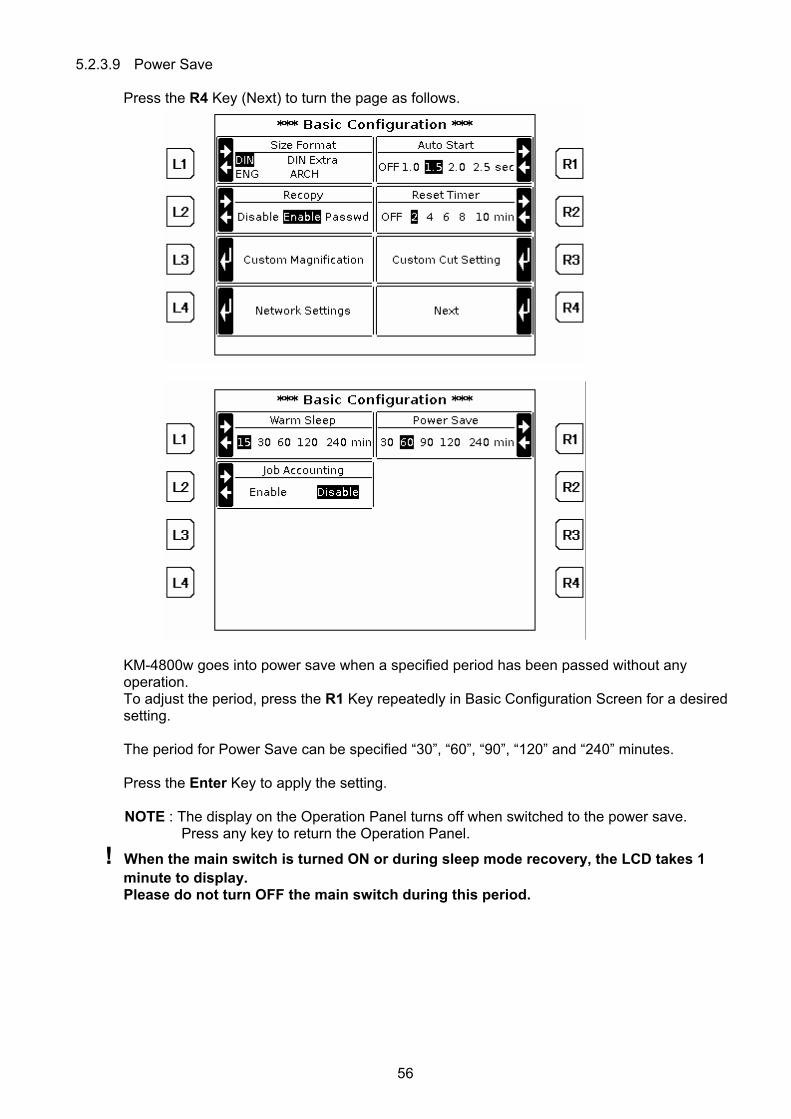
5.2.3.9 Power Save Press the R4 Key (Next) to turn the page as follows.
KM-4800w goes into power save when a specified period has been passed without any operation. To adjust the period, press the R1 Key repeatedly in Basic Configuration Screen for a desired setting. The period for Power Save can be specified “30”, “60”, “90”, “120” and “240” minutes. Press the Enter Key to apply the setting.
NOTE : The display on the Operation Panel turns off when switched to the power save. Press any key to return the Operation Panel.
! When the main switch is turned ON or during sleep mode recovery, the LCD takes 1 minute to display. Please do not turn OFF the main switch during this period.
57
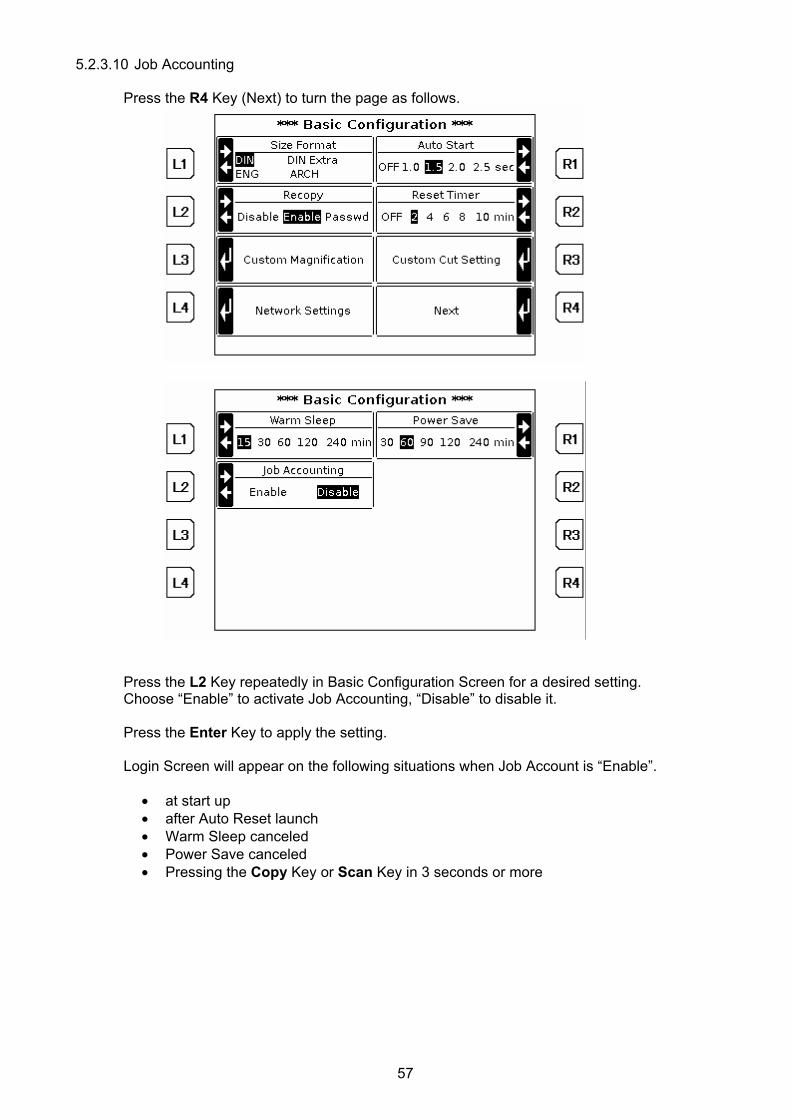
5.2.3.10 Job Accounting Press the R4 Key (Next) to turn the page as follows.
Press the L2 Key repeatedly in Basic Configuration Screen for a desired setting. Choose “Enable” to activate Job Accounting, “Disable” to disable it. Press the Enter Key to apply the setting. Login Screen will appear on the following situations when Job Account is “Enable”.
• at start up • after Auto Reset launch • Warm Sleep canceled • Power Save canceled • Pressing the Copy Key or Scan Key in 3 seconds or more
58
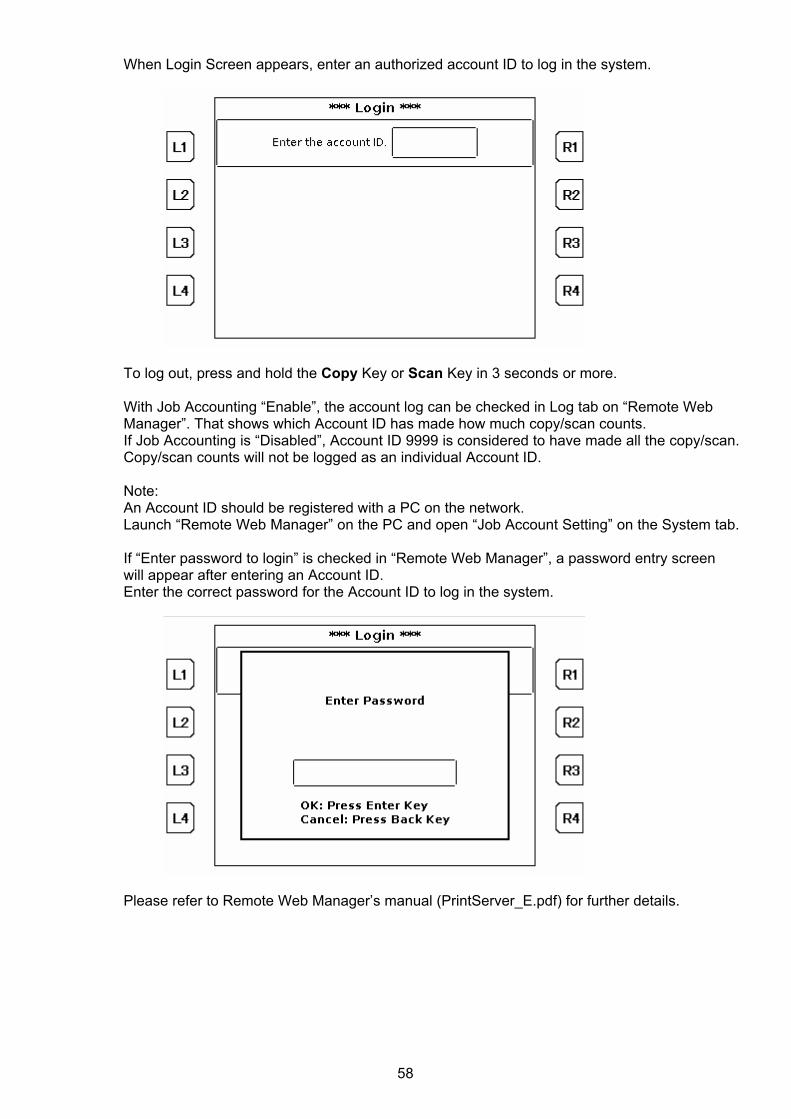
When Login Screen appears, enter an authorized account ID to log in the system.
To log out, press and hold the Copy Key or Scan Key in 3 seconds or more. With Job Accounting “Enable”, the account log can be checked in Log tab on “Remote Web Manager”. That shows which Account ID has made how much copy/scan counts. If Job Accounting is “Disabled”, Account ID 9999 is considered to have made all the copy/scan. Copy/scan counts will not be logged as an individual Account ID. Note: An Account ID should be registered with a PC on the network. Launch “Remote Web Manager” on the PC and open “Job Account Setting” on the System tab. If “Enter password to login” is checked in “Remote Web Manager”, a password entry screen will appear after entering an Account ID. Enter the correct password for the Account ID to log in the system.
Please refer to Remote Web Manager’s manual (PrintServer_E.pdf) for further details.
59
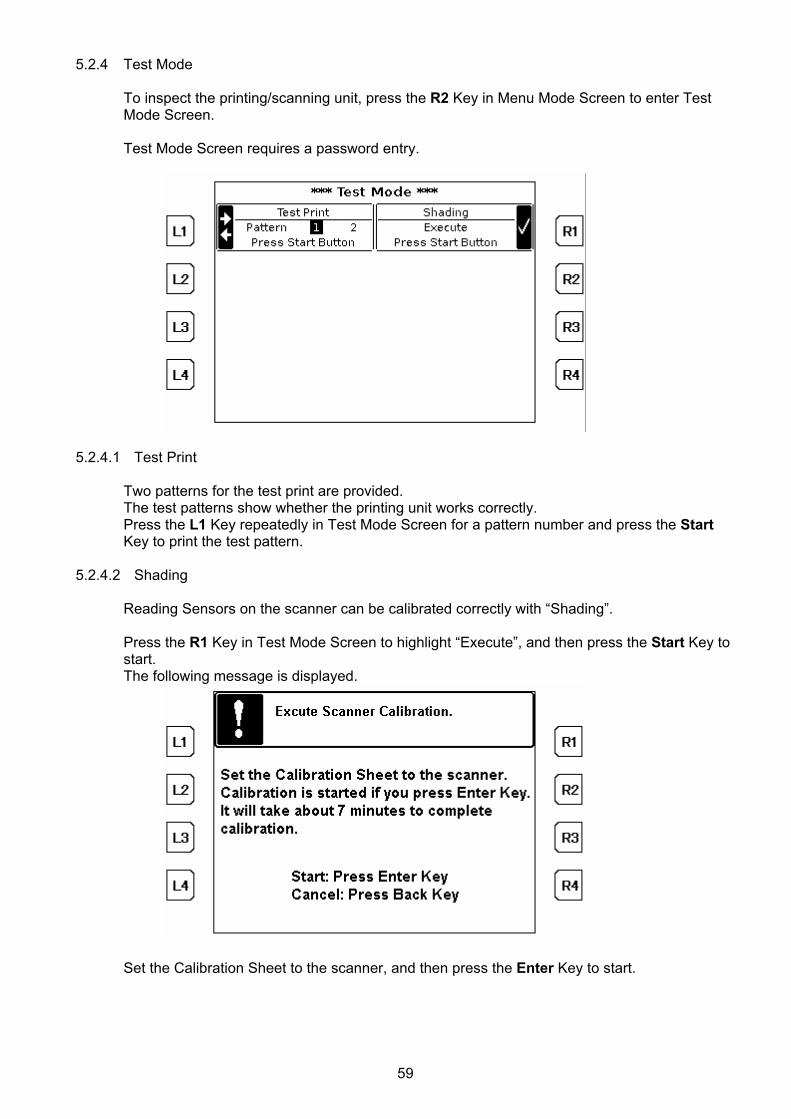
5.2.4 Test Mode To inspect the printing/scanning unit, press the R2 Key in Menu Mode Screen to enter Test Mode Screen. Test Mode Screen requires a password entry.
5.2.4.1 Test Print Two patterns for the test print are provided. The test patterns show whether the printing unit works correctly. Press the L1 Key repeatedly in Test Mode Screen for a pattern number and press the Start Key to print the test pattern.
5.2.4.2 Shading
Reading Sensors on the scanner can be calibrated correctly with “Shading”. Press the R1 Key in Test Mode Screen to highlight “Execute”, and then press the Start Key to start. The following message is displayed.
Set the Calibration Sheet to the scanner, and then press the Enter Key to start.
60
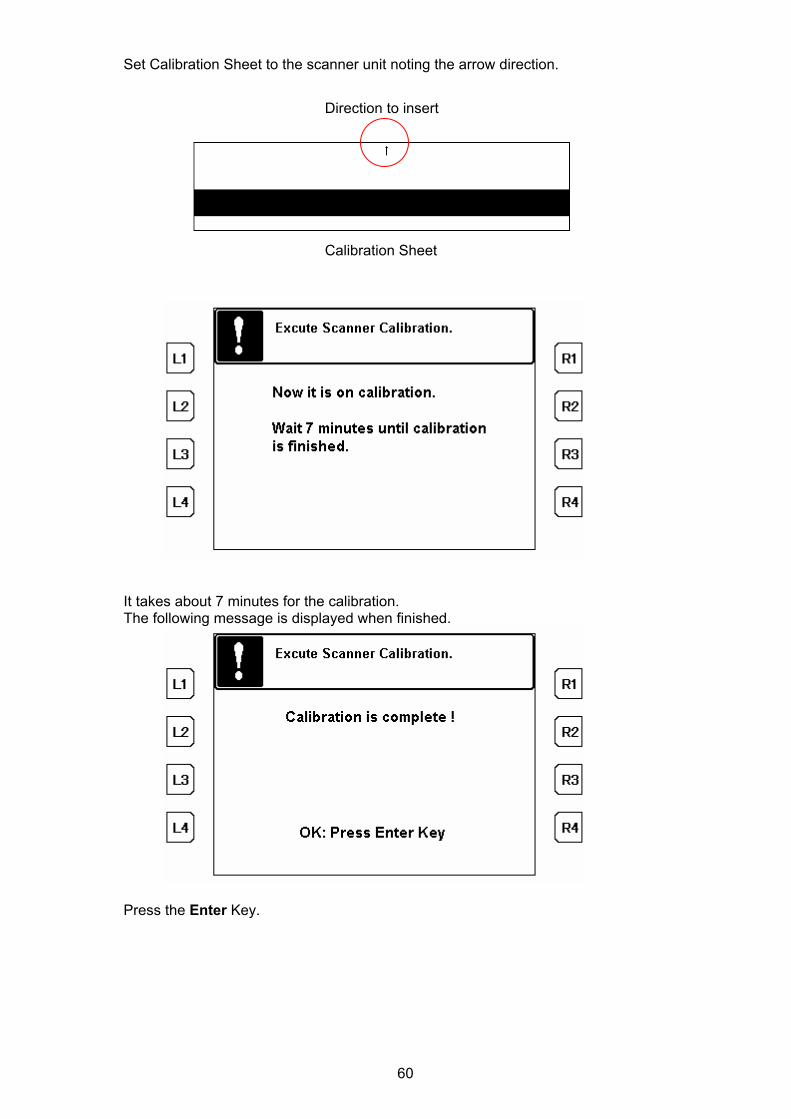
Set Calibration Sheet to the scanner unit noting the arrow direction.
It takes about 7 minutes for the calibration. The following message is displayed when finished.
Press the Enter Key.
Direction to insert
Calibration Sheet

61
5.2.5 Information Press the L3 Key in Menu Mode Screen to view information about KM-4800w. The following information is displayed.
• Date • Print Counter • Scanner Version • Printer Version • Controller Version • Print Information
5.2.6 User Mode To configure the following settings, press the R3 Key in Menu Mode Screen to enter User Mode Screen.
• User Default Settings • Change User Password • Initialize Scan to File Password • Printer Settings • Language
62
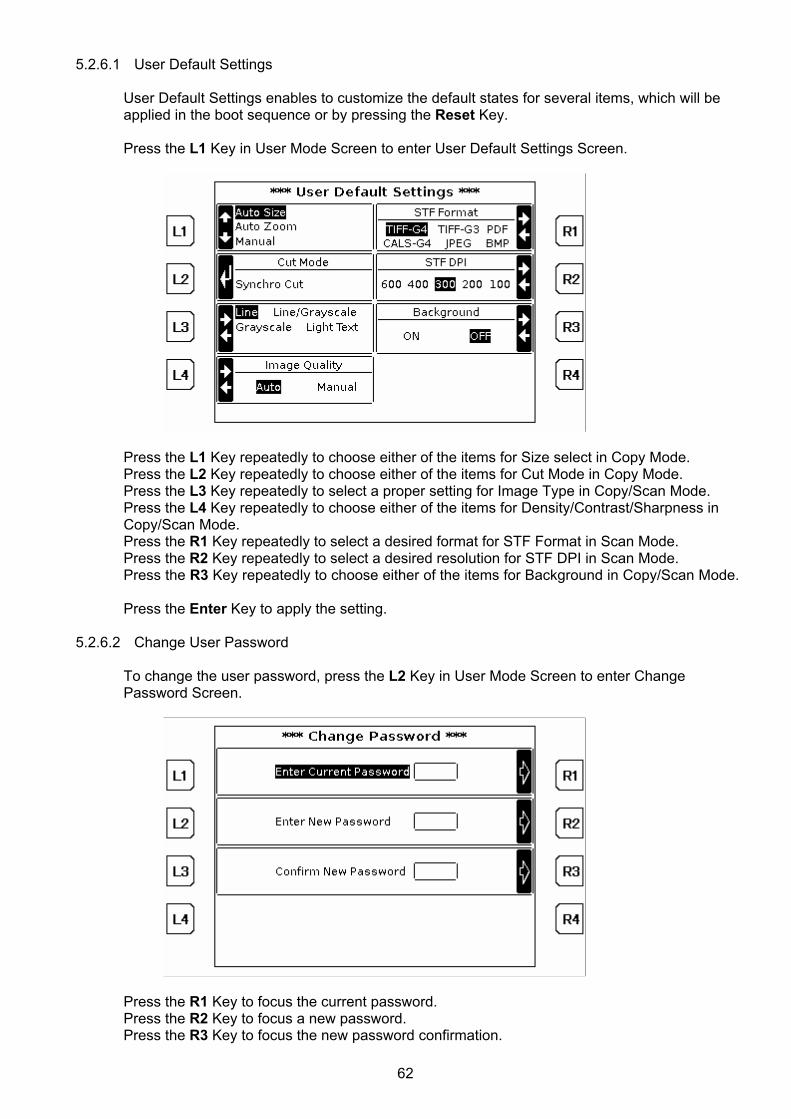
5.2.6.1 User Default Settings User Default Settings enables to customize the default states for several items, which will be applied in the boot sequence or by pressing the Reset Key. Press the L1 Key in User Mode Screen to enter User Default Settings Screen.
Press the L1 Key repeatedly to choose either of the items for Size select in Copy Mode. Press the L2 Key repeatedly to choose either of the items for Cut Mode in Copy Mode. Press the L3 Key repeatedly to select a proper setting for Image Type in Copy/Scan Mode. Press the L4 Key repeatedly to choose either of the items for Density/Contrast/Sharpness in Copy/Scan Mode. Press the R1 Key repeatedly to select a desired format for STF Format in Scan Mode. Press the R2 Key repeatedly to select a desired resolution for STF DPI in Scan Mode. Press the R3 Key repeatedly to choose either of the items for Background in Copy/Scan Mode. Press the Enter Key to apply the setting.
5.2.6.2 Change User Password To change the user password, press the L2 Key in User Mode Screen to enter Change Password Screen.
Press the R1 Key to focus the current password. Press the R2 Key to focus a new password. Press the R3 Key to focus the new password confirmation.
63
Type ones with the Numeric Keys. The message shown below is displayed with a successful authentication.
Press the Enter Key. 5.2.6.3 Initialize Scan to File Password
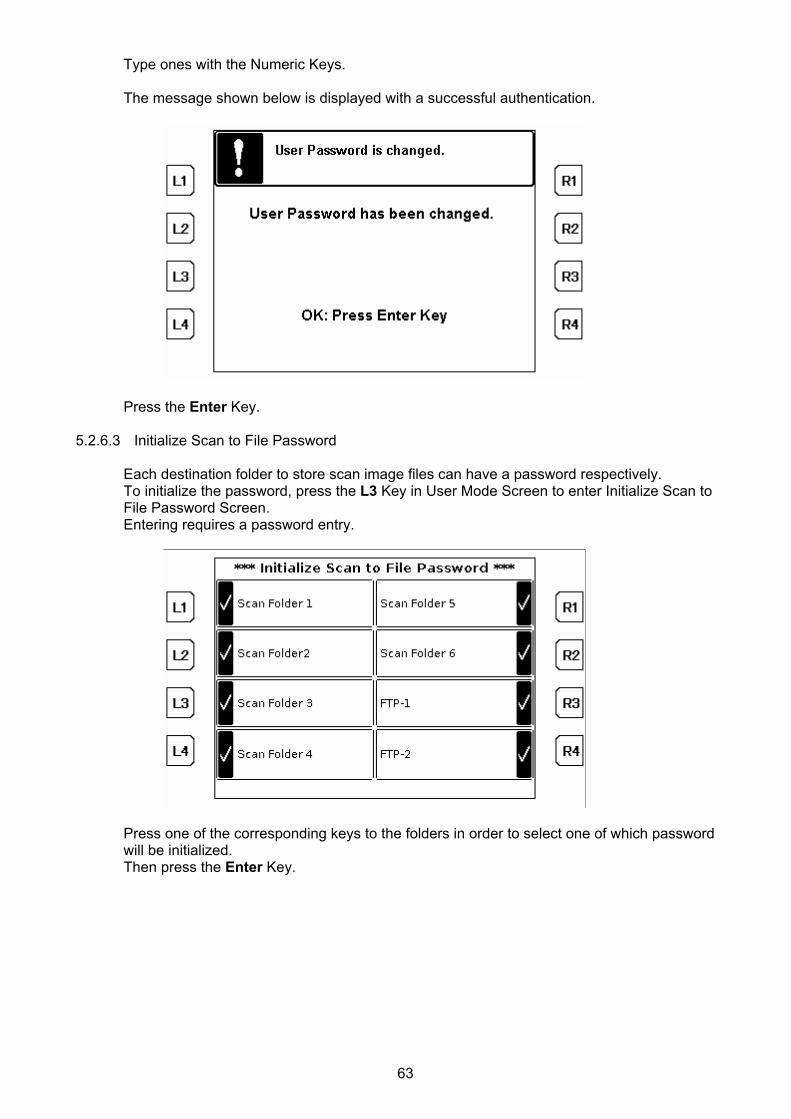
Each destination folder to store scan image files can have a password respectively. To initialize the password, press the L3 Key in User Mode Screen to enter Initialize Scan to File Password Screen. Entering requires a password entry.
Press one of the corresponding keys to the folders in order to select one of which password will be initialized. Then press the Enter Key.
64
Press the Enter Key to execute.
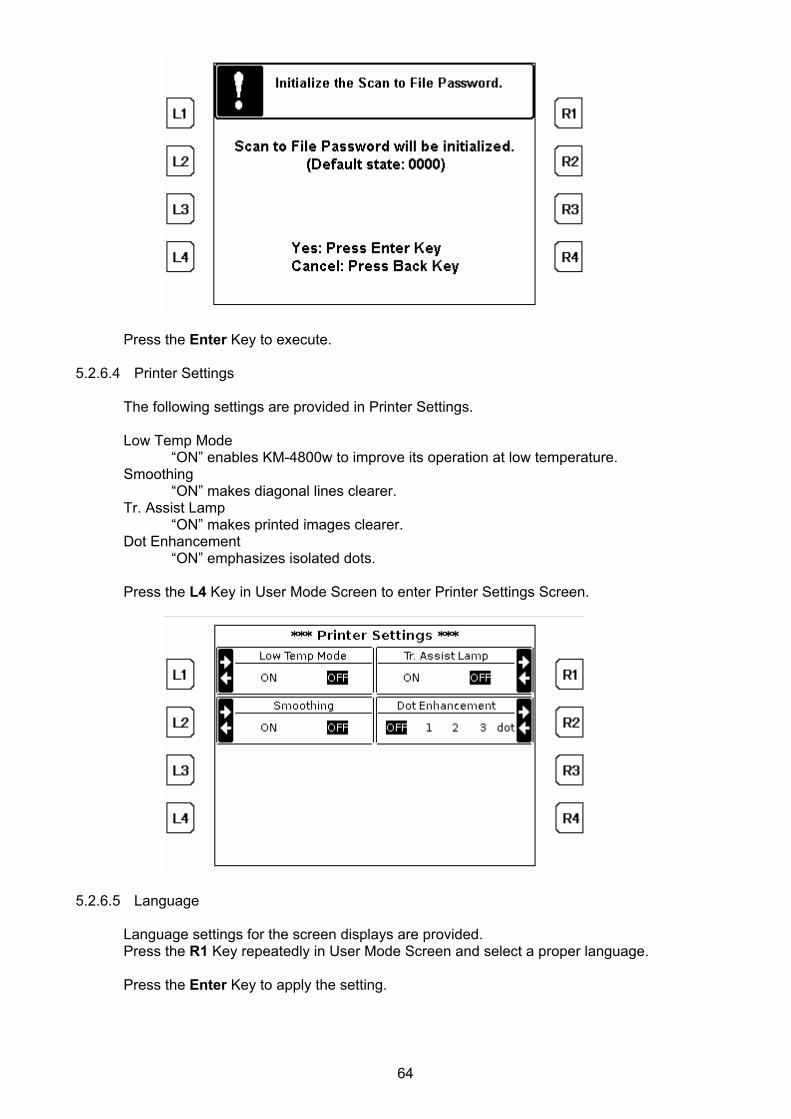
5.2.6.4 Printer Settings
The following settings are provided in Printer Settings. Low Temp Mode
“ON” enables KM-4800w to improve its operation at low temperature. Smoothing “ON” makes diagonal lines clearer. Tr. Assist Lamp “ON” makes printed images clearer. Dot Enhancement “ON” emphasizes isolated dots. Press the L4 Key in User Mode Screen to enter Printer Settings Screen.
5.2.6.5 Language
Language settings for the screen displays are provided. Press the R1 Key repeatedly in User Mode Screen and select a proper language. Press the Enter Key to apply the setting.
65
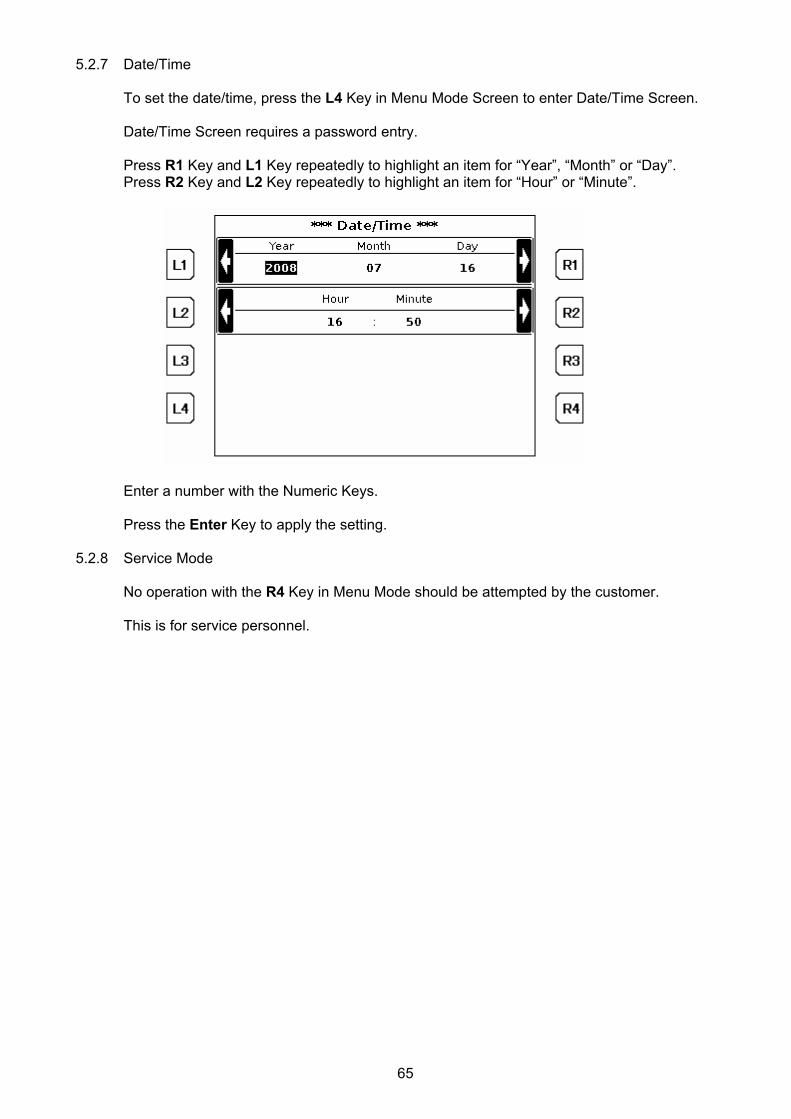
5.2.7 Date/Time
To set the date/time, press the L4 Key in Menu Mode Screen to enter Date/Time Screen. Date/Time Screen requires a password entry. Press R1 Key and L1 Key repeatedly to highlight an item for “Year”, “Month” or “Day”. Press R2 Key and L2 Key repeatedly to highlight an item for “Hour” or “Minute”.
Enter a number with the Numeric Keys. Press the Enter Key to apply the setting.
5.2.8 Service Mode
No operation with the R4 Key in Menu Mode should be attempted by the customer. This is for service personnel.

66
Copy/Scan Operation Manual 2008. 7 Rev. 1.0
The Copyright Act protects this manual. It is prohibited to copy or duplicate all or a part of this manual without permission.

![App Note Template - Nvidiadeveloper.download.nvidia.com/.../scan/doc/scan.pdf · Example: If is addition, then the exclusive scan operation on the array [3 1 7 0 4 1 6 3], returns](https://static.fdocuments.in/doc/165x107/5f4db5500f047b7ddc7aacac/app-note-template-example-if-is-addition-then-the-exclusive-scan-operation-on.jpg)