Cone Skimmers -
7
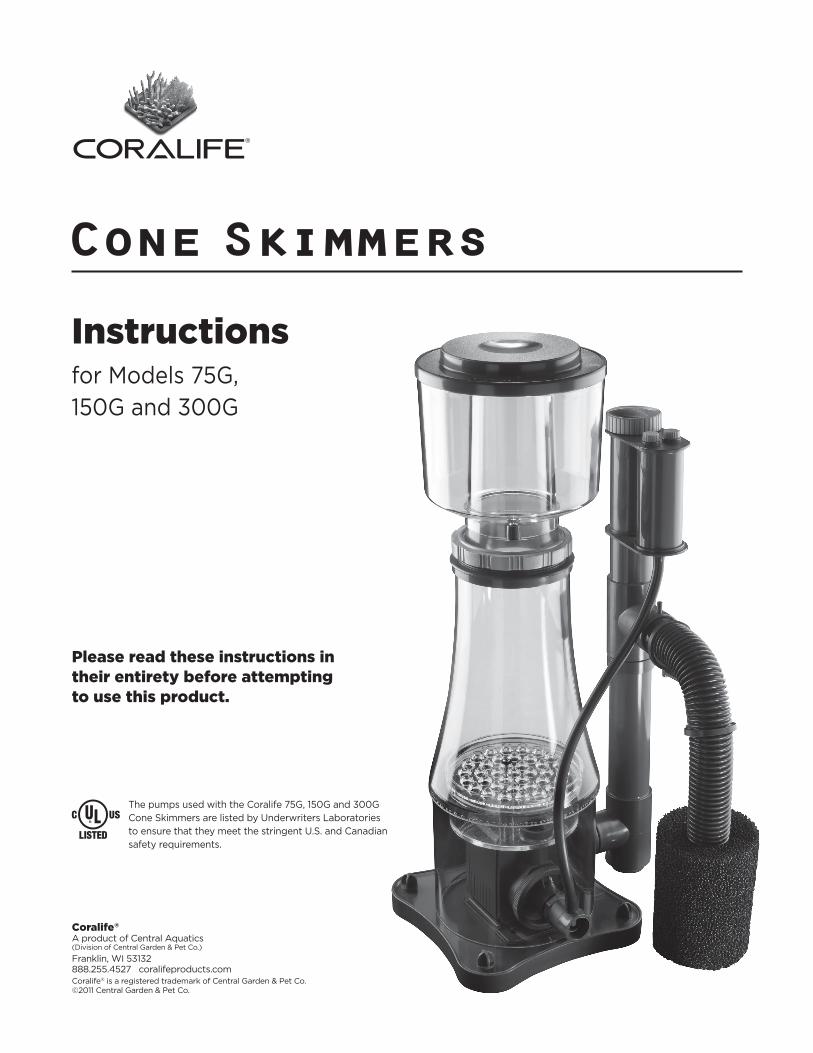
Cone Skimmers Coralife ® A product of Central Aquatics (Division of Central Garden & Pet Co.) Franklin, WI 53132 888.255.4527 coralifeproducts.com Coralife ® is a registered trademark of Central Garden & Pet Co. ©2011 Central Garden & Pet Co. Please read these instructions in their entirety before attempting to use this product. Instructions for Models 75G, 150G and 300G The pumps used with the Coralife 75G, 150G and 300G Cone Skimmers are listed by Underwriters Laboratories to ensure that they meet the stringent U.S. and Canadian safety requirements.
Transcript of Cone Skimmers -
Cone Skimmers
Coralife®
A product of Central Aquatics(Division of Central Garden & Pet Co.)
Franklin, WI 53132 888.255.4527 coralifeproducts.comCoralife® is a registered trademark of Central Garden & Pet Co. ©2011 Central Garden & Pet Co.
Please read these instructions in their entirety before attempting to use this product.
Instructionsfor Models 75G, 150G and 300G
The pumps used with the Coralife 75G, 150G and 300G Cone Skimmers are listed by Underwriters Laboratories to ensure that they meet the stringent U.S. and Canadian safety requirements.
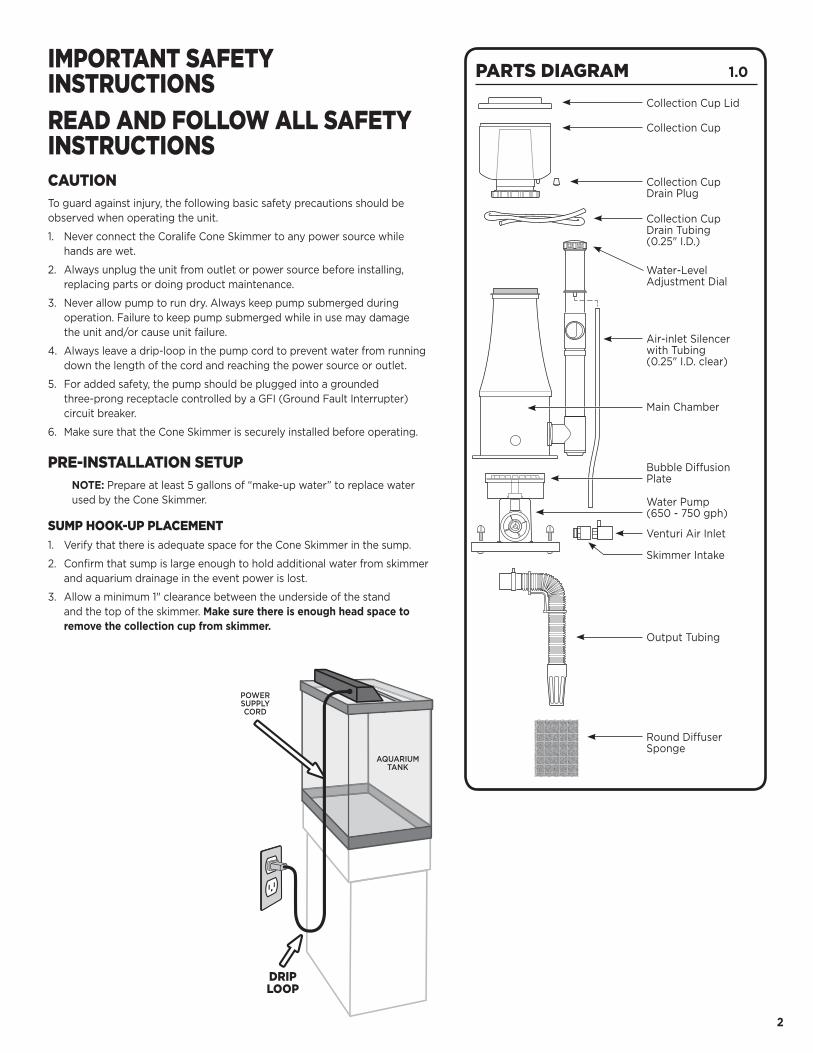
IMPORTANT SAFETY INSTRUCTIONS
READ AND FOLLOW ALL SAFETY INSTRUCTIONSCAUTIONTo guard against injury, the following basic safety precautions should be observed when operating the unit.
1. Never connect the Coralife Cone Skimmer to any power source while hands are wet.
2. Always unplug the unit from outlet or power source before installing, replacing parts or doing product maintenance.
3. Never allow pump to run dry. Always keep pump submerged during operation. Failure to keep pump submerged while in use may damage the unit and/or cause unit failure.
4. Always leave a drip-loop in the pump cord to prevent water from running down the length of the cord and reaching the power source or outlet.
5. For added safety, the pump should be plugged into a grounded three-prong receptacle controlled by a GFI (Ground Fault Interrupter) circuit breaker.
6. Make sure that the Cone Skimmer is securely installed before operating.
PRE-INSTALLATION SETUPNOTE: Prepare at least 5 gallons of “make-up water” to replace water used by the Cone Skimmer.
SUMP HOOK-UP PLACEMENT
1. Verify that there is adequate space for the Cone Skimmer in the sump.
2. Confirm that sump is large enough to hold additional water from skimmer and aquarium drainage in the event power is lost.
3. Allow a minimum 1" clearance between the underside of the stand and the top of the skimmer. Make sure there is enough head space to remove the collection cup from skimmer.
2
POWER SUPPLY CORD
DRIP LOOP
AQUARIUM TANK
PARTS DIAGRAM 1.0
Collection Cup Lid
Collection Cup
Main Chamber
Bubble Diffusion Plate
Output Tubing
Air-inlet Silencer with Tubing (0.25" I.D. clear)
Venturi Air Inlet
Skimmer Intake
Round Diffuser Sponge
Collection Cup Drain Plug
Collection Cup Drain Tubing(0.25" I.D.)
Water-Level Adjustment Dial
Water Pump(650 - 750 gph)

3

INSTALLATION SETUPIN-SUMP INSTALLATION SETUP
NOTE: Saltwater may need to be added to the aquarium to replace water used by the Cone Skimmer.
1. Locate desired area to place Skimmer.
2. Attach Venturi Air Inlet to Skimmer Intake. (4.0)
3. Place Cone Skimmer inside Sump at desired location. (4.1)
NOTE: Add saltwater to Skimmer to prevent from floating in the Sump.
WARNING: Do not submerse in water or obstruct airway passage through Air Inlet Silencer.
4. Attach Output Tubing onto Water Output with vent hole facing up. (4.1)
5. Place Round Diffuser Sponge into Sump. (4.2)
4
Collection CupAssembly
WaterOutput
MainChamber
Water-levelAdjustment Dial
Air Inlet Silencer
Venturi Air Inlet
Outlet Standpipe
Output Tubing
Siphon Break Air Vent Hole
Water Output
Water Line
Output Tubing
Bubble Diffuser Plate
Round Diffuser Sponge
Water Line
Water In
Skimmer Intake
Recommended Sump location for 3 chambered system
Water Out
FRONT VIEW 4.0
SIDE DETAIL 4.1
FRONT DETAIL 4.2
4.1
4.2

OPERATIONPRE-OPERATION1. Make sure that all tubing connections are tightly secured.
2. Verify that Collection Cup and Lid are tightly fastened and sealed to the Main Chamber.
3. Unscrew Air Silencer Control Valves fully.
4. Check Water-Level Adjustment Dial and make sure it is in the open position. (5.0)
INITIAL OPERATION1. Plug water pump into an outlet or power source.
2. Adjust Water-Level Adjustment Dial so that the micro-bubbles are below the Collection Cup Cone. (5.1) Let the pump run for 24 - 72 hours to “break-in” the unit. Use Water-Level Adjustment Dial for fine adjustment.
NOTE: Initial operation of protein skimmer may produce excess bubbles and waste. Allow Collection Cup to fill-up and discard waste-water until production decreases.
If unable to raise bubble height sufficiently using only the Water-Level Adjustment Dial, screw both Air Silencer Control Valves to the closed position to increase water velocity OR raise water level in sump.
OPERATION1. Turn Water-Level Adjustment Dial to raise water level within the
Main Chamber and Cone to desired skimming operation.
DRY SKIMMING OPERATION (5.2)
1. Adjust micro-bubbles to .25" - .75" high inside Collection Cup Cone.
NOTE: Dry skimming will produce a dense foam layer which rises to the top of the Cone where it collects until the dry foam overflows into the Collection Cup.
RESULTS: 1. Dry foam (froth) 2. Dark, concentrated waste material (Less Volume)
WET SKIMMING OPERATION (5.3)
1. Adjust micro-bubbles to .75" - 3" high inside Collection Cup Cone.
NOTE: Wet skimming will produce a thin bubble layer which rises to the Collection Cup Lid where it bursts and slides down the Collection C up as wet wastewater.
RESULTS: 1. Wet foam 2. Light, diluted waste material (More Volume)
5
Turn Water-Level Adjustment Dial to adjust water level
Air Silencer Control Valves
Collection Cup
Dry Foam (Froth)
Collection Cup Cone
Micro Bubbles
Micro Bubbles
Waste Materials
TOP VIEW 5.0
SIDE VIEW 5.1
DRY SKIMMING 5.2
WET SKIMMING 5.3

MAINTENANCEMAINTENANCE
SAFETY: Always disconnect needle-wheel pump from power supply before removing collection cup or cleaning unit.
WARNING: Only clean with warm fresh water. Do not use any type of chemical cleaning agent to clean the skimmer. These include, but not limited to, soap, detergents, alcohol, glass cleaners, polishers, ammonia, etc.
1. To operate efficiently, the Cone Skimmer must be in use 24 hours a day.
DAILY MAINTENANCE1. Make sure all connections are secure.
2. Observe to see if skimmer is functioning properly and producing waste material.
NOTE: Skimmer may need to be adjusted accordingly due to variables in water quality and fluctuations.
3. Check to see if the collection cup is full and empty waste material.
4. Check water outlet vent hole to make sure it is clear of dirt and debris.
5. Check air-inlet silencer and make sure it is clean and free of dirt and debris.
WEEKLY MAINTENANCE1. Clean the collection cup and neck of organic build up.
2. Clean or replace the round bubble diffuser sponge .
MONTHLY MAINTENANCE (6.0)
1. Remove venturi air inlet from water inlet.
2. Unscrew water inlet from pump.
3. Remove four thumbscrews from main body.
4. Separate skimmer body from base.
5. Clean pump and bubble diffusing plate.
6. Replace components.
TROUBLESHOOTINGNOTE: Variables that affect skimming to produce dry or wet foam are:
a. New Fish or Invertebrates
b. Frequent Feeding
c. Change in Water Chemistry
d. Supplements and Medication
e. Water Quality
f. Water Fluctuations/Evaporation
g. Addition of “Make-up” Water
h. Water Changes
i. Maintenance
j. Inserting hands in the tank
1. No microbubbles produced inside the skimmer.
a. The Air-Inlet Silencer, Air Intake Tubing or Venturi Air Inlet Hole are clogged.
b. Pump is not plugged in.
2. No foam produced inside Collection Cup.
a. Adjust water level inside the skimmer.
b. New skimmer may take up to 72 hours to adjust properly to aquarium system.
3. Water pump is not working.
a. Check to make sure power is supplied.
NOTE: Make sure to follow manufacturer instructions for component’s proper installation, operation and maintenance.
4. Skimmer water level fluctuates (pulses).
a. The Output Tubing Air Vent Hole is clogged causing the skimmer to create a siphon.
5. Water is rapidly overflowing into Collection Cup.
a. Reduce water level in the skimmer. Water level may be too high.
b. Make sure water is flowing through output tubing. Bubble production diffuser may be clogged, blocking water flow.
c. Changes in water chemistry. Readjust Water-Level Adjustment Dial to lower water level in skimmer.
d. Open Air Inlet Valves. Airflow may be restricted.
MAINTENANCE DETAIL 6.0
6
Venturi Air Inlet
Thumbscrews
Skimmer Body
Water Pump
Bubble Diffusing Plate
12 Month Limited WarrantyWHAT THE WARRANTY COVERS:
Central Aquatics (Company) warrants this Coralife product (see Exclusions below) to the original purchaser against defective material and workmanship that occurs during normal in-home use for 12 months from date of purchase. Company will, at Company’s option, either repair or replace same without charge (but no cash refunds will be made). This warranty is limited to replacement or repair of product only and does not cover loss of aquarium life, personal injury, property loss, or damage arising from the use of the product. You must retain original proof of purchase to validate this warranty.
EXCLUSIONS:
1. Damage resulting from accident, misuse, abuse, lack of reasonable care, subjecting the product to any but the specified electrical service, other than the normal and ordinary use of the product, subjecting the product to abnormal working conditions or any other failure not resulting from defects in materials or workmanship.
2. Damage resulting from modification, tampering with or attempted repair by anyone other than the Company.
3. Transfer of product to someone other than the original consumer or purchaser.
WHAT YOU MUST DO TO ENFORCE WARRANTY:
Contact the Company by telephone: 888-255-4527
Contact the Company by email: [email protected]
Or contact the Company by writing: Central Aquatics 5401 West Oakwood Park Drive, Franklin, WI 53132 Attn.: Warranty
You must pay any postage, shipping charges, insurance costs and other expenses to return the product along with the original cash register receipt to Central Aquatics. However, if the necessary repairs are covered by the warranty, Company will pay the return shipping charges to any destination within the United States or Canada.
LIMITATION OF IMPLIED WARRANTIES AND EXCLUSION OF CERTAIN DAMAGES: THE COMPANY DISCLAIMS LIABILITY FOR INCIDENTAL AND CONSEQUENTIAL DAMAGES FOR BREACH OF ANY EXPRESS OR IMPLIED WARRANTY, INCLUDING ANY IMPLIED WARRANTY OF MERCHANTABILITY, WITH RESPECT TO THIS PRODUCT. THIS WRITING CONSTITUTES THE ENTIRE AGREEMENT OF THE PARTIES WITH RESPECT TO THE SUBJECT MATTER HEREOF; NO WAIVER OR AMENDMENT SHALL BE VALID UNLESS IN WRITING SIGNED BY THE COMPANY.
Some states do not allow the exclusion or limitation of consequential damages, so the above limitation or exclusion may not apply to you.
7