CH 1627 Centec Hinged Frameless Door Installation GuideCentec Hinged Frameless Door Installation...
8
CH 1627 Centec Hinged Frameless Door Installation Guide
Transcript of CH 1627 Centec Hinged Frameless Door Installation GuideCentec Hinged Frameless Door Installation...
CH 1627 Centec Hinged Frameless Door Installation Guide
4
5
15
13
128
9
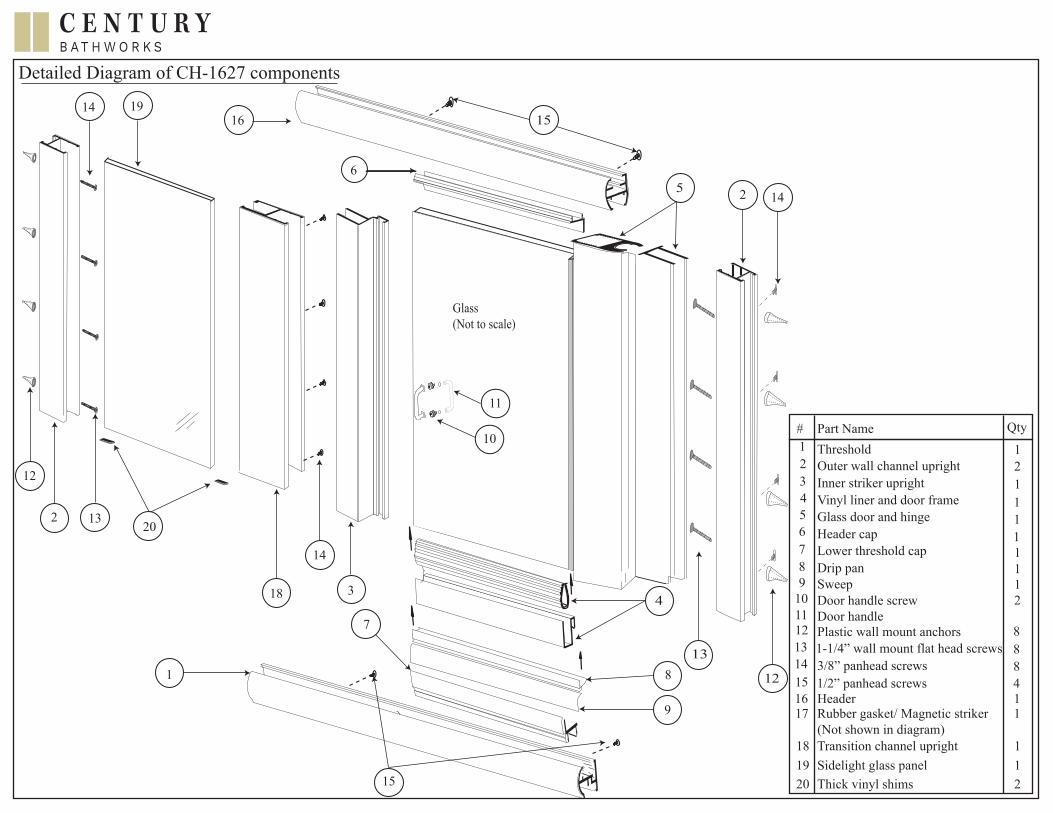
ThresholdOuter wall channel uprightInner striker uprightVinyl liner and door frameGlass door and hingeHeader capLower threshold capDrip panSweepDoor handle screwDoor handlePlastic wall mount anchors1-1/4” wall mount flat head screws3/8” panhead screws1/2” panhead screwsHeader
Part Name Qty
Detailed Diagram of CH-1627 components
1
16
16
1514
14 19
1312111098765432
#
1
111
11
12
21
1
88
2
48
14
6
2
1
7
3
13
18
2
12
Glass(Not to scale)
17 Rubber gasket/ Magnetic striker(Not shown in diagram)
1
11
181920
20
14
Transition channel uprightSidelight glass panelThick vinyl shims15
10
11
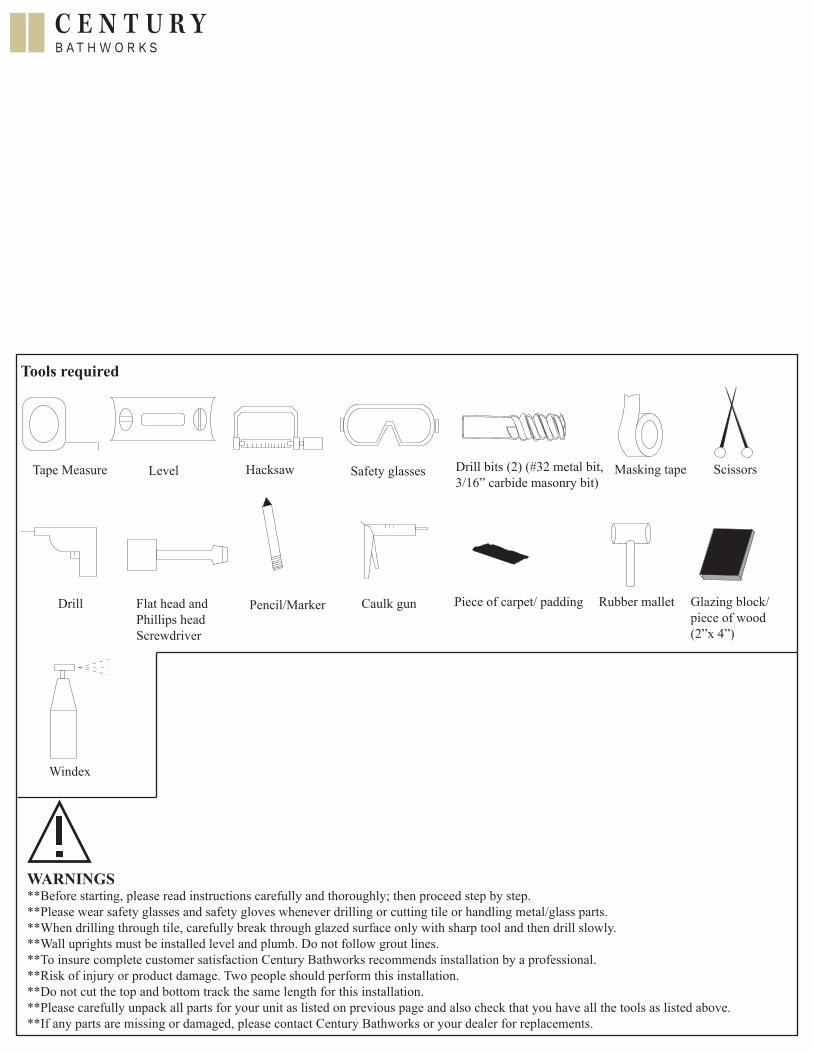
WARNINGS**Before starting, please read instructions carefully and thoroughly; then proceed step by step.**Please wear safety glasses and safety gloves whenever drilling or cutting tile or handling metal/glass parts.**When drilling through tile, carefully break through glazed surface only with sharp tool and then drill slowly.**Wall uprights must be installed level and plumb. Do not follow grout lines.**To insure complete customer satisfaction Century Bathworks recommends installation by a professional.**Risk of injury or product damage. Two people should perform this installation.**Do not cut the top and bottom track the same length for this installation.**Please carefully unpack all parts for your unit as listed on previous page and also check that you have all the tools as listed above.**If any parts are missing or damaged, please contact Century Bathworks or your dealer for replacements.
Piece of carpet/ padding
Safety glasses
Caulk gunPencil/MarkerFlat head and Phillips head Screwdriver
Drill
Level Hacksaw
Tools required
Tape Measure Drill bits (2) (#32 metal bit,3/16” carbide masonry bit)
Masking tape
Rubber mallet
Scissors
Glazing block/piece of wood(2”x 4”)
Windex
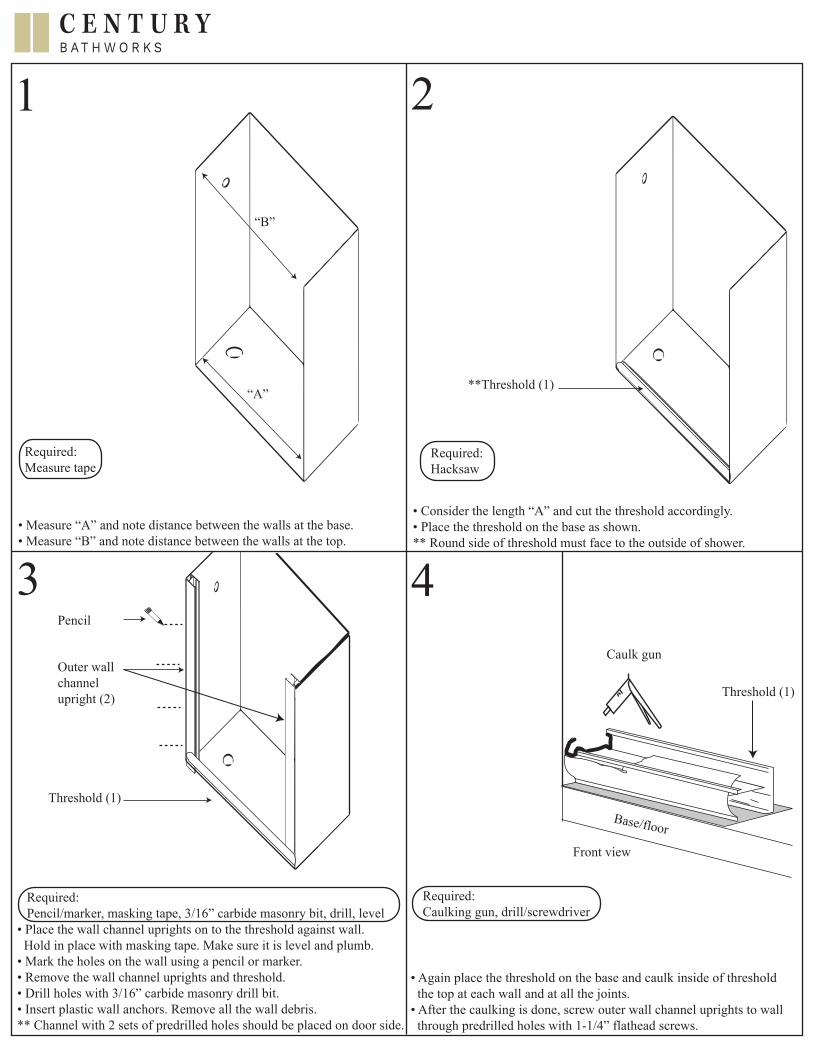
• Place the wall channel uprights on to the threshold against wall. Hold in place with masking tape. Make sure it is level and plumb.• Mark the holes on the wall using a pencil or marker.• Remove the wall channel uprights and threshold.• Drill holes with 3/16” carbide masonry drill bit.• Insert plastic wall anchors. Remove all the wall debris.** Channel with 2 sets of predrilled holes should be placed on door side.
• Again place the threshold on the base and caulk inside of threshold the top at each wall and at all the joints.• After the caulking is done, screw outer wall channel uprights to wall through predrilled holes with 1-1/4” flathead screws.
Required:Caulking gun, drill/screwdriver
Threshold (1)
Caulk gun
Base/floor
1 2
43• Measure “A” and note distance between the walls at the base. • Measure “B” and note distance between the walls at the top.
Required:Measure tape
“A”
“B”
• Consider the length “A” and cut the threshold accordingly.• Place the threshold on the base as shown.** Round side of threshold must face to the outside of shower.
Required:Hacksaw
**Threshold (1)
Front view
Required:Pencil/marker, masking tape, 3/16” carbide masonry bit, drill, level
Pencil
Outer wallchannel upright (2)
Threshold (1)
5 6
87
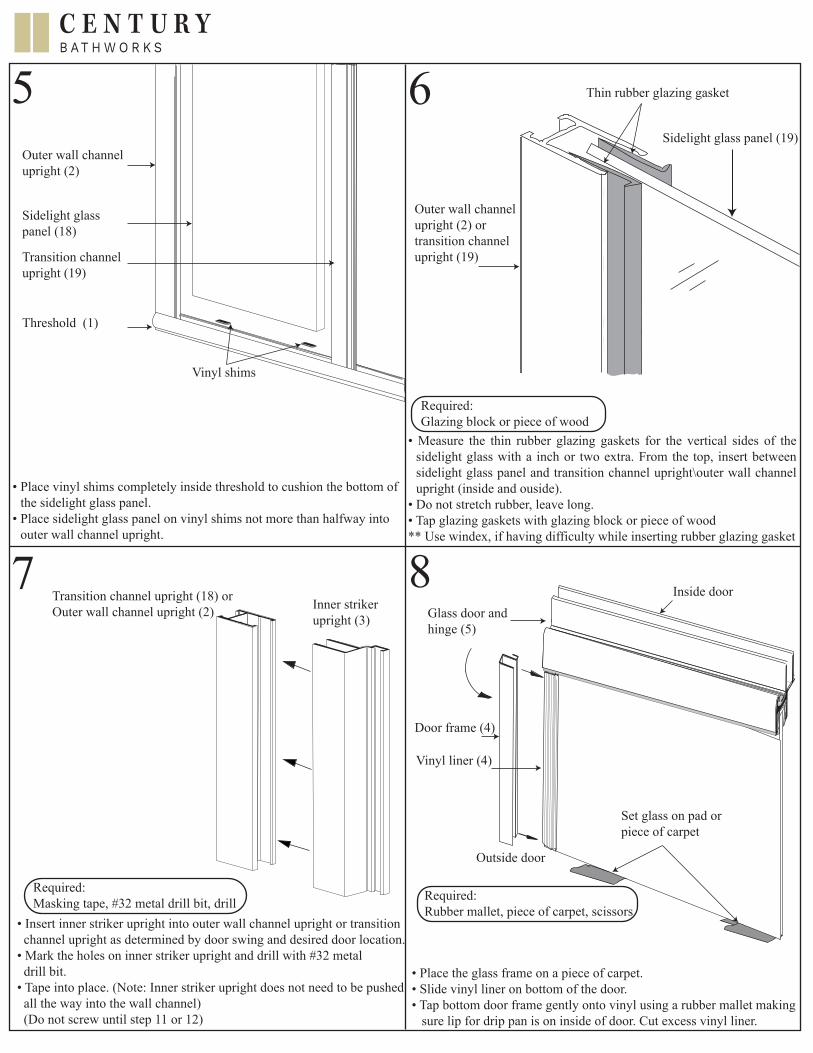
Outer wall channel upright (2)
Sidelight glasspanel (18)
Transition channel upright (19)
Threshold (1)
Vinyl shims
Transition channel upright (18) or Outer wall channel upright (2) Inner striker
upright (3)
Required: Masking tape, #32 metal drill bit, drill
• Insert inner striker upright into outer wall channel upright or transition channel upright as determined by door swing and desired door location. • Mark the holes on inner striker upright and drill with #32 metal drill bit. • Tape into place. (Note: Inner striker upright does not need to be pushed all the way into the wall channel) (Do not screw until step 11 or 12)
Required:Rubber mallet, piece of carpet, scissors
Set glass on pad orpiece of carpet
• Place the glass frame on a piece of carpet.• Slide vinyl liner on bottom of the door.• Tap bottom door frame gently onto vinyl using a rubber mallet making sure lip for drip pan is on inside of door. Cut excess vinyl liner.
Door frame (4)
Vinyl liner (4)
Glass door and hinge (5)
Outer wall channel upright (2) or transition channel upright (19)
Sidelight glass panel (19)
Required: Glazing block or piece of wood
Thin rubber glazing gasket
Outside door
Inside door
• Place vinyl shims completely inside threshold to cushion the bottom of the sidelight glass panel.
• Place sidelight glass panel on vinyl shims not more than halfway into outer wall channel upright.
• Measure the thin rubber glazing gaskets for the vertical sides of the sidelight glass with a inch or two extra. From the top, insert between sidelight glass panel and transition channel upright\outer wall channel upright (inside and ouside).
• Do not stretch rubber, leave long.• Tap glazing gaskets with glazing block or piece of wood ** Use windex, if having difficulty while inserting rubber glazing gasket
9 10
1211
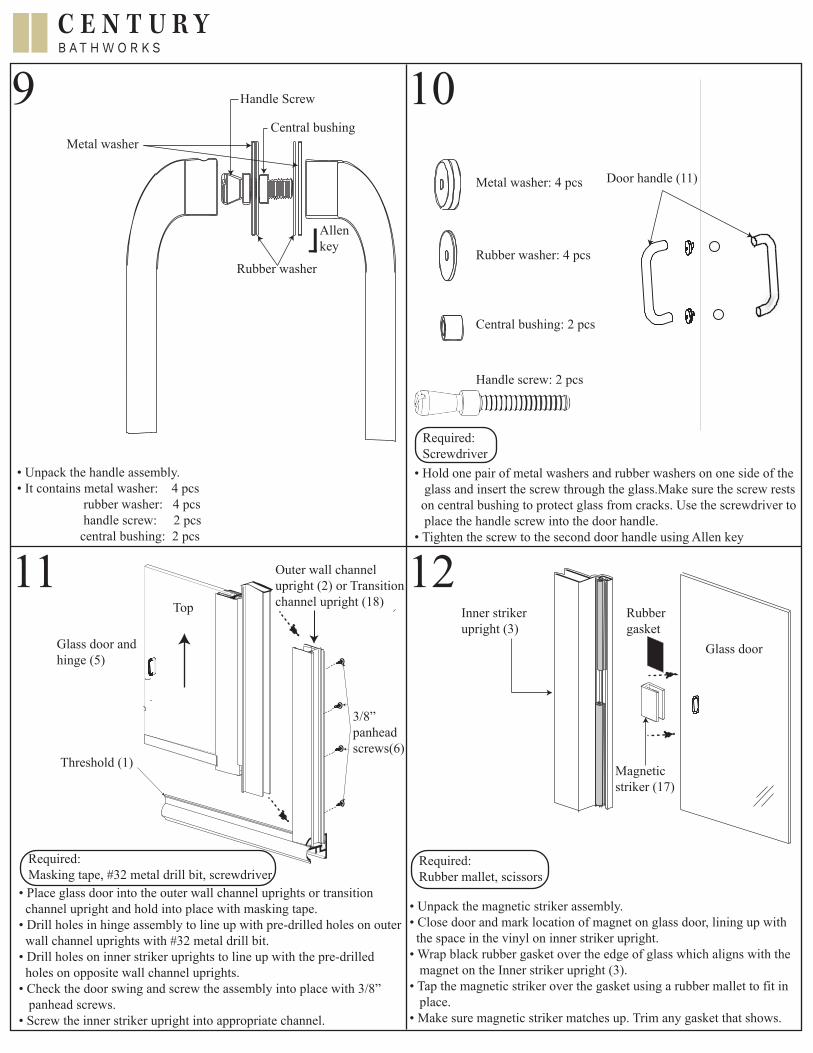
• Unpack the handle assembly. • It contains metal washer: 4 pcs rubber washer: 4 pcs handle screw: 2 pcs central bushing: 2 pcs
• Hold one pair of metal washers and rubber washers on one side of the glass and insert the screw through the glass.Make sure the screw rests on central bushing to protect glass from cracks. Use the screwdriver to place the handle screw into the door handle.• Tighten the screw to the second door handle using Allen key
Door handle (11)
Required:Screwdriver
Metal washer: 4 pcs
Rubber washer: 4 pcs
Central bushing: 2 pcs
Handle screw: 2 pcs
Allenkey
Central bushing
Rubber washer
Handle Screw
Metal washer
Glass door andhinge (5)
Outer wall channel upright (2) or Transition channel upright (18)
Required:Masking tape, #32 metal drill bit, screwdriver
• Place glass door into the outer wall channel uprights or transition channel upright and hold into place with masking tape.• Drill holes in hinge assembly to line up with pre-drilled holes on outer wall channel uprights with #32 metal drill bit.• Drill holes on inner striker uprights to line up with the pre-drilled holes on opposite wall channel uprights.• Check the door swing and screw the assembly into place with 3/8” panhead screws.• Screw the inner striker upright into appropriate channel.
Top
3/8”panheadscrews(6)
Threshold (1)
Required:Rubber mallet, scissors
Glass door
Inner striker upright (3)
Magneticstriker (17)
• Unpack the magnetic striker assembly.• Close door and mark location of magnet on glass door, lining up with the space in the vinyl on inner striker upright. • Wrap black rubber gasket over the edge of glass which aligns with the magnet on the Inner striker upright (3).• Tap the magnetic striker over the gasket using a rubber mallet to fit in place.• Make sure magnetic striker matches up. Trim any gasket that shows.
Rubber gasket
13
14
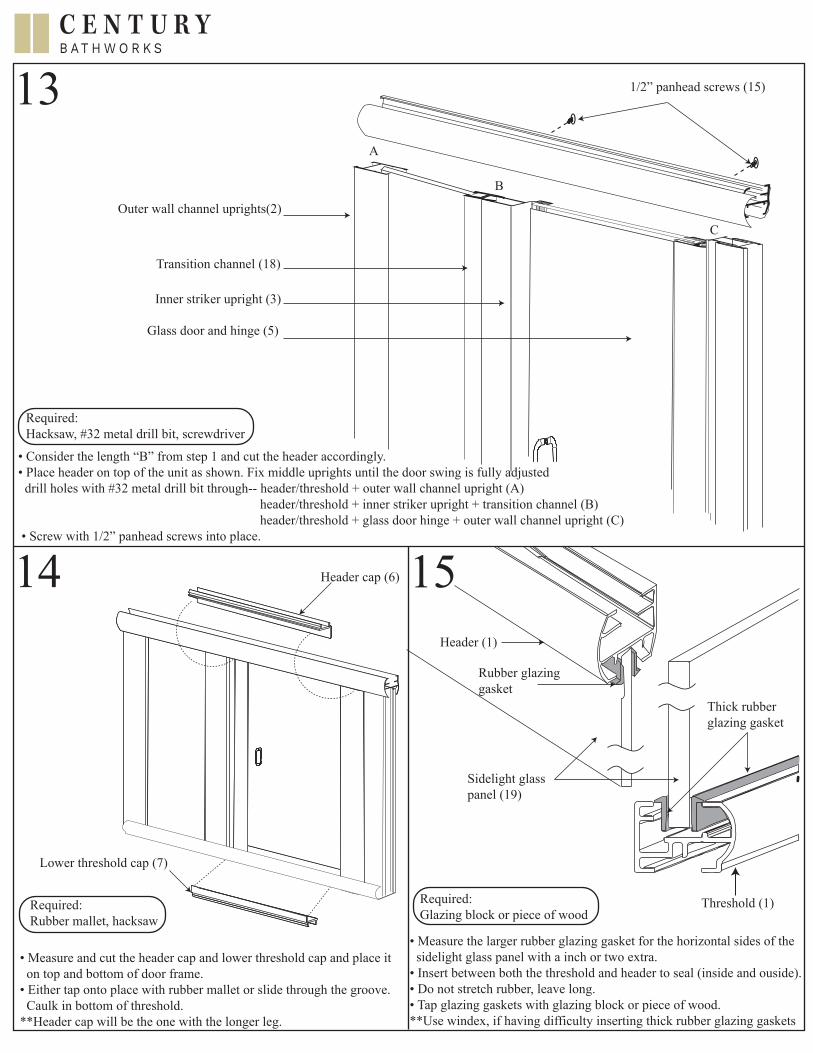
Required:Hacksaw, #32 metal drill bit, screwdriver
• Consider the length “B” from step 1 and cut the header accordingly. • Place header on top of the unit as shown. Fix middle uprights until the door swing is fully adjusted drill holes with #32 metal drill bit through-- header/threshold + outer wall channel upright (A) header/threshold + inner striker upright + transition channel (B) header/threshold + glass door hinge + outer wall channel upright (C) • Screw with 1/2” panhead screws into place.
1/2” panhead screws (15)
Outer wall channel uprights(2)
Transition channel (18)
Inner striker upright (3)
Glass door and hinge (5)
Required:Rubber mallet, hacksaw
Required:Glazing block or piece of wood
• Measure and cut the header cap and lower threshold cap and place it on top and bottom of door frame.• Either tap onto place with rubber mallet or slide through the groove. Caulk in bottom of threshold.**Header cap will be the one with the longer leg.
Header cap (6)
Lower threshold cap (7)
15
Threshold (1)
Thick rubber glazing gasket
Sidelight glasspanel (19)
Rubber glazing gasket
Header (1)
• Measure the larger rubber glazing gasket for the horizontal sides of the sidelight glass panel with a inch or two extra. • Insert between both the threshold and header to seal (inside and ouside).• Do not stretch rubber, leave long.• Tap glazing gaskets with glazing block or piece of wood. **Use windex, if having difficulty inserting thick rubber glazing gaskets
A
B
C
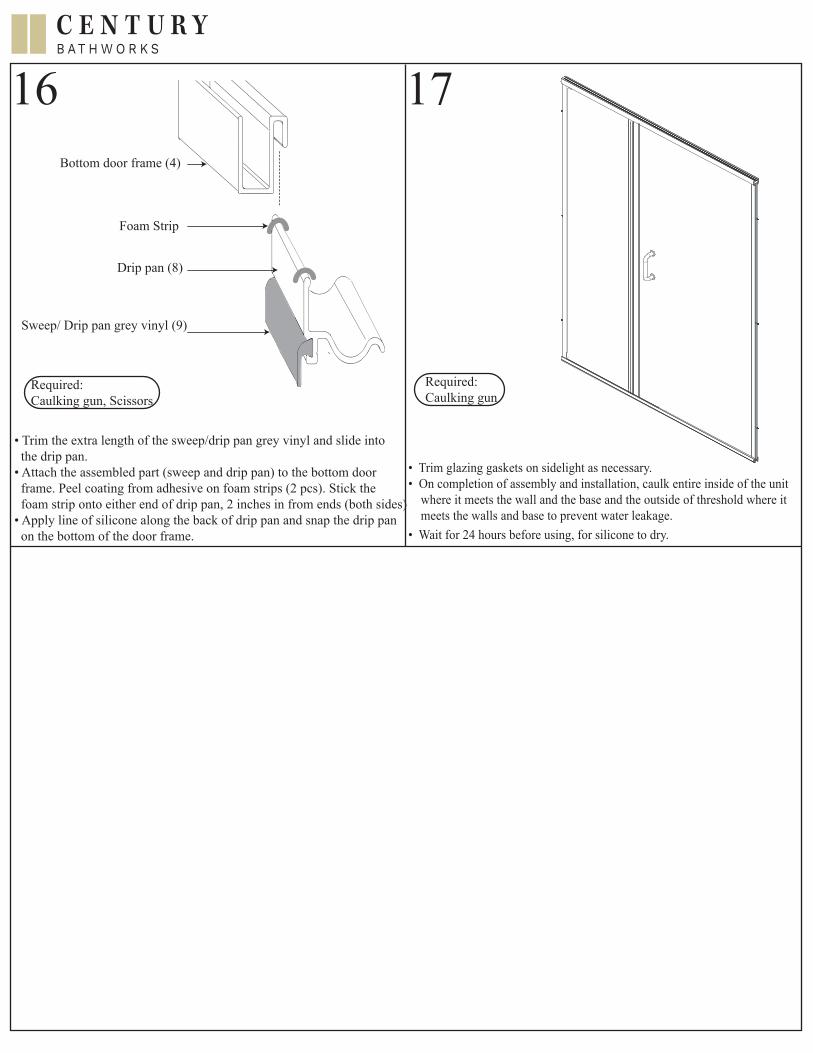
Required:Caulking gun, Scissors
• Trim the extra length of the sweep/drip pan grey vinyl and slide into the drip pan.• Attach the assembled part (sweep and drip pan) to the bottom door frame. Peel coating from adhesive on foam strips (2 pcs). Stick the foam strip onto either end of drip pan, 2 inches in from ends (both sides)• Apply line of silicone along the back of drip pan and snap the drip pan on the bottom of the door frame.
Bottom door frame (4)
Foam Strip
Drip pan (8)
Sweep/ Drip pan grey vinyl (9)
16 17
Required:Caulking gun
• Trim glazing gaskets on sidelight as necessary. • On completion of assembly and installation, caulk entire inside of the unit where it meets the wall and the base and the outside of threshold where it meets the walls and base to prevent water leakage.• Wait for 24 hours before using, for silicone to dry.