
CBSE Study Material Of EMPLOYBALITY CLASS X
192
1 CURRICULUM (X) 2019-20 CBSE Study Material Of EMPLOYBALITY CLASS X
Transcript of CBSE Study Material Of EMPLOYBALITY CLASS X

1 CURRICULUM (X) 2019-20
CBSE
Study Material
Of
EMPLOYBALITY
CLASS X

2 CURRICULUM (X) 2019-20
Acknowledgements
Content Developed By-
Communication Skill
Ms Kiran Bhatt , HOD English , Modern School
Ms Urmil Guliani, Teacher of English
Mrs Hemal Handoo, Principal , Hansraj Model School, Delhi
Self Management Skill
Dr Vinita Srivastiva , Assistant Professor, Jaipuria Institute of Management
Information & Communication Technology Skill by-
Mrs Hemal Handoo, Principal , Hansraj Model School, Delhi
Entrepreneurial Skill
Dr Neeta Agarwal, IGNOU
Green Skill
Dr Manta Mohan , Professor , Amity International Business School ,Amity University, Noida.

3 CURRICULUM (X) 2019-20
Part A
S.No Units Duration in
Periods
Marks
1. Unit 1: Communication Skills – II 13
10
2. Unit 2: Self-management Skills – II 07
3. Unit 3: Basic ICT Skills- II 13
4. Unit 4: Entrepreneurial Skills – II 10
5. Unit 5: Green Skills – II 07
Total 50

4 CURRICULUM (X) 2019-20
Unit 1: Communication Skills – II
Learning Outcome Theory (7 Periods ) Practical (5 Periods) Total Duration (12 Periods)
1. Demonstrate
knowledge of
various methods
of communication
1. Methods of
communication
A. Verbal
B. Non-verbal
C. Visual
1. Writing pros and
cons of written,
verbal and non-
verbal
communication
2. Listing do’s and
don’ts for avoiding
common body
language mistakes
2
2. Provide
descriptive and
specific feedback
1. Communication
cycle and
importance of
feedback
2. Meaning and
importance of
feedback
3. Descriptive
feedback - written
comments or
conversations
4. Specific and non-
specific feedback
1. Constructing
sentences for
providing
descriptive and
specific feedback
2
3. Apply measures
to overcome
barriers in
communication
1. Barriers to
effective
communication –
types and factors
2. Measures to
overcome
barriers in
effective
communication
1. Enlisting barriers
to effective
communication
2. Applying
measures to
overcome barriers
in communication
2
4. Apply principles of
communication
1. Principles of
effective
communication
2. Cs of effective
communication
1. Constructing
sentences that
convey all facts
required by the
receiver
2. Expressing in a
manner that shows
respect to the
receiver of the
2

5 CURRICULUM (X) 2019-20
message
3. Exercises and
games on applying
7Cs of
effective
communication
5. Demonstrate
basic writing skills
1. Writing skills to
the following:
Sentence
Phrase
Kinds of
Sentences
Parts of
Sentence
Parts of Speech
Articles
Construction of a
Paragraph
1. Demonstration
and practice of
writing sentences
and paragraphs
on topics related
to the subject 5
Total 13

6 CURRICULUM (X) 2019-20
Unit 2: Self-management Skills – II
Learning Outcome Theory Practical Total Duration
Periods
1. Apply stress
management
techniques
1. Meaning and
importance of
stress
management
2. Stress
management
techniques –
physical
exercise, yoga,
meditation
3. Enjoying, going
to vacations and
holidays with
family and
friends
4. Taking nature
walks
1. Exercises on stress
management
techniques – yoga,
meditation, physical
exercises
2. Preparing a write-up
on an essay on
experiences during a
holiday trip 4
2. Demonstrate the
ability to work
independently
1. Importance of
the ability to
work
independently
2. Describe the
types of self-
awareness
3. Describe the
meaning of self-
motivation and
self- regulation
1. Demonstration on
working
independently goals
2. Planning of an activity
3. Executing tasks in a
specific period, with
no help or directives
4. Demonstration on the
qualities required for
Working
independently
3
Total 7

7 CURRICULUM (X) 2019-20
Unit 3: Information and Communication Technology Skills– II
Learning Outcome Theory ( Period) Practical ( Period) Total Duration (13 Periods)
1. Distinguish between
different operating
systems
1. Classes of
operating systems
2. Menu, icons and
task bar on the
desktop
3. File concept, file
operations, file
organization,
directory structures,
and file- system
structures
4. Creating and
managing files and
folders
1. Identification of task
bar, icons, menu, etc.
2. Demonstration and
practicing of creating,
renaming and deleting
files and folders,
saving files in folders
and sub- folders,
restoring files and
folders from recycle
bin
6
2. Apply basic skills for
care and maintenance
of computer
1. Importance and
need of care and
maintenance of
computer
Cleaning
computer
components
Preparing
maintenance
schedule
Protecting
computer against
viruses
Scanning and
cleaning viruses
and removing
SPAM files,
temporary
files and folders
1. Demonstration of the
procedures to be
followed for cleaning,
care and maintenance
of hardware and
software
7
Total 13

8 CURRICULUM (X) 2019-20
Unit 4: Entrepreneurial Skills – II
Learning Outcome Theory ( Periods) Practical ( Periods) Total Duration (10 Periods)
1. List the characteristics
of successful
entrepreneur
1. Entrepreneurship
and society
2. Qualities and
functions of an
entrepreneur
3. Role and
importance of an
entrepreneur
4. Myth about
entrepreneurship
5. Entrepreneurship
as a career option
1. Writing a note on
entrepreneurship as
career option
2. Collecting success
stories of first
generation and local
entrepreneurs
3. Listing the
entrepreneurial
qualities analysis of
strength and
weaknesses
4. Group discussion of
self- qualities that
students feel are
needed to become
successful
entrepreneur
5. Collect information
and related data for a
business
6. Make a plan in team
for setting up a
business
10
Total 10
9 CURRICULUM (X) 2019-20
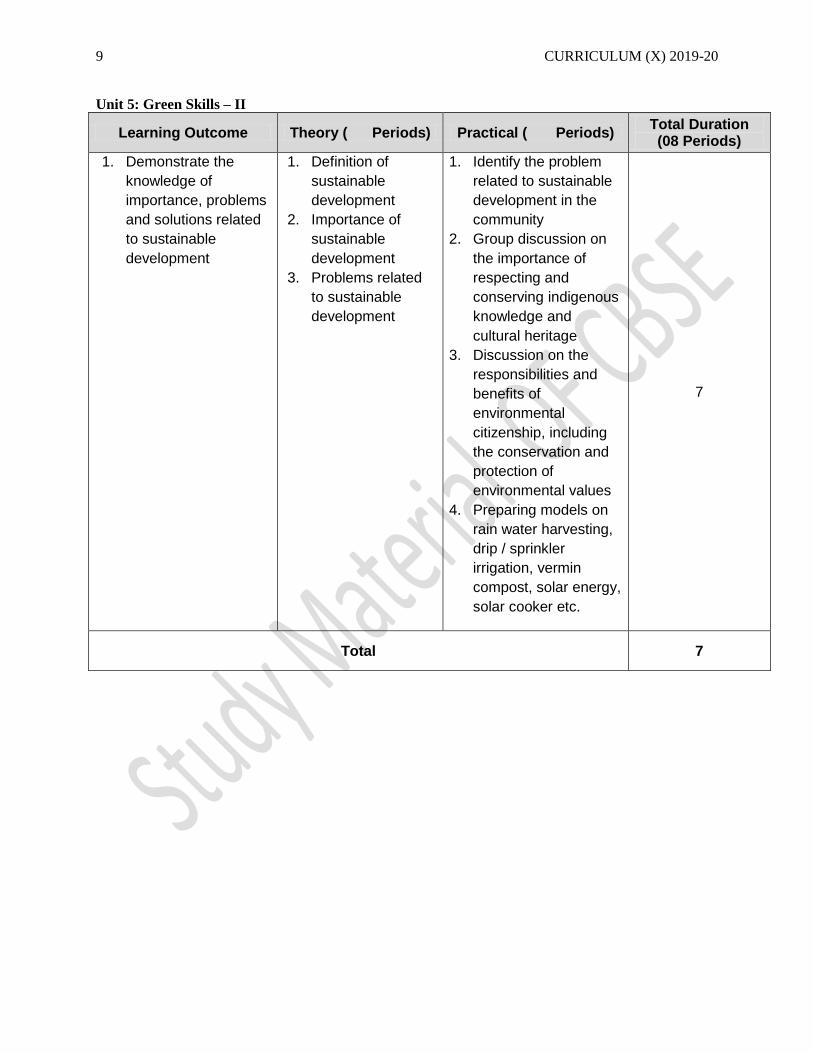
Unit 5: Green Skills – II
Learning Outcome Theory ( Periods) Practical ( Periods) Total Duration (08 Periods)
1. Demonstrate the
knowledge of
importance, problems
and solutions related
to sustainable
development
1. Definition of
sustainable
development
2. Importance of
sustainable
development
3. Problems related
to sustainable
development
1. Identify the problem
related to sustainable
development in the
community
2. Group discussion on
the importance of
respecting and
conserving indigenous
knowledge and
cultural heritage
3. Discussion on the
responsibilities and
benefits of
environmental
citizenship, including
the conservation and
protection of
environmental values
4. Preparing models on
rain water harvesting,
drip / sprinkler
irrigation, vermin
compost, solar energy,
solar cooker etc.
7
Total 7

Communication skills
What is communication?
The imparting or exchanging of information by speaking,writing or
using some other medium and means of sending or receiving
information.
*The following figure represents types of communication
(Fig 1)
Learning objectives of Effective communication
1. Development of Interpersonal Skills
2. To express effectively & with maximum efficiency
What is Writing?
Writing is a form of communication that allows students to put their
feelings and ideas on paper, to organize their knowledge and beliefs into

convincing arguments, and to convey meaning through well-constructed
text. In its most advanced form, written expression can be as vivid as a work
of art.
Grade 10
1.Phrases- Phrases are a group of words that work together to communicate
an element of speech.
The following figure represents the differet types of phrases
Fig 2
The following link further explains use of phrases in communicating better and
with much ease.
https://youtu.be/YbLUN_1YX2k
Activity 1 ( Writing skills)
The following activity may help the students to strengthen the concept further:
Description
Write phrases on both sides of the card or the paper. Show them only one side
and ask them to guess the back side.
*To further build up the concept, few worksheets will be given to check how
much they have learnt . One of the example is listed below

Identify the phrase type:
1..Houses are [unbelievably expensive] just now.
Adjective Phrase Adverb Phrase Noun Phrase Prepositonal Phrase Verb Phrase
2. We [met Paul] last week Adjective Phrase Adverb Phrase Noun Phrase Prepositonal Phrase Verb Phrase
3. 3. [A car that won't go] is not particularly useful
Adjective Phrase Adverb Phrase Noun Phrase Prepositonal Phrase Verb Phrase
4.. I enjoy eating [in Indian restaurants] Adjective Phrase Adverb Phrase Noun Phrase Prepositonal Phrase Verb Phrase
5. . Don't you have to leave [early]? Adjective Phrase Adverb Phrase Noun Phrase Prepositonal Phrase Verb Phrase
6. Tell [him] not to worry. Adjective Phrase Adverb Phrase Noun Phrase Prepositonal Phrase Verb Phrase
2.Kinds of sentences
What is a sentence?
A set of words that is complete in itself, typically containing a subject and
predicate, conveying a statement, question, exclamation, or command, and
consisting of a main clause and sometimes one or more subordinate clauses.

The above figure represents 4 types of sentences
The following link will further help to build up the concept)
(https://www.youtube.com/watch?v=IuDSRs_lZBk)
Activity 2
Whole-Group Game: Four Corners
Instructions
1. Hang the sentence banners in each corner of the classroom.
2. Students choose a corner in which to stand.
3. Teacher reads a sentence.
4. If students think it is the sentence type designated by their corner, they sit
down.
5. If students are wrong (they stand up in the wrong corner/don’t stand up in
the correct corner), they are out of the game!
6. Students who are correct get a punctuation badge (sticker).
7. Teacher reads 10 sentences. The student with the most stickers is the
Sentence Champ!

Name: ________________________ Date: ______________ Identifying Four Kinds of Sentences Worksheet
Directions: Read each sentence and add the correct punctuation mark. Then, label it; imperative, declarative, interrogative or exclamatory. How well she sings! 2. What is your name? 3. Did I say anything to make you angry? 4. What is your name? 5. Who told you this? 6. She is a successful writer. 7. It is raining cats and dogs. 8. I want to become a writer. 9. She does not eat meat or fish. 10. Go at once. 11. Bring me that file. 12. My mother makes delicious cookies. 3. Get lost. 14. Fetch me a glass of water. 15. Please be seated. 16. Sit down.
There are four kinds of sentences in the English language. 1. Imperative- gives a command (.) 2. Declarative- makes a statement (.) 3. Interrogative- asks a question (?) 4. Exclamatory- expresses strong feeling (!)
17. She writes with her left hand. 18. What a tragedy! 19. How beautiful she is! 20. I have two sisters. 21. How ridiculous this is! 22. I have lost my way.
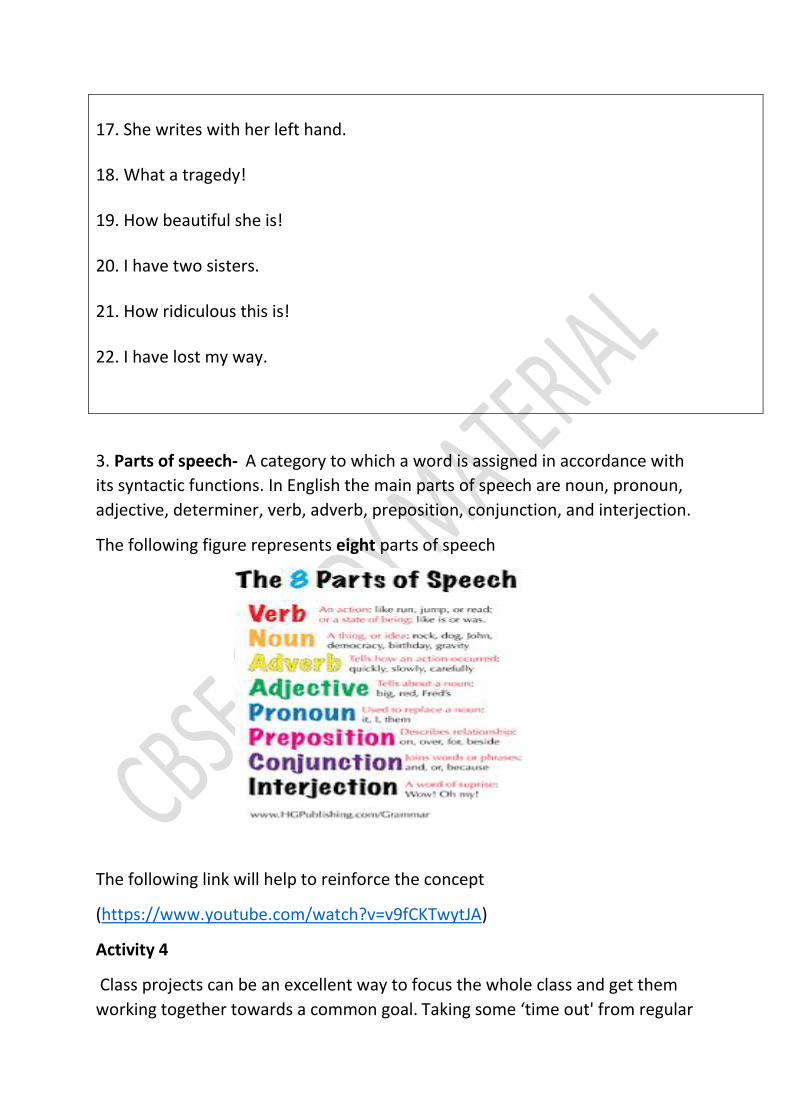
3. Parts of speech- A category to which a word is assigned in accordance with
its syntactic functions. In English the main parts of speech are noun, pronoun,
adjective, determiner, verb, adverb, preposition, conjunction, and interjection.
The following figure represents eight parts of speech
The following link will help to reinforce the concept
(https://www.youtube.com/watch?v=v9fCKTwytJA)
Activity 4
Class projects can be an excellent way to focus the whole class and get them
working together towards a common goal. Taking some ‘time out' from regular

classes and doing something completely different can really help group
dynamics and you may also give quieter or less able students a chance to
shine. Making a class magazine is a project that will appeal to most groups as it
allows individuals to work on what interests them. Starting a project from
scratch can seem a little daunting to begin with so here's a simple step-by-step
guide on how to make a class magazine.
Planning
*Bring in some magazines. Let the students have a look through them. The
teacher will a class survey on magazines at this stage or simply converse with
the class about the type of magazines they like.
*On the board. brainstorm the different sections that magazines have. Try to
include as much variety as possible so there's something for everyone.
(Horoscopes, sports pages, film reviews, cinema news, fashion, photo stories,
comic strips, puzzles, technology pages, music, interviews with famous people,
recipes, jokes, problem pages etc. etc.)
Making a class magazine should be an enjoyable experience for the students
.This will improve their writing skills and simultaneously help them to express
and know each other better.
Article writing
Article writing is the process of creating a non-fiction text about current or
recent news, items of general interest or specific topics.
The following figure represents the format of Article writing
* Figure 5

The following link will help to build up the concept
https://youtu.be/q2197KT1iNE?list=RDQMaJwsUDCsYv4
Activity 5
Doing surveys can be a useful way of getting your students to interact, produce
question forms and collect and analyse real information.
This survey has been designed for younger learners and is based on the theme
of school subjects.
Preparation
One class is going to survey a different class that they don't know. It’s a good
idea to choose a group who have a higher level than your own group as this
avoids misunderstandings in the survey. Examples of few questions which can
be asked are listed below
1) What’s your favourite subject?
2) What’s your worst subject?
3) What’s the most important school subject?

After a brief discussion,students will write an article highlighting the problems
students are facing in different subjects and remedial measures on the same.
This activity gives them the chance to practise target language in context and it
also prepares them for the survey with students they may not know.
5. Construction of the Paragraph
What is a paragraph?
A paragraph is a series of sentences that are organized and coherent, and
are all related to a single topic.

Activity – A perfect story
This activity leads students into writing a short story using the past simple,
present perfect simple and continuous, but in a more creative way.This activity
aims to help students to recognise their own problems with paragraph
construction and to identify errors, which improves their own re-drafting skills.
1.The students they are going to write a short story.
2.The students will read the following questions and decide, with a partner,
what the missing words are, but not answer the questions . What is his / her
name?
a) What is __________ about them? (e.g. strange / unusual / nice...)
b) What was their --problem last year?
c)What happened?
d) Why have they become so __________ ?
e) How many __________ have they -__________ ?
f) Who have they been __________ recently?
g) What have they been __________ for the last five years?
The students, working in pairs still, have to answer the questions. The answers
should link the questions together to form the basis of a story. Students can
draw their characters. This is fun and brings the character to life. Students can
laugh at each other's drawings. Using the notes above, students put the story
together. This activity aims to help students to recognise their own problems
with paragraph( story) construction and to identify errors, which improves
their own re-drafting skills


Summary:
A classroom environment relies heavily on the quality of communication
taking place within it. As an instructor, taking steps towards improving the
communication skills of your students will contribute positively towards your
classroom climate. Students with effective communication skills will be more
likely to contribute to class discussions, will be more productive members in
group projects, and will ultimately gain more from their experience in the
class. Learning and practicing writing skills help students to handle professional
and social tensions.

References
: You tube
: British council Library

Communication Skills - Activity
Unit -1
Demonstrative knowledge of Various methods of Communication
1
CS 10 Worksheet 1 : Actions Speak larger than words!
Role Plays :
A
Note to teacher.Before Class:
Allot the 4 role plays to students in advance to prepare i.e before the class period.
Ask them to exaggerate the body language.Guide and help the pairs.
In class:
Ask pairs to role play the situations .
In plenary or after each role play elicitwhat is being expressed so eloquently by the body language.
Post Each Role Play Ask class to describe what Student B was thinking and feeling; what message was he/she sending. Ask for specific “clues” based on what
Student B did with body ,face, hands etc.
Role Play 1[A1]:
Student A:Tell your partner aaallll about your family.
Student B You are getting bored. Tap your foot. Look around, fidget, look from side to side, avoid eye contact.
Role Play 2
Student A: Tell your partner what happens in your favorite movie
Student B Lean forward, keep still ,be comfortable ,have eye contact, and nod.
Role Play 3
Student A: Make a long list of excuses as to why you didn’t do your homework.
Student B You are the teacher. Put your hands on your hips, roll your eyes, shake your head, keep muscles tense, look angry.
Role Play 4
Student A: Ask student if he knows who has physically assaulted a class mate/or damaged the class furniture during interval.
Student B Sit hunched over, look
down, avoid eye contact, and fiddle with something-belt etc
Positive Body Language Negative Body Language
Communication Skills - Activity
Unit -1
Demonstrative knowledge of Various methods of Communication
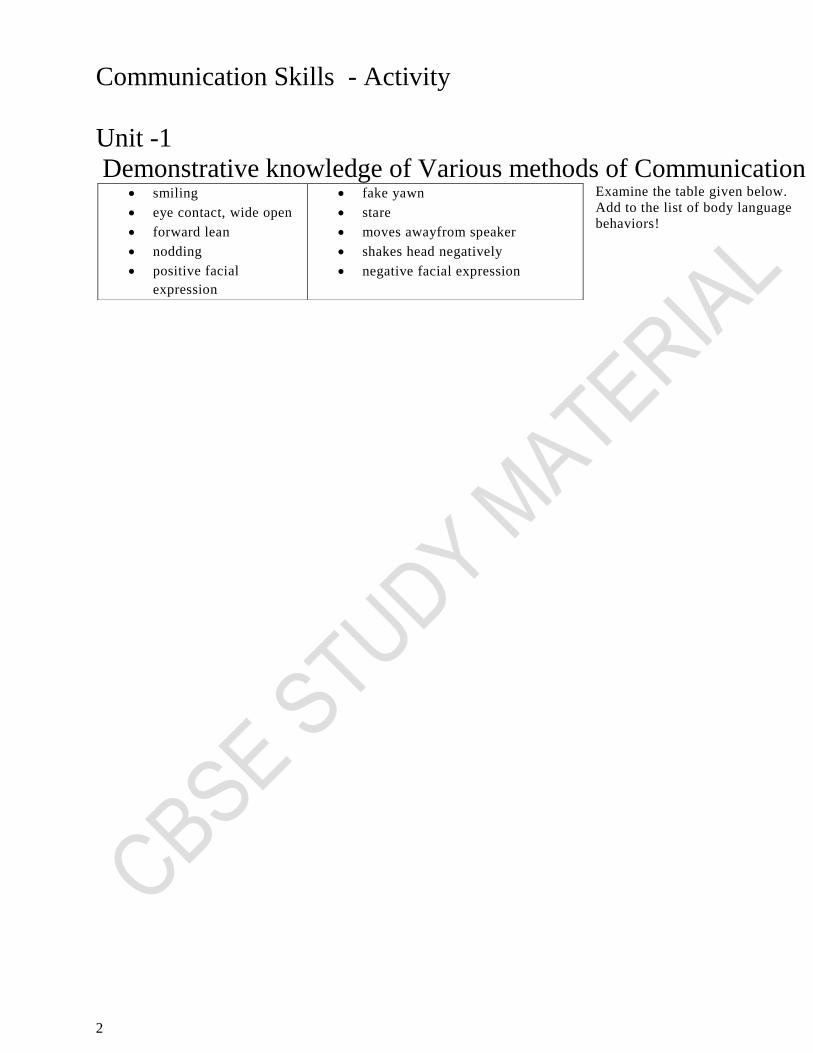
2
Examine the table given below.
Add to the list of body language
behaviors!
smiling
eye contact, wide open
forward lean
nodding
positive facial
expression
fake yawn
stare
moves awayfrom speaker
shakes head negatively
negative facial expression

Communication Skills - Activity
Unit -1
Demonstrative knowledge of Various methods of Communication
3
CS 10Worksheet 2 What’s Your Emotional Intelligence: How well do you read other people?
Adapted from Greater Good Magazine Berkeley
A Take the Quiz
1
This face is expressing...
1. Embarrassment
2. Fear
3. Sadness
4. Surprise
2
2. This face is expressing...
1. Shame
2. Anger
3. Sadness
4. Pain
Communication Skills - Activity
Unit -1
Demonstrative knowledge of Various methods of Communication
4
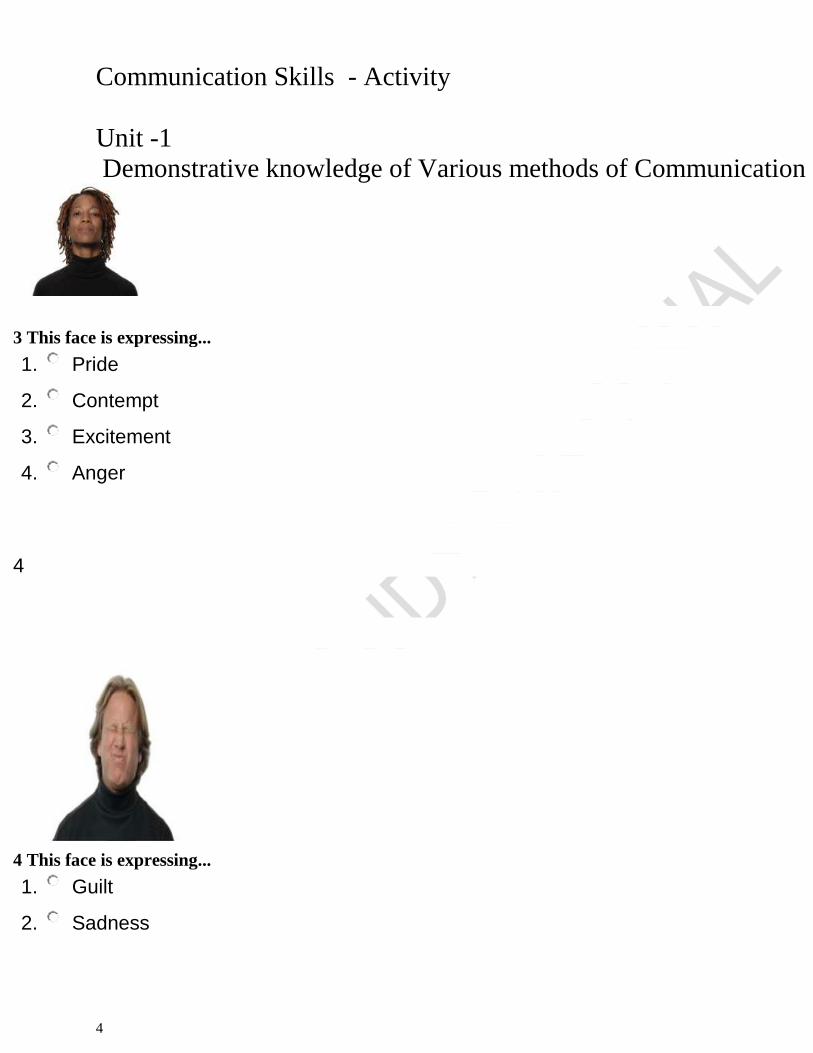
3 This face is expressing...
1. Pride
2. Contempt
3. Excitement
4. Anger
4
4 This face is expressing...
1. Guilt
2. Sadness

Communication Skills - Activity
Unit -1
Demonstrative knowledge of Various methods of Communication
5
3. Pain
4. Disgust

Communication Skills - Activity
Unit -1
Demonstrative knowledge of Various methods of Communication
6
5 This face is expressing...
1. Fear
2. Interest
3. Surprise
4. Compassion
6 This face is expressing...
1. Sadness
2. Shame
3. Disgust
4. Contempt
7This face is expressing...
1. Embarrassment
2. Sadness
3. Amusement
4. Shame

Communication Skills - Activity
Unit -1
Demonstrative knowledge of Various methods of Communication
7
8This face is expressing...
1. Happiness
2. Desire
3. Politeness
4. Compassion
9 This face is expressing...
1. Anger
2. Pain
3. Disgust
4. Sadness
10
10 This face is expressing...
1. Compassion
2. Sadness
3. Anger
4. Interest
Communication Skills - Activity
Unit -1
Demonstrative knowledge of Various methods of Communication
8
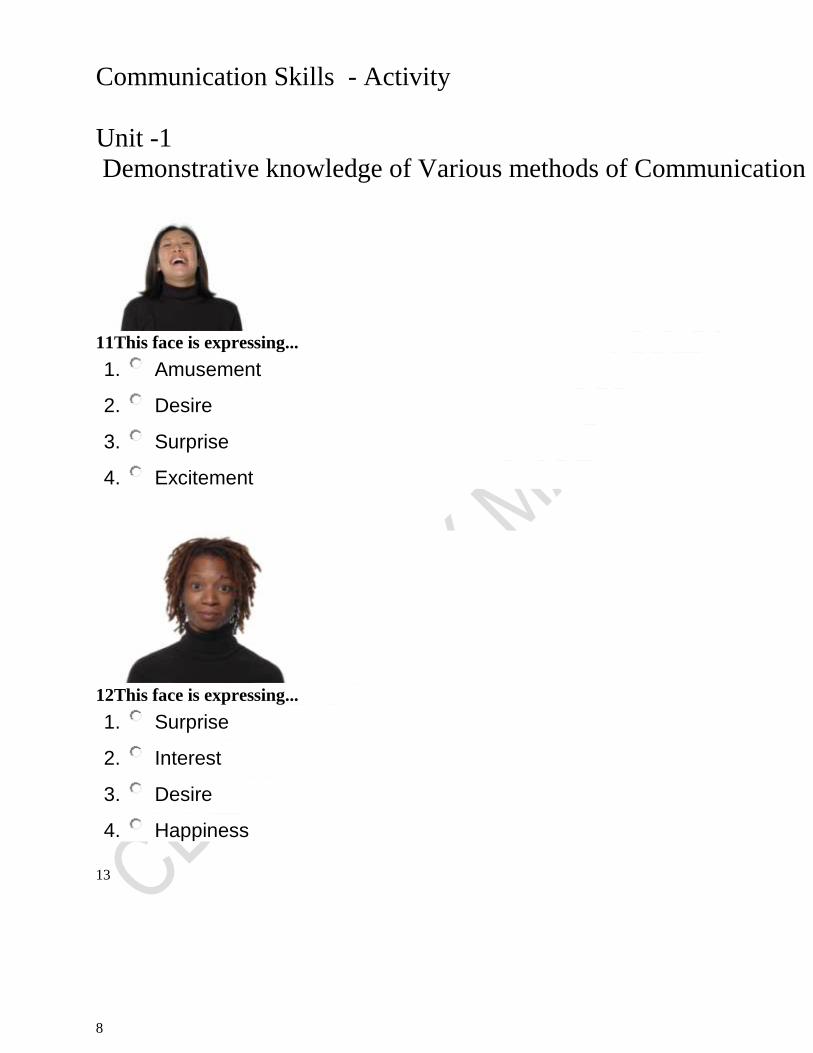
11This face is expressing...
1. Amusement
2. Desire
3. Surprise
4. Excitement
12This face is expressing...
1. Surprise
2. Interest
3. Desire
4. Happiness
13

Communication Skills - Activity
Unit -1
Demonstrative knowledge of Various methods of Communication
9
13This face is expressing...
1. Sadness
2. Shame
3. Disgust
4. Compassion
14 This face is expressing...
1. Sadness
2. Pride
3. Embarrassment
4. Shame

Communication Skills - Activity
Unit -1
Demonstrative knowledge of Various methods of Communication
10
15This face is expressing...
1. Flirtatiousness
2. Interest
3. Happiness
4. Politeness
16 This face is expressing...
1. Sadness
2. Pain
3. Anger
4. Disgust
Communication Skills - Activity
Unit -1
Demonstrative knowledge of Various methods of Communication
11
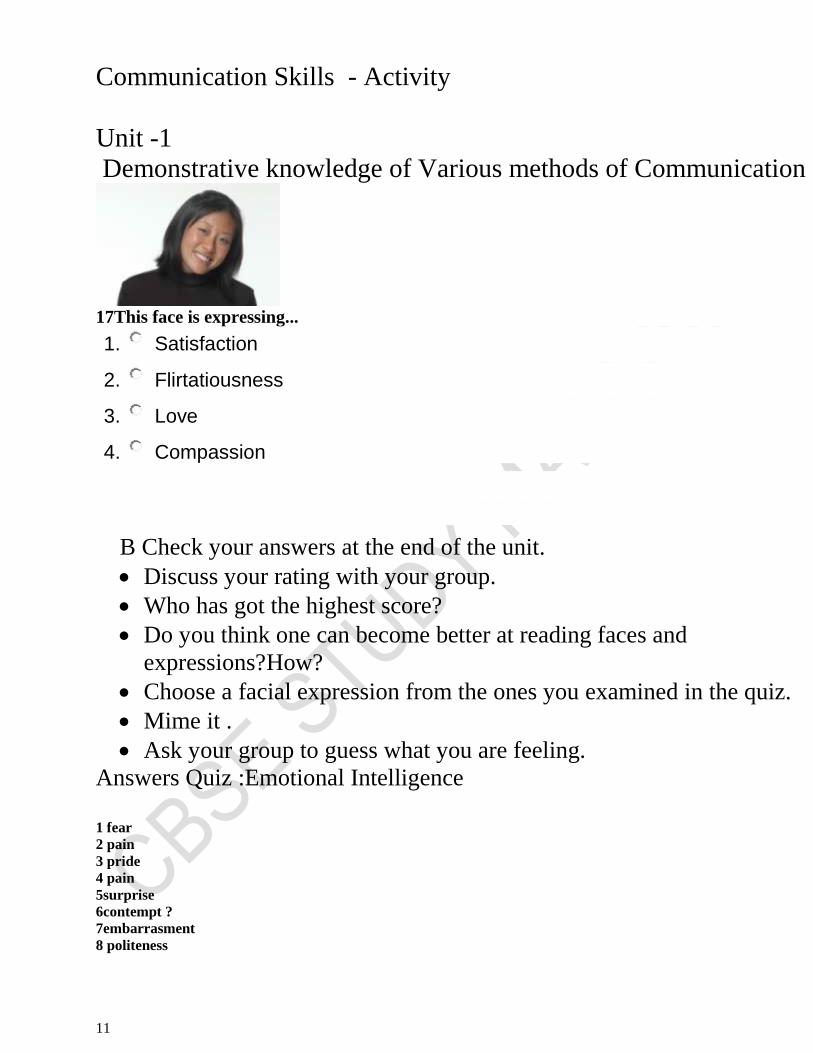
17This face is expressing...
1. Satisfaction
2. Flirtatiousness
3. Love
4. Compassion
B Check your answers at the end of the unit.
Discuss your rating with your group.
Who has got the highest score?
Do you think one can become better at reading faces and
expressions?How?
Choose a facial expression from the ones you examined in the quiz.
Mime it .
Ask your group to guess what you are feeling.
Answers Quiz :Emotional Intelligence
1 fear
2 pain
3 pride
4 pain
5surprise
6contempt ?
7embarrasment
8 politeness

Communication Skills - Activity
Unit -1
Demonstrative knowledge of Various methods of Communication
12
9 disgust
10 compassion
11amusement
12interest
13 sadness
14 shame
15happiness
16anger
17 love
C Look at the visuals of facial expressions below.
Learn more about how we form these expressions!
Discuss which expressions are desirable when you are with people.
Which expressions are undesirable when you are with people?
Choose a facial expression from the ones you examined in the quiz.
Mime it .
Ask your group to guess what you are feeling.

Communication Skills - Activity
Unit -1
Demonstrative knowledge of Various methods of Communication
13
1 Fear
Answer: Fear
We express fear when we feel threatened.
our eyes open wide open
our jaw drops
and the mouth hangs open.
2 Happiness
Submit Answ er
Submit Answ er

Communication Skills - Activity
Unit -1
Demonstrative knowledge of Various methods of Communication
14
3 Embarrassment
gaze is averted
head moved down to the side,
neck exposed.
4 Pride
5 surprise

Communication Skills - Activity
Unit -1
Demonstrative knowledge of Various methods of Communication
15
6 Contempt
7 Disgust

Communication Skills - Activity
Unit -1
Demonstrative knowledge of Various methods of Communication
16
8 Pain
Submit Answ er
9 Compassion

Communication Skills - Activity
Unit -1
Demonstrative knowledge of Various methods of Communication
17
10 Amusement
11 Interest

Communication Skills - Activity
Unit -1
Demonstrative knowledge of Various methods of Communication
18
12 Sadness

Communication Skills - Activity
Unit -1
Demonstrative knowledge of Various methods of Communication
19
13 Shame
14 Politeness

Communication Skills - Activity
Unit -1
Demonstrative knowledge of Various methods of Communication
20
15 Pain Submit Answ er
[A2]
Communication Skills - Activity
Unit -1
Demonstrative knowledge of Various methods of Communication
21
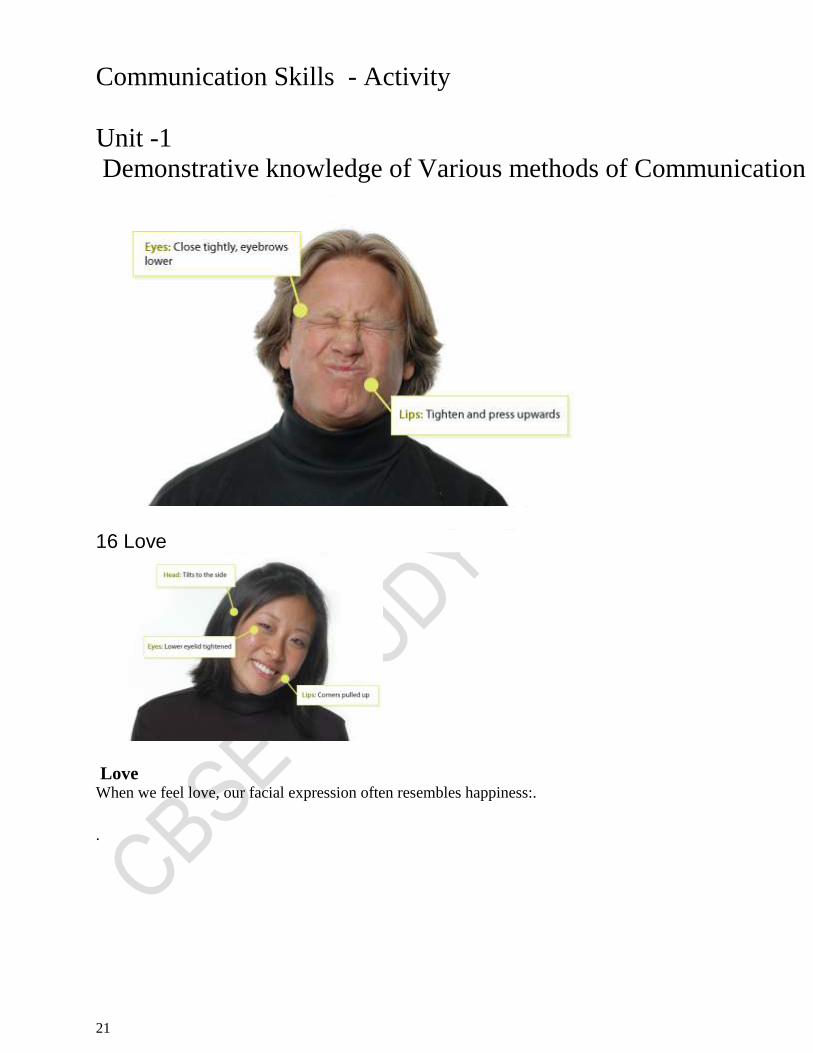
16 Love
Love When we feel love, our facial expression often resembles happiness:.
.

Communication Skills - Activity
Unit -1
Demonstrative knowledge of Various methods of Communication
22
CS 10 Worksheet 3
1.Examine the information given in Figure 1.
It shows the percentages allotted for the 3 elements of personal communication.
The 3 elements are :
a)spoken words
b)body language
c)voice and tone
2Try and guess what percentages each would have in order of importance?
Give reasons for your answers.
a)spoken words ----------%--
b)body language ----------%--
c)voice and tone ----------%--
3 Check the answer from the answers to Figure 1a and Figure 1b given at the end
of the unit.
4
Figure 1a
[A3][A4] Next check whether you were correct in your estimate of allotting percentages!

Communication Skills - Activity
Unit -1
Demonstrative knowledge of Various methods of Communication
23
Figure 1b
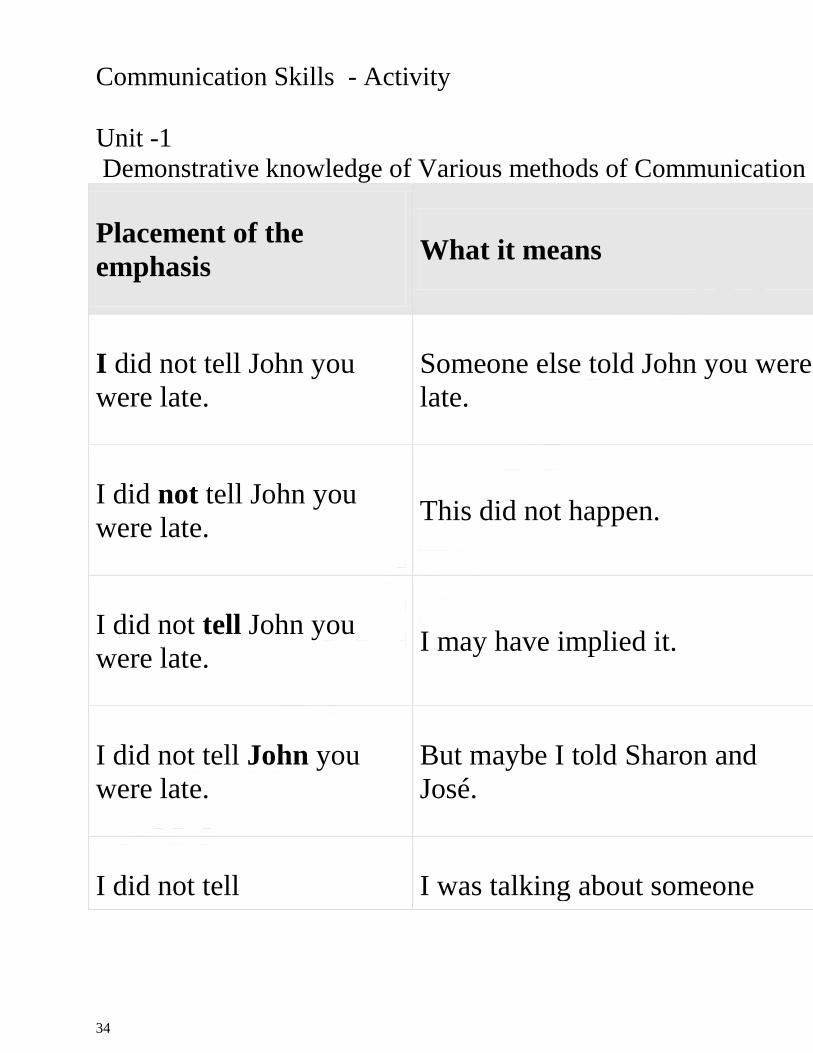
3 Notice how important voice and tone are in personal
communication.
a)Let us find out how to use our voice modulation ,tone and
word stress by doing the following activity. b)In pairs take turns and speak aloud the following
sentences.
c)The word that is in bold must be spoken with emphasis.
d) After each sentence discuss what you are trying to
communicate by using that particular tone and word
stress.The first one has been done for you.
e)Attempt all the sentence sin turns and write down what
each one means.
f) Finally check your answers given at the end of the unit.

Communication Skills - Activity
Unit -1
Demonstrative knowledge of Various methods of Communication
24
Placement of the
emphasis What it means
I did not tell John you
were late.
Someone else told John you were
late.
I did not tell John you
were late. This did not happen.
I did not tell John you
were late. I may have implied it.
I did not tell John you
were late.
But maybe I told Sharon and
José.
I did not tell I was talking about someone
Communication Skills - Activity
Unit -1
Demonstrative knowledge of Various methods of Communication
25
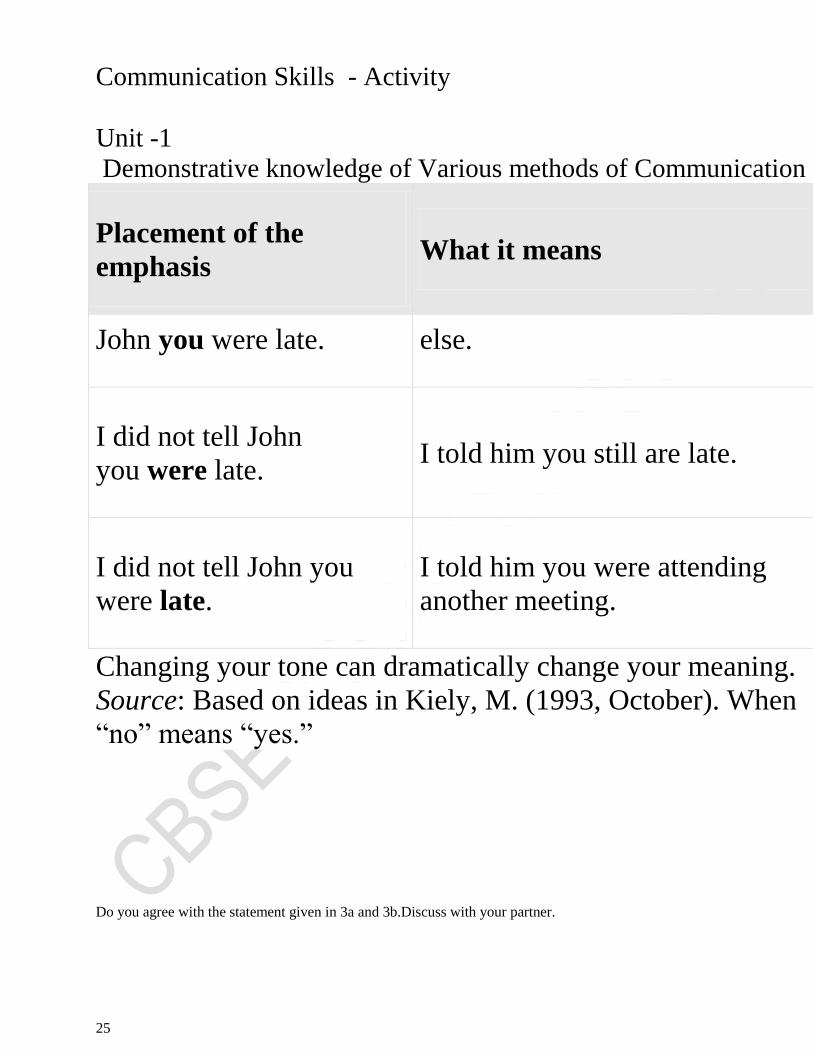
Placement of the
emphasis What it means
John you were late. else.
I did not tell John
you were late. I told him you still are late.
I did not tell John you
were late.
I told him you were attending
another meeting.
Changing your tone can dramatically change your meaning.
Source: Based on ideas in Kiely, M. (1993, October). When
“no” means “yes.”
Do you agree with the statement given in 3a and 3b.Discuss with your partner.

Communication Skills - Activity
Unit -1
Demonstrative knowledge of Various methods of Communication
26
Figure 3a
Figure 3b
Communication Skills - Activity
Unit -1
Demonstrative knowledge of Various methods of Communication
27
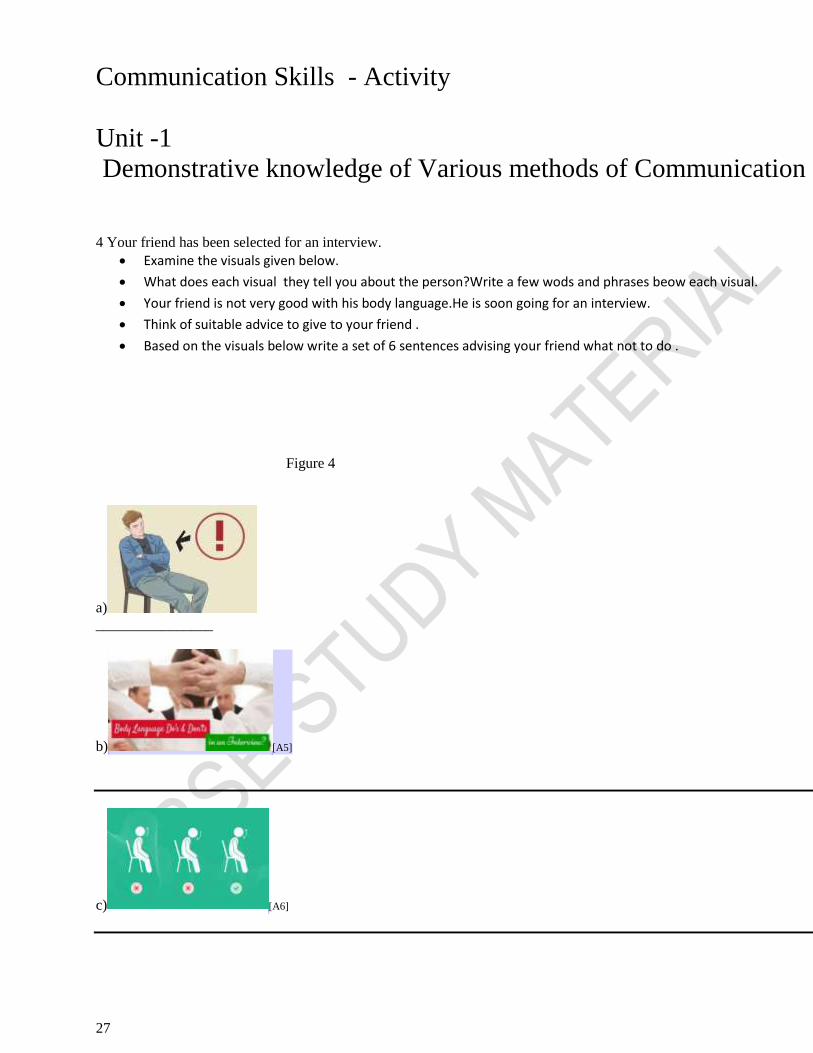
4 Your friend has been selected for an interview.
Examine the visuals given below.
What does each visual they tell you about the person?Write a few wods and phrases beow each visual.
Your friend is not very good with his body language.He is soon going for an interview.
Think of suitable advice to give to your friend .
Based on the visuals below write a set of 6 sentences advising your friend what not to do .
Figure 4
a)
________________
b) [A5]
c) [A6]

Communication Skills - Activity
Unit -1
Demonstrative knowledge of Various methods of Communication
28
d)
____________________________________
e)
_____________________________________
[A7] \
_______________________________
f)

Communication Skills - Activity
Unit -1
Demonstrative knowledge of Various methods of Communication
29
CS10Worksheet 4
1 Examine the following visual. What are the Do’s and Don’ts of body language when you are appearing for an
interview?
Complete the sentences given below the visual.
Figure 5
. [A8]

Communication Skills - Activity
Unit -1
Demonstrative knowledge of Various methods of Communication
30
Body Language :Don’t do the following:
(i)You mustn’t__________________
(ii)You shouldn’t___________________
(iii)Don’t________________
(iv)Be careful about ______________________
(v)Don’t________________
(vi)______________________
2Look at Figure 6a
a) Read the cues of the Do’s and Don’ts of body Language given in Figure 6a .
b) Discuss what are the five main elements of Body Language.
c) Using the clues given in Figure6b and the Do’s and Don’ts column,fill in the blanks using appropriate
words.
d) Check your answers given at the end of the unit.
Figure 6 a
s.n Element/Features of Body L Do’s Don’ts
1 a)____contact make appropriate eye contact - j)____away-shifty
prolonged eye contact
2 _b)_____ Expression
f) _______facial expression _ poker/k)____ face
3 c)_______________ keep g)____ uncrossed,using
meaningful and appropriate
gesture
cross arms,l)_______ or
exaggerate
4 _d)_________ head up and alert,h)___ leaning
forward
turn your m)____ on
someone,arm crossing,leg
crossing
5 e)___________ distance not too i)___ and not too close make listener uncomfortable
with your n)_____
Figure 6b
Far
Back

Communication Skills - Activity
Unit -1
Demonstrative knowledge of Various methods of Communication
31

Communication Skills - Activity
Unit -1
Demonstrative knowledge of Various methods of Communication
32
Worksheet 5
CS 10 Worksheet 5
1In Column A, fill in the 3 blanks by listing the 3 main kinds of communication.
2In column B list examples of each of the 3 kinds of communication.
3 In pairs discuss
How and when you use a particular kind of communication.
Whether these different kinds of communication occur separately or whether you use more than one type of
communication simultaneously!
4 In column C list the advantages of each of the 3 types of communication.
5 In Column D list the disadvantages of each of the 3 kinds of communication.. s.n
A
types of communication
definition
B
examples
C
Advantages
D
Disadvantages
1 ______________________ conversations
one on one
________
___________
__________
2 _______________ letter to
principal
_______
____________
_________
___________
3 Shaking
hands,smiling
Road signs
____________
__________

Communication Skills - Activity
Unit -1
Demonstrative knowledge of Various methods of Communication
33
ANSWERS
CS10 Worksheet 3 Figure 1a
Figure 1b
Figure 2
Communication Skills - Activity
Unit -1
Demonstrative knowledge of Various methods of Communication
34
Placement of the
emphasis What it means
I did not tell John you
were late.
Someone else told John you were
late.
I did not tell John you
were late. This did not happen.
I did not tell John you
were late. I may have implied it.
I did not tell John you
were late.
But maybe I told Sharon and
José.
I did not tell I was talking about someone

Communication Skills - Activity
Unit -1
Demonstrative knowledge of Various methods of Communication
35
Placement of the
emphasis What it means
John you were late. else.
I did not tell John
you were late. I told him you still are late.
I did not tell John you
were late.
I told him you were attending
another meeting.
Worksheet 4 Figure 6
Figure 6 a
s.n Element/Features of Body L Do’s Don’ts
1 a)____contact make appropriate eye contact - j)____away-shifty
prolonged eye contact
2 _b)_____ Expression
f) _______facial expression _ poker/k)____ face
3 c)_______________ keep g)____ uncrossed,using
meaningful and appropriate
cross arms,l)_______ or
exaggerate

Communication Skills - Activity
Unit -1
Demonstrative knowledge of Various methods of Communication
36
gesture
4 _d)_________ head up and alert,h)___ leaning
forward
turn your m)____ on
someone,arm crossing,leg
crossing
5 e)___________ distance not too i)___ and not too close make listener uncomfortable
with your n)_____
Figure 6b
i)Far
m)Back
k)blank
n)proximity
a)eye
h) body
d)posture
l)overdo
g) arms
e) physical
j) look
b)facial
c) gesture
f)pleasant
Communication Skills - Activity
Unit -1
Demonstrative knowledge of Various methods of Communication
37

Communication Skills - Activity
Unit -1
Demonstrative knowledge of Various methods of Communication
38

Barriers to Effective Communication
Apply Measures to Overcome Barriers to Communication Skills
Objectives: Learn about 1 Various barriers to effective communication: their types and factors 2 Different measures that need to be adopted to overcome barriers in effective communication 3 Gain practical experience of--
1. Role playing barriers to effective communication and identifying
them
2. Practicing ways to overcome barriers in communication in a)social
situations and b)at the workplace
3. Counselling someone whose communication skills are hampered due
to barriers ( enacting some situations)
Lesson 3.1 Types of Barriers to Effective Communication Communication means sharing meaning. With no sharing, there is no communication. Effective communication requires an understanding that -
A message is conveyed clearly between communicators in order that it is
effective and serves the desired purpose.
Whether in a team or with others, at work or in the community, the
communication environment is conducive and there are no barriers
which prevent messages being sent and received successfully.
Communication barriers create misunderstandings and
misinterpretations of messages.
To communicate successfully you must know what barriers to
communication exist and ensure that they do not obstruct

communication.
You must make efforts to navigate around these roadblocks.
A communication barrier is thus anything that prevents us from receiving and understanding the messages others use to convey their information, ideas and thoughts. Communication between two individuals should be simple. Remember that there are differences between talking and communicating. When we communicate, we are successful in getting our point across to the person we’re talking to. When we talk, we tend to erect barriers that hinder our ability to communicate. Some barriers to effective communication you should be aware of are: Physical Barriers – Physical barriers separate people from each other and mark territories. These barriers can often be seen in the workplace where offices and closed doors stop communication. Physical barriers can stop you from being comfortable communicating with a person whom you do not come face to face with often. As long as people still have a personal space that they can call their own, nearness to others aids communication because it helps us get to know one another.
Language Barriers – Not using words another can understand will certainly stop your message from being conveyed. This not only applies to actual languages but also expressions, format used, buzz words and other jargon. If one is not familiar with your language, misinterpretation will occur. The accents and dialect (use of words) of people belonging to different places differ even if their language is same and may become barriers to communication.
For example, the abbreviation “LOL” used in chat language used to mean Lots of Love before, which changed to Laugh Out Loud. If a person says LOL, the second person can interpret the meaning in any way they want or from their understanding. People use both the abbreviations according to the context and need. Gender Barriers – Variation exists among masculine and feminine styles of communication. There are distinct differences between the speech patterns in a man and those in a woman. A woman speaks between 22,000 and 25,000 words a day whereas a man speaks between 7,000 and 10,000.

While women often emphasize politeness, empathy, and rapport building, male communication is often more direct. This means that a man talks in a linear, logical and compartmentalised way, features of left-brain thinking; whereas a woman talks more freely mixing logic and emotion, features of both sides of the brain. Meshing these two styles without awareness could become a barrier. Attitudinal Barriers - as those behaviors or perceptions that are divisive in nature – the ones that can lead to nagging doubt, sullen disagreement or even overt conflict. They all interfere with and undermine communication. These are barriers that distance one from others. These are visible through withdrawal, meaningless rituals which keep one devoid of real contact, superficial activities and more. Perceptual Barriers – Different world views can create misunderstanding. People tend to interpret messages from their own point of view or ideologies. Without thinking, one might only view a message from his or her own mindset rather than looking at it from another viewpoint. The problem with communicating with others is that we all see the world differently. You might ask someone an innocent question based on a previous experience but it is quite likely for them to perceive it with suspicion. Cultural Barriers – Ethnic, religious, and social differences can often create misunderstandings when trying to communicate. These differences can also affect one’s perception and create confusion in getting a message. Emotional Barriers –If one is consumed with emotion he will have difficulty in understanding what is communicated. Hostility, anger, fear, and other emotions make it hard to hear outside one’s own self. The roots of our emotional mistrust of others lie in our childhood and infancy when we were taught to be careful about what we said to others. We must have been often warned- "Mind your P's and Q's". "Don't speak until you're spoken to". As a result, many people hold back from communicating their thoughts and feelings to others. While some caution may be wise in certain relationships, excessive fear of what others might think of us can stunt our development as effective communicators. Overcoming these barriers to communication is no easy task. You need

awareness and a willingness to adapt and try to form meaningful relationships. But, if you begin to focus on how these communication barriers are affecting your everyday conversation, you will be well on your way to becoming an effective communicator. Further reading : Read Dr K Usha Rani’s research paper on communication barriers at https.www.researchgate.net/publication/304038097_COMMUNICATION_BARRIERS
Class X : Lesson 3- Communication Skills Worksheet 3.1 : Barriers to Communication
Blindfold Game
In this game break off everyone into teams of two.
One member is blindfolded and navigates an obstacle course.
The other member shouts directions to the other member.
Blindfold Game works because it builds trust, listening, and instructional skills. Trust among team-members is crucial for effective communication. It encourages cooperation and successful teamwork. Lack of trust, though, builds suspicion and prevents buy-in. After playing the game discuss what went well and what did not. Identify the barriers that came in the way of effective communication. List what could have been done to improve communication. (E.g. - did you feel that personal or attitudinal barriers affected communication? Think of other barriers… gender/cultural)
Class X : Lesson 3- Communication Skills
Worksheet 3.2 : Barriers to Communication
Answer the following quiz questions-
1. Not stating instructions clearly is an example of……….. ( language barrier)
2. Not understanding the customs or traditions of a speaker could mean

there is a ………………. ( cultural barrier)
3. When you are overcome by your own feelings and unable to
communicate well it means there is an ………………..( emotional barrier)
4. Using slang or words that are used within your own social group is an
example of a ………………. ( cultural barrier)
5. You may like to have your own private cabin to work in but if you are not
willing to meet your team face to face it is an indication of a……….
(physical barrier)
6. You have an…………………. ( attitudinal barrier) if you think you are more
qualified than others and are superior in knowledge.
7. If you have a totally different viewpoint from your team mates on the
way a training programme is to be planned you have a
…………..(conceptual barrier)
Handling Barriers to Communication
Following are some practical ideas for dealing with attitudinal barriers to communication so that all of your exchanges as a small business owner or part of a team in an office are as productive as they can be: Engage in face-to-face interactions whenever possible. As you've probably learned from experience, text messages and even emails can be misinterpreted without the nonverbal “assist” of facial expressions, tone and inflection. When timely communication is of great importance, you may have no choice but to send a quick text or email. In this case, be sure to follow up later to seek questions and to ensure that your message was understood as you had intended it to be. Reduce or eliminate distractions around you. Noise from other people and office machines can sink even the most pleasant interactions, dooming them to a rough start. They interfere with the focus you need to have so that you can counteract any attitudinal barriers. Then again, sometimes a lack of noise from other people, such as if the environment is too quiet, can be distracting; this could mean that people are eavesdropping on your conversation – something you want to avoid. If “the walls have ears,” then move your conversation to another part of the building or go outdoors. Try to assess the needs of the receiver. This is not an easy objective. But as an employer, look at the bright side: you're privy to some attitudinal variables:

age, culture, education, experience, gender and race. Others, such as lifestyle and upbringing, may elude you. Use what you know to develop an empathetic stance and, if possible, tailor your message accordingly. This is another way of saying “know thy audience.” No doubt, you will get better with experience and practice. Hone your active listening skills. The University of Maine suggests a five-step approach to this alert and engaged listening style:
a) Acknowledge the other person's ideas, thoughts or feelings. Paraphrase
the other person's words to ensure understanding.
b) Ask questions without judging. Summarize and clarify what you hear.
Offer your opinion if it's requested.
c) Organize your thoughts. You don't have to write notes, but if doing so
helps you organize what you want to say and how you want to say it,
then by all means, start writing. Many communications go haywire
because the purpose is hazy in the mind of the sender. And if it's hazy in
the mind of the sender, it might be a complete blur to the recipient.
Soften your tone and language. As the boss, you know people watch your every move, so you also know that being courteous and professional is a must in every interaction. To defeat any attitudinal barriers, it can help immensely to maintain a gentle, reassuring tone and use simple, non-confrontational language. Keeping sentences short and direct can also help to prevent any misunderstandings. Encourage feedback. Even this seemingly benign step can be fraught with peril, if “the other guy” clams up and disses you behind your back. Now might be a good time to remember the advice about how the receiver also bears responsibility for whether a two-way exchange is a success or a failure. All you can do is ask that he understood what you had to say and if he has any questions you can clarify. At least, you will be doing your part as a conscientious communicator. Described below are some common barriers to effective communication which we must avoid: 1 Second guessing the sender: We do this when we are impatient with the speaker and are in a hurry to finish the sentence for the speaker. It takes away from the speaker the opportunity to compete what was being said. At times, we could be completely off the mark while finishing off the unspoken part and create antagonism in the speaker. We have thus defeated out first principle of
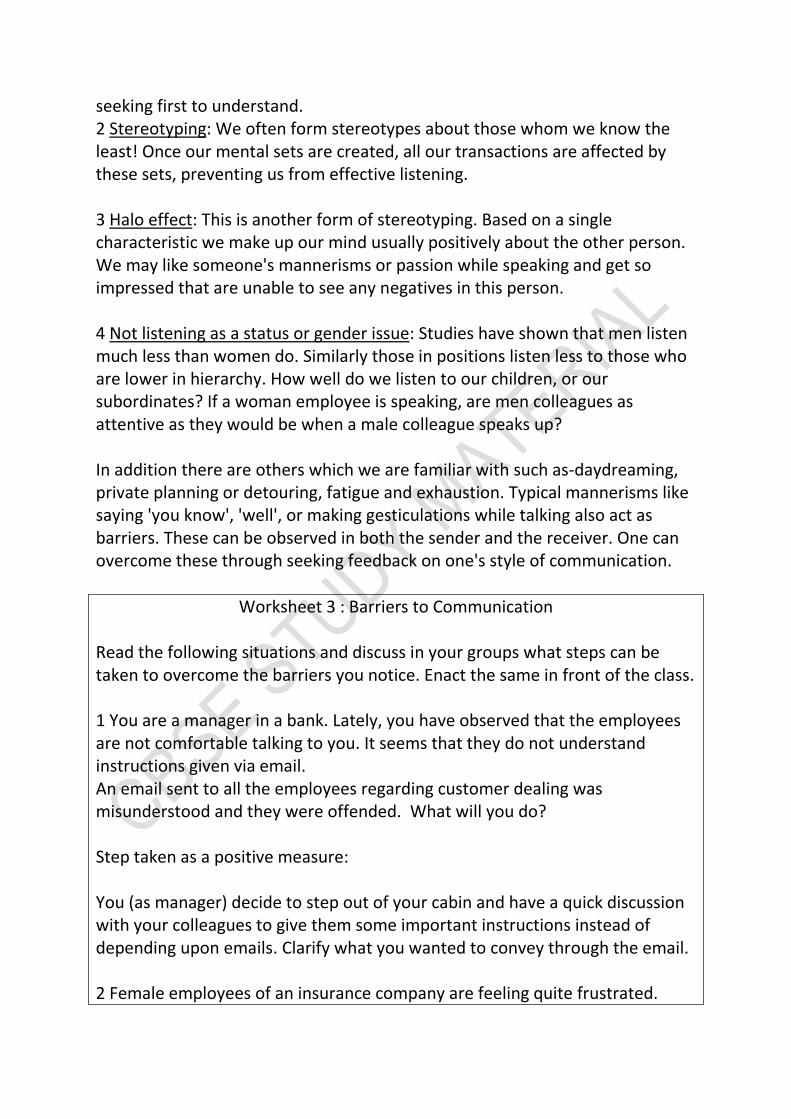
seeking first to understand. 2 Stereotyping: We often form stereotypes about those whom we know the least! Once our mental sets are created, all our transactions are affected by these sets, preventing us from effective listening. 3 Halo effect: This is another form of stereotyping. Based on a single characteristic we make up our mind usually positively about the other person. We may like someone's mannerisms or passion while speaking and get so impressed that are unable to see any negatives in this person. 4 Not listening as a status or gender issue: Studies have shown that men listen much less than women do. Similarly those in positions listen less to those who are lower in hierarchy. How well do we listen to our children, or our subordinates? If a woman employee is speaking, are men colleagues as attentive as they would be when a male colleague speaks up? In addition there are others which we are familiar with such as-daydreaming, private planning or detouring, fatigue and exhaustion. Typical mannerisms like saying 'you know', 'well', or making gesticulations while talking also act as barriers. These can be observed in both the sender and the receiver. One can overcome these through seeking feedback on one's style of communication.
Worksheet 3 : Barriers to Communication
Read the following situations and discuss in your groups what steps can be taken to overcome the barriers you notice. Enact the same in front of the class. 1 You are a manager in a bank. Lately, you have observed that the employees are not comfortable talking to you. It seems that they do not understand instructions given via email. An email sent to all the employees regarding customer dealing was misunderstood and they were offended. What will you do? Step taken as a positive measure: You (as manager) decide to step out of your cabin and have a quick discussion with your colleagues to give them some important instructions instead of depending upon emails. Clarify what you wanted to convey through the email. 2 Female employees of an insurance company are feeling quite frustrated.

Their boss who is a male does not listen to them and does not give importance to their suggestions. Without meaning to hurt them he is quite pompous and wants to do things his way. What would you like to suggest to him? 3 You work in a multinational company. Some of your colleagues from Sweden and China are coming for a conference to Delhi. You are in charge of receiving them. What steps would you take to -
receive them
make their stay in India comfortable
ensure they do not have problems with food
ensure they have no language problems
Worksheet 4 :Handling Misunderstanding
Play this game in pairs: This game entails two persons who must sit back to back. The first person has an object and must describe it (without explicitly saying what the object is) to person B. Person B must then draw it based on the person A’s descriptions. Causes of Miscommunication and Misunderstanding After you play the game try to fix things. The first step in fixing miscommunication is understanding where things go wrong. Understand misunderstanding The game Misunderstanding helps drive creative communication. Finding creative ways to communicate despite barriers builds problem-solving skills. No communication works exactly the same and creativity is required to make sure effective communication happens each time.

This game can be adapted for larger groups by working in teams of two. It can then become a competition based on who has the most accurate drawing.
Apply principles of communication Objectives In this lesson you will ----- 1. Know about the principles of effective communication 2. Identify the 7 Cs of effective communication 3. Apply knowledge of effective communication skills in real life situations
Lesson 4.1: Principles of Communication We all wish to communicate our ideas and thoughts effectively. There are some principles that must be followed for communication to be successful. A Seek first to understand, then diagnose and prescribe: The most important principle of communication is that we should understand the other person with our mind, heart and soul, deeply, without judging, without censoring. Stephen Covey in his book titled '7 Habits of Highly Effective People' gives an example of a father who complains that he is unable to understand his son as the son doesn't listen to him. After repeating, "I don't understand my son, he just doesn't listen to me", several times, the man realizes that in order to understand another person, one must deeply listen and only with the intention of truly wanting to understand. Very often we struggle to make ourselves understood. But if the person does not open up to the experience of wanting to understand the struggle continues and communication fails. Covey says seeking first to understand is like opening an emotional bank account. If you invest yourself emotionally and fully, you will get high returns in the form of a rewarding communication experience. When you truly understand the other person you can begin to explore for causes of problems and solutions. B Face to Face Communication is most effective:

One of the requirements within any organization is to put everything down on paper, in writing. While all of us follow this dictum, how many of us have chosen to precede or follow up our written communication with a personal discussion or meeting? A face to face discussion can give us much better results. In a face to face interaction, we are able to observe and respond to verbal and non-verbal cues, the inconsistence between the two, offer feedback and seek clarifications. Some of this is not possible for example, when we are engaged in a telephonic conversation. C Communication becomes complex as the number of people we are communicating with increases: In an interaction involving only two people, the number of communicative stimuli, both verbal and non-verbal, is limited. One is left to deal with and manage the partner's interactions and structure one's response based on the cues received from the partner. But as the number of people increases, stimuli, feedback, channels also increase and communication becomes complex. Suppose you are talking to a group of 5 persons. Four of them are listening intently to you while the fifth one seems bored and uninterested. If you continue, you have lost the opportunity to understand the reason for his or her disinterest and modify your delivery. However, if you single this person out, she might feel cornered while others may become impatient. Thus in a group context, one has to manage several different aspects of communication in order to be effective. D Communication across cultures differs: Culture can be defined as shared knowledge, symbols, conventions, folklore, language, habits, rituals, rules and lifestyles that link and give a common identity to a particular group of people at a given point in time. Cultural differences must be respected and kept in mind while communicating. It is a good idea to find out about the culture, traditions and customs of another country or state you are visiting for the first time. Also remember, in a large country like India people belonging to different states, tribes or communities have certain mannerisms and behavioural characteristics that need to be understood. Not giving eye-contact to a member of the opposite sex or a person who belongs to a higher caste class is common among Indians. To a Westerner, the same gesture may mean lack of earnestness of the people we are interacting with. E Feedback is the key to effective communication: Communication transactions continue to evolve effectively in the presence of feedback. Try
talking to a person with a deadpan face. Chances are, very soon the enthusiasm with which you started will wane. Conversely if the audience responds with nods, smiles, anything that conveys attention and interest, the speaker is encouraged to continue. Feedback also gives you an indication if there is any change needed in the communication stimuli. Adapted from IGNOU
Worksheet 1: Principles of effective communication
1. Name the 5 principles of effective communication. Which do you find
most important? Number them in order of importance you would like to
give them. Say why.
2. Do role plays in groups of 4 to show the importance of each principle.
Enact each in 2 ways- one showing effective communication because the
principle is followed and the other showing poor communication. Let
other judge and say how you could have done better.
3. You are Nazia, Group Leader, Marketing, ABC Consultants. You are very
upset. Shaheen, your junior has made a mess of the assigned task of
inviting the chief guest for the inaugural ceremony of the new office
block.
Analyze where you may have gone wrong in communicating the
assigned task. Find out from your junior, Shaheen what went wrong and
why it went wrong. Sit together and seek to clarify expectations.
Remember that you should have followed the principles of -
understanding, then prescribing; face to face contact, and understanding
cultural differences.
Lesson 4.2: The 7 Cs of Communication

Warm up- Try to guess what the 7 Cs of communication must be. C for clarity… C for courtesy… As you may have guessed, to be effective communication must be clear and courteous. It must also have other qualities. Can you name some other qualities? Watch this video (in the link given below) before you read about the 7 Cs. https://youtu.be/sYBw9-8eCuMCs
The 7 Cs of Communication In your daily life and at work you write emails, facilitate meetings, participate in conference calls, create reports, devise presentations, debate with your colleagues… the list goes on. We all spend almost our entire day communicating. So, it stands to reason that communicating clearly and effectively is very important and can boost our productivity. This is why the 7 Cs of Communication are stressed in our discussions on good communication. The 7 Cs provide a checklist for making sure that your meetings, emails, conference calls , reports , and presentations are well constructed and clear – so your audience gets your message.
Following are the 7 Cs of effective communication:
Watch this video that makes it easy to understand the 7 Cs: https//youtu.be/sYBw9-8eCuMs://youtu.be/sYBw9-8eCuM 1. Be Clear Begin every message by asking the question, “What is the purpose of this communication?” This will enable you to make the objective of your communication clear to the recipient. Clarity is also about avoiding the use of complex words, sentences, and fuzzy language. It is important that you clearly communicate the intended information to the recipient. You must be able to explain a concept several ways and answer clarifying questions about the topic. If you are not clear about the purpose of your communication, then your

objectives will not be met. Writing points on note cards or a notepad can help you methodically work through what you want to communicate. Most people will tend to drift or forget items if they don’t have a clear framework to operate within. Presentation slides can be helpful though very often a simple outline will be enough. 1. Be concise Make your message brief and to the point. Why use 10 sentences to explain something when a single sentence will suffice? Being concise will save time for both you and the receiver of your message. To help make your communications more concise, avoid going over the same point several times, and avoid the use of filler words, sentences, and over wordy expressions. Although we are trying to be concise, it is important to remember that we are not trying to lose completeness. 3. Be Concrete Concrete communication is about being specific and clear rather than vague, obscure, and general. To be more concrete use sentences that cannot be misinterpreted. Include supporting facts and figures to underscore your message, but don’t allow anything that detracts from the focus of your message. 4. Be Correct Incorrect information doesn’t help anyone and it does your credibility no good. Ensure that: Your message is typo-free; your facts and figures are correct and you are using the right level of language. Being correct first time will both save you time and boost your credibility. A correct message will also have a greater impact on the recipient than an incorrect one. 5. Be Coherent Does your message make sense? Does it flow logically from one sentence to the next? To ensure that your communication is coherent: Check that each sentence flows logically from one to the next and check that you haven’t tried to cover too many points or been distracted by side issues. 6. Be Complete Your message must contain all the necessary information to achieve the desired response. To ensure that your message is complete think about questions the receiver might think of as they receive your message. Address these questions. Ensure you have included a call to action so that your audience knows exactly what you expect them to do next. 7. Be Courteous

Be polite. You’re more likely to get what you want from your communication if you are courteous, as courtesy builds goodwill. Check that your message is polite, shows respect for the feelings of the receiver, and is tactful. Make your message brief and to the point.
The following table makes the 7Cs clear to you-
Sources: https://www.mindtools.com/pages/article/newCS_85.htm;
https://expertprogrammanagement.com/2018/04/7-cs-communication/

Class X - Communication Skills
Lesson 4 : Worksheet 1-Principles of Communication
Complete the following table with the appropriate adjectives to
be kept in mind while communicating with people.
Answers
Clear- no confusion, statement of requirement is direct, not ambiguous
or vague
Concise- brief, to the point, gives only relevant information, no extra
info
Correct- facts only are stated , no confusion or incorrect statement, very
precise
Courteous-
Considerate-
Complete-
Coherent-
Clear
• message easily understood
concise
correct
courteous
considerate
Complete
coherent

Lesson 4- Worksheet 2 : Practice the 7 Cs
Watch the following video and then do the activity in pairs. This activity will
help you to practice the 7 Cs. You will also understand the need for applying
the 7 Cs to your communication in daily life.
Prahttps://www.youtube.com/watch?v=8yGhNwDMT-gctising the 7 Cs
Practice communicating the following instructions or requests by writing
sentences keeping in mind the 7 Cs.
1. You have to give instructions to your assistant about the task of
completing a project report by tomorrow. Write the instructions in
language that is clear, courteous and complete.
2. Make a written request to your colleagues who are not reaching office in
time to sign in by 9.30 am daily. You are Kritika, Head, Department of IT,
NIOS. ( clarity, conciseness, courtesy, correctness coherence and
completeness) 3. Share a plan for an important office meeting with heads of different
departments and your colleagues. Remember to share details of the
meeting such as: purpose, people who have been invited, venue and
timings, agenda, sequence in which they will be discussed and other
arrangements such as seating, tea and refreshments. You are Rashi
Singh, Head, Human Resource, Alexis Ltd. ( clarity, conciseness,
concreteness, courtesy, correctness coherence and completeness)
4. Have a telephone conversation with a client. The topic is a business visit
the client wishes to make to your company to know about the goods you
manufacture for gifting during Diwali. ( correct, clear. coherent, concise,

courteous and complete)
5. Imagine you are the receiver for each of the above messages. Do you
think the messages were complete? What changes could be made in
them?
6. Share the above tasks and observations orally with the whole class and
critique for improvement where required.
Lesson 4 : Worksheet 3 Principles of Communication
Do the following role plays in pairs. (The first is done for you as a sample)-
Anita: Ma’am, could you please tell me what is to be written in the emails to
be sent for the meeting?
Suvarna: Yes. Please note all that I am saying. Remember to -
a) Address each participant by name … write ‘Dear Lalita’
b) Your invitation should be courteous and formal… write … ‘It would give
me great pleasure…….’etc.
c) Do not forget to write the date, timings and venue of the meeting (
mention the conference room and floor too)
d) State the agenda
e) Inform participants about arrangements for parking, who will receive
them at the reception counter and details of the contact person for any
queries.
f) Lastly, do share the draft with me.
Anita: Thanks a lot ma’am.
Suvarna: You’re welcome, Anita. I’m sure you’ll do a great job.
1 As product manager you have you the job of explaining to your team how to

pack the mobile phones that are to be sent via Amazon to customers. Give
clear, concise and complete instructions. Do not forget to be courteous.
2 You are a receptionist in a reputed school of Kanpur. You receive a phone
call. The caller is making a query about admission dates, sale of forms, fee
structure, seats for economically weak students etc.
Write the dialogue between the caller and yourself.
Write the dialogue. Remember to express yourself in a manner that shows
respect to the person who you are talking to.
After writing the dialogue check it for 7 Cs. Have you taken care of them?
Now enact the telephone conversation.
https://mail.google.com/mail/u/0/?tab=rm#search/HEEMAL+HANDOO?projector=1
https://mail.google.com/mail/u/0/?tab=rm#search/HEEMAL+HANDOO?projector=1

Introduction to word processor
A word processor is a software that helps you type and work with text on a
computer. You can create a document like, letter, memo, newsletter and save it in
word processor. The main advantage of creating a document is word processor is
that a document can always be opened and edited. You can also format it, check
and correct spellings and grammatical errors in it, insert drawings, images, and
pictures, apply page borders, and also print it.
A variety of word processors such as Microsoft Word, Open Office Writer, and
Star Office have been developed to make text input and editing on the computer
easy. An online word-processing applications such as Google Docs (part of Google
Drive), is also becoming popular.
In this chapter, you will learn about Apache Open Office Writer, a popular
Open source word processor.
Apache OpenOffice
Apache OpenOffice is a free and open-source software that has been developed by
the Apache Software Foundation. Apache OpenOffice can be downloaded for free
from:
http://www.openoffice.org/
It is available in a number of languages. It can also read/write files created in other
Office software packages.
The Apache OpenOffice package contains the following:
• OpenOffice Writer (Word processor)
• OpenOffice Calc (Spreadsheet)
• OpenOffice Impress (Presentation)
• OpenOffice Base (Database Management System)
• OpenOffice Draw (Graphics)
• OpenOffice Math (Equation Editor)

The latest version of Apache OpenOffice is 4.1.5 The new version of Apache
OpenOffice shows a sidebar on the interface of Writer, Impress, and Calc. It is
similar to the ribbon in Microsoft Office .
APACHE OPENOFFICE WRITER
Apache OpenOffice Writer is a word processor program, which is equivalent to
MS Word. It is used for creating, editing, formatting, and printing text documents.
You can include pictures, charts, tables, and can save the document in various
formats.
To start OpenOffice Writer, click Start All Programs OpenOffice 4.1.5
OpenOffice Writer.
The Apache OpenOffice Writer window, along with its sidebar and other
components, is shown in Figure 1.
Fig. 1 Apache OpenOffice Writer window
Title Bar The title bar is placed at the top of the Word 2013 window. It displays
the document name followed by the program name. To the right of the title bar,
you can see three buttons: Minimize, Restore Down/Maximize and Close.
Title bar Standard bar
Formatting
bar
Vertical
ruler
Status bar
Zoom control
Minimize Maximize/Re
store Down
Close
Side bar

The Minimize button is used to reduce the window to a small icon on the taskbar.
The Restore Down button is used to make the window smaller than full size. The
same button is used to bring it back to full size. The Close button is used to close
the window.
Menu bar The Menu bar has different options like, File, Edit, View, etc. clicking
on a menu option displays options of this menu.
Standard Toolbar It is displayed below the Menu bar and contains buttons for the
most commonly used commands, like, New, Open, Save, etc.
Formatting toolbar This toolbar has buttons for the most commonly used
formatting commands.
Document Window The document window is used to create a document. This is
the area where you can type text, insert pictures, etc.
Scroll bars The horizontal scroll bar is present at the bottom of the document
window and is used to move the document left or right. The vertical scroll bar is
present to the right of the document window and is used to move the document up
and down.
Rulers The horizontal ruler is present at the top of the document window and is
sued to set left and right margins. The vertical ruler is present to the right of the
document window and is used to set top and bottom margins.
Status bar The Status bar is present at the bottom of the Writer window. It
displays information about the current document, such as number of pages, current
page number, etc.
Zoom control The zoom level of the document can be set by clicking, holding,
and dragging the slider.
Let’s Try it
1. Start OpenOffice Writer.
2. Identify the following components of the OpenOffice Writer window:
i. Title bar
ii. Standard bar
iii. Formatting bar
iv. Horizontal and vertical scroll bar
v. Horizontal and vertical ruler
vi. Minimize, maximize and Close buttons
vii. Status bar
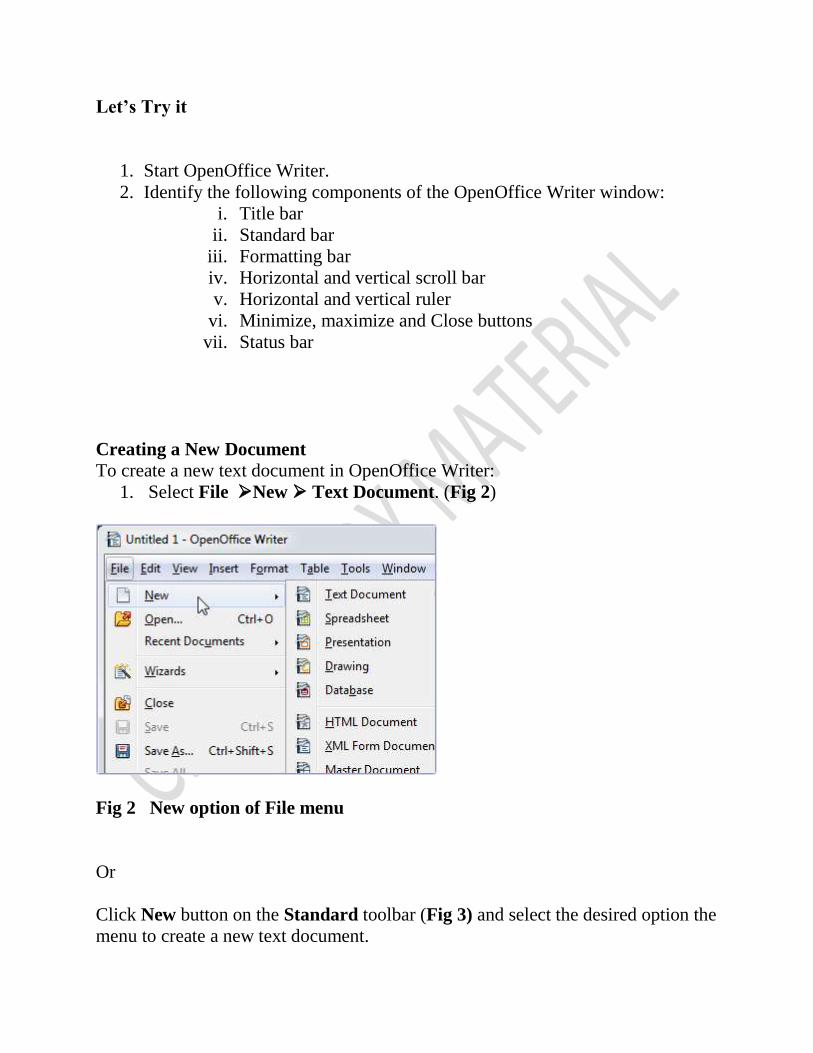
Creating a New Document
To create a new text document in OpenOffice Writer:
1. Select File New Text Document. (Fig 2)
Fig 2 New option of File menu
Or
Click New button on the Standard toolbar (Fig 3) and select the desired option the
menu to create a new text document.

Fig 3 New button on the Standard toolbar
Or
You can also press Ctrl + N on the keyboard to create a new document.
Saving a Document
To save a document,
1. Click the File menu
2. Select Save As option . (Fig 4 )
Fig 4 Save AS option of File menu
Or
New Button

Click the Save button on the Standard bar as shown in Figure 5.
Fig 5 Save button on the Standard toolbar
3. The Save As dialog box appears. (Fig 6)
4. Select the location where you want to save the document.
5. Type the file name, and click on the Save button. Documents created and
saved in Writer have the extension .odt by default.
Fig 6 Save As dialog box
Save button
Keyboard Shortcut
Save Ctrl +S
Save As Shift + Ctrl + S
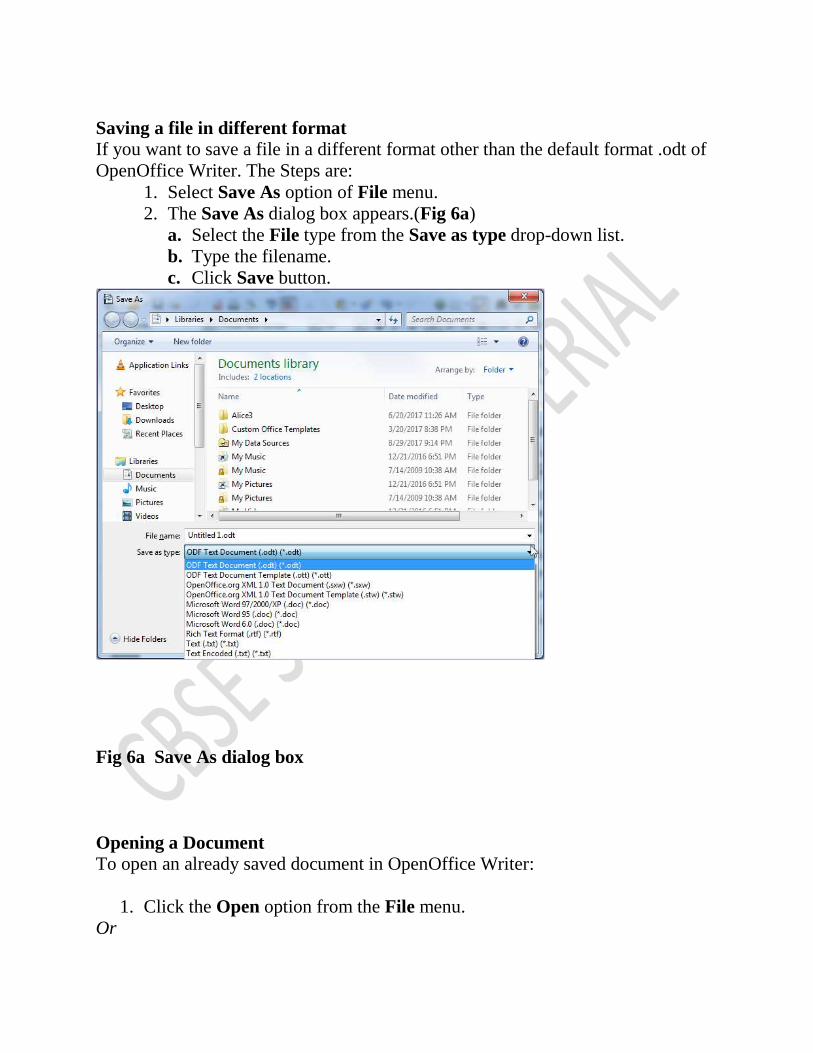
Saving a file in different format
If you want to save a file in a different format other than the default format .odt of
OpenOffice Writer. The Steps are:
1. Select Save As option of File menu.
2. The Save As dialog box appears.(Fig 6a)
a. Select the File type from the Save as type drop-down list.
b. Type the filename.
c. Click Save button.
Fig 6a Save As dialog box
Opening a Document
To open an already saved document in OpenOffice Writer:
1. Click the Open option from the File menu.
Or

Click the Open (Fig 7) button on the Standard bar.
Fig 7 Open button on the Standard bar
Or
Press Ctrl + O.
2. The Open dialog box appears (Fig 8).
3. Select the Drive and the folder.
4. Select the file and click Open button.
Fig 8 Open dialog box
Closing a Document
To close an open document, click the Close option from the File menu.
Exit Writer
To exit Writer, click the Exit option from the File menu.
Open button

Let’s Try it 1
1. Start OpenOffice Write.
2. Create a new document.
3. Type a paragraph about some of the activities organized in your school.
4. Save the document with name ‘activities’.
5. Close OpenOffice Writer.
Let’s Try it 2
1. Start OpenOffice Writer.
2. Open the already saved document ‘activities’.
3. Now add another paragraph about various competitions that your school is
planning to organize on ‘Independence Day’.
4. Save the document. Which option will you select to save the file with the
same name –Save or Save As?
5. Close the document.
6. Exit from Writer.
Worksheet 1
1. Name the two toolbars. ____________ ________________
2. Name the toolbar used to scroll the document up and down ________
3. Name the bar present at the bottom of the Writer window that gives
information about the number of pages in the document. __________
4. Name the two rulers ____________ ______________
5. Name the ruler that is used to set the left and right margins __________
6. Name the bar that has buttons for the most commonly used commands
______
7. Name the three buttons present to the right of the Title bar. ______
8. Name the button used to reduce the window to a small icon on the taskbar.
_____________
9. Which button is sued to make the window smaller than full size?
___________
10. Mention any two features of word processors.
___________________________
___________________________
Worksheet 2
1. Write Keyboard shortcuts for the following commands:
i. New
ii. Save
2. Name the menu that has option to create a new document.
3. What is the difference between Save and Save As options of File menu?
EDITING A DOCUMENT
Editing means making changes into existing text.
Before editing, you may need to select the text. Selection of text can be done with
the keyboard or the mouse.
The selected text gets highlighted with blue color.
OpenOffice Writer features various tools to edit text in a document.
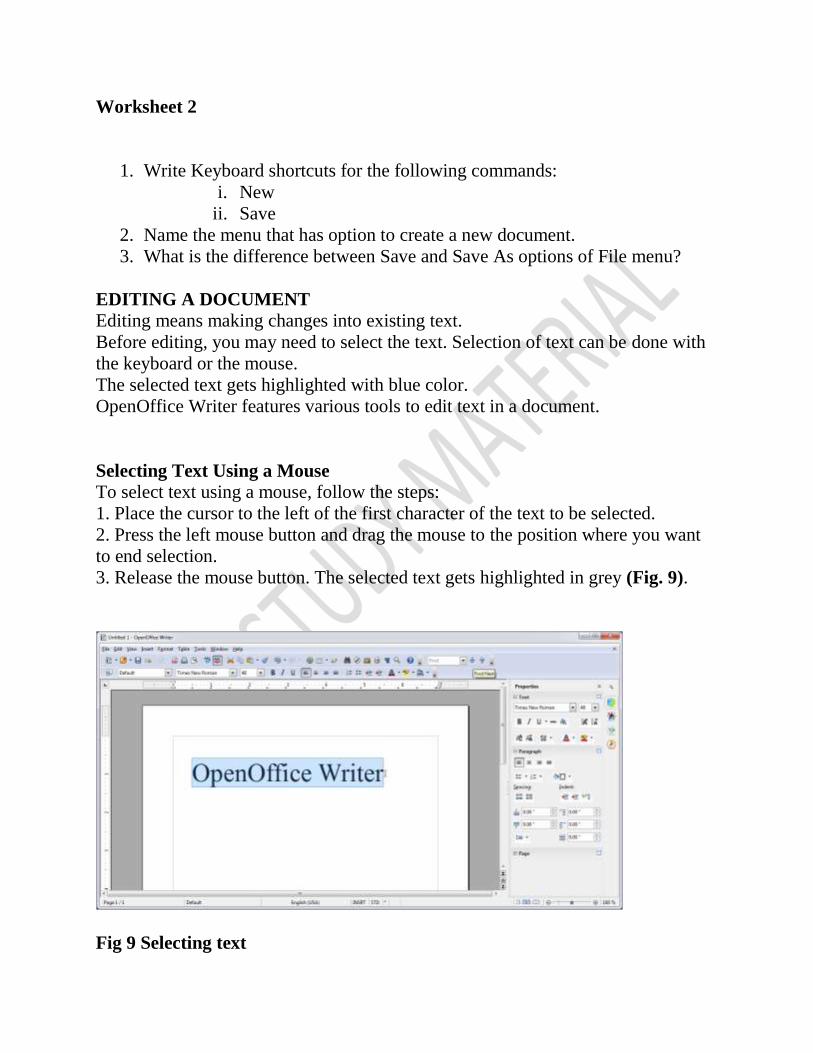
Selecting Text Using a Mouse
To select text using a mouse, follow the steps:
1. Place the cursor to the left of the first character of the text to be selected.
2. Press the left mouse button and drag the mouse to the position where you want
to end selection.
3. Release the mouse button. The selected text gets highlighted in grey (Fig. 9).
Fig 9 Selecting text

Selecting Text Using Keyboard
You can select text using even the keys on your keyboard. First, place the cursor to
the left of the first character you wish to select. Then use the following key
combinations:
To select Key combinations
One character to the left Shift +
One character to the right Shift +
One line up Shift +
One line down Shift +
To the end of the current line Shift + End
To the beginning of the current line Shift + Home
To the end of the current document Shift + Ctrl + End
To the beginning of the document Shift + Ctrl + Home
Entire document Ctrl + A
Inserting and Overtyping Text
You can insert (add) text into the existing text or overtype (replace old text with
the new one) text in OpenOffice Writer.
To insert text, press the Insert key, to turn ON the Insert mode, which is indicated
by INSRT appearing on the status bar (Fig. 10).
Fig. 10 INSRT on the status bar
Sometimes, you may need to type and replace the current text. This can be done
using the Overtype mode. To overtype text, press the Insert key or click on
INSRT on the status bar to turn ON the Overtype mode, which is indicated by
OVER appearing on the status bar (Fig. 11)
INSERT mode selected
on the Status bar
OVER mode selected on the
Status bar

Fig. 11 OVER on the status bar
Inserting a Blank Line
You can also insert a blank line between two existing lines. The steps are:
1. Place the cursor at the end of the line after which you want to insert a blank line.
2. Press Enter. You will notice that the next line gets shifted down and a blank line
is inserted.
Deleting Text
You can easily delete a character, a word, or a block of text in OpenOffice Writer.
Let us learn how to delete a character, a block of text or a word.
To delete a character, the steps are:
1. Position the cursor to the left of the character to be deleted.
2. Press DELETE.
Or
1. Position the cursor to the right of the character to be deleted.
2. Press BACKSPACE.
To delete a block of text, the steps are:
1. Select the text to be deleted.
2. Press DELETE or BACKSPACE.
To delete a word, the steps are:
1. Place the cursor to the left of the word to be deleted.
2. Press Ctrl + Delete.

Or
1. Place the cursor to the right of the word to be deleted.
2. Press Ctrl + Backspace.
Undo and Redo Commands
The Undo command is sued to reverse the last command/action.
To reverse the last action, click the Edit button and then click Undo in the drop-
down menu.(Fig 12)
Or
Click the Undo button on the Standard bar. (Fig 13)
Fig 12 Undo option of Edit menu.
Fig 13 Undo button on the Standard toolbar
Undo
Undo button Redo button

The Redo command is used to reverse the last Undo action. To apply this
command, click the Redo option from the Edit menu.
Or
Click the Redo button on the Standard bar.(Fig 13)
Note: As long as there is nothing to redo, the Redo command will
show up as Repeat command. The function of the Repeat
command is to repeat the last thing you did in OpenOffice Writer. When you
undo an action, the Repeat command changes to Redo.
Copying Text
You can easily copy text from one place to another in a document. For this
purpose, you will have to use Copy and Paste commands. The Copy command
creates a duplicate of the selected text and the Paste command pastes the copied
text at the position where the cursor is placed.
To copy text from one location and paste it at another location, the steps are:
1. Select the text to be copied.
2. Click the Copy option from the Edit menu. (Fig 12)
Or
Click the Copy button on the Standard bar. (Fig 14)
3. Position the cursor at the location where you want to paste the text.
4. Click Paste option from the Edit menu.
Or
Click the Paste button on the Standard bar. (Fig 14)
Cut Copy
paste
Keyboard Shortcut
Undo Ctrl + Z
Redo Ctrl + Y

Fig 14 Standard bar
Moving text
You can easily move text from one position to another using Cut and Paste
commands. The steps to move text from one location to another are:
1. Select the text to be moved.
2. Click the Cut option from the Edit menu. (Fig 15)
Or
Click the Cut button on the Standard bar. (Fig 14)
3. Position the cursor at the location where you want to paste the text.
4. Click Paste option in the Edit menu or Paste button on the Standard bar.
Fig 15 Edit menu
FORMATTING A DOC UMENT
Keyboard Shortcut
Copy Ctrl + C
Cut Ctrl + X
Paste Ctrl + V
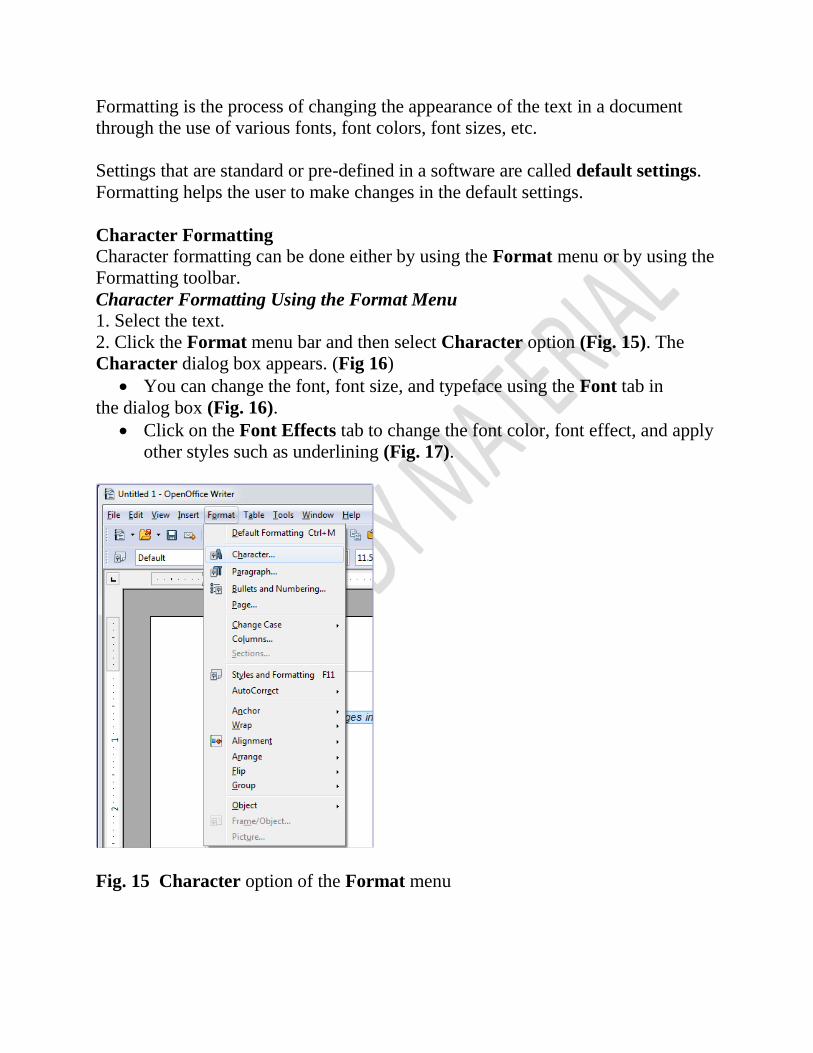
Formatting is the process of changing the appearance of the text in a document
through the use of various fonts, font colors, font sizes, etc.
Settings that are standard or pre-defined in a software are called default settings.
Formatting helps the user to make changes in the default settings.
Character Formatting
Character formatting can be done either by using the Format menu or by using the
Formatting toolbar.
Character Formatting Using the Format Menu
1. Select the text.
2. Click the Format menu bar and then select Character option (Fig. 15). The
Character dialog box appears. (Fig 16)
You can change the font, font size, and typeface using the Font tab in
the dialog box (Fig. 16).
Click on the Font Effects tab to change the font color, font effect, and apply
other styles such as underlining (Fig. 17).
Fig. 15 Character option of the Format menu
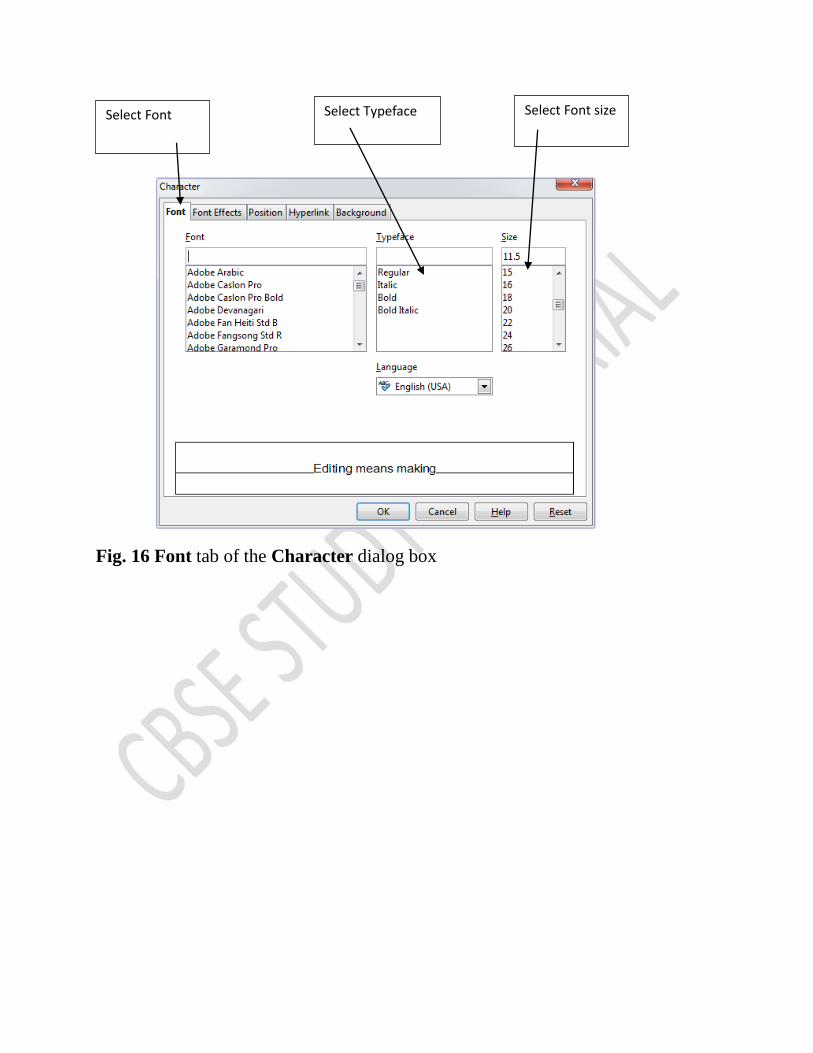
Fig. 16 Font tab of the Character dialog box
Select Font Select Typeface Select Font size

Fig. 17 Font Effects tab of the Character dialog box
You can change the position of the text (e.g., superscript, subscript, etc.)
using the Position tab (Fig. 18).

Fig. 18 Position tab of the Character dialog box
3. Click OK after choosing the desired options.
Character Formatting Using the Formatting Bar
The Formatting bar has various buttons on it, as shown in Figure 19. These
buttons can be used for character formatting.
Fig. 19 Formatting bar
Keyboard Shortcuts
Bold Ctrl + B
Italic Ctrl + I
Underline Ctrl + U
Select Font Font
Size
Bold Italic
Underline Text
Colo
r
Highlighting

You can also use the Properties side bar to format the text (Fig 21)
Fig 21 Properties Side bar
Fig 21 Properties bar
Highlighting Text
Highlighting means making the text look different to draw the reader’s attention
towards it. Highlighted text has a colored background.
The steps to highlight text are:
1. Select the text.
2. Click the drop-down arrow of the Highlighting button on the Formatting
bar.(Fig 22)
Font Font
Size
Underline
Italic Bold
Superscript
Subscript
Text
color
Highlighting

OR
You can click the drop-down arrow of Highlighting button on the Properties side
bar (Fig 23).
Fig 22 Highlighting button on Formatting bar
Highlighting
button
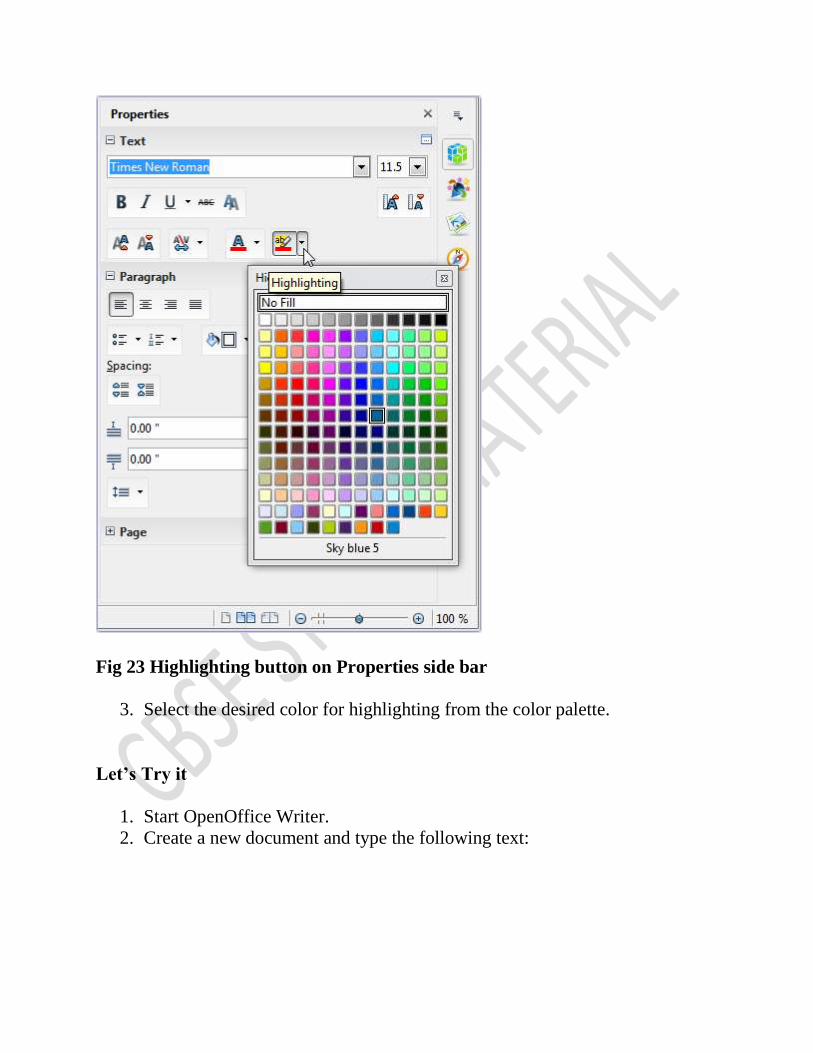
Fig 23 Highlighting button on Properties side bar
3. Select the desired color for highlighting from the color palette.
Let’s Try it
1. Start OpenOffice Writer.
2. Create a new document and type the following text:
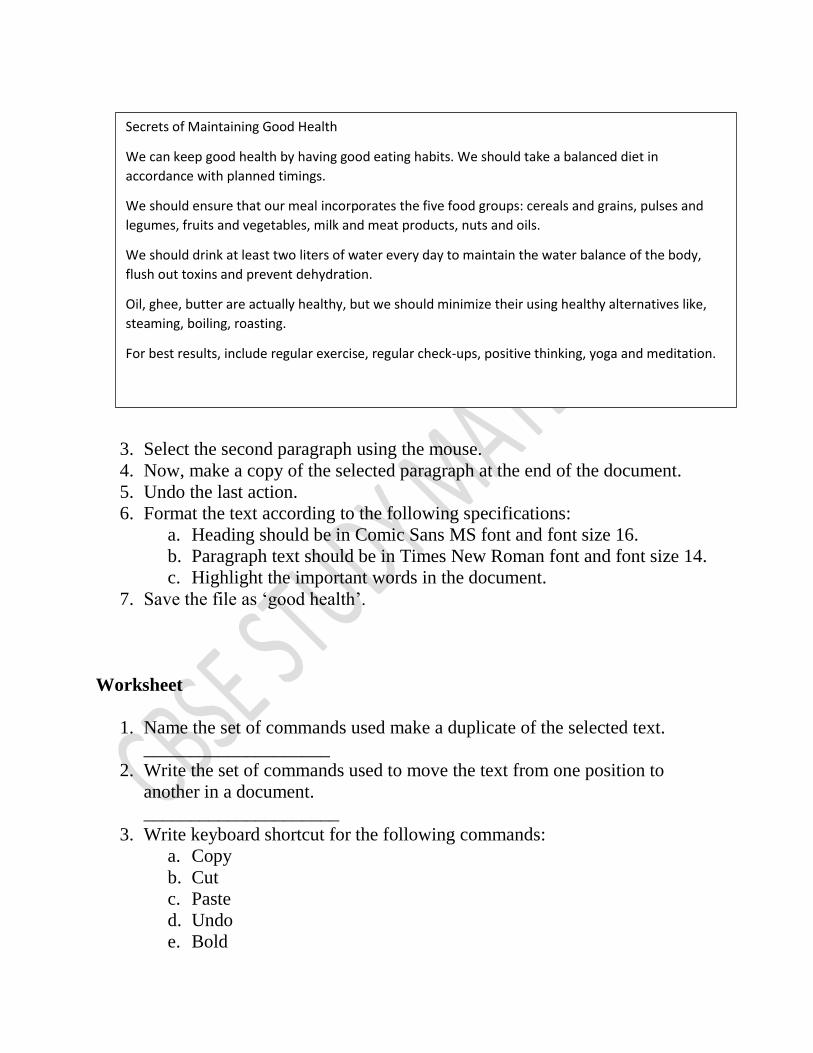
3. Select the second paragraph using the mouse.
4. Now, make a copy of the selected paragraph at the end of the document.
5. Undo the last action.
6. Format the text according to the following specifications:
a. Heading should be in Comic Sans MS font and font size 16.
b. Paragraph text should be in Times New Roman font and font size 14.
c. Highlight the important words in the document.
7. Save the file as ‘good health’.
Worksheet
1. Name the set of commands used make a duplicate of the selected text.
____________________
2. Write the set of commands used to move the text from one position to
another in a document.
_____________________
3. Write keyboard shortcut for the following commands:
a. Copy
b. Cut
c. Paste
d. Undo
e. Bold
Secrets of Maintaining Good Health
We can keep good health by having good eating habits. We should take a balanced diet in
accordance with planned timings.
We should ensure that our meal incorporates the five food groups: cereals and grains, pulses and
legumes, fruits and vegetables, milk and meat products, nuts and oils.
We should drink at least two liters of water every day to maintain the water balance of the body,
flush out toxins and prevent dehydration.
Oil, ghee, butter are actually healthy, but we should minimize their using healthy alternatives like,
steaming, boiling, roasting.
For best results, include regular exercise, regular check-ups, positive thinking, yoga and meditation.

4. Which command is used to make the text darker than the normal text?
____________________
5. How can you delete a character to the left of the cursor?
_______________________
6. How can you select entire document using the keyboard?
______________________
7. Name the command used to reverse the last action.
_____________________________
8. Write key combination to select one character to the right of the cursor.
___________________
9. Name the menu that has option to change the text color and size.
_______________________________
10. Which key will you press to turn on the INSERT mode?
________________________
Session
Line and Paragraph Spacing
Line spacing is the amount of white space between lines of text in a paragraph.
The steps to set the line spacing are:
1. Place the cursor within the paragraph whose line spacing you want to change
or select the paragraph.
2. Select Paragraph option from the Format menu (Fig 24).
Fig 24 Paragraph option of Format menu

3. The Paragraph dialog box appears (Fig 25).
Fig 25 Paragraph dialog box
4. Click the Indents & Spacing tab .
5. Specify the spacing before and after the paragraph.
6. You can also specify the Line spacing.
7. Click OK.
Setting Alignment
Alignment is the manner in which text is placed within the margins of a page.
The steps to change the alignment of text are:
1. Select the text.
2. Select Paragraph option from the Format menu.
3. The Paragraph dialog box appears. (Fig 26).
Specify
spacing before
and after the
paragraph
Specify value for Line
spacing
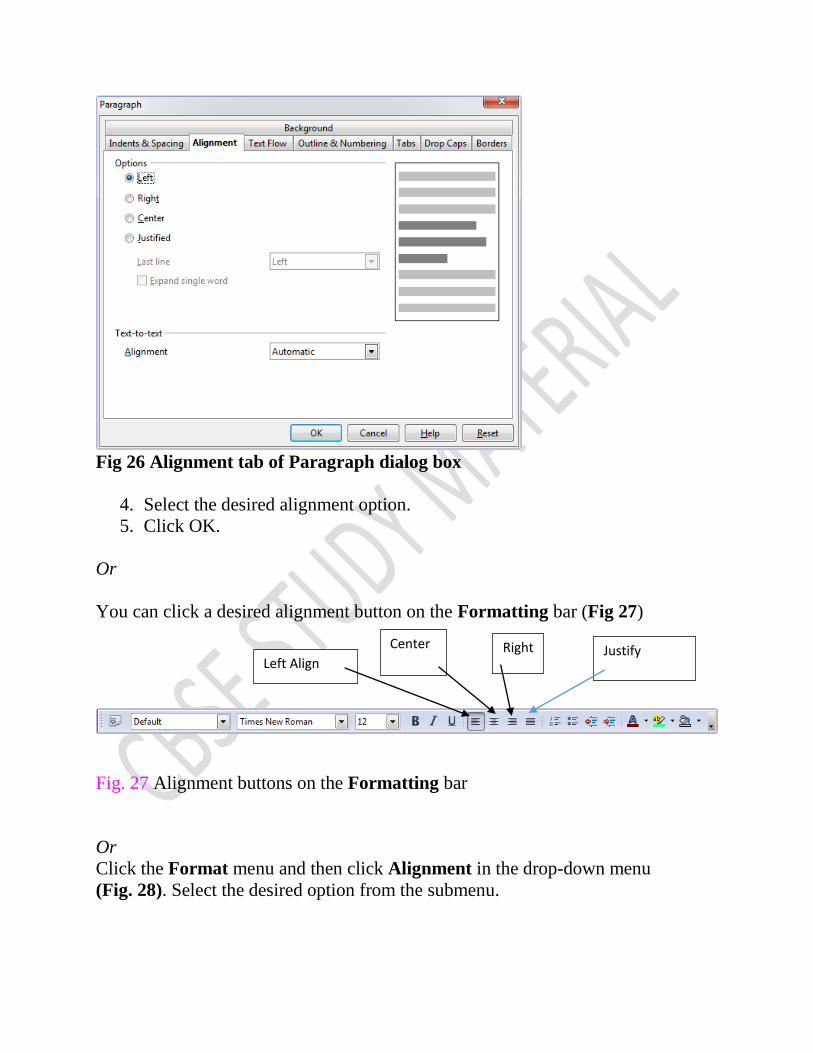
Fig 26 Alignment tab of Paragraph dialog box
4. Select the desired alignment option.
5. Click OK.
Or
You can click a desired alignment button on the Formatting bar (Fig 27)
Fig. 27 Alignment buttons on the Formatting bar
Or
Click the Format menu and then click Alignment in the drop-down menu
(Fig. 28). Select the desired option from the submenu.
Left Align
Center Right Justify

Fig. 28 Alignment option in the Format menu
Or
You can click the desired alignment option in the side bar (Fig 29)

Fig 29 Side bar
Left
Align
Center
align
Right
align
Justify align

Fig 29 Side bar
Setting Tabs
Each time you press the TAB key, the cursor moves ½ inch to the right.
The TAB selector is located to the left of the horizontal ruler.
In OpenOffice Writer, you can set four types of tab stops: Left, Right, Centered,
and Decimal.
Tab stops can be set in any one of the following ways:
By clicking TAB selector to the left of the horizontal ruler
By selecting Paragraph option of the Format menu.
Setting Tab stop using Format menu
To set tab stops, the steps are:
1. Select the Paragraph option of Format menu.
2. The Paragraph dialog box opens.( Fig 30). Click on Tabs tab.
3. Select the desired tab stop type.
Alignment
options

4. Repeat steps 2 and 3 to set more tab stops.
5. Then click OK.
Fig. 30 Tabs tab of the Paragraph dialog box
Setting Tab stop using horizontal ruler
You can set tab stops using the horizontal ruler:
1. Repeatedly click the tab selector at the left of the horizontal ruler to get the
desired type of tab you want.
2. Click on the horizontal ruler at the position where you want the tab stop.
(Fig 31).
Fig 31 Setting tab stops on horizontal ruler
Tabs tab
Select
tab stop
type
TAB selector Tab stops

Changing Page Settings
You can change page settings such as page size, margins, and orientation of a
document.
Margin is the amount of white space between the text and the edge of the page on
all four sides. You can set the margin using the rulers. On the horizontal ruler, the
shaded part depicts the left and right margins. On the vertical ruler, the shaded part
depicts the top and bottom margins.
Changing margins using rulers
To change the margin, say left margin, place the mouse pointer on the left margin
boundary. The pointer changes to a double-headed arrow. Drag the margin marker
to the desired location. (Fig 33)
Fig 33 Setting margin on ruler
Setting margins, paper size, and orientation using Format menu
Left margin Right margin
Left
margin
Bottom
margin

Orientation refers to the direction in which the page is printed. The default paper
orientation is Portrait in which document is printed along the width of the paper.
You can change the orientation to landscape, in which the document is printed
along the length of the page.
The steps to set the paper size, margins, and paper orientation are:
1. Select Page option from Format menu.
2. The Page Style: Default dialog box appears. (Fig 32)
a. Click the Page tab.
b. Select the page format.
c. Set custom page size by specifying the width and height.
d. Specify left, right, top, and bottom margins.
e. You can select page orientation as Portrait or landscape.
Fig. 32 Page tab of the Page Style: Default dialog box
Inserting a Page Break
To indicate the end of a page, you can insert a page break. The steps to insert a
page break are:

1. Click at the position where you want to insert a page break.
2. Select Manual Break option from the Insert menu.
The Insert Break dialog box appears (Fig. 33).
2. Select the Page break option.
3. Click OK.
Fig. 33 Insert Break dialog box
Setting Columns
When you create a document in OpenOffice Writer, there is only one column. You
can change the number of columns by following these steps:
1. Select the text.
2. Select Columns option from the Format menu. (Fig 34)
3. The Columns dialog box appears. (Fig 35)
a. Specify the number of columns.
b. Specify spacing between the columns.
c. Select the desired option if you want to draw a separator line between
the columns.
d. Click OK.

Fig 34 Columns option of Format menu
Fig. 35 Columns dialog box
SPELLING & GRAMMAR
While typing in an OpenOffice Writer document you will notice red or blue wavy
lines under the text. A red wavy line indicates a misspelled word and a wavy line
indicates a grammatical mistake.

OpenOffice Writer provides the following two ways of checking spelling and
grammar in a document:
• Using AutoSpellcheck
• Using the Spelling and Grammar option
Using AutoSpellcheck
The steps to check spellings as you type are:
1. Click the AutoSpellcheck button on the Standard bar (Fig. 35a).
2. Right-click the misspelled word (with a red wavy underline) and then choose a
word from the suggested list
or
from the AutoCorrect submenu (Fig. 35b).
If you choose a word from the AutoCorrect submenu, the misspelled and the
replacement words are automatically added to the AutoCorrect list for the current
language.
Fig 35 a AutoSpellcheck button on the Standard bar
AutoSpellcheck
button

Fig 35b AutoCorrect submenu
Using the Spelling and Grammar Option
The Spelling & Grammar option of OpenOffice Writer helps you check the
spelling and grammatical errors in your document. The steps are:
1. Select the Spelling and Grammar option from the Tools menu (Fig 36).
Or
Click the Spelling and Grammar button on the Standard bar. (Fig 37)
Or
Press F7
2. The Spelling dialog box appears (Fig. 38).
a. The unrecognized word is displayed in the Not in Dictionary text box
and the suggestions are displayed in the Suggestions box.
b. On clicking the desired button, the respective action takes place and
the next word is highlighted.
c. Repeat this step until a message box saying The spell check is
complete is displayed. (Fig 39)
3. Click OK.
129

Fig 36 Spelling and Grammar option of Tools menu
Fig 37 Spelling and Grammar button on the Standard bar
Spelling and
Grammar option

Fig. 38 Spelling dialog box
Fig 39 Message box
CHANGE CASE
Sometimes you type the entire text in upper case and after typing you realize that it
should have been in lowercase. You need not type the entire text again but use the
Change Case option to change the case of text. The steps are:
t
1. Select the Change Case option from the Format menu. (Fig. 40).
3. Select the desired option in the submenu.
Sentence case The first character in a sentence is capitalized and the rest
are in lowercase.
lowercase All characters are in lowercase (small letters)
UPPERCASE All characters are in uppercase (capital letters)

Capitalize Each Word The first character of each word is capital and the rest are
in lowercase
tOGGLE cASE Changes lowercase characters to uppercase and
uppercase characters to lowercase
Fig. 40 Change Case option in the Format menu
FIND & REPLACE
Sometimes you may need to search a word or text in a document and replace it
with another word or text. The Find option is used to search a word or text in a
document and Replace command is used to replace the specific word or text in a
document.
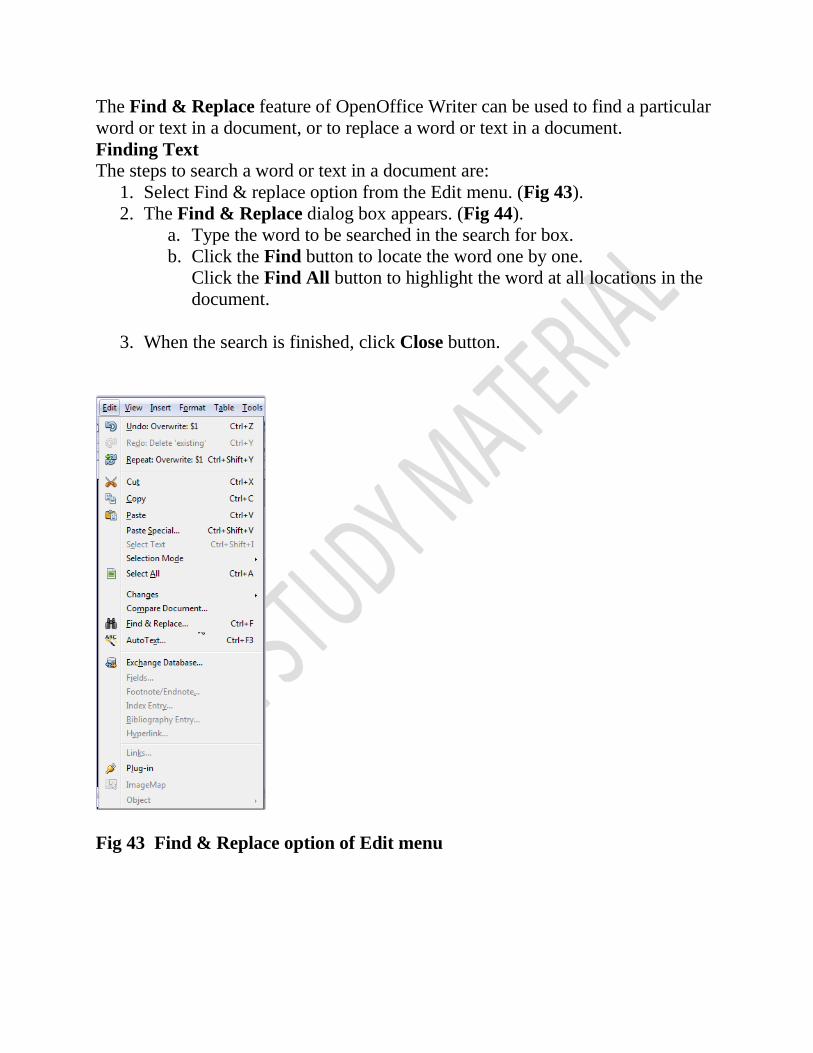
The Find & Replace feature of OpenOffice Writer can be used to find a particular
word or text in a document, or to replace a word or text in a document.
Finding Text
The steps to search a word or text in a document are:
1. Select Find & replace option from the Edit menu. (Fig 43).
2. The Find & Replace dialog box appears. (Fig 44).
a. Type the word to be searched in the search for box.
b. Click the Find button to locate the word one by one.
Click the Find All button to highlight the word at all locations in the
document.
3. When the search is finished, click Close button.
Fig 43 Find & Replace option of Edit menu

Fig 44 Find & Replace dialog box
Finding and Replacing Text
The steps to find and replace a word or text are:
1. Select Find & Replace option from Edit menu
2. The Find & Replace dialog box is displayed. (Fig 45)
a. Type the word to be searched in the Search for box.
b. In the Replace with box, type the word or text with which you want to
replace the word or text typed in the Search for box.
c. Click the Replace button to replace the word one by one, or click the
Replace All button to replace the word at all locations in the document.
3. When all the occurrences of the word are replaced, a message box will
appear. Click No to discontinue and close the Find & Replace dialog box.
(Fig 46)
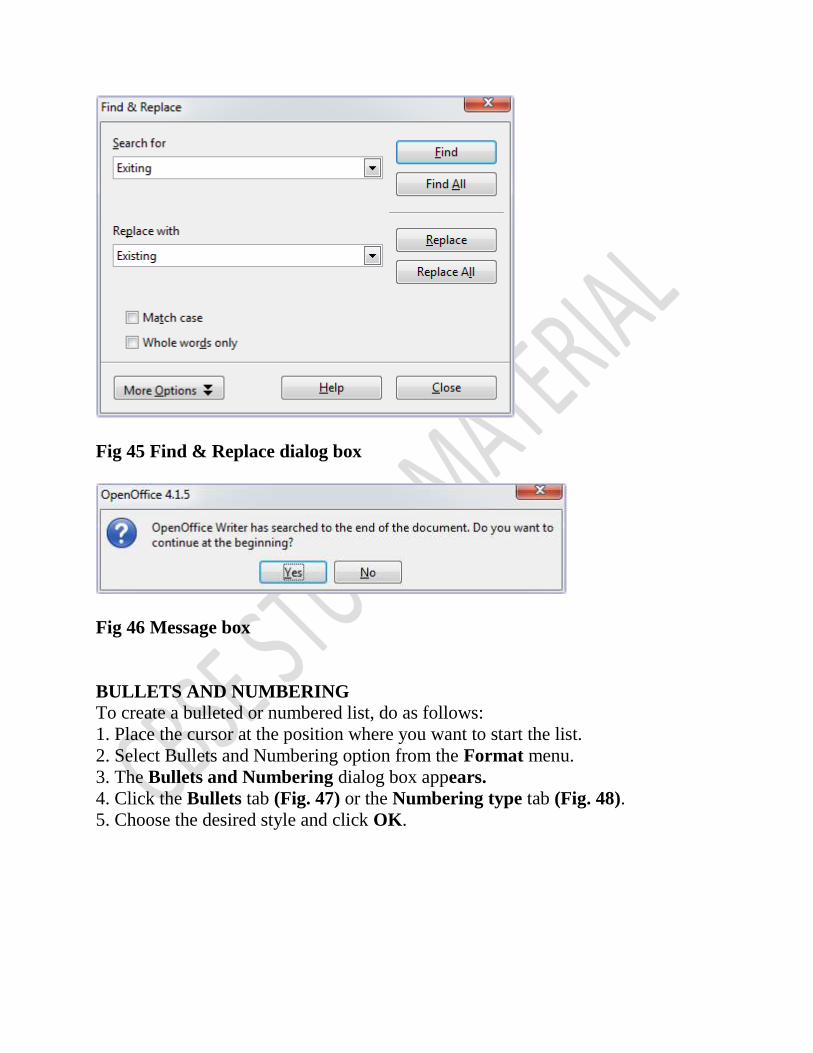
Fig 45 Find & Replace dialog box
Fig 46 Message box
BULLETS AND NUMBERING
To create a bulleted or numbered list, do as follows:
1. Place the cursor at the position where you want to start the list.
2. Select Bullets and Numbering option from the Format menu.
3. The Bullets and Numbering dialog box appears.
4. Click the Bullets tab (Fig. 47) or the Numbering type tab (Fig. 48).
5. Choose the desired style and click OK.
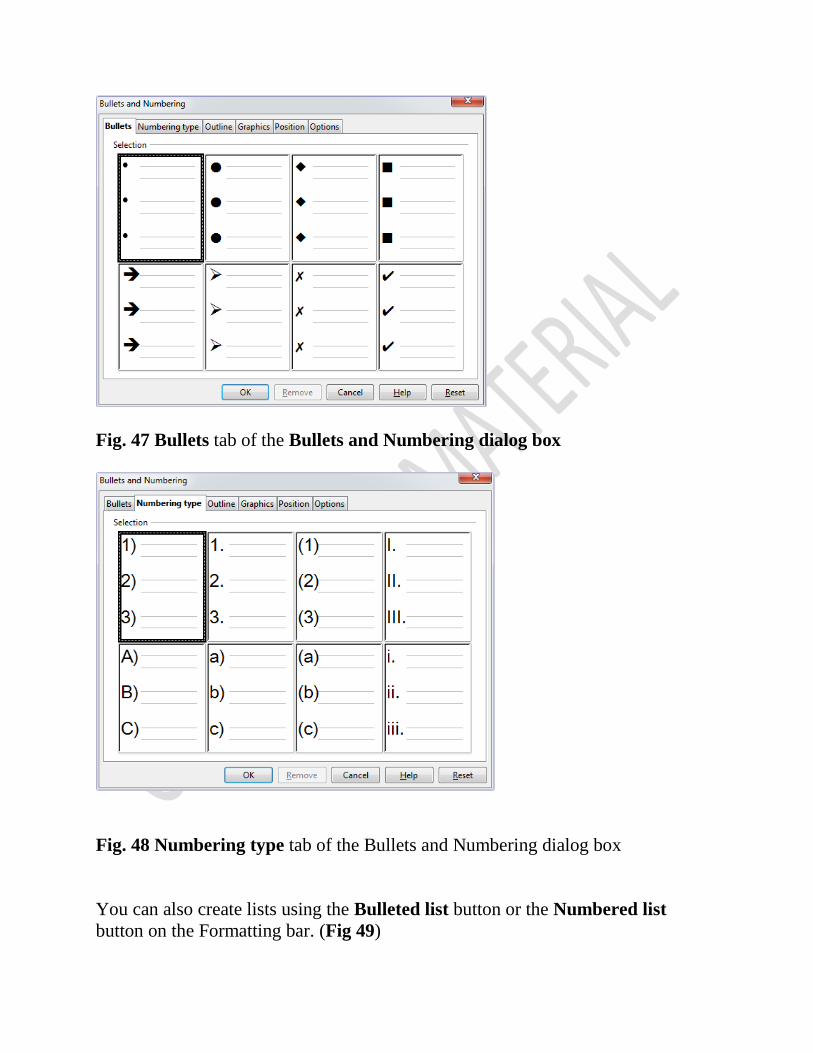
Fig. 47 Bullets tab of the Bullets and Numbering dialog box
Fig. 48 Numbering type tab of the Bullets and Numbering dialog box
You can also create lists using the Bulleted list button or the Numbered list
button on the Formatting bar. (Fig 49)

Fig 49 Formatting bar
CREATING TABLES IN OPENOFFICE WRITER
A table is a set of data arranged in rows and columns.
A column is a vertical series of cells in a table.
A row is a horizontal series of cells in a table.
The intersection of row and column forms a rectangular box called cell.
Tables can be created in OpenOffice Writer in any one of the following ways:
Using Table button
Using Table menu
Creating a Table Using the Table Button
The steps to create a table using the Table button are:
1. Click the drop-down menu arrow of the Table button on the Standard bar
(Fig. 50).
2. A grid of cells appears. Move the mouse pointer in the grid to highlight the
number of rows and columns required in the table (Fig. 50).
4. A table will be inserted at the insertion point.
Numbering Bullets
Cell
Rows
Columns
Table button

Fig. 50 Table Button
Creating a Table Using the Table Menu
The steps to create a table using the Table menu are:
1. Select Table Insert Table.
Or
Press Ctrl + F12.
Or
Select Insert Table
2. The Insert Table dialog box appears. (Fig 51)
a. Specify the number of columns
b. Specify the number of rows
5. Click OK
Fig. 51 Insert Table dialog box
Entering data in a cell

To enter data in a cell, click in the cell and then type the text.
Selecting row or column
To select a row or a column, click and drag the mouse button.
MODIFYING A TABLE
A table can be modified by inserting or deleting rows or columns, and by merging
or splitting cells.
Inserting Rows
The steps to insert rows in a table are:
1. Position the cursor in the cell where you want to insert a new row or a column.
2. Select Table Insert Rows.(Fig 52)
3. The Insert Rows dialog box appears (Figs. 53).
a. Specify the number of rows to be inserted.
b. Select the position – Before or After the selected row.
c. Click OK.
Fig 52 Table menu
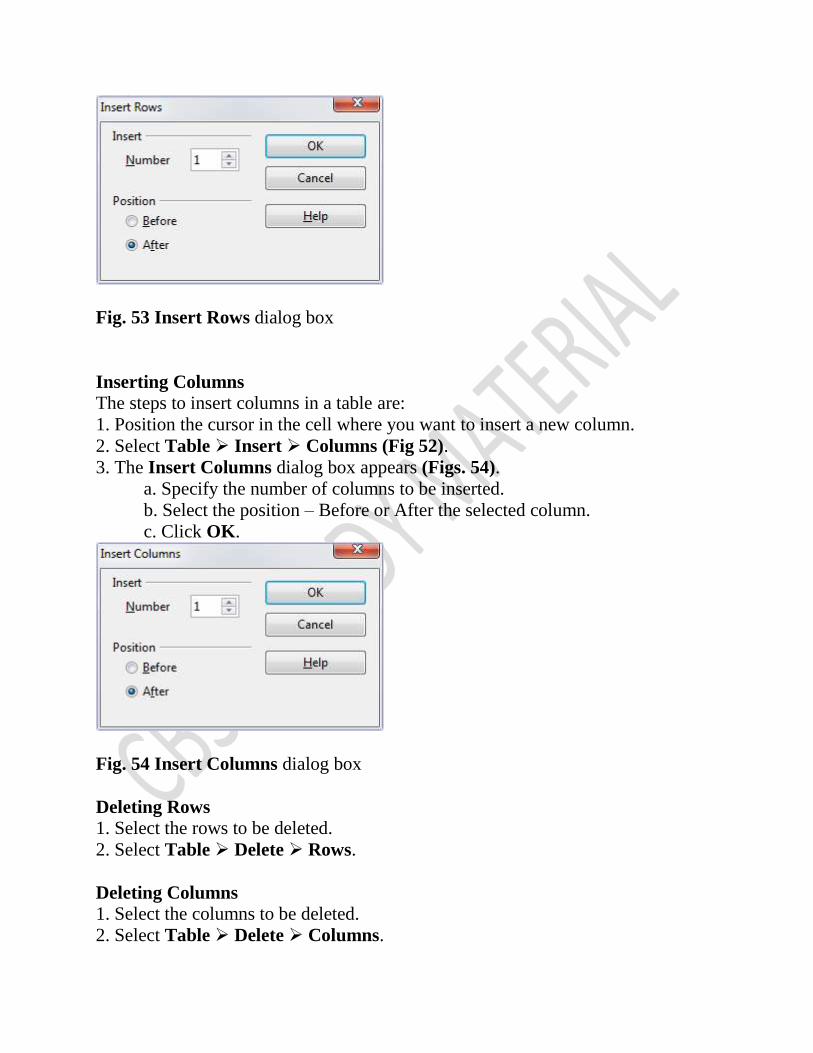
Fig. 53 Insert Rows dialog box
Inserting Columns
The steps to insert columns in a table are:
1. Position the cursor in the cell where you want to insert a new column.
2. Select Table Insert Columns (Fig 52).
3. The Insert Columns dialog box appears (Figs. 54).
a. Specify the number of columns to be inserted.
b. Select the position – Before or After the selected column.
c. Click OK.
Fig. 54 Insert Columns dialog box
Deleting Rows
1. Select the rows to be deleted.
2. Select Table Delete Rows.
Deleting Columns
1. Select the columns to be deleted.
2. Select Table Delete Columns.
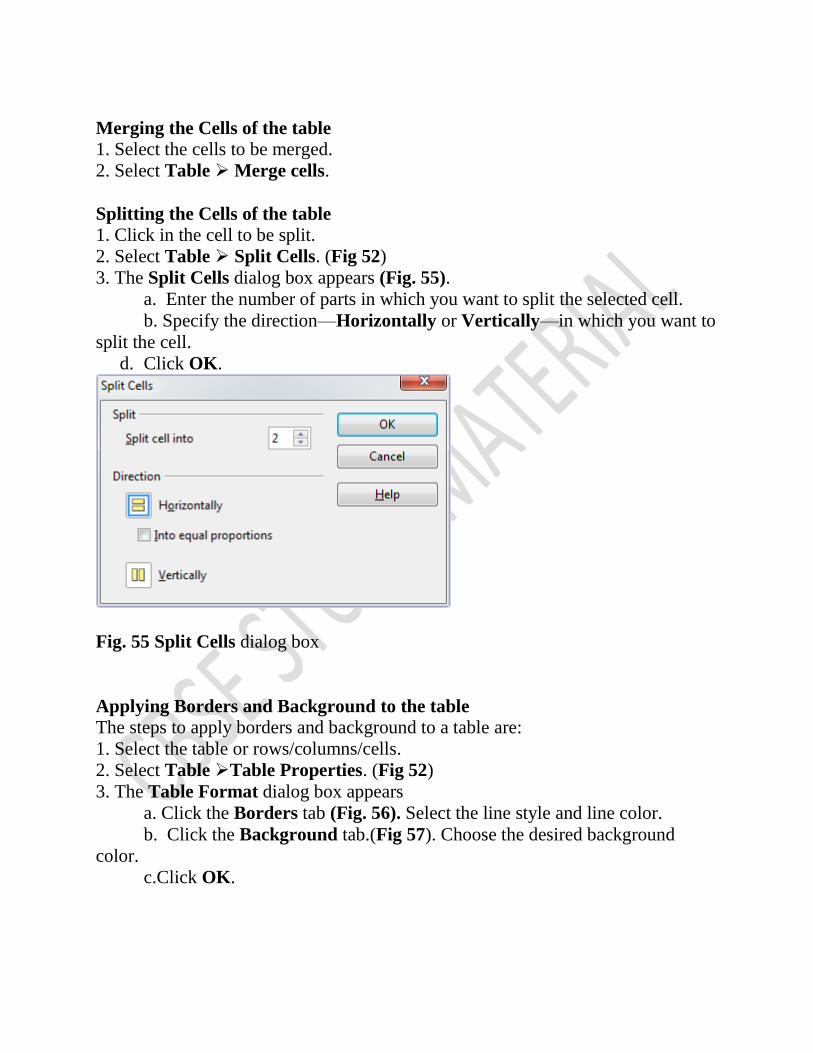
Merging the Cells of the table
1. Select the cells to be merged.
2. Select Table Merge cells.
Splitting the Cells of the table
1. Click in the cell to be split.
2. Select Table Split Cells. (Fig 52)
3. The Split Cells dialog box appears (Fig. 55).
a. Enter the number of parts in which you want to split the selected cell.
b. Specify the direction—Horizontally or Vertically—in which you want to
split the cell.
d. Click OK.
Fig. 55 Split Cells dialog box
Applying Borders and Background to the table
The steps to apply borders and background to a table are:
1. Select the table or rows/columns/cells.
2. Select Table Table Properties. (Fig 52)
3. The Table Format dialog box appears
a. Click the Borders tab (Fig. 56). Select the line style and line color.
b. Click the Background tab.(Fig 57). Choose the desired background
color.
c.Click OK.

Fig. 56 Borders tab of Table Format dialog box
Fig. 57 Background tab of Table Format dialog box
USING THE FONTWORK GALLERY
OpenOffice Writer has an inbuilt Fontwork Gallery that can be used to insert text
in different styles.
The steps to use the Fontwork Gallery are:
1. Click the Fontwork Gallery (Fig 58) button on the Drawing bar. If
Drawing toolbar is not visible, select View Toolbars Drawing.
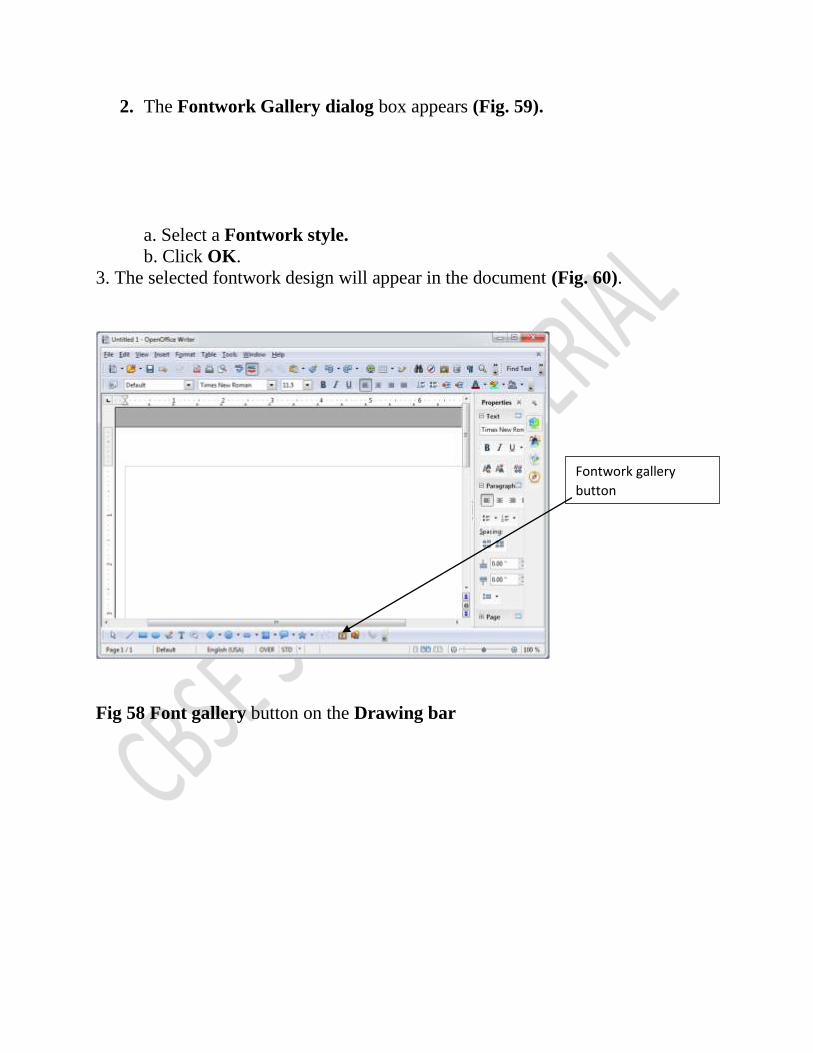
2. The Fontwork Gallery dialog box appears (Fig. 59).
a. Select a Fontwork style.
b. Click OK.
3. The selected fontwork design will appear in the document (Fig. 60).
Fig 58 Font gallery button on the Drawing bar
Fontwork gallery
button
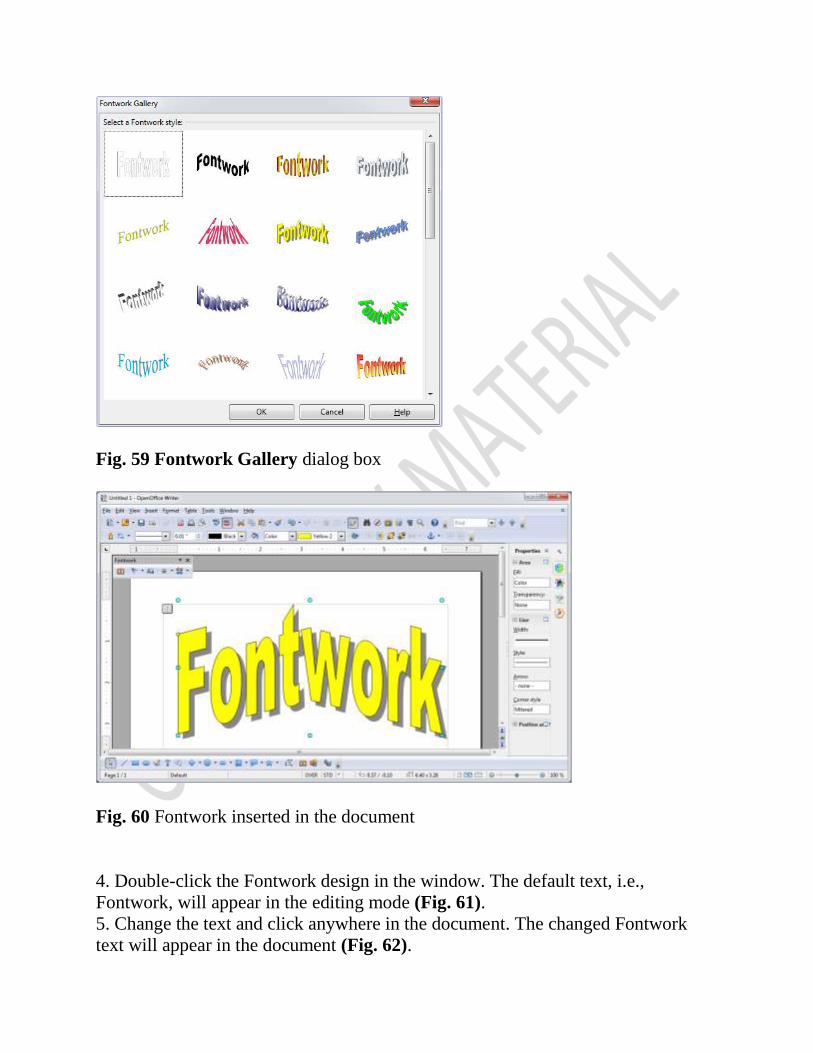
Fig. 59 Fontwork Gallery dialog box
Fig. 60 Fontwork inserted in the document
4. Double-click the Fontwork design in the window. The default text, i.e.,
Fontwork, will appear in the editing mode (Fig. 61).
5. Change the text and click anywhere in the document. The changed Fontwork
text will appear in the document (Fig. 62).

Fig. 61 Editing Fontwork text
Fig. 62 Fontwork text changed
6. You can change the properties such as the style of the text and
letter height using the Fontwork bar (Fig. 62).
Fig. 63 Fontwork bar
Fontwork bar

INSERTING IMAGES
You can insert images from either a file or from the OpenOffice Writer gallery.
Inserting Pictures from File
To insert pictures from a file in OpenOffice Writer, the steps are:
1. Click Insert Picture From File.
2. The Insert picture dialog box appears (Fig. 64).
2. Locate the picture you want to insert and click Open.
Fig. 64 Insert picture dialog box
Inserting Pictures From Gallery
To insert pictures from the OpenOffice Writer gallery, carry out the steps given
below:

1. Select Tools Gallery.
2. The Gallery appears above the document, as shown in Figure 65.
3. Select the theme that contains the image to be inserted.
4. Click on the required image. Drag and drop the image at the required position in
the document.
Fig. 65 Inserting a picture using Gallery
Wrapping Text
Text wrapping is a feature that automatically starts a new line when a word in a
sequence reaches the border of a picture, a text box, or the margin. There are
different options to wrap text around the image. The steps are:
1. Select the image.
2. Select Wrap option from the Format menu (Fig 65a).
a. Select the desired option.

Fig 65a Wrap option of Format menu.
HEADERS AND FOOTERS
Header is the text that is printed at the top of each page (in the top margin) in a
document. Footer is printed at the bottom of each page (in the bottom margin).
Header and Footers provide additional information about the document, like, date,
page number, etc.
To insert headers and footers in a document;
1. select Insert Header or Footer Default. (Fig 66)
The header area appears at the top of the document. (Fig 67) Type the
header.
Or
Select Page option from the Format menu. (Fig 68)
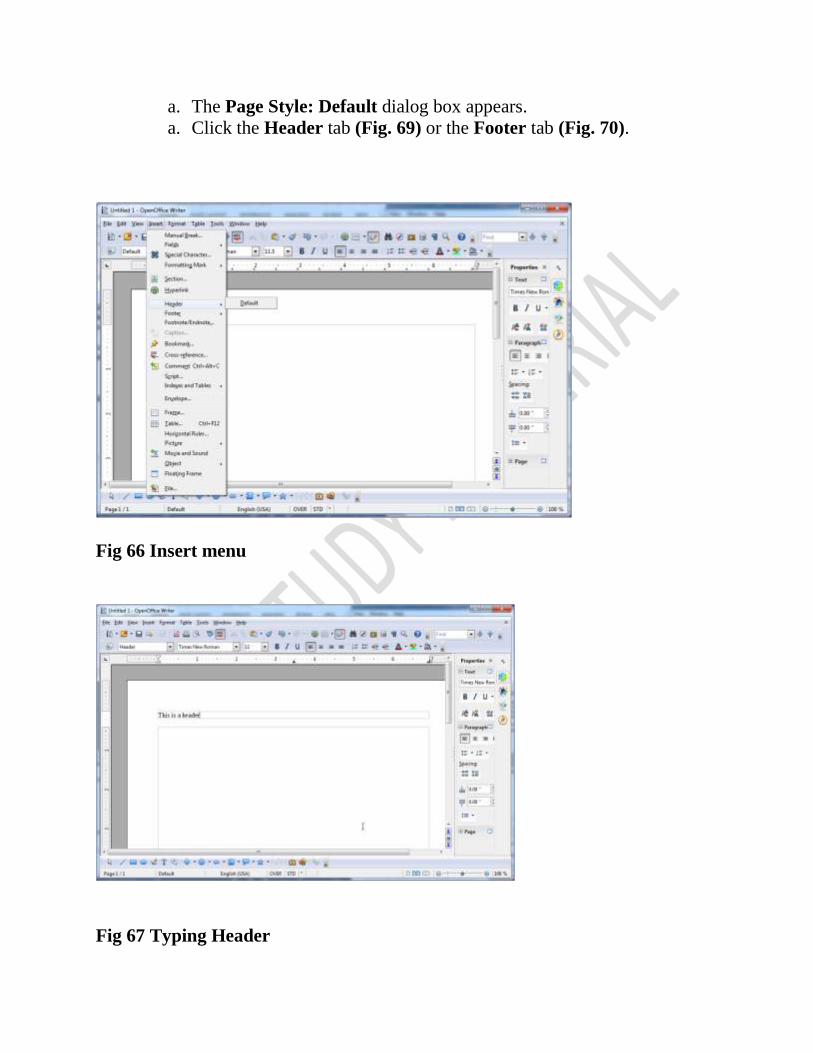
a. The Page Style: Default dialog box appears.
a. Click the Header tab (Fig. 69) or the Footer tab (Fig. 70).
Fig 66 Insert menu
Fig 67 Typing Header

Fig 68 Page option of Format menu
Fig. 69 Header tab of the Page Style: Default dialog box

Fig. 70 Footer tab of the Page Style: Default dialog box
c. A box will appear at the top and the bottom area of the page, respectively
(Fig. 71).
You can either type text or add date and time by selecting the Fields option in the
Insert menu.
4. Click in the document area to finish adding header or footer information.

Fig. 71 Inserting header
Removing Header or Footer
To remover header of footer, the steps are:
1. Select Insert Header or Footer Default.
2. A message box appears (Fig 71a).
3. Click Yes to delete the header or footer.
Fig 71 a Message box
Adding Page Numbers
You can add page numbers in the header or footer area. The steps are.
1. Click in the header or footer area.
2. Select Insert Fields Page Number (Fig 72).

Fig 72 Selecting Date option
PRINTING A DOCUMENT
To print a document, do the following:
1. Select Print option from File menu (Fig 73).
Or
Click the Print button on the Standard bar.(Fig 74)
3. The Print dialog box appears (Fig. 75).
a. Select the printer.

b. Specify the range of pages to be printed.
c. Specify the number of copies to be printed.
d. Click the Print button
Fig 73 Print option of File menu
Fig 74 Print button on Standard bar

Fig. 75 Print dialog box
Lets Try it 1
a. Design an advertisement for the ‘ABCD Personality Centre giving necessary
details. Run spell check to check spelling mistakes. You can also insert
suitable picture in the document. A sample is given below:
ABCD Personality Development Centre
New Delhi
Join the centre for overall personality growth.
The centre holds classes on:
English Speaking
Grooming and Etiquettes
Hobbies like, theatre, modelling, public speaking, yoga and meditation
Admission open for children between the age group of 10 to 18 years.
For further details contact
Mr. ABC 98######90

Let’s Try it 2
1. Create a new document in OpenOffice Writer.
2. Type an essay on the topic ‘Pollution’.
3. Insert page number as footer and ‘Pollution’ as header.
4. Use autocorrect to correct the spelling mistakes.
5. Insert suitable pictures in the document.
6. Use Wrap feature to wrap the text around the image.
7. Save the document in .doc format so that it can be opened in Microsoft
Word also.
Lets Try it 3
1. Create a new document in OpenOffice Writer.
2. Design your class time table.
3. Format the text in the table.
4. Apply border to the table and shading to the cells of the table.
5. You can also insert suitable picture in a table cell.
Worksheet
1. Write keyboard shortcut for the following commands:
a. Spelling and grammar option ___________
b. Find and Replace ______________
2. Name the menu that has option to change the alignment of text in a
document.
_________________________
3. Name the four alignment options.
__________________
__________________
_________________
_________________
4. The intersection of row and column in a table is called a ________.
5. What is the name given to the text printed on top of each page of the
document? ___________
6. What is the name given to the text printed at the bottom of every page in a
document? __________
7. AutoSpellcheck option is available on ___________ bar.
8. How ca you get the Drawing bar if is not there in the document window?

________________________________________
________________________________________
9. A ________ list is used when the order of items is important.
10. The default bullet style is ________________.

Basic Computer Operations
Session 1
As we all know that computer is a very useful machine. It is very important to properly
start the computer and after finishing the work, it needs to be properly shut down. If
the power of the computer is switched off, and the files you were working on were not
closed, the files and the operating system may get corrupted.
Operating System
An operating system is the basic software that controls the computer. It serves as an
interface between the user and the computer.
Some of the functions of Operating system are:
It manages all the devices of a computer and keeps track of the status of
the device, whether it is busy or not.
It also checks whether the device is functioning properly or not.
It also controls software resources of the computer.
t manages the computer memory and keeps track of which memory space
is in use by which program and which space is free.
It manages the structure of the files and directories on a computer system.
It keeps track of the amount of disk space used by a specific file.
It allows you to create, copy, move and delete files.
Types of Operating Systems
We have already discussed about some commonly used operating systems in class IX.
These are:
DOS DOS (Disk Operating System)
Windows It is an operating system developed by Microsoft.
Linux It is an operating system designed for personal computers. It is a free and
open-source software
Mobile operating Systems
Android

Symbian
Windows Phone
iOS
Types of Operating Systems
The different types of operating systems are as follows:
Interactive (GUI-based) A graphical user interface is a user-friendly operating system
in which commands can be entered by clicking/double-clicking/right clicking a
mouse. Windows operating system is an example of an interactive operating system.
Single-user , single-task operating system This type of operating system allows only
one user to do a task on the computer and one thing at a time.
Single-user, multi-task operating system This type of operating system is used on
Desktop computers, laptops, where a single user can operate on several programs at the
same time. For example, Windows, Apple MacOS are examples of single-user multi
task operating system.
Multi-user A multi-user operating system enables multiple users to work on the same
computer at different times or simultaneously.
Real Time A real time operating system is used to control machinery, scientific
instruments, like robots, in complex animations and computer controlled automated
machines. A real-time operating system is a computing environment that reacts to input
within a specific period of time. It manages the resources of the computer so that any
particular operation is executed in the same amount of time every time it is executed.
Windows CE and Lynx OS are examples of real-time operating systems.
Distributed A distributed operating system runs on a set of computers that are
interconnected by a network. It combines the different computers in the network into a
single integrated computer and storage location. Windows, UNIX, and LINUX are
examples of distributed operating systems.
Session 2
In class 9, we discussed about Windows 7 operating system.
Windows 7 operating system

Windows 7 is an operating system developed by Microsoft and is used on personal
computers.
After loading Windows 7, the first screen that appears on the monitor is called
desktop. From the desktop, you can access different components of Windows 7.
By default, Windows 7 has a picture for the desktop background. This is called
wallpaper.
Small pictures on the desktop are called icons. These icons represent files, folders,
applications, etc. At the bottom of the desktop is a long bar called the Taskbar. To the
left of the taskbar is the Start button.
Components of Windows 7 Desktop are shown below:
Fig: Desktop
We already know that use of following icons:
Computer It displays all the storage areas of the computer . Through the Computer
icon, you can access all drives, files, and folders on the computer. When you double-
click Computer icon, a window shown below appears on the screen.
Computer
icon
Recycle Bin
Start
button
Task bar
icons
Wallpapaer
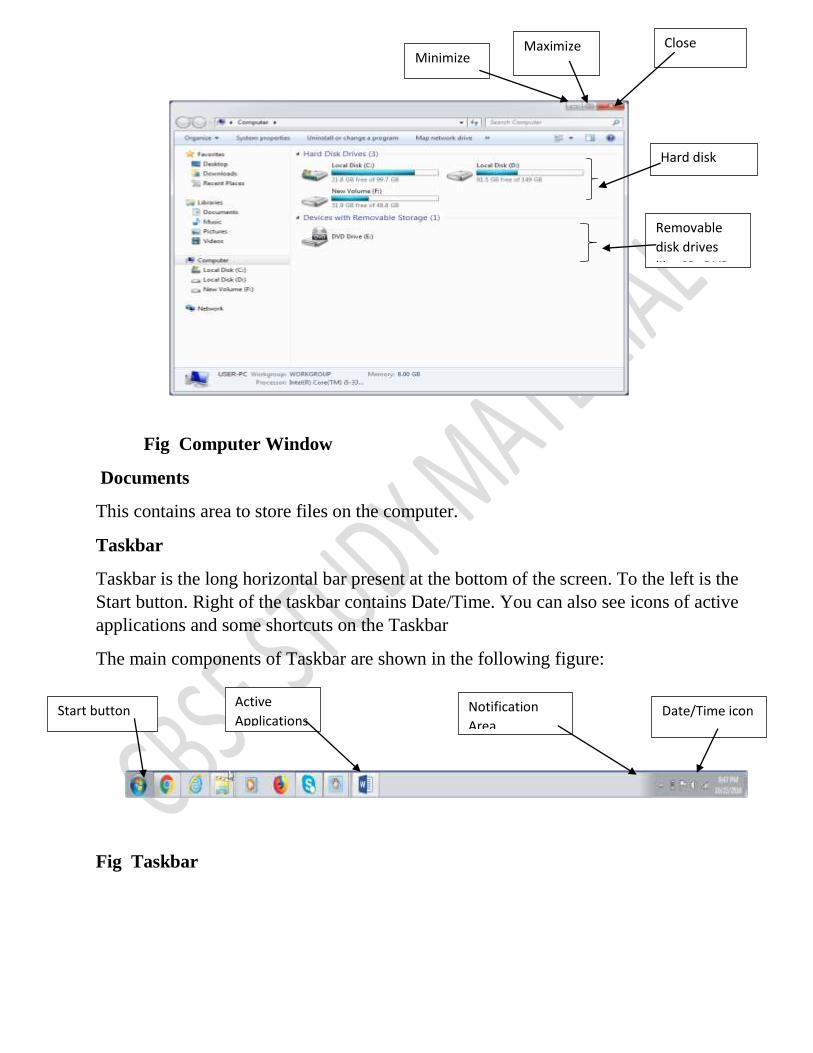
Fig Computer Window
Documents
This contains area to store files on the computer.
Taskbar
Taskbar is the long horizontal bar present at the bottom of the screen. To the left is the
Start button. Right of the taskbar contains Date/Time. You can also see icons of active
applications and some shortcuts on the Taskbar
The main components of Taskbar are shown in the following figure:
Fig Taskbar
Start button Date/Time icon Notification
Area
Active
Applications
Hard disk
drives
Removable
disk drives
like CD, DVD,
Pen Drive
Minimize Maximize Close

Start button It is located on the left of the taskbar. Clicking the Start button opens the
Start menu and provides access to programs and features, like:
Shut Down:- allows the user to turn off the computer
All Programs:- Provides access to all the installed
programs and applications. To start an application, just
click it.
Search Box:- This allows the user to search a file or a
folder or run executable files.
Control panel:- This allows the user to change various
settings.
Recycle Bin
Files and folders deleted by the user are stored in the Recycle Bin. From Recycle Bin,
you can retrieve files or folders deleted by mistake.
Session 3
Lets Try It
1. Start Your computer.
2. Name the operating system in your computer. ________________
3. Identify three main icons on the desktop and write their names
_________________
_________________
_________________
4. Identify and write names of three files on the desktop.
__________________
__________________
__________________
5. Identify the position of the taskbar on the desktop. Is it at the top, bottom, left or
right?
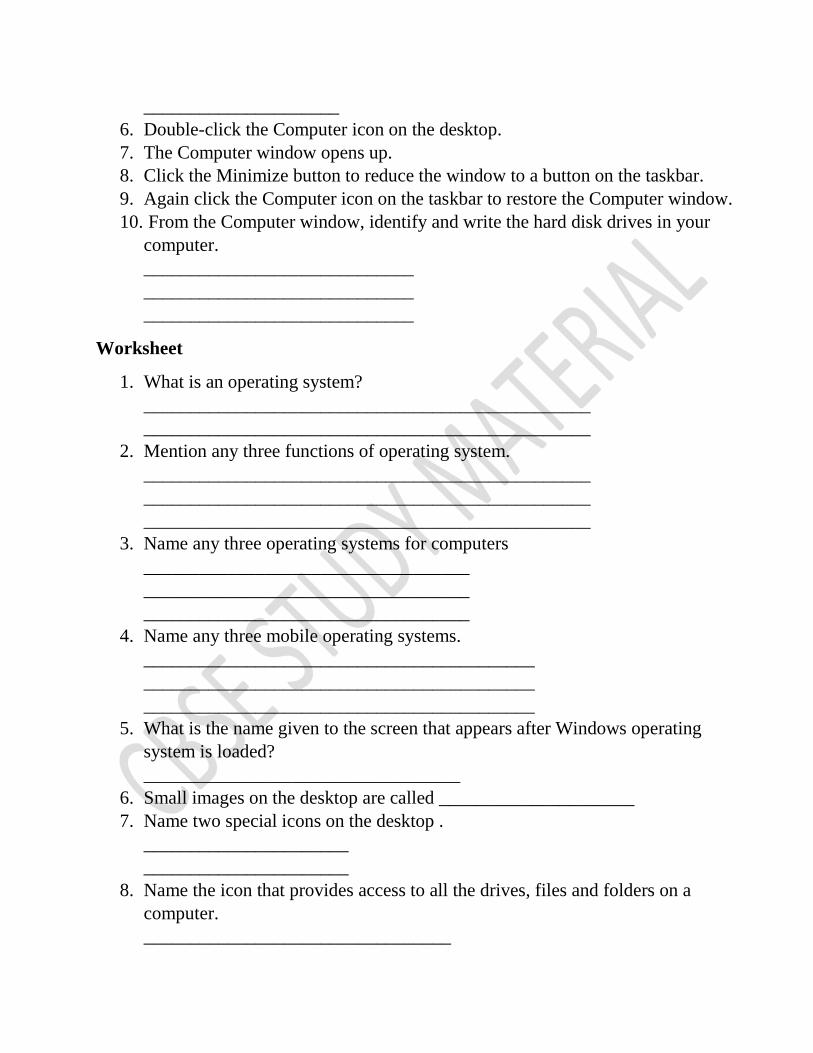
_____________________
6. Double-click the Computer icon on the desktop.
7. The Computer window opens up.
8. Click the Minimize button to reduce the window to a button on the taskbar.
9. Again click the Computer icon on the taskbar to restore the Computer window.
10. From the Computer window, identify and write the hard disk drives in your
computer.
_____________________________
_____________________________
_____________________________
Worksheet
1. What is an operating system?
________________________________________________
________________________________________________
2. Mention any three functions of operating system.
________________________________________________
________________________________________________
________________________________________________
3. Name any three operating systems for computers
___________________________________
___________________________________
___________________________________
4. Name any three mobile operating systems.
__________________________________________
__________________________________________
__________________________________________
5. What is the name given to the screen that appears after Windows operating
system is loaded?
__________________________________
6. Small images on the desktop are called _____________________
7. Name two special icons on the desktop .
______________________
______________________
8. Name the icon that provides access to all the drives, files and folders on a
computer.
_________________________________

9. Name the button to the left of the taskbar.
______________________________
10. Picture for the desktop background is called _____________.
Session 4
File System
Everything you store on your computer is stored in the form of a file. File system is a
way in which you give name to a file, store it and retrieve it. There are specific naming
conventions for naming files or folders, like characters that can be used, maximum
number of characters, etc.
Files can be separately placed into groups, called folders/directories. Each
directory/folder can contain related files and/or sub-folders. A sub-folder may contain
one or more files and sub-folders within. This allows easy accessibility of files.
Files are managed in a hierarchy. This allows you to view the files in the current
directory and then move to sub-directories.
Creating a folder
D:\
Folder 1
File 1 Folder 3
File 2 File 3
Folder 2
Folder 4
File 4 File 5

The steps to create a new folder are:
1. Double-click the Computer icon. (Fig )
Fig
2. Select the drive in which you want to create a new folder. Say, Local Disk D:.
3. Window will open up showing files and folders in Local Disc D: (Fig )
New Folder
option

Fig Files and folders in Local Disc D:
4. Click New Folder on the toolbar.
Or
Right-click anywhere in the blank area of the right column. A shortcut menu
appears. Select New Folder from the shortcut menu. (Fig )
Fig Shortcut menu
5. A new folder is created with name New Folder highlighted (Fig ).
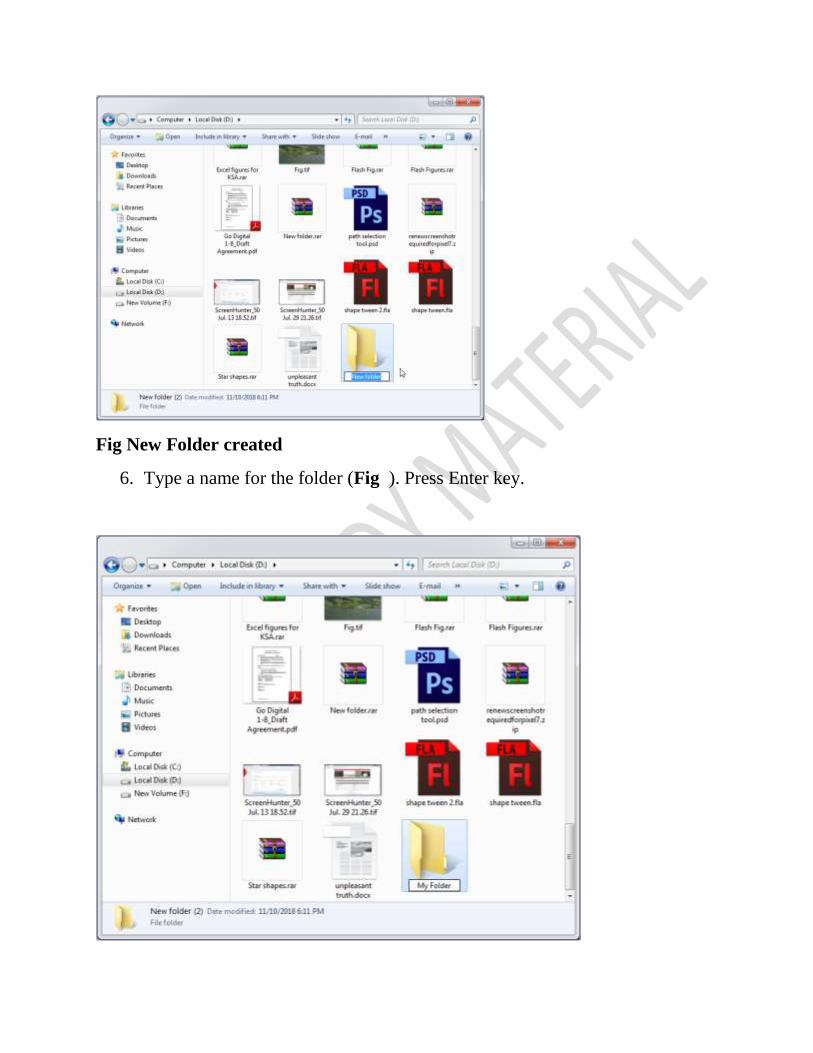
Fig New Folder created
6. Type a name for the folder (Fig ). Press Enter key.

Fig naming a folder
Creating a file
To create a new file:
1. Right-click anywhere in the blank area of the right-column.
2. In the Shortcut menu, click New and select the type of the file you want to
create.
Fig Creating a new file
Renaming folders and files
To rename a file or a folder, the steps are:
1. Right-click the file or the folder.

2. From the shortcut menu, select Rename option (Fig ).
Fig Rename option of Shortcut menu
3. Type the new name or edit the existing name and press the Enter key.
Deleting files or folders
To delete a file or a folder:
1. Click the file or the folder.
2. Press the Delete key.
Or
Right-click and select Delete option from the Shortcut menu.
Lets Try It
1. Start your computer.
2. Double-click the Computer icon.
3. Select Local Disk D:.
4. Create a folder named ‘MyNew Folder’ in Local Disk D:
5. Rename this folder as ‘My Folder 1’.
Worksheet

1. Similar types of files can be placed into groups called ___________.
2. Mention any one way in which can create a new folder.
________________________________
________________________________
3. To change the name of the folder, right-click and select __________ option from
the Shortcut menu.
4. How can you delete a folder?
Session 6
Copying Files and folders
When you copy a file or a folder, duplicate of the original file or folder is created at the
new location., the original remains as it is.
You can copy a file or a folder in any one of the following ways:
1. Shortcut menu:
a. Right-click the file or the folder you want to copy.
b. Select Copy option from the Shortcut menu. (Fig )
c. Select the drive or the folder where you want to make a copy of the
selected file or folder.
d. Right-click and select Paste option from the Shortcut menu.

Fig Shortcut menu
2. Drag and Drop method: To copy a file or a folder, hold down the Ctrl key
while dragging it to the new location.
3. Using Keyboard:
a. Select the file or the folder.
b. Press Ctrl + C to copy the file or the folder.
c. Open the destination folder.
d. Press Ctrl + V to paste the copied file.
Moving Files and folders
When you move a file or a folder, the original file or folder is moved to the new
location.
You can move a file or a folder in any one of the following ways:
1. Shortcut menu:
a. Right-click the file or the folder you want to copy.
b. Select Cut option from the Shortcut menu. (Fig )
c. Select the drive or the folder where you want to move the selected file or
folder.
d. Right-click and select Paste option from the Shortcut menu.
Fig Shortcut menu
2. Drag and Drop method: To copy a file or a folder, select the file and drag it to
a new location.
3. Using Keyboard:

a. Select the file or the folder.
b. Press Ctrl + X to cut the file or the folder.
c. Open the destination folder.
d. Press Ctrl + V to paste the copied file.
Permanently Deleting Files
You can permanently delete the contents of the Recycle Bin in any one of the
following ways:
Right-click the Recycle Bin icon and then click Empty Recycle Bin.
OR
1. Double-click the Recycle Bin icon.
2. The Recycle Bin window appears.
3. Click Empty the Recycle Bin.

Restore Files/Folder from Recycle Bin window
To recover a file from the Recycle Bin, right-click the file, and then click Restore.

Or
Select the file and click Restore this item
Lets Try It
1. Start your computer.
2. Double-click Computer icon.
3. Double-click Local Disk D:
4. Create a new folder name in Local Disk D:
5. Rename this new folder as ‘My Text Files’.
6. Copy this folder to My Documents.
7. Open folder ‘My Text Files’ in My documents.
8. Create another folder named ‘My New Files’.
9. Move this folder ‘My New files’ on the desktop.
10. Delete the folder ‘My New Files’
11. Restore the deleted folder.
Lets Try It
1. Start your computer.
2. Start Notepad.
3. Type few sentences about your school.
4. Save the file in the folder ‘My New Files’ created in the previous assignment.
Worksheet
5. What is the difference between moving and copying a folder?
_______________________________________
______________________________________
________________________________________
________________________________________
6. Differentiate between file and folder.
________________________________________
________________________________________
________________________________________
________________________________________
7. Name the set of commands to move a folder from one location to another.
___________________________
8. Name the place where deleted files are placed.
________________________
9. How can you empty the recycle Bin?
____________________________________
____________________________________

Unit - Apply Basic Skills for care and Maintenance of Computer
Session 1
Importance and need of care and maintenance of computer
Computer systems require maintenance so that the system works efficiently. Poor
maintenance may lead to system failure.
Regular care and maintenance may help you detect any issues at an early stage and
keep it functioning well.
Since a lot of important data is stored in the computer, it is necessary to have
regular maintenance of the computer to be done.
Computer virus, malware, and other harmful softwares can cause damage to the
working of the computer. If anti-virus is installed in the computer, and is updated
and run periodically, then any loss of data can be prevented.
A large number of files are stored on the computer. These files can be disorganized
and fragmented and may result in slowing down of the computer.
Regular maintenance of the system includes installing updates, security, taking
backups, scans, etc
Both internal and external parts of the computer system should be taken care of.
1. Keep the computer dust free.
2. Do not eat or drink while working on the computer. Food or drink may spill
on the system.
3. To keep the keyboard clean, make sure your hands are clean before using it.
4. CDs and DVDs should be handled carefully so that it does not get any
scratches.
5. Keep keyboard covered when not in use.
Cleaning the computer components

Computer components needs proper care for these to last longer. Preventive
maintenance increases the life of the components.
For example, a cable is damaged, but still working. It should be timely replaced or
repaired to prevent any other damage.
Fan in the CPU helps to cool down the CPU as it gets heated while working. If the
cooling fan is blocked, may be due to dust and is not repaired or replaced, can
easily catch fire. Therefore regular inspection of the components is required. This
increases the lifetime of the hardware.
General precautions to be takes while cleaning the computer components are:
Always Power Off the computer system before cleaning.
Never spray cleaning fluid directly on the component of the computer. First
spray the liquid on the cloth and then wipe the component.
Do not allow the cleaning liquid to drip near the circuit board.
Preferably use anti-static wrist band which helps to prevent building up of
static electricity near electronic device.
Lets Try It
Discuss the need of care and maintenance of computer
Session 2
Let’s discuss how to clean some common peripheral devices of computer
Computer monitor
To clean the computer monitor, you can use a soft lint-free cloth, like cotton and
water or special cleaning liquid. You should not spray water or cleaning liquid
directly on the computer monitor as it may run through the seams. Spray water or
cleaning liquid on the cloth and gently wipe the computer monitor
Keyboard

Dirt and dust can cause damage to the keyboard. Keys of the keyboard may not
function properly if dirt enters the keys. You should always clean the keyboard
periodically by holding upside down and shaking it. You can also clean it by
blasting it with compressed air. After this, use a damp lint-free cloth to clean top of
the keys. You should never spray any liquid cleaner or water directly on the keys
of the keyboard.
Optical Mouse
You can clean the bottom of the optical mouse with a clean lint-free cloth. Lens
area can be cleaned by blowing air or cotton swab.
Digital camera
Never touch the lens of the camera. To remove the dust, you can use soft lens
brush or wipe with a soft dry cloth. For stubborn dust, you can use special fluid for
lens cleaning which should be first pot on the tissue and then wipe the lens. Never
put the fluid directly on the lens.
CDs and DVDs
Keep CD/DVD in proper case to prevent it from scratch free. If there is some dirt
on the CD or DVD, it may not work at all. Finger prints and dirt can be removed
by lightly rubbing with a clean lint-free cotton cloth. If the dirt is hard to remove,
you can use special cleaning fluid. Put the drop of fluid on a swab of cotton and
gently rub on the media.
Lets Try It
Demonstrate the procedures for cleaning the components of the computer system
and other peripheral devices
Session 3
Preparing maintenance schedule
Regular maintenance of the computer system is very important.
Some of the maintenance activities are:

Keep the components of the computer, like keyboard, mouse, monitor, etc.
clean.
Replacing hardware that is not functioning properly
Keep food items away from the computer
Cables and chords should not be messed up
Removing unauthorized software from the computer
Taking regular backup of the data
Ensure backups are working properly by periodically restoring data. You
should use external hard drive for backup of data on your computer.
Running anti-virus periodically
Keeping anti-virus software up to date
Do not overcharge the batteries
Do not block the vents
Always shut down the computer properly
Regular scans should be done to check for viruses, malware, etc. An effective
antivirus software should be installed in your computer. Always keep your anti-
virus software updated so that it can detect new viruses. Full system scan should be
done to periodically, preferably weekly to scan for viruses.
A regular disk defragmentation should be done to remove all unnecessary
information that slows down the computer. Disk defragmentation done at regular
intervals helps the disc space to be used at an optimal level.
Take regular backup of the data on your computer. In case the data is lost due to
any reason, system failure, virus attack, etc. , you can easily retrieve your data
using backup files.
System should be upgraded with new technology that were not there at the time of
purchase, like, increasing RAM, to improve the performance. Also storage space
should also be increased for storage of more information.
If you are getting some disc errors, then make sure that temporary internet files
should be deleted from time to time.

Softwares should be updated regularly so that it works with maximum efficiency.
Lets Try It
1. Discuss the importance and need of care and maintenance of computer.
2. Discuss how to clean different components of the computer system.
Worksheet
1. What is the possible cause of slowing down of computer?
2. Why keyboard should be covered if not in use?
3. What general precautions should you take while cleaning the computer
components/
4. List some of the maintenance activities for the computer system.
5. Why regular disk defragmentation should be done?
Session 4
Computer virus
A computer virus is a software program that attaches itself to other programs and
alters their behavior. A virus may or may not be destructive. Some viruses erase
data or corrupt programs on the computer.
When a virus enters a computer system, it makes copies of itself and carries out the
harmful tasks that it is programmed for.
Some viruses get activated at a certain date and time. Viruses also attach to the
files stored on the computer or the storage media and harm these files.
A virus may get attached to e-mail messages and spread from one computer to
another.
A computer virus can infect only the software and not the hardware.
A computer can get infected with virus in any of the following ways:
Infected files
Infected pen drives
Infected CD-ROMs
Through infected file attachment of e-mails

A computer virus cannot do the following:
It cannot infect files on CD or DVD.
It cannot infect computer hardware like, keyboard, mouse, etc.
How do we know that our computer is infected with virus? Sometimes, computer
shows strange behavior. Some of the common signs of a virus attack are:
Computer runs very slow
There is change in the file size
Computer often stops responding
There is an increase in number of files (unusual)
Unusual error message appears on the screen
Computer restarts on its own
Lets Try It
1. Discuss the difference between human virus and computer virus.
2. Discuss various signs that indicate that computer is infected with virus.
3. Discuss various ways in which computer may get infected with virus.
Session 6
How to prevent virus infection
The following points should be kept in mind to prevent virus infection:
Install and use anti-virus software.
Keep anti-virus software updated.
Scan all the files that you download from the Internet
Do not open e-mails of an unknown person/sender
Don’t allow any untrustworthy person to use your system.
New use unknown pen drive/CD on your computer
Never click on the windows that pop-up when you are surfing the Internet.
Preparing computer against virus
To prevent our computer from being infected with virus, we should install anti-
virus software, run it periodically and keep it updated so that it can scan and
remove new viruses.
Antivirus software is a program designed to detect and remove malicious programs
from the computer.
Some examples of antivirus software are McAfee VirusScan, Norton AntiVirus,
Microsoft Security essentials, and Quick Heal.
For an anti-virus program to be effective:
• It needs to run in the background at all times.
• Keep the anti-virus software updated so that it can recognize new viruses.
• run full disk scans periodically.
Scanning and cleaning virus
Let us discuss how to use Quick Heal Total security to scan the computer system.
1. Click Start All Programs Quick Heal Total Security Quick
Heal Total Security.
Or
Double-click the Quick Heal Antivirus icon on the desktop.
2. The main window of Quick heal Total Security opens up (Fig 1)
Figure
Fig 1 Main window of Quick Heal Total Security
3. The main window has three sections:
a. Top section has the following options:
Option Description
Settings Using this option you can customize settings
like, automatic update, Internet settings, Self
Protection, Password Protection, Restore
Default Settings, etc.
Tools Helps you diagnose the system in case of
virus attacks, clean application and Internet
activities, restore the Internet Explorer
settings modified by malwares, isolate the
infected and suspicious files, prevent USB
drives against auto-run malware infection.
You can also exclude files from virus
protection.
Reports Helps you view the activity reports of
Scanner, Virus Protection, Email Protection,
Scan Scheduler, Behavior Detection, Quick
Update, Memory Scan, Phishing Protection,
Registry Restore, Boot Time Scanner, etc.
Help This option provides information on how to
use Quick Heal Antivirus and details about
the version, etc.
b. The middle section has the following options:
Files and Folders Helps you protect files and folders against
malicious threats.
With this option, you can configure Scan Settings,
Virus Protection, Block Suspicious Packed Files,
Screen Locker Protection, Scan Schedule, Exclude
Files & Folders, and Quarantine & Backup.
E-mails Helps you configure Email Protection, Trusted
Email Clients Protection, and Spam Protection.
Internet & Network Helps you configure the settings for Internet &
Network protection. With this option, you can
configure Firewall Protection, Browsing
Protection, Malware Protection, Phishing
Protection.
Parental Control Helps you control the Internet access, application
access, and computer access for the children and
other users.
External Drives & Devices This option allows you to configure settings
related to threats that come from CDs, pen drives,
external disks, etc.
c. The bottom section has the following options:
News This option provides you with the latest news from Quick Heal
PC Tuner Helps you improve system performance by cleaning your
system with features such as Disk Cleanup, Registry Cleanup,
Traces Cleanup, Duplicate File Finder, Secure Delete and
Registry Defragmenter.
Scan This option provides various scanning options, like, Full
System Scan, Custom Scan, Memory Scan, Mobile scan and
Boot Time Scan.
To perform full system scan,
1. Click Scan Full System Scan.
2. The scan process will begin
3. On completion of the scan, the scan statistics and reports are provided.
4. Click Close.
Fig Full System Scan in progress
Fig Scan statistics and reports
Lets Try It
1. Name the antivirus software installed in your computer.
2. Scan your computer with the anti-virus software installed in your
computer.
Worksheet
1. Mention few ways in which a computer gets infected with virus.
2. Can computer virus infect hardware?
3. What are the common signs of a virus attack?
4. How can you prevent your computer from virus infection?
5. What is the use of antivirus software? Name any two commonly used
anti-virus software.
Session 7
Removing Temporary Files
The steps to remove temporary files are:
1. Double-click Computer icon on the desktop.
2. The Computer Window opens.
Figure
Figure

3. Right-click Local Disk C: and select Properties option from the Shortcut
menu. (Fig)
Fig Computer window
4. The Properties window opens. (Fig)

Fig Properties window
5. Click Disk Cleanup.
6. The Disk Cleanup for C: window appears (Fig )
7. Click the Check box next to Temporary Files, Temporary Internet files,
etc. that you want to delete.

Fig Disk Cleanup window
8. Click OK.
9. A confirmation message will appear (Fig ).
Fig Confirmation message
10. Click Delete Files.
11. Windows will delete all the temporary files on the computer.

Removing files of Temporary Folder
The steps to remove files of temporary folder are:
1. Press Windows button + R on the keyboard.
2. The Run dialog box appears.
3. Type %temp% (Fig )
Fig Run dialog box
4. The Temp folder opens (Fig )

Fig Temp folder
5. Click Ctrl + A to select all the files in the folder. (Fig )
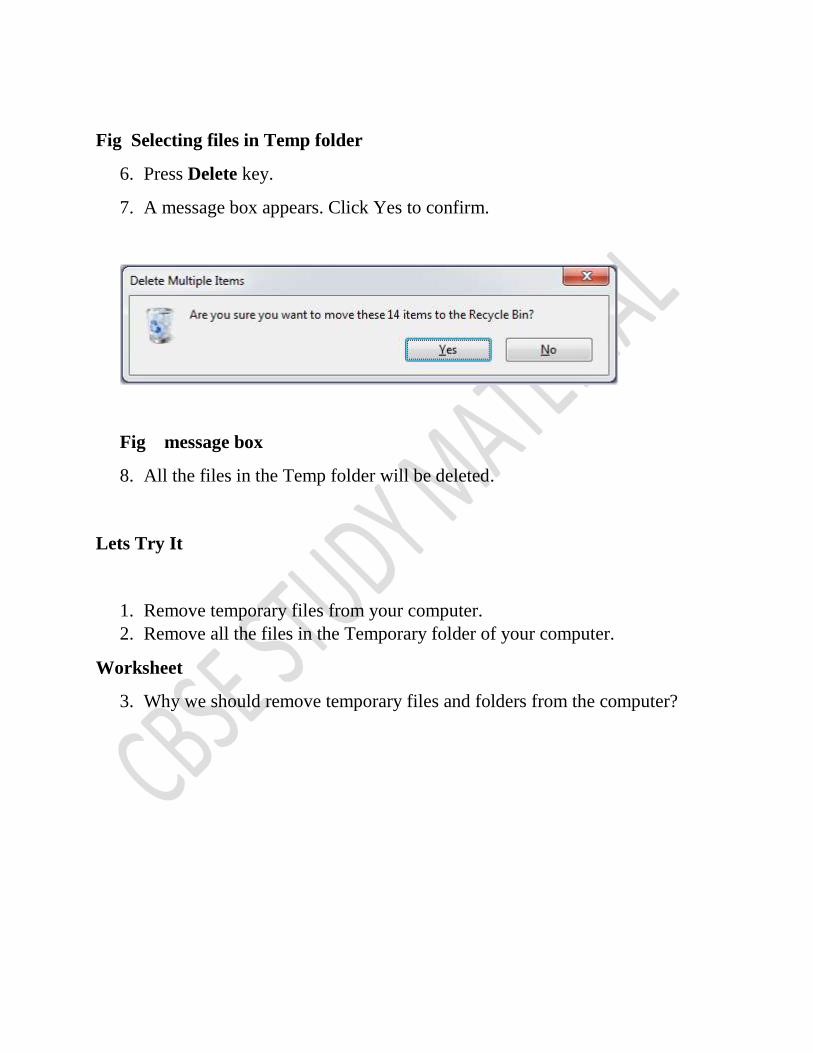
Fig Selecting files in Temp folder
6. Press Delete key.
7. A message box appears. Click Yes to confirm.
Fig message box
8. All the files in the Temp folder will be deleted.
Lets Try It
1. Remove temporary files from your computer.
2. Remove all the files in the Temporary folder of your computer.
Worksheet
3. Why we should remove temporary files and folders from the computer?

Self-Management Skills
Theory and 4 Let’s Do It
“Harmonise the head, the heart and the hands to be happy.
Be an integrated personality. Disintegration causes stress.
Integration gives tremendous satisfaction.”
Nastibuddhirayuktasya..Ch.2
Meaning and Importance of Stress Management
Stress Management refers to focusing human efforts for maintaining a healthy body and mind capable
of better withstanding stressful situations. Occasional stress is an unavoidable part of one’s life. Stress
refers to a “physical, mental, or emotional strain or tension”. Small amounts of stress have a positive
effect and they help us stretch ourselves to new level. High levels of stress over prolonged periods need
to be managed. A Stress well managed can help one view events and situations as challenges and
contributes in the growth of individual. Unmanaged stress leads to anxiety and sorrow resulting in ill
status of mental and physical health. Stress causal agents can have following origins.
Fig. 1 Stress Causal Agents’ Categories
STRESS CAUSAL AGENTS
Mental
Social
FINANCIAL
Physical

Mental: Students can be left overwhelmed, if they are unable to handle their assignment submission
deadlines and examinations grades. Overly high expectations from self can leave one with chronic
anxiety and stress.
Physical: As children grow up they may seek more independence, may become critically conscious of
their looks and have to cope up with hormonal changes. Issues related to general well-being and health
of an individual can lead to low self-esteem and cause stress.
Social : Discord amongst family members, peer pressure for doing things which kids will generally avoid ,
maintaining balance in relationships amongst friends, status show off may lead to stress at times.
Financial: Youngsters may have aspirational financial stress. This may of becoming findependent or
Finances aspirational stress may
Importance of Stress Management
Being well versed with stress coping mechanisms helps people lead and healthy and happier life.
Adequately managed stress prevents medical and physical illnesses. Stress management is vital because
it leads to following benefits.
Improves mood
Boosts immune system
Promotes longevity
Leads to burst of physical strength, which is vital for goal achievement
Complete mental and physical engagement for task accomplishment
Increases efficiency and effectiveness
Prevents psychological disorders and behavioral problems
Stress Management Techniques
Stress is a mental state where one size doesn’t fit all, what stresses one person may not stress others at
all. It is highly individualistic phenomenon and the solution has to be customized to individual’s mental
state. Physical signs which may suggest stress are: breathlessness, dry mouth, butterflies in stomach,
indigestion, nausea, acidity, fatigue, sweaty palms, cold hands and feet, irritation and hyperactivity etc.
At the mental level following symptoms may reflect stress irritation, impatience, loneliness, upset,
anxious, depressed, frustration, bored, guilty, insecure and forgetfulness.
Self-awareness amongst individuals for symptoms of stress will help them manage it better. They should
try understanding the cause, understanding self and taking remedial measures. Avoiding the issues or
procrastination is not the solution. Speaking out to the well-wishers like family and friends is of help in
stress management as they provide a social support system. Apart from positive thinking, managing
one’s time across any or a combination of the following activities aids in stress management.
Physical Exercise
When stress affects the brain, rest of the body also feels the impact. Physical exercise in the
form of walking, skipping or for that matter indulging in any sports has been found to relieve
stress as they stabilize mood, improve self-esteem and induce sleep.
Yoga
Yoga is a school of Hindu philosophy reduces stress, which includes a series of postures and
breathing exercises practiced to achieve control of body and mind.
Meditation
It is a practice where an individual is supposed to focus his/her mind on a particular object,
thought or activity to achieve a calm mental state reducing stress.
Enjoying
Recreational activities like watching movies, attending concerts, playing games, involving in
adventure sports, singing, dancing or even sketching can help individuals transcend to a happier
mental state and help manage stress.
Going On Vacations with Family and Friends
Vacations provide an opportunity of taking a holiday from our routine and appreciate different
facets of life. Vacations can be taken up to friends and relatives place as well as to far flung
attractive locations. Vacationing helps in de-stressing individuals.
Taking Nature Walks
Taking nature walks in a pristine environment of a national park or a sanctuary or a trail in
country side / village, brings us a calmness by allowing our over stimulated minds a chance to
relax and helps us relax.
Ability to Work Independently
Everyone who has been sent on this earth has been blessed in their own way. They together make this
earth a beautiful place. Some can sing well, others are good at sports, some are intellectuals and some
are good comedians. Everyone is special. But it is important that everyone learns the art of working
independently. This typically means that one must learn to take ownership of the task assigned and
leave no stone unturned in accomplishing the task. The individual who has the ability to work
independently need not be supervised for the task completion.

Importance of The Ability to Work Independently
Following benefits of working independently advocate its importance.
Ensures greater learning.
Individuals feel more empowered and responsible.
It provides flexibility to choose and define working hours and working mechanisms.
Failure and success of the task assigned are accounted by individuals.
Individuals become assets to organizations, groups and nations
It ensures creativity and satisfaction amongst individuals.
Enhancing Ability to Work Independently
Ability to work independently can be enhanced by being self-aware, self-motivated and self-regulated.
Let’s now learn what are these:
Self-Awareness
Having conscious knowledge of your own self, capabilities, feelings and one’s own character is called as
self-awareness. It helps individuals to chart their ways for working independently.
Self-Motivation
Self-motivated individuals have an inner urge to do something, achieve their goals without any external
pressure. It is a life skill and must be necessarily developed.
Self-Regulation
Self-regulation guides independent individuals as it helps them consider long term consequences rather
than just transient feelings. It leads to a responsible and a value driven behavior.
Lets’ Do It
Hands On Exercises to Understand the Concept Better
4 Sessions
Session A. Doing a yoga session/ meditation and discussing students’ about their
experiences.
Session B. Asking students to prepare a write-up/essay on experiences during a
holiday trip.
Session C. Asking students to present a talk on “what I Wish to become and what I
do about it”.
Session D. Planning of an activity in groups for creating a plan for school fest/ any
event in school/ class party and demonstrating how individual members contributed
the qualities required for working independently.

INTRODUCTION TO ENVIRONMENT
It is the natural surroundings of a living thing. It includes everything found in the
surroundings of living things such as air, water, plants, animals etc. Environment is essential
for continuation of life earth. It gives us everything needed to lead our life on Earth. It aids in
the growth & development of all livings things such as plants and animals. Our environment
plays a pivotal role in enabling the existence of healthy life on this planet.
Environment includes both the living things as well as non living things. The living things
broadly include plants and animals. The non-living things is constituted of three main parts –
1. Lithosphere – it refers to the outer layer of the earth. It includes rocks and soils found on
the surface of earth.
2. Hydrosphere – it refers to water bodies found on the surface of earth. E.g., seas, rivers,
oceans, streams etc.
3. Biosphere – it refers to that part of environment where life exists.
All living things such as Plants and animals require a healthy environment for their survival.
A healthy environment enables a diverse ecosystem with abundant diversity of species of
living things. Whenever ecosystems are harmed by man, it causes the threat to the survival of
a living thing. In the long run, it can even lead to the extinction of some species.
SOURCE - https://www.zmescience.com/ecology/ecosystems-what-they-are-and-why-they-are-important/

Human activities often wreak havoc on our environment leading to pollution of land, water,
and air pollution. However, our environment is degrading every single day. This is because of
the technological innovations in the modern age. The challenges posed by the continuous
technological advancements have lead to a decrease in the quality of environment. As a
result, environmental pollution has emerged as quite a hazard.
Forests are being cut with scant regard to the habitat of the wild animals. Destruction of
forests has lead to change in the climate as well. This can have disastrous impact in the long
run. Our water bodies such as rivers, lakes, ponds etc. have become dirty. This is caused due
to various activities of man such as washing of clothes in water bodies, flow of household
wastes and flow of industrial sewage into them. The air we breathe is becoming polluted too
because of the harmful gases emitted out by factories and industries. Same is the case of the
land we live on. We have infested our environment with harmful substances such as plastic.
If we fail to protect and conserve our environment, then it would become difficult to continue
life on earth.Another reason for deterioration of our environment is the non-stop exploitation
of our natural resources. In our continuous struggle for more and more industrial production,
we require more raw materials such as coal and petroleum. However, rampant use of these
natural resources, mainly fossil fuels, has lead to their continuous depletion. It is important to
realize that these resources are non-renewable which means that they cannot be replaced
naturally; if used indiscriminately, they can even get exhausted.
Environmental pollution affects millions worldwide In some of the world’s worst polluted
places, babies are born with birth defects, children have lost 30 to 40 IQ points, and life
expectancy may be as low as 45 years because of cancers and other diseases. So it becomes
important to save our environment so that our natural resources stay safe from pollution and
its toxic effects.

Source - https://slideplayer.com/slide/8012563/
RELATIONSHIP BETWEEN SOCIETY AND ENVIRONMENT,
ECOSYSTEM AND FACTORS CAUSING IMBALANCE
Interactions between human society and the environment are dynamic in nature. Man’s
relationship with environment has, over the course of earth’s history, followed a pattern of its
own. Every step in the history of man has seen a change in the nature of relationship with the
environment. Early humans, were, more or less in harmony with the environment. Being
hunter-gatherers, they took only so much from their environment as they required to fulfill
their basic needs. Their impact on environment was minimal owing to the nature of their
needs and the size of their population. However the situation changed with the increase in
population.
As the population increased, the lifestyle of the people also changed. This was accompanied
with the increase in demands of the people. It started an ever increasing dependence on
natural resources. This also saw a shift in living quarters of man; from living in small
settlements to residing in big towns and cities. This shift to city life inadvertently led to a

distancing from nature. While many people were still in-tune with nature on a subsistent
level, the need for more and more resources began to change our regard for nature. Thus
began a journey of imbalance and overuse of environment.
Although our distancing from nature began several thousand years ago with advancements in
agriculture and social order, it is the age of industry to which we owe our modern regard for
nature. The growth of cities allowed for a separation between people and nature and our
obsession with convenience and efficiency beckoned a new perspective on the
environment. With technological advancements, nature became something we were no
longer apart of and entirely subject to, but something that we could control and profit off
of. The growth of industry enabled humans to truly dominate the landscape and disrupt the
natural systems that have been in place for billions of years.
The story of human progress is also the story of increase in human greed and exploitation of
environment. The early societies were technologically backward and lead a simple lifestyle.
As such their needs were basic. They could not control the forces of nature and were in awe
of Nature. But modern societies are technologically advanced and sciectifically evolved.
Modern man has learnt to control nature. Man, no longer, holds Nature in venration; instead
man has learnt to yield Nature to his whims and desires. This has lead to a lopsided equation
between man and environment; with the balance now being tilted more towards man.
The sheer disregard of man towards environment has lead to the disruption of many
ecosystems. An ecosystem includes all of the living things (plants, animals and organisms) in
a given area, interacting with each other, and also with their non-living environments
(weather, earth, sun, soil, climate, atmosphere).
Example – A pond is an excellent example of an ecosystem. The living things in the pond
include microorganisms, plants and animals. The non-living things in the pond include
pebbles, water, sunlight etc. There is continuous interaction between the living and the non –
living things in the pond which makes life possible.

Source - http://www.desert-scape.com/pond-ecosystem.html
The stability of ecosystem refers to balance between production and consumption of each
element in the ecosystem. In other words, ecosystem stability means balance between input
and output of energy and normal functioning of different bio-geo-chemical cycles and
stable conditions of concentration of all elements. However sometimes ecosystem faces
imbalance. This is most likely to happen when an ecosystem is unable to adjust with
environmental changes. For example continuous destruction of trees in a forest ecosystem
rarely permits regeneration of forest community because exposed surface due to
deforestation is subjected to intense weathering and erosion and nutrients are washed out
by surface run-off.
The various factors causing ecological imbalance are as follows:
1. destruction of forests
2. industrialization
3. urbanization

4. large scale use of pesticides
5. overgrazing
NATURAL RESOURCE CONSERVATION
Resources that nature has provided such as soil, air, water, minerals, coal, sunshine
(sunlight), animals and plants, etc., are known as natural resources. These are utilized for by
human beings for the purposes of survival and welfare.
There are two main types of natural resources. These are :
1. Renewable natural resources
2. Non-renewable natural resources
Renewable natural resources- Resources that can be renewed naturally are known as
renewable resources. E.g., water, soil, wind etc.
Non-renewable natural resources - Resources that cannot be renewed naturally are known as
non-renewable resources. E.g., coal, petrol etc.

Source - http://www.eschooltoday.com/natural-resources/types-of-natural-
resources.html
The survival of mankind is linked to the conservation of the natural environment and the
natural resources. If the natural resources are not utilized properly then there would emerge a
situation where they would start disappearing altogether from the face of earth. There is
already a growing concern that resources such as oil wells may run dry in the next couple of
decades owing to their exploitation and overuse.
Conservation is the term used to denote proper management of a natural resource to prevent
its exploitation, destruction or degradation. Conservation means sustainable use of natural resources,
like soils, plants,water, animals, and minerals and other useful resources provided by nature. The objective
of resource conservation is that resources should not be used at a rate greater than the rate of their
replacement. Natural resources are of great utility - biological, economic, and recreational. Hence, there is
a need to conserve them for the future generations.
There is a growing concern worldwide regarding natural resources. The rapid speed at which they are
being used stems the fear that they would soon become scarce and beyond the reach of a common man. As
such, there is an ever increasing emphasis on conservation of natural resources so that even our future
generations can benefit from them.
Historically, India has always respected Nature. This is evident in the form of worship of various life forms
such as trees tulsi, peepal etc and animals such as cows and snakes. Even non-living forms such as
mountains (like Kailash Parbat) and rivers ( such as Ganga, Yamuna) too have been worshipped. In recent
times, mass movements have been launched for the conservation of our natural resources. Chipko
movement is one such movement where women of Gopaleshwar village in Garhwal would hug the trees to
prevent them from being cut down. This lead to conservation of 12000 square area of water catchment
area.

GREEN ECONOMY
An economy is called Green economy when it is based on the principles of sustainable
development. Reduction of environmental risks is the primary goal of Green economy. The
main focus is to ensure economic growth without harming the environment.
United Nations Environment Programme (UNEP) defines a green economy as one that
results in “improved human well-being and social equity, while significantly reducing
environmental risks and ecological scarcities”. The challenge is to find approaches to
environmental management that give people the quality of life they seek while protecting the
environmental systems that are also the foundations of our well being. A Green Economy is
based on three parameters : sustaining and advancing economic, environmental and social
well-being.
The transition from traditional market economy to green economy is driven by the fact that
the Earth is reaching its limits of natural resources such as forests and fossil fuels. The
environmental and social costs of our current economic model are becoming more and more
apparent. If we continue to exploit it any further without showing any appreciation for our
environment, then we might soon have to face catastrophic environmental impacts which
would make human survival impossible.
Many countries are now drawing up plans and strategies to protect environment. Following
are some examples of such countries.
1. China too has been plagued by many environmental issues owing to its large population
and less policy controls for conserving environment. However in recent years the awareness
regarding environmental issues has increased and the government has started many initiatives
for environment copnsservation. For example, in 2010, China increased its total installed

wind capacity by 64% in 2010. The move was aimed at reducing dependence on traditional
non-renewable energy sources.
2. Korea started a five year programme for green growth in 2013. Under this program, 2% of
GDP was allocated for investment in several green sectors such as renewable energy, energy
efficiency, clean technology and water. The government has also launched the Global Green
Growth Institute which aims to help countries (especially developing countries) develop
green growth strategies.
IMPORTANCE OF GREEN ECONOMY
1. Green economy promotes sustainable development
2. Green economy promotes effective resource utilization
References:
1. https://www.indiacelebrating.com/essay/environment-essay/
2. https://you.stonybrook.edu/environment/sample-page/
3.https://www.researchgate.net/publication/323943659_Ecological_Imbalances_Causes_
and_Consequences
4. https://www.wri.org/blog/2011/04/qa-what-green-economy-0