C115:26:38 · PDF fileantenna connection (GPS/DCF ... WARNING ZZ Connection and mounting must...
43
MENU 1 C1 15:26:38 Res. 1 6 12 18 24 2
Transcript of C115:26:38 · PDF fileantenna connection (GPS/DCF ... WARNING ZZ Connection and mounting must...

MENU
1
C115:26:38
Res.
1 6 12 18 24
2

EN 45
Safety Instructions ��������������������������������������� 47
Information about the device ����������������������� 48Description of the device 48Designated use 48Technical data 49
Installation and mounting ���������������������������� 50Mounting on DIN rail 50Connection diagram 50
Operation and configuration ������������������������ 51Display and function keys 51Menu structure 54Commissioning – Select menu language 56
Table of Contents

46
Set date and time 56AM/PM – 12/24 hour display 57Switchover summertime/wintertime 58Create weekly program 59Create yearly program 67View and edit program 72Delete program 73Random switching program 74Configuration 75Automatic/Manual mode 83
Maintenance and repair ������������������������������� 84Battery change 84
Disposal / Recycling ������������������������������������ 85

EN 47
Safety Instructions
• To avoid injuries, the device must be connected and mounted by a skilled electrician only!• Before changing the battery, the device must be disconnected from the power supply!• Please observe the national regulations and safety instructions• Interferences and changes to the device will invalidate the warranty and guaranty rights • Minimum diameter of the flexible lines for the terminals: 1 mm2
Maximum diameter: 4 mm2
Read and observe these instructions to guarantee a perfect function of the device and a safe operation
Danger! Risk of electric shock!ZZ Connection and mounting must be realized by a professional electrician!WARNING

48
Description of the deviceUniversal digital timer• 800 memory locations • Date-based programming• Pulse, cycle program• PC-assisted program generation• Extension to 8 channels through channel
extension • Powerline Communication (PLC)• LAN, Internet communication
Designated use• The timer is used for
– lighting in private homes and commerce – advertising – street lighting – shop window lighting – controlling devices, motors and pumps – controlling shutters and blinds – Presence simulation
• Mounting only on DIN rail• Suitable for use in dry rooms only!• Do not install in the vicinity of devices having
inductive discharges (motors, transformers, etc)
Information about the device
The timer talento 992 plus also has an antenna connection (GPS/DCF)

EN 49
Technical dataDimensions Hx W x D (mm)Weight g (approx) Main voltageProtection classPower consumptionSwitching capacity
– Ohmic load (VDE, IEC) – Inductive load cos φ 06 – Glow/halogen lamp load – Fluorescent light – Max switching capacity AC1 / AC15
Switching contacts Ambient temperatureAccuracyShortest switching intervalSwitching state displaySealable
45 x 525 x 60220 See rating plate||5 VA
16 A / 250 V AC10 A / 250 V AC2600W1000W3700W / 750WChange-over contact-10°C + 55°CType ± 1s/day at +20°C1 secYesYes

5 6 7
1 2 3 N
Ch1
S
L
Ch2
M~
+ _
DCF/GPS
External input
50
Mounting on DIN rail Connection diagramCH1 = channel 1CH2 = channel 2
Installation and mounting
Danger! Risk of electric shock!ZZ Connection and mounting must be realized by a professional electrician!WARNING
Put the device slightly inclined on top of the rail Then push it backwards until it engages
LAN module and timer must be oper-ated in the same phase The distance between the two devices must not be more than 50 meters

EN 51
Operation and configurationSwitch-off commands have a higher priority than switch-on commands
Display and function keys• The central line of the display, in which the
adjusted values and selected menu items are displayed, is displayed larger
• Flashing means that an entry is required If you do not enter anything within two minutes, the timer switches back to automatic operation
• "MAINSOFF" appears on the display when the device is not supplied with power
• "LOW BATT" appears on the display when a battery change is required within the next two weeks
• The programs are maintained when resetting You need to readjust date and time Press the reset button using a blunt object (ballpoint pen)

MENU
1 6 12 18 24
Res.A
F
B
C
D
E
H
I
JKL
C115:26:38
G
1 2
M
52
DisplayA Function displays of the two left keysB Switching state displays (ON/OFF/OVR/FIX)C 3 display linesD Weekdays
The assignment can be changed in the DATETIME menu, for example to 1 = Sunday
E Programmed switching timesF Radio antennaG Display of summer/winter timeH Function displays of the two right keys
Keys/InterfacesI ResetJ Right keysK Left keys with manual switch function in
Automatic modeL BatteryM Infrared interface

EN 53
Function displays of the two left keys: Scroll upwards in the menu Scroll downwards in the menu
Accept selection/proposal+ Brief key press = +1 / long key press (about 2 sec) = fast forward- Brief key press = -1 / long key press (about 2 sec) = fast forward
Function displays of the two right keys:MENU Leaves Automatic mode and enters Programming modeESC Brief key press = one step backward Long key press (about 2 sec) = Back to Automatic modeOK Make a selection and acceptEDT Change programs in "Read mode"NO Do not execute commandYES Execute commandDEL Delete

PROGRAM
NEW
WEEKLY
ON/OFFPULSECYCLE
ANNUAL
REPEATNO REPEAT ON/OFF
PULSECYCLE
DELETE
REVIEW
DAYLIGHT
AUTO
NO
CALIBR 1
CALIBR 2
MENU
CONFIG
CHL EXT
TAXIMODE
LAN
PIN
LIGHT
H COUNTER
EXT I/P
54
Menu structure

EN
RANDOM 12H 24H
AM PM
24H
LANGUAGE
DEUTSCH
ESPANOL
PORTUGES
NEDERLAND
ITALIANO
CESKY
FRANCAIS
DATETIME
...
55

MENU
LANGUAGEENGLISH
OKOK
MENU
DATETIMEYEAR
MONTHDAY
DAYHOUR
OK
OK
OKOK
OK
OK
MINUTE OK
*
56
Commissioning – Select menu language
When delivered, the timer is in automatic mode with preset time, date (CET) and menu in English Press the Menu button to make settings Then select the desired setting
Set date and time
*) Set the weekday in accordance with the current date

EN
MENU
12H 24HAM PM24H
OKOK
57
AM/PM – 12/24 hour display

MENU
DAYLIGHTCALIBR 1
SU START MONTHSU START DAY
WI START MONTHWI START DAY
SU WI2103:3110CAL
OK
OKOK
OKOK
OK
OK
58
Switchover summertime/wintertime
The following settings are possible:
AUTOIn-factory default setting as specified by law (USA or EU) It will be recalculated every year
NONo changeover
CALIBR 1 (AUTO)Manual Programming The programmed summer/winter time will be recalculated automatically for each year
– The change-over always takes place on the first Sunday of the selected month, if the entered date lies between 1 and 15
– The change-over always takes place on the last Sunday of the selected month, if the entered date lies between 16 and 31

EN
MENU
PROGRAMNEW
WEEKLY
CYCLEONOFFPULSE
OK
OKOK
CAB
59
Create weekly program
– The time change-over occurs on the respective Sunday from 2 to 3 o‘clock (summertime) or from 3 to 2 o‘clock (wintertime)
CALIBR 2 (FIX)Manual Programming The change-over takes place every year always on the same date

ON/OFF OK
CHL EXT OK
SELECT CHLDAY CHL ON
H CHL ONMIN CHL ON
OK
OKOK
OK
60
A ON/OFF programming1 Confirm ON/OFF by pressing OK
ZZ Free memory locations are briefly displayed
2 Select number of channel extensions and confirm by pressing OK
3 When prompted, select channels and confirm by pressing OKZZ The weekday display is flashing
ON command:4 Select the desired days and confirm by
pressing OK5 Enter hour (+/-) OK6 Enter minutes (+/-) OK

EN
DAY CHL OFFH CHL OFF
MIN CHL OFF
OK
OK
OK
SAVED
*
61
*) Available only if individual days have been selected for the ON command
OFF command:7 When prompted, select desired days and
confirm by pressing OK8 Enter hour (+/-) OK9 Enter minutes (+/-) OK
ZZ The program is saved

15.00 h
PULSE OK
CHL EXT OK
SELECT CHLDAY CHL ON
H CHL ONMIN CHL ON
OKOK
OK
OK
MIN DURATIONSEC DURATION OK
OK
SAVED
62
B Pulse programming
A pulse switching command consists of:• Start time • Duration = ON switching duration
shortest ON switching duration = 1 sec longest ON switching duration = 59 min, 59 sec
Example:ON command for channel 1 daily from Monday to Friday at 300 pm ON switching duration 15 minutes
Duration
Start time

EN 63
1 Confirm PULSE by pressing OKZZ Free memory locations are briefly
displayed2 Select number of channel extensions
and confirm by pressing OK3 When prompted, select channels and
confirm by pressing OKZZ The weekday display is flashing
ON command:4 Select the desired days and confirm by
pressing OK5 Enter hour (+/-) OK6 Enter minutes (+/-) OK
Duration:7 Enter minutes or seconds (+/-) and confirm
by pressing OKZZ The program is saved

19.00 h9.00 h
64
Duration
Pause
Duration of the cycle
Channel ON Channel OFF
PeriodStart time
Stop time
C Cycle programming
The cycle duration must not be less than the period No nesting of cycle programs is allowed
A cycle switching command consists of:• Start time • Duration = ON switching duration • Period = ON switching duration + pause• Cycle duration = time between channel
ON and channel OFF• Stop time
Example:Channel 1 is switched on every 30 minutes for 10 minutes, starting on Monday 900 am The stop time is Friday 700 pm
Start time Monday 0900 amDuration 10 minPeriod 30 minStop time Friday 0700 pm

EN
CYCLE OK
CHL EXT OK
SELECT CHLDAY CHL ON
OK
OK
H CHL ONMIN CHL ON
DAY PERIOD H PERIOD
OKOK
OK
OK
MIN PERIOD OK
OKSEC PERIOD
65
1 Confirm CYCLE by pressing OKZZ Free memory locations are briefly
displayed2 Select number of channel extensions
and confirm by pressing OK3 When prompted, select channels and
confirm by pressing OKZZ The weekday display is flashing
ON command:4 Select the desired days and confirm by
pressing OK5 Enter hour (+/-) OK6 Enter minutes (+/-) OK
Period:7 Enter days, hours, minutes or seconds (+/-)
and confirm by pressing OK

DAY DURATIONH DURATION
MIN DURATION
OK
OK
OK
SEC DURATION OK
DAY CHL OFF OK
H CHL OFFMIN CHL OFF
SAVED
OKOK
*
66
Duration:8 Enter days, hours, minutes or seconds (+/-)
and confirm by pressing OK
OFF command:9 When prompted, select desired days and
confirm by pressing OK10 Enter hour (+/-) OK11 Enter minutes (+/-) OK
ZZ The program is saved
*) Available only if individual days have been selected for the ON command

EN
MENU
PROGRAMNEW
ANNUALREPEATNO REPEAT
OK
OKOK
CYCLEONOFFPULSE
OK
BA
67
Create yearly program
A NO REPEATSwitching once Start and stop date (year, month, day,) are set by you B REPEAT
Recurring programThis is done each year at the same time until you remove the program in the menu under Program Delete

H CHL ONMIN CHL ON
OK
OK
DAY CHL OFF OK
H CHL OFFMIN CHL OFF
SAVED
OKOK
*
ON/OFF OK
CHL EXT OK
SELECT CHLDAY CHL ON
YEAR STARTMONTH START
DAY STARTYEAR END
MONTH END
OK
OKOK
OKOK
OK
OK
DAY END OK
68
For CYCLE and PULSE, you also have to set the duration and/or period The procedure is the same as for creating a weekly program
A NO REPEAT - ON/OFF programming
*) Available only if individual days have been selected for the ON command

EN 69
1 Confirm ON/OFF by pressing OKZZ Free memory locations are briefly
displayed2 Select number of channel extensions
and confirm by pressing OK3 When prompted, select channels and
confirm by pressing OKZZ The weekday display is flashing
ON command:4 Select the desired days and confirm by
pressing OK5 Enter start date (year, month and day) in the
relevant box (+/-) OK6 Enter stop date (year, month and day) in
the relevant box (+/-) OK7 Enter hour (+/-) OK8 Enter minutes (+/-) OK
OFF command:9 When prompted, select desired days and
confirm by pressing OK10 Enter hour (+/-) OK11 Enter minutes (+/-) OK
ZZ The program is saved

H CHL ONMIN CHL ON
OK
OK
DAY CHL OFF OK
H CHL OFFMIN CHL OFF
SAVED
OKOK
*
ON/OFF OK
CHL EXT OK
SELECT CHLDAY CHL ON
MONATH STARTDAY START
MONTH ENDDAY END
OK
OKOK
OKOK
OK
70
B REPEAT - ON/OFF programmingFor CYCLE and PULSE, you also have to set the duration and/or period The procedure is the same as for creating a weekly program
*) Available only if individual days have been selected for the ON command
EN 71
1 Confirm ON/OFF by pressing OKZZ Free memory locations are briefly
displayed2 Select number of channel extensions
and confirm by pressing OK3 When prompted, select channels and
confirm by pressing OKZZ The weekday display is flashing
ON command:4 Select the desired days and confirm by
pressing OK5 Enter start date (month and day) in the
relevant box (+/-) OK6 Enter stop date (month and day) in the
relevant box (+/-) OK7 Enter hour (+/-) OK8 Enter minutes (+/-) OK
OFF command:9 When prompted, select desired days and
confirm by pressing OK10 Enter hour (+/-) OK11 Enter minutes (+/-) OK
ZZ The program is saved

MENU
PROGRAMREVIEW
WEEKLYONOFF
OK
OKOK
ONO P001CHANNELS1
OK
EDT/OK
72
Weekly and yearly programs can beviewed and edited separately
• Press to scroll through the different program steps
• Press EDT to edit a programThis procedure is similar to creating a new program
• Press OK to go to the next program
View and edit program

EN
DELETEDELETE ALL
OW P0O1
OKNO
DEL/OK
CONFIRM
YES
MENU
PROGRAMDELETE
DELETE ALL
CONFIRM
OK
OKYES
YES
73
Delete program
Delete all programs• Press YES to delete all programs• Press NO to delete individual programs
Delete individual programs• Press OK to go to the next program

MENU
RANDOM OK
RANDOM OK
RANDOM OK
RANDOM DEL7:00 20:00OFF
ON
7:30 20:30
74
Random switching program
The programmed switching command is delayed by a variable (random) period of 0-30 minutes
Finish random switching program
1 Press OK to start the random switching programZZ RANDOM flashes
2 To return to the main menu, press the Menu key
ZX Press DEL to finish the random switching programZZ The timer returns to Automatic mode

EN
MENU
CONFIGEXT I/PCHL EXTTAXIMODE
OK
OK
...
75
Configuration
Channel extension – Add
Communication between the channel extension and the timer takes place via Powerline Communication (PLC)
Channel extension and timer must be oper-ated in the same phase The distance between the two devices must not be more than 50 meters
You can extend the timer to up to eight channels Add each extension separately
Extension A = Channels 3 and 4Extension B = Channels 5 and 6Extension C = Channels 7 and 8

CHL EXTADD EXT
OK
OK
ADD CHL EXT OK
PUSHCHL EXTBUTTON SYNCHRON
CHL EXT
OK
CHL EXTDEL EXT
OK
OK
DELETE EXT OK
CONFIRM
YES
76
ZX For synchronization, press any key on the channel extensionZZ After successful synchronization, a con-
firmation appears on the displayZZ If synchronization is not successful, the
message SYNCHRON ERROR is shown on the display
• Each channel extension must be deleted separately
• Press OK to go to the next channel extension• Press DEL to delete the channel extension
Channel extension – Delete

EN
outprogin
RS232
TAXXI
77
• A taxxi module can be used to exchange pro-grams via the IR interface To do so, the device must be in the TAXIMODE and connected to power
• Press ESC to finish the TAXIMODE
Taxxi Mode
Operation of taxxi module:1 Press PROG to select the program number2 Press IN to read in a program
Press OUT to read out a program3 Hold the taxxi module vertically over the IR
interface4 Pressing IN or OUT again will start the
transmission
A wrong transmission is shown by Er2
For further information, see the separate operating manual "talento taxxi plus"

EXT I/PEXT O/R
OK
OK
SELECT CHANNEL
OK
EXT I/PI/P COUNT
OK
OK
I/P00000
OK
78
Select EXT O/R to assign a channel to an external button
Upon pressing the button, an override switching command will be executed It will be in effect until the next time the button is pressed or until the next automatic switching command(For a description of the Override mode, see page 83)
External input - Manual switch
Press I/P COUNT to check the pulse counter It will count how many times the external button was pressed
!
Press RES to reset the pulse counter to zero and confirm by pressing YES
Do not confound it with the Reset key ( Res ) in the center of the selection keys!
External input – Pulse counter

EN
EXT I/PCOUNTDOWN
OK
OK
SELECT CHL OK
DURATION MIN:SEC
OK
79
Select COUNTDOWN to set the time for a count-down timer
Upon pressing the button, an ON switching com-mand will be carried out It switches the selected channel ON for the set time Pressing the button again will start the countdown timer again at the set time
If a program is already running on the se-lected channel, no switching command will be executed! After the time has expired, the timer returns to Automatic mode
Shortest ON switching duration: 30 secondsLongest ON switching duration: 90 minutes
External input - Countdown timer
Countdown timer and manual switch cannot be selected at the same time! The function selected last always applies

PINPIN
OK
OK
PIN 0000
OK
H COUNTERSELECT
OK
OK
SELECTCHANNEL
OK
80
• Press + - to set a numeric value• Press OK to set the next number
Set PIN
Select REVIEW to check the hour counter• Press to scroll through the different
program steps• Press RES to reset the hour counter for this
channelDo not confound it with the Reset key ( Res ) in the center of the selection keys!
Hour counter
• Press to select the channels
!
Select NO PIN, to remove the PIN
EN
LIGHTFIX ON2 MIN
OK
OK
H COUNTERSERVICE
OK
OK
SELCT CHL EDT/OK
CHANNEL100000H
OK
81
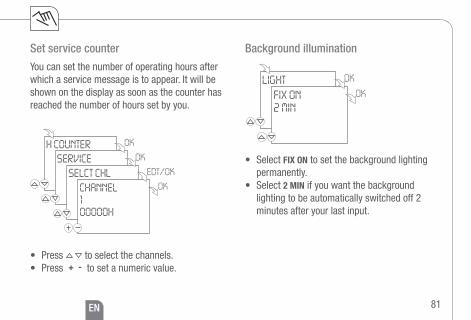
You can set the number of operating hours after which a service message is to appear It will be shown on the display as soon as the counter has reached the number of hours set by you
Set service counter
• Press to select the channels• Press + - to set a numeric value
Background illumination
• Select FIX ON to set the background lighting permanently
• Select 2 MIN if you want the background lighting to be automatically switched off 2 minutes after your last input

LANADD LAN
OK
OK
PUSHLANKEY
OK
SYNCHRONLAN
82
Add LAN module
Each LAN module must be added via the Timer menu!
Communication between the LAN module and the timer takes place via Powerline Communication (PLC)
LAN module and timer must be operated in the same phase The distance between the two devices must not be more than 50 meters
ZX For synchronization, you must press the COM key on the LAN moduleZZ After successful synchronization, the timer display shows a confirmation
The SYNC LED (yellow) on the LAN module goes outZZ If synchronization is not successful, the message SYNCHRON ERROR is shown on the timer
displayZX Select DEL EXT, to remove the LAN module

EN
MENU1
C115:26:38
Res.
1 6 12 18 24
2
83
Automatic/Manual mode
• Manual switch: Duration ON / Duration OFF / OVR / Automatic mode
• Left button = channel 1 / right button = channel 2
Press 1x = FIX ON = FIX = Duration ONPress 2x = FIX OFF = FIX = Duration OFFPress 3x = OVR = Override modePress 4x = Automatic mode
= channel ON = channel OFF
There is no display in automatic mode
Switching state display
Override modeThe Override function (temporary program overwrite) allows the user to finish the currently running program prematurely or start a program to run later before its scheduled start This depends of the current channel status The Over-ride function applies only to the current program and remains active until the next program change After that, the timer returns to Automatic mode

MENU1
C115:26:38
Res.
1 6 12 18 24
2
84
When a battery is changed without power supply, date and time will get lost!1 Lift the battery compartment using a screwdriver2 Take the battery out of the support3 Insert new battery into support Observe polarity of the battery! 4 Push battery support downward until it engages5 Dispose of the battery in an environmentally friendly manner
Battery change
Maintenance and repair

EN 85
Disposal / RecyclingDispose of the packing material correctly according to legal requirements and regulations
Observe the following notes for disposing of defective system components or the system after its service life:
• Dispose of appropriately, ie separating the parts to be disposed of according to material groups• Do not throw electrical and electronic components in the bin Bring these parts to the recycling
centers• Always ensure the environmentally sound disposal conform to the state-of-the-art environment
protection, recycling and disposal engineering

Grässlin GmbH
Bundesstraße 36D-78112 St Georgen
Germany
Phone: +49 (0) 7724 / 933-0Fax: +49 (0) 7724 / 933-240
wwwgraesslindeinfo@graesslinde801012327/10/10/01


![A* € 6.000 TAPPA BRENNER TOUR CLASSIFICA 001 - C115 …fiseveneto.com/wp-content/uploads/2017/02/RIS_MRJ_Com230717.pdf30 30 lechita pol 2008 schwingshackl julia [616098100040276]](https://static.fdocuments.in/doc/165x107/5e92bd50353d76572e6293e5/a-a-6000-tappa-brenner-tour-classifica-001-c115-30-30-lechita-pol-2008-schwingshackl.jpg)