BTL-08 ABPM II - Zone Medicalzonemedical.com.au/.../site/PDF/BTL/601-80quickguideABPMIIen100.pdf ·...
11
V100RK09/02/2009EN BTL-08 ABPM II QUICK GUIDE 100LF26/01/2010EN
-
Upload
truongcong -
Category
Documents
-
view
220 -
download
0
Transcript of BTL-08 ABPM II - Zone Medicalzonemedical.com.au/.../site/PDF/BTL/601-80quickguideABPMIIen100.pdf ·...
V 1 0 0 R K 0 9 / 0 2 / 2 0 0 9 E N
BTL-08 ABPM II
QUICK GUIDE
100LF26/01/2010EN
PAGE 2 OF 11
CONTENTS
1 HOW TO CREATE A NEW PATIENT ....................................................................................................................................3
2 HOW TO START NEW EXAMINATION.................................................................................................................................4
3 HOW TO WORK WITH THE ABPM UNIT..............................................................................................................................7
4 HOW TO LOAD AND REVIEW RECORDED EXAMINATION................................................................................................8
5 TRICKS & TIPS................................................................................................................................................................... 11
6 LIST OF ERROR CODES.................................................................................................................................................... 11
The purpose of this manual is to quickly summarize the work procedures with BTL-08 ABPM II. It guides the user through these steps: adding new patient and starting new examination, loading an examination and working with the ABPM II software and creating the final report. For more detailed info, please see User’s manual (100PL01/12/2008EN).

HOW TO CREATE A NEW PATIENT | PAGE 3 OF 11
1 H O W T O C R E A T E A N E W P A T I E N T
Start ABPM II software application (unless it is already running).
In the center of the screen, you can see a quick menu.
…and click Next .
A wizard for adding new patient will appear. It will guide you through the whole process.
Click on Add new patient.
Follow the instructions in the bubble…
HOW TO START NEW EXAMINATION | PAGE 4 OF 11
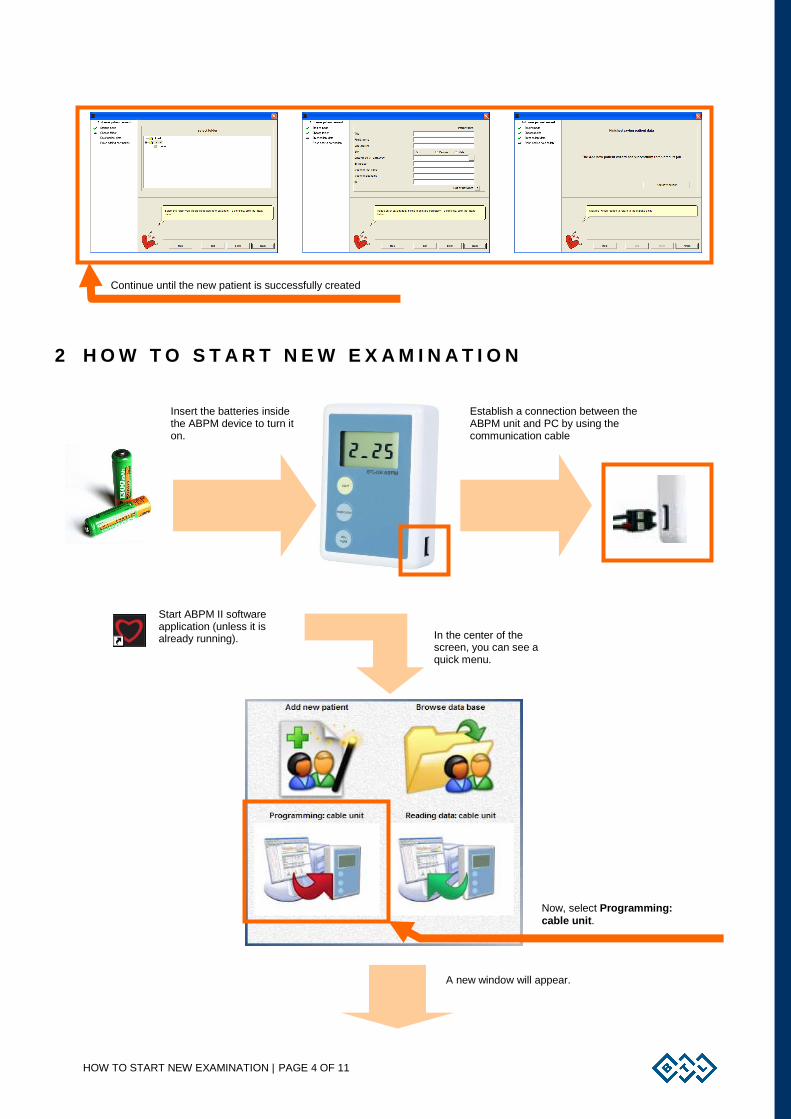
2 H O W T O S T A R T N E W E X A M I N A T I O N
Continue until the new patient is successfully created
Insert the batteries inside the ABPM device to turn it on.
Establish a connection between the ABPM unit and PC by using the communication cable
Now, select Programming: cable unit.
A new window will appear.
Start ABPM II software application (unless it is already running). In the center of the
screen, you can see a quick menu.
HOW TO START NEW EXAMINATION | PAGE 5 OF 11
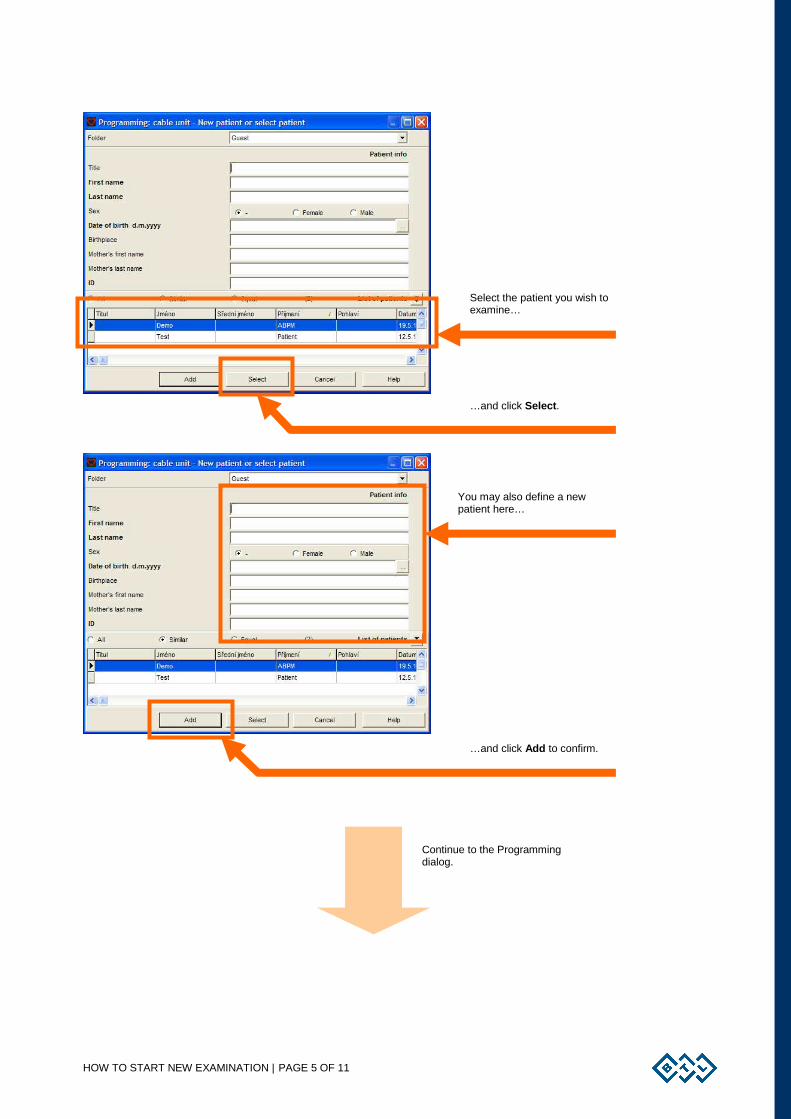
You may also define a new patient here…
…and click Add to confirm.
Select the patient you wish to examine…
…and click Select.
Continue to the Programming dialog.
HOW TO START NEW EXAMINATION | PAGE 6 OF 11
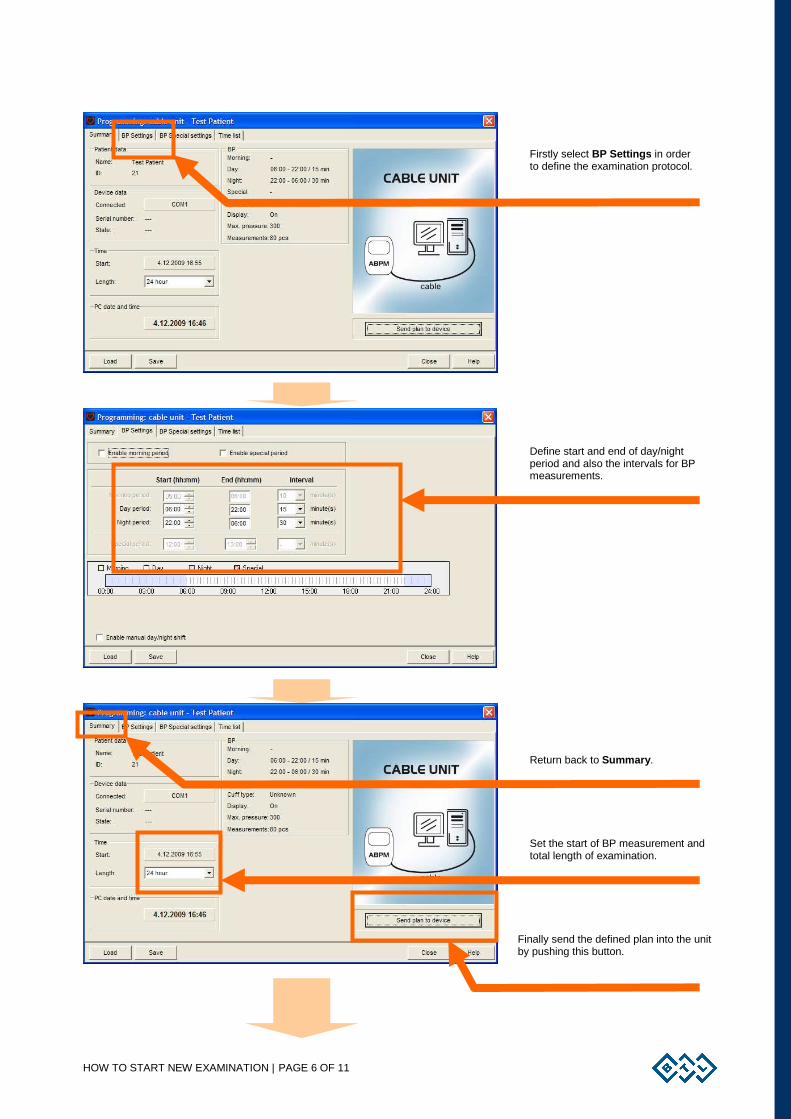
Firstly select BP Settings in order to define the examination protocol.
Define start and end of day/night period and also the intervals for BP measurements.
Return back to Summary.
Set the start of BP measurement and total length of examination.
Finally send the defined plan into the unit by pushing this button.
HOW TO WORK WITH THE ABPM UNIT | PAGE 7 OF 11
3 H O W T O W O R K W I T H T H E A B P M U N I T
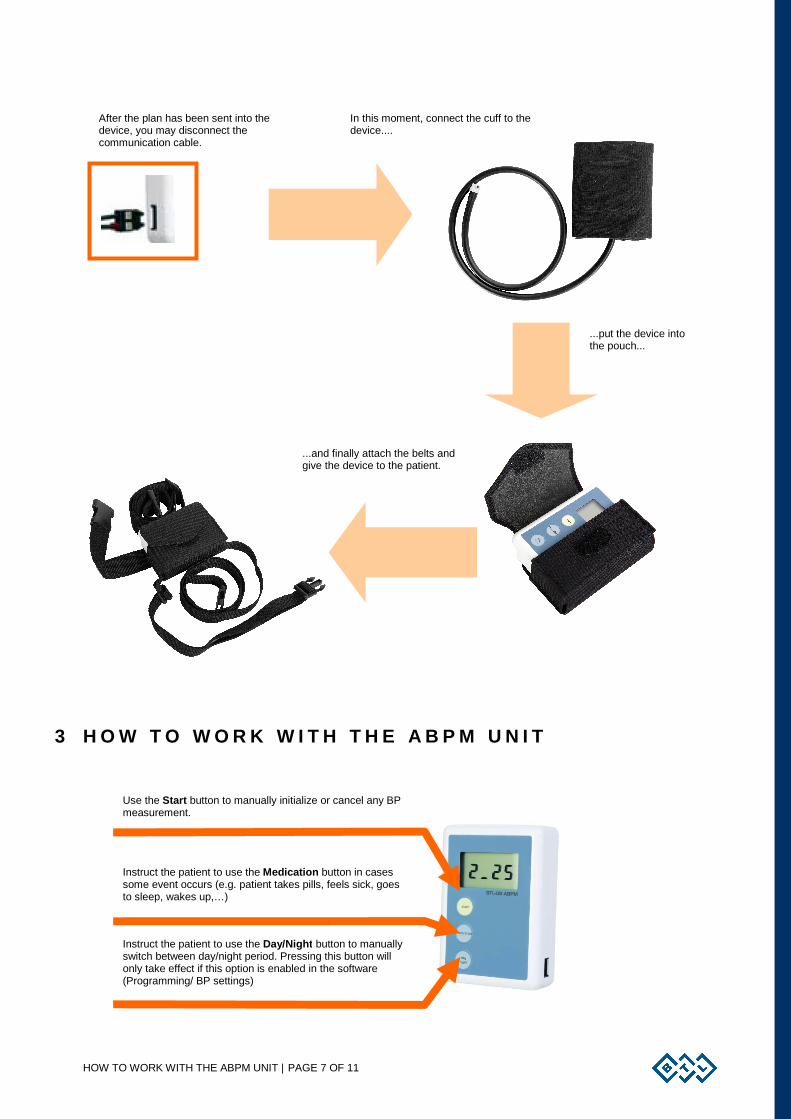
After the plan has been sent into the device, you may disconnect the communication cable.
In this moment, connect the cuff to the device....
...put the device into the pouch...
...and finally attach the belts and give the device to the patient.
Use the Start button to manually initialize or cancel any BP measurement.
Instruct the patient to use the Medication button in cases some event occurs (e.g. patient takes pills, feels sick, goes to sleep, wakes up,…)
Instruct the patient to use the Day/Night button to manually switch between day/night period. Pressing this button will only take effect if this option is enabled in the software (Programming/ BP settings)
HOW TO LOAD AND REVIEW RECORDED EXAMINATION | PAGE 8 OF 11
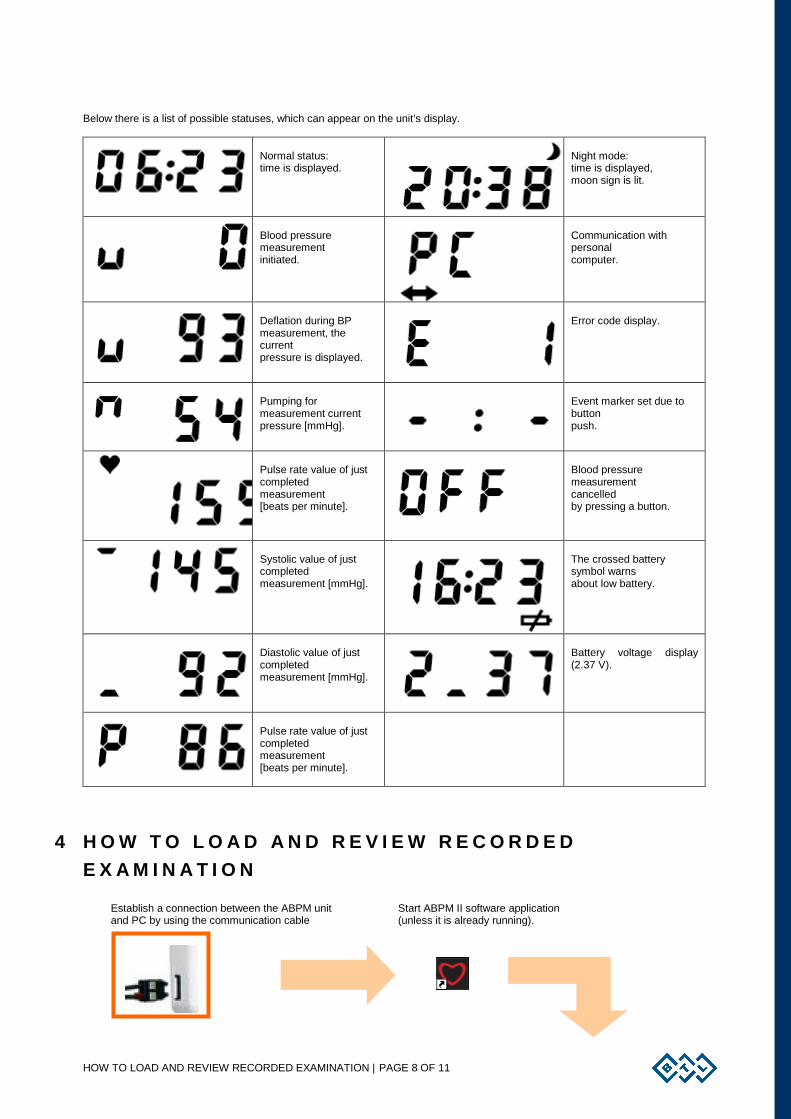
Below there is a list of possible statuses, which can appear on the unit’s display.
Normal status: time is displayed.
Night mode: time is displayed, moon sign is lit.
Blood pressure measurement initiated.
Communication with personal computer.
Deflation during BP measurement, the current pressure is displayed.
Error code display.
Pumping for measurement current pressure [mmHg].
Event marker set due to button push.
Pulse rate value of just completed measurement [beats per minute].
Blood pressure measurement cancelled by pressing a button.
Systolic value of just completed measurement [mmHg].
The crossed battery symbol warns about low battery.
Diastolic value of just completed measurement [mmHg].
Battery voltage display (2.37 V).
Pulse rate value of just completed measurement [beats per minute].
4 H O W T O L O A D A N D R E V I E W R E C O R D E D
E X A M I N A T I O N
Establish a connection between the ABPM unit and PC by using the communication cable
Start ABPM II software application (unless it is already running).
HOW TO LOAD AND REVIEW RECORDED EXAMINATION | PAGE 9 OF 11
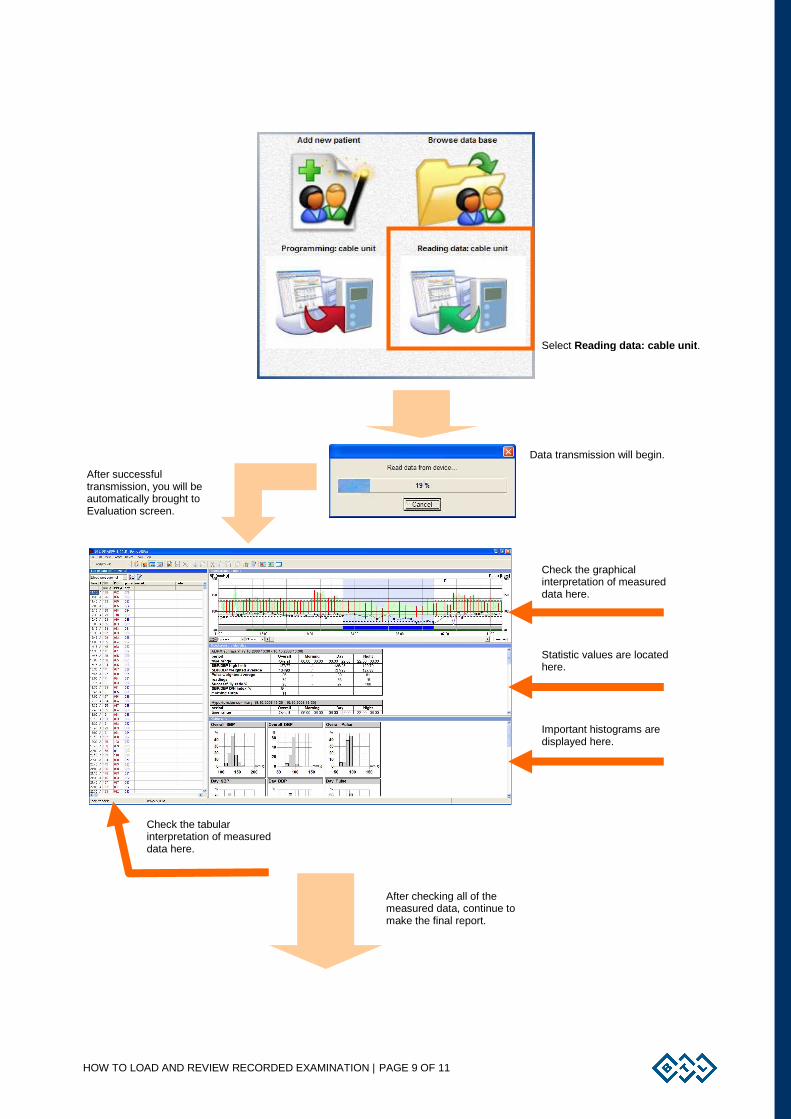
Select Reading data: cable unit.
Data transmission will begin.
After successful transmission, you will be automatically brought to Evaluation screen.
Check the tabular interpretation of measured data here.
Check the graphical interpretation of measured data here.
Statistic values are located here.
Important histograms are displayed here.
After checking all of the measured data, continue to make the final report.
HOW TO LOAD AND REVIEW RECORDED EXAMINATION | PAGE 10 OF 11
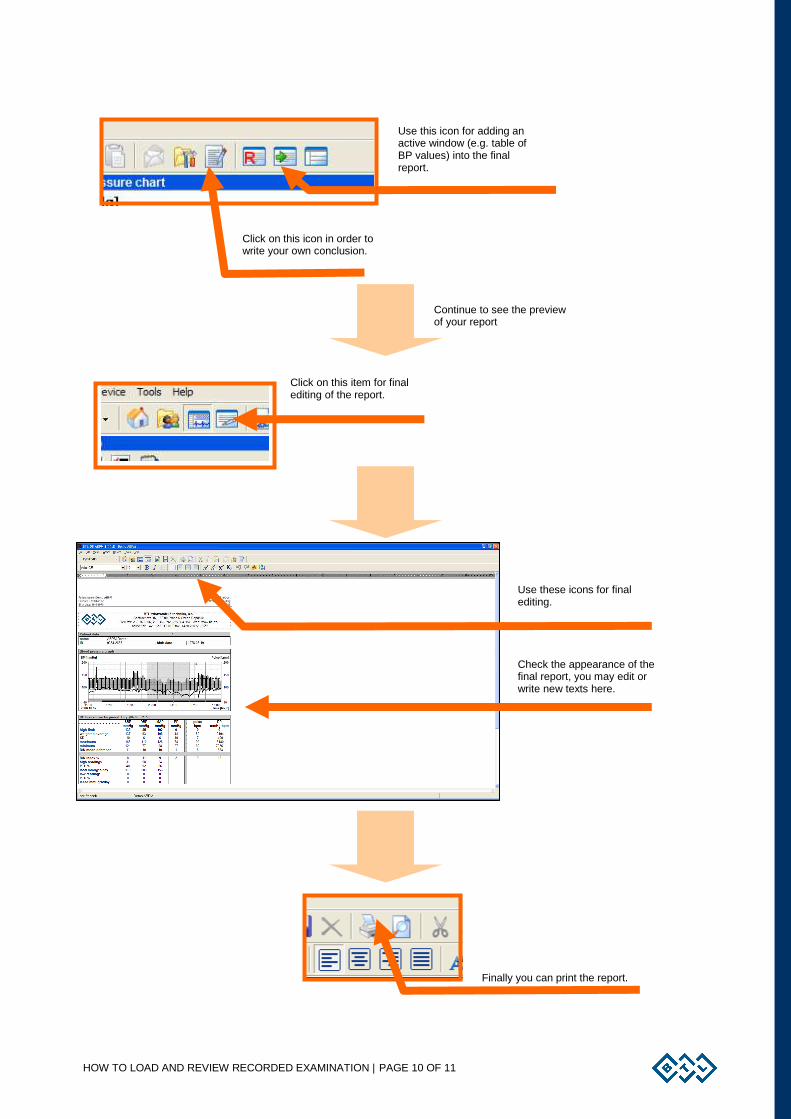
Click on this icon in order to write your own conclusion.
Use this icon for adding an active window (e.g. table of BP values) into the final report.
Continue to see the preview of your report
Click on this item for final editing of the report.
Use these icons for final editing.
Check the appearance of the final report, you may edit or write new texts here.
Finally you can print the report.
TRICKS & TIPS | PAGE 11 OF 11
5 T R I C K S & T I P S
6 L I S T O F E R R O R C O D E S
code description note
Unsuccessful measurements
1 aborted measurement the measurement timeout is over, the measurement had to be aborted
2 manually interrupted the measurement was stopped by pressing a button or one of the buttons were pressed and held (more than 30 secs) therefore the automatic measurement did not start.
3 battery rundown the AA batteries exhausted during measurement
4 batteries changed the AA batteries were replaced during the measurement
8 pressure limit exceeded the pressure in the pneumatic system exceeded the preset pressure limit
9 temporary disturbance external electric signal (e.g., static discharge) disturbed the operation of the device
Cuff related errors
31 cuff missing there was no cuff connected to the device
32 cuff tubing clogged the cuff is clogged or the rubber tube is broken
33 cuff leaking there is a hole in the cuff or device is leaking
34 cuff not on arm cuff is connected but the patient did not wear the cuff
Faulty device
90 device error the device could not measure due to a hardware error
99 device error the device does not start automatic measurement (until the next programming)
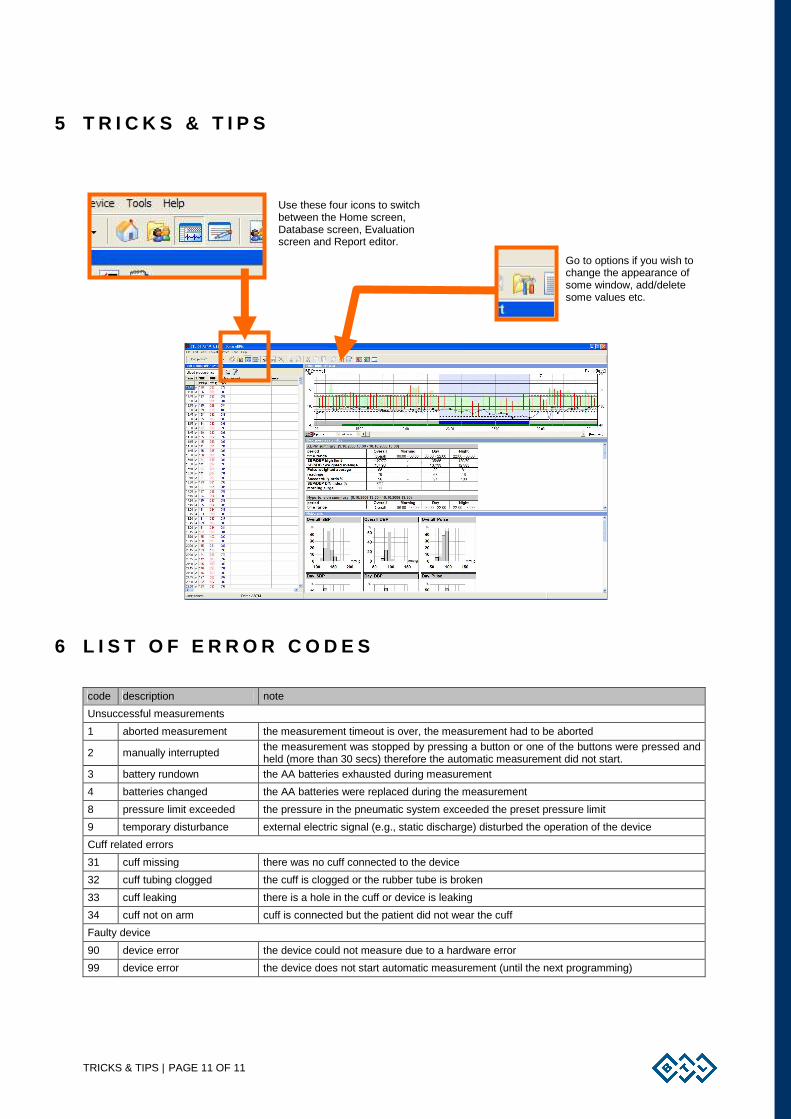
Use these four icons to switch between the Home screen, Database screen, Evaluation screen and Report editor.
Go to options if you wish to change the appearance of some window, add/delete some values etc.