
BroadWorks Hosted Thin Receptionist User Guide User... · 6.4 Hold and Resume Calls ... Figure 11...
63
CPBX Receptionist User Guide Release 17.sp2 Document Version 1 9737 Washingtonian Boulevard, Suite 350 Gaithersburg, MD 20878 Tel +1 301.977.9440 WWW.BROADSOFT.COM
Transcript of BroadWorks Hosted Thin Receptionist User Guide User... · 6.4 Hold and Resume Calls ... Figure 11...
CPBX Receptionist
User Guide
Release 17.sp2
Document Version 1
9737 Washingtonian Boulevard, Suite 350 Gaithersburg, MD 20878 Tel +1 301.977.9440
WWW.BROADSOFT.COM
CPBX RECEPTIONIST USER GUIDE
©2012 BROADSOFT, INC. PAGE II
BroadWorks® Guide
Copyright Notice
Copyright© 2012 BroadSoft, Inc.
All rights reserved.
Any technical documentation that is made available by BroadSoft, Inc. is proprietary and confidential and is considered the copyrighted work of BroadSoft, Inc.
This publication is for distribution under BroadSoft non-disclosure agreement only. No part of this publication may be duplicated without the express written permission of BroadSoft, Inc. 9737 Washingtonian Boulevard, Gaithersburg, MD 20878.
BroadSoft reserves the right to make changes without prior notice.
Trademarks
BroadWorks® and BroadWorks Assistant–Enterprise™, BroadWorks Receptionist™,
BroadWorks Communicator™, BroadWorks Receptionist™, and BroadWorks Deployment Studio™ are trademarks of BroadSoft, Inc.
Microsoft, MSN, Windows, and the Windows logo are registered trademarks of Microsoft Corporation. Other product names mentioned in this document may be trademarks or registered trademarks of their respective companies and are hereby acknowledged.
This document is printed in the United States of America.

CPBX RECEPTIONIST USER GUIDE
©2012 BROADSOFT, INC. PAGE III
Document Revision History
Release Version Reason for Change Date Author
17.sp2 1 Created document. June 15, 2012 Loren Lovell

CPBX RECEPTIONIST USER GUIDE
©2012 BROADSOFT, INC. PAGE IV
Table of Contents
1 Summary of Changes ...................................................................................................................9
1.1 Release 17.sp2, Document Version 1 ......................................................................................... 9
2 About This Document ................................................................................................................ 10
2.1 Audience .................................................................................................................................... 10
2.2 How This Guide is Organized ................................................................................................... 10
3 Introduction to Receptionist ..................................................................................................... 11
3.1 Receptionist Editions ................................................................................................................. 11
3.2 Receptionist Enterprise ............................................................................................................. 12
3.2.1 User Interface ................................................................................................................... 12
3.2.2 Contact Directories ........................................................................................................... 13
3.2.3 Call Management Functions ............................................................................................ 14
4 Getting Started ............................................................................................................................ 15
4.1 Sign in from Web Browser ........................................................................................................ 15
4.2 Get Help ..................................................................................................................................... 16
4.3 Sign Out ..................................................................................................................................... 16
4.4 Set Up Your Environment (Enterprise Edition) ........................................................................ 17
5 Explore Workspace .................................................................................................................... 18
5.1 Logo Pane .................................................................................................................................. 19
5.1.1 Global Message Area ....................................................................................................... 19
5.1.2 Settings, Help, and Sign Out Links .................................................................................. 19
5.1.3 Signed-in User Information .............................................................................................. 19
5.2 Call Console ............................................................................................................................... 20
5.2.1 Dialer ................................................................................................................................. 20
5.2.2 Current Calls ..................................................................................................................... 21
5.2.3 Conference Call Panel ..................................................................................................... 21
5.2.4 Call States and Actions .................................................................................................... 22
5.3 Contacts Pane ........................................................................................................................... 23
5.3.1 Search Contacts Panel .................................................................................................... 24
5.3.2 Monitored Contacts Panel ................................................................................................ 24
5.3.3 Company Contacts Panel ................................................................................................ 24
5.3.4 Personal Contacts Panel .................................................................................................. 25
5.3.5 Call Queues Panel ............................................................................................................ 25
5.3.6 Outlook Panel ................................................................................................................... 25
5.3.7 Directories Panel .............................................................................................................. 25
5.4 Queued Calls Pane ................................................................................................................... 26
5.5 Controls ...................................................................................................................................... 27
5.5.1 Call Action Buttons ........................................................................................................... 28
6 Manage Calls ............................................................................................................................... 30
6.1 Drag and Drop Call onto Contact ............................................................................................. 30
CPBX RECEPTIONIST USER GUIDE
©2012 BROADSOFT, INC. PAGE V
6.2 View Call Information................................................................................................................. 30
6.2.1 View Current Calls ............................................................................................................ 30
6.2.2 View Incoming Call Details ............................................................................................... 30
6.2.3 Save vCard ....................................................................................................................... 31
6.3 Answering Calls ......................................................................................................................... 31
6.3.1 Answer Call ....................................................................................................................... 31
6.3.2 Pick Up Call ....................................................................................................................... 32
6.4 Hold and Resume Calls ............................................................................................................ 32
6.4.1 Put Call on Hold ................................................................................................................ 32
6.4.2 Resume Held Call ............................................................................................................. 32
6.5 Make and End Calls .................................................................................................................. 32
6.5.1 Dial Ad Hoc Number ......................................................................................................... 32
6.5.2 Redial Number .................................................................................................................. 33
6.5.3 Dial Contact ....................................................................................................................... 33
6.6 End Call ...................................................................................................................................... 34
6.7 Transferring Calls ...................................................................................................................... 34
6.7.1 Blind Transfer Call ............................................................................................................ 34
6.7.2 Conduct Supervised Transfer .......................................................................................... 34
6.7.3 Transfer with Consultation ............................................................................................... 35
6.7.4 Transfer to Voice Mail ....................................................................................................... 35
6.7.5 Transfer to Queue ............................................................................................................ 35
6.8 Parking and Camping Calls ...................................................................................................... 36
6.8.1 Conduct Busy Camp On .................................................................................................. 36
6.8.2 Conduct Group Call Park ................................................................................................. 36
6.9 Manage Conference Calls ........................................................................................................ 37
6.9.1 Start Three-Way Conference ........................................................................................... 37
6.9.2 Hold Conference ............................................................................................................... 37
6.9.3 Resume Held Conference................................................................................................ 37
6.9.4 Put Conference Participant on Hold ................................................................................ 38
6.9.5 Resume Conference Participant ...................................................................................... 38
6.9.6 Leave Conference ............................................................................................................ 38
6.9.7 Remove Conference Participant ...................................................................................... 38
6.9.8 End Conference ................................................................................................................ 38
6.9.9 Barge in on Call ................................................................................................................ 38
7 Manage Contacts ........................................................................................................................ 40
7.1 Show/Hide Directories ............................................................................................................... 40
7.2 Show/Hide Directory Content ................................................................................................... 42
7.3 Search Contacts ........................................................................................................................ 42
7.4 Order Directory Entries .............................................................................................................. 43
7.5 View Contact Details and Make Notes ..................................................................................... 44
7.6 Manage Personal Contacts ...................................................................................................... 45
7.6.1 Add Personal Contact ...................................................................................................... 45

CPBX RECEPTIONIST USER GUIDE
©2012 BROADSOFT, INC. PAGE VI
7.6.2 Delete Personal Contact .................................................................................................. 46
8 Monitor Contacts ........................................................................................................................ 47
8.1 Phone States ............................................................................................................................. 47
8.2 Static Monitoring ........................................................................................................................ 48
8.3 Dynamic Monitoring ................................................................................................................... 48
8.3.1 Request Contact Monitoring ............................................................................................ 48
9 Manage Queued Calls ................................................................................................................ 50
9.1 Select Call Centers to Manage ................................................................................................. 50
9.2 Modify Number of Calls to Display ........................................................................................... 51
9.3 View Queued Calls .................................................................................................................... 51
9.4 Retrieve Call from Queue .......................................................................................................... 51
9.5 Transfer Call to Ad Hoc Number .............................................................................................. 52
9.6 Transfer Call Between Queues ................................................................................................ 52
9.7 Change Position of Call in Queue ............................................................................................ 52
9.8 Group Calls ................................................................................................................................ 52
9.9 Order Queued Calls .................................................................................................................. 53
10 Configure Receptionist .............................................................................................................. 54
10.1 Settings – General ..................................................................................................................... 54
10.2 Settings - Application ................................................................................................................. 54
10.2.1 Queue Membership .......................................................................................................... 54
10.3 Settings – Services .................................................................................................................... 55
10.4 Settings – Plug-ins ..................................................................................................................... 56
10.4.1 Microsoft Outlook .............................................................................................................. 56
10.5 Settings – About ......................................................................................................................... 56
11 Appendix A: Glossary and Definitions .................................................................................. 57
11.1 Phone States ............................................................................................................................. 57
11.2 Call States .................................................................................................................................. 57
12 Appendix B: Keyboard Shortcuts .......................................................................................... 58
13 Appendix C: Multi-Platform Support ...................................................................................... 60
Index ..................................................................................................................................................... 61

CPBX RECEPTIONIST USER GUIDE
©2012 BROADSOFT, INC. PAGE VII
Table of Figures
Figure 1 Receptionist Enterprise Main Interface ..................................................................................... 12 Figure 2 Receptionist Sign-in Page ......................................................................................................... 15 Figure 3 Receptionist Sign-in Page – Advanced Options ...................................................................... 16 Figure 4 Main Interface (Top of Page) – Help Link ................................................................................. 16 Figure 5 Question Dialog Box .................................................................................................................. 17 Figure 6 Receptionist Enterprise Main Interface ..................................................................................... 18 Figure 7 Receptionist Logo Pane ............................................................................................................ 19 Figure 8 Call Console ............................................................................................................................... 20 Figure 9 Call Console – Dialer ................................................................................................................. 20 Figure 10 Call Console – Current Calls ................................................................................................... 21 Figure 11 My Conference Calls Panel .................................................................................................... 21 Figure 12 Receptionist Enterprise Contacts Pane .................................................................................. 23 Figure 13 Company Panel – Contact in Focus with Action Buttons ...................................................... 24 Figure 14 Contacts Pane – Search Panel ............................................................................................... 24 Figure 15 Contacts Pane – Monitored Contacts Panel .......................................................................... 24 Figure 16 Contacts Pane – Company Contacts Panel ........................................................................... 24 Figure 17 Contacts Pane – Personal Contacts Panel ............................................................................ 25 Figure 18 Contacts Pane – Call Queues Panel ...................................................................................... 25 Figure 19 Contacts Pane – Outlook Panel .............................................................................................. 25 Figure 20 Contacts Pane – Directories Panel ......................................................................................... 25 Figure 21 Queued Calls Pane ................................................................................................................. 26 Figure 22 Queued Calls Pane – Call Center Panel (Expanded) ............................................................ 26 Figure 23 Company Contacts Panel – Contact in Focus with Action Buttons ..................................... 28 Figure 24 Call Console ............................................................................................................................. 30 Figure 25 Dragging Call and Dropping it on Contact .............................................................................. 30 Figure 26 Call Notification Pop-up Window for Non-ACD Call .............................................................. 31 Figure 27 Call Notification Pop-up Window − Call from Call Center...................................................... 31 Figure 28 Dialer ........................................................................................................................................ 32 Figure 29 Dialer – Select Recently Dialed Number ................................................................................ 33 Figure 30 Dialer – Redialing Number ...................................................................................................... 33 Figure 31 Company Contacts Panel – Contact in Focus with Call, Extension, and Mobile Buttons ... 33 Figure 32 Call Console – My Conference Calls Panel ........................................................................... 37 Figure 33 Starting Conference ................................................................................................................. 37 Figure 34 Contacts Pane ......................................................................................................................... 40 Figure 35 Contacts Pane – Expanded Options Menu ............................................................................ 40 Figure 36 Directories Panel – Selecting Directory to Display ................................................................. 41 Figure 37 Directories Panel – Selecting Directory .................................................................................. 41 Figure 38 Outlook Contacts Directory Displayed Below Call Console .................................................. 42 Figure 39 Search Contacts Feature ........................................................................................................ 42 Figure 40 Contacts Pane – Search Contacts Results ............................................................................ 43 Figure 41 Sort Directory ........................................................................................................................... 44 Figure 42 Company Contacts Contact Details and Notes ..................................................................... 44 Figure 43 Notes for Contact Dialog Box .................................................................................................. 45 Figure 44 Personal Contacts Panel ......................................................................................................... 45 Figure 45 Edit Personal Contacts Dialog Box – Add Entry .................................................................... 46 Figure 46 Edit Personal Contacts Dialog Box – Delete Entry ................................................................ 46 Figure 47 Monitored Contacts Directory.................................................................................................. 48 Figure 48 Company Contacts Directory with Monitored Contacts ......................................................... 48 Figure 49 Group Directory – Requesting Contact Monitoring ................................................................ 49 Figure 50 Company Contacts Directory – Monitored Contact ............................................................... 49

CPBX RECEPTIONIST USER GUIDE
©2012 BROADSOFT, INC. PAGE VIII
Figure 51 Queued Calls Pane ................................................................................................................. 50 Figure 52 Queued Calls – Options – Edit Queue Favorite Dialog ......................................................... 50 Figure 53 Edit Queue Favorites Dialog Box ............................................................................................ 51 Figure 54 Ad Hoc Queue Transfer .......................................................................................................... 52 Figure 55 Reordering Queued Call ......................................................................................................... 52 Figure 56 Queued Calls – Options – Group ............................................................................................ 53 Figure 57 Queued Calls – Options – Sort ................................................................................................ 53 Figure 58 Settings – Application .............................................................................................................. 54 Figure 59 Settings – Services .................................................................................................................. 55 Figure 60 Settings – Plug-ins ................................................................................................................... 56 Figure 61 Settings – About Page ............................................................................................................. 56

CPBX RECEPTIONIST USER GUIDE
©2012 BROADSOFT, INC. PAGE 9
1 Summary of Changes
This section describes the changes to this document for each release and document version.
1.1 Release 17.sp2, Document Version 1
This is a new document.

CPBX RECEPTIONIST USER GUIDE
©2012 BROADSOFT, INC. PAGE 10
2 About This Document
CPBX Receptionist Release 17.sp2 is a customized version of the BroadWorks Receptionist Hosted Thin Client. This guide provides step-by-step procedures and reference information for the CPBX Receptionist client.
The document applies to software versions 17.2.121 or later.
CPBX Receptionist herein is referred to as Receptionist, Receptionist client, or client.
Receptionist exists in three editions: Enterprise, Small Business, and Office, each tailored to the specific needs of its target users. This guide covers only the Enterprise edition of Receptionist as that is the version currently supported on the CPBX offering.
2.1 Audience
This document is intended for end users of the Receptionist Enterprise, Small Business, and Office.
2.2 How This Guide is Organized
The following table identifies the sections to refer to for information about the functionality provided by Receptionist.
Section Overview
Introduction to Receptionist This section provides an overview of Receptionist and its three editions: Enterprise, Small Business, and Office.
Getting Started This section describes how to sign in and out of Receptionist, perform the initial setup, and obtain help.
Explore Workspace This section provides an overview of the user interface.
Manage Calls This section provides information on how to make and manage calls. This includes using your contacts to make calls or perform actions on existing calls.
Manage Contacts This section provides information on managing contact directories and searching for contacts.
Monitor Contacts This section describes static and dynamic monitoring and includes information on how to select contacts to monitor.
Manage Queued Calls This section provides information on managing queued calls.
Configure Receptionist This section describes the settings you can configure to set up and customize Receptionist for improved usability.
Appendix A: Glossary and Definitions
This appendix contains definitions of call states and phone states used in Receptionist.
Appendix B: Keyboard Shortcuts
This appendix describes keyboard shortcuts available in Receptionist.
CPBX RECEPTIONIST USER GUIDE
©2012 BROADSOFT, INC. PAGE 11
3 Introduction to Receptionist
Receptionist is a carrier-class Internet Protocol (IP) Telephony Attendant Console, specifically developed for hosted environments. It is used by “front-of-house” receptionists or telephone attendants, who screen inbound calls for enterprises. Receptionist realizes the promise of IP telephony by enhancing business processes and delivering rich services in a user-friendly way.
Receptionist is a result of evolution from a traditional desktop-based application to a Rich Internet Application (RIA)-based, hosted, Software as a Service (SaaS) application.
Receptionist delivers the following real benefits to users:
An elegant design that is aesthetically pleasing
An ergonomic design that follows the natural work “flow” of a call from the left to the right of the screen
Improved business processes as only “valid” options are presented to the attendant
Professional call handling as critical information is available in “real time”
Accurate delivery of messages through a one-step process when people are unavailable
Web-based interface, accessible from a web browser. See Appendix C for a detailed list of requirements to run Receptionist.
3.1 Receptionist Editions
The following sections provide an overview of the Receptionist Enterprise interface and functionality and refers you to other sections of the document for more information.
NOTE: Features available in a specific version are identified and tagged with the edition’s name.
CPBX RECEPTIONIST USER GUIDE
©2012 BROADSOFT, INC. PAGE 12
3.2 Receptionist Enterprise
The Receptionist Enterprise edition is a full-featured client, designed to support the needs of front-office personnel in any environment. It supports the full set of call control options, large-scale line monitoring, queuing, multiple directory options, and views, Outlook integration, and other features required in large or distributed organizations.
3.2.1 User Interface
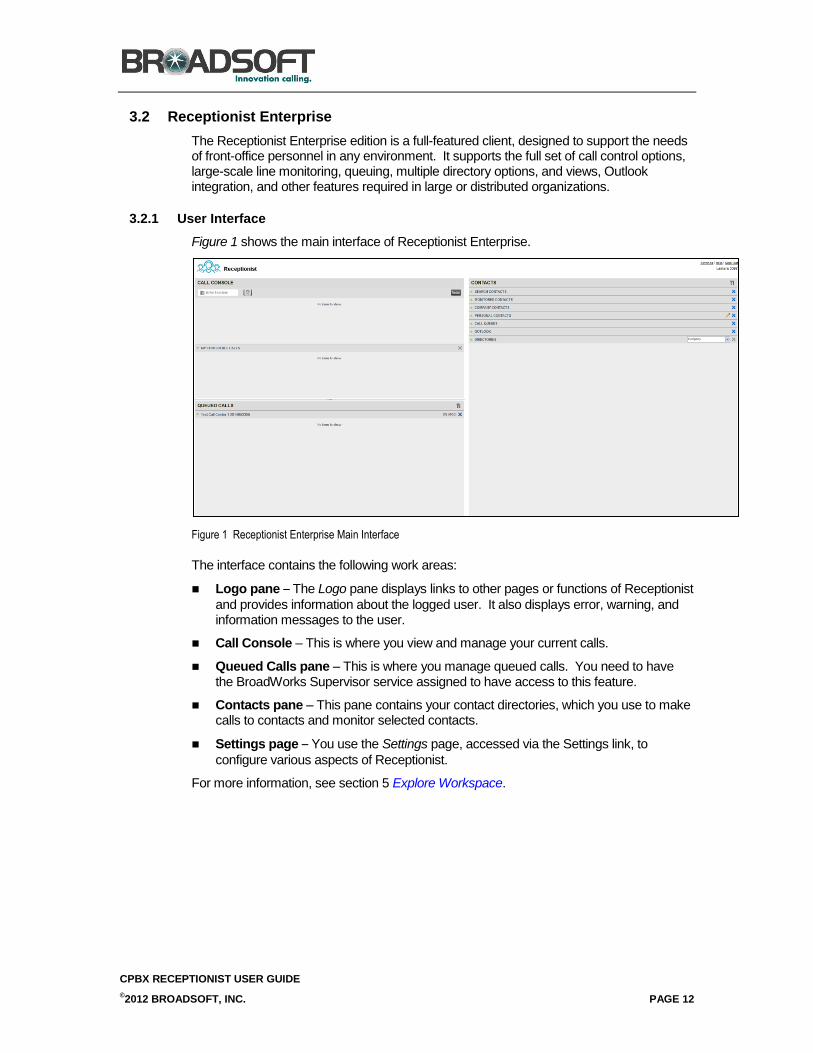
Figure 1 shows the main interface of Receptionist Enterprise.
Figure 1 Receptionist Enterprise Main Interface
The interface contains the following work areas:
Logo pane – The Logo pane displays links to other pages or functions of Receptionist
and provides information about the logged user. It also displays error, warning, and information messages to the user.
Call Console – This is where you view and manage your current calls.
Queued Calls pane – This is where you manage queued calls. You need to have the BroadWorks Supervisor service assigned to have access to this feature.
Contacts pane – This pane contains your contact directories, which you use to make calls to contacts and monitor selected contacts.
Settings page – You use the Settings page, accessed via the Settings link, to
configure various aspects of Receptionist.
For more information, see section 5 Explore Workspace.
CPBX RECEPTIONIST USER GUIDE
©2012 BROADSOFT, INC. PAGE 13
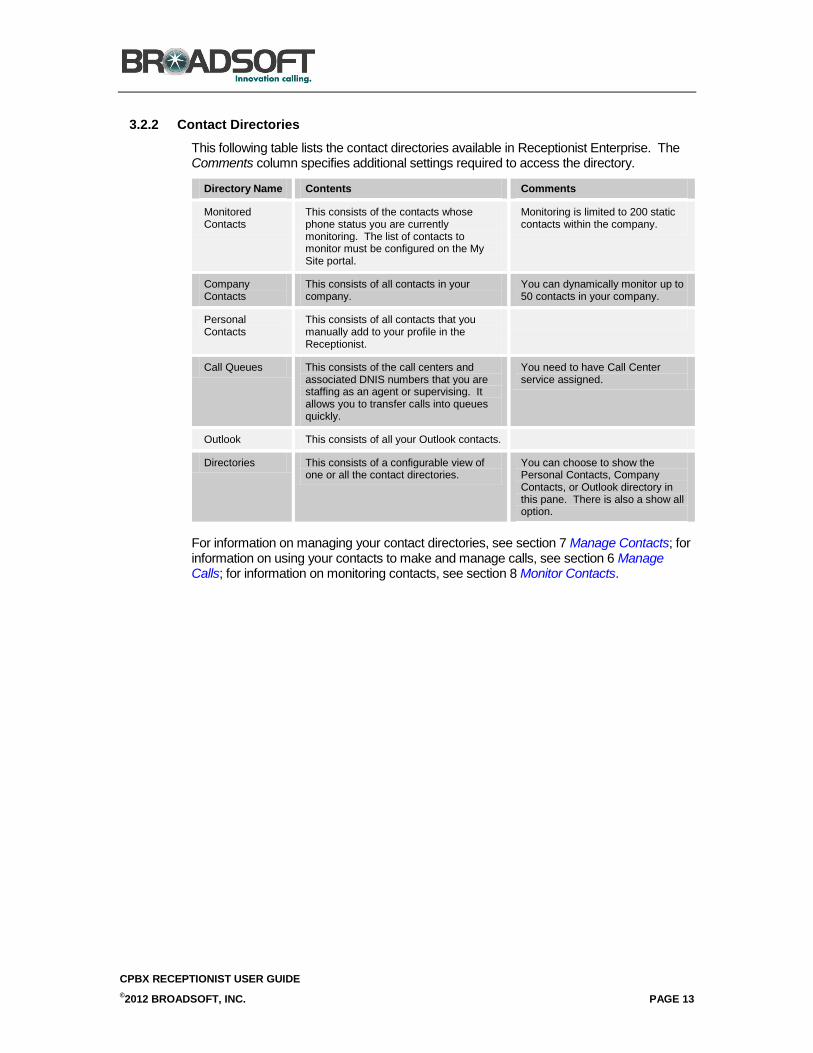
3.2.2 Contact Directories
This following table lists the contact directories available in Receptionist Enterprise. The Comments column specifies additional settings required to access the directory.
Directory Name Contents Comments
Monitored Contacts
This consists of the contacts whose phone status you are currently monitoring. The list of contacts to monitor must be configured on the My Site portal.
Monitoring is limited to 200 static contacts within the company.
Company Contacts
This consists of all contacts in your company.
You can dynamically monitor up to 50 contacts in your company.
Personal Contacts
This consists of all contacts that you manually add to your profile in the Receptionist.
Call Queues This consists of the call centers and associated DNIS numbers that you are staffing as an agent or supervising. It allows you to transfer calls into queues quickly.
You need to have Call Center service assigned.
Outlook This consists of all your Outlook contacts.
Directories This consists of a configurable view of one or all the contact directories.
You can choose to show the Personal Contacts, Company Contacts, or Outlook directory in this pane. There is also a show all option.
For information on managing your contact directories, see section 7 Manage Contacts; for information on using your contacts to make and manage calls, see section 6 Manage Calls; for information on monitoring contacts, see section 8 Monitor Contacts.
CPBX RECEPTIONIST USER GUIDE
©2012 BROADSOFT, INC. PAGE 14
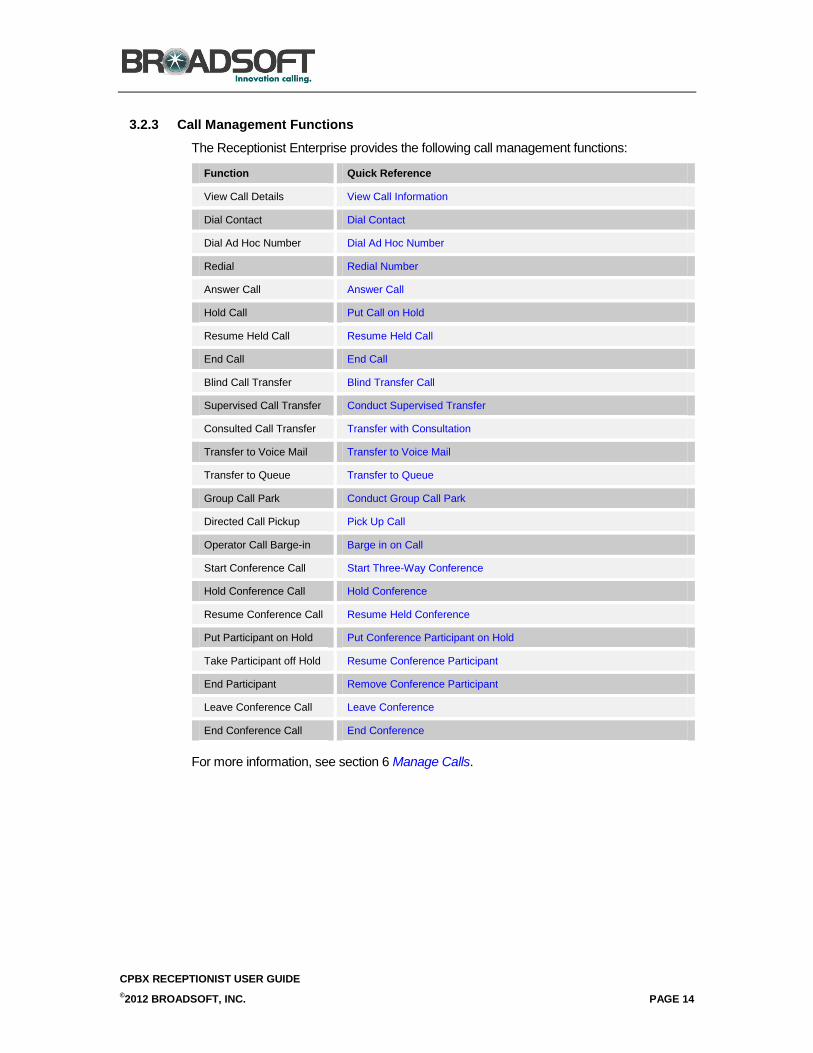
3.2.3 Call Management Functions
The Receptionist Enterprise provides the following call management functions:
Function Quick Reference
View Call Details View Call Information
Dial Contact Dial Contact
Dial Ad Hoc Number Dial Ad Hoc Number
Redial Redial Number
Answer Call Answer Call
Hold Call Put Call on Hold
Resume Held Call Resume Held Call
End Call End Call
Blind Call Transfer Blind Transfer Call
Supervised Call Transfer Conduct Supervised Transfer
Consulted Call Transfer Transfer with Consultation
Transfer to Voice Mail Transfer to Voice Mail
Transfer to Queue Transfer to Queue
Group Call Park Conduct Group Call Park
Directed Call Pickup Pick Up Call
Operator Call Barge-in Barge in on Call
Start Conference Call Start Three-Way Conference
Hold Conference Call Hold Conference
Resume Conference Call Resume Held Conference
Put Participant on Hold Put Conference Participant on Hold
Take Participant off Hold Resume Conference Participant
End Participant Remove Conference Participant
Leave Conference Call Leave Conference
End Conference Call End Conference
For more information, see section 6 Manage Calls.
CPBX RECEPTIONIST USER GUIDE
©2012 BROADSOFT, INC. PAGE 15
4 Getting Started
Receptionist is hosted on the network servers and you access it over the network either from your web portal or from a web browser. The sign-in procedure is the same for all Receptionist editions.
NOTE 1: The minimum required screen resolution for Receptionist is 1024 x 768 pixels.
NOTE 2: Receptionist does not support signing in as different users from the same machine at the same time.
4.1 Sign in from Web Browser
When signing in to the client, use the same credentials you use to connect to the web portal.
To access Receptionist from a web browser:
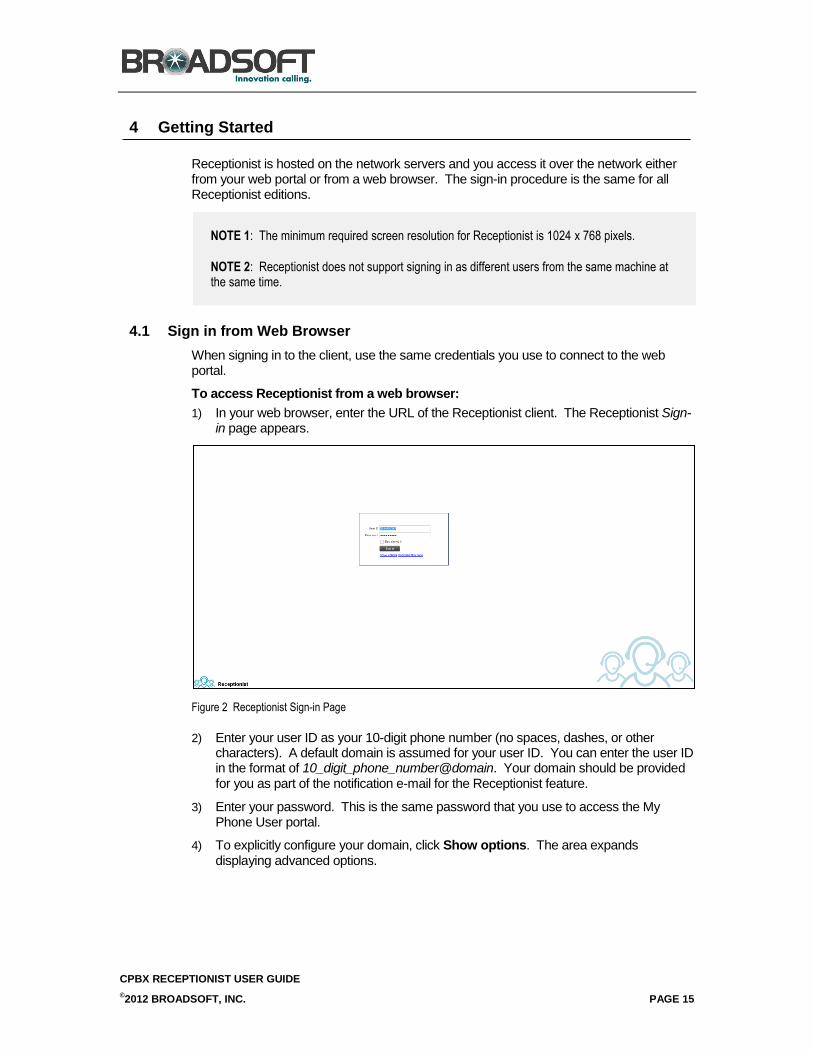
1) In your web browser, enter the URL of the Receptionist client. The Receptionist Sign-in page appears.
Figure 2 Receptionist Sign-in Page
2) Enter your user ID as your 10-digit phone number (no spaces, dashes, or other characters). A default domain is assumed for your user ID. You can enter the user ID in the format of 10_digit_phone_number@domain. Your domain should be provided for you as part of the notification e-mail for the Receptionist feature.
3) Enter your password. This is the same password that you use to access the My Phone User portal.
4) To explicitly configure your domain, click Show options. The area expands displaying advanced options.

CPBX RECEPTIONIST USER GUIDE
©2012 BROADSOFT, INC. PAGE 16
Figure 3 Receptionist Sign-in Page – Advanced Options
5) To configure your domain, in the Append Domain text box, enter your domain name. When you enter your user ID without a domain, the system appends the configured domain instead of the default domain.
6) The Language drop-down list is available. However, English is the only supported language in the current version of Receptionist.
7) Check Stay signed in to instruct the client to automatically connect and sign in to the server when it detects a network connection.
This should generally be enabled to help mitigate intermittent internet connections. When disabled, the client signs out the user when the connection is lost.
8) To add a bookmark to the Receptionist Sign-in page in your browser, click Bookmark this page and follow the instructions of your browser.
9) Click Sign In.
Receptionist starts and you are signed in.
4.2 Get Help
Receptionist provides you with online access to a portable document format (PDF) version of this guide.
Figure 4 Main Interface (Top of Page) – Help Link
To access this document:
Click the Help link at the top right-hand side of the main interface.
4.3 Sign Out
To sign out of Receptionist:
1) Click the Sign Out link at the top right-hand side of the main interface.
A message appears asking you whether you would like to save your current workspace.
CPBX RECEPTIONIST USER GUIDE
©2012 BROADSOFT, INC. PAGE 17
Figure 5 Question Dialog Box
2) Click Yes to save your current workspace. This allows you to retain the same setup at your next session.
4.4 Set Up Your Environment (Enterprise Edition)
It is recommended that you configure Receptionist as follows when you first log in.
Select call centers to manage – see section 9.1 Select Call Centers to Manage.
Join queues – see section 10.2 Settings - Application.
For information about other Receptionist configuration options, see section 10 Configure Receptionist.
CPBX RECEPTIONIST USER GUIDE
©2012 BROADSOFT, INC. PAGE 18
5 Explore Workspace
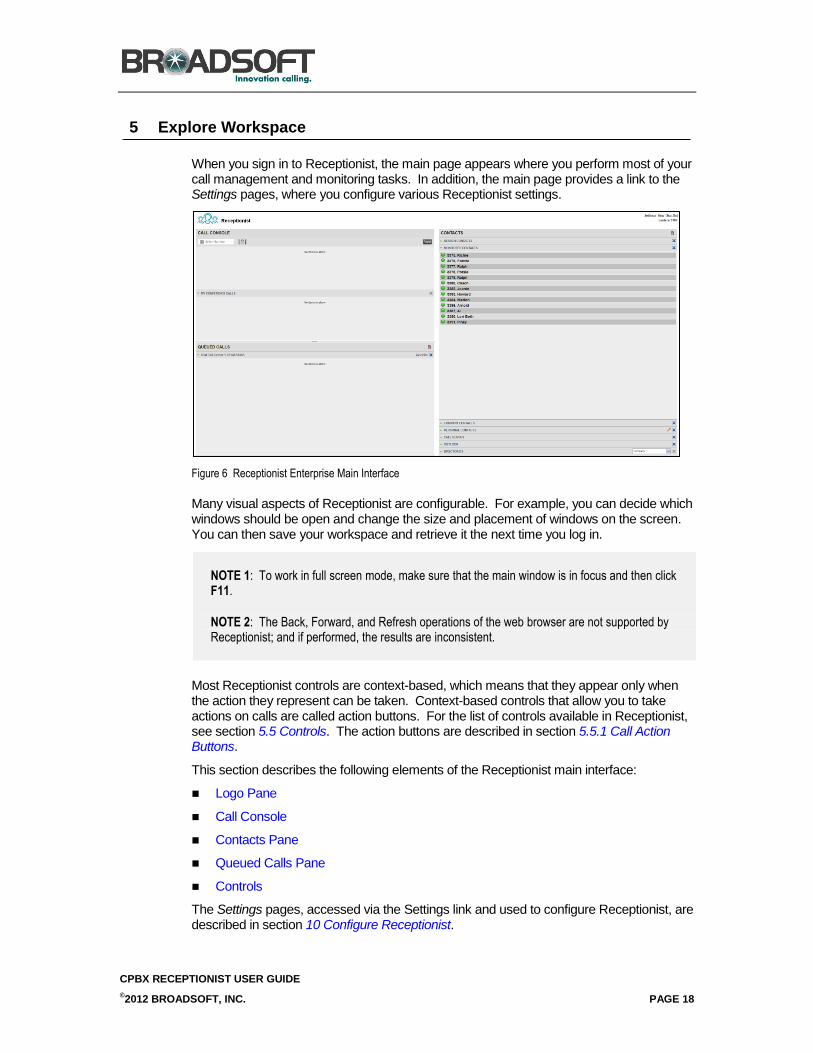
When you sign in to Receptionist, the main page appears where you perform most of your call management and monitoring tasks. In addition, the main page provides a link to the Settings pages, where you configure various Receptionist settings.
Figure 6 Receptionist Enterprise Main Interface
Many visual aspects of Receptionist are configurable. For example, you can decide which windows should be open and change the size and placement of windows on the screen. You can then save your workspace and retrieve it the next time you log in.
NOTE 1: To work in full screen mode, make sure that the main window is in focus and then click F11.
NOTE 2: The Back, Forward, and Refresh operations of the web browser are not supported by Receptionist; and if performed, the results are inconsistent.
Most Receptionist controls are context-based, which means that they appear only when the action they represent can be taken. Context-based controls that allow you to take actions on calls are called action buttons. For the list of controls available in Receptionist, see section 5.5 Controls. The action buttons are described in section 5.5.1 Call Action Buttons.
This section describes the following elements of the Receptionist main interface:
Logo Pane
Call Console
Contacts Pane
Queued Calls Pane
Controls
The Settings pages, accessed via the Settings link and used to configure Receptionist, are described in section 10 Configure Receptionist.
CPBX RECEPTIONIST USER GUIDE
©2012 BROADSOFT, INC. PAGE 19
5.1 Logo Pane
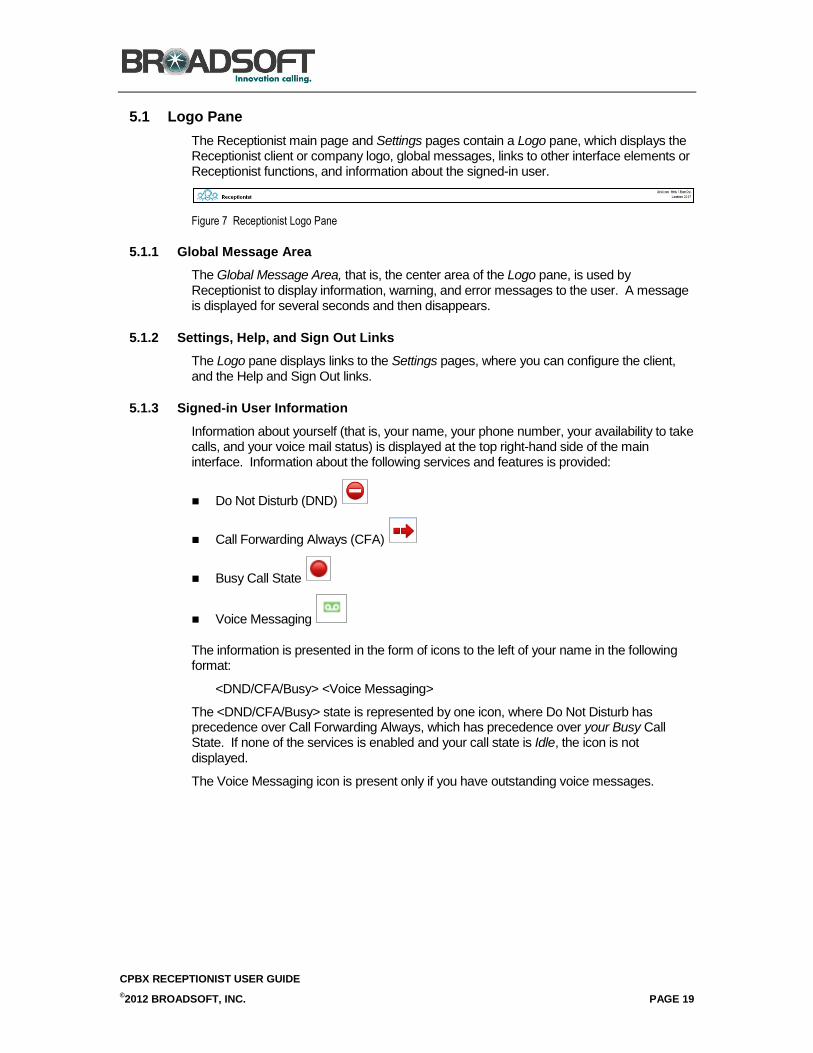
The Receptionist main page and Settings pages contain a Logo pane, which displays the Receptionist client or company logo, global messages, links to other interface elements or Receptionist functions, and information about the signed-in user.
Figure 7 Receptionist Logo Pane
5.1.1 Global Message Area
The Global Message Area, that is, the center area of the Logo pane, is used by Receptionist to display information, warning, and error messages to the user. A message is displayed for several seconds and then disappears.
5.1.2 Settings, Help, and Sign Out Links
The Logo pane displays links to the Settings pages, where you can configure the client, and the Help and Sign Out links.
5.1.3 Signed-in User Information
Information about yourself (that is, your name, your phone number, your availability to take calls, and your voice mail status) is displayed at the top right-hand side of the main interface. Information about the following services and features is provided:
Do Not Disturb (DND)
Call Forwarding Always (CFA)
Busy Call State
Voice Messaging
The information is presented in the form of icons to the left of your name in the following format:
<DND/CFA/Busy> <Voice Messaging>
The <DND/CFA/Busy> state is represented by one icon, where Do Not Disturb has precedence over Call Forwarding Always, which has precedence over your Busy Call State. If none of the services is enabled and your call state is Idle, the icon is not displayed.
The Voice Messaging icon is present only if you have outstanding voice messages.
CPBX RECEPTIONIST USER GUIDE
©2012 BROADSOFT, INC. PAGE 20
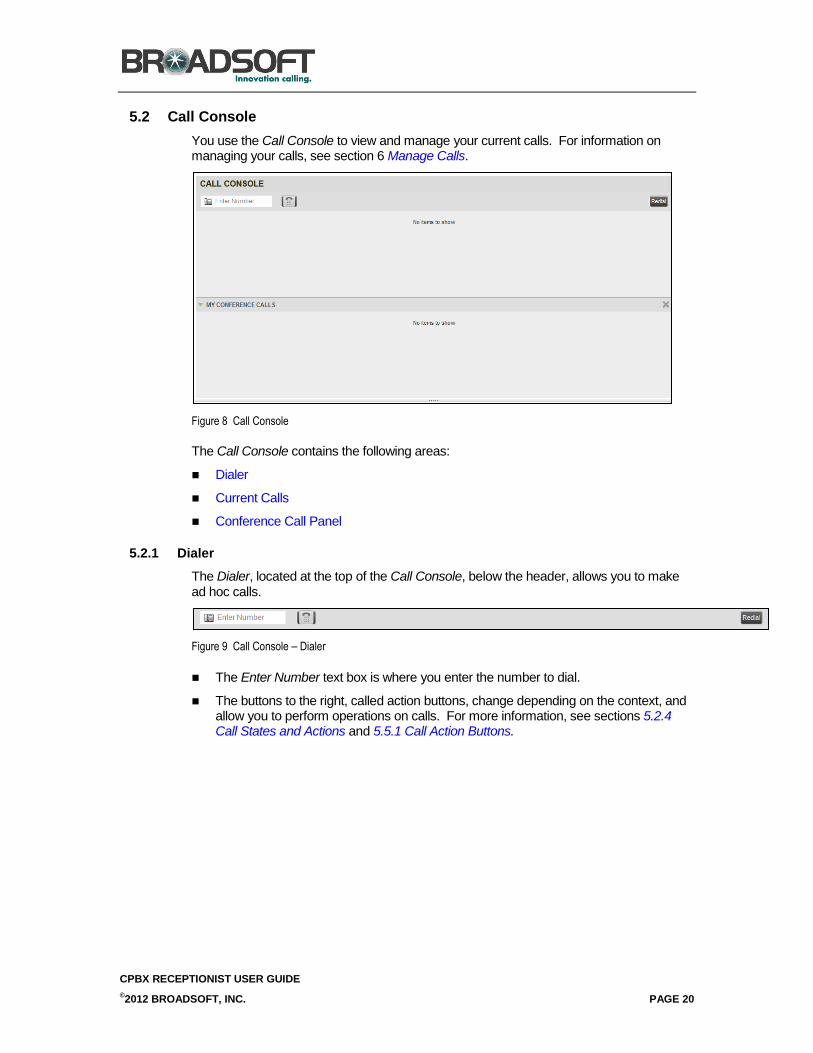
5.2 Call Console
You use the Call Console to view and manage your current calls. For information on managing your calls, see section 6 Manage Calls.
Figure 8 Call Console
The Call Console contains the following areas:
Dialer
Current Calls
Conference Call Panel
5.2.1 Dialer
The Dialer, located at the top of the Call Console, below the header, allows you to make ad hoc calls.
Figure 9 Call Console – Dialer
The Enter Number text box is where you enter the number to dial.
The buttons to the right, called action buttons, change depending on the context, and allow you to perform operations on calls. For more information, see sections 5.2.4 Call States and Actions and 5.5.1 Call Action Buttons.
CPBX RECEPTIONIST USER GUIDE
©2012 BROADSOFT, INC. PAGE 21
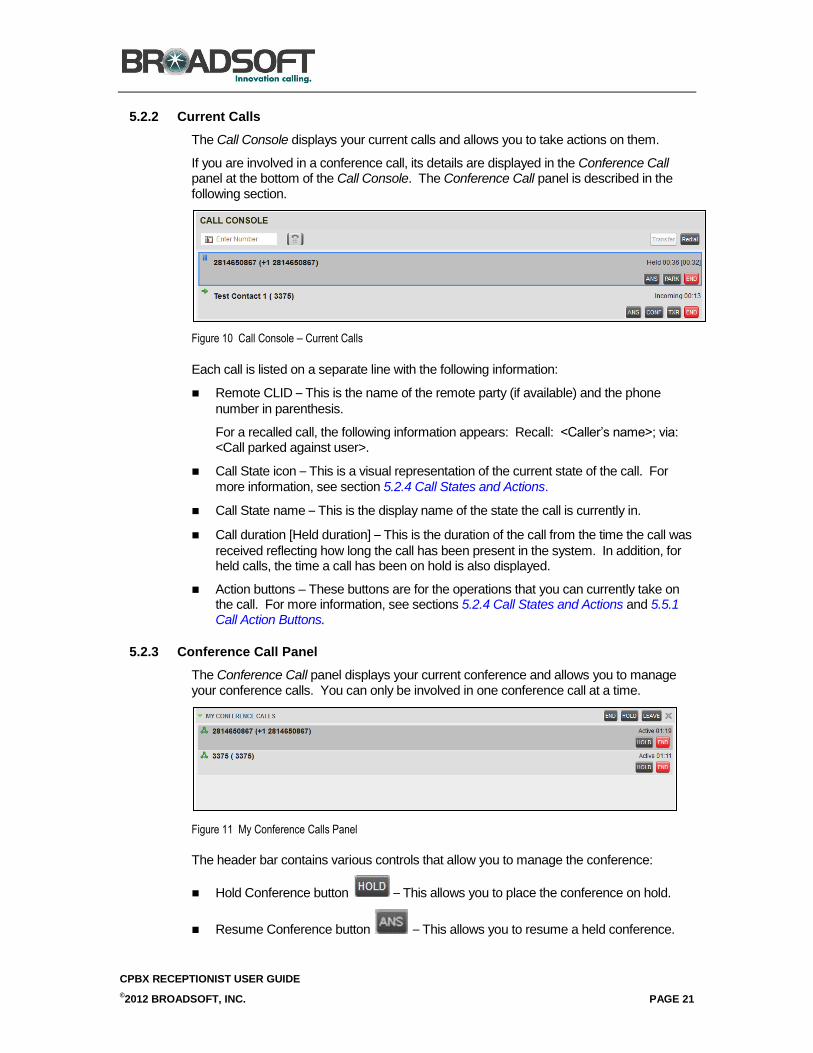
5.2.2 Current Calls
The Call Console displays your current calls and allows you to take actions on them.
If you are involved in a conference call, its details are displayed in the Conference Call panel at the bottom of the Call Console. The Conference Call panel is described in the following section.
Figure 10 Call Console – Current Calls
Each call is listed on a separate line with the following information:
Remote CLID – This is the name of the remote party (if available) and the phone
number in parenthesis.
For a recalled call, the following information appears: Recall: <Caller’s name>; via: <Call parked against user>.
Call State icon – This is a visual representation of the current state of the call. For
more information, see section 5.2.4 Call States and Actions.
Call State name – This is the display name of the state the call is currently in.
Call duration [Held duration] – This is the duration of the call from the time the call was
received reflecting how long the call has been present in the system. In addition, for held calls, the time a call has been on hold is also displayed.
Action buttons – These buttons are for the operations that you can currently take on the call. For more information, see sections 5.2.4 Call States and Actions and 5.5.1 Call Action Buttons.
5.2.3 Conference Call Panel
The Conference Call panel displays your current conference and allows you to manage your conference calls. You can only be involved in one conference call at a time.
Figure 11 My Conference Calls Panel
The header bar contains various controls that allow you to manage the conference:
Hold Conference button – This allows you to place the conference on hold.
Resume Conference button – This allows you to resume a held conference.
CPBX RECEPTIONIST USER GUIDE
©2012 BROADSOFT, INC. PAGE 22
Leave Conference button – This allows you to leave the conference.
End Conference button – This allows you to end the conference.
The panel lists the call legs that make up your current conference. Each two-way call is displayed on a separate line. The information displayed for each call leg is the same as the information displayed for a two-way call. For information, see section 5.2.2 Current Calls.
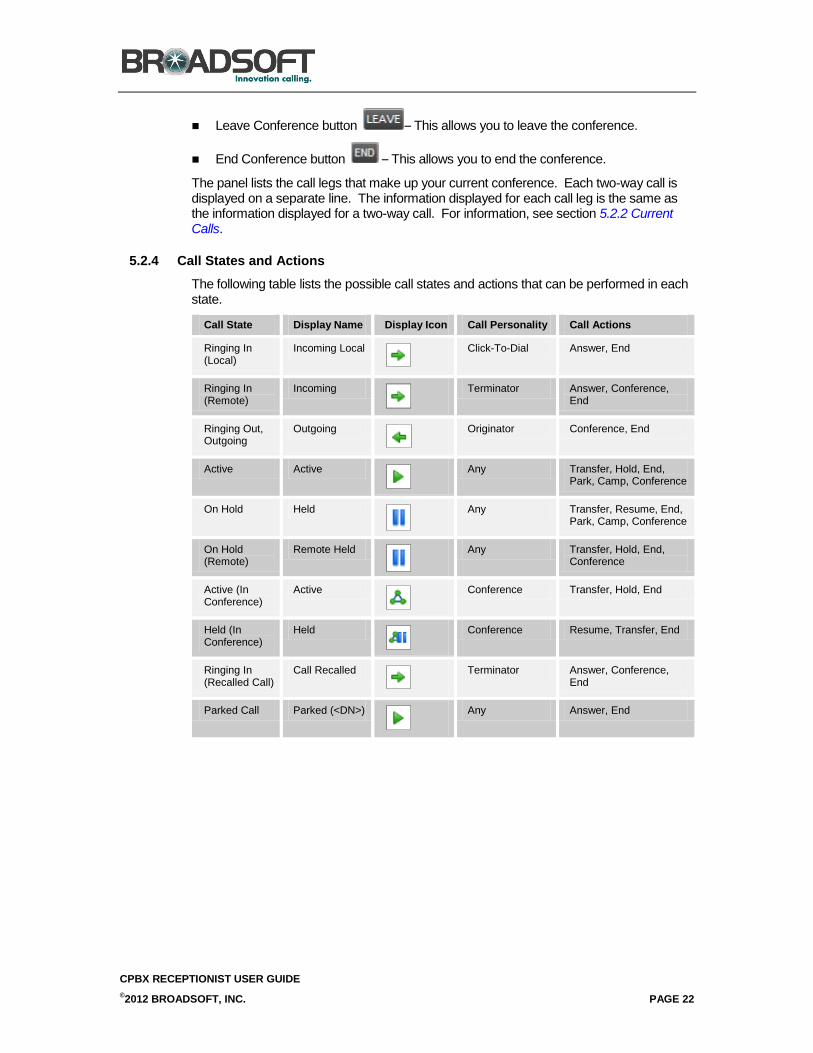
5.2.4 Call States and Actions
The following table lists the possible call states and actions that can be performed in each state.
Call State Display Name Display Icon Call Personality Call Actions
Ringing In (Local)
Incoming Local
Click-To-Dial Answer, End
Ringing In (Remote)
Incoming
Terminator Answer, Conference, End
Ringing Out, Outgoing
Outgoing
Originator Conference, End
Active Active
Any Transfer, Hold, End, Park, Camp, Conference
On Hold Held
Any Transfer, Resume, End, Park, Camp, Conference
On Hold (Remote)
Remote Held
Any Transfer, Hold, End, Conference
Active (In Conference)
Active
Conference Transfer, Hold, End
Held (In Conference)
Held
Conference Resume, Transfer, End
Ringing In (Recalled Call)
Call Recalled
Terminator Answer, Conference, End
Parked Call Parked (<DN>)
Any Answer, End
CPBX RECEPTIONIST USER GUIDE
©2012 BROADSOFT, INC. PAGE 23
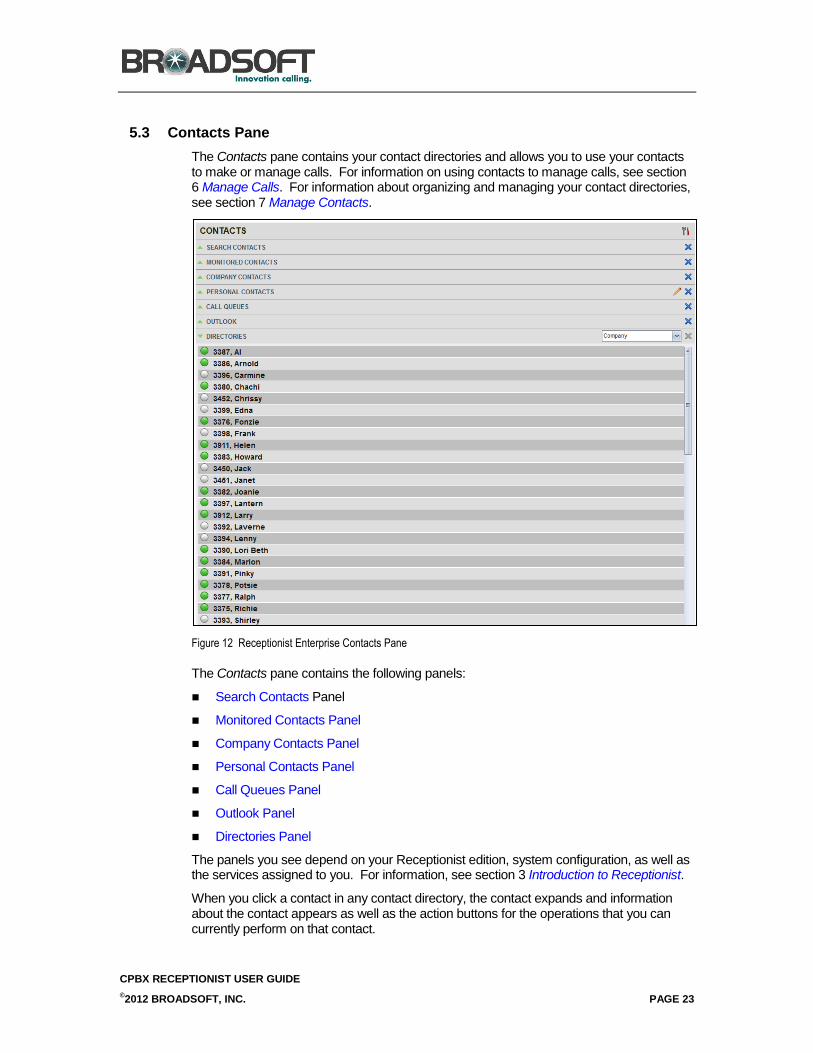
5.3 Contacts Pane
The Contacts pane contains your contact directories and allows you to use your contacts to make or manage calls. For information on using contacts to manage calls, see section 6 Manage Calls. For information about organizing and managing your contact directories, see section 7 Manage Contacts.
Figure 12 Receptionist Enterprise Contacts Pane
The Contacts pane contains the following panels:
Search Contacts Panel
Monitored Contacts Panel
Company Contacts Panel
Personal Contacts Panel
Call Queues Panel
Outlook Panel
Directories Panel
The panels you see depend on your Receptionist edition, system configuration, as well as the services assigned to you. For information, see section 3 Introduction to Receptionist.
When you click a contact in any contact directory, the contact expands and information about the contact appears as well as the action buttons for the operations that you can currently perform on that contact.

CPBX RECEPTIONIST USER GUIDE
©2012 BROADSOFT, INC. PAGE 24
Figure 13 Company Panel – Contact in Focus with Action Buttons
For the list of action buttons available in Receptionist, see section 5.5.1 Call Action Buttons.
5.3.1 Search Contacts Panel
You use the Search panel to look for specific contacts in your contacts directories and, if available, in the configured LDAP directory. For information on performing directory searches, see section 7.3 Search Contacts.
Figure 14 Contacts Pane – Search Panel
5.3.2 Monitored Contacts Panel
You use the Monitored Contacts panel to monitor the call status of selected contacts. The contacts to monitor must be configured for Receptionist using the My Site web portal. This is referred to as static monitoring. For more information, see section 8 Monitor Contacts.
Figure 15 Contacts Pane – Monitored Contacts Panel
5.3.3 Company Contacts Panel
The Company Contacts panel contains the contacts in your enterprise directory. However, if your company administrator restricted your access to your enterprise directory, you can only see the contacts from your group directory.
If you have the Receptionist Enterprise edition, you can also monitor selected contacts and view contact details. This is referred to as dynamic monitoring. For information, see section 8.3 Dynamic Monitoring .
Figure 16 Contacts Pane – Company Contacts Panel
CPBX RECEPTIONIST USER GUIDE
©2012 BROADSOFT, INC. PAGE 25
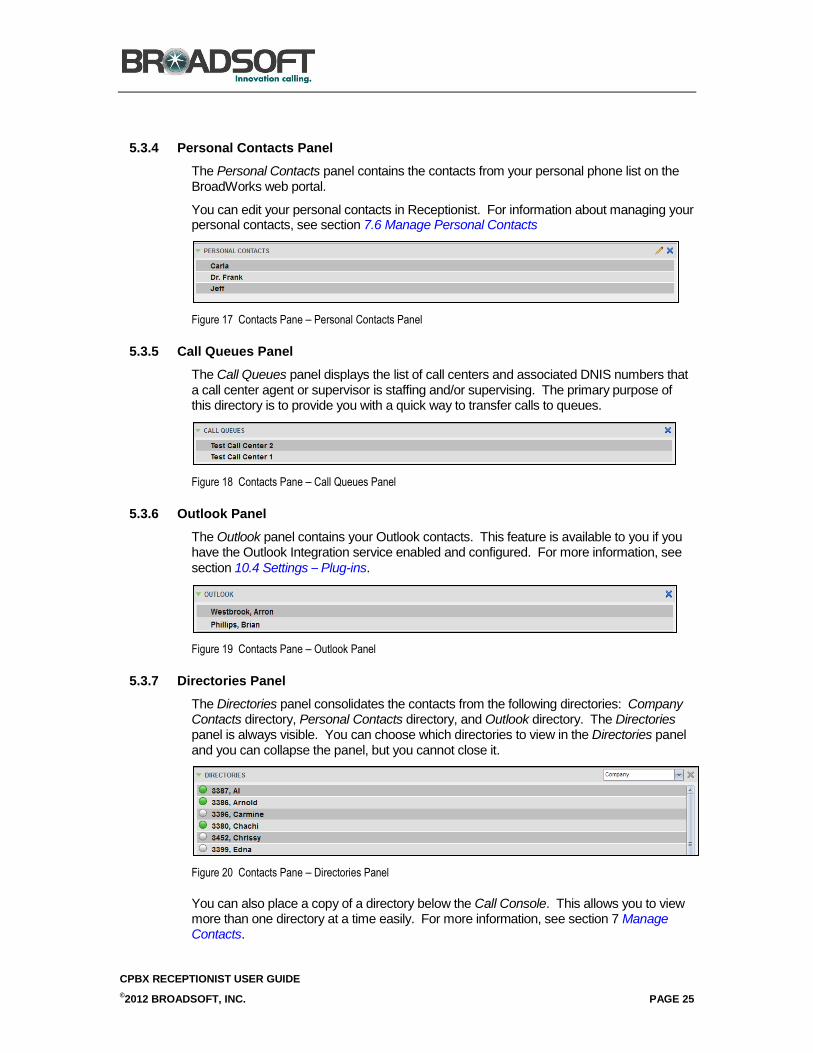
5.3.4 Personal Contacts Panel
The Personal Contacts panel contains the contacts from your personal phone list on the BroadWorks web portal.
You can edit your personal contacts in Receptionist. For information about managing your personal contacts, see section 7.6 Manage Personal Contacts
Figure 17 Contacts Pane – Personal Contacts Panel
5.3.5 Call Queues Panel
The Call Queues panel displays the list of call centers and associated DNIS numbers that a call center agent or supervisor is staffing and/or supervising. The primary purpose of this directory is to provide you with a quick way to transfer calls to queues.
Figure 18 Contacts Pane – Call Queues Panel
5.3.6 Outlook Panel
The Outlook panel contains your Outlook contacts. This feature is available to you if you have the Outlook Integration service enabled and configured. For more information, see
section 10.4 Settings – Plug-ins.
Figure 19 Contacts Pane – Outlook Panel
5.3.7 Directories Panel
The Directories panel consolidates the contacts from the following directories: Company Contacts directory, Personal Contacts directory, and Outlook directory. The Directories panel is always visible. You can choose which directories to view in the Directories panel and you can collapse the panel, but you cannot close it.
Figure 20 Contacts Pane – Directories Panel
You can also place a copy of a directory below the Call Console. This allows you to view more than one directory at a time easily. For more information, see section 7 Manage Contacts.

CPBX RECEPTIONIST USER GUIDE
©2012 BROADSOFT, INC. PAGE 26
5.4 Queued Calls Pane
You use the Queued Calls pane to manage queued calls in the selected call centers. For more information about managing queued calls, see section 9 Manage Queued Calls .
Figure 21 Queued Calls Pane
The pane lists queued calls for the selected call centers. For information on selecting call centers to display, see section 9.1 Select Call Centers to Manage.
Each call center is displayed in a separate panel. The panel’s header displays the following information:
The name of the call center.
The primary phone number of the call center.
The number of calls currently displayed for the queue against the maximum number of calls that can be displayed for a queue.
The number of calls in queue against the queue length.
When you expand the panel for a call center, the list of calls queued in that call center appears, with calls listed according to their position in the queue.
Figure 22 Queued Calls Pane – Call Center Panel (Expanded)
The following information is provided for each call:
Call Status icon – A graphic representation of the state of the queued call, which can
be one of the following:
Waiting – The call is queued, waiting to be answered.
Announcement – An announcement is being played to the caller.
Reordered – The position of the call in the queue has been changed.
Bounced – The call has been bounced.
Name (if available) and phone number of the calling party
The total call time, including the time in the current priority bucket (in parentheses)
CPBX RECEPTIONIST USER GUIDE
©2012 BROADSOFT, INC. PAGE 27
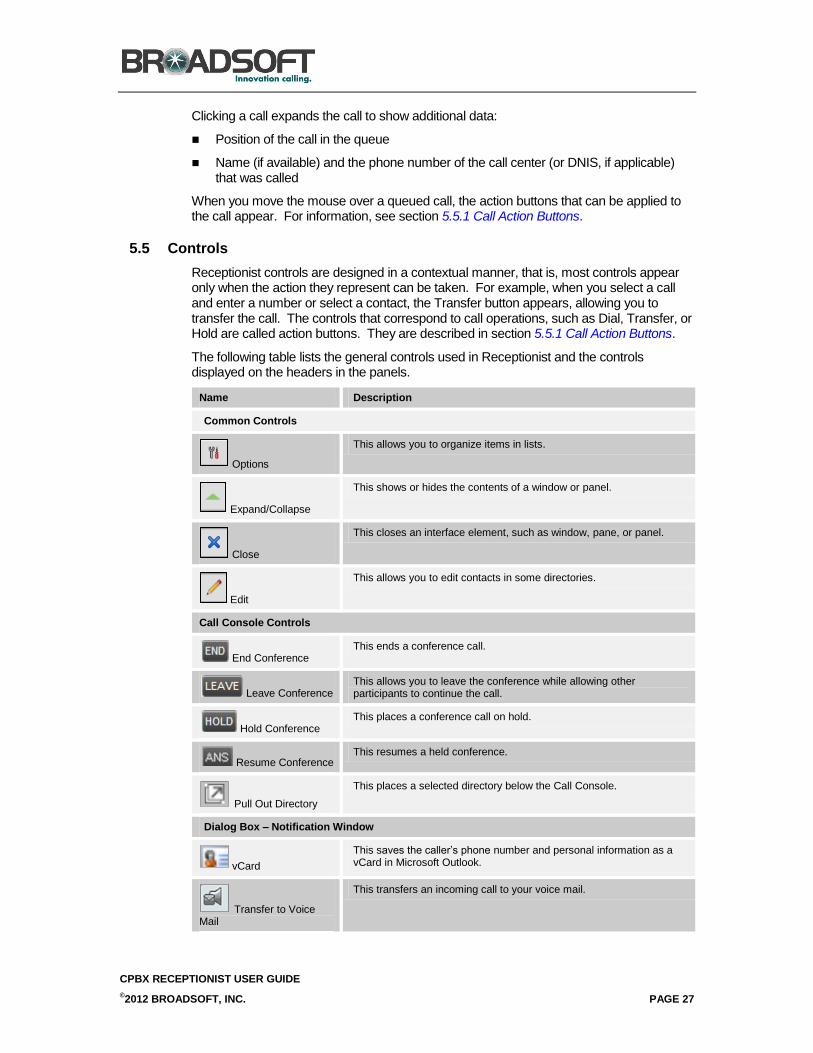
Clicking a call expands the call to show additional data:
Position of the call in the queue
Name (if available) and the phone number of the call center (or DNIS, if applicable) that was called
When you move the mouse over a queued call, the action buttons that can be applied to the call appear. For information, see section 5.5.1 Call Action Buttons.
5.5 Controls
Receptionist controls are designed in a contextual manner, that is, most controls appear only when the action they represent can be taken. For example, when you select a call and enter a number or select a contact, the Transfer button appears, allowing you to transfer the call. The controls that correspond to call operations, such as Dial, Transfer, or Hold are called action buttons. They are described in section 5.5.1 Call Action Buttons.
The following table lists the general controls used in Receptionist and the controls displayed on the headers in the panels.
Name Description
Common Controls
Options
This allows you to organize items in lists.
Expand/Collapse
This shows or hides the contents of a window or panel.
Close
This closes an interface element, such as window, pane, or panel.
Edit
This allows you to edit contacts in some directories.
Call Console Controls
End Conference This ends a conference call.
Leave Conference This allows you to leave the conference while allowing other participants to continue the call.
Hold Conference This places a conference call on hold.
Resume Conference This resumes a held conference.
Pull Out Directory
This places a selected directory below the Call Console.
Dialog Box – Notification Window
vCard
This saves the caller’s phone number and personal information as a vCard in Microsoft Outlook.
Transfer to Voice Mail
This transfers an incoming call to your voice mail.
CPBX RECEPTIONIST USER GUIDE
©2012 BROADSOFT, INC. PAGE 28
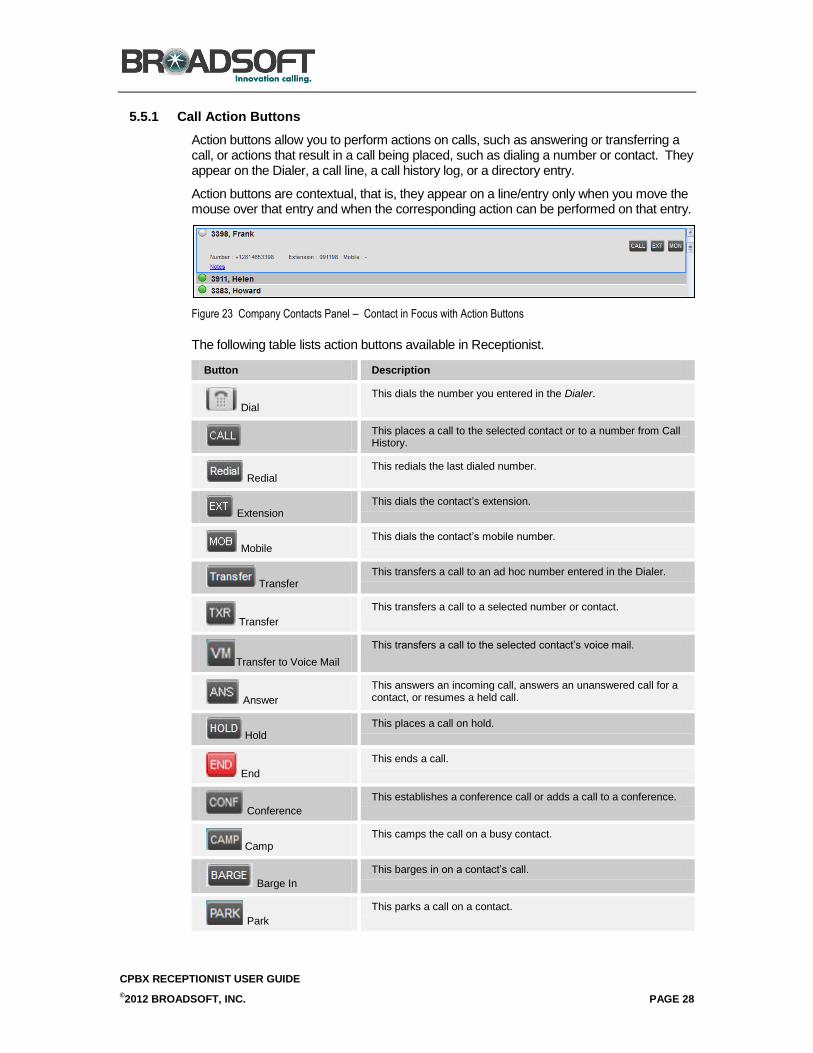
5.5.1 Call Action Buttons
Action buttons allow you to perform actions on calls, such as answering or transferring a call, or actions that result in a call being placed, such as dialing a number or contact. They appear on the Dialer, a call line, a call history log, or a directory entry.
Action buttons are contextual, that is, they appear on a line/entry only when you move the mouse over that entry and when the corresponding action can be performed on that entry.
Figure 23 Company Contacts Panel – Contact in Focus with Action Buttons
The following table lists action buttons available in Receptionist.
Button Description
Dial
This dials the number you entered in the Dialer.
This places a call to the selected contact or to a number from Call History.
Redial This redials the last dialed number.
Extension This dials the contact’s extension.
Mobile This dials the contact’s mobile number.
Transfer This transfers a call to an ad hoc number entered in the Dialer.
Transfer
This transfers a call to a selected number or contact.
Transfer to Voice Mail
This transfers a call to the selected contact’s voice mail.
Answer
This answers an incoming call, answers an unanswered call for a contact, or resumes a held call.
Hold This places a call on hold.
End
This ends a call.
Conference
This establishes a conference call or adds a call to a conference.
Camp This camps the call on a busy contact.
Barge In
This barges in on a contact’s call.
Park
This parks a call on a contact.

CPBX RECEPTIONIST USER GUIDE
©2012 BROADSOFT, INC. PAGE 29
Button Description
Monitor
This starts monitoring the state of the selected contact.
Retrieve
This retrieves a selected call from the queue to the supervisor’s device.
Reorder
This changes a selected call’s position in the queue.
CPBX RECEPTIONIST USER GUIDE
©2012 BROADSOFT, INC. PAGE 30
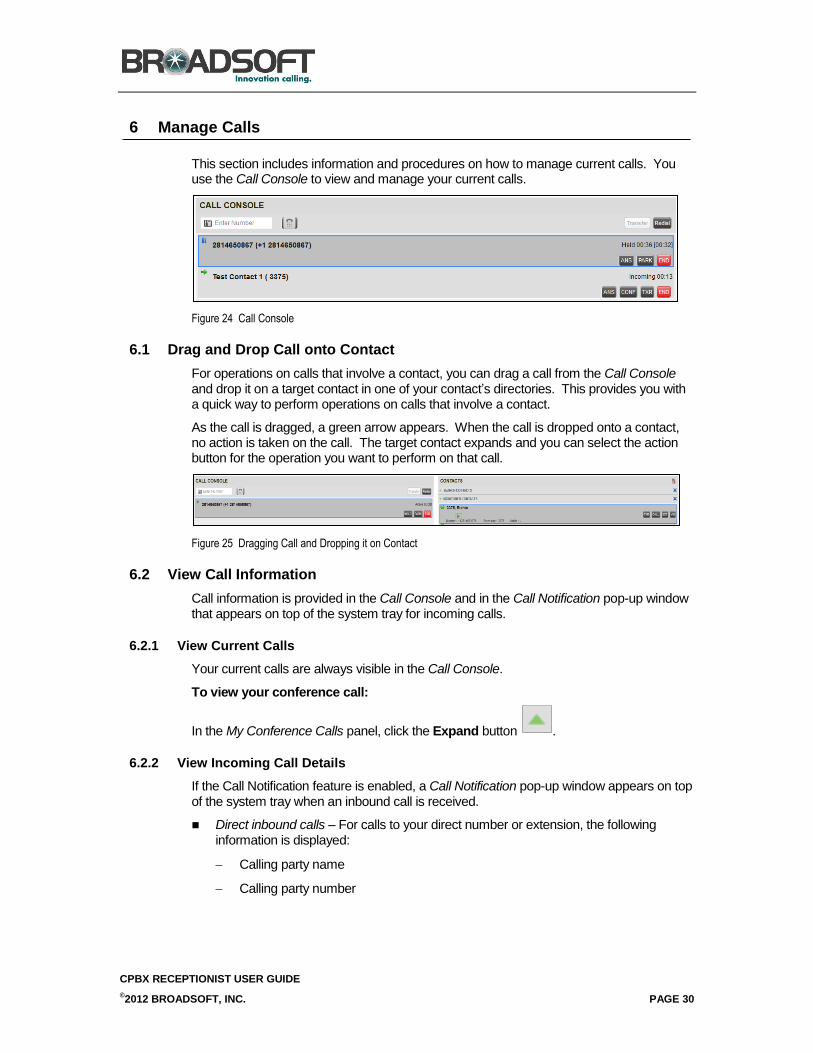
6 Manage Calls
This section includes information and procedures on how to manage current calls. You use the Call Console to view and manage your current calls.
Figure 24 Call Console
6.1 Drag and Drop Call onto Contact
For operations on calls that involve a contact, you can drag a call from the Call Console and drop it on a target contact in one of your contact’s directories. This provides you with a quick way to perform operations on calls that involve a contact.
As the call is dragged, a green arrow appears. When the call is dropped onto a contact, no action is taken on the call. The target contact expands and you can select the action button for the operation you want to perform on that call.
Figure 25 Dragging Call and Dropping it on Contact
6.2 View Call Information
Call information is provided in the Call Console and in the Call Notification pop-up window that appears on top of the system tray for incoming calls.
6.2.1 View Current Calls
Your current calls are always visible in the Call Console.
To view your conference call:
In the My Conference Calls panel, click the Expand button .
6.2.2 View Incoming Call Details
If the Call Notification feature is enabled, a Call Notification pop-up window appears on top of the system tray when an inbound call is received.
Direct inbound calls – For calls to your direct number or extension, the following information is displayed:
Calling party name
Calling party number
CPBX RECEPTIONIST USER GUIDE
©2012 BROADSOFT, INC. PAGE 31
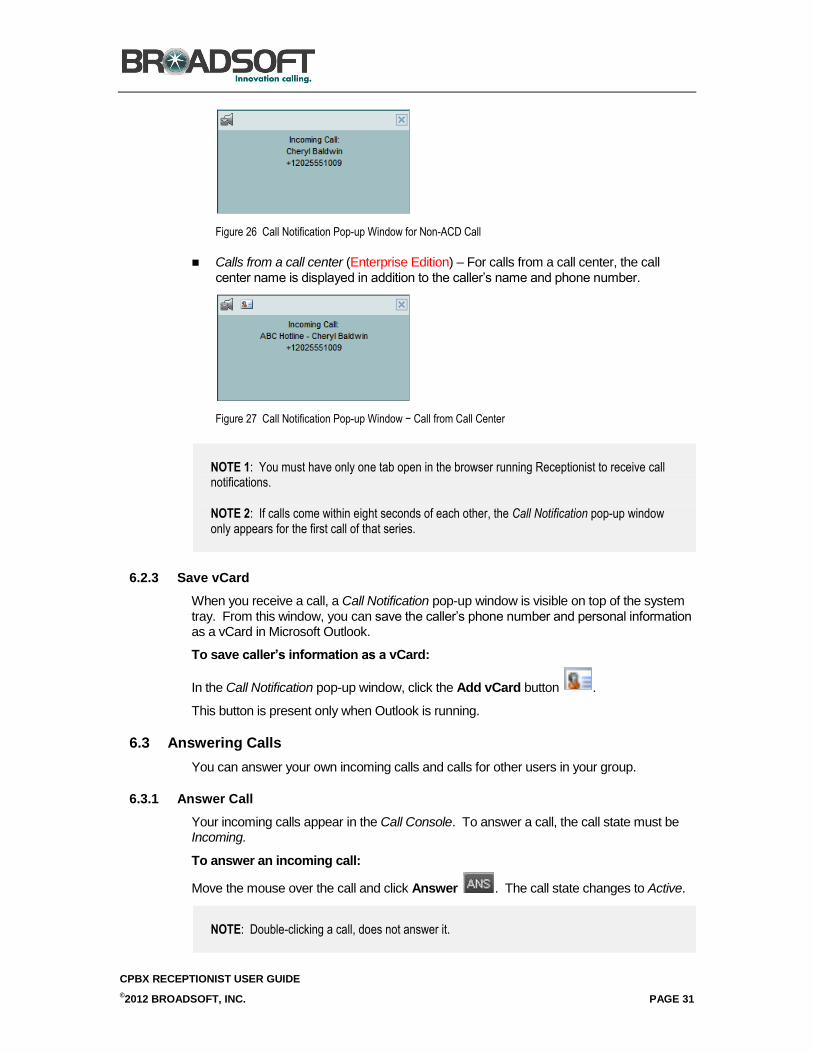
Figure 26 Call Notification Pop-up Window for Non-ACD Call
Calls from a call center (Enterprise Edition) – For calls from a call center, the call center name is displayed in addition to the caller’s name and phone number.
Figure 27 Call Notification Pop-up Window − Call from Call Center
NOTE 1: You must have only one tab open in the browser running Receptionist to receive call notifications.
NOTE 2: If calls come within eight seconds of each other, the Call Notification pop-up window only appears for the first call of that series.
6.2.3 Save vCard
When you receive a call, a Call Notification pop-up window is visible on top of the system tray. From this window, you can save the caller’s phone number and personal information as a vCard in Microsoft Outlook.
To save caller’s information as a vCard:
In the Call Notification pop-up window, click the Add vCard button .
This button is present only when Outlook is running.
6.3 Answering Calls
You can answer your own incoming calls and calls for other users in your group.
6.3.1 Answer Call
Your incoming calls appear in the Call Console. To answer a call, the call state must be Incoming.
To answer an incoming call:
Move the mouse over the call and click Answer . The call state changes to Active.
NOTE: Double-clicking a call, does not answer it.
CPBX RECEPTIONIST USER GUIDE
©2012 BROADSOFT, INC. PAGE 32
To answer an incoming call from a Call Notification pop-up window:
Click anywhere on the text in the window.
6.3.2 Pick Up Call
The Directed Call Pickup service allows you to answer a call that is incoming on another user. Depending on your setup, you can answer calls for users in your group or in the entire enterprise. This is useful when the user is currently not on hand to answer the call.
NOTE: To pick up a contact’s call, you need to have the Directed Call Pickup service assigned.
To answer a call for a contact:
1) Expand your Company Contacts or Monitored Contacts directory and click the target contact to expand it. The contact’s state must be Ringing.
2) Move the mouse over the contact and click Answer .
The call appears as Incoming in the Call Console.
6.4 Hold and Resume Calls
You can only put an active call on hold.
6.4.1 Put Call on Hold
To put a call on hold:
Move the mouse over the call and click Hold .
6.4.2 Resume Held Call
To resume a held call:
Move the mouse over the call and click Answer .
NOTE: Double-clicking a call does not take the call off hold.
6.5 Make and End Calls
Receptionist provides you with several ways in which you can make calls. When you dial a number or contact, the call appears in the Call Console as Incoming Local.
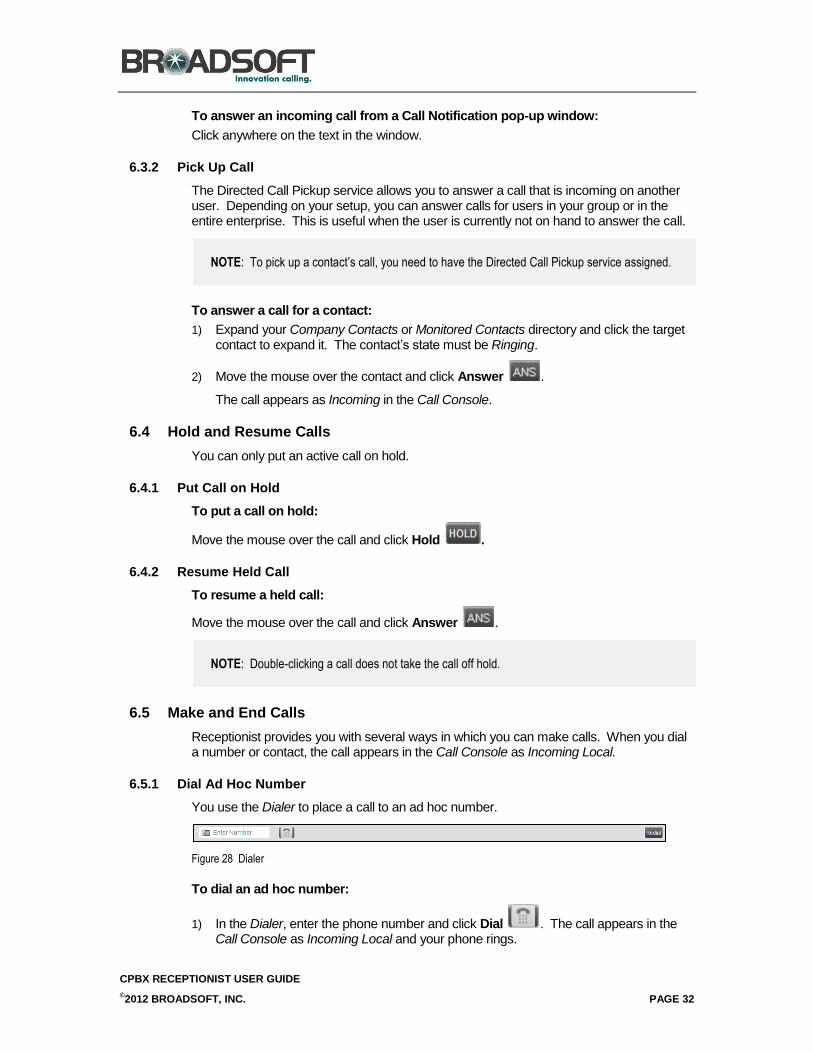
6.5.1 Dial Ad Hoc Number
You use the Dialer to place a call to an ad hoc number.
Figure 28 Dialer
To dial an ad hoc number:
1) In the Dialer, enter the phone number and click Dial . The call appears in the Call Console as Incoming Local and your phone rings.

CPBX RECEPTIONIST USER GUIDE
©2012 BROADSOFT, INC. PAGE 33
2) Click Answer for that call. An outbound call is placed and the call state changes to Outgoing.
6.5.2 Redial Number
Receptionist keeps up to ten most recently dialed numbers.
To redial one of the recently dialed numbers:
1) In the Dialer, place the cursor in the text box and start entering a number. A list of recently called numbers that start with the entered digits appears.
Figure 29 Dialer – Select Recently Dialed Number
2) Select the number to dial and click Dial .
The client issues a Click-To-Dial attempt to the selected number.
Alternatively, click the Redial button and select the number from the list that appears.
Figure 30 Dialer – Redialing Number
6.5.3 Dial Contact
You can dial contacts from any directory available in Receptionist.
To dial a contact:
1) In the Contacts pane, expand the directory from which you want to dial a contact.
2) Click the contact to expand it and click Call for that contact. A Click-To-Dial action is initiated and your phone rings.
Figure 31 Company Contacts Panel – Contact in Focus with Call, Extension, and Mobile Buttons
3) Answer the phone. An outbound call is placed.
CPBX RECEPTIONIST USER GUIDE
©2012 BROADSOFT, INC. PAGE 34
4) Alternatively, to dial the contact’s extension, click Extension or to dial the
contact’s mobile number, click Mobile .
6.6 End Call
To end a call:
Click End for that call.
6.7 Transferring Calls
There are a number of ways in which you can transfer a call. You can blind transfer calls or transfer calls with consultation or supervision. You can also transfer calls directly to voice mail or to a queue.
6.7.1 Blind Transfer Call
A blind transfer occurs when a call is transferred without an introduction. Calls may be blind transferred while active, held, or ringing (in) on your phone. If a call is ringing (in), blind transfer allows the call to be redirected before it is answered. You can blind transfer a call to an ad hoc number or to a contact.
To blind transfer a call to an ad hoc number:
1) In the Call Console, select the call to transfer.
2) In the Dialer, enter the destination number and click Transfer . The call is transferred and removed from the Call Console.
To blind transfer a call to a contact:
1) In the Call Console, select the call to transfer.
2) In the Contacts pane, expand the panel from which you want to select a contact.
3) Click the destination contact to expand it, and click Transfer for that contact. The call is transferred and removed from the Call Console.
Alternatively, drag the call onto the target contact and click Transfer for that contact.
6.7.2 Conduct Supervised Transfer
When you have an active inbound call that you want to transfer, you can follow this procedure.
To conduct a supervised transfer:
1) In the Call Console, select the call to transfer.
2) Dial the number or contact to whom you want to transfer the call.
3) If the dialed contact is busy, either retry or dial another contact.
4) Move the mouse over the new, non-selected call and click Transfer .
CPBX RECEPTIONIST USER GUIDE
©2012 BROADSOFT, INC. PAGE 35
6.7.3 Transfer with Consultation
Use this method to transfer a call with an introduction to the destination party. Calls may be transferred this way while active, held, or ringing (in) on your phone. In the latter case, the system redirects the call before it is answered.
To transfer a call with consultation:
1) Make a call to the person to whom you want to transfer the call. If the first call was active, it is put on hold. The new call appears in the Call Console.
2) Wait until the called party accepts your call and speak to the party.
3) When ready to transfer, in the Call Console, select one of the two calls.
4) Move the mouse over the non-selected call and click Transfer .
The calls are connected and removed from the Call Console.
6.7.4 Transfer to Voice Mail
You can transfer a call to a monitored contact’s voice mail or to your own voice mail. Calls may be transferred while active, held, or ringing (in) on your phone.
To transfer a call to voice mail:
1) In the Call Console, select the call to transfer.
2) In the Contacts pane, expand the Company Contacts or Monitored Contacts directory and find the contact. Find yourself if you want to transfer the call to your voice mail.
3) Click the contact and click Transfer to Voice Mail for that contact.
Alternatively, drag the call onto the target contact and click Transfer to Voice Mail for that contact.
NOTE: This option is only available if the contact has the Voice Messaging service assigned and enabled.
You can also transfer an incoming call to voice mail from the Call Notification pop-up window.
To transfer an incoming call to your voice mail:
In the Call Notification pop-up window that appears when you receive a call, click Transfer
to Voice Mail .
6.7.5 Transfer to Queue
You can transfer a current call to any queue that appears in your Call Queues panel. The call is placed at the bottom of the new queue.
To transfer a call to a queue:
1) In the Call Console, select the call to transfer.
2) Expand the Call Queues panel.
3) Click the destination queue and click Transfer .
CPBX RECEPTIONIST USER GUIDE
©2012 BROADSOFT, INC. PAGE 36
The call is transferred and removed from the Call Console.
Alternatively, drag the call onto the target queue and click Transfer for that queue.
6.8 Parking and Camping Calls
Call parking or camping allows you to find a temporary parking place for the call. If the parked or camped call is not answered within the predefined time, the call is recalled and reappears in your Call Console.
6.8.1 Conduct Busy Camp On
Busy Camp On allows you to place a call at a busy contact. The call is automatically transferred to the destination when the contact becomes available to take the call. A call to camp must be active or held, and the destination contact must be either Busy or Ringing.
NOTE: To use the feature, you need to have the Busy Camp On option enabled under the Call Transfer feature.
To camp a call on a busy contact:
1) In the Call Console, select the call to camp.
2) In your Company Contacts or Monitored Contacts directory, click a Busy or Ringing
contact and click Camp . Once the call is camped, it is removed from the Call Console.
If the call reaches the designated expiration timer before the call is answered, the call is recalled to your device and reappears in the Call Console.
6.8.2 Conduct Group Call Park
Group Call Park searches within a predefined hunt group for an available line on which to park a call. After a designated time, the call returns to the originating operator or a specified hunt group (depending on how the service is configured). If the parking attempt fails for any reason, the call remains in your Call Console.
To perform a Group Call Park:
In the Call Console, move the mouse over an active or held call and click Park . The call is parked on an available extension and removed from the Call Console.
If the call reaches the designated expiration timer before the call is answered, the call may be recalled to your device and reappear in your Call Console.
CPBX RECEPTIONIST USER GUIDE
©2012 BROADSOFT, INC. PAGE 37
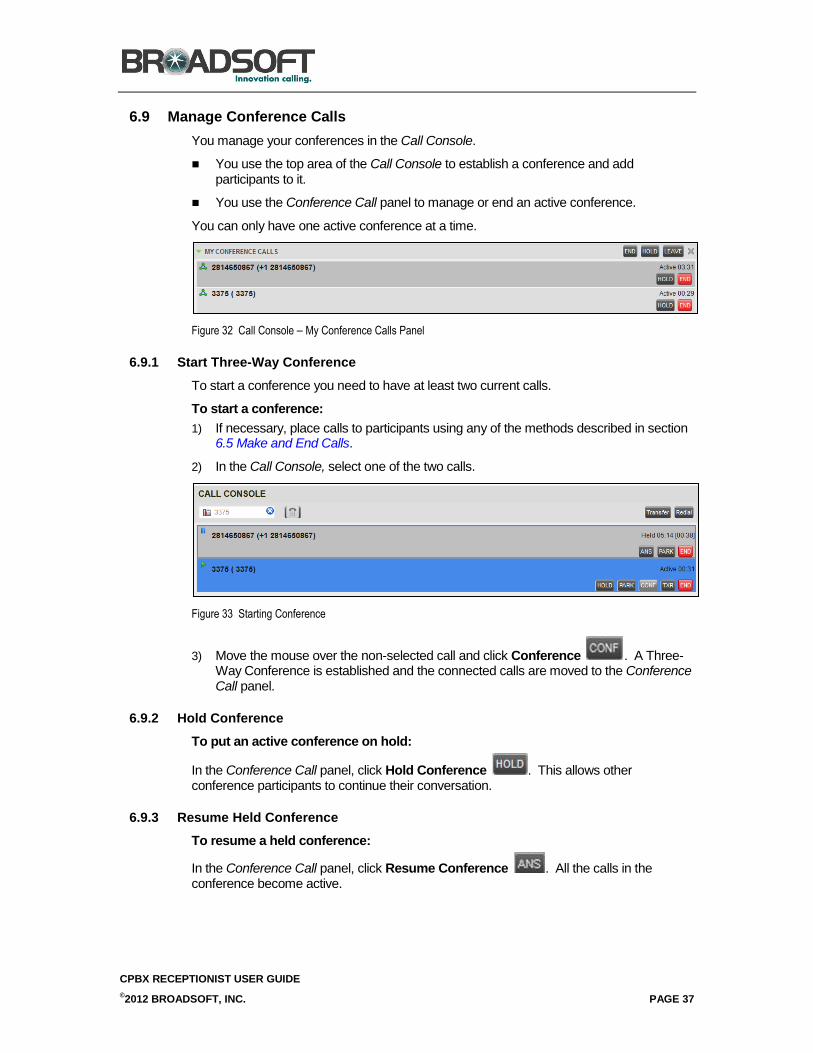
6.9 Manage Conference Calls
You manage your conferences in the Call Console.
You use the top area of the Call Console to establish a conference and add participants to it.
You use the Conference Call panel to manage or end an active conference.
You can only have one active conference at a time.
Figure 32 Call Console – My Conference Calls Panel
6.9.1 Start Three-Way Conference
To start a conference you need to have at least two current calls.
To start a conference:
1) If necessary, place calls to participants using any of the methods described in section 6.5 Make and End Calls.
2) In the Call Console, select one of the two calls.
Figure 33 Starting Conference
3) Move the mouse over the non-selected call and click Conference . A Three-Way Conference is established and the connected calls are moved to the Conference Call panel.
6.9.2 Hold Conference
To put an active conference on hold:
In the Conference Call panel, click Hold Conference . This allows other conference participants to continue their conversation.
6.9.3 Resume Held Conference
To resume a held conference:
In the Conference Call panel, click Resume Conference . All the calls in the conference become active.

CPBX RECEPTIONIST USER GUIDE
©2012 BROADSOFT, INC. PAGE 38
6.9.4 Put Conference Participant on Hold
To put a specific conference participant on hold:
1) Expand the Conference Call panel.
2) Move the mouse over the target call and click Hold .
6.9.5 Resume Conference Participant
To resume a conference participant:
1) Expand the Conference Call panel.
2) Move the mouse over the target call and click Answer .
6.9.6 Leave Conference
To leave the conference:
In the Conference Call panel, click the Leave Conference button.
NOTE: This function is only available for Three-Way Conferences.
6.9.7 Remove Conference Participant
To end a selected call in the conference:
1) Expand the Conference Call panel.
2) Move the mouse over the call and click End .
6.9.8 End Conference
To end the conference:
In the Conference Call panel, click End Conference . This releases all the calls that participate in the conference.
6.9.9 Barge in on Call
Call Barge-in allows you to barge in on a contact’s call. This is useful when you want to enter a call that is already established between two other people.
NOTE: This functionality is only available if you have been assigned this service by your administrator.
Depending on your setup, you can barge in on contacts in your group or enterprise.
To barge in on a call:
1) Expand the Company Contacts or Monitored Contacts directory.
2) Click the target contact and click Barge In . The contact’s status must be Busy.

CPBX RECEPTIONIST USER GUIDE
©2012 BROADSOFT, INC. PAGE 39
You enter an ongoing call, thereby establishing a Three-Way Conference. The calls appear in the Conference Call panel.
Alternatively, drag the call onto the target contact and click Barge In for that contact.
You can now perform any conference operation on the call.
CPBX RECEPTIONIST USER GUIDE
©2012 BROADSOFT, INC. PAGE 40
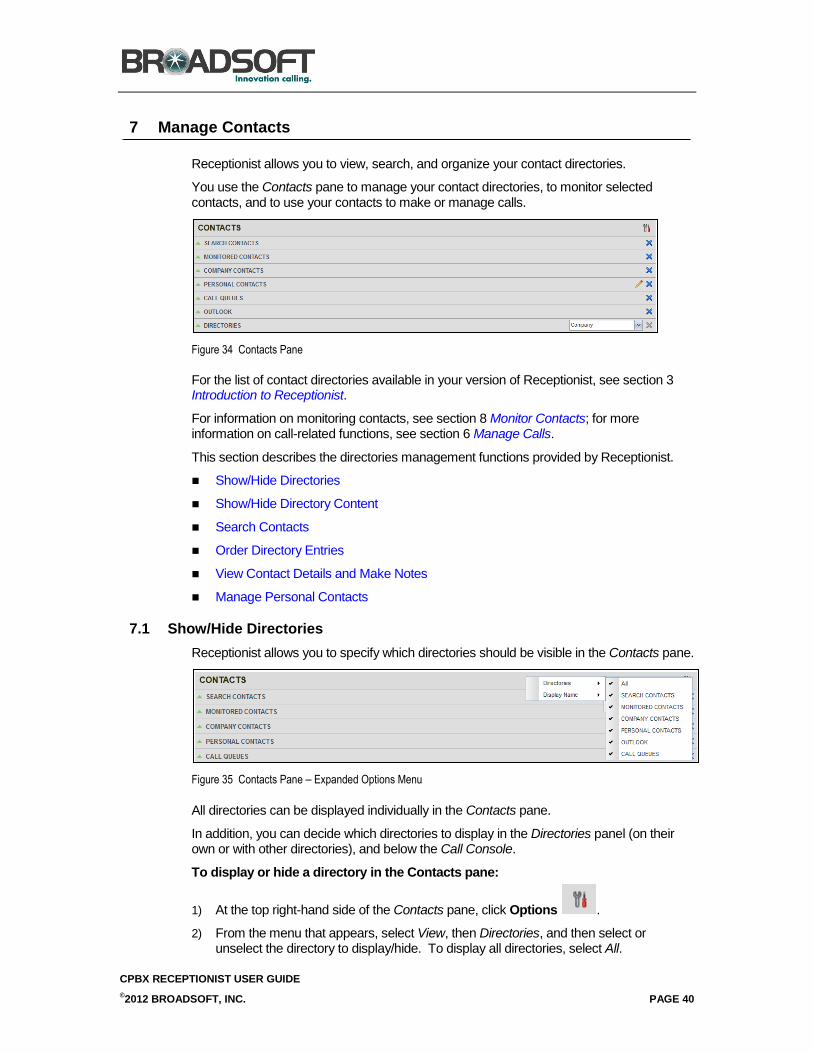
7 Manage Contacts
Receptionist allows you to view, search, and organize your contact directories.
You use the Contacts pane to manage your contact directories, to monitor selected contacts, and to use your contacts to make or manage calls.
Figure 34 Contacts Pane
For the list of contact directories available in your version of Receptionist, see section 3 Introduction to Receptionist.
For information on monitoring contacts, see section 8 Monitor Contacts; for more information on call-related functions, see section 6 Manage Calls.
This section describes the directories management functions provided by Receptionist.
Show/Hide Directories
Show/Hide Directory Content
Search Contacts
Order Directory Entries
View Contact Details and Make Notes
Manage Personal Contacts
7.1 Show/Hide Directories
Receptionist allows you to specify which directories should be visible in the Contacts pane.
Figure 35 Contacts Pane – Expanded Options Menu
All directories can be displayed individually in the Contacts pane.
In addition, you can decide which directories to display in the Directories panel (on their own or with other directories), and below the Call Console.
To display or hide a directory in the Contacts pane:
1) At the top right-hand side of the Contacts pane, click Options .
2) From the menu that appears, select View, then Directories, and then select or unselect the directory to display/hide. To display all directories, select All.
CPBX RECEPTIONIST USER GUIDE
©2012 BROADSOFT, INC. PAGE 41
To hide a directory, you can also click the Close button in that directory’s panel.
NOTE: You cannot close the Directories panel.
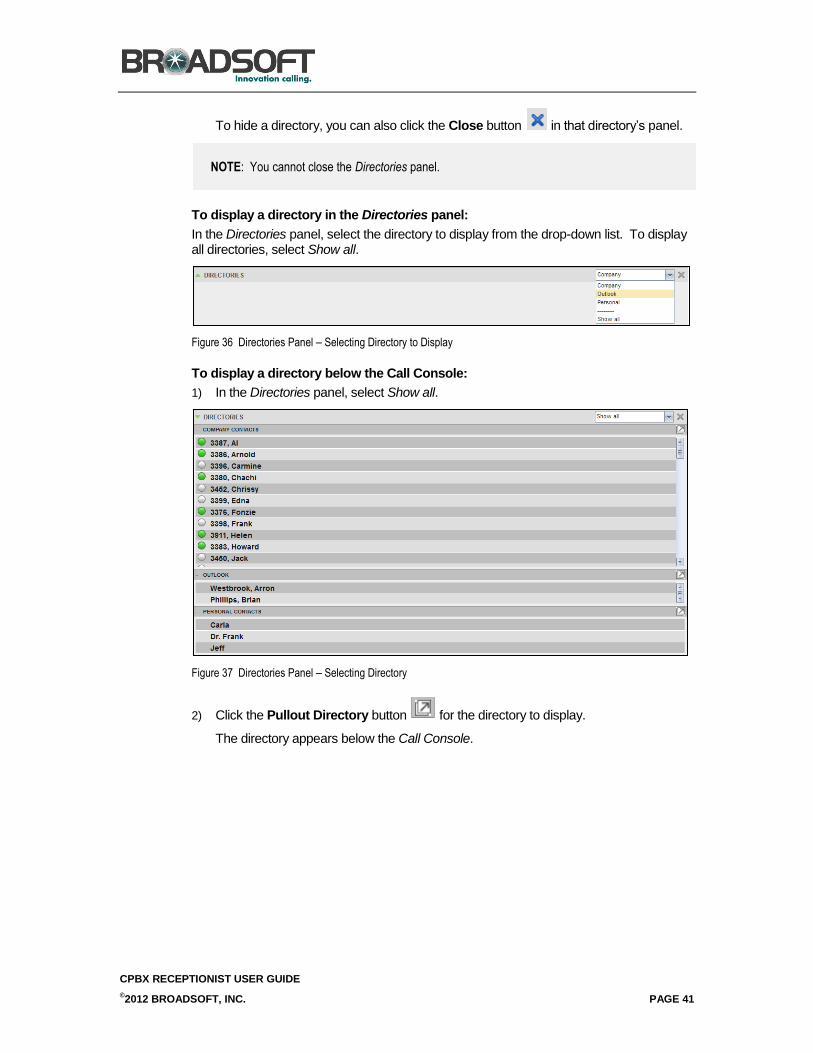
To display a directory in the Directories panel:
In the Directories panel, select the directory to display from the drop-down list. To display all directories, select Show all.
Figure 36 Directories Panel – Selecting Directory to Display
To display a directory below the Call Console:
1) In the Directories panel, select Show all.
Figure 37 Directories Panel – Selecting Directory
2) Click the Pullout Directory button for the directory to display.
The directory appears below the Call Console.
CPBX RECEPTIONIST USER GUIDE
©2012 BROADSOFT, INC. PAGE 42
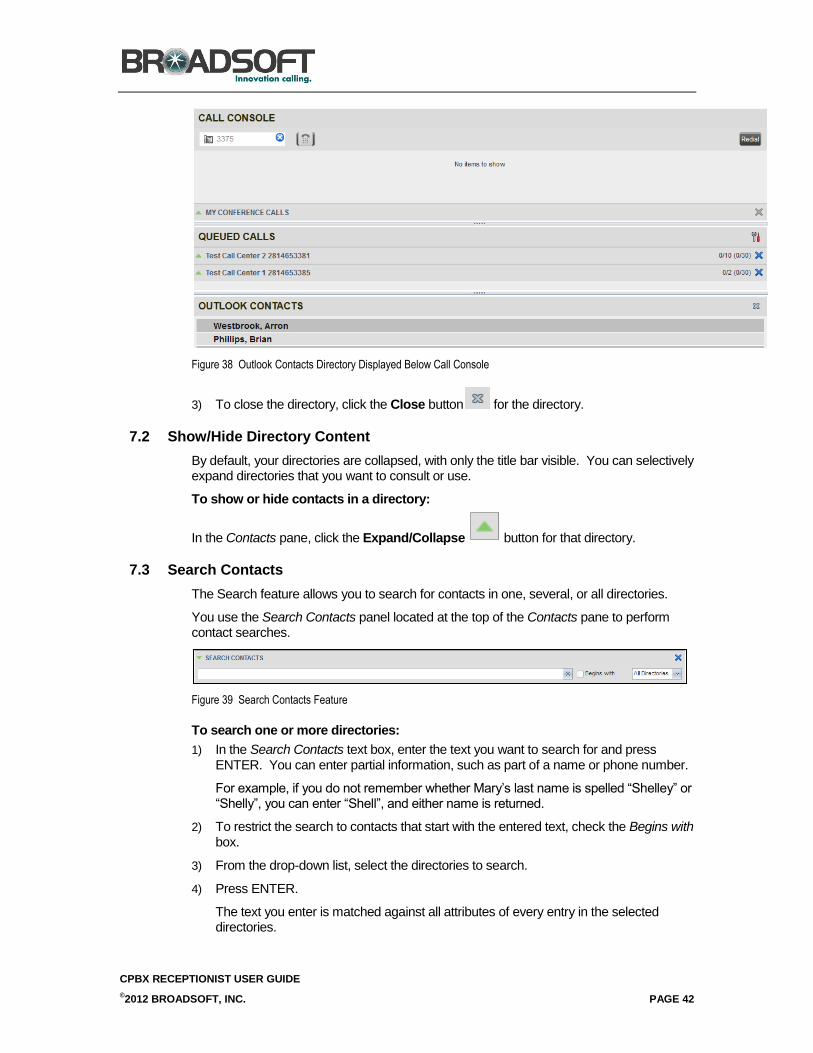
Figure 38 Outlook Contacts Directory Displayed Below Call Console
3) To close the directory, click the Close button for the directory.
7.2 Show/Hide Directory Content
By default, your directories are collapsed, with only the title bar visible. You can selectively expand directories that you want to consult or use.
To show or hide contacts in a directory:
In the Contacts pane, click the Expand/Collapse button for that directory.
7.3 Search Contacts
The Search feature allows you to search for contacts in one, several, or all directories.
You use the Search Contacts panel located at the top of the Contacts pane to perform contact searches.
Figure 39 Search Contacts Feature
To search one or more directories:
1) In the Search Contacts text box, enter the text you want to search for and press ENTER. You can enter partial information, such as part of a name or phone number.
For example, if you do not remember whether Mary’s last name is spelled “Shelley” or “Shelly”, you can enter “Shell”, and either name is returned.
2) To restrict the search to contacts that start with the entered text, check the Begins with box.
3) From the drop-down list, select the directories to search.
4) Press ENTER.
The text you enter is matched against all attributes of every entry in the selected directories.
CPBX RECEPTIONIST USER GUIDE
©2012 BROADSOFT, INC. PAGE 43
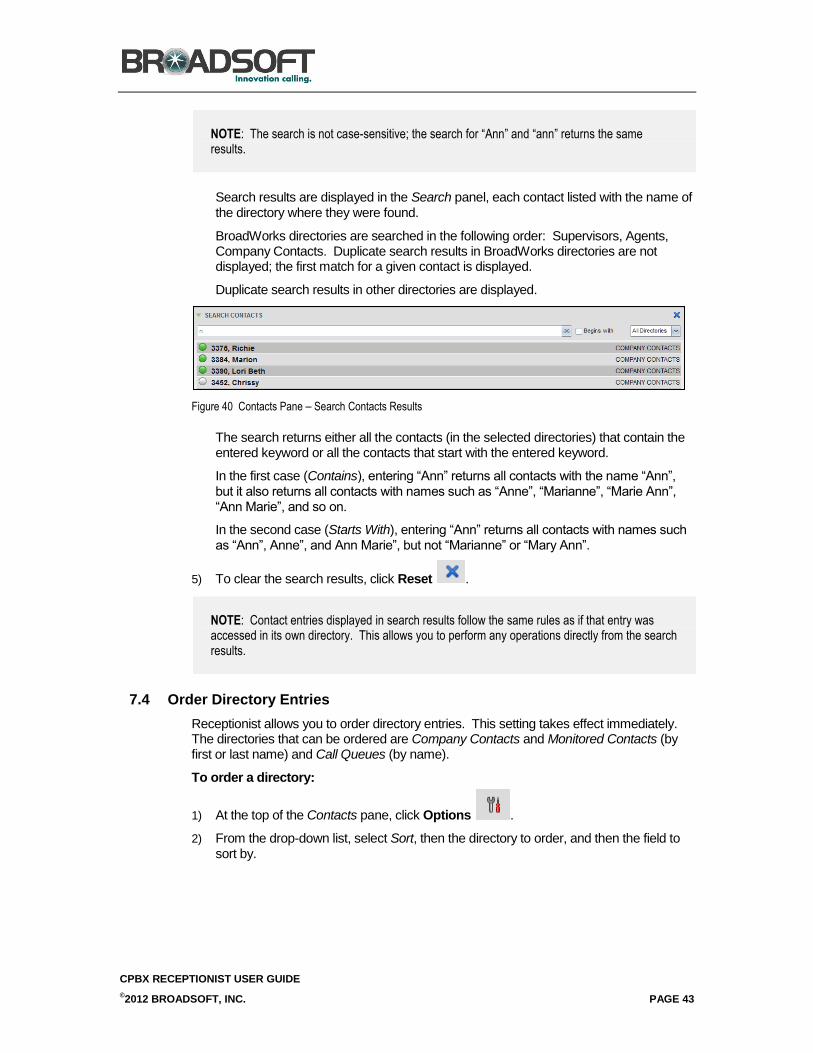
NOTE: The search is not case-sensitive; the search for “Ann” and “ann” returns the same results.
Search results are displayed in the Search panel, each contact listed with the name of the directory where they were found.
BroadWorks directories are searched in the following order: Supervisors, Agents, Company Contacts. Duplicate search results in BroadWorks directories are not displayed; the first match for a given contact is displayed.
Duplicate search results in other directories are displayed.
Figure 40 Contacts Pane – Search Contacts Results
The search returns either all the contacts (in the selected directories) that contain the entered keyword or all the contacts that start with the entered keyword.
In the first case (Contains), entering “Ann” returns all contacts with the name “Ann”, but it also returns all contacts with names such as “Anne”, “Marianne”, “Marie Ann”, “Ann Marie”, and so on.
In the second case (Starts With), entering “Ann” returns all contacts with names such as “Ann”, Anne”, and Ann Marie”, but not “Marianne” or “Mary Ann”.
5) To clear the search results, click Reset .
NOTE: Contact entries displayed in search results follow the same rules as if that entry was accessed in its own directory. This allows you to perform any operations directly from the search results.
7.4 Order Directory Entries
Receptionist allows you to order directory entries. This setting takes effect immediately. The directories that can be ordered are Company Contacts and Monitored Contacts (by first or last name) and Call Queues (by name).
To order a directory:
1) At the top of the Contacts pane, click Options .
2) From the drop-down list, select Sort, then the directory to order, and then the field to sort by.
CPBX RECEPTIONIST USER GUIDE
©2012 BROADSOFT, INC. PAGE 44
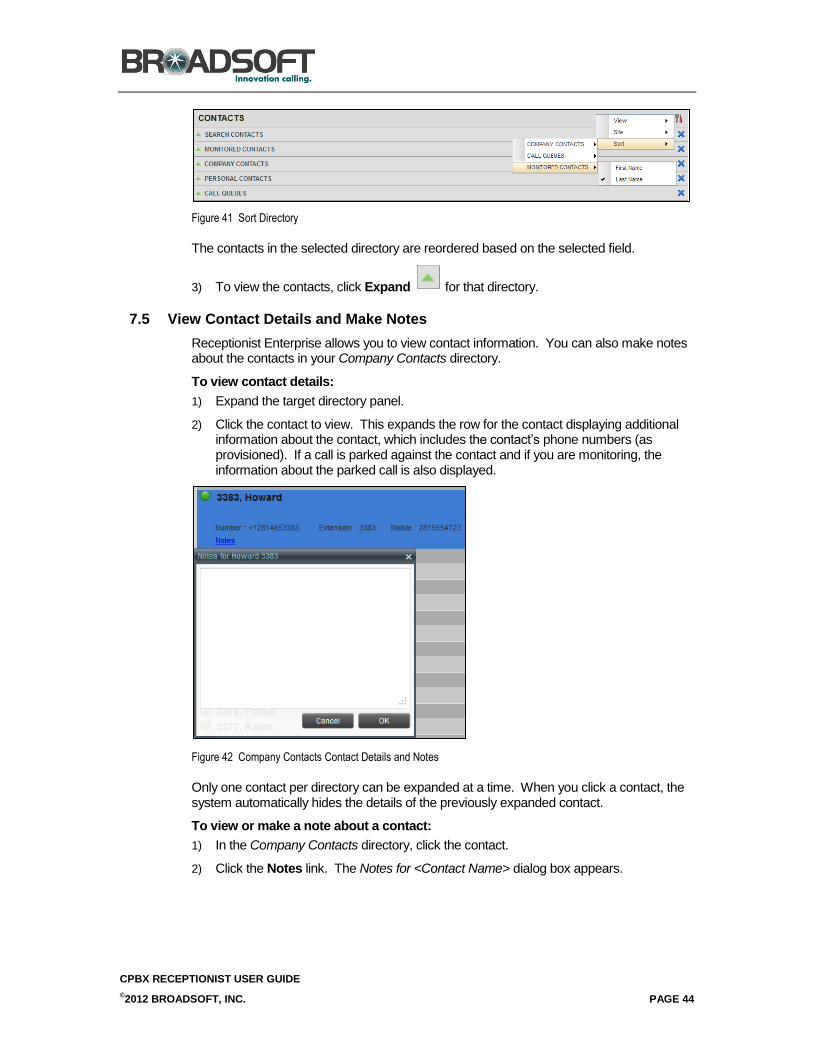
Figure 41 Sort Directory
The contacts in the selected directory are reordered based on the selected field.
3) To view the contacts, click Expand for that directory.
7.5 View Contact Details and Make Notes
Receptionist Enterprise allows you to view contact information. You can also make notes about the contacts in your Company Contacts directory.
To view contact details:
1) Expand the target directory panel.
2) Click the contact to view. This expands the row for the contact displaying additional information about the contact, which includes the contact’s phone numbers (as provisioned). If a call is parked against the contact and if you are monitoring, the information about the parked call is also displayed.
Figure 42 Company Contacts Contact Details and Notes
Only one contact per directory can be expanded at a time. When you click a contact, the system automatically hides the details of the previously expanded contact.
To view or make a note about a contact:
1) In the Company Contacts directory, click the contact.
2) Click the Notes link. The Notes for <Contact Name> dialog box appears.
CPBX RECEPTIONIST USER GUIDE
©2012 BROADSOFT, INC. PAGE 45
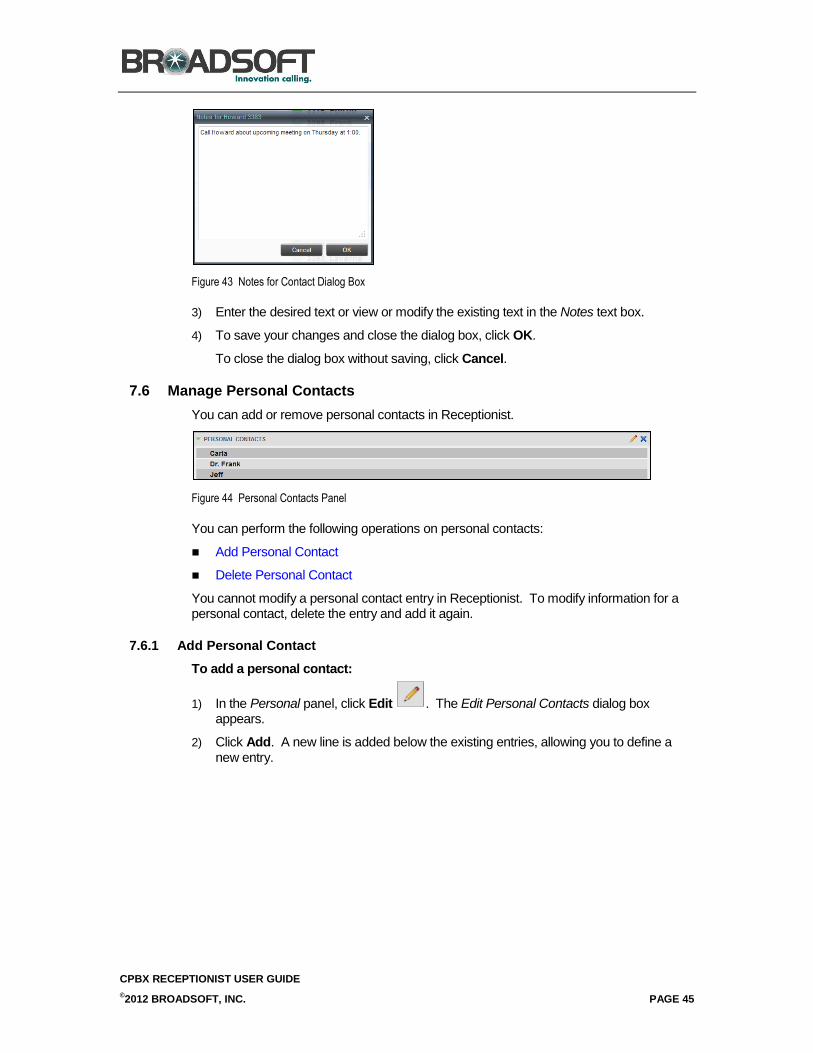
Figure 43 Notes for Contact Dialog Box
3) Enter the desired text or view or modify the existing text in the Notes text box.
4) To save your changes and close the dialog box, click OK.
To close the dialog box without saving, click Cancel.
7.6 Manage Personal Contacts
You can add or remove personal contacts in Receptionist.
Figure 44 Personal Contacts Panel
You can perform the following operations on personal contacts:
Add Personal Contact
Delete Personal Contact
You cannot modify a personal contact entry in Receptionist. To modify information for a personal contact, delete the entry and add it again.
7.6.1 Add Personal Contact
To add a personal contact:
1) In the Personal panel, click Edit . The Edit Personal Contacts dialog box appears.
2) Click Add. A new line is added below the existing entries, allowing you to define a new entry.
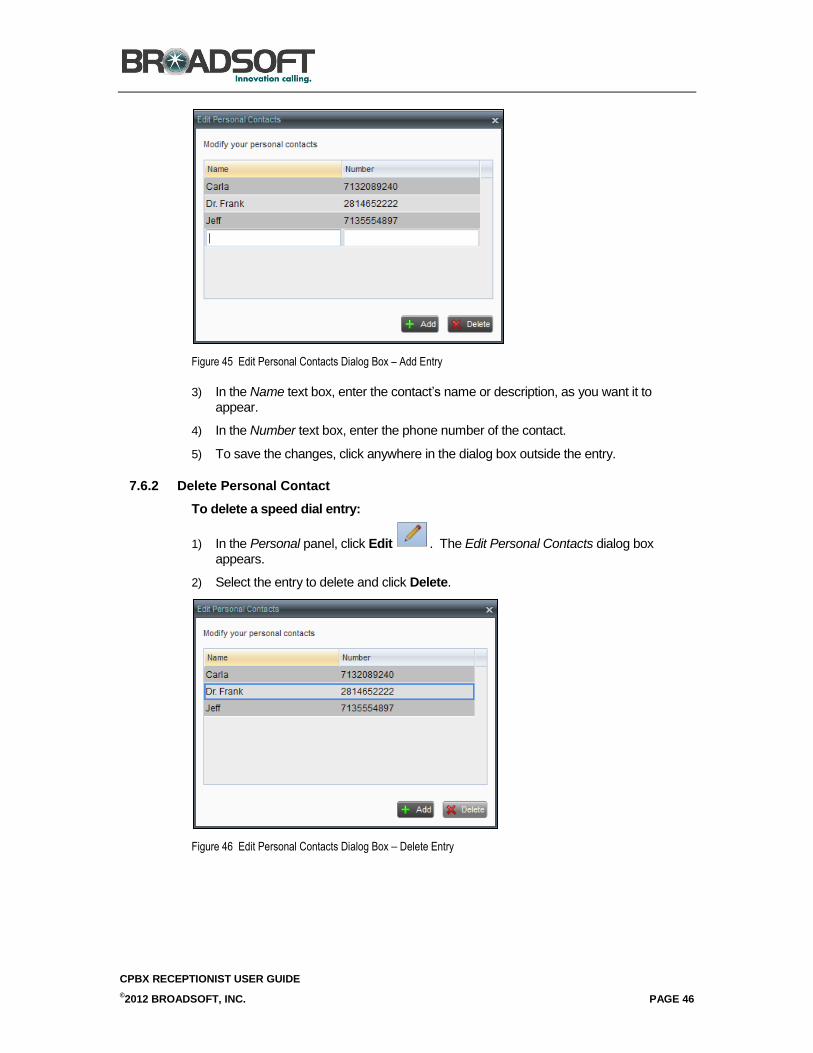
CPBX RECEPTIONIST USER GUIDE
©2012 BROADSOFT, INC. PAGE 46
Figure 45 Edit Personal Contacts Dialog Box – Add Entry
3) In the Name text box, enter the contact’s name or description, as you want it to appear.
4) In the Number text box, enter the phone number of the contact.
5) To save the changes, click anywhere in the dialog box outside the entry.
7.6.2 Delete Personal Contact
To delete a speed dial entry:
1) In the Personal panel, click Edit . The Edit Personal Contacts dialog box appears.
2) Select the entry to delete and click Delete.
Figure 46 Edit Personal Contacts Dialog Box – Delete Entry
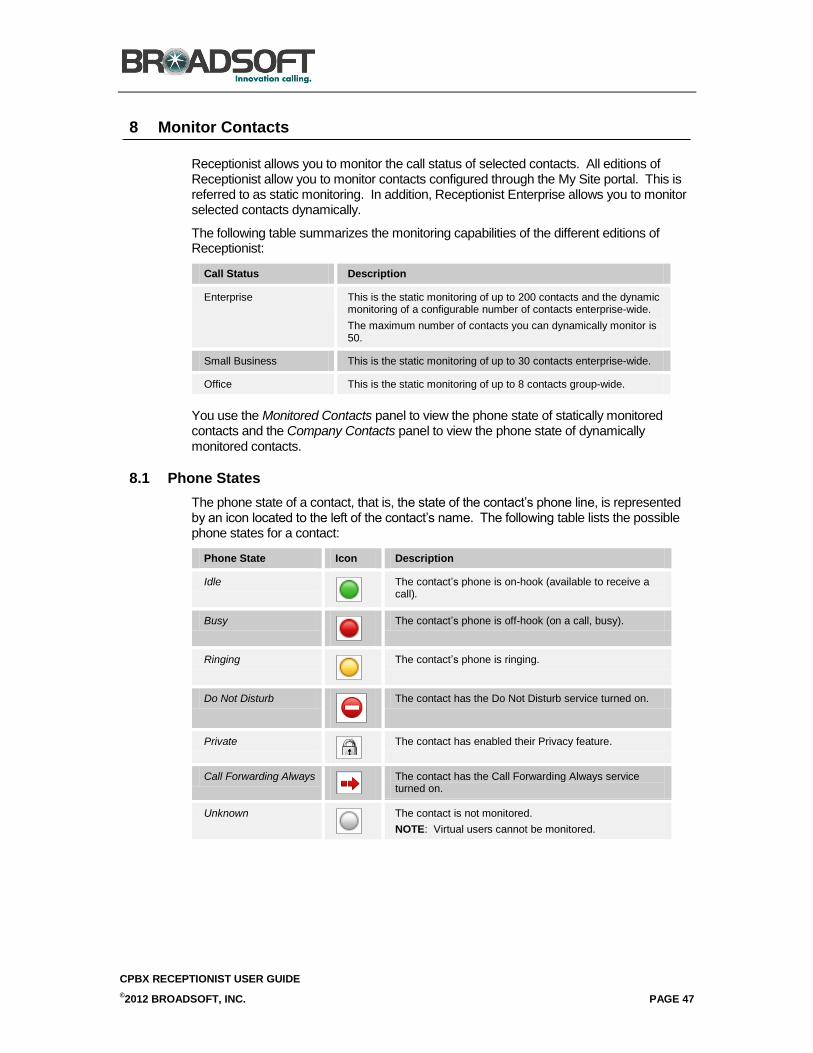
CPBX RECEPTIONIST USER GUIDE
©2012 BROADSOFT, INC. PAGE 47
8 Monitor Contacts
Receptionist allows you to monitor the call status of selected contacts. All editions of Receptionist allow you to monitor contacts configured through the My Site portal. This is referred to as static monitoring. In addition, Receptionist Enterprise allows you to monitor selected contacts dynamically.
The following table summarizes the monitoring capabilities of the different editions of Receptionist:
Call Status Description
Enterprise This is the static monitoring of up to 200 contacts and the dynamic monitoring of a configurable number of contacts enterprise-wide.
The maximum number of contacts you can dynamically monitor is 50.
Small Business This is the static monitoring of up to 30 contacts enterprise-wide.
Office This is the static monitoring of up to 8 contacts group-wide.
You use the Monitored Contacts panel to view the phone state of statically monitored contacts and the Company Contacts panel to view the phone state of dynamically monitored contacts.
8.1 Phone States
The phone state of a contact, that is, the state of the contact’s phone line, is represented by an icon located to the left of the contact’s name. The following table lists the possible phone states for a contact:
Phone State Icon Description
Idle
The contact’s phone is on-hook (available to receive a call).
Busy
The contact’s phone is off-hook (on a call, busy).
Ringing
The contact’s phone is ringing.
Do Not Disturb
The contact has the Do Not Disturb service turned on.
Private
The contact has enabled their Privacy feature.
Call Forwarding Always
The contact has the Call Forwarding Always service turned on.
Unknown
The contact is not monitored.
NOTE: Virtual users cannot be monitored.
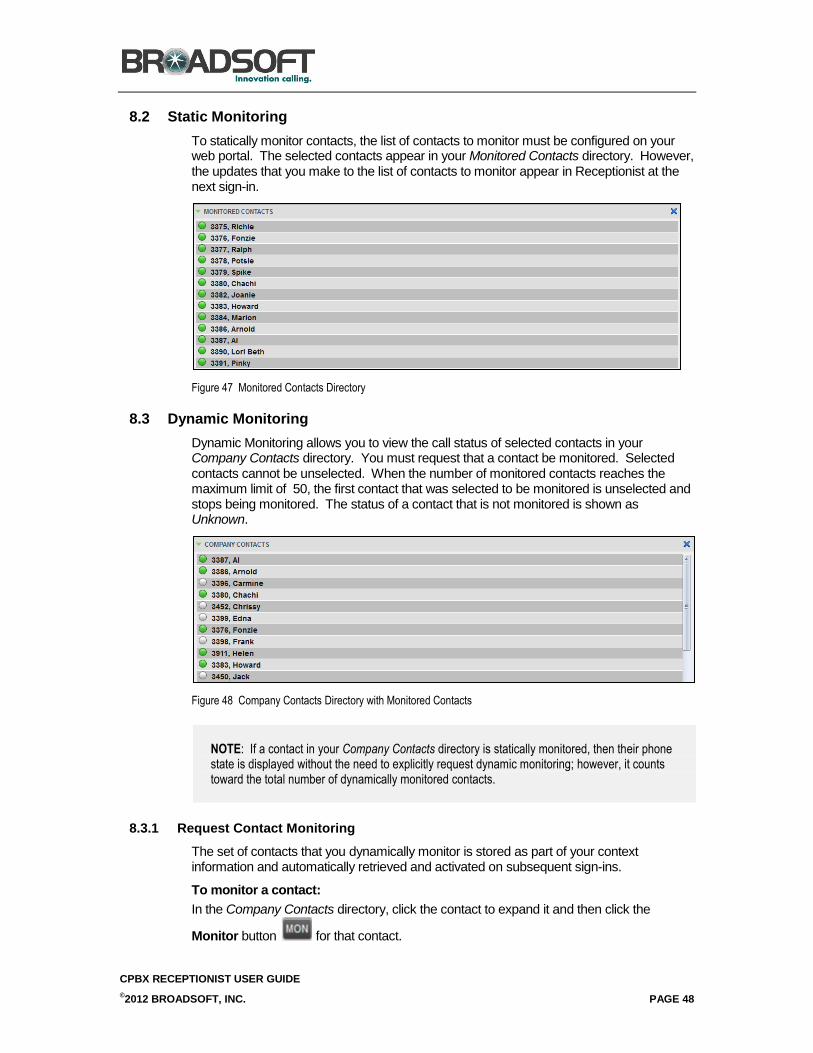
CPBX RECEPTIONIST USER GUIDE
©2012 BROADSOFT, INC. PAGE 48
8.2 Static Monitoring
To statically monitor contacts, the list of contacts to monitor must be configured on your web portal. The selected contacts appear in your Monitored Contacts directory. However, the updates that you make to the list of contacts to monitor appear in Receptionist at the next sign-in.
Figure 47 Monitored Contacts Directory
8.3 Dynamic Monitoring
Dynamic Monitoring allows you to view the call status of selected contacts in your Company Contacts directory. You must request that a contact be monitored. Selected contacts cannot be unselected. When the number of monitored contacts reaches the maximum limit of 50, the first contact that was selected to be monitored is unselected and stops being monitored. The status of a contact that is not monitored is shown as Unknown.
Figure 48 Company Contacts Directory with Monitored Contacts
NOTE: If a contact in your Company Contacts directory is statically monitored, then their phone state is displayed without the need to explicitly request dynamic monitoring; however, it counts toward the total number of dynamically monitored contacts.
8.3.1 Request Contact Monitoring
The set of contacts that you dynamically monitor is stored as part of your context information and automatically retrieved and activated on subsequent sign-ins.
To monitor a contact:
In the Company Contacts directory, click the contact to expand it and then click the
Monitor button for that contact.
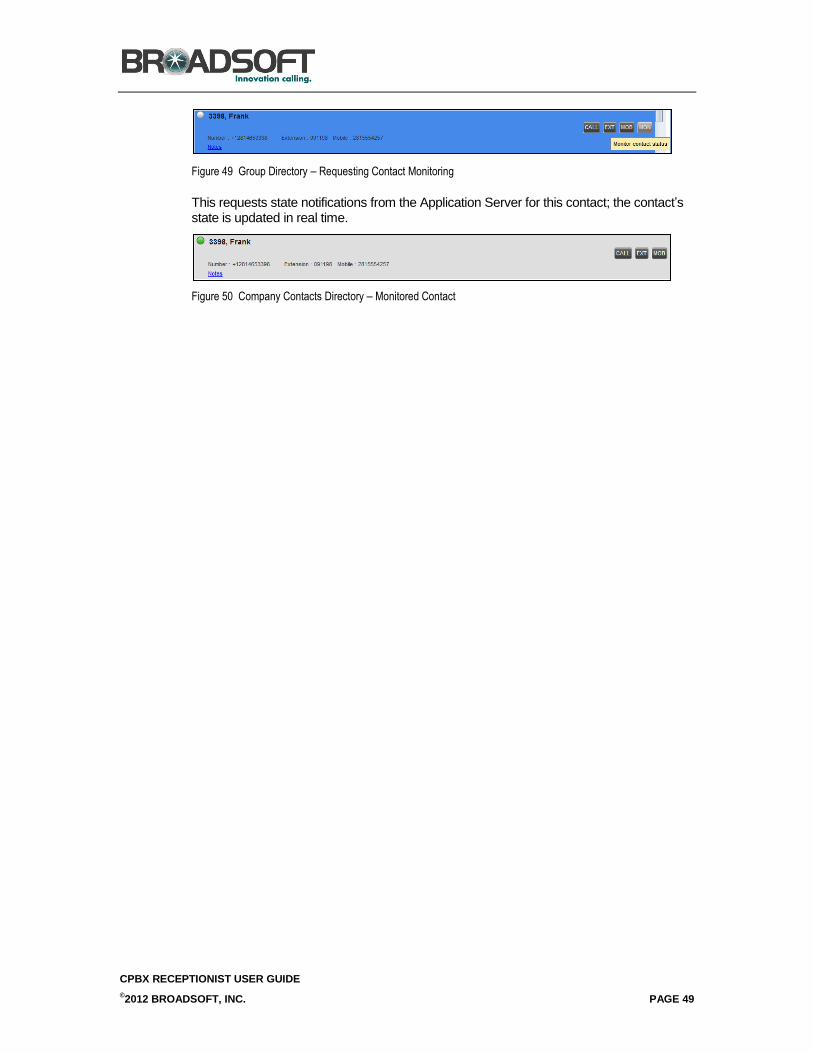
CPBX RECEPTIONIST USER GUIDE
©2012 BROADSOFT, INC. PAGE 49
Figure 49 Group Directory – Requesting Contact Monitoring
This requests state notifications from the Application Server for this contact; the contact’s state is updated in real time.
Figure 50 Company Contacts Directory – Monitored Contact
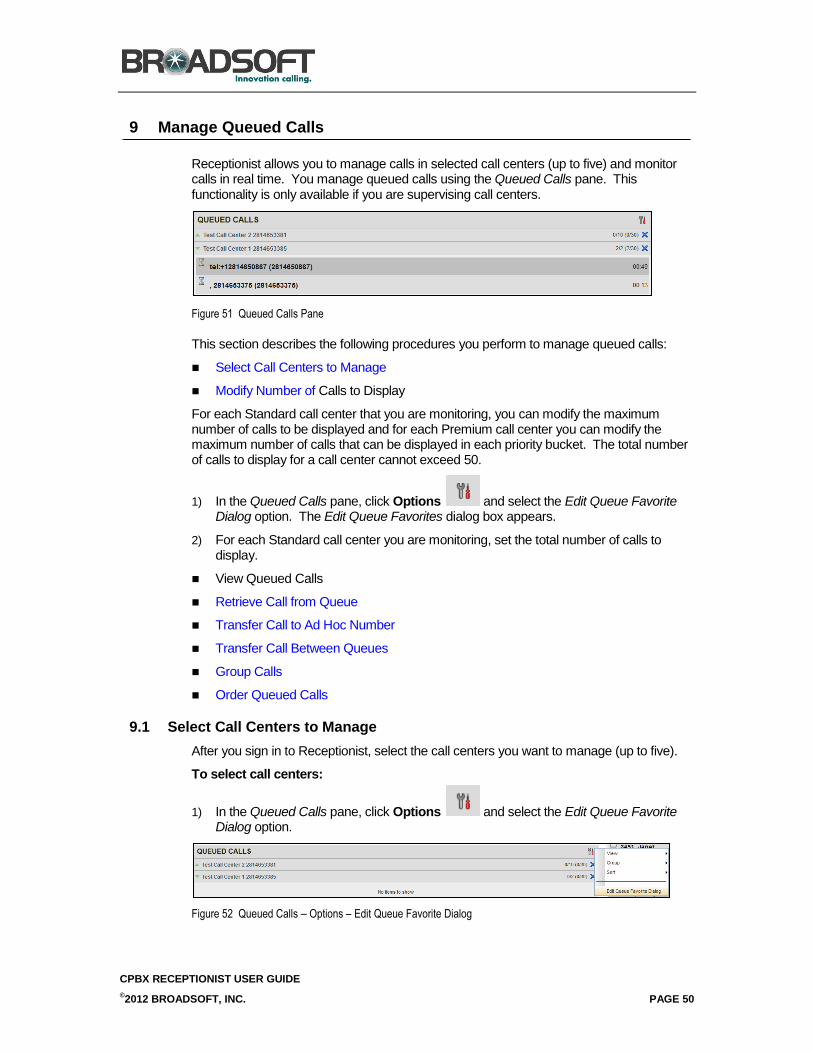
CPBX RECEPTIONIST USER GUIDE
©2012 BROADSOFT, INC. PAGE 50
9 Manage Queued Calls
Receptionist allows you to manage calls in selected call centers (up to five) and monitor calls in real time. You manage queued calls using the Queued Calls pane. This functionality is only available if you are supervising call centers.
Figure 51 Queued Calls Pane
This section describes the following procedures you perform to manage queued calls:
Select Call Centers to Manage
Modify Number of Calls to Display
For each Standard call center that you are monitoring, you can modify the maximum number of calls to be displayed and for each Premium call center you can modify the maximum number of calls that can be displayed in each priority bucket. The total number of calls to display for a call center cannot exceed 50.
1) In the Queued Calls pane, click Options and select the Edit Queue Favorite Dialog option. The Edit Queue Favorites dialog box appears.
2) For each Standard call center you are monitoring, set the total number of calls to display.
View Queued Calls
Retrieve Call from Queue
Transfer Call to Ad Hoc Number
Transfer Call Between Queues
Group Calls
Order Queued Calls
9.1 Select Call Centers to Manage
After you sign in to Receptionist, select the call centers you want to manage (up to five).
To select call centers:
1) In the Queued Calls pane, click Options and select the Edit Queue Favorite Dialog option.
Figure 52 Queued Calls – Options – Edit Queue Favorite Dialog

CPBX RECEPTIONIST USER GUIDE
©2012 BROADSOFT, INC. PAGE 51
The Edit Queue Favorites dialog box appears.
Figure 53 Edit Queue Favorites Dialog Box
2) Select the check boxes for the call centers you want to monitor.
3) Click Save.
The selected call centers appear in your Queued Calls pane.
9.2 Modify Number of Calls to Display
For each Standard call center that you are monitoring, you can modify the maximum number of calls to be displayed and for each Premium call center you can modify the maximum number of calls that can be displayed in each priority bucket. The total number of calls to display for a call center cannot exceed 50.
4) In the Queued Calls pane, click Options and select the Edit Queue Favorite Dialog option. The Edit Queue Favorites dialog box appears.
5) For each Standard call center you are monitoring, set the total number of calls to display.
9.3 View Queued Calls
To view calls in a queue:
Click the Expand button for that queue.
9.4 Retrieve Call from Queue
You can retrieve a call from a queue to your phone device.
To retrieve a call from the queue:
In the Queued Calls pane, click the call to expand it and click Retrieve for that call.
Once you retrieve the call, the call appears in the Call Console, and you treat it as any other call.
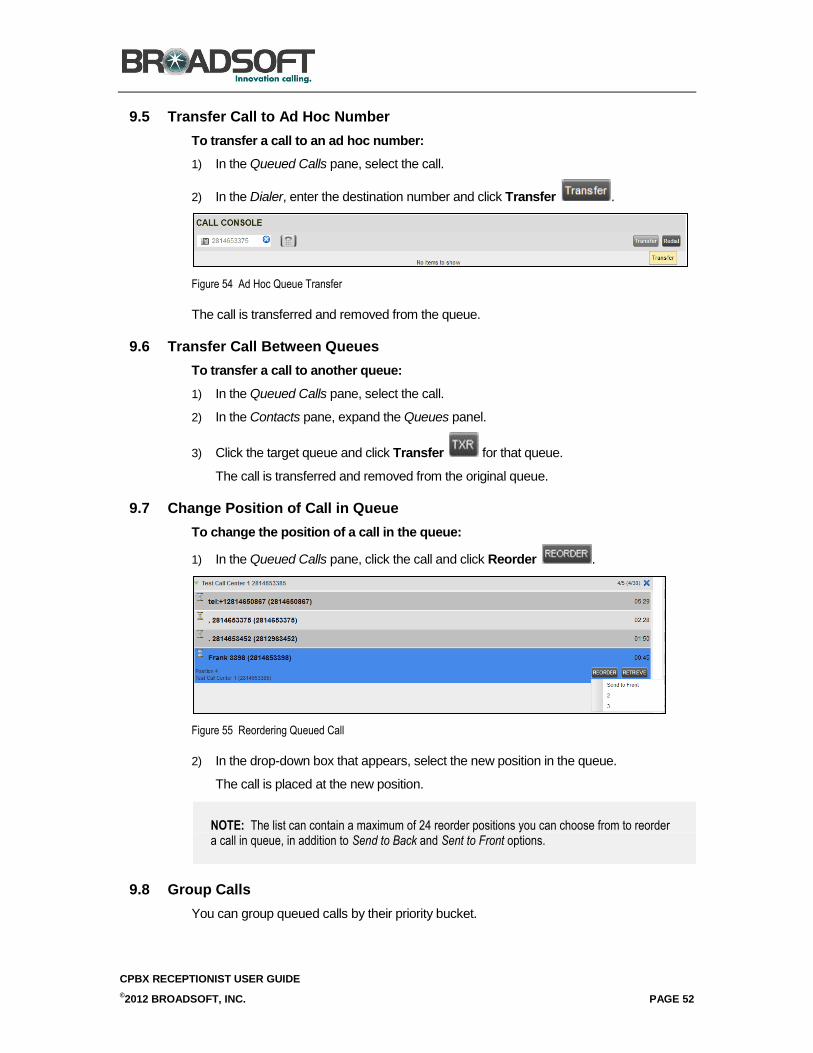
CPBX RECEPTIONIST USER GUIDE
©2012 BROADSOFT, INC. PAGE 52
9.5 Transfer Call to Ad Hoc Number
To transfer a call to an ad hoc number:
1) In the Queued Calls pane, select the call.
2) In the Dialer, enter the destination number and click Transfer .
Figure 54 Ad Hoc Queue Transfer
The call is transferred and removed from the queue.
9.6 Transfer Call Between Queues
To transfer a call to another queue:
1) In the Queued Calls pane, select the call.
2) In the Contacts pane, expand the Queues panel.
3) Click the target queue and click Transfer for that queue.
The call is transferred and removed from the original queue.
9.7 Change Position of Call in Queue
To change the position of a call in the queue:
1) In the Queued Calls pane, click the call and click Reorder .
Figure 55 Reordering Queued Call
2) In the drop-down box that appears, select the new position in the queue.
The call is placed at the new position.
NOTE: The list can contain a maximum of 24 reorder positions you can choose from to reorder a call in queue, in addition to Send to Back and Sent to Front options.
9.8 Group Calls
You can group queued calls by their priority bucket.
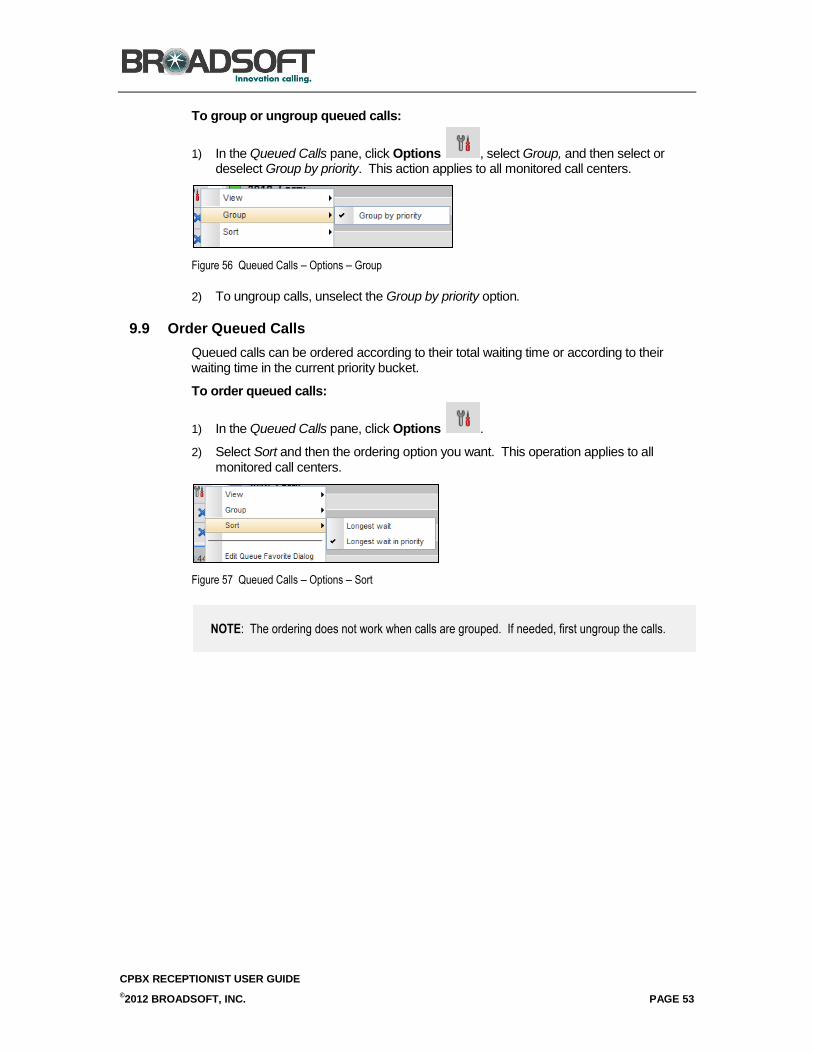
CPBX RECEPTIONIST USER GUIDE
©2012 BROADSOFT, INC. PAGE 53
To group or ungroup queued calls:
1) In the Queued Calls pane, click Options , select Group, and then select or deselect Group by priority. This action applies to all monitored call centers.
Figure 56 Queued Calls – Options – Group
2) To ungroup calls, unselect the Group by priority option.
9.9 Order Queued Calls
Queued calls can be ordered according to their total waiting time or according to their waiting time in the current priority bucket.
To order queued calls:
1) In the Queued Calls pane, click Options .
2) Select Sort and then the ordering option you want. This operation applies to all monitored call centers.
Figure 57 Queued Calls – Options – Sort
NOTE: The ordering does not work when calls are grouped. If needed, first ungroup the calls.
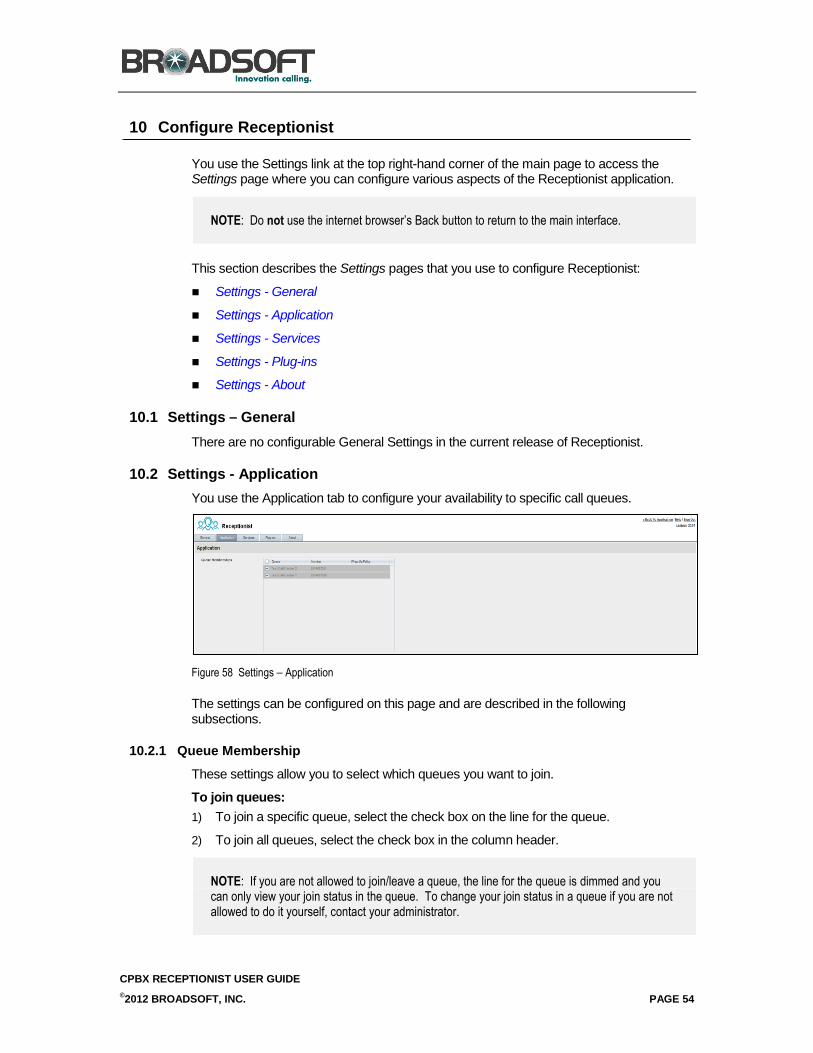
CPBX RECEPTIONIST USER GUIDE
©2012 BROADSOFT, INC. PAGE 54
10 Configure Receptionist
You use the Settings link at the top right-hand corner of the main page to access the Settings page where you can configure various aspects of the Receptionist application.
NOTE: Do not use the internet browser’s Back button to return to the main interface.
This section describes the Settings pages that you use to configure Receptionist:
Settings - General
Settings - Application
Settings - Services
Settings - Plug-ins
Settings - About
10.1 Settings – General
There are no configurable General Settings in the current release of Receptionist.
10.2 Settings - Application
You use the Application tab to configure your availability to specific call queues.
Figure 58 Settings – Application
The settings can be configured on this page and are described in the following subsections.
10.2.1 Queue Membership
These settings allow you to select which queues you want to join.
To join queues:
1) To join a specific queue, select the check box on the line for the queue.
2) To join all queues, select the check box in the column header.
NOTE: If you are not allowed to join/leave a queue, the line for the queue is dimmed and you can only view your join status in the queue. To change your join status in a queue if you are not allowed to do it yourself, contact your administrator.
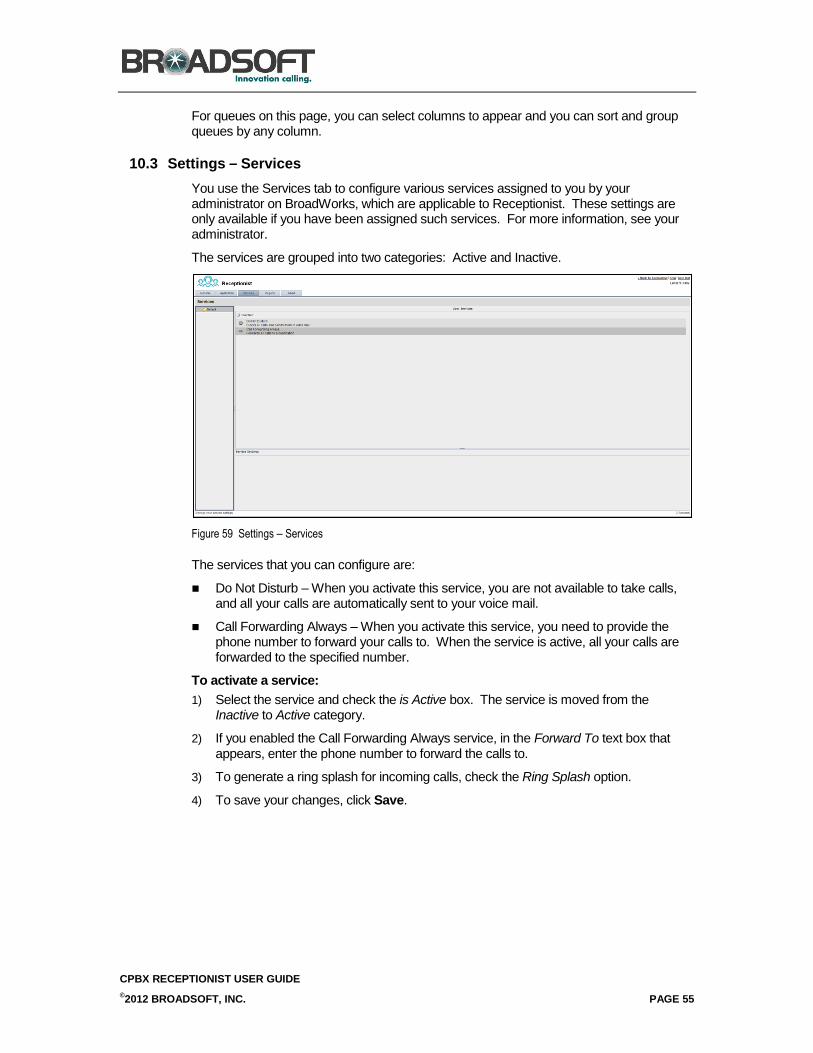
CPBX RECEPTIONIST USER GUIDE
©2012 BROADSOFT, INC. PAGE 55
For queues on this page, you can select columns to appear and you can sort and group queues by any column.
10.3 Settings – Services
You use the Services tab to configure various services assigned to you by your administrator on BroadWorks, which are applicable to Receptionist. These settings are only available if you have been assigned such services. For more information, see your administrator.
The services are grouped into two categories: Active and Inactive.
Figure 59 Settings – Services
The services that you can configure are:
Do Not Disturb – When you activate this service, you are not available to take calls, and all your calls are automatically sent to your voice mail.
Call Forwarding Always – When you activate this service, you need to provide the phone number to forward your calls to. When the service is active, all your calls are forwarded to the specified number.
To activate a service:
1) Select the service and check the is Active box. The service is moved from the Inactive to Active category.
2) If you enabled the Call Forwarding Always service, in the Forward To text box that appears, enter the phone number to forward the calls to.
3) To generate a ring splash for incoming calls, check the Ring Splash option.
4) To save your changes, click Save.
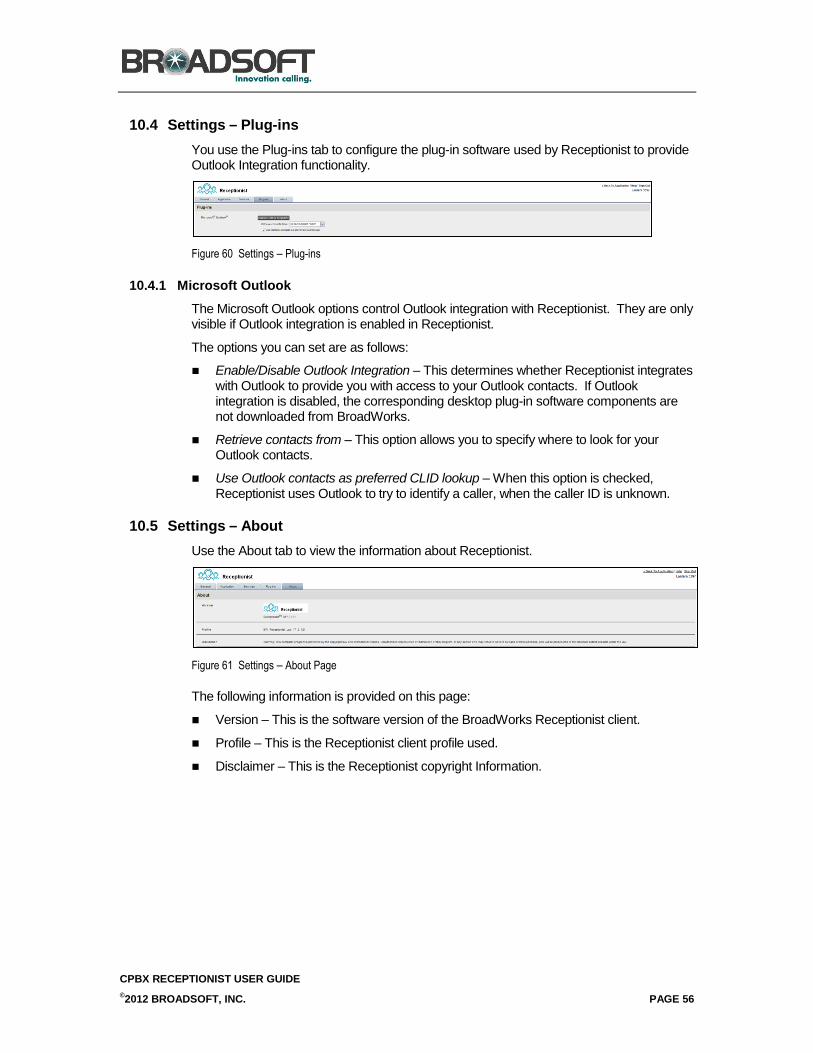
CPBX RECEPTIONIST USER GUIDE
©2012 BROADSOFT, INC. PAGE 56
10.4 Settings – Plug-ins
You use the Plug-ins tab to configure the plug-in software used by Receptionist to provide Outlook Integration functionality.
Figure 60 Settings – Plug-ins
10.4.1 Microsoft Outlook
The Microsoft Outlook options control Outlook integration with Receptionist. They are only visible if Outlook integration is enabled in Receptionist.
The options you can set are as follows:
Enable/Disable Outlook Integration – This determines whether Receptionist integrates with Outlook to provide you with access to your Outlook contacts. If Outlook integration is disabled, the corresponding desktop plug-in software components are not downloaded from BroadWorks.
Retrieve contacts from – This option allows you to specify where to look for your Outlook contacts.
Use Outlook contacts as preferred CLID lookup – When this option is checked, Receptionist uses Outlook to try to identify a caller, when the caller ID is unknown.
10.5 Settings – About
Use the About tab to view the information about Receptionist.
Figure 61 Settings – About Page
The following information is provided on this page:
Version – This is the software version of the BroadWorks Receptionist client.
Profile – This is the Receptionist client profile used.
Disclaimer – This is the Receptionist copyright Information.
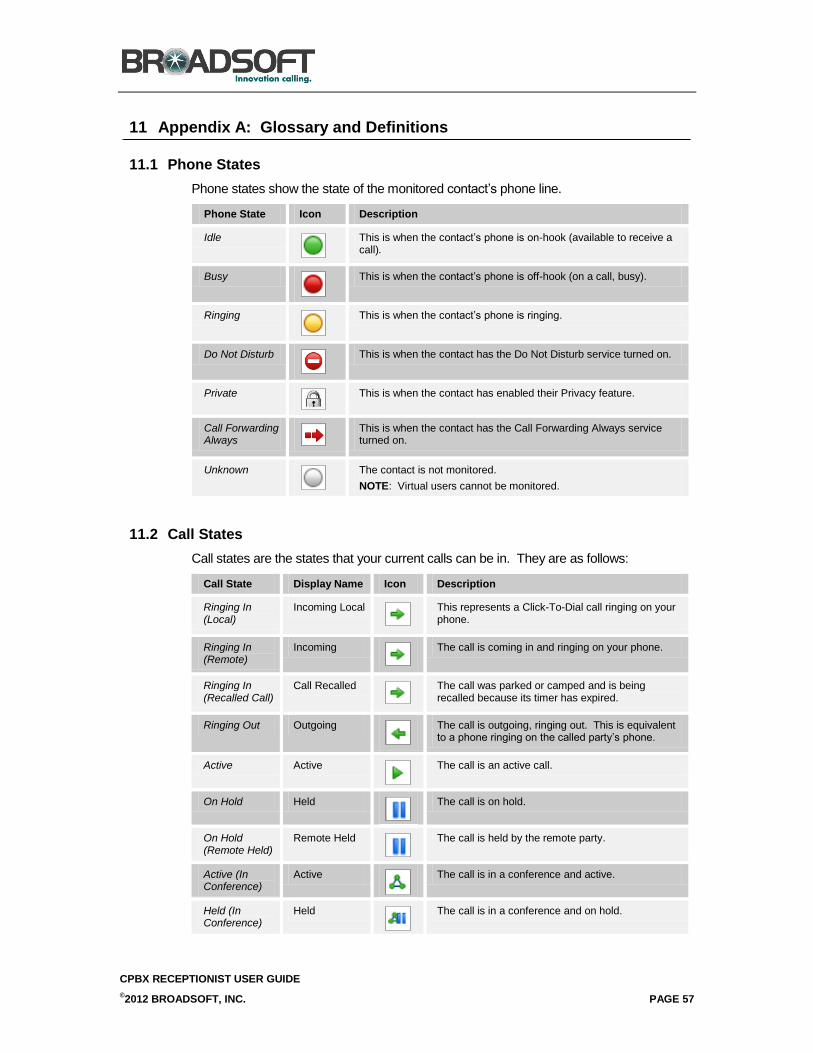
CPBX RECEPTIONIST USER GUIDE
©2012 BROADSOFT, INC. PAGE 57
11 Appendix A: Glossary and Definitions
11.1 Phone States
Phone states show the state of the monitored contact’s phone line.
Phone State Icon Description
Idle
This is when the contact’s phone is on-hook (available to receive a call).
Busy
This is when the contact’s phone is off-hook (on a call, busy).
Ringing
This is when the contact’s phone is ringing.
Do Not Disturb
This is when the contact has the Do Not Disturb service turned on.
Private
This is when the contact has enabled their Privacy feature.
Call Forwarding Always
This is when the contact has the Call Forwarding Always service turned on.
Unknown
The contact is not monitored.
NOTE: Virtual users cannot be monitored.
11.2 Call States
Call states are the states that your current calls can be in. They are as follows:
Call State Display Name Icon Description
Ringing In (Local)
Incoming Local
This represents a Click-To-Dial call ringing on your phone.
Ringing In (Remote)
Incoming
The call is coming in and ringing on your phone.
Ringing In (Recalled Call)
Call Recalled
The call was parked or camped and is being recalled because its timer has expired.
Ringing Out Outgoing
The call is outgoing, ringing out. This is equivalent to a phone ringing on the called party’s phone.
Active Active
The call is an active call.
On Hold Held
The call is on hold.
On Hold (Remote Held)
Remote Held
The call is held by the remote party.
Active (In Conference)
Active
The call is in a conference and active.
Held (In Conference)
Held
The call is in a conference and on hold.
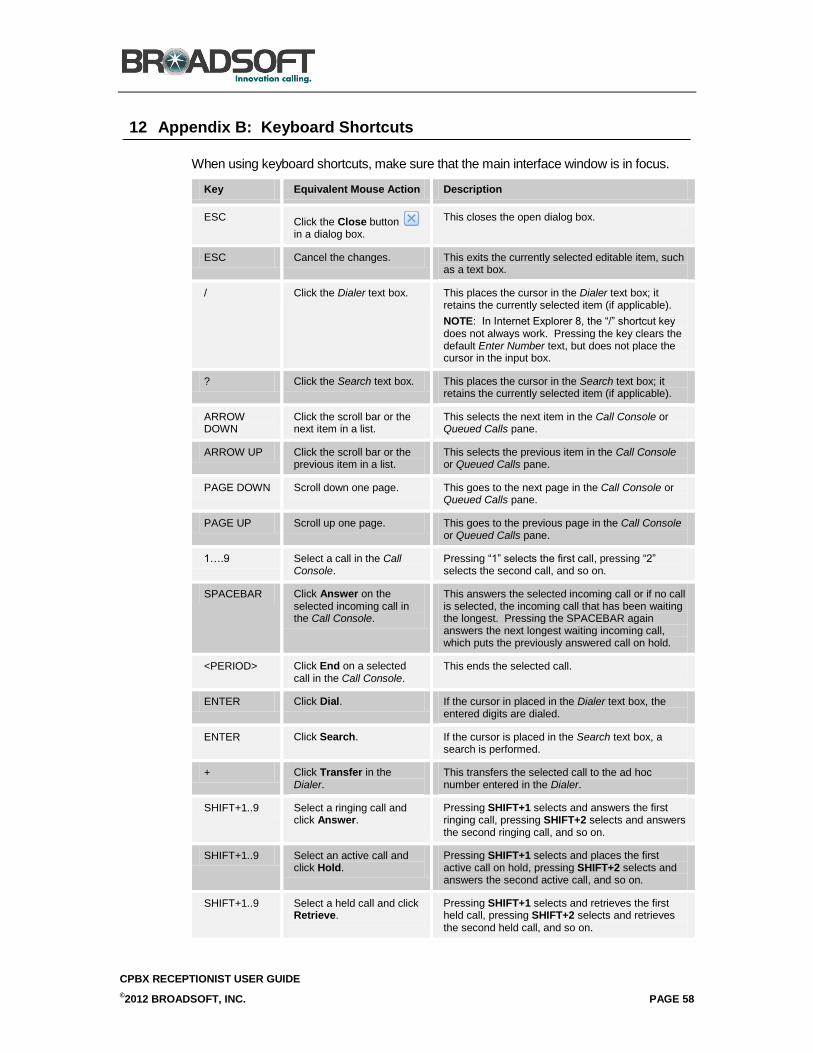
CPBX RECEPTIONIST USER GUIDE
©2012 BROADSOFT, INC. PAGE 58
12 Appendix B: Keyboard Shortcuts
When using keyboard shortcuts, make sure that the main interface window is in focus.
Key Equivalent Mouse Action Description
ESC Click the Close button in a dialog box.
This closes the open dialog box.
ESC Cancel the changes. This exits the currently selected editable item, such as a text box.
/ Click the Dialer text box. This places the cursor in the Dialer text box; it retains the currently selected item (if applicable).
NOTE: In Internet Explorer 8, the “/” shortcut key does not always work. Pressing the key clears the default Enter Number text, but does not place the cursor in the input box.
? Click the Search text box. This places the cursor in the Search text box; it retains the currently selected item (if applicable).
ARROW DOWN
Click the scroll bar or the next item in a list.
This selects the next item in the Call Console or Queued Calls pane.
ARROW UP Click the scroll bar or the previous item in a list.
This selects the previous item in the Call Console or Queued Calls pane.
PAGE DOWN Scroll down one page. This goes to the next page in the Call Console or Queued Calls pane.
PAGE UP Scroll up one page. This goes to the previous page in the Call Console or Queued Calls pane.
1….9 Select a call in the Call Console.
Pressing “1” selects the first call, pressing “2” selects the second call, and so on.
SPACEBAR Click Answer on the selected incoming call in the Call Console.
This answers the selected incoming call or if no call is selected, the incoming call that has been waiting the longest. Pressing the SPACEBAR again answers the next longest waiting incoming call, which puts the previously answered call on hold.
<PERIOD> Click End on a selected call in the Call Console.
This ends the selected call.
ENTER Click Dial. If the cursor in placed in the Dialer text box, the entered digits are dialed.
ENTER Click Search. If the cursor is placed in the Search text box, a search is performed.
+ Click Transfer in the Dialer.
This transfers the selected call to the ad hoc number entered in the Dialer.
SHIFT+1..9 Select a ringing call and click Answer.
Pressing SHIFT+1 selects and answers the first ringing call, pressing SHIFT+2 selects and answers the second ringing call, and so on.
SHIFT+1..9 Select an active call and click Hold.
Pressing SHIFT+1 selects and places the first active call on hold, pressing SHIFT+2 selects and answers the second active call, and so on.
SHIFT+1..9 Select a held call and click Retrieve.
Pressing SHIFT+1 selects and retrieves the first held call, pressing SHIFT+2 selects and retrieves the second held call, and so on.

CPBX RECEPTIONIST USER GUIDE
©2012 BROADSOFT, INC. PAGE 59
Key Equivalent Mouse Action Description
S or s Click on Settings link. This opens the Settings page if main window is in focus.
B or b Click on Back to Application link.
This goes back to the main page from the Settings page.
R or r Click the Call History button.
This opens the Call History dialog box.
H or h Click the Help link. This opens this guide in a PDF format.
SHIFT+L or SHIFT+l
Click the Sign Out link. This signs the user out of the application.
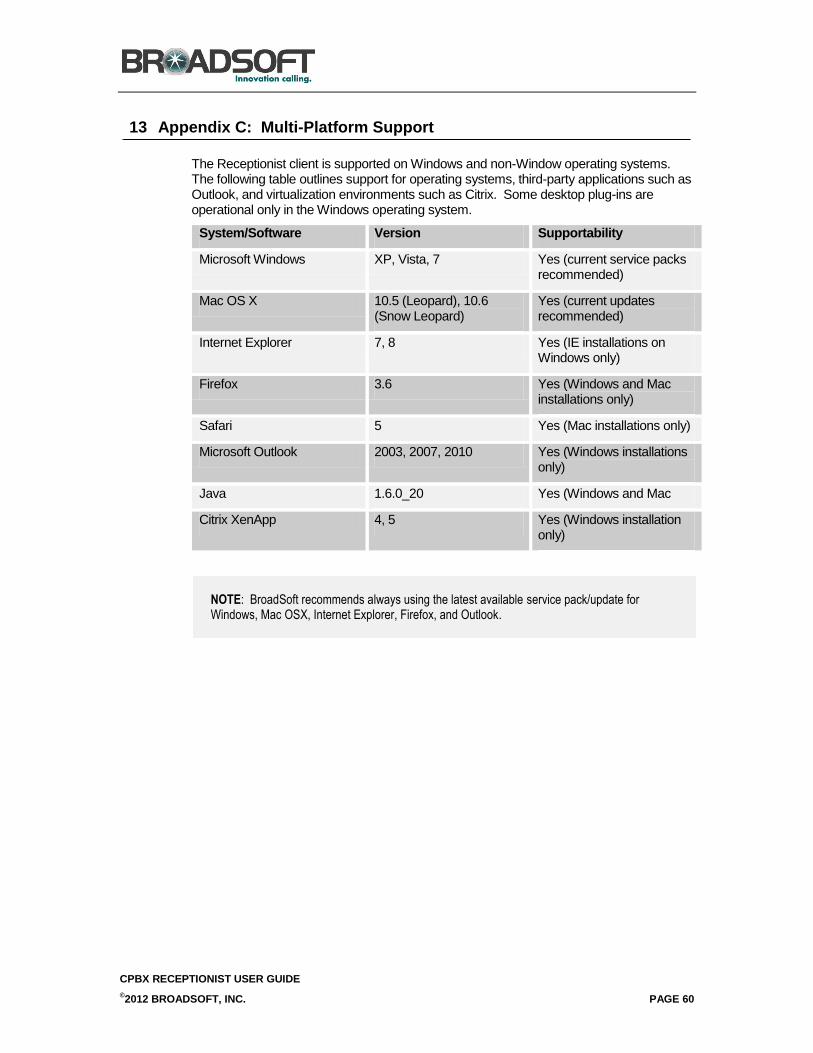
CPBX RECEPTIONIST USER GUIDE
©2012 BROADSOFT, INC. PAGE 60
13 Appendix C: Multi-Platform Support
The Receptionist client is supported on Windows and non-Window operating systems. The following table outlines support for operating systems, third-party applications such as Outlook, and virtualization environments such as Citrix. Some desktop plug-ins are operational only in the Windows operating system.
System/Software Version Supportability
Microsoft Windows XP, Vista, 7 Yes (current service packs recommended)
Mac OS X 10.5 (Leopard), 10.6 (Snow Leopard)
Yes (current updates recommended)
Internet Explorer 7, 8 Yes (IE installations on Windows only)
Firefox 3.6 Yes (Windows and Mac installations only)
Safari 5 Yes (Mac installations only)
Microsoft Outlook 2003, 2007, 2010 Yes (Windows installations only)
Java 1.6.0_20 Yes (Windows and Mac
Citrix XenApp 4, 5 Yes (Windows installation only)
NOTE: BroadSoft recommends always using the latest available service pack/update for Windows, Mac OSX, Internet Explorer, Firefox, and Outlook.
CPBX RECEPTIONIST USER GUIDE
©2012 BROADSOFT, INC. PAGE 61
Index
About Receptionist, 57
Action buttons, 28
Actions, in call states, 22
Ad hoc number Dialing, 32 Transferring queued call to, 52
Adding Personal contact, 45
Answering call, 31
Application settings, configuring, 55
Barge in on call, 38
Blind transfer, 34
Busy Camp On, 36
Buttons, action, 28
Call center, selecting to manage, 50
Call Console, 20, 21 Conference Call panel, 21 Current calls, 21 Dialer, 20
Call information, viewing, 30
Call management functionality Enterprise edition, 14
Call Queues panel, 25
Call states, 22, 58
Calls Answering, 31 Barging in, 38 Busy Camp On, 36 Current, 30 Dialing
Ad hoc number, 32 Contact, 33
Dragging and dropping, 30 Ending, 34 Holding and resuming, 32 Incoming, 30 Managing, 30 Number to modify, 50, 51 Parking, 36 Picking up, 32 Redialing number, 33 Saving vCard for, 31 Transferring, 34 Transferring to queue, 36 Transferring to voice mail, 35 Transferring with consultation, 35 Transferring with supervision, 34 Transferring, blind, 34
Camping calls, 36
Company Contacts panel, 24
Conference Ending, 38 Ending participant, 38 Holding, 37
Holding participant, 38 Leaving, 38 Managing, 37 Resuming, 38 Resuming participant, 38 Starting Three-Way Conference, 37
Conference Call, panel, 21
Configuring Application settings, 55 Outlook integration, 57 Plug-ins, 57 Queue membership, 55 Receptionist client, 55 Services, 56
Consultative transfer of calls, 35
Contact directories Enterprise edition, 13
Contacts Dialing, 33 Making notes about, 44 Managing, 40 Monitoring, 47
Dynamically, 48 Statically, 48
Phone states of, 47 Searching for, 42 Viewing details, 44
Contacts pane, 23, 40 Call Queues panel, 25 Company Contacts panel, 24 Directories panel, 25 Monitored Contacts panel, 24 Outlook panel, 25 Personal Contacts panel, 25 Search Contacts panel, 24
Controls, 27
Current calls, Call Console, 21
Deleting Personal contact, 46
Dial Ad hoc number, 32 Contact, 33
Dialer, 20
Directories Enterprise edition, 13 Ordering, 43 Panel, 25 Searching, 42 Showing or hiding, 40
Dragging and dropping calls, 30
Dynamic monitoring, 48 Requesting contact monitoring, 48
Ending Call, 34 Conference, 38

CPBX RECEPTIONIST USER GUIDE
©2012 BROADSOFT, INC. PAGE 62
Conference participant, 38
Enterprise edition Call management functionality, 14 Directories, 13 User interface, 12
Enterprise, Receptionist, 12
Exploring workspace, 18
Getting Help, 16 Started, 15
Global Message Area, 19
Group Call Park, 36
Grouping, queued calls, 53
Help, 19 Getting, 16
Holding Call, 32 Conference, 37 Conference participant, 38
Initial setup, 17
Keyboard shortcuts, 59
Launch Receptionist Web browser, 15
Leaving conference, 38
Logo pane, 19 Global Message Area, 19 Settings, Help, and Sign Out links, 19 Signed-in user information, 19
Making notes about contact, 44
Managing Calls, 30 Conference calls, 37 Contacts, 40 Personal contacts, 45 Queued calls, 50
Modifying number of calls to display, 50, 51
Monitored Contacts panel, 24
Monitoring Contacts, 47
Dynamically, 48 Statically, 48
Phone states, 47
Multi-Platform Support, 61
Ordering Contact directories, 43 Queued calls, 53
Outlook integration, configuring, 57
Outlook panel, 25
Pane Call Console, 20 Contacts, 23 Logo, 19 Queued Calls, 26
Parking calls, 36
Participant Ending in conference, 38 Holding in conference, 38
Resuming in conference, 38
Personal Contacts panel, 25
Personal contacts, managing, 45
Personal panel Adding contacts, 45 Deleting contacts, 46
Phone states, 47, 58
Picking up call, 32
Platforms, supported, 61
Plug-ins settings, configuring, 57
Position, changing call in queue, 53
Queue Membership, configuring, 55 Transferring calls to, 36
Queued calls Grouping, 53 Managing, 50 Ordering, 53 Reordering, 53 Retrieving, 52 Transferring between queues, 52 Transferring to ad hoc number, 52 Viewing, 51
Queued Calls pane, 26, 50
Receptionist Configuring, 55 Editions, 11 Enterprise, 12 Introduction, 11
Redialing number, 33
Reordering, calls in queue, 53
Requesting contact monitoring, 48
Resuming Conference participant, 38 Held call, 32 Held conference, 38
Retrieving calls from queue, 52
Search Contacts panel, 24
Searching for contacts, 42
Selecting call centers to manage, 50
Services settings, configuring, 56
Settings About, 57 Application, 55
Queue membership, 55 Plug-ins, 57
Outlook, 57 Services, 56
Settings, Help, and Sign Out links, 19
Setup, initial, 17
Shortcuts, keyboard, 59
Showing or hiding directories, 40
Sign Out, 16 Links, 19
Signed-in user information, 19
Starting Three-Way Conference, 37

CPBX RECEPTIONIST USER GUIDE
©2012 BROADSOFT, INC. PAGE 63
States Call, 58 Phone, 47, 58
Static monitoring, 48
Supervised transfer of calls, 34
Transferring calls, 34 Between queues, 52 Blind, 34 Consultation, 35 Queue, 36 Queue to ad hoc number, 52 Supervision, 34 To voice mail, 35
Unholding call, 32
User interface Action buttons, 28 Call Console, 20, 21 Call Queues panel, 25 Company Contacts panel, 24 Conference Call panel, 21 Contacts pane, 23 Controls, 27 Dialer, 20
Directories panel, 25 Enterprise edition, 12 Global Message Area, 19 Information about signed-in user, 19 Logo pane, 19 Monitored Contacts panel, 24 Outlook panel, 25 Personal Contacts panel, 25 Queued Calls pane, 26 Search Contacts panel, 24
vCard, saving, 31
View Call information, 30 Contact details, 44 Current calls, 30 Incoming calls, 30 Queued calls, 51 vCard, 31
Voice mail, transferring calls to, 35
Web browser, launching Receptionist from, 15
Workspace Exploring, 18