BRIDGE BROADCASTING
21
BRIDGE BROADCASTING The use of voice broadcasts for bridge teaching and mentoring has become very popular. BBO now allows the host of a teaching table to use voice broadcasts directly in BBO, but it also requires all listeners to be using the web browser version of BBO. Since not everyone likes the web version, there is an alternative way to broadcast that does not require listeners to be on the BBO webpage, but does require that listeners open a separate webpage instead. This "radio" webpage can be reduced and listened to while the listener is viewing the BBO window. This document contains instructions for setting up an account on a radio website called Listen2MyRadio, which permits you to broadcast your own lesson on your own "radio" channel. You can even set a unique URL to that webpage so only the listeners who have that link will be able to hear you. There are two sections to this document. 1. Setting up your radio. 2. Setting up and making a broadcast. There are two programs needed to do this. 1. The www.listen2myradio.com server, connected through their website, 2. The Adobe Flash Media Live Encoder, which will be installed on your computer. Section 1 of this document is SETUP. It will show you how to set up your listen2myradio account and how to set up the Flash Media Live Encoder. Section 2 of this document is BROADCAST. It will show you how to connect your microphone to the radio page that listeners will hear you on. This document is copyrighted © by Cornelia Yoder, all rights reserved.
Transcript of BRIDGE BROADCASTING

BRIDGE BROADCASTING
The use of voice broadcasts for bridge teaching and mentoring has become very popular.
BBO now allows the host of a teaching table to use voice broadcasts directly in BBO, but it also
requires all listeners to be using the web browser version of BBO.
Since not everyone likes the web version, there is an alternative way to broadcast that does not
require listeners to be on the BBO webpage, but does require that listeners open a separate
webpage instead.
This "radio" webpage can be reduced and listened to while the listener is viewing the BBO
window.
This document contains instructions for setting up an account on a radio website called
Listen2MyRadio, which permits you to broadcast your own lesson on your own "radio" channel.
You can even set a unique URL to that webpage so only the listeners who have that link will be
able to hear you.
There are two sections to this document.
1. Setting up your radio.
2. Setting up and making a broadcast.
There are two programs needed to do this.
1. The www.listen2myradio.com server, connected through their website,
2. The Adobe Flash Media Live Encoder, which will be installed on your computer.
Section 1 of this document is SETUP. It will show you how to set up your listen2myradio
account and how to set up the Flash Media Live Encoder.
Section 2 of this document is BROADCAST. It will show you how to connect your microphone
to the radio page that listeners will hear you on.
This document is copyrighted © by Cornelia Yoder, all rights reserved.

SETUP
There are two different parts to setting up your radio.
1. The server connection on www.listen2myradio.com.
2. The video program on your computer that will send your voice to the server.
We'll look at the video program first, then at the server connection.

Video Program Setup
Start with http://www.videohelp.com/tools/Flash-Media-Live-Encoder. This version is an older
release and now free to download.
Download the Adobe Flash Media Live Encoder program and Save it on your desktop.

Now double-click the downloaded
icon, and follow the instructions.
Have a shortcut icon put on your
desktop.
When the installation finishes,
double-click on the Adobe Flash
Media Live Encoder shortcut icon
to open the program.
You will see a window that looks like this. Start by duplicating the settings as I have them. If
you need to adjust later, you can. Select your preferred microphone in the Device setting.
Now close the encoder and the settings will be saved.

Server Setup
Start with www.listen2myradio.com.
Click on the section for free video streaming "SIGN UP NOW". Enter the required information
and create your free video streaming account.

Once your account is created, login to it. Click "LOGIN" on the top right, then enter your email
and password, then "LOGIN NOW".

You will now see a screen that looks like this:
All of the sections allow you to set up various characteristics for your radio broadcast system,
but don't panic, you only need a few of them for now.

The first thing you should do is click "Update text" and enter the three sets of information
describing what you are broadcasting, then click the "Update" button.

Next you need to set the server type you are going to use to match the video program you have
on your computer.
Click the "Change Server Type" link and you will see this screen.
Click the 4th line "Video streaming (RTMP)".
When you have completed these settings, log out of your account and the settings will be saved.
Now you are ready to set up a broadcast. You will not need to repeat the above steps unless you
want to change something.

BROADCAST
As in SETUP, there are two different parts to setting up a broadcast, but these you will need to
do each time you intend to broadcast.
1. Set up the server connection on www.listen2myradio.com.
2. Connect it to the video program on your computer that will send your voice to the server.
To get started, it's best to open both your Flash Media Encoder and login to your account at
www.listen2myradio.com in two separate windows.
Once you have both the website and the encoder open, go to the listen2myradio website and
click on "Stream Installation".
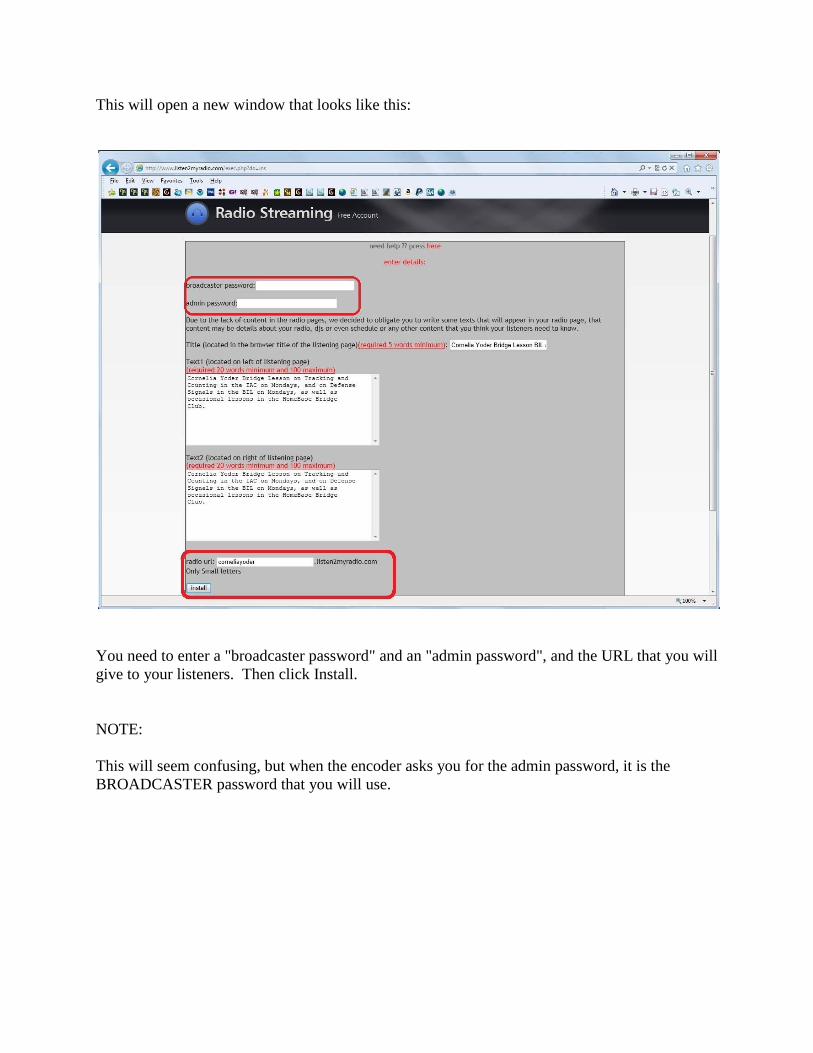
This will open a new window that looks like this:
You need to enter a "broadcaster password" and an "admin password", and the URL that you will
give to your listeners. Then click Install.
NOTE:
This will seem confusing, but when the encoder asks you for the admin password, it is the
BROADCASTER password that you will use.

Next you will see this:
Just click on the "PRESS HERE".

Next you will get the choice of video servers. Probably best to choose the one closest to your
physical location, although either seems to work just fine for me.
Choose one and click "here".

When you get this screen, wait 60 seconds and then click on "Radio Details".
This will give you the information you need to connect the Flash Media Live Encoder to the
server.

Now you need to give the server connection information to the Flash Media Live Encoder. The
information you need is shown here on the Radio Details webpage.
The URL you will give to students to access your radio is the Stream URL.
The FMS URL and the Stream name are what you will give to the Flash Media Live Encoder.
The username and password will be used to actually make the connection.

Now turn your attention to the Flash Media Live Encoder.
You must copy/paste the FMS URL and the Stream Name from the Radio Details webpage into
their respective places in the Encoder screen.
Then click "Connect".

A small window will pop up asking you for the username and password. Use the ones from the
Radio Details webpage.
Then click OK. This connects the Flash Media Live Encoder to the listen2myradio server.

You should now see the word "Connected" at the bottom left of the Encoder window.
To actually start the broadcast, you now need to tell the Encoder to go ahead and start sending
your voice, by clicking on the green "Start" button.
From this point on, every sound you make or that your microphone picks up from the room will
be audible to anyone connected to your radio website.

The green bar in the center top will give you an idea of the volume you are transmitting. If it
stays low, turn up your microphone volume or speak louder.

You must open and leave your listener's radio webpage open during your broadcast, so to avoid
feedback, you must mute it.

When your broadcast is finished, click the red "Stop" button to shut off the Encoder, and then the
"Disconnect" button to disconnect it from the server.