Blue Manual
158
blue a music composition environment for csound Steven Yi
-
Upload
fabian-gonzalez-ramirez -
Category
Documents
-
view
28 -
download
0
Transcript of Blue Manual
blue
a music composition environment for csound
Steven Yi
blue: a music composition environment for csoundby Steven Yi
2.5.0
Published 2013.08.12Copyright © 2000-2012 Steven Yi
Abstract
blue is a music composition environment for use with Csound. It is written in Java. The homepage for blue is availableat http://blue.kunstmusik.com.
iii
Table of ContentsPreface ............................................................................................................................ viiCredits ............................................................................................................................ viiiI. User's Manual ................................................................................................................. 1
1. Getting Started ........................................................................................................ 2Introduction ........................................................................................................ 2Installation ......................................................................................................... 2
Requirements .............................................................................................. 2Installing blue ............................................................................................. 3Installing Csound ........................................................................................ 3
Setting Up Program Options ................................................................................. 5Primary Editors ................................................................................................. 17
Score Timeline .......................................................................................... 17Orchestra Manager ..................................................................................... 24User-Defined Opcodes Manager ................................................................... 25Project Properties ...................................................................................... 28Mixer ...................................................................................................... 31Blue Live ................................................................................................. 38Tables Manager ......................................................................................... 41Globals Manager ....................................................................................... 42
Tools ............................................................................................................... 43BlueShare ................................................................................................. 43Code Repository ........................................................................................ 44Effects Library .......................................................................................... 45.csoundrc Editor ........................................................................................ 45Scanned Synthesis Matrix Editor .................................................................. 46Sound Font Viewer .................................................................................... 48FTable Converter ....................................................................................... 49Python Console ......................................................................................... 50
Other Features .................................................................................................. 51AutoBackup and Recovery .......................................................................... 51Sound Object Freezing ............................................................................... 51Auditioning SoundObjects ........................................................................... 52Importing ORC/SCO and CSD Files ............................................................. 53Importing MIDI Files ................................................................................. 53Blue Variables .......................................................................................... 55Command Line Options for blue .................................................................. 56
2. Concepts .............................................................................................................. 57Rendering ......................................................................................................... 57
Introduction .............................................................................................. 57Render Methods ........................................................................................ 57
SoundObjects .................................................................................................... 58Introduction .............................................................................................. 58What is a SoundObject? ............................................................................. 58
PolyObjects ...................................................................................................... 58Introduction .............................................................................................. 58Basic ....................................................................................................... 59Advanced ................................................................................................. 59Best Practices ........................................................................................... 62Debugging ................................................................................................ 63
NoteProcessors .................................................................................................. 63SoundObject Library .......................................................................................... 64

blue
iv
Introduction .............................................................................................. 64Usage ...................................................................................................... 64
Parameter Automation ........................................................................................ 65Introduction .............................................................................................. 65Available Parameters .................................................................................. 65Assigning Parameters ................................................................................. 65Score Timeline Modes ................................................................................ 66Editing Automations .................................................................................. 66Technical Details ....................................................................................... 66
Command Blocks .............................................................................................. 67Introduction .............................................................................................. 67Basic Usage .............................................................................................. 67Available Commands ................................................................................. 67
3. Reference ............................................................................................................. 69Sound Objects ................................................................................................... 69
AudioFile ................................................................................................. 70CeciliaModule ........................................................................................... 70Comment ................................................................................................. 71ClojureObject ............................................................................................ 71External SoundObject ................................................................................. 73GenericScore ............................................................................................ 74Instance ................................................................................................... 75JMask ...................................................................................................... 75LineObject ................................................................................................ 79ObjectBuilder ............................................................................................ 80PatternObject ............................................................................................ 82PianoRoll ................................................................................................. 87PolyObject ............................................................................................... 90PythonObject ............................................................................................ 90RhinoObject ............................................................................................. 92Sound SoundObject ................................................................................... 92Tracker .................................................................................................... 92ZakLineObject .......................................................................................... 97
NoteProcessors .................................................................................................. 99Add Processor ........................................................................................... 99Equals Processor ....................................................................................... 99Inversion Processor .................................................................................. 100LineAdd Processor ................................................................................... 100LineMultiply Processor ............................................................................. 101Multiply Processor ................................................................................... 101Pch Add Processor ................................................................................... 102Pch Inversion Processor ............................................................................ 102Python Processor ..................................................................................... 103Random Add Processor ............................................................................. 103Random Multiply Processor ....................................................................... 104Retrograde Processor ................................................................................ 105Rotate Processor ...................................................................................... 105SubList Processor .................................................................................... 107Switch Processor ..................................................................................... 107Time Warp Processor ............................................................................... 108Tuning Processor ..................................................................................... 108
Instruments ..................................................................................................... 109Generic Instrument ................................................................................... 109Python Instrument .................................................................................... 109

blue
v
Rhino Instrument ..................................................................................... 109blueX7 ................................................................................................... 109BlueSynthBuilder ..................................................................................... 111
Shortcuts ........................................................................................................ 116A. Introduction to Csound ......................................................................................... 119B. Breaks in Backwards Compatibility ........................................................................ 120C. Glossary ............................................................................................................. 121
II. Tutorials ..................................................................................................................... 122Your First Project .................................................................................................... 123Tutorial 1 ............................................................................................................... 131
Introduction .................................................................................................... 131Why Use Scripting? ......................................................................................... 132Scripting and blue ............................................................................................ 133External SoundObject ....................................................................................... 134Python SoundObject ......................................................................................... 137
Using Python with the External SoundObject versus the Python SoundObject ...... 138Usage ..................................................................................................... 140
Usage Ideas .................................................................................................... 142Future Enhancements ........................................................................................ 142Final Thoughts ................................................................................................ 143
Tutorial 2 ............................................................................................................... 144Introduction .................................................................................................... 144How to Use the Sound SoundObject ................................................................... 144What Happens When It Gets Processed ............................................................... 145Usage Scenarios and Patterns ............................................................................. 146Final Thoughts ................................................................................................ 147
III. Developers ................................................................................................................ 1484. Plugins ............................................................................................................... 149
Note Processors ............................................................................................... 149Instruments ..................................................................................................... 149Sound Objects ................................................................................................. 149
5. Core ................................................................................................................... 150Building blue .................................................................................................. 150
Requirements .......................................................................................... 150Getting the Sources .................................................................................. 150Maintaining a Version of blue from CVS ..................................................... 150
vi
List of Tables1.1. Shortcuts for the Timeline ............................................................................................ 231.2. Shortcuts for the Python Console ................................................................................... 511.3. Key Values ................................................................................................................ 541.4. ................................................................................................................................. 553.1. Parameter Types .......................................................................................................... 763.2. Parameter Modifier Support .......................................................................................... 763.3. Keyboard Shortcuts ..................................................................................................... 963.4. Keyboard Note Mode ................................................................................................... 973.5. Widget Values .......................................................................................................... 1143.6. General Shortcuts ...................................................................................................... 1163.7. Rendering ................................................................................................................. 1173.8. Score Timeline .......................................................................................................... 1173.9. Orchestra Manager ..................................................................................................... 1183.10. In a text box ........................................................................................................... 1183.11. Editing GenericScore, PythonObject, RhinoObject ......................................................... 118B.1. Compatibility Breaks ................................................................................................. 120
vii
Prefaceblue is my tool for composing with Csound. I originally created it for its ability to organize SoundObjects intime as well as to organize and automate the more mundane tasks that I've found in working with Csound.It's here to make working with Csound a more enjoyable and focused experience.
As the program develops over time I am finding more ways to make the user experience intuitive and theprogram faster to work with, as well as finding interesting new things to create to further the capacity formusical expression. The program's architecture is designed to be as open as possible in both things theuser can do within blue itself as well as the ability to expand blue through the creation of plugins, and bytaking advantage of both one can find many ways to create and shape musical ideas.
Beyond my own ideas on where to go with blue, user feedback has also greatly shaped the direction andrichness of the program. Please feel free to email me anytime with feedback, or join the blue mailing listand discuss your ideas and thoughts there.
If you'd like to find out more about me you can do so on my on my website:
http://www.kunstmusik.com
Thanks and I hope you enjoy composing with blue!
Steven Yi
viii
CreditsI would like to thank the following people following people for their contributions to blue:
Michael Bechard Java development
Andrés Cabrera Documentation, Tutorials, and Ideas
Dave Seidel Java development
Kevin Welsh PHP work on blueShare server, Java code
Part I. User's ManualThis section is for users
2
Chapter 1. Getting Started
Introduction
About blueblue is an music composition environment for use with Csound. blue interacts with Csound bygenerating .CSD files, which it then feeds to Csound for compilation. Any version of Csound that can becalled by commandline is able to be used with blue.
One of blue's main features is the graphical timeline of soundObjects, of which a special soundObject-the polyObject-is able to group other soundObjects. polyObjects feature their own timeline, allowing fortimelines within timelines. soundObjects can be anything that generates notes, be it a block of CsoundSCO, a script in python, or a graphical object.
SoundObjects may further have noteProcessors added to them, which may do things like "add .3 to all p4values" or "of these notes, only generate the first three". NoteProcessors are especially useful when usedwith Instance soundObjects from the soundObject Library.
The soundObject library allows for working with soundObjects by making instances of a soundObject.Instances point to a soundObject, and when they generate notes, they use the soundObject they are pointingto to generate the notes for them. Instances however can have their own properties which they will apply tothe generated notes, so that they can be of different duration and have different start times, as well as havedifferent noteProcessors used with them. the advante of instances versus manually copying a soundObjectover and over again is that if you want to change the notes for all of these soundObjects, you'd have tomanually go and change all of them, while with instances, you'd only have to change the one soundObjectall of the instances are pointing to. (which also means you could make a song template file, all pointingto empty soundObjects, build the form of the piece, then change the soundObject's note material to "fillin the form".)
Other features include the orchestra manager, which allows for importing of instruments from .CSD files,a list to manage instruments, and the ability to selectively generate instruments when compiling .CSDfiles. instruments can be either a single Csound instrument or may be a GUI instrument.
Installation
Requirementsblue requires a Java 7 (also known as 1.7) or greater JVM (Java Virtual Machine). To test to see if youhave a JVM installed and what version, at a command prompt type "java -version". If you see somethingalong the lines of "command not found" then you need to install a Java Virtual Machine.
A Java JVM for Linux, Windows, Mac OSX, and Solaris can be found at:
http://www.java.com
From this page, the correct download for the JRE (Java Runtime Environment) for your platform shouldbe chosen automatically for you. (Note: There are two main releases of Java, the JRE, and the JDK (JavaDevelopment Kit). You only need the JRE to run blue, though if you are interested in developing in Javayou need the JDK.)

Getting Started
3
Installing blueTo install blue, you should download the latest ZIP file or DMG from the blue Sourceforge page here[http://www.sourceforge.net/projects/bluemusic]. For OSX users, download the DMG file which containsa blue.app. You can double-click the Application to run, as well as copy it to your Applications folderto install it.
For Linux and Windows users, download the ZIP file and unzip it. Inside of the bin folder you will see a"blue" script for Linux or a "blue.exe" file for use on Windows.
Note: After starting blue, you may want to explore the example projects and pieces found in the blue/example folder (or right-click and explore contents of blue.app/example if on OSX).
Platform Specific Notes
The section below has notes for individual platforms.
Mac OSX
Blue uses the right mouse click often to show popup menus. If you do not have a right mouse button, youcan use ctrl-click for all "rt-clicks" that are mentioned in this documentation.
To make use of the function key shortcuts (F1-F12), you will need to go into System Preferences, chooseKeyboard, then enable "Use all F1, F2, etc. keys as standard function keys".
Linux
For 64-bit systems, you may run into issues when running blue with the API enabled where modifyingwidget values is not reflected in performance. This is likely due to the Csound Java API being compiledwith SWIG < 2.0. As of the time of this writing, the version of Csound in Debian Stable for amd64 iscompiled with SWIG 1.3.0, and does not work with blue. To work around this, you can install a newerversion of Csound if available (i.e. from a testing repo), or compile Csound yourself and ensure you areusing SWIG version 2.0 or greater.
Installing Csoundblue is able to interact with Csound either by calling Csound like a command-line program (classic blue),or by directly interacting with Csound via the Csound API. Instructions on setting up blue for each methodis described below as well as discussion on benefits and limitations.
Using blue with command-line Csound
This may be considered "classical" blue usage and interaction with Csound as this was the method bywhich blue ran with Csound for the first eight years in existance. The way blue operates in this mode is byrendering the .blue project into a temporary CSD file on disk, then calling Csound with that temporary CSDfile in the same way as if you were on a command-line shell and executing Csound yourself with that file.
The benefit to this mode of Csound usage is that it is easier to switch out your version of Csound or usemultiple versions of Csound on the same computer. It is also a little more stable than using the API inthat if Csound crashes for some reason, it won't take down blue with it. Also, it may be more performantto use the command-line mode. These benefits however need to be weighed against the benefits of usingthe API, which is described below.
To use the command-line version, one needs to set up the Csound executable option for Realtime and DiskRender settings in Program Options.

Getting Started
4
Using blue with the Csound API
Enabling blue to use the Csound API when rendering with Csound opens up the ability to manipulate andedit widget values and automations in realtime during a render, as well as the ability to use blueLive onWindows. Because of its enhancement to the user-experience while rendering and composing, it is nowthe preferred method of using blue with Csound. blue should work out-of-the-box with the API if Csoundis installed using the installers provided on SourceForge, or installed via a package manager if on Linux.
Note
blue currently only works with the API if the version of Csound used is compiled using 64-bitdoubles. (The float version is not currently supported when using the API.) There are technicaldifficulties in supporting two different versions of Csound API in the same build and it is notknown if or when the float build will be supported. For users interested in using the float buildof Csound with blue, you will need to run blue using the command-line Csound mode.
The Java API for Csound is split into two parts: the csnd6.jar file as well as the lib_jcsound6.so nativelibrary (this file is called _jcsound6.dll on Windows, and lib_jcsound6.jnilib on Mac OSX). For Csound5, the names use "csnd" and "_jcsound" instead. blue comes with it's own copy of csnd.jar and csnd6.jar;to use the API from blue it will need to have access to the native library to work. If the API is not enabledfor use out-of-the-box, the following explains how to setup the API on different platforms.
Windows
Users using the Windows Installer for Csound should use the doubles version from SourceForge (has -din the name). After installing, the installer should setup everything such that blue should work with theAPI. If for some reason it is unable to do so, or you have compiled Csound yourself and the location ofjcsound.dll is different from where it is installed with the installer, you can modify the blue/etc/blue.conffile to tell blue where to find the _jcsound6.dll. For example, if the directory where jcsound6.dll is locatedis in c:\myCsound, open up blue/etc/blue.conf and modify the default so that it contains:
default_options="--branding blue -J-Xms256m -J-Xmx768m -J-Djava.library.path=c:/myCsound"
Linux
Linux users should install a doubles version of Csound. The version of Csound found in packagerepositories should be one compiled for doubles. After installing Csound and the Java interface for Csound,locate where lib_jcsound6.so is and modify the blue/bin/blue file. Search for the lines that contain "-J-Djava.library.path=/usr/lib/jni" and modify /usr/lib/jni (the default for Debian/Ubuntu-based systems) tothe directory where lib_jcsound.so is located.
Mac OSX
Mac OSX users should use the installer for Csound from Sourceforge. The installer should install both thefloat and doubles version of Csound. The lib_jcsound.jnilib will be installed into /Library/Java/Extensions.If you are compiling your own version of Csound, you can remove the symlink in /Library/Java/Extensionsand either symlink your your version there or copy it into that folder.
Checking the API is Enabled
To check if the API is enabled, open blue and open up the Program Options. This is available from theBlue->Preferences menu option on OSX, and from the Tools->Options menu option Windows and Linux.
Getting Started
5
In the Blue tab, under both Disk and Realtime Render settings, there is an option called "Render Method".If Csound 6 is availble on your system and Blue was able to find it, it will show a "Csound 6 API" option.If it was not found but Csound 5 was found, then a "Csound 5 API" option will show. If neither could befound, you will only have the "Commandline Runner" option which is always available.
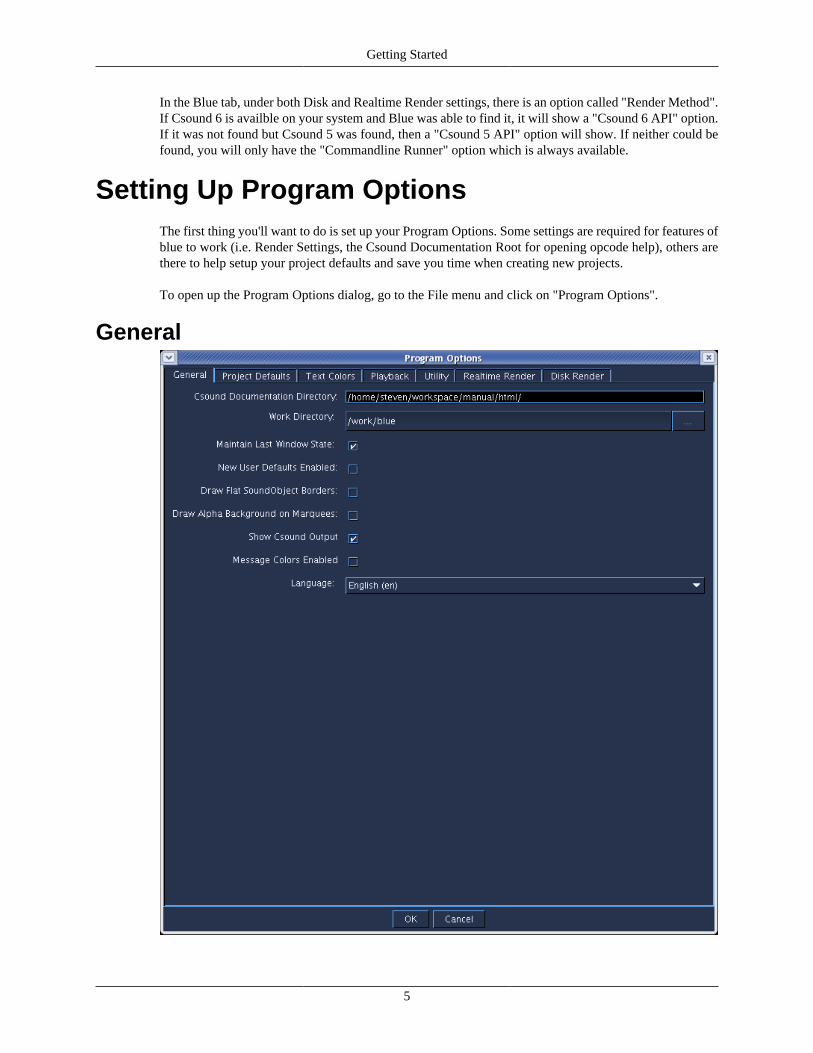
Setting Up Program OptionsThe first thing you'll want to do is set up your Program Options. Some settings are required for features ofblue to work (i.e. Render Settings, the Csound Documentation Root for opening opcode help), others arethere to help setup your project defaults and save you time when creating new projects.
To open up the Program Options dialog, go to the File menu and click on "Program Options".
General
Getting Started
6
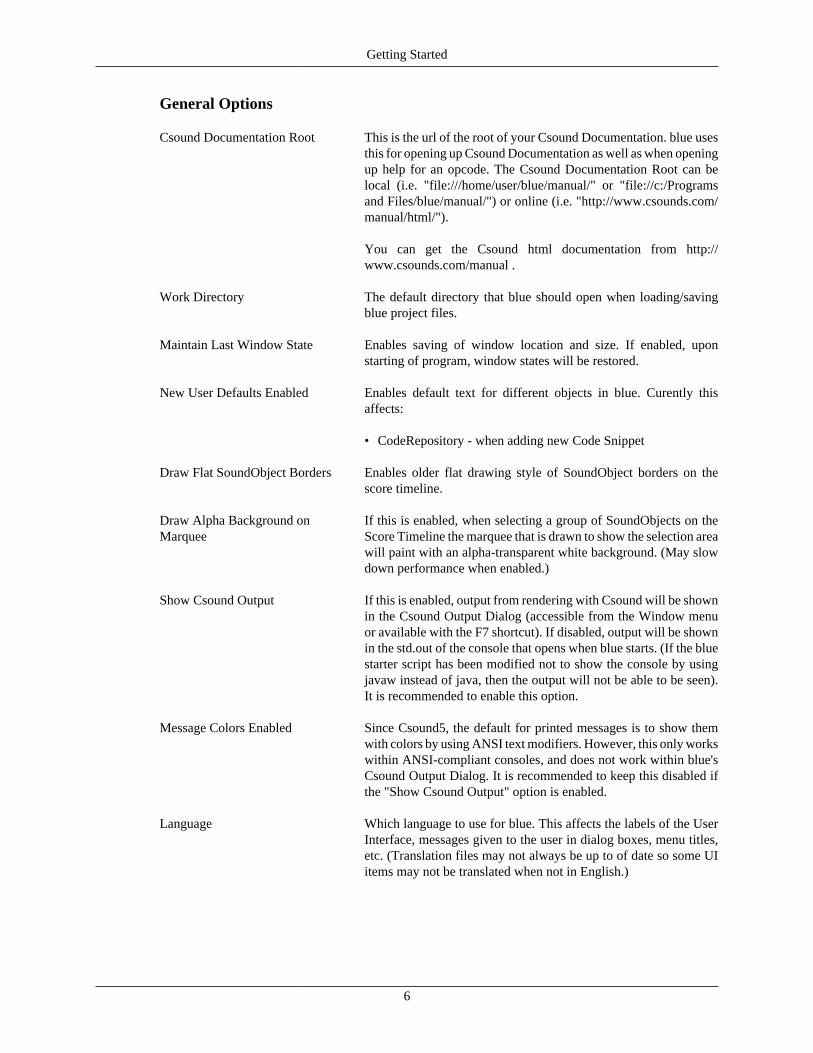
General Options
Csound Documentation Root This is the url of the root of your Csound Documentation. blue usesthis for opening up Csound Documentation as well as when openingup help for an opcode. The Csound Documentation Root can belocal (i.e. "file:///home/user/blue/manual/" or "file://c:/Programsand Files/blue/manual/") or online (i.e. "http://www.csounds.com/manual/html/").
You can get the Csound html documentation from http://www.csounds.com/manual .
Work Directory The default directory that blue should open when loading/savingblue project files.
Maintain Last Window State Enables saving of window location and size. If enabled, uponstarting of program, window states will be restored.
New User Defaults Enabled Enables default text for different objects in blue. Curently thisaffects:
• CodeRepository - when adding new Code Snippet
Draw Flat SoundObject Borders Enables older flat drawing style of SoundObject borders on thescore timeline.
Draw Alpha Background onMarquee
If this is enabled, when selecting a group of SoundObjects on theScore Timeline the marquee that is drawn to show the selection areawill paint with an alpha-transparent white background. (May slowdown performance when enabled.)
Show Csound Output If this is enabled, output from rendering with Csound will be shownin the Csound Output Dialog (accessible from the Window menuor available with the F7 shortcut). If disabled, output will be shownin the std.out of the console that opens when blue starts. (If the bluestarter script has been modified not to show the console by usingjavaw instead of java, then the output will not be able to be seen).It is recommended to enable this option.
Message Colors Enabled Since Csound5, the default for printed messages is to show themwith colors by using ANSI text modifiers. However, this only workswithin ANSI-compliant consoles, and does not work within blue'sCsound Output Dialog. It is recommended to keep this disabled ifthe "Show Csound Output" option is enabled.
Language Which language to use for blue. This affects the labels of the UserInterface, messages given to the user in dialog boxes, menu titles,etc. (Translation files may not always be up to of date so some UIitems may not be translated when not in English.)
Getting Started
7
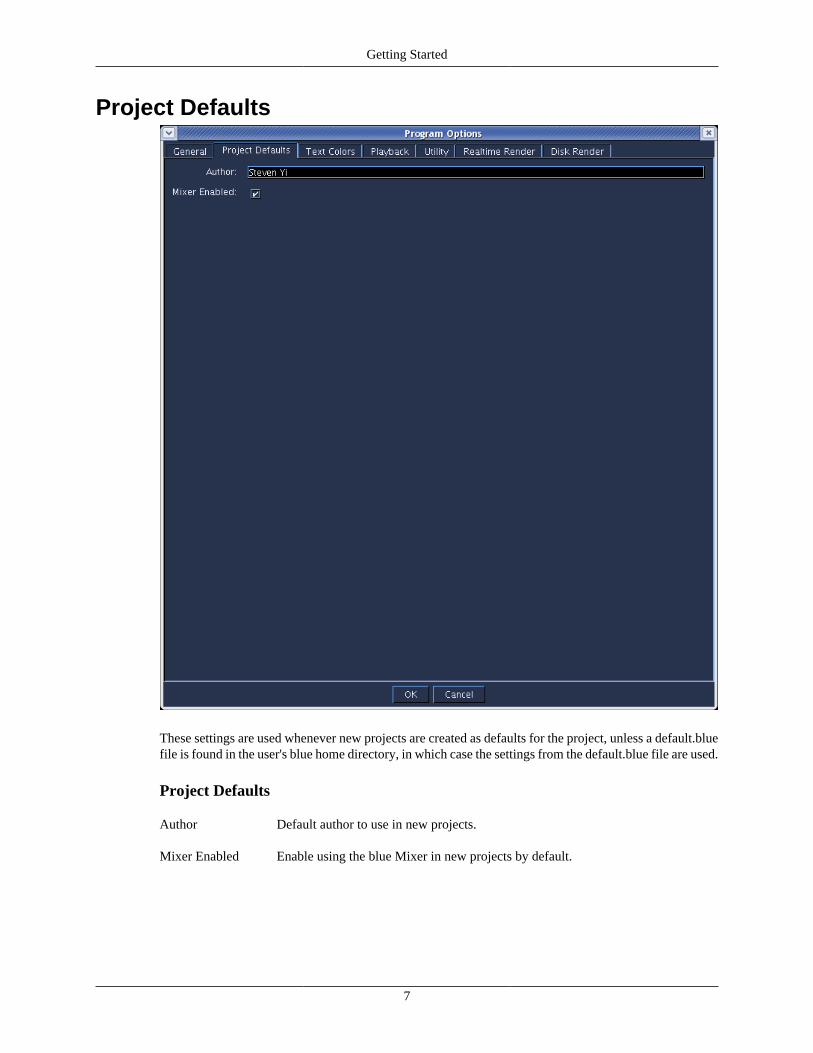
Project Defaults
These settings are used whenever new projects are created as defaults for the project, unless a default.bluefile is found in the user's blue home directory, in which case the settings from the default.blue file are used.
Project Defaults
Author Default author to use in new projects.
Mixer Enabled Enable using the blue Mixer in new projects by default.
Getting Started
8
Playback
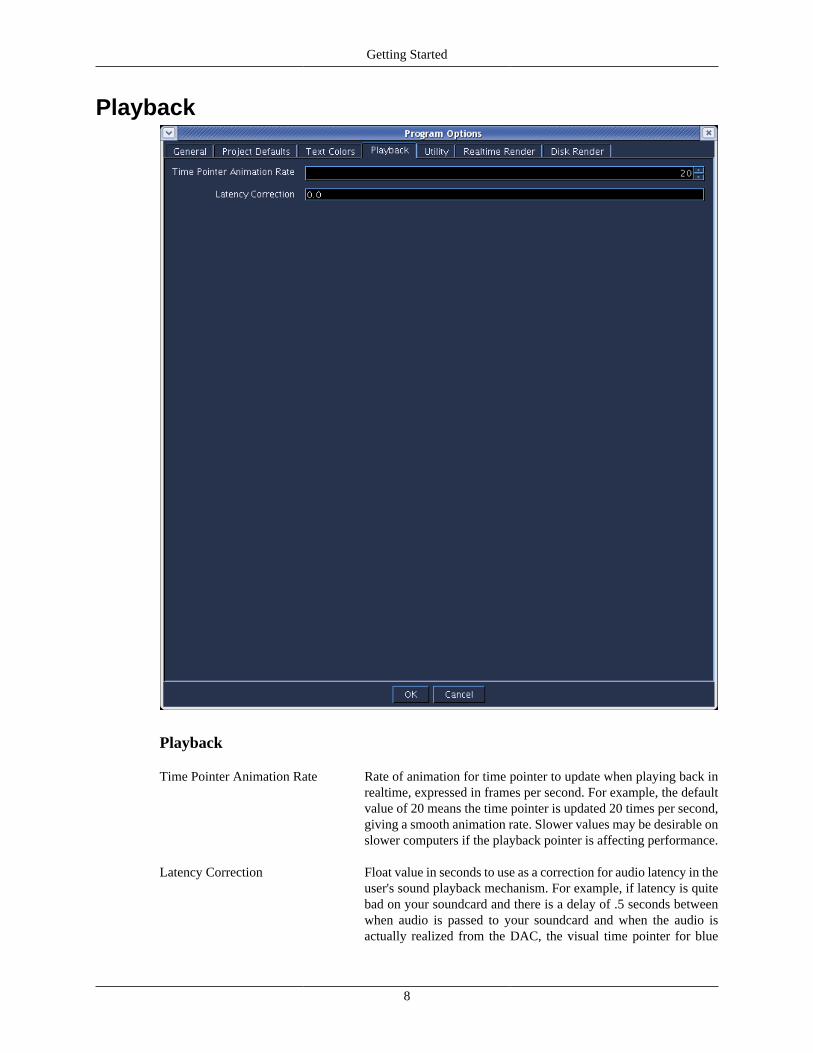
Playback
Time Pointer Animation Rate Rate of animation for time pointer to update when playing back inrealtime, expressed in frames per second. For example, the defaultvalue of 20 means the time pointer is updated 20 times per second,giving a smooth animation rate. Slower values may be desirable onslower computers if the playback pointer is affecting performance.
Latency Correction Float value in seconds to use as a correction for audio latency in theuser's sound playback mechanism. For example, if latency is quitebad on your soundcard and there is a delay of .5 seconds betweenwhen audio is passed to your soundcard and when the audio isactually realized from the DAC, the visual time pointer for blue
Getting Started
9
may appear ahead in time of what is being heard. Using a .5 valuefor latency correction would correct for this.
Utility
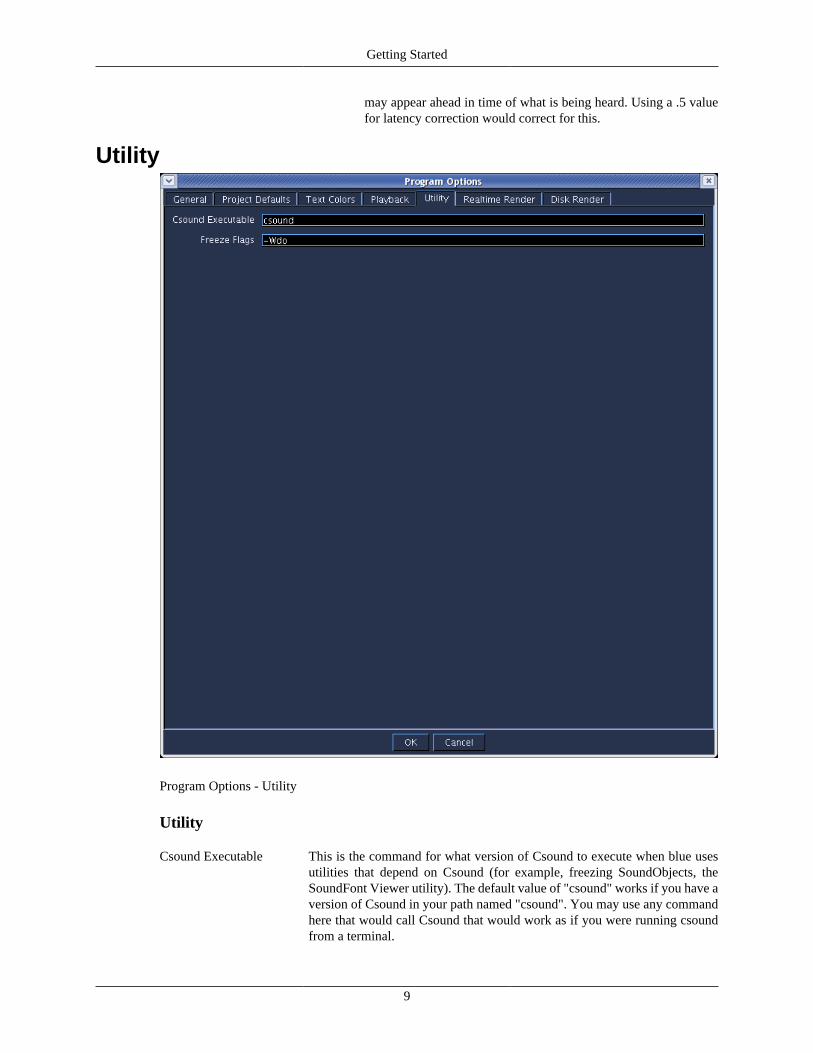
Program Options - Utility
Utility
Csound Executable This is the command for what version of Csound to execute when blue usesutilities that depend on Csound (for example, freezing SoundObjects, theSoundFont Viewer utility). The default value of "csound" works if you have aversion of Csound in your path named "csound". You may use any commandhere that would call Csound that would work as if you were running csoundfrom a terminal.
Getting Started
10
Note
The value defined for Csound Executable should only be thecommand to call Csound and no other flags should be added here.
Freeze Flags These are the flags for Csound that blue uses when performing SoundObjectfreezing. Defaults are "-Ado" for Mac and "-Wdo" for all other operatingsystems. Users may wish to modify this value if they would their frozensoundObjects to be in a different format, i.e. 32-bit float soundfiles.
Realtime Render
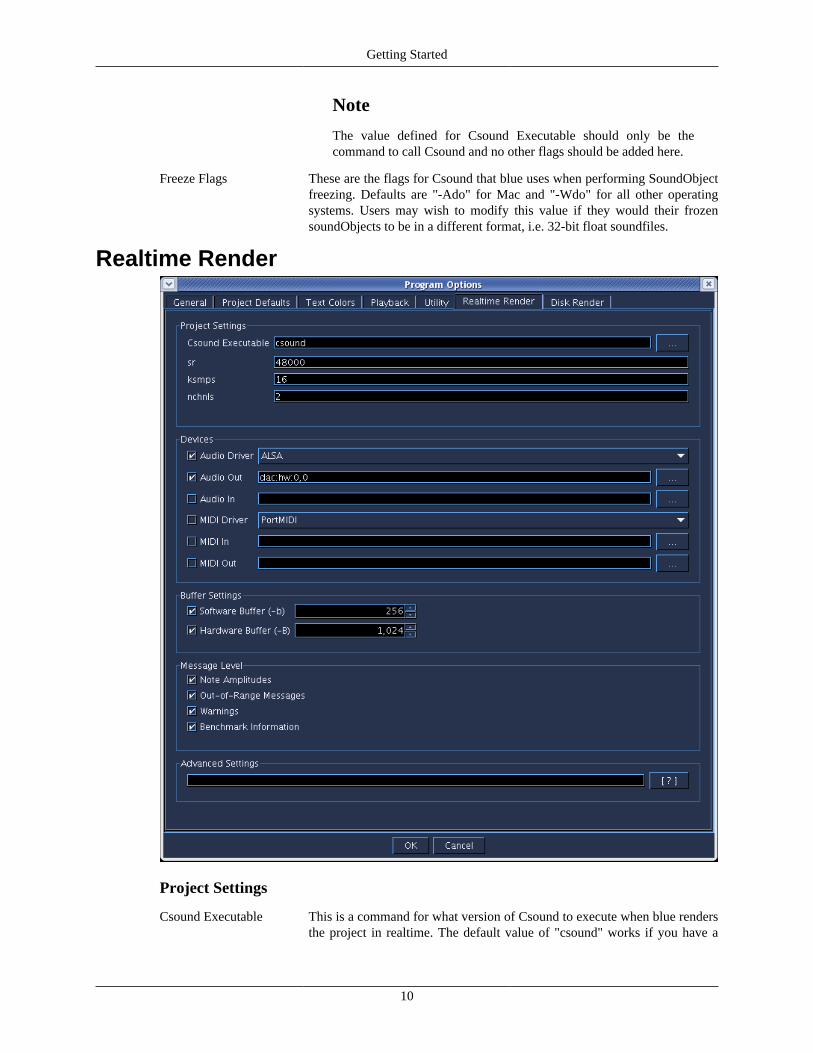
Project Settings
Csound Executable This is a command for what version of Csound to execute when blue rendersthe project in realtime. The default value of "csound" works if you have a

Getting Started
11
version of Csound in your path named "csound". You may use any commandhere that would call csound that would work as if you were running csoundfrom a terminal.
Using the button marked "..." on the right will open up a file dialog so that youcan find and select the Csound executable to use to run Csound.
If you are using the API, you still need to have something set here. You canset it to "csound" in that case.
Note
The value defined for Csound Executable should only be thecommand to call Csound and no other flags should be added here.
Render Method Choose which render service to use for rendering the project. When theprogram loads, Blue will first try to see if the Csound 6 API is available and ifso, show that option here. If it can not find the Csound 6 API, it will search forthe Csound 5 API and show that option here instead if it is found. If neither isfound, the Commandline Runner option will always be available to use.
Note: If you have both Csound 5 and Csound 6 installed, you can force Blue toignore Csound 6 on load by adding "-J-DDISABLE_CSOUND=true" to theblue/etc/blue.conf file in the default_options section. On OSX, this will be inblue.app/Contents/Resources/blue/etc/blue.conf.
sr Default sr to use for realtime settings in new projects.
ksmps Default ksmps to use for realtime settings in new projects.
0dbfs Default value to use for 0dbfs. Also, the checkbox denotes whether projectsshould use 0dbfs by default or not.
Devices
Audio Driver Driver to use for audio input and output. This is equivalent to using the --rtaudio=flag setting on the commandline.
Enabling the checkbox determines if this value will be used at all when rendering,and if so, will use the value from the dropdown as the driver setting.
Audio Out Audio output device to use. Equivalent to using -o flag setting on the commandline.This setting is dependent on the setting used on the audio driver setting. Using a valueof "dac" will use the default device for the driver.
The value of this setting will be used for all projects that set "Audio Out" enabled inthe project-level realtime render settings.
By selecting the [...] button to the right of this field, blue will try to detect what devicesare available for the chosen Audio Driver. If blue is able to find the devices, a popupdialog will appear with a list of available devices. Selecting from the popup will thenpopulate the textfield with the correct device string that Csound will use to choosethe device requested.

Getting Started
12
Note
If the driver is chosen but not enabled for use via its checkbox, when auto-detecting, blue will check for devices against the default driver and notnecessarily what is in the dropdown. Please be sure that if you are planningto use the auto-detect feature with a particular driver that you also select thedriver and enable it with the checkbox.
Enabling the checkbox determines if this device will be enabled by default for newprojects.
Audio In Audio input device to use. Equivalent to using -i flag setting on the commandline.This setting is dependent on the setting used on the audio driver setting. Using a valueof "adc" will use the default device for the driver.
The value of this setting will be used for all projects that set "Audio In" enabled inthe project-level realtime render settings.
By selecting the [...] button to the right of this field, blue will try to detect what devicesare available for the chosen Audio Driver. If blue is able to find the devices, a popupdialog will appear with a list of available devices. Selecting from the popup will thenpopulate the textfield with the correct device string that Csound will use to choosethe device requested.
Note
If the driver is chosen but not enabled for use via its checkbox, when auto-detecting, blue will check for devices against the default driver and notnecessarily what is in the dropdown. Please be sure that if you are planningto use the auto-detect feature with a particular driver that you also select thedriver and enable it with the checkbox.
Enabling the checkbox determines if this device will be enabled by default for newprojects.
MIDI Driver Driver to use for MIDI input and output. This is equivalent to using the --rtmidi= flagsetting on the commandline.
Enabling the checkbox determines if this value will be used at all when rendering,and if so, will use the value from the dropdown as the driver setting.
MIDI Out MIDI output device to use. Equivalent to using -Q flag setting on the commandline.This setting is dependent on the setting used on the MIDI driver setting.
The value of this setting will be used for all projects that set "MIDI Out" enabled inthe project-level realtime render settings.
By selecting the [...] button to the right of this field, blue will try to detect what devicesare available for the chosen MIDI Driver. If blue is able to find the devices, a popupdialog will appear with a list of available devices. Selecting from the popup will thenpopulate the textfield with the correct device string that Csound will use to choosethe device requested.

Getting Started
13
Note
If the driver is chosen but not enabled for use via its checkbox, when auto-detecting, blue will check for devices against the default driver and notnecessarily what is in the dropdown. Please be sure that if you are planningto use the auto-detect feature with a particular driver that you also select thedriver and enable it with the checkbox.
Enabling the checkbox determines if this device will be enabled by default for newprojects.
MIDI In MIDI input device to use. Equivalent to using -M flag setting on the commandline.This setting is dependent on the setting used on the audio driver setting.
The value of this setting will be used for all projects that set "MIDI In" enabled in theproject-level realtime render settings.
By selecting the [...] button to the right of this field, blue will try to detect what devicesare available for the chosen MIDI Driver. If blue is able to find the devices, a popupdialog will appear with a list of available devices. Selecting from the popup will thenpopulate the textfield with the correct device string that Csound will use to choosethe device requested.
Note
If the driver is chosen but not enabled for use via its checkbox, when auto-detecting, blue will check for devices against the default driver and notnecessarily what is in the dropdown. Please be sure that if you are planningto use the auto-detect feature with a particular driver that you also select thedriver and enable it with the checkbox.
Enabling the checkbox determines if this device will be enabled by default for newprojects.
Buffer Settings
Software Buffer Size of software sample buffer to use (-b). For more information, seeCommandFlags section of Csound manual for settings.
Enabling the checkbox determines if this value will be used at all when rendering.
Hardware Buffer Size of hardware sample buffer to use (-B). For more information, seeCommandFlags section of Csound manual for settings.
Enabling the checkbox determines if this value will be used at all when rendering.
Message Level
Note Amplitudes Enables note amplitude messages from Csound (-m1)
Out-of-Range Messages Enables samples out of range messages from Csound (-m2)
Warnings Enables warning messages from Csound (-m4)
Benchmark Information Enables benchmark information from Csound (-m128)
Getting Started
14
Advanced Settings
Advanced Settings Extra flags to append to the commandline that might not be covered by optionsin the UI. Pressing the [?] button will open the documentation for the Csoundcommand flags (Csound Documentation Root but be set for this to work).
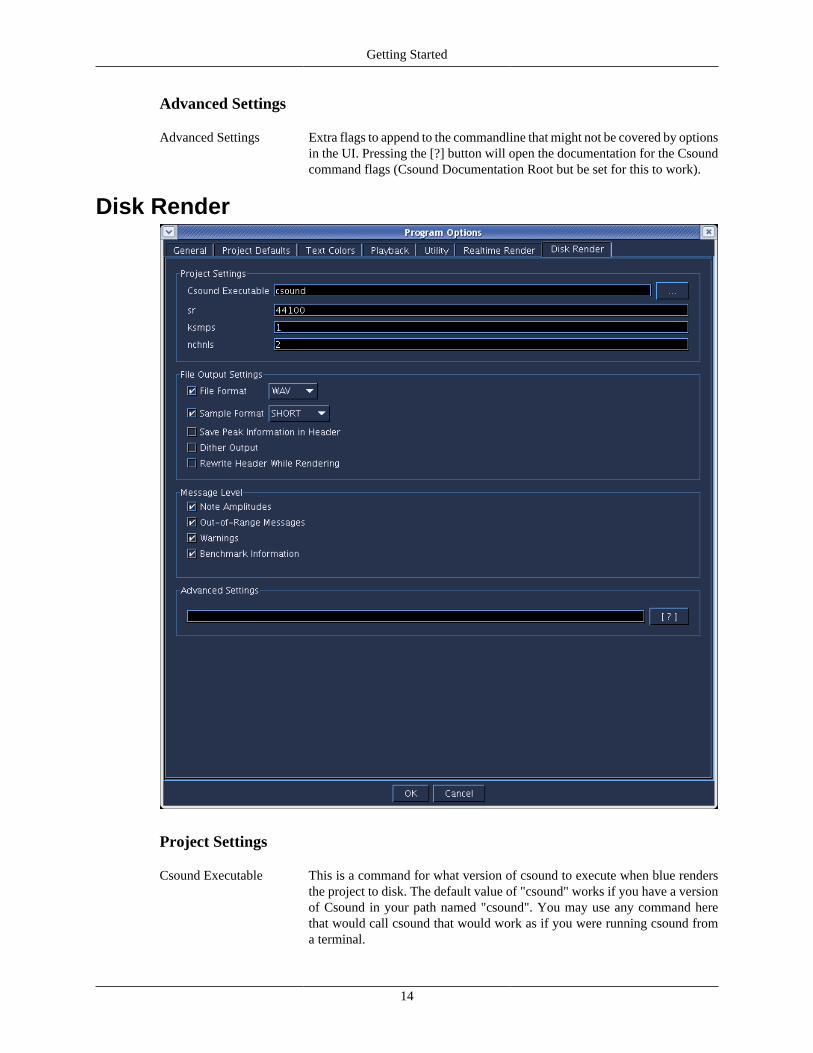
Disk Render
Project Settings
Csound Executable This is a command for what version of csound to execute when blue rendersthe project to disk. The default value of "csound" works if you have a versionof Csound in your path named "csound". You may use any command herethat would call csound that would work as if you were running csound froma terminal.
Getting Started
15
Using the button marked "..." on the right will open up a file dialog so that youcan find and select the csound executable to use to run Csound.
Note
The value defined for Csound Executable should only be thecommand to call Csound and no other flags should be added here.
Render Method Choose which render service to use for rendering the project. When theprogram loads, Blue will first try to see if the Csound 6 API is available and ifso, show that option here. If it can not find the Csound 6 API, it will search forthe Csound 5 API and show that option here instead if it is found. If neither isfound, the Commandline Runner option will always be available to use.
Note: If you have both Csound 5 and Csound 6 installed, you can force Blue toignore Csound 6 on load by adding "-J-DDISABLE_CSOUND=true" to theblue/etc/blue.conf file in the default_options section. On OSX, this will be inblue.app/Contents/Resources/blue/etc/blue.conf.
sr Default sr to use for disk render settings in new projects.
ksmps Default ksmps to use for disk render settings in new projects.
nchnls Default nchnls to use for disk render settings in new projects.
0dbfs Default value to use for 0dbfs. Also, the checkbox denotes whether projectsshould use 0dbfs by default or not.
Render and Play Command
Enabled Enable using custom play command when using "Render and Play". If not enabled, blue'sbuilt-in audio player will be used once the project is finished rendering to disk.
Command Command to call after finished rendering a project. The command line given should use the$outfile property where the name of the generated audio file should be passed to the program.For example, to open the rendered audio with VLC on Mac OSX, you can use this commandline:
open -a VLC $outfile
File Output Settings
File Format File format to use (i.e. WAV, AIFF, AU, etc.)
Enabling the checkbox determines if this value will be used at allwhen rendering.
Sample Format Sample format to use. The default of SHORT is the same as 16-bit integer audio (the same as used for CD's). Other formats areavailable in the dropdown to use.
Enabling the checkbox determines if this value will be used at allwhen rendering.
Save Peak Information in Header Save the peak information in the file header.
Getting Started
16
Enabling the checkbox determines if this value will be used at allwhen rendering.
Dither Output Use dither on output.
Enabling the checkbox determines if this value will be used at allwhen rendering.
Rewrite Header while Rendering Rewrite the file header while rendering. This makes it possible toplay the audio file in the middle of a render and is useful when therendering of the project will take a very long time. However, it doesslow down overall render time.
Enabling the checkbox determines if this value will be used at allwhen rendering.
Message Level
Note Amplitudes Enables note amplitude messages from Csound (-m1)
Out-of-Range Messages Enables samples out of range messages from Csound (-m2)
Warnings Enables warning messages from Csound (-m4)
Benchmark Information Enables benchmark information from Csound (-m128)
Advanced Settings
Advanced Settings Extra flags to append to the commandline that might not be covered by optionsin the UI. Pressing the [?] button will open the documentation for the Csoundcommand flags (Csound Documentation Root but be set for this to work).
MIDIThese settings are for blue's MIDI input, used with blueLive. The table shows what devices are currentlyavailable, and whether they are enabled for use with blueLive or not. You can use the "rescan" button tosearch for devices if you have just plugged in a device.
OSCThis allows you to set what port blue will listen to for incoming OSC messages. Defaults to 8000. Thefollowing messages are understood by blue:
• /score/play
• /score/stop
• /score/rewind
• /score/markerNext
• /score/markerPrevious
• /blueLive/onOff
• /blueLive/recompile
Getting Started
17
• /blueLive/allNotesOff
• /blueLive/toggleMidiInput
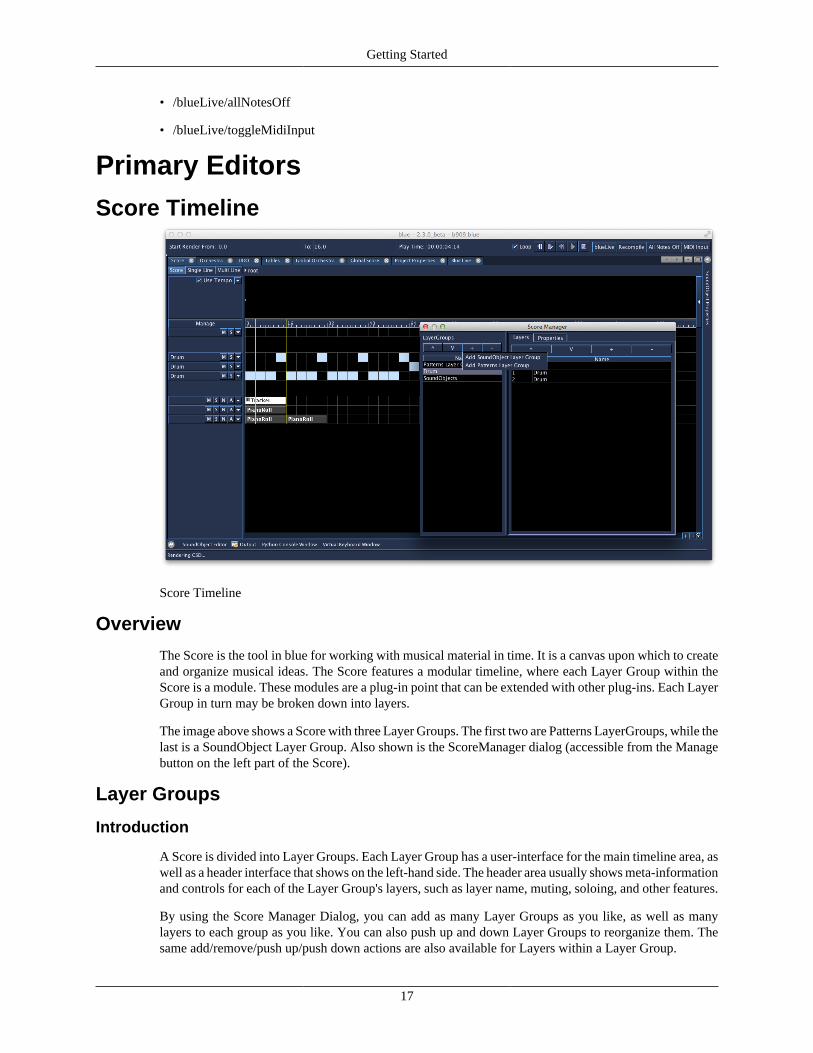
Primary EditorsScore Timeline
Score Timeline
Overview
The Score is the tool in blue for working with musical material in time. It is a canvas upon which to createand organize musical ideas. The Score features a modular timeline, where each Layer Group within theScore is a module. These modules are a plug-in point that can be extended with other plug-ins. Each LayerGroup in turn may be broken down into layers.
The image above shows a Score with three Layer Groups. The first two are Patterns LayerGroups, while thelast is a SoundObject Layer Group. Also shown is the ScoreManager dialog (accessible from the Managebutton on the left part of the Score).
Layer Groups
Introduction
A Score is divided into Layer Groups. Each Layer Group has a user-interface for the main timeline area, aswell as a header interface that shows on the left-hand side. The header area usually shows meta-informationand controls for each of the Layer Group's layers, such as layer name, muting, soloing, and other features.
By using the Score Manager Dialog, you can add as many Layer Groups as you like, as well as manylayers to each group as you like. You can also push up and down Layer Groups to reorganize them. Thesame add/remove/push up/push down actions are also available for Layers within a Layer Group.
Getting Started
18
Note
Add/Remove/Push Up/Push Down for layers is also available while working in the main scorearea by right-clicking the Layer panels on the right and selecting the options from the popup menu.
Also, all LayerGroups support having NoteProcessors used with them. Using a NoteProcessor ona LayerGroup will affect all notes generated within that LayerGroup. Editing the LayerGroup'sNoteProcessors can be done by right clicking on the root Score node in the Score Bar, described below.
Regarding the design, a Layer Group is primarily responsible for generating Csound Score notes. However,they are also able to generate tables, instruments, and anything else that is usable in Csound. It is up to thedeveloper to choose what features the Layer Group will use.
SoundObject
SoundObject Layer Groups are one of the primary Layer Group types. They support the SoundObjectsystem in blue for scoring them in time on the timeline. They also are the canvas on which automationsare drawn.
SoundObject Layer Groups are divided into SoundLayers. Each SoundLayer can contain SoundObjectsof any type as well as have automations assigned to the layer. Unlike MIDI-based studio software,where layers are bound to a single instrument or channel in a mixer, blue's SoundLayers are free to holdSoundObjects that generate any data for any instrument. This design choice allows freedoms for you todesign your project as you wish, though at the expense of being able to implement some things which maybe commonly found in MIDI-based studio software.
To use the SoundObject system, first create a SoundObject Layer Group using the Score Manager Dialog.(By default, new projects in blue start with a single SoundObject Layer Group.) Next, add as many layersas you would like to the LayerGroup. You can then edit the names of the layers using the ScoreManagerDialog, or back in the main Score area by double-clicking the area on the left of the Layer's panel on the left.
On the timeline, rt-clicking on any soundLayer will show menu options for adding different types ofSoundObjects, pasting a SoundObject from the buffer if any SoundObjects in the buffer are available, aswell as other commands. (Copying and pasting of SoundObjects can also be done using ctrl-c and ctrl-click on a layer.)
Once you have SoundObjects on the timeline, you can click on them to select it, or click in an empty areaand drag to show a selection rectangle. You can also add and remove SoundObjects to/from the selectionnby holding shift when clicking.
Once selected, you can move selected SoundObjects by pressing the mouse down on one of the selectedSoundObjects, then drag to move them in time as well as up and down layers. If you press shift down whenyou click, once you drag you will create clones of the original material and move them in time. If youmove the mouse to the right-side of a SoundObject, the cursor will change to a resize cursor, and clickingand dragging will allow you to change the duration of the SoundObject. (Note you can only resize oneSoundObject at a time.)
If you have a single SoundObject selected, you can edit the properties of the SoundObject by using theSoundObject Property Window. This window can be opened from the menu "Windows -> Sound ObjectProperties" or by using the shortcut "F3". From this window you can change the name of the SoundObject,its start time and subjective duration, as well as add and remove NoteProcessors (if the SoundObjectsupports it).
To edit a SoundObject, select a single SoundObject and open the SoundObject Editor window. You canalso double-click a SoundObject, which will set the editor for the SoundObject in the Editor window
Getting Started
19
as well as focus the SoundObject Editor window. (If the Editor window is docked, double-clicking theSoundObject will cause the editor to show the docked window.)
Patterns
Patterns Layer Groups are based upon the same SoundObject system as the SoundObject Layer Groups,but presents a different way to working with these objects. At a high-level, each Pattern layer has oneSoundObject assigned to it. The SoundObject is the source score material for a Pattern Layer. Selectingboxes in the grid that shows for the Patter Layer determines where that score material will be used togenerate notes. For music projects that rely on patterns and regular metered time, using the Pattern LayerGroups can be more efficient for creating a piece than using SoundObject Layer Groups.
The grid of time for Pattern Layers is currently hardcoded to repeat every four beats, or one measure at 4/4time. However, a SoundObject is not constrained to generate score for only one measure. For example, youcan create a PianoRoll that has a time behavior of "None", and have it last sixteen beats (four measures).Everywhere that the pattern grid is selected for the Pattern Layer that uses that SoundObject will thencreate that sixteen beat score and start it at the time of the grid box.
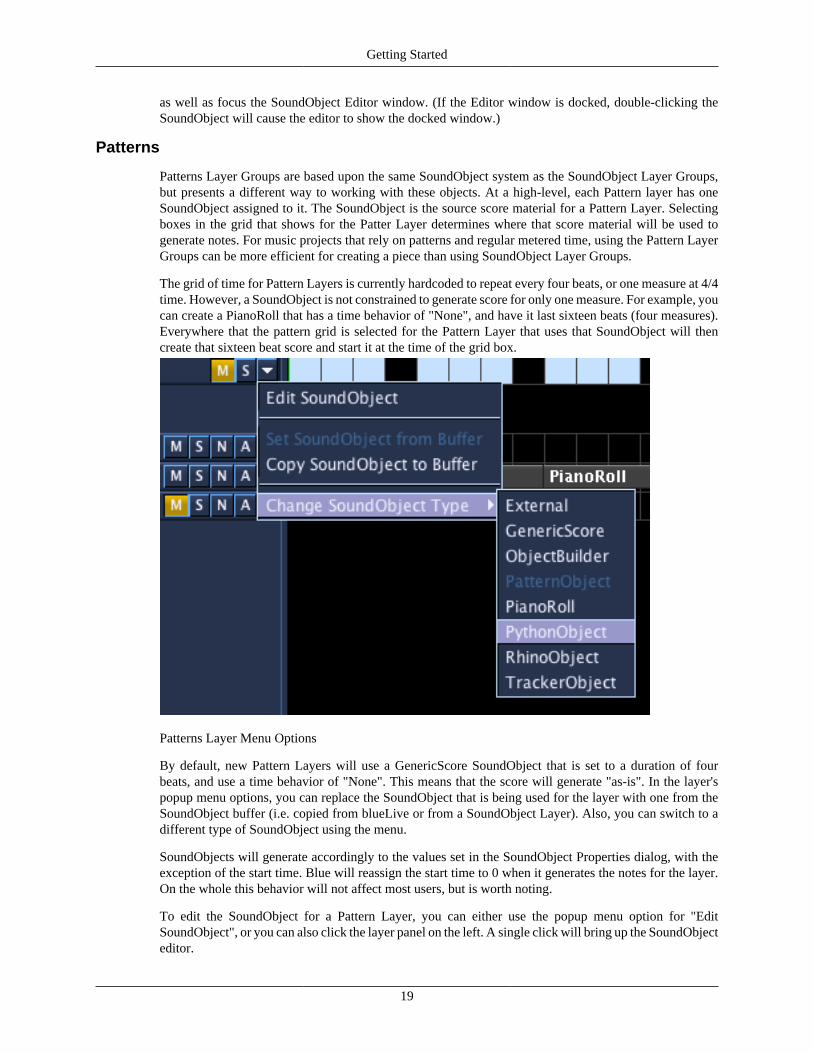
Patterns Layer Menu Options
By default, new Pattern Layers will use a GenericScore SoundObject that is set to a duration of fourbeats, and use a time behavior of "None". This means that the score will generate "as-is". In the layer'spopup menu options, you can replace the SoundObject that is being used for the layer with one from theSoundObject buffer (i.e. copied from blueLive or from a SoundObject Layer). Also, you can switch to adifferent type of SoundObject using the menu.
SoundObjects will generate accordingly to the values set in the SoundObject Properties dialog, with theexception of the start time. Blue will reassign the start time to 0 when it generates the notes for the layer.On the whole this behavior will not affect most users, but is worth noting.
To edit the SoundObject for a Pattern Layer, you can either use the popup menu option for "EditSoundObject", or you can also click the layer panel on the left. A single click will bring up the SoundObjecteditor.
Getting Started
20
To edit the layer's patterns, click on a grid box to toggle between on and off for that box. You can alsopress down and drag along to set multiple boxes. The value that is set for the multiple boxes will dependon the action of the first box selected. For example, if the first box when the initial mouse down is on, themouse down will turn it off, and dragging will turn off all boxes that the mouse extends through.
User-Interface Walkthrough
Play Bar
The play bar at the top has:
• time to start playing from
• what time to play to (if the render end time is set)
• the current play time
• Loop checkbox to have render looping from render start time to render end time
• Forward/Back buttons for jumping between markers
• Back button to start from beginning of Score
• Play/Stop buttons to start/stop rendering
• BlueLive buttons:
• blueLive toggle button to turn on/off blueLive
• Recompile button that will stop the current blueLive run, recompile the project, and start blueLiveagain
• All Notes Off Button to turn off any hanging notes in a blueLive run
• MIDI Input toggle button enabled/disables blue MIDI input into blueLive
Score Bar
the poly object bar (shown above with only one polyObject, "root") shows what polyObject you arecurrently editting. if you were to add a polyObject named "phrase 1" to the main timeline shown above,then double click that polyObject to edit it, the polyObject bar would have two buttons on it, one for "root",and one for "phrase 1". you would then be editting "phrase 1"'s timeline. by clicking on the "root" buttonof the timeline, you would then return out of the polyObject's timeline and back in the root's timeline.
SoundLayer Editor
Below the polyObject bar on the left, you will see the soundLayer edittor. here you can change the name ofthe soundLayer, as well as mute the layer (all soundObject's on muted layers will not be used to generatenotes when creating .CSD files).
on the bottom of the soundLayer edittor are four buttons, "^", "V", "+", and "-". "^" and "V" will push upor push down soundLayers. (HINT: You can move multiple soundLayers by clicking on one soundLayer,then holding down shift and clicking on the last of the soundLayers you want to move, then using the "^"and "V" buttons.) the "+" will add a soundLayer after the currently selected soundLayer. if no soundLayersare selected, then it will add one to the end of the list. the "-" button will remove any selected soundLayers.it should ask for a confirmation before removing any layers.
Getting Started
21
The Timeline
Below the polyObject bar on the right is the main time line. it shows the time line for the currently edittedpolyObject. The +/- buttons next to the scrollbars are used to zoom in on the time line, and those settingswill be maintained between work sessions.
Tempo Editor
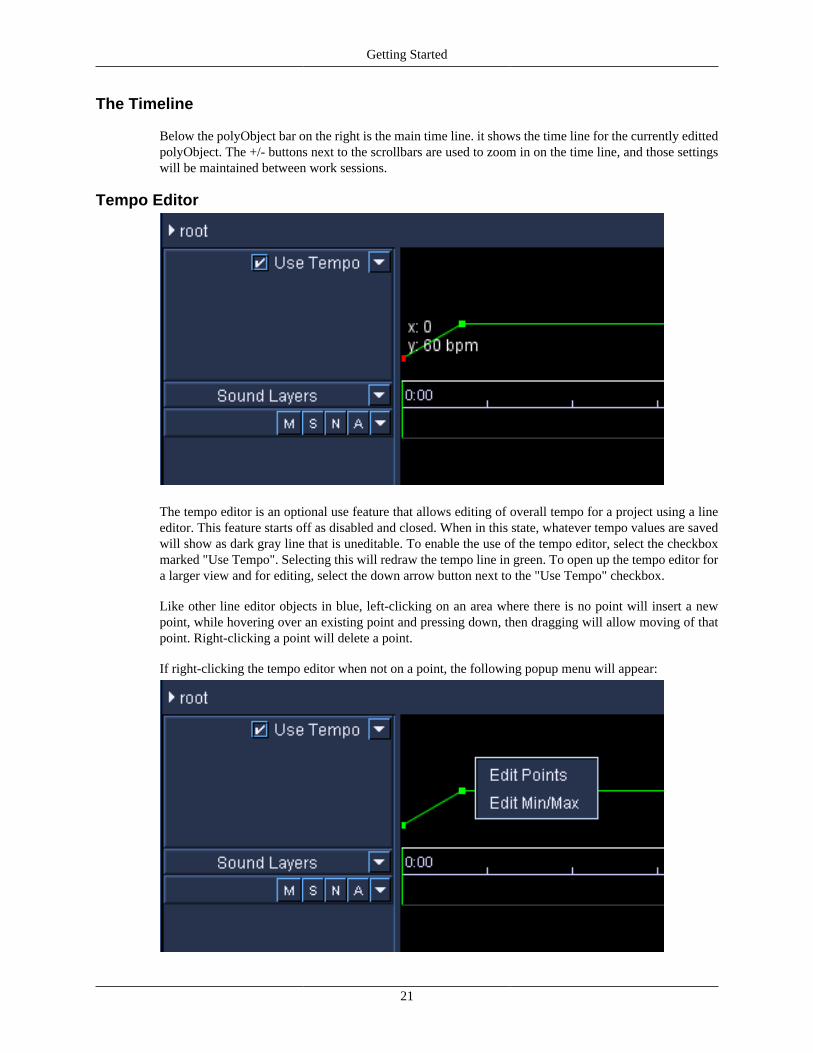
The tempo editor is an optional use feature that allows editing of overall tempo for a project using a lineeditor. This feature starts off as disabled and closed. When in this state, whatever tempo values are savedwill show as dark gray line that is uneditable. To enable the use of the tempo editor, select the checkboxmarked "Use Tempo". Selecting this will redraw the tempo line in green. To open up the tempo editor fora larger view and for editing, select the down arrow button next to the "Use Tempo" checkbox.
Like other line editor objects in blue, left-clicking on an area where there is no point will insert a newpoint, while hovering over an existing point and pressing down, then dragging will allow moving of thatpoint. Right-clicking a point will delete a point.
If right-clicking the tempo editor when not on a point, the following popup menu will appear:

Getting Started
22
The first option will allow editing of the values of the points entered into the line editor by use of a tablewith two columns: the first column being the beat on which the tempo change occurs and the right columnbeing the tempo value that it should have. One may find using the table editor easier to use to fine-tunevalues.
The second option will allow changing the boundary min and max tempo values for the line editor, as wellas the option for what to do for points that fall outside of the new range. The options here are "Truncate"which will set any points' values that lie outside the new range to the closest boundary value, or "Scale"which will take all point values from the old range and scale them to the new range.
Use of the tempo editor is completely optional and users familiar with Csound's t-statement for controllingglobal tempo may opt to disable using blue's tempo editor and to use a t-statement in the global orc sectionof the globals tab. Also, older blue projects that existed from before blue's tempo editor was developedcan count on their projects loading and running correctly even if opened with versions of blue that dohave a tempo editor, due to blue's default to disable the blue tempo editor. Regardless of which temposystem is chosen by the user, one should be careful not to use both at the same time as this will cause twot-statements to exist in the generated CSD (the hand-entered one and the one generated by blue), causingunexpected performance results.
Quick Time Dialog
While in the main timeline area, pressing ctrl-t when a soundObject is selected will bring up the quicktime dialog. Here you can edit the start time and duration of the currently selected soundObject. Whenthe dialog is first popped up the start time field is automatically focused for editing. You can press tabto switch between the two fields. Pressing enter will update the properties. Pressing escape, closing thedialog, or clicking anywhere outside of the dialog will cancel any changes and close the dialog.
Score Time Properties
In the upper right of the Score window is an arrow button; pressing this reveals the time properties for theScore. The two options here are Snap and Time Display. Snap provides a grid by which to line up your
Getting Started
23
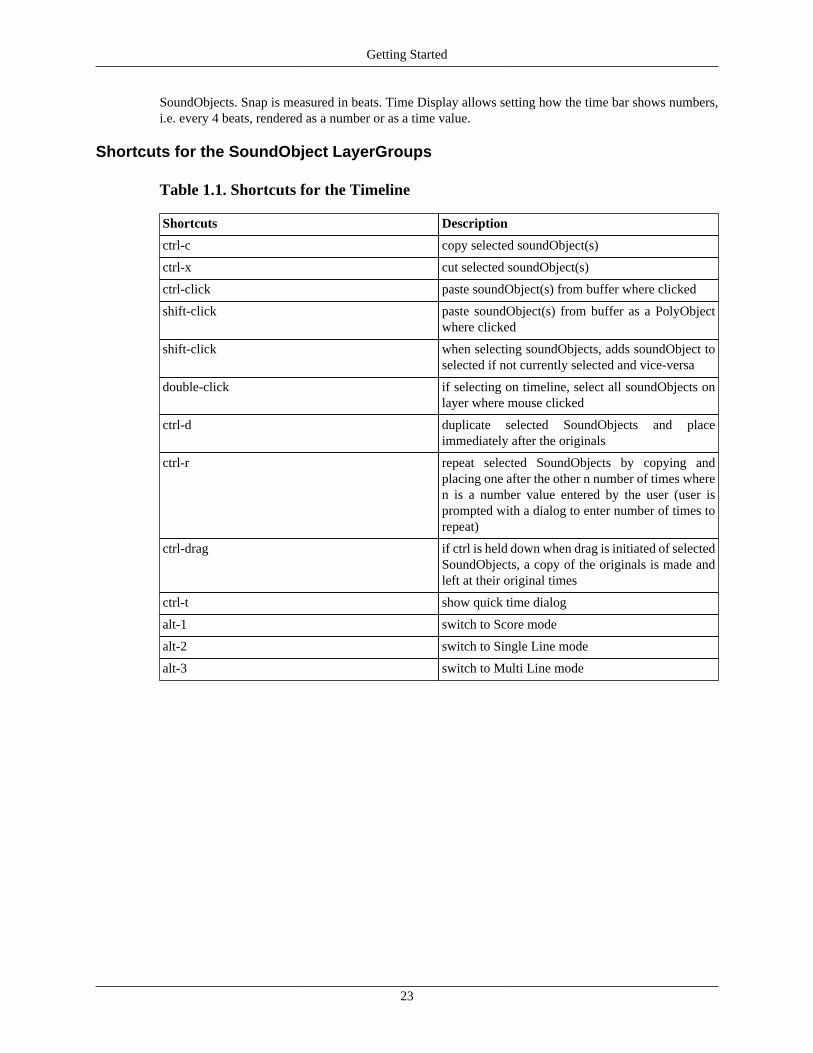
SoundObjects. Snap is measured in beats. Time Display allows setting how the time bar shows numbers,i.e. every 4 beats, rendered as a number or as a time value.
Shortcuts for the SoundObject LayerGroups
Table 1.1. Shortcuts for the Timeline
Shortcuts Description
ctrl-c copy selected soundObject(s)
ctrl-x cut selected soundObject(s)
ctrl-click paste soundObject(s) from buffer where clicked
shift-click paste soundObject(s) from buffer as a PolyObjectwhere clicked
shift-click when selecting soundObjects, adds soundObject toselected if not currently selected and vice-versa
double-click if selecting on timeline, select all soundObjects onlayer where mouse clicked
ctrl-d duplicate selected SoundObjects and placeimmediately after the originals
ctrl-r repeat selected SoundObjects by copying andplacing one after the other n number of times wheren is a number value entered by the user (user isprompted with a dialog to enter number of times torepeat)
ctrl-drag if ctrl is held down when drag is initiated of selectedSoundObjects, a copy of the originals is made andleft at their original times
ctrl-t show quick time dialog
alt-1 switch to Score mode
alt-2 switch to Single Line mode
alt-3 switch to Multi Line mode
Getting Started
24
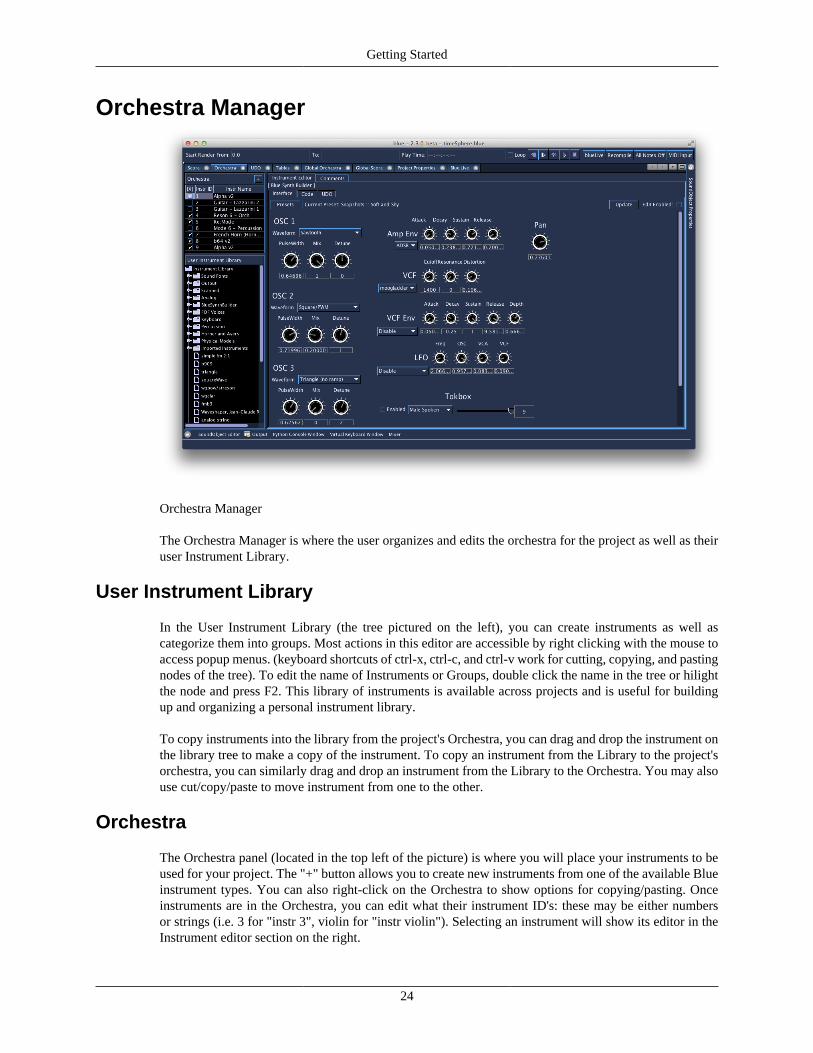
Orchestra Manager
Orchestra Manager
The Orchestra Manager is where the user organizes and edits the orchestra for the project as well as theiruser Instrument Library.
User Instrument Library
In the User Instrument Library (the tree pictured on the left), you can create instruments as well ascategorize them into groups. Most actions in this editor are accessible by right clicking with the mouse toaccess popup menus. (keyboard shortcuts of ctrl-x, ctrl-c, and ctrl-v work for cutting, copying, and pastingnodes of the tree). To edit the name of Instruments or Groups, double click the name in the tree or hilightthe node and press F2. This library of instruments is available across projects and is useful for buildingup and organizing a personal instrument library.
To copy instruments into the library from the project's Orchestra, you can drag and drop the instrument onthe library tree to make a copy of the instrument. To copy an instrument from the Library to the project'sorchestra, you can similarly drag and drop an instrument from the Library to the Orchestra. You may alsouse cut/copy/paste to move instrument from one to the other.
Orchestra
The Orchestra panel (located in the top left of the picture) is where you will place your instruments to beused for your project. The "+" button allows you to create new instruments from one of the available Blueinstrument types. You can also right-click on the Orchestra to show options for copying/pasting. Onceinstruments are in the Orchestra, you can edit what their instrument ID's: these may be either numbersor strings (i.e. 3 for "instr 3", violin for "instr violin"). Selecting an instrument will show its editor in theInstrument editor section on the right.

Getting Started
25
Instrument Editor
On the right hand side of the Orchestra Manager is the area for editing instruments. To make more spaceavailable for editing an instrument, you can drag the split pane splitter to the left, or double-click thesplitter to have it collapse to the left-hand side. Each blue instrument-type has its own editor. Note: if youare editing and instrument from the Library, blue will show a green border with the title "Editing LibraryInstrument" to help notify you what instrument you are editing.
Legacy Projects
For projects before 0.94.0, imported projects will have their instruments largely setup in the same wayas they were before.
For projects that were in the 0.94.0 beta series, per-project Instrument Libraries will be removed. Anoption to import the instrument library will be presented to the user and if the user agrees, a folder entitled"Imported from Project" will be added to the root of the user's InstrumentLibrary. On the whole, it isrecommended to import the library, review the instruments, and simply remove what is not necessary.Deleting the imported library is as simple as deleting the folder for the imported group. Instruments inthese project's Arrangements will be modified to hold copies of the instruments from the library as opposedto being references to instrument in the library. (Previously, if two instruments in the Arrangement pointedto the same instrument in the per-project InstrumentLibrary, changes to the instrument in the library wouldaffect all instruments in the Arrangment that pointed to it. Now, only copies are made and no referencesare used.)
User-Defined Opcodes Manager
User-Defined Opcodes Manager
The User-Defined Opcodes Manager contains three main parts:
• Program-wide User-Defined Opcode Library
Getting Started
26
• UDO list for Project-wide UDO's
• UDO Editor
The program-wide UDO library is where you can manage your entire library of UDO's. Right-clicking onthe tree allows adding and removing groups, as well as adding and removing UDO's. You can also dragUDO's into the library from the project-wide UDO list, or paste them using the popup menu. Clicking ona UDO in the library will populate the UDO Editor, and a green border will be shown to highlight thatyou are editing the library copy of the UDO.
The project-wide UDO list contains what UDO's are available for your project. Since UDO's can beembedded into Blue instruments, it is usually better to do so so that an instrument is encapsulated andcopying the instrument will include all of its UDO's it depends on. However, using the project-wide UDOlist can be useful when creating a new project and multiple new instrument designs might be using adeveloping UDO.
UDO's can be created in the project-wide list by using the "+" button, and removed by using the "-" buttonto the left the table on top. UDO's can also be dragged into this list from the library. You can also dragin a folder of UDO's from the library into this list, or copy/paste them using the popup menu. Dragging afolder is useful if you have a set of UDO's you commonly use in all of your instrument designs.
As UDO's may depend on other UDO's, the order in which they are generated can be significant. TheUDO's in the table are generated from top-down. To shift the order of the opcodes up and down, select anopcode in the table and use the "^" and "V" buttons to push up and push down.
To edit the UDO, select one from the table. After selecting a UDO, the UDO Editor will be populated withthat UDO. This time, no green border will show, as that is only done when a Library UDO is being edited.
Notes on Editing UDO's
For UDO's, you will need the name of the UDO, the intypes and outtypes, and the body of the code itself.For the body of the code, you will not need anything from the "opcode" line that normally starts a UDOdefinition (i.e. "opcode myOpcode, a, ak"), as those should be in the text fields for Opcode Name, InTypes, and Out Types, and you will not need an "endop", as blue will add that itself.
Getting Started
27
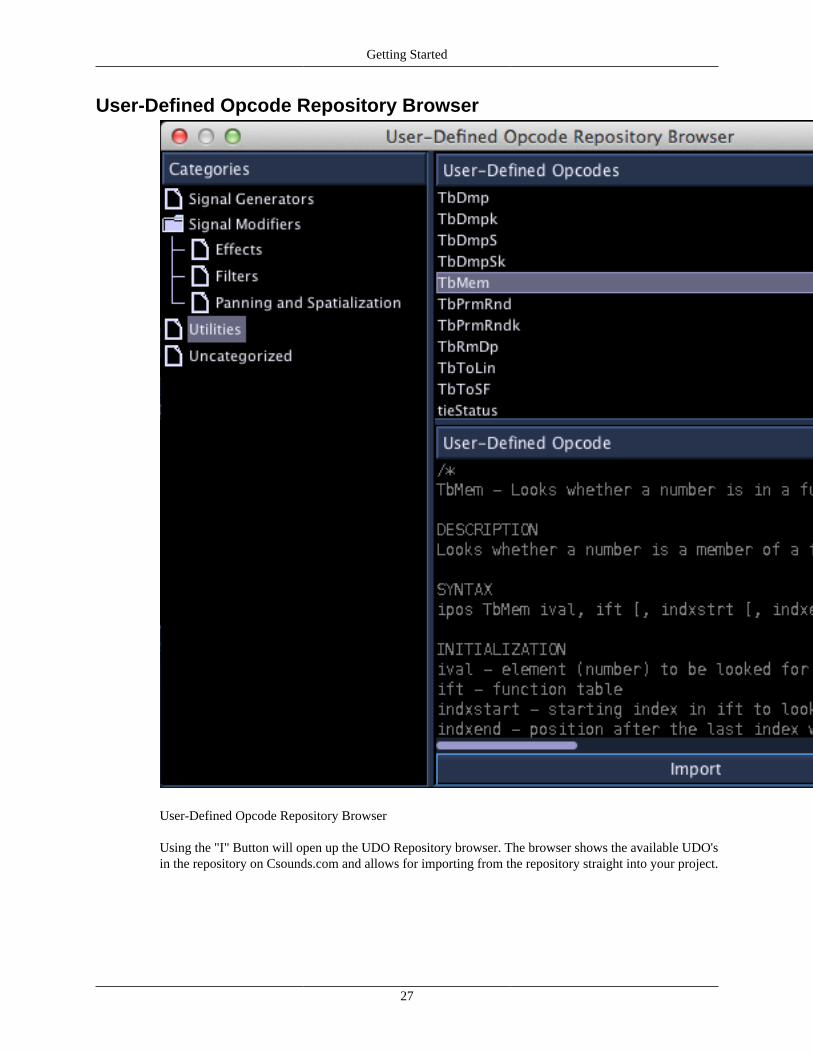
User-Defined Opcode Repository Browser
User-Defined Opcode Repository Browser
Using the "I" Button will open up the UDO Repository browser. The browser shows the available UDO'sin the repository on Csounds.com and allows for importing from the repository straight into your project.
Getting Started
28
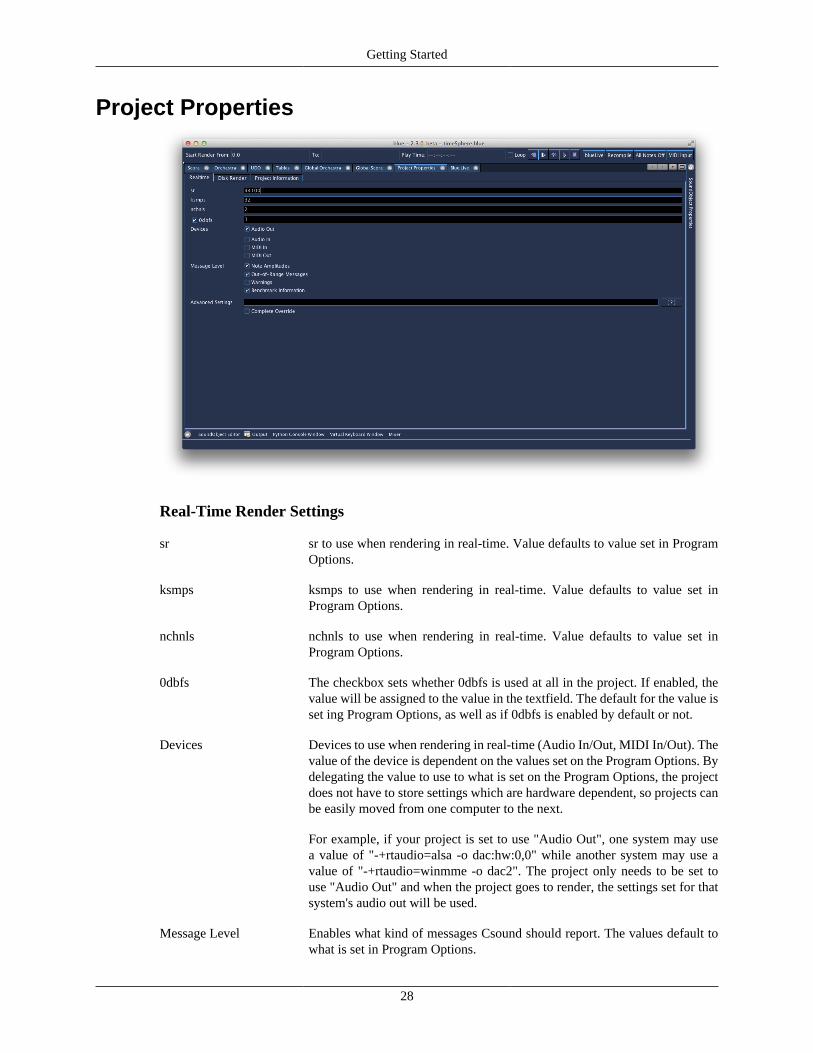
Project Properties
Real-Time Render Settings
sr sr to use when rendering in real-time. Value defaults to value set in ProgramOptions.
ksmps ksmps to use when rendering in real-time. Value defaults to value set inProgram Options.
nchnls nchnls to use when rendering in real-time. Value defaults to value set inProgram Options.
0dbfs The checkbox sets whether 0dbfs is used at all in the project. If enabled, thevalue will be assigned to the value in the textfield. The default for the value isset ing Program Options, as well as if 0dbfs is enabled by default or not.
Devices Devices to use when rendering in real-time (Audio In/Out, MIDI In/Out). Thevalue of the device is dependent on the values set on the Program Options. Bydelegating the value to use to what is set on the Program Options, the projectdoes not have to store settings which are hardware dependent, so projects canbe easily moved from one computer to the next.
For example, if your project is set to use "Audio Out", one system may usea value of "-+rtaudio=alsa -o dac:hw:0,0" while another system may use avalue of "-+rtaudio=winmme -o dac2". The project only needs to be set touse "Audio Out" and when the project goes to render, the settings set for thatsystem's audio out will be used.
Message Level Enables what kind of messages Csound should report. The values default towhat is set in Program Options.
Getting Started
29
Advanced Settings Extra flags to append to the commandline that might not be covered by optionsin the UI. Pressing the [?] button will open the documentation for the Csoundcommand flags (Csound Documentation Root but be set for this to work).
If "Complete Override" is enabled, the value given in the "Advanced Settings"textbox will be used as given and no other values set from the UI will beused. Projects prior to 0.106.0 will have their commandline settings copied tohere and the "Complete Override" section will be enabled. When this settingis enabled, the commandline should set the call to the Csound executableto use and the flags to use but with the name of the CSD left out as it willautomatically be appended to by blue. An example of a commandline to usehere with "Complete Override" is:
csound -Wdo dac
Disk Render Settings
sr sr to use when rendering to disk. Value defaults to value set in ProgramOptions.
ksmps ksmps to use when rendering to disk. Value defaults to value set in ProgramOptions.
nchnls nchnls to use when rendering to disk. Value defaults to value set in ProgramOptions.
0dbfs The checkbox sets whether 0dbfs is used at all in the project when renderingto disk. If enabled, the value will be assigned to the value in the textfield. Thedefault for the value is set ing Program Options, as well as if 0dbfs is enabledby default or not.
Filename Name to use for the rendered sound file. If a value is not given, blue will askon each render what to name the file and where to render it to.
If the "Ask on Render" is enabled, blue will always ask on each render what toname the file and where to render it to. This is useful to enable if temporarilyrendering parts of a project or if the project is only meant to be used to rendersmall sound samples.
Message Level Enables what kind of messages Csound should report. The values default towhat is set in Program Options.
Advanced Settings Extra flags to append to the commandline that might not be covered by optionsin the UI. Pressing the [?] button will open the documentation for the Csoundcommand flags (Csound Documentation Root but be set for this to work).
If "Complete Override" is enabled, the value given in the "Advanced Settings"textbox will be used as given and no other values set from the UI will beused. Projects prior to 0.106.0 will have their commandline settings copied tohere and the "Complete Override" section will be enabled. When this settingis enabled, the commandline should set the call to the Csound executableto use and the flags to use but with the name of the CSD left out as it willautomatically be appended to by blue. An example of a commandline to usehere with "Complete Override" is:
Getting Started
30
csound -Wdo mySoundFile.wav
Project Information
Title Title for this project. For general information purposes; is also used when generating headercomments in CSD.
Author Author for this project. Defaults to value set in Program Options. For general informationpurposes; is also used when generating header comments in CSD.
Notes Notes for this project. For general information purposes; is also used when generating headercomments in CSD.

Getting Started
31
Mixer
The Mixer system in blue allows for graphically editing levels for instruments, applying pre- and post-fader effects, and routing and mixing of signals through subchannels.
Architecture
The Mixer system has three panel sections:
Getting Started
32
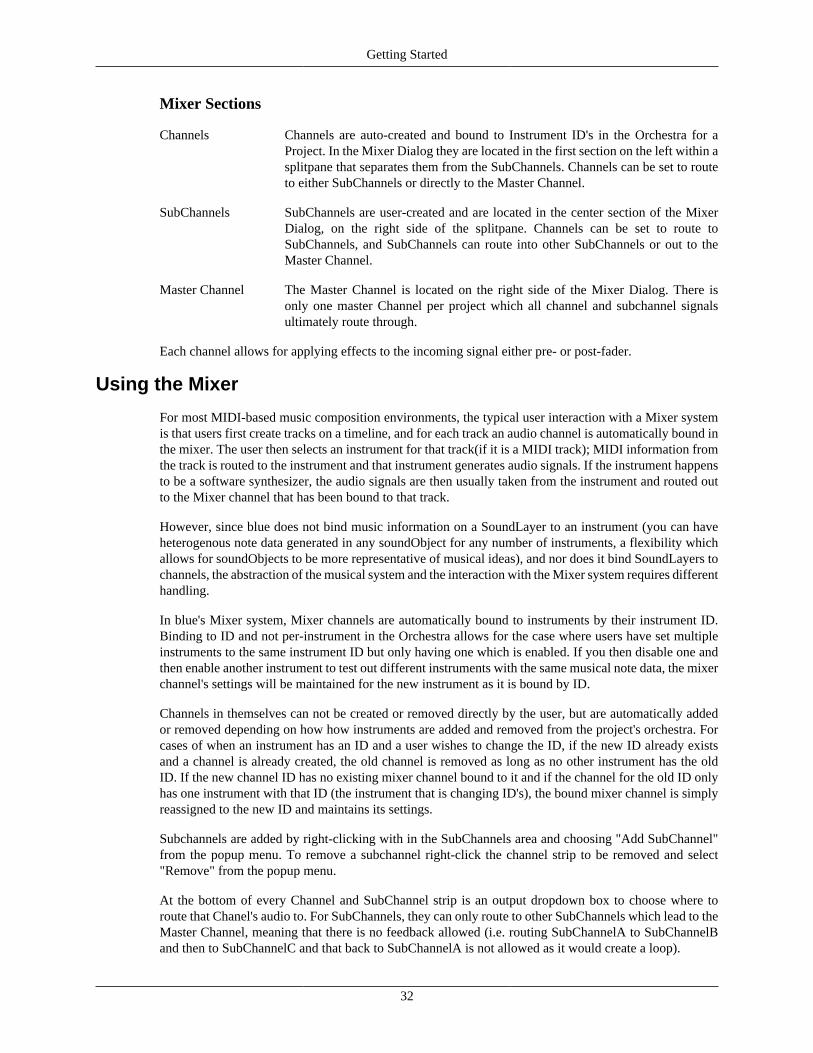
Mixer Sections
Channels Channels are auto-created and bound to Instrument ID's in the Orchestra for aProject. In the Mixer Dialog they are located in the first section on the left within asplitpane that separates them from the SubChannels. Channels can be set to routeto either SubChannels or directly to the Master Channel.
SubChannels SubChannels are user-created and are located in the center section of the MixerDialog, on the right side of the splitpane. Channels can be set to route toSubChannels, and SubChannels can route into other SubChannels or out to theMaster Channel.
Master Channel The Master Channel is located on the right side of the Mixer Dialog. There isonly one master Channel per project which all channel and subchannel signalsultimately route through.
Each channel allows for applying effects to the incoming signal either pre- or post-fader.
Using the Mixer
For most MIDI-based music composition environments, the typical user interaction with a Mixer systemis that users first create tracks on a timeline, and for each track an audio channel is automatically bound inthe mixer. The user then selects an instrument for that track(if it is a MIDI track); MIDI information fromthe track is routed to the instrument and that instrument generates audio signals. If the instrument happensto be a software synthesizer, the audio signals are then usually taken from the instrument and routed outto the Mixer channel that has been bound to that track.
However, since blue does not bind music information on a SoundLayer to an instrument (you can haveheterogenous note data generated in any soundObject for any number of instruments, a flexibility whichallows for soundObjects to be more representative of musical ideas), and nor does it bind SoundLayers tochannels, the abstraction of the musical system and the interaction with the Mixer system requires differenthandling.
In blue's Mixer system, Mixer channels are automatically bound to instruments by their instrument ID.Binding to ID and not per-instrument in the Orchestra allows for the case where users have set multipleinstruments to the same instrument ID but only having one which is enabled. If you then disable one andthen enable another instrument to test out different instruments with the same musical note data, the mixerchannel's settings will be maintained for the new instrument as it is bound by ID.
Channels in themselves can not be created or removed directly by the user, but are automatically addedor removed depending on how how instruments are added and removed from the project's orchestra. Forcases of when an instrument has an ID and a user wishes to change the ID, if the new ID already existsand a channel is already created, the old channel is removed as long as no other instrument has the oldID. If the new channel ID has no existing mixer channel bound to it and if the channel for the old ID onlyhas one instrument with that ID (the instrument that is changing ID's), the bound mixer channel is simplyreassigned to the new ID and maintains its settings.
Subchannels are added by right-clicking with in the SubChannels area and choosing "Add SubChannel"from the popup menu. To remove a subchannel right-click the channel strip to be removed and select"Remove" from the popup menu.
At the bottom of every Channel and SubChannel strip is an output dropdown box to choose where toroute that Chanel's audio to. For SubChannels, they can only route to other SubChannels which lead to theMaster Channel, meaning that there is no feedback allowed (i.e. routing SubChannelA to SubChannelBand then to SubChannelC and that back to SubChannelA is not allowed as it would create a loop).

Getting Started
33
For the instruments in the orchestra to be able to route out to the Mixer, a special pseudo-opcode must beused for the output of the instrument, entitled "blueMixerOut". You use blueMixerOut in the same wayas the outc opcode. If the Mixer is not enabled in the Dialog, when blue goes to process the instrument,blueMixerOut will be replaced with outc, thus making the audio of that instrument directly route out todac or disk, depending on how Csound is set to render. If the Mixer is enabled, blueMixerOut is translatedinto global variables and the Mixer's instrument code is generated automatically without the user havingto worry about the code details of setting up a Mixer system themselves in Csound code.
There is also a subChannel form of blueMixerOut available that is able to target a subchannel by name.This form is used in the following way:
blueMixerOut "subChannelName", asig1, asig2 [, asig3...]
Using this form, the asig signals will be mixed into the subChannel given by name. This form is availableto use within Instruments but is also very useful to use when working Sound SoundObjects and AudioFileSoundObjects, which do not have channels created for them. This way, you can route the output of anAudioFile to a named subchannel and apply Effects, etc.
Effects
Effects in blue are implemented as User-Defined Opcodes, and understanding of how User-DefinedOpcodes work in Csound is recommended before creating Effects. Understanding how UDO's workhowever is not necessary if one simply wants to use Effects.
The workflow for using Effects with your Mixer channels is:
1. Populate your Effects Library by either creating effects or importing them from blueShare.
2. In the Mixer, choose either the pre-fader or post-fader effects bin to add effects. Right click on the binsto open up a popup menu that shows effects that are currently in your library from which to chooseto insert.
3. In the Mixer, choose either the pre-fader or post-fader effects bin to add effects. Right click on the binsto open up a popup menu that shows effects that are currently in your library from which to chooseto insert.
4. Configure your effect by double-clicking it in the effects bin. Double-clicking the effect will open upa dialog that shows the effect's graphical user interface.
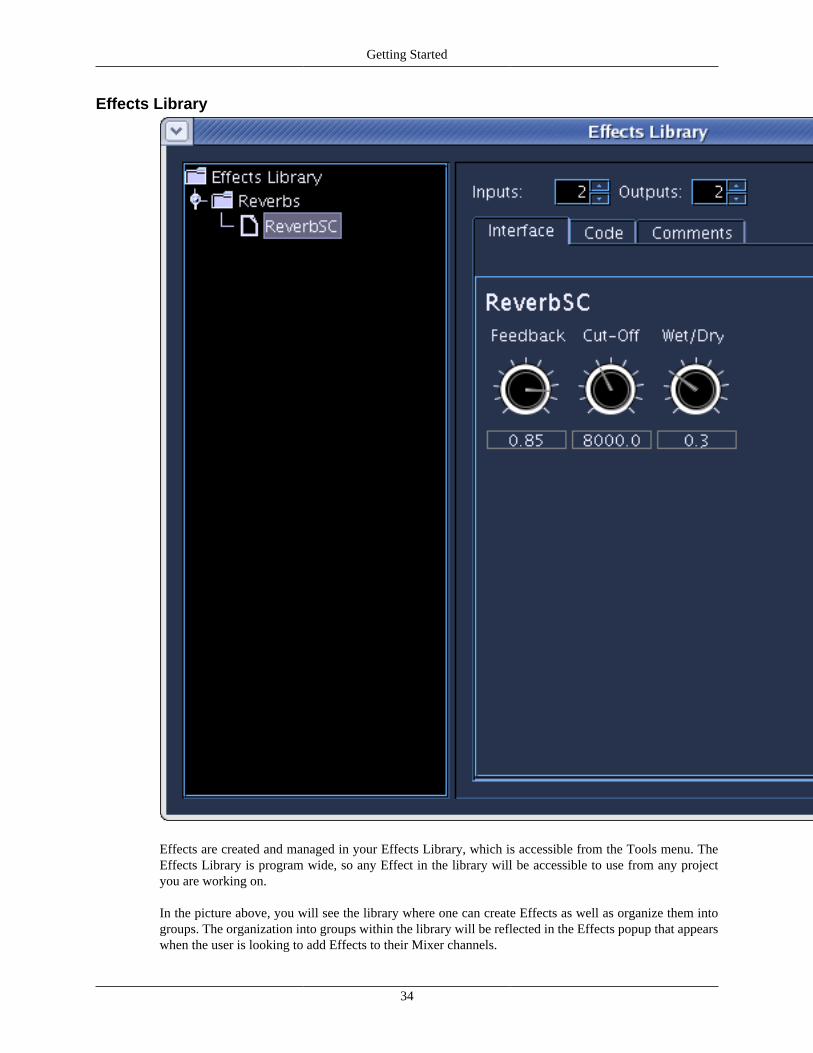
Getting Started
34
Effects Library
Effects are created and managed in your Effects Library, which is accessible from the Tools menu. TheEffects Library is program wide, so any Effect in the library will be accessible to use from any projectyou are working on.
In the picture above, you will see the library where one can create Effects as well as organize them intogroups. The organization into groups within the library will be reflected in the Effects popup that appearswhen the user is looking to add Effects to their Mixer channels.
Getting Started
35
To add a group or new Effect, right click on any node and choose the option from the popup. The popupwill also allow you to cut/copy/paste groups or Effects which is useful when reorganizing or when creatingnew Effects based on older ones.
Once an Effect or group is added, you can edit the the name by double-clicking the node in the tree.Selecting an effect by clicking it once will populate the editor on the right. The picture above showsthe User Interface editor for the Effect. Like other BlueSynthBuilder-based editors in blue, clicking EditEnabled will allow you to move between to edit modes, one in which you can add, remove, and movearound widgets, and another where you can interact with the widgets (useful for setting an initial valuefor the Effect.)

Getting Started
36
In the code editor for the Effect, one sees that the xin and xout lines of the User-Defined opcode displayaccording the number of in and out audio signals the Effect will support. The names of the signals arehard-coded, which makes it easier for others to know exactly what the incoming and outgoing signals willbe should they look at your code.
Code for the Effect should follow the same principles as User-Defined Opcodes(i.e. one can add a setksmpsline at the top of the code area). Values from the widgets follow the same principles as BlueSynthBuilder,and code completion for opcodes (ctrl-space) and BSB widgets (ctrl-shift-space) work within the codeeditor.
Getting Started
37
Note
blue currently expects Effects to have nchnls number of channels in and out where nchnls is thenumber set by the project.
Other Notes
• The Extra Render Time option in the Mixer dialog allows the user to add extra time to the end of thescore. This is useful to allow time for Effects which may have time delay (i.e. 3-second long reverb) tohave time enough for processing, as well as simply to add time at the end of a piece.
Sends
Besides effects, users are also able to put in Sends into the pre- and post-fader Effects bins. Sends willoutput the signal from that point in the channel's signal chain to a selected SubChannel. As with the outputchannels, Sends can only feed-forward down the chain to the Master Out and can not be made to create afeedback loop. Users are able to set the channel to send to as well as the amount to send. This send amountis also able to be Automated, just as the Effects are.
Randomization
Widget values are able to be randomized in the same way as in the BlueSynthBuilder, and is available inthe usage mode when working with Effects in the Effects Library or when using Effects from the mixer.Please further information, please see the documentation for BlueSynthBuilder Widget Randomization .
Code Generation Optimization
blue's mixer system optimizes when generated code for Csound to use. When compiling down to ORCcode, blue checks all signal paths to see if any path will result in unused audio and if so, will optimize outany code that is along that path. The rules for optimization are as follows:
• If channel does not generate signal to channel output (if no automation for level fader and fader ==-96.0f), only generate code up to last send in preFader effects chain
• When processing Sends, checks down the graph to see if send signal will make it to the Master outputor not, checking both down graph of output channels as well as sends for each channel. If not, does notgenerate output for Send.
• If channel does not have channel output and no valid prefader sends, do not generate anything forchannel.
• If SubChannel has no signal inputs (whether it's from another Channel's out channel, a Send, ordependency from code that uses the subChannel form of blueMixerOut), do not generate anything forchannel.
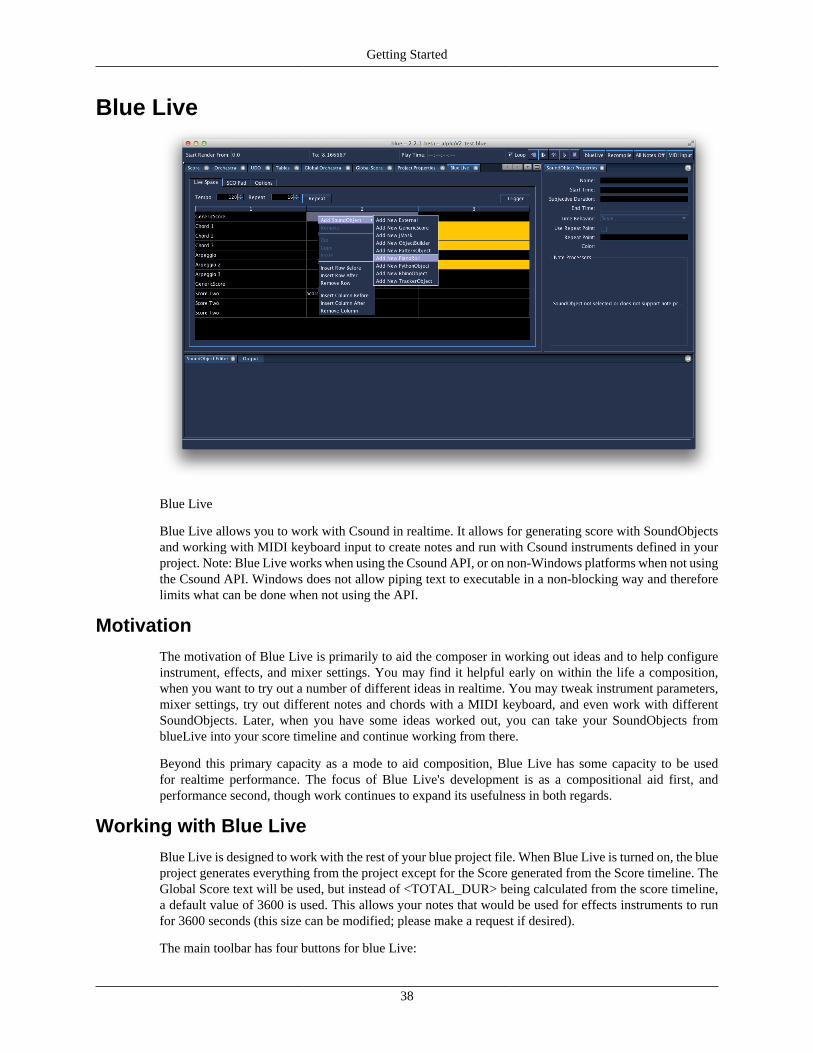
Getting Started
38
Blue Live
Blue Live
Blue Live allows you to work with Csound in realtime. It allows for generating score with SoundObjectsand working with MIDI keyboard input to create notes and run with Csound instruments defined in yourproject. Note: Blue Live works when using the Csound API, or on non-Windows platforms when not usingthe Csound API. Windows does not allow piping text to executable in a non-blocking way and thereforelimits what can be done when not using the API.
Motivation
The motivation of Blue Live is primarily to aid the composer in working out ideas and to help configureinstrument, effects, and mixer settings. You may find it helpful early on within the life a composition,when you want to try out a number of different ideas in realtime. You may tweak instrument parameters,mixer settings, try out different notes and chords with a MIDI keyboard, and even work with differentSoundObjects. Later, when you have some ideas worked out, you can take your SoundObjects fromblueLive into your score timeline and continue working from there.
Beyond this primary capacity as a mode to aid composition, Blue Live has some capacity to be usedfor realtime performance. The focus of Blue Live's development is as a compositional aid first, andperformance second, though work continues to expand its usefulness in both regards.
Working with Blue Live
Blue Live is designed to work with the rest of your blue project file. When Blue Live is turned on, the blueproject generates everything from the project except for the Score generated from the Score timeline. TheGlobal Score text will be used, but instead of <TOTAL_DUR> being calculated from the score timeline,a default value of 3600 is used. This allows your notes that would be used for effects instruments to runfor 3600 seconds (this size can be modified; please make a request if desired).
The main toolbar has four buttons for blue Live:

Getting Started
39
blueLive Toggle button that stops and starts blueLive
Recompile If blueLive is running, this button will cause blue to recompile the CSD from yourproject and restart blueLive. This is useful if you modify your orchestra code andwant to quickly recompile and continue working with blueLive.
All Notes Off Turns off any score notes that are actively playing
MIDI Input Toggle button that turns on and off the configured MIDI devices setup in ProgramOptions (discussed further below).
The primary Blue Live window is available from the Window Menu, or by using the ctrl-8 shortcut. TheBlue Live window has three main tabs: the Live Space, the SCO Pad, and Options. These will be discussedint he following sections.
Live Space
The Live Space is an area to work with SoundObjects. It is a table divided into bins and rows of spaces toplace SoundObjects. SoundObjects can be copied to/from the Score Timeline as well as the Live Space.SoundObjects can also be created within the Live Space by right clicking an empty bin within the binsand choosing "Add SoundObject" from the popup menu. Clicking on an occupied bin will select thatSoundObject. The properties for the SoundObject can be modified using the SoundObject PropertiesWindow, and the contents of the SoundObject can be modified from the SoundObject Editor Window.Besides the selected and unselected states, you can double-click a soundObject to put it into an enabledstate. Enabled objects are highlighted in orange and are the SoundObjects that are triggered when multi-trigger or repeat is used.
Once a SoundObject is added to the Live Space, it can be triggered in one of two ways:
Single Trigger Trigger the contents of the currently selected SoundObject. This is done by usingthe keyboard shortcut ctrl-T (cmd-T on OSX).
Multi Trigger Triggers the contents of the currently enabled SoundObjects. This is done eitherby using the Trigger button, or using the keyboard shortcut ctrl-shift-T (cmd-shift-T on OSX).
Triggering a soundObject will take the score generated from it and pass it immediately to the active Csoundinstance for blueLive (blueLive must be running for this to work). Scores are always generated with TimeBehavior of None, processed through their NoteProcessors, then scaled according to the given tempo.
One can turn on Repeat to cause repeated trigger of enabled SoundObjects according to the tempo givenand the number of beats in which to retrigger. For example, using a repeat of 4 means it will re-triggerevery four beats. The score is processed as mentioned above, but there is no truncation done. Therefore, ifa SoundObject generates a score of 8 beats, and there is a repeat of 4 beats, when the repeat occurs, therewill be 4 beats of overlap between the first trigger and the second trigger.
When Repeat is on, it will always finish out the current number of beats in the repeat at the current tempo,before applying any changes to tempo and repeat. Modifyications to tempo and repeat will apply then onthe next repeat trigger.
SCO Pad
Note
This feature will likely be removed in a future release.

Getting Started
40
This is an experimental feature to record MIDI input in a manner similar to to notation programs (presskeys, then press 4 for a quarter note, 8 for and 8th note, etc.). This feature requires MIDI Input to be turnedon. This feature is experimental at this time.
Options
The options panel allows setting up parameters for blue Live. Currently it contains options for modifyingthe commandline string used when running blueLive. For most users, these modification will not benecessary and the default commandline used will be sufficient.
Working with MIDI
blue's MIDI system, when enabled, will listen to configured MIDI devices for notes, map the key andvelocity, and generate Csound notes to achieve MIDI-like note-on and note-off type behavior. Thisallows working with a MIDI keyboard in realtime with your project instruments without modifying yourinstruments specifically for MIDI. This also means that when blue's MIDI system is enabled, Csound MIDIprocessing should be disabled for your project.
To configure what MIDI devices to use, go to the program Options settings (on OSX it is the application'sPreferences, on other platofrms it is the Options menu item in the Tools menu) and under "blue", go toMIDI. There you will see a list of MIDI devices connected to your computer. If you connected a deviceafter starting blue, you can rescan to find your MIDI device. In this window you will configure what MIDIdevices you want to use with blue, but these devices will not be opened for listening until you enable MIDIInput on the blueLive toolbar in the main application.
Once you have configured what devices to use with blue, return to the main program and enable MIDI inputusing the "MIDI Input" button, then start blueLive. At this point, when MIDI notes are played, blue willtake the incoming note data, map it according to the values configured in the MIDI Input Panel window(available from the Windows Menu), and then generate notes and pass them to Csound.
For a MIDI note on, blue will the channel number of the note and map it to the instrument in the orchestramanager by index. For example, if you have three instruments numbered 1, 3, and 5, notes for MIDIchannel 1 will generate with instr 1, notes for MIDI channel 2 will generate with instr 3, and notes forMIDI channel 3 will generate with instr 5.
The MIDI key number as well as the velocity will be mapped according to the settings set in the MIDIInput Panel window. This allows for generating frequency, Csound PCH, and using Scala Tuning files togenerate either frequencies or bluePCH format text, amongst other values.
Instruments that are intended to be used with blue's MIDI system will have to work with a 5 p-field noteformat. This does not mean your instrument can only work with 5 p-fields, but rather that your instrumentmust support at least that. An example blue project can be found in examples/features/blueLiveMidi.blue(if you are using the OSX application, you may need to explore the contents of the blue.app program tofind the examples folder).
Exploring Ideas
Blue Live uses a subset of the same soundObjects that are available on the score timeline within the mainediting window of blue. Some possible ways you could explore ideas are:
• trying out SCO ideas with genericScore
• testing your python functions with the pythonObject
• testing your javaScript functions with the rhinoObject
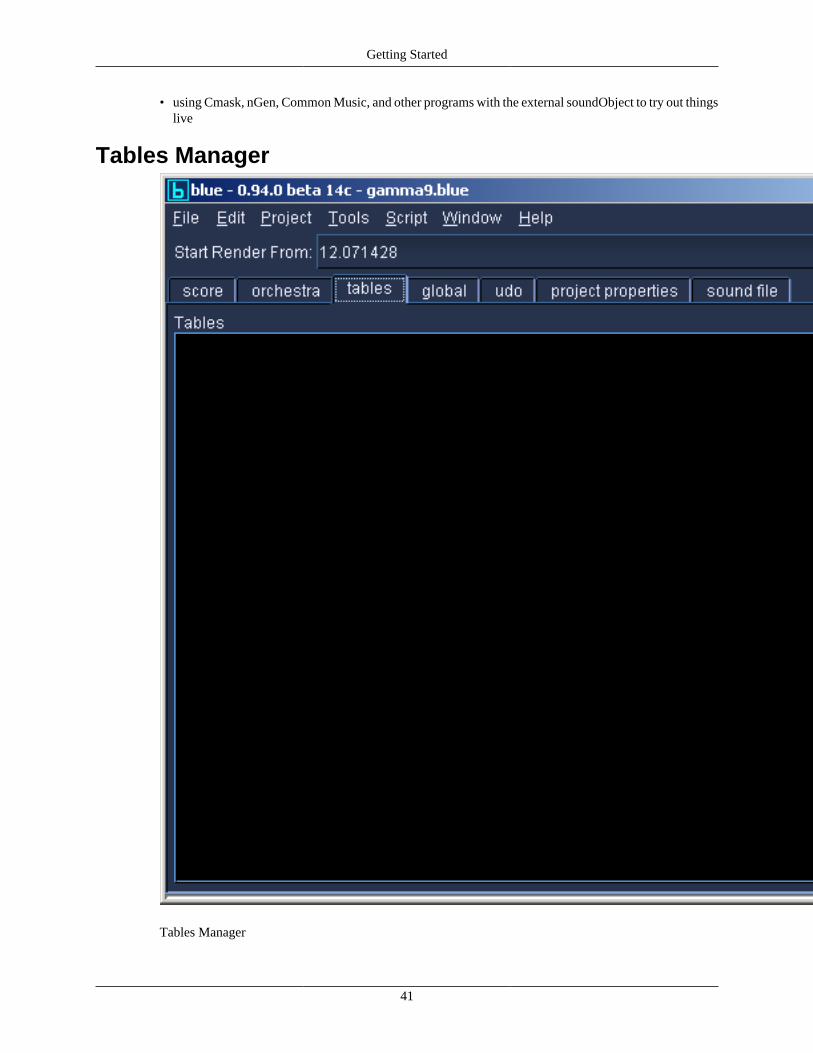
Getting Started
41
• using Cmask, nGen, Common Music, and other programs with the external soundObject to try out thingslive
Tables Manager
Tables Manager
Getting Started
42
The tables manager contains a text area for global tables. Table statements put here will be immediatelyinserted above i-statements of the <CsScore> area of the generated CSD file.
Globals Manager
Csound Orchestra and Score text can be passed directly into a generated CSD by using the Global Orchestraand Global Score windows.
Global Orchestra
Anything here will be inserted into the <CsOrchestra> section of the .CSD file before anything generatedby the Orchestra. Things like global variables, macros, or GUI instrument definitions may go here.
Global Score
Anything here will be inserted into <CsScore> section of the .CSD file before anything generated by thescore timeline. the global score's processing is done outside of the score timelines, so any notes put hereare not factored into values calculated from the timeline, like total duration, nor are any notes in the globalscore section translated like the timeline is when a different start time is used other than 0.0. for instance,if you use 2.0 as a start time, a note in the score timeline at 2.0 will be translated to start at 0.0, while anote with a start time of 2.0 in the global score section is not affected and will start at time 2.0.
There are also certain variables made available from blue (blue variables) that are useful for specificpurposes. One of them is <TOTAL_DUR>. An example of its use is:
i20 0 [<TOTAL_DUR> + 10] .95 1 1000
The note given above is for a global effect(a global reverb unit). This note will always start at time zeroregardless of when the score starts, and will always last as long as the duration of the generated scorefrom the timeline plus 10 seconds. Because blue variables are a text swap, the above use of the bracketnotation that Csound uses was necessary. For a score with a 20 second duration, the above note wouldhave been generated as:
i20 0 [20 + 10] .95 1 1000
Because of the blue variable used, the note will correclty play regardless of when the score starts. If thethe blue variable was note used and was put as a note in the Score timeline, the reverb may not run.
Note
When blue variables were created, blue did not have a Mixer system implemented. The abovesystem continues to function, the practice of using the Mixer is highly recommended. This featureis left in for legacy projects.

Getting Started
43
Tools
BlueShare
BlueShare
BlueShare is an online, in-program way to share instruments and effects with other blue users. BlueSharedoes not require a user account to download items, but does require one for uploading. If you would liketo share an instrument or effect, please sign up for an account at http://blue.kunstmusik.com
To use BlueShare, go to the Tools menu to open it up. Blue will contact the server to get a list of Instrumentand Effects available. From there, you can browse categories, then select an item in the upper-right tableto get more information. Once you find something you are interested to try, select "Import Instrument"or "Import Effect". The instrument or effect will download to your User Instrument Library or EffectsLibrary in a folder called "Imported Instruments" or "Imported Effects".
To use BlueShare, go to the Tools menu to open it up. Blue will contact the server to get a list of Instrumentand Effects available. From there, you can browse categories, then select an item in the upper-right tableto get more information. Once you find something you are interested to try, select "Import Instrument"or "Import Effect". The instrument or effect will download to your User Instrument Library or EffectsLibrary in a folder called "Imported Instruments" or "Imported Effects".
To upload and instrument or effect, switch to the Export tab. From there you will see a place to enteryour username and password, a listing of instruments or effects from your libraries, a tree of categoriesto use for uploading, and a description box (pre-populated with the Comments field of your Instrument orEffect). You can then press the "Submit" button to send it to the server.
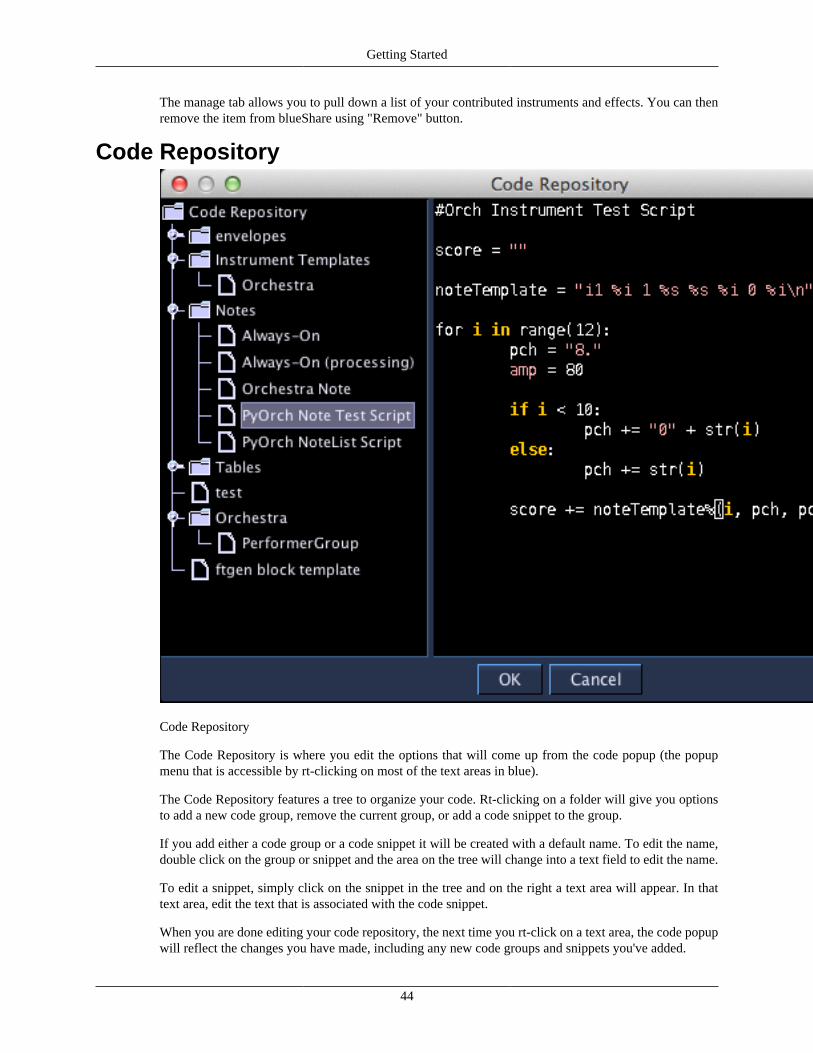
Getting Started
44
The manage tab allows you to pull down a list of your contributed instruments and effects. You can thenremove the item from blueShare using "Remove" button.
Code Repository
Code Repository
The Code Repository is where you edit the options that will come up from the code popup (the popupmenu that is accessible by rt-clicking on most of the text areas in blue).
The Code Repository features a tree to organize your code. Rt-clicking on a folder will give you optionsto add a new code group, remove the current group, or add a code snippet to the group.
If you add either a code group or a code snippet it will be created with a default name. To edit the name,double click on the group or snippet and the area on the tree will change into a text field to edit the name.
To edit a snippet, simply click on the snippet in the tree and on the right a text area will appear. In thattext area, edit the text that is associated with the code snippet.
When you are done editing your code repository, the next time you rt-click on a text area, the code popupwill reflect the changes you have made, including any new code groups and snippets you've added.
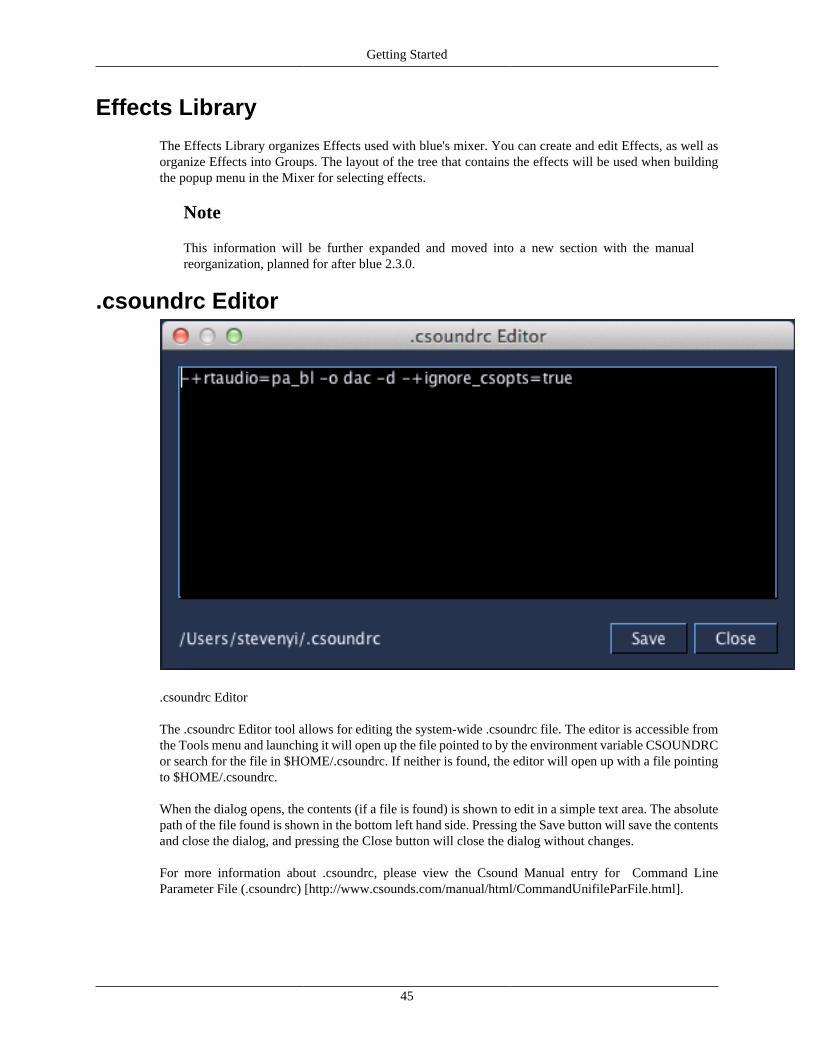
Getting Started
45
Effects Library
The Effects Library organizes Effects used with blue's mixer. You can create and edit Effects, as well asorganize Effects into Groups. The layout of the tree that contains the effects will be used when buildingthe popup menu in the Mixer for selecting effects.
Note
This information will be further expanded and moved into a new section with the manualreorganization, planned for after blue 2.3.0.
.csoundrc Editor
.csoundrc Editor
The .csoundrc Editor tool allows for editing the system-wide .csoundrc file. The editor is accessible fromthe Tools menu and launching it will open up the file pointed to by the environment variable CSOUNDRCor search for the file in $HOME/.csoundrc. If neither is found, the editor will open up with a file pointingto $HOME/.csoundrc.
When the dialog opens, the contents (if a file is found) is shown to edit in a simple text area. The absolutepath of the file found is shown in the bottom left hand side. Pressing the Save button will save the contentsand close the dialog, and pressing the Close button will close the dialog without changes.
For more information about .csoundrc, please view the Csound Manual entry for Command LineParameter File (.csoundrc) [http://www.csounds.com/manual/html/CommandUnifileParFile.html].

Getting Started
46
Scanned Synthesis Matrix Editor
Scanned Synthesis Matrix Editor

Getting Started
47
The Scanned Synthesis Matrix Editor tools allows for editing and creating matrix files used by the ScannedSynthesis opcodes in Csound.
• Using "New" will ask what size matrix to create.
• For editing, click anywhere on the matrix. This will either turn on or turn off that square, setting theconnection between the masses to either 1 or 0.
• After editing, press "Save" to save out the matrix to a file.
• You can also click the "Random" button to create a randomized matrix.
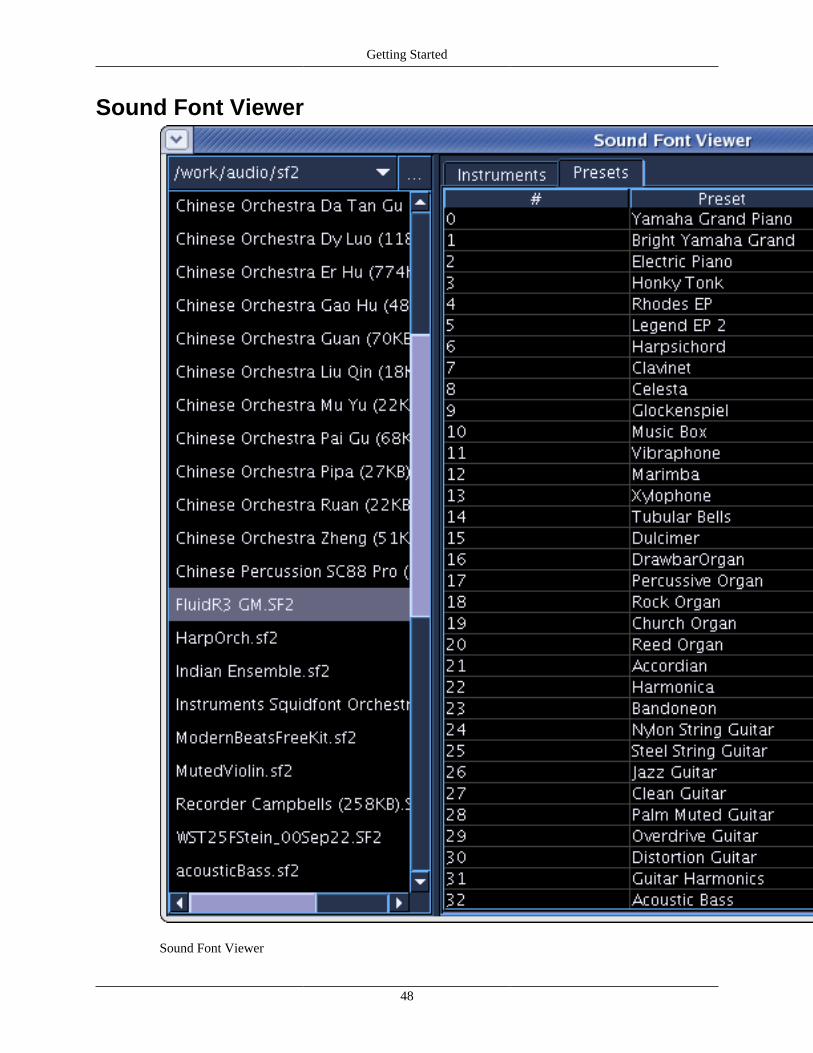
Getting Started
48
Sound Font Viewer
Sound Font Viewer

Getting Started
49
The Sound Font Viewer allows you to select SoundFonts from the file selection panel (on the left) and geta listing of the instruments and presets within that SoundFont.
To use, navigate using the file selection panel and double-click on a SoundFont. After processing iscomplete, the tables on the right side will be populated with a listing of instruments and presets held withinthat SoundFont.
FTable Converter
FTable Converter
The FTable Converter tool converts ftable statements into ftgen statements. When converted, the priorftable statement numbers are ignored and ftgen statements are created using requested ftable number of

Getting Started
50
0. The generated ftgen statements generate with the values of the ftables set to "gi_" with the expectationthat the user will fill out the rest of the name to be meaningful to them.
Conversion of ftable statements to ftgen statements is useful in creating ftables that will be referenced byglobal variables instead of hard-coded numbers.
To use, simply put your ftable statement text in the top text area and press the "Convert to FTGEN" buttonto convert. For example, if you use the following ftable statement text:
f1 0 128 7 0 128 0 ; initposf2 0 128 -7 1 128 1 ; massesf4 0 128 -7 0 128 2 ; centering forcef5 0 128 -7 1 128 1 ; dampingf6 0 128 -7 -.0 128 0 ; init velocityf7 0 128 -7 0 128 128 ; trajectory
you will get the following output:
gi_ ftgen 0, 0, 128, 7, 0, 128, 0 ; initposgi_ ftgen 0, 0, 128, -7, 1, 128, 1 ; massesgi_ ftgen 0, 0, 128, -7, 0, 128, 2 ; centering forcegi_ ftgen 0, 0, 128, -7, 1, 128, 1 ; dampinggi_ ftgen 0, 0, 128, -7, -.0, 128, 0 ; init velocitygi_ ftgen 0, 0, 128, -7, 0, 128, 128 ; trajectory
This work is based on the Steven Yi's FTable Converter web page utility located here [http://www.csounds.com/stevenyi/ftable.html].
Python Console
Python Console
The Python Console allows you to interactively write and execute python code using the Jython interpreterbuilt in to blue. Because blue does not clear the environment of the interpreter between runs, the consolecan be useful to interactively inspect objects. Some ways you might use the console:
• Use dir() to inspect objects to see what methods and members they have
• Use help() to view the documentation on an object or class.
• After generating a score or using the "Test" button on a PythonObject, you can interactively testfunctions you have written by calling it using code in the console.
• Practice your python coding live.
The console works much like running python interactively in a console or terminal. At the ">" prompt, youcan type in some code, then press enter to execute the code. All output from python functions (including

Getting Started
51
things like print statements in PythonObjects in the Score or Python NoteProcessors) will output to thePython Console.
Some useful shortcuts available while in the console:
Table 1.2. Shortcuts for the Python Console
Shortcuts Description
ctrl-up/ctrl-down cycle through previous commands used
ctrl-l clear the console (also available from the rt-clickpopup menu
Other FeaturesAutoBackup and Recovery
Temporary backups of open projects are generated every minute for projects which have previously beensaved to disk (new projects not yet saved are not backed up). If blue quits unexpectedly, those files willremain, otherwise on normal closing of the file they are deleted. If on opening a file a backup if found witha date newer than the original file, the option to open from the backup or the original is given.
If the backup is chosen, it is required to use "Save As" to save over the original file or to a new file. Atthat point the backup is deleted.
If the original file is chosen, then the backup file will be overwritten the next time the autobackup threadruns.
Sound Object Freezing
Introduction
Sound Object Freezing allows you to free up CPU-cycles by pre-rendering soundObjects. FrozensoundObjects can work with global processing instruments, and files are relative to the directory the projectfile is in, so can be moved from computer to computer without problem. Frozen soundObjects can beunfrozen at anytime, returning the original soundObject and removing the frozen wave file.
To freeze a soundObject, select one or many soundObjects on the timeline, rt-click on a selectedsoundObject, and then select "Freeze/Unfreeze SoundObjects". To unfreeze, select one or many frozensoundObjects and select the same menu option.
On the timeline, if your soundObject rendered wave is longer in duration than the original soundObject'sduration (as is the case if you have reverb processing), the frozen soundObject's bar will graphically showthe difference in times with two different colors.
Note: As currently implemented, when blue goes to freeze soundObjects it may appear to be frozen, butmessages will continue to appear in the console showing that csound is rendering the frozen soundObjects.Future versions will be more polished.
How SoundObject Freezing Works
1. An soundObject is selected
2. Using the same project settings (all of the instruments, tables,global orc/sco, etc.) but not scoreTimelinegenerated sco, blue generates the sco for the selected soundObject and produce a temporary .csd file
Getting Started
52
3. blue runs csound with "csound -Wdo freezex.wav tempfile.csd" where the x in freezex.wav is an integer,counting up. This wav file is generated in the same directory that the projectFile is located.
4. blue replaces the soundObject in the timeline with a FrozenSoundObject. The FrozenSoundObjectkeeps a copy of the original soundObject (for unfreezing), as well as shows the name of the frozen wavfile, the original soundObject's duration, and the frozen wav file's duration (not necessarily the same,as is the case if using global reverb, for example).
5. When you do a render of the entire piece now, the frozen sound object generates a very simple wavplaying csound instrument that will play the rendered wav file as-is. The instrument looks somethinglike:
aout1, aout2 diskin p4 outs aout1, aout2
and the FrozenSoundObject only generates a single note that has the start-time, the duration of thefrozen wav file, and the name of the file. This will end up playing the soundFile exactly as if the SCOfor the original soundObject was generated. This also bypasses any routing to global sound processing,as if you had any of these effects originally, the would be generated as part of the frozen file.
Notes
• You can select multiple soundObjects and batch freeze and unfreeze -the generated wav file may belonger than the original soundObject, due to global processing instruments (like reverb, echo, etc.) Thisis taken into account.
• The freezing system does *not* work for all graph toplogies. If you're using soundObjects withinstruments used as control signals, this won't work unless the notes for the instruments they arecontrolling are alsoin the same soundObject. I.e. I have one soundObject that has only notes that affectglobal variables, while I have one instrument thatuses those global variables. This could work thoughif you repackage the set of soundObjects into a polyObject. Probably best to generalize as:
• Your soundObject must be self-contained
• All sound output from instruments go directly out or piped through always-on instruments, thatmost likely should take advantage of the <total_dur> variable, as well as the new <processing_start>variable (more about this when I release, but together with freezing, this lets you set the start timeof always-on instruments to the first time where non-frozen soundObjects occur, so if the first halfof your piece is frozen and you're unfrozen stuff is in the second half, you don't need always oninstruments to be turned on until the second half as the first half is routed to outs
• This system is tested with 2-channel pieces. I'm not sure if this will work with higher number of channels,but I don't see why it wouldn't.
• Changing the number of channels on the project after a freeze may cause Csound errors when renderingthe frozen soundObject (can be remedied by unfreezing and refreezing)
• Frozen files are referenced relatively to the project file, so you are free to move your project directoryaround or rename it and the frozen files will work fine.
Auditioning SoundObjectsYou are able to quickly audition individual SoundObjects or groups of SoundObjects on the timeline.This can be very useful to test out single SoundObject ideas or see how a few different SoundObjects

Getting Started
53
sound together without having to mute/solo different SoundLayers. To use this feature, select desiredSoundObjects for testing, right-click on a selected SoundObject, and from the SoundObject popup menuchoose "Audition SoundObjects". You can also initiate the audition by using the ctrl-shift-a shortcut orby going to the Project menu and choosing "Audition Selected SoundObjects". To stop auditioning, clickanywhere on the Score timeline.
Importing ORC/SCO and CSD Files
blue is able to import ORC/SCO and CSD files and set up a blue project file, with instruments parsed outand put into the orchestra manager, project settings set, etc. Currently, there are three options to choosefrom when importing a CSD file, all relating to how you would like to import the notes from the CsScoresection:
• Import Score to Global Score - all score goes to the Global Score section
• Import All Score to Single SoundObject - all score goes into a single GenericScore SoundObject. Theduration of the soundObject will be set to the duration of the imported score. This is broken up intodifferent soundObjects and layers if sections (s-statement) are found in the score.
• Import Score and Split into SoundObjects by Instrument Number - score is split by instrument numberand a different GenericScore soundObject will be created for each block of score text per instrument.This is broken up into different soundObjects and layers if sections (s-statement) are found in the score.
Notes
• From the CsScore, blue will only import f-, i-, and s- statements. Other score statements are not currentlysupported at this time.
Importing MIDI Files
blue is able to import MIDI files and set up a blue project file from the note information in the MIDI file,using the settings given by the user. To import a MIDI file, choose the "Import MIDI File" option from theFile menu. Next, using the file dialog to locate the MIDI file to import. After selecting the desired file, bluewill show the following MIDI Import Settings dialog for you to configure how you would like to importthe MIDI note information. (Note: blue will only show information for tracks where note data was found.)
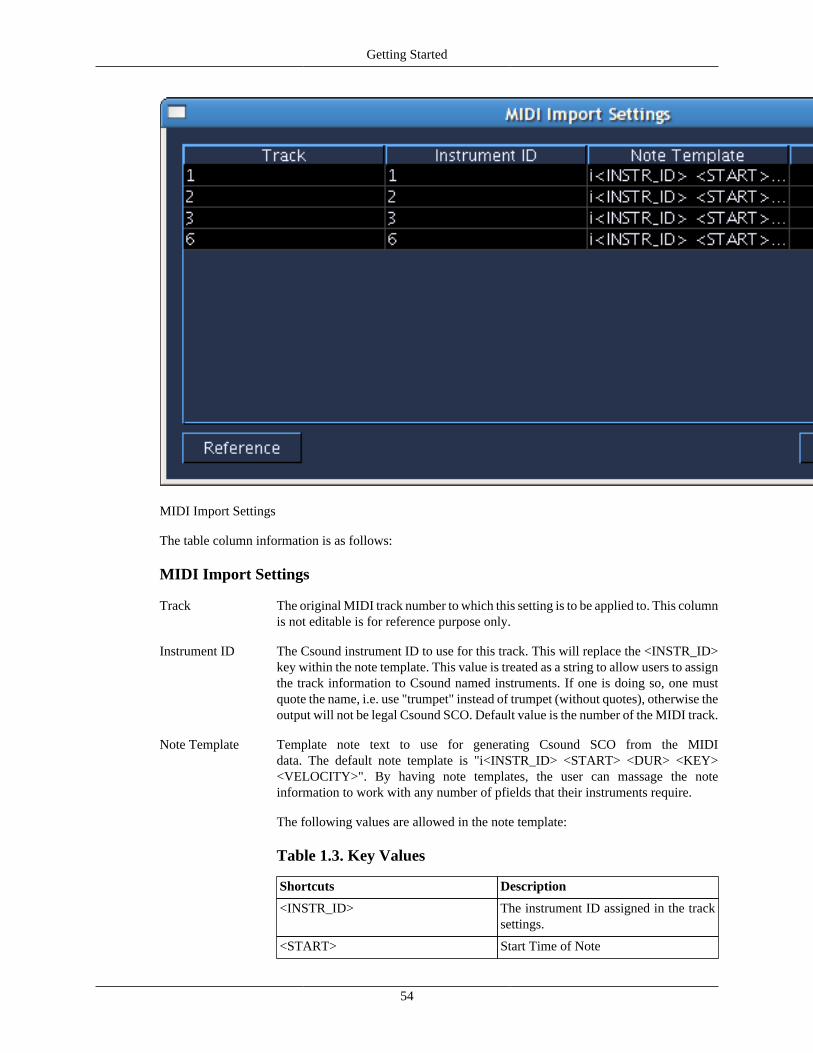
Getting Started
54
MIDI Import Settings
The table column information is as follows:
MIDI Import Settings
Track The original MIDI track number to which this setting is to be applied to. This columnis not editable is for reference purpose only.
Instrument ID The Csound instrument ID to use for this track. This will replace the <INSTR_ID>key within the note template. This value is treated as a string to allow users to assignthe track information to Csound named instruments. If one is doing so, one mustquote the name, i.e. use "trumpet" instead of trumpet (without quotes), otherwise theoutput will not be legal Csound SCO. Default value is the number of the MIDI track.
Note Template Template note text to use for generating Csound SCO from the MIDIdata. The default note template is "i<INSTR_ID> <START> <DUR> <KEY><VELOCITY>". By having note templates, the user can massage the noteinformation to work with any number of pfields that their instruments require.
The following values are allowed in the note template:
Table 1.3. Key Values
Shortcuts Description
<INSTR_ID> The instrument ID assigned in the tracksettings.
<START> Start Time of Note
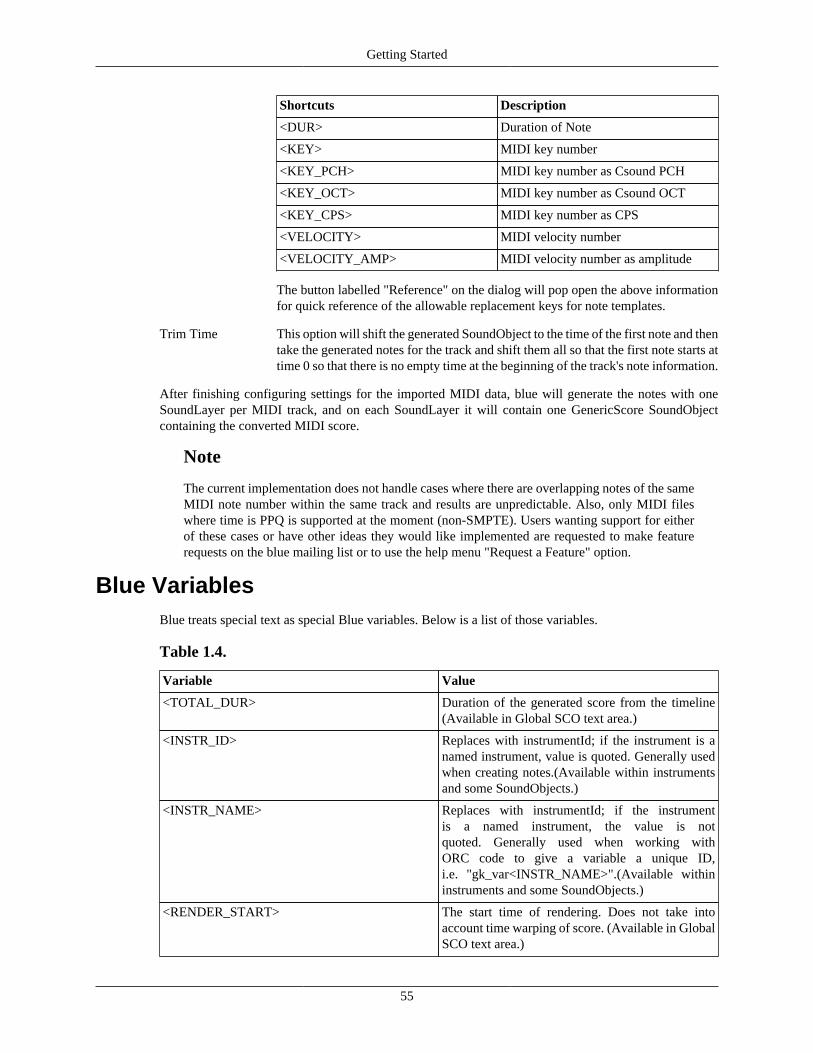
Getting Started
55
Shortcuts Description
<DUR> Duration of Note
<KEY> MIDI key number
<KEY_PCH> MIDI key number as Csound PCH
<KEY_OCT> MIDI key number as Csound OCT
<KEY_CPS> MIDI key number as CPS
<VELOCITY> MIDI velocity number
<VELOCITY_AMP> MIDI velocity number as amplitude
The button labelled "Reference" on the dialog will pop open the above informationfor quick reference of the allowable replacement keys for note templates.
Trim Time This option will shift the generated SoundObject to the time of the first note and thentake the generated notes for the track and shift them all so that the first note starts attime 0 so that there is no empty time at the beginning of the track's note information.
After finishing configuring settings for the imported MIDI data, blue will generate the notes with oneSoundLayer per MIDI track, and on each SoundLayer it will contain one GenericScore SoundObjectcontaining the converted MIDI score.
Note
The current implementation does not handle cases where there are overlapping notes of the sameMIDI note number within the same track and results are unpredictable. Also, only MIDI fileswhere time is PPQ is supported at the moment (non-SMPTE). Users wanting support for eitherof these cases or have other ideas they would like implemented are requested to make featurerequests on the blue mailing list or to use the help menu "Request a Feature" option.
Blue VariablesBlue treats special text as special Blue variables. Below is a list of those variables.
Table 1.4.
Variable Value
<TOTAL_DUR> Duration of the generated score from the timeline(Available in Global SCO text area.)
<INSTR_ID> Replaces with instrumentId; if the instrument is anamed instrument, value is quoted. Generally usedwhen creating notes.(Available within instrumentsand some SoundObjects.)
<INSTR_NAME> Replaces with instrumentId; if the instrumentis a named instrument, the value is notquoted. Generally used when working withORC code to give a variable a unique ID,i.e. "gk_var<INSTR_NAME>".(Available withininstruments and some SoundObjects.)
<RENDER_START> The start time of rendering. Does not take intoaccount time warping of score. (Available in GlobalSCO text area.)
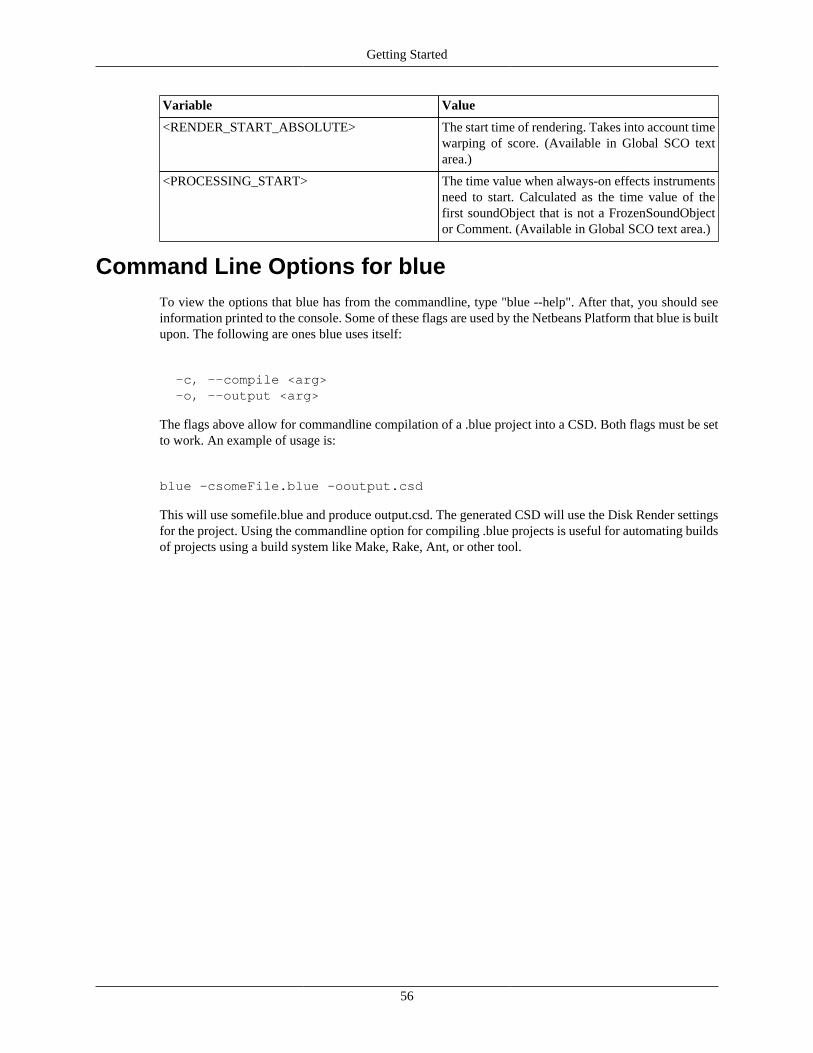
Getting Started
56
Variable Value
<RENDER_START_ABSOLUTE> The start time of rendering. Takes into account timewarping of score. (Available in Global SCO textarea.)
<PROCESSING_START> The time value when always-on effects instrumentsneed to start. Calculated as the time value of thefirst soundObject that is not a FrozenSoundObjector Comment. (Available in Global SCO text area.)
Command Line Options for blueTo view the options that blue has from the commandline, type "blue --help". After that, you should seeinformation printed to the console. Some of these flags are used by the Netbeans Platform that blue is builtupon. The following are ones blue uses itself:
-c, --compile <arg> -o, --output <arg>
The flags above allow for commandline compilation of a .blue project into a CSD. Both flags must be setto work. An example of usage is:
blue -csomeFile.blue -ooutput.csd
This will use somefile.blue and produce output.csd. The generated CSD will use the Disk Render settingsfor the project. Using the commandline option for compiling .blue projects is useful for automating buildsof projects using a build system like Make, Rake, Ant, or other tool.
57
Chapter 2. Concepts
Rendering
Introduction
blue offers a number of ways to render a project, each method useful for different purposes you may have.The following section explains the ways which blue is able to render a .blue project file as well as possibleuse-case scenarios to guide you on how that feature may be useful.
Render Methods
Render in Real-Time
Rendering in uses the project's Real-Time render settings to render the project in realtime to the userssoundcard. This is the most common rendering one will likely use. To use this, you can press the play buttonat the top of the window, use the "Project->Render/Stop Project" menu option, or use the F9 shortcut key.
Generate CSD to Screen
blue's general method of communicating with Csound is by generating a CSD file and calling Csoundto run it. For debugging purposes, it is often useful to see if what you think you are doing inside blue ismatching the generated CSD file. You can generate the CSD to screen by using the "Project->GenerateCSD to Screen" menu option, or by using the ctrl-shift-g shortcut.
Generate CSD to Disk
If you'd like to generate a CSD from the current project to a file, you can do so by using the "Project->Generate CSD to File" menu option, or by using the ctrl-g shortcut.
Render to Disk
The Render to Disk option will use the project's Disk Render Options from its project properties to generatea soundfile on disk (format of file depends on how user configures commandline options). I've found thisuseful for rendering a wav to disk and converting to MP3 to listen to on the go so I can review my currentwork. To render to disk, you can do so by using the "File->Render to Disk" menu option or use the ctrl-shift-F9 shortcut.
Render to Disk and Play
The Render to Disk and play option will use the project's Disk Render Options from its project propertiesto generate a soundfile on disk and after finishing, play the generated file using blue's soundfile player,located in the SoundFile manager tab. This feature is useful if you're working on a piece that has processingdemands beyond what your computer is capable of in realtime, so you can have it render to disk first andthen play, which will give very smooth playback. It is also useful if you render in realtime with lowerquality settings but use higher quality settings for final project output, as you can occasionally test whatthe output would be like using this feature. To use this option, you can use the "File->Render to Disk andPlay" menu option or use the ctrl-F9 shortcut.

Concepts
58
SoundObjects
Introduction
The concept of SoundObjects is the foundation of blue's design in organizing musical ideas. This sectionwill discuss what is a SoundObject, how this idea is implemented in blue, and strategies on how to use theconcept of SoundObjects in organizing your own musical work.
What is a SoundObject?
SoundObjects in blue represent a perceived sound idea, whether it be a single atomic sound event oraggregate of other sound objects . A SoundObject on the timeline can represent many things, whether itis a single sound, a melody, a rhythm, a phrase, a section involving phrases and multiple lines, a gesture,or anything else that is a perceived sound idea.
Just as there are many ways to think about music, each with their own model for describing sound andvocabulary for explaining music, there are a number of different SoundObjects in blue. Each SoundObjectin blue is useful for different purposes, with some being more appropriate for expressing certain musicalideas than others. For example, using a scripting object like the PythonObject or RhinoObject wouldservice a user who is trying to express a musical idea that may require an algorithmic basis, while thePianoRoll would be useful for those interested in notating melodic and harmonic ideas. The variety ofdifferent SoundObjects allows for users to choose what tool will be the most appropriate to express theirmusical ideas.
Since there are many ways to express musical ideas, to fully allow the range of expression that Csoundoffers, blue's SoundObjects are capable of generating different things that Csound will use. Although mostoften they are used mostly for generating Csound SCO text, SoundObjects may also generate ftables,instruments, user-defined opcodes, and everything else that would be needed to express a musical ideain Csound.
Beyond each SoundObject's unique capabilities, SoundObjects do share common qualities: name, starttime, duration, end time. Most will also support a Time Behavior (Scale, Repeat, or None) which affectshow the notes generated by the SoundObject will be adjusted--if at all--to the duration of the SoundObject.Most will also support NoteProcessors, another key tool in Csound for manipulating notes generated from aSoundObject. All SoundObjects also support a background color property, used strictly for visual purposeson the timeline.
PolyObjectsMichael Bechard2005Revision HistoryRevision 1.0 2005.05.05First version of article.
Introduction
PolyObjects are, in my opinion, one of the most powerful tools in blue. They provide encapsulation of anygrouping of SoundObjects, any way you like, into one logical SoundObject. Once encapsulated, the restof blue's powerful features (namely NoteProcessors) can be leveraged against the PolyObject, and that iswhen one really begins to realize the benefits of using PolyObjects.

Concepts
59
Basic
Explanation
To repeat what is stated in the reference documentation, a PolyObject can be seen as a container of otherSoundObjects. It contains its own series of SoundLayers, just like the main score, and, like the main score,one can add as many SoundLayers and SoundObjects as one likes to a PolyObject.
Think of the main score as a big box that holds sounds. Now, we can put whatever sounds we want inthe box, but we can also put smaller boxes inside the main box; these smaller boxes are our PolyObjects.We can put sounds inside the smaller boxes, just like we can in the big box, and we can arrange themin the same manner too. When we put sound A in the upper-right corner of a smaller box, it will stay inthat corner no matter where we move our box inside of the bigger box. However, it is the position andarrangement of the sounds themselves relative to the main score that is important and is, ultimately, thereason to use PolyObjects. With sound A in the upper-right corner of our small box, its relative positionin the main box will be dependent on the smaller box's position in the big box. Keep in mind, too, thatwe can put boxes inside of boxes inside of boxes, as many layers as we like. And when you realize thatyou can change the sounds inside of any box by applying a NoteProcessor to it (like making the box metalinstead of cardboard), you begin to see the power of using PolyObjects.
Usage
The way it works is, you create a PolyObject in a SoundLayer like you would any other SoundObject; byright-clicking on the SoundLayer and selecting "Add New PolyObject;" it should be at the very top. Afterdoing this, the PolyObject is empty and will not generate any notes in its current state. You have to double-click on it in order to edit the contents of the PolyObject. Once you're editing the empty PolyObject, thescore editor looks a lot like it does when you're editing an empty blue score. That's because the main scoreis just one big container for notes, like PolyObjects (in fact, in the code, the main score IS a PolyObject).
You can see which container you are currently editing by looking at the buttons just underneath the tabsfor "score," "orchestra," etc. When you're editing the main score, there will only be one button there called"root;" you're editing the root container. When you're editing a PolyObject called "Group A," you'll see twobuttons; "root" and "Group A." Pressing any of these buttons will change the view to edit that container.
Once a PolyObject has been created, you can add and arrange SoundObject on it just like you do in themain score. Each PolyObject is going to have its own Snap and Time Display settings too, so you maywant to set those accordingly. Add SoundLayers just as you would in the main score too.
After you've added all of the notes you wish to the PolyObject, click on the "root" button and feelfree to move the PolyObject around in the main score, just as you would any other SoundObject. AddNoteProcessors too, or alter the Time Behavior; these changes, in turn, will be applied to the contents ofthe PolyObject.
AdvancedBefore tackling some of the more advanced concepts of PolyObjects, a couple of clarifications must bemade. When this document refers to editing the actual PolyObject, that means editing it as a SoundObject(moving it around on the timeline, stretching it, editing its properties, etc.). This is very different fromediting the contents of said PolyObject. The distinction will be made in this section whenever applicable.
Time
PolyObjects can have their Time Behavior changed like any other SoundObject when one is editing theactual PolyObject. This is very important to keep in mind, because your sounds within the PolyObject
Concepts
60
may span 10 beats, but if you leave the Time Behavior settings for the PolyObject to the default (Scale),they may in actuality span only two beats, depending on the size of your PolyObject. One can test thiswith the Test button: shrink a PolyObject that has the Scale Time Behavior and the notes within it willshrink as well.
No Special Time Behavior
There are a couple of easy ways to make sure that the sounds you place in a PolyObject remain to scale inthe parent container, or the root score. One method is to right-click on the PolyObject itself and click "SetSubjective Time to Objective Time." This will change the length of the PolyObject to be equal to the beatat the end of the last SoundObject within it. In other words, it will expand or contract to the actual totallength of all of the notes within it. The other method is to change the Time Behavior of the PolyObjectto None. Blue will not do any processing of the length of the notes within the PolyObject; they'll just beplayed exactly the way they are in the PolyObject.
There are advantages and disadvantages to each method. The first is good because it allows one to see theactual length of the PolyObject within the main score, but you have to remember to click "Set SubjectiveTime to Objective Time" each and every time you make a change to the PolyObject's contents. If you setthe Time Behavior to None, the length of the PolyObject may appear to be two beats, but it may actuallybe ten or 20 or whatever; you don't know until you edit the contents of that PolyObject. However, witha Time Behavior of None, you can edit the contents of the PolyObject frequently and drastically withouthaving to worry if your changes will be accurately represented in the CSD rendering. A good way to workmay be to set a new PolyObject's Time Behavior to None and edit the contents of it as much as you like.Then, when it sounds satisfactory, you can click "Set Subjective Time to Objective Time" on it, so thatyou may edit the rest of the score while having an accurate picture of the actual length of the PolyObject.Keep in mind that you may use the "Set Subjective Time to Objective Time" feature on any SoundObjectwith any Time Behavior setting.
Repeat/Looping Time Behavior
One can lay down a series of sounds in a PolyObject and setup the PolyObject to loop them. The TimeBehavior of the PolyObject itself needs to be set to Repeat, and the notes will loop for as long as thePolyObject's length. When the PolyObject's contents actually start looping in relationship to each other isdetermined by the Repeat Point; one can edit the Repeat settings in the property box of any SoundObject.The Repeat Point specifies the beat at which the group of notes will begin after the previous note groupbegins. If the Use Repeat Point is not checked, the next note group will begin immediately after the previousnote group's last note ends.
An example would be a PolyObject whose contents are three one-beat notes played back-to-back:
i1 0.0 1.0 3 4 5i2 1.0 1.0 3 4 5i3 2.0 1.0 3 4 5
If one set the Time Behavior to Repeat without using a Repeat Point and stretched the length of the actualPolyObject to six beats, six one-beat notes would play back-to-back, like this:
i1 0.0 1.0 3 4 5i2 1.0 1.0 3 4 5i3 2.0 1.0 3 4 5i1 3.0 1.0 3 4 5i2 4.0 1.0 3 4 5i3 5.0 1.0 3 4 5
Concepts
61
However, if one were to change the PolyObject to use Repeat Points and set the repeat point to 2.5, thiswould be the result:
i1 0.0 1.0 3 4 5i2 1.0 1.0 3 4 5i3 2.0 1.0 3 4 5i1 2.5 1.0 3 4 5i2 3.5 1.0 3 4 5i3 4.5 1.0 3 4 5i1 5.0 1.0 3 4 5
Note that there are more notes being played this time. Why? Because with a Time Behavior of Repeat, bluewill try to fit as many notes that it can into the PolyObject using the repeat settings given, without violatingthe order and length of the PolyObject's note arrangement. With the previous example, blue played thesecond group of three notes at beat 2.5, and realized it could squeeze in a partial third loop. This third loopbegins at beat five, since that is equivalent to beat 2.5 in the second loop, which is our Repeat Point. Itinserted the first note there and realized it couldn't fit any more notes, since the next note would begin atbeat six and play until beat seven; that's longer than the length of our PolyObject, which is six.
NoteProcessors and PolyObjects
NoteProcessors are great when used in conjunction with PolyObjects. They can be very powerful, but youhave to be careful of a few gotcha's.
P-fields and PolyObjects
One thing to be aware of with PolyObjects and NoteProcessors are p-fields. The user must make surethat the p-field(s) that is being operated on by the Note Processor(s) is the same for all sounds within thePolyObject. If one has a lot of typical notes in a PolyObject where p4 equals the pitch, and one errant notewhere p4 equals phase, for instance, things could get disastrous if one tries to apply a PchAddProcessorto the whole PolyObject. Please refer to the Best Practices section for more information.
Time Behavior and NoteProcessors
Everything that is to follow in this section can be summed up in one important fact: NoteProcessors getapplied to SoundObjects before the Time Behavior does. What this means is, if you have a PolyObject withRepeat Time Behavior and set it up to loop twice, and have a LineAddProcessor on that same PolyObject,you will have a group of notes looped twice with the LineAddProcessor behavior applied twice; that is,applied individually to each looped group of notes.
So, to borrow from the example in Repeat/Looping Time Behavior, our group of three notes with noNoteProcessor and no Repeat Point would render like this:
i1 0.0 1.0 3 4 5i2 1.0 1.0 3 4 5i3 2.0 1.0 3 4 5i1 3.0 1.0 3 4 5i2 4.0 1.0 3 4 5i3 5.0 1.0 3 4 5
If I add a LineAddProcessor to p-field four, starting from zero and going to two, here's what the resultwould look like:
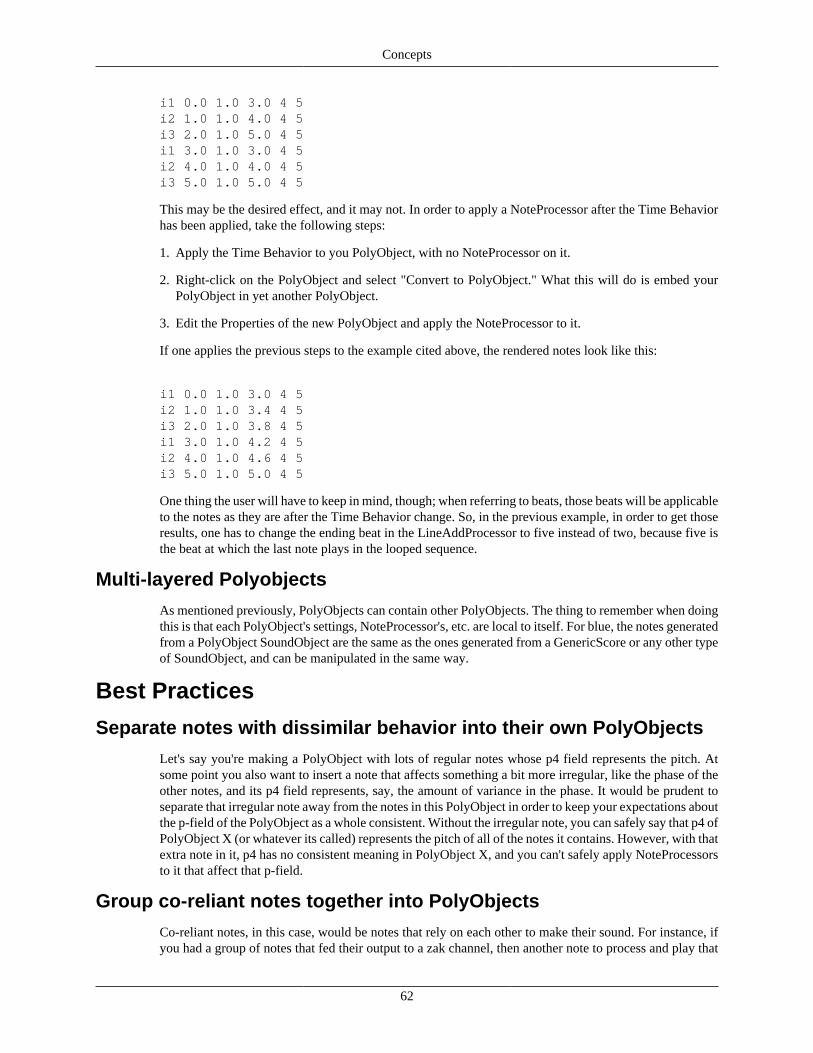
Concepts
62
i1 0.0 1.0 3.0 4 5i2 1.0 1.0 4.0 4 5i3 2.0 1.0 5.0 4 5i1 3.0 1.0 3.0 4 5i2 4.0 1.0 4.0 4 5i3 5.0 1.0 5.0 4 5
This may be the desired effect, and it may not. In order to apply a NoteProcessor after the Time Behaviorhas been applied, take the following steps:
1. Apply the Time Behavior to you PolyObject, with no NoteProcessor on it.
2. Right-click on the PolyObject and select "Convert to PolyObject." What this will do is embed yourPolyObject in yet another PolyObject.
3. Edit the Properties of the new PolyObject and apply the NoteProcessor to it.
If one applies the previous steps to the example cited above, the rendered notes look like this:
i1 0.0 1.0 3.0 4 5i2 1.0 1.0 3.4 4 5i3 2.0 1.0 3.8 4 5i1 3.0 1.0 4.2 4 5i2 4.0 1.0 4.6 4 5i3 5.0 1.0 5.0 4 5
One thing the user will have to keep in mind, though; when referring to beats, those beats will be applicableto the notes as they are after the Time Behavior change. So, in the previous example, in order to get thoseresults, one has to change the ending beat in the LineAddProcessor to five instead of two, because five isthe beat at which the last note plays in the looped sequence.
Multi-layered Polyobjects
As mentioned previously, PolyObjects can contain other PolyObjects. The thing to remember when doingthis is that each PolyObject's settings, NoteProcessor's, etc. are local to itself. For blue, the notes generatedfrom a PolyObject SoundObject are the same as the ones generated from a GenericScore or any other typeof SoundObject, and can be manipulated in the same way.
Best Practices
Separate notes with dissimilar behavior into their own PolyObjects
Let's say you're making a PolyObject with lots of regular notes whose p4 field represents the pitch. Atsome point you also want to insert a note that affects something a bit more irregular, like the phase of theother notes, and its p4 field represents, say, the amount of variance in the phase. It would be prudent toseparate that irregular note away from the notes in this PolyObject in order to keep your expectations aboutthe p-field of the PolyObject as a whole consistent. Without the irregular note, you can safely say that p4 ofPolyObject X (or whatever its called) represents the pitch of all of the notes it contains. However, with thatextra note in it, p4 has no consistent meaning in PolyObject X, and you can't safely apply NoteProcessorsto it that affect that p-field.
Group co-reliant notes together into PolyObjects
Co-reliant notes, in this case, would be notes that rely on each other to make their sound. For instance, ifyou had a group of notes that fed their output to a zak channel, then another note to process and play that
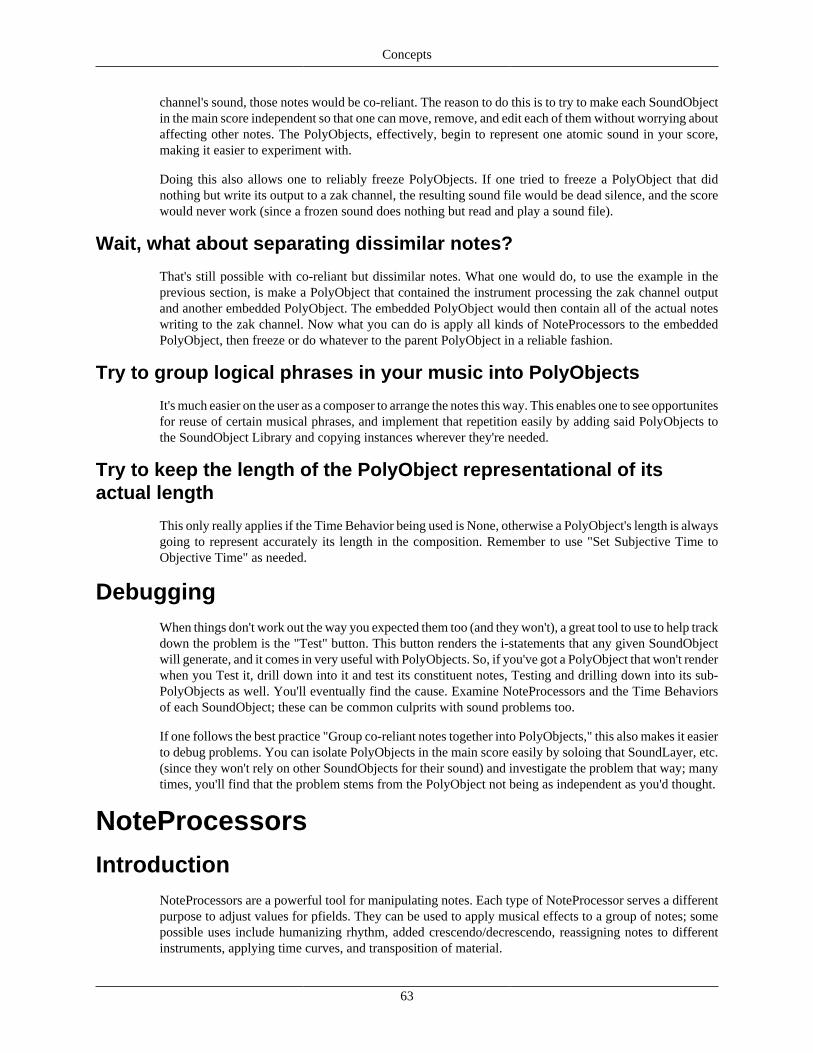
Concepts
63
channel's sound, those notes would be co-reliant. The reason to do this is to try to make each SoundObjectin the main score independent so that one can move, remove, and edit each of them without worrying aboutaffecting other notes. The PolyObjects, effectively, begin to represent one atomic sound in your score,making it easier to experiment with.
Doing this also allows one to reliably freeze PolyObjects. If one tried to freeze a PolyObject that didnothing but write its output to a zak channel, the resulting sound file would be dead silence, and the scorewould never work (since a frozen sound does nothing but read and play a sound file).
Wait, what about separating dissimilar notes?
That's still possible with co-reliant but dissimilar notes. What one would do, to use the example in theprevious section, is make a PolyObject that contained the instrument processing the zak channel outputand another embedded PolyObject. The embedded PolyObject would then contain all of the actual noteswriting to the zak channel. Now what you can do is apply all kinds of NoteProcessors to the embeddedPolyObject, then freeze or do whatever to the parent PolyObject in a reliable fashion.
Try to group logical phrases in your music into PolyObjects
It's much easier on the user as a composer to arrange the notes this way. This enables one to see opportunitesfor reuse of certain musical phrases, and implement that repetition easily by adding said PolyObjects tothe SoundObject Library and copying instances wherever they're needed.
Try to keep the length of the PolyObject representational of itsactual length
This only really applies if the Time Behavior being used is None, otherwise a PolyObject's length is alwaysgoing to represent accurately its length in the composition. Remember to use "Set Subjective Time toObjective Time" as needed.
DebuggingWhen things don't work out the way you expected them too (and they won't), a great tool to use to help trackdown the problem is the "Test" button. This button renders the i-statements that any given SoundObjectwill generate, and it comes in very useful with PolyObjects. So, if you've got a PolyObject that won't renderwhen you Test it, drill down into it and test its constituent notes, Testing and drilling down into its sub-PolyObjects as well. You'll eventually find the cause. Examine NoteProcessors and the Time Behaviorsof each SoundObject; these can be common culprits with sound problems too.
If one follows the best practice "Group co-reliant notes together into PolyObjects," this also makes it easierto debug problems. You can isolate PolyObjects in the main score easily by soloing that SoundLayer, etc.(since they won't rely on other SoundObjects for their sound) and investigate the problem that way; manytimes, you'll find that the problem stems from the PolyObject not being as independent as you'd thought.
NoteProcessors
IntroductionNoteProcessors are a powerful tool for manipulating notes. Each type of NoteProcessor serves a differentpurpose to adjust values for pfields. They can be used to apply musical effects to a group of notes; somepossible uses include humanizing rhythm, added crescendo/decrescendo, reassigning notes to differentinstruments, applying time curves, and transposition of material.

Concepts
64
NoteProcessors can be applied on a per-SoundObject basis. They can also be applied to an entire Layer toaffect all SoundObjects in that layer, as well as applied to a LayerGroup or to the entire Score.
UsageYou can add NoteProcessors to SoundObjects by using the SoundObject Properties window. You can addthem to Layers the support them by using the "N" button the layer's header panel. To apply them to aLayerGroup or Score, right click the Root Score in the Score Bar and use the popup menus to choosewhich item you'd like to apply NoteProcessors to.
Role in Score GenerationNoteProcessors are applied after the notes of a SoundObject, Layer, LayerGroup, or Score are generatedand before time behavior is applied. Processing starts with the first NoteProcessor in the chain and theresults of that are passed down the chain.
SoundObject Library
IntroductionThe SoundObject Library is a place where one can store soundObjects from the timeline. The library cansimply be a place to store a soundObject idea that the user may want to user later, but more importantly itallows for Instances of the soundObject to be made. Instances of soundObjects point to and soundObjectin the library and when the instance is generating its score, it will actually call the soundObject in thelibrary to generate its score and then apply it's own properties and noteProcessors to the generated score.Updating a soundObject in the library will then update all instances of that soundObject. This feature isuseful to represent the idea of a motive, with instances of the motive allowing to have transformationsby use of noteProcessors.
UsageThe general pattern of usage for the SoundObject Library entails:
1. Add SoundObject to the Library. This is done by selecting a soundObject, right-clicking thesoundObject to open up the popup menu and selecting "Add to SoundObject Library".
2. After doing this, your soundObject will have been added to the library and the soundObject onthe timeline will have been replaced with an Instance soundObject which will be pointing to thesoundObject now in the library.
3. At this point, the user can now take advantage of the library by making copies of the instanceobject on the timeline and pasting in more instances. These instances can be placed anywhere, havedifferent durations and time behaviors, as well as have their own individual noteProcessors. This allowsexpressing ideas such as "This is an instance of the primary motive (soundObject in the library) buttransposed up a major 3rd, retrograded, and inverted", or an idea like "I've got drum pattern A in thelibrary and I have instances of it here and here and ...".
Note
When copying and pasting Instance soundObjects, they are all pointing to the soundObjectin the library.
Concepts
65
4. You can also then make instances of soundObjects in the library by opening up the SoundObject Librarydialog (available from the Window menu or by using the F4 shortcut key). There you have the followingoptions:
Copy This makes a copy of the selected SoundObject and puts it in the buffer. This is acopy of the original soundObject and not an Instance. After copying to the buffer,you can paste as normal on the timeline.
Copy Instance This makes a Instance of the selected SoundObject and puts it in the buffer. ThisInstance will point to the original soundObject. After copying to the buffer, youcan paste as normal on the timeline.
Remove This will remove the selected SoundObject from the library.
5. You can also then edit the soundObject in the library from within the SoundObject Library dialog byselecting the soundObject in the list. The editor for the SoundObject will appear below.
Note
Editing the SoundObject in the library will affect all instances of that SoundObject.
Parameter AutomationIntroduction
Blue allows for a few ways to enter in values to automate parameters over time. The parameters that can beautomated are those in BlueSynthBuilder Instruments, Mixer Effects, Mixer Sends, and Mixer Volumes.The following sections will describe how to use Parameter Automation and technical details in how thisall works within the context of blue and Csound.
Available ParametersBesides the Volume sliders in the mixer and level amount on mixer sends, the following GUI Parametersare automatable when found in BlueSynthBuilder instruments and Mixer Effects:
• Knob
• HSlider
• HSliderBank
• VSlider
• VSliderBank
• XYController
• Dropdown
• Checkbox
Assigning ParametersAutomations for Parameters are assignable to SoundObject LayerGroup Layers that exist in the root Scoreby selecting from the popup menu that appears when selecting the "A" button on a SoundLayer's panel (onthe left of the timeline). The menu shows what Parameters are available to use from Instruments and the
Concepts
66
Mixer. Those with normal color text are Parameters which are not currently automated, those in green areones currently automated in that SoundLayer, and those in orange are ones which are currently automatedon a different SoundLayer. Selecting normal color text will enable automation for that parameter on theSoundLayer, while selecting a green colored text one will disable automation for that parameter, andselecting an orange one will move it from the layer it is currently on to the one being worked with.
Score Timeline ModesThe Score timeline has three different modes:
Score This is the primary mode for adding and editing SoundObjects. Parameter Automationswill be drawn but are not editable in this mode.
Single Line This is the primary mode for editing line points for Parameter Automations. The useris able to edit a single line at a time per SoundLayer, and can enter and remove points,modify points by dragging them, as well as selecting a region and move the the pointsby dragging the region. While dragging the region, the region will show that data willoverwrite the area dragged to. This overwriting will not be committed however untilthe user releases the mouse button.
Multi Line This is the mode for selecting and moving line points for all Parameter Automationson a single or multiple SoundLayers. The use can click and drag to create a selectionregion, then click within the selection region to move all points from all lines withinthe region. While dragging the region, the region will show that data will overwrite thearea dragged to. This overwriting will not be committed however until the user releasesthe mouse button.
Editing AutomationsTo edit line values in a Parameter Automation, first switch to Single Line mode. Then, for the desiredSoundLayer, select which of the assigned parameters to edit. This can be done either by using theSoundLayer Edit Panel's Parameter selector (found on the second row below the row with mute, solo, etc.;only shown when SoundLayer size is greater than 1), or by right-clicking the SoundLayer in the main areaand selecting from the popup menu (the actively editable Parameter Automation will be disabled fromthe popup menu).
Once a parameter is selected, the user can change the color of the line by using the color box next to theparameter selector panel on the SoundLayer Edit Panel. To add new points, use the mouse and mouseover to where you would like to add a point and press the left mouse button. After pressing, the point willbe added, and the user can drag to modify the just entered point. Releasing the button will complete theaddition of the line point. To edit an existing point, mouse over a point until it is highlighted in red, thenpress the left mouse button, drag, and release when finished. To remove an existing point, mouse over apoint until it is highlighted and press the right mouse button.
For finer control over the line points, right-click on the parameter line panel when not over an existing linepoint. A popup menu will appear and select "Edit Line Points". A dialog showing a table of line pointswith time values in one column and parameter values in a second column. The user can then enter in valuesby text entry.
Technical Detailsblue's parameter automation system is implemented in Csound code in a few different areas. Forinstruments and effects, when an Automatable Parameter is not set for automation, it will replace itsreplacement key in its ORC code with a constant value from the UI item. If the parameter is set toallow automation, then the replacement key is replaced with a blue generated global k-rate signal name.

Concepts
67
Therefore, when coding instruments and effects, the user should be careful to make sure that if they wantthe parameter to be automatable that the replacement key is placed in the code where a k-rate signal is legalto use. If the user is not expecting to automate that value, then it would be safe to place that replacementkey wherever a constant is allowed. This is also useful to know when migrating older BSB Instrumentsand Effects to be used with the purpose of Automation.
After setting up the Instrument and Effects, blue will then handle compiling the automations into a waythat works with Csound. Currently, blue will first calculate init statements from where the render starttime is and add that to the CSD to make sure that the global krate signals will be initiated by the time anyinstrument could use them. Then, blue creates instruments for each parameter that will be automated. Theinstruments are driven by score and either an instrument for continuous data or resolution dependent datawill be created. Score is then generated for the parameter automation data that together with the instrumentsgenerated will create the signals.
Care was taken to optimize the generated score and instruments. Unnecessary score will not be generatedif multiple points with the same value are found as well as when there is a discontinous break in the values.Values from the parameter automation will also correctly be generated from render start time until renderend time (if used). For parameters with resolution, every value is a discrete jump, so the instrument forresolution based parameters will on it's i-time run will simply set the new value and then turn the instrumentinstance off to save CPU cycles.
Command Blocks
IntroductionCommand Blocks are Csound ORC code with special directions to blue on how to processes them. Theare available to use only within the Global Orchestra areas of Instruments (not to be confused with theglobal orchestra area in the globals manager tab) and were created to help users build fully-encapsulatedinstruments, such that an instrument and all of its necessary parts could be grouped together.
Note
This feature has largely been made unnecessary due to new Csound programming practices thathave developed since this was initially introduced. This feature is left in blue though to supportlegacy projects.
Basic UsageTo use a command block, you will need to wrap the section of orc code that you want blue to process withthe command in the following manner:
;[command to use]{ ...Csound Orchestra Code... ;}
Available Commands
once
Once blocks are useful to limit how many times a block of code will be generated in the final CSD andis more for efficiency than anything else (so Csound doesn't define the same ftable more than it has to,for example). An example of this:

Concepts
68
;[once]{ gaLeft init 0 gaRight init 0 ;}
In this case, if the above gaLeft and gaRight init statement, wrapped in a once block, is used in multipleinstruments, then regardless it will be generated only once in the final CSD. So a use case for the abovewould be if you have all of your instruments output to the above global variables for extra processing byan always-on reverb, you would want to add the above to all of the instruments and also the reverb. Then,if you start a new project and may want to reuse a few of your instruments as well as the reverb, you canjust copy them into your new project's orchestra and start working away, knowing your global variableswill be initialized and ready to go.
pre
Pre blocks are useful if you need the enclosed ORC code to be generated before any other global orc code.When blue goes to process the project to generate a CSD file, it normally starts of the existing globalorchestra code from the globals manager, then appends all global orc from instruments and soundObjectsto it, one after the other. By using a pre block, the code enclosed will be pushed up to the top of the globalorchestra of the CSD (instrument 0).
The scenario which required a solution such as this was when working with the fluidSynth opcodes. Forthose set of opcodes, a fluidEngine needs to be initialized before loading of soundfonts into that engine. Thedesign I had wanted was to have the instrument that did the fluidOutput also have the engine initialization.This was a problem because the fluidOutput needed to be placed at an instrument number higher than thefluidNote playing instruments for the output chain to work correctly. So here was a case of an instrumentthat needed to have its instrument generate later than the instruments that it depended on, but also haveits own fluidEngine initialization happen before all the other soundFonts load in in their own global orcstatements. The solution then was to create the once block feature and allow for targetting global orc codeto be prepended to the top of the generated global orc code.

69
Chapter 3. Reference
Sound ObjectsSound Objects are objects on the score timeline that are primarily responsible for generating score data.
Common Properties
The following are properties that all SoundObjects share.
Common Properties
Name Name of the Soundobject
Subjective Duration The duration of the soundObject on the timeline (versus the duration of thegenerated score within the soundObject, which may be different). How theduration relates to the generated score contents is controlled by the "TimeBehavior" property.
End Time Read-Only property that shows the end-time of the soundObject
Time Behavior Selects how subjective time should be used on a soundObject. Options are:
1. Scale - The default option, stretches generated score to last the durationof the soundObject
2. Repeat - repeats generated score up to the duration of the soundObject
3. None - Passes the score data as-is (When using Time-Behavior of None,width of soundObject no longer visually corresponds to duration of thesoundObject's score.)
About Note Generation
Sound Objects generate notes in the following manner:
• SoundObject generates initial notes
• NoteProcessors are applied to the generated notes
• Time Behavior is applied to the notes
Partial Object Rendering
When using a render start time other than 0.0, how soundObjects contribute notes depends on if theysupport partial object rendering. Normally, notes from all soundObjects which can possibly contributenotes to the render (taking into account render start and render end) are gathered and then if any notesstart before the render start time they are discarded as there is no way to start in the middle of a note andto know exactly that it sounds as it should as blue's timeline only knows about notes and not how thoseinstruments render.
Reference
70
However, there are certain cases where blue soundObjects *can* know about the instrument that the notesare generated for and can therefore do partial object rendering to start in the middle of a note. This the is thecase for those soundObjects which generate their own instruments, such as the AudioFile SoundObject,FrozenObject, the LineObject, and the ZakLineObject. For those soundObjects, if render is started withinthe middle of one of those, you will hear audio and have control signals generated from the correct placeand time.
AudioFile
Accepts NoteProcessors: no
Allows for quickly putting in a soundfile on the timeline.
CeciliaModule
Accepts NoteProcessors: no, Supports TimeBehavior: no
Note
This SoundObject is unfinished and not enabled for normal use. This information is left here forthe future if the module is ever finished and reenabled.
Description
The CeciliaModule is a soundObject that is meant to be compatible with modules for the programCecilia (http://www.sourceforge.net/projects/cecilia), created by Alexandre Burton and Jean Piche. TheCeciliaModule is not as fully featured as Cecilia itself as some features found in Cecilia do not make sensewithin the context of blue.
One major advantage of the CeciliaModule is the ability to have as manyinstances of a module onthe timeline as one likes, all without one worrying about variable name clashes or other issues. blueautomatically parses and renumbers instruments, ftables, and score statements so that they do not interferewith other instances of the same module.
Differences between Cecilia and CeciliaModule
Modifications required for Cecilia Modules to run in CeciliaModule
Cecilia modules require at least one modification before they are able to run in blue, and also must adhereto a few more constraints of design.
Appending “ftable” in Instrument Definitions . Instruments are required to append the word “ftable”before any number that is meant to be an ftable. For example:
instr 1
aout oscil 10000, 440, 1
out aout, aout endin
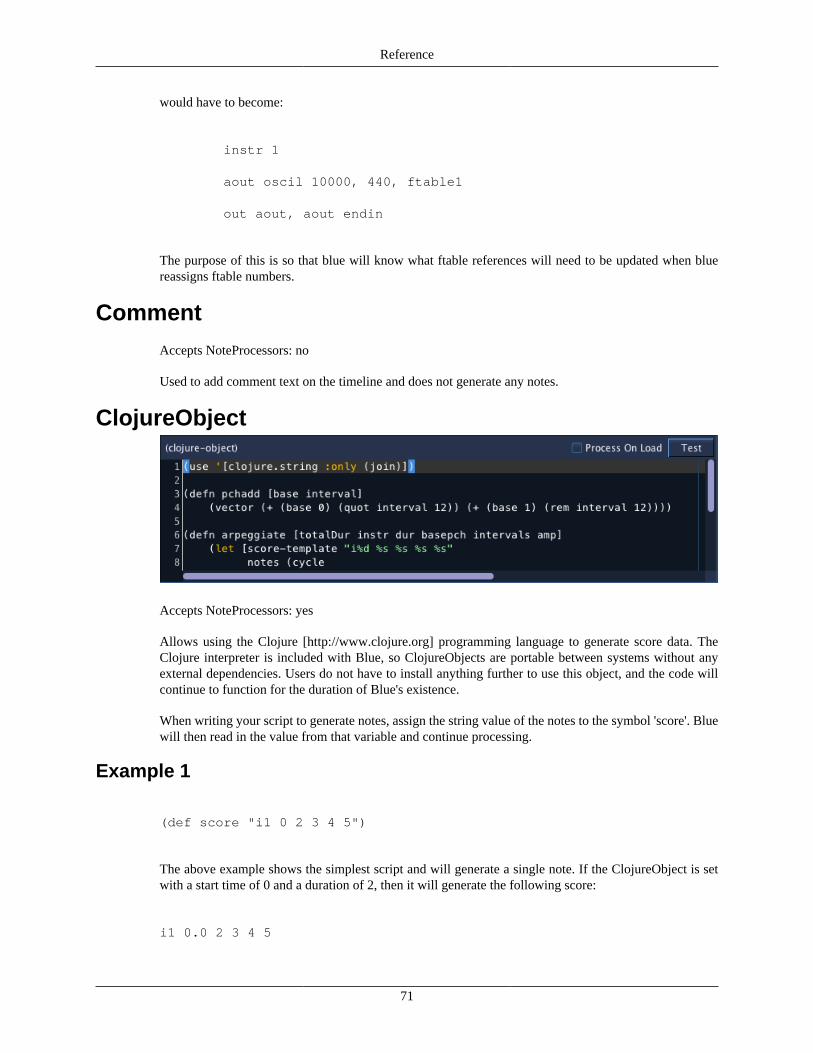
Reference
71
would have to become:
instr 1
aout oscil 10000, 440, ftable1
out aout, aout endin
The purpose of this is so that blue will know what ftable references will need to be updated when bluereassigns ftable numbers.
Comment
Accepts NoteProcessors: no
Used to add comment text on the timeline and does not generate any notes.
ClojureObject
Accepts NoteProcessors: yes
Allows using the Clojure [http://www.clojure.org] programming language to generate score data. TheClojure interpreter is included with Blue, so ClojureObjects are portable between systems without anyexternal dependencies. Users do not have to install anything further to use this object, and the code willcontinue to function for the duration of Blue's existence.
When writing your script to generate notes, assign the string value of the notes to the symbol 'score'. Bluewill then read in the value from that variable and continue processing.
Example 1
(def score "i1 0 2 3 4 5")
The above example shows the simplest script and will generate a single note. If the ClojureObject is setwith a start time of 0 and a duration of 2, then it will generate the following score:
i1 0.0 2 3 4 5
Reference
72
Example 2
(use '[clojure.string :only (join)])
(defn pchadd [base interval] (vector (+ (base 0) (quot interval 12)) (+ (base 1) (rem interval 12))))
(defn arpeggiate [totalDur instr dur basepch intervals amp] (let [score-template "i%d %s %s %s %s" notes (cycle (map #(apply format "%d.%02d" (pchadd basepch %1)) (concat intervals (subvec intervals 1 (- (count intervals) 1)))))] (join \newline (map #(format score-template instr %1 dur %2 amp) (range 0 totalDur dur) ; list that will limit the map notes))))
(def score (arpeggiate blueDuration 1 0.25 [8 0] [0 4 7] -12))
The above example is taken from blue/examples/soundObjects/clojureSoundObject.blue. This scriptdefines an apreggiate function, then calls that assigns the value to score. Notice the use of blueDuration,a symbol that is automatically assigned to the duration of the ClojureObject.
If the ClojureObject is set with a start time of 0 and a duration of 4, then it will generate the following score:
i1 0.0 0.25 8.00 -12i1 0.25 0.25 8.04 -12i1 0.5 0.25 8.07 -12i1 0.75 0.25 8.04 -12i1 1.0 0.25 8.00 -12i1 1.25 0.25 8.04 -12i1 1.5 0.25 8.07 -12i1 1.75 0.25 8.04 -12i1 2.0 0.25 8.00 -12i1 2.25 0.25 8.04 -12i1 2.5 0.25 8.07 -12i1 2.75 0.25 8.04 -12i1 3.0 0.25 8.00 -12i1 3.25 0.25 8.04 -12i1 3.5 0.25 8.07 -12i1 3.75 0.25 8.04 -12
Regarding Processing
Blue processes soundObjects by going through each SoundLayer and generating score for each objectwithin each layer. This is useful to know so that if you are using a ClojureObject that has utility functionsthat you later use in other ClojureObjects, you should put that utility ClojureObject on the first SoundLayerclosest to the top, or at least on a layer above all others that contain ClojureObjects.
Also to note, as a feature, Blue uses a single interpreter instance for processing Clojure code. Therefore, ifone ClojureObject has code evaluated, the values from that code can be read by other objects. This allows
Reference
73
creating utility ClojureObjects. However, one can use stale values (or values from another project even)if one is not careful to always assign values in the project that require being set for this particular project.
Variables from blue
The following variables are avaialable from blue:
Variables from blue
blueDuration Duration of the Clojure SoundObject
blueProjectDir The location of the current project's directory. Includes path separator at end.
Process at Start
There is a checkbox entitled "Process at Start". Selecting this option will have the script of theClojureObject run when a .blue project is loaded. This is useful for scripts that act as library functions, butthemselves do not generate any notes. For example, you might define a number of score generation utilityfunctions in one ClojureObject that has "Process at Start" enabled. Your other ClojureObject may then usethe functions from that ClojureObject Next time you load your project, if that ClojureObject hasn't beenrun, your other ClojureObject will not be able to be run either. If you are rendering from the beginningof a project, this won't be an issue, but if you're starting work in the middle of a project, you will need toevaluate that utility ClojureObject at least once. You can either do a run from the start at least once, usethe "Test" button to have that evaluated, or use "Process at Start" and have blue ensure it is loaded intothe Clojure interpreter when you load your projects.
Using External CLJ Scripts
Blue is able to load external .clj scripts, resolved from the .blue/script/clojure or PROJECT_DIR/script/clojure directory. For example, if you use:
(use 'my.script)
This will try to load the script from "/Users/me/.blue/script/clojure/my/script.clj" or "/path/to/blueProject/script/clojure/script.clj".
External SoundObjectAccepts NoteProcessors: no
Allows you to write script within blue and execute an external program on that script, bringing in generatednotes back into blue. There is a field for 'command line' as well as a text area for your script. When thissoundObject is called for generating it's notes, it will write the text within the text area into a temp file andthen use the user-supplied 'command line' to execute on that temp file.
When blue runs the commandline, it defaults to appending the temp file's name to the end of thecommandline. For example, if you wrote a perl script in the text area and used a commandline of "perl",then when blue runs the command, it would be something like "perl /the/path/to/the/tempFile". If you needto explicitly put the name of the temp file somewhere else in the command line than the end, you can use"$infile" in your commandline. For example, if you needed something like "myCommand somefileName-w -d --some-other-flags" and had to have it in that order, you could type "myCommand $infile -w -d --

Reference
74
some-other-flags" and blue will replace that $infile with the temp file's name instead of appending it tothe end.
When designing your scripts that you will be using with external programs, you should either setcommandline flags to the program or script your script in a way that it will write out to stdout(to thescreen), as that is what blue will capture and bring in as notes.
A second method for the external object was created for bringing in score data after running thecommandline as some programs (i.e. Cmask) do not have any possible way to write directly to stdout. Theprocess is to use "$outfile" in the commandline to pass in a filename to the program. That $outfile will bethe name of a temp file that the external program will write score data into. After the program is finished,blue will open up that temp file, read in the score data, and then remove the temp file. So, if your programneeded a commandline of something like "myProgram -i inputfilename -o outputfilename" and no optionsfor writing to screen, then you could use a commandline of "myProgram -i $infile -o $outfile".
There is a test button that you may use to check to see that blue properly brings in the generated notes.
Command Lines and Notes Other Programs
This is a list of commandlines to use when using other programs with blue and any notes that may concernother programs when being used with blue. These commandlines assume that the programs being called areon the system path. If not on the path, please append the full path to the program before the program name.
Command Lines for Programs
CMask Homepage: http://www.kgw.tu-berlin.de/~abart/index.html Author: Andre Bartetzki
Comandline to use:
cmask $infile $outfile
nGen Homepage: http://mustec.bgsu.edu/~mkuehn/ngen/ Author: Mikel Kuehn
Comandline to use:
ngen $infile $outfile
GenericScoreAccepts NoteProcessors: yes
Contains a block of Csound score text. The objective time within the GenericScore starts at time 0, andnotes within the genericScore are written relative to 0. The start time of the GenericScore object withinthe timeline will translate the score text's time, and the SoundObject's time behavior will determine howthe notes are processed relative to the GenericScore's duration. For example, for the following score:
i1 0 1 2 3 4 5i1 1 1 2 3 4 5i1 2 1 2 3 4 5
If this SoundObject is moved to start at time 2.0 with duration 6.0, the generated score will be:
i1 2 2 2 3 4 5
Reference
75
i1 4 2 2 3 4 5i1 6 2 2 3 4 5
Note
Score blocks support only a subset of the Csound Score Syntax. Using "+" in p2 and "." in pfields,as well as "<" and ">" is supported.
InstanceAccepts NoteProcessors: yes
A SoundObject that points to a SoundObject in the SoundObject library. The content of the SoundObjectis not editable except by editing the SoundObject in the library to which the instance is pointing to. Ifediting the SoundObject in the library, all instances that point to that SoundObject will be changed.
When clicking on an Instance object to edit it, the SoundObject from the library will show its editorinstead in the SoundObject edit area, but it will be clearly marked that the user is currently editing a librarySoundObject and not an individual SoundObject.
The instance object is very useful if your work entails using many variations of single source of material.For example, you can take a SoundObject that represents a drum pattern, then make many Instances of thatpattern and add them to your project. If you want to later change the base pattern, it will update everywherethat there are Instance objects pointing to it.
Another example, if you have a SoundObject that represents a motive or melodic fragment, you can putit into the SoundObject library, then make 10 instances of it, adding noteProcessors to do things liketranspose or get the retrograde, etc. Later, if you decide you want to change the base material, you'd onlyhave to edit it once within the library. All Instance objects pointing to the changed object will be updatedand will maintain all of their transformations and relationships that were added via NoteProcessors.
If you later decide that you want to work with the original material where you have an Instance and wantto break the link, replacing the instance with a copy of the original to modify, you can convert the Instanceobject to a GenericScore. To do this, you can use one of two methods:
• Right-click the Instance object and choose "Convert to Generic Score"
• Go the SoundObject Library, select the original and use "Copy", then select the Instance object and use"Replace with SoundObject in Buffer"
JMaskAccepts NoteProcessors: yes
JMask is GUI score generating soundObject based on Andre Bartetzki's CMask [http://www.bartetzki.de/en/software.html]. JMask currently supports all features of CMask except field precision, though supportfor this feature is planned. Users of JMask are encouraged to read the CMask manual available at AndreBartetzki's site to get familiar with CMask concepts as they are represented 1:1 in JMask.
JMask builds on top of CMask's concepts and feature set by providing the user a graphical way to editparameter values, tables, masks, etc. Also, by using JMask, the user's projects are guaranteed to run onall blue installations, while using CMask from blue requires anyone opening and using the project to haveCMask installed on their system.
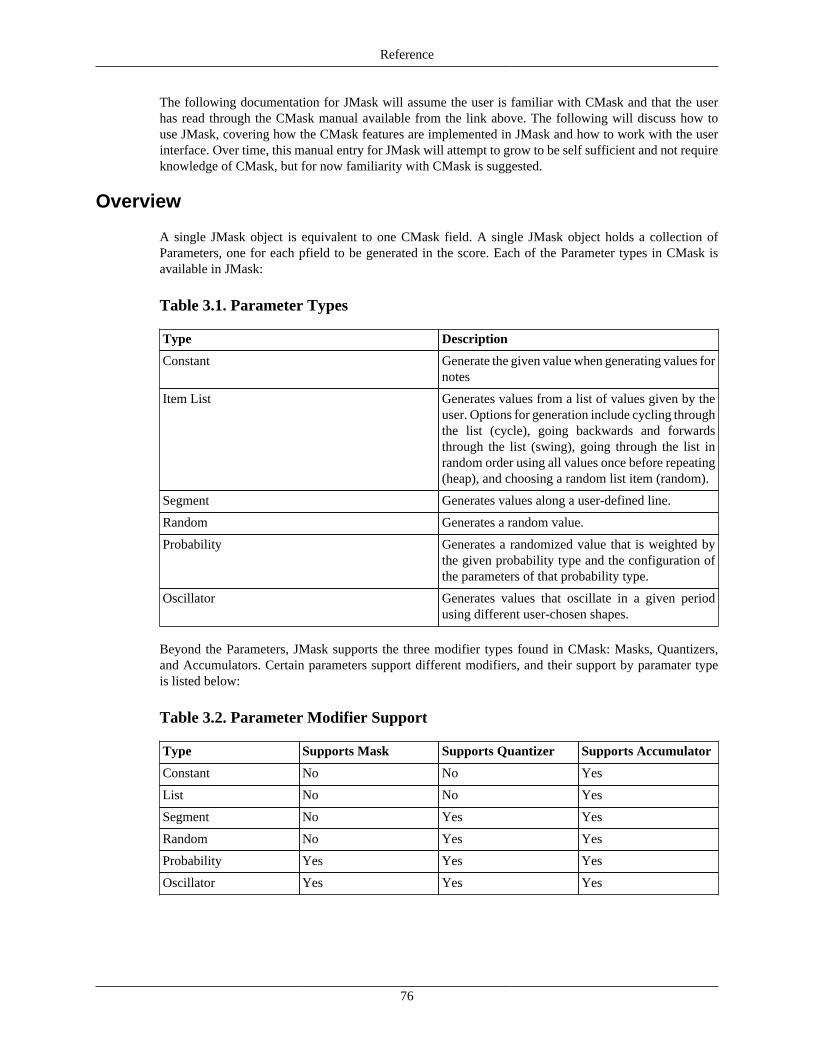
Reference
76
The following documentation for JMask will assume the user is familiar with CMask and that the userhas read through the CMask manual available from the link above. The following will discuss how touse JMask, covering how the CMask features are implemented in JMask and how to work with the userinterface. Over time, this manual entry for JMask will attempt to grow to be self sufficient and not requireknowledge of CMask, but for now familiarity with CMask is suggested.
Overview
A single JMask object is equivalent to one CMask field. A single JMask object holds a collection ofParameters, one for each pfield to be generated in the score. Each of the Parameter types in CMask isavailable in JMask:
Table 3.1. Parameter Types
Type Description
Constant Generate the given value when generating values fornotes
Item List Generates values from a list of values given by theuser. Options for generation include cycling throughthe list (cycle), going backwards and forwardsthrough the list (swing), going through the list inrandom order using all values once before repeating(heap), and choosing a random list item (random).
Segment Generates values along a user-defined line.
Random Generates a random value.
Probability Generates a randomized value that is weighted bythe given probability type and the configuration ofthe parameters of that probability type.
Oscillator Generates values that oscillate in a given periodusing different user-chosen shapes.
Beyond the Parameters, JMask supports the three modifier types found in CMask: Masks, Quantizers,and Accumulators. Certain parameters support different modifiers, and their support by paramater typeis listed below:
Table 3.2. Parameter Modifier Support
Type Supports Mask Supports Quantizer Supports Accumulator
Constant No No Yes
List No No Yes
Segment No Yes Yes
Random No Yes Yes
Probability Yes Yes Yes
Oscillator Yes Yes Yes
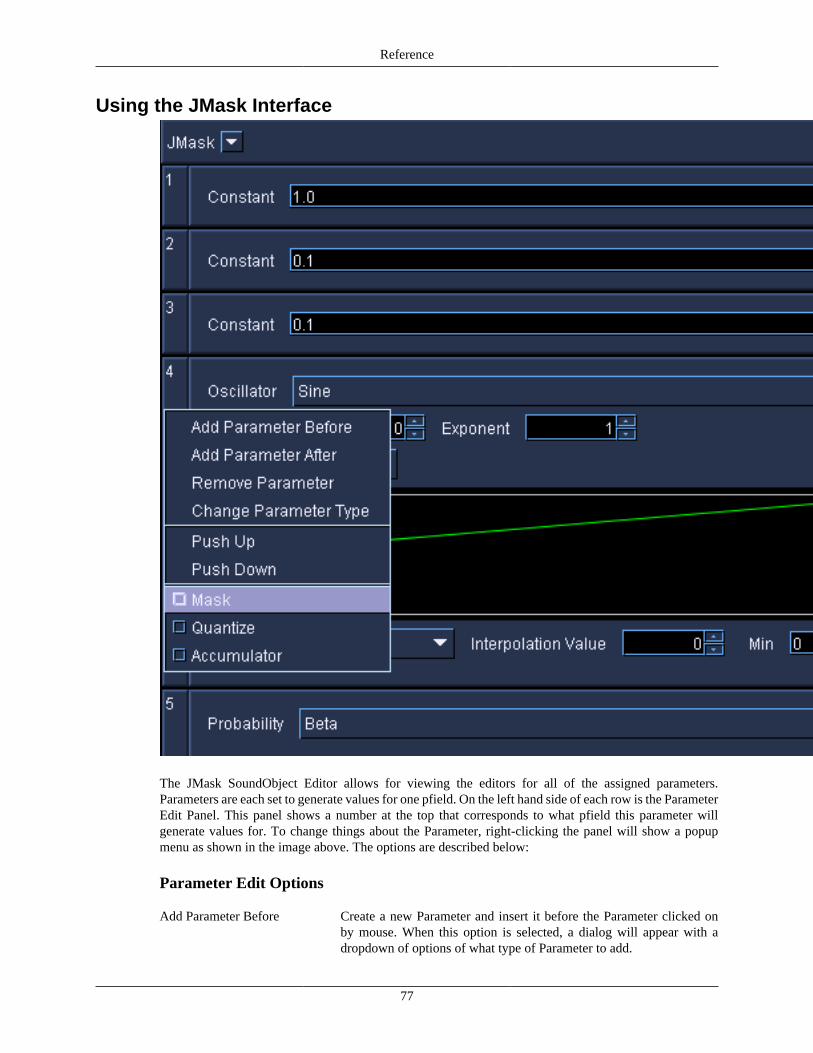
Reference
77
Using the JMask Interface
The JMask SoundObject Editor allows for viewing the editors for all of the assigned parameters.Parameters are each set to generate values for one pfield. On the left hand side of each row is the ParameterEdit Panel. This panel shows a number at the top that corresponds to what pfield this parameter willgenerate values for. To change things about the Parameter, right-clicking the panel will show a popupmenu as shown in the image above. The options are described below:
Parameter Edit Options
Add Parameter Before Create a new Parameter and insert it before the Parameter clicked onby mouse. When this option is selected, a dialog will appear with adropdown of options of what type of Parameter to add.

Reference
78
Add Parameter After Create a new Parameter and insert it after the Parameter clicked onby mouse. When this option is selected, a dialog will appear with adropdown of options of what type of Parameter to add.
Remove Parameter Remove this Parameter. Will not be allowed if trying to edit parameters1-3 as JMask requires a minimum of 3 pfields.
Change Parameter Type Choose a different type of Parameter and replace the current one withthe selected one. Any edits from the old Parameter will be lost once anew parameter type is chosen.
Push Up Move the selected Parameter to before the previous Parameter.Example: Push up parameter at pfield 5 to pfield 4, moving what waspreviously at 4 to 5.
Push Down Move the selected Parameter to after the next Parameter. Example: Pushdown parameter at pfield 4 to pfield 5, moving what was previously at5 to 4.
Mask Enable/disable using a Mask with this parameter. If enabled, the Maskeditor will appear, and if disabled, the Mask editor will disappear. Thismenu option will not show for those Parameters that do not supportMasks.
Quantizer Enable/disable using a Quantizer with this parameter. If enabled, theQuantizer editor will appear, and if disabled, the Quantizer editor willdisappear. This menu option will not show for those Parameters that donot support Quantizers.
Accumulator Enable/disable using an Accumulator with this parameter. If enabled,the Accumulator editor will appear, and if disabled, the Accumulatoreditor will disappear. This menu option will not show for thoseParameters which do not support Accumulators.
Beyond the basics of moving around Parameters, adding new ones, and choosing whether to enable Masks,Quantizeres, and Accumulators, one can also choose to show/hide Parameters by using the popup menuthat appears when choosing the down arrow button in the JMask title bar, as shown in the screenshot below.
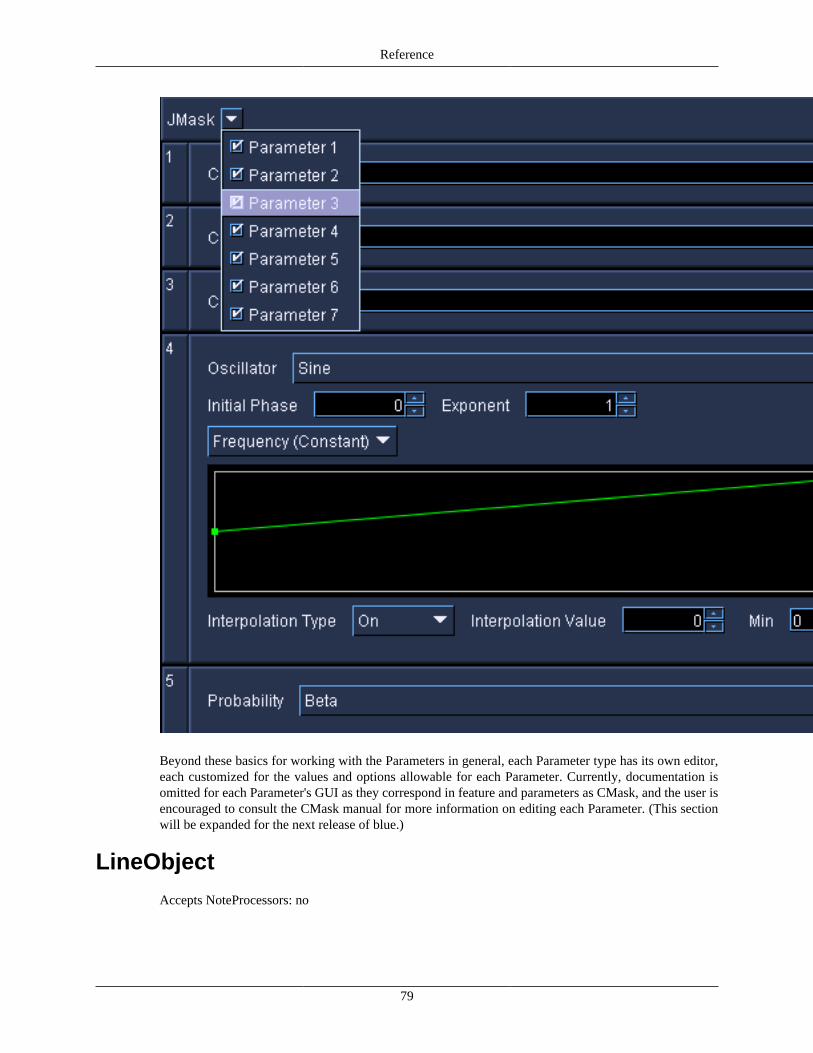
Reference
79
Beyond these basics for working with the Parameters in general, each Parameter type has its own editor,each customized for the values and options allowable for each Parameter. Currently, documentation isomitted for each Parameter's GUI as they correspond in feature and parameters as CMask, and the user isencouraged to consult the CMask manual for more information on editing each Parameter. (This sectionwill be expanded for the next release of blue.)
LineObject
Accepts NoteProcessors: no

Reference
80
Line Object
Add and graphically edit global k-rate signals.
Use the bottom + and - buttons to add/remove lines.
Use the table to select a line. After selecting a line, you can edit the points by dragging them, add pointsby clicking where you want the new point, and remove points by rt-clicking them.
Use the table to edit the name of the signal, as well as the max and min values (need to be floating pointvalues). For editing the color of the line, double-click the color box to the left of the lineName. A colorselection dialog will appear for the user to choose their desired color.
The name of the signal will be prepended with "gk" when outputing a signal, i.e. a line name of "cutoff"will become "gkcutoff".
ObjectBuilder
Accepts NoteProcessors: Yes

Reference
81
This SoundObject allows users to build their own SoundObjects by using the same widgets and features asthe BlueSynthBuilder for creating user interfaces, as well as using either Python script or External Scriptfor the score generation. When generating score, the script has token values replaced by values from theuser interface before generating. The scripts generated in the same manner as the PythonObject and asthe ExternalObject .
Note: The code completion feature using ctrl-shift-space for values from the UI that is available inBlueSynthBuilder is also available in this SoundObject.
Interface Editor

Reference
82
Code Editor
PatternObject
Accepts NoteProcessors: yes

Reference
83
Reference
84
About the PatternObject
The PatternObject is pattern-based score editor, based on the author's previous project "Patterns". It is aflexible pattern-oriented score editor, useful for musical ideas which are pattern based, such as drum partsor minimalist-style musical ideas.
Usage
For the general workflow of using the PatternObject, users will liked likely want to:
1. Setup the PatternObject Properties (number of beats and subdivisions)
2. Add Patterns, giving each pattern a name to help identify what the pattern is for
3. Edit each Pattern's score
4. Visually edit the PatternObject score
Setting PatternObject Properties
The PatternObject's Time Properties can be modified by clicking on the button in the upper-right cornerof the editor. Clicking the button will hide or show the properties panel on the right, as shown below:
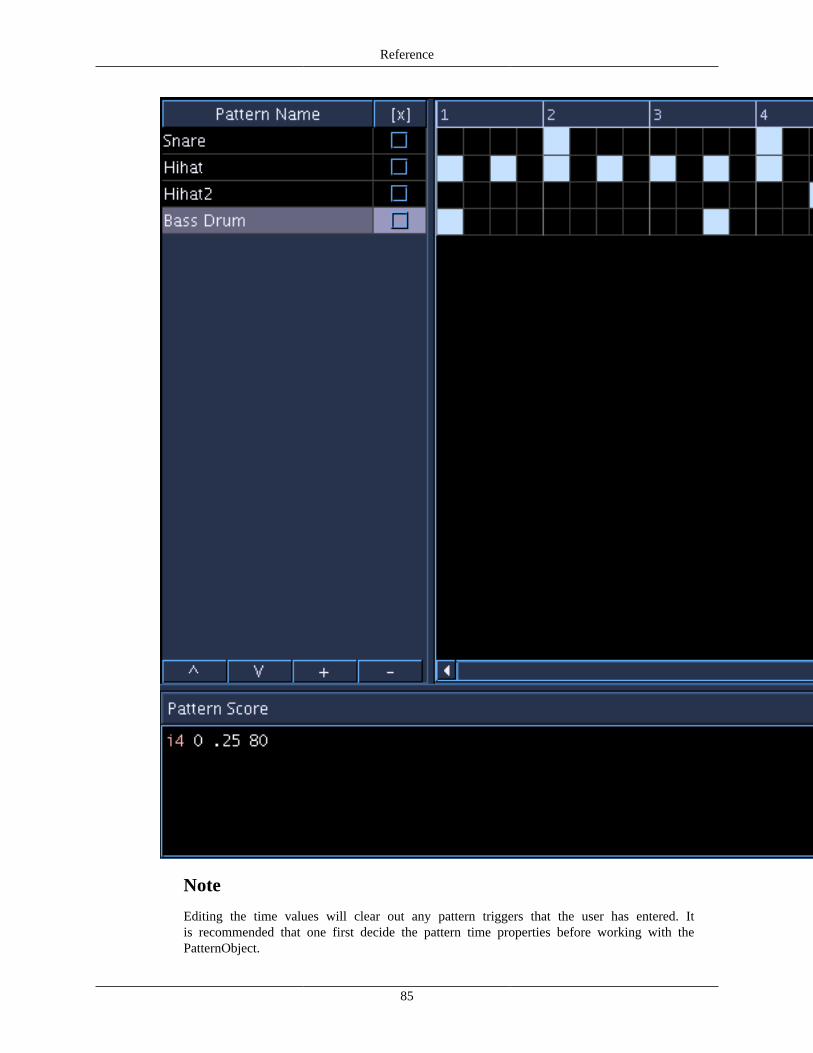
Reference
85
Note
Editing the time values will clear out any pattern triggers that the user has entered. Itis recommended that one first decide the pattern time properties before working with thePatternObject.
Reference
86
Adding Patterns
To add Patterns to the PatternObject, use the "+" button on the bottom of the left hand section. Double-clicking the name of the pattern name will allow editing of the name, and clicking on the [x] box will allowfor muting the Pattern. Clicking on the Pattern in the table will also bring up it's score in the area below.
Editing the Pattern's Score
The Pattern's score is standard Csound SCO text, with the same features supported as by the GenericScoreSoundObject. Each score should be started from time zero. The Pattern's score should be set such thatits score's total duration fits within the time of the subDivision. For example, if the properties set for thePatternObject's time values are 4 beats and 4 subdivisions, each beat is 1.0 in duration (corresponds to p3value of a note) and thus a single subdivision in this case would be equivalent to .25. Scores shorter orlonger than the subdivision length are allowed, but one should be aware that the resultant score may ormay not longer than what is visually represented on the PatternObject score.
Editing the PatternObject Score
The PatternObject score is visually edited by click on squares which correspond to subdivisions of thebeat. For example, if a Pattern's score is .25 in total duration, and the time value of the PatternObject is setto 4 and 4, then clicking a square would be to insert a 16th note in a score.
To add to the PatternObject score, simply click on the square where one wishes to have a Pattern triggered.To remove, simply click on a selected square. The user can also click and drag to add or remove mutlipletriggers.
Other Notes
• Users may be surprised at the generated score if time behavior is not set to None(while others mayprefer to use Scale, which is the default). Please be mindful of this, especially when using PatternObjectsand the SoundObject library, where the default for creating instances of SoundObjects is to have TimeBehavior of Scale on the Instance SoundObject.
• When the PatternObject is used with a Scale time behavior, you may not get the results you think youwill get if the pattern is not filled in in the last subdivision of the beat. When blue goes to generatea score for a soundObject, with a scale time behavior, the score is first generated, then scaled to theduration of the soundObject. So, if you're pattern has empty subdivisions and you're expecting there tobe a space at the end of your pattern, when you go to generate the CSD, the space won't be there.
To get around this, you may want to use a time behavior of None, or you may want put in a "ghost note"in a Pattern layer, using a note like:
i 10000 0 .25
Where 10000 is not an instrument in use in your project. Then you can put in a trigger for this pattern inthe last subdivision. What will happen is that blue will process the score with this note's time and thuswill generate with this out to the CSD, but Csound will ignore the note.
When the PatternObject is set to use a time behavior of Repeat, the same situation can occur as whenusing Scale if a Repeat Point is not set, as the default for Repeat when no repeat point is set is to takethe generated score and repeat it after the duration of the last note. To prevent this, either use the ghostnote technique above or set a repeat point.

Reference
87
PianoRollAccepts NoteProcessors: yes
About the PianoRoll
The PianoRoll SoundObject is a graphical tool to enter in notes, commonly available in many MIDIsequencer environments. This PianoRoll is unique in that it is Microtonal: it supports loading any Scala[http://www.huygens-fokker.org/scala/] scale file and editing of notes adapts to that scale. For example,in the picture above, the scale loaded is a Bohlen-Pierce scale with 13 tones to the tritave. The PianoRollabove has adapted to that scale to show 13 scale degrees per octave of its editor. The generated notes canoutput values as either frequency or PCH notation (octave.scaleDegree). But don't worry, if you're notinterested in alternate tunings, the PianoRoll is set by default to use 12-TET tuning, the "standard" tuningsystem in use today.
About Note Template Strings
The PianoRoll uses Note Template strings as a way to maintain flexibility and be able to handle the open-ended nature of Csound's instruments. Since the user who builds the instrument designs what each pfieldwill mean(besides p1, p2, and p3), the Note Template string should be made to match the instrument theuser wants to use the PianoRoll with. When the note is generated, certain special text values (those enclosedin < and >) will be replaced by values unique to the note.
For example, the following Note Template string:
i<INSTR_ID> <START> <DUR> <FREQ> 0 1 1
Will have the <INSTR_ID> replaced with the value set in the Piano Roll properties, <START> replacedthe start time for the note, <DUR> replaced with the duration of the note, and <FREQ> replaced witheither a frequency or PCH value, depending on how the Piano Roll is configured in its properties. Theother values will pass through as part of the note.
Warning
Caution should be used when creating a Note Template string to make sure that there are enoughspaces allowed between replacement strings. For example, the following:
i<INSTR_ID> <START> <DUR> <FREQ> <FREQ> 0 1 1

Reference
88
would result in:
i1 0 2 440 440 0 1 1
while the following:
i<INSTR_ID> <START> <DUR> <FREQ><FREQ> 0 1 1
which does not have proper space between the two <FREQ> tags, results in:
i1 0 2 440440 0 1 1
Piano Roll Properties
The PianoRoll requires a bit of configuration before using. The properties page below shows the propertiesthat should be configure before using the actual note drawing canvas.
PianoRoll Properties
Instrument ID Instrument name or number to be used when replacing <INSTR_ID> in Notetemplate strings.
Note Template The default note template when inserting notes. Notes make a copy of this templatestring when created and edits to the note's string stay with the note. Generally,you'll want to create a template string that will match the instrument this PianoRollwill be used with.
Scale The scale used with this PianoRoll. The PianoRoll defaults to a 12-TET scale, the"standard" scale in use in Western classical and popular music. Pressing the buttonlabeled "..." will open a file browser for selecting Scala scales to use in place ofthe default. After selecting a scale, the PianoRoll will adjust the note canvas forthe number of scale degrees the newly selected scale contains.

Reference
89
Base Frequency The base frequency of the scale for octave 8 and scale degree 0 (8.00). Defaultsto C below A440.
Pch Generation Selects how the notes will generate their value to be used when replacing the<FREQ> tag value in a note template. The options are:
Frequency The value of the note's pitch expressed in terms of frequencyin hertz. This value is calculated using the chosen Scale for thePianoRoll.
blue PCH Value of note expressed in blue PCH, a format similar to CsoundPCH but differs in that it does not allow fractional values. Valuesare generated as "octave.scaleDegree" i.e. "8.22" would be octave8 and scale degree 22 in a scale that has 23 or more notes, or wouldwrap around as it does in Csound PCH. If the scale had 12 scaledegrees, the "8.22" would be interpreted as "9.10". blue PCH isallowed as an option to be used with blue PCH note processors andthen to be used with the Tuning NoteProcessor.
MIDI When this Pch Generation method is chosen, a MIDI note value(0-127, 60 = Middle-C) is used for <FREQ> and the chosen Scalewill not be used. The display for the editor will automaticallyswitch to show octaves and notes for standard MIDI scale values.Using MIDI note values is useful for instruments that exepct MIDInote values such as the fluidsynth opcodes as well as midiout.
Time Options
The Time Options in the PianoRoll are accessed and behave very much in the same manner as those thatare in the main timeline. The button labelled "..." in the upper right corner of the PianoRoll canvas willopen and close the panel on the right that contains the properties.
Time Options
Snap Enabled Enables snapping behavior on the timeline. If enabled, vertical lines will be drawn atsnap points, set by the value below it. In the screenshot above, the snap is enabledand set to every 1.0 beats.
Time Display Controls how the time in the time bar above the PianoRoll canvas will display. Thetime value will show as time, while Number display will display as integers. Thenumber below show how often to put a label. In the screenshot above, the TimeDisplay is set to show a label in units of time and at every 5.0 seconds.
Reference
90
Using the Note Canvas
To enter notes, hold down the shift key and press the left mouse button down on the canvas. A note willbe entered where you pressed and will be set to resize as you move the mouse around. When you finallyrelease the mouse, the note will be finished entering.
After that, you can select notes by clicking on them or drag and selecting notes by marquee. You can alsopress the shift key and click on notes to add to the currently selected notes. You can then drag the notesaround by click a selected note and dragging. To resize a note, select a single note, and after hilighted,move the mouse to the right edge of the selected now, and then click and drag.
To remove a note or notes, select the notes, then press the del key.
To cut or copy a note, select a single note (only one note in the buffer is currently supported), then pressctrl-x or ctrl-c to cut or copy, respectively.
To paste, ctrl-click on the PianoNote canvas. (This is the same behavior as pasting soundObjects on themain score timeline.)
To edit a note's template, select a single note. After selecting a note, the text field for editing the note'stemplate text will be enabled. Here you can then edit the note's values.
For more Information
See the example .blue file in the blue/examples/soundObjects folder.
PolyObject
Accepts NoteProcessors: yes
A timeline object that acts as a container for other SoundObjects. PolyObjects can also be embedded withineach other.
Try This
On the root timeline, rt-click on a soundLayer and select "Add new PolyObject". You should haveadded a new PolyObject to the timeline. Now either double-click or rt-click on the PolyObject andselect "Edit SoundObject". You should now be within the PolyObjects timeline, and the buttonwhich says [root] should now have another button next to it that says [PolyObject]. Now tryadding a few soundLayers and a few GenericScore Objects. Now click on [root]. You have nowreturned to the root timeline. Here you should see the PolyObject you've edited. Now you canscale the object you've created and all of the objects held within will scale together as a group.
PythonObject
Accepts NoteProcessors: yes
Allows for using of the Python programming language to generate score data, using the Jython interpreterto interpret Python scripts. You may add your own python classes to the library for use with "import"statements by adding them to your BLUE_HOME/pythonLib folder. Included with blue is MaurizioUmberto Puxeddu's pmask, as well as Steven Yi's Orchestral Composition library, found in Blue'sapplication directory under blue/pythonLib.

Reference
91
After writing your script to generate notes, assign the string value of the notes to the variable 'score'. Bluewill then read in the value from that variable and continue processing.
Example
temp = ""
for i in range(4): temp += "i1 %d 1 %s %s\n"%(i, "8.0" + str(i), 80)
score = temp
The above example script will generate four notes at ascending half steps. If the PythonObject is set witha start time of 0 and a duration of 2, then it will generate the following score:
i1 0.0 0.5 8.00 80i1 0.5 0.5 8.01 80i1 1.0 0.5 8.02 80i1 1.5 0.5 8.03 80
Regarding Processing
Blue processes soundObjects by going through each SoundLayer and generating score for each objectwithin each layer. This is useful to know so that if you are using a PythonObject that has utility functionsthat you later use in other PythonObjects, you should put that utility PythonObject on the first SoundLayerclosest to the top, or at least on a layer above all others that contain PythonObjects.
Also to note, as a feature, Blue uses a single interpreter instance for processing python code. Therefore, ifone PythonObject has code evaluated, the values from that code can be read by other objects. This allowscreating utility PythonObjects. However, one can use stale values (or values from another project even) ifone is not careful to always assign values in the project that require being set for this particular project.
Variables from blue
The following variables are avaialable from blue:
Variables from blue
blueDuration Duration of the Python SoundObject
blueProjectDir The location of the current project's directory. Includes path separator at end.
Process at Start
There is a checkbox entitled "Process at Start". Selecting this option will have the script of thePythonObject run when a .blue project is loaded. This is useful for scripts that act as library functions, butthemselves do not generate any notes. For example, you might define a number of score generation utilityfunctions in one PythonObject that has "Process at Start" enabled. Your other PythonObjects may then use
Reference
92
the functions from that PythonObject. Next time you load your project, if that PythonObject hasn't beenrun, your other PythonObjects will not be able to be run either. If you are rendering from the beginningof a project, this won't be an issue, but if you're starting work in the middle of a project, you will need toevaluate that utility PythonObject at least once. You can either do a run from the start at least once, usethe "Test" button to have that evaluated, or use "Process at Start" and have blue ensure it is loaded intothe python interpreter when you load your projects.
RhinoObject
Accepts NoteProcessors: yes
Allows for the use of the JavaScript programming language to create score data. uses the Rhino interpreterto interpret JavaScript scripts.
After writing your script to generate notes, you'll have to bring back into blue by assigning the variable'score' the text string of the generated javaScript score.
Example
[code for generating score]... score = myScoreGenerator();
(where myScoreGenerator() is a function that will generate Csound SCO)
Sound SoundObject
Accepts NoteProcessors: no
Inline instruments. When experimenting with sounds, or if you're going to make a soundEffect and nota whole composition, it might be tedious to go and make an instrument and then have to edit scoreinformation. This object is here so that you can add instruments directly to the timeline. What is generatedis a minimal i-statement that corresponds to the sound soundObject's bar on a timeline. This abstracts aconcept of working with the sound itself instead of through the level of time of a note.
Tracker
Accepts NoteProcessors: yes
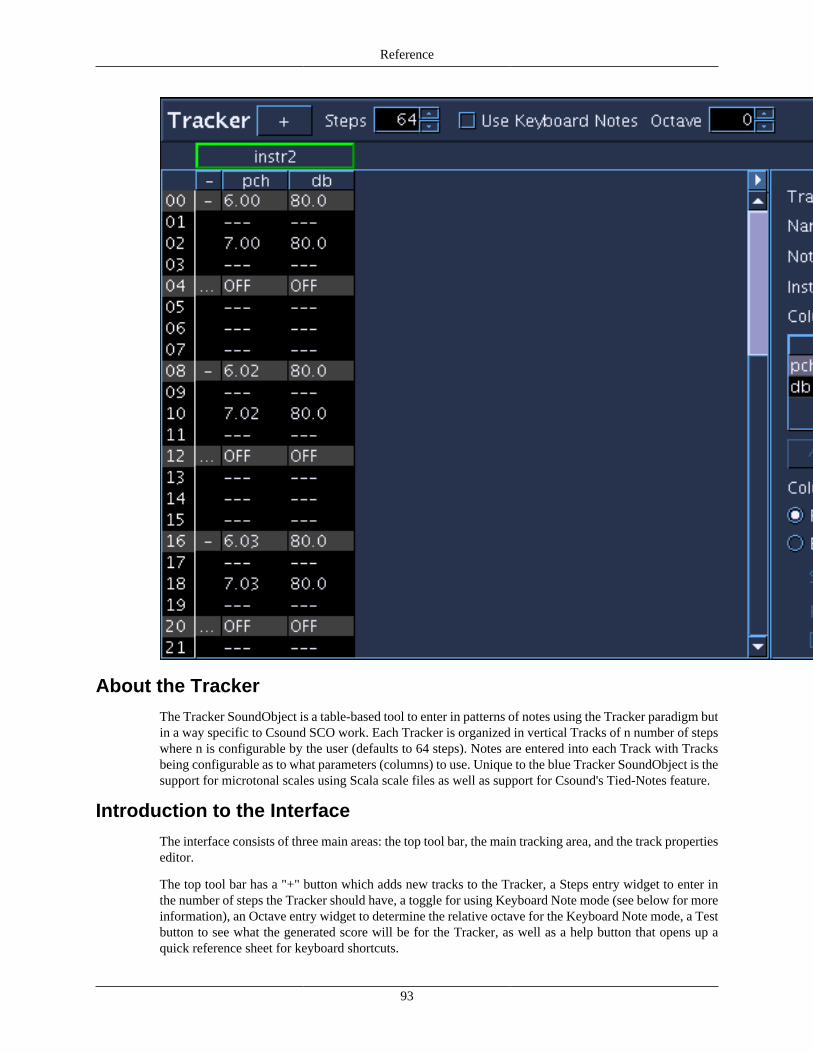
Reference
93
About the Tracker
The Tracker SoundObject is a table-based tool to enter in patterns of notes using the Tracker paradigm butin a way specific to Csound SCO work. Each Tracker is organized in vertical Tracks of n number of stepswhere n is configurable by the user (defaults to 64 steps). Notes are entered into each Track with Tracksbeing configurable as to what parameters (columns) to use. Unique to the blue Tracker SoundObject is thesupport for microtonal scales using Scala scale files as well as support for Csound's Tied-Notes feature.
Introduction to the Interface
The interface consists of three main areas: the top tool bar, the main tracking area, and the track propertieseditor.
The top tool bar has a "+" button which adds new tracks to the Tracker, a Steps entry widget to enter inthe number of steps the Tracker should have, a toggle for using Keyboard Note mode (see below for moreinformation), an Octave entry widget to determine the relative octave for the Keyboard Note mode, a Testbutton to see what the generated score will be for the Tracker, as well as a help button that opens up aquick reference sheet for keyboard shortcuts.
Reference
94
The main tracking area is where all of the score work is done to enter and modify notes. More informationabout note entry and modification is available below in the section "Entering in Notes".
The last interface area is the track properties editor. The track properties editor is held in a collapsible paneand when the tracker editor initially loads it will be collapsed. To open up the track properties, at least onetrack needs to be added to the tracker. Once one track exists, click the small button above the right scrollbar to open and close the track editor properties. More information on using the properties editor followsbelow in the section "Settings Things Up".
Setting Things Up
When the Tracker Object is edited it is completely blank. To start, click the "+" button to add as many tracksas you would like to use. After adding the number of tracks you'd like to use you will need to configurethe track to work with your Csound instruments. Open up the track properties editor using the "<" togglebutton above the right scroll bar. Afterwards, select a track by clicking the name panel above a track.Selecting a track will populate the track properties editor as well as hilight the name panel with a greenborder. A track's properties consist of a Name, Note Template, Instrument ID, and Columns; descriptionsof the values are listed below.
Track Properties
Name The name property is used only for reference; editing the name changes the titleshown on the name panel and is for the user's reference.
Note Template The note template is used when generating the notes for the track. Items in thetemplate that are within < and > tags will be replaced by values either from theTracker (START and DUR), the Instrument ID (INSTR_ID) or values from thecolumns, using the column's name as a key (i.e. if a column is called "space", whengenerating a note for the track, any value in the space column will replace the<space> text in the note template). Note templates will generally follow the form"i <INSTR_ID> <START> <DUR>" and then have tag keys for each column forthe track.
Instrument Instrument name or number to be used when replacing <INSTR_ID> in Notetemplate strings.
Columns Each track has a minimum of one configurable column (the tied-note is a feature ofall tracks and is not a part of this editor) and is user-configurable to add as manycolumns as the user needs for the values to use in their notes for their instruments.Columns are added and removed using the Columns table and can be organized bypushing up and down in the table which will move their order left and right in themain tracking area. To edit the name of the Column, use the Columns table to editthe name of the column.
Each Column also has a type. The type information is used by the tracker whenentering data to verify that the data being input is of that column's type, as well asused when using shortcuts to manipulate data in that column.
Column Properties
PCH Csound PCH format. Entering data will verify that data is inthe octave.pitch format. Using the increment and decrement valueshortcuts will propertly add or subtract one to pitch value, i.e.incrementing the value of 8.11 will result in 9.00.
Reference
95
blue PCH The blue PCH format is like the Csound PCH format except that thepitch part is always a whole number integer and is the scale degreeof the selected Scale. A valid value in Csound PCH such as 8.01 isnot valid in Blue PCH as 01 is not an integer (the equivalent in bluePCH would be 8.1).
Using blue PCH allows for using Scala scale files to do microtonaltracking. To choose a Scala scale, use the "..." button to open up afile selector to choose a Scala scale. Afterwards, enter in the basefrequency for the scale (the default is 261.62558 or middle-c). The"output frequencies" checkbox will determine how the values enteredinto this column will be interpreted. By default, "output frequencies"is enabled, meaning when the tracker goes to generate notes, it willtake the blue PCH values that are entered and convert them to afrequency value in hertz. If you deselect this option, the tracker willpass the blue PCH value out. This option should generally be leftenabled unless the user is planning to do further operation on the pchvalues via NoteProcessors that work with blue PCH.
Using blue PCH, data will be verified on entry and increment/decrement value options will work in the same way as for PCH.
MIDI MIDI will limit the values entered to whole number integers from0-127. Using the increment and decrement value shortcuts will addor subtract 1 to the value.
String The String type allows the user to input any value they want. Noverification is done on entry and the increment/decrement valueshortcuts will have no effect.
Number The Number format will limit the values entered to only numbers.Values can be further restricted to a given range as well as to onlyuse whole number integers. Using the increment and decrement valueshortcuts will add or subtract 1 to the value.
Entering in Notes
Entering in data into the tracker is much like entering data into any other table, though learning thekeyboard shortcuts will vastly speed up entering and modifying data. To begin click anywhere on a trackwhere you would like to add a note. Now, begin typing to enter in a value for that note, then press enterwhen you are finished. Depending on the type of column you have configured, blue will verify that thedata entered is allowable and if so it will save that data to the note. If the value is not allowable, the cellwill become hilighted in red and will require you to either fix your input to be valid or press esc to cancelentering in data.
When entering in data for a new note, the first time you enter in information for a column in the note'srow, it will not only enter in the data for the column, but also copy values for all other columns from thefirst note that exists previous to the note being edited. If there is no notes entered, some default settingswill be used based on the column type.
Like other tracker systems, the duration of a note entered will last as long as until either the next enterednote, the end of the pattern, or until an OFF note is encountered. So, for example, if a note is entered instep 0 and step 2, the duration of the first note will last 2 steps while the second note will last until theend of the pattern (62 steps in a default 64 step track). To enter an OFF statement, go to the row where
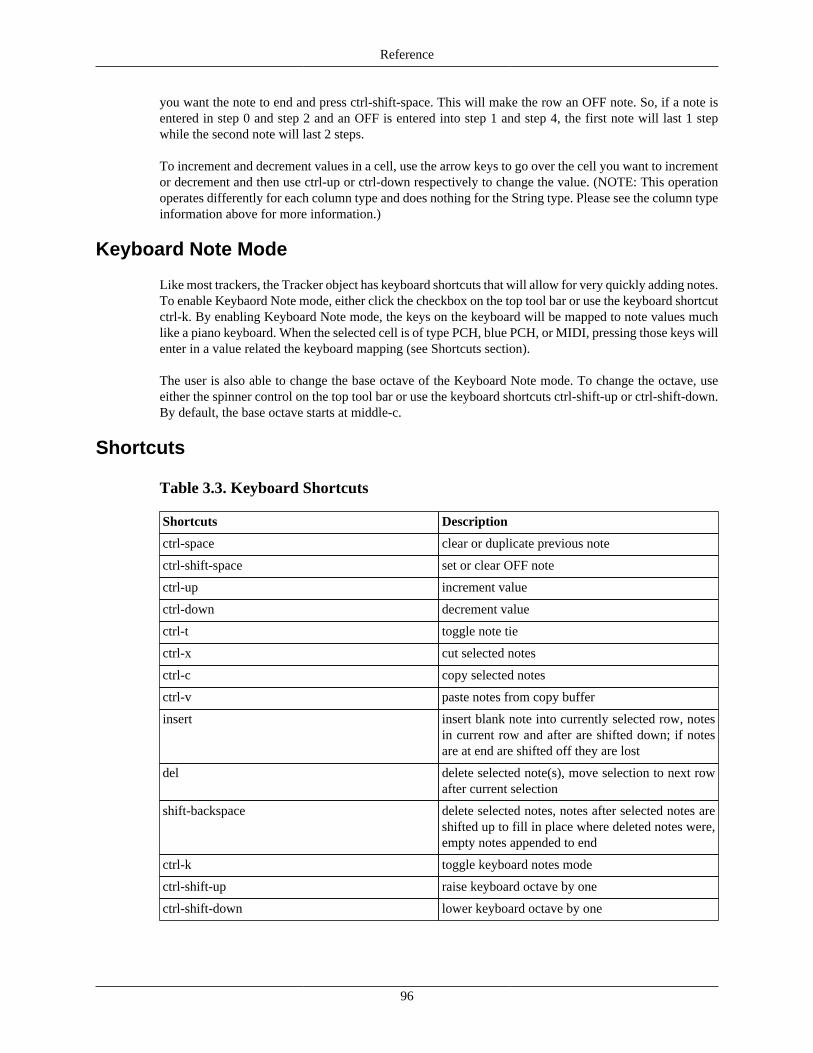
Reference
96
you want the note to end and press ctrl-shift-space. This will make the row an OFF note. So, if a note isentered in step 0 and step 2 and an OFF is entered into step 1 and step 4, the first note will last 1 stepwhile the second note will last 2 steps.
To increment and decrement values in a cell, use the arrow keys to go over the cell you want to incrementor decrement and then use ctrl-up or ctrl-down respectively to change the value. (NOTE: This operationoperates differently for each column type and does nothing for the String type. Please see the column typeinformation above for more information.)
Keyboard Note Mode
Like most trackers, the Tracker object has keyboard shortcuts that will allow for very quickly adding notes.To enable Keybaord Note mode, either click the checkbox on the top tool bar or use the keyboard shortcutctrl-k. By enabling Keyboard Note mode, the keys on the keyboard will be mapped to note values muchlike a piano keyboard. When the selected cell is of type PCH, blue PCH, or MIDI, pressing those keys willenter in a value related the keyboard mapping (see Shortcuts section).
The user is also able to change the base octave of the Keyboard Note mode. To change the octave, useeither the spinner control on the top tool bar or use the keyboard shortcuts ctrl-shift-up or ctrl-shift-down.By default, the base octave starts at middle-c.
Shortcuts
Table 3.3. Keyboard Shortcuts
Shortcuts Description
ctrl-space clear or duplicate previous note
ctrl-shift-space set or clear OFF note
ctrl-up increment value
ctrl-down decrement value
ctrl-t toggle note tie
ctrl-x cut selected notes
ctrl-c copy selected notes
ctrl-v paste notes from copy buffer
insert insert blank note into currently selected row, notesin current row and after are shifted down; if notesare at end are shifted off they are lost
del delete selected note(s), move selection to next rowafter current selection
shift-backspace delete selected notes, notes after selected notes areshifted up to fill in place where deleted notes were,empty notes appended to end
ctrl-k toggle keyboard notes mode
ctrl-shift-up raise keyboard octave by one
ctrl-shift-down lower keyboard octave by one

Reference
97
Table 3.4. Keyboard Note Mode
Shortcut PCh Value blue PCH Value MIDI Value
z 8.00 8.0 60
s 8.01 8.1 61
x 8.02 8.2 62
d 8.03 8.3 63
c 8.04 8.4 64
v 8.05 8.5 65
g 8.06 8.6 66
b 8.07 8.7 67
h 8.08 8.8 68
n 8.09 8.9 69
j 8.10 8.10 70
m 8.11 8.11 71
q 9.00 9.0 72
2 9.01 9.1 73
w 9.02 9.2 74
3 9.03 9.3 75
e 9.04 9.4 76
r 9.05 9.5 77
5 9.06 9.6 78
t 9.07 9.7 79
6 9.08 9.8 80
y 9.09 9.9 81
7 9.10 9.10 82
u 9.11 9.11 83
i 10.00 10.0 84
9 10.01 10.1 85
o 10.02 10.2 86
0 10.03 10.3 87
p 10.04 10.4 88
For More Information
See the tracker.blue example file in the blue/examples/soundObjects folder.
ZakLineObject
Accepts NoteProcessors: no
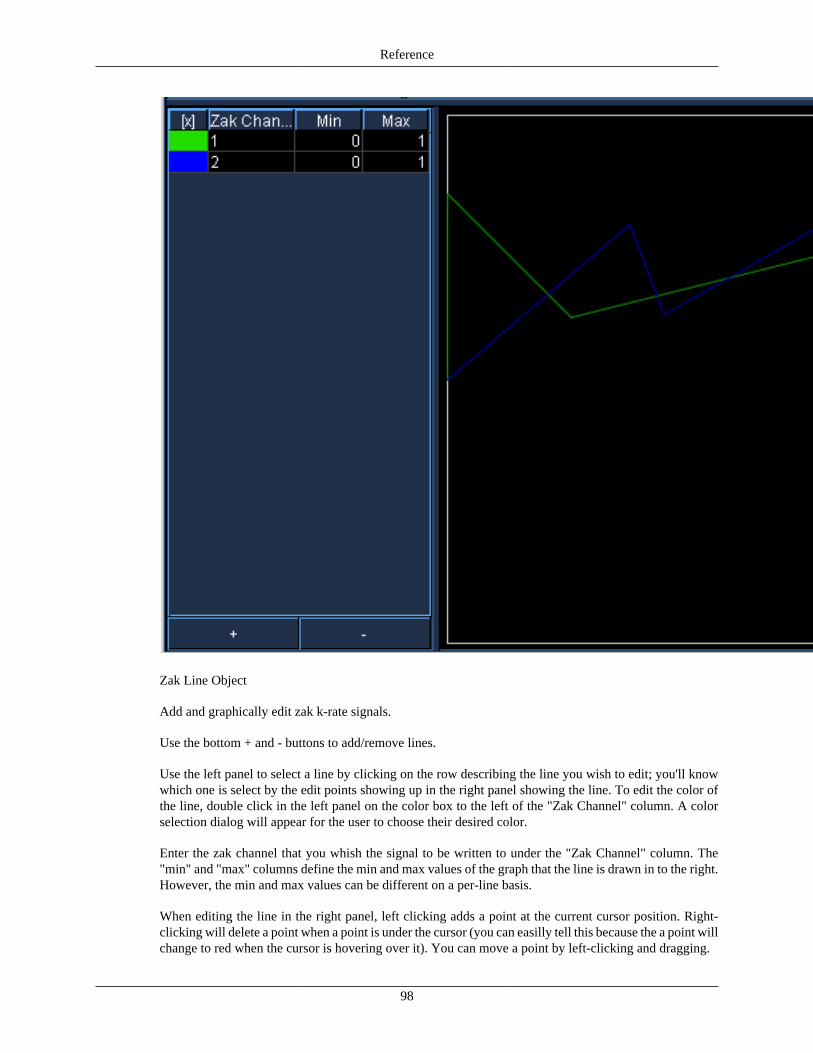
Reference
98
Zak Line Object
Add and graphically edit zak k-rate signals.
Use the bottom + and - buttons to add/remove lines.
Use the left panel to select a line by clicking on the row describing the line you wish to edit; you'll knowwhich one is select by the edit points showing up in the right panel showing the line. To edit the color ofthe line, double click in the left panel on the color box to the left of the "Zak Channel" column. A colorselection dialog will appear for the user to choose their desired color.
Enter the zak channel that you whish the signal to be written to under the "Zak Channel" column. The"min" and "max" columns define the min and max values of the graph that the line is drawn in to the right.However, the min and max values can be different on a per-line basis.
When editing the line in the right panel, left clicking adds a point at the current cursor position. Right-clicking will delete a point when a point is under the cursor (you can easilly tell this because the a point willchange to red when the cursor is hovering over it). You can move a point by left-clicking and dragging.
Reference
99
NoteProcessorsNoteProcessors are used in conjunction with soundObjects, and are used post-generation of thesoundObject's noteList. They are used to modify values within the noteList.
NoteProcessors can be added via the soundObject property dialog. When a soundObject is selected on thetimeline, and if the soundObject supports noteProcessors, you can add, remove, push up, or push downnoteProcessors on the property dialog.
Role in Score GenerationNoteProcessors are applied after the notes of the soundObject are generated and before time behavior isapplied. Processing starts with the first NoteProcessor in the chain and the results of that are passed downthe chain.
Add ProcessorParameters: pfield, value
The AddProcessor takes two parameters, one for pfield (positive integer > 0) and one for value (anynumber). When applied, it will add the user-defined value to the set pfield for all notes.
For example, if you have a SoundObject with notes for an instrument that uses p4 as its amplitude. If youhave values for p4 within the range of 78 and 82, such as the following score:
i1 0 2 78i1 + . 80i1 + . 81i1 + . 82
If an AddProcessor is used that was set to 4.4 for value 4 for pfield, your notes afterwards would be movedto the range of 82.4 to 86.4:
i1 0.0 0.5 82.4i1 0.5 0.5 84.4i1 1.0 0.5 85.4i1 1.5 0.5 86.4
(The p2 and p3 times above are post-processing for a 2 second duration SoundObject with time behaviorset to scale.)
Equals ProcessorParameters: pfield, value
Sets user-given pField of all notes in soundObject to user-given value, i.e. set all p4's to value "440", orset all p6's to value "/work/audio/wav/mySample2.wav". The following score:
Reference
100
i1 0 2 8.00i1 + . 8.04i1 + . 8.07i1 + . 9.00
If used with an EqualsProcessor with value 7.00 and pfield 4, would result in the following score:
i1 0.0 0.5 7.00i1 0.5 0.5 7.00i1 1.0 0.5 7.00i1 1.5 0.5 7.00
(The p2 and p3 times above are post-processing for a 2 second duration SoundObject with time behaviorset to scale.)
Tip: One can use this NoteProcessor to quickly try testing a score with another insturment. To do this, usethis NoteProcessor to reassign p1.
Inversion ProcessorParameters: pfield, value
This NoteProcessor flips all values in designated pfield about an axis (value). The following score:
i1 0 2 80i1 + . 85i1 + . 95i1 + . 100
If processed with an InversionProcessor with value 90 and pfield 4 would result in:
i1 0.0 0.5 100.0i1 0.5 0.5 95.0i1 1.0 0.5 85.0i1 1.5 0.5 80.0
(The p2 and p3 times above are post-processing for a 2 second duration SoundObject with time behaviorset to scale.)
LineAdd ProcessorParameters: pfield, LineAdd String
The LineAdd Processor adds values to a user-defined pfield. This noteProcessor differs from theAddProcessor in that the value added is variable over time. The LineAdd String is a set of beat/value pairsthat are like the breakpoints on curve. The following score:
i1 0 2 80i1 + . 80i1 + . 80
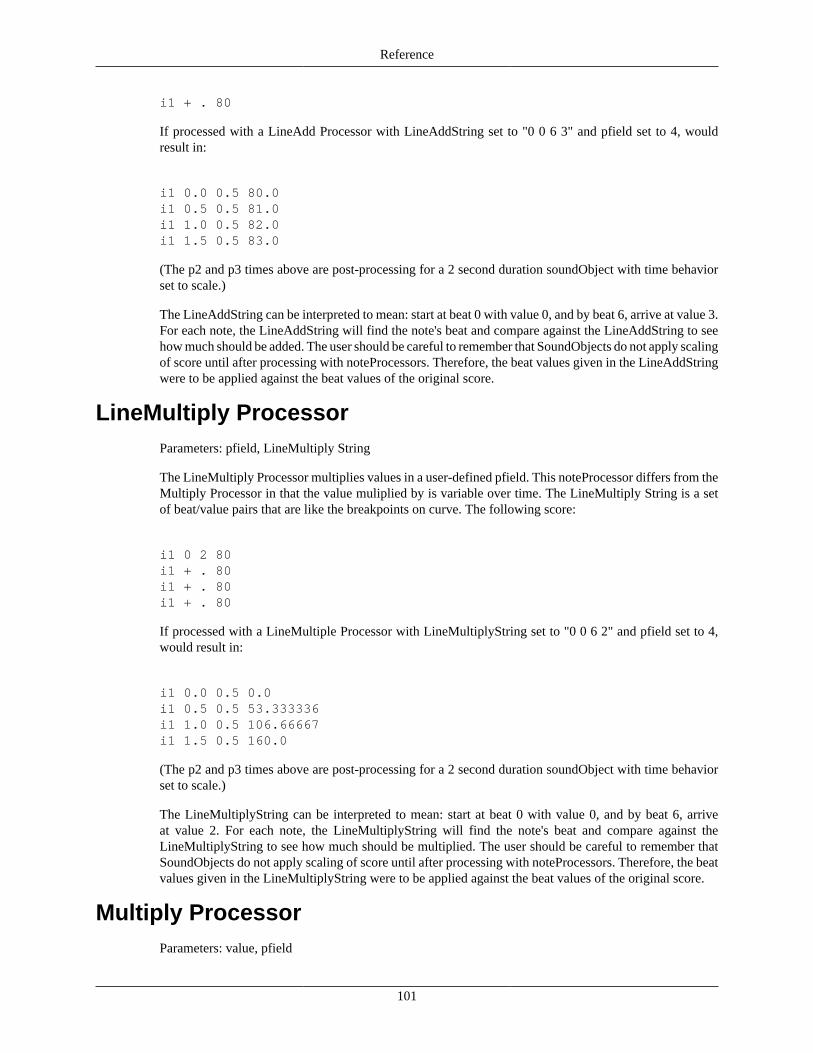
Reference
101
i1 + . 80
If processed with a LineAdd Processor with LineAddString set to "0 0 6 3" and pfield set to 4, wouldresult in:
i1 0.0 0.5 80.0i1 0.5 0.5 81.0i1 1.0 0.5 82.0i1 1.5 0.5 83.0
(The p2 and p3 times above are post-processing for a 2 second duration soundObject with time behaviorset to scale.)
The LineAddString can be interpreted to mean: start at beat 0 with value 0, and by beat 6, arrive at value 3.For each note, the LineAddString will find the note's beat and compare against the LineAddString to seehow much should be added. The user should be careful to remember that SoundObjects do not apply scalingof score until after processing with noteProcessors. Therefore, the beat values given in the LineAddStringwere to be applied against the beat values of the original score.
LineMultiply ProcessorParameters: pfield, LineMultiply String
The LineMultiply Processor multiplies values in a user-defined pfield. This noteProcessor differs from theMultiply Processor in that the value muliplied by is variable over time. The LineMultiply String is a setof beat/value pairs that are like the breakpoints on curve. The following score:
i1 0 2 80i1 + . 80i1 + . 80i1 + . 80
If processed with a LineMultiple Processor with LineMultiplyString set to "0 0 6 2" and pfield set to 4,would result in:
i1 0.0 0.5 0.0i1 0.5 0.5 53.333336i1 1.0 0.5 106.66667i1 1.5 0.5 160.0
(The p2 and p3 times above are post-processing for a 2 second duration soundObject with time behaviorset to scale.)
The LineMultiplyString can be interpreted to mean: start at beat 0 with value 0, and by beat 6, arriveat value 2. For each note, the LineMultiplyString will find the note's beat and compare against theLineMultiplyString to see how much should be multiplied. The user should be careful to remember thatSoundObjects do not apply scaling of score until after processing with noteProcessors. Therefore, the beatvalues given in the LineMultiplyString were to be applied against the beat values of the original score.
Multiply ProcessorParameters: value, pfield
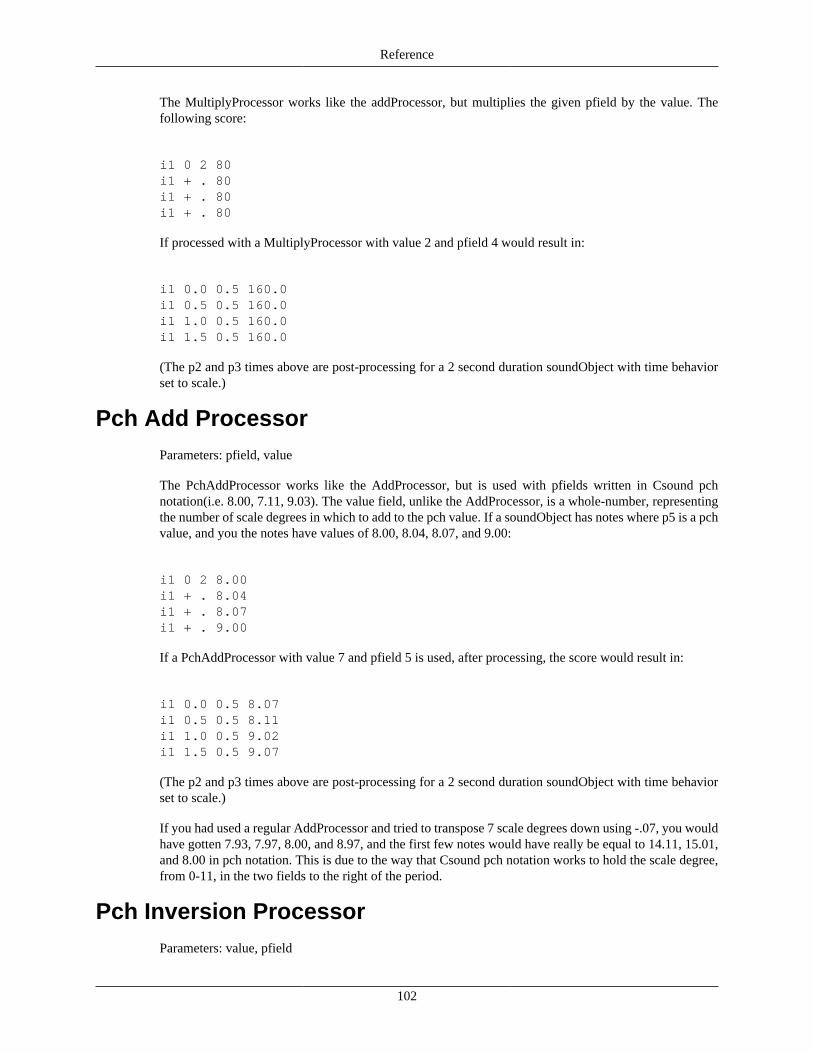
Reference
102
The MultiplyProcessor works like the addProcessor, but multiplies the given pfield by the value. Thefollowing score:
i1 0 2 80i1 + . 80i1 + . 80i1 + . 80
If processed with a MultiplyProcessor with value 2 and pfield 4 would result in:
i1 0.0 0.5 160.0i1 0.5 0.5 160.0i1 1.0 0.5 160.0i1 1.5 0.5 160.0
(The p2 and p3 times above are post-processing for a 2 second duration soundObject with time behaviorset to scale.)
Pch Add ProcessorParameters: pfield, value
The PchAddProcessor works like the AddProcessor, but is used with pfields written in Csound pchnotation(i.e. 8.00, 7.11, 9.03). The value field, unlike the AddProcessor, is a whole-number, representingthe number of scale degrees in which to add to the pch value. If a soundObject has notes where p5 is a pchvalue, and you the notes have values of 8.00, 8.04, 8.07, and 9.00:
i1 0 2 8.00i1 + . 8.04i1 + . 8.07i1 + . 9.00
If a PchAddProcessor with value 7 and pfield 5 is used, after processing, the score would result in:
i1 0.0 0.5 8.07i1 0.5 0.5 8.11i1 1.0 0.5 9.02i1 1.5 0.5 9.07
(The p2 and p3 times above are post-processing for a 2 second duration soundObject with time behaviorset to scale.)
If you had used a regular AddProcessor and tried to transpose 7 scale degrees down using -.07, you wouldhave gotten 7.93, 7.97, 8.00, and 8.97, and the first few notes would have really be equal to 14.11, 15.01,and 8.00 in pch notation. This is due to the way that Csound pch notation works to hold the scale degree,from 0-11, in the two fields to the right of the period.
Pch Inversion ProcessorParameters: value, pfield
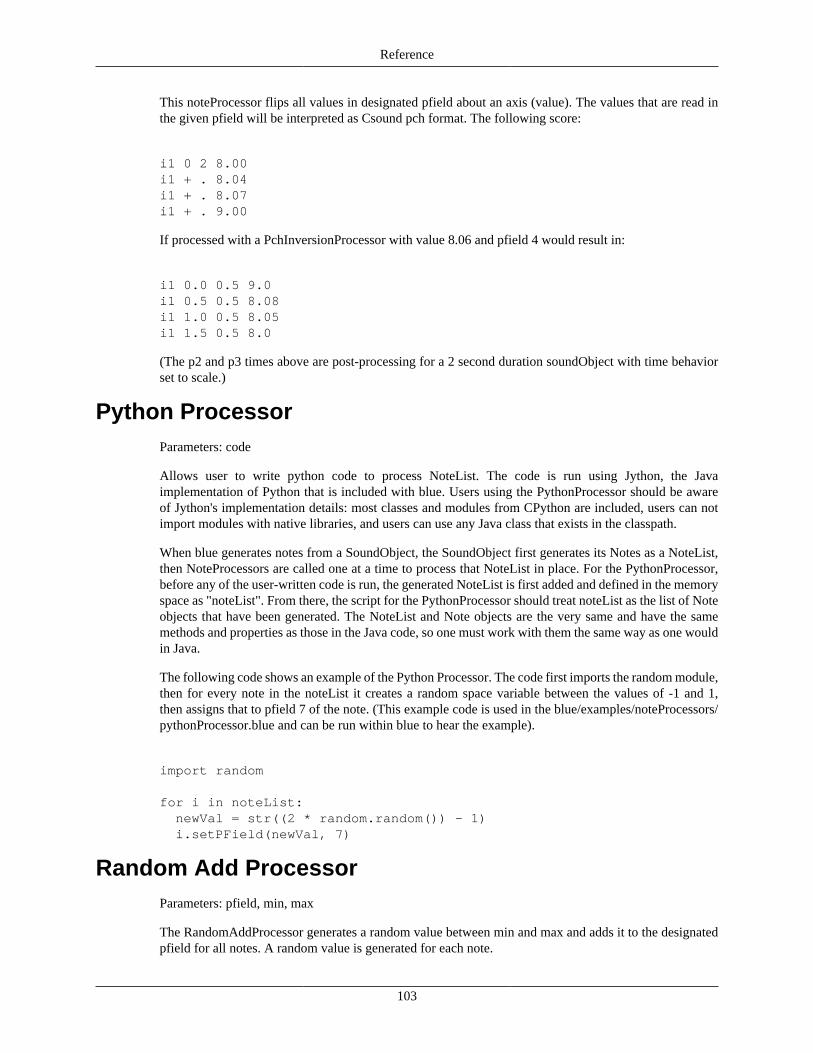
Reference
103
This noteProcessor flips all values in designated pfield about an axis (value). The values that are read inthe given pfield will be interpreted as Csound pch format. The following score:
i1 0 2 8.00i1 + . 8.04i1 + . 8.07i1 + . 9.00
If processed with a PchInversionProcessor with value 8.06 and pfield 4 would result in:
i1 0.0 0.5 9.0i1 0.5 0.5 8.08i1 1.0 0.5 8.05i1 1.5 0.5 8.0
(The p2 and p3 times above are post-processing for a 2 second duration soundObject with time behaviorset to scale.)
Python ProcessorParameters: code
Allows user to write python code to process NoteList. The code is run using Jython, the Javaimplementation of Python that is included with blue. Users using the PythonProcessor should be awareof Jython's implementation details: most classes and modules from CPython are included, users can notimport modules with native libraries, and users can use any Java class that exists in the classpath.
When blue generates notes from a SoundObject, the SoundObject first generates its Notes as a NoteList,then NoteProcessors are called one at a time to process that NoteList in place. For the PythonProcessor,before any of the user-written code is run, the generated NoteList is first added and defined in the memoryspace as "noteList". From there, the script for the PythonProcessor should treat noteList as the list of Noteobjects that have been generated. The NoteList and Note objects are the very same and have the samemethods and properties as those in the Java code, so one must work with them the same way as one wouldin Java.
The following code shows an example of the Python Processor. The code first imports the random module,then for every note in the noteList it creates a random space variable between the values of -1 and 1,then assigns that to pfield 7 of the note. (This example code is used in the blue/examples/noteProcessors/pythonProcessor.blue and can be run within blue to hear the example).
import random
for i in noteList: newVal = str((2 * random.random()) - 1) i.setPField(newVal, 7)
Random Add ProcessorParameters: pfield, min, max
The RandomAddProcessor generates a random value between min and max and adds it to the designatedpfield for all notes. A random value is generated for each note.
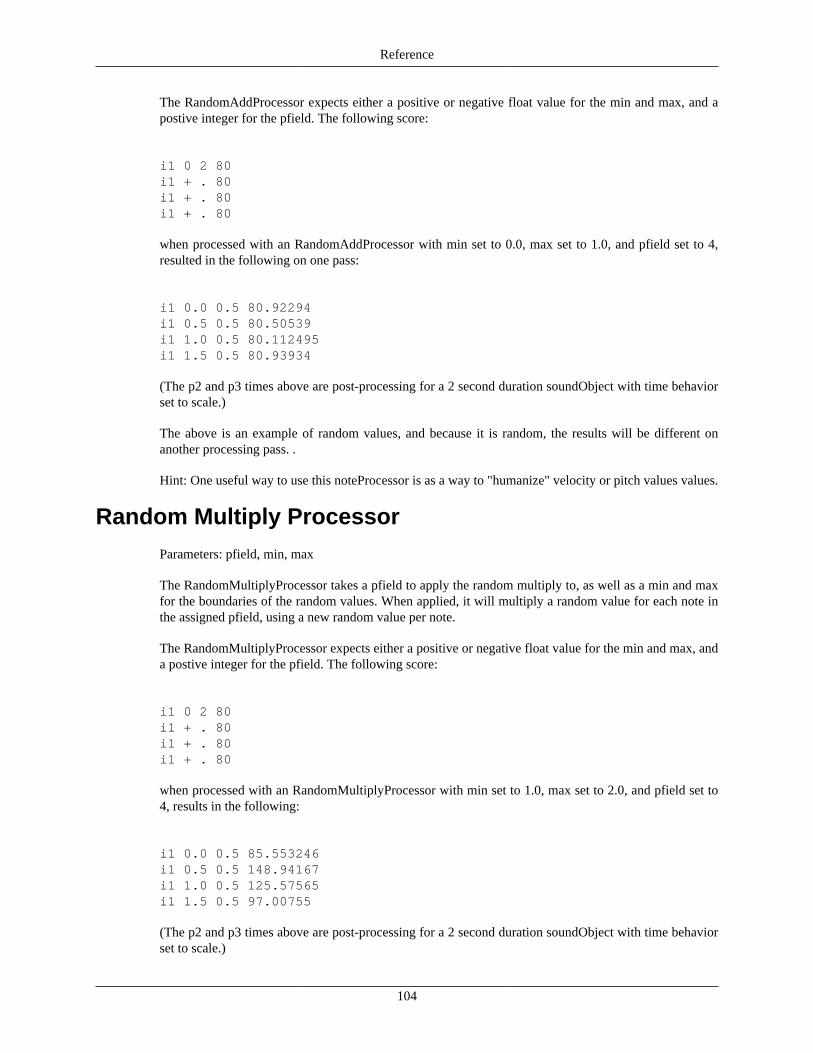
Reference
104
The RandomAddProcessor expects either a positive or negative float value for the min and max, and apostive integer for the pfield. The following score:
i1 0 2 80i1 + . 80i1 + . 80i1 + . 80
when processed with an RandomAddProcessor with min set to 0.0, max set to 1.0, and pfield set to 4,resulted in the following on one pass:
i1 0.0 0.5 80.92294i1 0.5 0.5 80.50539i1 1.0 0.5 80.112495i1 1.5 0.5 80.93934
(The p2 and p3 times above are post-processing for a 2 second duration soundObject with time behaviorset to scale.)
The above is an example of random values, and because it is random, the results will be different onanother processing pass. .
Hint: One useful way to use this noteProcessor is as a way to "humanize" velocity or pitch values values.
Random Multiply ProcessorParameters: pfield, min, max
The RandomMultiplyProcessor takes a pfield to apply the random multiply to, as well as a min and maxfor the boundaries of the random values. When applied, it will multiply a random value for each note inthe assigned pfield, using a new random value per note.
The RandomMultiplyProcessor expects either a positive or negative float value for the min and max, anda postive integer for the pfield. The following score:
i1 0 2 80i1 + . 80i1 + . 80i1 + . 80
when processed with an RandomMultiplyProcessor with min set to 1.0, max set to 2.0, and pfield set to4, results in the following:
i1 0.0 0.5 85.553246i1 0.5 0.5 148.94167i1 1.0 0.5 125.57565i1 1.5 0.5 97.00755
(The p2 and p3 times above are post-processing for a 2 second duration soundObject with time behaviorset to scale.)

Reference
105
The above is an example of random values, and because it is random, the results will be different onanother processing pass.
Retrograde Processor
Parameters: none
Reverses all the generated notes in time. The following score:
i1 0 2 1i1 + . 2i1 + . 3i1 + . 4
If processed with a RetrogradeProcessor would result in:
i1 1.5 0.5 1i1 1.0 0.5 2i1 0.5 0.5 3i1 0.0 0.5 4
which if re-sorted by start time would result in:
i1 0.0 0.5 4i1 0.5 0.5 3i1 1.0 0.5 2i1 1.5 0.5 1
(The p2 and p3 times above are post-processing for a 2 second duration soundObject with time behaviorset to scale.)
Rotate Processor
parameters: noteIndex
The RotateProcessor rotates the order of the notes, making the noteIndex the first note. For example anoteIndex of 2 means "make the second note of the notes generated the first, shifting the first note to theend". With a noteIndex of 3, the following score:
i1 0 2 1i1 2 2 2i1 4 2 3i1 5 2 4i1 6 2 5
will become:
i1 0 2 3
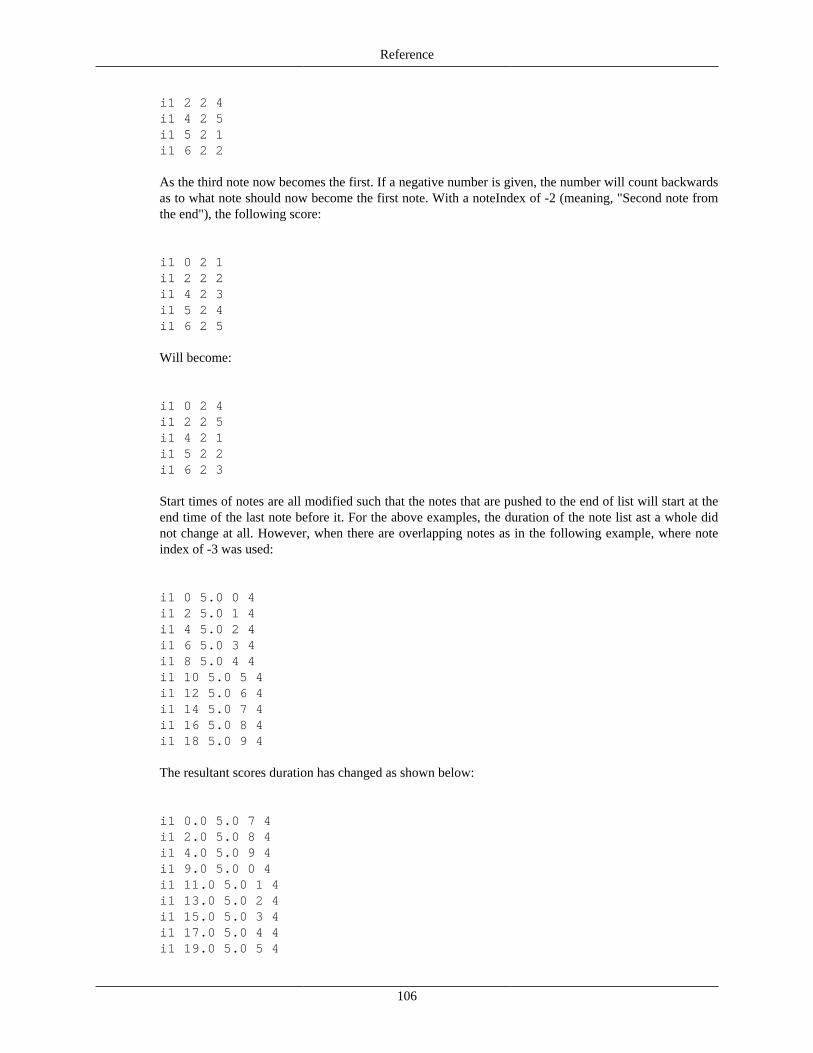
Reference
106
i1 2 2 4i1 4 2 5i1 5 2 1i1 6 2 2
As the third note now becomes the first. If a negative number is given, the number will count backwardsas to what note should now become the first note. With a noteIndex of -2 (meaning, "Second note fromthe end"), the following score:
i1 0 2 1i1 2 2 2i1 4 2 3i1 5 2 4i1 6 2 5
Will become:
i1 0 2 4i1 2 2 5i1 4 2 1i1 5 2 2i1 6 2 3
Start times of notes are all modified such that the notes that are pushed to the end of list will start at theend time of the last note before it. For the above examples, the duration of the note list ast a whole didnot change at all. However, when there are overlapping notes as in the following example, where noteindex of -3 was used:
i1 0 5.0 0 4 i1 2 5.0 1 4 i1 4 5.0 2 4 i1 6 5.0 3 4 i1 8 5.0 4 4 i1 10 5.0 5 4 i1 12 5.0 6 4 i1 14 5.0 7 4 i1 16 5.0 8 4 i1 18 5.0 9 4
The resultant scores duration has changed as shown below:
i1 0.0 5.0 7 4 i1 2.0 5.0 8 4 i1 4.0 5.0 9 4 i1 9.0 5.0 0 4 i1 11.0 5.0 1 4 i1 13.0 5.0 2 4 i1 15.0 5.0 3 4 i1 17.0 5.0 4 4 i1 19.0 5.0 5 4

Reference
107
i1 21.0 5.0 6 4
Please be aware of this behavior when using this NoteProcessor with scores that have overlapping notes.
SubList ProcessorParameters: start, end
The SubListProcessor will cut out notes from the soundObject's generated noteList. An example of it's usemay be that you have a 12-tone row as soundObject in the soundObject library, and you're using instancesof it as the basis of your work. You may only want to use notes 1-3 of the row, so you would use theSublistProcessor with a start of 1 and an end of 3.
The SubListProcessor will cut out notes, then translate them to start at the start of the soundObject, andthen scale them so that they take up the duration of the soundObject. If you had a five note soundObjectwith all notes have a duration of 1 second, all starting one after the other, with the soundObject starting at0 seconds on the timeline, and if you used a SubListProcessor with start of 1 and end of 4, you'd end upwith four notes being generated(the first four from the original soundObject), starting a 0 seconds on thetimeline, with each notes duration lasting 1.25 seconds, each starting one right after the other.
The following score:
i1 0 2 1i1 + . 2i1 + . 3i1 + . 4
when processed with a SubList processor with start 2 and end 3, would result in:
i1 0.0 1 2i1 1.0 1 3
(The p2 and p3 times above are post-processing for a 2 second duration soundObject with time behaviorset to scale.)
Switch Processorparameters: pfield1, pfield2
A Switch Processor switches pfield1 with pfield2 for all notes in SoundObject. It is useful in conjunctionwith RetrogradeProcessor when reversing notes that have start and end values in pfields, i.e.
;inum start dur start endi1 0 1 8.04 8.00i1 1 2 8.00 8.07
with just retrograde processor becomes:
;inum start dur start endi1 0 2 8.00 8.07
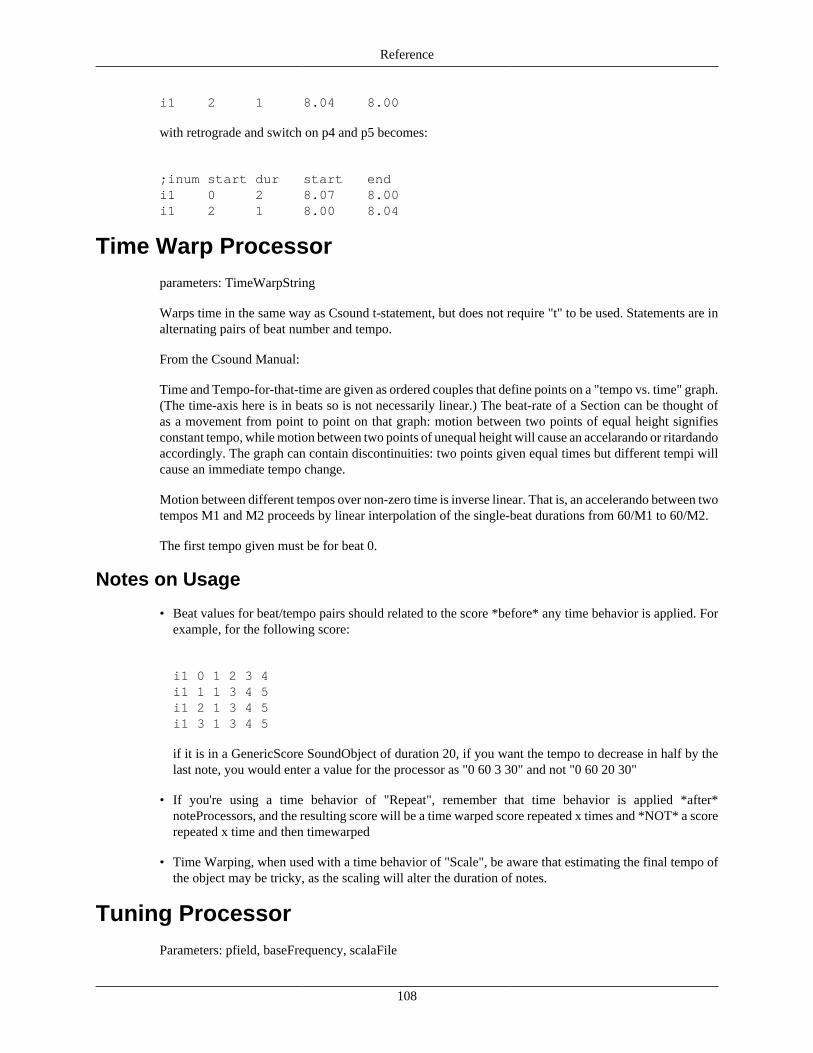
Reference
108
i1 2 1 8.04 8.00
with retrograde and switch on p4 and p5 becomes:
;inum start dur start endi1 0 2 8.07 8.00i1 2 1 8.00 8.04
Time Warp Processorparameters: TimeWarpString
Warps time in the same way as Csound t-statement, but does not require "t" to be used. Statements are inalternating pairs of beat number and tempo.
From the Csound Manual:
Time and Tempo-for-that-time are given as ordered couples that define points on a "tempo vs. time" graph.(The time-axis here is in beats so is not necessarily linear.) The beat-rate of a Section can be thought ofas a movement from point to point on that graph: motion between two points of equal height signifiesconstant tempo, while motion between two points of unequal height will cause an accelarando or ritardandoaccordingly. The graph can contain discontinuities: two points given equal times but different tempi willcause an immediate tempo change.
Motion between different tempos over non-zero time is inverse linear. That is, an accelerando between twotempos M1 and M2 proceeds by linear interpolation of the single-beat durations from 60/M1 to 60/M2.
The first tempo given must be for beat 0.
Notes on Usage
• Beat values for beat/tempo pairs should related to the score *before* any time behavior is applied. Forexample, for the following score:
i1 0 1 2 3 4i1 1 1 3 4 5 i1 2 1 3 4 5 i1 3 1 3 4 5
if it is in a GenericScore SoundObject of duration 20, if you want the tempo to decrease in half by thelast note, you would enter a value for the processor as "0 60 3 30" and not "0 60 20 30"
• If you're using a time behavior of "Repeat", remember that time behavior is applied *after*noteProcessors, and the resulting score will be a time warped score repeated x times and *NOT* a scorerepeated x time and then timewarped
• Time Warping, when used with a time behavior of "Scale", be aware that estimating the final tempo ofthe object may be tricky, as the scaling will alter the duration of notes.
Tuning ProcessorParameters: pfield, baseFrequency, scalaFile
Reference
109
Converts blue PCH notation to frequency according to scale values in a Scala scale file. The scale willdefault to 12TET wheen TuningProcessor is initially created. The file selector for choosing a Scala .sclfile will default to user's .blue directory, under the scl subdirectory. It is advised that users download the3000+ scale archive from the Scala website at: http://www.huygens-fokker.org/scala/ and place them inthe .blue/scl directory or whever they find convenient.
Base frequency determines what 8.00 should be set to, defaulting to middle-C below A440 (same as inScala). Input for the noteProcessor should be:
oct.scaleDegree
where oct is equal to octave, and scale degree equal to what degree of the scale to use. The output will befrequency values, so instruments should be set to accept values as frequency.
NOTES
• Fractional scaleDegree's are not supported.
• For the scaleDegree, the blue PCH does not work exactly like Csound pch notation. In Csound pch,"8.01" would be different than "8.1", while for the Tuning processor, there is no difference. The tuningprocessor takes everything from the right side of the decimal and converts that to an integer to figureout the scale degree.
• If you enter in a scale degree higher than the number degrees in the scale, it will be converted as if theoctave is raised. For example, in a 19 tone scale, an input of "8.21" would get converted to "9.1".
Instrumentsmanaged by the orchestra manager, the instruments are generated into the <CsOrchestra> section ofthe .CSD file.
Generic InstrumentA generic editor for Csound instruments. Insert your instrument text in the editor, without "instr" or"endin", as they're not necessary and will be generated by blue.
Python InstrumentUse Python code to generate Csound instrument text.
Rhino InstrumentUse JavaScript code to generate a Csound instrument.
blueX7
Note
This instrument is currently undergoing re-implementation.
A 6 Operator Phase Modulation instrument using Russell Pinkston's DX7 Emulation Patches.
Reference
110
The blueX7 editor contains two tabs, the 'patch' tab, where the sound creation parameters are tweaked anda second tab called 'csound' which can contain further post-processing algorithms or special routing ofthe instrument's output.
The patch tab contains three panels: Common, LFO and operators. The common panel deals with globalaspects of the instrument like transposition, FM algorithm used, feedback, operator enable/disable andLFO characteristics. The transposition made by Key Transpose is handled in half-tones, with C3 beingthe normal (central) pitch.
There are 32 algorithms to choose from which represent the original DX7 possibilities. You can see avisual representation of the algorithm on the left of this panel.
Feedback represents the amount of feedback into a modulator. The position and result of this feedbackdepends entirely on the algorithm used. The range of feedback is 0 to 7(this range is the same as on theoriginal DX7). The operator on/off checks turn on and off operators (current, this is here but the emulationpatches do not use them).
The LFO panel sets the global LFO parameters. The parameters are: Speed, Delay, PMD (Pitch ModulationDepth) and AMD (Amplitude Modulation Depth). They all have ranges from 0 to 99(the range is thesame as on the original DX7). Additionally you can select the shape of the LFO from: triangle, saw up,saw down, square, sine and sample-and-hold. You can also sync the operators: if sync is on, changingModulation Sensitivity for pitch (marked with an asterisk *) on any of the operators will affect the rest.
Finally you have the 6 operators plus an envelope generator (PEG) each on its own tab. All six operatorshave the same parameters divided in the following sections:
• Oscillator
• Keyboard Level Scaling
• Operator
• Modulation sensitivity
• Envelope Generator
An important feature of the blueX7 is that it can import DX7 banks. A large collection can be found in thebigdx7.zip file within the dx72csound.zip file from: http://www.parnasse.com/dx72csnd.shtml. (to steven:reading this page it seems part of the model is unfinished, which may answer some of my questions above)
On the 'csound' tab you find by default:
blueMixerOut aout, aout
This routes the output of the instrument directly to the stereo output of csound. You can include furthercode to process the 'aout' signal produced by the blueX7, or to route it as needed. For example, if you areoutputing in mono, you could code such as:
out aout
To call the blueX7 instrument in the orchestra, create a GenericScore object in the timeline, and call the theblueX7 instrument. blueX7 requires 2 additional p-fields. P-field 4 is the pitch class of the note in format
Reference
111
octave.semitone (e.g. C4 is 4.00, C#1 is 1.01 and F6 is 6.05). P-field 5 contains the midi velocity for thenote with values from 0 to 127. For example:
i1 0 1 8.00 100i1 + 1 8.02 100i1 + 1 8.04 100i1 + 1 8.05 100i1 + 1 8.07 100
BlueSynthBuilder
BlueSynthBuilder (BSB) allows the user to graphically build instrument interfaces for their Csoundinstruments. The graphical interface is designed for the use of exploring configuration of an instrument aswell as adjustment to values in realtime(requires enabling using the Csound API, see here.
About BlueSynthBuilder
Principle of Design
It has been my experience that most Csound instruments tend to be limited in user configurability ofparameters than commercial synthesizer counterparts. It is my belief that a large part of that is due to thetext-based nature of instruments. I've found that:
• Modular instruments are easier to express connections of modules via text or code rather than visualparadigms (patch cables, line connections), and thus easier to create the instrument by text
• Graphical elements, however, excel in relaying information about the configuration of the instrumentto the user and also invite experimentation, while text-based configuration of instruments is often moredifficult to quickly understand the parameters settings and limits
Going completely graphical for the building of instruments, in the case of systems like Max/PD/jMax orReaktor, I've found that the instrument's design no longer become apparent when viewing complicatedpatches. On the other hand, using completely textual systems such as Csound or C++ coding, the designof the instrument has a degree of transparency, while the configuration of the parameters of the instrumentbecomes difficult to understand and invites less exploration.
Hybrid Design
Using systems like MacCsound's widgets or blue's BlueSynthBuilder, one is able to use graphical elementswhere they excel, in showing configuration of an instrument and for manipulation of values, while usingtextual elements where they excel, in the design of instruments and expressing the connections betweenmodules.
I have found that this sort of hybrid design offers the best of both worlds and when I am spending timebuilding and using new instruments, I can quickly design an instrument and also explore the parametersof an instrument's design by using blueSynthBuilder.
Using BlueSynthBuilder
BlueSynthBuilder is divided up into two tabs, each of which handles the different concerns of theinstrument builder. Also, the process of creating instruments and using instruments is also split between

Reference
112
edit and usage modes. Instrument builders will tend to use both modes, while users of BSB instrumentsmay not ever have to touch a line of Csound instrument code or have to modify the instrument's UI at all(though that liberty to do so is there).
Interface Editor
The Interface editor has two modes:
Edit Mode
The user can add interface elements and modify their properties using the property sheet on the right. Toenable edit mode, click on the "Edit Enabled" checkbox in the upper right of the BSB instrument editor.
Once the edit mode is enabled, right clicking in the main panel will show a popup menu of available UIwidgets for your instrument. After selecting and inserting a widget, clicking on the widget will hilight it andshow it's properties in the property editor. You can also then drag the widget around to place as you desire.

Reference
113
You may select multiple widgets by shift-clicking them, or by clicking on an empty part of the edit paneland dragging a marquee to select a group of widgets. After selecting multiple widgets, you can drag themaround as a group, as well as use the alignment and distribution options found on the right side bottomto tidy up the UI.
Usage Mode
Once in usage mode, users can configure the instrument by working with the UI widgets: rotating knobs,moving sliders, etc. The values of the different UI widgets will be reflected in the generated Csoundinstrument and will affect the values in realtime if using the Csound API.
Code Editor
The code editor is where the Csound instrument code is to be written. To use the values from the widgets,use the replacement key of the widget within < >'s, and that value will be replaced when the instrument isgenerated (the replacement key is usually the objectName of the object; see table below).
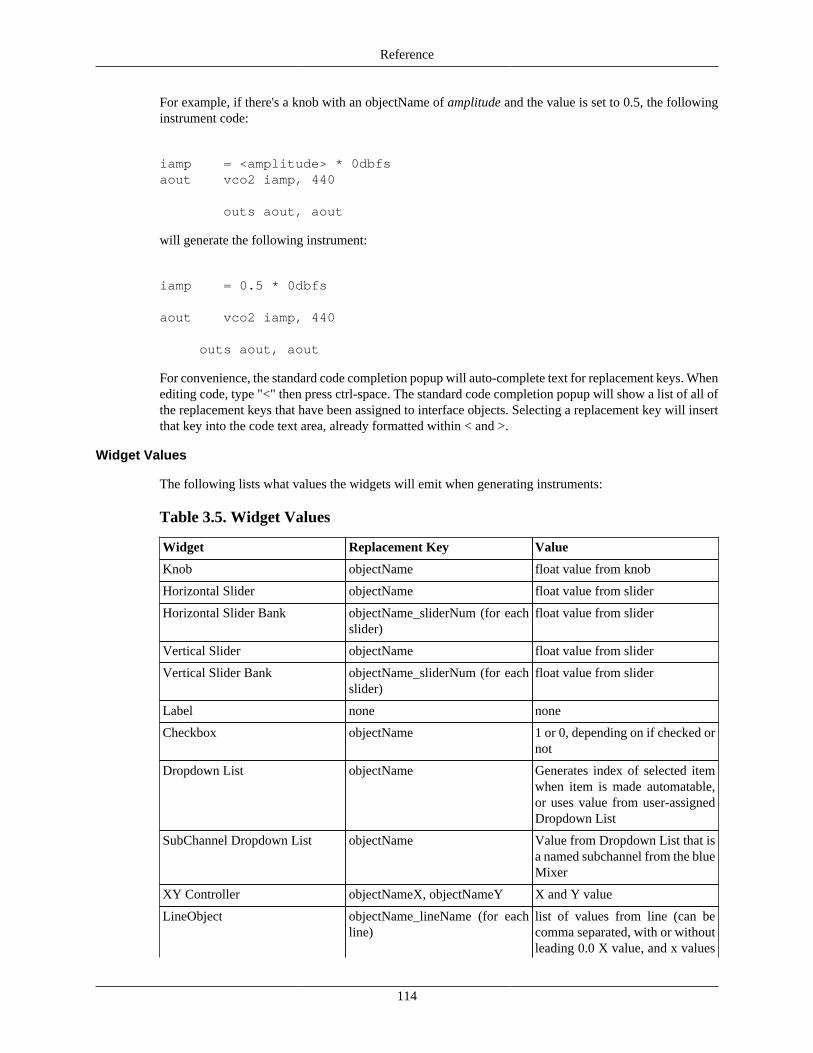
Reference
114
For example, if there's a knob with an objectName of amplitude and the value is set to 0.5, the followinginstrument code:
iamp = <amplitude> * 0dbfsaout vco2 iamp, 440
outs aout, aout
will generate the following instrument:
iamp = 0.5 * 0dbfs
aout vco2 iamp, 440
outs aout, aout
For convenience, the standard code completion popup will auto-complete text for replacement keys. Whenediting code, type "<" then press ctrl-space. The standard code completion popup will show a list of all ofthe replacement keys that have been assigned to interface objects. Selecting a replacement key will insertthat key into the code text area, already formatted within < and >.
Widget Values
The following lists what values the widgets will emit when generating instruments:
Table 3.5. Widget Values
Widget Replacement Key Value
Knob objectName float value from knob
Horizontal Slider objectName float value from slider
Horizontal Slider Bank objectName_sliderNum (for eachslider)
float value from slider
Vertical Slider objectName float value from slider
Vertical Slider Bank objectName_sliderNum (for eachslider)
float value from slider
Label none none
Checkbox objectName 1 or 0, depending on if checked ornot
Dropdown List objectName Generates index of selected itemwhen item is made automatable,or uses value from user-assignedDropdown List
SubChannel Dropdown List objectName Value from Dropdown List that isa named subchannel from the blueMixer
XY Controller objectNameX, objectNameY X and Y value
LineObject objectName_lineName (for eachline)
list of values from line (can becomma separated, with or withoutleading 0.0 X value, and x values

Reference
115
Widget Replacement Key Value
can be generated either in absoluteor relative terms)
Text Field objectName Value from text field (compile-time only).
File Selector objectName If stringChannelEnabled isselected, outputs a Csound stringvariable (S-var) that can beupdated at runtime if API isenabled, if stringChannelEnabledis set to off, outputs as a string(without quotes) at compilationtime
NOTES
• For the Label object, you are able to style the label by using HTML. To use this feature, when settingthe text of the label, enter the HTML label within <html> tags, such as "<html><font size="+1">MyLabel</font></html>".
Presets
Since 0.95.0, BlueSynthBuilder now has the capability to save and load presets. These presets are forusage-time and not design-time, and they save a snapshot of all of the values for the widgets. They do notsave x/y coordinates or other configuration for the widget, only the value.
You can add presets and folders of presets using the presets menu in the upper left of the BSB editor. Eachmenu has an option for adding a folder or adding a preset to it. You can also manage presets by usingthe "Manage Presets" button. This will open up a dialog with a tree view of your presets, allowing you torename the presets and folders, as well as reorganize by dragging and dropping. You can remove presetsand folders here by right-clicking and selecting the remove option. Changes in the dialog are not committeduntil you press the save button, so if you close the window or cancel, you're old settings will be still in tact.
Automation
blue supports automation of BSB Widget values for those which support automation. For these widgets,automation must be enabled before they allowed to be automated. When making them automatable, theplace in Csound instrument code where the widget value will be added to the generated Csound code mustbe a place where a k-rate signal is allowed, otherwise the code will not compile and Csound will not runthe project. This is required because when using the Csound API, the signal will need to be k-rate to allowfor live modification of the value when rendering.
More information on paramenter automation can be found here.
Note
In 0.124.3, a change was made that breaks backwards compatibility. Previously, if a BSBObjectwas set to have "Automation Allowed" but was not itself automated, it would compile as aconstant in the generated CSD. As of 0.124.3, if a widget is made to allow automation, the Csoundcode that uses the widget value must accept a k-rate signal, whether the API is used or not.
If you have a project that rendered fine before 0.124.3 but afterwards can not render due toproblems with Csound complaining that "k-rate signals not allowed", then you will need to either

Reference
116
set the widget to not allow automation or change the Csound code so that it will work with thegenerated k-rate signal.
Randomization
Since 0.117.0, users are able to randomize values for widgets in a BlueSynthBuilder instrument. To use,first choose which widgets are set to be randomized in edit mode, then in usage mode, right click on thepanel in an area not covered by a widget, then select "Randomize" from the popup menu. The followingwidgets are cable of being randomized:
• Knob
• Horizontal Slider
• Vertical Slider
• Horizontal Slider Bank
• Vertical Slider Bank
• XY Controller
• Checkbox
• Dropdown List
ShortcutsTable 3.6. General Shortcuts
Shortcuts Description
ctrl-1 brings the score tab into focus
ctrl-2 brings the orchestra tab into focus
ctrl-3 brings the tables tab into focus
ctrl-4 brings the globals tab into focus
ctrl-5 brings the project properties tab into focus
ctrl-6 brings the soundfile tab into focus
alt-right brings the next manager tab into focus
alt-left brings the previous manager tab into focus
F9 start/stop a render (equivalent to pressing the render/stop button)
ctrl-g generate a CSD file
ctrl-shift-g generate a CSD to screen (for previewing)
ctrl-o open a work file
ctrl-s save work file (must use "Save as" from file menuif a new work file)
ctrl-w close the current work file
alt-F4 close blue

Reference
117
Table 3.7. Rendering
Shortcuts Description
F9 Render project using project's real-time renderoptions
shift-F9 Render to Disk and Play using project's disk renderoptions and playing with blue's builtin sound fileplayer
ctrl-shift-F9 Render to Disk using project's disk render options
Table 3.8. Score Timeline
Shortcuts Description
ctrl-c copy selected soundObject(s)
ctrl-x cut selected soundObject(s)
ctrl-d duplicate selected soundObject(s) and place directlyafter originals
ctrl-r the repeat selected SoundObjects by copying andplacing one after the other n number of times wheren is a number value entered by the user (user isprompted with a dialog to enter number of times torepeat)
ctrl-click paste soundObject(s) from buffer where clicked
shift-click on timeline, paste soundObjects from buffer as aPolyObject where clicked, if only one sound objectis in the buffer it will be pasted as the type it is andnot a PolyObject
shift-click when selecting soundObjects, adds soundObject toselected if not currently selected and vice-versa
double-click if selecting on timeline, select all soundObjects onlayer where mouse clicked
ctrl-t show quick time dialog
right click pops up a popup menu for adding soundObjects andother tasks
left click + drag creates a selection marquee for selecting multiplesoundObjects (when Score mode)
alt-1 switch to Score mode
alt-2 switch to Single Line mode
alt-3 switch to Mult Line mode
left nudge selected soundObjects one pixel to the left
right nudge selected soundObject one pixel to the right
shift-left nudge selected soundObjects ten pixels to the left
shift-right nudge selected soundObjects ten pixels to the right
up move selected soundObjects up one layer
down move selected soundObjects down one layer

Reference
118
Shortcuts Description
ctrl-left decrease horizontal zoom
ctrl-right incrase horizontal zoom
Table 3.9. Orchestra Manager
Shortcuts Description
ctrl-left click if on the column header of the instruments table, willenable/disable all instruments
Table 3.10. In a text box
Shortcuts Description
right click pops up a popup menu that contains entries foropcodes as well as user-defined entries from thecode repository
ctrl-space brings up a dialog that shows all possible opcodematches for the current word being typed in (codecompletion)
shift-F1 if cursor is within a word that is an opcode, attemptsto look up manual entry for that opcode
shift-F2 if cursor is within a word that is an opcode, attemptsto find a manual example CSD for that opcode andif found opens a dialog showing the example
ctrl-; comment out line or selected lines (prepends ";" toevery line)
ctrl-shift-; uncomment out line or selected lines (removes ";"at beginning of every line if found)
Table 3.11. Editing GenericScore, PythonObject, RhinoObject
Shortcuts Description
ctrl-T when the text area is focused, ctrl-T runs test on thesoundObject (same as pressing the test button)

119
Appendix A. Introduction to CsoundCurrently, this section is not yet written.
For more information on Csound, please read Dr. Richard Boulanger's wonderful TOOTS for Csound,available at here [http://csounds.com/toots/].
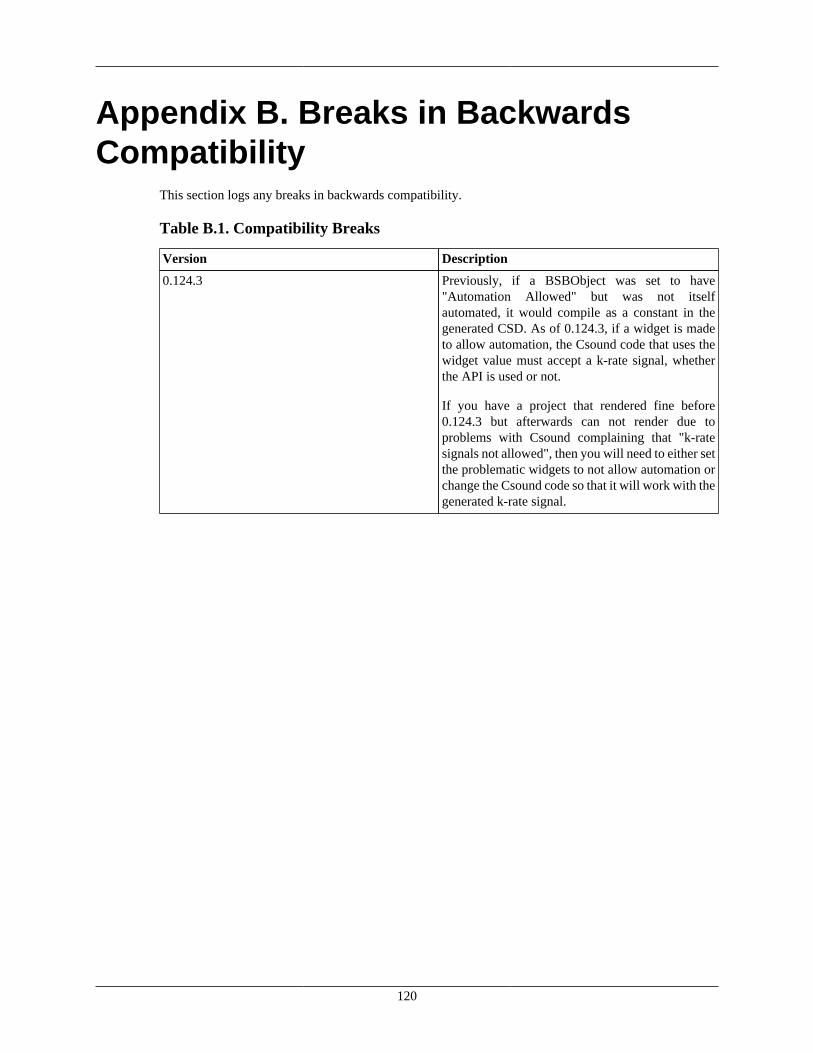
120
Appendix B. Breaks in BackwardsCompatibility
This section logs any breaks in backwards compatibility.
Table B.1. Compatibility Breaks
Version Description
0.124.3 Previously, if a BSBObject was set to have"Automation Allowed" but was not itselfautomated, it would compile as a constant in thegenerated CSD. As of 0.124.3, if a widget is madeto allow automation, the Csound code that uses thewidget value must accept a k-rate signal, whetherthe API is used or not.
If you have a project that rendered fine before0.124.3 but afterwards can not render due toproblems with Csound complaining that "k-ratesignals not allowed", then you will need to either setthe problematic widgets to not allow automation orchange the Csound code so that it will work with thegenerated k-rate signal.
121
Appendix C. Glossary
GlossaryB
.blue directory
blue Home
blue PCH
Part II. TutorialsTutorials
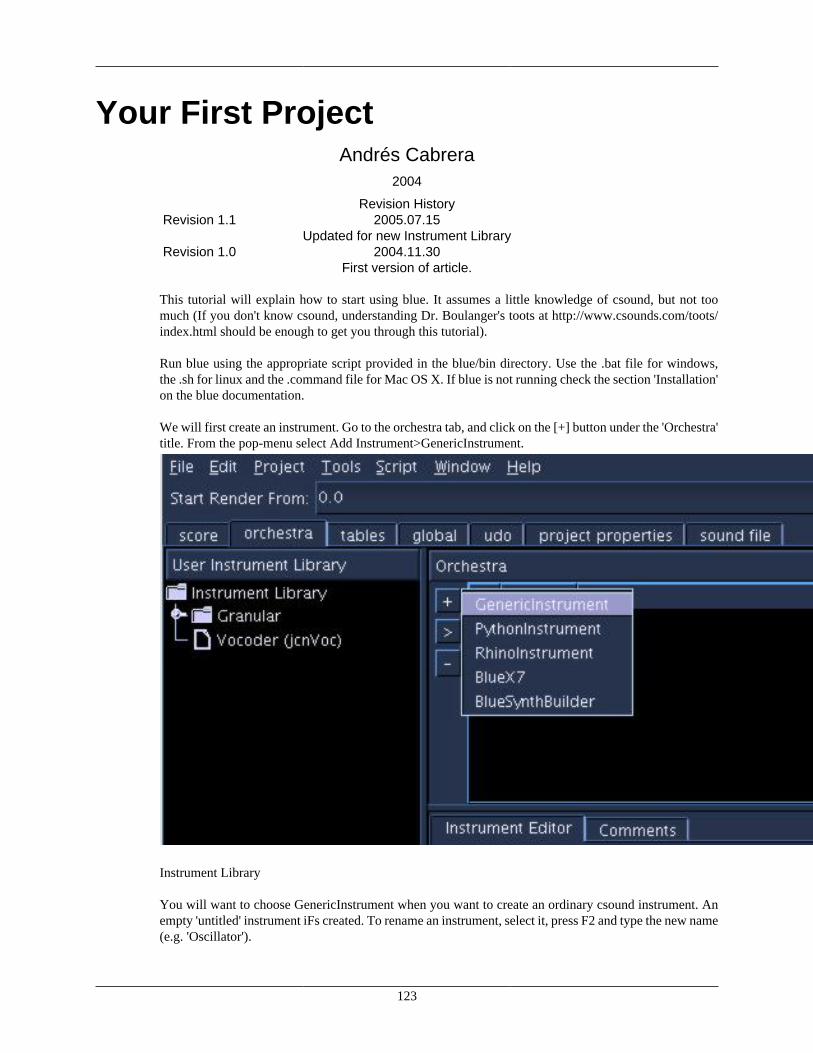
123
Your First ProjectAndrés Cabrera
2004
Revision HistoryRevision 1.1 2005.07.15
Updated for new Instrument LibraryRevision 1.0 2004.11.30
First version of article.
This tutorial will explain how to start using blue. It assumes a little knowledge of csound, but not toomuch (If you don't know csound, understanding Dr. Boulanger's toots at http://www.csounds.com/toots/index.html should be enough to get you through this tutorial).
Run blue using the appropriate script provided in the blue/bin directory. Use the .bat file for windows,the .sh for linux and the .command file for Mac OS X. If blue is not running check the section 'Installation'on the blue documentation.
We will first create an instrument. Go to the orchestra tab, and click on the [+] button under the 'Orchestra'title. From the pop-menu select Add Instrument>GenericInstrument.
Instrument Library
You will want to choose GenericInstrument when you want to create an ordinary csound instrument. Anempty 'untitled' instrument iFs created. To rename an instrument, select it, press F2 and type the new name(e.g. 'Oscillator').

Your First Project
124
The instrument library on the left panel is where instruments are saved for use in any blue project. To placean instrument in the library so it is always available, drag it to the Instrument Library folder.
Assigning Instrument to Arrangement
The '>' button brings an instrument from the library to the project. To remove an instrument from theproject, select it and press '-'.
It is important to understand that instruments which are in the Instrument Library but not the Arrangementare not available for use in the csd because they haven't been assigned an instrument id (number or string,if used as a Csound named instrument).
Now that the instrument is there, we need to define how it will sound. We use ordinary csound code todo this (since it is a GenericInstrument). The code for the instrument is written on the lower right panel,inside the Instrument Text tab within Instrument Editor tab. Make sure you type the code in this tab, andnot the 'Global Orchestra' or 'Global Score' tabs.
We will create a simple oscillator with an amplitude envelope like this:
kenv linen 10000,1,p3,1asig oscil kenv, 440, gitabouts asig,asig
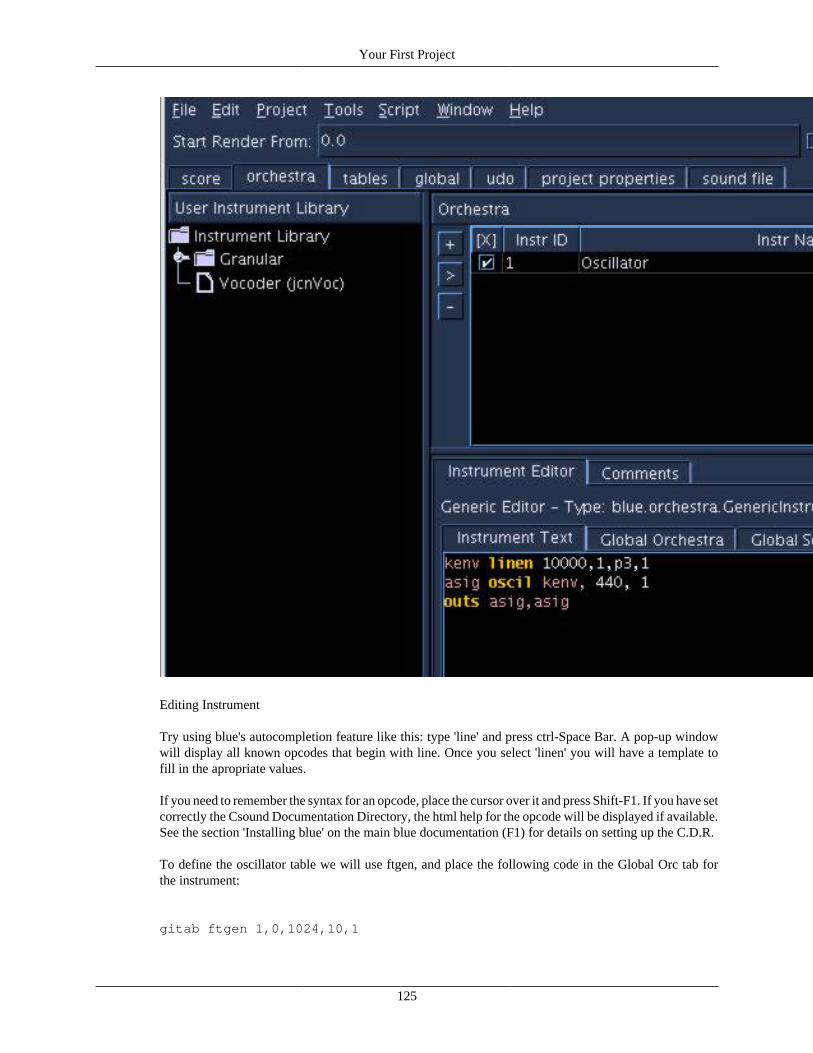
Your First Project
125
Editing Instrument
Try using blue's autocompletion feature like this: type 'line' and press ctrl-Space Bar. A pop-up windowwill display all known opcodes that begin with line. Once you select 'linen' you will have a template tofill in the apropriate values.
If you need to remember the syntax for an opcode, place the cursor over it and press Shift-F1. If you have setcorrectly the Csound Documentation Directory, the html help for the opcode will be displayed if available.See the section 'Installing blue' on the main blue documentation (F1) for details on setting up the C.D.R.
To define the oscillator table we will use ftgen, and place the following code in the Global Orc tab forthe instrument:
gitab ftgen 1,0,1024,10,1
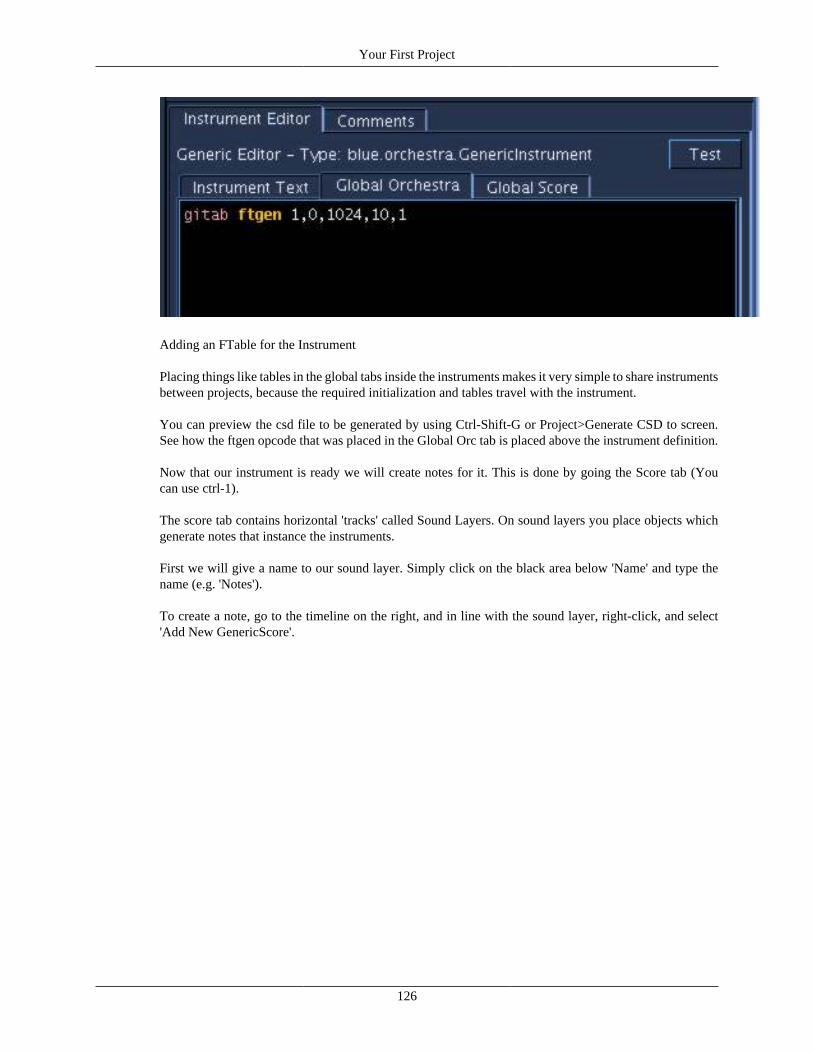
Your First Project
126
Adding an FTable for the Instrument
Placing things like tables in the global tabs inside the instruments makes it very simple to share instrumentsbetween projects, because the required initialization and tables travel with the instrument.
You can preview the csd file to be generated by using Ctrl-Shift-G or Project>Generate CSD to screen.See how the ftgen opcode that was placed in the Global Orc tab is placed above the instrument definition.
Now that our instrument is ready we will create notes for it. This is done by going the Score tab (Youcan use ctrl-1).
The score tab contains horizontal 'tracks' called Sound Layers. On sound layers you place objects whichgenerate notes that instance the instruments.
First we will give a name to our sound layer. Simply click on the black area below 'Name' and type thename (e.g. 'Notes').
To create a note, go to the timeline on the right, and in line with the sound layer, right-click, and select'Add New GenericScore'.

Your First Project
127
Adding a Generic Score
GenericScore allows ordinary csound code to be used, in this case things like 'i' statements. When youclick on the genericScore that has been created, the bottom panel will show the contents of the object. Youcan add as many 'i' statements as you need inside a genericScore Object. We want our score to generate anote for instrument 1, our 'oscillator' instrument. We'll use the simple:
i 1 0 1

Your First Project
128
Editing a Generic Score
You can preview how the object will generate the csound score by pressing the [ t e s t ] button on the rightside of the panel. Notice that the start time is the place where the object was placed on the timeline, but theduration of the note is 2 seconds instead of the 1 second we typed. By default blue creates genericScoreobjects set to 'scale' the notes inside it. Try dragging the right corner of the object to make it longer, andtry the [test] button again. The duration of the note now scales to the size of the object. Don't forget thatwhen multiple notes are inside an object, it is the note with the longest duration that scales to the size ofthe object and the rest of the notes are scaled proportionally.
Now let's create a second note a few seconds later. First zoom out by pressing the '-' button on the rightendof the horizontal scroll bar. Now select the genericScore we have created and press ctrl-C (or command-C on Mac), and right click where you want to paste the copy and select 'Paste'. You should now have twoobjects like in figure 7.

Your First Project
129
Copying SoundObjects
You can use the snap feature to move the objects by fixed values. press the [...] button on the upper rightcorner of the timeline to open the snap properties. Enable snap to 1 second (Fig. 8). You can also configurethe timeline time display to show numbers instead of time. This is useful if you set the tempo using a 't'statement, and want blue to display numbers instead of time values.
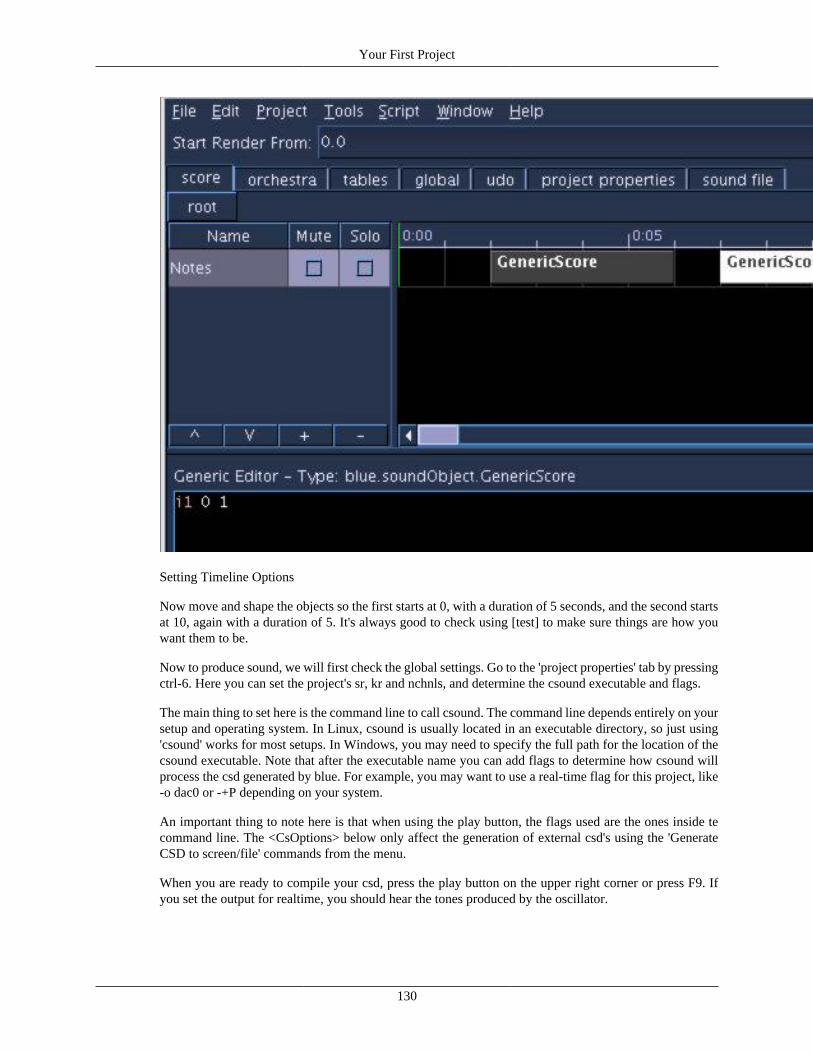
Your First Project
130
Setting Timeline Options
Now move and shape the objects so the first starts at 0, with a duration of 5 seconds, and the second startsat 10, again with a duration of 5. It's always good to check using [test] to make sure things are how youwant them to be.
Now to produce sound, we will first check the global settings. Go to the 'project properties' tab by pressingctrl-6. Here you can set the project's sr, kr and nchnls, and determine the csound executable and flags.
The main thing to set here is the command line to call csound. The command line depends entirely on yoursetup and operating system. In Linux, csound is usually located in an executable directory, so just using'csound' works for most setups. In Windows, you may need to specify the full path for the location of thecsound executable. Note that after the executable name you can add flags to determine how csound willprocess the csd generated by blue. For example, you may want to use a real-time flag for this project, like-o dac0 or -+P depending on your system.
An important thing to note here is that when using the play button, the flags used are the ones inside tecommand line. The <CsOptions> below only affect the generation of external csd's using the 'GenerateCSD to screen/file' commands from the menu.
When you are ready to compile your csd, press the play button on the upper right corner or press F9. Ifyou set the output for realtime, you should hear the tones produced by the oscillator.
131
ScriptingSteven Yi
2002
Revision HistoryRevision 1.1 2004.11.7
Converted to DocBook. Some information revised as no longer applicableRevision 1.0 2002.10.28
First version of article.
IntroductionThe blue music composition environment entails the use of timelines on which SoundObjects are placed.these SoundObjects are basically lists of notes, grouped as a single perceived object. These can be assimple as a single note, or a group of notes one might handle as a "motive", the "bassline for the A phrase","the results of an predetermined matrix of sounds and silences through 28 flippings of coins", or "thestochastic group motion of migrating birds mapped to 17 instruments that produce variable timbres", etc.but underneath it all, regardless of what SoundObject you use, ultimately the SoundObject will producenotes in which blue will add to the running score and output to a .CSD file.
Seen this way, blue represents a sort of visual note-generator scheduling system. when blue was earlieron in it's development, I realized that in creating blue, I created a simple generic temporal framworkwhich would allow people to create score generators and only worry about generating those scores, whileeasily adding them to the framework of blue which would allow the manipulation and scheduling of thosescore generators without the original authors having to worry about developing that aspect of it. as myimagination began to wander, I saw that things like cmask, mother, cybil, and other scoring languages thathave been built over time for csound could be used in the way they've always been used, but that theycould easily be integrated into blue.
for myself, the SoundObjects I've built have offered me the ability to separate my concerns: as the authorof blue, I concern myself with finding new ways to organize and manipulate SoundObjects, and as aSoundObject author, I concern myself just with making objects that generate notes, leaving the schedulingof that SoundObject to the framework.
But, not everyone programs in Java, and there are also scripts and script libraries to be used in otherlanguages already made.
Having seen that the SoundObject system and temporal framework of blue was a pretty open architecture,I decided at the time to explore the possibilities of using script within blue by creating the PythonSoundObject so that i could use maurizio umberto puxeddu's Python pmask library within blue. whatthat allowed was for the ability to write Python scripts within blue, blue executing and bringing back inthe generated notes from the Python script and integrating that with the other notes of the native JavaSoundObjects.
After successfully developing and proving the possibility to myself, I continued on to build otherSoundObjects as user's requested or as I desired for my own compositional explorations.
One day, some time back, a user suggested that I build a generic external SoundObject that would letyou write any script within blue, provide a commandline to be used, and have blue write the script to atemporary file, run the commandline on it, and bring the generated notes back into blue. busy at the time,I later did build that SoundObject, and it opened up a world of possibilities.
Tutorial 1
132
With the new external SoundObject, it became possible to write script in any language within blue. thismeans one could use not only scripting languages like perl, Python, shell scripts, batch files, JavaScript,wscript, etc., but also run specially created text input for score generators like CMask, nGen, etc. (note:cmask does not currently work within blue, as it is unable to print to stdout; more on this and possible waysaround it later). It also meant that other people's work on score generating libraries and scripts, regardlessof language, now had the ability to be reused within blue.
As blue has developed the past couple of years, from its initial goals of embedding timelines withintimelines, to its current state as a generic temporal framework and all-around composition environment,I've always developed with the mindset of keeping this as open and generic as possible, to build a toolthat could grow as I knew I'd always be exploring new things in composition. These days, the inclusionof these two SoundObjects, the external SoundObject and the Python SoundObject, are now becomingpart of my everyday use as I work with blue, allowing me to explore ideas rapidly, creating objects andfunctions which follow the models of my musical work, and which also serve as possible prototypes tonew SoundObjects which I may later decide to create in Java and add to blue.
From my own experience, I'd highly recommend to anyone that they learn a little bit about scripting andhow to use it to achieve their musical goals, as I've found the experience highly liberating and musicallyrewarding .
Why Use Scripting?For some, the use of scripting or programming may never be a factor in how they go about creating theirmusic, as the tools they have already are enough. But for some, it may be easier to go about expressingtheir needs musically by use of script. and for others, there just might not be anything available to do whatone wants to do.
Within blue, there are many ways to go about expressing and designing your musical work. Included withblue are the built in SoundObjects which can take in standard csound scores. Together with the use of thenoteProcessors in blue, already there are the tools to write standard csound scores, move them in time,and manipulate those scores by adding or multiplying pfields by user given values(to achieve things likescaling amplitudes or transposing notes) or retrograde notes.
However, lets say you might find scripting in your prefered language to be easier to achieve your goals, oryou want to use a scoring language other than csound's standard score format, or someone has advertiseda new set of scripts or libraries to use. you could do all of this within blue.
In my case, I was recently modeling an object system that represented a musical model that hasn't beenused much in current electronic music programs. I enjoy using the blue environment, but this was a casewhere I needed to do some work by programming, and the existing tools didn't exist in blue. The processwas pretty experimental and the use of compiled languages like Java would have been slower than usinga scripting language, as the prototypes for the object model I was building were changing rapidly. Whatended up happening is that I worked in Python within blue using the Python SoundObject, developing mycore objects, and was then able to rapidly experiment with composing with these objects by using otherPython SoundObjects which used my core class definitions, moving them around visually and listeningto how the musical output. I could have done all of this outside of blue, strictly using script, but thevisual element and the ease of quickly copying blocks of Python script and moving them around, madeexperimentation much quicker and more apparent to me. A great benefit out of all of this is now I have aprototype which I can then perhaps use to program SoundObjects for blue in Java, maybe adding a GUIto the object to control parameters, making the process of using the SoundObjects that much easier.
The total process of prototyping and experimenting was a great experience, as I felt that each part of theprocess functioned to help me best express what I was going after. I used script to quickly create the objectsI wanted to use to model the musical model I had in mind, and then used blue to experiment with thosescripts to hear the sounds they could produce.
Tutorial 1
133
Finally, it lead to strong candidates for objects which I could go on to build in a more generic fashion foreveryone to else to use in blue, adding to the compositional possibilities.
In the past, I've also built simple functions to do a very specific task, like "add a value to all p4's of allnotes". Something like this could be the case where you have a simple task that might be monotonousand you could probably achieve your goal much more quickly by a little script. (For example, I want togenerate a test file for my orchestra and all it has are notes lasting two seconds duration, whose start timesare every three seconds; something like this could be done in maybe 6-10 lines of script, regardless ofthe size of the orchestra.)
Those are some of my reasons for the use of script for musical work, and I'm sure others have their ownreasons. In the end, it's up to you to evaluate your situation and see if it will aid in your work or not.
Scripting and blueEvery once in a while someone releases a new program for score generation, a utility they've decided tomake for their own benefit that they've graciously shared with the community. Often, these musical toolsare exclusive in their use, meaning they're good for their use, but are difficult to integrate with other work.
For example: say you're working on a piece and want to use an external score generator to generate a scoreto add to your piece. now, in experimenting, you might have to:
1. Create your csound score
2. Create your input file for the external score generator in another file
3. Run the score generator
4. Copy the generated score into your csound score file
5. Repeat process as you experiment
Now imagine that process to the nth degree if you decide to use multiple external programs!
However, with blue, you can do all of that in one environment. You could write your standard csoundscores as well as your input to your chosen score generator within blue, press the play button and thenhave blue do the work of going out to compile the score generator material and bring it back in, integrateit with your csound score, and output a single unified score file. You get the benefit of using the visualtimeline to move your generated score blocks around in time, as well as only having to concentrate on thescore input to the score generator, leaving all of the tedious work to blue to handle.
Or, say you're working on a score generating library in a scripting language. Now that you've finished it,you want to start working with it. but say you want to also do standard csound scores along with yourscripts; having to do the two in the single scripting environment might not be optimal, as you wouldconstantly have to use "print()" functions or use note objects, when it might just be easier to write "i1 01 2 3 4 5" and work with that for some of your work, and use your libraries for others. In this case, bluecan handle that in that you can call your libraries you've developed and script the parts you want to scriptwithin blue, as well handle all of the standard csound score type work.
Within blue there are currently two main objects for scripting, the Python SoundObject and the externalSoundObject. The external SoundObject runs scripts outside of blue and brings the results back into blue,and the execution of those scripts is as fast as it would be running the script outside of blue. With theexternal SoundObject, one may also choose from a variety of scripting and score generating languages touse. The Python SoundObject is limited to Python, and runs Python scripts much slower than they would befor running a Python script outside of blue using the external SoundObject. However, the PythonObject has
Tutorial 1
134
two main features which may influence your decision in which to use it or not: it does not require Pythonto be installed on the system as it uses Jython to interpret the script (Jython is an all-Java implmentation ofthe Python interpreter; for more information about Jython, visit http://www.jython.org ), and it does notreinitialize the interpreter between uses.
The second point regarding the Python SoundObject may need some explanation: by not reinitializing theinterpreter between uses, all Python SoundObjects in blue all share the same interpreter. By doing this,you can define variables, functions, and objects in one block, while using those variables in another block.
As an example, in my recent work with the Python SoundObject, I've set up the first PythonObjectin my blue work file to have nothing but class definitions as well as function definitions. The secondPythonObject block only has script that sets up instances of those classes written in the first PythonObject,and in this second block I did all of my initialization work for these classes. Finally, throughout the restof the blue work file, I had PythonObjects that used the class objects I set up in the second PythonObject.This would not be possible using the external SoundObject, as once a script is run, all existing informationin memory for that script is lost (unless you decided to make some kind of serialization scheme to writedata to a file to be accessed by other scripts, or perhaps were using a web server to maintain state data).
The next two sections below will explain how to use the two different SoundObjects, and for the Pythonprogrammer, help you determine when you might want to use one object verse the other.
External SoundObjectThe external SoundObject is a generic object that allows you to write script within blue to be executedoutside of blue and have the generated score be brought back in. The way this is implemented, blue willread in anything that the external program writes to stdout. for most scripting languages, this equates toa "print()" command of some sort in your script.
The external SoundObject's editor takes in two inputs, a script and a commandline to run on that script.technically, when blue is in the score generating pass and comes to an external SoundObject, the externalSoundObject writes your script to a temp file, then runs the commandline given, either swapping “$infile”with the name of the temporary file generated, or appending the name of the temporary file to the end ofthe commandline if no “$infile” is found.
A Simple ExampleLet's say you're writing a simple perl script:
print "i1 0 2 3 4 5\n"
and you for your commandline you use:
perl
or perhaps:
/usr/bin/perl $infile
When blue goes to generate a .CSD file and comes across your external SoundObject, what will happenis that:
1. Your script will get written to a temp file (for this example, let's say it's "/tmp/temp4253.txt")
2. blue executes the commandline given with that temp file.
Tutorial 1
135
a. For the first commandline, it'll then run:
perl /tmp/temp4253.txt
b. For the second commandline, it'll then run:
/usr/bin/perl /tmp/temp4253.txt
3. perl runs, and will print "i1 0 2 3 4 5\n" to stdout
4. blue will get that output from perl, then bring that back in, convert it to blue Note class.
5. blue then will shift the note over to the start time of your external SoundObject, then scale the note tothe duration of the SoundObject.
And that's it!
Note. In general, all time values for start are from time-zero within the SoundObject. This is like takinga three notes: you know one starts at the beginning, one starts 1 second later, and one starts 2 seconds later.No matter where you put those three notes, the relationship of that block of notes is the same, one at thebeginning, one 2 seconds later, etc. so it is with SoundObjects in blue. When you make a script to generatenotes, have it start at time zero and let blue do the scaling and translation of time for the SoundObject. bluewas made this way so that no matter what you generate within the block, the generated notes will start atthe start of the SoundObject and will last the duration of the SoundObject.
A More Complex ExampleNow, any script that has a commandline that can execute on a file will work with blue. so, as anotherexample, let's say you want to use Python and you're using the pmask library. You have both of theseinstalled on your system and you know they work fine because you've tested them outside of blue. Now,let's say you wrote the following Python script (which really, was written by Hans Mikelson as a an examplefor using pmask, taken from the CSound Magazine):
from pmask import *
density = Mask(UniformRandom(), PowerSegment([(0.0, 0.03), (20.0, 0.5)], 3.0), PowerSegment([(0.0, 0.08), (20.0, 1.0)], 3.0)) duration = Mask(UniformRandom(), PowerSegment([(0.0, 0.4), (20.0, 3.0)], 1.0), PowerSegment([(0.0, 0.8), (20.0, 5.0)], 1.0)) frequency_mask = Mask(UniformRandom(), PowerSegment([(0.0, 3000.0), (20.0, 90.0)], 1.0), PowerSegment([(0.0, 5000.0), (20.0, 150.0)], 1.0)) frequency = Quantizer(frequency_mask, LinearSegment([(0.0, 400.0), (20.0, 50.0)]), 0.95)
index = Mask(UniformRandom(), PowerSegment([(0.0,2.0), (20.0, 3.0)], 1.0), PowerSegment([(0.0, 3.0), (20.0, 5.0)], 1.0)) panorama = Range(0, 1) amplitude = Lorenz('x') ss = ScoreSection(0.0, 20.0, 1, density, duration, frequency, index, panorama, amplitude)

Tutorial 1
136
print str(ss)
and you tested it outside of blue and it worked fine. Well, now you could create an external SoundObjectin blue, paste in this script, set the commandline to "python", and now have the notes imported into blue.
Using a Score Generating LanguageLet's try a non-scripting example now and use Mark Williamson's drum pattern scoring utility to generatea drum pattern(available at http://www.junklight.com). Mark's utility is itself a perl script, but it takes ina text file using a scoring language he developed.
copying in the example drum.pat file into the scripting area:
instrument1 "i1 $now .2 2000 2.2 0"instrument2 "i1 $now .2 2000 2.4 1"instrument3 "i1 $now .1 2000 4 1"instrument4 "i1 $now .2 2000 1.6 0.5"
instrument5 "i1 $now .1 2000 4 0"pattern1 1 1 1 pattern2 1 1
pattern3 1 1 1 1pattern4 1 1 1 1 1 1 1 1pattern5 1 1 1 1 1 1 1 1 1 1 1 1 1 1 1 1plist1 1 2ilist1 3 5
bar length 1 secondtime error .01# poly rhythm exampleloop 5
play 1 with 1 play 2 with 2
endloop# straight 4/4
loop 5 play 2 with 1 play 3 with 3
endloop
loop 5 play plist 1 with 4
play 4 with ilist 1
Tutorial 1
137
play 3 with 1endloop
loop 5 play plist 1 with 4 play 5 with ilist 1
play 4 with 1
endloop
Having unzipped the drumscript.zip into my home direcotory, I used the following commandline:
perl /home/steven/drumText/drums.pl -input
I ran the test button and got... nothing! I got alot of exceptions printed to the console. Running the drumscript outside of blue, I saw that by default, some logging information was being printed (the name of theinfile and input). Modifying mark's perl script a bit to comment out those two print statements, I reranthe script within blue and... success! The generated output from mark's script successfully was rebroughtback into blue.
Notes on Score Generating Programs and the ExternalSoundObject
Score generation programs can either print out to stdout or write out to a file. If writing out to a file, caremust be taken to use the $outfile parameter of the External SoundObject so that after the external programfinishes, blue will know to grab the file's contents back into blue.
Python SoundObjectThe Python SoundObject is a Python-only scripting SoundObject which uses the Jython Python interpreter(more information about this all-Java Python interpreter is available at http://www.jython.org). Jython isincluded with blue, and being so, it means that if you are using the Python SoundObject in blue, you do notneed Python installed on your computer. The Python SoundObject is made in such a way that it in no wayuses any Python installations you may or may not have on your computer, but instead only uses what is apart of Jython. If you want to add extra packages and libraries to use with the Python SoundObject, youmay copy them into the lib/PythonLib directory or in the userhome/.blue/pythonLib folder. As an exampleof adding your own library, you can see that already included with blue in the lib/PythonLib directoryis the pmask library by Maurizio Umberto Puxeddu (currently, I do not know where this library existsanymore on the internet; if you know where it can be downloaded from, please let me know and I willupdate this part of the documentation to better give credit to Maurizio).
So, to clarify, having a Python interpreter installed on your computer does not in any way affect the PythonSoundObject within blue; they are two completely different entities. also, if you have a library installedfor use with your Python interpreter installed on your computer, it will *NOT* be accessible to the PythonSoundObject. to use it, you will have to copy it into the lib/PythonLib directory of blue.
Note: what you could do, also, is put the individual libraries you install in the lib/PythonLib directory aspart of your PythonPATH environment variable, such that all of the libraries will be both accessible toyour Python interpreter on your computer as well as the one in blue. It is not recommended to put the entirePythonLib directory as part of your PythonPath, however, as the PythonLib has many of the same files

Tutorial 1
138
from the standard Python installation and may cause issues with locating standard library files. However, Ifind that just copying the library twice into both the PythonLib and my standard Python install's directoryto be sufficient and easier to manage.
Using Python with the External SoundObject versus thePython SoundObject
This has been the most often asked question since the addition of the external SoundObject blue, andwhen I initially put in the external SoundObject, I thought that the Python SoundObject would becomesomewhat unnecessary.
But a week or so after the addition the of externalObject, I started using Python alot more in conjunctionwith blue and found that the Python SoundObject has a few key benefits which make me use it noweveryday.
The Case for Using the External SoundObject
First of all, performance of the PythonObject is not as fast as using the standard Python interpreter withthe external SoundObject. For simple scripts, the difference in speed isn't that noticeable, but when usingsomething like pmask which has alot of calculations when generating score output, the speed differencedoes become an issue. If speed is an issue, then you might choose to use the external SoundObject, if thebenefits listed below aren't an issue.
Also, if you have an existing Python interpreter installed on your computer and have libraries installed andare just simply used to your setup, then it might be just plain easier to use your existing Python setup ratherthan dealing with where things are in blue and managing having libraries installed for both the residentPython interpreter and blue's PythonLib.
And to add to all of that, you may be using features which are part of the most recent Python interpeterversion, and those features may not be available as part of Jython (more information as to what Jythonsupports is available at the Jython homepage, http://www.jython.org). Also, if you're using libraries whichcall native code, they will not work with Jython.
So, if the Python SoundObject is slower, if you have to manage another set of libraries, and you might nothave all of the features of standard Python available, why use the Python SoundObject at all?
The Case for Using the Python SoundObject
Now, just to let you know, I use exclusively the Python SoundObject when I'm doing Python scripts inblue. I haven't come across any of the standard libraries I've needed that were't included with Jython, andif it's a sign of anything, Maurizio Umberto Puxeddu's pmask library works fine with the PythonObject.
One of the things I used to do is keep an installation of blue on a zip disk, including my work. The nicething about this was that I was able to take this disk and work off it while at work on a windows machine,as well as take it home everyday to my linux machine and start up blue without having to do anythingdifferent. Because I used the PythonObject at that time, I didn't have to worry at all about anything installedwithin either system, as all of it was contained within blue. It's also a reassuring thought that if I took mywork to a friend's computer, be it a macintosh, windows, or linux pc, I wouldn't have to worry about ifPython was installed on their computer.
Besides these very practical issues, the way you can go about using the PythonObject differs very muchfrom the usage of Python with the externalObject.
With the externalObject, each script run is its own entity, run with a different interpreter. This meansthat memory is not shared between instances of the externalObject: variables and results of execution

Tutorial 1
139
in one externalObject are not accessible to another externalObject. However, with the PythonObject, theinterpreter is not reinitialized between runs, meaning you can share results between one PythonObject andthe next. This can of course lead to very convoluted methods of developing scripts within blue, which isof course not recommended, but it does have some very pragmatic possibilities which are very useful.
In my latest work with blue, I've been using almost exclusively the PythonObject for all of mySoundObjects in blue. I did use some sound SoundObjects initially to draft some sounds out, convertingthem to instruments in the orchestra manager later. I also used genericScore objects for writing some testnotes for my instruments which I keep around also for experimenting, but for the piece's final output, theyare not being used.
For setting up my piece, I developed some classes to use in Python, instantiated multiple instances ofthe classes set with different parameters, and then use those instances in different PythonObjects in bluefor creating the score of my piece. Because the interpreter is not being reinitialized between uses by thePythonObject, I'm able to use one PythonObject to hold only definitions of functions and classes, anotherPythonObject which only has my initialization scripts that makes instances of the classes defined in thefirst PythonObject, and from all other PythonObjects, I use the instances from the second PythonObjectas my generators.
to better clarify, my first PythonObject has scripts like:
class Yo(): def do(self, a,b): print "doing something with " + str(a) + " : " + str(b)
def yoyo(self, a,b): print "do something with a and b which are instances of Yo()"
while my second PythonObject has script like:
generator1 = Yo()generator2 = Yo()generator3 = Yo()
while all other PythonObjects in my piece have a minimal amount of script, something like:
generator1.generateNotes(input1, input2, input3)
I find that it's a nice way to separate the concerns of each object. as I'm currently in the middle of workingon the piece, I'm finding that first PythonObject getting a bit big, so I'm thinking i'll split that into differentPythonObjects, which I can visually see labeled on the timeline by changing their names to something like"generator classes", "generator utility functions", "constants", etc. and probably in the future, as I get tofinishing this piece, I'll probably take all of these class definitions and make a library of Python code outof it and just have it installed into my PythonLib directory. But having the way it is now I've found to bevery convenient in development as it's easy to find all of my code.
Note: the execution order of blue is top-down per soundLayer, meaning it will process all SoundObjectsin the first soundLayer, and if it finds a polyObject, it will go down into that and process the firstsoundLayer, etc. before going on to the next SoundObject. because of the execution order, I can put all ofmy PythonObjects that have nothing to do with note generation (my class definitions, utility functions, andintitialization scripts) in the first few soundLayers of my piece and know that they'll always get interpretedby the jython interpreter and left in the memory space first before trying to process the other SoundObjects.
Tutorial 1
140
Note: as a warning, also because of the execution order, if you reopen your piece and try the [test] buttonon a PythonObject that uses code from the initial PythonObjects and find that it's not generating notes, it'sbecause that code has yet to be entered into the memory space of the interpreter. either individually runningall of the PythonObjects that deal with class definitions and initialization or just pressing the [play/stop]button to generate your score will get those objects interpreted and entered into the jython interpreter'smemory.
Because of this alone, I find I use the Python SoundObject more than I do using the external SoundObject.if I was to use the external SoundObject and wanted work an even remotely similar manner, I'd have tocome up with some strange hack to maybe write script in one external object have the execution of thatobject write that script into a file which would have to be reimported into other scripts. not a horrible hack,but enough for me to want to avoid, especially when it's not necessary. (though, if you're programming ina scripting language besides Python, you would hack to work in a manner like this...)
UsageFor the PythonObject, instead of using a print command to stdout to bring things back into blue, you simplyassign the variable
score
to the text string of your generated notes. when the PythonObject is done processing, blue gets whatevervalue is assigned to that variable and parses it as a text score, then proceeds to do the standard operationsof scaling and translating the notes in time, then applying any noteProcessors which may have been addedto it.
Also, should you need, the variable
blueDuration
is assigned the value of the subjective duration of the PythonObject on the timeline.
So, within your scripts, you have access to the duration of the SoundObject should you want to make yourscript use that for any purpose you might have. one example might be that you have a score generatingfunction that depends on duration, maybe if it has less duration it produces notes with louder amplitudeand than if it has a longer duration.
A Simple ExampleLet's say you're writing a simple Python script:
score = "i1 0 2 3 4 5\n"
1. the first thing blue does is clear the
score
variable in the interpreter and assign the variable
blueDuration
the value of the duration of the SoundObject on the timeline. For this example, it does not affect theoutcome of the score generated
2. Next, blue runs the script. in this case, the only thing that happens is that the

Tutorial 1
141
score
variable is being assigned the text string of a single note, along with a newline.
3. At the end of the script's execution, the
score
variable is read. the score variable may or may not have anything assigned to it, but the script withinthe PythonObject is still run. this allows for the possibility of code that needs to be run but doesn'tnecessary need to generate score text at that time. (as mentioned above in the section called “The Casefor Using the Python SoundObject”)
4. blue parses the score text, making Note objects for blue to use, applies scaling and translation of timeto make the genreated notes start at the time of the PythonObject and last the subjective duration, thenapplies any noteProcessors.
And that's it!
A More Complex ExampleFor the following example, I will make a very simple score generator that produces as many notes as Igive as an argument. the entire code for the script is:
def generateNotes(numOfNotes): scoreText = "" for i in range(numOfNotes): scoreText += "i1 " + str(i) + " 2 3 4 5\n" return scoreText
score = generateNotes(10)
The function I made,
generateNotes(numOfNotes)
, takes in the number of notes I want to generate. for the above, I wanted it to generate 10 notes, and ifI printed out the above
generateNotes(10)
, I would have gotten the result:
i1 0 2 3 4 5 i1 1 2 3 4 5i1 2 2 3 4 5i1 3 2 3 4 5i1 4 2 3 4 5i1 5 2 3 4 5i1 6 2 3 4 5
Tutorial 1
142
i1 7 2 3 4 5i1 8 2 3 4 5i1 9 2 3 4 5
This text string above is returned by the
generateNotes()
function and assigned to the
score
variable. blue then grabs that text from the
score
variable and parses it and the proceeds with compiling out the .CSD file.
Note: this is a very basic example of a note generator. As you work with Python more for score generation,you'll probably either create a slew of text-handling classes that use lots of regular expressions or a moreobject-based system that interacts amongst itself before generating score text output. I hope to addressthese types of design decisions in the near future in another tutorial which will hopefully help those newto scripting and programming learn how to go about analyzing music goals in terms of programming andthen designing and implementing their solutions.
Usage IdeasUsing the external SoundObject and the Python SoundObject, besides their general usefulness of allowingscripting in blue, may be considered alternative methods of extending blue through script rather thancompiling Java programs. The extensibility of the system is very open-ended, as whatever is available toPython and other languages now becomes accesible to blue, as well as using score-generating programsthat are able to print to stdout.
So if you wanted to write a perl script that hits weather websites on the internet, gathers data from them,and then maps that data to different parameters of a note generating algorithm, you could build that outsideof blue, but then have the added benefit of being able to use that within blue.
If you build a C++ program to generate scores, you're able to call it from within blue.
Maybe even something simple like doing a text include of a text file could be done rather easily with afew lines of Python or perl script.
Also, you can approach building scripts for tools as also being prototypes for building fully qualified blueSoundObjects and noteProcessors in Java, which has the added benefit of being able to have a GUI addedto it. so if you have a utility script you use often, suggesting it to a Java programmer could lead to it'sinclusion into blue, where it could be remade in a way to have it be usable by non-programmers as well.
Future EnhancementsAs blue has developed over time, and as the ways to use it are being augmented with each new build, I'malways looking for new ways to make the process of working with blue easier. My recent work with thePython SoundObject and the External SoundObject have shown me that there's a lot of neat things thatcan be done with blue, things I really didn't account for when I first built blue, and would now love tohandle. For the future, in addition to developing more and more tools for blue itself, it would be nice tobe able to have more conventional coding tools to aid scripters in the script work for blue. I'm aware of
Tutorial 1
143
the limitations for debugging and console output right now in blue, but, then again, all of the scriptingadditions to blue are rather young, and blue's development continues every day.
For immediate goals, I've written down the following as things I should look into now:
Python test console for the PythonObject
Like the test button, but would show all output to stdout as it looks before being processed by blue, aswell as showing all output to stderr.
Language neutral script library
With the PythonLib for the Python SoundObject, it's nice to have a portable way of keeping all of thescripts that can be used with blue along with blue, if you happen to be carrying your work around withyou. I think that this ability would be fantastic for the external SoundObject. already i have a method thatreturns the absolute path to the lib directory of blue; with this, I think it should be possible that before blueruns any script, it could look for a "<BLUE_SCRIPT_LIB>" constant of some sort and do a text replaceto put in the absolute path to the lib directory. that way, you could do something like:
from <BLUE_SCRIPT_LIB>.myLibrary import *
as well as use a commandline like:
perl <BLUE_SCRIPT_LIB>/myLibrary/myProgram -input $infile
Which would make the library accessible from any system. the nice thing about something like this isthat I could then include other people's script libraries and programs as part of the blue release, or otherpeople may wish to advertise that their scripts are usable within blue and have a place to install it in thatis easily accessible on any blue system. (For example, using the above convention, if I have a blue workfile that repeatedly calls a library that someone else developed, I can put that library in my lib dir, usethe convention above, and then say if someone else wanted to run that file or if I was bringing that file toanother computer, all I'd have to do is install the library in the lib directory and everything should work,as opposed to having to do a find and replace on ever call to the library to change the path to where itis on the new computer.)
Finding a text editor component thats made for programming
This would be fantastic, to find a Java text component that I can swap in that would handle things likesyntax-hilighting of different languages, maybe has some kind of help system for syntax and references,etc. I haven't found one I could easily use or modify yet, but hopefully something will come along.
Final ThoughtsAs time goes on, I'm sure there will be alot of additions to blue to help aid scripting and the use of otherscore generating programs within blue. I hope this tutorial has helped to show how to use the externalSoundObject and Python SoundObject in blue, as well as helped show what's very possible by using theseSoundObjects.
If you have any comments, suggestions for improving this tutorial, or questions, please feel free to emailme at <[email protected].>
Thanks and good luck!
Steven

144
Sound SoundObjectSteven Yi
2002
Revision HistoryRevision 1.1 2004.11.7
Converted to DocBook. Some information revised as no longer applicableRevision 1.0 2002.11.6
First version of article.
IntroductionOne of the more curious soundObjects in blue is the Sound SoundObject, which allows for the direct writingof instruments in the score. It's origin came a long time ago now when I was first beginning to create moresoundObjects for blue. I was thinking of what exactly should be possible for a soundObject, thinking thatif someone were to make a soundObject, they should be able to also embed instruments and f-tables thatthey'll know will always be generated and available. The case which I was thinking about at the time werenon-generic soundObjects like a drum machine, where the soundObject would not only have a GUI todevelop pattern tracks for different drum sounds, but also would be able to furnish the instruments and f-tables needed to generate those sounds, the idea being that one could release a soundObject that a user coulduse "straight out of the box", no instrument writing or tables required. That design decision eventually leadme to the conception of the Sound SoundObject, which uses those mechanisms that were put in place forall soundObjects. Theoretically I was very fascinated with the possibility of writing instruments within themain scoring area, mixing note blocks with pure sound blocks. It became possible to really compose withthe sound in a very direct manner; saying things like "I want a sine wave here with this envelope, then atriangle wave here, and on top of that i want a processed sample sound to come in here" now had a directtranslation. You didn't need to write the instrument, then write a note for it, and then have to work with bothof them as separate entities. You could just add a Sound SoundObject block on the timeline, write yoursound using standard orc code, and move it around in time on the timeline. After having thought throughthat possibility to express my musical goals by using the Sound SoundObject, I found that it opened up alot of how I saw blue's timeline as well as how I thought about ways to work with blue.
As a Csound user or general electronic musician, it might seem strange to think of directly writinginstruments in a score, especially in context to the existing music tools and musical models that you'veprobably worked with. However, by having the Sound SoundObject, I've found that interesting possibilitieshave opened up, and since it's creation and inclusion into blue it has been used and has played a part ofjust about every piece that I've worked on.
Note: It's not that it's impossible to implement this any other way. Really, it's just a single instrument with asingle note, but, that's a technical issue, an implementation issue. The interesting thing is that when workingwith it, it's really a different thing altogether conceptually. It's the sound soundObject in the context of thetimeline that makes its usage interesting and useful(well, for me at least!).
The following sections will go over how to use Sound SoundObject, what happens when it gets processedby blue, as well as some usage scenarios and patterns that have arose while using it in my own work.
How to Use the Sound SoundObjectFirst, insert the Sound SoundObject as you would any soundObject by rt-clicking (for Mac users, holddown the apple key and click) on the main timeline of the score area and chose "Add New Sound" fromthe popup menu.
Tutorial 2
145
A Sound SoundObject will be inserted wherever you clicked on the timeline. You'll notice that thissoundObject acts and behaves like any other soundObject: you can move it around in time, drag to changethe duration, change it's name in the soundObject property dialog, and click on it to edit it. You won'tbe able to add any noteProcessors to it, however, but that will be explained more in detail in the "Whathappens when it gets processed" section.
If you click on the soundObject to pull up its editor, you'll see a text box with a default message "insertinstrument text here". In the editor is where you write your instrument definition, but without writing any"instr 11" or "endin": the number of the instrument and the correct formatting of the instrument is handledby the soundObject. For a simple example, you might try:
aout oscili 30000, 440, 1 outs aout, aout
where the 1 at the end of the oscili line is an ftable numbered 1, defined in the tables editor under the tablestab. (For our example, let's go ahead and definte the ftable as "f1 0 65536 10 1", which is a sin wave). Atthis point you might want to try listening your work file with the play button (assuming you've set up thecommand line under project properties to a command line that will output to speaker; for more informationon this, please consult the blue user's manual). What you should hear is that where you've put your SoundSoundObject on the timeline (i.e. starts at .5 seconds) should play the sound you've written, in this examplecase, a sine wave at 440hz at 30000 amp, playing at equal volume out both left and right channels.
And that's pretty much it! From here you might want to try copying the block and pasting it a few times,changing some parameters, embellishing your instrument definitions, etc. Also, you might want to trymixing this with other soundObject, i.e. write some instruments in the orchestra manager, then write somegenericScore soundObjects to play those instruments, as well as use some Sound SoundObjects directlyon the timeline.
What Happens When It Gets ProcessedIf your confused as to what's going on, it'll probably help to know exactly what happens when blueprocesses Sound SoundObjects. blue, whenever it goes to create a .CSD file to use with a commandlineor to generatoe out to a file, has different stages of its compilation. The relevant parts to know here arethat all instruments from the orchestra manager are first generated, but not yet put into the .CSD. Next, allsoundObjects are called to generate any instruments they might have. This is where the Sound SoundObjectwould generate an instrument from your text input. The generated instruments from Sound SoundObjectsat this point are assigned an instrument number. After all instruments are generated from soundObjects,all score text is then generated. At this point, the instrument number assigned in the earlier pass is nowused by the Sound SoundObject to generate a note for your instrument. The note generated by the SoundSoundObject consists of only three p-fields: the instrument number, the start of the soundObject, and theduration. No other p-fields are generated (so your instrument should not use any other p-fields).
For example, let's say you have a Sound SoundObject with a start time at 0.5 seconds and a duration of 2seconds. When blue goes to get it's instrument, let's say it is assigned instrument number 2. The generatednote will be:
i2 0.5 2
Perhaps the best way to see it is to do the simple example from the "How to use the Sound SoundObject"section, generate a CSD file (from the Project menu, select "Generate CSD to file"), and inspect what gotgenerated. Comparing the soundObject's representation on the timeline as a sound and seeing how it gotgenerated out might explain things better.
Tutorial 2
146
(NOTE: because the Sound SoundObject only write out the three p-fields, using a noteProcessor reallydoesn't have any purpose, which is why the sound soundObject does not support noteProcessors)
Ultimately in the lowest level implementation, there is a separation of a note as well as an instrument,but within blue, that separation is hidden from the user. From the user's point of view, all they have todo is write their sounds on the timeline, and they don't have to worry about numbering the instrumentsor creating notes for that instrument.
Usage Scenarios and Patterns
Prototyping/SketchingMost of the time I've found myself using the Sound SoundObject at the start of a project when I'mcreating new sounds for a piece. I find it's good a prototyping tool, initially working with sounds on thescoreTimeCanvas (this is the name of java object that is the main score timeline area). Usually, when Iwrite instruments in the Sound SoundObject, I define all of the i-time variables in a way that will facilitateeasy conversion to full-fledged instruments should I later want to do so. This is a general instrument writingpattern of mine that I would do anyways even before I had blue to use. For example, I might be designingan sound on the timeline with the something like the following at the top of the text:
ipch = cpspch(8.02)iamp = ampdb(80)ispace = .2
Later, when I get to a point after sketching out some sounds and finding I like how things are beginningto flow in the piece, I find that i usually want to start working with the sounds then as instruments. Atthis point, I normally convert the Sound SoundObject to a genericScore object (done by rt-clicking on thesoundObject and picking "Convert to Generic Score" from the popup menu), which automatically takesthe the instrument from the soundObject and adds it to the orchestra under the orchestra manager, and alsoleaves me with a single three p-field note, which also shows me what instrument number the instrumentwas assigned. After that I'll go to the orchestra manager and edit the instrument to now take in more p-fields, changing the top text to something like:
ipch = cpspch(p4)iamp = ampdb(p5)ispace = p6
I usually find myself making two or three different sounds, then copying a bunch of them and changinga few parameters to try out things in time, then converting them into instruments. It's a nice separation tohave the ability to work just with sounds at the start of a piece for me, as really, that's what I'm concernedwith at the beginning of a piece, finding the sounds and initially sculpting the sound space that the piecewill take on. After I find what I'm looking for, it's easy for me to convert all the sounds into instrumentsand then proceed from there.
Sound DesignSometimes when you're wanting to just to build a single sound or texture, maybe to use as a sound effectin project, you might not really be thinking in terms of scores, notes, and instruments but rather in termsof sounds in time. In situations like this, the Sound SoundObject would be the first thing I would use, andmight really be the only soundObject I would use. Notes, as a concept, somtimes really don't play a partof the musical model for a piece. It's not that you have all these instruments being played everywhere, but

Tutorial 2
147
rather you have sounds going on here and there. It might seem like I'm being a little to theoretical here,but I really think it does play a part in the work process.
In the situations I've been in when I've been asked to make a sound for a friend's website or game, I'vefound it nice to fire up blue, set the timeline to a really close-up zoom on time, and just work from there tocraft a sound. I would add a Sound SoundObject here and there, maybe use some global variables so I canmake Sound SoundObjects that might just function as an lfo or other control instrument, moving thingsaround just slightly around in time to sculpt the sound. An oscillator here, maybe blending it into an fmsound, throw in a noise generator with some formants and a notch filter sweep...
Learning and PracticeSometimes I find myself just making sounds with blue and Csound. It might be because I'm just curiousto try something out, I might be working on really getting to know a synthesis technique, trying to learnhow to express a sound in my mind or maybe to better train my imagination to know what a sound willreally sound like when I write it down, etc. Sometimes its just that I want to try out some new opcodesI haven't really ever used.
It's times like this when I find myself just using the Sound SoundObject, as I'm not interested in thenote-instrument paradigm, it's the furthest thing from my mind. I'm focused on achieving a sound, or onexperimenting to see what is the sound of instrument code I've just written. And I want the flexibility toadd more sounds on the timeline: I don't want to break my concentration to go and think about numberinginstruments, writing notes, moving the note around in time. I want to see and work with it all of it in oneplace., as that's what's going on in my mind.
It's also great practice too, just writing alot of instruments. I'd imagine that the Sound SoundObject wouldbe a useful tool for a person new Csound, as it allows just working with instrument code. (Note: you wouldstill need to know the basics of how Csound works, what is a CSD, and understand how things in bluemap the different parts if itself to the different parts of a CSD file).
Final ThoughtsThanks for reading the tutorial! I hope this tutorial has helped to show how to use Sound SoundObject inblue, as well as helped show some ways in which you might want to use it.
If you have any comments, suggestions for improving this tutorial, or questions, please feel free to emailme at <[email protected].>
Thanks and good luck!
Steven

Part III. DevelopersInformation here for Developers.

149
Chapter 4. PluginsNote Processors
Instruments
Sound Objects
150
Chapter 5. CoreBuilding blue
RequirementsTo build blue, the following programs are used:
Java Development Kit 1.4+ Contains javac java compiler and other development tools.
Apache Ant or Apache Maven blue comes with both an Apache Ant build file as well as an ApacheMaven (1.0.x) build file. Either can be used to build blue from thecommandline, though the user can also easily import the sourcesand libraries of blue into an IDE (i.e. Netbeans, Eclipse, Idea) anduse the IDE's project build system.
The Maven build file is mostly used when doing releases, while theAnt build file will be more useful for those who are simply wantingto build and use blue.
JUnit JUnit is required to run the unit tests and is integrated as part ofthe build.
IzPack IzPack is used for building the blue installer jar; if you are notbuilding an installer, this library won't be necessary.
xsltproc, Apache FOP, Sun JAIlibrary
xsltproc is used to build all versions of the manual. To build thePDF manual, Apache FOP and Sun JAI library are required.
Getting the SourcesTo build blue, you will either need to download a src.zip file from the Soureforge release server or useCVS to download the latest sources.
Maintaining a Version of blue from CVSAfter checking out from CVS and building, one should modify the appropriate starter script in the blue/bin directory for your platform to correctly point to BLUE_HOME. After that, running CVS update andrebuilding using Ant should keep you up to date.
Note
While checkins to CVS are almost always done in such a way that the program is in a state whichit will compile and function cleanly, it sometimes does happen that a broken checkin occurs.Users building from CVS should be careful to depend on using only a version from CVS if theyare not able to fix code to make things compile. If you are not able to fix Java code, then it isrecommended to keep two copies of builds from CVS, one which to use for your general use andanother for using to test if things will build.