Blackboard Learn 9.1 - Help for...
316
Help for Students Blackboard Learn Release 9.1 - Help for Students - Page 1 © 2011 Blackboard Inc. Proprietary and Confidential. U.S. Patent No. 6,988,138. Additional Patents Pending.
Transcript of Blackboard Learn 9.1 - Help for...
Help for Students
Blackboard Learn Release 9.1 - Help for Students - Page 1© 2011 Blackboard Inc. Proprietary and Confidential. U.S. Patent No. 6,988,138. Additional Patents Pending.

Publication Date and Copyright NoticeBlackboard Learn™Help for Release 9.1 Service Pack 5 (SP 5)
Publication Date: April 20, 2011
Worldwide Headquarters International Headquarters
Blackboard Inc. Blackboard International B.V.
650 Massachusetts Avenue NWSixth FloorWashington, DC 20001-3796 USA
Dam 272nd Floor1012 JSAmsterdamThe Netherlands
+1 800 424 9299 toll free US & Canada
+1 202 463 4860 telephone +31 20 5206884 (NL) telephone
+1 202 463 4863 fax +31 20 5206885 (NL) fax
www.blackboard.com www.blackboard.com
Copyright © 1997-2011. Blackboard, the Blackboard logo, BbWorld, Blackboard Learn, Blackboard Transact,Blackboard Connect, the Blackboard Outcomes System, Behind the Blackboard, and Connect-ED aretrademarks or registered trademarks of Blackboard Inc. or its subsidiaries in the United States and othercountries. U.S. Patent Numbers: 6,988,138; 7,493,396; 6,816,878.
Microsoft andWindows are registered trademarks of Microsoft Corporation in the United States and/or othercountries. Sun, Solaris, and Java are either registered trademarks or trademarks of SunMicrosystems, Inc. inthe United States and/or other countries. Oracle is a registered trademark of Oracle Corporation in the UnitedStates and/or other countries. Red Hat is a registered trademark of Red Hat, Inc. in the United States and/orother countries. Linux is a registered trademark of Linus Torvalds in the United States and/or other countries. Apache is a trademark of The Apache Software Foundation in the United States and/or other countries. RealPlayer and Real AudioMovie are trademarks of RealNetworks in the United States and/or other countries.Macromedia, Authorware, Shockwave, Adobe and Acrobat Reader are either registered trademarks ortrademarks of Adobe Systems Incorporated in the United States and/or other countries. Macintosh andQuickTime are registered trademarks of Apple Computer, Inc. in the United States and/or other countries.Crystal Reports is a trademark of Business Objects in the United States and/or other countries. WebEQ is atrademark of Design Science, Inc. in the United States and/or other countries. JSpell is a trademark of TheSolution Café in the United States and/or other countries.
Other product and company names mentioned herein may be the trademarks of their respective owners.
No part of the contents of this project may be reproduced or transmitted in any form or by any means withoutthe written permission of the publisher, Blackboard Inc.
Blackboard Learn Release 9.1 - Help for Students - Page 2© 2011 Blackboard Inc. Proprietary and Confidential. U.S. Patent No. 6,988,138. Additional Patents Pending.

Contents
Help for Students 1Blackboard Learn Environment 9Logging In to Blackboard Learn 9
Frequently AskedQuestions 9
About the Gateway Page 9
How to Log In 10
Forget Your Password? 10
How to Retrieve Your Password 10
About the Blackboard Learn Environment 12
Learning YourWay Around 12
More About the Page Header 13
Next Steps 13
My Places: Edit Personal Information and Settings 13
How to Edit Personal Information 13
How to Change Your Password 15
How to PersonalizeMy Places 17
How to Change Personal Settings 19
How to Set Privacy Options 21
Next Steps 23
Course Catalog 23
Browsing the Course Catalog 24
Viewing a Course as aGuest 24
CourseMenu 24
CourseMenu Icons 25
Viewing New Content 27
Viewing the CourseMap 27
Search for Users 28
How to Search for Other Students in Your Course Using the Roster 29
How to Search for Users Using the User Directory 29
Screen Readers 30
Language Packs 31
How to Set a Language Pack Preference 31
Tabs and Modules 33My Institution Tab 33
Exploring the Tools Panel 34
Exploring theModules 34
Next Steps 35
Blackboard Learn Release 9.1 - Help for Students - Page 3© 2011 Blackboard Inc. Proprietary and Confidential. U.S. Patent No. 6,988,138. Additional Patents Pending.
What's New Module 35
Courses Tab 36
Customizing TabModules 38
How to CustomizeModule Layout 38
How to Personalize the Page 40
How to Add aModule 41
Next Steps 44
Working with TabModules 44
EditingModule Content 44
Minimizing aModule 44
Opening aModule in a New Window 44
Removing aModule 45
Accessing Information in aModule 45
Notifications 46
Exploring the Notifications Settings 46
How to Edit the Notification Settings 47
Deciding upon Notifications and Email Notifications 49
Text Editor 51Using the Text Editor 51
Entering Text 51
Compatible Browsers 51
Text Editor Features 51
Keyboard Shortcuts for the Text Editor 54
InsertingMultimedia Files from the Text Editor 56
Image Fields 57
MPEG or AVI Fields 57
QuickTime Fields 58
Audio Fields 58
Flash or Shockwave Fields 59
Linking to File Attachments from the Text Editor 59
Using theMath and Science Notation Tool 61
MathML Equation Editor 61
Accessing the Equation Editor 62
Running Spell Check in the Text Editor 62
Word Lists 63
Personal Word List and Cookie 63
Using Spell Check 64
Recognized Errors 64
Tools 65
Blackboard Learn Release 9.1 - Help for Students - Page 4© 2011 Blackboard Inc. Proprietary and Confidential. U.S. Patent No. 6,988,138. Additional Patents Pending.

About Course Tools 65
Announcements 65
How to View Announcements 66
Blogs 67
How to Access a Blog 68
How to Create a Blog Entry 69
Viewing Blog Drafts 71
How to Comment on a Blog Entry 72
How to Edit a Blog Entry 74
How to Delete a Blog Entry 77
Viewing Blog Grades 79
Troubleshooting BlogManagement 79
Calendar 80
How to Open the Calendar 80
How to Create a Personal Event 81
How to Delete and Edit a Personal Event 83
How to View a Specific Date 85
Collaboration Tools 86
About Collaboration Tools 86
Virtual Classroom 88
Chat 100
Accessing Recorded Collaboration Sessions 105
Contacts 122
How to View Contacts 122
How to Create or Edit a Contact 123
How to Delete a Contact 125
How to Search for a Contact 125
Discussion Board 125
How to Access the Discussion Board 126
Viewing a Discussion Forum 127
Using List View and Tree View in Discussions 129
Viewing a Discussion Thread 130
About the Thread Detail Page 131
How to Create Threads in a Discussion Forum 133
How to Save Posts as Draft and Submit Later 134
How to Change the Displayed Threads 138
How to Reply to Discussion Posts 140
How to Rate Discussion Posts 143
How to Search Discussion Posts 144
Blackboard Learn Release 9.1 - Help for Students - Page 5© 2011 Blackboard Inc. Proprietary and Confidential. U.S. Patent No. 6,988,138. Additional Patents Pending.

How to Collect Discussion Posts 146
How to Filter Discussion Posts After Searching or Collecting 148
How to Sort Discussion Posts After Searching or Collecting 150
How to View Discussion Board Grades 152
Email 154
Before You Begin 154
How to Send Email 154
Troubleshooting 156
Journals 157
How to Access a Journal 159
How to Create a Journal Entry 160
Viewing Journal Drafts 162
How to Comment on a Journal Entry 163
How to Edit a Journal Entry 165
How to Delete a Journal Entry 168
Viewing Journal Grades 170
Troubleshooting Journal Management 170
Messages 171
How to Create aMessage 172
How to Create aMessage Folder 175
How to View aMessage 176
How to Reply to aMessage 178
How to Forward aMessage 181
How toMove aMessage 185
How to Delete aMessage 186
How to Print a Message 188
My Grades 190
How to Access My Grades 190
How to View Grade Details 191
My Grade Item Status 193
Search for Users 194
How to Search for Other Students in Your Course Using the Roster 194
How to Search for Users Using the User Directory 195
Tasks 196
How to Open the Task List 196
How to Create or Edit a Personal Task 197
How to Sort the List of Tasks 199
How to Change the Status of a Task 200
How to Delete a Personal Task 201
Blackboard Learn Release 9.1 - Help for Students - Page 6© 2011 Blackboard Inc. Proprietary and Confidential. U.S. Patent No. 6,988,138. Additional Patents Pending.

How to View Task Details 202
Wikis 204
How to Create aWiki Page 204
How to Edit Wiki Content 206
How to Link to otherWiki Pages 208
How to Comment on aWiki Entry 212
How to View Your Contributions 214
How to View Grades forWiki Contributions 217
Courses and Content 220About Courses 220
Next Steps 220
About Course Content 220
Course Content Areas 222
Next Steps 223
Course Cartridges 223
Accessing a Course Cartridge 223
Lesson Plans 224
LearningModules 226
Following a Sequential Path 226
Navigating within LearningModules 226
Using the Table of Contents 227
How toMove the Table of Contents 227
Mashups 227
Default Mashup Types 228
How to Create aMashup Item Using the Text Editor 228
Course Groups 232
About Course Groups 232
Managing Group Collaboration Sessions 239
Exchanging Files within a Course Group 245
Emailing a Course Group 248
Group Assignments 252
Tests and Assignments 271Tests and Surveys 271
Question Types 271
Grading Questions 271
How to Take an Assessment 272
Feedback andGrades 273
Multiple Assessment Attempts 274
Presentation Option 274
Blackboard Learn Release 9.1 - Help for Students - Page 7© 2011 Blackboard Inc. Proprietary and Confidential. U.S. Patent No. 6,988,138. Additional Patents Pending.

Submitting Assignments 275
Frequently AskedQuestions 275
How to Submit an Assignment 276
How to Save an Assignment as Draft and Submit Later 278
How to Edit or Resubmit an Assignment 283
How to View Assignment Grades and Feedback 287
Next Steps 291
Group Assignments 291
Frequently AskedQuestions 292
How to Submit Work for a Group Assignment 292
How to Save aGroup Assignment as Draft and Submit Later 295
How to Edit or Resubmit a Group Assignment 300
How to View Group Assignment Grades and Feedback 304
About SafeAssign 309
How SafeAssignments Work 309
How to Submit a SafeAssignment 311
How to View SafeAssignment Submissions 312
Blackboard Learn Release 9.1 - Help for Students - Page 8© 2011 Blackboard Inc. Proprietary and Confidential. U.S. Patent No. 6,988,138. Additional Patents Pending.

Blackboard Learn Environment > Logging In to Blackboard Learn
Blackboard Learn Environment
Logging In to Blackboard LearnThe first step in using Blackboard Learn is to log in on theGateway page. Your school will provide the URL,username, and password.
Note: Youmay be directed immediately to theMy Institution tab. If so, youmay also log in through a buttonon the header frame or a special portal module.
IMPORTANT! Passwords enable access to personal information. Tomaintain security do not sharepasswords with others.
Frequently Asked Questions
What do I do if I can't log in?Please contact the computing help desk at your school. If you’re not sure how to contact them, look for thetechnology office on your school’s website or search the web for your school’s name + Blackboard + help orsupport.
About the Gateway PageTheGateway page welcomes you and provides a login button to access Blackboard Learn. Youmust have avalid username and password to log in.
If theGateway page does not appear, youmay also log in through a button on the header frame or a specialportal module.
IMPORTANT! Cookies must be enabled within the web browser.
Login: Use this function to log in to Blackboard Learn.
Blackboard Learn Release 9.1 - Help for Students - Page 9© 2011 Blackboard Inc. Proprietary and Confidential. U.S. Patent No. 6,988,138. Additional Patents Pending.

Blackboard Learn Environment > Forget Your Password?
Change Text Size: Display assistance in changing the size of the text displayed in the browser.
High Contrast Setting: Change the display to assist low vision users. You can select whether to use youroperating system's High Contrast settings or use Blackboard styles.
Create a New Account: Create an account on Blackboard Learn.
View Course Catalog: View courses belonging to your preferred category.
Preview as Guest: Preview Blackboard Learn without using a system account. Youmay be able to browsethe catalog and preview courses as a guest but you do not have access to the entire course.
How to Log In1. Type yourUsername.2. Type yourPassword. Themaximum number of characters in a password is 32. Passwords are
case sensitive.3. Click Login.
ResultYou are directed to theMy Institution tab.
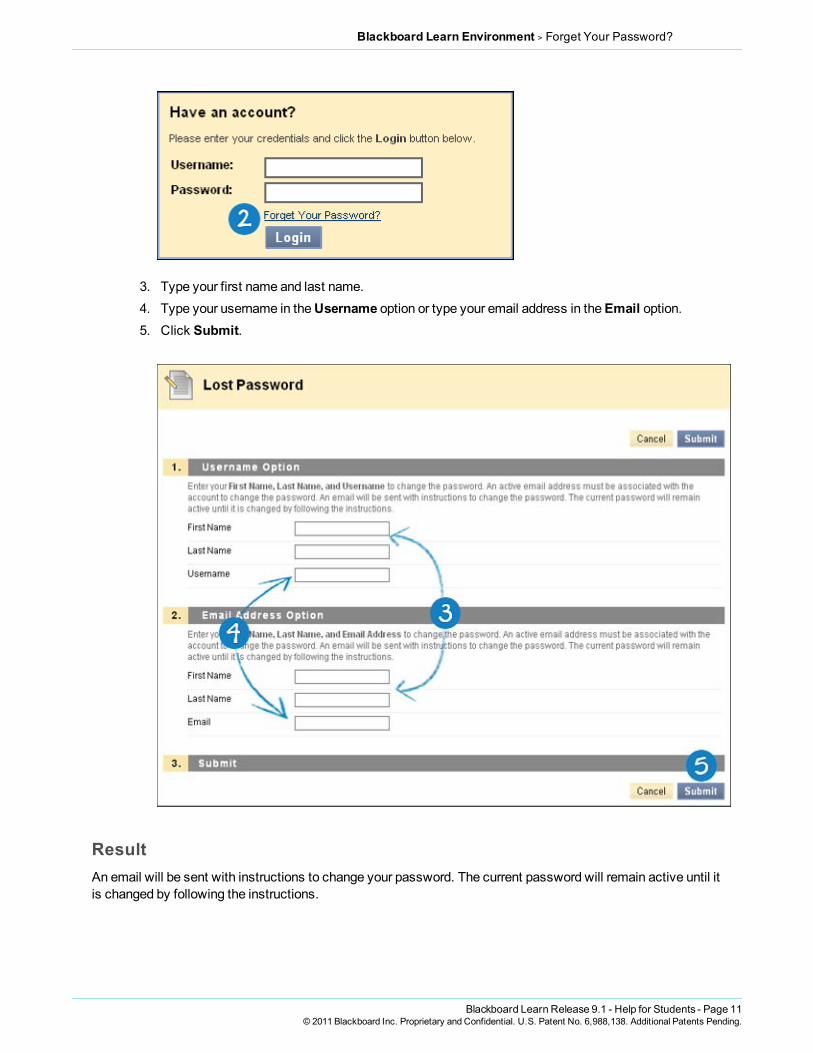
Forget Your Password?Youmust complete the Lost Password page to obtain a new password. You will create a new password basedon instructions received in an email. Youmust enter information in all the fields in theUsername Optionsection or all of the fields in theEmail Address Option section.
How to Retrieve Your Password1. Type the URL for Blackboard Learn into a web browser.2. On theGateway page, click Forgot Your Password?
Blackboard Learn Release 9.1 - Help for Students - Page 10© 2011 Blackboard Inc. Proprietary and Confidential. U.S. Patent No. 6,988,138. Additional Patents Pending.
Blackboard Learn Environment > Forget Your Password?
3. Type your first name and last name.4. Type your username in theUsername option or type your email address in theEmail option.5. Click Submit.
ResultAn email will be sent with instructions to change your password. The current password will remain active until itis changed by following the instructions.
Blackboard Learn Release 9.1 - Help for Students - Page 11© 2011 Blackboard Inc. Proprietary and Confidential. U.S. Patent No. 6,988,138. Additional Patents Pending.

Blackboard Learn Environment > About the Blackboard Learn Environment
About the Blackboard Learn EnvironmentThe following are some things to keep inmind when using Blackboard Learn:
l System administrators have the ability to disable certain tools within the application. If you encountertools that you are unable to access contact your system administrator.
l The openness of Blackboard Learn allows instructors, leaders and administrators to be very creative.The names for items in Blackboard Learnmay differ from those in the documentation.
l Building Blocks allow your school to integrate external applications, tools, content, and services intoBlackboard Learn.
Learning Your Way Around
Page Header: Area at the top of the screen that contains the tabs, theMy Places link, and the links forHome, Help, and Logout. To learnmore, seeMore About the Page Header .
Tabs: Blackboard Learn has two common tabs, theMy Institution tab and theCourses tab. If your schoollicenses community engagement, theMy Institution tab, Community tab, andServices tab are available. Inaddition, community engagement enables your school to create custom tabs. The Blackboard administrator atyour school can rename the tabs. To learnmore, seeMy Institution Tab.
Course Menu: Panel on the left side of the screen when inside a course. Users click button or text links toaccess all course content, such as Content Areas, individual tools, external links, course links, andmodulepages. To learnmore, see CourseMenu.
Content Frame: Large area of the screen adjacent to the CourseMenu that displays the selected ContentArea, tool, or material.
Blackboard Learn Release 9.1 - Help for Students - Page 12© 2011 Blackboard Inc. Proprietary and Confidential. U.S. Patent No. 6,988,138. Additional Patents Pending.

Blackboard Learn Environment > My Places: Edit Personal Information and Settings
Action Bar: Rows at the top of the page, containing page-level actions, such as Build Content, Search,Delete, andUpload.
More About the Page HeaderThe Blackboard Learn user interface is made up of components that allow you to easily navigate, enter data,edit items, and change options within Blackboard Learn. After logging into Blackboard, you will "land" on theMyInstitution page, or a similar page. Pages and the tabs that access them can be renamed by your school. Tabsthat are visible depend on what capabilities your school has licensed. On that page, as well as others, you can access tools and information contained within modules.
The Page Header component displays information about the current screen. Its purpose is to orient the user.The Page Header always contains the tabs, theMy Places link, and the links forHome, Help, and Logout.Notice that even within a course, the page header remains. We refer to the tabs and buttons in this area asuniversal navigation since they stay with you nomatter where you are in Blackboard.
Tabs: Blackboard Learn has two common tabs, theMy Institution tab, and theCourses tab. If your schoollicenses community engagement,My Institution tab, Community tab, andServices tab are available. Inaddition, community engagement enables your school to create custom tabs and present different tabs to usersbased on Institution Roles.
My Places:My Places provides users with quick and easy navigation to a variety of places withinBlackboard Learn. This feature contains a customizable set of links to frequently accessed information andtools.
Home: TheHome link directs you to the Blackboard website where you can see information about theirproducts and services.
Help: TheHelp link can be set by the administrator at your school to point to school resources for providingassistance to users.
Logout: You can use Logout to exit from Blackboard Learn.
Next StepsTo learnmore about tabs, seeMy Institution Tab and Courses Tab.
To learnmore about My Places link, seeMy Places: Edit Personal Information and Settings.
My Places: Edit Personal Information and SettingsMy Places provides you with quick and easy navigation to a variety of places within Blackboard Learn. Thisfeature contains a customizable set of links to frequently accessed information and tools. My Places alsoallows you to edit your personal information and settings.
How to Edit Personal InformationYou can edit the information that appears in your account profile on theEdit Personal Information page.
Blackboard Learn Release 9.1 - Help for Students - Page 13© 2011 Blackboard Inc. Proprietary and Confidential. U.S. Patent No. 6,988,138. Additional Patents Pending.

Blackboard Learn Environment > My Places: Edit Personal Information and Settings
Changes made on this page are reflected throughout Blackboard Learn. For example, if you change your lastname, the new last name appears in all courses you are enrolled in. Most of the personal information is optional.
1. Click theMy Places link at the top of the page.2. On theMy Places page, select Personal Information. You can also access Personal
Information on the Tools panel.
3. On thePersonal Information page, select Edit Personal Information.
4. On theEdit Personal Information page, make changes to the appropriate fields.
Blackboard Learn Release 9.1 - Help for Students - Page 14© 2011 Blackboard Inc. Proprietary and Confidential. U.S. Patent No. 6,988,138. Additional Patents Pending.

Blackboard Learn Environment > My Places: Edit Personal Information and Settings
Note: If you are unable to change your information, your school may not allow you to change itthrough Blackboard Learn. Because Blackboard Learn often shares data with other systems oncampus, such as the registrar's office, it may be necessary to ensure that your information is thesame everywhere. In this case, your school will have a different way to change your information. Tolearnmore, please contact the computing help desk at your school. If you’re not sure how to contactthem, look for the technology office on your school’s website or search the web for your school’sname + Blackboard + help or support.
5. Click Submit.
How to Change Your PasswordBlackboard recommends that you change your password periodically to ensure security. Do not use common
Blackboard Learn Release 9.1 - Help for Students - Page 15© 2011 Blackboard Inc. Proprietary and Confidential. U.S. Patent No. 6,988,138. Additional Patents Pending.
Blackboard Learn Environment > My Places: Edit Personal Information and Settings
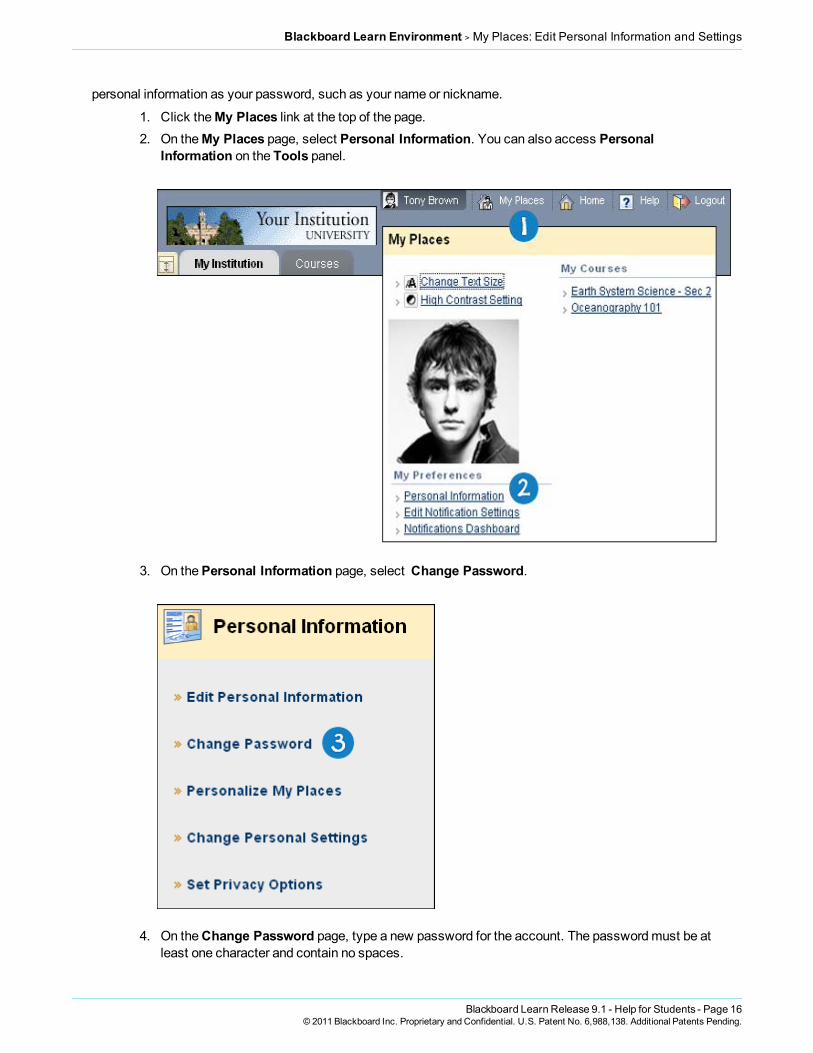
personal information as your password, such as your name or nickname.
1. Click theMy Places link at the top of the page.2. On theMy Places page, select Personal Information. You can also access Personal
Information on the Tools panel.
3. On thePersonal Information page, select Change Password.
4. On theChange Password page, type a new password for the account. The passwordmust be atleast one character and contain no spaces.
Blackboard Learn Release 9.1 - Help for Students - Page 16© 2011 Blackboard Inc. Proprietary and Confidential. U.S. Patent No. 6,988,138. Additional Patents Pending.

Blackboard Learn Environment > My Places: Edit Personal Information and Settings
5. Type the password again to ensure accuracy.6. Click Submit.
How to Personalize My PlacesYou can upload an avatar which can be used to represent you throughout Blackboard Learn and display links tothe courses that you are enrolled in.
1. Click theMy Places link at the top of the page.2. On theMy Places page, select Personal Information. You can also access Personal
Information on the Tools panel.
3. On thePersonal Information page, select Personalize My Places.
Blackboard Learn Release 9.1 - Help for Students - Page 17© 2011 Blackboard Inc. Proprietary and Confidential. U.S. Patent No. 6,988,138. Additional Patents Pending.
Blackboard Learn Environment > My Places: Edit Personal Information and Settings
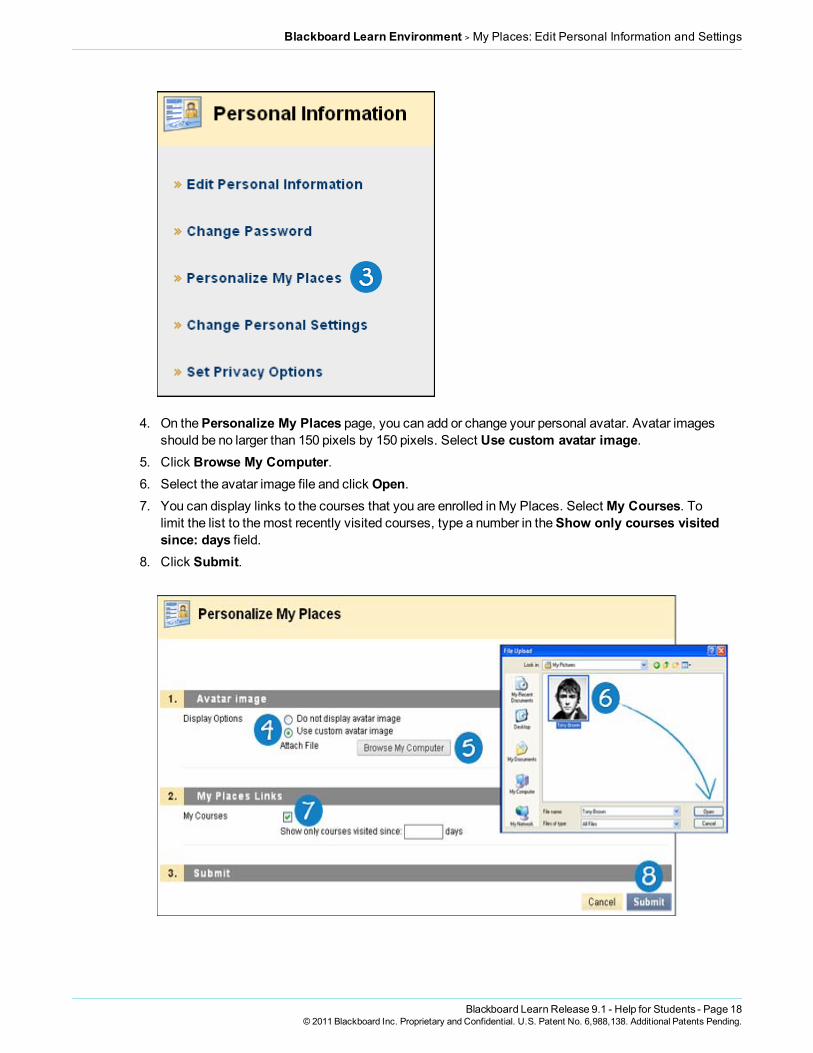
4. On thePersonalize My Places page, you can add or change your personal avatar. Avatar imagesshould be no larger than 150 pixels by 150 pixels. Select Use custom avatar image.
5. Click Browse My Computer.6. Select the avatar image file and click Open.7. You can display links to the courses that you are enrolled in My Places. Select My Courses. To
limit the list to themost recently visited courses, type a number in theShow only courses visitedsince: days field.
8. Click Submit.
Blackboard Learn Release 9.1 - Help for Students - Page 18© 2011 Blackboard Inc. Proprietary and Confidential. U.S. Patent No. 6,988,138. Additional Patents Pending.
Blackboard Learn Environment > My Places: Edit Personal Information and Settings
ResultYour personal avatar is displayed inMy Places, Blogs, Journals, and within Notifications Modules (includingWhat's New, Needs Attention, To Do, and Alerts).
Links to your courses are displayed inMy Places.
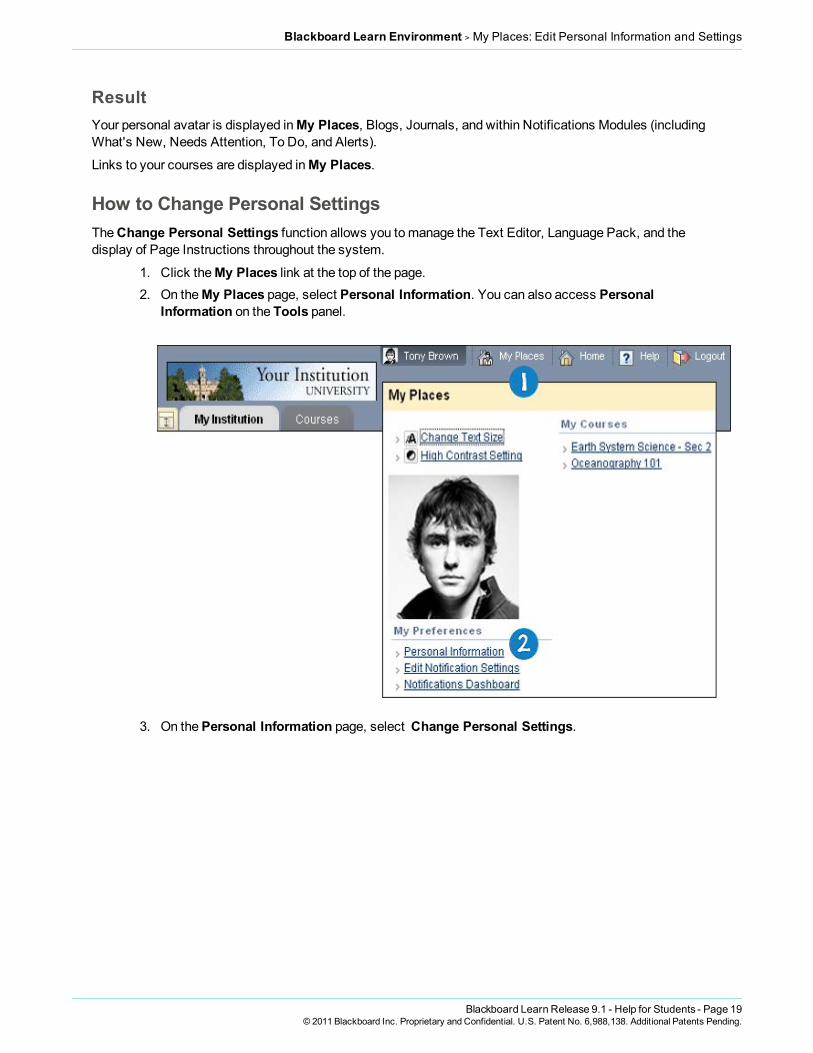
How to Change Personal SettingsTheChange Personal Settings function allows you tomanage the Text Editor, Language Pack, and thedisplay of Page Instructions throughout the system.
1. Click theMy Places link at the top of the page.2. On theMy Places page, select Personal Information. You can also access Personal
Information on the Tools panel.
3. On thePersonal Information page, select Change Personal Settings.
Blackboard Learn Release 9.1 - Help for Students - Page 19© 2011 Blackboard Inc. Proprietary and Confidential. U.S. Patent No. 6,988,138. Additional Patents Pending.

Blackboard Learn Environment > My Places: Edit Personal Information and Settings
4. On theChange Personal Settings page, click On to enable the Text Editor, which allows you tocreate content through a simple editor when you enter content in text boxes throughout BlackboardLearn.
5. Select aUser Language Pack from the drop-down list that is localized to your culture or acceptthe default.
6. To display page instructions for every page, click Yes. Page Instructions are brief explanations ofthe features of a particular page.
7. Click Submit.
Blackboard Learn Release 9.1 - Help for Students - Page 20© 2011 Blackboard Inc. Proprietary and Confidential. U.S. Patent No. 6,988,138. Additional Patents Pending.

Blackboard Learn Environment > My Places: Edit Personal Information and Settings
How to Set Privacy OptionsPrivacy Options allows you to choose the information you would like tomake publicly available. Thisinformation appears inRosters andGroup pages. Youmay also select to make this information available in theUser Directory. If an email address is not made available it does not appear in theRoster, Group pages, UserDirectory, the Collaboration tool or in any other part of the application.
1. Click theMy Places link at the top of the page.2. On theMy Places page, select Personal Information. You can also access Personal
Information on the Tools panel.
3. On thePersonal Information page, select Set Privacy Options.
Blackboard Learn Release 9.1 - Help for Students - Page 21© 2011 Blackboard Inc. Proprietary and Confidential. U.S. Patent No. 6,988,138. Additional Patents Pending.

Blackboard Learn Environment > My Places: Edit Personal Information and Settings
4. On theSet Privacy Options page, select the appropriate check boxes tomake personalinformation visible to other Blackboard users.
5. To list your profile information in the user directory, click the check box.6. To prevent other coursemembers from contacting you by email, click the email option check box.7. To prevent your name from being displayed in the course roster, click the check box.8. Click Submit.
Blackboard Learn Release 9.1 - Help for Students - Page 22© 2011 Blackboard Inc. Proprietary and Confidential. U.S. Patent No. 6,988,138. Additional Patents Pending.

Blackboard Learn Environment > Course Catalog
Related Tutorials Editing Your Personal Information (Flashmovie | 1m58s | 3,429KB) | Changing YourPassword (Flashmovie | 1m32s | 3,117KB) | Setting Your Privacy Options (Flashmovie | 2m09s | 3,709KB)
Next StepsTomanage notification settings for all courses and organizations you are enrolled in, see Notifications.
To learnmore about Text Editor features, see Using the Text Editor.
To learnmore about Language Pack, see Language Packs.
Course CatalogThe Course Catalog lists all courses offered at the school in defined categories such as semester and subjectmatter.
If your school licenses community engagement, the Organization Catalog lists all organizations at the school indefined categories, such as organization type or semester availability.
The catalog allows you to search for courses or organizations via a keyword or a specific category. The links inthe catalog display instructor information and a course description. Youmay also be able to enroll, preview, orlog into a course depending on how your school customizes Blackboard Learn.
Note: The administrator at your school may choose to use a different catalog or no catalog at all.
Blackboard Learn Release 9.1 - Help for Students - Page 23© 2011 Blackboard Inc. Proprietary and Confidential. U.S. Patent No. 6,988,138. Additional Patents Pending.

Blackboard Learn Environment > Course Menu
Browsing the Course CatalogClick View Course Catalog on theGateway page. Or, log in and open theCourses tab or theCommunitiestab.
Search Catalog: Use the drop-down lists to limit the search by parameters.
Go: Click Go to search for a course.
Browse Categories: Click the hyperlink of the category or courses to view the catalog.
Viewing a Course as a GuestYoumay be able to browse the catalog and preview courses as a guest. Click on the link to a course to view itas a guest. Guests do not have access to the entire course.
Note: Your instructor determines whether you are allowed to preview a course prior to enrollment. Thus, thisoptionmay not be available for all courses.
Course MenuThe CourseMenu appears on the left side of a course and contains links tomaterials and tools within thecourse. Your instructor can customize the style of the CourseMenu and the content and tools available tousers. As such, your courses may look a bit different from each other and have different sets of tools available.
Blackboard Learn Release 9.1 - Help for Students - Page 24© 2011 Blackboard Inc. Proprietary and Confidential. U.S. Patent No. 6,988,138. Additional Patents Pending.

Blackboard Learn Environment > Course Menu
You can expand or collapse the CourseMenu frame. Click to collapse the CourseMenu so it is out of sightor expand it to its fullest size.
Course Menu IconsAt the top of the CourseMenu is a set of icons that can be used to change the display of the CourseMenu. Themenu can be displayed as text links or buttons, as a Folder tree, or in a separate window .
List View: The List View icon contains text links that lead to coursematerials and tools.
Blackboard Learn Release 9.1 - Help for Students - Page 25© 2011 Blackboard Inc. Proprietary and Confidential. U.S. Patent No. 6,988,138. Additional Patents Pending.

Blackboard Learn Environment > Course Menu
Folder View: The Folder View icon uses icons and expandable folders to access content and tools. Youcan expand folders to reveal items and collapse to save space.
Display in a New Window: The Display in a New Window icon opens the CourseMenu in a separatewindow.
Refresh: The Refresh icon is used to view any new content added to the CourseMenu.
Note: Your instructor can determine the default view of the CourseMenu, so these options may beunavailable.
Blackboard Learn Release 9.1 - Help for Students - Page 26© 2011 Blackboard Inc. Proprietary and Confidential. U.S. Patent No. 6,988,138. Additional Patents Pending.

Blackboard Learn Environment > Course Menu
Viewing New ContentWhen content is added to the CourseMenu or the CourseMap, that content does not appear for 20minutes. Toensure that you are viewing the latest content for a course, click Refresh.
Viewing the Course MapThe CourseMap is a collapsible tree directory that is used for navigation within a course. You can open theCourseMap from the CourseMenu. When you use Virtual Classroom, the CourseMap is calledMap in theTools list.
The pop-up CourseMap provides a view of the course content and available tools in Folder View. You canexpand or collapse folders in the CourseMap to help organize your view. You can browse andmake selectionsfrom the CourseMapwhen adding a course link to an Announcement, the CourseMenu, or a course area, suchas a Content Area, LearningModule, Lesson Plan, or folder. You can also view the CourseMapwhen using theCollaboration tool and the Performance Dashboard.
Blackboard Learn Release 9.1 - Help for Students - Page 27© 2011 Blackboard Inc. Proprietary and Confidential. U.S. Patent No. 6,988,138. Additional Patents Pending.

Blackboard Learn Environment > Search for Users
Search for UsersNote: Your instructor controls which tools are available. If these tools are not available, your instructor mayhave disabled them.
To search for other students in your course, use the Roster. The name of each student is included in the Rosterautomatically. You cannot remove your name from the Roster, but you can choose tomake your email addressavailable.
To search for other students and instructors in the entire Blackboard system, use the User Directory. You canchoose whether to be included and what information to share by setting your privacy options. To learnmore,see How to Set Privacy Options.
Blackboard Learn Release 9.1 - Help for Students - Page 28© 2011 Blackboard Inc. Proprietary and Confidential. U.S. Patent No. 6,988,138. Additional Patents Pending.

Blackboard Learn Environment > Search for Users
For your personal information to appear in the Roster or User Directory, it must be appear on theEdit PersonalInformation page. To learnmore, see How to Edit Personal Information.
How to Search for Other Students in Your Course Using the Roster1. On the CourseMenu, click Tools.2. On the Tools page, click Roster.
3. On theRoster page, use the following parameters to search for users, or click Go to list allstudents:
l First Namel Last Namel Containsl Equal tol Starts withl Not blank
4. Type a keyword or text string in the box.5. Click Go.
How to Search for Users Using the User Directory1. On the Tools panel, click User Directory.
Blackboard Learn Release 9.1 - Help for Students - Page 29© 2011 Blackboard Inc. Proprietary and Confidential. U.S. Patent No. 6,988,138. Additional Patents Pending.

Blackboard Learn Environment > Screen Readers
2. On theUsers page, use the following parameters to search for users, or click Go to list allstudents:
l Usernamel First Namel Last Namel Emaill Containsl Equal tol Starts with
3. Type a keyword or text string in the box.4. Click Go.
Screen ReadersBlackboard Learn has created a Screen Reader Tutorial to provide users who access Blackboard Learn througha screen reader with information to help them use Blackboard Learn successfully.
To view the tutorial, see the Blackboard Learn Screen Reader Tutorial.
Blackboard Learn Release 9.1 - Help for Students - Page 30© 2011 Blackboard Inc. Proprietary and Confidential. U.S. Patent No. 6,988,138. Additional Patents Pending.

Blackboard Learn Environment > Language Packs
Language PacksLanguage Packs present Blackboard Learn using language and cultural norms matched to different audiences.Language Packs are defined at the system level, the course level and finally at the user level.
At the system level, the administrator defines one language pack as the system default. This is the languagethat appears when no other language packs are specified at the course level or at the user level.
At the course level, the instructor can set a language pack and enforce it. When a language pack is enforced, allusers see that language pack. If the language pack is not enforced, and a user has a preferred language packassociated with their account, the user’s language pack preference overrides the course language pack.
At the user level, individuals may select their preferred language pack.
How to Set a Language Pack Preference1. Click theMy Places link at the top of the page.2. On theMy Places page, select Personal Information. You can also access Personal
Information from the Tools panel.
3. On thePersonal Information page, select Change Password.
Blackboard Learn Release 9.1 - Help for Students - Page 31© 2011 Blackboard Inc. Proprietary and Confidential. U.S. Patent No. 6,988,138. Additional Patents Pending.

Blackboard Learn Environment > Language Packs
4. On theChange Personal Settings page, select a language pack from the drop-down list.5. Click Submit.
Spell Check and Language Packs
The Spell Check tool supports English (United States), English (Great Britain), French, and Spanish. The SpellCheck tool does not work with other language packs. If Spell Check does not recognize the language pack ituses a supported dictionary.
Blackboard Learn Release 9.1 - Help for Students - Page 32© 2011 Blackboard Inc. Proprietary and Confidential. U.S. Patent No. 6,988,138. Additional Patents Pending.

Tabs and Modules > My Institution Tab
Tabs and Modules
My Institution TabTheMy Institution tab contains tools and content. Several modules include content pulled from coursesspecific to each user. Remember that the Blackboard administrator at your school can rename tabs.
You can personalize the content and layout of theMy Institution tab. After personalization, theMy Institutionarea displays the desired settings when you log in again. While you can choose whichmodules appear, theBlackboard administrator at your school may restrict or require modules.
In some instances, youmay have access to several tabs that contain modules. These additional tabs includethe same features for customizing the content and layout of modules.
Tools: The Tools panel is the area that contains tools to manage information and communicate with otherusers. It is a quick access point to important information.
Module: Modules contain links that allow you to view information and navigate to your course. TheBlackboard administrator at your school determines what default modules will appear on theMy Institutiontab, so youmay see different items.
Add Module: TheAdd Module function allows you to select modules to appear on theMy Institutionpage.
Personalize Page: ThePersonalize Page function allows you to change the theme color of your page.
Blackboard Learn Release 9.1 - Help for Students - Page 33© 2011 Blackboard Inc. Proprietary and Confidential. U.S. Patent No. 6,988,138. Additional Patents Pending.

Tabs and Modules > My Institution Tab
Exploring the Tools PanelThe Blackboard administrator at your school determines what default Tools panel links will appear on theMyInstitution tab, so youmay see different items.
l Announcements: You can use this tool to view important information, reminders, or updates postedby your instructor. For example, your instructor can use announcements to provide corrections andclarifications of materials, assignment due dates or exam schedules, or reminders or helpful tips.
l Calendar: You can consult theCalendar tool to see events that your instructor has added. You canalso post your private or personal events in the calendar.
l Tasks: You can add your personal tasks using the Tasks tool. You can also use this tool to keeptrack of work that must be completed..
l My Grades: TheMy Grades page shows the status of gradable items such as tests, assignments,journal, and blog entries, and Discussion Board posts.
l Send Email: In your course, you can send email messages to other coursemembers' external emailaddresses.
l User Directory: TheUser Directory lists users. Users only appear in theUser Directory if theyindicate that they want to be included on theSet Privacy Options page.
l Address Book: You can store contact information in an address book. The address book is emptyuntil you create contacts. Youmust create a profile for anyone you want to add to your address book,even if the contact is a Blackboard Learn user.
l Personal Information: You can use thePersonal Information link to access and edit the samepersonal information found in theMy Places link in the header.
Exploring the ModulesTheMy Institution tab contains modules. Modules are packets of content that appear on tabs. Modules allowyou to view information such as events, announcements, and a list of your courses. Administrators can alsopresent more advancedmodules, such as news channels or tools using the Content Collection. Modulescontain links that allow you to navigate to areas in your courses. The Blackboard administrator at your schoolcan renamemodules and determine which will appear when you log in to your course for the first time.
Blackboard Learn Release 9.1 - Help for Students - Page 34© 2011 Blackboard Inc. Proprietary and Confidential. U.S. Patent No. 6,988,138. Additional Patents Pending.

Tabs and Modules > What's New Module
My Announcements: TheMy Announcementsmodule displays announcements from all courses inwhich you are enrolled, as well as school-wide announcements. It can also contain announcements from yourschool’s administrator. Announcements communicate important, time-sensitive information. When you click anannouncement link, you are taken to themainAnnouncements page.
My Courses: TheMy Coursesmodule lists all the courses to which you have access.
My Calendar: TheMy Calendarmodule displays calendar dates for courses in which you are enrolled andany personal events you have added.
My Tasks: TheMy Tasksmodule lists tasks for all courses in which you are enrolled.
Next StepsYou can personalize the placement, color, and selection of modules that appear on theMy Institution orNotifications Dashboard tabs. To learnmore, see Customizing TabModules. You can see updates for acourse in amodule. To learnmore, seeWhat's New Module.
What's New ModuleTheWhat's Newmodule reports on additions and changes to course content. Themodule displays the numberof new items for each content type and links to a details page for each course. It displays items going backseven days. TheWhat's Newmodulemay appear at theMy Institution tab if your school licenses communityengagement.
Blackboard Learn Release 9.1 - Help for Students - Page 35© 2011 Blackboard Inc. Proprietary and Confidential. U.S. Patent No. 6,988,138. Additional Patents Pending.
Tabs and Modules > Courses Tab
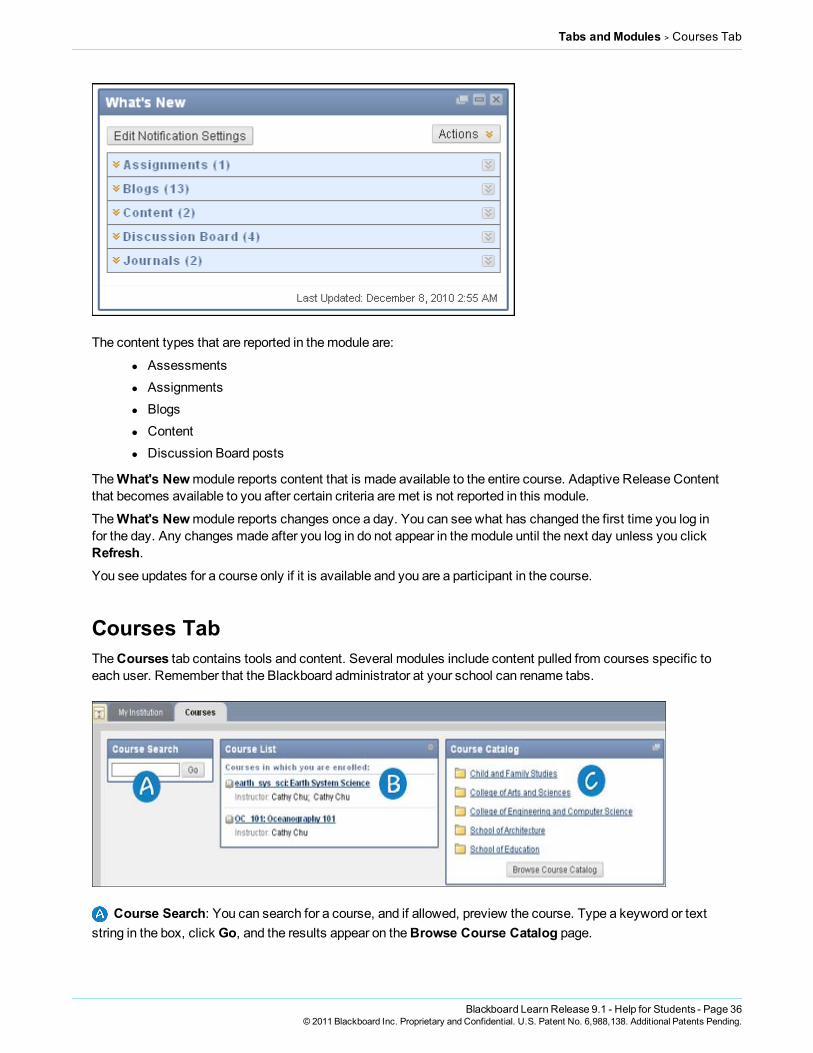
The content types that are reported in themodule are:
l Assessmentsl Assignmentsl Blogsl Contentl Discussion Board posts
TheWhat's Newmodule reports content that is made available to the entire course. Adaptive Release Contentthat becomes available to you after certain criteria aremet is not reported in this module.
TheWhat's Newmodule reports changes once a day. You can see what has changed the first time you log infor the day. Any changes made after you log in do not appear in themodule until the next day unless you clickRefresh.You see updates for a course only if it is available and you are a participant in the course.
Courses TabTheCourses tab contains tools and content. Several modules include content pulled from courses specific toeach user. Remember that the Blackboard administrator at your school can rename tabs.
Course Search: You can search for a course, and if allowed, preview the course. Type a keyword or textstring in the box, click Go, and the results appear on theBrowse Course Catalog page.
Blackboard Learn Release 9.1 - Help for Students - Page 36© 2011 Blackboard Inc. Proprietary and Confidential. U.S. Patent No. 6,988,138. Additional Patents Pending.

Tabs and Modules > Courses Tab
Course List: From the list, you can access any course you are enrolled in or teaching. For example, if youare a student in two courses and a Teaching Assistant in one course, your course list will be divided into thecourses you are enrolled in and the courses in which you are a TA.
Course Catalog: You can search the catalog for courses or organizations. Select a category link or clicktheBrowse Course Catalog function to begin your search. On theBrowse Course Catalog page, you cannarrow your search by course name, ID, description, or instructor. Type a keyword or text string in the box,click Go, and the results appear.
Blackboard Learn Release 9.1 - Help for Students - Page 37© 2011 Blackboard Inc. Proprietary and Confidential. U.S. Patent No. 6,988,138. Additional Patents Pending.

Tabs and Modules > Customizing Tab Modules
If your school licenses community engagement, the organization catalog lists all organizations in categories,such as organization type or semester availability.
Guests are able to browse the catalog and preview courses. Guests do not have access to the entire course.Instructors determine whether users are allowed to preview a course prior to enrollment.
Note: The Blackboard administrator at your school may choose to use a different catalog or no catalog at all.
Customizing Tab ModulesYou can personalize the placement, color, and selection of modules that appear on theMy Institution orNotifications Dashboard tabs. TheNotifications Dashboard tab appears only if your school licensescommunity engagement.
How to Customize Module LayoutYou can reorder themodules on any tab using the drag-and-drop function or theKeyboard AccessibleReordering tool.
Blackboard Learn Release 9.1 - Help for Students - Page 38© 2011 Blackboard Inc. Proprietary and Confidential. U.S. Patent No. 6,988,138. Additional Patents Pending.

Tabs and Modules > Customizing Tab Modules
Using the Drag-and-Drop Function1. Press and hold the header of amodule tomove it to a new location. Themodule is surrounded by a
dashed line as it is moved.2. Release themodule to place it in its new location.
Using the Keyboard Accessible Reordering ToolTheKeyboard Accessible Reordering tool provides users with an alternativemethod to reorder items. Thetool appears on the Action Bar wherever content can be reordered, such as on amodule page, a content page,or the CourseMenu.
Blackboard Learn Release 9.1 - Help for Students - Page 39© 2011 Blackboard Inc. Proprietary and Confidential. U.S. Patent No. 6,988,138. Additional Patents Pending.

Tabs and Modules > Customizing Tab Modules
1. On the Action Bar, click to access the pop-upReorder: Moduleswindow.
2. Select one of themodules.3. Use the up and down arrow icons tomove themodule to a new position in a column list.
-OR-Use the right and left pointing arrows tomovemodules between columns.
4. Click Submit.5. Click OK.
How to Personalize the Page1. Open theMy Institution tab or another tab containingmodules.2. Click Personalize Page in the top right-hand corner.
3. On thePersonalize page, select a color theme from theColor Palette Library.4. Click Submit.
Blackboard Learn Release 9.1 - Help for Students - Page 40© 2011 Blackboard Inc. Proprietary and Confidential. U.S. Patent No. 6,988,138. Additional Patents Pending.

Tabs and Modules > Customizing Tab Modules
How to Add a Module1. Open theMy Institution tab or another tab containingmodules.2. Click Add Module on the upper left-hand corner.
3. On theAdd Module page, select the boxes next to thosemodules to appear on the tab.Checkboxes that appear faded out have been set by the Blackboard administrator at your schooland cannot be changed.
Blackboard Learn Release 9.1 - Help for Students - Page 41© 2011 Blackboard Inc. Proprietary and Confidential. U.S. Patent No. 6,988,138. Additional Patents Pending.

Tabs and Modules > Customizing Tab Modules
4. Click Submit.
Blackboard Learn Release 9.1 - Help for Students - Page 42© 2011 Blackboard Inc. Proprietary and Confidential. U.S. Patent No. 6,988,138. Additional Patents Pending.

Tabs and Modules > Customizing Tab Modules
Blackboard Learn Release 9.1 - Help for Students - Page 43© 2011 Blackboard Inc. Proprietary and Confidential. U.S. Patent No. 6,988,138. Additional Patents Pending.

Tabs and Modules > Working with Tab Modules
Next StepsYou can edit, minimize, display in a separate window, and removemodules from a tab area. To learnmore, seeWorking with TabModules.
Working with Tab ModulesYou can edit, minimize, display in a separate window, removemodules from a tab area unless themodule isrequired , and access information in amodule.
Editing Module ContentClick theManage Module Settings icon located at the top of eachmodule to edit the content of that specificmodule.
Minimizing a ModuleClick theminus (-) button located at the top of eachmodule tominimize amodule.
Opening a Module in a New WindowClick the dual-window icon located at the top of eachmodule to open it in a separate window. If the icon doesnot appear, then this option is not available for that module.
Blackboard Learn Release 9.1 - Help for Students - Page 44© 2011 Blackboard Inc. Proprietary and Confidential. U.S. Patent No. 6,988,138. Additional Patents Pending.

Tabs and Modules > Working with Tab Modules
Removing a ModuleClick the remove icon (X) located at the top of eachmodule to remove themodule. Click Remove and aconfirmation receipt appears when the process is complete. Removing amodule does not mean deleting it. Youcan restore deletedmodules by usingAdd Module function. Modules that do not have a remove icon arerequired and cannot be removed.
Accessing Information in a ModuleClick the link in themodule window to display the information that you want to view. Informationmay display in
Blackboard Learn Release 9.1 - Help for Students - Page 45© 2011 Blackboard Inc. Proprietary and Confidential. U.S. Patent No. 6,988,138. Additional Patents Pending.
Tabs and Modules > Notifications
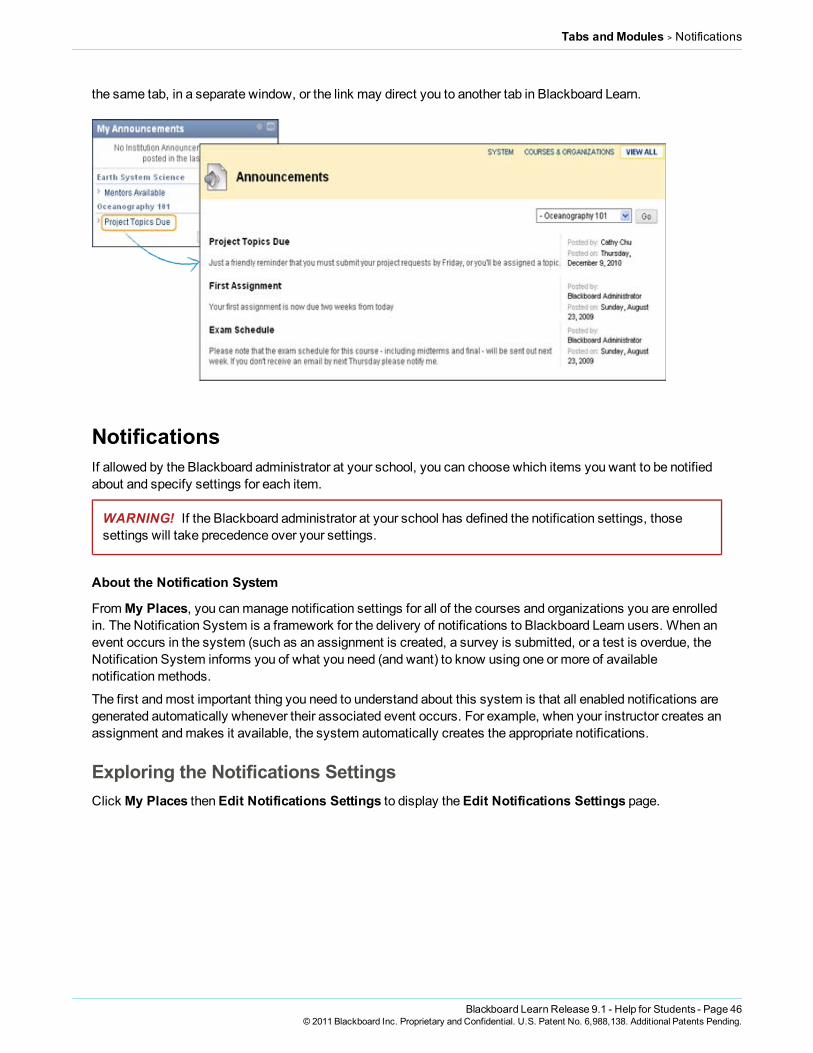
the same tab, in a separate window, or the link may direct you to another tab in Blackboard Learn.
NotificationsIf allowed by the Blackboard administrator at your school, you can choose which items you want to be notifiedabout and specify settings for each item.
WARNING! If the Blackboard administrator at your school has defined the notification settings, thosesettings will take precedence over your settings.
About the Notification System
FromMy Places, you canmanage notification settings for all of the courses and organizations you are enrolledin. The Notification System is a framework for the delivery of notifications to Blackboard Learn users. When anevent occurs in the system (such as an assignment is created, a survey is submitted, or a test is overdue, theNotification System informs you of what you need (and want) to know using one or more of availablenotificationmethods.
The first andmost important thing you need to understand about this system is that all enabled notifications aregenerated automatically whenever their associated event occurs. For example, when your instructor creates anassignment andmakes it available, the system automatically creates the appropriate notifications.
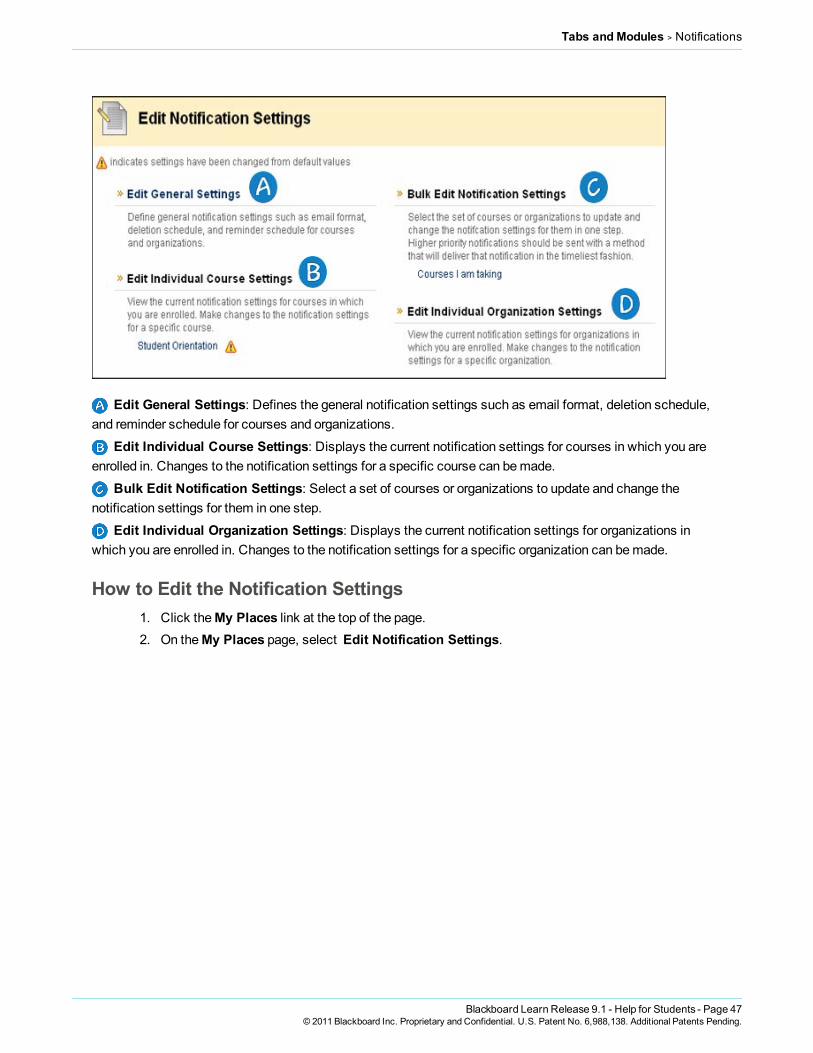
Exploring the Notifications SettingsClick My Places thenEdit Notifications Settings to display theEdit Notifications Settings page.
Blackboard Learn Release 9.1 - Help for Students - Page 46© 2011 Blackboard Inc. Proprietary and Confidential. U.S. Patent No. 6,988,138. Additional Patents Pending.
Tabs and Modules > Notifications
Edit General Settings: Defines the general notification settings such as email format, deletion schedule,and reminder schedule for courses and organizations.
Edit Individual Course Settings: Displays the current notification settings for courses in which you areenrolled in. Changes to the notification settings for a specific course can bemade.
Bulk Edit Notification Settings: Select a set of courses or organizations to update and change thenotification settings for them in one step.
Edit Individual Organization Settings: Displays the current notification settings for organizations inwhich you are enrolled in. Changes to the notification settings for a specific organization can bemade.
How to Edit the Notification Settings1. Click theMy Places link at the top of the page.2. On theMy Places page, select Edit Notification Settings.
Blackboard Learn Release 9.1 - Help for Students - Page 47© 2011 Blackboard Inc. Proprietary and Confidential. U.S. Patent No. 6,988,138. Additional Patents Pending.

Tabs and Modules > Notifications
3. On theEdit Notification Settings page, select Edit General Settings.
4. On theGeneral Settings page, youmay elect to receive an email for each notification, or elect toreceive a daily digest email that contains information on all of the notifications for that day. You setthe time for the daily digest.
l Individual emails: Emails will be sent for each notification. For Early Warning Systemdetails, unread Discussion Boardmessages, unread blog posts, and unread journalentries, however, the digest selection is necessary.
l Daily Digest email: All notifications will be collected and sent in a daily digest.5. Set the number of days until a notification is automatically removed.
Blackboard Learn Release 9.1 - Help for Students - Page 48© 2011 Blackboard Inc. Proprietary and Confidential. U.S. Patent No. 6,988,138. Additional Patents Pending.

Tabs and Modules > Notifications
6. You can set Due Date reminders for notifications. Select Yes. This reminder will be emailed to you.Set the number of days before the Due Date to send an email. The email will be sent as a digestemail or as individual emails, depending upon the option selected by the user.
7. Click Submit.
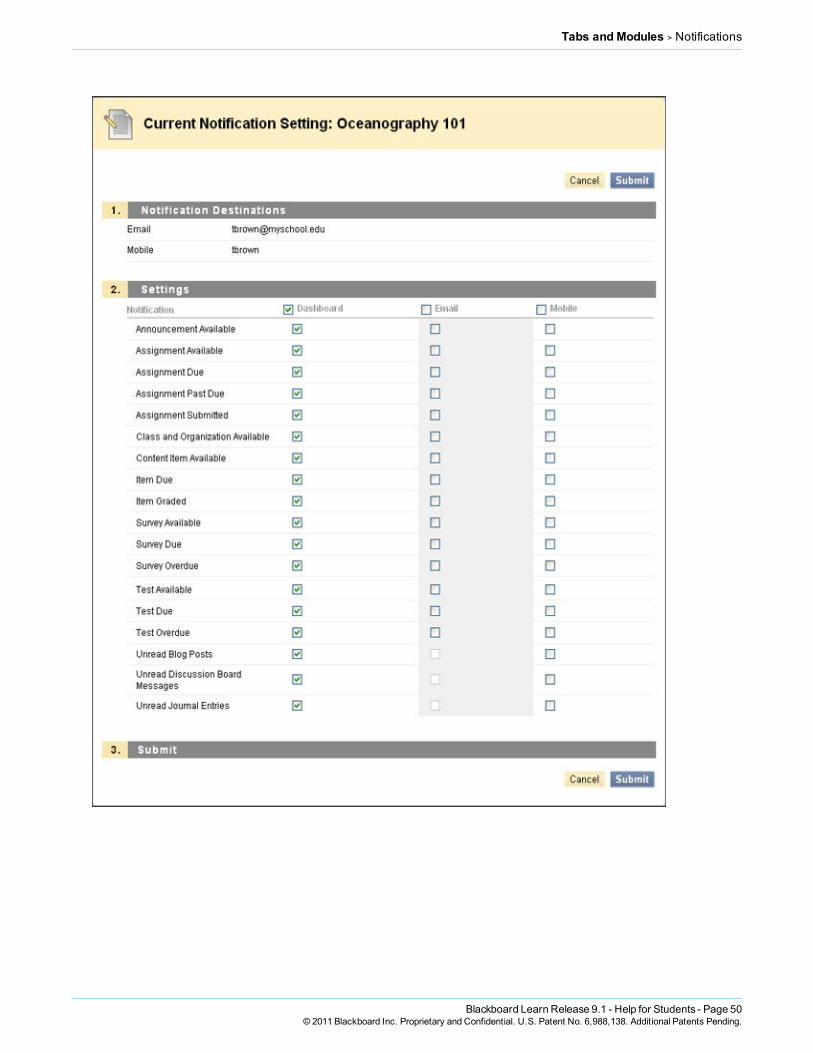
Deciding upon Notifications and Email NotificationsIt is possible to decide the notification types and emails to receive.
All Notification types, by default, are turnedOn. Thus, these notifications will display in the NotificationsDashboardmodules.
All Email Notification types, by default, are turnedOff. An email will be sent out corresponding to thatnotification, though for the following items, email notifications can only be sent out if daily digest email isselected:
l Early Warning System Rule detailsl Unread Discussion Boardmessagesl Unread blog postsl Unread journal entries
After choosing the appropriate settings, click Submit to save these settings.
Blackboard Learn Release 9.1 - Help for Students - Page 49© 2011 Blackboard Inc. Proprietary and Confidential. U.S. Patent No. 6,988,138. Additional Patents Pending.
Tabs and Modules > Notifications
Blackboard Learn Release 9.1 - Help for Students - Page 50© 2011 Blackboard Inc. Proprietary and Confidential. U.S. Patent No. 6,988,138. Additional Patents Pending.

Text Editor > Using the Text Editor
Text Editor
Using the Text EditorThe Text Editor presents controls for adding and formatting text, equations, andmultimedia files. When it isenabled, it appears throughout the system as the default editor when adding text through a text box.
Note: The Blackboard administrator at your school and your instructor control whether this tool is available. Ifthis tool has been turned off, it will not appear in the interface and will not be available for you to use.
If the Text Editor does not appear, first check the following list of browsers to ensure that the current browser iscompatible. If the Text Editor still does not appear, it has most likely been disabled by the Blackboardadministrator at your school.
Users who access the system through assistive technologies should use standard text entry options instead ofthe Text Editor.
Administrators can disable the Text Editor and control the availability of the features (Spell Check, WebEQ,MathML, HTMLValidation). It is possible that not all users will see all features.
WARNING! Users have the option to attach different types of files to the Text Editor. Do not copy andpaste a file from one text box to another. This will result in an error.
Entering TextBy default, Blackboard Learn will format text to 12-point, left-justified Arial. Any other formattingmust be doneusing the Text Editor.
Compatible BrowsersThe Text Editor is compatible with all the supported browsers for Blackboard Learn.
Firefox does not permit users to access their computer's clipboard.
l To cut, use CTRL-X, the contextual menu or theEditmenu in the browser's toolbar.l To copy, use CTRL-C, the contextual menu or theEditmenu in the browser's toolbar.l To paste, use CTRL-V the contextual menu or theEditmenu in the browser's toolbar.
Macintosh users can use right-click paste on Firefox nomatter where the clipboard content originates.Macintosh users may find that this does not fully resolve the problem, particularly because Firefox does notpermit pasting text fromMicrosoft Office files on theMac. To accomplish this task, paste the text into a basictext editor, such as TextEdit or Notepad, and then paste the text into the Text Editor.
Safari does not permit users to access their computer's clipboard.
l To cut, use CTRL-X, the contextual menu or the Edit menu in the browser's toolbar.l To copy, use CTRL-C, the contextual menu or the Edit menu in the browser's toolbar.l To paste, use CTRL-V the contextual menu or the Edit menu in the browser's toolbar.
Text Editor FeaturesThe Text Editor has three collapsible rows of functions.
Blackboard Learn Release 9.1 - Help for Students - Page 51© 2011 Blackboard Inc. Proprietary and Confidential. U.S. Patent No. 6,988,138. Additional Patents Pending.

Text Editor > Using the Text Editor
The following tables define each function:
Function Description
Select a style for the text. The options correspond to standard HTML Style types.
Select the size of the text.
Select the font face for the text.
Make selected text bold.
Make selected text italic.
Underline the selected text.
Display text with a horizontal line through the characters. This font style is not supported by allbrowsers.
Display text on the same line, but slightly below the current text.
Display text on the same line, but slightly above the current text.
Align text to the left.
Align text in the center.
Align text to the right.
Begin typing on the left side of the Text box and text typed moves across the screen left to right.
Begin typing on the right side of the Text box and text typed moves across the screen right toleft.
Create an ordered or numbered list or add a numbered list item.
Create an unordered or bulleted list or add a bullet list item.
Move text left.
Move text right.
Function Description
Select the ABC check mark to open Spell Check.
Cut the selected items.
Copy the selected items.
Paste copied or cut content.
Blackboard Learn Release 9.1 - Help for Students - Page 52© 2011 Blackboard Inc. Proprietary and Confidential. U.S. Patent No. 6,988,138. Additional Patents Pending.

Text Editor > Using the Text Editor
Function Description
Deletes formatting tags that are shown in the Pathfinder at the bottom of the text box. Select theformatting tag to delete in the Pathfinder and then click Clear Formatting to delete. This is useful whencopying and pasting text from another application yields discrepancies in formatting.
Select the circular arrow pointing to the left to undo the previous action.
Select the circular arrow pointing to the right to redo the previous action.
Add a hyperlink. Types include: file, ftp, gopher, http, https, mailto, news, telnet, and wais. Please keep inmind that when creating a hyperlink, the text that appears on the page is separate from the informationabout the link. Information about where the link points is stored in a tag that surrounds the text.Therefore, it is possible to change the link without changing the text that appears to users. Please becareful when constructing links to ensure that the text is consistent with where users will be taken whenthey click the link.
Add a table.
Add a horizontal line.
Add a select color to the selected text.
Click and select a symbol to be used in the text.
Select text, click the Highlight Text icon, and select a color to use to set off the selected text.
Open the WebEQ Equation Editor icon (vx) to add an equation. Equations cannot be added to a cell in atable. Instead, create the equation outside the table and then cut and paste the equation into the cell.
Open the MathML Equation Editor icon to add an equation.
Click the opposing chevrons icon (< >) to view and edit the text in the source code that is generated bythe Text Editor. Click the icon again to restore the standard view.
Preview the content as it will be seen by end users.
Opens a new window that reports on the validation of the source coding. Validation of source code is runagainst XHTML 1.0 Strict rules. Not all reported errors will cause pages to malfunction; however, errorscan affect the way a page appears, how style sheets are employed, and accessibility. Poorly formedHTML will be selected and can be corrected.
The third row will only appear where it is possible to attach a file or link to a file.
Blackboard Learn Release 9.1 - Help for Students - Page 53© 2011 Blackboard Inc. Proprietary and Confidential. U.S. Patent No. 6,988,138. Additional Patents Pending.
Text Editor > Using the Text Editor
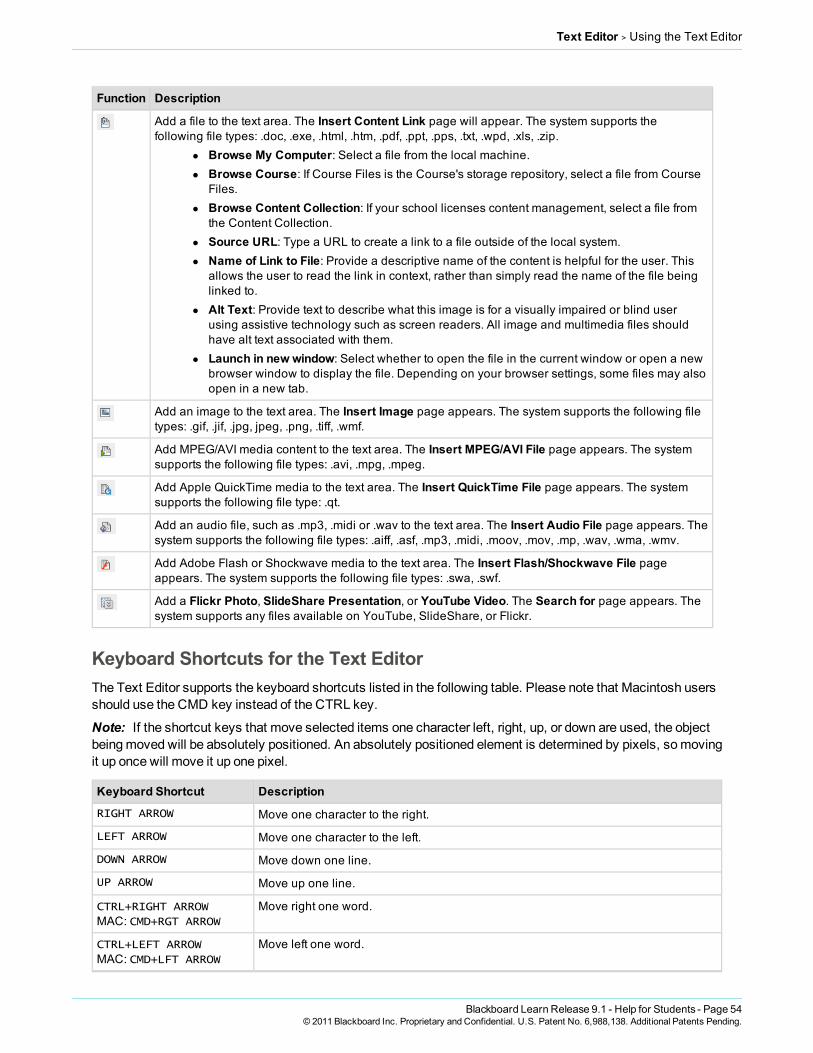
Function Description
Add a file to the text area. The Insert Content Link page will appear. The system supports thefollowing file types: .doc, .exe, .html, .htm, .pdf, .ppt, .pps, .txt, .wpd, .xls, .zip.
l Browse My Computer: Select a file from the local machine.l Browse Course: If Course Files is the Course's storage repository, select a file from Course
Files.l Browse Content Collection: If your school licenses content management, select a file from
the Content Collection.l Source URL: Type a URL to create a link to a file outside of the local system.l Name of Link to File: Provide a descriptive name of the content is helpful for the user. This
allows the user to read the link in context, rather than simply read the name of the file beinglinked to.
l Alt Text: Provide text to describe what this image is for a visually impaired or blind userusing assistive technology such as screen readers. All image and multimedia files shouldhave alt text associated with them.
l Launch in new window: Select whether to open the file in the current window or open a newbrowser window to display the file. Depending on your browser settings, some files may alsoopen in a new tab.
Add an image to the text area. The Insert Image page appears. The system supports the following filetypes: .gif, .jif, .jpg, jpeg, .png, .tiff, .wmf.
Add MPEG/AVI media content to the text area. The Insert MPEG/AVI File page appears. The systemsupports the following file types: .avi, .mpg, .mpeg.
Add Apple QuickTime media to the text area. The Insert QuickTime File page appears. The systemsupports the following file type: .qt.
Add an audio file, such as .mp3, .midi or .wav to the text area. The Insert Audio File page appears. Thesystem supports the following file types: .aiff, .asf, .mp3, .midi, .moov, .mov, .mp, .wav, .wma, .wmv.
Add Adobe Flash or Shockwave media to the text area. The Insert Flash/Shockwave File pageappears. The system supports the following file types: .swa, .swf.
Add a Flickr Photo, SlideShare Presentation, or YouTube Video. The Search for page appears. Thesystem supports any files available on YouTube, SlideShare, or Flickr.
Keyboard Shortcuts for the Text EditorThe Text Editor supports the keyboard shortcuts listed in the following table. Please note that Macintosh usersshould use the CMD key instead of the CTRL key.
Note: If the shortcut keys that move selected items one character left, right, up, or down are used, the objectbeingmoved will be absolutely positioned. An absolutely positioned element is determined by pixels, somovingit up once will move it up one pixel.
Keyboard Shortcut Description
RIGHT ARROW Move one character to the right.
LEFT ARROW Move one character to the left.
DOWN ARROW Move down one line.
UP ARROW Move up one line.
CTRL+RIGHT ARROW
MAC: CMD+RGT ARROW
Move right one word.
CTRL+LEFT ARROW
MAC: CMD+LFT ARROW
Move left one word.
Blackboard Learn Release 9.1 - Help for Students - Page 54© 2011 Blackboard Inc. Proprietary and Confidential. U.S. Patent No. 6,988,138. Additional Patents Pending.

Text Editor > Using the Text Editor
Keyboard Shortcut Description
END Move to the end of the line.
HOME Move to the start of the line.
CTRL+DOWN ARROW
MAC: CMD+DWN ARROW
Move down one paragraph.
CTRL+UP ARROW
MAC: CMD+UP ARROW
Move up one paragraph.
PAGE DOWN Move down one page.
PAGE UP Move up one page.
CTRL+HOME
MAC: CMD+HOMEMove to the beginning of the text.
CTRL+END
MAC: CMD+ENDMove to the end of the text.
Selection
SHIFT+RIGHT ARROW Extend the selection one character to the right.
SHIFT+LEFT ARROW Extend the selection one character to the left.
CTRL+SHIFT+RIGHTARROW
MAC: CMD+SHIFT+RIGHTARROW
Extend the selection right one word.
CTRL+SHIFT+LEFT ARROW
MAC: CMD+SHIFT+LEFTARROW
Extend the selection left one word.
SHIFT+UP ARROW Extend the selection up one line.
SHIFT+DOWN ARROW Extend the selection down one line.
SHIFT+END Extend the selection to the end of the current line.
SHIFT+HOME Extend the selection to the start of the current line.
SHIFT+PAGE DOWN Extend the selection down one page.
SHIFT+PAGE UP Extend the selection up one page.
CTRL+SHIFT+END Extend the selection to the end of the document.
CTRL+SHIFT+HOME
MAC: CMD+SHIFT+HOMEExtend the selection to the beginning of the document.
CTRL+AMAC: CMD+A Select all elements in the document.
Editing
BACKSPACE Delete the selection. Or, if there is no selection, delete the character to the left of themouse pointer.
CTRL+BACKSPACE
MAC: CMD+BACKSPACEDelete all of a word to the left of the mouse pointer.
CTRL+CMAC: CMD+C Copy the selection.
CTRL+VMAC: CMD+V Paste cut contents or copied contents.
CTRL+XMAC: CMD+X Cut the selection.
Blackboard Learn Release 9.1 - Help for Students - Page 55© 2011 Blackboard Inc. Proprietary and Confidential. U.S. Patent No. 6,988,138. Additional Patents Pending.

Text Editor > Inserting Multimedia Files from the Text Editor
Keyboard Shortcut Description
DELETE Delete the selection.
INSERT Toggle between inserting and overwriting text.
CTRL+Z
MAC: CMD+ZUndo the most recent formatting command.
CTRL+Y
MAC: CMD+YRedo the most recent undone command.
CTRL+F
MAC: CMD+FFind text.
SHIFT+F10 Display the context menu. This is the same as a right-click.
Formatting
CTRL+B
MAC: CMD+BToggle bold formatting.
CTRL+I
MAC: CMD+IToggle italic formatting.
CTRL+U
MAC: CMD+UToggle underlining.
Inserting Multimedia Files from the Text EditorUsers may add the followingmultimedia files when authoring content in the Text Editor.
l Imageo MPEG or AVI: MPEG (Moving Picture Expert Groups) files are audio-visual files in a digital
compressed format. AVI (Audio Video Interleave) is Microsoft’s file format for storing audioand video data.
o QuickTime: QuickTime is a video and animation system that supports most formats,including JPG andMPEG. Users with a PC will require a QuickTime driver to viewQuickTime files. Macintosh users do not require this driver.
l Audioo Flash or Shockwave: Adobe Flash and Shockwave files support audio, animation and
video. They are also browser independent. Browsers require specific plug-ins to run Flashand Shockwave files.
The following table explains which function in the File Attachment Toolbar of the Text Editor is used to adddifferent file types.
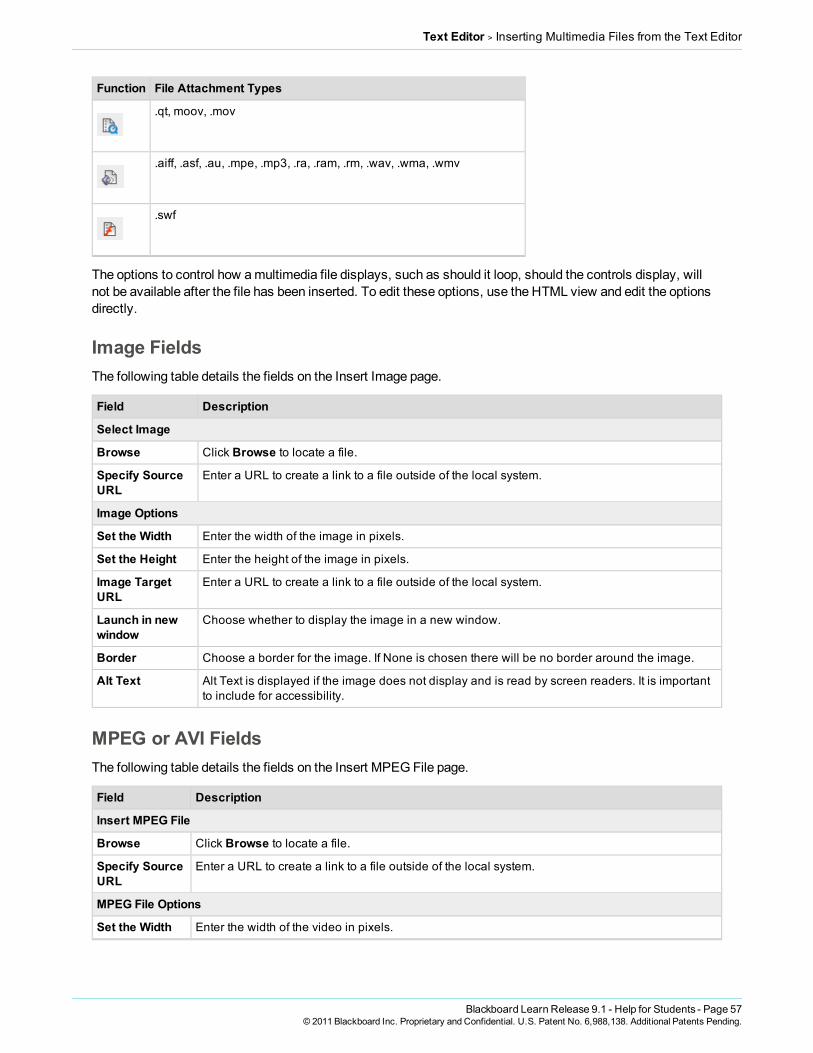
Function File Attachment Types
.doc, .exe, .html, .htm, .pdf, .ppt, .pps, .rtf, .tiff .txt, .wmf, .wpd, .xls, .zip
.gif, .jif, .jpg, .jpeg, .tiff, .wmf
.asf, .avi, .mpg, .mpeg, .wmv
Blackboard Learn Release 9.1 - Help for Students - Page 56© 2011 Blackboard Inc. Proprietary and Confidential. U.S. Patent No. 6,988,138. Additional Patents Pending.
Text Editor > Inserting Multimedia Files from the Text Editor
Function File Attachment Types
.qt, moov, .mov
.aiff, .asf, .au, .mpe, .mp3, .ra, .ram, .rm, .wav, .wma, .wmv
.swf
The options to control how amultimedia file displays, such as should it loop, should the controls display, willnot be available after the file has been inserted. To edit these options, use the HTML view and edit the optionsdirectly.
Image FieldsThe following table details the fields on the Insert Image page.
Field Description
Select Image
Browse Click Browse to locate a file.
Specify SourceURL
Enter a URL to create a link to a file outside of the local system.
Image Options
Set the Width Enter the width of the image in pixels.
Set the Height Enter the height of the image in pixels.
Image TargetURL
Enter a URL to create a link to a file outside of the local system.
Launch in newwindow
Choose whether to display the image in a new window.
Border Choose a border for the image. If None is chosen there will be no border around the image.
Alt Text Alt Text is displayed if the image does not display and is read by screen readers. It is importantto include for accessibility.
MPEG or AVI FieldsThe following table details the fields on the Insert MPEG File page.
Field Description
Insert MPEG File
Browse Click Browse to locate a file.
Specify SourceURL
Enter a URL to create a link to a file outside of the local system.
MPEG File Options
Set the Width Enter the width of the video in pixels.
Blackboard Learn Release 9.1 - Help for Students - Page 57© 2011 Blackboard Inc. Proprietary and Confidential. U.S. Patent No. 6,988,138. Additional Patents Pending.

Text Editor > Inserting Multimedia Files from the Text Editor
Field Description
Set the Height Enter the height of the video in pixels.
AutoStart Select Yes to start playing when the page is opened. Select No to let users start playingmanually after opening the page.
Loop Choose whether the file repeats continuously.
Controls Select the size of controls to appear to users. Controls must be available if users are to start thevideo manually.
Alt Text Alt Text is displayed if the image does not display and is read by screen readers. It is important toinclude for accessibility.
QuickTime FieldsThe following table details the fields on the Insert QuickTime File page.
Field Description
Insert QuickTime File
Browse Click Browse to locate a file.
Specify SourceURL
Enter a URL to create a link to a file outside of the local system.
QuickTime File Options
Set the Width Enter the width of the video.
Set the Height Enter the height of the video.
AutoStart Select Yes to start playing when the page is opened. Select No to let users start playingmanually after opening the page.
Loop Choose whether the file should repeat continuously.
Controls Select to display controls.
Alt Text Alt Text is displayed if the image does not display and is read by screen readers. It is important toinclude for accessibility.
Audio FieldsThe following table details the fields on the Insert Audio File page.
Field Description
Insert Audio File
Browse Click Browse to locate a file.
Specify SourceURL
Enter a URL to create a link to a file outside of the local system.
Audio File Options
AutoStart Select Yes to start playing when the page is opened. Select No to let users start playingmanually after opening the page.
Loop Choose whether the file repeats continuously.
Controls Select to display controls.
Alt Text Alt Text is displayed if the image does not display and is read by screen readers. It is important toinclude for accessibility.
Blackboard Learn Release 9.1 - Help for Students - Page 58© 2011 Blackboard Inc. Proprietary and Confidential. U.S. Patent No. 6,988,138. Additional Patents Pending.

Text Editor > Linking to File Attachments from the Text Editor
Flash or Shockwave FieldsThe following table details the fields on the Insert SWF File page.
Field Description
Insert SWF File
Browse Click Browse to locate a file.
SpecifySource URL
Enter a URL to create a link to a file outside of the local system.
SWF File Options
Set theWidth
Enter the width of the Flash file.
Set theHeight
Enter the height of the Flash file.
AutoStart Select Yes to start playing when the page is opened. Select No to let users start playing manuallyafter opening the page.
Loop Choose whether the file repeats continuously.
Set Quality Select the quality of the images that will appear to users. Note that the better the quality of an imagethe larger the file. Larger files take longer to open.
Alt Text Alt Text is displayed if the image does not display and is read by screen readers. It is important toinclude for accessibility.
Linking to File Attachments from the Text EditorYou can include a link to a file attachment by clicking theAdd File Text Editor function from the Text Editor.You can select a file from your computer or from Content Collection, or insert a file as a URL link.
Blackboard Learn Release 9.1 - Help for Students - Page 59© 2011 Blackboard Inc. Proprietary and Confidential. U.S. Patent No. 6,988,138. Additional Patents Pending.

Text Editor > Linking to File Attachments from the Text Editor
The following table details the fields on the Insert Content Link to Filewindow.
Field Description
Select Content Link
Browse Click Browse to locate a file.
Specify SourceURL
Enter a URL to create a link to a file outside of the local system. For example:http://blackboard/images/picture1.jpeg.
Content Link Options
Name of Link toFile
Enter the name of the link that users click to access the attached file.
Alt Text Enter text that appears when a pointer hovers over the link. Alternate text is important foraccessibility.
Launch in NewWindow
Select Yes to have the file open in a new separate window. Select No to have the file open inthe content frame.
Blackboard Learn Release 9.1 - Help for Students - Page 60© 2011 Blackboard Inc. Proprietary and Confidential. U.S. Patent No. 6,988,138. Additional Patents Pending.

Text Editor > Using the Math and Science Notation Tool
Using the Math and Science Notation ToolTheMath and Science Notation Tool (WebEQEquation Editor) is a general purpose equation editor. TheMathand Science Notation Tool enables you to usemathematical and scientific notation. You can add equations,edit existing equations, andmove equations within the Equation Editor. All of the Equation Editor symbols arebased onMathML, amarkup language for math on theWeb. MathML is a subset of XHTML.
The Java 2 Run Time Environment is required to use theMath and Science Notation Tool.
For best performance on aWindows® operating system use Internet Explorer 6.0.
For best performance on aMacintosh®:
l Mac OS X v 10.2 or laterl Install theMRJ Plug-in from http://homepage.mac.com/pcbeard/MRJPlugin/.
Youmay receive a pop-up box when launchingWebEQ that asks you to trust an applet provided by DesignScience, themaker of WebEQ. If you click Always, the pop-up will no longer appear on that computer whenlaunchingWebEQ.
MathML Equation EditorTheMathML Equation Editor functions in the sameway at theMath and Science Notation Tool. Instead of
Blackboard Learn Release 9.1 - Help for Students - Page 61© 2011 Blackboard Inc. Proprietary and Confidential. U.S. Patent No. 6,988,138. Additional Patents Pending.

Text Editor > Running Spell Check in the Text Editor
opening with the symbol buttons, a blank text box will appear where users can enter XML.
Accessing the Equation EditorYou can access theWebEQEquation Editor by clicking theMath and Science Notation Tool icon. To insertXML, you can click theMathML Equation Editor icon.
Tip: If an equation is more than one line or uses a large font size, the equationmay be cut off when it appearson the page. Add an empty line after the final line in the equation to prevent this error.
Running Spell Check in the Text EditorTheSpell Check function supports a full English dictionary, a supplemental word list configured by theBlackboard administrator at your school, and custom word lists that are stored on your local machine. TheSpell Check function is available wherever you can enter blocks of text. It is also available as amodule if yourschool licenses community engagement.
When Spell Check is launched it will review the text block and sequentially bring up any words it does notrecognize for review.
Blackboard Learn Release 9.1 - Help for Students - Page 62© 2011 Blackboard Inc. Proprietary and Confidential. U.S. Patent No. 6,988,138. Additional Patents Pending.

Text Editor > Running Spell Check in the Text Editor
Word ListsMisspelled words are determined by the following three sources:
l Spell Check Dictionary: A full English dictionary that includes words that will not be flagged forcorrection. The dictionary is also the only source for suggestions. This dictionary cannot be edited.
l Supplemental Word List: A list of additional terms added by the Blackboard administrator at yourschool that do not appear in the default dictionary.
l Personal Word List: This word list is stored on each user’s local machine. Words are added to thislist using the Learn function. The words in the personal word list are not flagged for correction. Thesewords are not included as suggestions for misspelled words. Extensive personal word lists may slowperformance of theSpell Check tool.
Personal Word List and CookieThe personal word list is stored as a cookie on the user’s local machine. The cookie is not user or installationspecific. Therefore, a user’s word list will be available to them whenever they are using Spell Check as long asthey are on the same local machine. Also, if another user logs onto the samemachine, that user will have thepersonal word list stored on that machine applied to Spell Check. For example, if a user creates a personal
Blackboard Learn Release 9.1 - Help for Students - Page 63© 2011 Blackboard Inc. Proprietary and Confidential. U.S. Patent No. 6,988,138. Additional Patents Pending.
Text Editor > Running Spell Check in the Text Editor
word list on a computer in the computer lab, this word list will be available to all users who use this computer inthe lab. The user may not take this word list with them to a different computer.
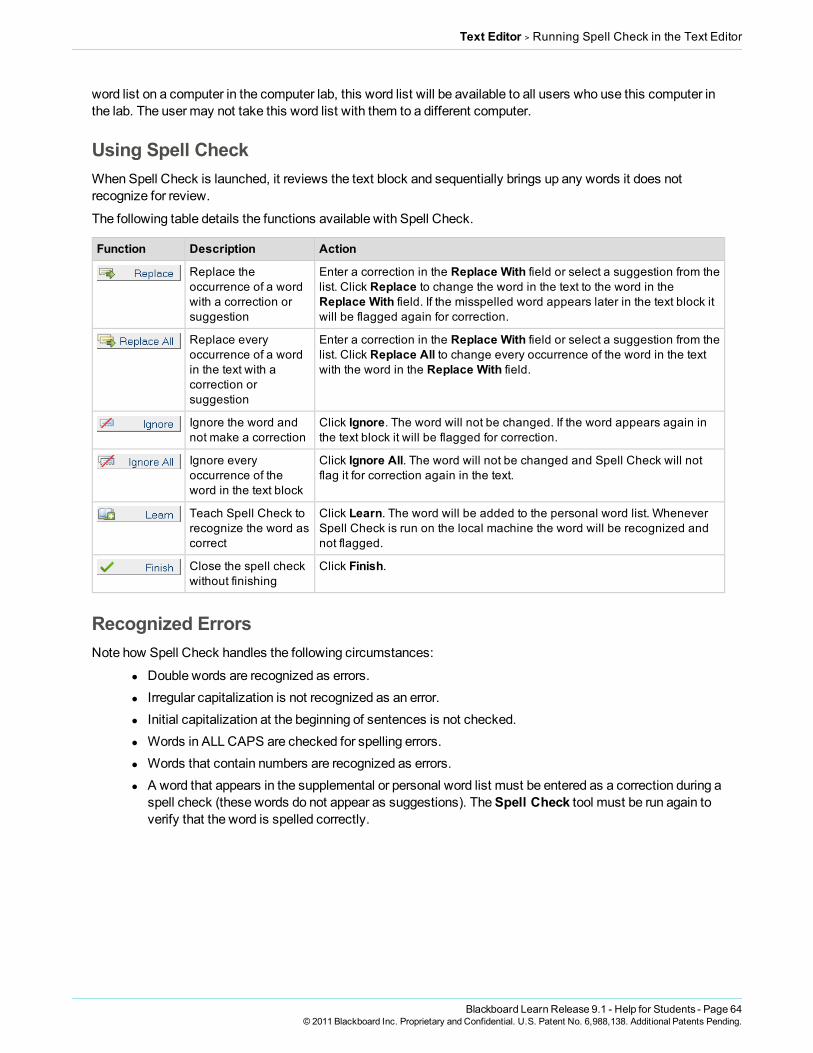
Using Spell CheckWhen Spell Check is launched, it reviews the text block and sequentially brings up any words it does notrecognize for review.
The following table details the functions available with Spell Check.
Function Description Action
Replace theoccurrence of a wordwith a correction orsuggestion
Enter a correction in the Replace With field or select a suggestion from thelist. Click Replace to change the word in the text to the word in theReplace With field. If the misspelled word appears later in the text block itwill be flagged again for correction.
Replace everyoccurrence of a wordin the text with acorrection orsuggestion
Enter a correction in the Replace With field or select a suggestion from thelist. Click Replace All to change every occurrence of the word in the textwith the word in the Replace With field.
Ignore the word andnot make a correction
Click Ignore. The word will not be changed. If the word appears again inthe text block it will be flagged for correction.
Ignore everyoccurrence of theword in the text block
Click Ignore All. The word will not be changed and Spell Check will notflag it for correction again in the text.
Teach Spell Check torecognize the word ascorrect
Click Learn. The word will be added to the personal word list. WheneverSpell Check is run on the local machine the word will be recognized andnot flagged.
Close the spell checkwithout finishing
Click Finish.
Recognized ErrorsNote how Spell Check handles the following circumstances:
l Double words are recognized as errors.l Irregular capitalization is not recognized as an error.l Initial capitalization at the beginning of sentences is not checked.l Words in ALL CAPS are checked for spelling errors.l Words that contain numbers are recognized as errors.l A word that appears in the supplemental or personal word list must be entered as a correction during a
spell check (these words do not appear as suggestions). TheSpell Check tool must be run again toverify that the word is spelled correctly.
Blackboard Learn Release 9.1 - Help for Students - Page 64© 2011 Blackboard Inc. Proprietary and Confidential. U.S. Patent No. 6,988,138. Additional Patents Pending.

Tools > About Course Tools
Tools
About Course ToolsTools appear throughout Blackboard Learn. You can access tools from inside a course or from a tab.
Note: Your instructor controls which tools are available. If a tool is not available, your instructor may havedisabled it.
AnnouncementsNote: Your instructor controls which tools are available. If this tool is not available, your instructor may havedisabled it.
Users and course groupmembers can view important messages from instructors in theMy Announcementsmodule or through the Announcements tool. As a default module on the homepage, announcements aretypically one of the first things you see when accessing your course. When you click an announcement link on
Blackboard Learn Release 9.1 - Help for Students - Page 65© 2011 Blackboard Inc. Proprietary and Confidential. U.S. Patent No. 6,988,138. Additional Patents Pending.
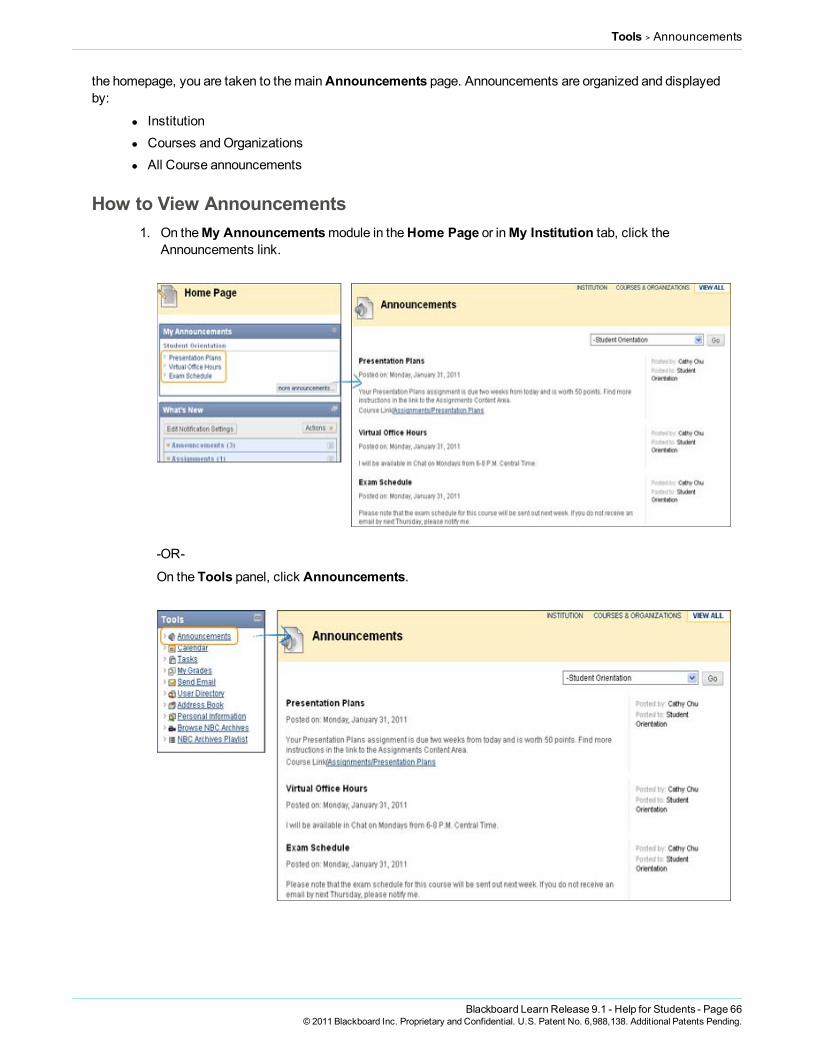
Tools > Announcements
the homepage, you are taken to themainAnnouncements page. Announcements are organized and displayedby:
l Institutionl Courses andOrganizationsl All Course announcements
How to View Announcements1. On theMy Announcementsmodule in theHome Page or inMy Institution tab, click the
Announcements link.
-OR-
On the Tools panel, click Announcements.
Blackboard Learn Release 9.1 - Help for Students - Page 66© 2011 Blackboard Inc. Proprietary and Confidential. U.S. Patent No. 6,988,138. Additional Patents Pending.

Tools > Blogs
BlogsNote: Your instructor controls which tools are available. If this tool is not available, your instructor may havedisabled it.
A blog is your personal online journal. Each blog entry youmake can include any combination of text, images,links, multimedia, Mashups, and attachments. Blogs are an effectivemeans of sharing knowledge andmaterials created and collected by the group in the course. You can post to the blog and add comments toexisting posts. Use your blog to express your ideas and share them with the class.
As the owner of a blog, you will want to createmultiple entries over a period of time. Your instructor and coursemembers can then add comments. A blog can also be owned by the course or a group. In the Group area, allmembers of a group can create entries for the same blog, building upon one another. Any coursemember canread and comment on aGroup blog, but cannot make entries if not amember of the group. Your instructor canalso offer comments and grade individual posts.
The Blog topic page is divided into twomain sections. You can view the Instructions in the content frame.Click theX to collapse the field. In the side panel, you can view information about the blog. You can expand andcollapse sections in the side panel using the double arrows.
Blackboard Learn Release 9.1 - Help for Students - Page 67© 2011 Blackboard Inc. Proprietary and Confidential. U.S. Patent No. 6,988,138. Additional Patents Pending.

Tools > Blogs
Create Blog Entry: You canmake a blog entry using theCreate Blog Entry function. You canmakeanother blog entry for a topic at any time. For example, your instructor may add a comment requesting that youclarify what has been written before a grade is assigned or suggest a topic for another entry.
View Drafts: You can access any entries saved as drafts. Click View Drafts on the Action Bar.
Blog Entry: Your blog entries appear in the content frame following the Instructions.
Comments: Following an entry, you can see if comments weremade. Click the link to view comments.
Comment: You can add comments by clickingComment.
About this Blog: In the side panel, you can see the blog information in theAbout this Blog section.
Blog Grade: TheBlog Grade section appears if a blog is set to be graded. You can see if your blog entrieshave been graded..
More Blogs: You can see other blog entries made by other coursemembers in theMore Blogs section.
Index: You can see the titles of your selected entries for either the week or themonth in the Index section,determined by the settings your instructor makes during blog creation. Themost recent entry title appears first.
How to Access a BlogThere are three different types of blogs that you can access:
l Class: All enrolled users are able to post blog entries. All enrolled users can post comments to blogentries.
If you are removed from the class, you will not have access to any blogs. If you are removed from theclass after individual blogs have been created, all your entries and comments will be deleted. If youare removed from a class after class blogs have been created, all your entries and comments will beretained, but the name of the author or commenter will be changed to "Anonymous."
l Individual: Only the owner of the blog is able to post blog entries. All other users enrolled in the classare able to view and add comments.
l Group: If your instructor enables theBlogs tool for the group, all groupmembers can post blogentries andmake comments on blog entries. Any class member can view group blogs, but can onlyadd comments.
Your instructor can edit and delete entries in any of the three blog types and delete any user comments.
1. On the CourseMenu, click Blogs.-OR-
On the CourseMenu, click Tools and then click Blogs.
Blackboard Learn Release 9.1 - Help for Students - Page 68© 2011 Blackboard Inc. Proprietary and Confidential. U.S. Patent No. 6,988,138. Additional Patents Pending.

Tools > Blogs
2. On theBlogs listing page, click the name of the blog to open.
How to Create a Blog EntryOnly your instructor can create a blog, but once created, you can create entries. The blog topics appear inalphabetical order on the Blogs listing page. On the Blogs listing page, under each blog title, you can see if theblog belongs to a group, the course, or to individual students. Your instructor can use blog entries to providestructure for discussions on class topics and other issues. If allowed by your school, you can add an avatarwhich will appear with individual blogs.
Blackboard Learn Release 9.1 - Help for Students - Page 69© 2011 Blackboard Inc. Proprietary and Confidential. U.S. Patent No. 6,988,138. Additional Patents Pending.

Tools > Blogs
1. On the CourseMenu, click Blogs.-OR-
On the CourseMenu, click Tools and then click Blogs.
2. On theBlogs list page, click the name of the blog to open.3. On theBlog topic page, click Create Blog Entry.
4. On theCreate Blog Entry page, type anEntry Title.5. Type the text in theEntry Message text box.6. Alternatively, in theAttach File field, attach a file using one of the following options:
l To upload a file from your computer, click Browse My Computer.l To upload a file from the course's storage repository:
o If Course Files is the course's storage repository, click Browse Course.-OR-
Blackboard Learn Release 9.1 - Help for Students - Page 70© 2011 Blackboard Inc. Proprietary and Confidential. U.S. Patent No. 6,988,138. Additional Patents Pending.

Tools > Blogs
o If your school licenses content management, click Browse ContentCollection.
Note: Files added by students are not uploaded to the course repository.
7. Click Post Entry.-OR-
Click Save Entry as Draft to save the entry for later posting.
Viewing Blog DraftsYou can save blog entries for later posting by clickingSave Entry as Draft. You can view these drafts byclickingView Drafts on themain blog page, then click the name of the blog entry.
Blackboard Learn Release 9.1 - Help for Students - Page 71© 2011 Blackboard Inc. Proprietary and Confidential. U.S. Patent No. 6,988,138. Additional Patents Pending.

Tools > Blogs
How to Comment on a Blog EntryYou can comment on one another’s blog entries, whether they belong to an individual, the course, or a group.Your instructor determines if comments can bemade anonymously or deleted.
1. On the CourseMenu, click Blogs.-OR-
On the CourseMenu, click Tools and then click Blogs.
2. On theBlogs list page, click the name of the blog to open.
Blackboard Learn Release 9.1 - Help for Students - Page 72© 2011 Blackboard Inc. Proprietary and Confidential. U.S. Patent No. 6,988,138. Additional Patents Pending.

Tools > Blogs
3. On theBlog topic page, select a blog to view by selecting the user’s name in the side panel underMore Blogs section. The user’s blog entries open in the content frame.
4. Click Comment for the appropriate post.5. Type a comment in theComment field.6. Click Add.
Blackboard Learn Release 9.1 - Help for Students - Page 73© 2011 Blackboard Inc. Proprietary and Confidential. U.S. Patent No. 6,988,138. Additional Patents Pending.

Tools > Blogs
How to Edit a Blog EntryYour instructor will determine if you are allowed to edit your blog entries. However, if you edit gradable blogentries, the original graded entry will be lost. If you edit an entry be sure tomark it as New so others will knowyou changed the post and they can read it again.
1. On the CourseMenu, click Blogs.-OR-
On the CourseMenu, click Tools and then click Blogs.
Blackboard Learn Release 9.1 - Help for Students - Page 74© 2011 Blackboard Inc. Proprietary and Confidential. U.S. Patent No. 6,988,138. Additional Patents Pending.

Tools > Blogs
2. On theBlogs list page, click the name of the blog to open.
3. On theBlog topic page, select Edit from the contextual menu for the blog entry.
Blackboard Learn Release 9.1 - Help for Students - Page 75© 2011 Blackboard Inc. Proprietary and Confidential. U.S. Patent No. 6,988,138. Additional Patents Pending.

Tools > Blogs
4. On theEdit Blog Entry page, make the necessary changes.5. Click Post Entry.
Blackboard Learn Release 9.1 - Help for Students - Page 76© 2011 Blackboard Inc. Proprietary and Confidential. U.S. Patent No. 6,988,138. Additional Patents Pending.
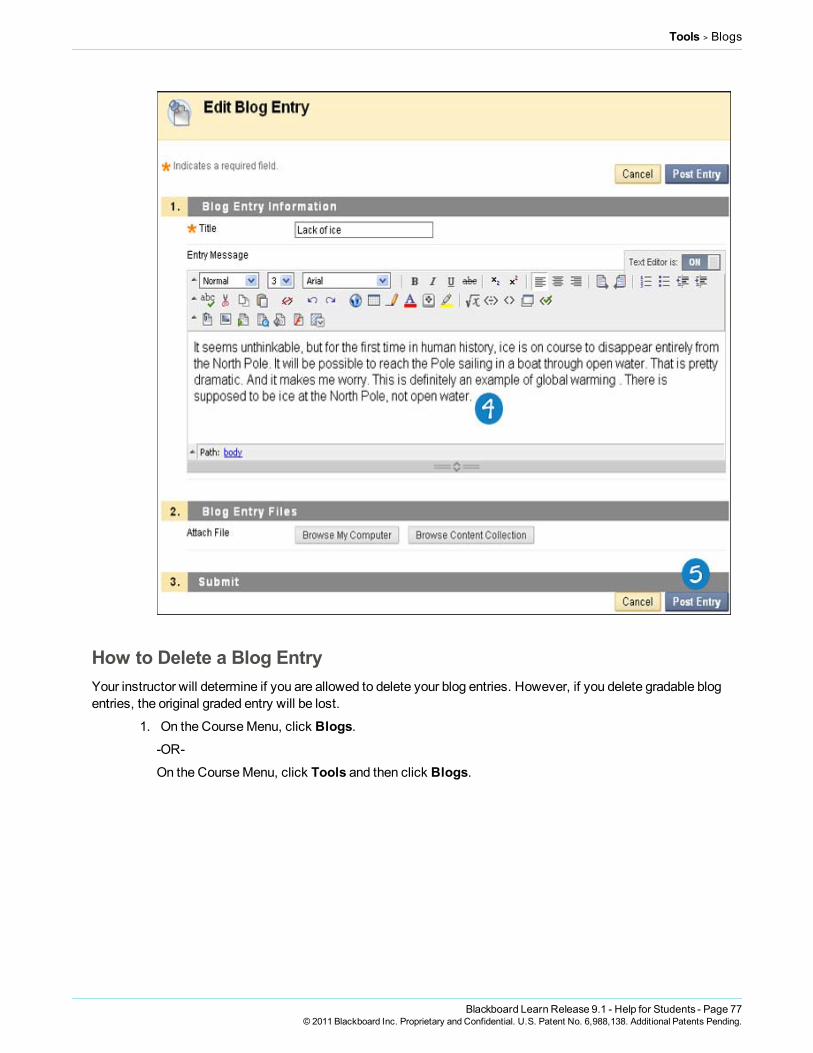
Tools > Blogs
How to Delete a Blog EntryYour instructor will determine if you are allowed to delete your blog entries. However, if you delete gradable blogentries, the original graded entry will be lost.
1. On the CourseMenu, click Blogs.-OR-
On the CourseMenu, click Tools and then click Blogs.
Blackboard Learn Release 9.1 - Help for Students - Page 77© 2011 Blackboard Inc. Proprietary and Confidential. U.S. Patent No. 6,988,138. Additional Patents Pending.

Tools > Blogs
2. On theBlogs list page, click the name of the blog to open.
3. On theBlog topic page, select Delete from the contextual menu for the blog entry. This action isfinal and cannot be undone.
Blackboard Learn Release 9.1 - Help for Students - Page 78© 2011 Blackboard Inc. Proprietary and Confidential. U.S. Patent No. 6,988,138. Additional Patents Pending.

Tools > Blogs
Viewing Blog GradesWhen your blog entries have been graded, you can view your grade in two places . The grading informationappears underBlog Grade section on theBlog topic page and in theMy Grades tool. Any feedback and thedate the grade was assigned also appear in these areas.
Troubleshooting Blog Managementl If your instructor deleted the blog while you are posting, the blog and all comments are deleted.l If a blog is made unavailable while you are posting, the blog remains visible to your instructor inEdit
view but is not displayed to you.
Blackboard Learn Release 9.1 - Help for Students - Page 79© 2011 Blackboard Inc. Proprietary and Confidential. U.S. Patent No. 6,988,138. Additional Patents Pending.

Tools > Calendar
l If theAllow Users to Edit and Delete Entries setting is changed, entries remain but you cannotedit them.
l If theAllow Users to Delete Comments setting is changed, comments remain but you cannot editthem.
Related Tutorials Creating a Blog Entry (Flashmovie | 2m35s | 8,225KB)
CalendarNote: Your instructor controls which tools are available. If this tool is not available, your instructor may havedisabled it.
TheCalendar tool allows you to view events by day, week, month, or year. You can view and organizeupcoming and past events into categories.
You will see different options in the calendar depending on where you access it. When you access the calendaroutside of a course, you can view all items on your calendar and have the options to add andmodify personalevents. When you access the calendar through a course only those calendar items that relate to your courseappear.
Course Calendar events appear to all members of the course. Common entries include upcoming tests, duedates for assignments, or special lectures. If you access the calendar while in your course, you will only seethe entries you have added. If you access the calendar from the Tools panel in theMy Institution tab, itincludes the following:
l Your personal entriesl Entries for all courses in which you are enrolledl Entries for any organizations in which you are enrolledl Institution-wide events
How to Open the Calendar1. On the CourseMenu, click Tools.2. On the Tools page, click Calendar.
Blackboard Learn Release 9.1 - Help for Students - Page 80© 2011 Blackboard Inc. Proprietary and Confidential. U.S. Patent No. 6,988,138. Additional Patents Pending.

Tools > Calendar
-OR-
On the Tools panel, select Calendar.
How to Create a Personal Event1. On the Tools panel, clink Calendar.2. On thePersonal Calendar page, click Create Personal Event.
Blackboard Learn Release 9.1 - Help for Students - Page 81© 2011 Blackboard Inc. Proprietary and Confidential. U.S. Patent No. 6,988,138. Additional Patents Pending.

Tools > Calendar
3. On theCreate Personal Event page, type theEvent Name.4. Type aDescription.5. Use theDate and Time fields to select anEvent Time or use theDate Selection Calendar to
select the date, and Time Selection Menu to select the time.6. Click Submit.
Blackboard Learn Release 9.1 - Help for Students - Page 82© 2011 Blackboard Inc. Proprietary and Confidential. U.S. Patent No. 6,988,138. Additional Patents Pending.

Tools > Calendar
How to Delete and Edit a Personal Event1. On the Tools panel, clink Calendar.2. To delete a personal event, on thePersonal Calendar page, navigate to the date of the event to
delete. Select Delete from the contextual menu for the event.
Blackboard Learn Release 9.1 - Help for Students - Page 83© 2011 Blackboard Inc. Proprietary and Confidential. U.S. Patent No. 6,988,138. Additional Patents Pending.

Tools > Calendar
-OR-To edit a personal event, on thePersonal Calendar page, navigate to the date of the event to edit.Select Edit from the contextual menu for the event.
Blackboard Learn Release 9.1 - Help for Students - Page 84© 2011 Blackboard Inc. Proprietary and Confidential. U.S. Patent No. 6,988,138. Additional Patents Pending.

Tools > Calendar
How to View a Specific DateStudents can view the calendar by day, week, month, year or by specific date. If viewed by month, only the firstfew characters of the event title appear on the Calendar. Click the link for details.
1. On the Tools panel, click Calendar.2. On thePersonal Calendar page, click Jump To.
3. On theCalendar Quick Jump pop-up window, type a date in theSelect a Date field (using themm/dd/yyyy format) or use theDate Selection Calendar to select a date.
4. Select theMonth,Week, orDay options toSelect the type of view.
Blackboard Learn Release 9.1 - Help for Students - Page 85© 2011 Blackboard Inc. Proprietary and Confidential. U.S. Patent No. 6,988,138. Additional Patents Pending.
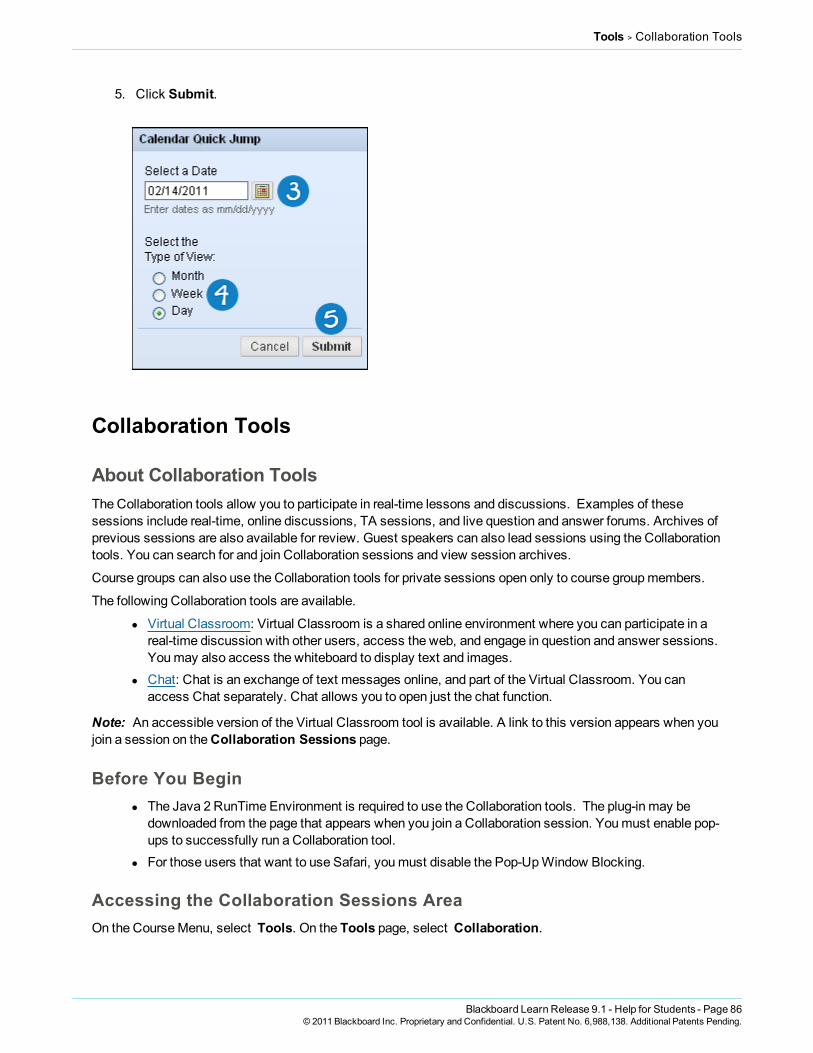
Tools > Collaboration Tools
5. Click Submit.
Collaboration Tools
About Collaboration ToolsThe Collaboration tools allow you to participate in real-time lessons and discussions. Examples of thesesessions include real-time, online discussions, TA sessions, and live question and answer forums. Archives ofprevious sessions are also available for review. Guest speakers can also lead sessions using the Collaborationtools. You can search for and join Collaboration sessions and view session archives.
Course groups can also use the Collaboration tools for private sessions open only to course groupmembers.
The following Collaboration tools are available.
l Virtual Classroom: Virtual Classroom is a shared online environment where you can participate in areal-time discussion with other users, access the web, and engage in question and answer sessions.Youmay also access the whiteboard to display text and images.
l Chat: Chat is an exchange of text messages online, and part of the Virtual Classroom. You canaccess Chat separately. Chat allows you to open just the chat function.
Note: An accessible version of the Virtual Classroom tool is available. A link to this version appears when youjoin a session on theCollaboration Sessions page.
Before You Beginl The Java 2 RunTime Environment is required to use the Collaboration tools. The plug-in may be
downloaded from the page that appears when you join a Collaboration session. Youmust enable pop-ups to successfully run a Collaboration tool.
l For those users that want to use Safari, youmust disable the Pop-UpWindow Blocking.
Accessing the Collaboration Sessions AreaOn the CourseMenu, select Tools. On the Tools page, select Collaboration.
Blackboard Learn Release 9.1 - Help for Students - Page 86© 2011 Blackboard Inc. Proprietary and Confidential. U.S. Patent No. 6,988,138. Additional Patents Pending.

Tools > Collaboration Tools
Filter: You can filter the sessions listed on the page. Click the arrow next to the drop-down list and selectthe type of session to display and click Go:
l Show All: The default filter that displays all of the Collaboration sessions.l Available Sessions: Displays all of the sessions that are in use.l Session with Recordings: Displays completed sessions that have an archive.l Future Sessions: Displays sessions that are scheduled to take place in the future.
Search: You can search for a specific session by clicking the Session Name, Start Date, orEnd Dateoption and then type a value in the field. Click Search.
Join: You can enter a session by clicking theSession Name.
Recordings: You can access the recordings for a session. Select Recordings from the contextual menufor the session.
User RolesBy default, participants are Active Users when they enter a collaboration session. At any time, your instructorcan change your role to Passive. Passive Users can view the exchange, but can contribute only if they raisetheir hands and are granted permission by theModerator.
Your instructor might change your role to Passive if you are dominating the conversation or respondinginappropriately.
The following three roles are available in a collaboration session:
l The Moderator is represented by a globe icon. TheModerator is typically the instructor. TheModerator canmodify participant roles, grant passive users permission to participate, expel users,and record and end the session.
l An Active User is represented by a full color icon. By default, Active Users can sendmessages asoften as they like during a chat session.
l A Passive User is represented by a gray toned icon. Passive Users can observe the chat exchange,but must raise their hands to request permission to sendmessages. If more than one student raisestheir hands, numbers are assigned to the handraise icons to represent the order they raised theirhands.
Blackboard Learn Release 9.1 - Help for Students - Page 87© 2011 Blackboard Inc. Proprietary and Confidential. U.S. Patent No. 6,988,138. Additional Patents Pending.

Tools > Collaboration Tools
Virtual Classroom
About Virtual ClassroomNote: Your instructor controls which tools are available. If this tool is not available, your instructor may havedisabled it.
You can ask questions, draw on the whiteboard, and participate in breakout sessions from the VirtualClassroom.
Note: Before joining a Virtual Classroom session, follow the checklist below tomake sure that your computeris set up properly.
l Be sure to turn off any pop-up blockers that may be enabled on your Internet browser. Don't forget todisable any additional pop-up blockers that may be enabled in your browser toolbar, for example,Yahoo or Google toolbars.
l Make sure that you have the required Sun Java plug-in.l Try joining the Virtual Classroom session well in advance of the scheduled session to ensure that the
tool loads properly.
How to Open the Virtual Classroom1. On the CourseMenu, select Tools.2. On the Tools page, click Collaboration.
Blackboard Learn Release 9.1 - Help for Students - Page 88© 2011 Blackboard Inc. Proprietary and Confidential. U.S. Patent No. 6,988,138. Additional Patents Pending.

Tools > Collaboration Tools
3. On theCollaboration Sessions page, click theSession Name next to a Virtual Classroomsession.
Virtual Classroom AreasWhen you launch the Virtual Classroom, it appears in a new window.
Blackboard Learn Release 9.1 - Help for Students - Page 89© 2011 Blackboard Inc. Proprietary and Confidential. U.S. Patent No. 6,988,138. Additional Patents Pending.

Tools > Collaboration Tools
Menu Bar: Allows your instructor l to control the Virtual Classroom. This includes managing participation,selecting user access rights, ending the sessions, andmonitoring breakout session.
Recording Tool: Allows you to record Virtual Classroom sessions.
Tools: Includes all the tools used during the Virtual Classroom session. This includes accessing theCourseMap, utilizing theWhiteboard, searching for website, and asking and answering questions .
Chat: Allows you to composemessages, raise hand to ask questions, and activate privatemessages.
Virtual Classroom Menu Bar and Record MenuGroup Collaboration Sessions have additional SessionManager features including aMenu Bar and a RecordMenu.
Menu Bar
Only users with active privileges can access the options on themenu bar.
Blackboard Learn Release 9.1 - Help for Students - Page 90© 2011 Blackboard Inc. Proprietary and Confidential. U.S. Patent No. 6,988,138. Additional Patents Pending.
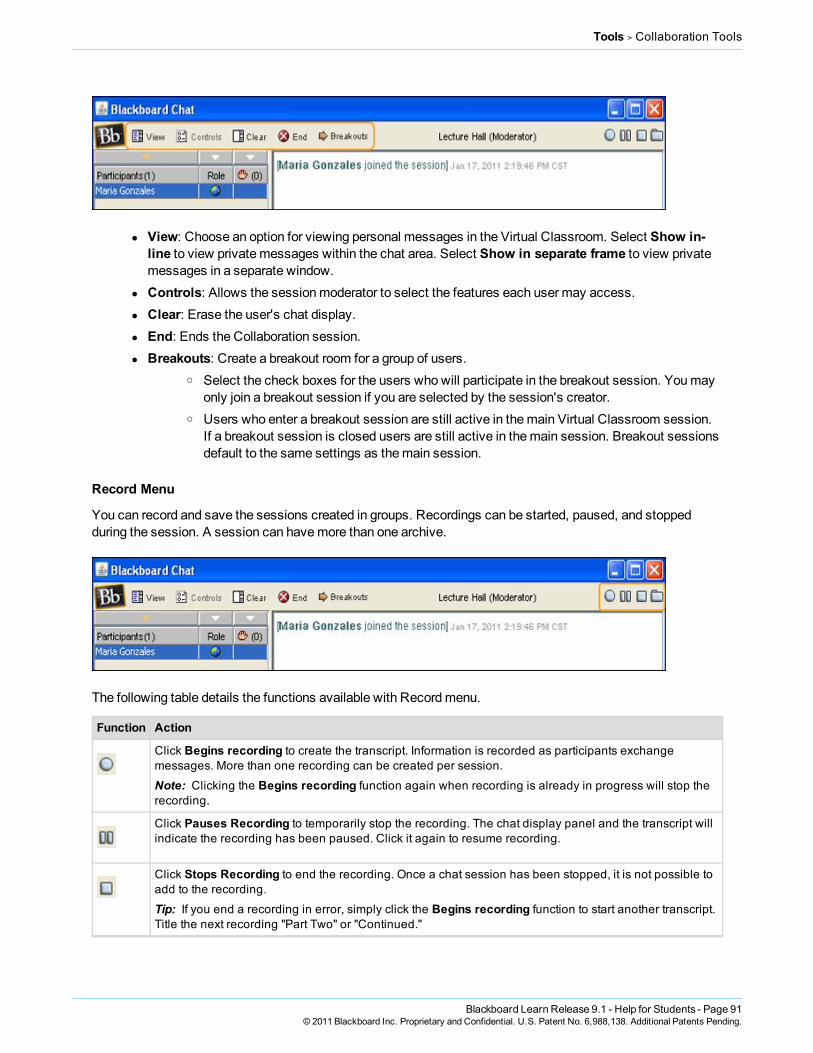
Tools > Collaboration Tools
l View: Choose an option for viewing personal messages in the Virtual Classroom. Select Show in-line to view privatemessages within the chat area. Select Show in separate frame to view privatemessages in a separate window.
l Controls: Allows the sessionmoderator to select the features each user may access.l Clear: Erase the user's chat display.l End: Ends the Collaboration session.l Breakouts: Create a breakout room for a group of users.
o Select the check boxes for the users who will participate in the breakout session. Youmayonly join a breakout session if you are selected by the session's creator.
o Users who enter a breakout session are still active in themain Virtual Classroom session.If a breakout session is closed users are still active in themain session. Breakout sessionsdefault to the same settings as themain session.
Record Menu
You can record and save the sessions created in groups. Recordings can be started, paused, and stoppedduring the session. A session can havemore than one archive.
The following table details the functions available with Recordmenu.
Function Action
Click Begins recording to create the transcript. Information is recorded as participants exchangemessages. More than one recording can be created per session.
Note: Clicking the Begins recording function again when recording is already in progress will stop therecording.
Click Pauses Recording to temporarily stop the recording. The chat display panel and the transcript willindicate the recording has been paused. Click it again to resume recording.
Click Stops Recording to end the recording. Once a chat session has been stopped, it is not possible toadd to the recording.
Tip: If you end a recording in error, simply click the Begins recording function to start another transcript.Title the next recording "Part Two" or "Continued."
Blackboard Learn Release 9.1 - Help for Students - Page 91© 2011 Blackboard Inc. Proprietary and Confidential. U.S. Patent No. 6,988,138. Additional Patents Pending.

Tools > Collaboration Tools
Function Action
Click Bookmark to add comments to the recording. For instance, make a note that you are about tointroduce a new topic. When adding bookmark comments, remember students can view recordings.Bookmarks will appear in a different color than the chat text.
Virtual Classroom ToolsIf granted access to these tools by your instructor, you can view the CourseMap, use theWhiteboard, accesswebsites, and ask questions.
Classroom tools appear on the left side of the Virtual Classroom. To begin using items in the Tools area, clickthe name of the tool.
Virtual Classroom Course MapThe CourseMap enables you to browse the course while in a Virtual Classroom. Youmust have activeprivileges to use the CourseMap in a Virtual Classroom.
Blackboard Learn Release 9.1 - Help for Students - Page 92© 2011 Blackboard Inc. Proprietary and Confidential. U.S. Patent No. 6,988,138. Additional Patents Pending.

Tools > Collaboration Tools
The following table details the available functions in the CourseMap.
Function Action
Display an element on themap to all users
Click the Content Area in the Map and select Display To Users in the drop-down list.Click Go.
Display an element on themap in a separate window
Click the Content Area in the Map and select Preview in NewWindow in the drop-down list. Click Go. The new window is only visible to the user who opens it.
Refresh the map during aCollaboration session
Select Refresh Tree in the drop-down list. Click Go. This edits the map to match theCourse Menu.
Virtual ClassroomWhiteboardThe Virtual ClassroomWhiteboard enables you to present different types of information as you would on awhiteboard in a classroom. Using the tools in theWhiteboard tools palette, you can draw images, type text, andpresent equations. Your instructor determines whether these functions are available.
Blackboard Learn Release 9.1 - Help for Students - Page 93© 2011 Blackboard Inc. Proprietary and Confidential. U.S. Patent No. 6,988,138. Additional Patents Pending.

Tools > Collaboration Tools
The following table details the tools available for use on theWhiteboard.
Function Description Action
Select anitem
Click the Arrow tool and then click on an item for selection. You can perform the followingoptions on selected items:
l Enlarge: Click one of the small black boxes that surround the item and drag it tothe desired size.
l Move: Click the item and move it to the appropriate location.l Cut: Click the Whiteboard item and then click the Cut icon.l Copy: Click the Whiteboard item and then click the Copy icon.l Paste: Click the Whiteboard item and then click the Paste icon.l Delete: Click the Whiteboard item, click the selected object, and then click the
Delete icon.l Group items: Click the Whiteboard items and then click the Group icon.l Ungroup: Click a Whiteboard item in a group and then click the Ungroup icon.l Bring front: Click the Whiteboard item, click the selected object, and then click
the Bring to front icon.l Bring back: Click the Whiteboard item, click the selected object, and then click
the Send to back icon.l Select all figures on the Whiteboard and then click the Selects all Figures icon.
Draw freehand
Click the Pen tool. Choose the color of the pen in the Fill Color drop-down list.
Type textusing thekeyboard
Click the text tool (T) and then click the Whiteboard area. A Whiteboard Text Input boxappears. Type the text in the box and click Insert. Use the options in the Tools palette toselect color, font, and size.
Draw astraight line
Click the Slanted Line tool.
Draw asquare
Click the Square tool. Choose the color of the square from the Fill Color drop-down list.
Draw acircle
Click the Oval tool. Choose the color of the circle from the Fill Color drop-down list.
Blackboard Learn Release 9.1 - Help for Students - Page 94© 2011 Blackboard Inc. Proprietary and Confidential. U.S. Patent No. 6,988,138. Additional Patents Pending.

Tools > Collaboration Tools
Function Description Action
Input anequation
Click The Math and Science Equation Editor icon (?). The Equation Editor appears. Inputthe equation and click Insert Equation.
Virtual Classroom Group BrowserTheGroup Browser enables you to collaboratively browse the web. This tool opens a URL that is viewable byall users. URL's used in the session are recorded in the archive if one is created. The Blackboard administratordetermines whether this function is made available to users.
How to Open a WebsiteType the URL in theEnter Address field. Click Go.
How to Choose Where to Display the WebsiteClick Display To Users to display the website in theWhiteboard, or click Preview in New Window to openthe website in a new browser window. The preview window is only displayed to the user that opened it.
Blackboard Learn Release 9.1 - Help for Students - Page 95© 2011 Blackboard Inc. Proprietary and Confidential. U.S. Patent No. 6,988,138. Additional Patents Pending.

Tools > Collaboration Tools
How to Ask a Question in the Virtual ClassroomIf allowed by your instructor, you can ask questions during the session. As you submit questions during thesession, your instructor can view and respond to them.
1. On theAsk Question area, click Compose.2. On theSubmit Question pop-up window, type the question in the text box.
Blackboard Learn Release 9.1 - Help for Students - Page 96© 2011 Blackboard Inc. Proprietary and Confidential. U.S. Patent No. 6,988,138. Additional Patents Pending.

Tools > Collaboration Tools
3. Click Send.
Virtual Classroom Question InboxQuestions from users are sent to theQuestion Inbox during the Virtual Classroom session. TheQuestionInbox is used tomanage and respond to questions during a Collaboration session.
How to Respond to a Question1. In the From list, click the username.2. Click theRespond to Question icon.
Blackboard Learn Release 9.1 - Help for Students - Page 97© 2011 Blackboard Inc. Proprietary and Confidential. U.S. Patent No. 6,988,138. Additional Patents Pending.

Tools > Collaboration Tools
3. On theRespond to Question pop-up window, type your message in theResponse text box.4. Click Send.
How to Delete a Question1. In the From list, click the username.2. Click theDelete icon.
Blackboard Learn Release 9.1 - Help for Students - Page 98© 2011 Blackboard Inc. Proprietary and Confidential. U.S. Patent No. 6,988,138. Additional Patents Pending.

Tools > Collaboration Tools
How to View Unanswered QuestionSelect the check box next toShow unanswered only.
Respond to Question FieldsWhen you click theRespond to Question icon, theRespond to Questionwindow appears.
Blackboard Learn Release 9.1 - Help for Students - Page 99© 2011 Blackboard Inc. Proprietary and Confidential. U.S. Patent No. 6,988,138. Additional Patents Pending.

Tools > Collaboration Tools
Question: Display the question that was submitted.
Response: Use to provide the response to the question.
Private: Select this check box tomake the response to the question private. If marked private, theresponse is only sent to the person who submitted themessage.
Send: Send the response to the person who submitted themessage.
ChatNote: Your instructor controls which tools are available. If this tool is not available, your instructor may havedisabled it.
The Chat tool allows you to interact with other users using a text-based chat. Chat is part of the VirtualClassroom. It can also be accessed separately. Some of the functions in the Chat are limited to those userswith an active role.
How to Join Chat1. On the CourseMenu, click Tools.2. On the Tools page, click Collaboration.
Blackboard Learn Release 9.1 - Help for Students - Page 100© 2011 Blackboard Inc. Proprietary and Confidential. U.S. Patent No. 6,988,138. Additional Patents Pending.
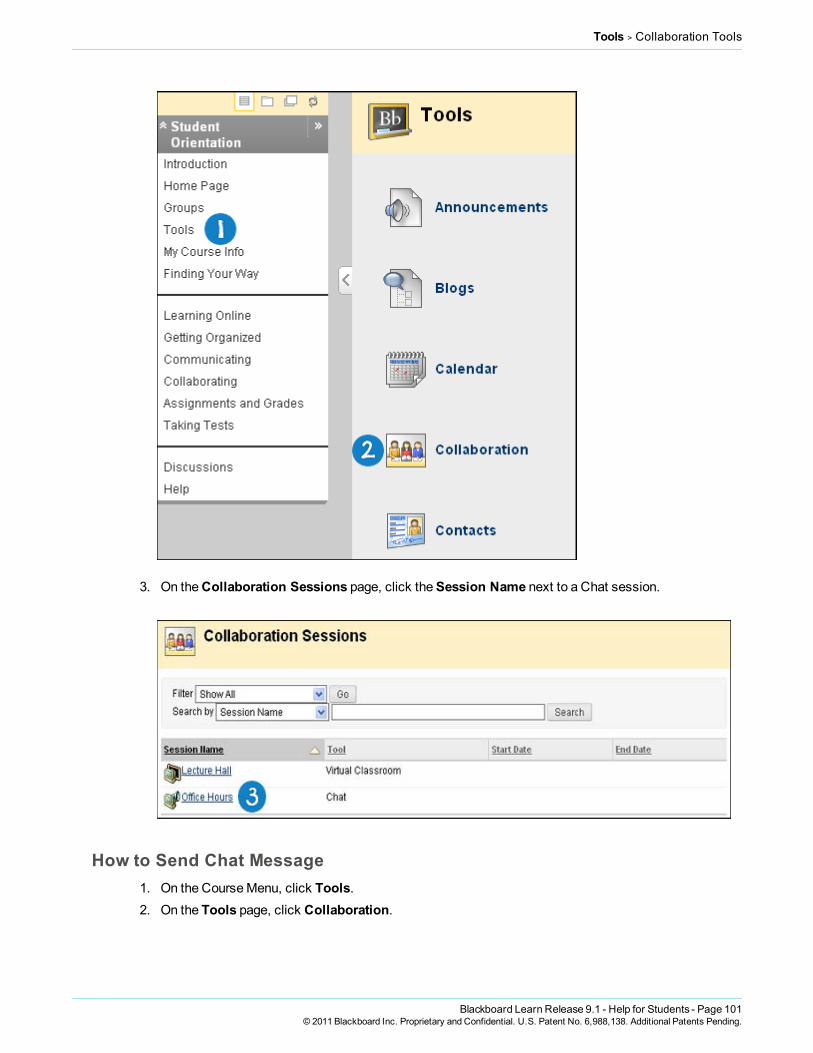
Tools > Collaboration Tools
3. On theCollaboration Sessions page, click theSession Name next to a Chat session.
How to Send Chat Message1. On the CourseMenu, click Tools.2. On the Tools page, click Collaboration.
Blackboard Learn Release 9.1 - Help for Students - Page 101© 2011 Blackboard Inc. Proprietary and Confidential. U.S. Patent No. 6,988,138. Additional Patents Pending.

Tools > Collaboration Tools
3. On theCollaboration Sessions page, click theSession Name next to a Chat session.
4. On theChatwindow, type your message in theCompose text box.5. Click Send.
Blackboard Learn Release 9.1 - Help for Students - Page 102© 2011 Blackboard Inc. Proprietary and Confidential. U.S. Patent No. 6,988,138. Additional Patents Pending.

Tools > Collaboration Tools
Sending a Private MessageYou can send privatemessages to other users if your instructor enables this tool in the session controls.Privatemessages are not recorded or archived.
Note: Only users who have an active role can send privatemessages.
Blackboard Learn Release 9.1 - Help for Students - Page 103© 2011 Blackboard Inc. Proprietary and Confidential. U.S. Patent No. 6,988,138. Additional Patents Pending.

Tools > Collaboration Tools
Viewing User InformationThe User Information pop-up window displays personal information about a user such as name, email address,and any other information the user has chosen to add to their profile.
On theParticipants column, click the name of the user. Click User Info in the Chat area and theUserInformation pop-up window appears.
Chat FunctionsThe following table details the functions available in the Chat.
Function Action
Enter a message forthe class to read
Type the message in the Compose field. Click Send. The message appears in the chatarea. There is 1000 character limit for chat messages.
Blackboard Learn Release 9.1 - Help for Students - Page 104© 2011 Blackboard Inc. Proprietary and Confidential. U.S. Patent No. 6,988,138. Additional Patents Pending.

Tools > Collaboration Tools
Function Action
Become an Active user Click the hand symbol. A hand appears next to the username. The Blackboardadministrator clicks on the hand to make the user active.
View user information Select a username in the participant list and then click User Info.
Send a privatemessage to a user
Select a username in the participant list and then click Private Message.
Accessing Recorded Collaboration SessionsNote: Your instructor controls which tools are available. If this tool is not available, your instructor may havedisabled it.
Recording sessions allow you to review the discussions and questions raised during a Collaboration session.Sessions are listed by date. Recordings created by groups using Collaboration tools can be deleted by anygroupmember.
How to Access Collaboration Session Recordings1. On the CourseMenu, select Tools.2. On the Tools page, click Collaboration.
3. On the contextual menu for the session, select Recordings.4. On theSession Recordings page, select theRecording Name of the recording that you want to
view.
Blackboard Learn Release 9.1 - Help for Students - Page 105© 2011 Blackboard Inc. Proprietary and Confidential. U.S. Patent No. 6,988,138. Additional Patents Pending.
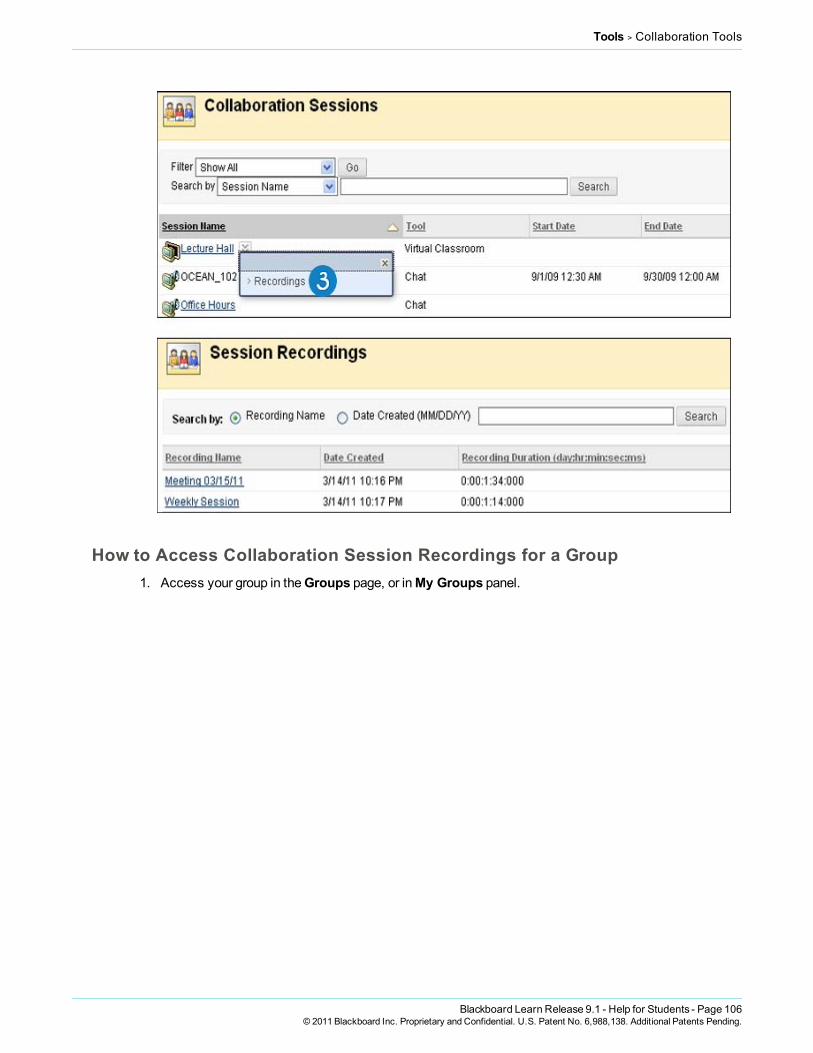
Tools > Collaboration Tools
How to Access Collaboration Session Recordings for a Group1. Access your group in theGroups page, or inMy Groups panel.
Blackboard Learn Release 9.1 - Help for Students - Page 106© 2011 Blackboard Inc. Proprietary and Confidential. U.S. Patent No. 6,988,138. Additional Patents Pending.

Tools > Collaboration Tools
2. On theGroup Tools, select Collaboration.
Blackboard Learn Release 9.1 - Help for Students - Page 107© 2011 Blackboard Inc. Proprietary and Confidential. U.S. Patent No. 6,988,138. Additional Patents Pending.

Tools > Collaboration Tools
3. On the contextual menu for the session, select Recordings.4. On theSession Recordings page, select theRecording Name of the recording that you want to
view.
Blackboard Learn Release 9.1 - Help for Students - Page 108© 2011 Blackboard Inc. Proprietary and Confidential. U.S. Patent No. 6,988,138. Additional Patents Pending.

Tools > Collaboration Tools
How to Create a Recording1. Access your group in theGroups page, or inMy Groups panel.
Blackboard Learn Release 9.1 - Help for Students - Page 109© 2011 Blackboard Inc. Proprietary and Confidential. U.S. Patent No. 6,988,138. Additional Patents Pending.

Tools > Collaboration Tools
2. On theGroup Tools, select Collaboration.
Blackboard Learn Release 9.1 - Help for Students - Page 110© 2011 Blackboard Inc. Proprietary and Confidential. U.S. Patent No. 6,988,138. Additional Patents Pending.

Tools > Collaboration Tools
3. On theCollaboration Sessions page, click the session name to join.
Blackboard Learn Release 9.1 - Help for Students - Page 111© 2011 Blackboard Inc. Proprietary and Confidential. U.S. Patent No. 6,988,138. Additional Patents Pending.

Tools > Collaboration Tools
4. After joining the session, click Begins recording function.5. On theName Recording pop-up window, type the name of the recording or the date it was
created.6. Click OK.
How to Search for a Recording1. Access your group in theGroups page, or inMy Groups panel.
Blackboard Learn Release 9.1 - Help for Students - Page 112© 2011 Blackboard Inc. Proprietary and Confidential. U.S. Patent No. 6,988,138. Additional Patents Pending.

Tools > Collaboration Tools
2. On theGroup Tools, select Collaboration.
Blackboard Learn Release 9.1 - Help for Students - Page 113© 2011 Blackboard Inc. Proprietary and Confidential. U.S. Patent No. 6,988,138. Additional Patents Pending.

Tools > Collaboration Tools
3. On the contextual menu for the session, select Recordings.
Blackboard Learn Release 9.1 - Help for Students - Page 114© 2011 Blackboard Inc. Proprietary and Confidential. U.S. Patent No. 6,988,138. Additional Patents Pending.
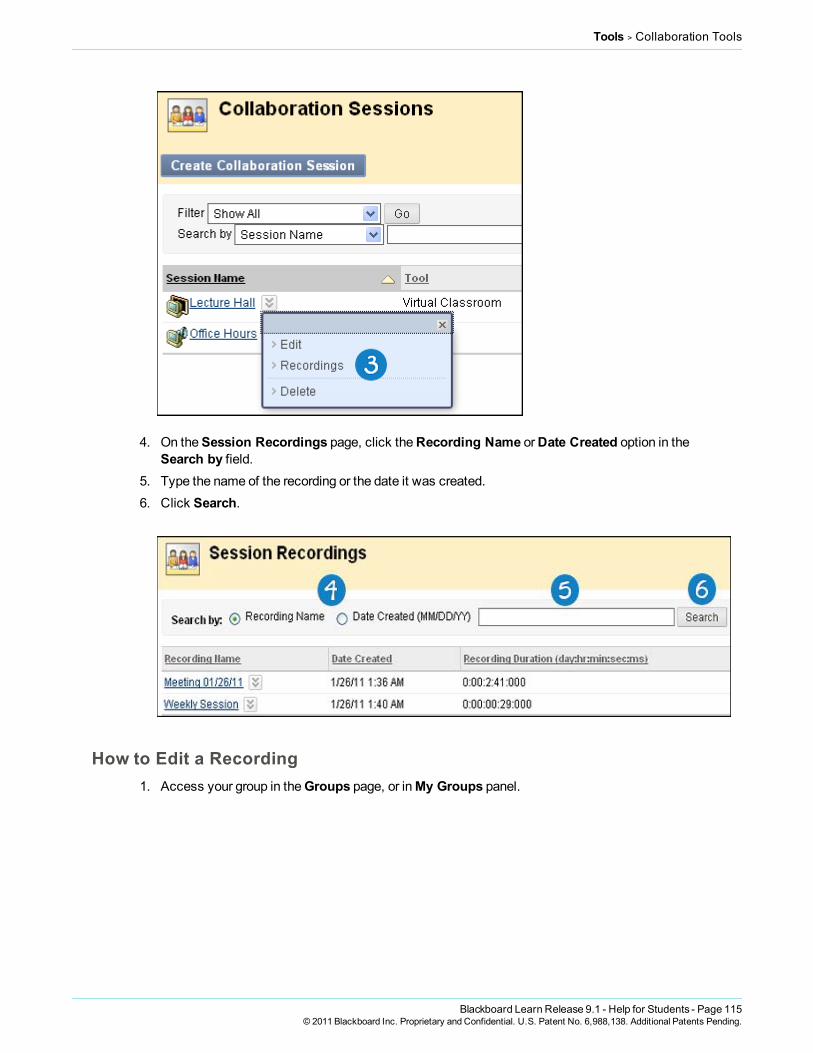
Tools > Collaboration Tools
4. On theSession Recordings page, click theRecording Name orDate Created option in theSearch by field.
5. Type the name of the recording or the date it was created.6. Click Search.
How to Edit a Recording1. Access your group in theGroups page, or inMy Groups panel.
Blackboard Learn Release 9.1 - Help for Students - Page 115© 2011 Blackboard Inc. Proprietary and Confidential. U.S. Patent No. 6,988,138. Additional Patents Pending.

Tools > Collaboration Tools
2. On theGroup Tools, select Collaboration.
Blackboard Learn Release 9.1 - Help for Students - Page 116© 2011 Blackboard Inc. Proprietary and Confidential. U.S. Patent No. 6,988,138. Additional Patents Pending.
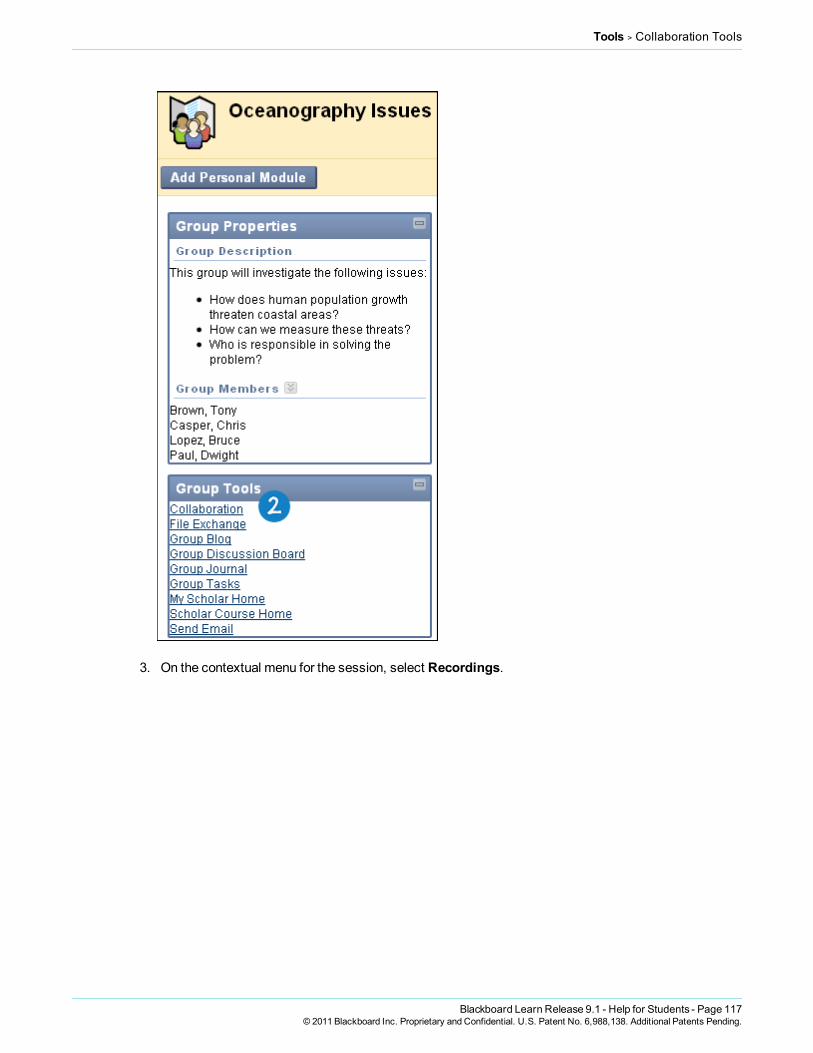
Tools > Collaboration Tools
3. On the contextual menu for the session, select Recordings.
Blackboard Learn Release 9.1 - Help for Students - Page 117© 2011 Blackboard Inc. Proprietary and Confidential. U.S. Patent No. 6,988,138. Additional Patents Pending.

Tools > Collaboration Tools
4. On theSession Recordings page, select Edit from the contextual menu for the appropriaterecording.
5. On theRecording Properties page, type a name in theRecording Name field.6. Choose whether toPermit Participants to View Recording.7. Click Submit.
Blackboard Learn Release 9.1 - Help for Students - Page 118© 2011 Blackboard Inc. Proprietary and Confidential. U.S. Patent No. 6,988,138. Additional Patents Pending.

Tools > Collaboration Tools
How to Delete a Recording1. Access your group in theGroups page, or inMy Groups panel.
2. On theGroup Tools, select Collaboration.
Blackboard Learn Release 9.1 - Help for Students - Page 119© 2011 Blackboard Inc. Proprietary and Confidential. U.S. Patent No. 6,988,138. Additional Patents Pending.

Tools > Collaboration Tools
3. On the contextual menu for the session, select Recordings.
Blackboard Learn Release 9.1 - Help for Students - Page 120© 2011 Blackboard Inc. Proprietary and Confidential. U.S. Patent No. 6,988,138. Additional Patents Pending.

Tools > Collaboration Tools
4. On theSession Recordings page, select Delete from the contextual menu for the appropriaterecording.
5. On theDelete Recording page, click Delete to confirm the deletion.
Blackboard Learn Release 9.1 - Help for Students - Page 121© 2011 Blackboard Inc. Proprietary and Confidential. U.S. Patent No. 6,988,138. Additional Patents Pending.
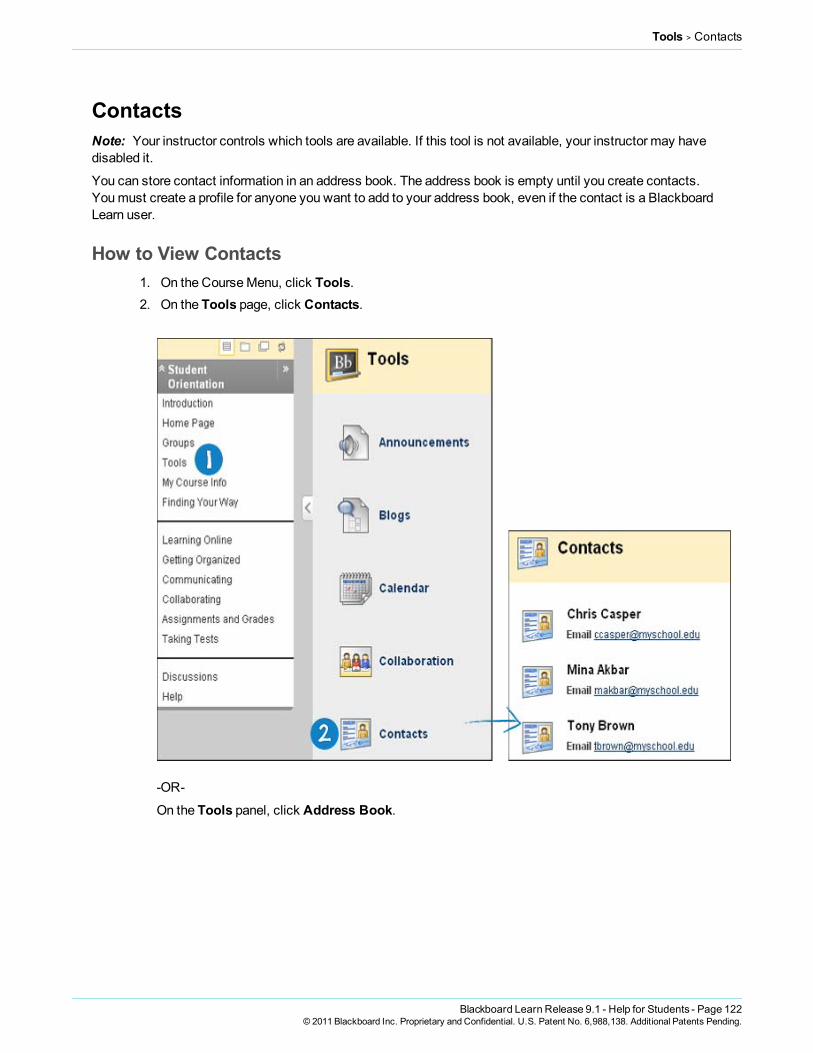
Tools > Contacts
ContactsNote: Your instructor controls which tools are available. If this tool is not available, your instructor may havedisabled it.
You can store contact information in an address book. The address book is empty until you create contacts.Youmust create a profile for anyone you want to add to your address book, even if the contact is a BlackboardLearn user.
How to View Contacts1. On the CourseMenu, click Tools.2. On the Tools page, click Contacts.
-OR-
On the Tools panel, click Address Book.
Blackboard Learn Release 9.1 - Help for Students - Page 122© 2011 Blackboard Inc. Proprietary and Confidential. U.S. Patent No. 6,988,138. Additional Patents Pending.

Tools > Contacts
How to Create or Edit a Contact1. On the Tools panel, select Address Book.2. On theAddress Book page, click Create Contact.
-OR-
To edit an existing contact, on theAddress Book page, select Edit in the contextual menu for thecontact.
Blackboard Learn Release 9.1 - Help for Students - Page 123© 2011 Blackboard Inc. Proprietary and Confidential. U.S. Patent No. 6,988,138. Additional Patents Pending.

Tools > Contacts
The following table details the available fields that may appear. Fields can be changed by theBlackboard administrator.
Field Description
Personal Information
First Name [r] Contact’s first name.
Last Name [r] Contact’s last name.
Email Contact’s email address.
Other Information
Company Contact’s company.
Job Title Contact’s job title.
Address Contact’s address.
Address(cont.)
Contact’s additional address information.
City Contact’s city.
State/Province Contact’s state or province.
Zip/PostalCode
Contact’s ZIP code or postal code.
Country Contact’s country.
Website URL of the contact’s personal website. When adding a URL, include the HTTPprotocol. For example: http://www.blackboard.com
Home Phone Contact’s home phone number. The phone number displays exactly as entered.
Work Phone Contact’s work phone number. The phone number displays exactly as entered.
Work Fax Contact’s fax number. The fax number displays exactly as entered.
Mobile Phone Contact’s mobile phone. The phone number displays exactly as entered.
3. Click Submit.
Blackboard Learn Release 9.1 - Help for Students - Page 124© 2011 Blackboard Inc. Proprietary and Confidential. U.S. Patent No. 6,988,138. Additional Patents Pending.

Tools > Discussion Board
How to Delete a ContactNote: This action is final and cannot be undone.
1. On the Tools panel, click Address Book.2. On theAddress Book page, click Delete in the contextual menu for a contact.
How to Search for a ContactThe Address Book contains a search function on the Action Bar. Youmay search using different variablesselected from the search tabs.
1. On the Tools panel, click Address Book.2. On theAddress Book page, search using the Last Name orEmail options of your contact.3. Click Go.
Discussion BoardNote: Your instructor controls which tools are available. If this tool is not available, your instructor may havedisabled it.
Blackboard Learn Release 9.1 - Help for Students - Page 125© 2011 Blackboard Inc. Proprietary and Confidential. U.S. Patent No. 6,988,138. Additional Patents Pending.

Tools > Discussion Board
The Discussion Board is a tool for sharing thoughts and ideas about class materials. Themain DiscussionBoard page displays a list of available discussion forums that may appear anywhere in the course. A forum isan area where a topic or a group of related topics are discussed. A Discussion Board can contain one or moreforums. For each forum, the page displays the total number of posts, the number of unread posts, and thenumber of users who have participated in the forum.
Forum title: Click the forum title to view themessages. Forums containing unread posts appear in bold.
Total Posts / Total Participants: View data on the number of posts and participants.
Unread Posts: TheUnread Posts column provides one-click access to the forum’s unreadmessages.
Note: The Blackboard administrator at your school and your instructor control whether this tool is available. Ifthis tool has been turned off, it will not appear in the interface and will not be available for you to use.
Within each forum, users can createmultiple threads. A thread includes the initial post and any replies to it.When creating a forum, your instructor has the option of allowing or not allowing you to start threads. If threadsare graded, you cannot start threads. Generally, the purpose of the forum will dictate whether or not you canstart threads. A moderated, graded forum used to evaluate student performance will usually be tightlycontrolled, and you cannot create threads. Other forums are designed for users to share opinions and thoughtson tangential or unrelated topics.
Course groups can have their own Discussion Boards that can be set up using theGroups tool. GroupDiscussion Boards are available only to users who aremembers of the group. If a Group Discussion Board hasbeen set up, access it from the groups link in the CourseMenu or in theMy Groups area.Note: Whenmoving through the different parts of the Discussion Board, use the internal navigation, such asthe breadcrumbs, CourseMenu, and other page links to return to a previous page. Using the browser navigationcontrols can result in page load errors.
How to Access the Discussion Board1. On the CourseMenu, click Discussions.
Blackboard Learn Release 9.1 - Help for Students - Page 126© 2011 Blackboard Inc. Proprietary and Confidential. U.S. Patent No. 6,988,138. Additional Patents Pending.

Tools > Discussion Board
-OR-
On the CourseMenu, click Tools and then click Discussion Board.
Viewing a Discussion ForumWhen you access a forum in the Discussion Board, a list of threads appears. The following columns displayinformation for each thread:
l Date: Displays the date that the thread was created.l Thread: Displays the name of the thread.l Author: Displays the name of user who created the thread.l Status: Indicates whether the thread is published, locked, hidden, or a draft.
Blackboard Learn Release 9.1 - Help for Students - Page 127© 2011 Blackboard Inc. Proprietary and Confidential. U.S. Patent No. 6,988,138. Additional Patents Pending.
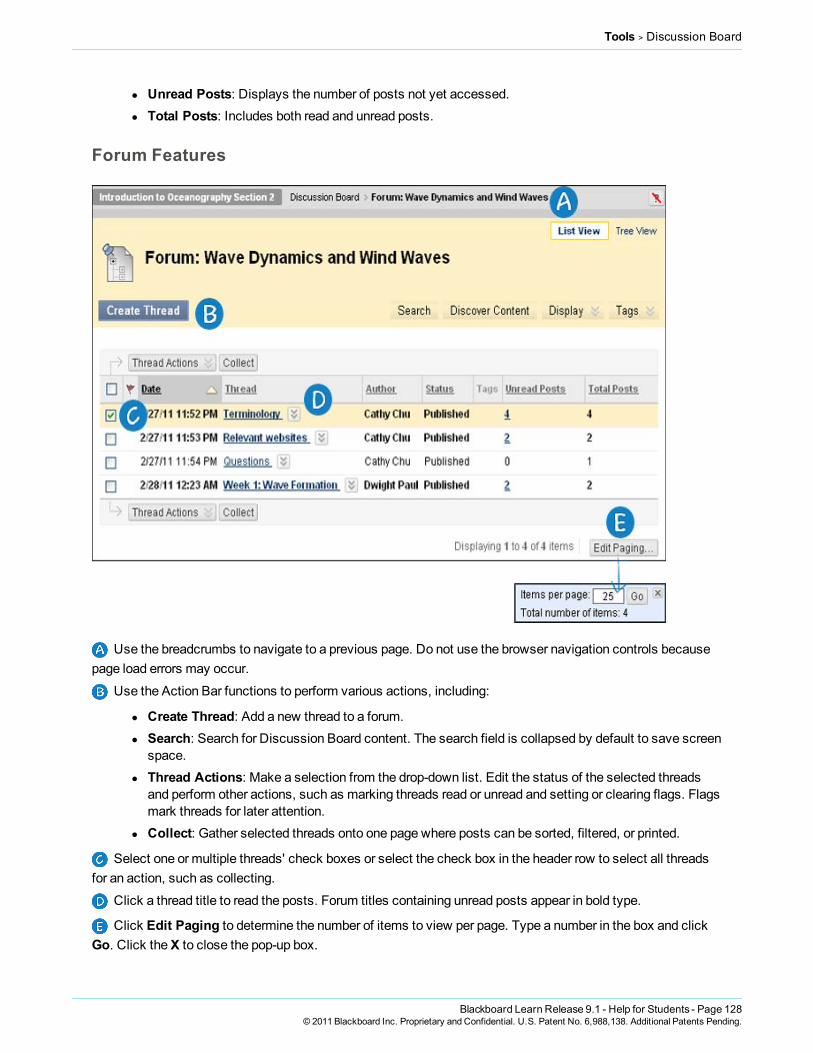
Tools > Discussion Board
l Unread Posts: Displays the number of posts not yet accessed.l Total Posts: Includes both read and unread posts.
Forum Features
Use the breadcrumbs to navigate to a previous page. Do not use the browser navigation controls becausepage load errors may occur.
Use the Action Bar functions to perform various actions, including:
l Create Thread: Add a new thread to a forum.l Search: Search for Discussion Board content. The search field is collapsed by default to save screen
space.l Thread Actions: Make a selection from the drop-down list. Edit the status of the selected threads
and perform other actions, such as marking threads read or unread and setting or clearing flags. Flagsmark threads for later attention.
l Collect: Gather selected threads onto one page where posts can be sorted, filtered, or printed.
Select one or multiple threads' check boxes or select the check box in the header row to select all threadsfor an action, such as collecting.
Click a thread title to read the posts. Forum titles containing unread posts appear in bold type.
Click Edit Paging to determine the number of items to view per page. Type a number in the box and clickGo. Click theX to close the pop-up box.
Blackboard Learn Release 9.1 - Help for Students - Page 128© 2011 Blackboard Inc. Proprietary and Confidential. U.S. Patent No. 6,988,138. Additional Patents Pending.

Tools > Discussion Board
Using List View and Tree View in DiscussionsAfter you click a forum title, a page loads displaying all forum threads. You can view the page in either ListView or Tree View. This choice remains in effect until you change it and youmay change it at any time. On theforum page, in the upper-right corner, toggle between the two views.
List ViewClick List View to present the threads in a table format. Threads containing any unread posts appear in boldtype.
From the Action Bar, you can create threads, or collect posts.
Depending on the settings your instructor made when creating the forum, different functions appear on theAction Bar. For example, if your instructor allowed tagging, a Tags function appears.
To sort a column, click the column heading or caret.
Select the check box next to a thread andmake a selection from the Thread Actions drop-down list. Youcan select multiple threads or select the check box in the header to select all threads. The actions include:
l Marking threads read or unread.l Setting or clearing flags. Flags mark threads for later attention.
Blackboard Learn Release 9.1 - Help for Students - Page 129© 2011 Blackboard Inc. Proprietary and Confidential. U.S. Patent No. 6,988,138. Additional Patents Pending.

Tools > Discussion Board
Tree ViewClick Tree View to show the thread starter messages and their replies. From the Action Bar, you can createthreads, or collect posts.
You can expand and collapse threads by using the plus andminus icons next to the titles. If a thread startermessage contains unread posts, the thread starter title appears in bold type. On the Action Bar, use theCollapse All andExpand All functions to hide or see all posts included in all threads.Select the check box next to a thread andmake a selection from theMessage Actions drop-down list on theAction Bar. You can select multiple threads or select the check box in the header to select all threads. Actionsincludemarking threads read or unread and setting or clearing flags. Flags mark threads for later attention.
Viewing a Discussion ThreadWhen you click a thread, the Thread Detail page appears. The page is divided into three sections:Section 1:
The Action Bar contains functions that allow you to select, flag, mark read/unread, and collect posts.
Section 2:
TheMessage List contains a list of all the posts in a thread, beginning with the initial post. The selected post ishighlighted. Use the plus andminus icons to expand and collapse the posts.
Section 3:
The Current Post contains the text of the selected post and information about the post.
Blackboard Learn Release 9.1 - Help for Students - Page 130© 2011 Blackboard Inc. Proprietary and Confidential. U.S. Patent No. 6,988,138. Additional Patents Pending.

Tools > Discussion Board
About the Thread Detail PageOn the Thread Detail page, you can navigate from post to post, adjust your view of the page, view informationabout the selected post, and reply to others.
Blackboard Learn Release 9.1 - Help for Students - Page 131© 2011 Blackboard Inc. Proprietary and Confidential. U.S. Patent No. 6,988,138. Additional Patents Pending.

Tools > Discussion Board
On the Action Bar, you can access functions such as Subscribe, Unsubscribe, orSearch. Whensubscribed to a thread, you receive an email alert when a post is updated or a reply is posted. Your instructormust enable this function when creating a forum. The search field is hidden by default to save screen space.
Select one or multiple threads' check boxes andmake a selection in theMessage Actions drop-down list.Actions includemarking threads read or unread and setting or clearing flags. Flags mark threads for laterattention. You can also use the functions for collecting posts and selecting all posts.
Arrange your view using the icons on the Action Bar.
l Swap Up orDown: Switches themessage tree section and the reply section of the screen.l Hide orRestore to Minimum: Collapses or displays themessage tree section of the screen.l Maximize orMinimize: Displays themessage tree fully or just a portion of themessage tree.
Use theMove to previous message orMove to next message arrows for navigating betweenmessagesin the thread.
Blackboard Learn Release 9.1 - Help for Students - Page 132© 2011 Blackboard Inc. Proprietary and Confidential. U.S. Patent No. 6,988,138. Additional Patents Pending.

Tools > Discussion Board
Click Parent Post to display or hide the parent message in the thread.
How to Create Threads in a Discussion ForumForums havemany settings that control who can post, and what other types of actions you can take, such asediting your own threads, posting anonymously, or rating posts. Depending on which forum settings yourinstructor has selected, youmay be allowed to create a new thread.
1. On the CourseMenu, click Discussions.2. On theDiscussion Board page, click the name of the forum.
3. On the Forum page, click Create Thread.
4. On theCreate Thread page, type aSubject.
Blackboard Learn Release 9.1 - Help for Students - Page 133© 2011 Blackboard Inc. Proprietary and Confidential. U.S. Patent No. 6,988,138. Additional Patents Pending.

Tools > Discussion Board
5. In theMessage text box, type your reply. You can use the Text Editor functions to format the textand add files, images, external links, multimedia, andMashups.
6. Alternatively, underAttachments, attach a file using one of the following options:l To upload a file from your computer, click Browse My Computer.l If your school licenses content management, click Browse Content Collection.
7. Click Submit to create the thread.
ResultThe newly created thread appears in the forum
How to Save Posts as Draft and Submit LaterTheSave Draft function is available if you need to return to your post at a later time. This function saves yourcomments and files on the page.
When you finish your post, youmust click Submit to publish the thread in the forum.
Blackboard Learn Release 9.1 - Help for Students - Page 134© 2011 Blackboard Inc. Proprietary and Confidential. U.S. Patent No. 6,988,138. Additional Patents Pending.

Tools > Discussion Board
Saving a Post as Draft1. On the CourseMenu, click Discussions.2. On theDiscussion Board page, click the name of the forum.
3. On the Forum page, click Create Thread.
4. On theCreate Thread page, type aSubject.5. In theMessage text box, type your reply. You can use the Text Editor functions to format the text
and add files, images, external links, multimedia, andMashups.6. Alternatively, underAttachments, attach a file using one of the following options:
l To upload a file from your computer, click Browse My Computer.l If your school licenses content management, click Browse Content Collection.
Blackboard Learn Release 9.1 - Help for Students - Page 135© 2011 Blackboard Inc. Proprietary and Confidential. U.S. Patent No. 6,988,138. Additional Patents Pending.

Tools > Discussion Board
7. Click Save Draft to store a draft of the post and continue working later.
Submitting a Draft Post1. Return to the Forum page. On the Forum page, point toDisplay to access the drop-down list.2. Select Drafts Only to view the saved post.3. On the Thread column, click the name of the draft post.
Blackboard Learn Release 9.1 - Help for Students - Page 136© 2011 Blackboard Inc. Proprietary and Confidential. U.S. Patent No. 6,988,138. Additional Patents Pending.

Tools > Discussion Board
4. On the Thread Detail page, click the post's title. The post appears in the Current Post portion ofthe content frame. You can view the text of the post and information about the post, such as theAuthor andPosted Date.
5. Click Edit.
Blackboard Learn Release 9.1 - Help for Students - Page 137© 2011 Blackboard Inc. Proprietary and Confidential. U.S. Patent No. 6,988,138. Additional Patents Pending.

Tools > Discussion Board
6. On theEdit Post page, make the necessary changes in your post. You can use the Text Editorfunctions to format the text and add files, images, external links, multimedia, andMashups.
7. Click Submit.
How to Change the Displayed ThreadsYour instructor sets the thread status as published, hidden, or draft, but you can choose which type of threadswill appear. By default, published threads appear.
1. On the CourseMenu, click Discussions.2. On theDiscussion Board page, click the name of the forum.
Blackboard Learn Release 9.1 - Help for Students - Page 138© 2011 Blackboard Inc. Proprietary and Confidential. U.S. Patent No. 6,988,138. Additional Patents Pending.

Tools > Discussion Board
3. On the Forum page, select List View.4. On the Action Bar, point toDisplay to access the drop-down list.5. Select the type of threads to view in the forum.
l Published: A post with a Published status is available to users.l Hidden: A thread that is locked and not visible by default. Youmay choose to display
Hidden threads in List View. Hidden threads cannot be edited, even if editing has beenenabled for the thread. Hiding threads helps you find relevant content, as unneededcontent is hidden from view.
l Draft: A Draft thread is saved to Blackboard Learn by the author for future editing, but isnot submitted for publication. It becomes available to other users when it is published.
Blackboard Learn Release 9.1 - Help for Students - Page 139© 2011 Blackboard Inc. Proprietary and Confidential. U.S. Patent No. 6,988,138. Additional Patents Pending.

Tools > Discussion Board
ResultThe forum page displays only those threads that have the status selected from theDisplay drop-down list.
How to Reply to Discussion PostsNote: You can reply to published threads, but cannot reply to locked or hidden threads.
1. On the CourseMenu, click Discussions.2. On theDiscussion Board page, click the name of the forum.
3. On the Forum page, click the name of the thread.
Blackboard Learn Release 9.1 - Help for Students - Page 140© 2011 Blackboard Inc. Proprietary and Confidential. U.S. Patent No. 6,988,138. Additional Patents Pending.

Tools > Discussion Board
4. On the Thread Detail page, click a post's title. The post appears in the Current Post portion of thecontent frame. You can view the text of the post and information about the post, such as theAuthor andPosted Date.
5. Click Reply. Alternatively, click Quote to include the post's text as part of your reply.
6. On theReply to Post page, click View Original Post on the Action Bar to include the originalmessage on the page while replying. Click Close Original Post to hide the original post from view.If needed, edit theSubject.
7. In theMessage text box, type your reply. You can use the Text Editor functions to format the textand add files, images, external links, multimedia, andMashups.
8. Alternatively, underAttachments, attach a file using one of the following options:
Blackboard Learn Release 9.1 - Help for Students - Page 141© 2011 Blackboard Inc. Proprietary and Confidential. U.S. Patent No. 6,988,138. Additional Patents Pending.

Tools > Discussion Board
l To upload a file from your computer, click Browse My Computer.l If your school licenses content management, click Browse Content Collection.
9. Click Save Draft to store a draft of the post or click Submit to create the thread.
ResultYour reply appears on the Thread Detail page, indented under the parent post. If you attached a file, a paperclip icon appears in the post's row. Click the title to open the post in the Current Post portion of the contentframe. Use theMove to previous andMove to next arrows to view another post or use the breadcrumbs toreturn to the forum or theDiscussion Board page.
Blackboard Learn Release 9.1 - Help for Students - Page 142© 2011 Blackboard Inc. Proprietary and Confidential. U.S. Patent No. 6,988,138. Additional Patents Pending.

Tools > Discussion Board
How to Rate Discussion PostsYou can use the Discussion Board for peer review. Students start threads and include their work in their initialposts. Other users review the work, assign a rating to the initial post, andmay include comments in a response.
Rating posts also allows you to focus onmessages considered especially informative or useful by others.Depending on the forum settings, you can rate a post using a five star system. Your instructor can also rateposts.
1. On the CourseMenu, click Discussions.2. On theDiscussion Board page, click the name of the forum.
3. On the Forum page, click the name of the thread.
Blackboard Learn Release 9.1 - Help for Students - Page 143© 2011 Blackboard Inc. Proprietary and Confidential. U.S. Patent No. 6,988,138. Additional Patents Pending.

Tools > Discussion Board
4. On the Thread Detail page, click a post's title. The post appears in the Current Post portion of thecontent frame.
5. ForYour Rating, select one to five stars. You can add and delete stars at any time.
ResultYour rating is now included in theOverall Rating, which is the combined rating of all users. The individualrating appears inYour Rating. Use theMove to previous andMove to next arrows to view another post.
How to Search Discussion PostsYou can search for specific text—a phrase, word, or part of a word—in the Discussion Board. The resultsappear on aSearch Results page.
Blackboard Learn Release 9.1 - Help for Students - Page 144© 2011 Blackboard Inc. Proprietary and Confidential. U.S. Patent No. 6,988,138. Additional Patents Pending.

Tools > Discussion Board
1. On the CourseMenu, click Discussions.2. On theDiscussion Board page, click Search. TheSearch field expands.3. In theSearch text box, type a search criterion.4. In the drop-down list, select an area to search.
l Current Discussion Boardl All Forums in Course
5. To further narrow your search results, select theAfter andBefore check boxes to enable the dateand time selections. Type dates and times in the boxes or use the pop-upDate SelectionCalendar and Time Selection Menu to select dates and times.
6. Click Go.
Blackboard Learn Release 9.1 - Help for Students - Page 145© 2011 Blackboard Inc. Proprietary and Confidential. U.S. Patent No. 6,988,138. Additional Patents Pending.
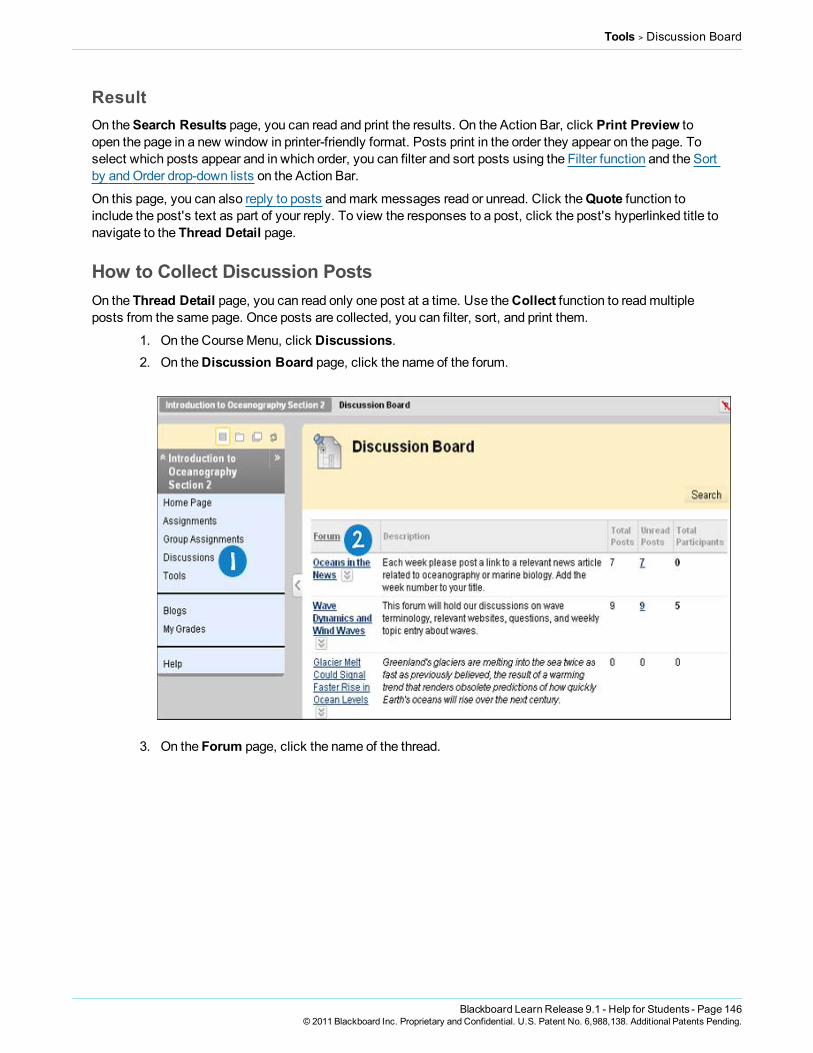
Tools > Discussion Board
ResultOn theSearch Results page, you can read and print the results. On the Action Bar, click Print Preview toopen the page in a new window in printer-friendly format. Posts print in the order they appear on the page. Toselect which posts appear and in which order, you can filter and sort posts using the Filter function and the Sortby andOrder drop-down lists on the Action Bar.
On this page, you can also reply to posts andmark messages read or unread. Click theQuote function toinclude the post's text as part of your reply. To view the responses to a post, click the post's hyperlinked title tonavigate to the Thread Detail page.
How to Collect Discussion PostsOn the Thread Detail page, you can read only one post at a time. Use theCollect function to readmultipleposts from the same page. Once posts are collected, you can filter, sort, and print them.
1. On the CourseMenu, click Discussions.2. On theDiscussion Board page, click the name of the forum.
3. On the Forum page, click the name of the thread.
Blackboard Learn Release 9.1 - Help for Students - Page 146© 2011 Blackboard Inc. Proprietary and Confidential. U.S. Patent No. 6,988,138. Additional Patents Pending.

Tools > Discussion Board
4. On the Thread Detail page, select the check boxes of the posts to collect. If a post has replies andyou want them to appear on theCollection page, click the plus sign to expand the post and selectthe check boxes for thosemessages.
Note: To select all the posts in a thread, click Select: All above theMessage List. All check boxesfor all the posts are selected whether they are expanded or collapsed.
5. On the Action Bar, click Collect.Note: TheCollect function is also available in the forum page, where it is used to gather all thepostings made to different threads. Once collected, sort themessages to further organize them.
Blackboard Learn Release 9.1 - Help for Students - Page 147© 2011 Blackboard Inc. Proprietary and Confidential. U.S. Patent No. 6,988,138. Additional Patents Pending.

Tools > Discussion Board
ResultOn theSearch Results page, you can read and print the results. On the Action Bar, click Print Preview toopen the page in a new window in printer-friendly format. Posts print in the order they appear on the page. Toselect which posts appear and in which order, you can filter and sort posts using the Filter function and the Sortby andOrder drop-down lists on the Action Bar.
On this page, you can also reply to posts andmark messages read or unread. Click theQuote function toinclude the post's text as part of your reply. To view the responses to a post, click the post's hyperlinked title tonavigate to the Thread Detail page.
How to Filter Discussion Posts After Searching or CollectingYou can filter collected posts to narrow your search results or sort a collection. If you print the posts afterfiltering, the posts print in the order they appear on the page.
Note: If the author or authors of some posts are no longer enrolled in the course, the posts may appear out oforder.
1. On the CourseMenu, click Discussions.2. On theDiscussion Board page, click the name of the forum.
3. On the Forum page, click the name of the thread.
Blackboard Learn Release 9.1 - Help for Students - Page 148© 2011 Blackboard Inc. Proprietary and Confidential. U.S. Patent No. 6,988,138. Additional Patents Pending.

Tools > Discussion Board
4. On the Thread Detail page, select the check boxes of the posts to collect.5. On the Action Bar, click Collect.
Note: TheCollect function is also available from the forum page, where it is used to gather all thepostings made to different threads. Once collected, sort themessages to further organize them.
6. On theCollection page, click the Filter function on the Action Bar to expand the field and selectoptions from the following drop-down lists:
l Author: Select All or select an author.l Status: Show All or select a status.l Read Status: Select Show All, Read, or Unread posts.l Tags: Show All tags or select a tag.
Blackboard Learn Release 9.1 - Help for Students - Page 149© 2011 Blackboard Inc. Proprietary and Confidential. U.S. Patent No. 6,988,138. Additional Patents Pending.

Tools > Discussion Board
7. Click Go to apply the selections. You can further organize the results using the Sort by andOrderdrop-down lists.
8. Click theX to close the Filter field.Note: You can select Tags if your instructor has enabled post tagging for the forum.
How to Sort Discussion Posts After Searching or CollectingTo narrow your search results or sort a collection, you can use theSort by andOrder drop-down lists. If youprint the posts after sorting, the posts print in the order they appear on the page.
Note: If the author or authors of some posts are no longer enrolled in the course, the posts may appear out oforder.
1. On the CourseMenu, click Discussions.2. On theDiscussion Board page, click the name of the forum.
3. On the Forum page, click the name of the thread.
Blackboard Learn Release 9.1 - Help for Students - Page 150© 2011 Blackboard Inc. Proprietary and Confidential. U.S. Patent No. 6,988,138. Additional Patents Pending.

Tools > Discussion Board
4. On the Thread Detail page, select the check boxes of the posts to collect.5. On the Action Bar, click Collect.
Note: TheCollect function is also available from the forum page, where it is used to gather all thepostings made to different threads. Once collected, sort themessages to further organize them.
6. On theCollection page, point toSort by on the Action Bar to access the drop-down list. Select anoption:
l Author's Last Namel Author's First Namel Subjectl Date of Last Postl Thread Order
Blackboard Learn Release 9.1 - Help for Students - Page 151© 2011 Blackboard Inc. Proprietary and Confidential. U.S. Patent No. 6,988,138. Additional Patents Pending.

Tools > Discussion Board
7. On the Action Bar, point toOrder to access the drop-down list. Sort posts in ascending ordescending order.
How to View Discussion Board Grades1. On the CourseMenu, click Tools.2. On the Tools page, click My Grades.
3. If your posts to the forum have not been graded, theGrade column contains a symbol indicating itsstatus. If your post has been submitted and graded, the grade appears in theGrade column. Toview more detail, click the link to see the post's Grade Forum page. This page includes:
l Forum Statistics: This section shows information about your posts, such as Date ofLast Post, Average Post Length, andAverage Post Position.
l Forum Grade: This section provides information about yourGrade, instructor'sFeedback, andGrading Notes.
l Contributors: This section shows other users who participated in the forum.
Blackboard Learn Release 9.1 - Help for Students - Page 152© 2011 Blackboard Inc. Proprietary and Confidential. U.S. Patent No. 6,988,138. Additional Patents Pending.

Tools > Discussion Board
Note: If you see feedback for an item but do not see a grade, contact your instructor.
Related Tutorials Creating a New Discussion Board Thread (Flashmovie | 1m52s | 4,750KB) | Replying toa Discussion Board Thread (Flashmovie | 1m59s | 5,083KB) | Creating a Discussion Board Post (Flashmovie | 2m40s | 5,135KB) | Organizing Discussion Board Posts (Flashmovie | 2m27s | 4,624KB) | Viewing DiscussionBoard Grades (Flashmovie | 1m38s | 3,181KB)
Blackboard Learn Release 9.1 - Help for Students - Page 153© 2011 Blackboard Inc. Proprietary and Confidential. U.S. Patent No. 6,988,138. Additional Patents Pending.

Tools > Email
EmailNote: Your instructor controls which tools are available. If this tool is not available, your instructor may havedisabled it.
You can send email to the following people in a course:
l All Users: Sends email to all users in the course.l All Groups: Sends email to all of the groups in a specified course.l All Student Users: Sends an email to all students in the course.l All Teaching Assistant Users: Sends email to all of the Teaching Assistants in a specified course.l All Instructor Users: Sends email to all of the instructors for a specified course.l Select Users: Sends email to select users.l Select Groups: Sends email to select groups.
Note: Recipients of each email will not see the email addresses of other recipients.
Before You Beginl Blackboard Learn keeps no record of sent emails. You will receive a copy of your email in the Inbox of
your external email account. Keep a copy of important messages in case you need them at a laterdate.
l Blackboard Learn will NOT recognize files or email addresses with spaces or special characters,such as #, &, %, and $. In general, use only alphanumeric file names and addresses in BlackboardLearn.
l Do not send email through Blackboard Learn without content in the subject line. Leaving the subjectline blank can prevent themessage from being delivered.
How to Send Email1. On the CourseMenu, click Tools.2. On the Tools page, click Send Email.
Note: You can also access the Send Email feature for all of your courses through the Tools panelon theMy Institution tab. The Email tool may also be available directly from the CourseMenuwhen added by your instructor.
Blackboard Learn Release 9.1 - Help for Students - Page 154© 2011 Blackboard Inc. Proprietary and Confidential. U.S. Patent No. 6,988,138. Additional Patents Pending.
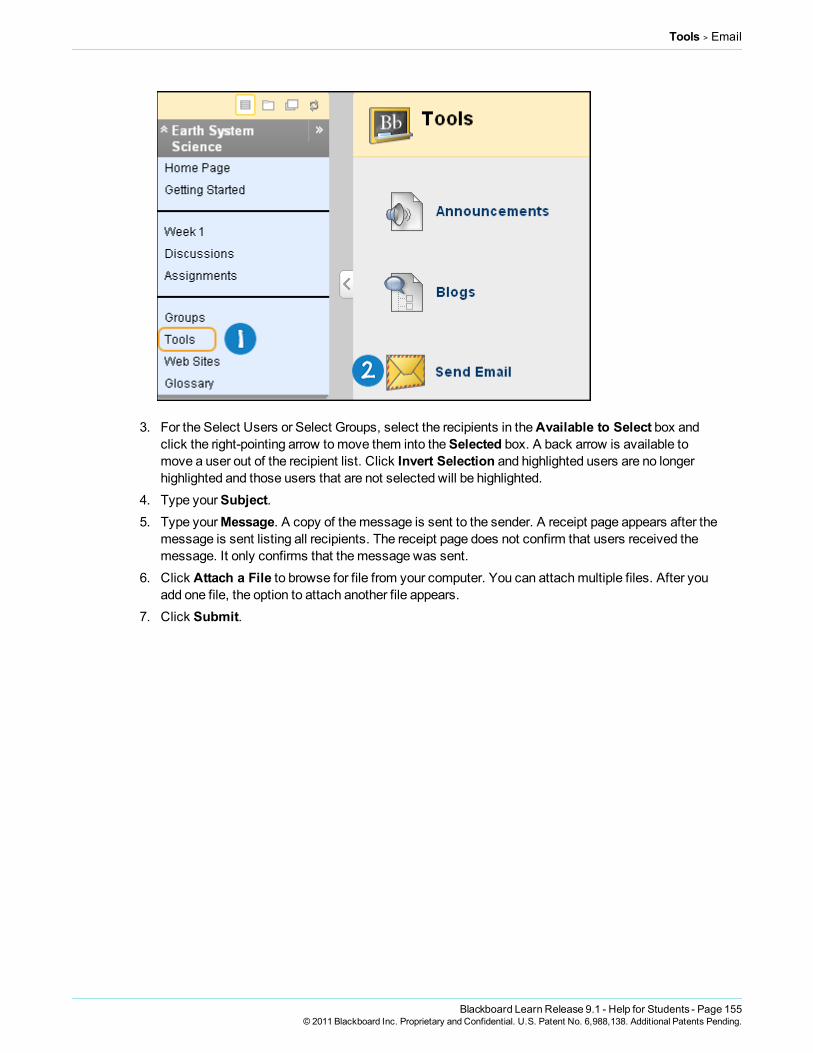
Tools > Email
3. For the Select Users or Select Groups, select the recipients in theAvailable to Select box andclick the right-pointing arrow tomove them into theSelected box. A back arrow is available tomove a user out of the recipient list. Click Invert Selection and highlighted users are no longerhighlighted and those users that are not selected will be highlighted.
4. Type yourSubject.5. Type yourMessage. A copy of themessage is sent to the sender. A receipt page appears after the
message is sent listing all recipients. The receipt page does not confirm that users received themessage. It only confirms that themessage was sent.
6. Click Attach a File to browse for file from your computer. You can attachmultiple files. After youadd one file, the option to attach another file appears.
7. Click Submit.
Blackboard Learn Release 9.1 - Help for Students - Page 155© 2011 Blackboard Inc. Proprietary and Confidential. U.S. Patent No. 6,988,138. Additional Patents Pending.

Tools > Email
To select multiple users in a row, press the SHIFT key and click the first and last names. To selectusers out of sequence, press the CTRL key and click each name needed. You can also select allcoursemembers with theSelect All function.
Troubleshootingl Your email address is not visible unless you choose tomake it visible to coursemembers. Find this
setting in the page header above the tabs at:My Places > Personal Information > Set PrivacyOptions. From this page, you can choose the information you want coursemembers to see.
l You can change your external email address used in your course. Change your email address bygoing toMy Places > Personal Information > Edit Personal Information. Type your preferredemail address and click Submit.
l Email clients, such as Hotmail, Yahoo, and AOLmay identify email from Blackboard Learn as junkmail and either automatically delete the email or move it to a junk mail folder. If you have problems,
Blackboard Learn Release 9.1 - Help for Students - Page 156© 2011 Blackboard Inc. Proprietary and Confidential. U.S. Patent No. 6,988,138. Additional Patents Pending.

Tools > Journals
check your user preferences or options for settings regarding the handling of junk email. You can alsochange your email address.
JournalsNote: Your instructor controls which tools are available. If this tool is not available, your instructor may havedisabled it.
Journals are a personal space for you to communicate privately with your instructor. You can also use a journalas a self-reflective tool to post your opinions, ideas, and concerns about your course, or discuss and analyzecourse relatedmaterials. For example, you can describe problems faced and how you solved them. Yourinstructor can direct journal entries to bemore formal in nature and narrower in focus by listing topics fordiscussion.
Your instructor can choose tomake journal entries public, allowing all coursemembers to view all entries. Youcan read what other students wrote and build upon those ideas.
When used in the group area, members of a group can view and comment on each other’s entries for a groupjournal. The group can communicate with their instructor as a whole and all members can benefit from thecomments made.
Your instructor can grade group journals and apply the grade to every member of the course group. Journalentries can also be used solely for communication. In either instance, you canmakemultiple entries for onejournal topic.
The Journal topic page is divided into twomain sections. You can view the Instructions in the content frame.Click theX to collapse the field. In the side panel, you can view information about the journal. You can expandand collapse sections in the side panel using the double arrows.
Blackboard Learn Release 9.1 - Help for Students - Page 157© 2011 Blackboard Inc. Proprietary and Confidential. U.S. Patent No. 6,988,138. Additional Patents Pending.

Tools > Journals
Create Journal Entry: You canmake a journal entry using theCreate Journal Entry function. You canmake another journal entry for a topic at any time. For example, your instructor may add a comment requestingthat you clarify what has been written before a grade is assigned or suggest a topic for another entry.
View Drafts: You can access any entries saved as drafts. Click View Drafts on the Action Bar.
Journal Entry: Your journal entries appear in the content frame following the Instructions.
Comments: Following an entry, you can see if comments weremade. Click the link to view comments.
Comment: You can add comments by clickingComment.
About this Journal: In the side panel, you can see the journal information in theAbout this Journalsection.
Journal Grade: The Journal Grade section appears if a journal is set to be graded. You can see if yourjournal entries have been graded..
More Journals: You can see other journal entries made by other coursemembers in theMore Journalssection.
Index: You can see the titles of your selected entries for either the week or themonth in the Index section,determined by the settings your instructor makes during journal creation. Themost recent entry title appearsfirst.
Blackboard Learn Release 9.1 - Help for Students - Page 158© 2011 Blackboard Inc. Proprietary and Confidential. U.S. Patent No. 6,988,138. Additional Patents Pending.

Tools > Journals
How to Access a Journal1. On the CourseMenu, click Journals.
-OR-
On the CourseMenu, click Tools and then click Journals.
2. On the Journals listing page, select a journal to open.
Blackboard Learn Release 9.1 - Help for Students - Page 159© 2011 Blackboard Inc. Proprietary and Confidential. U.S. Patent No. 6,988,138. Additional Patents Pending.

Tools > Journals
How to Create a Journal EntryOnly your instructor can create a journal topic, but once created, you can create entries. The journal topicsappear in alphabetical order on the Journals listing page. Instructors and users can create and post journalentries or save them in draft form for later posting.
1. On the CourseMenu, click Journals.-OR-
On the CourseMenu, click Tools and then click Journals.
Blackboard Learn Release 9.1 - Help for Students - Page 160© 2011 Blackboard Inc. Proprietary and Confidential. U.S. Patent No. 6,988,138. Additional Patents Pending.

Tools > Journals
2. On the Journals listing page, select a journal to open.3. On the Journal topic page, click Create Journal Entry.
4. On theCreate Journal Entry page, type anEntry Title.5. Type the text in theEntry Message text box.6. Alternatively, in theAttach File field, attach a file using one of the following options:
l To upload a file from your computer, click Browse My Computer.l To upload a file from the course's storage repository:
o If Course Files is the course's storage repository, click Browse Course.-OR-
Blackboard Learn Release 9.1 - Help for Students - Page 161© 2011 Blackboard Inc. Proprietary and Confidential. U.S. Patent No. 6,988,138. Additional Patents Pending.

Tools > Journals
o If your school licenses content management, click Browse ContentCollection.
Note: Files added by students are not uploaded to the course repository.
7. Click Post Entry.-OR-
Click Save Entry as Draft to save the entry for later posting.
Viewing Journal DraftsYou can save journal entries for later posting by clickingSave Entry as Draft. You can view these drafts byclickingView Drafts on themain journal page.
Blackboard Learn Release 9.1 - Help for Students - Page 162© 2011 Blackboard Inc. Proprietary and Confidential. U.S. Patent No. 6,988,138. Additional Patents Pending.

Tools > Journals
How to Comment on a Journal EntryYou can create comments to journal entries if commenting is allowed by your instructor. You canmake acomment after your instructor comments on an entry to continue the conversation.
You cannot make comments on another user’s journal entry, even if the journal has beenmade public. Userscan only comment on another user’s entry when they aremembers of a group. For group journals, all groupmembers and their instructor are allowed tomake comments on individual entries.
1. On the CourseMenu, click Journals.-OR-
On the CourseMenu, click Tools and then click Journals.
Blackboard Learn Release 9.1 - Help for Students - Page 163© 2011 Blackboard Inc. Proprietary and Confidential. U.S. Patent No. 6,988,138. Additional Patents Pending.

Tools > Journals
2. On the Journals listing page, select a journal to open.
3. On the Journal topic page, click Comment for the selected entry.4. Type a comment in theComment field.5. Click Add.
Blackboard Learn Release 9.1 - Help for Students - Page 164© 2011 Blackboard Inc. Proprietary and Confidential. U.S. Patent No. 6,988,138. Additional Patents Pending.

Tools > Journals
How to Edit a Journal EntryYou can edit your journal entries if your instructor allows it. However, if you edit gradable journal entries, theoriginal graded entry will be lost.
1. On the CourseMenu, click Journals.-OR-
On the CourseMenu, click Tools and then click Journals.
Blackboard Learn Release 9.1 - Help for Students - Page 165© 2011 Blackboard Inc. Proprietary and Confidential. U.S. Patent No. 6,988,138. Additional Patents Pending.

Tools > Journals
2. On the Journals listing page, select a journal to open.
3. On the Journal topic page, select Edit from the contextual menu for the journal entry.
Blackboard Learn Release 9.1 - Help for Students - Page 166© 2011 Blackboard Inc. Proprietary and Confidential. U.S. Patent No. 6,988,138. Additional Patents Pending.

Tools > Journals
4. On theEdit Journal Entry page, make the necessary changes.5. Click Post Entry.
Blackboard Learn Release 9.1 - Help for Students - Page 167© 2011 Blackboard Inc. Proprietary and Confidential. U.S. Patent No. 6,988,138. Additional Patents Pending.

Tools > Journals
How to Delete a Journal EntryYou can delete your journal entries if your instructor allows it. However, if you delete gradable journal entries,the original graded entry will be lost.
1. On the CourseMenu, click Journals.-OR-
On the CourseMenu, click Tools and then click Journals.
Blackboard Learn Release 9.1 - Help for Students - Page 168© 2011 Blackboard Inc. Proprietary and Confidential. U.S. Patent No. 6,988,138. Additional Patents Pending.

Tools > Journals
2. On the Journals list page, select a journal to open.
3. On the Journal topic page, select Delete from the contextual menu for the journal entry. Thisaction is final and cannot be undone.
Blackboard Learn Release 9.1 - Help for Students - Page 169© 2011 Blackboard Inc. Proprietary and Confidential. U.S. Patent No. 6,988,138. Additional Patents Pending.

Tools > Journals
Viewing Journal GradesWhen your journal entries have been graded, you can view your grade in two places . The grading informationappears under Journal Grade section on the Journal topic page and in theMy Grades tool. Any feedback andthe date the grade was assigned also appear in these areas.
Troubleshooting Journal Management
Blackboard Learn Release 9.1 - Help for Students - Page 170© 2011 Blackboard Inc. Proprietary and Confidential. U.S. Patent No. 6,988,138. Additional Patents Pending.

Tools > Messages
l If your instructor deleted the journal while you are posting, the journal and all comments are deleted.l If a journal is made unavailable while you are posting, the journal remains visible to your instructor in
Edit view but is not displayed to you.l If theAllow Users to Edit and Delete Entries setting is changed, entries remain but you cannot
edit them.l If theAllow Users to Delete Comments setting is changed, comments remain but you cannot edit
them.
MessagesNote: Your instructor controls which tools are available. If this tool is not available, your instructor may havedisabled it.
The Blackboard LearnMessages tool provides you with a familiar, email-like environment that you can use forcourse communication. Accounts are automatically created for eachmember of the course, andmessages aresent and received using that account. This provides additional privacy because external email addresses arenot used, so external factors will not affect course communication.
You cannot receivemessages outside your course and you are not notified if you receive a new message, somake routine checks for new messages.
Messages are usually accessed through the tools area of a course. However, your instructor can restrictaccess or create a link on the CourseMenu so that messages are directly accessible .
Create Message: Use theCreate Message function to create new messages.
Create Folder: Use theCreate Folder function to add a new folder. You can use folders to organizemessages.
Inbox: The Inbox folder opens with a list of messages received.
Sent: TheSent folder opens with a list of messages sent.
Blackboard Learn Release 9.1 - Help for Students - Page 171© 2011 Blackboard Inc. Proprietary and Confidential. U.S. Patent No. 6,988,138. Additional Patents Pending.

Tools > Messages
Delete Folder/ Delete: TheDelete Folder orDelete function in the folder contextual menu removes thefolder. To delete personal folders, select the check box next to each folder that will be deleted. Then clickDelete Folder in the action bar. The folders, and any messages in the folders, are deleted.
Edit: TheEdit function changes the name of a personal folder. It is not possible to modify the Inbox folderorSent folder.
How to Create a MessageYou can also sendmessages to coursemembers using theMessages tool. Using theMessages tool insteadof theEmail tool can also bemore reliable. Problems with incorrect or out-of-date student email addresses willnot affect course communication.
1. On the CourseMenu, click Tools.2. On the Tools page, click Messages.
3. On theMessages page, click Create Message on the Action Bar.
Blackboard Learn Release 9.1 - Help for Students - Page 172© 2011 Blackboard Inc. Proprietary and Confidential. U.S. Patent No. 6,988,138. Additional Patents Pending.

Tools > Messages
4. On theCompose Message page, click To, and a list of coursemembers appears.5. In theSelect Recipients: To line box, select the recipients and click the right-pointing arrow to
move them to theRecipients box. You can use theCc, andBcc functions to send themessage tothose users that may be interested in themessage, but are not the primary recipients. When usingBcc, other recipients do not know that the users listed in theBcc field are receiving themessage.
6. Type aSubject.7. Type amessage. You can use the Text Editor to format theBody text, if you want.8. Click Browse to select a file to attach to themessage. If themessage is a reply or a forward, you
have the option of including the original attachment.
Note: The Blackboard administrator at your school and your instructor control whether this tool isavailable. If this tool has been turned off, it will not appear in the interface and will not be availablefor you to use.
9. Click Submit.
Blackboard Learn Release 9.1 - Help for Students - Page 173© 2011 Blackboard Inc. Proprietary and Confidential. U.S. Patent No. 6,988,138. Additional Patents Pending.

Tools > Messages
Note: To select multiple users in a row, press the SHIFT key and click the first and last names. Toselect users out of sequence, press the CTRL key and click each name needed. You can alsoselect all coursemembers with theSelect All function.
Blackboard Learn Release 9.1 - Help for Students - Page 174© 2011 Blackboard Inc. Proprietary and Confidential. U.S. Patent No. 6,988,138. Additional Patents Pending.

Tools > Messages
How to Create a Message FolderYou can create personal folders to help organize your messages. Personal folders are only for storingmessages. Messages received always appear in the Inbox folder first andmessages sent always appear in theSent folder. Once amessage appears, it can bemoved into a personal folder.Note: The Blackboard administrator at your school and your instructor control whether this tool is available. Ifthis tool has been turned off, it will not appear in the interface and will not be available for you to use.
1. On the CourseMenu, click Tools.2. On the Tools page, click Messages.
3. On theMessages page, click Create Folder on the Action Bar.
4. On theAdd Folder page, type the name of the new personal folder in theName box.
Blackboard Learn Release 9.1 - Help for Students - Page 175© 2011 Blackboard Inc. Proprietary and Confidential. U.S. Patent No. 6,988,138. Additional Patents Pending.

Tools > Messages
5. Click Submit.
How to View a Message1. On the CourseMenu, click Tools.2. On the Tools page, click Messages.
3. On theMessages page, select a folder.
Blackboard Learn Release 9.1 - Help for Students - Page 176© 2011 Blackboard Inc. Proprietary and Confidential. U.S. Patent No. 6,988,138. Additional Patents Pending.
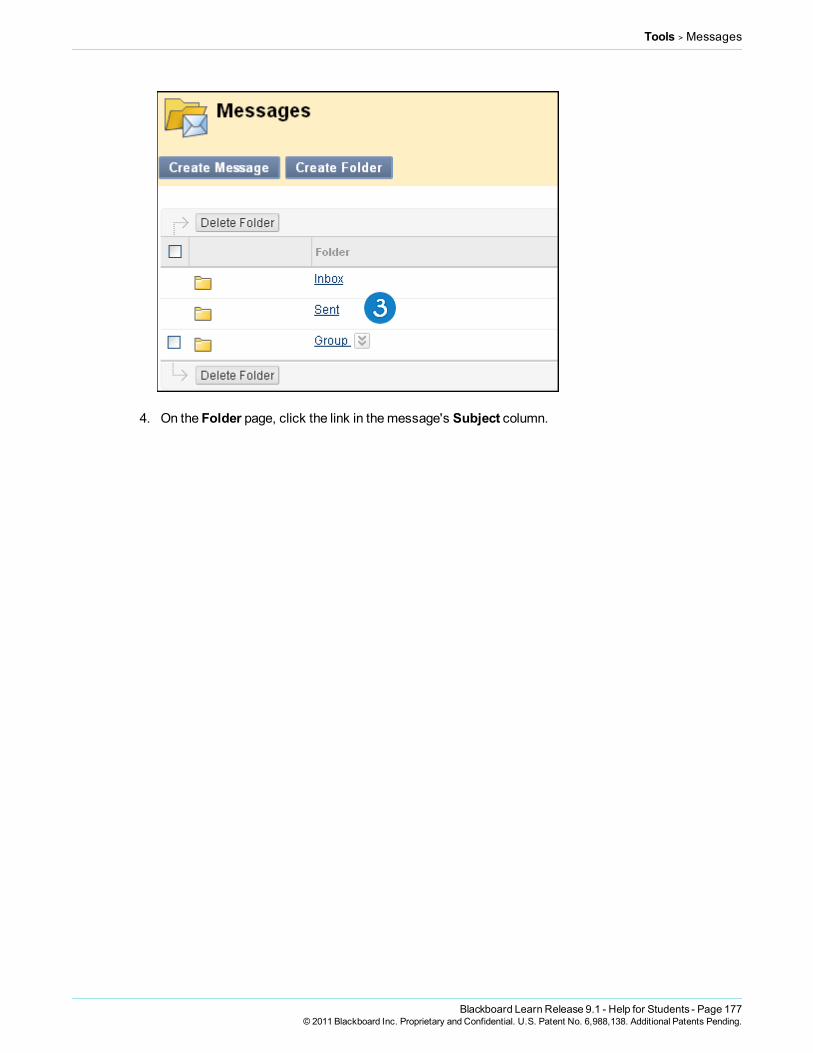
Tools > Messages
4. On the Folder page, click the link in themessage's Subject column.
Blackboard Learn Release 9.1 - Help for Students - Page 177© 2011 Blackboard Inc. Proprietary and Confidential. U.S. Patent No. 6,988,138. Additional Patents Pending.

Tools > Messages
How to Reply to a Message1. On the CourseMenu, click Tools.2. On the Tools page, click Messages.
Blackboard Learn Release 9.1 - Help for Students - Page 178© 2011 Blackboard Inc. Proprietary and Confidential. U.S. Patent No. 6,988,138. Additional Patents Pending.

Tools > Messages
3. On theMessages page, select a folder.
4. On the Folder page, click the link in themessage's Subject column.
Blackboard Learn Release 9.1 - Help for Students - Page 179© 2011 Blackboard Inc. Proprietary and Confidential. U.S. Patent No. 6,988,138. Additional Patents Pending.

Tools > Messages
5. On theView Message page, click Reply to compose amessage to the sender orReply All toreply to the sender and all other recipients of themessage already populated in the To: field.Note: You can add other users to themessage. The text of themessage is already populated withthe text of the original message. Additional text may be added.
6. On theReply to Message page, compose your message.7. Click Submit.
Blackboard Learn Release 9.1 - Help for Students - Page 180© 2011 Blackboard Inc. Proprietary and Confidential. U.S. Patent No. 6,988,138. Additional Patents Pending.

Tools > Messages
How to Forward a Message1. On the CourseMenu, click Tools.2. On the Tools page, click Messages.
Blackboard Learn Release 9.1 - Help for Students - Page 181© 2011 Blackboard Inc. Proprietary and Confidential. U.S. Patent No. 6,988,138. Additional Patents Pending.
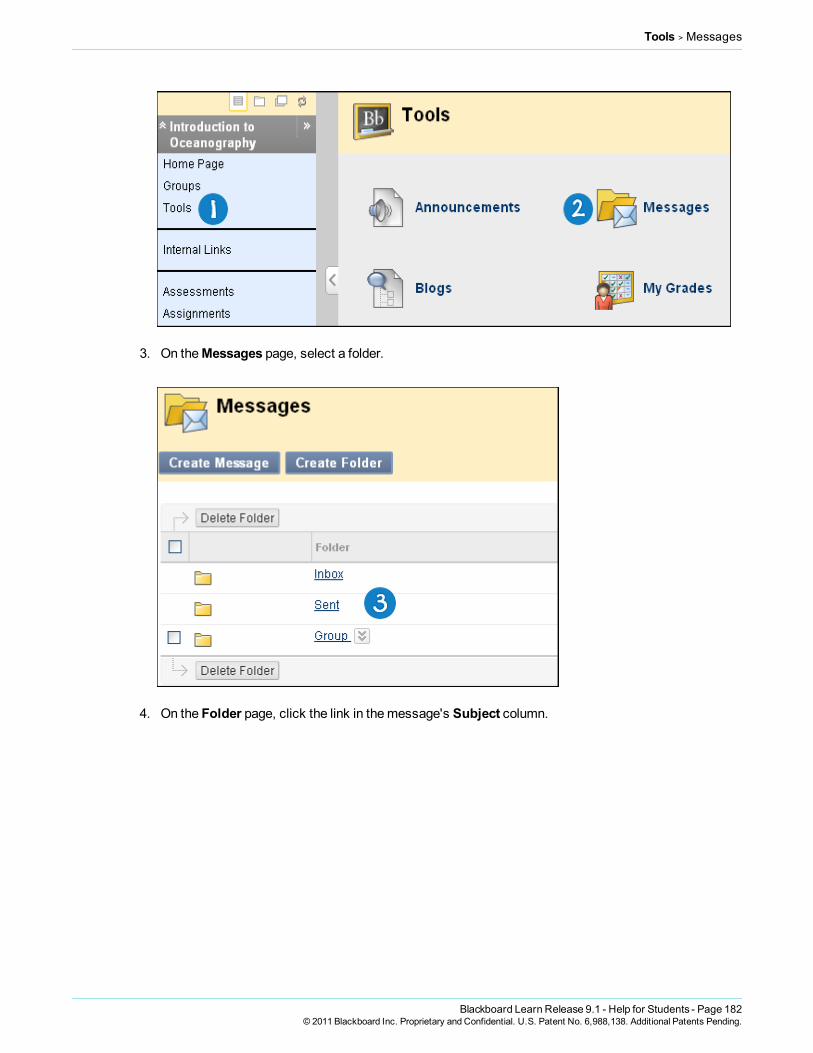
Tools > Messages
3. On theMessages page, select a folder.
4. On the Folder page, click the link in themessage's Subject column.
Blackboard Learn Release 9.1 - Help for Students - Page 182© 2011 Blackboard Inc. Proprietary and Confidential. U.S. Patent No. 6,988,138. Additional Patents Pending.
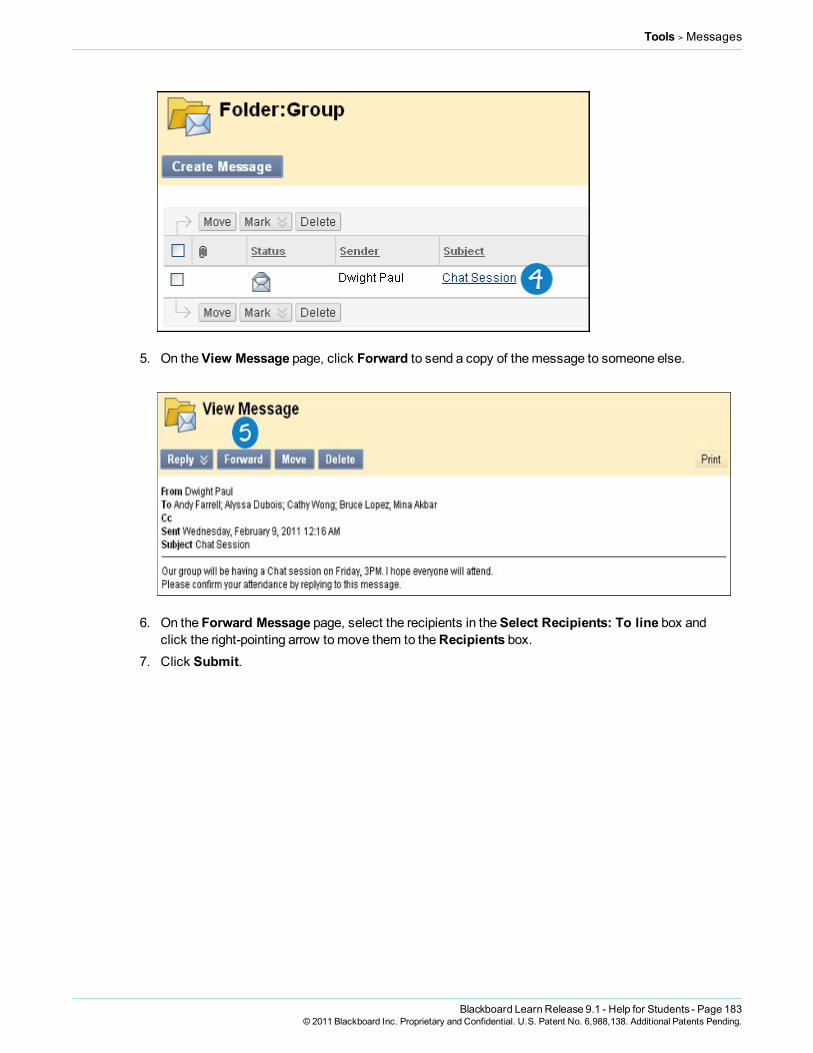
Tools > Messages
5. On theView Message page, click Forward to send a copy of themessage to someone else.
6. On the Forward Message page, select the recipients in theSelect Recipients: To line box andclick the right-pointing arrow tomove them to theRecipients box.
7. Click Submit.
Blackboard Learn Release 9.1 - Help for Students - Page 183© 2011 Blackboard Inc. Proprietary and Confidential. U.S. Patent No. 6,988,138. Additional Patents Pending.
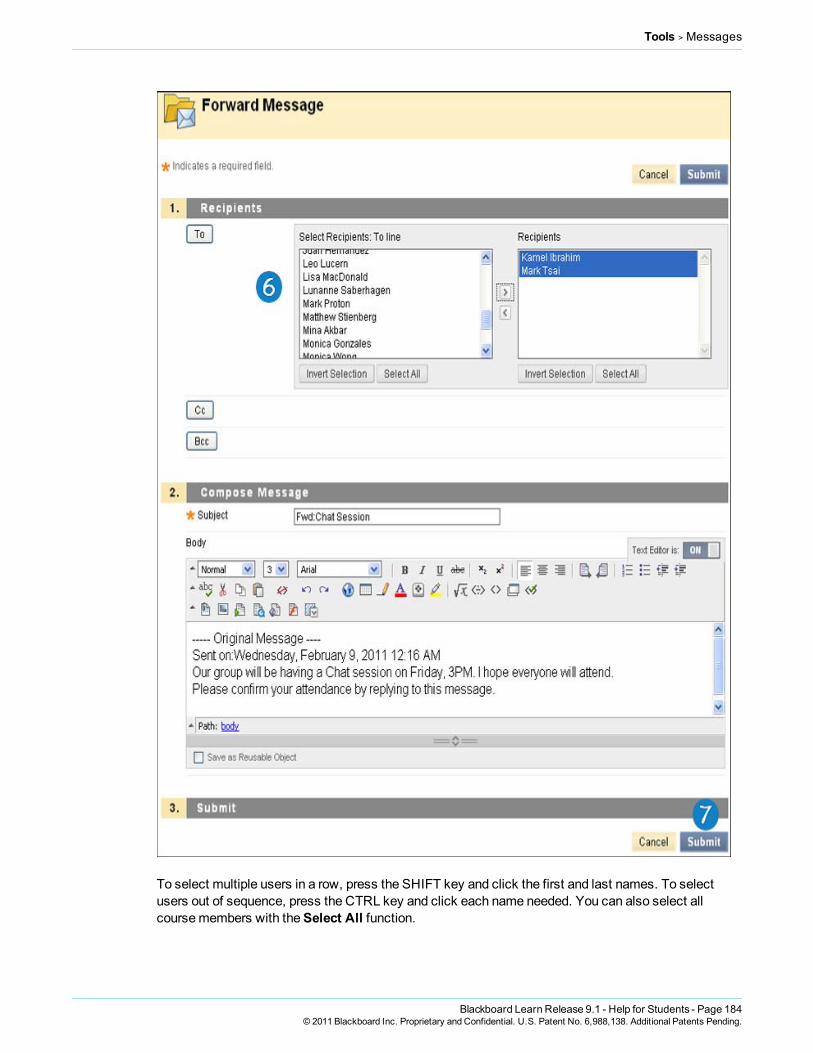
Tools > Messages
To select multiple users in a row, press the SHIFT key and click the first and last names. To selectusers out of sequence, press the CTRL key and click each name needed. You can also select allcoursemembers with theSelect All function.
Blackboard Learn Release 9.1 - Help for Students - Page 184© 2011 Blackboard Inc. Proprietary and Confidential. U.S. Patent No. 6,988,138. Additional Patents Pending.
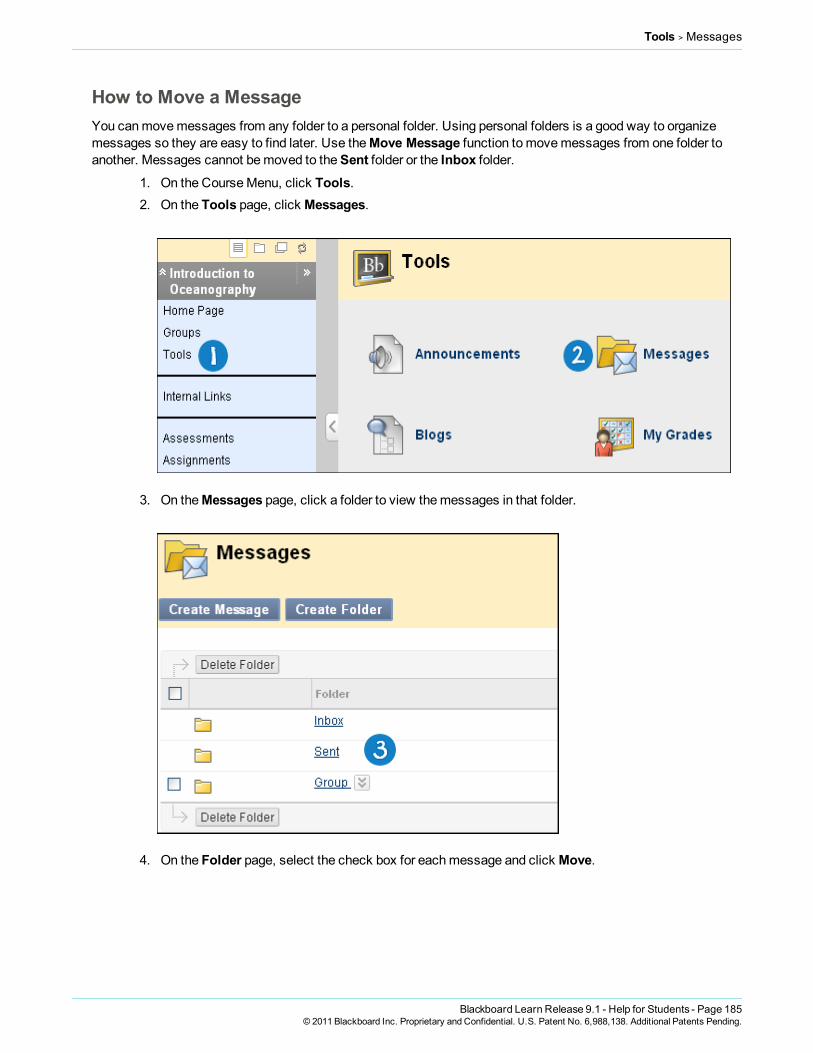
Tools > Messages
How to Move a MessageYou canmovemessages from any folder to a personal folder. Using personal folders is a good way to organizemessages so they are easy to find later. Use theMove Message function tomovemessages from one folder toanother. Messages cannot bemoved to theSent folder or the Inbox folder.
1. On the CourseMenu, click Tools.2. On the Tools page, click Messages.
3. On theMessages page, click a folder to view themessages in that folder.
4. On the Folder page, select the check box for eachmessage and click Move.
Blackboard Learn Release 9.1 - Help for Students - Page 185© 2011 Blackboard Inc. Proprietary and Confidential. U.S. Patent No. 6,988,138. Additional Patents Pending.

Tools > Messages
5. On theMove Message page, select a folder from theSelect a Personal Folder drop-down list.This is the folder where you will store your messages. Themessages are deleted from the oldfolder after they have beenmoved to the new folder.
6. Click Submit.
How to Delete a Message1. On the CourseMenu, click Tools.2. On the Tools page, click Messages.
Blackboard Learn Release 9.1 - Help for Students - Page 186© 2011 Blackboard Inc. Proprietary and Confidential. U.S. Patent No. 6,988,138. Additional Patents Pending.

Tools > Messages
3. On theMessages page, click a folder to view themessages in that folder.
4. On the Folder page, select the check box for eachmessage and click Delete.Note: This action is final and cannot be undone.
Blackboard Learn Release 9.1 - Help for Students - Page 187© 2011 Blackboard Inc. Proprietary and Confidential. U.S. Patent No. 6,988,138. Additional Patents Pending.

Tools > Messages
How to Print a Message1. On the CourseMenu, click Tools.2. On the Tools page, click Messages.
3. On theMessages page, select a folder.
Blackboard Learn Release 9.1 - Help for Students - Page 188© 2011 Blackboard Inc. Proprietary and Confidential. U.S. Patent No. 6,988,138. Additional Patents Pending.

Tools > Messages
4. On the Folder page, click the link in themessage's Subject column.
5. On theView Message page, click Print. Themessage is printed using theWeb browser's printsettings.
Blackboard Learn Release 9.1 - Help for Students - Page 189© 2011 Blackboard Inc. Proprietary and Confidential. U.S. Patent No. 6,988,138. Additional Patents Pending.

Tools > My Grades
My GradesNote: Your instructor controls which tools are available. If this tool is not available, your instructor may havedisabled it.
TheMy Grades page shows the status of gradable items, such as tests, assignments, journal and blog entries,and discussion posts.
TheMy Grades pagemay include item names, details, due dates, student and instructor dates of activity,posted grades, points possible, and your instructor's comments about the items.
How to Access My Grades
Accessing My Grades From Within Your Course1. On the CourseMenu, click Tools.2. On the Tools page, click My Grades.
Blackboard Learn Release 9.1 - Help for Students - Page 190© 2011 Blackboard Inc. Proprietary and Confidential. U.S. Patent No. 6,988,138. Additional Patents Pending.

Tools > My Grades
Accessing My Grades From Outside Your Course1. On theMy Institution tab, click My Grades on the Tools panel.2. On theMy Courses/Organizations page, click the name of your course.
How to View Grade Details1. On the CourseMenu, click Tools.2. On the Tools page, click My Grades.
Blackboard Learn Release 9.1 - Help for Students - Page 191© 2011 Blackboard Inc. Proprietary and Confidential. U.S. Patent No. 6,988,138. Additional Patents Pending.

Tools > My Grades
3. If your assignment has not been graded, theGrade column contains a symbol indicating its status.If your assignment has been submitted and graded, the grade appears in theGrade column. Toview more detail, click the link to see the assignment's Review Submission History page. Thispage includes:
l Instructor Feedback: This section lists your grade and any feedback provided by yourinstructor.
l Attached Files: This section provides links to open or download any files attached by youor your instructor. For example, your instructor might provide comments in a file that yousubmitted with your assignment. In the following image, notice that the student includedhis last name in the file name before uploading it.
Blackboard Learn Release 9.1 - Help for Students - Page 192© 2011 Blackboard Inc. Proprietary and Confidential. U.S. Patent No. 6,988,138. Additional Patents Pending.

Tools > My Grades
Note: If you see feedback for an item but do not see a grade, contact your instructor.
My Grade Item StatusThe following table describes the symbols appearing on theMy Grades page.
SymbolDescription
- Item has not yet been completed. No information is available.
Item has been completed, but will not have a grade (for items such as surveys).
Item has been submitted. This item is waiting to be reviewed by your instructor.
-OR-
Item has been submitted. Your instructor may review this item but may not be provided a grade (for itemssuch as surveys).
Blackboard Learn Release 9.1 - Help for Students - Page 193© 2011 Blackboard Inc. Proprietary and Confidential. U.S. Patent No. 6,988,138. Additional Patents Pending.

Tools > Search for Users
SymbolDescription
Grade Item has been graded. Click the grade to view detailed feedback.
Attempt is in progress. This item has not been submitted. To submit the item, see Submitting a DraftAssignment.
Grade is exempted for this user. If you do not complete this assignment, it will not affect your grade.
Error has occurred. Contact your instructor.
Related Tutorials Checking Your Grades (Flashmovie | 2m18s | 4,007KB)
Search for UsersNote: Your instructor controls which tools are available. If these tools are not available, your instructor mayhave disabled them.
To search for other students in your course, use the Roster. The name of each student is included in the Rosterautomatically. You cannot remove your name from the Roster, but you can choose tomake your email addressavailable.
To search for other students and instructors in the entire Blackboard system, use the User Directory. You canchoose whether to be included and what information to share by setting your privacy options. To learnmore,see How to Set Privacy Options.
For your personal information to appear in the Roster or User Directory, it must be appear on theEdit PersonalInformation page. To learnmore, see How to Edit Personal Information.
How to Search for Other Students in Your Course Using the Roster1. On the CourseMenu, click Tools.2. On the Tools page, click Roster.
3. On theRoster page, use the following parameters to search for users, or click Go to list allstudents:
Blackboard Learn Release 9.1 - Help for Students - Page 194© 2011 Blackboard Inc. Proprietary and Confidential. U.S. Patent No. 6,988,138. Additional Patents Pending.

Tools > Search for Users
l First Namel Last Namel Containsl Equal tol Starts withl Not blank
4. Type a keyword or text string in the box.5. Click Go.
How to Search for Users Using the User Directory1. On the Tools panel, click User Directory.
2. On theUsers page, use the following parameters to search for users, or click Go to list allstudents:
l Usernamel First Namel Last Namel Emaill Contains
Blackboard Learn Release 9.1 - Help for Students - Page 195© 2011 Blackboard Inc. Proprietary and Confidential. U.S. Patent No. 6,988,138. Additional Patents Pending.

Tools > Tasks
l Equal tol Starts with
3. Type a keyword or text string in the box.4. Click Go.
TasksNote: Your instructor controls which tools are available. If this tool is not available, your instructor may havedisabled it.
The Tasks page organizes projects (referred to as tasks), defines task priority, and tracks task status. Yourinstructors can post tasks to users participating in their course. Tasks can also be assigned to all members of acourse group.
From the Tools panel you can view all of your tasks, including those from the courses you are participating in,tasks posted by the Blackboard administrator at your school, and your personal tasks. You can create your owntasks and post them to the Tasks page. When you access tasks through the course, you view tasks for thatspecific course.
How to Open the Task List1. On the CourseMenu, click Tools.2. On the Tools page, click Tasks.
Blackboard Learn Release 9.1 - Help for Students - Page 196© 2011 Blackboard Inc. Proprietary and Confidential. U.S. Patent No. 6,988,138. Additional Patents Pending.
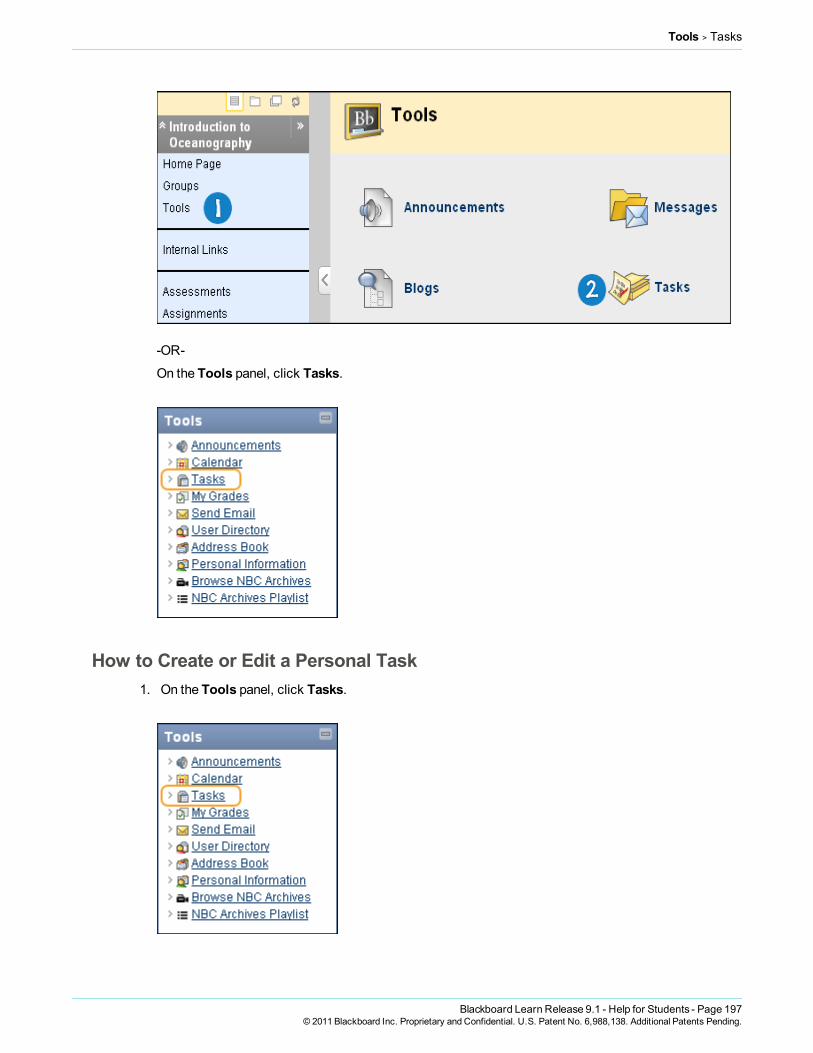
Tools > Tasks
-OR-
On the Tools panel, click Tasks.
How to Create or Edit a Personal Task1. On the Tools panel, click Tasks.
Blackboard Learn Release 9.1 - Help for Students - Page 197© 2011 Blackboard Inc. Proprietary and Confidential. U.S. Patent No. 6,988,138. Additional Patents Pending.
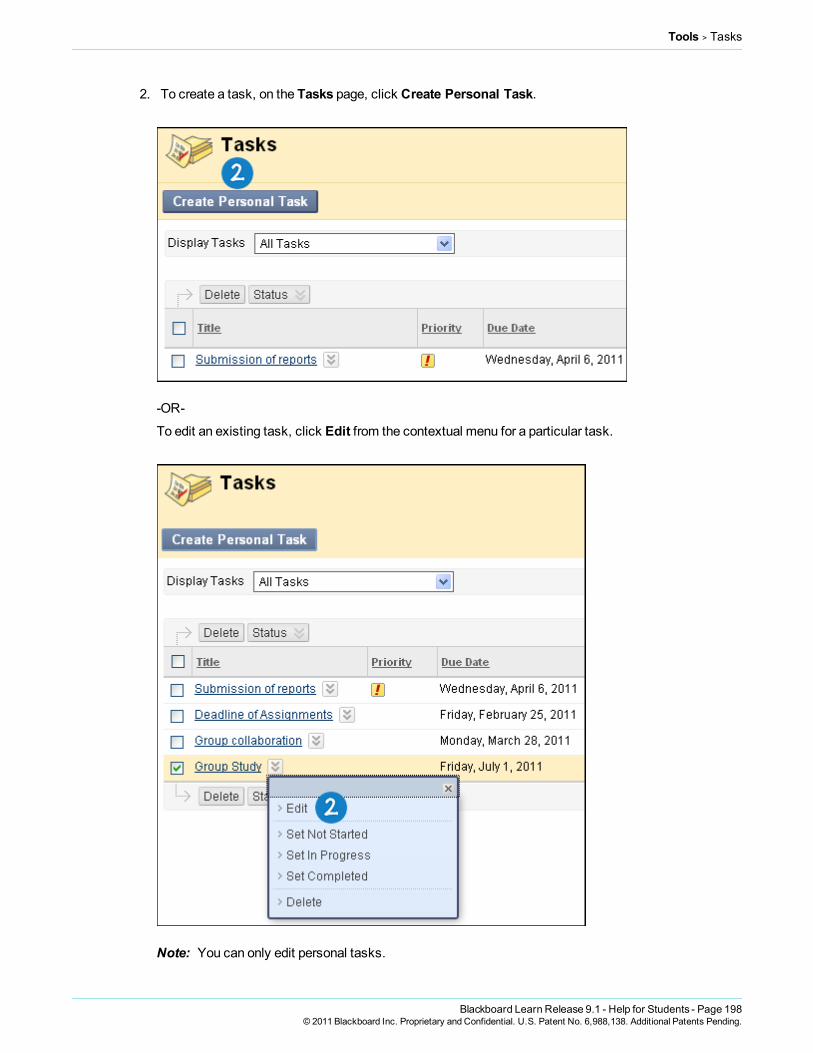
Tools > Tasks
2. To create a task, on the Tasks page, click Create Personal Task.
-OR-
To edit an existing task, click Edit from the contextual menu for a particular task.
Note: You can only edit personal tasks.
Blackboard Learn Release 9.1 - Help for Students - Page 198© 2011 Blackboard Inc. Proprietary and Confidential. U.S. Patent No. 6,988,138. Additional Patents Pending.

Tools > Tasks
3. OnCreate Personal Task page, type your Task Name.4. Type aDescription.5. Type aDue Date or use theDate Selection Calendar to set the due date.6. Select the level of priority for your task from thePriority drop-down list.7. Click Submit.
How to Sort the List of Tasks1. On the Tools panel, click Tasks.
Blackboard Learn Release 9.1 - Help for Students - Page 199© 2011 Blackboard Inc. Proprietary and Confidential. U.S. Patent No. 6,988,138. Additional Patents Pending.

Tools > Tasks
2. On the Tasks page, click the drop-down arrow and select a task category. Categories include: AllTasks,My Tasks, andBy Course.
How to Change the Status of a Task1. On the Tools panel, click Tasks.
Blackboard Learn Release 9.1 - Help for Students - Page 200© 2011 Blackboard Inc. Proprietary and Confidential. U.S. Patent No. 6,988,138. Additional Patents Pending.

Tools > Tasks
2. On the Tasks page, select the tasks and click Status to select the current status: Set Not Started,Set In Progress, andSet Complete.
How to Delete a Personal TaskNote: This action is final and cannot be undone.
Blackboard Learn Release 9.1 - Help for Students - Page 201© 2011 Blackboard Inc. Proprietary and Confidential. U.S. Patent No. 6,988,138. Additional Patents Pending.
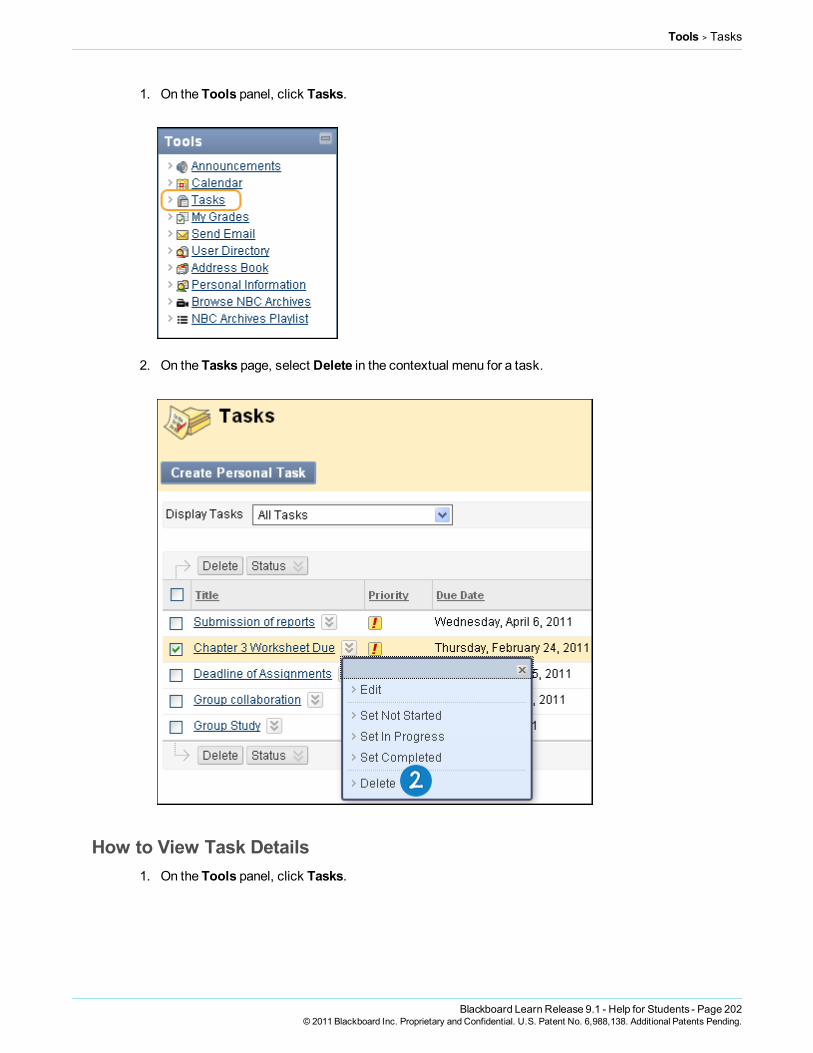
Tools > Tasks
1. On the Tools panel, click Tasks.
2. On the Tasks page, select Delete in the contextual menu for a task.
How to View Task Details1. On the Tools panel, click Tasks.
Blackboard Learn Release 9.1 - Help for Students - Page 202© 2011 Blackboard Inc. Proprietary and Confidential. U.S. Patent No. 6,988,138. Additional Patents Pending.

Tools > Tasks
2. On the Tasks page, click on a task.
Blackboard Learn Release 9.1 - Help for Students - Page 203© 2011 Blackboard Inc. Proprietary and Confidential. U.S. Patent No. 6,988,138. Additional Patents Pending.

Tools > Wikis
Related Tutorials Stay Organized by Managing Your Course and Personal Tasks (Flashmovie | 3m02s | 4,994KB)
WikisNote: Your instructor controls which tools are available. If this tool is not available, your instructor may havedisabled it.
A wiki is a collaborative tool that allows you to contribute andmodify one or more pages of course relatedmaterials. The wiki page is an area where users can collaborate on content. Users within a course can createand edit wiki pages in the course or within a course group. Instructors and students can offer comments andyour instructor can grade individual work.
Wikis are an effective way to contribute andmodify one or more pages of relatedmaterial.
How to Create a Wiki Page1. On the CourseMenu, click Tools.2. On the Tools page, clickWikis.
3. On theWikis listing page, select a wiki title.
Blackboard Learn Release 9.1 - Help for Students - Page 204© 2011 Blackboard Inc. Proprietary and Confidential. U.S. Patent No. 6,988,138. Additional Patents Pending.

Tools > Wikis
4. On theWiki's topic page, click Create Wiki Page.
5. On theCreate Wiki Page, type aName for the wiki page.6. Type text in theContent text box. You can use the Text Editor functions to format the text and
include files, images, external links, multimedia, andMashups.7. Click Submit.
Blackboard Learn Release 9.1 - Help for Students - Page 205© 2011 Blackboard Inc. Proprietary and Confidential. U.S. Patent No. 6,988,138. Additional Patents Pending.

Tools > Wikis
How to Edit Wiki ContentAny coursemember can edit a course wiki page and any groupmember can edit a group wiki page. All coursemembers, including your instructor, edit in the sameway.
Note: The Blackboard administrator at your school and your instructor control whether this tool is available. Ifthis tool has been turned off, it will not appear in the interface and will not be available for you to use.
When a wiki page is being edited by one user, it is locked to prevent others from editing the same page. If youtry to edit a page someone else is editing, you are informed that the page is currently being edited by anotheruser.
1. On the CourseMenu, click Tools.2. On the Tools page, clickWikis.
Blackboard Learn Release 9.1 - Help for Students - Page 206© 2011 Blackboard Inc. Proprietary and Confidential. U.S. Patent No. 6,988,138. Additional Patents Pending.

Tools > Wikis
3. On theWikis listing page, select a wiki title.
4. On theWiki's topic page, select the wiki page that you like to edit.5. Click Edit Wiki Content.
Blackboard Learn Release 9.1 - Help for Students - Page 207© 2011 Blackboard Inc. Proprietary and Confidential. U.S. Patent No. 6,988,138. Additional Patents Pending.

Tools > Wikis
6. On theEdit Wiki Page, make the necessary changes.7. Click Submit to save your work.
How to Link to other Wiki Pages
Blackboard Learn Release 9.1 - Help for Students - Page 208© 2011 Blackboard Inc. Proprietary and Confidential. U.S. Patent No. 6,988,138. Additional Patents Pending.

Tools > Wikis
If the wiki consists of many pages, it can be helpful to insert a link to that page right on the page currently beingviewed. You can only create links to other wiki pages when at least two pages exist. The link icon appears inthe text editor of the page you are working on.
1. On the CourseMenu, click Tools.2. On the Tools page, clickWikis.
3. On theWikis listing page, select a wiki title.
4. On theWiki's topic page, select the wiki page where you want to place the link. The wiki pageopens in the content frame.
5. Click Edit Wiki Content.
Blackboard Learn Release 9.1 - Help for Students - Page 209© 2011 Blackboard Inc. Proprietary and Confidential. U.S. Patent No. 6,988,138. Additional Patents Pending.

Tools > Wikis
6. On theEdit Wiki Page, position your mouse pointer where you want to add a link to another wikipage.
7. Click the Link to Wiki page function in the Text Editor, represented by several sheets of paper. Ifthere is only one page in the wiki, this function is disabled.
8. On the Insert Wiki Page Link pop-up window, select the wiki page to link to from the drop-downlist.
Blackboard Learn Release 9.1 - Help for Students - Page 210© 2011 Blackboard Inc. Proprietary and Confidential. U.S. Patent No. 6,988,138. Additional Patents Pending.

Tools > Wikis
9. Optionally, type a name for the link in theRename Wiki Page Link text box. If you do not renamethe link, the original page title is used as the link.
10. Click Submit. The link appears in the Text Editor.
11. OnEdit Wiki Page, click Submit. The new page with the link is added to theWiki.
Blackboard Learn Release 9.1 - Help for Students - Page 211© 2011 Blackboard Inc. Proprietary and Confidential. U.S. Patent No. 6,988,138. Additional Patents Pending.
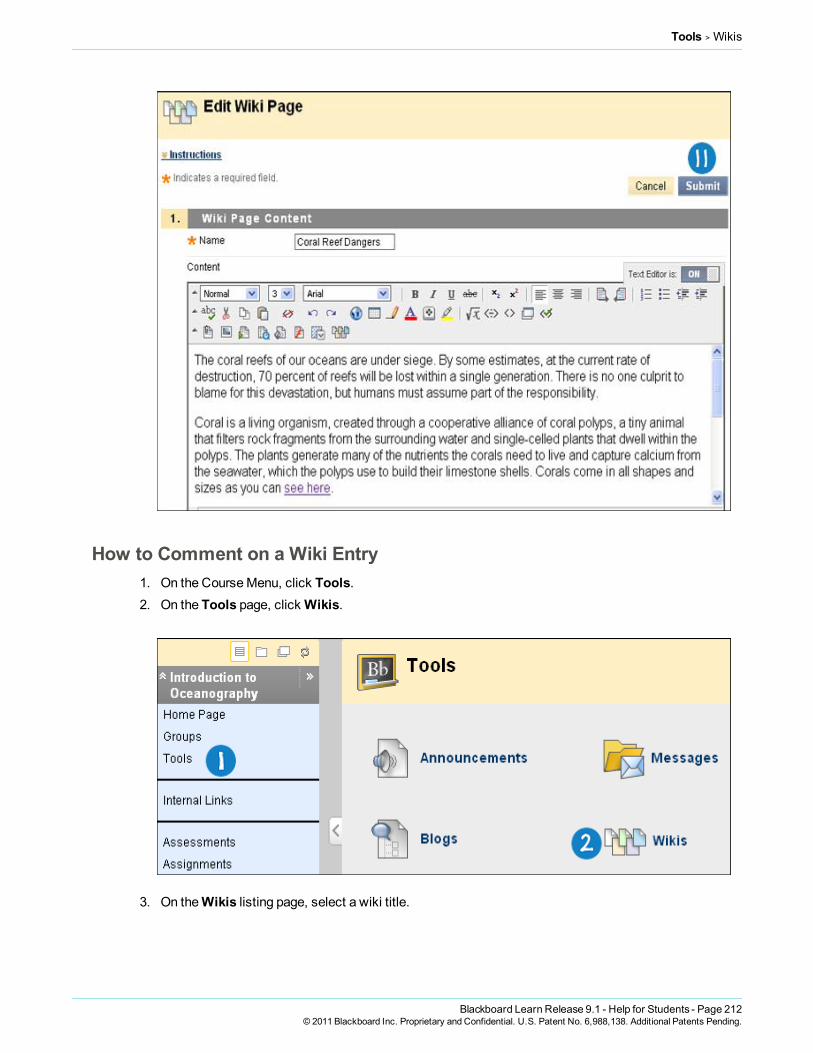
Tools > Wikis
How to Comment on a Wiki Entry1. On the CourseMenu, click Tools.2. On the Tools page, clickWikis.
3. On theWikis listing page, select a wiki title.
Blackboard Learn Release 9.1 - Help for Students - Page 212© 2011 Blackboard Inc. Proprietary and Confidential. U.S. Patent No. 6,988,138. Additional Patents Pending.

Tools > Wikis
4. On theWiki's topic page, select the wiki page where you want to place your comment. The wikipage opens in the content frame.
5. Click Comment following the user’s entry.6. Type your comments in theComment text box.7. Click Add. To view all the comments, expand theComments link.
Blackboard Learn Release 9.1 - Help for Students - Page 213© 2011 Blackboard Inc. Proprietary and Confidential. U.S. Patent No. 6,988,138. Additional Patents Pending.

Tools > Wikis
How to View Your ContributionsYou can view a list of all the pages and versions you have contributed or modified and determine if proper effortwas made.
1. On the CourseMenu, click Tools.2. On the Tools page, clickWikis.
Blackboard Learn Release 9.1 - Help for Students - Page 214© 2011 Blackboard Inc. Proprietary and Confidential. U.S. Patent No. 6,988,138. Additional Patents Pending.

Tools > Wikis
3. On theWikis listing page, select a wiki title.
4. On theWiki's topic page, clickMy Contribution on the Action Bar. On theMy Contributionpage, you can view information about your contribution to the wiki in the content frame and the sidepanel.
Blackboard Learn Release 9.1 - Help for Students - Page 215© 2011 Blackboard Inc. Proprietary and Confidential. U.S. Patent No. 6,988,138. Additional Patents Pending.

Tools > Wikis
The My Contribution Page
Display Pages: All pages and versions that you added andmodified are listed in theDisplayPages. Use theDisplay Pages drop-down list on the Action Bar to narrow what is shown in theMyContribution page..
Blackboard Learn Release 9.1 - Help for Students - Page 216© 2011 Blackboard Inc. Proprietary and Confidential. U.S. Patent No. 6,988,138. Additional Patents Pending.

Tools > Wikis
Page Version: In thePage Version column, page titles appear with their corresponding versionnumbers. Click a title to view the page without annotated changes. The page opens in a newwindow. By default, themost recent page version is listed first.
User's Modification: In theUser’s Modifications column, click a link to compare a page to itsprevious version. ThePage Comparison page opens in a new window. Click the Legend tab toview the comparison with a legend or explanation of the formatting used to communicate versiondifferences.
About This Wiki: In theAbout This Wiki section, the you can view wiki information, howmany pages you added and edited, and how many comments you added to the wiki.
Participation Summary: In theParticipation Summary section, you can viewWordsModified, which tallies any word added, deleted, or edited in all pages and each page’s versions,available in number count and percentage. Total Page Saves tallies any timeSubmit is clicked onany Edit Wiki Page in the wiki—regardless of content being changed—available in number countand percentage.
Grade: TheGrade section appears if the wiki is set to be graded.
How to View Grades for Wiki ContributionsOnce wiki contributions have been graded, you can view the grade in two places. The grading informationappears on theMy Contribution page and in theMy Grades tool.
1. On the CourseMenu, click Tools.2. On the Tools page, clickWikis.
3. On theWikis listing page, select a wiki title.
Blackboard Learn Release 9.1 - Help for Students - Page 217© 2011 Blackboard Inc. Proprietary and Confidential. U.S. Patent No. 6,988,138. Additional Patents Pending.

Tools > Wikis
4. On theWiki's topic page, clickMy Contribution on the Action Bar. On theMy Contributionpage's Grade section, you can view the assigned grade for the contributions listed in the contentframe, feedback, and the date the grade was assigned.
Blackboard Learn Release 9.1 - Help for Students - Page 218© 2011 Blackboard Inc. Proprietary and Confidential. U.S. Patent No. 6,988,138. Additional Patents Pending.
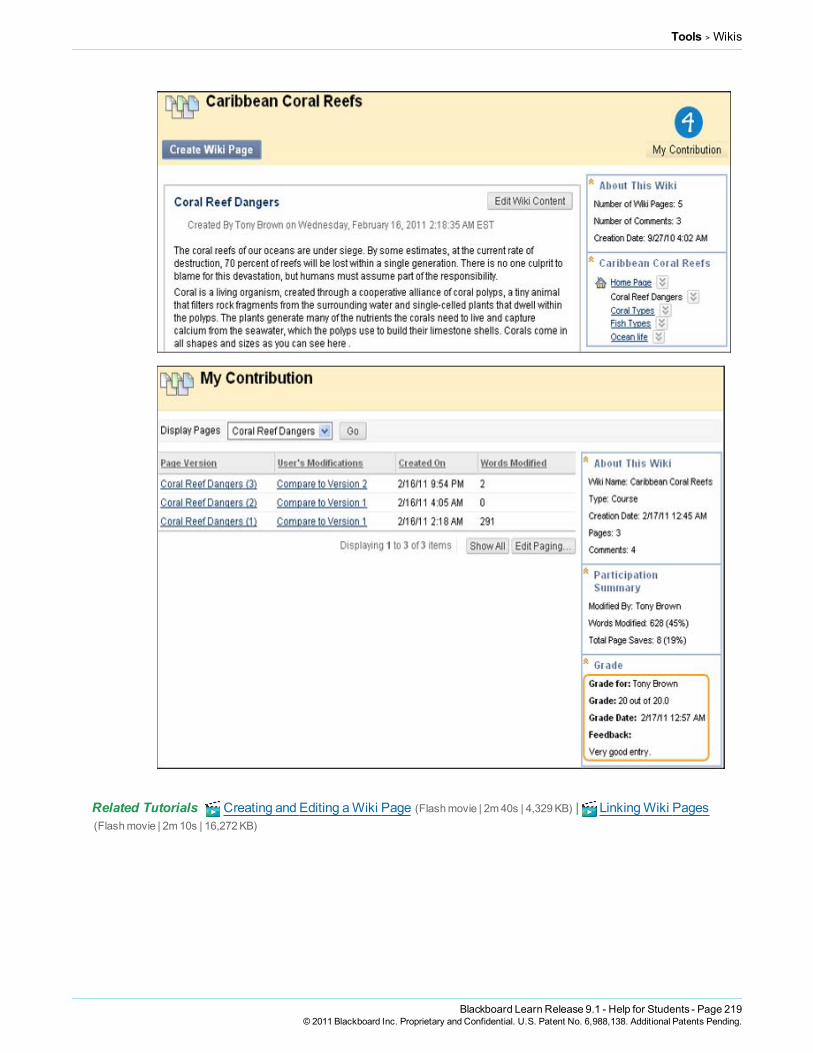
Tools > Wikis
Related Tutorials Creating and Editing aWiki Page (Flashmovie | 2m40s | 4,329KB) | LinkingWiki Pages (Flashmovie | 2m10s | 16,272KB)
Blackboard Learn Release 9.1 - Help for Students - Page 219© 2011 Blackboard Inc. Proprietary and Confidential. U.S. Patent No. 6,988,138. Additional Patents Pending.

Courses and Content > About Courses
Courses and Content
About CoursesCourses contain content and tools for teaching and learning. Your instructor assigned to a course oversees thecourse through the CourseMenu and Control Panel. While your instructor has control over the course, theBlackboard administrator at your school can set overrides that restrict or require course areas and tools.
A course consists of the CourseMenu and a content frame. The CourseMenu links users to content and tools.The content frame displays content and tools.
Course Menu: The CourseMenu appears on the left side of a course and contains links tomaterials andtools within the course.
Content Frame: The content frame occupies most of the screen to display the current view. Users interactwith content from this view.
Content Area: Content Areas are top-level containers that organize and store course content, such aslecture notes, assignments, and tests. The content appears in the content frame.
Next StepsTo learnmore, see About the CourseMenu, About the Content Area.
About Course ContentA Content Item is any type of file, text, image, or link that appears to users in a Content Area, LearningModule,Lesson Plan, or folder. Your instructors can add a number of different types of content to these course areas.
Types of Content
You can view different types of content in a Content Area. All content shares a few similarities. Each piece ofcontent has a name and description. Many types of content allow your instructor to set options, such asavailability and date restrictions.
Blackboard Learn Release 9.1 - Help for Students - Page 220© 2011 Blackboard Inc. Proprietary and Confidential. U.S. Patent No. 6,988,138. Additional Patents Pending.

Courses and Content > About Course Content
Note: Icons may be different because the Blackboard administrator at your school selects which icon set touse.
Icon Content Type Description
Item A general piece of content, such as a file, image, text, or link to whicha description and other items may be attached.
File An HTML file that can be used in the course. These files can beviewed as a page within the course or as a separate piece of contentin a separate browser window.
Audio Audio file that can be played in a page. If Autostart and Loop areboth set to Yes, the audio file will begin playing when users open thepage and will continue to play until they stop it or navigate away fromthe page.
Image Image file that can be shown on the page.
Video Video file that can be played by the user. The video player will appeardirectly on the page.
URL Link to a website or resource to provide a quick access point torelevant materials.
Learning Module A set of content that focuses on a specific subject that you cannavigate at your own pace. Instructors can set the path so studentsmust view content sequentially, or permit users to view the content inany order. All types of contents, such as items, assignments, and tests,can be included in a Learning Module.
Lesson Plan A Lesson Plan is special content type that combines information aboutthe lesson itself with the curriculum resources used to teach it.
Syllabus An outline of a course of study. It can contain course information,objectives, instructor contact information, assignments, class meetingdates, textbook information, and more.
Course Link A shortcut to an item, tool, or area in a course. A Course Link providesa quick access point to relevant materials and tools.
Content Folder A Content Folder is a way of organizing content items. Content foldersand sub-folders set up a hierarchy to group related material together.Content folders can be used to group material based on a theme,such as media clips. Content folders can also be used to groupmaterial based on a schedule, for example, placing all items for "week1" together. Using folders to organize content items can makematerials easier to find and reduce the length of a Content Area page.
Blank Page A Blank Page can be added and customized it to fit your course.
Module Page Module Pages are specialized content pages that present content indiscrete boxes. The modules that appear on this page can bearranged in any order. Module Pages can be personalized bystudents if the instructor permits it.
Tools Area A shortcut to a specific tool in the course, such as the DiscussionBoard or Messages. The link to a tool brings students to that tool andaway from any other content they may be viewing unless the contenthas been set by the instructor to open in a separate window.
Flickr® Photo A link to a site for viewing and sharing photographic images.
SlideShare Presentation A link to a site for viewing and sharing Microsoft® PowerPoint®,Microsoft® OpenOffice, or Adobe® PDF presentations.
Blackboard Learn Release 9.1 - Help for Students - Page 221© 2011 Blackboard Inc. Proprietary and Confidential. U.S. Patent No. 6,988,138. Additional Patents Pending.

Courses and Content > Course Content Areas
Icon Content Type Description
YouTube™ Video A link to a site for viewing and sharing online videos.
Content Availability
Your instructors can limit the availability of content items based on date, time, individual users, course groups,and performance on graded items. This means that the content displayed in the CourseMenu or Content Areascan change over time. For example, if your instructor restricts access to content until a test is complete, thecontent does not appear until you complete the test.
Review Status
Review Status allows your instructor to track user review of specific content items andmay affect the releaseof additional content. For example, your instructor can enable Review Status for an article added to a ContentArea and canmake the release of a quiz contingent upon you reviewing the article. After youmark the articleReviewed, the quiz appears.
AMark Reviewed function appears on the item when it is opened. After reviewing the item, click the function tomark it as Reviewed.Note: You can toggle betweenReviewed andMark Reviewed. You can use these functions if you want to goback to a content item and review it again. Your instructor only views the current setting. If the item is markedReviewed, then switched toMark Review, your instructor does not see that the item was markedReviewed atany time.
Course Content AreasContent Areas are top-level containers that organize and store course content, such as lecture notes,assignments, and tests. Content Areas that are available to users make up the CourseMenu that appears aslinks in the frame on the left side of the course. To access a Content Area, click its name on the CourseMenu.The content appears in the content frame.
Blackboard Learn Release 9.1 - Help for Students - Page 222© 2011 Blackboard Inc. Proprietary and Confidential. U.S. Patent No. 6,988,138. Additional Patents Pending.

Courses and Content > Course Cartridges
Your instructor or administrator creates the names of the areas in a course, whichmay differ from the namesshown in this section.
Content Area Organization
You can access a Content Area item by clicking its link, such as a Discussion Board link or a file link. Yourinstructors can further organize content using folders, subfolders, LearningModules, or Lesson Plans.
Breadcrumbs
As items and links are viewed in a Content Area, use the breadcrumbs to navigate to previous pages.
Next StepsTo learnmore about content items, see About the Course Content.
Course CartridgesYour instructors have the option of using Course Cartridge content in their courses. This content is created bypublishers and is available for instructors to download. When you access this content within a course, you areprompted for an Access key. Cartridge content often includes:
l Slidesl Documentsl Quiz questionsl Lists of relevant links
Accessing a Course CartridgeYou should be enrolled in the course, and youmust have an Access Key to open the coursematerial. When youattempt to access Course Cartridge content the first time, you are prompted for a key. Access Keys are
Blackboard Learn Release 9.1 - Help for Students - Page 223© 2011 Blackboard Inc. Proprietary and Confidential. U.S. Patent No. 6,988,138. Additional Patents Pending.

Courses and Content > Lesson Plans
obtained from the publisher. Keys may be found in the course text book or on the publisher’s website. Once thekey is entered, the content is available.
After the key has been entered once, you can open any content in the course that comes from the CourseCartridge.
Lesson PlansA Lesson Plan is a container for content similar to a Content Area or folder. This allows you to view the lessonprofile, objectives, and content items you need to complete a lesson. Your instructor can provide you withinformation on how your knowledge will bemeasured, the neededmaterials, the duration of the instruction, andwhat you should have learned after the instruction.
Typically, Lesson Plans are added to Content Areas, but they can be added to LearningModules and folders.
The Lesson Plan appears first in the content list and has its own unique icon. If a description was added to theLesson Plan when it was created, it appears following the title.
1. Select the Content Area from the CourseMenu that holds the Lesson Plan. For example, Week 2.2. Click the name of the Lesson Plan.
Blackboard Learn Release 9.1 - Help for Students - Page 224© 2011 Blackboard Inc. Proprietary and Confidential. U.S. Patent No. 6,988,138. Additional Patents Pending.

Courses and Content > Lesson Plans
Blackboard Learn Release 9.1 - Help for Students - Page 225© 2011 Blackboard Inc. Proprietary and Confidential. U.S. Patent No. 6,988,138. Additional Patents Pending.

Courses and Content > Learning Modules
The Lesson Plan’s general information and content items are organized following the title. The top portioncontains general information about the lesson, which appears in the gray area, while the bottom containscontent items.
In this example, the content items for the lesson are shownwith icons and text. Your instructor can selectIcons Only, Text Only, or Icons and Text for the content view. By default Lesson Plans have four sections:
l Instructional Levell Instructorl Subject Areal Objectives
Your instructor may customize the sections in the lesson plan, so youmay see different sections.
Learning ModulesA LearningModule is an organized collection of content presented together. The LearningModule is a shell towhich other content items such as files, folders and tools are added. It can support a course goal, a courseobjective, a subject, a concept, or a theme. LearningModules enable you to follow a structured path forprogressing through content.
Following a Sequential PathThe sequential pathmay be enforced or youmay be allowed to access any item at any time. For example, yourinstructor may set up a LearningModule on Astronomy. This unit walks you through a series of articles aboutAstronomy, displays media files, and finally presents an assessment about the information covered. Youmustmove through the contents in this order if the sequential path is enforced. If the sequential path is not enforced,you can view thematerial in any order.
Navigating within Learning ModulesTomove from page to page within amodule, click the right and left arrow buttons on the top right of the contentarea. Example: The button will appear next to the text, "Page 1 of 3."
Note: The name of a folder or subfolder will count as a page. For example, if the LearningModule contains twofolders, each containing one file, there will be a total of 4 pages.
Blackboard Learn Release 9.1 - Help for Students - Page 226© 2011 Blackboard Inc. Proprietary and Confidential. U.S. Patent No. 6,988,138. Additional Patents Pending.

Courses and Content > Mashups
It is also possible to navigate by clicking the name of the page in the Table of Contents instead of clicking theforward or back arrow buttons.
Using the Table of ContentsThe Table of Contents displays next to the CourseMenu on the left-hand side of the page. It can also bemovedbelow the LearningModule content area.
There are three display options available on the header of the Table of Contents:
l Minimizel Maximizel Move to the bottom or the left
How to Move the Table of ContentsClick the button with the arrow pointing down ( ) to move the Table of Contents to the bottom of the page. Tomove the Table of Contents back to the left, click the left-facing arrow ( ). Themove to the left option willreposition the Table of Contents to the left of the content area.
Note: Your instructors can organize the Table of Contents however they see fit. The Table of Contents can bedisplayed using roman numerals, numbers, letters, or any combination of the three.
MashupsNote: Your instructor controls which tools are available. If this tool is not available, your instructor may havedisabled it.
A Mashup combines elements from two ormore sources. When you view a YouTube™ video in a BlackboardLearn course as part of the course content, you are experiencing aMashup. Mashups can also include Flickr®photos and SlideShare presentations.
Blackboard Learn Release 9.1 - Help for Students - Page 227© 2011 Blackboard Inc. Proprietary and Confidential. U.S. Patent No. 6,988,138. Additional Patents Pending.

Courses and Content > Mashups
You can use this content in a variety of ways within a course: a standalone piece of content, part of a testquestion, a topic in a Discussion Board, or as part of an assignment. For example, you can include a clip of yourfavorite movie in a journal entry.
Mashups are displayed in the following ways:
l Embed: TheMashup displays directly on the page.l Thumbnail: A small picture of theMashup displays on the page with controls to launch it.l Text Link with Player: A link to theMashup is displayed on the page. Click the link to launch the
Mashup.
Mashups are added through the Text Editor.
Default Mashup TypesBlackboard Learn supports any file type available on the following websites:
l Flickr: A website for viewing and sharing photographic images.l SlideShare: A website for viewing and sharing slide presentations and documents.l YouTube: A website for viewing and sharing online videos.
The Blackboard administrator at your school may enable other types of Mashups.
How to Create a Mashup Item Using the Text Editor1. Navigate to an assignment, journal, or other piece of content, for example, Lesson 1: Ocean
Exploration assignment inChapter 2Content Area.
2. On theUpload Assignment page, click Add Mashup in the third row of Text Editor functions.3. Select Flickr Photo, SlideShare Presentation, orYouTube Video.
Blackboard Learn Release 9.1 - Help for Students - Page 228© 2011 Blackboard Inc. Proprietary and Confidential. U.S. Patent No. 6,988,138. Additional Patents Pending.

Courses and Content > Mashups
4. On theSearch for Mashup pop-up window, search for content. Type the content name in theSearch box and click Go.
Blackboard Learn Release 9.1 - Help for Students - Page 229© 2011 Blackboard Inc. Proprietary and Confidential. U.S. Patent No. 6,988,138. Additional Patents Pending.
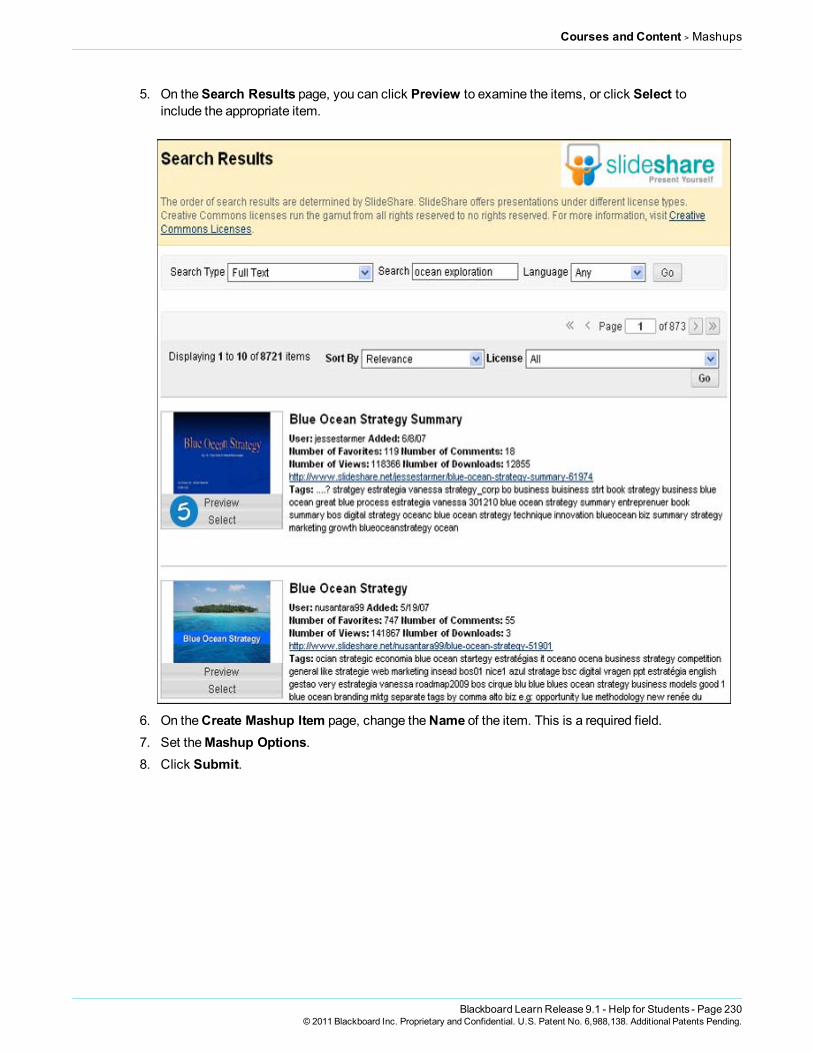
Courses and Content > Mashups
5. On theSearch Results page, you can click Preview to examine the items, or click Select toinclude the appropriate item.
6. On theCreate Mashup Item page, change theName of the item. This is a required field.7. Set theMashup Options.8. Click Submit.
Blackboard Learn Release 9.1 - Help for Students - Page 230© 2011 Blackboard Inc. Proprietary and Confidential. U.S. Patent No. 6,988,138. Additional Patents Pending.

Courses and Content > Mashups
9. On theUpload Assignment page, click Submit.
Blackboard Learn Release 9.1 - Help for Students - Page 231© 2011 Blackboard Inc. Proprietary and Confidential. U.S. Patent No. 6,988,138. Additional Patents Pending.
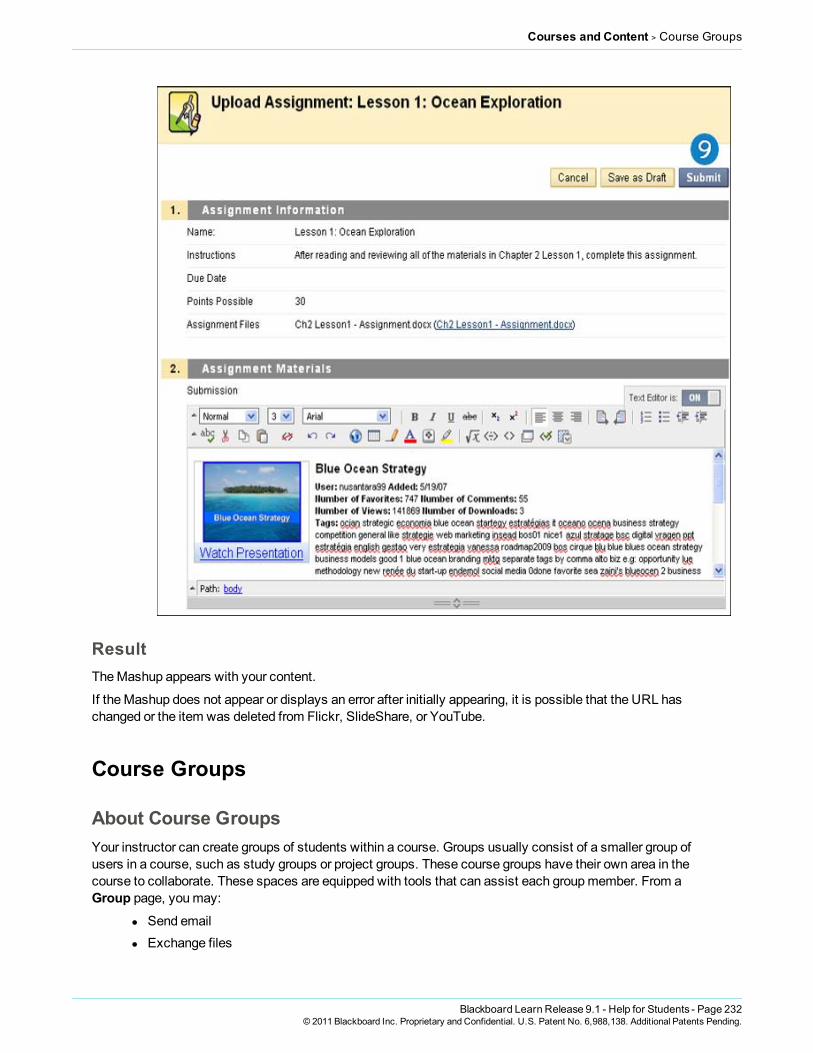
Courses and Content > Course Groups
ResultTheMashup appears with your content.
If theMashup does not appear or displays an error after initially appearing, it is possible that the URL haschanged or the item was deleted from Flickr, SlideShare, or YouTube.
Course Groups
About Course GroupsYour instructor can create groups of students within a course. Groups usually consist of a smaller group ofusers in a course, such as study groups or project groups. These course groups have their own area in thecourse to collaborate. These spaces are equipped with tools that can assist each groupmember. From aGroup page, youmay:
l Send emaill Exchange files
Blackboard Learn Release 9.1 - Help for Students - Page 232© 2011 Blackboard Inc. Proprietary and Confidential. U.S. Patent No. 6,988,138. Additional Patents Pending.

Courses and Content > Course Groups
l Enter discussion forumsl Enter collaboration sessionsl Change the position of individual modules by dragging and dropping
Your instructor can provide Communication and Collaboration tools that only groupmembers can access, suchas a private File Exchange area, a Group Discussion Board, and aGroup Journal.
Your instructor can assign specific students or random groups of students to a course group, or they can allowstudents to sign up for a course group.
Accessing GroupsYou can only access a group within a course, and you have several ways to access a group.
Groups page link: TheGroups page link appears on the CourseMenu or in a course area, such as aContent Area. TheGroups page lists all available groups and sign-up sheets for self-enroll groups.
My Groups panel: TheMy Groups panel appears following the CourseMenu. TheMy Groups panelprovides direct links to the group space for each group you belong to. You can expand the panel to reveal all thetools that are available for the group to use. If you are enrolled in a group, the panel appears automatically.
Group Link: A Group Link is a link to a single group, sign-up sheet, or theGroups pagemade available in acourse area.
Group HomepageA Group Homepage is the center for group activity and can contain a description of the group, a list of members,and tools. The HomePage opens to amodule page. If your instructor permits, this page can be customized byadding a banner, by selecting a color scheme, and by adding Personal Modules, such as My Calendar or ReportCard, which are visible only to themember who added themodules. Access to theGroup Tools andGroup
Blackboard Learn Release 9.1 - Help for Students - Page 233© 2011 Blackboard Inc. Proprietary and Confidential. U.S. Patent No. 6,988,138. Additional Patents Pending.

Courses and Content > Course Groups
Members occurs here.
Group ToolsEach group has its own space in the course to work together. When inside your group, you will find the toolsyour instructor has made available to you. Your instructor may not turn on all the available tools. Be sure to askabout any tools you want to use but do not find on your groups page. Review any instructions provided by yourinstructor on how to utilize these tools to complete group work. Tools that can bemade available to a groupinclude:
l Collaboration: Users within the group can create and attend chat sessions and virtual classroomsessions.
l File Exchange: Groupmembers and your instructor can share files in this area. All members, as wellas your instructor, can add files. They can also delete files, regardless of who added them.
l Group Blog: In the group area, all members of a group can create entries for the same blog, buildingupon one another. Any coursemember can read and comment on a group blog, but cannot make
Blackboard Learn Release 9.1 - Help for Students - Page 234© 2011 Blackboard Inc. Proprietary and Confidential. U.S. Patent No. 6,988,138. Additional Patents Pending.

Courses and Content > Course Groups
entries if they are not amember of the group. Your instructor can select the grade option for groupblogs.
l Group Discussion Board: Users within the group can create andmanage their own forums anddiscuss topics with only the groupmembers.
l Group Journal: When used in the group area, all members of a group can view each other's entries,but the group journal can only be viewed by the group and your instructor. Your instructor can selectthe grade option for journals.
l Group Task: Users within the group can create tasks that are distributed to all groupmembers.l Group Wiki: Users within the group can edit, and view their group wiki. Your instructor can view and
edit a group wiki and can select the grade option for group wikis.l Send Email: Users within the group can email individual members or the entire group.
How to Open a Group Page1. On the CourseMenu, select the Content Area that holds the group, for example, theGroups
Content Area.2. On theGroups page, click the name of a group.
-OR-
On theMy Groups panel, click the name of a group.
How to Create a GroupYou can create course groups that other users in the course can sign up to join on theGroups page.
Blackboard Learn Release 9.1 - Help for Students - Page 235© 2011 Blackboard Inc. Proprietary and Confidential. U.S. Patent No. 6,988,138. Additional Patents Pending.

Courses and Content > Course Groups
1. On the CourseMenu, select the Content Area that holds the group, for example, theGroupsContent Area.
2. On theGroups page, click Create Group.
3. On theCreate Self-Enrollment Group page, type the groupName.4. Type aDescription of the group.
5. Type aName of Sign-up Sheet.6. TypeSign-up Sheet Instructions.7. Type theMaximum Number of Members.8. Click Submit.
Blackboard Learn Release 9.1 - Help for Students - Page 236© 2011 Blackboard Inc. Proprietary and Confidential. U.S. Patent No. 6,988,138. Additional Patents Pending.

Courses and Content > Course Groups
Signing Up to Join a Course GroupThe course group creator can choose whether to allow you to self-enroll in a course group. The creator also hasthe option to display the names of other members of the group to help you choose which group to join.
The creator can choose whether to display the sign-up sheet on the groups listing page. The creator can alsoadd the sign-up sheet as a link from other areas, such as a Content Area, folder, LearningModule, or LessonPlan.
On theGroups page, click Sign Up to access the sign-up sheet. On theSign Up Sheet page, when you clickSign Up, you are automatically added to the group.
Blackboard Learn Release 9.1 - Help for Students - Page 237© 2011 Blackboard Inc. Proprietary and Confidential. U.S. Patent No. 6,988,138. Additional Patents Pending.

Courses and Content > Course Groups
Next StepsTo learnmore about Group page functions, see these topics:
Managing Group Collaboration Sessions
Exchanging Files within a Course Group
Sending an Email to a Course Group
Blackboard Learn Release 9.1 - Help for Students - Page 238© 2011 Blackboard Inc. Proprietary and Confidential. U.S. Patent No. 6,988,138. Additional Patents Pending.

Courses and Content > Course Groups
Managing Group Collaboration SessionsTheGroup Collaboration Sessions have all of the same features as those in the course. All groupmembers aremoderators in Group Collaboration Sessions. Therefore, all groupmembers canmanage sessions and accessall of the available tools.
Groups can schedule sessions for specific dates and times.
TheCreate Collaboration Session page andEdit Collaboration Session page function in a similar manner.TheCreate Collaboration Session page opens with empty fields while theEdit Collaboration Sessionpage opens an existing session.
How to Create or Edit Collaboration Sessions1. Access your group in theGroups page, or inMy Groups panel.
2. On the group HomePage, click Collaboration fromGroup Tools.
Blackboard Learn Release 9.1 - Help for Students - Page 239© 2011 Blackboard Inc. Proprietary and Confidential. U.S. Patent No. 6,988,138. Additional Patents Pending.

Courses and Content > Course Groups
3. To create a new Collaboration session, click Create Collaboration Session.-OR-To edit an existing Collaboration session, in the contextual menu for the session, click Edit.
Blackboard Learn Release 9.1 - Help for Students - Page 240© 2011 Blackboard Inc. Proprietary and Confidential. U.S. Patent No. 6,988,138. Additional Patents Pending.
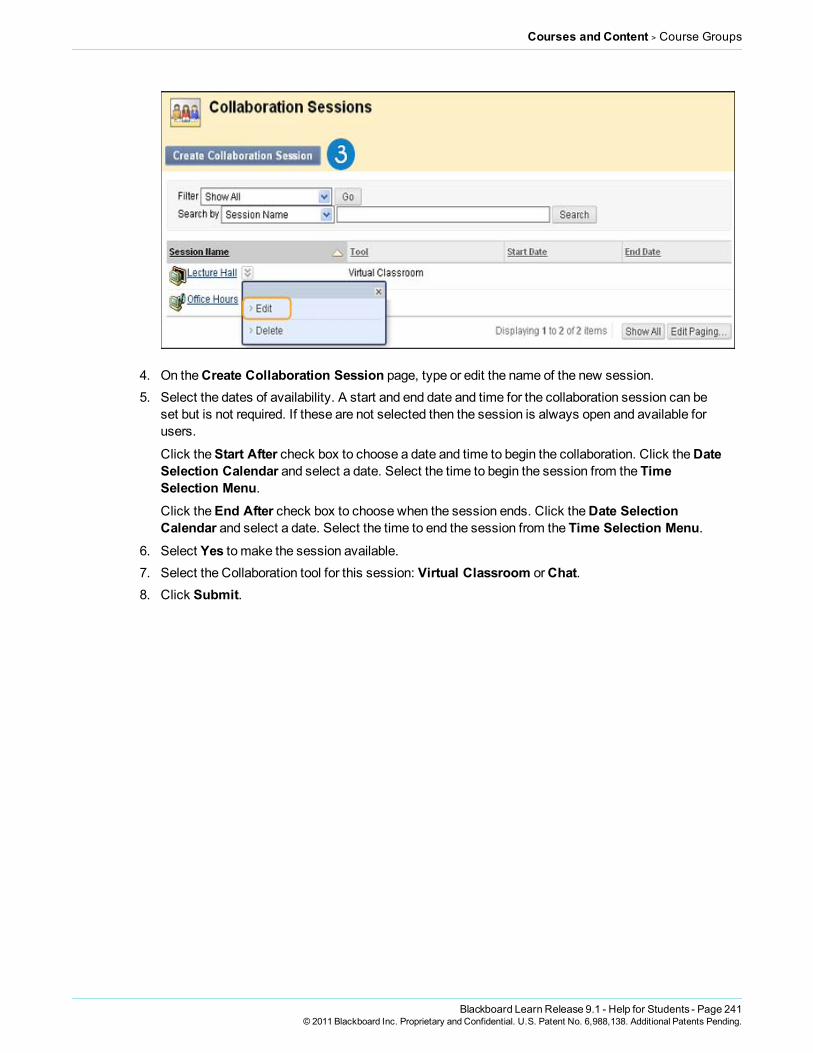
Courses and Content > Course Groups
4. On theCreate Collaboration Session page, type or edit the name of the new session.5. Select the dates of availability. A start and end date and time for the collaboration session can be
set but is not required. If these are not selected then the session is always open and available forusers.
Click theStart After check box to choose a date and time to begin the collaboration. Click theDateSelection Calendar and select a date. Select the time to begin the session from the TimeSelection Menu.Click theEnd After check box to choose when the session ends. Click theDate SelectionCalendar and select a date. Select the time to end the session from the Time Selection Menu.
6. Select Yes to make the session available.7. Select the Collaboration tool for this session: Virtual Classroom orChat.8. Click Submit.
Blackboard Learn Release 9.1 - Help for Students - Page 241© 2011 Blackboard Inc. Proprietary and Confidential. U.S. Patent No. 6,988,138. Additional Patents Pending.

Courses and Content > Course Groups
How to Delete a Collaboration Session1. You can access your group in theGroups page, or inMy Groups section.
Blackboard Learn Release 9.1 - Help for Students - Page 242© 2011 Blackboard Inc. Proprietary and Confidential. U.S. Patent No. 6,988,138. Additional Patents Pending.
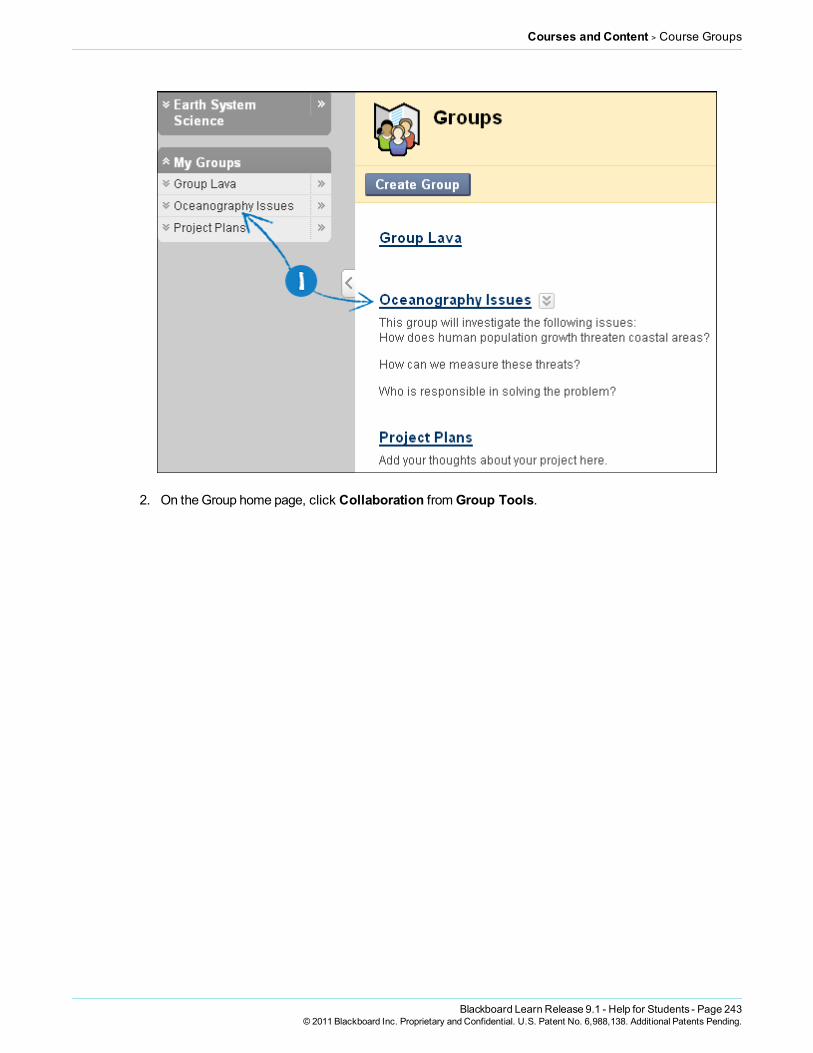
Courses and Content > Course Groups
2. On theGroup home page, click Collaboration fromGroup Tools.
Blackboard Learn Release 9.1 - Help for Students - Page 243© 2011 Blackboard Inc. Proprietary and Confidential. U.S. Patent No. 6,988,138. Additional Patents Pending.

Courses and Content > Course Groups
3. To delete a Collaboration session, in the contextual menu for the session, click Delete. This actionis final and cannot be undone.
Blackboard Learn Release 9.1 - Help for Students - Page 244© 2011 Blackboard Inc. Proprietary and Confidential. U.S. Patent No. 6,988,138. Additional Patents Pending.

Courses and Content > Course Groups
Next StepsTo learnmore about Collaboration tool features, see About Collaboration Tools.
Exchanging Files within a Course GroupFile Exchange enables you to exchange files with other members of a group, including the instructor.
How to Add a File to the File Exchange1. On the CourseMenu, select the Content Area that holds the group, for example, theGroups
Content Area.2. On theGroups page, click a group name.
3. On theGroup Toolsmodule, click File Exchange.
Blackboard Learn Release 9.1 - Help for Students - Page 245© 2011 Blackboard Inc. Proprietary and Confidential. U.S. Patent No. 6,988,138. Additional Patents Pending.

Courses and Content > Course Groups
4. On the File Exchange page, click Add File.
5. On theAdd File page, type the name of the file in theName field.6. In theAttach File field, click Browse My Computer and select the file to upload from your
computer. If you have the Content Collection, click Browse Content Collection and select the fileto upload.
7. Click Submit.
Blackboard Learn Release 9.1 - Help for Students - Page 246© 2011 Blackboard Inc. Proprietary and Confidential. U.S. Patent No. 6,988,138. Additional Patents Pending.

Courses and Content > Course Groups
How to Delete a File1. On the CourseMenu, select the Content Area that holds the group, for example, theGroups
Content Area.2. On theGroups page, click a group name.
3. On theGroup Toolsmodule, click File Exchange.
Blackboard Learn Release 9.1 - Help for Students - Page 247© 2011 Blackboard Inc. Proprietary and Confidential. U.S. Patent No. 6,988,138. Additional Patents Pending.

Courses and Content > Course Groups
4. On the File Exchange page, click Delete from a file's contextual menu.
Emailing a Course GroupInstructors and course groupmembers can send email messages to selected groupmembers or the entiregroup.
Blackboard Learn Release 9.1 - Help for Students - Page 248© 2011 Blackboard Inc. Proprietary and Confidential. U.S. Patent No. 6,988,138. Additional Patents Pending.

Courses and Content > Course Groups
IMPORTANT! Blackboard Learn keeps no record of sent emails. You will receive a copy of your email inthe Inbox of your external email account. Keep a copy of important messages in case you need them at alater date.
How to Send an Email Message within a Course Group1. Access your group in theGroups page, or inMy Groups panel.
2. On theGroup Toolsmodule, click Send Email.
Blackboard Learn Release 9.1 - Help for Students - Page 249© 2011 Blackboard Inc. Proprietary and Confidential. U.S. Patent No. 6,988,138. Additional Patents Pending.

Courses and Content > Course Groups
3. On theSend Email page, select the recipients from theAvailable to Select box and click theright-pointing arrow tomove them into theSelected box.Note: To select multiple recipients, hold down Shift and click the name of the recipients. To selectrecipients out of sequence, hold down the Control Key and select individual names. You can alsoselect all coursemembers with theSelect All function.
Blackboard Learn Release 9.1 - Help for Students - Page 250© 2011 Blackboard Inc. Proprietary and Confidential. U.S. Patent No. 6,988,138. Additional Patents Pending.

Courses and Content > Course Groups
4. Type aSubject.5. Type theMessage.6. In theAttachments field, click Attach a file and select the file to upload from your computer.7. Click Submit.
Blackboard Learn Release 9.1 - Help for Students - Page 251© 2011 Blackboard Inc. Proprietary and Confidential. U.S. Patent No. 6,988,138. Additional Patents Pending.

Courses and Content > Course Groups
Group AssignmentsYou can submit your work to satisfy group assignments. You can submit group assignments in the followingways:
l Text typed on theUpload Assignment page.l Files attached from your computer or from the Content Collection.l A combination of both text and attached files.
Assignments list the name, description, and attachments for class work. You can also choose to includecomments for your instructor.
The grade provided by your instructor for the final assignment is given to every member of the group.
Frequently Asked Questions
Why can't I open our group assignment?Please contact the computing help desk at your school. They can help you troubleshoot and download anyapplication youmight need. If you’re not sure how to contact them, look for the technology office on yourschool’s website or search the web for your school’s name + Blackboard + help or support. Youmay also checktomake sure you are using a supported Internet browser and operating system for the version of Blackboardthat your school is using.
Blackboard Learn Release 9.1 - Help for Students - Page 252© 2011 Blackboard Inc. Proprietary and Confidential. U.S. Patent No. 6,988,138. Additional Patents Pending.

Courses and Content > Course Groups
Why can't I find our group assignment?Your instructor might make an assignment unavailable until after a certain date or until other criteria has beenmet. For example, youmight have tomark a lecture as reviewed before you can access the assignment.Please contact your instructor for more information.
My instructor did not receive our group assignment. What do I do?Youmust discuss this issue with your instructor. To see the step-by-step instructions for submitting a groupassignment, see How to Submit Work for a Group Assignment.
How do I edit or resubmit a group assignment?Editing a group assignment requires you to resubmit the assignment, and not all assignments can beresubmitted. If your instructor has not allowed you to submit an assignment more than once and youmade amistake when submitting the assignment, youmust contact your instructor to ask for the opportunity toresubmit the assignment.
If your instructor has allowed you to submit an assignment more than once, you will see aStart NewSubmission function on theReview Submission History page. You access this page by clicking theassignment link in your course. To learnmore, see How to Edit or Resubmit a Group Assignment.
How do I know whether my assignment has been graded?On the CourseMenu, click Tools, and then click My Grades. If your assignment has not been graded, theGrade column contains a symbol indicating its status. If your assignment has been submitted and graded, thegrade appears in theGrade column. To view more detail, click the link to see the assignment's ReviewSubmission History page.To learnmore, see How to View Group Assignment Grades and Feedback.
How to Submit Work for a Group Assignment1. On the CourseMenu, select the Content Area that holds the group assignment, for example, the
Group AssignmentsContent Area. Click the name of the assignment.
-OR-
1. In theMy Groups panel, select your group name. On the group homepage, click the name of theassignment in theGroup Assignments section.
Blackboard Learn Release 9.1 - Help for Students - Page 253© 2011 Blackboard Inc. Proprietary and Confidential. U.S. Patent No. 6,988,138. Additional Patents Pending.

Courses and Content > Course Groups
2. On theUpload Assignment page, download any files provided by your instructor and completethe assignment using one or both of the following:
l In theSubmission box, type your response. You can use the Text Editor functions toformat the text and include files, images, external links, multimedia, andMashups.
l If your response to the assignment is in a separate file, click Browse My Computer andselect a file to attach. If you attach a file, type a Link Title. If the box is left blank, the filename becomes the link. Follow any instructions that your instructor provided for namingyour file.
Note: TheDo not attach option appears next to an uploaded file. If you have selected anincorrect file, you can remove it with this option. If the same file is attached to yourassignment more than once, the new file is saved with a number appended to the name.For example, history_assignment(1).doc.
3. Optionally, in theComments box, type your comments.
Blackboard Learn Release 9.1 - Help for Students - Page 254© 2011 Blackboard Inc. Proprietary and Confidential. U.S. Patent No. 6,988,138. Additional Patents Pending.

Courses and Content > Course Groups
WARNING! If your instructor has not allowedmultiple attempts, assignments can besubmitted only once. Ensure that you have attached any required files to your assignmentbefore you click Submit.
4. Click Submit.
WARNING! When you finish your assignment, youmust click Submit. If you do not, yourinstructor will not receive your completed assignment.
Blackboard Learn Release 9.1 - Help for Students - Page 255© 2011 Blackboard Inc. Proprietary and Confidential. U.S. Patent No. 6,988,138. Additional Patents Pending.

Courses and Content > Course Groups
How to Save a Group Assignment as Draft and Submit LaterTheSave as Draft function is available if you need to return to your group assignment at a later time. This
Blackboard Learn Release 9.1 - Help for Students - Page 256© 2011 Blackboard Inc. Proprietary and Confidential. U.S. Patent No. 6,988,138. Additional Patents Pending.

Courses and Content > Course Groups
function saves your comments and files on the page.
When you finish your assignment, youmust click Submit. If you do not, your instructor will not receive yourcompleted assignment.
Saving a Group Assignment as Draft1. On the CourseMenu, select the Content Area that holds the group assignment, for example, the
Group AssignmentsContent Area. Click the name of the assignment.
2. On theUpload Assignment page, download any files provided by your instructor and completethe assignment using one or both of the following:
l In theSubmission box, type your response. You can use the Text Editor functions toformat the text and include files, images, external links, multimedia, andMashups.
l If your response to the assignment is in a separate file, click Browse My Computer andselect a file to attach. If you attach a file, type a Link Title. If the box is left blank, the filename becomes the link. Follow any instructions that your instructor provided for namingyour file.
Note: TheDo not attach option appears next to an uploaded file. If you have selected anincorrect file, you can remove it with this option. If the same file is attached to yourassignment more than once, the new file is saved with a number appended to the name.For example, history_assignment(1).doc.
3. Optionally, in theComments box, type your comments.4. Click Save as Draft to save your changes and continue working later.
Blackboard Learn Release 9.1 - Help for Students - Page 257© 2011 Blackboard Inc. Proprietary and Confidential. U.S. Patent No. 6,988,138. Additional Patents Pending.

Courses and Content > Course Groups
5. When you reach theReview Submission History page, click OK.
Blackboard Learn Release 9.1 - Help for Students - Page 258© 2011 Blackboard Inc. Proprietary and Confidential. U.S. Patent No. 6,988,138. Additional Patents Pending.

Courses and Content > Course Groups
Submitting a Draft Assignment1. Return to the group assignment link in the Content Area that holds the assignment, for example,
theGroup AssignmentsContent Area.
2. On theReview Submission History page, click Continue Current Submission.
Blackboard Learn Release 9.1 - Help for Students - Page 259© 2011 Blackboard Inc. Proprietary and Confidential. U.S. Patent No. 6,988,138. Additional Patents Pending.

Courses and Content > Course Groups
3. On theUpload Assignment page, make the necessary changes in your assignment.4. Optionally, in theComments box, type your comments.
WARNING! If your instructor has not allowedmultiple attempts, assignments can besubmitted only once. Ensure that you have attached any required files to your assignmentbefore you click Submit.
5. Click Submit. TheReview Submission History page appears showing the information aboutyour submitted assignment.
WARNING! When you finish your assignment, youmust click Submit. If you do not, yourinstructor will not receive your completed assignment.
Blackboard Learn Release 9.1 - Help for Students - Page 260© 2011 Blackboard Inc. Proprietary and Confidential. U.S. Patent No. 6,988,138. Additional Patents Pending.

Courses and Content > Course Groups
How to Edit or Resubmit a Group AssignmentEditing a group assignment requires you to resubmit the assignment, and not all assignments can be
Blackboard Learn Release 9.1 - Help for Students - Page 261© 2011 Blackboard Inc. Proprietary and Confidential. U.S. Patent No. 6,988,138. Additional Patents Pending.

Courses and Content > Course Groups
resubmitted. If your instructor has not allowed you to submit a group assignment more than once and youmadeamistake when submitting the assignment, youmust contact your instructor to ask for the opportunity toresubmit the assignment.
Your instructor may allow you to submit a group assignment more than once for a variety of reasons. Forexample, your instructor can provide comments on your first draft so that you can try to improve your work.Your instructor can choose to use either the highest graded attempt or the last graded attempt for your grade.
If your instructor has allowed you to submit a group assignment more than once, you will see aStart NewSubmission function on theReview Submission History page. You access this page by clicking the groupassignment link in your course.
1. Return to the group assignment link in the Content Area that holds the assignment, for example,theGroup AssignmentsContent Area.
2. Click the name of the assignment.
3. On theReview Submission History page, view the details of your first submission. Click StartNew Submission.
Blackboard Learn Release 9.1 - Help for Students - Page 262© 2011 Blackboard Inc. Proprietary and Confidential. U.S. Patent No. 6,988,138. Additional Patents Pending.

Courses and Content > Course Groups
4. On theUpload Assignment page, download any files provided by your instructor and completethe assignment using one or both of the following:
l In theSubmission box, type your response. You can use the Text Editor functions toformat the text and include files, images, external links, multimedia, andMashups.
l If your response to the assignment is in a separate file, click Browse My Computer andselect a file to attach. If you attach a file, type a Link Title. If the box is left blank, the filename becomes the link. Follow any instructions that your instructor provided for namingyour file.
Note: TheDo not attach option appears next to an uploaded file. If you have selected anincorrect file, you can remove it with this option. If the same file is attached to yourassignment more than once, the new file is saved with a number appended to the name.For example, history_assignment(1).doc.
5. Optionally, in theComments box, type your comments.
WARNING! Ensure that you have attached any required files to your assignment before youclick Submit.
6. Click Submit.
Blackboard Learn Release 9.1 - Help for Students - Page 263© 2011 Blackboard Inc. Proprietary and Confidential. U.S. Patent No. 6,988,138. Additional Patents Pending.

Courses and Content > Course Groups
WARNING! When you finish your assignment, youmust click Submit. If you do not, yourinstructor will not receive your completed assignment.
7. On theReview Submission History page, you can see all of your submissions listed by date andtime. To view the details of a submission, click the plus sign next to an attempt.
Blackboard Learn Release 9.1 - Help for Students - Page 264© 2011 Blackboard Inc. Proprietary and Confidential. U.S. Patent No. 6,988,138. Additional Patents Pending.
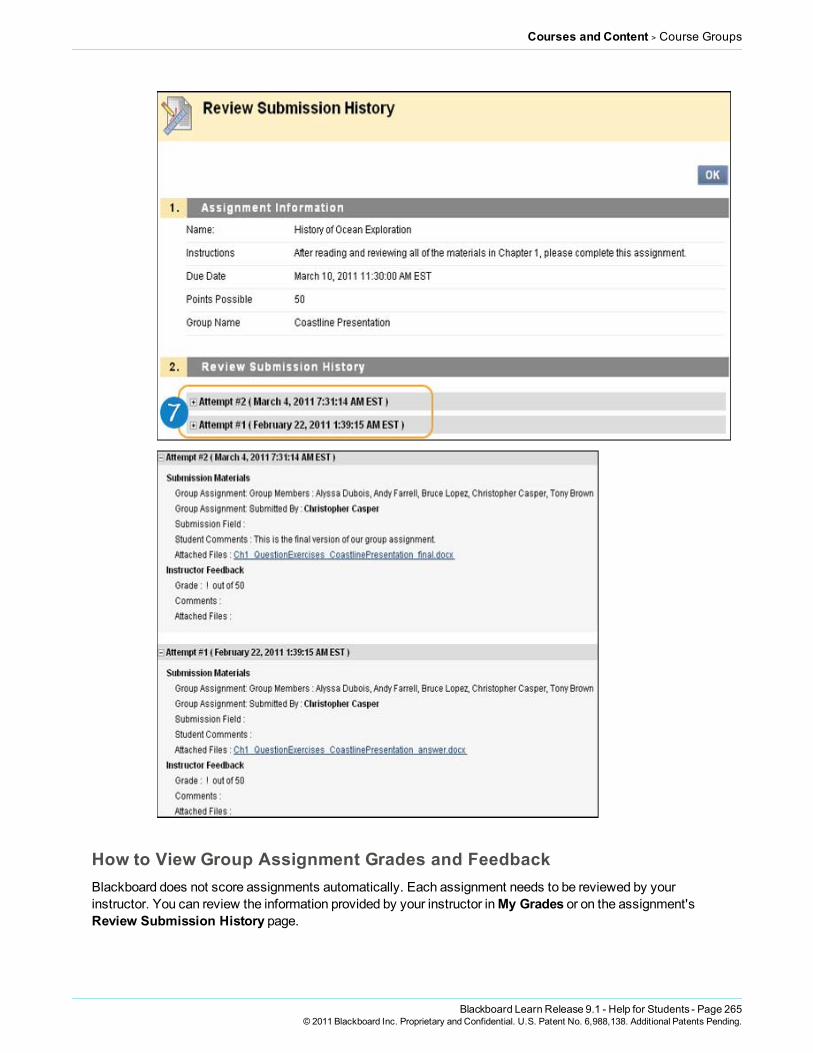
Courses and Content > Course Groups
How to View Group Assignment Grades and FeedbackBlackboard does not score assignments automatically. Each assignment needs to be reviewed by yourinstructor. You can review the information provided by your instructor inMy Grades or on the assignment'sReview Submission History page.
Blackboard Learn Release 9.1 - Help for Students - Page 265© 2011 Blackboard Inc. Proprietary and Confidential. U.S. Patent No. 6,988,138. Additional Patents Pending.

Courses and Content > Course Groups
Accessing My Grades FromWithin Your Course1. On the CourseMenu, click Tools2. On the Tools page, click My Grades.
Accessing My Grades From Outside Your Course1. On theMy Institution tab, click My Grades on the Tools panel.2. On theMy Courses/Organizations page, click the name of your course.
Blackboard Learn Release 9.1 - Help for Students - Page 266© 2011 Blackboard Inc. Proprietary and Confidential. U.S. Patent No. 6,988,138. Additional Patents Pending.

Courses and Content > Course Groups
Reviewing Your Gradel If your group assignment has not been graded, theGrade column contains a symbol indicating its
status.
Blackboard Learn Release 9.1 - Help for Students - Page 267© 2011 Blackboard Inc. Proprietary and Confidential. U.S. Patent No. 6,988,138. Additional Patents Pending.
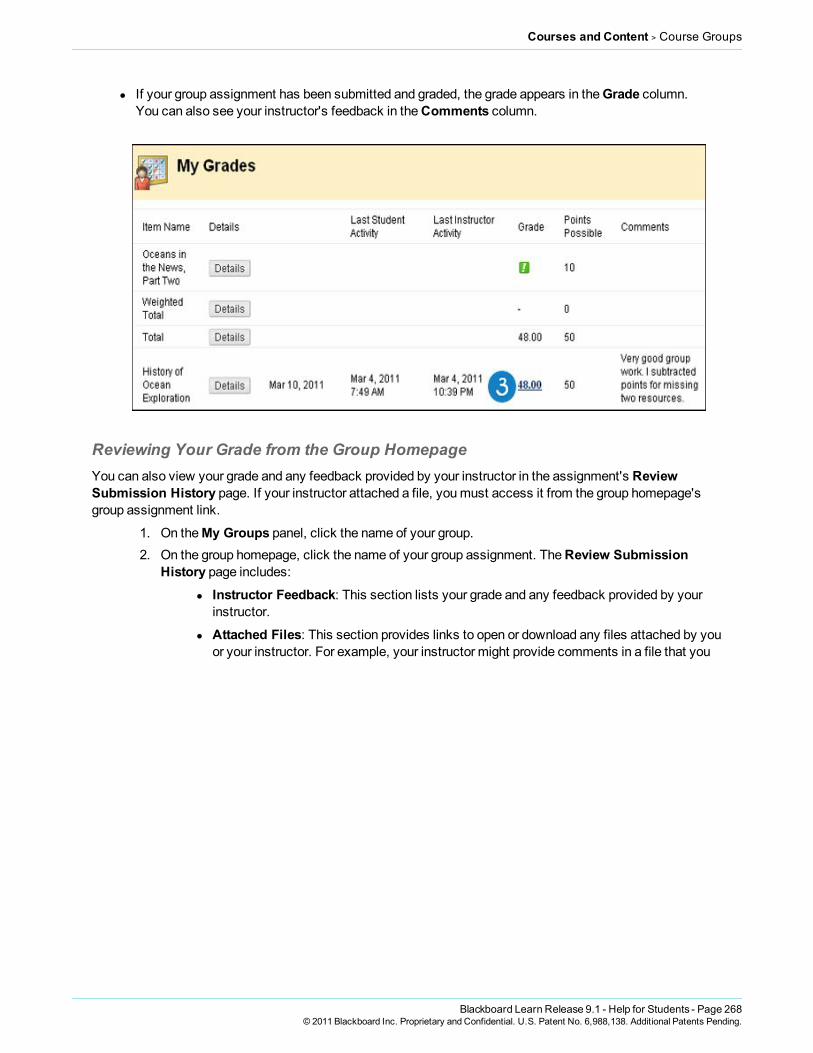
Courses and Content > Course Groups
l If your group assignment has been submitted and graded, the grade appears in theGrade column.You can also see your instructor's feedback in theComments column.
Reviewing Your Grade from the Group HomepageYou can also view your grade and any feedback provided by your instructor in the assignment's ReviewSubmission History page. If your instructor attached a file, youmust access it from the group homepage'sgroup assignment link.
1. On theMy Groups panel, click the name of your group.2. On the group homepage, click the name of your group assignment. TheReview Submission
History page includes:l Instructor Feedback: This section lists your grade and any feedback provided by your
instructor.
l Attached Files: This section provides links to open or download any files attached by youor your instructor. For example, your instructor might provide comments in a file that you
Blackboard Learn Release 9.1 - Help for Students - Page 268© 2011 Blackboard Inc. Proprietary and Confidential. U.S. Patent No. 6,988,138. Additional Patents Pending.
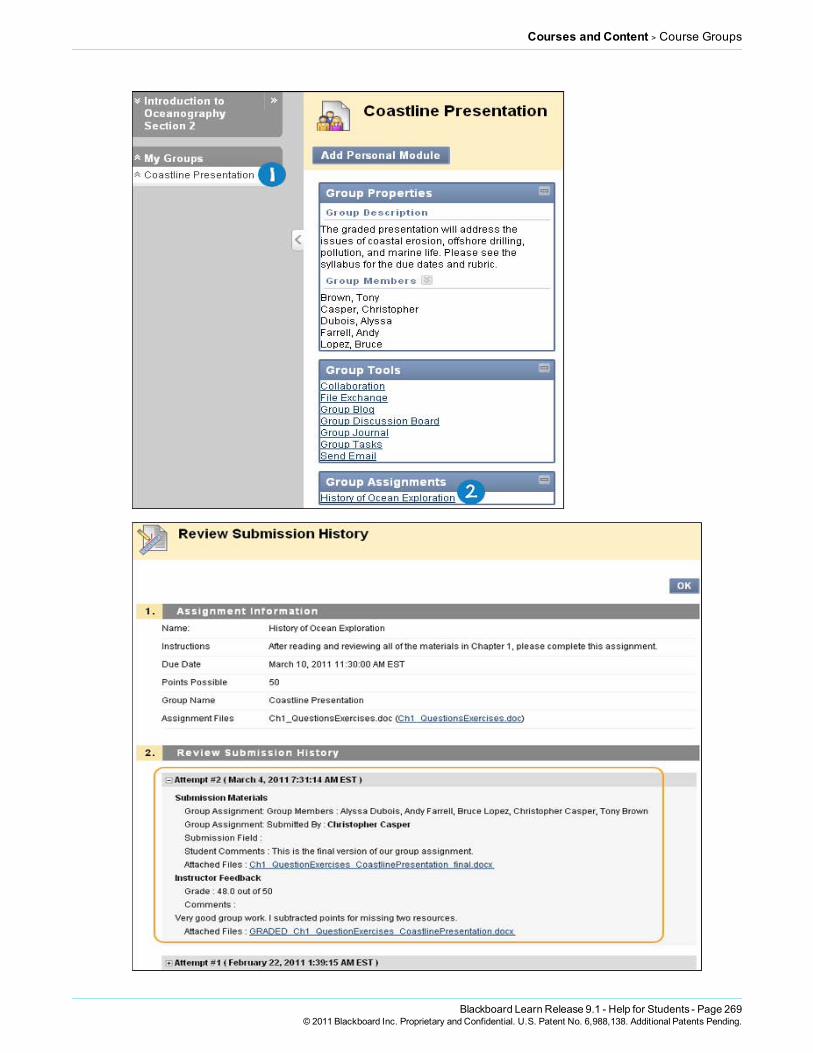
Courses and Content > Course Groups
Blackboard Learn Release 9.1 - Help for Students - Page 269© 2011 Blackboard Inc. Proprietary and Confidential. U.S. Patent No. 6,988,138. Additional Patents Pending.

Courses and Content > Course Groups
Accessing the Review Submission History Page from Group Assignments1. Return to the group assignment link in the Content Area that holds the assignment, for example,
theGroup AssignmentsContent Area.2. Click the name of the assignment.
My Grades Item StatusThe following table describes the symbols appearing on theMy Grades page.
SymbolDescription
- Item has not yet been completed. No information is available.
Item has been completed, but will not have a grade (for items such as surveys).
Item has been submitted. This item is waiting to be reviewed by your instructor.
-OR-
Item has been submitted. Your instructor may review this item but may not be provided a grade (for itemssuch as surveys).
Grade Item has been graded. Click the grade to view detailed feedback.
Attempt is in progress. This item has not been submitted. To submit the item, see Submitting a DraftAssignment.
Grade is exempted for this user. If you do not complete this assignment, it will not affect your grade.
Error has occurred. Contact your instructor.
Blackboard Learn Release 9.1 - Help for Students - Page 270© 2011 Blackboard Inc. Proprietary and Confidential. U.S. Patent No. 6,988,138. Additional Patents Pending.

Tests and Assignments > Tests and Surveys
Tests and Assignments
Tests and SurveysYou can find tests and surveys (referred to collectively as assessments) in any Content Area, Content Areafolder, or LearningModule.
Tests can be used to assess your knowledge. Your instructor assigns point values to questions. Your answersare submitted for grading, and the results are recorded in the Grade Center.
Surveys can be used for polling purposes and evaluations. These assessments are not graded.
Question TypesThere aremany types of questions that can be included in an assessment.
l Calculated Formula: Contains a formula with a number of variables. The correct answer can be aspecific value or a range of values.
l Calculated Numeric Response: Resembles a fill-in-the-blank question except a number is enteredto complete the statement. The correct answer can be a specific number or within a range ofnumbers.
l Either / Or: A statement with a pre-defined choice of two answers (Yes/No, On/Off).l Essay: A question where the answermust be typed in a text box.l File Response: Uploaded files are used to respond to the question.l Fill in Multiple Blanks: Multiple responses are inserted into a sentence or paragraph.l Fill in the Blank: A statement that requires an answer to complete it. Answers are evaluated based
on an exact text match.l Hot Spot: A specific point on an image is used to indicate the answer.l Jumbled Sentence: A sentence with a number of variables within it.l Matching: Two columns of items where each item in the first columnmust bematched to an item in
the second column.l Multiple Answer: A number of choices with one or more correct answers.l Multiple Choice: Allows a number of choices with one correct answer. Indicate the correct answer
by selecting a radio button.l Opinion Scale / Likert: A rating scale used tomeasure attitudes or reactions.l Ordering: A question that requires users to provide an answer by selecting the correct order of a
series of items.l Quiz Bowl: An answer appears; the users respond with a who, what, or where question to respond.l Short Answer: Similar to Essay questions; answer length is limited.l True / False: A statement with the option to choose either true or false. True/False answer options
are limited to the words True and False.
Grading QuestionsThemajority of questions in assessments are auto-graded. Your instructor defines the correct answers andassigns a certain number of points to each question when the assessment is created. The system validatesyour answers against the key and assigns the score. Youmay find out your score on an assessment
Blackboard Learn Release 9.1 - Help for Students - Page 271© 2011 Blackboard Inc. Proprietary and Confidential. U.S. Patent No. 6,988,138. Additional Patents Pending.

Tests and Assignments > Tests and Surveys
immediately after completing it if all questions are auto-graded and your instructor releases this information.
Essay questions, file response, and short answer questions are not auto-graded, meaning that your instructormust grade these questions manually. After you submit an assessment, your instructor reviews thesequestions andmanually provides a score. If an assessment contains these question types, the grade for theassessment is not immediately available after the assessment is submitted.
How to Take an AssessmentAssessments are located within Content Areas in a course.
Note: Contact you instructor if you encounter issues or problems while taking your assessment.
1. Navigate to an assessment and click the link associated with it.2. Click Begin to take the assessment.
3. Your instructor may choose to have you type a password to begin taking an assessment. Ifnecessary, type the valid password and click Submit to begin the assessment. The assessmentcontinues to prompt for a valid password until the correct one is provided.
Blackboard Learn Release 9.1 - Help for Students - Page 272© 2011 Blackboard Inc. Proprietary and Confidential. U.S. Patent No. 6,988,138. Additional Patents Pending.

Tests and Assignments > Tests and Surveys
4. Click Save and Submitwhen you complete the assessment.
Note: If the Assessment is timed, the remaining time appears in the bottom of the browser.
WARNING! Do not use the browser's Back button during an assessment. This may cause loss of data.
Feedback and GradesThe performance results you receive after completing a test depends on the options selected by your instructor.For example, your instructor may only show the final score for one test, while for another test the final score andcorrect answers are displayed. Feedback includes one or more of the following:
l Final score for the testl Answers users submitted
Blackboard Learn Release 9.1 - Help for Students - Page 273© 2011 Blackboard Inc. Proprietary and Confidential. U.S. Patent No. 6,988,138. Additional Patents Pending.

Tests and Assignments > Tests and Surveys
l Correct answersl Feedback for the questions
To access Feedback andGrade information, select the test in the Content Area or use theMy Grades tool.
Multiple Assessment AttemptsYoumay be allowed to take an assessment multiple times. If multiple attempts is allowed, this is noted at thetop of the assessment. Your instructor may also set a limit on the number of attempts, which will also be notedat the top. A link to take the test again appears if the test is re-opened. Your instructor determines if one or moreof the test attempt scores are recorded in the Grade Center.
Presentation Option
Force Assessment CompletionYoumust complete the assessment the first time it is launched if Force Completion is enabled. If ForceCompletion is enabled, this is noted at the top of the assessment. Youmay not exit the assessment andcontinue working on it at a later date. TheSave function is available for you to save the assessment as youwork through it, but youmay not exit and re-enter the assessment.
Backtrack ProhibitedYoumay not go back to questions you have already answered if backtracking is prohibited. If backtracking isprohibited, this is noted at the top of the assessment. When you take an assessment that does not allowbacktracking, an error appears if you attempt to use theBack function within the assessment.
Assessment PresentationYour instructor has two different options for presenting Assessments: all-at-once and one-at-a-time.
All-at-once assessments present all of the questions at the same time. The following options are availablewhile taking this type of assessment:
Function Action
Store answers Select Save All Answers. A Saved icon appears in the Question Status Indicator. Answers maybe changed after they are saved.
Finish theassessment
Select Save and Submit. A confirmation, then receipt page appears that states the assessmenthas been completed.
One-at-a-time assessments present questions separately, only one question appears on the screen. Youdecide when you are ready tomove onto the next question. The following options are available while taking thistype of assessment:
Function Action
Navigatethroughquestions
Use the navigation arrows (<<, <, >, or >>). The Question/Section Indicator describes the currentlocation in the assessment and the overall number of questions. If backtracking is prohibited, thesearrows do not appear.
Saveanswers
Select Save All Answers. Questions answered up to this point are saved.
Finish the Select Save and Submit. A confirmation, then receipt page appears that states the assessment hasbeen completed.
Blackboard Learn Release 9.1 - Help for Students - Page 274© 2011 Blackboard Inc. Proprietary and Confidential. U.S. Patent No. 6,988,138. Additional Patents Pending.

Tests and Assignments > Submitting Assignments
Function Action
assessment
Question Completion StatusTheQuestions Status Indicator provides you with a quick up-to-date look at complete or incomplete questionsin an assessment at all times. TheSave function next to each question provides a visual reminder to save yourprogress periodically.
Completion status of assessment questions is displayed at the top of the page.
The status of which questions have been answered is displayed at the top of the page, just below theinstructions.
When you answer a question andmove to the next question in a question-by-question assessment, the statusbox is edited on the next page to show that the previous question was answered. If you do not answer aquestion andmove on to the next page in a question-by-question assessment, the status box will show on thenext page that the previous question was not answered. Navigate between questions by clicking on thequestion number in the status indicator.
When you take an all-at-once assessment (an assessment where the questions all appear on the same page),click Save Answer to save a specific question without scrolling to the bottom of the page to save. Savingeither a single question or all of the questions that have been answered (with theSave All Answers at the topor bottom of the page) changes the status indicator to show which questions have been completed.
Submitting AssignmentsThe Assignments tool is used to present a variety of learning activities to students, allowing them to view andsubmit assignments from one location. You can submit assignments in the following ways:
l Text typed on theUpload Assignment page.l Files attached from your computer or from the Content Collection.l A combination of both text and attached files.
Assignments list the name, description, and attachments for class work. You can also choose to includecomments for your instructor.
Frequently Asked Questions
Why can't I open my assignment?Please contact the computing help desk at your school. They can help you troubleshoot and download anyapplication youmight need. If you’re not sure how to contact them, look for the technology office on yourschool’s website or search the web for your school’s name + Blackboard + help or support. Youmay also checktomake sure you are using a supported Internet browser and operating system for the version of Blackboardthat your school is using.
Why can't I find my assignment?Your instructor might make an assignment unavailable until after a certain date or until other criteria has beenmet. For example, youmight have tomark a lecture as reviewed before you can access the assignment.
Blackboard Learn Release 9.1 - Help for Students - Page 275© 2011 Blackboard Inc. Proprietary and Confidential. U.S. Patent No. 6,988,138. Additional Patents Pending.
Tests and Assignments > Submitting Assignments
Please contact your instructor for more information.
My instructor did not receive my assignment. What do I do?Youmust discuss this issue with your instructor. To see the step-by-step instructions for submitting anassignment, see How to Submit an Assignment.
How do I edit or resubmit an assignment?Editing an assignment requires you to resubmit the assignment, and not all assignments can be resubmitted. Ifyour instructor has not allowed you to submit an assignment more than once and youmade amistake whensubmitting the assignment, youmust contact your instructor to ask for the opportunity to resubmit theassignment.
If your instructor has allowed you to submit an assignment more than once, you will see aStart NewSubmission function on theReview Submission History page. You access this page by clicking theassignment link in your course. To learnmore, see How to Edit or Resubmit an Assignment.
How do I know whether my assignment has been graded?On the CourseMenu, click Tools, and then click My Grades. If your assignment has not been graded, theGrade column contains a symbol indicating its status. If your assignment has been submitted and graded, thegrade appears in theGrade column. To view more detail, click the link to see the assignment's ReviewSubmission History page.To learnmore, see How to View Assignment Grades and Feedback.
How to Submit an AssignmentWhen you finish your assignment, youmust click Submit. If you do not, your instructor will not receive yourcompleted assignment.
1. On the CourseMenu, select the Content Area that holds the assignment, for example, theAssignmentsContent Area.
2. Click the name of the assignment.
Blackboard Learn Release 9.1 - Help for Students - Page 276© 2011 Blackboard Inc. Proprietary and Confidential. U.S. Patent No. 6,988,138. Additional Patents Pending.

Tests and Assignments > Submitting Assignments
3. On theUpload Assignment page, download any files provided by your instructor and completethe assignment using one or both of the following:
l In theSubmission box, type your response. You can use the Text Editor functions toformat the text and include files, images, external links, multimedia, andMashups.
l If your response to the assignment is in a separate file, click Browse My Computer andselect a file to attach. If you attach a file, type a Link Title. If the box is left blank, the filename becomes the link. Follow any instructions that your instructor provided for namingyour file.
Note: TheDo not attach option appears next to an uploaded file. If you have selected anincorrect file, you can remove it with this option. If the same file is attached to yourassignment more than once, the new file is saved with a number appended to the name.For example, history_assignment(1).doc.
4. Optionally, in theComments box, type your comments.
WARNING! If your instructor has not allowedmultiple attempts, assignments can besubmitted only once. Ensure that you have attached any required files to your assignmentbefore you click Submit.
5. Click Submit.
WARNING! When you finish your assignment, youmust click Submit. If you do not, yourinstructor will not receive your completed assignment.
Blackboard Learn Release 9.1 - Help for Students - Page 277© 2011 Blackboard Inc. Proprietary and Confidential. U.S. Patent No. 6,988,138. Additional Patents Pending.
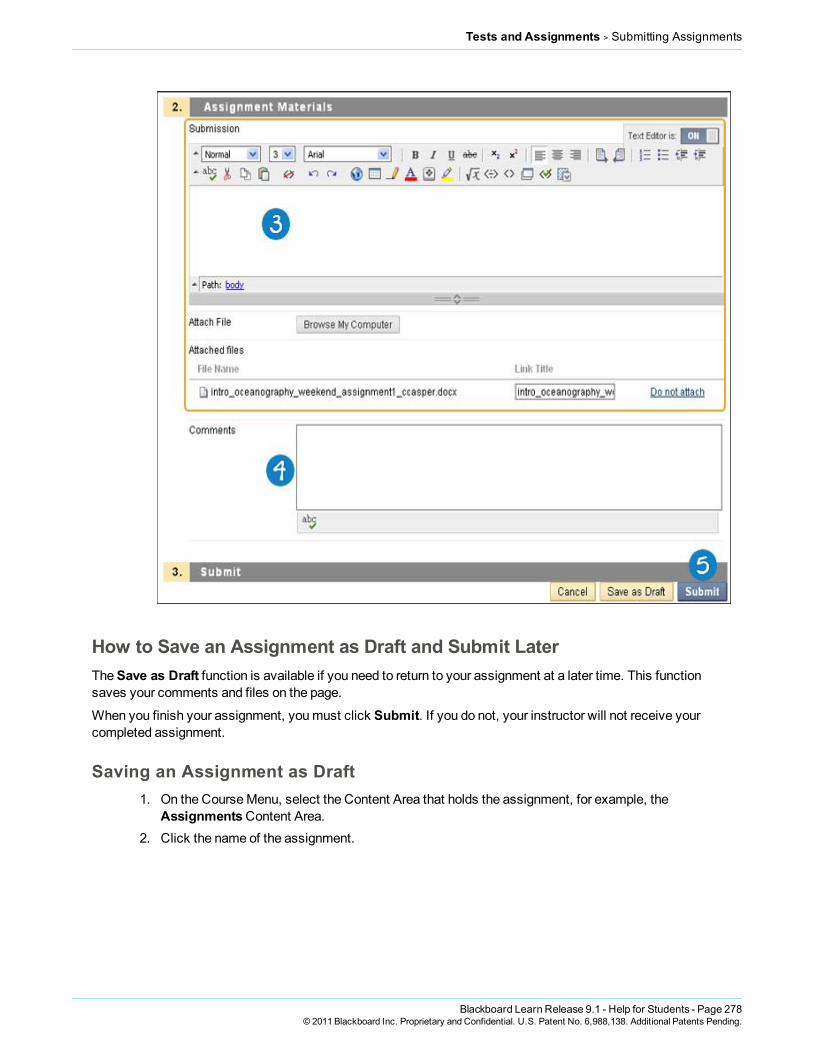
Tests and Assignments > Submitting Assignments
How to Save an Assignment as Draft and Submit LaterTheSave as Draft function is available if you need to return to your assignment at a later time. This functionsaves your comments and files on the page.
When you finish your assignment, youmust click Submit. If you do not, your instructor will not receive yourcompleted assignment.
Saving an Assignment as Draft1. On the CourseMenu, select the Content Area that holds the assignment, for example, the
AssignmentsContent Area.2. Click the name of the assignment.
Blackboard Learn Release 9.1 - Help for Students - Page 278© 2011 Blackboard Inc. Proprietary and Confidential. U.S. Patent No. 6,988,138. Additional Patents Pending.
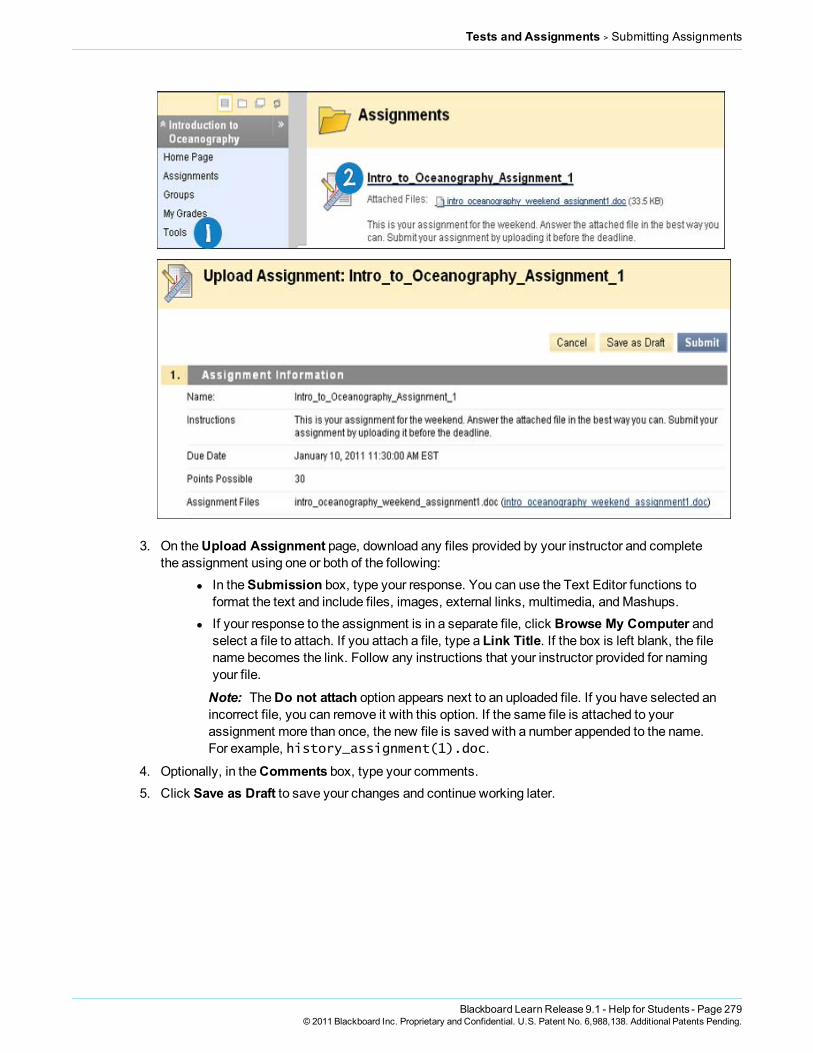
Tests and Assignments > Submitting Assignments
3. On theUpload Assignment page, download any files provided by your instructor and completethe assignment using one or both of the following:
l In theSubmission box, type your response. You can use the Text Editor functions toformat the text and include files, images, external links, multimedia, andMashups.
l If your response to the assignment is in a separate file, click Browse My Computer andselect a file to attach. If you attach a file, type a Link Title. If the box is left blank, the filename becomes the link. Follow any instructions that your instructor provided for namingyour file.
Note: TheDo not attach option appears next to an uploaded file. If you have selected anincorrect file, you can remove it with this option. If the same file is attached to yourassignment more than once, the new file is saved with a number appended to the name.For example, history_assignment(1).doc.
4. Optionally, in theComments box, type your comments.5. Click Save as Draft to save your changes and continue working later.
Blackboard Learn Release 9.1 - Help for Students - Page 279© 2011 Blackboard Inc. Proprietary and Confidential. U.S. Patent No. 6,988,138. Additional Patents Pending.
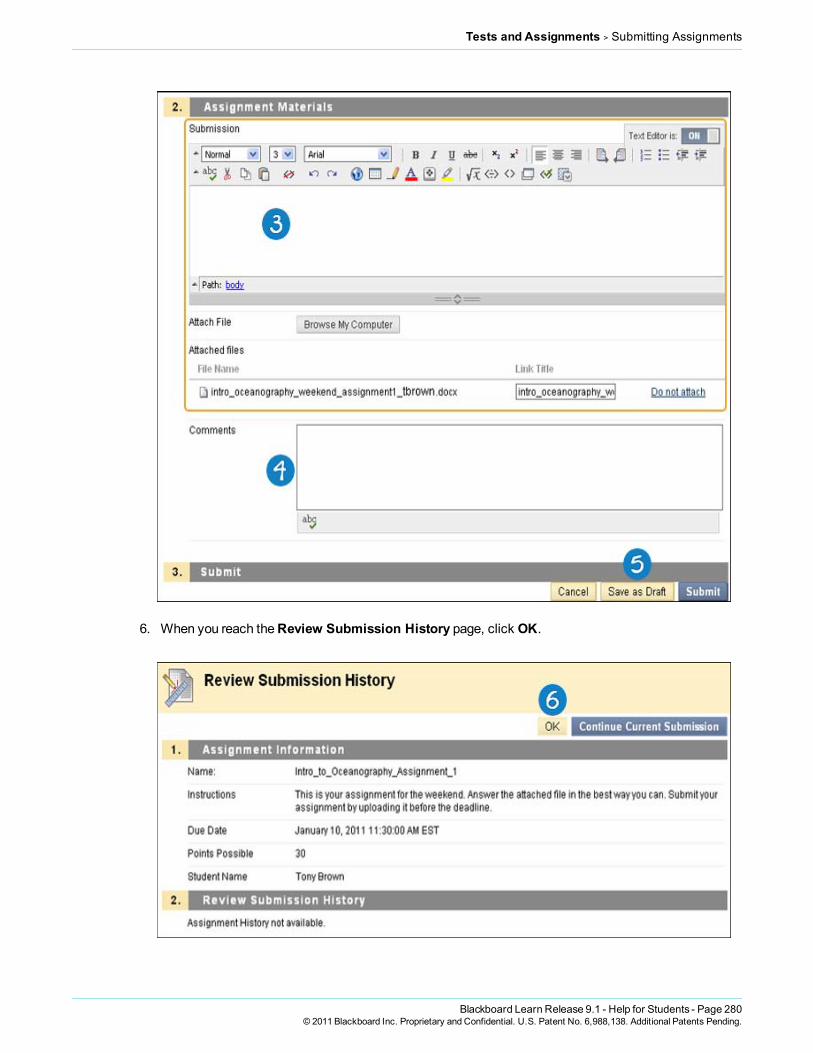
Tests and Assignments > Submitting Assignments
6. When you reach theReview Submission History page, click OK.
Blackboard Learn Release 9.1 - Help for Students - Page 280© 2011 Blackboard Inc. Proprietary and Confidential. U.S. Patent No. 6,988,138. Additional Patents Pending.

Tests and Assignments > Submitting Assignments
Submitting a Draft Assignment1. Return to the assignment link in the Content Area that holds the assignment, for example, the
AssignmentsContent Area.
2. On theReview Submission History page, click Continue Current Submission.
3. On theUpload Assignment page, make the necessary changes in your assignment.4. Optionally, in theComments box, type your comments.
Blackboard Learn Release 9.1 - Help for Students - Page 281© 2011 Blackboard Inc. Proprietary and Confidential. U.S. Patent No. 6,988,138. Additional Patents Pending.
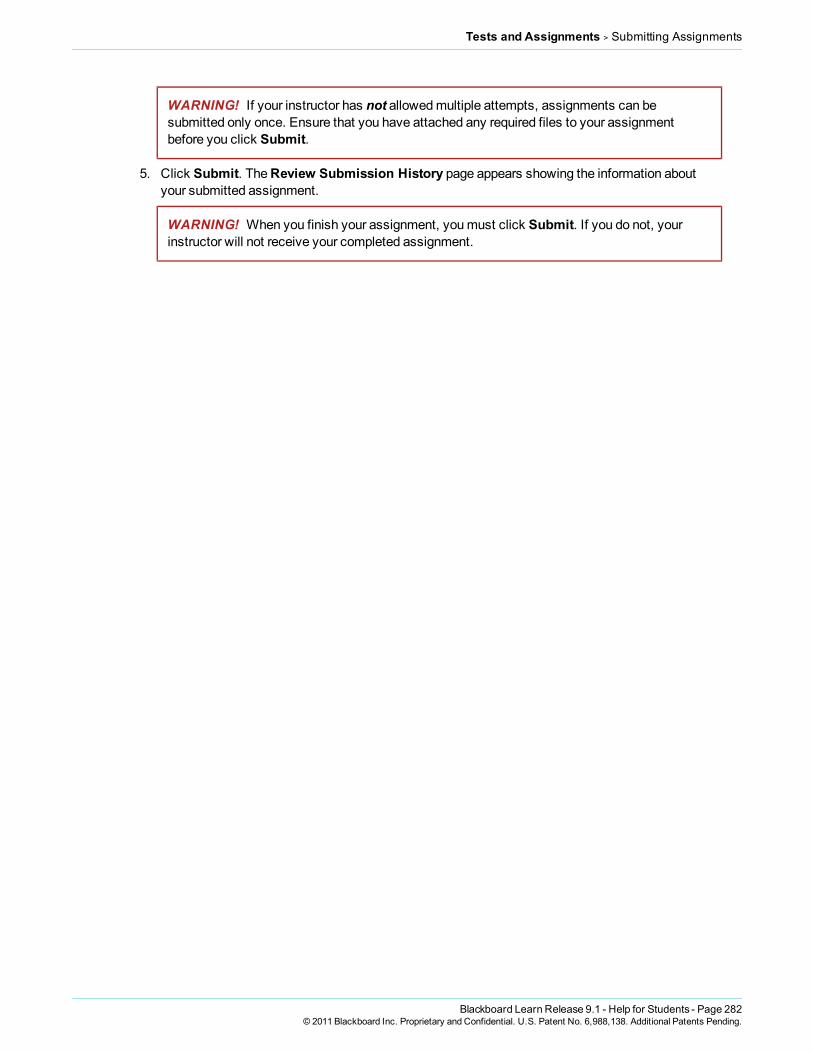
Tests and Assignments > Submitting Assignments
WARNING! If your instructor has not allowedmultiple attempts, assignments can besubmitted only once. Ensure that you have attached any required files to your assignmentbefore you click Submit.
5. Click Submit. TheReview Submission History page appears showing the information aboutyour submitted assignment.
WARNING! When you finish your assignment, youmust click Submit. If you do not, yourinstructor will not receive your completed assignment.
Blackboard Learn Release 9.1 - Help for Students - Page 282© 2011 Blackboard Inc. Proprietary and Confidential. U.S. Patent No. 6,988,138. Additional Patents Pending.

Tests and Assignments > Submitting Assignments
How to Edit or Resubmit an AssignmentEditing an assignment requires you to resubmit the assignment, and not all assignments can be resubmitted. Ifyour instructor has not allowed you to submit an assignment more than once and youmade amistake whensubmitting the assignment, youmust contact your instructor to ask for the opportunity to resubmit the
Blackboard Learn Release 9.1 - Help for Students - Page 283© 2011 Blackboard Inc. Proprietary and Confidential. U.S. Patent No. 6,988,138. Additional Patents Pending.

Tests and Assignments > Submitting Assignments
assignment.
Your instructor may allow you to submit an assignment more than once for a variety of reasons. For example,your instructor can provide comments on your first draft so that you can try to improve your work. Yourinstructor can choose to use either the highest graded attempt or the last graded attempt for your grade.
If your instructor has allowed you to submit an assignment more than once, you will see aStart NewSubmission function on theReview Submission History page. You access this page by clicking theassignment link in your course.
1. Return to the assignment link in the Content Area that holds the assignment, for example, theAssignmentsContent Area.
2. Click the name of the assignment.
3. On theReview Submission History page, view the details of your first submission. Click StartNew Submission.
Blackboard Learn Release 9.1 - Help for Students - Page 284© 2011 Blackboard Inc. Proprietary and Confidential. U.S. Patent No. 6,988,138. Additional Patents Pending.

Tests and Assignments > Submitting Assignments
4. On theUpload Assignment page, download any files provided by your instructor and completethe assignment using one or both of the following:
l In theSubmission box, type your response. You can use the Text Editor functions toformat the text and add files, images, external links, multimedia, andMashups.
l If your response to the assignment is in a separate file, click Browse My Computer andselect a file to attach. If you attach a file, type a Link Title. If the box is left blank, the filename becomes the link. Follow any instructions that your instructor provided for namingyour file.
Note: TheDo not attach option appears next to an uploaded file. If you have selected anincorrect file, you can remove it with this option. If the same file is attached to yourassignment more than once, the new file is saved with a number appended to the name.For example, history_assignment(1).doc.
5. Optionally, in theComments box, type your comments.
Blackboard Learn Release 9.1 - Help for Students - Page 285© 2011 Blackboard Inc. Proprietary and Confidential. U.S. Patent No. 6,988,138. Additional Patents Pending.

Tests and Assignments > Submitting Assignments
WARNING! Ensure that you have attached any required files to your assignment before youclick Submit.
6. Click Submit.
WARNING! When you finish your assignment, youmust click Submit. If you do not, yourinstructor will not receive your completed assignment.
Blackboard Learn Release 9.1 - Help for Students - Page 286© 2011 Blackboard Inc. Proprietary and Confidential. U.S. Patent No. 6,988,138. Additional Patents Pending.
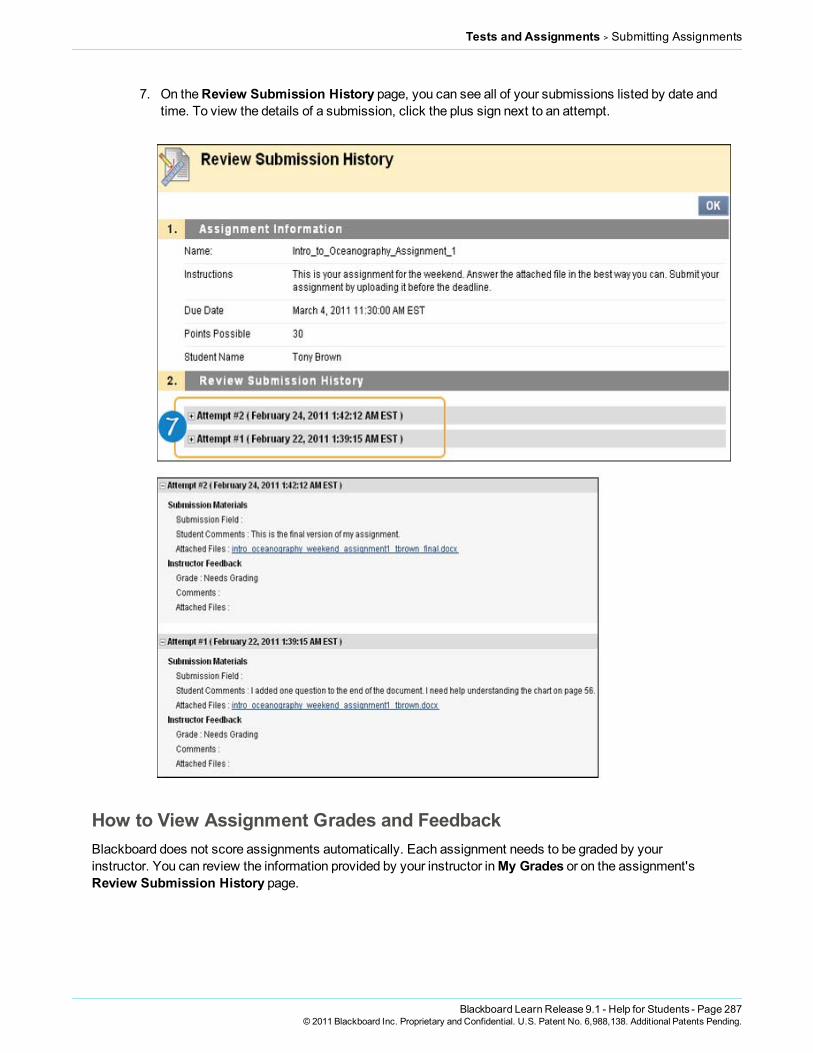
Tests and Assignments > Submitting Assignments
7. On theReview Submission History page, you can see all of your submissions listed by date andtime. To view the details of a submission, click the plus sign next to an attempt.
How to View Assignment Grades and FeedbackBlackboard does not score assignments automatically. Each assignment needs to be graded by yourinstructor. You can review the information provided by your instructor inMy Grades or on the assignment'sReview Submission History page.
Blackboard Learn Release 9.1 - Help for Students - Page 287© 2011 Blackboard Inc. Proprietary and Confidential. U.S. Patent No. 6,988,138. Additional Patents Pending.
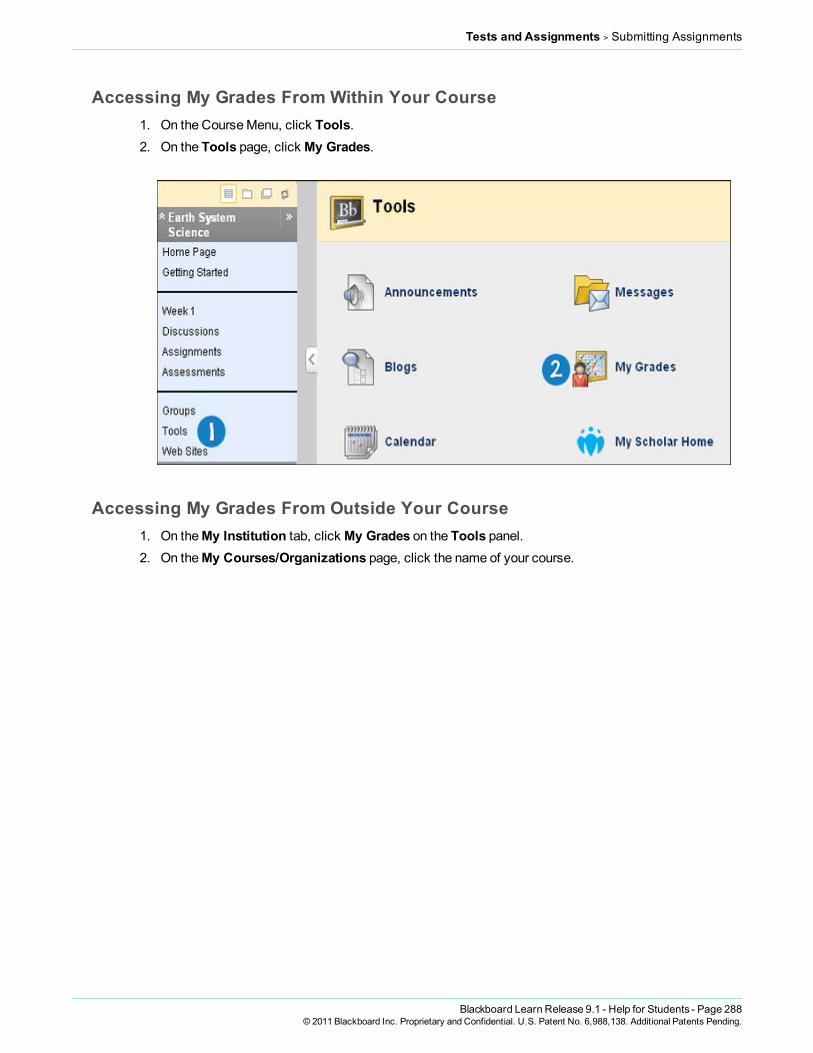
Tests and Assignments > Submitting Assignments
Accessing My Grades From Within Your Course1. On the CourseMenu, click Tools.2. On the Tools page, click My Grades.
Accessing My Grades From Outside Your Course1. On theMy Institution tab, click My Grades on the Tools panel.2. On theMy Courses/Organizations page, click the name of your course.
Blackboard Learn Release 9.1 - Help for Students - Page 288© 2011 Blackboard Inc. Proprietary and Confidential. U.S. Patent No. 6,988,138. Additional Patents Pending.
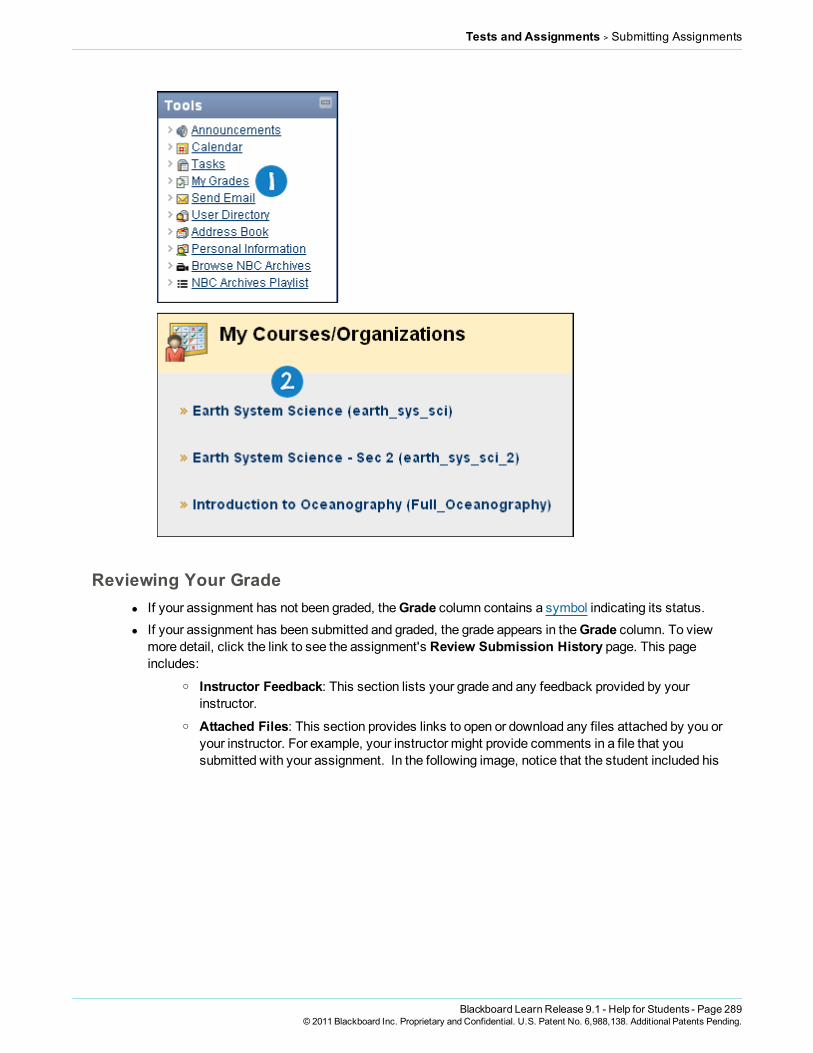
Tests and Assignments > Submitting Assignments
Reviewing Your Gradel If your assignment has not been graded, theGrade column contains a symbol indicating its status.l If your assignment has been submitted and graded, the grade appears in theGrade column. To view
more detail, click the link to see the assignment's Review Submission History page. This pageincludes:
o Instructor Feedback: This section lists your grade and any feedback provided by yourinstructor.
o Attached Files: This section provides links to open or download any files attached by you oryour instructor. For example, your instructor might provide comments in a file that yousubmitted with your assignment. In the following image, notice that the student included his
Blackboard Learn Release 9.1 - Help for Students - Page 289© 2011 Blackboard Inc. Proprietary and Confidential. U.S. Patent No. 6,988,138. Additional Patents Pending.

Tests and Assignments > Submitting Assignments
Accessing the Review Submission History Page from the Assignment1. Return to the assignment link in the Content Area that holds the assignment, for example, the
AssignmentsContent Area.
Blackboard Learn Release 9.1 - Help for Students - Page 290© 2011 Blackboard Inc. Proprietary and Confidential. U.S. Patent No. 6,988,138. Additional Patents Pending.

Tests and Assignments > Group Assignments
2. Click the name of the assignment.
My Grades Item StatusThe following table describes the symbols appearing on theMy Grades page.
SymbolDescription
- Item has not yet been completed. No information is available.
Item has been completed, but will not have a grade (for items such as surveys).
Item has been submitted. This item is waiting to be reviewed by your instructor
-OR-
Item has been submitted. Your instructor may review this item but may not be provided a grade (for itemssuch as surveys).
Grade Item has been graded. Click the grade to view detailed feedback.
Attempt is in progress. This item has not been submitted. To submit the item, see Submitting a DraftAssignment.
Grade is exempted for this user. If you do not complete this assignment, it will not affect your grade.
Error has occurred. Contact your instructor.
Related Tutorials Submitting Assignments (Flashmovie | 2m43s | 5,775KB)
Next StepsTo learn how to submit a group assignment, seeGroup Assignments.
Group AssignmentsYou can submit your work to satisfy group assignments. You can submit group assignments in the followingways:
l Text typed on theUpload Assignment page.l Files attached from your computer or from the Content Collection.l A combination of both text and attached files.
Blackboard Learn Release 9.1 - Help for Students - Page 291© 2011 Blackboard Inc. Proprietary and Confidential. U.S. Patent No. 6,988,138. Additional Patents Pending.

Tests and Assignments > Group Assignments
Assignments list the name, description, and attachments for class work. You can also choose to includecomments for your instructor.
The grade provided by your instructor for the final assignment is given to every member of the group.
Frequently Asked Questions
Why can't I open our group assignment?Please contact the computing help desk at your school. They can help you troubleshoot and download anyapplication youmight need. If you’re not sure how to contact them, look for the technology office on yourschool’s website or search the web for your school’s name + Blackboard + help or support. Youmay also checktomake sure you are using a supported Internet browser and operating system for the version of Blackboardthat your school is using.
Why can't I find our group assignment?Your instructor might make an assignment unavailable until after a certain date or until other criteria has beenmet. For example, youmight have tomark a lecture as reviewed before you can access the assignment.Please contact your instructor for more information.
My instructor did not receive our group assignment. What do I do?Youmust discuss this issue with your instructor. To see the step-by-step instructions for submitting a groupassignment, see How to Submit Work for a Group Assignment.
How do I edit or resubmit a group assignment?Editing a group assignment requires you to resubmit the assignment, and not all assignments can beresubmitted. If your instructor has not allowed you to submit an assignment more than once and youmade amistake when submitting the assignment, youmust contact your instructor to ask for the opportunity toresubmit the assignment.
If your instructor has allowed you to submit an assignment more than once, you will see aStart NewSubmission function on theReview Submission History page. You access this page by clicking theassignment link in your course. To learnmore, see How to Edit or Resubmit a Group Assignment.
How do I know whether my assignment has been graded?On the CourseMenu, click Tools, and then click My Grades. If your assignment has not been graded, theGrade column contains a symbol indicating its status. If your assignment has been submitted and graded, thegrade appears in theGrade column. To view more detail, click the link to see the assignment's ReviewSubmission History page.To learnmore, see How to View Group Assignment Grades and Feedback.
How to Submit Work for a Group Assignment1. On the CourseMenu, select the Content Area that holds the group assignment, for example, the
Group AssignmentsContent Area. Click the name of the assignment.
Blackboard Learn Release 9.1 - Help for Students - Page 292© 2011 Blackboard Inc. Proprietary and Confidential. U.S. Patent No. 6,988,138. Additional Patents Pending.

Tests and Assignments > Group Assignments
-OR-
1. In theMy Groups panel, select your group name. On the group homepage, click the name of theassignment in theGroup Assignments section.
Blackboard Learn Release 9.1 - Help for Students - Page 293© 2011 Blackboard Inc. Proprietary and Confidential. U.S. Patent No. 6,988,138. Additional Patents Pending.

Tests and Assignments > Group Assignments
2. On theUpload Assignment page, download any files provided by your instructor and completethe assignment using one or both of the following:
l In theSubmission box, type your response. You can use the Text Editor functions toformat the text and include files, images, external links, multimedia, andMashups.
l If your response to the assignment is in a separate file, click Browse My Computer andselect a file to attach. If you attach a file, type a Link Title. If the box is left blank, the filename becomes the link. Follow any instructions that your instructor provided for namingyour file.
Note: TheDo not attach option appears next to an uploaded file. If you have selected anincorrect file, you can remove it with this option. If the same file is attached to yourassignment more than once, the new file is saved with a number appended to the name.For example, history_assignment(1).doc.
3. Optionally, in theComments box, type your comments.
WARNING! If your instructor has not allowedmultiple attempts, assignments can besubmitted only once. Ensure that you have attached any required files to your assignmentbefore you click Submit.
4. Click Submit.
WARNING! When you finish your assignment, youmust click Submit. If you do not, yourinstructor will not receive your completed assignment.
Blackboard Learn Release 9.1 - Help for Students - Page 294© 2011 Blackboard Inc. Proprietary and Confidential. U.S. Patent No. 6,988,138. Additional Patents Pending.

Tests and Assignments > Group Assignments
How to Save a Group Assignment as Draft and Submit LaterTheSave as Draft function is available if you need to return to your group assignment at a later time. This
Blackboard Learn Release 9.1 - Help for Students - Page 295© 2011 Blackboard Inc. Proprietary and Confidential. U.S. Patent No. 6,988,138. Additional Patents Pending.

Tests and Assignments > Group Assignments
function saves your comments and files on the page.
When you finish your assignment, youmust click Submit. If you do not, your instructor will not receive yourcompleted assignment.
Saving a Group Assignment as Draft1. On the CourseMenu, select the Content Area that holds the group assignment, for example, the
Group AssignmentsContent Area. Click the name of the assignment.
2. On theUpload Assignment page, download any files provided by your instructor and completethe assignment using one or both of the following:
l In theSubmission box, type your response. You can use the Text Editor functions toformat the text and include files, images, external links, multimedia, andMashups.
l If your response to the assignment is in a separate file, click Browse My Computer andselect a file to attach. If you attach a file, type a Link Title. If the box is left blank, the filename becomes the link. Follow any instructions that your instructor provided for namingyour file.
Note: TheDo not attach option appears next to an uploaded file. If you have selected anincorrect file, you can remove it with this option. If the same file is attached to yourassignment more than once, the new file is saved with a number appended to the name.For example, history_assignment(1).doc.
3. Optionally, in theComments box, type your comments.4. Click Save as Draft to save your changes and continue working later.
Blackboard Learn Release 9.1 - Help for Students - Page 296© 2011 Blackboard Inc. Proprietary and Confidential. U.S. Patent No. 6,988,138. Additional Patents Pending.

Tests and Assignments > Group Assignments
5. When you reach theReview Submission History page, click OK.
Blackboard Learn Release 9.1 - Help for Students - Page 297© 2011 Blackboard Inc. Proprietary and Confidential. U.S. Patent No. 6,988,138. Additional Patents Pending.

Tests and Assignments > Group Assignments
Submitting a Draft Assignment1. Return to the group assignment link in the Content Area that holds the assignment, for example,
theGroup AssignmentsContent Area.
2. On theReview Submission History page, click Continue Current Submission.
Blackboard Learn Release 9.1 - Help for Students - Page 298© 2011 Blackboard Inc. Proprietary and Confidential. U.S. Patent No. 6,988,138. Additional Patents Pending.

Tests and Assignments > Group Assignments
3. On theUpload Assignment page, make the necessary changes in your assignment.4. Optionally, in theComments box, type your comments.
WARNING! If your instructor has not allowedmultiple attempts, assignments can besubmitted only once. Ensure that you have attached any required files to your assignmentbefore you click Submit.
5. Click Submit. TheReview Submission History page appears showing the information aboutyour submitted assignment.
WARNING! When you finish your assignment, youmust click Submit. If you do not, yourinstructor will not receive your completed assignment.
Blackboard Learn Release 9.1 - Help for Students - Page 299© 2011 Blackboard Inc. Proprietary and Confidential. U.S. Patent No. 6,988,138. Additional Patents Pending.
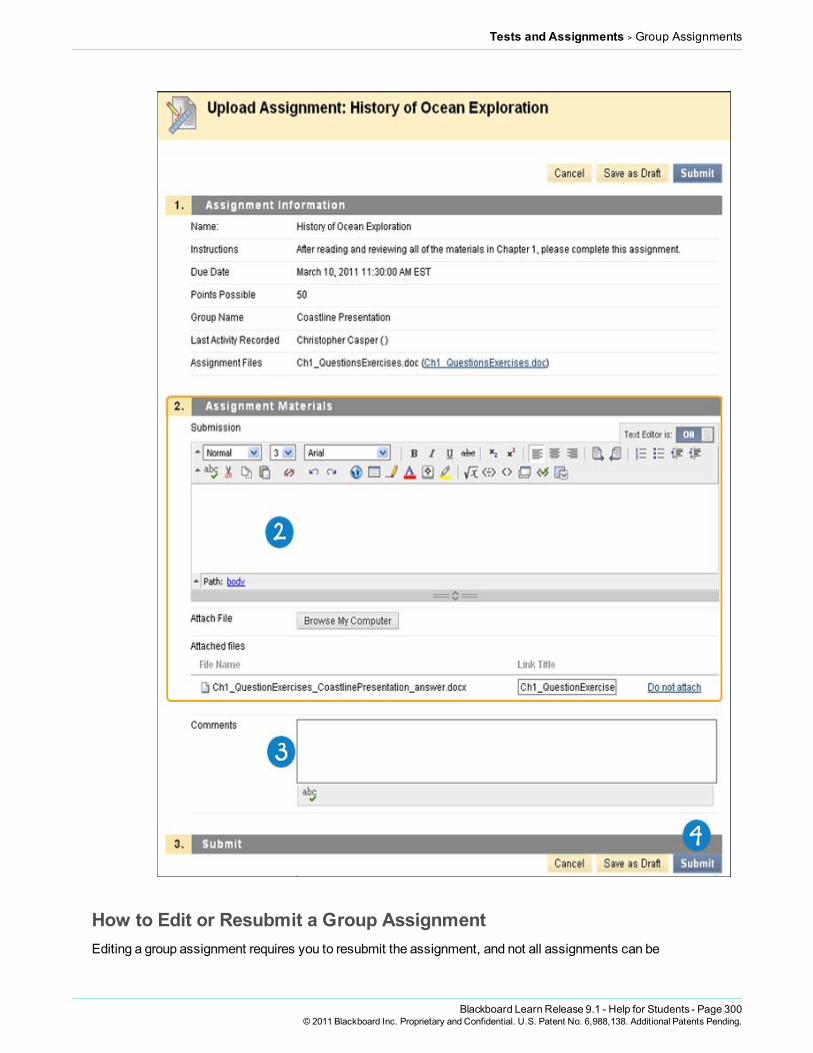
Tests and Assignments > Group Assignments
How to Edit or Resubmit a Group AssignmentEditing a group assignment requires you to resubmit the assignment, and not all assignments can be
Blackboard Learn Release 9.1 - Help for Students - Page 300© 2011 Blackboard Inc. Proprietary and Confidential. U.S. Patent No. 6,988,138. Additional Patents Pending.

Tests and Assignments > Group Assignments
resubmitted. If your instructor has not allowed you to submit a group assignment more than once and youmadeamistake when submitting the assignment, youmust contact your instructor to ask for the opportunity toresubmit the assignment.
Your instructor may allow you to submit a group assignment more than once for a variety of reasons. Forexample, your instructor can provide comments on your first draft so that you can try to improve your work.Your instructor can choose to use either the highest graded attempt or the last graded attempt for your grade.
If your instructor has allowed you to submit a group assignment more than once, you will see aStart NewSubmission function on theReview Submission History page. You access this page by clicking the groupassignment link in your course.
1. Return to the group assignment link in the Content Area that holds the assignment, for example,theGroup AssignmentsContent Area.
2. Click the name of the assignment.
3. On theReview Submission History page, view the details of your first submission. Click StartNew Submission.
Blackboard Learn Release 9.1 - Help for Students - Page 301© 2011 Blackboard Inc. Proprietary and Confidential. U.S. Patent No. 6,988,138. Additional Patents Pending.

Tests and Assignments > Group Assignments
4. On theUpload Assignment page, download any files provided by your instructor and completethe assignment using one or both of the following:
l In theSubmission box, type your response. You can use the Text Editor functions toformat the text and include files, images, external links, multimedia, andMashups.
l If your response to the assignment is in a separate file, click Browse My Computer andselect a file to attach. If you attach a file, type a Link Title. If the box is left blank, the filename becomes the link. Follow any instructions that your instructor provided for namingyour file.
Note: TheDo not attach option appears next to an uploaded file. If you have selected anincorrect file, you can remove it with this option. If the same file is attached to yourassignment more than once, the new file is saved with a number appended to the name.For example, history_assignment(1).doc.
5. Optionally, in theComments box, type your comments.
WARNING! Ensure that you have attached any required files to your assignment before youclick Submit.
6. Click Submit.
Blackboard Learn Release 9.1 - Help for Students - Page 302© 2011 Blackboard Inc. Proprietary and Confidential. U.S. Patent No. 6,988,138. Additional Patents Pending.

Tests and Assignments > Group Assignments
WARNING! When you finish your assignment, youmust click Submit. If you do not, yourinstructor will not receive your completed assignment.
7. On theReview Submission History page, you can see all of your submissions listed by date andtime. To view the details of a submission, click the plus sign next to an attempt.
Blackboard Learn Release 9.1 - Help for Students - Page 303© 2011 Blackboard Inc. Proprietary and Confidential. U.S. Patent No. 6,988,138. Additional Patents Pending.

Tests and Assignments > Group Assignments
How to View Group Assignment Grades and FeedbackBlackboard does not score assignments automatically. Each assignment needs to be reviewed by yourinstructor. You can review the information provided by your instructor inMy Grades or on the assignment'sReview Submission History page.
Blackboard Learn Release 9.1 - Help for Students - Page 304© 2011 Blackboard Inc. Proprietary and Confidential. U.S. Patent No. 6,988,138. Additional Patents Pending.

Tests and Assignments > Group Assignments
Accessing My Grades From Within Your Course1. On the CourseMenu, click Tools2. On the Tools page, click My Grades.
Accessing My Grades From Outside Your Course1. On theMy Institution tab, click My Grades on the Tools panel.2. On theMy Courses/Organizations page, click the name of your course.
Blackboard Learn Release 9.1 - Help for Students - Page 305© 2011 Blackboard Inc. Proprietary and Confidential. U.S. Patent No. 6,988,138. Additional Patents Pending.

Tests and Assignments > Group Assignments
Reviewing Your Gradel If your group assignment has not been graded, theGrade column contains a symbol indicating its
status.
Blackboard Learn Release 9.1 - Help for Students - Page 306© 2011 Blackboard Inc. Proprietary and Confidential. U.S. Patent No. 6,988,138. Additional Patents Pending.

Tests and Assignments > Group Assignments
l If your group assignment has been submitted and graded, the grade appears in theGrade column.You can also see your instructor's feedback in theComments column.
Reviewing Your Grade from the Group HomepageYou can also view your grade and any feedback provided by your instructor in the assignment's ReviewSubmission History page. If your instructor attached a file, youmust access it from the group homepage'sgroup assignment link.
1. On theMy Groups panel, click the name of your group.2. On the group homepage, click the name of your group assignment. TheReview Submission
History page includes:l Instructor Feedback: This section lists your grade and any feedback provided by your
instructor.
l Attached Files: This section provides links to open or download any files attached by youor your instructor. For example, your instructor might provide comments in a file that you
Blackboard Learn Release 9.1 - Help for Students - Page 307© 2011 Blackboard Inc. Proprietary and Confidential. U.S. Patent No. 6,988,138. Additional Patents Pending.

Tests and Assignments > Group Assignments
Blackboard Learn Release 9.1 - Help for Students - Page 308© 2011 Blackboard Inc. Proprietary and Confidential. U.S. Patent No. 6,988,138. Additional Patents Pending.

Tests and Assignments > About SafeAssign
Accessing the Review Submission History Page from Group Assignments1. Return to the group assignment link in the Content Area that holds the assignment, for example,
theGroup AssignmentsContent Area.2. Click the name of the assignment.
My Grades Item StatusThe following table describes the symbols appearing on theMy Grades page.
SymbolDescription
- Item has not yet been completed. No information is available.
Item has been completed, but will not have a grade (for items such as surveys).
Item has been submitted. This item is waiting to be reviewed by your instructor.
-OR-
Item has been submitted. Your instructor may review this item but may not be provided a grade (for itemssuch as surveys).
Grade Item has been graded. Click the grade to view detailed feedback.
Attempt is in progress. This item has not been submitted. To submit the item, see Submitting a DraftAssignment.
Grade is exempted for this user. If you do not complete this assignment, it will not affect your grade.
Error has occurred. Contact your instructor.
About SafeAssignSafeAssign compares submitted assignments against a set of academic papers to identify areas of overlapbetween the submitted assignment and existing works. Safe Assign is used to prevent plagiarism and to createopportunities to help students identify how to properly attribute sources rather than paraphrase. SafeAssign iseffective as both a deterrent and an educational tool.
How SafeAssignments Work
Blackboard Learn Release 9.1 - Help for Students - Page 309© 2011 Blackboard Inc. Proprietary and Confidential. U.S. Patent No. 6,988,138. Additional Patents Pending.

Tests and Assignments > About SafeAssign
SafeAssign is based on a unique text matching algorithm capable of detecting exact and inexact matchingbetween a paper and sourcematerial. SafeAssignments are compared against several different databases,including:
l Internet: Comprehensive index of documents available for public access on the Internetl ProQuest ABI/Inform database: More than 1,100 publication titles and about 2.6million articles
from 1990s to present time, updated weekly (exclusive access)l Institutional document archives: Contains all papers submitted to SafeAssign by users in their
respective institutionsl Global Reference Database: Contains papers that were volunteered by students from Blackboard
client institutions to help prevent cross-institutional plagiarism
Global Reference DatabaseBlackboard’s Global Reference Database is a separate database where students voluntarily donate copies oftheir papers to help prevent plagiarism. It is separated from each institution’s internal database, where allpapers are stored by each corresponding institution, and students are free to select the option to check theirpapers without submitting them to the Global Reference Database. Students submit their papers to thedatabase voluntarily and agree not to delete papers in the future. Submissions to the Global ReferenceDatabase are extra copies that are given voluntarily for the purpose of helping with plagiarism prevention.Blackboard does not claim ownership of submitted papers.
SafeAssign Originality ReportsAfter a paper has been processed, a report will be available detailing the percentage of text in the submittedpaper that matches existing sources. It also shows the suspected sources of each section of the submittedpaper that returns amatch. Instructors can delete matching sources from the report and process it again. Thismay be useful if the paper is a continuation of a previously submitted work by the same student.
Because SafeAssign identifies all matching blocks of text, it is important to read the report carefully andinvestigate whether or not the block of text is properly attributed.
Interpreting SafeAssign ScoresSentencematching scores represent the percentage probability that two phrases have the samemeaning. Thisnumber can also be interpreted as the reciprocal to the probability that these two phrases are similar by chance.For example, a score of 90 percent means that there is a 90 percent probability that these two phrases are thesame and a 10 percent probability that they are similar by chance and not because the submitted paper includescontent from the existing source (whether or not it is appropriately attributed).
Overall score is an indicator of what percentage of the submitted paper matches existing sources. This score isa warning indicator only and papers should be reviewed to see if thematches are properly attributed.
l Scores below 15 percent: These papers typical include some quotes and few common phrases orblocks of text that match other documents. These papers typically do not require further analysis, asthere is no evidence of the possibility of plagiarism in these papers.
l Scores between 15 percent and 40 percent: These papers include extensive quoted orparaphrasedmaterial or they may include plagiarism. These papers should be reviewed to determineif thematching content is properly attributed.
l Scores over 40 percent: There is a very high probability that text in this paper was copied from othersources. These papers include quoted or paraphrased text in excess and should be reviewed forplagiarism.
Blackboard Learn Release 9.1 - Help for Students - Page 310© 2011 Blackboard Inc. Proprietary and Confidential. U.S. Patent No. 6,988,138. Additional Patents Pending.

Tests and Assignments > About SafeAssign
Grade Center IntegrationSafeAssignments are created with associated Grade Center items. The score is then recorded in the GradeCenter.
How to Submit a SafeAssignment1. On the CourseMenu, select the Content Area that holds the SafeAssignment, for example, the
AssignmentsContent Area.2. On theAssignments page, look for the SafeAssignment and click View/Complete.
3. On theUpload SafeAssignment page, optionally, type your comment in theComment box.4. Click Browse to select a file to attach as your submission.5. Optionally, select theGlobal Reference Database check box to upload your paper to the Global
Reference Database.
Note: Submitting to the SafeAssign Global Reference Database allows papers from otherinstitutions to be checked against your paper to protect the originality of your work acrossinstitutions.
6. Click Submit.Note: After you submit SafeAssignments, there is a slight delay between the upload and theavailability of the SafeAssign report. Results are normally available within 10-15minutes.
Blackboard Learn Release 9.1 - Help for Students - Page 311© 2011 Blackboard Inc. Proprietary and Confidential. U.S. Patent No. 6,988,138. Additional Patents Pending.

Tests and Assignments > About SafeAssign
How to View SafeAssignment SubmissionsYour submissions and the SafeAssign reports associated with submissions are viewable by accessing theSafeAssignment after submitting your paper.
Note: This option is only available if allowed by your instructor.
Viewing a SafeAssign Submission1. Return to the assignment link in the Content Area that holds the SafeAssignment, for example, the
AssignmentsContent Area.2. On theAssignments page, look for the SafeAssignment and click View/Complete. TheView
SafeAssignment page appears. This page includes:l Assignment Information: This section displays the name of the SafeAssignment and its
description.l Submitted Work: This section provides link to the following :
o Text: Select this option to view your paper and comments.o File: Select this option to download the submission.
Blackboard Learn Release 9.1 - Help for Students - Page 312© 2011 Blackboard Inc. Proprietary and Confidential. U.S. Patent No. 6,988,138. Additional Patents Pending.

Tests and Assignments > About SafeAssign
o Matching: The percentage listed is the percentage of your paper that matchesother sources. Read the full report to determine if thematching is properlyattributed.
o SA Report: Select this option to view the full SafeAssign report.l View Grade: This section lists the grade given by your instructor.l Instructor's Feedback: This section lists any feedback, and provides links to open or
download any files attached by your instructor..
Blackboard Learn Release 9.1 - Help for Students - Page 313© 2011 Blackboard Inc. Proprietary and Confidential. U.S. Patent No. 6,988,138. Additional Patents Pending.
Tests and Assignments > About SafeAssign
Viewing a SafeAssign ReportSafeAssign Report provides detailed information about thematches found between your submitted paper andexisting sources. The SafeAssign Report identifies all matching blocks of text. It is your and your instructor'sresponsibility to investigate whether thematching text is properly referenced or not. Detailing every matchprevents detection errors due to differences in citing standards.
1. Return to theView SafeAssignment page.2. On theView SafeAssignment page, click the green check mark link underSA Report. TheSA
Report provides extensive information to help you determine whether you are appropriately citingyour works. This page includes:
l Paper Information: This section lists data about the paper, such as the author, percentmatching, and when it was submitted. This section also includes options for downloadingthe report, emailing the report, or viewing a printable version. Note that the printableversionmay be themost effective view of the report for those users that rely on assistivetechnologies to access Blackboard Learn.
l Suspected Sources: This section lists the original sources that match sections of thesubmitted paper.
o To display the original work, click on the source title.o To display the related phrase within your paper, click themagnifying glass.
l Paper Text: This section shows the submitted paper. All matching blocks of text areidentified and numbered. Click a phrase to display the Source ComparisonWindow whichprovides a direct comparison between your paper’s phrase and the source document it
Blackboard Learn Release 9.1 - Help for Students - Page 314© 2011 Blackboard Inc. Proprietary and Confidential. U.S. Patent No. 6,988,138. Additional Patents Pending.

Tests and Assignments > About SafeAssign
Blackboard Learn Release 9.1 - Help for Students - Page 315© 2011 Blackboard Inc. Proprietary and Confidential. U.S. Patent No. 6,988,138. Additional Patents Pending.

Tests and Assignments > About SafeAssign
Interpreting the Overall SafeAssign ScoreThe overall SafeAssign score indicates the percentage of the submitted paper that matches existing sources.
l Scores below 15 percent: These papers typically include some quotes and few common phrases orblocks of text matching other documents.
l Scores between 15 percent and 40 percent: These papers include extensive quoted orparaphrasedmaterial or they may include plagiarism.
l Scores over 40 percent: There is a very high probability that text in this paper was copied from othersources. These papers include quoted or paraphrased text in excess.
Blackboard Learn Release 9.1 - Help for Students - Page 316© 2011 Blackboard Inc. Proprietary and Confidential. U.S. Patent No. 6,988,138. Additional Patents Pending.