
BK Crew Schedule - Papa Vino's · 2 Process Overview (Sequence of Events) Manager Enters: Employee...
41
Crew Scheduling Putting The: Right People In The: Right Place At The: Right Time For The: Best Labor Cost
Transcript of BK Crew Schedule - Papa Vino's · 2 Process Overview (Sequence of Events) Manager Enters: Employee...
Crew Scheduling
Putting The:
Right People
In The:
Right Place
At The:
Right Time
For The:
Best Labor Cost

1
Table of Contents Table of Contents 1 Process Overview (Sequence of Events) 2 Main Menu 3
Database Maintenance Functions
Add New, Active, Inactive and Terminate Employees 4 Employee Selection (Choosing specific Employees) 5
Employee Maintenance Sub-Menu 6 Personal Data (General Information Tab) 7 Personal Data (Filing Status Tab) 8 Personal Data (Review/Termination Tab) 9 Schedule Preferences 10 Employee Reviews (Numerical Rating Tab) 11 Employee Reviews (Summary, Actions & Comments Tab) 12 Employee Reviews (Finish Review Tab) 13 Skill Levels by Job Position 14 Requests for Time Off 15
Sales History 16 System Settings Sub-Menu 17
Job Codes 18 Sales Per Labor ½ Hour 19 Shift Times 20
Skill Levels & Labor Costs 21
Work With Schedule Functions Create Sales Forecast 22 Modify Sales Forecast 23 Schedule Builder 24-25 Scheduled Shifts Button 26 Scheduled Hours Button 27 Minor-Aged Restrictions Button 28 Michigan Restrictions 29 Indiana Restrictions 30 View Schedule 31 Copy Schedule 32 Report Sub-Menu 33 Employee Data Listing 34
Position Chart 35 Employee Roster 36-38 Schedule Listing 39-40

2
Process Overview (Sequence of Events)
Manager Enters:
Employee Data Program Builds:
Initial Sales Forecast Manager Adjusts:
Modified Sales Forecast
Program Projects: Direct Labor Staffing Needs
Manager Creates:
Shifts & Job Positions
Manager Assigns to Shifts:
Salaried & Hourly Employees
Program Constantly Monitors:
Scheduled Hours & Projected Costs

3
Main Menu
The Main Menu is the first screen in the Crew Scheduling application. Repetitive tasks done periodically through the week are organized on the left side of the screen under the title of “Database Maintenance” and primarily allow you to keep up with information pertaining to your employees – both active and terminated. Adding new employees or changing information pertaining to existing employees will be frequent tasks executed from this menu. The Add New Employee button has been set up as a separate function so that the system can prompt you through all the necessary steps when you process a new-hire to ensure no pertinent data is missed. Sales History allows you to view historical sales collected from the point-of-sale system on a daily basis. This option is primarily utilized to view the sales that will be used to forecast or project future sales weeks. The System Settings button will display a sub-menu allowing you to view system parameters that control certain aspects of the program – such as job codes, sales per labor half-hour, shift times, and labor cost targets. These programs will rarely be used. The weekly tasks necessary to create a schedule are on the right side under the title “Work with Schedule”. Each week, begin with the Create Sales Forecast function and then use the Modify Forecast option to make changes based on any known information for the upcoming week. You will then use the Schedule Builder function to create a schedule for each day of the week in a line-bar fashion. Other options allow copying, viewing, and printing reports or schedules.
4
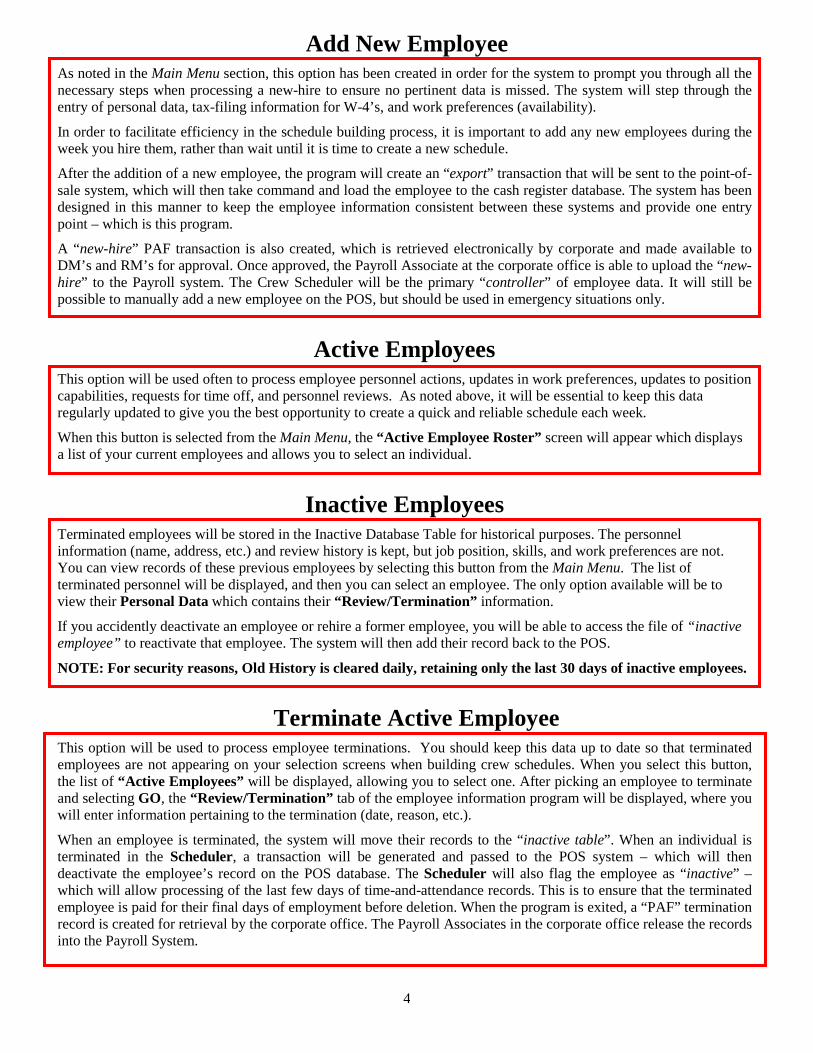
Add New Employee As noted in the Main Menu section, this option has been created in order for the system to prompt you through all the necessary steps when processing a new-hire to ensure no pertinent data is missed. The system will step through the entry of personal data, tax-filing information for W-4’s, and work preferences (availability).
In order to facilitate efficiency in the schedule building process, it is important to add any new employees during the week you hire them, rather than wait until it is time to create a new schedule.
After the addition of a new employee, the program will create an “export” transaction that will be sent to the point-of-sale system, which will then take command and load the employee to the cash register database. The system has been designed in this manner to keep the employee information consistent between these systems and provide one entry point – which is this program.
A “new-hire” PAF transaction is also created, which is retrieved electronically by corporate and made available to DM’s and RM’s for approval. Once approved, the Payroll Associate at the corporate office is able to upload the “new-hire” to the Payroll system. The Crew Scheduler will be the primary “controller” of employee data. It will still be possible to manually add a new employee on the POS, but should be used in emergency situations only.
Active Employees
This option will be used often to process employee personnel actions, updates in work preferences, updates to position capabilities, requests for time off, and personnel reviews. As noted above, it will be essential to keep this data regularly updated to give you the best opportunity to create a quick and reliable schedule each week.
When this button is selected from the Main Menu, the “Active Employee Roster” screen will appear which displays a list of your current employees and allows you to select an individual.
Inactive Employees
Terminated employees will be stored in the Inactive Database Table for historical purposes. The personnel information (name, address, etc.) and review history is kept, but job position, skills, and work preferences are not. You can view records of these previous employees by selecting this button from the Main Menu. The list of terminated personnel will be displayed, and then you can select an employee. The only option available will be to view their Personal Data which contains their “Review/Termination” information.
If you accidently deactivate an employee or rehire a former employee, you will be able to access the file of “inactive employee” to reactivate that employee. The system will then add their record back to the POS.
NOTE: For security reasons, Old History is cleared daily, retaining only the last 30 days of inactive employees.
Terminate Active Employee
This option will be used to process employee terminations. You should keep this data up to date so that terminated employees are not appearing on your selection screens when building crew schedules. When you select this button, the list of “Active Employees” will be displayed, allowing you to select one. After picking an employee to terminate and selecting GO, the “Review/Termination” tab of the employee information program will be displayed, where you will enter information pertaining to the termination (date, reason, etc.).
When an employee is terminated, the system will move their records to the “inactive table”. When an individual is terminated in the Scheduler, a transaction will be generated and passed to the POS system – which will then deactivate the employee’s record on the POS database. The Scheduler will also flag the employee as “inactive” – which will allow processing of the last few days of time-and-attendance records. This is to ensure that the terminated employee is paid for their final days of employment before deletion. When the program is exited, a “PAF” termination record is created for retrieval by the corporate office. The Payroll Associates in the corporate office release the records into the Payroll System.

5
Employee Roster (Active or Terminated Employees)
This selection screen is displayed when you press any the following buttons on the Main Menu: Active Employees, Inactive Employees or Terminate Active Employee. This screen allows you to select an employee in order to update personnel and scheduling data. If you click the mouse in any of the top text windows – labeled Emp No, Last Name, or First Name – your employee list will resort in that order. For example, if you click in the Emp No window, the list will resort in the order of the employees’ numbers. If you then begin to type an employee number, the system will bring that number to the top of the list and highlight it in yellow. If you click in the Last Name window and begin to type the first few letters of an employee’s last name, the first match will appear at the top of the list – again highlighted in yellow. If the computer finds no match, the next employee in the list will move to the top of the screen but will not be highlighted. The First Name field is handled in the same manner as the last name. This function was designed in this manner in order to provide flexibility and speed in accessing employee information. If you know the employee numbers, it may be the fastest approach. If not, last name, first name, or scrolling down through the list will work fine. You may also manually select a name on the list – which will become highlighted in yellow. Once an employee is selected, press the Go! button – double clicking on the employee will not work. The system will then display a sub-menu that will allow access to information about the chosen employee.
6
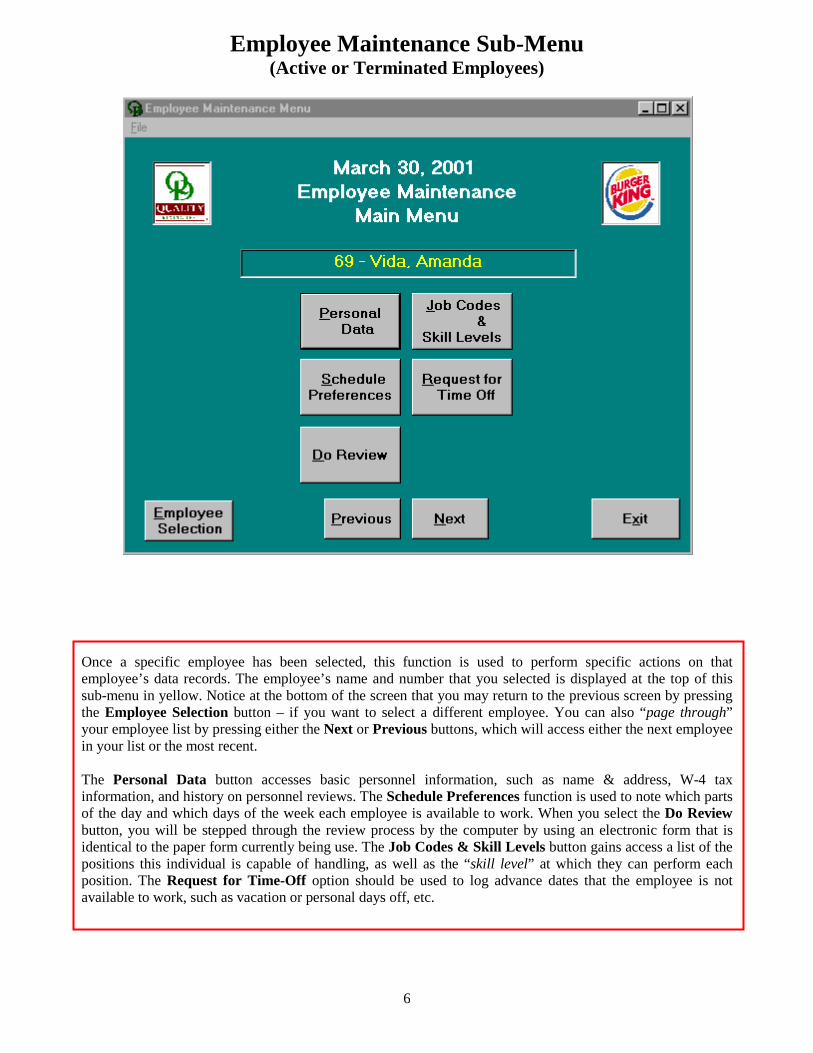
Employee Maintenance Sub-Menu (Active or Terminated Employees)
Once a specific employee has been selected, this function is used to perform specific actions on that employee’s data records. The employee’s name and number that you selected is displayed at the top of this sub-menu in yellow. Notice at the bottom of the screen that you may return to the previous screen by pressing the Employee Selection button – if you want to select a different employee. You can also “page through” your employee list by pressing either the Next or Previous buttons, which will access either the next employee in your list or the most recent. The Personal Data button accesses basic personnel information, such as name & address, W-4 tax information, and history on personnel reviews. The Schedule Preferences function is used to note which parts of the day and which days of the week each employee is available to work. When you select the Do Review button, you will be stepped through the review process by the computer by using an electronic form that is identical to the paper form currently being use. The Job Codes & Skill Levels button gains access a list of the positions this individual is capable of handling, as well as the “skill level” at which they can perform each position. The Request for Time-Off option should be used to log advance dates that the employee is not available to work, such as vacation or personal days off, etc.
7
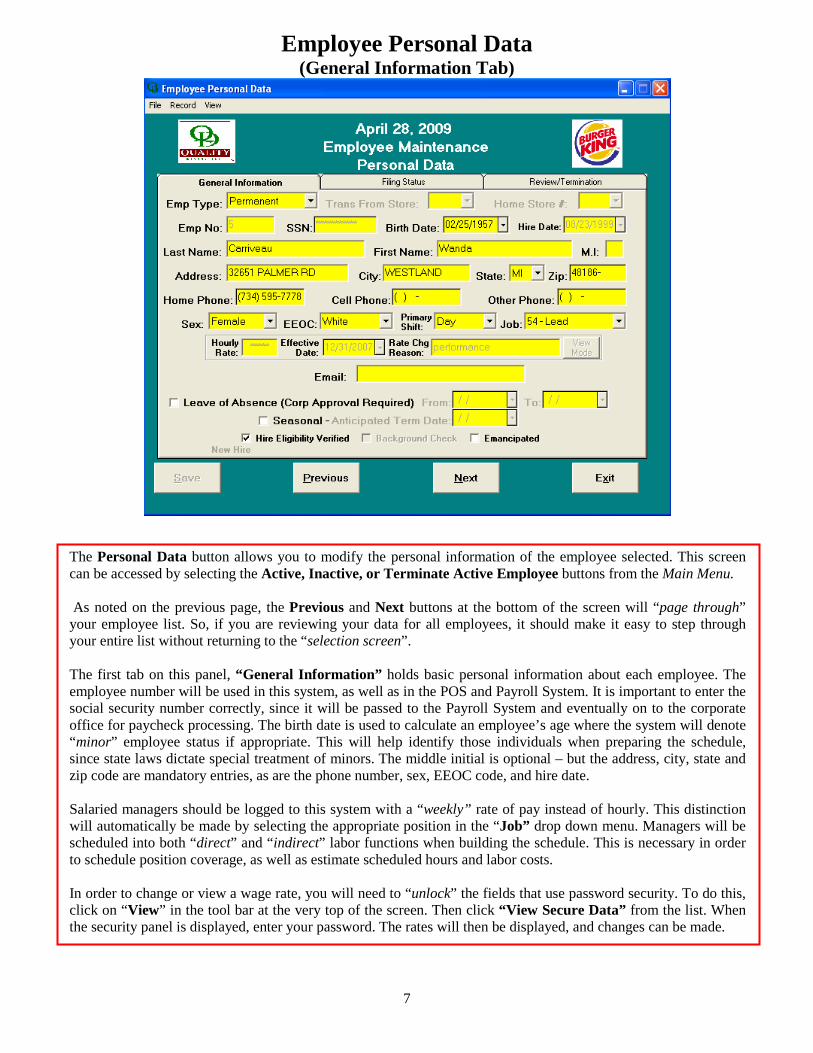
Employee Personal Data (General Information Tab)
The Personal Data button allows you to modify the personal information of the employee selected. This screen can be accessed by selecting the Active, Inactive, or Terminate Active Employee buttons from the Main Menu. As noted on the previous page, the Previous and Next buttons at the bottom of the screen will “page through” your employee list. So, if you are reviewing your data for all employees, it should make it easy to step through your entire list without returning to the “selection screen”. The first tab on this panel, “General Information” holds basic personal information about each employee. The employee number will be used in this system, as well as in the POS and Payroll System. It is important to enter the social security number correctly, since it will be passed to the Payroll System and eventually on to the corporate office for paycheck processing. The birth date is used to calculate an employee’s age where the system will denote “minor” employee status if appropriate. This will help identify those individuals when preparing the schedule, since state laws dictate special treatment of minors. The middle initial is optional – but the address, city, state and zip code are mandatory entries, as are the phone number, sex, EEOC code, and hire date. Salaried managers should be logged to this system with a “weekly” rate of pay instead of hourly. This distinction will automatically be made by selecting the appropriate position in the “Job” drop down menu. Managers will be scheduled into both “direct” and “indirect” labor functions when building the schedule. This is necessary in order to schedule position coverage, as well as estimate scheduled hours and labor costs. In order to change or view a wage rate, you will need to “unlock” the fields that use password security. To do this, click on “View” in the tool bar at the very top of the screen. Then click “View Secure Data” from the list. When the security panel is displayed, enter your password. The rates will then be displayed, and changes can be made.

8
Employee Personal Data
(Filing Status Tab)
The second tab on the panel is “Filing Status” and is used to log tax-related information. This Data is being passed to the corporate office as part of the “new-hire” PAF via electronic collection

9
Employee Personal Data (Review/Termination Tab)
The third tab pertains to “Review/Termination” information. When an employee is added to the system, a new-hire record is added with the starting pay noted. As reviews are processed or additional records are added, the “Review History” will reflect the scoring of the review as well as the new wage rate. Over time, this should provide history on a staff member that would be useful when reviewing performance on individuals or for a newly hired store as manager to become familiar with the staff. You can view a previous personnel review by “double-clicking” on one of the rows in the grid. The actual form will be displayed with all scoring and notes that were taken when the review was entered. When the Terminate Active Employees button is selected – from the Main Menu – the employee roster selection screen is displayed. After the employee to be terminated is selected, the system takes you directly to this panel to enter the data needed to process the termination. You must enter the “Termination Date”, “Termination Type”, and “Termination Reason” in order to select the Save button which will then complete the termination process of the employee.

10
Schedule Preferences
The Schedule Preferences function is accessed from the Employee Maintenance Sub-Menu. This function is used to log the “days of the week” and “times of each day” that employees are available to work. For each day of the week, left-click the mouse on the earliest time an individual is available, drag the bar to the latest time and release the mouse button. If an employee wants to work split shifts and is not available between the two shifts, you can draw multiple bars on one day. If an employee has full availability – available everyday at all times with no restrictions – select the 24/7 button in the top right corner. This will automatically fill in all the days and times, making the employee available all day, every day. Also, the 24/7 button can be used if an employee has almost full availability by simply removing the days and times the employee is unavailable. If the employee has a large amount of days and times that they are available, using this method will be easier and more efficient than manually entering all the available days and times. To remove a bar from the availability chart, simply right-click on bar you want to remove and select “Delete Selected Shift Preference”, this can also be done by using the “Edit” tab. If used properly, this function will give useful information about availability and help in the scheduling process. As in the previous functions that manage employee information, the Next and Previous buttons at the bottom of the screen are used to move forward and backward through the employee list.

11
Employee Review (Numerical Rating Tab)
When you press the Do Review button on the Employee Maintenance Sub-Menu, a security screen is displayed and you must enter the appropriate password. This has been placed under security because the current wage rate is displayed on the review form. This electronic form is identical to the paper forms being used in the stores currently. To process a review, you should click on the column that identifies the performance level (1-5) of that category (noted in red). The rating number will appear in the “Rating” column to the far right. Next, you should click on the “scroll bar” located next to the “Rating” column to position the screen to the next category. Continue in this manner until the square tab in the scroll bar is at the bottom of the scroll bar and you cannot scroll down further. Once finished with all the ratings, click on the middle tab – “Summary, Actions & Comments”. If you select Exit, a prompt will appear asking if you would like to “Finish Review”. If you would like complete the review select “Yes”. A message “Entry Required” will appear – select “OK”. The Finish Review tab will then be displayed. Instructions for this tab will be given later.
12
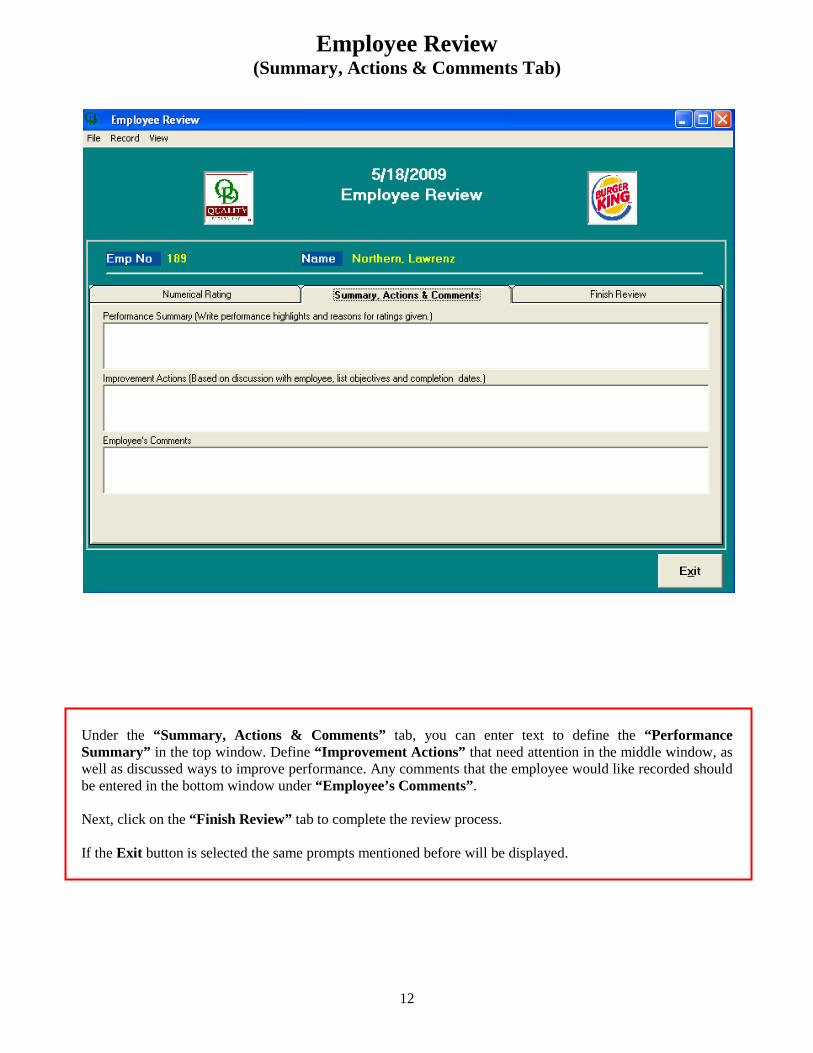
Employee Review (Summary, Actions & Comments Tab)
Under the “Summary, Actions & Comments” tab, you can enter text to define the “Performance Summary” in the top window. Define “Improvement Actions” that need attention in the middle window, as well as discussed ways to improve performance. Any comments that the employee would like recorded should be entered in the bottom window under “Employee’s Comments”. Next, click on the “Finish Review” tab to complete the review process. If the Exit button is selected the same prompts mentioned before will be displayed.

13
Employee Review
(Finish Review Tab)
In the “Finish Review” tab, you should see the rating calculated by the computer. In this area, you should enter the “Review Date”, “New Wage Rate”, and the “Next Review Date”. You will also need to enter the “Rater/Title” and Date. The witness name and date are optional, and only need to be entered if you had a “third party” witness the signing of the review by the employee. When the input for the review is complete, select the Finish button. The review will be stored on the computer and two copies will automatically be printed. One copy should be kept for your records and the other is for the employee. An electronic PAF is created and collected by the corporate office. It is flagged to require rejections or approval by the DM and RM. If rejected by the RM, the wage is reset to the previous rate. Once approved by the RM, the wage rate change is available for the Payroll Associate to release the wage change to the corporate Payroll System. All information contained in the review will be stored for future use and can be accessed via the “Review/Termination” tab in the Personal Data function inside the Active Employee function.
14
Job Position & Skill Levels (Active Employees Only)
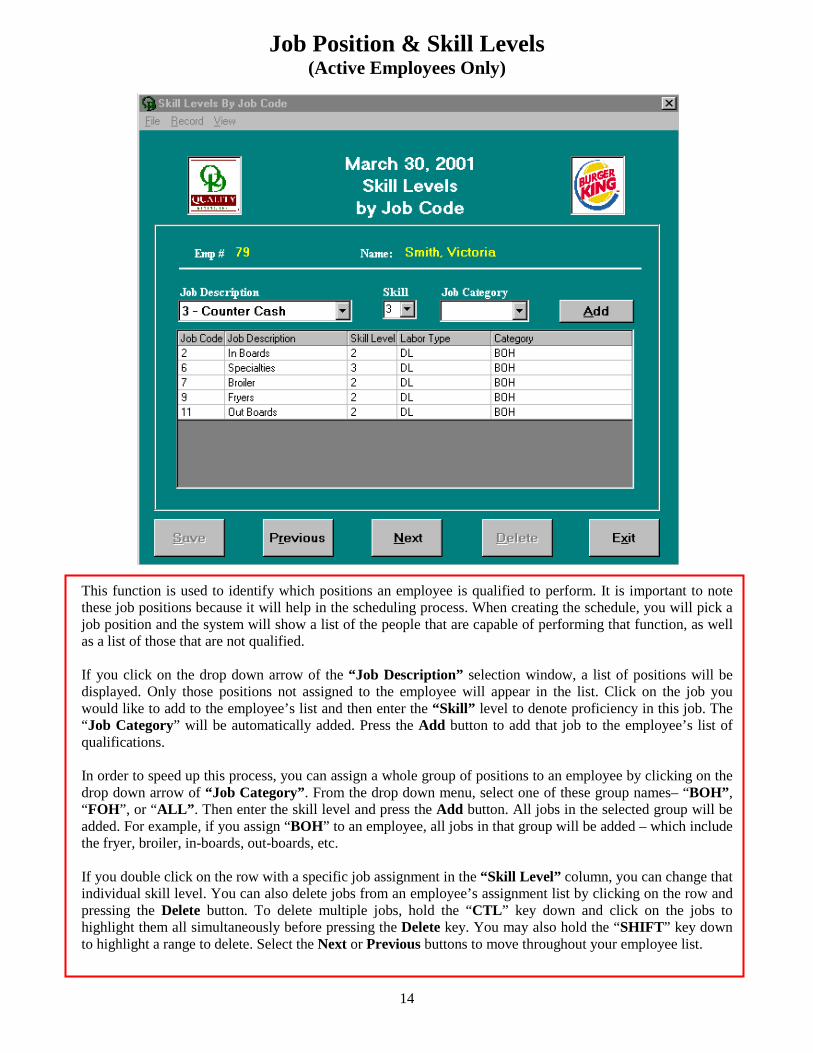
This function is used to identify which positions an employee is qualified to perform. It is important to note these job positions because it will help in the scheduling process. When creating the schedule, you will pick a job position and the system will show a list of the people that are capable of performing that function, as well as a list of those that are not qualified. If you click on the drop down arrow of the “Job Description” selection window, a list of positions will be displayed. Only those positions not assigned to the employee will appear in the list. Click on the job you would like to add to the employee’s list and then enter the “Skill” level to denote proficiency in this job. The “Job Category” will be automatically added. Press the Add button to add that job to the employee’s list of qualifications. In order to speed up this process, you can assign a whole group of positions to an employee by clicking on the drop down arrow of “Job Category”. From the drop down menu, select one of these group names– “BOH”, “FOH”, or “ALL”. Then enter the skill level and press the Add button. All jobs in the selected group will be added. For example, if you assign “BOH” to an employee, all jobs in that group will be added – which include the fryer, broiler, in-boards, out-boards, etc. If you double click on the row with a specific job assignment in the “Skill Level” column, you can change that individual skill level. You can also delete jobs from an employee’s assignment list by clicking on the row and pressing the Delete button. To delete multiple jobs, hold the “CTL” key down and click on the jobs to highlight them all simultaneously before pressing the Delete key. You may also hold the “SHIFT” key down to highlight a range to delete. Select the Next or Previous buttons to move throughout your employee list.

15
Requests for Time Off
This function should be used to enter planned time off work (for events such as vacations, funerals, leaves of absence, or other conflicts) for days that the employee is normally willing to work – without changing the “Shift Preferences” for the employee. This will allow you to keep an employee’s basic work preferences intact, but still denote upcoming times of unavailability. You may enter these requests as far in advance as you would like and the system will make them obtainable when preparing the schedule. This will help ensure that you do not attempt to schedule an individual that will be unavailable. To add an entry, either key in the date range or select the pull-down arrow from the “From” and “To” windows and then click on the date. To define the “Reason” for the requested time off, you can either select from the pull-down list or key in your own description. The Add button will become active only after a date and reason have been entered. When the Add button has been selected the entry will be placed in a row in the window. To delete an entry, highlight the entry in the window by clicking anywhere in that the row. The Delete button will then be activated at the top of the screen, and when pressed the entry will be removed. As in the previous functions dealing with employees, the Next and Previous buttons at the bottom of the screen are used to move forward and backward through the employee list.

16
Sales History
Sales history – which is located on the Main Menu – is collected from the POS system daily and logged to this system. With this function, you are able to view the history used to generate the sales forecast. You should rarely need to access this part of the system. It should only be necessary to determine possible failures in the forecasting process. For example, if the forecast is not reasonable, a sale here could reflect a problem with the collection of the data from the POS. If you encounter a problem of this nature, you should contact the IT department so that we can help resolve the issue.

17
System Settings Sub-Menu
“System Settings” are other aspects of the system that you will not need to access often. These are global parameters of the system that are used for schedule preparations, but will need little day-to-day maintenance. Some items, such as Job Codes and Sales per Labor Hours, are controlled by corporate and will be downloaded when changes are needed. The other two options – Shift Times and Skill-Level Labor Cost – will be set up once and rarely changed. They would only need attention if your breakfast or closing times are changed, or your labor budget was modified.

18
Job Codes
Job codes and descriptions – as well as the direct/indirect categorizations – will be maintained by personnel in the IT department of the corporate office. New entries will be downloaded to all stores when necessary. This is handled in this manner to ensure consistency amongst all units. Selecting the Previous and Next buttons are used to move forward and backward through the job codes by “Name”. The Exit button will return you to the Main Menu.

19
Sales Per Labor ½-Hour
This section is located by selecting System Settings on the Main Menu and then selecting Sales Per Labor Hours. As with the job codes, these productivity targets will be maintained by personnel in the IT department of the corporate office. New entries will be downloaded to all stores when necessary. These sales targets are used to “suggest” the number of “man-hours” in direct labor needed to support the sales forecast for specific parts of the day. The sales are forecasted in 15-minute increments and then summed into half-hour totals. This chart is then used to estimate the number of “direct labor” crew required to support that level of sales volume. It is very important when scheduling to remember the critical aspects of how this part of the system is used. For one thing – as with anything based on ranges – your actual requirements will vary based on whether the sales forecast for a time period is at the low end or the high end of the range. You will still need to use your “management intuition” and experience to determine when to bring on additional employees. The second thing to remember is that these ranges only suggest direct labor man-hours. That is because only the man-hours for job positions that support sales – direct labor functions – will vary, substantially due to fluctuations in sales volume. Man-hours for “indirect labor” functions – such as cleaning and maintenance – must be scheduled based on a much wider set of weekly sales ranges, which do not fluctuate nearly as much from week-to-week. The Exit button will return you to the Main Menu.

20
Shift Times
This section is located by selecting System Settings on the Main Menu and then selecting Shift Times. Once defined, this part of the system should require very little on-going attention. In this area, you will define the beginning and end of each part of the day. The business day has been set to begin at 5:00 AM and end at 4:59 AM the next day. This is to ensure that the entire 24-hour day is accounted for in the set of shifts. You can only change the “End-Times” and the computer will automatically reset the “Start-Times” based on your changes in preceding shifts to avoid any time overlaps. For example, you should set the “End Time” for the “Pre-Open” shift to end a minute before breakfast starts. Then the system will automatically reset the “Start-Time” for breakfast one minute later. If you set the “End-Time” for “Late-Night” to coincide with your closing time (3:00 am), then the system will reset the “Start-Time” of the “Post-Close” shift so that it begins a minute after closing (3:01 am). Since day and closing times vary by day of the week, you must click each day at the top of the screen in order to set the times properly for each of the days. The Exit button will return you to the Main Menu.

21
Skill Levels & Labor Cost
This part is located by selecting System Settings on the Main Menu then selecting Skill-Level Labor Cost. For each day of the week, you should enter your target for the average “Skill Level” desired in the first column on this form. These skill-level targets are purely informational, but will serve as benchmarks against the skill levels of the mix of employees you schedule each day of the week. The Schedule Builder will provide the status of the average level of those scheduled – by using these targets as a comparison. The “Total Labor” target, a percent of projected sales, is a more useful guideline. As you schedule salaried management personnel, a fifth of their weekly salary will be allocated to management labor for that day. For each day being scheduled, the hourly labor target will be recalculated as you schedule salaried management personnel – by subtracting the cost of scheduled management labor from the total labor target. As you build the schedule, the system will constantly inform you of the relationship between the scheduled hours of labor and these budget targets. When you first begin using this system, you may not have a good understanding of the total labor percents-of-sales that you are able to run on a Friday versus a Monday – with salaried management allocated to the days they work. If that is the case, enter the same weekly target for each day of the week. When management costs take up a larger percent-of-sales on a slow day, the hourly labor costs available to use are lower. As you gain an understanding of daily costs targets – including management allocation – you should return to this program to change the targets to vary by day. This will help in preparing future schedules, by supplying more realistic daily targets. Color Coding – Remember that “green” is good and “red” is bad! In the Schedule Builder program, these targets are used to measure against your schedule in-progress. If the cost of your scheduled labor is below the budget, the numbers will be green. If your cost exceeds the budget, they will be turned red.
22
Create Sales Forecast
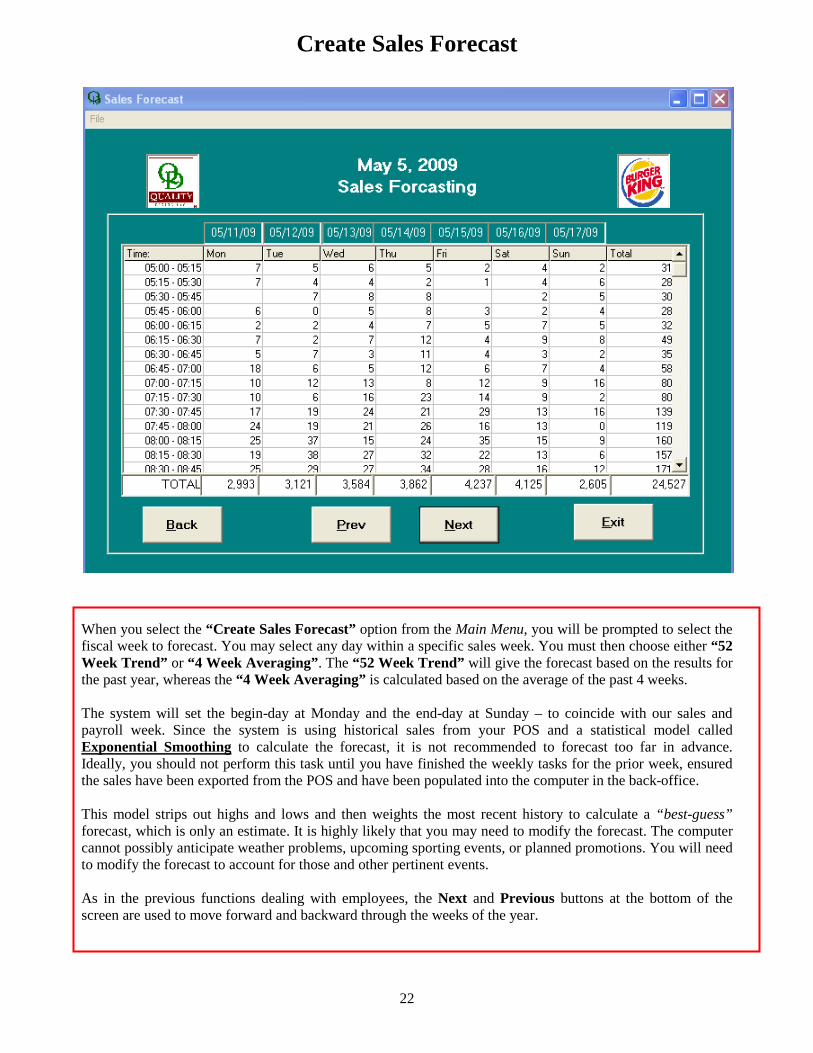
When you select the “Create Sales Forecast” option from the Main Menu, you will be prompted to select the fiscal week to forecast. You may select any day within a specific sales week. You must then choose either “52 Week Trend” or “4 Week Averaging”. The “52 Week Trend” will give the forecast based on the results for the past year, whereas the “4 Week Averaging” is calculated based on the average of the past 4 weeks. The system will set the begin-day at Monday and the end-day at Sunday – to coincide with our sales and payroll week. Since the system is using historical sales from your POS and a statistical model called Exponential Smoothing to calculate the forecast, it is not recommended to forecast too far in advance. Ideally, you should not perform this task until you have finished the weekly tasks for the prior week, ensured the sales have been exported from the POS and have been populated into the computer in the back-office. This model strips out highs and lows and then weights the most recent history to calculate a “best-guess” forecast, which is only an estimate. It is highly likely that you may need to modify the forecast. The computer cannot possibly anticipate weather problems, upcoming sporting events, or planned promotions. You will need to modify the forecast to account for those and other pertinent events. As in the previous functions dealing with employees, the Next and Previous buttons at the bottom of the screen are used to move forward and backward through the weeks of the year.

23
Modify Sales Forecast
This function allows two methods of “modifying the forecast”. If you click one of the two “sale percent modification” buttons – by either day or week – you can affect multiple parts of the forecast by a set percent. Every 15-minute day-part will be modified by the same percentage. If you click on the “Week” button, and then enter a percentage – positive or negative – the computer will change the entire forecast for the week by the specified percent. If you click on the “Day” button, a list of days will appear and you will be able to select only one day and then apply the percentage change to that specific day. In order to make the modifications, you must select the Save button after you have made your changes to the percentage. You can modify the forecast mid-week and re-cost your current schedule, if needed. At the end of the week, you can run a report that will show how close the computer’s original forecast was to actual sales, as well as the accuracy of your modified forecast. Changes should be made sparingly and reviewed at the end of the week, since the computer has access to a great deal more history than we can keep in our heads. This tool is relatively effective due to the daily trends in our business. When building this model, we reviewed graphs of sales for 52 weeks of history for each of our Burger King units. We noticed that the scale shifts up and down based on seasonality and promotions, but the trend across day-parts for each day of the week for each store is very stable. In other words, every store had a predictable trend line from breakfast to lunch to dinner to late-night with the same rises and dips evident in specific days of the week. For example, when reviewing a specific store, every Friday’s trend line was similar to every other Friday – but with different levels of sales. This means that the modifications by percentage across all day-parts should be most effective in modifying the projections. This topic needs one final note – forecasting is not an exact science – it is at best an educated guess that will require review and modification by an intelligent life form – that is YOU!

24
Schedule Builder
This is the heart of the Crew Scheduling program. All the functionality defined up to this point has been put in place to support this process. The top row of the screen reflects the sales forecast by the hour. The sales were actually forecasted in 15-minute increments and then summed into hourly totals on this screen. The second row at the top suggests the number of crew members needed in “direct labor” positions to support the sales forecast for each hour. Hours where peaks or valleys in sales cause different requirements in the first half-hour than the second will show two numbers separated by a dash. For example, in the 2:00 PM slot above, the “8-7” means that eight crew members in direct labor positions are suggested in the first half-hour from 2:00 to 2:30 and seven are suggested in the second half-hour between 2:30 and 3:00. The third row reflects the number of man-hours (both hourly crew & salaried managers) that have been placed into direct labor positions in that hour. Numbers in green denote hours where you are under or at the suggested man-hours and numbers in red reflect hours where you have exceeded the suggested man-hours. Shifts are built when you click on the grid and drag the cursor from the begin-time to the end-time of a shift. The computer will then show you a list of positions to pick from. Once you select the job position, two lists will be displayed – one will show “available” employees and the other will show “unavailable” people. Employees are placed in one list or the other based on shift preferences, job position qualifications and requests-for-time-off. You may select employees from either list – available or unavailable – except for employees listed in red. They may not be selected because they are either already on the schedule for the time you are filling – or you have entered vacation days or other requests for time off for that person. Employees scheduled into overtime will appear in the “unavailable” list, and if selected, you will receive a warning message. You can override the warning and place them on the schedule if necessary.

25
Schedule Builder As you build shifts, the numbers in the bottom window will be continually updated. Again, when monitoring these tracking totals at the bottom of the screen – “green numbers” are good and “red numbers” are not! There are two sets of numbers for each row – “Daily” on the left side and “Week-to-Date” on the right side. On the first row in the “monitoring totals” window at the bottom of your screen, the “Sales Forecast” for the day and the week-to-date is displayed. You can modify this forecast as often as needed by returning to the “Modify Sales Forecast” function described in previous sections. The second row reflects “Hourly Labor Percentages”. If no salaried managers have been scheduled, the budget for this category will equal the budget percentage on the “Total Labor” row. As soon as a salaried manager is placed on the schedule, one-fifth of the salary will be allocated to the “Management Labor” row. The hourly labor target will then be reduced by the same percentage – reflecting the gap between salaried management labor and total labor. The hourly labor scheduled is calculated based on actual wage rates in your personnel database – including any overtime costs if scheduled. If the scheduled labor is below the target for the day or week-to-date, the percentage will be displayed in green and in red if over the targets. The third row tracks “Management Labor Percentages”. There will never be a difference between the target and the scheduled labor. This is because the target is modified every time a salaried person is placed on the schedule in order to re-calculate the hourly target. If a manager is on vacation or loaned out to another store for a day, the entire weekly salary will not be allocated to your schedule – but only the days worked. The fourth row shows “Total Labor Percentages” and compares targets entered in the System Settings Menu to the combined total of the “Management Labor Percentage” and “Hourly Labor Percentage”. Due to the method in which salaried management costs are allocated to each day of the week in which they work, these percentages will be higher on slower days, but should be lower on busier days. This is because of the “economies of scale” that allow you to do “more with less” when sales are higher. As you use this system, you should gain a good understanding of the total labor percents-of-sales that you are able to run on a Friday versus a Monday. When management costs take up a larger percent-of-sales on a slow day, you have less to work with in hourly labor costs – if your goal is to meet your labor budget. As you prepare your schedule, watch the week-to-date numbers closely to keep track of your expected costs. You will probably need to schedule through Sunday to get a good feel for the weekly cost of your labor – with all management labor fully allocated. As you gain an understanding of daily costs targets – including management allocation – you should return to the System Settings Menu and change the daily labor targets to vary by day. This will help in preparing future schedules, by giving you more realistic daily targets. The fifth row displays “Direct Labor Hours” suggested by the Schedule Builder, compared to the hours scheduled for direct labor positions – including both salaried management and hourly staff. The total for the day is equivalent to the sum of the hourly numbers at the very top of the screen. If you have the proper number of direct labor hours scheduled – based on the suggestions at the top of the screen – but are over your budget, then you will have to look at the mix of people scheduled. You may have hourly staff scheduled into overtime or a great deal more higher-paid staff scheduled than lower-paid ones. The sixth row reflects “Hourly Crew Hours”, comparing budgeted hours to scheduled hours. The budgeted hours are calculated by multiplying the hourly budget percentage (on row two in the target column) by the sales forecast for the day, generating an hourly dollar budget. This dollar figure is divided by the “mean wage rate” to give the budgeted hours. Again, setting the daily total labor targets – in the System Settings area of the system – to vary by day of the week, will give much more useful hourly budget numbers on this row. The last row in the tracking area compares “Skill Level” targets from the System Settings Menu to the average of the certification levels of employees for all jobs scheduled. If the skill levels are kept up to date in your employee database, this will show you the mix of experience levels you have scheduled from day-to-day.

26
Schedule Builder
(Scheduled Shifts)
If the button labeled Sched Shifts at the bottom of the Schedule-Builder screen is selected, you will be presented with a selection window to pick the week of the schedule needed to be viewed. This is the same function that is available in the Report Sub-Menu defined later. After you pick the week, the above window will be displayed. This form shows all employees that have been scheduled for the week, reflecting begin-times and end-times for each shift. You should run this report periodically, as the schedule is being created in order to stay aware of your schedule in progress. You may also print this form. By selecting the Exit button, you will be brought back to the selection screen asking you to choose a week in which you wish to view a schedule. By selecting Exit again on this screen, you will return to the actual Schedule Builder. Select the Exit in the lower right corner on this screen and a Management Coverage window will appear. Verify that all the management positions you require to be covered have the correct number of managers working and then select Ok.

27
Schedule Builder (Scheduled Hours)
If the button labeled Sched Hours at the bottom of the Schedule Builder screen is selected, you will be presented with this form – listing all active employees even if they are not on the schedule. The total hours scheduled for each day and the total for the week are shown for each employee. As you build the schedule, you should view this form periodically to help balance your shifts between employees, ensure that you do not miss an employee, and avoid scheduling employees into overtime. Selecting the Exit button will return you to the Schedule Builder screen.

28
Schedule Builder (Minor-Aged Restrictions)
If the Minor button at the bottom of the Schedule-Builder screen is selected, you will be presented with this form – listing the rules restricting work-hours of minor-aged employees in your state. When employees are added to your database, the birth date is one of the required fields. Each time an employee’s record is retrieved, the age is calculated based on the birth date and the current system date – and a notation is displayed if the employee is of minor-age. When preparing your schedule, the minor-age notation is displayed in the list of available employees so that you can ensure that the rules are being followed. Due to the number of rules, and complexity required to support automation in this area, the “restrictions are not programmed” into the system at this time. At some later date, we will attempt to automate these restrictions. In the meantime, you must review this form periodically in order to ensure the rules are being followed.

29
Schedule Builder (Michigan Minor-Aged Restrictions)
AGE WORK PERMIT DEVIATION START
TIME ENDING
TIME DAILY MAX
WEEKLY MAX
MAX DAYS BREAK RESTRICTIONS
Put Original in Personnel File
Deviation of Hours Form
Cannot clock in before
Must clock out by
Maximum # of hours per
day
Maximum # of hours per
wk
Maximum days per wk
Uninterrupted 30 min. if shift is 4 ½+ hours
Can only work
Labor Day thru May 31st 7:00
PM
3 hours on school
days
18 hours for school
week Front Counter Drive-Thru Dining
Room Hours must be listed on a
separate schedule
15 YES YES 7:00 AM June 1 thru Labor Day 9:00
PM
8 hours on non-
school days
40 hours for non-school week
6 days YES
15
Withdrawn
Yes AND a Withdrawn Letter from school or YES 7:00 AM
Labor Day thru May 31st 7:00
PM 8 hours 40 hours 6 days YES
Front Counter Drive-Thru Dining
Room Expelled
Graduated Proof of
graduation or GED is required
June 1 thru Labor Day 9:00
PM
Hours must be listed on a
separate schedule
6:00 AM
16 & 17 in School
Withdrawn or Expelled
Yes Work Permit must state if withdrawn or expelled or a letter from the
5:00 AM Sat & Sun
with Deviation of Hours
and Parental
Permission
School Nights 10:30 PM or
11:30 PM Sun - Thurs and
12:30 AM Fri & Sat with
Deviation of Hours and Parental
Permission
Weekly average of
8 hours per day not to
exceed 10 hours in a
day
48 hours of school and work combined
school must be in the
personnel file
YES School
Vacations 5:00 am
with Deviation of Hours & Parental
Permission
School Vacations
11:30 PM or 12:30 AM with
Deviation of Hours and Parental
Permission
6 days YES No Restrictions
16 & 17 Graduated
Proof of graduation or
GED is required
YES No Restrictions
No Restrictions
No Restrictions
No Restrictions
No Restrictions
No Restrictions No Restrictions
15, 16 & 17 Emancipated
Proof of Emancipation
is required
No Restrictions
No Restrictions
No Restrictions
No Restrictions
No Restrictions
No Restrictions
No Restrictions
No Restrictions
14/15 year olds cannot work deviated hours and may not work during school hours. All stores must have posted and approved Application for Deviation for Minors Form from the Michigan Department of Labor. Unless emancipated or graduated, a minor may not work hours in which school is attended. Proof of emancipation can consist of: documentation from the court that the minor has been emancipated; a copy of the minor’s diploma or GED certificate; a copy of the minor’s marriage license.
Above are the restrictions on minors for the state of Michigan.

30
Schedule Builder (Indiana Minor-Aged Restrictions)
AGE WORK PERMIT
START TIME ENDING TIME DAILY MAX WEEKLY MAX MAX
DAYS BREAK ** RESTRICTIONS
Put Original in Personnel File
Cannot clock in before Must clock out by
Maximum # of hours per day
Maximum # of hours per wk
Maximum days per wk Uninterrupted
30 min. if shift is 4 ½+ hrs
Can only work
School Night 10:00 PM 8 hours
30 hours or with parental permission
40 hours
16 YES 6:00 AM Non-school Night: 10:00 pm or with
parental permission
12:00 / midnight
Non-School Day: 8 hours or 9 hours
with parental permission
Summer vacation: 30 hours or 48
hours with parental permission
6 days YES No Restrictions
6:00 AM on School Days
School Night 10:00 pm or with
parental permission 11:30
pm
8 hours 30 hours or 40
hours with parental permission
No Restrictions
17 YES
Non-School Day no
restrictions on start
time
Non-School Day followed by a
School Day (i.e. Sunday, Labor Day, Inservice Day): 1:00 AM with parental
permission; may not be
consecutive and not exceed 2 nights/week
Non-School Day: 8 hours or 9 hours
with parental permission
Summer vacation: 30 hours or 48
hours with parental permission
6 days YES
Non-School Night: no
required ending time
16 & 17 Withdrawn Expelled
Emancipated*
Yes, stating no longer in school or work permit AND a letter from school
No Restrictions
No Restrictions
No Restrictions
No Restrictions
No Restrictions
No Restrictions No Restrictions
16 & 17 Graduated
Proof of graduation or
GED is required
No Restrictions
No Restrictions
No Restrictions
No Restrictions
No Restrictions
No Restrictions No Restrictions
A minor may work between 7:30 AM and 3:30 PM on a school day with written permission issued by the school that the minor attends. All employers must post the Notice of Teen Worker Hour Restrictions in a conspicuous place.
*If the Minor is emancipated and enrolled in school, the minor is subject to the state hours restricts and break policy.
**Company policy requires a break to be given if a minor works 4 ½ hours or more. State law requires all minors working 6 or more consecutive hours to receive a 30 minute uninterrupted break.
DEFINITIONS School Week: A school week refers to a week that contains three (3) or more school days. School Day: A school day refers to a day that contains more than four (4) hours of classroom instructions. Non-School Night: Nights that are not followed by a school day. Non-School Week: A non-school week is defined as a week that contains two (2) or fewer school days.
Above are the restrictions on minors for the state of Indiana.
31
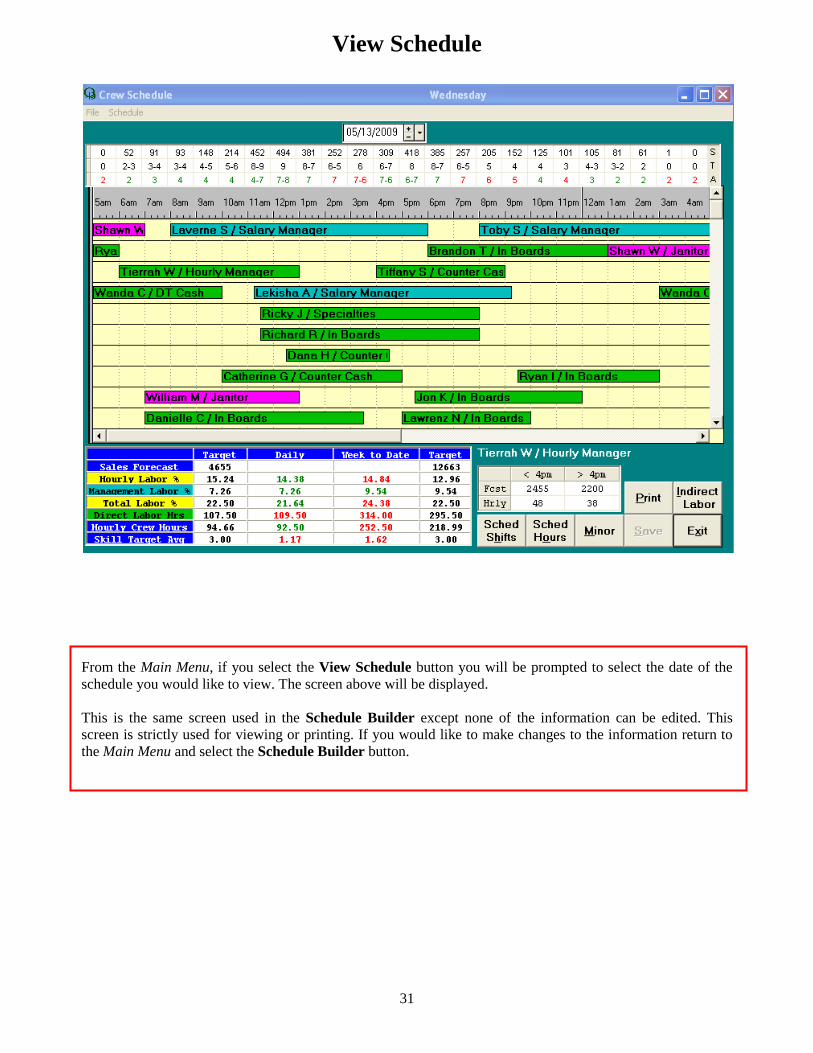
View Schedule
From the Main Menu, if you select the View Schedule button you will be prompted to select the date of the schedule you would like to view. The screen above will be displayed. This is the same screen used in the Schedule Builder except none of the information can be edited. This screen is strictly used for viewing or printing. If you would like to make changes to the information return to the Main Menu and select the Schedule Builder button.

32
Copy Schedule
From the Main Menu, if you select the Copy Schedule button this screen will appear. A great time saver, this function allows you to copy one week’s schedule to another – or one day to another. If you have a relatively stable staff, you should select “Copy Week of” and “Clear Unavailable” only. Any terminated employees or individuals with “Requests for Time-Off” for the week being copied to, will be removed from the schedule. The shift and position will stay on the schedule, but the name will be removed. This function highlights one big reason you should do all employee maintenance – terminations and requests for time off – before executing this function. If not, your new schedule could contain people that are unable to work. Clear all Names will do exactly as it states. Your new schedule will retain all shifts and jobs, but no employee names. This will rarely be used. Note: This function is not meant to circumvent the scheduling process. You will still need to create a forecast before executing this program and prepare a meaningful schedule by entering employees on shifts where the system has removed people. You will also need to review the labor and budgeted hours targets to ensure you can meet your financial objectives with the new schedule and the new forecast.

33
Report Sub-Menu
To access this screen, select Print Reports from the Main Menu. This sub-menu is the entry point for all reports. As time goes on, we will continue to add helpful reports to this area. Any suggestions for additional reports are welcomed. Selecting Exit at any time on this screen will return you to the Main Menu.

34
Employee Data Listing
When you select Employee Data from the Report Menu, a listing of your “active employees” will be displayed. Any terminated employees have been moved to the “inactive” table and will not be listed. This panel displays most of the information entered on the “General Information” tab of the Personal Data function. As with most other reports, once viewing it, you may send a copy to your printer by pressing the Print key. Selecting Exit will return you to the Report Menu Screen.

35
Position Chart
The Position Chart button from the Report Menu currently does not have an online display feature. The “Position Chart” that you have been previously filling out by hand will be produced and sent directly to your printer. Only the current or future days can be selected. Selecting Exit will return you to the Report Menu screen.

36
Employee Roster
When you select Roster from the Report Menu, you will be required to enter the date range. You may specify one day or a range of days – the range can be no greater than 7 days. If you select the “Day of Week” option, the report will be ordered by displaying all employees for that specific day before displaying any information for the next day. In other words, if Monday through Wednesday were requested, all employees scheduled for Monday would be printed first, then all employees for Tuesday, and finally Wednesday’s list of employees. If the “Employee” option is selected, the order of the report is reversed from the one described above. Each employee is listed with their scheduled days following – before moving on to the next employee. This version may also be printed. Select View Report to view the results. Choosing Exit will return you to the Report Menu screen.

37
Employee Roster (Ordered by Day-of-Week)
This version of the “Roster” is displayed when the “Day of Week” option is selected. Notice that Monday, May 21st is listed at the top, with all employees scheduled to work that day listed below. If requested, May 22nd would be listed below all the information for May 21st. The employees on this list are in order of start time – not alphabetically. Selecting Exit will return you to the Employee Roster selection screen.
38
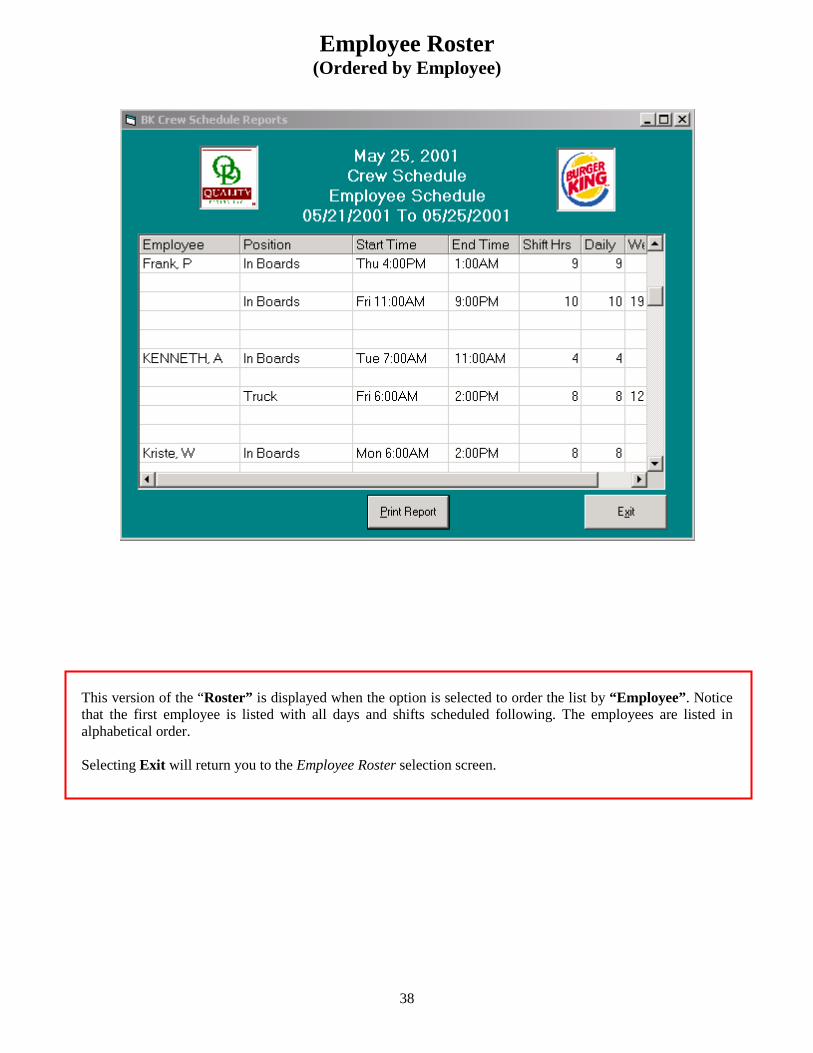
Employee Roster (Ordered by Employee)
This version of the “Roster” is displayed when the option is selected to order the list by “Employee”. Notice that the first employee is listed with all days and shifts scheduled following. The employees are listed in alphabetical order. Selecting Exit will return you to the Employee Roster selection screen.

39
Schedule Listing (Weekly by Shift)
When the Schedule option is selected from the Report Menu, this prompt is displayed and you must select the week you would like to view or print. Then select the Go button.

40
Schedule Listing (Weekly by Shift)
This is the form that is displayed after the week is selected from the prompt issued by the Schedule button from the Report Menu. Each employee scheduled is listed along with each shift for each day of the week. Split shifts will appear on separate lines for an employee. Multiple shifts that do not have a gap between will be displayed as one – since those are typically only position changes. This report may be printed by selecting the Print button at the bottom of the screen. This is the report that should be posted for employees. Management and crew will be segregated on two separate pages automatically. Selecting the Exit button will return you to the prompt screen for viewing or printing the weekly schedule.