
BIM 360 Field - Subcontractor Web Guide...
13
Autodesk – BIM 360 Field BIM 360 Field – Subcontractor Web Portal User guide This guide explains how subcontractors can use their own special BIM 360 Field portal to access realtime information and collaborate on issues, inspections, and tasks to be performed. You can access similar functionality disconnected from the internet in the field within BIM 360 Field iPad application (see BIM 360 Field iPad Subcontractor Portal User Guide).
Transcript of BIM 360 Field - Subcontractor Web Guide...

Autodesk – BIM 360 Field BIM 360 Field – Subcontractor Web Portal User guide
This guide explains how subcontractors can use their own special BIM 360 Field portal to access real-‐time information and collaborate on issues, inspections, and tasks to be performed. You can access similar functionality disconnected from the internet in the field within BIM 360 Field iPad application (see BIM 360 Field iPad Subcontractor Portal User Guide).
Autodesk®
BIM 360®
Field Subcontractor Web Portal User Guide
© Copyright 2013 Autodesk, Inc. All rights reserved. 1
Table of Contents 1. ISSUE TRACKING ................................................................................................................................................. 2
About Issues ....................................................................................................................................................... 2
How to manage your issues ............................................................................................................................. 3
2. OPTIONALLY ENABLED FEATURES .................................................................................................................... 5
3. MANAGING TASKS: ............................................................................................................................................. 6
About Tasks ........................................................................................................................................................ 6
How to manage your Tasks .............................................................................................................................. 7
4. MANAGING YOUR PROFILE SETTINGS ............................................................................................................. 12
For access to the BIM 360 Field subcontractor portal, you will need a reliable internet connection and a supported web-browser; Autodesk recommends Mozilla Firefox and Google Chrome, and supports Safari and Internet Explorer v7, 8 and 9.
Autodesk®
BIM 360®
Field Subcontractor Web Portal User Guide
© Copyright 2013 Autodesk, Inc. All rights reserved. 2
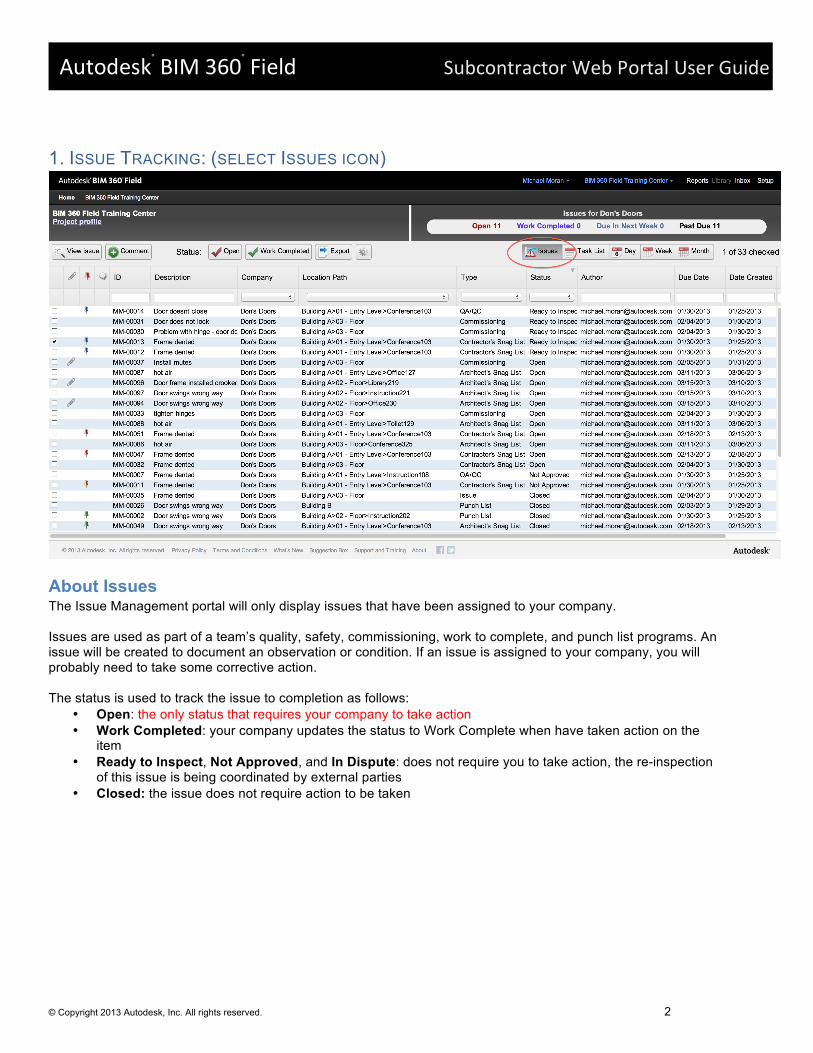
1. ISSUE TRACKING: (SELECT ISSUES ICON)
About Issues The Issue Management portal will only display issues that have been assigned to your company. Issues are used as part of a team’s quality, safety, commissioning, work to complete, and punch list programs. An issue will be created to document an observation or condition. If an issue is assigned to your company, you will probably need to take some corrective action. The status is used to track the issue to completion as follows:
• Open: the only status that requires your company to take action • Work Completed: your company updates the status to Work Complete when have taken action on the
item • Ready to Inspect, Not Approved, and In Dispute: does not require you to take action, the re-inspection
of this issue is being coordinated by external parties • Closed: the issue does not require action to be taken

Autodesk®
BIM 360®
Field Subcontractor Web Portal User Guide
© Copyright 2013 Autodesk, Inc. All rights reserved. 3
How to manage your issues
Activity Procedure
1a Review an issue assigned to you, read-only • Select an issue, click
1b Update the Status of a single issue. Mark an issue “Work Completed” to signify that you have taken appropriate corrective action.
• Select an issue, and then click at the top of portal.
• Note: you can click at the top of portal when an issue is to be re-opened, or if changed to “Work Completed” in error.
1c Update the Status of multiple issues at once. Mark “Work Completed” to signify that you have taken appropriate corrective action
• Select checkbox for multiple issues to change and click
or at top of portal. • Alternatively, enter the Path filter to bring up issues for a specific
area, click on the checkbox at top left corner of the screen to select all and click on “Work Completed” or “Open” at the top of portal. Example: In the Path field enter “Floor 01>Room 100” and all Room 100 issues will be displayed.
1d Add a Comment to an issue. Note the corrective action taken, provide feedback, or ask a question.
• Select an issue, and then click at the top of portal.
• Enter Comment and click on before you click
1e Review any attachments linked to an issue. Attachments may be photos, documents, or web hyperlinks that will provide more detailed information about the issue.
• Issues that have attachments will have a “paper clip” icon next to the issue. Select the issue, and then go to the “paper clip” tab to view or download any attachments.
• When finished viewing any attachments click

Autodesk®
BIM 360®
Field Subcontractor Web Portal User Guide
© Copyright 2013 Autodesk, Inc. All rights reserved. 4
Activity Procedure
1f Review any pushpins linked to an issue. Pushpins assist in showing the location of an issue on a drawing or a plan.
• Issues that have pushpins will have a “pushpin” icon next to the issue. Select the issue , and then go to the “pushpin” tab to view the pushpin on a drawing or plan.
• When finished viewing the pushpin click
1g Customize your view • Click on at top of portal to add or remove columns from your
issue list view.

Autodesk®
BIM 360®
Field Subcontractor Web Portal User Guide
© Copyright 2013 Autodesk, Inc. All rights reserved. 5
2. OPTIONALLY ENABLED FEATURES (The following functionality may not be enabled for all users. The BIM 360 Field Team Project Administrator controls access to these features).
Activity Procedure
2a Run the Issue Detail report for all issues assigned to your company.
• Click at the top right corner of screen. • Click “Run Reports”. • Filter and select the report criteria based on how the report is to be run. • View the report online or save there report to file (.PDF) and print. • Click on the home icon on the top left to navigate back to your home-page.
2b Read-only view documents in the team library.
• Click Library at the top right corner of the screen. • Navigate to a folder. • Select a file or document.
• Click to download and view the file. Any changes made to the file will not be saved back into BIM 360 Field.
• Click on the home icon on the top left to navigate back to your home-page.
2c Upload a photo/ attachment to an issue to document the corrective action taken, respond, or collaborate.
• While viewing an issue, click on the paper-clip tab on the top. You can: o Select and upload a “File” from your machine. o Select a document in the team’s document “Library” o Add a “Link” with a path to a web-site. o Select “Camera” to take a picture (if you have a camera on your
device). • If the attachment is an image or PDF, click on the thumbnail to sketch and
mark-up an attachment you added (note: you can not mark-up an attachment not added by your team).

Autodesk®
BIM 360®
Field Subcontractor Web Portal User Guide
© Copyright 2013 Autodesk, Inc. All rights reserved. 6
3. MANAGING TASKS: (SELECT TASK LIST, DAY, WEEK, OR MONTH ICON)
About Tasks Tasks are used to schedule or plan future work or events and track to completion. Tasks can have associated checklists, issues, and attachments. Some common uses for tasks:
• Created by you or your team o To request and schedule the prime contractor or a 3rd party inspector to verify work completed by
your team is in accordance with plans, specifications, and requirements • Created by your team or the prime contractor and assigned to you
o To perform an attached QA/QC, Safety, or Commissioning checklist inspection to verify and document that the work or inspection has been completed in accordance with specific requirements
o Reminders or appointments on the calendar You can view tasks in a list or with a calendar (Day, Week, or Month) View. The Tasks displayed will be any that:
• Were created by you • Are assigned to you (“Assigned to” field set to your user login email) • Have the “Responsible Subcontractor” (same as “Assigned to Company”) field set to your company
The Status of the Task is used to drive completion and route the task and will be defined by the prime contractor and include: “New”, “Open”, “On Hold”, “Assigned”, “Cancelled”, “Rejected”, and “Closed”

Autodesk®
BIM 360®
Field Subcontractor Web Portal User Guide
© Copyright 2013 Autodesk, Inc. All rights reserved. 7
How to manage your Tasks
Autodesk®
BIM 360®
Field Subcontractor Web Portal User Guide
© Copyright 2013 Autodesk, Inc. All rights reserved. 8
Activity Procedure
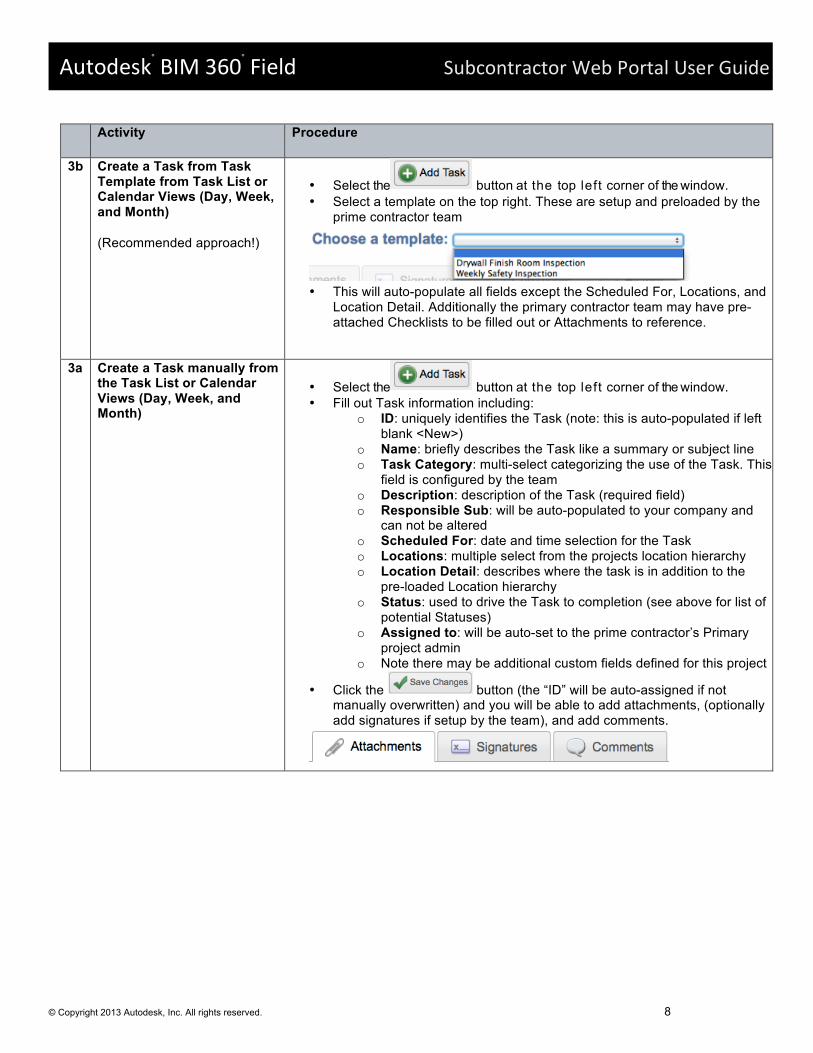
3b Create a Task from Task Template from Task List or Calendar Views (Day, Week, and Month) (Recommended approach!)
• Select the button at the top left corner of the window. • Select a template on the top right. These are setup and preloaded by the
prime contractor team
• This will auto-populate all fields except the Scheduled For, Locations, and
Location Detail. Additionally the primary contractor team may have pre-attached Checklists to be filled out or Attachments to reference.
3a Create a Task manually from the Task List or Calendar Views (Day, Week, and Month)
• Select the button at the top left corner of the window. • Fill out Task information including:
o ID: uniquely identifies the Task (note: this is auto-populated if left blank <New>)
o Name: briefly describes the Task like a summary or subject line o Task Category: multi-select categorizing the use of the Task. This
field is configured by the team o Description: description of the Task (required field) o Responsible Sub: will be auto-populated to your company and
can not be altered o Scheduled For: date and time selection for the Task o Locations: multiple select from the projects location hierarchy o Location Detail: describes where the task is in addition to the
pre-loaded Location hierarchy o Status: used to drive the Task to completion (see above for list of
potential Statuses) o Assigned to: will be auto-set to the prime contractor’s Primary
project admin o Note there may be additional custom fields defined for this project
• Click the button (the “ID” will be auto-assigned if not manually overwritten) and you will be able to add attachments, (optionally add signatures if setup by the team), and add comments.

Autodesk®
BIM 360®
Field Subcontractor Web Portal User Guide
© Copyright 2013 Autodesk, Inc. All rights reserved. 9
3c Edit / manage Task • From the Task List select a single task and click the button • From a Calendar view (Day, Week, or Month), hover over the Task (note
preview is displayed) and double click • While editing a Task you can
o Update fields associated with the Task except Responsible Sub and Assigned to.
o Manage Issues associated with Task (also editable from Issue list – see above)
o Review and fill-out pre-attached checklist inspections o Review pre-attached attachments or add your own o Optionally add signature captures (if setup by prime contractor
team) o Review and add comments o Review history of modifications to Task
• Note: due to permissions set by the prime contractor you may only be able to edit Tasks where you are the current assignee

Autodesk®
BIM 360®
Field Subcontractor Web Portal User Guide
© Copyright 2013 Autodesk, Inc. All rights reserved. 10
Activity Procedure
3d Fill-out a checklist inspection (reference image above) Note: Subcontractors can only fill out a checklist if: o The checklist was
attached by the prime contractor and assigned to you
o Your company created the task from a template that had the checklist attached
Note: this feature may not be enabled for all teams. Access to this capability is managed by the prime contractor’s project admin.
• From the Task detail page, select “Checklists” tab • Select the appropriate checklist template from the drop-down • Click the “Fill Out Checklist” button • Enter top-level header details information such as the location you are
inspecting. • For each item, make any comments and mark the appropriate response. • Marking an item as non-conformant may create an issue to follow up on.
To view (read-only), add attachment or comment to the created issue, click on the issues button for the item and select Edit button. Optionally, click the Add button will add additional issues.
• Add an attachment or photo to further document an item (often conformant
responses), click on “Details” button and the Attachments paperclip tab.
• Periodically click on the top of the checklist to save progress
• When the checklist is complete, click to return to the Task
3e Review an attachment or upload a photo or attachment to a Task Note: the ability to upload your own photo or attachment may not be enabled for all teams. Access to this capability is managed by the prime contractor’s project admin
• From Task Details, click on the paper-clip tab on the top. You can: o Select and upload a “File” from your machine. o Select a document in the team’s document “Library” o Add a “Link” with a path to a web-site. o Select “Camera” to take a picture (if you have a camera on your
device). • If the attachment is an image or PDF, click on the thumbnail to sketch and
mark-up an attachment you added (note: you can not mark-up an attachment not added by your team).

Autodesk®
BIM 360®
Field Subcontractor Web Portal User Guide
© Copyright 2013 Autodesk, Inc. All rights reserved. 11
Activity Procedure
3f Add and review Comments to the Task for collaboration.
• From the Task Details, click on the Comments tab
• Enter Comment and remember to click on button
3g Review and manage issues associated with the Task. Note: • Issues here are often auto-
created from checklists associated with the task
• These same issues are also manageable from the Issue List (See instructions above)
• From the Task Details, click on the Issues tab
3h Sign-Off Task Note: Not all projects will have signatures setup. Signature sign-off for tasks is controlled by the team Project Admin.
• From the Task Details, click on Signatures tab
• When Completed, remember to click the icon

Autodesk®
BIM 360®
Field Subcontractor Web Portal User Guide
© Copyright 2013 Autodesk, Inc. All rights reserved. 12
4. MANAGING YOUR PROFILE SETTINGS
Activity Procedure
4a Setup user profile settings and email notifications
• Click setup gear icon on the top right to shows your user profile information. You can add or change any information on this screen. Click on “Save Changes” on top right of screen.
• Email Notifications – this defaults to Daily Summary but can be changed by checking the boxes next to the other options below. If desired, you can receive an automatic email notification for: o Issue Changes (Status and assigned Company) o Issue Comments o Task Changes (Assigned To, Responsible Company, Status, or
Scheduled For) o Task Comments o Library Updates
• Click on “Save Changes” on top right of screen. • Click on the home icon on the top left to navigate back to your home-page.