AUTOMATIC WALL PAINTING ROBOT
15
ISSN: 2319-8753 International Journal of Innovative Research in Science, Engineering and Technology Vol. 2, Issue 7, July 2013 Copyright to IJIRSET www.ijirset.com 3009 AUTOMATIC WALL PAINTING ROBOT P.Keerthanaa 1 , K.Jeevitha 2 , V.Navina 3 , G.Indira 4 , S.Jayamani 5 Student, Department of Electronics and Communication Engineering, K.S.Rangasamy College of Technology, Tiruchengode, Tamilnadu, India 1,2,3,4 Assistant Professor, Department of Electronics and Communication Engineering, K.S.Rangasamy College of Technology, Tiruchengode, Tamilnadu, India 5 Abstract: The primary aim of the project is to design, develop and implement Automatic Wall Painting Robot which helps to achieve low cost painting equipment. Despite the advances in robotics and its wide spreading applications, interior wall painting has shared little in research activities. The painting chemicals can cause hazards to the human painters such as eye and respiratory system problems. Also the nature of painting procedure that requires repeated work and hand rising makes it boring, time and effort consuming. When construction workers and robots are properly integrated in building tasks, the whole construction process can be better managed and savings in human labour and timing are obtained as a consequence. In addition, it would offer the opportunity to reduce or eliminate human exposure to difficult and hazardous environments, which would solve most of the problems connected with safety when many activities occur at the same time. These factors motivate the development of an automated robotic painting system. Keywords: Building automation; Robotics; Construction; Spray Painting; Safety I. INTRODUCTION Building and construction is one of the major industries around the world. In this fast moving life construction industry is also growing rapidly. But the labors in the construction industry are not sufficient. This insufficient labors in the construction industry is because of the difficulty in the work. In construction industry, during the work in tall buildings or in the sites where there is more risky situation like interior area in the city. There are some other reasons for the insufficient labor which may be because of the improvement the education level which cause the people to think that these types of work is not as prestigious as the other jobs. The construction industry is labor-intensive and conducted in dangerous situations; therefore the importance of construction robotics has been realized and is grown rapidly. Applications and activities of robotics and automation in this construction industry started in the early 90‟s aiming to optimize equipment operations, improve safety, enhance perception of workspace and furthermore, ensure quality environment for building occupant. After this, the advances in the robotics and automation in the construction industry has grown rapidly. Despite the advances in the robotics and its wide spreading applications, painting is also considered to be the difficult process as it also has to paint the whole building. To make this work easier and safer and also to reduce the number of labors automation in painting was introduced. The automation for painting the exterior wall in buildings has been proposed. Above all these the interior wall painting has shared little in research activities. The painting chemicals can cause hazards to the painters such as eye and respiratory system problems. Also the nature of painting procedure that requires repeated work and hand rising makes it boring, time and effort consuming. These factors motivate the development of an automated robotic painting system. This project aims to develop the interior wall painting robot. This automatic wall painting robot is not designed using complicated components. This robot is simple and portable. The robot is designed using few steels, conveyor shaft, spray gun and a controller unit to control the entire operation of the robot. This robot is compact because of high speed and pressure capabilities they have. They also have a very small weight to power output ratio and predictable performance ie., losses are minimum due to less number of moving parts and so gives expected performance. Due to elegant and simple control systems it can control noise vibration and does silent operation and no vibration is produced. It has longer life, flexibility and it is efficient and dependable, and the installation is simple and the maintenance is also easy. Some of the conditions that have to be considered while using this robot is that the system is operates in pneumatics, so it needs air tank or compressor and the electric shock is always there, which makes the machines ugly and dust and dirt are adhering to them. The life of the parts like seals, packing and gaskets etc., are very short but, they are essential to prevent leakage so that the system becomes costlier. The construction of the automatic wall painting robot consists of two main parts. They are 1. Mobile platform Frame stand Wheel
Transcript of AUTOMATIC WALL PAINTING ROBOT
ISSN: 2319-8753
International Journal of Innovative Research in Science, Engineering and Technology Vol. 2, Issue 7, July 2013
Copyright to IJIRSET www.ijirset.com 3009
AUTOMATIC WALL PAINTING ROBOT P.Keerthanaa
1, K.Jeevitha
2, V.Navina
3, G.Indira
4, S.Jayamani
5
Student, Department of Electronics and Communication Engineering, K.S.Rangasamy College of Technology,
Tiruchengode, Tamilnadu, India 1,2,3,4
Assistant Professor, Department of Electronics and Communication Engineering, K.S.Rangasamy College of
Technology, Tiruchengode, Tamilnadu, India 5
Abstract: The primary aim of the project is to design, develop and implement Automatic Wall Painting Robot which
helps to achieve low cost painting equipment. Despite the advances in robotics and its wide spreading applications,
interior wall painting has shared little in research activities. The painting chemicals can cause hazards to the human
painters such as eye and respiratory system problems. Also the nature of painting procedure that requires repeated work
and hand rising makes it boring, time and effort consuming. When construction workers and robots are properly
integrated in building tasks, the whole construction process can be better managed and savings in human labour and
timing are obtained as a consequence. In addition, it would offer the opportunity to reduce or eliminate human exposure
to difficult and hazardous environments, which would solve most of the problems connected with safety when many
activities occur at the same time. These factors motivate the development of an automated robotic painting system.
Keywords: Building automation; Robotics; Construction; Spray Painting; Safety
I. INTRODUCTION
Building and construction is one of the major industries around the world. In this fast moving life construction
industry is also growing rapidly. But the labors in the construction industry are not sufficient. This insufficient labors in
the construction industry is because of the difficulty in the work. In construction industry, during the work in tall
buildings or in the sites where there is more risky situation like interior area in the city. There are some other reasons
for the insufficient labor which may be because of the improvement the education level which cause the people to think
that these types of work is not as prestigious as the other jobs.
The construction industry is labor-intensive and conducted in dangerous situations; therefore the importance of
construction robotics has been realized and is grown rapidly. Applications and activities of robotics and automation in
this construction industry started in the early 90‟s aiming to optimize equipment operations, improve safety, enhance
perception of workspace and furthermore, ensure quality environment for building occupant. After this, the advances in
the robotics and automation in the construction industry has grown rapidly.
Despite the advances in the robotics and its wide spreading applications, painting is also considered to be the
difficult process as it also has to paint the whole building. To make this work easier and safer and also to reduce the
number of labors automation in painting was introduced. The automation for painting the exterior wall in buildings has
been proposed. Above all these the interior wall painting has shared little in research activities. The painting chemicals
can cause hazards to the painters such as eye and respiratory system problems. Also the nature of painting procedure
that requires repeated work and hand rising makes it boring, time and effort consuming. These factors motivate the
development of an automated robotic painting system. This project aims to develop the interior wall painting robot.
This automatic wall painting robot is not designed using complicated components. This robot is simple and
portable. The robot is designed using few steels, conveyor shaft, spray gun and a controller unit to control the entire
operation of the robot. This robot is compact because of high speed and pressure capabilities they have. They also have
a very small weight to power output ratio and predictable performance ie., losses are minimum due to less number of
moving parts and so gives expected performance. Due to elegant and simple control systems it can control noise
vibration and does silent operation and no vibration is produced. It has longer life, flexibility and it is efficient and
dependable, and the installation is simple and the maintenance is also easy. Some of the conditions that have to be
considered while using this robot is that the system is operates in pneumatics, so it needs air tank or compressor and the
electric shock is always there, which makes the machines ugly and dust and dirt are adhering to them. The life of the
parts like seals, packing and gaskets etc., are very short but, they are essential to prevent leakage so that the system
becomes costlier.
The construction of the automatic wall painting robot consists of two main parts. They are
1. Mobile platform
Frame stand
Wheel
ISSN: 2319-8753
International Journal of Innovative Research in Science, Engineering and Technology Vol. 2, Issue 7, July 2013
Copyright to IJIRSET www.ijirset.com 3010
DC motor
Battery
Control unit
2. Spray gun mount
IR sensor
Solenoid valve
Sprocket
Flow control valve
Spray gun
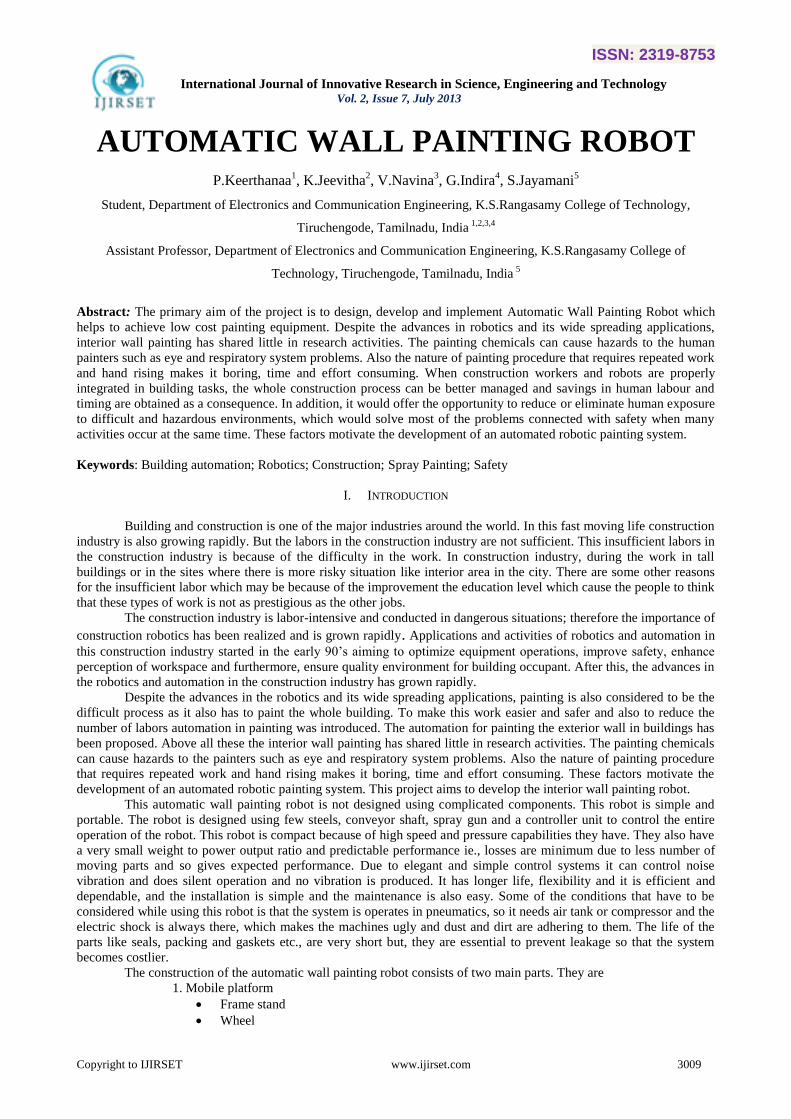
Fig. 1 Block diagram of automated wall painting robot
II. THE MOBILE PLATFORM DESIGN
A. Frame Stand and Wheel
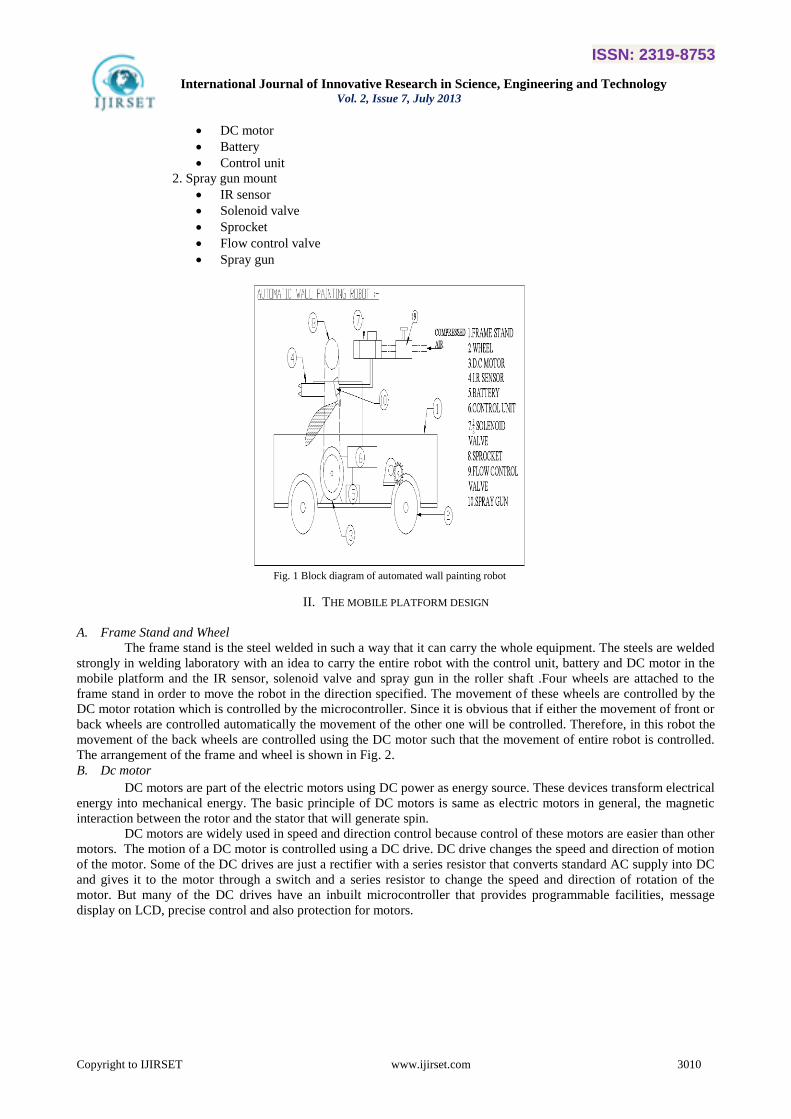
The frame stand is the steel welded in such a way that it can carry the whole equipment. The steels are welded
strongly in welding laboratory with an idea to carry the entire robot with the control unit, battery and DC motor in the
mobile platform and the IR sensor, solenoid valve and spray gun in the roller shaft .Four wheels are attached to the
frame stand in order to move the robot in the direction specified. The movement of these wheels are controlled by the
DC motor rotation which is controlled by the microcontroller. Since it is obvious that if either the movement of front or
back wheels are controlled automatically the movement of the other one will be controlled. Therefore, in this robot the
movement of the back wheels are controlled using the DC motor such that the movement of entire robot is controlled.
The arrangement of the frame and wheel is shown in Fig. 2.
B. Dc motor
DC motors are part of the electric motors using DC power as energy source. These devices transform electrical
energy into mechanical energy. The basic principle of DC motors is same as electric motors in general, the magnetic
interaction between the rotor and the stator that will generate spin.
DC motors are widely used in speed and direction control because control of these motors are easier than other
motors. The motion of a DC motor is controlled using a DC drive. DC drive changes the speed and direction of motion
of the motor. Some of the DC drives are just a rectifier with a series resistor that converts standard AC supply into DC
and gives it to the motor through a switch and a series resistor to change the speed and direction of rotation of the
motor. But many of the DC drives have an inbuilt microcontroller that provides programmable facilities, message
display on LCD, precise control and also protection for motors.
ISSN: 2319-8753
International Journal of Innovative Research in Science, Engineering and Technology Vol. 2, Issue 7, July 2013
Copyright to IJIRSET www.ijirset.com 3011
Fig. 2 Frame stand with wheel arrangement
Controlling of DC motor using Microcontroller
1. Microcontroller provides us only digital logic (1 or o)
2. The polarity can‟t be provided from microcontroller
3. The motors can‟t be connected to Controller as mostly motors runs on voltage higher that +5V, and
motors demands high current (depends),this can be remove by use of a “H Bridge ”here four transistors are
used to change polarity
1) Specification of DC motor: The specification the DC motor used in this project is mentioned as follows:
Voltage -12V
No load speed -810 rpm
Load speed -120rpm
No load current -75mA
Load current -1400mA
Power -17W
C. Battery
In order to provide supply to the controller unit battery is used. Lead acid battery is used in this project. The
lead-acid battery is a rechargeable battery. Despite having a very low energy-to-weight ratio and a low energy-to-
volume ratio, their ability to supply high surge currents means that the cells maintain a relatively large power-to-weight
ratio. These features, along with their low cost, make them attractive for use in motor vehicles to provide the high
current required by automobile starter motors.
D. Control unit
The microcontroller used in the controller unit is AT89c52. The microcontroller unit is used to control the DC
motors and the movement of spray gun fitted on the conveyor belt. Microcontroller unit is provided with the 5V signal
and as soon as the supply is ON, LCD gets initialized. The controller sets to setting mode and the moving and painting
distance are given as input to the microcontroller. The microcontroller controls the rotation of DC motor based on the
distances given in order to control the wheel and conveyor belt movement. When IR receiver receives the signal, the
conveyor belt moves and the spray gun goes to ON condition and if the conveyor belt stops, the spray gun goes to OFF
condition. It contains relays for the control of forward and backward movement of the DC motors.
IC AT89C52 is a low-power, high performance, 8-bit microcontroller with 8kB of Flash programmable and
erasable read-only memory (EPEROM) ,256 bytes of RAM,32 input/output (I/O)lines, three 16-bit timers/counters, a
six-vector two-level interrupt architecture, a full-duplex serial port, on-chip oscillator and clock circuitry. AT89C52 is
designed with static logic for operation down to zero frequency and supports two software selectable power-saving
modes. The idle mode stops the CPU while allowing the RAM, timers/counters, serial port and interrupt system to
continue functioning. The power-down mode saves the RAM contents but freezes the oscillator, disabling all other chip
functions until the next hardware reset is activated. When the microcontroller receives the signals from IR sensor, it
will be taking a decision to operate the machine. This pulse signal received from IR sensor circuit when there is any
object. At starting time RL1 is in “OFF” position which is given to the conveyor motor (conveyor Movement). The
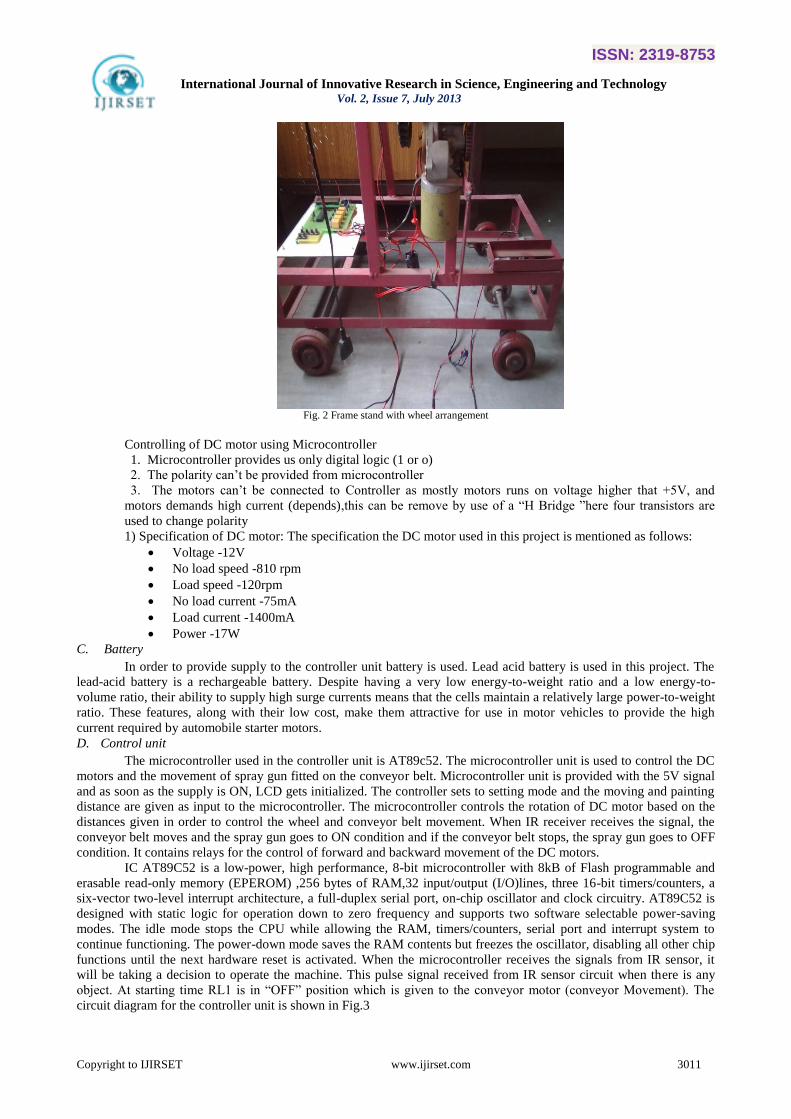
circuit diagram for the controller unit is shown in Fig.3
ISSN: 2319-8753
International Journal of Innovative Research in Science, Engineering and Technology Vol. 2, Issue 7, July 2013
Copyright to IJIRSET www.ijirset.com 3012
1) Programming in AT89c52: The Keil Cx51 ANSI C Complier supports all classic and extended 8051 device
variants. Compiler extensions provide full access to all CPU resources and support up to 16MB memory. The Keil
Cx51 generates code with the efficiency and speed of hand-optimized assembly. New compiler and linker
optimizations shrink programs into the smallest single-chip devices. The Keil µVision4 IDE fully integrates Cx51
Version 9 and provides control of the Compiler, Assembler, Real-Time OS, Project Manager and Debugger in a single,
intelligent environment. With support for all 8051 devices and full compatibility with emulators and third-party tools,
Keil Cx51 is clearly the best choice for your 8051 project.
Fig. 3 Microcontroller circuit
E. Power Supply Unit
The DC level obtained from a sinusoidal input can be improved 100% using a process called full-wave
rectification. It used 2 diodes in this configuration. From the basic configuration we see that one diode is conducting
while the other one diode is in “off” state during the period t = 0 to T/2 Accordingly for the negative of the input the
conducting diodes. Thus the polarity across the load is the same.
The filter circuit used here is the capacitor filter circuit where a capacitor is connected at the rectifier output,
and a DC is obtained across it. The filtered waveform is essentially a DC voltage with negligible ripples, which is
ultimately fed to the load.
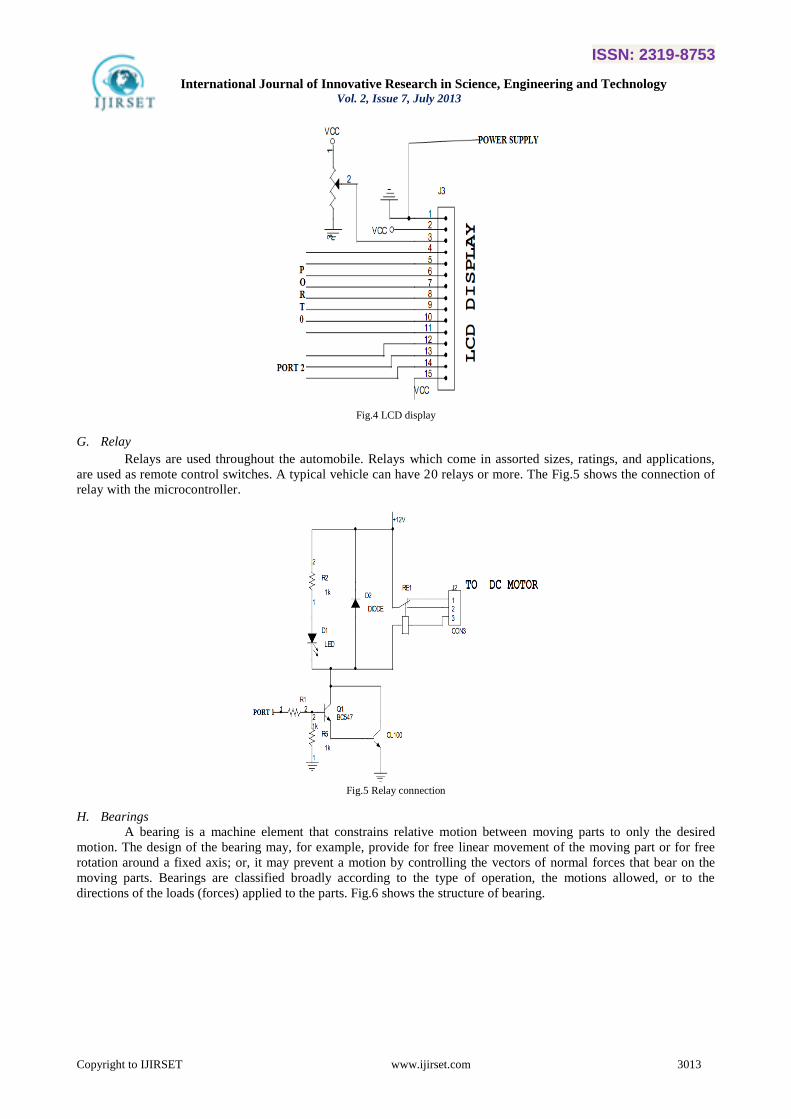
F. Liquid Crystal Display
A liquid crystal display (LCD) is a flat panel display, electronic visual display, or video display that uses the
light modulating properties of liquid crystals (LCs). LCs do not emit light directly. They are used in a wide range of
applications, including computer monitors, television, instrument panels, aircraft cockpit displays, signage, etc. They
are common in consumer devices such as video players, gaming devices, clocks, watches, calculators, and telephones.
LCDs have replaced cathode ray tube (CRT) displays in most applications. They are available in a wider range of
screen sizes than CRT and plasma displays, and since they do not use phosphors, they cannot suffer image burn-in.
LCDs are, however, susceptible to persistence. A 16x2 LCD is connected to the microcontroller. The Fig.4 shows the
LCD connection with microcontroller.
ISSN: 2319-8753
International Journal of Innovative Research in Science, Engineering and Technology Vol. 2, Issue 7, July 2013
Copyright to IJIRSET www.ijirset.com 3013
Fig.4 LCD display
G. Relay
Relays are used throughout the automobile. Relays which come in assorted sizes, ratings, and applications,
are used as remote control switches. A typical vehicle can have 20 relays or more. The Fig.5 shows the connection of
relay with the microcontroller.
Fig.5 Relay connection
H. Bearings
A bearing is a machine element that constrains relative motion between moving parts to only the desired
motion. The design of the bearing may, for example, provide for free linear movement of the moving part or for free
rotation around a fixed axis; or, it may prevent a motion by controlling the vectors of normal forces that bear on the
moving parts. Bearings are classified broadly according to the type of operation, the motions allowed, or to the
directions of the loads (forces) applied to the parts. Fig.6 shows the structure of bearing.

ISSN: 2319-8753
International Journal of Innovative Research in Science, Engineering and Technology Vol. 2, Issue 7, July 2013
Copyright to IJIRSET www.ijirset.com 3014
Fig.6 Structure of bearing
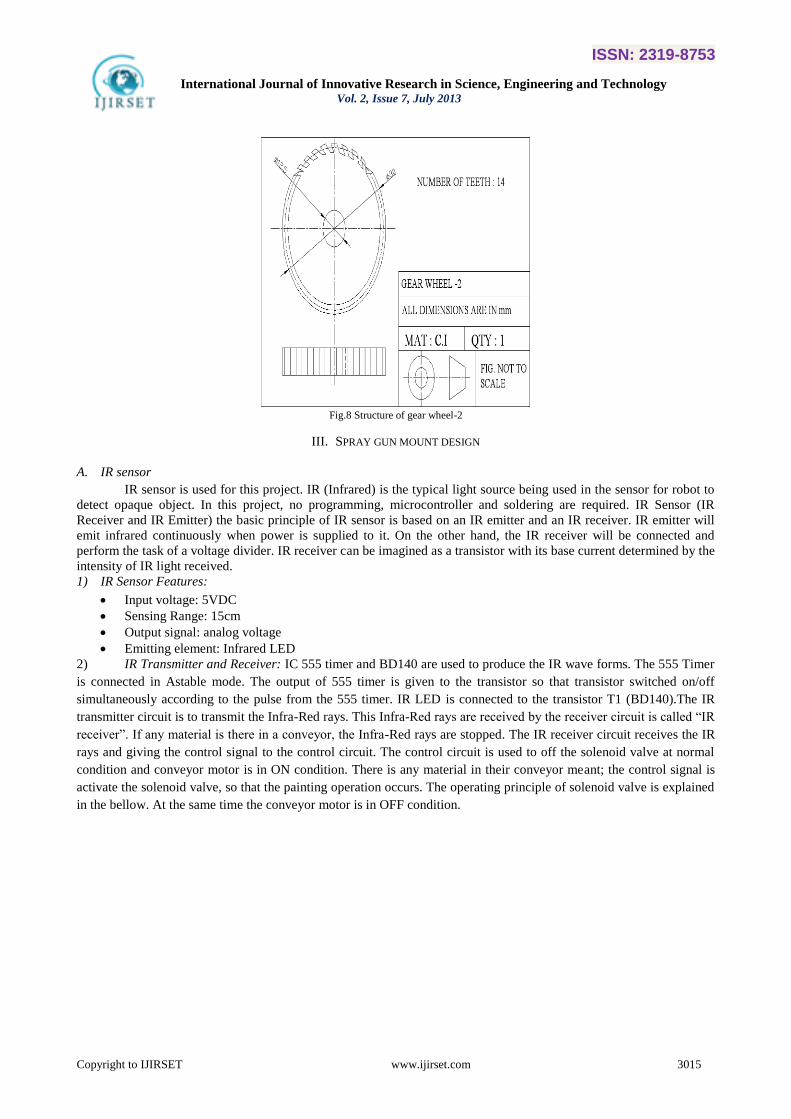
I. Gear Wheel Mechanism
The spur gears, which are designed to transmit motion and power between parallel shafts, are the most
economical gears in the power transmission industry. The spur gear arrangement is used to move the conveyor in
forward and direction. The gear wheel mechanism arrangement is shown in Fig.7 and Fig.8.
Fig.7 Structure of gear wheel-1
ISSN: 2319-8753
International Journal of Innovative Research in Science, Engineering and Technology Vol. 2, Issue 7, July 2013
Copyright to IJIRSET www.ijirset.com 3015
Fig.8 Structure of gear wheel-2
III. SPRAY GUN MOUNT DESIGN
A. IR sensor
IR sensor is used for this project. IR (Infrared) is the typical light source being used in the sensor for robot to
detect opaque object. In this project, no programming, microcontroller and soldering are required. IR Sensor (IR
Receiver and IR Emitter) the basic principle of IR sensor is based on an IR emitter and an IR receiver. IR emitter will
emit infrared continuously when power is supplied to it. On the other hand, the IR receiver will be connected and
perform the task of a voltage divider. IR receiver can be imagined as a transistor with its base current determined by the
intensity of IR light received.
1) IR Sensor Features:
Input voltage: 5VDC
Sensing Range: 15cm
Output signal: analog voltage
Emitting element: Infrared LED
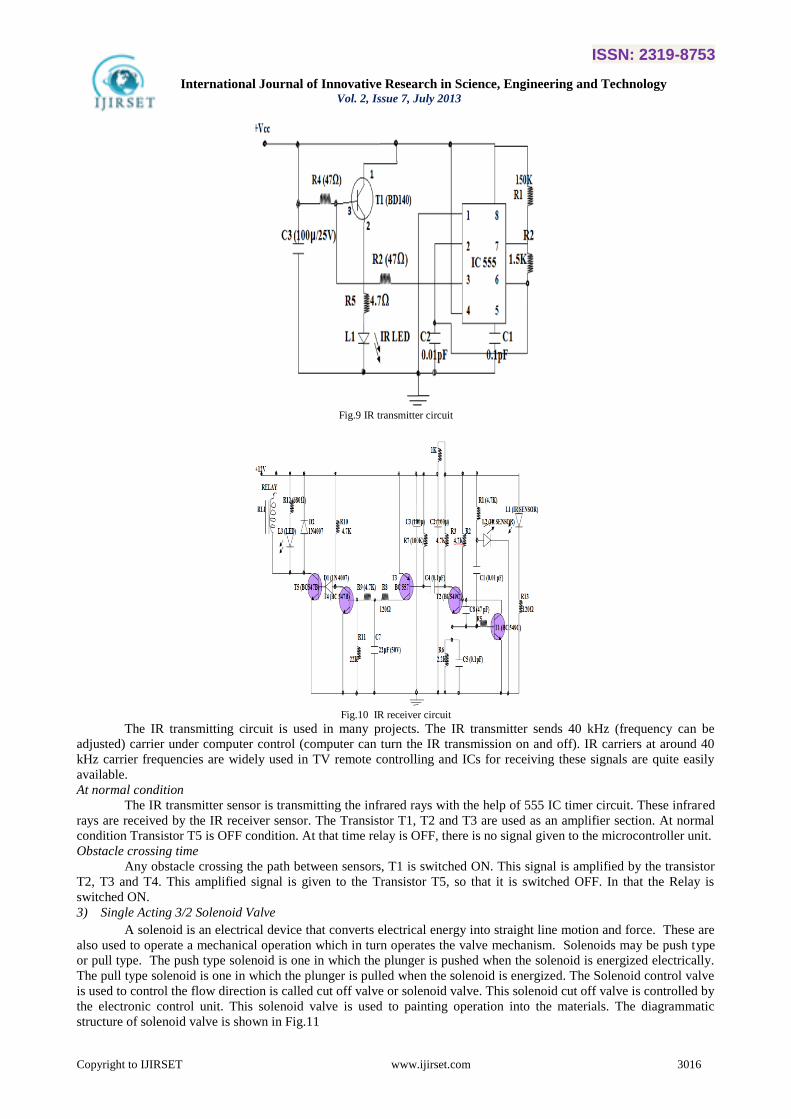
2) IR Transmitter and Receiver: IC 555 timer and BD140 are used to produce the IR wave forms. The 555 Timer
is connected in Astable mode. The output of 555 timer is given to the transistor so that transistor switched on/off
simultaneously according to the pulse from the 555 timer. IR LED is connected to the transistor T1 (BD140).The IR
transmitter circuit is to transmit the Infra-Red rays. This Infra-Red rays are received by the receiver circuit is called “IR
receiver”. If any material is there in a conveyor, the Infra-Red rays are stopped. The IR receiver circuit receives the IR
rays and giving the control signal to the control circuit. The control circuit is used to off the solenoid valve at normal
condition and conveyor motor is in ON condition. There is any material in their conveyor meant; the control signal is
activate the solenoid valve, so that the painting operation occurs. The operating principle of solenoid valve is explained
in the bellow. At the same time the conveyor motor is in OFF condition.
ISSN: 2319-8753
International Journal of Innovative Research in Science, Engineering and Technology Vol. 2, Issue 7, July 2013
Copyright to IJIRSET www.ijirset.com 3016
Fig.9 IR transmitter circuit
Fig.10 IR receiver circuit
The IR transmitting circuit is used in many projects. The IR transmitter sends 40 kHz (frequency can be
adjusted) carrier under computer control (computer can turn the IR transmission on and off). IR carriers at around 40
kHz carrier frequencies are widely used in TV remote controlling and ICs for receiving these signals are quite easily
available.
At normal condition
The IR transmitter sensor is transmitting the infrared rays with the help of 555 IC timer circuit. These infrared
rays are received by the IR receiver sensor. The Transistor T1, T2 and T3 are used as an amplifier section. At normal
condition Transistor T5 is OFF condition. At that time relay is OFF, there is no signal given to the microcontroller unit.
Obstacle crossing time
Any obstacle crossing the path between sensors, T1 is switched ON. This signal is amplified by the transistor
T2, T3 and T4. This amplified signal is given to the Transistor T5, so that it is switched OFF. In that the Relay is
switched ON.
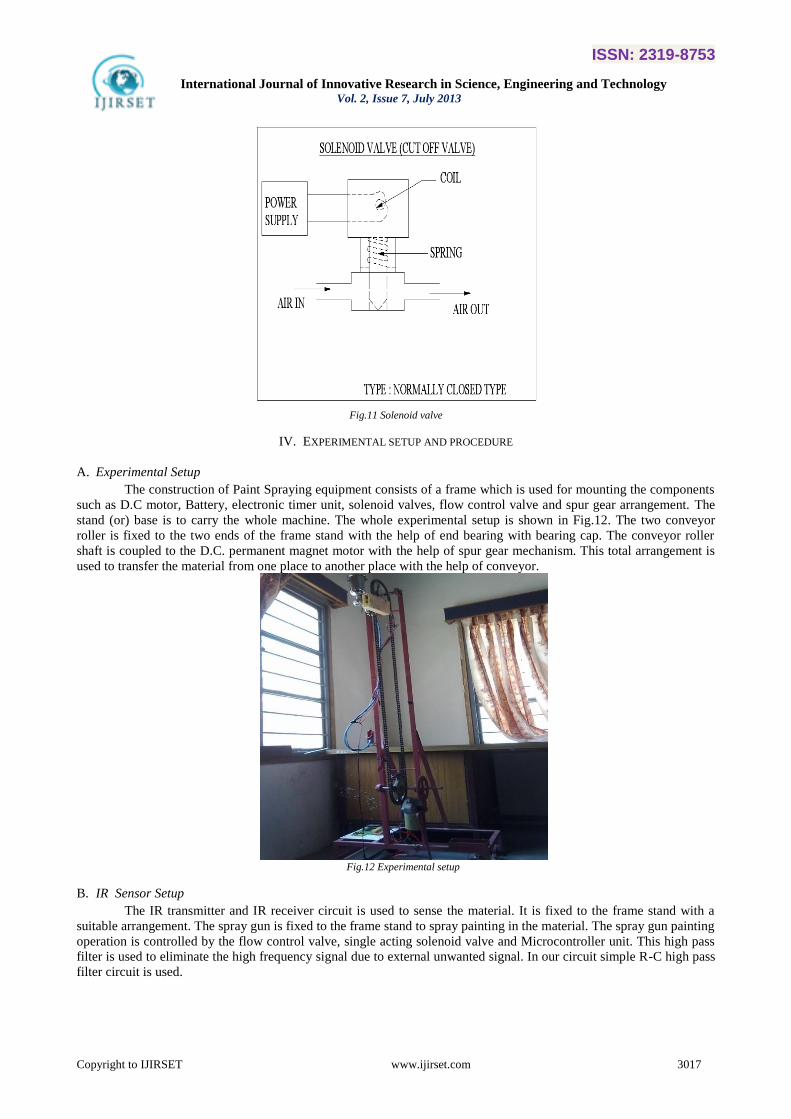
3) Single Acting 3/2 Solenoid Valve
A solenoid is an electrical device that converts electrical energy into straight line motion and force. These are
also used to operate a mechanical operation which in turn operates the valve mechanism. Solenoids may be push type
or pull type. The push type solenoid is one in which the plunger is pushed when the solenoid is energized electrically.
The pull type solenoid is one in which the plunger is pulled when the solenoid is energized. The Solenoid control valve
is used to control the flow direction is called cut off valve or solenoid valve. This solenoid cut off valve is controlled by
the electronic control unit. This solenoid valve is used to painting operation into the materials. The diagrammatic
structure of solenoid valve is shown in Fig.11
ISSN: 2319-8753
International Journal of Innovative Research in Science, Engineering and Technology Vol. 2, Issue 7, July 2013
Copyright to IJIRSET www.ijirset.com 3017
Fig.11 Solenoid valve
IV. EXPERIMENTAL SETUP AND PROCEDURE
A. Experimental Setup
The construction of Paint Spraying equipment consists of a frame which is used for mounting the components
such as D.C motor, Battery, electronic timer unit, solenoid valves, flow control valve and spur gear arrangement. The
stand (or) base is to carry the whole machine. The whole experimental setup is shown in Fig.12. The two conveyor
roller is fixed to the two ends of the frame stand with the help of end bearing with bearing cap. The conveyor roller
shaft is coupled to the D.C. permanent magnet motor with the help of spur gear mechanism. This total arrangement is
used to transfer the material from one place to another place with the help of conveyor.
Fig.12 Experimental setup
B. IR Sensor Setup
The IR transmitter and IR receiver circuit is used to sense the material. It is fixed to the frame stand with a
suitable arrangement. The spray gun is fixed to the frame stand to spray painting in the material. The spray gun painting
operation is controlled by the flow control valve, single acting solenoid valve and Microcontroller unit. This high pass
filter is used to eliminate the high frequency signal due to external unwanted signal. In our circuit simple R-C high pass
filter circuit is used.
ISSN: 2319-8753
International Journal of Innovative Research in Science, Engineering and Technology Vol. 2, Issue 7, July 2013
Copyright to IJIRSET www.ijirset.com 3018
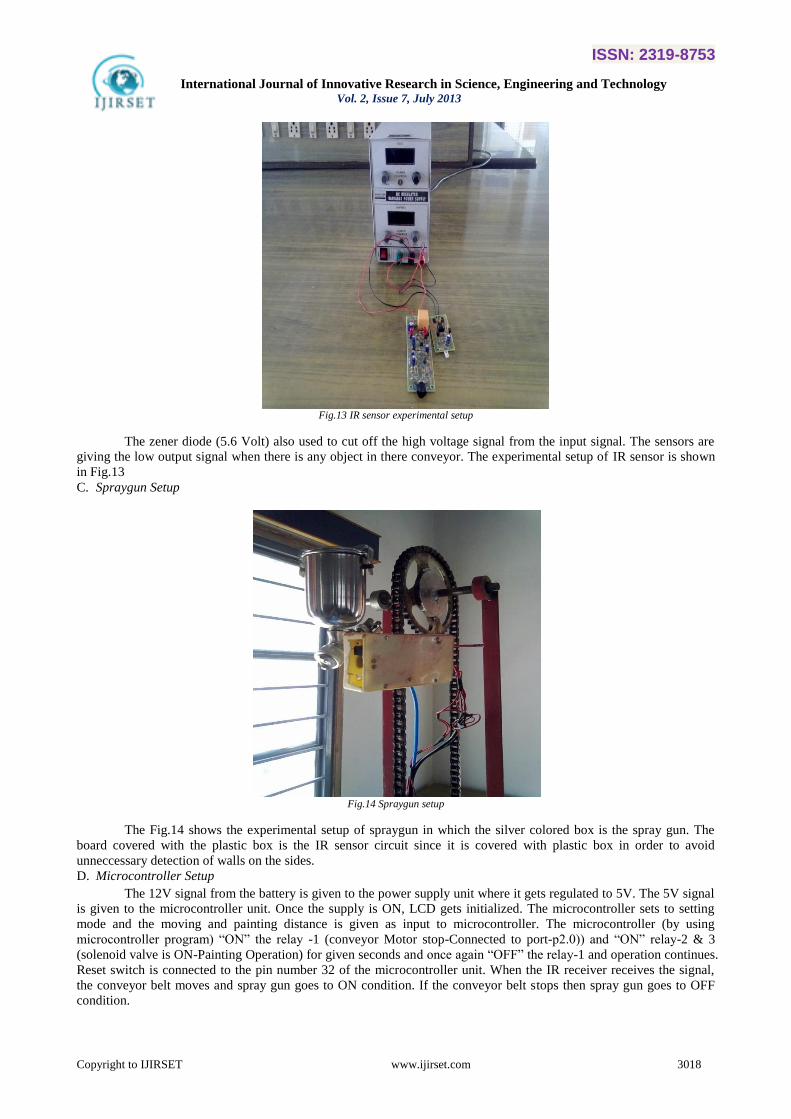
Fig.13 IR sensor experimental setup
The zener diode (5.6 Volt) also used to cut off the high voltage signal from the input signal. The sensors are
giving the low output signal when there is any object in there conveyor. The experimental setup of IR sensor is shown
in Fig.13
C. Spraygun Setup
Fig.14 Spraygun setup
The Fig.14 shows the experimental setup of spraygun in which the silver colored box is the spray gun. The
board covered with the plastic box is the IR sensor circuit since it is covered with plastic box in order to avoid
unneccessary detection of walls on the sides.
D. Microcontroller Setup
The 12V signal from the battery is given to the power supply unit where it gets regulated to 5V. The 5V signal
is given to the microcontroller unit. Once the supply is ON, LCD gets initialized. The microcontroller sets to setting
mode and the moving and painting distance is given as input to microcontroller. The microcontroller (by using
microcontroller program) “ON” the relay -1 (conveyor Motor stop-Connected to port-p2.0)) and “ON” relay-2 & 3
(solenoid valve is ON-Painting Operation) for given seconds and once again “OFF” the relay-1 and operation continues.
Reset switch is connected to the pin number 32 of the microcontroller unit. When the IR receiver receives the signal,
the conveyor belt moves and spray gun goes to ON condition. If the conveyor belt stops then spray gun goes to OFF
condition.
ISSN: 2319-8753
International Journal of Innovative Research in Science, Engineering and Technology Vol. 2, Issue 7, July 2013
Copyright to IJIRSET www.ijirset.com 3019
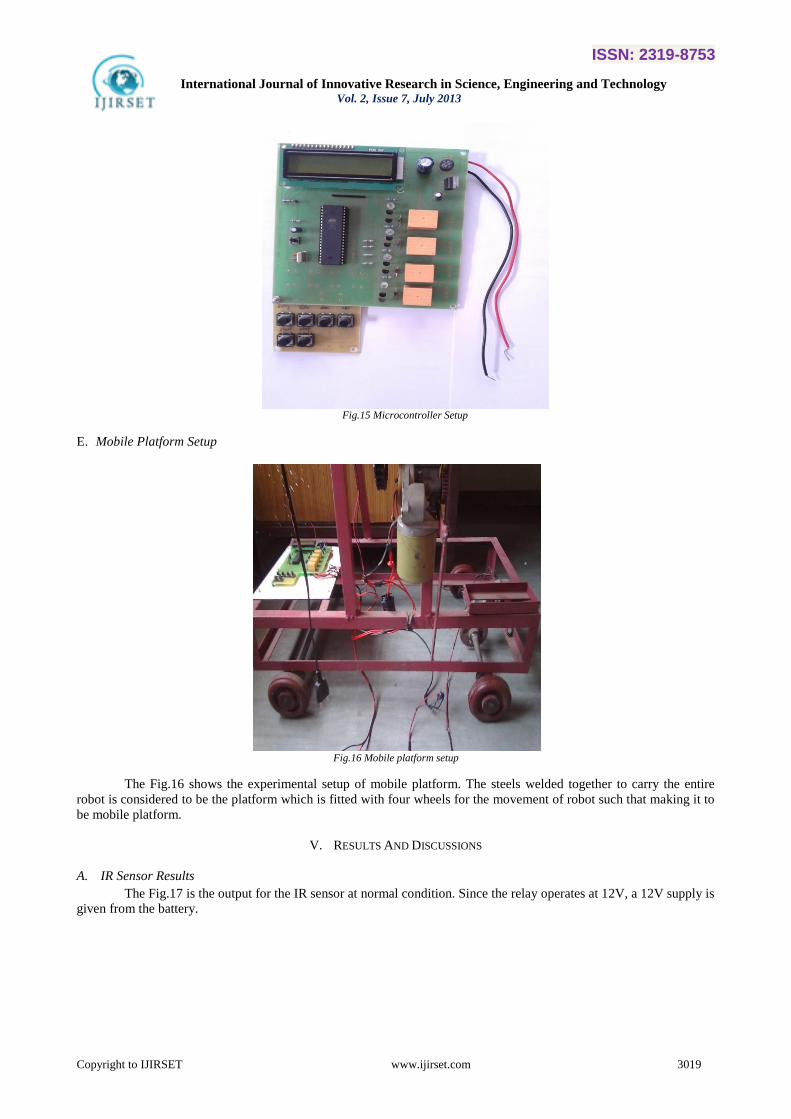
Fig.15 Microcontroller Setup
E. Mobile Platform Setup
Fig.16 Mobile platform setup
The Fig.16 shows the experimental setup of mobile platform. The steels welded together to carry the entire
robot is considered to be the platform which is fitted with four wheels for the movement of robot such that making it to
be mobile platform.
V. RESULTS AND DISCUSSIONS
A. IR Sensor Results
The Fig.17 is the output for the IR sensor at normal condition. Since the relay operates at 12V, a 12V supply is
given from the battery.
ISSN: 2319-8753
International Journal of Innovative Research in Science, Engineering and Technology Vol. 2, Issue 7, July 2013
Copyright to IJIRSET www.ijirset.com 3020
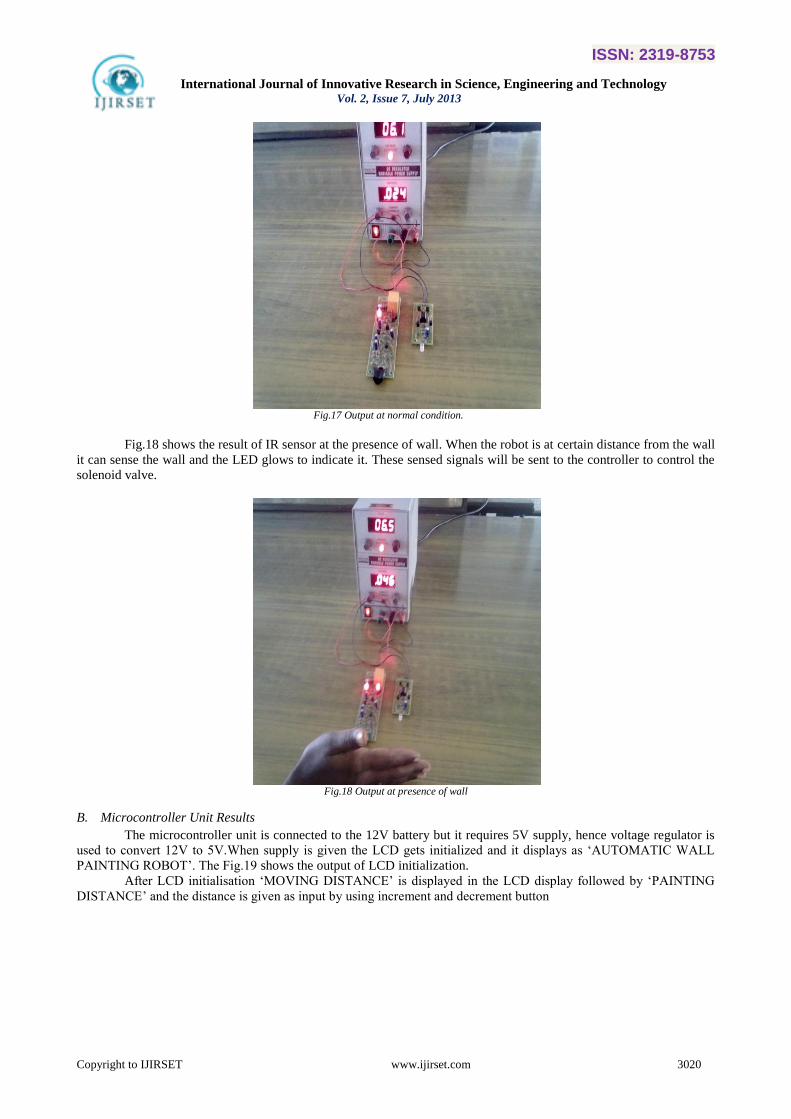
Fig.17 Output at normal condition.
Fig.18 shows the result of IR sensor at the presence of wall. When the robot is at certain distance from the wall
it can sense the wall and the LED glows to indicate it. These sensed signals will be sent to the controller to control the
solenoid valve.
Fig.18 Output at presence of wall
B. Microcontroller Unit Results
The microcontroller unit is connected to the 12V battery but it requires 5V supply, hence voltage regulator is
used to convert 12V to 5V.When supply is given the LCD gets initialized and it displays as „AUTOMATIC WALL
PAINTING ROBOT‟. The Fig.19 shows the output of LCD initialization.
After LCD initialisation „MOVING DISTANCE‟ is displayed in the LCD display followed by „PAINTING
DISTANCE‟ and the distance is given as input by using increment and decrement button

ISSN: 2319-8753
International Journal of Innovative Research in Science, Engineering and Technology Vol. 2, Issue 7, July 2013
Copyright to IJIRSET www.ijirset.com 3021
Fig.19 LCD initialisation
Fig.20 Moving distance input
Fig.21 Painting distance input

ISSN: 2319-8753
International Journal of Innovative Research in Science, Engineering and Technology Vol. 2, Issue 7, July 2013
Copyright to IJIRSET www.ijirset.com 3022
The Fig.20 and Fig.21 shows the moving distance and painting distance input. For the robot to start painting
the start button has to be pressed. The robot continues to paint till the wall ends by having painting distance as its
breath of the wall. The Fig.22 shows the indication of painting robot in the diplay.
Fig.22 Robot starts to paint
The Fig.23 shows the indication of the movement of robot in while painting. The movement of the robot wil
be in one direction along the wall.
Fig.23 Mobile platform moves
VI. CONCLUSION
Automatically paint the wall of given dimension has been designed and implemented. The approach uses IR
transmitter and IR receiver to detect the presence of wall. The microcontroller unit to control the movement of the DC
motor. The robot eliminates the hazards caused due to the painting chemicals to the human painters such as eye and
respiratory system problems and also the nature of painting procedure that requires repeated work and hand rising
makes it boring, time and effort consuming. The robot is cost effective, reduces work force for human workers, reduces
time consumption. The pitfall of the project is that the robot continues painting even after the end of the wall hence it
can be overcomed by adding some indicating objects such as buzzers. In the future the painting robot can be enhanced
by using image processing in order to scan the objects and obstacles that are present in the wall so that those objects
can be automatically omitted while painting.

ISSN: 2319-8753
International Journal of Innovative Research in Science, Engineering and Technology Vol. 2, Issue 7, July 2013
Copyright to IJIRSET www.ijirset.com 3023
REFERENCES
[1] Mohamed T. Sorour, Mohamed A. Abdellatif, Ahmed A. Ramadan, and Ahmed A. Abo-Ismail, Development of Roller-Based Interior Wall
Painting Robot, World Academy of Science, Engineering and Technology Vol 59 2011.
[2] S.m.s.Elattar, Automation and robotics in construction: Opportunities and challenges, Emirates journal for engineering research, Vol no 13 (2),
Page no 21-26 2008
[3] Naticchia, A. Giretti, A. Carbonari,Set up of a robotized system for interior wall painting, Proceedings of the 23rd ISARC, October 3-5,Tokyo,
Japan, 2006.
[4] Johan Forsberg Roger AarenstrupAke Wernersson, A Construction Robot for Autonomous Plastering of Walls and Ceilings, Vol 6, 2000.
[5] Jayshree sahu, S.K.Sahu, Jayendra Kumar, Microcontroller Based Dc Motor Control, International Journal of Engineering Research &
Technology (IJERT),Vol. 1 Issue 3, May – 2012.


![Kawasaki Robot K series · K series Kawasaki Robot K series Painting robots explosion-proof and painting package cells Cat. No. 3L1900 Sep. ’19 F Printed in Japan Kawasaki Robot]](https://static.fdocuments.in/doc/165x107/5e3e5cb6e37ed2437d3270c6/kawasaki-robot-k-series-k-series-kawasaki-robot-k-series-painting-robots-explosion-proof.jpg)