
Auto Care Software Contents BUSINESS INTERNET BANKING MODULE 3 SETTING UP THE BUSINESS INTERNET...
47
Auto Care Software Version 14.00 PREMIUM MANUAL www.autocaresoftware.com.au
Transcript of Auto Care Software Contents BUSINESS INTERNET BANKING MODULE 3 SETTING UP THE BUSINESS INTERNET...

Auto Care Software
Version 14.00
PREMIUM MANUAL
www.autocaresoftware.com.au

2
Contents
BUSINESS INTERNET BANKING MODULE ................................................. 3
SETTING UP THE BUSINESS INTERNET BANKING MODULE ........................................................... 3 Entering Bank Details into Auto Care Software ................................................................................. 4 Entering Your Suppliers’ Bank Details ............................................................................................... 6 Entering Creditors’ Bank Details in the Make a Payment Module ..................................................... 7 Entering Your Employees’ Bank Details ............................................................................................ 7
PROCESSING PAYMENTS BY INTERNET BANKING ........................................................................ 8 Supplier Payment Module ................................................................................................................. 8 Make a Payment Module ................................................................................................................. 10 Payroll Module................................................................................................................................. 10 Creating Business Internet Banking Transfer File ........................................................................... 11 Saving a Business Internet Banking File ......................................................................................... 13 Deleting a Business Internet Banking File ....................................................................................... 14
SMS MODULE .............................................................................................. 16
Receiving SMS Messages .............................................................................................................. 18 SENDING AND RECEIVING SMS MESSAGES ON CUSTOMER INVOICE .......................................... 19
INTERNAL WORKSHOP JOB MODULE (IWJ) ........................................... 21
ACTIVATING THE INTERNAL JOB MODULE ................................................................................. 21 Card File Set-up (initially only)......................................................................................................... 21 Creating Stock Codes for Internal Jobs ........................................................................................... 22
USING THE INTERNAL JOB MODULE ......................................................................................... 22 Warranty / Build ID Numbers ........................................................................................................... 24 Invoicing Internal Job Products ....................................................................................................... 24 Return or re-work of an Internal Job Item ........................................................................................ 26
COST CENTRES .......................................................................................... 27
Configuring your cost of sales accounts .......................................................................................... 27 To activate your new settings click on the Set all Stock item, Billing Code and Assembly codes in Stock table using account codes selected above button. ............................................................ 28 To Set Sales and Cost of Sales accounts for stock categories follow the steps below: .................. 29
JOB/TIME RECORDING AND REPORTS MODULE ................................... 32
REQUIREMENTS AND SET UP .................................................................................................... 32 GENERAL OPERATION AND REPORTING ................................................................................... 37
Job / Time Report by Technicians ................................................................................................... 41 Job / Time Report by Jobs .............................................................................................................. 42 Job / Time Report by Job Number ................................................................................................... 43 Productivity report by Employee and/or Department ....................................................................... 44
3
INTRODUCTION
Auto Care Software Version 14 Premium is an advanced form of Auto Care Software Version 14. This comprehensive package has all the modules included in Auto Care Software 14. In addition it provides you with the following new features:
Business Internet Banking module
Send and Receive SMS text messages (conditions apply)
Internal Jobs module
Option to create Cost Centres
Job Time Recording module.
Business Internet Banking Module Business Internet Banking is for you if you have Internet access and you would like to pay your suppliers and employees electronically without too much hassle. Auto Care Software will create a standard data file with all payment transactions. All banks and financial institutions in Australia accept this data file. It can contain up to 500 credits (payments). You can login to your Bank website and upload the transaction file you have just created. If you have dozens of transactions at the end of the month or any other time, this module will save you considerable time. To use this module you need to have a contract with your bank, which specifies the account or accounts you will use for fund transfers. You can use accounts held at different financial institutions. Your bank or financial institution will provide you with a Direct Entry user ID and a Bank Code. You have to enter them in Auto Care Software.
Setting up the Business Internet Banking Module On the main menu screen select “SYSTEM”. Click “System Setup” and select “System3” page. Tick on the “Business Internet Banking” check box to turn this feature on. Click “Exit” to return to the main menu screen.

4
On the main menu screen select “SYSTEM”. Click “Operators and Passwords” and select the operator who is permitted to use this module. Tick the “Internet Banking” check box for this operator. Click “Exit” to return to the main menu screen.
Entering Bank Details into Auto Care Software In order to use the Internet Banking module you have to enter bank details for both your company and your creditors. You will enter bank details in the following modules:
General Ledger - to enter your company’s bank details
Supplier Card Files - to enter your suppliers’ bank details
Make a Payment module - to enter bank details for those creditors who you pay in this module
Payroll module - to enter your employees’ bank details.

5
Entering your company’s bank details To enter your bank details, click “General Ledger” on the main menu screen and click on the “Chart of Accounts” icon. Select the account you are going to use for Internet banking and click “Edit”. On the Account Information screen click on the “Bank Details” button.
The Bank Details dialog box appears. You have to enter the following information in the relevant fields:
BSB number: This is 7 characters long with a hyphen in position 4. Enter leading zeros.
Account Number: This is maximum 9 characters long. If it does not fit into the field take the hyphen out.
Financial Institution Abbreviation: This is the “bank code” that you receive from your bank (maximum 3 characters).
User Name: This is the user-preferred name as advised on your Internet Banking application.
User ID Number assigned by APCA: This is the User Identification Number, which is assigned by APCA (Australian Payments Clearing Association) and your Financial Institution. It is maximum 6 characters long (enter leading zeros).

6
Description of entries: This will appear in the first line of your transfer file. It is the name of your transfer file as well. Enter different names to different accounts! (Cannot be longer than 12 characters.)
Name of Remitter: This is 16 characters long and helps to identify each line in the body of your transfer file.
Entering Your Suppliers’ Bank Details Next you have to enter the bank details for each of your suppliers. In the Suppliers Card files click on “Bank Details”.

7
Click on the “Business Internet Banking” check box and enter the required data into each field.
Entering Creditors’ Bank Details in the Make a Payment Module To enter your payees’ bank details, click “General Ledger” on the main menu screen and click on the “Make a Payment” button. Click “Find”, select “Payee” and click “OK”. Select the payee for which you want to enter the bank details and click “OK”. Click on any of the cheques on the list and click “OK”. Click on the “Bank Details” button on the top right hand side of the screen to display the Make a Payment Bank Details window and enter bank details for each creditor.
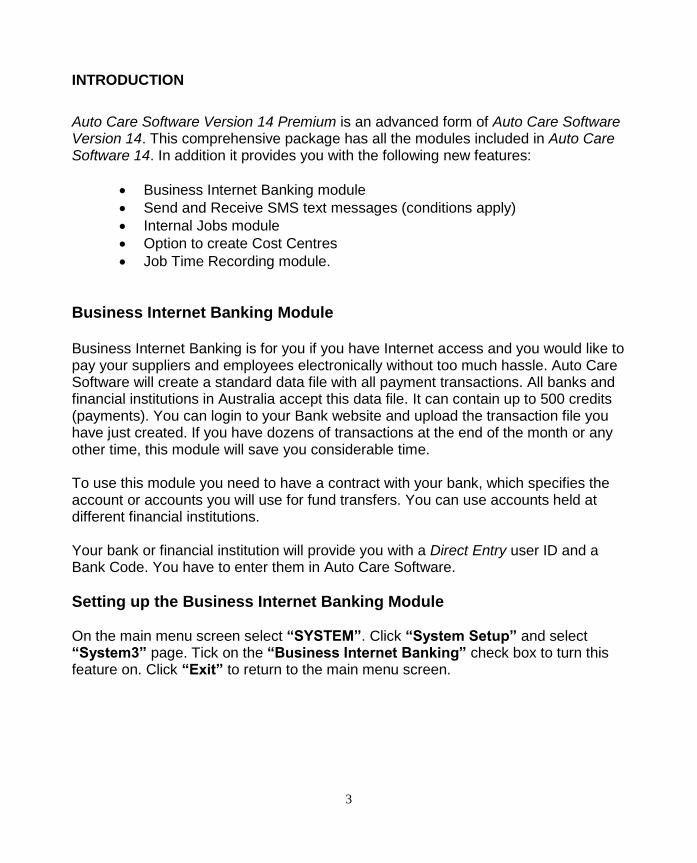
Entering Your Employees’ Bank Details To enter your employees’ bank details, select “Utility/Payroll” on the main menu screen. Select “Employees Card File” page and click on the “Bank Details” button. Enter Bank details for each employee.
8
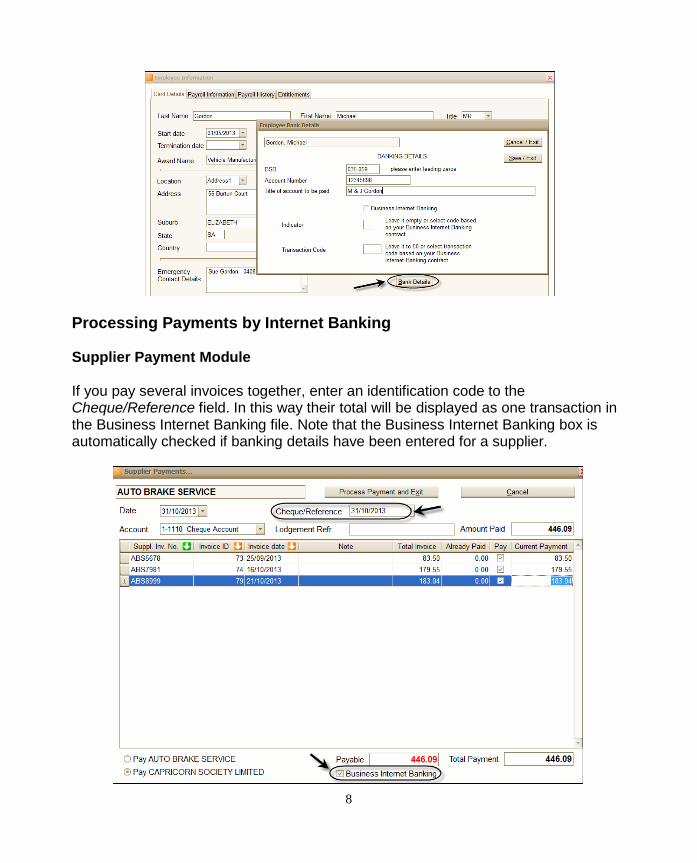
Processing Payments by Internet Banking Supplier Payment Module If you pay several invoices together, enter an identification code to the Cheque/Reference field. In this way their total will be displayed as one transaction in the Business Internet Banking file. Note that the Business Internet Banking box is automatically checked if banking details have been entered for a supplier.

9
In the Business Internet Banking file it will be one transaction line.
Note the Lodgements Reference column includes 31/10/2013 and part of the supplier’s name (maximum 18 characters). This Lodgements Reference will be used by the financial institutions for statement narrative. If you want to pay these invoices separately, you have to leave the Cheque/Reference field empty.
In this case, in the Business Internet Banking transfer file all three invoices will appear separately. The Lodgements Reference includes the Supplier invoice number and part of the Supplier’s name (maximum 18 characters).

10
Make a Payment Module You can have several items on the Make a Payment page, but it will always be processed as one payment. Enter the lodgement reference (maximum 18 characters) in to the Lodgements Reference Field.
Payroll Module When you process a pay advice, the payment number and employee’s name will be displays in the Note/Reference field automatically. Note that if you use the internet banking for paying an employee than you cannot use this field for entering notes.

11
Creating Business Internet Banking Transfer File In the General Ledger module click on the Business Internet Banking command button.
12
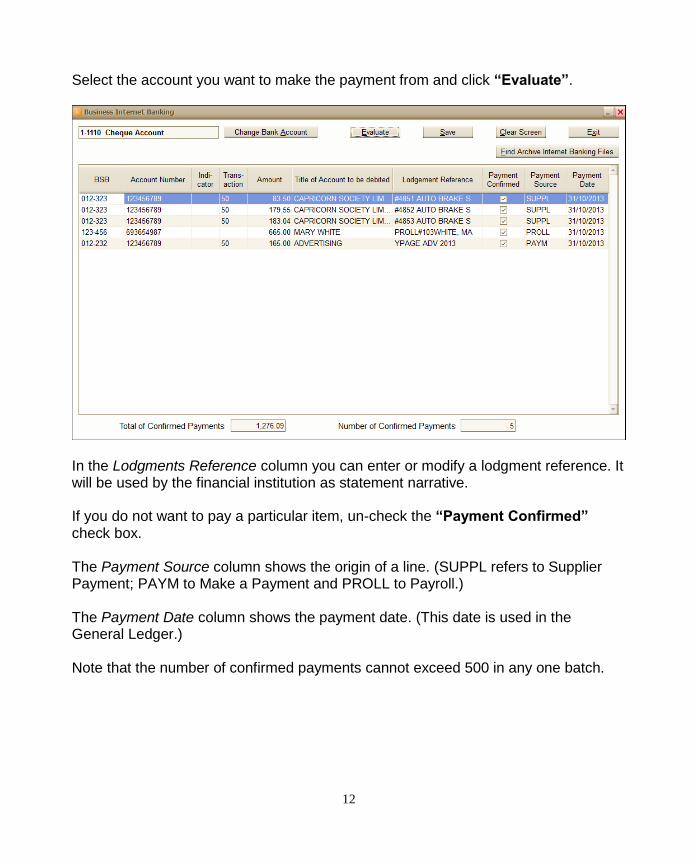
Select the account you want to make the payment from and click “Evaluate”.
In the Lodgments Reference column you can enter or modify a lodgment reference. It will be used by the financial institution as statement narrative. If you do not want to pay a particular item, un-check the “Payment Confirmed” check box. The Payment Source column shows the origin of a line. (SUPPL refers to Supplier Payment; PAYM to Make a Payment and PROLL to Payroll.) The Payment Date column shows the payment date. (This date is used in the General Ledger.) Note that the number of confirmed payments cannot exceed 500 in any one batch.

13
Saving a Business Internet Banking File To save a Business Internet Banking file, click on the “Save” command button. Auto Care software will display the message that the file has been saved in the BUSINESS INTERNET BANKING folder of the C: drive.
The file’s name is “Payment Data.aba”. This is the file that you have to upload to your financial institution web site.
Each file will be archived and can be viewed at and printed any time. Click on “Find Archived Internet Banking Files” to find a file.

14
The file can be printed or exported to a format requested by the bank by clicking on the Create .aba file.
Note that if you create a payment transaction file in this dialog box, the file name will include the word “Archive”. Deleting a Business Internet Banking File In case you need to delete an .aba file, click on the “Delete transaction” button. Click Accept and Yes. Note that an extra line item will be added to the deleted batch displaying the date and time of the deletion and the person who deleted the batch.

15

16
SMS Module The SMS module enables you to send standard or personalised text messages to your customers from Auto Care Software’s Booking Diary, Customer Invoice and Marketing modules without touching a mobile phone by using your computer keyboard and mouse. For example, you can set up standard messages in the Booking Diary module to confirm bookings or convey other information to your clients. You send the following message to your customer: “We confirm that your vehicle is booked into our workshop on – Tuesday 22nd January 2013. Sunshine Auto Repairs. Please reply.” Your client will receive this message within 2 minutes. He may reply: “Thanks, will be there at 8am. John” You will receive this reply in Auto Care Software and if action is required, you could send a second message. Based on the same principle, you can set up standard messages in the Customer Invoice and Marketing modules. For example, you can send the following message to your customer: “Your vehicle is ready to collect. Sunshine Auto Repairs” In order to use the Auto Care Software SMS feature, you need to have:
Broadband internet connection
A contract with Silver Messages for broadcasting your messages (Data Development owns Silver Message. For contract details please call your local agent or dial 08 8396 5605).
Sending SMS Messages in the Booking Diary To send a message from the Booking Diary module, follow steps below:
Click on the Booking Diary button on the Auto Care Software main menu screen.
Select the client who you want to send an SMS to and click on the Send SMS button to display the SMS dialog box.

17
Enter your text message and click on the Send SMS button. The SMS Sent field now displays the date and time when the message was sent.
Creating standard messages
To create a standard message, click on the Send SMS button.
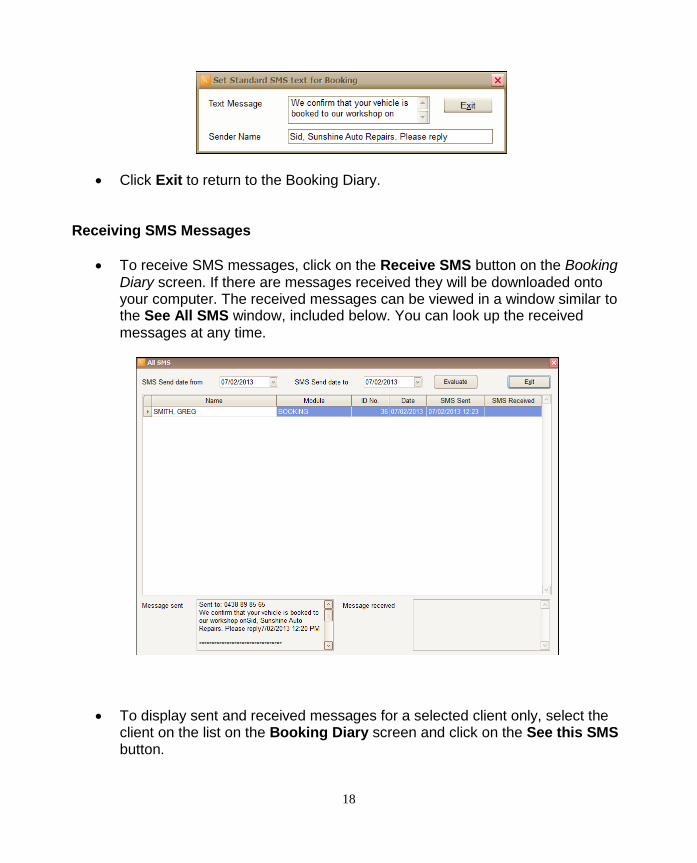
The SMS dialog box appears. Click on the Set Standard Message button. A window pops up where you can set a standard message. This message will automatically be displayed in the SMS dialog box every time you click on the Send SMS button on the Booking Diary screen. Note that this message can be modified if needed at the time of sending an SMS. Click Exit to return to the SMS dialog box.
18
Click Exit to return to the Booking Diary.
Receiving SMS Messages
To receive SMS messages, click on the Receive SMS button on the Booking Diary screen. If there are messages received they will be downloaded onto your computer. The received messages can be viewed in a window similar to the See All SMS window, included below. You can look up the received messages at any time.
To display sent and received messages for a selected client only, select the client on the list on the Booking Diary screen and click on the See this SMS button.

19
Sending and Receiving SMS Messages on Customer Invoice Sending and receiving SMS messages from the customer invoice module is based on the same principle as sending and receiving SMS in the booking diary.
Sending and Receiving SMS Messages in the Marketing Module Sending and receiving SMS messages from the customer invoice module is based on the same principle as sending and receiving SMS in the booking diary.

20

21
Internal Workshop Job Module (IWJ)
This module is a powerful tool for businesses having a requirement for the repair or rebuilding of assemblies that will be placed in stock ready for sale. It allows you to manage data related to:
Processing jobs for stock
Stock control (spare part components and finished product stages)
Warranty traceability (parts and labour).
Activating the Internal Job Module
On main menu screen select SYSTEM then SYSTEM SETUP.
Select Debtors 1 tab.
Tick Internal Workshop Job.
Click Exit.
Card File Set-up (initially only)
Select Customers Card File from main menu screen.
Click New, enter customers name as INTERNAL JOB.
Tick the INTERNAL WORKSHOP JOB box.
Click EXIT.

22
Creating Stock Codes for Internal Jobs
Select Stock & Billing Codes from main menu screen.
Click New and enter a part number for the product you rebuild and keep as an internal job.
Change stock type to Internal Job.
Enter Unit, Description and select Category.
Tick Manual or Automatic Markup depending on your own preferences.
Using the Internal Job Module You can create an internal job in the Customer Invoice module.
Select Customer Invoices from main menu screen.
Click New. Select INTERNAL JOB and click OK.
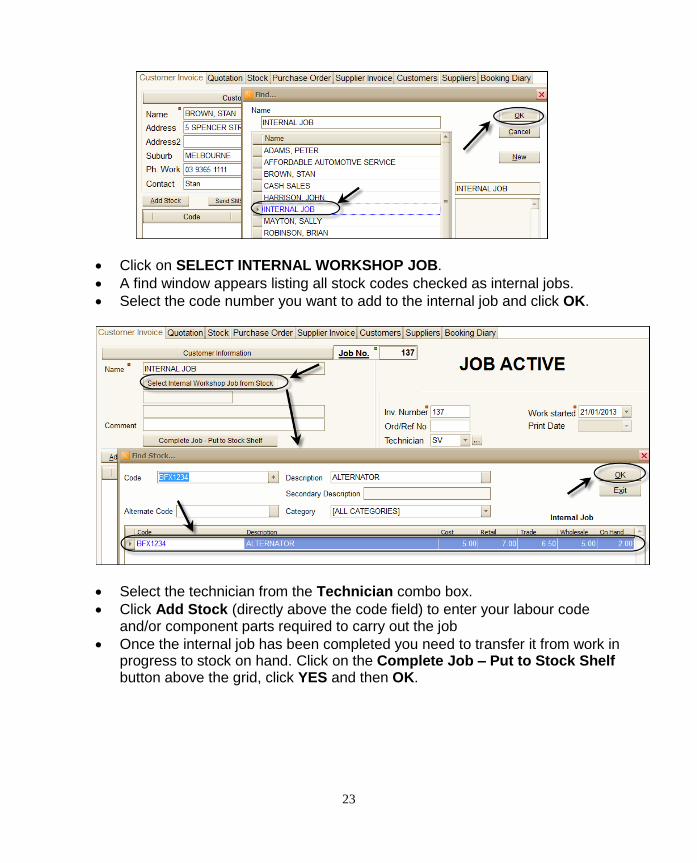
23
Click on SELECT INTERNAL WORKSHOP JOB.
A find window appears listing all stock codes checked as internal jobs.
Select the code number you want to add to the internal job and click OK.
Select the technician from the Technician combo box.
Click Add Stock (directly above the code field) to enter your labour code and/or component parts required to carry out the job
Once the internal job has been completed you need to transfer it from work in progress to stock on hand. Click on the Complete Job – Put to Stock Shelf button above the grid, click YES and then OK.

24
Note that the Job Completed sign appears on the invoice.
Warranty / Build ID Numbers All stock items that have been raised through the internal job module are automatically assigned a build ID (warranty) number which is actually the internal job invoice number. NOTE THAT THIS NUMBER SHOULD BE PERMANENTLY STAMPED ON THE PRODUCT. Both the build ID number & manufacture date are listed on the stock screen, including other relevant information.
Invoicing Internal Job Products
Raise an invoice for the customer with usual method
Click Add Stock. A find window appears.
Select the stock code required and click Add.
A selection window appears listing all internal jobs in stock. Tick Show Cost if you want to compare the costs against all products listed.
Select the stock item you want to sell by its Build Invoice number and click OK.

25
Tracing on hand & sold items
In the Stock module select the Internal job code
Click on the Show On Hand and Sold Stock button just above the grid. Here you will see a list of both on hand and sold items with information including the build invoice number, build date, sale invoice number and sale date.

26
Return or re-work of an Internal Job Item
To return the item, do the following:
Find the customer invoice for the item.
Tick the invoice back to Work in Progress.
Delete the quantity and press Enter.
You will be asked if you want to delete this item put back to stock. Click Yes. If re-work is needed follow the steps below:
Find the internal job in the Customer invoice module.
Re-open the internal job card by clicking on the Recall from stock button under the JOB COMPLETED sign.
Carry out re-work as required. Add additional part and/or labour as requested. Close internal job when completed by clicking on the Complete Job – Put to Stock Shelf button above the grid
Replace internal job item on customer invoice in normal way. Note that extra component parts and labour will be reflected in the adjusted cost total.

27
Cost Centres In Auto Care Software there are three primary methods of implementing your sales and cost of sales ledger accounts.
Default settings (single sales and cost of sales account)
By Stock, Billing and Assembly (where you nominate a different sales and corresponding cost of sales account for each sales type)
By computers (where you nominate a different sales and corresponding cost of sales account for individual computers)
IMPORTANT: We recommend that you consult your accountant when configuring your accounts. To modify the default Sales and Cost of Sales account setting, do the following:
Select System from the menu at the top of the screen.
Select System Setup.
Click on the Ledger tab.
Make changes according to your business needs. Configuring your cost of sales accounts No special settings (Default configuration) The default configuration of Auto Care Software offers a single sales and corresponding cost of sales accounts. Commonly these are account numbers are: Sales account 4-1100 Cost of Sales account 5-1100

28
Setting ledger accounts by Stock, Billing Code and Assembly If you select this option, you will able to nominate an individual sales and cost of sales account for each sales type (Stock items, Billing Codes, Assembly).
To select the accounts, click on the arrow on the right hand side of each field and select the appropriate account from the drop down menu. Note that you cannot set a cost of sales account for Billing Codes, as the cost of sales is wages.
To activate your new settings click on the Set all Stock item, Billing Code and Assembly codes in Stock table using account codes selected above button.

29
To make these changes across the board for existing invoices and credit notes, click on the Change historical Sales and Cost Accounts on customer invoices and credit adjustment notes using account codes above button.
Sales and Cost of Sales Accounts by stock categories If you want to select individual sales and cost of sales accounts for your stock categories, tick the Sales and Cost of Sales set by stock categories box. This allows each sales category to have a unique sales and cost of sales account. Note that to use this feature, you have to select the stock categories ON in the System Setup/Stock module.
To Set Sales and Cost of Sales accounts for stock categories follow the steps below:
In the Stock module click on the button next to the Category field.

30
The Stock Categories and markup % window appears.
Click Edit at the bottom of the screen.
Select the appropriate sales and cost of sales accounts from the drop down menu corresponding to each category.
31
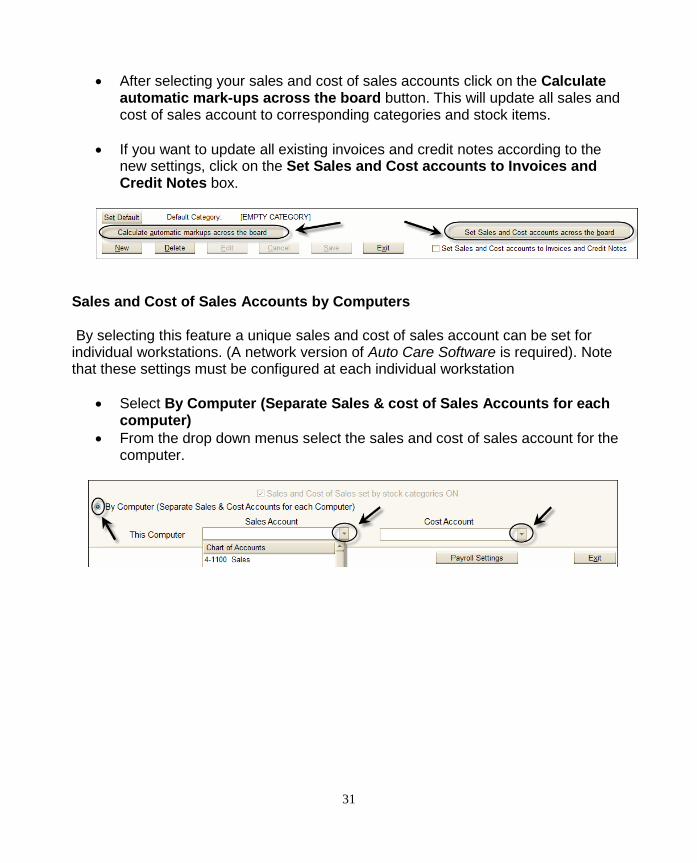
After selecting your sales and cost of sales accounts click on the Calculate automatic mark-ups across the board button. This will update all sales and cost of sales account to corresponding categories and stock items.
If you want to update all existing invoices and credit notes according to the new settings, click on the Set Sales and Cost accounts to Invoices and Credit Notes box.
Sales and Cost of Sales Accounts by Computers By selecting this feature a unique sales and cost of sales account can be set for individual workstations. (A network version of Auto Care Software is required). Note that these settings must be configured at each individual workstation
Select By Computer (Separate Sales & cost of Sales Accounts for each computer)
From the drop down menus select the sales and cost of sales account for the computer.

32
Job/Time Recording and Reports Module
The Job/Time Recording and Reports Module has been specifically designed to enable you to record and report the exact times your technicians have been working on a given job. If you have more than one technician working on a job, it records each individual time accordingly. But not only does it record time spent working on jobs, when it implemented, it is designed to clock your employees on, record the time they spend working on various jobs, as well as recording various breaks (i.e. morning tea, lunch, etc) and finally when they clock off for the day. You can create and modify the internal jobs as required. Furthermore, you can have full control over error correction of times (e.g. an employee forgets to clock off for the day and it may create problems in recording his times).
Requirements and Set up The Job/Time Module uses bar codes to record the technician’s name against a job number. Therefore, initially you will need to ensure that the Barcode Font is installed on your computer. If you cannot find the Font on your computer, the Auto Care CD has a folder with the Barcode Font in it, ready to install if needed. Installing Barcode Fonts To ascertain whether your computer has the Barcode font installed, carry out the following:
Click on the Start button on your computer screen and select Run.
Once the Run box has opened up, delete what ever is in the Open box and type the following exactly as it is written here: %systemroot%\fonts. Then click OK.

33
The Fonts folder will open up. Have a look to see if the font 3 of 9 Barcode is there or not. If it is, skip the next few steps.
If you cannot find the font 3 of 9 Barcode In the very top left hand corner, click on the File menu. Select Install a New Font.
The Add Font window appears. All you need to do now is select your drive (in which you placed the Auto Care DVD), select the barcodefont folder and in the top box, select the font by clicking on it. Finally, click OK. A small screen will quickly pop up and the font will then be installed on your computer. It can be seen in the Fonts folder which is still open. Once you are satisfied that the Barcode font has been installed, close the Fonts folder.
Due to the fact that the Job/Time Module uses bar codes to carry out the recording, you will also need a barcode reader. Your Auto Care agent can assist you with this, if you don’t already have one.

34
The next thing you need to do is to turn on the ability to print bar codes for your employees. To do this, start Auto Care and go into System Setup in the System menu. Once it has opened up, select the Debtors 4 tab and you will see a tick box where you can turn ON or OFF the technician barcodes. Put a tick in it by clicking on it and then click Exit.
You can now go in and set up all your technicians with barcodes. To do this, go to the Utility menu and select Servicemen Card File. When it opens up, you will see two new features. One is the ability to add a Barcode to become the employee’s barcode (this can be their initials, their employee number, or anything you like, as long as it is only 12 characters long (letters, numbers or both) and there are NO spaces in it). The other new feature is the ability to print out the barcodes.
Entering Barcodes for Servicemen Once you have entered the barcodes, click the Print Servicemen Barcodes button and you can then select the number of barcodes you want to print for each employee

35
and print them on the default printer. You can print them on ‘sticky labels’ and attach them where ever you like or, print them onto normal A4 paper, laminate it and place it next to the barcode scanner.
The printed barcodes will look like this:
Managing Job/Time Barcodes Once you have your employee barcodes set, you now need to have a look at the existing Fixed Job barcodes, add, modify and delete to suit your needs. To access this area, click on the System menu and at the bottom, you will see the Job/Time Recording module. Click on it and the Job/Time menu will be displayed.
Click on the Job/Time Code Database icon. Once selected, the following screen will appear. It contains all the System Jobs (E. G. Morning Brake, Delivery, Cleaning, etc) currently in the system.

36
From this screen, you can add, edit and /or delete the existing System Jobs. The third column defaults for Clock In/Out indicating that when an employee comes to work in the morning, they can clock straight onto their first job and the system will also clock them on for the day (or whichever is selected in the third column).
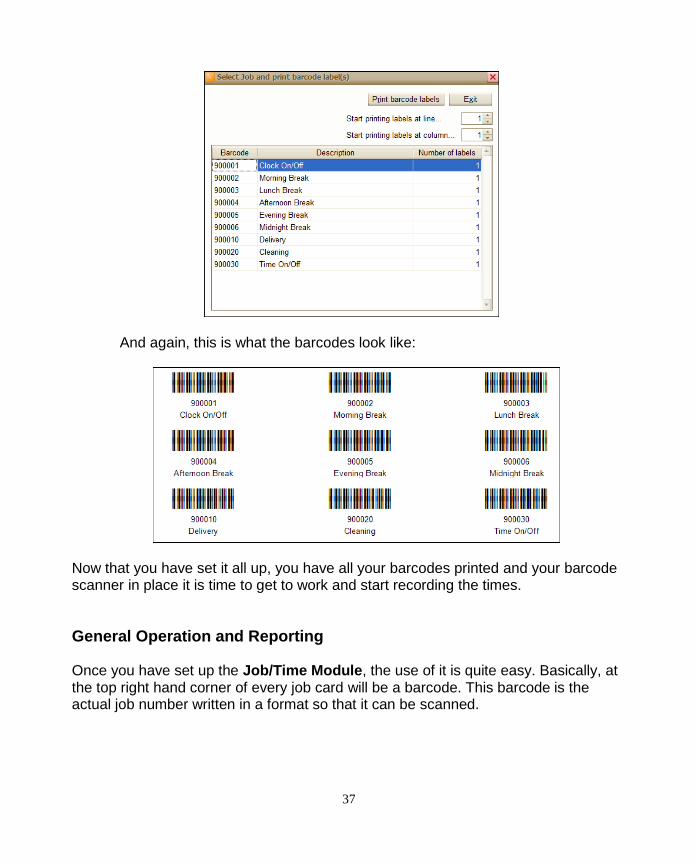
When you are finished setting it all up, click on the Print Barcodes button. Select the barcodes and the number you want to print out. Then click Print barcode labels.
You can print out these barcodes to either stickers or an A4 sheet and then laminate it.
37
And again, this is what the barcodes look like:
Now that you have set it all up, you have all your barcodes printed and your barcode scanner in place it is time to get to work and start recording the times.
General Operation and Reporting Once you have set up the Job/Time Module, the use of it is quite easy. Basically, at the top right hand corner of every job card will be a barcode. This barcode is the actual job number written in a format so that it can be scanned.

38
The advantage of this system is that instead of trying to read the times either written on the job card by the technician or a time stamp from a card clocking machine, all the times are actually stored in a database where it can be read at a later stage, at your leisure. The actual time recording module needs to be actively up on the screen of the computer upon which it is designated to run. You may have an old computer (from home or replaced out of the general computer population and is just sitting in the corner collecting dust) which may be ideal for this. All you need to do is run the Auto Care program and ensure that the bar code reader is installed and up and running (again, if you are not too sure about this, your Auto Care agent can assist you with it).
To start recording times, click on the Clock On/Off icon on the main menu screen in the Job Time Recording and Reports module and the recording screen will open up.
The recording screen is now waiting for you to scan the first employee’s barcode. Once it is scanned, the name of the employee will appear and all they need to do now is to scan their job card to record their name and time against it. If they are starting a System Job, they can just scan the appropriate job from the preprinted list. On the screen you will see that an employee who has clocked on for the day as well as clocking onto their first job.

39
The system now has started recording your employees’ time and when they are issued another job, they can either clock off the existing job or just clock on to the new job. The Job/ Time Module will clock them off their existing job and clock them onto their new job.
The New Login button at the top is there to be used when the next employee is ready to log on. It is also used not only for the next employee but, when any employee wants to update their records. When clicked, it presents an empty log in screen and when the employee scans their name, it shows their current times.
Eventually, by the end of the day, they will have clocked on and off a number of charge-able jobs as well as system jobs. The following figure shows a basic example of a day’s work (this is only an example and has only two jobs logged on it). It shows that the start and finish date for the jobs as well as the time spent on them.

40
Rectifying Entry Errors If there is an error of some sort in the actual time recorded, the manager/supervisor can make amendments in the Job/Time Module.
Click on the Clock On/Off Error Correction.
The log in screen appears (exactly the same as the normal Clock On / Clock off screen),
To carry out an error correction, all you need to do is to scan the barcode of the employee, whose times require adjusting, then select the offending entry and adjust it accordingly. Use the Tab key to move from one column to the next in the line. To make changes to a date, click on the date and overtype it. To move the cursor within the field use the Enter key.
Job/Time Reports The reports from the time recording system can be accessed from the same menu.

41
Job / Time Report by Technicians Once selected, this report allows you to generate a report based on a daily period (from midnight to midnight). Obviously, you can change the selection criteria to suit your needs and report on the times you require.
The report displays all the technicians’ activity details for the selected period.

42
As can be seen from this report, it shows when the technician clocked on and off for the day as well as showing all the jobs he worked on and the time spent on each, culminating in their productive time in hours and as a percentage of their total time clocked on for the day. Job / Time Report by Jobs This report shows the jobs worked from the date entered to the date entered.

43
The information presented this time, as indicated above, shows the hours allocated (assigned when the billing code is set up) and the real hours worked (hours charged – recorded by the use of the barcodes and the reader, etc), and finally the effective percentages. This report uses the assigned times allocated to billing codes. For correct information to be presented and for it to be accountable, whenever any labour related work is carried out, it must be recorded against a labour related billing code as this gives a better indication of productivity. Job / Time Report by Job Number This report shows all the technicians who worked on a specific job number.
Select the job number you wish to report on. Once you enter the job number, the input screen will pick up the customers details before you click OK, allowing you to make sure that you have the correct job number.
44
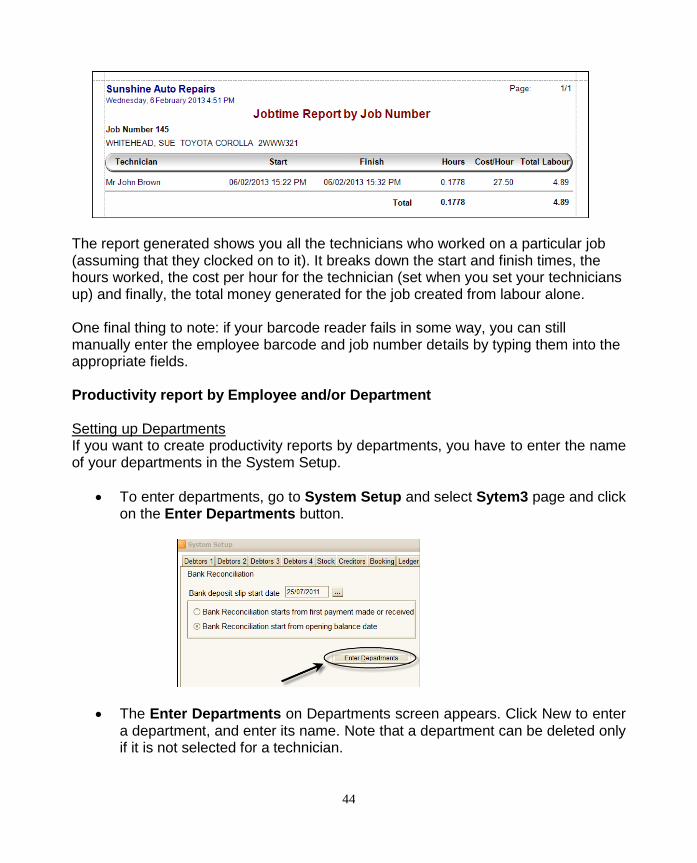
The report generated shows you all the technicians who worked on a particular job (assuming that they clocked on to it). It breaks down the start and finish times, the hours worked, the cost per hour for the technician (set when you set your technicians up) and finally, the total money generated for the job created from labour alone. One final thing to note: if your barcode reader fails in some way, you can still manually enter the employee barcode and job number details by typing them into the appropriate fields. Productivity report by Employee and/or Department Setting up Departments If you want to create productivity reports by departments, you have to enter the name of your departments in the System Setup.
To enter departments, go to System Setup and select Sytem3 page and click on the Enter Departments button.
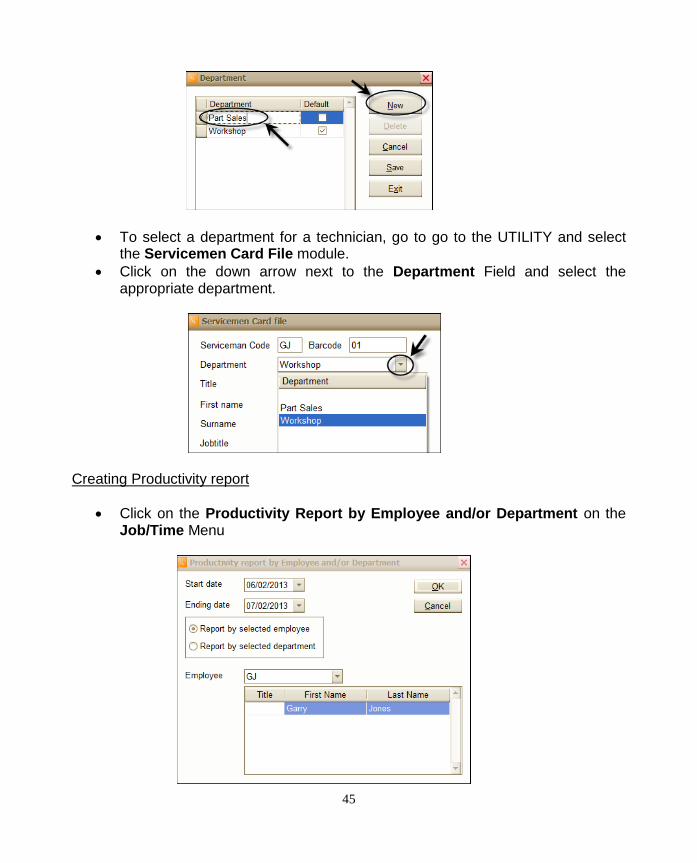
The Enter Departments on Departments screen appears. Click New to enter a department, and enter its name. Note that a department can be deleted only if it is not selected for a technician.
45
To select a department for a technician, go to go to the UTILITY and select the Servicemen Card File module.
Click on the down arrow next to the Department Field and select the appropriate department.
Creating Productivity report
Click on the Productivity Report by Employee and/or Department on the Job/Time Menu

46
As a default the Report for a selected employee button is ticked. Simply enter the start and ending date, select the employee form the Employee down-drop menu and click OK.
The report shows the Employee name, the productivity report start and ending dates, Job number, Job description, Hours Worked, Hours Charged and % Productivity. Total hours and total productivity % are also printed.
To create a report by departments, tick the Report by department radio button. Enter the start and ending date, select the department form the Department down-drop menu and click OK.

47
The report shows the Department, the productivity report start and ending dates, the Job number, Job description, Hours Worked, Hours Charged and % Productivity. Total hours and total productivity % are also printed.


![Banking Truths Auto Saved]](https://static.fdocuments.in/doc/165x107/577d2f7d1a28ab4e1eb1daf0/banking-truths-auto-saved.jpg)