Attended Installation of Windows XP Professional
14
Attended Installation of Windows XP Professional By Jason Zandri << Inde x | Next >> This article covers attended installations of Windows XP Professional from a CD-ROM. Installing Windows XP Professional from a CD-ROM to a clean hard disk consists of these four stages: Running the Setup program - Partitions and formats the hard disk (if required) for the installation to proceed and copies the files necessary to run the Setup Wizard. Running the Setup Wizard - Requests setup information about the local workstation where the installation is taking place. Networking components - Installs the networking components that allow the computer to communicate with other computers on the local network. Completing the installation - This final phase copies files to the hard drive and configures the final stages of the setup. There are some noted differences in the Windows XP Professional installation and older Windows NT4 and Windows Professional installations. The design of the installation program assumes that your system has the ability to boot directly from a CD-ROM or that you will use a Windows 95/98/ME boot floppy to begin installing from a CD. The ability to directly create setup floppies has been dropped from Windows XP. Setup boot disks are available only by download from Microsoft . The Setup boot disks are available so that you can run Setup on computers that do not support a bootable CD-ROM. There are six Windows XP Setup boot floppy disks. These disks contain the files and drivers that are required to access the CD-ROM drive through generic PCI drivers and begin the Setup process.
-
Upload
rrrrrrrrre -
Category
Documents
-
view
224 -
download
0
Transcript of Attended Installation of Windows XP Professional

8/7/2019 Attended Installation of Windows XP Professional
http://slidepdf.com/reader/full/attended-installation-of-windows-xp-professional 1/14
Attended Installation of Windows XP
Professional
By Jason Zandri
<< Index | Next >>
This article covers attended installations of Windows XP Professional from a CD-ROM.
Installing Windows XP Professional from a CD-ROM to a clean hard disk consists of these four stages:
Running the Setup program - Partitions and formats the hard disk (if required) for theinstallation to proceed and copies the files necessary to run the Setup Wizard.
Running the Setup Wizard - Requests setup information about the local workstationwhere the installation is taking place.
Networking components - Installs the networking components that allow the computer to communicate with other computers on the local network.
Completing the installation - This final phase copies files to the hard drive and
configures the final stages of the setup.
There are some noted differences in the Windows XP Professional installation and older
Windows NT4 and Windows Professional installations.
The design of the installation program assumes that your system has the ability to boot
directly from a CD-ROM or that you will use a Windows 95/98/ME boot floppy to begin
installing from a CD. The ability to directly create setup floppies has been dropped fromWindows XP. Setup boot disks are available only by download from Microsoft. The
Setup boot disks are available so that you can run Setup on computers that do not support
a bootable CD-ROM.
There are six Windows XP Setup boot floppy disks. These disks contain the files and
drivers that are required to access the CD-ROM drive through generic PCI drivers and begin the Setup process.

8/7/2019 Attended Installation of Windows XP Professional
http://slidepdf.com/reader/full/attended-installation-of-windows-xp-professional 2/14

8/7/2019 Attended Installation of Windows XP Professional
http://slidepdf.com/reader/full/attended-installation-of-windows-xp-professional 3/14
You would select "F8-I agree" to continue. (If you elect not to accept the agreement, the
installation will end)
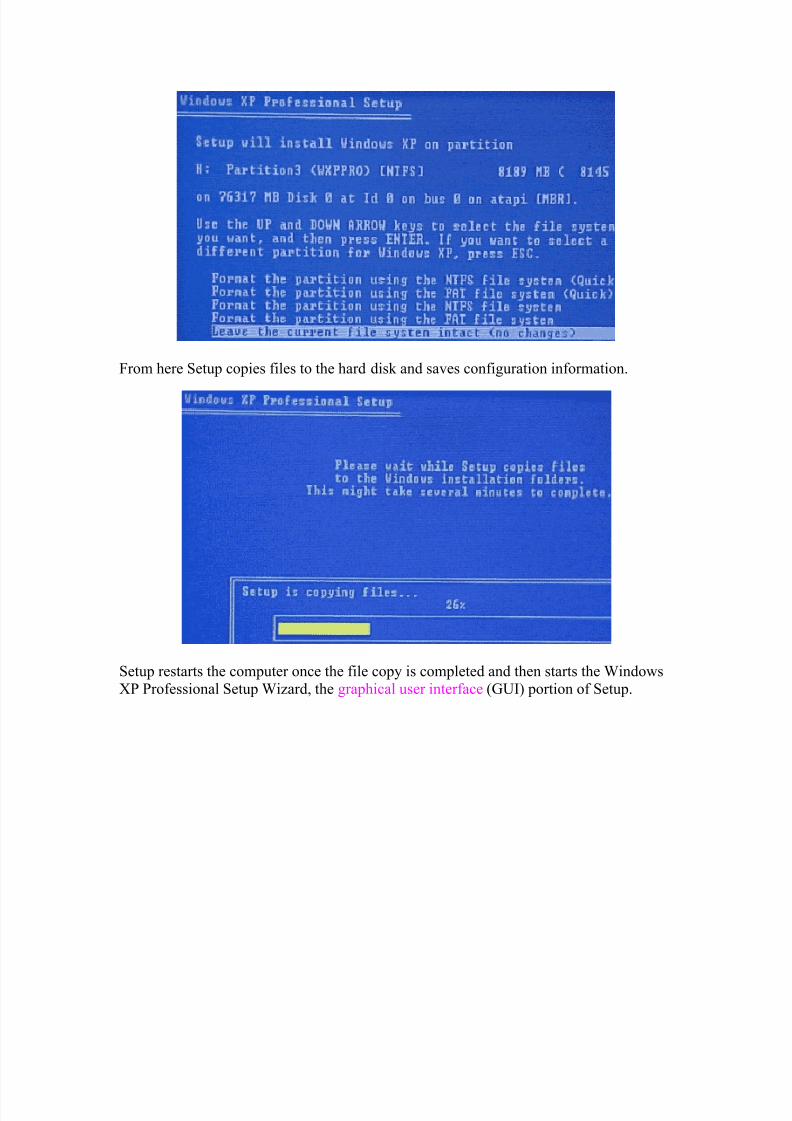
You are then prompted to select a partition on which to install Windows XP Professional.You can select an existing partition or create a new partition by using any unpartitioned
free space on the hard drive(s).
(The above example shows a partitioned and formatted drive)
Once a partition has been selected the next step is to select a file system for the new partition. Next, Setup formats the partition with the selected file system. (This would
assume that a file system didn't currently exist. In this example, one already does and it is
formatted in NTFS so I have elected to leave it as is. Any formatting done here duringsetup will destroy any existing data on the partitions formatted.)
8/7/2019 Attended Installation of Windows XP Professional
http://slidepdf.com/reader/full/attended-installation-of-windows-xp-professional 4/14
8/7/2019 Attended Installation of Windows XP Professional
http://slidepdf.com/reader/full/attended-installation-of-windows-xp-professional 5/14
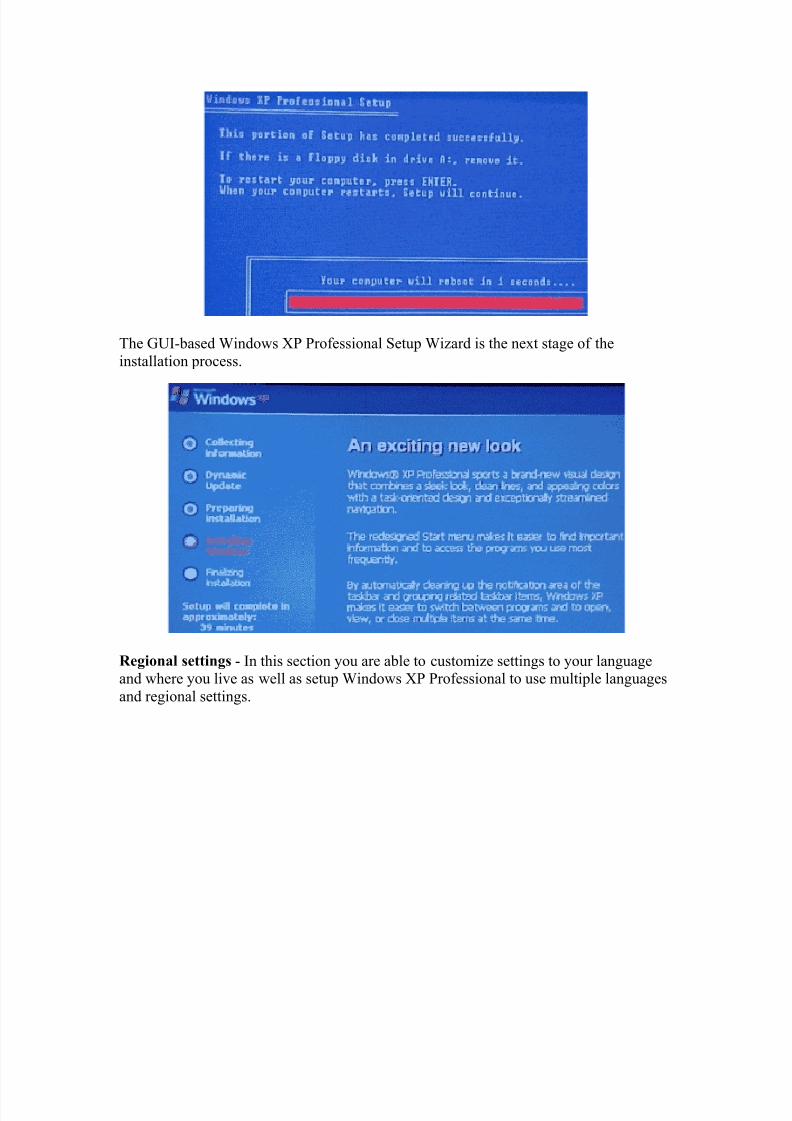
The GUI-based Windows XP Professional Setup Wizard is the next stage of the
installation process.
Regional settings - In this section you are able to customize settings to your languageand where you live as well as setup Windows XP Professional to use multiple languages
and regional settings.

8/7/2019 Attended Installation of Windows XP Professional
http://slidepdf.com/reader/full/attended-installation-of-windows-xp-professional 6/14
Personalize your Software - In this section you can enter the name of the person and the
organization to which this copy of Windows XP Professional is licensed. This can beyour own name and nothing in the organization field or the name of the company in both
places if this installation is being performed in a place of business. Software installed on
the system later will often use this information for product registration and document
identification.
Your Product Key - This page is where you enter your 25-character product key in order
to install the software.
If you incorrectly type the key, an error message will be generated.

8/7/2019 Attended Installation of Windows XP Professional
http://slidepdf.com/reader/full/attended-installation-of-windows-xp-professional 7/14
Computer Name And Administrator Password - Here you enter a name for thecomputer or use the auto generated one that Windows XP Professional provided.
The computer name will always display in all uppercase letters, no matter how you typeit. The name is not case sensitive.
In the Administrator Password box on the same screen, you will enter the password to be
used for the administrator account and in the Confirm Password box you will re-enter it
to make sure that it is entered correctly.

8/7/2019 Attended Installation of Windows XP Professional
http://slidepdf.com/reader/full/attended-installation-of-windows-xp-professional 8/14
If the passwords do not match, the above error message will appear and you will need to
enter them again.
Modem Dialing Information - This section will begin only if an installed modem has
been found on your system.
Enter the correct country or region if it is not selected. (It should match your selectionfrom the Regional settings page.) Type your area code or city code and any number you
might need to dial to get an outside line. You can also select either tone or pulse dialingon this page as well.

8/7/2019 Attended Installation of Windows XP Professional
http://slidepdf.com/reader/full/attended-installation-of-windows-xp-professional 9/14
Date and Time Settings - This section of Setup allows you to verify that the correct date,time and time zone are entered and whether or not the system should adjust itself
automatically at the daylight savings times events each year.
Network Settings - The next section of setup deals entirely with installing the Windows
XP Professional networking components on your system.
Installing Windows XP Professional networking components involves the following processes:
Detect network adapter cards - The Setup Wizard detects and configures any network
adapter cards installed on the computer. By default, it attempts to locate a DHCP server on the network. If none is found it will use an Automatic Private IP Addressing (APIPA)
IP address. (The APIPA IP address feature of Windows XP Professional automaticallyconfigures a unique IP address from the range 169.254.0.1 to 169.254.255.255 and a
subnet mask of 255.255.0.0 when TCP/IP is configured for dynamic addressing and a
DHCP server is not available.)
Select networking components - The Setup Wizard prompts you to choose typical or
customized settings for networking components.

8/7/2019 Attended Installation of Windows XP Professional
http://slidepdf.com/reader/full/attended-installation-of-windows-xp-professional 10/14
The Typical (selected by default) installation includes the following options:
• Client For Microsoft Networks. Allows your computer to access network resources.
• File And Printer Sharing For Microsoft Networks. Allows other computers to
access file and print resources on your computer.
• QoS Packet Scheduler. Helps provide a guaranteed delivery system for network
traffic, such as Internet Protocol (TCP/IP) packets.• Internet Protocol (TCP/IP). Allows your computer to communicate over local area
networks (LANs) and wide area networks (WANs). TCP/IP is the default
networking protocol.
You can install other clients, services, and network protocols during the Windows XP
Professional installation by choosing CUSTOM, but it is recommended that you waituntil after the installation has completed to add additional services. (The exception would
be if the lack of these services would prevent the system from coming online to your
network properly upon restart.)
Workgroup or Computer Domain - This section allows you to choose to join a domainfor which you have administrative privileges or to join a local workgroup. You can create
the computer account in the domain you are joining ahead of time or during installation.(The Setup Wizard prompts you for the name and password of a user account with
authority to add domain computer accounts if you elect to create the account during the
Windows XP Professional installation).

8/7/2019 Attended Installation of Windows XP Professional
http://slidepdf.com/reader/full/attended-installation-of-windows-xp-professional 11/14
After installing the networking components, Setup starts the final steps of the installation process, which include:
• Installs Start menu items - Shortcuts that will appear on the Start menu are
installed and configured during this stage.
• Registers components - The configuration settings that you specified earlier during the install are configured now.
• Saves the configuration - The Setup Wizard saves your entered configuration
settings. Once the system is restarted, the computer uses this configuration bydefault.
•
Removes temporary files - Any files used by the Setup Wizard that are no longer needed are deleted.
• Restarts the computer - The computer is automatically restarted. This is the finalstep of the Setup Wizard.
Upon restart, the computer will either boot directly to Windows XP Professional or it will
bring up the operating system selection window (the text of the BOOT.INI file) if you
have more than one operating system installed.

8/7/2019 Attended Installation of Windows XP Professional
http://slidepdf.com/reader/full/attended-installation-of-windows-xp-professional 12/14
After you start Windows XP for the first time, you will come to the Welcome to
Microsoft Windows screen to finish setting up your computer. Click on the Green NEXTarrow at the bottom right hand corner of the display.
The system will then check to see how you will connect to the Internet. If Windowscannot detect the settings it will prompt you for input. (You can also select SKIP to by
pass this section).
The Registration of your Windows XP Professional software IS NOT REQUIRED. Youcan skip this step and never go back to it.
The Windows Product Activation screen appears next. Windows Product Activation has been designed by Microsoft it protect their intellectual property as much as possible from
software piracy. According to Microsoft through the setup feature, you do not need to
send any information at all when you activate the product, not even a name. This step isrequired, at this time or within the first 30 days.

8/7/2019 Attended Installation of Windows XP Professional
http://slidepdf.com/reader/full/attended-installation-of-windows-xp-professional 13/14
If you decide to skip this registration step now, you will only be able to use Windows XP
Professional for 30 days. At that time, the operating system will not function withoutactivating the product. You will have no other option but to either blow the partition
away and reinstall the OS for another 30 days or activate the software.
If you skip this step, Windows XP will periodically remind us during our 30-day period
to Activate the product.
The next screen we are brought to is the Internet Access screen, which allows us toconfigure our Internet connection at this time as well. You do have the option to skip thisstep as well.
The next screen that appears is the User Setup screen. On this setup page you are able toenter the name of each person that will have local access to this computer. If you choose
to do this now, Windows XP Professional would create a separate user account for each
name entered.
These names would first appear on the Welcome Screen in alphabetical order. At that point, users would be able to select their name from the Welcome screen to use the
computer. The local administrator can use User Accounts in the system Control Panel to
assign these users with passwords and system permission limits. It is also where
additional users can be created, in lieu of doing here or in addition to entering some here.
At least one name needs to be entered.

8/7/2019 Attended Installation of Windows XP Professional
http://slidepdf.com/reader/full/attended-installation-of-windows-xp-professional 14/14
This first user becomes a local administrator by default.
Best of luck in your studies and please feel free to contact me with any questions on myarticle and remember, "If a bad guy can alter the operating system on your computer, it
may not be your computer anymore"
Jason Zandri