ASICamerasSoftwareManual WindowsPlatform - … · ASICamerasSoftwareManual WindowsPlatform...
46
1 ASI Cameras Software Manual Windows Platform Revision 1.3 Jan, 2017 All materials related to this publication are subject to change without notice and its copyright totally belongs to Suzhou ZWO CO.,LTD.
Transcript of ASICamerasSoftwareManual WindowsPlatform - … · ASICamerasSoftwareManual WindowsPlatform...

1
ASI Cameras Software Manual
Windows Platform
Revision 1.3
Jan, 2017
All materials related to this publication are subject to change without noticeand its copyright totally belongs to Suzhou ZWO CO.,LTD.

ASI Cameras User Guide
2
Table of ContentsASI Cameras Software Manual.......................................................................................................... 1Windows Platform...............................................................................................................................1Instruction............................................................................................................................................31. Camera Driver Installation..........................................................................................................5
1.1 Connect camera to USB port................................................................................................ 81.2 Driver Update........................................................................................................................91.3 Driver Uninstall...................................................................................................................10
2. Directshow Driver.........................................................................................................................113. ASCOM Driver............................................................................................................................. 184. Planetary Imaging software.......................................................................................................... 21
4.1 SharpCap.............................................................................................................................214.2 FireCapture..........................................................................................................................234.3 capture settings....................................................................................................................244.4 Get the best performance of the camera............................................................................. 26
5. DSO imaging software..................................................................................................................285.1 Sequence Generator Pro(SGP)............................................................................................285.2 Astro Photography Tool(APT)........................................................................................... 295.3 Nebulosity........................................................................................................................... 305.4 TheSkyX............................................................................................................................. 32
6. Auto Guider...................................................................................................................................366.1 Guider with PHD Guiding.................................................................................................. 376.2 Auto Guider with MaxIm_DL............................................................................................ 41

ASI Cameras User Guide
3
Instruction
There are several ways to control our cameras through software on windows.You need to install the driver before operating the camera under varioussoftware.
ASCOM:This is the standard platform for astronomy, so you just need to install theASCOM platform 6.2 or newer, and our ASI Camera ASCOM driver.Advantage: Almost all astronomy software support ASCOM.Disadvantage: Performance is poor, suitable for DSO imaging or guiding.
DirectShow:This is the standard media-streaming architecture for windows. There are lotsof software support DirectShow devices under windows. Including Skype, QQ,HandyAvi etc..Advantage: Fast transfer speed and many software support.Disadvantage: RAW16 is not supported.
SDK:This is Software Development Kit for developer, user don’t need to install it.Advantages: This is the most flexible way to control our camera and it canprovide the fastest speed.Disadvantage: the API is not standard, software developer need to integrateour SDK to their. Limited software supports, such like SharpCap, FireCaptureNebulosity, PHD2, etc..
Plug-in:Currently we provide plug-in for TheSkyX and Micro-Manager.

ASI Cameras User Guide
4
PC Windows
Software
ASCOM
Direct Show
SDK

ASI Cameras User Guide
5
1. Camera Driver InstallationWith several clicks, the super easy driver installation can be done in just oneminute.
Supported OS: Windows XP 32bit/64bit, Windows 7 32bit/64bit, Windows 832bit/64bit, Windows 10 32bit/64bit
Installation steps:1. download the latest driver fromhttps://astronomy-imaging-camera.com/software/
or run the CD-ROM.
If driver of version 1.3.9.29 or older is installed, you’re requested to uninstall itfirst.
Press yes to start to uninstall.

ASI Cameras User Guide
6
Run installer again
Choose a folder to install the driver.

ASI Cameras User Guide
7
Windows will show the confirmation of the driver installation and you need tochoose “trust” and install it.
When “Completed”, you are welcome to visit our website!

ASI Cameras User Guide
8
1.1 Connect camera to USB port
You can use USB2.0 or USB3.0 cable to connect the camera to USB2.0 orUSB3.0 port of your desktop or laptop. All our USB3.0 cameras are compatiblewith USB2.0, just slower output fps.
And we do not recommend using a USB extension cable or USB hub whichmay affect the speed and stability of fast image transfer.
Wait for a while, Windows will prompt "Found New Hardware"
Windows 7 and newest OS will install the driver automatically.
Now you should see the camera listed in the Device Manager, under “Imagingdevices” category
.

ASI Cameras User Guide
9
1.2 Driver Update
You don't need to uninstall the old driver when there is a new one.
Just run the new downloaded driver, it will automatically detect and prompt youto update.
New driver will be installed to the old path.

ASI Cameras User Guide
10
1.3 Driver Uninstall
You can uninstall the driver from the “Start Menu”.

ASI Cameras User Guide
11
2. Directshow Driver
Because it is using one of the most popular driver types in the world (WindowsDirectShow), the camera can be used on a variety of image/video grabbingsoftware.
You can run “ASI Cameras DirectShow driver Setup.exe ” to install thecamera’s DirectShow driver, so more windows app such like Skype orHandyAvi etc. can control the camera through DirectShow interface.
Run the installer
Select your camera model

ASI Cameras User Guide
12
Other step is similar with camera driver installing.
Here is the way to test the camera with SharpCap software if you install theDirectShow driver.
Select the camera from Cameras menu.

ASI Cameras User Guide
13
If this dialog shows up, it means the camera is not connected or notrecognized by windows.
Please check the driver installation and verify that the camera driver is listedunder Device Manager.
You should see an image or some brightness if everything is fine.

ASI Cameras User Guide
14
Color Space has two variants: RGB24 and MONO8.
Image type is transformed as:
Color camera: RAW8 =interpolation=> RGB24 =Y8_convertion=>Y8
Mono camera only has RAW8 type
For color camera, when MONO8 is selected, enabling RAW Outputcorresponds to RAW8, otherwise is Y8 output.

ASI Cameras User Guide
15
Click "Video Capture Filter" under “Options” menu to change camera settings.
This is very important to adjust “USB Traffic” to a suitable value to match yourPC, this depends on the USB controller. And you may need to adjust it lower ifthere is other device to share USB bandwidth with your camera.

ASI Cameras User Guide
16
You can test the cooler here if it’s a cooled camera. Check Anti-dew to turn onthe window heater.
Click "Video Capture Pin" to change Resolutions (You can edit the resolutionsyou like).

ASI Cameras User Guide
17

ASI Cameras User Guide
18
3. ASCOM Driver
ASCOM is standard for astronomy, download ASCOM Platform installer fromtheir official website :http://ascom-standards.org/index.htm or our website.Install “ASCOM Platform 6.2”, then install “ASICamera ASCOM Setup”. Weuse MaxIm DL 5 to show its usage.
Select our ASCOM camera driver with step1-5 , then you can connect camera.Open setup dialog with step6.
In setup dialog you can select which ASI camera you want to use if you havemore than one camera.Pre Defined Settings contain some hard coded setting like "highest dynamic

ASI Cameras User Guide
19
range", "unity gain" and "lowest read noise", press Set to make it effective.Press OK to save the setting
It also supports user editable setting, select “…” in combo box and press Edit
Press OK to save

ASI Cameras User Guide
20
New item is added to the list.
If you want to operate two cameras in one software to capture and guiderespectively, please select “ASI Camera(1)” and select one camera in setupdialog and do the same with “ASI Camera(2)” for the other camera.

21
4. Planetary Imaging software
SharpCap and FireCapture are suggested as the Capture Software for astronomy image capturing.You can find them in the CD-ROM or download from our official website.Both are easy to use and very compatible with the ASI Cameras.
4.1 SharpCap
Connect camera through SDK
Most of the control is in the Camera Control Panel

ASI Cameras User Guide
22
Color space:
Color camera have four variant: RAW8/RAW16/RGB24/MONO8, andmono camera only have RAW8/RAW16. RAW8 is 8bit original data, length of aimage buffer is width*height, width and height is the resolution of sensor,RGB24 is generated by interpolation of RAW8 data, its length is 3*width*height,every pixel corresponds to three byte Red Green Blue, and cost more CPUutilization, MONO8 is converted from RGB24, so it cost the most CPUutilization in these color spaces.
Binning:
“2” means merging 2x2 pixels to one, and so on.
Thermal Controls provides the control of cooling

ASI Cameras User Guide
23
4.2 FireCapture
FireCapture is more effective due to a wider variety of options it offers.
General setting of camera is in Image and Control panel
Click more to show other controls

ASI Cameras User Guide
24
For cooled camera, enable the check box in control “TargetTemp” to turn onauto cooling, sensor temperature and cooler power is shown on title bar ofimage display panel.
4.3 capture settings
Gamma: 50 is the default linear output data. This is the recommended setting.But you can use lower value to help focus when previewing. Always rememberto return it to “50” before starting capture! Otherwise onion ring may be thereafter stacking and processing.

ASI Cameras User Guide
25
Gain: The higher the value, the more noise there will be. But it is often neededto be set high to achieve short exposures/faster frame-rates which can help tofreeze seeing. Remember that faster FPS will result in more frames to stackwhich will dramatically reduce noise problems associated with High Gain.
Exposure: The shorter the value, the faster the fps achieved. Fps is usuallycalculated like this: fps = 1000 ÷ exposure time (in milliseconds, ms). Forexample, 20ms provides 1000 ÷ 20 = 50FPS.
But there are limits to USB bandwidth and the sensor’s capability. Usually30-40 fps is a good choose for dim object like Saturn and you can achievehigher fps when capturing bright objects like Jupiter and Mars, Venus.
Brightness or Offset: This is an offset value added to the output data to avoidany data negative. You may need to turn it up for DSO imaging.

ASI Cameras User Guide
26
4.4 Get the best performance of the camera.
1. Connect the camera to USB 3.0 port.
ASI USB 3.0 cameras can run at its fastest speed when connected to USB 3.0port. USB 3.0 has 10X faster speed than USB 2.0. So please make sure yourcamera is recognized as USB 3.0 device.
You can see if the camera is recognized as USB 3.0 device from the softwaretitle. You may need to update the host USB Controller driver if it always showsas USB 2.0, but actually you connect it to a USB 3.0 socket and through oneUSB3.0 cable.
And for PointGrey's camera user who use ASI camera, please make sure you
didn't select "install USBPro" when install FlyCapture, otherwise other USB3.0
cameras won't function on that port.
2. Adjust “USB Bandwidth” and “High Speed”.
ASI Cameras User Guide
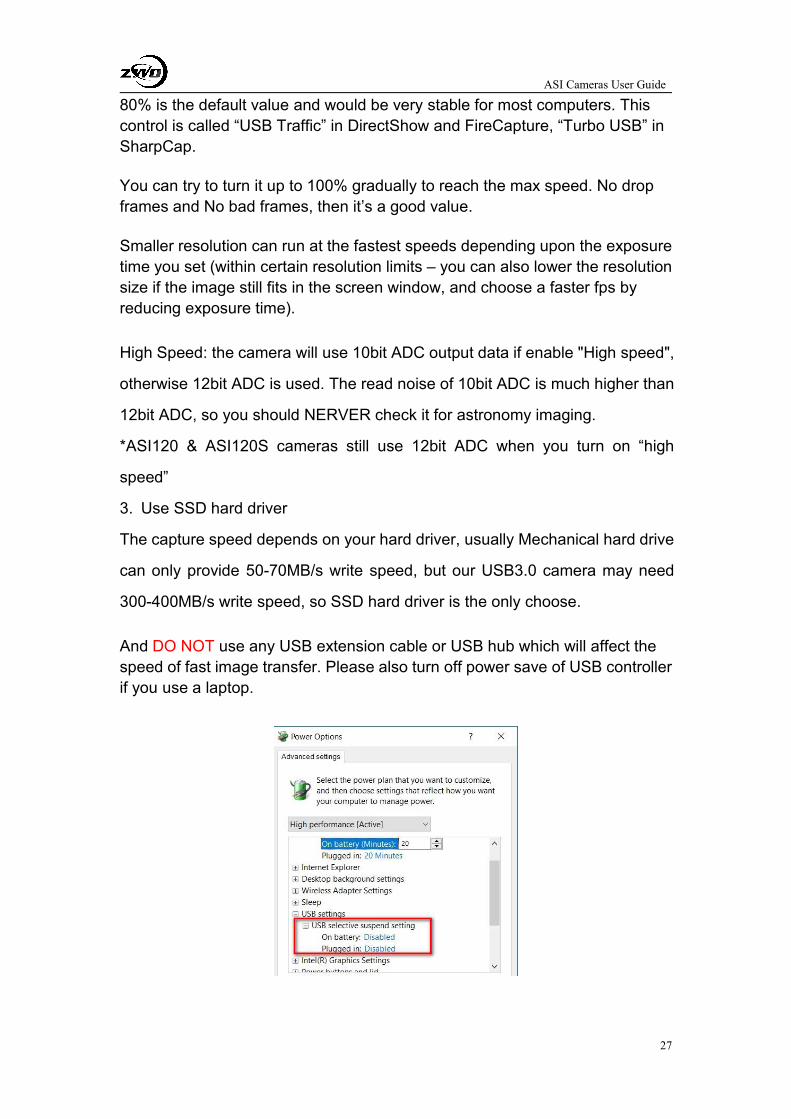
27
80% is the default value and would be very stable for most computers. Thiscontrol is called “USB Traffic” in DirectShow and FireCapture, “Turbo USB” inSharpCap.
You can try to turn it up to 100% gradually to reach the max speed. No dropframes and No bad frames, then it’s a good value.
Smaller resolution can run at the fastest speeds depending upon the exposuretime you set (within certain resolution limits – you can also lower the resolutionsize if the image still fits in the screen window, and choose a faster fps byreducing exposure time).
High Speed: the camera will use 10bit ADC output data if enable "High speed",
otherwise 12bit ADC is used. The read noise of 10bit ADC is much higher than
12bit ADC, so you should NERVER check it for astronomy imaging.
*ASI120 & ASI120S cameras still use 12bit ADC when you turn on “high
speed”
3. Use SSD hard driver
The capture speed depends on your hard driver, usually Mechanical hard drive
can only provide 50-70MB/s write speed, but our USB3.0 camera may need
300-400MB/s write speed, so SSD hard driver is the only choose.
And DO NOT use any USB extension cable or USB hub which will affect thespeed of fast image transfer. Please also turn off power save of USB controllerif you use a laptop.

ASI Cameras User Guide
28
5. DSO imaging software
5.1 Sequence Generator Pro(SGP)
Connects camera through ASCOM driver.
Cooling configure

ASI Cameras User Guide
29
5.2 Astro Photography Tool(APT)
Connect camera through ASCOM driver
Cooling configure

ASI Cameras User Guide
30
5.3 Nebulosity
Connect camera through ASCOM driver
Connect camera through SDK

ASI Cameras User Guide
31
Cooling configure

ASI Cameras User Guide
32
5.4 TheSkyX
You cam connect ASI camera through ASCOM driver, it’s similar with other software, here weintroduce connect camera through our x2camera driver.
Install plug-in driver.

ASI Cameras User Guide
33
Choose camera
Camera setting, select a camera as imaging camera.

ASI Cameras User Guide
34
Connect
Cooling configure

ASI Cameras User Guide
35
You can choose another camera as guider camera

36
6. Auto Guider
ASI cameras which have a Guider Control Port can be used in conjunction withPHD or Maxlm DL to guide your mount for long time exposure imaging.The image below summarizes how the Guider Port defines.
The connecting cable is a 6P6C telephone-style directly connecting cable.
ASI Cameras User Guide
37
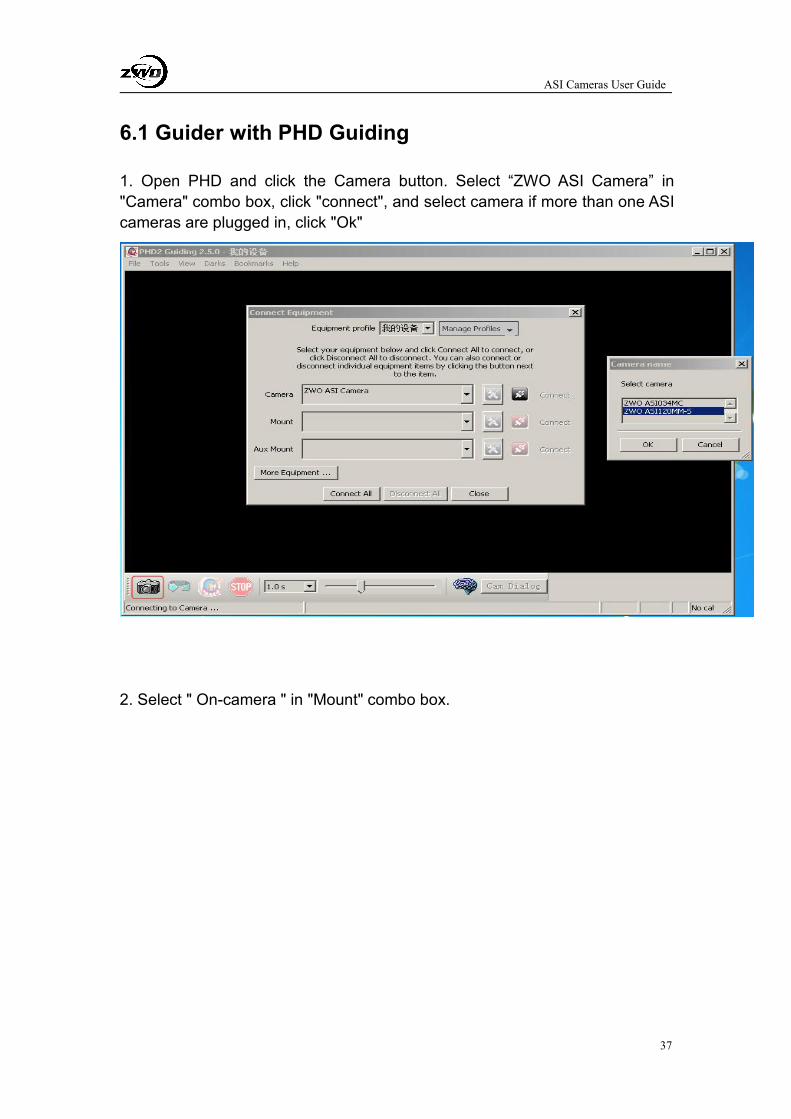
6.1 Guider with PHD Guiding
1. Open PHD and click the Camera button. Select “ZWO ASI Camera” in"Camera" combo box, click "connect", and select camera if more than one ASIcameras are plugged in, click "Ok"
2. Select " On-camera " in "Mount" combo box.

ASI Cameras User Guide
38
3. Click the refresh button to get image.
4. Now can see the star in the image.
5. Choose a star and Click the guider button.

ASI Cameras User Guide
39
6. PHD is calibrating now.
7. PHD start guiding after calibrating.

ASI Cameras User Guide
40
8. Enable Graph to see the guiding result.

ASI Cameras User Guide
41
6.2 Auto Guider with MaxIm_DL
1. Select Camera from the toolbar of MaxIM_DL
2. Click “setup camera” from the Camera2
3. Camera Model select “ASCOM” and click “Advanced”. You can choose“video” if connecting through the WDM driver.

ASI Cameras User Guide
42

ASI Cameras User Guide
43
4. Select "ASI Camera(1)" or "ASI Camera(2)" from the popup dialog and click"Properties". Click “Ok” after setting a reasonable gain value.
5. Connect now

ASI Cameras User Guide
44
6. Shift to the Guide page and Click “start” to expose one image.
7. Choose a bright start and click it to be a “Guide Star”
8. Click “Setting” to make sure that Autoguider Output is “Guider Relays". ThenMaxIm_DL will use the ST4 port on the camera to guide. Or choose “ASCOM”driver to connect “ASI Camera ST4 telescope driver” if you connect camerathrough WDM driver.

ASI Cameras User Guide
45
9. select “Calibrate” and click Start.
10.There is a cross red line when calibrate successful. Select “Track” and click“Start” to start to guide.

ASI Cameras User Guide
46
11. Click “Graph” to show the guiding result.