AKURATE KONTROL pre-amplifier - english · akurate kontrol pre-amplifier owner, s manual english ak...
36
AKURATE KONTROL PRE - AMPLIFIER OWNER , S MANUAL ENGLISH AKURATE KONTROL
-
Upload
vuongthien -
Category
Documents
-
view
216 -
download
0
Transcript of AKURATE KONTROL pre-amplifier - english · akurate kontrol pre-amplifier owner, s manual english ak...
AKURATE KONTROL PRE- AMPLIFIER
OWNER,S MANUAL
ENGLISH
A K U R A T E K O N T R O L
V O L U M E
S O U R C E
S E L E C T
AKURATE KONTROL pre-amplifier - english 15/5/07 15:17 Page 1

AKURATE KONTROL pre-amplifier - english 15/5/07 15:17 Page 2

EN
GLI
SH
General Safety Instructions 11.. RReeaadd tthheessee iinnssttrruuccttiioonnss.. 22.. KKeeeepp tthheessee iinnssttrruuccttiioonnss..33.. HHeeeedd aallll wwaarrnniinnggss..44.. FFoollllooww aallll iinnssttrruuccttiioonnss..55.. DDoo nnoott uussee tthhee aappppaarraattuuss nneeaarr wwaatteerr, for example near a bathtub,
washbowl, kitchen sink, laundry tub, in a wet basement, near a swimming pool etc.
66.. CClleeaann oonnllyy wwiitthh ddrryy ccllootthh..77.. DDoo nnoott bblloocckk aannyy vveennttiillaattiioonn ooppeenniinnggss.. IInnssttaallll iinn aaccccoorrddaannccee
wwiitthh tthhee mmaannuuffaaccttuurreerr’’ss iinnssttrruuccttiioonnss.. Site the apparatus so that its location or position does not interfere with its proper ventilation. For example, the apparatus should not be situated on a bed, sofa, rug, or similar surface that may block the ventilation openings, or placed in a built-in installation such as a bookcase or cabinet that may impede the flow of air through the ventilation openings.
88.. DDoo nnoott iinnssttaallll nneeaarr aannyy hheeaatt ssoouurrcceess ssuucchh aass rraaddiiaattoorrss,, hheeaatt rreeggiisstteerrss,, ssttoovveess,, oorr ootthheerr aappppaarraattuuss ((iinncclluuddiinngg aammpplliiffiieerrss)) tthhaatt pprroodduuccee hheeaatt..
99.. DDoo nnoott ddeeffeeaatt tthhee ssaaffeettyy ppuurrppoossee ooff tthhee ppoollaarriisseedd oorr ggrroouunnddiinngg ttyyppee pplluugg.. A polarised plug has two blades with one wider than the other. A grounding type plug has two blades and a third grounding prong. The wide blade or the third prong is provided for your safety. If the provided plug does not fit into your outlet, consult an electrician for replacement of the obsolete outlet.
1100.. PPrrootteecctt tthhee ppoowweerr ccoorrdd ffrroomm bbeeiinngg wwaallkkeedd oonn oorr ppiinncchheedd ppaarrttiiccuullaarrllyy aatt pplluuggss,, ccoonnvveenniieennccee rreecceeppttaacclleess,, aanndd aatt tthhee ppooiinntt wwhheerree tthheeyy eexxiitt ffrroomm tthhee aappppaarraattuuss..
1111.. OOnnllyy uussee aattttaacchhmmeennttss//aacccceessssoorriieess ssppeecciiffiieedd bbyy tthhee mmaannuuffaaccttuurreerr..1122.. UUssee oonnllyy wwiitthh tthhee ssttaanndd,, ttrriippoodd,, bbrraacckkeett,, oorr ttaabbllee ssppeecciiffiieedd bbyy
tthhee mmaannuuffaaccttuurreerr,, oorr ssoolldd wwiitthh tthhee aappppaarraattuuss..1133.. UUnnpplluugg tthhiiss aappppaarraattuuss dduurriinngg lliigghhttnniinngg ssttoorrmmss oorr wwhheenn uunnuusseedd ffoorr lloonngg
ppeerriiooddss ooff ttiimmee..1144.. RReeffeerr aallll sseerrvviicciinngg ttoo qquuaalliiffiieedd sseerrvviiccee ppeerrssoonnnneell.. Servicing is required
when the apparatus has been damaged in any way, such as power-supply cord or plug has been damaged, liquid has been spilled or objects have fallen into the apparatus, the apparatus has been exposed to rain or moisture, does not operate normally, or has been dropped.
1155.. WWaallll oorr cceeiilliinngg mmoouunnttiinngg.. Mount the apparatus to a wall or ceiling only as recommended by the manufacturer.
Important Safety Instructions Explanation of symbols used in this manual or on the rear/underside of theapparatus:
This symbol is intended to alert the user to the presence of uninsulateddangerous voltages within the enclosure of sufficient magnitude to causeelectric shock.
This symbol is intended to alert the user to the presence of importantoperation, maintenance and servicing information in the instruction andservice manuals.
For apparatus connected to the mains electricity supplyCCAAUUTTIIOONN TTOO RREEDDUUCCEE TTHHEE RRIISSKK OOFF EELLEECCTTRRIICC SSHHOOCCKK DDOO NNOOTT RREEMMOOVVEE TTHHEECCOOVVEERR.. NO USER SERVICEABLE PARTS INSIDE.REFER SERVICING TO QUALIFIED SERVICE PERSONNEL.REPLACE THE MAINS FUSE IN THE PLUG WITH ONE OF THE SAME TYPEAND RATING.DISCONNECT SUPPLY CORD BEFORE CHANGING FUSE.
WWAARRNNIINNGGTO REDUCE THE RISK OF FIRE OR ELECTRIC SHOCK DO NOT EXPOSE THISAPPARATUS TO RAIN OR MOISTURE. SHOCK HAZARD - DO NOT OPEN.
MMAAIINNSS PPLLUUGGSS This apparatus is supplied with a non-rewireable mains plug for the intendedcountry. Replacement mains leads can be obtained from your Linn retailer.Should you need to change the plug please dispose of it carefully. A plug withbared conductors is dangerous if engaged in a live socket.
The Brown wire must be connected to the Live (Line) supply pin.The Blue wire must be connected to the Neutral supply pin.The Green/Yellow wire must be connected to the Earth (Ground) supply pin.
Please contact your retailer or a competent electrician if you are in any doubt.
Refer to the rear or underside of the product for fuse and powerconsumption information.
iAKURATE KONTROL
AKURATE KONTROL pre-amplifier - english 15/5/07 15:17 Page 3
EN
GLIS
H
ii AKURATE KONTROL
1166.. PPoowweerr ssoouurrcceess.. Connect the apparatus to a power supply only of the type described in the operating instructions or marked on the apparatus.
1177.. MMaaiinnss pplluugg.. Use the mains plug to disconnect the apparatus from the mains supply. The mains plug must be accessible at all times. Use the mains switch (if applicable) when the apparatus is not in use.
1188.. PPoowweerr lliinneess.. An outdoor antenna should be located away from power lines.
1199.. OOuuttddoooorr aanntteennnnaa ggrroouunnddiinngg.. If an outdoor antenna is connected to the apparatus, ensure that the antenna system is grounded to provide some protection against voltage surges and static build up. In the USA see article810 of the National Electrical Code ANSI/NFPA 70 concerning installation requirements.
2200.. TTeelleepphhoonnee lliinnee.. Do not connect the apparatus to a telephone line except where specifically instructed to do so.
2211.. OObbjjeeccttss aanndd lliiqquuiidd eennttrryy.. Do not let objects or liquids fall into the apparatus. Do not expose the apparatus to dripping or splashing. Do not place a vessel containing liquid on top of the apparatus.
2222.. NNoo nnaakkeedd ffllaammee ssoouurrcceess,, ssuucchh aass lliigghhtteedd ccaannddlleess,, sshhoouulldd bbee ppllaacceedd oonn tthhee aappppaarraattuuss..
2233.. TThhee aappppaarraattuuss hhaass bbeeeenn ddeessiiggnneedd ffoorr uussee iinn mmooddeerraattee aanndd ttrrooppiiccaall cclliimmaatteess..
UK USERS PLEASE READ THIS IMPORTANT SAFETYINFORMATION
Fuse replacement This appliance is fitted with a non-rewireable 13 amp mains plug. The plugcontains a 5 amp fuse. If the fuse has blown it can be replaced as follows:
a) Pull out the red fuse cover/carrier.b) Remove and dispose of the blown fuse.c) Fit a new 5 amp BS1362 approved fuse into the carrier and
push the carrier back into the plug.
Always ensure the fuse cover is fitted. If the fuse cover is missing do not use theplug. Contact your Linn retailer to obtain a replacement fuse cover.
Fuses are for fire protection and do not protect against electric shock.
Mains plug replacement Should your mains plug need replacing and you are competent to do thisproceed as follows. If you are in doubt contact your Linn retailer or a competentelectrician.
a) Disconnect the plug from the mains supply.b) Cut off the plug and dispose of it safely. A plug with bared
conductors is dangerous if engaged in a live socket.c) Only fit a 13 amp BS1363A approved plug with a 5 amp fuse.d) The cable wire colours or a letter will be marked at the
connection points of most quality plugs.
Attach the wires securely to their respective points. The Brown wire must go tothe Live pin, the Blue wire must go to the Neutral pin, and the Green/Yellow wiremust go to the Earth pin.
e) Before replacing the plug top ensure that the cable restraint is holding the outer sheath of the cable firmly and that the wires are correctly connected.
WARNING THIS APPLIANCE MUST BE EARTHED.
AKURATE KONTROL pre-amplifier - english 15/5/07 15:17 Page 4

iiiAKURATE KONTROL
EN
GLI
SH
CE Declaration of ConformityLinn Products Ltd declare that this product is in conformance with the Low VoltageDirective 73/23/EEC and Electromagnetic Compatibility 89/336/EEC as amendedby 92/31/EEC and 93/68/EEC.
The conformity of the designated product with the provisions of Directive number73/23/EEC (LVD) is proved by full compliance with the following standards:
SSttaannddaarrdd nnuummbbeerr DDaattee ooff iissssuuee TTeesstt ttyyppee EN60065 2002 General requirements
MarkingHazardous radiationHeating under normal conditionsShock hazards under normaloperating conditionsInsulation requirementsFault conditionsMechanical strengthParts connected to the mains supplyComponentsTerminal devicesExternal flexible cordsElectrical connections and mechanical fixingsProtection against electric shockStability and mechanical hazardsResistance to fire
The conformity of the designated product with the provisions of Directive number89/336/EEC (EMC) is proved by full compliance with the following standards:
SSttaannddaarrdd nnuummbbeerr DDaattee ooff iissssuuee TTeesstt ttyyppeeEN55013 2001 Conducted emissionsEN55013 2001 Absorbed emissionsEN55020 2002 Immunity
FCC notice Note:This equipment has been tested and found to comply with the limits for a ClassB digital device, pursuant to Part 15 of the FCC Rules. These limits are designedto provide reasonable protection against harmful interference in a residentialinstallation. This equipment generates, uses and can radiate radio frequencyenergy and, if not installed and used in accordance with the instructions, maycause harmful interference to radio communications. However, there is noguarantee that interference will not occur in a particular installation.If this equipment does cause harmful interference to radio or televisionreception, which can be determined by turning the equipment off and on, theuser is encouraged to try to correct the interference by one or more of thefollowing measures:
• Reorient or relocate the receiving antenna.
• Increase the separation between the equipment and receiver.
• Connect the equipment into an outlet on a circuit different from that to which the receiver is connected.
• Consult the dealer or an experienced radio/TV technician for help.
Waste Electrical and Electronic Equipment (WEEE)DirectiveDirective 2002/96/EC of the European Parliament and of the Council
The symbol (right) is shown on this product. It indicates that theproduct should not be disposed of with regular household waste,but should be disposed of separately.
Electrical and electronic equipment can contain materials that arehazardous to the environment and human health and thereforeshould be disposed of at a designated waste facility or returned toyour retailer for the appropriate recycling to take place (seewww.linn.co.uk for further information).
If you wish to dispose of this product and the product still functions, pleaseconsider recycling/reusing it by donating it to a charity shop, selling it orpart-exchanging it with your retailer.
AKURATE KONTROL pre-amplifier - english 15/5/07 15:17 Page 5
EN
GLIS
H
iv AKURATE KONTROL
Copyright and Acknowledgements Copyright © 2007 Linn Products Ltd. First edition May 2007.
Linn Products Limited, Glasgow Road, Waterfoot, Eaglesham,Glasgow, G76 OEQ, Scotland, United Kingdom.
All rights reserved. No part of this publication may be reproduced,stored in a retrieval system, or transmitted, in any form or by anymeans, electronic, mechanical, photocopying, recording, or otherwise,without the prior written permission of the publisher.
The content of this manual is furnished for information use only, issubject to change without notice, and should not be construed as acommitment by Linn Products Limited. Linn Products Limitedassumes no responsibility or liability for any errors or inaccuracies thatmay appear in this manual.
Trade marks used in this publication: LLiinnnn and the LLiinnnn llooggoo areregistered trade marks of Linn Products Limited. AAKKUURRAATTEE,,UUNNIIDDIISSKK,, KKLLIIMMAAXX,, LLIIMMBBIIKK and KKNNEEKKTT are trade marks of LinnProducts Limited.
Manufactured under license from Dolby Laboratories. “Dolby”, “ProLogic” and the double-D symbol are trade marks of DolbyLaboratories.
"DTS", "DTS-ES" “Neo:6” and “DTS 96/24” are trade marks of DigitalTheater Systems, Inc.
Linn Products Limited disclaims any proprietary interest in trademarks and trade names other than its own.
Printed in the United Kingdom.
Pack 1321
AKURATE KONTROL pre-amplifier - english 15/5/07 15:17 Page 6
Contents
Introduction 1
Installation 1Unpacking 1Connecting to the mains supply 1Positioning 2Cleaning 2Important information – phono input 2
Setup 3Back panel 3Connecting 5Setup menus 5
Using the setup menus 6Speaker setup 6Source setup 8Audio setup 10General setup 11Linn Disc setup 13Installer menu 14
Using the AKURATE KONTROL with a 14Linn AKURATE CD player
Using the AKURATE KONTROL with a 15Linn UNIDISK player
Front Panel and Handset 17Front panel 17Handset 18
Operation 19Standby key 19Amp mode 19Selecting a source 19Adjusting the audio 19
Volume 20Balance 20Speaker trim 20Lip Sync Delay 20Surround sound formats 21Midnight Movie mode 23Restoring the original audio settings 23
Record function 23
Technical Specifications 24
Guarantee and Service 25
EN
GLI
SH
vAKURATE KONTROL
AKURATE KONTROL pre-amplifier - english 15/5/07 15:17 Page 7

AKURATE KONTROL pre-amplifier - english 15/5/07 15:17 Page 8

IntroductionThe AKURATE KONTROL pre-amplifier has been designed to providesuperb audio performance with both stereo and multi-channel sourcematerial. AKURATE KONTROL uses technology developed for Linn’saward-winning flagship KLIMAX KONTROL pre-amplifier and offerspurist audio performance and access to and control of the newgeneration of multi-channel sound formats.
Among its many features, the AKURATE KONTROL offers an internalphono stage for connecting to a turntable, six analogue and six digitalinputs, and processing of all major audio algorithms, including DolbyDigital 5.1, Dolby Pro Logic II, DTS Surround and DTS 96/24.
The AKURATE KONTROL pre-amplifier exemplifies a commitment byLinn to new products which can take advantage of the latesttechnology and audio formats, whilst continuing to support existingLinn customers with improved performance and superb value.
The AKURATE KONTROL is the perfect partner for Linn’s AKURATECD and AKURATE power amplifier range. Add the AKURATE Tunerand AKURATE loudspeakers for a complete AKURATE System andexperience the exceptional sound quality delivered by this dedicatedmusic system.
InstallationIt is strongly recommended that the AKURATE KONTROL is installedand configured by an authorised Linn retailer.
UnpackingThe AKURATE KONTROL is supplied with the following accessories:
• luminous handset
• 2 x AAA batteries for the handset
• 1 pair of black interconnect cables
• RS232 lead
• mains lead
• warranty pack
• this manual
We recommend you retain the packaging in case you need totransport the unit at any time.
Connecting to the mains supplyManual voltage selection is not required as the AKURATE KONTROLoperates from any mains AC power supply. There are no user-replaceable fuses inside the unit. The mains lead supplied may befitted with a fused plug according to local regulations. If this is thecase, always replace this fuse with another of the same type andrating.
The AKURATE KONTROL must always be earthed whenconnected to the mains supply. Use the earthed mains leadsupplied. Never use an unearthed plug or adapter with thisunit.
EN
GLI
SH
1AKURATE KONTROL
AKURATE KONTROL pre-amplifier - english 15/5/07 15:17 Page 9

PositioningYou can locate your AKURATE KONTROL anywhere you findconvenient (including in a 19” rack), but there are a few simple pointsto note regarding positioning:
• The unit should be placed on a flat, stable and rigid surface.
• Do not position the unit where sunlight can shine (whether directly, diffused or reflected) on its display as the infra-red (IR) radiation in sunlight will be picked up by the unit’s IR remote sensor and this can adversely affect its operation. Similarly, some electrical devices such as plasma TVs, fluorescent lights and energy saving lamps can emit IR which can likewise affect the operation.
• For best performance, do not stack the unit with other products.Ideally, position the unit on a shelf by itself or, if proximity to other products is unavoidable, positioning side-by-side is preferable to stacking.
• The unit should not be situated above, or otherwise directly adjacent to, sources of heat such as radiators, power amplifiers etc. Nor should it be enclosed in a cabinet with such devices.
• Allow at least 4" (10 cm) free space above and at each side of the unit.
• Do not block the vents on the product’s casing.
CleaningDisconnect the AKURATE KONTROL from the power supply beforecleaning. Remove dust and fingerprints with a soft, dry cloth. Avoidusing domestic cleaning products on the unit.
Important information – phono inputPlease read the following bbeeffoorree installing the AKURATE KONTROL:your unit may require reconfiguration.
The AKURATE KONTROL includes a phono input (it is marked6/PHONO on the back panel) for connecting to a record turntable. Evenif you do not have a turntable, please consider the following points:
6/PHONO can be configured to operate as a moving-magnet (MM)phono stage, a moving-coil (MC) phono stage or an extra line-levelinput. See notes below for an explanation of these terms.
6/PHONO is factory-set to operate as an MM phono stage.
If you require 6/PHONO to operate in MC or line-level mode, thisrequires a change to the internal hardware which must be carried out byyour Linn retailer. Dismantling or adjustment by persons other than Linnappointed personnel will invalidate the manufacturer’s warranty.
If you wish to know the current configuration of 6/PHONO, this can beviewed in the AKURATE KONTROL’s setup menus – see ANALOG 6TYPE, page 13.
Notes:‘Moving-magnet’ and ‘moving-coil’ are the two types of phono cartridgeavailable. If you have a turntable and are not sure which type ofcartridge you are using, consult the cartridge packaging, themanufacturer’s published information or the retailer from whom it waspurchased. ‘Line-level’ inputs are for audio sources other thanturntables, e.g. CD players, DVD players, radio tuners and satellitereceivers.
Phono stages amplify extremely low-level signals, and if they are nottreated with great care they can be susceptible to noise and signaldegradation. Linn have therefore designed the AKURATE KONTROL’sphono stage as a hard-wired circuit, rather than one which can bealtered via a switch or by software. This has been done in order tooptimise audio performance and remove components such as switches,which could potentially degrade the signal in this most precise ofcircuits.
EN
GLIS
H
2 AKURATE KONTROL
AKURATE KONTROL pre-amplifier - english 15/5/07 15:17 Page 10
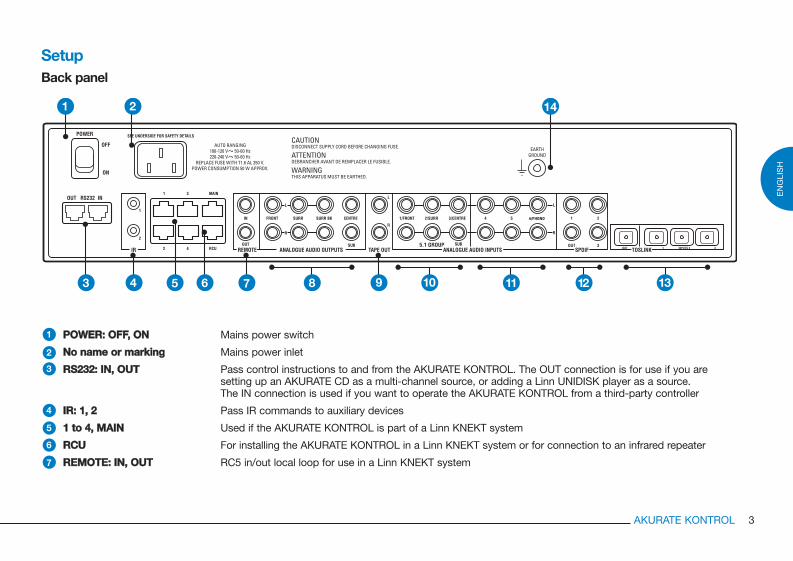
SetupBack panel
PPOOWWEERR:: OOFFFF,, OONN
NNoo nnaammee oorr mmaarrkkiinngg
RRSS223322:: IINN,, OOUUTT
IIRR:: 11,, 22
11 ttoo 44,, MMAAIINN
RRCCUU
RREEMMOOTTEE:: IINN,, OOUUTT
Mains power switch
Mains power inlet
Pass control instructions to and from the AKURATE KONTROL. The OUT connection is for use if you aresetting up an AKURATE CD as a multi-channel source, or adding a Linn UNIDISK player as a source.The IN connection is used if you want to operate the AKURATE KONTROL from a third-party controller
Pass IR commands to auxiliary devices
Used if the AKURATE KONTROL is part of a Linn KNEKT system
For installing the AKURATE KONTROL in a Linn KNEKT system or for connection to an infrared repeater
RC5 in/out local loop for use in a Linn KNEKT system
1
2
3
4
5
6
7
EN
GLI
SH
3AKURATE KONTROL
AKURATE KONTROL pre-amplifier - english 15/5/07 15:17 Page 11

EN
GLIS
H
4 AKURATE KONTROL
AANNAALLOOGGUUEE AAUUDDIIOOOOUUTTPPUUTTSS
TTAAPPEE OOUUTT
AANNAALLOOGGUUEE AAUUDDIIOO IINNPPUUTTSS::11 ttoo 33//55..11 GGRROOUUPP
AANNAALLOOGGUUEE AAUUDDIIOO IINNPPUUTTSS::44 ttoo 66
SSPPDDIIFF:: OOUUTT,, IINNPPUUTTSS 11 ttoo 33
TTOOSSLLIINNKK:: OOUUTT,, IINNPPUUTTSS 11 ttoo 33
EEAARRTTHH GGRROOUUNNDD
One 7.1 analogue audio output. The SURR outputs are for connection to the two surround loudspeakers ina 5.1 system. The SURR BK outputs are for connection to the two additional loudspeakers in a 7.1 system– located at the rear of the room.For two-channel systems, use the FRONT outputs (and SUB if required) only
One pair of analogue outputs for connection to a recording device e.g. DAT recorder
Three stereo analogue audio inputs or one 5.1 analogue audio input
Three stereo analogue audio inputs. Input 6/PHONO is for the connection of a turntable
One electrical digital audio output and three inputs
One optical digital audio output and three inputs
For connecting the earthing lead from the tonearm cable of a turntable. Also for connecting the unit to anearthing terminal if no mains earth is available
9
8
10
11
12
13
14
Switch off the AKURATE KONTROL before connecting plugs to, or disconnecting plugsfrom, the back panel to avoid generating an electrical surge that may damage the unit orother components in your system.
AKURATE KONTROL pre-amplifier - english 15/5/07 15:17 Page 12
EN
GLI
SH
ConnectingThe first stage in setting up your AKURATE KONTROL is to connectyour sources, power amplifier(s) and other peripheral devices to theAKURATE KONTROL.
1. Ensure your AKURATE KONTROL and all components that you will be connecting to it are disconnected from the mains power supply.
2. Connect your source components, power amplifier(s) and any communication/control devices you wish to use, referring to the back panel diagram on page 3.
3. Connect the AKURATE KONTROL to the mains power supply and turn the unit on using the switch on the back panel. For the next 10 seconds or so the AKURATE KONTROL will configure itself. During this time three dots will be shown on the display.
4. Wait until the three dots are replaced by the symbol, then press the key on the front panel or handset.
The main stage in setup is configuring the AKURATE KONTROL tosuit your requirements. This is achieved using the setup menus. Howto configure the AKURATE KONTROL is explained in the rest of thischapter.
Setup menusThe setup menus enable you to configure your AKURATE KONTROLfor all sources it is connected to, the loudspeakers in your system andmuch more. To take advantage of your AKURATE KONTROL’sfeatures, please take the time to configure your unit correctly.
The setup menus are divided into five categories and are accessed viathe MAIN MENU:
SSPPEEAAKKEERR SSEETTUUPPFor configuring the AKURATE KONTROL for the number, size anddistance of the loudspeakers in your system, and for calibrating theirvolume level.
SSOOUURRCCEE SSEETTUUPPFor configuring sources on the AKURATE KONTROL.
AAUUDDIIOO SSEETTUUPPFor configuring the audio output of the AKURATE KONTROL.
GGEENNEERRAALL SSEETTUUPPFor adjusting general settings on the AKURATE KONTROL.
LLIINNNN DDIISSCC SSEETTUUPPFor adjusting the input settings if you are using a Linn AKURATE CDplayer as a multi-channel source, or a UNIDISK player, with theAKURATE KONTROL.
In addition, the AKURATE KONTROL features an INSTALLER MENUfor saving the configuration of the unit as set in the above menus, andrestoring the factory defaults. For full information see Installer menu,page 14.
5AKURATE KONTROL
AKURATE KONTROL pre-amplifier - english 15/5/07 15:17 Page 13
EN
GLIS
H
6 AKURATE KONTROL
Speaker setupSSIIZZEEAccesses the SPEAKER SIZE sub-menu.
For all loudspeakers in your system (except a subwoofer) you mustinform the AKURATE KONTROL whether the loudspeakers are LARGEor SMALL. These terms refer to the frequency response of theloudspeakers, not to their physical size. LARGE refers to loudspeakersthat respond to frequencies from the very low to the very high. SMALLrefers to loudspeakers that do not respond to very low frequencies(typically, a loudspeaker that does not respond to frequencies below80 Hz can be considered SMALL).
If you are unsure as to whether your loudspeakers respond to very lowfrequencies, consult the information supplied with the loudspeakers,the manufacturer’s published information or the retailer from whomthey were purchased.
SSMMAALLLL FFRREEQQUUEENNCCYYSelect the operating frequency that your limited bass response(SMALL) loudspeakers operate above. Frequencies in the audiosignal that are below the selected option will be routed to asubwoofer if present, or any full-range (LARGE) loudspeakers ifnot. (As the human ear cannot detect the position of the source ofvery low frequencies, it will not affect your enjoyment of your musicor movies if some of your loudspeakers are set to SMALL.)
Options: 4400 HHzz,, 6600 HHzz,, 8800 HHzz,, 110000 HHzz,, 112200 HHzz
Default setting: 8800 HHzz
FFRROONNTTFor full-range front loudspeakers, set to LLAARRGGEE.For front loudspeakers with limited bass response, set to SSMMAALLLL.
Default setting: LLAARRGGEE
STORE
SHIFT
AMPAMPDVD
SURR
LIP SYNC MONO
AUX TUNERDVD CD
DO CLOCKWHERE WHAT
AUDIOADJUST
VIDEOADJUST
PRESET
SRC +
+ --
SRC -
BANDSCAN TUNE
DISP MORE SETUP
SETUP
SELECT
HELP
1 2 3
4 5 6
7 8 9SIGNALRECORDLISTEN
EXCLUDEINCLUDESHUFFLE
0
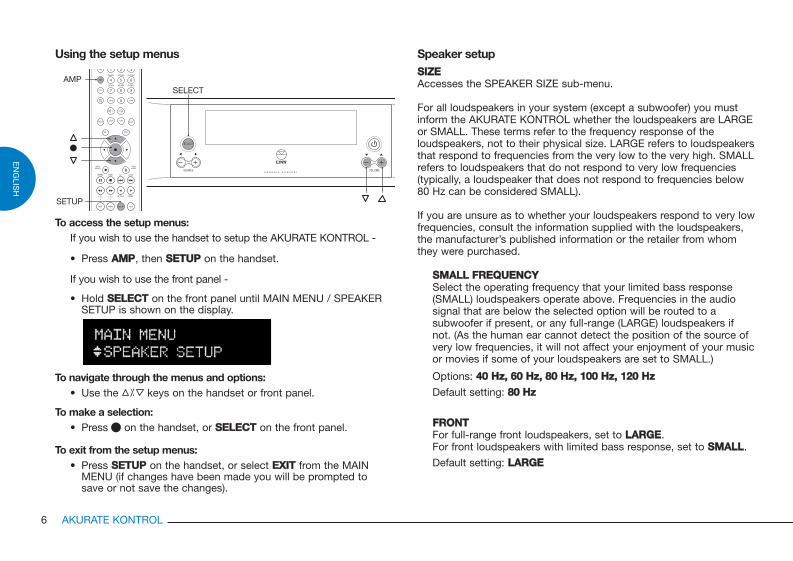
Using the setup menus
To access the setup menus:If you wish to use the handset to setup the AKURATE KONTROL -
• Press AAMMPP, then SSEETTUUPP on the handset.
If you wish to use the front panel -
• Hold SSEELLEECCTT on the front panel until MAIN MENU / SPEAKER SETUP is shown on the display.
To navigate through the menus and options:• Use the / keys on the handset or front panel.
To make a selection:• Press on the handset, or SSEELLEECCTT on the front panel.
To exit from the setup menus:• Press SSEETTUUPP on the handset, or select EEXXIITT from the MAIN
MENU (if changes have been made you will be prompted to save or not save the changes).
AKURATE KONTROL pre-amplifier - english 15/5/07 15:17 Page 14
EN
GLI
SH
7AKURATE KONTROL
CCEENNTTRREEFor a full-range centre loudspeaker, set to LLAARRGGEE.For a centre loudspeaker with limited bass response, set toSSMMAALLLL.If there is no centre loudspeaker, set to NNOONNEE.
Default setting: NNOONNEE
SSUURRRROOUUNNDDFor full-range surround loudspeakers, set to LLAARRGGEE.For surround loudspeakers with limited bass response, set toSSMMAALLLL.If there are no surround loudspeakers, set to NNOONNEE.
Default setting: NNOONNEE
SSUURRRROOUUNNDD BBAACCKKFor full-range surround back loudspeakers, set to LLAARRGGEE.For surround back loudspeakers with limited bass response, setto SSMMAALLLL.If there are no surround back loudspeakers, set to NNOONNEE.
Default setting: NNOONNEE
SSUUBBWWOOOOFFEERRIf you have connected a subwoofer, set to YYEESS.If you have not connected a subwoofer, set to NNOO.
Default setting: NNOO
Select SSAAVVEE to save your changes and return to the SPEAKERSETUP menu.
Select BBAACCKK to return to the SPEAKER SETUP menu withoutsaving changes.
Select EEXXIITT to leave setup (if changes have been made and SAVEhas not been selected, you will be prompted to save or not savethe changes).
DDIISSTTAANNCCEEAccesses the SPEAKER DISTANCE sub-menu.
DDIISSTTAANNCCEE UUNNIITTSSSelect the units for loudspeaker distance measurements.
Options: FFEEEETT,, MMEETTRREESS
Default setting: FFEEEETT
SSPPEEAAKKEERR DDIISSTTAANNCCEEIn order to ensure that sound from all loudspeakers in your systemreaches you at the same time, you must inform the AKURATEKONTROL as to the distance each loudspeaker is from yourseating position. The AKURATE KONTROL will then add a timedelay to the appropriate loudspeakers.
Set the distance from your seating position for all loudspeakers inyour system.
Range: 00 fftt ((00..00 mm)) ttoo 2277 fftt ((88..22 mm))
Default setting: 66 fftt ((11..88 mm))
Select SSAAVVEE to save your changes and return to the SPEAKERSETUP menu.
Select BBAACCKK to return to the SPEAKER SETUP menu withoutsaving changes.
Select EEXXIITT to leave setup (if changes have been made and SAVEhas not been selected, you will be prompted to save or not savethe changes).
AKURATE KONTROL pre-amplifier - english 15/5/07 15:17 Page 15
EN
GLIS
H
8 AKURATE KONTROL
CCAALLIIBBRRAATTIIOONNAccesses the SPEAKER CALIBRATION sub-menu.
SSPPEEAAKKEERR CCAALLIIBBRRAATTIIOONNYou can use the speaker calibration feature to ensure that thevolume level that reaches your seating position is the same foreach loudspeaker (speaker calibration is not required for two-channel systems). Calibration can be done by ear or by using anSPL (Sound Pressure Level) meter.
To perform speaker calibration:
• Switch on your power amplifier(s) and subwoofer, if one is connected.
• Select CCAALLIIBBRRAATTIIOONN LLEEVVEELL. Adjust the reference calibration level so that the signal you hear is at a comfortable listening level (or reaches a preset level on an SPL meter).
• Select SSTTAARRTT. The signal will move round the loudspeakers in your system in a clockwise direction and will be indicated on the display.
• When the signal reaches a loudspeaker which is louder or quieter than the other loudspeakers, use the / keys on the handset to trim the volume as required. A few seconds after the or key has been released the signal will continue its clockwise direction.
• To stop loudspeaker calibration, press SSEETTUUPP on the handset.
Range: --1155 ddBB ttoo 1155 ddBB (in 0.5 steps)
Default setting: :: 00 ddBB
Select SSAAVVEE to save your changes and return to the SPEAKERSETUP menu.
Select BBAACCKK to return to the SPEAKER SETUP menu withoutsaving changes.
Select EEXXIITT to leave setup (if changes have been made and SAVEhas not been selected, you will be prompted to save or not savethe changes).
Select BBAACCKK to return to the MAIN MENU.
Select EEXXIITT to leave setup.
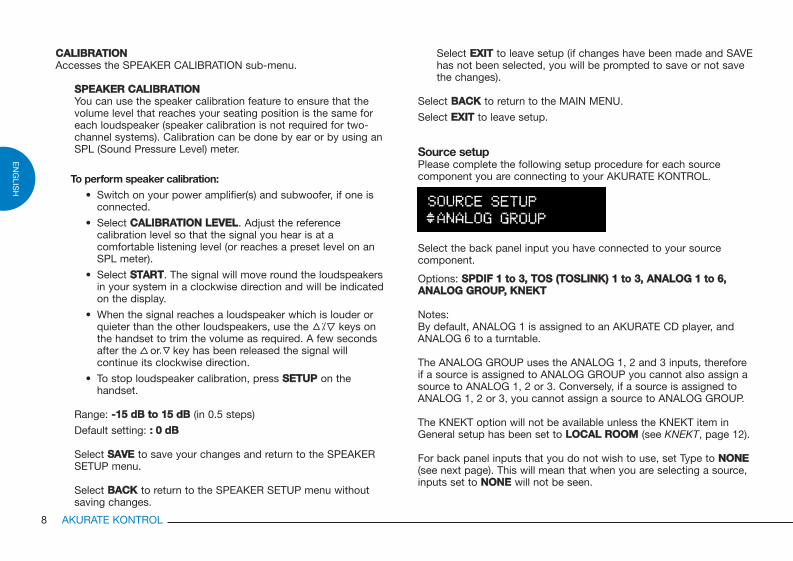
Source setupPlease complete the following setup procedure for each sourcecomponent you are connecting to your AKURATE KONTROL.
Select the back panel input you have connected to your sourcecomponent.
Options: SSPPDDIIFF 11 ttoo 33,, TTOOSS ((TTOOSSLLIINNKK)) 11 ttoo 33,, AANNAALLOOGG 11 ttoo 66,,AANNAALLOOGG GGRROOUUPP,, KKNNEEKKTT
Notes:By default, ANALOG 1 is assigned to an AKURATE CD player, andANALOG 6 to a turntable.
The ANALOG GROUP uses the ANALOG 1, 2 and 3 inputs, thereforeif a source is assigned to ANALOG GROUP you cannot also assign asource to ANALOG 1, 2 or 3. Conversely, if a source is assigned toANALOG 1, 2 or 3, you cannot assign a source to ANALOG GROUP.
The KNEKT option will not be available unless the KNEKT item inGeneral setup has been set to LLOOCCAALL RROOOOMM (see KNEKT, page 12).
For back panel inputs that you do not wish to use, set Type to NNOONNEE(see next page). This will mean that when you are selecting a source,inputs set to NNOONNEE will not be seen.
AKURATE KONTROL pre-amplifier - english 15/5/07 15:17 Page 16

EN
GLI
SH
9AKURATE KONTROL
NNAAMMEEYou are able to give the source a name which will be shown on the display when that source is selected.
To change the flashing character:
• Repeatedly press or hold / on the handset or front panel.
The following characters are available: A to Z, 0 to 9, space.
To move to the next or previous character:
• Press or .
When you have finished inputting the name, press or SSEELLEECCTT.
Default setting: ((nnaammee ooff bbaacckk ppaanneell ccoonnnneeccttoorr,, ‘‘AAKKUURRAATTEE CCDD’’ oorr ‘‘PPHHOONNOO’’))
Note:The name can be up to twelve characters long.
TTYYPPEESelect a type for this source. These are the types that are shown in blue above the bottom two rows of keys on the handset.
Options: DVD, CD, AUX (auxiliary), TUNER, TV, DIGITAL, PHONO, SAT (satellite), NONEDefault setting: AAUUXX (Except for inputs ANALOG 1 which is set to CCDD, ANALOG 6 which is set to PPHHOONNOO, and ANALOG GROUP which is set to NNOONNEE.)
Note:The type for the Linn Disc source (see Linn Disc setup, page 13) isDVD. It is not possible to change the type for this source.
VVOOLLUUMMEE OOFFFFSSEETTVolume Offset is for adjusting the volume of a source incomparison to other sources. You may want to adjust VolumeOffset if, for example, your tuner sounds quieter than your CDplayer when played at the same volume setting.
Range: --1155 ttoo 1155 (in 0.5 steps). No volume offset equals 0.
Default setting: 00
SSAATT ((ssaatteelllliittee)) SSOOUURRCCEE -- aapppplliieess ttoo ddiiggiittaall ssoouurrcceess oonnllyySet to YYEESS if this source is a satellite or cable TV receiver. Settingto YYEESS will stabilise the audio signal when the channel on thereceiver is being changed. Set to NNOO if this source is not a satelliteor cable TV receiver.
Options: YYEESS,, NNOO
Default setting: NNOO
SSUURRRROOUUNNDD CCHHAANNNNEELLSSIf you are setting up the ANALOG GROUP source, or are adding aLinn UNIDISK player and have a 7.1 loudspeaker configuration,you are able to select whether to use your side surround or backsurround loudspeakers when listening to a 5.1 channel audiosource.
Set to SSUURRRROOUUNNDD to send the surround audio signal to your sidesurround loudspeakers.Set to SSUURRRROOUUNNDD BBAACCKK to send the surround audio signal toyour back surround loudspeakers.
Default setting: SSUURRRROOUUNNDD
Select SSAAVVEE to save your changes and return to the SOURCESETUP menu.
Select BBAACCKK to return to the SOURCE SETUP menu withoutsaving changes.
AKURATE KONTROL pre-amplifier - english 15/5/07 15:17 Page 17

MMIIDDNNIIGGHHTT MMOOVVIIEE For use with a Linn UNIDISK player or other DVDplayer.
This feature allows you to add compression to the Dolby Digital signalon DVD-Videos. Adding compression reduces sudden increases involume, such as the sound of an explosion. When watching a DVD-Video it is operated by pressing and holding SSUURRRR on the handsetuntil MIDNIGHT MOVIE ON/OFF is shown on the front panel display,then pressing SSUURRRR to toggle between on and off (see MidnightMovie mode, page 23).
Range: LLOOWW (least effective), MMEEDDIIUUMM,, HHIIGGHH (most effective)
Default setting: LLOOWW
DDOOLLBBYY PPRROO LLOOGGIICC IIII MMUUSSIICCDolby Pro Logic II is an audio signal processing algorithm thatconverts a stereo audio signal to a five-channel audio signal. Dolby Pro Logic II Music is a mode of Dolby Pro Logic II that isparticularly suited to music. It features three user-adjustableparameters that are accessed from this item.
CCEENNTTRREE WWIIDDTTHH This parameter allows adjustment of the audio signal between thecentre and front loudspeakers.
If set to 00, all of the signal for the centre channel is sent to thecentre loudspeaker.
If set to 33, a portion of the centre channel signal is also sent to thefront loudspeakers.
If set to 77, all of the centre channel signal is split evenly betweenthe front left and right loudspeakers.
Range: 00 ttoo 77
Default setting: 33
EN
GLIS
H
10 AKURATE KONTROL
Select EEXXIITT to leave setup (if changes have been made and SAVEhas not been selected, you will be prompted to save or not savethe changes).
Select BBAACCKK to return to the MAIN MENU.
Select EEXXIITT to leave setup.
Audio setupVVOOLLUUMMEE RRAATTEESet the speed at which the AKURATE KONTROL changes volumewhen the volume keys are pressed.
Range: 11//1100 (slowest) ttoo 1100//1100 (fastest)
Default setting: 88//1100
MMUUTTEE RRAATTEESet the speed at which the AKURATE KONTROL mutes or unmutesthe volume when is pressed, or when the source is changed.
Range: 11//1100 (slowest) ttoo 1100//1100 (fastest)
Default setting: 88//1100
VVOOLLUUMMEE LLIIMMIITTSet the maximum volume level of the AKURATE KONTROL.
Range: 00 ttoo 110000 (in 0.5 steps)
Default setting: 110000
VVOOLLUUMMEE PPRREESSEETTSet the volume level of the AKURATE KONTROL when it is brought outof standby. The setting cannot be higher than the Volume Limit setting(see above).
Range: 00 ttoo 110000 (in 0.5 steps)
Default setting: 4400
AKURATE KONTROL pre-amplifier - english 15/5/07 15:17 Page 18
EN
GLI
SH
11AKURATE KONTROL
EN
GLI
SH
PPAANNOORRAAMMAA CCOONNTTRROOLLIf set to OONN the Panorama Control extends the audio signal fromthe front loudspeakers to include the surround loudspeakers. Thisadds a "wraparound" effect to the sound.
Options: OONN,, OOFFFF
Default setting: OOFFFF
DDIIMMEENNSSIIOONN CCOONNTTRROOLLThis parameter allows you to shift the balance between the frontand rear loudspeakers. Positive values move the sound towardsthe front, negative values towards the rear. If a recording is toospacious or strong from the surround loudspeakers it can beshifted "forward" to get a better balance. Likewise, a recording thatis too strong from the front loudspeakers can be shifted"backward" to make the sound more enveloping.
Range: --33 (most rear) ttoo 33 (most front)
Default setting: 00 (neutral)
Select SSAAVVEE to save your changes and return to the AUDIOOPTIONS menu.
Select BBAACCKK to return to the AUDIO OPTIONS menu withoutsaving changes.
Select EEXXIITT to leave setup (if changes have been made and SAVEhas not been selected, you will be prompted to save or not savethe changes).
Select SSAAVVEE to save your changes and return to the MAIN MENU.
Select BBAACCKK to return to the MAIN MENU without saving changes.
Select EEXXIITT to leave setup (if changes have been made and SAVE hasnot been selected, you will be prompted to save or not save thechanges).
General setupDDIISSPPLLAAYY IINNTTEENNSSIITTYYSet the brightness of the front panel display.
Options: LLOOWW,, MMEEDDIIUUMM,, HHIIGGHH
Default setting: MMEEDDIIUUMM
DDIISSPPLLAAYY CCOONNTTEENNTTSet what information you want displayed on the AKURATEKONTROL’s front panel when it is in normal operation.
Options: LLAASSTT UUSSEEDD**,, SSOOUURRCCEE AANNDD VVOOLLUUMMEE,, VVOOLLUUMMEE,, SSOOUURRCCEE
Default setting: SSOOUURRCCEE AANNDD VVOOLLUUMMEE
* If you change source, the new source will remain displayed on the front panel. If you change volume, the volume level will remain displayed.
DDIISSPPLLAAYY TTIIMMEEOOUUTTSet the time that new volume or source information is displayed onthe front panel before the AKURATE KONTROL shows its DisplayContent (see above).
Options: 11 SSEECC.. ttoo 1100 SSEECC..
Default setting: 22 SSEECC..
SSLLEEEEPP TTIIMMEEOOUUTTSet the elapsed time before the front panel display enters sleep mode(i.e. shows three dots) after a key on the front panel or handset ispressed.
Options: NNEEVVEERR SSLLEEEEPP,, IIMMMMEEDDIIAATTEE,, 3300 SSEECC..,, 55 MMIINNSS..
Default setting: NNEEVVEERR SSLLEEEEPP
AKURATE KONTROL pre-amplifier - english 15/5/07 15:17 Page 19
RRCCUU//IIRR SSOOCCKKEETTDefine the use of the socket marked RCU on the back panel.
Options: RRCCUU** (KNEKT Room Control Unit), IIRR (Infrared Repeater)
Default setting: RRCCUU
* For use with Linn KNEKT systems only.
PPRROODDUUCCTT IIRREnable or disable the infrared receiver on the front of the unit.
Options: EENNAABBLLEEDD,, DDIISSAABBLLEEDD
Default setting: EENNAABBLLEEDD
RRSS223322 SSEETTUUPP Accesses the RS232 SETUP sub-menu.
The RS232 Setup sub-menu is for use if the AKURATE KONTROL iscommunicating with other RS232 enabled products (e.g. a third-partycontroller).
BBAAUUDD RRAATTEESet the baud rate to suit the RS232 protocol being used.
Range: 44880000 ttoo 223300440000 (9 settings)
Default setting: 99660000
PPAARRIITTYYSet parity to suit the RS232 protocol being used.
Options: EEVVEENN,, OODDDD,, NNOONNEE
Default setting: EEVVEENN
DDAATTAA BBIITTSSSet the data bits to suit the RS232 protocol being used.
Options: 77,, 88
Default setting: 77
SSEELLEECCTTIIOONN TTIIMMEEOOUUTTSet the time the AKURATE KONTROL takes to select a source whenthe source is changed.
Range: 11 SSEECC.. ttoo 1100 SSEECC..
Default setting: 22 SSEECC..
SSTTAARRTTUUPP SSOOUURRCCEESet the source the AKURATE KONTROL selects when brought out ofstandby.
Options: LLAASSTT UUSSEEDD,, NNOONNEE,, ((aannyy ooff tthhee ssoouurrccee iinnppuuttss))
Default setting: LLAASSTT UUSSEEDD
SSTTAANNDDBBYY RREECCOORRDD FFRROOMMYou can record from a source component to a recording devicethrough the AKURATE KONTROL, even if the AKURATE KONTROL isin standby mode.* Set which source you want the AKURATEKONTROL to select when it is in standby.
Options: LLAASSTT UUSSEEDD,, NNOONNEE,, ((aannyy ooff tthhee ssoouurrcceess)),, KKNNEEKKTT****
Default setting: LLAASSTT UUSSEEDD
* For information on setting-up a record path see Record function, page 23.
** Is only available when KNEKT (see below) is set to LOCAL ROOM.
KKNNEEKKTTIf your AKURATE KONTROL is installed in a Linn KNEKT multi-roomsystem, select the appropriate setting. If your AKURATE KONTROL isnot installed in a KNEKT system, select NNOONNEE.
Options: NNOONNEE,, MMAAIINN RROOOOMM,, LLOOCCAALL RROOOOMM,, IINNTTEERRSSEEKKTT
Default setting: NNOONNEE
EN
GLIS
H
12 AKURATE KONTROL
AKURATE KONTROL pre-amplifier - english 15/5/07 15:17 Page 20
EN
GLI
SH
13AKURATE KONTROL
EN
GLI
SH
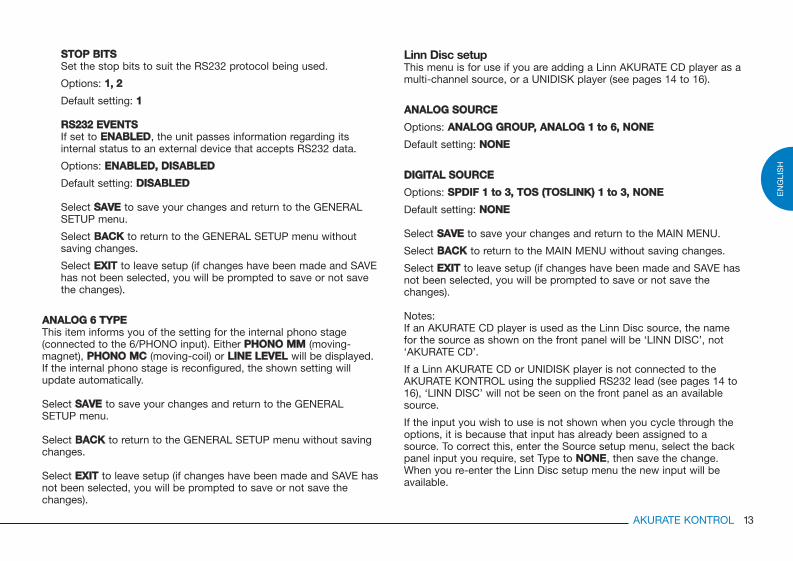
SSTTOOPP BBIITTSSSet the stop bits to suit the RS232 protocol being used.
Options: 11,, 22
Default setting: 11
RRSS223322 EEVVEENNTTSS If set to EENNAABBLLEEDD, the unit passes information regarding itsinternal status to an external device that accepts RS232 data.
Options: EENNAABBLLEEDD,, DDIISSAABBLLEEDD
Default setting: DDIISSAABBLLEEDD
Select SSAAVVEE to save your changes and return to the GENERALSETUP menu.
Select BBAACCKK to return to the GENERAL SETUP menu withoutsaving changes.
Select EEXXIITT to leave setup (if changes have been made and SAVEhas not been selected, you will be prompted to save or not savethe changes).
AANNAALLOOGG 66 TTYYPPEEThis item informs you of the setting for the internal phono stage(connected to the 6/PHONO input). Either PPHHOONNOO MMMM (moving-magnet), PPHHOONNOO MMCC (moving-coil) or LLIINNEE LLEEVVEELL will be displayed.If the internal phono stage is reconfigured, the shown setting willupdate automatically.
Select SSAAVVEE to save your changes and return to the GENERALSETUP menu.
Select BBAACCKK to return to the GENERAL SETUP menu without savingchanges.
Select EEXXIITT to leave setup (if changes have been made and SAVE hasnot been selected, you will be prompted to save or not save thechanges).
Linn Disc setupThis menu is for use if you are adding a Linn AKURATE CD player as amulti-channel source, or a UNIDISK player (see pages 14 to 16).
AANNAALLOOGG SSOOUURRCCEE
Options: AANNAALLOOGG GGRROOUUPP,, AANNAALLOOGG 11 ttoo 66,, NNOONNEE
Default setting: NNOONNEE
DDIIGGIITTAALL SSOOUURRCCEE
Options: SSPPDDIIFF 11 ttoo 33,, TTOOSS ((TTOOSSLLIINNKK)) 11 ttoo 33,, NNOONNEE
Default setting: NNOONNEE
Select SSAAVVEE to save your changes and return to the MAIN MENU.
Select BBAACCKK to return to the MAIN MENU without saving changes.
Select EEXXIITT to leave setup (if changes have been made and SAVE hasnot been selected, you will be prompted to save or not save thechanges).
Notes:If an AKURATE CD player is used as the Linn Disc source, the namefor the source as shown on the front panel will be ‘LINN DISC’, not‘AKURATE CD’.
If a Linn AKURATE CD or UNIDISK player is not connected to theAKURATE KONTROL using the supplied RS232 lead (see pages 14 to16), ‘LINN DISC’ will not be seen on the front panel as an availablesource.
If the input you wish to use is not shown when you cycle through theoptions, it is because that input has already been assigned to asource. To correct this, enter the Source setup menu, select the backpanel input you require, set Type to NNOONNEE, then save the change.When you re-enter the Linn Disc setup menu the new input will beavailable.
AKURATE KONTROL pre-amplifier - english 15/5/07 15:17 Page 21

Using the AKURATE KONTROL with a Linn AKURATECD playerIf an AKURATE CD is being used as a two-channel (stereo) source,simply connect the AKURATE CD’s FRONT A or B analogue lineoutputs to the AKURATE KONTROL’s 1/FRONT ANALOGUE AUDIOINPUTS (the AKURATE KONTROL is factory configured for anAKURATE CD to be connected to this input).
If an AKURATE CD is being used as a multi-channel source there areadvantages in operation when using the AKURATE KONTROL:
• The AKURATE KONTROL will choose an appropriate surround sound format for a disc’s audio stream.
• When playing a CD you will be able to select the Dolby Pro Logic II surround sound format.
If you wish to use your AKURATE KONTROL with an AKURATE CDplayer in multi-channel configuration, follow the instructions below.
1. Switch off all equipment.
2. Connect the AKURATE CD’s FRONT A or B, SURR, CENTRE and SUB line output connectors to the 5.1 GROUP input on the AKURATE KONTROL (requires 6 RCA phono-to-phono leads)
3. Connect the RS232 product-to-product lead (supplied with the AKURATE KONTROL) from the AKURATE KONTROL’s RS232 OUT to the AKURATE CD’s RS232 IN.
4. Connect the AKURATE KONTROL’s REMOTE OUT to the AKURATE CD’s REMOTE IN (requires an RCA phono-to-phono lead).
5. Switch on all equipment.
Installer menuTo access the Installer menu:
• Press AAMMPP, then hold SSEETTUUPP on the handset, or hold SSEELLEECCTTon the front panel, until INSTALLER MENU is shown on the display (approximately 5 seconds).
SSAAVVEE AASS IINNSSTTAALLLLEERRAfter you have set up the AKURATE KONTROL you can save thesettings by selecting this item. The saved Installer configuration canbe restored at any time should the AKURATE KONTROL’s setup bechanged (see below). Any alterations to the AKURATE KONTROL’ssetup that you wish to keep can be stored by selecting this item,which will overwrite the existing Installer configuration.
RREESSTTOORREE IINNSSTTAALLLLEERRIf you have made changes to the setup of the AKURATE KONTROLthat you do not wish to keep, use this option to restore the Installerconfiguration.
RREESSTTOORREE FFAACCTTOORRYYUse this option to restore the default settings for all the setup menus.
HH88 SSOOFFTTWWAARREE VVEERRSSIIOONNDisplays the version of the software installed on the AKURATEKONTROL.
EN
GLIS
H
14 AKURATE KONTROL
AKURATE KONTROL pre-amplifier - english 15/5/07 15:17 Page 22
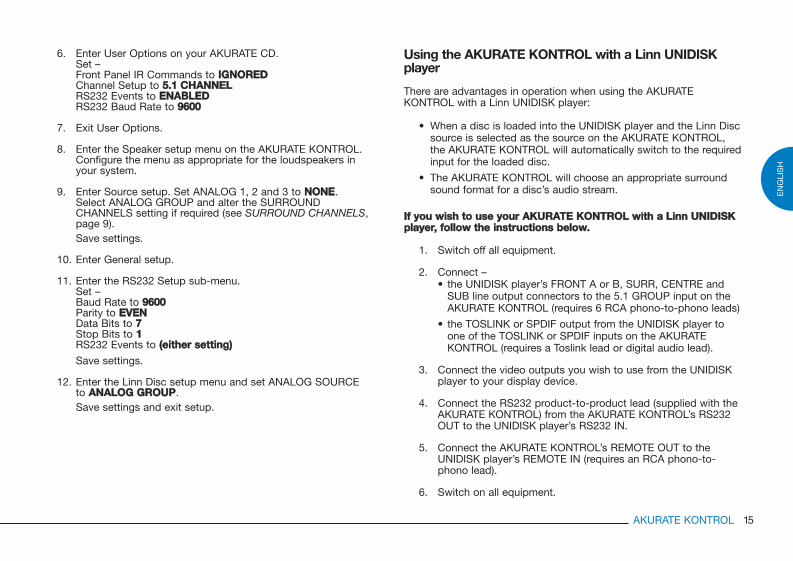
Using the AKURATE KONTROL with a Linn UNIDISKplayer
There are advantages in operation when using the AKURATEKONTROL with a Linn UNIDISK player:
• When a disc is loaded into the UNIDISK player and the Linn Discsource is selected as the source on the AKURATE KONTROL, the AKURATE KONTROL will automatically switch to the requiredinput for the loaded disc.
• The AKURATE KONTROL will choose an appropriate surround sound format for a disc’s audio stream.
IIff yyoouu wwiisshh ttoo uussee yyoouurr AAKKUURRAATTEE KKOONNTTRROOLL wwiitthh aa LLiinnnn UUNNIIDDIISSKKppllaayyeerr,, ffoollllooww tthhee iinnssttrruuccttiioonnss bbeellooww..
1. Switch off all equipment.
2. Connect – • the UNIDISK player’s FRONT A or B, SURR, CENTRE and
SUB line output connectors to the 5.1 GROUP input on the AKURATE KONTROL (requires 6 RCA phono-to-phono leads)
• the TOSLINK or SPDIF output from the UNIDISK player to one of the TOSLINK or SPDIF inputs on the AKURATE KONTROL (requires a Toslink lead or digital audio lead).
3. Connect the video outputs you wish to use from the UNIDISK player to your display device.
4. Connect the RS232 product-to-product lead (supplied with the AKURATE KONTROL) from the AKURATE KONTROL’s RS232 OUT to the UNIDISK player’s RS232 IN.
5. Connect the AKURATE KONTROL’s REMOTE OUT to the UNIDISK player’s REMOTE IN (requires an RCA phono-to-phono lead).
6. Switch on all equipment.
6. Enter User Options on your AKURATE CD.Set –Front Panel IR Commands to IIGGNNOORREEDDChannel Setup to 55..11 CCHHAANNNNEELLRS232 Events to EENNAABBLLEEDDRS232 Baud Rate to 99660000
7. Exit User Options.
8. Enter the Speaker setup menu on the AKURATE KONTROL. Configure the menu as appropriate for the loudspeakers in your system.
9. Enter Source setup. Set ANALOG 1, 2 and 3 to NNOONNEE. Select ANALOG GROUP and alter the SURROUND CHANNELS setting if required (see SURROUND CHANNELS, page 9).Save settings.
10. Enter General setup.
11. Enter the RS232 Setup sub-menu.Set –Baud Rate to 99660000Parity to EEVVEENNData Bits to 77Stop Bits to 11RS232 Events to ((eeiitthheerr sseettttiinngg))
Save settings.
12. Enter the Linn Disc setup menu and set ANALOG SOURCE to AANNAALLOOGG GGRROOUUPP.Save settings and exit setup.
15AKURATE KONTROL
EN
GLI
SH
AKURATE KONTROL pre-amplifier - english 15/5/07 15:17 Page 23
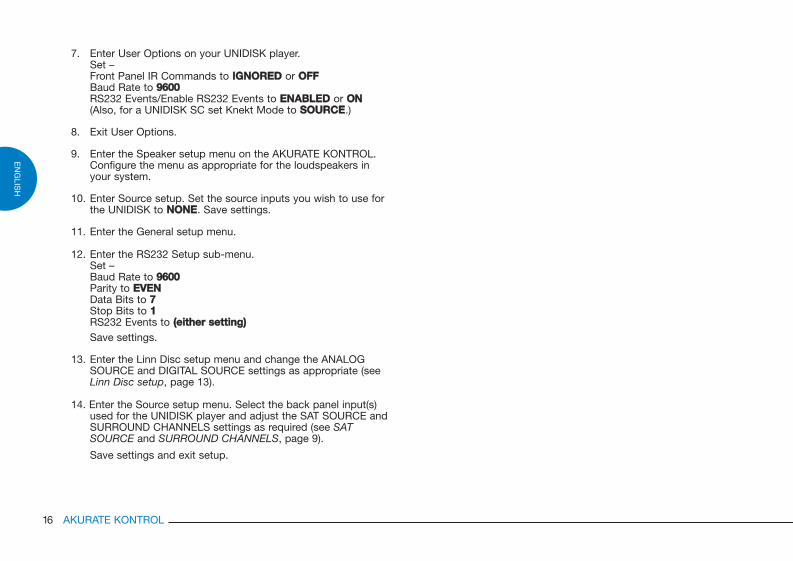
7. Enter User Options on your UNIDISK player.Set –Front Panel IR Commands to IIGGNNOORREEDD or OOFFFFBaud Rate to 99660000RS232 Events/Enable RS232 Events to EENNAABBLLEEDD or OONN(Also, for a UNIDISK SC set Knekt Mode to SSOOUURRCCEE.)
8. Exit User Options.
9. Enter the Speaker setup menu on the AKURATE KONTROL. Configure the menu as appropriate for the loudspeakers in your system.
10. Enter Source setup. Set the source inputs you wish to use for the UNIDISK to NNOONNEE. Save settings.
11. Enter the General setup menu.
12. Enter the RS232 Setup sub-menu.Set –Baud Rate to 99660000Parity to EEVVEENNData Bits to 77Stop Bits to 11RS232 Events to ((eeiitthheerr sseettttiinngg))Save settings.
13. Enter the Linn Disc setup menu and change the ANALOG SOURCE and DIGITAL SOURCE settings as appropriate (see Linn Disc setup, page 13).
14. Enter the Source setup menu. Select the back panel input(s) used for the UNIDISK player and adjust the SAT SOURCE and SURROUND CHANNELS settings as required (see SAT SOURCE and SURROUND CHANNELS, page 9).
Save settings and exit setup.
EN
GLIS
H
16 AKURATE KONTROL
AKURATE KONTROL pre-amplifier - english 15/5/07 15:17 Page 24

Front Panel and HandsetFront panel The front panel display shows you information regarding what you are listening to. The current volume, current source, or both, can be displayedalong with the input audio signal and audio processing format. The display also shows the setup menus and other information depending on thecurrent operation.
SSEELLEECCTT Selects/executes options and certain commands. Accesses setup menus
FFrroonntt ppaanneell ddiissppllaayy
Brings unit out of, or puts into, standby mode
SSOOUURRCCEE --/++, / Change source, adjust settings
VVOOLLUUMMEE --/++, / Adjust volume level, navigate setup menus and adjust settings
1
2
3
4
5
EN
GLI
SH
17AKURATE KONTROL
AKURATE KONTROL pre-amplifier - english 15/5/07 15:17 Page 25

STORE
SHIFT
AMP
DVD
SURR
LIP SYNC MONO
AUX TUNERDVD CD
PHONO SATTV DIGITAL
DO CLOCKWHERE WHAT
OFF
CD
DVD CD
AMP
AUDIOADJUST
VIDEOADJUST
PRESET
SRC +
+ --
SRC -
BANDSCAN TUNE
DISP MORE SETUP HELP
AUDIO SUB-T ANGLE ZOOM
TITLE MENU GOTO
1 2 3
4 5 6
7 8 9SIGNALRECORDLISTEN
EXCLUDEINCLUDESHUFFLE
A-BTRACKDISC
0
14
15
12
1
3
9
10
11
2
4
5
13
6
7
8
LLEEDDss Indicate the mode of the handset when a key is pressed
AAMMPP Puts handset into Amp mode (functions marked in blue above keys)
SSHHIIFFTT Allows access to RECORD and OFF functions
Mutes/unmutes the audio output
// Adjust volume level
SSRRCC-- // SSRRCC++ ((ssoouurrccee -- // ssoouurrccee ++)) Change source
AAUUDDIIOO AADDJJUUSSTT Adjusts loudspeaker balance and trim. Resets audio settings
DDiirreecctt ssoouurrccee kkeeyyss Provide direct selection of sources
, OOFFFF Brings unit out of, or puts into, standby mode. Sends ‘off’ (i.e. puts into standby)command to all available Linn equipment
RREECCOORRDD For setting up/altering a record path
SSUURRRR Selects a surround sound format. Switches Midnight Movie mode on/off
/ / / For navigating setup menus and adjusting settings
Selects/executes options and certain commands
LLIIPP SSYYNNCC Accesses Lip Sync Delay feature
SSEETTUUPP Enters/exits setup menus
Keys and functions of the handset not listed above do not function with the AKURATE KONTROLbut may with other Linn products.
Note:If your AKURATE KONTROL is not responding as expected to handset keys, it is likely that thehandset is not in Amp mode. To correct this, press the AAMMPP key on the handset.
Handset1
2
3
4
5
6
7
8
9
10
11
12
13
14
15
EN
GLIS
H
18 AKURATE KONTROL
AKURATE KONTROL pre-amplifier - english 15/5/07 15:17 Page 26
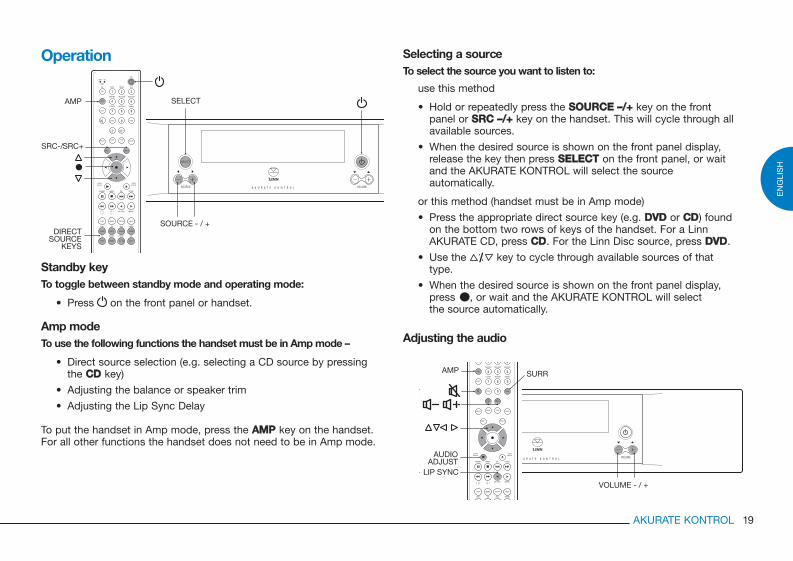
Operation
Standby keyTo toggle between standby mode and operating mode:
• Press on the front panel or handset.
Amp modeTo use the following functions the handset must be in Amp mode –
• Direct source selection (e.g. selecting a CD source by pressing the CCDD key)
• Adjusting the balance or speaker trim
• Adjusting the Lip Sync Delay
To put the handset in Amp mode, press the AAMMPP key on the handset.For all other functions the handset does not need to be in Amp mode.
STORE
SHIFT
AMP
DVD
SURR
LIP SYNC MONO
DO CLOCKWHERE WHAT
OFF
CD
DVD CD
AMP
AUDIOADJUST
VIDEOADJUST
PRESET
SRC +
+ --
SRC -SRC+SRC-/
BANDSCAN TUNE
DISP MORE SETUP
SELECT
SOURCE - / +HELP
1 2 3
4 5 6
7 8 9SIGNALRECORDLISTEN
EXCLUDEINCLUDESHUFFLE
A-BTRACKDISC
0
AMP
DIRECTSOURCE
KEYS
AUX TUNERDVD CD
PHONO SATTV DIGITAL
AUDIO SUB-T ANGLE ZOOM
TITLE MENU GOTO
EN
GLI
SH
19AKURATE KONTROL
VOLUME - / +
STORE
SHIFT
AMP
AUDIOADJUST
AMPDVD
SURR
LIP SYNC MONO
DO CLOCKWHERE WHAT
AUDIOADJUST
VIDEOADJUST
PRESET
SRC +
+ --
SRC -
BANDSCAN TUNE
DISP MORE SETUP HELP
1 2 3
4 5 6
7 8 9SIGNALRECORDLISTEN
EXCLUDEINCLUDESHUFFLE
0
SURR
LIP SYNC
AUX TUNERDVD CD
Selecting a sourceTo select the source you want to listen to:
use this method
• Hold or repeatedly press the SSOOUURRCCEE ––//++ key on the front panel or SSRRCC ––//++ key on the handset. This will cycle through all available sources.
• When the desired source is shown on the front panel display, release the key then press SSEELLEECCTT on the front panel, or wait and the AKURATE KONTROL will select the source automatically.
or this method (handset must be in Amp mode)
• Press the appropriate direct source key (e.g. DDVVDD or CCDD) found on the bottom two rows of keys of the handset. For a Linn AKURATE CD, press CCDD. For the Linn Disc source, press DDVVDD.
• Use the / key to cycle through available sources of that type.
• When the desired source is shown on the front panel display, press , or wait and the AKURATE KONTROL will select the source automatically.
Adjusting the audio
AKURATE KONTROL pre-amplifier - english 15/5/07 15:17 Page 27
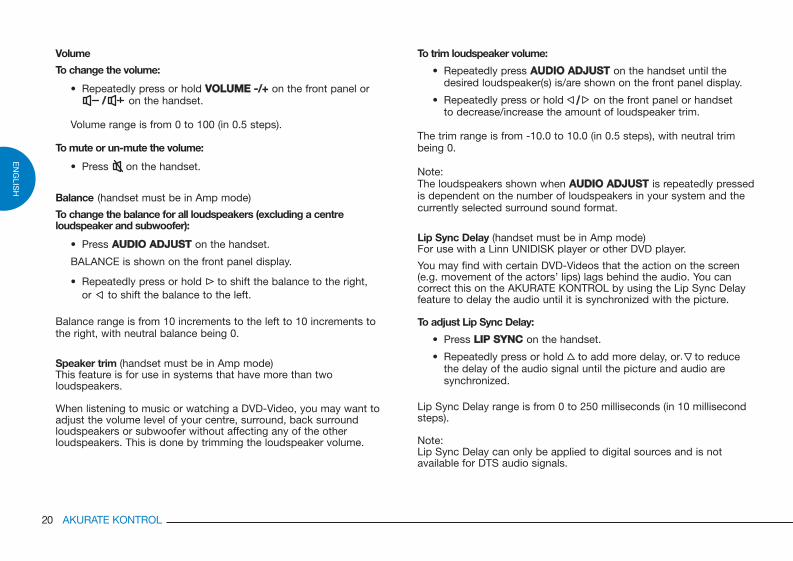
To trim loudspeaker volume:
• Repeatedly press AAUUDDIIOO AADDJJUUSSTT on the handset until the desired loudspeaker(s) is/are shown on the front panel display.
• Repeatedly press or hold / on the front panel or handset to decrease/increase the amount of loudspeaker trim.
The trim range is from -10.0 to 10.0 (in 0.5 steps), with neutral trimbeing 0.
Note:The loudspeakers shown when AAUUDDIIOO AADDJJUUSSTT is repeatedly pressedis dependent on the number of loudspeakers in your system and thecurrently selected surround sound format.
Lip Sync Delay (handset must be in Amp mode)For use with a Linn UNIDISK player or other DVD player.
You may find with certain DVD-Videos that the action on the screen(e.g. movement of the actors’ lips) lags behind the audio. You cancorrect this on the AKURATE KONTROL by using the Lip Sync Delayfeature to delay the audio until it is synchronized with the picture.
To adjust Lip Sync Delay:
• Press LLIIPP SSYYNNCC on the handset.
• Repeatedly press or hold to add more delay, or to reducethe delay of the audio signal until the picture and audio are synchronized.
Lip Sync Delay range is from 0 to 250 milliseconds (in 10 millisecondsteps).
Note:Lip Sync Delay can only be applied to digital sources and is notavailable for DTS audio signals.
Volume
To change the volume:
• Repeatedly press or hold VVOOLLUUMMEE --//++ on the front panel or // on the handset.
Volume range is from 0 to 100 (in 0.5 steps).
To mute or un-mute the volume:
• Press on the handset.
Balance (handset must be in Amp mode)
To change the balance for all loudspeakers (excluding a centre loudspeaker and subwoofer):
• Press AAUUDDIIOO AADDJJUUSSTT on the handset.
BALANCE is shown on the front panel display.
• Repeatedly press or hold to shift the balance to the right,or to shift the balance to the left.
Balance range is from 10 increments to the left to 10 increments tothe right, with neutral balance being 0.
Speaker trim (handset must be in Amp mode)This feature is for use in systems that have more than twoloudspeakers.
When listening to music or watching a DVD-Video, you may want toadjust the volume level of your centre, surround, back surroundloudspeakers or subwoofer without affecting any of the otherloudspeakers. This is done by trimming the loudspeaker volume.
EN
GLIS
H
20 AKURATE KONTROL
AKURATE KONTROL pre-amplifier - english 15/5/07 15:17 Page 28

Surround sound formatsThe AKURATE KONTROL is equipped with a wide range of surroundsound formats to enhance your audio experience.
To change the surround sound format:
• Repeatedly press SSUURRRR on the handset until the desired formatis shown on the front panel display.
The available surround sound formats, and a brief description of each,is as follows:
Dolby Digital
Dolby Digital EX
Dolby Pro Logic II*
Dolby Pro Logic IIMusic*
DTS DigitalSurround
DTS 96/24
DTS ES Matrix
A standard for storing 5.1 channels of audiosignal on to discs such as DVD-Videos
Spreads the surround speaker portion of a DolbyDigital 5.1 audio signal to two back loudspeakers- converting 5.1 audio to 7.1 audio
Converts any non-surround sound audio signalinto a surround sound 5.0 signal
Same as Dolby Pro Logic II but is particularlysuited to music. Features three user-adjustableparameters that are accessed via the AKURATEKONTROL’s setup menus
A standard for storing 5.1 channels of audiosignal on to discs such as DVD-Videos
Same as DTS Digital Surround but offers betteraudio quality
Spreads the surround speaker portion of a DTS5.1 audio signal to two back loudspeakers -converting 5.1 audio to 7.1 audio
SSuurrrroouunndd DDeessccrriippttiioonnssoouunndd ffoorrmmaatt
DTS ES Discrete
DTS 96/24 ESMatrix
Phantom
3 Stereo
Stereo Sub
MPEG Stereo
MPEG Surround
AAC Stereo
AAC Surround
LIMBIK Party
A standard for storing 6.1 channels of audiosignal on to discs such as DVD-Videos. On theAKURATE KONTROL the extra channel can bespread over two back loudspeakers - converting6.1 audio to 7.1 audio
Higher quality of DTS Digital Surround with theaddition of the surround sound speaker portion ofthe signal being spread to two back loudspeakers- converting 5.1 audio to 7.1 audio
Passes the centre channel portion of a 5.1 or 7.1audio signal to the front left and rightloudspeakers
Downmixes a 5.1 or 7.1 audio signal and passesit to the front and centre loudspeakers only
Downmixes a 5.1 audio signal to a two-channelsignal and then routes the signal to the frontloudspeakers and subwoofer. Routes a stereosignal to the front loudspeakers and subwoofer
A standard for storing two-channel audio inMPEG files
A standard for storing surround sound audio inMPEG files
A standard for storing two-channel audio
A standard for storing surround sound audio
A Linn algorithm that sends essentially the sameaudio signal to all loudspeakers in your system
SSuurrrroouunndd DDeessccrriippttiioonnssoouunndd ffoorrmmaatt
EN
GLI
SH
21AKURATE KONTROL
* You do not need a full surround sound loudspeaker system to hear these formats. If you have more than front loudspeakers (and a subwoofer) in your system, when you select either of these formats the signal will be converted into a 5.0 signal then downmixed to matchthe number of loudspeakers in your system.
AKURATE KONTROL pre-amplifier - english 15/5/07 15:17 Page 29
Stereo 2.0 - - - 2.0
Phantom 4.1 4.1 4.1 4.1 4.1
3 Stereo 3.1 3.1 3.1 3.1 3.1
Stereo Sub 2.1 2.1 2.1 2.1 2.1
Dolby Digital 5.1 - - - -
Dolby Digital + 6.1 - - - -Dolby Digital EX
DTS DigitalSurround - 5.1 - - -
DTS 96/24 - 5.1 - - -
DTS ES Matrix - 7.1 - - -
DTS ES Discrete - 7.1 - - -
DTS 96/24ES Matrix - 7.1 - - -
MPEG Stereo - - 2.0 - -
MPEG Surround - - 5.1 - -
AAC Stereo - - - 2.0 -
AAC Surround - - - 5.1 -LIMBIK Party 5.0 & 7.0 5.0 & 7.0 5.0 & 7.0 5.0 & 7.0 -
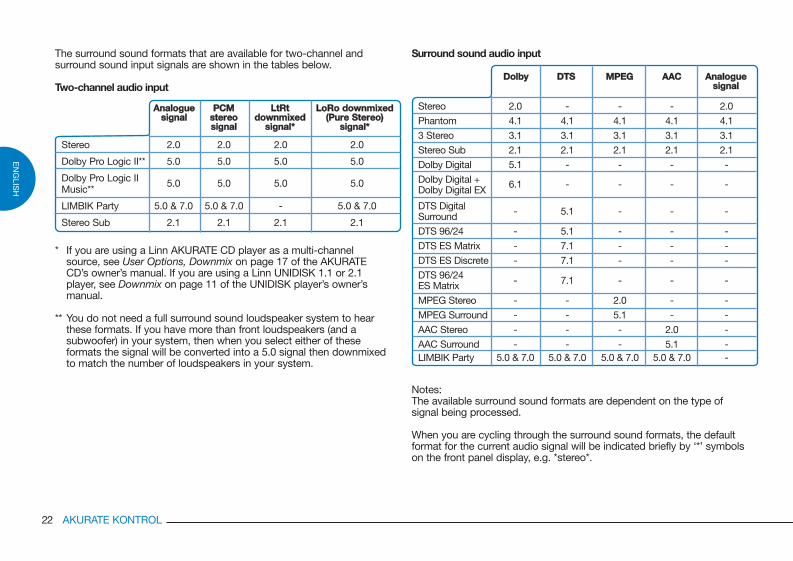
The surround sound formats that are available for two-channel andsurround sound input signals are shown in the tables below.
Two-channel audio input
* If you are using a Linn AKURATE CD player as a multi-channel source, see User Options, Downmix on page 17 of the AKURATE CD’s owner’s manual. If you are using a Linn UNIDISK 1.1 or 2.1 player, see Downmix on page 11 of the UNIDISK player’s owner’s manual.
** You do not need a full surround sound loudspeaker system to hear these formats. If you have more than front loudspeakers (and a subwoofer) in your system, then when you select either of these formats the signal will be converted into a 5.0 signal then downmixed to match the number of loudspeakers in your system.
Stereo
Dolby Pro Logic II**
Dolby Pro Logic IIMusic**
LIMBIK Party
Stereo Sub
2.0
5.0
5.0
5.0 & 7.0
2.1
2.0
5.0
5.0
-
2.1
2.0
5.0
5.0
5.0 & 7.0
2.1
2.0
5.0
5.0
5.0 & 7.0
2.1
AAnnaalloogguueessiiggnnaall
PPCCMMsstteerreeoossiiggnnaall
LLttRRttddoowwnnmmiixxeedd
ssiiggnnaall**
LLooRRoo ddoowwnnmmiixxeedd((PPuurree SStteerreeoo))
ssiiggnnaall**
Surround sound audio input
Notes:The available surround sound formats are dependent on the type ofsignal being processed.
When you are cycling through the surround sound formats, the defaultformat for the current audio signal will be indicated briefly by ‘*’ symbolson the front panel display, e.g. *stereo*.
DDoollbbyy DDTTSS MMPPEEGG AAAACC AAnnaalloogguueessiiggnnaall
EN
GLIS
H
22 AKURATE KONTROL
AKURATE KONTROL pre-amplifier - english 15/5/07 15:17 Page 30
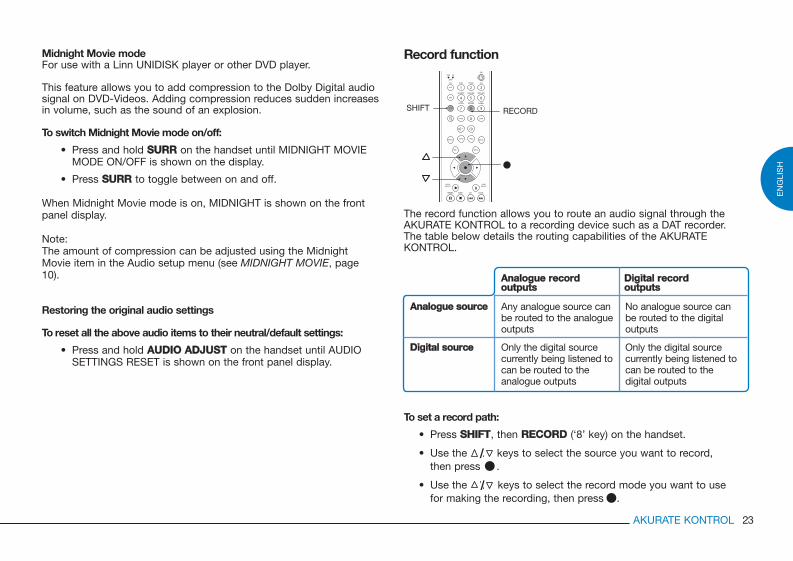
Record function
The record function allows you to route an audio signal through theAKURATE KONTROL to a recording device such as a DAT recorder.The table below details the routing capabilities of the AKURATEKONTROL.
To set a record path:
• Press SSHHIIFFTT, then RREECCOORRDD (‘8’ key) on the handset.
• Use the / keys to select the source you want to record, then press .
• Use the / keys to select the record mode you want to use for making the recording, then press .
Midnight Movie modeFor use with a Linn UNIDISK player or other DVD player.
This feature allows you to add compression to the Dolby Digital audiosignal on DVD-Videos. Adding compression reduces sudden increasesin volume, such as the sound of an explosion.
To switch Midnight Movie mode on/off:
• Press and hold SSUURRRR on the handset until MIDNIGHT MOVIE MODE ON/OFF is shown on the display.
• Press SSUURRRR to toggle between on and off.
When Midnight Movie mode is on, MIDNIGHT is shown on the frontpanel display.
Note:The amount of compression can be adjusted using the MidnightMovie item in the Audio setup menu (see MIDNIGHT MOVIE, page10).
Restoring the original audio settings
To reset all the above audio items to their neutral/default settings:
• Press and hold AAUUDDIIOO AADDJJUUSSTT on the handset until AUDIO SETTINGS RESET is shown on the front panel display.
STORE
SHIFT
AMP
RECORD
DVD
SURR
DO CLOCKWHERE WHAT
OFF
CD
DVD CD
AMP
AUDIOADJUST
VIDEOADJUST
PRESET
SRC +
+ --
SRC -
BANDSCAN TUNE
1 2 3
4 5 6
7 8 9SIGNALRECORDLISTEN
EXCLUDEINCLUDESHUFFLE
A-BTRACKDISC
0
SHIFT
AAnnaalloogguuee ssoouurrccee No analogue source canbe routed to the digitaloutputs
Any analogue source canbe routed to the analogueoutputs
DDiiggiittaall ssoouurrccee Only the digital sourcecurrently being listened tocan be routed to thedigital outputs
Only the digital sourcecurrently being listened tocan be routed to theanalogue outputs
AAnnaalloogguuee rreeccoorrddoouuttppuuttss
DDiiggiittaall rreeccoorrddoouuttppuuttss
EN
GLI
SH
23AKURATE KONTROL
AKURATE KONTROL pre-amplifier - english 15/5/07 15:17 Page 31
Notes on the list of sources:NO SOURCE: No record path will be set.KNEKT: When a record path on the AKURATE KONTROL is being used,this setting will allow users of a KNEKT Line Driver system to change thesource they are listening to (which also changes the record path). Toprotect a record path, select the required record option. Once recordinghas finished, reselect the KNEKT option.
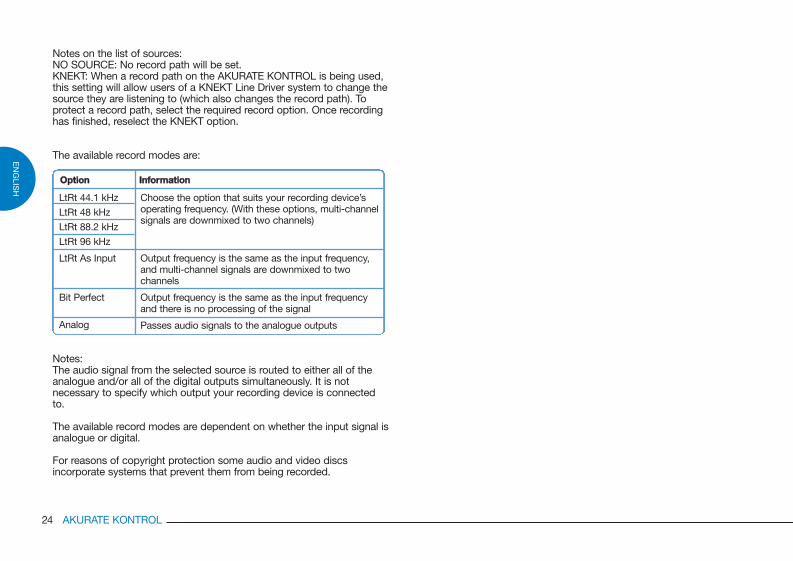
The available record modes are:
Notes:The audio signal from the selected source is routed to either all of theanalogue and/or all of the digital outputs simultaneously. It is notnecessary to specify which output your recording device is connectedto.
The available record modes are dependent on whether the input signal isanalogue or digital.
For reasons of copyright protection some audio and video discsincorporate systems that prevent them from being recorded.
LtRt 44.1 kHz
LtRt 48 kHz
LtRt 88.2 kHz
LtRt 96 kHz
LtRt As Input
Bit Perfect
Analog
Choose the option that suits your recording device’soperating frequency. (With these options, multi-channelsignals are downmixed to two channels)
Output frequency is the same as the input frequency,and multi-channel signals are downmixed to twochannels
Output frequency is the same as the input frequencyand there is no processing of the signal
Passes audio signals to the analogue outputs
OOppttiioonn IInnffoorrmmaattiioonn
EN
GLIS
H
24 AKURATE KONTROL
AKURATE KONTROL pre-amplifier - english 15/5/07 15:17 Page 32
Technical Specifications
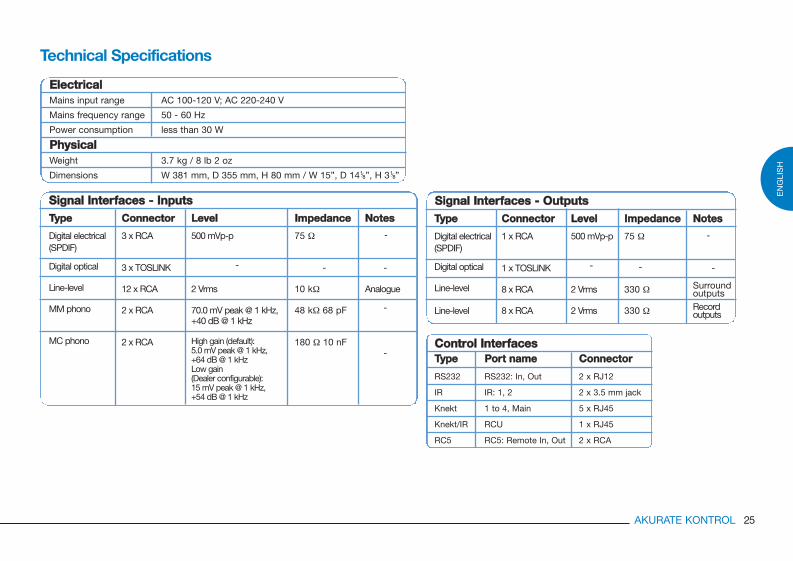
SSiiggnnaall IInntteerrffaacceess -- IInnppuuttssTTyyppee
Digital electrical(SPDIF)
Digital optical
Line-level
MM phono
MC phono
CCoonnnneeccttoorr
3 x RCA
3 x TOSLINK
12 x RCA
2 x RCA
2 x RCA
LLeevveell
500 mVp-p
-
2 Vrms
70.0 mV peak @ 1 kHz,+40 dB @ 1 kHz
High gain (default):5.0 mV peak @ 1 kHz,+64 dB @ 1 kHzLow gain(Dealer configurable):15 mV peak @ 1 kHz,+54 dB @ 1 kHz
IImmppeeddaannccee
75 Ω
-
10 kΩ
48 kΩ 68 pF
180 Ω 10 nF
NNootteess
-
-
Analogue
-
-
SSiiggnnaall IInntteerrffaacceess -- OOuuttppuuttssTTyyppee
Digital electrical(SPDIF)
Digital optical
Line-level
Line-level
CCoonnnneeccttoorr
1 x RCA
1 x TOSLINK
8 x RCA
8 x RCA
LLeevveell
500 mVp-p
-
2 Vrms
2 Vrms
IImmppeeddaannccee
75 Ω
-
330 Ω
330 Ω
NNootteess
-
-
SurroundoutputsRecordoutputs
EN
GLI
SH
25AKURATE KONTROL
EElleeccttrriiccaallMains input range AC 100-120 V; AC 220-240 V
Mains frequency range 50 - 60 Hz
Power consumption less than 30 W
PPhhyyssiiccaallWeight 3.7 kg / 8 lb 2 oz
Dimensions W 381 mm, D 355 mm, H 80 mm / W 15”, D 14 ”, H 3 ” 1/81/8
CCoonnttrrooll IInntteerrffaacceessTTyyppee PPoorrtt nnaammee CCoonnnneeccttoorr
RS232 RS232: In, Out 2 x RJ12
IR IR: 1, 2 2 x 3.5 mm jack
Knekt 1 to 4, Main 5 x RJ45
Knekt/IR RCU 1 x RJ45
RC5 RC5: Remote In, Out 2 x RCA
AKURATE KONTROL pre-amplifier - english 15/5/07 15:17 Page 33
Linn Products LimitedGlasgow RoadWaterfootEagleshamGlasgow G76 0EQScotland, UK
Phone: +44 (0)141 307 7777Fax: +44 (0)141 644 4262Helpline: 0500 888909Email: [email protected]: www.linn.co.uk
Linn Incorporated8787 Perimeter Park BoulevardJacksonvilleFL 32216 USA
Phone: +1 (904) 645 5242Fax: +1 (904) 645 7275Helpline: 888-671-LINNEmail: [email protected]: www.linninc.com
Linn Deutschland GmbHHühnerposten 1d D-20097 Hamburg Deutschland
Phone: +49-(0) 40-890 660-0Fax: +49-(0) 40-890 660-29Email: [email protected]: www.linn.co.uk
Guarantee and ServiceThis product is guaranteed under the conditions which apply in thecountry of purchase and your statutory rights are not limited. Inaddition to any statutory rights you may have, Linn undertake toreplace any parts which have failed due to faulty manufacture. To helpus, please ask your Linn retailer about the Linn warranty scheme inoperation in your country.
In parts of Europe, the United States of America and some othermarkets, extended warranty may be available to customers whoregister their purchase with Linn. A warranty registration card isincluded with the product and should be returned to Linn as soon aspossible. Alternatively, you can register your warranty online atwww.linn.co.uk.
Warning Unauthorised servicing or dismantling of the product invalidates themanufacturer's warranty. There are no user serviceable parts insidethe product and all enquiries relating to product servicing should bereferred to authorised retailers only.
Technical support and informationFor technical support, product queries and information, pleasecontact either your local retailer or one of the Linn offices opposite.
Full details of your local retailer/distributor can be found on the Linnweb site: www.linn.co.uk.
ImportantPlease keep a copy of the sales receipt to verify the purchase date of the product.
Please ensure that your equipment is insured by you during any transit or shipment for repair.
EN
GLIS
H
26 AKURATE KONTROL
AKURATE KONTROL pre-amplifier - english 15/5/07 15:17 Page 34

AKURATE KONTROL pre-amplifier - english 15/5/07 15:17 Page 35

Pack 1321
AKURATE KONTROL pre-amplifier - english 15/5/07 15:17 Page 36