
AirPOS Install Guide & User Manualairpos-docs.s3.amazonaws.com/AirPOS Self Install Guide...
32
AirPOS Install Guide & User Manual Updated 19/10/12 [email protected] Contents Page 1. Section A:What is AirPOS 2. Section B: Signing up for AirPOS 3. Section C: Quick Steps 4. Section D: Organising Stock and Inventory 5. Section E: Sales & Reporting 6. Section F: Webstore 7. Section G: Setting up your PayPal Business account 8. Section H: Settings 9. Section I: Contact us Section A: What is AirPOS? AirPOS is simple, affordable and powerful integrated ePOS and e-commerce software for SME retailers. Following an easy setup and install process, the system allows for rapid deployment of ePOS applications for bricks and mortar stores, a comprehensive online back office for administration of data and an integrated web store that can be launched with a single click. This combination of software allows granular inventory control, visibility across finances, customer information and other collated data coupled with the ability to sell both online and offline seamlessly. AirPOS offering is unique, giving independent retailers access to technologies that have traditionally been available only to very large companies. Best of all, setting up and operating AirPOS is simple by design. The follow set of instructions will assist you step-by-step in implementing your AirPOS installation and enabling multi- channel sales for your business. First off, a few frequently asked questions…
Transcript of AirPOS Install Guide & User Manualairpos-docs.s3.amazonaws.com/AirPOS Self Install Guide...

AirPOS Install Guide & User ManualUpdated 19/10/12 [email protected]
Contents Page1. Section A:What is AirPOS
2. Section B: Signing up for AirPOS
3. Section C: Quick Steps
4. Section D: Organising Stock and Inventory
5. Section E: Sales & Reporting
6. Section F: Webstore
7. Section G: Setting up your PayPal Business account
8. Section H: Settings
9. Section I: Contact us
Section A: What is AirPOS?AirPOS is simple, affordable and powerful integrated ePOS and e-commerce software for SMEretailers. Following an easy setup and install process, the system allows for rapid deploymentof ePOS applications for bricks and mortar stores, a comprehensive online back office foradministration of data and an integrated web store that can be launched with a single click.
This combination of software allows granular inventory control, visibility across finances,customer information and other collated data coupled with the ability to sell both online andoffline seamlessly.
AirPOS offering is unique, giving independent retailers access to technologies that havetraditionally been available only to very large companies.
Best of all, setting up and operating AirPOS is simple by design. The follow set of instructionswill assist you step-by-step in implementing your AirPOS installation and enabling multi-channel sales for your business.
First off, a few frequently asked questions…

The following are questions we have had from customers that may help to determine yourreadiness for AirPOS, and our readiness for your business.
What hardware does AirPOS Support?
Currently the recommended hardware setup for AirPOS is:
Android tablet (2.2+ recommended with 3.1+ required for printing. Android phones are notsupported) or PC (Windows XP SP2+ required minimum, Windows Vista, Windows 7)
Touchscreen optional (but recommended for simpler operation)
AirPOS now supports a wide variety of receipt printer including functionality for Serial,USB, Parallel, Bluetooth and many more so long as it is ESC/POS compatible and can beinstalled as a Windows printer.
Any cash drawer that connects to the above receipt printers via RJ11 connection. USBcash drawers are not yet supported
Any bar code scanner (USB) set to the Keyboard Wedge setting (please refer to yourmanual for how to program your scanner for Keyboard Wedge)
AirPOS may also need to be allowed via your firewall in order to function correctly, in particularon Windows 7. Details on how to allow programs access through Windows 7 firewall areavailable by clicking here.
Okay so if your hardware is suitable lets get started…
Section B: Signing up for AirPOS

Signing up for AirPOS is simple. Visit the website at http://www.airpointofsale.com and click onthe SIGN UP link.
To complete the signup process you will need to enter the following information:
Your Name
Email Address (NOTE: this will also be your username for logging into your AirPOSaccount and the Desktop ePOS Application)
Password (NOTE: Please record your password for future use, you will need it later to login to the Desktop ePOS Application)
Finally read our Terms and Conditions and if you're happy to proceed, press the 'SignUp' button to progress to the next steps…
Once you have clicked the 'Sign Up' button the above screen shot will appear. At this stage,you must enter in your Company Name, Country and Currency.
Referral Codes
If you have been given a referral code by a reseller please enter it here. This makes sure ourpartners get what they deserve (in the nicest possible way of course!) and helps us to providesupport to customers from third parties.
Then, to finish the sign up process, simply click “Create”
The AirPOS Dashboard

The AirPOS dashboard is the central hub of your AirPOS account, providing real-timeinformation on your business statistics including sales information, web orders that need to beprocessed, items in your inventory, employees and more.
Next we'll cover the simple steps involved in getting your AirPOS desktop ePOS client(s),Online Back Office and Web Store configured for use.
Section C: Quicksteps to setting up AirPOS
At AirPOS, we believe in making things easy. The first time you log into AirPOS you will seethat we’ve built you a step-by-step tutorial to help get you setup quickly.
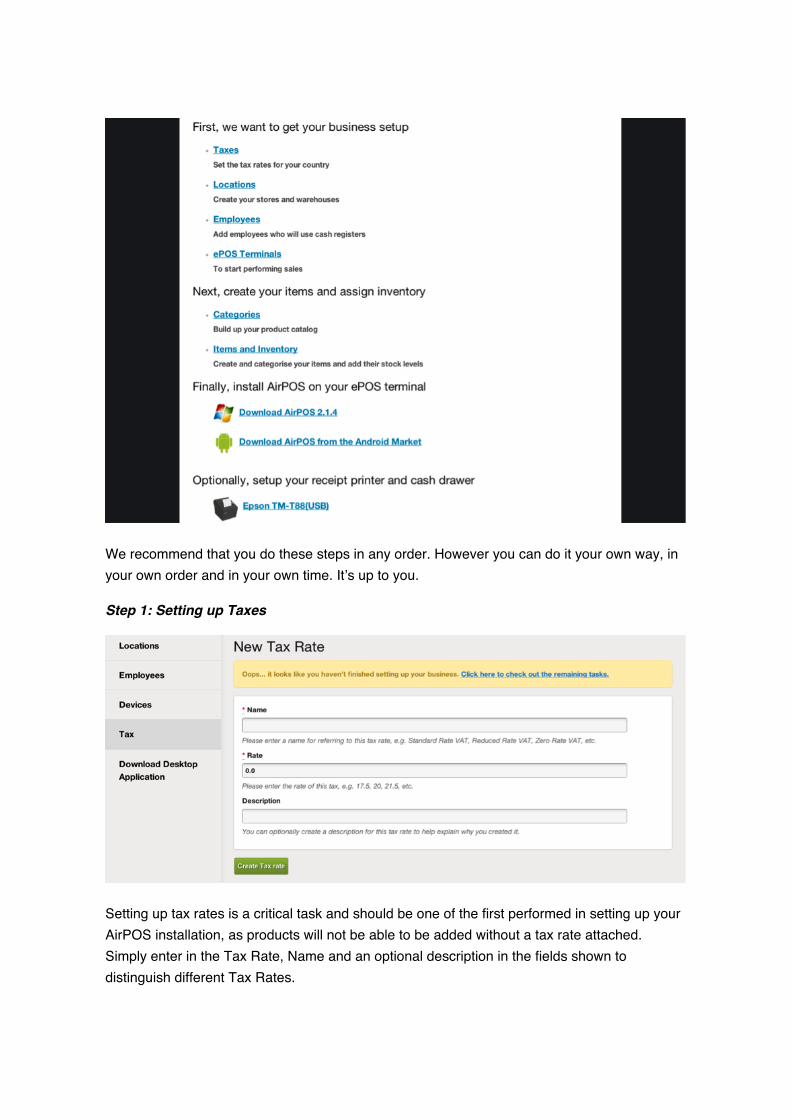
We recommend that you do these steps in any order. However you can do it your own way, inyour own order and in your own time. It’s up to you.
Step 1: Setting up Taxes
Setting up tax rates is a critical task and should be one of the first performed in setting up yourAirPOS installation, as products will not be able to be added without a tax rate attached.Simply enter in the Tax Rate, Name and an optional description in the fields shown todistinguish different Tax Rates.

AirPOS employs an open and flexible tax tabling system allowing you to create your own taxrates allowing the system to be used in many differing locations where tax rates vary. Anexample of this is United Kingdom VAT (Value Added Tax) which is applied to most items soldin the United Kingdom and at the time of writing was set at 20%. Another example is US SalesTax, which not only varies from state to state, but can actually be set at differing rates withinStates. This necessitates the need for a flexible tax system and therefore within AirPOS eachproduct can have their own Tax Rate attached, however these must be created prior to addingthe product.
NOTE: If a 0% Tax Rate is required for products or services being sold through AirPOS thismust also be created for use. The logic behind this is that while some products or services maycurrently have a 0% Tax Rate, this may later change in line with new legislation for example.Again, AirPOS allows the flexibility to change this rate, and any rate, at any time using the‘Modify Tax Rate’ button. AirPOS also maintains a record of the past rate that was set so asaudit trails are correct and sales reporting is accurate.
Once you have clicked “Create New Tax Rate” you will see that it gets checked of your quicklist as shown below;

Step 2: Setting up Locations
By design AirPOS is flexible in serving both small vendors and also larger, multi-siteoperations as required. The AirPOS ePOS desktop client can be installed and configuredeasily in any location, allowing true flexibility in scaling up and scaling down client installationson an on demand basis.
Setting up locations therefore couldn’t be easier. For a single retailer for example you wouldsimply enter the details of your store location and click “Create Location” and it will appear inyour POS tab under locations as can be seen;

For larger operations, it’s the same idea. Enter all of the locations at which you will have pointsof sale and they will all appear in your POS tab under locations.
An Example Setup
Let's assume as an example that The Premier League Store have a store based in NorthernIreland and a store in Manchester and want to use AirPOS both to sell online and through theirtwo bricks and mortar high street outlets. The first step is to create each of the locations byentering their addresses into the AirPOS back office under the Locations tab. In step 4, we willsetup the devices that will be used for Point of Sale in these outlets…
Step 3: Setting up Employees and their Roles
After you have created a location, it then makes sense to determine what staff members aresituated in those specific locations.
AirPOS features three user levels (Staff, Supervisor and Manager) with different permissionsassigned to each. ePOS functions such as discounts, voids, price changes, settings and XYZreads can be accessed or restricted based on an employee’s role in AirPOS.
Staff: Staff can perform a basic sale but if they wish to discount or void a transaction, asupervisor or Managers pin is required. Staff will not be able to access Settings or XYZ Reads.
Supervisor: Supervisors have access to all areas of the ePOS apart from settings.Supervisors only require a Managers pin when trying to access XYZ Reads.
Manager: Managers have access to all areas of the AirPOS ePOS
To create an employee and their role, simply fill in the fields that can be found in the POS tab
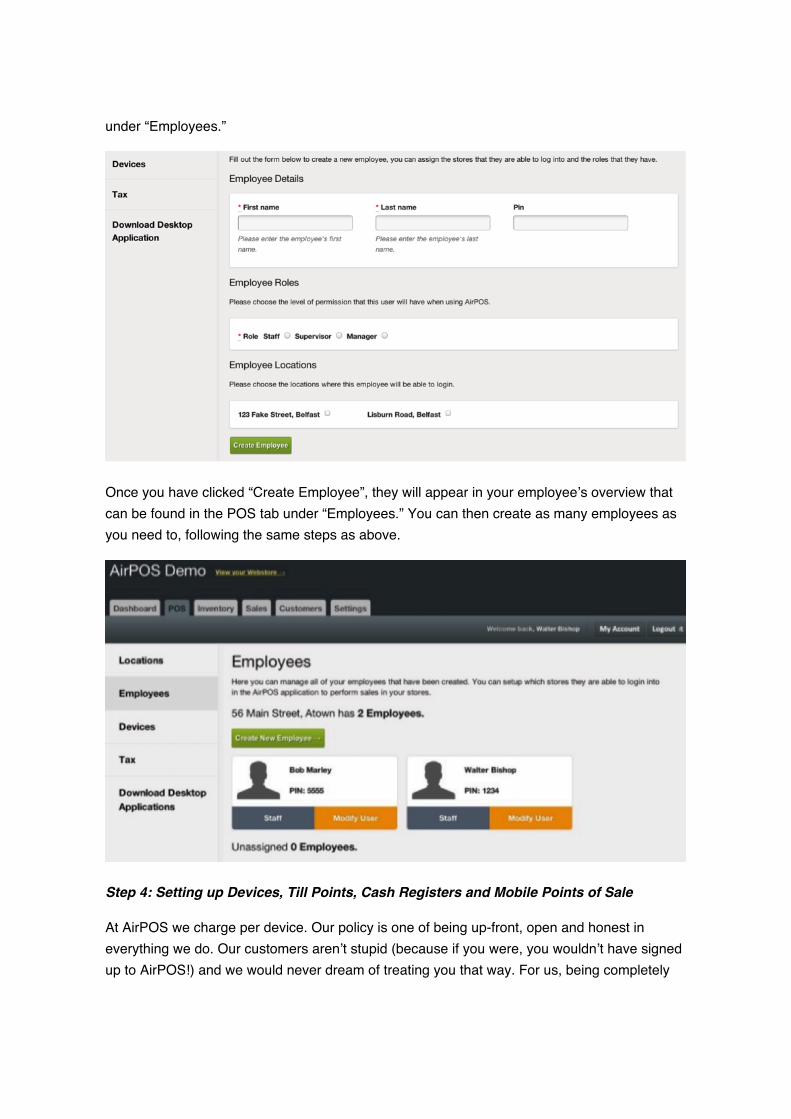
under “Employees.”
Once you have clicked “Create Employee”, they will appear in your employee’s overview thatcan be found in the POS tab under “Employees.” You can then create as many employees asyou need to, following the same steps as above.
Step 4: Setting up Devices, Till Points, Cash Registers and Mobile Points of Sale
At AirPOS we charge per device. Our policy is one of being up-front, open and honest ineverything we do. Our customers aren’t stupid (because if you were, you wouldn’t have signedup to AirPOS!) and we would never dream of treating you that way. For us, being completely
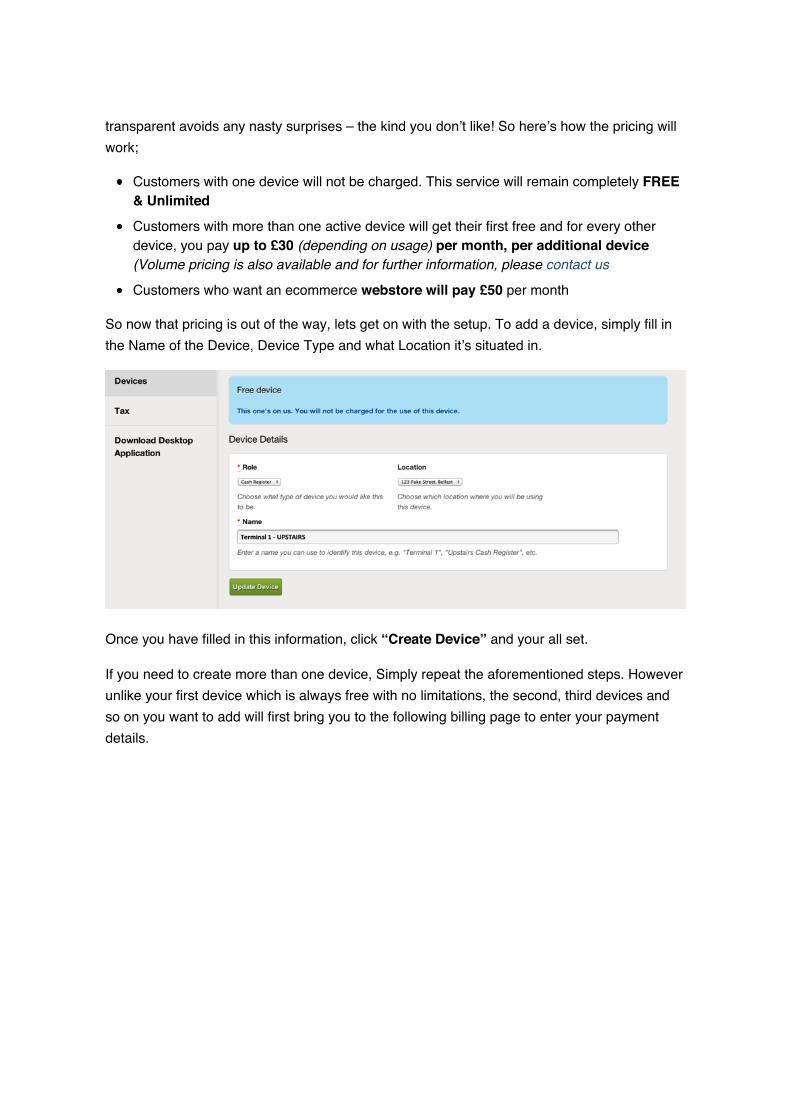
transparent avoids any nasty surprises – the kind you don’t like! So here’s how the pricing willwork;
Customers with one device will not be charged. This service will remain completely FREE& Unlimited
Customers with more than one active device will get their first free and for every otherdevice, you pay up to £30 (depending on usage) per month, per additional device(Volume pricing is also available and for further information, please contact us
Customers who want an ecommerce webstore will pay £50 per month
So now that pricing is out of the way, lets get on with the setup. To add a device, simply fill inthe Name of the Device, Device Type and what Location it’s situated in.
Once you have filled in this information, click “Create Device” and your all set.
If you need to create more than one device, Simply repeat the aforementioned steps. Howeverunlike your first device which is always free with no limitations, the second, third devices andso on you want to add will first bring you to the following billing page to enter your paymentdetails.

So to best illustrate devices, we shall carry on with the example we started earlier:
The Premier League Store has two stores, one in Belfast in Northern Ireland and one inManchester, England. Both of these stores would use their AirPOS online backoffice to listtheir device requirements and then install their AirPOS POS desktop clients as required in thestores.
The setup process for an organisation like this is as follows:
1. The Premier League Store login to their AirPOS online back office
2. Next they select the Location that the device will be used in (e.g. The Premier LeagueStore, 123 Fake Street, Belfast, Northern Ireland)
3. They then give the Device a name that will help them in identifying it (eg POS Terminal 1,Belfast)
4. Repeat for each Location and Device as required. AirPOS allows an unlimited amount oflocations and devices to be added to accounts for true flexibility in setting up yourorganisation.
When these steps are complete AirPOS creates two unique keys for later use when installingthe AirPOS desktop POS clients in the various locations. These two keys are the Retailer Key(used by AirPOS to identify the account in use) and the Device Key (used by AirPOS to identifythe device the AirPOS desktop POS client is installed on). These keys are used by the AirPOSonline back office, allowing the back office to accurately track stock data and inventorymovement, record sales taken at the Points of Sale, record manual stock movements,employee logins and more.

Next we'll look at the process of installing the AirPOS desktop POS client application(s) for useon the devices we've just setup.
Installing the AirPOS desktop ePOS Application
Installing the AirPOS desktop ePOS client is a simple process. The first step is downloadingthe application. This can be achieved through the following steps.
1. Open your internet browser (AirPOS supports all of the major browsers such as GoogleChrome, Mozilla Firefox. Apple Safari, Opera and Microsoft Internet Explorer.
2. Visit the AirPOS back office at the following URL http://backoffice.airposapp.com
3. Login using your AirPOS username and password (available in your welcome email)
4. Click on the prominent link in the right sidebar of the AirPOS online back office that states'Download Desktop ePOS Application.'
5. Choose where the AirPOS installer will download onto your desktop PC or tablet andchoose Save.
Alternatively the latest build of the AirPOS desktop ePOS client application is available todownload in your back office. Login to your account at http://backoffice.airposapp.com
When the AirPOS desktop ePOS client has downloaded on to your machine, simply double

click the AirPOS icon to begin the installation process.
NOTE: AirPOS requires the Adobe Air runtime to operate successfully on your PC. If theAdobe Air runtime is not available AirPOS will begin a download of the runtime and install atthe same time as the AirPOS desktop ePOS client. If your machine does not allow the AdobeAir runtime to install in this way, your AirPOS back office will feature a prominent link to theAdobe Air Installer. The steps to installing Adobe Air are identical to the steps above forinstalling AirPOS.
Section D: Organising Stock and Inventory
By default when you sign up for an AirPOS account the AirPOS online back office creates alocation called Virtual Warehouse. The intention of this is to have a central location throughwhich to enter product inventory prior to assigning stock levels for products and ultimatelychecking stock out to the various locations in which the products will be sold. The first step inreadying your Virtual Warehouse for import or entering of products is to define the productcatalogs you wish to have in the system... This step is critical in setting up your AirPOSinstallation and will determine how your products are organised both on your Web Store andalso in your Desktop ePOS Application.
An example of a Category structure is below:
Top Level: The Wonderful World of Sports (This is your store name and is hidden from view inthe back office)
If we wanted to enter a series of football kits (soccer to our US friends!) we could build thecategories as follows:
For a catalogue of Arsenal items for example:
Parent Category: Football Shirts
Sub Category: Premier League

Sub Category: Arsenal FC
Sub Category: Home Kit
Sub Category: Away Kit
Sub Category: Tracksuits
Sub Category: Socks
And another Category of Arsenal items:
Parent Category: Football Shirts
Sub Category: Premier League
Sub Category: Arsenal FC
Sub Category: Home Kit
Sub Category: Away Kit
Sub Category: Tracksuits
Sub Category: Socks
Creating Catalogs
The menus used to create product catalogs are available under the Inventory Tab > ManageItem Catalogs in your online backoffice. Creating product catalogs in AirPOS is simple but is acritical task to get right when building your AirPOS installation.
Product catalogs are not only a great way of organising your products for use in the AirPOS

online back office, they are also the first step towards building your AirPOS web store.Therefore some thought should be given to how your products are to be organised prior tobeginning this task.
AirPOS employs an open approach to creating product catalogs in that it is possible to createan unlimited amount of categories and sub categories in your product catalog.
To carry on with the above example, The Wonderful World of Sport are a sports retailer with avaried stock of 2500 product lines. As they are using AirPOS not only to sell in their stores butalso online, care needs to be taken in defining the catalogs as they are entered to ensure thattheir AirPOS online back office and their AirPOS web store are orderly and that the AirPOSweb store is usable for their customers. If we imagine that they have 250 product lines acrosstheir stores and that they wish to sell 100 of these product lines on their AirPOS web store.Across these 250 product lines they have devised 10 categories of products for use on theweb. These are their 'top level' categories and are made up as follows…
Replica Kits, Footballs, Key-rings, Calendars, Posters, Tracksuits, Training Shoes, FootballBoots, Bags and Holdalls and a general category called Merchandise to carry small items.
Within each of these top level categories they need to have a number of sub categories inorder to organise their products on their AirPOS web store and make them easier forcustomers to navigate.
In the Replica Kits category for example they have decided to list each of the Replica Kitsavailable by the football club. This would necessitate a category structure as follows:
Replica Kits
Liverpool FC
Manchester United
Chelsea FC
Tottenham Hotspur
Arsenal
Etc
To achieve this through the AirPOS online back office each of these sub-categories would becreated with their Parent Category as Replica Kits.
This approach can then be replicated in order to build up product catalogues both for theAirPOS desktop POS client and the webstore.
Adding Items

The menus used to create items are available under the inventory tab / Manage Your Items /Create New Item in your online backoffice.
When catalogs have been successfully created the next step is to add individual items to thecreated catalogs. In order to be useful within the AirPOS desktop POS client and the web storea number of parameters are required in items. Some of these parameters will apply to yoursetup and the types of items being sold, while others may not.
The required fields in creating an item are as follows and are denoted in the online backofficewith a *
Item Name: This will appear both in your AirPOS desktop POS client and also on your webstore.

Description: This will appear on your web store as the item description, and should beinformative without being overly lengthy.The better the description of your item, the more likelyyou are to achieve sales on your web store so spending time getting this right is critical.
Retail Price (including TAX): This is the full price at which you intend to sell the item. Forexample if an item costs £100 and UK VAT applies to the item you would enter the item priceat £120 (NOTE: the UK VAT rate at the time of writing was set at 20%)
Cost Price: This is the price at which you purchase the item. Entering the cost price of theitem is important as it informs both the rofit Margin displayed on the AirPOS Desktop POSclient at the point of sale as well as allowing cashiers to make an informed decision whendiscounting at the point of sale, again performed through the AirPOS desktop POS client.
Tax Rate: This is the tax rate that is to be applied to the item (e.g. UK VAT or US Sales Tax).
Web Price: This is the price at which you intend to sell the item online. This price may differfrom your retail price. For example if an item costs £100 in store, you may want to charge£89.99 on your webstore.
Sell on Web Store? This is a simple yes / no answer as to whether the item should bedisplayed for sale on your web store.
Stock Level Warning: This is important for maintaining your stock levels on items whenselling across multiple channels (e.g. on your web store and through your stores.) Theintention of setting a Stock Level Warning on items is two fold; to ensure that you are aware ofwhen items are low in stock and also to give you a mechanism through which to automaticallyremove items from your web store when they reach a defined stock level. This assists inensuring that out of stock items or items low in stock cannot be ordered through the web store,whereby avoiding selling items that are unavailable or likely to be unavailable. This isparticularly useful for vendors selling unique items or items of which they only carry a limitedstock.
Supplier: This function will be used in the future for managing purchase orders and supplychain, it is however only a placeholder in this version of AirPOS.
Weight (kg): Item weights are used to calculate postage. Postage tables are as of yetunavailable but will be available in future versions of AirPOS.
Barcode: Barcodes are central to the successful operation of your AirPOS desktop POS clientalthough it should be noted that they are not essential to use the software. When enteringitems there are two methods for adding barcodes.
1. Using a Barcode Laser Scanner. We recommend the use of a barcode laser scanner forentering barcodes as the automated nature of this assists in minimising errors that may beincurred through manual entry. The method for adding barcodes is simply to click into the

text field beneath the barcode heading and scan the barcode into this field. Note thatAirPOS pops up a warning asking if you wish to submit the item to the inventory. This isdue to the operation of many barcode scanners in that they are set to automatically add areturn to the end of a scanning operation for use in many POS systems. This would be theequivalent of typing a barcode and pressing return / enter, expect it is simply automatedfor speed through the barcode laser scanner. If you are happy to submit the item as addedchoose OK when the warning pops up to continue.
2. Manual Entry. It is also possible to manually enter barcodes into the AirPOS systemalthough great care should be taken when doing so to avoid errors as errors in barcodeswill have an adverse effect on the smooth operation of the AirPOS Desktop POS client.Manually entering a barcode is as simple as typing the barcode into the text field beneaththe barcode heading. Again when you have completed the form and submitted the item tothe inventory, AirPOS will pop up a warning as it assumes you are using a barcodescanner to enter items. Simply click OK to submit the item or cancel to continue, the itemcan be submitted after everything has been added.
SKU: Stock Keeping Units (SKU) are often assigned by the individual retailer in order to trackitems from warehouses or in stores for example. In AirPOS case the system is designed tomanage inventory and this is generally achieved through the use of bar codes. However asvendors may wish to record an SKU for internal use or other purposes the ability to add StockKeeping Units has been retained in the AirPOS system.
Catalog Item: Beneath the Add Item form will be a list of the categories and sub categoriesthat were created in the previous step to assist you in cataloging your new item. To selectcategories in which this item should appear simply tick the check boxes next to the categoryyou wish to add the item to.
Item Images: The final step in adding an item is to choose the images that are to be attachedto this item. This is an essential step if you wish to sell the item online as items without imageswill not appear in your web store. Adding images to an item is performed using the followingmethod:
1. Click on the Select Images button
2. Browse to find the images on your computer
3. Select a single image or multiple images to upload
4. Press OK to begin uploading the images
AirPOS will then begin uploading these images and you will see each image appear as theyare successfully uploaded.

NOTES: if you have uploaded an image in error simply click on the thumbnail of this image toremove it from the system. In addition to this images should be resized prior to uploading ifthey are very large in file size, as uploading very large images will be slow and error prone inAirPOS as it would be in any browser-based system. We also recommend that JPEGs areused as they are best for displaying on the web.
AirPOS automatically creates thumbnails of your images and resizes them to a size suitablefor use on your web store. However we recommend that images are a minimum of 500 pixelswide prior to uploading to ensure they display correctly and are not 'upscaled' by your webstore as this will cause blockiness and blurring of the images. When you have selected theimages for your item, please click Save Item at the bottom of the form to submit this item toyour inventory, and if 'Sell on Web Store' was selected as a yes the item will also be added toyour web store.
Modifying Items
Modify Items can be found under Inventory > Manage Your Items > Modify Item (Beside theItem on the Items List)
Modifying items is very similar to Adding Items in that the same interface and itemrequirements apply. Modifying many aspects of an item is a simple case of replacing theinformation in the text boxes with new information. This method is useful for replacinginformation in the following aspects:
Name
Description
Retail Price
Cost Price

Status on Web Store (i.e. Sell Online Yes or No)
Weight
Barcode
SKU
Modifying Item's Categories
Modifying an Items Catalog is performed by using the tick boxes under the Catalog Itemheading. Simply tick the boxes beside the item's categories in which you want the item toappear on your web store.
Adjusting Stock and Inventory
Updating Stock Levels of Items
The updating stock interface can be found under Inventory > Manage Your Items and selectingAdjust Stock beside the item you wish to modify.
Maintaining stock is central to the successful operation of your AirPOS installation. Successfulmaintenance of your stock levels within AirPOS will minimise many of the time consumingrestocking tasks you will face and remove the need for manual reconciliation of web storesales and in store sales.
When in the Adjust Stock screen for the item under the Add or Remove Stock heading there isa dialogue box that is used to control the stock movement of items. This box is simple on a peritem basis with a field for the number of stock items to add or remove and a box to recordnotes intended to be used for the reason the stock was reduced or replenished. This notes boxis used for audit trail purposes and to ensure that staff moving stock leave a note forsupervisors, avoiding employee fraud and helping to identify human error in stock taking. Thisnotes field can also be used to incidentals such as recording breakages and theft if required.
Prior to moving stock there is a link above the dialogue box that states 'View Current Stock
Levels'. Clicking this link will display the current stock levels of the item across all locations inwhich the item is available.
Adding Stock to an Items Inventory
Adding stock of an item to the Virtual Warehouse is a simple case of adding the number ofstock items to add in the 'Amount of Stock to Add or Remove' dialogue and completing thenotes field for the reason this stock has been added. NOTE: The notes field is also a requiredstep in this process.
Removing or Reducing the Stock of an Item from the Inventory
Removing or reducing the stock on an item is a simple case of entering the amount to removeas a negative value (e.g. -17) and entering a note stating the reason for this stock reduction inthe notes field.
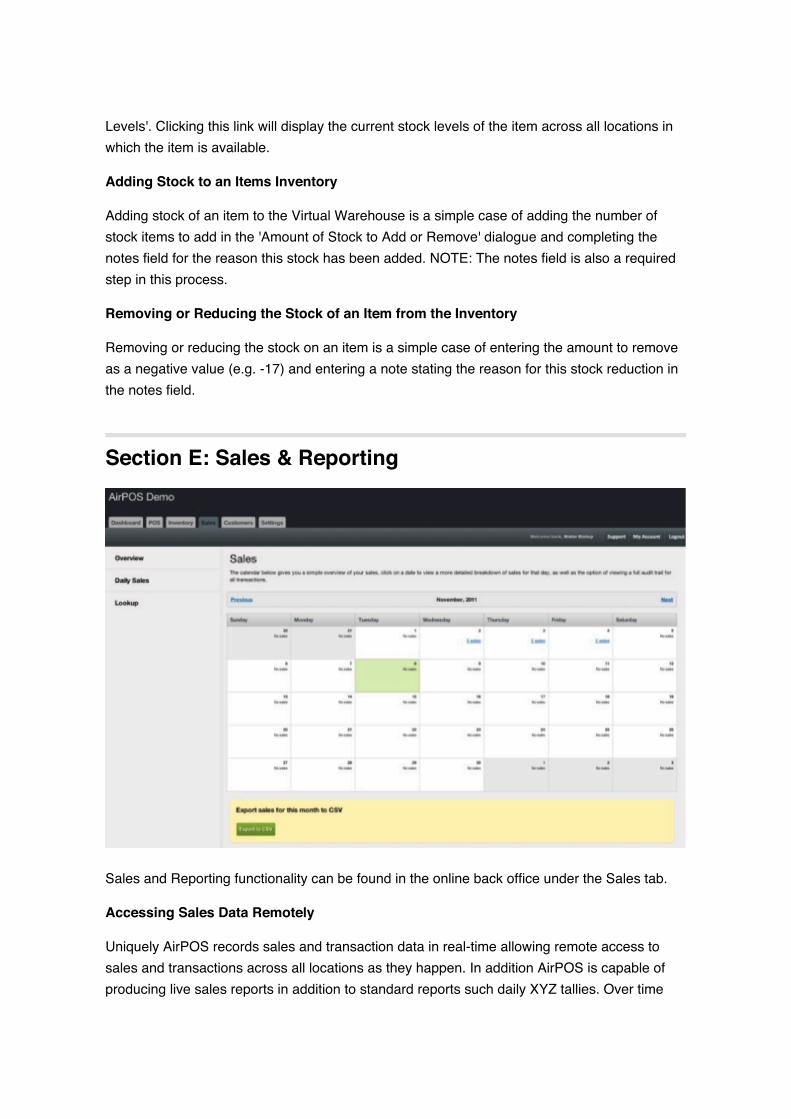
Section E: Sales & Reporting
Sales and Reporting functionality can be found in the online back office under the Sales tab.
Accessing Sales Data Remotely
Uniquely AirPOS records sales and transaction data in real-time allowing remote access tosales and transactions across all locations as they happen. In addition AirPOS is capable ofproducing live sales reports in addition to standard reports such daily XYZ tallies. Over time

the AirPOS software will feature granular sales reporting on a location-based, employee-based, brand-based or product-based basis.
Sales Overview
The default view for Sales data features a simple tally of that day's sales, transaction totals andweb orders on a per location basis.
Viewing Daily Sales**
Daily sales data and historical daily sales data are accessible via the 'View Detailed DailySales' link beneath the sales overview on the Sales page.
NOTE: Real-time sales reporting is only enabled if an internet connection is maintained at thePoint of Sale terminals operating the AirPOS desktop POS client. If the AirPOS desktop ePOSclient is in offline mode sales will only be reconciled to the back office when an internetconnection is re-established. However that days sales will remain available inside the AirPOSdesktop ePOS client.
Exporting Daily Sales
A simple export facility is available for exporting daily sales totals and sales by line items fromAirPOS for use in your accountancy package such as Quickbooks, Xero or others. To exportdaily sales simply navigate to the month you with to export your sales for using the calendarview and forward next buttons and then select the Export to CSV button beneath the calendarview to download your sales as a CSV (comma separated variable) file useful in spreadsheetpackages such as Excel.
Detailed Sales and Reporting

Daily Sales are available in a calendar view under the Sales tab and then via the 'ViewDetailed Daily Sales' link beneath the sales overview on the Sales page.
Daily sales are reported in a calendar view offering simple access to both current and historicalsales data.
It is also possible to filter sales data by both the location the sales were recorded in and alsothe AirPOS desktop POS client that processed the sales. This is useful for recording andmonitoring sales across locations and also for comparison of performance among outlets.
Granular sales reporting will be made available in future versions of AirPOS including filteringby employee, filtering by product, timebased sales filtering (e.g. day time vs night time sales)and more. Sales reports will also be made available via a report builder.
Section F: WebstoreThe AirPOS webstores can be used as a stand-alone ecommerce store, or in conjunction withour cloud based POS software resulting in no third party integration and above all else, aplatform that provides the scalability, flexibility and features for business growth offering youtotal visibility and control over your online and offline channels. AirPOS merges all of yoursales channels into one, and stores all the vital information in one place allowing real-timevisibility across your inventory, sales data, financial data and customer information, from bothin-store and web sales. Customers who want an ecommerce webstore will pay £50 permonth.

Enable Webstore
To enable your webstore, the first thing you must do is enter your PayPal settings. This verysimple payment integration will allow your customers to pay for web orders using PayPal.
(NOTE: Section… will take you through how to set up your PayPal business account and alsohow to access the details you require to enable your webstore.)
Shipping Zones and Rates
Under the Webstore tab in the ‘Shipping Zone’ section, you can manage your Shipping ratesand zones. Setting these up mean that when people place orders online, they will be chargeddelivery and shipping costs based on the zones and rates you have set.
We advise that you contact the courier service you plan to use when dispatching items to getan idea of shipping.
Webstore Pages

In the ‘Webstore Pages’ section under the Webstore tab, you can create and manage custompages on your webstore. Here you can add pages like Terms and Conditions, Shipping andReturns, FAQ's etc as can be seen below;
The custom webstore theme also automatically generates links to these pages for you.
Custom Domain
At the minute the only way to use a custom domain is to contact us to begin using your owndomain name with your AirPOS Webstore.
Webstore Orders
The ‘Webstore Orders’ section under the Webstore tab will give you an overview of yourpending web orders that are still to be completed and dispatched.
Section G: Setting up a PayPal Business AccountIn order to enable your AirPOS web store you need to have PayPal operable as a paymentprocessor in order to accept customer payments.
Signing up for a PayPal account can be performed via http://www.paypal.com orhttp://www.paypal.co.uk (regional variations may apply). Note that a PayPal business accountis required to use your AirPOS web store. To sign up for a PayPal business account (if you donot already have one) please visit:

In the UK: http://www.paypal.co.uk
In the USA: http://www.paypal.com
Using your PayPal API credentials with AirPOS
Your AirPOS web store requires you to enter your PayPal API credentials in order toseamlessly process payments for your customers’ orders through PayPal. This may sound likea very technical thing to do, but in actuality it’s a relatively simple process.
Step 1: Log in to your PayPal Business account. You should see the screen that follows.
Step 2: On the horizontal navigation click on the Profile tab at the far right of the menu bar.

Step 3: On the page that follows, click on the link Request API Credentials which can be foundunder the Account Information heading
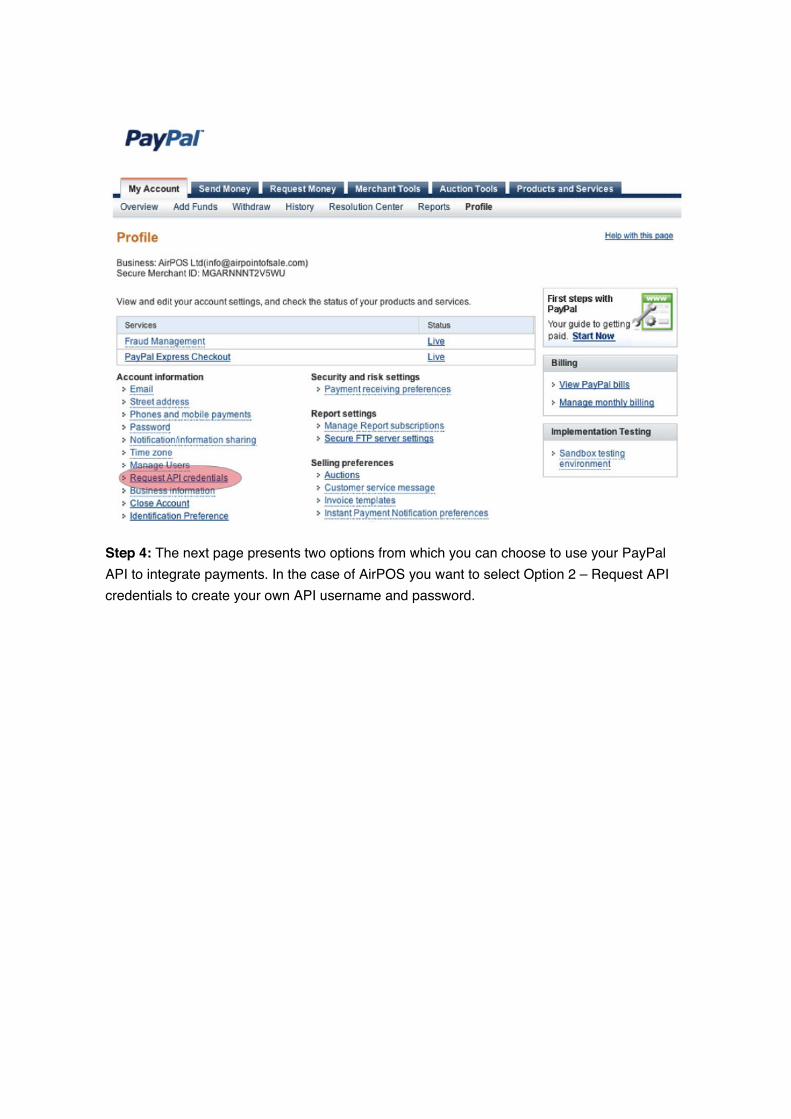
Step 4: The next page presents two options from which you can choose to use your PayPalAPI to integrate payments. In the case of AirPOS you want to select Option 2 – Request APIcredentials to create your own API username and password.

Step 5: On the page that follows you will see your PayPal API credentials. The Importantinformation for AirPOS is your API Username, your API Password and your Signature. Thesedetails are what are required to link your AirPOS account to PayPal and enable you to acceptpayments through your AirPOS webstore.
We recommend if possible copying and pasting these details into your AirPOS back office asthe Signature in particular is long and complex to type.
Step 6: To enter your API details into AirPOS system visit http://backoffice.airposapp.com andlogin using your username and password.
Following this on the horizontal navigation click on the Webstore tab and on the page thatfollows select PayPal Settings from the vertical navigation on the left hand side of the page.
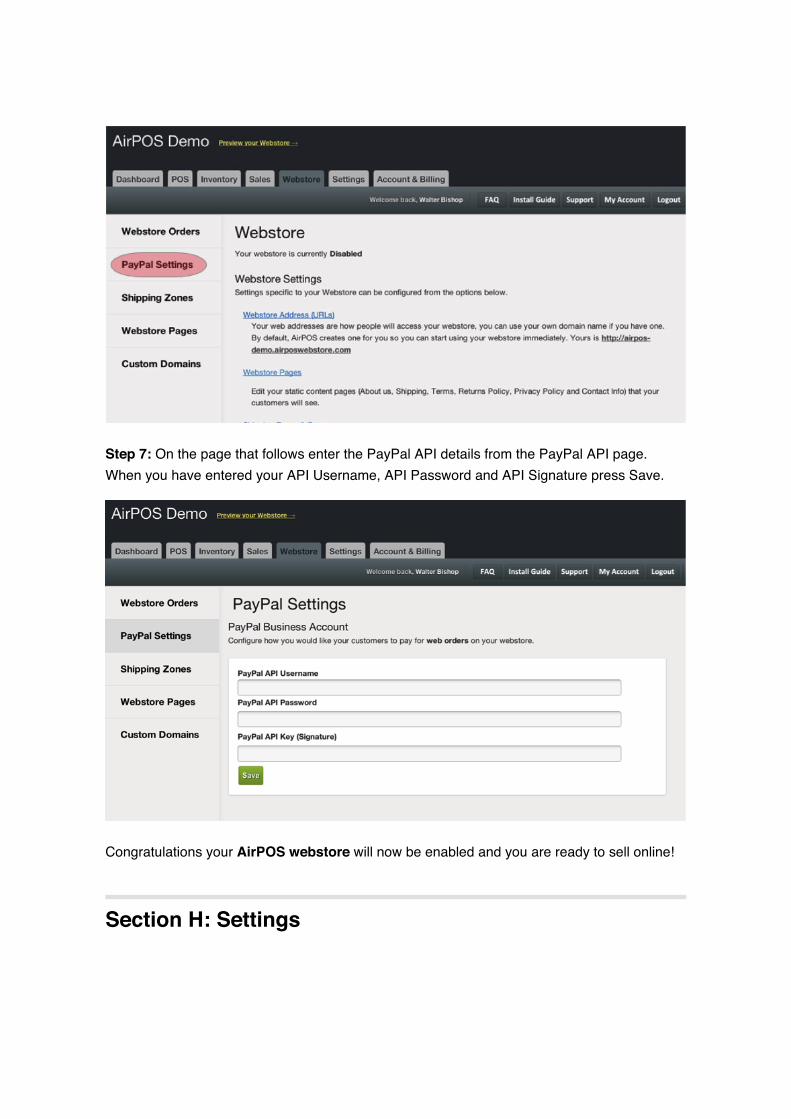
Step 7: On the page that follows enter the PayPal API details from the PayPal API page.When you have entered your API Username, API Password and API Signature press Save.
Congratulations your AirPOS webstore will now be enabled and you are ready to sell online!
Section H: Settings
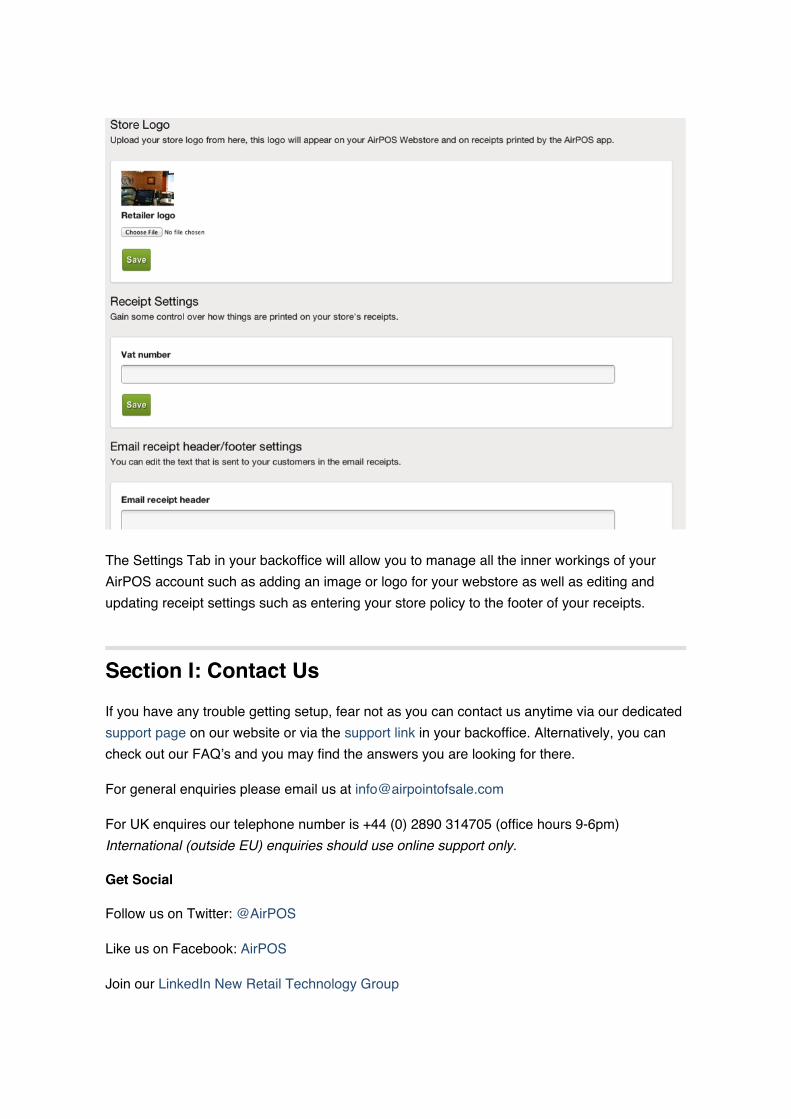
The Settings Tab in your backoffice will allow you to manage all the inner workings of yourAirPOS account such as adding an image or logo for your webstore as well as editing andupdating receipt settings such as entering your store policy to the footer of your receipts.
Section I: Contact UsIf you have any trouble getting setup, fear not as you can contact us anytime via our dedicatedsupport page on our website or via the support link in your backoffice. Alternatively, you cancheck out our FAQ’s and you may find the answers you are looking for there.
For general enquiries please email us at [email protected]
For UK enquires our telephone number is +44 (0) 2890 314705 (office hours 9-6pm)International (outside EU) enquiries should use online support only.
Get Social
Follow us on Twitter: @AirPOS
Like us on Facebook: AirPOS
Join our LinkedIn New Retail Technology Group