Agile Product Lifecycle Management for Process User Group … · v Preface The Agile Product...
50
Oracle® Agile Product Lifecycle Management for Process User Group Management User Guide Release 6.2.2 E79134-01 May 2017
Transcript of Agile Product Lifecycle Management for Process User Group … · v Preface The Agile Product...

Oracle® Agile Product Lifecycle Management for ProcessUser Group Management User Guide
Release 6.2.2
E79134-01
May 2017
Agile Product Lifecycle Management for Process User Group Management User Guide, Release 6.2.2
E79134-01
Copyright © 2017, Oracle and/or its affiliates. All rights reserved.
This software and related documentation are provided under a license agreement containing restrictions on use and disclosure and are protected by intellectual property laws. Except as expressly permitted in your license agreement or allowed by law, you may not use, copy, reproduce, translate, broadcast, modify, license, transmit, distribute, exhibit, perform, publish, or display any part, in any form, or by any means. Reverse engineering, disassembly, or decompilation of this software, unless required by law for interoperability, is prohibited.
The information contained herein is subject to change without notice and is not warranted to be error-free. If you find any errors, please report them to us in writing.
If this is software or related documentation that is delivered to the U.S. Government or anyone licensing it on behalf of the U.S. Government, the following notice is applicable:
U.S. GOVERNMENT END USERS: Oracle programs, including any operating system, integrated software, any programs installed on the hardware, and/or documentation, delivered to U.S. Government end users are "commercial computer software" pursuant to the applicable Federal Acquisition Regulation and agency-specific supplemental regulations. As such, use, duplication, disclosure, modification, and adaptation of the programs, including any operating system, integrated software, any programs installed on the hardware, and/or documentation, shall be subject to license terms and license restrictions applicable to the programs. No other rights are granted to the U.S. Government.
This software or hardware is developed for general use in a variety of information management applications. It is not developed or intended for use in any inherently dangerous applications, including applications that may create a risk of personal injury. If you use this software or hardware in dangerous applications, then you shall be responsible to take all appropriate fail-safe, backup, redundancy, and other measures to ensure its safe use. Oracle Corporation and its affiliates disclaim any liability for any damages caused by use of this software or hardware in dangerous applications.
Oracle and Java are registered trademarks of Oracle and/or its affiliates. Other names may be trademarks of their respective owners.
Intel and Intel Xeon are trademarks or registered trademarks of Intel Corporation. All SPARC trademarks are used under license and are trademarks or registered trademarks of SPARC International, Inc. AMD, Opteron, the AMD logo, and the AMD Opteron logo are trademarks or registered trademarks of Advanced Micro Devices. UNIX is a registered trademark of The Open Group.
This software or hardware and documentation may provide access to or information on content, products, and services from third parties. Oracle Corporation and its affiliates are not responsible for and expressly disclaim all warranties of any kind with respect to third-party content, products, and services. Oracle Corporation and its affiliates will not be responsible for any loss, costs, or damages incurred due to your access to or use of third-party content, products, or services.
iii
Contents
Preface ................................................................................................................................................................. v
Audience....................................................................................................................................................... vVariability of Installations.......................................................................................................................... vDocumentation Accessibility ..................................................................................................................... vSoftware Availability .................................................................................................................................. viRelated Documents ..................................................................................................................................... viConventions ................................................................................................................................................ vii
1 Introducing User Group Management
UGM Administration Overview ........................................................................................................... 1-1
2 Using UGM to Manage Users
Accessing UGM and Using Roles ......................................................................................................... 2-1Associated Roles................................................................................................................................. 2-2
Managing Action Items ........................................................................................................................... 2-2Searching for Users .................................................................................................................................. 2-2Creating a Change Request .................................................................................................................... 2-3
Creating a User ................................................................................................................................... 2-3General Tab.................................................................................................................................. 2-4
Logins Section ...................................................................................................................... 2-4eSignature Passphrase Section........................................................................................... 2-4Contact Information Section .............................................................................................. 2-5Visibility and Security Section ........................................................................................... 2-5User Available Languages Section.................................................................................... 2-6User Preferences Section..................................................................................................... 2-7
Access Tab.................................................................................................................................... 2-9Site Access Section ............................................................................................................... 2-9Group Membership Section ............................................................................................ 2-10Resolved Roles Section..................................................................................................... 2-10DRL Catalogs Section....................................................................................................... 2-11Supplier Portal: Associated Countries Section ............................................................. 2-11Access Privileges Section ................................................................................................. 2-11UGM Admin Privileges Section ..................................................................................... 2-12
Approval/Audit Tab............................................................................................................... 2-13Status Section..................................................................................................................... 2-13

iv
Event History Section....................................................................................................... 2-13Editing Users.................................................................................................................................... 2-13Copying a User Profile ................................................................................................................... 2-14
Using User Approval Workflows....................................................................................................... 2-14Approving a Request...................................................................................................................... 2-15
Exporting and Importing User Data .................................................................................................. 2-15Exporting Users from Your Staging Environment..................................................................... 2-15Importing Users into Your Production Environment................................................................ 2-16
3 Using UGM to Manage Groups
Accessing UGM and Using Roles ......................................................................................................... 3-1Associated Roles................................................................................................................................. 3-2
Managing Action Items........................................................................................................................... 3-2Searching for Groups............................................................................................................................... 3-2Creating a Change Request .................................................................................................................... 3-2
Creating Groups ................................................................................................................................. 3-2General Tab.................................................................................................................................. 3-4
Summary Section ................................................................................................................. 3-4Related Groups Section....................................................................................................... 3-4
Access Tab.................................................................................................................................... 3-5Assigned Users Section....................................................................................................... 3-5Supplier Users Section ........................................................................................................ 3-6Roles Section......................................................................................................................... 3-6Workflow Visibility Tags Section ...................................................................................... 3-6Access Privileges Section .................................................................................................... 3-6
Approval/Audit Tab.................................................................................................................. 3-8Status Section........................................................................................................................ 3-8Event History Section.......................................................................................................... 3-8
Editing Existing Groups.................................................................................................................... 3-8Using Group Approval Workflows ...................................................................................................... 3-9
Approving a Request......................................................................................................................... 3-9Exporting and Importing Group Data............................................................................................... 3-11
Exporting Groups from Your Staging Environment ................................................................. 3-11Importing Groups into Your Production Environment ............................................................ 3-11
4 Reference Cache
UGM Cache ............................................................................................................................................... 4-1
A System-Based Roles
Roles........................................................................................................................................................... A-1
v
Preface
The Agile Product Lifecycle Management for Process User Group Management User Guide contains instructions for administering the User Group Management (UGM) application of Agile Product Lifecycle Management (PLM) for Process.
This preface contains these topics:
■ Audience
■ Variability of Installations
■ Documentation Accessibility
■ Software Availability
■ Related Documents
■ Conventions
AudienceThis user guide is intended for Agile PLM for Process administrators, including user administrators and group administrators.
Variability of InstallationsDescriptions and illustrations of the Agile PLM for Process user interface included in this manual may not match your installation. The user interface of Agile PLM for Process applications and the features included can vary greatly depending on such variables as:
■ Which applications your organization has purchased and installed
■ Configuration settings that may turn features off or on
■ Customization specific to your organization
■ Security settings as they apply to the system and your user account
Documentation AccessibilityFor information about Oracle's commitment to accessibility, visit the Oracle Accessibility Program website at http://www.oracle.com/pls/topic/lookup?ctx=acc&id=docacc.
vi
Access to Oracle SupportOracle customers have access to electronic support through My Oracle Support. For information, visit http://www.oracle.com/pls/topic/lookup?ctx=acc&id=info or visit http://www.oracle.com/pls/topic/lookup?ctx=acc&id=trs if you are hearing impaired.
Software AvailabilityOracle Software Delivery Cloud (OSDC) provides the latest copy of the core software. Note the core software does not include all patches and hot fixes. Access OSDC at:
http://edelivery.oracle.com.
Related DocumentsFor more information, see the following documents in the Agile PLM for Process documentation set:
■ Agile Product Lifecycle Management for Process Administrator User Guide
■ Agile Product Lifecycle Management for Process User Group Management User Guide
■ Agile Product Lifecycle Management for Process Workflow Administration User Guide
■ Agile Product Lifecycle Management for Process Global Specification Management User Guide
■ Agile Product Lifecycle Management for Process Supply Chain Relationship Management User Guide
■ Agile Product Lifecycle Management for Process eQuestionnaire User Guide
■ Agile Product Lifecycle Management for Process Document Reference Library User Guide
■ Agile Product Lifecycle Management for Process Content Synchronization and Syndication User Guide
■ Agile Product Lifecycle Management for Process Supplier Portal User Guide
■ Agile Product Lifecycle Management for Process New Product Development User Guide
■ Agile Product Lifecycle Management for Process Product Quality Management User Guide
■ Agile Product Lifecycle Management for Process Extensibility Guide
■ Agile Product Lifecycle Management for Process Security Configuration Guide
■ Agile Product Lifecycle Management for Process Release Notes. Up-to-date Release Notes and other documentation are posted on Oracle Technology Network (OTN) at this location: http://www.oracle.com/technetwork/documentation/agile-085940.html#plmprocess

vii
ConventionsThe following text conventions are used in this document:
Convention Meaning
boldface Boldface type indicates graphical user interface elements associated with an action, or terms defined in text or the glossary.
italic Italic type indicates book titles, emphasis, or placeholder variables for which you supply particular values.
monospace Monospace type indicates commands within a paragraph, URLs, code in examples, text that appears on the screen, or text that you enter.

viii
1
Introducing User Group Management 1-1
1Introducing User Group Management
This chapter introduces the key responsibilities of an Agile Product Lifecycle Management for Process administrator using the User Group Management (UGM) application. This chapter includes the following topic:
■ UGM Administration Overview
UGM Administration OverviewAs an Agile PLM for Process UGM administrator, you can perform the following duties:
Group management—Involves use of the User Group Management (UGM) application in Agile PLM for Process. In managing groups, you create new groups, edit existing groups, and assign roles and privileges to groups. Groups are simply a collection of users having the same functional purpose. Groups can be created according to business unit, geographical area, and so on. For details, see Chapter 3, "Using UGM to Manage Groups".
User management—Involves use of the User Group Management (UGM) application in Agile PLM for Process. In managing users, you create new users, edit existing users, and assign users to groups. For details, see Chapter 2, "Using UGM to Manage Users".
Cache management—Involves use of the Manage Data Caches (CACHE) application to manage data caches. In managing caches, you schedule cache flushes for various cache groups. For details, see Chapter 4, "Reference Cache".
Role management—Manage system based roles for Agile PLM for Process. For details, see Appendix A, "System-Based Roles".
For general information on using Agile PLM for Process software, see the Agile Product Lifecycle Management for Process Getting Started Guide.
UGM Administration Overview
1-2 Agile Product Lifecycle Management for Process User Group Management User Guide
2
Using UGM to Manage Users 2-1
2Using UGM to Manage Users
This chapter explains how to manage user data within Agile Product Lifecycle Management for Process. Topics in this chapter include:
■ Accessing UGM and Using Roles
■ Managing Action Items
■ Searching for Users
■ Creating a Change Request
■ Using User Approval Workflows
■ Exporting and Importing User Data
Accessing UGM and Using RolesThe User Group Management (UGM) application allows you to create, modify, search for, import, and export users and groups. This chapter discusses the user-related features of the UGM application.
Note: Perform user creation and modification tasks in a staging environment. Once you have set up your users, you can export them to a production environment.
When you log in to Agile PLM for Process, you access the UGM application by clicking UGM in the left navigation panel. A new left navigation panel is displayed with the following user management options, most of which are discussed in detail in this chapter:
■ Action Items
■ Users
■ Groups (see Chapter 3, "Using UGM to Manage Groups")
■ Import
■ Export
Managing Action Items
2-2 Agile Product Lifecycle Management for Process User Group Management User Guide
Associated RolesThree user roles are associated with UGM users:
[UGM_GLOBAL_ADMIN]—Can see and use the Create User and Create User Group buttons
[UGM_GROUP_ADMIN]—Can see and use the Create User Group button and initiate user change requests.
[UGM_USER_APPROVER]—Can approve user change requests.
Managing Action ItemsWhen you click Action Items, UGM displays the Action Items table. This table lists your pending administrative tasks.
The Action Items table contains a list of user and group profiles that you have created/edited or that are awaiting your final approval. The table contains the following fields:
■ Type—Specifies if this is a user- or group-related action.
■ Name—The user’s login name or the full name of the group.
■ First Name—The user’s first name.
■ Last Name—The user’s last name.
■ Country—The user’s country.
■ Created—The date and time when the create or change request was made.
■ Action—Specifies if this is a create or edit action.
■ Status—The status of the action. For example, “Review” indicates this request is awaiting approval.
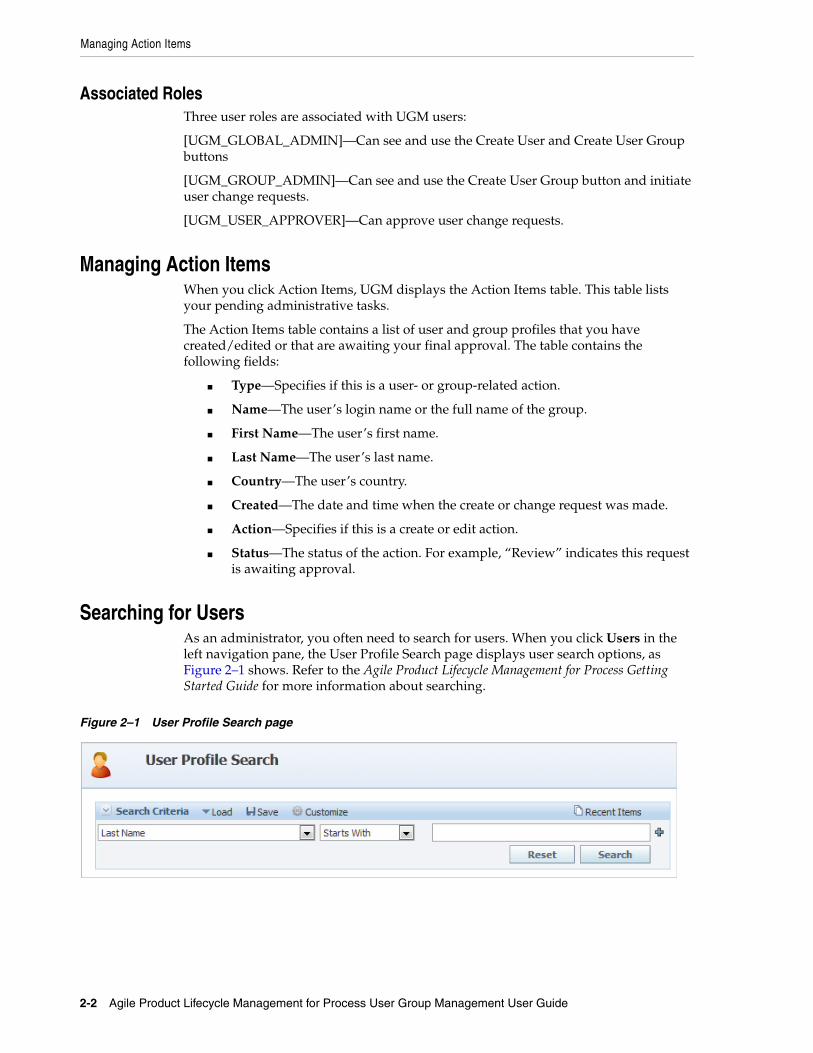
Searching for UsersAs an administrator, you often need to search for users. When you click Users in the left navigation pane, the User Profile Search page displays user search options, as Figure 2–1 shows. Refer to the Agile Product Lifecycle Management for Process Getting Started Guide for more information about searching.
Figure 2–1 User Profile Search page
Creating a Change Request
Using UGM to Manage Users 2-3
Creating a Change RequestTo create a new user or make changes to an existing user, you must initiate a change request and advance it in the workflow.
Creating a UserTo create a new user:
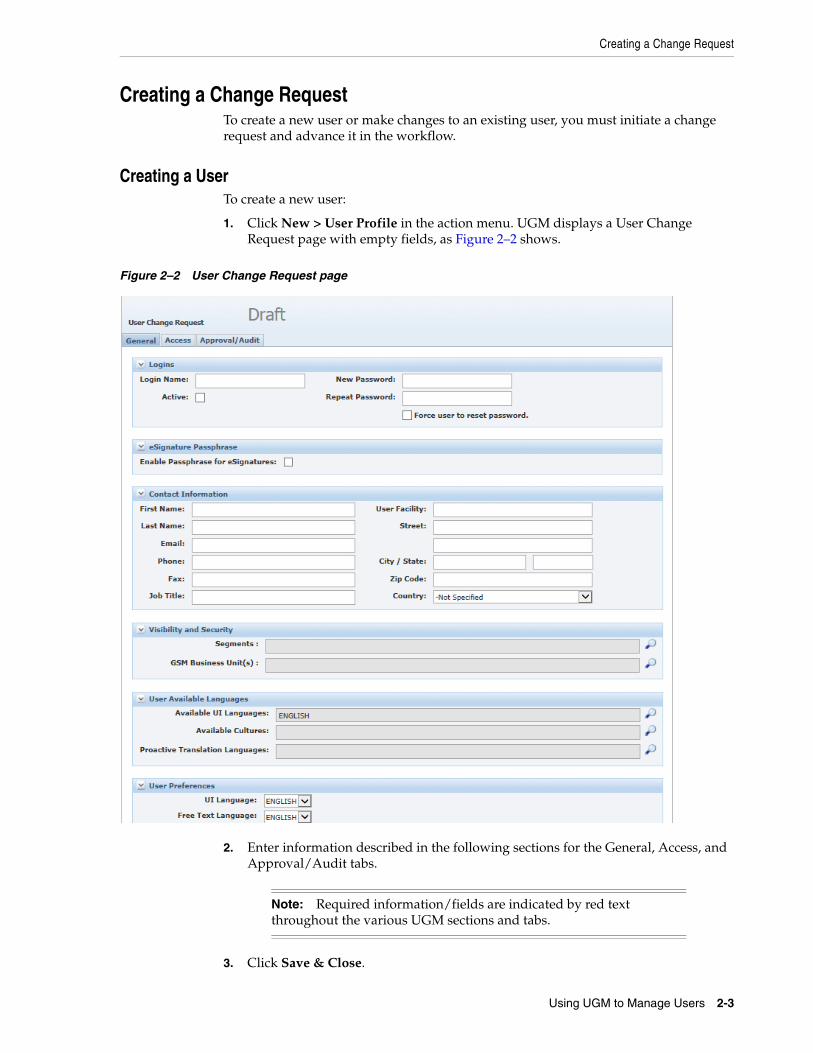
1. Click New > User Profile in the action menu. UGM displays a User Change Request page with empty fields, as Figure 2–2 shows.
Figure 2–2 User Change Request page
2. Enter information described in the following sections for the General, Access, and Approval/Audit tabs.
Note: Required information/fields are indicated by red text throughout the various UGM sections and tabs.
3. Click Save & Close.

Note: Upon saving, UGM places the request in draft mode. You can continue to edit it until the change request is canceled or submitted for review.
Creating a Change Request
2-4 Agile Product Lifecycle Management for Process User Group Management User Guide
4. Click Workflow to move the change request to the next step/action.
5. In the Workflow dialog box, under Next Action, click the drop-down list and make your selection as follows:
■ Review—Submits the change request to the selected approver group for review and notifies the approver(s) by email. The email includes the comments that you entered in the workflow dialog box.
■ Canceled—Terminates the change request.
6. In the Approver Group drop-down list, select the group of users who must review your change request. The drop-down list contains all groups with the [UGM_USER_APPROVER] role.
7. Click the move step forward icon to move the request to the next step.
8. Once an approver reviews your request, UGM notifies you of the status of your request by email.
General Tab
Logins Section
Enter the following user information in the Logins section of the General tab, as shown in Figure 2–3.
Figure 2–3 Logins section
■ Login Name—Enter a login name for the user to access Agile PLM for Process. This is a required field.
■ Active—Specify if the user is an active user.
■ New Password—Enter a new password for the user to access Agile PLM for Process.
■ Repeat Password—Re-enter the user password for verification purposes.
■ Force user to reset password—Forces a user to change password upon next login.
eSignature Passphrase Section
Specification, sourcing approval, and signature document workflows can be configured to require re-authentication from a user before the user can transition the object to a specific status. (See the “eSignature” section in the Agile Product Lifecycle

Creating a Change Request
Using UGM to Manage Users 2-5
Management for Process Workflow Administration User Guide for more information.) Use the eSignature Passphrase section to allow the user to enter a passphrase when transitioning a GSM specification, SCRM sourcing approval, or PQM object to a certain status, or when transitioning a signature document to a Go or No Go status. Figure 2–4 shows this section. If a passphrase is not enabled for a user, the user is not allowed to re-authenticate when workflowing an object.
Users manage their passphrase in Profiles and Preferences. For more information, refer to the Profiles and Preferences section in the Agile Product Lifecycle Management for Process Getting Started Guide.
Figure 2–4 eSignature Passphrase section
■ Enable Passphrase for Signatures—When checked, the user is allowed to re-authenticate when workflowing an object and the passphrase option displays in the user’s Profiles and Preferences.
■ Clear current passphrase—This field is displayed when the Enable Passphrase for Signatures field is checked. When checked, the user’s passphrase is cleared and the user is prompted to reset it when opening Profile and Preferences or when asked to re-authenticate while workflowing an object. This is typically used when a user forgets the passphrase he or she set up.
Contact Information Section
Enter general user information in the Contact Information section of the General tab. First Name, Last Name, and Email are required fields. The User Facility field is only available if your installation includes the SCRM application. Figure 2–5 shows the Contact Information section.
Figure 2–5 Contact Information section
Visibility and Security Section
Depending on your configuration choices, users may be required to be associated with GSM Business Units, SCRM Business Units and/or Segments. The selection here affects which objects the user is allowed to see. More information around security
Creating a Change Request
2-6 Agile Product Lifecycle Management for Process User Group Management User Guide
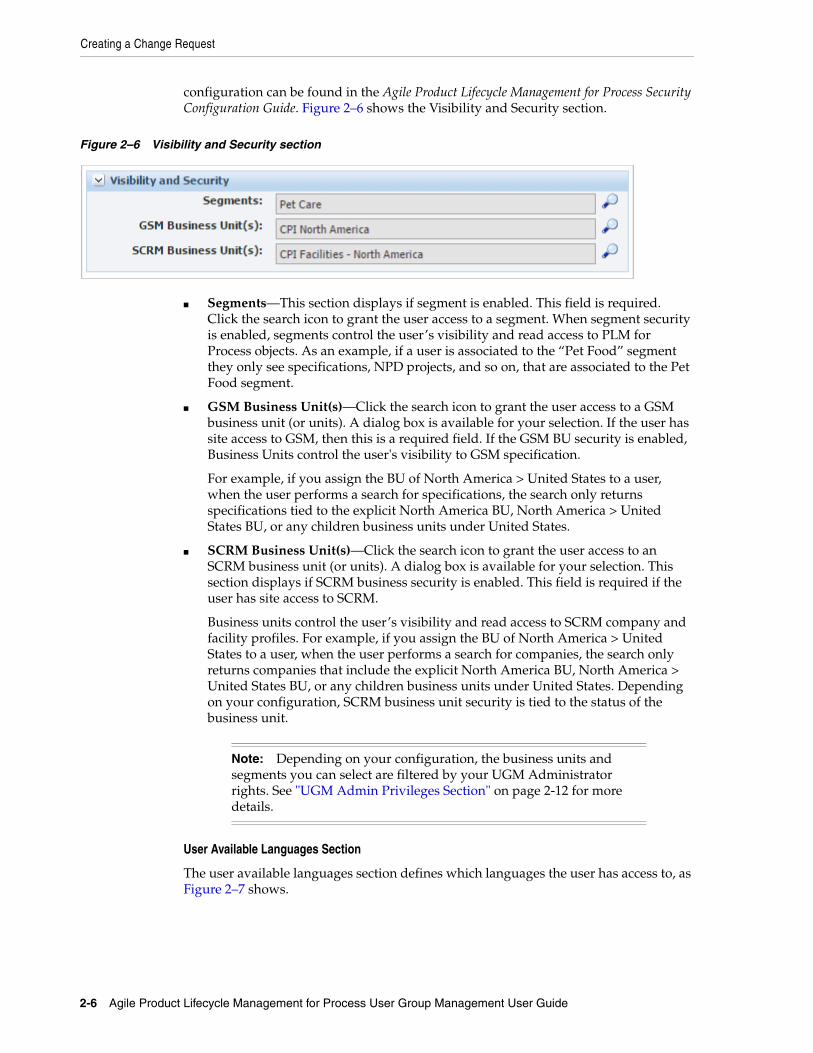
configuration can be found in the Agile Product Lifecycle Management for Process Security Configuration Guide. Figure 2–6 shows the Visibility and Security section.
Figure 2–6 Visibility and Security section
■ Segments—This section displays if segment is enabled. This field is required. Click the search icon to grant the user access to a segment. When segment security is enabled, segments control the user’s visibility and read access to PLM for Process objects. As an example, if a user is associated to the “Pet Food” segment they only see specifications, NPD projects, and so on, that are associated to the Pet Food segment.
■ GSM Business Unit(s)—Click the search icon to grant the user access to a GSM business unit (or units). A dialog box is available for your selection. If the user has site access to GSM, then this is a required field. If the GSM BU security is enabled, Business Units control the user's visibility to GSM specification.
For example, if you assign the BU of North America > United States to a user, when the user performs a search for specifications, the search only returns specifications tied to the explicit North America BU, North America > United States BU, or any children business units under United States.
■ SCRM Business Unit(s)—Click the search icon to grant the user access to an SCRM business unit (or units). A dialog box is available for your selection. This section displays if SCRM business security is enabled. This field is required if the user has site access to SCRM.
Business units control the user’s visibility and read access to SCRM company and facility profiles. For example, if you assign the BU of North America > United States to a user, when the user performs a search for companies, the search only returns companies that include the explicit North America BU, North America > United States BU, or any children business units under United States. Depending on your configuration, SCRM business unit security is tied to the status of the business unit.
Note: Depending on your configuration, the business units and segments you can select are filtered by your UGM Administrator rights. See "UGM Admin Privileges Section" on page 2-12 for more details.
User Available Languages Section
The user available languages section defines which languages the user has access to, as Figure 2–7 shows.
Creating a Change Request
Using UGM to Manage Users 2-7
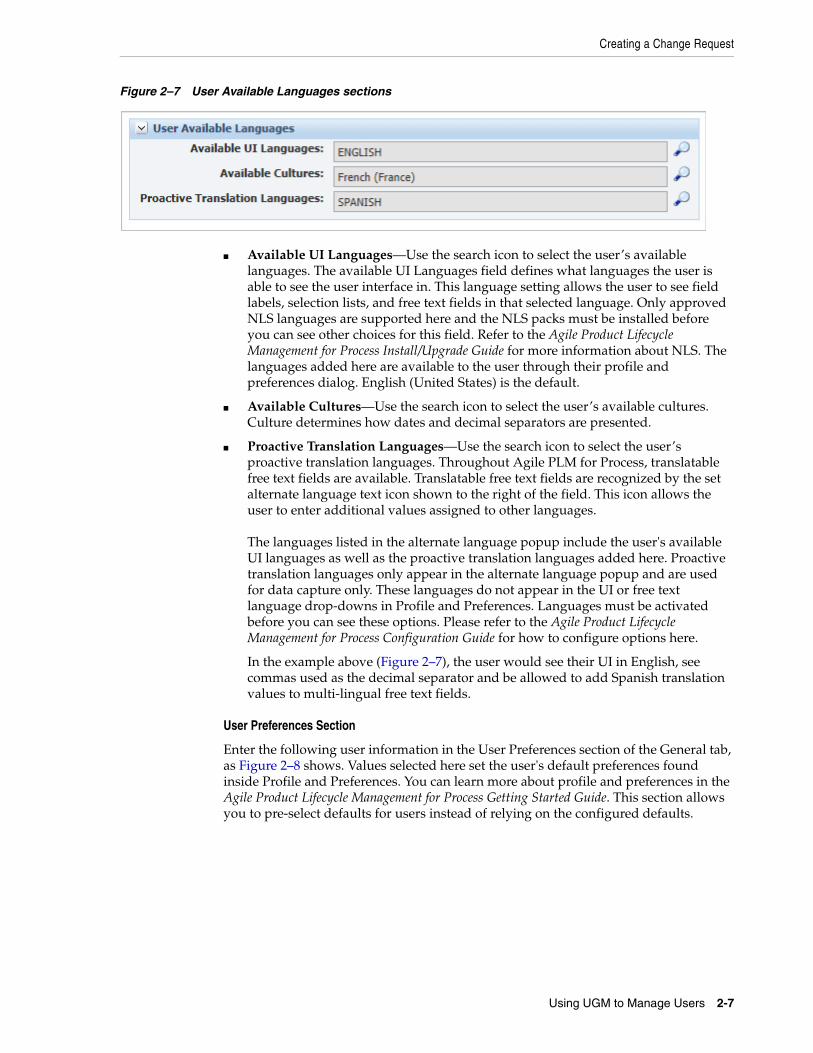
Figure 2–7 User Available Languages sections
■ Available UI Languages—Use the search icon to select the user’s available languages. The available UI Languages field defines what languages the user is able to see the user interface in. This language setting allows the user to see field labels, selection lists, and free text fields in that selected language. Only approved NLS languages are supported here and the NLS packs must be installed before you can see other choices for this field. Refer to the Agile Product Lifecycle Management for Process Install/Upgrade Guide for more information about NLS. The languages added here are available to the user through their profile and preferences dialog. English (United States) is the default.
■ Available Cultures—Use the search icon to select the user’s available cultures. Culture determines how dates and decimal separators are presented.
■ Proactive Translation Languages—Use the search icon to select the user’s proactive translation languages. Throughout Agile PLM for Process, translatable free text fields are available. Translatable free text fields are recognized by the set alternate language text icon shown to the right of the field. This icon allows the user to enter additional values assigned to other languages. The languages listed in the alternate language popup include the user's available UI languages as well as the proactive translation languages added here. Proactive translation languages only appear in the alternate language popup and are used for data capture only. These languages do not appear in the UI or free text language drop-downs in Profile and Preferences. Languages must be activated before you can see these options. Please refer to the Agile Product Lifecycle Management for Process Configuration Guide for how to configure options here.
In the example above (Figure 2–7), the user would see their UI in English, see commas used as the decimal separator and be allowed to add Spanish translation values to multi-lingual free text fields.
User Preferences Section
Enter the following user information in the User Preferences section of the General tab, as Figure 2–8 shows. Values selected here set the user's default preferences found inside Profile and Preferences. You can learn more about profile and preferences in the Agile Product Lifecycle Management for Process Getting Started Guide. This section allows you to pre-select defaults for users instead of relying on the configured defaults.
Creating a Change Request
2-8 Agile Product Lifecycle Management for Process User Group Management User Guide
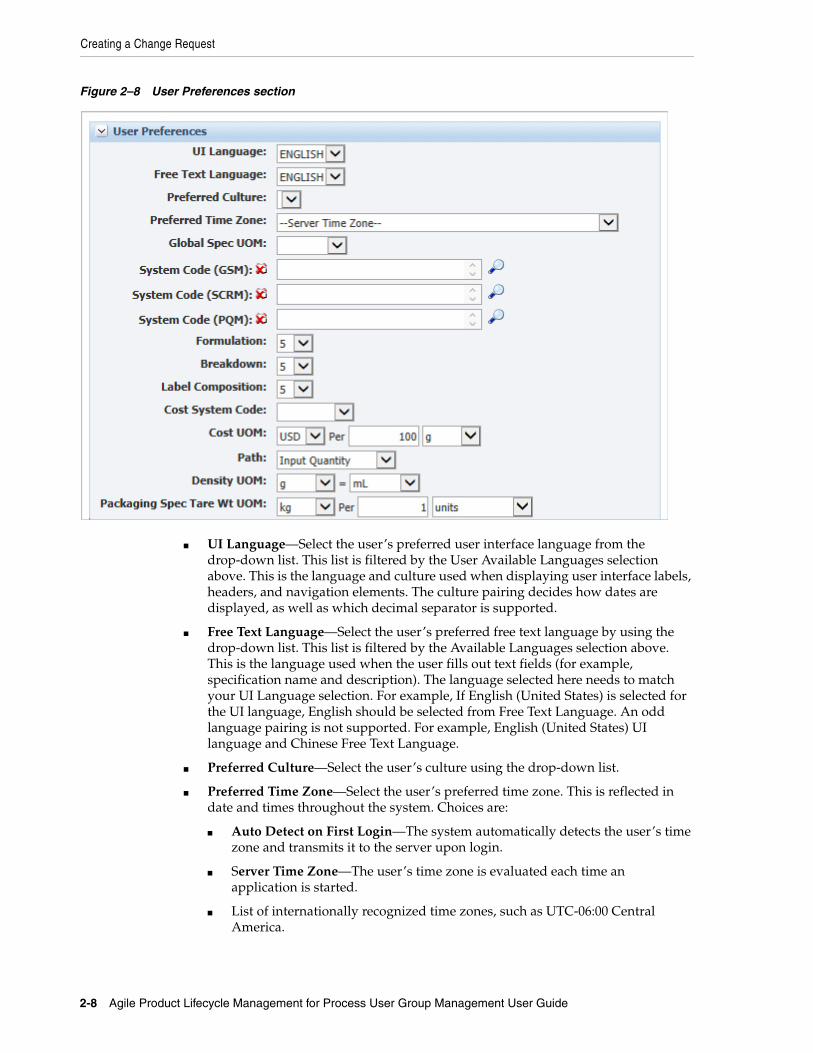
Figure 2–8 User Preferences section
■ UI Language—Select the user’s preferred user interface language from the drop-down list. This list is filtered by the User Available Languages selection above. This is the language and culture used when displaying user interface labels, headers, and navigation elements. The culture pairing decides how dates are displayed, as well as which decimal separator is supported.
■ Free Text Language—Select the user’s preferred free text language by using the drop-down list. This list is filtered by the Available Languages selection above. This is the language used when the user fills out text fields (for example, specification name and description). The language selected here needs to match your UI Language selection. For example, If English (United States) is selected for the UI language, English should be selected from Free Text Language. An odd language pairing is not supported. For example, English (United States) UI language and Chinese Free Text Language.
■ Preferred Culture—Select the user’s culture using the drop-down list.
■ Preferred Time Zone—Select the user’s preferred time zone. This is reflected in date and times throughout the system. Choices are:
■ Auto Detect on First Login—The system automatically detects the user’s time zone and transmits it to the server upon login.
■ Server Time Zone—The user’s time zone is evaluated each time an application is started.
■ List of internationally recognized time zones, such as UTC-06:00 Central America.
Creating a Change Request
Using UGM to Manage Users 2-9
■ Global Spec UOM—This sets the user’s default UOM (unit of measure), which is used in selected areas of Agile PLM for Process applications.
■ System Code (APP)—Selections made in the System Code fields designate which cross reference systems are used as the preferred system for identity information displayed in areas like search results and object headers. Preferred Cross References are supported in GSM, SCRM and PQM. This is a multi selection field.
■ Formulation—The user’s precision default for formulations. The default value is 5.
■ Breakdown—The user’s precision default for breakdowns. The default value is 5.
■ Label Composition—The user’s precision default for label compositions. The default value is 5.
■ Cost System Code—Determines the cross reference system used when looking up cost values. See the Agile Product Lifecycle Management for Process Global Specification Management User Guide for more information about cost.
■ Cost UOM—Sets the default currency and per UOM for cost displayed. By default, cost is displayed in USD per 100 kg. With this preference you can adjust how cost is displayed, for example: USD per 100 lbs or EUR per 1000 kg.
■ Path—Sets the default calculation path to use when creating formulation specifications. Options are:
■ Fixed Input Percent
■ Input Percent
■ Input Quantity (default)
■ Input Yield
■ Density UOM—Sets the UOM to be used for density during formulation theoretical calculations. By default this is set to g = ml.
■ Packaging Spec Tare Wt UOM—Sets the UOM to be used for packaging specification tare weight calculations.
Access Tab
Site Access Section
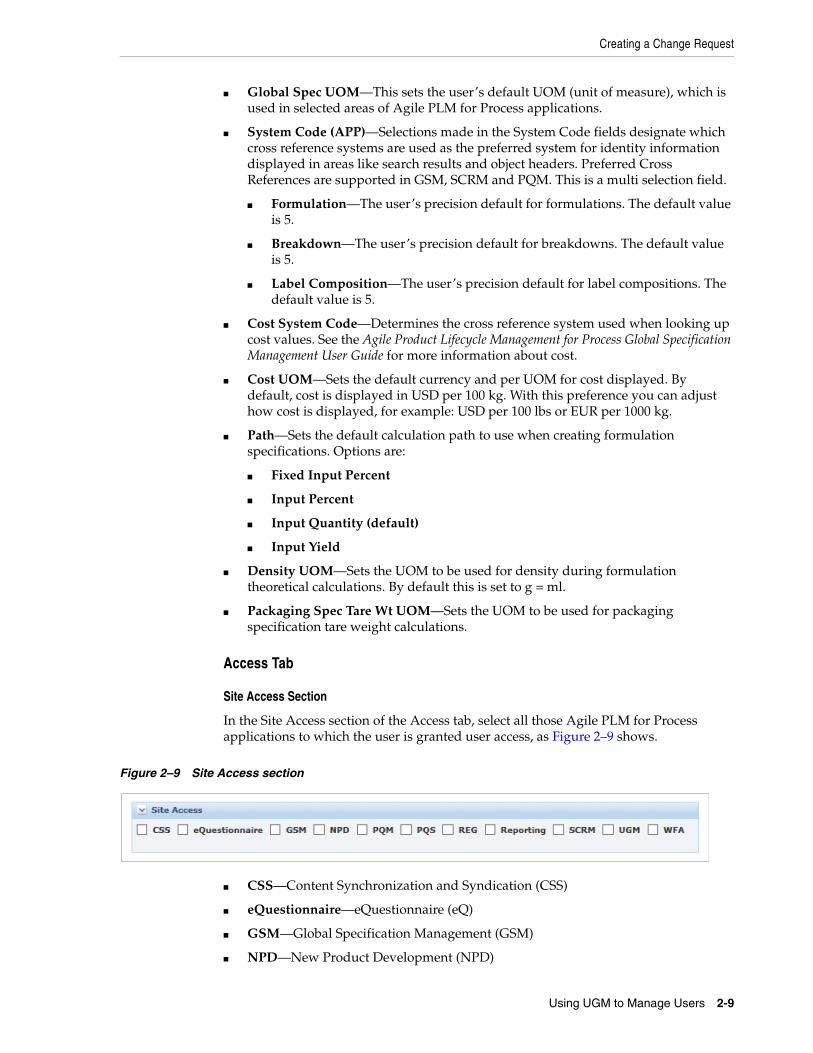
In the Site Access section of the Access tab, select all those Agile PLM for Process applications to which the user is granted user access, as Figure 2–9 shows.
Figure 2–9 Site Access section
■ CSS—Content Synchronization and Syndication (CSS)
■ eQuestionnaire—eQuestionnaire (eQ)
■ GSM—Global Specification Management (GSM)
■ NPD—New Product Development (NPD)
Creating a Change Request
2-10 Agile Product Lifecycle Management for Process User Group Management User Guide
■ PQM—Product Quality Management (PQM)
■ PQS—Product Quality Scorecarding (PQS)
■ REG—Computer-Aided Compliance Screening, (CACS), Nutrition Surveillance Management (NSM), extended attributes administration, custom sections administration, and Component Catalog
■ Reporting—Reporting (RPT)
■ SCRM—Supply Chain Relationship Management (SCRM)
■ UGM—User Group Management (UGM)
■ WFA—Workflow Administration (WFA)
This guide explains the UGM application. The Agile Product Lifecycle Management for Process Administrator User Guide explains extended attributes and custom sections. For more information on the other applications listed above, refer to the applicable Agile PLM for Process user guide.
Group Membership Section
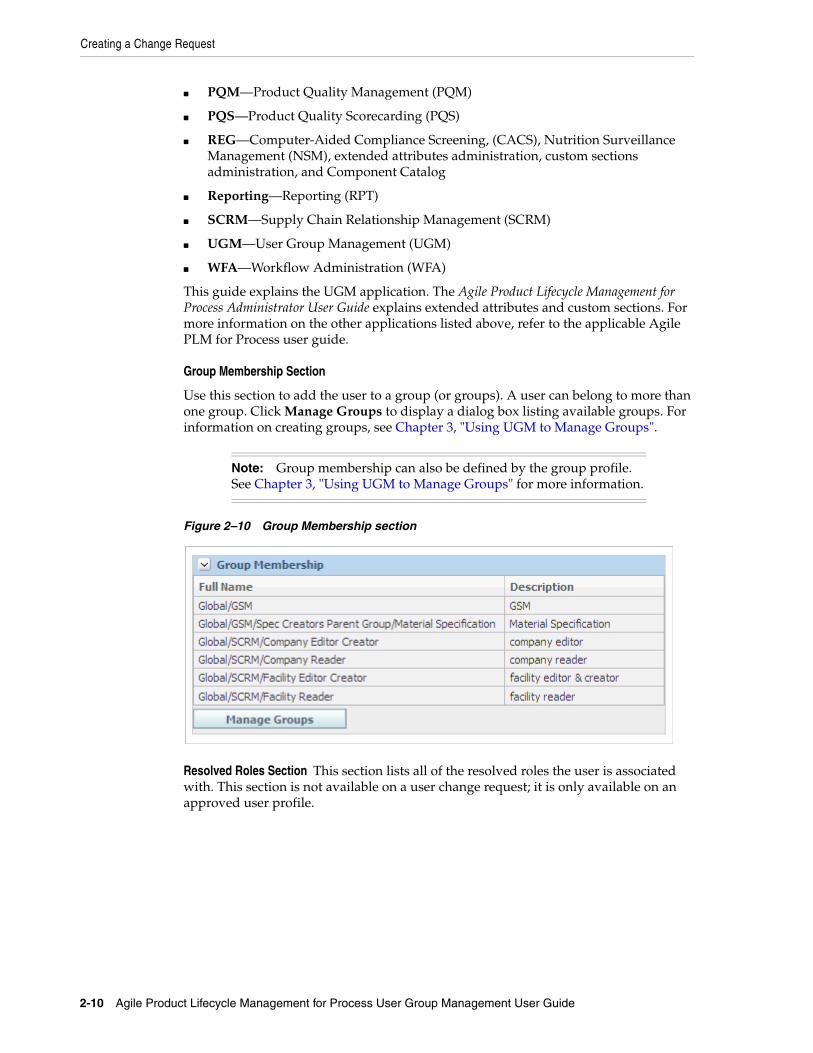
Use this section to add the user to a group (or groups). A user can belong to more than one group. Click Manage Groups to display a dialog box listing available groups. For information on creating groups, see Chapter 3, "Using UGM to Manage Groups".
Note: Group membership can also be defined by the group profile. See Chapter 3, "Using UGM to Manage Groups" for more information.
Figure 2–10 Group Membership section
Resolved Roles Section This section lists all of the resolved roles the user is associated with. This section is not available on a user change request; it is only available on an approved user profile.

Creating a Change Request
Using UGM to Manage Users 2-11
Figure 2–11 Resolved Roles section
DRL Catalogs Section
Use this section to grant user visibility to various document reference library (DRL) catalogs. These catalogs serve as a repository for business documents. A user can have access to more than one DRL catalog. Click the search icon to display a dialog box listing available catalogs.
Figure 2–12 DRL Catalogs section
Refer to the Agile Product Lifecycle Management for Process Document Reference Library User Guide for more information.
Supplier Portal: Associated Countries Section
If the user has the [SUPPLIER_PORTAL_ADMIN] role, this section is displayed, as Figure 2–13 shows. Supplier Portal administrators are users who manage suppliers who register using the Supplier Portal self registration form. UGM users are associated to the countries they manage. For example, if User A is associated with the United States, User A sees those supplier registrations in their SCRM “New Registrations” Action Items listing for those suppliers whose addresses include the value of United States. See the Agile Product Lifecycle Management for Process Supply Chain Relationship Management User Guide for more information
Figure 2–13 Supplier Portal: Associated Countries section
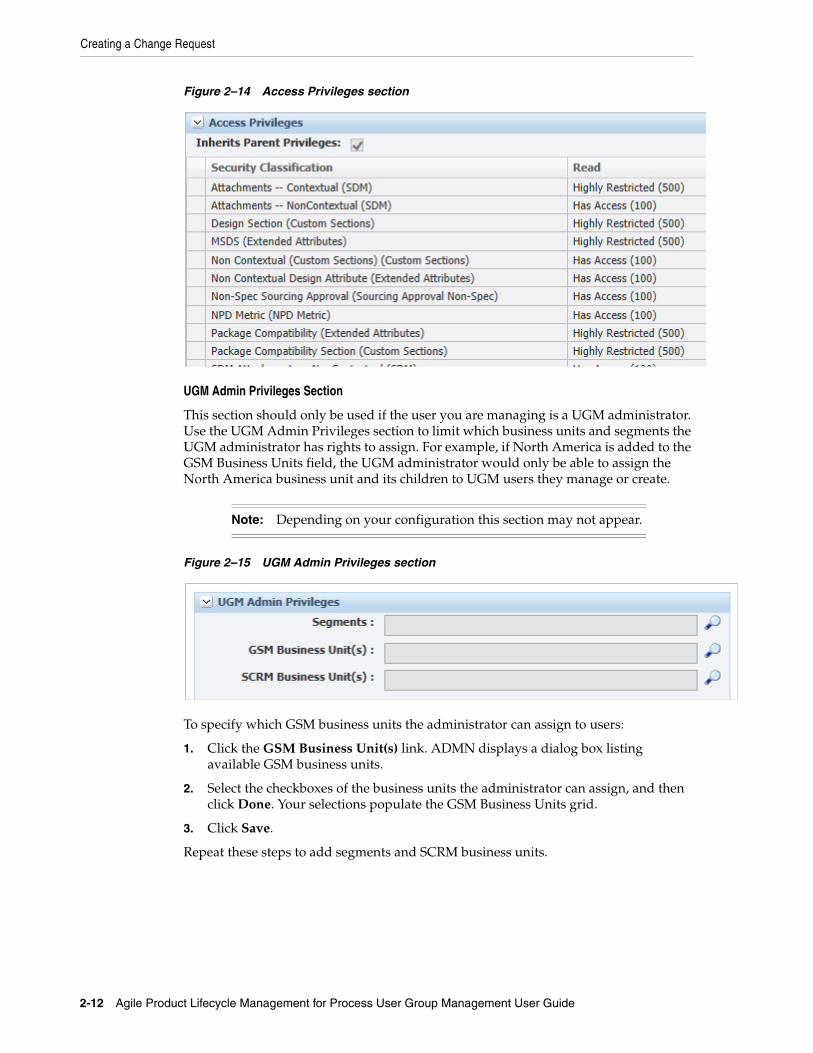
Access Privileges Section
This section is read-only and is displayed if object level security is enabled. Object level security privileges are group-defined, so this section displays once a group is added and saved to the user profile. A privilege consists of a security classification and an access level. Refer to the Agile Product Lifecycle Management for Process Security Configuration Guide for more information.
Creating a Change Request
2-12 Agile Product Lifecycle Management for Process User Group Management User Guide
Figure 2–14 Access Privileges section
UGM Admin Privileges Section
This section should only be used if the user you are managing is a UGM administrator. Use the UGM Admin Privileges section to limit which business units and segments the UGM administrator has rights to assign. For example, if North America is added to the GSM Business Units field, the UGM administrator would only be able to assign the North America business unit and its children to UGM users they manage or create.
Note: Depending on your configuration this section may not appear.
Figure 2–15 UGM Admin Privileges section
To specify which GSM business units the administrator can assign to users:
1. Click the GSM Business Unit(s) link. ADMN displays a dialog box listing available GSM business units.
2. Select the checkboxes of the business units the administrator can assign, and then click Done. Your selections populate the GSM Business Units grid.
3. Click Save.
Repeat these steps to add segments and SCRM business units.

Creating a Change Request
Using UGM to Manage Users 2-13
Approval/Audit TabThe information in the Approval/Audit tab is read only and is for viewing purposes only.
Figure 2–16 Approval/Audit tab
Status Section
The Status section of the Approval/Audit tab contains the following information:
■ Status—Displays the user request status.
■ Owner—Displays the owner of the request.
■ Originator—Displays the UGM administrator that initiated the change request.
■ Action—Indicates whether the change request created a new user (“Create”) or modified an existing user (“Edit”).
■ Created—Displays the date and time when the request was made.
■ Last Workflow—Displays the date and time when the request was last workflowed.
■ Last Workflowed By—Displays the person who last workflowed the request.
Event History Section
The Event History section of the Approval/Audit tab contains a listing of events that have occurred for the request. It includes the following information:
■ Status—Displays the user request status for this event.
■ User—Displays the person who recorded this event.
■ Time—Displays the time and date when the event was recorded.
■ Comments—Displays any comments appended to this event.
Editing UsersTo edit a user:
1. Click Open > User Profile in the action menu and search for the user to modify.
Using User Approval Workflows
2-14 Agile Product Lifecycle Management for Process User Group Management User Guide
2. Click the login name of the user in the returned search results to display the user profile.
3. In the action menu, click Create Change Request to initiate a change request.
4. Make edits to the user profile by following the instructions starting with step 2 of "Creating a User" on page 2-3.
5. Click Save & Close.
Note: Upon saving, UGM places the request in draft mode. You can continue to edit it until the change request is canceled or submitted for review.
6. Click Workflow to submit your change request for review and follow the workflow instructions as listed in step 5 of "Creating a User" on page 2-3.
Copying a User ProfileYou can create a new user profile by copying an existing one. The copied data includes business units, available languages, user preferences, and the access information defined on the Access tab.
To copy a user profile:
1. Click Open > User Profile in the action menu and search for the user profile to copy.
2. Click the login name of the user in the returned search results to display the user profile.
3. In the action menu, click Copy.
4. Enter/review information in the General, Access, and Approval/Audit tabs. Refer to "General Tab" on page 2-4 through "Approval/Audit Tab" on page 2-13 for more information.
5. Click Save & Close.
Note: Upon saving, UGM places the request in draft mode. You can continue to edit it until the change request is canceled or submitted for review.
6. Click Workflow to submit your change request for review and follow the workflow instructions as listed in step 5 of "Creating a User" on page 2-3.
Using User Approval WorkflowsDepending on your configuration, all change requests need to be workflowed. The approval workflow process is the basis for ensuring compliance and auditing. The solution works in two modes:
Noncompliance Enforcement—In this mode an approver can approve change requests that they have originated, including changes to their own profile.
Compliance Enforcement—The compliance mode prevents approvers from approving their own requests or making changes to their own profiles.
Exporting and Importing User Data
Using UGM to Manage Users 2-15
Approving a RequestTo approve a request, you must belong to a group with the role of [UGM_USER_APPROVER]. When a change request is submitted for your approval, you are notified by email and the change request appears in your Action Items list (see "Managing Action Items" on page 2-2).
To approve a request:
1. Click the name of the user in your Action Items list to display the change request.
2. Review all data entered for the request in the General, Access, and Approval/Audit tabs. For details on how to use the General, Access, and Approval/Audit tabs, see "Creating a User" on page 2-3.
3. When you are ready to transition the workflow, click Workflow in the action menu to display the Workflow dialog box.
4. In the Workflow dialog box, under Next Action, click the drop-down list and make your selection as follows:
■ Approved—Approves the change request and notifies the originator by email.
■ Not approved—Sends the change request to the originator for modification and notifies originator by email.
■ Canceled—Terminates the change request and notifies the originator by email.
Note: Any of the emails sent in the above three options includes the comments that you entered in the Workflow dialog box.
5. In the Workflow dialog box, click the move step forward icon to move the change request to the next step.
6. If the change request was approved, flush the user cache group in CACHE management. See Chapter 4, "Reference Cache" for more information.
Exporting and Importing User DataAs an administrator, you perform all user creation and edit tasks in a staging environment. As a result, once you have made final user request approvals, you must export these out of the staging environment. You must then import them into the production environment, making the changes active.
Warning: Before exporting users, you must export all groups associated with those users.
Exporting Users from Your Staging EnvironmentTo export user data from your staging environment:
Log in to your staging environment.
1. Click Export in the action menu. UGM displays the Export page.
2. Click Add New in the Users to Export section. UGM displays a search page to assist you in searching for various users to export.
3. Use the search page to search for users to export.
Note: To search for users that were edited on a certain date, select the “Last Updated” option from the key field drop-down list, and then use the other search fields to select a date.
Exporting and Importing User Data
2-16 Agile Product Lifecycle Management for Process User Group Management User Guide
4. From the search results, click each user name to export. The names that you clicked appear in the Selected Items box at the bottom of the search page.
5. When you have made your selections, click Done at the bottom right of the page. The dialog box closes and your group selections display in the Users to Export section.
6. Click Export at the bottom of the page. A dialog box appears, allowing you to select the location on your hard drive to export the user data to.
7. Click Save. A Save As dialog box displays.
8. Click Save. Agile PLM for Process encrypts the selected user data in a single file, closes the dialog box, and saves the encrypted file to your local drive.
Importing Users into Your Production EnvironmentTo import data into your production environment:
1. Log in to your production environment.
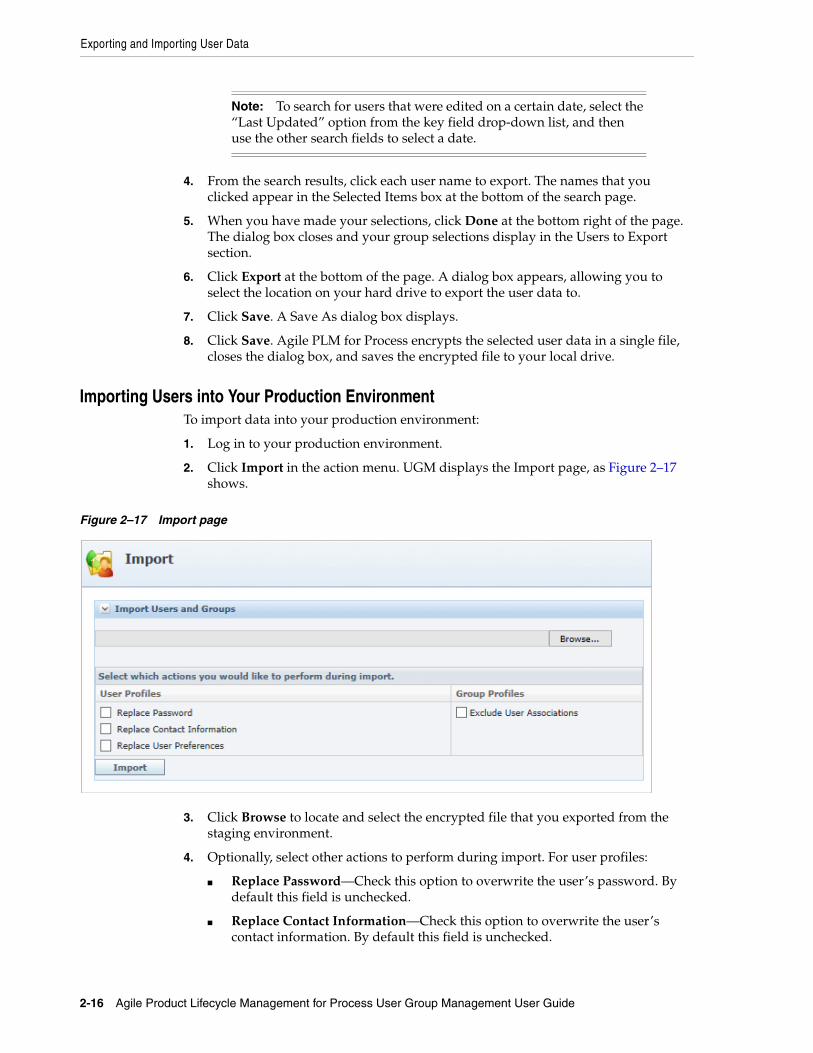
2. Click Import in the action menu. UGM displays the Import page, as Figure 2–17 shows.
Figure 2–17 Import page
3. Click Browse to locate and select the encrypted file that you exported from the staging environment.
4. Optionally, select other actions to perform during import. For user profiles:
■ Replace Password—Check this option to overwrite the user’s password. By default this field is unchecked.
■ Replace Contact Information—Check this option to overwrite the user’s contact information. By default this field is unchecked.

Exporting and Importing User Data
Using UGM to Manage Users 2-17
■ Replace User Preferences—Check this option to overwrite the user’s preferences. By default this field is unchecked.
For group profiles:
■ Exclude User Associations—By default all group to user associations go with your import. If you do not want to carry over user associations, click Exclude User Associations. Checking this option imports your group without its assigned user list. This is valuable when you are making a non-user change to a group and still want to maintain your import environment’s current membership list.
5. Click Import at the bottom of the page.
6. In the production environment, flush the user cache group, as described in "Reference Cache" on page 4-1.
Exporting and Importing User Data
2-18 Agile Product Lifecycle Management for Process User Group Management User Guide
3
Using UGM to Manage Groups 3-1
3Using UGM to Manage Groups
This chapter introduces the User Group Management (UGM) application and explains how to maintain groups within Agile PLM for Process. Topics in this chapter include:
■ Accessing UGM and Using Roles
■ Managing Action Items
■ Searching for Groups
■ Creating a Change Request
■ Using Group Approval Workflows
■ Exporting and Importing Group Data
Accessing UGM and Using RolesThe User Group Management (UGM) application enables you to create, modify, search for, import, and export users and groups. This chapter discusses the group-related features of the UGM application.
Note: Perform group creation and modification tasks in a staging environment. Once you have set up your groups, you can export them to a production environment.
When you log in to Agile PLM for Process, you access the UGM application by clicking UGM in the left navigation panel. Agile PLM for Process displays a left navigation panel with the following user management options, most of which are discussed in detail in this chapter:
■ Action Items
■ Users (see Chapter 2, "Using UGM to Manage Users")
■ Groups
■ Import
■ Export
Managing Action Items
3-2 Agile Product Lifecycle Management for Process User Group Management User Guide
Associated RolesThree user roles are associated with UGM groups:
[UGM_GLOBAL_ADMIN]—Can see and use the Create User and Create User Group buttons and initiate user change requests.
[UGM_USER_ADMIN]—Can see and use the Create User button and initiate user change requests.
[UGM_GROUP_APPROVER]—Can approve UGM group change requests.
Managing Action ItemsWhen you click Action Items, the Action Items table displays. This table lists your pending administrative tasks, as described in "Managing Action Items" on page 2-2.
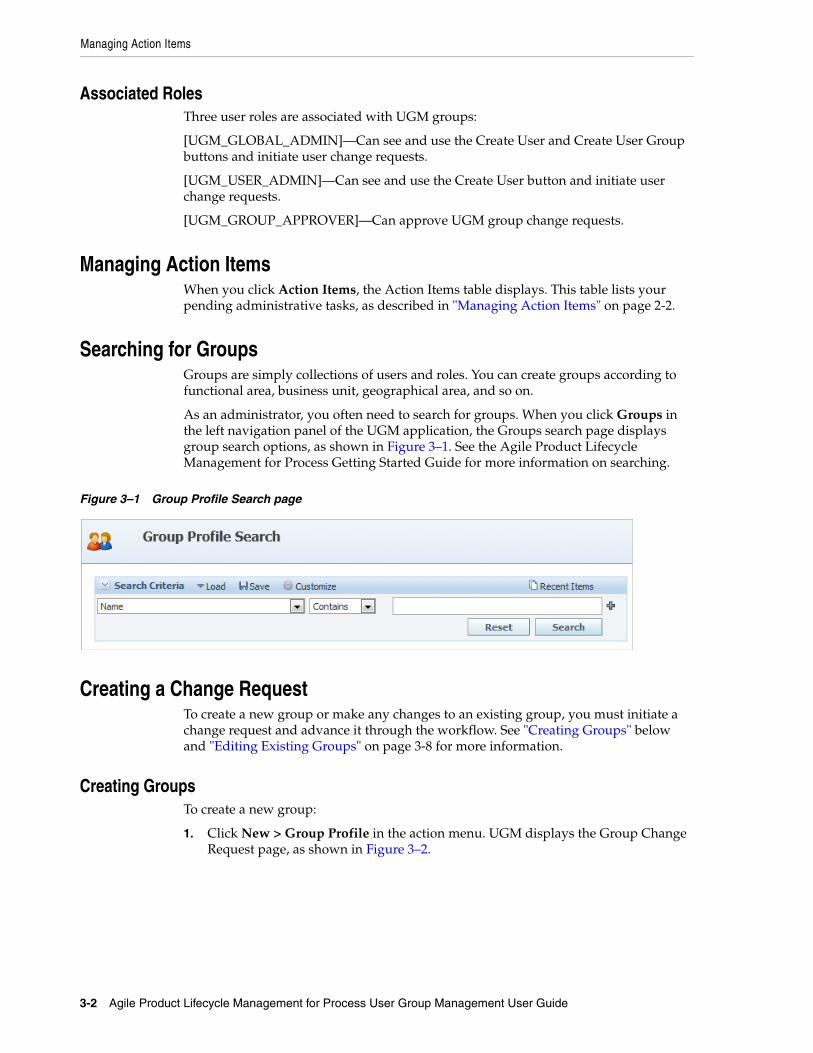
Searching for GroupsGroups are simply collections of users and roles. You can create groups according to functional area, business unit, geographical area, and so on.
As an administrator, you often need to search for groups. When you click Groups in the left navigation panel of the UGM application, the Groups search page displays group search options, as shown in Figure 3–1. See the Agile Product Lifecycle Management for Process Getting Started Guide for more information on searching.
Figure 3–1 Group Profile Search page
Creating a Change RequestTo create a new group or make any changes to an existing group, you must initiate a change request and advance it through the workflow. See "Creating Groups" below and "Editing Existing Groups" on page 3-8 for more information.
Creating GroupsTo create a new group:
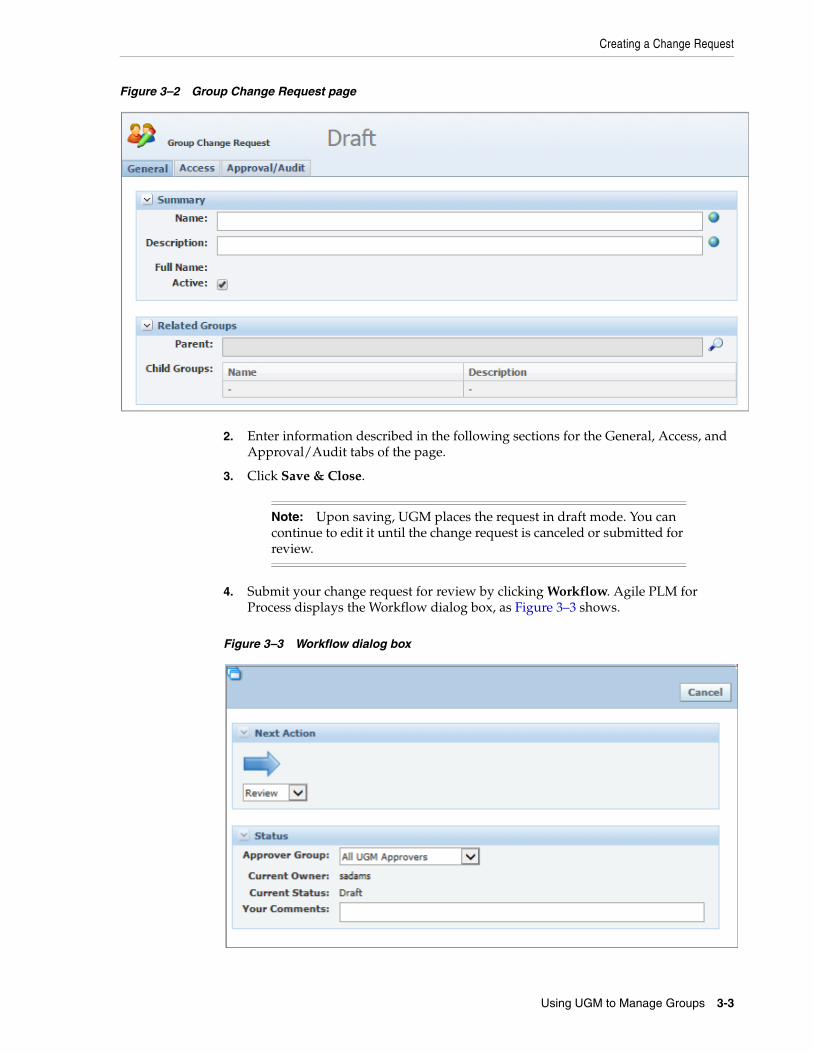
1. Click New > Group Profile in the action menu. UGM displays the Group Change Request page, as shown in Figure 3–2.
Creating a Change Request
Using UGM to Manage Groups 3-3
Figure 3–2 Group Change Request page
2. Enter information described in the following sections for the General, Access, and Approval/Audit tabs of the page.
3. Click Save & Close.
Note: Upon saving, UGM places the request in draft mode. You can continue to edit it until the change request is canceled or submitted for review.
4. Submit your change request for review by clicking Workflow. Agile PLM for Process displays the Workflow dialog box, as Figure 3–3 shows.
Figure 3–3 Workflow dialog box
Creating a Change Request
3-4 Agile Product Lifecycle Management for Process User Group Management User Guide
5. In the Workflow dialog box, under Next Action, click the drop-down list and make your selection as follows:
■ Review—Submits the change request to the selected approver group for review and notifies the approver(s) by email. The email includes the comments that you entered in the workflow dialog box.
■ Canceled—Terminates the change request.
6. In the Approver Group drop-down list, select the group of users who must review your change request. The drop-down list contains all groups with the [UGM_GROUP_APPROVER] role. (This option is only available if you select Review for the Next Action.)
7. Click the move step forward icon to move the change request to the next step.
8. Once an approver reviews your request, UGM notifies you of the status of your request by email.
General Tab
Summary Section
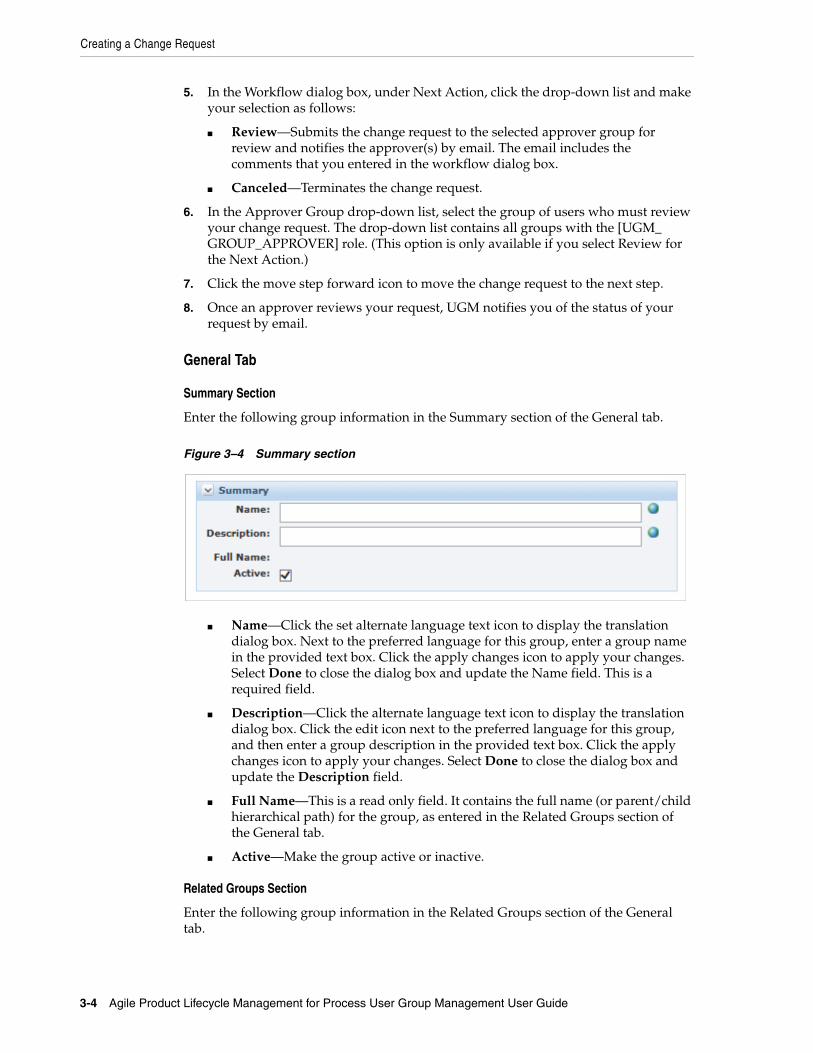
Enter the following group information in the Summary section of the General tab.
Figure 3–4 Summary section
■ Name—Click the set alternate language text icon to display the translation dialog box. Next to the preferred language for this group, enter a group name in the provided text box. Click the apply changes icon to apply your changes. Select Done to close the dialog box and update the Name field. This is a required field.
■ Description—Click the alternate language text icon to display the translation dialog box. Click the edit icon next to the preferred language for this group, and then enter a group description in the provided text box. Click the apply changes icon to apply your changes. Select Done to close the dialog box and update the Description field.
■ Full Name—This is a read only field. It contains the full name (or parent/child hierarchical path) for the group, as entered in the Related Groups section of the General tab.
■ Active—Make the group active or inactive.
Related Groups Section
Enter the following group information in the Related Groups section of the General tab.
Creating a Change Request
Using UGM to Manage Groups 3-5
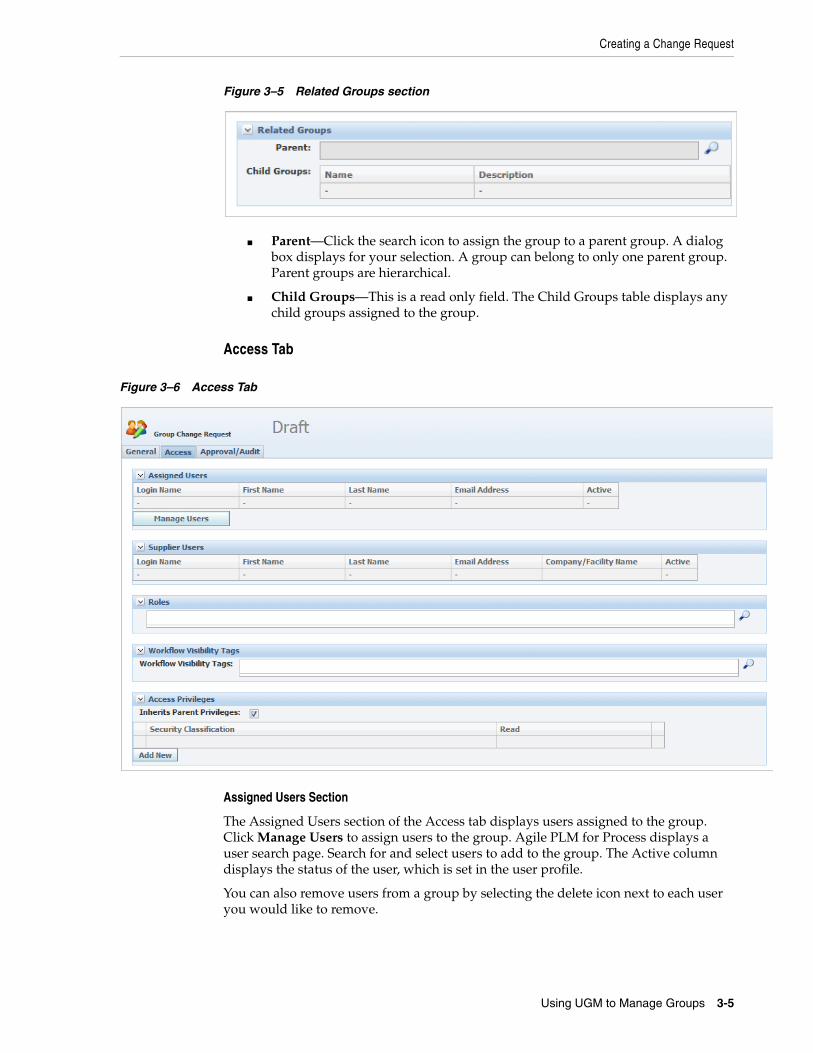
Figure 3–5 Related Groups section
■ Parent—Click the search icon to assign the group to a parent group. A dialog box displays for your selection. A group can belong to only one parent group. Parent groups are hierarchical.
■ Child Groups—This is a read only field. The Child Groups table displays any child groups assigned to the group.
Access Tab
Figure 3–6 Access Tab
Assigned Users Section
The Assigned Users section of the Access tab displays users assigned to the group. Click Manage Users to assign users to the group. Agile PLM for Process displays a user search page. Search for and select users to add to the group. The Active column displays the status of the user, which is set in the user profile.
You can also remove users from a group by selecting the delete icon next to each user you would like to remove.

Note: Users can also be assigned to groups individually through their user profile. See Chapter 2, "Using UGM to Manage Users" for more details.
Creating a Change Request
3-6 Agile Product Lifecycle Management for Process User Group Management User Guide
Supplier Users Section
The Supplier Users section of the Access tab displays the Supplier Portal users that have been assigned to this group. For more information see the Agile Product Lifecycle Management for Process Supplier Portal Guide.
Roles Section
The Roles section of the Access tab displays all the roles assigned to the group. Roles provide access and privileges to the group. For example, the [SCRM_COMPANY_EDITOR] role allows all the users in the group to edit SCRM company profiles.
Click the search icon to assign roles to the new group. Agile PLM for Process displays a dialog box listing available roles. A group can have more than one role assigned to it; check the box next to each role to assign to the group. Roles are predefined system values that cannot be modified. For a list of predefined roles, see Appendix A, "System-Based Roles". Roles are also be inherited from parent groups.
Workflow Visibility Tags Section
The Workflow Visibility Tags section of the Access tab displays all the workflow visibility tags assigned to the group. Workflow Visibility tags filter EQT search results based on the specification’s workflow status. See the “Controlling Specification Visibility” section of the GSM WFA chapter in the Agile Product Lifecycle Management for Process Workflow Administration Guide for more information. Click the search icon to assign tags to the new group. A group can have more than one visibility tag assigned to it. Visibility tags are not inherited from parent groups.
Access Privileges Section
This section is displayed if Object Level Security (OLS) is enabled. A privilege consists of a security classification and an access level. You can add contextual and non-contextual security classifications to the privileges table by clicking Add New. Assigning classifications to groups allows users within the group to see certain secured objects on a specification or profile. Secured objects include: Extended Attributes, Sections, Sourcing Approvals, Attachments, and Supplier Documents. Refer to the Agile Product Lifecycle Management for Process Security Configuration Guide for more information. The Access Privileges section contains the following:
■ Inherits Parent Privileges—Check this field to inherit privileges from the parent group(s). For more information, refer to the “User Access Privilege Resolution” section of the Agile Product Lifecycle Management for Process Workflow Administration User Guide.
■ Security Classification—This table lists defined privileges, as Figure 3–7 shows.

Creating a Change Request
Using UGM to Manage Groups 3-7
Figure 3–7 Security Classification table
To add a new classification privilege:
1. Click Add New. UGM opens a multiple selection dialog box, as Figure 3–8 shows.
Figure 3–8 Access classification dialog box
2. Select the access classifications from the left and move them to the right using the add selected data icon.
3. Click Done. You now must select the read access level for that classification in the read column.
4. Select an appropriate access level from the drop-down box.
5. Click the apply changes icon to apply your changes.
Creating a Change Request
3-8 Agile Product Lifecycle Management for Process User Group Management User Guide
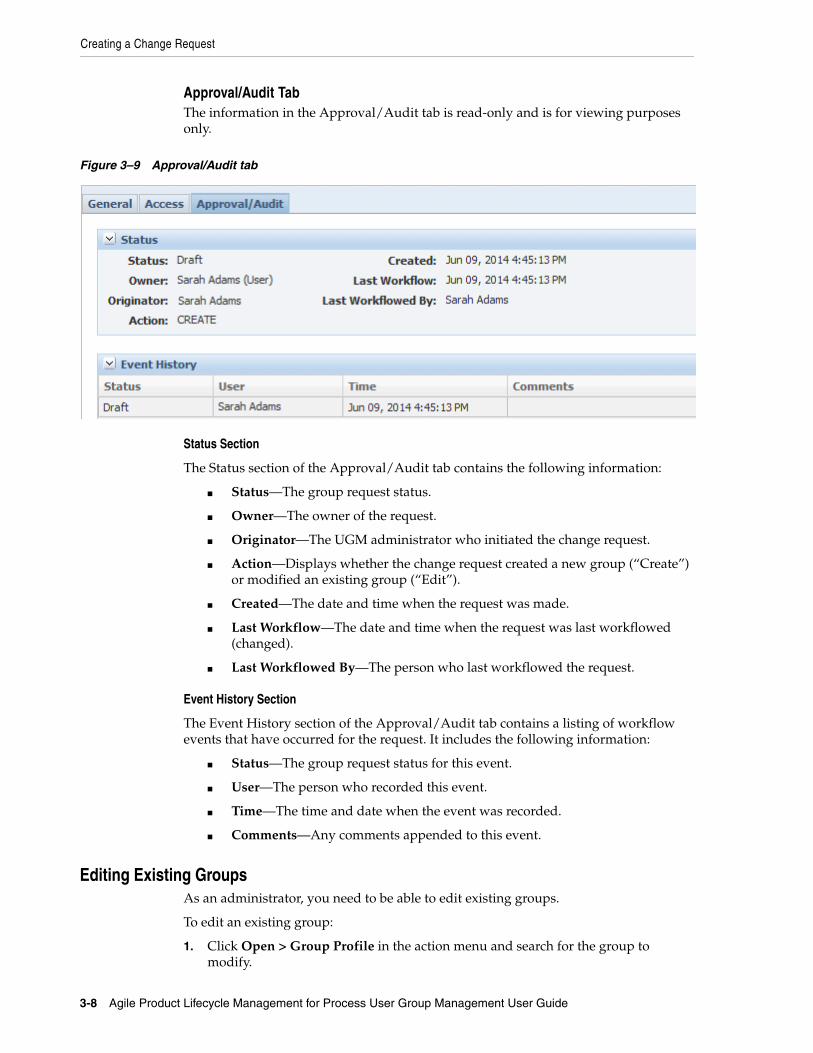
Approval/Audit TabThe information in the Approval/Audit tab is read-only and is for viewing purposes only.
Figure 3–9 Approval/Audit tab
Status Section
The Status section of the Approval/Audit tab contains the following information:
■ Status—The group request status.
■ Owner—The owner of the request.
■ Originator—The UGM administrator who initiated the change request.
■ Action—Displays whether the change request created a new group (“Create”) or modified an existing group (“Edit”).
■ Created—The date and time when the request was made.
■ Last Workflow—The date and time when the request was last workflowed (changed).
■ Last Workflowed By—The person who last workflowed the request.
Event History Section
The Event History section of the Approval/Audit tab contains a listing of workflow events that have occurred for the request. It includes the following information:
■ Status—The group request status for this event.
■ User—The person who recorded this event.
■ Time—The time and date when the event was recorded.
■ Comments—Any comments appended to this event.
Editing Existing GroupsAs an administrator, you need to be able to edit existing groups.
To edit an existing group:
1. Click Open > Group Profile in the action menu and search for the group to modify.
Using Group Approval Workflows
Using UGM to Manage Groups 3-9
2. Click the linked Full Name of the group in the search results provided to display the group profile.
3. In the action menu, click Create Change Request to initiate a change request.
4. Make edits to the group profile using the instructions provided in "Creating Groups" on page 3-2.
5. Click Save & Close.
Note: Upon saving, UGM places the request in draft mode. You can continue to edit it until the change request is canceled or submitted for review.
6. Click Workflow to move your change request to the next step or action.
7. In the Workflow dialog box, under Next Action, click the drop-down list and make your selection as follows:
■ Review—Submits the change request to the selected approver group for review and notifies the approver(s) by email. The email includes the comments that you entered in the workflow dialog box.
■ Canceled—Terminates the change request.
8. In the Approver Group drop-down list, select the group of users who must review your change request. The drop-down list contains all groups with the [UGM_GROUP_APPROVER] role. (This option is only available if you selected Review for the Next Action.)
9. In the Workflow dialog box, click the move step forward icon to move the request to the next step.
10. Once an approver reviews your request, UGM notifies you by email of the status of your request.
Using Group Approval WorkflowsDepending on your configuration, all change requests need to be advanced through a workflow. The solution works in two modes:
■ Noncompliance Enforcement—In this mode as an approver you can approve change requests that you have originated, including changes to your own profile.
■ Compliance Enforcement—The compliance mode prevents you (as an approver) from approving your own requests or from making changes to your own profile.
Approving a RequestTo approve a group request, you must belong to a group with the role of [UGM_GROUP_APPROVER]. When a change request is submitted for your approval, you are notified by email and the change request is added to your Action Items list (see "Managing Action Items" on page 3-2).
To approve a request:
1. Click the name of the group in the Action Items table to display the change request.
2. Review all data entered for the request in the General, Access, and Approval/Audit tabs. Refer to "General Tab" on page 3-4 through
Using Group Approval Workflows
3-10 Agile Product Lifecycle Management for Process User Group Management User Guide
"Approval/Audit Tab" on page 3-8 for more information.
3. When you are ready to advance the request in the workflow, click Workflow in the action menu to display the Workflow dialog box.
4. In the Workflow dialog box, under Next Action, click the drop-down list and make your selection as follows:
■ Approved—Approves the change request and notifies the originator by email. The email includes the comments that you entered in the workflow dialog box.
■ Not approved—Sends the change request back to the originator for modification and sends an email notification. The email includes the comments that you entered in the workflow dialog box.
■ Canceled—Terminates the change request and notifies the originator by email.
5. In the Workflow dialog box, click the move step forward icon to move the change request to the next step.
6. If the change request was approved, the user cache group needs to be flushed before the changes are available. See "UGM Cache" on page 4-1 for more information.
Exporting and Importing Group Data
Using UGM to Manage Groups 3-11
Exporting and Importing Group DataAs an administrator, you perform all group creation and editing tasks in a staging environment. As a result, once you have made final group request approvals, you must export these profiles from the staging environment and then import them into the production environment, making the changes live.
Exporting Groups from Your Staging EnvironmentTo export group data from your staging environment:
1. Log in to your staging environment.
2. Click Export in the action menu.
3. Click Add New in the Users to Export section. UGM displays a search page to assist you in searching for groups to export.
4. Use the search page to search for groups to export.
Note: To search for groups that were edited on a certain date, select the “Last Updated” option from the key field drop-down list, and then use the other search fields to select a date.
5. From the search results, click each group name to export. The names that you clicked appear in the Selected Items box at the bottom of the search page.
6. When you have made your selections, click Done at the bottom right of the page. The page closes and your group selections display in the Groups to Export table.
7. Click Export at the bottom of the page. A dialog box appears, allowing you to select the location on your hard drive to export the user data to.
8. Click Save. A Save As dialog box displays.
9. Click Save. Agile PLM for Process encrypts the selected groups in a single file, closes the dialog box, and saves the encrypted file to your local drive.
Importing Groups into Your Production EnvironmentTo import group data into your production environment:
1. Log in to your production environment.
2. Click Import in the action menu. UGM displays the Import page, as shown in Figure 3–10.
Exporting and Importing Group Data
3-12 Agile Product Lifecycle Management for Process User Group Management User Guide
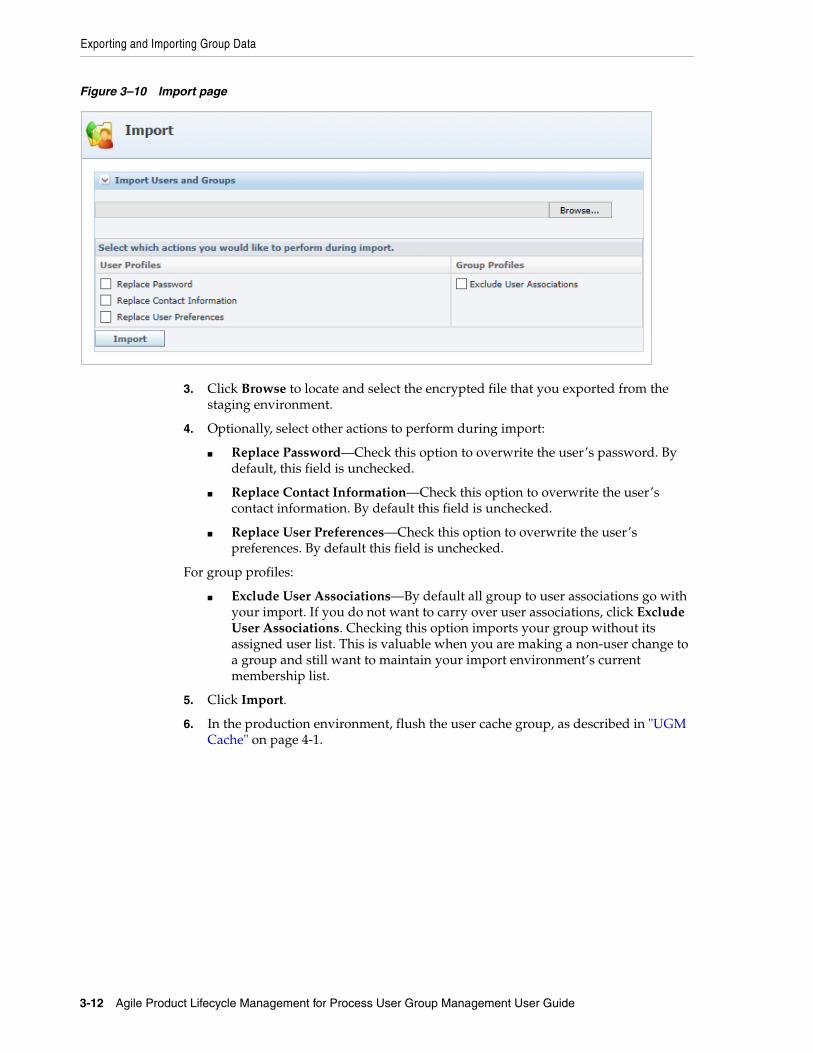
Figure 3–10 Import page
3. Click Browse to locate and select the encrypted file that you exported from the staging environment.
4. Optionally, select other actions to perform during import:
■ Replace Password—Check this option to overwrite the user’s password. By default, this field is unchecked.
■ Replace Contact Information—Check this option to overwrite the user’s contact information. By default this field is unchecked.
■ Replace User Preferences—Check this option to overwrite the user’s preferences. By default this field is unchecked.
For group profiles:
■ Exclude User Associations—By default all group to user associations go with your import. If you do not want to carry over user associations, click Exclude User Associations. Checking this option imports your group without its assigned user list. This is valuable when you are making a non-user change to a group and still want to maintain your import environment’s current membership list.
5. Click Import.
6. In the production environment, flush the user cache group, as described in "UGM Cache" on page 4-1.
4
Reference Cache 4-1
4Reference Cache
This chapter outlines UGM-related cache tasks. For full details around cache management, see the CACHE chapter of the Agile Product Lifecycle Management for Process Administrator User Guide.
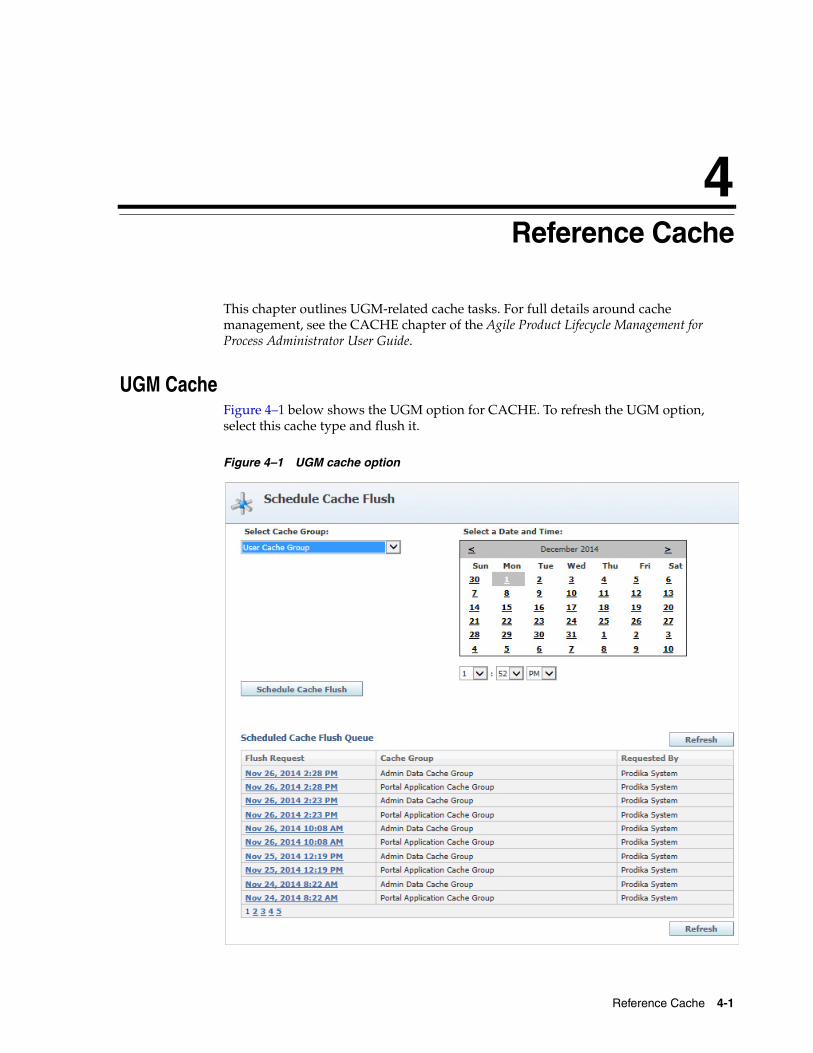
UGM CacheFigure 4–1 below shows the UGM option for CACHE. To refresh the UGM option, select this cache type and flush it.
Figure 4–1 UGM cache option
UGM Cache
4-2 Agile Product Lifecycle Management for Process User Group Management User Guide
A
System-Based Roles A-1
ASystem-Based Roles
This appendix contains a list of system-based roles provided with Agile PLM for Process.
RolesThe following definitions include references to Agile PLM for Process applications, group profiles, and user profiles. For more information on the applications, refer to the applicable user guide. For more information about groups, see Chapter 3, "Using UGM to Manage Groups". For more information about user profiles and site access, see Chapter 2, "Using UGM to Manage Users".
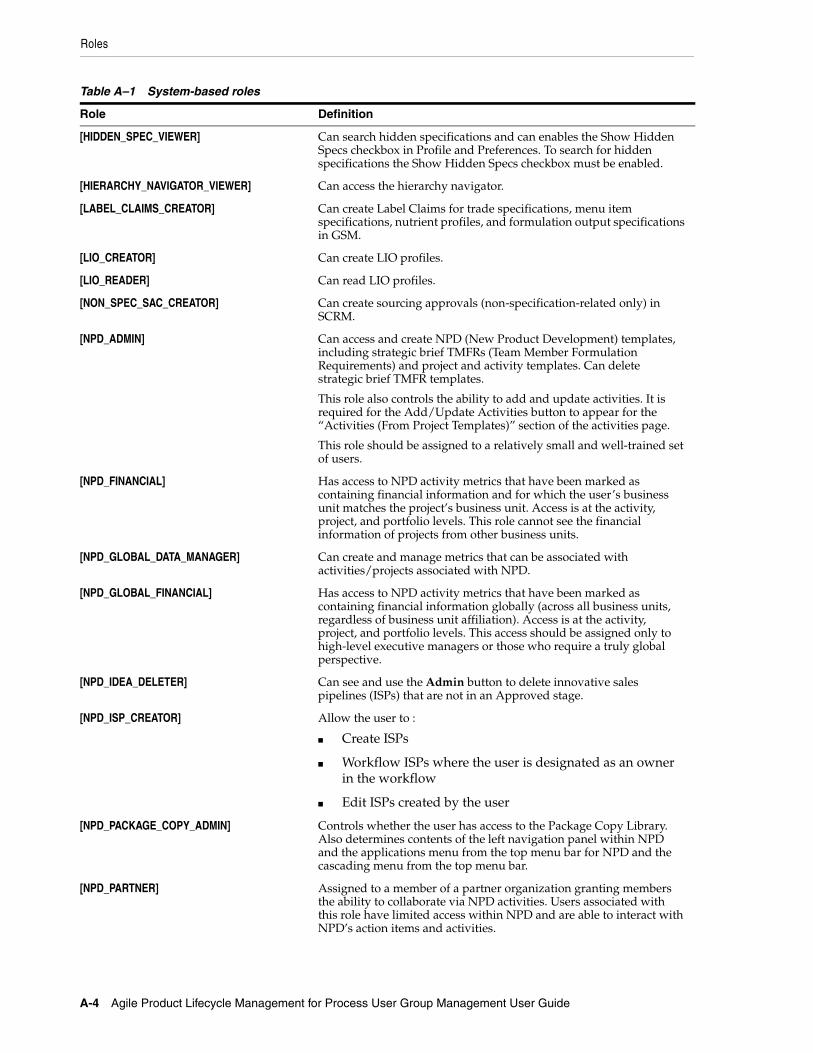
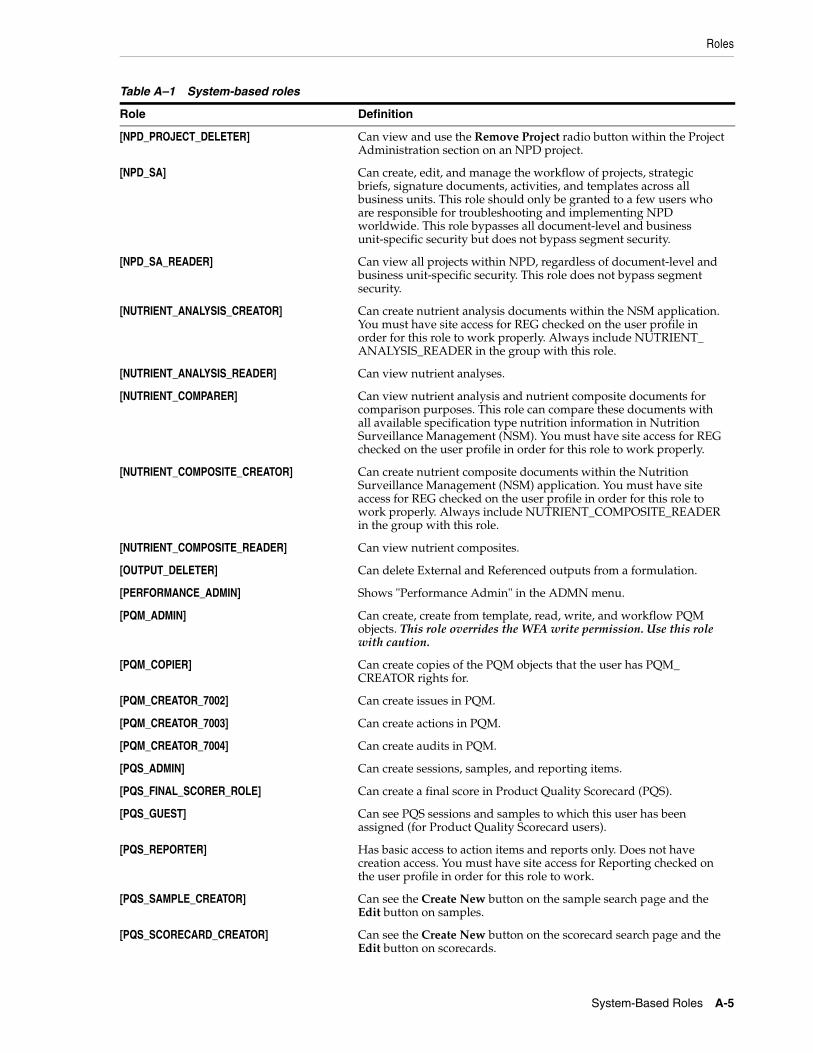
Table A–1 System-based roles
Role Definition
[ACCESS_LEVEL_EDITOR] Can edit access levels in Global Specification Management (GSM).
[ADD_CUSTOM_SECTION] Can add custom sections.
[ADD_EXT_ATT] Can add extended attributes.
[ARCHIVED_SCRM_VIEWER] Can view archived SCRM companies, facilities and contact profiles in EQT search results and various SCRM grids.
[AVAILABLE_UOM_ADMIN] Can manage units of measure (UOM) conversions in the Available UOM control as long as the specification has not been consumed on another specification.
[CACHE_ADMIN] Has access to the CACHE application and can schedule flushes related to taxonomy, workflow, user group, administrator data, and extended attributes/ sections.
[CACHE_SERVER_VIEWER] Can see the Server column in the cache details pop-up window.
[CAN_RERESOLVE_WORKFLOWS] Can re-resolve workflows.
[CAN_RERESOLVE_WORKFLOWS_
SCRM]
Can re-resolve workflows in Supply Chain Relationship Management (SCRM).
[CHANGE_OWNER] Can change the owner on specifications or ADMN lists. For single change, the user must have specification edit permission. For bulk change, the user must also have the ADMN site access role [DATA_ADMIN] or [SUPER_DATA_ADMIN].
[COMPANY_CREATOR] Can create company records in the SCRM (Supply Chain Relationship Management) application.
Always include SCRM_COMPANY_READER in the group with this role.
Roles
A-2 Agile Product Lifecycle Management for Process User Group Management User Guide
[COMPLIANCE_REVIEWER] Can review compliance of an item using existing screens (displays the CACS button on specifications that support this feature).
[COMPONENT_CATALOG_CREATOR] Can add and edit component catalog terms, alias names, disclosures, groups, and reconstitution rules. Basically, this role can edit all portions of the component catalog term. Always include COMPONENT_CATALOG_READER in the group with this role. You must have site access for REG.
[COMPONENT_CATALOG_ID_ADMIN] Allows the user to edit the ID field for a component catalog item.
[COMPONENT_CATALOG_READER] Can view any component catalog-related information. You must have site access for REG.
[COMPONENT_GROUP_ADMIN] Can create and edit new component groups.
[COMPONENT_GROUP_READER] Can search and open component groups in navigation options. This role is not needed to add a group to a breakdown control or component catalog term. It will only control read only access to the group admin search/item pages.
[CONFIG_ROLLUP_VIEWER] Allows the user to view key environment information for PLM for Process.
[CONTACT_CREATOR] Can create a contact profile in SCRM.
In addition, can add or remove Associated Companies or Associated Facilities on the Portal Access tab (cannot edit the User Access field).
Can modify all fields on Contact and Company Information tabs on contact profiles.
[CONTACT_EDITOR] Can modify all fields on Contact and Company Information tabs on contact profiles.
Can add or remove Associated Companies or Associated Facilities on the Portal Access tab (cannot edit the User Access field).
[CONTACT_READER] Can view a contact profile.
[CP_ACCESS_ADMIN] Allows users to manage Custom Portal profiles. See the Agile Product Lifecycle Management for Process Custom Portal Implementation Guide in the Extensibility Pack for more information.
[CP_SYSTEM_ADMIN] Allows users to configure Custom Portals and Views in ADMN. See the Agile Product Lifecycle Management for Process Custom Portal Implementation Guide in the Extensibility Pack for more information.
[CREATE_FROM_TEMPLATE_1004] Can create material specifications from templates.
[CREATE_FROM_TEMPLATE_1005] Can create master specifications from templates.
[CREATE_FROM_TEMPLATE_1006] Can create labeling specifications from templates,
[CREATE_FROM_TEMPLATE_1009] Can create packaging material specifications from templates.
[CREATE_FROM_TEMPLATE_1010] Can create delivered material packing specifications from templates.
[CREATE_FROM_TEMPLATE_2076] Can create packing configuration specifications from templates.
[CREATE_FROM_TEMPLATE_2121] Can create printed packaging specifications from templates.
[CREATE_FROM_TEMPLATE_2147] Can create trade specifications from templates.
[CREATE_FROM_TEMPLATE_2280] Can create equipment specifications from templates.
[CREATE_FROM_TEMPLATE_2283] Can create activity specifications from templates.
[CREATE_FROM_TEMPLATE_5001] Can create companies from templates.
[CREATE_FROM_TEMPLATE_5002] Can create facilities from templates.
Table A–1 System-based roles
Role Definition
Roles
System-Based Roles A-3
[CREATE_FROM_TEMPLATE_5012] Can create specification related sourcing approvals from templates.
[CREATE_FROM_TEMPLATE_5019] Can create non-specification related sourcing approvals from templates.
[CREATE_FROM_TEMPLATE_5750] Can create nutrient profiles from templates.
[CREATE_FROM_TEMPLATE_5816] Can create formulation specifications from templates.
[CREATE_FROM_TEMPLATE_6500] Can create menu item specifications from templates.
[CREATE_FROM_TEMPLATE_6501] Can create product specifications from templates.
[CREATE_FROM_TEMPLATE_7002] Can create issues from templates.
[CREATE_FROM_TEMPLATE_7003] Can create actions from templates.
[CREATE_FROM_TEMPLATE_7004] Can create audits from templates.
[CSS_ADMIN] Can create, read, edit, and manage Trans-active Item Publications (TIP) / Publication Path documents.
[CUSTOM_REPORTER] Can view custom reports.
[CUSTOM_SECTION_DENORM_ENABLER] Can edit the custom section’s Include in De-normalization checkbox.
[DATA_ADMIN] Has access to the ADMN (Manage Core Data) application.
[DENORMALIZED_CUSTOM_SECTION_EDITOR] Once a custom section has been activated (status of active, inactive, archived) and is flagged as Include in De-normalization, a user needs this role to make any edits to the custom section. Users without this role do not see the Edit action button.
[DRL_CREATOR] Can see the Create New and Create Copy buttons in Document Reference Library (DRL). Always include DRL_VIEWER in the group with this role.
[DRL_EDITOR] Can see the Edit button in DRL. Always include DRL_VIEWER in the group with this role.
[DRL_VIEWER] Can view DRL documents.
[EA_SECTION_CREATOR] Can see the Create New button on custom sections in ADMN (Data Administration) and can see the Edit button.
[EQ_ACCESS_LEVEL_EDITOR] Can edit access levels in eQ.
[EQ_TEMPLATE_CREATOR] Can create templates in eQ.
[EXTERNALLY_MANAGED_CROSS_REF_ADMIN] Can edit the GSM Cross Reference data even when the column is locked in ADMN. Can set the Managed Externally flag in ADMN. This role only applies if the system is configured for externally managed cross references.
[FACILITY_CREATOR] Can create facility records in SCRM. Always include SCRM_FACILITY_READER in the group with this role and SCRM_EDITOR.
[FRM_ OPTIMIZATION] Can access a formulation specification’s optimization tool in GSM.
[FRM_ REFRESH_HIERARCHY] Can run refresh hierarchy on formulation/Hierarchy Navigator. For single refresh, the user must have specification edit permission to all formulations that are in the hierarchy. For bulk change, the user must also have the ADMN site access role [DATA_ADMIN] or [SUPER_DATA_ADMIN].
[GSM_PRINT_ADMIN] Can create/edit the print models for process specification worksheets.
[HIDDEN_SA_VIEWER] Can search hidden SCRM sourcing approvals and can access the Show Hidden Sourcing Approvals toggle in Profile and Preferences.
Table A–1 System-based roles
Role Definition
Roles
A-4 Agile Product Lifecycle Management for Process User Group Management User Guide
[HIDDEN_SPEC_VIEWER] Can search hidden specifications and can enables the Show Hidden Specs checkbox in Profile and Preferences. To search for hidden specifications the Show Hidden Specs checkbox must be enabled.
[HIERARCHY_NAVIGATOR_VIEWER] Can access the hierarchy navigator.
[LABEL_CLAIMS_CREATOR] Can create Label Claims for trade specifications, menu item specifications, nutrient profiles, and formulation output specifications in GSM.
[LIO_CREATOR] Can create LIO profiles.
[LIO_READER] Can read LIO profiles.
[NON_SPEC_SAC_CREATOR] Can create sourcing approvals (non-specification-related only) in SCRM.
[NPD_ADMIN] Can access and create NPD (New Product Development) templates, including strategic brief TMFRs (Team Member Formulation Requirements) and project and activity templates. Can delete strategic brief TMFR templates.
This role also controls the ability to add and update activities. It is required for the Add/Update Activities button to appear for the “Activities (From Project Templates)” section of the activities page.
This role should be assigned to a relatively small and well-trained set of users.
[NPD_FINANCIAL] Has access to NPD activity metrics that have been marked as containing financial information and for which the user’s business unit matches the project’s business unit. Access is at the activity, project, and portfolio levels. This role cannot see the financial information of projects from other business units.
[NPD_GLOBAL_DATA_MANAGER] Can create and manage metrics that can be associated with activities/projects associated with NPD.
[NPD_GLOBAL_FINANCIAL] Has access to NPD activity metrics that have been marked as containing financial information globally (across all business units, regardless of business unit affiliation). Access is at the activity, project, and portfolio levels. This access should be assigned only to high-level executive managers or those who require a truly global perspective.
[NPD_IDEA_DELETER] Can see and use the Admin button to delete innovative sales pipelines (ISPs) that are not in an Approved stage.
[NPD_ISP_CREATOR] Allow the user to :
■ Create ISPs
■ Workflow ISPs where the user is designated as an owner in the workflow
■ Edit ISPs created by the user
[NPD_PACKAGE_COPY_ADMIN] Controls whether the user has access to the Package Copy Library. Also determines contents of the left navigation panel within NPD and the applications menu from the top menu bar for NPD and the cascading menu from the top menu bar.
[NPD_PARTNER] Assigned to a member of a partner organization granting members the ability to collaborate via NPD activities. Users associated with this role have limited access within NPD and are able to interact with NPD’s action items and activities.
Table A–1 System-based roles
Role Definition
Roles
System-Based Roles A-5
[NPD_PROJECT_DELETER] Can view and use the Remove Project radio button within the Project Administration section on an NPD project.
[NPD_SA] Can create, edit, and manage the workflow of projects, strategic briefs, signature documents, activities, and templates across all business units. This role should only be granted to a few users who are responsible for troubleshooting and implementing NPD worldwide. This role bypasses all document-level and business unit-specific security but does not bypass segment security.
[NPD_SA_READER] Can view all projects within NPD, regardless of document-level and business unit-specific security. This role does not bypass segment security.
[NUTRIENT_ANALYSIS_CREATOR] Can create nutrient analysis documents within the NSM application. You must have site access for REG checked on the user profile in order for this role to work properly. Always include NUTRIENT_ANALYSIS_READER in the group with this role.
[NUTRIENT_ANALYSIS_READER] Can view nutrient analyses.
[NUTRIENT_COMPARER] Can view nutrient analysis and nutrient composite documents for comparison purposes. This role can compare these documents with all available specification type nutrition information in Nutrition Surveillance Management (NSM). You must have site access for REG checked on the user profile in order for this role to work properly.
[NUTRIENT_COMPOSITE_CREATOR] Can create nutrient composite documents within the Nutrition Surveillance Management (NSM) application. You must have site access for REG checked on the user profile in order for this role to work properly. Always include NUTRIENT_COMPOSITE_READER in the group with this role.
[NUTRIENT_COMPOSITE_READER] Can view nutrient composites.
[OUTPUT_DELETER] Can delete External and Referenced outputs from a formulation.
[PERFORMANCE_ADMIN] Shows "Performance Admin" in the ADMN menu.
[PQM_ADMIN] Can create, create from template, read, write, and workflow PQM objects. This role overrides the WFA write permission. Use this role with caution.
[PQM_COPIER] Can create copies of the PQM objects that the user has PQM_CREATOR rights for.
[PQM_CREATOR_7002] Can create issues in PQM.
[PQM_CREATOR_7003] Can create actions in PQM.
[PQM_CREATOR_7004] Can create audits in PQM.
[PQS_ADMIN] Can create sessions, samples, and reporting items.
[PQS_FINAL_SCORER_ROLE] Can create a final score in Product Quality Scorecard (PQS).
[PQS_GUEST] Can see PQS sessions and samples to which this user has been assigned (for Product Quality Scorecard users).
[PQS_REPORTER] Has basic access to action items and reports only. Does not have creation access. You must have site access for Reporting checked on the user profile in order for this role to work.
[PQS_SAMPLE_CREATOR] Can see the Create New button on the sample search page and the Edit button on samples.
[PQS_SCORECARD_CREATOR] Can see the Create New button on the scorecard search page and the Edit button on scorecards.
Table A–1 System-based roles
Role Definition

Roles
A-6 Agile Product Lifecycle Management for Process User Group Management User Guide
[PQS_SESSION_CREATOR] Can see the Create New button on the session search page and the Edit button on sessions.
[PRINT_DEBUG] Within a Print dialog box, has access to the Output Format selection of XSL-FO and XML. (Otherwise, the default is PDF.) This role should only be granted to system administrators.
[READY_REPORT_ADMIN] Allows a user to access the Ready Reports administration application. This user can create ready reports as well as edit reports they originated.
[READY_REPORT_SUPER_ADMIN] Allows everything READY_REPORT_ADMIN allows, however, this role allows the user to adjust the Max Results field. Editing the Max Results field could greatly affect performance, so this role should be reserved for a more technical administrator.
[REGULATORY_FILING_CREATOR] Has access to the FSIS/Regulatory Filing button within the GSM > Trade Specification > Supporting Documents tab.
[REMOVE_CUSTOM_SECTION] Can remove custom sections.
[REMOVE_EXT_ATT] Can remove extended attributes.
[SAC_CREATOR] Can create sourcing approvals (specification-related only) in SCRM. [SCRM_COMPANY_READER] and [SCRM_FACILITY_READER] is also required.
[SCREEN_CREATOR] Has access to the Add New and Copy buttons in the CACS (Computer Aided Compliance Screening) application.
This role also determines whether CACS is displayed in the left navigation panel.
[SCRM_ADMIN] Can access the Archive/Restore features in the drop-down menus for company profiles, facility profiles and sourcing approvals.
[SCRM_COMPANY_EDITOR] Can edit SCRM company records.
Always include SCRM_COMPANY_READER in the group with this role.
[SCRM_COMPANY_READER] Can read SCRM company records.
[SCRM_COPIER] Can copy contact profiles. This role plus the corresponding creator role is required to copy an SCRM object. For example, a user must have the SCRM_COPIER and SAC_CREATOR role to copy specification-related sourcing approvals.
[SCRM_FACILITY_EDITOR] Can edit SCRM facility records.
Always include SCRM_FACILITY_READER in the group with this role.
[SCRM_FACILITY_READER] Can read SCRM facility records.
[SCRM_FACILITY_RELOCATOR] Can assign a saved facility to a different company.
[SCRM_LOGIN] Has access to the SCRM application.
[SCRM_PRINCIPAL_EDITOR] Can view and edit associated users in SCRM.
[SCRM_SEARCH] Can search for SCRM objects (companies, facilities, sourcing approvals).
[SMART_ISSUE_CREATOR] Can create smart issue requests. Always include SMART_ISSUE_EDITOR and SMART_ISSUE_READER in the group with this role.
[SMART_ISSUE_EDITOR] Can edit smart issue requests. Always include SMART_ISSUE_READER in the group with this role.
Table A–1 System-based roles
Role Definition
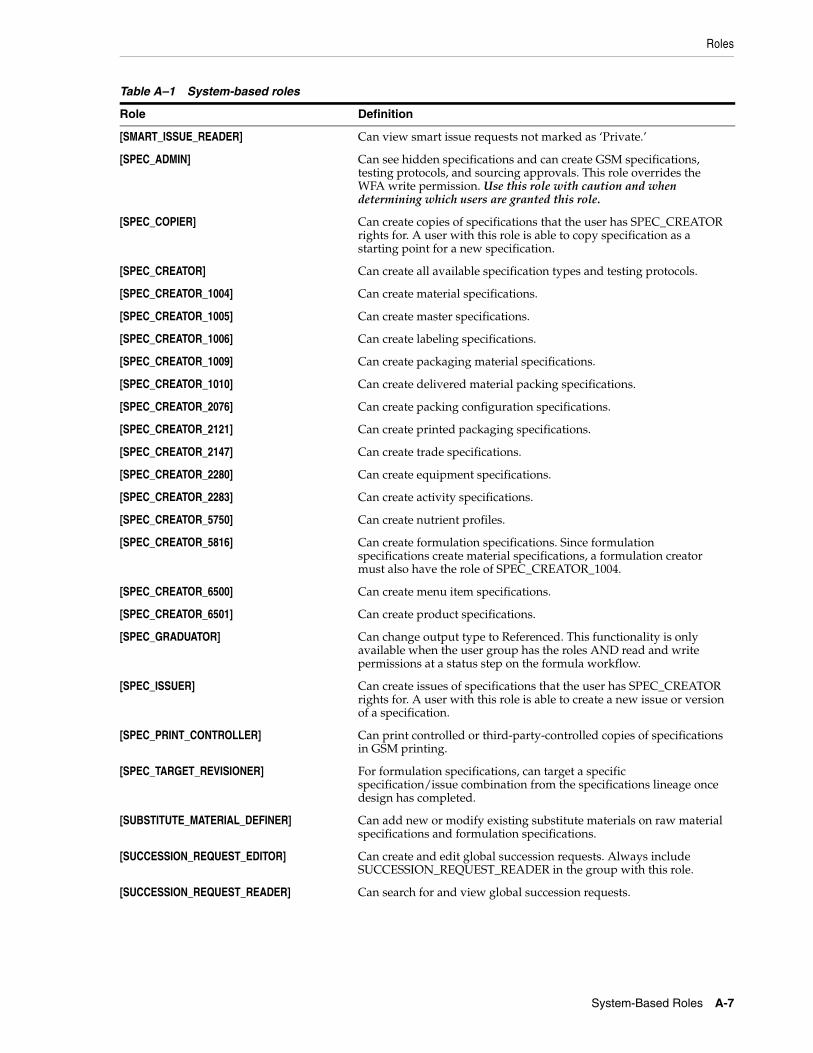
Roles
System-Based Roles A-7
[SMART_ISSUE_READER] Can view smart issue requests not marked as ‘Private.’
[SPEC_ADMIN] Can see hidden specifications and can create GSM specifications, testing protocols, and sourcing approvals. This role overrides the WFA write permission. Use this role with caution and when determining which users are granted this role.
[SPEC_COPIER] Can create copies of specifications that the user has SPEC_CREATOR rights for. A user with this role is able to copy specification as a starting point for a new specification.
[SPEC_CREATOR] Can create all available specification types and testing protocols.
[SPEC_CREATOR_1004] Can create material specifications.
[SPEC_CREATOR_1005] Can create master specifications.
[SPEC_CREATOR_1006] Can create labeling specifications.
[SPEC_CREATOR_1009] Can create packaging material specifications.
[SPEC_CREATOR_1010] Can create delivered material packing specifications.
[SPEC_CREATOR_2076] Can create packing configuration specifications.
[SPEC_CREATOR_2121] Can create printed packaging specifications.
[SPEC_CREATOR_2147] Can create trade specifications.
[SPEC_CREATOR_2280] Can create equipment specifications.
[SPEC_CREATOR_2283] Can create activity specifications.
[SPEC_CREATOR_5750] Can create nutrient profiles.
[SPEC_CREATOR_5816] Can create formulation specifications. Since formulation specifications create material specifications, a formulation creator must also have the role of SPEC_CREATOR_1004.
[SPEC_CREATOR_6500] Can create menu item specifications.
[SPEC_CREATOR_6501] Can create product specifications.
[SPEC_GRADUATOR] Can change output type to Referenced. This functionality is only available when the user group has the roles AND read and write permissions at a status step on the formula workflow.
[SPEC_ISSUER] Can create issues of specifications that the user has SPEC_CREATOR rights for. A user with this role is able to create a new issue or version of a specification.
[SPEC_PRINT_CONTROLLER] Can print controlled or third-party-controlled copies of specifications in GSM printing.
[SPEC_TARGET_REVISIONER] For formulation specifications, can target a specific specification/issue combination from the specifications lineage once design has completed.
[SUBSTITUTE_MATERIAL_DEFINER] Can add new or modify existing substitute materials on raw material specifications and formulation specifications.
[SUCCESSION_REQUEST_EDITOR] Can create and edit global succession requests. Always include SUCCESSION_REQUEST_READER in the group with this role.
[SUCCESSION_REQUEST_READER] Can search for and view global succession requests.
Table A–1 System-based roles
Role Definition
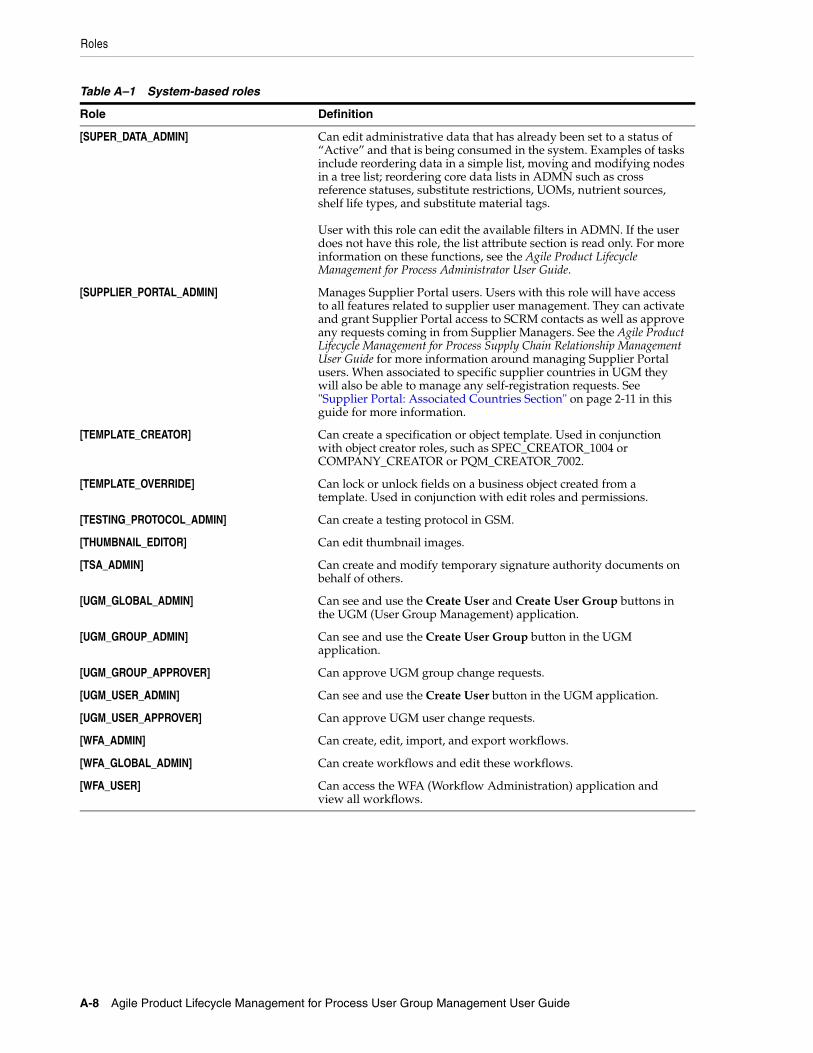
Roles
A-8 Agile Product Lifecycle Management for Process User Group Management User Guide
[SUPER_DATA_ADMIN] Can edit administrative data that has already been set to a status of “Active” and that is being consumed in the system. Examples of tasks include reordering data in a simple list, moving and modifying nodes in a tree list; reordering core data lists in ADMN such as cross reference statuses, substitute restrictions, UOMs, nutrient sources, shelf life types, and substitute material tags. User with this role can edit the available filters in ADMN. If the user does not have this role, the list attribute section is read only. For more information on these functions, see the Agile Product Lifecycle Management for Process Administrator User Guide.
[SUPPLIER_PORTAL_ADMIN] Manages Supplier Portal users. Users with this role will have access to all features related to supplier user management. They can activate and grant Supplier Portal access to SCRM contacts as well as approve any requests coming in from Supplier Managers. See the Agile Product Lifecycle Management for Process Supply Chain Relationship Management User Guide for more information around managing Supplier Portal users. When associated to specific supplier countries in UGM they will also be able to manage any self-registration requests. See "Supplier Portal: Associated Countries Section" on page 2-11 in this guide for more information.
[TEMPLATE_CREATOR] Can create a specification or object template. Used in conjunction with object creator roles, such as SPEC_CREATOR_1004 or COMPANY_CREATOR or PQM_CREATOR_7002.
[TEMPLATE_OVERRIDE] Can lock or unlock fields on a business object created from a template. Used in conjunction with edit roles and permissions.
[TESTING_PROTOCOL_ADMIN] Can create a testing protocol in GSM.
[THUMBNAIL_EDITOR] Can edit thumbnail images.
[TSA_ADMIN] Can create and modify temporary signature authority documents on behalf of others.
[UGM_GLOBAL_ADMIN] Can see and use the Create User and Create User Group buttons in the UGM (User Group Management) application.
[UGM_GROUP_ADMIN] Can see and use the Create User Group button in the UGM application.
[UGM_GROUP_APPROVER] Can approve UGM group change requests.
[UGM_USER_ADMIN] Can see and use the Create User button in the UGM application.
[UGM_USER_APPROVER] Can approve UGM user change requests.
[WFA_ADMIN] Can create, edit, import, and export workflows.
[WFA_GLOBAL_ADMIN] Can create workflows and edit these workflows.
[WFA_USER] Can access the WFA (Workflow Administration) application and view all workflows.
Table A–1 System-based roles
Role Definition


![Agile Product Lifecycle Management Agile Plug-in for ... · [1]Agile Product Lifecycle Management Monitoring Agile PLM using the Enterprise Manager User Guide Release 9.3.6 E71167-01](https://static.fdocuments.in/doc/165x107/5f3c2fbd1adcdc27e34fd85d/agile-product-lifecycle-management-agile-plug-in-for-1agile-product-lifecycle.jpg)

![Agile Product Lifecycle Management Import/Export Guide · 2020. 10. 29. · [1]Agile Product Lifecycle Management Import/Export User Guide Release 9.3.6 E71157-04 September 2020](https://static.fdocuments.in/doc/165x107/613c4d904c23507cb6354bcb/agile-product-lifecycle-management-importexport-guide-2020-10-29-1agile.jpg)