2.Material Master Data - MM01
9
MATERIAL MASTER RECORD: Definition: The material master record contains all information about the materials a company procures, manufactures, stores and ships. The data stored in the material master is not only used by Warehouse Management (WM), but also by other application components, such as Inventory Management (IM), Production Planning (PP), Quality Management (QM) and Shipping (SD-SHP). The integration of all information about a material into a single record eliminates redundancy and makes it possible to store material data for all relevant system components in a single database. Views in the Material Master Record: You maintain and display material master records using views. Just as data in the material master record is maintained for specific departments, such as quality assurance, sales or product planning, some of the data is used specifically by the Warehouse Management (WM) application. Organizational Level for Data: There are two organizational levels that can be defined for WM. In the WM view of the material master record, all the indicators and fields that are used for the entire warehouse number are entered at the warehouse number level. There is also a storage type level with all the indicators that apply to a single storage type but do not for the entire warehouse. If you enter a storage type for a material on the initial screen for the WM view, the system displays an additional section in which you can enter, for example, a fixed storage bin or a control quantity. These fields only apply to the storage type and not to the entire warehouse. INITIAL SCREEN:
description
MATERIAL MASTER
Transcript of 2.Material Master Data - MM01
MATERIAL MASTER RECORD:
Definition:
The material master record contains all information about the materials a company procures,
manufactures, stores and ships. The data stored in the material master is not only used by
Warehouse Management (WM), but also by other application components, such as Inventory
Management (IM), Production Planning (PP), Quality Management (QM) and Shipping (SD-SHP).
The integration of all information about a material into a single record eliminates redundancy and
makes it possible to store material data for all relevant system components in a single database.
Views in the Material Master Record:
You maintain and display material master records using views. Just as data in the material master
record is maintained for specific departments, such as quality assurance, sales or product planning,
some of the data is used specifically by the Warehouse Management (WM) application.
Organizational Level for Data:
There are two organizational levels that can be defined for WM. In the WM view of the material
master record, all the indicators and fields that are used for the entire warehouse number are
entered at the warehouse number level. There is also a storage type level with all the indicators that
apply to a single storage type but do not for the entire warehouse.
If you enter a storage type for a material on the initial screen for the WM view, the system displays
an additional section in which you can enter, for example, a fixed storage bin or a control quantity.
These fields only apply to the storage type and not to the entire warehouse.
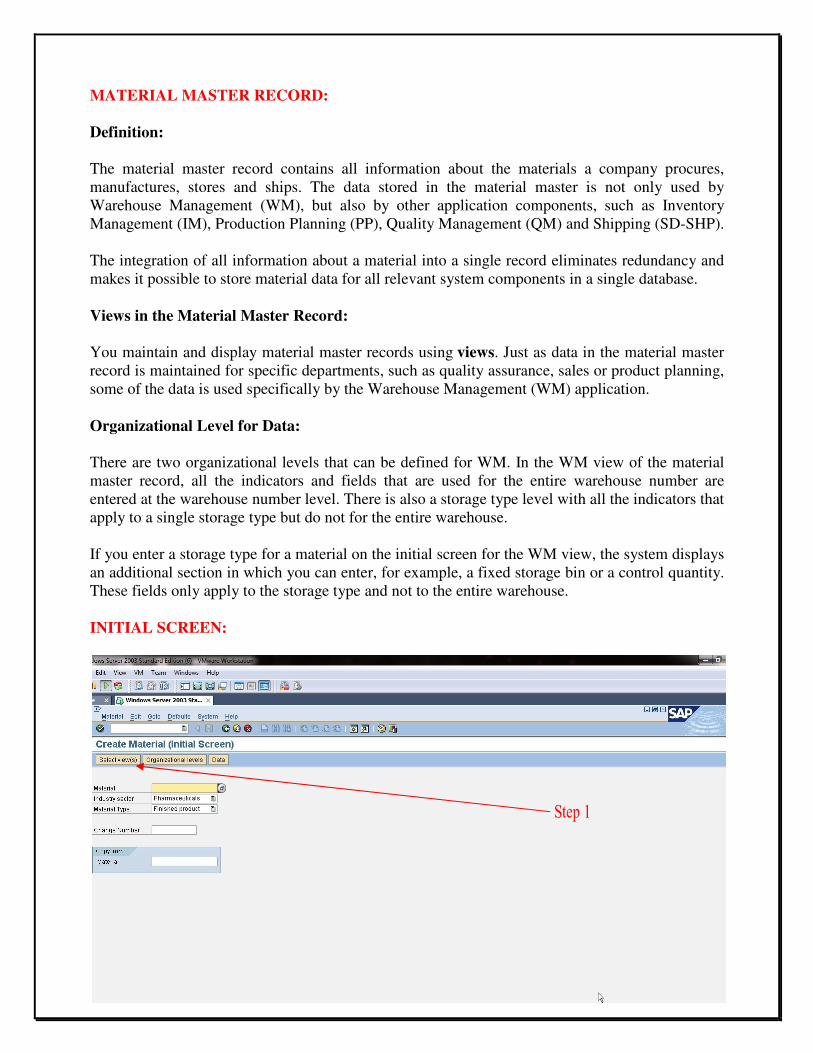
INITIAL SCREEN:
Phase 1: Material Master Data 1
SAP Easy Access PATH:
SPRO Menu � Logistics � Sales and Distribution � Master Data � Products � Material �
Other Material � MM01 – Create
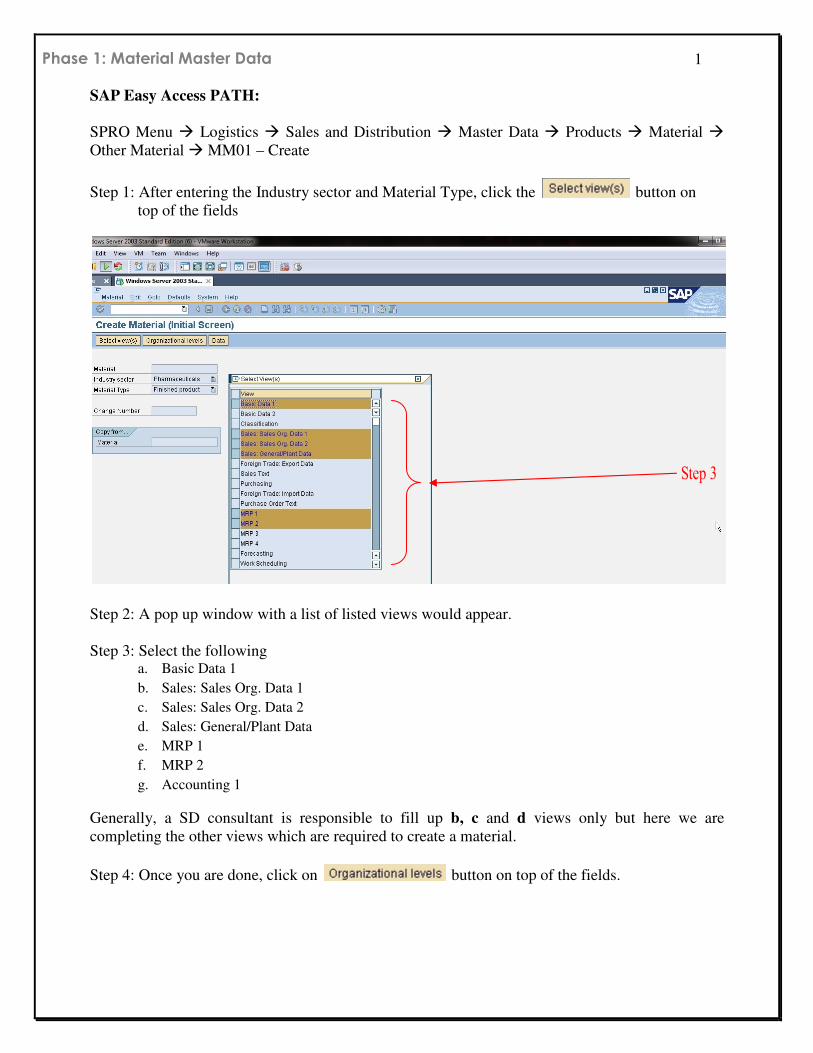
Step 1: After entering the Industry sector and Material Type, click the button on
top of the fields
Step 2: A pop up window with a list of listed views would appear.
Step 3: Select the following a. Basic Data 1
b. Sales: Sales Org. Data 1
c. Sales: Sales Org. Data 2
d. Sales: General/Plant Data
e. MRP 1
f. MRP 2
g. Accounting 1
Generally, a SD consultant is responsible to fill up b, c and d views only but here we are
completing the other views which are required to create a material.
Step 4: Once you are done, click on button on top of the fields.
Phase 1: Material Master Data 2
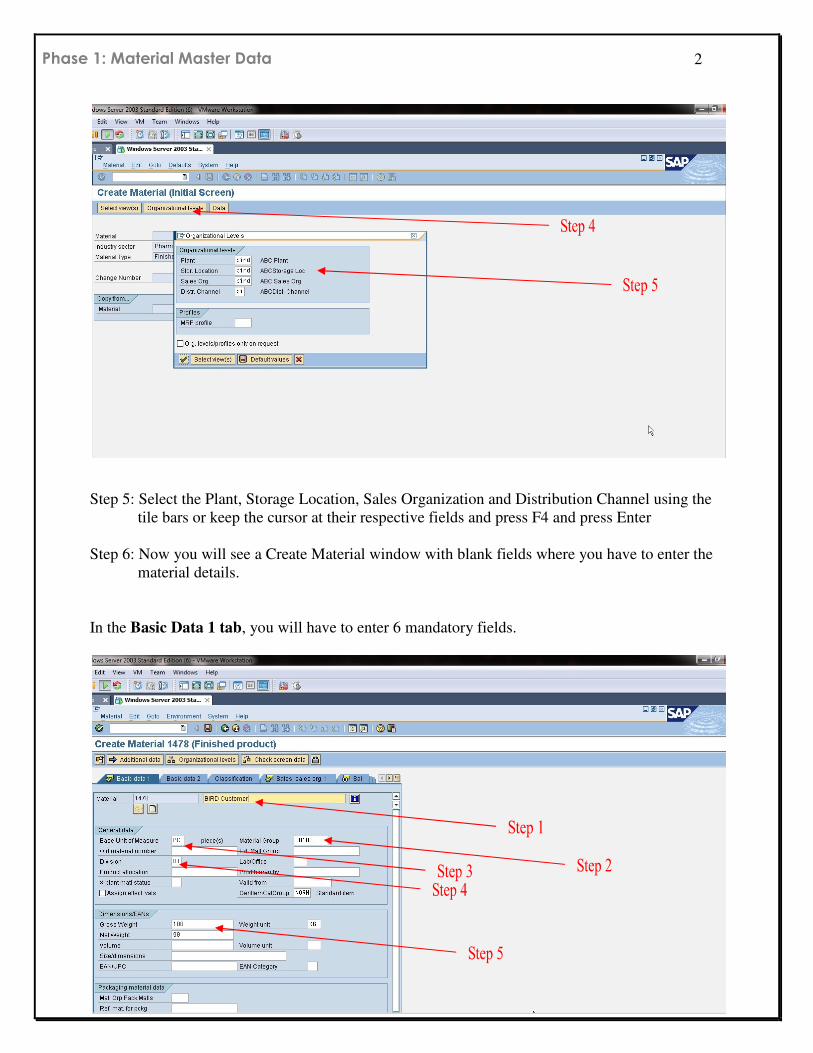
Step 5: Select the Plant, Storage Location, Sales Organization and Distribution Channel using the
tile bars or keep the cursor at their respective fields and press F4 and press Enter
Step 6: Now you will see a Create Material window with blank fields where you have to enter the
material details.
In the Basic Data 1 tab, you will have to enter 6 mandatory fields.

Phase 1: Material Master Data 3
Step 1: Enter the Material Description in the Material field (it’s a text field)
Step 2: Select the Base Unit of Measure (e.g. PC, EA) using the tilt bar or keep the cursor in the
field and press F4
Step 3: Select the Material Group (e.g. Metal, Steel, Plastic) using the tilt bar or keep the cursor
in the field and press F4
Step 4: Select the Division using the tilt bar or keep the cursor in the field and press F4
Step 5: Type the Gross Weight (Weight after packing) and Net Weight (Weight before packing).
After entering the details, click on Sales: Sales Org. Data 1 tab
In the Sales: Sales Org. Data 1 tab, you will have to enter only 2 mandatory fields.
Step 1: Select the Division using the tilt bar or keep the cursor in the field and press F4
Step 2: Select the Tax Classification (e.g. Output tax) using the tilt bar or keep the cursor in the
field and press F4
Phase 1: Material Master Data 4
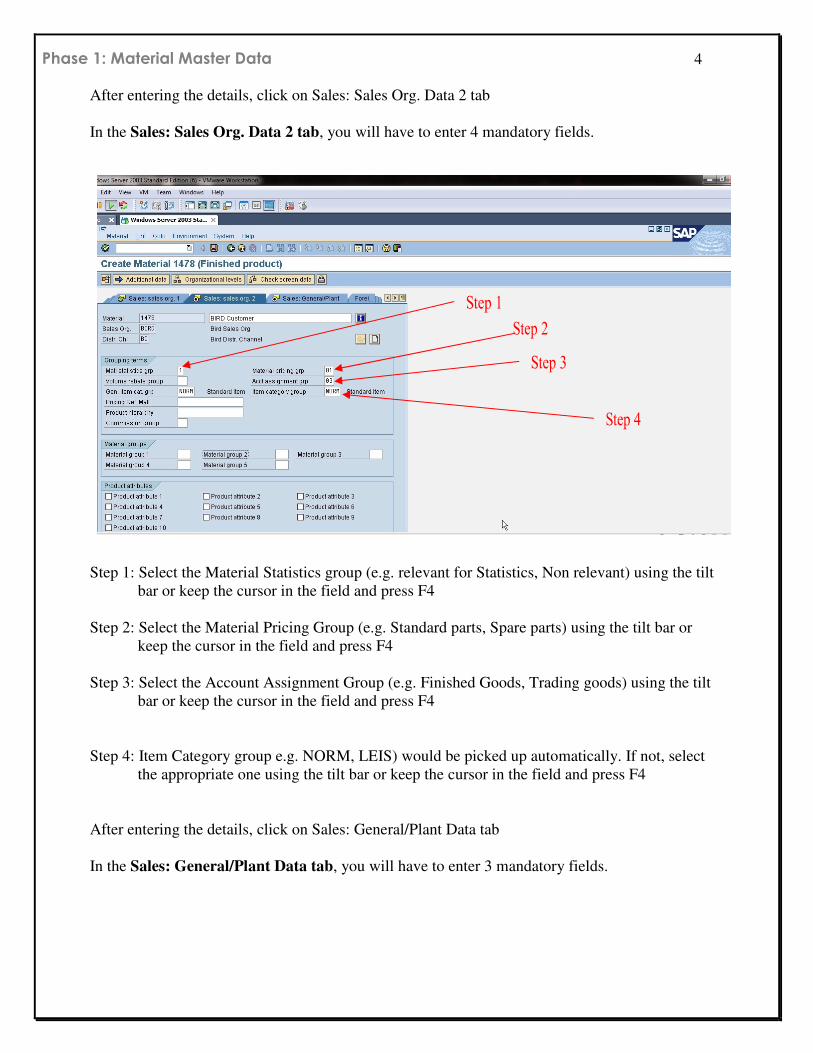
After entering the details, click on Sales: Sales Org. Data 2 tab
In the Sales: Sales Org. Data 2 tab, you will have to enter 4 mandatory fields.
Step 1: Select the Material Statistics group (e.g. relevant for Statistics, Non relevant) using the tilt
bar or keep the cursor in the field and press F4
Step 2: Select the Material Pricing Group (e.g. Standard parts, Spare parts) using the tilt bar or
keep the cursor in the field and press F4
Step 3: Select the Account Assignment Group (e.g. Finished Goods, Trading goods) using the tilt
bar or keep the cursor in the field and press F4
Step 4: Item Category group e.g. NORM, LEIS) would be picked up automatically. If not, select
the appropriate one using the tilt bar or keep the cursor in the field and press F4
After entering the details, click on Sales: General/Plant Data tab
In the Sales: General/Plant Data tab, you will have to enter 3 mandatory fields.

Phase 1: Material Master Data 5
Step 1: Select the Availability Check (e.g. Daily requirements, Individual) using the tilt bar or keep
the cursor in the field and press F4
Step 2: Select the Transportation Group (e.g. On palettes, truck) using the tilt bar or keep the
cursor in the field and press F4
Step 3: Select the Loading Group (e.g. Crane, Manual) using the tilt bar or keep the cursor in the
field and press F4
After entering the details, click on MRP 1 tab
In the MRP 1 tab, you will have to enter 3 mandatory fields.
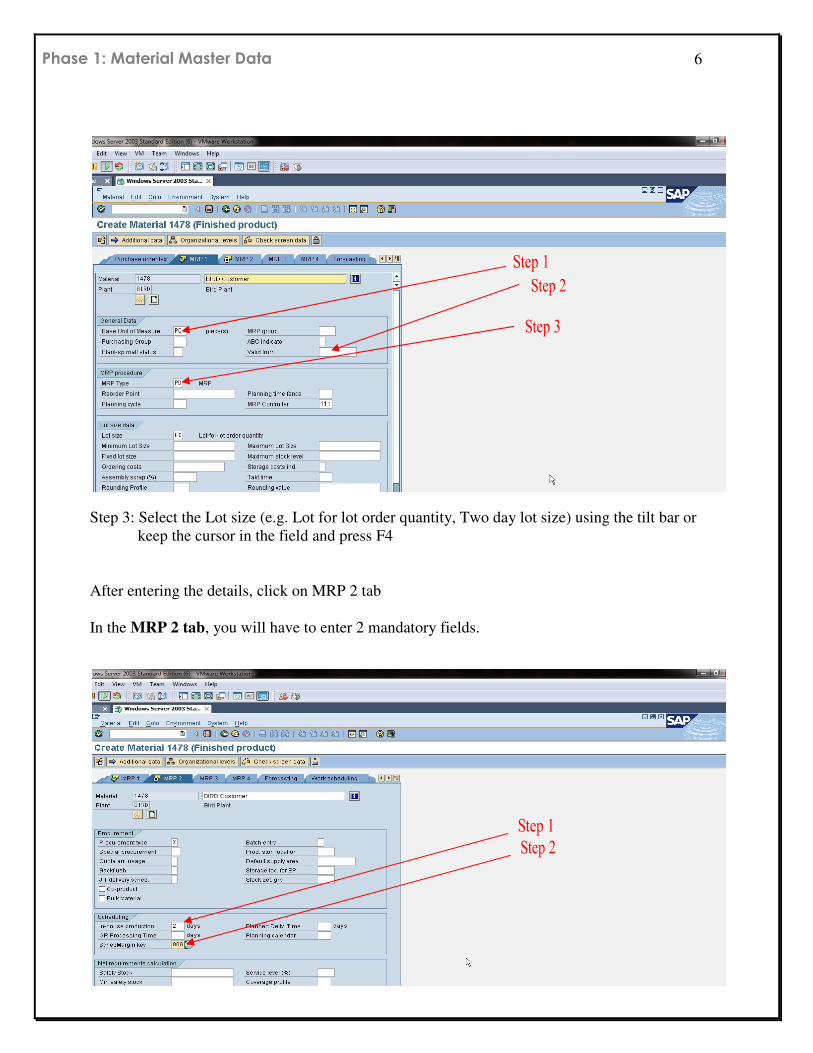
Step 1: Select the MRP Type (e.g. PD, ND) using the tilt bar or keep the cursor in the field and
press F4
Step 2: Select the MRP Controller (employees who are controlling) using the tilt bar or keep the
cursor in the field and press F4
Phase 1: Material Master Data 6
Step 3: Select the Lot size (e.g. Lot for lot order quantity, Two day lot size) using the tilt bar or
keep the cursor in the field and press F4
After entering the details, click on MRP 2 tab
In the MRP 2 tab, you will have to enter 2 mandatory fields.

Phase 1: Material Master Data 7
Step 1: Select the In-house production (no. of days for the production) using the tilt bar or keep the
cursor in the field and press F4
Step 2: Select the Schedule Margin key using the tilt bar or keep the cursor in the field and press
F4
After entering the details, click on Accounting 1 tab
In the Accounting 1 tab, you will have to enter 2 mandatory fields.
Step 1: Select the Valuation Class (e.g.7920 for Finished goods) using the tilt bar or keep the
cursor in the field and press F4
Step 2: Select the Standard price (actual cost of the material) using the tilt bar or keep the cursor in
the field and press F4.
Step 3: Press Enter and Save. A pop window will appear with a transport request. Press Enter or
click to continue.
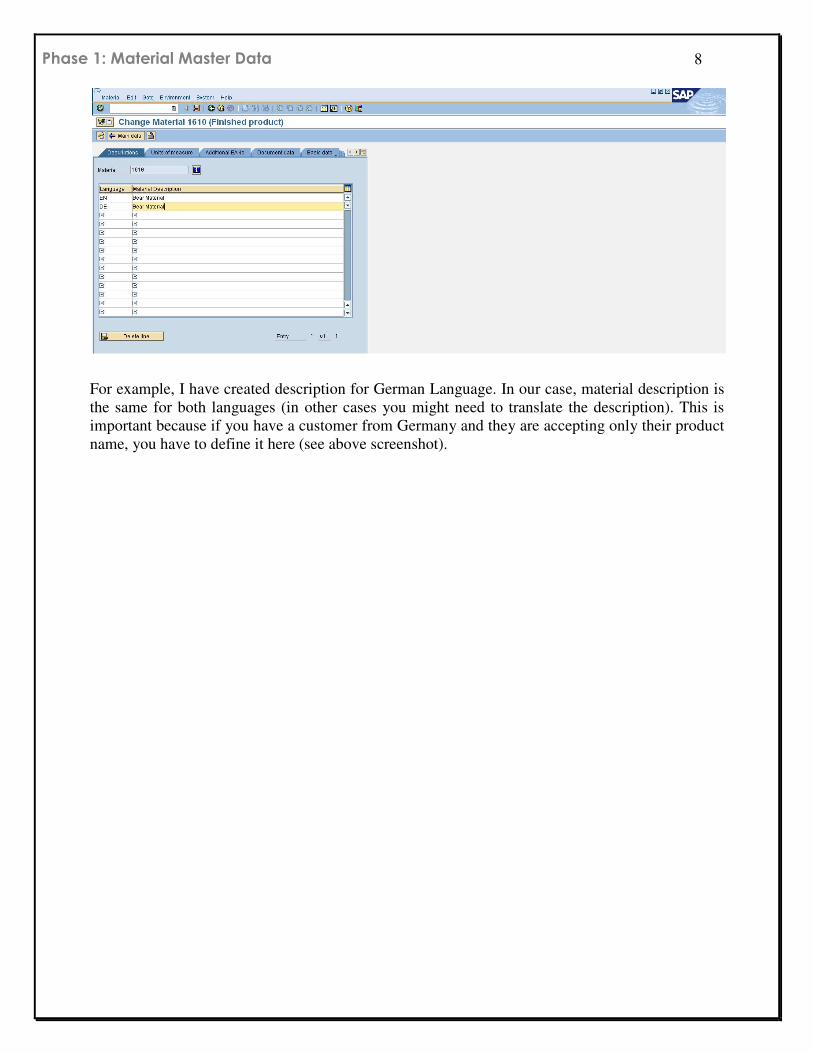
Besides material master views, we have another level of maintenance in MM01 transaction. It is
also with no. reference to organizational levels. From any view in material master you can choose
“Additional Data” button. In additional data, we can define descriptions for any other language
needed.
Phase 1: Material Master Data 8
For example, I have created description for German Language. In our case, material description is
the same for both languages (in other cases you might need to translate the description). This is
important because if you have a customer from Germany and they are accepting only their product
name, you have to define it here (see above screenshot).