2014 NAVIGATION SYSTEM - Nissan USA NAVIGATION SYSTEM OWNER’S MANUAL For your safety, read...
252
→ 2014 NAVIGATION SYSTEM OWNER’S MANUAL For your safety, read carefully and keep in this vehicle.
Transcript of 2014 NAVIGATION SYSTEM - Nissan USA NAVIGATION SYSTEM OWNER’S MANUAL For your safety, read...

®
2014 NAVIGATIONSYSTEM
OWNER’S MANUAL
For your safety, read carefully and keep in this vehicle.
20
14
NIS
SA
N N
AV
IGA
TIO
N S
YS
TE
M8
NA
V-N
8NAV-N
Printing : June 2013 (07)Publication No.:
Printed in U.S.A.N14E 08NUU0

NISSAN NAVIGATION SYSTEM HELP-DESK CONTACT INFORMATION
For assistance or inquiries about the NISSAN
Navigation System, or to order updated map
data, contact the NISSAN NAVIGATION SYS-
TEM HELPDESK at:
• ADDRESS: P.O. Box 1588,
Orem, UT 84059-992
• E-MAIL: [email protected]
• WEB SITE: www.NissanNavigation.com or
www.nissan.ca
• PHONE: 1-888-661-9995
• HOURS: 6:00 AM to 5:00 PM
(Pacifi c Time)
NISSAN CONSUMER AFFAIRS DE-PARTMENT
For assistance or inquiries about the NISSAN
warranty, service or general questions, contact
the NISSAN Consumer Affairs Department at:
For U.S. customers
Nissan North America, Inc.
Consumer Affairs Department
P.O. Box 685003
Franklin, TN 37068-5003
1-800-NISSAN-1
(1-800-647-7261)
For Canadian customers
Nissan Canada Inc.
5290 Orbitor Drive
Mississauga, Ontario L4W 4Z5
1-800-387-0122
Thank you for purchasing a NISSAN vehicle.
This user’s manual is for the navigation system
only. This manual contains operating instructions
for the NISSAN Navigation System offered in
your NISSAN vehicle.
Please read this manual carefully to ensure safe
operation of the navigation system.
• Because of possible specifi cation changes
and optional equipment, sections of this
manual may not apply to your vehicle.
• All information, specifi cations and illustra-
tions in this manual are those in effect at the
time of printing. NISSAN reserves the right to
change specifi cations or design at any time
without notice.
• Do not remove this manual from the vehicle
when selling this vehicle. The next user of this
navigation system may need the manual.
FOREWORD
NISSAN NAVIGATION SYSTEM HELP-DESK CONTACT INFORMATIONFor assistance or inquiries about the NISSANNavigation System, or to order updated mapdata, contact the NISSAN NAVIGATION SYS-TEM HELPDESK at:
. ADDRESS: P.O. Box 1588, Orem, UT84059-992
. E-MAIL: [email protected]
. WEB SITE: www.NissanNavigation.com orwww.nissan.ca
. PHONE: 1-888-661-9995
. HOURS: 6:00 AM to 5:00 PM (PacificTime)
NISSAN CONSUMER AFFAIRS DE-PARTMENTFor assistance or inquiries about the NISSANwarranty, service or general questions, contactthe NISSAN Consumer Affairs Department at:
For U.S. customers
Nissan North America, Inc.
Consumer Affairs Department
P.O. Box 685003
Franklin, TN 37068-5003
1-800-NISSAN-1
(1-800-647-7261)
For Canadian customers
Nissan Canada Inc.
5290 Orbitor Drive
Mississauga, Ontario L4W 4Z5
1-800-387-0122
Thank you for purchasing a NISSAN vehicle.
This user’s manual is for the navigation systemonly. This manual contains operating instructionsfor the NISSAN Navigation System offered inyour NISSAN vehicle.
Please read this manual carefully to ensure safeoperation of the navigation system.
. Because of possible specification changesand optional equipment, sections of thismanual may not apply to your vehicle.
. All information, specifications and illustra-tions in this manual are those in effect at thetime of printing. NISSAN reserves the rightto change specifications or design at anytime without notice.
. Do not remove this manual from the vehiclewhen selling this vehicle. The next user ofthis navigation system may need the manual.
FOREWORD


Introduction 1
Getting started
Map settings
Setting destination
Route guidance
Storing location/route
Viewing technical information
Other settings
Voice recognition
General system information
Troubleshooting guide
Index
2
3
4
5
6
7
8
9
10
11
12
Contents

1 Introduction
How to use this manual .......................................................... 1-2
For safe operation ............................................................... 1-2
Reference symbols ............................................................. 1-2
Safety information ..................................................................... 1-2
Laser product ............................................................................ 1-3

1-2 Introduction
This manual uses special words, symbols andicons that are organized by function.
Please refer to the following items to understandhow to use this manual properly.
FOR SAFE OPERATION
WARNING
Indicates the presence of a hazard thatcould cause death or serious personalinjury. To avoid or reduce the risk, theprocedures must be followed precisely.
CAUTION
Indicates the presence of a hazard thatcould cause minor or moderate perso-nal injury or damage to your vehicle. Toavoid or reduce the risk, the proceduresmust be followed carefully.
NOTE:
Indicates items that help you understandand maximize the performance of yourvehicle. If ignored, they may lead to amalfunction or poor performance.
REFERENCE SYMBOLS
INFO:
Indicates information that is necessary forefficient use of your vehicle or accessories.
Reference page:
Indicates the title and page that you should referto.
<>:
Indicates a button on the control panel.
[ ]:
Indicates a key/item displayed on the screen.
Voice Command:
Indicates an operation by voice command.
Variable commands, such as numbers, areindicated in italics in parentheses < >.
This system is primarily designed to help youreach your destination, and it also performsother functions as outlined in this manual.However, you, the driver, must use the systemsafely and properly. Information concerning roadconditions, traffic signs and the availability ofservices may not always be up to date. Thesystem is not a substitute for safe, proper andlegal driving.
Before using the navigation system, please readthe following safety information. Always use thesystem as outlined in this manual.
WARNING
. To operate the navigation system oruse the multi-function controller,first park the vehicle in a safelocation and set the parking brake.Operating the system while drivingcan distract the driver and mayresult in a serious accident.
. Do not rely on route guidance alone.Always be sure that all drivingmaneuvers are legal and safe inorder to avoid accidents.
. Do not disassemble or modify thissystem. If you do, it may result inaccidents, fire or electrical shock.
HOW TO USE THIS MANUAL SAFETY INFORMATION

. If you notice any foreign objects inthe system hardware, spill liquid onthe system or notice smoke or asmell coming from it, stop using thesystem immediately and contact aNISSAN dealer. Ignoring such con-ditions may lead to accidents, fire orelectrical shock.
CAUTION
. Do not use this system if you noticeany malfunctions such as a frozenscreen or the lack of sound. Con-tinued use of the system may resultin accidents, fire or electrical shock.
. Some states/provinces may havelaws limiting the use of videoscreens while driving. Use this sys-tem only where it is legal to do so.
. Extreme temperature conditions[below −48F (−208C) and above1588F (708C)] could affect the per-formance of the system.
. The glass display screen may breakif it is hit with a hard or sharp object.If the glass screen breaks, do not
touch it. Doing so could result in aninjury.
NOTE:
Do not keep the navigation system runningwith the engine or the hybrid systemstopped. Doing so may discharge thevehicle battery (12V battery). When youuse the navigation system, always keepthe engine or the hybrid system running.
This navigation system is certified as a Class 1laser product.
The navigation system complies with DHHSRules 21 CFR Chapter 1, Subchapter J.
WARNING
. Do not disassemble or modify thissystem. There are no user service-able parts in this navigation system.
. If maintenance, adjustments andoperations other than those speci-fied in this manual are attempted,injury due to laser radiation andexposure could occur.
Required SiriusXM Satellite Radio and NavTraf-fic monthly subscriptions are sold separately.NavTraffic are only available in select markets.For more information,
see www.siriusxm.com/navtraffic.
Introduction 1-3
LASER PRODUCT

1-4 Introduction
Required SiriusXM Satellite Radio and Nav-WeatherXM monthly subscriptions are soldseparately. NavWeatherXM is only available inselect markets. For more information,
see www.siriusxm.com/navweather.

2 Getting started
Control buttons and functions ............................................... 2-2
Control panel ........................................................................ 2-2
Multi-function controller ................................................... 2-5
Steering wheel switch ....................................................... 2-5
Starting the system ................................................................... 2-7
Navigation system status screen .......................................... 2-7
Functions disabled while driving ........................................... 2-8
Menu screen and how to operate ..................................... 2-10
Menu screens and their purposes ............................... 2-10
Using controls to adjust values, levels, etc. .............. 2-11
Start menu ......................................................................... 2-12
List screen ......................................................................... 2-13
Touch panel operation .......................................................... 2-14
Example of touch panel operation ............................... 2-14
How to input letters and numbers ..................................... 2-15
Character (letters and numbers) input screen ......... 2-15
Number input screen ....................................................... 2-16
Map menu screen ................................................................. 2-17
Current location map screen ...................................... 2-17
Scrolled location map screen ..................................... 2-18
Storing home location/address .......................................... 2-18
How to store home location ....................................... 2-18
Setting destination ................................................................ 2-20
Searching for destination ............................................. 2-20
Starting route guidance ................................................ 2-21
Canceling route .............................................................. 2-21
Operating maps ..................................................................... 2-22
How to view map screen ............................................. 2-22
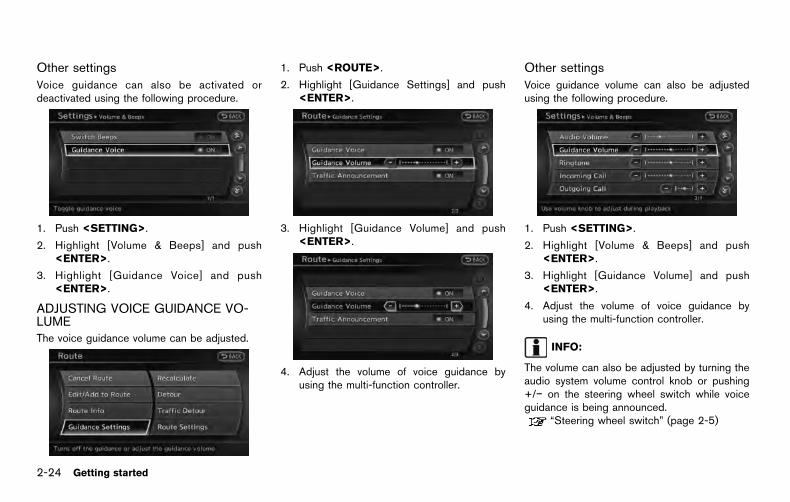
Setting voice guidance ........................................................ 2-23
Turning voice guidance ON/OFF ............................... 2-23
Adjusting voice guidance volume .............................. 2-24
NISSAN voice recognition .................................................. 2-25
Using the system ........................................................... 2-25
Before starting ................................................................ 2-25
Giving voice commands ............................................... 2-25
Command list .................................................................. 2-27

2-2 Getting started
CONTROL PANEL
Type A
Type B
CONTROL BUTTONS ANDFUNCTIONS

Type C
Type D
Getting started 2-3

2-4 Getting started
Type E
*1 <STATUS>:
Push multiple times to display audio in-formation with either the air conditionerstatus, fuel economy or navigation direc-tions.
*2 <DEST>:
Push to enter a destination. Various meth-ods for entering a destination are available.
“4. Setting destination”
*3 <ROUTE>:
Push to access guidance control functions(guidance cancellation, route priority, way-point setting on the route, etc.).
*4 Multi-function controller:
Turn to highlight an item on the screen,push to select the highlighted item or scrollthe map.
*5 <INFO>:
Push to display the vehicle, traffic, weatheror voice recognition information.
*6 <DAY/NIGHT OFF> :
Push to switch between the day screen(bright) and the night screen (dark). Pushand hold to turn off the display. Push againto turn on the display.
*7 <SETTING>:
Push to access the system settings.
*8 <VOICE>:
Push to hear the current guidance for aprogrammed route.
*9 <BACK>:
Push to return to the previous screen. In asettings screen, this button can also beused to apply the setting.
In a character input screen, this button canalso delete the characters that have beenentered.
*10 <MAP>:
Push to display the map. While followingprogrammed route, push multiple times tochange the type of route information.
*11 <ZOOM IN>, <ZOOM OUT>:
Push to switch to the zoom mode tochange the map scale.
*12 <DISP>/<DISPLAY>:
Push to access the display settings.
INFO:
. If <BACK> needs to be pushed to applythe setting on a settings screen, this manualwill explicitly include a step for this proce-dure. Otherwise, pushing <BACK> returnsthe display to the previous screen.
. The layout of the control panel switches mayvary depending on the vehicle model andequipment.

MULTI-FUNCTION CONTROLLER
With Directional buttons
*1 <ENTER>:
Push to select the highlighted item on thescreen.
If this button is pushed while a map isdisplayed, the map menu screen is dis-played.
*2 Main directional buttons:
Use to move across the map, highlight anitem on the screen or adjust a setting(volume, brightness, etc.).
*3 Additional directional buttons:
Use to move across the map or highlight anitem on the character input screen.
*4 Center dial:
Turn to highlight an item on the screen oradjust a setting.
Turn the center dial on the map screen. Themap scale is displayed. Use the center dialto adjust the map scale.
Without Directional buttons
*1 <ENTER>:
Push to select the highlighted item on thescreen.
If this button is pushed while a map isdisplayed, the map menu screen is dis-played.
*2 Center dial/Slide switch:
Center dial
Turn to highlight an item on the screen oradjust a setting.
The center dial can also be used to adjustthe map scale.
Slide switch
Slide (push upward/downward/leftward/rightward) to select an item on the screenor to adjust a setting (volume, brightness,etc.)
The map can be scrolled in 8 directions bysliding this switch.
STEERING WHEEL SWITCH
Type A
Getting started 2-5

2-6 Getting started
Type B
Type C
*1 <ENTER>:
Tilt to highlight an item on the screen oradjust a setting. Push to select the high-lighted item.
If this button is pushed while a map isdisplayed, the map menu screen is dis-
played.“Map menu screen” (page 2-17)
Push and hold while a map or status screenis shown to display the Start Menu.
“Start menu” (page 2-12)
If this button is tilted up while the audiofunction is activated and the map or statusscreen is displayed, the audio system canbe operated.
*2 < >:
Push this button during a setting operationto return to the previous screen. In asettings screen, this button can also beused to apply the setting.
*3 <− +>:
Use to adjust the volume. These buttonshave the same function as that of thevolume control knob. Refer to the vehicleOwner’s Manual.
*4 <TALK >:
Push to start the voice recognition mode. Ifthe voice recognition mode is alreadyactivated, pushing this button cancels thevoice guidance and you can speak a voicecommand immediately.
*5 < >:
Push to display the phone mode screen.
Refer to the vehicle Owner’s Manual.
*6 <SOURCE> :
Use to switch the audio mode (source).
Refer to the vehicle Owner’s Manual.
*7 < >:
Push to change what is shown on thevehicle information display.
Refer to the vehicle Owner’s Manual.

The navigation system starts when the ignitionswitch is placed in the ACC or ON position.
NOTE:
Do not keep the navigation system on withthe engine or the hybrid system stopped.Doing so may discharge the vehicle battery(12V battery). When you use the navigationsystem, always keep the engine or thehybrid system running.
By pushing <STATUS> at anytime, you candisplay a split screen with audio information thatis always at the top. Each time <STATUS> ispushed, the bottom part of the screen changesbetween air conditioner, fuel economy or navi-gation directions.
INFO:
There are different status screens displayeddepending on various factors, such as thecurrently active mode, whether a destinationhas been set or not, etc.
When a route to the destination is set and theaudio system is on, a screen similar to the oneabove appears.
*1 Turning direction at the next intersection
*2 Name of the next street
*3 Distance to the next intersection
*4 Distance remaining to the destination
*5 Remaining time to the destination
When a route to the destination is not set andthe audio system is off, a screen similar to theone above appears.
Getting started 2-7
STARTING THE SYSTEM NAVIGATION SYSTEM STATUSSCREEN

2-8 Getting started
To ensure safe driving, some functions cannotbe operated or have limited operation when thevehicle driving speed is above 5 MPH (8 km/h).
The on-screen text and keys for these restrictedfunctions will be "grayed-out" or muted andcannot be selected while driving. In some cases,a screen message will appear indicating arestricted function.
Restricted functions while driving include:
. Character (letter and number) input screenduring destination entry (street address,phone number, freeway entrance/exit, inter-section, city center)
. Places search by name and city name
. Scrolling and viewing of certain navigationlists
. Adding/editing address book entries
. Adding/editing home location
. Storing current position, information, desti-nations
These functions will become available againwhen the vehicle speed is reduced to 5 MPH (8km/h).
Destination functions available while drivinginclude:
FUNCTIONS DISABLED WHILEDRIVING

. Home
. Address Book
. Previous Destinations
. Nearby places
. Address book
. My places
. Map input
Getting started 2-9

2-10 Getting started
MENU SCREENS AND THEIR PUR-POSESPush <DEST> , <ROUTE> , <INFO> ,<SETTING> or <PHONE> (if so equipped)to display the corresponding menu screen.
How to select a menu itemExample: <DEST> screen
1. Highlight the preferred menu item using themulti-function controller.
2. To select the preferred menu item, highlightthe item and push <ENTER>. The nextscreen is displayed.
3. Push <BACK> to return to the previousscreen without applying any changes.
Push <MAP> to return to the currentlocation map screen without applying anychanges.
INFO:
An item can also be selected by tilting<ENTER> on the steering wheel up and down.
MENU SCREEN AND HOW TOOPERATE

USING CONTROLS TO ADJUST VALUES, LEVELS, ETC.
With directional buttons
Getting started 2-11

2-12 Getting started
Without directional buttons
There are five main methods to control thenavigation system: the center dial, the maindirectional buttons, the slide switch, the touchpanel and the switches on the steering wheel.Use these controls to adjust the volume of thephone and voice guidance, the display bright-ness, etc.
How to adjust1. Highlight the preferred setting item and
push <ENTER>. The color of the corre-sponding adjustment item changes.
2. Adjust the value or level of the indicator barusing the multi-function controller.
3. Push <ENTER> or <BACK> to apply thesetting.
INFO:
. The volume of phone and voice guidance,the display brightness, etc. can be adjustedby tilting <ENTER> on the steering wheelup and down.
. These same adjustments can also beperformed using the touch panel operation.
“Adjusting volume and others”(page 2-14)
START MENUThe start menu can be displayed using thesteering wheel switch.
1. Push and hold <ENTER> on the steeringwheel.
2. Highlight the preferred item and push<ENTER>.
INFO:
<ENTER> on the steering wheel switch can beused to display the start menu only when themap or status screen is displayed.

Available items. [Destination]:
Displays the destination screen. It is thesame screen that appears when <DEST> ispushed.
“4. Setting destination”
. [Route]:
Displays the route screen. It is the samescreen that appears when <ROUTE> ispushed.
“5. Route guidance”
. [Info]:
Displays the information screen. It is thesame screen that appears when <INFO> ispushed.
“7. Viewing technical information”
. [Settings]:
Displays the settings screen. It is the samescreen that appears when <SETTING> ispushed.
“8. Other settings”
LIST SCREEN
After searching for a point of interest, a listscreen is displayed.
Depending on the list displayed, it can besorted.
Items displayed in a list
*1 Highlight the preferred item from the listand push <ENTER> to select it. If alocation or facility name is not completelydisplayed (due to length), highlight the itemto display the hidden part of the name.
*2 Distance from the current location
*3 Direction to the point of interest
*4 If the entire list cannot be displayed on thescreen, the system displays the totalnumber of items in the list and the entrynumber of the selected item. Scroll the listusing the multi-function controller.
*5 An item that starts with the selected letterwill be displayed at the top of the list.
Getting started 2-13

2-14 Getting started
*6 Highlight and push <ENTER> to sort thelist in the original order.
*7 When the list is sorted by the shortestdistance, the selected location can beconfirmed in the preview on the right sideof the screen.
*8 Highlight and push <ENTER> to modifysearch conditions.
With this system, the same operations as thosefor the multi-function controller are possibleusing the touch panel operation.
This manual describes the operations using themulti-function controller.
For the operations that differ from those of themulti-function controller and for useful methodsfor using the touch panel operation, refer to eachsection.
EXAMPLE OF TOUCH PANEL OPERA-TIONHere, the operation examples performed withthe touch panel operation are described.
Selecting item
When the item is touched, the next screen isdisplayed.
Adjusting volume and others
Touch [+] or [−] located on the right and left ofthe bar graph to perform the adjustment.
Scrolling message or list
Touch [ ] or [ ] to scroll the message or list.
Touch [ ] or [ ] to skip to the next page.
TOUCH PANEL OPERATION

Inputting letters and numbers
1. Touch the letter or number.
2. To delete a character, touch [Delete]. Pushand hold [Delete] to delete all of thecharacters.
CHARACTER (letters and numbers) IN-PUT SCREENWhen setting a destination, searching for afacility or editing the stored locations, etc.alphanumeric characters must be entered intothe system.
1. Use the multi-function controller to highlighta character on the displayed keyboard.
2. Push <ENTER>. The highlighted characteris entered.
3. Push <BACK>, or highlight [Delete] andpush <ENTER> to delete the last characterentered.
Push and hold <BACK> to delete all thecharacters entered.
Highlight [Space] and push <ENTER> toenter a space.
4. After finishing the entry, highlight [List] andpush <ENTER>.
Getting started 2-15
HOW TO INPUT LETTERS ANDNUMBERS

2-16 Getting started
INFO:
. Push <BACK> on the control panel toreturn to the previous screen, but only afterdeleting all the characters entered.
. When [BACK] is touched on the screen, thescreen returns to the previous screen evenwhen characters have been entered.
. When text has been entered and the numberof matching list items has been narroweddown enough so that they fit on the screen,the list screen appears automatically.
Symbol input screen
INFO:
Symbol keys are displayed by highlighting[Symbols] and pushing <ENTER>. Alphabetkeys are displayed by highlighting [A-Z] andpushing <ENTER>.
NUMBER INPUT SCREENA phone number or a street number can also beentered as a search method to look for adestination.
INFO:
Only the locations included in the map datadatabase can be searched for by a phonenumber.
1. Use the multi-function controller to highlighta number on the displayed keyboard.
2. Push <ENTER>. The highlighted number isentered.
3. Push <BACK>, or highlight [Delete] andpush <ENTER> to delete the last numberentered.
Push and hold <BACK> to delete all thenumbers entered.
4. After finishing the entry, highlight [List] andpush <ENTER>.

INFO:
. <BACK> can be pushed on the controlpanel to return to the previous screen, butonly after deleting all the numbers entered.
. When [BACK] is touched on the screen, thescreen returns to the previous screen evenwhen numbers have been entered.
Push <ENTER> while the current location mapscreen or a scrolled map screen is displayed todisplay the menu corresponding to that screen.
This menu can be used to access helpfulfunctions quickly, such as setting a destinationand searching for points of interest nearby.
To select a menu item, use the methoddescribed earlier in this manual.
“Menu screen and how to operate”(page 2-10)
INFO:
With the touch operation, the same screen canbe displayed by touching [Map Menu] locatedon the map screen.
CURRENT LOCATION MAP SCREEN
If <ENTER> is pushed while the currentlocation map screen is displayed, the followingoptions are available.
. [Store Location]:
Store the current vehicle location in theAddress Book. The stored location can beretrieved as necessary to set it as adestination (waypoint).
“Storing location” (page 6-2)
. [Nearby Places]:
Search for points of interest near the currentvehicle location, such as restaurants andgas stations, etc.
“Finding nearby place” (page 4-5)
. [Map View]:
Perform map operations such as the switch-ing of map type and the setting of maporientation and scale.
“3. Map settings”
. [Map Icons]:
Select map icons of certain points of interest(such as restaurants and gas stations, etc.)to be displayed on the map around thecurrent vehicle location.
“Displaying map icons” (page 3-17)
. [Store Tracking]:
Store in the Address Book the routetravelled from the starting point to thecurrent location.
“Storing tracked route” (page 6-6)
Getting started 2-17
MAP MENU SCREEN

2-18 Getting started
SCROLLED LOCATION MAP SCREEN
If <ENTER> is pushed while a scrolled mapscreen is displayed, the following options areavailable.
. [New Dest.]:
Set the destination to the map locationwhere <ENTER> was pushed. If a destina-tion is already set, the location will be set asthe new destination.
“Setting point on map” (page 4-19)
. [Add to Route]:
Set the map location where <ENTER> waspushed as a destination or a waypoint.
This is available only when the suggestedroute is already set.
“Setting destination or waypoint”(page 5-14)
. [Nearby Places]:
Search for points of interest near the maplocation where <ENTER> was pushed and
set them as a destination or waypoint.
Use the same search method as the one for[Places].
“Finding nearby place” (page 4-5)
. [Store Location]:
Store in the Address Book the map locationwhere <ENTER> was pushed. The storedlocation can be retrieved to set it as adestination or waypoint.
“Storing location” (page 6-2)
. [Delete]:
Delete a stored location. To delete it, placethe cross pointer over the correspondingicon.
. [Incident Detail]:
This function can be selected only when thetraffic information icon is displayed.
Display the details of the traffic informationicon.
Place the cross pointer over the icon youwant to check.
INFO:
Incident details are a feature of Traffic Informa-tion, and that a NavTraffic subscription isrequired in order to receive Traffic Information.
HOW TO STORE HOME LOCATIONIf a home location is already stored in theAddress Book, it can be easily retrieved to setthe route to the stored home location.
The procedure to store the home location is thesame as for storing any other location.
“4. Setting destination”
As an example, the procedure for storing thehome location by searching for a destination byaddress is described here.
1. Push <DEST>.
2. Highlight [Home (Add New)] and push<ENTER>.
STORING HOME LOCATION/ADDRESS

3. A confirmation message is displayed. Con-firm the contents of the message, highlight[Yes] and push <ENTER>.
4. Highlight [Street Address] and push<ENTER>. A character input screen isdisplayed.
5. Enter the address of the home location,highlight [OK] and push <ENTER>.
“Finding address” (page 4-4)
The map screen is displayed.
6. Adjust the location of your home using themuti-function controller, if necessary.
7. After adjust ing the locat ion, push<ENTER>.
8. A message is displayed and the homelocation is stored.
9. Highlight [OK] and push <ENTER>.
10. Push <MAP> to return to the currentlocation map screen. The home icon isdisplayed on the map.
INFO:
The same setting can also be performed bypushing <SETTING> and highlighting [Naviga-tion].
“Storing location by searching” (page 6-2)Getting started 2-19

2-20 Getting started
SEARCHING FOR DESTINATIONAs an example, the method for setting arestaurant as the destination using [Places] isdescribed here.
1. Push <DEST>.
2. Highlight [Places] and push <ENTER>.
3. Highlight [Nearby RESTAURANT] and push<ENTER>.
INFO:
The search can also be narrowed down byselecting [All Categories or Name] or[ZAGAT] on this screen. By selecting [AllCategories or Name], the area, name offacility, etc. can be specified. By selecting[ZAGAT], restaurants registered in the ZA-GAT database can be searched and sortedby its rating regarding food, decor, cost,service, etc.
4. Highlight the preferred restaurant from thelist and push <ENTER>.
INFO:
. The position of the selected location isdisplayed in the preview on the right sideof the screen.
. If there is a route already in progress, onlyplaces along the current route will belisted. Turn off [Show Along Route] at the
top of list to display all nearby places.
5. The entire route is shown on the map.Highlight [Start] after confirming the locationof the displayed destination, and push<ENTER>.
The system sets the destination to theselected location and starts calculating aroute.
INFO:
Even after setting a destination, the locationof the destination can be adjusted, the routecan be stored, etc. if necessary.
“Procedures after setting destination”(page 5-2)
SETTING DESTINATION

STARTING ROUTE GUIDANCEAfter setting the destination and performingroute calculation, the suggested route is dis-played.
1. Highlight [Start] and push <ENTER>.
2. Once route guidance is started, the systemnavigates through the guide points usingvisual and voice guidance.
3. When approaching a guide point, thesystem automatically changes to the splitscreen and shows an enlarged view of theintersection in the left screen.
Push <MAP> to switch to the full mapscreen.
4. When arriving at the destination, routeguidance automatically ends.
CANCELING ROUTEDelete a route that is already set according tothe following procedure.
1. Push <ROUTE>.
2. Highlight [Cancel Route] and push<ENTER>.
3. A confirmation message is displayed. High-light [Yes] and push <ENTER>.
Getting started 2-21

2-22 Getting started
INFO:
. If a route is canceled, [Cancel Route]changes to [Resume Route].
Highlight [Resume Route] and push<ENTER> to reactivate the canceled route.
This is available only until a new route is setor a currently set destination is deleted.
. The above step does not delete thedestination that has been set. To delete adestination, push <DEST> and highlight[Delete Destination], then push <ENTER>.
“Delete destination” (page 4-20)
HOW TO VIEW MAP SCREENThe navigation system displays various informa-tion on the map screen.
Screen information
*1 Vehicle icon:
Indicates the current vehicle location andthe direction of travel.
*2 Starting point:
Displays the vehicle location, with which theroute is set, as the starting point.
*3 Guide point:
Indicates a guide point on the route.
*4 Waypoint:
Displays locations between the startingpoint and the destination. A maximum of 5waypoints can be set.
OPERATING MAPS

*5 Destination:
Indicates the destination location of theroute guidance.
When you reach your destination, theaddress will be displayed on the mapscreen.
*6 Suggested route:
Appears in bold yellow during route gui-dance.
*7 Map Menu icon:
Touch the icon to display the Map Menuscreen.
“Map menu screen” (page 2-17)
*8 / Direction indicator:
Indicates the directional setting of the map.Touch the icon to change the setting.
: North always pointing up.
: Traveling direction always pointing up.“Setting map orientation” (page 3-14)
*9 Scale indicator:
Indicates the scale of the map.
Touch the icon to display the scale bar. Thisallows the map scale to be adjusted.
“Operating with touch operation”(page 3-10)
*10 Street name:
Displays the name of the street that thevehicle is currently driving on.
TURNING VOICE GUIDANCE ON/OFFVoice guidance can be activated or deactivated.
1. Push <ROUTE>.
2. Highlight [Guidance Settings] and push<ENTER>.
3. Highlight [Guidance Voice] and push<ENTER>. The indicator illuminates if voiceguidance is activated.
Getting started 2-23
SETTING VOICE GUIDANCE
2-24 Getting started
Other settingsVoice guidance can also be activated ordeactivated using the following procedure.
1. Push <SETTING>.
2. Highlight [Volume & Beeps] and push<ENTER>.
3. Highlight [Guidance Voice] and push<ENTER>.
ADJUSTING VOICE GUIDANCE VO-LUMEThe voice guidance volume can be adjusted.
1. Push <ROUTE>.
2. Highlight [Guidance Settings] and push<ENTER>.
3. Highlight [Guidance Volume] and push<ENTER>.
4. Adjust the volume of voice guidance byusing the multi-function controller.
Other settingsVoice guidance volume can also be adjustedusing the following procedure.
1. Push <SETTING>.
2. Highlight [Volume & Beeps] and push<ENTER>.
3. Highlight [Guidance Volume] and push<ENTER>.
4. Adjust the volume of voice guidance byusing the multi-function controller.
INFO:
The volume can also be adjusted by turning theaudio system volume control knob or pushing+/− on the steering wheel switch while voiceguidance is being announced.
“Steering wheel switch” (page 2-5)

NISSAN Voice Recognition allows hands-freeoperation of the navigation system and othersystems equipped on this vehicle, such as thephone, vehicle information and audio. NISSANVoice Recognition can be used in one of twoselectable modes, Standard Mode or AlternateCommand Mode.
In Standard Mode, the commands that areavailable are always shown on the display andannounced by the system. To perform opera-tions, simply follow the prompts given by thesystem.
For advanced operation, change to AlternateCommand Mode. When this mode is active, anexpanded list of commands can be spoken afterpushing <TALK > on the steering wheelswitch and the voice command menu promptsare turned off. Note that in this mode therecognition success rate may be affectedbecause the number of available commandsand ways of speaking each command areincreased. Otherwise, it is recommended thatAlternate Command Mode be turned to OFFand Standard Mode be used for the bestrecognition performance.
For U.S. customers, Standard Mode is selectedby default. For Canadian customers, AlternateCommand Mode is the default mode.
Otherwise, it is recommended that Alternate
Command Mode be turned to OFF and Stan-dard Mode be used for the best recognitionperformance.
INFO:
. For voice recognition system operationrelated to the phone, audio or vehicleinformation systems, refer to the Owner’sManual of your vehicle.
. When the system language is set to“Francais” (French) or “Espanol” (Spanish),the available commands and functions maydiffer from those that are available whenusing the system in English.
USING THE SYSTEM
InitializationWhen the ignition switch is pushed to the ONposition, NISSAN Voice Recognition is initia-lized, which may take up to one minute. Whencompleted, the system is ready to accept voicecommands. If <TALK > is pushed before theinitialization completes, the display will show themessage: “System not ready.”
BEFORE STARTINGTo get the best recognition performance fromNISSAN Voice Recognition, observe the follow-ing points:
. The interior of the vehicle should be as quietas possible. Close the windows to eliminatethe surrounding noises (traffic noise andvibration sounds, etc.), which may preventthe system from correctly recognizing thevoice commands.
. The voice recognition system cannot beoperated when the soft top is not closed (forRoadster and CrossCabriolet models).
. Wait until the tone sounds before speaking acommand.
. Speak in a natural conversational voicewithout pausing between words.
. If the air conditioner is set to “Auto”, the fanspeed is automatically lowered so that voicecommands can be recognized more easily.
GIVING VOICE COMMANDSThe method of giving a voice command inStandard Mode is described in this section.
Getting started 2-25
NISSAN VOICE RECOGNITION

2-26 Getting started
Type A
Type B
Type C
1. Push <TALK > located on the steeringwheel switch.
2. A list of commands appears on the screen,and the system provides the voice menuprompt “Would you like to access Phone,Navigation, Information, Audio or Help?”.
3. After the tone sounds and the icon on thescreen changes from [ ] to [ ], speak acommand.
4. Continue to follow the voice menu promptsand speak after the tone sounds untiloperation is completed.
Operating tips. Say a command after the tone.
. Commands that are available are alwaysshown on the display and spoken throughvoice menu prompts. Commands other thanthose that are displayed are not accepted.Please follow the prompts given by thesystem.
. If the command is not recognized, thesystem announces, “Please say again”.Repeat the command in a clear voice.
. Push <BACK> once to return to theprevious screen.
. To cancel the command, push and hold<TALK >. The message, “Voice recogni-tion is canceled” will be announced.
. Push<TALK > to stop the voice promptand give the command at once. Rememberto wait for the tone before speaking.
. To adjust the volume of the system feed-back, push the volume control buttons <+>or <−> on the steering wheel switch or usethe audio system volume control knob whilethe system is making an announcement.

COMMAND LIST
Category Command
Command Action
Phone Operates Phone function.
Navigation Operates Navigation function.
Information Displays Vehicle Information function.
Audio Operates Audio function.
Help Displays User Guide.
Navigation Command
Command Action
Destination Home Sets a route to the home location that is stored in the Address book.
Address Searches for a location by the street address specified, and sets a route (for continental U.S. and Canada only).
Places Sets a route to a facility near the current vehicle location.
Address Book Searches for information stored in the Address Book.
Previous Destinations Sets a route to a previous destination.
Phone Command
Command Action
Dial Number Makes a call to a spoken phone number up to 10 digits.
Quick Dial Makes a call to a contact that is stored in the Quick Dial.
Phonebook Makes a call to a phone number stored in a mobile phone.
Call History Incoming Calls Makes a call to an incoming call number.
Outgoing Calls Makes a call to a dialed number.
Missed Calls Makes a call to a missed calls number.
Getting started 2-27

2-28 Getting started
Command Action
International Call Makes an international call by allowing more than 10 digits to be spoken.
Information Command
Command Action
Fuel Economy Displays fuel economy information.
Trip Computer (if so equipped) Displays trip information.
Maintenance Displays maintenance information.
Where am I? Displays GPS information.
Traffic Information Turns the traffic information system on and off.
Audio Command
Command Action
AM Turns to the AM band, selecting the station last played.
FM Turns to the FM band, selecting the station last played.
XM Turns to the SiriusXM Satellite radio band, selecting the channel last played.
CD Starts to play a CD.
General Commands
Command Action
Go back Corrects the last recognition result to return to the previous screen
Exit Cancels Voice Recognition

INFO:
Refer to the vehicle Owner’s Manual for theoperations related to phone, information andaudio.
Voice command examplesTo use the voice recognition function, speakingone command is sometimes sufficient, but atother times it is necessary to speak two or morecommands. As examples, some additional basicoperations that are performed by voice com-mands are described here.
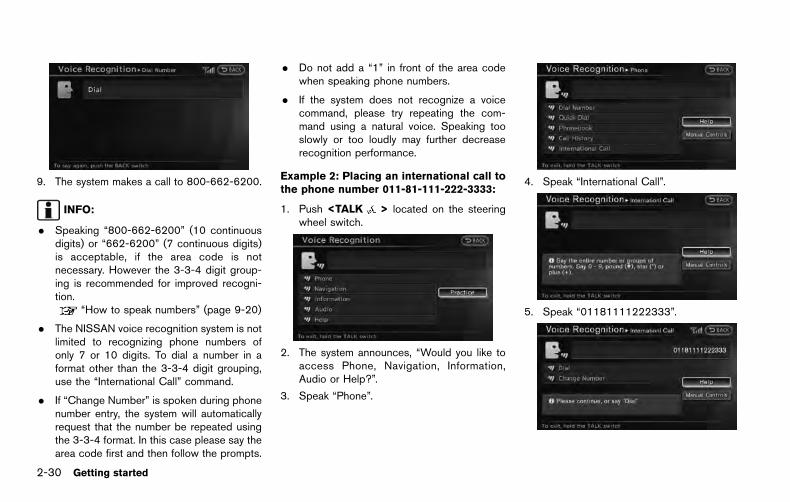
Example 1: Placing a call to the phonenumber 800-662-6200:
1. Push <TALK > located on the steeringwheel switch.
2. The system announces, “Would you like toaccess Phone, Navigation, Information,Audio or Help?”.
3. Speak “Phone”.
4. Speak “Dial Number”.
5. Speak “800”.
6. The system announces, “Please say nextthree digits or dial, or say change number”.Speak “662”.
7. The system announces, “Please say last fourdigits or say change number”. Speak“6200”.
8. The system announces, “Dial or ChangeNumber?”. Speak “Dial”.
Getting started 2-29
2-30 Getting started
9. The system makes a call to 800-662-6200.
INFO:
. Speaking “800-662-6200” (10 continuousdigits) or “662-6200” (7 continuous digits)is acceptable, if the area code is notnecessary. However the 3-3-4 digit group-ing is recommended for improved recogni-tion.
“How to speak numbers” (page 9-20)
. The NISSAN voice recognition system is notlimited to recognizing phone numbers ofonly 7 or 10 digits. To dial a number in aformat other than the 3-3-4 digit grouping,use the “International Call” command.
. If “Change Number” is spoken during phonenumber entry, the system will automaticallyrequest that the number be repeated usingthe 3-3-4 format. In this case please say thearea code first and then follow the prompts.
. Do not add a “1” in front of the area codewhen speaking phone numbers.
. If the system does not recognize a voicecommand, please try repeating the com-mand using a natural voice. Speaking tooslowly or too loudly may further decreaserecognition performance.
Example 2: Placing an international call tothe phone number 011-81-111-222-3333:
1. Push <TALK > located on the steeringwheel switch.
2. The system announces, “Would you like toaccess Phone, Navigation, Information,Audio or Help?”.
3. Speak “Phone”.
4. Speak “International Call”.
5. Speak “01181111222333”.

6. Speak “Dial”.
7. The system makes a call to 011-81-111-222-3333.
INFO:
Any digit input format is available in theInternational Number input process.
Example 3: Setting a destination by astreet address:
1. Push <TALK > located on the steeringwheel switch.
2. The system announces, “Would you like toaccess Phone, Navigation, Information,Audio or Help?”.
3. Speak “Navigation”.
4. Speak “Address”.
5. Speak the name of the state, “California”.
6. Speak the name of the city, “Gardena”.
7. Voice feedback will be provided when thecommand is accepted, and the list of citynames is displayed.
8. After the tone sounds and the icon on thescreen changes again, speak “One”.
Getting started 2-31

2-32 Getting started
9. Speak the name of the street, “SouthFigueroa street”.
INFO:
Only the official street names stored in themap database can be recognized by thesystem. To improve accuracy, speak thestreet name precisely and include Boule-vard, Way, North, South, etc., if known. Ifunsure of the full name, speaking only part ofthe street name such as “Figueroa” isacceptable, but recognition accuracy maybe reduced.
10. Voice feedback will be provided when thecommand is accepted, and the list of streetnames appears.
11. After the tone sounds and the icon on thescreen changes again, speak “One”.
12. Speak the house number.“How to speak numbers” (page 9-5)
INFO:
If the house number is unknown, speak “Nohouse number”.
13. To confirm the destination location on themap, speak “Show map”. To calculate aroute, speak “Calculate route”.

MEMO
Getting started 2-33

2-34 Getting started
MEMO

3 Map settings
Map types ................................................................................... 3-2
2D map .................................................................................. 3-2
BirdviewTM (3D) map ......................................................... 3-3
Building graphics ................................................................ 3-3
Displaying the current vehicle location ................................ 3-4
Operating with control panel ........................................... 3-4
Operating with touch operation ...................................... 3-4
Moving a map ............................................................................ 3-5
2D map .................................................................................. 3-5
BirdviewTM (3D) map ......................................................... 3-7
Changing the scale of a map ................................................ 3-8
Operating with zoom buttons (if so equipped) ........... 3-8
Operating with center dial ................................................ 3-9
Operating with touch operation ................................... 3-10
Map scale ........................................................................... 3-10
Changing map view .............................................................. 3-11
Available views ............................................................... 3-12
Other settings ................................................................. 3-12
Setting the map view ........................................................... 3-13
Basic operation .............................................................. 3-13
Setting map orientation ................................................ 3-14
Settings long range map view .................................... 3-15
Setting map color ......................................................... 3-15
Changing BirdviewTM angle ........................................ 3-16
Setting left screen display ........................................... 3-17
Looking at information on the map ................................... 3-17
Displaying map icons .................................................... 3-17
Map scrolling information ............................................. 3-18
Map symbols ................................................................... 3-20
Road color ....................................................................... 3-21
Traffic information on map ........................................... 3-21

3-2 Map settings
Two types of map views are available: 2D andBirdviewTM (3D) map.
2D MAP2D map displays the map in a 2-dimensionalenvironment similar to a road map.
Screen information
*1 Vehicle icon:
Indicates the current vehicle location andthe direction of travel.
*2 Guide point:
Indicates a guide point on the route.
*3 Remaining time and distance to thedestination:
Indicates the approximate remaining timeand distance to the destination or waypoint.
This indicator will appear when the destina-tion or waypoint is set and route guidanceis started.
When the vehicle is not driven on thesuggested route, the screen displays thedirection to the destination and the dis-tance to the destination from the currentvehicle position.
“Switching estimated arrival time dis-play” (page 5-28)
*4 Suggested route:
Appears in bold yellow during route gui-dance.
*5 / Direction indicator:
Indicates the directional setting of the map.Touch the icon to change the setting.
: North always pointing up.
: Traveling direction always pointing up.“Setting map orientation” (page 3-14)
*6 Scale indicator:
Indicates the scale of the map.
Touch the icon to display the scale bar.
This allows the map scale to be adjusted.“Operating with touch operation”(page 3-10)
MAP TYPES

*7 Arrow:
Indicates the distance to the next guidepoint and the turning direction at that guidepoint.
*8 Stored location (orange):
Displays the locations that are stored in theAddress Book. Icons can be changedaccording to personal preferences.
“Storing location” (page 6-2)
*9 Avoid Area (green or blue):
Displays the areas to avoid that are storedin the Address Book with green or blueicons. During the route search, the routeguidance is performed by searching for aroute that avoids those areas.
“Storing avoid area” (page 6-7)
*10 Street name:
Displays the name of the street the vehicleis currently driving on.
*11 Traffic indicator:
Displays the reception condition of trafficinformation transmitted from the provider.
Green: Reception condition is good.
Gray: Reception condition is not good.
No mark: Subscription to NavTraffic serviceis not detected.
BirdviewTM (3D) MAPBirdviewTM displays the map from an elevatedperspective. In BirdviewTM, it is easy to recog-nize an image of the route because it provides apanoramic view over a long distance.
INFO:
About the BirdviewTM display. “BirdviewTM” is a registered trademark of
Clarion Co., Ltd.
. The map in BirdviewTM always appears withthe current forward direction facing up.
BUILDING GRAPHICSIn the area where the building graphics arestored in the map data, the building graphics aredisplayed when the map is zoomed in. On the2D map display, these are called “Buildingfootprint graphics”, and on the BirdviewTM
display, these are called “3D building graphics”.
The method to look at the map is the same forthe 2D and BirdviewTM maps.
Building footprint graphics (2D map)
3D building graphics (BirdviewTM map)
INFO:
In the area where the building graphics are notstored in the map data, the normal map isdisplayed even when the map is zoomed in.
Map settings 3-3

3-4 Map settings
OPERATING WITH CONTROL PANEL
The basic map screen displays the currentlocation (the position where the vehicle mark islocated). Push <MAP> to display the currentlocation on the map while on any screen.
OPERATING WITH TOUCH OPERA-TION
After moving the map, touch [BACK] on the mapscreen to display the current location map
screen.
DISPLAYING THE CURRENTVEHICLE LOCATION

The operations for moving across the map aredifferent between the 2D and BirdviewTM maps.
2D MAP
Operating with the multi-function con-trollerPush one of the directional buttons or the slideswitch. Press and hold a directional button orthe slide switch to move continuously across themap in a direction.
While moving across the map, the cross pointerappears.
If the map scale is set to 1/8 mile (200 m) or
less, the cross pointer will blink in pink whenpositioned on a street, and the street name willbe displayed.
Screen information:
*1 Cross pointer
*2 Distance from the current location to thecross pointer
*3 Street name
Operating with touch operation
1. Touch the screen.
Displays the cross pointer, and the touchedposition is set as the center of the screen.
2. Touch the direction to move to. The mapcontinues to scroll while the screen istouched.
Map settings 3-5
MOVING A MAP

3-6 Map settings
INFO:
While driving, one touch continuous scrolling isdisabled. Touch the screen again to scrollfurther.If the map screen is set to the building footprintgraphics, the map cannot be scrolled whiledriving.
Fine-adjusting the cursor position:
1. Touch [Slow].
Displays the 8-directional key.
2. Touch the 8-directional key to adjust thecross pointer position. Touch [BACK] to endthe adjustment.
INFO:
Fine-adjusting the cursor position is not possiblewhile driving.

BirdviewTM (3D) MAP
Operating with multi-function controller
Use the multi-functional controller to moveacross the map.
While moving on the map, the cross pointerappears.
Rotates the map clockwise.
Rotates the map counterclockwise.
The cross pointer moves in the directionof the arrow.
Once moving on the map, the cross pointer
appears.
Screen information:
*1 Cross pointer
*2 Distance from the vehicle position to thecross pointer
*3 Street name
Operating with touch panel
1. Touch the screen.
Displays the cross pointer and 8-directionalkey.
2. Touch the direction to move to. The mapcontinues to scroll while the screen istouched.
Map settings 3-7

3-8 Map settings
3. Touch [ ] or [ ] to change the direction ofthe map.
Rotates the map clockwise.
Rotates the map counterclockwise.
INFO:
While driving, scrolling on the map is limited to aspecified distance.
OPERATING WITH ZOOM BUTTONS (if so equipped)
CHANGING THE SCALE OF A MAP

Push <ZOOM IN> or <ZOOM OUT>. A scaleappears on the right side of the screen.
To view the map in detail, push <ZOOM IN>.
To view a wider area, push <ZOOM OUT> .
The scale will automatically disappear whenneither <ZOOM IN> nor <ZOOM OUT> hasbeen pushed for several seconds.
If the scaling operation is not performed for aspecified period of time, the scale displaydisappears.
INFO:
Free zoom:The scale can be changed in smaller steps when<ZOOM IN> or <ZOOM OUT> is pushed andheld than when the button is pushed briefly.When the button is pushed briefly, the scale canbe changed in large steps.
“Other navigation settings” (page 8-7)
OPERATING WITH CENTER DIAL
1. Turn the center dial when the map screen isdisplayed. The map scale is displayed on theright side of the screen.
2. Use the center dial to adjust the map scale.
*1 Clockwise: Zoom in
*2 Counterclockwise: Zoom out
INFO:
Free zoom:Depending on the setting, using the center dialto change the map scale may adjust the scalenormally, or it may engage the free zoom (finerscale adjustment in smaller steps).
“Other navigation settings” (page 8-7)
Map settings 3-9

3-10 Map settings
OPERATING WITH TOUCH OPERA-TION
1. Touch .
Displays the scale.
2. Touch [ZOOM IN] or [ZOOM OUT] tochange the scale.
INFO:
Free zoom:Once the [Small Step Zoom by Dial] is set to ONin the setting screen, the scale can be changedin smaller steps, when [ZOOM IN] or [ZOOMOUT] is pushed and held, than when eitherbutton is briefly pushed.If briefly pushed, operation returns to normal.
Voice command
1. Push <TALK > located on the steeringwheel switch.
2. After the tone sounds, speak a command.
To change the map scale:
“Zoom In <1 to 13>” (Alternate commandmode)
“Zoom Out <1 to 13>” (Alternate commandmode)
MAP SCALEAny required map scale (map coverage) be-tween 320 miles (640 km) and 1/64 of a mile(25 m) can be selected.
Scale level for 2D map and BirdviewTM
map (3D) display
Normal Map
US Units Metric Units
320 miles 640 km
80 miles 160 km
32 miles 64 km
8 miles 16 km
5 miles 10 km
2 miles 4 km
1 mile 2 km
1/2 mile 1 km
1/4 mile 500 m
1/8 mile 200 m
1/16 mile 100 m
1/32 mile 50 m
Shows build-ing footprintgraphics
1/32 mile 50 m
1/64 mile 25 m
Example: The most detailed level (2D map)

Example: The widest level (2D map)
Example: The most detailed level (BirdviewTM map)
Example: The widest level (BirdviewTM map)
INFO:
The traffic information icons are not displayed onthe map screen when the map scale is set to 32miles (64 km) or higher.
“Traffic information display and scale le-vels” (page 7-7)
The map view can be changed between the 2Dand BirdviewTM maps. The map can also bedisplayed in the split screen mode.
1. Push <ENTER> while the current locationmap screen is displayed.
2. Highlight [Map View] and push <ENTER>.
Map settings 3-11
CHANGING MAP VIEW
3-12 Map settings
3. Highlight [Change View] and push the rightbutton of the directional buttons.
4. Highlight the preferred map view and push<ENTER>. The indicator of the selectedmap view illuminates.
5. The display automatically returns to the mapscreen.
AVAILABLE VIEWS. [2D map]:
Switches to the 2D map.
. [Birdview (3D)]:
Switches to the BirdviewTM map.
. [Split: 2D Map]:
Changes to the split screen mode and bothhalves display maps in 2D.
. [Split: BirdviewTM Map]:
Changes to the split screen mode and theleft half displays the map in 2D and the right
half displays the map in BirdviewTM.
INFO:
. When the split screen mode is selected, themap settings for the left screen can bechanged independently.
“Setting left screen display”(page 3-17)
. If the split screen mode is selected, thenormal map scrolling and scale adjustmentare set in the right screen. However, if anicon is touched before adjusting the mapdirection or scale, then each screen can beadjusted independently.
Split: 2D Map
Split: BirdviewTM Map
OTHER SETTINGSThe map view can also be set using thefollowing procedure.
1. Push <SETTING>.
2. Highlight [Navigation] and push <ENTER>.
3. Highlight [Map View] and push <ENTER>.
4. Highl ight [Change View] and push<ENTER>.
5. Highlight the preferred item and push<ENTER>.

Voice command
1. Push <TALK > located on the steeringwheel switch.
2. After the tone sounds, speak a command.
. To display the 2D map:
“Plan View map” (Alternate commandmode)
. To display the BirdviewTM map:
“Birdview map” (Alternate commandmode)
Other settings are also available for the mapscreen, such as changing the map direction,map color, BirdviewTM angle, etc.
BASIC OPERATION
1. Push <ENTER> while the current locationmap screen is displayed.
2. Highlight [Map View] and push <ENTER>.
3. Highlight [Map Settings] and push<ENTER>.
4. Highlight the preferred item and push<ENTER>.
Available setting items. [Map Orientation]:
Set the map direction to North up orHeading Up.
“Setting map orientation” (page 3-14)
. [Long Range]:
Set the long range map view display ON/
Map settings 3-13
SETTING THE MAP VIEW

3-14 Map settings
OFF.“Settings long range map view”(page 3-15)
. [Map Color]:
Change the map color.“Setting map color ” (page 3-15)
. [Birdview Angle]:
Change the BirdviewTM angle.“Changing BirdviewTM angle”(page 3-16)
. [Left Split Map Settings]:
Set the map settings for the left screen ofthe split map.
“Setting left screen display”(page 3-17)
. [Show all Freeway Exits on Route]/[Auto.Show Turn List on Freeway]:
Set the display of the freeway exit informa-tion ON/OFF.
“Show exit information on freeways”(page 5-10)
Other settingsThe orientation of the map can also be set usingthe following procedure.
1. Push <SETTING>.
2. Highlight [Navigation] and push <ENTER>.
3. Highlight [Map View] and push <ENTER>.
SETTING MAP ORIENTATIONThe map direction (orientation) can also bechanged in the 2D map. These settings areavailable only in the 2D map or 2D/2D split map.
1. Highlight [Map Orientation] and push<ENTER>.
2. Highlight the preferred map orientation andpush <ENTER>. The indicator of theselected map orientation illuminates.
3. Push <MAP> to return to the currentlocation map screen.
Available map orientations. [North Up]:
North is set at the top of the map.
. [Heading Up]:
The traveling direction is set at the top of themap.
INFO:
If the map orientation is switched, the icondisplayed in the lower left corner is alsoswitched.
: North Up
: Heading Up

North Up
Heading Up
INFO:
Touching the icon on the map screen can alsochange the direction of the map.
Voice command
1. Push <TALK > located on the steeringwheel switch.
2. After the tone sounds, speak a command.
To change the map direction:
“North Up” (Alternate command mode)
“Heading Up” (Alternate command mode)
SETTINGS LONG RANGE MAP VIEWThe position of the vehicle icon can be changedto view a wider area in the traveling direction. Ifthis function is activated, the vehicle icon islocated slightly lower than the center of thescreen.
1. Highl ight [Long Range] and push<ENTER>. The indicator illuminates.
2. Push <MAP> to return to the currentlocation map screen.
Long Range Map View
INFO:
[Long Range] is displayed only when [HeadingUp] is selected.
SETTING MAP COLORThe map color can be changed to a warm orcool color, or a light color to emphasize thetraffic information.
1. Highlight [Map Color] and push <ENTER>.
Map settings 3-15

3-16 Map settings
2. Highlight the preferred map color and push<ENTER>. The indicator light of the se-lected color illuminates.
Available map colors. [Warm]:
Set warm colors for the map coloring.
. [Cool]:
Set cool colors for the map coloring.
. [Traffic Emphasis]:
Set light colors for the map coloring toemphasize the traffic information.
INFO:
The effect of setting changes can be confirmedon the preview displayed on the right side of thescreen.
CHANGING BirdviewTM ANGLEThe BirdviewTM angle can be changed.
This setting is available only in the BirdviewTM
map or 2D/BirdviewTM split map.
1. Highlight [Birdview Angle] and push<ENTER>.
2. Adjust the BirdviewTM angle using the multi-function controller.
3. Push <MAP> to return to the currentlocation map screen.

SETTING LEFT SCREEN DISPLAYWhen the split screen is displayed, the mapsettings of the left screen can be changed.
1. Highlight [Left Split Map Settings] and push<ENTER>.
2. Highlight the preferred map view and push<ENTER>.
3. Push <MAP> to return to the currentlocation map screen.
Available setting items. [Map Orientation]:
The map direction can be selected asfollows.
— [North Up]:North is set at the top of the map.
— [Heading Up]:The traveling direction is set at the top ofthe map.
. [Long Range]:
The vehicle icon is located slightly lowerthan the center of the screen. This offers awider view in the traveling direction.
. [Map Scale]:
A scale appears on the left side of thescreen. This changes the scale of a map.
INFO:
. The settings of the right screen are the sameas the settings of the full screen map.
. Touching the icon on the map can alsochange the direction and scale of the map.
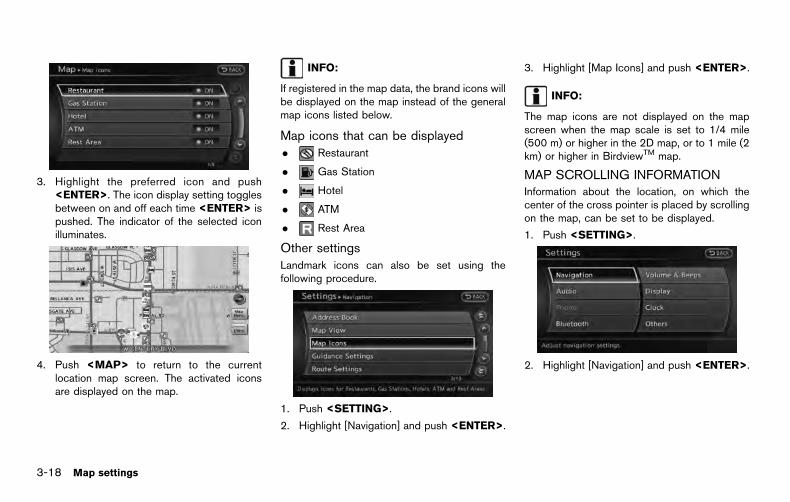
Icons of particular facilities can be displayed onthe map.
DISPLAYING MAP ICONSMap icons can be displayed or hidden by type.
1. Push <ENTER> while the current locationmap screen is displayed.
2. Highlight [Map Icons] and push <ENTER>.
Map settings 3-17
LOOKING AT INFORMATION ONTHE MAP
3-18 Map settings
3. Highlight the preferred icon and push<ENTER>. The icon display setting togglesbetween on and off each time <ENTER> ispushed. The indicator of the selected iconilluminates.
4. Push <MAP> to return to the currentlocation map screen. The activated iconsare displayed on the map.
INFO:
If registered in the map data, the brand icons willbe displayed on the map instead of the generalmap icons listed below.
Map icons that can be displayed. Restaurant
. Gas Station
. Hotel
. ATM
. Rest Area
Other settingsLandmark icons can also be set using thefollowing procedure.
1. Push <SETTING>.
2. Highlight [Navigation] and push <ENTER>.
3. Highlight [Map Icons] and push <ENTER>.
INFO:
The map icons are not displayed on the mapscreen when the map scale is set to 1/4 mile(500 m) or higher in the 2D map, or to 1 mile (2km) or higher in BirdviewTM map.
MAP SCROLLING INFORMATIONInformation about the location, on which thecenter of the cross pointer is placed by scrollingon the map, can be set to be displayed.
1. Push <SETTING>.
2. Highlight [Navigation] and push <ENTER>.

3. Highlight [Others] and push <ENTER>.
4. Highlight [Map Scrolling Information] andpush <ENTER>.
5. Highlight the preferred information item andpush <ENTER>. The indicator of theselected information item illuminates.
Available information items:
. [Address Book Icons]
. [Destination/Waypoint Icons]
. [Latitude/Longitude Info.]
6. Push <MAP> to return to the currentlocation map screen. Move the cross pointerto the set location to display the information.
Map settings 3-19

3-20 Map settings
MAP SYMBOLSThis navigation system uses symbols to displayfacilities.

ROAD COLORThe road types are differentiated by colors.
Freeway: Red or Light Red (zoomed in)
Main road: Brown or Dark Yellow
Narrow street: Gray
Road with incomplete map data: Dark green
TRAFFIC INFORMATION ON MAPWith a subscription to NavTraffic service, trafficinformation is displayed.
“Viewing available traffic information”(page 7-3)
Free Flow: Green arrow
Moderate traffic: Yellow arrow
Heavy traffic: Red arrow
Section affected by serious traffic event: Purpledashed arrow
Traffic information icons:
Accident
Closed road
Information
Road work
Slippery road
Weather
Incident
Map settings 3-21

3-22 Map settings
MEMO

4 Setting destination
Destination screen .................................................................... 4-2
Basic operation .................................................................... 4-2
Changing region .................................................................. 4-2
Finding address ................................................................... 4-4
Finding place ........................................................................ 4-5
Setting home as destination ......................................... 4-10
Searching from address book ...................................... 4-11
Setting previous destination .......................................... 4-12
Setting previous start point ......................................... 4-13
Setting from stored routes .......................................... 4-14
Setting by phone number ............................................ 4-14
Setting freeway entrance/exit ..................................... 4-15
Setting intersection ....................................................... 4-17
Setting city center ......................................................... 4-18
Setting point on map .................................................... 4-19
Delete destination ................................................................. 4-20

4-2 Setting destination
There are several methods available to set adestination. Understand the advantages of eachmethod and select the best method for findingand setting a preferred destination.
BASIC OPERATION1. Push <DEST>.
2. Highlight the preferred destination settingmethod and push <ENTER>.
Available setting items. [Street Address]:
Searches for a destination by address.
. [Places]:
Searches for a destination from variouscategories of businesses or locations.
. [Home]:
Searches for a route from the currentlocation to the previously stored homedestination.
. [Address Book]:
Searches for a destination from the list of thestored locations.
. [Previous Destinations]:
Searches for a destination from the previousdestinations.
. [Delete Destination]:
Deletes the currently set destination.
Available setting items (next pagescreen). [Previous Start Point]:
Sets the previous starting point as thedestination.
. [Stored Routes]:
Selects a stored route.
. [Phone Number]:
Searches for a point of interest by atelephone number.
INFO:
The system cannot be used to search forresidential phone numbers.. [Freeway Entrance/Exit]:
Searches for a destination from a freewayentrance/exit.
. [Intersection]:
Searches for a destination from intersec-tions.
. [City Center]:
Sets the center of a city as the destination.
CHANGING REGIONWhen setting a destination, the location can benarrowed down by specifying the region or city.
Specifying the region
1. Push <DEST>.
2. Highlight [Change Region] and push<ENTER>.
DESTINATION SCREEN

3. Highlight the preferred region and push<ENTER>.
Available setting items:
. US1: CA, NV
. US2: AZ, CO, ID, MT, NM, OR, UT, WA, WY
. US3: IA, KS, MN, MO, ND, NE, SD
. US4: AR, LA, MS, OK, TX
. US5: IL, IN, MI, WI
. US6: DC, DE, KY, MD, OH, PA, VA, WV
. US7: CT, MA, ME, NH, NJ, NY, RI, VT
. US8: AL, FL, GA, NC, SC, TN
. US9: AK
. US10: HI
. Canada
. Puerto Rico
. Virgin Islands
INFO:
. It is also possible to select a region bytouching the map on the right side of thescreen.
. It is not possible to search for a route fromthe continental United States to Hawaii,Puerto Rico and Virgin Islands.
Specifying cityWhen searching for a destination with “Places”,“Freeway Entrance/Exit”, “Intersection” or “CityCenter”, the search can be narrowed down byspecifying the city.
1. Highlight [Select a City] and push<ENTER>.
2. Enter the name of the city, highlight [List]and push <ENTER>.
A list screen is displayed.
INFO:
. The same screen will be displayed whena location is searched from a streetaddress, and when [City] is highlightedand <ENTER> is pushed.
“Finding address” (page 4-4)
. Highlight [Last 5 Cities] and push<ENTER> to display 5 cities recentlyset as destinations.
Setting destination 4-3

4-4 Setting destination
3. Highlight the city of the destination from thelist and push <ENTER>.
INFO:
In some cases, when a city name has beenentered, the number of matching destinations inthe “Matches” column may be different from thenumber displayed on the list screen. If thisoccurs, enter more characters to further reducethe number of matches.
FINDING ADDRESSWhen the address of the destination is available,use this method to enter the address and thenhave the system calculate a route. A locationnear the preferred destination can also besearched for by entering the house number ifthe map data contains the relevant data.
1. Push <DEST>, highlight [Street Address]and push <ENTER>. A character inputscreen is displayed.
2. Enter the house number, highlight [OK] andpush <ENTER>. If the house number is notavailable, highlight [No House #] and push<ENTER>. A street name input screen isdisplayed.
3. Enter the name of the street. After finishingthe entry, highlight [List] and push<ENTER>. A list of streets is displayed.
INFO:
When [City] is highlighted and <ENTER>pushed, a city can be specified by typing thecity name.
“Specifying city” (page 4-3)
4. Highlight the correct street of the destina-tion from the list and push <ENTER>.

INFO:
In some cases, when a street name hasbeen entered, the number of matchingdestinations in the “Matches” column maybe different from the number displayed onthe list screen. If this occurs, enter morecharacters to further reduce the number ofmatches.
5. The entire route is shown on the map.Highlight [Start] after confirming the locationof the displayed destination, and push<ENTER>. The system sets the destinationto the selected location and starts calculat-ing a route.
INFO:
Even after setting a destination, the locationof the destination can be adjusted, the routecan be stored, etc.
“Procedures after setting destination”
(page 5-2)
Voice command
1. Push <TALK > located on the steeringwheel switch.
2. After the tone sounds, speak a command.
To set the destination from a street address:
“Navigation” “Address” (Standard mode)
“Address” (Alternate command mode)
INFO:
When using a voice command to set a streetname, the complete street name is recom-mended to be stated.
Examples:
Correct input – North Elm StreetEast Jefferson Boulevard
Incorrect input – Elm StreetEast Jefferson
FINDING PLACEThere are 3 methods to set the destination toplaces of interest: typing the name, choosing acategory or selecting a Zagat reviewed location.To help improve searching, different start pointscan be chosen to search from such as NearCurrent Location, Near the Destination, or a CityCenter.
Finding nearby place
1. Push <DEST>.
2. Highlight [Places] and push <ENTER>.
3. Highlight the preferred nearby category fromthe list and push <ENTER>.
A list screen is displayed.
INFO:
Highlight [Customize Nearby Places] tocustomize the nearby places list to showcategories that are frequently used.
Setting destination 4-5

4-6 Setting destination
4. Highlight the preferred destination from thelist, and push <ENTER>. The position ofthe selected location is displayed in thepreview on the right side of the screen.
INFO:
. A maximum of 100 facilities can bedisplayed on the list screen.
. To search for facilities along your route,select [Show Along Route].
5. The entire route is shown on the map.Highlight [Start] after confirming the locationof the displayed destination, and push<ENTER>. The system sets the destinationto the selected location and starts calculat-ing a route.
INFO:
If there is a route already set, the newly selectedlocation can substitute a previously set destina-tion or be added to a route already set.
Other settings:
The destination can also be set by pushing<ENTER> in the current or scrolled locationmap screen and selecting [Nearby Places].
Voice command
1. Push <TALK > located on the steeringwheel switch.
2. After the tone sounds, speak a command.
To display the nearby category list and select thedestination from it:
“Navigation” “Places” (Standard mode)
“Places” (Alternate command mode)
Searching by other methods
1. Push <DEST>.
2. Highlight [Places] and push <ENTER>.

3. Highlight [All Categories or Name] and push<ENTER>.
4. Set the narrowing down conditions for thelandmarks and push <ENTER>.
INFO:
Highlight [Change Region] and push<ENTER> to change the region. A screenfor selecting a region is displayed.
“Changing region” (page 4-2)
INFO:
If [Select a City] is highlighted and<ENTER> is pushed, a city name inputscreen is displayed. Specify the city tosearch for before narrowing down thecategories.
“Specifying city” (page 4-3)
5. Highlight the main category from the list andpush <ENTER>.
INFO:
To select the category by directly inputtingthe category name, highlight [CategorySearch] and push <ENTER>. The categoryname input screen is displayed.
6. Highlight the subcategory and push<ENTER>.
Setting destination 4-7
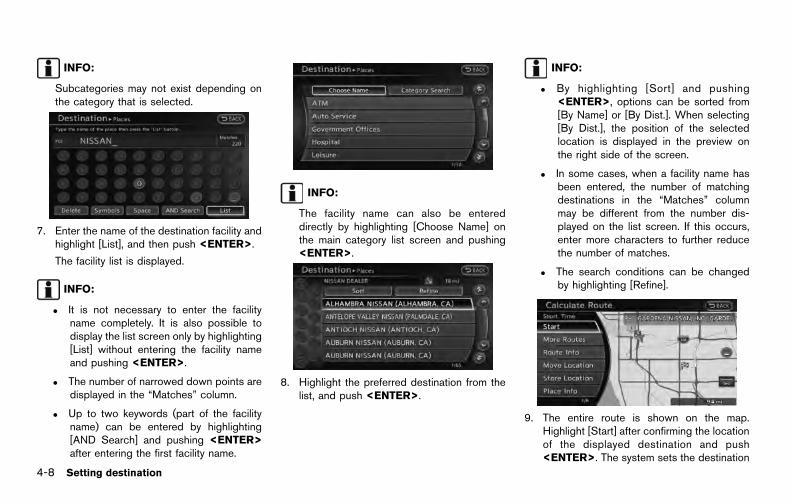
4-8 Setting destination
INFO:
Subcategories may not exist depending onthe category that is selected.
7. Enter the name of the destination facility andhighlight [List], and then push <ENTER>.
The facility list is displayed.
INFO:
. It is not necessary to enter the facilityname completely. It is also possible todisplay the list screen only by highlighting[List] without entering the facility nameand pushing <ENTER>.
. The number of narrowed down points aredisplayed in the “Matches” column.
. Up to two keywords (part of the facilityname) can be entered by highlighting[AND Search] and pushing <ENTER>after entering the first facility name.
INFO:
The facility name can also be entereddirectly by highlighting [Choose Name] onthe main category list screen and pushing<ENTER>.
8. Highlight the preferred destination from thelist, and push <ENTER>.
INFO:
. By highlighting [Sort] and pushing<ENTER>, options can be sorted from[By Name] or [By Dist.]. When selecting[By Dist.], the position of the selectedlocation is displayed in the preview onthe right side of the screen.
. In some cases, when a facility name hasbeen entered, the number of matchingdestinations in the “Matches” columnmay be different from the number dis-played on the list screen. If this occurs,enter more characters to further reducethe number of matches.
. The search conditions can be changedby highlighting [Refine].
9. The entire route is shown on the map.Highlight [Start] after confirming the locationof the displayed destination and push<ENTER>. The system sets the destination

to the selected location and starts calculat-ing a route.
INFO:
Even after setting a destination, the locationof the destination can be adjusted, the routecan be stored, etc.
“Procedures after setting destination”(page 5-2)
Searching for restaurant by ZAGAT
1. Push <DEST>.
2. Highlight [Places] and push <ENTER>.
3. Highlight [ZAGAT] and push <ENTER>.
4. Highlight the preferred state and push<ENTER>. A list screen is displayed.
5. Highlight the preferred city and push<ENTER>. A list screen is displayed.
6. Highlight [RESTAURANT] and push<ENTER>. A list screen is displayed.
7. Highlight the preferred category and push<ENTER>. A list screen is displayed.
Setting destination 4-9

4-10 Setting destination
8. Highlight the preferred sorting order andpush <ENTER>. A list screen is displayed.
9. Highlight the preferred destination facilityfrom the list, and then push <ENTER>.
INFO:
. By highlighting [Sort] and pushing<ENTER>, sorting options can be se-lected to re-sort the list.
. The search conditions can be changedby highlight [Refine].
. By highlighting [Ratings] and pushing<ENTER>, an explanation of the ZAGATratings can be displayed.
10. The entire route is shown on the map.Highlight [Start] after confirming the locationof the displayed destination and pushing<ENTER>. The system sets the destinationto the selected location and starts calculat-ing a route.
INFO:
Even after setting a destination, the locationof the destination can be adjusted, the routecan be stored, etc.
“Procedures after setting destination”(page 5-2)
*C 2009 Zagat Survey, LLC. Zagat Survey is aregistered trademark of Zagat Survey, LLC
SETTING HOME AS DESTINATIONThe home location can be set as the destinationto which the system calculates a route. Thisfunction is especially useful when searching fora route to return to the home location.
1. Push <DEST>.
2. Highlight [Home] and push <ENTER>.
3. The home location is displayed and set asthe destination.

INFO:
If the home location is not stored yet, thesystem will automatically display a screen forstoring it.
“Storing location” (page 6-2)
4. The entire route to home is shown on themap. Highlight [Start] after confirming thelocation of the displayed destination, andpush <ENTER>. The system sets thedestination to the selected location andstarts calculating a route.
Voice command
1. Push <TALK > located on the steeringwheel switch.
2. After the tone sounds, speak a command.
To set the home location as the destination:
“Navigation” “Destination Home” (Standardmode)
“Destination Home” (Alternate command mode)
SEARCHING FROM ADDRESS BOOKA location stored in the Address Book can beset as the destination to which the systemcalculates a route. To utilize this function moreeffectively, destinations that are often traveled toshould be stored in advance.
1. Push <DEST>.
2. Highlight [Address Book] and push<ENTER>. A list screen is displayed.
3. Highlight the preferred location from the listand push <ENTER>.
INFO:
Selecting [Sort] displays a list of various sortfunctions. To use the sort functions, storedlocations must be set in advance.
“Storing location” (page 6-2)
INFO:
*1 Sort by Number:
The Address Book entries are displayedin ascending numerical order.
*2 Sort by Name:
The Address Book entries are displayedin alphabetic order.
*3 Sort by Icon:
By selecting a particular icon, a list thatcontains only the Address Book entries
Setting destination 4-11

4-12 Setting destination
associated with that icon is displayed.
*4 Sort by Group:
By selecting a particular group (family,friends, leisure, etc.), the selected groupis displayed at the top of the list.
4. The entire route is shown on the map.Highlight [Start] after confirming the locationof the displayed destination, and push<ENTER>. The system sets the destinationto the selected location and starts calculat-ing a route.
INFO:
Even after setting a destination, the location ofthe destination can be adjusted, the route canbe stored, etc.
“Procedures after setting destination”(page 5-2)
Voice command
1. Push <TALK > located on the steeringwheel switch.
2. After the tone sounds, speak a command.
To set the destination from the Address Book:
“Navigation” “Address Book” (Standard mode)
“Address book” (Alternate command mode)
SETTING PREVIOUS DESTINATIONA previously set destination can be set again asthe destination to which the system calculates aroute. Up to 300 previous destinations will beautomatically stored.
If the number of previous destinations exceeds300, the oldest one will be replaced by the newone.
1. Push <DEST>.
2. Highlight [Previous Destinations] and push<ENTER>. A list screen is displayed.
3. Highlight the preferred destination from thelist and push <ENTER>.
INFO:
By highlighting [By Date], the list can besorted in chronological order. By highlight-ing [By Name], it can be sorted in alphabe-tical order.
4. The entire route is shown on the map.Highlight [Start] after confirming the locationof the displayed destination, and push<ENTER>. The system sets the destination

to the selected location and starts calculat-ing a route.
INFO:
Even after setting a destination, the location ofthe destination can be adjusted, the route canbe stored, etc.
“Procedures after setting destination”(page 5-2)
Voice command
1. Push <TALK > located on the steeringwheel switch.
2. After the tone sounds, speak a command.
To display the Previous Destinations list:
“Navigation” “Previous Destinations” (Standardmode)
“Previous Destinations” (Alternate commandmode)
SETTING PREVIOUS START POINTThe start point of the previous route guidancecan be set as the destination to which thesystem calculates a route.
1. Push <DEST>.
2. Highlight [Next Page] and push <ENTER>.
3. Highlight [Previous Start Point] and push<ENTER>.
4. The previous start point is set as a destina-tion, and the entire route is shown on themap. Highlight [Start] after confirming thelocation of the displayed destination, andpush <ENTER>. The system sets thedestination to the selected location andstarts calculating a route.
INFO:
Even after setting a destination, the location ofthe destination can be adjusted, the route canbe stored, etc.
“Procedures after setting destination”(page 5-2)
Voice command
1. Push <TALK > located on the steeringwheel switch.
Setting destination 4-13
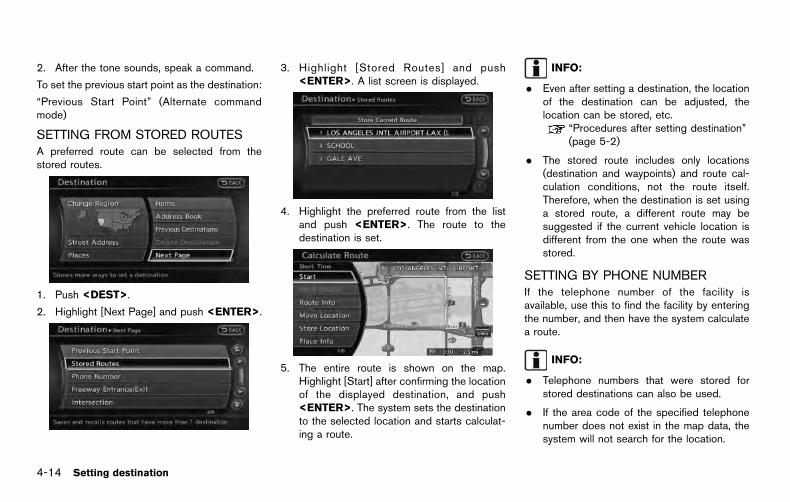
4-14 Setting destination
2. After the tone sounds, speak a command.
To set the previous start point as the destination:
“Previous Start Point” (Alternate commandmode)
SETTING FROM STORED ROUTESA preferred route can be selected from thestored routes.
1. Push <DEST>.
2. Highlight [Next Page] and push <ENTER>.
3. Highlight [Stored Routes] and push<ENTER>. A list screen is displayed.
4. Highlight the preferred route from the listand push <ENTER>. The route to thedestination is set.
5. The entire route is shown on the map.Highlight [Start] after confirming the locationof the displayed destination, and push<ENTER>. The system sets the destinationto the selected location and starts calculat-ing a route.
INFO:
. Even after setting a destination, the locationof the destination can be adjusted, thelocation can be stored, etc.
“Procedures after setting destination”(page 5-2)
. The stored route includes only locations(destination and waypoints) and route cal-culation conditions, not the route itself.Therefore, when the destination is set usinga stored route, a different route may besuggested if the current vehicle location isdifferent from the one when the route wasstored.
SETTING BY PHONE NUMBERIf the telephone number of the facility isavailable, use this to find the facility by enteringthe number, and then have the system calculatea route.
INFO:
. Telephone numbers that were stored forstored destinations can also be used.
. If the area code of the specified telephonenumber does not exist in the map data, thesystem will not search for the location.

. Only the locations included in the databasein the map data can be searched by thephone number. Residential phone numberscannot be used to search for a location.
1. Push <DEST>.
2. Highlight [Next Page] and push <ENTER>.
3. Highlight [Phone Number] and push<ENTER>. The telephone number inputscreen is displayed.
4. Enter the telephone number including thearea code.
5. After finishing the entry, highlight [List] andpush <ENTER>.
“Number input screen” (page 2-16)
6. Displays a list screen if there are two ormore search results. Highlight the preferreddestination from the list and push<ENTER>.
A confirmation screen for the place nameand the location is displayed, and the systemstarts calculating.
7. The entire route is shown on the map.Highlight [Start] after confirming the locationof the displayed destination, and push<ENTER>. The system sets the destinationto the selected location and starts calculat-ing a route.
INFO:
Even after setting a destination, the location ofthe destination can be adjusted, the route canbe stored, etc.
“Procedures after setting destination”(page 5-2)
SETTING FREEWAY ENTRANCE/EXITThe entrance or exit of a freeway can be set asthe destination to which the system calculates aroute.
Setting destination 4-15

4-16 Setting destination
1. Push <DEST>.
2. Highlight [Next Page] and push <ENTER>.
3. Highlight [Freeway Entrance/Exit] and push<ENTER>. A character input screen isdisplayed.
4. Enter the name of the freeway.
5. After finishing the entry, highlight [List] andpush <ENTER>.
6. Highlight the freeway of the destination fromthe list, and push <ENTER>.
7. Highlight [Entrance] or [Exit] and push<ENTER>. A list screen is displayed.
8. Select the preferred destination from the list.The position of the selected location isdisplayed in the preview on the right sideof the screen. Then, push <ENTER>.

INFO:
By selecting [By Distance], the list can besorted by the nearest distance.
9. The entire route is shown on the map.Highlight [Start] after confirming the locationof the displayed destination, and push<ENTER>. The system sets the destinationto the selected location and starts calculat-ing a route.
INFO:
Even after setting a destination, the location ofthe destination can be adjusted, the route canbe stored, etc.
“Procedures after setting destination”(page 5-2)
SETTING INTERSECTIONAn intersection of any two streets can be set asthe destination to which the system calculates aroute.
1. Push <DEST>.
2. Highlight [Next Page] and push <ENTER>.
3. H igh l igh t [ In te rsect ion ] and push<ENTER>. A character input screen isdisplayed.
4. Enter the name of the 1st street.
After finishing the entry, highlight [List] andpush <ENTER>. A list screen is displayed.
Setting destination 4-17

4-18 Setting destination
5. Highlight a street as the 1st street from thelist and push <ENTER>. A character inputscreen is displayed.
6. Enter the name of the 2nd street.
After finishing the entry, highlight [List] andpush <ENTER>. A list screen is displayed.
7. Highlight a street as the 2nd street from thelist and push <ENTER>.
8. The entire route is shown on the map.Highlight [Start] after confirming the locationof the displayed destination, and push<ENTER>. The system sets the destinationto the selected location and starts calculat-ing a route.
INFO:
Even after setting a destination, the location ofthe destination can be adjusted, the route canbe stored, etc.
“Procedures after setting destination”(page 5-2)
SETTING CITY CENTERThe system can calculate a route to the center ofa city, without setting a specific location.
1. Push <DEST>.
2. Highlight [Next Page] and push <ENTER>.

3. High l ight [Ci ty Center ] and push<ENTER>. A character input screen isdisplayed.
4. Enter the name of the city, highlight [List]and push <ENTER>. A list screen isdisplayed.
INFO:
Highlight [Last 5 Cities] and push<ENTER> to display 5 cities recently setas destinations.
5. Highlight the preferred destination from thelist and push <ENTER>. The position of theselected location is displayed in the previewon the right side of the screen.
INFO:
By selecting [By Distance], the list can besorted by the nearest distance.
6. The selected destination is displayed at thecenter of the map. Highlight [Start] afterconfirming the location of the displayeddestination, and push <ENTER>.
The system sets the destination to theselected location and starts calculating aroute.
INFO:
Even after setting a destination, the locationof the destination can be adjusted, the routecan be stored, etc.
“Procedures after setting destination”(page 5-2)
SETTING POINT ON MAPA location scrolled to on the map can be set asthe destination to which the system calculates aroute.
1. Scroll the map, place the cross pointer overthe preferred location, and push <ENTER>.
Setting destination 4-19

4-20 Setting destination
INFO:
. Adjust the map scale to search for alocation more effectively.
. The point on the blinking road where thecenter of the cross pointer is located canbe set as a destination.
2. Highlight [New Dest.] and push <ENTER>.
INFO:
For the items except for [New Dest.], refer to“Map menu screen”.
“Scrolled location map screen”(page 2-18)
3. The system sets the destination to theselected location and starts calculating aroute.
INFO:
If a point on a freeway is set as the destination, aconfirmation message is displayed.
It is possible to delete a destination and allwaypoints that have already been set.
1. Press <DEST>.
2. Select [Delete Destination] and press<ENTER>.
3. A confirmation message is displayed. Select[Yes] and press <ENTER>.
The destination and the waypoints aredeleted.
DELETE DESTINATION

INFO:
The deleted destination and waypoints are notable to be reactivated.
Voice command
1. Push <TALK > on the steering wheel.
2. After the tone sounds, speak a command.
To delete a destination and all waypoints:
“Delete Destination” (Alternate CommandMode)
Setting destination 4-21

4-22 Setting destination
MEMO

5 Route guidance
Procedures after setting destination .................................... 5-2
Available items after setting destination ........................ 5-2
Starting route guidance ..................................................... 5-2
Selecting route .................................................................... 5-3
Confirming route .................................................................. 5-3
Moving location of destination ......................................... 5-4
Storing location ................................................................... 5-5
Viewing information about searched location .............. 5-5
About route guidance .............................................................. 5-7
Voice guidance during route guidance ......................... 5-7
Guidance screens and preview mode ........................... 5-7
Guidance screen settings ................................................. 5-9
Route screen ........................................................................... 5-12
Basic operation ................................................................. 5-12
Canceling/reactivating route ......................................... 5-13
Editing route .................................................................... 5-14
Confirming route ............................................................ 5-18
Guidance settings .......................................................... 5-20
Recalculating route ........................................................ 5-21
Setting detour route ...................................................... 5-22
Searching for detour route taking traffic informationinto consideration ........................................................... 5-22
Setting conditions for route calculation ................... 5-23
Route guidance settings ..................................................... 5-26
Basic operation .............................................................. 5-26
Setting voice guidance at intersections ................... 5-27
Displaying small turn arrow on map .......................... 5-28
Switching estimated arrival time display .................. 5-28
Set average speeds ...................................................... 5-29

5-2 Route guidance
After performing a route search, the routeguidance can be started immediately. Also, it ispossible to confirm or change a route.
AVAILABLE ITEMS AFTER SETTINGDESTINATION. [Start]:
Starts route guidance to the selecteddestination.
“Starting route guidance” (page 5-2)
. [More Routes]:
Displays 3 alternative routes.“Selecting route” (page 5-3)
. [Add/Route Info]:
Displays the route information or add adestination or a waypoint.
“Confirming route” (page 5-3)
. [Move Location]:
Displays a map screen and allows thelocation of the destination to be adjusted.
“Moving location of destination”(page 5-4)
. [Store Location]:
Stores the location in the Address Book.“Storing location” (page 5-5)
. [Place Info]:
Displays information about the facility that isset as the destination if it is included in themap data.
“Viewing information about searchedlocation” (page 5-5)
INFO:
. If no operations are performed on thesystem for several seconds, [Start] is auto-matically selected, and the system startsroute guidance.
. When using waypoints, [More Routes] isdisabled. After the route is started, push<ROUTE> then select [Edit/Add to Route]to change the route between each waypoint.
“Editing route” (page 5-14)
. The same screen as when [Move Location]is selected can be displayed with thefollowing operations:
— Touching the map screen
— Pushing the directional buttons exceptfor the up/down button (multi-functioncontroller with directional buttons)
— Pushing the slide switch except in theupward/downward direction (multi-func-tion controller without directional but-tons)
STARTING ROUTE GUIDANCE
1. Highlight [Start] and push <ENTER>.
Route guidance starts.
PROCEDURES AFTER SETTINGDESTINATION
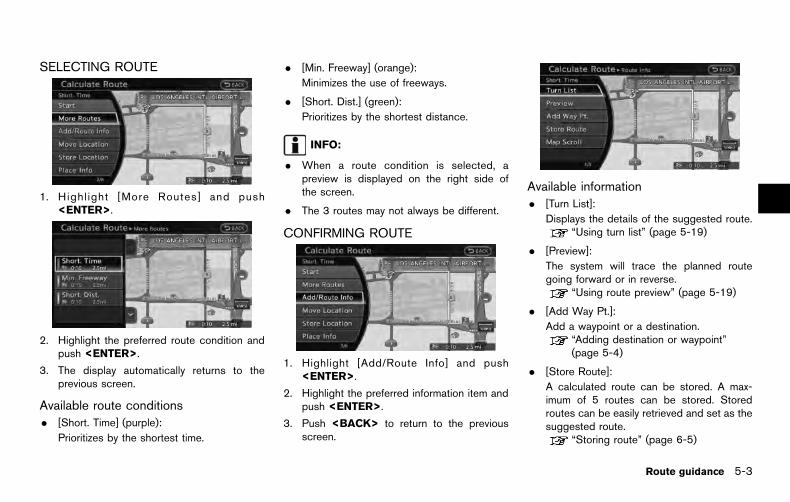
SELECTING ROUTE
1. Highl ight [More Routes] and push<ENTER>.
2. Highlight the preferred route condition andpush <ENTER>.
3. The display automatically returns to theprevious screen.
Available route conditions. [Short. Time] (purple):
Prioritizes by the shortest time.
. [Min. Freeway] (orange):
Minimizes the use of freeways.
. [Short. Dist.] (green):
Prioritizes by the shortest distance.
INFO:
. When a route condition is selected, apreview is displayed on the right side ofthe screen.
. The 3 routes may not always be different.
CONFIRMING ROUTE
1. Highlight [Add/Route Info] and push<ENTER>.
2. Highlight the preferred information item andpush <ENTER>.
3. Push <BACK> to return to the previousscreen.
Available information. [Turn List]:
Displays the details of the suggested route.“Using turn list” (page 5-19)
. [Preview]:
The system will trace the planned routegoing forward or in reverse.
“Using route preview” (page 5-19)
. [Add Way Pt.]:
Add a waypoint or a destination.“Adding destination or waypoint”(page 5-4)
. [Store Route]:
A calculated route can be stored. A max-imum of 5 routes can be stored. Storedroutes can be easily retrieved and set as thesuggested route.
“Storing route” (page 6-5)
Route guidance 5-3

5-4 Route guidance
. [Map Scroll]:
Displays a map screen where the location ofthe destination can be confirmed.
The same screen as when [Map Scroll] istouched can be displayed with the followingoperations:
— Touching the map screen.
— Pushing the directional buttons exceptfor the up/down button (multi-functioncontroller with directional buttons).
— Pushing the slide switch except in theupward/downward direction (multi-func-tion controller without directional but-tons).
Adding destination or waypointBefore starting route guidance, destinationsand/or waypoints can be added. A total of 6destinations or waypoints can be set.
1. Highlight [Add Way Pt.] and push<ENTER>.
2. Set additional destinations or waypoints andpush <ENTER>.
The method of searching for a location is thesame as the one for a destination.
“4. Setting destination”
3. Highlight [Add Destination] or [Add Way-point] and push <ENTER>.
4. The system starts calculating a route thatincludes the added destination or waypoint.When the calculation is finished, the route isdisplayed.
INFO:
. If a waypoint was added, [More Routes]cannot be selected.
. If a destination was added, the priordestination becomes a waypoint.
MOVING LOCATION OF DESTINATIONThe location of the destination can be adjustedby moving the cross pointer across the map.
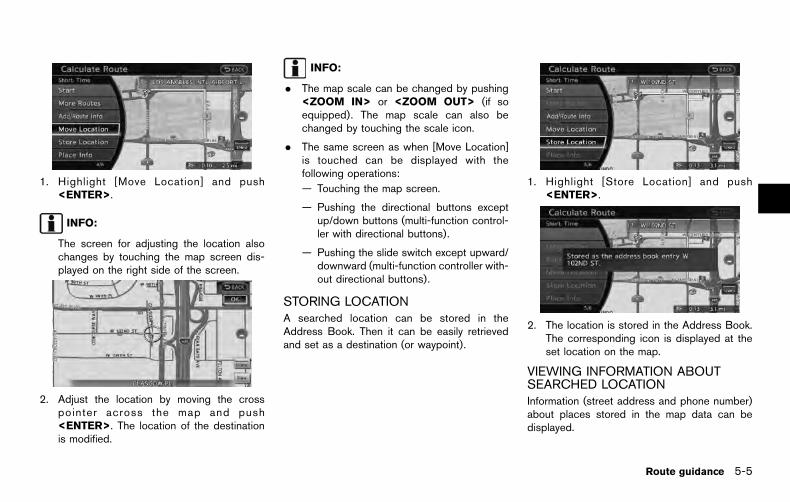
1. Highlight [Move Location] and push<ENTER>.
INFO:
The screen for adjusting the location alsochanges by touching the map screen dis-played on the right side of the screen.
2. Adjust the location by moving the crosspointer across the map and push<ENTER>. The location of the destinationis modified.
INFO:
. The map scale can be changed by pushing<ZOOM IN> or <ZOOM OUT> (if soequipped). The map scale can also bechanged by touching the scale icon.
. The same screen as when [Move Location]is touched can be displayed with thefollowing operations:
— Touching the map screen.
— Pushing the directional buttons exceptup/down buttons (multi-function control-ler with directional buttons).
— Pushing the slide switch except upward/downward (multi-function controller with-out directional buttons).
STORING LOCATIONA searched location can be stored in theAddress Book. Then it can be easily retrievedand set as a destination (or waypoint).
1. Highlight [Store Location] and push<ENTER>.
2. The location is stored in the Address Book.The corresponding icon is displayed at theset location on the map.
VIEWING INFORMATION ABOUTSEARCHED LOCATIONInformation (street address and phone number)about places stored in the map data can bedisplayed.
Route guidance 5-5

5-6 Route guidance
1. Select [Place Info] and push <ENTER>.
2. Information about the location is displayed.
3. Push <BACK> to return to the previousscreen.
INFO:
. If [Call] is displayed on the right side of thescreen, it is possible to call the locationindicated.
. The Bluetooth® Hands-Free Phone systemis required to be active and the cellular
phone must be connected to call thelocation indicated.
. Information about locations is not displayedwhile driving.

After setting the route, select [Start] to beginroute guidance.
Throughout route guidance, the system navi-gates through the guide points using visual andvoice guidance.
CAUTION
. The navigation system’s visual andvoice guidance is for reference pur-poses only. The contents of theguidance may be inappropriate de-pending on the situation.
. When driving along the suggestedroute, follow all traffic regulations(e.g., one-way traffic).
“Route guidance” (page 10-9)
VOICE GUIDANCE DURING ROUTEGUIDANCEWhen approaching a guide point (intersection orcorner), destination, etc. during route guidance,voice guidance announces the remaining dis-tance and/or turning direction. Push <VOICE>to repeat voice guidance.
Example of voice guidance
*1 “In about one quarter mile (400 meters),right (left) turn.”
“Right (left) turn ahead.”
*2 “In about one quarter mile (400 meters)freeway entrance on your right onto (roadnumber and direction).”
“Freeway entrance on your right onto (roadnumber and direction).”
*3 “In about one mile (1.6 kilometers), exit onyour right.”
“Exit on your right.”
*4 “You have arrived at your destination. End-ing route guidance.”
GUIDANCE SCREENS AND PREVIEWMODERoute guidance displays map screens andvarious information according to the situation.
Route guidance 5-7
ABOUT ROUTE GUIDANCE
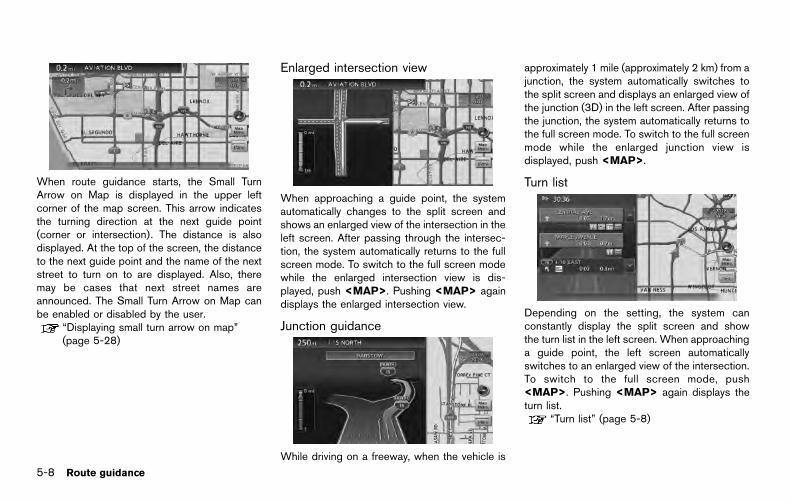
5-8 Route guidance
When route guidance starts, the Small TurnArrow on Map is displayed in the upper leftcorner of the map screen. This arrow indicatesthe turning direction at the next guide point(corner or intersection). The distance is alsodisplayed. At the top of the screen, the distanceto the next guide point and the name of the nextstreet to turn on to are displayed. Also, theremay be cases that next street names areannounced. The Small Turn Arrow on Map canbe enabled or disabled by the user.
“Displaying small turn arrow on map”(page 5-28)
Enlarged intersection view
When approaching a guide point, the systemautomatically changes to the split screen andshows an enlarged view of the intersection in theleft screen. After passing through the intersec-tion, the system automatically returns to the fullscreen mode. To switch to the full screen modewhile the enlarged intersection view is dis-played, push <MAP>. Pushing <MAP> againdisplays the enlarged intersection view.
Junction guidance
While driving on a freeway, when the vehicle is
approximately 1 mile (approximately 2 km) from ajunction, the system automatically switches tothe split screen and displays an enlarged view ofthe junction (3D) in the left screen. After passingthe junction, the system automatically returns tothe full screen mode. To switch to the full screenmode while the enlarged junction view isdisplayed, push <MAP>.
Turn list
Depending on the setting, the system canconstantly display the split screen and showthe turn list in the left screen. When approachinga guide point, the left screen automaticallyswitches to an enlarged view of the intersection.To switch to the full screen mode, push<MAP>. Pushing <MAP> again displays theturn list.
“Turn list” (page 5-8)

GUIDANCE SCREEN SETTINGSThe guidance screen can be displayed at alltimes even when the vehicle is located awayfrom the guide point. The screen to be displayedcan be set.
Split screen settingsThe display setting on the left-hand side screenshown during route guidance can be changed.
1. Push <ENTER> while the current locationmap screen is displayed.
2. Highlight [Map View ] and push <ENTER>.
3. Highlight [View Settings] and push<ENTER>.
4. Highlight the preferred screen and push<ENTER>. The indicator of the selectedscreen illuminates.
Intersection:
The map screen and the enlarged intersectionview can be displayed at the same time.
Push <MAP> to switch to the full map screen.
Turn list:
The list screen for showing the guide points tothe destination and the map screen can bedisplayed at the same time. An enlargedintersection view is automatically displayedwhen the vehicle approaches the guide point.
Turn list can be scrolled using the center dial,the main directional buttons or slide switch bytouching the up/down buttons on the screen.
Push <MAP> to switch to the full map screen.Push <MAP> again to display the turn list.
Route guidance 5-9

5-10 Route guidance
Fuel Economy:
The current fuel consumption rate, average fuelconsumption rate, instantaneous fuel consump-tion rate and distance to empty can be displayedon the map screen. An enlarged intersectionview is automatically displayed when the vehicleapproaches the guide point.
Push <MAP> to switch to the full map screen.
Push <MAP> again to display the fuel economyscreen. When approaching a guide point, theenlarged view of the intersection is automaticallydisplayed. To display the fuel economy informa-tion, push <MAP>. To display the map screen,push <MAP> again.
NOTE:
Use the values displayed on the fueleconomy screen as a guide. When the fuelgauge indicates empty or the low fuelwarning light illuminates even if the dis-
tance to entry reading indicates a suffi-cient amount of fuel remains, refuel thevehicle as soon as possible.
Full map:
The current location map is displayed. Anenlarged intersection view is automatically dis-played when the vehicle approaches the guidepoint.
When an enlarged intersection view is dis-played, pushing <MAP> returns to the mapscreen.
Show exit information on freewaysWhen the vehicle travels on a highway or a tollroad, the display automatically provides exitinformation in the turn list.
1. Push <ENTER> while the current locationmap screen is displayed.
2. Highlight [Map View] and push <ENTER>.
3. Highlight [Map Settings] and push<ENTER>.

4. Highlight [Show all Freeway Exits on Route]or [Auto. Show Turn List on Freeway] andpush <ENTER>. The indicator illuminateswhen the item is set.
5. Push <MAP> to return to the currentlocation map screen.
Showing freeway exit information:
When [Show all Freeway Exits on Route] is setto ON and the route includes a freeway or tollroad, all exits along the route which have exitinformation will be shown in the turn list.
The exit information is shown as icons.
Displaying turn list automatically on free-way:
When [Auto. Show Turn List on Freeway] is setto ON, the turn list will be automaticallydisplayed while the vehicle travels on a freewayor a toll road.
Selecting a waypoint from the exit infor-mation list:
When exit information is displayed in the turn list,a waypoint to a facility located near the freewayexit can be set as a waypoint.
1. Highlight the exit where the exit informationicon is displayed, and push <ENTER>. Thecategory list screen is displayed.
2. Highlight the landmark category and push<ENTER>. The list screen for showingfacilities located near the freeway exit isdisplayed.
3. Highlight the preferred facility for the way-point and push <ENTER>.
Route guidance 5-11

5-12 Route guidance
4. The waypoint is set, and the route search isperformed.
“Procedures after setting destination”(page 5-2)
WARNING
Always stop the vehicle in a safelocation before modifying the routeconditions.
Modifying the route conditions whiledriving may cause an accident.
During route guidance, the route conditions canbe modified and the route information can beconfirmed. Set route conditions according topersonal preference.
BASIC OPERATION1. Push <ROUTE>.
2. Highlight the preferred setting item andpush <ENTER>.
3. Push <MAP> to return to the currentlocation map screen.
Available setting items. [Cancel Route/Resume Route]:
Cancel the current route guidance. Acanceled route can also be reactivated. Ifthe suggested route is canceled, [CancelRoute] changes to [Resume Route].
“Canceling/reactivating route”(page 5-13)
. [Edit/Add to Route]:
Edit or add a destination or waypoints to theroute that is already set.
“Editing route” (page 5-14)
. [Route Info]:
Confirm the route by the route information orsimulation. The confirmed route can also bestored.
“Confirming route” (page 5-18)
. [Guidance Settings]:
Activate or deactivate route, voice guidanceand/or traffic announcement and adjust thevolume level of voice guidance.
“Guidance settings” (page 5-20)
. [Recalculate]:
Manually search for the route again afterchanging the search condition.
“Recalculating route” (page 5-21)
ROUTE SCREEN
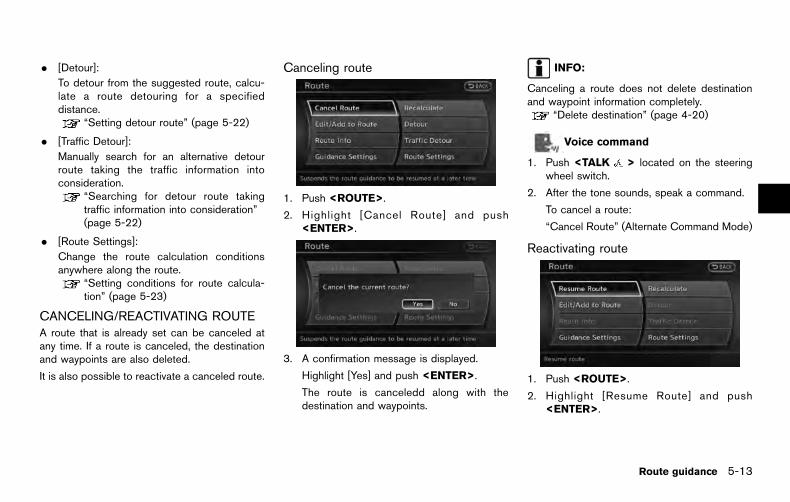
. [Detour]:
To detour from the suggested route, calcu-late a route detouring for a specifieddistance.
“Setting detour route” (page 5-22)
. [Traffic Detour]:
Manually search for an alternative detourroute taking the traffic information intoconsideration.
“Searching for detour route takingtraffic information into consideration”(page 5-22)
. [Route Settings]:
Change the route calculation conditionsanywhere along the route.
“Setting conditions for route calcula-tion” (page 5-23)
CANCELING/REACTIVATING ROUTEA route that is already set can be canceled atany time. If a route is canceled, the destinationand waypoints are also deleted.
It is also possible to reactivate a canceled route.
Canceling route
1. Push <ROUTE>.
2. Highlight [Cancel Route] and push<ENTER>.
3. A confirmation message is displayed.
Highlight [Yes] and push <ENTER>.
The route is canceledd along with thedestination and waypoints.
INFO:
Canceling a route does not delete destinationand waypoint information completely.
“Delete destination” (page 4-20)
Voice command
1. Push <TALK > located on the steeringwheel switch.
2. After the tone sounds, speak a command.
To cancel a route:
“Cancel Route” (Alternate Command Mode)
Reactivating route
1. Push <ROUTE>.
2. Highlight [Resume Route] and push<ENTER>.
Route guidance 5-13
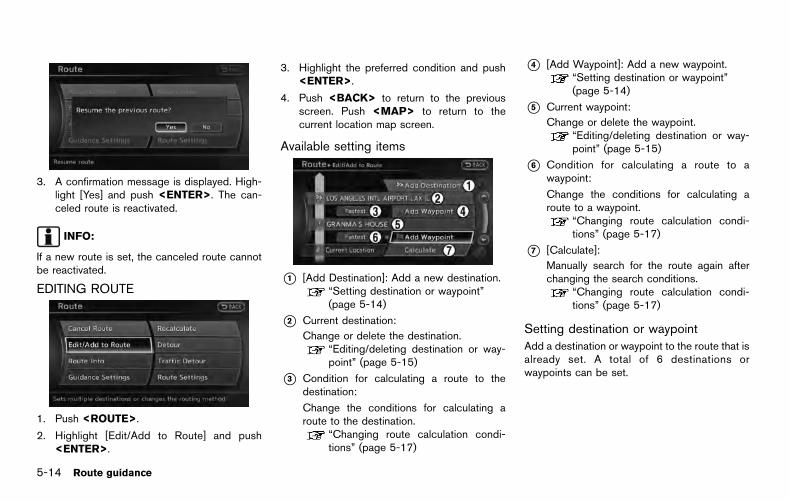
5-14 Route guidance
3. A confirmation message is displayed. High-light [Yes] and push <ENTER>. The can-celed route is reactivated.
INFO:
If a new route is set, the canceled route cannotbe reactivated.
EDITING ROUTE
1. Push <ROUTE>.
2. Highlight [Edit/Add to Route] and push<ENTER>.
3. Highlight the preferred condition and push<ENTER>.
4. Push <BACK> to return to the previousscreen. Push <MAP> to return to thecurrent location map screen.
Available setting items
*1 [Add Destination]: Add a new destination.“Setting destination or waypoint”(page 5-14)
*2 Current destination:
Change or delete the destination.“Editing/deleting destination or way-point” (page 5-15)
*3 Condition for calculating a route to thedestination:
Change the conditions for calculating aroute to the destination.
“Changing route calculation condi-tions” (page 5-17)
*4 [Add Waypoint]: Add a new waypoint.“Setting destination or waypoint”(page 5-14)
*5 Current waypoint:
Change or delete the waypoint.“Editing/deleting destination or way-point” (page 5-15)
*6 Condition for calculating a route to awaypoint:
Change the conditions for calculating aroute to a waypoint.
“Changing route calculation condi-tions” (page 5-17)
*7 [Calculate]:
Manually search for the route again afterchanging the search conditions.
“Changing route calculation condi-tions” (page 5-17)
Setting destination or waypointAdd a destination or waypoint to the route that isalready set. A total of 6 destinations orwaypoints can be set.

1. Push <ROUTE>.
2. Highlight [Edit/Add to Route] and push<ENTER>.
3. Highlight [Add Destination] or [Add Way-point] and push <ENTER>.
If [Add Destination] is selected, the currentdestination changes to a waypoint.
4. Set a destination or waypoint. The method ofsearching for a destination or waypoint is thesame as the one for a destination.
“4. Setting destination”
5. The selected location is displayed at thecenter of the map. Highlight [Add to Route]after confirming the location and push<ENTER>.
INFO:
Even after setting a destination/waypoint,the destination/waypoint location can beadjusted, the route can be stored, etc.
“Editing/deleting destination or way-point” (page 5-15)
6. Return to the Edit Route screen. Set theroute conditions as necessary.
7. Highlight [Calculate] and push <ENTER>.The system will recalculate the routes. Afterthe route search is completed, the displaywill automatically return to the presentlocation screen.
INFO:
. The prior route is automatically deleted.
. Added waypoints and search conditions willnot be taken into consideration for the routecalculation until [Calculate] is highlightedand <ENTER> is pushed.
Editing/deleting destination or waypointThe destination or waypoint that is already setcan be modified or deleted.
If a location is modified or deleted when asuggested route is already set, the priorsuggested route will be recalculated accord-ingly.
Route guidance 5-15

5-16 Route guidance
1. Push <ROUTE>.
2. Highlight [Edit/Add to Route] and push<ENTER>.
3. Highlight a destination or waypoint that isalready set and push <ENTER>.
4. Highlight [Move Dest.] to modify the locationand push <ENTER>.
“Moving location of destination”(page 5-4)
5. Highlight [Delete] and push <ENTER> todelete the location.
6. A confirmation message is displayed. Con-firm the contents of the message, highlight[Yes] and push <ENTER>. The destinationor waypoint is deleted from the route. Returnto the [Edit Route] screen.
7. By highlighting [Calculate] and pushing<ENTER>, the system will recalculate theroutes. After the route search is completed,the display will automatically return to thepresent location screen.
INFO:
. If the destination is deleted, the finalwaypoint of the route becomes the destina-tion.
. When the map screen is touched, the samemap screen as when [Move Dest.] isselected is displayed.
Changing order of destination and way-pointsThe order of a destination and waypoints thatare already set can be changed.

1. Push <ROUTE>.
2. Highlight [Edit/Add to Route] and push<ENTER>.
3. Highlight a destination or waypoint that isalready set and push <ENTER>.
4. Highlight [Change Order] and push<ENTER>. A list of the destination andwaypoints is displayed.
5. Highlight a preferred destination or waypointto replace the previously selected destina-tion or waypoint and push <ENTER>.
6. A message is displayed and the order of thedestination or waypoint is changed.
7. By highlighting [Calculate] and pushing<ENTER>, the system will recalculate theroutes. After the route search is complete,the display will automatically return to thepresent location screen.
Changing route calculation conditionsEach section of the route between waypointscan have different route calculation conditions.After setting these conditions, the entire routecan be recalculated.
Route guidance 5-17

5-18 Route guidance
1. Push <ROUTE>.
2. Highlight [Edit/Add to Route] and push<ENTER>.
3. Highlight the preferred section of the routeto the destination or waypoint and push<ENTER>.
4. Highlight the preferred condition and push<ENTER>.
Available conditions:
: [Fastest Route]
: [Minimize Freeway]
: [Shortest Route]
5. The condition has been changed and thedisplay returns to the [Edit/Add to Route]screen.
6. By highlighting [Calculate] and pushing<ENTER>, the system will recalculate theroutes. After the route search is completed,the display will automatically return to thepresent location screen.
INFO:
. The recalculated route may not be theshortest route because the system priori-tizes easy-to-drive roads for safety reasons.
. If the route conditions are set from [RouteSettings], all sections in the route aresubject to the same route conditions. Thisapplies even if different route conditions areset for different sections in [Edit/Add toRoute].
CONFIRMING ROUTEWhen the suggested route is displayed aftercalculation, the route information can be con-firmed or the suggested route simulated.

Basic operation1. Push <ROUTE>.
2. Highlight [Route Info] and push <ENTER>.
3. Highlight the preferred item and push<ENTER>.
Available items:
. [Turn List]:
Displays the details of the suggested route.“Using turn list” (page 5-19)
. [Preview]:
The system will trace the planned routegoing forward or in reverse.
“Using route preview” (page 5-19)
. [Simulation]:
Simulate the suggested route. This functionprovides a detailed image of the route withvoice guidance.
“Confirming route by simulation”
(page 5-20)
. [Store Route]:
A calculated route can be stored. A max-imum of 5 routes can be stored. Storedroutes can be easily retrieved and set as thesuggested route.
“Storing route” (page 6-5)
. [Map Scroll]:
Displays a map screen where the location ofthe destination can be confirmed.
The same screen as when [Map Scroll] istouched can be displayed with the followingoperations:
— Touching the map screen.
— Pushing the directional buttons exceptfor the up/down buttons (multi-functioncontroller with directional buttons).
— Pushing the slide switch except in theupward/downward direction (multi-func-tion controller without directional but-tons).
Using turn list
1. Highlight [Turn List] and push <ENTER>.
2. The information (e.g., intersections) can beconfirmed on the route to the destination byscrolling the screen pushing the up anddown switches of the main directionalbuttons, pushing the slide switch upwardor downward or rotating the center dial.
3. Push <MAP> to return to the currentlocation map screen.
Using route preview
Route guidance 5-19
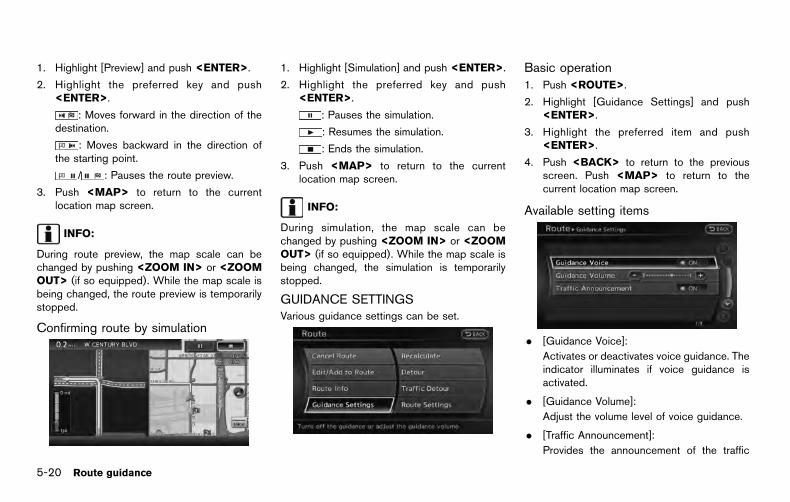
5-20 Route guidance
1. Highlight [Preview] and push <ENTER>.
2. Highlight the preferred key and push<ENTER>.
: Moves forward in the direction of thedestination.
: Moves backward in the direction ofthe starting point.
/ : Pauses the route preview.
3. Push <MAP> to return to the currentlocation map screen.
INFO:
During route preview, the map scale can bechanged by pushing <ZOOM IN> or <ZOOMOUT> (if so equipped). While the map scale isbeing changed, the route preview is temporarilystopped.
Confirming route by simulation
1. Highlight [Simulation] and push <ENTER>.
2. Highlight the preferred key and push<ENTER>.
: Pauses the simulation.
: Resumes the simulation.
: Ends the simulation.
3. Push <MAP> to return to the currentlocation map screen.
INFO:
During simulation, the map scale can bechanged by pushing <ZOOM IN> or <ZOOMOUT> (if so equipped). While the map scale isbeing changed, the simulation is temporarilystopped.
GUIDANCE SETTINGSVarious guidance settings can be set.
Basic operation1. Push <ROUTE>.
2. Highlight [Guidance Settings] and push<ENTER>.
3. Highlight the preferred item and push<ENTER>.
4. Push <BACK> to return to the previousscreen. Push <MAP> to return to thecurrent location map screen.
Available setting items
. [Guidance Voice]:
Activates or deactivates voice guidance. Theindicator illuminates if voice guidance isactivated.
. [Guidance Volume]:
Adjust the volume level of voice guidance.
. [Traffic Announcement]:
Provides the announcement of the traffic
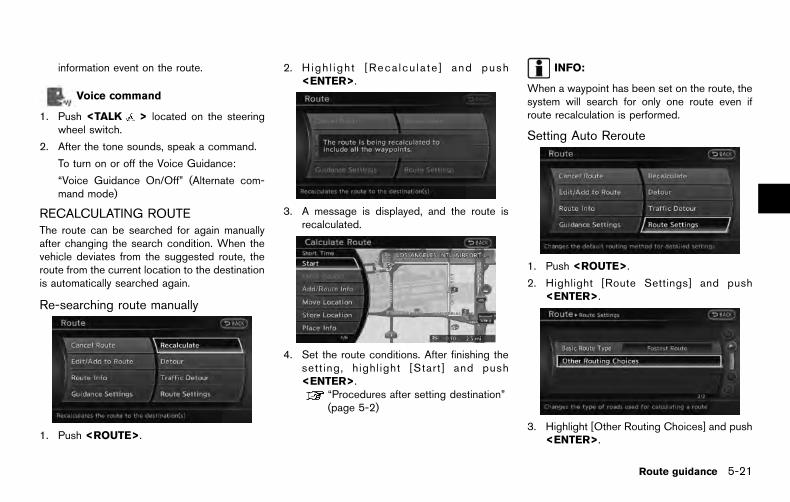
information event on the route.
Voice command
1. Push <TALK > located on the steeringwheel switch.
2. After the tone sounds, speak a command.
To turn on or off the Voice Guidance:
“Voice Guidance On/Off” (Alternate com-mand mode)
RECALCULATING ROUTEThe route can be searched for again manuallyafter changing the search condition. When thevehicle deviates from the suggested route, theroute from the current location to the destinationis automatically searched again.
Re-searching route manually
1. Push <ROUTE>.
2. H igh l igh t [Reca lcu la te ] and push<ENTER>.
3. A message is displayed, and the route isrecalculated.
4. Set the route conditions. After finishing thesett ing, highl ight [Start] and push<ENTER>.
“Procedures after setting destination”(page 5-2)
INFO:
When a waypoint has been set on the route, thesystem will search for only one route even ifroute recalculation is performed.
Setting Auto Reroute
1. Push <ROUTE>.
2. Highlight [Route Settings] and push<ENTER>.
3. Highlight [Other Routing Choices] and push<ENTER>.
Route guidance 5-21

5-22 Route guidance
4. Highlight [Auto Reroute] and push<ENTER>. The indicator for the selectedcondition illuminates. When the currentlocation map screen or route setting screenis displayed, the system recalculates a routewith the set conditions.
“Basic operation” (page 5-24)
SETTING DETOUR ROUTETo detour from the suggested route, a routedetouring for a specified distance can becalculated.
1. Push <ROUTE>.
2. Highlight [Detour] and push <ENTER>.
3. Highlight a detour distance and push<ENTER>.
After calculating the detour, the system displaysthe detour route on the map.
INFO:
. When the vehicle has deviated from thesuggested route, [Detour] cannot be se-lected.
. If the system cannot calculate a detour withthe specified conditions, it displays theprevious suggested route.
. If the vehicle is traveling very fast, the detourroute may start from a location that thevehicle has already passed.
SEARCHING FOR DETOUR ROUTETAKING TRAFFIC INFORMATION INTOCONSIDERATIONWhen a serious traffic event occurs on the route,or if the system finds a faster route, a detour alertwill pop up automatically. If the automatic alert ismissed, a detour can also be searched formanually.
1. Push <ROUTE>.
2. Highlight [Traffic Detour] and push<ENTER>.
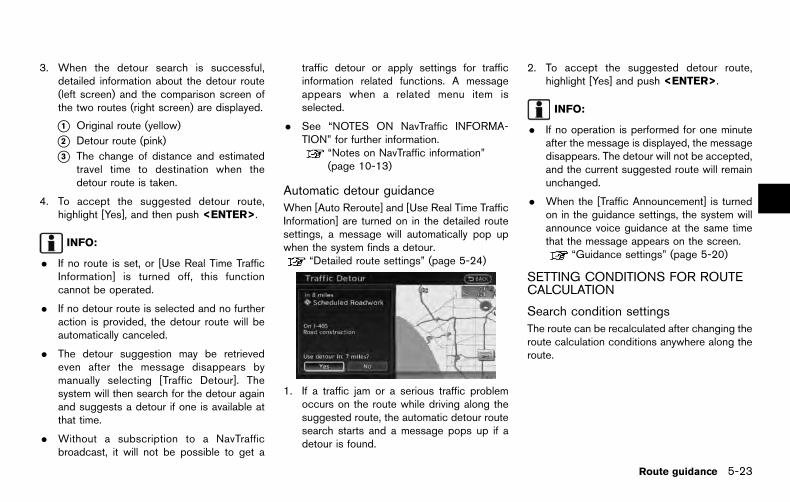
3. When the detour search is successful,detailed information about the detour route(left screen) and the comparison screen ofthe two routes (right screen) are displayed.
*1 Original route (yellow)
*2 Detour route (pink)
*3 The change of distance and estimatedtravel time to destination when thedetour route is taken.
4. To accept the suggested detour route,highlight [Yes], and then push <ENTER>.
INFO:
. If no route is set, or [Use Real Time TrafficInformation] is turned off, this functioncannot be operated.
. If no detour route is selected and no furtheraction is provided, the detour route will beautomatically canceled.
. The detour suggestion may be retrievedeven after the message disappears bymanually selecting [Traffic Detour]. Thesystem will then search for the detour againand suggests a detour if one is available atthat time.
. Without a subscription to a NavTrafficbroadcast, it will not be possible to get a
traffic detour or apply settings for trafficinformation related functions. A messageappears when a related menu item isselected.
. See “NOTES ON NavTraffic INFORMA-TION” for further information.
“Notes on NavTraffic information”(page 10-13)
Automatic detour guidanceWhen [Auto Reroute] and [Use Real Time TrafficInformation] are turned on in the detailed routesettings, a message will automatically pop upwhen the system finds a detour.
“Detailed route settings” (page 5-24)
1. If a traffic jam or a serious traffic problemoccurs on the route while driving along thesuggested route, the automatic detour routesearch starts and a message pops up if adetour is found.
2. To accept the suggested detour route,highlight [Yes] and push <ENTER>.
INFO:
. If no operation is performed for one minuteafter the message is displayed, the messagedisappears. The detour will not be accepted,and the current suggested route will remainunchanged.
. When the [Traffic Announcement] is turnedon in the guidance settings, the system willannounce voice guidance at the same timethat the message appears on the screen.
“Guidance settings” (page 5-20)
SETTING CONDITIONS FOR ROUTECALCULATION
Search condition settingsThe route can be recalculated after changing theroute calculation conditions anywhere along theroute.
Route guidance 5-23

5-24 Route guidance
Basic operation:
1. Push <ROUTE>.
2. Highlight [Route Settings] and push<ENTER>.
3. Highlight [Basic Route Type] and push<ENTER>.
4. Highlight the preferred condition and push<ENTER>. The indicator for the selectedcondition illuminates.
5. When the conditions are set, the systemstarts calculating the route with the newconditions, and the current location mapscreen is displayed.
Available conditions:
. [Fastest Route]:
Prioritizes by the fastest time.
. [Minimize Freeway]:
Minimizes the use of motorways.
. [Shortest Route]:
Prioritizes by the shortest route.
INFO:
Only one of these conditions can be utilized at atime.
Voice command
1. Push <TALK > located on the steeringwheel switch.
2. After the tone sounds, speak a command.
To set conditions for the route calculation(Alternate command mode):
“Fastest Route”
“Minimize Freeway Route”
“Shortest Route”
Detailed route settingsDetailed conditions can be set for the routecalculation.
Basic operation:
1. Push <ROUTE>.
2. Highlight [Route Settings] and push<ENTER>.
3. Highlight [Other Routing Choices] and push<ENTER>.
4. Highlight the preferred condition and push<ENTER>. The indicator for the selectedcondition illuminates.
5. If [Route Settings] is exited after changingthe settings, the system starts calculatingthe route with the new conditions.
Available setting items:
. [Minimize Toll Roads]:
Minimizes the use of toll roads.
. [Use Time Restricted Roads]:
Uses any roads subject to time restrictions.

. [Use Statistical Traffic Information]:
Uses statistical traffic information that isstored in the map data.
. [Use Real Time Traffic Information]:
Uses the latest traffic information receivedvia the SiriusXM broadcast.
. [Use Avoid Area Settings]:
Enables the avoid area setting.
. [Use Ferries]:
Includes the use of ferries.
. [Use Learned Routes]:
Uses the roads that are most frequentlytraveled with the help of self-learningtechnology.
. [Auto Reroute]:
If the vehicle deviates from the suggestedroute, the system automatically recalculatesa route that leads the vehicle to thesuggested route.
INFO:
. The recalculated route may not be theshortest route because the system priori-tizes easy-to-drive roads for safety reasons.
. If route conditions are set from [RouteSettings], all sections in the route are
subject to the same route conditions eventhough different route conditions are set fordifferent sections in [Edit/Add to Route].
. If [Use Time Restricted Roads] is deacti-vated, the system calculates a route withoutany consideration of the regulations con-cerning the time or day of the week. There-fore, the suggested route may include a roadsubject to traffic regulations concerning thetime or day of the week. When driving alongthe route, always follow all traffic regulationsregardless of whether [Use Time RestrictedRoads] is ON or OFF.
. If the system cannot calculate any alternativeroutes, it displays the previous route.
. If the vehicle overly deviates from thesuggested route, the system calculates anew route.
. Statistical traffic information is based onprevious traffic data. When the traffic situa-tion rapidly changes due to unexpectedaccidents, construction work, traffic restric-tions, emergencies, etc., the predictionaccuracy of the system may be reduced.
. Traffic jam information displayed on the mapscreen is not statistical traffic information.
. When [Use Statistical Traffic Information] isturned on, the system may lead to a roadwhere a traffic jam occurs or to a detoureven though the shortest route does nothave a traffic jam.
. Even when [Use Real Time Traffic Informa-tion] is turned on, if traffic information hasnot been provided for the area, sometimes itis possible that a detour will not be indicatedin a location where a traffic jam occurs.
. The system may not lead to a detour if trafficclosure or a traffic jam occurs far from thepresent location.
. The system calculates to reduce the timerequired for the entire route from the start todestination. If there are no appropriateroutes, the system may lead to a routewhere a traffic jam occurs instead of leadingto a detour.
. This system can learn and memorize theroute that is most frequently used. However,despite driving on the same route severaltimes so that the system can learn the route,the system may have difficulty learning theroute under the following conditions:
— [Use Time Restricted Roads] is turnedon.
Route guidance 5-25

5-26 Route guidance
— [Use Real Time Traffic Information] isturned on.
Various guidance information can be set to beplayed during route guidance and activate ordeactivate route and/or voice guidance.
BASIC OPERATION
1. Push <SETTING>.
2. Highlight [Navigation] and push <ENTER>.
3. Highlight [Guidance Settings] and push<ENTER>.
4. Highlight the preferred item and push<ENTER>.
5. Push <BACK> to return to the previousscreen. Push <MAP> to return to thecurrent location map screen.
Available setting items
. [Guidance Volume]:
Adjusts the volume level of voice guidance.“Guidance settings” (page 5-20)
. [Guidance Voice]:
Activates or deactivates voice guidance.
The indicator illuminates if voice guidance isactivated.
“Guidance settings” (page 5-20)
. [Traffic Announcement]:
Provides an announcement of a trafficinformation event on the route.
“Guidance settings” (page 5-20)
. [Voice Guidance Settings]:
Sets advanced settings for the voice gui-dance announced at guide points.
“Setting voice guidance at intersec-tions” (page 5-27)
ROUTE GUIDANCE SETTINGS

. [Guidance Display Settings]:
Activates or deactivates small turn arrowdisplay on the map.
“Displaying small turn arrow on map”(page 5-28)
. [Estimated Time]:
Switches the display of estimated travel timeto the destination or waypoint that isdisplayed on the map screen.
“Switching estimated arrival time dis-play” (page 5-28)
. [Others]:
— [Set Average Speeds]:Set an average vehicle speed for eachtype of road, which is reflected in thecalculation of the required time to thedestination.
“Set average speeds” (page 5-29)
— [Auto Reroute]:If the vehicle deviates from the sug-gested route, the system automaticallyrecalculates a route.
“Setting Auto Reroute” (page 5-21)
SETTING VOICE GUIDANCE AT IN-TERSECTIONS
1. Push <SETTING>.
2. Highlight [Navigation] and push <ENTER>.
3. Highlight [Guidance Settings] and push<ENTER>.
4. Highlight [Voice Guidance Settings] andpush <ENTER>.
5. Highlight [Intersection Guidance Settings]and push <ENTER>.
6. Highlight the preferred item and push<ENTER>.
Available setting items. [Voice Announcements]:
Sets how many times the voice guidance isannounced before the vehicle reaches anintersection.
1. Highlight [Voice Announcements] and push<ENTER>.
2. Highlight the preferred item and push<ENTER>.
. [Full]:The system announces three kinds ofvoice guidance: “Turning Point”, “1Guide” and “2 Guide”.
. [Concise]:The system announces two kinds ofvoice guidance: “Turning Point” and “1Guide”.
Route guidance 5-27

5-28 Route guidance
. [Turning Point]:
Turns on the sound that chimes when amaneuver is supposed to be occurring.
DISPLAYING SMALL TURN ARROWON MAPThe guidance screen displayed when the vehiclepasses through an intersection can be changed.
1. Push <SETTING>.
2. Highlight [Navigation] and push <ENTER>.
3. Highlight [Guidance Settings] and push<ENTER>.
4. Highlight [Guidance Display Settings] andpush <ENTER>.
5. Highlight [Small Turn Arrow on Map] andpush <ENTER> to activate or deactivateSmall Turn Arrow on the Map (simplified turnindicator) displayed in the upper left cornerof the map screen. The indicator illuminatesif the Small Turn Arrow on the Map isdisplayed.
SWITCHING ESTIMATED ARRIVALTIME DISPLAYThe display of the travel time on the map screencan be switched between the travel time to thedestination and the travel time to the waypoint.
Example: Switching the display to the travel timeto the waypoint
1. Push <SETTING>.
2. Highlight [Navigation] and push <ENTER>.
3. Highlight [Guidance Settings] and push<ENTER>.
4. Highlight [Estimated Time] and push<ENTER>.
5. Highlight [Waypoint] and push <ENTER>.
The indicator for the selected conditionilluminates.

6. Push <MAP> to return to the currentlocation map screen.
7. The icon displayed on the map screen isswitched, and the travel time to the waypointis displayed.
Displayed icon
: Display of the travel time to the destina-tion
: Display of the travel time to the waypoint
SET AVERAGE SPEEDSThe required time to the destination can becalculated based on the set vehicle speeds.
Basic operation1. Push <SETTING>.
2. Highlight [Navigation] and push <ENTER>.
3. Highlight [Guidance Settings] and push<ENTER>.
4. Highlight [Others] and push <ENTER>.
5. Highlight [Set Average Speeds] and push<ENTER>.
6. Highlight the preferred item and push<ENTER>.
7. Use the multi-function controller to make anadjustment. The speed can be increased/decreased by 5 MPH (5 km/h).
8. After finishing the setting, push <ENTER>or <BACK> to activate the setting.
9. Push <BACK> to return to the previousscreen. Push <MAP> to return to thecurrent location map screen.
Available setting items:
. [Auto]:
If set to ON, the system automaticallycalculates the required time to the destina-tion, the indicator illuminates and the speedsettings cannot be changed.
. [Freeway]:
Adjust the average vehicle speed on afreeway by moving the multi-function con-troller in the direction of [+] or [-].
. [Main Road]:
Adjust the average vehicle speed on a mainroad by moving the multi-function controllerin the direction of [+] or [-].
. [Town Road]:
Adjust the average vehicle speed on a townroad by moving the multi-function controllerin the direction of [+] or [-].
Route guidance 5-29

5-30 Route guidance
. [Residential]:
Adjust the average vehicle speed in aresidential area by moving the multi-functioncontroller in the direction of [+] or [-].
. [Reset]:
Sets the average vehicle speeds to thedefault values.

6 Storing location/route
Storing location ......................................................................... 6-2
Storing location by searching .......................................... 6-2
Storing current vehicle location ....................................... 6-3
Storing location by moving map ..................................... 6-4
Storing route .............................................................................. 6-5
Other settings ...................................................................... 6-5
Storing tracked route ............................................................... 6-6
Other settings ...................................................................... 6-6
Storing avoid area ..................................................................... 6-7
Editing address book ............................................................... 6-8
Basic operation .................................................................... 6-8
Editing stored home and address ................................ 6-8
Minor adjustment of home or stored address ........... 6-9
Editing stored route ....................................................... 6-14
Editing stored tracking ................................................. 6-14
Editing avoid area .......................................................... 6-15
Deleting stored item ............................................................. 6-18
Deleting stored item individually ................................. 6-18
Deleting individual item on the map .......................... 6-19
Deleting all stored items .............................................. 6-19
Transferring information to/from address book .............. 6-21

6-2 Storing location/route
Often visited locations can be stored in theAddress Book. The stored addresses can beeasily retrieved to set them as a destination orwaypoint.
INFO:
. The Address Book can store up to 300locations.
. New information placed in the same storageposition will overwrite the old data.
STORING LOCATION BY SEARCHINGAfter a location is searched for once, it can bestored for future use.
1. Push <SETTING>.
2. Highlight [Navigation] and push <ENTER>.
3. Highlight [Address Book] and push<ENTER>.
4. Highlight [Stored Location] and push<ENTER>.
5. Highlight [Home Location (None)] or [AddNew] and push <ENTER>.
6. Highlight the appropriate method to searchfor a location and push <ENTER>.
“4. Setting destination”
7. When a preferred location is displayed atthe center of the map, confirm the addressof the location and push <ENTER>.
A message is displayed, and the address ofthe location is stored in the Address Book.
STORING LOCATION

8. Adjust the location of the stored item andedit the contents of the stored item asnecessary. After finishing the setting, high-light [OK] and push <ENTER>.
INFO:
. When the location is stored in the AddressBook, [Address Book] can be used tosearch for the location.
. A location can be adjusted by selecting[Move Location] using the same method asthe one for a destination.
“Moving location of destination”(page 5-4)
Other settingsAn address can also be stored using thefollowing procedure.
1. Push <DEST>.
2. Highlight [Address Book] and push<ENTER>.
3. Highlight [Store/Edit] and push <ENTER>.
4. Highlight [Add New] and push <ENTER>.
5. Highlight the appropriate method to searchfor a location and push <ENTER>. Theaddress of the searched location is stored.
“4. Setting destination”
STORING CURRENT VEHICLE LOCA-TION
1. Push <MAP> to display the current loca-tion map screen.
2. Push <ENTER> at the current vehiclelocation.
3. Highlight [Store Location] and push<ENTER>. A message is displayed, andthe current vehicle location is stored in theAddress Book.
Storing location/route 6-3

6-4 Storing location/route
4. The icon representing the stored location isdisplayed on the map.
Push <MAP> or <BACK> to return to thecurrent location map screen.
INFO:
The location is stored in the first availableposition number in the Address Book list.
STORING LOCATION BY MOVINGMAP
1. Move to the preferred location on the mapand push <ENTER>.
2. Highlight [Store Location] and push<ENTER>. A message is displayed, andthe address of the location is stored in theAddress Book.
3. The icon representing the stored location isdisplayed on the map.
Push <MAP> to return to the currentlocation map screen.
INFO:
The address is stored in the first availableposition number in the Address Book list.

A maximum of 5 calculated routes can bestored.
Stored routes can be easily retrieved and set asthe suggested route.
INFO:
Stored route includes only locations (destinationand waypoints) and route calculation conditions,not the route itself.
1. Push <ROUTE>.
2. Highlight [Route Info] and push <ENTER>.
3. Highl ight [Store Route] and push<ENTER>.
4. A confirmation message is displayed. Con-firm the contents of the message, highlight[Yes] and push <ENTER>.
The current route is stored.
OTHER SETTINGSA route can also be stored using the followingprocedure.
1. Push <SETTING>.
2. Highlight [Navigation] and push <ENTER>.
3. Highlight [Address Book] and push<ENTER>.
4. Highlight [Stored Routes] and push<ENTER>.
5. Highlight [Store Current Route] and push<ENTER>.
6. A confirmation message is displayed. Con-firm the contents of the message, highlight[Yes] and push <ENTER>. The currentroute is stored.
INFO:
. The route is stored in the first availableposition number in the store current routelist.
. A maximum of 5 routes can be stored. When5 routes are stored in the Address Book, anew route cannot be stored until a route isdeleted.
“Deleting stored item” (page 6-18)
. If any waypoints are not set on the route, theroute cannot be stored.
Storing location/route 6-5
STORING ROUTE

6-6 Storing location/route
A travelled route up to the current location canbe stored. A maximum of 5 tracked routes canbe stored.
1. Push <MAP> to display the current loca-tion map screen.
2. Push <ENTER> at the current vehiclelocation.
3. Highlight [Store Tracking] and push<ENTER>.
4. A confirmation message is displayed.
Confirm the contents of the message, high-light [Yes] and push <ENTER>.
The tracked route you have traveled isstored.
5. Push <MAP> or <BACK> to return to thecurrent location map screen.
INFO:
. A maximum of 5 tracked routes can bestored. When 5 tracked routes are stored inthe Address Book, a new tracked routecannot be stored until a tracked route isdeleted.
“Deleting stored item” (page 6-18)
. The tracked route is stored in the firstavailable position number in the storetracking list.
OTHER SETTINGSA tracked route can also be stored using thefollowing procedure.
1. Push <SETTING>.
2. Highlight [Navigation] and push <ENTER>.
3. Highlight [Address Book] and push<ENTER>.
4. Highlight [Stored Tracking] and push<ENTER>.
5. Highlight [Add New] and push <ENTER>.
INFO:
A tracked route can only be stored using thesetting screen when [Current Tracking] is set toon.
STORING TRACKED ROUTE

An Avoid Area can be stored.
The Avoid Area is an area that can be excludedfrom a route, such as a road that is alwayscongested. Once Avoid Areas are stored, thesystem avoids those areas when calculating aroute. Up to 10 Avoid Areas can be stored.
1. Push <SETTING>.
2. Highlight [Navigation] and push <ENTER>.
3. Highlight [Address Book] and push<ENTER>.
4. Highlight [Avoid Area] and push <ENTER>.
5. Highlight [Add New] and push <ENTER>.
INFO:
A maximum of 10 Avoid Areas can bestored.When 10 Avoid Areas are already stored, anew Avoid Area cannot be stored until acurrently stored Avoid Area is deleted.
“Deleting stored item” (page 6-18)
6. Highlight the appropriate method to searchfor a location and push <ENTER>.
“4. Setting destination”
7. Set the following items for the searchedlocation.
Available setting items:
. [Rename]:
Changes the name.“Rename” (page 6-16)
. [Move Location]:
Adjusts the location of the Avoid Area.“Move Location” (page 6-16)
Storing location/route 6-7
STORING AVOID AREA
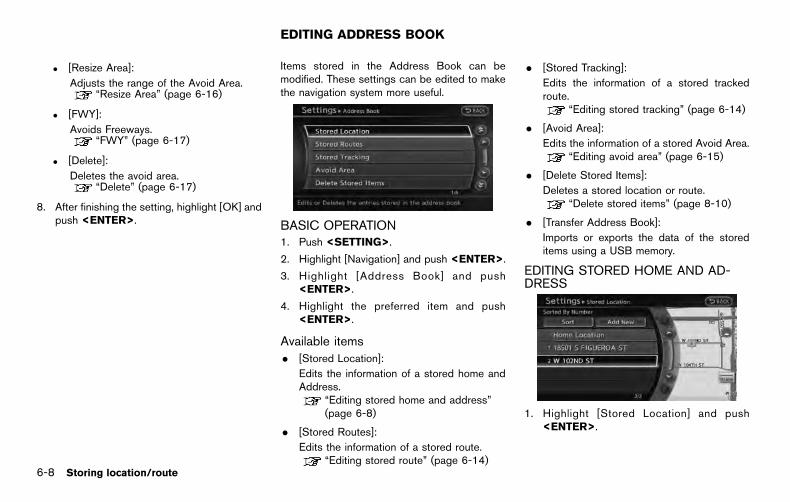
6-8 Storing location/route
. [Resize Area]:
Adjusts the range of the Avoid Area.“Resize Area” (page 6-16)
. [FWY]:
Avoids Freeways.“FWY” (page 6-17)
. [Delete]:
Deletes the avoid area.“Delete” (page 6-17)
8. After finishing the setting, highlight [OK] andpush <ENTER>.
Items stored in the Address Book can bemodified. These settings can be edited to makethe navigation system more useful.
BASIC OPERATION1. Push <SETTING>.
2. Highlight [Navigation] and push <ENTER>.
3. Highlight [Address Book] and push<ENTER>.
4. Highlight the preferred item and push<ENTER>.
Available items. [Stored Location]:
Edits the information of a stored home andAddress.
“Editing stored home and address”(page 6-8)
. [Stored Routes]:
Edits the information of a stored route.“Editing stored route” (page 6-14)
. [Stored Tracking]:
Edits the information of a stored trackedroute.
“Editing stored tracking” (page 6-14)
. [Avoid Area]:
Edits the information of a stored Avoid Area.“Editing avoid area” (page 6-15)
. [Delete Stored Items]:
Deletes a stored location or route.“Delete stored items” (page 8-10)
. [Transfer Address Book]:
Imports or exports the data of the storeditems using a USB memory.
EDITING STORED HOME AND AD-DRESS
1. Highlight [Stored Location] and push<ENTER>.
EDITING ADDRESS BOOK
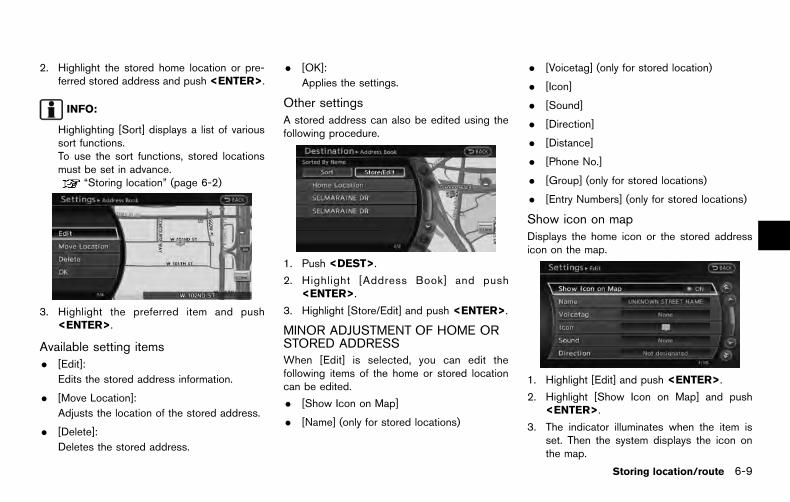
2. Highlight the stored home location or pre-ferred stored address and push <ENTER>.
INFO:
Highlighting [Sort] displays a list of varioussort functions.To use the sort functions, stored locationsmust be set in advance.
“Storing location” (page 6-2)
3. Highlight the preferred item and push<ENTER>.
Available setting items. [Edit]:
Edits the stored address information.
. [Move Location]:
Adjusts the location of the stored address.
. [Delete]:
Deletes the stored address.
. [OK]:
Applies the settings.
Other settingsA stored address can also be edited using thefollowing procedure.
1. Push <DEST>.
2. Highlight [Address Book] and push<ENTER>.
3. Highlight [Store/Edit] and push <ENTER>.
MINOR ADJUSTMENT OF HOME ORSTORED ADDRESSWhen [Edit] is selected, you can edit thefollowing items of the home or stored locationcan be edited.
. [Show Icon on Map]
. [Name] (only for stored locations)
. [Voicetag] (only for stored location)
. [Icon]
. [Sound]
. [Direction]
. [Distance]
. [Phone No.]
. [Group] (only for stored locations)
. [Entry Numbers] (only for stored locations)
Show icon on mapDisplays the home icon or the stored addressicon on the map.
1. Highlight [Edit] and push <ENTER>.
2. Highlight [Show Icon on Map] and push<ENTER>.
3. The indicator illuminates when the item isset. Then the system displays the icon onthe map.
Storing location/route 6-9
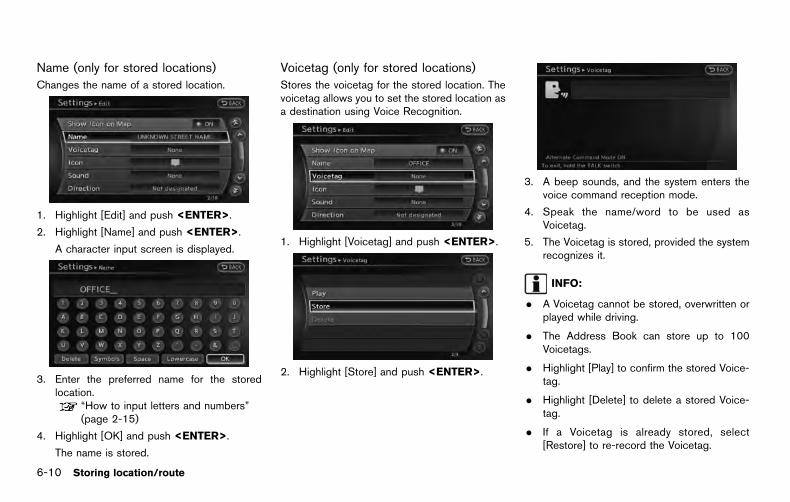
6-10 Storing location/route
Name (only for stored locations)Changes the name of a stored location.
1. Highlight [Edit] and push <ENTER>.
2. Highlight [Name] and push <ENTER>.
A character input screen is displayed.
3. Enter the preferred name for the storedlocation.
“How to input letters and numbers”(page 2-15)
4. Highlight [OK] and push <ENTER>.
The name is stored.
Voicetag (only for stored locations)Stores the voicetag for the stored location. Thevoicetag allows you to set the stored location asa destination using Voice Recognition.
1. Highlight [Voicetag] and push <ENTER>.
2. Highlight [Store] and push <ENTER>.
3. A beep sounds, and the system enters thevoice command reception mode.
4. Speak the name/word to be used asVoicetag.
5. The Voicetag is stored, provided the systemrecognizes it.
INFO:
. A Voicetag cannot be stored, overwritten orplayed while driving.
. The Address Book can store up to 100Voicetags.
. Highlight [Play] to confirm the stored Voice-tag.
. Highlight [Delete] to delete a stored Voice-tag.
. If a Voicetag is already stored, select[Restore] to re-record the Voicetag.

IconChanges the icon of the home or stored addressto the preferred one. By changing the icons, theusage of the [By Icon] option of the sort functioncan be optimized more effectively ([Sort] menusituation).
1. Highlight [Icon] and push <ENTER>.
A list of icons is displayed.
2. Highlight the preferred icon and push<ENTER>.
3. The icon is changed.
SoundSets the tone of the alarm that sounds when thevehicle approaches the home or a storedaddress.
1. Highlight [Sound] and push <ENTER>.
A sound list is displayed.
2. Select the preferred alarm tone and push<ENTER>.
The indicator of the selected alarm toneilluminates.
Sound list:
None
Chime
Melody
Sound
Dog
Cat
Wave
Church bell
Marimba
Trumpet
Horn
Scratch
DirectionSets the alarm to sound when approaching froma specific direction.
Storing location/route 6-11

6-12 Storing location/route
1. Highlight [Direction] and push <ENTER>.
A map screen with the home or storedlocation located on the map center isdisplayed.
2. Set the direction that sounds the alarm andpush <ENTER>.
The selected direction is set.
INFO:
After the direction is set and [Direction] isselected and set again, a confirmationmessage is displayed. Confirm the contentsof the message, highlight [Yes] and push<ENTER>. The set direction is overwritten.
DistanceSets the alarm to sound when reaching aspecific distance to the home or stored address.
1. Highlight [Distance] and push <ENTER>.
2. Highlight the preferred distance option andpush <ENTER>. The indicator of theselected distance illuminates.
Available distance options:
. 150 feet (50 m)
. 300 feet (100 m)
. 1000 feet (300 m)
. 1500 feet (500 m)
INFO:
Once the direction and the distance to sound analarm are set, the system will sound the alarmwhen the vehicle enters the triggering zone.
Phone No.Stores the telephone number of the home or astored location.
1. Highlight [Edit] and push <ENTER>.
2. Highlight [Phone No.] and push <ENTER>.The telephone number entry screen isdisplayed.

3. Enter the telephone number of the home orstored location.
“Number input screen” (page 2-16)
4. Highlight [OK] and push <ENTER>.
The telephone number is stored.
INFO:
If the phone number of the home or a location isstored, the phone number can be used to searchfor the destination even if it is not included in themap data.
Group (only for stored locations)This groups the stored locations.
By grouping the stored locations, the [By Group]option of the sort function can be used moreeffectively in the [Sort Entries] mode.
1. Highlight [Group] and push <ENTER>.
2. Highlight the preferred group and push<ENTER>.
When the indicator of the selected groupilluminates, the stored location is classifiedinto the applicable group.
Entry Number (only for stored locations)Index the position numbers of any two storedlocations in the list.
1. Highlight [Entry Number] and push<ENTER>.
A list of stored locations is displayed.
2. Highlight the stored addresses that youwant to change and push <ENTER>.
The position numbers of the selected storedlocations are changed.
Storing location/route 6-13

6-14 Storing location/route
EDITING STORED ROUTE
1. Highlight [Stored Routes] and push<ENTER>.
2. Highlight the preferred stored route andpush <ENTER>.
3. Highlight the preferred item to edit from thelist on the right side of the screen and push<ENTER>.
4. After finishing the editing, highlight [OK] andpush <ENTER>.
INFO:
If [Store Current Route] is selected, the systemstores the current route.
Available setting items:
. [Rename]:
Changes the name.“Character (letters and numbers) inputscreen” (page 2-15)
. [Replace]:
Overwrites the stored route to the currentroute.
. [Delete]:
Deletes the stored route.
. [OK]:
Applies the settings.
EDITING STORED TRACKING
1. Highlight [Stored Tracking] and push<ENTER>.
2. Highlight a stored tracked route and push<ENTER>. When the “ON” indicator is notilluminated, push <ENTER>. The indicatorilluminates, and the Edit screen is displayed.
If <ENTER> is pushed while the “ON”indicator is illuminated, the indicator turnsoff.
3. Highlight the preferred item and push<ENTER>.
Available setting items (Current tracking):
. [View Track]:
Displays the tracked route up to the currentlocation.
. [Delete]:
Deletes the stored current tracking.
. [OK]:
Applies the settings.

Available setting items (Stored tracked routes):
. [View Track]:
Displays a stored tracked route on the map.
. [Rename]:
Changes the name.“Character (letters and numbers) inputscreen” (page 2-15)
. [Replace]:
Overwrites the stored tracked route to thecurrent tracked route.
. [Delete]:
Deletes the stored tracked route.
. [OK]:
Applies the settings.
Displaying tracked routeThe stored tracked route can be displayed onthe map as necessary.
1. Highlight [Stored Tracking] and push<ENTER>.
2. Highlight a tracked route to display on themap screen, and push <ENTER>. The“ON” indicator illuminates, and the Editscreen is displayed.
3. After confirming the location to display thetracked route, highlight [OK] and push<ENTER>. The screen returns to the
previous screen.
4. Push <MAP> to return to the currentlocation map screen.
INFO:
. Current tracking is displayed up to 6miles (10 km).
. Stored tracking is displayed up to 12miles (20 km).
EDITING AVOID AREA
1. Highlight [Avoid Area] and push <ENTER>.
2. Highlight the preferred Avoid Area and push<ENTER>.
Storing location/route 6-15

6-16 Storing location/route
3. Highlight the preferred items and push<ENTER>.
Available setting items:
. [Rename]:
Changes the name.
. [Move Location]:
Adjusts the location of the Avoid Area.
. [Resize Area]:
Adjusts the range of the Avoid Area.
. [FWY]:
Avoids freeways.
. [Delete]:
Deletes the Avoid Area.
. [OK]:
Applies the setting.
4. After finishing the setting, highlight [OK] andpush <ENTER>.
INFO:
An Avoid Area can be added by selecting [AddNew].
“Storing avoid area” (page 6-7)
RenameChanges the name of an Avoid Area.
1. Highlight [Rename] and push <ENTER>. Acharacter input screen is displayed.
2. Enter the preferred name for the avoid area.
3. Highlight [OK] and push <ENTER>. Thename is stored.
Move LocationAdjusts the location of the Avoid Area.
1. Highlight [Move Location] and push<ENTER>.
2. Adjust the location of the Avoid Area.
3. After adjust ing the locat ion, push<ENTER>.
Resize AreaAdjusts the range of the Avoid Area.

1. Highl ight [Resize Area] and push<ENTER>.
2. Highlight the range from 5 available levels.
3. After highl ight ing the range, push<ENTER>.
INFO:
Push <ZOOM IN> or <ZOOM OUT> (if soequipped) to change the scale of the map.
FWYSets the route to avoid freeways.
1. Highlight [FWY].
To include freeways in the Avoid Area, push<ENTER> to illuminate this indicator.
2. The Avoid Area is displayed in green if itincludes a freeway or in blue if it does notinclude a freeway.
INFO:
If the current vehicle location is set to an AvoidArea, the system will not provide route guidance.
DeleteDeletes the Avoid Area.
1. Highlight [Delete] and push <ENTER>.
2. A confirmation message is displayed. Con-firm the contents of the message, highlight[Yes] and push <ENTER>. The stored itemis deleted from the Address Book.
Storing location/route 6-17

6-18 Storing location/route
The locations and routes in the Address Bookcan be deleted. Two deletion methods areavailable: deleting an individual item and delet-ing all stored items.
NOTE:
Deleted items cannot be restored. Beforedeleting an item, always make sure thatthe item is truly not necessary.
DELETING STORED ITEM INDIVIDU-ALLYYou can delete stored addresses, routes, track-ing and avoid areas individually.
1. Push <SETTING>.
2. Highlight [Navigation] and push <ENTER>.
3. Highlight [Address Book] and push<ENTER>.
Example: [Stored Location] is highlighted.
4. Highlight the preferred item for deletion andpush <ENTER>.
5. Highlight the preferred location/route fordeletion and push <ENTER>.
6. Highlight [Delete] and push <ENTER>.
DELETING STORED ITEM

7. A confirmation message is displayed. Con-firm the contents of the message, highlight[Yes] and push <ENTER>. The stored itemis deleted from the Address Book.
Other settingsA stored address can also be deleted using thefollowing procedure.
1. Push <DEST>.
2. Highlight [Address Book] and push<ENTER>.
3. Highlight [Store/Edit] and push <ENTER>.
4. Highlight [Edit or Delete an Entry] and push<ENTER>.
5. Highlight a preferred address and push<ENTER>.
“4. Setting destination”
INFO:
This procedure applies only for deleting a storedhome or address. A stored route, tracking oravoid area cannot be deleted using this proce-dure.
DELETING INDIVIDUAL ITEM ON THEMAP1. Align the cross pointer over the preferred
stored location for deletion by moving on themap. Then push <ENTER>.
2. Highlight [Delete] and push <ENTER>.
3. A confirmation message is displayed. Con-firm the contents of the message, highlight[Yes] and push <ENTER>.
The stored item is deleted from the AddressBook.
DELETING ALL STORED ITEMS
1. Push <SETTING>.
2. Highlight [Navigation] and push <ENTER>.
3. Highlight [Address Book] and push<ENTER>.
Storing location/route 6-19
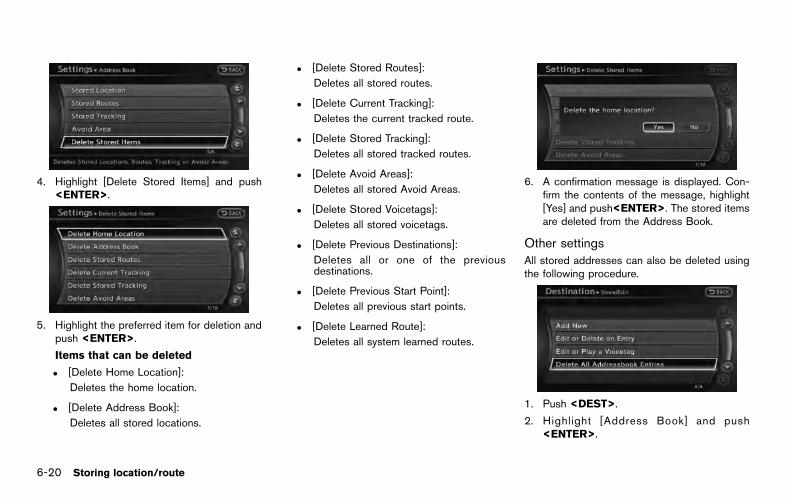
6-20 Storing location/route
4. Highlight [Delete Stored Items] and push<ENTER>.
5. Highlight the preferred item for deletion andpush <ENTER>.
Items that can be deleted
. [Delete Home Location]:
Deletes the home location.
. [Delete Address Book]:
Deletes all stored locations.
. [Delete Stored Routes]:
Deletes all stored routes.
. [Delete Current Tracking]:
Deletes the current tracked route.
. [Delete Stored Tracking]:
Deletes all stored tracked routes.
. [Delete Avoid Areas]:
Deletes all stored Avoid Areas.
. [Delete Stored Voicetags]:
Deletes all stored voicetags.
. [Delete Previous Destinations]:
Deletes all or one of the previousdestinations.
. [Delete Previous Start Point]:
Deletes all previous start points.
. [Delete Learned Route]:
Deletes all system learned routes.
6. A confirmation message is displayed. Con-firm the contents of the message, highlight[Yes] and push<ENTER>. The stored itemsare deleted from the Address Book.
Other settingsAll stored addresses can also be deleted usingthe following procedure.
1. Push <DEST>.
2. Highlight [Address Book] and push<ENTER>.

3. Highlight [Store/Edit] and push <ENTER>.
4. Highlight [Delete All Addressbook Entries]and push <ENTER>.
“4. Setting destination”
INFO:
This procedure applies only for deleting a storedhome or address. A stored route, tracking oravoid area cannot be deleted using this proce-dure.
The information of the stored home and ad-dresses can be exported and imported using aUSB memory.
1. I nse r t a USB memory and push<SETTING>.
INFO:
Refer to the vehicle Owner’s Manual for thelocation of the USB connector.
2. Highlight [Navigation] and push <ENTER>.
3. Highlight [Address Book] and push<ENTER>.
4. Highlight [Transfer Address Book] and push<ENTER>.
5. Highlight [Download Address Book to USB]or [Download Address Book from USB] andpush <ENTER>.
Storing location/route 6-21
TRANSFERRING INFORMATION TO/FROM ADDRESS BOOK

6-22 Storing location/route
6. Highlight a stored item. The [ON] indicatorilluminates.
7. Highlight [Download] and push <ENTER>.
NOTE:
Do not remove the USB memory untilthe system completely imports or ex-ports the data.
INFO:
If the USB memory already has the data for astored address, a confirmation message isdisplayed. Once overwritten, the original datacannot be recovered.

MEMO
Storing location/route 6-23

6-24 Storing location/route
MEMO

7 Viewing technical information
Information screen .................................................................... 7-2
Basic operation .................................................................... 7-2
Viewing information about current vehicle location .......... 7-3
Basic operation .................................................................... 7-3
Viewing available traffic information ..................................... 7-3
Basic operation .................................................................... 7-4
Info on route ......................................................................... 7-4
Nearby traffic info. ............................................................... 7-5
Display urgent traffic information .................................... 7-5
Traffic information on map ................................................ 7-6
Traffic information settings ................................................ 7-7
Viewing available weather information ................................ 7-8
Displaying weather information screen ....................... 7-9
Destination weather on suggested route screen ... 7-15
Automatically display warnings/watches .................. 7-15
Map update ............................................................................. 7-17
Viewing navigation system unit identification ................. 7-18
Basic operation .............................................................. 7-18
Viewing navigation system version information ............. 7-18
Basic operation .............................................................. 7-18
Viewing GPS current location information ..................... 7-19
Basic operation .............................................................. 7-19

7-2 Viewing technical information
This screen sets or displays various informationthat is helpful for using the vehicle safely andcomfortably.
Available items include the vehicle information,Traffic Info. setup, current location information,GPS information, Voice recognition list and mapversion.
Designs and items displayed on the screen mayvary depending on the markets and the models.
INFO:
A NavTraffic subscription is necessary to viewTraffic Info.
BASIC OPERATION
1. Push <INFO>.
2. Highlight the preferred item and push<ENTER>.
Available items. [Fuel Economy]:
Refer to the vehicle Owner’s Manual.
. [Tire Pressure] (if so equipped):
Refer to the vehicle Owner’s Manual.
. [Trip Computer] (if so equipped):
Refer to the vehicle Owner’s Manual.
. [Maintenance]:
Refer to the vehicle Owner’s Manual.
. [Where am I?]:
Displays information regarding the currentvehicle location.
“Viewing information about currentvehicle location” (page 7-3)
. [Traffic Info]:
Allows Traffic Info. setup.“Viewing available traffic information”(page 7-3)
. [Weather Info]:
Displays weather information.“Viewing available weather informa-tion” (page 7-8)
. [Others]:
— [Map Update]:Display the map version and enableupdating of the map data.
“Map update” (page 7-17)
— [Navigation Version]:Displays the current navigation systemversion.
“Viewing navigation system versioninformation” (page 7-18)
— [GPS Position]:Displays GPS information regarding thecurrent vehicle location.
“Viewing GPS current location in-formation” (page 7-19)
— [Voice Recognition]:Displays the voice recognition list.
“9. Voice recognition”
INFO:
The displayed items vary depending on theoptions that are equipped on the vehicle.
INFORMATION SCREEN

This displays the information about the vehiclelocation on the route when driving according toroute guidance.
BASIC OPERATION1. Push <INFO>.
2. Highlight [Where am I?] and push<ENTER>.
3. Push <BACK> to return to the previousscreen. Push <MAP> to return to thecurrent location map screen.
Contents of vehicle location information
*1 Next Street:
Displays the next street on the route.
*2 Current Street:
Displays the current street on the route.
*3 Previous Street:
Displays the previous street on the route.
*4 Displays the distance to the next intersec-tion on the route.
*5 Displays the distance traveled from theprevious intersection on the route.
NavTraffic information is a subscription serviceoffered by SiriusXM Satellite Radio.
This service provides real-time informationregarding traffic flow, accidents, road construc-tion and other incidents, where available.
NavTraffic combines information from commer-cial and public traffic data providers includinggovernment departments of transportation, po-lice, emergency services, road sensors, camerasand aircraft reports. The traffic information isbroadcast to the vehicle by the SiriusXMsatellites. Available traffic information on theroute the driver selected is shown on thenavigation screen so traffic conditions betweenyou and the destination are known. Three typesof real-time traffic information for major road-ways are shown on the navigation system:
* Unscheduled traffic data for example, acci-dents and disabled vehicles.
* Scheduled traffic data, for example roadconstruction and road closures.
* Traffic flow information (rate of speed data).
WARNING
NavTraffic information is not a substi-tute for attentive driving. Traffic condi-tions change constantly and emergency
Viewing technical information 7-3
VIEWING INFORMATION ABOUTCURRENT VEHICLE LOCATION
VIEWING AVAILABLE TRAFFICINFORMATION

7-4 Viewing technical information
situations can arise without warning.Relying only on NavTraffic informationmay lead to a collision and could resultin serious personal injury.
NOTE:
Flow information is provided only forroads equipped with traffic sensors andis not available in all markets covered bythe service. Flow data may not be availableon portions of a road that is underconstruction.NavTraffic information is available in limitedmarkets. To subscribe or to check if this serviceis available in the area:
call 1-866-635-2349 or see www.siriusxm.com/navtraffic
INFO:
If a contract is not completed for NavTrafficinformation service, a message appears, and itwill not be possible to check the information onthe traffic information system.
BASIC OPERATION
1. Push <INFO>.
2. Highlight [Traffic Info] and push <ENTER>.
3. Highlight the preferred information and push<ENTER>.
4. Push <BACK> to return to the previousscreen.
Push <MAP> to return to the currentlocation map screen.
Available items. [Info on Route]:
Displays the list of traffic information foundon the recommended route from the currentvehicle location to the destination.
. [Nearby Traffic Info]:
Displays the list of traffic information aroundthe current vehicle location.
INFO ON ROUTEThis is only available when a route is set.
The list of traffic information found on therecommended route from the current vehiclelocation to the destination is displayed. Thedetailed information about displayed events canalso be checked.
1. Highlight [Info. on Route] and push<ENTER>. A list screen is displayed.
2. Highlight the event to check the detailedinformation, and push <ENTER>.

3. The map screen centered around theselected event is displayed. On the leftscreen, the detailed information about theevent is displayed.
The message can be scrolled using themulti-function controller or the steeringwheel.
4. Push <BACK> to return to the previousscreen.
NEARBY TRAFFIC INFO.The list of available traffic information around thecurrent vehicle location is displayed.
1. Highlight [Nearby Traffic Info] and push<ENTER>. A list screen is displayed.
2. Highlight the event to check the detailedinformation for and push <ENTER>.
3. The map screen centered around theselected event is displayed. On the leftscreen, the detailed information about theevent is displayed. The message can bescrolled using the multi-function controlleror the steering wheel.
4. Push <BACK> to return to the previousscreen.
DISPLAY URGENT TRAFFIC INFOR-MATIONWhen an urgent event is found around thecurrent vehicle location, a message pops upautomatically with a voice announcement.
The message includes the icon, event type,event information and the direct distance fromthe current location to the event.
Viewing technical information 7-5

7-6 Viewing technical information
INFO:
. Urgent traffic information is displayed re-gardless of whether the traffic informationsystem is on or off.
. When there are multiple urgent events, theevent with the shortest direct distance fromthe current location is displayed.
. If the urgent event is on the recommendedroute, and if a detour is found, the detourroute notification screen is displayed whenthe vehicle approaches the detour point.
TRAFFIC INFORMATION ON MAPWith subscription to NavTraffic service, trafficinformation is displayed on both Plan View andBirdviewTM map screen.
See “NOTES ON NavTraffic INFORMATION” forfurther information.
“Notes on NavTraffic information”(page 10-13)
Screen information
*1 Road conditionsFree Flow: Green arrowModerate traffic: Yellow arrowHeavy traffic: Red arrowSection affected by serious traffic event:Purple dashed arrow
*2 Estimated travel time to destinationcalculated with consideration of trafficinformation on route.
*3 Traffic information icon:If the route is not already set, all of thetraffic information icons on the mapscreen are displayed in color. Whenthe route is already set, the icons on theroute are displayed in color, and theicons outside the route are displayed ingray.
: Accident
: Closed road

: Information
: Road work
: Slippery road
: Weather
: Incident
*4 Traffic indicator:Displays the reception condition of trafficinformation transmitted from the provi-der.Green: Reception condition is good.Gray: Reception condition is not good.No mark: Subscription to NavTrafficservice is not detected.
Traffic information display and scalelevels
2D map and Birdview Map
5 miles 10 km
2 miles 4 km
1 mile 2 km
1/2 mile 1 km
1/4 mile 500 m
1/8 mile 200 m
1/16 mile 100 m
1/32 mile 50 m
2D map and Birdview Map
1/64 mile 25 m
Checking detailed information for trafficinformation icons on the map
1. Place the cross pointer over the trafficinformation icon. The general description ofthe icon is displayed.
2. Push <ENTER> or touch [Detail]. Thescreen for showing the detailed informationfor the traffic information icon is displayed.
3. The map screen centered around theselected event is displayed. On the leftscreen, the detailed information about theevent is displayed. You can scroll themessage by using the multi-function con-troller or the steering wheel.
4. Push <MAP> to return to the currentlocation map screen.
TRAFFIC INFORMATION SETTINGSThis displays or changes the settings for thetraffic information related functions.
1. Push <SETTING>.
2. Highlight [Navigation] and push <ENTER>.
3. Highlight [Traffic Info Settings] and push<ENTER>.
Viewing technical information 7-7

7-8 Viewing technical information
4. Highlight the preferred setting and push<ENTER>. The indicator for the selectedsetting illuminates.
Available setting items. [Use Traffic Info]:
Enables all traffic information related func-tions.
. [Show Incidents on Map]:
Displays the traffic incidents (e.g., accident)on the map screen.
. [Show Traffic Flow on Map]:
Displays the traffic flow with an arrow on themap screen.
. [Blink Red Traffic Flow]:
Blinks the red traffic flow lines that representcongestions.
. [Traffic Announcement]:
Announces the traffic information event on
the route.
INFO:
. Even when [Show Traffic Flow on Map] and[Show Incidents on Map] are set to off, thelist display of [Info on Route] and [NearbyTraffic Info] will not be affected.
. Even when [Traffic Announcement] is set tooff, the route guidance will not be affected.Also, the announcement of emergencyinformation and weather information will notbe turned off.
Voice command
1. Push <TALK > located on the steeringwheel switch.
2. After the tone sounds, speak a command.
To turn on or off the traffic information system:
“Information” “Traffic Information” (Standardmode)
“Traffic Information” (Alternate command mode)
NavWeatherXM information is a subscriptionservice offered by SiriusXM Satellite Radio.
This service provides real-time informationregarding current weather, temperature, warn-ings, road conditions and forecasts whereavailable. The weather information is broadcastto the vehicle by the SiriusXM Satellite Radio.
The service enables you to view the followinginformation on the navigation system.
. Current weather information icon of thedestination on the screen of suggestedroute
. Detailed weather information and forecastsof an area of interest
. Countrywide and local maps with thecurrent weather, temperature, warnings androad condition information
. List of warning/watches events detectedaround the current location
. Pop-up messages on the navigation screenwith voice announcements when warningsand watches are detected around thecurrent location
VIEWING AVAILABLE WEATHERINFORMATION

WARNING
NavWeatherXM information is not asubstitute for attentive driving. Weatherconditions change constantly andemergency situations can arise withoutwarning. Relying only on Nav-WeatherXM information could result inserious personal injury.
NavWeatherXM information is available in lim-ited markets. To subscribe to or check if thisservice is available in the area, call 1-866-635-2349 or access www.siriusxm.com/navweather.
INFO:
. If a contract is not completed for theNavWeatherXM information service, a mes-sage appears and it will not be possible tocheck the information on the traffic informa-tion system.
. The weather information is available only forareas that provide weather information toNavWeatherXM.
INFO:
The reception condition of the NavWeatherXMinformation transmitted from the provider can beconfirmed using the “Weather” indicator on theupper right side of the screen.Green: The reception condition is good.Gray: The reception condition is not good.No mark: A subscription to the NavWeatherXMservice is not detected.
DISPLAYING WEATHER INFORMA-TION SCREEN
Basic Operation1. Push <INFO>.
2. Highl ight [Weather Info] and push<ENTER>.
3. Highlight the preferred information and push<ENTER>.
4. Push <BACK> to return to the previousscreen. Push <MAP> to return to thecurrent location map screen.
Available items:
. Current Weather and Forecasts:
Displays current weather information andthree-day forecasts.
. Warnings and Watches History:
Displays a list of warnings and watchesrecently detected around the current loca-
Viewing technical information 7-9

7-10 Viewing technical information
tion.
. Weather Map:
Displays the current weather map for thepreferred area.
. Temperature Map:
Displays the current temperature map for thepreferred area.
. Warnings Map:
Displays the current watches/warnings mapfor the preferred area.
. Road Condition Map:
Displays the current road condition map forthe preferred area.
Selecting cityWhen displaying various weather informationscreens by pushing <INFO>, the range can bespecified for the weather information fromamong the current location (local), destination,countrywide (nation) or a specified city.
The city can be specified by selecting one fromthe list that is displayed.
1. Push <INFO>.
2. Highl ight [Weather Info] and push<ENTER>.
3. Highlight the preferred information and push<ENTER>.
4. Highlight [Select Other City from Menu] andpush <ENTER>.
5. Highlight the preferred state from the listand push <ENTER>.

6. Highlight the preferred city from the list andpush <ENTER>.
INFO:
[Select Other City from Menu] is not availablewhile driving.
Current weather and forecastsThe current weather information and a three-dayforecast for the current location, the destinationor the preferred city.
1. Highlight [Current Weather and Forecasts]and push <ENTER>.
2. Highlight the preferred area and push<ENTER>.
INFO:
. [Weather Info on Destination] is notavailable unless a destination is set forthe route guidance.
. When a destination is not set, nearbyweather information is displayed.
3. A weather information screen is displayed.Highlight [Forecast] and push <ENTER>.
4. The forecast screen is displayed. A three-day forecast can be confirmed for thepreferred area.
5. Push <BACK> to return to the previousscreen. Push <MAP> to return to thecurrent location map screen.
Voice command
1. Push <TALK > located on the steeringwheel switch.
2. After the tone sounds, speak a command.
To display the list for weather information:
“Weather Information” (Alternate commandmode)
Viewing technical information 7-11

7-12 Viewing technical information
Warnings and watches historyA list can be displayed for the warning/watchevents detected around the current location. Thedetailed information of each event can also bedisplayed.
1. Highlight [Warnings and Watches History]and push <ENTER>. A list warning/watchevents around the current location is dis-played.
2. Highlight the event to check the detailedinformation and push <ENTER>.
3. A screen with detailed information of theevent is displayed.
4. Push <BACK> to return to the previousscreen. Push <MAP> to return to thecurrent location map screen.
Weather MapThe current weather map can be confirmed forthe current location, the destination, the entirecountry or the preferred city.
1. Highlight [Weather Map] and push<ENTER>.
2. Highlight the preferred map area push<ENTER>.
INFO:
[Destination Map] is not available unless adestination is set for the route guidance.
3. A weather map is displayed. The weatherand precipitation level are shown by colors.
4. Push <BACK> to return to the previousscreen. Push <MAP> to return to thecurrent location map screen.

INFO:
Touch [Legend] to display the map legend.
Voice command
1. Push <TALK > located on the steeringwheel switch.
2. After the tone sounds, speak a command.
To display the list for weather map:
“Weather Map” (Alternate command mode)
Temperature MapThe current temperature map can be confirmedfor the current location, the destination, theentire country or the preferred city.
1. Highlight [Temperature Map] and push<ENTER>.
2. Highlight the preferred map area and push<ENTER>.
INFO:
. [Destination Map] is not available unlessa destination is set for the route gui-dance.
. When a destination is not set, a nearbyweather map is displayed.
3. A temperature map is displayed. The tem-perature information is shown by numbersand colors.
4. Push <BACK> to return to the previousscreen. Push <MAP> to return to thecurrent location map screen.
INFO:
Touch [Legend] to display the map legend.
Viewing technical information 7-13
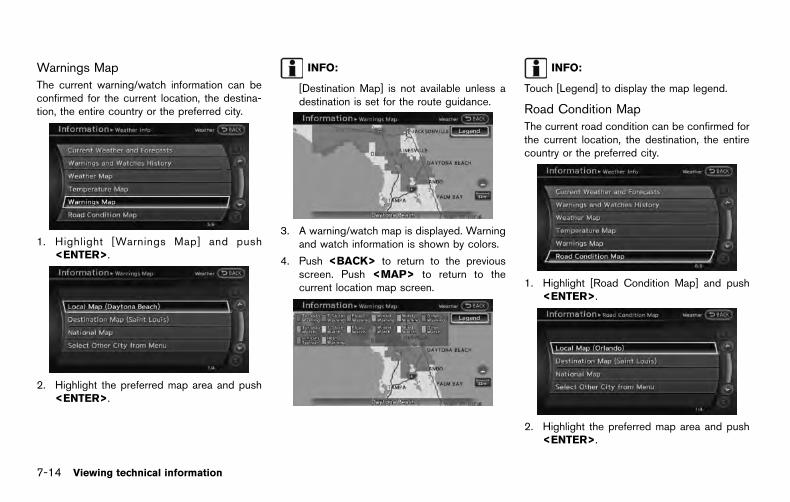
7-14 Viewing technical information
Warnings MapThe current warning/watch information can beconfirmed for the current location, the destina-tion, the entire country or the preferred city.
1. Highlight [Warnings Map] and push<ENTER>.
2. Highlight the preferred map area and push<ENTER>.
INFO:
[Destination Map] is not available unless adestination is set for the route guidance.
3. A warning/watch map is displayed. Warningand watch information is shown by colors.
4. Push <BACK> to return to the previousscreen. Push <MAP> to return to thecurrent location map screen.
INFO:
Touch [Legend] to display the map legend.
Road Condition MapThe current road condition can be confirmed forthe current location, the destination, the entirecountry or the preferred city.
1. Highlight [Road Condition Map] and push<ENTER>.
2. Highlight the preferred map area and push<ENTER>.

INFO:
[Destination Map] is not available unless adestination is set for the route guidance.
3. A road condition map is displayed. The roadconditions are shown by colors.
4. Push <BACK> to return to the previousscreen. Push <MAP> to return to thecurrent location map screen.
INFO:
Touch [Legend] to display the map legend.
DESTINATION WEATHER ON SUG-GESTED ROUTE SCREEN
On the screen of the suggested route aftersetting a destination, the current weatherinformation around the destination is displayedvia icons.
Weather information icons
ClearMostly Clear
Partly Cloudy
Mostly Cloudy
Cloudy
Haze
Fog
Rain, Light Rain
HailHeavy Rain
Freezing Rain/Ice
SnowHeavy Snow
Dust/SandSmoke/Ash
Thunderstorm
Tornado/FunnelCloud
AUTOMATICALLY DISPLAY WARN-INGS/WATCHESWhen an urgent warning/watch is detectedaround the current vehicle location, a messagepops up automatically with a voice announce-ment.
Viewing technical information 7-15

7-16 Viewing technical information
The message includes the weather icon and textdescribing the event.
INFO:
. The pop-up messages and announcementscan be set to on or off.
“Weather information settings”(page 7-16)
. If multiple warning/watch events are de-tected, they will be displayed in orderstarting with the one having the shortestlinear distance from the vehicle.
Weather information settingsThe settings can be confirmed and changed forthe urgent weather information related functions.
1. Push <SETTING>.
2. Highlight [Navigation] and push <ENTER>.
3. Highlight [Weather Info Settings] and push<ENTER>.
4. Highlight the preferred setting and push<ENTER>. The indicator for the settingilluminates.
Available setting items:
. Display an Alert for Weather Warnings:
Displays a message screen automaticallywhen the system detects urgent warninginformation.
. Display an Alert for Weather Watches:
Displays a message screen automaticallywhen the system detects urgent watchinformation.
. Voice Announcements:
Provides urgent information announcementsfor warnings and watches around the
current location.
Types of warnings/watches
Category Warnings/Watches
Tornado Tornado Watch, Tornado
Hurricane Inland Hurricane Wind, Hurri-cane Force Wind, Hurricane,Typhoon
Storm Severe Thunderstorm Watch,Severe Thunderstorm, Storm,Tropical Storm, Inland TropicalStorm, Dust Storm
Flood Flood Watch, Flash Flood,Coastal Flood, LakeshoreFlood, High Surf, Flood
Winter Winter Watch, Heavy Snow,Heavy Sleet, Lake Effect Snow,Freeze, Heavy Freezing Spray,Blizzard, Ice Storm, WinterStorm
Wind Wind Watch, High Wind, WindChill, Gale
Extremes Excessive Heat
Other Red Flag, Tsunami, Avalanche,Special Marine, Earthquake,Law Enforcement, HazardousMaterials, Nuclear Power Plant,Radiological Hazard, Civil Dan-ger, Fire, Shelter in Place,Volcano, Other Watches,Other Warnings

INFO:
. The “Other Watches” category in the“Other” category includes Inland HurricaneWatch, Hurricane Watch, Typhoon Watch,Tropical Storm Watch, Inland Tropical StormWatch and Fire Weather Watch.
. The “Other Warnings” category in the“Other” category includes Dense Fog Warn-ing, Freezing Fog Warning, Extreme ColdWarning, Frost Warning, Hydrologic Warn-ing, Ashfall Warning, Air Stagnation Warn-ing, Low Water Warning, Ice AccretionWarning, Dense Smoke Warning, DenseSmoke Advisory, Freezing Fog Advisory,Dense Fog Advisory, Ashfall Advisory andAir Stagnation Advisory.
New map data can be downloaded.
1. Push <INFO>.
2. Highl ight [Map Update] and push<ENTER>.
3. To update the map data, insert the first of themap update DVDs.
4. Highl ight [DVD Update] and push<ENTER>.
INFO:
. Refer to the vehicle Owner’s Manual for thelocation of the DVD slot.
. Do not eject the DVD while updating themap data. Doing so will result in anincomplete update.
. Multiple DVDs are required to fully updatethe system. In addition, a Digital RightsManagement (DRM) activation code isrequired to complete the installation. Topurchase a map update and DRM code,please visit www.nissannavigation.com. Youwill need your Unit ID in order to purchase amap update.
“Viewing navigation system unit identi-fication” (page 7-18)
NOTE:
In handling the DVD-ROM, be careful onthe following points.. Do not try to bend the DVD-ROM. Do
not use any disk that is bent or cracked.
. Do not use any benzine, thinner, orantistatic spray on them.
. Do not put on any sticker or writeanything on either surface.
Viewing technical information 7-17
MAP UPDATE

7-18 Viewing technical information
. If you need to clean it, do so with a softcloth by wiping from the centre out-ward.
. Do not use a DVD Laser Lens Cleanersas they may cause the DVD player tomalfunction.
The navigation system unit identification numberand the current map version can be located.
BASIC OPERATION1. Push <INFO>.
2. Highl ight [Map Update] and push<ENTER>.
3. The unit Identification (Unit ID) number isdisplayed.
4. Push <BACK> to return to the previousscreen. Push <MAP> to return to thecurrent location map screen.
“Map update” (page 7-17)
This displays the map version information.
BASIC OPERATION1. Push <INFO>.
2. Highlight [Navigation Version] and push<ENTER>.
3. Push <BACK> to return to the previousscreen. Push <MAP> to return to thecurrent location map screen.
VIEWING NAVIGATION SYSTEMUNIT IDENTIFICATION
VIEWING NAVIGATION SYSTEMVERSION INFORMATION

This displays GPS information, such as thepositioning status, latitude/longitude, altitudeand satellite locations.
BASIC OPERATION1. Push <INFO>.
2. Highlight [Others] and push <ENTER>.
3. Highlight [GPS Position] and push<ENTER>.
4. Push <BACK> to return to the previousscreen. Push <MAP> to return to thecurrent location map screen.
Contents of GPS information
*1 GPS Reception:
Displays the GPS positioning method.
3-dimension Calculating the latitude, longitudeand altitude by four or moresatellites.
2-dimension Calculating the latitude, longitudeand altitude by three or moresatellites.
Out of range Cannot calculate because noGPS satellites can be located.
*2 Latitude:
Displays the latitude.
*3 Longitude:
Displays the longitude.
*4 Approx Altitude:
Displays the approximate altitude.
*5 Positioning status:
(green)Satellites are available.
(gray)Satellites are being searched for.
Viewing technical information 7-19
VIEWING GPS CURRENT LOCATIONINFORMATION

7-20 Viewing technical information
MEMO

8 Other settings
Settings screen ......................................................................... 8-2
Basic operation .................................................................... 8-2
Display settings ......................................................................... 8-3
Basic operation .................................................................... 8-3
Display adjustment .............................................................. 8-3
Basic operation .................................................................... 8-3
Setting color theme ............................................................ 8-5
Navigation setting ..................................................................... 8-6
Basic operation .................................................................... 8-6
Speed limit indication on map ......................................... 8-6
Other navigation settings ................................................ 8-7
Delete stored items ....................................................... 8-10
Reset all navigation settings to default .................... 8-10
Volume adjustment ................................................................ 8-11
Basic operation .............................................................. 8-11
Clock settings ........................................................................ 8-12
Basic operation .............................................................. 8-12
Language and unit settings ................................................ 8-13
Language settings ......................................................... 8-13
Unit settings .................................................................... 8-14

8-2 Other settings
The navigation system can be customized tomake it easier for you to use.
BASIC OPERATION
1. Push <SETTING>.
2. Highlight the preferred setting item andpush <ENTER>.
Available setting items. [Navigation]:
Adjust various settings of the navigationsystem.
“Navigation setting” (page 8-6)
. [Audio]:
Refer to the vehicle Owner’s Manual.
. [Phone]:
Refer to the vehicle Owner’s Manual.
. [Bluetooth]:
Set Bluetooth® Audio and Phone.
Refer to the vehicle Owner’s Manual.
. [Volume and Beeps]:“Volume adjustment” (page 8-11)
. [Rear Display] (if so equipped):
Refer to the vehicle Owner’s Manual.
. [Display]:“Display settings” (page 8-3)
. [Clock]:“Clock settings” (page 8-12)
. [Others]:
— [Comfort]:This item is displayed when the ignitionswitch is in the ON position.
Refer to the vehicle Owner’s Manual.
— [Language and Units]:“Language and unit settings”(page 8-13)
— [Voice Recognition]:“System feedback announcementmodes” (page 9-20)
— [Camera] (if so equipped):Refer to the vehicle Owner’s Manual.
— [Sonar] (if so equipped):Adjust the parking sensor detectionsensitivity, etc.
Refer to the vehicle Owner’s Manual.
— [Image Viewer]:Refer to the vehicle Owner’s Manual.
INFO:
The displayed items vary depending on theequipped options.
SETTINGS SCREEN

This menu turns on and off the display, adjustthe image quality of the navigation screen andchange the color of the menu screen.
BASIC OPERATION
1. Push <SETTING>.
2. Highlight [Display] and push <ENTER>.
3. Highlight the preferred adjustment item andpush <ENTER>.
INFO:
If a rear display is equipped, it is possible toselect [Display] after pushing <SETTING>,highlighting [Others] and then pushing<ENTER>.
Available setting items
. [Display Adjustment]
Turn on and off the display and adjust theimage quality of the navigation screen.
. [Color Theme]
Set the color of the menu screen.
DISPLAY ADJUSTMENTThis menu turns on and off the display andadjusts the image quality of the navigationscreen.
BASIC OPERATION
1. Highlight [Display Adjustment] and push<ENTER>.
2. Highlight the preferred adjustment item andpush <ENTER>.
3. Use the multi-function controller to adjust tothe preferred setting.
4. After setting, push <ENTER> or <BACK>to apply the setting.
5. Highlight <BACK> to return to the previousscreen. Push <MAP> to return to thecurrent location map screen.
Other settings 8-3
DISPLAY SETTINGS

8-4 Other settings
Available setting items
. [Display]:
Turn on or off the screen.“Display” (page 8-4)
. [Brightness]:
Adjust the screen brightness.“Brightness” (page 8-4)
. [Contrast]:
Adjust the screen contrast.“Contrast” (page 8-4)
. [Background Color]:
Set the background color.“Background color” (page 8-5)
Display
To turn off the display, push <ENTER>.
The display can also be turned off by pushingand holding <DAY/NIGHT OFF> for more than2 seconds.
When any button is pushed with the display off,the display turns on. The display will automati-cally turn off when there is no switch operationfor 5 seconds.
To turn on the display, push <DAY/NIGHTOFF>.
Brightness
Adjust the display brightness by rotating thecenter dial in the [+] or [−] direction on the multi-function controller.
Each time [+] or [−] is pushed, the displaybrightness changes.
Contrast
Adjust the display contrast by rotating the centerdial in the [+] or [−] direction on the multi-function controller.
Each time [+] or [−] is pushed, the display
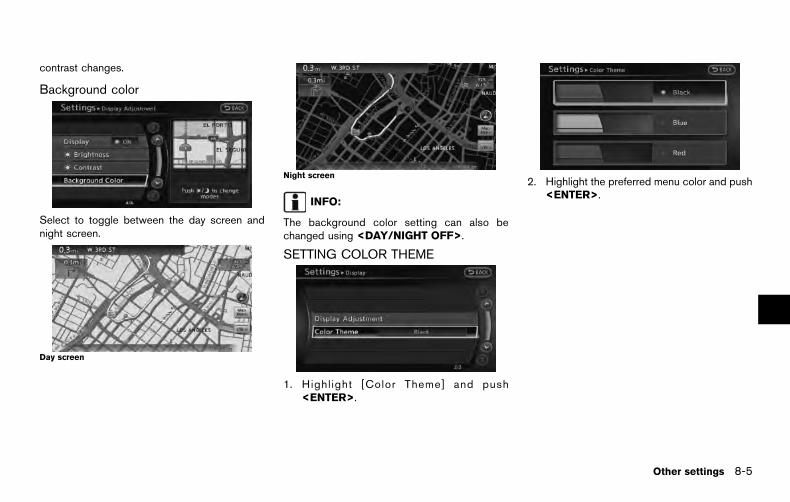
contrast changes.
Background color
Select to toggle between the day screen andnight screen.
Day screen
Night screen
INFO:
The background color setting can also bechanged using <DAY/NIGHT OFF>.
SETTING COLOR THEME
1. Highl ight [Color Theme] and push<ENTER>.
2. Highlight the preferred menu color and push<ENTER>.
Other settings 8-5

8-6 Other settings
The navigation system can be set in details tomeet the preference.
BASIC OPERATION
1. Push <SETTING>.
2. Highlight [Navigation] and push <ENTER>.
3. Highlight the preferred setting item andpush <ENTER>.
Available setting items. [Address Book]:
Store locations and routes, and edit thestored items.
“Storing location” (page 5-5)
. [Map View]:
Set the display method and the direction ofthe map.
“Changing map view” (page 3-11)
. [Map Icons]:
Set the map icons to display on the map.
“Displaying map icons” (page 3-17)
. [Guidance Settings]:
Set the various functions for the routeguidance.
“Guidance settings” (page 5-20)
. [Route Settings]:
Change the routing preferences.“Detailed route settings” (page 5-24)
. [Traffic Info Settings]:
Set the various functions of the NavTrafficinformation system.
“Traffic information settings”(page 7-7)
. [Weather Info Setting]:
Set the functions of the NavWeatherXMinformation system.
“Weather information settings”(page 7-16)
. [Speed Limit Info]:
Display speed limit information.“Speed limit indication on map”(page 8-6)
. [Others]:
Display other setting items.“Other navigation settings” (page 8-7)
. [Delete Stored Information]:
Delete stored locations and the homesetting in the Address Book.
“Delete stored items” (page 8-10)
. [Delete All Previous Destinations]:
Delete all previous destinations.“Delete stored items” (page 8-10)
. [Delete Previous Starting Point]:
Delete all previous starting points.“Delete stored items” (page 8-10)
. [Reset all Navigation Settings to Default]:
Reset all of the settings to default.“Reset all navigation settings to de-fault” (page 8-10)
SPEED LIMIT INDICATION ON MAPTurn the [Speed Limit Info] display on or off. Theindicator light illuminates when the speed limitdisplay function is set to on.
NAVIGATION SETTING

1. Highlight [Speed Limit Info] and push<ENTER>.
2. Highlight [Speed Limit Indication on Map] totoggle the function between on and off. Theindicator light illuminates when the speedlimit display function is set to on.
OTHER NAVIGATION SETTINGS
Basic Operation1. Push <SETTING>.
2. Highlight [Navigation] and push <ENTER>.
3. Highlight [Others] and push <ENTER>.
4. Highlight the preferred setting item andpush <ENTER>.
Available Setting Items. [Audio Display on Map]:
Allows the audio information to be displayedat all times.
“Displaying audio information on mapscreen” (page 8-7)
. [Small Step Zoom by Dial]:
Sets the free zoom function on or off. Whenthis setting is on, it is possible to adjust thescale in smaller steps than with normal scaleadjustment.
. [Map Scrolling Information]:
Sets the system so that when the mapscrolls the information about the locationaligned at the center of the cross pointer isdisplayed.
“Map scrolling information”(page 3-18)
. [Customize Nearby Places]:
Set the category of frequently visited land-marks.
“Customizing Nearby Places”(page 8-8)
. [Keyboard Type]:
Switches the keyboard layout for the char-acter input screen.
“Settings keyboard layout of characterinput screen” (page 8-9)
. [North Up when Zoom Out]:
When this setting is ON, the orientation ofthe map is automatically changed to NorthUp when the widest map scale is selected.The orientation is changed to North Up evenwhen Heading Up is set.
. [Adjust Current Location]:
Corrects the position of the current location.“Adjusting current vehicle location”(page 8-9)
Displaying audio information on mapscreenThe operating status of audio functions can bedisplayed on the map screen.
Other settings 8-7

8-8 Other settings
1. Highlight [Others] and push <ENTER>.
2. Highlight [Audio Display on Map] and push<ENTER>. The indicator illuminates whenthe item is set.
3. Push <MAP> to return to the currentlocation map screen.
4. On the bottom of the map screen, theoperating status of an audio/visual functionis displayed at all times.
Customizing Nearby PlacesThe modified list of places of interest can beused for searching for a location using [Places].
“Searching for destination” (page 2-20)
1. Highlight [Others] and push <ENTER>.
2. Highlight [Customize Nearby Places] andpush <ENTER>.
3. Highlight the preferred item and push<ENTER>. The main category list is dis-played.
4. Highlight a main category and push<ENTER>. The sub category list is dis-played. Highlight [Category Search] andpush <ENTER>. The preferred categorycan also be input directly.
5. Highlight a sub category and push<ENTER>. The category setting is mod-ified.
6. Push <MAP> to return to the currentlocation map screen.

Settings keyboard layout of characterinput screenDepending on the user’s preference for thekeyboard layout of character input screen, theABC layout or QWERTY layout can be selected.
Example: Switching to the QWERTY layout
1. Highlight [Others] and push <ENTER>.
2. Highlight [Keyboard Type] and push<ENTER>.
3. Highlight [QWERTY] and push <ENTER>.The indicator illuminates when the item is
set.
4. Push <MAP> to return to the currentlocation map screen.
ABC layout
QWERTY layout
Adjusting current vehicle locationIf the vehicle icon indicating the current vehiclelocation is not in the correct position, thelocation of the vehicle icon on the map screencan be adjusted.
INFO:
. Regardless of the map view setting, the mapis displayed in Plan View when adjusting theposition of the vehicle icon.
. When correcting the position of the vehicleicon, the map is automatically displayed inthe North Up mode. After finishing thecorrection, the map restores the currentorientation setting.
. The position and direction of the vehicle iconmay be misaligned depending on theexternal conditions and environment.
. If the vehicle icon is misaligned, drive for awhile in a location where the GPS signalscan be received. This may correct theposition of the vehicle icon.
1. Highlight [Others] and push <ENTER>.
Other settings 8-9
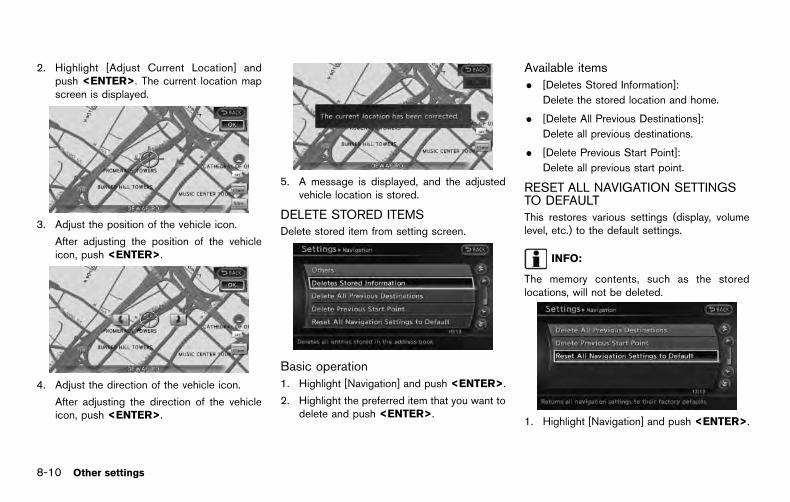
8-10 Other settings
2. Highlight [Adjust Current Location] andpush <ENTER>. The current location mapscreen is displayed.
3. Adjust the position of the vehicle icon.
After adjusting the position of the vehicleicon, push <ENTER>.
4. Adjust the direction of the vehicle icon.
After adjusting the direction of the vehicleicon, push <ENTER>.
5. A message is displayed, and the adjustedvehicle location is stored.
DELETE STORED ITEMSDelete stored item from setting screen.
Basic operation1. Highlight [Navigation] and push <ENTER>.
2. Highlight the preferred item that you want todelete and push <ENTER>.
Available items. [Deletes Stored Information]:
Delete the stored location and home.
. [Delete All Previous Destinations]:
Delete all previous destinations.
. [Delete Previous Start Point]:
Delete all previous start point.
RESET ALL NAVIGATION SETTINGSTO DEFAULTThis restores various settings (display, volumelevel, etc.) to the default settings.
INFO:
The memory contents, such as the storedlocations, will not be deleted.
1. Highlight [Navigation] and push <ENTER>.

2. Highlight [Reset All Navigation Settings toDefault] and push <ENTER>.
3. A confirmation message is displayed. Con-firm the contents of the message, highlight[Yes] and push <ENTER>.
This turns on and off, as well as adjusts, thephone function (ringer, incoming and outgoingvolume), the voice guide function and the beepfunction.
BASIC OPERATION
1. Push <SETTING>.
2. Highlight [Volume & Beeps] and push<ENTER>.
3. Highlight the preferred adjustment item andpush <ENTER>.
4. Use the multi-function controller to adjustthe volume. Push <ENTER> to set to on oroff.
5. After setting, push <ENTER> or <BACK>to apply the setting.
6. Push <BACK> to return to the previousscreen. Push <MAP> to return to thecurrent location map screen.
Setting items. [Audio Volume]:
Adjust the volume level of the audio systemby pushing the main directional buttons orrotating the center dial in the direction of [+]or [−].
. [Guidance Volume]:
Adjust the volume level of voice guidance bypushing the main directional buttons orrotating the center dial in the direction of[+] or [−].
. [Ringtone]:
Adjust the volume level of the ringtone bypushing the main directional buttons orrotating the center dial in the direction of[+] or [−].
. [Incoming Call]:
Adjust the incoming call volume by pushingthe main directional buttons or rotating thecenter dial in the direction of [+] or [−].
. [Outgoing Call]:
Adjust the outgoing call volume by pushingthe main directional buttons or rotating thecenter dial in the direction of [+] or [−].
. [Switch Beeps]:
Select to toggle the beep function betweenon and off. The indicator light illuminates
Other settings 8-11
VOLUME ADJUSTMENT

8-12 Other settings
when the beep function is set to on. Thebeep sounds when pushing and holding abutton or when a prohibited operation isperformed.
. [Guidance Voice]:
Select to toggle the voice guidance functionbetween on and off. The indicator lightilluminates when the voice guidance func-tion is set to on.
INFO:
For more details about [Ringtone], [IncomingCall] and [Outgoing Call], refer to the vehicleOwner’s Manual.
This changes the clock settings.
BASIC OPERATION
1. Push <SETTING>.
2. Highlight [Clock] and push <ENTER>.
3. Highlight the preferred adjustment item andpush <ENTER>.
4. Use the multi-function controller to adjust tothe preferred setting. Push <ENTER> toset on or off.
5. After setting, push <ENTER> or <BACK>to apply the setting.
6. Push <BACK> to return to the previousscreen. Push <MAP> to return to thecurrent location map screen.
Setting items. [On-screen Clock]:
Select to toggle the clock display located inthe top right corner of the display betweenon and off. The indicator light illuminates
when the clock display is set to on.
. [Clock Format (24h)]:
Select the clock format between 12-hourand 24-hour times. The indicator lightilluminates when the clock is set to the 24-hour format.
. [Offset (hour)]:
Use the main directional buttons or thecenter dial to adjust the offset value(between −12 and +12).
. [Offset (min)]:
Use the main directional buttons or thecenter dial to adjust the offset value(between −59 and +59).
. [Daylight Savings Time]:
Select to toggle the daylight savings timesetting between on and off. The indicatorlight illuminates when the daylight savingstime setting is set to on.
. [Time Zone]:
Select an appropriate time zone from the listthat appears when this item is highlighted.
— Pacific
— Mountain
— Central
CLOCK SETTINGS
— Eastern
— Atlantic
— Newfoundland
— Hawaii
— Alaska
This changes the language and measurementunit used in the system.
LANGUAGE SETTINGS
1. Push <SETTING>.
2. Highlight [Others] and push <ENTER>.
3. Highlight [Language & Units] and push<ENTER>.
4. Highlight [Select Language] and push<ENTER>.
5. Highlight the preferred setting item andpush <ENTER>. The indicator light of theselected item illuminates.
Available languages:
. [English]
. [Francais]
. [Espanol]
NOTE:
Do not change the ignition switch positionwhile changing the language. Doing somay cause a system malfunction.
Other settings 8-13
LANGUAGE AND UNIT SETTINGS
8-14 Other settings
UNIT SETTINGS
1. Push <SETTING>.
2. Highlight [Others] and push <ENTER>.
3. Highlight [Language & Units] and push<ENTER>.
4. Highl ight [Select Units] and push<ENTER>.
5. Highlight the preferred unit and push<ENTER>. The indicator of the selectedunit illuminates.
Available units:
. US:
mile, MPH, 8F, MPG
. Metric:
km, km/h, 8C, L/100 km
6. Push <BACK> to return to the previousscreen. Push <MAP> to return to thecurrent location map screen.

9 Voice recognition
NISSAN voice recognition ...................................................... 9-2
Standard mode .......................................................................... 9-3
Confirming how to use voice commands ..................... 9-3
Using the system ................................................................. 9-4
Before starting ..................................................................... 9-4
Giving voice commands .................................................... 9-5
Voice command examples ................................................ 9-8
Alternate command mode .................................................... 9-12
Displaying how to operate VoiceRecognition System ........................................................ 9-12
Confirming how to use voice commands ................ 9-17
Using the system ........................................................... 9-19
Before starting ................................................................ 9-19
Giving voice commands ............................................... 9-19
System feedback announcement modes ................. 9-20
Setting alternate command mode ............................. 9-21
Speaker adaptation ....................................................... 9-21
Voice command examples ........................................... 9-23
9-2 Voice recognition
NISSAN Voice Recognition allows hands-freeoperation of the navigation system and othersystems equipped on this vehicle, in one of twomodes, Standard Mode or Alternate CommandMode. Standard Mode allows the operation ofNavigation, Phone, Audio, Information and Help.
The commands that are available are alwaysshown on the display and announced by thesystem. To perform operations, simply follow theprompts given by the system. In Standard Mode,hands-free operation of Change map view,Route selection and Bluetooth Audio, etc. isnot available through Voice Recognition.
Alternate Command Mode allows advancedoperations. When this mode is active, anexpanded list of commands can be spoken afterpushing <TALK >, and the voice commandmenu prompts are turned off. Note that in thismode the recognition success rate may beaffected because the number of availablecommands and ways of speaking each com-mand are increased. Otherwise, it is recom-mended that Alternate Command Mode beturned OFF and Standard Mode be used forthe best recognition performance.
“Alternate command mode” (page 9-12)
INFO:
. To improve recognition success when Alter-nate Command Mode is active, try using theSpeaker Adaptation function available in thatmode.
“Speaker adaptation” (page 9-21)
Otherwise, it is recommended that AlternateCommand Mode be turned OFF and Stan-dard Mode be used for the best recognitionperformance.
. For the voice commands for the audio,phone and other systems, refer to thevehicle Owner’s Manual. The following sec-tions refer only to the navigation, phone andinformation systems.
. The voice recognition system cannot beoperated when the soft top is not closed (forRoadster and CrossCabriolet models).
NISSAN VOICE RECOGNITION

CONFIRMING HOW TO USE VOICECOMMANDSWhen operating the voice recognition systemfor the first time or if help is preferred to use thesystem, the User Guide can be displayed.
It is possible to confirm how to use voicecommands by accessing a simplified UserGuide, which contains basic instructions andtutorials for several voice commands.
Basic operation1. Push <INFO>.
2. Highlight [Others] and push <ENTER>.
3. Highlight [Voice Recognition] and push<ENTER>.
4. H igh l ight [User Guide] and push<ENTER>.
5. Highlight the preferred item and push<ENTER>.
Available items:
. [Getting Started]:
Describes the basics of how to operate thevoice recognition system.
. [Let’s Practice]:
Mode for practice following the systemvoice.
. [Using the Address Book]:
Tutorial for entering a destination by theAddress Book.
. [Finding a Street Address]:
Tutorial for entering a destination by streetaddress.
. [Placing Calls]:
Tutorial for making a phone call by voicecommand operation. Refer to the vehicleOwner’s Manual for details.
. [Help on Speaking]:
Displays useful tips regarding speaking forcorrect command recognition by the system.
INFO:
The Command List feature is only available whenAlternate Command Mode is active.
Getting StartedBefore using the voice recognition system forthe first time, it is possible to confirm how to usecommands by viewing the Getting Startedsection of the User Guide.
1. Highlight [Getting Started] and push<ENTER>.
2. To confirm the page, scroll the screen usingthe multi-function controller.
Practicing voice commandsPractice for using the voice recognition functioncan be performed by repeating a phone numberafter the system announces it.
Voice recognition 9-3
STANDARD MODE

9-4 Voice recognition
1. Highlight [Let’s Practice] and push<ENTER>.
2. Practice voice commands in accordancewith the audio guidance.
Tutorials on operation of voice recogni-tion systemWhen highlighting [Using the Address Book],[Finding a Street Address] or [Placing Calls] andpushing <ENTER>, the system displays tutor-ials on how to perform these operations usingvoice recognition.
Useful tips for correct operationIt is possible to display useful speaking informa-tion that may help the system to accept a voicecommand correctly.
1. Highlight [Help on Speaking] and push<ENTER>.
2. To confirm the page, scroll the screen usingthe multi-function controller.
USING THE SYSTEM
InitializationWhen the ignition switch is pushed to the ONposition, Voice Recognition is initialized, whichmay take up to one minute. When completed,the system is ready to accept voice commands.If <TALK > is pushed before the initializationcompletes, the display will show the message:“System not ready”.
BEFORE STARTINGTo get the best recognition performance fromVoice Recognition, observe the following items.
. The interior of the vehicle should be as quietas possible. Close the windows to eliminatethe surrounding noises (traffic noise andvibration sounds, etc.), which may preventthe system from correctly recognizing thevoice commands.
. Wait until the tone sounds before speaking acommand.
. Speak in a natural conversational voicewithout pausing between words.
. If the air conditioner is set to “Auto”, the fanspeed is automatically lowered so that voicecommands can be recognized more easily.

GIVING VOICE COMMANDS1. Push <TALK > located on the steering
wheel switch.
2. A list of commands appears on the screen,and the system provides the voice menuprompt “Would you like to access Phone,Navigation, Information, Audio or Help?”.
3. After the tone sounds and the icon on thescreen changes from [ ] to [ ], speak acommand.
4. Continue to follow the voice menu promptsand speak after the tone sounds until thepreferred operation is completed.
Operating tips. Speak a command after the tone.
. Commands that are available are alwaysshown on the display and spoken throughvoice menu prompts. Commands other thanthose that are displayed are not accepted.
Follow the prompts given by the system.
. If the command is not accepted, the systemannounces, “Please say again”. Repeat thecommand in a clear voice.
. Push <BACK> once to return to theprevious screen.
. To cancel the command, push and hold<TALK >. The message, “Voice can-celed” will be announced.
. Push <TALK > to stop the voice promptand give the command at once. Rememberto wait for the tone before speaking.
. To adjust the volume of the system feed-back, push the volume control buttons <+>or <−> on the steering wheel switch or usethe audio system volume control knob whilethe system is making an announcement.
How to speak numbersNISSAN Voice Recognition requires a certainway to speak numbers when giving voicecommands. Refer to the following examples.
General rule:
Only single digits 0 (zero) to 9 can be used. (Forexample, if speaking 500, “five zero zero” can beused, but “five hundred” cannot.
Examples:
1-800-662-6200
“One eight zero zero six six two six two zerozero”
Improving Recognition of Phone numbers:
Recognition of phone numbers can be improvedby saying the phone number in 3 groups ofnumbers. For example, to call 800-662-6200,say “Eight Zero Zero” first, and the system willthen ask to speak the next three digits. Then, say“Six Six Two”. After recognition, the system willthen ask to speak the last 4 digits. Say, “Six TwoZero Zero”. Using this method of phone digitentry can improve recognition performance.
INFO:
For best recognition, speak “zero” for thenumber “0” and “oh” for the letter “o”.
Voice recognition 9-5

9-6 Voice recognition
Command List
Category Command:
Command Action
Navigation Operates Navigation function.
Phone Operates Phone function.
Information Displays vehicle Information function.
Audio Operates Audio function.
Help Displays User Guide.
Navigation Command:
Command Action
Destination Home Sets a route to the home that is stored in the Address Book.
Address Searches for a location by the street address specified, and sets a route (for continental U.S. only).
Places Sets a route to a facility near the current vehicle location.
Address Book Searches for stored information in the Address Book.
Previous Destinations Sets a route to a previous destination.
Information Command:
Command Action
Fuel Economy Displays fuel economy information.
Trip Computer (if so equipped) Displays trip information.
Maintenance Displays maintenance information.
Traffic Information Turns the traffic information system on and off.
Where am I? Displays the current location.

Vehicle Phone Command:
Command Action
Dial Number Makes a call to a spoken phone number up to 10 digits.
Quick Dial Makes a call to a contact that is stored in the Quick Dial.
Phonebook Makes a call to a contact that is stored in the mobile phone.
Call history Incoming Calls Makes a call to the incoming call number.
Outgoing Calls Makes a call to the dialed number.
Missed Calls Makes a call to the Missed calls number.
International Call Makes an international call by allowing more than 10 digits to be spoken.
Audio Command:
Command Action
AM Turns to the AM band, selecting the station last played.
FM Turns to the FM band, selecting the station last played.
XM Turns to the SiriusXM Satellite Radio band, selecting the channel last played.
CD Starts to play a CD.
General Commands:
Command Action
Go back Corrects the last recognition result to return to the previous screen
Exit Cancels Voice Recognition
Voice recognition 9-7

9-8 Voice recognition
INFO:
Refer to the vehicle Owner’s Manual for theoperations related to phone, information andaudio.
VOICE COMMAND EXAMPLESTo use the voice recognition function, speakingone command is sometimes sufficient, but atother times it is necessary to speak two or morecommands. As examples, some additional basicoperations that can be performed by voicecommands are described here.
Example 1: Placing a call to the phonenumber 800-662-62001. Push <TALK > located on the steering
wheel switch.
2. The system announces, “Would you like toaccess Phone, Navigation, Information,Audio or Help?”.
3. Speak “Phone”.
4. Speak “Dial Number”.
5. Speak “800”.
6. The system announces, “Please say nextthree digits or dial, or say change number”.Speak “662”.
7. The system announces, “Please say last fourdigits or say change number”. Speak“6200”.
8. The system announces, “Dial or ChangeNumber?”. Speak “Dial”.
9. The system makes a call to 800-662-6200.
INFO:
. Speaking “800-662-6200” (10 continuousdigits) or “662-6200” (7 continuous digits)is acceptable, if the area code is notnecessary. However the 3-3-4 digit group-ing is recommended for improved recogni-tion.
“How to speak numbers” (page 9-20)
. The NISSAN voice recognition system is notlimited to recognizing phone numbers ofonly 7 or 10 digits. To dial a number in aformat other than the 3-3-4 digit grouping,use the “International Call” command.
. If “Change Number” is spoken during phonenumber entry, the system will automaticallyrequest that the number be repeated usingthe 3-3-4 format. In this case please say thearea code first and then follow the prompts.
. Do not add a “1” in front of the area codewhen speaking phone numbers.
. If the system does not recognize a voicecommand, please try repeating the com-mand using a natural voice. Speaking tooslowly or too loudly may further decreaserecognition performance.
Example 2: Placing an international callto the phone number 011-81-111-222-33331. Push <TALK > located on the steering
wheel switch.
2. The system announces, “Would you like toaccess Phone, Navigation, Information,Audio or Help?”.
3. Speak “Phone”.
4. Speak “International Call”.
5. Speak “01181111222333”.
Voice recognition 9-9

9-10 Voice recognition
6. Speak “Dial”.
7. The system makes a call to 011-81-111-222-3333.
INFO:
Any digit input format is available in theInternational Number input process.
Example 3: Setting a destination by astreet address1. Push <TALK > located on the steering
wheel switch.
2. The system announces, “Would you like toaccess Phone, Navigation, Information,Audio or Help?”.
3. Speak “Navigation”.
4. Speak “Address”.
INFO:
Press <ENTER> or touch [Help] to displaythe user guide screen.
5. Speak the name of the state, “California”.
6. Speak the name of the city, “Gardena”.
7. Voice feedback will be provided when thecommand is accepted, and the list of citynames is displayed.
8. After the tone sounds and the icon on thescreen changes again, speak “One”.

9. Speak the name of the street, “SouthFigueroa street”.
INFO:
. Only the official street names stored inthe map database can be recognized bythe system. To improve accuracy, speakthe street name precisely and includeBoulevard, Way, North, South, etc., ifknown. If unsure of the full name, speak-ing only part of the street name such as“Figueroa” is acceptable, but recognitionaccuracy may be reduced.
. To correct the entered city, street orhouse number, speak “Change City”,“Change Street” or “Change HouseNumber”.
10. Voice feedback will be provided when thecommand is accepted, and the list of streetnames appears.
11. After the tone sounds and the icon on thescreen changes again, speak “One”.
12. Speak the house number.“How to speak numbers” (page 9-5)
INFO:
If the house number is unknown, speak “Nohouse number”.
13. To confirm the destination location on themap, speak “Show map”. To calculate aroute, speak “Calculate route”.
Voice recognition 9-11

9-12 Voice recognition
The following section is applicable when Alter-nate Command Mode is active.
“Setting alternate command mode”(page 9-21)
When Alternate Command Mode is active, anexpanded list of commands can be used afterpushing <TALK >. In this mode, availablecommands are not fully shown on the display orprompted. Review the expanded command list,available when this mode is active. See exam-ples of Alternate Command Mode screens.Otherwise, it is recommended that AlternateCommand Mode be turned OFF and StandardMode be used for the best recognition perfor-mance.
“Confirming voice commands”(page 9-12)
DISPLAYING HOW TO OPERATEVOICE RECOGNITION SYSTEMWhen operating the voice recognition systemfor the first time or if help is preferred to use thesystem, the Command List (available only inAlternate Command Mode) or the User Guideare available.
Basic operation1. Push <INFO>.
2. Highlight [Others] and push <ENTER>.
3. Highlight [Voice Recognition] and push<ENTER>.
4. Highlight the preferred item and push<ENTER>.
Available items:
. [Command List]:
A list of voice commands that the systemcan accept is displayed.
. [User Guide]:
A simplified operation manual of the voicerecognition system can be displayed andhow to use the voice commands can beconfirmed.
INFO:
The Command List feature is only available whenAlternate Command Mode is active.
Confirming voice commandsWhen controlling the system by voice com-mands for the first time or if an appropriate voicecommand is unknown, confirm using the voicecommand lists.
The following information describes how todisplay the navigation command list and thehelp list. For information about the operations ofother functions, refer to the vehicle Owner’sManual.
Example: Displaying the navigation com-mand list:
1. Push <INFO>.
2. Highlight [Others] and push <ENTER>.
3. Highlight [Voice Recognition] and push<ENTER>.
ALTERNATE COMMAND MODE

4. Highlight [Command List] and push<ENTER>.
5. Highlight the preferred item and push<ENTER>.
Available items:
. Phone Commands
. Navigation Commands
. Information Commands
. Audio Commands
. Help Commands
6. To confirm the list, scroll the screen usingthe multi-function controller.
7. Push <BACK> to return to the previousscreen.
Voice recognition 9-13

9-14 Voice recognition
Command List
Navigation Command:
INFO:
The words in italics are variable.
Command Action
Destination Home Sets a route to your home location.
Address Sets a route to the street address that you specify (for continental U.S. and Canda only).
Places Sets a route to a facility near the current vehicle location.
Address Book Sets a route to a location stored in the Address Book.
Previous Destinations Sets a route to a previously entered destination.
Previous Start Point Sets a route to the previous starting point.
Minimize Freeway Route Sets the route search condition to minimize the usage of freeways.
Fastest Route Sets the route search condition to find the fastest time.
Shortest Route Sets the route search condition to find the shortest distance.
Cancel Route Stops the current route but can be resumed by using <ROUTE>.
Delete Destination Deletes the entire route (destination and waypoints).
Birdview Map Displays the map in BirdviewTM (3D).
Planview Map Displays the map in Plan View (2D).
North Up Locks the map to make North always point up.
Heading Up Locks the vehicle indicator to make it always point up.
Zoom In <1 to 13> Increases the magnification of the map by the number of steps specified.
Zoom Out <1 to 13> Decreases the magnification of the map by the number of steps specified.
Voice Guidance On/Off Turns the navigation guidance on and off.
Guidance Voice Repeat Speaks the current navigation guidance.

Information Command:
Command Action
Fuel Economy Displays fuel economy information.
Tire pressure (if so equipped) Displays tire pressure information.
Trip Computer (if so equipped) Displays trip information.
Maintenance Displays maintenance information.
Where am I? Displays the current location.
Traffic Information Turns the traffic information system on and off.
Weather Information Displays weather information (for continental U.S. and Canada only).
Weather Map Displays the weather map (for continental U.S. and Canada only).
Vehicle Phone Command:
Command Action
Dial Number Makes a call to a spoken phone number.
Quick Dial Makes a call to a contact that is stored in the Quick Dial.
Phonebook Makes a call to a contact that is stored in the mobile phone.
Call History Incoming Calls Makes a call to the incoming call number.
Outgoing Calls Makes a call to the dialed number.
Missed Calls Makes a call to the Missed calls number.
International Call Makes an international call by allowing more than 10 digits to be spoken.
Call <name> Makes a call to a contact that is stored in either Quick Dial or Phonebook.Please say “Call” followed by a stored name.
Voice recognition 9-15

9-16 Voice recognition
Audio Command:
Command Action
CD Starts to play a CD.
FM Turns to the FM band, selecting the station last played.
AM Turns to the AM band, selecting the station last played.
XM Turns to the SiriusXM Satellite Radio band, selecting the channel last played.
USB Turns on the USB memory.
Bluetooth Audio Turns on the Bluetooth audio player.
AUX Turns on the AUX.
General Command:
Command Action
Go back Corrects the last recognition result to return to the previous screen
Exit Cancels Voice Recognition
Help Command:
Command Action
Command List Navigation Commands Displays the navigation command list.
Phone Commands Displays the phone command list.
Audio Commands Displays the audio command list.
Information Commands Displays the information command list.
Help Commands Displays the help command list.
User Guide Displays the User Guide
Speaker Adaptation The system memorizes the voices of up to three persons for better voice recognition performance.
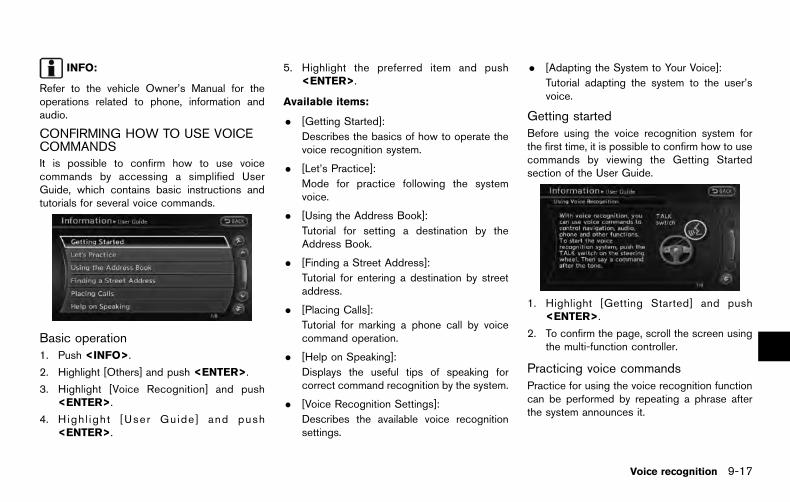
INFO:
Refer to the vehicle Owner’s Manual for theoperations related to phone, information andaudio.
CONFIRMING HOW TO USE VOICECOMMANDSIt is possible to confirm how to use voicecommands by accessing a simplified UserGuide, which contains basic instructions andtutorials for several voice commands.
Basic operation1. Push <INFO>.
2. Highlight [Others] and push <ENTER>.
3. Highlight [Voice Recognition] and push<ENTER>.
4. H igh l ight [User Guide] and push<ENTER>.
5. Highlight the preferred item and push<ENTER>.
Available items:
. [Getting Started]:
Describes the basics of how to operate thevoice recognition system.
. [Let’s Practice]:
Mode for practice following the systemvoice.
. [Using the Address Book]:
Tutorial for setting a destination by theAddress Book.
. [Finding a Street Address]:
Tutorial for entering a destination by streetaddress.
. [Placing Calls]:
Tutorial for marking a phone call by voicecommand operation.
. [Help on Speaking]:
Displays the useful tips of speaking forcorrect command recognition by the system.
. [Voice Recognition Settings]:
Describes the available voice recognitionsettings.
. [Adapting the System to Your Voice]:
Tutorial adapting the system to the user’svoice.
Getting startedBefore using the voice recognition system forthe first time, it is possible to confirm how to usecommands by viewing the Getting Startedsection of the User Guide.
1. Highlight [Getting Started] and push<ENTER>.
2. To confirm the page, scroll the screen usingthe multi-function controller.
Practicing voice commandsPractice for using the voice recognition functioncan be performed by repeating a phrase afterthe system announces it.
Voice recognition 9-17

9-18 Voice recognition
1. Highlight [Let’s Practice] and push<ENTER>.
2. Practice voice commands in accordancewith the audio guidance.
Tutorials on operation of voice recogni-tion systemWhen highlighting [Using the Address Book],[Finding a Street Address] or [Placing Calls] andpushing <ENTER>, the system displays tutor-ials on how to perform these operations usingvoice recognition.
Example: With [Using the Address Book] high-lighted
1. Highlight [Using the Address Book] andpush <ENTER>. The tutorial starts.
2. The voice guide demonstrates how to speakwhen giving commands.
3. When the tutorial is completed, the systemautomatically switches to the Menu screen.
Useful tips for correct operationIt is possible to display useful speaking tips thatmay help the system to accept a voice commandcorrectly.
1. Highlight [Help on Speaking] and push<ENTER>.
2. To confirm the page, scroll the screen usingthe multi-functionI controller.
Voice recognition settingsThe settings for easy operation of the voicerecognition system are displayed.

1. Highlight [Voice Recognition Settings] andpush <ENTER>.
2. To confirm the page, scroll the screen usingthe multi-function controller.
Adapting System to Your VoiceThe voice recognition system is equipped with alearning function to adapt to the user’s voice forbetter recognition. It is possible to confirm howto operate the learning function through thistutorial.
1. Highlight [Adapting the System to YourVoice] and push <ENTER>. The tutorialstarts.
2. The voice guide demonstrates the steps thathave to be performed.
3. When the tutorial is completed, the systemautomatically switches to the Menu screen.
USING THE SYSTEM
InitializationWhen the ignition switch is pushed to the ONposition, Voice Recognition is initialized, whichmay take up to one minute. When completed,the system is ready to accept voice commands.If <TALK > is pushed before the initializationcompletes, the display will show the message:“System not ready”.
BEFORE STARTINGTo get the best recognition performance out ofVoice Recognition, observe the following:
. The interior of the vehicle should be as quietas possible. Close the windows to eliminatethe surrounding noises (traffic noise and
vibration sounds, etc.), which may preventthe system from correctly recognizing thevoice commands.
. Wait until the tone sounds before speaking acommand.
. Speak in a natural conversational voicewithout pausing between words.
. If the air conditioner is set to “Auto”, the fanspeed is automatically lowered so that voicecommands can be recognized more easily.
. The voice recognition system cannot beoperated when the soft top is not closed (forRoadster and CrossCabriolet models).
GIVING VOICE COMMANDS1. Push <TALK > located on the steering
wheel switch.
2. A list of commands appears on the screen,and the system announces, “Please say acommand”.
Voice recognition 9-19

9-20 Voice recognition
3. After the tone sounds and the icon on thescreen changes from [ ] to [ ], speak acommand.
Operating tips. If the command is not recognized, the
system announces, “Please say again”.
Repeat the command in a clear voice.
. Push <BACK> once to return to theprevious screen.
. To cancel the command, push and hold<TALK >. The message, “Voice can-celed” will be announced.
. Push <TALK > to stop the voice promptand give the command at once. Rememberto wait for the tone before speaking.
. To adjust the volume of the system feed-back, push the volume control buttons [+] or[−] on the steering wheel switch or use theaudio system volume control knob while thesystem is making an announcement.
How to speak numbersNISSAN Voice Recognition requires a certainway to speak numbers when giving voicecommands. Refer to the following examples.
General rule:
Only single digits 0 (zero) to 9 can be used. Forexample, to say 500, “five zero zero” can beused, but “five hundred” cannot.
Examples:
1-800-662-6200
“One eight zero zero six six two six two zerozero”
Improving Recognition of Phone numbers:
Recognition of phone numbers can be improvedby saying the phone number in 3 groups ofnumbers. For example, to call 800-662-6200,speak “Eight Zero Zero” first, and the system willthen ask to speak the next three digits. Then, say“Six Six Two”. After recognition, the system willthen ask to speak the last 4 digits. Say, “Six TwoZero Zero”. Using this method of phone digitentry can improve recognition performance.
INFO:
For best recognition, speak “zero” for thenumber “0” and “oh” for the letter “o”.
SYSTEM FEEDBACK ANNOUNCE-MENT MODES
It is possible to select two modes, long or short,for the announcement by the system.
How to set1. Push <SETTING>.
2. Highlight [Others] and push <ENTER>.
3. Highlight [Voice Recognition] and push<ENTER>.

4. Highlight [Minimize Voice Feedback] andpush <ENTER>. The indicator illuminates,and the system announcement modeswitches to the short mode.
5. Push <BACK> to return to the previousscreen. Push <MAP> to return to thecurrent location map screen.
SETTING ALTERNATE COMMANDMODEThis mode enables the operation of the displayand audio through Voice Recognition. When thismode is active, an expanded list of commandscan be spoken after pushing <TALK >, andthe voice command menu prompts are turnedoff. Note that in this mode the recognitionsuccess rate may be affected because thenumber of available commands and ways ofspeaking each command are increased.
This mode can be turned on or off.
How to set1. Push <SETTING>.
2. Highlight [Others] and push <ENTER>.
3. Highlight [Voice Recognition] and push<ENTER>.
4. Highlight [Alternate Command Mode] andpush <ENTER>. A confirmation message isdisplayed. Highlight [Yes] and push<ENTER>. The indicator illuminates, andAlternate Command Mode switches to ON.
5. Push <BACK> to return to the previousscreen. Push <MAP> to return to thecurrent location map screen.
SPEAKER ADAPTATIONThe voice recognition system has a function tolearn the user’s voice for better voice recognitionperformance.
The system can memorize the voices of up tothree persons.
Having the system learn the user’s voice1. Push <SETTING>.
2. Highlight [Others] and push <ENTER>.
3. Highlight [Voice Recognition] and push<ENTER>.
4. Highlight [Speaker Adaptation] and push<ENTER>.
5. Highlight the user whose voice is memorizedby the system, and push <ENTER>.
Voice recognition 9-21

9-22 Voice recognition
6. Highlight [Start Speaker Adaptation Learn-ing] and push <ENTER>.
7. Highlight the voice command category to belearned by the system, and push <ENTER>.The voice command category list is dis-played.
8. Highlight the voice command to be learnedby the system, and push <ENTER>. Thevoice recognition system starts.
9. The system announces, “Please say acommand”.
10. After the tone sounds and the icon on thescreen changes from [ ] to [ ], speak acommand.
11. When the system has recognized the voicecommand, the voice of the user is learned.Push <BACK> once to return to theprevious screen.
INFO:
With [Continuous Learning] set to on, thesystem does not go back to the commandlist screen, allowing to continue voicecommand learning by the system.
12. If the system has learned the commandcorrectly, “None” will change to “Stored”.
Editing registered itemsIt is possible to edit user names and selectlearning function settings.
1. Push <SETTING>.
2. Highlight [Others] and push <ENTER>.

3. Highlight [Voice Recognition] and push<ENTER>.
4. Highlight [Speaker Adaptation] and push<ENTER>.
5. Highlight a user to edit, and push<ENTER>.
6. Highlight [Setting] and push <ENTER>.
7. Highlight an item to edit, and push<ENTER>.
Setting items
. [Edit User Name]:
Edit the user name.
. [Delete Voice Data]:
Reset the user voice that the voicerecognition system has learned.
. [Continuous Learning]:
Have the system learn the voice com-mands of the user in succession, withoutselecting commands one by one.
VOICE COMMAND EXAMPLESTo use the voice recognition function, speakingone command is sometimes sufficient, but atother times it is necessary to speak two or morecommands. As examples, some additional basicoperations by voice commands are describedhere.
Example 1: Switching the map to 2D(Plan View) mode
1. Push <TALK > located on the steeringwheel switch.
2. The system announces, “Please say acommand”.
3. After the tone sounds and the icon on thescreen changes from [ ] to [ ], speak
Voice recognition 9-23

9-24 Voice recognition
“Plan View Map”.
4. Voice feedback will be provided when thecommand is accepted, and the map isdisplayed in 2D (Plan View).
Example 2: Setting a destination usingplaces list
1. Push <TALK > located on the steeringwheel switch.
2. The system announces, “Please say acommand”.
3. After the tone sounds and the icon on thescreen changes from [ ] to [ ], speak“Places”.
4. If a route is already set, choose “NearCurrent Location”, “Along Route” or “NearDestination”.
5. After the tone sounds and the icon on thescreen changes again, speak “Along Route”.
6. Voice feedback will be provided when thecommand is accepted, and the list of placesof interest categories appears.
7. After the tone sounds and the icon on thescreen changes again, speak “Two”.
8. Voice feedback will be provided when thecommand is accepted, and the list of placesof interest in the category specified in theprevious step appears.
9. After the tone sounds and the icon on thescreen changes again, speak “One”.
10. Voice feedback will be provided when thecommand is accepted, and the systemstarts calculating a route to the selectedfacility.

Example 3: Setting a destination by astreet address
1. Push <TALK > located on the steeringwheel switch.
2. The system announces, “Please say acommand”.
3. Speak “Address”.
4. Speak the name of the state, “California”.
5. Speak the name of the city, “Gardena”.
6. Speak the name of the street, “SouthFigueroa street”.
INFO:
Speak the street name precisely includingboulevard, way, north, south, etc. In Alter-nate Command Mode, the system does notrecognize abbreviated names when they arespoken. In this case, the system does notaccept “Figueroa street” or “Figueroa”.
7. Voice feedback will be provided when thecommand is accepted, and the list of streetnames appears.
8. After the tone sounds and the icon on thescreen changes again, speak “One”.
Voice recognition 9-25

9-26 Voice recognition
9. Speak the house number.“How to speak numbers” (page 9-20)
INFO:
If the house number is unknown, speak “Nohouse number”.
10. To confirm the destination location on themap, speak “Show map”. To calculate aroute, speak “Calculate route”.

10 General system information
Features of this navigation system .................................... 10-2
Route guidance ................................................................ 10-2
Places of interest (PLACES) directory ....................... 10-2
Address book .................................................................... 10-2
Avoid area .......................................................................... 10-2
NavTraffic information ...................................................... 10-2
Automatic reroute ............................................................. 10-2
Detour ................................................................................. 10-2
BirdviewTM .......................................................................... 10-3
Voice guidance ................................................................. 10-3
Current vehicle location ........................................................ 10-3
Display of current vehicle location ............................... 10-3
What is GPS (Global Positioning System)? ............. 10-3
Incorrect display of vehicle position ............................ 10-5
Detailed Map Coverage Areas (MCA) fornavigation system ............................................................. 10-7
When gray road is displayed on map ........................ 10-7
Route calculation ................................................................... 10-8
Route guidance ...................................................................... 10-9
Basics of voice guidance ............................................. 10-9
Directions provided and distances toguide points .................................................................. 10-10
Repeating voice guidance ........................................ 10-11
Notes on voice guidance .......................................... 10-12
Notes on NavTraffic information ..................................... 10-13
Notes on NavWeatherXM information .......................... 10-14
Map data .............................................................................. 10-15
How to order map data updates ............................ 10-15
About map icons ......................................................... 10-15
About map data ........................................................... 10-15
End-user terms ............................................................ 10-16
How to handle display ...................................................... 10-19
Characteristics of liquid crystal display ................. 10-19
Maintenance of display .............................................. 10-19

10-2 General system information
ROUTE GUIDANCEThe main features of the NISSAN NavigationSystem are visual guidance and voice guidancein selected map coverage areas. Utilizing anetwork of GPS (Global Positioning System)satellites, the NISSAN Navigation System tracksthe location on the map and navigates to apreferred location.
Once the destination is set in a map coveragearea, the NISSAN Navigation System willcalculate a route from the current location tothe destination. The real-time map display andturn-by-turn voice guidance leads the driveralong the route. These features can be espe-cially helpful when driving to unfamiliar locations.
The system may be unable to set a destinationand/or calculate a route when the destination isoutside the map coverage area. Additionally,voice guidance may not be available if thedestination is outside the map coverage area.For more information on how to set a destina-tion, refer to section 4.
PLACES OF INTEREST (PLACES) DI-RECTORYThe NISSAN Navigation System offers anextensive places of interest (Places) directoryin map coverage areas. This directory includes awide variety of destinations ranging from gasstations, ATMs, and restaurants to casinos, ski
resorts, shopping centers and businesses. Apoint of interest can be searched by category,name or phone number. After selecting adestination, the NISSAN Navigation System willcalculate a route to that destination.
The Places directory has many uses. Forexample, the directory can be sorted by thevarious types of restaurants near the currentlocation. If an ATM or gas station is needed, theNISSAN Navigation System can navigate to theclosest preferred location.
For more information on how to use the Placesdirectory, refer to section 4.
ADDRESS BOOKThe Address Book can store up to 300 locationsfrom map coverage areas into a personaldirectory. This is especially useful for frequentlyvisited locations, such as clients, relatives andfriends. The Address Book function allows easyaccess to frequently visited locations whensetting them as your destination.
For more information on how to use the AddressBook, refer to section 6.
AVOID AREAThe Avoid Area function sets areas or freewaysthat the NISSAN Navigation System does notinclude in the suggested route when calculatingroutes. For example, if a freeway or area that is
always congested with traffic.
For more information on the Avoid Area function,refer to section 6.
NavTraffic INFORMATIONWhen available, the NavTraffic Informationbroadcast may help to avoid delays due totraffic incidents. Traffic jams, roadwork, closedroads around the current location, etc. arerepresented graphically on the map by iconsdepicting the nature of the event. Incidents onthe route are automatically brought to theattention when they are approached.
The NavTraffic Information feature, via theguidance mode, may help to detour aroundtraffic problems. For more information on theNavTraffic Information feature, refer to section 5.
AUTOMATIC REROUTEWhen detecting a deviation from the suggestedroute, the NISSAN Navigation System willautomatically recalculate a new route to thedestination.
For more information on the Automatic reroutefunction, refer to section 5.
DETOURTo make a detour due to traffic conditions, theDetour function calculates an alternative route.The NISSAN Navigation System can calculate a
FEATURES OF THIS NAVIGATIONSYSTEM

route using secondary roads that will return toprimary roads after a specified number of miles.
For more information on the Detour function,refer to section 5.
BirdviewTM
Two map types, the 2D (Plan View) map andBirdviewTM (3D) map, are available in theNISSAN Navigation System. BirdviewTM mapdisplays the map from an elevated perspective.In BirdviewTM map, it is easy to recognize animage of the route because it provides apanoramic view over a long distance.
For more information on BirdviewTM map, referto section 3.
VOICE GUIDANCE
Route guidance is provided through voice andvisual instructions. Voice guidance announcesthe appropriate directions when approaching anintersection to turn.
For more information on voice guidance, refer tosection 5.
DISPLAY OF CURRENT VEHICLE LO-CATIONThis navigation system combines the dataobtained from the vehicle (by gyro sensor) andfrom GPS (Global Positioning System) satellitesto calculate the current location of the vehicle.This position is then displayed throughout routeguidance to a destination.
WHAT IS GPS (Global PositioningSystem)?GPS is a position detecting system that usessatellites deployed by the U.S. government. Thisnavigation system receives radio signals fromthree or more different satellites that orbit13,049 miles (21,000 km) above the earth inspace, and detects the position of the vehicle byutilizing the principle of triangulation.
Positioning adjustmentWhen the system judges that the vehicleposition information is not accurate based onvehicle speed and gyro sensor data calculations,the system will automatically adjust the positionof the vehicle icon using GPS signals.
General system information 10-3
CURRENT VEHICLE LOCATION

10-4 General system information
Receiving signals from GPS satellitesThe reception of GPS signals can be weak,depending on the environment. Vehicles in thefollowing areas/environments may not receiveGPS signals (indicator color: gray).
* Inside tunnels or parking garages
* Areas with numerous tall buildings
* Under multi-layered highways
* Under many large trees
* In a canyon
INFO:
The GPS antenna is located on the instrumentpanel inside the vehicle. Do not place anyobjects, especially mobile phones or transcei-vers, on the instrument panel. Because thestrength of the GPS signal is approximately onebillionth of that of TV waves, phones andtransceivers will affect or may totally disruptthe signal.
Display of GPS informationGPS information can be displayed.
“Viewing GPS current location informa-tion” (page 7-19)

NOTE:
Route guidance provided by the navigationsystem does not take carpool lane drivinginto consideration, especially when car-pool lanes are separated from other roadlanes.
INCORRECT DISPLAY OF VEHICLEPOSITIONThe following cases may affect the displayaccuracy of the vehicle’s position or travelingdirection. The accuracy will return to normal ifthe driving conditions return to normal.
* When there is a similar road nearby.
* When the vehicle is traveling in an area witha grid pattern road system.
* When the vehicle is passing through a largeY-shaped intersection/junction.
* When the vehicle is traveling on a contin-uous, slowly curving road.
* When the vehicle is traveling on a road withrepeating S-shaped curves.
General system information 10-5

10-6 General system information
* When the vehicle is on a loop bridge.
* When the vehicle is on a snow-covered orunpaved road.
* When repeatedly turning left or right, ordriving in zigzags.
* When the vehicle is rotated on a parking lotturntable while the ignition switch is off.
* When driving on a road not displayed onthe map screen or a road that has beenchanged due to additional construction orother reasons.
* When the GPS positioning accuracy is low.

INFO:
. The vehicle icon may be misaligned whenstarting the vehicle just after starting theengine or the hybrid system.
. The vehicle icon may also be misaligned ifdifferent sized tires or tire chains areinstalled.
. The system has a function that automaticallycorrects the vehicle icon position when it ismisaligned from the actual position.
. Vehicle position correction by GPS may notfunction when the vehicle is stopped.
. If the vehicle icon position does not return tonormal even after driving for a while, correctthe vehicle icon position manually.
“Adjusting current vehicle location”(page 8-9)
DETAILED MAP COVERAGE AREAS(MCA) FOR NAVIGATION SYSTEMThis system is designed to help guiding to thedestination, and it also performs other functionsas outlined in this manual. However, the systemmust be used safely and properly. Informationconcerning road conditions, traffic signs and theavailability of services may not always be up-to-date. The system is not a substitute for safe,proper and legal driving. Map data covers select
metropolitan areas in the United States andCanada.
Map data includes two types of areas: “Detailedcoverage areas” providing all detailed road dataand other areas showing “Main roads only”.
NOTE:
Detailed map data is not available in manyareas and is generally limited to selectmajor metropolitan areas.
WHEN GRAY ROAD IS DISPLAYEDON MAP. When you are driving on a road displayed in
gray after the vehicle has deviated from thesuggested route during route guidance,automatic rerouting may not start immedi-ately.
. The navigation system does not provideroute guidance for roads displayed in darkgreen. Therefore, if the destination is set ona road displayed in dark green, the enlargedmap display will return to the ordinary mapscreen at some point on a suggested routethat is near the destination. Also, voiceguidance will stop at some point on asuggested route that is near the destination.
. Places information and street names nearroads displayed in gray may not be con-
tained in the map data.
General system information 10-7

10-8 General system information
. There may be cases that carpool lanes areincluded on a suggested route when theautomatic rerouting function is activated,even if the “Use Time Restricted Roads” isturned off.
“Setting conditions for route calcula-tion” (page 5-23)
. The navigation system does not provideroute guidance for roads displayed in darkgreen.
. If the destination is set on a dark green road,the enlarged map display will switch to theordinary map screen at some point andsuggest a route that is near the destination.The distance and direction to the endpointof the suggested route will be displayed inthe lower right corner of the screen. Also, atthis time, voice guidance will announce,“The route to the destination includes roadsthrough incomplete map areas. Voice gui-dance will not be provided in these areas”.
When approaching the endpoint of thesuggested route, voice guidance will an-nounce, “Entering the road with incompletemap data. Use the direction arrow anddistance information to proceed to yourdestination.”
To reach the destination, refer to the mapscreen. Always follow actual roads and
regulations and drive safely.
. The suggested route may not be the short-est, nor are other circumstances such astraffic jams considered.
. Because of the inevitable difference in roadconditions and circumstances between thetime you use this system and the time theinformation was produced for the map data,there may be discrepancies in roads andregulations. In such cases, follow the actualinformation available.
. During route calculation, the map will notscroll, however the vehicle icon will movewith the actual vehicle’s movement.
. During route calculation, buttons such as<MAP>, <DEST>, <ZOOM OUT> and<ZOOM IN> (if so equipped) and the multi-function controller will be disabled.
. In some cases, after the calculation iscomplete, the calculated route may not beimmediately displayed.
. Waypoints that have been passed will bedisregarded by rerouting calculation.
. If you scroll the map while the suggestedroute is being drawn, it may take more timeto finish drawing.
. If waypoints are set, the system calculatesmultiple routes between waypoints simulta-neously, and the following may result.
— If one section between waypoints cannotbe calculated, none of the route will bedisplayed.
— The route may not connect completely atsome waypoints.
— The route may require a U-turn close tosome waypoints.
. Route calculation may not be completed inthe following cases.
— If there is no main road within a range of1.5 miles (2.5 km) from the vehicle, amessage saying so will appear on thescreen. Try recalculating when the vehi-cle is closer to a main road.
— If there is no main road within a range of1.5 miles (2.5 km) from the destination orwaypoint, a message saying so willappear on the screen. Try setting thelocation closer to a main road.
— If the vehicle is too close to the destina-tion or if there are no roads to thedestination, a message saying so willappear on the screen.
ROUTE CALCULATION
— If it is impossible to reach the destinationor waypoints because of traffic regula-tions, etc.
— If the only route to reach the destinationor waypoints is extremely complicated.
— If the destination, current vehicle positionor waypoint is within the “Avoid Area”.
— If a part of the route is included in the“Avoid Area”.
. The following may occur when the route isdisplayed.
— If you calculate a route on a main road,the starting point of the route may notexactly match the current vehicle loca-tion.
— The endpoint of the route may not exactlymatch the destination.
— If you calculate a route on a main road,the system may display a route fromanother main road. This may be becausethe position of the vehicle icon is notaccurate. In this case, park the vehicle ina safe location and reset the vehicle icon,or continue driving to see if the positionof the vehicle icon is automaticallyadjusted before recalculating the route.
— There are cases in which the systemshows an indirect route to reach thedestination or waypoints, if you set themfrom stored or facility information. Inorder to correct this, you must be carefulabout the traffic direction, especiallywhen lanes with different travel directionsare shown separately, such as inter-changes and service areas.
— This system makes no distinction be-tween limited traffic control and totalcontrol (blockage). It may show anindirect route even if the road is usable.
— Even if the freeway preference is set toOFF, a route that uses the freeway maybe suggested.
— Even if the ferry preference is set to OFF,a route that uses a ferry line may besuggested.
— Ferry lines, excluding those that are onlyfor pedestrians, bicycles and motor-cycles, are stored in this system. Takeinto consideration the travel time requiredand operational condition before decid-ing whether to use them or not.
INFO:
The system will only announce street nameswhen the system language is set to English.Street names are not announced when thesystem is set to Francais (French).
BASICS OF VOICE GUIDANCEVoice guidance announces which direction toturn when approaching an intersection in whicha turn is necessary.
NOTE:
. There may be some cases in whichvoice guidance and actual road condi-tions do not correspond. This mayoccur because of discrepancies be-tween the actual road and the informa-tion on the map data, or it is due to thevehicle’s speed.
. In case voice guidance does not corre-spond to the actual road conditions,follow the information obtained fromtraffic signs or notices on the road.
. Route guidance provided by the navi-gation system does not take carpoollane driving into consideration, espe-cially when carpool lanes are separatedfrom other road lanes.
General system information 10-9
ROUTE GUIDANCE

10-10 General system information
DIRECTIONS PROVIDED AND DIS-TANCES TO GUIDE POINTSDirections will differ, depending on the roadtype.
INFO:
Distances may vary, depending on the vehiclespeed.
Notification of intersection on ordinaryroads
1. “In about one quarter mile (400 meters),right (left) turn.”
2. “Right (left) turn ahead.”
Notification of consecutive intersectionson ordinary roads
When the road has three or more consecutiveintersections ahead, voice guidance will an-nounce the following.
1. “In about one quarter mile (400 meters),right (left) turn, then in about one quartermile (400 meters) left (right) turn.”
2. “Left (right) turn ahead, then in about onequarter mile (400 meters) right (left) turn.”
Notification of freeway entrance
1. “In about one quarter mile (400 meters)freeway entrance on your right onto (roadnumber and direction).”
2. “Freeway entrance on your right onto (roadnumber and direction).”

Notification of freeway junction
1. “In about one mile (1.6 kilometers), keep tothe right (left) onto (road number anddirection), then in about one quarter mile(400 meters) keep to the right (left).”
2. “Keep to the right (left) onto (road numberand direction), then in about one quartermile (400 meters) keep to the right (left)onto (road number and direction).”
3. “Keep to the right (left) onto (road numberand direction).”
Notification of freeway exit
1. “In about one mile (1.6 kilometers), exit onyour right.”
2. “Take the second exit on your right.”
Notification when approaching destina-tionOrdinary road:
When approaching the destination, voice gui-dance will announce, “You have arrived at yourdestination. Ending route guidance.” To finallyreach your destination, refer to the map screen.
Dark green road:
After passing the last turning point on asuggested route, voice guidance will announce,“The route to your destination includes roadsthrough incomplete map areas. Voice guidancewill not be provided in these areas.” Whenapproaching the endpoint of the suggestedroad, voice guidance will announce, “Enteringthe road with incomplete map data. Please usethe direction arrow and distance information toproceed to your destination.”
REPEATING VOICE GUIDANCEThis function is available throughout routeguidance, from the time after the route calcula-tion is completed until the vehicle arrives at thedestination. Push <VOICE>. Voice guidancewill be repeated.
General system information 10-11

10-12 General system information
INFO:
. If <VOICE> is pushed when the vehicle isdeviating from the suggested route andwhen the automatic reroute function is off,voice guidance will announce, “Proceed tothe highlighted route.”
. If <VOICE> is pushed when the vehicle isgoing in the wrong direction, voice guidancewill announce: “Please make a legal U-turn ifpossible.”
NOTES ON VOICE GUIDANCE. Voice guidance in this system should be
regarded as a supplementary function.When driving the vehicle, check the routeon the map and follow the actual roads andtraffic regulations.
. Voice guidance is activated only for inter-sections with certain conditions. There maybe cases that the vehicle has to turn, butvoice guidance is not provided.
. Voice guidance contents may vary, depend-ing on the direction of the turn and the typeof intersection.
. The voice guidance timing will vary depend-ing on the situation.
. When the vehicle has deviated from thesuggested route, voice guidance is notavailable. The system will not announce this.Refer to the map and recalculate the route.
“Recalculating route” (page 5-21)
. Voice guidance may not accurately corre-spond with road numbers and directions atfreeway junctions.
. Voice guidance may not accurately corre-spond to street names at freeway exits.
. The displayed street names may sometimesdiffer from the actual names, or “UN-KNOWN STREET NAME” may be dis-played.
. Voice guidance is not available when the[Guidance Voice] is turned off.
“Turning voice guidance ON/OFF”(page 2-23)
. Voice guidance will start when the vehicleenters the suggested route. Refer to themap for directions to the starting point of theroute.
. When approaching a waypoint, voice gui-dance will announce, “You have arrived atwaypoint 1 (2, 3, 4,...).” Voice guidance willswitch to the next section of the route. Whenvoice guidance is not available, refer to themap for directions.
. In some cases, voice guidance ends beforearrival at the destination. Refer to thedestination icon on the map to reach thedestination.
. If the system recognizes on which side thedestination (waypoint) is located, voiceguidance will announce “on the right/left”after announcing the arrival at the destina-tion.
. Voice guidance may be partially operationalor inoperative due to the angle of roads at anintersection.
. Because freeway lane information is avail-able only for approximately 7,000 majorfreeways in North America, it is not possibleto display information for all junctions andexits.
. Freeway exit information may differ from theinformation on the actual exit signs.
. Because it is not possible to consider dataconcerning roads that are seasonally avail-able or unavailable, a route may be displayedthat does not match the actual trafficrestrictions. Be sure to follow the actualtraffic restrictions while driving.
. Canada and Alaska contain many roads withincomplete map data. As a result, whensearching for a route, the route may include

roads with incomplete data. In regionswhere road data is not complete, voiceguidance may stop for long periods of time.Be sure to follow the actual traffic restric-tions while driving.
. The NavTraffic information service is notprovided for some cities. In addition, thecities for which the traffic information serviceis provided may be changed.
. In some cases, infrastructure problems mayprevent the complete display of the trafficinformation. This is not a malfunction.
. Due to infrastructure problems, or due to thetime when the traffic information servicebroadcast is received, the displayed infor-mation may differ from the actual trafficconditions.
. Depending on the traffic information, adetour route may be slower than the originalroute.
. NavTraffic is a service of SiriusXM SatelliteRadio. NavTraffic is only available in selectmarkets and is subject to data availability.Reception of the SiriusXM signal may varydepending on location. It requires a monthlypremium subscription. The service provideris solely responsible for the quality andaccuracy of the information provided. Allfees and programming are subject tochange. For more details on the NavTrafficservice, terms and conditions, please visit
www.siriusxm.com/navtraffic.
You can also contact SiriusXM Satellite
Radio at
1-866-635-2349.
. As of January 31, 2009, the NavTrafficservice covers 80 major metropolitan mar-kets. For the most current list of marketscovered, please refer to
www.siriusxm.com/navtraffic, or call Sir-iusXM Satellite Radio customer support at1-866-635-2349.
. Due to road maintenance, infrastructureproblems (e.g. malfunction of road sensors,outage of central computer of infrastructure)or natural disasters, there are times whensome or all traffic information may not beavailable.
. Incident information is based on humancollection. Not all incidents that have hap-pened are collected and provided.
. Due to infrastructure problems, or transmis-sion delay, there are times when theinformation may differ from the actual con-dition. Always observe safe driving practicesand follow all traffic regulations.
. Due to the coverage and quality of trafficinformation and road conditions, it is notalways possible for the system to providethe shortest time route even when trafficinformation is considered.
General system information 10-13
NOTES ON NavTrafficINFORMATION
10-14 General system information
. Traffic information that is displayed maydiffer from information from other media(e.g., radio), as other media may usedifferent information sources.
. The NavWeatherXM information service isnot provided for some cities. In addition, thecities for which the weather informationservice is provided may be changed.
. In some cases, infrastructure problems mayprevent the complete display of the weatherinformation. This is not a malfunction.
. Due to infrastructure problems, or due to thetime when the weather information servicebroadcast is received, the displayed infor-mation may differ from the actual weatherconditions.
. NavWeatherXM is a service of SiriusXMSatellite Radio. NavWeatherXM is onlyavailable in select markets and is subjectto data availability. Reception of the Sir-iusXM signal may vary depending on loca-tion. It requires a monthly premiumsubscription. The service provider is solelyresponsible for the quality and accuracy ofthe information provided. All fees andprogramming are subject to change. Formore details on the NavWeatherXM service,terms and conditions, please visit www.siriusxm.com/navweather. You can also con-tact SiriusXM Satellite Radio at 1-866-635-2349.
. NavWeatherXM is designed to provide real-time weather and forecasting information inyour general vicinity. Discrepancies may beencountered between the system and youractual location. Road system and weatherchanges may affect the accuracy of theinformation provided. Rely on your commonsense to decide whether to follow aspecified route. Detailed coverage is notavailable in every city or roadway.
NOTES ON NavWeatherXMINFORMATION

HOW TO ORDER MAP DATA UP-DATESTo order updated map data, contact theNISSAN NAVIGATION SYSTEM HELPDESK.See the contact information on the inside frontcover of this manual.
ABOUT MAP ICONSThe marks of companies displayed by thisproduct to indicate business locations are themarks of their respective owners. The use ofsuch marks in this product does not imply anysponsorship, approval, or endorsement by suchcompanies of this product.
ABOUT MAP DATA1. This map data has been prepared by
HITACHI, LTD. under licence from ZENRINCO., LTD. and NAVTEQ. ZENRIN CO., LTD.has added, processed and digitized databased on the digital road map data ofNavigation Technologies Corporation. Dueto the production timing of the map data,some new roads may not be included in thismap data or some of the names or roadsmay be different from those at the time youuse this map data.
2. Traffic control and regulation data used inthis map data may be different from those atthe time you use this map data due to the
data production timing. When driving yourvehicle, follow the actual traffic control signsand notices on the roads.
3. Reproducing or copying this map softwareis strictly prohibited by law.
Published by Nissan North America, Inc.
*C 2006 Navigation Technologies. All rightsreserved.
Certain business data provided by infoUSA, Inc.,Omaha, NE, Copyright
*C 1993-2008 NAVTEQ. All Rights Reserved.
*C 2008, All Rights Reserved.
*C ZENRIN CO., LTD. 2009. All rights reserved.
*C ZENRIN USA, INC. 2008. All rights reserved.
*C 2008 Zagat Survey, LLC.
WARNING
. This navigation system should notbe used to replace your own judge-ment. No itinerary suggested by thisnavigation system should ever over-ride any highway regulations, yourown judgement, or a knowledge ofsafe driving practices. Do not followthe navigation system’s suggesteditinerary if it would cause you to
perform a dangerous or illegal act,place you in a dangerous situation,or take you into an area you con-sider unsafe.
. The advice provided by the naviga-tion system is to be regarded as asuggestion only. There may betimes when the navigation systemdisplays the vehicle’s location in-correctly, fails to suggest the short-est route, or fails to direct you to theyour desired destination. In suchinstances, rely on your own drivingjudgement, taking into account thedriving conditions at the time.
. Do not use the navigation system tolocate emergency services. The da-tabase does not contain a completelisting of emergency services suchas police stations, fire halls, hospi-tals and walk-in clinics. Pleaseshow discretion and ask for direc-tions in such instances.
. As the driver, you alone are respon-sible for your driving safety.
— In order to avoid a traffic accident,do not operate the system whiledriving.
General system information 10-15
MAP DATA
10-16 General system information
— In order to avoid a traffic accident,operate the system only when thevehicle is stopped at a safe placeand the parking brake is on.
— In order to avoid a traffic accidentor traffic offence, remember thatactual road conditions and trafficregulations take precedence overthe information contained on thenavigation system.
— The Software may contain inaccu-rate or incomplete informationdue to the passage of time, chan-ging circumstances, and thesources of information used.Please respect current traffic con-ditions and regulations at alltimes while driving.
— Where actual road conditions andhighway regulations differ fromthe information contained on thenavigation system, abide by thehighway regulations.
— Keep the amount of time spentviewing the screen while drivingto a strict minimum.
The navigation system does not provide,nor represent in any way information on:traffic and highway regulations; technicalaspects of the vehicle including weight,height, width, load and speed limits; roadconditions including grade, percentage ofincline and surface conditions; obstaclessuch as the height and width of bridgesand tunnels; and other current driving orroad conditions. Always rely on your ownjudgement when driving a car, taking intoaccount current driving conditions.
The marks of companies displayed by thisproduct to indicate business locations are themarks of their respective owners. The use ofsuch marks in this product does not imply anysponsorship, approval, or endorsement by suchcompanies of this product.
END-USER TERMSThe data (“Data”) is provided for your personal,internal use only and not for resale. It isprotected by copyright, and is subject to thefollowing terms and conditions which are agreedto by you, on the one hand, and HITACHI(“HITACHI”) and its licensors (including theirlicensors and suppliers) on the other hand.
*C 2008 NAVTEQ. All rights reserved.
The Data for areas of Canada includes informa-tion taken with permission from Canadian
authorities, including: *C Her Majesty the Queenin Right of Canada, *C Queen’s Printer forOntario, *C Canada Post Corporation, Geo-Base®.
NAVTEQ holds a non-exclusive license from theUnited States Postal Service® to publish andsell ZIP+4® information.
*C United States Postal Service® 2008. Pricesare not established, controlled or approved bythe United States Postal Service®. The followingtrademarks and registrations are owned by theUSPS: United States Postal Service, USPS, andZIP+4.
The Data may include or reflect data of licensors,including Her Majesty the Queen in the Right ofCanada (“Her Majesty”), Canada Post Corpora-tion (“Canada Post”) and the Department ofNatural Resources Canada (“NRCan”). Suchdata is licensed on an “as is” basis. Thelicensors, including Her Majesty, Canada Postand NRCan, make no guarantees, representa-tions or warranties respecting such data, eitherexpress or implied, arising by law or otherwise,including but not limited to, effectiveness,completeness, accuracy or fitness for a parti-cular purpose.
The licensors, including Her Majesty, CanadaPost and NRCan, shall not be liable in respect ofany claim, demand or action, irrespective of the

nature of the cause of the claim, demand oraction alleging any loss, injury or damages,direct or indirect, which may result from the useor possession of the data or the Data. Thelicensors, including Her Majesty, Canada Postand NRCan, shall not be liable in any way forloss of revenues or contracts, or any otherconsequential loss of any kind resulting from anydefect in the data or the Data.
End User shall indemnify and save harmless thelicensors, including Her Majesty, Canada Postand NRCan, and their officers, employees andagents from and against any claim, demand oraction, irrespective of the nature of the cause ofthe claim, demand or action, alleging loss, costs,expenses, damages or injuries (including injuriesresulting in death) arising out of the use orpossession of the data or the Data.
Terms and conditionsPersonal Use Only. You agree to use this Datatogether with Nissan Automotive Products forthe solely personal, non-commercial purposesfor which you were licensed, and not for servicebureau, timesharing or other similar purposes.Accordingly, but subject to the restrictions setforth in the following paragraphs, you may copythis Data only as necessary for your personaluse to (i) view it, and (ii) save it, provided thatyou do not remove any copyright notices thatappear and do not modify the Data in any way.You agree not to otherwise reproduce, copy,modify, decompile, disassemble or reverseengineer any portion of this Data, and may nottransfer or distribute it in any form, for anypurpose, except to the extent permitted bymandatory laws. Multi-disc sets may only betransferred or sold as a complete set asprovided by HITACHI and not as a subsetthereof.
Restrictions. Except where you have beenspecifically licensed to do so by HITACHI, andwithout limiting the preceding paragraph, youmay not (a) use this Data with any products,systems, or applications installed or otherwiseconnected to or in communication with vehicles,capable of vehicle navigation, positioning, dis-patch, real time route guidance, fleet manage-ment or similar applications; or (b) with or in
communication with any positioning devices orany mobile or wireless-connected electronic orcomputer devices, including without limitationcellular phones, palmtop and handheld compu-ters, pagers, and personal digital assistants orPDAs.
Warning. The Data may contain inaccurate orincomplete information due to the passage oftime, changing circumstances, sources usedand the nature of collecting comprehensivegeographic data, any of which may lead toincorrect results.
No Warranty. This Data is provided to you “asis,” and you agree to use it at your own risk.HITACHI and its licensors (and their licensorsand suppliers) make no guarantees, representa-tions or warranties of any kind, express orimplied, arising by law or otherwise, includingbut not limited to, content, quality, accuracy,completeness, effectiveness, reliability, fitnessfor a particular purpose, usefulness, use orresults to be obtained from this Data, or that theData or server will be uninterrupted or error-free.
Disclaimer of Warranty: HITACHI AND ITSLICENSORS (INCLUDING THEIR LICENSORSAND SUPPLIERS) DISCLAIM ANY WARRAN-TIES, EXPRESS OR IMPLIED, OF QUALITY,PERFORMANCE, MERCHANTABILITY, FIT-NESS FOR A PARTICULAR PURPOSE OR
General system information 10-17

10-18 General system information
NONINFRINGEMENT. Some States, Territoriesand Countries do not allow certain warrantyexclusions, so to that extent the above exclusionmay not apply to you.
Disclaimer of Liability: HITACHI AND ITSLICENSORS (INCLUDING THEIR LICENSORSAND SUPPLIERS) SHALL NOT BE LIABLE TOYOU: IN RESPECT OF ANY CLAIM, DEMANDOR ACTION, IRRESPECTIVE OF THE NATUREOF THE CAUSE OF THE CLAIM, DEMAND ORACTION ALLEGING ANY LOSS, INJURY ORDAMAGES, DIRECT OR INDIRECT, WHICHMAY RESULT FROM THE USE OR POSSES-SION OF THE INFORMATION; OR FOR ANYLOSS OF PROFIT, REVENUE, CONTRACTSOR SAVINGS, OR ANY OTHER DIRECT,INDIRECT, INCIDENTAL, SPECIAL OR CON-SEQUENTIAL DAMAGES ARISING OUT OFYOUR USE OF OR INABILITY TO USE THISINFORMATION, ANY DEFECT IN THE INFOR-MATION, OR THE BREACH OF THESETERMS OR CONDITIONS, WHETHER IN ANACTION IN CONTRACT OR TORT OR BASEDON A WARRANTY, EVEN IF HITACHI OR ITSLICENSORS HAVE BEEN ADVISED OF THEPOSSIBILITY OF SUCH DAMAGES. SomeStates, Territories and Countries do not allowcertain liability exclusions or damages limita-tions, so to that extent the above may not applyto you.
Export Control. You agree not to export fromanywhere any part of the Data provided to you orany direct product thereof except in compliancewith, and with all licenses and approvalsrequired under, applicable export laws, rulesand regulations.
Entire Agreement. These terms and conditionsconstitute the entire agreement betweenHITACHI (and its licensors, including theirlicensors and suppliers) and you pertaining tothe subject matter hereof, and supersedes intheir entirety any and all written or oral agree-ments previously existing between us withrespect to such subject matter.
Governing Law. The above terms and conditionsshall be governed by the laws of the State ofIllinois, without giving effect to (i) its conflict oflaws provisions, or (ii) the United NationsConvention for Contracts for the InternationalSale of Goods, which is explicitly excluded. Youagree to submit to the jurisdiction of the State ofIllinois for any and all disputes, claims andactions arising from or in connection with theData provided to you hereunder.
Government End Users. If the Data is beingacquired by or on behalf of the United Statesgovernment or any other entity seeking orapplying rights similar to those customarilyclaimed by the United States government,
NAVTEQ Data (hereinafter “Data”) is a “com-mercial item” as that term is defined at 48 C.F.R.(“FAR”) 2.101, is licensed in accordance withENDUSER TERMS, and each copy of the Datadelivered or otherwise furnished shall be markedand embedded as appropriate with the following“Notice of Use,” and shall be treated inaccordance with such Notice:
NOTICE OF USECONTRACTOR (MANUFACTURER/SUPPLIER)
NAME: NAVTEQCONTRACTOR (MANUFACTURER/SUPPLIER)ADDRESS: 425 West Randolph St., Chicago,
Illinois 60606This Data is a commercial item as defined in FAR2.101 and is subject to END-USER TERMS
under which this Data was provided.*C 2008 NAVTEQ – All rights reserved.
If the Contracting Officer, federal governmentagency, or any federal official refuses to use thelegend provided herein, the Contracting Officer,federal government agency, or any federalofficial must notify NAVTEQ prior to seekingadditional or alternative rights in the Data.

The display is a liquid crystal display and shouldbe handled with care.
WARNING
Never disassemble the display. Someparts utilize extremely high voltage.Touching them may result in seriouspersonal injury.
CHARACTERISTICS OF LIQUIDCRYSTAL DISPLAY. If the temperature inside the vehicle is
especially low, the display will stay relativelydim or the movement of the images may beslow. These conditions are normal. Thedisplay will function normally when theinterior of the vehicle has warmed up.
. Some pixels in the display are darker orbrighter than others. This condition is aninherent characteristic of liquid crystal dis-plays, and it is not a malfunction.
. A remnant of the previous display image mayremain on the screen. This screen burn isinherent in displays, and it is not a malfunc-tion.
INFO:
The screen may become distorted by strongmagnetic fields.
MAINTENANCE OF DISPLAY
CAUTION
. To clean the display, never use arough cloth, alcohol, benzine, thin-ner and any kind of solvent or papertowel with a chemical cleaningagent. They will scratch or deterio-rate the panel.
. Do not splash any liquid such aswater or car fragrance on the dis-play. Contact with liquid will causethe system to malfunction.
To clean the display screen, use a dry, soft cloth.If additional cleaning is necessary, use a smallamount of neutral detergent with a soft cloth.Never spray the screen with water or detergent.Dampen the cloth first, then wipe the screen.
General system information 10-19
HOW TO HANDLE DISPLAY

10-20 General system information
MEMO

11 Troubleshooting guide
Customer assistance ............................................................. 11-2
Basic operations .................................................................... 11-3
Vehicle icon ............................................................................. 11-4
Route calculation and visual guidance ............................. 11-6
Voice guidance ...................................................................... 11-8
Voice recognition ................................................................... 11-9
Traffic information ............................................................... 11-10

11-2 Troubleshooting guide
For assistance or inquiries about the NISSANNavigation System, contact the NISSAN NAVI-GATION SYSTEM HELPDESK. See the contactinformation on the inside front cover of thismanual.
CUSTOMER ASSISTANCE

Symptom Possible cause Possible solution
No image is displayed. The brightness is at the lowest setting. Adjust the brightness of the display.
The system in the video mode. Push appropriate button (depending on models)on the control panel to change the mode. Referto the vehicle Owner’s Manual.
The display is turned off. Push <DAY/NIGHT OFF> to turn on thedisplay.
No voice guidance is available.orThe volume is too high or too low.
The volume is not set correctly, or it is turned off. Adjust the volume of voice guidance.
Voice guidance is not provided for certain streets (roads displayed ingray).
This is not a malfunction.
No map is displayed on the screen. A screen other than map screen is displayed. Push <MAP>.
The screen is too dim. The movementis slow.
The temperature in the interior of the vehicle is low. Wait until the interior of the vehicle has warmedup.
Some pixels in the display are darkeror brighter than others.
This condition is an inherent characteristic of liquid crystal displays. This is not a malfunction.
Some menu items cannot be se-lected.
Some menu items become unavailable while the vehicle is driven. Park the vehicle in a safe location, and thenoperate the navigation system.
Troubleshooting guide 11-3
BASIC OPERATIONS

11-4 Troubleshooting guide
Symptom Possible cause Possible solution
Names of roads and locations differbetween Plan View and BirdviewTM.
This is because the quantity of the displayed information is reduced sothat the screen does not become too crowded. There is also a chancethat names of the roads or locations may be displayed multiple times,and the names appearing on the screen may be different because of aprocessing procedure.
This is not a malfunction.
The vehicle icon is not displayed inthe correct position.
The vehicle was transported after the ignition switch was pushed off,for example, by a ferry or car transporter.
Drive the vehicle for a while on a road whereGPS signals can be received.
The position and direction of the vehicle icon may be incorrectdepending on the driving environments and the levels of positioningaccuracy of the navigation system.
This is not a malfunction. Drive the vehicle for awhile to automatically correct the position anddirection of the vehicle icon.
“Current vehicle location” (page 10-3)
When the vehicle is traveling on anew road, the vehicle icon is locatedon another road nearby.
Because the new road is not stored in the map data, the systemautomatically places the vehicle icon on the nearest road available.
Updated road information will be included in thenext version of the map data.
The screen does not switch to thenight screen even after turning on theheadlights.
The daytime screen was set the last time the headlights were turnedon.
Set the screen to the night screen mode using<Day/Night OFF> when turning on the head-lights.
“Display settings” (page 8-3)
The map does not scroll even whenthe vehicle is moving.
The current location map screen is not displayed. Push <MAP>.
The vehicle icon is not displayed. The current location map screen is not displayed. Push <MAP>.
The GPS indicator on the screenremains gray.
GPS signals cannot be received under certain conditions, such as in aparking garage, on a road with many tall buildings, etc.
Drive on an open, straight road for a while.
GPS signals cannot be received because objects are placed on theinstrument panel.
Remove the objects from the instrument panel.
A sufficient number of GPS satellites is not available. Wait for the satellites to move to locationsavailable for the navigation system.
VEHICLE ICON

Symptom Possible cause Possible solution
The location of the vehicle icon ismisaligned from the actual position.
When using tire chains or replacing the tires, speed calculationsbased on the speed sensor may be incorrect.
Drive the vehicle for about 30 minutes atapproximately 19 MPH (30 km/h) to automaticallycorrect the vehicle icon position.If this does not correct the vehicle icon position,contact a NISSAN dealer.
The map data has a mistake or is incomplete (the vehicle icon positionis always misaligned in the same area).
Updated road information will be included in thenext version of the map data.
Troubleshooting guide 11-5

11-6 Troubleshooting guide
Symptom Possible cause Possible solution
Waypoints are not included in theauto reroute calculation.
Waypoints that have been already passed are not included in the autoreroute calculation.
To go to that waypoint again, edit the route.
Route information is not displayed. Route calculation has not yet been performed. Set the destination and perform route calculation.
The vehicle is not on the suggested route. Drive on the suggested route.
Route guidance is set to off. Turn on route guidance.
Route information is not provided for certain types of roads (roadsdisplayed in gray).
This is not a malfunction.
The auto reroute calculation (or de-tour calculation) suggests the sameroute as the one previously sug-gested.
Route calculations took priority conditions into consideration, but thesame route was calculated.
This is not a malfunction.
A waypoint cannot be added. Five waypoints are already set on the route, including ones that thevehicle has already passed.
A maximum of 5 waypoints can be set on theroute. To go to 6 or more waypoints, performroute calculations multiple times as necessary.
[Calculate] must be selected for route calculation after Waypoints areselected from the “Edit/Add to Route” screen.
Highlight [Calculate] and push <ENTER> afterselecting waypoints.
The suggested route is not displayed. Roads near the destination cannot be calculated. Reset the destination to a main or ordinary road,and recalculate the route.
The starting point and destination are too close. Set a more distant destination.
The starting point and destination are too far away. Divide the trip by selecting one or two inter-mediate destinations, and perform route calcula-tions multiple times.
There are time restricted roads (by the day of the week, by time) nearthe current vehicle location or destination.
Set [Use Time Restricted Roads] to off.“Setting conditions for route calculation”(page 5-23)
A part of the route is not displayed. The suggested route includes narrow streets (roads displayed ingray).
This is not a malfunction.
ROUTE CALCULATION AND VISUALGUIDANCE

Symptom Possible cause Possible solution
The part of the route that the vehiclehas already passed is deleted.
A route is managed by sections between waypoints. If the vehiclepassed the first waypoint, the section between the starting point andthe waypoint is deleted (it may not be deleted depending on the area).
This is not a malfunction.
An indirect route is suggested. If there are restrictions (such as one-way streets) on roads close to thestarting point or destination, the system may suggest an indirect route.
Adjust the location of the starting point ordestination.
The system may suggest an indirect route because route calculationdoes not take into consideration some areas such as narrow streets(gray roads).
Reset the destination to a main or ordinary road,and recalculate the route.
The landmark information does notcorrespond to the actual information.
This may be caused by insufficient or incorrect map data. Updated information will be included in the nextversion of the map data.
The suggested route does not exactlyconnect to the starting point, way-points, or destination.
There is no data for route calculation closer to these locations. Set the starting point, waypoints and destinationon a main road, and perform route calculation.
Troubleshooting guide 11-7
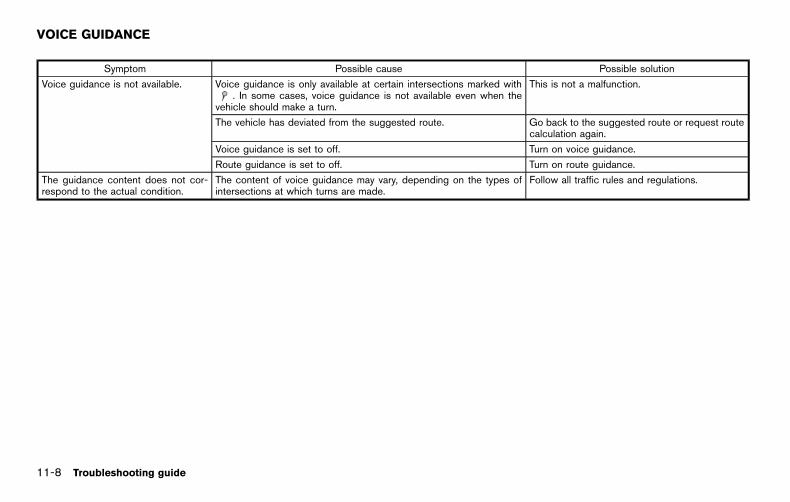
11-8 Troubleshooting guide
Symptom Possible cause Possible solution
Voice guidance is not available. Voice guidance is only available at certain intersections marked with. In some cases, voice guidance is not available even when the
vehicle should make a turn.
This is not a malfunction.
The vehicle has deviated from the suggested route. Go back to the suggested route or request routecalculation again.
Voice guidance is set to off. Turn on voice guidance.
Route guidance is set to off. Turn on route guidance.
The guidance content does not cor-respond to the actual condition.
The content of voice guidance may vary, depending on the types ofintersections at which turns are made.
Follow all traffic rules and regulations.
VOICE GUIDANCE

Symptom Possible cause Possible solution
The system does not accept the voicecommand.orThe system accepts the voice com-mand incorrectly.
The interior of the vehicle is too noisy. Close the windows or have other occupants bequiet.
The volume of the voice is too low. Speak louder.
The volume of the voice is too loud. Speak softer.
Pronunciation is unclear. Speak clearly.
The voice command is given before the voice recognition system isready.
Push <TALK > on the steering wheel switch,and speak a command after the tone sounds.
8 seconds or more have passed after pushing <TALK > on thesteering wheel switch.
Make sure to speak a command within 8 secondsafter the beep tone sounds.
Only a limited range of voice commands is usable for each screen. Use a correct voice command appropriate for thecurrent screen.
The system cannot be operated. The soft top is not closed (for Roadster and CrossCabriolet models). Close the soft top.
INFO:
For the best recognition, speak appropriatecommands. Command lists are available earlierin this manual.Standard Mode:
“Command List” (page 9-6)Alternate Command Mode:
“Command List” (page 9-14)
Troubleshooting guide 11-9
VOICE RECOGNITION

11-10 Troubleshooting guide
Symptom Possible cause Possible solution
The traffic information is not dis-played.
The traffic information is not set to on. Set the traffic information to on.
The vehicle is in an area where traffic information is not available. Scroll to an area where traffic information isavailable.
The subscription to NavTraffic is incomplete, or the subscription toNavTraffic has expired.
Check the subscription status of NavTraffic.
The map scale is set at a level where the display of icons is impossible. Check that the map scale is set at a level in whichthe display of icons is possible.
“Traffic information display and scale le-vels” (page 7-7)
With the automatic detour routesearch ON, no detour route is set toavoid congested areas.
There is no faster route compared to the current route, based on theroad network and traffic information.
The automatic detour search is not intended foravoiding traffic jams. It searches for the fastestroute taking into consideration such things astraffic jams. Follow the current route. Also see“NOTES ON NavTraffic INFORMATION” forfurther information.
The route does not avoid a roadsection with traffic information statingthat it is closed due to road construc-tion.
The navigation system is designed not to avoid this event because theactual period of closure may differ from the declared roadwork period.
Observe the actual road conditions and followthe instructions on the road for detour whennecessary. If the road actually is closed, use thedetour function and set the detour distance toavoid the road section that is closed.
TRAFFIC INFORMATION

12 IndexCURRENT LOCATION MAP SCREEN<ENTER> Store Location page 6-2
Nearby Places page 4-5
Map View Change View 2D Map page 3-11
Split: 2D Map page 3-11
Birdview (3D) page 3-11
Split: Birdview Map page 3-11
View Settings Intersection page 5-9
Turn List page 5-9
Fuel Economy page 5-9
Full Map page 5-9
Map Settings Map Orientation page 3-14
Long Range page 3-15
Map Color page 3-15
Birdview Angle page 3-16
Index 12-1

12-2 Index
<ENTER> Map View Map Settings Left Split Map Settings page 3-17
Show All Freeway Exits on Route page 5-10
Auto. Show Turn List on Freeway page 5-10
Map Icons Restaurant page 3-17
Gas Station page 3-17
Hotel page 3-17
ATM page 3-17
Rest Area page 3-17
Store Tracking page 6-6

SCROLL LOCATION MAP SCREEN<ENTER> New Dest. Start page 5-2
More Routes page 5-3
Add/Route Info page 5-3
Move Location page 5-4
Store Location page 5-5
Place Info page 5-5
Add to Route page 5-14
Nearby Places page 4-5
Store Location page 5-5
Delete page 6-19
Incident Detail page 7-7
Index 12-3

12-4 Index
DESTINATION SCREEN<DEST> Change Region page 4-2
Street Address page 4-4
Places page 4-5
Home page 4-10
Address Book page 4-11
Previous Destinations page 4-12
Delete Destination page 4-20
Next Page Previous Start Point page 4-13
Stored Routes page 4-14
Phone Number page 4-14
Freeway Entrance/Exit page 4-15
Intersection page 4-17
City Center page 4-18

ROUTE SCREEN<ROUTE> Cancel Route/Resume Route page 5-13
Edit/Add to Route page 5-14
Route Info page 5-18
Guidance Settings Guidance Voice page 5-20
Guidance Volume page 5-20
Traffic Announcement page 5-20
Recalculate page 5-21
Detour page 5-22
Traffic Detour page 5-22
Route Settings Basic Route Type page 5-23
Other Routing Choices page 5-24
Index 12-5

12-6 Index
SETTING SCREEN<SETTING> Navigation Address Book page 6-8
Map View page 3-13
Map Icons page 3-17
Guidance Settings page 5-26
Route Settings page 5-24
Traffic Info Settings page 7-7
Weather Info Settings page 7-16
Speed Limit Info page 8-6
Others page 8-7
Delete Stored Information page 8-10
Delete All Previous Destinations page 8-10
Delete All Previous Start Point page 8-10

<SETTING> Navigation Reset All Navigation Settings to Default page 8-10
Audio Vehicle Owner’s Manual
Phone Vehicle Owner’s Manual
Bluetooth Vehicle Owner’s Manual
Volume & Beeps page 8-11
Display Display Adjustment page 8-3
Color Theme page 8-5
Clock page 8-12
Others Comfort Vehicle Owner’s Manual
Language & Units page 8-13
Voice Recognition page 9-20
Camera Vehicle Owner’s Manual
Sonar Vehicle Owner’s Manual
Image Viewer Vehicle Owner’s Manual
Index 12-7

12-8 Index
INFORMATION SCREEN<INFO> Fuel Economy Vehicle Owner’s Manual
Maintenance Vehicle Owner’s Manual
Where am I? page 7-3
Traffic Info page 7-3
Weather Info page 7-8
Map Update page 7-17
Navigation Version page 7-18
Others GPS Position page 7-19
Voice Recognition“9. Voice recognition”

Number
2D map ...................................................... 3-2, 3-5
A
About map data ............................................ 10-15About map icons .......................................... 10-15About route guidance....................................... 5-7Adding destination or waypoint ..................... 5-4Address book .................................................. 10-2Adjusting current vehicle location ................. 8-9Adjusting voice guidance volume............... 2-24Alternate command mode ............................ 9-12Automatic reroute ........................................... 10-2Automaticallydisplay warnings/watches ............................ 7-15Available items after setting destination ...... 5-2Available views ................................................ 3-12Avoid area......................................................... 10-2
B
Background color .............................................. 8-5Basics of voice guidance ............................. 10-9Before starting............................ 2-25, 9-4, 9-19BirdviewTM ........................................................ 10-3BirdviewTM (3D) map.............................. 3-3, 3-7Brightness ........................................................... 8-4Building graphics............................................... 3-3
C
Canceling route............................................... 2-21Canceling/reactivating route ........................ 5-13Changing BirdviewTM angle ......................... 3-16Changing map view ....................................... 3-11Changing region ................................................ 4-2Changing the scale of a map......................... 3-8Character (letters and numbers)input screen ..................................................... 2-15Characteristics of liquid crystal display.... 10-19Clock settings.................................................. 8-12Command list................................................... 2-27Confirming how to usevoice commands .................................... 9-3, 9-17Confirming route .................................... 5-3, 5-18Control buttons and functions ....................... 2-2Control panel ...................................................... 2-2Current location map screen ....................... 2-17Current vehicle location ................................ 10-3Customer assistance ..................................... 11-2Customizing Nearby Places............................ 8-8
D
Delete destination........................................... 4-20Delete stored items........................................ 8-10Deleting all stored items ............................... 6-19Deleting individual item on the map .......... 6-19Deleting stored item ...................................... 6-18Deleting stored item individually ................. 6-18
Destination screen............................................. 4-2Destination weather on suggestedroute screen ..................................................... 7-15Detailed Map Coverage Areas (MCA) fornavigation system ........................................... 10-7Detour................................................................ 10-2Directions provided and distances toguide points ................................................... 10-10Display adjustment ............................................ 8-3Display of current vehicle location ............. 10-3Display settings.................................................. 8-3Display urgent traffic information................... 7-5Displaying how to operate VoiceRecognition System....................................... 9-12Displaying map icons .................................... 3-17Displaying small turn arrow on map .......... 5-28Displaying the current vehicle location ........ 3-4Displaying weather information screen ........ 7-9
E
Editing address book........................................ 6-8Editing avoid area........................................... 6-15Editing route..................................................... 5-14Editing stored home and address................. 6-8Editing stored route ....................................... 6-14Editing stored tracking .................................. 6-14End-user terms.............................................. 10-16Example of touch panel operation.............. 2-14
Index 12-9

12-10 Index
F
Features of this navigation system............. 10-2Finding address ................................................. 4-4Finding place ...................................................... 4-5For safe operation ............................................. 1-2Functions disabled while driving ................... 2-8
G
Giving voice commands .......... 2-25, 9-5, 9-19Guidance screen settings ............................... 5-9Guidance screens and preview mode ......... 5-7Guidance settings .......................................... 5-20
H
How to handle display................................. 10-19How to input letters and numbers ............. 2-15How to order map data updates .............. 10-15How to store home location ........................ 2-18How to use this manual ................................... 1-2How to view map screen ............................. 2-22
I
Incorrect display of vehicle position .......... 10-5Info on route........................................................ 7-4Information screen ............................................. 7-2
L
Language and unit settings ......................... 8-13Language settings .......................................... 8-13Laser product ..................................................... 1-3List screen ........................................................ 2-13Looking at information on the map ............ 3-17
M
Maintenance of display ............................... 10-19Map data......................................................... 10-15Map menu screen........................................... 2-17Map scale ......................................................... 3-10Map scrolling information ............................. 3-18Map symbols.................................................... 3-20Map types............................................................ 3-2Map update ...................................................... 7-17Menu screen and how to operate.............. 2-10Menu screens and their purposes ............. 2-10Minor adjustment of home orstored address ................................................... 6-9Moving a map..................................................... 3-5Moving location of destination ....................... 5-4multi-function controller withDirectional buttons ............................................ 2-5multi-function controller withoutDirectional buttons ............................................ 2-5
N
Navigation setting .............................................. 8-6Navigation system status screen................... 2-7NavTraffic information .................................... 10-2Nearby traffic info. ............................................. 7-5NISSAN voice recognition .................. 2-25, 9-2Notes on NavTraffic information................ 10-13Notes on NavWeatherXM information .... 10-14Notes on voice guidance............................ 10-12Number input screen ..................................... 2-16
O
Operating maps .............................................. 2-22Other navigation settings ................................ 8-7
P
Places of interest (PLACES) directory ..... 10-2Procedures after setting destination............. 5-2
R
Recalculating route ........................................ 5-21Reference symbols............................................ 1-2Repeating voice guidance.......................... 10-11Reset all navigation settings to default ..... 8-10Route calculation ............................................ 10-8Route calculation and visual guidance ..... 11-6Route guidance................................... 10-2, 10-9Route guidance settings............................... 5-26

Route screen ................................................... 5-12
S
Safety information.............................................. 1-2Scrolled location map screen...................... 2-18Searching for destination ............................. 2-20Searching for detour route taking trafficinformation into consideration ..................... 5-22Searching from address book..................... 4-11Selecting route ................................................... 5-3Set average speeds....................................... 5-29Setting alternate command mode .............. 9-21Setting by phone number............................. 4-14Setting city center .......................................... 4-18Setting color theme .......................................... 8-5Setting conditions for route calculation .... 5-23Setting destination ......................................... 2-20Setting detour route....................................... 5-22Setting freeway entrance/exit ...................... 4-15Setting from stored routes ........................... 4-14Setting home as destination ........................ 4-10Setting intersection ........................................ 4-17Setting left screen display............................ 3-17Setting map color ......................................... 3-15Setting map orientation................................. 3-14Setting point on map..................................... 4-19Setting previous destination ........................ 4-12Setting previous start point.......................... 4-13Setting the map view..................................... 3-13Setting voice guidance ................................. 2-23
Setting voice guidance at intersections ... 5-27Settings long range map view .................... 3-15Settings screen .................................................. 8-2Speaker adaptation ........................................ 9-21Speed limit indication on map ....................... 8-6Standard mode .................................................. 9-3Start menu........................................................ 2-12Starting route guidance ....................... 2-21, 5-2Steering wheel switch ...................................... 2-5Storing avoid area ............................................. 6-7Storing current vehicle location ..................... 6-3Storing home location/address................... 2-18Storing location ........................................ 5-5, 6-2Storing route ....................................................... 6-5Storing tracked route........................................ 6-6System feedbackannouncement modes ................................... 9-20
T
Touch panel operation................................... 2-14Traffic information ......................................... 11-10Traffic information on map................... 3-21, 7-6Traffic information settings .............................. 7-7Transferring information to/fromaddress book ................................................... 6-21Turning voice guidance ON/OFF ............... 2-23
U
Unit settings ..................................................... 8-14Using controls to adjust values,levels, etc. ......................................................... 2-11
V
Vehicle icon...................................................... 11-4Viewing available traffic information.............. 7-3Viewing available weather information ......... 7-8Viewing GPS currentlocation information ........................................ 7-19Viewing information about currentvehicle location................................................... 7-3Viewing information aboutsearched location .............................................. 5-5Viewing navigation systemversion information ......................................... 7-18Voice command examples................... 9-8, 9-23Voice guidance.................................... 10-3, 11-8Voice guidance during route guidance ........ 5-7Voice recognition ............................................ 11-9Voicetag (only for stored locations) ........... 6-10Volume adjustment ......................................... 8-11
W
Weather information settings ...................... 7-16What is GPS (GlobalPositioning System)?..................................... 10-3
Index 12-11

12-12 Index
When gray road is displayed on map....... 10-7


NISSAN NAVIGATION SYSTEM HELP-DESK CONTACT INFORMATION
For assistance or inquiries about the NISSAN
Navigation System, or to order updated map
data, contact the NISSAN NAVIGATION SYS-
TEM HELPDESK at:
• ADDRESS: P.O. Box 1588,
Orem, UT 84059-992
• E-MAIL: [email protected]
• WEB SITE: www.NissanNavigation.com or
www.nissan.ca
• PHONE: 1-888-661-9995
• HOURS: 6:00 AM to 5:00 PM
(Pacifi c Time)
NISSAN CONSUMER AFFAIRS DE-PARTMENT
For assistance or inquiries about the NISSAN
warranty, service or general questions, contact
the NISSAN Consumer Affairs Department at:
For U.S. customers
Nissan North America, Inc.
Consumer Affairs Department
P.O. Box 685003
Franklin, TN 37068-5003
1-800-NISSAN-1
(1-800-647-7261)
For Canadian customers
Nissan Canada Inc.
5290 Orbitor Drive
Mississauga, Ontario L4W 4Z5
1-800-387-0122
Thank you for purchasing a NISSAN vehicle.
This user’s manual is for the navigation system
only. This manual contains operating instructions
for the NISSAN Navigation System offered in
your NISSAN vehicle.
Please read this manual carefully to ensure safe
operation of the navigation system.
• Because of possible specifi cation changes
and optional equipment, sections of this
manual may not apply to your vehicle.
• All information, specifi cations and illustra-
tions in this manual are those in effect at the
time of printing. NISSAN reserves the right to
change specifi cations or design at any time
without notice.
• Do not remove this manual from the vehicle
when selling this vehicle. The next user of this
navigation system may need the manual.
FOREWORD

®
2014 NAVIGATIONSYSTEM
OWNER’S MANUAL
For your safety, read carefully and keep in this vehicle.
20
14
NIS
SA
N N
AV
IGA
TIO
N S
YS
TE
M8
NA
V-N
8NAV-N
Printing : June 2013 (07)Publication No.:
Printed in U.S.A.N14E 08NUU0