10 Slab Saw - Aussie Sapphire
16
10" Slab Saw INSTRUCTION MANUAL EST. 1984 HI TECH
Transcript of 10 Slab Saw - Aussie Sapphire

10" Slab Saw
INSTRUCTION MANUAL
EST. 1984
HI TECHEST. 1984
HI TECH

2
SAFETY INSTRUCTIONS
IMPORTANT! READ FIRST
For your own safety be sure to read, understand and follow all warnings, safety rules and instructions in this instruction manual before using this machine. Failure to do so can result in serious personal injury. This instruction manual is intended for the following
machine models: 31-000, 31-001, 31-004 and 31-006. Save these instructions
SETUP
• Intended for indoor use only.
• Avoid dangerous environments. Do not use this machine near gasoline or other flammable liquids.
• Make sure machine is securely placed on a sturdy, level surface with ample working area and away from open electrical outlets.
• Check for damaged parts. Before use of this machine, always check for any damaged parts to determine that it will operate properly and perform its intended function. Check for proper alignment of moving parts, binding of moving parts, breakage of parts, mounting, and any other conditions that may affect its operation. A part that is damaged must be properly replaced through the manufacturer of this machine to avoid risk of injury.
• Use only identical 10" Slab saw parts for replacement parts. Use of any other parts not originally intended for the 10" Slab saw machine may create a hazard or cause product damage.
• Know your power tool. Read this instruction manual carefully. Learn the correct applications and limitations as well as specific warnings and hazards related to this machine.
USAGE
• Always wear proper apparel. Do not wear any loose clothing, gloves, neckties or jewelry that can get caught in the machine’s moving parts. Secure long hair with a rubber band or hair tie.
• Always wear proper eye protection to protect you from any debris that may fly out while sawing. We recommend wearing safety goggles or safety glasses with side shields. Everyday glasses

3
SAFETY INSTRUCTIONS
are not safety glasses. If anyone is around the machine while it’s in use, they must also wear safety glasses.
• Keep work area well lit and clean. Make sure your work area is not cluttered.
• Do not operate unattended. Adult supervision is required at all times. Never leave the machine running unattended.
• Do not operate this machine while under the influence of drugs, alcohol or any medication.
• Never run saw blades dry. Saw blades are designed to be used with a lubricant, such as oil or water, and will be ruined immediately if used dry. Always make sure you are using adequate oil or water while sawing so that rock dust doesn’t form. This dust contains chemicals that can be hazardous to your lungs if inhaled and is known to cause cancer, birth defects or other reproductive harm. To reduce your exposure to these chemicals, work in a well ventilated area and wear a face or dust mask if the sawing operation is dusty.
• Never attempt to cut curves with the saw blade. Saw blades are designed to cut straight lines only. Ignoring this warning may result in a damaged saw blade and possible injury.
• Never cut more than one workpiece at a time.
• Some rocks contain poisonous elements. Avoid sawing rocks that contain uranium, mercury, lead, arsenic, etc. Make sure you know the material you are sawing.
• Allow your trim saw to cool. By ignoring this warning, the 10" Slab saw can overheat and deform the saw housing. We recommend cutting on the 10" Slab saw for 30 minutes on, then allow 30 minutes off so the machine can cool down.
• Do not force the tool or attachment to do a job it is not designed to do.
• Saw blades continue to spin after turn off, eventually slowing to a stop.
• Avoid awkward operations and hand positions. Make sure you have good balance while working on this machine. A sudden slip could cause your hand to move into the disc.
• Always stay alert. You must be focused while working on this machine. Stones can catch on the saw blade and eject out of the sawing area.
MAINTENANCE
• Always disconnect from power before servicing. Disconnect machine from power source before making any adjustments and when not in use.
• Do not abuse the power cord. Never carry the machine by the cord or yank it to disconnect from receptacle. Keep cord away from heat, oil and sharp edges.
• Do not open the saw housing. There are no user serviceable parts inside.
• Clean and dry machine after use.

4
TABLE OF CONTENTS
SAFETY INSTRUCTIONS 2
WARRANTY INFORMATION 5
MACHINE DETAILS 6
OPERATING INSTRUCTIONS 7
CUTTING TIPS 9
MAINTENANCE 10
SAW BLADE ADJUSTMENTS 11
ACCESSORIES 12
FAQS 14
TROUBLESHOOTING 15
REGISTER YOUR PRODUCTRegister your Hi-Tech Diamond 10" Slab saw at hitechdiamond.com/register to help facilitate any warranty related requests. You can also register your 10" Slab saw by completing and mailing us the enclosed registration form. Complimentary mailing envelope is included for your convenience.

5
ONE-YEAR LIMITED WARRANTY
What does this warranty cover?This warranty covers all structural and electrical parts of the Hi-Tech Diamond 10" Slab saw such as the motor, rectifier, etc.
What does this warranty not cover?This warranty does not cover any consumable goods such as saw blades, diamond abrasives and/or polishing products. This warranty also does not cover any abuse, misuse, intentional damage, incorrect usage, failure to adequately take care of the machine, improperly following the instructions, servicing by someone other than Hi-Tech Diamond personnel, theft or loss and/or any act of nature.
Who is covered under this warranty?This warranty only covers the original purchaser of the equipment. It is non-transferable.
What is the warranty period?This warranty service is in force for one full year from the date of your purchase. Please retain the original invoice of your machine for proof of warranty or register your 10" Slab saw.
Need our warranty service?Contact us directly by phone at (630) 596-9909 or by email at [email protected] and we will assist you. You must prove that you are under warranty by providing us with the original invoice of your machine or by registering your 10" Slab saw to receive our warranty service.
This 10" Slab saw is warranted by the manufacturer to be free from defect for the period of one full year from the date of purchase.
Extended warranty programYou’ve made a smart investment by purchasing this Hi-Tech Diamond 10" Slab saw so protect it by extending this manufacturer’s warranty another 1-2 years! For purchase and more details, visit hitechdiamond.com or call (630) 596-9909. Important note: You have up to 45 days from the purchase date of this Hi-Tech Diamond machine to add this extended warranty.

6
MACHINE DETAILS
This image shows parts and accessories included with your 10" Slab saw machine.
1
2
3
4
5
1. 10" Slab saw base unit (1/3 hp, 1,740 rpm motor)
2. On/off power switch
3. Slab saw blade guard
4. Slab saw table
5. Drain plug
6. 10" thick notched diamond saw blade
7. 10" thick sintered diamond saw blade
8. Slab saw spray shield (included with insturction manual)
9. Stainless steel arbor
10. Washers (4pcs)
11. Nut
12. Brass bar and screw
13. 1/8" Allen wrench (included with instruction manual)
6
87
7
9 10 11
12 13

7
OPERATING INSTRUCTIONS
1Carefully unpack the slab saw from the box and remove all loose foam and accessories.
Set the packaging aside should you need it in the future. Check to make sure all parts are present on both the machine and in the instruction manual. If you find any missing or damaged parts, call us immediately at 1 (630) 596-9909 or email us at [email protected]. Place the slab saw on a table or flat surface in a well lit location. The machine must sit level.
2 Remove the black saw table from the machine. Install the stainless steel arbor, washers,
saw blade, nut and brass bar according to Fig. A below. To do this, first slide the stainless steel arbor onto the motor shaft. The two set screws located on the arbor must be over the flat part of the motor shaft.
Fig. A
Fig. B
3 The slab saw is designed to operate with oil or water. What you use is your preference. Never
run the saw blade dry. Fill the reservoir with oil or water until the bottom of the saw blade is 1/8" deep (Fig. B). Do not overfill the reservoir or there will be excessive oil or water spraying from the saw blade while you cut.
Tighten these two set screws onto the FLAT part of the motor shaft marked red using the included Allen wrench. If you do not tighten the set screws to the flat part of the motor shaft, you will ruin the motor shaft by creating burrs. Next, slide two washers onto the arbor, then one of the two included saw blades, then two more washers. Slide the nut onto the arbor and tighten by turning clockwise. Do not over tighten the nut, it should only be slightly tighter than finger tight. Last, slide the brass bar onto the arbor, then insert the screw into the hole of the brass bar and the housing, then screw the brass bar into the housing using a Phillips #2 screwdriver (not included). Note: Only use 10" saw blades with 5/8" arbor holes on this slab saw machine.
8
OPERATING INSTRUCTIONS
7There should be a fine mist coming from your saw blade while it spins. If there isn’t, pour
additional water over the blade until there is a mist. Note: In use, always make sure the saw blade is properly lubricated. Never run dry.
8After each use, turn off the machine, then unplug your slab saw from its power source.
Drain the water reservoir be removing the drain plug. Dry the machine and saw blade with paper towels or a cloth. You may also spin dry the saw blade by running it on the slab saw until it is completely dry. Notes: Always dry your saw blade after each use to prevent rusting. Keep out of reach of children.
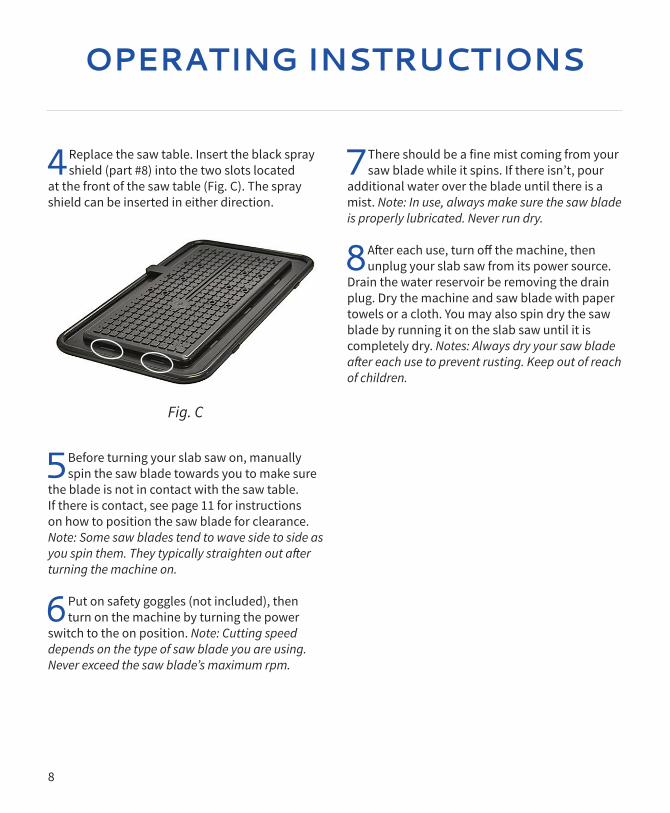
4 Replace the saw table. Insert the black spray shield (part #8) into the two slots located
at the front of the saw table (Fig. C). The spray shield can be inserted in either direction.
5Before turning your slab saw on, manually spin the saw blade towards you to make sure
the blade is not in contact with the saw table. If there is contact, see page 11 for instructions on how to position the saw blade for clearance. Note: Some saw blades tend to wave side to side as you spin them. They typically straighten out after turning the machine on.
6 Put on safety goggles (not included), then turn on the machine by turning the power
switch to the on position. Note: Cutting speed depends on the type of saw blade you are using. Never exceed the saw blade’s maximum rpm.
Fig. C

9
CUTTING TIPS
1Before you make the first cut, line up your rock or glass properly with the saw blade.
Lightly slide the material into the saw blade until a groove forms, then push the material firmly through the saw blade. Do not attempt to cut curves with the trim saw, it is designed to cut straight lines only. As you near the end of the cut, reduce pressure to avoid a sudden “break-through”. Reducing pressure also gives you a cleaner cut. Note: Never force a saw blade, let the blade do the work.
2 This slab saw is to be used for slabbing larger material. The rocks and glass you are sawing
should never exceed more than 2/3 the size of the visible cutting area of the saw blade. The blade height of the 10" slab saw is 3-3/4". This measurement is taken from the saw table to the top of the saw blade (Fig. D).
3 The red saw blade included with your saw has a sintered diamond rim that may require
“sharpening” or “dressing” over long, continuous use. Simply put, the diamonds embedded into the sintered matrix of the blade are wearing down, and the metal sintered matrix surrounding the diamonds are deforming over them. This metal matrix needs to be abraded away to expose the diamond surface. Dress and sharpen sintered saw blades with aluminum oxide, silicon carbide stone, dressing stick or brick. Run 3-4 times through the saw blade for a quick fix. Note: Always abide by your saw blade instructions. Not all saw blades should be sharpened or dressed, as it can ruin the saw blade.
Fig. D
10
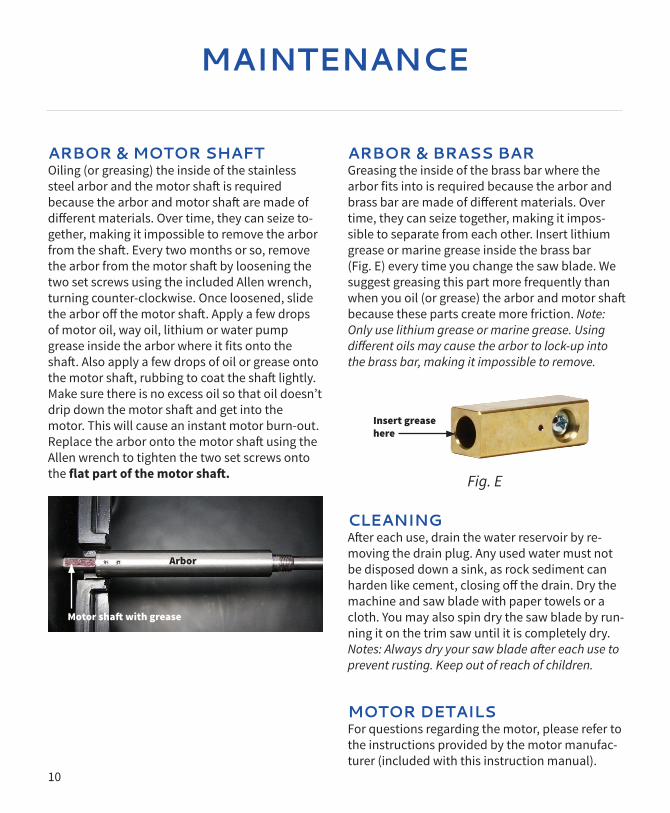
ARBOR & BRASS BARGreasing the inside of the brass bar where the arbor fits into is required because the arbor and brass bar are made of different materials. Over time, they can seize together, making it impos-sible to separate from each other. Insert lithium grease or marine grease inside the brass bar (Fig. E) every time you change the saw blade. We suggest greasing this part more frequently than when you oil (or grease) the arbor and motor shaft because these parts create more friction. Note: Only use lithium grease or marine grease. Using different oils may cause the arbor to lock-up into the brass bar, making it impossible to remove.
CLEANINGAfter each use, drain the water reservoir by re-moving the drain plug. Any used water must not be disposed down a sink, as rock sediment can harden like cement, closing off the drain. Dry the machine and saw blade with paper towels or a cloth. You may also spin dry the saw blade by run-ning it on the trim saw until it is completely dry. Notes: Always dry your saw blade after each use to prevent rusting. Keep out of reach of children.
MOTOR DETAILSFor questions regarding the motor, please refer to the instructions provided by the motor manufac-turer (included with this instruction manual).
MAINTENANCE
ARBOR & MOTOR SHAFTOiling (or greasing) the inside of the stainless steel arbor and the motor shaft is required because the arbor and motor shaft are made of different materials. Over time, they can seize to-gether, making it impossible to remove the arbor from the shaft. Every two months or so, remove the arbor from the motor shaft by loosening the two set screws using the included Allen wrench, turning counter-clockwise. Once loosened, slide the arbor off the motor shaft. Apply a few drops of motor oil, way oil, lithium or water pump grease inside the arbor where it fits onto the shaft. Also apply a few drops of oil or grease onto the motor shaft, rubbing to coat the shaft lightly. Make sure there is no excess oil so that oil doesn’t drip down the motor shaft and get into the motor. This will cause an instant motor burn-out. Replace the arbor onto the motor shaft using the Allen wrench to tighten the two set screws onto the flat part of the motor shaft. Fig. E
Insert greasehere
Arbor
Motor shaft with grease

11
SAW BLADE ADJUSTMENTS
BLADE POSITIONING & CLEARANCE ADJUSTMENTSFollow these four steps to adjust the position of the saw arbor and saw blade so that the blade does not make contact with the saw table. This process may require trial and error.
1Remove the saw table, then remove the brass bar. Loosen the two set screws located in
the saw arbor using the Allen wrench, turning counter-clockwise (Fig. F). Once loosened, the saw arbor can slide side to side.
2 Replace the saw table and position the saw blade so that it is not in contact with the saw
table. Your blade should spin freely.
3 Remove the saw table to tighten the two set screws using the Allen wrench, turning
clockwise, then replace the brass bar. Make sure to tighten the set screws to the FLAT part of the motor shaft.
4Replace the saw table and manually rotate the saw blade, making sure the blade is not
making contact with the saw table one last time before turning the slab saw on.
Fig. F
NEED A REPLACEMENT SET SCREW?The two set screws located in the saw arbor are available at your local hardware store. The size of the set screws are 18-8 stainless steel, cup point, 10-32 thread, 3/16" long.

12
ACCESSORIES
Saw fenceThe saw fence accessory aligns your material for precise, accurate cuts. It securely fits onto the 10" slab saw table and is adjustable to accommodate the size of the material you are cutting. If you have trouble cutting your stones or glass in perfect, straight lines, then this helpful accessory is for you.
Saw viseThe saw vise accessory secures your material while you cut so you can be hands-free. It secures onto the 10" slab saw housing and is an adjustable guide that allows for precise cuts. The carriage advances slowly to feed your material evenly into the saw blade. Installation is fast and easy. If you don’t want your hands near the saw blade while you cut, then this helpful accessory is for you.
The accessories featured on this page are compatible with the Hi-Tech Diamond 10" slab saw machine. For a listing of all Hi-Tech Diamond products, visit hitechdiamond.com.

13
ACCESSORIES
The saw blades featured on this page are compatible with the Hi-Tech Diamond 10" slab saw machine. For a listing of all Hi-Tech Diamond products, visit hitechdiamond.com.
Thick notched diamond saw bladesOur green, thick notched diamond saw blades are designed for cutting and slabbing material such as agates, jades and geodes.
Available sizes for this trim saw10" diameter X .031" core X .044" kerf
Note: This saw blade is included with this slab saw machine.
Thin sintered diamond saw bladesOur red, thin sintered diamond saw blades are designed for cutting and slabbing material such as quartz, topaz, glass and fine agates.
Available sizes for this trim saw10" diameter X .031" core X .038" kerf
Note: This saw blade is included with this slab saw machine.
Thick sintered diamond saw bladesOur black, thick sintered diamond saw blades are designed for cutting and slabbing material such as agates, geodes, tile and ceramic.
Available sizes for this trim saw10" diameter X .062" core X .078" kerf
14
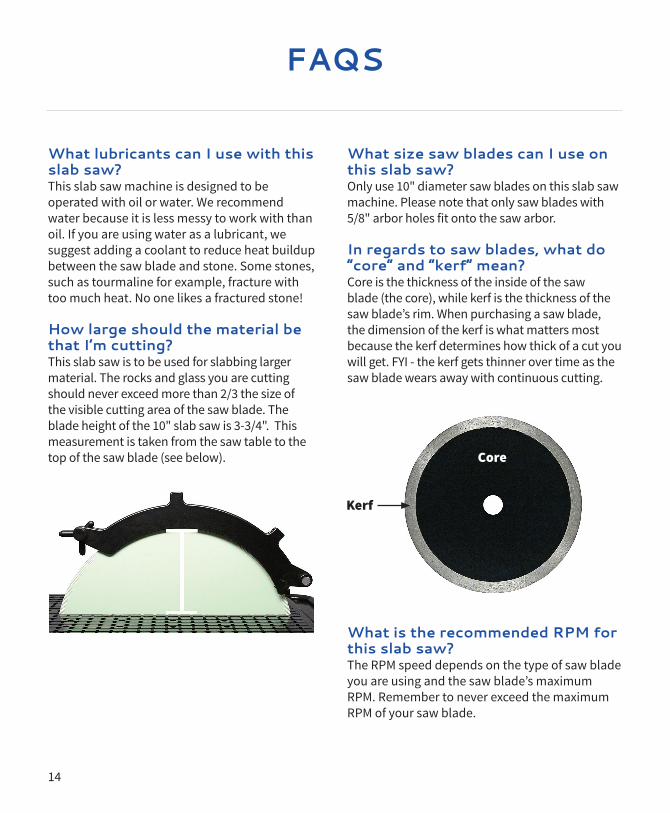
Kerf
FAQS
What lubricants can I use with this slab saw?This slab saw machine is designed to be operated with oil or water. We recommend water because it is less messy to work with than oil. If you are using water as a lubricant, we suggest adding a coolant to reduce heat buildup between the saw blade and stone. Some stones, such as tourmaline for example, fracture with too much heat. No one likes a fractured stone!
How large should the material be that I’m cutting?This slab saw is to be used for slabbing larger material. The rocks and glass you are cutting should never exceed more than 2/3 the size of the visible cutting area of the saw blade. The blade height of the 10" slab saw is 3-3/4". This measurement is taken from the saw table to the top of the saw blade (see below).
What size saw blades can I use on this slab saw?Only use 10" diameter saw blades on this slab saw machine. Please note that only saw blades with 5/8" arbor holes fit onto the saw arbor.
In regards to saw blades, what do “core” and “kerf” mean?Core is the thickness of the inside of the saw blade (the core), while kerf is the thickness of the saw blade’s rim. When purchasing a saw blade, the dimension of the kerf is what matters most because the kerf determines how thick of a cut you will get. FYI - the kerf gets thinner over time as the saw blade wears away with continuous cutting.
What is the recommended RPM for this slab saw?The RPM speed depends on the type of saw blade you are using and the saw blade’s maximum RPM. Remember to never exceed the maximum RPM of your saw blade.
Core

15
Why is there excessive oil or water spraying from the saw blade?If there is excessive oil or water spraying from the saw blade while you’re cutting, this means you have over-filled the water reservoir. Fill the reservoir with water (or oil) so that just the bottom of the saw blade is sitting in it, about 1/8" deep (see below).
My saw blades keep rusting. How can I prevent this?Rusting occurs when the saw blade is not properly dried off after each use or if the saw blade is left sitting in the saw machine’s water reservoir when not in use. The best solution to prevent rusting is to remove the saw blade from your trim saw after each use and dry with a paper towel or cloth. Remember to always keep saw blades away from children.
TROUBLESHOOTING
What happens if my saw machine overheats?The housing that the slab saw is made out of is polyethylene, which can deform if the machine is run too long, causing the machine to overheat. To prevent this from happening, you must take time to cool your machine. We suggest running your slab saw for 30 minutes on, 30 minutes off to cool. Alternatively, you can use an external fan to blow air through the vent located on the side of the motor housing. This will help prolong usage time.
I can’t remove the arbor from the motor shaft.If you can’t remove the arbor from the motor shaft using the Allen wrench, it is most likely because the arbor and motor shaft seized together. This is a result from not oiling the inside of the arbor according to the oiling instructions on page 10. If it is impossible to remove, please contact Hi-Tech Diamond at 1 (630) 596-9909 and one of our specialized technicians will help you over the phone for correct removal.
Do you sell electrical spare parts for my slab saw? Whom do I contact if I need a repair or replacement for my slab saw?Due to the technical nature of our machines, we do not offer electrical spare parts for you to install yourself such as motors, speed controllers, rectifiers, etc. Instead, we offer a repair service that is done in-house by our qualified technicians. For more information about our repair service, visit hitechdiamond.com/repairs.

MANUFACTURED BYReentel International Inc.
808 Burr Oak DriveWestmont, IL 60559
U.S.A.
PHONE1 (630) 596-9909
WEBSITEhitechdiamond.com
FACEBOOKfacebook.com/hitechdiamond
YOUTUBEyoutube.com/hitechdiamond
Rev 04/01/20
EST. 1984
HI TECHEST. 1984
HI TECH