Groupwaresoftware.open-xchange.com/products/appsuite/doc/OX-App-Suite-User... · TableofContents...
300
bla Groupware User Guide bla
Transcript of Groupwaresoftware.open-xchange.com/products/appsuite/doc/OX-App-Suite-User... · TableofContents...

bla
GroupwareUser Guide
bla
Groupware: User GuidePublication date Friday, 01. June 2018 Version 7.10.0Copyright© 2016-2018 OX Software GmbH , This document is the intellectual property of OX SoftwareGmbH
The document may be copied in whole or in part, provided that each copy contains this copyright notice. The information containedin this book was compiled with the utmost care. Nevertheless, erroneous statements cannot be excluded altogether. OX SoftwareGmbH, the authors and the translators are not liable for possible errors and their consequences. The names of software andhardware used in this book may be registered trademarks; they are used without warranty of free usability. OX Software GmbHgenerally follows the spelling conventions of the manufacturers. The reproduction of brand names, trade names, logos, etc. inthis book (even without special markings) does not justify the assumption that such names can be considered free (for thepurposes of trademark and brand name regulations).
2
Groupware

Table of Contents
1 About this Documentation ..................................................................... 111.1 Target Groups, Contents ..................................................................................... 12
1.2 Design Elements ................................................................................................. 13
1.3 Terminology ........................................................................................................ 15
2 Getting Started with the Groupware ................................................... 192.1 Groupware Definition ......................................................................................... 20
2.2 System Requirements ......................................................................................... 22
2.3 Operating Instructions ........................................................................................ 23
2.4 Signing in, Signing out ......................................................................................... 24
3 First Steps ................................................................................................. 253.1 General Description of the User Interface ........................................................... 26
3.1.1 The menu bar ........................................................................................... 263.1.2 App Launcher ............................................................................................ 273.1.3 The search bar .......................................................................................... 283.1.4 The toolbar ............................................................................................... 293.1.5 The folder tree .......................................................................................... 303.1.6 The display area ........................................................................................ 313.1.7 The pop-up ............................................................................................... 323.1.8 The notification area ................................................................................. 333.1.9 The editing window ................................................................................... 34
3.2 Keyboard Input ................................................................................................... 353.2.1 Keys and key combinations ....................................................................... 363.2.2 Interacting with the user interface via keyboard ........................................ 373.2.3 Use cases .................................................................................................. 38
3.3 Customizing the Basic Settings ............................................................................ 39
3.4 Changing Personal Contact Data ......................................................................... 40
3.5 Changing the Password ....................................................................................... 41
3.6 Receiving Notifications ........................................................................................ 42
3.7 Manually Downloading and Installing Clients and Apps ....................................... 44
3.8 Using a Wizard to Set Up Clients and Apps .......................................................... 45
4 Portal ........................................................................................................ 474.1 The PortalComponents ........................................................................................ 48
4.1.1 Signed in as ................................................................................................ 494.1.2 Customize this page button .................................................................... 494.1.3 Add widget button ................................................................................... 494.1.4 Appointments widget .................................................................................. 494.1.5 Inbox widget .............................................................................................. 494.1.6 Tasks widget .............................................................................................. 494.1.7 Recently changed files widget ...................................................................... 49
3

4.1.8 User data widget ........................................................................................ 494.1.9 Quota widget ............................................................................................. 504.1.10 News widgets ........................................................................................... 504.1.11 Widgets with news from your social networks ............................................ 504.1.12 Widgets with information about Drive apps ............................................. 50
4.2 Customizing the Portal ........................................................................................ 514.2.1 Changing the widgets' order ...................................................................... 514.2.2 Removing Portal widgets ........................................................................... 514.2.3 Adding Portal widgets ............................................................................... 524.2.4 Adding a Portal widget for social networks ................................................ 524.2.5 Changing the Portal widgets' settings ........................................................ 53
5 E-Mail ........................................................................................................ 555.1 The E-Mail Components ...................................................................................... 56
5.1.1 The E-Mail search bar ................................................................................ 575.1.2 The E-Mail toolbar ..................................................................................... 585.1.3 The E-Mail folder tree ................................................................................ 595.1.4 The E-Mail categories bar .......................................................................... 605.1.5 The E-Mail display area .............................................................................. 605.1.6 The E-Mail list ............................................................................................ 615.1.7 The E-Mail detail view ................................................................................ 625.1.8 The E-Mail pop-up ..................................................................................... 635.1.9 The E-Mail editing window ......................................................................... 64
5.2 Displaying E-Mails ............................................................................................... 65
5.3 Viewing or Saving E-Mail Attachments ................................................................. 66
5.4 Sending E-Mails ................................................................................................... 675.4.1 Sending a new E-Mail ................................................................................ 685.4.2 Selecting contacts from a list ..................................................................... 695.4.3 Selecting sender address ........................................................................... 695.4.4 Sending copies as CC or BCC ..................................................................... 705.4.5 Adding attachments .................................................................................. 715.4.6 Sending attachments as link ...................................................................... 725.4.7 Using signatures ....................................................................................... 735.4.8 Replying to E-Mails .................................................................................... 745.4.9 Forwarding E-Mails .................................................................................... 755.4.10 Automatically forwarding E-Mails ............................................................ 765.4.11 Sending a vacation notice automatically .................................................. 77
5.5 Adding E-Mail Folders .......................................................................................... 78
5.6 Organizing E-Mails .............................................................................................. 795.6.1 Working with tabs ..................................................................................... 805.6.2 Moving E-Mails .......................................................................................... 815.6.3 Copying E-Mails ......................................................................................... 825.6.4 Marking E-Mails as read or unread ............................................................ 825.6.5 Collecting addresses ................................................................................. 835.6.6 Categorizing E-Mails .................................................................................. 835.6.7 Showing the E-Mail source ......................................................................... 845.6.8 Working with E-Mail drafts ......................................................................... 845.6.9 Creating E-Mail reminders ......................................................................... 855.6.10 Adding an E-Mail to the portal ................................................................. 855.6.11 Saving E-Mails ......................................................................................... 85
4
Groupware

5.6.12 Importing E-Mails .................................................................................... 855.6.13 Printing E-Mails ....................................................................................... 865.6.14 Archiving E-Mails ..................................................................................... 875.6.15 Deleting E-Mails ...................................................................................... 875.6.16 Cleaning up E-Mail folders ....................................................................... 895.6.17 Using Unified Mail ................................................................................... 90
5.7 Using E-Mail Filters .............................................................................................. 915.7.1 Creating new rules .................................................................................... 925.7.2 Creating a new rule when moving .............................................................. 935.7.3 Changing a rule ......................................................................................... 935.7.4 Use cases for E-Mail filters ......................................................................... 94
5.8 Searching for E-Mails ........................................................................................... 95
5.9 E-Mails within a team .......................................................................................... 975.9.1 Sharing E-Mails ......................................................................................... 975.9.2 Subscribing to E-Mail folders ..................................................................... 975.9.3 Inviting all E-Mail recipients to an appointment ......................................... 975.9.4 Saving all recipients of an E-Mail as a distribution list ................................ 98
5.10 Adding E-Mail Accounts ..................................................................................... 99
5.11 E-Mail Settings ................................................................................................. 1005.11.1 Settings for receiving E-Mails. ................................................................ 1015.11.2 Settings for composing E-Mails .............................................................. 103
6 Address Book ......................................................................................... 1056.1 The Address Book Components .......................................................................... 106
6.1.1 The Address Book search bar .................................................................. 1076.1.2 The Address Book toolbar ....................................................................... 1086.1.3 The Address Book folder tree .................................................................. 1096.1.4 The Address Book navigation bar ............................................................ 1096.1.5 The Address Book display area ................................................................ 1106.1.6 The Address Book list .............................................................................. 1106.1.7 The Address Book detail view .................................................................. 1106.1.8 The contact editing window ..................................................................... 111
6.2 Displaying contacts ........................................................................................... 112
6.3 Viewing or Saving Contact Attachments ............................................................. 113
6.4 The Halo View ................................................................................................... 114
6.5 Adding Contacts ................................................................................................ 1156.5.1 Creating a new contact ............................................................................ 1156.5.2 Adding a contact from vCard ................................................................... 1166.5.3 Adding attachments ................................................................................ 116
6.6 Creating distribution lists .................................................................................. 117
6.7 Adding Address Books ...................................................................................... 1186.7.1 Adding address books ............................................................................. 1186.7.2 Subscribing to external address books .................................................... 1186.7.3 Importing address books from files ......................................................... 119
6.8 Organizing Contacts .......................................................................................... 1206.8.1 Sending E-Mails from within an address book .......................................... 1206.8.2 Inviting contacts to an appointment ........................................................ 120
5
Groupware

6.8.3 Editing contacts ....................................................................................... 1216.8.4 Moving Contacts ...................................................................................... 1216.8.5 Copying Contacts .................................................................................... 1216.8.6 Exporting contacts ................................................................................... 1226.8.7 Sending contacts as vCard ....................................................................... 1226.8.8 Adding contacts as Xing contacts ............................................................. 1226.8.9 Inviting contacts to Xing .......................................................................... 1236.8.10 Printing Contacts ................................................................................... 1236.8.11 Deleting contacts ................................................................................... 123
6.9 Searching for Contacts ...................................................................................... 124
6.10 Contacts in Teams ........................................................................................... 125
6.11 Interchanging Contacts with Other Applications .............................................. 126
6.12 Address Book Settings ..................................................................................... 127
7 Calendar ................................................................................................. 1297.1 The Calendar Components ................................................................................ 130
7.1.1 The Calendar search bar ......................................................................... 1317.1.2 The Calendar toolbar ............................................................................... 1327.1.3 The mini calendar .................................................................................... 1337.1.4 The Calendar folder tree .......................................................................... 1347.1.5 The Calendar display area ....................................................................... 1347.1.6 Day, Work week, Week, Month or Year calendar view. .............................. 1357.1.7 The date picker ....................................................................................... 1367.1.8 The Calendar pop-up ............................................................................... 1377.1.9 The Calendar list ..................................................................................... 1377.1.10 The Calendar detail view ........................................................................ 1387.1.11 The scheduling view .............................................................................. 1397.1.12 The appointment editing window: ......................................................... 140
7.2 Viewing Appointments ...................................................................................... 1417.2.1 Displaying appointments in a calendar view ............................................ 1417.2.2 Displaying multiple time zones ................................................................ 1427.2.3 Displaying appointments in the list view .................................................. 1427.2.4 How are appointments displayed? ........................................................... 143
7.3 Viewing or Saving Appointment Attachments .................................................... 144
7.4 Creating Appointments ..................................................................................... 1457.4.1 Creating new appointments .................................................................... 1467.4.2 Using the date picker ............................................................................... 1477.4.3 Setting recurring appointments ............................................................... 1487.4.4 Setting an appointment's display ............................................................. 1497.4.5 Using appointment reminders ................................................................. 1507.4.6 Adding participants or resources to an appointment ............................... 1507.4.7 Adding attachments ................................................................................ 1517.4.8 Using the scheduling view ....................................................................... 1527.4.9 Creating a follow-up appointment ........................................................... 1537.4.10 Creating appointments from iCal attachments ....................................... 1537.4.11 Resolving appointment conflicts ............................................................ 154
7.5 Answering appointment invitations ................................................................... 155
7.6 Adding Calendars .............................................................................................. 156
6
Groupware

7.6.1 Adding personal calendars ...................................................................... 1577.6.2 Subscribing to public calendars ............................................................... 1577.6.3 Subscribing to Google calendars ............................................................. 1587.6.4 Subscribing to iCal calendars ................................................................... 1587.6.5 Importing calendars from files ................................................................. 159
7.7 Managing Appointments ................................................................................... 1607.7.1 Editing appointments .............................................................................. 1617.7.2 Editing appointments with drag and drop ................................................ 1627.7.3 Changing the appointment confirmation or status .................................. 1627.7.4 Managing favorite timezones .................................................................. 1637.7.5 Using calendar colors .............................................................................. 1647.7.6 Moving appointments to another calendar .............................................. 1647.7.7 Exporting appointments .......................................................................... 1647.7.8 Printing appointments ............................................................................. 1657.7.9 Deleting appointments ............................................................................ 166
7.8 Searching for Appointments .............................................................................. 167
7.9 Appointments in teams ..................................................................................... 1687.9.1 Sharing appointments ............................................................................. 1687.9.2 Sending an E-Mail to participants ............................................................ 1687.9.3 Inviting participants to a new appointment .............................................. 1697.9.4 Creating a distribution list from the list of participants ............................ 169
7.10 Managing Groups ............................................................................................ 170
7.11 Managing Resources ....................................................................................... 171
7.12 Interchanging Appointments with Other Applications ...................................... 172
7.13 Calendar Settings ............................................................................................ 173
8 Tasks ........................................................................................................ 1758.1 The Taskscomponents ....................................................................................... 176
8.1.1 The Tasks search bar ............................................................................... 1778.1.2 The Tasks toolbar .................................................................................... 1778.1.3 The Tasks folder tree ............................................................................... 1788.1.4 The Tasks display area ............................................................................. 1788.1.5 The Tasks list ........................................................................................... 1798.1.6 The Tasks detail view ............................................................................... 1808.1.7 The task editing window .......................................................................... 181
8.2 Viewing tasks .................................................................................................... 182
8.3 Viewing or Saving Task Attachments .................................................................. 183
8.4 Creating Tasks ................................................................................................... 1848.4.1 Creating new tasks .................................................................................. 1848.4.2 Creating recurring tasks .......................................................................... 1858.4.3 Adding participants to a task ................................................................... 1858.4.4 Adding attachments ................................................................................ 186
8.5 Answering Task Invitations ................................................................................ 187
8.6 Adding Task Folders .......................................................................................... 1888.6.1 Adding personal task folders ................................................................... 1888.6.2 Importing tasks from files ........................................................................ 188
8.7 Managing Tasks ................................................................................................. 189
7
Groupware

8.7.1 Editing tasks ............................................................................................ 1908.7.2 Marking tasks as done ............................................................................. 1908.7.3 Changing a task's due date ...................................................................... 1918.7.4 Moving tasks to another folder ................................................................ 1918.7.5 Exporting tasks ........................................................................................ 1918.7.6 Changing tasks confirmations ................................................................. 1928.7.7 Printing tasks .......................................................................................... 1928.7.8 Deleting tasks .......................................................................................... 192
8.8 Searching for Tasks ........................................................................................... 193
8.9 Tasks in teams ................................................................................................... 1948.9.1 Sharing tasks ........................................................................................... 1948.9.2 Delegating tasks ...................................................................................... 194
8.10 Interchanging Tasks with Other Applications ................................................... 195
8.11 Tasks Settings .................................................................................................. 196
9 Drive ........................................................................................................ 1979.1 The Drive Components ...................................................................................... 198
9.1.1 The Drive search bar ............................................................................... 1999.1.2 The Drive folder tree ............................................................................... 1999.1.3 The Drive toolbar .................................................................................... 2009.1.4 The Drive navigation bar ......................................................................... 2019.1.5 The Drive display area ............................................................................. 2029.1.6 The file details ......................................................................................... 2039.1.7 The viewer ............................................................................................... 204
9.2 Viewing Files and Folders .................................................................................. 2059.2.1 Displaying a file's content ........................................................................ 2069.2.2 Displaying E-Mail attachments ................................................................. 2089.2.3 Holding a presentation ............................................................................ 208
9.3 Downloading Files or Folder Contents ............................................................... 210
9.4 Creating Files or Folders .................................................................................... 211
9.5 Creating or Editing Text Files .............................................................................. 212
9.6 Organizing Files and Folders .............................................................................. 2139.6.1 Sending files as E-Mail attachments ......................................................... 2149.6.2 Editing file names .................................................................................... 2149.6.3 Creating or editing descriptions ............................................................... 2159.6.4 Moving files or folders ............................................................................. 2159.6.5 Copying files ............................................................................................ 2169.6.6 Saving files as PDF ................................................................................... 2169.6.7 Adding files to the portal ......................................................................... 2179.6.8 Adding files or folders to favorites ........................................................... 2179.6.9 Adding files or folders ............................................................................. 2189.6.10 Locking or unlocking files ...................................................................... 2199.6.11 Working with versions ........................................................................... 220
9.7 Searching for Files ............................................................................................. 222
9.8 Accessing Files with WebDAV ............................................................................. 2239.8.1 Setting up WebDAV under Linux .............................................................. 2239.8.2 Setting up WebDAV under Windows 7 ..................................................... 223
8
Groupware
9.9 Adding storage accounts ................................................................................... 225
9.10 Files and Teams ............................................................................................... 226
9.11 DriveSettings ................................................................................................... 227
10 Data Organization, Shared Objects, Security ................................... 22910.1 Folders ............................................................................................................ 230
10.1.1 Folder types .......................................................................................... 23110.1.2 What is the purpose of permissions? ..................................................... 23210.1.3 Navigating within the folder structure ................................................... 23310.1.4 Hiding folders ........................................................................................ 23410.1.5 Adding folders to favorites .................................................................... 23510.1.6 Renaming folders .................................................................................. 23510.1.7 Moving folders ...................................................................................... 23610.1.8 Deleting folders ..................................................................................... 236
10.2 Sharing ........................................................................................................... 23710.2.1 Sharing with public links ........................................................................ 23810.2.2 Inviting to a shared item ........................................................................ 24010.2.3 Editing shares ........................................................................................ 24210.2.4 Resending an invitation ......................................................................... 24310.2.5 Removing shares ................................................................................... 24410.2.6 Viewing or editing shares in the Drive app ............................................. 24510.2.7 Accessing other users' shares ................................................................ 24610.2.8 Which permissions can be used? ........................................................... 24710.2.9 Use cases for permissions ..................................................................... 249
10.3 Accounts ......................................................................................................... 25110.3.1 Editing the primary E-Mail account ........................................................ 25110.3.2 Editing accounts .................................................................................... 25210.3.3 Removing accounts ............................................................................... 252
10.4 Managing Subscriptions .................................................................................. 25310.4.1 refresh subscribed data ......................................................................... 25310.4.2 Managing subscribed folders ................................................................. 253
10.5 Security ........................................................................................................... 25510.5.1 Automatic sign out ................................................................................ 25610.5.2 Externally linked images in E-Mails ........................................................ 25610.5.3 Show email authenticity ........................................................................ 25710.5.4 Displaying or terminating sessions ........................................................ 258
11 Interchanging Data ............................................................................. 25911.1 Importing Data ................................................................................................ 260
11.1.1 Importing appointments and tasks in iCal format .................................. 26011.1.2 Importing contacts in the vCard format ................................................. 26411.1.3 Importing contacts in the CSV format .................................................... 264
11.2 Exporting a Folder's Data. ................................................................................ 265
12 Encrypting Data ................................................................................... 26712.1 Setting up Guard ............................................................................................. 268
12.2 Encrypting E-Mail Conversations ..................................................................... 269
9
Groupware

12.2.1 Reading encrypted E-Mails .................................................................... 26912.2.2 Sending encrypted E-Mails .................................................................... 27012.2.3 How can external recipients read an encrypted E-Mail? .......................... 271
12.3 Encrypting files ................................................................................................ 27212.3.1 Encrypting files ...................................................................................... 27212.3.2 Creating new encrypted files ................................................................. 27312.3.3 Opening encrypted files ........................................................................ 27312.3.4 Downloading encrypted files ................................................................. 27412.3.5 Decrypting files ..................................................................................... 274
12.4 Encrypting Office Documents .......................................................................... 27512.4.1 Creating new encrypted documents ...................................................... 27612.4.2 Saving selected documents in an encrypted format ............................... 27612.4.3 Opening an encrypted document .......................................................... 277
12.5 Sign out Guard ................................................................................................ 278
12.6 GuardSettings ................................................................................................. 27912.6.1 Password management ......................................................................... 28112.6.2 Managing own keys ............................................................................... 28312.6.3 Managing public keys ............................................................................ 285
13 Questions and Answers ...................................................................... 287
Index .......................................................................................................... 293
10
Groupware

1 About this DocumentationThe following information will help you make better use of the documentation.▪ This documentation's target group and contents▪ Which design elements are used?▪ What terminology is used in the documentation?
11

1.1 Target Groups, ContentsThis documentation is addressed to the end user.
This documentation describes working with a typical groupware installation and configuration. The in-stalled version and the configuration of your groupware might differ from what is described here.
If this documentation contains descriptions of functions that are not available in your installation, pleasecontact your administrator or host. As the groupware's software has a modularized structure consistingof individual applications, it is possible to purchase additional applications or functions through upgrades.
The contents of this documentation are also available in the on-line help.
12
Target Groups, ContentsAbout this Documentation

1.2 Design ElementsIn favor of better legibility the text content of this guide is illustrated using the following design elements:
ButtonsButtons or functions that can be clicked are highlighted in bold.Example:Click on Compose new email.
LabelLabels for user interface elements like the names of windows or input fields are highlighted in italics.Example:The Compose new email page is displayed.
Key labelsKey labels are displayed in square brackets "[ ]". If several keys must be pressed, the plus sign "+" isadded between the individual key labels.Example:Use [ctrl]+[c] to copy the content to the clipboard.
LinksLinks in the text appear in blue.Example:Information can be found in 5.4: Sending E-Mails (page 67).
Explanatory textText that describes several functions or options is written in list form.Example:The following options exist:
▪ Send new E-Mails
▪ Reply to E-Mails
▪ Forward E-Mails
Step by step instructionsInstructions are shown as a numbered list. If the instruction only consists of one step or several al-ternative steps, numbering is not required. Instructions are always introduced with wording indicatingthe target of the instructions. Usually, at the end of the instructions the result is mentioned.Example:How to reply to an E-Mail:
1. Select an E-Mail in the sidebar.
2. Click on Reply in the display area next to the E-Mail header .
3. Enter the E-Mail text.
4. Click on Send in the command bar.Result: The E-Mail is sent.
13
About this DocumentationDesign Elements

Tips for making the work much easierThe tips for making work easier refer to actions that are optional e.g., alternatives to an instruction.A tip is introduced with the word Tip:.Example:Tip: You can also add an attachment by dragging and dropping a document from a file browser orfrom the desktop to the E-Mail window.
Malfunction noteA malfunction note indicates actions that can not be executed in the current situation. A malfunctionnote helps to avoid handling errors.A handling error is introduced with the word Note:.Example:Note: In order to add a signature, you need to have created one in the E-Mail settings.
Warning about loss of data or security risksA data loss warning indicates an action that irrevocably deletes data as soon as the action is executed.A security risk warning indicates an action that possibly endangers the security of your data.A warning is introduced with the word Warning:.Example:Warning: Permanently deleted E-Mails messages are irrevocably lost. Prior to permanently deletingE-Mails, make sure you no longer need the E-Mail messages.
14
Design ElementsAbout this Documentation

1.3 Terminology
Account An account or an user account is an access permission to a computersystem, e.g. to the groupware server. To get access, a user has to login with the user name and the password. Based on the account, thecomputer system identifies the single users. This allows to assignspecific properties to a user, like access permissions or settings.Also see:Accounts (p. 251)
App An application is a groupware component that provides certainfunctions. Example: With the E-Mail application you can send, receiveand organize E-Mails.
Distribution list A distribution list consists of a distribution list name and a numberof E-Mail addresses of internal users or external partners. You cancreate and edit own distribution lists. Other users can not see yourdistribution lists. Distribution lists can be used as follows.▪ send an E-Mail to multiple contacts▪ add internal or external participants to an appointment or a task▪ grant permissions to multiple users or guests by inviting them to
a shareDepending on the groupware configuration, specific distribution listsare predefined for all users.Also see:Creating distribution lists (p. 117)
E-Mail thread An E-Mail thread is an E-Mail conversation and a running list of allthe subsequent replies pertaining to the original E-Mail. All E-Mailsin an E-Mail thread have the same subject. The current E-Mail corre-sponds to the last reply.Also see:The E-Mail list (p. 61)
Elements Elements of the user interface. Example: windows, labels, buttons.
External participant A person that is not a user but that participates in an appointmentor task.
Function An action performed by the user. Example: sending an E-Mail, deletingan appointment.
Global address book Contains the contact data for all internal users. The users can edittheir own personal data in the global address book.
Group A group consists of a group name and a number of internal users.Groups can be used as follows.▪ add to an appointment or task▪ grant permissions by inviting to a shareDepending on the groupware configuration, specific groups arepredefined. Depending on the groupware configuration, users canget the permission to create additional groups.Also see:Managing Groups (p. 170)
Groupware The software described in this documentation.
15
About this DocumentationTerminology

Guest A person who received an invitation to a share by another user orhas been added to an appointment or task as external participant.Each guest user belongs to the Guests group. This group can not bechanged or deleted.
16
TerminologyAbout this Documentation
Internal E-Mail account Your Groupware E-Mail account You will automatically get this ac-count. You can not delete this account.
17
About this DocumentationTerminology

Objects Objects are created and organized by the user. Examples: E-Mails,contacts, appointments, tasks, documents, files, folders, addressbooks, calendars
Participant A user invited to an appointment or task.
Resource A resource consists of a resource name, an E-Mail address and anoptional description. Resources can be used as follows.▪ Add to an appointment. You can only add resources that are not
used for other appointments.▪ Resource examples: conference room, beamer, carDepending on the groupware configuration, specific resources arepredefined. Depending on the groupware configuration, users canget the permission to create additional resources.Also see:Managing Resources (p. 171)
Session A session is a connection between a client, e.g. a browser, an E-Mailclient or a smartphone app and a server, e.g. the groupware server.A session starts with the login and ends with the logout.Also see:Displaying or terminating sessions (p. 258)
Tabs Tabs provide an easy and simple way of keeping the Inbox folderneat. With tabs, incoming E-Mails are saved separated by sender inthe Inbox folder. Depending on the groupware configuration, specifictabs are predefined. You can set additional tabs according to yourneeds.Tabs can only be used in the Inbox folder. If you need further storageoptions, use the folder tree to create E-Mail folders.Also see:Working with tabs (p. 80)
User A person working with the groupware. Each user has a usernameand a password. Each groupware user belongs to the default group.Those users are also called internal users.
User interface This refers to the groupware user interface. The user interface con-sists of individual elements.
18
TerminologyAbout this Documentation

2 Getting Started with the GroupwareThe following information will help you get started with the groupware.▪ Which functions does the groupware provide?▪ Which system requirements have to be met by a local machine?▪ What skills are required for handling the groupware?▪ How do I sign in or sign out?
19

2.1 Groupware DefinitionLearn which applications are part of the groupware. Get an initial insight into the tasks that can be ac-complished using the applications.
PortalYour information centre for scheduled appointments, new E-Mails or messages from messaging platforms.▪ Get an overview of current appointments and new E-Mails. Launch the Calendar or E-Mail app by
clicking on an appointment or an E-Mail.▪ Read current messages from your favorite messaging source.▪ Follow news from your social networks.▪ Launch applications like E-Mail, Address Book or Calendar apps with a mouse click.Learn more [47].
E-MailSend, receive and organize your E-Mails.▪ Besides your internal E-Mail account use external E-Mail accounts that you have set up with other
providers.▪ Find E-Mails with the help of several search criteria. Follow E-Mail threads.▪ Use E-Mail folders to organize your E-Mails. Co-operate with your team by sharing selected E-Mail
folders.▪ Use the other applications by creating a new contact from an E-Mail address or creating a new ap-
pointment from an iCal attachment.Learn more [55].
Address BookOrganize and maintain your private and business contacts.▪ Use the global address book to communicate with internal participants. Create personal address
books to keep an overview of your contacts.▪ Use address books to organize your contacts. Co-operate with your team by sharing selected address
books.▪ Use the contacts from your social networks. This enables you to use the groupware as a central
collection point for your contacts.▪ Work with external partners by sending contact data in vCard format or sharing address books.Learn more [105].
CalendarKeep an overview of your private and business appointments.▪ Use individual or recurring appointments to schedule meetings and activities.▪ Use calendars to organize appointments. Specify the team members who can access selected calen-
dars.▪ Use the team view functions to find windows of free time and to check whether resources like rooms
or devices are available.▪ When scheduling appointments with external participants the iCal functions ensure automated invi-
tation management.Learn more [129].
20
Groupware DefinitionGetting Started with the Groupware

TasksSchedule and organize your activities.▪ Use the due date to organize your tasks. Use the reminder for tasks that are due.▪ Manage your team by delegating selected tasks to others.▪ Use the tasks folders to organize your tasks. Specify team members who can access selected tasks.▪ Use the recurring tasks functions to keep track of recurring activities.Learn more [175].
DriveUse the file store to centrally manage information or to share information with others.▪ Save any files, notes or Internet links. Give your team read or write access to selected document
folders.▪ Create and edit simple text files.▪ Send individual files as E-Mail attachments or links.▪ Provide information to external partners by sharing document folders.Learn more [197].
Folders and permissionsFolders and their permissions play an important role in exchanging information with other users. Eachgroupware object is saved in a specific folder. The folder tree helps to manage folders and permissions.▪ Use personal folders for sorting your E-Mails, contacts, appointments, tasks, and Infostore items.▪ Support your team by sharing certain folders with read or write access.▪ Benefit from the information of others by using objects in public or shared folders for your work.Learn more [229].
21
Getting Started with the GroupwareGroupware Definition

2.2 System RequirementsIn order to successfully work with the groupware, your local machine has to meet the following systemrequirements.
Resolution/screen sizeThe minimum display resolution is 1024 x 768.
Browser▪ Microsoft Internet Explorer 11, Edge▪ Mozilla Firefox, latest version▪ Apple Safari on Mac OS X, current version▪ Google Chrome, latest version
Browser settings▪ Cookies must be enabled▪ JavaScript must be enabled
22
System RequirementsGetting Started with the Groupware

2.3 Operating InstructionsThe following techniques are required:
▪ Using the left mouse button for clicking on elements
▪ Using drag and drop
▪ Multi-selection by pressing the <ctrl> key or the <cmd> key on Mac systems
▪ Working with several windows
▪ Opening, saving, and closing files
▪ Opening, closing, and selecting files in a folder treeInformation on these techniques can be found in your operating system documentation.
23
Getting Started with the GroupwareOperating Instructions

2.4 Signing in, Signing outIn order to sign in you need to know the server address, your username and your password. This infor-mation is provided by your administrator or host.
How to sign in to the server:
1. Open a web browser.
2. Enter the server address in the address bar. The login window will be displayed.
3. Enter your username and your password. Note that they are case-sensitive.
4. To save your credentials locally, enable Stay signed in.Warning: Only use this option if this machine is used solely by you. When signing in to a public ma-chine do not use this option.
5. Click on Sign in.Note: If you enter the wrong username or password an error message is displayed. Enter the correctinformation.
How to sign out:
1. Click the Settings icon on the right side of the menu bar. Click on Sign out. The login window willbe displayed.Depending on the groupware configuration, there is a Sign out icon .
2. If anyone else has access to the machine, close the browser.
Warning: If you close the web browser tab without signing out, you stay signed in to the server. If an-other person enters the server address, this person is automatically signed in with your username andhas full access to your data.Always sign out from the server when you are finished working.Warning: Your credentials might stay in the system memory as long as your browser is open. This canbe a security risk. Close the browser to remove your credentials from the system memory.
24
Signing in, Signing outGetting Started with the Groupware

3 First StepsWhat you initially should do.▪ Get familiar with the common user interface.▪ Get familiar with the keyboard input.▪ Customize the basic settings.▪ Check your personal contact data. Change or complete it, if required.▪ For security reasons you should change your password.▪ Define whether you want to receive a notification for new events like receiving a new E-Mail or ap-
pointment invitation.▪ In order to access your groupware data from local clients or apps, you can install clients or apps for
workstations or mobile devices. Depending on the groupware configuration, you have the followingoptions:▫ manually download and install clients and apps▫ use a wizard to set up clients and apps
25

3.1 General Description of the User InterfaceThe user interface includes the following components:▪ A menu bar on the top.▪ On the left side below the menu bar the search bar is displayed. It can be enabled or disabled together
with the folder tree.▪ The Folder tree can be activated on the left side.▪ On the right side below the menu bar a toolbar is displayed. It contains app specific functions and
functions for selecting the view in the display area.▪ The remaining space is used for the display area.▪ Depending on the action executed, the pop-up window or the notification area will overlap the display
area.▪ To create new items or edit existing ones, the editing window will be used.▪ Text that can be clicked is displayed in blue.▪ You can also use the keyboard to access the user interface functions.The following screen shots show the user interface, using the E-Mail application as an example.
3.1.1 The menu bar
Content
▪ Depending on the groupware configuration: Quick launch icons for launching frequently used apps.▪ App Launcher icon . Opens a menu with icons for launching an app.▪ Notifications icon . The icon is displayed when receiving a new notification. The icon notifies you
of the number of new notifications e.g., new appointment invitations. If clicking the icon, the notifi-cation area opens.
▪ Refresh icon . Reloads objects from the server. Irrespective of this function, objects are refreshedin regular intervals.
▪ Help icon . Opens a context related help page. Depending on the current app, the respective helppage from the online help is displayed. You can also open the online help from the system menu.Tip: Some dialog windows also include the help icon. If clicking on it, the respective help for the dialogwindow context is displayed.
▪ Settings icon Your profile picture is used for the icon. If clicking the icon, a menu with the followingentries opens:▫ Settings. Opens a page that allows customizing settings.▫ My contact data. Opens a window where you can adjust your personal contact data in the
global address book.▫ Help. Opens the online help.▫ Sign out. Signs you out from the groupware.
Depending on the groupware's configuration, further menu entries might be available.
Also see
App Launcher (p. 27)The search bar (p. 28)The notification area (p. 33)
26
General Description of the User Inter-faceFirst Steps

3.1.2 App Launcher
Contains squares for launching the apps. Depending on the groupware configuration, the number ofsquares can vary.
Also see
The menu bar (p. 26)
27
First StepsApp Launcher

3.1.3 The search bar
In order to display the search bar, click on View in the toolbar. Enable Folder view.
Content
▪ Input field for the search termAs soon as clicking in the input field, additional icons are displayed.
▪ Options icon . Opens a menu with app specific parameters for controlling the search.Depending on the app, additional drop-downs for controlling the search are available.
▪ Close icon . Finishes the search.▪ Online help icon . Displays a context-sensitive help.The search result is displayed in the display area.
Also see
The menu bar (p. 26)The E-Mail search bar (p. 57)The Address Book search bar (p. 107)The Calendar search bar (p. 131)The Tasks search bar (p. 177)The Drive search bar (p. 199)
28
The search barFirst Steps
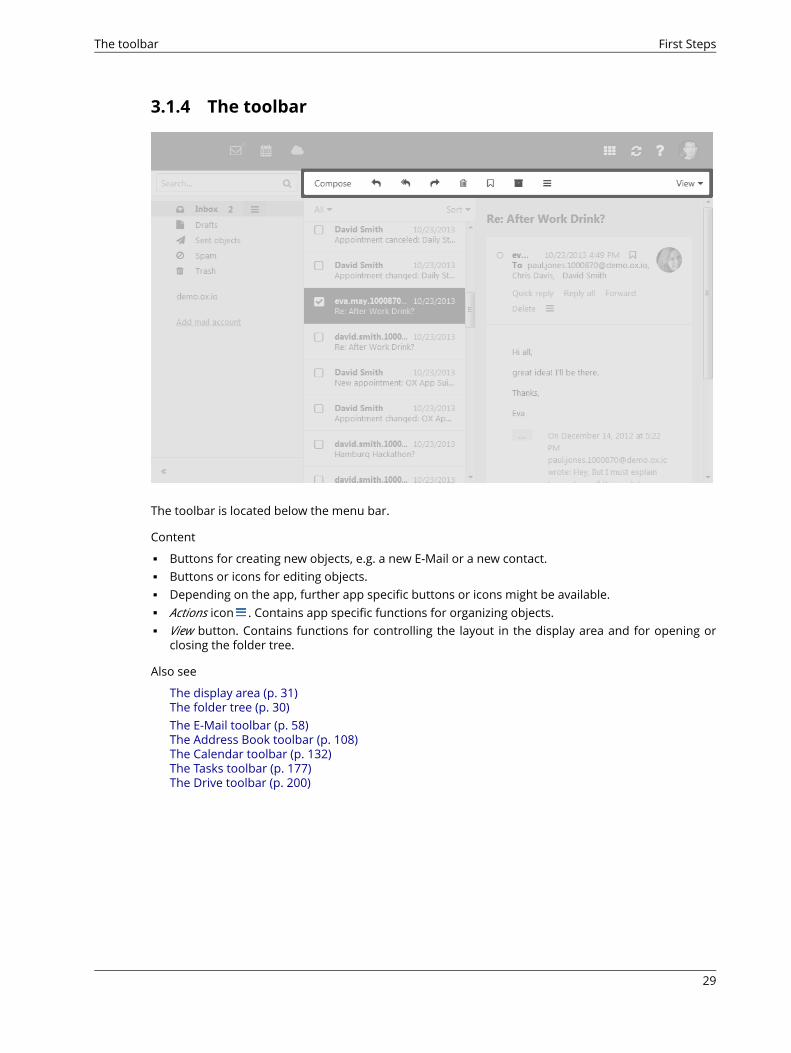
3.1.4 The toolbar
The toolbar is located below the menu bar.
Content
▪ Buttons for creating new objects, e.g. a new E-Mail or a new contact.▪ Buttons or icons for editing objects.▪ Depending on the app, further app specific buttons or icons might be available.▪ Actions icon . Contains app specific functions for organizing objects.▪ View button. Contains functions for controlling the layout in the display area and for opening or
closing the folder tree.
Also see
The display area (p. 31)The folder tree (p. 30)The E-Mail toolbar (p. 58)The Address Book toolbar (p. 108)The Calendar toolbar (p. 132)The Tasks toolbar (p. 177)The Drive toolbar (p. 200)
29
First StepsThe toolbar

3.1.5 The folder tree
To open or close the folder tree, use one of the following methods:▪ Click on View in the toolbar. Enable or disable Folder view.▪ On the bottom left side, click the Open folder view icon or the Close folder view icon .
Content
▪ The app specific foldersFolders are called differently in the following apps:▫ A folder is called address book in the Address Book app.▫ A folder is called calendar in the Calendar app.
▪ Depending on the application, sections for personal, public and shared foldersNote: Depending on the groupware configuration, those sections might not be displayed if thereare no public or shared folders.
▪ The Folder-specific actions icon next to the selected folder. It contains functions for organizingfolders. Depending on the folder, further functions might be available.Tip: You can also access the folder-specific actions by right-clicking on a folder.
▪ Depending on the app, further functions might be available.
Also see
The toolbar (p. 29)Folders (p. 230)The E-Mail folder tree (p. 59)The Address Book folder tree (p. 109)The Calendar folder tree (p. 134)The Tasks folder tree (p. 178)The Drive folder tree (p. 199)
30
The folder treeFirst Steps

3.1.6 The display area
Content
▪ A list of objects. On top of the list, control elements for selecting or sorting objects are displayed.The details of the object selected in the list, are displayed in a detail view.
▪ Depending on the app, objects might be displayed as icons. Clicking on an object opens a pop-upwindow. The object's details are displayed in the pop-up.
You can change the view in the display area by using the View button in the toolbar.
Also see
The pop-up (p. 32)The toolbar (p. 29)The E-Mail display area (p. 60)The Address Book display area (p. 110)The Calendar display area (p. 134)The Tasks display area (p. 178)The Drive display area (p. 202)
31
First StepsThe display area
3.1.7 The pop-up
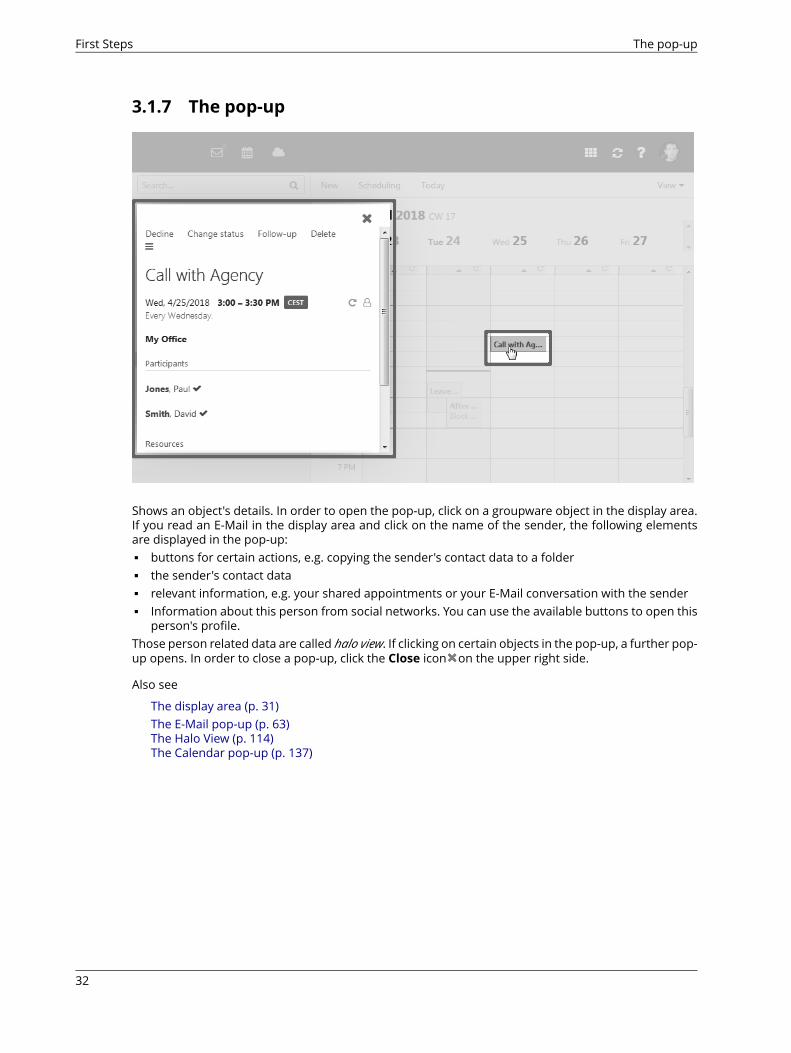
Shows an object's details. In order to open the pop-up, click on a groupware object in the display area.If you read an E-Mail in the display area and click on the name of the sender, the following elementsare displayed in the pop-up:▪ buttons for certain actions, e.g. copying the sender's contact data to a folder▪ the sender's contact data▪ relevant information, e.g. your shared appointments or your E-Mail conversation with the sender▪ Information about this person from social networks. You can use the available buttons to open this
person's profile.Those person related data are called halo view. If clicking on certain objects in the pop-up, a further pop-up opens. In order to close a pop-up, click the Close icon on the upper right side.
Also see
The display area (p. 31)The E-Mail pop-up (p. 63)The Halo View (p. 114)The Calendar pop-up (p. 137)
32
The pop-upFirst Steps

3.1.8 The notification area
Displays notifications about the following events:▪ new appointment invitations▪ reminder for a scheduled appointment or taskThe following actions open the notification area:▪ Clicking the Notification icon in the menu bar. The icon is displayed when receiving a new notifi-
cation.▪ Depending on the settings, the notification area automatically opens if there is a new notification.Content▪ Close icon . Closes the notification area. The notifications are displayed again if the notification
area reopens.▪ Notify me again later. Closes the notification area. The notifications are displayed again later.▪ An appointment or task invitation includes the following elements:
▫ Delete icon . Deletes the invitation.▫ Appointment invitations: Open in calendar button. Displays the appointment suggestion in the
calendar.▫ Accept/Decline button. Opens the Change confirmation status dialog window for accepting or
declining the appointment or task.▫ Accept button. Accepts the appointment or task.
▪ An appointment or task reminder includes the following elements:▫ Delete icon ,OK button. Deletes the reminder.▫ Clicking on the reminder shows details in the pop-up.▫ Remind me again. Opens a menu for setting a new reminder for this appointment or task.▫ For reminders of overdue tasks: Done button. Clicking on it marks the task as done.
Also see
The menu bar (p. 26)Receiving Notifications (p. 42)Customizing the Basic Settings (p. 39)Answering appointment invitations (p. 155)Answering Task Invitations (p. 187)
33
First StepsThe notification area
3.1.9 The editing window
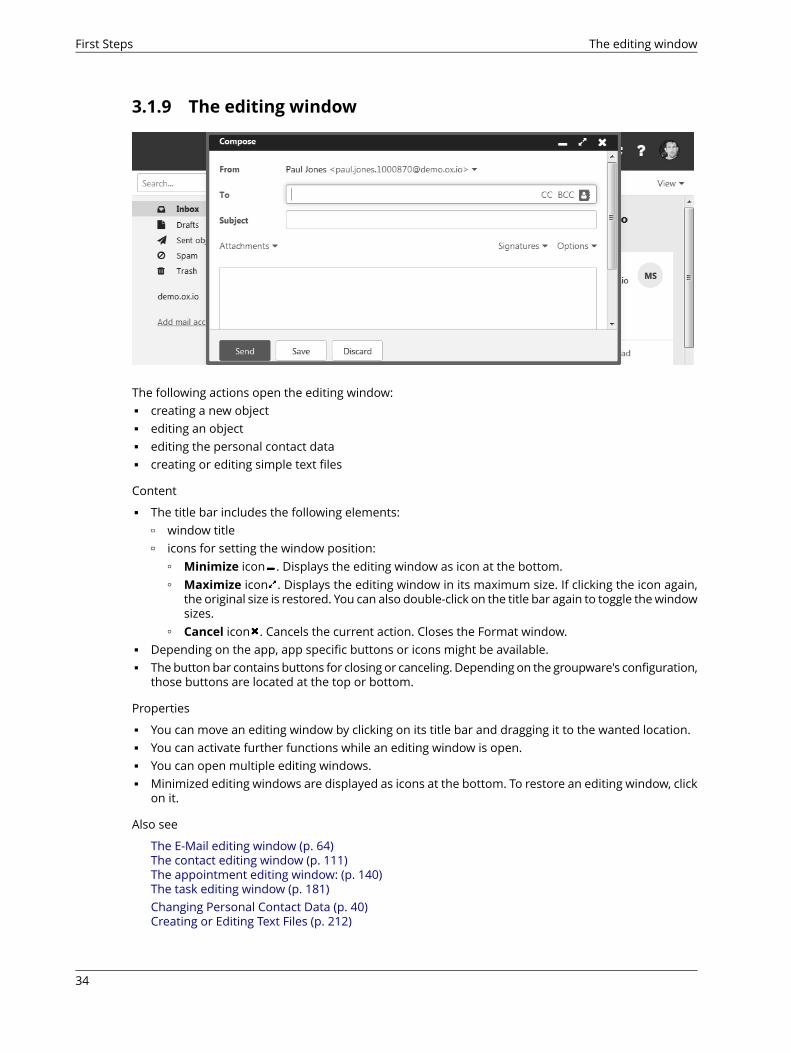
The following actions open the editing window:▪ creating a new object▪ editing an object▪ editing the personal contact data▪ creating or editing simple text files
Content
▪ The title bar includes the following elements:▫ window title▫ icons for setting the window position:
◦ Minimize icon . Displays the editing window as icon at the bottom.◦ Maximize icon . Displays the editing window in its maximum size. If clicking the icon again,
the original size is restored. You can also double-click on the title bar again to toggle the windowsizes.
◦ Cancel icon . Cancels the current action. Closes the Format window.▪ Depending on the app, app specific buttons or icons might be available.▪ The button bar contains buttons for closing or canceling. Depending on the groupware's configuration,
those buttons are located at the top or bottom.
Properties
▪ You can move an editing window by clicking on its title bar and dragging it to the wanted location.▪ You can activate further functions while an editing window is open.▪ You can open multiple editing windows.▪ Minimized editing windows are displayed as icons at the bottom. To restore an editing window, click
on it.
Also see
The E-Mail editing window (p. 64)The contact editing window (p. 111)The appointment editing window: (p. 140)The task editing window (p. 181)Changing Personal Contact Data (p. 40)Creating or Editing Text Files (p. 212)
34
The editing windowFirst Steps

3.2 Keyboard InputLearn how to use key shortcuts for interacting with the groupware.▪ list of defined keys and key combinations▪ use the keyboard to interact with the groupware▪ examples for keyboard input
35
First StepsKeyboard Input
3.2.1 Keys and key combinations
The following key combinations are defined. Depending on the system, further key combinations mightbe preset, whereas those key combinations are not officially supported.
Arrow down Opens a menu.
Arrow left or right Moves the cursor within input fields.Moves the cursor within the calendar views or the date picker.Opens or closes a folder in the folder tree.Selects a function in the toolbar.
Arrow up or down Selects elements in the folder tree, the sidebar or the display area.Moves the cursor within the calendar views or the date picker.Opens or closes a folder in the folder tree.Selects a menu entry.
[a] Moves the selected E-Mail to the Archive folder.
[Ctrl]+[a] Selects all objects in the list.
[Ctrl]+[F6] on Windows andLinux systems,[F6] on MacOS systems
Switches between menu bar, folder tree, sidebar and display area.
[Del], [Backspace] Deletes the selected object.
[End] Moves the cursor to the end of the line in input fields.
[Enter] Executes the selected function.
[Esc] Closes a pop-up. Cancels a dialog window.
[Home] Moves the cursor to the beginning of the line in input fields.
[Page up], [page down] Browses the folder tree or the sidebar.Browses the calendar view or the date picker, depending on the timerange displayed.
[Space] Enables or disables the selected checkbox.
[Tab], [Shift]+[Tab] Selects a function, an input field or a checkbox.
36
Keys and key combinationsFirst Steps

3.2.2 Interacting with the user interface via keyboardAs an alternative to the mouse you can use the following keys:▪ To switch between the menu bar, the folder tree, the sidebar, and the display area, use [Ctrl]+[F6]
on Windows and Linux systems, [F6] on MacOS systems.▪ To move the cursor within input fields, use the following keys: cursor keys, [Home], [End].▪ To browse the folder tree or the sidebar, use the following keys: [Page up], [page down]▪ To open or close a folder in the folder tree, use the left or right arrow key.▪ To select elements in the folder tree, the toolbar, the sidebar or the display area, use the cursor
keys.▪ To select a function, an input field or a checkbox, use the [Tab] key. The selected element will be
highlighted.With [Shift]+[Tab] you can select elements in reverse order.
▪ To execute the function selected, press [Enter].▪ To enable or disable a selected checkbox, press the [Space bar].▪ To toggle the checkboxes, use the cursor keys.▪ To close a popup or cancel a dialog window, press [Esc].▪ To delete the selected E-Mails, folders or files press [Del] or [Backspace].▪ To move selected E-Mails to the Archive folder, press [a].▪ To select all objects in a list, press [ctrl]+[a]
37
First StepsInteracting with the user interface viakeyboard

3.2.3 Use casesInstructions that show how to use the keyboard control:▪ How to use the keyboard to send a new E-Mail▪ How to use the keyboard to reply to an E-Mail
How to use the keyboard to send a new E-Mail:
1. If the E-Mail app is not launched, do the following:Repeatedly press [Ctrl]+[F6] or [F6] on Mac OS systems to highlight the menu bar.Press [Tab] to highlight E-Mail in the menu bar.Press [Enter]. The E-Mail app will be launched.
2. Repeatedly press [Tab] until the Compose button is highlighted. Press [Enter]. The Compose pageopens. The input field To: is enabled.
3. Enter the recipient's E-Mail address. Press [Enter].
4. Repeatedly press [Tab] until the Subject input field is highlighted. Enter the subject. Press [Enter].The input field for the E-Mail text is enabled.
5. Enter the E-Mail text.
6. To send the E-Mail, repeatedly press [Tab], until the Send function is highlighted. Press [Enter]. TheE-Mail is sent.
7. To add attachments, repeatedly press [Tab] or [Shift]+[Tab] until theAttachment button is highlight-ed. Press [Enter]. Select Add local file.A dialog field for selecting files opens. Depending on the system, use the [Tab] key, the [Enter] keyand the cursor keys to select a file and to close the system dialog.Repeatedly press [Tab] until the Send button is highlighted. Press [Enter]. The E-Mail is sent.
How to use the keyboard to reply to an E-Mail:
1. If the E-Mail app is not launched, do the following:Repeatedly press [Ctrl]+[F6] or [F6] on Mac OS systems to highlight the menu bar.Press [Tab] to highlight E-Mail in the menu bar.Press [Enter]. The E-Mail app will be launched.
2. Repeatedly press [Ctrl]+[F6] or [F6] on Mac OS systems to highlight a folder in the folder tree. Usethe cursor keys to select the desired folder. To view or hide a subfolder, use the left or right arrowkey.
3. If the desired folder is highlighted, repeatedly press [Tab], until an E-Mail is highlighted in the sidebar.
4. Use the cursor keys to select the desired E-Mail.
5. To reply to the E-Mail, repeatedly press [Tab] or [Shift]+[Tab] , until the Reply function or the Replyall function is highlighted. Press [Enter] to activate the function.You can also repeatedly press [Shift]+[Tab] until the toolbar is highlighted. Use the cursor keys tobrowse to the Reply to sender icon or to the Reply to all recipients icon . Press [Enter].
38
Use casesFirst Steps
3.3 Customizing the Basic SettingsHow to customize the basic settings:
1. Click the Settings icon on the right side of the menu bar. Click the Settings menu item.
2. Click on Basic settings in the sidebar.
3. Change the settings.
The following settings are available. Depending on the groupware's configuration, some settings mightnot be available.
▪ LanguageDefines the user interface language.
▪ TimezoneDefines the time zone to which all time-bound entries refer.
▪ DesignDefines the color scheme for the user interface.
▪ Refresh intervalDefines the interval for retrieving new objects from the server.
▪ Default app after sign inDefines the application that is displayed after login.
▪ Automatic sign outSpecifies whether you are automatically signed out if you have not worked with the groupware fora specific time.
▪ Automatic opening of notification areaSpecifies whether the notification are is automatically opened when receiving a new notification orE-Mail.
▪ Show desktop notificationsDefines whether you will receive a desktop notification for new E-Mails. Depending on the browsersettings, the Manage browser permissions now button is displayed. If clicking on the button, abrowser specific dialog for allowing notifications opens.
▪ My contact data buttonIn order to change your personal contact data in the global address book, click on this button.
▪ Change passwordIn order to change your password, click on this button.
Also see
The notification area (p. 33)Changing Personal Contact Data (p. 40)Changing the Password (p. 41)Receiving Notifications (p. 42)Manually Downloading and Installing Clients and Apps (p. 44)Using a Wizard to Set Up Clients and Apps (p. 45)
39
First StepsCustomizing the Basic Settings

3.4 Changing Personal Contact DataThe following options exist:▪ change personal contact data▪ create a contact picture by uploading an existing picture or by taking a new photo with the device
camera
How to change your personal contact data:
1. Click the Settings icon on the right side of the menu bar. Click on My contact data in the menu.You can also click on Settings in the menu. Click on Basic settings or on Address book in thesidebar. Click on the My contact data button.
2. Change the data. Click on Save.
Tip: You can also change your personal contact data by using the User data widget in the Portal app.
How to create a contact picture:
1. Click the Settings icon on the right side of the menu bar. Click on My contact data in the menu.You can also click on Settings in the menu. Click on Basic settings in the sidebar. Click on the Mycontact data button.
2. Click on the empty contact picture. The Edit image window opens.▪ To upload an existing picture, click the Upload image icon.▪ To make a new picture with the device camera, click the Take photo icon.You can adjust the image section with the zoom and by moving or rotating the photo.Click on OK.
3. Click on Save. The photo will be inserted.In order to edit the photo, click on it.
Also see
User data widget (p. 49)Customizing the Basic Settings (p. 39)Changing the Password (p. 41)Receiving Notifications (p. 42)Manually Downloading and Installing Clients and Apps (p. 44)Using a Wizard to Set Up Clients and Apps (p. 45)The editing window (p. 34)
40
Changing Personal Contact DataFirst Steps

3.5 Changing the PasswordHow to change your password:
Note: Depending on the groupware's configuration the procedure for changing the password mightdiffer from this instruction. In this case, contact your administrator or host.
1. Click the App Launcher icon in the menu bar. Click on Portal in the App Launcher.
2. If the User data widget is not displayed, click on Add widget on the upper right side. Click on Userdata.Click on My password in the User data widget.
3. Enter the current password. Enter the new password twice.
4. Click on Change password.
Also see
Customizing the Basic Settings (p. 39)Changing Personal Contact Data (p. 40)Receiving Notifications (p. 42)Manually Downloading and Installing Clients and Apps (p. 44)Using a Wizard to Set Up Clients and Apps (p. 45)
41
First StepsChanging the Password

3.6 Receiving NotificationsYou can configure the groupware to receive notifications about the following events:▪ new E-Mails▪ new appointment invitations▪ appointment reminders▪ due tasks▪ tasks with a due date in the pastDepending on the notification, different actions are triggered:▪ When receiving a new E-Mail, you will get a desktop notification.▪ For all other events, you will be notified in the notification area.
42
Receiving NotificationsFirst Steps

How to enable desktop notifications about the receipt of new E-Mails:
1. Click the Settings icon on the right side of the menu bar. Click the Settings menu item.
2. Click on Basic settings in the sidebar.
3. Enable Show desktop notifications in the notification area.Depending on the browser settings, the Manage browser permissions now button is displayed.Click the button. You are asked by the browser whether the receipt of notifications should be allowed.Grant this permission.Note: Depending on the browser, you might have to allow the receipt of notifications in the browsersettings for the setting above to take effect. Information can be found in the browser help pages.
How to use the notification area when being notified about new events:
1. As soon as a notification is being received, the Notifications icon shows the number of new noti-fications. To open the notification area, click the icon.If the notification area is to be opened automatically upon receipt of new notifications, proceed asfollows:
a. Click the Settings icon on the right side of the menu bar. Click the Settings menu item.
b. Click on Basic settings in the sidebar.Enable Automatic opening of notification area in the display area.
2. You can do the following:▪ To close the notification area, click the Close icon . The notifications will be hidden.
In order to show the notifications again, click the Notifications icon in the menu bar.▪ To receive the notification again later, click on Notify me again later. The notification area will
be closed.▪ To show a notification's details, click on the notification title.▪ To display appointment invitation suggestions in the calendar, click on Open in calendar.▪ To accept or decline an invitation, click on the respective button.▪ To receive a specific reminder again, select a value in Remindme again. Click on OK. The notifi-
cation area will be closed.▪ To mark overdue tasks as done, click on the respective button.▪ To delete a reminder, click on OK next to the reminder.
You can also click the Delete icon next to the reminder.
Also see
Customizing the Basic Settings (p. 39)Changing Personal Contact Data (p. 40)Changing the Password (p. 41)Manually Downloading and Installing Clients and Apps (p. 44)Using a Wizard to Set Up Clients and Apps (p. 45)Settings for receiving E-Mails. (p. 101)The notification area (p. 33)
43
First StepsReceiving Notifications

3.7 Manually Downloading and Installing Clients and AppsYou can manually install local Drive apps for MS Windows, macOS, iOS or Android. The local Drive clientssynchronize your Drive app data with your local workstation or mobile device.Note: Depending on the groupware's configuration, some settings might not be available. In this caseyou can use a wizard to set up the apps.
How to install local Drive apps for workstations or mobile devices:
1. Click the Settings icon on the right side of the menu bar. Click the Settings menu item.
2. In the sidebar, click on Downloads.Click the respective icon in the display area. Follow the instructions on installing the apps.
Also see
Customizing the Basic Settings (p. 39)Changing Personal Contact Data (p. 40)Changing the Password (p. 41)Receiving Notifications (p. 42)Using a Wizard to Set Up Clients and Apps (p. 45)
44
Manually Downloading and InstallingClients and AppsFirst Steps

3.8 Using a Wizard to Set Up Clients and AppsYou can also access your E-Mails or groupware data by using suitable apps and clients on mobile devicesand workstations. You can use a wizard in the groupware to install and configure those apps and clients.The wizard includes the following functions:▪ Installing and configuring apps and clients on devices auch as PCs, tablets and smartphones. The
supported devices are: Windows, Apple and Android.▪ Installing an E-Mail client on Windows systems. The client makes your E-Mails, appointments, tasks
and contacts locally available.▪ Installing the local Drive app for desktop and mobile devices. This app is downloaded and installed
from respective the app store for the device. The local Drive clients synchronize your Drive app datawith your local workstation or mobile device.
▪ Depending on the device, the configuration might also be possible by E-Mail or SMS. Advanced userscan display the configuration data for a manual configuration.
Note: Depending on the groupware's configuration, the wizard might not be available. In this case youcan manually install clients and apps.
How to use the wizard:
1. Click the Settings icon on the right side of the menu bar. Click on Connect your device in the menu.The wizard will be launched.
2. Select your system and the required devices. Follow the instructions.
Also see
Customizing the Basic Settings (p. 39)Changing Personal Contact Data (p. 40)Changing the Password (p. 41)Receiving Notifications (p. 42)Manually Downloading and Installing Clients and Apps (p. 44)
45
First StepsUsing a Wizard to Set Up Clients andApps

46
4 PortalLearn how to work with the Portal application.▪ the Portal components▪ customize the contents
How to launch the Portal app:Click the App Launcher icon in the menu bar. Click on Portal in the App Launcher.
47

4.1 The PortalComponentsThe portal includes the following components.▪ Signed in as▪ Customize this page button▪ Add widget button▪ Appointments widget▪ Inbox widget▪ Tasks widget▪ Recently changed files widget▪ User data widget▪ Quota widget▪ News widgets▪ Widgets with news from your social networks▪ Widgets with information about Drive appsDepending on your groupware's configuration, the portal components can differ from the display de-scribed. If a widget is not displayed, you can add the widget.
48
The PortalComponentsPortal

4.1.1 Signed in asDisplays the username that you used for signing in.
4.1.2 Customize this page buttonClicking on this button displays a page that allows customizing the Portal.
Also see
Customizing the Portal (p. 51)
4.1.3 Add widget buttonClicking on this button opens a menu that allows adding new widgets.
Also see
Adding Portal widgets (p. 52)
4.1.4 AppointmentswidgetDisplays your current appointments. You can do the following:▪ If clicking on an appointment, a pop-up opens. The pop-up shows the appointment data.▪ If clicking on a participant an additional pop-up opens.▪ In order to close a pop-up, click on Close in the top right corner.
4.1.5 Inbox widgetShows new E-Mails. You can do the following:▪ If clicking on an E-Mail, a pop-up opens. The pop-up displays the E-Mail's contents.▪ To delete, reply to or forward the E-Mail, click on the respective button in the pop-up.▪ To close a pop-up, click on Close in the top right corner.▪ To compose a new E-Mail, click on the Compose new E-Mail list item.
4.1.6 Tasks widgetShows unfinished tasks. You can do the following:▪ If clicking on a task, a pop-up opens. The pop-up shows the appointment data.▪ In order to close a pop-up, click on Close in the top right corner.
4.1.7 Recently changed files widgetDisplays new or changed files.
4.1.8 User data widgetIncludes links for the following functions:▪ Changing your personal contact data▪ Changing your password
49
PortalSigned in as

4.1.9 QuotawidgetDisplays the current quota used on your account on the server.
4.1.10 News widgetsDisplay current messages from different message sources:▪ Messages from RSS feeds▪ Photos from web pages like Flickr or TumblrTo subscribe to a message source or an RSS feed, add a new widget to the Portal. The settings or amessage source of an RSS feed can be changed later.
4.1.11 Widgets with news from your social networksShow current information from own social networks.▪ The most recent messages from a social network are displayed.▪ If clicking on a content, a pop-up opens with details and links to the contact's profile.▪ Depending on the network, certain functions are displayed, e.g. for posting or creating a message.To display news from your social networks, add a new widget to the Portal. You can change your settingsat a later point of time.
4.1.12 Widgets with information about Drive appsDepending on the server configuration, there are widgets being displayed that contain information onthe installation of local Drive apps. Further information can be found in the Drive apps user guide.
50
Quota widgetPortal

4.2 Customizing the PortalThe following options exist:▪ Changing the widgets' order▪ Removing Portal widgets▪ Adding Portal widgets▪ Adding a Portal widget for social networks▪ Changing the Portal widgets' settingsNote: Depending on your groupware's configuration, some widgets might not be changeable.
4.2.1 Changing the widgets' orderYou can define the order of the widgets.
How to change the order of the widgets:
1. Drag a widget to another position.
2. Drop the widget in the new position.
Also see
Removing Portal widgets (p. 51)Adding Portal widgets (p. 52)Adding a Portal widget for social networks (p. 52)Changing the Portal widgets' settings (p. 53)
4.2.2 Removing Portal widgetsYou can remove a widget from the portal by closing it.
How to remove a widget:
Click the Close icon in the widget.Use the Portal settings to display the widget again
Also see
Changing the widgets' order (p. 51)Adding Portal widgets (p. 52)Adding a Portal widget for social networks (p. 52)Changing the Portal widgets' settings (p. 53)
51
PortalCustomizing the Portal

4.2.3 Adding Portal widgetsYou can extend the existing widgets by adding new ones.
How to add new widgets:
1. Use one of the following methods:▪ Click the Settings icon on the right side of the menu bar. Click the Settings menu item.
Click on Portal in the sidebar. Click on Add widget. Select an entry.▪ In the Portal app click on Add widget on the upper right side. Select an entry.
2. Some widgets require additional data. Enter the required values. Click on Save.
Tips:▪ In the Drive app you can add a file as portal widget.▪ In the E-Mail app you can add a Portal widget.
Also see
Changing the widgets' order (p. 51)Removing Portal widgets (p. 51)Adding a Portal widget for social networks (p. 52)Changing the Portal widgets' settings (p. 53)
4.2.4 Adding a Portal widget for social networksThere are the following options:▪ In order to access information and functions of your social networks, you can add widgets for social
networks.▪ If you do not have a Xing account yet, you can use a widget to create a new Xing account.
How to add a widget for accessing social networks:
1. In the Portal app click on Add widget on the upper right side. Select one of the entries. The widgetwill be added.
2. To enable the access, add your social network account by clicking on the respective button in thewidget.You can change or delete the account in the account settings.
How to create a Xing account by using your groupware data:
1. In the Portal app click on Add widget on the upper right side. Select Xing. The widget will be added.
2. Click on Create a Xing account using the data stored here in the widget.
3. Check the suggested data for creating the Xing account. In order to create the account, click onConfirm.
Also see
Changing the widgets' order (p. 51)Removing Portal widgets (p. 51)Adding Portal widgets (p. 52)Changing the Portal widgets' settings (p. 53)Editing accounts (p. 252)
52
Adding Portal widgetsPortal

4.2.5 Changing the Portal widgets' settings
How to use the Portal widgets settings:
1. Click the Settings icon on the right side of the menu bar. Click the Settings menu item.
2. Click on Portal in the sidebar.
3. Change the settings.
Tip: You can also display the portal widgets settings page by clicking on Customize this page in thePortal app.
The following settings are available.
▪ Edit buttonAllows editing a widget's settings, e.g. the url or description.Note: This button is only available for certain widgets.
▪ Color buttonDefines the color used for displaying a widget's name.
▪ Disable buttonRemoves a widget from the Portal. To display the widget again, click on the Enable button.
▪ Delete iconWarning: If you delete a widget, all settings for this widget will be lost.This icon deletes a widget from the portal and from the list of widgets on the settings page.
▪ Reduce to widget summary checkboxDefines whether the complete content of a widget is displayed on mobile devices or just an overview.This is e.g. valid for the widgets Recently changed files, Appointments, Inbox. In order to view thecomplete content of the widget, tap the overview text.Note: You have to re-login in order for the new setting to get activated.
Also see
Changing the widgets' order (p. 51)Removing Portal widgets (p. 51)Adding Portal widgets (p. 52)Adding a Portal widget for social networks (p. 52)
53
PortalChanging the Portal widgets' settings

54

5 E-MailLearn how to work with the E-Mail application.▪ the E-Mail components▪ display E-Mails▪ view or save E-Mail attachments▪ send E-Mails▪ create E-Mail folders▪ organize E-Mails▪ use E-Mail filters▪ search for E-Mails▪ share E-Mails with other users▪ access your external mail accounts that you have set up with other providers▪ use the E-Mail settings
How to launch the E-Mail app:Click the App Launcher icon in the menu bar. Click on E-Mail in the App Launcher.Depending on the groupware configuration, you can also click the quick start icon for launching theE-Mail app in the menu bar.
55

5.1 The E-Mail ComponentsThe E-Mail app includes the following components.▪ The E-Mail search bar▪ The E-Mail toolbar▪ The E-Mail folder tree▪ The E-Mail categories bar▪ The E-Mail display area
▫ The E-Mail list▫ The E-Mail detail view▫ The E-Mail pop-up
▪ The E-Mail editing window
56
The E-Mail ComponentsE-Mail
5.1.1 The E-Mail search barEnables you to search for E-Mails
Also see
The search bar (p. 28)Searching for E-Mails (p. 95)Displaying E-Mails (p. 65)
57
E-MailThe E-Mail search bar

5.1.2 The E-Mail toolbarContains the following:▪ Compose. Creates a new E-Mail.▪ Icons for replying to and forwarding the selected E-Mail:▪ Delete icon . Deletes the E-Mails selected by you.▪ Set category icon . Opens a menu allowing you to move an E-Mail to a category. This icon is only
available if the categories bar is displayed.▪ Icons for flagging E-Mails.
▫ Set color icon . Opens a menu allowing you to assign a colored label to the E-Mail.▫ Flag icon . Flags the E-Mail.Note: Depending on the groupware's configuration, not all options for flagging might be available.
▪ Archive icon . Archives the E-Mails selected by you.▪ More actions icon . Opens a menu with further functions.▪ View. Opens a menu with checkboxes for controlling the view.
▫ Defining the layout of the list and detail view: Vertically, Compact, Horizontally▫ List. Shows the list of E-Mails. To display the detail view click on an E-Mail. Above the detail view
a navigation bar is displayed.▫ Use categories. Opens or closes the categories bar.▫ Configure. Opens the dialog window for configuring the categories bar.▫ Folder view. Opens or closes the folder tree.▫ Checkboxes. Displays checkboxes in the list, for marking objects.▫ Text preview. Shows a preview of the E-Mail content for each E-Mail in the list.▫ Contact pictures. Next to each E-Mail in the list, a contact picture of the sender is displayed,
provided the sender saved one in the address book.▫ Date and time. Shows the exact date and time when the E-Mail was received.▫ Message size. Shows the E-Mail size.▫ Vacation notice. Opens the Vacation notice window.▫ All attachments. Shows all attachment that you have sent or received, in the Drive app.
Also see
The toolbar (p. 29)Instructions for the buttons and icons:Sending a new E-Mail (p. 68)Replying to E-Mails (p. 74)Forwarding E-Mails (p. 75)Deleting E-Mails (p. 87)Categorizing E-Mails (p. 83)Archiving E-Mails (p. 87)Instructions for the functions in the More actions menu :Marking E-Mails as read or unread (p. 82)Moving E-Mails (p. 81)Copying E-Mails (p. 82)Printing E-Mails (p. 86)Saving E-Mails (p. 85)Showing the E-Mail source (p. 84)Creating E-Mail reminders (p. 85)Adding an E-Mail to the portal (p. 85)
58
The E-Mail toolbarE-Mail

5.1.3 The E-Mail folder treeDisplays the E-Mail folders.
Content
▪ Inbox. Per default, all incoming E-Mails are received in this folder.▪ Unread messages. This folder shows all unread messages.▪ Drafts. Contains the E-Mails saved as draft.▪ Sent objects. Contains the E-Mail sent by you.▪ Trash. Contains the E-Mail deleted by you.▪ Archive. Contains the E-Mails archived by you.▪ My folders. Contains the E-Mail folders created by you.Depending on the groupware configuration, the content can differ from this information.
Functions
▪ To display the number of E-Mails in a folder, hover over the folder name. A tooltip shows the numberof E-Mails.
▪ If clicking on a folder, its E-Mails are displayed.▪ The Actions icon next to the selected folder offers functions for organizing data and app specific
folder functions.▪ In the Drive app, the View all Attachments button below the folders shows all E-Mail attachments
that you have received or sent .▪ Below the folders there's the button Add mail account for adding E-Mail accounts.
Also see
The folder tree (p. 30)Folders (p. 230)Navigating within the folder structure (p. 233)Adding E-Mail Folders (p. 78)Renaming folders (p. 235)Moving folders (p. 236)Deleting folders (p. 236)Adding E-Mail Accounts (p. 99)
59
E-MailThe E-Mail folder tree

5.1.4 The E-Mail categories barShows predefined categories for the E-Mails in the Inbox folder. This allows to assign incoming E-Mailsto certain categories sorted by senders.
Notes
▪ Depending on the groupware's configuration, categories might not be available. If categories areavailable, you can show or hide the categories bar in the View menu in the toolbar.
▪ The categories' number, names and order are preset. Depending on the server configuration, somecategories can be renamed or disabled.
Functions
▪ If clicking on a category, only the E-Mails assigned to this category are shown in the display area.▪ If double-clicking or right-clicking on a category, a window opens that allows to rename or disable
categories.
Also see
The E-Mail list (p. 61)Working with tabs (p. 80)Displaying E-Mails (p. 65)
5.1.5 The E-Mail display areaContains the E-Mail list and an E-Mail's detail view. In order to select a layout, click on the View buttonin the toolbar.
Also see
The display area (p. 31)
60
The E-Mail categories barE-Mail

5.1.6 The E-Mail listDisplays a list of the E-Mails in the current folder. If you use categories, the E-Mails of the selected cate-gory are displayed in the inbox.
Content
▪ If a vacation notice is active, a notification is displayed above the list.If you close the notification, the vacation notice remains active.
▪ The following details are displayed for each E-Mail: sender, subject, date or time of the receipt orthe E-Mail's size. Unread E-Mails are marked with the Unread icon .If Text preview is enabled in theView toolbar menu, a preview of the E-Mail content will be displayedbelow the subject.
▪ If available, additional information is shown: attachment icons, colored label, flag, number of E-Mailsin conversation, priority.
▪ Encrypted E-Mails are marked with the Encrypted icon . Information on encrypting E-Mails can befound in Encrypting Data (p. 267)
Functions
▪ To select multiple E-Mails, enable the Checkboxes option in the View drop-down in the toolbar.You can also use your system's multi selection functions.
▪ If clicking on the All button above the list, a drop-down opens. It allows to execute the followingfunctions for all E-Mails in the current E-Mail folder: mark as read, move, archive, delete.
▪ If clicking on the Sort by button above the list, a menu opens that helps you sort your E-Mails.To combine all E-Mails of a conversation in a single list entry, enable the Conversations checkboxin Sort by.The sorting setting will be applied to the selected E-Mail folder. You can use different settings forthe single folders.
▪ To display a sender's E-Mail address instead of the sender name, hover over the sender name. Theoriginal E-Mail address is displayed in a tooltip.
▪ If clicking on an E-Mail, its content is displayed in the display area.▪ To enable frequently used functions, you can use the context menu for an E-Mail or for multiple E-
Mails.▪ To adjust the list width, hover over the line between the list and the detail view. Drag the border to
the left or to the right.
Also see
Displaying E-Mails (p. 65)Replying to E-Mails (p. 74)Forwarding E-Mails (p. 75)Organizing E-Mails (p. 79)Sending a vacation notice automatically (p. 77)
61
E-MailThe E-Mail list

5.1.7 The E-Mail detail viewDisplays the E-Mail that you selected in the list. If double-clicking on the E-Mail in the list, the content isdisplayed in a window.
Content
▪ SubjectIf E-Mails are sorted by conversations, the Open/close all messages icon is displayed next to theconversation subject. If clicking on a free area between the sender and the date of receipt, the E-Mail opens or closes.
▪ Read icon . Changes the status from Read to Unread and vice versa.▪ The sender's name or E-Mail address. If clicking on it, a pop-up opens. It displays information about
the contact.If you selected in the settings that an E-Mail's authenticity should be displayed, the E-Mail's authen-ticity can be identified by the color and an icon. If clicking the icon, a respective notification is dis-played.
▪ The recipient's name. The names of additional E-Mail recipients, if existing. If clicking on a name, apop-up opens. It displays information about the contact.
▪ Date and time of the receipt.▪ Icons for flagging E-Mails.
▫ Flag icon . Flags the E-Mail.▫ Set color icon . Opens a menu allowing you to assign a colored label to the E-Mail.Note: Depending on the groupware's configuration, not all options for flagging might be available.
▪ A picture of the sender, if available.▪ Frequently used functions: Reply, Reply all, Forward, Delete▪ More actions icon . Opens a menu with editing functions.▪ If the E-Mail contains attachments, further elements are displayed:
▫ Attachment icon . If clicking on it, the attachments are displayed as icons or list.▫ Buttons that allow to apply a function to all E-Mail attachments at once.▫ Squares , List icons . Shows the attachments as squares or as list. To apply a function to a
specific attachment, click on the attachment's name in the List view.▪ If selecting an E-Mail with an attachment as link in the Sent items folder, information about the at-
tachment are displayed at the top of the E-Mail.▪ E-Mail text
Quotes from previous E-Mails are marked at the beginning of the line. If the quote is only partlydisplayed, you can use the Show quoted text icon to display the complete quote.
Also see
Viewing or Saving E-Mail Attachments (p. 66)Replying to E-Mails (p. 74)Forwarding E-Mails (p. 75)Inviting all E-Mail recipients to an appointment (p. 97)Saving all recipients of an E-Mail as a distribution list (p. 98)Organizing E-Mails (p. 79)Show email authenticity (p. 257)The E-Mail pop-up (p. 63)
62
The E-Mail detail viewE-Mail

5.1.8 The E-Mail pop-upIf clicking on a sender's or recipient's name in the detail view, a pop-up opens.
Content
▪ Buttons for frequently used functions:▫ If this contact is not yet in a address book, Add to address book is displayed. If clicking on the
button, the window for creating a new contact opens.▫ Send mail. Opens the window for sending a new E-Mail to the person.▫ Invite to appointment. Opens the window for creating an appointments with this person.▫ If the contact is saved in a personal address book, Edit is displayed. If clicking on the button, the
window for editing the contact opens.▫ Delete icon . Removes the contact from the address book shown in Saved as.
▪ More actions icon . If clicking on the button, a menu with frequently used functions for organizingcontacts is opened.
▪ The person's contact data.▪ If the contact data of this person are saved, the path to the address book with the contact data is
displayed.▪ Information about this person from social networks. You can use the available buttons to open this
person's profile.▪ If you share appointments with this person, they are displayed below Shared appointments.▪ If you exchanged E-Mails with this person, they are displayed below Recent conversations.
Also see
The pop-up (p. 32)Creating a new contact (p. 115)Sending a new E-Mail (p. 68)Creating new appointments (p. 146)The E-Mail detail view (p. 62)
63
E-MailThe E-Mail pop-up

5.1.9 The E-Mail editing windowThis window is used when creating a new E-Mail or editing an E-Mail draft.
Content
▪ The title bar includes the following elements:▫ window title▫ icons for adjusting the window position, cancel icons
▪ Addresses▫ From. Shows your sender address. In order to select another sender address, click on the address.▫ To input field. Enter one or several recipients in this field.
While entering the recipients, matching suggestions are displayed. To accept a suggestion, clickon it.Select contacts icon . Opens a window for selecting contacts from a list.
▫ To send a copy to other recipients, click on CC or BCC on the right side of the input field.▫ If clicking on To, CC oder BCC, a window opens that allows to select contacts from a list.
▪ E-Mail content▫ Subject input field. Enter your E-Mail's subject in this field.▫ Attachments. Adds local files or files that are saved in the Drive app.▫ Signatures. Let's you define whether to add a signature to the E-Mail text.▫ Options. Shows the following options: Defining an E-Mail's text format, setting the priority, attach-
ing a vCard, requesting a read receipt.▫ Depending on the configuration, there are functions for sending E-Mails in an encrypted format.
◦ Encrypt icon◦ Security button.Information on encryption can be found in Encrypting Data (p. 267).
▫ Input field for the E-Mail text. Enter the text in the field. If having selected the html format fromthe Options, you can format the text or add images.
▪ button bar▫ Send. Sends the E-Mail. Closes the Format window.▫ Save. Saves the current E-Mail content in the Drafts folder.▫ Cancel. Cancels composing the E-Mail.
Also see
The editing window (p. 34)Sending a new E-Mail (p. 68)Working with E-Mail drafts (p. 84)
64
The E-Mail editing windowE-Mail

5.2 Displaying E-MailsBy default, the content of the inbox is displayed. Other E-Mail folders can be opened from within thefolder tree. In the E-Mail settings, you can define whether a notification sound is to be played for incomingE-Mails.
How to display an E-Mail:
1. Open an E-Mail folder in the folder tree.When having selected the Inbox folder and if you are using E-Mail categories, you can select a cate-gory.
2. In order to select a layout, click on View in the toolbar. Enable an entry below Layout.
3. To sort the E-Mail list, click on Sort by above the list. Enable an entry.Note: To reduce latency when loading the E-Mail list, only a certain percentage of the E-Mails in afolder will be loaded by the server if their number exceeds a defined limit. If browsing to the bottomof the list, the next part will be loaded.To combine all E-Mails of a conversation in a single list entry, enable the Conversations checkboxin Sort by.
4. Click an E-Mail in the list. The content of the E-Mail will be displayed in the detail view.You can open the E-Mail in a window by double-clicking on the E-Mail in the list.▪ If the E-Mail is part of a conversation, all E-Mails in the conversation are displayed one below the
other. To open or close an E-Mail that is part of a conversation, click on a free area between thesender and the date of receipt.To open or close all E-Mails in the conversation, click the Open/close all messages icon onthe upper right side of the detail view.
▪ If the E-Mail includes a quote from a previous E-Mail, you can display the quote by clicking theShow quoted text icon .
▪ When having selected List from the View drop-down in the toolbar, the display area contains alist of all E-Mails in the folder. If clicking on an E-Mail, the E-Mail's detail view is displayed. Thefollowing functions are available above the detail view, :
To open the list again, click on the Back button or icon .To display the next E-Mail, click the View next icon .To display the previous E-Mail, click the View previous icon .
Note: Depending on the server configuration, the content of very big E-Mails might be displayedincompletely. In this case, you will receive an E-Mail with a link. In order to completely display the E-Mail, click on the link.
Also see
Navigating within the folder structure (p. 233)Working with tabs (p. 80)Searching for E-Mails (p. 95)Viewing or Saving E-Mail Attachments (p. 66)Showing the E-Mail source (p. 84)The E-Mail detail view (p. 62)The E-Mail list (p. 61)The E-Mail pop-up (p. 63)
65
E-MailDisplaying E-Mails

5.3 Viewing or Saving E-Mail AttachmentsThe file names of E-Mail attachments are displayed in the detail view. The following functions areavailable:▪ view or download attachments▪ Depending on the groupware configuration, you can display attachments in the Drive app.
How to use the E-Mail attachment functions:
1. Select an E-Mail with one or multiple attachments.To show the attachments, click the Expand icon on the left side. The attachments are displayed assquares or as a list. To toggle the view, click the Squares icon or the List icon on the right side.
2. To apply a function to all attachments, click on a button next to the Attachment icon .▪ To view the attachments in the Viewer, click on View.
Note: Depending on the file format, this function might not be available.▪ If the attachment includes a presentation, you can start the presentation by clicking on Present.▪ In order to download the attachments, click on Download.▪ To save the attachments in Drive, click on Save to Drive.
3. In order to apply a function to a specific attachment, you have the following options.▪ To view or download a specific attachment or to save it in Drive, select it in the list view. Select a
function from the menu.▪ To display an attachment in the Viewer, select the attachment in the squares view.
How to view attachments in the Drive app:Note: Depending on the groupware's configuration, this setting might not be available.
1. Use one of the following methods:▪ Click on View in the toolbar. Click on All attachments.▪ Click on View all attachments in the folder tree.In the Drive app, the My attachments folder contains the attachments sent or received by you.
2. You can use functions of Drive.
Also see
Displaying E-Mails (p. 65)The E-Mail detail view (p. 62)The E-Mail list (p. 61)The E-Mail pop-up (p. 63)
66
Viewing or Saving E-Mail AttachmentsE-Mail

5.4 Sending E-MailsThe following options exist:▪ Sending a new E-Mail▪ Selecting contacts from a list▪ Selecting sender address▪ Sending copies as CC or BCC▪ Adding attachments▪ Sending attachments as link▪ Using signatures▪ Replying to E-Mails▪ Forwarding E-Mails▪ Automatically forwarding E-Mails▪ Sending a vacation notice automatically
67
E-MailSending E-Mails

5.4.1 Sending a new E-Mail
How to send a new E-Mail:
1. Click on Compose in the toolbar.
2. Enter the recipient's E-Mail address in the To field. Tips:▪ While entering the E-Mail address, several matching suggestions are displayed. To accept a sug-
gestion, use one of the following methods:▫ Use the scrollbar to browse the list. Click on a suggestion.▫ Use the cursor keys to select a suggestion. Press Enter.
▪ To select contacts from a list, click the Address bookicon on the right side of the input field.If there are several recipients, repeat the action. As an alternative, you can enter the name of a dis-tribution list.In order to delete a recipient, click the Delete icon .
3. Enter a subject.Enter the E-Mail text.In order to compose the E-Mail in text format, select Options. Select Plain text.In order to compose the E-Mail in HTML format, select Options. Select HTML. A formatting bar ap-pears.You can define default values for the font style, size and color in the E-Mail settings.
4. If you use the html format, you can insert images into the text. To do so, proceed as follows:Place the cursor at the position where you want to insert images.Drag one image or several images from a file browser or the desktop to the E-Mail window.
In order to remove an image from the text, select the image. Press the delete key on your keyboard.
5. In order to show further options, click on Options. You can use the following options: set the prior-ity, attach your vCard, request a delivery receiptDepending on the configuration, there are functions for sending E-Mails in an encrypted format.▪ Encrypt icon▪ Security button.Information on encryption can be found in Encrypting Data (p. 267).
6. You can use additional functions:▪ Selecting sender address (p. 69)▪ Sending copies as CC or BCC (p. 70)▪ Adding attachments (p. 71)▪ Sending attachments as link (p. 72)▪ Using signatures (p. 73)
7. Click on Send.
Also see
Selecting contacts from a list (p. 69)The E-Mail editing window (p. 64)Replying to E-Mails (p. 74)Forwarding E-Mails (p. 75)Automatically forwarding E-Mails (p. 76)Sending a vacation notice automatically (p. 77)
68
Sending a new E-MailE-Mail

5.4.2 Selecting contacts from a list
How to select the contacts from a list in the Select contactswindow:1. You have the following possibilities to find a specific contact:
▪ Enter a name in Search.▪ To view the contacts of a specific address book, click on All folders. Select an address book from
the list. Depending on the groupware configuration, you can select a department from the list.
2. Select one or several contacts. The selected contacts are displayed below the list. To undo the selec-tion, click on Clear selection.You can also use your system's multi selection functions.
3. In confirm your selection of selected contacts, click on Select.
Also see
Sending a new E-Mail (p. 68)Selecting sender address (p. 69)Sending copies as CC or BCC (p. 70)Adding attachments (p. 71)Sending attachments as link (p. 72)Using signatures (p. 73)Creating distribution lists (p. 117)Adding participants or resources to an appointment (p. 150)Using the scheduling view (p. 152)Adding participants to a task (p. 185)Sharing with public links (p. 238)Inviting to a shared item (p. 240)
5.4.3 Selecting sender address
How to select your sender address in the E-Mail editing window:
1. Click on the sender address next to From:. A menu opens.
2. If you have set up external E-Mail accounts, you can use those addresses as sender addresses. Selectan E-Mail address from the list.Note: Depending on the folder selected, a defined sender address will be preset.
3. You can define the name to be displayed with your E-Mail addresses. To do so, proceed as follows:Click on Edit name. The Edit real names window opens. The names that are preset in the accountsettings are displayed.Enable the checkbox of the name that you want to edit. Edit the name. Click on Save.
In order to display the sender addresses without names, disable Show names.
Also see
Sending a new E-Mail (p. 68)Selecting contacts from a list (p. 69)Sending copies as CC or BCC (p. 70)Adding attachments (p. 71)Sending attachments as link (p. 72)Using signatures (p. 73)Adding E-Mail Accounts (p. 99)
69
E-MailSelecting contacts from a list
5.4.4 Sending copies as CC or BCC
How to send copies to other recipients in the E-Mail editing window:
Depending on whether the recipients are to see who gets a copy, use the input fields CC or BCC.
1. If the recipients are to see who gets a copy of the E-Mail, click on CC on the right side of the To field.Enter the E-Mail address of the copy's recipient in the CC field.
2. If you want to prevent the recipients from seeing who gets a copy of the E-Mail, send a blind copy.To do so, click on BCC on the right side of the To field. Enter the E-Mail address of the blind copy'srecipient in the BCC field.
Tips:▪ With drag and drop you can move the recipients between the fields To, CC and BCC.▪ To select contacts from a list, click the Address bookicon on the right side of the input field.▪ In the E-Mail settings, you can determine that each outgoing E-Mail will also be sent as blind copy
to a specific E-Mail address.
Also see
Sending a new E-Mail (p. 68)Selecting contacts from a list (p. 69)Selecting sender address (p. 69)Adding attachments (p. 71)Sending attachments as link (p. 72)Using signatures (p. 73)
70
Sending copies as CC or BCCE-Mail
5.4.5 Adding attachments
How to add attachments to an E-Mail in the E-Mail editing window:
1. Select the files to be sent as attachment.▪ To send a local file as attachment, click on Attachments. Click on Add local file. Select one or
more files.Tip: You can also add an attachment by dragging one or several files from a file browser or fromthe desktop to the E-Mail window and dropping them below the Attachments button.
▪ In order to use the current version of a file from the Drive app as an attachment, click on Attach-ments. Click on Add from Drive.Open a folder in the Add attachments window. Select one or several files. Click on Add.
2. You can use the following functions:▪ In order to remove an attachment, click the Delete attachment icon .▪ To hide or show the attachments, click the Expand icon on the left side. The attachments are
displayed as squares or as a list. To toggle the view, click the Squares icon or the List icon onthe right side.
Notes:▪ As long as the attachments are being uploaded, a progress bar is displayed below the folder tree.▪ Depending on the groupware configuration, attachments will not be sent when having reached a
certain size limit. In this case, the attachment will be saved in the E-Mail attachments folder in theDrive app. The E-Mail includes a link to the attachment.
Also see
Sending a new E-Mail (p. 68)Sending attachments as link (p. 72)
71
E-MailAdding attachments

5.4.6 Sending attachments as linkThis function allows to send large attachments by E-Mail. This is how it works:▪ The attachments are uploaded to a new folder below Drive Mail in the Drive app. The name of this
folder corresponds to the E-Mail subject. The folder is shared with a public link.▪ The E-Mail recipients receive a link for downloading the attachments.
How to send attachments as link in the E-Mail editing window:
1. Select the files to be sent as attachment.▪ To send a local file as link, click on Attachments. Click on Add local file. Select one or more files.
Tip: You can also add an attachment by dragging one or several files from a file browser or fromthe desktop to the E-Mail window and dropping them below the Attachments button.
▪ In order to use the current version of a file from the Drive app as an attachment, click on Attach-ments. Click on Add from Drive.Open a folder in the Add attachments window. Select one or several files. Click on Add.
2. You can use the following functions:▪ In order to remove an attachment, click the Delete attachment icon .▪ To hide or show the attachments, click the Expand icon
3. Click on Use Drive Mail . The Options button will be displayed.Click on Options. The Drive Mail options window opens.▪ To set the expiration date for the public link, click on an entry below Expiration.
If you select an expiration date, you can let the attachment be deleted after the expiration date.To do so, enable delete if expired.Note: Depending on the groupware's configuration, those functions are optional or mandatory.
▪ To protect the public link with the attachments with a password, enable Use password. Enter apassword. To view the password while entering it, click the icon on the right side in the inputfield.
▪ To receive notifications about certain actions, enable one or several entries below Email notifi-cations.Note: Depending on the groupware's configuration, this setting might not be available.
Notes:▪ Depending on the groupware configuration, there might be a maximum file size for attachments
that can be sent as link.▪ As long as the attachments are being uploaded, a progress bar is displayed below the folder tree.▪ In the Sent objects folder, the E-Mail is marked with the icon . When viewing the E-Mail. the following
information is displayed at the top of the E-Mail text.▫ A link to the folder containing the attachment.▫ Information about the expiration date and a possibly used password.▫ A list of the attachments' file names.
Also see
Sending a new E-Mail (p. 68)Adding attachments (p. 71)
72
Sending attachments as linkE-Mail
5.4.7 Using signaturesAn E-Mail signature is text that is automatically entered in the E-Mail when being composed. It is typicallyused for inserting the name, company, and contact address at the bottom of the E-Mail text. You cancreate signatures in the plain text or html format. The following functions are available.▪ create new signature▪ Manage signatures: edit, delete, set default signature. The default signatures for new messages,
replies or forwarded messages are labeled.▪ add a signature to the E-Mail text
How to create a new signature:
1. Click the Settings icon on the right side of the menu bar. Click the Settings menu item.
2. Select the entry E-Mail in the sidebar. Click on Signatures.The existing signatures are shown in the display area.
3. In the display area, click on Add new signature. The Add signature window opens.
4. Enter a name for the signature.Enter the text for the signature. In order to format the text, select single text contents and click onan element in the formatting bar.Define whether the signature is to be entered below or above the E-Mail text.
5. Click on Save.
How to manage existing signatures:
1. Click the Settings icon on the right side of the menu bar. Click the Settings menu item.
2. Select the entry E-Mail in the sidebar. Click on Signatures.
3. Use the following methods:▪ In order to edit a signature's text, click on Edit next to the signature.▪ To define a signature to be used as default when composing a new message, select a signature
in Default signature for new messages.▪ To define a signature to be used as default when replying to or forwarding a message, select a
signature in Default signature for replies or forwardings.▪ In order to delete a signature, click the Delete icon next to the signature.
How to add a signature to the E-Mail text in the E-Mail editing window:
1. Click on Signatures.
2. Select a signature from the list.
Also see
Sending a new E-Mail (p. 68)
73
E-MailUsing signatures

5.4.8 Replying to E-MailsWhen replying to an E-Mail, some of the E-Mail's input fields are pre-filled:▪ The sender of the E-Mail and additional recipients of the E-Mail are automatically entered as recipients
of the reply E-Mail.▪ The E-Mail subject is entered in the subject field of the reply E-Mail. The subject is preceded with the
text "Re: ".▪ The E-Mail text is entered in the forwarded E-Mail. Each cited line is marked at the beginning.
How to reply to an E-Mail:
1. Select an E-Mail.
2. Click the Reply to sender icon in the toolbar. To also reply to all other recipients click the Replyto all recipients icon .You can also use one of the following methods:▪ Click on the Reply all button in the detail view.▪ Use the context menu in the E-Mail list.Note: If the E-Mail you want to reply to has been sent to a distribution list, the dialog window Replyto mailing list opens. You can decide whether the reply should be sent to the distribution list or tothe E-Mail sender only.
3. Enter the E-Mail text. You can use additional functions e.g., E-Mail attachments.
4. Click on Send.
Also see
Sending a new E-Mail (p. 68)Forwarding E-Mails (p. 75)Automatically forwarding E-Mails (p. 76)Sending a vacation notice automatically (p. 77)
74
Replying to E-MailsE-Mail

5.4.9 Forwarding E-MailsIf you forward an E-Mail, some of the E-Mail's input fields are pre-filled:▪ The subject of the E-Mail is entered as the subject of the forwarded E-Mail. The subject is preceded
with the text "Fwd: ".▪ The E-Mail text is entered in the forwarded E-Mail. The text is preceded with the following details:
The header "Original message"Sender, recipient, date, and subject of the original message
If you forward multiple E-Mails, the selected E-Mails are sent as attachments in eml format.
How to forward an E-Mail:
1. Select one or several E-Mails.
2. Click the Forward icon in the toolbar.You can also use one of the following methods:▪ Click on the Forward button in the detail view.▪ Use the context menu in the E-Mail list.
3. Select one or more recipients. Information can be found in Sending a new E-Mail (page 68).
4. Enter the E-Mail text. You can use additional functions e.g., E-Mail attachments.
5. Click on Send.
Also see
Sending a new E-Mail (p. 68)Replying to E-Mails (p. 74)Automatically forwarding E-Mails (p. 76)Sending a vacation notice automatically (p. 77)
75
E-MailForwarding E-Mails

5.4.10 Automatically forwarding E-MailsYou can let E-Mails be automatically forwarded to another address.
How to automatically forward E-Mails:
1. Click the Settings icon on the right side of the menu bar. Click the Settings menu item.
2. Select the entry E-Mail in the sidebar.Click on Auto forward ... in the display area. The Auto forward window opens.
3. To activate the auto forwarding, click the icon on the upper left side.Enter the E-Mail address to which you want to forward the messages.In order to keep a copy of the E-Mail, enable Keep a copy of the message.
4. The auto forwarding is entered as E-Mail filter. If additional filter rules are to be applied after theauto forwarding, enable Process subsequent rules. You can also edit the auto forwarding in the E-Mail filter settings.
5. Click on Apply changes.
Also see
Using E-Mail Filters (p. 91)Settings for receiving E-Mails. (p. 101)Sending a new E-Mail (p. 68)Replying to E-Mails (p. 74)Forwarding E-Mails (p. 75)Sending a vacation notice automatically (p. 77)
76
Automatically forwarding E-MailsE-Mail

5.4.11 Sending a vacation notice automaticallyA vacation notice informs the sender of an E-Mail that you will not retrieve your E-Mails for a specificperiod of time. You can set the following:▪ the subject and text of the vacation notice▪ the time frame when the vacation notice is active▪ the E-Mail addresses for which the vacation notice is active
How to create and activate a vacation notice:
1. Click on View in the toolbar. Click on Vacation notice at the bottom.You can also use the Vacation notice button in the E-Mail settings.The Vacation notice window opens.
2. To activate the vacation notice, click the icon on the upper left side.To define the time range for sending the vacation notice, enable Send vacation notice during thistime only. Set the start and end date.Note: Depending on the groupware's configuration, this setting might not be available.
3. Enter a subject and a text for the vacation notice.
4. In order to display all options, enable Showadvancedoptions. The following functions are displayed.▪ Specify an interval for sending a vacation notice if there are several E-Mails from the same sender.▪ The vacation notice will be sent if messages are reaching your primary E-Mail address. To also
send a vacation notice if messages reach your other E-Mail addresses, enable the respectivecheckboxes.The vacation notice is entered as E-Mail filter. You can also edit the vacation notice in the E-Mailfilter settings.
5. Click on Apply changes.If a vacation notice is active, the following is displayed:▪ On the E-Mail settings page, the Vacation notice button is marked with an additional icon.▪ In the E-Mail app, a notification is displayed above the E-Mail list. If clicking on the notification,
the Vacation notice dialog window opens.
Also see
Using E-Mail Filters (p. 91)Settings for receiving E-Mails. (p. 101)Sending a new E-Mail (p. 68)Replying to E-Mails (p. 74)Forwarding E-Mails (p. 75)Automatically forwarding E-Mails (p. 76)
77
E-MailSending a vacation notice automatical-ly

5.5 Adding E-Mail FoldersYou can create additional E-Mail folders below your primary E-Mail account.
How to create a new E-Mail folder:
1. Select the folder in which you want to create the new subfolder in the folder tree.
2. Click the Actions icon next to the folder name. Click on Add new folder.A window opens.
3. Enter a name. Click on Add.
Also see
Folders (p. 230)
78
Adding E-Mail FoldersE-Mail

5.6 Organizing E-MailsSome of the techniques for organizing contacts require that contact folders have already been set upby you. Information on creating folders can be found in Folders (page 230).
The following options exist:▪ Working with tabs▪ Moving E-Mails▪ Copying E-Mails▪ Marking E-Mails as read or unread▪ Collecting addresses▪ Categorizing E-Mails▪ Showing the E-Mail source▪ Working with E-Mail drafts▪ Creating E-Mail reminders▪ Adding an E-Mail to the portal▪ Saving E-Mails▪ Importing E-Mails▪ Printing E-Mails▪ Archiving E-Mails▪ Deleting E-Mails▪ Cleaning up E-Mail folders▪ Using Unified Mail
79
E-MailOrganizing E-Mails

5.6.1 Working with tabsTabs allow you to save incoming E-Mails in the Inbox folder separated by senders. There are the followingoptions:▪ enable or disable tabs▪ assign incoming E-Mails to a tab▪ edit the tabs view
How to enable or disable the usage of tabs:
1. Click on View in the toolbar.
2. Enable or disable the Use categories checkbox below Inbox.
How to assign incoming E-Mails in the inbox to categories:
1. Select the Inbox folder in the folder tree.Select a category from the categories bar. E-Mails that have not been assigned to a category yet, aredisplayed in the category General.
2. Drag an E-Mail from the list to a category in the categories bar and drop it there.You can also select an E-Mail. Click the Move icon in the toolbar. Select a category from the menu.A pop-up window notifies you that the E-Mail has been moved to the category.
3. In order to finish the process, do one of the following:▪ In order to only move the selected E-Mail to the category, close the pop-up window.▪ In order to move all existing and future incoming E-Mails from this sender to the category, click
on Move all messages.
How to edit the tabs view:
1. Click on View in the toolbar. Click on Configure below Inbox.You can also double-click or right-click on a category in the categories bar.The Configure categories window opens.
2. To enable or disable a tab, enable or disable the respective checkbox.To rename a tab, edit the respective text.Note: Some tabs can not be edited.In order to hide the categories bar, click on Disable categories.
3. Click on Save.
Also see
Displaying E-Mails (p. 65)Navigating within the folder structure (p. 233)
80
Working with tabsE-Mail
5.6.2 Moving E-MailsThere are the following options:▪ move an individual E-Mail or a complete E-Mail conversation to another folder▪ move all E-Mails of an E-Mail folder
How to move an E-Mail:
Prerequisite: You need to have the appropriate permissions to create objects in the target folder.
1. Select one or several E-Mails.
2. Click the More actions icon in the toolbar. Select Move from the menu.You can also use one of the following methods:▪ Use the More actions icon in the detail view.▪ Use the context menu in the E-Mail list.
3. Select a folder in the Move window. You can create a new folder by clicking on Create folder.4. Click on Move.
Tips:▪ To move E-Mails of a specific sender to a folder, you can create a new rule when moving E-Mails.▪ In order to move E-Mails using drag and drop, select an E-Mail or multiple E-Mails in the sidebar.
Drag the selected E-Mails to a folder in the folder tree.
How to move all E-Mails of a folder:
Prerequisite: You need to have the appropriate permissions to create objects in the target folder.
1. In the folder tree, select the folder which E-Mails you want to move.
2. You have the following options:▪ Click on All above the list. Select Move all messages.▪ Click the Actions icon next to the folder name. Click on the Move all messages button.
3. Select a folder in the Move all messages window. You can create a new folder by clicking on Createfolder.
4. Click on Move all.
Also see
Copying E-Mails (p. 82)
81
E-MailMoving E-Mails

5.6.3 Copying E-MailsYou can copy an individual E-Mail or a complete E-Mail conversation to another folder.
How to copy an E-Mail:
Prerequisite: You need to have the appropriate permissions to create objects in the target folder.
1. Select one or several E-Mails.
2. Click the More actions icon in the toolbar. Select Copy from the menu.You can also use one of the following methods:▪ Use the More actions icon in the detail view.▪ Use the context menu in the E-Mail list.
3. Select a folder in the Copy window. You can create a new folder by clicking on Create folder.4. Click on Copy.
Also see
Moving E-Mails (p. 81)
5.6.4 Marking E-Mails as read or unreadUnread E-Mails are marked with the Unread icon . In order to mark an E-Mail as read or unread, youcan do the following:▪ mark single E-Mails as read or unread▪ mark all E-Mails of an E-Mail folder as read
How to mark an E-Mail as unread or read:
1. Select one or several E-Mails.
2. Click the More actions icon in the toolbar. Click on Mark as unread in the menu. If the E-Mail ispart of a conversation, all messages received for this conversation are marked as unread.You can also use one of the following methods:▪ Use the More actions icon in the detail view.▪ Click the Read icon . The icon changes to the Unread icon .▪ Use the context menu in the E-Mail list.
3. In order to mark this E-Mail as read, analogously do the same.
How to mark all E-Mails of a folder as read:
1. Select an E-Mail folder in the folder tree.
2. You have the following options:▪ Click on All above the list. Select Mark all E-Mails as read.▪ Click the Actions icon next to the folder name. Click on Mark all E-Mails as read.
Also see
Displaying E-Mails (p. 65)
82
Copying E-MailsE-Mail
5.6.5 Collecting addressesYou can collect E-Mail addresses by adding the addresses to an address book. The following optionsexist:▪ Automatically collect new E-Mail addresses when sending or reading E-Mails by activating this function
in the E-Mail settings.▪ Manually adding E-Mail addresses to an address book
How to manually add an E-Mail address to an address book:
1. Select an E-Mail.
2. Click on the sender's or a recipient's name in the detail view.
3. Click on Add to address book in the popup.
Note: This function is only available if the contact has not been added yet.
Also see
Displaying E-Mails (p. 65)
5.6.6 Categorizing E-MailsDepending on the groupware configuration, you have several options for categorizing E-Mails. The fol-lowing options are available:▪ a colored label▪ a flag
How to categorize an E-Mail:
1. Select one or several E-Mails.
2. To add a colored label, click the Set color icon in the toolbar. Select a color from the menu.You can also use the Set color icon in the detail view.In order to remove the label, again click the icon in the toolbar or in the detail view. Click the Nonemenu item.
3. To add a flag, click the Flag icon in the toolbar.You can also use one of the following methods:▪ Click the Flag icon in the detail view.▪ Open the context menu in the E-Mail list. Click on Flag.To remove the flag, use one of the following methods:▪ Again click the icon in the toolbar or in the detail view.▪ Open the context menu in the E-Mail list. Click on Unflag.
Tip: To sort E-Mails by flags, click on Sort by above the list.
Also see
Displaying E-Mails (p. 65)
83
E-MailCollecting addresses
5.6.7 Showing the E-Mail sourceThe E-Mail source contains the complete content of an E-Mail i.e., the complete E-Mail header data.
How to display the E-Mail source:
1. Select an E-Mail.
2. Click the More actions icon in the toolbar. Select View source from the menu. The source is dis-played in the View source window.You can also use one of the following methods:▪ Use the More actions icon in the detail view.▪ Use the context menu in the E-Mail list.
Tip: The context menu allows you to select the source and copy it to the clipboard.
Also see
Displaying E-Mails (p. 65)Creating new rules (p. 92)
5.6.8 Working with E-Mail draftsThe following options exist:▪ Saving an E-Mail as a draft while you are composing the E-Mail.▪ Sending a saved E-Mail draft. The draft will be deleted after it has been sent.▪ Sending a copy of an E-Mail draft. The draft will be kept.
How to save an E-Mail as a draft:
Click on Save in the E-Mail editing window.
Result: The E-Mail is saved in the Drafts folder.In the E-Mail settings, you have the option to let an E-Mail that you are composing be saved in regularintervals.
How to send a saved E-Mail draft:
1. Open the Drafts folder. Select an E-Mail.
2. Click on Edit draft in the toolbar.
3. Complete the entries. Click on Send.
How to send a copy of an E-Mail draft:
1. Open the Drafts folder. Select an E-Mail.
2. Click on Edit copy in the toolbar.
3. Complete the entries. Click on Send.
Also see
Sending E-Mails (p. 67)
84
Showing the E-Mail sourceE-Mail

5.6.9 Creating E-Mail remindersYou can activate a reminder for an E-Mail. This function creates a task and reminds you of the due date.
How to create an E-Mail reminder:
1. Select an E-Mail.
2. Click the More actions icon in the toolbar. Select Reminder from the menu.You can also use the More actions icon in the detail view.Note: When having selected an E-Mail conversation, this function is only available in the detail view,not in the toolbar.
3. Complete the details in the Remind me window. Select a time from the Remindme drop-down field.Click on Create reminder.
Result: A task will be created. A button is shown below the task text. If clicking on this button, the orig-inal E-Mail will be displayed.
Also see
Creating Tasks (p. 184)
5.6.10 Adding an E-Mail to the portalYou can add an E-Mail as widget to the Portal.
How to add an E-Mail to the portal:
1. Select an E-Mail.
2. Click the More actions icon in the toolbar. Click on Add to portal in the menu.You can also use the More actions icon in the detail view.Note: When having selected an E-Mail conversation, this function is only available in the detail view,not in the toolbar.
Also see
Customizing the Portal (p. 51)
5.6.11 Saving E-MailsYou can save an E-Mail as a text file. The text file has the file extension EML. If you select multiple E-Mails, an eml file will be created for each E-Mail. The eml file will be saved as zip archive then.
How to save an E-Mail:
1. Select one or several E-Mails.
2. Click the More actions icon in the toolbar. Select Save as file from the menu.You can also use the More actions icon in the detail view.
3. Fill in the details for saving the file.
Also see
Importing E-Mails (p. 85)
5.6.12 Importing E-MailsYou can import an E-Mail that is available in the EML format.
85
E-MailCreating E-Mail reminders

How to import an E-Mail:
1. Open the E-Mail folder to which you want to import the E-Mail.
2. Drag the EML file from a file browser or from the desktop to the E-Mail app window. Drop the EMLfile in the list in the display area.
Also see
Saving E-Mails (p. 85)
5.6.13 Printing E-Mails
How to print an E-Mail's content:
1. Select one or several E-Mails.
2. Click the More actions icon in the toolbar. Click on Print in the menu.You can also use one of the following methods:▪ Use the More actions icon in the detail view.▪ Use the context menu in the E-Mail list.A window with a print preview opens.
3. If required, change the printer settings. Click on the Print button.
4. Close the print preview window.
Also see
Archiving E-Mails (p. 87)
86
Printing E-MailsE-Mail

5.6.14 Archiving E-MailsWhen archiving E-Mails, those E-Mails are moved to the Archive folder. The Archive folder contains aseparate subfolder for each calendar year. The archived E-Mails are saved to those subfolders sortedby the year of receipt. The Archive folder is created as soon as you initially use this function. There arethe following options:▪ archive a folder's E-Mails that are older than 90 days▪ archive single E-Mails
How to archive an E-Mail folder's content:
1. Select an E-Mail folder in the folder tree.
2. You have the following options:▪ Click on All above the list. Select Archive all messages.▪ Click the Actions icon next to the folder name. Click on Archive all messages.
3. In the Archive messages window click on Archive.
Result: All E-Mails that are older than 90 days are moved to the archive folder.
How to archive single E-Mails:
1. Select one or several E-Mails.
2. Click the Archive icon in the toolbar.You can also use one of the following methods:▪ Press the [a] key on the keyboard.▪ Use the context menu in the E-Mail list.
Result: The E-Mails are moved to the Archive folder.
Also see
Printing E-Mails (p. 86)
5.6.15 Deleting E-MailsThe following options exist:▪ Delete individual E-Mail messages or entire E-Mail conversations. By default, the E-Mails are moved
to the Trash folder.▪ Delete all E-Mails of an E-Mail folder. By default, the E-Mails are moved to the Trash folder.▪ Recover deleted E-Mail messages from the Trash.▪ Permanently delete E-Mail messages from the trash. You can also permanently delete all E-Mails
from the trash by emptying the trash.
Warning: If you enable the E-Mail settings option Permanently remove deleted emails you will notbe able to recover deleted E-Mail messages. It is recommended that you not use this setting.
How to delete an E-Mail:
1. Select one or several E-Mails.
2. Click the Delete icon in the toolbar.You can also use one of the following methods:▪ Press the [Del] or [Backspace] key on the keyboard.▪ Use the Delete button in the detail view.▪ Use the context menu in the E-Mail list.
87
E-MailArchiving E-Mails

Result: The E-Mail is moved to the Trash folder.
How to delete all E-Mails of a folder:
1. In the folder tree, select the folder which E-Mails you want to delete.
2. You have the following options:▪ Click on All above the list. Select Delete all messages.▪ Click the Actions icon next to the folder name. Click on the Delete all messages button.
Result: The E-Mail is moved to the Trash folder.
How to recover deleted E-Mails:
1. Select the Trash folder in the folder tree.
2. Select one or several E-Mails.
3. Click the More actions icon in the toolbar. Select Move from the menu.
4. Select a folder in the Move window. Click on the Move button.
How to permanently delete an E-Mail:
Warning: Permanently deleted E-Mails can not be recovered. Before permanently deleting an E-Mail, make sure you no longer need the E-Mail.
1. Open the Trash folder in the folder tree.
2. Select one or several E-Mails.
3. Click the Delete icon in the toolbar.
Result: The E-Mail is permanently deleted.
88
Deleting E-MailsE-Mail

How to permanently delete the content of the Trash folder:
Warning: Permanently deleted E-Mails can not be recovered. Before permanently deleting an E-Mail, make sure you no longer need the E-Mail.
1. Select the Trash folder in the folder tree.
2. Click the Actions icon next to the folder name. Click on Empty folder.3. Confirm that you want to empty the folder.
Result: The objects in the trash are permanently deleted.
Also see
Archiving E-Mails (p. 87)Cleaning up E-Mail folders (p. 89)
5.6.16 Cleaning up E-Mail foldersDepending on the E-Mail client's settings, E-Mails that you deleted from within an E-Mail client like AppleMail, MS Outlook or Mozilla Thunderbird, might be deleted only after having signed our from the client.In the meantime, those E-Mails will be shown as crossed out in the groupware. To delete those E-Mailsclean up the E-Mail folder.
Note: Depending on the groupware configuration, this function is not available as such E-Mails are notdisplayed.
How to clean up an E-Mail folder:
1. In the folder tree, select the folder that you want to clean up.
2. Click the Actions icon next to the folder name. Click on Clean up.
Also see
Deleting E-Mails (p. 87)
89
E-MailCleaning up E-Mail folders
5.6.17 Using Unified MailWith Unified Mail you can display E-Mails from multiple E-Mail accounts in one central folder. This givesyou a quick overview of the multiple E-Mail accounts' inboxes. Unified Mail can be described as follows:▪ In addition to an E-Mail account's Inbox the Unified Mail folder displays a further E-Mail view for an
account. The E-Mails actually exist only once.▪ E-Mails in the Inbox's subfolders are not displayed in the Unified Mail folder.▪ The E-Mails in the Unified Mail folder are marked with a label in the sidebar. It contains the E-Mail
account's name. The internal E-Mail account is marked with the label Primary account.The following functions are available:▪ To use Unified Mail, enable the function for one or several E-Mail accounts.▪ You can display E-Mails in the Unified Mail folder.
How to activate Unified Mail for an E-Mail account:
1. Click the Settings icon on the right side of the menu bar. Click the Settings menu item.
2. In the sidebar, click on Accounts.
3. Click on Edit next to an external E-Mail account in the display area. The settings are displayed in apop-up.
4. Enable Use Unified Mail for this account.Click on Save at the bottom of the pop-up.
How to display E-Mails in theUnified Mail folder:1. Open the Unified Mail folder in the folder tree.
2. As an alternative, click on a subfolder of the Unified Mail folder.
Tip: The account is indicated with a label next to an E-Mail's subject in the sidebar.
Also see
Displaying E-Mails (p. 65)Editing accounts (p. 252)
90
Using Unified MailE-Mail

5.7 Using E-Mail FiltersE-Mail filters help you organize incoming E-Mail messages. An E-Mail filter consists of one or severalrules. By setting rules you can e.g. trigger the following actions:▪ The E-Mail is moved to a specific E-Mail folder.▪ The E-Mail is forwarded to another E-Mail address.▪ The E-Mail is marked as read.In order to use E-Mail filters, proceed as follows:▪ Create E-Mail folders.▪ Create one or several rules.▪ Specify an order for the rules.▪ Set if subsequent rules are to be processed when a rule matches.There are the following options:▪ Creating a new rule.▪ To move E-Mails of a specific sender to a folder, you can create a new rule when moving E-Mails.▪ Changing existing rules.▪ The following examples should help you to better understand E-Mail filters.Note: For the following instructions and examples, it is assumed that the complete range of E-Mail filterfunctions is available. Depending on the server configuration, some functions might not be available.
91
E-MailUsing E-Mail Filters

5.7.1 Creating new rulesA rule contains:▪ a name,▪ one or several conditions,▪ one or several actions. You can specify whether one or all conditions are to be met in order to process
the actions.
How to create a new rule:
1. Click the Settings icon on the right side of the menu bar. Click the Settings menu item.
2. Select the entry E-Mail in the sidebar. Click on Filter rules.
3. In the display area, click on Add new rule. The Create new rule window opens.
4. Enter a rule name.
5. In order to add a condition click on Add condition. Make a selection from the drop-down menu.Please note the following:▪ In order to use an E-Mail part that is not contained in the list, selectHeader. Enter a header entry
in the Name input field. You can read an E-Mail's header by displaying the source data.▪ In order to consider the BCC part, select Envelope - To. Envelope includes the E-Mail recipients
entered in the To, CC or BCC field.▪ In order to use a part of the E-Mail content in the condition, select Content.▪ In order to use the date of receipt in the condition, select Current Date.Select a criterion from the drop-down next to the E-Mail part. Enter an argument in the input field.You can add further conditions. You can then specify whether one or all conditions are to be met inorder to process the actions. To do so, click on Apply rule if all conditions are met.As soon as there is a condition, you can create nested conditions. To do so, click on Add condition.Select Nested condition.To delete a condition, click the Delete icon next to the condition.
6. Specify the action to be executed if the rule is met. To do so, click on Add action. Select an actionfrom the menu. Depending on the action, further details might be required.You can add further actions.
7. You can set whether subsequent rules are to be processed if the rule is met. To do so, enable ordisable Process subsequent rules.
8. Click on Save.
Also see
Creating a new rule when moving (p. 93)Changing a rule (p. 93)Use cases for E-Mail filters (p. 94)Showing the E-Mail source (p. 84)
92
Creating new rulesE-Mail

5.7.2 Creating a new rule when movingYou can create a new rule when moving an E-Mail to another folder. Incoming E-Mails for which thisrule applies, will then be moved to this folder automatically.
How to create a new rule when moving an E-Mail
1. Select an E-Mail.
2. Click the More actions icon in the toolbar. Select Move from the menu.You can also use the More actions icon in the detail view.Select a folder in the Move window. Click on the Move button.
3. Enable Create filter rule. A note with details about the filter is displayed.Click on the Move button. The Create new rule window opens.
4. Enter a rule name. You can adjust the conditions or actions. Click on Save.The E-Mail will be moved. The new rule will be created.
Also see
Creating new rules (p. 92)Changing a rule (p. 93)Use cases for E-Mail filters (p. 94)
5.7.3 Changing a ruleThere are the following options:▪ edit a rule's settings: name, condition, actions▪ disable, enable, delete a rule▪ change the activation order of the rules
How to change existing rules:
1. Click the Settings icon on the right side of the menu bar. Click the Settings menu item.
2. Select the entry E-Mail in the sidebar. Click on Filter rules.
3. To edit a rule's settings, click on Edit next to the rule. Change the settings in the Edit rule window.
4. To disable a rule, click on Disable next to the rule.To enable a rule, click on Enable next to the rule.
5. To change the order, hover the mouse pointer over the Move icon next to a rule. Drag the ruleup or down and drop it appropriately.Note: This function is only available if there are at least two rules.
6. To delete a rule, click the Delete icon next to the rule.
Also see
Creating new rules (p. 92)Creating a new rule when moving (p. 93)Use cases for E-Mail filters (p. 94)
93
E-MailCreating a new rule when moving

5.7.4 Use cases for E-Mail filtersYou can create a condition by▪ selecting an E-Mail part, e.g. "Subject";▪ selecting a criterion, e.g. "Is exactly";▪ entering an argument, e.g. "minutes".In this case it would be verified whether the subject of an E-Mail exactly matches the argument's char-acters ("minutes"). You can control if the condition is met with the criterion and the character string.The differences between the single criteria will be explained in the examples below. In the examples,the subject is used for filtering E-Mails.▪ Criterion: "contains"
The condition is met if the subject contains the characters in the argument.Example: The argument is "minutes".
The condition is met for the subject "minutes".The condition is also met for the subject "meeting minutes".
▪ Criterion: "is exactly"The condition is met if the subject exactly matches the argument's character string.Example: The argument is "minutes".
The condition is met for the subject "minutes".The condition is not met for the subject "meeting minutes".
▪ Criterion: "Matches"The condition is met if the subject exactly matches the characters in the argument. The characterstring can contain wildcards.Example: The argument is "minutes*". The "*" character is a wildcard for any characters.
The condition is met for the subject "minutes".The condition is not met for the subject "meeting minutes".
▪ Criterion: "Regex"The condition is met if the subject contains the characters provided by the regular expression in theargument. Regular expressions allow complex requests. More information can be found on respectivesites on the Web. The following, very simple regular expression should give an insight to the topic.Example: The argument is "organi(z|s)ation". The expression "(z|s)" stands for either the "z" or the"s" character.
The condition is met for the subject "minutes".The condition is also met for the subject "organisation".The condition is not met for the subject "Organic".
Also see
Creating new rules (p. 92)Creating a new rule when moving (p. 93)Changing a rule (p. 93)
94
Use cases for E-Mail filtersE-Mail

5.8 Searching for E-MailsIn order to search for specific E-Mails, you can use the following search criteria:▪ search terms for subject, E-Mail text, sender, recipients, attachment name▪ Search terms for a time range. Searches for E-Mails that you received within the time range. You
define a valid time range with the following details.▫ The key words today, yesterday, last week, last month, last year▫ The key words for those time intervals: last 7 days, last 30 days, last 365 days▫ A day of the week, e.g. Monday▫ A specific month, e.g. July▫ A four digit date, e.g. 2015▫ A date, e.g. 1/31/2015▫ A date interval, e.g. 12/1/2014 - 1/31/2015
▪ folders that are to be searched
95
E-MailSearching for E-Mails

How to search for E-Mails:
1. Click on the Search input field. Additional icons are displayed.
2. Enter a search term in the input field. The search menu opens.
Define the data sources to be searched by clicking on an entry in the search menu.▪ If clicking on the search term or pressing enter, the following data sources are searched: sender,
recipient, subject, E-Mail text▪ In order to only search in the subject, click on in subject.▪ In order to only search in the E-Mail text, click on in mail text.▪ To search within the attachments' file names, click on iin attachment file names.▪ In order to search for senders or recipients matching the search term, click on a name.
You can define whether to search the sender, recipients or both. To do so, click the Optionsicon next to the name.
▪ In order to search for E-Mails within a specific time range, use a valid time range as search term.As soon as a valid time range is recognized in your input, the time range is displayed in the searchmenu. Click on the time frame.
The search results are displayed in the list that is shown in the display area. For each search result,the folder with the found object is displayed.
3. To select a folder for the search, click the Options icon in the input field. The current folder willbe displayed in a drop-down. To select another folder, open the drop-down.▪ If you select All folders, all folders and subfolders of the internal E-Mail account are searched.
Note: Depending on the E-Mail server, this function might not be available. In this case, only thecurrent folder will be searched, no subfolders.
▪ If you select a specific folder or the folder of an external E-Mail account, only this folder is searched,but no subfolders.
4. To refine the search result, enter further search terms: To remove a search term, click the Removeicon next to the search term.
5. In order to finish the search, click the Close icon in the input field.
96
Searching for E-MailsE-Mail

5.9 E-Mails within a teamThe following options exist:▪ Sharing E-Mails▪ Subscribing to E-Mail folders▪ Inviting all E-Mail recipients to an appointment▪ Saving all recipients of an E-Mail as a distribution list
5.9.1 Sharing E-MailsYou can share your E-Mails with internal users. Depending on the requirements, different methods exist.▪ To make E-Mails available to internal users, proceed as follows:
Create a new personal folder to which you will copy or move the required E-Mails.Share this folder.The users have to subscribe to your shared E-Mail folder in order to have access to the E-Mails.
▪ If another user shared an E-Mail folder with you, you have to subscribe to the shared E-Mail folderin order to have access to the E-Mails.
Also see
Subscribing to E-Mail folders (p. 97)Inviting all E-Mail recipients to an appointment (p. 97)Saving all recipients of an E-Mail as a distribution list (p. 98)
5.9.2 Subscribing to E-Mail foldersIn order to see E-Mail folders shared by other users, you have to subscribe to those folders.
How to subscribe to shared E-Mail folders:
1. Click the Settings icon on the right side of the menu bar. Click the Settings menu item.
2. Click on E-Mail in the sidebar.
3. Click on Change IMAP subscription in the display area.
4. In the Subscribe IMAP folderswindow activate the checkboxes of the folders that you want to subscribeto. Click on Save.
Also see
Settings for receiving E-Mails. (p. 101)Sharing E-Mails (p. 97)Inviting all E-Mail recipients to an appointment (p. 97)Saving all recipients of an E-Mail as a distribution list (p. 98)
5.9.3 Inviting all E-Mail recipients to an appointmentIf there are several E-Mail recipients, all recipients can be invited to a new appointment.
How to invite all E-Mail recipients to an appointment:
1. Select an E-Mail.
2. Click the More actions icon in the detail view.Select Invite to appointment from the menu.
3. Complete the data for Creating an appointment.
97
E-MailE-Mails within a team

Also see
Sharing E-Mails (p. 97)Subscribing to E-Mail folders (p. 97)Saving all recipients of an E-Mail as a distribution list (p. 98)
5.9.4 Saving all recipients of an E-Mail as a distribution listIf an E-Mail contains multiple recipients, you can save all the recipients as a new distribution list.
How to save the recipients of an E-Mail as a distribution list:
1. Select an E-Mail.
2. Click the More actions icon in the detail view.Select Save as distribution list from the menu.
3. Complete the data for creating a distribution list.
Also see
Sharing E-Mails (p. 97)Subscribing to E-Mail folders (p. 97)Inviting all E-Mail recipients to an appointment (p. 97)
98
Saving all recipients of an E-Mail as adistribution listE-Mail
5.10 Adding E-Mail AccountsAs default, you use your primary E-Mail account in the groupware. If you use further E-Mails accountslike Google Mail, you can access those accounts' E-Mails from within the groupware, by adding thoseaccounts as E-Mail accounts.
How to add an E-Mail account:
1. Click on Add Mail Account in the folder tree. The Add Mail Account window opens.
2. Click an icon. The further procedure depends on the E-Mail account provider.▪ For some providers, a new browser window opens. Log in with your credentials to grant access
to the E-Mail account.▪ If the provider asks you for the permission to access the data, grant this permission.▪ For some providers, enter your credentials in the Add Mail Account window. Then, click on Add.You can also manually enter the required data by clicking on Manually.
3. If the E-Mails in this account are also to be shown in the Unified Mail folder, enable Use unifiedmailfor this account.Note: Depending on the groupware's configuration, this setting might not be available.
An entry for the E-Mail account appears in the folder tree. The entry contains this account's E-Mailfolders. Open one of those folders to do the following:▪ read this account's E-Mails▪ send E-Mails from this account
Also see
Editing the primary E-Mail account (p. 251)Editing accounts (p. 252)Removing accounts (p. 252)Using Unified Mail (p. 90)
99
E-MailAdding E-Mail Accounts
5.11 E-Mail SettingsThere are the following options:▪ Settings for receiving E-Mails. (p. 101)▪ Settings for composing E-Mails (p. 103)
100
E-Mail SettingsE-Mail

5.11.1 Settings for receiving E-Mails.
How to use the settings for receiving E-Mails:
1. Click the Settings icon on the right side of the menu bar. Click the Settings menu item.
2. Click on E-Mail in the sidebar.
3. Change the settings.
The following settings are available. Depending on the groupware's configuration, some settings mightnot be available.
Buttons▪ Vacation notice
See Sending a vacation notice automatically (p. 77)▪ Auto forward
See Automatically forwarding E-Mails (p. 76)▪ Change IMAP subscriptions
See Subscribing to E-Mail folders (p. 97)
View▪ Allow HTML formatted E-Mail messages?
Specifies whether or not displaying HTML messages is allowed. In terms of bandwidth, HTML messageshave a high impact and can be a high security risk as they can contain dangerous scripts.
▪ Color quoted linesSpecifies whether original messages are highlighted and introduced with a vertical line. The messagesor replies will be displayed as embedded. This option assumes that the original mail text is not at-tached but appended to the E-Mail.
▪ Use fixed-width font for text mailsSpecifies whether a fixed-width font is used when displaying a plain text E-Mail.
▪ Show requests for read receiptsDefines whether a return receipt is displayed if a received E-Mail includes receipt confirmation request.
▪ Show folder with all unseen messagesDefines whether the Unreadmessages folder is displayed in the folder tree. If you enable this setting,unread messages from different folders are additionally displayed in this folder.
Notification sounds▪ Play sound on incoming mail
Defines whether a sound is played for incoming E-Mails.Note: Desktop notifications have to be allowed in the browser settings. Information can be foundin Receiving Notifications (p. 42).
▪ SoundYou can select between different sounds.
Behavior▪ Permanently remove deleted emails
Defines whether E-Mail messages will be removed permanently immediately after you click theDelete button or whether they will go to the trash folder.Warning: Permanently removed E-Mail messages can not be restored.
▪ Automatically collect contacts in the "Collected addresses" folder while sending E-MailsDefines whether new E-Mail addresses are automatically collected in the Collected contacts folderwhen sending a new E-Mail. The Collected addresses folder is located below your personal contactfolder.
▪ Automatically collect contacts in the "Collected addresses" folder while reading E-MailsDefines whether new E-Mail addresses are automatically collected in the Collected addressesfolder when reading a new E-Mail. The Collected addresses folder is located below your personalcontact folder.
101
E-MailSettings for receiving E-Mails.

▪ Ask for mailto link registrationDefines whether the groupware can ask for a mailto link registration.
Also see
Settings for composing E-Mails (p. 103)
102
Settings for receiving E-Mails.E-Mail
5.11.2 Settings for composing E-Mails
How to use the settings for composing E-Mails:
1. Click the Settings icon on the right side of the menu bar. Click the Settings menu item.
2. Select the entry E-Mail in the sidebar. Click on Compose.
3. Change the settings.
The following settings are available. Depending on the groupware's configuration, some settings mightnot be available.
Format emails asDefines the format in which E-Mails are sent:▪ HTML
The E-Mail is sent with html markup. You can format the E-Mail text.▪ Plain text
The E-Mail text is sent as plain text without formatting.▪ HTML and plain text
The E-Mail is sent with html markup and additionally as plain text.
Default font styleDefines the preset font style for E-Mail text in html format.
Forward emails asSpecifies how an E-Mail text is sent when forwarding the E-Mail.▪ Inline
The text is sent within the new E-Mail text.▪ Attachment
The text is sent as attachment to the new E-Mail.
Advanced settings▪ Append vcard
Specifies whether your contact data will be attached to a new E-Mail in the vCard format.▪ Insert the original E-Mail text into a reply?
Specifies whether the original E-Mail text is appended to an E-Mail reply.▪ Confirm recipients when replying to a mailing list
Defines whether you have to confirm the recipient when replying to a mailing list.▪ Auto-save email drafts
Specifies the interval for saving an E-Mail while being composed to the Drafts folder.▪ Default sender address
Specifies the pre-set sender address for new E-Mails.Note: The sender's name is displayed in front of the sender address. If you enter a name in the Yourname input field in the Account settings, this name overwrites the preset sender name.
▪ Always add the following recipient to blind carbon copy (BCC)To send each outgoing E-Mail as blind copy (BCC) to an E-Mail address, enter the wanted E-Mail ad-dress in this field.
Also see
Settings for receiving E-Mails. (p. 101)
103
E-MailSettings for composing E-Mails

104
6 Address BookLearn how to work with the Address Book application.▪ the Address Book components▪ view contacts▪ view or save contact attachments▪ create and add contacts from various sources▪ combine several contacts into distribution lists▪ add address books▪ edit and organize contacts▪ search for contacts▪ share contacts with other users▪ access contacts in your social networks▪ interchange contacts with other applications▪ use the Address Book settings
How to launch the Address Book app:Click the App Launcher icon in the menu bar. Click on Address Book in the App Launcher.
105

6.1 The Address Book ComponentsThe Address Book app includes the following components.▪ The Address Book search bar▪ The Address Book toolbar▪ The Address Book folder tree▪ The Address Book navigation bar▪ The Address Book display area
▫ The Address Book list▫ The Address Book detail view
▪ The contact editing window
106
The Address Book ComponentsAddress Book
6.1.1 The Address Book search barEnables you to search for contacts.
Also see
The search bar (p. 28)Searching for Contacts (p. 124)Displaying contacts (p. 112)
107
Address BookThe Address Book search bar
6.1.2 The Address Book toolbarNotes: Some functions are only available if you opened an address book for which you have the appro-priate permissions to create or edit objects. Some buttons are only displayed if the selected contactshave an E-Mail address.▪ New. Creates a new contact or a new distribution list.▪ Send mail. Sends an E-Mail to the contact.▪ Invite. Invites the contact to an appointment.▪ Edit. Edits the contact's data.▪ Delete. Deletes the contacts selected by you.▪ More actions icon . Opens a menu with further functions.
Notes:▫ Some buttons might not be displayed if you do not have the appropriate permissions.▫ Depending on the address book or the contact's data, some buttons might be sorted differently
or might not be available.▪ View. Opens a menu with checkboxes for controlling the view.
▫ Folder view. Opens or closes the folder tree.▫ Checkboxes. Displays a checkbox next to each contact in the list. This allows to select multiple
contacts to edit them at once.
Also see
The toolbar (p. 29)Instructions for the buttons and iconsCreating a new contact (p. 115)Sending E-Mails from within an address book (p. 120)Inviting contacts to an appointment (p. 120)Editing contacts (p. 121)Deleting contacts (p. 123)Instructions for the functions in the More actions menuExporting contacts (p. 122)Sending contacts as vCard (p. 122)Printing Contacts (p. 123)Moving Contacts (p. 121)Copying Contacts (p. 121)Adding contacts as Xing contacts (p. 122)
108
The Address Book toolbarAddress Book

6.1.3 The Address Book folder treeDisplays the address books.
Content
▪ My address books. Contains your personal address books.▪ Public address books. Contains address books shared with all users.▪ Shared address books. Contains address books shared with you by other users.Depending on the groupware configuration, the content can differ from this information.
Functions
▪ If clicking on an address book, its contacts are displayed.▪ The Actions icon next to the selected address book offers functions for organizing data and for
exchanging data.▪ The Add new address book button allows to create a new private or public address book.▪ The My contact data button opens a dialog for changing your contact data in the global address
book.▪ The Subscribe address book button below the address books allows to add contacts from other
accounts.
Also see
The folder tree (p. 30)Folders (p. 230)Navigating within the folder structure (p. 233)Adding Address Books (p. 118)Renaming folders (p. 235)Moving folders (p. 236)Deleting folders (p. 236)
6.1.4 The Address Book navigation bar
Displays the contacts in the list starting with the letter selected.
Also see
Displaying contacts (p. 112)
109
Address BookThe Address Book folder tree

6.1.5 The Address Book display areaContains the contacts list and a contact's detail view.
Also see
The display area (p. 31)
6.1.6 The Address Book listDisplays the names of the contacts in the opened address book.
Content
▪ The following details are displayed for each contact: name, company, primary E-Mail address.▪ The text above the list contains the name of the selected address book. The number corresponds
to the number of contacts in the selected address book.▪ Names that start with a figure or a special character are displayed below # at the top of the list.
Names that start with a special sign are displayed below Ω at the bottom of the list.
Functions
▪ To select multiple contacts, enable the Checkboxes option in the View drop-down in the toolbar.You can also use your system's multi selection functions.In order to select all contacts in the address book, enable the Select all checkbox above the list.
▪ If clicking on a contact, its data is displayed in the detail view [110].▪ To adjust the list width, hover over the line between the list and the detail view. Drag the border to
the left or to the right.
Also see
Searching for Contacts (p. 124)
6.1.7 The Address Book detail viewShows the data of the contact that you selected in the list [110]. If double-clicking on the contact in thelist, the data are displayed in a window.
Content
▪ Picture, name, job position, profession▪ E-Mail addresses. If clicking on an E-Mail address, the page for sending a new E-Mail is displayed.▪ Business and private phone numbers▪ Business and private addresses. In the address book settings, you can define whether a map service
should be used when clicking on an address.The extent of information displayed can vary.
Also see
Viewing or Saving Contact Attachments (p. 113)Sending E-Mails from within an address book (p. 120)Organizing Contacts (p. 120)
110
The Address Book display areaAddress Book

6.1.8 The contact editing windowThis window is used when creating a new contact or editing a contact.Note: To display all elements, enable Show all fields in the button bar.
Content
▪ title bar▫ window title▫ icons for adjusting the window position, cancel icons
▪ contact picture, name, companyClick on the contact picture to edit it or to upload a new contact picture.
▪ Contact data▫ Personal Data. Enter the title, name, birthday, and additional personal data.
This contact is private. If the contact is not to be displayed when its address book is beingshared, enable this checkbox.
▫ Job description. Enter the contact's business data in those fields.▫ Messaging. Enter E-Mail addresses or other messaging addresses.▫ Phone & fax numbers. Enter private and business phone and fax numbers.▫ Private address, Business address, Address Other. Enter the postal address.▫ Comment. You can enter any information here.▫ User fields. You can enter additional information here.
▪ Add attachments. Adds files.▪ button bar
▫ Save. Saves the current data of the contact. Closes the Format window.▫ Cancel. Cancels creating or editing the contact.▫ Show all fields. Defines whether all available data fields are displayed. Per default, only the data
fields that are most frequently used are displayed.
Also see
The editing window (p. 34)Creating a new contact (p. 115)Editing contacts (p. 121)
111
Address BookThe contact editing window
6.2 Displaying contactsYour personal address book can be found in the folder tree below Contacts. In the address book settings,you can define the address book that is to be opened as default.
How to display a contact:
1. Open an address book in the folder tree.
2. In order to display contacts with a certain initial letter, click a letter in the navigation bar.3. Click on a contact in the list. The contact's data is displayed in the detail view.
You can open the contact in a window by double-clicking on the contact in the list.
4. In order to display another contact, do one of the following:▪ Click on another contact in the list.▪ Use the cursor keys to browse the list.
Also see
Navigating within the folder structure (p. 233)Searching for Contacts (p. 124)Viewing or Saving Contact Attachments (p. 113)The Halo View (p. 114)The Address Book navigation bar (p. 109)The Address Book detail view (p. 110)The Address Book list (p. 110)
112
Displaying contactsAddress Book
6.3 Viewing or Saving Contact AttachmentsThe file names of contact attachments are displayed in the display area below the contact name. Thefollowing functions are available:▪ display the attachment in the Viewer▪ download the attachment▪ save the attachment to DriveNote: Depending on the attachment's file format, the available function might differ.
How to use the contact attachment functions:
1. Select a contact with an attachment.
2. Click on an attachment's name in the detail view. A menu with several functions opens.
3. Click on the function wanted. Depending on the function, further actions might be available.
Tip: If a contact contains several attachments, an action can be executed for all attachments at once.To do so, click on All attachments. Click on the function wanted.
Also see
Displaying contacts (p. 112)The Address Book detail view (p. 110)The Address Book list (p. 110)
113
Address BookViewing or Saving Contact Attachments

6.4 The Halo ViewThe halo view opens a popup with all relevant information on a contact:▪ addresses, E-Mail addresses, phone numbers▪ your current correspondence with this contact▪ shared appointments with this contact▪ Information about this person from social networks. You can use the available buttons to open this
person's profile.
How to display a contact in the halo view:
1. Depending on the app, use one of the following methods:Select an E-Mail in the E-Mail app. Click on a recipient or the sender in the detail view.Select an appointment or a task in the Calendar or Tasks app. Click on a participant in the detailview or in the pop-up.
2. To close the halo view, click the Close icon in the pop-up.
Also see
The pop-up (p. 32)Displaying contacts (p. 112)The Address Book detail view (p. 110)
114
The Halo ViewAddress Book

6.5 Adding ContactsThe following options exist:▪ Creating a new contact▪ Adding a contact from vCard▪ Adding attachments
6.5.1 Creating a new contactIn order to create a new contact, you must at least enter one name in the Add contact window. All otherdata is optional.
How to create a new contact:
1. Open an address book in the folder tree.Note: Open an address book for which you have the appropriate permissions to create objects.
2. Click on New in the toolbar. Click on Add contact.3. To add a contact picture, click on the empty contact picture. The Edit image window opens.
▪ To upload an existing picture, click the Upload image icon.▪ To make a new picture with the device camera, click the Take photo icon.You can adjust the image section with the zoom and by moving or rotating the photo.Click on OK. Click on Save. The photo will be inserted.In order to edit the photo, click on it.
4. Enter the data.A description of the input fields can be found in The contact editing window (page 111).
5. You can use additional functions:▪ Adding attachments (p. 116)
6. Click on Save.
Also see
Creating distribution lists (p. 117)Adding a contact from vCard (p. 116)The contact editing window (p. 111)
115
Address BookAdding Contacts

6.5.2 Adding a contact from vCardYou can add a contact from a vCard attachment to an E-Mail. A vCard attachment per default has thename extension vcf.
How to add a contact from an E-Mail's vCard attachment:
1. Select an E-Mail with a vCard attachment in the E-Mail application.
2. Click on an attachment's name in the detail view. Click on Add to address book in the menu.
Also see
Creating a new contact (p. 115)Adding attachments (p. 116)Creating distribution lists (p. 117)
6.5.3 Adding attachments
How to add attachments in the contact editing window:
1. Click on Add attachments below Attachments.
2. Select one or several files.In order to remove an attachment, click the Delete icon .
Tip: You can also add an attachment by dragging and dropping a document from a file browser or fromthe desktop to the contacts window.
Also see
Creating a new contact (p. 115)Creating distribution lists (p. 117)Adding a contact from vCard (p. 116)The contact editing window (p. 111)
116
Adding a contact from vCardAddress Book
6.6 Creating distribution listsA distribution list allows you to simultaneously send an E-Mail to multiple recipients by entering thedistribution list in the E-Mail's recipients field. In order to create a new distribution list, enter a nameand add contacts.
How to create a new distribution list:
1. Open an address book in the folder tree.Note: Open an address book for which you have the appropriate permissions to create objects.
2. Click on New. Click on Add distribution list.3. Enter a name for the distribution list in the Name field.
4. Enter a participant's E-Mail address in the Participants field. Tips:▪ While entering the E-Mail address, several matching suggestions are displayed. To accept a sug-
gestion, use one of the following methods:▫ Use the scrollbar to browse the list. Click on a suggestion.▫ Use the cursor keys to select a suggestion. Press Enter.
▪ To select contacts from a list, click the Address bookicon on the right side of the input field.In order to add further contacts, repeat this step. In order to remove a contact, click next to thecontact.
5. Click on Create list.
Also see
Selecting contacts from a list (p. 69)Creating a new contact (p. 115)The contact editing window (p. 111)
117
Address BookCreating distribution lists
6.7 Adding Address BooksThe following options exist:▪ Adding address books▪ Subscribing to external address books▪ Importing address books from files
Also see
Folders (p. 230)
6.7.1 Adding address booksYou can create additional personal address books below My calendars.
How to create a new personal address book:
1. In the folder tree, click on Add new address book. A window opens.
2. Enter a name. In case the new address book should be a public address book, enable Add as publicfolder. Click on Add.
Also see
Subscribing to external address books (p. 118)Importing address books from files (p. 119)
6.7.2 Subscribing to external address booksYou can subscribe to external address books, e.g. from your social networks. The following applies:▪ Changes that you apply to the subscribed address book in the groupware are not transfered to the
external address book.▪ Changes that you apply to the external address book can be transfered to the groupware by refreshing
subscribed data.
How to subscribe to external address books:
1. Click on Subscribe address book in the folder tree. The Subscribe address book window opens.
2. Click one of the icons. Depending on the data source, the further procedure varies.▪ For some data sources, a new browser window opens. Log in with your credentials to grant access
to the address data.▪ If the provider asks you for the permission to access the data, grant this permission.▪ For some data sources, you have to enter your credentials for the data source in the Subscribe
address book window.As soon as the import has been completed, the Subscribe address book window will be closed.
Tip: An address book with subscribed contacts is marked with the Subscribed icon . If clicking theicon, the Subscriptions settings are opened.
Also see
refresh subscribed data (p. 253)Managing subscribed folders (p. 253)Adding address books (p. 118)Importing address books from files (p. 119)
118
Adding Address BooksAddress Book

6.7.3 Importing address books from filesInformation on importing contacts from various files can be found in Importing Data (page 260).
Also see
Adding address books (p. 118)Subscribing to external address books (p. 118)
119
Address BookImporting address books from files

6.8 Organizing ContactsSome of the techniques for organizing contacts require that address books have already been set upby you. Information on creating address books can be found in Folders (page 230).
The following options exist:▪ Sending E-Mails from within an address book▪ Inviting contacts to an appointment▪ Editing contacts▪ Moving Contacts▪ Copying Contacts▪ Exporting contacts▪ Sending contacts as vCard▪ Adding contacts as Xing contacts▪ Inviting contacts to Xing▪ Printing Contacts▪ Deleting contacts
6.8.1 Sending E-Mails from within an address bookYou can send an E-Mail from within your address book to contacts or to a distribution list.
How to send an E-Mail from within an address book:
1. Select a single contact, multiple contacts or distribution lists from the list.
2. Click on Send mail in the toolbar.
3. Fill in the details for sending a new E-Mail.
Also see
Sending a new E-Mail (p. 68)
6.8.2 Inviting contacts to an appointmentYou can use the address book to invite contacts or a distribution list's contacts to an appointment.
How to invite contacts to an appointment:
1. Select a single contact or distribution list, multiple contacts or distribution lists from the list.
2. Click on Invite in the toolbar.
3. Complete the details for creating an appointment.
Also see
Creating new appointments (p. 146)
120
Organizing ContactsAddress Book

6.8.3 Editing contactsContact data can be edited at a later point of time. The contact editing window shows the data that ismost frequently used. Other data can be displayed.
How to edit a contact:
Prerequisite: You have the appropriate permissions to edit objects in the address book containingthe contact.
1. Select a contact from the list.
2. Click on Edit in the toolbar. The contact's data is displayed.
3. Edit the data.
4. Click on Save.
Also see
The contact editing window (p. 111)
6.8.4 Moving ContactsYou can move contacts or distribution lists to another address book.
How to move contacts to another address book:
Prerequisite: You need to have the appropriate permissions to create objects in the target addressbook.
1. Select a single contact or distribution list, multiple contacts or distribution lists from the list.
2. Click the More actions icon in the toolbar. Select Move from the menu.
3. Select an address book in theMovewindow. You can create a new address book by clicking onCreatefolder.
4. Click on Move.
Tip: In order to move contacts using drag and drop, select contacts or distribution lists in the list. Dragthe selected objects to an address book in the folder tree.
Also see
How to copy contacts to another address book: (p. 121)
6.8.5 Copying ContactsYou can copy contacts or distribution lists to another address book.
How to copy contacts to another address book:
Prerequisite: You need to have the appropriate permissions to create objects in the target addressbook.
1. Select a single contact or distribution list, multiple contacts or distribution lists from the list.
2. Click the More actions icon in the toolbar. Select Copy from the menu.
3. Select an address book in the Copy window. You can create a new address book by clicking on Createfolder.
4. Click on Copy.
Also see
How to move contacts to another address book: (p. 121)
121
Address BookEditing contacts

6.8.6 Exporting contactsYou can export contacts or distribution lists to those formats:▪ vCard. You can e.g. use this format to exchange contacts with other E-Mail applications.▪ CSV You can use this format to export contacts to spreadsheet formats.
How to export contacts:
1. Select a single contact or distribution list, multiple contacts or distribution lists from the list.
2. Click the More actions icon in the toolbar. Click the Export menu item. The Export selected dialogwindow opens.
3. Select a format.To export selected distribution lists, enable With distribution lists.
4. Click on Export. Complete the entries.
Also see
Sending contacts as vCard (p. 122)Exporting a Folder's Data. (p. 265)
6.8.7 Sending contacts as vCardYou can send contacts or distribution lists as vCard attachment to an E-Mail.
How to send a contact as vCard attachment:
1. Select a single contact or distribution list, multiple contacts or distribution lists from the list.
2. Click the More actions icon in the toolbar. Click on Send as vCard in the menu.
3. Fill in the details for sending a new E-Mail.
Also see
Sending a new E-Mail (p. 68)Exporting contacts (p. 122)
6.8.8 Adding contacts as Xing contactsYou can add a contact as Xing contact if you are not connected with this contact in Xing. The contactand you need to have a Xing account.
How to add a contact as Xing contact:
1. Select a contact from the list.
2. Click the More actions icon in the toolbar. Click on Add to Xing in the menu.
Also see
Inviting contacts to Xing (p. 123)
122
Exporting contactsAddress Book
6.8.9 Inviting contacts to XingYou can invite a contact to Xing if this contact has no Xing account yet.
How to invite a contact to Xing:
1. Select a contact from the list.
2. Click the More actions icon in the toolbar. Click the menu entry Invite to Xing.
Also see
Adding contacts as Xing contacts (p. 122)
6.8.10 Printing ContactsYou can print the data of a single contact or of multiple contacts. You can select between different printlayouts.
How to print a contact's data:
1. Open an address book in the folder tree. Select a single contact or multiple contacts from the list.
2. Click on More actions in the toolbar. Click on Print in the menu. The Select print layout windowopens.
3. Select a print layout. Click on Print.Complete the steps for starting the printing process.
4. Close the print preview window.
6.8.11 Deleting contactsYou can delete contacts or distribution lists. If you delete a distribution list, the distribution list's contactsare kept.
How to delete contacts:
Warning: If you delete contacts or distribution lists, those items are irrevocably lost.
1. Select a single contact or distribution list, multiple contacts or distribution lists from the list.
2. Click on Delete in the toolbar.
3. Confirm that you want to delete the items.
Result: The items will be deleted.
123
Address BookInviting contacts to Xing

6.9 Searching for ContactsIn order to search for specific contacts, you can use the following search criteria:▪ search terms for name, E-Mail address, phone number, department, address
Depending on the groupware configuration, you can search in departments.▪ address books that are to be searched▪ type: all, contact, distribution list
How to search for contacts:
1. Click on the Search input field. Additional icons are displayed.
2. Enter a search term in the input field. The search menu opens.
Define the data sources to be searched by clicking on an entry in the search menu.▪ If clicking on the search term or pressing enter, the following data sources are searched: name,
address, phone number▪ In order to only search in names, click on in names in the search menu.
Accordingly, you can limit the search to E-Mail addresses, phone numbers, departments or ad-dresses.
▪ In order to search for a contact matching the search term, click on a name in the search menu.The search results are displayed in the list that is shown in the display area.
3. To select an address book for the search, click the Options icon in the input field. The addressbook that is searched, is displayed in the Folder drop-down. To select another address book, openthe drop-down.If you select All folders, all private, public, and shared address books are searched.
4. To limit the search to contacts or distribution lists, click the Options icon in the input field. Openthe Type drop-down. Select a type.
5. To refine the search result, enter further search terms: To remove a search term, click the Removeicon next to the search term.
6. In order to finish the search, click the Close icon in the input field.
124
Searching for ContactsAddress Book

6.10 Contacts in TeamsYou can share your contacts with internal and external partners. Depending on the requirements, dif-ferent methods exist.▪ The Global address book provides the contact data for all users. Each user can use those contacts.▪ To make additional contacts available for internal users or external partners, proceed as follows:
Create a new personal or public address book where you can copy or move the wanted contactsto.Share this address book.
You can also share an existing address book.▪ If another internal user shared an address book with you, you can access this address book in the
folder tree.
125
Address BookContacts in Teams

6.11 Interchanging Contacts with Other ApplicationsThe following options exist:▪ export [265] contacts to use them in other applications▪ import [260] contacts that you created in other applications
126
Interchanging Contacts with OtherApplicationsAddress Book

6.12 Address Book SettingsHow to use the address book settings:
1. Click the Settings icon on the right side of the menu bar. Click the Settings menu item.
2. Click on Address Book in the sidebar.
3. Change the settings.
The following settings are available.
My contact data buttonIn order to change your personal contact data in the global address book, click on this button.Also see: Changing Personal Contact Data (p. 40)
Display of namesSpecifies the order in which a contact's first name and surname are displayed in the address book.
Initial folderDefines the address book that is opened as default after having logged in.
Link postal addresses with map serviceDefines the map service to be used for displaying the address when clicking on a contact's postal addressin the address book.
127
Address BookAddress Book Settings

128

7 CalendarLearn how to work with the Calendar application.▪ the Calendar components▪ display appointments▪ view or save appointment attachments▪ create appointments▪ answer appointment invitation▪ add calendars▪ manage appointments▪ search for appointments▪ share calendars with other users▪ manage participant groups▪ manage resources▪ interchange appointments with other applications▪ use the Calendar settings
How to launch the Calendar app:Click the App Launcher icon in the menu bar. Click on Calendar in the App Launcher.Depending on the groupware configuration, you can also click the quick start icon for launching theCalendar app in the menu bar.
129

7.1 The Calendar ComponentsThe Calendar app includes the following components.▪ The Calendar search bar▪ The Calendar toolbar▪ The mini calendar▪ The Calendar folder tree▪ The Calendar display area
▫ Day, Work week, Week, Month or Year calendar view.▫ The date picker▫ The Calendar pop-up▫ The Calendar list▫ The Calendar detail view
▪ The scheduling view▪ The appointment editing window:
130
The Calendar ComponentsCalendar

7.1.1 The Calendar search barEnables you to search for appointments.
Also see
The search bar (p. 28)Searching for Appointments (p. 167)Viewing Appointments (p. 141)
131
CalendarThe Calendar search bar

7.1.2 The Calendar toolbarNote: Some functions are only available if you opened a calendar for which you have the appropriatepermissions to create or edit objects.▪ New. Creates a new appointment.▪ Scheduling. Opens the scheduling view for scheduling appointments with multiple participants.▪ If a calendar view is selected in View: Today button. Selects the time frame with the current day.▪ View. Opens a menu with checkboxes for controlling the view.
▫ Day, Work week, Week, Month or Year. Selects a calendar view.▫ List. Activates the list view.▫ Folder view. Opens or closes the folder tree.▫ Mini calendar. Opens or closes the mini calendar.▫ If the list view is selected and checkboxes are enabled, checkboxes for marking objects are dis-
played in the list.▫ Print. Opens the print preview for printing a calendar sheet.
If you select an appointment in the list view, additional elements are displayed:▪ Edit. Edits an appointment's data.▪ Status. Changes the status of the appointment confirmation.▪ Delete. Deletes the appointments selected by you.▪ More actions icon . Opens a menu with further functions.
Also see
The toolbar (p. 29)The mini calendar (p. 133)Day, Work week, Week, Month or Year calendar view. (p. 135)Instructions for the buttons and icons:Creating Appointments (p. 145)Using the scheduling view (p. 152)Editing appointments (p. 161)Changing the appointment confirmation or status (p. 162)Deleting appointments (p. 166)Instructions for the functions in the More actions menu :Exporting appointments (p. 164)Printing appointments (p. 165)Moving appointments to another calendar (p. 164)
132
The Calendar toolbarCalendar
7.1.3 The mini calendarThe mini calendar is displayed if Folder view and Mini calendar are enabled in the View drop-downin the toolbar. The mini calendar displays a clear overview of a month, year or several years.
Content
▪ Browse icons . If clicking the icons, the displayed time range is browsed: one month, one year,12 years.
▪ If a month is displayed:▫ The header contains the name of the month and the year.▫ Calendar weeks and the days of the month are displayed.
The current day is highlighted.▫ If clicking on a day, the respective time range is used in the calendar view.▫ If clicking on the name of the month in the header, the year is displayed.
▪ If a year is displayed:▫ The header contains the year.▫ The names of the months are displayed.▫ If clicking on a month name, the month is displayed.▫ If clicking on the year in the header, a time range of 12 months is displayed.
▪ If a time range of 12 months is displayed:▫ The header contains the start and end of the time range.▫ The years within the time range are displayed.▫ If clicking on a year, the name of the months of the year are displayed.
The date picker offers similar functions.
Also see
The date picker (p. 136)The Calendar toolbar (p. 132)Day, Work week, Week, Month or Year calendar view. (p. 135)
133
CalendarThe mini calendar

7.1.4 The Calendar folder treeDisplays the calendars.
Content
▪ My calendars. Contains your personal calendars.▪ Public calendars. Contains calendars shared with all users.
The All my public appointments calendar contains the public appointments you participate in.▪ Shared calendars. Contains calendars shared with you by other users.Depending on the groupware configuration, the content can differ from this information.
Functions
▪ If clicking on a calendar, appointments within that calendar are displayed.▪ If enabling the checkbox next to a calendar, this calendar's appointments are displayed in addition
to the current calendar's appointments.▪ TheActions icon next to the selected calendar offers functions for organizing data, for exchanging
data and for selecting a calendar color.Depending on the calendar, a function for displaying the calendar properties is available.
▪ The addnew calendar button opens a menu with functions for creating, subscribing to or importingcalendars.
Also see
The folder tree (p. 30)Using calendar colors (p. 164)Folders (p. 230)Navigating within the folder structure (p. 233)Adding Calendars (p. 156)Renaming folders (p. 235)Moving folders (p. 236)Deleting folders (p. 236)
7.1.5 The Calendar display areaEither includes a calendar view or a list view of the appointments. In order to select a view, click on theView button in the toolbar.
Also see
The display area (p. 31)
134
The Calendar folder treeCalendar

7.1.6 Day, Work week, Week, Month or Year calendar view.Displays the appointments of the calendars selected in the folder tree, for the chosen time range. TheBrowse icons enable you to browse back and forth. If clicking on an appointment, its data is shownin the pop-up.
Contents of the Day view
▪ Day of the week, date, calendar week. Clicking on it opens the date picker.▪ Split button. Displays the calendars selected in the folder tree, in separate columns.▪ The red line in the calendar sheet displays the current time.▪ On the left side of the calendar sheet, the timezone is displayed above the dates.
To add a further column with dates in another timezone, click on the timezone.▪ If there are further appointments above or below the visible calendar sheet, arrows are displayed
at the top or the bottom of the calendar sheet.
Contents of the Work week and Week view.
▪ Month, year, calendar week. Clicking on it opens the date picker.▪ Days of the week. The current weekday is highlighted in red.
In the calendar settings, you can define the number of days for a work week and the first day of awork week.
▪ If clicking on a weekday, the window for creating a new whole day appointment opens.▪ The red line in the calendar sheet displays the current time.▪ On the left side of the calendar sheet, the timezone is displayed above the dates.
To add a further column with dates in another timezone, click on the timezone.▪ If there are further appointments above or below the visible calendar sheet, arrows are displayed
at the top or the bottom of the calendar sheet for the respective day.
Contents of the Month view
▪ Days of the week.Month, year.
▪ The calendar weeks are displayed on the left side of the calendar sheets.
Contents of the Year view
▪ Year. If clicking on it, a window for selecting a year opens.The calendar sheet shows an overview of a year's days and months. Appointments are not displayed.
▪ If clicking on a month, the calendar is opened in the month viewNote: In the Year view, no appointments are displayed.
Also see
Viewing Appointments (p. 141)Displaying multiple time zones (p. 142)How are appointments displayed? (p. 143)Creating Appointments (p. 145)Managing Appointments (p. 160)The Calendar toolbar (p. 132)
135
CalendarDay, Work week, Week, Month or Yearcalendar view.

7.1.7 The date pickerThe following actions open the date picker:▪ If the mini calendar is not visible: Clicking on the date on the upper left side of theDay, Work week or
Week calendar view .▪ Clicking on the date on the upper left side of the scheduling view.▪ Clicking on a date input field in the appointment editing window.
Content
▪ Browse icons . If clicking the icons, the displayed time range is browsed: one month, one year,12 years.
▪ If a month is displayed:▫ The header contains the name of the month and the year.▫ Calendar weeks and the days of the month are displayed.▫ If clicking on a day, the date picker closes. The selected date will be used.
If clicking on Today, the date picker closes. The current date will be used.▫ If clicking on the name of the month in the header, the year is displayed.
▪ If a year is displayed:▫ The header contains the year.▫ The names of the months are displayed.▫ If clicking on a month name, the month is displayed.▫ If clicking on Today, the date picker closes. The current date will be used.▫ If clicking on the year in the header, a time range of 12 months is displayed.
▪ If a time range of 12 months is displayed:▫ The header contains the start and end of the time range.▫ The years within the time range are displayed.▫ If clicking on a year, the name of the months of the year are displayed.▫ If clicking on Today, the current month is displayed. The current day is highlighted.
The mini calendar offers similar functions.
Also see
Using the date picker (p. 147)The mini calendar (p. 133)Day, Work week, Week, Month or Year calendar view. (p. 135)The appointment editing window: (p. 140)The task editing window (p. 181)
136
The date pickerCalendar

7.1.8 The Calendar pop-upIf clicking on an appointment in a calendar view, a pop-up opens. It shows the appointment's data.
Content
▪ Accept, Decline, Change status, Edit, Follow-up, Delete buttons.Note: Depending on the server configuration, the following limitations might prevail: Some buttonsfor appointments in your private calendars are only displayed if you have the respective permissionsfor executing the function. If you are a participant, you can not change or delete the appointment.If you are the organizer, you can not change your status.
▪ If clicking the More actions icon a menu with further functions opens.Below the buttons, the same information are shown as in the Detail view in the List view.
Also see
The pop-up (p. 32)Day, Work week, Week, Month or Year calendar view. (p. 135)Changing the appointment confirmation or status (p. 162)Instructions for the buttons and icons:Editing appointments (p. 161)Changing the appointment confirmation or status (p. 162)Creating a follow-up appointment (p. 153)Deleting appointments (p. 166)Instructions for the functions in the More actions menu :Printing appointments (p. 165)Moving appointments to another calendar (p. 164)
7.1.9 The Calendar listDisplays a list of the appointments of the calendars selected in the folder tree.
Content
▪ Each day with appointments shows a header with the date.▪ The following details are displayed for each appointment: date, time, color, private appointment
icon, subject and location.
Functions
▪ If clicking on an appointment, its data is displayed in the detail view.▪ To select multiple appointments, enable the Checkboxes option in the View drop-down in the
toolbar.You can also use your system's multi selection functions.In order to select all appointments in the calendar, enable the Select all checkbox above the list.
▪ If clicking the Sort icon above the list, a menu opens that allows to sort appointments.▪ To adjust the list width, hover over the line between the list and the detail view. Drag the border to
the left or to the right.
Also see
Searching for Appointments (p. 167)
137
CalendarThe Calendar pop-up

7.1.10 The Calendar detail viewIf clicking on an appointment in the list, the detail view shows the appointment's data. If double-clickingon the appointment in the list, the data are displayed in a window.
Content
▪ Subject▪ Date, time, time zone▪ The recurrence type (for recurring appointments)▪ Appointment location, if entered▪ Appointment description, if entered▪ If the appointment has several participants, the number of participants that accepted, declined or
have not replied yet are shown on the top right side above the list of participants. In order to filterthe list of participants, click the icons.
▪ Names of the participants, if they exist. If clicking on a name, a pop-up opens. It displays informationabout the contact.▫ The person's contact data.▫ If you exchanged E-Mails with this person, they are displayed below Recent conversations.▫ If you have appointments scheduled with this person, they are displayed below Shared appoint-
ments.▫ Information about this person from social networks. You can use the available buttons to open
this person's profile.If clicking on an appointment or an E-Mail, an additional pop-up opens.
▪ Names of existing resources. If clicking on a resource a pop-up opens.▪ If the appointment includes external participants, their names are displayed below External partici-
pants.▪ If clicking on Details, further information are displayed:
▫ the appointment's organizer▫ availability▫ which calendar▫ who created the appointment and when▫ who was the last person to modify the appointment
Also see
Editing appointments (p. 161)Changing the appointment confirmation or status (p. 162)Deleting appointments (p. 166)Printing appointments (p. 165)Moving appointments to another calendar (p. 164)
138
The Calendar detail viewCalendar

7.1.11 The scheduling viewThere are the following options to open the scheduling view:▪ In the toolbar: Click on Scheduling▪ on the appointment editing window: Click on Find a free time
Content
▪ The Browse icons enable you to browse back and forth.▪ Start and end date of the selected time range and the calendar week. If clicking on it, the date picker
opens that allows to set a different time range.▪ Icons for adjusting the zoom ratio for the calendar sheet view▪ Options button. If clicking on it, a menu with several functions opens:
▫ Compact. Defines the line height for displaying the participants and resources▫ Show fine grid. Defines a smaller grid spacing for the time grid.▫ Free. Defines whether free appointments are displayed. Such appointments do not cause conflicts.▫ Reserved. Defines whether reserved appointments are displayed.▫ Reserved. Defines whether reserved appointments are displayed.▫ Week or Month date range. Defines the date range that is displayed in the scheduling view.▫ Hide non-working time. Defines whether times that are outside the working hours are hidden.
▪ If the scheduling view was opened from the toolbar: Close icon▪ An input field for participants and resources▪ A list of participants. The following information are shown for each participant: Name, Remove
icon , appointments in the calendar sheet.▪ The calendar sheet of the selected time range.▪ Scrollbar. The scrollbar allows to set the part of the time range to be displayed.▪ Save as distribution list button. Saves the added participants in a new distribution list.▪ Elements for closing the scheduling view:
▫ If the scheduling view was opened from the toolbar: Create appointment button▫ If the scheduling view has been opened in an appointment editing window:Cancel button,Create
appointment button.
Also see
The date picker (p. 136)The appointment editing window: (p. 140)Using the scheduling view (p. 152)Creating new appointments (p. 146)Editing appointments (p. 161)
139
CalendarThe scheduling view
7.1.12 The appointment editing window:This window is used when creating a new appointment or editing an appointment.
Content
▪ The title bar includes the following elements:▫ window title▫ icons for adjusting the window position, cancel icons
▪ Appointment data▫ Subject input field. Enter the subject in this field. The subject is displayed as appointment title.▫ Location button. Here, you can enter the location where the appointment is to take place.▫ Starts on and Ends on. Set the start and end date of the appointment. Clicking on it opens the
date picker.If All day is disabled, you can set start and end times.
▫ If clicking on a timezone button next to a time, a dialog window opens that allows to select a timezone for the appointment's start and end time. You can set frequently used time zones as favoritesin the calendar settings.
▫ All day. Defines whether the appointment is supposed to last whole days.▫ Find a free time. Opens the scheduling view. In this view, you can find a free time when
scheduling an appointment with several participants.▫ Repeat. Defines whether the appointment is supposed to last whole days. Examples can be found
in the questions about appointments and tasks.▫ Description input field. You can enter a description for the appointment in this field.
▪ Appointment view▫ Show as free. Defines whether the appointment is displayed as free. Enable this checkbox to
avoid conflicts with overlapping appointments.▫ Appointment color. You can define the color in which the appointment is displayed. If the No
color checkbox is enabled, the appointment is displayed in the color of the calendar. In order toset a different color for the appointment, click on a color field.
▫ Visibility. Defines the visibility of the appointment in a shared calendar.◦ Standard. The appointment is visible to all users.◦ Private. Users that are no participants can only view the appointment date.◦ Secret. Users that are no participants can not view the appointment.
▪ Reminder. Defines when and how you will be reminded about the appointment's due date.▪ Add contact/resource input field. Enter the names of the participants or resources.▪ Add attachments. Adds files.▪ button bar
▫ Create. Saves the current data of the appointment. Closes the Format window.▫ Cancel. Cancels creating or editing the appointment.▫ Calendar. Shows the calendar in which the appointment will be created. If clicking on it, a window
for selecting a calendar opens.
Also see
The editing window (p. 34)The date picker (p. 136)The scheduling view (p. 139)Creating new appointments (p. 146)Editing appointments (p. 161)
140
The appointment editing window:Calendar

7.2 Viewing AppointmentsThe following options exist:▪ Displaying appointments in a calendar view
In the calendar views Day, Work week, and Week, you can display the day times in multiple time zones.▪ Displaying appointments in the list view
7.2.1 Displaying appointments in a calendar view
How to display appointments in a calendar view:
1. Click on View in the toolbar. Select one of the following entries: Day, Work week, Week or Month.
2. Open a calendar in the folder tree.
3. To view the appointments of other calendars, enable the checkboxes next to the respective calendars.If you selected the Day view, you can display the selected calendars next to each other by clickingon Split.To only view the appointments of a single calendar, you have the following options.▪ Double-click on the calendar in the folder tree.
To display the previously displayed calendars again, double-click on this calendar again.▪ Click the Actions icon next to the calendar. Click on Show this calendar only in the menu.▪ Disable the checkboxes next to the other calendars.Note: if a subscribed calendar is marked with an exclamation mark, there is an issue with retrievingthis calendar's appointments. To get further information, click on the exclamation mark.
4. Click on an appointment in the calendar sheet. The calendar's data is displayed in the pop-up.
5. In order to browse the calendar, use the navigation bar on top of the calendar sheet.In order to display the time frame with the current day, click on Today in the toolbar.
Also see
Navigating within the folder structure (p. 233)How are appointments displayed? (p. 143)Searching for Appointments (p. 167)Displaying appointments in the list view (p. 142)Displaying multiple time zones (p. 142)Viewing or Saving Appointment Attachments (p. 144)Day, Work week, Week, Month or Year calendar view. (p. 135)The date picker (p. 136)The Calendar pop-up (p. 137)
141
CalendarViewing Appointments

7.2.2 Displaying multiple time zonesIn addition to the default timezone, you can display time zones that have been marked as favorites byyou. The default timezone can be changed in the basic settings
How to display multiple time zones in a calendar view:
1. Click on View in the toolbar. Select one of the following entries: Day, Work week or Week.
2. Click on the Timezone button on the left side above the calendar sheet.
A menu opens. Enable a timezone in the menu below Favorites.By clicking on Manage favorites you can add/remove timezones to/from favorites.
Also see
Displaying appointments in a calendar view (p. 141)Day, Work week, Week, Month or Year calendar view. (p. 135)
7.2.3 Displaying appointments in the list view
How to display an appointment in the list view:
1. Click on View in the toolbar. Select List.2. Open a calendar in the folder tree.
To view the appointments of other calendars, enable the checkboxes next to the respective calendars.Note: if a subscribed calendar is marked with an exclamation mark, there is an issue with retrievingthis calendar's appointments. To get further information, click on the exclamation mark.
3. Click on an appointment in the list. The appointment's data is displayed in the detail view.You can open the appointment in a window by double-clicking on the appointment in the list.
4. To display another appointment, use one of the following methods:▪ Click on another appointment in the list.▪ Use the cursor keys to browse the list.
Also see
Navigating within the folder structure (p. 233)Searching for Appointments (p. 167)Displaying appointments in a calendar view (p. 141)Displaying multiple time zones (p. 142)Viewing or Saving Appointment Attachments (p. 144)The Calendar list (p. 137)
142
Displaying multiple time zonesCalendar
7.2.4 How are appointments displayed?In a calendar view, the appointment display is defined by the following details:▪ Your availability displayed during the appointment duration: Reserved, Free▪ Your appointment confirmation status: Accepted, Tentative, Declined▪ Visibility of the appointment in shared calendars for users who are no participants: Standard, Private,
Secret▪ If there is enough space, icons for the following appointments are displayed in the Day, Workweek
and Week calendar view: serial appointment, appointment with participants, private appointment,secret appointment, tentative appointment
The display is distinguished by the colors, icons and different shadings.
Display of appointments that are visible to allDepending on the displayed availability, public appointments are displayed in the following colors andpatterns:▪ Free: Selected color with broad diagonal stripes▪ Booked: Selected colorIf you do not select a color, the color of the calendar is used. Depending on the appointment confirmationstatus, public appointments are displayed as follows:▪ Accepted appointments are displayed in the color and pattern of the availability▪ Tentatively accepted appointments are displayed with question marks.▪ Declined appointments are displayed in light gray with crossed subject.
Tip: In the calendar settings, you can define whether declined appointments are displayed.
Private or secret appointments displayPrivate and secret appointments are displayed as follows:▪ Private appointments are displayed in gray and are marked with the Private icon .
Users that are no participants can only view the appointment date in shared calendars.▪ Secret appointments are displayed in gray and are marked with the Private icon .
Users that are no participants can not view the appointment in shared calendars. Secret appointmentsare not considered for the conflict handling. Secret appointments are not displayed in the schedulingview.
Also see
Displaying appointments in a calendar view (p. 141)
143
CalendarHow are appointments displayed?

7.3 Viewing or Saving Appointment AttachmentsDepending on the view selected, the file names of appointment attachments are either displayed in thepop-up or in the display area below the subject. The following functions are available:▪ display the attachment in the Viewer▪ download the attachment▪ save the attachment to DriveNote: Depending on the attachment's file format, the available function might differ.
How to use the appointment attachment functions:
1. Depending on the view selected, use one of the following methods:Click on an appointment with an attachment in a calendar view. Click on an attachment's namein the pop-up.Click on an appointment with an attachment in the list view. Click on an attachment's name inthe detail view.
A menu with several functions opens.
2. Click on the function wanted. Depending on the function, further actions might be available.
Tip: If an appointment contains several attachments, an action can be executed for all attachments atonce. To do so, click on All attachments. Click on the function wanted.
Also see
Viewing Appointments (p. 141)The Calendar list (p. 137)The Calendar detail view (p. 138)Day, Work week, Week, Month or Year calendar view. (p. 135)The Calendar pop-up (p. 137)
144
Viewing or Saving Appointment Attach-mentsCalendar

7.4 Creating AppointmentsThe following options exist:▪ Creating new appointments▪ Using the date picker▪ Using appointment reminders▪ Setting recurring appointments▪ Adding participants or resources to an appointment▪ Setting an appointment's display▪ Adding attachments▪ Using the scheduling view▪ Creating a follow-up appointment▪ Creating appointments from iCal attachments▪ Resolving appointment conflicts
145
CalendarCreating Appointments

7.4.1 Creating new appointments
How to create a new appointment:
1. Open a calendar in the folder tree.Note: Open a calendar for which you have the appropriate permissions to create appointments. Ifselecting a shared calendar, you are asked where to create the appointment:▪ If you create the appointment on behalf of the owner, the appointment is created in the owner's
shared calendar.▪ If you invite the owner to the appointment though, the appointment is saved in your calendar.
2. Click on New in the toolbar.
3. Enter a subject. If required, enter the location and a description.If you want create the appointemnt in another calendar, click on the calendar name next to Calendarin the button bar. Select a calendar.
4. To set an appointment's start and end time, use the following options below Start date and Endson.▪ Click on a date. The date picker opens. Enter a date or select a date in the date picker.
For all day appointments, activate All day.▪ Click on a time. Enter the time or select a time from the list.▪ You can set the timezone for the start or end time by clicking on the timezone button next to a
time. You can set different timezones for the start and end time.
5. You can use additional functions:▪ Setting recurring appointments (p. 148)▪ Setting an appointment's display (p. 149)▪ Using appointment reminders (p. 150)▪ Adding participants or resources to an appointment (p. 150)▪ Adding attachments (p. 151)
6. Click on Create.
Tip: As an alternative, you can use one of the following methods:In the calendar sheet double-click on a free area or drag open an area ranging from the beginningto the end of the new appointment.In order to create an all day appointment, select the Work week or Week calendar view. Click on a dayabove the calendar sheet.
Also see
Using the date picker (p. 147)The appointment editing window: (p. 140)Using the scheduling view (p. 152)Creating a follow-up appointment (p. 153)Creating appointments from iCal attachments (p. 153)Resolving appointment conflicts (p. 154)
146
Creating new appointmentsCalendar
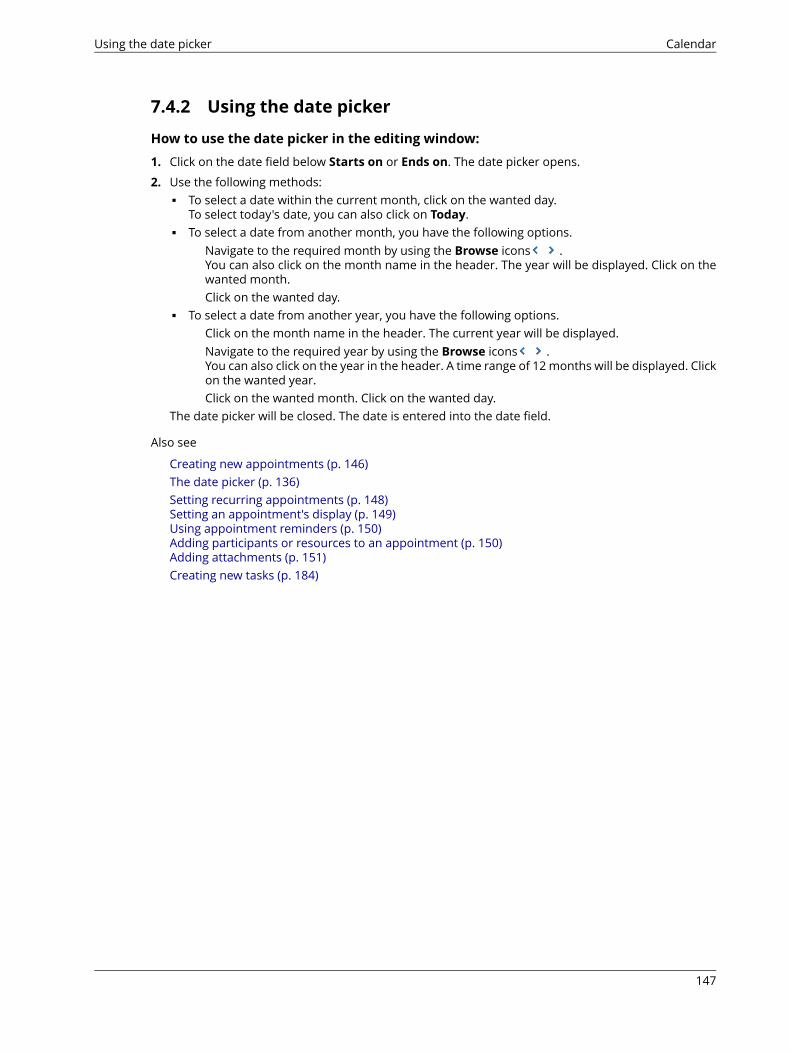
7.4.2 Using the date picker
How to use the date picker in the editing window:
1. Click on the date field below Starts on or Ends on. The date picker opens.
2. Use the following methods:▪ To select a date within the current month, click on the wanted day.
To select today's date, you can also click on Today.▪ To select a date from another month, you have the following options.
Navigate to the required month by using the Browse icons .You can also click on the month name in the header. The year will be displayed. Click on thewanted month.Click on the wanted day.
▪ To select a date from another year, you have the following options.Click on the month name in the header. The current year will be displayed.Navigate to the required year by using the Browse icons .You can also click on the year in the header. A time range of 12 months will be displayed. Clickon the wanted year.Click on the wanted month. Click on the wanted day.
The date picker will be closed. The date is entered into the date field.
Also see
Creating new appointments (p. 146)The date picker (p. 136)Setting recurring appointments (p. 148)Setting an appointment's display (p. 149)Using appointment reminders (p. 150)Adding participants or resources to an appointment (p. 150)Adding attachments (p. 151)Creating new tasks (p. 184)
147
CalendarUsing the date picker

7.4.3 Setting recurring appointments
How to create a recurring appointment in the appointment editing window:
1. Enable Repeat. The current repetition parameters are displayed.
2. To set the repetition parameters, click on the value. The Edit recurrence window opens.
3. Set the repetition parameters.▪ In Repeat, you can set the interval between the appointments.▪ Below the interval, you can set the interval parameters.▪ In Ends, you can define when the recurring appointment ends.
Tip: Examples can be found in Questions and Answers.
Also see
Creating new appointments (p. 146)The appointment editing window: (p. 140)Using the date picker (p. 147)Setting an appointment's display (p. 149)Using appointment reminders (p. 150)Adding participants or resources to an appointment (p. 150)Adding attachments (p. 151)
148
Setting recurring appointmentsCalendar

7.4.4 Setting an appointment's displayThe following options exist:▪ display the appointment as free▪ select an appointment color▪ define the visibility in shared calendars
How to set the appointment's display in the appointment editing window:
1. If there should be no conflict with overlapping appointments, enable Show as free.
2. In order to set an individual color for the appointment, click on a color field. If theNo color checkboxis enabled, the appointment is displayed in the color of the calendar.
3. In a shared calendar, you can use the Visibility drop-down to define the calendar's visibility forother users who are no participants.▪ In the default setting Standard, the appointment is visible to all users who have the permission
to see the calendar.▪ If only the appointment date should be visible for other users but not the subject or other ap-
pointment data, select Private from the drop-down. Private appointments are marked with thePrivate icon .
▪ If the appointment is to be invisible for other users, select Secret from the drop-down. Secretappointments are marked with the Private icon .Secret appointments do not conflict with other appointments. The are no displayed in thescheduling view.
Also see
Creating new appointments (p. 146)The appointment editing window: (p. 140)Using the date picker (p. 147)Setting recurring appointments (p. 148)Using appointment reminders (p. 150)Adding participants or resources to an appointment (p. 150)Adding attachments (p. 151)
149
CalendarSetting an appointment's display

7.4.5 Using appointment reminders
How to set an appointment reminder in the appointment editing window:
1. Click on the current setting below Reminder. The Edit reminders window opens. It shows the currentreminder.
2. To change the current reminder, select the reminder type. Select a time for the reminder. Definethe benchmark for the time.
3. In order to add another reminder, click on Add new Reminder.In order to delete a reminder, click the Delete icon.
4. Click on OK.
Also see
Creating new appointments (p. 146)The date picker (p. 136)Using the date picker (p. 147)Setting recurring appointments (p. 148)Setting an appointment's display (p. 149)Adding participants or resources to an appointment (p. 150)Adding attachments (p. 151)Creating new tasks (p. 184)
7.4.6 Adding participants or resources to an appointment
How to add participants or resources in the appointment editing window:
Enter the E-Mail addresses of the participants, the name of a group, distribution list or resource inthe input field below Participants. Tips:▪ While entering the E-Mail address, several matching suggestions are displayed. To accept a sug-
gestion, use one of the following methods:▫ Use the scrollbar to browse the list. Click on a suggestion.▫ Use the cursor keys to select a suggestion. Press Enter.
▪ To select contacts from a list, click the Address bookicon on the right side of the input field.To remove participants or resources, click the icon next to the name.All participants are notified about the new appointment in an E-Mail.
Tip: To find free appointments of all participants and resources you can use the schedule view.
Also see
Creating new appointments (p. 146)Selecting contacts from a list (p. 69)The appointment editing window: (p. 140)Using the date picker (p. 147)Setting recurring appointments (p. 148)Setting an appointment's display (p. 149)Using appointment reminders (p. 150)Adding attachments (p. 151)
150
Using appointment remindersCalendar

7.4.7 Adding attachments
How to add attachments in the appointment editing window:
1. Click on Add attachments below Attachments.
2. Select one or several files.In order to remove an attachment, click the Delete icon .
Tip: You can also add an attachment by dragging and dropping a document from a file browser or fromthe desktop to the appointments window.
Also see
Creating new appointments (p. 146)The appointment editing window: (p. 140)Using the date picker (p. 147)Setting recurring appointments (p. 148)Setting an appointment's display (p. 149)Using appointment reminders (p. 150)Adding participants or resources to an appointment (p. 150)
151
CalendarAdding attachments

7.4.8 Using the scheduling viewWhen scheduling an appointment with several participants or resources, the Scheduling view showsfree and busy time periods for the users and resources.
How to use the scheduling view for creating appointments:
1. You have the following possibilities to open the scheduling view:▪ To use the scheduling view before creating a new appointment, click on Scheduling in the toolbar.
The Scheduling page opens.▪ To use the scheduling view while creating a new appointment or editing an existing appointment,
click on Find a free time in the appointment editing window. The Scheduling window opens.
2. Enter a participant's or resource's name in Participants. Tips:▪ While entering the E-Mail address, several matching suggestions are displayed. To accept a sug-
gestion, use one of the following methods:▫ Use the scrollbar to browse the list. Click on a suggestion.▫ Use the cursor keys to select a suggestion. Press Enter.
▪ To select contacts from a list, click the Address bookicon on the right side of the input field.The appointments of the participant or resource are displayed in the calendar sheet.You can save the participants as distribution list. To do so, select Save as distribution list belowthe list.
3. Search for a free time in the calendar. Use the following methods:▪ To set a time range, click on the date on the upper left side. You can also use the browse icons▪ To set the display size of the calendar sheet, use the control elements on the upper right side.▪ To set the Week or Month date range, enable the respective entries in the Options drop-down.▪ Use the Options menu to adjust the view in the calendar sheet.▪ To adjust the visible part of the time range, use the scrollbar below the calendar sheet.
4. Define the appointment's start and end by using one of the following options:▪ In the calendar sheet drag open an area ranging from the beginning to the end of the new ap-
pointment.If pressing the [Alt] key before releasing the mouse button, the appointment's start and end dateare entered on the appointment editing page.
▪ To set the appointment's duration to one hour, click on the wanted time.Depending on how you opened the scheduling view, either click onCreate appointmentor onAcceptchanges to finish the process. The appointment editing window will be displayed.
5. Complete the details for creating or editing the appointment.
Also see
Selecting contacts from a list (p. 69)Creating new appointments (p. 146)Creating a follow-up appointment (p. 153)Creating appointments from iCal attachments (p. 153)Resolving appointment conflicts (p. 154)The scheduling view (p. 139)The date picker (p. 136)
152
Using the scheduling viewCalendar

7.4.9 Creating a follow-up appointmentYou can create a follow-up appointment for an existing appointment. The follow-up appointment isprefilled with essential data from the existing appointment.
How to create a follow-up appointment:
1. Depending on the view selected, use one of the following methods:▪ Click on an appointment in a calendar view. In the pop-up, click on Follow-up.▪ Double-click on an appointment in the list view. The appointment will be displayed in a window.
Click on Follow-up.
2. Adjust the data for the new appointment. Click on Create.
Also see
Creating new appointments (p. 146)Using the scheduling view (p. 152)Creating appointments from iCal attachments (p. 153)Resolving appointment conflicts (p. 154)
7.4.10 Creating appointments from iCal attachmentsYou can create an appointment from an E-Mail's iCal attachment. An iCal attachment can be identifiedby the file extension .ics.
How to create an appointment from an E-Mail's iCal attachment:
1. Select an E-Mail with an iCal attachment in the E-Mail application.
2. Click on an attachment's name in the detail view. Click on Add to calendar in the menu.
Also see
Creating new appointments (p. 146)Using the scheduling view (p. 152)Creating a follow-up appointment (p. 153)Resolving appointment conflicts (p. 154)
153
CalendarCreating a follow-up appointment
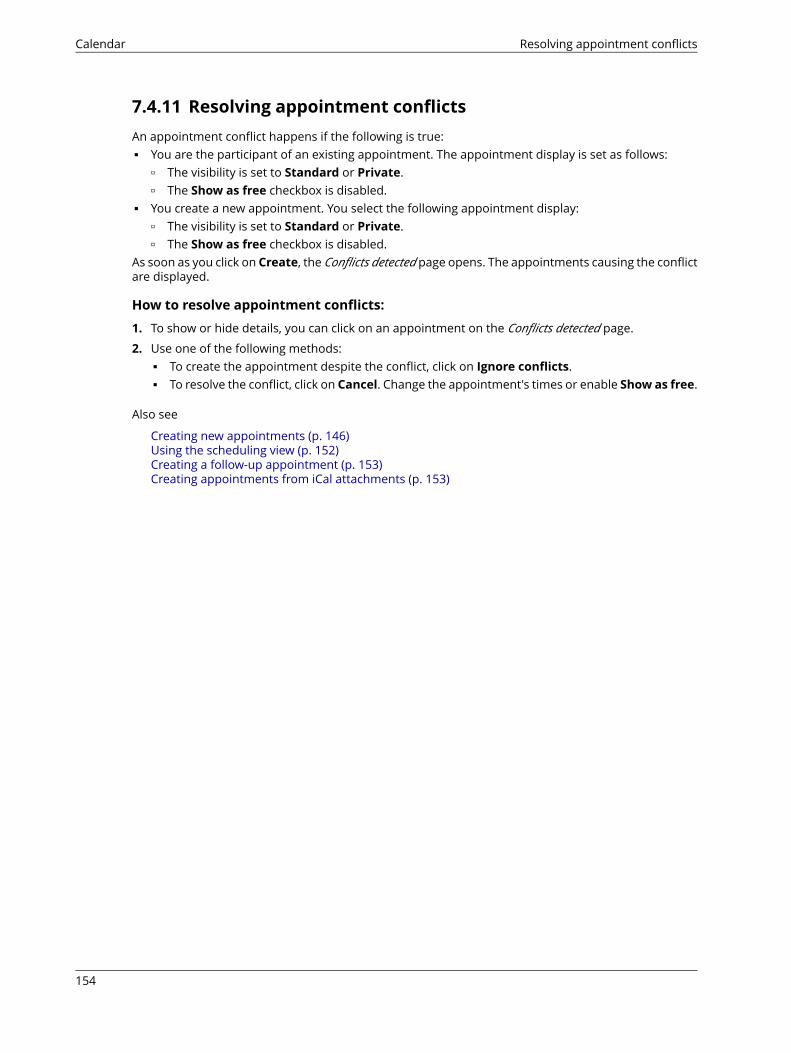
7.4.11 Resolving appointment conflictsAn appointment conflict happens if the following is true:▪ You are the participant of an existing appointment. The appointment display is set as follows:
▫ The visibility is set to Standard or Private.▫ The Show as free checkbox is disabled.
▪ You create a new appointment. You select the following appointment display:▫ The visibility is set to Standard or Private.▫ The Show as free checkbox is disabled.
As soon as you click on Create, the Conflicts detected page opens. The appointments causing the conflictare displayed.
How to resolve appointment conflicts:
1. To show or hide details, you can click on an appointment on the Conflicts detected page.
2. Use one of the following methods:▪ To create the appointment despite the conflict, click on Ignore conflicts.▪ To resolve the conflict, click on Cancel. Change the appointment's times or enable Show as free.
Also see
Creating new appointments (p. 146)Using the scheduling view (p. 152)Creating a follow-up appointment (p. 153)Creating appointments from iCal attachments (p. 153)
154
Resolving appointment conflictsCalendar

7.5 Answering appointment invitationsIf a user or an external partner adds you to the appointment recipients, you will receive at least one ofthe following notifications:▪ You are informed about this appointment in the Notification area.▪ You will receive an E-Mail invitation for the appointment.You can accept, temporarily accept or refuse your participation in the appointment. You can alwayschange your appointment confirmation status later.
How to answer an appointment invitation in the notification area:
1. Click the Notifications icon in the menu bar. The Notification area is displayed.
2. To display the suggested appointment in the calendar, click on Open in calendar.To answer the appointment invitation, click on Accept/Decline below the invitation.
3. Enter a comment in the Change confirmation status window. Click on one of the buttons Decline,Tentative or Accept.
Tip: You can accept the appointment directly within the notification area by clicking on the Accept invi-tation button.
How to answer an appointment invitation in an E-Mail invitation:
1. Open an E-Mail with an appointment invitation in the E-Mail application.
2. Enter a comment below This email contains an appointment in the detail view. Click on one of thebuttons Accept, Tentative or Decline.
Note: In the calendar settings you can define whether the invitation mail is automatically deleted whenaccepting or declining an appointment.
Also see
The notification area (p. 33)Changing the appointment confirmation or status (p. 162)
155
CalendarAnswering appointment invitations

7.6 Adding CalendarsThe following options exist:▪ Adding personal calendars▪ Subscribing to public calendars▪ Subscribing to Google calendars▪ Subscribing to iCal calendars▪ Importing calendars from files
Also see
Folders (p. 230)
156
Adding CalendarsCalendar

7.6.1 Adding personal calendarsYou can create additional personal calendars below My calendar.
How to create a new personal calendar:
1. In the folder tree, click on Add new calendar. A menu opens.Click the Personal calendar menu item.A window opens.
2. Enter a name. In case the new calendar should be a public calendar, enableAdd as public calendar.Click on Add.
Also see
Subscribing to public calendars (p. 157)Subscribing to Google calendars (p. 158)Subscribing to iCal calendars (p. 158)Importing calendars from files (p. 159)
7.6.2 Subscribing to public calendarsYou can subscribe to calendars that are publicly available on the Internet. Those are e.g., calendars withinternational public holidays, sport events, media events or stock exchanges. Changes that you applyto the external calendar can be transfered to the groupware by refreshing the subscribed calendar.Note: Depending on the groupware's configuration, this function might not be available.
How to subscribe to public calendars:
1. In the folder tree, click on Add new calendar. A menu opens.Click on Browse calendars of interest in the menu. The Add calendar window opens.
2. Select the language and country of the calendar that you want to subscribe to.Select one or several calendars.
3. Click on Save.The appointments will be imported to a new calendar.
4. In order to refresh the subscribed data, click theAction icon next to the calendar. Click on Refreshthis calendar in the menu.
Also see
Adding personal calendars (p. 157)Subscribing to Google calendars (p. 158)Subscribing to iCal calendars (p. 158)Importing calendars from files (p. 159)Managing subscribed folders (p. 253)
157
CalendarAdding personal calendars
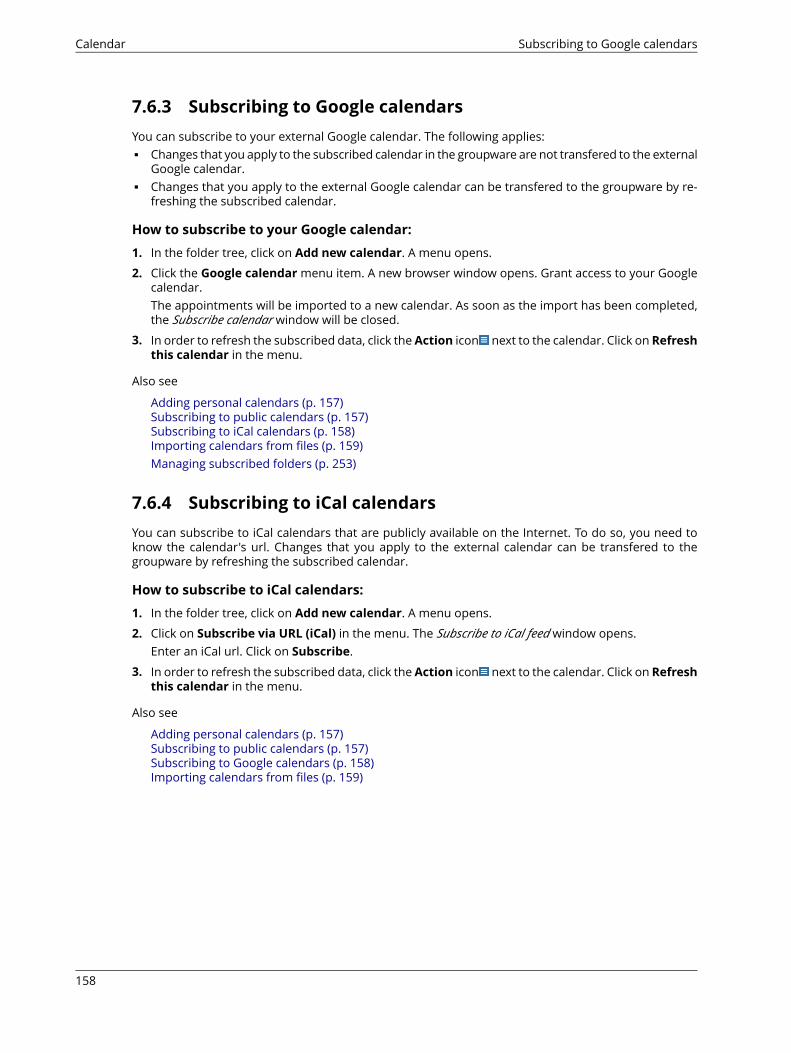
7.6.3 Subscribing to Google calendarsYou can subscribe to your external Google calendar. The following applies:▪ Changes that you apply to the subscribed calendar in the groupware are not transfered to the external
Google calendar.▪ Changes that you apply to the external Google calendar can be transfered to the groupware by re-
freshing the subscribed calendar.
How to subscribe to your Google calendar:
1. In the folder tree, click on Add new calendar. A menu opens.
2. Click the Google calendar menu item. A new browser window opens. Grant access to your Googlecalendar.The appointments will be imported to a new calendar. As soon as the import has been completed,the Subscribe calendar window will be closed.
3. In order to refresh the subscribed data, click theAction icon next to the calendar. Click on Refreshthis calendar in the menu.
Also see
Adding personal calendars (p. 157)Subscribing to public calendars (p. 157)Subscribing to iCal calendars (p. 158)Importing calendars from files (p. 159)Managing subscribed folders (p. 253)
7.6.4 Subscribing to iCal calendarsYou can subscribe to iCal calendars that are publicly available on the Internet. To do so, you need toknow the calendar's url. Changes that you apply to the external calendar can be transfered to thegroupware by refreshing the subscribed calendar.
How to subscribe to iCal calendars:
1. In the folder tree, click on Add new calendar. A menu opens.
2. Click on Subscribe via URL (iCal) in the menu. The Subscribe to iCal feed window opens.Enter an iCal url. Click on Subscribe.
3. In order to refresh the subscribed data, click theAction icon next to the calendar. Click on Refreshthis calendar in the menu.
Also see
Adding personal calendars (p. 157)Subscribing to public calendars (p. 157)Subscribing to Google calendars (p. 158)Importing calendars from files (p. 159)
158
Subscribing to Google calendarsCalendar

7.6.5 Importing calendars from filesYou can import calendars that have been created from within other applications. The calendar you wantto import needs to be available as iCal file.
How to import calendars from a file:
1. In the folder tree, click on Add new calendar. A menu opens.
2. Select Upload file from the menu. The Import from file window opens.Select a file. Click on Import.
Also see
Adding personal calendars (p. 157)Subscribing to public calendars (p. 157)Subscribing to Google calendars (p. 158)Subscribing to iCal calendars (p. 158)
159
CalendarImporting calendars from files

7.7 Managing AppointmentsSome of the techniques for organizing appointments require having all ready set up your own calendars.Information on creating calendars can be found in Folders (page 230).
The following options exist:▪ Editing appointments▪ Editing appointments with drag and drop▪ Changing the appointment confirmation or status▪ Managing favorite timezones▪ Using calendar colors▪ Moving appointments to another calendar▪ Exporting appointments▪ Printing appointments▪ Deleting appointments
160
Managing AppointmentsCalendar

7.7.1 Editing appointmentsYou can edit all data entered when having created an appointment at a later time.
How to edit an appointment:
Prerequisite: You have the appropriate permissions to modify objects in the calendar containing theappointment.Depending on the server configuration, you can only edit an appointment in your private calendarsif you are the appointment's organizer.
1. Depending on the view selected, use one of the following methods:Click on an appointment in a calendar view. Click on Edit in the pop-up.Select an appointment in the list view. Click on Edit in the toolbar.
When having selected a serial appointment, you are asked to which appointments of the series thechanges should be applied.▪ When having selected the first appointment of the series, you can only change the first appoint-
ment or the complete series.▪ When having selected an appointment within the series, you can only change the selected ap-
pointment or all future appointments of the series.▪ When having selected the last appointment of the series, you can only change the last appoint-
ment. In the latter case, you are not asked to which appointments the changes should be applied.The appointment's data is displayed.
2. Edit the data.
3. Click on Save.
Also see
Editing appointments with drag and drop (p. 162)The appointment editing window: (p. 140)The date picker (p. 136)
161
CalendarEditing appointments
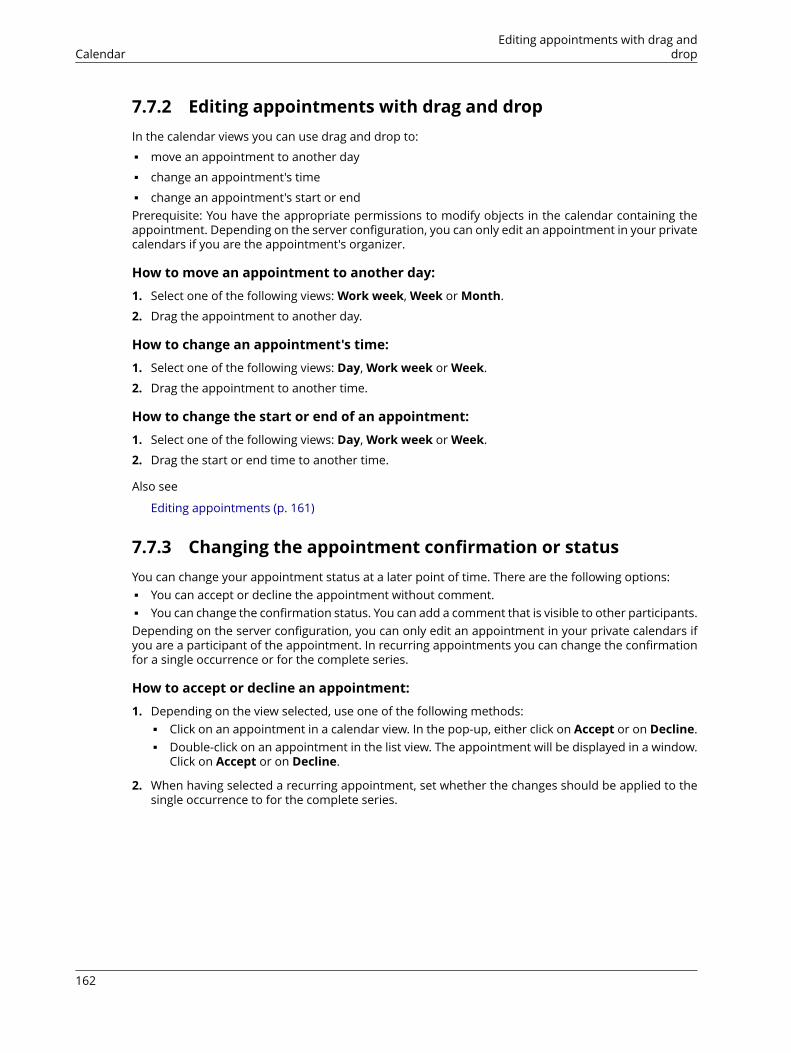
7.7.2 Editing appointments with drag and dropIn the calendar views you can use drag and drop to:
▪ move an appointment to another day
▪ change an appointment's time
▪ change an appointment's start or endPrerequisite: You have the appropriate permissions to modify objects in the calendar containing theappointment. Depending on the server configuration, you can only edit an appointment in your privatecalendars if you are the appointment's organizer.
How to move an appointment to another day:
1. Select one of the following views: Work week, Week or Month.
2. Drag the appointment to another day.
How to change an appointment's time:
1. Select one of the following views: Day, Work week or Week.
2. Drag the appointment to another time.
How to change the start or end of an appointment:
1. Select one of the following views: Day, Work week or Week.
2. Drag the start or end time to another time.
Also see
Editing appointments (p. 161)
7.7.3 Changing the appointment confirmation or statusYou can change your appointment status at a later point of time. There are the following options:▪ You can accept or decline the appointment without comment.▪ You can change the confirmation status. You can add a comment that is visible to other participants.Depending on the server configuration, you can only edit an appointment in your private calendars ifyou are a participant of the appointment. In recurring appointments you can change the confirmationfor a single occurrence or for the complete series.
How to accept or decline an appointment:
1. Depending on the view selected, use one of the following methods:▪ Click on an appointment in a calendar view. In the pop-up, either click on Accept or on Decline.▪ Double-click on an appointment in the list view. The appointment will be displayed in a window.
Click on Accept or on Decline.
2. When having selected a recurring appointment, set whether the changes should be applied to thesingle occurrence to for the complete series.
162
Editing appointments with drag anddropCalendar

How to change your confirmation status:
1. Depending on the view selected, use one of the following methods:Click on an appointment in a calendar view. In the pop-up, click on Change status.Select an appointment in the list view. Click on Status in the toolbar.
2. When having selected a recurring appointment, set whether the changes should be applied to thesingle occurrence to for the complete series.
3. Enter a comment in the Change confirmation status window. Click on one of the buttons Decline,Tentative or Accept.
7.7.4 Managing favorite timezonesTimezones marked as favorites by you, can be displayed in the calendar sheet in addition to the presettimezone.
How to mark a timezone as favorite:
1. Click the Settings icon on the right side of the menu bar. Click the Settings menu item.
2. Select Calendar from the sidebar. Click on Favorite timezones.
3. Click on Add timezone in the display area. The Select favorite timezone window opens.
4. Select a timezone from the list. Click on Add.
To remove a timezone from the list of favorites, click the Delete icon next to the timezone.
Also see
The appointment editing window: (p. 140)Displaying multiple time zones (p. 142)
163
CalendarManaging favorite timezones

7.7.5 Using calendar colorsYou can assign a color to a calendar. All appointments in this calendar will then be displayed in thecolor of the calendar. If you assign an individual color to an appointment when creating or editing it,the appointment will be displayed in the color assigned, not in the color of the calendar.
How to select a calendar color:
1. Click the Actions icon next to the calendar name.
2. Select a color from the color selection drop down.
Also see
How are appointments displayed? (p. 143)
7.7.6 Moving appointments to another calendarYou can move appointments to another calendar.
How to move appointments to another calendar:
Prerequisite: You need to have the appropriate permissions to create objects in the target calendar.
1. Depending on the view selected, use one of the following methods:Click on an appointment in a calendar view. In the pop-up, click the More actions icon . SelectMove from the menu.Select an appointment or multiple appointments in the list view. Click theMore actions icon inthe toolbar. Select Move from the menu.
2. Select a calendar in the Move window. You can create a new calendar by clicking on Create folder.3. Click on Move.
7.7.7 Exporting appointmentsYou can export appointments in the iCalendar format. You can e.g. use this format to exchange appoint-ments with other calendar applications.
How to export appointments:
1. Depending on the view selected, use one of the following methods:Click on an appointment in a calendar view. In the pop-up, click the More actions icon . Clickthe Export menu item.Select an appointment or multiple appointments in the list view. Click theMore actions icon inthe toolbar. Click the Export menu item.
The Export selected dialog window opens.
2. Click on Export. Complete the entries.
Also see
Exporting a Folder's Data. (p. 265)
164
Using calendar colorsCalendar
7.7.8 Printing appointmentsTo print calendars and appointments you can:▪ print a calendar sheet with appointments▪ print appointment data▪ print a detailed or compact list of appointments
How to print a calendar sheet with appointments:
1. Click on View in the toolbar. Select one of the following entries: Day, Work week, Week or Month.
2. Open a calendar in the folder tree.
3. Click on View in the toolbar. Click on Print in the menu. A window with a print preview opens.
4. If required, change the printer settings. Click on the Print button.
5. Close the print preview window.
How to print an appointment's data:
1. Depending on the view selected, use one of the following methods:Click on an appointment in a calendar view. In the pop-up, click the More actions icon . Clickon Print in the menu.Select an appointment or multiple appointments in the list view. Click theMore actions icon inthe toolbar. Click on Print in the menu.
A window with a print preview opens.
2. If required, change the printer settings. Click on the Print button.
3. Close the print preview window.
How to print a list of appointments:
1. Click on View in the toolbar. Select List.2. Select the appointments to be printed.
3. Click the More actions icon in the toolbar. Click on Print in the menu. A window opens. You areasked how you want to print the appointments.▪ To print a list with detailed appointment data, click on Detailed.▪ To print a compact list, click on Compact.
4. If required, change the printer settings. Click on the Print button.
5. Close the print preview window.
165
CalendarPrinting appointments

7.7.9 Deleting appointmentsYou can delete appointments.
How to delete appointments:
Warning: If you delete an appointment it will be irrevocably lost.Depending on the server configuration, you can only edit an appointment in your private calendarsif you are the appointment's organizer.
1. Depending on the view selected, use one of the following methods:Click on an appointment in a calendar view. In the pop-up, click on Delete.Select an appointment or multiple appointments in the list view. Click on Delete in the toolbar.
2. Confirm that you want to delete the appointment.
Result: The appointment will be deleted.
166
Deleting appointmentsCalendar

7.8 Searching for AppointmentsIn order to search for specific appointments, you can use the following search criteria:▪ search terms for subject, description, location, attachments' names, participants▪ calendars that are to be searched▪ appointment confirmation status▪ Time frame of the appointment creation, related to the current date: one month, three months, one
year▪ type: all, series, single appointment
How to search for appointments:
1. Click on the Search input field. Additional icons are displayed.
2. Enter a search term in the input field. The search menu opens.
Define the data sources to be searched by clicking on an entry in the search menu.▪ If clicking on the search term or pressing enter, the following data sources are searched: subject,
description▪ In order to only search in the subject, click on in subject in the search menu.
Accordingly, you can limit the search to the description, location or the attachment's name.▪ In order to search for appointments with a specific participant, click on a name in the search
menu.The search results are displayed in the list that is shown in the display area.
3. To select a calendar for the search, click the Options icon in the input field. The calendar that issearched, is displayed in the Folder drop-down. To select another calendar, open the drop-down.If you select All folders, all private, public, and shared calendars are searched.
4. You have the following options to limit the search to specific appointments:▪ To limit the search to appointments with a specific confirmation status, click theOptions icon
in the input field. Open the My status drop-down. Select a status.▪ To limit the search to a specific time range, click the Options icon in the input field. Open the
Range drop-down. Select a time range.▪ To limit the search to single or recurring appointments, click the Options icon in the input
field. Open the Type drop-down. Select a type.
5. To refine the search result, enter further search terms: To remove a search term, click the Removeicon next to the search term.
6. In order to finish the search, click the Close icon .
167
CalendarSearching for Appointments

7.9 Appointments in teamsThe following options exist:▪ Sharing appointments▪ Sending an E-Mail to participants▪ Inviting participants to a new appointment▪ Creating a distribution list from the list of participants
7.9.1 Sharing appointmentsYou can share your appointments with internal as well as external partners. Depending on the require-ments, different methods exist.▪ To make a calendar available for internal users or external partners, proceed as follows:
Create a new personal or public calendar.Share this calendar.
You can also share an existing calendar.▪ If another internal user shared a calendar with you, you can access this calendar in the folder tree.▪ In case you want to invite external partners to an appointment, enter their E-Mail addresses in the
input field below Participants.The external partners receive an E-Mail with an appointment invitation.
Also see
Sending an E-Mail to participants (p. 168)Inviting participants to a new appointment (p. 169)Creating a distribution list from the list of participants (p. 169)
7.9.2 Sending an E-Mail to participantsYou can send an E-Mail to all appointment participants.
How to send an E-Mail to all appointment participants:
1. Depending on the view selected, use one of the following methods:▪ In a calendar view, click on an appointment with multiple participants. In the pop-up, click the
More actions icon . Click on Send mail to all participants in the menu.▪ In the list view, double-click on an appointment with multiple participants. The appointment will
be displayed in a window. Click the More actions icon . Click on Sendmail to all participantsin the menu.
2. Fill in the details in order to Send a new E-Mail.
Also see
Sharing appointments (p. 168)Inviting participants to a new appointment (p. 169)Creating a distribution list from the list of participants (p. 169)
168
Appointments in teamsCalendar

7.9.3 Inviting participants to a new appointmentIf an appointment has several participants, you can invite those participants to a new appointment.
How to invite participants to a new appointment:
1. Depending on the view selected, use one of the following methods:In a calendar view, click on an appointment with multiple participants. In the pop-up, click theMore actions icon . Click on Invite to new appointment in the menu.In the list view, double-click on an appointment with multiple participants. The appointment willbe displayed in a window. Click the More actions icon . Click on Invite to new appointmentin the menu.
2. Complete the data for Creating an appointment.
Also see
Sharing appointments (p. 168)Sending an E-Mail to participants (p. 168)Creating a distribution list from the list of participants (p. 169)
7.9.4 Creating a distribution list from the list of participantsYou can create a distribution list from an appointment's list of participants.
You can create a distribution list from an appointment's list of participants.
1. Depending on the view selected, use one of the following methods:In a calendar view, click on an appointment with multiple participants. In the pop-up, click theMore actions icon . Select Save as distribution list from the menu.In the list view, double-click on an appointment with multiple participants. The appointment willbe displayed in a window. Click the More actions icon . Select Save as distribution list fromthe menu.
2. Complete the details for creating the distribution list.
Also see
Sharing appointments (p. 168)Sending an E-Mail to participants (p. 168)Inviting participants to a new appointment (p. 169)
169
CalendarInviting participants to a new appoint-ment

7.10 Managing GroupsIn case you frequently want to add the same persons to appointments or tasks, you can create a groupconsisting of those persons. You can then add the group as participant instead of adding single persons.There are the following options:▪ create a new group▪ edit an existing group▪ delete an existing groupNote: Depending on the server configuration, those functions are not available for all users.
How to create a new group:
1. Click the Settings icon on the right side of the menu bar. Click the Settings menu item.In the sidebar, click on Groups.
2. In the display area, click on Create new group.
3. Enter a group name in the Create new group window. Add members. The members are displayedbelow MembersIn order to remove a member, click the Remove member icon next to the name.Click on Create.
How to edit a group:
1. Click the Settings icon on the right side of the menu bar. Click the Settings menu item.In the sidebar, click on Groups.
2. Select a group in the display area. Click on Edit.3. Edit the group's data in the Edit group window.
Click on Save.
How to delete a group:
1. Click the Settings icon on the right side of the menu bar. Click the Settings menu item.In the sidebar, click on Groups.
2. Select a group in the display area.
3. Click the Delete button.
Also see
Managing Resources (p. 171)
170
Managing GroupsCalendar

7.11 Managing ResourcesOther than participant conflicts, resource conflicts can not be ignored when creating appointments. Ifcreating appointments, resources that are already booked for other appointments can not be added.There are the following options:▪ create new resources▪ edit existing resources▪ delete existing resourcesNote: Depending on the server configuration, those functions are not available for all users.
How to create a new resource:
1. Click the Settings icon on the right side of the menu bar. Click the Settings menu item.In the sidebar, click on Resources.
2. In the display area, click on Create new resource.
3. Enter a resource name in the Create new resource window. You can enter a description.Define an E-Mail address for the resource.Click on Create.
How to edit a resource:
1. Click the Settings icon on the right side of the menu bar. Click the Settings menu item.In the sidebar, click on Resources.
2. Select a resource in the display area. Click on Edit.3. Edit the resource's data in the Edit resource window.
Click on Save.
How to delete a resource:
1. Click the Settings icon on the right side of the menu bar. Click the Settings menu item.In the sidebar, click on Resources.
2. Select a resource in the display area.
3. Click the Delete button.
Also see
Managing Groups (p. 170)
171
CalendarManaging Resources

7.12 Interchanging Appointments with Other ApplicationsThe following options exist:▪ export appointments to use them in other applications▪ import appointments that you created in other applications
172
Interchanging Appointments withOther ApplicationsCalendar

7.13 Calendar SettingsHow to use the calendar settings:
1. Click the Settings icon on the right side of the menu bar. Click the Settings menu item.
2. Click on Calendar in the sidebar.
3. Change the settings.
The following settings are available.
View▪ Start of working time
Defines the start of the working hours.▪ End of working time
Defines the end of the working hours.▪ Time scale in minutes
Specifies the interval for dividing the time grid in the Day, Work week, Week calendar views.▪ Display refused appointments
Defines whether appointments that you refused are displayed.
Birthday calendar▪ Show birthday calendar
Defines whether a birthday calendar is displayed in the folder tree.
Workweek view▪ Week start
Defines the beginning of a work week.▪ Workweek length
Defines the number of days of a work week.
New appointment▪ Default reminder
Defines the pre-set time interval for the appointment reminder. To change the setting, click on thecurrent setting. Change the current reminder in the Edit reminders dialog window. You can add furtherreminders.
▪ Default reminder for all-day appointmentsDefines the default time for the reminder for all-day appointments. To change the setting, click onthe current setting. Change the current reminder in the Edit reminders dialog window. You can addfurther reminders.
▪ Default reminder for appointments in birthday calendarDefines the reminder's default time for appointments in the birthday calendar. To change the setting,click on the current setting. Change the current reminder in the Edit reminders dialog window. Youcan add further reminders.
▪ Mark all day appointments as freeDefines whether all day appointments are displayed as free per default.
Email notifications▪ Receive notification for appointment changes
Specifies whether you will receive an E-Mail notification, if the following is true: An appointment inwhich you participate has been re-created, changed or deleted.
▪ Receive notification as appointment creator when participants accept or declineSpecifies whether you will receive an E-Mail notification, if the following is true: a participant acceptedor declined an appointment created by you.
173
CalendarCalendar Settings

▪ Receive notification as appointment participant when other participants accept or declineSpecifies whether you will receive an E-Mail notification, if the following is true: a participant acceptedor declined an appointment in which you participate.
▪ Automatically delete the invitationemail after theappointmenthasbeenacceptedor declinedDefines whether the E-Mail notification for an appointment invitation will be automatically deletedwhen accepting or declining the appointment.
174
Calendar SettingsCalendar
8 TasksLearn how to work with the Tasks application.▪ the Taskscomponents▪ view tasks▪ view or save task attachment▪ create tasks▪ answer task invitation▪ add task folders▪ organize tasks▪ search for tasks▪ share tasks with other users▪ interchange tasks with other applications▪ use the Tasks settings
How to launch the Tasks app:Click the App Launcher icon in the menu bar. Click on Tasks in the App Launcher.
175
8.1 The TaskscomponentsThe Tasks app includes the following components.▪ The Tasks search bar▪ The Tasks toolbar▪ The Tasks folder tree▪ The Tasks display area
▫ The Tasks list▫ The Tasks detail view
▪ The task editing window
176
The TaskscomponentsTasks

8.1.1 The Tasks search barEnables you to search for tasks.
Also see
The search bar (p. 28)Searching for Tasks (p. 193)Viewing tasks (p. 182)
8.1.2 The Tasks toolbarContains the following:▪ New. Creates a new task.▪ Edit. Edits a task's data.▪ Due. Changes a task's due date.▪ Done. Marks a task as done.▪ Delete. Deletes the tasks selected by you.▪ More actions icon . Opens a menu with further functions:▪ View. Opens a menu with checkboxes for controlling the view.
▫ Folder view. Opens or closes the folder tree.▫ Checkboxes. Displays checkboxes in the list, for marking objects.
Also see
The toolbar (p. 29)Instructions for the buttons and icons:Creating Tasks (p. 184)Editing tasks (p. 190)Changing a task's due date (p. 191)Marking tasks as done (p. 190)Deleting tasks (p. 192)Keys and key combinations (p. 36)Instructions for the functions in the More actions menu :Exporting tasks (p. 191)Printing tasks (p. 192)Moving tasks to another folder (p. 191)
177
TasksThe Tasks search bar
8.1.3 The Tasks folder treeDisplays the tasks folders.
Content
▪ My tasks. Contains your personal tasks.▪ Public tasks. Contains tasks shared with all users.▪ Shared tasks. Contains tasks shared with you by other users.Depending on the groupware configuration, the content can differ from this information.
Functions
▪ If clicking on a folder, its tasks are displayed.▪ TheActions icon next to the selected folder offers functions for organizing data and for exchanging
data.▪ The Add new folder button allows to create a new private or public folder.
Also see
The folder tree (p. 30)Folders (p. 230)Navigating within the folder structure (p. 233)Adding Task Folders (p. 188)Renaming folders (p. 235)Moving folders (p. 236)Deleting folders (p. 236)
8.1.4 The Tasks display areaContains the contacts list and a contact's detail view.
Also see
The display area (p. 31)
178
The Tasks folder treeTasks

8.1.5 The Tasks listDisplays a list of tasks in the folder selected.
Content
▪ The following details are displayed for each task: subject, status or due date, and the progress.▪ The text above the list contains the name of the selected folder. The number corresponds to the
number of objects in the selected folder.
Functions
▪ If clicking on a task, its content is displayed in the detail view.▪ To select multiple tasks, enable the Checkboxes option in the View drop-down in the toolbar.
You can also use your system's multi selection functions.In order to select all contacts in folder, enable the Select all checkbox above the list.
▪ If clicking the Sort icon above the list, a menu opens that allows to sort tasks. You can also definein this menu whether tasks done are displayed.
▪ To adjust the list width, hover over the line between the list and the detail view. Drag the border tothe left or to the right.
Also see
Searching for Tasks (p. 193)
179
TasksThe Tasks list

8.1.6 The Tasks detail viewShows the data of the task that you selected in the list. If double-clicking on the task in the list, the dataare displayed in a window.
Content
▪ Icon for the task's priority, if set.SubjectPrivate tasks are marked with the Private icon .
▪ Task's start date, if available▪ Status and progress▪ If the task has attachments, the names of the attachments are displayed.▪ Task's description, if available▪ If the task is a recurring task, recurrence parameters will be displayed.▪ Task's start date, if available▪ Task details like billing information, if available▪ If the task has several participants, the number of participants that accepted, declined or have not
replied yet are shown on the top right side above the list of participants. In order to filter the list ofparticipants, click the icons.
▪ Names of the participants, if they exist. If clicking on a name, a pop-up opens. It displays informationabout the contact.▫ The person's contact data.▫ If you exchanged E-Mails with this person, they are displayed below Recent conversations.▫ If you have appointments scheduled with this person, they are displayed below Shared appoint-
ments.▫ Information about this person from social networks. You can use the available buttons to open
this person's profile.If clicking on an appointment or an E-Mail, an additional pop-up opens.
▪ If the appointment includes external participants, their names are displayed below External partici-pants.
Also see
Viewing or Saving Task Attachments (p. 183)Managing Tasks (p. 189)
180
The Tasks detail viewTasks

8.1.7 The task editing windowThis window is used when creating a new task or editing a task.
Content
▪ The title bar includes the following elements:▫ window title▫ icons for adjusting the window position, cancel icons
▪ Task data.▫ Subject input field. Enter the subject in this field. The subject is displayed as task title.▫ Description input field. You can enter a description for the task in this field.▫ Expand form. Displays additional input fields.▫ Start date andDue date. Defines the start and the due date. Clicking on it opens the date picker.
If All day is disabled, you can set start and due times.▫ All day. Defines whether the task is supposed to last whole days.▫ Repeat. Defines whether the task is to be repeated. Examples can be found in the questions
about appointments and tasks.▪ Reminder. Defines when and how you will be reminded about the task's due date. You can also set
a date and time for the reminder in Reminder date. In this case, Manual input will be preselectedin the Reminder field.
▪ Task view▫ Status. Defines the task's status. You can also enter a percentage value for the task completion
in Progress.▫ Priority. Defines the task's priority.▫ Private. Enable this checkbox if other users are not to see the task's subject and description.
▪ Add contact input field. Enter the names of the participants that are to take part in the task in thisfield.Select contacts icon . Opens a window for selecting contacts from a list.
▪ Add attachments. Adds files.▪ Showdetails. Displays additional data fields where you can enter billing details like estimated efforts,
actual efforts or billing information.▪ button bar
▫ Create. Saves the current data of the task. Closes the Format window.▫ Cancel. Cancels creating or editing the task.
Also see
The editing window (p. 34)The date picker (p. 136)Creating Tasks (p. 184)Editing tasks (p. 190)
181
TasksThe task editing window

8.2 Viewing tasksHow to display a task:
1. Open a tasks folder in the folder tree.
2. To sort the tasks list, click the Sort icon above the list. Select a sort criterion from the menu.To only display due tasks in the list, click the Sort icon above the list. Disable Show done tasksin the menu.
3. Click on a task in the list. The task's data is displayed in the detail view.You can open the task in a window by double-clicking on the task in the list.
4. To display another task, use one of the following methods:▪ Click on another task in the list.▪ Use the cursor keys to browse the list.
Also see
Navigating within the folder structure (p. 233)Searching for Tasks (p. 193)Viewing or Saving Task Attachments (p. 183)The Tasks detail view (p. 180)The Tasks list (p. 179)
182
Viewing tasksTasks

8.3 Viewing or Saving Task AttachmentsThe file names of task attachments are displayed in the display area below the subject. The followingfunctions are available:▪ display the attachment in the Viewer▪ download the attachment▪ save the attachment to DriveNote: Depending on the attachment's file format, the available function might differ.
How to use the task attachment functions:
1. Select a task with an attachment.
2. Click on an attachment's name in the detail view. A menu with several functions opens.
3. Click on the function wanted. Depending on the function, further actions might be available.
Tip: If a task contains several attachments, an action can be executed for all attachments at once. Todo so, click on All attachments. Click on the function wanted.
Also see
Viewing tasks (p. 182)The Tasks detail view (p. 180)The Tasks list (p. 179)
183
TasksViewing or Saving Task Attachments

8.4 Creating TasksThe following options exist:▪ Creating new tasks▪ Creating recurring tasks▪ Adding participants to a task▪ Adding attachments
8.4.1 Creating new tasks
How to create a new task:
1. Open a tasks folder in the folder tree.Note: Select a folder for which you have the permission to create tasks.
2. Click on New in the toolbar.
3. Enter a subject. Enter a description, if needed.To view the complete form, click on Expand form. The following optional functions are available.▪ Set the task's start and due date.▪ To get an appointment reminder, select a setting in Reminder. The respective date and time are
entered in Reminder date.To use custom values, set them inReminder date. In this case,Manual inputwill be preselectedin the Reminder field.
▪ If the subject and description are not to be shown to other users, activate Private. Private tasksare marked with the Private icon .
▪ In order to add details like billing information, click on Show details. Enter the data required.
4. You can use additional functions:▪ Creating recurring tasks (p. 185)▪ Adding participants to a task (p. 185)▪ Adding attachments (p. 186)
5. Click on Create.
Also see
Using the date picker (p. 147)The task editing window (p. 181)
184
Creating TasksTasks

8.4.2 Creating recurring tasks
How to create a recurring task in the task editing window:
1. To view the complete form, click on Expand form.
2. Enable Repeat. The current repetition parameters are displayed.
3. To set the repetition parameters, click on the value. The Edit recurrence window opens.
4. Set the repetition parameters.▪ In Repeat, you can set the interval between the appointments.▪ Below the interval, you can set the interval parameters.▪ In Ends, you can define when the recurring tasks ends.
Tip: Examples can be found in Questions and Answers.
Also see
Creating new tasks (p. 184)Adding participants to a task (p. 185)Adding attachments (p. 186)The task editing window (p. 181)
8.4.3 Adding participants to a task
How to add participants in the task editing window:
Enter the participants' E-Mail addresses, a group's name or a distribution list's name in the inputfield below Participants. Tips:▪ While entering the E-Mail address, several matching suggestions are displayed. To accept a sug-
gestion, use one of the following methods:▫ Use the scrollbar to browse the list. Click on a suggestion.▫ Use the cursor keys to select a suggestion. Press Enter.
▪ To select contacts from a list, click the Address bookicon on the right side of the input field.In order to remove a participant, click the icon next to the name.
Also see
Creating new tasks (p. 184)Selecting contacts from a list (p. 69)Creating recurring tasks (p. 185)Adding attachments (p. 186)
185
TasksCreating recurring tasks

8.4.4 Adding attachments
How to add attachments in the task editing window:
1. Click on Add attachments below Attachments.
2. Select one or several files.In order to remove an attachment, click the Delete icon .
Tip: You can also add an attachment by dragging and dropping a document from a file browser or fromthe desktop to the task window.
Also see
Creating new tasks (p. 184)Creating recurring tasks (p. 185)Adding participants to a task (p. 185)The task editing window (p. 181)
186
Adding attachmentsTasks

8.5 Answering Task InvitationsIf a user or an external partner adds you to a task as participant, you will receive at least one of thefollowing notifications:▪ You are informed about this task in the Notification area.▪ You will receive an E-Mail invitation for the task.You can accept, temporarily accept or refuse your participation in the task.
How to answer a task invitation in the notification area:
1. Click the Notifications icon in the menu bar. The Notification area is displayed.
2. Click on Accept/Decline below the invitation.
3. Enter a comment in the Change confirmation status window. Click on one of the buttons Accept,Tentative or Decline.
Tip: You can confirm the task directly in the notification area by clicking on theAccept invitation button.
How to answer a task invitation in an E-Mail invitation:
1. Display an E-Mail with a task invitation in the E-Mail application.
2. Click on one of the buttonsConfirm, Temporary,Decline in the detail view below This email containsa task.
Also see
The notification area (p. 33)
187
TasksAnswering Task Invitations

8.6 Adding Task FoldersThe following options exist:▪ Adding personal task folders▪ Importing tasks from files
Also see
Folders (p. 230)
8.6.1 Adding personal task foldersYou can create additional personal task folders below My tasks.
How to create a new personal task folder:
1. In the folder tree, click on Add new folder. A window opens.
2. Enter a name. In case the new folder should be a public folder, enable Add as public folder. Clickon Add.
Also see
Importing tasks from files (p. 188)
8.6.2 Importing tasks from filesInformation on importing tasks can be found in Importing Data (page 260).
Also see
Adding personal task folders (p. 188)
188
Adding Task FoldersTasks

8.7 Managing TasksSome of the techniques for organizing tasks require having set up own tasks folders. Information oncreating folders can be found in Folders (page 230).
The following options exist:▪ Editing tasks▪ Marking tasks as done▪ Changing a task's due date▪ Moving tasks to another folder▪ Exporting tasks▪ Changing tasks confirmations▪ Printing tasks▪ Deleting tasks
189
TasksManaging Tasks

8.7.1 Editing tasksYou can edit a task's data at a later point.
How to edit a task:
Prerequisite: You have the permission to create objects in the folder containing the task.
1. Select a task from the list.
2. Click on Edit in the toolbar. The task's data are displayed.
3. Edit the data.A description of the input fields can be found in The task editing window (page 181).
4. Click on Save.
Also see
Marking tasks as done (p. 190)Changing a task's due date (p. 191)Changing tasks confirmations (p. 192)The task editing window (p. 181)
8.7.2 Marking tasks as doneYou can mark tasks as done.
How to mark a task as done:
Prerequisite: You have the permission to create objects in the folder containing the task.
1. Select a task or multiple tasks from the list.
2. Click on Done in the toolbar.To mark the selected tasks as undone, click on Undone.
Also see
Editing tasks (p. 190)Changing a task's due date (p. 191)Changing tasks confirmations (p. 192)The task editing window (p. 181)
190
Editing tasksTasks

8.7.3 Changing a task's due dateYou can change a task's due date.
How to change a task's due date:
Prerequisite: You have the permission to create objects in the folder containing the task.
1. Select a task from the list.
2. Click on Due in the toolbar. Select an entry.
Also see
Editing tasks (p. 190)Marking tasks as done (p. 190)Changing tasks confirmations (p. 192)The task editing window (p. 181)
8.7.4 Moving tasks to another folderYou can move tasks to another folder.
How to move tasks to another folder:
Prerequisite: You need to have the appropriate permissions to create objects in the target folder.
1. Select a task or multiple tasks from the list.
2. Click the More actions icon in the toolbar. Select Move from the menu.
3. Select a folder in the Move window. You can create a new folder by clicking on Create folder.4. Click on Move.
Tip: In order to move tasks using drag and drop, select a task or multiple tasks in the list. Drag the se-lected tasks to a folder in the folder tree.
8.7.5 Exporting tasksYou can export tasks in the iCalendar format. You can e.g. use this format to exchange tasks with othercalendar applications.
How to export tasks:
1. Select a task or multiple tasks from the list.
2. Click the More actions icon in the toolbar. Click the Export menu item. The Export selected dialogwindow opens.
3. Click on Export. Complete the entries.
Also see
Sending contacts as vCard (p. 122)Exporting a Folder's Data. (p. 265)
191
TasksChanging a task's due date

8.7.6 Changing tasks confirmationsYou can change your task confirmation at a later point of time.
How to change your task confirmation:
1. Select a task from the list.
2. Click the More actions icon in the toolbar. Click on Change confirmation status in the menu.
3. A window opens. Select a confirmation status. If required, enter a message.
4. Click on Change status.
8.7.7 Printing tasksYou can print the data of a single task or of multiple tasks.
How to print a task's data:
1. Select a task or multiple tasks from the list.
2. Click theMore actions icon in the toolbar. Click onPrint in the menu. A window with a print previewopens.
3. If required, change the printer settings. Click on the Print button.
4. Close the print preview window.
8.7.8 Deleting tasksYou can delete tasks.
How to delete tasks:
Warning: When deleting a task, this task is irrevocably lost.
1. Select a task or multiple tasks from the list.
2. Click on Delete in the toolbar.
3. Confirm that you want to delete the task.
Result: The task will be deleted.
192
Changing tasks confirmationsTasks

8.8 Searching for TasksIn order to search for tasks, you can use the following search criteria:▪ search terms for subject, description, attachments' names, participants▪ folders that are to be searched▪ the task's status▪ task type: single or recurring task▪ folder type: all, private, public, shared
How to search for tasks:
1. Click on the Search input field. Additional icons are displayed.
2. Enter a search term in the input field. The search menu opens.
Define the data sources to be searched by clicking on an entry in the search menu.▪ If clicking on the search term or pressing enter, the following data sources are searched: subject,
description▪ In order to only search in the subject, click on in subject in the search menu.
Accordingly, you can limit the search to the description or the attachment's name.▪ In order to search for appointments with a specific participant, click on a name in the search
menu.The search results are displayed in the list that is shown in the display area.
3. To select a folder for the search, click theOptions icon in the input field. The folder that is searched,is displayed in the Folder drop-down. To select another folder, open the drop-down.If you select All folders, all private, public, and shared folders are searched.
4. You have the following options to limit the search to specific tasks:▪ To limit the search to tasks with a specific editing status, click the Options icon in the input
field. Open the Task status drop-down. Select a status.▪ To limit the search to single or recurring tasks, click the Options icon in the input field. Open
the Task type drop-down. Select a type.▪ To limit the search to private, public or shared tasks, click the Options icon in the input field.
Open the Folder type drop-down. Select a type.
5. To refine the search result, enter further search terms: To remove a search term, click the Removeicon next to the search term.
6. In order to finish the search, click the Close icon .
193
TasksSearching for Tasks
8.9 Tasks in teamsThe following options exist:▪ Sharing tasks with other users▪ Delegating tasks to other users
8.9.1 Sharing tasksYou can share your tasks with internal as well as external partners. Depending on the requirements,different methods exist.▪ To make a folder available for internal users or external partners, proceed as follows:
Create a new personal or public tasks folder.Share this folder.
You can also share an existing folder.▪ If another internal user shared a task folder with you, you can access this folder in the folder tree.▪ To invite external partners to a task, proceed as follows:
When creating the task, add external partners as external participants.
Also see
Delegating tasks (p. 194)
8.9.2 Delegating tasksYou can delegate a task to an internal user when newly creating the task. To do so enter the name ofthe internal user as participant.
Also see
Sharing tasks (p. 194)
194
Tasks in teamsTasks

8.10 Interchanging Tasks with Other ApplicationsThe following options exist:▪ export [265] tasks to use them in other applications▪ import [260] tasks that you created in other applications
195
TasksInterchanging Tasks with Other Appli-cations

8.11 Tasks SettingsHow to use the tasks settings:
1. Click the Settings icon on the right side of the menu bar. Click the Settings menu item.
2. Click on Tasks in the sidebar.
3. Change the settings.
The following settings are available.
Email notifications▪ Receive notifications when a task in which you participate is created, modified or deleted
Specifies whether you will receive an E-Mail notification, if the following is true: A task in which youparticipate has been re-created, changed or deleted.
▪ Receive notifications when a participant accepted or declined a task created by youSpecifies whether you will receive an E-Mail notification, if the following is true: A participant acceptedor declined a task created by you.
▪ Receive notificationswhen a participant accepted or declined a task inwhich you participateSpecifies whether you will receive an E-Mail notification, if the following is true: A participant acceptedor declined a task in which you participate.
196
Tasks SettingsTasks

9 DriveLearn how to work with the Drive application.▪ the Drive components▪ view files and folders▪ download files or folder contents▪ create files or folders▪ create or edit text files▪ organize files and folders▪ search for files▪ share files and folders with other users or external partners.▪ access data with WebDAV▪ access your cloud storage that you set up in third party products like Dropbox▪ work in teams with other users or external partners▪ use the Drive settingsInformation on the usage of local apps on desktops and mobile devices can be found in the Drive appsuser guide.
How to launch the Drive app:Click the App Launcher icon in the menu bar. Click on Drive in the App Launcher.Depending on the groupware configuration, you can also click the quick start icon for launching theDrive app in the menu bar.
197
9.1 The Drive ComponentsThe Drive app includes the following components.▪ The Drive search bar▪ The Drive folder tree▪ The Drive toolbar▪ The Drive navigation bar▪ The Drive display area▪ The file details▪ The viewer
198
The Drive ComponentsDrive

9.1.1 The Drive search barEnables you to search for files.
Also see
The search bar (p. 28)Searching for Files (p. 222)Viewing Files and Folders (p. 205)
9.1.2 The Drive folder treeDisplays the folders.
Content
▪ My files. Contains your personal files and folders. Per default, it contains folders for documents,music, images, and videos.
▪ My shares. Shows the files and folders shared by you for other users or external partners.▪ My attachments. Displays the file attachments of E-Mails sent or received by you.▪ Trash. Contains the files and folders deleted by you.▪ Shared files. Contains files shared with you by other users.▪ Public files. Contains files shared with all users.Depending on the groupware configuration, the content can differ from this information.
Functions
▪ If clicking on a folder, its contents are displayed.▪ TheActions icon next to the selected folder offers functions for organizing data and for exchanging
data.▪ TheAdd storageaccountbutton below the folders offers functions for adding cloud storage accounts
that you set up in third party products like Dropbox.
Also see
The folder tree (p. 30)Folders (p. 230)Sharing (p. 237)Navigating within the folder structure (p. 233)Renaming folders (p. 235)Moving folders (p. 236)Deleting folders (p. 236)Adding storage accounts (p. 225)
199
DriveThe Drive search bar

9.1.3 The Drive toolbarContains the following elements. Note: Some buttons are only displayed, if objects have been selected.▪ New. Contains the following functions:
▫ Add local file. Adds one or multiple local files.▫ Depending on the configuration, a function for adding files in an encrypted format will be available.
Information on encrypting files can be found in Encrypting Data (p. 267)▫ Add note. Creates a simple text file.▫ New text document. Creates a new text document.▫ New spreadsheet Creates a new spreadsheet.▫ Add new folder. Creates a new folder.
▪ Edit. Edits a text file or an Office document. This function is only available if selecting a text file oran Office document.
▪ Share icon . This function allows to share files or folders.▪ View icon . Shows the contents of the folder's files in the viewer.▪ Download icon . Downloads the files selected by you. Multiple files are downloaded as zip archive.▪ Present icon . Starts a presentation. This function is only available if you select a document in the
PowerPoint or PDF format.▪ Delete icon . Deletes the files or folders selected by you.▪ More actions icon . Opens a menu with further functions. Notes:
▫ If you selected multiple files, some functions are not available.▫ If displaying a document or a text file, the function Save as PDF is available.
▪ View. Allows to select the view in the display area [202].
Also see
The toolbar (p. 29)Instructions for the buttons and icons:Creating Files or Folders (p. 211)Sharing (p. 237)Displaying a file's content (p. 206)Holding a presentation (p. 208)Downloading Files or Folder Contents (p. 210)Adding files or folders (p. 218)Instructions for the functions in the More actions menu :Encrypting files (p. 272)Decrypting files (p. 274)Adding files or folders to favorites (p. 217)Editing file names (p. 214)Creating or editing descriptions (p. 215)Saving files as PDF (p. 216)Sending files as E-Mail attachments (p. 214)Adding files to the portal (p. 217)Moving files or folders (p. 215)Copying files (p. 216)Locking or unlocking files (p. 219)
200
The Drive toolbarDrive

9.1.4 The Drive navigation barThe navigation path is located below the toolbar.
Functions
▪ Navigation path. It shows the path to the folder opened. To open a parent folder, click on a pathentry.
▪ Sort by button. Sorts the files in the display area by various criteria.▪ Select button. Contains functions for selecting or filtering objects in the display area [202]:
▫ select all files and folders, select all files, clear the selection▫ display certain file types only, display all file types
Also see
Viewing Files and Folders (p. 205)
201
DriveThe Drive navigation bar
9.1.5 The Drive display areaDisplays the files and folders as list, icons or tiles In order to select a view, click on the View button inthe toolbar.▪ For each file and folder a row with the following content is displayed in the List view.
▫ An icon. There are different icons for the single object types.▫ The name of the file or folder.▫ Date or time of the last change▫ In the case of files, the size is displayed.
▪ For each file and folder the following information is displayed in the Icons view.▫ An icon. If available, a file preview is shown.▫ The name of the file or folder.
▪ Files and folders are displayed as squares in the Tiles view.▪ Encrypted files are marked with the Encrypted icon . Information on encrypting files can be found
in Encrypting Data (p. 267)
Functions
▪ In order to display details of a selected object, click onView in the toolbar. Enable File Details. Detailsare displayed in a sidebar.
▪ In order to display specific object types only, click on Select in the navigation bar. Enable an entrybelow Filter.In order to display all objects, click on Select in the navigation bar. Enable the entry None belowFilter.
▪ In order to sort objects, click on Sort by in the navigation bar. Enable an entry.▪ Select a file or folder by clicking on it. You can also use your system's multi selection functions.
You can also use checkboxes to select files or folders. In order to display the checkboxes, click onthe View button in the toolbar. Enable Checkboxes.To select all objects or files or to clear the selection, click on Select in the navigation bar. Click on anentry below Select.
▪ If double-clicking on a folder, it will be opened.▪ For frequently used functions, you can use the context menu for a folder, a file or multiple files.
Also see
The display area (p. 31)Viewing Files and Folders (p. 205)Downloading Files or Folder Contents (p. 210)Organizing Files and Folders (p. 213)Sharing (p. 237)
202
The Drive display areaDrive
9.1.6 The file detailsDisplays information about the selected object in a sidebar. If no sidebar is displayed, click on View inthe toolbar. Enable File Details.
Content
▪ Details. Displays general information about the object selected in the display area:▫ the name of the file or folder▫ file size or number of objects in the folder▫ date of the last change▫ the editor's name▫ the parent folder's nameIf you shared the object, the button next to Shares can be used to open the dialog window for editingshares.When having selected an object in the My attachments folder, the Viewmessage button is displayed.If clicking on it, the respective E-Mail with the attachment is displayed.
▪ Description. Shows file comments, if available.In order to add a description, click on Add a description. In order to edit a description, click on Editdescription.
▪ Upload a new version button. Click on this button to select a file that is uploaded as new version.▪ If there are several file versions, the Versions area is displayed. For each version the following infor-
mation is displayed:▫ The version's file name. If clicking on it, a menu with several functions opens:▫ The version's file size▫ name of the user who uploaded the version▫ date and time of the version's upload
Also see
Viewing Files and Folders (p. 205)How to download files: (p. 210)Organizing Files and Folders (p. 213)Sharing (p. 237)Working with versions (p. 220)
203
DriveThe file details

9.1.7 The viewerShows the contents of files. In order to launch the viewer, do one of the following:▪ Select a file. Click the View icon in the toolbar.▪ Double-click on a file in the display area.
Note: If double-clicking on an office document, the respective Documents is launched if configuredaccordingly.
Content
▪ Name of the selected file. If clicking on the name, the Rename dialog window opens.▪ Depending on the selected file type, the respective functions are displayed.
▫ If the selected file is editable, the Edit button is displayed.▫ If a document template is shown, the New from template button is displayed.▫ Depending on the content of the selected file, the Zoom out icon and the Zoom in icon are
displayed.▫ If a presentation or a PDF document is shown, the Present icon is displayed.
▪ Functions▫ Download icon . Downloads the file.▫ Share icon . This function allows to share data.▫ More actions icon . Opens a menu with further functions. If displaying a document or a text
file, the function Print as PDF is available.▫ Viewdetails icon . Opens or closes a sidebar with information about the file. The sidebar contains
the same functions as the sidebar in the display area.▫ Pop out icon . Displays the contents of the selected file on a new page. For documents in the
Office format, there are page navigation functions available:▫ Close icon . Closes the Viewer.
▪ If possible, the file content is displayed.If there are further files, icons for browsing are displayed to the left and to the right of the view.
Also see
Instructions for the buttons and icons:Displaying a file's content (p. 206)Holding a presentation (p. 208)Downloading Files or Folder Contents (p. 210)Sharing (p. 237)Working with versions (p. 220)Instructions for the functions in the More actions menu :Encrypting files (p. 272)Decrypting files (p. 274)Editing file names (p. 214)Creating or editing descriptions (p. 215)Inviting to a shared item (p. 240)Sharing with public links (p. 238)Sending files as E-Mail attachments (p. 214)Adding files or folders to favorites (p. 217)Adding files to the portal (p. 217)Working with versions (p. 220)Adding files or folders (p. 218)
204
The viewerDrive
9.2 Viewing Files and FoldersBy default, the content of theMy files folder is displayed. Depending on a file's content, different functionsare available:▪ display a file's content▪ display attachments of E-Mails sent or received by you▪ hold presentations in familiar Office formats or in the PDF format
205
DriveViewing Files and Folders

9.2.1 Displaying a file's contentThere are the following options:▪ display text files, documents or images in the viewer▪ view images as a slideshow▪ play audio and video files, provided they are in a suitable format
206
Displaying a file's contentDrive

How to display a file's content:
1. Open a folder containing files.
2. In order to select a view for the objects, click on View in the toolbar. Select one of those entries: List,Icons, Tiles.In order to display details of a selected file, click onView in the toolbar. Enable File Details. If selectingmultiple files by using the checkboxes, details about the last selected file are displayed.
3. To change the sorting, click on Sort by in the navigation bar. Enable an entry.In order to display specific object types only, click on Select in the navigation bar. Enable an entrybelow Filter.
4. Use one of the following options to open a file in the Viewer:▪ Double-click on a file in the display area.▪ Select one or several files in the display area. Click the View icon in the toolbar.▪ Select View from the context menu.If the sidebar is not displayed, click the View Details icon to view details for the file selected.Depending on the file type, different functions can be available:▪ If the file content can not be displayed, a button for downloading the file will be shown.▪ For text files and documents in the Office format, there are editing functions available: Information
on editing documents can be found in the Documents user documentation.▪ For pictures, an icon for starting a slide show is displayed in the centre of the picture.▪ For presentations, an icon for presenting the presentation is shown.▪ For audio and video files in suitable formats, there are playing functions available.
Note: The playing options depend from the browser used.
5. In order to open the previous or next file, click the Back icon or the Next icon next to the view.In order to display the file in a new page, click the Pop out icon . For documents in the Office format,there are page navigation functions available:▪ In order to browse page by page or to view a specific page, use the elements above the document.▪ In order to navigate with the help of thumbnail images, activate the Thumbnail tab in the sidebar.
Click on a thumbnail image.
Also see
Navigating within the folder structure (p. 233)Searching for Files (p. 222)Displaying E-Mail attachments (p. 208)Holding a presentation (p. 208)Downloading Files or Folder Contents (p. 210)The Drive display area (p. 202)The file details (p. 203)The viewer (p. 204)
207
DriveDisplaying a file's content
9.2.2 Displaying E-Mail attachmentsThe attachments of E-Mails that have been sent or received by you, are displayed in a separate folder.
How to display E-Mail attachments:
1. Open the My attachments folder.
2. To view an attachment's content, use the methods for viewing files.To display the E-Mail that belongs to the selected attachment, click on View in the toolbar. EnableFile Details. Click on View message.
Also see
Displaying a file's content (p. 206)Holding a presentation (p. 208)Downloading Files or Folder Contents (p. 210)The Drive display area (p. 202)The file details (p. 203)
9.2.3 Holding a presentationYou can hold presentations in common Office formats or in the PDF format. Depending on the require-ment, use one of the following methods.▪ Locally hold a presentation on the machine.▪ Hold a remote presentation. This enables users who are not on-site, to follow the presentation.
How to locally hold a presentation:
1. Open a folder containing presentations.
2. Select a presentation in the display area. Click the Present icon in the toolbar.You can also use the Present icon in the Viewer.The presentation is opened in a new page. To browse the pages before the start, use the navigationelements next to the sheet or the previews below the sheet. You can also use the cursor keys.You can use the icons on the right side of the toolbar to adjust the sheet size.
3. In order to locally start the presentation, click on Start presentation in the toolbar. Select Startlocal presentation.During the presentation, the following functions are available.
To display a function bar, hover the mouse over the bottom of the screen. The following functionsare available:browse, display a specific sheet, display the participants list, pause presentation, activate fullscreenmode.If clicking on Pause presentation, the presentation is stopped at the current sheet.If clicking the icon Toggle fullscreen, the fullscreen mode is activated You can use the [esc]key or the function bar at the bottom of the screen to leave the fullscreen mode.
4. In order to end the presentation, click on End presentation in the toolbar.
208
Displaying E-Mail attachmentsDrive

How to hold a remote presentation:
1. Open a folder containing presentations.
2. Select a presentation in the display area. Click the Present icon in the toolbar.You can also use the Present icon in the Viewer.The presentation is opened in a new page. To browse the pages before the start, use the navigationelements next to the sheet or the previews below the sheet. You can also use the cursor keys.You can use the icons on the right side of the toolbar to adjust the sheet size.
3. Send the url of the selected presentation to the users who should take part in the presentation. Theusers have to open the url in their browser.If clicking the Show participants icon the users who remotely take part in the presentation areshown in the sidebar.
4. Click on Start presentation in the toolbar. Select Start remote presentation.During the presentation, the following functions are available.
To display a function bar, hover the mouse over the bottom of the screen. The following functionsare available:browse, display a specific sheet, display the participants list, pause presentation, activate fullscreenmode.If clicking on Pause presentation, the presentation is stopped at the current sheet.If clicking the icon Toggle fullscreen, the fullscreen mode is activated You can use the [esc]key or the function bar at the bottom of the screen to leave the fullscreen mode.
5. In order to end the presentation, click on End presentation in the toolbar.
Also see
Displaying a file's content (p. 206)Displaying E-Mail attachments (p. 208)Downloading Files or Folder Contents (p. 210)The Drive display area (p. 202)The file details (p. 203)The viewer (p. 204)
209
DriveHolding a presentation
9.3 Downloading Files or Folder ContentsThe following options exist:▪ download one or several files▪ download the complete content of a folder as zip archive
How to download files:
1. Open a folder containing files.Select one or several files in the display area.
2. Use one of the following methods:▪ Click the Download icon in the toolbar.▪ Select Download from the context menu.▪ Use the Download button in the Viewer.
3. Complete the steps for downloading the file.
Tip: Learn how to download a certain file version by reading Section 9.6.11, “Working with versions”.
How to download the complete content of a folder:
1. Select the folder containing the content to be downloaded in the folder tree.
2. Click the Actions icon next to the folder name. Click on Download entire folder.3. Complete the steps for downloading the folder. The folder's content is saved as a zip archive.
You can also download a folder by using the context menu in the display area.
Also see
Displaying a file's content (p. 206)Displaying E-Mail attachments (p. 208)Holding a presentation (p. 208)The Drive display area (p. 202)The file details (p. 203)
210
Downloading Files or Folder ContentsDrive

9.4 Creating Files or FoldersYou can add new files or create a new subfolder in the selected folder.
How to add new files:
1. Open a folder.Note: Open a folder for which you have the appropriate permissions to create objects.
2. Click on New in the toolbar. Click on Add local file.Depending on the configuration, a function for adding files in an encrypted format will be available.Information on encrypting files can be found in Encrypting Data (p. 267)
3. Select one or several files in the Upload file window.Click on Open. The display area shows the current progress status.In order to cancel the process, click on Cancel at the bottom right side of the display area.In order to cancel the process for single files, click on File Details at the bottom right side of thedisplay area. Click on Cancel next to a file name in the Upload progress window.In the Settings, you can define whether a new file or a new version of a possibly existing file with thesame name should be created.
Tips:▪ You can continue working in the groupware during the upload process.▪ You can also create a new file by dragging a file from a file browser or from your desktop to the Drive
app window and drop it in the display area.
How to create a new folder:
1. Open a folder.Note: Open a folder for which you have the appropriate permissions to create objects.
2. Click on New in the toolbar. Click on Add new folder.Click the Actions icon next to the folder name. Click on Add new folder.
3. Enter a name in the Add new folder window. Click on Add.
Also see
Viewing Files and Folders (p. 205)Creating or Editing Text Files (p. 212)Organizing Files and Folders (p. 213)Searching for Files (p. 222)Folders (p. 230)Sharing (p. 237)The Drive display area (p. 202)The file details (p. 203)
211
DriveCreating Files or Folders

9.5 Creating or Editing Text FilesYou can create text files with plain text. You can either enter the text or paste it from the clipboard.
How to create a new text file:
1. Open a folder in the folder tree.Note: Open a folder for which you have the appropriate permissions to create objects.
2. Click on New in the toolbar. Click on Add note.
3. Enter a title.Enter the text or paste text from the clipboard.In order to edit the text, use the common techniques from the familiar applications.
4. In order to save the text, click on Save.In order to finish, click on Close.
How to edit a text file:
1. Open a folder containing text files, in the folder tree.Note: Open a folder for which you have the permission to create objects.
2. Use one of the following methods:▪ Select a text file. Click on Edit in the toolbar.▪ Double-click on a text file.▪ Display a text file in the Viewer. Click on Edit.The text will be opened for editing.
3. In order to edit the text, use the common techniques from the familiar applications.
4. In order to save the text, click on Save.In order to finish, click on Close.
Also see
Viewing Files and Folders (p. 205)Creating Files or Folders (p. 211)Organizing Files and Folders (p. 213)Searching for Files (p. 222)Sharing (p. 237)The editing window (p. 34)
212
Creating or Editing Text FilesDrive

9.6 Organizing Files and FoldersSome of the techniques for managing files require having all ready set up your own folders. Informationon creating folders can be found in Creating Files or Folders (p. 211).
The following options exist:▪ Sending files as E-Mail attachments▪ Editing file names▪ Creating or editing descriptions▪ Moving files or folders▪ Copying files▪ Saving files as PDF▪ Adding files to the portal▪ Adding files or folders to favorites▪ Adding files or folders▪ Locking or unlocking files▪ Working with versions
213
DriveOrganizing Files and Folders

9.6.1 Sending files as E-Mail attachmentsYou can send the current versions of files as E-Mail attachments.
How to send files as an E-Mail attachment:
1. Select one or several files in the display area.
2. Use one of the following methods:▪ Click the More actions icon in the toolbar. Click on Send by mail in the menu.▪ Click on Send by mail in the context menu.▪ Use the More actions icon in the Viewer.
3. In the E-Mail edit window, fill in the details to send a new E-Mail.
Also see
The Drive display area (p. 202)The viewer (p. 204)
9.6.2 Editing file namesYou can edit a file name.
How to edit the file name:
Prerequisite: You have the appropriate permissions for editing objects in the folder containing thefile.
1. Select a file in the display area.
2. Use one of the following methods:▪ Click the More actions icon in the toolbar. Click on Rename in the menu.▪ Select Rename from the context menu.▪ Use the More actions icon in the Viewer.▪ Click on the file name on the upper left side of the Viewer.
3. Edit the file name in the Rename window. Note the name extension. Click on Rename.
Also see
Creating or editing descriptions (p. 215)The Drive display area (p. 202)The file details (p. 203)The viewer (p. 204)
214
Sending files as E-Mail attachmentsDrive
9.6.3 Creating or editing descriptionsYou can newly create or edit a file's description.
How to create or edit a file's description:
Prerequisite: You have the appropriate permissions for editing objects in the folder containing thefile.
1. Select a file in the display area.If no details are displayed, click on View in the toolbar. Enable File Details.
2. In order to add a description, click on Add a description.In order to edit a description, double-click on the description.Enter a new text or change the existing one. Click on Save.
You can also use the function in the sidebar of the Viewer.
Also see
Editing file names (p. 214)The Drive display area (p. 202)The file details (p. 203)The viewer (p. 204)
9.6.4 Moving files or foldersYou can move objects like files or folders to another folder. Allowed objects are:▪ one or multiple files▪ one or multiple folders▪ a combination of files and folders
How to move objects to another folder:
Prerequisite: You need to have the appropriate permissions to create objects in the target folder.
1. Select the objects in the display area.
2. Use one of the following methods:▪ Click the More actions icon in the toolbar. Select Move from the menu.▪ Select Move from the context menu.▪ Use drag and drop to move the items to a folder in the folder tree.
3. Select a folder in the Move window. You can create a new folder by clicking on Create folder.Click on Move.
Also see
Copying files (p. 216)The Drive display area (p. 202)
215
DriveCreating or editing descriptions

9.6.5 Copying filesYou can copy files to another folder: When copying a shared file, the permission will not be copied. Thismeans, the file's copy is not shared.
How to copy files to another folder:
Prerequisite: You need to have the appropriate permissions to create objects in the target folder.
1. Select one or several files in the display area.
2. Use one of the following methods:▪ Click the More actions icon in the toolbar. Select Copy from the menu.▪ Select Copy from the context menu.
3. Select a folder in the Copy window. You can create a new folder by clicking on Create folder.Click on Copy.
Also see
Moving files or folders (p. 215)The Drive display area (p. 202)
9.6.6 Saving files as PDFYou can save documents and text files in PDF format. The PDF file will be saved to the folder that containsthe document or text file.
How to save a file in the PDF format:
1. Select a file in the display area.
2. Use one of the following methods:▪ Click the More actions icon in the toolbar. Select Save as PDF from the menu.▪ Select Save as PDF from the context menu.▪ Use the More actions icon in the Viewer.
3. In the Save as PDF window, you can enter a name for the PDF file. Click on Save.
Also see
Copying files (p. 216)The Drive display area (p. 202)The viewer (p. 204)
216
Copying filesDrive

9.6.7 Adding files to the portalYou can add a file as widget to the Portal.
How to add a file to the portal:
Select a file in the display area. Click the More actions icon in the toolbar. Click on Add to portalin the menu.
Also see
Customizing the Portal (p. 51)The Drive display area (p. 202)
9.6.8 Adding files or folders to favoritesYou can add frequently used objects like files or folders to the symbolic folder Favorites. The followingfunctions are available:▪ add objects to favorites▪ remove objects from favoritesThe original position of the objects in the folder tree will not be affected by those actions.
How to add objects to Favorites:1. Select the objects in the display area.
2. Use one of the following methods:▪ Click the More actions icon in the toolbar. Click on Add to favorites in the menu.▪ Select Add to favorites from the context menu.
Result: The objects are displayed in the upper part of the folder tree below Favorites.
How to remove objects from Favorites:1. Click on Favorites in the folder tree. Select the objects in the display area.
2. Click on Remove from favorites in the toolbar.
Result: The objects are removed from Favorites. If Favorites is empty, the folder will be removed.
Also see
Moving files or folders (p. 215)The Drive display area (p. 202)
217
DriveAdding files to the portal

9.6.9 Adding files or foldersYou can delete objects in the same way as files and folders. The following options exist:▪ delete object The objects are moved to the Trash folder.▪ Restore deleted objects from the Trash folder.
The objects are restored in their original location.▪ Permanently delete objects from the Trash folder. You can also permanently delete all items in a
folder by emptying the trash.Warning: If you delete objects from the Trash folder, they are irrevocably deleted.
How to delete objects:
1. Select the objects in the display area.
2. Use one of the following methods:▪ Click the Delete icon in the toolbar.▪ Select Delete from the context menu.
3. Confirm that you want to delete the selected objects.
Result: The selected objects are deleted.
How to restore deleted objects:
1. Open the Trash folder.
2. Select the objects to be restored.
3. Use one of the following methods:▪ Click the More actions icon in the toolbar. Click the Restore menu item.▪ Select Restore from the context menu.
Result: The objects are restored in their original location.
How to permanently delete objects:
Warning: Permanently deleted objects can not be restored.
1. Open the Trash folder.
2. Select the objects.
3. Click the Permanently delete icon in the toolbar.
4. Confirm that you want to delete the items.
Result: The items are permanently deleted.
How to permanently delete the content of the Trash folder:
Warning: Permanently deleted objects can not be restored.
1. Select the Trash folder in the folder tree.
2. Click the Actions icon next to the folder name. Click on Empty folder.3. Confirm that you want to empty the folder.
Result: The objects in the trash are permanently deleted.
218
Adding files or foldersDrive

9.6.10 Locking or unlocking filesWhen editing a file, you can lock this file. The lock has the following purposes:▪ The file lock informs other users that the file is currently being edited and might no longer be up-to-
date.▪ If the file is located in a folder that you share with other users whom you granted edit permissions,
those users can not edit the locked file.▪ If you are the owner of a shared file and another user locks the file, you can always unlock it.
How to lock files:
1. Select one or several files in the display area.
2. Click the More actions icon in the toolbar. Click on Lock in the menu.
How to unlock files:
1. Select one or several locked files in the display area.
2. Click the More actions icon in the toolbar. Click on Unlock in the menu.
219
DriveLocking or unlocking files

9.6.11 Working with versionsThere are the following options for working with versions:▪ opening or saving the current version▪ uploading a new version▪ opening or saving the current version▪ setting a particular version as the current version▪ deleting a certain version
220
Working with versionsDrive

How to open or save the current version:
1. Select a file in the display area. Click the Download icon in the toolbar.
2. Complete the steps for opening or downloading.
How to upload a new version:
1. Select a file in the display area. If no sidebar is displayed, click on View in the toolbar. Enable FileDetails.
2. Click on Upload new version in the sidebar. Select a file.
3. Enter a version comment.
4. Click on Upload.
You can also use the function in the sidebar of the Viewer.Tip: You can also upload a new version by dragging a file from a file browser or from the desktop tothe viewer's or the display area's sidebar and dropping it there.
How to open or save a certain version:
1. Select a file in the display area. If no sidebar is displayed, click on View in the toolbar. Enable FileDetails.
2. Click the Panel on/off icon next to Versions in the sidebar. The list of versions is displayed.Click on a version. Click the Download menu item.
3. Complete the steps for opening or downloading.
You can also use the function in the sidebar of the Viewer.
How to set a certain file version as the current version:
1. Select a file in the display area. If no sidebar is displayed, click on View in the toolbar. Enable FileDetails.
2. Click the Panel on/off icon next to Versions in the sidebar. The list of versions is displayed.Click on a version. Click on the Make this the current version menu entry .
You can also use the function in the sidebar of the Viewer.
How to delete a certain version:
1. Select a file in the display area. If no sidebar is displayed, click on View in the toolbar. Enable FileDetails.
2. Click the Panel on/off icon next to Versions in the sidebar. The list of versions is displayed.
3. Click on a version. Click on Delete version in the menu.
You can also use the function in the sidebar of the Viewer.
Also see
The Drive display area (p. 202)The file details (p. 203)The viewer (p. 204)
221
DriveWorking with versions

9.7 Searching for FilesIn order to search for files, you can use the following search criteria:▪ search terms for file names, file descriptions▪ folders that are to be searched▪ file type: all, audio, documents, images, other, video▪ file size▪ time frame of the latest change, related to the current date: last week, last month, last year▪ folder type: all, private, public, shared
How to search for files:
1. Click on the Search input field in the menu bar. Additional icons are displayed.
2. Enter a search term in the input field. The search menu opens.
Define the data sources to be searched by clicking on an entry in the search menu.▪ If clicking on the search term or pressing enter, the following data sources are searched: file
name, description▪ In order to only search in the file names, click on in file name in the search menu.
Accordingly, you can limit the search to the file description.The search results are displayed in the list that is shown in the display area.
3. To select a folder for the search, click theOptions icon in the input field. The folder that is searched,is displayed in the Folder drop-down. To select another folder, open the drop-down.▪ If you select All folders, all private, public, and shared folders and subfolders are searched.
To limit the search to private, public or shared folders, click on Options. Select a type.▪ If you select a specific folder or the folder, only this folder is searched, but no subfolders.
4. You have the following options to limit the search to specific files:▪ To search for specific files, click the Options icon in the input field. Open the File type drop-
down. Select a type.▪ To limit the search to files with a specific size, click the Options icon in the input field. Open
the File size drop-down. Select a size.▪ To search for files that have been modified within a specific time frame, click theOptions icon
in the input field. Open the Date drop-down. Select a value.
5. To refine the search result, enter further search terms: To remove a search term, click the Removeicon next to the search term.
6. In order to finish the search, click the Close icon .
222
Searching for FilesDrive
9.8 Accessing Files with WebDAVWith WebDAV you can access the Drive app files in the same way as when accessing local files on yourdisk. Compared with the access from the Groupware GUI, WebDAV has advantages and disadvantages:
▪ The advantage is the quick and direct access with a file browser e.g. the Windows Explorer. You neednot be logged in to the Groupware GUI.
▪ The disadvantage is that you can only see the current document version. Neither the version historynor additional information, like comments, are displayed.
Warning: If you delete a file with WebDAV, all versions will be lost, not only the current version.Note: To create objects with WebDAV in a public or shared folder, you need to have at least the followingpermissions for the respective folder: create objects, edit own objects. To also read own objects, youadditionally need this permission: read own objects. Information on permissions can be found in 10.2.8:Which permissions can be used? (page 247).
Prior to accessing the Drive app files with a file browser, e.g. the Windows Explorer, you have to set upthe WebDAV access. Depending on the system software the procedure differs:▪ Setting up WebDAV under Linux▪ Setting up WebDAV under Windows 7
9.8.1 Setting up WebDAV under Linux
How to set up WebDAV access under Linux:
1. Open the KDE Konqueror or a similar browser.
2. Enter the following address in the address bar:webdav://<address>/servlet/webdav.infostoreReplace the <address> with the Groupware Server's ip address or url.
3. Enter your username and password for accessing the Groupware Server.
Result: The Drive app files are displayed in the browser.
9.8.2 Setting up WebDAV under Windows 7
How to set up WebDAV access under Windows 7:
Prerequisite: The registry key BasicAuthLevel has to be set to 2 in the Windows registry database.Further information can be found in the Microsoft articles http://support.microsoft.com/kb/928692and https://support.microsoft.com/kb/841215.Note: Depending on the Windows 7 setup, there can be delays when accessing WebDAV folders. Ifthis is the case, follow the instructions in this article:http://support.microsoft.com/kb/2445570.
223
DriveAccessing Files with WebDAV

1. In the navigation area of the Windows Explorer select the entry Computer.2. In the icon bar click on Connect drive. The Connect drive window opens.
3. Click onConnect to aWeb site that you canuse to store your documents. The Add network addresswindow opens. Click on Next.
4. Select Select custom network address. Click on Next.5. In the Add network path dialog window enter the following address:
https://<address>/servlet/webdav.infostorewhere <address> needs to be replaced by the Groupware server's ip address or url.Click on Next.
6. Enter your username and password for accessing the Groupware Server. Click on OK.
7. On the next page you can assign a name to the network address. Click on Next.8. Click on Finish.
Result: Below Computer you can access your Drive app files.
224
Setting up WebDAV under Windows 7Drive

9.9 Adding storage accountsIf you use third party cloud storages like Google Drive, Dropbox, Box or OneDrive, you can access thedata of those accounts from within the groupware by adding those accounts as storage accounts.
How to add a storage account:
1. Click on Add storage account in the folder tree. The Add storage account window opens.
2. Click an icon. The further procedure depends on the cloud storage account provider.▪ If the provider asks for credentials, enter your credentials for the cloud storage account.▪ If the provider asks you for the permission to access the data, grant this permission.
An entry for the storage account appears in the folder tree. The entry contains this account's folders.Open one of those folders to do the following:▪ You can use the folder tree to access the your storage account contents.
Note:Depending on the storage account's functionality, working with versions might not be support-ed.
▪ Depending on the content, you can use the menu bar functions, e.g. to view pictures or to copy data.
Also see
Editing accounts (p. 252)Removing accounts (p. 252)
225
DriveAdding storage accounts

9.10 Files and TeamsYou can share your files with internal users. Depending on the requirements, different methods exist.▪ In Public files and in Shared files you can find file folders shared by other users.▪ To make additional files available for internal users or external partners, proceed as follows:
Create a new personal or public folder and copy or move the required files to this folder.Share this folder.
You can also share an existing folder.
226
Files and TeamsDrive
9.11 DriveSettingsHow to use the Drive settings:
1. Click the Settings icon on the right side of the menu bar. Click the Settings menu item.
2. Click on Drive in the sidebar.
3. Change the settings.
The following settings are available.
Adding files with identical namesDefines whether a new file or a new version of a possibly existing file with the same name should becreated.▪ Add new version
A new version of the file will be created.▪ Add new version and show notification
A new version of the file will be created. As soon as the process is finished, you will receive a notifi-cation.
▪ Add separate fileA new file will be added. The file name is enhanced with a consecutive number.
Slideshow / Autoplay modeDefines how to present pictures that are displayed in the viewer
Advanced settings▪ Show hidden files and folders
Defines whether hidden files and folders are displayed. The names of hidden files and folders arepreceded by a dot. The local Drive apps require such files and folders for internal purposes. In orderto not endanger the functionality of the local Drive apps, such hidden files and folders must not bechanged or deleted.
227
DriveDriveSettings

228
10 Data Organization, Shared Objects, SecurityLearn how to organize your data and how to share your data with others.▪ Work more efficiently with folder management.▪ Organize your team work with the help of shares.▪ When having set up additional E-Mail accounts, storage accounts or access to social networks, you
can edit or remove those accounts.▪ Use the data from your social networks by using subscriptions.▪ Take care about security when handling your groupware data.
Information on encrypting E-Mails and files can be found in Encrypting Data (p. 267)
229

10.1 Foldersfolders help you to:▪ keep an overview of your objects▪ share information with other users and external partners▪ search for certain information and quickly find the information againFolders are called differently in the following apps:▪ A folder is called address book in the Address Book app.▪ A folder is called calendar in the Calendar app.The following information about folders can also be applied to address books and calendars.▪ Folder types▪ What is the purpose of permissions?▪ Navigating within the folder structure▪ Hiding folders▪ Adding folders to favorites▪ Renaming folders▪ Moving folders▪ Deleting foldersFurther information on files and folders in the Drive app can be found in Organizing Files and Folders.
Also see
The folder tree (p. 30)Adding E-Mail Folders (p. 78)Adding Address Books (p. 118)Adding Calendars (p. 156)Adding Task Folders (p. 188)Creating Files or Folders (p. 211)
230
FoldersData Organization, Shared Objects,Security

10.1.1 Folder typesThe following folder types exist in the folder tree:▪ Personal folders
▫ Personal folders contain your E-Mails, contacts, appointments, tasks, and files. Other users cannot view your personal folders, unless you share them with other users.
▫ Your personal folders for contacts, appointments, tasks, and files can be found below My addressbooks, My calenders, My tasks, My files in the respective app.
▪ Public folders▫ Public folders contain contacts, appointments, and documents that are of common interest to
all users. Each user can create public folders and share them with other users.▫ The public folders for contacts, appointments, tasks, and files can be found below Public address
books, Public calenders, Public tasks, Public files in the respective app.▪ Shared folders
▫ Shared folders have been shared with you by other users with read or write access.▫ The shared folders for contacts, appointments, tasks, and files can be found below Shared address
books, Shared calenders, Shared tasks, Shared files in the respective app.Note: If there are no public or shared folders, their folder type headers are not be displayed.
Also see
What is the purpose of permissions? (p. 232)
231
Data Organization, Shared Objects,SecurityFolder types

10.1.2 What is the purpose of permissions?Permissions define what an internal user or external partner is allowed to do with a particular folderand its contents. The following information about folders can also be applied to address books andcalendars.▪ As internal user you have preset permissions for existing folders.
When creating a new folder, you will be granted the preset permissions.▪ When inviting other persons to a shared item, you grant them particular permissions.
You have the following permissions for folders that already exist:▪ You are the owner of your personal folders.
The owner has the same permissions as an administrator. The owner has all permissions for thisfolder. The owner can grant other users permissions to the folder.
▪ You are allowed to create folders and objects in public folders.▪ You are allowed to view folders and read objects in the Global Address book.
Depending on where you create a new folder, particular rights are assigned to you.▪ If you create a new folder in a personal folder:
▫ You are the owner.▫ In the E-Mail app and the Drive app, other users inherit their permissions for the parent folder.
In the other apps, other users do not inherit permissions.▪ If you create a new folder in the Public files folder:
▫ You are the owner.▫ Other users will get no rights. You have to set the permissions for the new folder. If you then
create new subfolders in this folder, the permissions for this folder are inherited by the newsubfolders.
▪ If you create a new folder in the shared folder of another user:▫ The user who shared the folder is the administrator of the new folder.▫ You are the author of the new folder.
An author is allowed to change or delete existing objects, to create and edit new objects, and tocreate subfolders.
▫ Other users will get the same rights as for the parent folder.Note: You need to have the permission to create objects in the shared folder.
Also see
Folder types (p. 231)Sharing (p. 237)Which permissions can be used? (p. 247)Use cases for permissions (p. 249)
232
What is the purpose of permissions?Data Organization, Shared Objects,Security

10.1.3 Navigating within the folder structureThe following functions are available:▪ open or close the folder tree▪ change the folder tree width▪ open or select a folder in the folder tree or by using the navigation pathThe following information about folders can also be applied to address books and calendars.
How to open or close the folder tree:
Use one of the following methods:Click on View in the toolbar. Enable or disable Folder view.Below the folder tree, click the Open folder view icon or the Close folder view icon .
How to change the folder tree width:
1. Move the cursor to the right border of the folder tree. A double arrow will be displayed.
2. Drag the border to the left or to the right.
How to open or select a folder:
1. If the folder tree is closed, open it.
2. To view a folder's subfolders, click on the arrow next to the folder name.
3. Click on a folder. The folder's items are displayed in the detail view.In the Drive app, you additionally have the following options:
Click on an entry in the navigation bar to open a parent folder.To open a folder, double-click on it in the detail view.
Also see
Displaying E-Mails (p. 65)Working with tabs (p. 80)Displaying contacts (p. 112)Displaying appointments in a calendar view (p. 141)Displaying appointments in the list view (p. 142)Viewing tasks (p. 182)Displaying a file's content (p. 206)Hiding folders (p. 234)Adding folders to favorites (p. 235)
233
Data Organization, Shared Objects,SecurityNavigating within the folder structure

10.1.4 Hiding foldersIn the Address Book, Calendar oder Tasks apps, you can hide certain personal, shared or public folders.The following functions are available:▪ hide single folders▪ display hidden folders againEach hidden folder is displayed in a collective folder at the bottom of the folder tree. The following in-formation about folders can also be applied to address books and calendars.
How to hide a folder:
1. In the Address Book, Calendar or Tasks app, open the folder tree and select the folder that you wantto hide.
2. Click the Actions icon next to the folder name. Click on Hide.Note: If you select a folder that can not be hidden, this function is not displayed.
How to display a hidden folder again:
1. Depending on the app, open the entry Hidden address books, Hidden calendars or Hidden tasksat the bottom of the folder tree in the Address Book, Calendar or Tasks app. The hidden folders willbe displayed.
2. Click the Actions icon next to a folder name. Click on Show.
Also see
Navigating within the folder structure (p. 233)Adding folders to favorites (p. 235)
234
Hiding foldersData Organization, Shared Objects,Security

10.1.5 Adding folders to favoritesYou can add frequently used folders to the symbolic folder Favorites. The following functions are available:▪ add folders to favorites▪ remove folders from favoritesThe original position of the folders in the folder tree will not be affected by those actions. The followinginformation about folders can also be applied to address books and calendars.
How to add a folder to Favorites:1. Select a folder in the folder tree.
2. Click the Actions icon next to the folder name. Click on Add to favorites.
Result: The folder is displayed in the upper part of the folder tree below Favorites. If Favorites does notexist already, it will be created automatically.
How to remove a folder from Favorites:1. Select a folder in the folder tree below Favorites.
2. Click the Actions icon next to the folder name. Click on Remove from favorites.You can also activate this function by right-clicking on the folder in its original position in the foldertree.
Result: The folder is removed from Favorites. If Favorites is empty, the folder will be removed.
Also see
Navigating within the folder structure (p. 233)Hiding folders (p. 234)
10.1.6 Renaming foldersYou can rename subfolders in your personal folders. For other folders you need administrator permis-sions. The following information about folders can also be applied to address books and calendars.
How to rename a folder:
Note: In order to rename a folder, you need to have administrator permissions for the folder.
1. In the folder tree, select the folder that you want to rename.
2. Click the Actions icon next to the folder name. Click on Rename.
3. Edit the name or enter a new name. Click on Rename.
Also see
Navigating within the folder structure (p. 233)Moving folders (p. 236)Deleting folders (p. 236)
235
Data Organization, Shared Objects,SecurityAdding folders to favorites
10.1.7 Moving foldersYou can move subfolders from your personal folders. For other folders you need the appropriate per-missions. The following information about folders can also be applied to address books and calendars.
How to move a folder:
Note: In order to move a folder, you need to have administrator permissions for the folder and thepermission to create subfolders in the target folder.
1. In the folder tree, select the folder that you want to move.
2. Click the Actions icon next to the folder name. Click on Move.
3. Select a folder in the Move folder window. You can create a new folder by clicking on Create folder.4. Click on Move.
Also see
Navigating within the folder structure (p. 233)Renaming folders (p. 235)Deleting folders (p. 236)
10.1.8 Deleting foldersYou can delete subfolders in your personal folders. For other folders you need the appropriate permis-sions. The following information about folders can also be applied to address books and calendars.
How to delete a folder:
Warning: If you delete a folder, all subfolders and objects in this folder will also be deleted. Deletedsubfolders and objects can not be restored.Note: In order to delete a folder, you need to have administrator permissions for the folder.
1. In the folder tree, select the folder that you want to delete.
2. Click the Actions icon next to the folder name. Click the Delete button.
3. Confirm that you want to delete the folder.
Result: The folder and its objects are permanently deleted.
Also see
Navigating within the folder structure (p. 233)Renaming folders (p. 235)Moving folders (p. 236)
236
Moving foldersData Organization, Shared Objects,Security

10.2 SharingBy sharing data with read or edit access, you can co-operate with internal users or external partners.You can share items like E-Mails, address books, calendars, tasks, folders or files. When sharing items,particular permissions are granted to the persons you share the items with.
Note the following:
▪ In order to share data, you need to have administrator permissions for the respective folder.▪ The global address book can not be shared.▪ E-Mails can only be shared with internal users, not with external partners.▪ Address books, calendars, and tasks can only by shared with external partners with read access, not
with edit access.▪ If you share a folder in the Drive app, you can define whether subfolders should be shared as well.
There are the following options:
▪ Sharing with public links (p. 238)You can give this link to other persons. The data are shared with read permissions. Other permissionscan not be granted.
▪ Inviting to a shared item (p. 240)The data are shared with internal users or external partners with read or edit permissions. You definethe permissions for the single persons.
▪ Editing shares (p. 242)You can change permissions or add persons.
▪ Resending an invitation (p. 243)▪ Removing shares (p. 244)▪ Viewing or editing shares in the Drive app (p. 245)▪ Accessing other users' shares (p. 246)
Information about permissions that can be used when sharing, are to be found here:
▪ Which permissions can be used? (p. 247)▪ Use cases for permissions (p. 249)
Also see
What is the purpose of permissions? (p. 232)
237
Data Organization, Shared Objects,SecuritySharing

10.2.1 Sharing with public linksYou can share data with read access by creating a public link. You can give this link to other persons.Everyone who gets this link can view the data.
There are the following options:
▪ You can share the following data with read access by using a public link: address books, calendars,tasks, folders. files.E-Mails can not be shared with a public link.
▪ You can set a password for the access. You can define that the link expires after a specific time frame,e.g. after one month.
▪ You can revoke the public link.The following information about folders can also be applied to address books and calendars.
238
Sharing with public linksData Organization, Shared Objects,Security

How to share data with read access by using a public link:
1. Select the app that should be used for sharing data.Select a folder in the folder tree.Note: Select a folder for which you have the permission to share. Depending on the app, somefolders can not be shared.In the Drive, you can also select a folder or file in the display area.
2. Click the Actions icon next to the folder name. Click on Create sharing link.In the Drive app, you can also use one of the following methods:▪ Click the Share icon in the toolbar. Click on Invite people.▪ Select Invite people from the context menu.A window opens. It contains a public link for a read access to the share.
3. To share the link, you have the following options.▪ To insert the link into other applications, click the Copy to clipboard icon next to the link.▪ In order to directly send the link per E-Mail, enter the respective E-Mail addresses. Tips:
▫ While entering the E-Mail address, several matching suggestions are displayed. To accept asuggestion, click on it.
▫ To select contacts from a list, click the Address bookicon on the right side of the input field.You can enter a message for the recipients.
▪ Per default, the data are shared with read access for an unlimited time. To set a time limit forthe access to the shared data, enable Expires in. Select a time range.
▪ To protect the access with a password, enable Password required. Enter a password. If yousend the public link per E-Mail, the E-Mail contains the password.
4. If you share a folder in the Drive app, you can transfer the folder's permissions to all existing ornewly created subfolders of this folder. To do so, enable Apply to all subfolders.
5. Click on Close.
Also see
Selecting contacts from a list (p. 69)Inviting to a shared item (p. 240)Editing shares (p. 242)Resending an invitation (p. 243)Removing shares (p. 244)Viewing or editing shares in the Drive app (p. 245)Accessing other users' shares (p. 246)
239
Data Organization, Shared Objects,SecuritySharing with public links

10.2.2 Inviting to a shared itemIn order to share data with specific persons with read or edit access, you can invite internal users orexternal partners to a shared item. The users will receive an E-Mail invitation. If an external partner ac-cesses the share, the partner will automatically be logged in as guest user.
There are the following options:
▪ You can share E-Mails with internal users with read access.▪ You can share address books, calendars and tasks with internal users with read or edit access, with
external partners only with read access.▪ You can share folders and files with internal users and external partners with read or edit access.When sharing items, internal users or external partners are granted certain permissions for the shareddata.
Note the following:
▪ You can not share your personal Inbox folder. In order to grant other users access to your E-Mailmessages, share an E-Mail folder that is located below your Inbox folder. Other users have to subscribeto this E-Mail folder then.
▪ You have the exclusive administrator rights for your personal address book, calendar and taskfolders. You can not grant administrator rights for these folders to other users.
The following information about folders can also be applied to address books and calendars.
240
Inviting to a shared itemData Organization, Shared Objects,Security

How to invite internal users or external partners to a share:
1. Select the app that should be used for sharing data.Select a folder in the folder tree.Note: Select a folder for which you have the permission to share. Depending on the app, somefolders can not be shared.In the Drive, you can also select a folder or file in the display area.
2. Click the Actions icon next to the folder name. Click on Permissions / Invite people.In the Drive app, you can also use one of the following methods:▪ Click the Share icon in the toolbar. Click on Create sharing link.▪ Select Create sharing link from the context menu.The window for adjusting the permissions opens.
3. Enter a name or an E-Mail address in Add people. Tips:▪ While entering the recipients, matching suggestions are displayed. To accept a suggestion, click
on it.▪ To select contacts from a list, click the Address bookicon on the right side of the input field.The selection will be added to the list as internal user, group or guest. Preset permissions aregranted.If required, enter a message.
4. To edit the permissions, you have the following options.▪ To adjust a user role, click on the entry in Current role. Select an entry from the menu.▪ To adjust the permission details, click on the entry inDetailed access rights. Select a permission
from the menu.▪ In order to remove a permission, click theAction icon next to the name. Click onRevokeaccess.
5. If no E-Mail notifications about the shared item are to be sent, disable Send notifications.Note: The checkbox can not be enabled when inviting external partners to a shared item.
6. If you share a folder in the Drive app, you can transfer the folder's permissions to all existing ornewly created subfolders of this folder. To do so, enable Apply to all subfolders.
7. Click on Save.
Also see
Selecting contacts from a list (p. 69)Sharing with public links (p. 238)Editing shares (p. 242)Resending an invitation (p. 243)Removing shares (p. 244)Viewing or editing shares in the Drive app (p. 245)Accessing other users' shares (p. 246)Which permissions can be used? (p. 247)Use cases for permissions (p. 249)
241
Data Organization, Shared Objects,SecurityInviting to a shared item

10.2.3 Editing sharesThere are the following options:▪ adjust user roles or permissions▪ add new persons to a shareThe following information about folders can also be applied to address books and calendars.
How to edit existing shares:
1. In the folder tree, select a folder that you shared.
2. Click the Actions icon next to the folder name. Click on Permissions / Invite people.In the Drive app, you can also click the Share icon in the toolbar. Click on Invite people.The window for adjusting the permissions opens.
3. To edit the user roles or permissions, you have the following options.▪ To adjust a user role, click on the entry in Current role. Select an entry from the menu.▪ To adjust the permission details, click on the entry inDetailed access rights. Select a permission
from the menu.Notes:▫ You cannot change the administrator permissions of a personal folder.▫ Permissions can not be changed for public links.▫ Guests only get read permissions. You can not change this permission.
4. In order to add new persons, enter an E-Mail address in Add people. The E-Mail address will be addedto the list as internal user, group or guest.Tips:▪ While entering the E-Mail address, several matching suggestions are displayed. To accept a sug-
gestion, click on it.▪ To select contacts from a list, click the Address bookicon on the right side of the input field.
5. Click on Save.
Also see
Selecting contacts from a list (p. 69)Sharing with public links (p. 238)Inviting to a shared item (p. 240)Resending an invitation (p. 243)Removing shares (p. 244)Viewing or editing shares in the Drive app (p. 245)Accessing other users' shares (p. 246)Which permissions can be used? (p. 247)Use cases for permissions (p. 249)
242
Editing sharesData Organization, Shared Objects,Security

10.2.4 Resending an invitationYou can resend an invitation to an already granted share. The following information about folders canalso be applied to address books and calendars.
How to resend an invitation to a person:
1. In the folder tree, select a folder that you shared.
2. Click the Actions icon next to the folder name. Click on Permissions / Invite people.In the Drive app, you can also click the Share icon in the toolbar. Click on Invite people.The window for adjusting the permissions opens.
3. Click the Actions icon next to a user name. Click on Resend invitation in the menu.
4. Click on Save.
Also see
Sharing with public links (p. 238)Inviting to a shared item (p. 240)Editing shares (p. 242)Removing shares (p. 244)Viewing or editing shares in the Drive app (p. 245)Accessing other users' shares (p. 246)
243
Data Organization, Shared Objects,SecurityResending an invitation
10.2.5 Removing sharesThere are the following options:▪ remove shares for single persons or remove a public link▪ remove all existing permissions for a file or a folder in the Drive appThe following information about folders can also be applied to address books and calendars.
How to remove shares for single persons or remove a public link.
1. In the folder tree, select a folder that you shared.
2. Click the Actions icon next to the folder name. Click on Permissions / Invite people.In the Drive app, you can also click the Share icon in the toolbar. Click on Invite people.The window for adjusting the permissions opens.
3. Click the Actions icon on the upper right side. Click on Revoke access in the menu.
4. Click on Save.
How to remove all permissions for a file or a folder in the Drive app
1. In the Drive app, open My shares in the folder tree.
2. Select a share in the detail view. Click on Revoke access in the toolbar.
Also see
Sharing with public links (p. 238)Inviting to a shared item (p. 240)Editing shares (p. 242)Resending an invitation (p. 243)Viewing or editing shares in the Drive app (p. 245)Accessing other users' shares (p. 246)
244
Removing sharesData Organization, Shared Objects,Security

10.2.6 Viewing or editing shares in the Drive appIn addition to the basic functions, there are the following options in the Drive app:▪ You can display your shared objects as a list. You can sort the list by different criteria.▪ You can edit or revoke shares.
How to view your shares in the Drive app:
1. In the Drive app, open My shares in the folder tree.The folders and files shared by you are displayed in the detail view. For each share a row with thefollowing details is displayed.▪ An icon indicates the share's object type: file or folder.▪ The share's name and folder path. To open a folder, click on a path entry.▪ Three icons in different colors indicate whether an object has been shared for specific users.
▫ The icon indicates whether the object has been shared for internal users.▫ The icon indicates whether the object has been shared for guest users.▫ The icon indicates whether the object has been shared by using a public link.
▪ The share's creation date.
2. You can do the following:▪ To sort the shares list, click on Sort by above the list.▪ To display the folder of a shared object, open the object's context menu. Select Show in Drive.▪ To display the content of a share's parent folder, click on a path entry in the list.
How to edit a share in the Drive app:
1. In the Drive app, open My shares in the folder tree.The folders and files shared by you are displayed in the detail view.
2. Select a folder or file in the detail view. You have the following options:▪ To edit the share, click on Edit share in the toolbar or context menu.
Depending on the type of share, the window for editing the public link or the window for changingthe permissions opens. Change the settings.
▪ To revoke the share, click on Revoke access in the toolbar or context menu.
Also see
Sharing with public links (p. 238)Inviting to a shared item (p. 240)Editing shares (p. 242)Resending an invitation (p. 243)Removing shares (p. 244)Accessing other users' shares (p. 246)Which permissions can be used? (p. 247)Use cases for permissions (p. 249)What is the purpose of permissions? (p. 232)
245
Data Organization, Shared Objects,Security
Viewing or editing shares in the Driveapp

10.2.7 Accessing other users' sharesIn the folder tree, you have access to data shared with you by other users. The following informationabout folders can also be applied to address books and calendars.
How to access data shared by other users:
1. Open the shared folder in the folder tree. Depending on the app, you can find these folders belowShared address books, Shared calendars, Shared tasks, Shared files.If a user shared data with you, a folder named after the user will be displayed.Tip: To see the permissions that have been granted for the shared folder, click the Actions icon .Click on Permissions / Invite people.
2. Open the folder to display its contents.
3. Select one or several objects. Use the function bar entries.Note: Depending on whether the objects are shared with read or edit rights, different functions canbe available.
Also see
Sharing with public links (p. 238)Inviting to a shared item (p. 240)Editing shares (p. 242)Resending an invitation (p. 243)Removing shares (p. 244)Viewing or editing shares in the Drive app (p. 245)Which permissions can be used? (p. 247)Use cases for permissions (p. 249)
246
Accessing other users' sharesData Organization, Shared Objects,Security

10.2.8 Which permissions can be used?In order to easily grant logical permission combinations, there are specific preset user roles: A user roleconsists of logical permission combinations. You can also grant detailed permissions. You can grantsuch permissions by sharing objects. The following information about folders can also be applied toaddress books and calendars.
AdministratorA folder's administrator owns all permissions for this folder. The owner can grant other users permissionsto the folder.▪ Folder permissions: create objects and subfolders, rename folders▪ Object permissions: read all objects, edit all objects, delete all objects
ViewerA viewer can read all existing objects. A viewer has not other permissions.▪ Folder permissions: view the folder▪ Object permissions: read all objects
ReviewerA reviewer can read and edit existing objects. The reviewer can not create new objects though. The re-viewer can not delete objects.▪ Folder permissions: view the folder▪ Object permissions: read all objects, edit all objects
AuthorAn author is allowed to change or delete existing objects, to create and edit new objects, and to createsubfolders.▪ Folder permissions: create objects and subfolders▪ Object permissions: read all objects, edit all objects, delete all objects
Detailed permissionsThe preset permissions for the user roles can be refined. The following permissions can be granted.▪ folders
▫ view the folder▫ create objects▫ create objects and subfolders
▪ read permissions▫ none▫ read own objects▫ read all objects
▪ write permissions▫ none▫ edit own objects▫ edit all objects
▪ delete permissions▫ none▫ delete own objects▫ delete all objects
247
Data Organization, Shared Objects,SecurityWhich permissions can be used?

Also see
Inviting to a shared item (p. 240)Accessing other users' shares (p. 246)Editing shares (p. 242)Resending an invitation (p. 243)Removing shares (p. 244)Viewing or editing shares in the Drive app (p. 245)Use cases for permissions (p. 249)What is the purpose of permissions? (p. 232)
248
Which permissions can be used?Data Organization, Shared Objects,Security
10.2.9 Use cases for permissionsThe following examples show which permissions need to be granted to other users or external partnersto enable them to execute specific actions in a shared folder. You can grant such permissions by sharingobjects. The following information about folders can also be applied to address books and calendars.▪ Example 1: View objects. Not change and delete objects. Not create new objects.
Settings in Details:Folders: view the folderRead permissions: read all objectsWrite permissions: noneDelete permissions: noneAdministrative role: User
You can also assign the Viewer role.▪ Example 2: View objects. Not change and delete objects. Create and edit new objects.
Settings in Details:Folders: view the folderRead permissions: read all objectsWrite permissions: edit own objectsDelete permissions: delete own objectsAdministrative role: User
▪ Example 3: Not view existing objects. Create and edit new objects.Settings in Details:
Folders: create objectsRead permissions: read own objectsWrite permissions: edit own objectsDelete permissions: delete own objectsAdministrative role: User
▪ Example 4: View and edit all objects. Create and edit subfolders and objects,Settings in Details:
Folders: create objects and subfoldersRead permissions: read all objectsWrite permissions: edit all objectsDelete permissions: delete all objectsAdministrative role: User
You can also assign the Author role.▪ Example 5: All permissions. Grant permissions to other users.
Settings in Details:Folders: create objects and subfoldersRead permissions: read all objectsWrite permissions: edit all objectsDelete permissions: delete all objectsAdministrative role: Administrator
You can also assign the Administrator role.
249
Data Organization, Shared Objects,SecurityUse cases for permissions

Also see
Inviting to a shared item (p. 240)Accessing other users' shares (p. 246)Editing shares (p. 242)Resending an invitation (p. 243)Removing shares (p. 244)Viewing or editing shares in the Drive app (p. 245)Which permissions can be used? (p. 247)What is the purpose of permissions? (p. 232)
250
Use cases for permissionsData Organization, Shared Objects,Security

10.3 AccountsThere are the following options:▪ Editing the primary E-Mail account (p. 251)▪ Editing accounts (p. 252)
You can edit those accounts: external E-Mail accounts, storage accounts, accounts for social networks▪ Removing accounts (p. 252)
10.3.1 Editing the primary E-Mail accountThere are the following options:▪ You can change the name of your primary E-Mail account. This name is displayed in the E-Mail settings.▪ Change the preset sender name.▪ You can change the folders of your primary E-Mail account by assigning other folders to a standard
folder.
How to edit the primary E-Mail account:
1. Click the Settings icon on the right side of the menu bar. Click the Settings menu item.
2. In the sidebar, click on Accounts.
3. Click on Edit next to E-Mail in the display area. The Edit mail account window displays the currentsettings.
4. To change the account name, click into the input field next to Account name.Note: The entries for Incoming server and Outgoing server can not be changed.
5. To change the preset sender name, click into the input field next to Your name.You can overwrite this preset name when composing an E-Mail.
6. To select other folders, browse down to Standard folders.Click on Select next to a folder. Select another folder.
7. Click on Save at the bottom of the window.
Also see
Settings for composing E-Mails (p. 103)Editing accounts (p. 252)
251
Data Organization, Shared Objects,SecurityAccounts

10.3.2 Editing accountsDepending on the account type, you can edit different account settings.▪ For E-Mail accounts: account name, sender name, Unified Mail usage, server parameters, folder
names▪ For storage accounts: folder name, re-authorization of the data access▪ For social networks: account name, re-authorization of the data access
How to edit an account:
1. Click the Systemmenu icon on the right side of the menu bar. Click the Settings menu item.
2. In the sidebar, click on Accounts.
3. Click on Edit next to an account in the display area. The settings are displayed in a window.If you use multiple services of the selected provider e.g., E-Mail and cloud storage, select the serviceyou want to edit.
4. Change the settings.Notes for editing external E-Mail accounts:
To change the preset sender name, click into the input field next to Your name.You can overwrite this preset name when composing an E-Mail.
5. Click on Save at the bottom of the window.
Also see
Adding a Portal widget for social networks (p. 52)Adding E-Mail Accounts (p. 99)Using Unified Mail (p. 90)Selecting sender address (p. 69)Adding storage accounts (p. 225)Editing the primary E-Mail account (p. 251)Removing accounts (p. 252)
10.3.3 Removing accountsIf you no longer want to access an account from within the groupware, you can delete this account. Youcan remove all accounts except your primary E-Mail account.
How to remove an account:
1. Click the Settings icon on the right side of the menu bar. Click the Settings menu item.
2. In the sidebar, click on Accounts.
3. Click the Delete icon
Also see
Adding a Portal widget for social networks (p. 52)Adding E-Mail Accounts (p. 99)Adding storage accounts (p. 225)Editing the primary E-Mail account (p. 251)Editing accounts (p. 252)
252
Editing accountsData Organization, Shared Objects,Security

10.4 Managing SubscriptionsThe following options exist:▪ refresh subscribed data
You can transfer changes that have been applied to subscibed data to the groupware by refreshingthe subscribed data.
▪ Managing subscribed foldersIn order to keep the overview of your subscribed data, you can manage them on an overview page.
10.4.1 refresh subscribed dataThe following changes are applied when refreshing subscribed data:▪ new appointments or contacts▪ edited appointments or contacts▪ deleted appointments
How to refresh subscribed data:
1. Click the Settings icon on the right side of the menu bar. Click the Settings menu item.
2. In the sidebar, click on Subscriptions.
3. Click on refresh next to a subscription in the display area.
Also see
Subscribing to external address books (p. 118)Subscribing to public calendars (p. 157)Subscribing to Google calendars (p. 158)Managing subscribed folders (p. 253)
10.4.2 Managing subscribed foldersThe following options exist:▪ show all subscriptions▪ disable or enable a subscription▪ remove a subscription
How to display all subscriptions:
1. Click the Settings icon on the right side of the menu bar. Click the Settings menu item.
2. In the sidebar, click on Subscriptions.
3. To show the folder with the subscribed data, click on the navigation path below the subscription'sname.
Tip: You can only view information for a specific folder. To do so, click the Subscriptions icon nextto a folder with subscriptions, in the folder tree.
How to disable or enable a subscription:
1. Click the Settings icon on the right side of the menu bar. Click the Settings menu item.
2. In the sidebar, click on Subscriptions.
3. Click on Disable or Enable in the display area next to a subscription.
253
Data Organization, Shared Objects,SecurityManaging Subscriptions

How to remove a subscription:
1. Click the Settings icon on the right side of the menu bar. Click the Settings menu item.
2. In the sidebar, click on Subscriptions.
3. Click the Delete icon next to a subscription in the display area.
Also see
Subscribing to external address books (p. 118)Subscribing to public calendars (p. 157)Subscribing to Google calendars (p. 158)refresh subscribed data (p. 253)
254
Managing subscribed foldersData Organization, Shared Objects,Security

10.5 SecurityThere are the following options:▪ Automatic sign out (p. 256)
You can define whether you are automatically signed out.▪ Externally linked images in E-Mails (p. 256)
You can define whether externally linked images in E-Mails are automatically loaded and displayed.▪ Show email authenticity (p. 257)
You can define the E-Mails for which the authenticity is displayed.▪ Displaying or terminating sessions (p. 258)
You can display active sessions and terminate them if required.
Information on encrypting data can be found in Encrypting Data (p. 267)
255
Data Organization, Shared Objects,SecuritySecurity

10.5.1 Automatic sign outYou can define whether you are automatically signed out if you have not worked with the groupwarefor a specific time.
How to define whether you are automatically signed out:
1. Click the Settings icon on the right side of the menu bar. Click the Settings menu item.
2. In the sidebar, click on Security.
3. Select an entry from the Automatic sign out drop-down in the display area.
Also see
Externally linked images in E-Mails (p. 256)Show email authenticity (p. 257)Displaying or terminating sessions (p. 258)
10.5.2 Externally linked images in E-MailsExternally linked images are not part of the E-Mail itself. They are loaded from an external source uponreading the E-Mail. You can define whether those images are loaded and displayed. If you allow loadingexternally linked images, your privacy and computer are endangered by the following security issues:▪ The sender can gather information, e.g. whether your E-Mail address is valid or when you retrieved
the E-Mail. Such information can e.g. be used to purposefully send spam E-Mails.▪ The externally linked graphic can be used to infect your computer with malware.
How to define the loading of externally linked images:
1. Click the Settings icon on the right side of the menu bar. Click the Settings menu item.
2. You can enable or disable the Allow pre-loading of externally linked images option in the displayarea.▪ If externally linked images are not to be displayed, disable the setting.▪ If externally linked images are to be loaded and displayed, enable the setting.
Also see
Automatic sign out (p. 256)Show email authenticity (p. 257)Displaying or terminating sessions (p. 258)
256
Automatic sign outData Organization, Shared Objects,Security

10.5.3 Show email authenticityFor incoming E-Mails, the server checks whether the E-Mail actually originates from the provided senderaddress. The check is run to identify illegitimate E-Mails. The E-Mail authenticity check provides one ofthe following results.▪ Dangerous. The E-Mail is classified as potentially dangerous. In the detail view, the sender is displayed
in red font color.▪ Neutral. The authenticity cannot definitely be verified. In the detail view, the sender is displayed in
yellow font color.▪ Valid. The verification was successful. In the detail view, the sender is displayed in green font color.▪ Trusted. The verification was successful. The E-Mail was sent from a trustworthy address.
You can define the E-Mails for which the authenticity is displayed:
1. Click the Settings icon on the right side of the menu bar. Click the Settings menu item.
2. In the sidebar, click on Security.
3. Select an entry from the Show email authenticity drop-down in the display area.▪ Disabled. No authenticity is displayed. If a hoster marks the E-Mail sent from the hoster's address
as trustworthy though, this authenticity will be displayed.▪ Dangerous and inconclusive emails only. Displays the authenticity for the following E-Mails:
▫ E-Mails that are classified as potentially dangerous.▫ E-Mails which authenticity can not definitely be verified
▪ Alle E-Mails. Displays the authenticity for all E-Mails.
Also see
Displaying E-Mails (p. 65)Automatic sign out (p. 256)Externally linked images in E-Mails (p. 256)Displaying or terminating sessions (p. 258)The E-Mail detail view (p. 62)
257
Data Organization, Shared Objects,SecurityShow email authenticity

10.5.4 Displaying or terminating sessionsYou can be logged in to your groupware account with different devices on various clients simultaneously,e.g. with desktop browsers, E-Mail clients, tablets, smartphones. With each login, an active session iscreated on the groupware server. On the following occasions it can make sense to list active sessionsand to terminate them if required.▪ You want to check whether you are logged in to a certain device or client.▪ You want to log our from a certain device.▪ You want to prevent reaching the maximum number of allowed sessions as you then could no longer
log in to a further device.There are the following options:▪ display all active sessions▪ terminate single sessions▪ terminate all sessions except the current one
How to edit the active sessions:
1. Click the Settings icon on the right side of the menu bar. Click the Settings menu item.
2. Select Security in the sidebar. Click on Active clients.All active sessions are listed in the display area.
3. In order to terminate sessions, do one of the following:▪ In order to terminate a single session, click on Sign out next to the client.▪ To terminate all sessions except the active one, click on Sign out from all clients.
Also see
Automatic sign out (p. 256)Externally linked images in E-Mails (p. 256)Show email authenticity (p. 257)
258
Displaying or terminating sessionsData Organization, Shared Objects,Security

11 Interchanging DataLearn how to exchange data with other applications.▪ You can import appointments, tasks, and contacts created with other applications.▪ You can export appointments, tasks, and contacts.
259
11.1 Importing DataThe import functions allow to import data created in other applications. There are the following options:▪ Importing appointments and tasks in iCal format▪ Importing contacts in the vCard format▪ Importing contacts in the CSV format
11.1.1 Importing appointments and tasks in iCal formatThe following table shows which iCal objects are imported and which are not. The information in thecolumns "Appointments" and "Tasks" have the following meaning:▪ "X" means the object is imported. The object value is set in RFC2445.▪ A number like "255" means the object is imported. The number indicates the maximum number of
characters.▪ The entry "unlimited" means the object is imported. There is no limit for the maximum number of
characters.▪ The entry "-" means the object is not imported.A description of all iCal objects can be found in the document RFC2445 [http://tools.ietf.org/html/rfc2445].
260
Importing DataInterchanging Data

TasksAppointmentsiCal objectCategory
--CALSCALECalendar Properties
--METHOD
XXPRODID
XXVERSION
XXVALARMCalendar Components
XXVEVENT
--VFREEBUSY
--VJOURNAL
XXVTIMEZONE
XXVTODO
--ATTACHComponent Properties
XXATTENDEE
XXCATEGORIES
XXCLASS
--COMMENT
X-COMPLETED
--CONTACT
XXCREATED
UnlimitedUnlimitedDESCRIPTION
XXDTEND
XXDTSTAMP
XXDTSTART
XXDUE
XXDURATION
-XEXDATE
--EXRULE
--FREEBUSY
--GEO
--LAST-MODIFIED
-255LOCATION
--ORGANIZER
X-PERCENT-COMPLETE
X-PRIORITY
261
Interchanging DataImporting appointments and tasks iniCal format

TasksAppointmentsiCal objectCategory
--RDATE
--RECURRENCE-ID
--RELATED-TO
--REPEAT
--REQUEST-STATUS
-XRESOURCES
XXRRULE
--SEQUENCE
X-STATUS
255255SUMMARY
X-TRANSP
XXTRIGGER
XXTZID
XXTZNAME
XXTZOFFSETFROM
XXTZOFFSETTO
XXTZURL
XXUID
--URL
XXCUTYPEProperty Parameters
--DELEGATED-FROM
--DELEGATED-TO
--DIR
XXENCODING
--FMTTYPE
--FBTYPE
--LANGUAGE
--MEMBER
--PARTSTAT
--RANGE
--RELATED
--RELTYPE
--ROLE
262
Importing appointments and tasks iniCal formatInterchanging Data
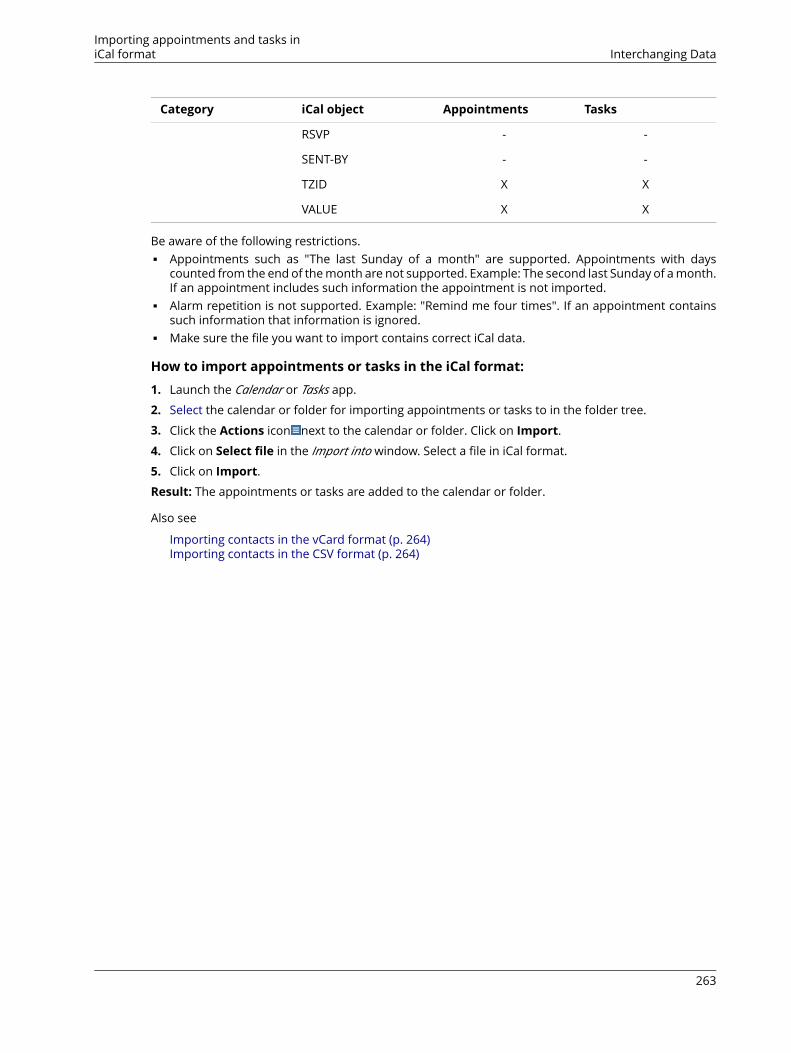
TasksAppointmentsiCal objectCategory
--RSVP
--SENT-BY
XXTZID
XXVALUE
Be aware of the following restrictions.▪ Appointments such as "The last Sunday of a month" are supported. Appointments with days
counted from the end of the month are not supported. Example: The second last Sunday of a month.If an appointment includes such information the appointment is not imported.
▪ Alarm repetition is not supported. Example: "Remind me four times". If an appointment containssuch information that information is ignored.
▪ Make sure the file you want to import contains correct iCal data.
How to import appointments or tasks in the iCal format:
1. Launch the Calendar or Tasks app.
2. Select the calendar or folder for importing appointments or tasks to in the folder tree.
3. Click the Actions icon next to the calendar or folder. Click on Import.4. Click on Select file in the Import into window. Select a file in iCal format.
5. Click on Import.Result: The appointments or tasks are added to the calendar or folder.
Also see
Importing contacts in the vCard format (p. 264)Importing contacts in the CSV format (p. 264)
263
Interchanging DataImporting appointments and tasks iniCal format
11.1.2 Importing contacts in the vCard formatNote the following when importing vCard data.▪ Make sure the file to be imported contains correct vCard data.▪ For each contact only one private and one business address are imported. If the imported vCard file
contains additional private and business addresses, those addresses are ignored when importing.
How to import contacts in vCard format:
1. Launch the Address Book app.
2. Select the address book for importing the contacts to in the folder tree.
3. Click the Actions icon next to the address book. Click on Import.4. Select the vCard format in the Import into window. Click on Select file. Select a file in the vCard format.
5. Click on Import.Result: The contacts are added to the address book.
Also see
Importing appointments and tasks in iCal format (p. 260)Importing contacts in the CSV format (p. 264)
11.1.3 Importing contacts in the CSV formatThe following CSV files are supported:▪ Standard CSV files with comma separated values▪ CSV files from the following Microsoft Outlook versions:
▫ Microsoft Outlook 2003, 2007▫ German, English, and French language versions
The correct format of the CSV file is automatically recognized. The data assignment to specific datafields depends on the assignment in your configuration. Further information are provided by your ad-ministrator or host.
How to import contacts from a CSV file:
1. Launch the Address Book app.
2. Select the address book for importing the contacts to in the folder tree.
3. Click the Actions icon next to the address book. Click on Import.4. Select the data format. Click on Import.Result: The contacts are added to the address book.
Also see
Importing appointments and tasks in iCal format (p. 260)Importing contacts in the vCard format (p. 264)
264
Importing contacts in the vCard formatInterchanging Data
11.2 Exporting a Folder's Data.With the Export function you can export a folder's complete content to a file for use with other applica-tions. The following information about folders can also be applied to address books and calendars. Youcan export the following data from personal or public folders:▪ Contacts and distribution lists in the following formats:
▫ CSV▫ vCard
▪ Appointments in the following formats:▫ iCalendar
▪ Tasks in the following formats:▫ iCalendar
Those formats are standardized and can be imported by many other programs.
How to export a folder's objects:
1. Select a personal or public folder in the folder tree.
2. Click the Actions icon next to the folder name. Click on Export.3. Select a data format.
Together with the contacts, you can also export distribution lists. To do so, enable Include dis-tribution lists.Note: Some applications can not import contacts with distribution lists. In such applications, theimport of contacts with distribution lists can cause errors.
Click on Export.
Also see
Exporting contacts (p. 122)Exporting appointments (p. 164)Exporting tasks (p. 191)
265
Interchanging DataExporting a Folder's Data.

266

12 Encrypting DataGuard is a groupware security component that allows to encrypt E-Mails and files.▪ Encrypt your E-Mail communication with other users or external partners.▪ Encrypt your files. Share the encrypted data with other users.▪ Use the security options to define the encryption level.▪ The encrypted data are password-protected. Depending on the configuration, you can reset your
password if forgotten.
Learn how to work with the Guard application.▪ apply basic settings▪ encrypt E-Mail communications▪ encrypt files▪ encrypt Office documents▪ sign out from Guard▪ apply security settings
Information on further security-related topics can be found in Security (p. 255).
267
12.1 Setting up GuardPrior to be able to use Guard, you have to apply some basic settings.▪ First of all you have to enter a Guard security password that is used to encrypt data and to access
encrypted data.▪ Enter a secondary E-Mail address that is used if you forget your Guard security password. In this
case, use the function for resetting the Guard security password. A new password will then be sentto you. For security reasons, it is highly recommended to enter a secondary E-Mail address for thispurpose. Otherwise the new password is sent to your primary E-Mail account.
There are two options for making the basic settings:▪ Define the basic settings while initially using an encryption function.▪ Define the basic settings in the groupware settings before using the encryption function.
How to define the basic settings when initially using an encryption function:
1. Enable the encryption function when composing an E-Mail, encrypting a file or uploading a new fileby clicking on the Encrypt icon next to the folder name in the folder tree.
2. You consecutively will be asked to enter a Guard security password and a secondary E-Mail address.Enter the data.
How to define the basic settings before initially using an encryption:
1. Click the Systemmenu icon on the right side of the menu bar. Click the Settings menu item.
2. Select Security in the sidebar. Click on Guard Security.When initially opening the Guard security settings, the Guard Create Security Keys window opens.
3. In the Password field, enter the password that you want to use for encrypting your data.Confirm the password in the Verify field by entering it again.
4. In the Enter new secondary email field, enter the E-Mail address that is used for receiving a tem-porary password for resetting your Guard security password.
5. Click on OK.
268
Setting up GuardEncrypting Data
12.2 Encrypting E-Mail ConversationsThe following options exist:▪ Reading encrypted E-Mails▪ Sending encrypted E-Mails▪ How can external recipients read an encrypted E-Mail?
12.2.1 Reading encrypted E-MailsTo be able to read an encrypted E-Mail, the Guard security password is required.
How to read an encrypted E-Mail:
1. Select an E-Mail with the Encrypted icon . In the detail view, the notification Secure E-Mail, enter yourGuard security password. is displayed.Note: If, when having used guard the last time, you set that Guard should remember the securitypassword, the E-Mail will be displayed immediately.
2. Enter the Guard security password.You can define how long the security password should be remembered by Guard. To do so, enableKeep me logged into Guard . Select a time range from the list.In the Guard security settings, you can define a default value for the time range.
3. Click on OK. The content is shown in plain text.If the E-Mail includes attachments, functions for using the attachments' decrypted or encryptedversions are displayed.
Also see
Sending encrypted E-Mails (p. 270)How can external recipients read an encrypted E-Mail? (p. 271)
269
Encrypting DataEncrypting E-Mail Conversations

12.2.2 Sending encrypted E-MailsThe following options exist:▪ Sending an encrypted E-Mail. Only you and the recipients can read the E-Mail content.▪ Sending an E-Mail with a signature. The signature ensures that the recipient is able to recognize
whether the E-Mail content has been changed on the transport.▪ Sending an encrypted E-Mail with a signature.
How to send an encrypted E-Mail:
1. Compose an E-Mail in the E-Mail app as usual.In the Compose page, click the Encrypt icon on the upper right side.You can also click on Security below the subject. Depending on the configuration of the Guard se-curity settings, the menu contains different entries.▪ If Show advanced settings is disabled, click on Secure.▪ If Show advanced settings is enabled, click on encrypt.Icons next to the recipients indicate whether the message can be encrypted for this recipient. Ifhovering over an icon, a description will be displayed.
2. In order to additionally sign the E-Mail, click on Security. Enable Sign.
3. If Show advanced settings is enabled in the Guard security settings, you can use further options.To do so, click on Security. You can activate the following options.▪ Per default, encrypted E-Mails are sent in PGP Mime format. Some older clients only support
PGP Inline. If the recipient uses such a client, enable PGP Inline.If you use PGP Inline, you can not send E-Mails in html format.
▪ To enable The E-Mail recipient to send an encrypted reply, the recipient needs to have yourpublic key. You can send your public key as attachment. To do so, enable Attach my key.
4. Click on Send encrypted.When sending to new recipients, a window is displayed that allows to send notes for opening theencrypted E-Mail [271] to the recipients.
Also see
GuardSettings (p. 279)Reading encrypted E-Mails (p. 269)How can external recipients read an encrypted E-Mail? (p. 271)
270
Sending encrypted E-MailsEncrypting Data

12.2.3 How can external recipients read an encrypted E-Mail?You can also send encrypted E-Mails to external recipients who are no groupware users. When addingan external recipient, Guard checks whether a public key is available for this E-Mail address. Dependingon the result, Guard uses different procedures for sending the encrypted E-Mail.▪ If there is a public key for the recipient:
▫ The message is sent encrypted with this key. The recipient can read the message with his/herprivate key.
▪ If there is no public key for the recipient:▫ If the external user already has a guest account, he/she receives an E-Mail with the link to the
login page of his/her guest account. When having logged in, he/she can read the encrypted E-Mailon the guest page. He/she can send an encrypted reply from this page.
▫ If there is no guest account, a guest account will be created. The external recipient receives anE-Mail with a link to a guest page and an automatically created password. The user logs in to theguest page. Then he/she can create an own password.Depending on the configuration, the automatically created password and the link to the guestpage are sent in separate E-Mails.
▫ Depending on the groupware configuration, guest account E-Mails are deleted after a specificnumber of days.
The external recipient can send an encrypted reply to the encrypted E-Mail. It is not possible to addadditional recipients though.
Also see
Reading encrypted E-Mails (p. 269)Sending encrypted E-Mails (p. 270)
271
Encrypting DataHow can external recipients read anencrypted E-Mail?
12.3 Encrypting filesThe following options exist:▪ Encrypting files▪ Creating new encrypted files▪ Opening encrypted files▪ Downloading encrypted files▪ Decrypting files
12.3.1 Encrypting filesWhen encrypting a file, only the last version of this files will be encrypted. All other versions will bedeleted.
How to encrypt a file:
Warning:When encrypting a file, all versions of this file will be deleted, except for the current version.If you need to keep an older version, save it before encrypting the file.
1. Select one or several files in the Drive app.
2. Use one of the following methods:▪ Click the Actions icon in the toolbar. Click on Encrypt in the menu.▪ Select Encrypt from the context menu.▪ Use the Actions icon in the Viewer. Click on Encrypt in the menu.
Also see
Creating new encrypted files (p. 273)Opening encrypted files (p. 273)Downloading encrypted files (p. 274)Decrypting files (p. 274)
272
Encrypting filesEncrypting Data

12.3.2 Creating new encrypted filesYou can create a new encrypted file by uploading a local file with encryption.
How to create a new encrypted file:
1. In the Drive app, select a folder in the folder tree.Note: Open a folder for which you have the appropriate permissions to create objects.
2. Click on New in the toolbar. Click on Add and encrypt local file.
3. Select one or several files in the Upload file window.Click on Open. The display area shows the current progress status.In order to cancel the process, click on File Details at the bottom right side of the display area. Clickon Cancel next to a file name in the Upload progress window.
Tip: You can also create a new encrypted file by dragging a file from your operating system's desktopto the Drive app window and drop it in the upper part.
Also see
Encrypting files (p. 272)Opening encrypted files (p. 273)Downloading encrypted files (p. 274)Decrypting files (p. 274)
12.3.3 Opening encrypted filesYou can open and read an encrypted file. The file remains encrypted on the server.
How to open an encrypted file:
1. In the Drive app, select an encrypted file in the display area. Click the View icon in the toolbar.
2. If the Enter Guard security password window opens, enter the Guard security password.You can define how long the security password should be remembered by Guard. To do so, enableRemember my password. Select a value from the list.In the Guard security settings, you can define a default value for the time range.Click on OK.
Also see
Encrypting files (p. 272)Creating new encrypted files (p. 273)Downloading encrypted files (p. 274)Decrypting files (p. 274)
273
Encrypting DataCreating new encrypted files

12.3.4 Downloading encrypted filesYou can download an encrypted file to locally read or edit it. The file remains encrypted on the server.
How to download an encrypted file:
1. In the Drive app, select an encrypted file in the display area. Click the View icon in the toolbar.Note: If you click onDownload in the toolbar or context menu instead, the downloaded file remainsencrypted.
2. The Enter Guard security password window opens. Enter the Guard security password.You can define how long the security password should be remembered by Guard. To do so, enableRemember my password. Select a value from the list.In the Guard security settings, you can define a default value for the time range.Click on OK.
3. Click the More actions icon in the Viewer. Click on Download Decrypted.
Also see
Encrypting files (p. 272)Creating new encrypted files (p. 273)Opening encrypted files (p. 273)Decrypting files (p. 274)
12.3.5 Decrypting filesYou can remove a file's encryption by decrypting the file.
How to decrypt a file:
1. In the Drive app, select an encrypted file in the display area.
2. Use one of the following methods:▪ Click the Actions icon in the toolbar. Click on Remove Encryption in the menu.▪ Select Remove Encryption from the context menu.
3. The Enter Guard security password window opens. Enter the Guard security password.You can define how long the Guard security password should be valid. To do so, enable Remembermy password. Select a value from the list.In the Guard security settings, you can define a default value for the time range.Click on OK.
Also see
Encrypting files (p. 272)Creating new encrypted files (p. 273)Opening encrypted files (p. 273)Downloading encrypted files (p. 274)
274
Downloading encrypted filesEncrypting Data

12.4 Encrypting Office DocumentsThe following options exist:▪ Creating new encrypted documents▪ Saving selected documents in an encrypted format▪ Opening an encrypted documentFurther functions are available in the Drive app:▪ encrypt existing documents▪ decrypt documents
275
Encrypting DataEncrypting Office Documents

12.4.1 Creating new encrypted documentsWhen creating a new document, you have the option to create a document that will be saved encrypted..
How to create a new encrypted document:
1. Depending on whether you want to create an encrypted text document, spreadsheet or presentation,select one of the apps Text, Spreadsheet or Presentation.
2. In the Office menu bar, click on one of the respective buttons New text document (encrypted),New spreadsheet (encrypted), New presentation (encrytped).
3. If the Enter Guard security password window opens, enter the Guard security password.You can define how long the security password should be remembered by Guard. To do so, enableRemember my password. Select a value from the list.In the Guard security settings, you can define a default value for the time range.Click on OK.
Also see
Saving selected documents in an encrypted format (p. 276)Opening an encrypted document (p. 277)Encrypting files (p. 272)
12.4.2 Saving selected documents in an encrypted formatWhen having opened a text document, spreadsheet or a presentation, you can save this document inan encrypted format.
How to save the selected document in an encrypted format:
1. Open a document in the Text, Spreadsheet or Presentation app.
2. In the File toolbar, click on Save in Drive. Select Save as (encrypted).The Save as (encrypted) window opens. Select a folder and a file name. Click on OK.
3. If the Enter Guard security password window opens, enter the Guard security password.You can define how long the security password should be remembered by Guard. To do so, enableRemember my password. Select a value from the list.In the Guard security settings, you can define a default value for the time range.Click on OK.
Also see
Creating new encrypted documents (p. 276)Opening an encrypted document (p. 277)Encrypting files (p. 272)
276
Creating new encrypted documentsEncrypting Data

12.4.3 Opening an encrypted documentYou can open an encrypted document to do the following:▪ read or edit the document▪ download the document in decrypted format▪ print the document as pdf in decrypted formatThe document remains encrypted on the server.
How to open an encrypted document:
1. Open a document in the Text, Spreadsheet or Presentation app.
2. If the Enter Guard security password window opens, enter the Guard security password.You can define how long the security password should be remembered by Guard. To do so, enableRemember my password. Select a value from the list.In the Guard security settings, you can define a default value for the time range.Click on OK.
3. You can use the following functions:▪ Edit the document. Information can be found in the Documents user guide.▪ To download the document in a decrypted format, click the Download icon on the upper right
side.▪ To save the document as pdf in a decrypted format, click the Print as PDF icon on the upper
right side.
Also see
Creating new encrypted documents (p. 276)Saving selected documents in an encrypted format (p. 276)Encrypting files (p. 272)
277
Encrypting DataOpening an encrypted document

12.5 Sign out GuardYou can sign out from Guard without closing the groupware. To open an encrypted E-Mail or file afterhaving signed out, you have to re-enter the Guard security password.Note: This function is only available if you enable Remember Password when opening an encryptedE-Mail or file.
How to sign out from Guard:
1. Click the Systemmenu icon on the right side of the menu bar.
2. Click on Sign out Guard in the menu.
278
Sign out GuardEncrypting Data

12.6 GuardSettingsHow to use the Guard settings:
1. Click the Settings icon on the right side of the menu bar. Click the Settings menu item.
2. Select Security in the sidebar. Click on Guard.
3. Change the settings.
The following settings are available.
Defaults▪ Default to send encrypted when composing email
Defines whether a new E-Mail is encrypted by default.▪ Default adding signature to outgoing mails
Defines whether a new E-Mail is encrypted per default.▪ Remember password default
Defines the time range default for Guard to remember the password. You can change this defaultwhen being asked for your Guard password.
Password managementContains functions for changing or resetting the password
Also see
Password management (p. 281)
Advanced▪ Show advanced settings
Defines whether the Keys section is displayed. Those functions allow to manage own or public keys.If Showadvanced settings is enabled, you can use further options when sending encrypted E-Mails.
Also see
Sending encrypted E-Mails (p. 270)
279
Encrypting DataGuardSettings

KeysUsually, the key management functions are not required for sending or receiving encrypted messages.Those functions can be useful though under the following circumstances:▪ You want to use your Guard PGP keys in other E-Mail clients, e.g. in local E-Mail clients.▪ You have PGP keys from other PGP applications. You want to use those keys in Guard.▪ You have an external partner's public key. In order to send encrypted messages to this external
partner or verify received signed messages without having to access a key server, you want to importthe partner's public key into Guard.
▪ You want to provide your public key to an external partner in order to allow the external partner tosend encrypted messages to you without the need to access a key server.
There are the following options:▪ Download my public key button
Locally saves your public key.▪ Your keys button
Opens the Your Keys dialog window for managing your own keys.▪ Public keys of recipients button
Opens the Your Keys dialog window for managing public keys.
280
GuardSettingsEncrypting Data

12.6.1 Password managementThere are the following options:▪ change the Guard security password▪ When having lost your Guard security password, you can request a temporary Guard security
password by resetting the Guard security password.Note: Depending on the configuration, this function might not be available.
▪ Defining an E-Mail address for resetting the password.▪ To be able to reset your password if needed, your password has to be saved on the server in an
encrypted version. If you do not want your password to be saved on the server, you can completelyremove the function for resetting the password.This function is only available if Show advanced settings is enabled.
Depending on the groupware's configuration, some settings might not be available.
281
Encrypting DataPassword management

How to change the Guard password:
1. Click on Change Password on the Guard page. The Change Password window opens.
2. In the Enter current Guard security password field, enter the password that you have used so farfor encrypting your data.In the Enter new Guard security password field, enter the password that you want to use for en-crypting your data from now on.Confirm the password in the Verify new Guard security password field by entering it again.
3. Click on Change.
How to reset the Guard password:
1. Click on Reset Password on the Guard page. The Change Password window opens.Click on Reset.
2. A new password will be sent to your secondary E-Mail address.If not having entered a secondary E-Mail address, the new password will be sent to your primary E-Mail address.This new password is now your current Guard security password. You should immediately changethis password.
How to change your secondary E-Mail address for resetting the password:
1. Click on Set email address for reset on theGuard page. The Secondary Email Addresswindow opens.
2. In the Enter current Guard security password field, enter the password that you have used so farfor encrypting your data.In the Enter new secondary email field, enter the E-Mail address that is used for receiving a tem-porary password for resetting your Guard security password.Re-enter the E-Mail address in Verify email address.Click on Change email address.
How to remove the function for resetting the password:
Warning: If you remove the function for resetting the password, you can no longer reset your pass-word. if you forget your password afterwards, there will be no possibility to decrypt your encryptedE-Mails or files.
1. Click onDelete password recoveryon theGuardSecurity Settingspage. TheDelete recoverywindowopens.
2. Click the Delete button.
Also see
Managing own keys (p. 283)Managing public keys (p. 285)
282
Password managementEncrypting Data

12.6.2 Managing own keysThere are the following options:▪ display own keys, display details
Make a key the current one. Others can use this key to encrypt data.▪ add new keys▪ add user IDs
When adding additional user IDs to a key, you can use the key for multiple E-Mail accounts.▪ download keys▪ delete keys
How to display your own keys or make a key the current one:
1. Enable the Show Advanced Settings checkbox below Advanced.Click on Your keys below Keys. The Your Keys window opens.▪ Your existing keys are displayed. Each key consists of a master key and a subkey.
▫ Among other things, the master key is used for signing your E-Mails.▫ The subkey is used for encrypting and decrypting E-Mails and files.Depending on the requirement, Guard automatically uses the master key or the subkey.
2. If your key list contains more than one key, you can define the current key. To do so, enable theCurrent checkbox next to the key. From now on, the current key will be used for encryption.
3. To display details for a key, click the Details icon next to a key. The Key Details window opens. Toview the key's signatures, click on Signatures.
How to add a new key in the Your Keys window:1. Click the Add icon on the upper right side. The Adding Keys window opens.
2. You have the following options:▪ To add a private key, click onUpload Private Key. Select a file containing a private key. The Upload
Private Keys window opens.To upload the new key, enter your Guard security password. Enter a new password for the newkey.
▪ To add a public key, click on Upload Public Key Only. Select a file containing a public key.▪ To create a new key pair, click on CreateNewKeys. The Create Guard Security Keyswindow opens.
Enter a password for the new key. Confirm the password.The new key consists of a master key and a corresponding subkey.
The new key will be entered on top of your key list. The new key becomes the current key.
283
Encrypting DataManaging own keys

How to add an additional user ID in the Your Keys window:1. Click the Edit icon next to a key. The Add User ID window opens.
2. Enter a name for the user ID. Enter the E-Mail address that you want to use for this key.Enter your password for this key.Click on OK.
How to download a key in the Your Keys window:1. Click the Download icon next to a key.
2. Define whether to download your private key only, your public key only or both keys.Caution: Your private key will be downloaded in encrypted form. You should not download yourprivate key to a publicly accessible system, though.
How to delete a key in the Your Keys window:Warning: If you delete a private key, you can no longer decrypt objects that have been encryptedwith this key. If you are unsure, you should not delete the key but revoke it. A revoked key can nolonger be used for encryption. But you can still decrypt objects that have been encrypted with thiskey.
1. Click the Delete icon next to a key. The Delete Private Key window opens.
2. You have the following options:▪ To revoke a private key, click on Revoke.
if you revoke a key, it will no longer be used. But you can still decrypt objects that have beenencrypted with this key. For this reason, revoking a key is better than deleting it.Enter the password for the private key. If required, select a reason for revoking the key.Click on Revoke.
▪ In order to delete a private key, click on Delete.Warning: If you delete a private key, you can no longer decrypt objects that have been encryptedwith this key.Enter the password for the private key.Click the Delete button.
When deleting a master key, the corresponding subkey will be deleted too.
Also see
Managing public keys (p. 285)Password management (p. 281)
284
Managing own keysEncrypting Data

12.6.3 Managing public keysThere are the following options:▪ display public keys▪ upload public keys▪ delete an own public key
How to show public keys:
1. Enable the Show Advanced Settings checkbox below Advanced.Click on Public keys of recipients below Keys. The Public Keys window opens.The public keys shared by you or other users are displayed. If a user's public key is displayed in thislist, you can send an encrypted E-Mail to this user and verify signed E-Mails that have been sent toyou by this user.
2. To display details for a key, click theDetails icon next to a key. The Public Keys Detail window opens.You can share public keys by enabling Share key. Other users can view and download your sharedkeys. Public keys are only available for groupware users.
How to upload a recipient's public key in the Public Keys window:Click the Add icon next to PGP Public Key List. Select a file containing a public key.
How to delete a public key in the Public Keys window:Click the Delete icon next to a public key.Confirm that you want to delete the public key.
Also see
Managing own keys (p. 283)Password management (p. 281)
285
Encrypting DataManaging public keys

286

13 Questions and AnswersGeneral questions .......................................................................................................... 288
Where can I find my personal data and settings? .................................................... 288How can I change my password? ............................................................................. 288How am I notified about new E-Mails or appointment invitations? .......................... 288How can I read current messages from social networks or news pages? ................. 288
Questions about E-Mails and contacts ........................................................................... 289How can I send an E-Mail to multiple addresses at once? ........................................ 289What is the purpose of the input fields Cc and Bcc? ................................................ 289I regularly send E-Mails with identical or similar content. How can I speed up this
process? ....................................................................................................... 289Can I e.g. access E-Mails sent to my Google Mail account? ....................................... 289How can I automatically forward E-Mails to my replacement? ................................. 289How to keep the overview over my E-Mail accounts inboxes? .................................. 289
Questions about tasks, calendars, and appointments .................................................... 290When should I use a task and when should I use an appointment? ......................... 290How can I hide my appointments' or tasks' subject in shared folders? ..................... 290How can I create a task from an E-Mail? ................................................................. 290How can I organize another person's appointments as a representative? ................ 290How do I use the calendar or tasks recurrence settings? ......................................... 291How to find free times when creating appointments? ............................................. 291
Questions about data organization and team work ........................................................ 292How can I make certain contacts available to my external partners? ....................... 292How can I share specific documents with my external partners? ............................. 292
287
General questionsWhere can I find my personal data and settings?
You can customize the following data and settings:▪ Learn how to change your personal data.▪ Learn how to customize the basic settings.▪ Learn how to set up additional E-Mail accounts.
How can I change my password?In order to change your password, click on My password in the User data widget in the Portalapp. Learn more from this instruction.
How am I notified about new E-Mails or appointment invitations?If there are new E-Mails or appointment notifications, the Unread Badge icon to the rightside of the menu bar shows the number of new objects. Click the icon to open the NotificationArea. It contains information about the new objects. From there you can also directly activatefunctions, e.g. read the new E-Mail or confirm the new appointment. Information can be foundin The notification area.
How can I read current messages from social networks or news pages?In the Portal app you can read current messages from your social networks or from newspages or view photos of specific web pages by adding news widgets.
288
Questions and Answers

Questions about E-Mails and contactsHow can I send an E-Mail to multiple addresses at once?
To send an E-Mail to multiple recipients at once, you can choose from the following options:▪ Enter all recipients in the input fields To, Cc or Bcc. Use the auto-complete function to
more easily enter the addresses. This FAQ list provides an explanation of the differencesbetween the input fields.
▪ If you regularly send E-Mails to the same group of people, create a distribution list in theAddress Book app and add the E-Mail addresses to the distribution list. Information canbe found in Creating distribution lists (page 117).
What is the purpose of the input fields Cc and Bcc?Recipients entered in the input fields To or Cc can be viewed by all other recipients enteredin the input fields To or Cc. Recipients entered in the input field Bcc cannot be viewed byother recipients entered in the input fields To, Cc or Bcc. In practice, this means:▪ If you send an E-Mail to a team and every recipient should be able to see who else receives
the E-Mail, enter the recipients in the input fields To or Cc▪ If you send an E-Mail to recipients who should not see the names of the other recipients,
enter the recipients in the input field Bcc.
I regularly send E-Mails with identical or similar content. How can I speed up thisprocess?
Make use of the ability to save E-Mails as drafts. Information can be found in Working withE-Mail drafts (page 84).
Can I e.g. access E-Mails sent to my Google Mail account?For many E-Mail service providers you can set up external E-Mail accounts, e.g. for GoogleMail. You only need your account data for the respective provider. As soon as you set up theexternal E-Mail account you have access to the E-Mails from within the folder tree. Informationcan be found in Adding E-Mail Accounts (page 99).
How can I automatically forward E-Mails to my replacement?Enable the function Auto Forward in the settings. Information can be found in Automaticallyforwarding E-Mails (page 76).
How to keep the overview over my E-Mail accounts inboxes?Use Unified Mail to display the inboxes of multiple E-Mail accounts in a central folder. Infor-mation can be found in Using Unified Mail (page 90).
289
Questions and Answers
Questions about tasks, calendars, and appointmentsWhen should I use a task and when should I use an appointment?
Whether it is best to use an appointment or a task can be determined based on the followingcriteria:▪ An appointment takes place at a defined point in time. If you need to execute an action
at a defined point in time, create an appointment for this action.▪ A task has a due date and sometimes a priority. If you are flexible regarding the time
schedule of an action and only have to respect the due date, enter a task for this action.
How can I hide my appointments' or tasks' subject in shared folders?When creating appointments or tasks in public or shared folders, enable thePrivate checkbox.Other persons can see the appointment or task but not the subject or the description.
How can I create a task from an E-Mail?Use the Reminder function in the display area of the E-Mail app. Information can be found inCreating E-Mail reminders (page 85).
How can I organize another person's appointments as a representative?Ask the other person to share a calendar folder with write permissions. Then enter this person'sappointments in the shared folder. The other person will be displayed as the organizer of theappointments.
290
Questions and Answers

How do I use the calendar or tasks recurrence settings?Example 1: An appointment or a task should take place each second day. It should start on04-01-2017. and should take place five times.
Repeat DailyInterval 2 daysEnds After a number of occurrencesOccurrences 5
Example 2: An appointment or a task should take place each Tuesday and Friday. It shouldstart on 10-01-2017.
Repeat WeeklyWeekday Tue, FrInterval 1 week(s)Ends Never
Example 3: An appointment or a task should take place every second Wednesday. It shouldstart on 11-01-2017. The last appointment should be on 08-03-2017.
Repeat WeeklyWeekday WedInterval 2 week(s)Ends On specific dateEnds on 08-03-2017
Example 4: An appointment or a task should take place on the first Monday of a month. Itshould start on 06-02-2017. The event should take place twelve times.
Repeat MonthlyRepeat by DateInterval 1 month(s)Ends After a number of occurrencesOccurrences 12
Example 5: An appointment or a task should take place each year on the last Friday inNovember. It should start on 24-11-2017.
Repeat YearlyRepeat by Week dayEnds Never
Also see
The appointment editing window: (p. 140)The task editing window (p. 181)
How to find free times when creating appointments?Click on Find a free timewhen creating an appointment or click on Scheduling in the toolbar.Information can be found in Using the scheduling view (page 152).
291
Questions and Answers
Questions about data organization and team workHow can I make certain contacts available to my external partners?
You can also give external partners access to your groupware address books' contacts or toyour social networks' contacts like. To do this proceed as follows:1. Add contacts from your social networks to an address book.2. Create a new contacts folder. Copy all contacts that you want to share from your address
books to this contact's folder.3. Share this contact folder. Information can be found in Sharing (page 237).
How can I share specific documents with my external partners?You can share the contents of documents folders with external partners. To do this proceedas follows:1. In the Drive app, you can collect the documents in a separate folder.2. Share this folder. Information can be found in Sharing (page 237) .
292
Questions and Answers

Index
AAccount
definition, 15Accounts
add E-Mail accounts, 99add storage accounts, 225edit, 252edit primary E-Mail account, 251remove, 252see accounts, 251set up social networks, 52
Add as Xing contact, 122Add storage accounts, 225Add Xing widget button, 52Address Book, 105
Components, 106Address book
add personal address books, 118invite contact to appointment, 120send E-Mails, 120settings, 127
Address book settingsDisplay of names, 127initial folder, 127Link postal addresses with map service, 127My contact data, 127
An appointment's color, 143Answering appointment invitations, 155Answering Task Invitations, 187App
definition, 15App Address Book, 105App Calendar, 129App Drive, 197App E-Mail, 55App Tasks, 175Appointments, 129
add participants or resources, 150Adding attachments, 151change status, 162changing status, 162co-operate with others, 168colors, 143confirm invitation, 155create, 145create a follow-up appointment, 153create from iCal, 153create new, 146creating a distribution list from the list of participants,169delete, 166display, 141, 143display in calendar view, 141display in list view, 142display time zones, multiple -, 142edit, 161
edit with drag and drop, 162export, 164export calendar, 265finding free times, 152import, 260invite from address book, 120Inviting participants to a new appointment, 169manage, 160manage favorite timezones, 163move to calendar, 164print, 165resolve conflicts, 154save attachment, 144search, 167send an E-Mail to participants, 168set an appointment's display, 149set recurring appointments, 148use appointment reminders, 150use the date picker, 147use the scheduling view, 152using calendar colors, 164view attachment, 144
AppsAddress Book, 105Calendar, 129Drive, 197E-Mail, 55Tasks, 175
ArchiveE-Mails, 87
BBasic settings, 39
Automatic opening of notification area, 39Automatic sign out, 39change password, 39Default application after sign in, 39Design, 39Language, 39My contact data, 39Refresh interval, 39Show desktop notifications, 39Timezone, 39
CCalendar, 129
add calendars, 156add personal calendars, 157Components, 130Date picker, 136import, 159mini calendar, 133share, see sharing, 237subscribe to Google calendars, 158subscribe to iCal calendars, 158subscribe to public calendars, 157use the scheduling view, 152
Calendar settings
293

Automatically delete the invitation email after theappointment has been accepted or declined, 174Birthday calendar, 173calendar work week view, 173Default reminder, 173Default reminder for all-day appointments, 173Default reminder for appointments in birthday calen-dar, 173Display refused appointments, 173End of working time, 173Mark all day appointments as free, 173Receive notification as appointment creator whenparticipants accept or decline, 173Receive notification as appointment participant whenother participants accept or decline, 174Receive notification for appointment changes, 173Start of working time, 173Time scale in minutes, 173
Change password, 41Change the password, 281Changing tasks confirmations, 192Changing the appointment status, 162Cloud storage
see add storage accounts, 225Collecting addresses, 83Contacts
add, 115add address books, 118add as Xing contact, 122add from vCard, 116Adding attachments, 116copy, 121create, 115create contact picture, 115delete, 123display, 112displaying the halo view, 114distribution list, 117edit, 121export, 122export address book, 265import from file, 119importing in CSV format, 264importing in vCard format, 264invite to appointment, 120invite to Xing , 123move, 121organize, 120print, 123save attachment, 113search, 124send as vCard, 122send E-Mails to, 120share, see sharing, 237subscribe to external address books, 118view attachment, 113
Copycontacts, 121E-Mails, 82
Files, 216Create
contact, 115create
distribution list, 117text files, 212
Create a follow-up appointment, 153Create new
address book, 118appointments, 146Calendar, 156E-Mail folders, 78file or folder, 211personal address books, 118personal calendars, 157personal task folder, 188task, 184task folder, 188
Create new encrypted document, 276Create new encrypted files, 273Creating a distribution list from the list of participants,169CSV
export, 122
DData organization, shared objects, security, 229Date picker, 136Decrypt files, 274Default group
see group, 15see users, 18
Definitionsaccount, 15app, 15distribution list, 15E-Mail thread, 15Elements, 15External participant, 15Function, 15Global address book, 15Group, 15Groupware, 15groupware, 15Guest, 16Internal E-Mail account, 17Objects, 18Participant, 18resource, 18session, 18tabs, 18User, 18user interface, 18
deleteaccounts, 252Appointments, 166Contacts, 123E-Mails, 87
294
Index

Files, 218Tasks, 192
DeleteFolders, 236
Design Elements, 13Desktop notifications, 42Display
appointment attachment, 144Appointments, 141, 142contact attachment, 113Contacts, 112E-Mail attachment, 66E-Mails, 65Files, 205Folders, 205task attachment, 183Tasks, 182
Display contentsFiles, 206Presentations, 208
Distribution listcreate, 117definition, 15send E-Mails to, 120
distribution listinvite to appointment, 120
Documentation, 11Content, 12Design Elements, 13target group, 12
Download encrypted files, 274Drive, 197
Components, 198DriveSettings
add files with identical names, 227default view, 227Slideshow / Autoplay mode, 227
EE-Mail, 55
Components, 56E-Mail authenticity, 257E-Mail filters, 91
change rules, 93create new rule when moving, 93create rule, 92Examples, 94
E-Mail settingsadvanced settings, 103Allow HTML formatted E-Mail messages?, 101Append vcard, 103Ask for mailto link registration, 102auto forward, 101Auto-save email drafts, 103Automatically collect contacts while reading, 101Automatically collect contacts while sending, 101automatically send E-Mails to BCC, 103Color quoted lines, 101
Confirm recipients when replying to a mailing list,103default font style, 103default sender address, 103Fixed-width font, 101format emails as, 103Forward emails as, 103IMAP folder subscription, 101Insert the original E-Mail text into a reply?, 103notification sounds, 101Permanently remove deleted emails, 101Show folder with all unseen messages, 101Show requests for read receipts, 101vacation notice, 101
E-Mail tabsdefinition, 18working with, 80
E-Mail threaddefinition, 15
E-Mail, see E-Mail, 55E-Mails
add E-Mail accounts, 99add folder, 78add to portal, 85Adding attachments, 71archive, 87automatically forward, 76categorize, 83clean up folders, 89co-operate with others, 97Collecting addresses, 83copy, 82create reminder, 85delete, 87display, 65display attachments, 208drafts, 84filters, 91forward, 75import from EML, 85invite recipients to appointment, 97mark as read, 82mark as unread, 82mark folder as read, 82move, 81notification sounds, 101organize, 79print, 86reply, 74save as EML, 85save attachment, 66saving recipients as distribution list, 98search, 95select contacts from a list, 69Selecting sender address, 69send, 67, 68send a vacation notice, 77send from address book, 120send to appointment participants, 168
295
Index

Sending attachments as link, 72Sending copies as CC or BCC, 70share, see sharing, 237show authenticity, 257show E-Mail source, 84subscribe folder, 97tabs, 80Unified Mail, 90use signatures, 73view attachment, 66
Editaccounts, 252Appointments, 161, 162Contacts, 121file description, 215Tasks, 190Text files, 212versions, 220
Elementsdefinition, 15
Encryptcreate new encrypted documents, 276create new encrypted files, 273E-Mail conversation, 269encrypt Office documents, 275Files, 272Saving selected documents in an encrypted format,276
Encrypt E-Mail conversations, 269Encrypt Office documents, 275Encrypted document
open, 277Encrypted E-Mails
access for external recipients, 271block, 270read, 269send, 270
Encrypted filesdecrypt, 274download, 274open, 273
Encrypting files, 272Examples
E-Mail filters, 94Permissions, 249
Exportaddress book, 265Appointments, 164Calendar, 265Contacts, 122task folder, 265Tasks, 191
External participantdefinition, 15
FFAQ, see questions and answers, 287favorites
add files or folders, 217Favorite time zones, 163folder favorites, 235
Filesaccess with WebDAV, 223add favorites, 217add folder, 211add to portal, 217copy, 216create description, 215create new, 211delete, 218display, 205display contents, 206display E-Mail attachments, 208download, 210edit description, 215editing versions, 220lock, 219move, 215organize, 213rename file, 214save as PDF, 216search, 222send as E-Mail attachment, 214share, see sharing, 237Unlock, 219WebDAV under Linux, 223WebDAV under Windows 7, 223
First Steps, 25Folder structure
favorites, 235hiding folders, 234navigate, 233
Folder treechange width, 233favorites, 235hiding folders, 234open, 233
Folders, 230add favorites, 217add folders to favorites, 235clean up, 89delete, 236display, 205download contents, 210hide, 234move, 236navigate in folder structure, 233open, 233Permissions, 232personal folders, 231public folders, 231Rename, 235share, see sharing, 237shared folders, 231subscribe to E-Mail folders, 97type, 231
Forward E-Mails, 75
296
Index

Functiondefinition, 15
GGetting started, 19Global address book
definition, 15Groups
definition, 15manage, 170
Groupwaredefinition, 15, 20handling, 23requirements, 22user interface, 26
Guard, 267manage public keys, 285managing own keys, 283password management, 281set up, 268settings, 279sign out, 278
Guard Guard PGP SettingsRemember Password Default, 279
Guard Security settingsDefault adding signature to outgoing mails, 279Default to send encrypted when composing email,279download public key, 280public keys, 280Show Advanced Settings, 279Your Keys, 280
GuardSettingschange password, 281Reset the password, 281
Guestdefinition, 16
Guest groupsee guest, 16
Hhalo view, 114Handling the groupware , 23
IiCalendar
export, 164import
Calendar, 159Import
Appointments, 260contacts in CSV format, 264contacts in vCard format, 264Tasks, 260
Import from fileContacts, 119Tasks, 188
Importing
E-Mails, 85Importing Data, 260Install clients or apps, 44Interchange data, 259
Appointments, 172Contacts, 126Tasks, 195
Internal E-Mail accountdefinition, 17
Invite to a shared item, 240Invite to Xing, 123Inviting participants to a new appointment, 169
KKeyboard input, 35
interact with the user interface, 37keys and key combinations, 36use cases, 38
LLabel
categorize E-Mails, 83Lock
Files, 219
MManage subscriptions, 253Mini calendar, 133Move
appointments to calendar, 164Contacts, 121E-Mails, 81files or folders, 215Folders, 236Tasks, 191
NNew
E-Mails, 67, 68Notification area, 42Notifications
receive desktop notifications, 42receive notifications in the notification area, 42
OObjects
definition, 18Open encrypted documents, 277Open encrypted files, 273Organize
E-Mails, 79
PParticipant
definition, 18PDF, save files as, 216
297
Index
PermissionsAdministrator, 247application, 247Author, 247definition, 232Examples, 249Reviewer, 247Viewer, 247
personal contact data, 40personal contact picture, 40personal folders, 231Personal root folder, 231Picture
create contact picture, 115create personal contact picture, 40
Portal, 47add E-Mails, 85add file, 217Components, 48customize, 51
Portal widgetsadd, 52change order, 51remove, 51set up social networks, 52
Portal widgets settingsColor button, 53Delete icon, 53Disable button, 53Edit button, 53Enable button, 53Reduce to widget summary checkbox, 53
Presentationshold, 208
Primary E-Mail accountassign folders, 251change name, 251change sender name, 251
printAppointments, 165calendar sheet, 165Contacts, 123E-Mails, 86
Printlist of appointments, 165Tasks, 192
public folders, 231Public link, 238
QQuestions and answers, 287
calendar, create appointment as representative, 290calendar, using recurring appointments, 291change password, 288create tasks from E-Mails, 290E-Mail, auto-forward, 289E-Mail, External E-Mail accounts, 289E-Mail, reduce typing, 289
find free times when creating appointments, 291messages from social networks or news pages, 288notify new objects, 288personal data and settings, 288send E-Mail to multiple addresses at once, 289share contacts with external partners, 292sharing documents with external partners, 292tasks, using recurring tasks, 291using tasks or appointments, 290
Questions and AnswersE-Mail, Unified Mail, 289E-Mail, using Cc and Bcc, 289private appointments and tasks, 290
RReminder
E-Mails, 85Rename
Files, 214Renaming folders, 235Reply to E-Mails, 74Reset the password, 281Resolving appointment conflicts, 154Resource
definition, 18manage, 171
SSave
E-Mails, 84, 85Saving selected documents in an encrypted format, 276Search
Appointments, 167contacts, 124E-Mails, 95Files, 222Tasks, 193
SecurityAutomatic sign out, 256Displaying or terminating sessions, 258encrypt E-Mail conversations, 269encrypt Office documents, 275Encrypting files, 272externally linked images in E-Mails, 256GuardSettings, 279Show email authenticity, 257
Sendingcontacts as vCard, 122E-Mails, 67, 68
Sessiondefinition, 18
Set up clients or apps with a wizard, 45Settings
Accounts, 251Address book, 127Basic settings, 39Calendar, 173change password, 41
298
Index
Drive, 227E-Mails, 100E-Mails, receive, 101, 103install clients or apps, 44personal contact data, 40Portal widgets, 53security, 255set up clients or apps with a wizard, 45Tasks, 196
shared folders, 231Sharing, 237
Access other users' shares, 246add person, 242edit, 242edit in the Drive app, 245invite to a shared item, 240public link, 238remove, 244resend an invitation, 243share with read access, 238share with read or edit access, 240view in the Drive app, 245
Show birthday calendar, 173Show E-Mail source
categorize E-Mails, 84Sign in, sign out, 24Sign out
change password, 278Subscribe
E-Mail folders, 97Folder overview, 253Google calendar, 158iCal calendars, 158managing folders, 253messages from social networks, 52public calendars, 157refresh data, 253subscribe contacts from external address books, 118subscribe to RSS feeds, 52
Subscribe to RSS feeds, 52
TTabs
definition, 18working with tabs, 80
Tasks, 175add participant, 185add personal task folder, 188add task folder, 188Adding attachments, 186change due date, 191changing status, 192co-operate with others, 194Components, 176confirm invitation, 187create new, 184create recurring task, 185delegate to others, 194
delete, 192display, 182edit, 190export, 191export folder, 265import, 260import from file, 188manage, 189mark as done, 190move, 191print, 192save attachment, 183search, 193share, see sharing, 237view attachment, 183
Tasks settingsReceive notifications when a participant accepted ordeclined a task created by you, 196Receive notifications when a participant accepted ordeclined a task in which you participate, 196Receive notifications when a task in which you partic-ipate is created, modified or deleted, 196
Team workAppointments, 168Contacts, 125E-Mails, 97Files, 226Tasks, 194
Terminology, 15Text files
create, 212edit, 212
Timezonedisplay multiple time zones, 142manage favorite timezones, 163
UUnified Mail, 90Unlock
Files, 219Use the scheduling view, 152User
definition, 18User interface
App Launcher, 27definition, 18Display area, 31editing window, 34Folder tree, 30halo view, 32Keyboard input, 35, 36, 37Menu bar, 26notification area, 33Pop-up, 32search bar, 28Toolbar, 29
Using calendar colors, 164
299
Index
VVacation notice, 77vCalendar
export, 191vCard
export, 122send, 122
WWebDAV
accessing files, 223definition, 223set up under Linux, 223set up under Windows 7, 223
XXing
add as Xing contact, 122invite to Xing, 123
300
Index


![Messenger - software.open-xchange.com€¦ · Barradeherramientas Contienelosbotoneseiconossiguientes BotónNuevaconversación.Iniciaunnuevochatengrupo[16]. BotónAñadiramigo.Añadeunusuario[13](https://static.fdocuments.in/doc/165x107/5fbf0ccefbc57d178947c085/messenger-barradeherramientas-contienelosbotoneseiconossiguientes-botnnuevaconversacininiciaunnuevochatengrupo16.jpg)