


Languages
Pages
Legal

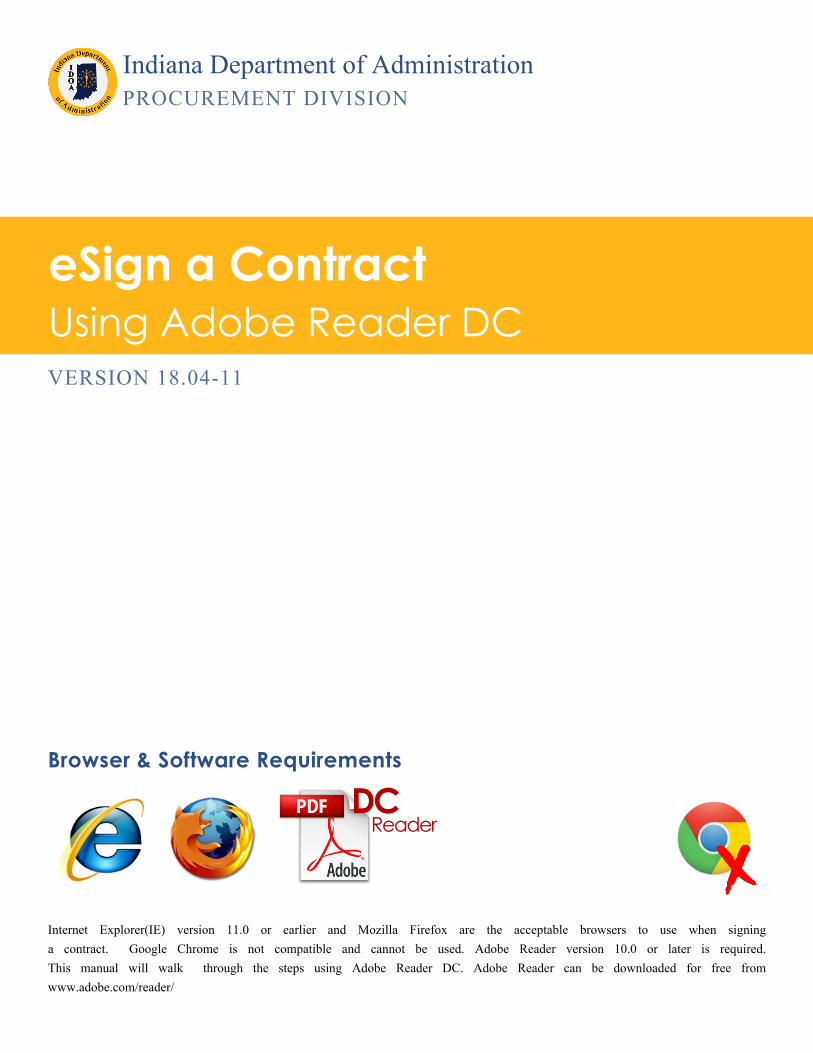
Indiana Department of AdministrationPROCUREMENT DIVISION
eSign a Contract Using Adobe Reader DC VERSION 18.04-11
Browser & Software Requirements
Internet Explorer(IE) version 11.0 or earlier and Mozilla Firefox are the acceptable browsers to use when signing a contract. Google Chrome is not compatible and cannot be used. Adobe Reader version 10.0 or later is required. This manual will walk through the steps using Adobe Reader DC. Adobe Reader can be downloaded for free from www.adobe.com/reader/
DCReader

2
Table of Contents
Email Notification .............................................................................................................. 3Document for Review/Signature ................................................. 3
Find the Contract to Sign .................................................................................................. 4Log in to the Supplier Portal ......................................................... 4Navigate to the Contract ............................................................ 4Navigate to the Contract Continued ......................................... 5
Save and Open the Document to eSign .......................................................................... 6Open the Main Document for Signing ........................................ 6
eSign the PDF Contract Document ................................................................................... 7Review and Choose the Method of Signing .............................. 7
Method 1 ........................................................................................................................... 8Using the Add Text Feature .......................................................... 8
Method 2 ............................................................................................................................ 9Setting up the Sign Feature .......................................................... 9Using the Sign Feature .................................................................. 11
Upload the eSigned Contract Document ........................................................................ 13Upload the Signed Contract ....................................................... 13
eSigning Questions and Answers ..................................................................................... 14Troubleshooting Guide ................................................................. 14
3
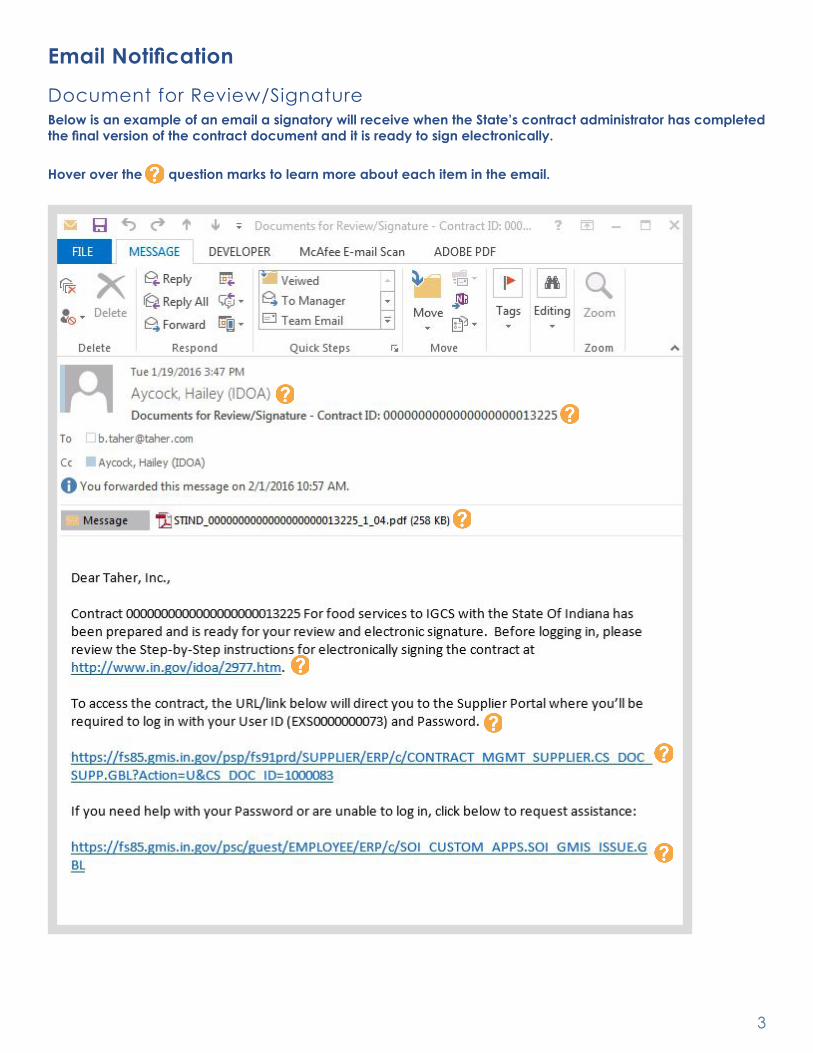
Email Notification
Document for Review/SignatureBelow is an example of an email a signatory will receive when the State’s contract administrator has completed the final version of the contract document and it is ready to sign electronically. Hover over the question marks to learn more about each item in the email.
4
Subsequent Log Ins: Navigating to the Maintain Contract Documents Page
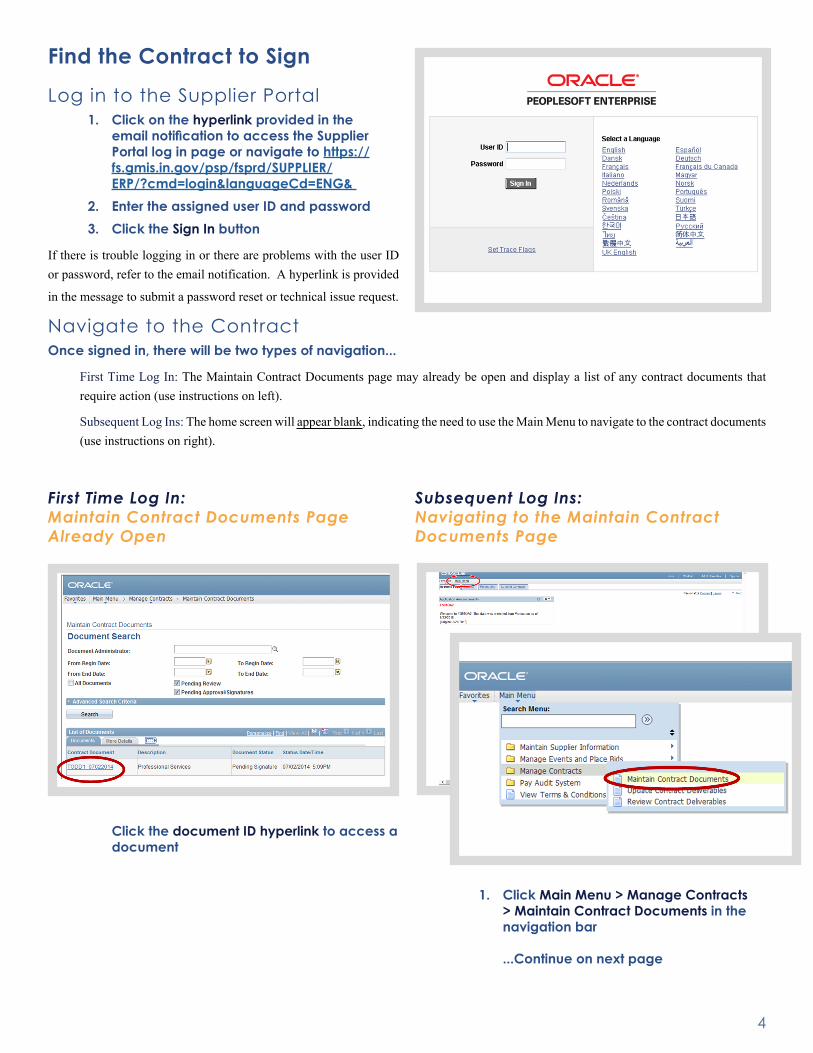
1. Click Main Menu > Manage Contracts > Maintain Contract Documents in the navigation bar ...Continue on next page
First Time Log In: Maintain Contract Documents Page Already Open
Click the document ID hyperlink to access a document
Find the Contract to Sign
Log in to the Supplier Portal1. Click on the hyperlink provided in the
email notification to access the Supplier Portal log in page or navigate to https://fs.gmis.in.gov/psp/fsprd/SUPPLIER/ERP/?cmd=login&languageCd=ENG&
2. Enter the assigned user ID and password3. Click the Sign In button
If there is trouble logging in or there are problems with the user ID or password, refer to the email notification. A hyperlink is provided
in the message to submit a password reset or technical issue request.
Navigate to the ContractOnce signed in, there will be two types of navigation...
First Time Log In: The Maintain Contract Documents page may already be open and display a list of any contract documents that require action (use instructions on left).
Subsequent Log Ins: The home screen will appear blank, indicating the need to use the Main Menu to navigate to the contract documents (use instructions on right).
5
Subsequent Log Ins: Navigating to the Maintain Contract Documents Page
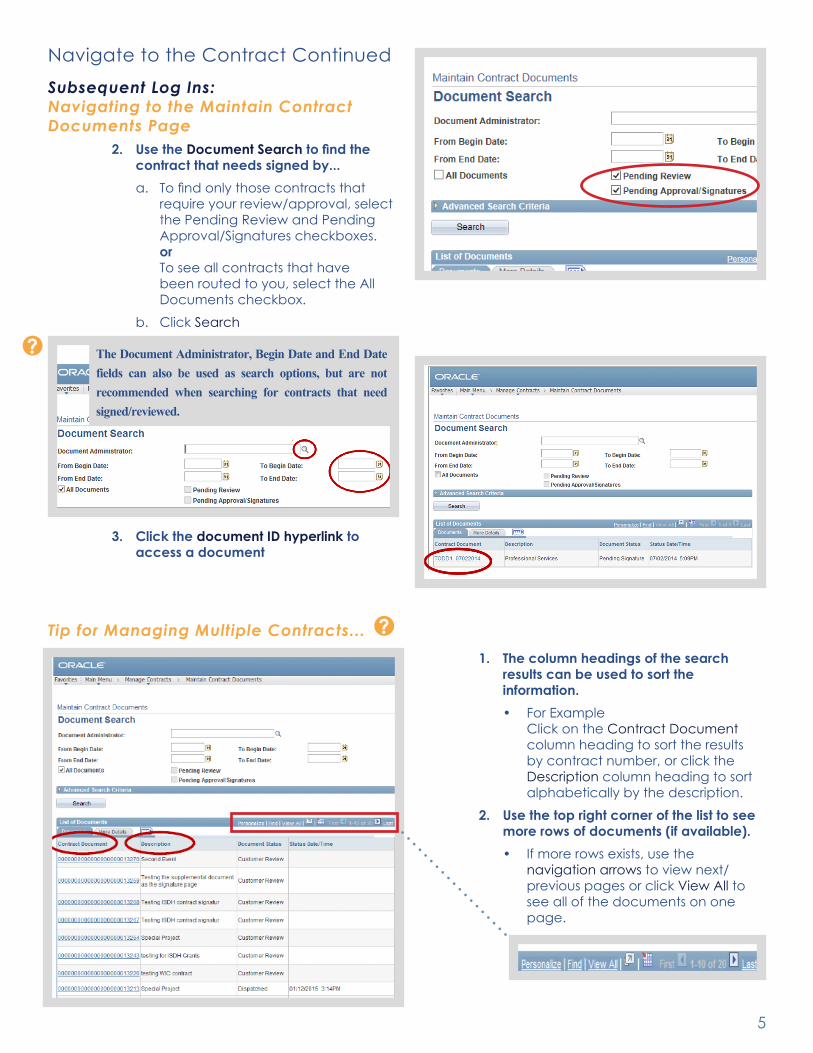
2. Use the Document Search to find the contract that needs signed by...a. To find only those contracts that
require your review/approval, select the Pending Review and Pending Approval/Signatures checkboxes. or To see all contracts that have been routed to you, select the All Documents checkbox.
b. Click Search
3. Click the document ID hyperlink to access a document
Navigate to the Contract Continued
?
Tip for Managing Multiple Contracts... ?1. The column headings of the search
results can be used to sort the information. • For Example
Click on the Contract Document column heading to sort the results by contract number, or click the Description column heading to sort alphabetically by the description.
2. Use the top right corner of the list to see more rows of documents (if available). • If more rows exists, use the
navigation arrows to view next/previous pages or click View All to see all of the documents on one page.
The Document Administrator, Begin Date and End Date fields can also be used as search options, but are not recommended when searching for contracts that need signed/reviewed.

6
It is extremely important to keep the naming convention created by the Supplier Portal, otherwise the contract may not get submitted correctly back into the system.
Save and Open the Document to eSign
Open the Main Document for SigningThe Document Management page will display some basic information concerning the contract, and offer several options.
1. Click Open Main Document for SigningA pop-up message will open
2. Click Open
?
7
eSign the PDF Contract Document
Review and Choose the Method of Signing
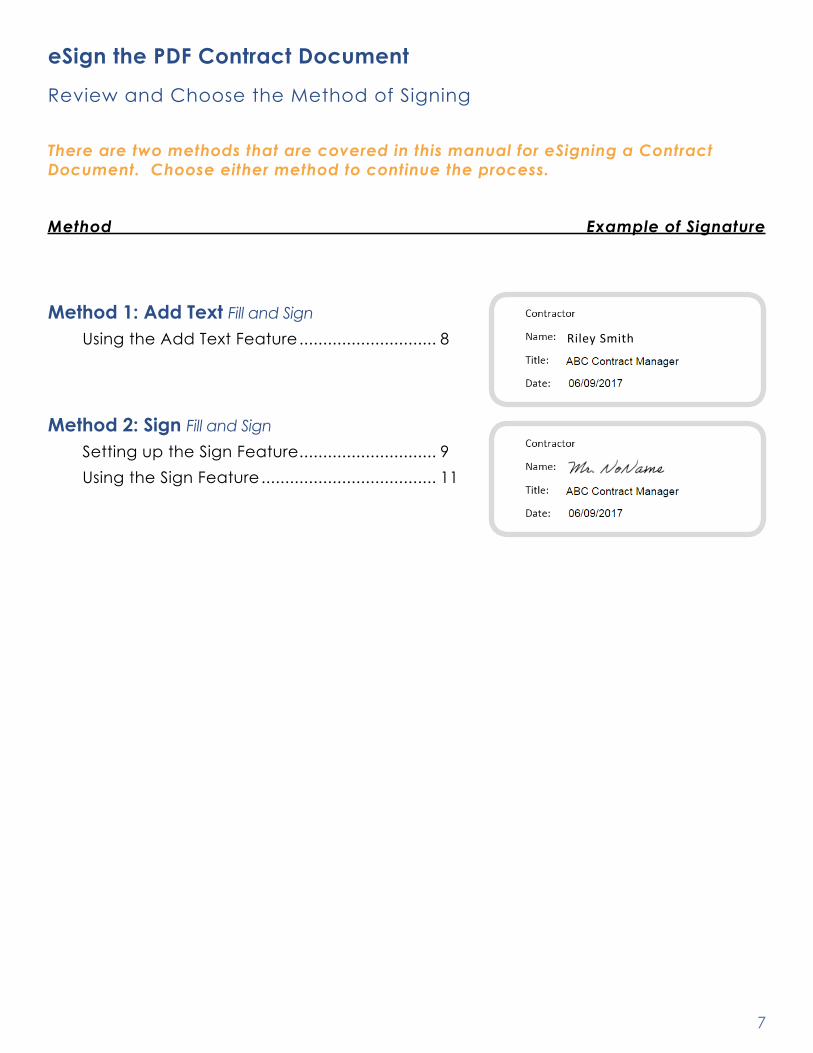
There are two methods that are covered in this manual for eSigning a Contract Document. Choose either method to continue the process.
Method Example of Signature
Method 1: Add Text Fill and SignUsing the Add Text Feature ............................. 8
Method 2: Sign Fill and SignSetting up the Sign Feature ............................. 9Using the Sign Feature ..................................... 11
Riley Smith
8
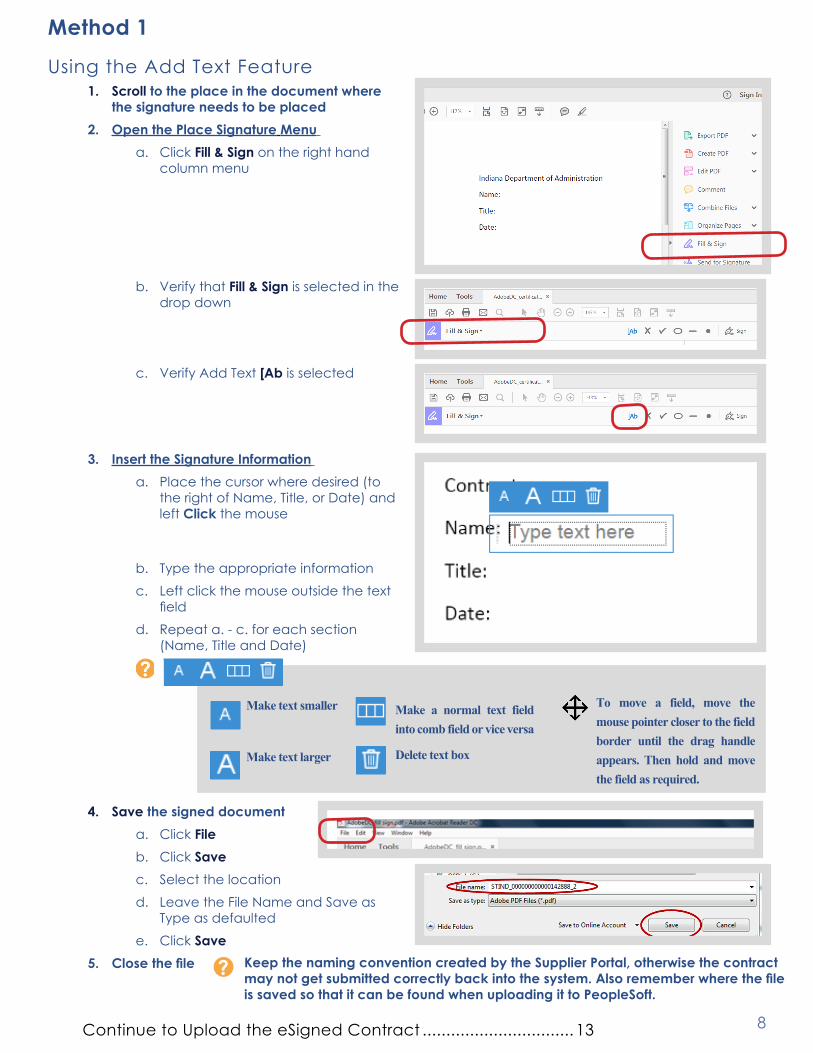
Method 1
Using the Add Text Feature1. Scroll to the place in the document where
the signature needs to be placed 2. Open the Place Signature Menu
a. Click Fill & Sign on the right hand column menu
b. Verify that Fill & Sign is selected in the drop down
c. Verify Add Text [Ab is selected
3. Insert the Signature Information a. Place the cursor where desired (to
the right of Name, Title, or Date) and left Click the mouse
b. Type the appropriate informationc. Left click the mouse outside the text
fieldd. Repeat a. - c. for each section
(Name, Title and Date)
4. Save the signed document a. Click Fileb. Click Savec. Select the locationd. Leave the File Name and Save as
Type as defaultede. Click Save
5. Close the file Keep the naming convention created by the Supplier Portal, otherwise the contract may not get submitted correctly back into the system. Also remember where the file is saved so that it can be found when uploading it to PeopleSoft.
?
Make text smaller
Make text larger
Make a normal text field into comb field or vice versa
Delete text box
To move a field, move the mouse pointer closer to the field border until the drag handle appears. Then hold and move the field as required.
Continue to Upload the eSigned Contract ................................ 13

9
Method 2
Setting up the Sign Feature
1. Open the Place Signature Menu
a. Click Fill & Sign on the right hand column menu
b. Verify that Fill & Sign is selected in the drop down
c. Click Sign
3. Create a signaturea. Click Add Signature
b. Verify that the Type option is selected
c. Type your name
Click Change Style to pick a different font for the signature.
If the signature that will be used is shown instead of Add Signature, continue to Using the Sign Feature pg. 11.
If a signature is shown that will not be used, click the minus (-) to delete it.
10
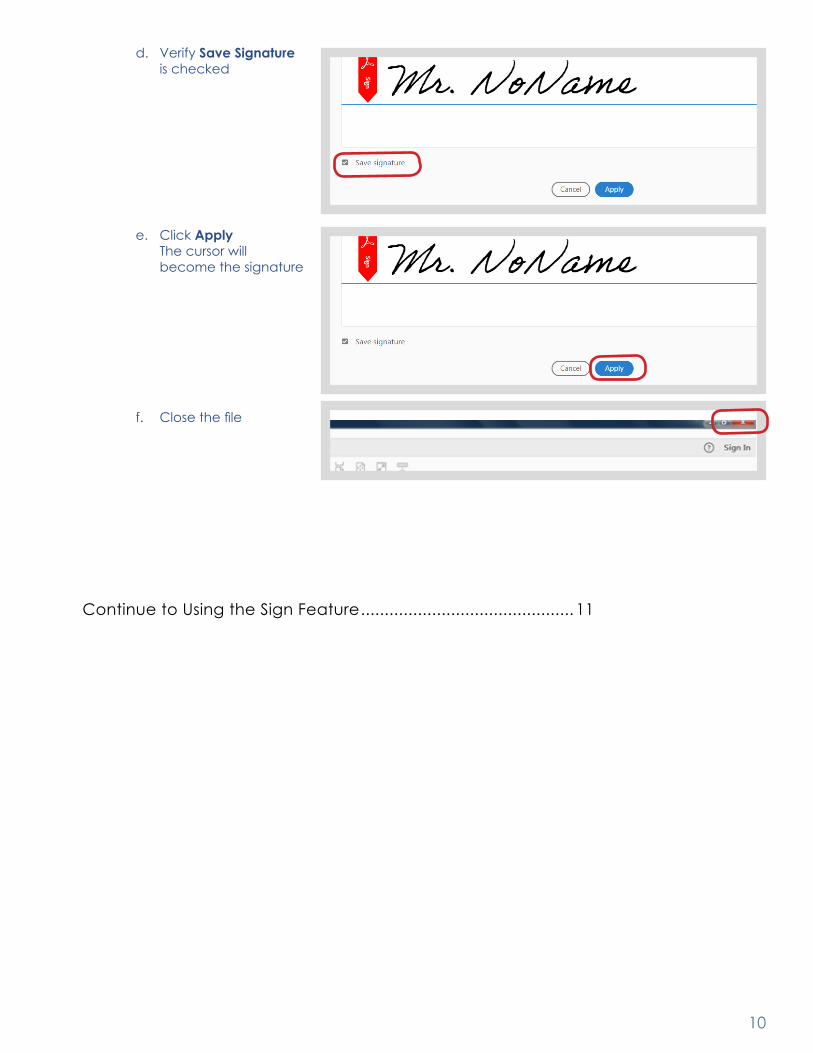
d. Verify Save Signature is checked
e. Click Apply The cursor will become the signature
f. Close the file
Continue to Using the Sign Feature ............................................. 11

11
Using the Sign Feature
1. Scroll to the place in the document where the signature needs to be placed
2. Open the Place Signature Menu
a. Click Fill & Sign on the right hand column menu
b. Verify that Fill & Sign is selected in the drop down
c. Click Sign
3. Create a signaturea. Select the Signature
that was saved The cursor will become the signature
b. Place the cursor where desired (to the right of Name) and left Click the mouse
If Add Signature is seen or if a signature is shown that will not be used, go to Setting up the Sign Feature pg. 9.

12
4. Insert the Title and Date a. Verify [Ab is selected
b. Place the cursor where desired (to the right of Title or Date) and left Click the mouse
c. Type the appropriate information
d. Left click the mouse outside the text field
e. Repeat b. - d. for each section (Title and Date)
5. Save the signed document a. Click Fileb. Click Savec. Select the locationd. Leave the File Name and Save as
Type as defaultede. Click Save
f. Close the file
Make text smaller
Make text larger
Make a normal text field into comb field or vice versa
Delete text box
To move a field, move the mouse pointer closer to the field border until the drag handle appears. Then hold and move the field as required.
Continue to Upload the eSigned Contract ................................ 13
Keep the naming convention created by the Supplier Portal, otherwise the contract may not get submitted correctly back into the system. Also remember where the file is saved so that it can be found when uploading it to PeopleSoft.
?

13
Upload the eSigned Contract Document
Upload the Signed ContractOnce signed, the revised document (with the same name) must be uploaded back into the Supplier Portal.
1. Login to the supplier portal (if logged out)See page 4 of this guide for navigation instructions.
2. Click Upload Signed Document
A pop-up window will open to locate the signed contract in the file directory where it was saved.
3. Click Browse to locate the document4. Click Upload
When the signed document has been successfully uploaded, the Maintain Contract Documents Document Search page will open.
5. Sign Out of the Supplier PortalThis is the last step of eSigning a Contract in this phase of the contracting process. If other contract documents require action, use the Maintain Contract Documents Document Search Page to locate and fulfill the necessary tasks.

14
eSigning Questions and Answers
Troubleshooting Guide
Help! What is the contract number? What is my User ID? Where do I get the contract? How do I get my password reset? PeopleSoft generates an email to you when the contract is ready to sign. Unless the content was edited, the email provides the Contract ID number, your User ID, a link to the supplier portal and information about how to get your password reset.
How do I find my User ID and password if I can’t find my email? You must log into the Supplier Portal with the User ID for the signatory assigned to the contract by the State’s Contract Administrator.If you’re the creator of the Bidder Registration, your User ID will begin with “EXT” and will be followed by the ten digit bidder id number. (Example: EXT0000012345.) Your password will be the same as what you use to sign into your Bidder Registration.If you’re not the creator of the Bidder Registration, but you were linked to the existing profile by the Contract Administrator, your User ID will begin with “EXS” and will be followed by a ten digit number assigned to you. (Example: EXS0000000678.) When you are initially set up with an EXS User ID, you’ll receive an email including your User ID and temporary password (INDIANA). The first time you log in, you’ll be immediately prompted to change your password. Some signatories have been mistakenly assigned multiple User IDs – you may need to contact the State Contract Administrator so he/she can give you the User ID assigned to the contract.
Where do I log in to download the contract?
https://fs.gmis.in.gov/psp/fsprd/SUPPLIER/ERP/?cmd=login&languageCd=ENG&
Once you’re in, Navigate to Main Menu >> Manage Contracts >> Maintain Contract DocumentsIf you can’t get logged into the Supplier Portal, use the “Report an Issue” link on the log in page to request assistance.
Q
A
Q
A
Q
A
15
Why can’t I get logged in?
Internet Explorer version 11.0 or earlier and Mozilla Firefox are the acceptable browsers (Google Chrome is not compatible).
How do I electronically sign the contract?
Step by step information is included in the eSigning a Contract manual and video posted at https://secure.in.gov/idoa/2977.htm.
Why can’t I sign the contract?
Adobe Reader version 10.0 or later is required. This manual walks through the process using Adobe Reader DC. If needed, the signatory can download a free copy at www.adobe.com/reader/.
Where did I save the contract?
Search your computer for the last 5 digits of the contract number or look in your temporary files folder.
Nothing worked. What can I do now?
If all else fails, contact the State Contract Administrator so that he/she can cancel the signing process and start over. A new email will be generated so you can access the contract through it.
Q
A
Q
A
Q
A
Q
A
Q
A
Top Related