


Languages
Pages
Legal

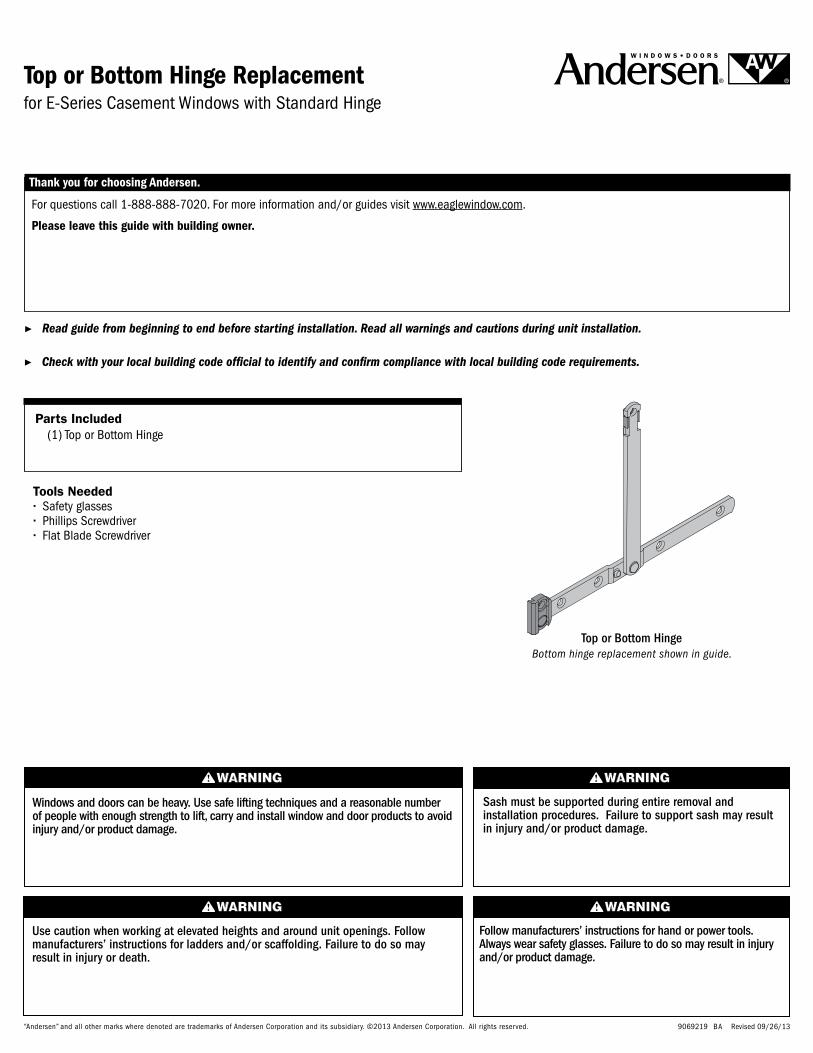
Top or Bottom Hinge
Tools Needed ∙ Safety glasses ∙ Phillips Screwdriver ∙ Flat Blade Screwdriver
Parts Included (1) Top or Bottom Hinge
Use caution when working at elevated heights and around unit openings. Follow manufacturers’ instructions for ladders and/or scaffolding. Failure to do so may result in injury or death.
Follow manufacturers’ instructions for hand or power tools. Always wear safety glasses. Failure to do so may result in injury and/or product damage.
9069219 BA Revised 09/26/13
Top or Bottom Hinge Replacementfor E-Series Casement Windows with Standard Hinge
For questions call 1-888-888-7020. For more information and/or guides visit www.eaglewindow.com.
Please leave this guide with building owner.
▶ Read guide from beginning to end before starting installation. Read all warnings and cautions during unit installation.
▶ Check with your local building code official to identify and confirm compliance with local building code requirements.
“Andersen” and all other marks where denoted are trademarks of Andersen Corporation and its subsidiary. ©2013 Andersen Corporation. All rights reserved.
Thank you for choosing Andersen.
Windows and doors can be heavy. Use safe lifting techniques and a reasonable number of people with enough strength to lift, carry and install window and door products to avoid injury and/or product damage.Las puertas y las ventanas pueden ser pesadas. Utilice técnicas seguras de levantamiento de peso y un número razonable de personas con suficiente fuerza para levantar, cargar e instalar los productos de puertas y ventanas, a fin de evitar lesiones y/o daños al producto.
Sash must be supported during entire removal and installation procedures. Failure to support sash may result in injury and/or product damage.La hoja debe sostenerse durante todo el proceso de extracción e instalación. De no sostenerla, podrían producirse lesiones y/o daños al producto.
Bottom hinge replacement shown in guide.
29069219
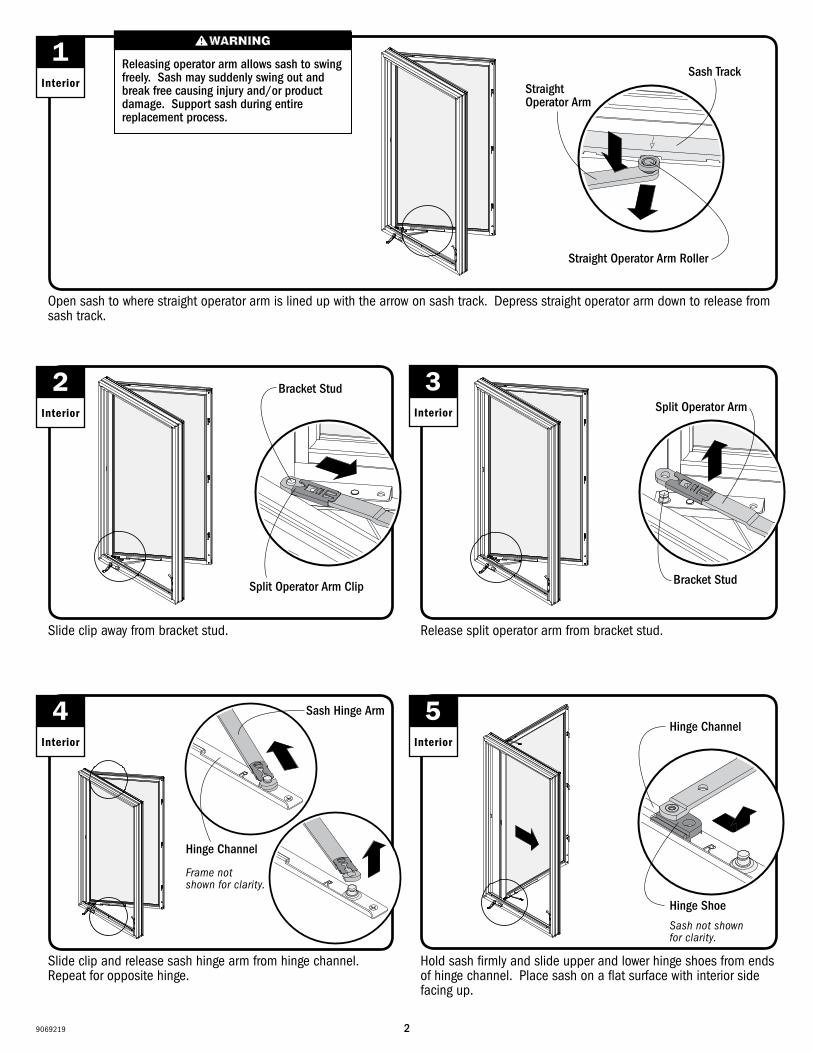
2Interior
3Interior
Slide clip away from bracket stud. Release split operator arm from bracket stud.
4Interior
Slide clip and release sash hinge arm from hinge channel. Repeat for opposite hinge.
Split Operator Arm Clip
Bracket Stud
Bracket Stud
Split Operator Arm
Sash Hinge Arm
Hinge Channel
Frame not shown for clarity.
1Interior
`
Releasing operator arm allows sash to swing freely. Sash may suddenly swing out and break free causing injury and/or product damage. Support sash during entire replacement process.
Sash Track
Straight Operator Arm Roller
Straight Operator Arm
Open sash to where straight operator arm is lined up with the arrow on sash track. Depress straight operator arm down to release from sash track.
Hold sash firmly and slide upper and lower hinge shoes from ends of hinge channel. Place sash on a flat surface with interior side facing up.
5Interior
Hinge Shoe
Hinge Channel
Sash not shown for clarity.
39069219
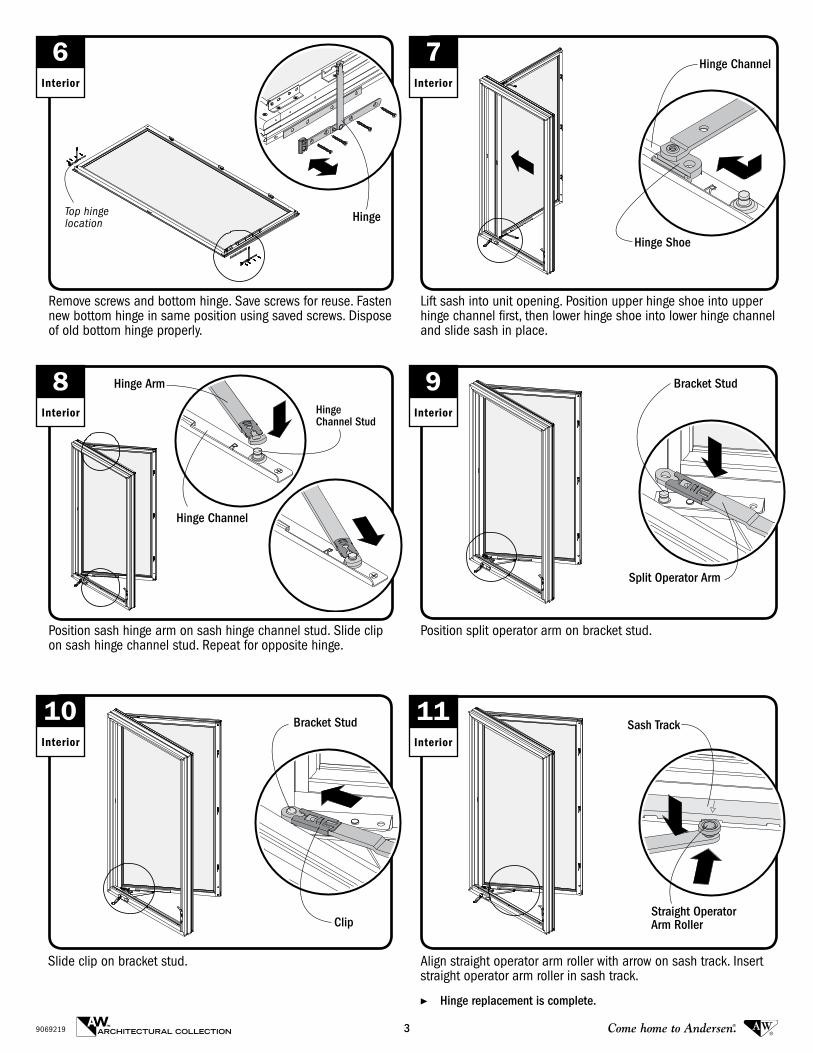
Lift sash into unit opening. Position upper hinge shoe into upper hinge channel first, then lower hinge shoe into lower hinge channel and slide sash in place.
7Interior
Hinge Shoe
Hinge Channel
8Interior
9Interior
Position split operator arm on bracket stud.
Bracket Stud
Split Operator Arm
Hinge Arm
Hinge Channel
Position sash hinge arm on sash hinge channel stud. Slide clip on sash hinge channel stud. Repeat for opposite hinge.
Hinge Channel Stud
6Interior
Hinge
Remove screws and bottom hinge. Save screws for reuse. Fasten new bottom hinge in same position using saved screws. Dispose of old bottom hinge properly.
Top hinge location
10Interior
Slide clip on bracket stud.
Clip
Bracket Stud 11Interior
Align straight operator arm roller with arrow on sash track. Insert straight operator arm roller in sash track.
Sash Track
Straight Operator Arm Roller
▶ Hinge replacement is complete.
\\Bpfile1\Groups\Service\Public\Eagle Service Folder\Eagle Newly Created Guides\Accessories\2013.09.17 to Eagle (Accessories, Comm Door, Foot Bolt)
Top Related