


Languages
Pages
Legal


Magezon Core Builder
0
Magezon Core Builder
User Guide
Version 1.0
Magezon Core Builder
1
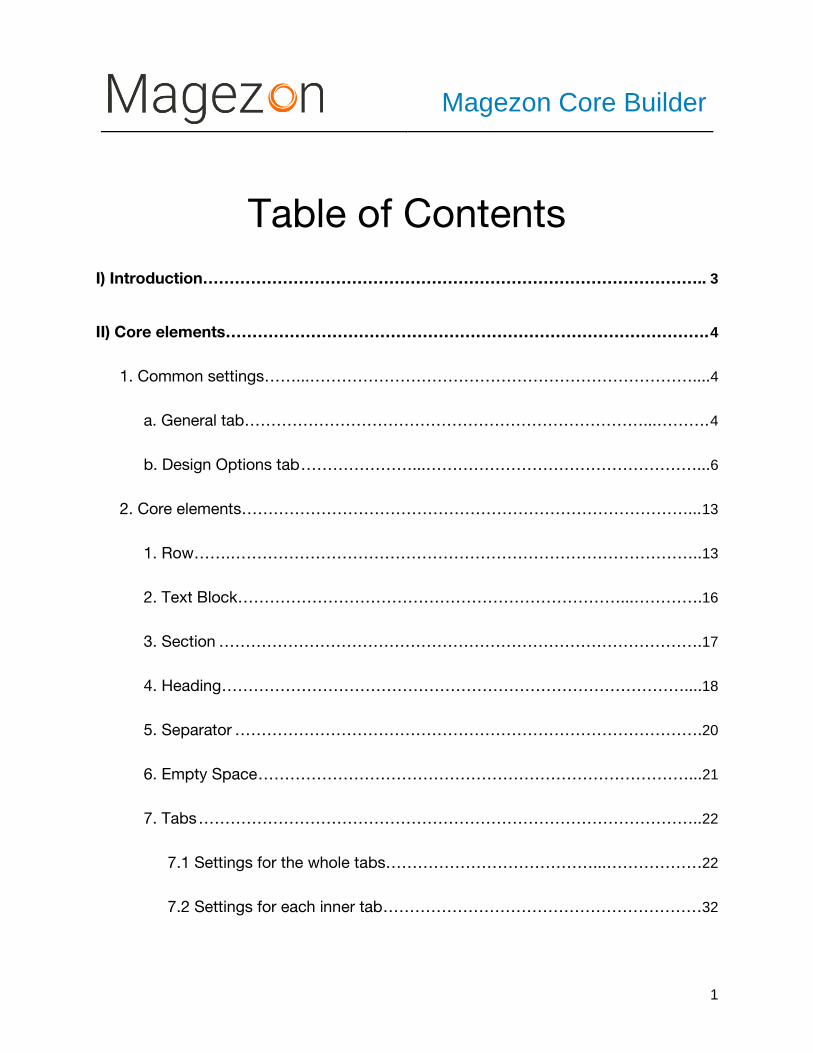
Table of Contents
I) Introduction………………………………………………………………………………….. 3
II) Core elements………………………………………………………………………………. 4
1. Common settings ……...………………………………………………………………....4
a. General tab…………………………………………………………………...………. 4
b. Design Options tab …………………...……………………………………………...6
2. Core elements…………………………………………………………………………... 13
1. Row …….……………………………………………………………………………..13
2. Text Block………………………………………………………………...………….16
3. Section ……………………………………………………………………………….17
4. Heading ……………………………………………………………………………....18
5. Separator …………………………………………………………………………….20
6. Empty Space ………………………………………………………………………...21
7. Tabs …………………………………………………………………………………..22
7.1 Settings for the whole tabs…………………………………...………………22
7.2 Settings for each inner tab ……………………………………………………32

Magezon Core Builder
2
8. Generate Block……………………………………………………...……………....35
9. Magento Widget …………………………………………………...………………..36
III) Builder section …………………………………………………………………………....38
1. General settings…………………………………...…………………………………….38
2. Element customization …………………………..……………………………………..43
2.1 Row ………………………………………………………………………………....44
2.2 Column……………………………………………………………………………...46
2.3 Element ……………………………………………………………………………..50
IV) Support ……………………………………………………………………………………..53

Magezon Core Builder
3
I) Introduction
For builder extensions such as form builder, page builder, mega menu or single
product page builder, we have 2 kinds of element:
- Core elements are elements that all builder extensions have.
- Builder-specific elements are those intended for only one builder extension. It
means they are different for each builder extension.
In this guide, we’ll give you an overview of core elements.

Magezon Core Builder
4
II) Core elements
1. Common settings
All elements have common settings including:
a. General tab
● CSS Animation: choose the appearing animation for element. The Animate it
tab beside will show you how the chosen animation effect looks like.
● Disable Element: if yes, the element will be invisible on frontend.
● Enable Cache: turn on the button to apply cache to the element.
● Cache Lifetime (Seconds): after how many seconds to refresh cache.
● Element ID / Element Class Attribute / Element Inner Class Attribute: this is
for developers to add additional functions.

Magezon Core Builder
5

Magezon Core Builder
6
b. Design Options tab

Magezon Core Builder
7
● CSS Box: used to customize margin, border, padding and radius of an element.
Simplify Control: tick the checkbox to set margin, border and padding for all
four sides of the element with the same values.

Magezon Core Builder
8
● Alignment: align element to left, right or center.
● Border Color: color of element border.
● Border Styles: choose border style.
● Minimum Height: minimum height of element.
● Content Width: width of element content.

Magezon Core Builder
9

Magezon Core Builder
10
● Background Type: there are 2 types for you to choose - Image or video from
Youtube / Vimeo.
Background Image: upload the image used for background.
If you choose Youtube/Vimeo, you will see:

Magezon Core Builder
11

Magezon Core Builder
12
- Youtube/Vimeo: enter URL of the video.
- Start Time / End Time: duration of the video to set as background.
- Enable on Mobile Devices: turn on the button if you want to enable this kind of
background on mobiles.
● Background Style: style of background.
● Background Position: position of background.
● Background Color: color of background.
● Parallax Type: choose parallax effect for the background. If you choose a
specific effect, you will see:
- Parallax Speed: the speed of parallax effect (in seconds).
- Enable on Mobile Devices: apply the effect to background on mobile or not.
● Mouse Parallax: if you turn on this function, the background will move when
you hover the mouse over it.
- Size: zoom level of background.
- Speed: moving speed of background.
At the bottom of the settings popup, there are 3 buttons:
● Replace with: replace the element with another one.
● Close: close the popup.
● Save: save settings changes.

Magezon Core Builder
13
2. Core elements
1. Row

Magezon Core Builder
14
● Appearance:
NOTE: For this function to work, in the edit backend of the page, open Design
tab. Then choose 1 column Full Width in the Layout drop-down. (This option
only appears in the drop-down after you install the builder extension):
There are 3 options:
- Contained: the row is contained within the site width.
- Full Width Row: the row expands out to 100% width of the browser window but
the row content doesn’t.
- Full Width Row and Content: both the row and row content expand out to
100% of the browser window.

Magezon Core Builder
15
● Column Equal Height: if you turn on this button, all columns in the row have the
same height. At the same time, you will see Content Position field show up
where you choose position for column content.
● Column Gaps: the gap between columns in pixels.

Magezon Core Builder
16
2. Text Block
Text Block element is used for entering text.
● Content: enter text here with WYSIWYG editor.

Magezon Core Builder
17
3. Section
This element is a kind of container where you can add other elements.

Magezon Core Builder
18
4. Heading

Magezon Core Builder
19
● Text: enter heading text.
● Heading Type: choose heading type.
● Font size: size of heading font (px).
● Text Color: color of text.
● Line height: height of text line (px).
● Font Weight: the thickness of font (px).

Magezon Core Builder
20
5. Separator
This element is used to separate between elements/sections. It comes in form of line.
● Title: title of the separator line. It will show up in the middle of the separator.
● Color: color of the separator.
● Style: style of the separator.
● Border Width: width or thickness of separator line (px).
Magezon Core Builder
21
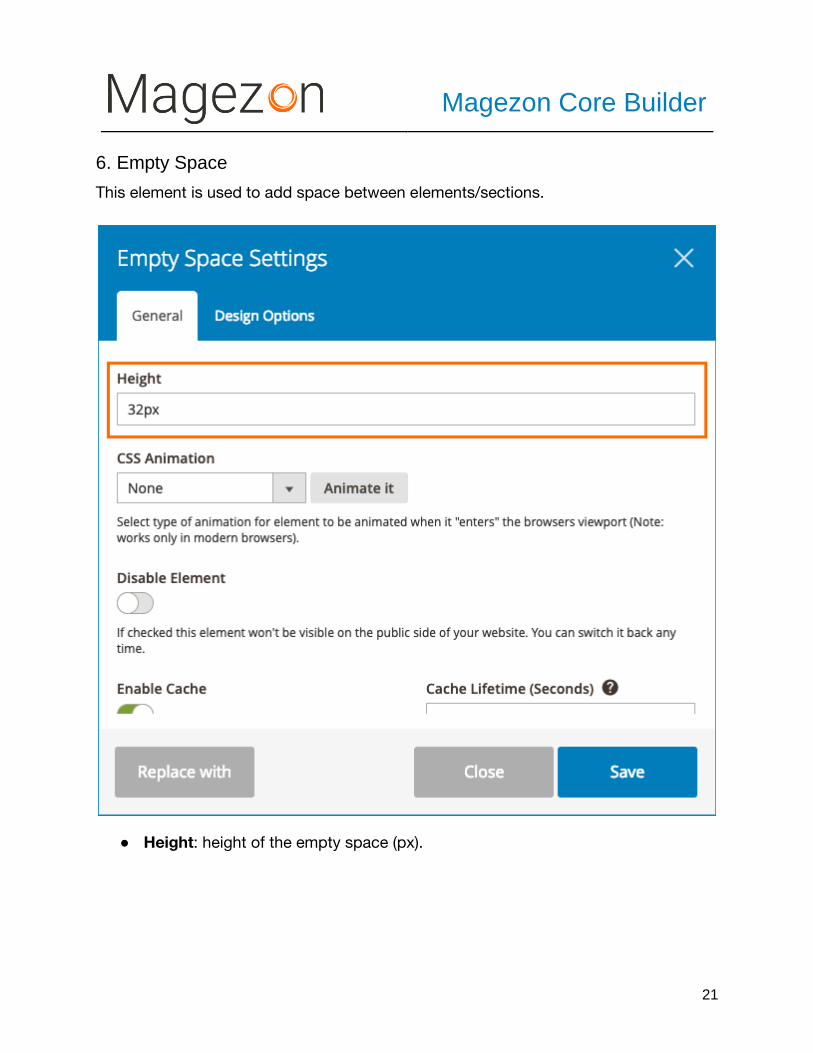
6. Empty Space
This element is used to add space between elements/sections.
● Height: height of the empty space (px).

Magezon Core Builder
22
7. Tabs
This element is used to add multiple tabs. This is how it looks in backend:
Click plus icon to add another tab. You can add other elements into tabs.
7.1 Settings for the whole tabs
When hovering over the top of the whole tabs, you will see a bar. Then hover over
Tabs to view a drop-down like this:
● Add Tab: add another inner tab. For example, if I click this, another tab will be
added next to “Custom Tab”.

Magezon Core Builder
23
● Design options: click to open design options. View here >>
● Duplicate: duplicate the whole tabs.
● Copy: copy the tabs.
● Replace with: replace the whole tabs with another element.
● Remove: delete the whole tabs.
● Edit: click to open the settings popup.

Magezon Core Builder
24

Magezon Core Builder
25
● Widget Title: title of the whole tabs.
● Title Alignment: alignment of the title.
● Title Tag: title heading type.
● Show Line: show the line on 2 sides of the title.
● Gap: the width of gap between tab navigation bar and the main content (px).
● Active Tab: enter the tab that will be active on page load.
● Hide Empty Tab: if yes, empty tabs will be invisible on frontend.
Magezon Core Builder
26
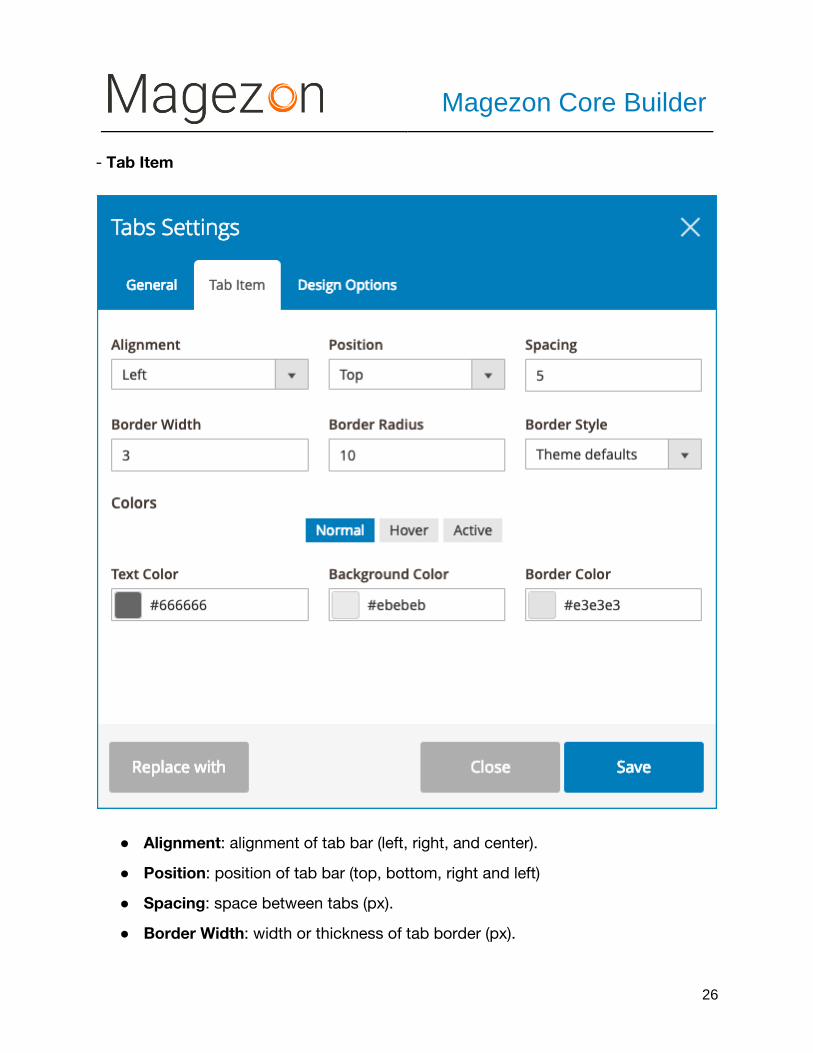
- Tab Item
● Alignment: alignment of tab bar (left, right, and center).
● Position: position of tab bar (top, bottom, right and left)
● Spacing: space between tabs (px).
● Border Width: width or thickness of tab border (px).

Magezon Core Builder
27
● Border Radius: the roundness of border (px).
● Border Style: style of border.
● Color: include text color, background color and border color.
Let’s see the frontend:

Magezon Core Builder
28
- Normal: tab color when not active.

Magezon Core Builder
29
- Hover: tab color on hovering.

Magezon Core Builder
30
- Active: tab color when active.

Magezon Core Builder
31
Let’s see how it looks on frontend:

Magezon Core Builder
32
7.2 Settings for each inner tab
You can add elements into each inner tab. When hovering over the element, you will
see a bar like this:
- Hover over the first Tabs (number 1) to edit settings for the whole tabs.
- Hover over the second Tabs (number 2) to edit settings for the inner tab (in the image
above is “Details” tab). Click Edit to open the settings popup for the tab as follows:

Magezon Core Builder
33
● Title: title of each tab.
● Add Icon: add icon to the tab.

Magezon Core Builder
34
● Icon Library: choose the library of icons. After you choose a library, the icons in
the “Add Icon” field will change accordingly.
● Icon Position: position of icon (on the left or right of the tab title).
Let’s see how it looks on frontend:

Magezon Core Builder
35
8. Generate Block
This is for developers to enter a block name to insert in the page, form, etc.
Magezon Core Builder
36
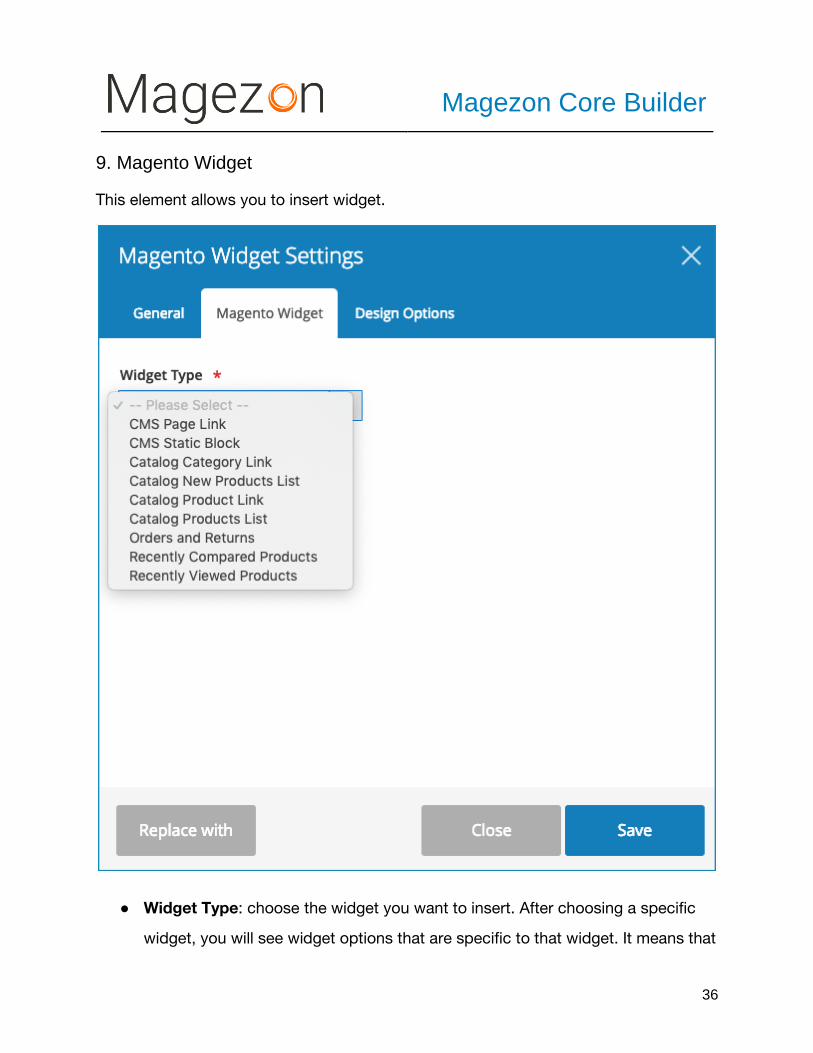
9. Magento Widget
This element allows you to insert widget.
● Widget Type: choose the widget you want to insert. After choosing a specific
widget, you will see widget options that are specific to that widget. It means that
Magezon Core Builder
37
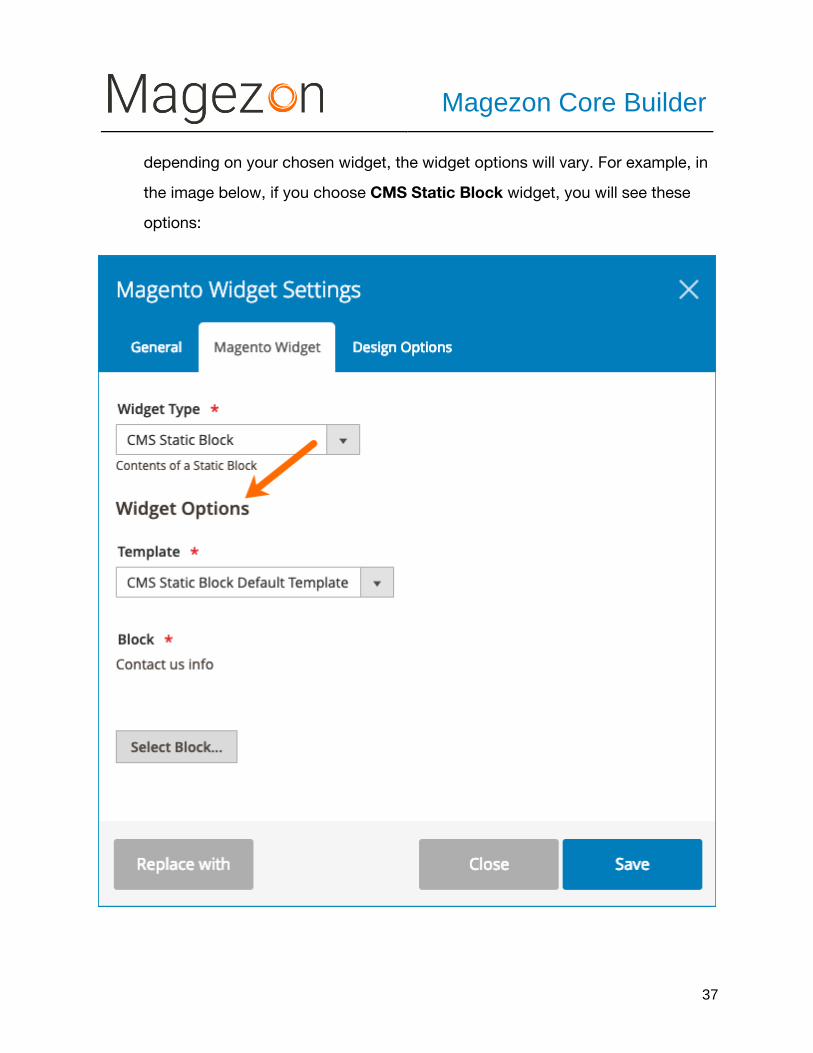
depending on your chosen widget, the widget options will vary. For example, in
the image below, if you choose CMS Static Block widget, you will see these
options:

Magezon Core Builder
38
III) Builder section
1. General settings
Where you add elements to build a page, form, etc.
1. Plus icon: click this icon and there will appear a popup with all elements that you
can add to the builder section.

Magezon Core Builder
39
2. Undo/Redo
3. Settings icon: click this icon to open a popup where you can customize with CSS.

Magezon Core Builder
40

Magezon Core Builder
41
4. Device icon: Hover over icon to show a drop-down with icons of 4 devices
(desktop, laptop, tablet and mobile). Choose a device to see how the layout looks on
this device (note that you can only see width changes).
5. Open the builder in fullscreen.
At the bottom of the builder section, you can view some options for quick
customization.
Magezon Core Builder
42
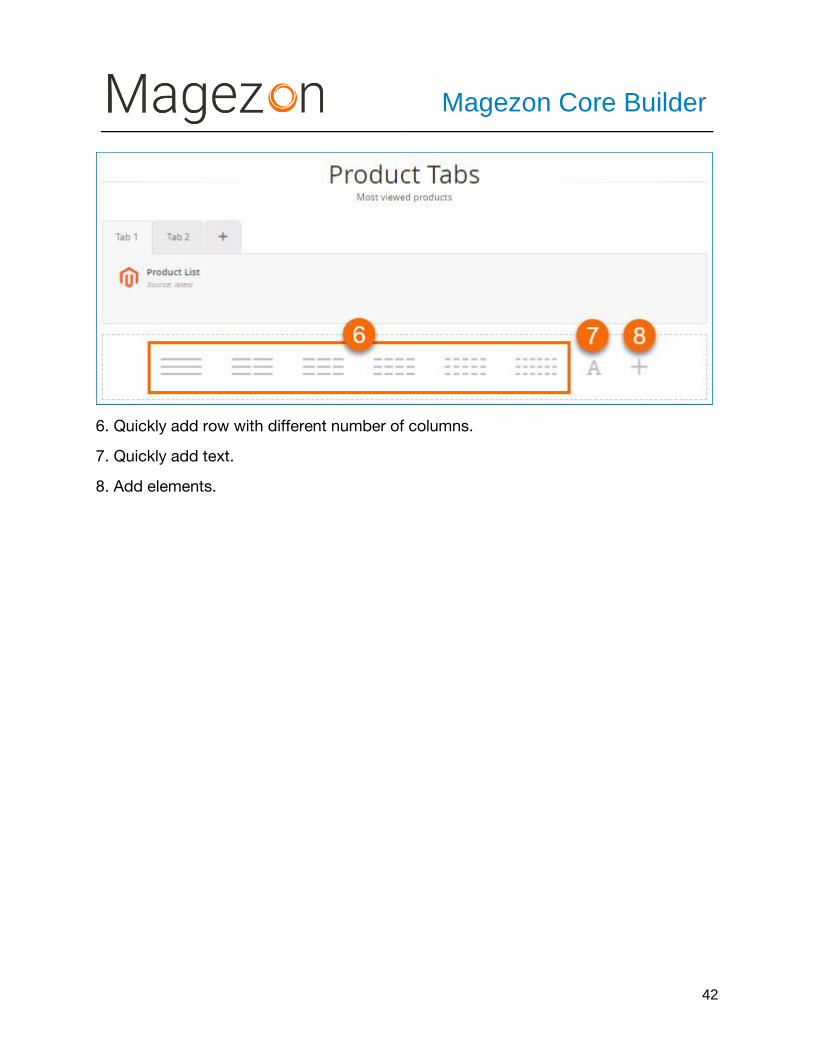
6. Quickly add row with different number of columns.
7. Quickly add text.
8. Add elements.

Magezon Core Builder
43
2. Element customization
When hovering over an element, you will see a bar appearing at the top of the element.

Magezon Core Builder
44
2.1 Row
This is the row that contains the element. Click the drag-drop icon to move the row.
Hover over the Row tab and you’ll see a drop down like this:
● Add Column: add another column to the row.
● Edit: Click to open the popup with row settings. View here >>
● Design Options: customize design options for the row. View here >>
● Row Layout: hover over the tab and choose your wanted layout (in other words,
column number and column size) for the row.

Magezon Core Builder
45
● Duplicate: duplicate the row.
● Copy: copy the row and paste it in another position.
● Remove: delete the row.

Magezon Core Builder
46
2.2 Column
This is the column that contains the element and lies in the row. Click the drag-drop
icon to move the column. Hover over this tab and you’ll see a drop-down like this:
● Add Element: add element into the column.
● Edit: click to open the popup with column settings.

Magezon Core Builder
47

Magezon Core Builder
48
In the image above you can see Responsive Options tab. In this tab, you’ll customize
the column width on different devices.

Magezon Core Builder
49
- Column 1: 4 devices (desktop, laptop, tablet and mobile).
- Column 2 - Offset: the distance/gap between left border of the column and
column content.
- Column 3 - Width: the column width on different devices.
- Column 4 - Hide on device?: tick the checkbox(es) and the column will be
hidden on relevant device(s).
● Design Options: customize design options for the column. View here >>
● Duplicate: duplicate the column.
● Cope: copy the column and paste it in another position.
● Paste: if you’ve do previous copying, this tab will become active.
● Remove: delete the column.

Magezon Core Builder
50
2.3 Element
Click the drag-drop icon to move the element. Hover over this tab and you’ll see a
drop-down like this:
● Edit: click to open the popup with element settings. View here >>
● Design Options: customize design options for the element. View here >>
● Duplicate: duplicate the element.
● Copy: copy the element and paste it in another position.
● Replace with: replace the element with another.
● Remove: delete the element.

Magezon Core Builder
51
2.4 Edit icon: Click this icon to quickly open the settings popup for the element.
2.5 Recycle bin icon: delete icon
* When hovering over the element, you will see the plus icon at the bottom which is
used to add another element below this element.
NOTE: After you add elements into the builder section, some elements will look like
exactly as they will look on frontend, like this:

Magezon Core Builder
52
But some elements are displayed partly and you can only see them in full details on
frontend:
Magezon Core Builder
53
IV) Support
If you have any questions or need any support, feel free to contact us via following
ways. We will get back to you within 24 hours since you submit your support request.
● Submit Contact Us form.
● Email us at [email protected].
● Submit a ticket.
● Contact us through Skype: [email protected].
● Contact us on live chat on our website: magezon.com.
Top Related