


Languages
Pages
Legal

Configuring NTP
This chapter contains the following sections:
• Information About NTP, page 1
• Licensing Requirements, page 3
• Prerequisites for NTP, page 3
• Guidelines and Limitations for NTP, page 3
• Default Settings for NTP, page 4
• Configuring NTP, page 4
• Verifying the NTP Configuration, page 14
• Configuration Examples for NTP, page 15
Information About NTP
Information About the NTP ServerThe Network Time Protocol (NTP) synchronizes the time of day among a set of distributed time servers andclients so that you can correlate events when you receive system logs and other time-specific events frommultiple network devices. NTP uses the User Datagram Protocol (UDP) as its transport protocol.
All NTP communications use Coordinated Universal Time (UTC).
An NTP server usually receives its time from an authoritative time source, such as a radio clock or an atomicclock attached to a time server, and then distributes this time across the network. NTP is extremely efficient;no more than one packet per minute is necessary to synchronize two machines to within a millisecond of eachother.
NTP uses a stratum to describe the distance between a network device and an authoritative time source:
• A stratum 1 time server is directly attached to an authoritative time source (such as a radio or atomicclock or a GPS time source).
• A stratum 2 NTP server receives its time through NTP from a stratum 1 time server.
Cisco Nexus 5000 Series NX-OS System Management Configuration Guide, Release 5.0(3)N1(1) 1
Before synchronizing, NTP compares the time reported by several network devices and does not synchronizewith one that is significantly different, even if it is a stratum 1. Because Cisco NX-OS cannot connect to aradio or atomic clock and act as a stratum 1 server, we recommend that you use the public NTP serversavailable on the Internet. If the network is isolated from the Internet, Cisco NX-OS allows you to configurethe time as though it were synchronized through NTP, even though it was not.
You can create NTP peer relationships to designate the time-serving hosts that you want your networkdevice to consider synchronizing with and to keep accurate time if a server failure occurs.
Note
The time kept on a device is a critical resource, so we strongly recommend that you use the security featuresof NTP to avoid the accidental or malicious setting of incorrect time. Twomechanisms are available: an accesslist-based restriction scheme and an encrypted authentication mechanism.
NTP as Time ServerOther devices can configure it as a time server. You can also configure the device to act as an authoritativeNTP server, enabling it to distribute time even when it is not synchronized to an outside time source.
Distributing NTP Using CFSCisco Fabric Services (CFS) distributes the local NTP configuration to all Cisco devices in the network.
After enabling CFS on your device, a network-wide lock is applied to NTP whenever an NTP configurationis started. After making the NTP configuration changes, you can discard or commit them.
In either case, the CFS lock is then released from the NTP application.
Clock ManagerClocks are resources that need to be shared across different processes.
Multiple time synchronization protocols, such as NTP and Precision Time Protocol (PTP), might be runningin the system.
High AvailabilityStateless restarts are supported for NTP. After a reboot or a supervisor switchover, the running configurationis applied.
You can configure NTP peers to provide redundancy in case an NTP server fails.
Cisco Nexus 5000 Series NX-OS System Management Configuration Guide, Release 5.0(3)N1(1)2
Configuring NTPNTP as Time Server
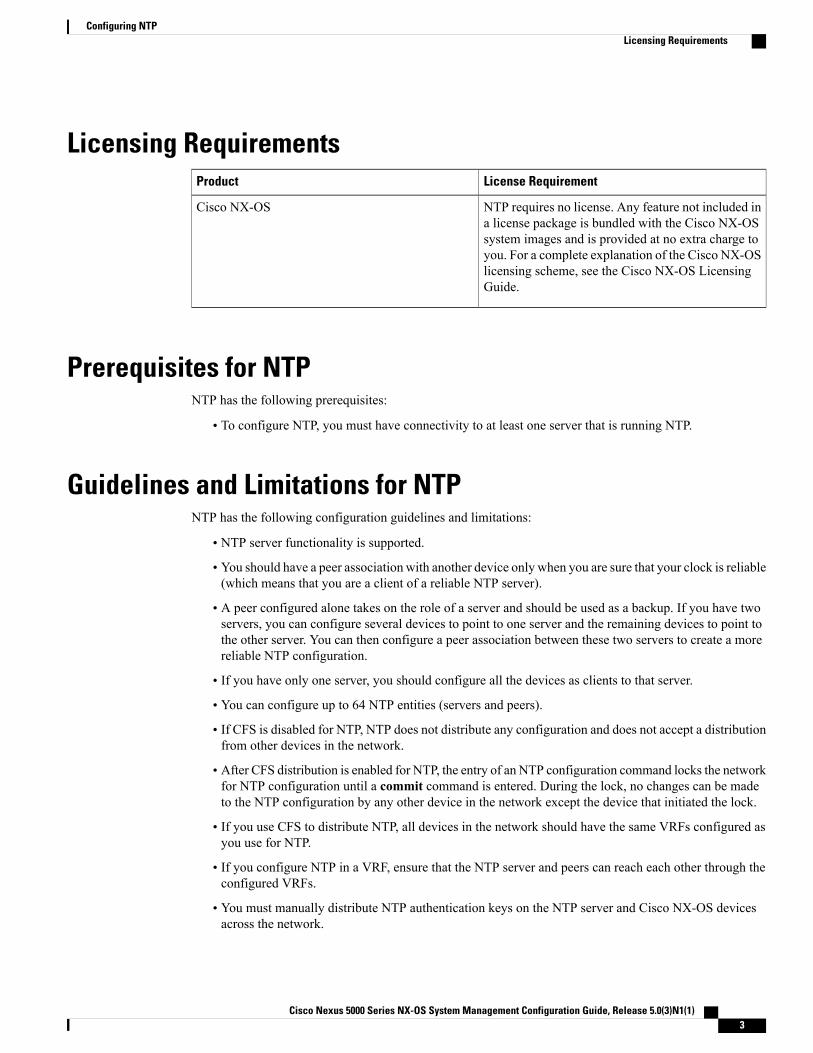
Licensing RequirementsLicense RequirementProduct
NTP requires no license. Any feature not included ina license package is bundled with the Cisco NX-OSsystem images and is provided at no extra charge toyou. For a complete explanation of the Cisco NX-OSlicensing scheme, see the Cisco NX-OS LicensingGuide.
Cisco NX-OS
Prerequisites for NTPNTP has the following prerequisites:
• To configure NTP, you must have connectivity to at least one server that is running NTP.
Guidelines and Limitations for NTPNTP has the following configuration guidelines and limitations:
• NTP server functionality is supported.
• You should have a peer association with another device only when you are sure that your clock is reliable(which means that you are a client of a reliable NTP server).
• A peer configured alone takes on the role of a server and should be used as a backup. If you have twoservers, you can configure several devices to point to one server and the remaining devices to point tothe other server. You can then configure a peer association between these two servers to create a morereliable NTP configuration.
• If you have only one server, you should configure all the devices as clients to that server.
• You can configure up to 64 NTP entities (servers and peers).
• If CFS is disabled for NTP, NTP does not distribute any configuration and does not accept a distributionfrom other devices in the network.
• After CFS distribution is enabled for NTP, the entry of an NTP configuration command locks the networkfor NTP configuration until a commit command is entered. During the lock, no changes can be madeto the NTP configuration by any other device in the network except the device that initiated the lock.
• If you use CFS to distribute NTP, all devices in the network should have the same VRFs configured asyou use for NTP.
• If you configure NTP in a VRF, ensure that the NTP server and peers can reach each other through theconfigured VRFs.
• You must manually distribute NTP authentication keys on the NTP server and Cisco NX-OS devicesacross the network.
Cisco Nexus 5000 Series NX-OS System Management Configuration Guide, Release 5.0(3)N1(1) 3
Configuring NTPLicensing Requirements
• Use NTP broadcast or multicast associations when time accuracy and reliability requirements are modest,your network is localized, and the network has more than 20 clients. We recommend that you use NTPbroadcast or multicast associations in networks that have limited bandwidth, system memory, or CPUresources.
Time accuracy is marginally reduced in NTP broadcast associations because information flows only oneway.
Note
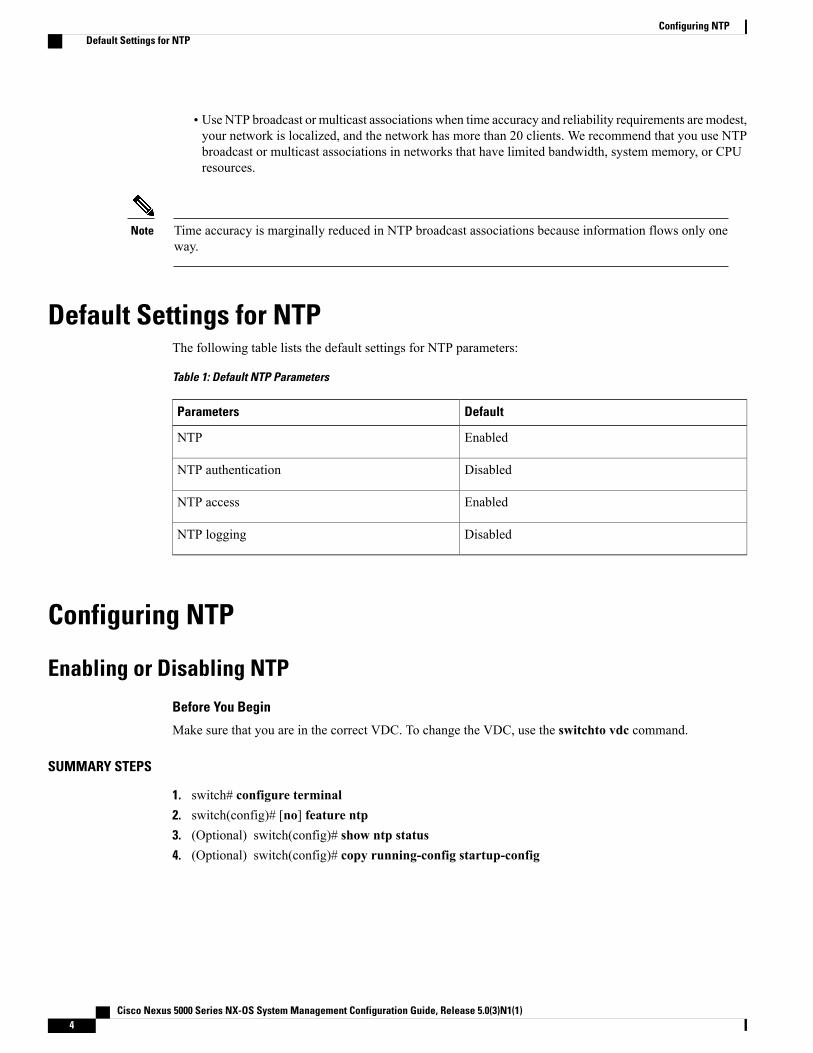
Default Settings for NTPThe following table lists the default settings for NTP parameters:
Table 1: Default NTP Parameters
DefaultParameters
EnabledNTP
DisabledNTP authentication
EnabledNTP access
DisabledNTP logging
Configuring NTP
Enabling or Disabling NTP
Before You Begin
Make sure that you are in the correct VDC. To change the VDC, use the switchto vdc command.
SUMMARY STEPS
1. switch# configure terminal2. switch(config)# [no] feature ntp3. (Optional) switch(config)# show ntp status4. (Optional) switch(config)# copy running-config startup-config
Cisco Nexus 5000 Series NX-OS System Management Configuration Guide, Release 5.0(3)N1(1)4
Configuring NTPDefault Settings for NTP
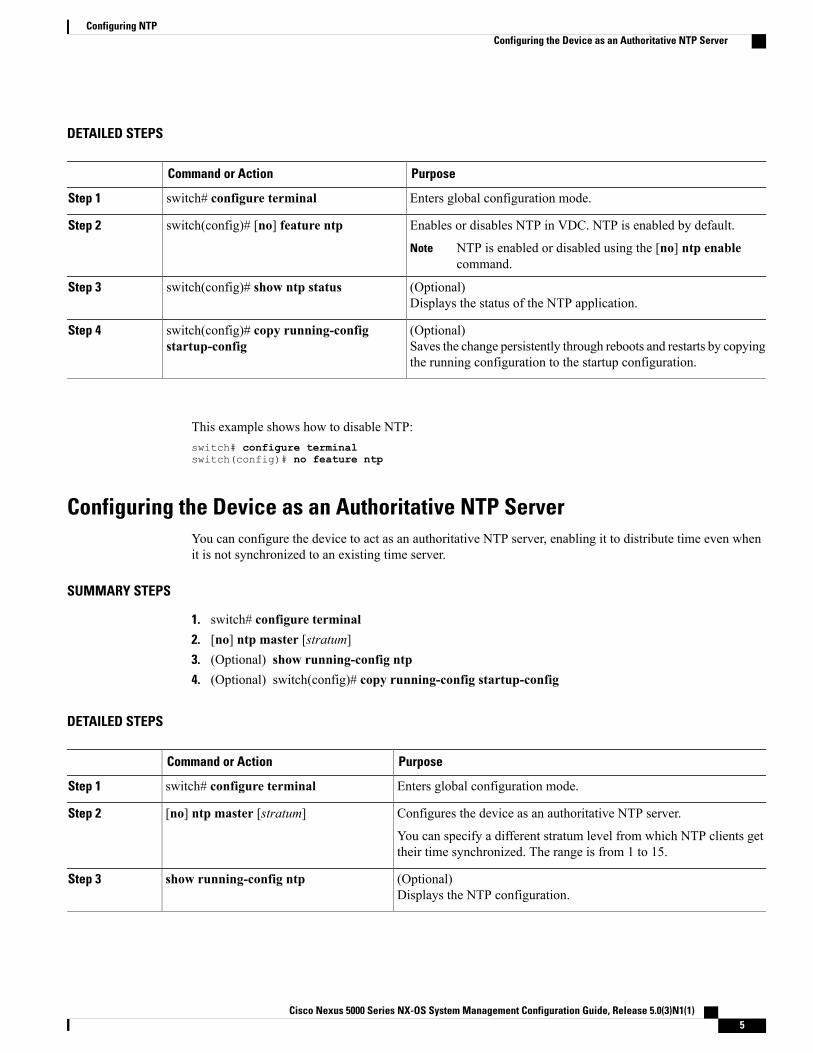
DETAILED STEPS
PurposeCommand or Action
Enters global configuration mode.switch# configure terminalStep 1
Enables or disables NTP in VDC. NTP is enabled by default.switch(config)# [no] feature ntpStep 2
NTP is enabled or disabled using the [no] ntp enablecommand.
Note
(Optional)Displays the status of the NTP application.
switch(config)# show ntp statusStep 3
(Optional)Saves the change persistently through reboots and restarts by copyingthe running configuration to the startup configuration.
switch(config)# copy running-configstartup-config
Step 4
This example shows how to disable NTP:switch# configure terminalswitch(config)# no feature ntp
Configuring the Device as an Authoritative NTP ServerYou can configure the device to act as an authoritative NTP server, enabling it to distribute time even whenit is not synchronized to an existing time server.
SUMMARY STEPS
1. switch# configure terminal2. [no] ntp master [stratum]3. (Optional) show running-config ntp4. (Optional) switch(config)# copy running-config startup-config
DETAILED STEPS
PurposeCommand or Action
Enters global configuration mode.switch# configure terminalStep 1
Configures the device as an authoritative NTP server.[no] ntp master [stratum]Step 2
You can specify a different stratum level from which NTP clients gettheir time synchronized. The range is from 1 to 15.
(Optional)Displays the NTP configuration.
show running-config ntpStep 3
Cisco Nexus 5000 Series NX-OS System Management Configuration Guide, Release 5.0(3)N1(1) 5
Configuring NTPConfiguring the Device as an Authoritative NTP Server
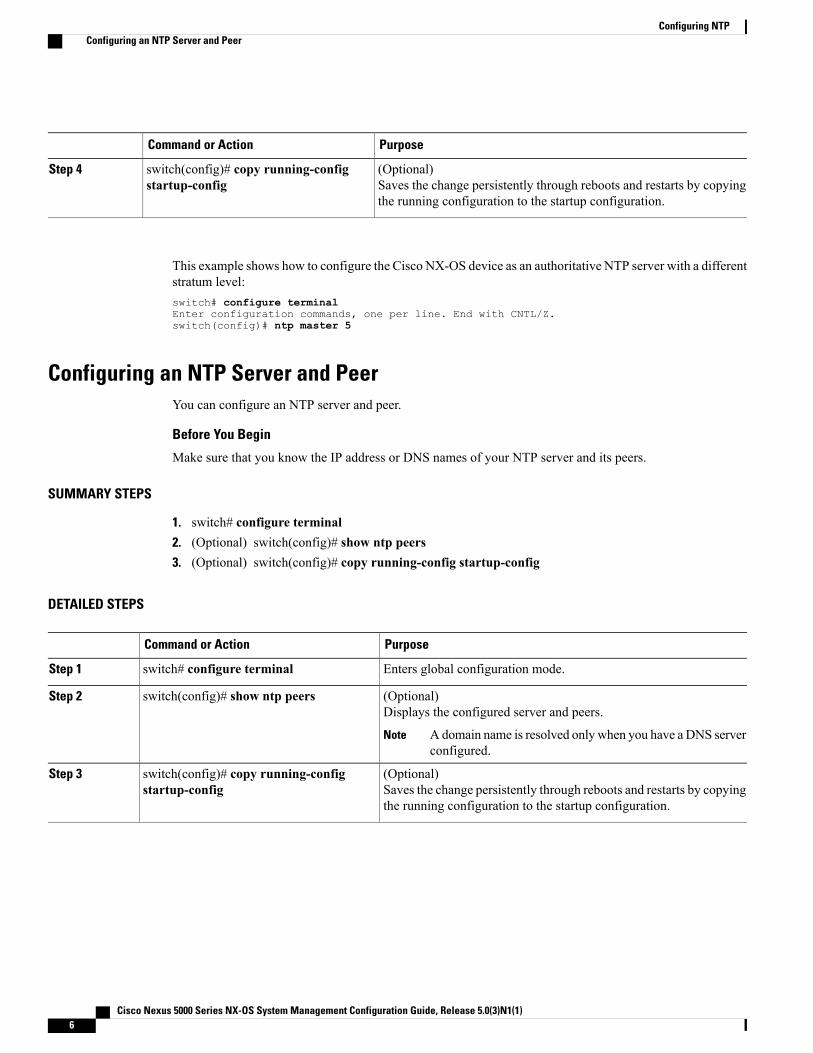
PurposeCommand or Action
(Optional)Saves the change persistently through reboots and restarts by copyingthe running configuration to the startup configuration.
switch(config)# copy running-configstartup-config
Step 4
This example shows how to configure the Cisco NX-OS device as an authoritative NTP server with a differentstratum level:switch# configure terminalEnter configuration commands, one per line. End with CNTL/Z.switch(config)# ntp master 5
Configuring an NTP Server and PeerYou can configure an NTP server and peer.
Before You Begin
Make sure that you know the IP address or DNS names of your NTP server and its peers.
SUMMARY STEPS
1. switch# configure terminal2. (Optional) switch(config)# show ntp peers3. (Optional) switch(config)# copy running-config startup-config
DETAILED STEPS
PurposeCommand or Action
Enters global configuration mode.switch# configure terminalStep 1
(Optional)Displays the configured server and peers.
switch(config)# show ntp peersStep 2
Adomain name is resolved only when you have a DNS serverconfigured.
Note
(Optional)Saves the change persistently through reboots and restarts by copyingthe running configuration to the startup configuration.
switch(config)# copy running-configstartup-config
Step 3
Cisco Nexus 5000 Series NX-OS System Management Configuration Guide, Release 5.0(3)N1(1)6
Configuring NTPConfiguring an NTP Server and Peer
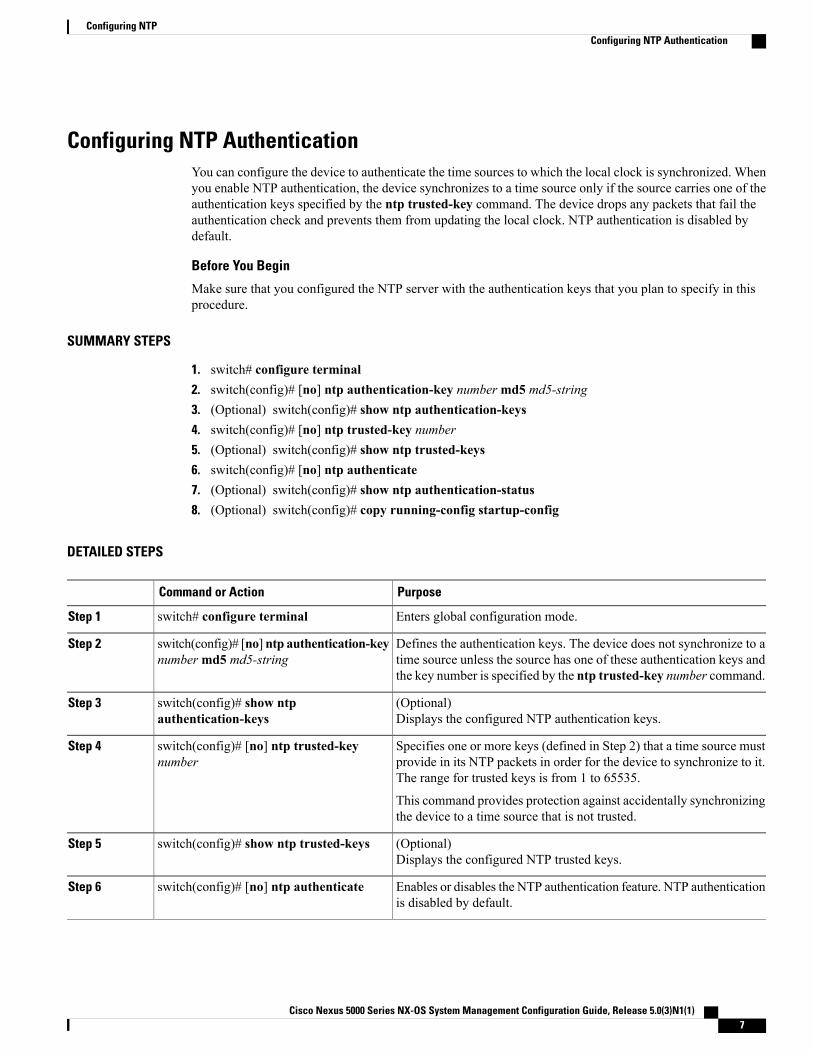
Configuring NTP AuthenticationYou can configure the device to authenticate the time sources to which the local clock is synchronized. Whenyou enable NTP authentication, the device synchronizes to a time source only if the source carries one of theauthentication keys specified by the ntp trusted-key command. The device drops any packets that fail theauthentication check and prevents them from updating the local clock. NTP authentication is disabled bydefault.
Before You Begin
Make sure that you configured the NTP server with the authentication keys that you plan to specify in thisprocedure.
SUMMARY STEPS
1. switch# configure terminal2. switch(config)# [no] ntp authentication-key number md5 md5-string3. (Optional) switch(config)# show ntp authentication-keys4. switch(config)# [no] ntp trusted-key number5. (Optional) switch(config)# show ntp trusted-keys6. switch(config)# [no] ntp authenticate7. (Optional) switch(config)# show ntp authentication-status8. (Optional) switch(config)# copy running-config startup-config
DETAILED STEPS
PurposeCommand or Action
Enters global configuration mode.switch# configure terminalStep 1
Defines the authentication keys. The device does not synchronize to atime source unless the source has one of these authentication keys andthe key number is specified by the ntp trusted-key number command.
switch(config)# [no] ntp authentication-keynumber md5 md5-string
Step 2
(Optional)Displays the configured NTP authentication keys.
switch(config)# show ntpauthentication-keys
Step 3
Specifies one or more keys (defined in Step 2) that a time source mustprovide in its NTP packets in order for the device to synchronize to it.The range for trusted keys is from 1 to 65535.
switch(config)# [no] ntp trusted-keynumber
Step 4
This command provides protection against accidentally synchronizingthe device to a time source that is not trusted.
(Optional)Displays the configured NTP trusted keys.
switch(config)# show ntp trusted-keysStep 5
Enables or disables the NTP authentication feature. NTP authenticationis disabled by default.
switch(config)# [no] ntp authenticateStep 6
Cisco Nexus 5000 Series NX-OS System Management Configuration Guide, Release 5.0(3)N1(1) 7
Configuring NTPConfiguring NTP Authentication
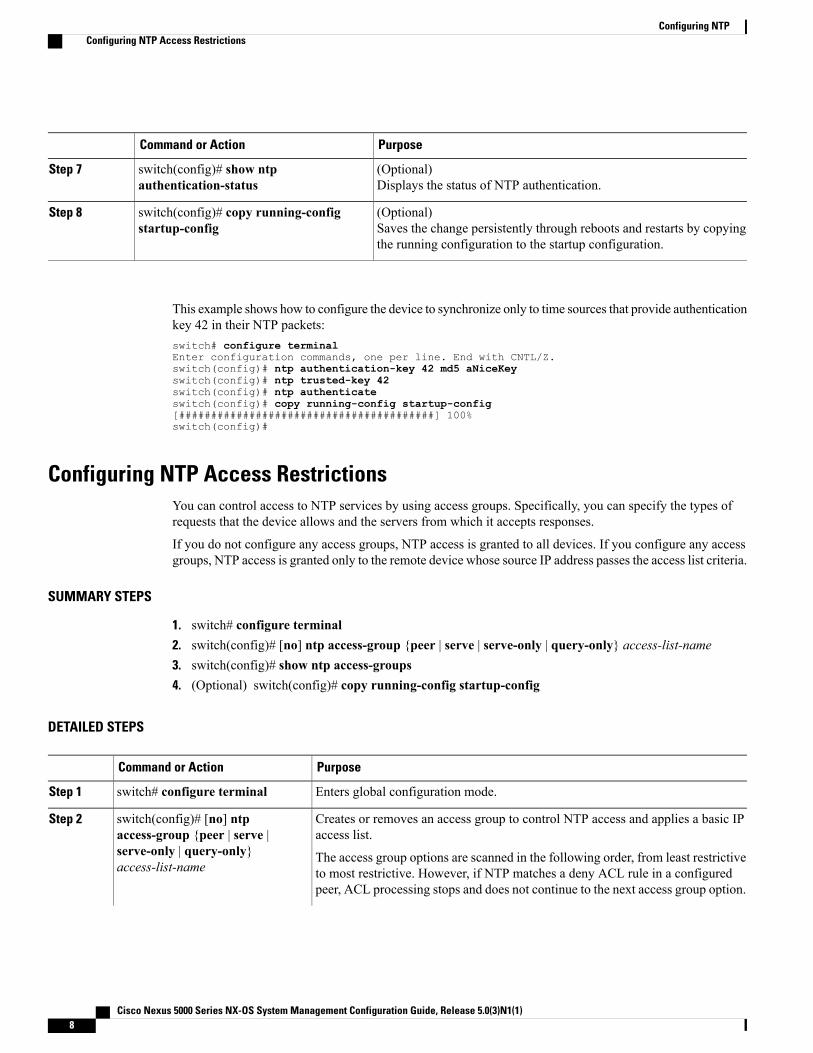
PurposeCommand or Action
(Optional)Displays the status of NTP authentication.
switch(config)# show ntpauthentication-status
Step 7
(Optional)Saves the change persistently through reboots and restarts by copyingthe running configuration to the startup configuration.
switch(config)# copy running-configstartup-config
Step 8
This example shows how to configure the device to synchronize only to time sources that provide authenticationkey 42 in their NTP packets:switch# configure terminalEnter configuration commands, one per line. End with CNTL/Z.switch(config)# ntp authentication-key 42 md5 aNiceKeyswitch(config)# ntp trusted-key 42switch(config)# ntp authenticateswitch(config)# copy running-config startup-config[########################################] 100%switch(config)#
Configuring NTP Access RestrictionsYou can control access to NTP services by using access groups. Specifically, you can specify the types ofrequests that the device allows and the servers from which it accepts responses.
If you do not configure any access groups, NTP access is granted to all devices. If you configure any accessgroups, NTP access is granted only to the remote device whose source IP address passes the access list criteria.
SUMMARY STEPS
1. switch# configure terminal2. switch(config)# [no] ntp access-group {peer | serve | serve-only | query-only} access-list-name3. switch(config)# show ntp access-groups4. (Optional) switch(config)# copy running-config startup-config
DETAILED STEPS
PurposeCommand or Action
Enters global configuration mode.switch# configure terminalStep 1
Creates or removes an access group to control NTP access and applies a basic IPaccess list.
switch(config)# [no] ntpaccess-group {peer | serve |
Step 2
serve-only | query-only}access-list-name
The access group options are scanned in the following order, from least restrictiveto most restrictive. However, if NTP matches a deny ACL rule in a configuredpeer, ACL processing stops and does not continue to the next access group option.
Cisco Nexus 5000 Series NX-OS System Management Configuration Guide, Release 5.0(3)N1(1)8
Configuring NTPConfiguring NTP Access Restrictions
PurposeCommand or Action
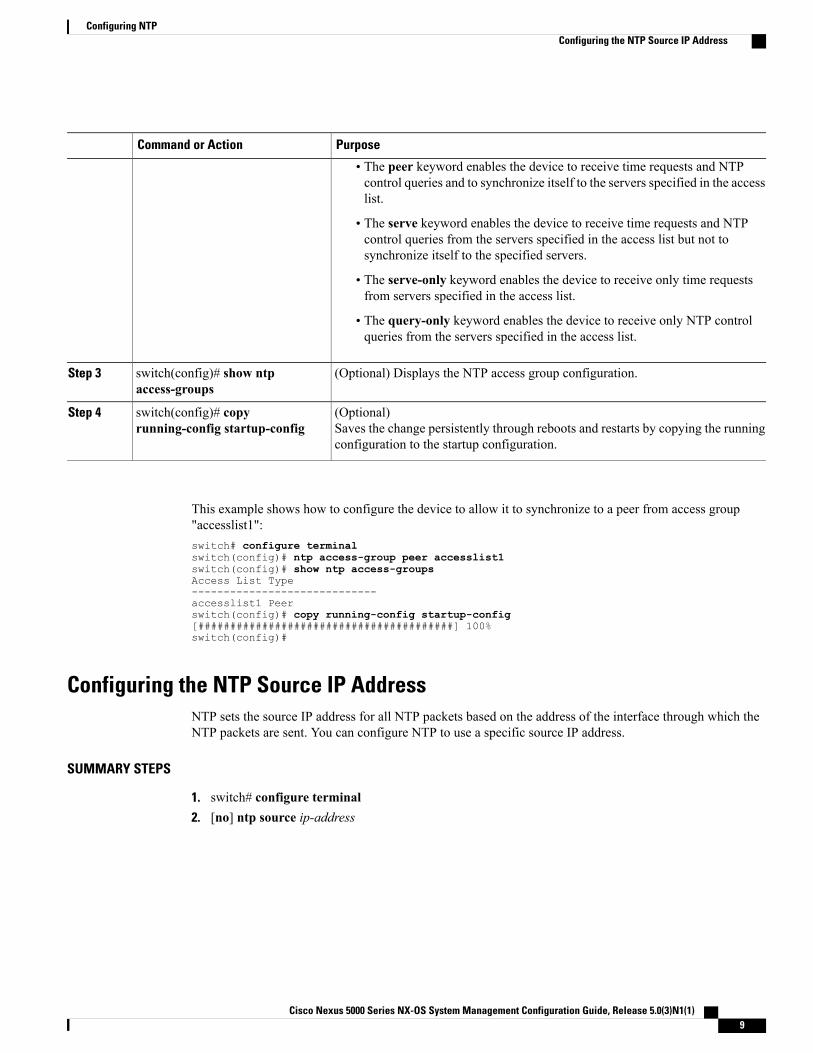
• The peer keyword enables the device to receive time requests and NTPcontrol queries and to synchronize itself to the servers specified in the accesslist.
• The serve keyword enables the device to receive time requests and NTPcontrol queries from the servers specified in the access list but not tosynchronize itself to the specified servers.
• The serve-only keyword enables the device to receive only time requestsfrom servers specified in the access list.
• The query-only keyword enables the device to receive only NTP controlqueries from the servers specified in the access list.
(Optional) Displays the NTP access group configuration.switch(config)# show ntpaccess-groups
Step 3
(Optional)Saves the change persistently through reboots and restarts by copying the runningconfiguration to the startup configuration.
switch(config)# copyrunning-config startup-config
Step 4
This example shows how to configure the device to allow it to synchronize to a peer from access group"accesslist1":switch# configure terminalswitch(config)# ntp access-group peer accesslist1switch(config)# show ntp access-groupsAccess List Type-----------------------------accesslist1 Peerswitch(config)# copy running-config startup-config[########################################] 100%switch(config)#
Configuring the NTP Source IP AddressNTP sets the source IP address for all NTP packets based on the address of the interface through which theNTP packets are sent. You can configure NTP to use a specific source IP address.
SUMMARY STEPS
1. switch# configure terminal2. [no] ntp source ip-address
Cisco Nexus 5000 Series NX-OS System Management Configuration Guide, Release 5.0(3)N1(1) 9
Configuring NTPConfiguring the NTP Source IP Address
DETAILED STEPS
PurposeCommand or Action
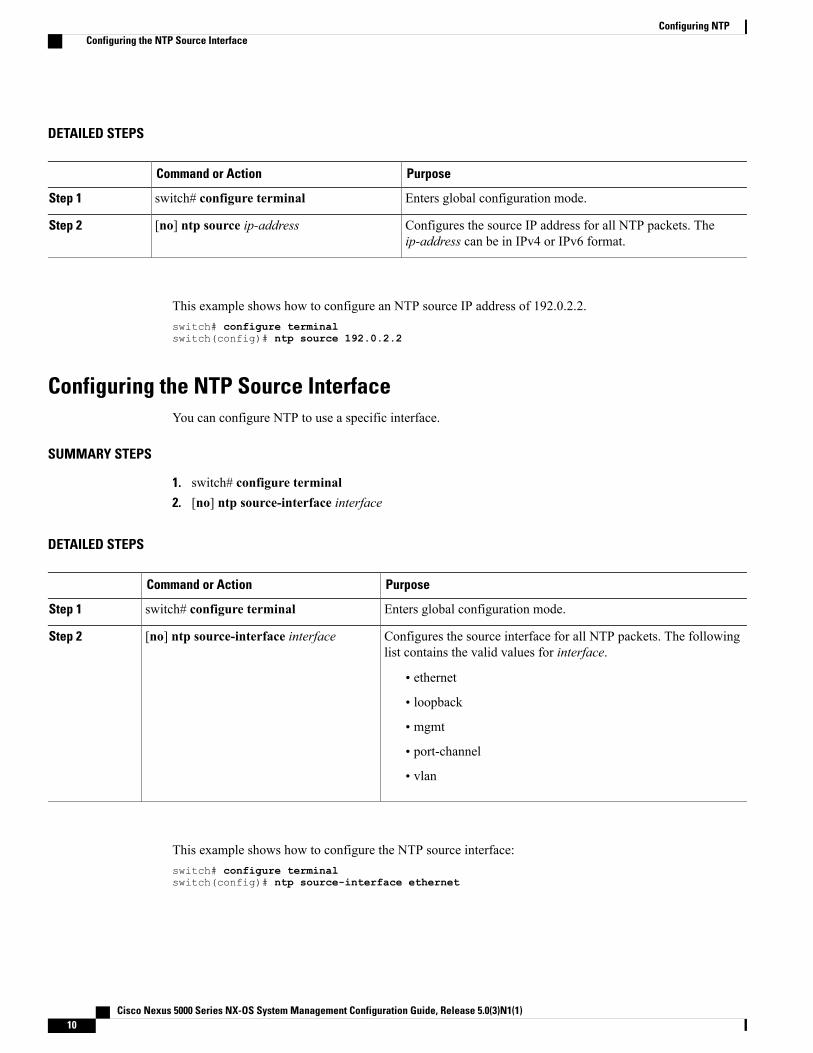
Enters global configuration mode.switch# configure terminalStep 1
Configures the source IP address for all NTP packets. Theip-address can be in IPv4 or IPv6 format.
[no] ntp source ip-addressStep 2
This example shows how to configure an NTP source IP address of 192.0.2.2.switch# configure terminalswitch(config)# ntp source 192.0.2.2
Configuring the NTP Source InterfaceYou can configure NTP to use a specific interface.
SUMMARY STEPS
1. switch# configure terminal2. [no] ntp source-interface interface
DETAILED STEPS
PurposeCommand or Action
Enters global configuration mode.switch# configure terminalStep 1
Configures the source interface for all NTP packets. The followinglist contains the valid values for interface.
[no] ntp source-interface interfaceStep 2
• ethernet
• loopback
• mgmt
• port-channel
• vlan
This example shows how to configure the NTP source interface:switch# configure terminalswitch(config)# ntp source-interface ethernet
Cisco Nexus 5000 Series NX-OS System Management Configuration Guide, Release 5.0(3)N1(1)10
Configuring NTPConfiguring the NTP Source Interface
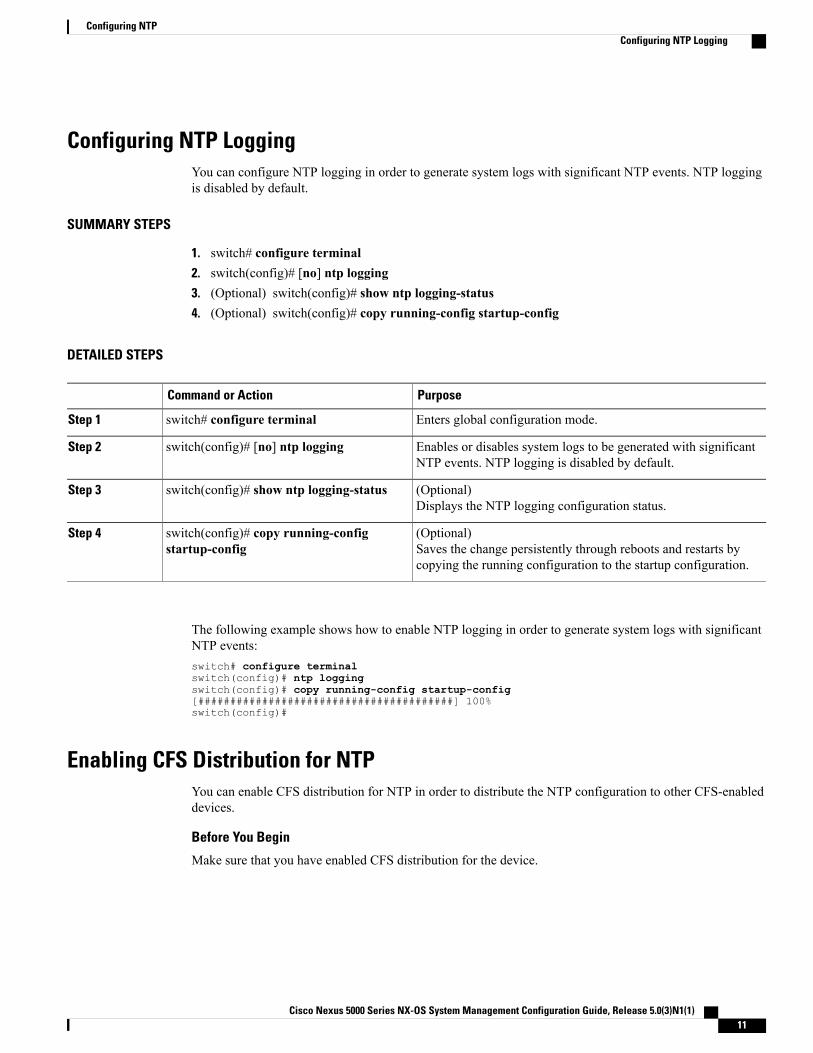
Configuring NTP LoggingYou can configure NTP logging in order to generate system logs with significant NTP events. NTP loggingis disabled by default.
SUMMARY STEPS
1. switch# configure terminal2. switch(config)# [no] ntp logging3. (Optional) switch(config)# show ntp logging-status4. (Optional) switch(config)# copy running-config startup-config
DETAILED STEPS
PurposeCommand or Action
Enters global configuration mode.switch# configure terminalStep 1
Enables or disables system logs to be generated with significantNTP events. NTP logging is disabled by default.
switch(config)# [no] ntp loggingStep 2
(Optional)Displays the NTP logging configuration status.
switch(config)# show ntp logging-statusStep 3
(Optional)Saves the change persistently through reboots and restarts bycopying the running configuration to the startup configuration.
switch(config)# copy running-configstartup-config
Step 4
The following example shows how to enable NTP logging in order to generate system logs with significantNTP events:switch# configure terminalswitch(config)# ntp loggingswitch(config)# copy running-config startup-config[########################################] 100%switch(config)#
Enabling CFS Distribution for NTPYou can enable CFS distribution for NTP in order to distribute the NTP configuration to other CFS-enableddevices.
Before You Begin
Make sure that you have enabled CFS distribution for the device.
Cisco Nexus 5000 Series NX-OS System Management Configuration Guide, Release 5.0(3)N1(1) 11
Configuring NTPConfiguring NTP Logging
SUMMARY STEPS
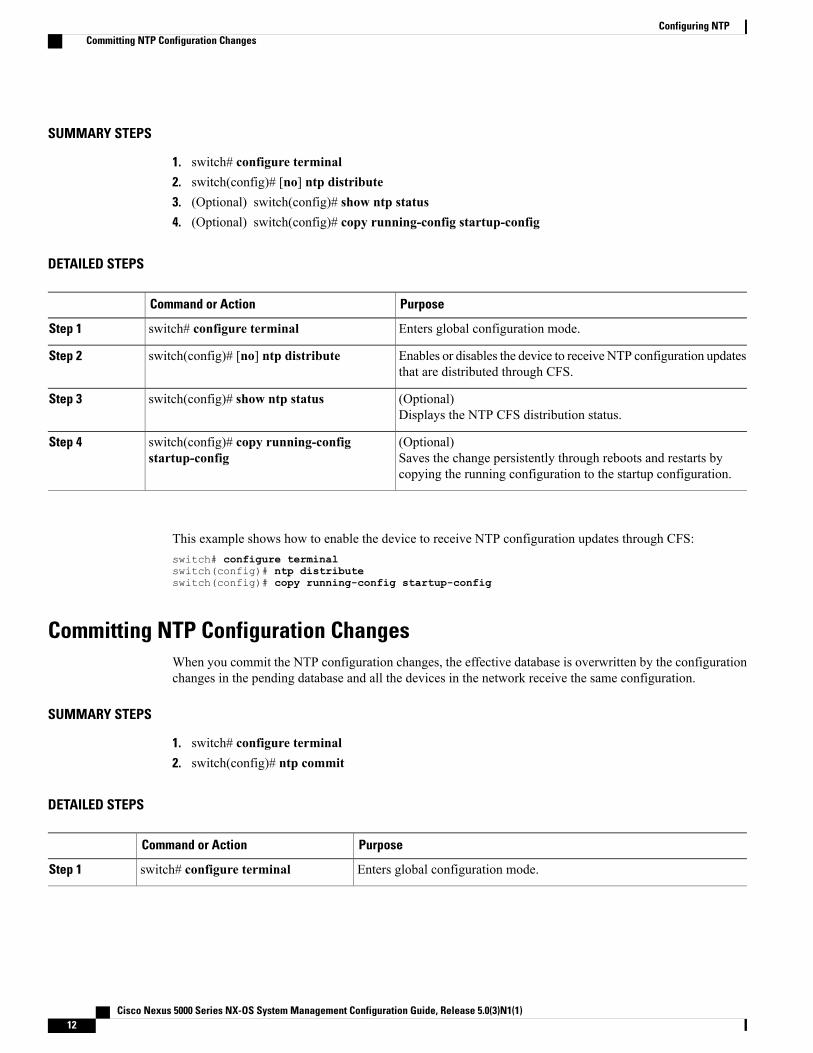
1. switch# configure terminal2. switch(config)# [no] ntp distribute3. (Optional) switch(config)# show ntp status4. (Optional) switch(config)# copy running-config startup-config
DETAILED STEPS
PurposeCommand or Action
Enters global configuration mode.switch# configure terminalStep 1
Enables or disables the device to receive NTP configuration updatesthat are distributed through CFS.
switch(config)# [no] ntp distributeStep 2
(Optional)Displays the NTP CFS distribution status.
switch(config)# show ntp statusStep 3
(Optional)Saves the change persistently through reboots and restarts bycopying the running configuration to the startup configuration.
switch(config)# copy running-configstartup-config
Step 4
This example shows how to enable the device to receive NTP configuration updates through CFS:switch# configure terminalswitch(config)# ntp distributeswitch(config)# copy running-config startup-config
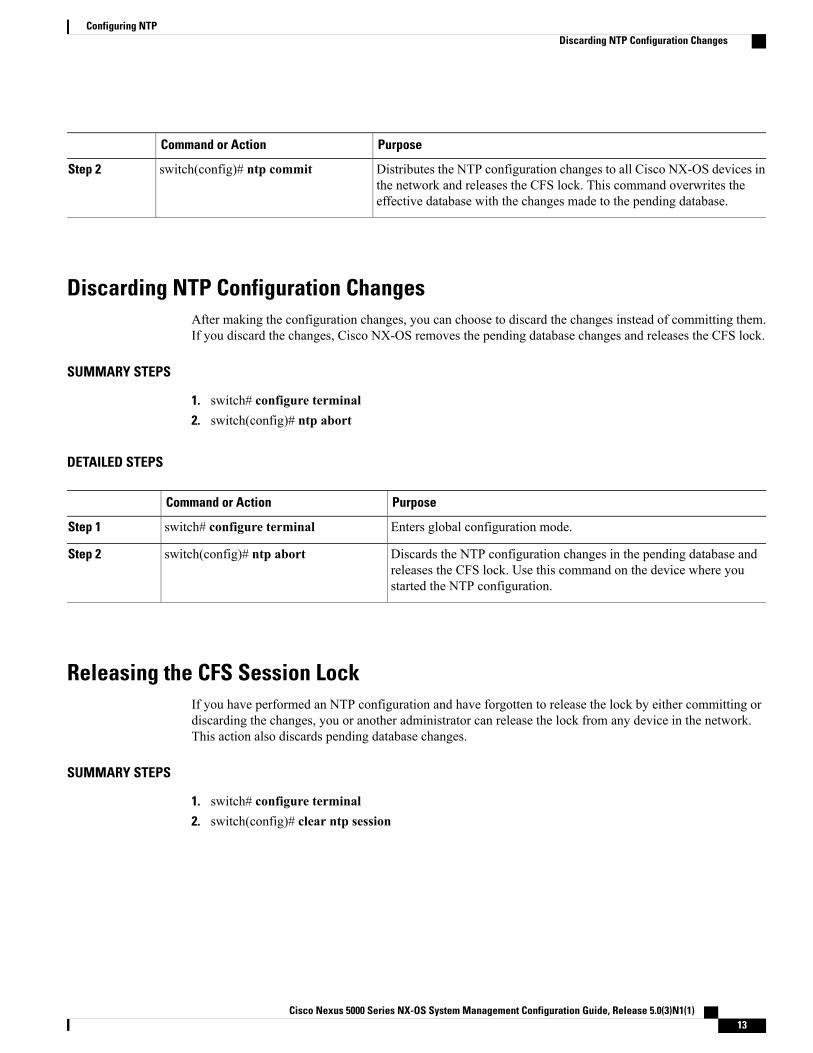
Committing NTP Configuration ChangesWhen you commit the NTP configuration changes, the effective database is overwritten by the configurationchanges in the pending database and all the devices in the network receive the same configuration.
SUMMARY STEPS
1. switch# configure terminal2. switch(config)# ntp commit
DETAILED STEPS
PurposeCommand or Action
Enters global configuration mode.switch# configure terminalStep 1
Cisco Nexus 5000 Series NX-OS System Management Configuration Guide, Release 5.0(3)N1(1)12
Configuring NTPCommitting NTP Configuration Changes
PurposeCommand or Action
Distributes the NTP configuration changes to all Cisco NX-OS devices inthe network and releases the CFS lock. This command overwrites theeffective database with the changes made to the pending database.
switch(config)# ntp commitStep 2
Discarding NTP Configuration ChangesAfter making the configuration changes, you can choose to discard the changes instead of committing them.If you discard the changes, Cisco NX-OS removes the pending database changes and releases the CFS lock.
SUMMARY STEPS
1. switch# configure terminal2. switch(config)# ntp abort
DETAILED STEPS
PurposeCommand or Action
Enters global configuration mode.switch# configure terminalStep 1
Discards the NTP configuration changes in the pending database andreleases the CFS lock. Use this command on the device where youstarted the NTP configuration.
switch(config)# ntp abortStep 2
Releasing the CFS Session LockIf you have performed an NTP configuration and have forgotten to release the lock by either committing ordiscarding the changes, you or another administrator can release the lock from any device in the network.This action also discards pending database changes.
SUMMARY STEPS
1. switch# configure terminal2. switch(config)# clear ntp session
Cisco Nexus 5000 Series NX-OS System Management Configuration Guide, Release 5.0(3)N1(1) 13
Configuring NTPDiscarding NTP Configuration Changes
DETAILED STEPS
PurposeCommand or Action
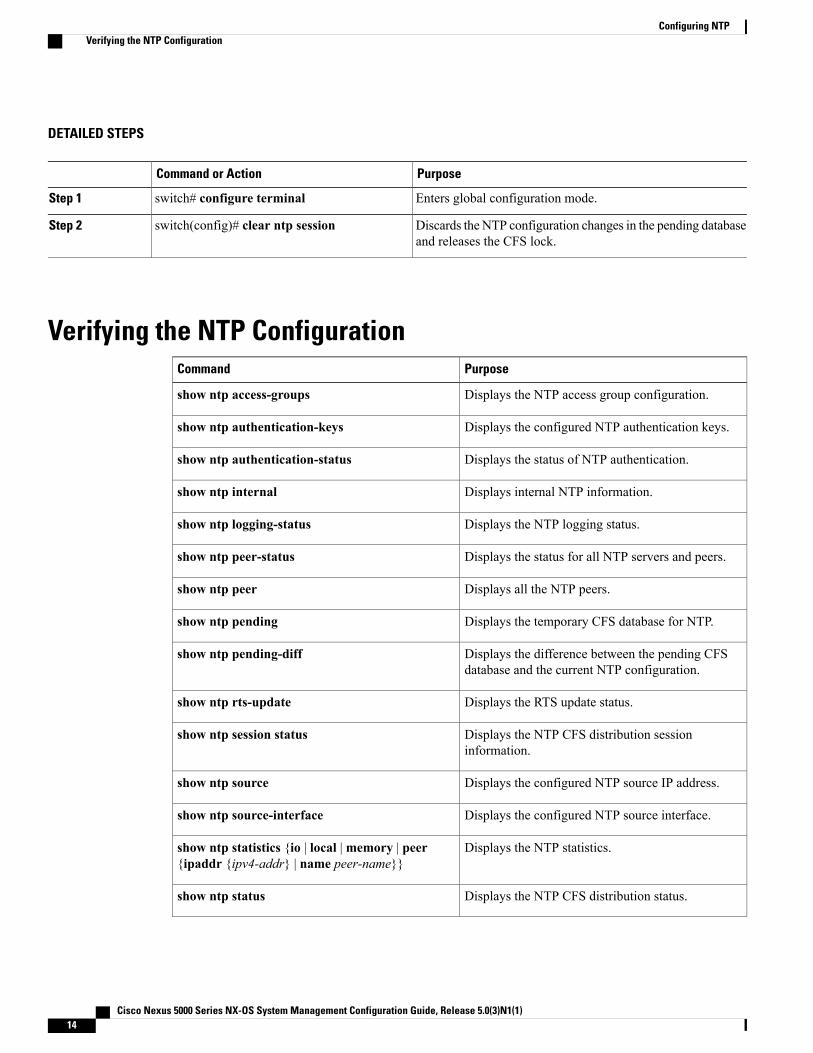
Enters global configuration mode.switch# configure terminalStep 1
Discards the NTP configuration changes in the pending databaseand releases the CFS lock.
switch(config)# clear ntp sessionStep 2
Verifying the NTP ConfigurationPurposeCommand
Displays the NTP access group configuration.show ntp access-groups
Displays the configured NTP authentication keys.show ntp authentication-keys
Displays the status of NTP authentication.show ntp authentication-status
Displays internal NTP information.show ntp internal
Displays the NTP logging status.show ntp logging-status
Displays the status for all NTP servers and peers.show ntp peer-status
Displays all the NTP peers.show ntp peer
Displays the temporary CFS database for NTP.show ntp pending
Displays the difference between the pending CFSdatabase and the current NTP configuration.
show ntp pending-diff
Displays the RTS update status.show ntp rts-update
Displays the NTP CFS distribution sessioninformation.
show ntp session status
Displays the configured NTP source IP address.show ntp source
Displays the configured NTP source interface.show ntp source-interface
Displays the NTP statistics.show ntp statistics {io | local |memory | peer{ipaddr {ipv4-addr} | name peer-name}}
Displays the NTP CFS distribution status.show ntp status
Cisco Nexus 5000 Series NX-OS System Management Configuration Guide, Release 5.0(3)N1(1)14
Configuring NTPVerifying the NTP Configuration
PurposeCommand
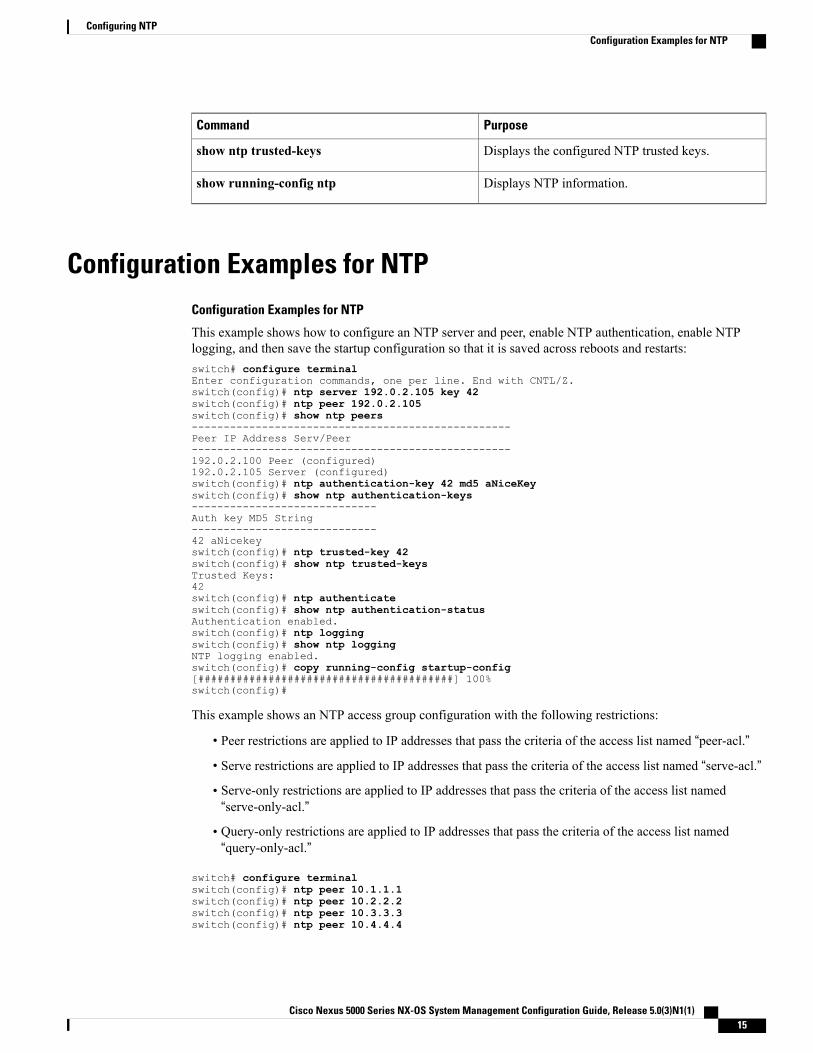
Displays the configured NTP trusted keys.show ntp trusted-keys
Displays NTP information.show running-config ntp
Configuration Examples for NTPConfiguration Examples for NTP
This example shows how to configure an NTP server and peer, enable NTP authentication, enable NTPlogging, and then save the startup configuration so that it is saved across reboots and restarts:switch# configure terminalEnter configuration commands, one per line. End with CNTL/Z.switch(config)# ntp server 192.0.2.105 key 42switch(config)# ntp peer 192.0.2.105switch(config)# show ntp peers--------------------------------------------------Peer IP Address Serv/Peer--------------------------------------------------192.0.2.100 Peer (configured)192.0.2.105 Server (configured)switch(config)# ntp authentication-key 42 md5 aNiceKeyswitch(config)# show ntp authentication-keys-----------------------------Auth key MD5 String-----------------------------42 aNicekeyswitch(config)# ntp trusted-key 42switch(config)# show ntp trusted-keysTrusted Keys:42switch(config)# ntp authenticateswitch(config)# show ntp authentication-statusAuthentication enabled.switch(config)# ntp loggingswitch(config)# show ntp loggingNTP logging enabled.switch(config)# copy running-config startup-config[########################################] 100%switch(config)#
This example shows an NTP access group configuration with the following restrictions:
• Peer restrictions are applied to IP addresses that pass the criteria of the access list named “peer-acl.”
• Serve restrictions are applied to IP addresses that pass the criteria of the access list named “serve-acl.”
• Serve-only restrictions are applied to IP addresses that pass the criteria of the access list named“serve-only-acl.”
• Query-only restrictions are applied to IP addresses that pass the criteria of the access list named“query-only-acl.”
switch# configure terminalswitch(config)# ntp peer 10.1.1.1switch(config)# ntp peer 10.2.2.2switch(config)# ntp peer 10.3.3.3switch(config)# ntp peer 10.4.4.4
Cisco Nexus 5000 Series NX-OS System Management Configuration Guide, Release 5.0(3)N1(1) 15
Configuring NTPConfiguration Examples for NTP
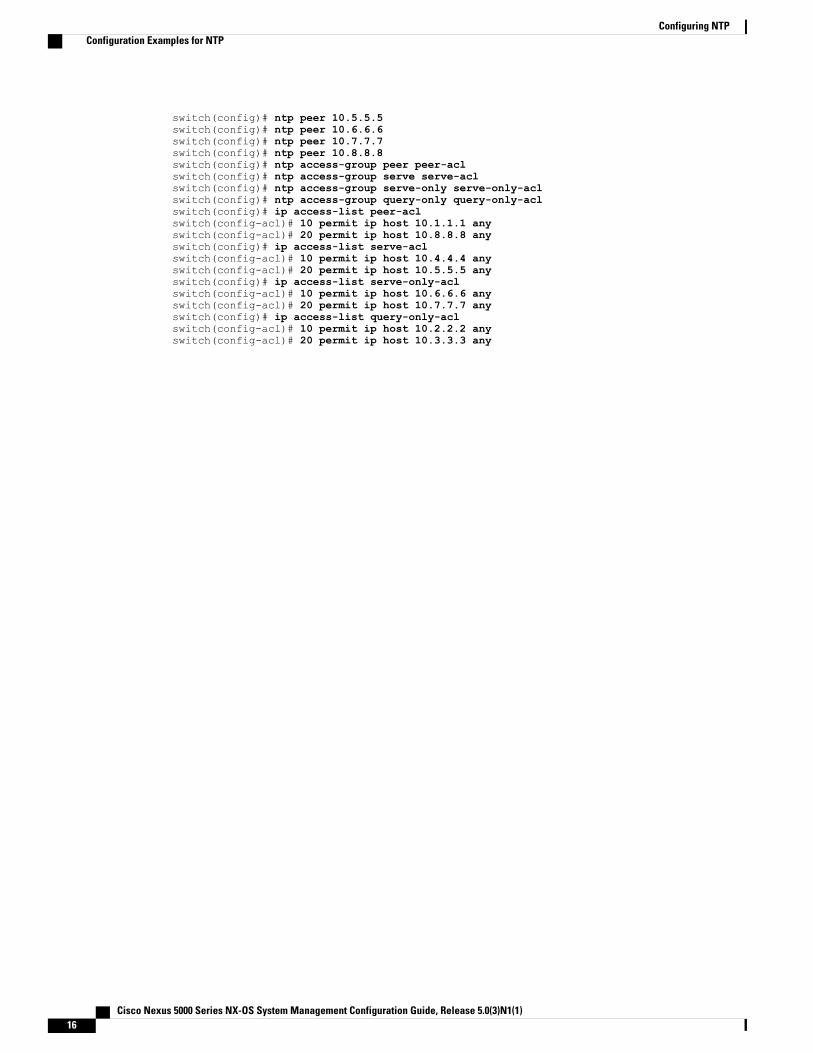
switch(config)# ntp peer 10.5.5.5switch(config)# ntp peer 10.6.6.6switch(config)# ntp peer 10.7.7.7switch(config)# ntp peer 10.8.8.8switch(config)# ntp access-group peer peer-aclswitch(config)# ntp access-group serve serve-aclswitch(config)# ntp access-group serve-only serve-only-aclswitch(config)# ntp access-group query-only query-only-aclswitch(config)# ip access-list peer-aclswitch(config-acl)# 10 permit ip host 10.1.1.1 anyswitch(config-acl)# 20 permit ip host 10.8.8.8 anyswitch(config)# ip access-list serve-aclswitch(config-acl)# 10 permit ip host 10.4.4.4 anyswitch(config-acl)# 20 permit ip host 10.5.5.5 anyswitch(config)# ip access-list serve-only-aclswitch(config-acl)# 10 permit ip host 10.6.6.6 anyswitch(config-acl)# 20 permit ip host 10.7.7.7 anyswitch(config)# ip access-list query-only-aclswitch(config-acl)# 10 permit ip host 10.2.2.2 anyswitch(config-acl)# 20 permit ip host 10.3.3.3 any
Cisco Nexus 5000 Series NX-OS System Management Configuration Guide, Release 5.0(3)N1(1)16
Configuring NTPConfiguration Examples for NTP
Top Related