


Languages
Pages
Legal


Everything you need to make technology come to life with our amazing ideas to try with your Pi!
www.linuxuser.co.uk24
10 amazing Raspberry Pi projects
Around six months ago we put together an article featuring ten of the most amazing Raspberry Pi projects in the world. Those projects featured lofty goals (like taking pictures from the edge of space) achieved by some devilishly clever people that we could only dream of emulating. As well as proving the power and versatility of the Raspberry Pi, these projects served as inspiration for the rest of us.
This time we’re getting practical. We want you to pick up the gauntlet and actually get building and we’ve hand-picked another ten amazing projects, but each one of these can be put
together in a day – some in just an afternoon of light tinkering. In fact, most need little more than the technology you’ve already got in your home – a TV, a camera, a mobile phone or videogame controller. Even for the few projects that do need a bit more practical hacking, the bits and bobs you need are unlikely to cost much more than £10 or £15 – a small price to pay for the gadgets you’ll get in return.
Hopefully these projects will give you just enough expertise and practical experience to allow you to take things even further and come up with projects of your own. Perhaps you could
monitor the temperature of your bedroom and trigger an electric blanket to come on for an hour in those chilly winter evenings. Or maybe you could sample the soil moisture of a houseplant and have it tweet you when it’s thirsty. Many of the techniques featured in the following pages (and even entire chunks of code) would translate perfectly to projects just like these – all you need is an idea and a little bit of know-how.
In another six months we’re going to lay down the gauntlet all over again, but next time we want to show off your projects in these pages. Get hacking and show us what you can do!
WorldMags.netWorldMags.net
WorldMags.net

www.linuxuser.co.uk25
Practical Raspberry Pi projects to amaze and inspire10 Raspberry Pi projects made easy
028 - 029Portable internet radio
026 - 027Complete media centre
032 - 033Time-lapse camera trigger
034 - 035Retro games console
042 - 043Wireless access point
040 - 041VoIP server
036 - 037File server
030 - 031
Always-on torrent box
038 - 039
Security camera
044 - 045
Voice-control Your Pi
WorldMags.netWorldMags.net
WorldMags.net
www.linuxuser.co.uk26
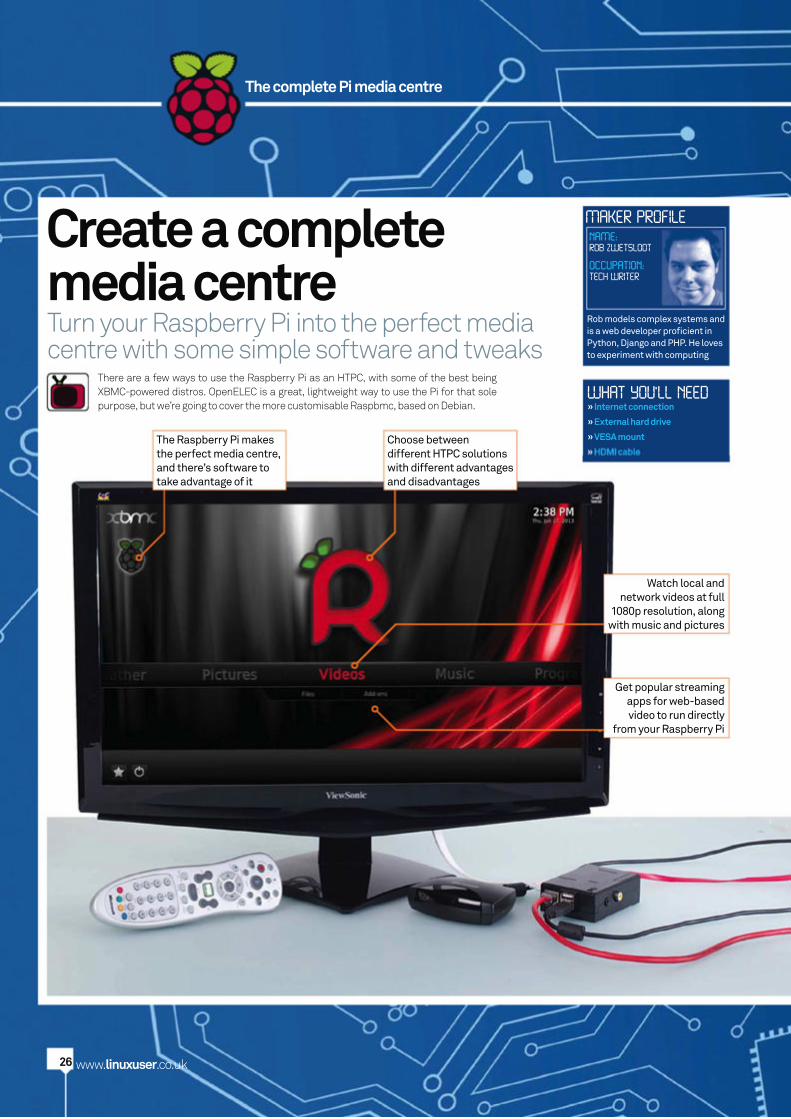
Create a complete media centreTurn your Raspberry Pi into the perfect media centre with some simple software and tweaks
There are a few ways to use the Raspberry Pi as an HTPC, with some of the best being XBMC-powered distros. OpenELEC is a great, lightweight way to use the Pi for that sole purpose, but we’re going to cover the more customisable Raspbmc, based on Debian.
WHAT YOU'LL NEED
NAME:ROB ZWETSLOOT
OCCUPATION:TECH WRITER
Rob models complex systems and is a web developer profi cient in Python, Django and PHP. He loves to experiment with computing
» Internet connection
» External hard drive
» VESA mount
MAKER PROFILE
The Raspberry Pi makes the perfect media centre, and there’s software to take advantage of it
Choose between different HTPC solutions with different advantages and disadvantages
The complete Pi media centre
Watch local and network videos at full
1080p resolution, along with music and pictures
Get popular streaming apps for web-based video to run directly
from your Raspberry Pi
WorldMags.netWorldMags.net
WorldMags.net
www.linuxuser.co.uk27
01 Install RaspbmcRaspbmc has a downloadable installer
that always gets the latest image for your Pi. Create a new directory and then download it with:
$ wget http://svn.stmlabs.com/svn/raspbmc/release/installers/python/install.pyMake it executable with:$ chmod +x install.pyAnd then run it with:$ sudo python install.py
Follow the on-screen instructions and it will then install onto your Pi.
06 Web remoteIn Settings, go to Services and then
Webserver. Enable it and you will now be able to control your Raspberry Pi using a web browser. To access the web browser remote, enter the IP address – found in System Info under the home screen’s Settings tab – into your browser, followed by ‘:80’.
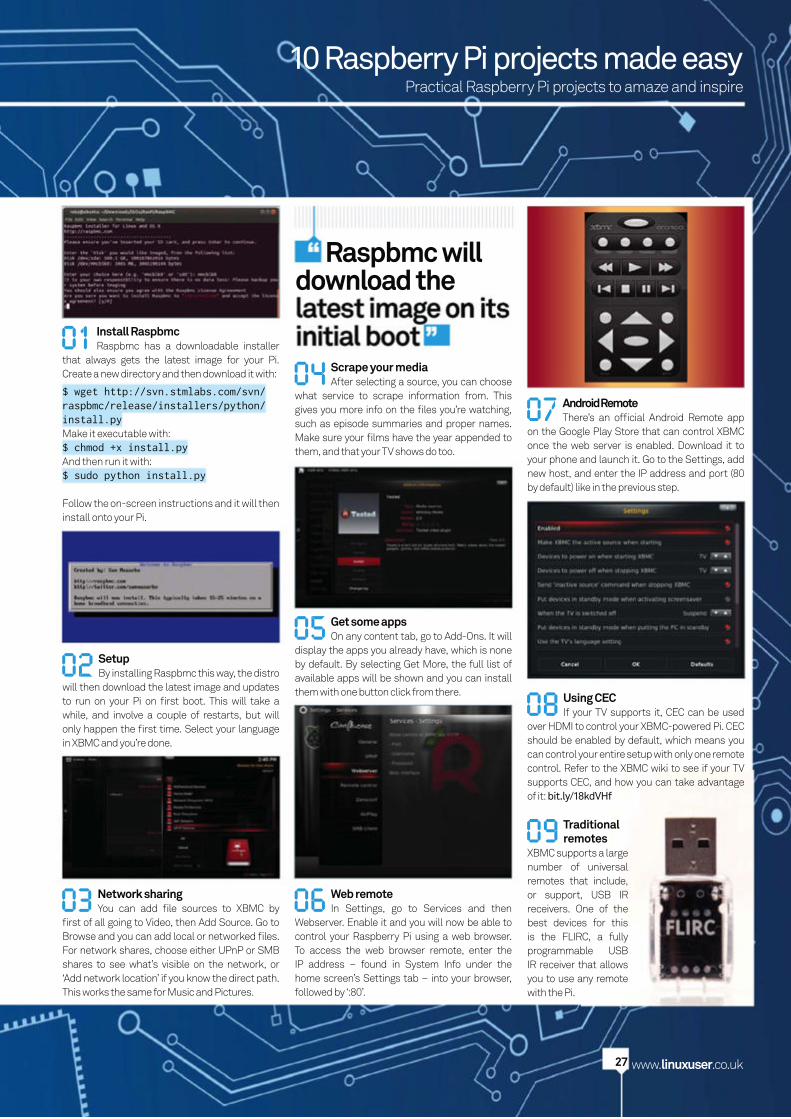
07 Android RemoteThere’s an offi cial Android Remote app
on the Google Play Store that can control XBMC once the web server is enabled. Download it to your phone and launch it. Go to the Settings, add new host, and enter the IP address and port (80 by default) like in the previous step.
08 Using CECIf your TV supports it, CEC can be used
over HDMI to control your XBMC-powered Pi. CEC should be enabled by default, which means you can control your entire setup with only one remote control. Refer to the XBMC wiki to see if your TV supports CEC, and how you can take advantageof it: bit.ly/18kdVHf
09 Traditional remotes
XBMC supports a large number of universal remotes that include, or support, USB IR receivers. One of the best devices for this is the FLIRC, a fully programmable USB IR receiver that allows you to use any remote with the Pi.
05 Get some appsOn any content tab, go to Add-Ons. It will
display the apps you already have, which is noneby default. By selecting Get More, the full list of available apps will be shown and you can install them with one button click from there.
03 Network sharingYou can add fi le sources to XBMC by
fi rst of all going to Video, then Add Source. Go to Browse and you can add local or networked fi les. For network shares, choose either UPnP or SMB shares to see what’s visible on the network, or ‘Add network location’ if you know the direct path. This works the same for Music and Pictures.
02 SetupBy installing Raspbmc this way, the distro
will then download the latest image and updates to run on your Pi on fi rst boot. This will take a while, and involve a couple of restarts, but will only happen the fi rst time. Select your language in XBMC and you’re done.
Raspbmc will download the
04 Scrape your mediaAfter selecting a source, you can choose
what service to scrape information from. This gives you more info on the fi les you’re watching, such as episode summaries and proper names. Make sure your fi lms have the year appended tothem, and that your TV shows do too.
Practical Raspberry Pi projects to amaze and inspire10 Raspberry Pi projects made easy
WorldMags.netWorldMags.net
WorldMags.net
Portable internet radio
www.linuxuser.co.uk28
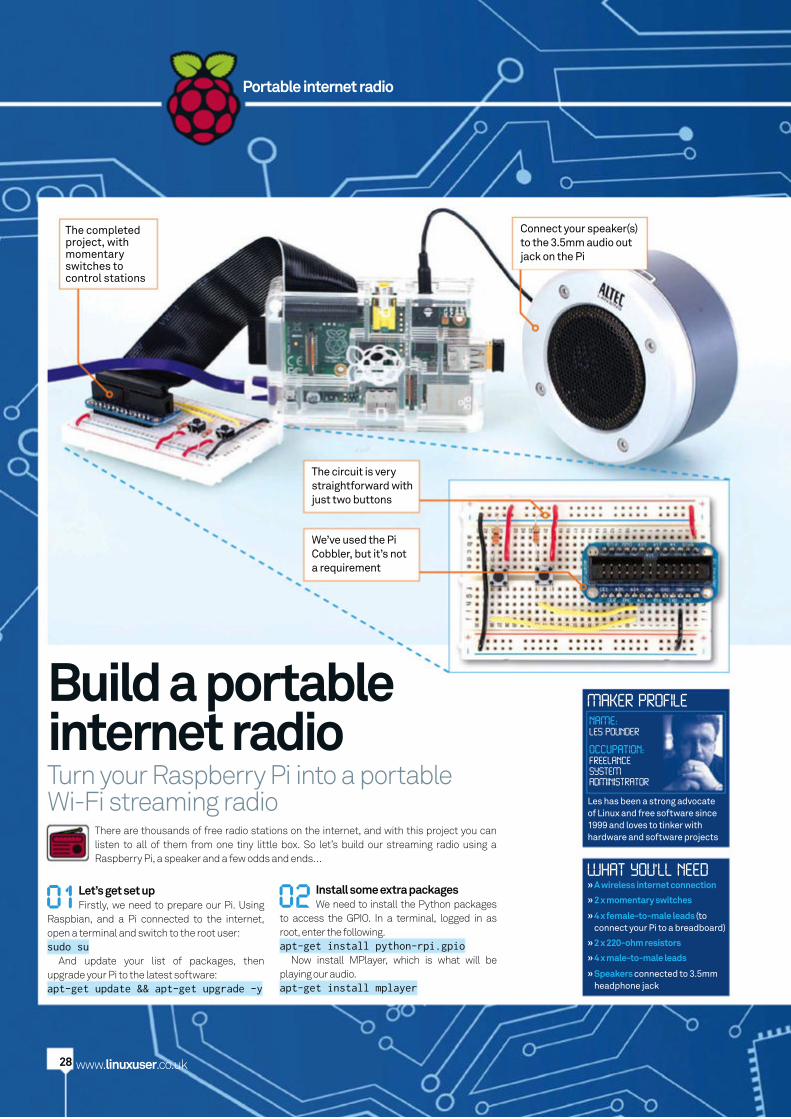
Build a portable internet radioTurn your Raspberry Pi into a portable Wi-Fi streaming radio
There are thousands of free radio stations on the internet, and with this project you can listen to all of them from one tiny little box. So let’s build our streaming radio using a Raspberry Pi, a speaker and a few odds and ends…
WHAT YOU'LL NEED» A wireless internet connection
» 2 x momentary switches
» 4 x female-to-male leads (to connect your Pi to a breadboard)
» 2 x 220-ohm resistors
» 4 x male-to-male leads
» Speakers connected to 3.5mm headphone jack
01 Let’s get set up Firstly, we need to prepare our Pi. Using
Raspbian, and a Pi connected to the internet, open a terminal and switch to the root user:sudo su
And update your list of packages, then upgrade your Pi to the latest software:apt-get update && apt-get upgrade -y
The completed project, with momentary switches to control stations
02 Install some extra packagesWe need to install the Python packages
to access the GPIO. In a terminal, logged in as root, enter the following.apt-get install python-rpi.gpio
Now install MPlayer, which is what will be playing our audio.apt-get install mplayer
Connect your speaker(s) to the 3.5mm audio out jack on the Pi
The circuit is very straightforward with just two buttons
We’ve used the Pi Cobbler, but it’s not a requirement
MAKER PROFILE
NAME:LES POUNDER
OCCUPATION:FREELANCE
SYSTEM
ADMINISTRATOR
Les has been a strong advocate of Linux and free software since 1999 and loves to tinker with hardware and software projects
WorldMags.netWorldMags.net
WorldMags.net
Practical Raspberry Pi projects to amaze and inspire
www.linuxuser.co.uk29
07 Make it executableSave and exit radio in /etc/init.d by
pressing Ctrl+X and then answering yes to the prompt.
Now make radio executable by typing (as root):chmod 755 radio
Then, as root, register radio to start on boot by typing in a terminal:update-rc.d radio defaults
08 Raspi-configIn a terminal as root, use
raspi-confi g to change the boot behaviour of your Pi. We don’t want it to load the desktop,
09 First testOnce the Pi has fi nished loading, press
one of the buttons on your breadboard. In a few seconds you should hear the audio come through the speakers that you attached to the 3.5mm headphone jack.
That’s it, you have a wireless internet radio. Why not add a mute function using amixer (manpages.ubuntu.com/manpages/gutsy/man1/amixer.1.html) and another momentary switch. Or even add an LCD screen (www.rpiblog.com/2012/11/interfacing-16x2-lcd-with-raspberry-pi.html) to show the station details.
04 Set up the softwareCopy radio.py from the cover disc to
your home directory – we’ll use the code as is for this guide, but feel free to edit the code to suit your needs later on.
Now open a terminal and switch to root, and edit your network interface confi g:nano /etc/network/interfaces
05 Wi-Fi configurationWe want the Pi to automatically connect
to your router via Wi-Fi during boot.Edit your /etc/network/interfaces fi le to resemble this:auto loiface lo inet loopbackiface eth0 inet dhcpallow-hotplug wlan0auto wlan0iface wlan0 inet dhcpwpa-ssid “ssid”wpa-psk “password”
Replace the “ssid” and “password” with your own details, but keep the quotation marks.
03 Make the files executable and InstallTo install the tools, we need to navigate
to PiAUISuite-master/Install. We now need to make InstallAUISuite.sh
executable for all users, so use:chmod 777 InstallAUISuite.sh
Now that the fi le is executable, let’s install:sudo ./ InstallAUISuite.sh
There are thousands of free radio stations on the internet, and you can listen to
06 Configure the radio to start at boot In a terminal, as root, navigate to
/etc/init.d/ and then create a fi le called radiousing nano.nano radioIn that fi le, type in the following:#! /bin/bashmodprobe snd_bcm2835amixer cset numid=3 1python /home/pi/radio.py
This loads the kernel module for the sound card Amixer sets the output to the 3.5mm headphone jack (that’s what 1 means, HDMI is 2). Lastly it calls the Python script.
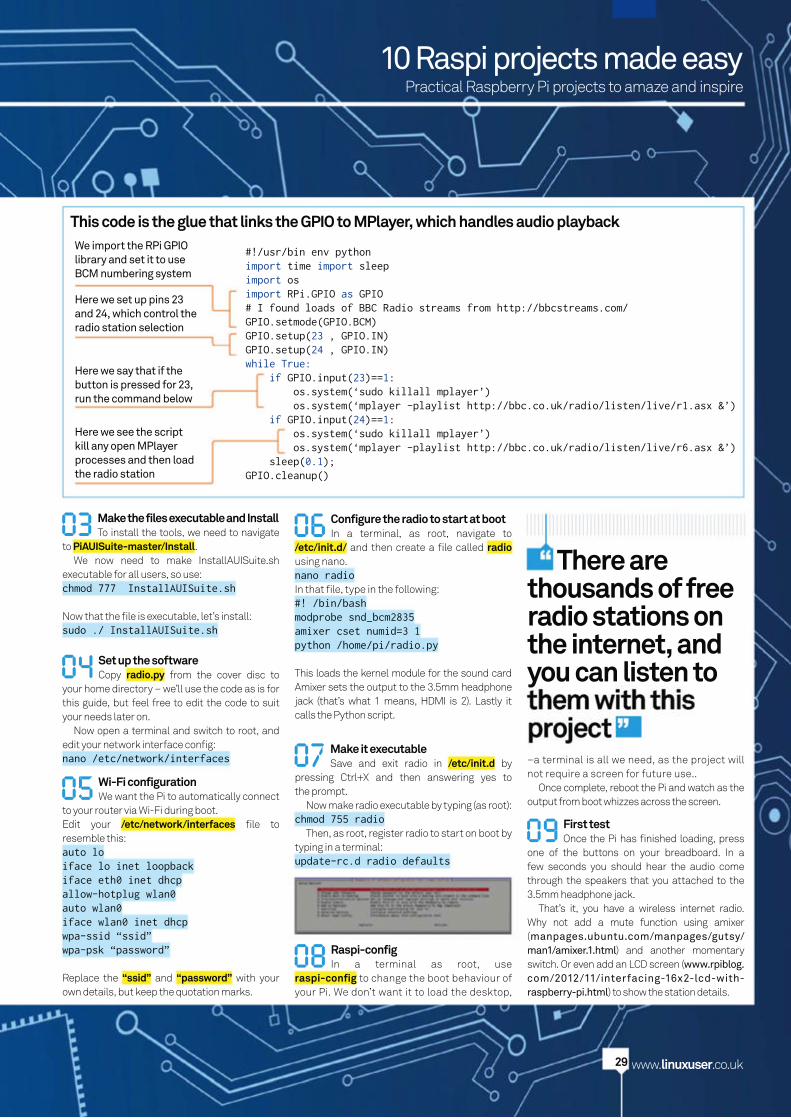
#!/usr/bin env pythonimport time import sleepimport osimport RPi.GPIO as GPIO# I found loads of BBC Radio streams from http://bbcstreams.com/GPIO.setmode(GPIO.BCM)GPIO.setup(23 , GPIO.IN)GPIO.setup(24 , GPIO.IN)while True:
if GPIO.input(23)==1: os.system(‘sudo killall mplayer’) os.system(‘mplayer -playlist http://bbc.co.uk/radio/listen/live/r1.asx &’) if GPIO.input(24)==1: os.system(‘sudo killall mplayer’) os.system(‘mplayer -playlist http://bbc.co.uk/radio/listen/live/r6.asx &’) sleep(0.1);GPIO.cleanup()
We import the RPi GPIO library and set it to use BCM numbering system
Here we set up pins 23 and 24, which control the radio station selection
Here we say that if the button is pressed for 23, run the command below
Here we see the script kill any open MPlayer processes and then load the radio station
This code is the glue that links the GPIO to MPlayer, which handles audio playback
–a terminal is all we need, as the project will not require a screen for future use..
Once complete, reboot the Pi and watch as the output from boot whizzes across the screen.
10 Raspi projects made easy
WorldMags.netWorldMags.net
WorldMags.net
www.linuxuser.co.uk30
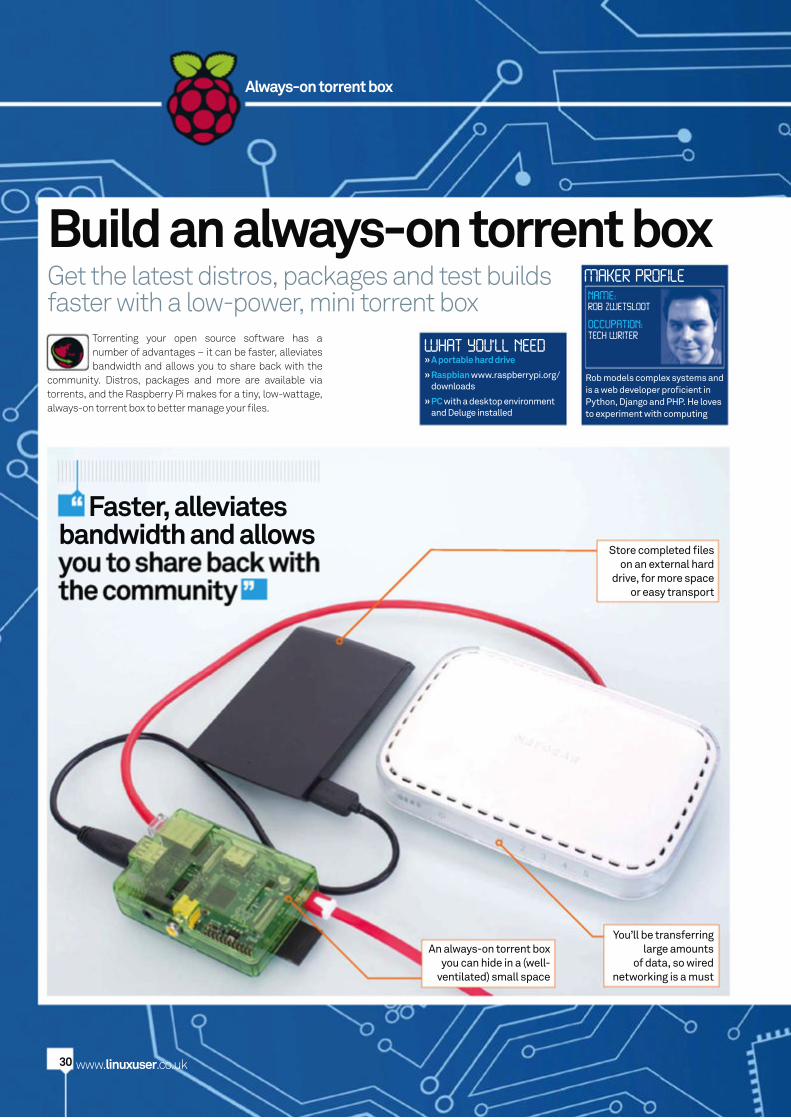
Build an always-on torrent boxGet the latest distros, packages and test builds faster with a low-power, mini torrent box
Torrenting your open source software has a number of advantages – it can be faster, alleviates bandwidth and allows you to share back with the
community. Distros, packages and more are available via torrents, and the Raspberry Pi makes for a tiny, low-wattage, always-on torrent box to better manage your fi les.
WHAT YOU'LL NEED» A portable hard drive
» Raspbian www.raspberrypi.org/downloads
» PC with a desktop environment and Deluge installed
NAME:ROB ZWETSLOOT
OCCUPATION:TECH WRITER
Rob models complex systems and is a web developer profi cient in Python, Django and PHP. He loves to experiment with computing
MAKER PROFILE
Faster, alleviates bandwidth and allows
Store completed fi les on an external hard
drive, for more space or easy transport
You’ll be transferring large amounts
of data, so wired networking is a must
Always-on torrent box
An always-on torrent box you can hide in a (well-
ventilated) small space
WorldMags.netWorldMags.net
WorldMags.net
www.linuxuser.co.uk31
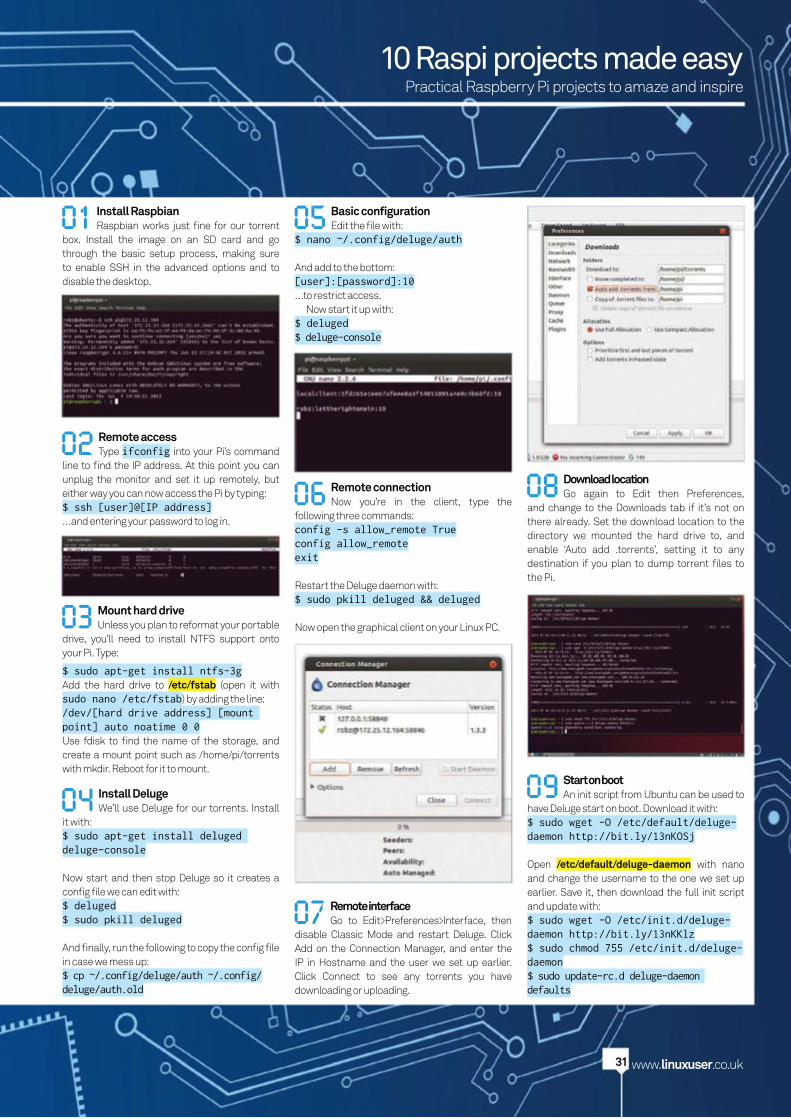
01 Install RaspbianRaspbian works just fi ne for our torrent
box. Install the image on an SD card and go through the basic setup process, making sure to enable SSH in the advanced options and to disable the desktop.
06 Remote connectionNow you’re in the client, type the
following three commands:config -s allow_remote Trueconfig allow_remoteexit
Restart the Deluge daemon with:$ sudo pkill deluged && deluged
Now open the graphical client on your Linux PC.
07 Remote interfaceGo to Edit>Preferences>Interface, then
disable Classic Mode and restart Deluge. Click Add on the Connection Manager, and enter the IP in Hostname and the user we set up earlier. Click Connect to see any torrents you have downloading or uploading.
08 Download locationGo again to Edit then Preferences,
and change to the Downloads tab if it’s not on there already. Set the download location to the directory we mounted the hard drive to, and enable ‘Auto add .torrents’, setting it to any destination if you plan to dump torrent fi les to the Pi.
09 Start on bootAn init script from Ubuntu can be used to
have Deluge start on boot. Download it with:$ sudo wget -O /etc/default/deluge-daemon http://bit.ly/13nKOSj
Open /etc/default/deluge-daemon with nano and change the username to the one we set up earlier. Save it, then download the full init script and update with:$ sudo wget -O /etc/init.d/deluge-daemon http://bit.ly/13nKKlz$ sudo chmod 755 /etc/init.d/deluge-daemon$ sudo update-rc.d deluge-daemon defaults
05 Basic configurationEdit the fi le with:
$ nano ~/.config/deluge/auth
And add to the bottom:[user]:[password]:10…to restrict access.
Now start it up with:$ deluged$ deluge-console
03 Mount hard driveUnless you plan to reformat your portable
drive, you’ll need to install NTFS support onto your Pi. Type:
$ sudo apt-get install ntfs-3gAdd the hard drive to /etc/fstab (open it with sudo nano /etc/fstab) by adding the line:/dev/[hard drive address] [mount point] auto noatime 0 0Use fdisk to fi nd the name of the storage, and create a mount point such as /home/pi/torrents with mkdir. Reboot for it to mount.
02 Remote accessType ifconfig into your Pi’s command
line to fi nd the IP address. At this point you can unplug the monitor and set it up remotely, but either way you can now access the Pi by typing:$ ssh [user]@[IP address]…and entering your password to log in.
04 Install DelugeWe’ll use Deluge for our torrents. Install
it with:$ sudo apt-get install deluged deluge-console
Now start and then stop Deluge so it creates a confi g fi le we can edit with:$ deluged$ sudo pkill deluged
And fi nally, run the following to copy the confi g fi le in case we mess up:$ cp ~/.config/deluge/auth ~/.config/deluge/auth.old
Practical Raspberry Pi projects to amaze and inspire10 Raspi projects made easy
WorldMags.netWorldMags.net
WorldMags.net
www.linuxuser.co.uk32
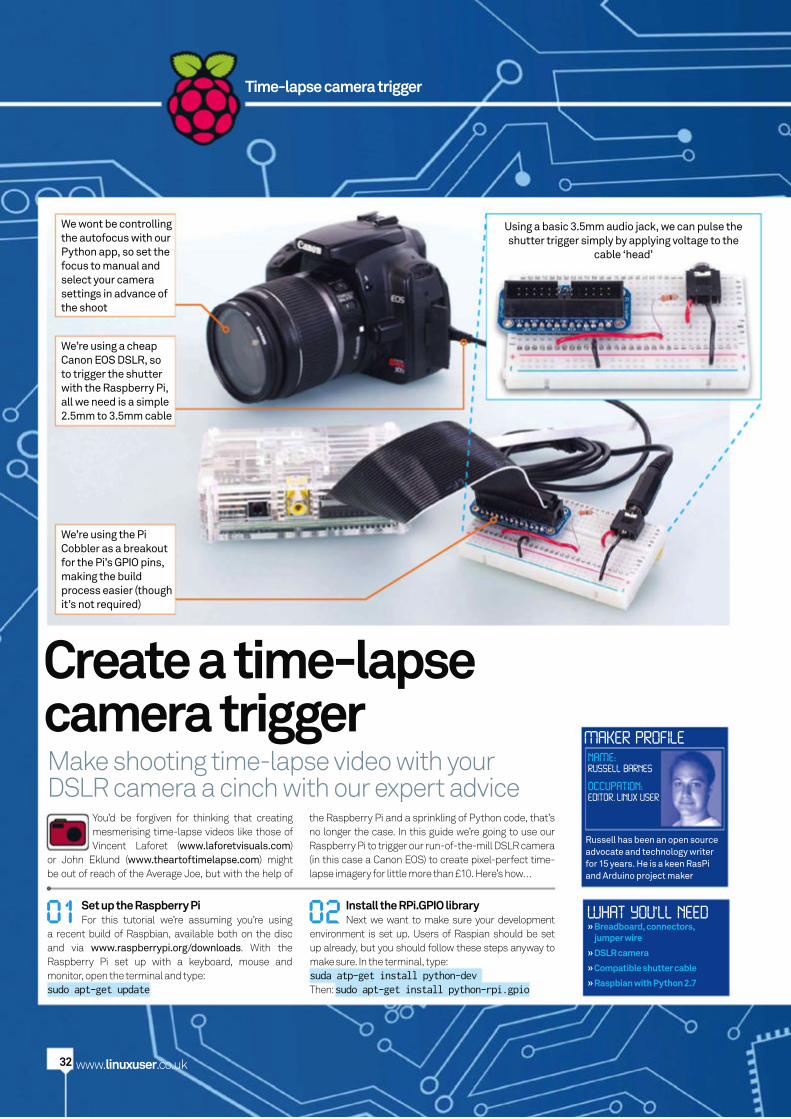
Create a time-lapse camera triggerMake shooting time-lapse video with your DSLR camera a cinch with our expert advice
You’d be forgiven for thinking that creating mesmerising time-lapse videos like those of Vincent Laforet (www.laforetvisuals.com)
or John Eklund (www.theartoftimelapse.com) might be out of reach of the Average Joe, but with the help of
the Raspberry Pi and a sprinkling of Python code, that’s no longer the case. In this guide we’re going to use our Raspberry Pi to trigger our run-of-the-mill DSLR camera (in this case a Canon EOS) to create pixel-perfect time-lapse imagery for little more than £10. Here’s how…
01 Set up the Raspberry PiFor this tutorial we’re assuming you’re using
a recent build of Raspbian, available both on the disc and via www.raspberrypi.org/downloads. With the Raspberry Pi set up with a keyboard, mouse and monitor, open the terminal and type: sudo apt-get update
02 Install the RPi.GPIO libraryNext we want to make sure your development
environment is set up. Users of Raspian should be set up already, but you should follow these steps anyway to make sure. In the terminal, type: suda atp-get install python-dev Then: sudo apt-get install python-rpi.gpio
WHAT YOU'LL NEED» Breadboard, connectors,
jumper wire
» DSLR camera
» Compatible shutter cable
» Raspbian with Python 2.7
NAME:RUSSELL BARNES
OCCUPATION:EDITOR, LINUX USER
Russell has been an open source advocate and technology writer for 15 years. He is a keen RasPi and Arduino project maker
MAKER PROFILE
Time-lapse camera trigger
We’re using a cheap Canon EOS DSLR, so to trigger the shutter with the Raspberry Pi, all we need is a simple 2.5mm to 3.5mm cable
We’re using the Pi Cobbler as a breakout for the Pi’s GPIO pins, making the build process easier (though it’s not required)
Using a basic 3.5mm audio jack, we can pulse the shutter trigger simply by applying voltage to the
cable ‘head’
We wont be controlling the autofocus with our Python app, so set the focus to manual and select your camera settings in advance of the shoot
WorldMags.netWorldMags.net
WorldMags.net
www.linuxuser.co.uk33
06 Creating a video from the imagesWith your camera packed with images,
we need to now collect and output them as a video fi le. While it’s technically possible to do on the Pi, we’d recommend copying them to an easily accessible folder on a separate Linux PC since there will be quite a lot of heavy lifting involved. We’re going to use FFmpeg. With the terminal open in the folder where your images are stored, type: ffmpeg -f image2 -i image%04d.jpg -vcodec libx264 -b 800k video.avi. This obviously assumes you have libx264 installed on your machine and the ‘image%o4d.jpg’ assumes the fi le format and the number of digits it’s dealing with (in this case: ‘picture0001.jpg’). See ffmpeg.org/ffmpeg.html for full documentation of FFmpeg’s incredible capabilities, but the fl ags we’ve selected should make for good results.
03 Set up the Pi CobblerWith the development environment set
up, we can turn our attention to the hardware. For this tutorial we’ve used a cheap prototyping breadboard and an Adafruit Pi Cobbler (learn.adafruit.com/adafruit-pi-cobbler-kit/overview) to give us easy access to the Raspberry Pi’s GPIO pins. As you can see from the picture, the Cobbler straddles the centre-point of the breadboard and a ribbon cable connects the two.
04 Configure the breadboardFor the Raspberry Pi’s GPIO to control
the camera, we need to create a circuit between a pin on the GPIO (in this case pin 23 on the Cobbler – but it’s actually physical pin 16) and the pin that connects to the ‘head’ or ‘tip’ of the camera cable that activates the shutter when connected. We’ve also used a resistor, but it isn’t required. The base of the connector cable is always ground, so make sure you ground the ‘GND’ pin on the Cobbler and the middle pin on the audio jack. It’s very simple stuff. With the circuit complete, we can focus on the code.
05 The Linux User Time-lapse Photography Tool
We’ve created a small 55-line Python utility called The Linux User Time-lapse Photography Tool, which asks the user to input how many shots they’d like to take and the frequency they’d like them taken. It then takes that information and uses it in a For loop to activate the shutter using GPIO pin 16 . If you’d like to use the project ‘in the fi eld’ we’d recommend using the Android app ConnectBot to SSH into your RasPi for input and feedback. Don’t forget to start your script with sudo python time_lapse_camera.py
Practical Raspberry Pi projects to amaze and inspire10 Raspi projects made easy
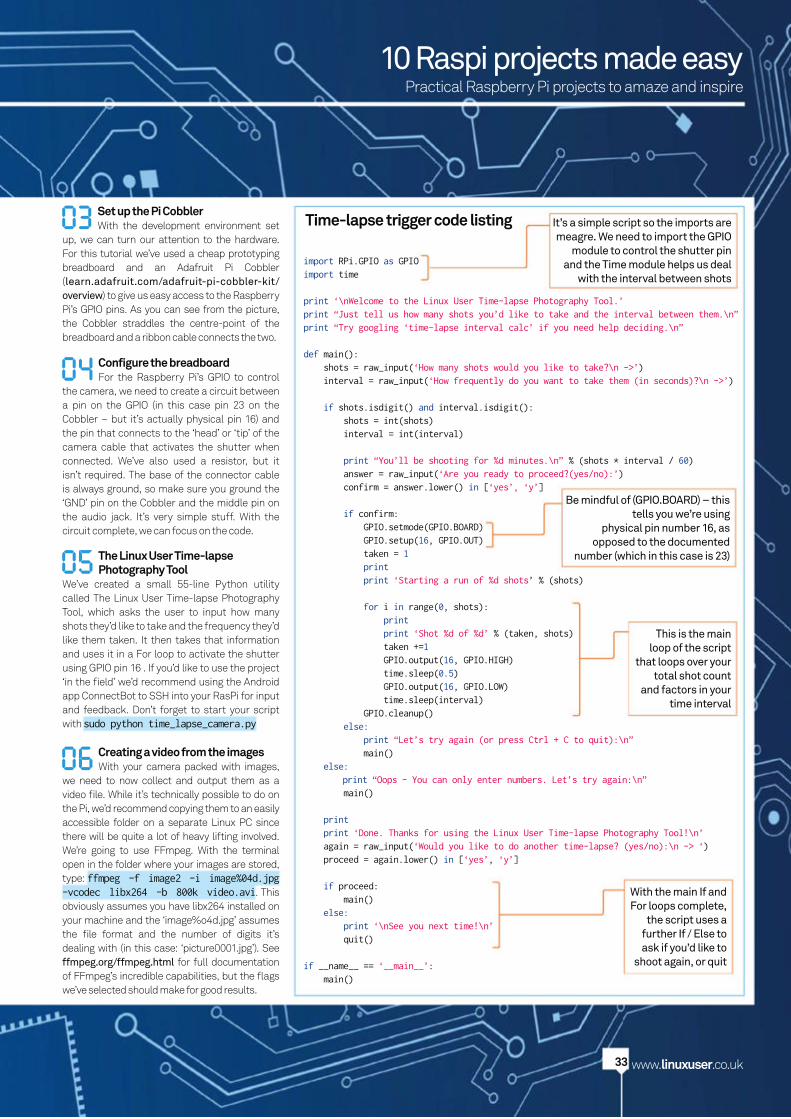
import RPi.GPIO as GPIOimport time
print ‘\nWelcome to the Linux User Time-lapse Photography Tool.’print “Just tell us how many shots you’d like to take and the interval between them.\n”print “Try googling ‘time-lapse interval calc’ if you need help deciding.\n”
def main(): shots = raw_input(‘How many shots would you like to take?\n ->’) interval = raw_input(‘How frequently do you want to take them (in seconds)?\n ->’) if shots.isdigit() and interval.isdigit(): shots = int(shots) interval = int(interval) print “You’ll be shooting for %d minutes.\n” % (shots * interval / 60) answer = raw_input(‘Are you ready to proceed?(yes/no):’) confirm = answer.lower() in [‘yes’, ‘y’] if confirm: GPIO.setmode(GPIO.BOARD) GPIO.setup(16, GPIO.OUT) taken = 1 print print ‘Starting a run of %d shots’ % (shots) for i in range(0, shots): print print ‘Shot %d of %d’ % (taken, shots) taken +=1 GPIO.output(16, GPIO.HIGH) time.sleep(0.5) GPIO.output(16, GPIO.LOW) time.sleep(interval) GPIO.cleanup() else: print “Let’s try again (or press Ctrl + C to quit):\n” main() else: print “Oops - You can only enter numbers. Let’s try again:\n” main()
print print ‘Done. Thanks for using the Linux User Time-lapse Photography Tool!\n’ again = raw_input(‘Would you like to do another time-lapse? (yes/no):\n -> ‘) proceed = again.lower() in [‘yes’, ‘y’] if proceed: main() else: print ‘\nSee you next time!\n’ quit() if __name__ == ‘__main__’: main()
Time-lapse trigger code listing It’s a simple script so the imports are meagre. We need to import the GPIO
module to control the shutter pin and the Time module helps us deal
with the interval between shots
Be mindful of (GPIO.BOARD) – this tells you we’re using
physical pin number 16, as opposed to the documented
number (which in this case is 23)
This is the main loop of the script
that loops over your total shot count
and factors in your time interval
With the main If and For loops complete,
the script uses a further If / Else to ask if you’d like to
shoot again, or quit
WorldMags.netWorldMags.net
WorldMags.net

www.linuxuser.co.uk34
Make your own retro games consoleGet your retro gaming fi x with RetroPie, a distro for getting the games of yesteryear onto your Raspberry Pi
There’s a growing trend for people to create their own arcade cabinet or hack together their own retro console, and the Raspberry Pi’s size and power makes it perfect for this. Follow our tutorial to turn your Pi into a fully functional emulating powerhouse.
Retro games console
Turn your Raspberry Pi into the ultimate
portable retro games console
Confi gure RetroPie for more
power control
WHAT YOU'LL NEED
NAME:ROB ZWETSLOOT
OCCUPATION:TECH WRITER
Rob models complex systems and is a web developer profi cient in Python, Django and PHP. He loves to experiment with computing
» RetroPie blog.petrockblock.com/download/retropie-project-image/
MAKER PROFILE
Properly confi gure USB and PS3 controllers out of the box
Install drivers to use the Xbox 360 controller
WorldMags.netWorldMags.net
WorldMags.net
www.linuxuser.co.uk35
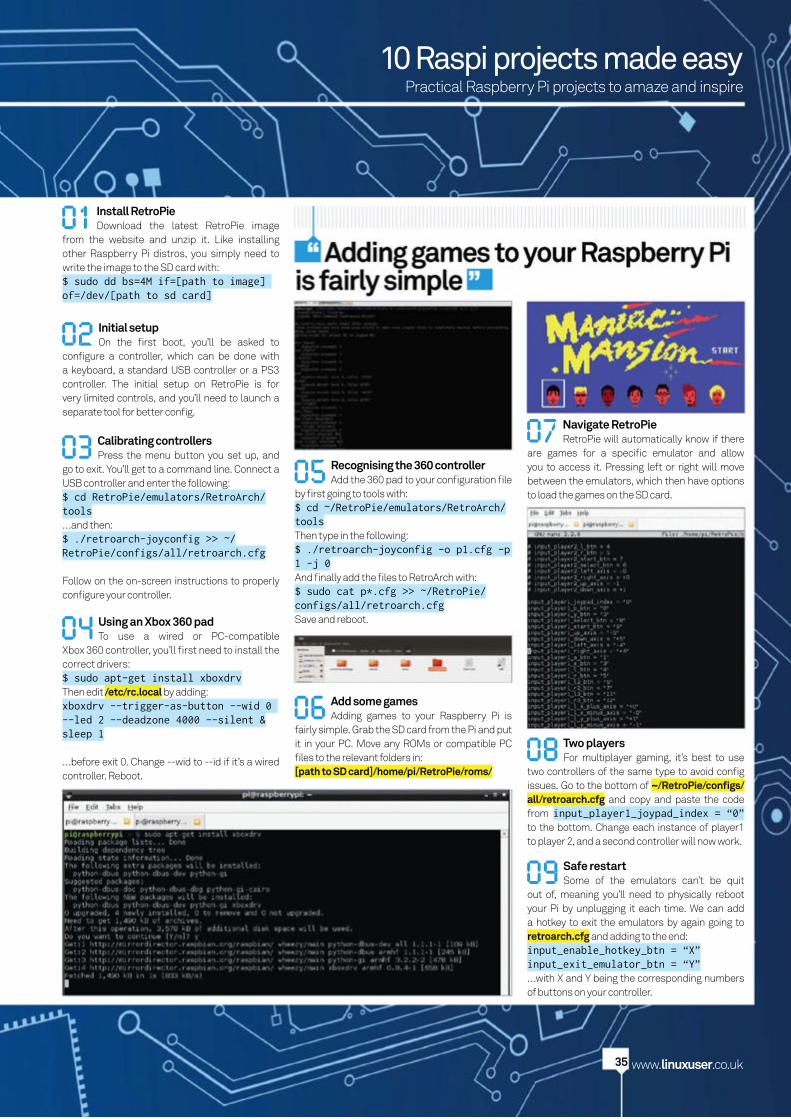
01 Install RetroPieDownload the latest RetroPie image
from the website and unzip it. Like installing other Raspberry Pi distros, you simply need to write the image to the SD card with:$ sudo dd bs=4M if=[path to image] of=/dev/[path to sd card]
06 Add some gamesAdding games to your Raspberry Pi is
fairly simple. Grab the SD card from the Pi and put it in your PC. Move any ROMs or compatible PC fi les to the relevant folders in: [path to SD card]/home/pi/RetroPie/roms/
07 Navigate RetroPieRetroPie will automatically know if there
are games for a specifi c emulator and allow you to access it. Pressing left or right will move between the emulators, which then have options to load the games on the SD card.
08 Two playersFor multiplayer gaming, it’s best to use
two controllers of the same type to avoid confi g issues. Go to the bottom of ~/RetroPie/confi gs/all/retroarch.cfg and copy and paste the code from input_player1_joypad_index = “0” to the bottom. Change each instance of player1 to player 2, and a second controller will now work.
09 Safe restartSome of the emulators can’t be quit
out of, meaning you’ll need to physically reboot your Pi by unplugging it each time. We can add a hotkey to exit the emulators by again going to retroarch.cfg and adding to the end:input_enable_hotkey_btn = “X”input_exit_emulator_btn = “Y”…with X and Y being the corresponding numbers of buttons on your controller.
04 Using an Xbox 360 padTo use a wired or PC-compatible
Xbox 360 controller, you’ll fi rst need to install the correct drivers:$ sudo apt-get install xboxdrvThen edit /etc/rc.local by adding:xboxdrv --trigger-as-button --wid 0 --led 2 --deadzone 4000 --silent &sleep 1
…before exit 0. Change --wid to --id if it’s a wired controller. Reboot.
05 Recognising the 360 controllerAdd the 360 pad to your confi guration fi le
by fi rst going to tools with:$ cd ~/RetroPie/emulators/RetroArch/toolsThen type in the following:$ ./retroarch-joyconfig -o p1.cfg -p 1 -j 0And fi nally add the fi les to RetroArch with:$ sudo cat p*.cfg >> ~/RetroPie/configs/all/retroarch.cfgSave and reboot.
03 Calibrating controllersPress the menu button you set up, and
go to exit. You’ll get to a command line. Connect a USB controller and enter the following:$ cd RetroPie/emulators/RetroArch/tools…and then:$ ./retroarch-joyconfig >> ~/RetroPie/configs/all/retroarch.cfg
Follow on the on-screen instructions to properly confi gure your controller.
02 Initial setupOn the fi rst boot, you’ll be asked to
confi gure a controller, which can be done with a keyboard, a standard USB controller or a PS3 controller. The initial setup on RetroPie is for very limited controls, and you’ll need to launch a separate tool for better confi g.
Practical Raspberry Pi projects to amaze and inspire
10 Raspi projects made easy
WorldMags.netWorldMags.net
WorldMags.net
File server
www.linuxuser.co.uk36
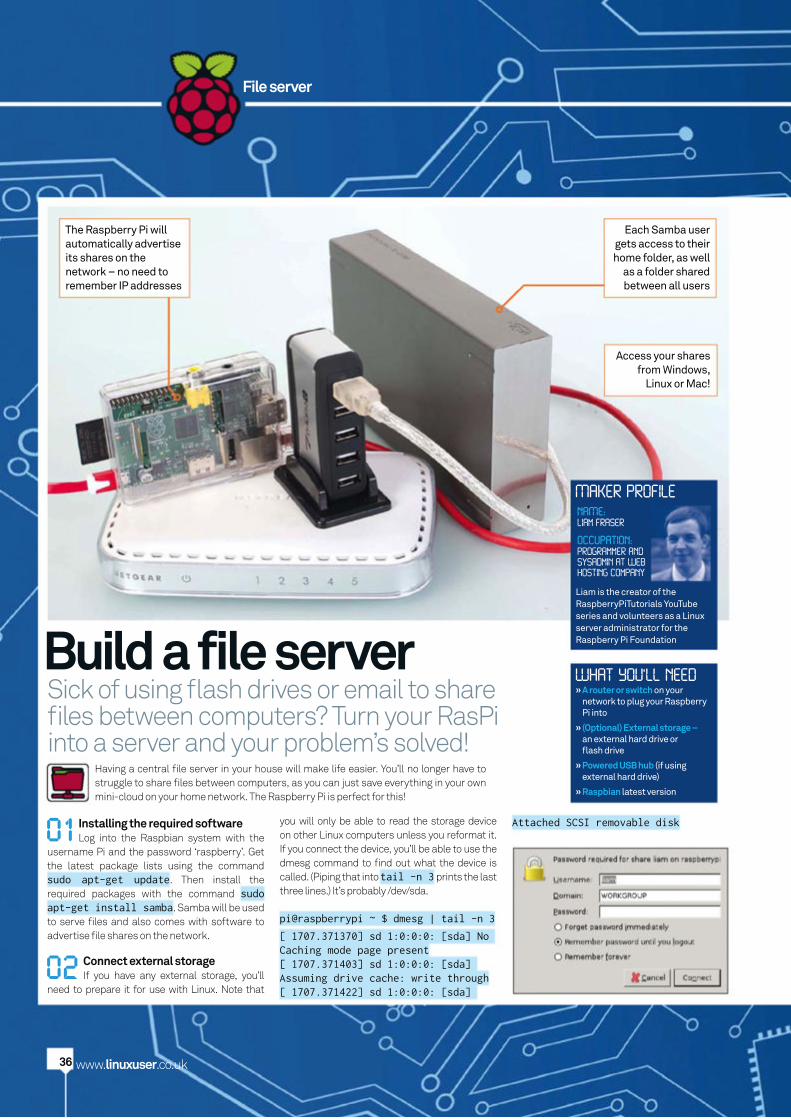
Build a file serverSick of using flash drives or email to share fi les between computers? Turn your RasPi into a server and your problem’s solved!
Access your shares from Windows,
Linux or Mac!
Having a central fi le server in your house will make life easier. You’ll no longer have to struggle to share fi les between computers, as you can just save everything in your own mini-cloud on your home network. The Raspberry Pi is perfect for this!
WHAT YOU'LL NEED» A router or switch on your
network to plug your Raspberry Pi into
» (Optional) External storage – an external hard drive or fl ash drive
» Powered USB hub (if using external hard drive)
» Raspbian latest version
MAKER PROFILE
NAME:Liam Fraser
OCCUPATION:Programmer and
Sysadmin at Web
Hosting company
Liam is the creator of the RaspberryPiTutorials YouTube series and volunteers as a Linux server administrator for the Raspberry Pi Foundation
01 Installing the required softwareLog into the Raspbian system with the
username Pi and the password ‘raspberry’. Get the latest package lists using the command sudo apt-get update. Then install the required packages with the command sudo apt-get install samba. Samba will be used to serve fi les and also comes with software to advertise fi le shares on the network.
02 Connect external storageIf you have any external storage, you’ll
need to prepare it for use with Linux. Note that
The Raspberry Pi will automatically advertise its shares on the network – no need to remember IP addresses
you will only be able to read the storage device on other Linux computers unless you reformat it. If you connect the device, you’ll be able to use the dmesg command to fi nd out what the device is called. (Piping that into tail -n 3 prints the last three lines.) It’s probably /dev/sda.
pi@raspberrypi ~ $ dmesg | tail -n 3
[ 1707.371370] sd 1:0:0:0: [sda] No Caching mode page present[ 1707.371403] sd 1:0:0:0: [sda] Assuming drive cache: write through[ 1707.371422] sd 1:0:0:0: [sda]
Attached SCSI removable disk
Each Samba user gets access to their home folder, as well
as a folder shared between all users
WorldMags.netWorldMags.net
WorldMags.net
Practical Raspberry Pi projects to amaze and inspire
www.linuxuser.co.uk37
06 Create a shared directoryWe’re going to create a directory that
any users in the sambashare group can access and change. Setting the setgid permission on a directory (chmod g+s) causes new fi les andsubdirectories created within it to inherit its group ID. This means that each user in the sambashare group can access and change the fi les.
pi@raspberrypi /home $ sudo mkdir /home/alluserspi@raspberrypi /home $ sudo chown
07 Confi guring SambaOpen /etc/samba/smb.conf in an editor
using sudo. Scroll down to the Authentication section and uncomment the security = user line. Then scroll down to the Share Defi nitions section and change read only to no in the [homes] section.
Finally, scroll down to the bottom of the fi le and add a section for the shared folder.[allusers] comment = Shared Folder path = /home/allusers read only = no guest ok = no browseable = yes create mask = 0770 directory mask = 0770
Restart Samba withsudo /etc/init.d/samba restart
08 Connecting to the sharesThe Raspberry Pi will advertise its shares
automatically. Each user will get access to their home folder, as well as the allusers directory. If the user isn’t in the sambashares group, they won’t be able to get it. The syntax for accessing Samba shares is as follows:
Windows: \\raspberrypi\share_name
Mac: smb://raspberrypi/share_name
Linux: smb://raspberrypi/share_name
The share name is optional – you should be able to browse for them. In fact, you shouldn’t even need to use these; you just need to go to the Network section of your fi le manager and select ‘raspberrypi’.
04 Mount external storageWe’re going to move /home onto our
external storage. We’ll do that by mounting it on /mnt/storage, moving the fi les from /home to /mnt/storage, and then mounting the partition on the now empty /home.
pi@raspberrypi ~ $ sudo suroot@raspberrypi:/home/pi# cd /root@raspberrypi:/# mkdir /mnt/homeroot@raspberrypi:/# mount /dev/sda1 /mnt/home/root@raspberrypi:/# mv /home/* /mnt/home/root@raspberrypi:/# umount /mnt/home/root@raspberrypi:/# rmdir /mnt/home/root@raspberrypi:/# echo ‘/dev/sda1 /home ext4 defaults 0 1’ >> /etc/fstabroot@raspberrypi:/# mount -aroot@raspberrypi:/# mount | grep sda1/dev/sda1 on /home type ext4 (rw,relatime,data=ordered)root@raspberrypi:/# ls /homelost+found piroot@raspberrypi:/# exit
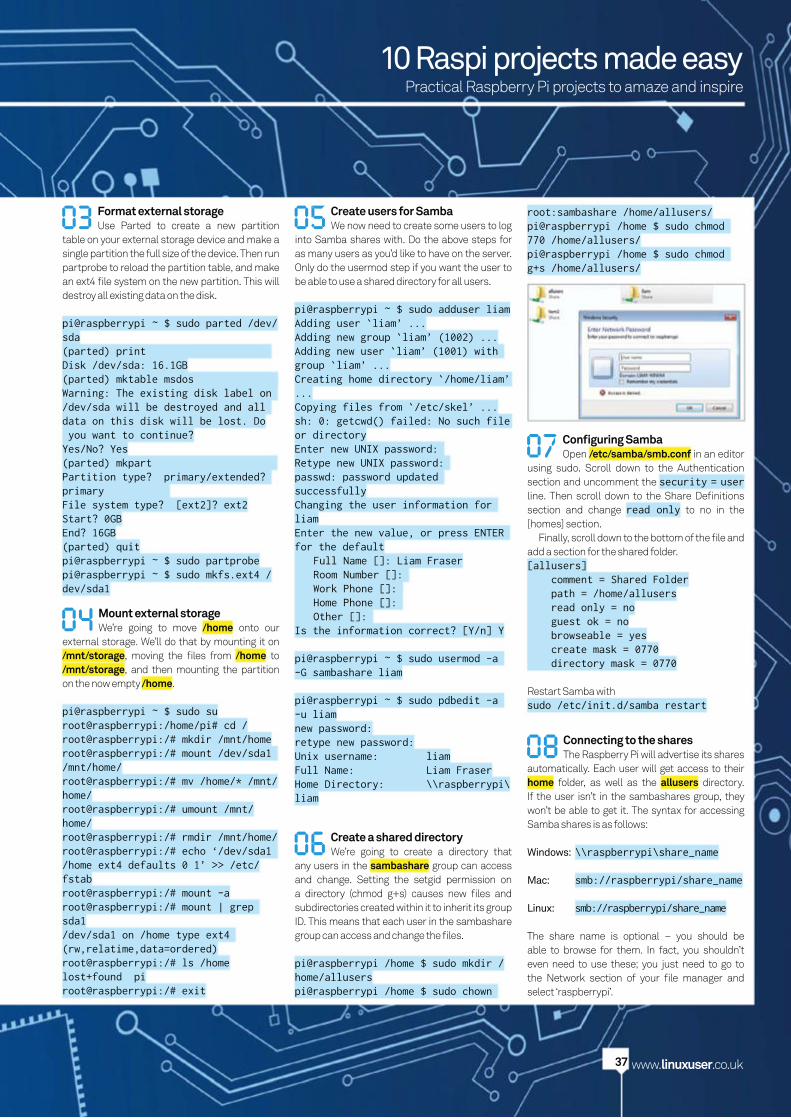
05 Create users for SambaWe now need to create some users to log
into Samba shares with. Do the above steps for as many users as you’d like to have on the server. Only do the usermod step if you want the user to be able to use a shared directory for all users.
pi@raspberrypi ~ $ sudo adduser liamAdding user `liam’ ...Adding new group `liam’ (1002) ...Adding new user `liam’ (1001) with group `liam’ ...Creating home directory `/home/liam’ ...Copying files from `/etc/skel’ ...sh: 0: getcwd() failed: No such file or directoryEnter new UNIX password: Retype new UNIX password: passwd: password updated successfullyChanging the user information for liamEnter the new value, or press ENTER for the default Full Name []: Liam Fraser Room Number []: Work Phone []: Home Phone []: Other []: Is the information correct? [Y/n] Y
pi@raspberrypi ~ $ sudo usermod -a -G sambashare liam
pi@raspberrypi ~ $ sudo pdbedit -a -u liamnew password:retype new password:Unix username: liamFull Name: Liam FraserHome Directory: \\raspberrypi\liam
03 Format external storageUse Parted to create a new partition
table on your external storage device and make a single partition the full size of the device. Then run partprobe to reload the partition table, and make an ext4 fi le system on the new partition. This will destroy all existing data on the disk.
pi@raspberrypi ~ $ sudo parted /dev/sda(parted) print Disk /dev/sda: 16.1GB(parted) mktable msdos Warning: The existing disk label on /dev/sda will be destroyed and all data on this disk will be lost. Do you want to continue?Yes/No? Yes(parted) mkpart Partition type? primary/extended? primary File system type? [ext2]? ext2Start? 0GBEnd? 16GB(parted) quitpi@raspberrypi ~ $ sudo partprobepi@raspberrypi ~ $ sudo mkfs.ext4 /dev/sda1
root:sambashare /home/allusers/pi@raspberrypi /home $ sudo chmod 770 /home/allusers/pi@raspberrypi /home $ sudo chmod g+s /home/allusers/
10 Raspi projects made easy
WorldMags.netWorldMags.net
WorldMags.net
Security camera
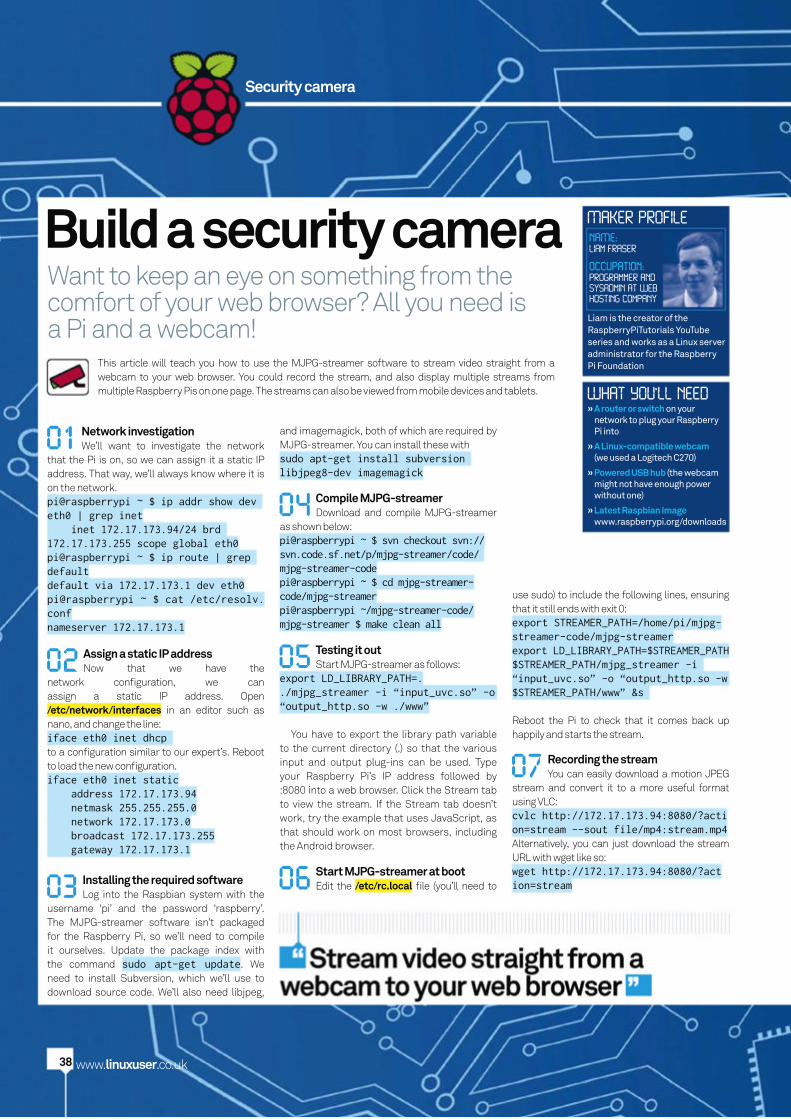
Build a security cameraWant to keep an eye on something from the comfort of your web browser? All you need is a Pi and a webcam!
This article will teach you how to use the MJPG-streamer software to stream video straight from a webcam to your web browser. You could record the stream, and also display multiple streams from multiple Raspberry Pis on one page. The streams can also be viewed from mobile devices and tablets.
MAKER PROFILE
WHAT YOU'LL NEED
NAME:Liam Fraser
OCCUPATION:Programmer and
Sysadmin at Web
Hosting company
Liam is the creator of the RaspberryPiTutorials YouTube series and works as a Linux server administrator for the Raspberry Pi Foundation
» A router or switch on your network to plug your Raspberry Pi into
» A Linux-compatible webcam (we used a Logitech C270)
» Powered USB hub (the webcam might not have enough power without one)
» Latest Raspbian Image www.raspberrypi.org/downloads
01 Network investigation We’ll want to investigate the network
that the Pi is on, so we can assign it a static IP address. That way, we’ll always know where it is on the network.pi@raspberrypi ~ $ ip addr show dev eth0 | grep inet inet 172.17.173.94/24 brd 172.17.173.255 scope global eth0pi@raspberrypi ~ $ ip route | grep defaultdefault via 172.17.173.1 dev eth0pi@raspberrypi ~ $ cat /etc/resolv.confnameserver 172.17.173.1
06 Start MJPG-streamer at bootEdit the /etc/rc.local fi le (you’ll need to
07 Recording the streamYou can easily download a motion JPEG
stream and convert it to a more useful format using VLC:cvlc http://172.17.173.94:8080/?action=stream --sout file/mp4:stream.mp4Alternatively, you can just download the stream URL with wget like so:wget http://172.17.173.94:8080/?action=stream
04 Compile MJPG-streamerDownload and compile MJPG-streamer
as shown below:pi@raspberrypi ~ $ svn checkout svn://svn.code.sf.net/p/mjpg-streamer/code/ mjpg-streamer-codepi@raspberrypi ~ $ cd mjpg-streamer-code/mjpg-streamerpi@raspberrypi ~/mjpg-streamer-code/mjpg-streamer $ make clean all
05 Testing it outStart MJPG-streamer as follows:
export LD_LIBRARY_PATH=../mjpg_streamer -i “input_uvc.so” -o “output_http.so -w ./www”
You have to export the library path variable to the current directory (.) so that the various input and output plug-ins can be used. Type your Raspberry Pi’s IP address followed by :8080 into a web browser. Click the Stream tab to view the stream. If the Stream tab doesn’t work, try the example that uses JavaScript, as that should work on most browsers, including the Android browser.
03 Installing the required softwareLog into the Raspbian system with the
username ‘pi’ and the password ‘raspberry’. The MJPG-streamer software isn’t packaged for the Raspberry Pi, so we’ll need to compile it ourselves. Update the package index with the command sudo apt-get update. We need to install Subversion, which we’ll use to download source code. We’ll also need libjpeg,
02 Assign a static IP addressNow that we have the
network confi guration, we can assign a static IP address. Open /etc/network/interfaces in an editor such as nano, and change the line:iface eth0 inet dhcp to a confi guration similar to our expert’s. Reboot to load the new confi guration.iface eth0 inet static address 172.17.173.94 netmask 255.255.255.0 network 172.17.173.0 broadcast 172.17.173.255 gateway 172.17.173.1
and imagemagick, both of which are required by MJPG-streamer. You can install these withsudo apt-get install subversion libjpeg8-dev imagemagick
use sudo) to include the following lines, ensuring that it still ends with exit 0:export STREAMER_PATH=/home/pi/mjpg-streamer-code/mjpg-streamerexport LD_LIBRARY_PATH=$STREAMER_PATH$STREAMER_PATH/mjpg_streamer -i “input_uvc.so” -o “output_http.so -w $STREAMER_PATH/www” &s
Reboot the Pi to check that it comes back up happily and starts the stream.
www.linuxuser.co.uk38WorldMags.netWorldMags.net
WorldMags.net
Practical Raspberry Pi projects to amaze and inspire
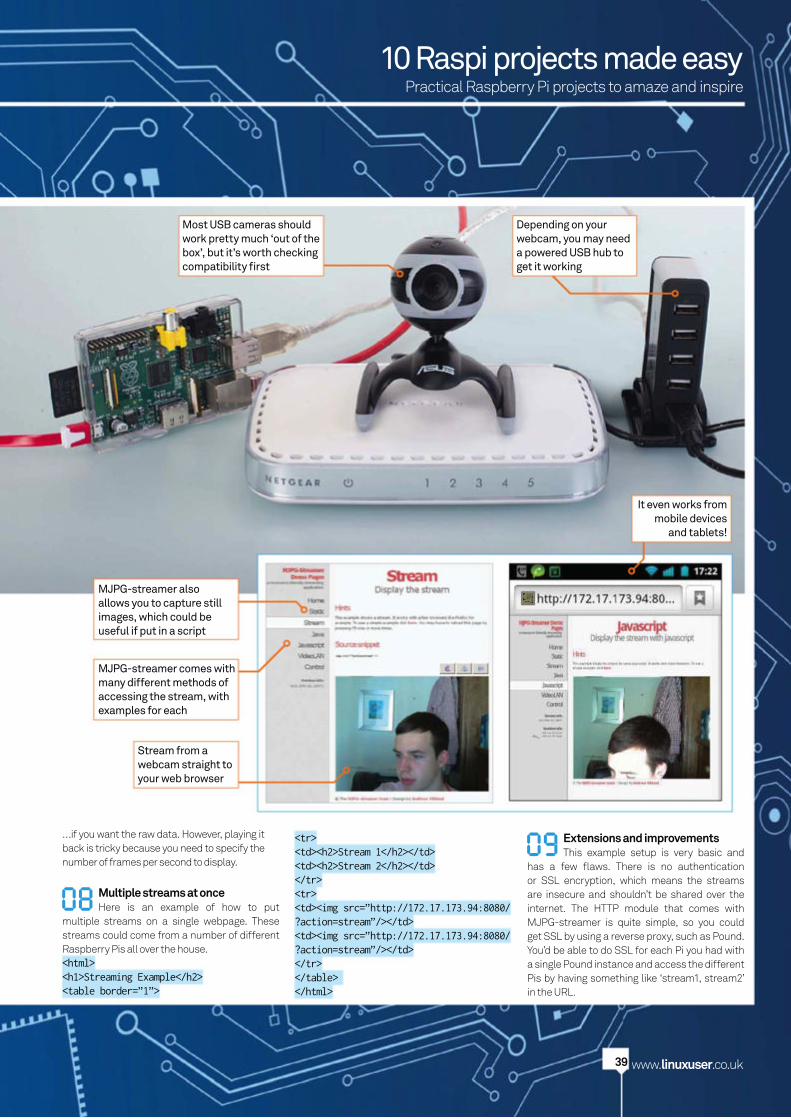
08 Multiple streams at onceHere is an example of how to put
multiple streams on a single webpage. These streams could come from a number of different Raspberry Pis all over the house.<html><h1>Streaming Example</h2><table border=”1”>
Stream from a webcam straight to your web browser
MJPG-streamer also allows you to capture still images, which could be useful if put in a script
MJPG-streamer comes with many different methods of accessing the stream, with examples for each
Most USB cameras should work pretty much ‘out of the box’, but it’s worth checking compatibility fi rst
Depending on your webcam, you may need a powered USB hub to get it working
It even works from mobile devices
and tablets!
<tr><td><h2>Stream 1</h2></td><td><h2>Stream 2</h2></td></tr><tr><td><img src=”http://172.17.173.94:8080/?action=stream”/></td><td><img src=”http://172.17.173.94:8080/?action=stream”/></td></tr></table> </html>
09 Extensions and improvementsThis example setup is very basic and
has a few fl aws. There is no authentication or SSL encryption, which means the streams are insecure and shouldn’t be shared over the internet. The HTTP module that comes with MJPG-streamer is quite simple, so you could get SSL by using a reverse proxy, such as Pound. You’d be able to do SSL for each Pi you had with a single Pound instance and access the different Pis by having something like ‘stream1, stream2’ in the URL.
www.linuxuser.co.uk39
…if you want the raw data. However, playing it back is tricky because you need to specify the number of frames per second to display.
10 Raspi projects made easy
WorldMags.netWorldMags.net
WorldMags.net
VoIP server
www.linuxuser.co.uk40
Build a VoIP serverUse your Raspberry Pi as a voice over IP server, perfect for phone calls in the home or a small business
RasPBX is a project that brings Asterisk – industry-standard voice over IP software – to the Raspberry Pi. There are VoIP clients for many platforms, including hardware that converts VoIP to a conventional telephone line. Each
client gets a phone number and can call other clients. You can also have conference calls, perfect for meetings over the phone. As an extension of this article, you could also share the VoIP server over the internet, allowing remote clients to connect.
WHAT YOU'LL NEED» A router or switch on your
network to plug your Raspberry Pi into
» Smartphones, computers, or VoIP phones on the same network to use as clients
» Powered USB hub (if using external hard drive)
» The latest RasPBX image www.raspberry-asterisk.org/downloads
MAKER PROFILE
NAME:Liam Fraser
OCCUPATION:Programmer and
Sysadmin at Web
Hosting company
Liam is the creator of the RaspberryPiTutorials YouTube series and volunteers as a Linux server administrator for the Raspberry Pi Foundation
01 Initial setupRasPBX is good to go as soon as the
image is fl ashed to your SD card: there is a web interface for confi guration, and SSH is included for remote login. As this will be a server, we’ll log in with the user ‘root’ and password ‘raspberry’ and change the IP address to a static one so we always know where it is on the network.root@raspbx:~# ip addr show dev eth0 | grep inet inet 172.17.173.94/24 brd 172.17.173.255 scope global eth0 inet6 fe80::ba27:ebff:fef3:9016/64 scope link root@raspbx:~# ip route | grep defaultdefault via 172.17.173.1 dev eth0 root@raspbx:~# cat /etc/resolv.confnameserver 127.0.0.1nameserver 8.8.8.8nameserver 8.8.8.4
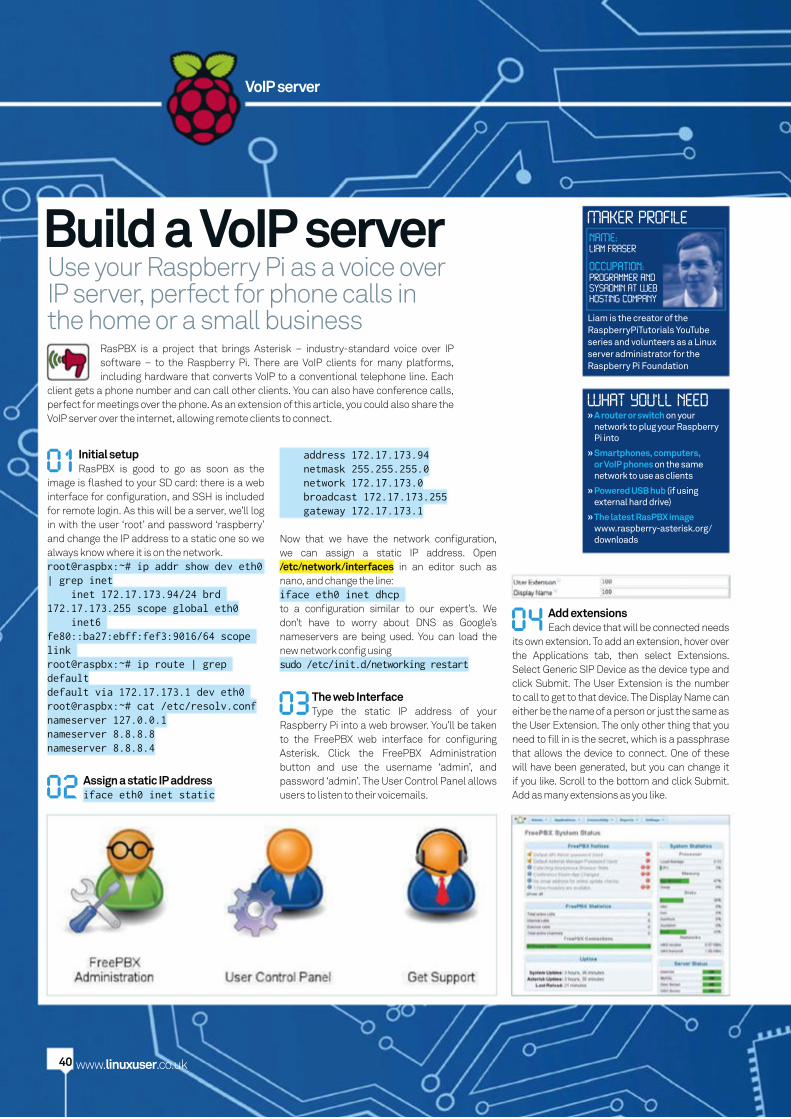
03 The web InterfaceType the static IP address of your
Raspberry Pi into a web browser. You’ll be taken to the FreePBX web interface for confi guring Asterisk. Click the FreePBX Administration button and use the username ‘admin’, and password ‘admin’. The User Control Panel allows users to listen to their voicemails.02 Assign a static IP address
iface eth0 inet static
04 Add extensions Each device that will be connected needs
its own extension. To add an extension, hover over the Applications tab, then select Extensions. Select Generic SIP Device as the device type and click Submit. The User Extension is the number to call to get to that device. The Display Name can either be the name of a person or just the same as the User Extension. The only other thing that you need to fi ll in is the secret, which is a passphrase that allows the device to connect. One of these will have been generated, but you can change it if you like. Scroll to the bottom and click Submit. Add as many extensions as you like.
address 172.17.173.94 netmask 255.255.255.0 network 172.17.173.0 broadcast 172.17.173.255 gateway 172.17.173.1
Now that we have the network confi guration, we can assign a static IP address. Open /etc/network/interfaces in an editor such as nano, and change the line:iface eth0 inet dhcp to a confi guration similar to our expert’s. We don’t have to worry about DNS as Google’s nameservers are being used. You can load the new network confi g using sudo /etc/init.d/networking restart
WorldMags.netWorldMags.net
WorldMags.net
Practical Raspberry Pi projects to amaze and inspire10 Raspi projects made easy
www.linuxuser.co.uk41
08 Trying a conference callCall the conference number that you
set up from one of the devices. You’ll need to enter the PIN code you set followed by the # key. You’ll be told that you are the only person in this conference, and will hear a notifi cation whenever anyone else joins and leaves the conference.
05 Add a conference extension Go to the Applications section and select
Conferences. Choose a number and name for the conference, and a PIN number if you’d like users to require a PIN to join. Click Submit Changes once you’re done.
06 Apply config Changes such as adding extensions and
conferences are not made until the Apply Confi g button is pressed, so be sure to do that before closing the web interface.
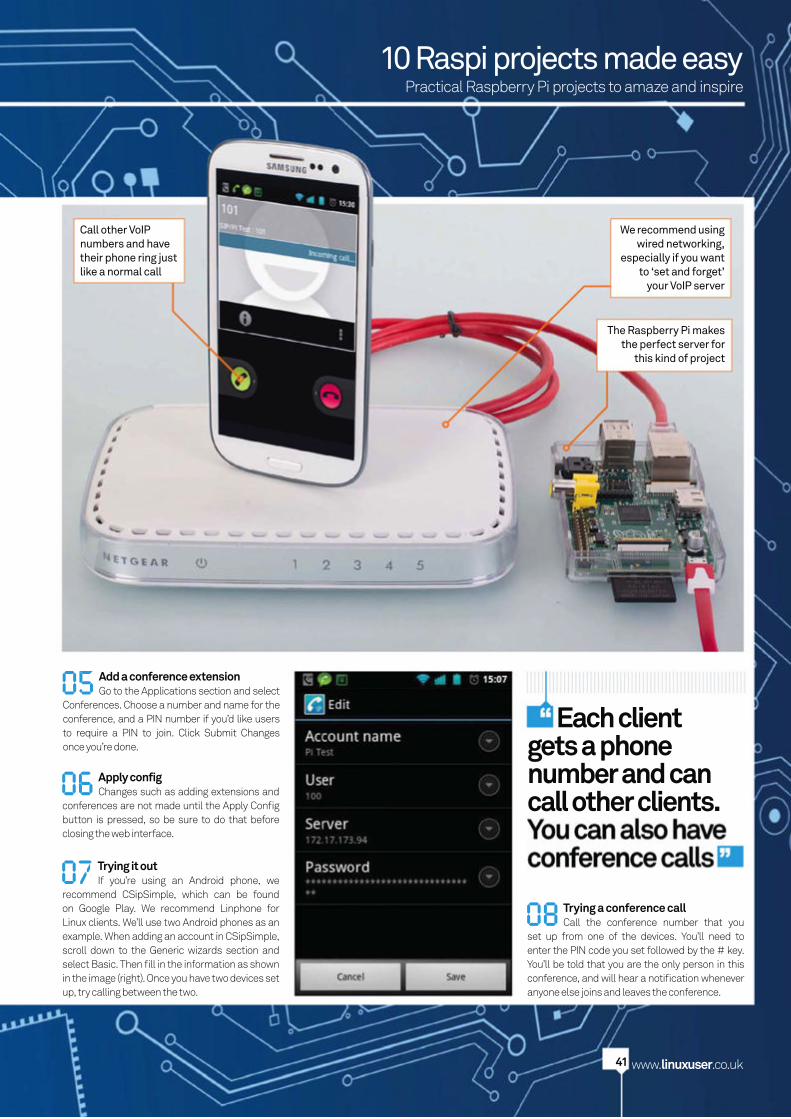
07 Trying it out If you’re using an Android phone, we
recommend CSipSimple, which can be found on Google Play. We recommend Linphone for Linux clients. We’ll use two Android phones as an example. When adding an account in CSipSimple, scroll down to the Generic wizards section and select Basic. Then fi ll in the information as shown in the image (right). Once you have two devices set up, try calling between the two.
Call other VoIP numbers and have their phone ring just like a normal call
Each client gets a phone number and can call other clients.
The Raspberry Pi makes the perfect server for
this kind of project
We recommend using wired networking,
especially if you want to ‘set and forget’
your VoIP server
WorldMags.netWorldMags.net
WorldMags.net
Portable wireless access point
www.linuxuser.co.uk42
Create a portable wireless access pointWith the help of a Wi-Fi adaptor, you can turn your Raspberry Pi into a wireless access point for other devices
The Raspberry Pi’s portability makes it ideal for carrying around as an emergency wireless router and access point – great for some hotels and visiting less tech-adept friends and family.
WHAT YOU'LL NEED» Model B Raspberry Pi
» Compatible Wi-Fi adaptor www.adafruit.com/products/814
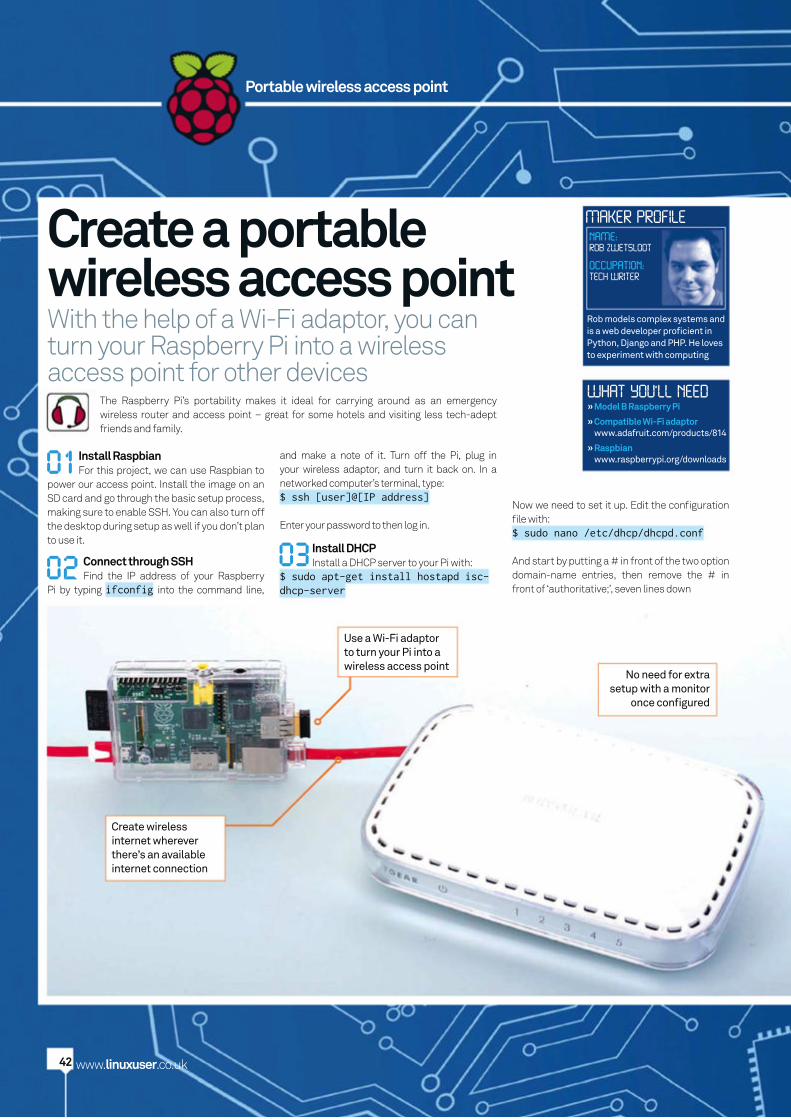
» Raspbian www.raspberrypi.org/downloads01 Install Raspbian
For this project, we can use Raspbian to power our access point. Install the image on an SD card and go through the basic setup process, making sure to enable SSH. You can also turn off the desktop during setup as well if you don’t plan to use it.
NAME:ROB ZWETSLOOT
OCCUPATION:TECH WRITER
Rob models complex systems and is a web developer profi cient in Python, Django and PHP. He loves to experiment with computing
MAKER PROFILE
Use a Wi-Fi adaptor to turn your Pi into a wireless access point
Create wireless internet wherever there’s an available internet connection
No need for extra setup with a monitor
once confi gured
02 Connect through SSH Find the IP address of your Raspberry
Pi by typing ifconfig into the command line,
and make a note of it. Turn off the Pi, plug in your wireless adaptor, and turn it back on. In a networked computer’s terminal, type:$ ssh [user]@[IP address]
Enter your password to then log in.
03Install DHCPInstall a DHCP server to your Pi with:
$ sudo apt-get install hostapd isc-dhcp-server
Now we need to set it up. Edit the confi guration fi le with:$ sudo nano /etc/dhcp/dhcpd.conf
And start by putting a # in front of the two option domain-name entries, then remove the # in front of ‘authoritative;’, seven lines down
WorldMags.netWorldMags.net
WorldMags.net
Practical Raspberry Pi projects to amaze and inspire10 Raspi projects made easy
www.linuxuser.co.uk43
09 Finish upSo that this works after a reboot, type:
$ sudo sh -c “iptables-save > /etc/iptables.ipv4.nat”
Then add up iptables-restore < /etc/iptables.ipv4.nat to the end of the /etc/network/interfaces fi le.
Finally, set it up as a daemon with:sudo service hostapd startsudo service isc-dhcp-server startsudo update-rc.d hostapd enablesudo update-rc.d isc-dhcp-server enable
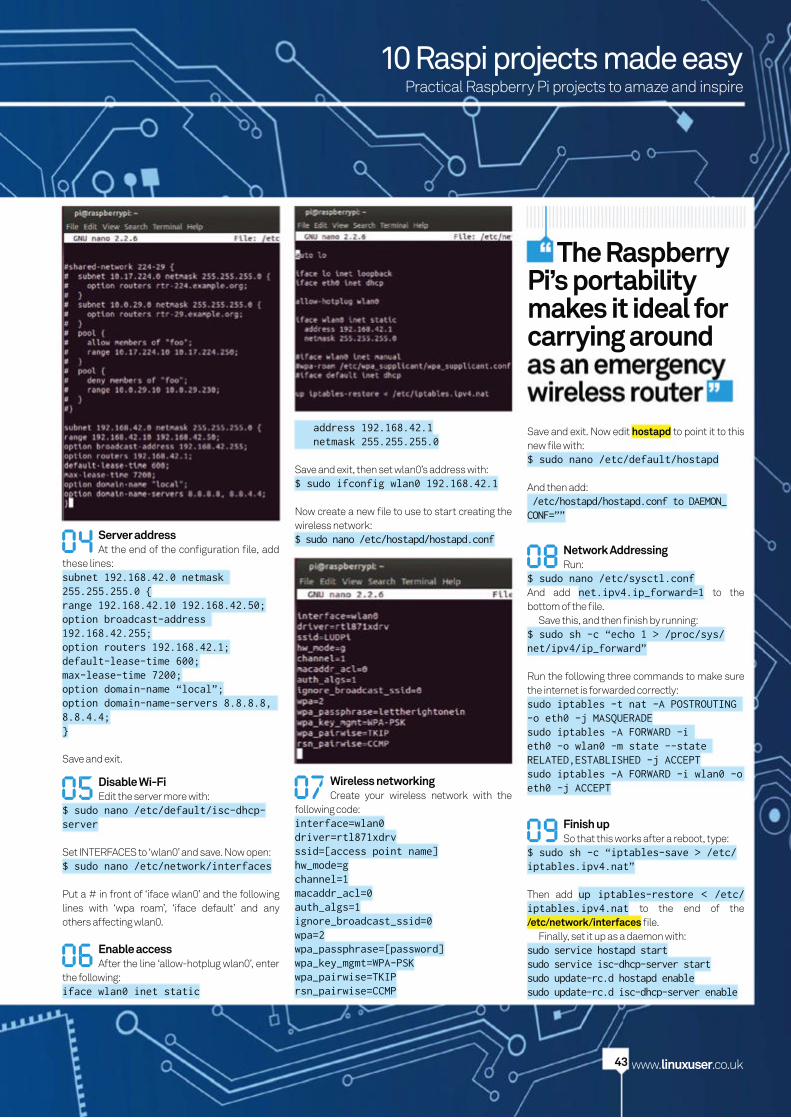
04 Server addressAt the end of the confi guration fi le, add
these lines:subnet 192.168.42.0 netmask 255.255.255.0 {range 192.168.42.10 192.168.42.50;option broadcast-address 192.168.42.255;option routers 192.168.42.1;default-lease-time 600;max-lease-time 7200;option domain-name “local”;option domain-name-servers 8.8.8.8, 8.8.4.4;}
Save and exit.
05 Disable Wi-FiEdit the server more with:
$ sudo nano /etc/default/isc-dhcp-server
Set INTERFACES to ‘wlan0’ and save. Now open:$ sudo nano /etc/network/interfaces
Put a # in front of ‘iface wlan0’ and the following lines with ‘wpa roam’, ‘iface default’ and any others affecting wlan0.
06 Enable accessAfter the line ‘allow-hotplug wlan0’, enter
the following:iface wlan0 inet static
07 Wireless networking Create your wireless network with the
following code:interface=wlan0driver=rtl871xdrvssid=[access point name]hw_mode=gchannel=1macaddr_acl=0auth_algs=1ignore_broadcast_ssid=0wpa=2wpa_passphrase=[password]wpa_key_mgmt=WPA-PSKwpa_pairwise=TKIPrsn_pairwise=CCMP
The Raspberry Pi’s portability makes it ideal for carrying around
08 Network AddressingRun:
$ sudo nano /etc/sysctl.confAnd add net.ipv4.ip_forward=1 to the bottom of the fi le.
Save this, and then fi nish by running:$ sudo sh -c “echo 1 > /proc/sys/net/ipv4/ip_forward”
Run the following three commands to make sure the internet is forwarded correctly:sudo iptables -t nat -A POSTROUTING -o eth0 -j MASQUERADEsudo iptables -A FORWARD -i eth0 -o wlan0 -m state --state RELATED,ESTABLISHED -j ACCEPTsudo iptables -A FORWARD -i wlan0 -o eth0 -j ACCEPT
address 192.168.42.1 netmask 255.255.255.0
Save and exit, then set wlan0’s address with:$ sudo ifconfig wlan0 192.168.42.1
Now create a new fi le to use to start creating the wireless network:$ sudo nano /etc/hostapd/hostapd.conf
Save and exit. Now edit hostapd to point it to this new fi le with:$ sudo nano /etc/default/hostapd
And then add: /etc/hostapd/hostapd.conf to DAEMON_CONF=””
WorldMags.netWorldMags.net
WorldMags.net

Voice-control your Pi
www.linuxuser.co.uk44
Voice-control your PiControl your Raspberry Pi using just your voice
Ever since Captain Jean-Luc Picard fi rst spoke to the Enterprise computer, there has been a fascination with verbally interacting with a computer by voice alone. Now you can do the same with your Raspberry Pi. Special thanks to Steve Hickson and his PiAUISuite…
MAKER PROFILE
WHAT YOU'LL NEED
NAME:LES POUNDER
OCCUPATION:FREELANCE
SYSTEM
ADMINISTRATOR
Les has been a strong advocate of Linux and free software since 1999, and loves to tinker with hardware and software projects
» USB microphone (check compatibility – your expert used a Zoom H2)
» Powered USB hub (particularly if using an external hard drive)
» Source code available from https://github.com/StevenHickson/PiAUISuite
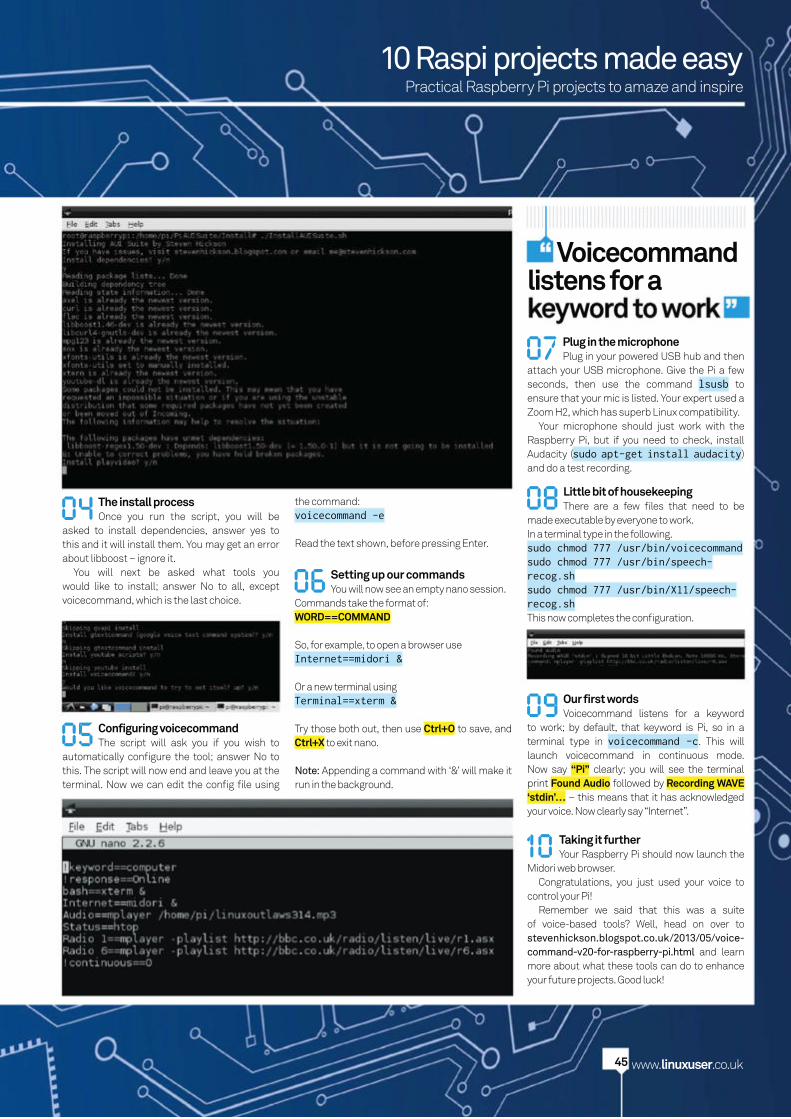
01 Download the softwareWe start by downloading the suite
of software from the repository on GitHub: https://github.com/StevenHickson/PiAUISuite/archive/master.zip
What you are downloading is a suite of software for the Pi; however, we will focus solely on voicecommand.
In a terminal, navigate to the download folder and unzip the fi le using unzip master.zip. You will now have a folder called PiAUISuite-master.
03 Make the files executable and installTo install the tools, we need to navigate
to PiAUISuite-master/Install. We now need to make InstallAUISuite.sh executable for all users, so usechmod 777 InstallAUISuite.sh
Now that the fi le is executable, let’s install:sudo ./ InstallAUISuite.sh
Practically any USB microphone should work, but always check compatibility
We recommend using a powered USB hub for your microphone and any storage you might use
02 Download the dependenciesYou will need to install a few
dependencies to build your project, so open a terminal and run the following:
sudo apt-get install libboost1.50-dev libboost-regex1.50-dev youtube-dl axel curl xterm libcurl4-gnutls-dev mpg123 flac sox libboost1.46This will take a bit of time, so go grab a drink.
We’ve used a VESA mount to fi x the RasPi
to the back of the monitor. See
shop.pimoroni.com
WorldMags.netWorldMags.net
WorldMags.net
Practical Raspberry Pi projects to amaze and inspire10 Raspi projects made easy
www.linuxuser.co.uk45
06 Setting up our commands You will now see an empty nano session.
Commands take the format of:WORD==COMMAND
So, for example, to open a browser useInternet==midori &
Or a new terminal usingTerminal==xterm &
Try those both out, then use Ctrl+O to save, and Ctrl+X to exit nano.
Note: Appending a command with ‘&’ will make it run in the background.
07 Plug in the microphonePlug in your powered USB hub and then
attach your USB microphone. Give the Pi a few seconds, then use the command lsusb to ensure that your mic is listed. Your expert used a Zoom H2, which has superb Linux compatibility.
Your microphone should just work with the Raspberry Pi, but if you need to check, install Audacity (sudo apt-get install audacity) and do a test recording.
08 Little bit of housekeepingThere are a few fi les that need to be
made executable by everyone to work.In a terminal type in the following.sudo chmod 777 /usr/bin/voicecommandsudo chmod 777 /usr/bin/speech-recog.shsudo chmod 777 /usr/bin/X11/speech-recog.shThis now completes the confi guration.
09 Our first wordsVoicecommand listens for a keyword
to work; by default, that keyword is Pi, so in a terminal type in voicecommand -c. This will launch voicecommand in continuous mode. Now say “Pi” clearly; you will see the terminal print Found Audio followed by Recording WAVE ‘stdin’… – this means that it has acknowledged your voice. Now clearly say “Internet”.
10 Taking it furtherYour Raspberry Pi should now launch the
Midori web browser.Congratulations, you just used your voice to
control your Pi!Remember we said that this was a suite
of voice-based tools? Well, head on over to stevenhickson.blogspot.co.uk/2013/05/voice-command-v20-for-raspberry-pi.html and learn more about what these tools can do to enhance your future projects. Good luck!
04 The install processOnce you run the script, you will be
asked to install dependencies, answer yes to this and it will install them. You may get an error about libboost – ignore it.
You will next be asked what tools you would like to install; answer No to all, except voicecommand, which is the last choice.
05 Configuring voicecommandThe script will ask you if you wish to
automatically confi gure the tool; answer No to this. The script will now end and leave you at the terminal. Now we can edit the confi g fi le using
Voicecommand listens for a
the command:voicecommand -e
Read the text shown, before pressing Enter.
WorldMags.netWorldMags.net
WorldMags.net
Top Related