
Zoom Guide Book - Ottawa...
18
The Office of Academic Technology http://academictech.ottawa.edu/ Zoom End-User Guide Book – Leader Guide 1 Last updated: January 28, 2014 For technical assistance, contact OU Help ([email protected] or 855-268-4357). For feedback regarding this document, contact [email protected]. Zoom Guide Book LEADER GUIDE Documentation and screenshots are based on Zoom version 2.5.XXXX About Zoom: Zoom is a cloud-based conferencing solution that provides both video conferencing and screen share capabilities. Its high-quality and easy to use format have made it a great choice for Ottawa University. Requests for a Zoom account should be sent to OU Help at [email protected] or by submitting a ticket via the e-request form on the MyOttawa portal. Once approved OU Help will send you login credentials and install the Zoom software on your computer. About this Documentation: In this guide book you’ll be provided with the critical information you need to conduct successful Zoom meetings. We’d like to thank our friends at Zoom for allowing use of their technical database articles, and note content from the knowledge base at https://support.zoom.us/forums is used with permission. Topics covered in this training: 1. Technical Things to Know 2. Keeping it Professional 3. Best Practices 4. How to Get Help with Zoom
-
Upload
nguyenkiet -
Category
Documents
-
view
241 -
download
0
Transcript of Zoom Guide Book - Ottawa...
The Office of Academic Technology http://academictech.ottawa.edu/
Zoom End-User Guide Book – Leader Guide 1 Last updated: January 28, 2014 For technical assistance, contact OU Help ([email protected] or 855-268-4357). For feedback regarding this document, contact [email protected].
Zoom Guide Book
LEADER GUIDE
Documentation and screenshots are based on Zoom version 2.5.XXXX
About Zoom:
Zoom is a cloud-based conferencing solution that provides both video conferencing and
screen share capabilities. Its high-quality and easy to use format have made it a great
choice for Ottawa University.
Requests for a Zoom account should be sent to OU Help at [email protected] or by
submitting a ticket via the e-request form on the MyOttawa portal. Once approved OU
Help will send you login credentials and install the Zoom software on your computer.
About this Documentation:
In this guide book you’ll be provided with the critical information you need to conduct
successful Zoom meetings. We’d like to thank our friends at Zoom for allowing use of
their technical database articles, and note content from the knowledge base at
https://support.zoom.us/forums is used with permission.
Topics covered in this training:
1. Technical Things to Know
2. Keeping it Professional
3. Best Practices
4. How to Get Help with Zoom
2
1. Technical Things to Know
How to Launch Zoom and Start a Meeting
Once you’re set up with a Zoom account, you can access your account online or via the
desktop software installed on your Ottawa University computer. This training focuses on
accessing your account from the Zoom desktop software.
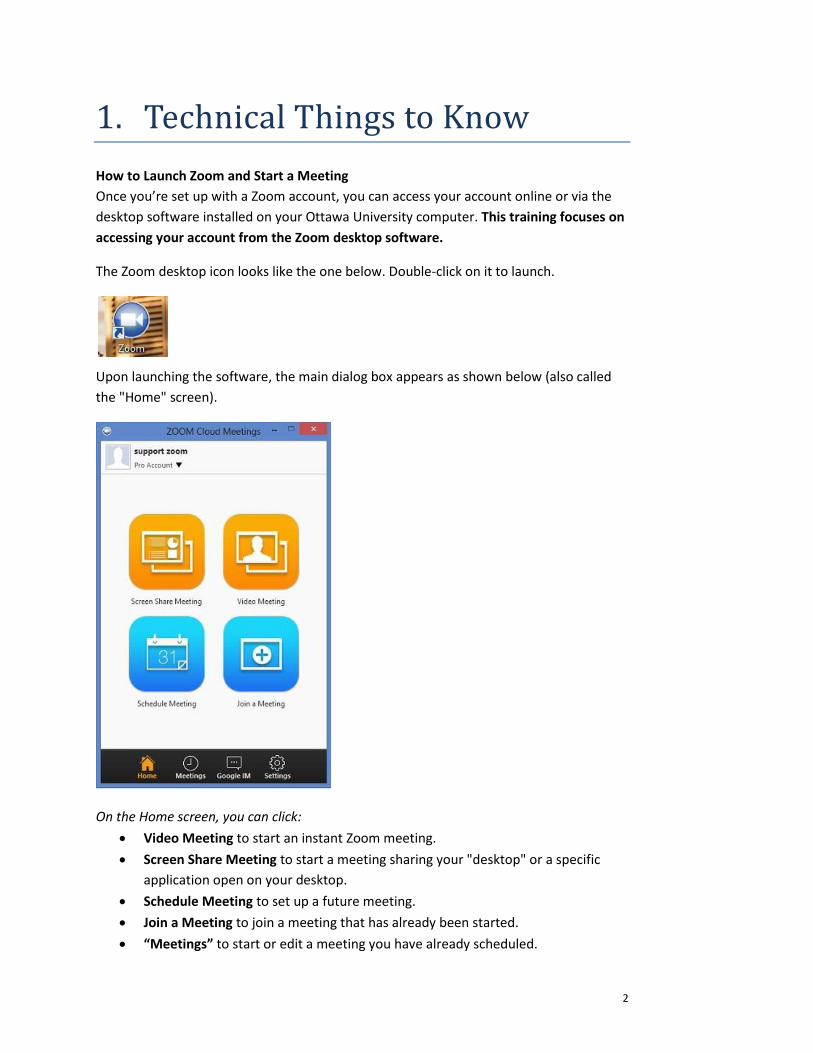
The Zoom desktop icon looks like the one below. Double-click on it to launch.
Upon launching the software, the main dialog box appears as shown below (also called
the "Home" screen).
On the Home screen, you can click:
Video Meeting to start an instant Zoom meeting.
Screen Share Meeting to start a meeting sharing your "desktop" or a specific
application open on your desktop.
Schedule Meeting to set up a future meeting.
Join a Meeting to join a meeting that has already been started.
“Meetings” to start or edit a meeting you have already scheduled.

3
Meetings
The “My Meeting” tab displays your upcoming scheduled or recurring meetings. The
“Recorded” tab allows you to view previously recorded meetings.
You will also find that a Personal Meeting ID (PMI) is assigned to you automatically as a
permanent virtual room. You can start it at any time or schedule it for a future use.
Your Personal Meeting ID becomes your Personal Meeting URL as well; for example:
https://ottawa.zoom.us/j/4545454545
You can customize the 10 digit PMI to something more personal, like your phone
number. To customize, hit the “Edit” button below the PMI to change it.
To take action on a scheduled meeting, choose one of the following options:
Start: Starts the pre-scheduled meeting listed in your upcoming meetings.
Edit: Edit or update your scheduled meeting.
Delete: Selecting delete will permanently delete your scheduled meeting.
Copy URL: Copy the web link for the so that you can paste it into an email, IM,
SMS, etc.

4
NOTE: if you do not see your scheduled meeting, click the refresh icon in the upper right-
hand corner to update/refresh the meeting list.
How to Schedule a Meeting in Zoom (Individual and Recurring)
To schedule a meeting, you must first log in to Zoom, and then click-on the "Schedule
Meeting" icon (see below).
Once you have opened the zoom scheduler, use the following options to help set-up your
meeting:
Topic: Type your meeting topic. This name for the meeting appears in the My
Meetings list and is also use for the file name of the recording, should you choose
to record the meeting. Thus, be sure to choose a meaningful name.
When: Select a date and time of your meeting (local, device time zone).
Recurring meeting: Choose this if you want the meeting ID to be persistent for
the recurring meetings so that attendees can use the same link for every instance
of the meeting. Recurring meeting links are valid for one year from the date of
creation.
Video Meeting: Start your meeting from video mode.
Screen Sharing Meeting: Start your meeting from a screen share (without video).
5
Password: You can select and input a password here, so that users will need a
password to join your scheduled meeting. Setting a meeting password is
optional.
Enable join before host: Allow participants to join your meeting before you.
NOTES: If you choose this option
o And enter the meeting without logging into your personal Zoom account
yourself, you will have only the participant view of the session like
everyone else. Any controls available only to the host will not be
available (e.g., the ability to mute the microphones of participants or to
allow someone else to control the presenter’s mouse).
o Participants will potentially be able to see and talk with one another
before you arrive (if you arrive after they do). Depending on your use-
case, this may or may not be desirable.
Calendar: Choose what calendar type you want your meeting to appear on.
After you are done setting up your scheduled meeting, click the Schedule button at the
lower right-hand side of the window.
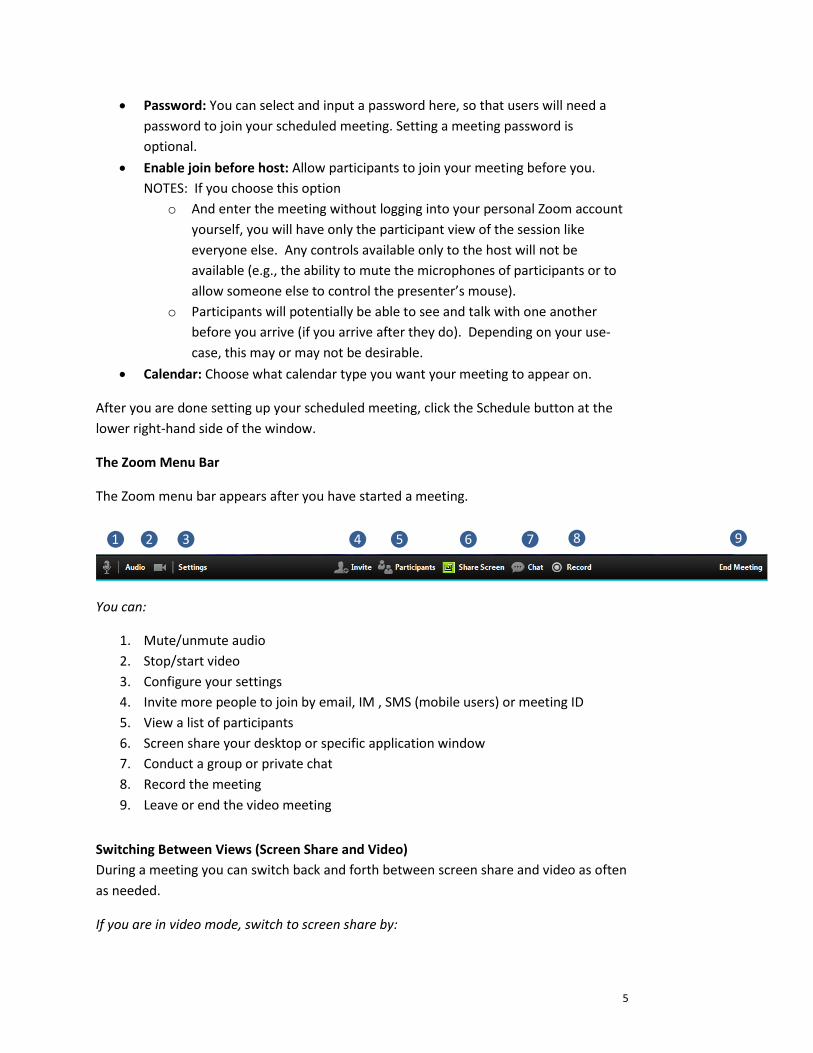
The Zoom Menu Bar
The Zoom menu bar appears after you have started a meeting.
You can:
1. Mute/unmute audio
2. Stop/start video
3. Configure your settings
4. Invite more people to join by email, IM , SMS (mobile users) or meeting ID
5. View a list of participants
6. Screen share your desktop or specific application window
7. Conduct a group or private chat
8. Record the meeting
9. Leave or end the video meeting
Switching Between Views (Screen Share and Video)
During a meeting you can switch back and forth between screen share and video as often
as needed.
If you are in video mode, switch to screen share by:
❶ ❷ ❸ ❹ ❺ ❻ ❼ ❽ ❾

6
1. Clicking on “Share Screen”:
2. Click on the item you want to display and then click “OK”:
If you’re displaying your screen, switch to video by:
1. Clicking “Stop Share”:
2. The view immediately switches back to video.
What to Know About Audio
Feedback
Audio feedback sometimes occurs during large group meetings, but there are a few
things you can do to prevent (or at least minimize) distracting feedback.
Ask participants to mute their lines until ready to speak.
Mute all participants if needed.
How to Mute Your Audio
Your own audio is muted by clicking on the microphone in the lower left-hand corner of
the screen.
Audio is not muted Audio is muted
How to Mute Others

7
As the host you can mute others.
Mute an individual by rolling over a name in the participant list and clicking on
“Mute”.
Mute all participants at once by clicking on the “Mute All” button.
How to Give Mouse and Keyboard Control
While "Screen Sharing" in a Zoom meeting, you can give mouse/keyboard “Remote
Control" to another participant in the meeting.
1. Locate the sharing/annotation menu at the top of the screen:
2. Then select "Remote Control" and choose a participant’s name:
3. Regain control over mouse and keyboard by simply clicking anywhere on your screen.
Chat
The chat feature provides you and your participants the ability to chat during the session.
You can send private chat or group chat messages.
1. Click on “Chat”:
2. Type a message and hit “enter” on your keyboard to send. You can message an
individual participant via private chat by
clicking on the drop down menu, and
selecting an individual’s name before
you send the chat message.

8
How to Record a Session
To record a meeting you’ll need to either be the host, or the host must grant permission
to record.
1. Record the session by clicking the “Record” button.
2. Click “Stop Recording” to end the recording (note: this ends the recording but not the
meeting).
3. After the meeting you’ll find the recorded session listed in “Meetings” under the
“Recorded” tab:
Play Video: Plays the saved meeting with your default media player.
Open: Opens the folder where the file is saved.

9
Delete: Erases your stored meeting from the list in your Zoom client (but not
from the save location).
4. Allow others to record by rolling over their names in the participant list and clicking
on “Allow Record”.
How to Configure the Settings
You can find the Settings tab in the main dialog box or in the meeting menu bar. After
clicking Settings, you have the following options:
Audio: Test, select and adjust your speakers, and microphone
Video: Test and select your video camera
General: Select additional preferences
Feedback: Send questions, comments, or feedback to Zoom
Recording: Here you can browse/open your stored recordings (all recordings are
stored on your local device/computer)
Account: Here you can upgrade your account or manage your account details
(Note: all Ottawa University users are already upgraded as Pro users)
These settings can also be changed from the control panel of your desktop software.
10
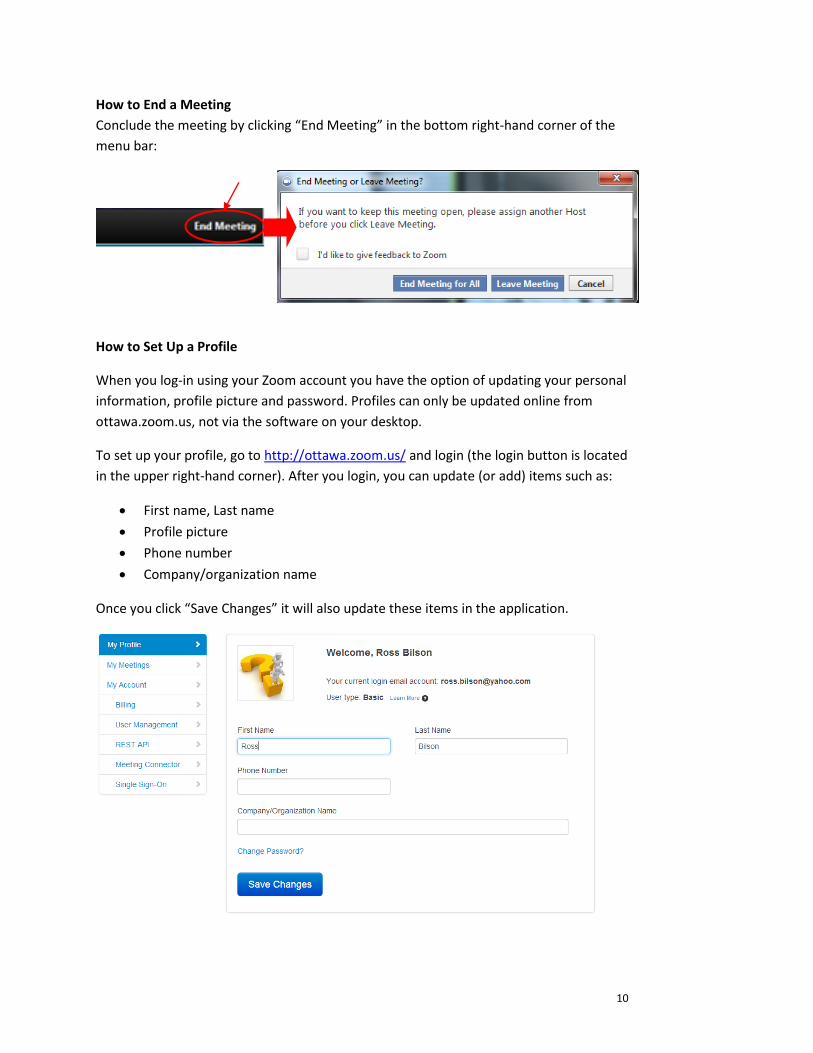
How to End a Meeting
Conclude the meeting by clicking “End Meeting” in the bottom right-hand corner of the
menu bar:
How to Set Up a Profile
When you log-in using your Zoom account you have the option of updating your personal
information, profile picture and password. Profiles can only be updated online from
ottawa.zoom.us, not via the software on your desktop.
To set up your profile, go to http://ottawa.zoom.us/ and login (the login button is located
in the upper right-hand corner). After you login, you can update (or add) items such as:
First name, Last name
Profile picture
Phone number
Company/organization name
Once you click “Save Changes” it will also update these items in the application.
11
2. Keeping it Professional
Whether using Zoom with internal or external participants, it’s important to keep in mind
that you are representing Ottawa University during your meeting. A professional
experience creates a positive, lasting impression.
Surroundings
Think about what the participants will see and hear while you’re meeting. Are you
making the right impression?
Background – Check the background and rid the space of any clutter. Keep
Ottawa University branding visible (if possible).
Noise – Is there background noise that could prevent participants from hearing
clearly? If you’re conducting a meeting from an “open” environment keep out of
earshot of others so that confidential information is not overheard by your
participant, or that others are not hearing confidential information.
Distractions – Minimize distractions and interruptions by letting others know
you’re in a Zoom meeting.
Lighting – Double check the lighting when you launch the meeting and the video
has started. Make sure more light is on your face than is coming
from behind you. Adjust the lighting and/or web cam if it’s too dark.
Framing – As an additional consideration be aware of your distance
from the camera (not too close, not too far).
Posture and Body Language
As when meeting face-to-face it is important to maintain good posture and body
language.
Here are some tips:
Sit up/don’t slouch – This helps you look engaged and confident.
Smile – It’s easy to forget to smile, but it’s important to maintain a welcoming,
positive interview.
Hand gestures – Avoid using your hands too much. It can get distracting and
hands look very big in front of the camera.
Appearance
Maintain a professional appearance on camera as you would in a face-to-face meeting.
Dress professionally and consider wearing your name tag if meeting with external
participants.

12
Start with Video versus Screen Share
Create a welcoming environment by starting with video. Zoom sounds a “doorbell” to
alert you when your guest has arrived so you needn’t be concerned about sitting in front
of your camera waiting for him or her to arrive. When you hear the doorbell, position
yourself in front of the camera (and smile!).
Zoom Use Policy
Your use of Zoom falls under the “Confidentiality/Use of University Resources and
Information” as located in the OU Employee Handbook:
University resources must be reserved for business purposes on behalf of the
University. They may not be used for personal gain except in a manner that is
incidental, and reasonable in light of the person’s duties. University resources
include, but are not limited to, the use of University systems, such as telephone
systems, data communication and networking systems, and the domain for
electronic communication forums; the use of University equipment; the use of
procurement tools such as purchasing cards, credit cards, and petty cash; and the
time and effort of other staff, students, and others at the University.
What to Know About Recording
If you are going to record the session it’s important to let participants know you’re going
to do so.

13
3. Best Practices
“Dos” and “Don’ts”
The following list of items to be aware of before, during, and while conducting a Zoom
session were established to promote a stress-free and successful meeting.
Do: Don’t:
Be a little bit early (10 minutes) Have unnecessary screens and applications open (to preserve computer resources and prevent information being displayed that shouldn’t be)
Notify others around you when you’re going to conduct a Zoom session
Bring your cell phone or other distractions
Check camera placement before starting the session
Fidget around in your seat
Check your audio before you start Leave open applications such as Pandora, email, irrelevant web sites
Conduct a mirror check (look in the mirror before you begin)
Smile! They can see you.
Talk toward the camera, not the screen
Be prepared and have all relevant applications and web sites open and ready to go before you start
For groups:
Review session guidelines such as muting, how to ask questions, how to use the chat, etc.
Repeat questions so everyone can hear
14
4. How to Get Help with Zoom
How and When to Contact OU Help
OU Help is your support for Zoom. Contact OU Help:
When a new Zoom account needs to be created
Ahead of time if you are going to conduct a group session (OU Help
will schedule someone to be available during that time when possible)
If you need help during a session (be prepared with your 9 or 10-digit
meeting ID)
Forgot Your Password?
Zoom is a hosted solution and so password resets are done by Zoom, not OU Help. If you
need assistance with your password or are experiencing an issue with logging in, OU Help
will send you the “forgot password” link. You can also access the “forgot password” link
directly at: (https://ottawa.zoom.us/forgot_password).
Be Proactive – Avoid Issues by Updating the Software Application When Prompted
Zoom will periodically send out notices (emails) to licensed users when updates and new
versions are available (or you might be prompted to update upon launching the
software). Account holders can (and should) update when prompted to do so.
Please Keep in Mind…
Zoom is a cloud-based service, so no internet connection = no Zoom. If you are or your
participant(s) is experiencing internet connection issues, Zoom will too. For best results
use a wired connection whenever possible.
For Further Information: The Zoom Web Site Knowledge Base
Would you like to know more about Zoom? For more information, visit their knowledge
base: http://support.zoom.us/home.

15
Common Zoom Troubleshooting Steps for PC
The following steps should be used to help correct any technology issues while using the
Zoom system. Note: Documentation and screenshots are based on Zoom version
2.5.XXXX
Audio Issues
1. Can’t hear the other participants in the meeting?
a. Make sure your computer speaker volume is turned up.
b. Make sure your speakers are selected for the active output in Zoom.
In the Zoom meeting, Choose Audio > Audio Settings
Click the Test Speaker button, if you hear audio this is setup correctly. If
you do not hear audio, use the drop down box and select a different
output and press Test Speaker again. Repeat this step until you hear
audio.
16
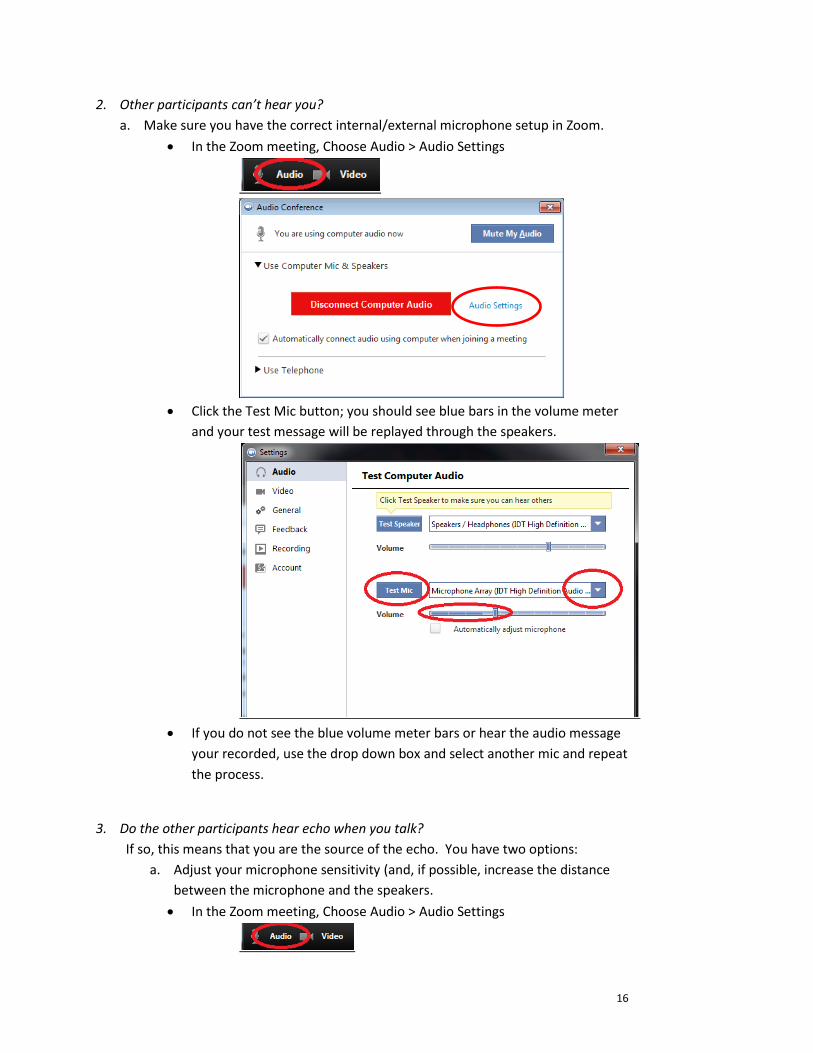
2. Other participants can’t hear you?
a. Make sure you have the correct internal/external microphone setup in Zoom.
In the Zoom meeting, Choose Audio > Audio Settings
Click the Test Mic button; you should see blue bars in the volume meter
and your test message will be replayed through the speakers.
If you do not see the blue volume meter bars or hear the audio message
your recorded, use the drop down box and select another mic and repeat
the process.
3. Do the other participants hear echo when you talk?
If so, this means that you are the source of the echo. You have two options:
a. Adjust your microphone sensitivity (and, if possible, increase the distance
between the microphone and the speakers.
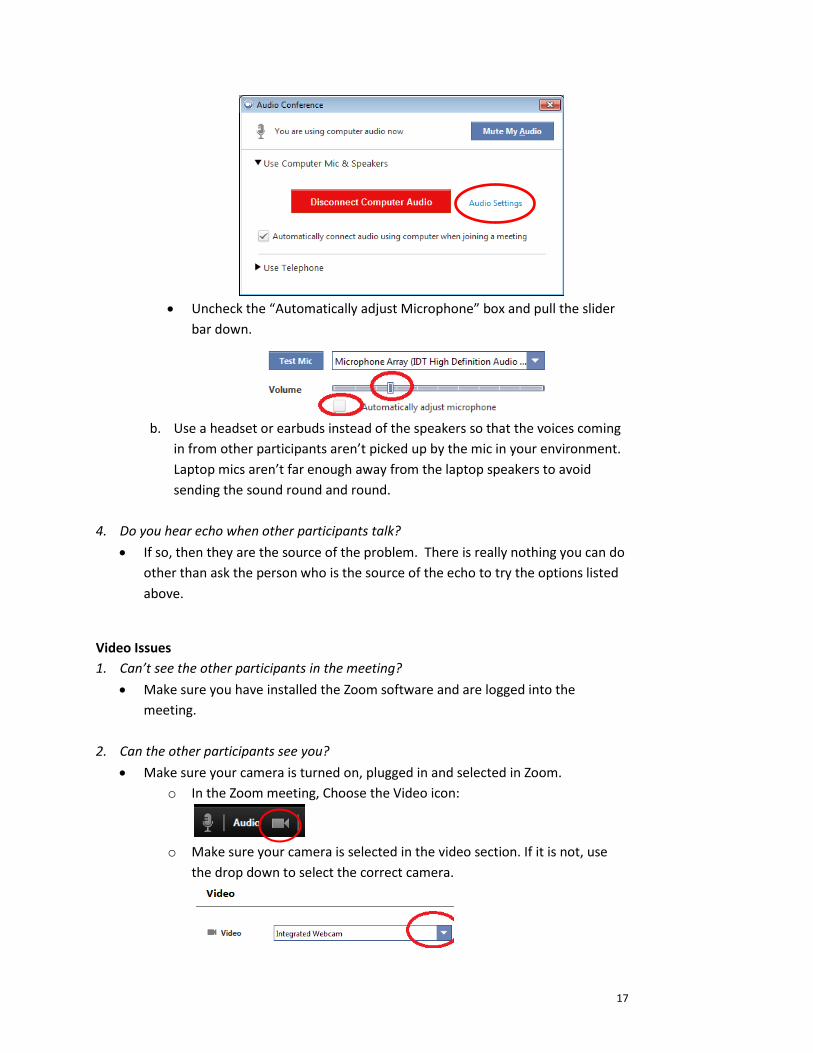
In the Zoom meeting, Choose Audio > Audio Settings
17
Uncheck the “Automatically adjust Microphone” box and pull the slider
bar down.
b. Use a headset or earbuds instead of the speakers so that the voices coming
in from other participants aren’t picked up by the mic in your environment.
Laptop mics aren’t far enough away from the laptop speakers to avoid
sending the sound round and round.
4. Do you hear echo when other participants talk?
If so, then they are the source of the problem. There is really nothing you can do
other than ask the person who is the source of the echo to try the options listed
above.
Video Issues
1. Can’t see the other participants in the meeting?
Make sure you have installed the Zoom software and are logged into the
meeting.
2. Can the other participants see you?
Make sure your camera is turned on, plugged in and selected in Zoom.
o In the Zoom meeting, Choose the Video icon:
o Make sure your camera is selected in the video section. If it is not, use
the drop down to select the correct camera.

18
If the camera is turned on, make sure nothing is blocking the camera view.
If using an external web camera, try connecting it to a different USB port and
repeat steps 1 and 2 above.


