YZF-R1M - Yamaha Motorsports USA · PDF fileYZF-R1M . YAMAHA Wireless ... Standard R1 or the M...
25
YZF-R1M YAMAHA Wireless Mobile Applications: for Android™ YRC SET-UP & DATA ACQUISITION YRC Setting app 1 Y-TRAC app 9 CCU Config app 16 Genuine Yamaha Accessories 20 YAMALUBE® Products 23 ® ™
-
Upload
duongnguyet -
Category
Documents
-
view
222 -
download
2
Transcript of YZF-R1M - Yamaha Motorsports USA · PDF fileYZF-R1M . YAMAHA Wireless ... Standard R1 or the M...

YZF-R1M
YAMAHA Wireless Mobile Applications: for Android™
YRC SET-UP & DATA ACQUISITION
YRC Setting app 1
Y-TRAC app 9
CCU Config app 16
Genuine Yamaha Accessories 20
YAMALUBE® Products 23
® ™

YRC Setting app Wireless Network Connection & Installation To connect to the YZF-R1M wireless network, you’ll need the
serial number of the CCU module.
Turn main switch ON, go to Network, or Wi-Fi section in the Settings of your device, you should see an entry titled YAMAHA MOTOR CCU DF0010*, tap and enter serial number from CCU in the password field. Tap connect.
The message; Obtaining IP address should display, then connected. If successful, turn off the main switch if you're not going to connect immediately.
App Install
Search the Google Play™ store for the apps; YRC Setting, Y-TRAC and CCU Config.
Install and accept all the default app choices – access to networks, to SD card, etc.
When the YRC Setting app is first launched after installation, you will get a prompt to download data from the bike.
Refer to the following sections for the Y-TRAC and CCU Config apps.
TIP If you currently have settings on the bike you’d like to save, choose OK. If not, then choose Cancel.
* The last 6 characters will vary, this is determined by the specific MAC address of each CCU module.
1

A) If you select OK – turn Main switch ON, make sure your device is connected to the YAMAHA MOTOR CCU network, press download icon.
OK the Data Download prompt. The white LED on the meter flashes once, and the Save data success! pop-up message in the app confirms the data was received. Tap save, confirm the Save complete! message appears.
TIP
The note in brackets [download data] will confirm with the
settings displayed have been downloaded from the bike.
B) If you select Cancel - you will see prompt for Standard R1 or the M model – make the appropriate choice.
The app will populate the Quick Setting screen with the current default settings for the 2015 model year.
Tap save, and confirm Save complete! message appears.
2
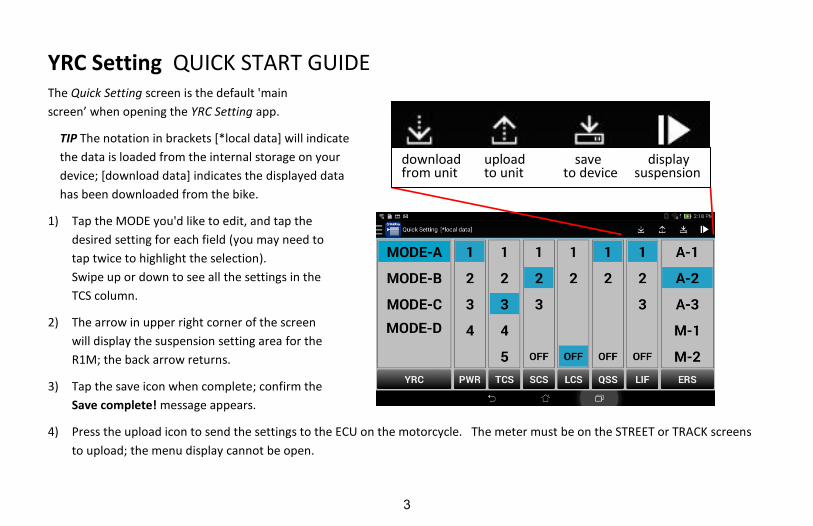
YRC Setting QUICK START GUIDE The Quick Setting screen is the default 'main
screen’ when opening the YRC Setting app.
TIP The notation in brackets [*local data] will indicate
the data is loaded from the internal storage on your
device; [download data] indicates the displayed data
has been downloaded from the bike.
1) Tap the MODE you'd like to edit, and tap the
desired setting for each field (you may need to
tap twice to highlight the selection).
Swipe up or down to see all the settings in the
TCS column.
2) The arrow in upper right corner of the screen
will display the suspension setting area for the
R1M; the back arrow returns.
3) Tap the save icon when complete; confirm the
Save complete! message appears.
4) Press the upload icon to send the settings to the ECU on the motorcycle. The meter must be on the STREET or TRACK screens
to upload; the menu display cannot be open.
download upload save display from unit to unit to device suspension
3

5) Tap OK to confirm sending the settings.
6) The white LED will flash once on the meter, and the Send data success! pop-up message in the app confirms the data was
successfully sent.
7) Close the app, turn main switch off.
NOTE: Sending data from the Quick Setting screen will
send all 4 MODE’s, if you unintentionally changed one of
the settings, it will send it to the bike. If you've changed
settings and not sure which you've changed, close the app
without saving. You can also reset the bike to factory
specs in the menu, and then download to your device.
NOTE: The bike will not change modes automatically – for example, if the meter is displaying MODE-A, and you
were only changing MODE-B settings, you must use the left handle MODE switch to select MODE-B as the active
mode.
Upload will not work if the MENU is open on the multi-function meter.
4

NOTES regarding suspension settings:
AUTOMATIC MODE The damping adjustment ranges in A-1 and A-2 are limited to plus 5 to minus 5 steps from the preset values. The settings in A-3 cannot be changed. The Öhlins® Automatic Mode, which actively adjusts the damping as you ride, is ON in A-1, A-2 and A-3.
MANUAL MODE M-1, M-2 and M-3 provide a full range of adjustment steps; 1 to 32. The Automatic Mode is turned off in these 3 manual setting modes.
SETTINGS Low numbers: increases damping force (stiffer setting) High numbers: decreases damping force (softer setting)
Think of the numbers like turns out on a damping adjustment screw – more turns out = less damping.
IMPORTANT NOTE: Changing any of the settings in either A-1 or A-2, by any amount, plus or minus, will change both A-1 and A-2 by that amount (ex., changing the Front Compression damping setting by + 5 in A-1, will also change the Front Compression damping setting in A-2 by +5). This occurs when using the app, or changing the setting in the YRC Menu on the bike. This is normal and is coded in the Öhlins® suspension ECU.
NOTES regarding the Traction Control System – TCS:
To turn off TCS, stop the unit, and then use the left handle switch assembly MODE button, press the center button to select TCS on the meter. Repeatedly press the rocker switch up until you get to 1, then press and hold the rocker up until the TCS indicator disappears.
You cannot turn the Traction Control System off with the YRC Setting app, it must be done on either the STREET or TRACK screens on the multi-function meter. Turning off TCS will also turn off the SCS, LCS, and LIF and illuminates the stability control light (SC) on the multi-function meter. Turning the main switch off, then back on, sets TCS back on (at the TCS 1 setting, NOT the preset value that it was before being turned off). To turn on, press rocker switch down at least once, or cycle main switch off then back on.
5

YRC Setting Detail Settings Screen
Tapping the upper left corner displays the Detail
Setting screen option; it has two areas; the top
shows the 4 current saved settings from the Quick
Setting screen (main screen).
We do not recommend making
changes to the current settings on
this screen, it’s much easier to use the
main screen.
The lower part is labeled Setting File; this area allows you to build custom settings, add notes in a free-text area, and you can send
the YRC settings and suspension settings independently.
The Setting File area contains 4 setting files labeled Default 1 through 4. These are meant to be templates to use to build your own
setting; you should not send one of these to the bike “as is” without editing (notice for example, the suspension setting numbers do
not match the ERS code, A-2, etc.).
1) To build custom settings, tap to check mark one of the Default files, and press the pencil icon in the upper right corner.
6

2) You can edit the YRC label, 2nd
column, if you wish. There is a 4 character maximum, letters (caps), numbers, no special
characters except the dash are allowed (ex., SLIC or SL-1.)
TIP This will be the label that appears on the meter assembly (instead of MODE-A, etc.) when the setting file is uploaded to the bike. When editing the YRC field AFTER changing the FileName, and the name is very long, the YRC field will be pushed out of sight to the right side of the screen.
3) Tap each setting area, and swipe up or down to select the desired setting (swipe to the left to display all the suspension settings areas on the YZF-R1M).
4) Tap OK when done, and when all settings are complete, tap the save icon.
5) Enter the desired file name. This is a free- text area, with space for over 256 characters. All letters (upper and lower case), numbers and special characters are OK. This is a great place to save notes you may want to capture; gearing, tire specs, tire pressures, weather, track name, date, etc.
6) Tap OK when done, then tap the Android™ back button.
7) You should now see your new setting file in the Setting File area in the lower section, tap to remove the check mark.
8) To send a file to the motorcycle, tap to check mark the desired.
7

9) Tap the pencil icon, which will bring you to the edit screen; leave as is or edit.
10) Tap the right facing arrow icon to get to the upload screen.
Notice that the file auto-populates into the MODE-A slot - if you send this to the bike it will overwrite your current MODE-A
settings, and leave MODE-B, C and D as they are currently set.
If you wish to keep the current settings in MODE-A, you must move your custom file to another slot.
REMEMBER: If your custom settings add or subtract from any of the suspension damping settings in either A-1 or A-2, it will affect all
other MODEs that are set to use A1 or A2 by the same amount.
If you wish to load your custom file in the MODE-D spot, you must set MODE A to the Current A for example.
Tap the FileName field for MODE-A. You can see all available setting files that can be sent. This is where you can also see all your
notes on a file. Select Current A (confirm that Current A settings are what you wish).
Then Tap the FileName field for MODE-D. You can see all available setting files that can be sent, and again see all your notes on a
file. Select your custom file.
When ready, hit upload icon, then OK – the white LED on the meter will flash once and the Send data success! pop-up message in
the app confirms the data was sent.
8

Y-TRAC Quick Start Guide Yamaha - Telemetry Recording and Analysis Controller Features
Download log files from the CCU to your mobile device o Log files of a street ride or timed laps on a race course.
(The race course must be configured in the CCU Config app to enable automatic lap timing.) o Motorcycle position indicated on a Google Maps™ image of the race course, or street route taken.
Log viewer/player o View/replay log files in real-time with position indicated on a Google Maps™ image of the route or race course, can also
scroll through each lap corner by corner, zoom in/out, customize and highlight data streams.
Analyze and compare log data - individual laps (any or all systems below avail.), or overlay 2 laps (5 systems max.) o Engine rpm o Throttle-grip position (degrees) o Actual throttle opening (degrees) o Rear wheel speed o Front wheel speed o Transmission Gear position o Lean angle (degrees) o Pitch (front-back in degrees per second) o Rear brake pressure in BAR (1 BAR = 14.5 psi) o Front brake pressure in BAR (1 BAR = 14.5 psi) o Engine coolant temperature o Ambient air temperature
o Fuel usage (real time data in gallons or cc’s) o Acceleration – X axis (G-force fwd/bkward) o Acceleration – Y axis (G-force side to side) o Graph indicates when YRC systems are activated/
deactivated in the timeline (individual lap view only); TCS – Traction Control System SCS – Slide Control System LIF – Lift Control LCS – Launch Control System Front ABS Rear ABS
.
9

Default view – the number of downloaded log files, shown in red dots on the actual day recorded (can also display downloaded log files in a list view)
1
2
3
4
Toggles list view, single or multiple selection, trash can
Resets calendar to current date
Opens the Favorites folder
Download from CCU unit on motorcycle to mobile device
5
6
7
Opens the Unit Settings screen
Launches YRC Setting app
Launches CCU Config app
(Tap and hold any icon to see label)
1 2 3 4 5 6 7
Tap the individual log file to select.
10

Y-TRAC Quick Start Guide
Download Procedure – from CCU to Y-TRAC
Connect the mobile device to the CCU wireless network - YAMAHA MOTOR CCU DF0010*
Tap the download icon on the main screen
App will connect to the CCU and display the available log file(s) – Figure 1
Tap the log file
Tap Download to confirm – Figure 2
* The last 6 characters will vary, this is determined by the specific MAC address of each CCU module.
Figure 1 Multiple Log Files: Use the check-box feature when there is more than one log file in the list – after selection, tap the download icon once again.
Tap the check-box icon to select multiple/specific log files when there is more than one file.
Figure 2 11

Y-TRAC Quick Start Guide
The downloaded log file(s) will then appear on the main screen – Figure 3
Tap the log file – it may take 2~3 seconds for the data to load (proceed to the Log Viewer/Player section on next page)
Figure 3
NOTES: 1. The serial number on the CCU unit is the
password for the YAMAHA MOTOR CCU network.
2. Tap and hold a log file name to open the options box, where you can edit file name, add weather and bike tuning notes, add log file to favorites, Share or Delete the file.
3. The Android™ back button returns to previous screens.
4. The Y-TRAC app defaults to km/h and C°. Go to the Unit Settings screen to change.
12

Y-TRAC Quick Start Guide Log Viewer/Player 1. If the recorded log file has
individual laps, this selection screen will display. Select a lap then tap icon 1 to open Viewer/Player.
2. If there are no individual laps, e.g. a street route, the Viewer/Player will open directly to the screen shown on the next page.
1
2
Opens the Viewer/Player displaying the selected lap(s)
Adds the log file to Favorites
3
4
Share – copies log file & opens email, etc.
Opens Favorites for comparison to current
1 2 3 4
Tap to select a lap, then tap icon 1; or select 2 laps for direct comparison via course overlay – 5 data streams max.
13

Y-TRAC Quick Start Guide
Viewer/Player showing one selected lap
1 2 3 4 5 6 7
8
9
10
11 12
13
14

Y-TRAC Quick Start Guide
1
2
3
4
5
6
7
8
Exports YRC modes/settings to YRC Setting app
Adds the log file to the Favorites folder
Share – copies log file & opens email, etc.
Opens the Unit Settings screen
Jump back to start of timeline
Play button – plays log file in real time
Stop button
Indicates when each YRC system is activated
9
10
11
12
13
Data stream – can tap & drag timeline manually
Play head – can tap & drag play head
Zoom in, zoom out, and reset the timeline
Graph options/value; customize in Unit Settings – scroll up/down
Google Maps™ with route/course overlay, tap on route line to move pin & timeline to that point (if the device does not have access to the Internet at this time, route will be displayed on a blank screen, all other features function normally)
15

CCU Config Quick Start Guide
Features
AutoLap Setting Allows you to preload and configure race courses for the automatic lap counter and lap timing function built into the CCU/GPS unit.
Logging Mode Sets the sampling rate of the Logging Mode.
Usage
Logging Mode Select the desired sampling rate; Street (low rate, 1Hz) or Track (high rate, 10Hz) This setting will be sent to the CCU unit with the AutoLap Setting data.
16

AutoLap Setting This example shows race courses that have been previously loaded into the app. Tap the desired race course to open and upload to the CCU. Tap and hold track name to rename or delete.
1
2
Download current AutoLap course from CCU
Add a new race course – see next page
1
2
3
4
5
+ = add data line to map x = delete displayed data line
Save race course/changes to device memory
Upload race course to the CCU
Turn on Google Maps™ satellite view
Google Location Service™ icon
1 2
1 2 3 4
Tap and hold Point A and B push-pins and drag to proper location if needed. The line between Point A and B should traverse the start/finish line (including pit lane).
The map display can be resized in the usual touch-screen method; pinch-to-zoom or expand using the forefinger and thumb.
5
17

CCU Config Quick Start Guide Adding a new Race Course
Add a new race course with internet-connected device(1)
at the track using Google Location Service™;
1) Open the CCU Config app and select AutoLap Setting,
2) tap ‘+’ icon,
3) tap Google Location Service™ icon, a blue dot should display on the
map at your present location,
4) tap ‘+’ icon to add the data line to the map,
5) Point A and B push-pins should appear with a line bisecting your
location dot,
6) tap & hold Point A and Point B push-pins and drag to traverse the
start/finish line (including the pit lane if present),
7) tap save and name the track/file.
To add a new race course WITHOUT Internet connectivity at the track,
configure the track beforehand at a location with internet access.
1) Connect your device to the Internet, perform steps 1 & 2 from above.
2) Pinch-to-zoom in or out and ‘drag’ the map as needed to locate the track on the Goggle Maps™ screen.
3) Perform steps 4 thru 7 above (the blue location dot will not be displayed).
(1) You’ll see the location icon at the top of your screen when your device’s precise location is being used by any app.
18

CCU Config Quick Start Guide OPTIONAL Adding a new race course MANUALLY.
1) Using a personal computer (PC) search for the race track on Google Maps™. 2) Using the satellite view, zoom in on the start/finish line, right mouse click on one side of the track near the start/finish
line and select ‘What’s here? ’. The latitude and longitude coordinates will be displayed in a message box. 3) On your mobile devoice, manually enter the coordinates into the CCU Config app for Point A (the blue location icon
spaces). 4) On the PC, right mouse click on the other side of the start/finish
line and select ‘What’s here? ’. The coordinates for that position will be displayed in a message box. These coordinates must be more than 20 meters (65 ft) apart, or an error message will display when you attempt to save the track.
5) Enter these coordinates into the CCU Config app, for Point B (the green location icon spaces).
6) Tap the save icon and name the track. 7) Tap the Android™ back button to return to the CCU Config main
screen, and select the newly added race track. 8) You should now see Point A and Point B push-pins, and a red line that traverses the start/finish line. 9) Tap & hold the Point A and Point B push-pins and drag the pins to adjust the line if needed. 10) Tap save.
19

Y-SERIES SLIP-ON by YOSHIMURA®
Visit: yamahapartsandaccessories.com for the complete line of
Genuine Yamaha Parts & Accessories and Yamalube® maintenance and care products.
20

Frame Sliders 2CR-F11D0-V0-00
Endurance Race Windscreen
2CR-F83J0-T0-00 also in Clear
Seat Cowl Rapid Red 2CR-F47F0-T0-00 Team Yamaha Blue 2CR-F47F0-V0-00 Raven 2CR-F47F0-S0-00
YZF-R1 shown with optional accessories.
Seat Cowl Rapid Red
2CR-F47F0-T0-00 Team Yamaha Blue
2CR-F47F0-V0-00 Raven
2CR-F47F0-S0-00
21

Endurance Race Windscreen
2CR-F83J0-V0-00 also in Smoke
Sprint Race Windscreen 2CR-F83J0-S0-00
Shown with optional accessories.
MotoGP® type Stand Hook
2CR-F21B0-V0-00
22

Engine Oil
This full synthetic race oil is used by Yamalube-sponsored race teams on the road courses
and in the dirt. Fortified with the highest amount of ester, exceeds JASO MA certification,
provides smooth shifting, no clutch slippage, and quick revving.
Chain Lube
A high-quality synthetically based chain lubricant for use in off-road and on-road
applications. Long-lasting deep-penetrating lubricant resists corrosion and water.
For use on all motorsports drive chains including O-ring chains.
23

See the complete line of Genuine Yamaha Accessories and
Yamalube® maintenance and care products at: yamahapartsandaccessories.com
This document contains many of the valuable trademarks and service marks owned and used by
Yamaha throughout the world. The document may also contain references to other company,
brand, and product names that may be the trademarks/service marks of their respective owners.
These company, brand, and product names are used herein for identification purposes only, and
references to any names, marks, products or services of third parties do not constitute or imply
endorsement, sponsorship or recommendation of the third party or the products or services.
Android, Google Location Service, Google Play and Google Maps are trademarks of Google Inc.