XenApp / XenDesktop 7.6 Lab...
95
Project Arthur XenApp / XenDesktop 7.6 Lab Guide October 2014 Support – Support Readiness (Americas, APAC, EMEA, India) On-demand when you need us...
Transcript of XenApp / XenDesktop 7.6 Lab...
Project Arthur XenApp / XenDesktop 7.6 Lab Guide
October 2014
#Support – Support Readiness (Americas, APAC, EMEA, India) On-demand when you need us...
2 Worldwide Support Readiness Release Training
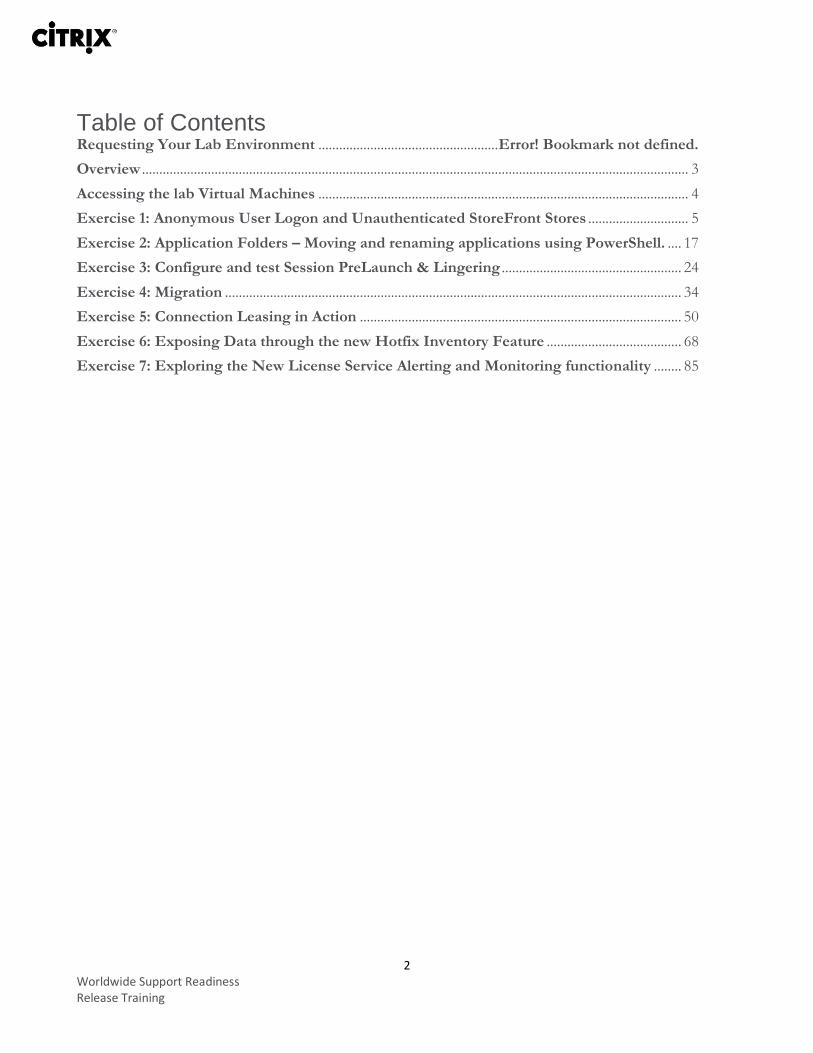
Table of Contents Requesting Your Lab Environment .................................................... Error! Bookmark not defined.
Overview .............................................................................................................................................................. 3
Accessing the lab Virtual Machines ........................................................................................................... 4
Exercise 1: Anonymous User Logon and Unauthenticated StoreFront Stores ............................. 5
Exercise 2: Application Folders – Moving and renaming applications using PowerShell. .... 17
Exercise 3: Configure and test Session PreLaunch & Lingering .................................................... 24
Exercise 4: Migration .................................................................................................................................... 34
Exercise 5: Connection Leasing in Action ............................................................................................. 50
Exercise 6: Exposing Data through the new Hotfix Inventory Feature ....................................... 68
Exercise 7: Exploring the New License Service Alerting and Monitoring functionality ........ 85
3 Worldwide Support Readiness Release Training
Overview
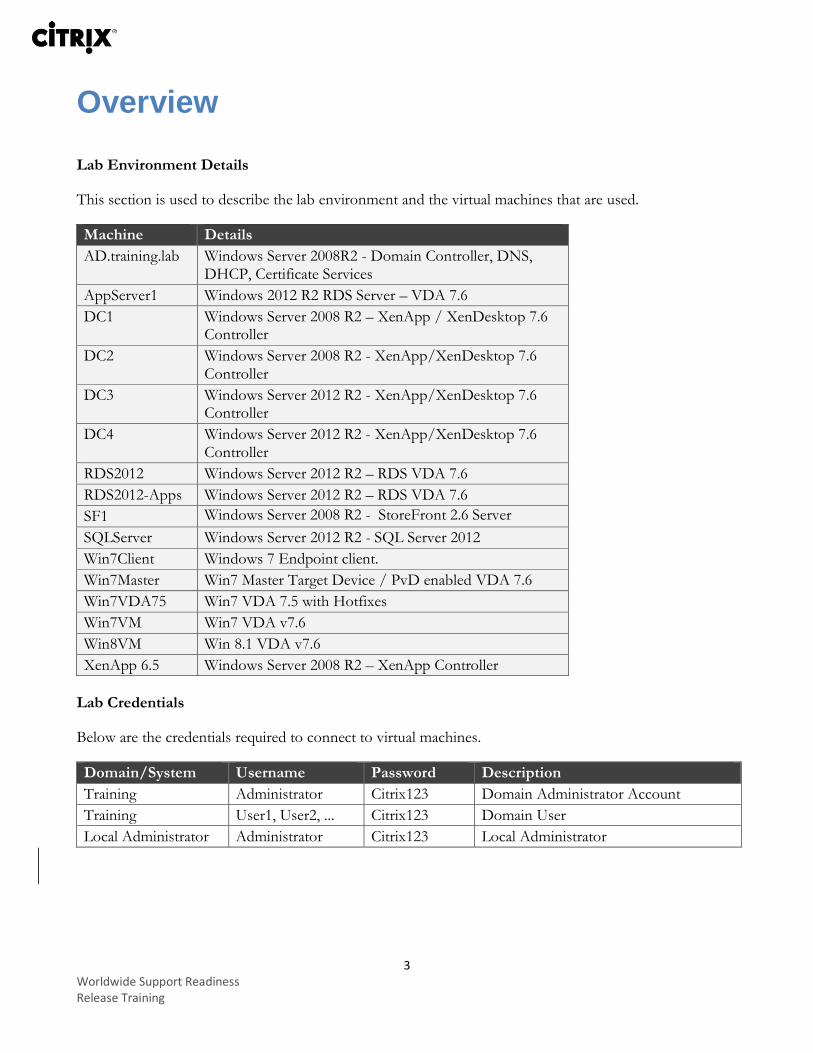
Lab Environment Details
This section is used to describe the lab environment and the virtual machines that are used.
Machine Details
AD.training.lab Windows Server 2008R2 - Domain Controller, DNS, DHCP, Certificate Services
AppServer1 Windows 2012 R2 RDS Server – VDA 7.6
DC1 Windows Server 2008 R2 – XenApp / XenDesktop 7.6 Controller
DC2 Windows Server 2008 R2 - XenApp/XenDesktop 7.6 Controller
DC3 Windows Server 2012 R2 - XenApp/XenDesktop 7.6 Controller
DC4 Windows Server 2012 R2 - XenApp/XenDesktop 7.6 Controller
RDS2012 Windows Server 2012 R2 – RDS VDA 7.6
RDS2012-Apps Windows Server 2012 R2 – RDS VDA 7.6
SF1 Windows Server 2008 R2 - StoreFront 2.6 Server
SQLServer Windows Server 2012 R2 - SQL Server 2012
Win7Client Windows 7 Endpoint client.
Win7Master Win7 Master Target Device / PvD enabled VDA 7.6
Win7VDA75 Win7 VDA 7.5 with Hotfixes
Win7VM Win7 VDA v7.6
Win8VM Win 8.1 VDA v7.6
XenApp 6.5 Windows Server 2008 R2 – XenApp Controller
Lab Credentials
Below are the credentials required to connect to virtual machines.
Domain/System Username Password Description
Training Administrator Citrix123 Domain Administrator Account
Training User1, User2, ... Citrix123 Domain User
Local Administrator Administrator Citrix123 Local Administrator
4 Worldwide Support Readiness Release Training
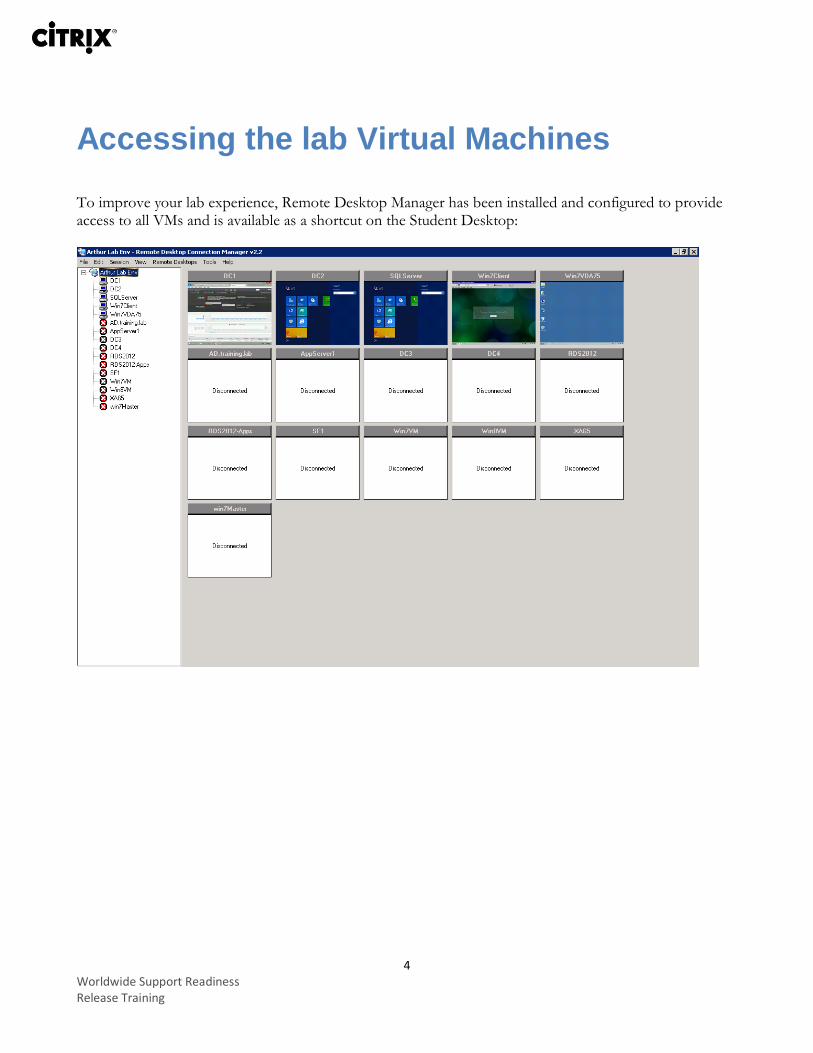
Accessing the lab Virtual Machines To improve your lab experience, Remote Desktop Manager has been installed and configured to provide access to all VMs and is available as a shortcut on the Student Desktop:
5 Worldwide Support Readiness Release Training
Exercise 1: Anonymous User Logon and Unauthenticated StoreFront Stores Overview In this exercise you will configure anonymous user access to resources using Citrix Studio and StoreFront.
Step-by-step guidance Follow the steps below to complete the task. Estimated time to complete this lab: 15 minutes.
Step Action
1. Logon to the DC4 virtual machine as training\administrator
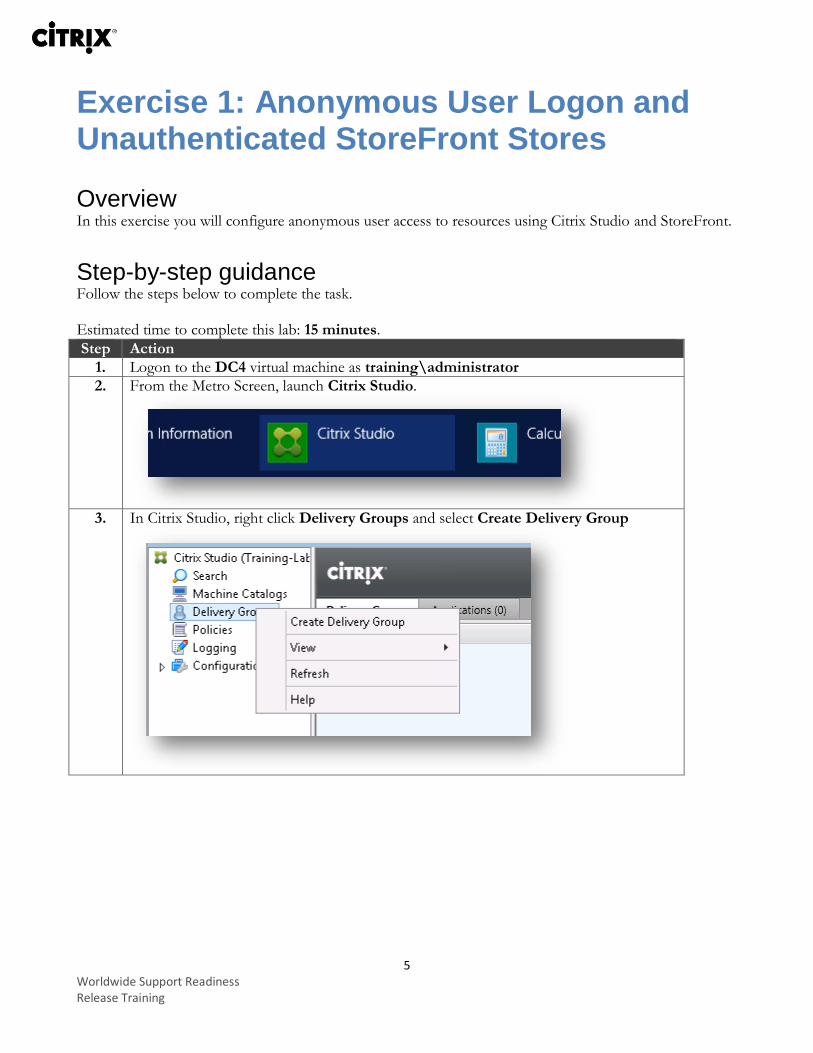
2. From the Metro Screen, launch Citrix Studio.
3. In Citrix Studio, right click Delivery Groups and select Create Delivery Group
6 Worldwide Support Readiness Release Training
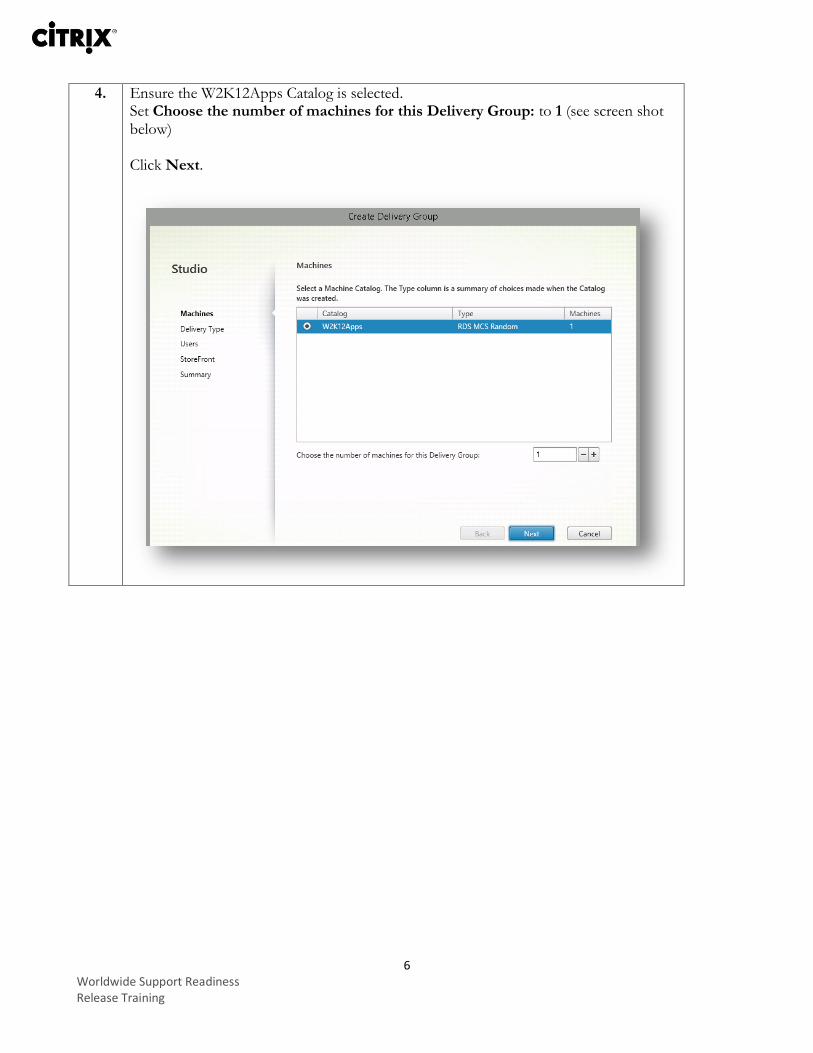
4. Ensure the W2K12Apps Catalog is selected. Set Choose the number of machines for this Delivery Group: to 1 (see screen shot below) Click Next.

7 Worldwide Support Readiness Release Training
5. For Delivery Type select Applications and click Next.
6. Check Give Access to unauthenticated (anonymous) users and click Next.
8 Worldwide Support Readiness Release Training
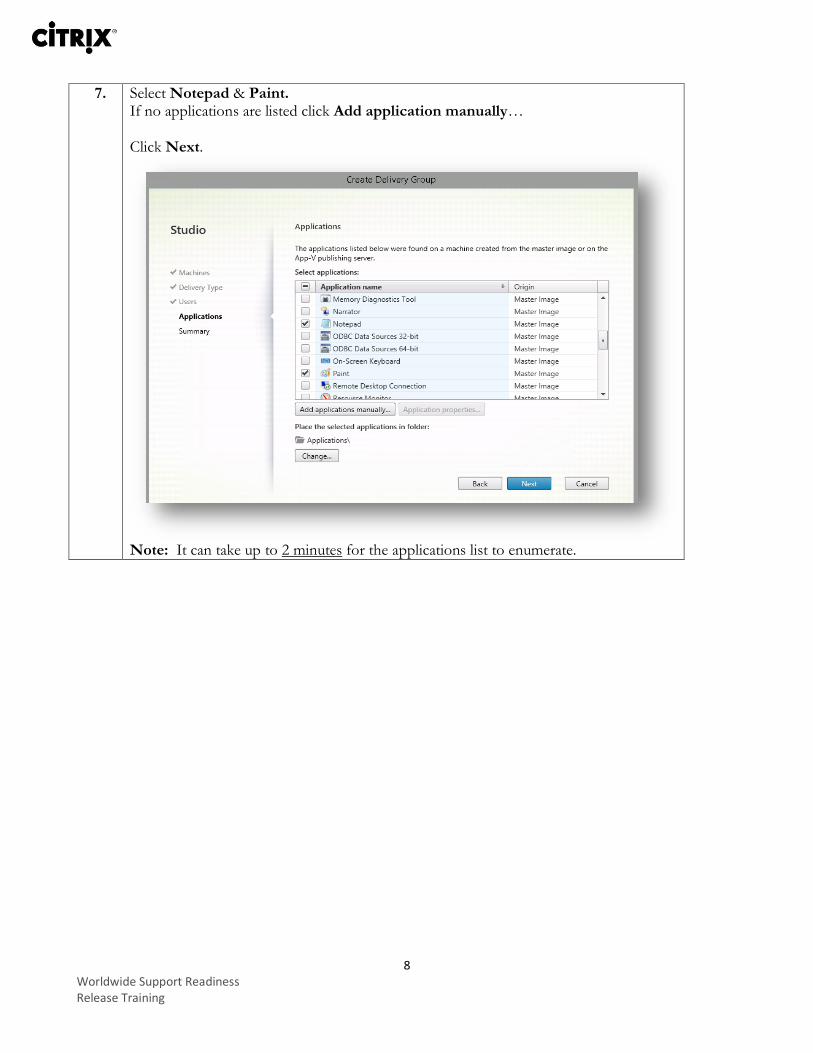
7. Select Notepad & Paint. If no applications are listed click Add application manually… Click Next.
Note: It can take up to 2 minutes for the applications list to enumerate.

9 Worldwide Support Readiness Release Training
8. Delivery Group a name: W2K12Apps Click Finish
9. The newly created Delivery Group W2K12Apps should be added in Studio.
10. Logon to the SF1 virtual machine as training\administrator and Citrix123
10 Worldwide Support Readiness Release Training
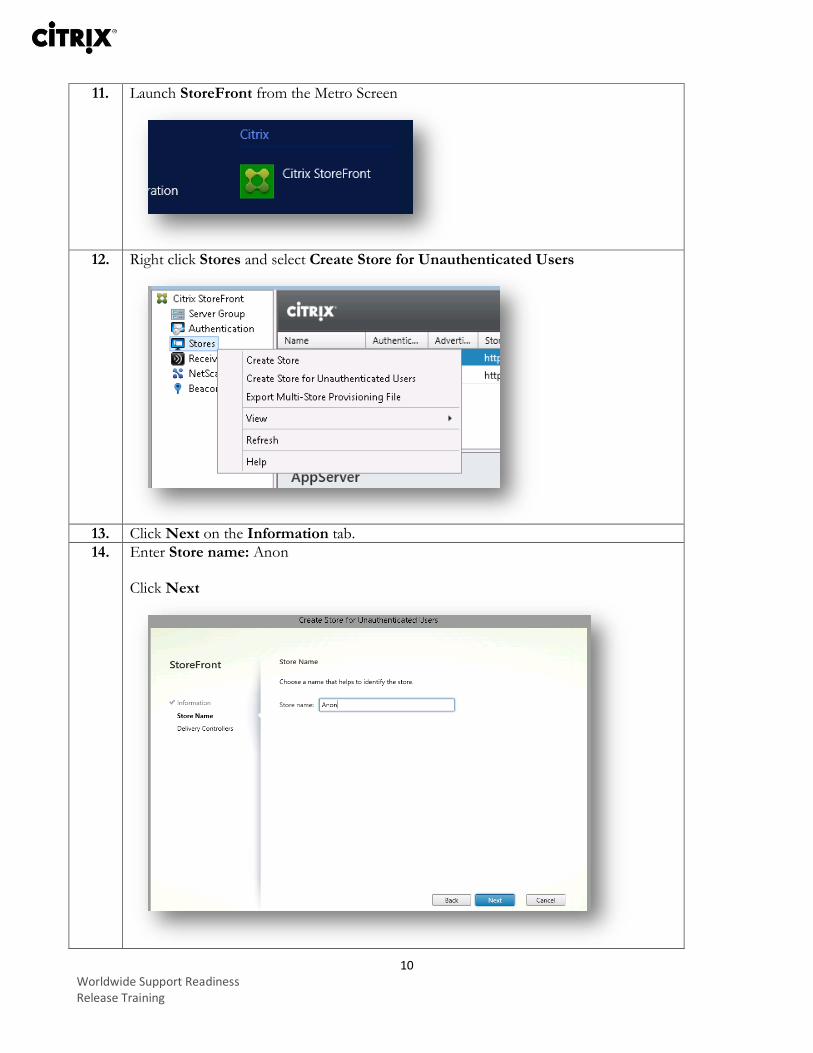
11. Launch StoreFront from the Metro Screen
12. Right click Stores and select Create Store for Unauthenticated Users
13. Click Next on the Information tab.
14. Enter Store name: Anon Click Next
11 Worldwide Support Readiness Release Training
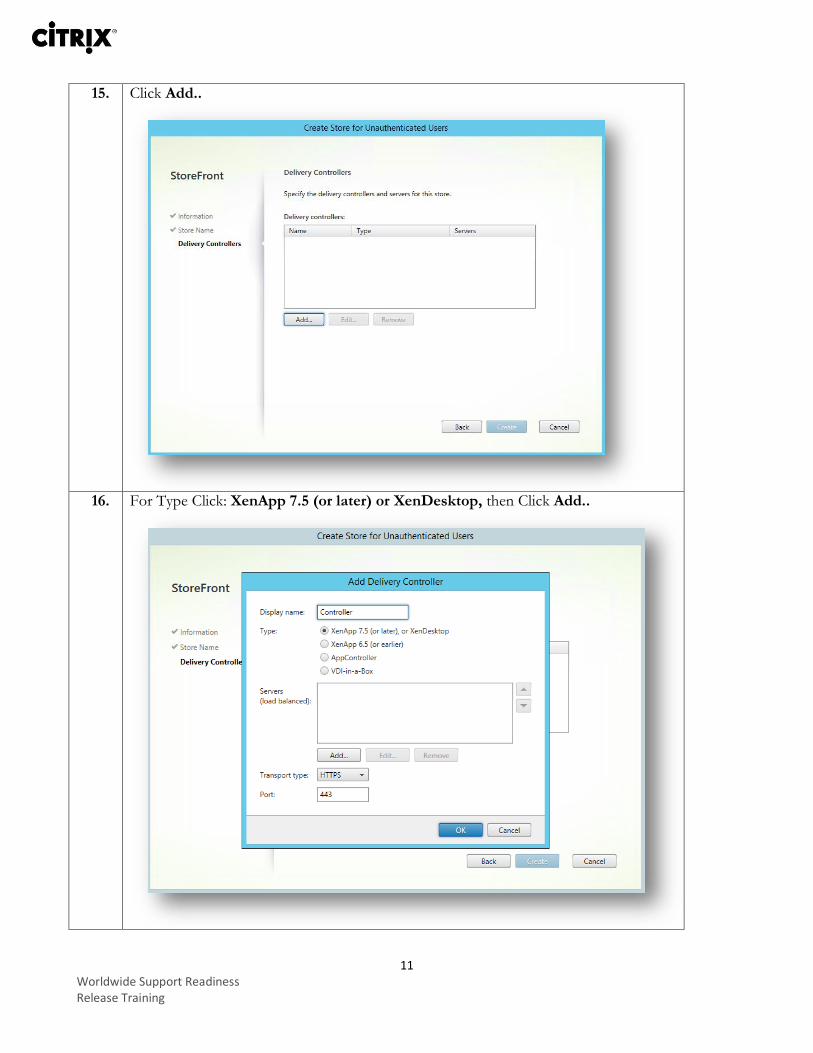
15. Click Add..
16. For Type Click: XenApp 7.5 (or later) or XenDesktop, then Click Add..
12 Worldwide Support Readiness Release Training
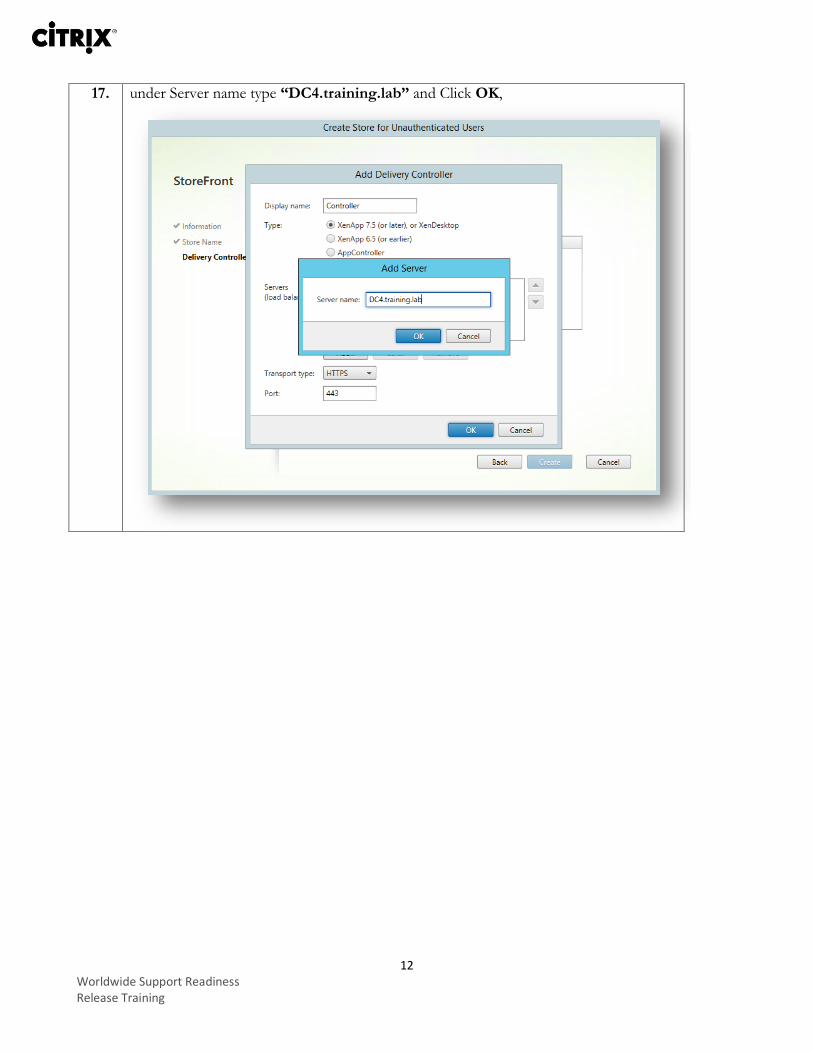
17. under Server name type “DC4.training.lab” and Click OK,
13 Worldwide Support Readiness Release Training
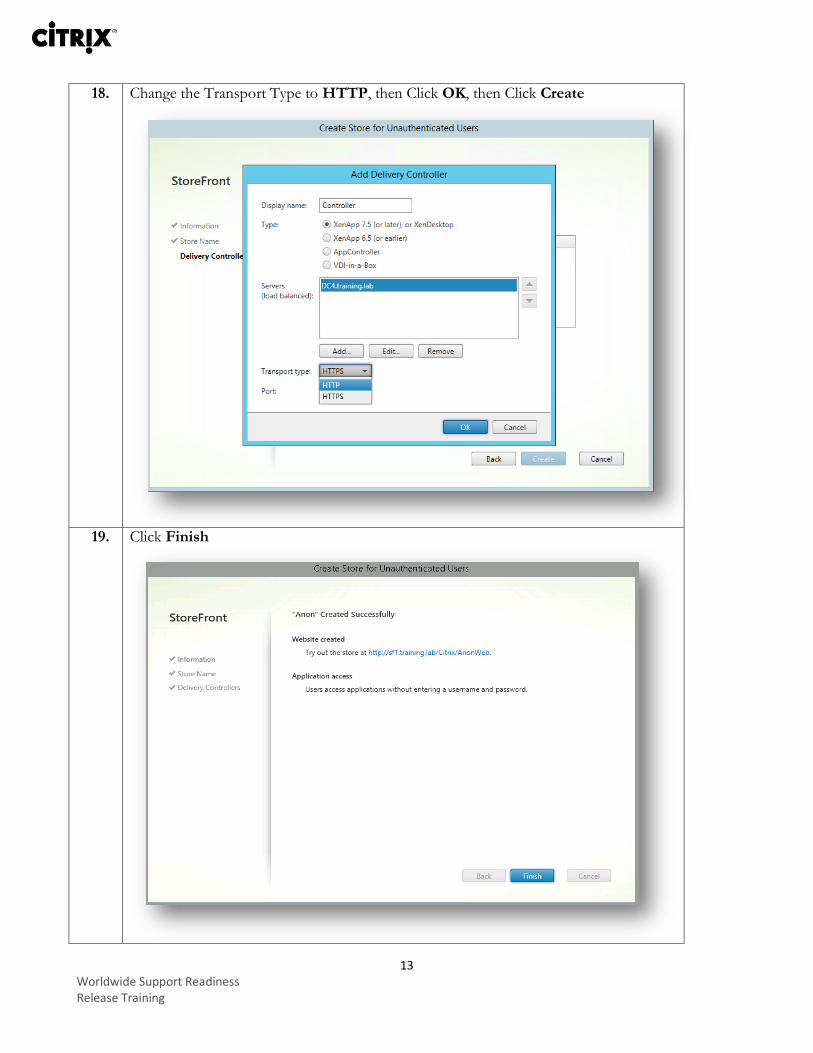
18. Change the Transport Type to HTTP, then Click OK, then Click Create
19. Click Finish
14 Worldwide Support Readiness Release Training
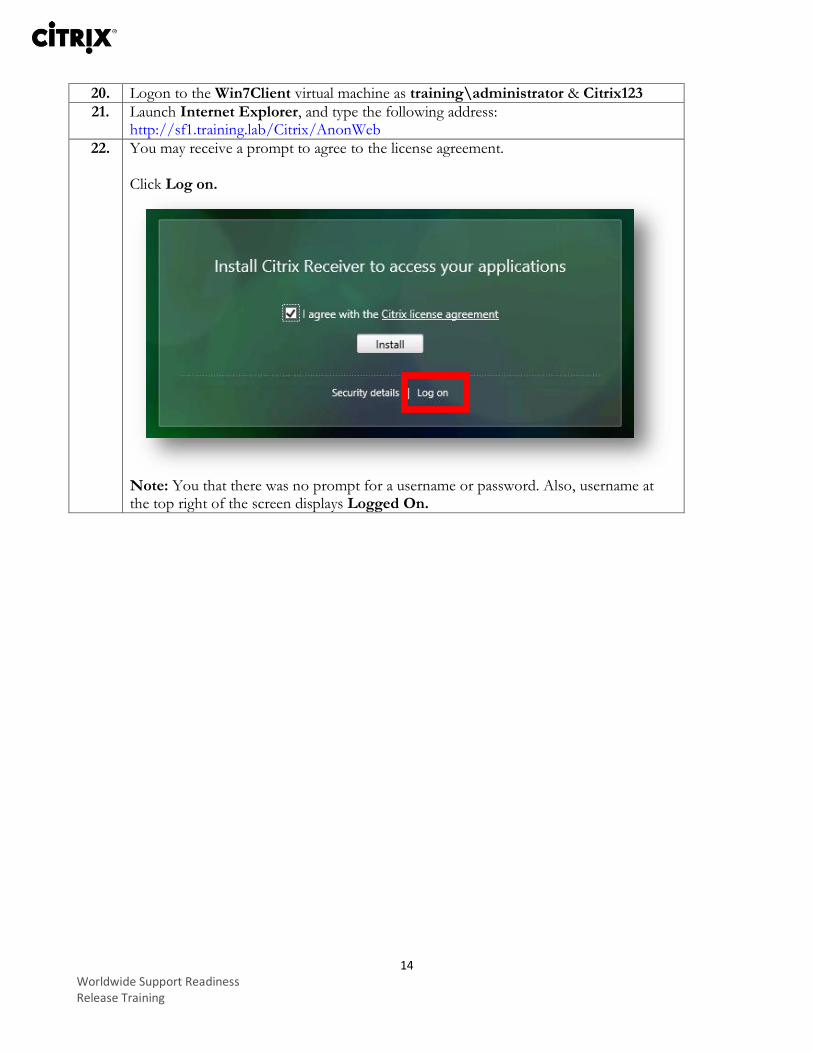
20. Logon to the Win7Client virtual machine as training\administrator & Citrix123
21. Launch Internet Explorer, and type the following address: http://sf1.training.lab/Citrix/AnonWeb
22. You may receive a prompt to agree to the license agreement. Click Log on.
Note: You that there was no prompt for a username or password. Also, username at the top right of the screen displays Logged On.
15 Worldwide Support Readiness Release Training
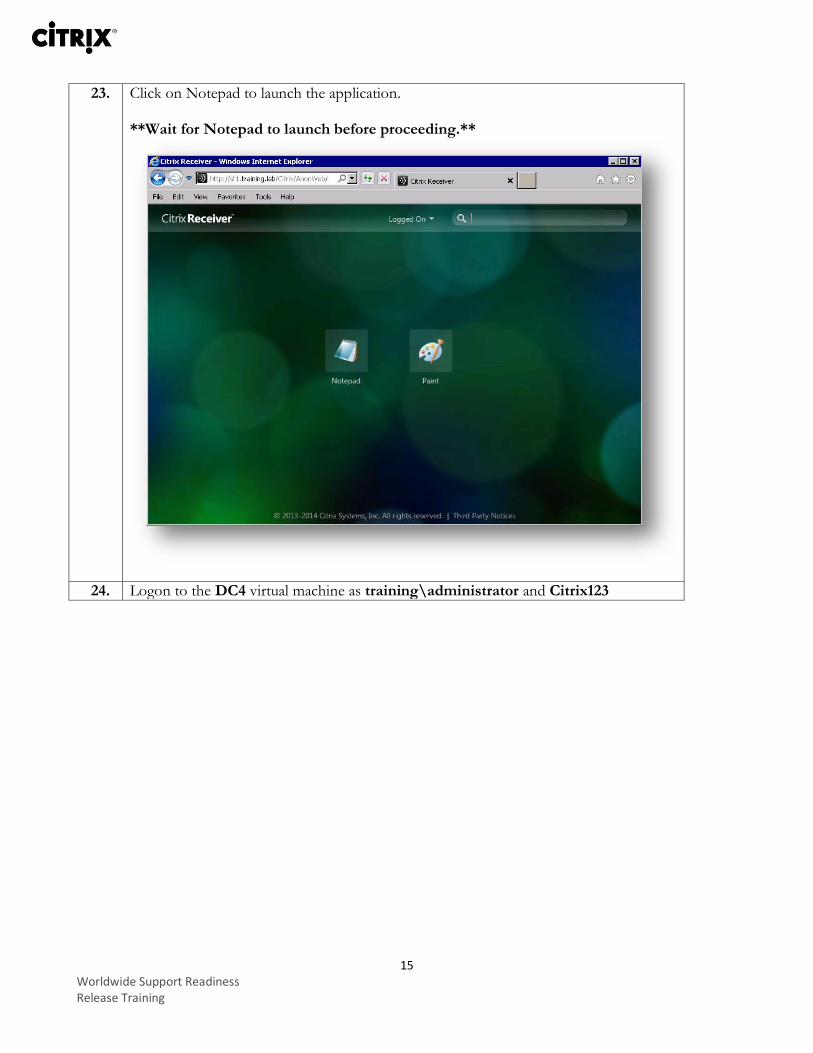
23. Click on Notepad to launch the application. **Wait for Notepad to launch before proceeding.**
24. Logon to the DC4 virtual machine as training\administrator and Citrix123
16 Worldwide Support Readiness Release Training
Key Takeaways
Configuring Anonymous User Logon is done through Delivery Groups
An Unauthenticated StoreFront store is required
Version 7.6 of the VDA is a requirement for this feature to function properly.
Default session timeout is 10 minutes.
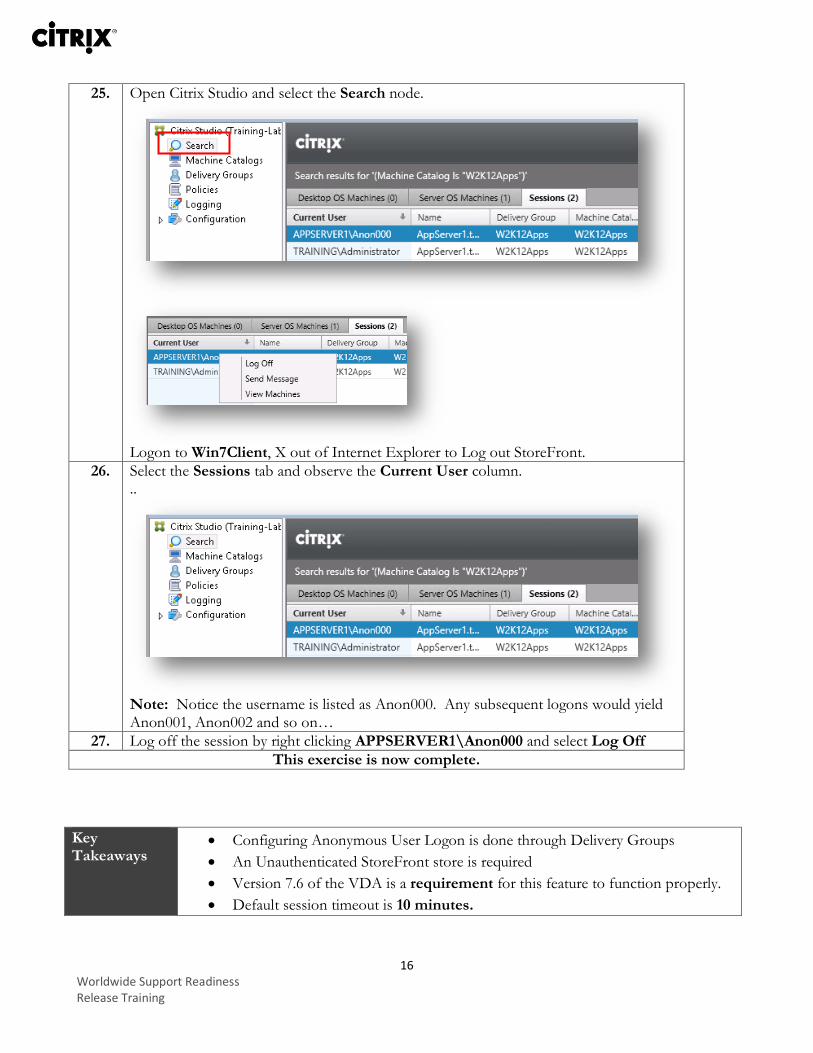
25. Open Citrix Studio and select the Search node.
Logon to Win7Client, X out of Internet Explorer to Log out StoreFront.
26. Select the Sessions tab and observe the Current User column. ..
Note: Notice the username is listed as Anon000. Any subsequent logons would yield Anon001, Anon002 and so on…
27. Log off the session by right clicking APPSERVER1\Anon000 and select Log Off
This exercise is now complete.
17 Worldwide Support Readiness Release Training
Exercise 2: Application Folders – Moving and renaming applications using PowerShell.
Overview In this exercise you will use PowerShell to add, move and remove applications in application folders. **This lab assumes you have completed the anonymous user lab and you have the following applications published: Notepad and Paint**
Step-by-step guidance Follow the steps below to complete the task. Estimated time to complete this lab: 15 minutes.
Step Action
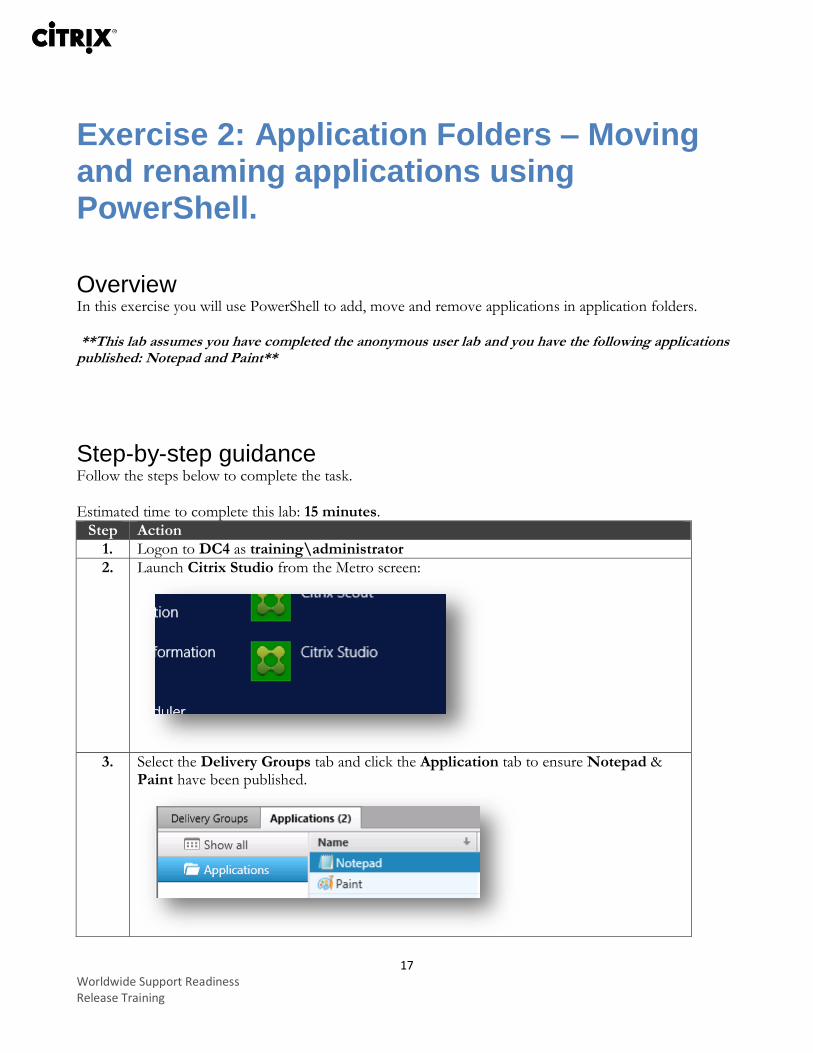
1. Logon to DC4 as training\administrator
2. Launch Citrix Studio from the Metro screen:
3. Select the Delivery Groups tab and click the Application tab to ensure Notepad &
Paint have been published.
18 Worldwide Support Readiness Release Training
Step Action
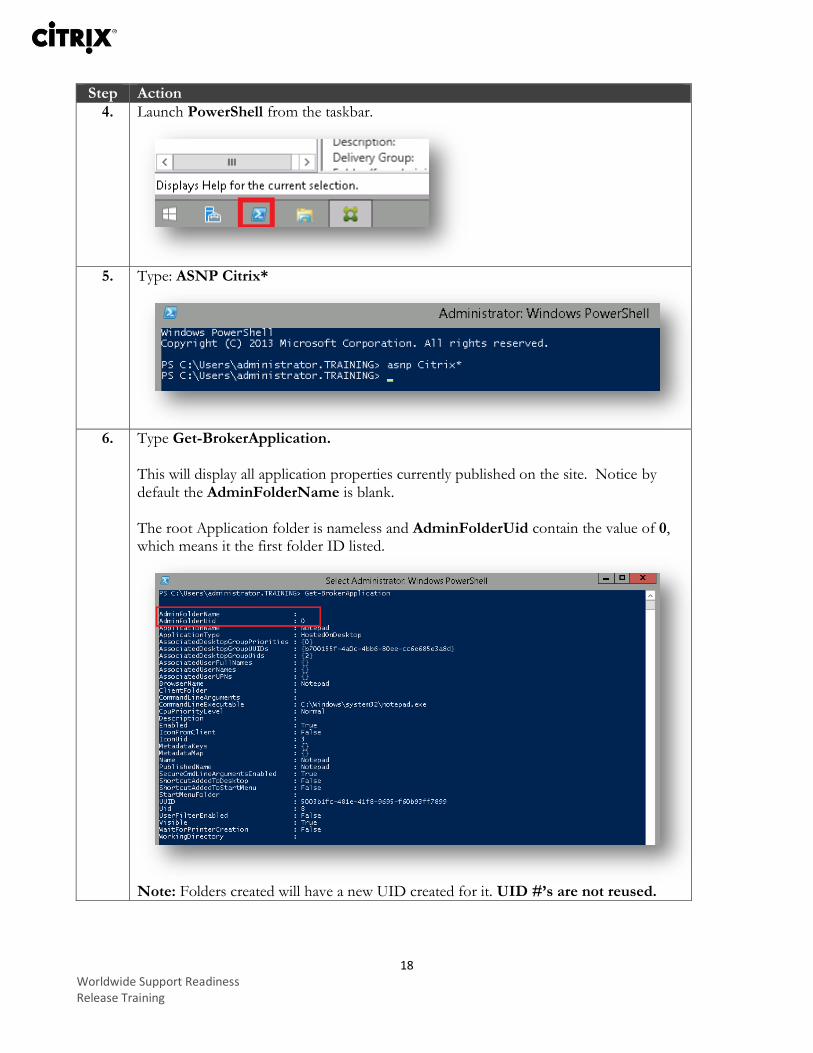
4. Launch PowerShell from the taskbar.
5. Type: ASNP Citrix*
6. Type Get-BrokerApplication.
This will display all application properties currently published on the site. Notice by default the AdminFolderName is blank. The root Application folder is nameless and AdminFolderUid contain the value of 0, which means it the first folder ID listed.
Note: Folders created will have a new UID created for it. UID #’s are not reused.
19 Worldwide Support Readiness Release Training
Step Action
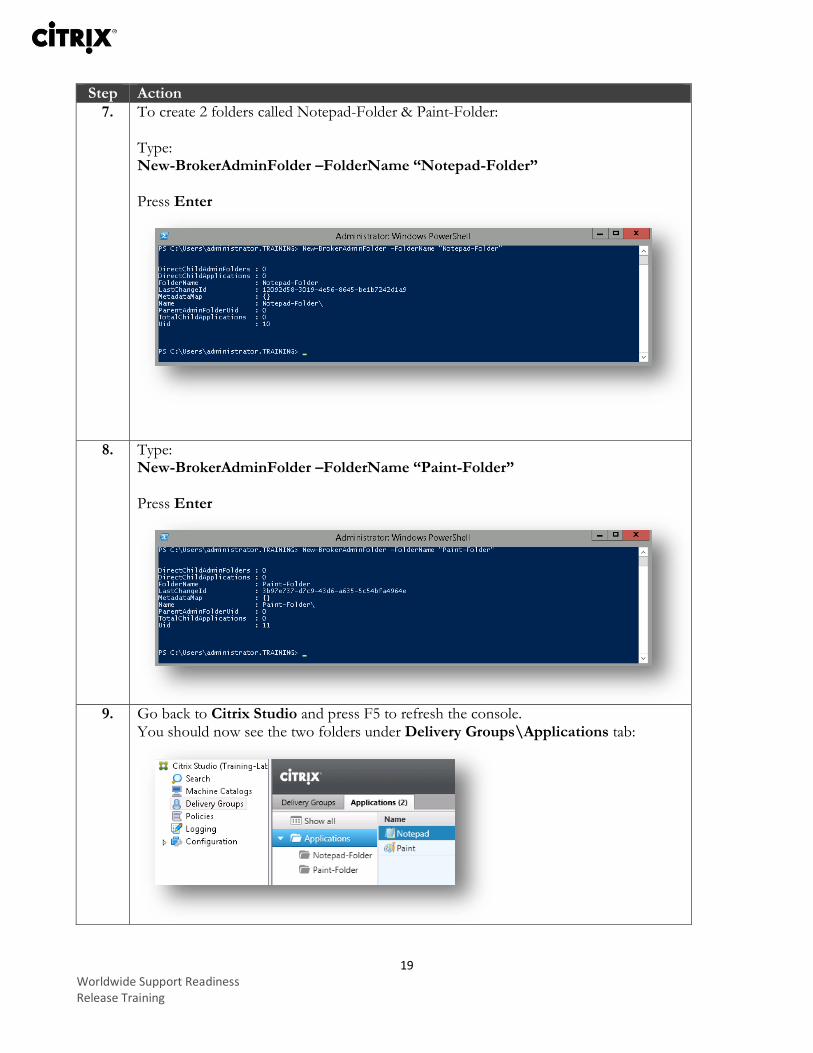
7. To create 2 folders called Notepad-Folder & Paint-Folder: Type: New-BrokerAdminFolder –FolderName “Notepad-Folder” Press Enter
8. Type: New-BrokerAdminFolder –FolderName “Paint-Folder” Press Enter
9. Go back to Citrix Studio and press F5 to refresh the console.
You should now see the two folders under Delivery Groups\Applications tab:
20 Worldwide Support Readiness Release Training
Step Action
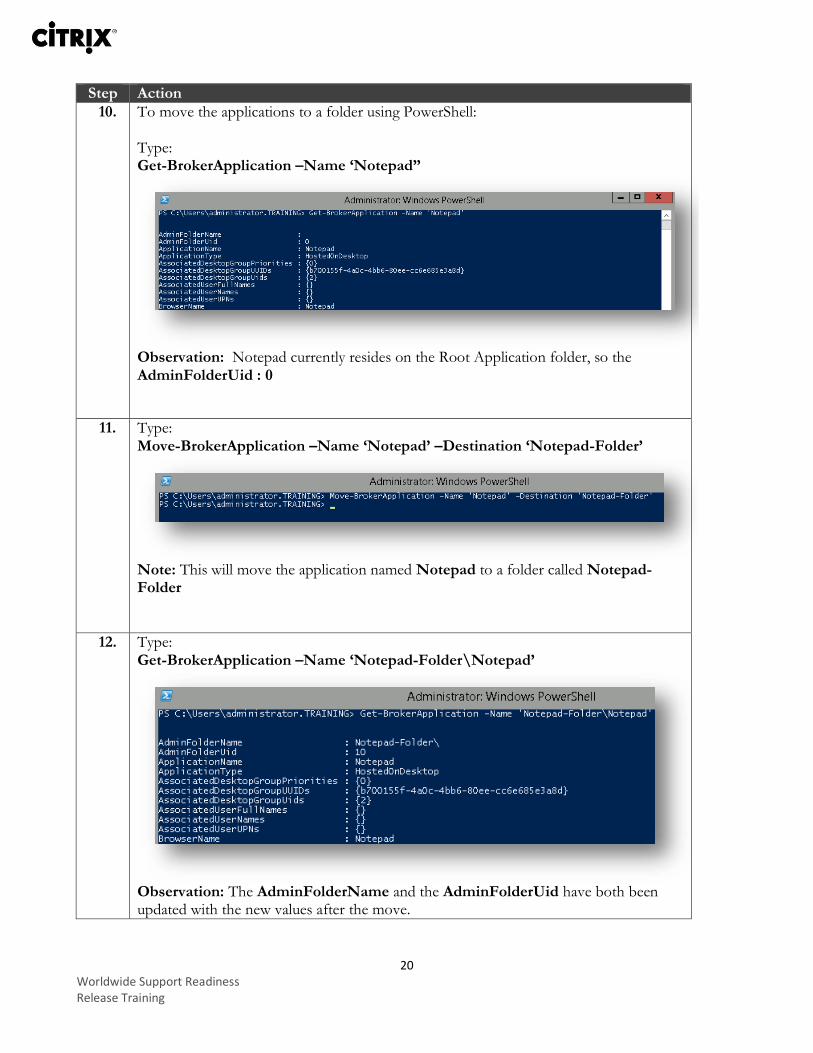
10. To move the applications to a folder using PowerShell: Type: Get-BrokerApplication –Name ‘Notepad”
Observation: Notepad currently resides on the Root Application folder, so the AdminFolderUid : 0
11. Type: Move-BrokerApplication –Name ‘Notepad’ –Destination ‘Notepad-Folder’
Note: This will move the application named Notepad to a folder called Notepad-Folder
12. Type: Get-BrokerApplication –Name ‘Notepad-Folder\Notepad’
Observation: The AdminFolderName and the AdminFolderUid have both been updated with the new values after the move.
21 Worldwide Support Readiness Release Training
Step Action
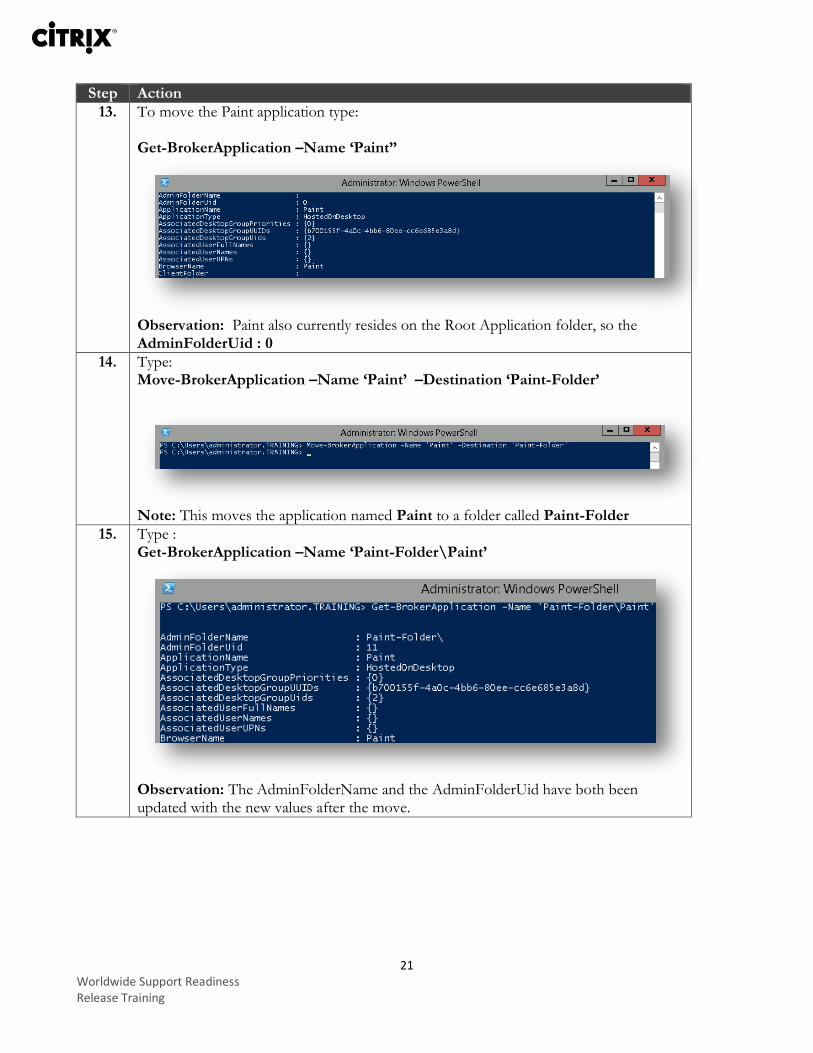
13. To move the Paint application type: Get-BrokerApplication –Name ‘Paint”
Observation: Paint also currently resides on the Root Application folder, so the AdminFolderUid : 0
14. Type: Move-BrokerApplication –Name ‘Paint’ –Destination ‘Paint-Folder’
Note: This moves the application named Paint to a folder called Paint-Folder
15. Type : Get-BrokerApplication –Name ‘Paint-Folder\Paint’
Observation: The AdminFolderName and the AdminFolderUid have both been updated with the new values after the move.
22 Worldwide Support Readiness Release Training
Step Action
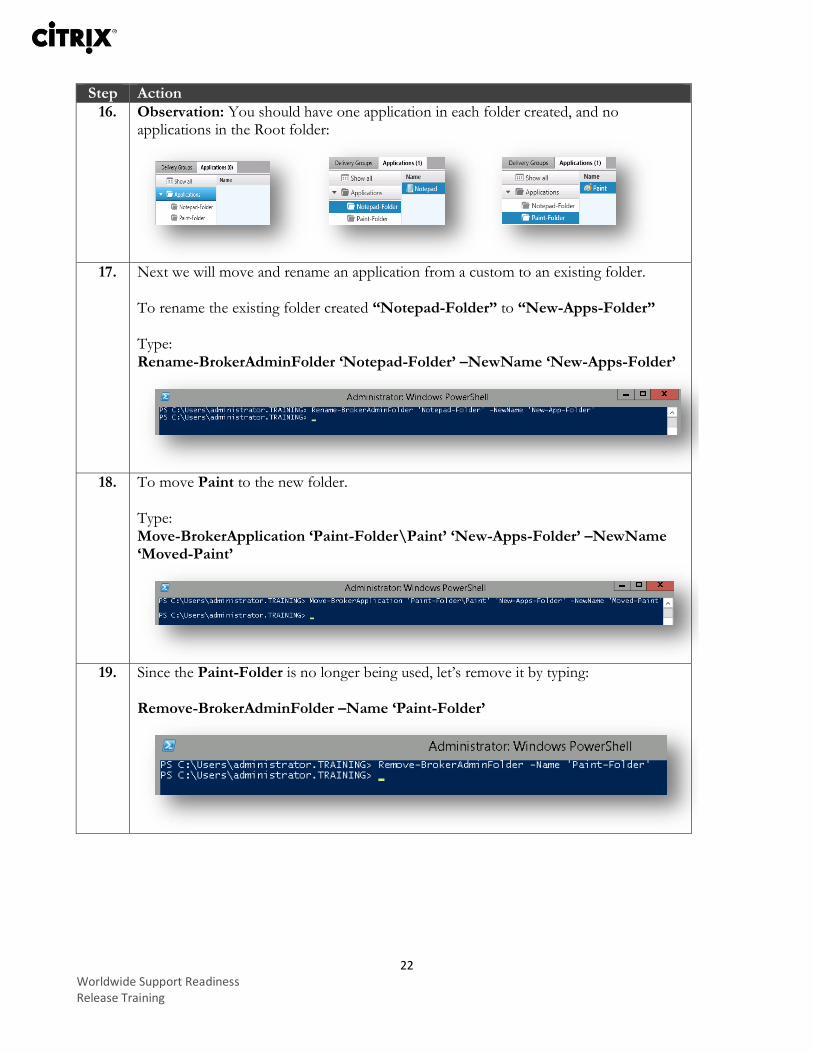
16. Observation: You should have one application in each folder created, and no applications in the Root folder:
17. Next we will move and rename an application from a custom to an existing folder.
To rename the existing folder created “Notepad-Folder” to “New-Apps-Folder” Type: Rename-BrokerAdminFolder ‘Notepad-Folder’ –NewName ‘New-Apps-Folder’
18. To move Paint to the new folder.
Type: Move-BrokerApplication ‘Paint-Folder\Paint’ ‘New-Apps-Folder’ –NewName ‘Moved-Paint’
19. Since the Paint-Folder is no longer being used, let’s remove it by typing:
Remove-BrokerAdminFolder –Name ‘Paint-Folder’

23 Worldwide Support Readiness Release Training
Step Action
20. The two applications should be located in ‘New-Apps-Folder’
Summary Key Takeaways
Applications can be moved from folder to folder using PowerShell
AdminFolderUid’s are not reused; every new folder created has a new Uid.
Applications can be renamed during the move to a new folder.
24 Worldwide Support Readiness Release Training
Exercise 3: Configure and test Session PreLaunch & Lingering Overview In this exercise you will configure Session Prelaunch and Lingering in a Delivery Group and test the feature in a 7.6 Site.
Step-by-step guidance Follow the steps below to complete the task. Estimated time to complete this lab: 15 minutes.
Step Action
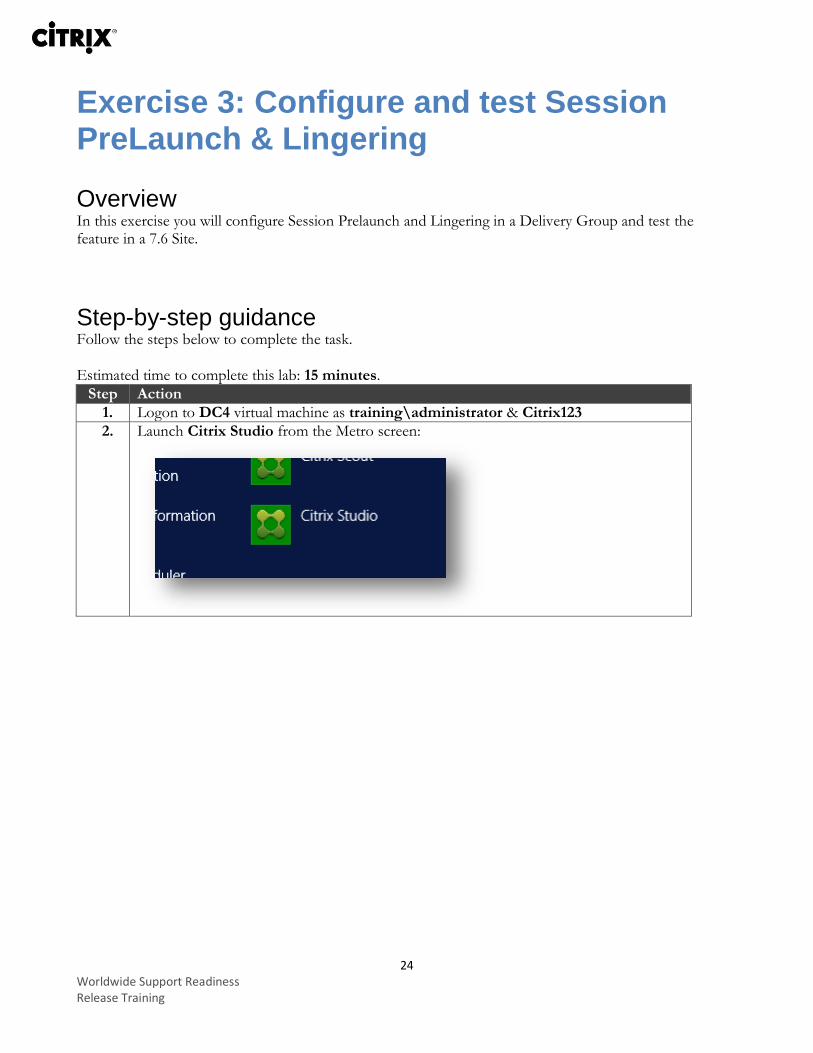
1. Logon to DC4 virtual machine as training\administrator & Citrix123
2. Launch Citrix Studio from the Metro screen:
25 Worldwide Support Readiness Release Training
Step Action
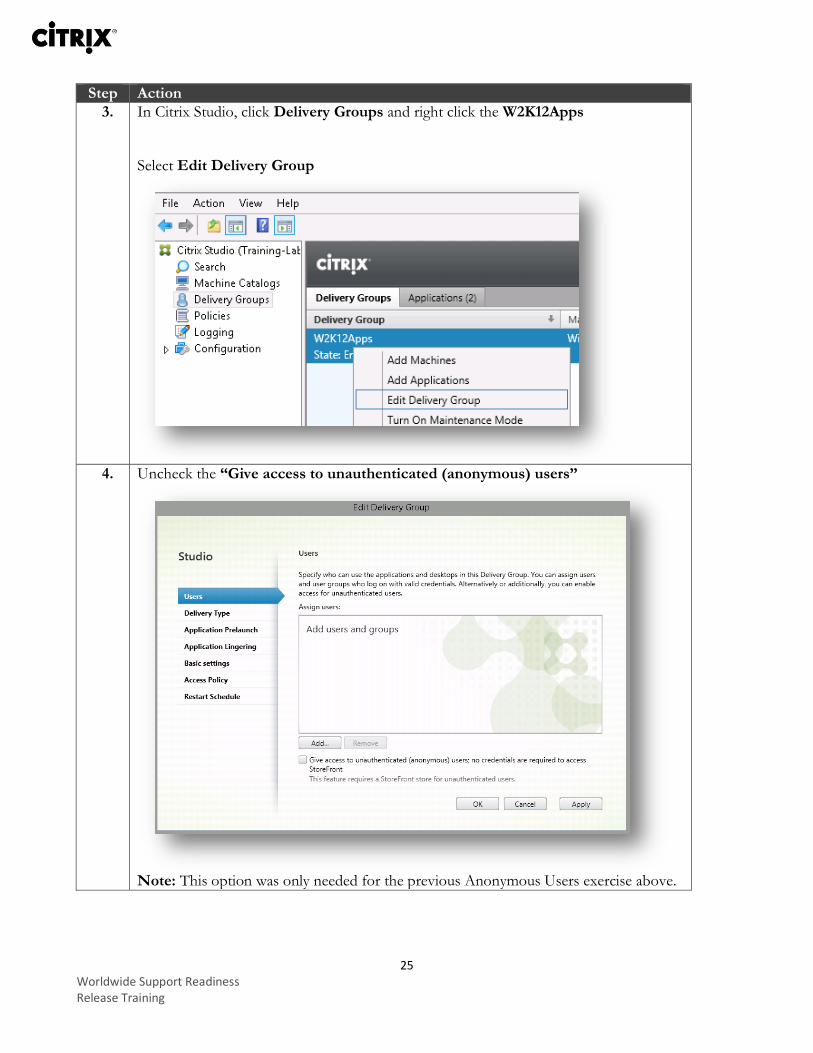
3. In Citrix Studio, click Delivery Groups and right click the W2K12Apps Select Edit Delivery Group
4. Uncheck the “Give access to unauthenticated (anonymous) users”
Note: This option was only needed for the previous Anonymous Users exercise above.
26 Worldwide Support Readiness Release Training
Step Action
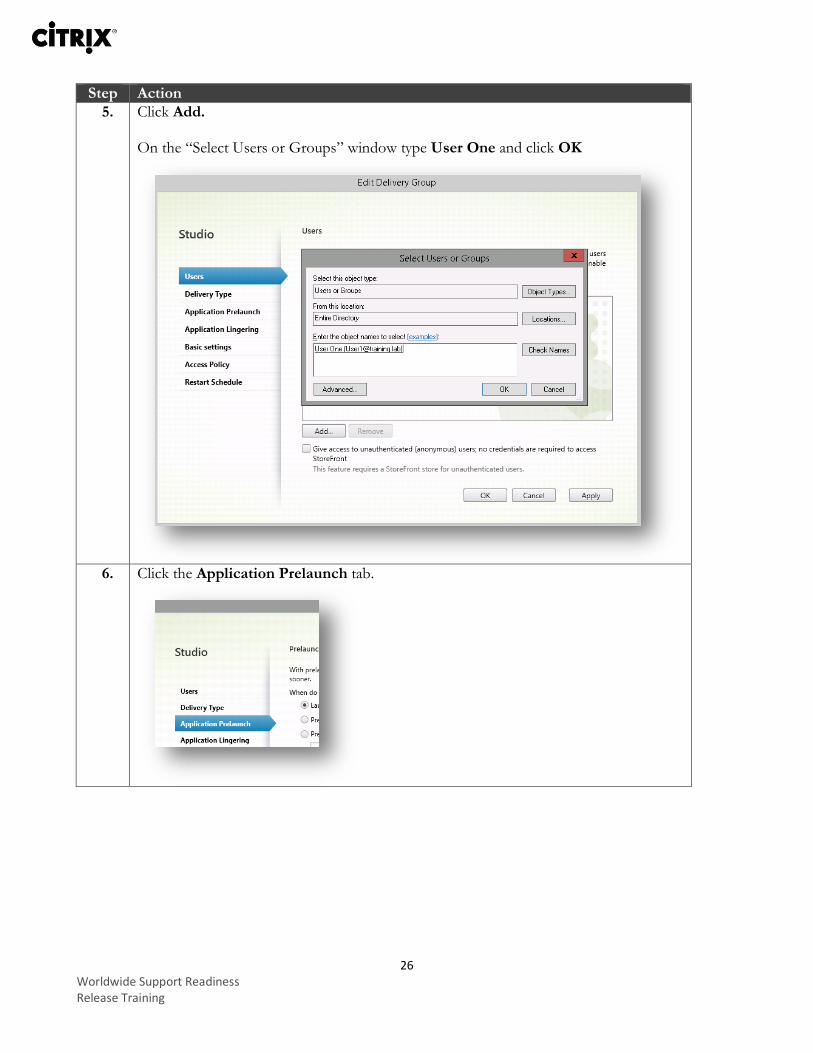
5. Click Add. On the “Select Users or Groups” window type User One and click OK
6. Click the Application Prelaunch tab.
27 Worldwide Support Readiness Release Training
Step Action
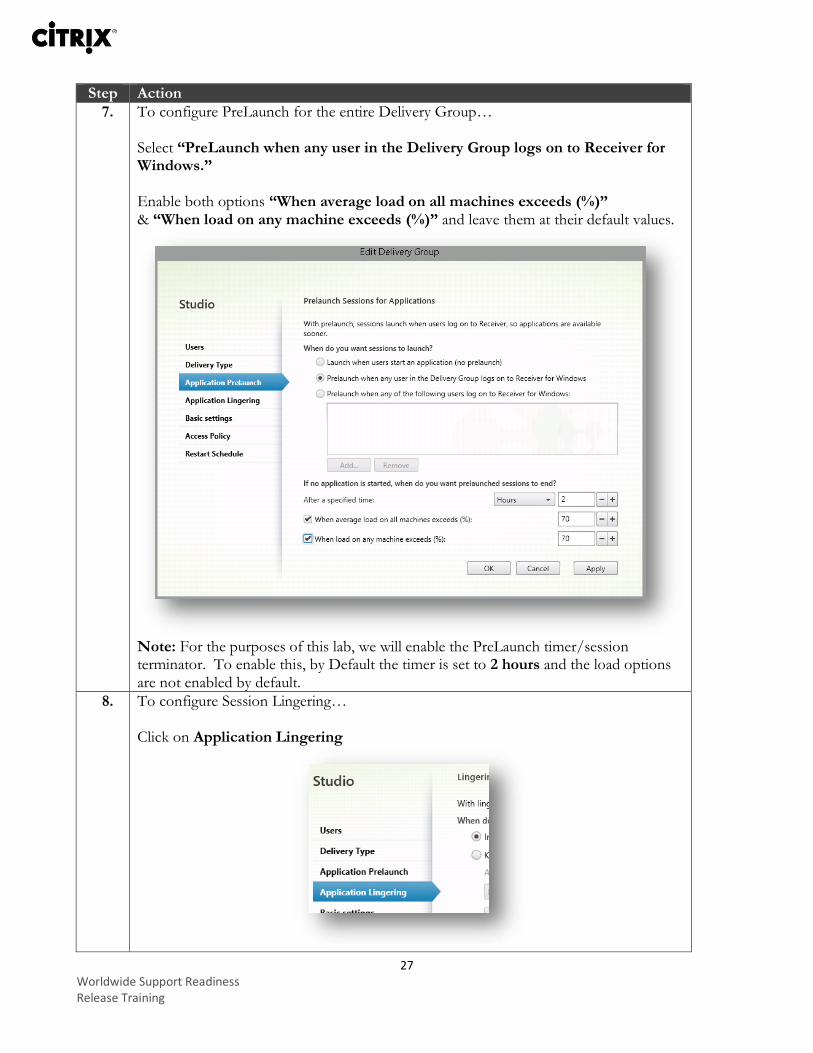
7. To configure PreLaunch for the entire Delivery Group… Select “PreLaunch when any user in the Delivery Group logs on to Receiver for Windows.” Enable both options “When average load on all machines exceeds (%)” & “When load on any machine exceeds (%)” and leave them at their default values.
Note: For the purposes of this lab, we will enable the PreLaunch timer/session terminator. To enable this, by Default the timer is set to 2 hours and the load options are not enabled by default.
8. To configure Session Lingering… Click on Application Lingering
28 Worldwide Support Readiness Release Training
Step Action
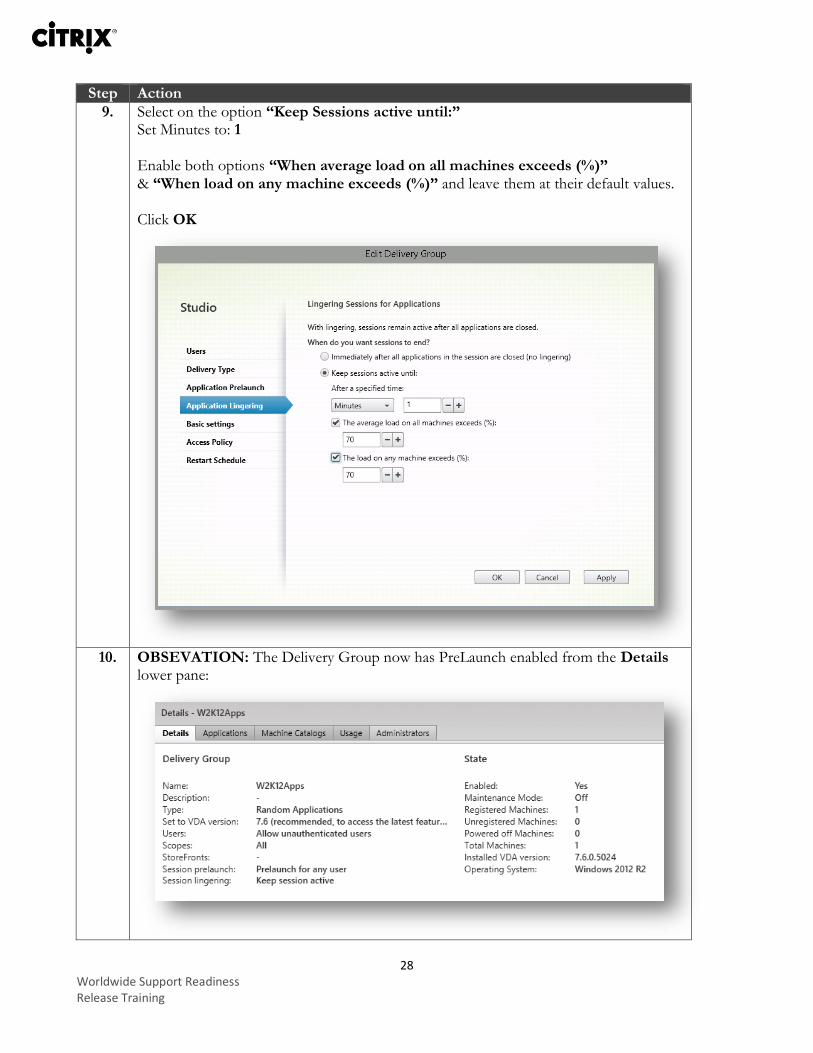
9. Select on the option “Keep Sessions active until:” Set Minutes to: 1 Enable both options “When average load on all machines exceeds (%)” & “When load on any machine exceeds (%)” and leave them at their default values. Click OK
10. OBSEVATION: The Delivery Group now has PreLaunch enabled from the Details
lower pane:

29 Worldwide Support Readiness Release Training
Step Action
11. Logon to Win7Client virtual machine as training\administrator & Citrix123 Click on the Start button, and type regedit, and press Enter
12. For PreLaunch to function, you need to enable a registry entry on the client side
Receiver for Windows. Navigate to: HKLM\Software\Wow6432Node\Citrix\Dazzle Right click EnablePreLaunch Set Value data: true Click OK.
13. Logoff and log back on to Win7Client.
14. On the taskbar right click the Receiver Icon and select Open

30 Worldwide Support Readiness Release Training
Step Action
15. Type the StoreFront address: http://sf1.training.lab/Citrix/AppServer Click Next
16. Logon to Receiver for Windows using the following credentials:
User: [email protected] Password: Citrix123
31 Worldwide Support Readiness Release Training
Step Action
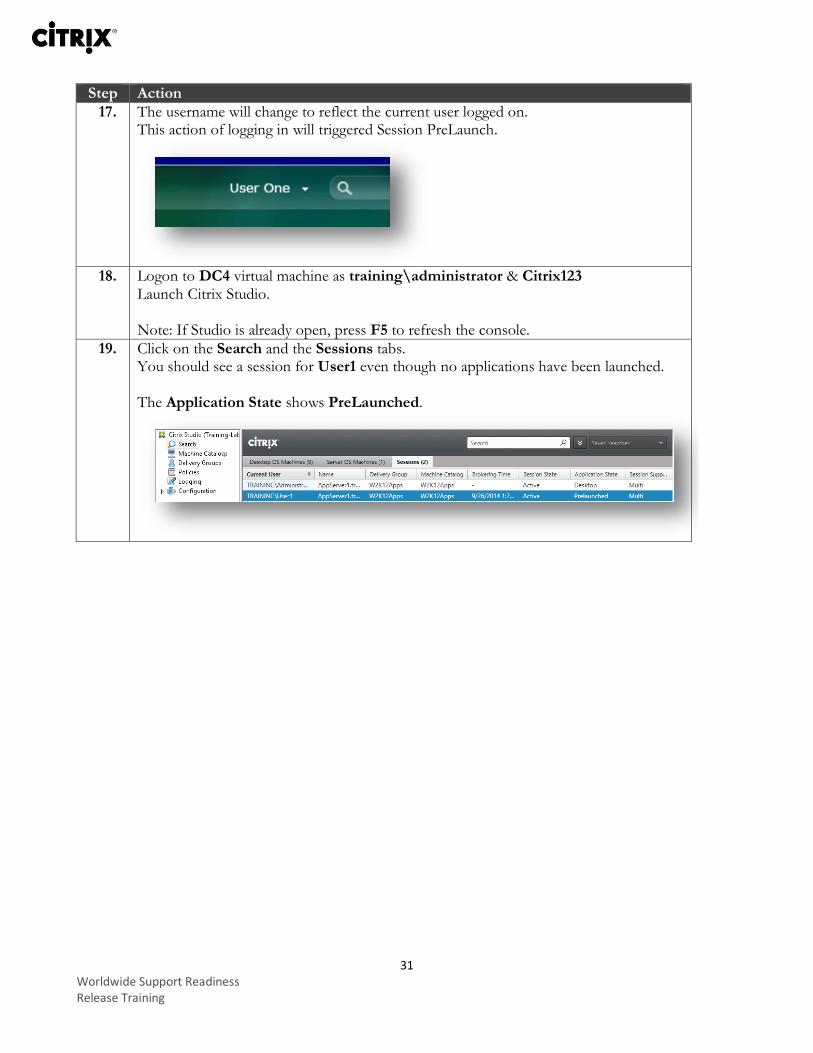
17. The username will change to reflect the current user logged on. This action of logging in will triggered Session PreLaunch.
18. Logon to DC4 virtual machine as training\administrator & Citrix123
Launch Citrix Studio. Note: If Studio is already open, press F5 to refresh the console.
19. Click on the Search and the Sessions tabs. You should see a session for User1 even though no applications have been launched. The Application State shows PreLaunched.
32 Worldwide Support Readiness Release Training
Step Action
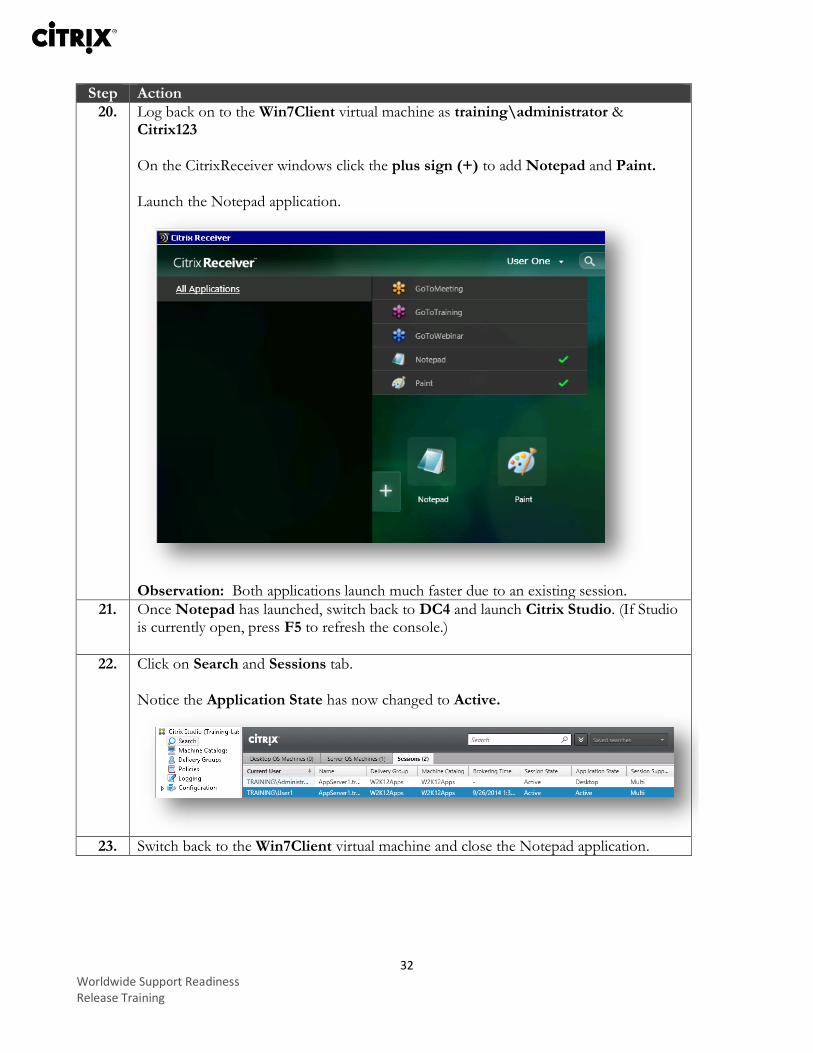
20. Log back on to the Win7Client virtual machine as training\administrator & Citrix123 On the CitrixReceiver windows click the plus sign (+) to add Notepad and Paint. Launch the Notepad application.
Observation: Both applications launch much faster due to an existing session.
21. Once Notepad has launched, switch back to DC4 and launch Citrix Studio. (If Studio is currently open, press F5 to refresh the console.)
22. Click on Search and Sessions tab. Notice the Application State has now changed to Active.
23. Switch back to the Win7Client virtual machine and close the Notepad application.
33 Worldwide Support Readiness Release Training
Step Action
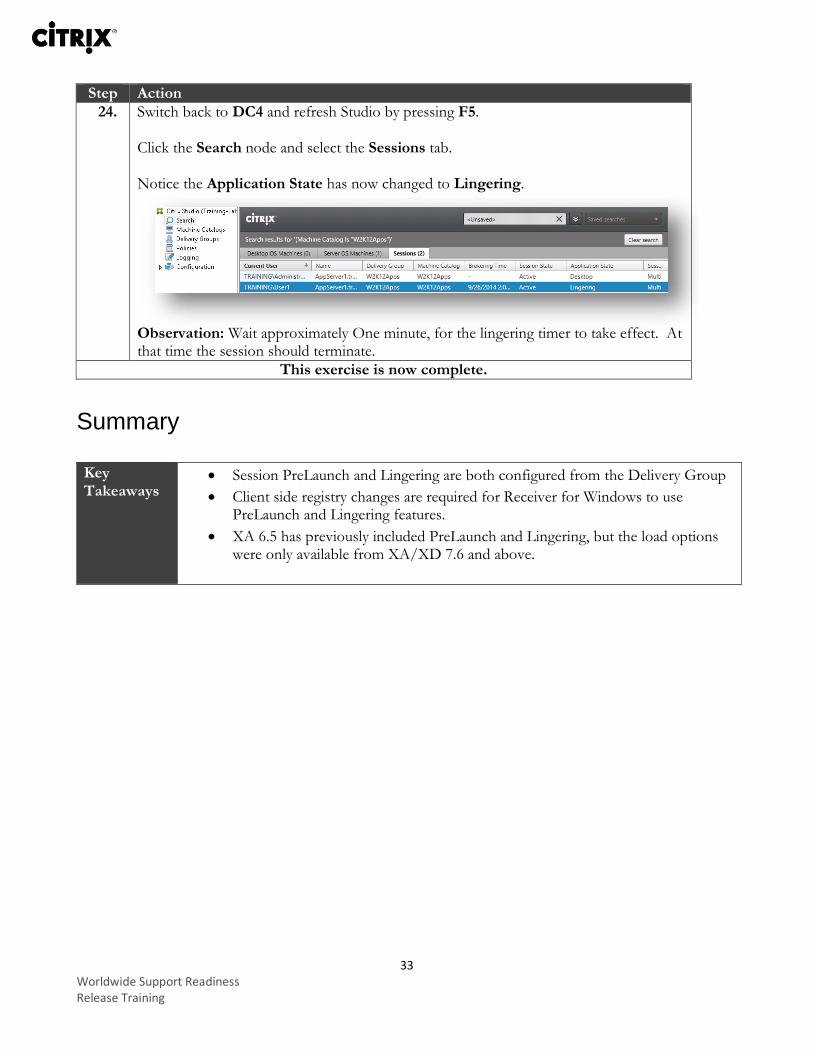
24. Switch back to DC4 and refresh Studio by pressing F5. Click the Search node and select the Sessions tab. Notice the Application State has now changed to Lingering.
Observation: Wait approximately One minute, for the lingering timer to take effect. At that time the session should terminate.
This exercise is now complete.
Summary Key Takeaways
Session PreLaunch and Lingering are both configured from the Delivery Group
Client side registry changes are required for Receiver for Windows to use PreLaunch and Lingering features.
XA 6.5 has previously included PreLaunch and Lingering, but the load options were only available from XA/XD 7.6 and above.
34 Worldwide Support Readiness Release Training
Exercise 4: Migration Moving from XenApp 6.5 to XenApp 7.6 using the ‘Migration Tool’ Overview In this exercise we will use the ‘Migration Tool’ to export XenApp 6.5 Farm policies and data to an XML file. After configuring an empty XenApp 7.6 Site, you will import the data using the newly created XML files.
Step-by-step guidance Follow the steps below to complete the task. Estimated time to complete this lab: 30 minutes.
Step Action
1. Logon to XA65 as Training\Administrator and Citrix123.
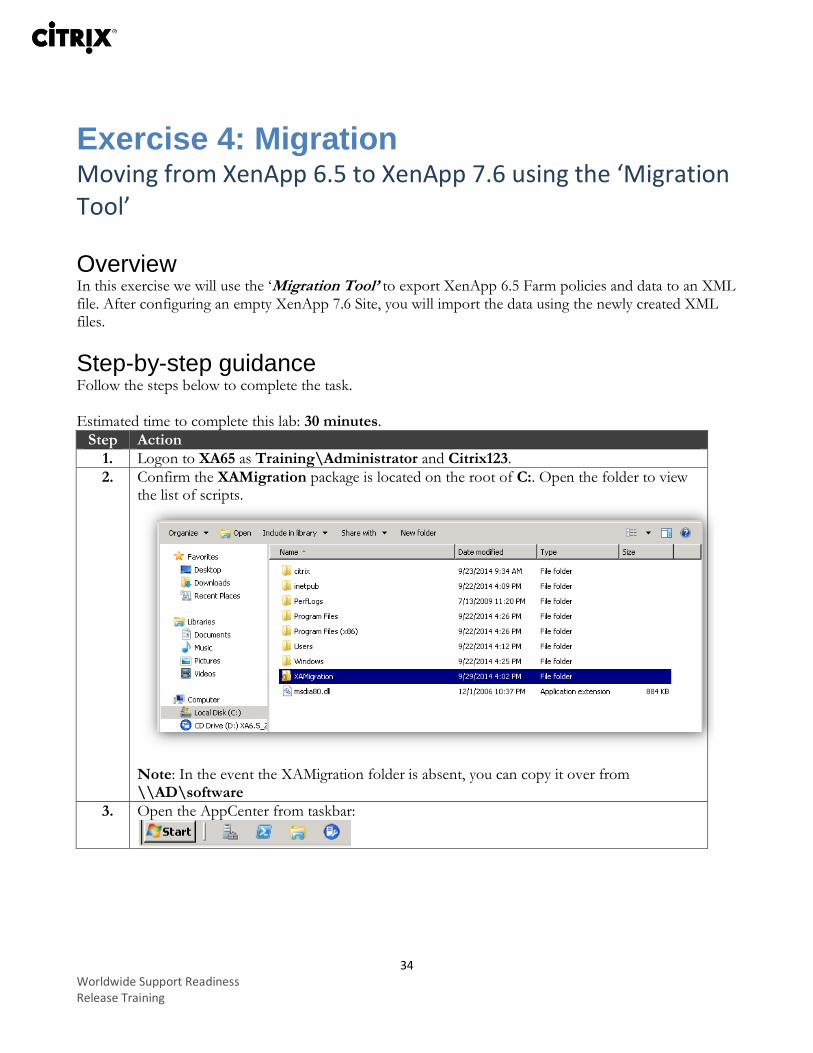
2. Confirm the XAMigration package is located on the root of C:. Open the folder to view the list of scripts.
Note: In the event the XAMigration folder is absent, you can copy it over from \\AD\software
3. Open the AppCenter from taskbar:
35 Worldwide Support Readiness Release Training
Step Action
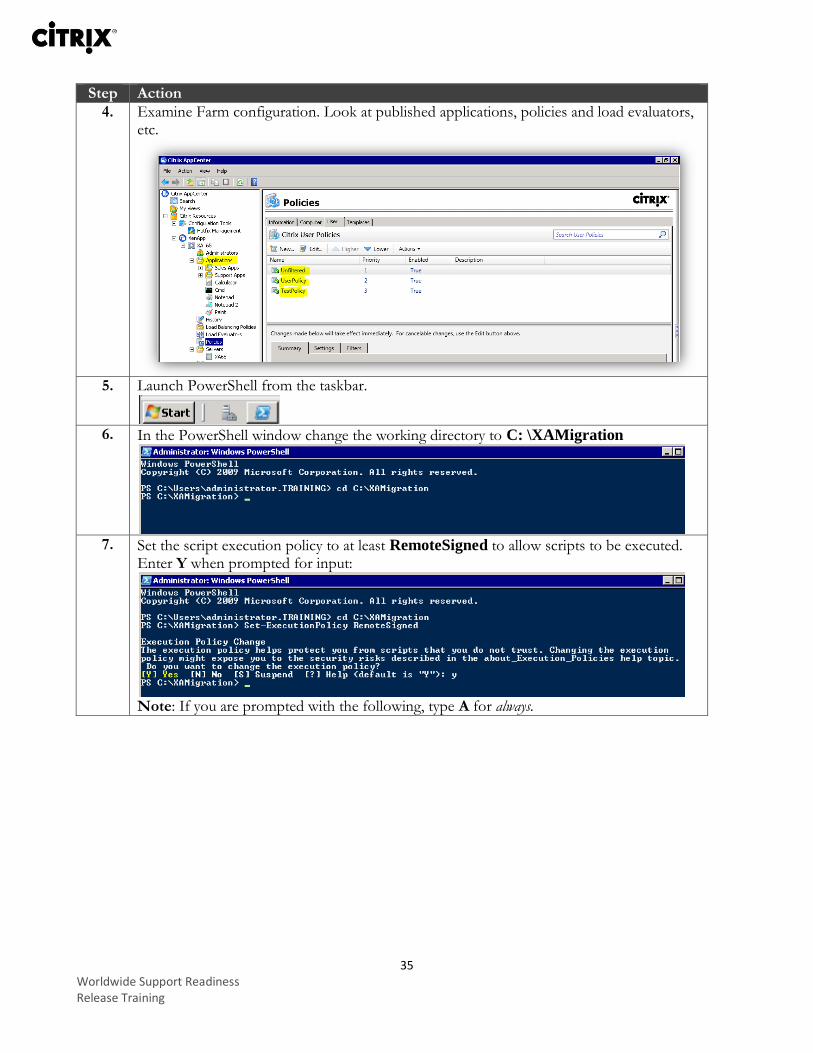
4. Examine Farm configuration. Look at published applications, policies and load evaluators, etc.
5. Launch PowerShell from the taskbar.
6. In the PowerShell window change the working directory to C: \XAMigration
7. Set the script execution policy to at least RemoteSigned to allow scripts to be executed.
Enter Y when prompted for input:
Note: If you are prompted with the following, type A for always.
36 Worldwide Support Readiness Release Training
Step Action
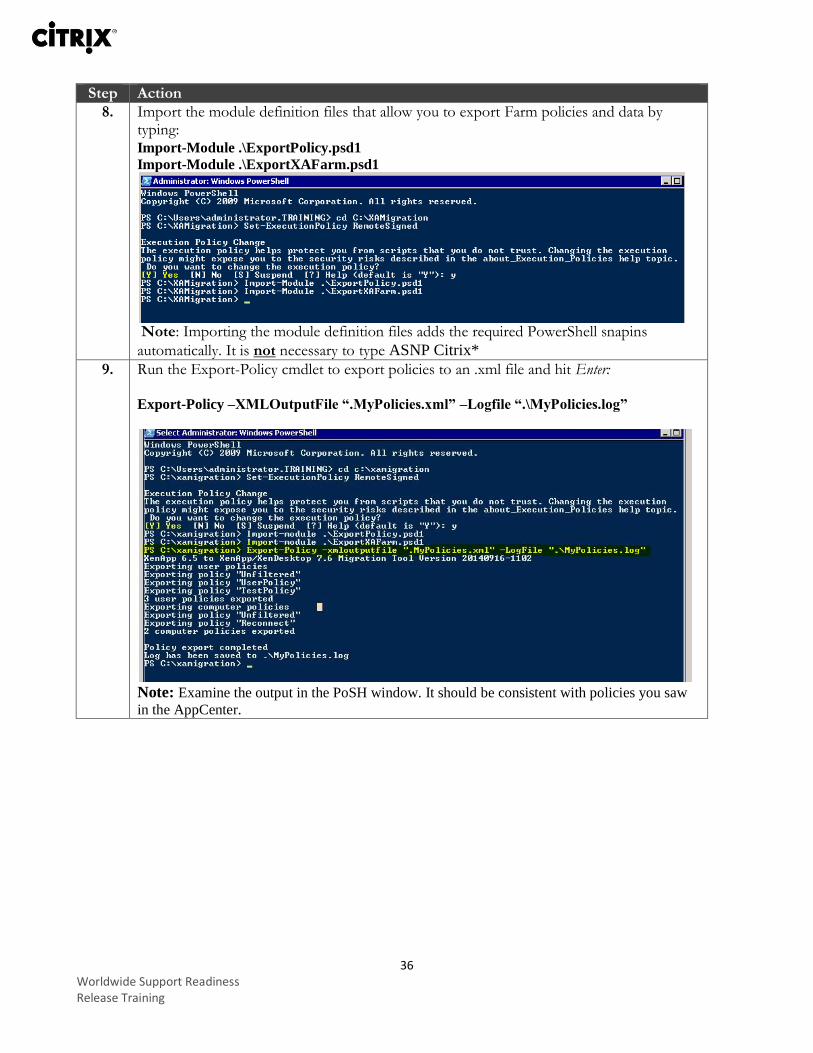
8. Import the module definition files that allow you to export Farm policies and data by typing: Import-Module .\ExportPolicy.psd1
Import-Module .\ExportXAFarm.psd1
Note: Importing the module definition files adds the required PowerShell snapins
automatically. It is not necessary to type ASNP Citrix*
9. Run the Export-Policy cmdlet to export policies to an .xml file and hit Enter:
Export-Policy –XMLOutputFile “.MyPolicies.xml” –Logfile “.\MyPolicies.log”
Note: Examine the output in the PoSH window. It should be consistent with policies you saw
in the AppCenter.
37 Worldwide Support Readiness Release Training
Step Action
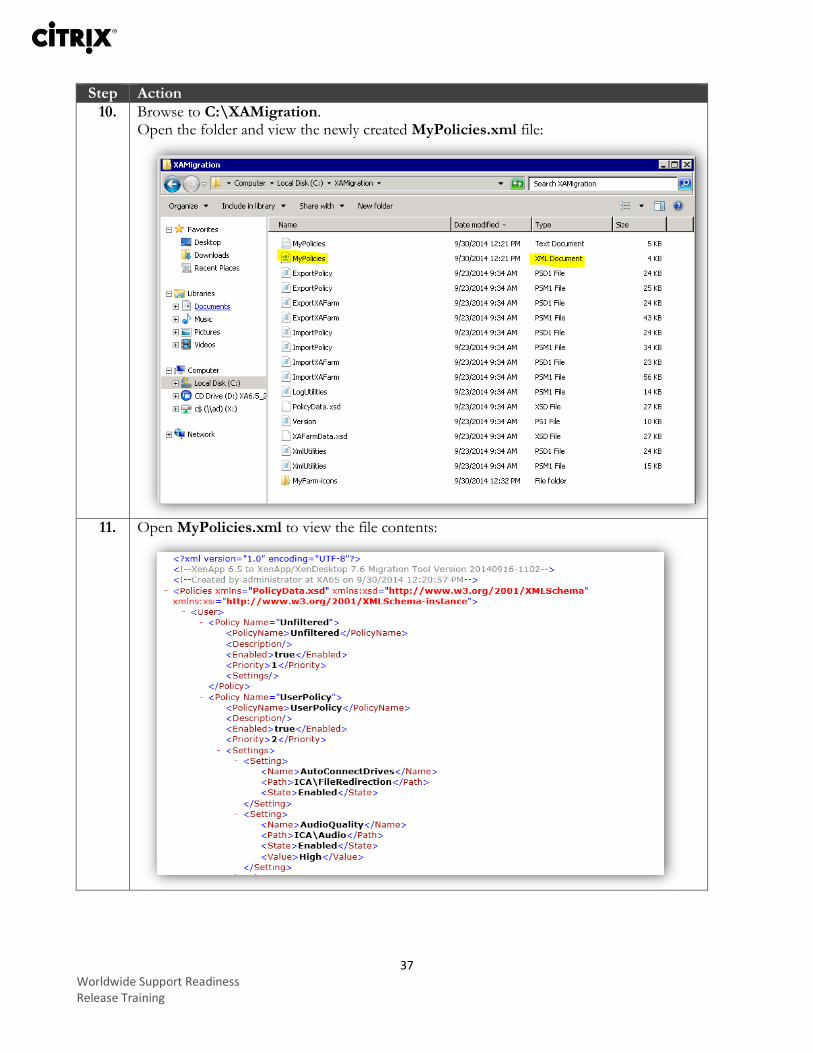
10. Browse to C:\XAMigration. Open the folder and view the newly created MyPolicies.xml file:
11. Open MyPolicies.xml to view the file contents:
38 Worldwide Support Readiness Release Training
Step Action
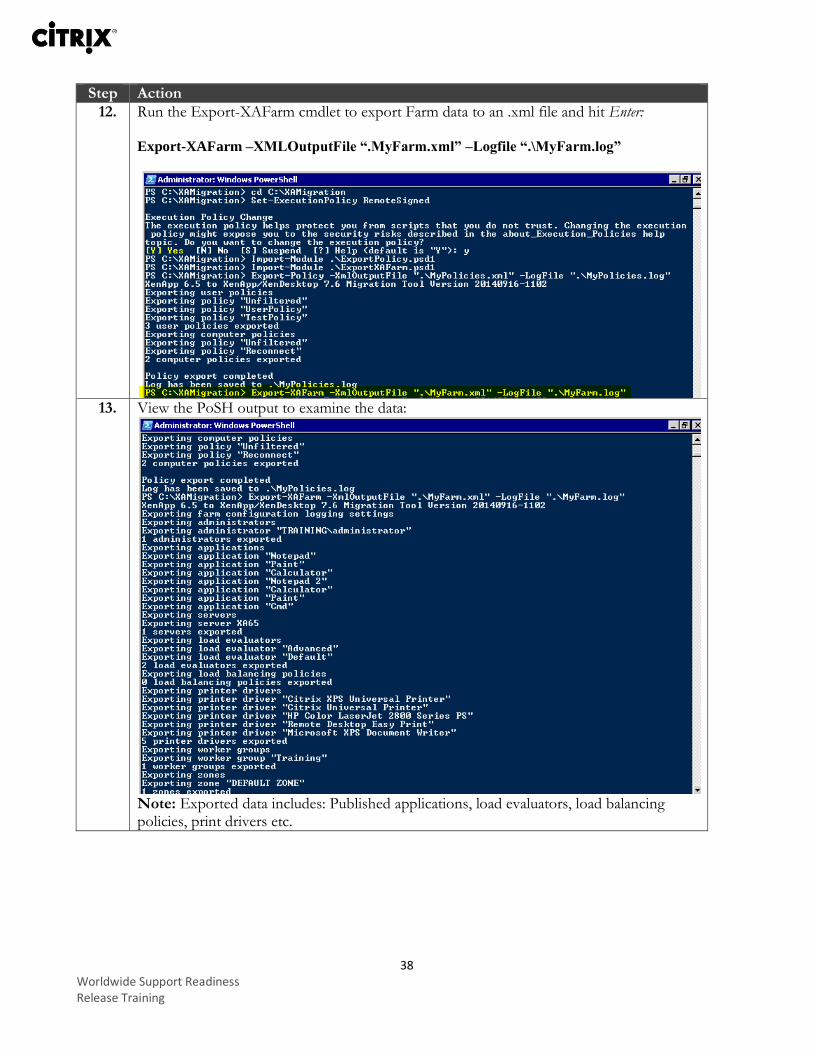
12. Run the Export-XAFarm cmdlet to export Farm data to an .xml file and hit Enter:
Export-XAFarm –XMLOutputFile “.MyFarm.xml” –Logfile “.\MyFarm.log”
13. View the PoSH output to examine the data:
Note: Exported data includes: Published applications, load evaluators, load balancing policies, print drivers etc.
39 Worldwide Support Readiness Release Training
Step Action
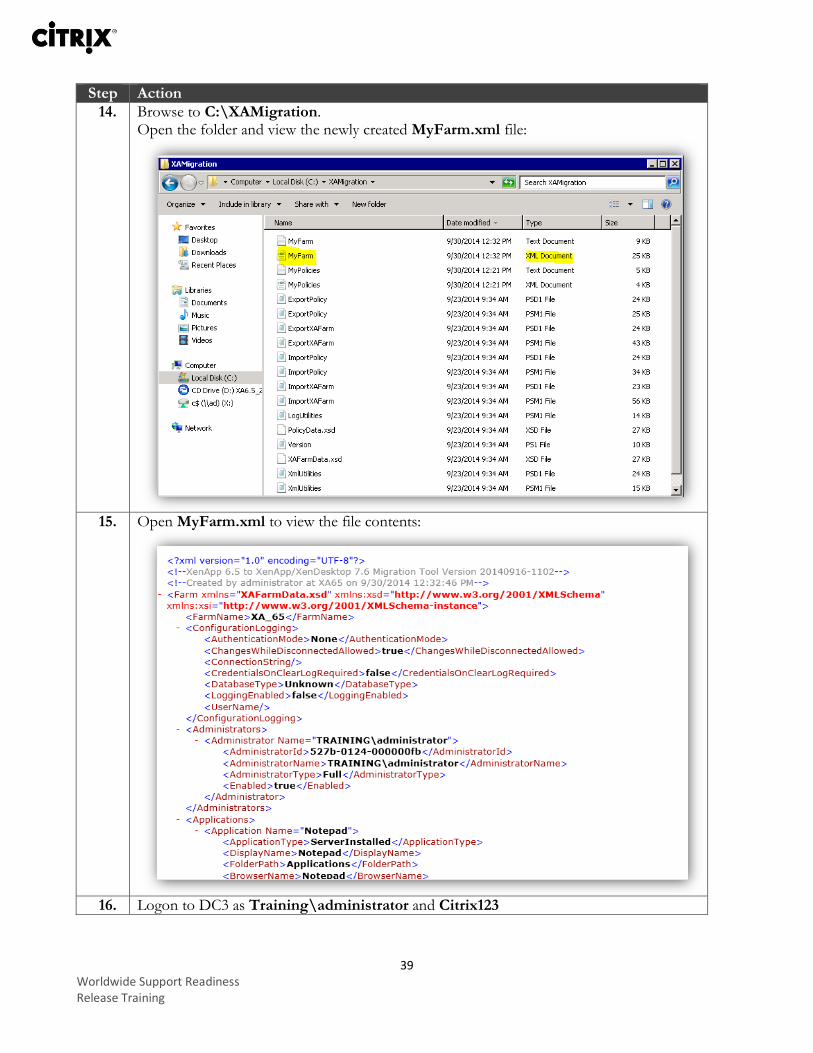
14. Browse to C:\XAMigration. Open the folder and view the newly created MyFarm.xml file:
15. Open MyFarm.xml to view the file contents:
16. Logon to DC3 as Training\administrator and Citrix123
40 Worldwide Support Readiness Release Training
Step Action
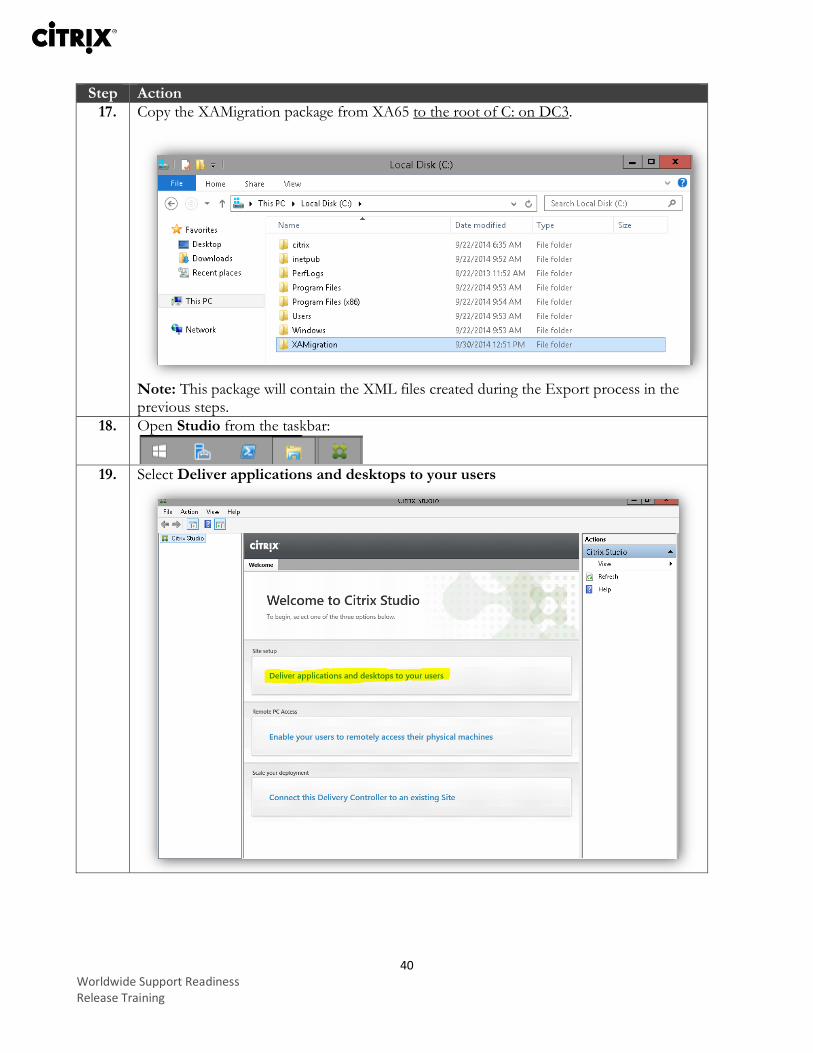
17. Copy the XAMigration package from XA65 to the root of C: on DC3.
Note: This package will contain the XML files created during the Export process in the previous steps.
18. Open Studio from the taskbar:
19. Select Deliver applications and desktops to your users
41 Worldwide Support Readiness Release Training
Step Action
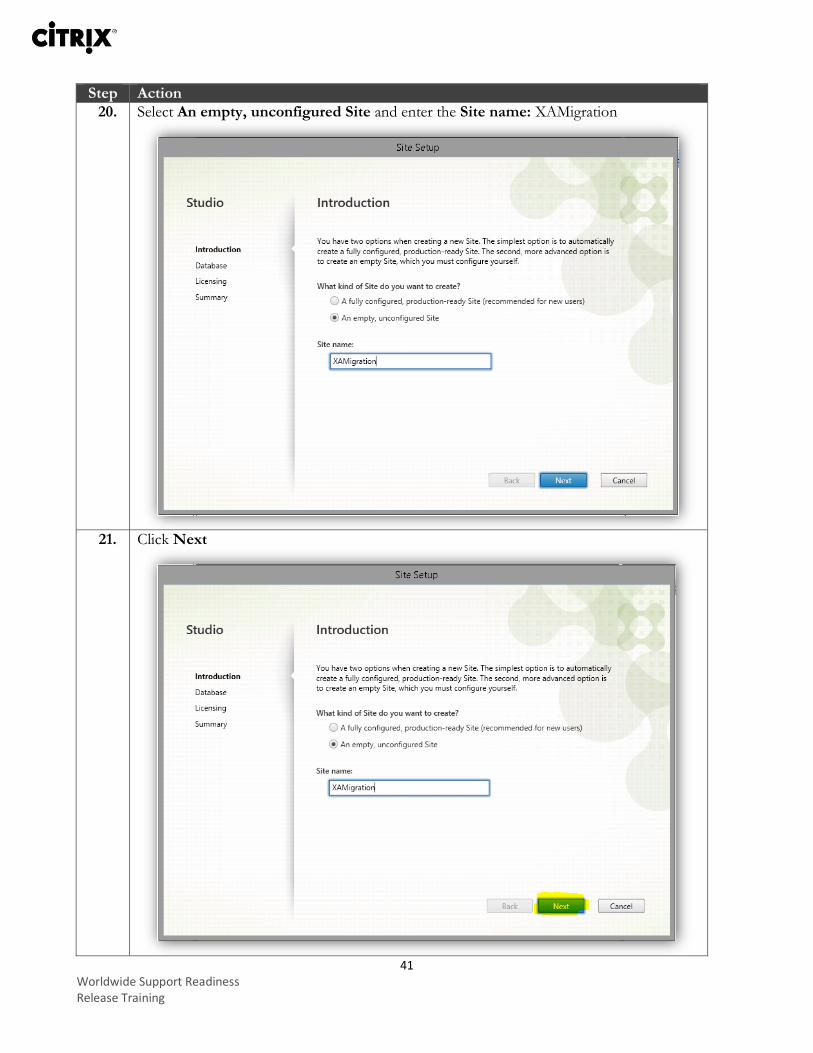
20. Select An empty, unconfigured Site and enter the Site name: XAMigration
21. Click Next
42 Worldwide Support Readiness Release Training
Step Action
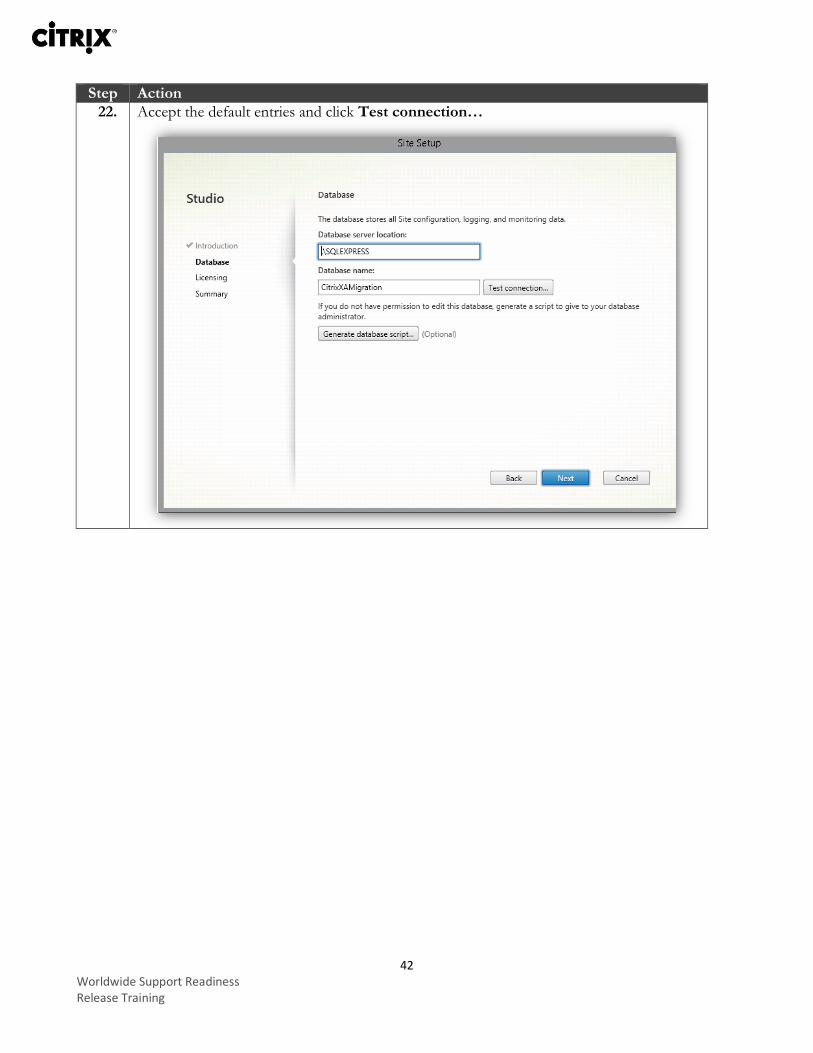
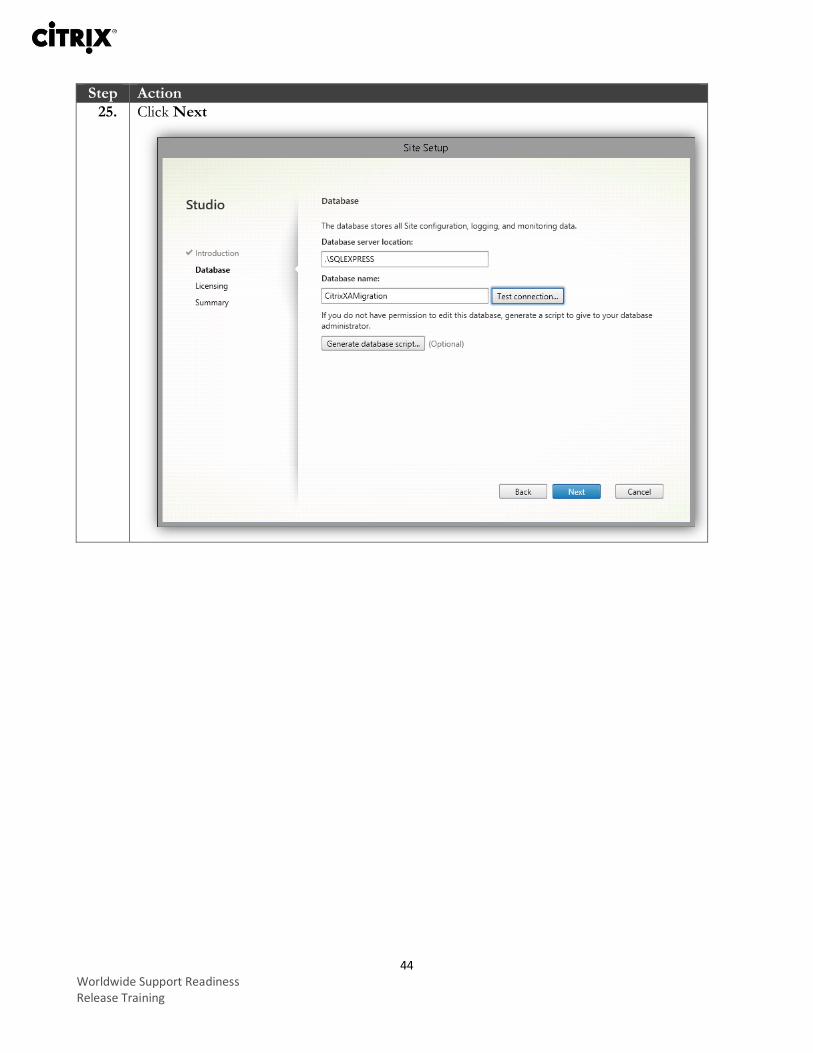
22. Accept the default entries and click Test connection…
43 Worldwide Support Readiness Release Training
Step Action
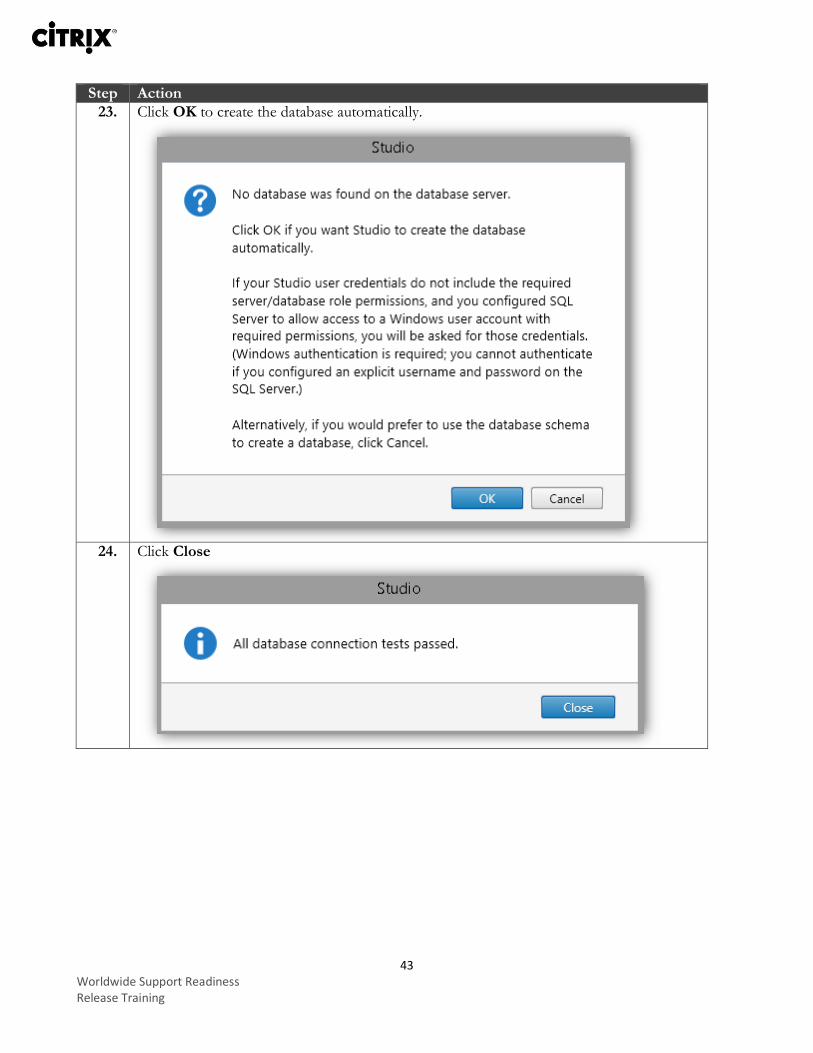
23. Click OK to create the database automatically.
24. Click Close
44 Worldwide Support Readiness Release Training
Step Action
25. Click Next
45 Worldwide Support Readiness Release Training
Step Action
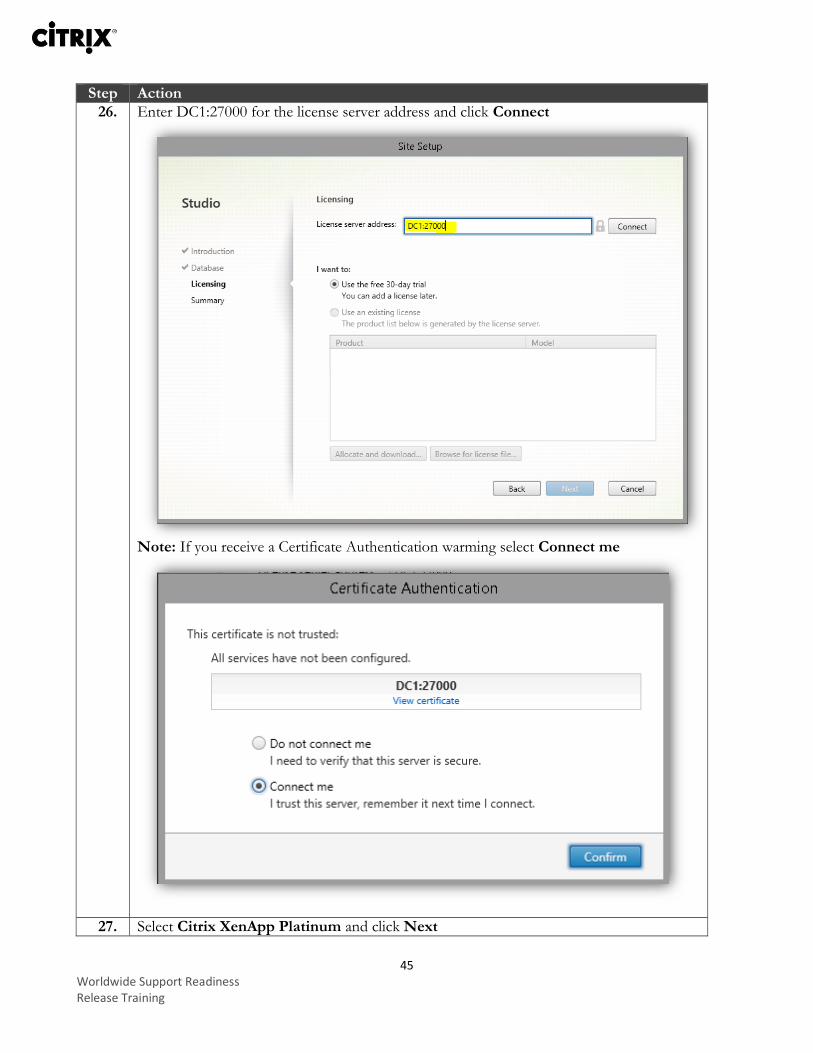
26. Enter DC1:27000 for the license server address and click Connect
Note: If you receive a Certificate Authentication warming select Connect me
27. Select Citrix XenApp Platinum and click Next
46 Worldwide Support Readiness Release Training
Step Action
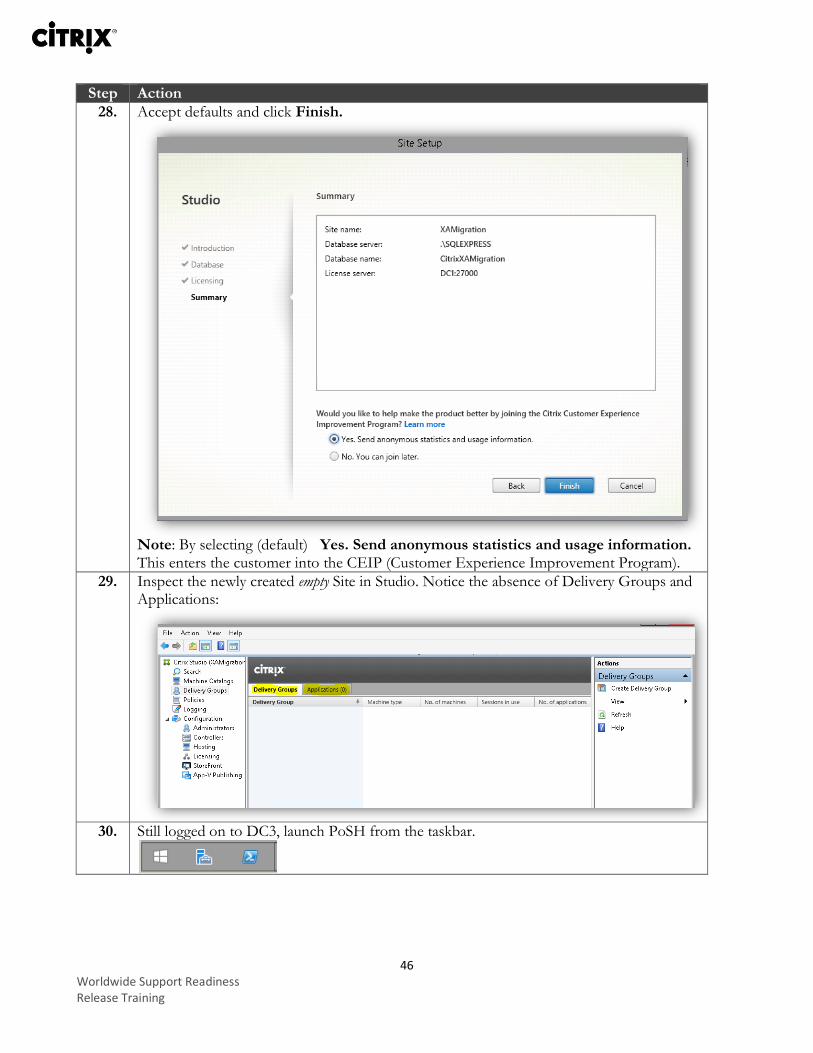
28. C Accept defaults and click Finish.
Note: By selecting (default) Yes. Send anonymous statistics and usage information. This enters the customer into the CEIP (Customer Experience Improvement Program).
29. I Inspect the newly created empty Site in Studio. Notice the absence of Delivery Groups and Applications:
30. Still logged on to DC3, launch PoSH from the taskbar.
47 Worldwide Support Readiness Release Training
Step Action
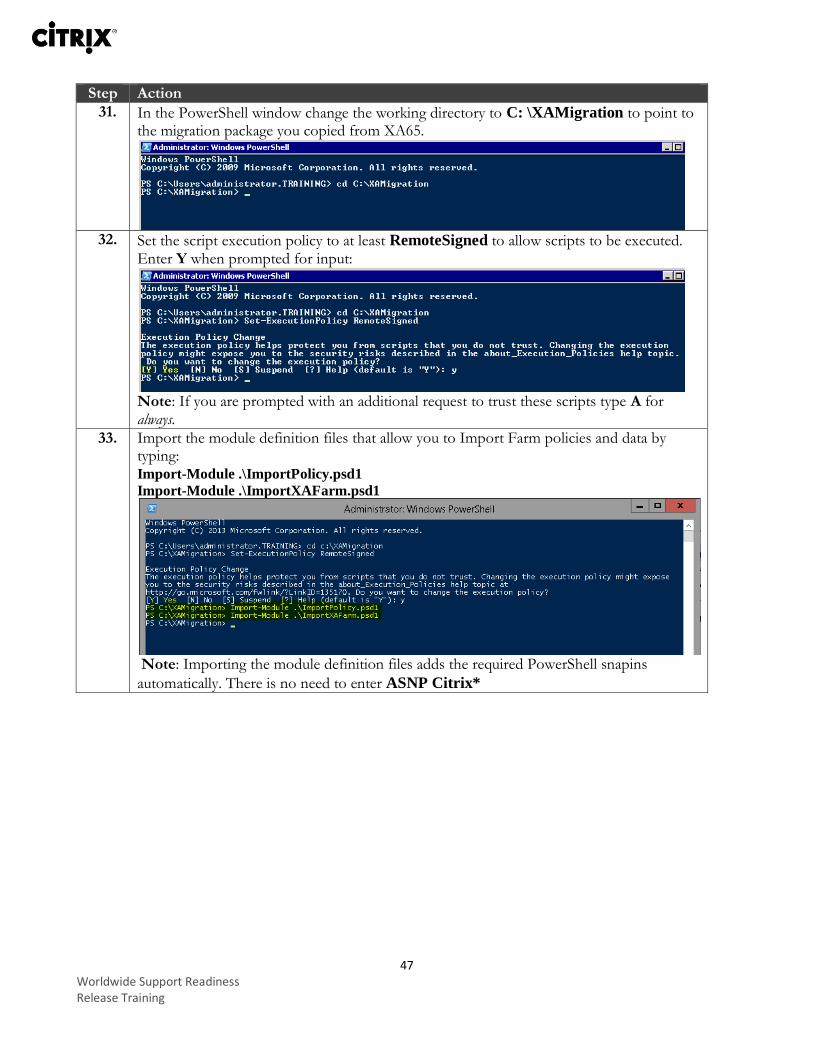
31. In the PowerShell window change the working directory to C: \XAMigration to point to the migration package you copied from XA65.
32. Set the script execution policy to at least RemoteSigned to allow scripts to be executed.
Enter Y when prompted for input:
Note: If you are prompted with an additional request to trust these scripts type A for always.
33. Import the module definition files that allow you to Import Farm policies and data by typing: Import-Module .\ImportPolicy.psd1
Import-Module .\ImportXAFarm.psd1
Note: Importing the module definition files adds the required PowerShell snapins
automatically. There is no need to enter ASNP Citrix*
48 Worldwide Support Readiness Release Training
Step Action
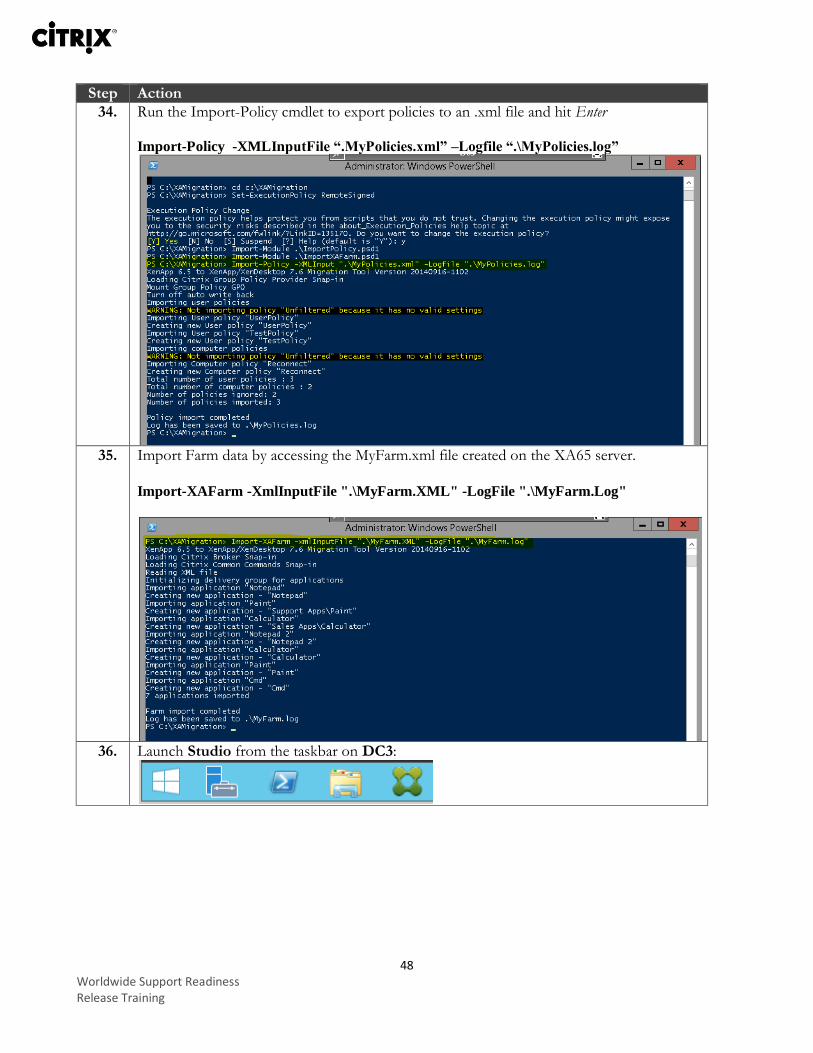
34. Run the Import-Policy cmdlet to export policies to an .xml file and hit Enter
Import-Policy -XMLInputFile “.MyPolicies.xml” –Logfile “.\MyPolicies.log”
35. Import Farm data by accessing the MyFarm.xml file created on the XA65 server.
Import-XAFarm -XmlInputFile ".\MyFarm.XML" -LogFile ".\MyFarm.Log"
36. Launch Studio from the taskbar on DC3:
49 Worldwide Support Readiness Release Training
Step Action
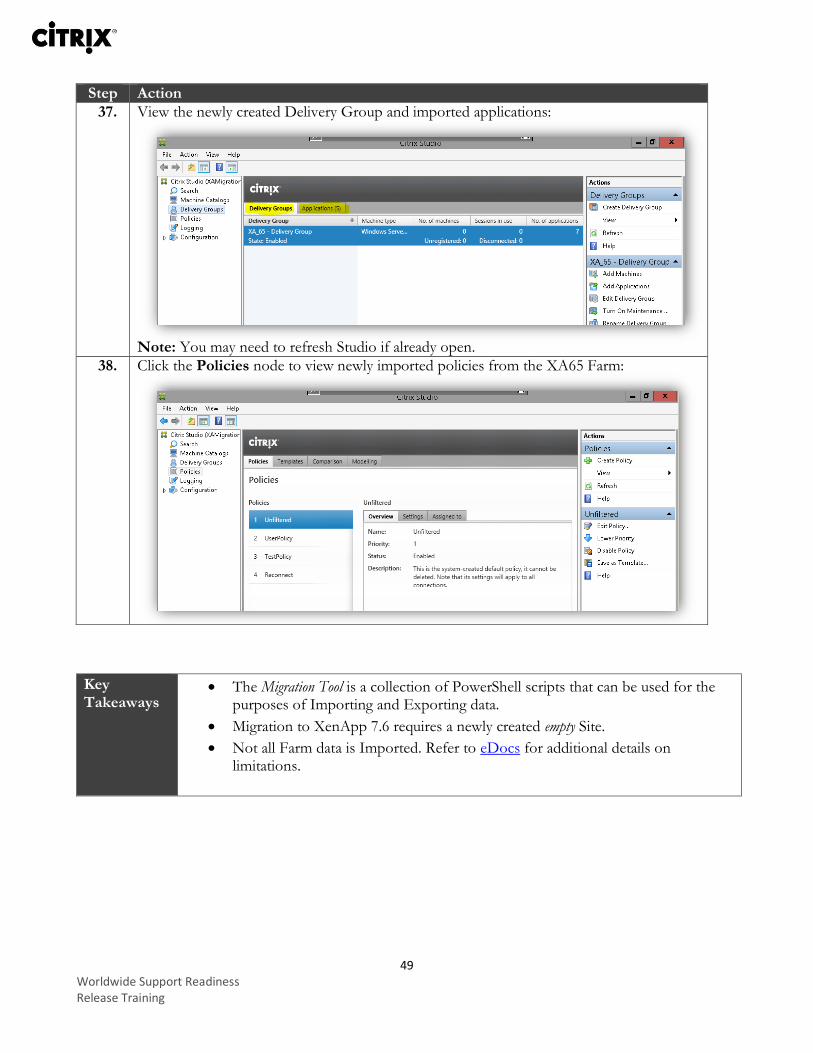
37. View the newly created Delivery Group and imported applications:
Note: You may need to refresh Studio if already open.
38. Click the Policies node to view newly imported policies from the XA65 Farm:
Key Takeaways
The Migration Tool is a collection of PowerShell scripts that can be used for the purposes of Importing and Exporting data.
Migration to XenApp 7.6 requires a newly created empty Site.
Not all Farm data is Imported. Refer to eDocs for additional details on limitations.
50 Worldwide Support Readiness Release Training
Exercise 5: Connection Leasing in Action Overview In this exercise we will use the Connection Leasing feature to allow users enumerate resources and launch sessions through StoreFront when the Site DB is down. Similar to the LHC in IMA. Connection Leasing provides true built-in resilience for user connections against complete DB Outages.
Step-by-step guidance Follow the steps below to complete the task. Estimated time to complete this lab: 45 minutes.
Step Action
1. Login to DC1 as training\administrator with password Citrix123 and launch a
PowerShell window by clicking on the PoSH icon on the taskbar:
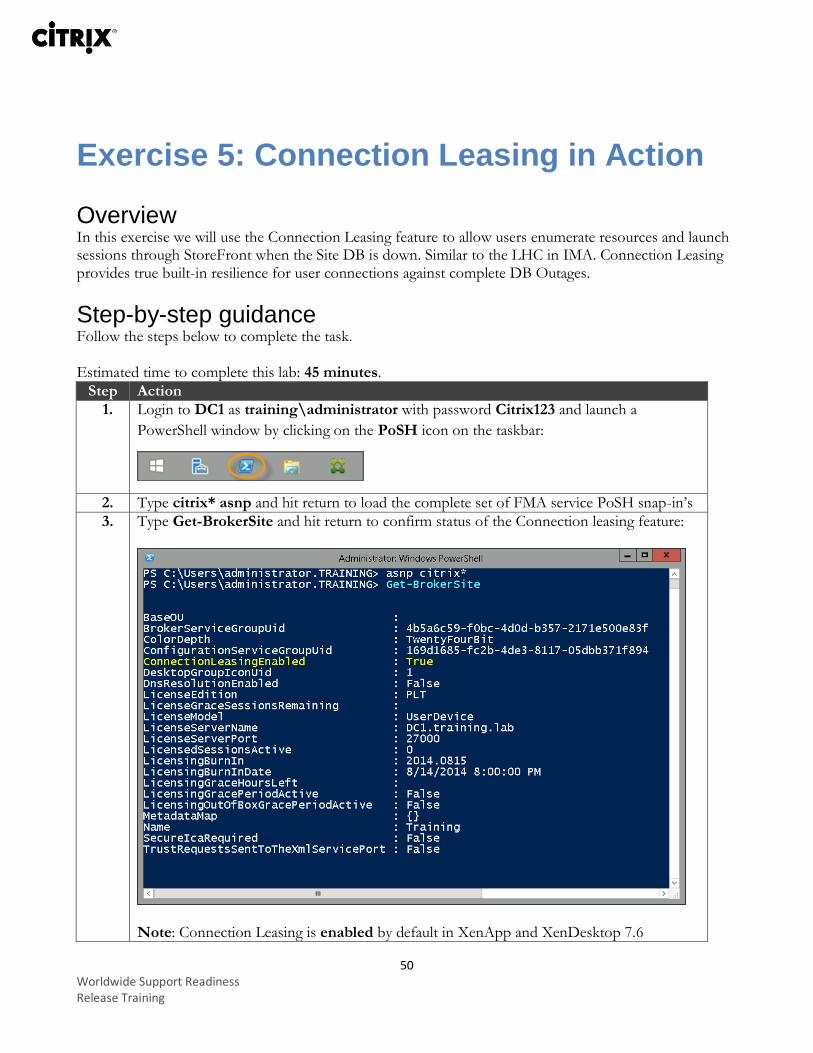
2. Type citrix* asnp and hit return to load the complete set of FMA service PoSH snap-in’s
3. Type Get-BrokerSite and hit return to confirm status of the Connection leasing feature:
Note: Connection Leasing is enabled by default in XenApp and XenDesktop 7.6
51 Worldwide Support Readiness Release Training
Step Action
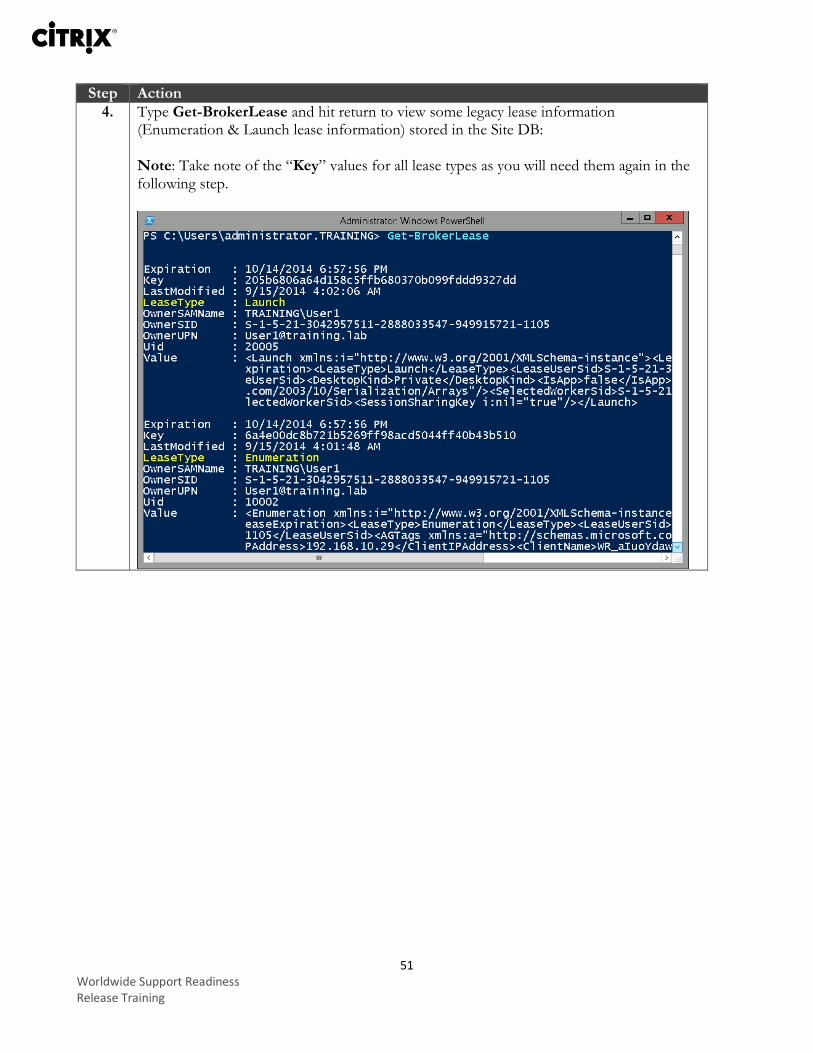
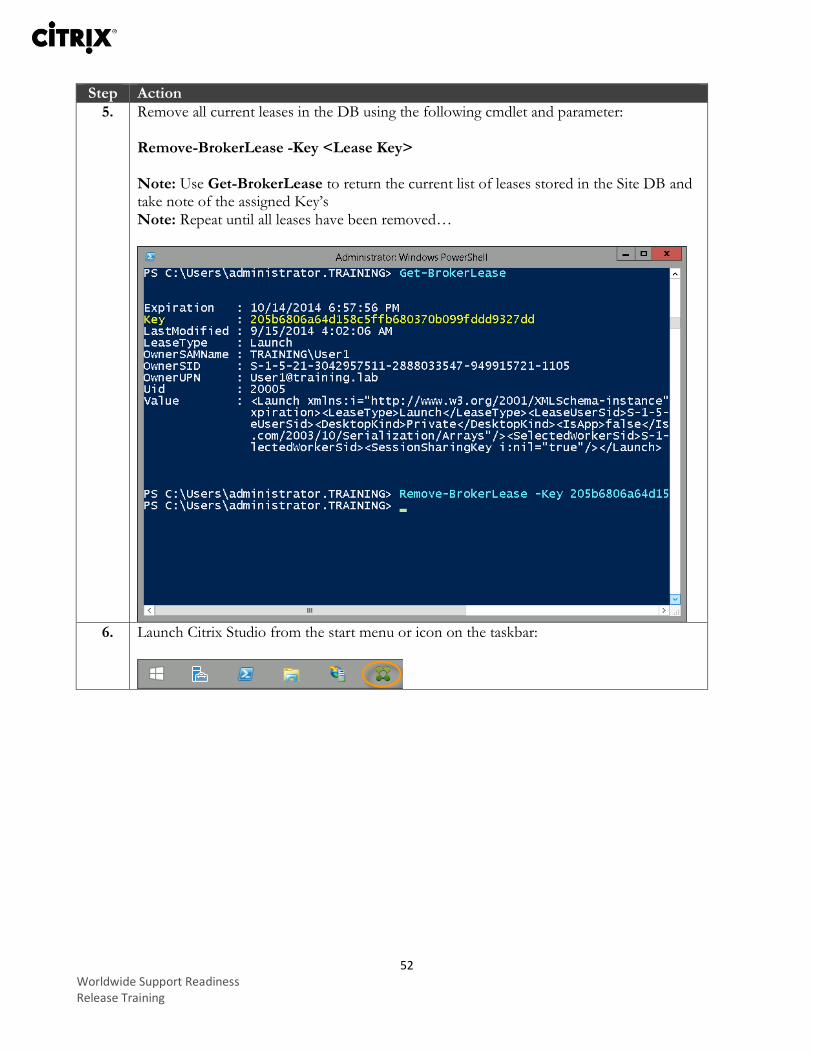
4. Type Get-BrokerLease and hit return to view some legacy lease information (Enumeration & Launch lease information) stored in the Site DB: Note: Take note of the “Key” values for all lease types as you will need them again in the following step.
52 Worldwide Support Readiness Release Training
Step Action
5. Remove all current leases in the DB using the following cmdlet and parameter: Remove-BrokerLease -Key <Lease Key> Note: Use Get-BrokerLease to return the current list of leases stored in the Site DB and take note of the assigned Key’s Note: Repeat until all leases have been removed…
6. Launch Citrix Studio from the start menu or icon on the taskbar:
53 Worldwide Support Readiness Release Training
Step Action
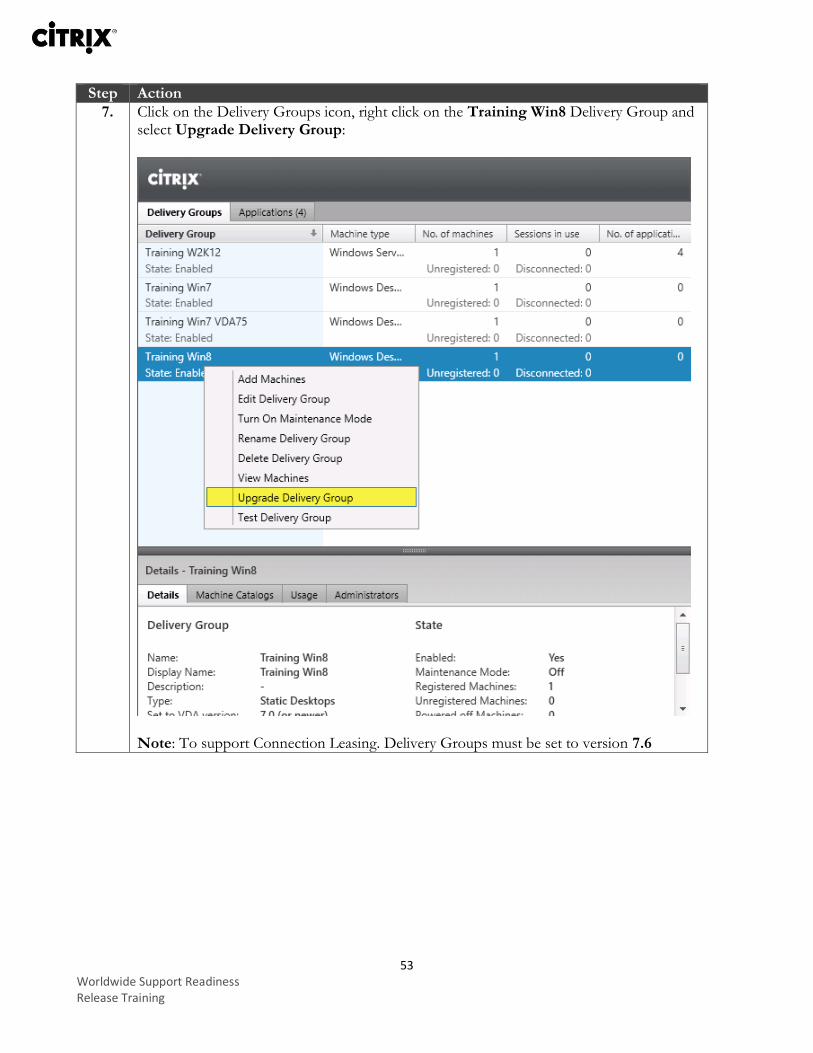
7. Click on the Delivery Groups icon, right click on the Training Win8 Delivery Group and select Upgrade Delivery Group:
Note: To support Connection Leasing. Delivery Groups must be set to version 7.6
54 Worldwide Support Readiness Release Training
Step Action
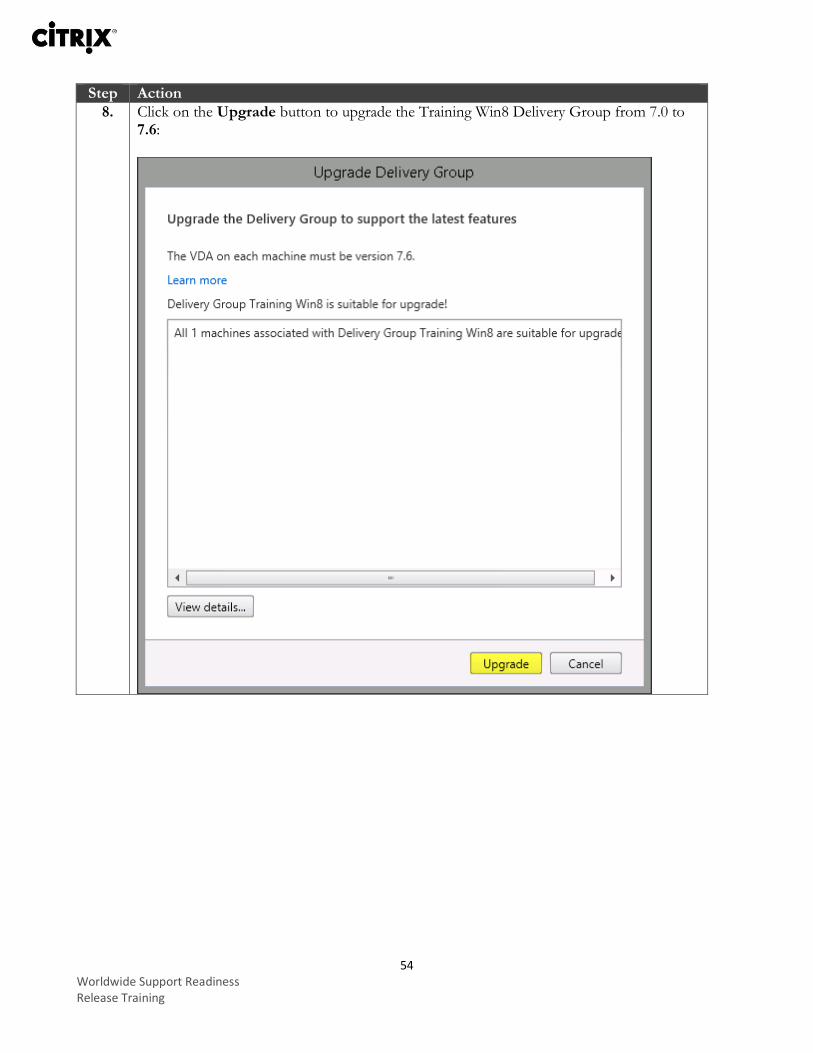
8. Click on the Upgrade button to upgrade the Training Win8 Delivery Group from 7.0 to 7.6:
55 Worldwide Support Readiness Release Training
Step Action
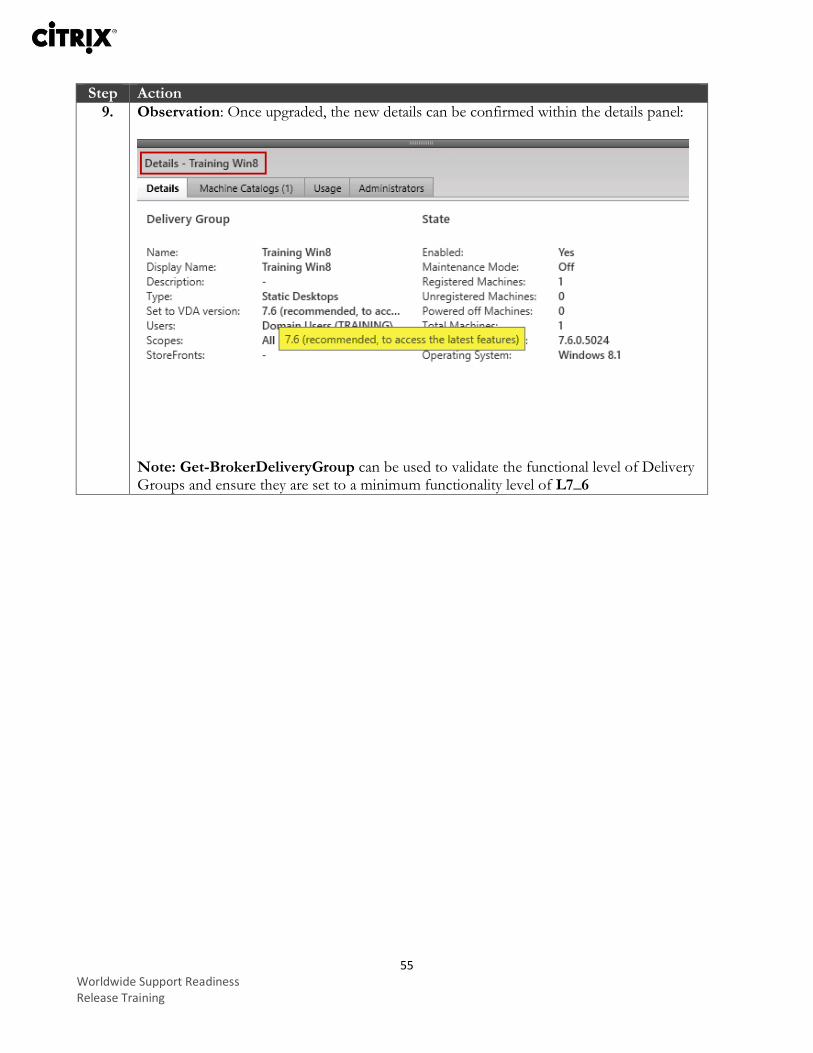
9. Observation: Once upgraded, the new details can be confirmed within the details panel:
Note: Get-BrokerDeliveryGroup can be used to validate the functional level of Delivery Groups and ensure they are set to a minimum functionality level of L7_6
56 Worldwide Support Readiness Release Training
Step Action
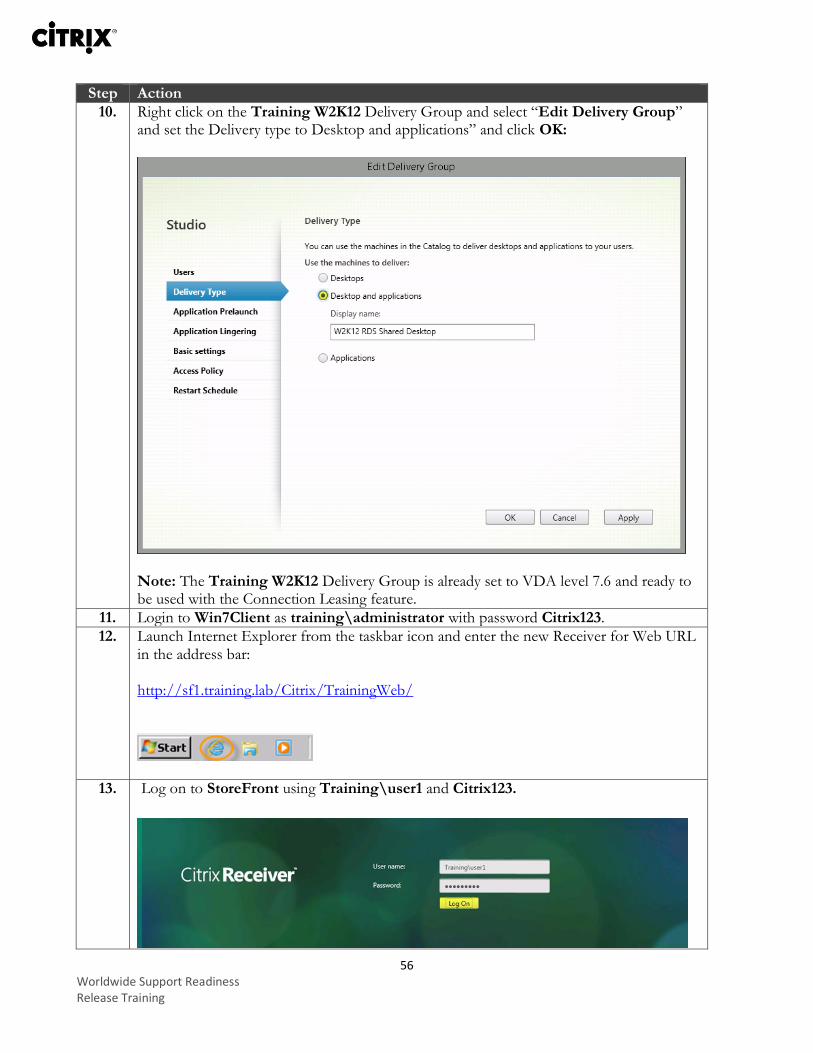
10. Right click on the Training W2K12 Delivery Group and select “Edit Delivery Group” and set the Delivery type to Desktop and applications” and click OK:
Note: The Training W2K12 Delivery Group is already set to VDA level 7.6 and ready to be used with the Connection Leasing feature.
11. Login to Win7Client as training\administrator with password Citrix123.
12. Launch Internet Explorer from the taskbar icon and enter the new Receiver for Web URL in the address bar: http://sf1.training.lab/Citrix/TrainingWeb/
13. Log on to StoreFront using Training\user1 and Citrix123.
57 Worldwide Support Readiness Release Training
Step Action
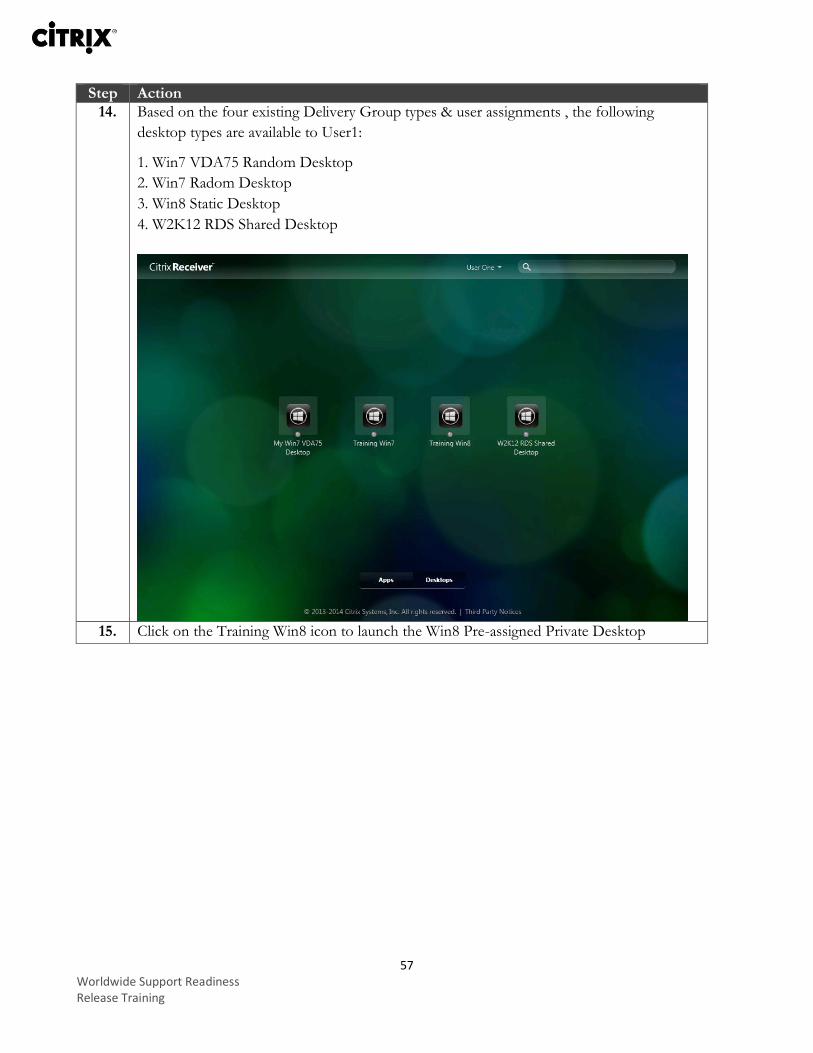
14. Based on the four existing Delivery Group types & user assignments , the following
desktop types are available to User1:
1. Win7 VDA75 Random Desktop
2. Win7 Radom Desktop
3. Win8 Static Desktop
4. W2K12 RDS Shared Desktop
15. Click on the Training Win8 icon to launch the Win8 Pre-assigned Private Desktop
58 Worldwide Support Readiness Release Training
Step Action
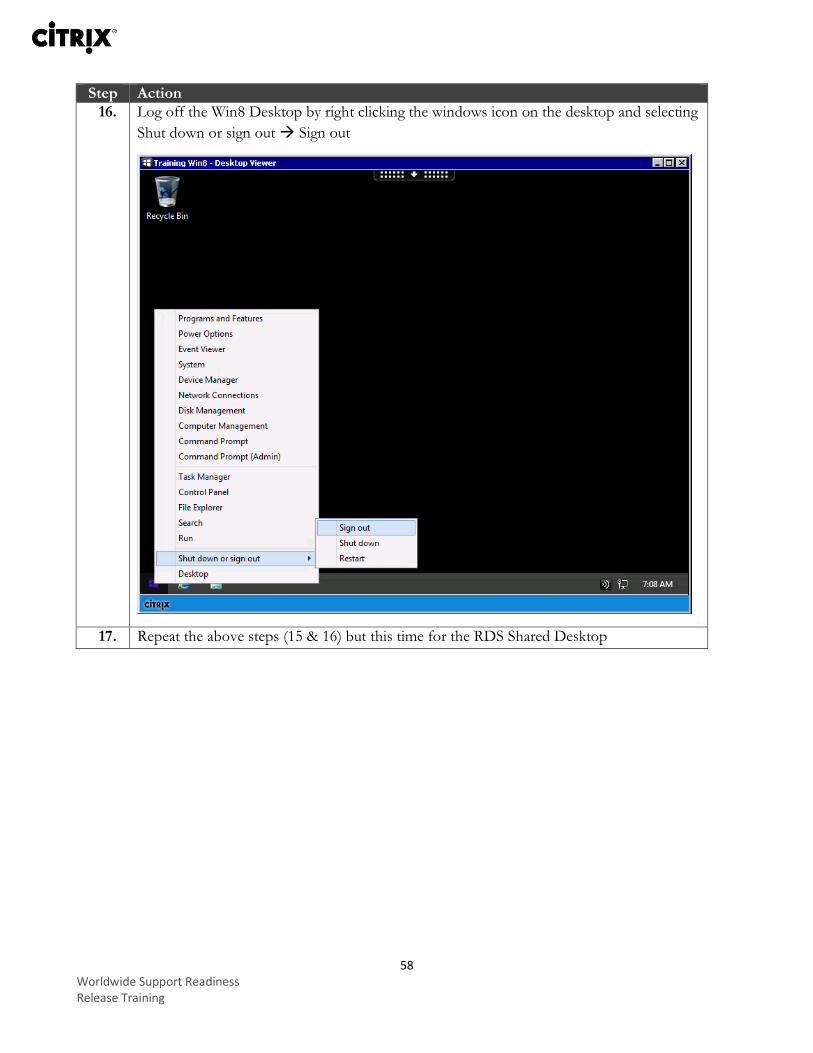
16. Log off the Win8 Desktop by right clicking the windows icon on the desktop and selecting
Shut down or sign out Sign out
17. Repeat the above steps (15 & 16) but this time for the RDS Shared Desktop
59 Worldwide Support Readiness Release Training
Step Action
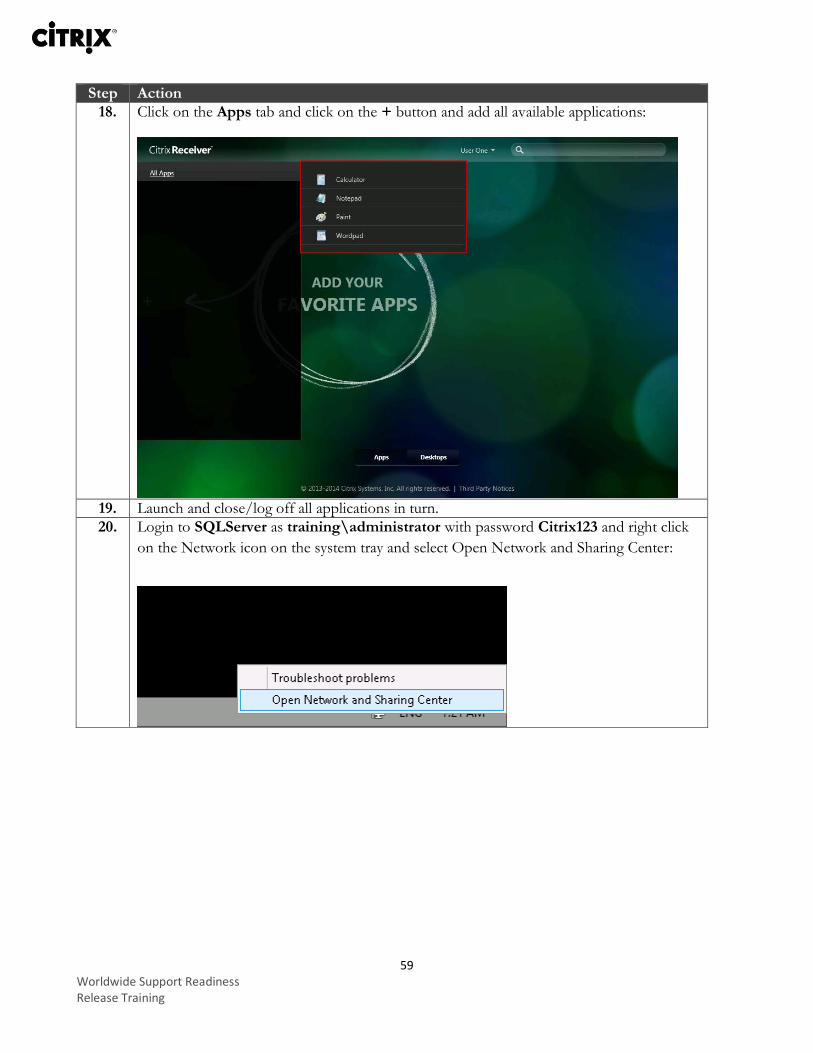
18. Click on the Apps tab and click on the + button and add all available applications:
19. Launch and close/log off all applications in turn.
20. Login to SQLServer as training\administrator with password Citrix123 and right click
on the Network icon on the system tray and select Open Network and Sharing Center:
60 Worldwide Support Readiness Release Training
Step Action
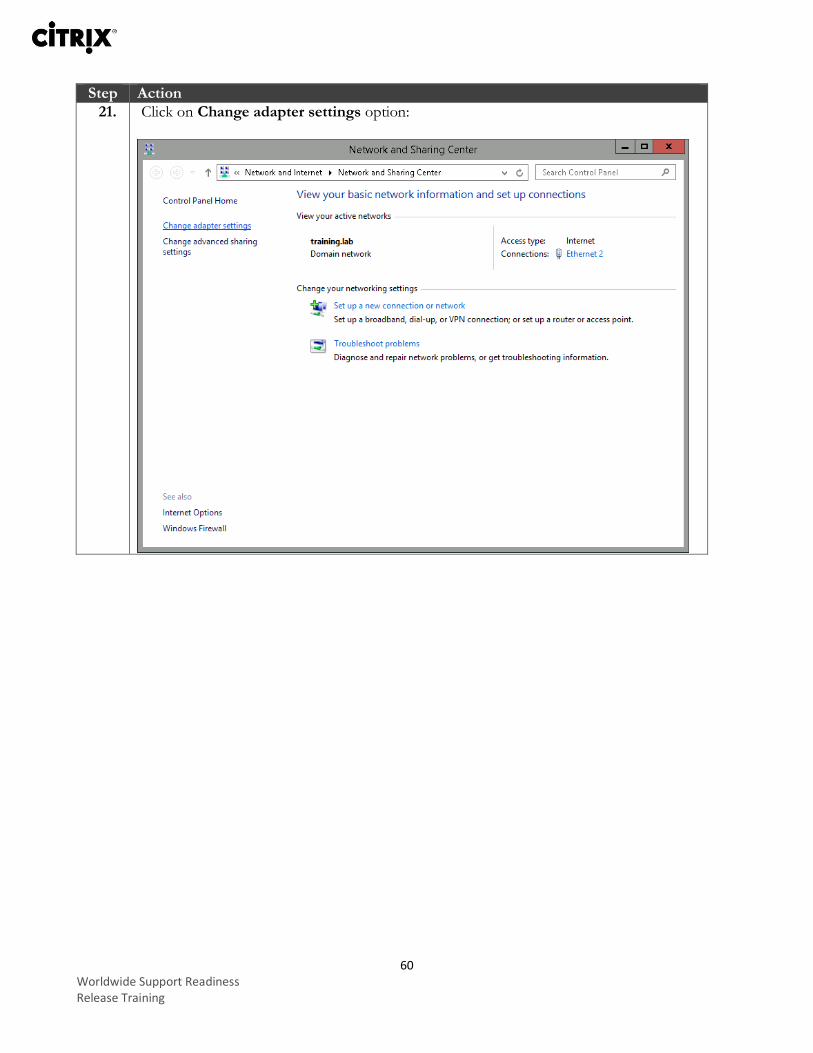
21. Click on Change adapter settings option:
61 Worldwide Support Readiness Release Training
Step Action
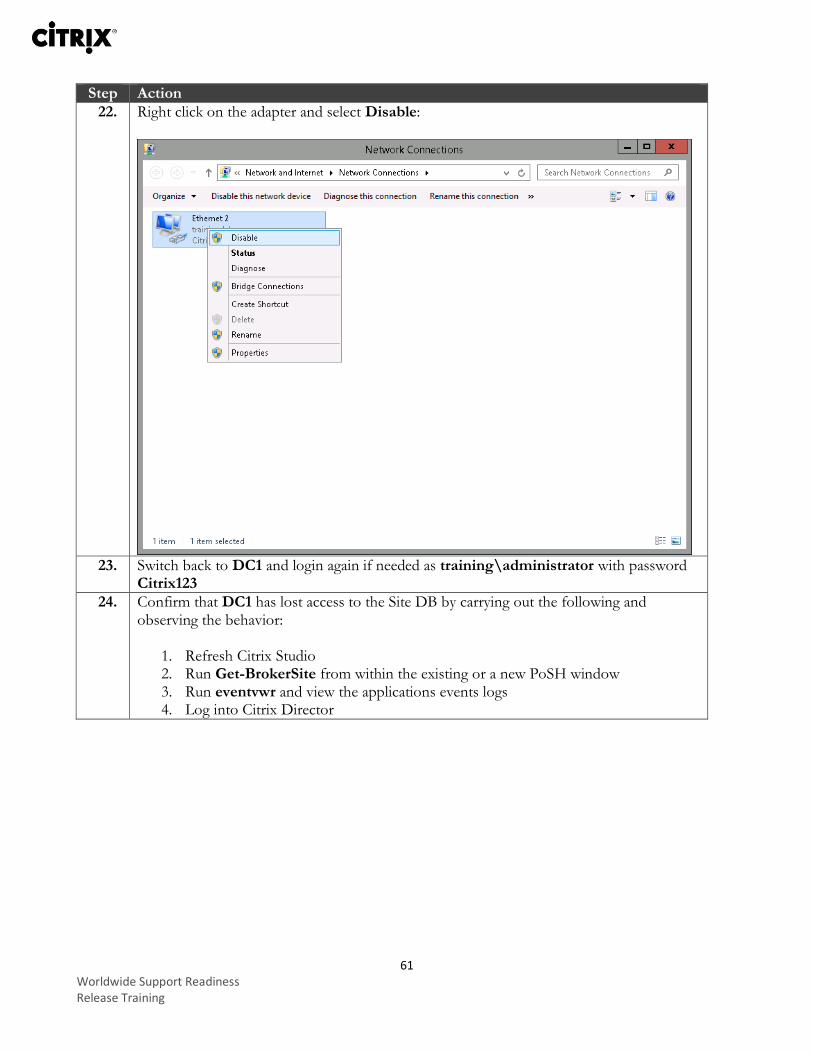
22. Right click on the adapter and select Disable:
23. Switch back to DC1 and login again if needed as training\administrator with password
Citrix123
24. Confirm that DC1 has lost access to the Site DB by carrying out the following and observing the behavior:
1. Refresh Citrix Studio 2. Run Get-BrokerSite from within the existing or a new PoSH window 3. Run eventvwr and view the applications events logs 4. Log into Citrix Director
62 Worldwide Support Readiness Release Training
Step Action
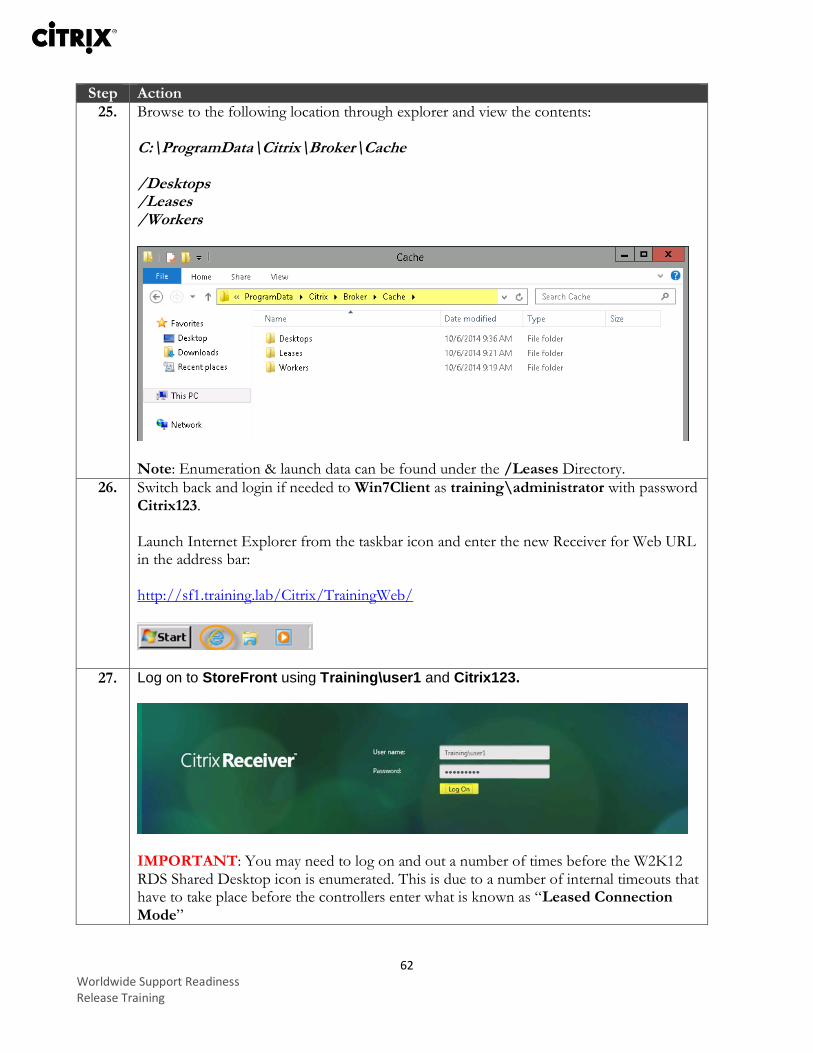
25. Browse to the following location through explorer and view the contents: C:\ProgramData\Citrix\Broker\Cache /Desktops /Leases /Workers
Note: Enumeration & launch data can be found under the /Leases Directory.
26. Switch back and login if needed to Win7Client as training\administrator with password Citrix123. Launch Internet Explorer from the taskbar icon and enter the new Receiver for Web URL in the address bar: http://sf1.training.lab/Citrix/TrainingWeb/
27. Log on to StoreFront using Training\user1 and Citrix123.
IMPORTANT: You may need to log on and out a number of times before the W2K12 RDS Shared Desktop icon is enumerated. This is due to a number of internal timeouts that have to take place before the controllers enter what is known as “Leased Connection Mode”
63 Worldwide Support Readiness Release Training
Step Action
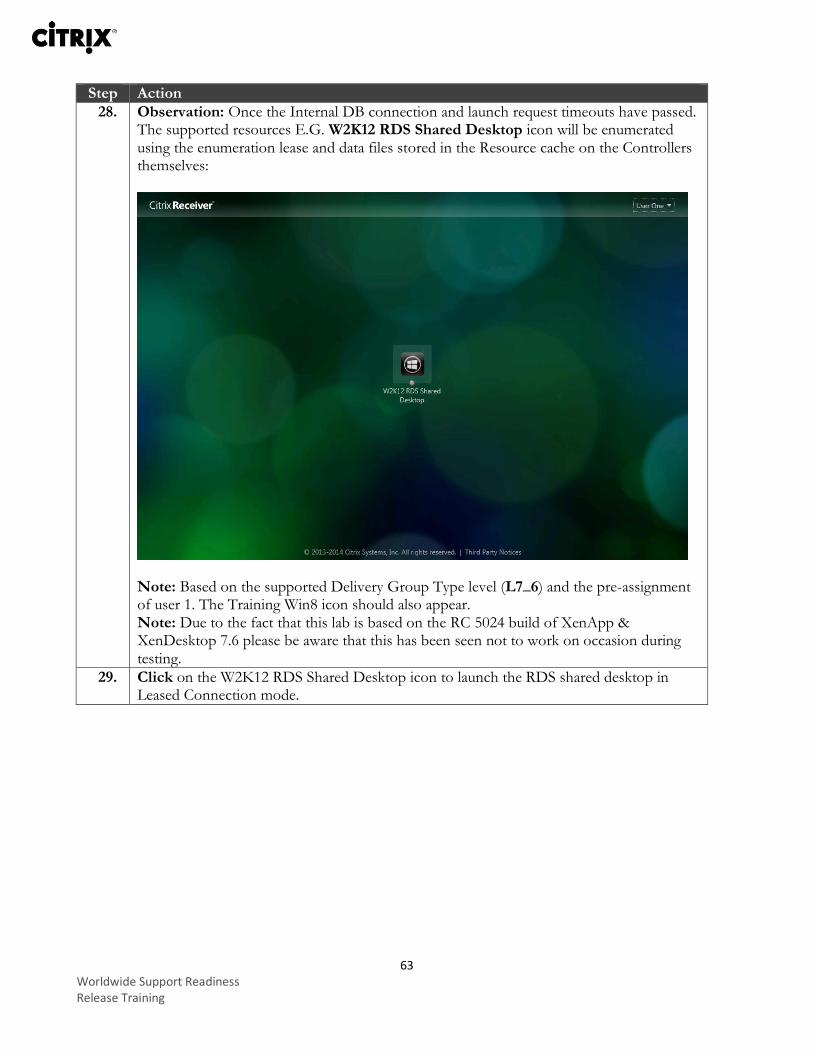
28. Observation: Once the Internal DB connection and launch request timeouts have passed. The supported resources E.G. W2K12 RDS Shared Desktop icon will be enumerated using the enumeration lease and data files stored in the Resource cache on the Controllers themselves:
Note: Based on the supported Delivery Group Type level (L7_6) and the pre-assignment of user 1. The Training Win8 icon should also appear. Note: Due to the fact that this lab is based on the RC 5024 build of XenApp & XenDesktop 7.6 please be aware that this has been seen not to work on occasion during testing.
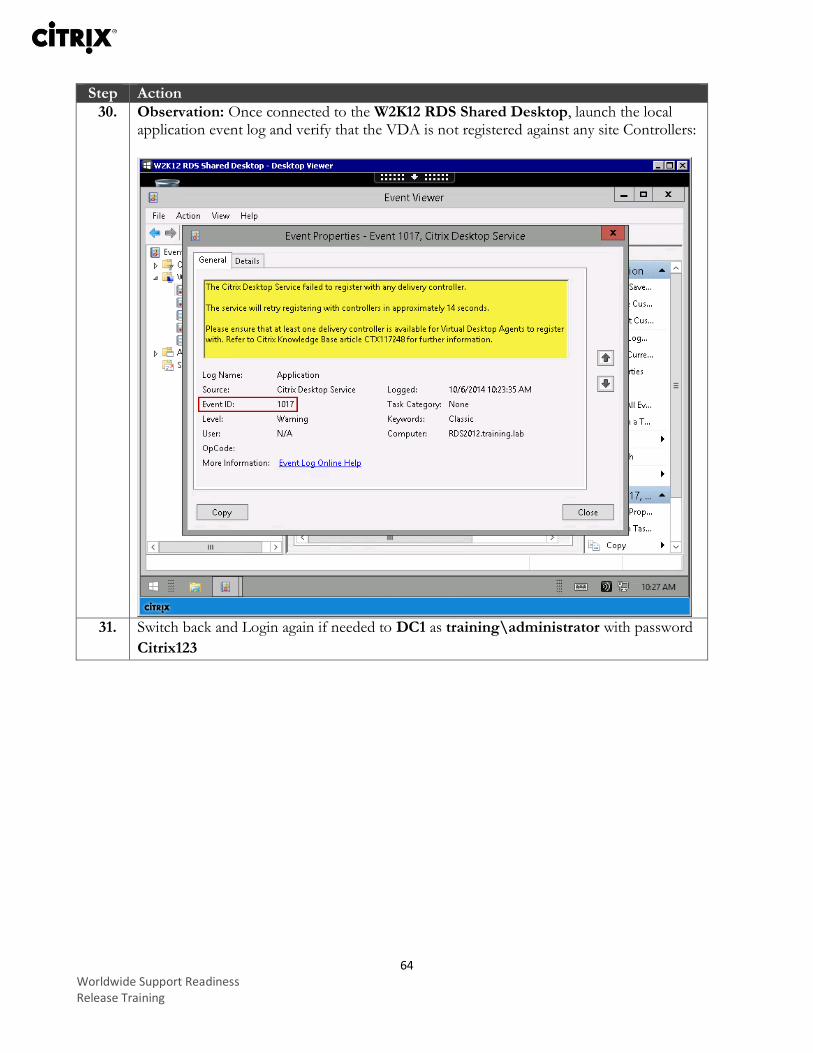
29. Click on the W2K12 RDS Shared Desktop icon to launch the RDS shared desktop in Leased Connection mode.
64 Worldwide Support Readiness Release Training
Step Action
30. Observation: Once connected to the W2K12 RDS Shared Desktop, launch the local application event log and verify that the VDA is not registered against any site Controllers:
31. Switch back and Login again if needed to DC1 as training\administrator with password
Citrix123
65 Worldwide Support Readiness Release Training
Step Action
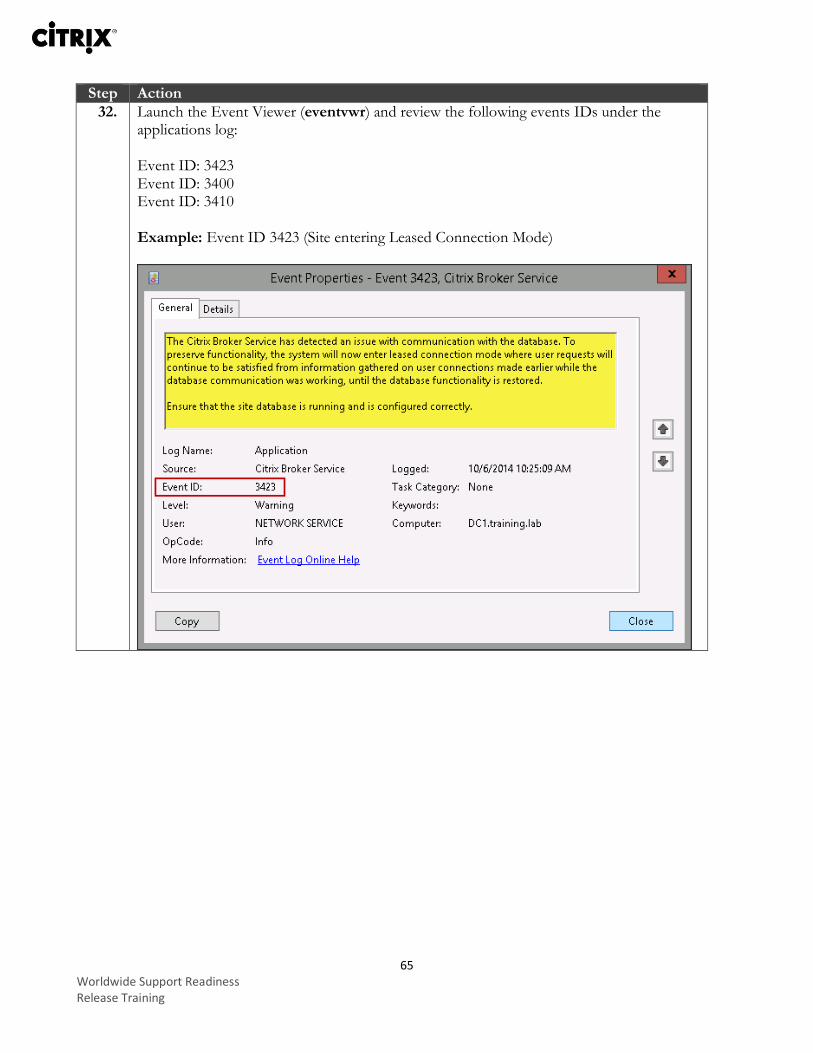
32. Launch the Event Viewer (eventvwr) and review the following events IDs under the applications log: Event ID: 3423 Event ID: 3400 Event ID: 3410 Example: Event ID 3423 (Site entering Leased Connection Mode)
66 Worldwide Support Readiness Release Training
Step Action
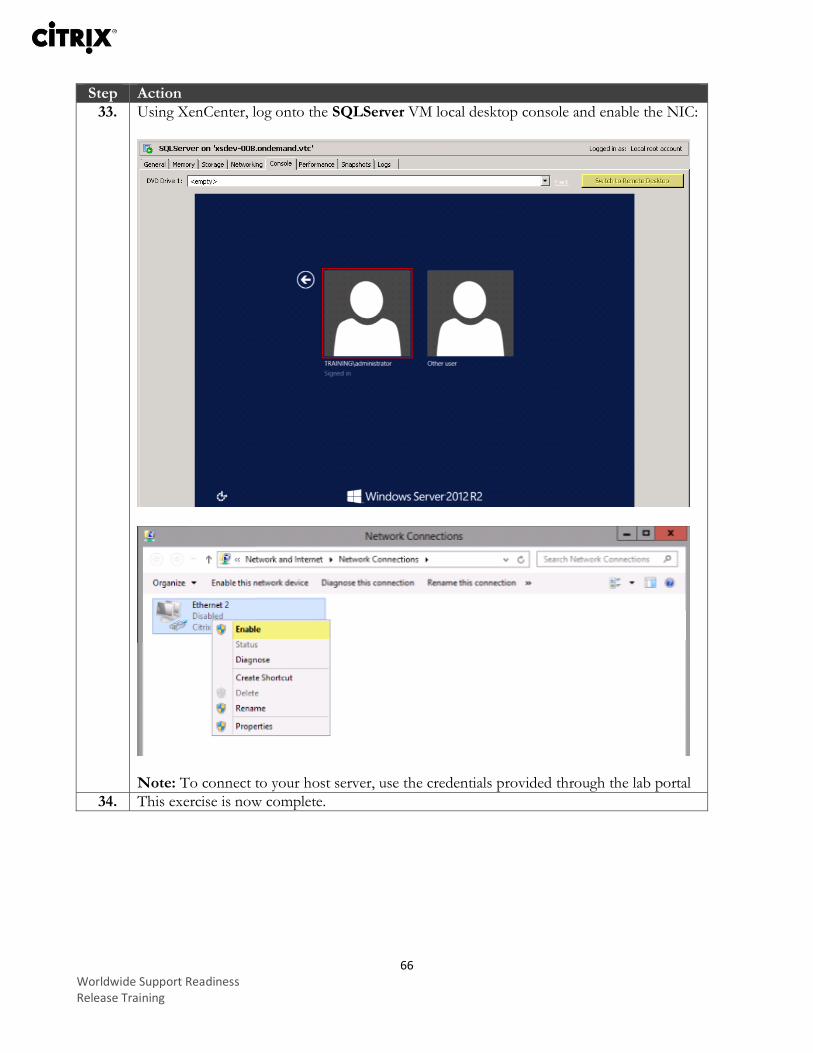
33. Using XenCenter, log onto the SQLServer VM local desktop console and enable the NIC:
Note: To connect to your host server, use the credentials provided through the lab portal
34. This exercise is now complete.
67 Worldwide Support Readiness Release Training
Key Takeaways
Connection Leasing is enabled by default.
For Connection Leasing to work against a specific resource, users must have first launched a connection to a supported resource in order for the lease information and data files to be available locally on each Controller prior to loss of the Site DB.
Supported Delivery Groups must be set to VDA version 7.6 to support Connection Leasing.
There are a number of important PoSH cmdlets that can be used to view and configure the Connection leasing feature.
68 Worldwide Support Readiness Release Training
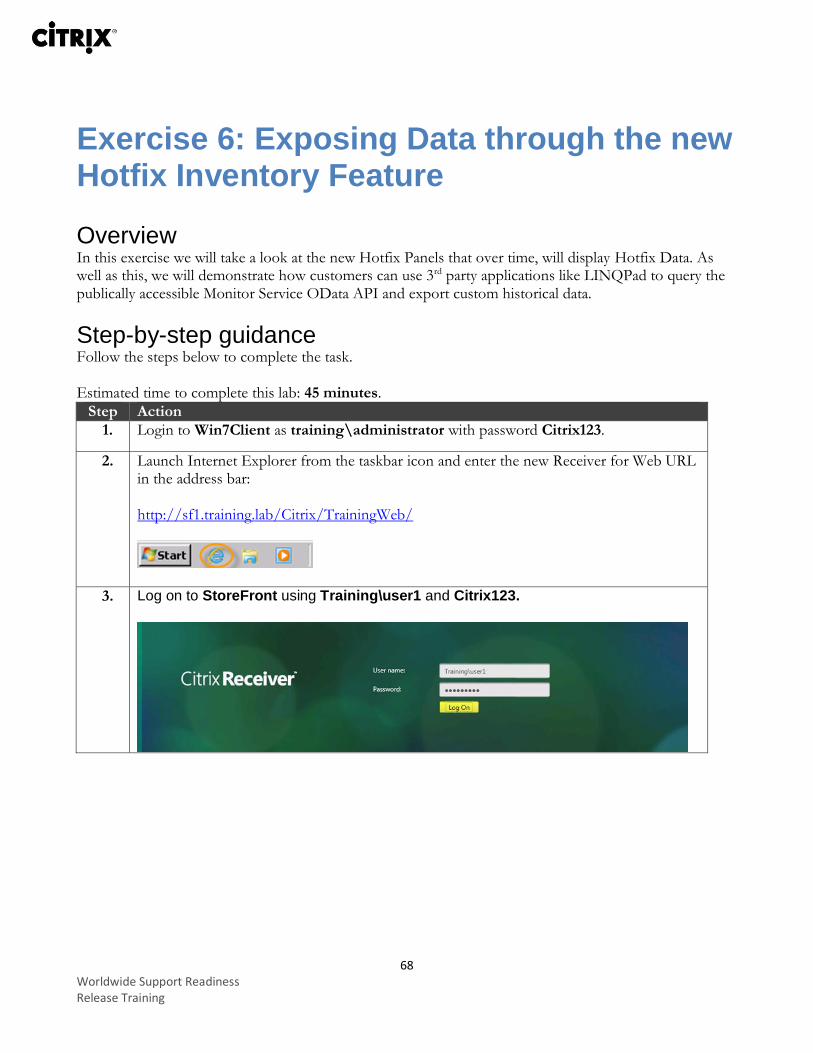
Exercise 6: Exposing Data through the new Hotfix Inventory Feature Overview In this exercise we will take a look at the new Hotfix Panels that over time, will display Hotfix Data. As well as this, we will demonstrate how customers can use 3rd party applications like LINQPad to query the publically accessible Monitor Service OData API and export custom historical data.
Step-by-step guidance Follow the steps below to complete the task. Estimated time to complete this lab: 45 minutes.
Step Action
1. Login to Win7Client as training\administrator with password Citrix123.
2. Launch Internet Explorer from the taskbar icon and enter the new Receiver for Web URL in the address bar: http://sf1.training.lab/Citrix/TrainingWeb/
3. Log on to StoreFront using Training\user1 and Citrix123.
69 Worldwide Support Readiness Release Training
Step Action
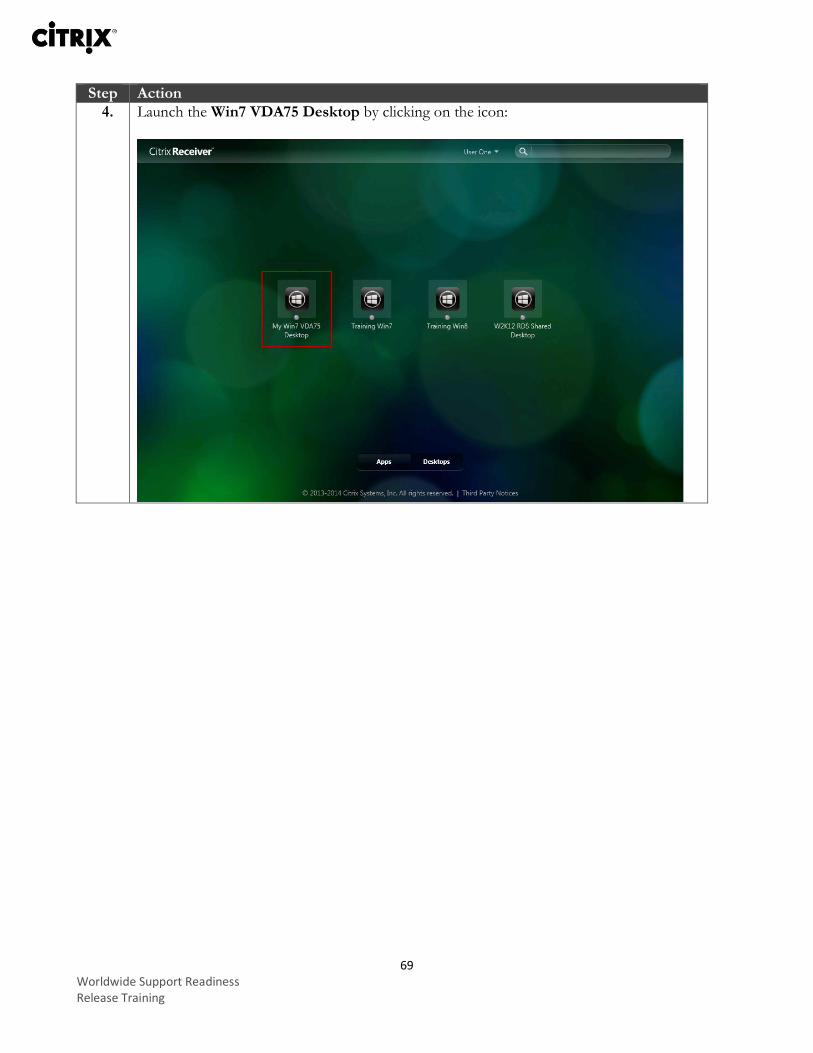
4. Launch the Win7 VDA75 Desktop by clicking on the icon:
70 Worldwide Support Readiness Release Training
Step Action
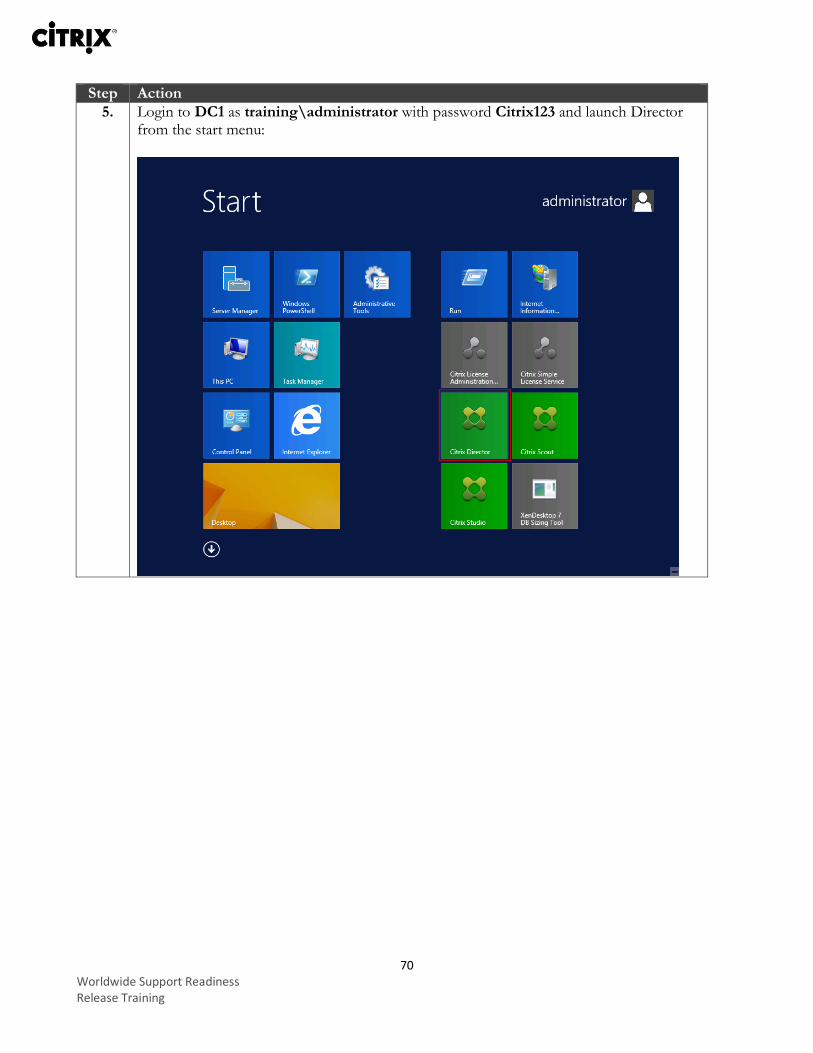
5. Login to DC1 as training\administrator with password Citrix123 and launch Director from the start menu:
71 Worldwide Support Readiness Release Training
Step Action
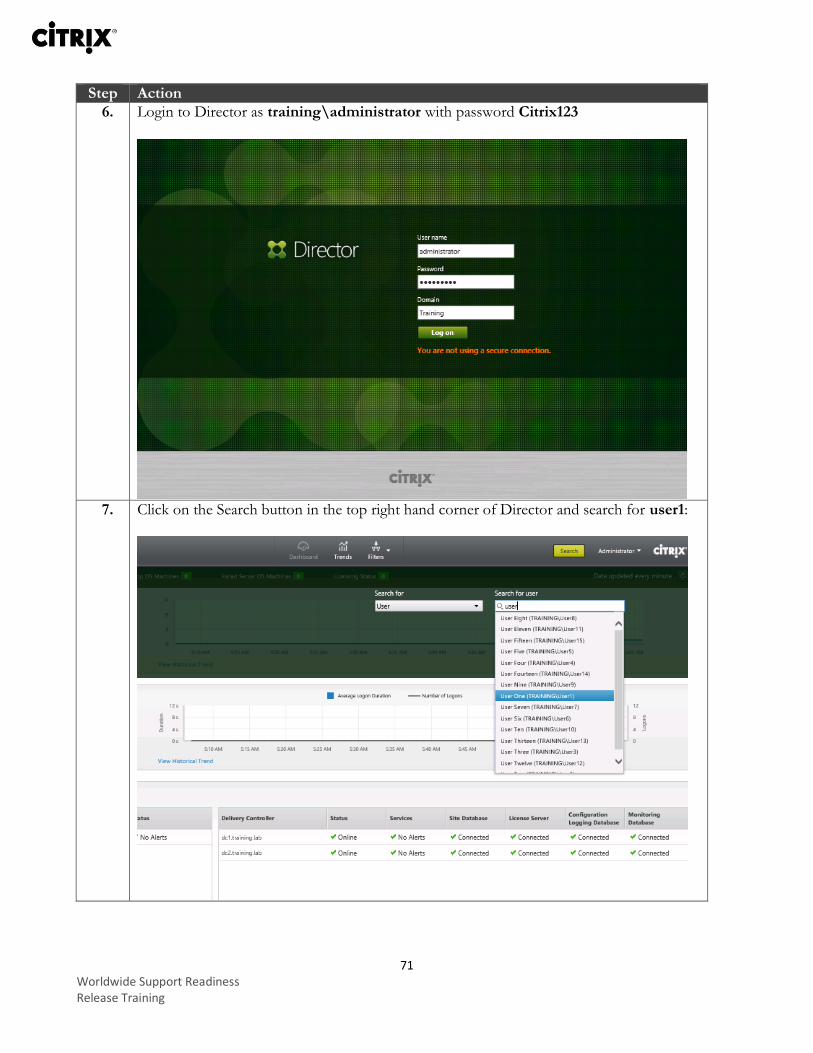
6. Login to Director as training\administrator with password Citrix123
7. Click on the Search button in the top right hand corner of Director and search for user1:
72 Worldwide Support Readiness Release Training
Step Action
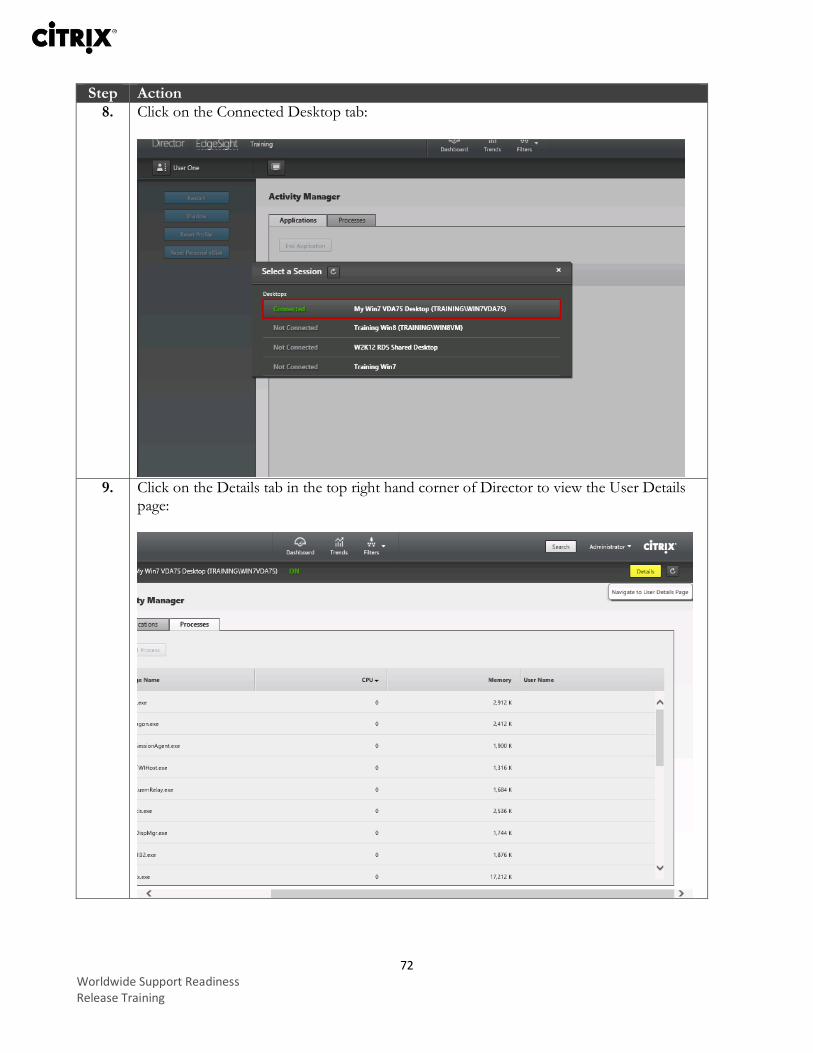
8. Click on the Connected Desktop tab:
9. Click on the Details tab in the top right hand corner of Director to view the User Details
page:
73 Worldwide Support Readiness Release Training
Step Action
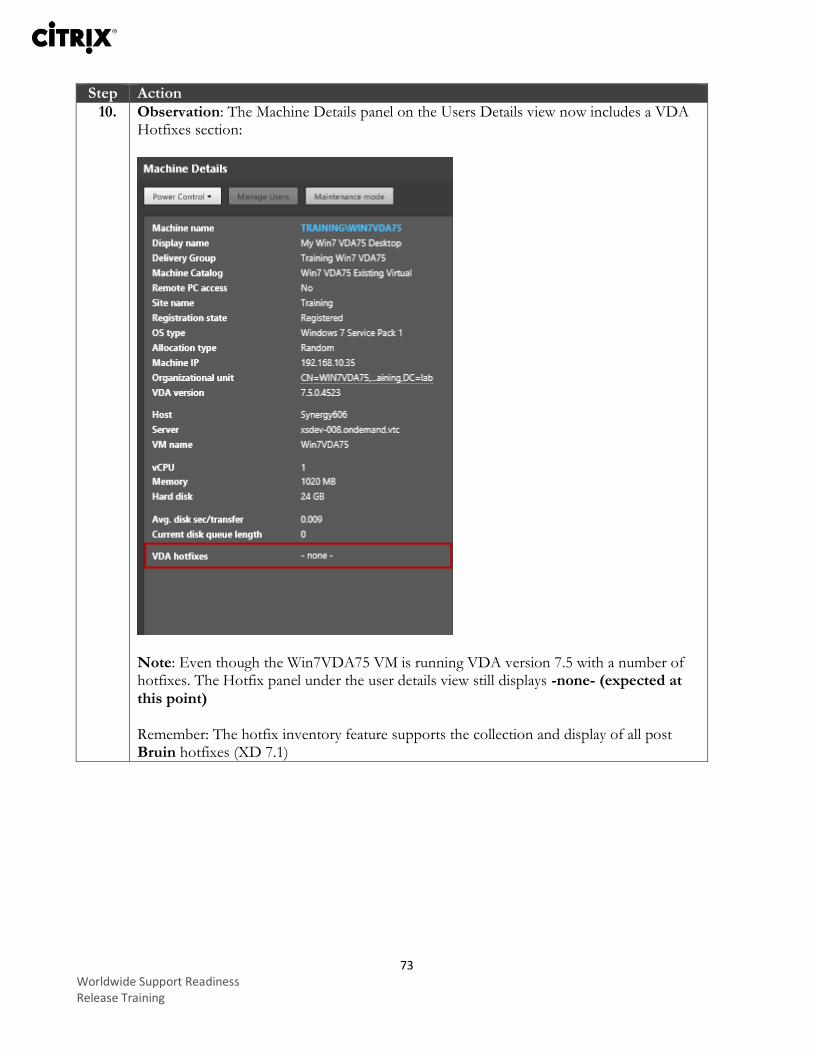
10. Observation: The Machine Details panel on the Users Details view now includes a VDA Hotfixes section:
Note: Even though the Win7VDA75 VM is running VDA version 7.5 with a number of hotfixes. The Hotfix panel under the user details view still displays -none- (expected at this point) Remember: The hotfix inventory feature supports the collection and display of all post Bruin hotfixes (XD 7.1)
74 Worldwide Support Readiness Release Training
Step Action
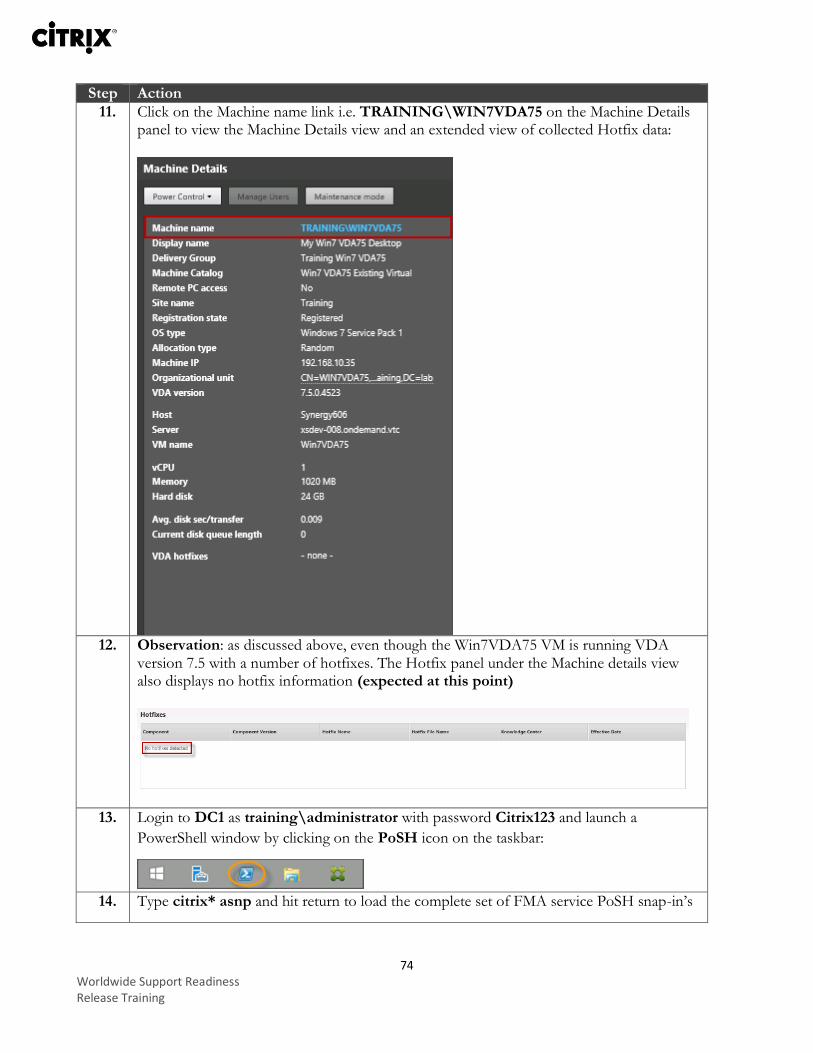
11. Click on the Machine name link i.e. TRAINING\WIN7VDA75 on the Machine Details panel to view the Machine Details view and an extended view of collected Hotfix data:
12. Observation: as discussed above, even though the Win7VDA75 VM is running VDA
version 7.5 with a number of hotfixes. The Hotfix panel under the Machine details view also displays no hotfix information (expected at this point)
13. Login to DC1 as training\administrator with password Citrix123 and launch a
PowerShell window by clicking on the PoSH icon on the taskbar:
14. Type citrix* asnp and hit return to load the complete set of FMA service PoSH snap-in’s
75 Worldwide Support Readiness Release Training
Step Action
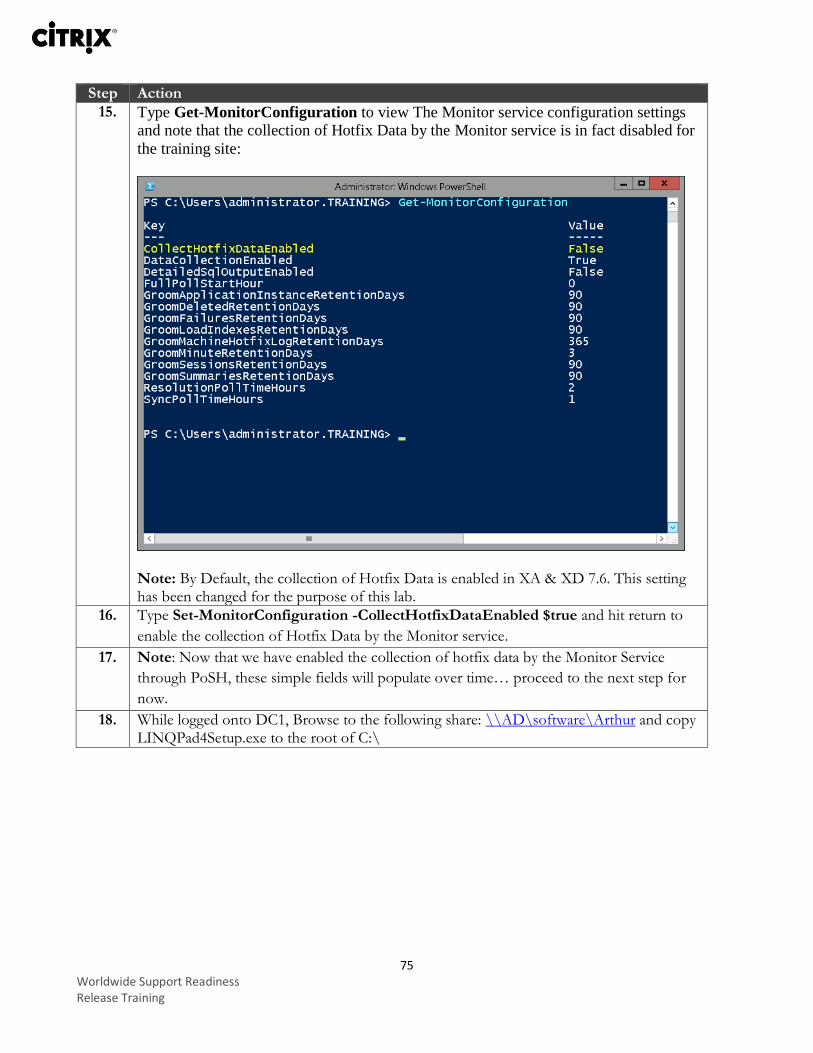
15. Type Get-MonitorConfiguration to view The Monitor service configuration settings and note that the collection of Hotfix Data by the Monitor service is in fact disabled for
the training site:
Note: By Default, the collection of Hotfix Data is enabled in XA & XD 7.6. This setting has been changed for the purpose of this lab.
16. Type Set-MonitorConfiguration -CollectHotfixDataEnabled $true and hit return to
enable the collection of Hotfix Data by the Monitor service.
17. Note: Now that we have enabled the collection of hotfix data by the Monitor Service
through PoSH, these simple fields will populate over time… proceed to the next step for
now.
18. While logged onto DC1, Browse to the following share: \\AD\software\Arthur and copy LINQPad4Setup.exe to the root of C:\
76 Worldwide Support Readiness Release Training
Step Action
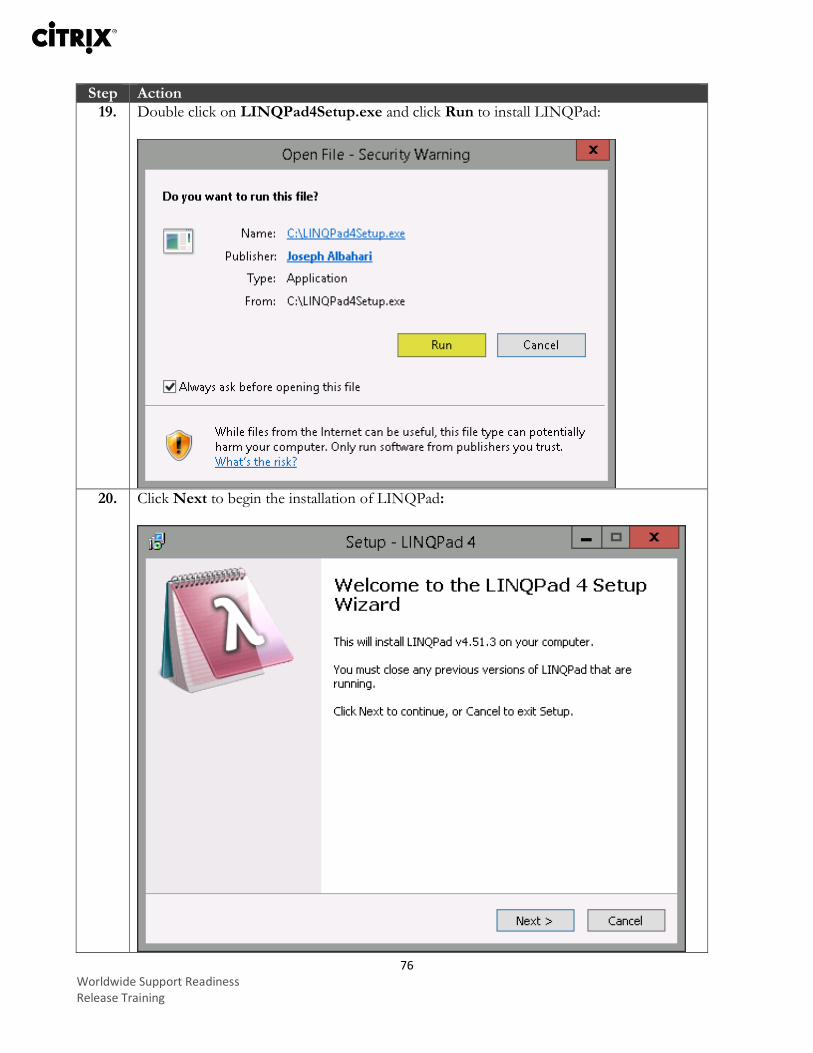
19. Double click on LINQPad4Setup.exe and click Run to install LINQPad:
20. Click Next to begin the installation of LINQPad:
77 Worldwide Support Readiness Release Training
Step Action
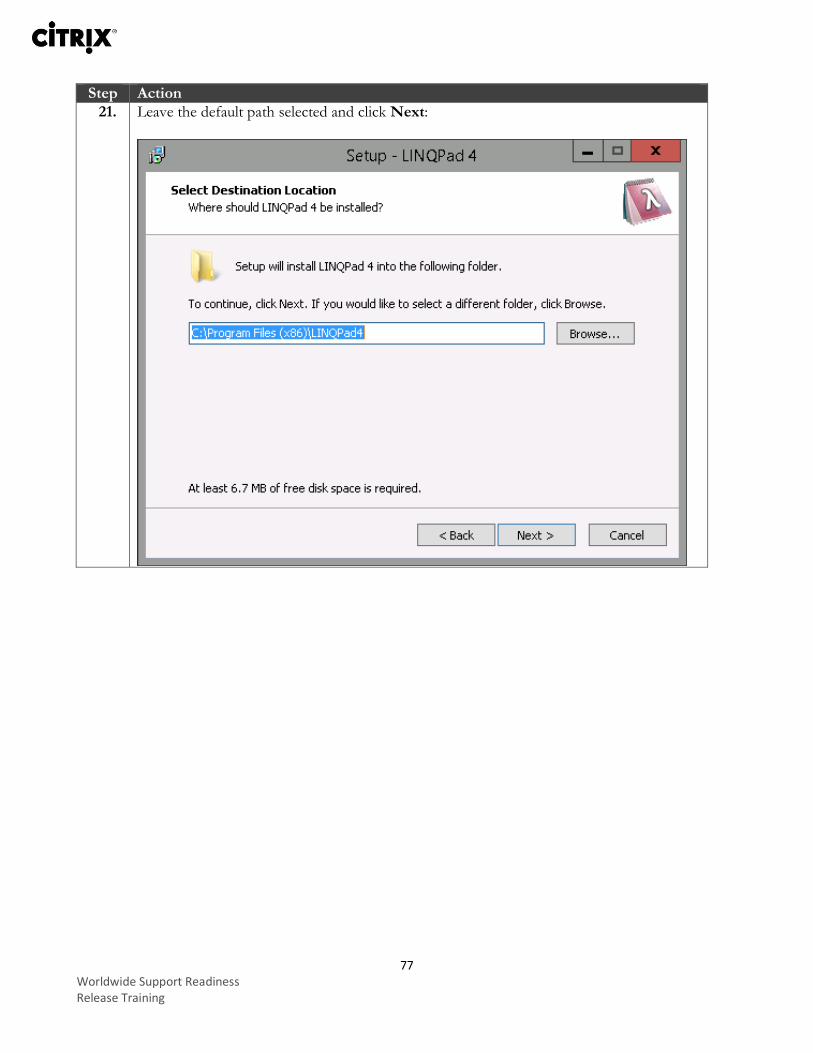
21. Leave the default path selected and click Next:
78 Worldwide Support Readiness Release Training
Step Action
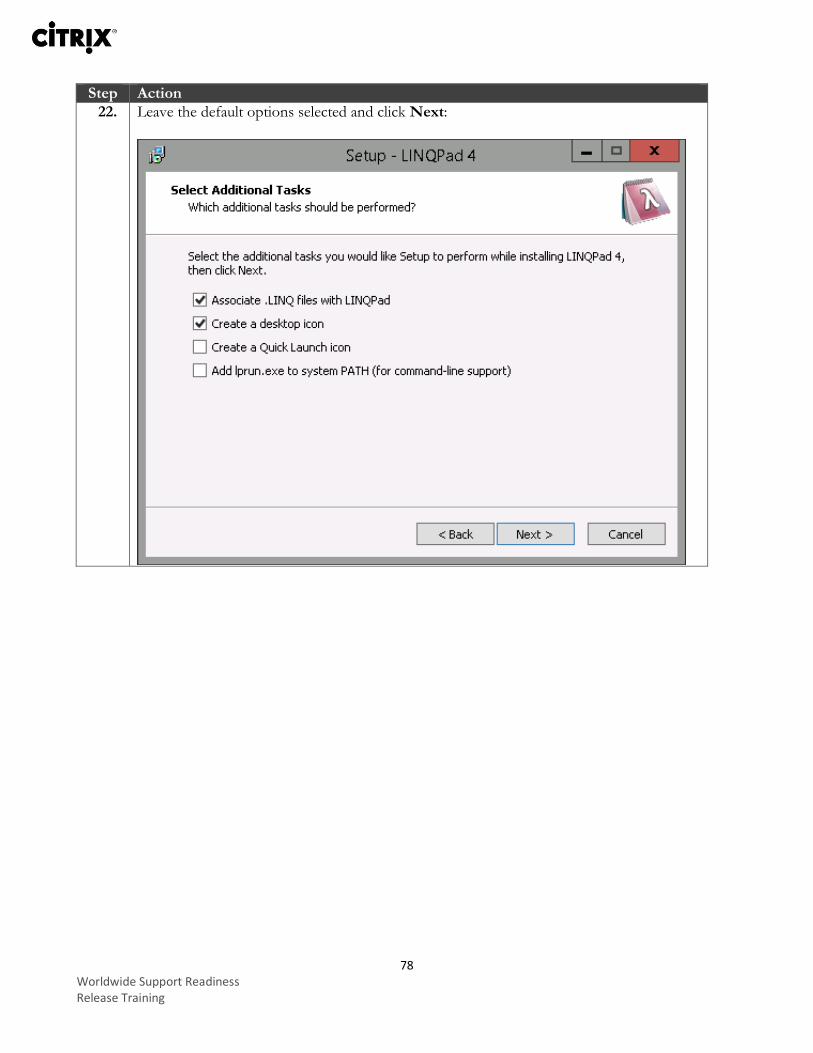
22. Leave the default options selected and click Next:
79 Worldwide Support Readiness Release Training
Step Action
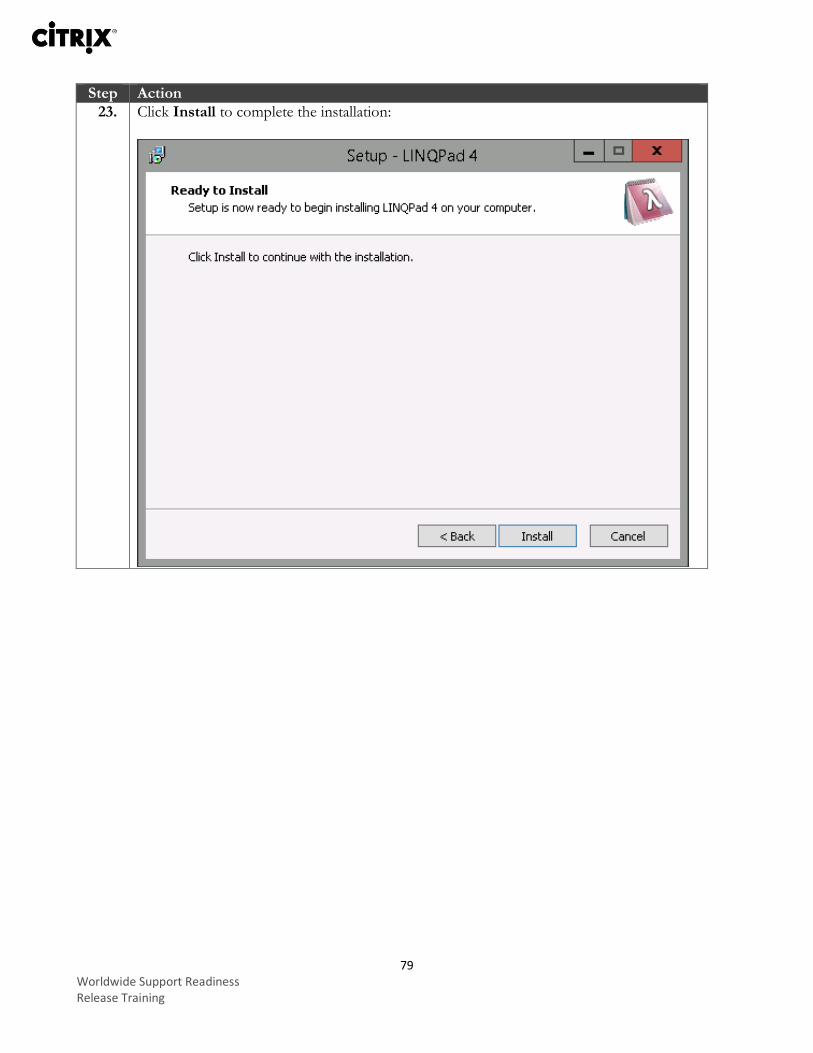
23. Click Install to complete the installation:
80 Worldwide Support Readiness Release Training
Step Action
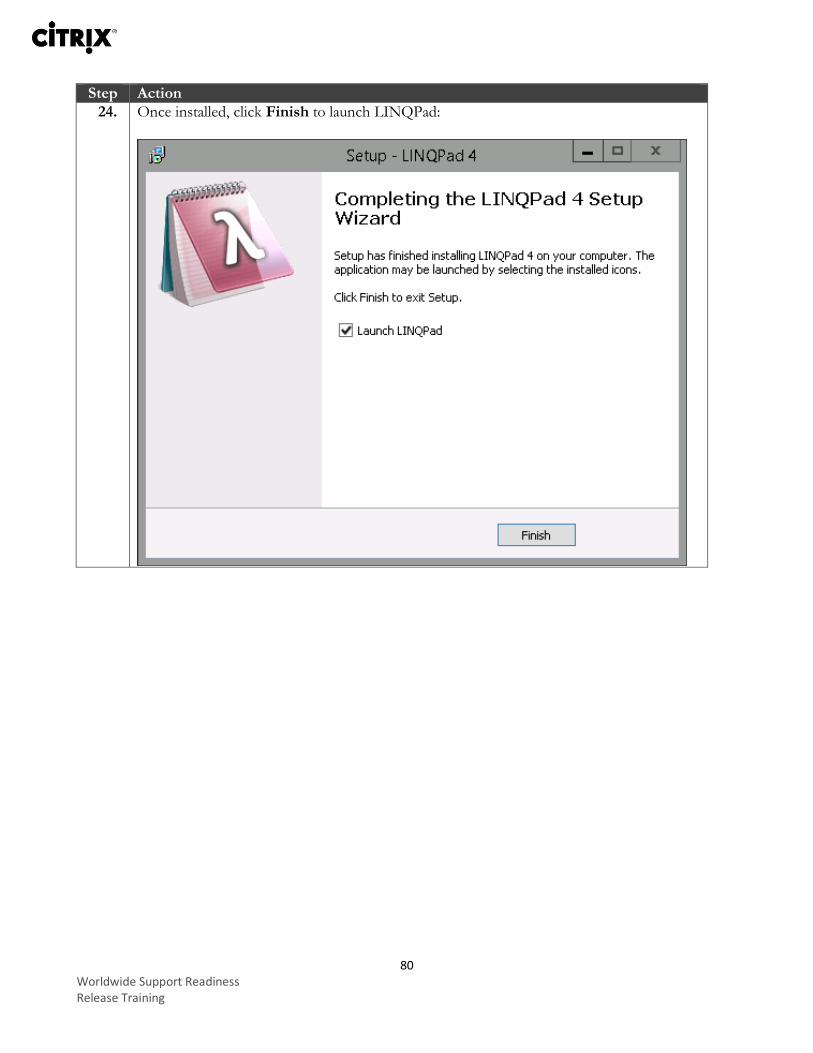
24. Once installed, click Finish to launch LINQPad:
81 Worldwide Support Readiness Release Training
Step Action
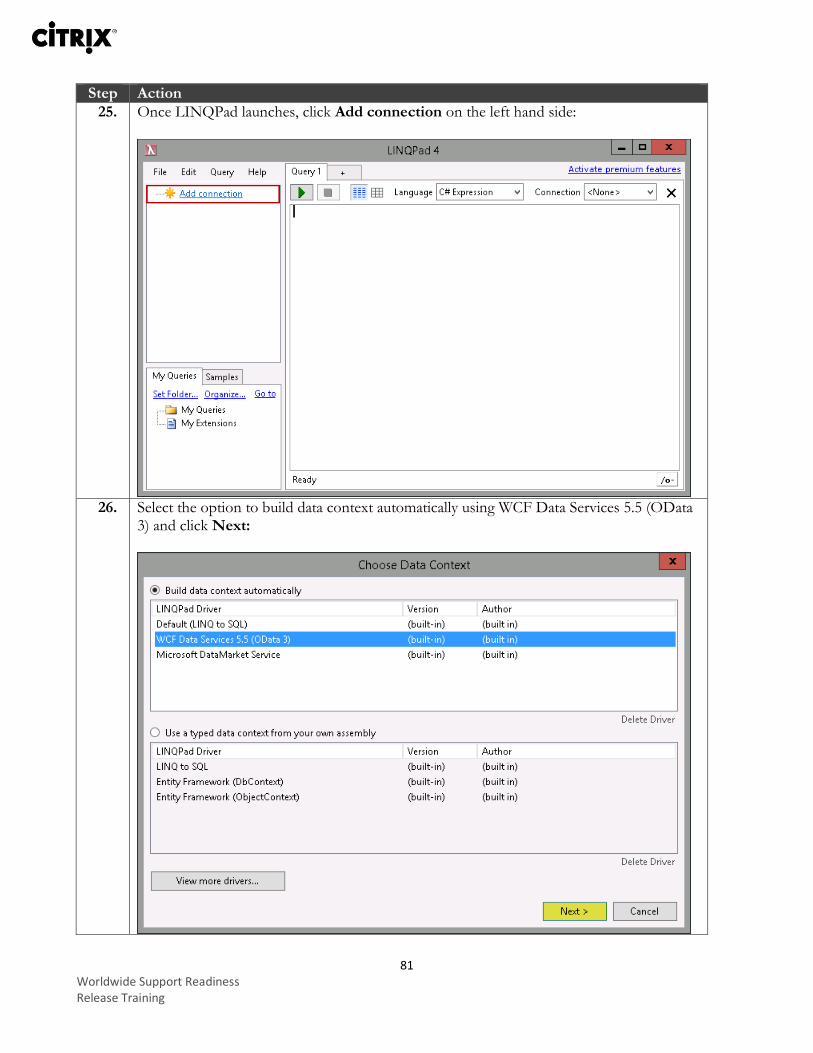
25. Once LINQPad launches, click Add connection on the left hand side:
26. Select the option to build data context automatically using WCF Data Services 5.5 (OData
3) and click Next:
82 Worldwide Support Readiness Release Training
Step Action
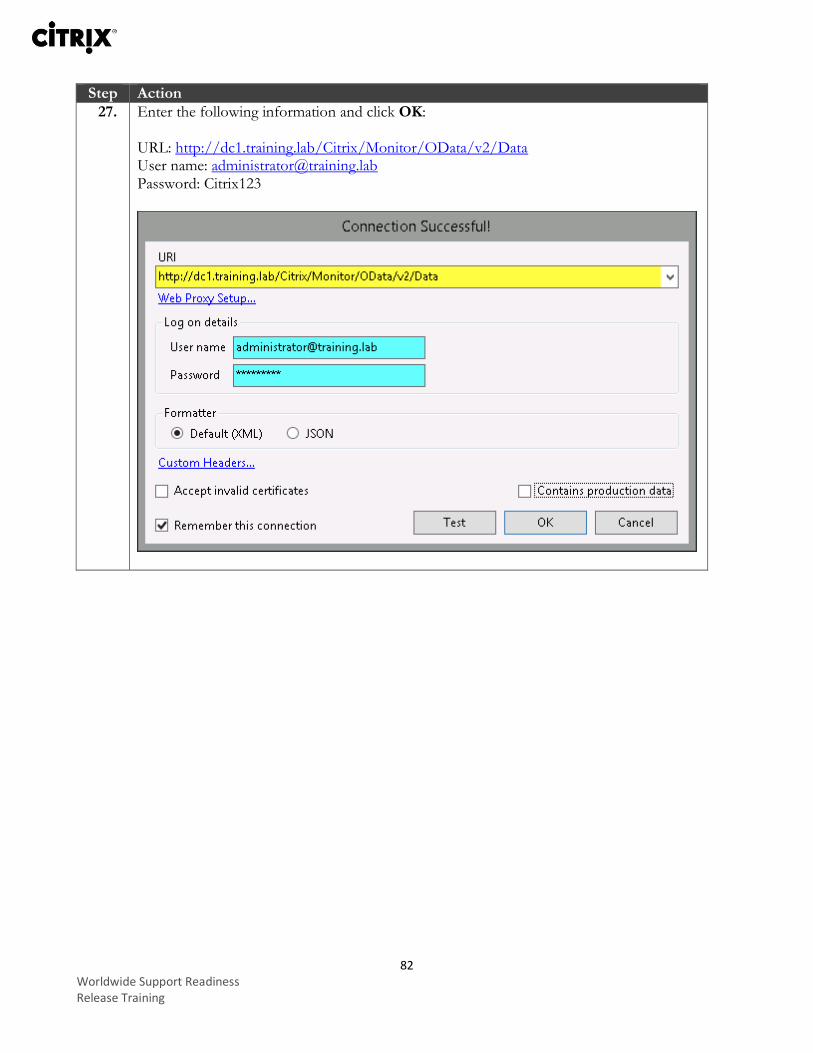
27. Enter the following information and click OK: URL: http://dc1.training.lab/Citrix/Monitor/OData/v2/Data User name: [email protected] Password: Citrix123
83 Worldwide Support Readiness Release Training
Step Action
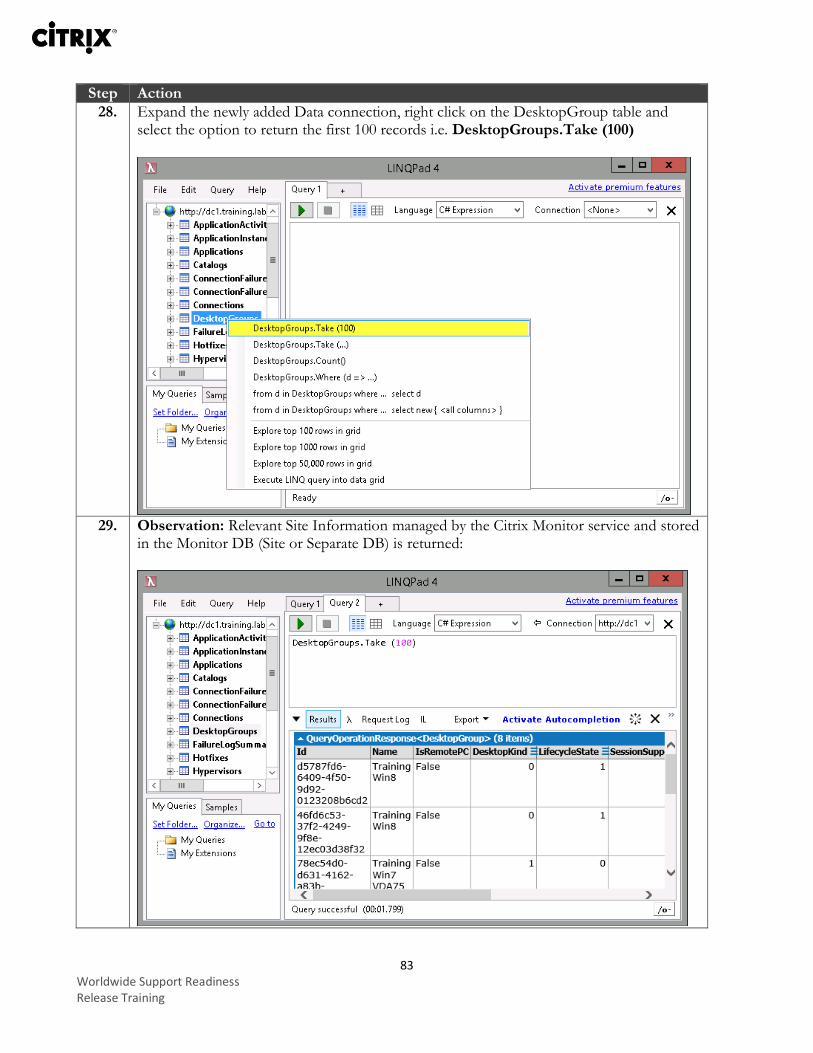
28. Expand the newly added Data connection, right click on the DesktopGroup table and select the option to return the first 100 records i.e. DesktopGroups.Take (100)
29. Observation: Relevant Site Information managed by the Citrix Monitor service and stored
in the Monitor DB (Site or Separate DB) is returned:
84 Worldwide Support Readiness Release Training
Step Action
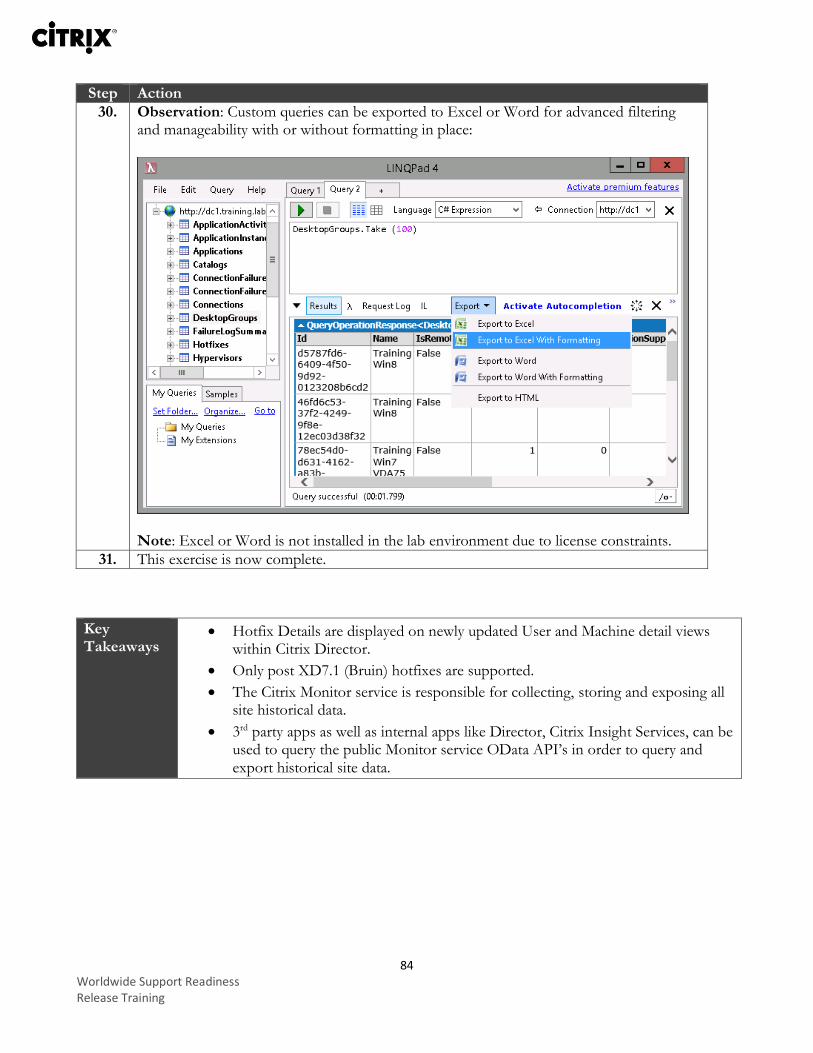
30. Observation: Custom queries can be exported to Excel or Word for advanced filtering and manageability with or without formatting in place:
Note: Excel or Word is not installed in the lab environment due to license constraints.
31. This exercise is now complete.
Key Takeaways
Hotfix Details are displayed on newly updated User and Machine detail views within Citrix Director.
Only post XD7.1 (Bruin) hotfixes are supported.
The Citrix Monitor service is responsible for collecting, storing and exposing all site historical data.
3rd party apps as well as internal apps like Director, Citrix Insight Services, can be used to query the public Monitor service OData API’s in order to query and export historical site data.
85 Worldwide Support Readiness Release Training
Exercise 7: Exploring the New License Service Alerting and Monitoring functionality Overview In this exercise we will take a look at the updated license alerting and validation functionality in Studio as well as the new Licensing Status tab and functionality built into Director.
Step-by-step guidance Follow the steps below to complete the task. Estimated time to complete this lab: 25 minutes.
Step Action
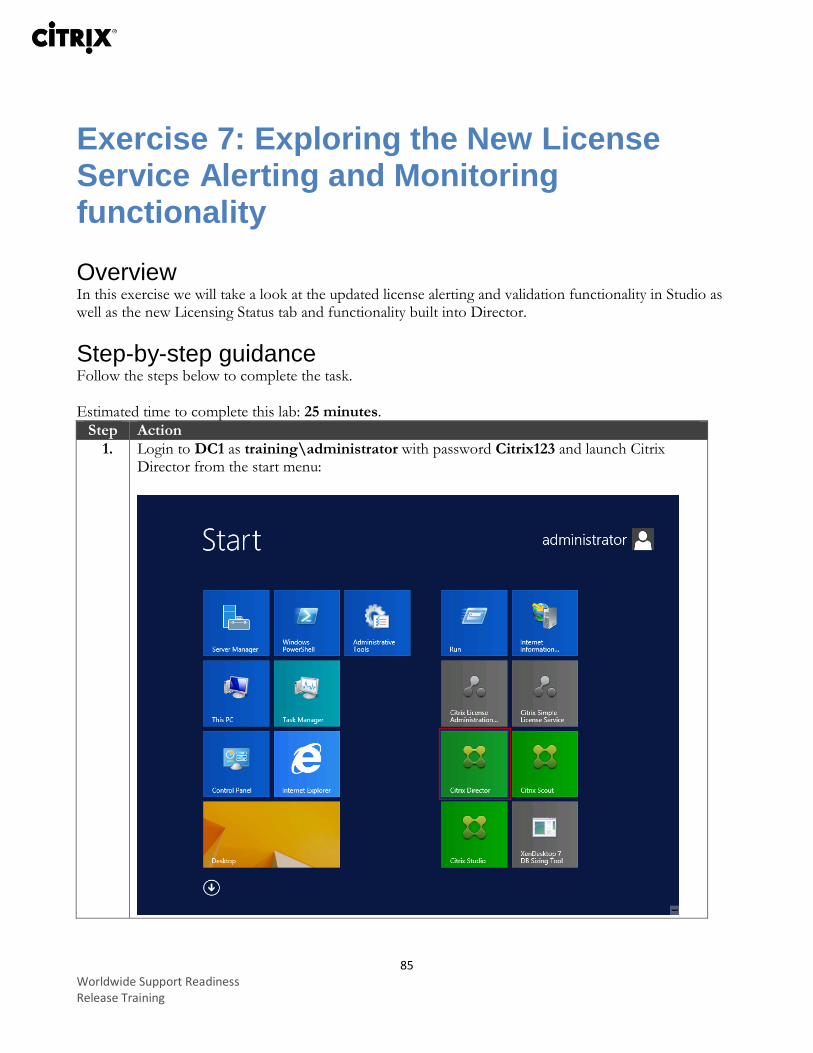
1. Login to DC1 as training\administrator with password Citrix123 and launch Citrix Director from the start menu:
86 Worldwide Support Readiness Release Training
Step Action
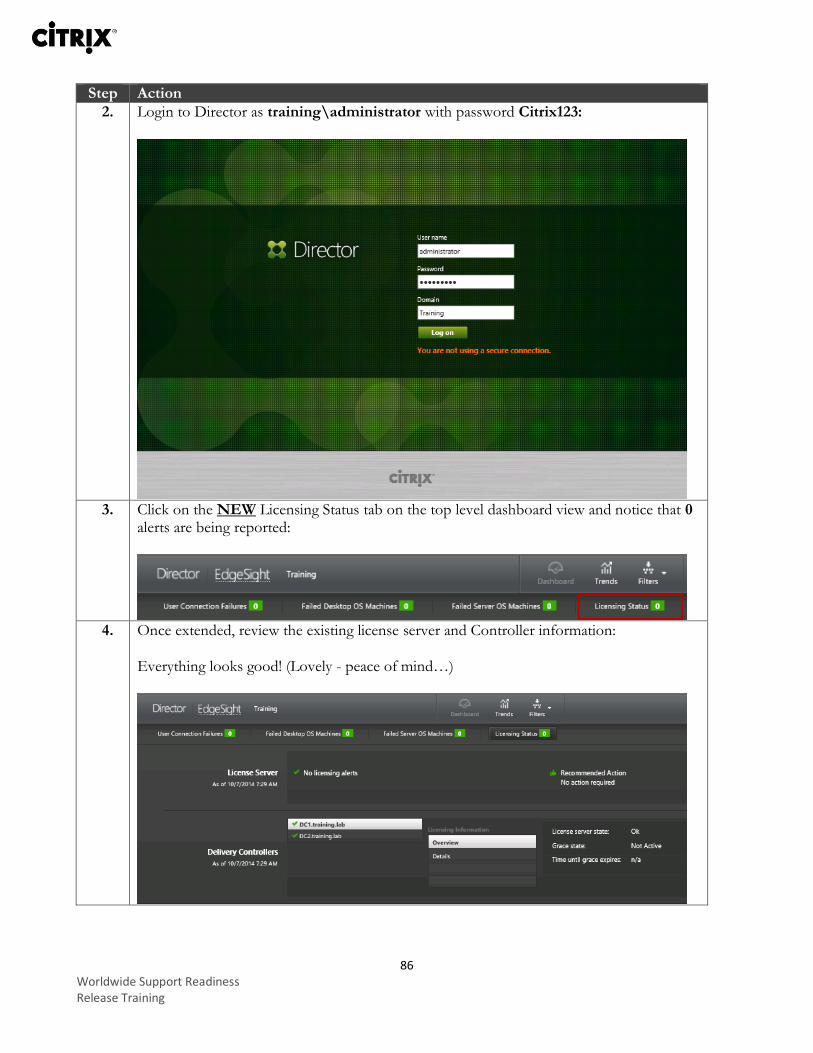
2. Login to Director as training\administrator with password Citrix123:
3. Click on the NEW Licensing Status tab on the top level dashboard view and notice that 0
alerts are being reported:
4. Once extended, review the existing license server and Controller information:
Everything looks good! (Lovely - peace of mind…)
87 Worldwide Support Readiness Release Training
Step Action
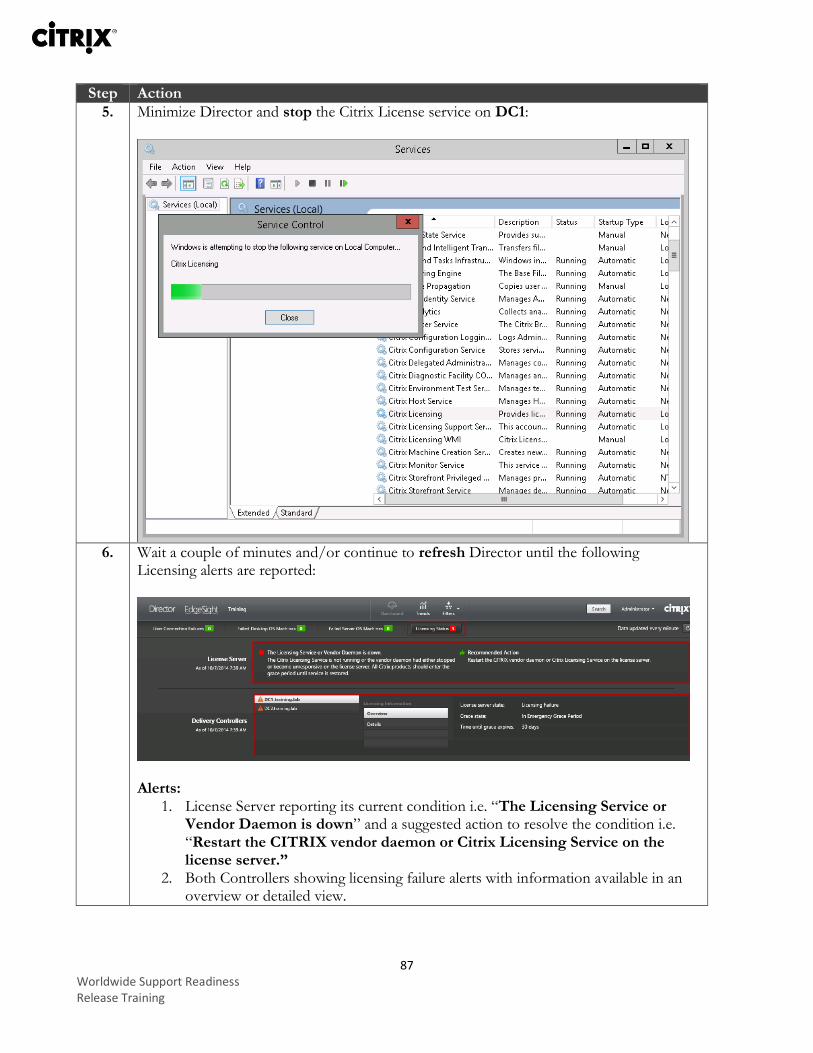
5. Minimize Director and stop the Citrix License service on DC1:
6. Wait a couple of minutes and/or continue to refresh Director until the following
Licensing alerts are reported:
Alerts:
1. License Server reporting its current condition i.e. “The Licensing Service or Vendor Daemon is down” and a suggested action to resolve the condition i.e. “Restart the CITRIX vendor daemon or Citrix Licensing Service on the license server.”
2. Both Controllers showing licensing failure alerts with information available in an overview or detailed view.
88 Worldwide Support Readiness Release Training
Step Action
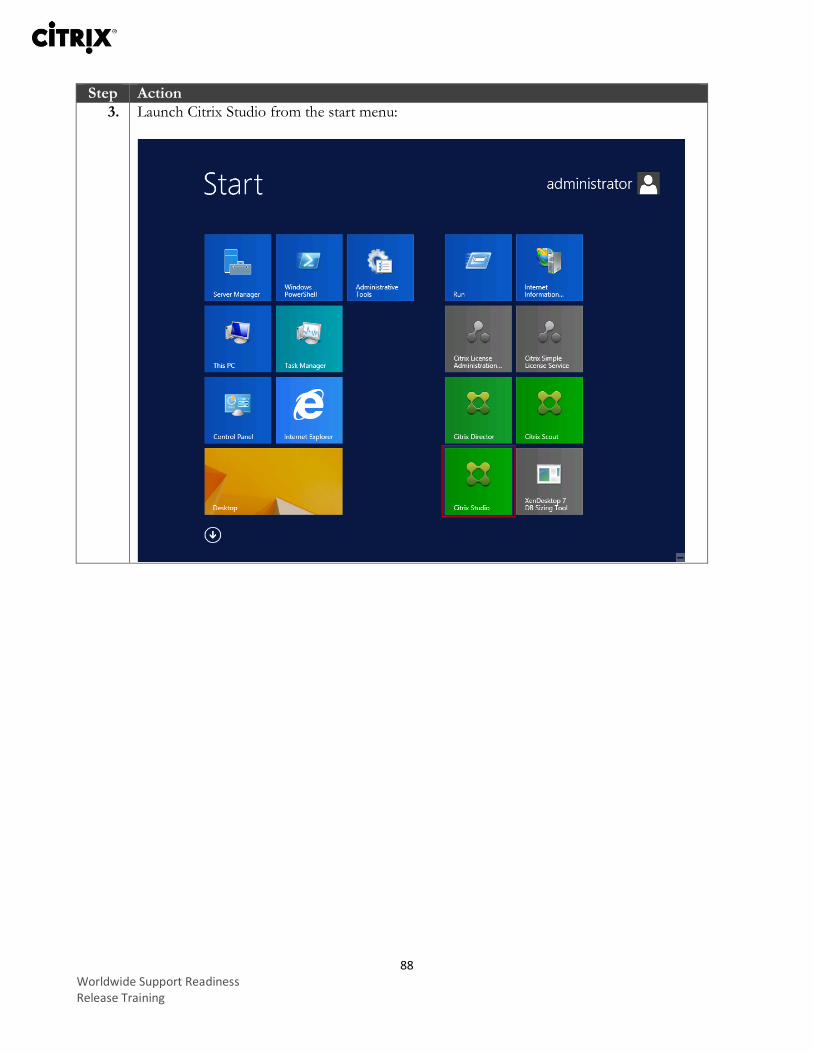
3. Launch Citrix Studio from the start menu:
89 Worldwide Support Readiness Release Training
Step Action
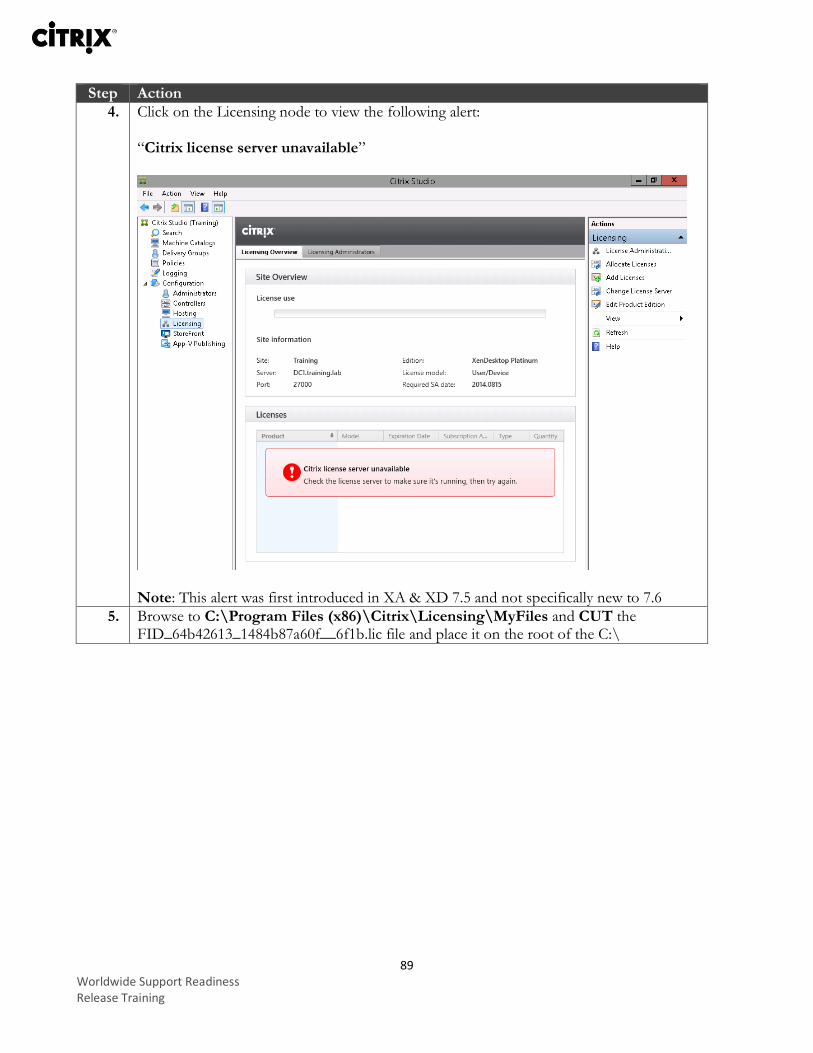
4. Click on the Licensing node to view the following alert: “Citrix license server unavailable”
Note: This alert was first introduced in XA & XD 7.5 and not specifically new to 7.6
5. Browse to C:\Program Files (x86)\Citrix\Licensing\MyFiles and CUT the FID_64b42613_1484b87a60f__6f1b.lic file and place it on the root of the C:\

90 Worldwide Support Readiness Release Training
Step Action
6. Right click on the .lic file and send to a compressed zip folder of the same name:
7. Start the Citrix License service on DC1
91 Worldwide Support Readiness Release Training
Step Action
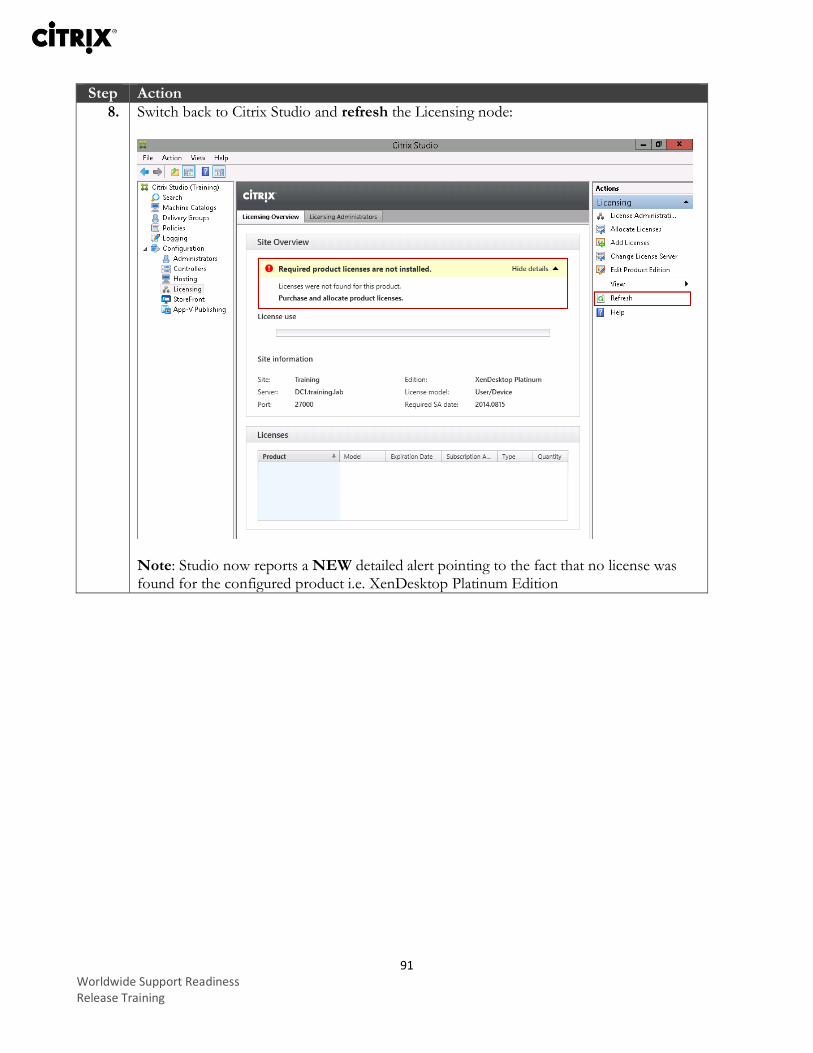
8. Switch back to Citrix Studio and refresh the Licensing node:
Note: Studio now reports a NEW detailed alert pointing to the fact that no license was found for the configured product i.e. XenDesktop Platinum Edition
92 Worldwide Support Readiness Release Training
Step Action
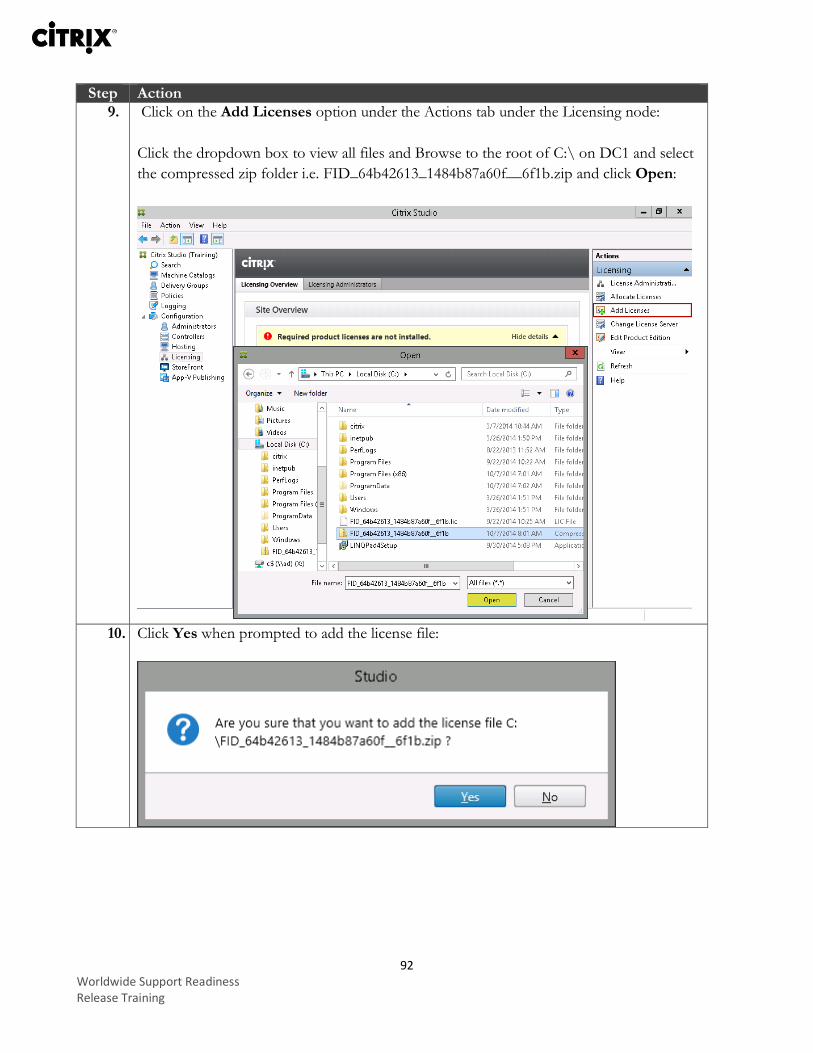
9. Click on the Add Licenses option under the Actions tab under the Licensing node:
Click the dropdown box to view all files and Browse to the root of C:\ on DC1 and select
the compressed zip folder i.e. FID_64b42613_1484b87a60f__6f1b.zip and click Open:
10. Click Yes when prompted to add the license file:
93 Worldwide Support Readiness Release Training
Step Action
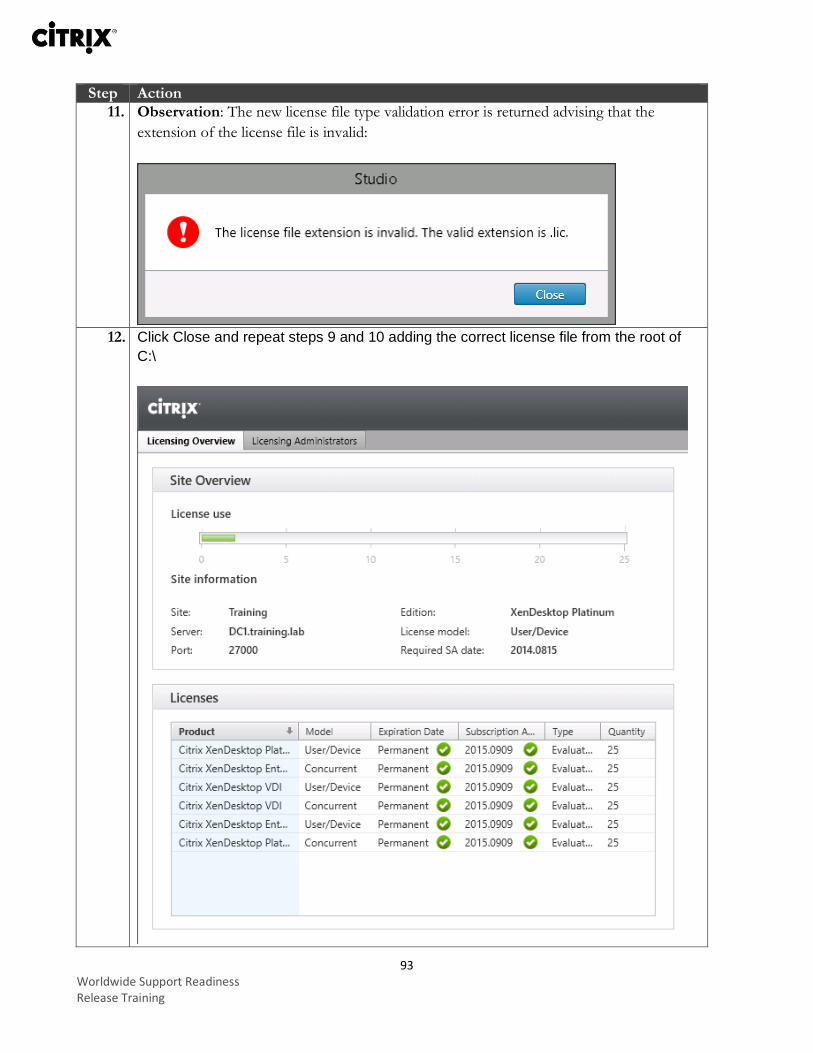
11. Observation: The new license file type validation error is returned advising that the
extension of the license file is invalid:
12. Click Close and repeat steps 9 and 10 adding the correct license file from the root of
C:\
94 Worldwide Support Readiness Release Training
Step Action
13. This exercise is now complete.
Key Takeaways
New more detailed licensing alerts have been added to Citrix Studio along with new license file validation functionality.
A new Licensing status tab has been added to the main dashboard page in Director which will report any license related issues with the license server and site controllers as well as suggest actions to resolve the issues aka conditions.
Revision History Name Date Comments Verison
Kimberly Ferrie Sept 30 /2014 Version 1 Version 1.0
Carlos Lopez October 1 / 2014 Minor edits Version 1.2
Kimberly Ferrie October 2/ 2014 Lab Details Updated Version 1.3
Michael Glover October 3/ 2014 Added Pt 2 Exercises Version 1.4
Michael Glover October 7/ 2014 All exercises added/verified Version 1.5
Kimberly Ferrie October 21/2014 Combined Pt 1 & 2 into one document for VTC.
Final
About Citrix Citrix Systems, Inc. (NASDAQ:CTXS) is the leading provider of virtualization, networking and software as a service technologies for more than 230,000 organizations worldwide. It’s Citrix Delivery Center, Citrix Cloud Center (C3) and Citrix Online Services product families radically simplify computing for millions of users, delivering applications as an on-demand service to any user, in any location on any device. Citrix customers include the world’s largest Internet companies, 99 percent of Fortune Global 500 enterprises, and hundreds of thousands of small businesses and prosumers worldwide. Citrix partners with over 10,000 companies worldwide in more than 100 countries. Founded in 1989, annual revenue in 2008 was $1.6 billion. http://www.citrix.com © 2010-2011 Citrix Systems, Inc. All rights reserved. Citrix®, Citrix Delivery Center™, Citrix Cloud Center™, XenApp™, XenServer™, NetScaler®, XenApp™, Citrix Repeater™, Citrix Receiver™, Citrix Workflow Studio™, GoToMyPC®, GoToAssist®, GoToMeeting®, GoToWebinar®, GoView™ and HiDef Corporate™ are trademarks of Citrix Systems, Inc. and/or one or more of its subsidiaries, and may be registered in the United States
95 Worldwide Support Readiness Release Training
Patent and Trademark Office and in other countries. All other trademarks and registered trademarks are property of their respective owners.