
Workflow€¦ · Web viewIn this step you will be importing a pre-existing non-credit course...
21
SAIT Non-Credit Data Population Final Version 10/8/2015 1
Transcript of Workflow€¦ · Web viewIn this step you will be importing a pre-existing non-credit course...

SAIT
Non-Credit Data Population
Final Version
10/8/2015
1

Table of ContentsWorkflow........................................................................................................................................2
Processes (P’s)..............................................................................................................................3
P1 – Log in to Curriculog...........................................................................................................4
P2 – Start the Proposal..............................................................................................................4
P3 – Import the Course..............................................................................................................5
P4 – Populate Required Fields..................................................................................................7
P5 – Launch the Proposal..........................................................................................................8
P6 – Enter Course Changes......................................................................................................9
P7 – Approve the Proposal......................................................................................................15
P8 – Review a Rejected Proposal...........................................................................................16
Decisions (D’s).............................................................................................................................17
D1 – Were any proposals rejected?.........................................................................................17
2

Workflow
3

The CSI project team has loaded all the non-credit course outlines that the schools made available into SAIT’s new curriculum management software (Acalog). Between October 8th and October 27th, the schools have the opportunity to access the information in the new curriculum management software and update it in advance of the Validation Process (happening November 2nd to November 20th). This Data Population Process will help speed up the Validation Process and will give the schools access to their information sooner.
This data-population process assumes that you know which fields (sections) on your non-credit course outline need to be updated. To help make this determination, the CSI team has provided you with copies of your course outlines as they currently look in the system. These current outlines will provide you with a baseline to see where updates need to be/should be made. This information should allow you to make decision regarding which fields need to be updated and how to proceed in the Data-Population approval process.Processes (P’s)
4
IMPORTANT:
This process will only be available from October 8th – October 27th. Note that there is a possibility that Student Services could reject a proposal in the workflow, in which case it will need to be corrected and this will add to the through-put time.
It is suggested that all originators begin their proposals before October 25th. The Data Population approval process will be unavailable after October 27th regardless of a proposal’s status.

P1 – Log in to Curriculog
1. In the Firefox web browser, navigate to: https://sait.curriculog.com/ then click on the “Login” link located in the top right hand corner.
2. Login using your SAIT email address and your Curriculog password.
P2 – Start the Proposal
1. Click on the My Proposals tab, and click New Proposal
5

2. Click Next 10 until you see the Non Credit: Data Population approval process
3. Click the Start Proposal checkmark icon on the right of the Non Credit: Data Population
4. (OPTIONAL) Click the Toggle Full-Width Form icon to expand the proposal form across the full width of the screen.
P3 – Import the Course
In this step you will be importing a pre-existing non-credit course outline, but before you can update the course information, you must import the course data from Acalog (the central curriculum database). To do this:
1. Click the Import icon.
6

2. When the pop-up dialog window appears, select the Continuing Education Working Copy Catalog.
3. Click on the Filter by Field dropdown menu if you want to search by a specific element (e.g. code, name, description, etc.).
Filtering by Prefix, filters on course subject (e.g. ACCT) Filtering by Code filters on course number (e.g. 215) You can also browse the catalog for the course you wise to import by clicking on
Search Available Curriculum (see next step)
4. Click Search Available Curriculum.
5. Once you have found the course that you’re looking for, click on the course name.
7

6. Click Import This Item at the bottom of the dialog. Do not uncheck any of the import field buttons as they are all necessary for this proposal.
P4 – Populate Required Fields
In the next step you will launch the proposal. In order for the proposal to launch successfully, all required fields must be completed. It may be tempting to update fields that are already populated and that you need to change, but DO NOT make any changes in this step.
Any changes prior to launching the proposal will not be tracked.
IMPORTANT:
Curriculog is designed to track changes only once a proposal is launched. However, users are able to change many data fields on the form without being required to launch. When this happens, changes are neither tracked nor captured.
This is important because in order for Student Services to update course data, they will need to see what has been changed in the course. If non-required data fields are changes prior to launch Student Services will not be able to see what has changed and will likely reject the proposal.
1. Check off the fields that you are changing.
8

2. If there is no description after the import (P3), enter the description of the course. This field is to be written in paragraph format. Non-credit course descriptions must be written according to the Guidelines for Non-Credit Course Descriptions document that can be found on SAITNOW.
P5 – Launch the Proposal
1. Click the ‘Launch Proposal’ icon.
2. If you do not get a pop-up window asking to confirm your decision to launch the proposal (as shown below) it is because you have not populated all of the required fields (as noted with an asterisk [*]).
9
TIP
If you try to launch when required fields are not populated, Curriculog will present a warning dialog informing you that the proposal cannot be launched. It will then highlight all of the required field in orange.

P6 – Enter Course Changes
Note:
It is very important that you reference the Style Guide for formatting non-credit course outlines in Curriculog available on the Educational Technology Services (ETS) Portal to ensure consistency across SAIT.
1. Enter the requester’s name in the Requested By field. This field allows for follow-up to be simplified if there are multiple people requesting changes.
2. Enter the Timing of the changes if Fall 2015 or later: a) Select the radio button for the Effective Semester that the change will be effective
for.
b) Select the effective academic year from when the change will be active.i. Click Add Itemii. Select the Academic Yeariii. Click Done
10

3. Enter any Course Description changes. This field is to be written in paragraph format. Non-credit course descriptions must be written according to the Guidelines for Non-Credit Course Descriptions document that can be found on SAITNOW.
4. Enter the Course Learning Outcomes and Objectives.
Standard formatting (as found on the ‘Style Guide Formatting non-credit course outlines’ at http://ets.sait.ca/forums/21673694-Documentation must be used in this section.)
11

5. Enter any Additional Requisite Information.12
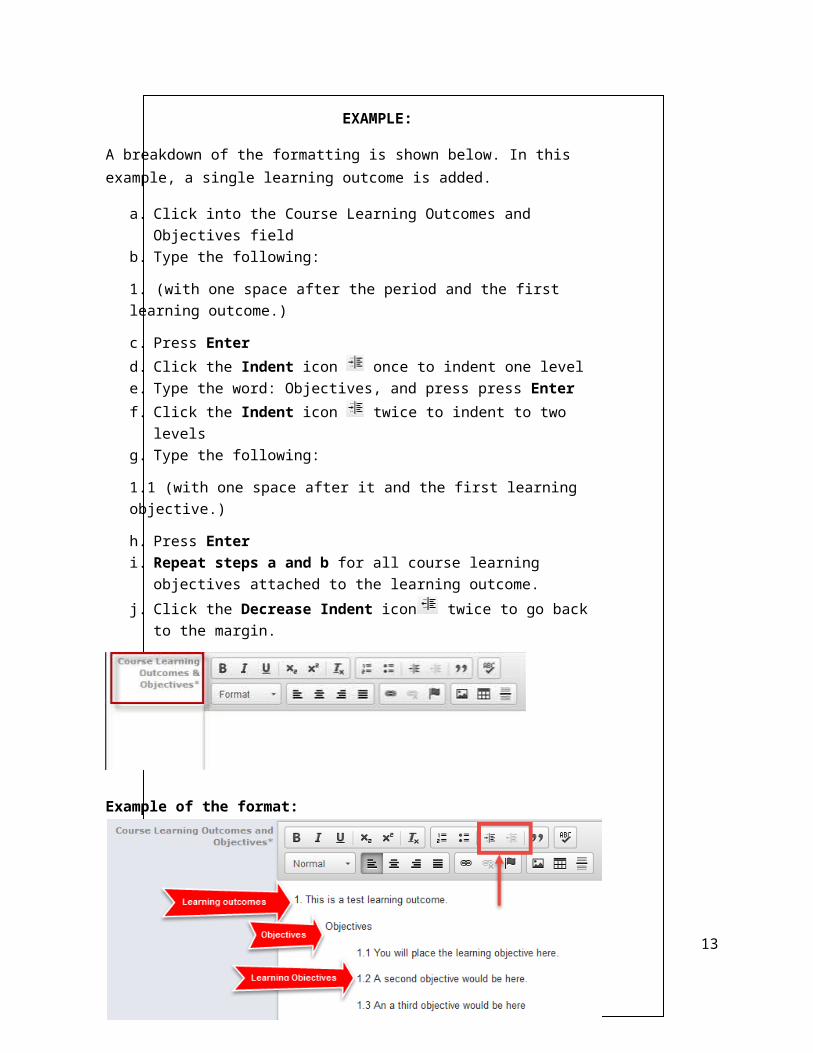
EXAMPLE:
A breakdown of the formatting is shown below. In this example, a single learning outcome is added.
a. Click into the Course Learning Outcomes and Objectives fieldb. Type the following:
1. (with one space after the period and the first learning outcome.)
c. Press Enterd. Click the Indent icon once to indent one levele. Type the word: Objectives, and press press Enterf. Click the Indent icon twice to indent to two levelsg. Type the following:
1.1 (with one space after it and the first learning objective.)
h. Press Enteri. Repeat steps a and b for all course learning objectives attached to
the learning outcome.j. Click the Decrease Indent icon twice to go back to the margin.
Example of the format:
6. Enter the Time Guidelines.
a. The following sentence structure must be used in this field:
“The standard instructional time for this course is ___ hours.”
b. If the course is offered through Distance Education, the following sentence should also appear:
“Instructional hours are not applicable to courses offered through Distance Education.”
7. Enter the Course Assessment.
Refer to the ‘Style Guide Formatting non-credit course outlines in Curriculog’ document located at http://ets.sait.ca/forums/21673694-Documentation.
13
NOTE:
This field is strictly reserved for information about instructional hours. Information related to the hourly or weekly breakdown of content delivery is to be included in the Other Course Information field.

8. Enter any Required Course Publications.
Required Course Publications must be formatted as follows: 1) APA style, 2) Alphabetical order and 3) No bulleted lists.
9. Enter any Optional Reference Publications.
Optional Reference Publications must be formatted as follows:
1) APA style2) Alphabetical order; and, 3) No bulleted lists.
14
IMPORTANT:
Student Services’ Curriculum Controls team will reject a proposal if the Course Assessment field in Curriculog and the Grade Mode field in Banner do not match.
For example, courses with a Grade Mode of “Letter Grade” or “Pass/No Pass” must include a formal evaluation in the course assessment.
Courses without a formal evaluation identified in the Course Assessment, must have a Grade Mode of “Attendance/Participation” or “Ungradable.”
What if these fields don’t match?
If the proposal is rejected because of either the Course Assessment is incorrect, or the Grade Mode is incorrect, it will return to the originator for revision.
If you did not select the Course Assessment field in P4 when you were asked to identify which fields you would be changing, these rules will not cause your proposal to be rejected. However, these rules will apply during the official Validation Process happening November 2nd to November 20th.

10. Enter any Course Materials.
If more than one material is listed, present materials in a bulleted list.
11. Enter any Other Course Information.
This is generally entered in paragraph form but users can use the standard formatting available in Curriculog such as bulleted and numbered lists, tables, indents, bold, underline and italics.
Most often this field is used to for:
Hourly breakdown of content delivery School-specific policies
In cases when both kinds of information are being housed in this field, the hourly breakdown of content delivery should appear first.
Refer to the ‘Style Guide Formatting non-credit course outlines in Curriculog’ document located at http://ets.sait.ca/forums/21673694-Documentation for examples.
12. Enter any Accrediting Body/Professional Designations.
15

13. Enter any Additional Accrediting Body/Professional Designations Information.
P7 – Approve the ProposalIf you are finished making edits to your proposal, you must approve the proposal to send it to the next step in the workflow. To approve the proposal:
a) Click the Decisions buttonb) Click the Approve radio buttonc) Add any commentsd) Click Make My Decision
16

P8 – Review a Rejected ProposalThis task will only need to be completed if a proposal has been rejected.
1. Log in to Curriculog (P1)2. Go to My Tasks.
3. Scroll down until you find the proposal that requires review. You may need to click on the page numbers at the bottom to navigate to a different page.
4. Click the Edit Proposal icon shown below.
5. As the proposal moves through the workflow, Approvers can make comments on it. These comments are captured in a feed in the Proposal Toolbox pane along the right side of the screen.
6. Review these comments to understand why the proposal was rejected.7. Enter the changes required.8. In the Proposal Toolbox on the right, select Show current with markup to view your
changes.
17
Important:
After you’ve approved this proposal, it will automatically be sent to Student Services’ Curriculum Controls team. You will receive a system notification email letting you know when the proposal was been either approved or rejected.
If approved, your work on the proposal is complete. If the proposal is rejected, you must log back into the Curriculog system, view the proposal and resolve the issue. A comment/rational will be provided anytime a proposal is rejected.

9. Navigate to the Proposal Toolbox and click the Discussion icon .10. Click on the Add Comment button to add your comments in the feed.
Decisions (D’s)
D1 – Were any proposals rejected?As you originate proposals, the system will send you follow-up emails. Below is an example of what the email notification will look like. Click on the Click Here links to be directed to the Curriculog login page.
18

19
EXAMPLE:
You can see above that COMM 256 was approved and COMP 274 was rejected by multiple users. P8 in this process will show you what to do if your proposal is rejected.