Work with the Table App - Schoolwires,...
19
Work with the Table App Blackboard Web Community Manager
Transcript of Work with the Table App - Schoolwires,...
Work with the Table App
Blackboard Web Community Manager

Trademark Notice Blackboard, the Blackboard logos, and the unique trade dress of Blackboard are the trademarks, service marks, trade dress and logos of Blackboard, Inc. All other trademarks, service marks, trade dress and logos used in Blackboard and the Website are the trademarks, service marks, trade dress and logos of their respective owners.
Copyright Notice © 2016 Blackboard Inc. All rights reserved.
This guide covers all available features and functionality. Features included in your contract may vary.
Blackboard Web Community Manager Table App
C2TableApp_110816 i
Table of Contents Introduction .................................................................................................................................................. 1
Working with the Table App ......................................................................................................................... 2
Add a Table App to a Page ........................................................................................................................ 2
Edit a New Table App on a Page ............................................................................................................... 4
Table Content Options .............................................................................................................................. 7
Editor Toolbar ....................................................................................................................................... 7
Insert Toolbar ........................................................................................................................................ 7
Right Click Menu Options ........................................................................................................................ 10
Table App Options ....................................................................................................................................... 12
Accessing App Options ............................................................................................................................ 12
General Tab Options ............................................................................................................................... 13
Sharing Tab Options ................................................................................................................................ 14
Social Settings Tab Options ..................................................................................................................... 15

Blackboard Web Community Manager Table App
C2TableApp_110816 1
Introduction
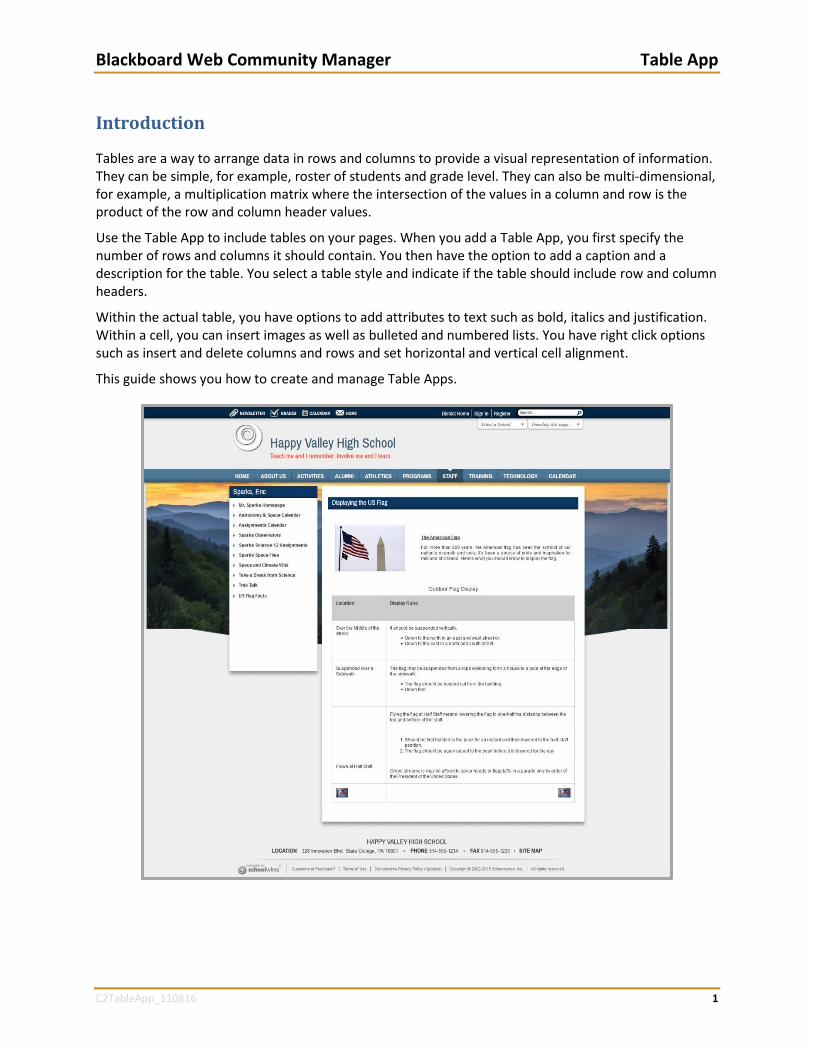
Tables are a way to arrange data in rows and columns to provide a visual representation of information. They can be simple, for example, roster of students and grade level. They can also be multi-dimensional, for example, a multiplication matrix where the intersection of the values in a column and row is the product of the row and column header values.
Use the Table App to include tables on your pages. When you add a Table App, you first specify the number of rows and columns it should contain. You then have the option to add a caption and a description for the table. You select a table style and indicate if the table should include row and column headers.
Within the actual table, you have options to add attributes to text such as bold, italics and justification. Within a cell, you can insert images as well as bulleted and numbered lists. You have right click options such as insert and delete columns and rows and set horizontal and vertical cell alignment.
This guide shows you how to create and manage Table Apps.
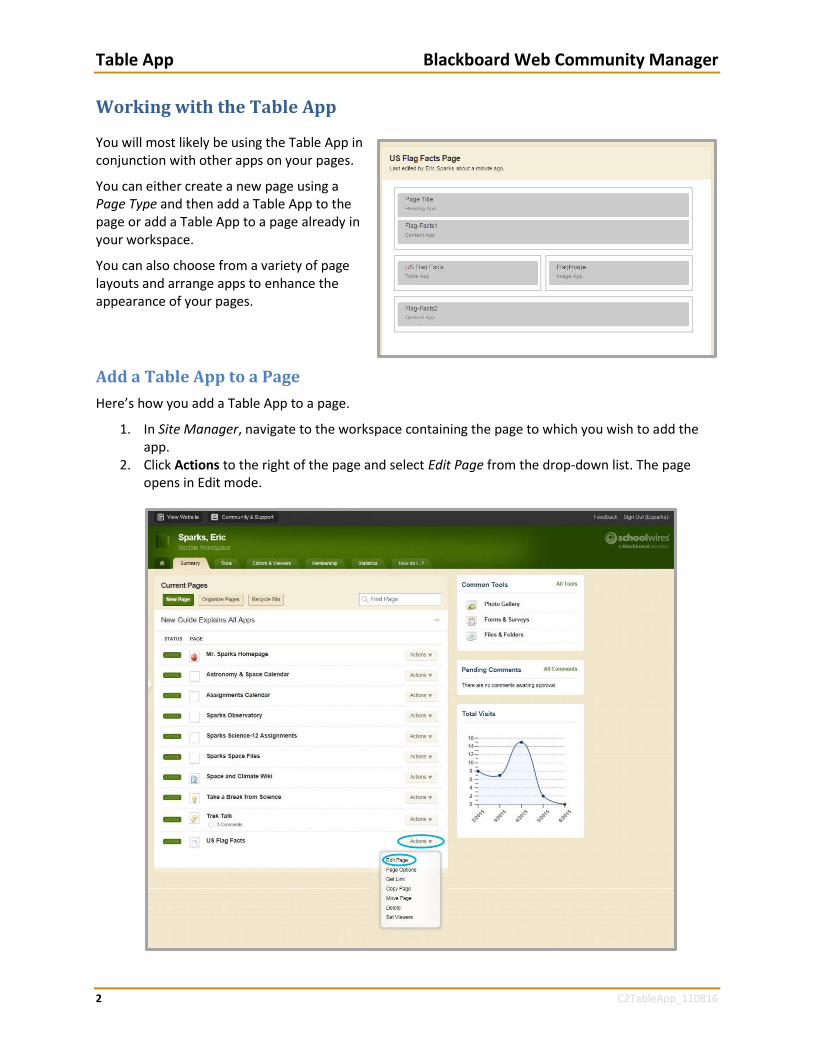
Table App Blackboard Web Community Manager
2 C2TableApp_110816
Working with the Table App
You will most likely be using the Table App in conjunction with other apps on your pages.
You can either create a new page using a Page Type and then add a Table App to the page or add a Table App to a page already in your workspace.
You can also choose from a variety of page layouts and arrange apps to enhance the appearance of your pages.
Add a Table App to a Page
Here’s how you add a Table App to a page.
1. In Site Manager, navigate to the workspace containing the page to which you wish to add the app.
2. Click Actions to the right of the page and select Edit Page from the drop-down list. The page opens in Edit mode.
Blackboard Web Community Manager Table App
C2TableApp_110816 3
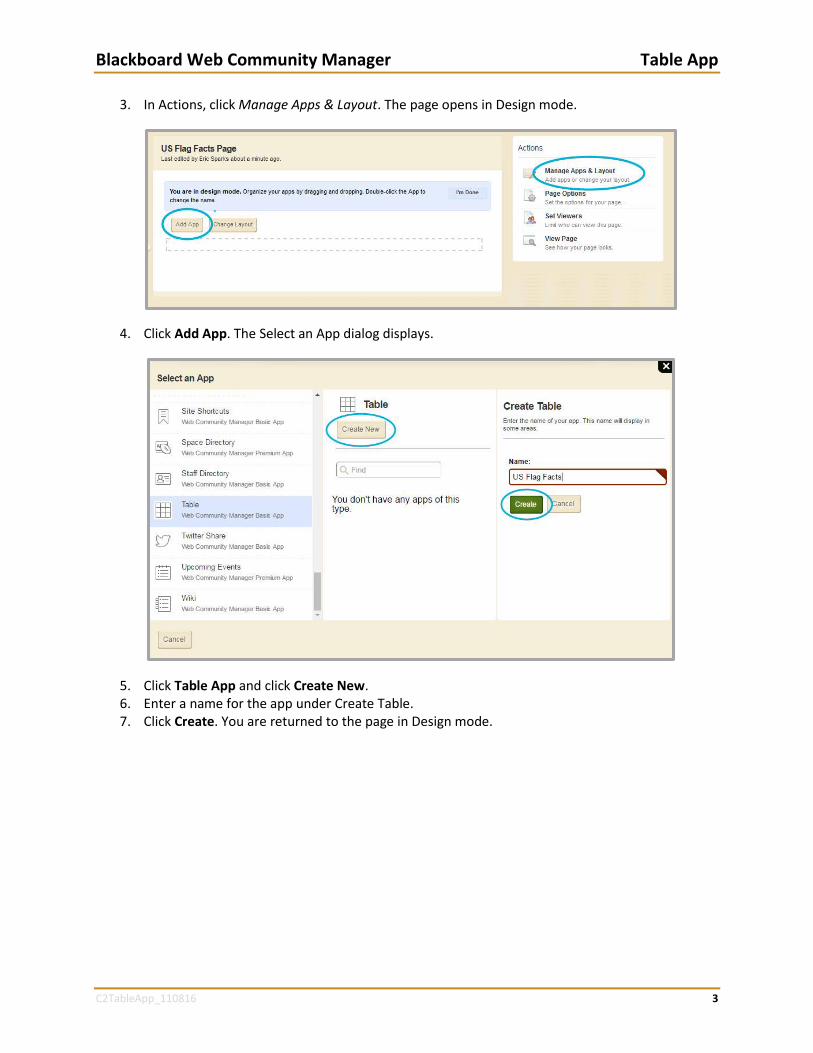
3. In Actions, click Manage Apps & Layout. The page opens in Design mode.
4. Click Add App. The Select an App dialog displays.
5. Click Table App and click Create New. 6. Enter a name for the app under Create Table. 7. Click Create. You are returned to the page in Design mode.
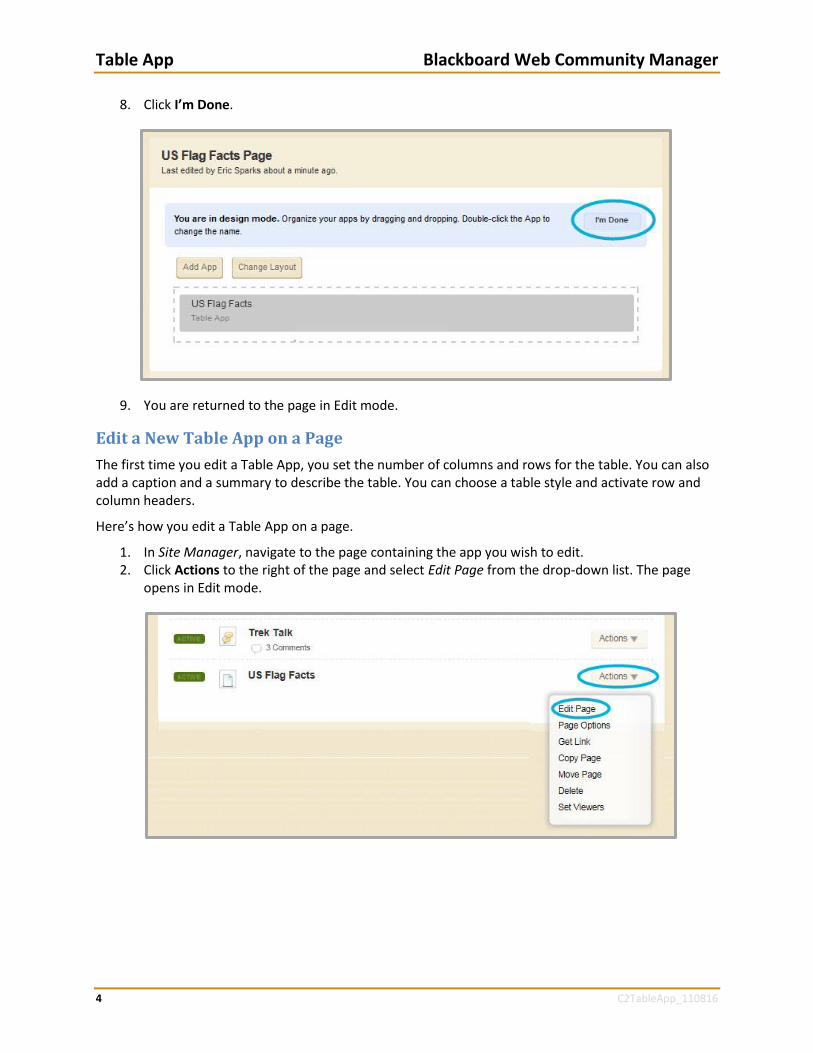
Table App Blackboard Web Community Manager
4 C2TableApp_110816
8. Click I’m Done.
9. You are returned to the page in Edit mode.
Edit a New Table App on a Page
The first time you edit a Table App, you set the number of columns and rows for the table. You can also add a caption and a summary to describe the table. You can choose a table style and activate row and column headers.
Here’s how you edit a Table App on a page.
1. In Site Manager, navigate to the page containing the app you wish to edit. 2. Click Actions to the right of the page and select Edit Page from the drop-down list. The page
opens in Edit mode.
Blackboard Web Community Manager Table App
C2TableApp_110816 5
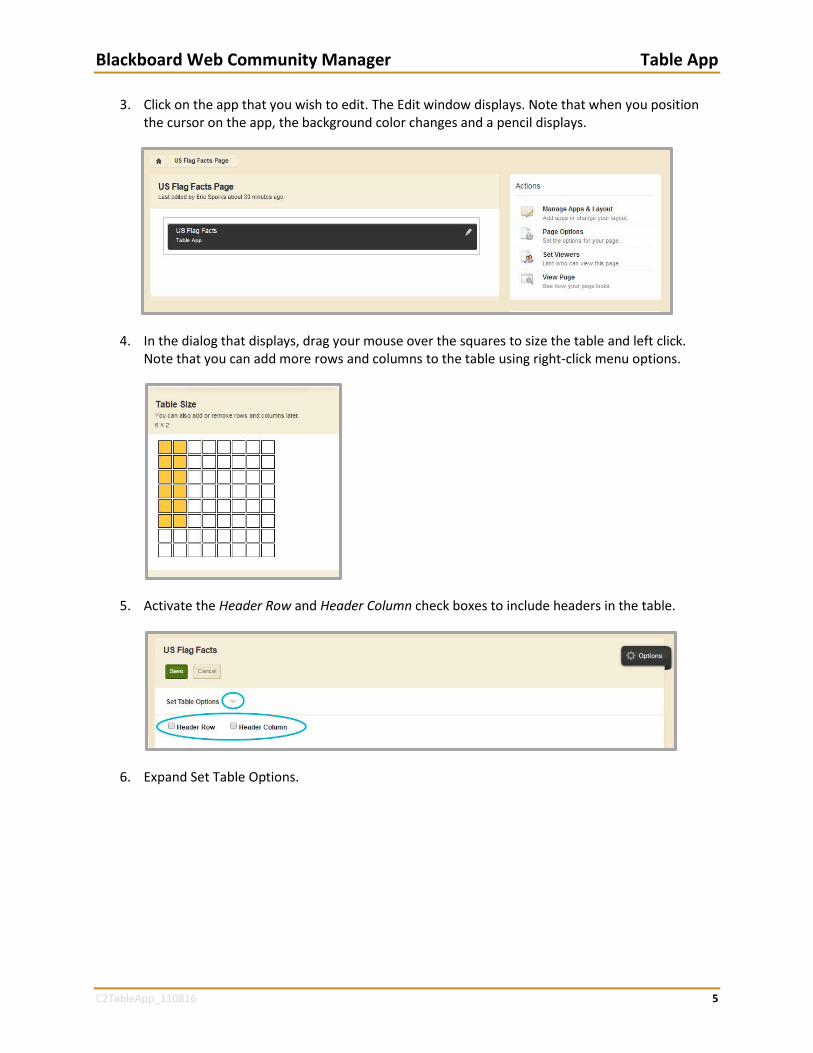
3. Click on the app that you wish to edit. The Edit window displays. Note that when you position the cursor on the app, the background color changes and a pencil displays.
4. In the dialog that displays, drag your mouse over the squares to size the table and left click. Note that you can add more rows and columns to the table using right-click menu options.
5. Activate the Header Row and Header Column check boxes to include headers in the table.
6. Expand Set Table Options.
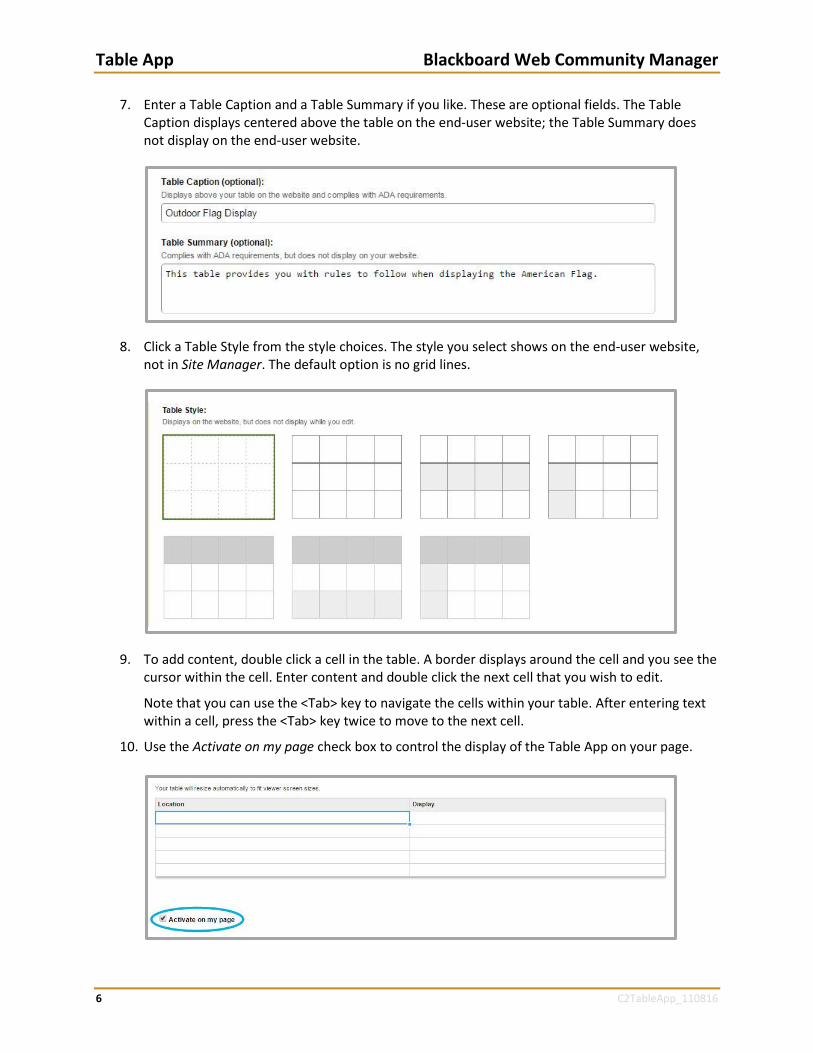
Table App Blackboard Web Community Manager
6 C2TableApp_110816
7. Enter a Table Caption and a Table Summary if you like. These are optional fields. The Table Caption displays centered above the table on the end-user website; the Table Summary does not display on the end-user website.
8. Click a Table Style from the style choices. The style you select shows on the end-user website, not in Site Manager. The default option is no grid lines.
9. To add content, double click a cell in the table. A border displays around the cell and you see the cursor within the cell. Enter content and double click the next cell that you wish to edit.
Note that you can use the <Tab> key to navigate the cells within your table. After entering text within a cell, press the <Tab> key twice to move to the next cell.
10. Use the Activate on my page check box to control the display of the Table App on your page.
Blackboard Web Community Manager Table App
C2TableApp_110816 7
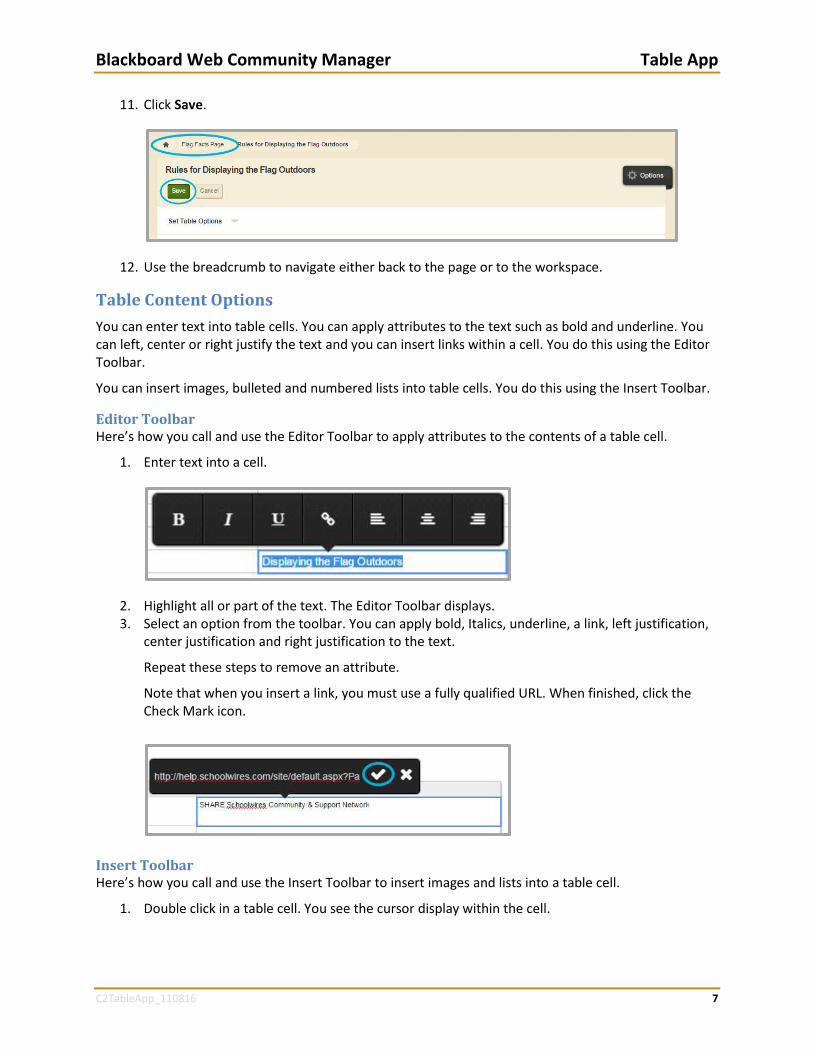
11. Click Save.
12. Use the breadcrumb to navigate either back to the page or to the workspace.
Table Content Options
You can enter text into table cells. You can apply attributes to the text such as bold and underline. You can left, center or right justify the text and you can insert links within a cell. You do this using the Editor Toolbar.
You can insert images, bulleted and numbered lists into table cells. You do this using the Insert Toolbar.
Editor Toolbar Here’s how you call and use the Editor Toolbar to apply attributes to the contents of a table cell.
1. Enter text into a cell.
2. Highlight all or part of the text. The Editor Toolbar displays. 3. Select an option from the toolbar. You can apply bold, Italics, underline, a link, left justification,
center justification and right justification to the text.
Repeat these steps to remove an attribute.
Note that when you insert a link, you must use a fully qualified URL. When finished, click the Check Mark icon.
Insert Toolbar Here’s how you call and use the Insert Toolbar to insert images and lists into a table cell.
1. Double click in a table cell. You see the cursor display within the cell.
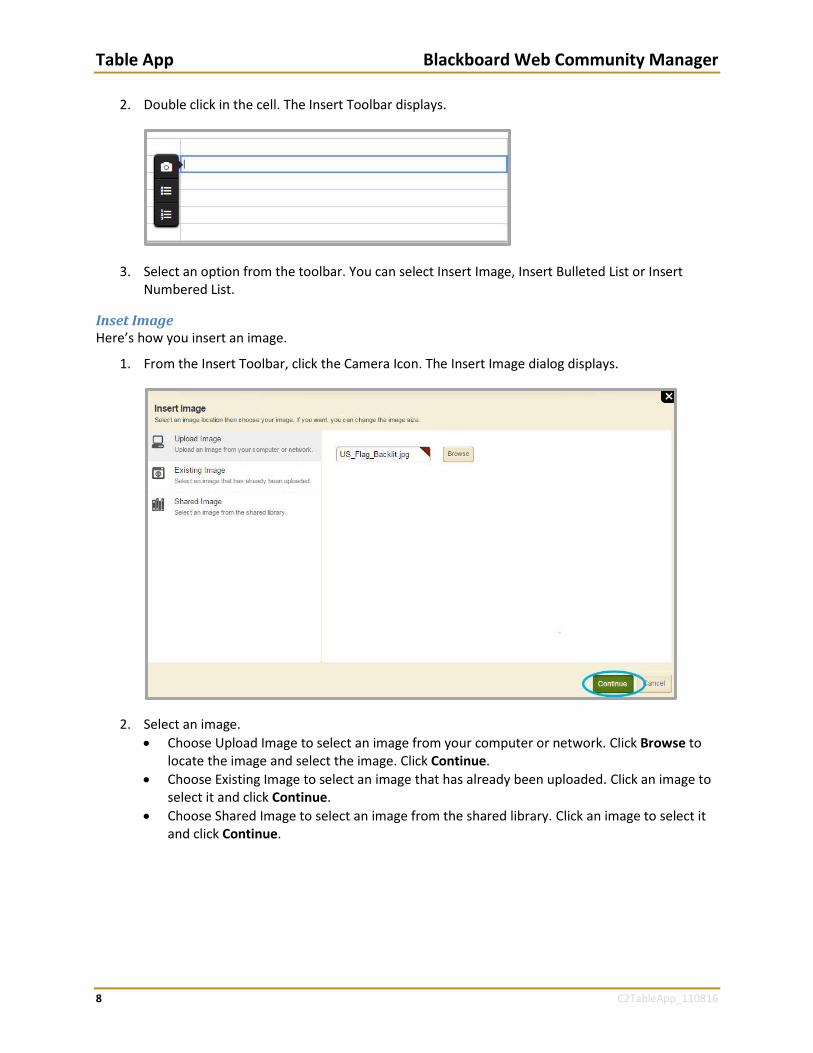
Table App Blackboard Web Community Manager
8 C2TableApp_110816
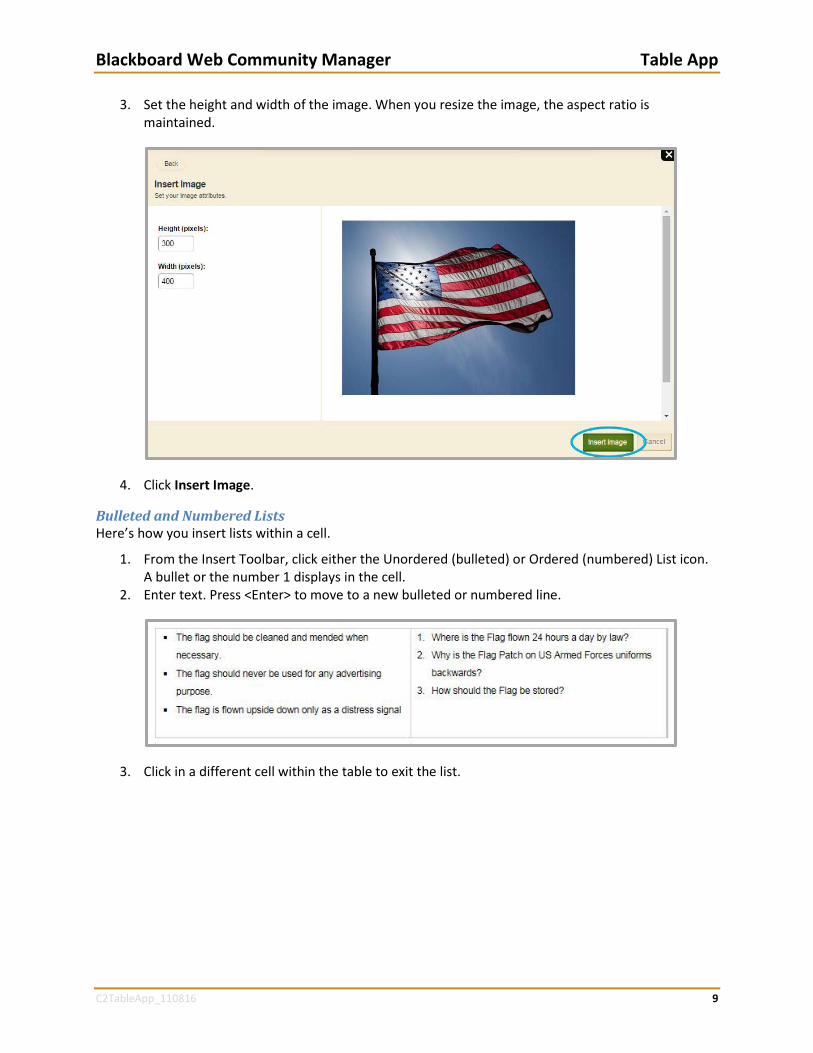
2. Double click in the cell. The Insert Toolbar displays.
3. Select an option from the toolbar. You can select Insert Image, Insert Bulleted List or Insert Numbered List.
Inset Image Here’s how you insert an image.
1. From the Insert Toolbar, click the Camera Icon. The Insert Image dialog displays.
2. Select an image.
Choose Upload Image to select an image from your computer or network. Click Browse to locate the image and select the image. Click Continue.
Choose Existing Image to select an image that has already been uploaded. Click an image to select it and click Continue.
Choose Shared Image to select an image from the shared library. Click an image to select it and click Continue.
Blackboard Web Community Manager Table App
C2TableApp_110816 9
3. Set the height and width of the image. When you resize the image, the aspect ratio is maintained.
4. Click Insert Image.
Bulleted and Numbered Lists Here’s how you insert lists within a cell.
1. From the Insert Toolbar, click either the Unordered (bulleted) or Ordered (numbered) List icon. A bullet or the number 1 displays in the cell.
2. Enter text. Press <Enter> to move to a new bulleted or numbered line.
3. Click in a different cell within the table to exit the list.
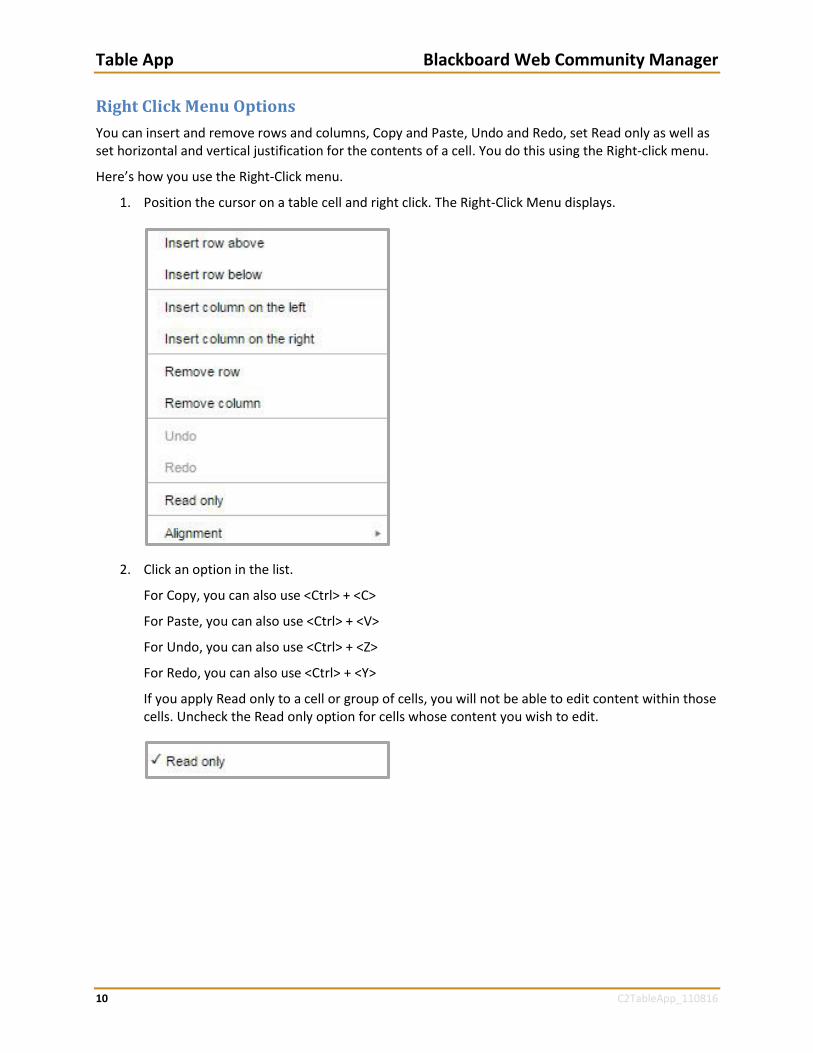
Table App Blackboard Web Community Manager
10 C2TableApp_110816
Right Click Menu Options
You can insert and remove rows and columns, Copy and Paste, Undo and Redo, set Read only as well as set horizontal and vertical justification for the contents of a cell. You do this using the Right-click menu.
Here’s how you use the Right-Click menu.
1. Position the cursor on a table cell and right click. The Right-Click Menu displays.
2. Click an option in the list.
For Copy, you can also use <Ctrl> + <C>
For Paste, you can also use <Ctrl> + <V>
For Undo, you can also use <Ctrl> + <Z>
For Redo, you can also use <Ctrl> + <Y>
If you apply Read only to a cell or group of cells, you will not be able to edit content within those cells. Uncheck the Read only option for cells whose content you wish to edit.
Blackboard Web Community Manager Table App
C2TableApp_110816 11
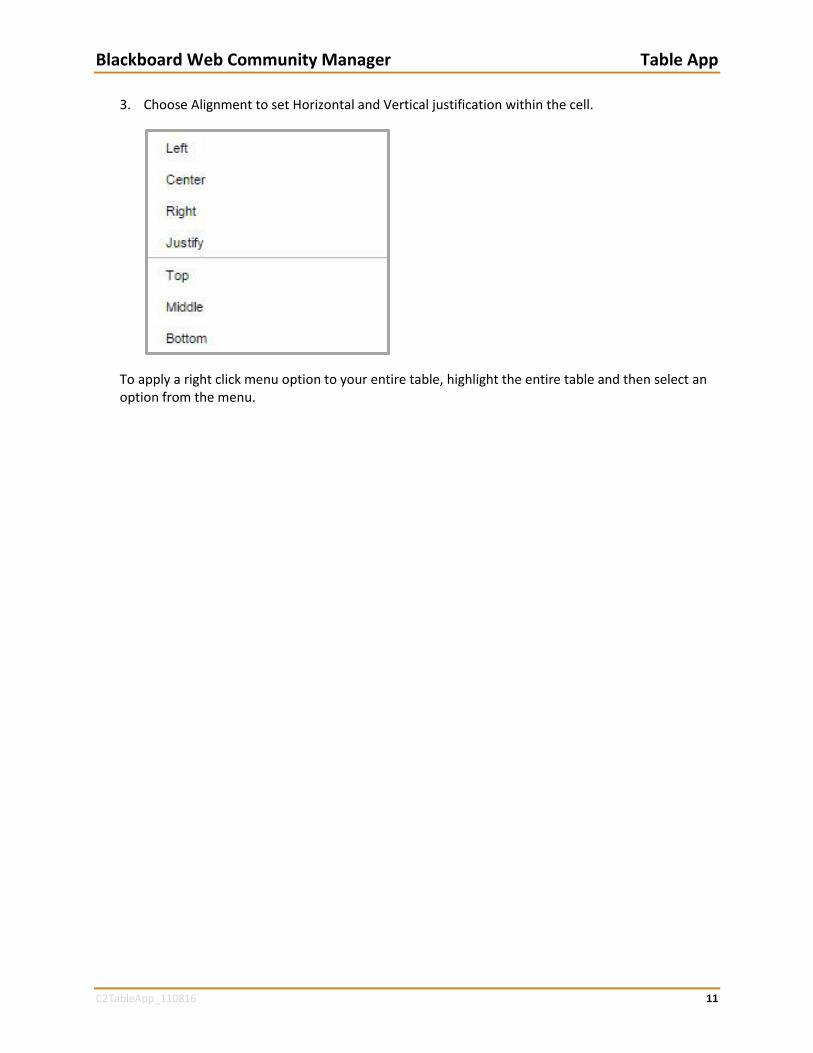
3. Choose Alignment to set Horizontal and Vertical justification within the cell.
To apply a right click menu option to your entire table, highlight the entire table and then select an option from the menu.
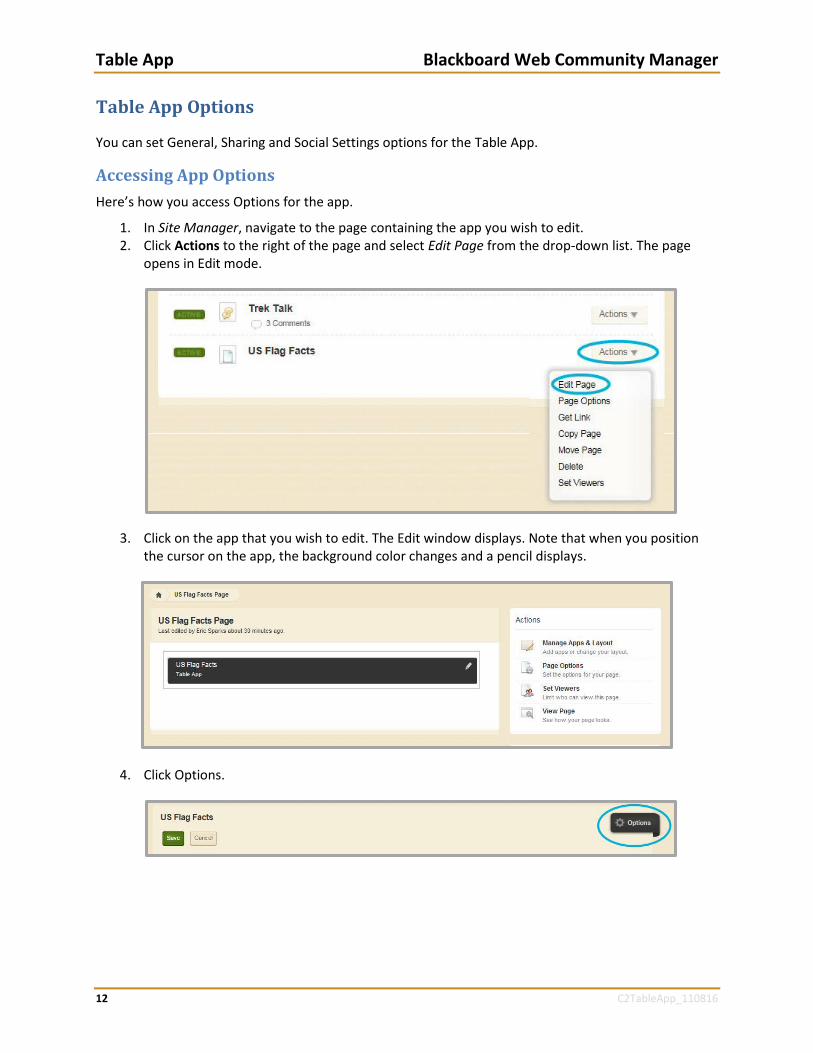
Table App Blackboard Web Community Manager
12 C2TableApp_110816
Table App Options
You can set General, Sharing and Social Settings options for the Table App.
Accessing App Options
Here’s how you access Options for the app.
1. In Site Manager, navigate to the page containing the app you wish to edit. 2. Click Actions to the right of the page and select Edit Page from the drop-down list. The page
opens in Edit mode.
3. Click on the app that you wish to edit. The Edit window displays. Note that when you position the cursor on the app, the background color changes and a pencil displays.
4. Click Options.
Blackboard Web Community Manager Table App
C2TableApp_110816 13
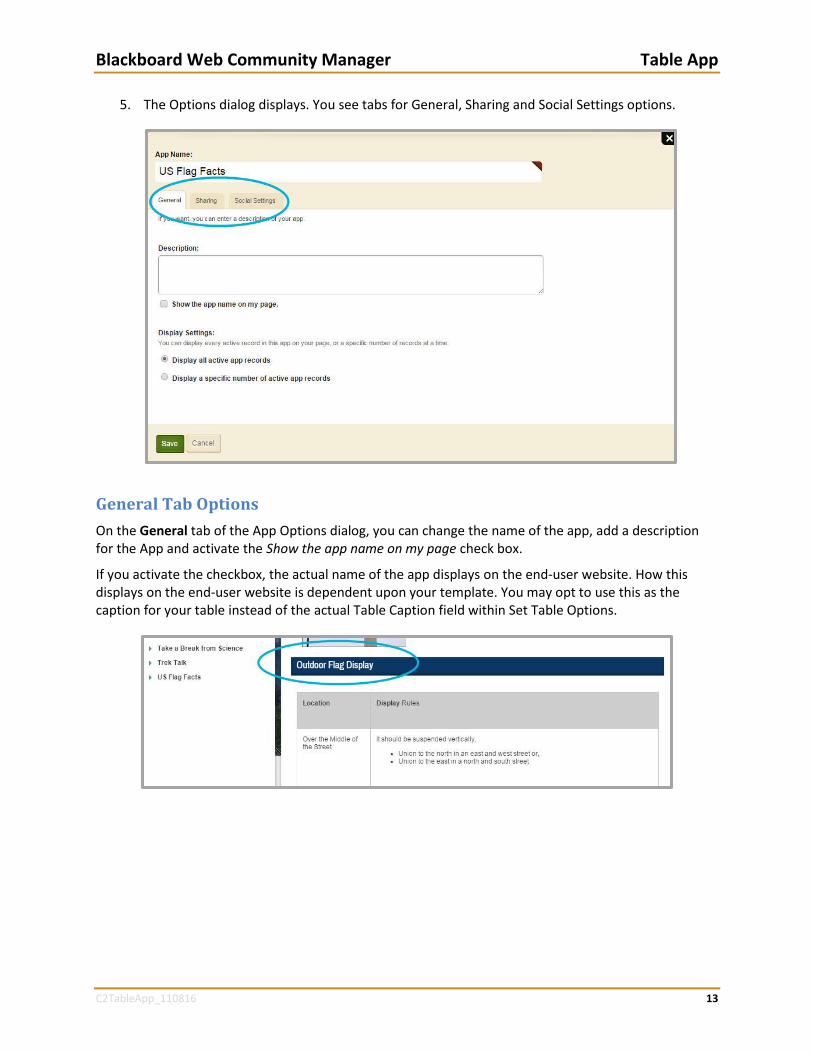
5. The Options dialog displays. You see tabs for General, Sharing and Social Settings options.
General Tab Options
On the General tab of the App Options dialog, you can change the name of the app, add a description for the App and activate the Show the app name on my page check box.
If you activate the checkbox, the actual name of the app displays on the end-user website. How this displays on the end-user website is dependent upon your template. You may opt to use this as the caption for your table instead of the actual Table Caption field within Set Table Options.
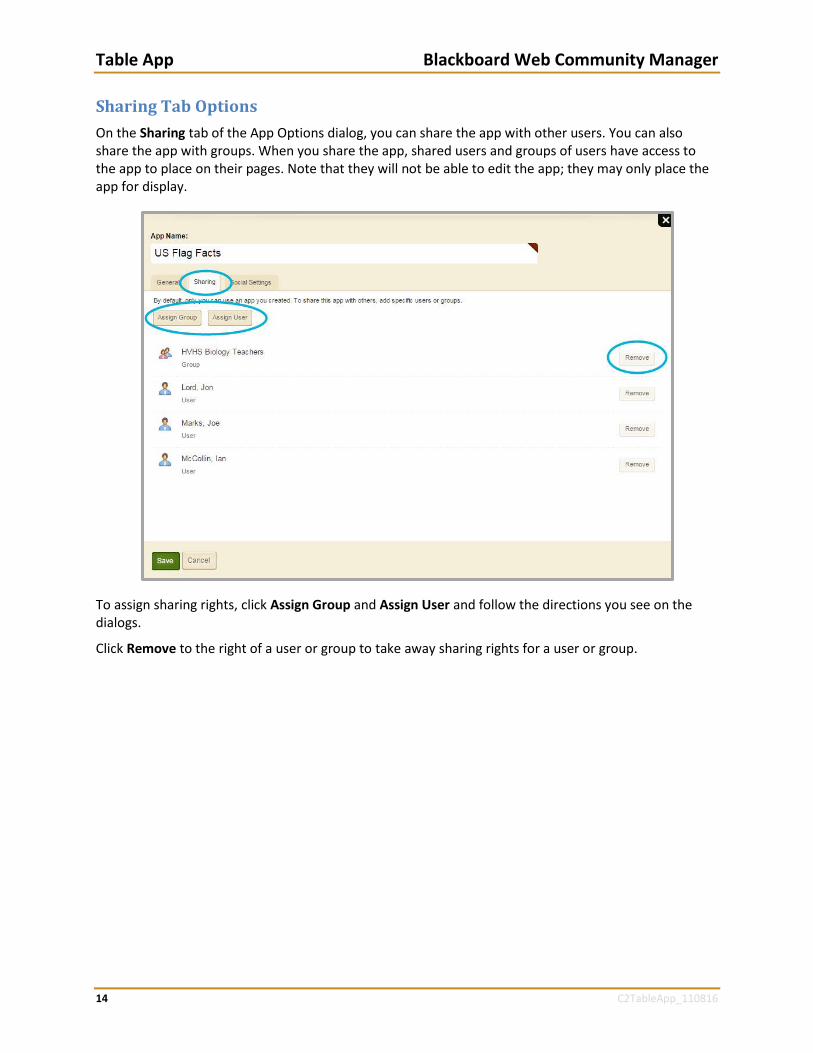
Table App Blackboard Web Community Manager
14 C2TableApp_110816
Sharing Tab Options
On the Sharing tab of the App Options dialog, you can share the app with other users. You can also share the app with groups. When you share the app, shared users and groups of users have access to the app to place on their pages. Note that they will not be able to edit the app; they may only place the app for display.
To assign sharing rights, click Assign Group and Assign User and follow the directions you see on the dialogs.
Click Remove to the right of a user or group to take away sharing rights for a user or group.

Blackboard Web Community Manager Table App
C2TableApp_110816 15
Social Settings Tab Options
On the Social Settings tab, you can apply the Commenting and Rating social media elements for the app.
If you activate the Commenting check box, visitors may comment on your app. We recommend that you activate the Require Approval check box so that you may screen and approve comments before they display on the end-user website.
If you activate the Rating check box, visitors may rate your app by clicking on a series of five stars.