Woodshop/Metalshop Policies - Saint Mary's...
36
W oodshop/Metalshop Policies Users must be familiar with these shop policies for safety, security and efficiency. In order to be authorized to use the shop, students and faculty must first read all of the Woodshop/Metalshop Policies and sign the agreement at the end of this handbook.
Transcript of Woodshop/Metalshop Policies - Saint Mary's...
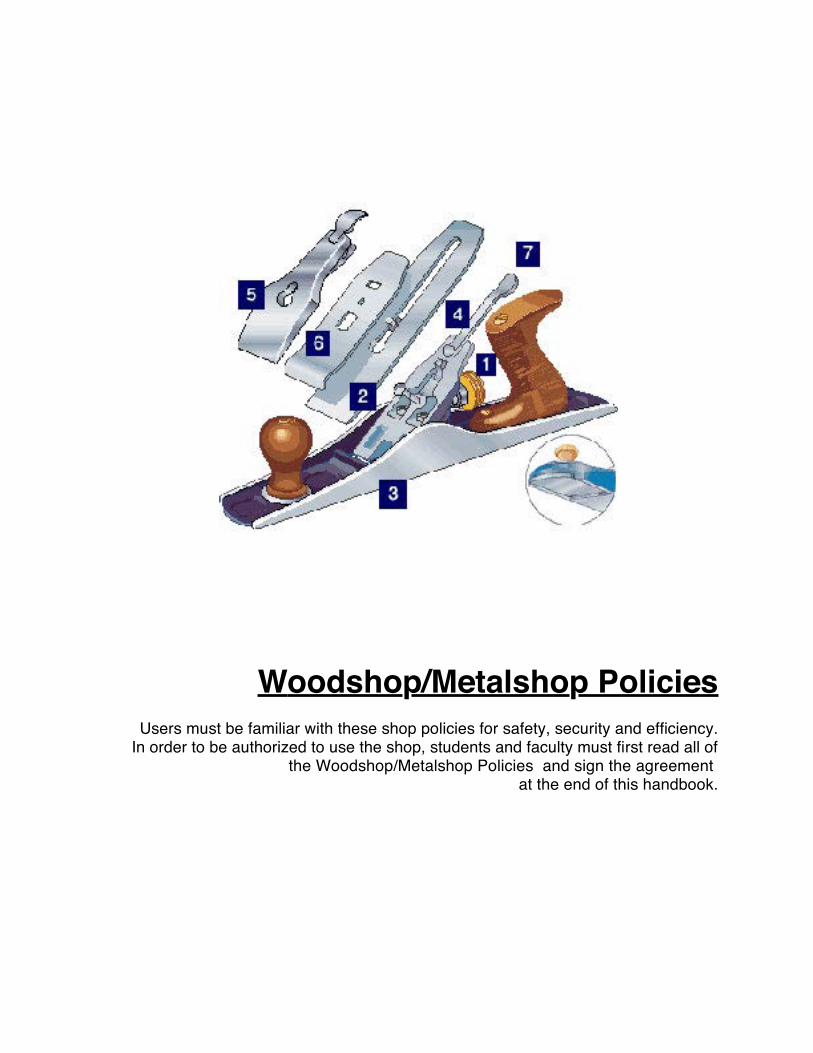
Woodshop/Metalshop PoliciesUsers must be familiar with these shop policies for safety, security and efficiency.
In order to be authorized to use the shop, students and faculty must first read all of the Woodshop/Metalshop Policies and sign the agreement
at the end of this handbook.
Table of Contents:
General Studio Policies
Woodshop/Metalshop Supplies
Storage, Disposal, and Types of Materials
Damage to Equipment
Closing the Shop
New Tools
Related Areas: Plaster
Related Areas: Concrete/adjacent Courtyard
First Aid and Emergency
Material Safety Data Sheets (MSDS)
Safety Information and PPE requirements for Powertools--Woodshop
Safety Information and PPE requirements for Powertools for Tools--Metalshop
Agreement Signature Page

General Studio Policies:
1. No one can work alone in the shop with powertools. They must be accompanied and supervised by an instructor conducting a course.
2. Only students enrolled in appropriate studio courses, Department of Art faculty, and approved staff employed by Saint Mary's College are allowed to use the wood/metalshop.
3. Do not operate any tools while under the influence of drugs, alcohol, certain types of medication, or if you feel fatigued.
4. Use of protective guards, eyewear, and ear protection is mandatory in the shop. Dust masks are highly recommended and required in some instances. Please note that different tools each have specific requirements for protection (also known as Personal Protection Equipment, or PPE), which will be posted at each machine. All users must comply with the PPE standards for each powertool at all times.
5. Dust collection must be used when power tools are in operation and where provided. You are responsible for cleaning out dust collection systems after you're finished working, as a part of proper clean up procedures (see below), especially if the dust collection is filled. *Note--the new Grizzly dust collection portable unit operates on a 220V outlet only. There is a 220 outlet installed by the planer for use with the bandsaws, radial arm saw, planar, and new spindle sander. DO NOT use in any other outlet.
6. All safety guards must be in place and cannot be removed from tools, machines, or any other equipment in the woodshop. All guards must be in the "down" position (completely covering the blade) when finished, including the bandsaws.
7. Tools must never be left running unattended. The user must wait until the tool has been turned off and all motion has stopped before leaving the tool.
8. If a user chooses to bring his or her own personal tools to work on a project, the user will be solely responsible for understanding and abiding by the proper operation of those tools, and does so at his or her own risk of loss or damage.
9. If a power tool is defective -or- damaged, this must be reported to Krista Hoefle and the Department of Art immediately. The defective tool will be tagged as being “out of order” and will be repaired or replaced as soon as (or if) possible.
10. All injuries must be reported to the Department of Art and Krista Hoefle immediately. See First Aid and Emergency Procedures for more detailed information.

11. Any damage to tools or accidents must be reported to the Department of Art and Krista Hoefle immediately. Incidents of unreported injury or damage will result in limitation of shop usage for students and faculty.
12. The appropriate dress code must be respected while working in the shop: no neck ties, scarves, necklaces, rings or other jewelry, or loose clothing will be permitted. No flip flops -or- open-toe sandals are allowed. Leather top shoes are required for the metals area and metal tools that produce sparks or open flame. Long hair should be tied back when using powertools.
13. No food or drink is permitted in the shop.
14. No one is to be disturbed while operating the equipment. No iPod or cellphone use is allowed when operating powertools.

Woodshop/Metalshop Supplies:
1. The shop will provide all users with appropriate safety equipment for use of the shop including: eye protection, ear protection, dust masks, and welding gear. Depending upon the enrollment in your course, instructors may want to purchase additional safety gear just in case.
2. Some consumable supplies will be available in the shop on an ongoing basis--such as wood glue and basic drywall screws. Even so, users should plan on purchasing their own consumables for projects and coursework.
3. Certain small handtools habitually disappear -or- are used inappropriately (i.e., pliers, screwdrivers, drill bits). Instructors should plan on purchasing a small set of handtools for their courses to use as needed.
4. Small handtools and other tools (such as handheld drills, etc) can be checked out for a designated period of time by students. Contact Krista -or- workstudy shop tech to do so. Users may check out tools for a 24 hour period, or over a weekend (return Monday morning). You will be held responsible for any damaged (or missing) tools you've checked out.
5. The Sculpture area will provide blades for the tablesaw, panelsaw, and bandsaws, specifically: blade intended for panel stock (such as plywood and MDF) for the panel saw; a rip blade for the tables saw; high gauge sheet metal blade (intended for more curvilinear cuts) for the metal bandsaw; and an all-purpose cutting blade for the new & older (wood) bandsaws.
6. Users must get preapproval for any new (hazardous) materials brought into the shop, especially those intended for storage in the flammables cabinet, from Krista Hoefle. Users are responsible for MSDS sheets for all approved materials brought into the shop/Design area, including those stored in the flammables cabinet. Users are also responsible for the proper disposal of these materials.
7. Please contact Krista Hoefle before you donate materials to the shop/Sculpture area for preapproval.

Storage, Disposal, and Types of Materials:
1. Users must provide their own materials for courses and projects. Materials in the crawl space may not be appropriate or available for use in projects; please check with Krista or the Department of Art prior to using these materials. Do not use gallery pedestals or plinths as fabrication aids.
2. Please tag materials intended for coursework and projects, and store *temporarily* in the crawl space -or- your designated studio area.
3. Materials and projects *temporarily* stored in the crawl space MUST be moved immediately at the end of the semester. Users will be held responsible for all materials/projects left in the crawl space area after the semester is over. Build up of materials in this space is a serious fire hazard.
4. No recycled wood (especially with hardware in it) is allowed; no pressure treated -or- 'raw' wood allowed in shop. Only new, kiln-dried wood is allowed for projects.
5. Before welding, cutting, or grinding, make sure you know what type of metal you are working with. Know what types of safety precautions are necessary when working with various metals. Galvanized steel is not allowed for certain processes, as it releases harmful fumes when welding, etc. Galvanized steel is only recommended for use in cold-connection joinery (i.e., mechanical fasteners).
6. Projects and materials cannot be stored in the shop area by faculty or students. Please continue fabrication in your designated studio area. Any projects left in the shop area will be disposed of immediately.
7. Installation projects cannot be set up anywhere in the shop area, even for short periods of time. Projects cannot be connected to, in front of, behind, or above any of the powertools. Projects found around powertools will be taken down and disposed of immediately.
8. The shop is green! No oil-based or laquer-based stains, finishes, varnishes or paints of any type are permitted in the woodshop. No spray painting is allowed inside the shop -or- adjacent areas. There is no appropriate disposal method for these materials in the wood/metalshop.
9. No painting or finish work is allowed in the shop area. Please use water-based paint, stain, and sealants in your designated studio area or outside.
10. Individual instructors using the shop area will outline proper disposal methods of materials to students; for any questions related to material disposal, contact Krista Hoefle. The crawl space is not a disposal area for projects or materials.

Damage to Equipment:
1. All damage to tools or equipment in the woodshop must be reported immediately to Department of Art and Krista Hoefle so that assessment and repairs can be made as quickly as possible.
2. DO NOT ATTEMPT TO REPAIR ANY TOOLS. Any missing, malfunctioning, or broken equipment should be reported to the Department of Art and Krista Hoefle.
3. Unreported incidences of damage to powertools and other equipment will result in limitation to usage of shop. Users will be expelled from the shop, and his or her privileges to use the shop in the future may be revoked. Further control measures may be taken if necessary.
4. Anyone checking out additional keys to newer tools is responsible for damage to those tools during their check out period (see New Tools section).
Closing the Shop:
The last person to leave the woodshop must be the supervising woodshop work study student -or- an instructor conducting a course. The following requirements must be met before leaving the shop:
1. All equipment must be turned off.
2. Tool crib and cabinets must be locked.
3. Projects must be removed and stored in their appropriate studio areas.
4. The shop must be clean and left ready for the next group, including dust collection.
5. Lights must be turned off.

New Tools, Additions, and Subtractions:
There have been some exciting new additions to the shop area, which are outlined in this guidebook. Please meet with Krista if you would like to incorporate their usage into your courses or research and are unsure about their usage. These include:
--Spindle sander--Metal band saw
--New 19" (wood) band saw--English Wheel
--Brake--Floor shear
--Grizzly 220V Portable Dust Collector
The table saw, variable speed (metal) bandsaw, and 19" (wood) bandsaw require an additional key for use. You will need to check out the additional key from Sue in the Art Office. Key check-out is available for a class session -or- a 24-hour period. Faculty can check out the key over a weekend, but must return the key by Monday morning. Students cannot check out keys. If Sue is unavailable for key check out -or- turn-in, please contact Krista.
Related to this, some of the new tools (19" bandsaw and the spindle sander) are hooked up to retractable ceiling outlets, that are connected to the standard lock out boxes. Please take care not to leave cords on the floor after use.
For safety and space reasons, the two large workbenches have been removed from the shop area. There is a work table on wheels (that can also be used as a feed table for the tablesaw) for temporary use during a class or work session. This table must be cleared after every class/work session; projects left on this table will be removed/disposed of immediately. Wood and metalworking only on this table, as well...no plaster casting or moldmaking allowed.

Related Areas: Plaster Area
1. Absolutely no casting or plasterwork is allowed in the shop area or around powertools. Please mix plaster in the mixing area, and return to your designated studio area for moldmaking and casting. If you need an area to cast or make molds, please contact Krista.
2. No casting or plaster work is allowed on tables designated as woodworking or metal working tables, especially the new worktable in the shop (on wheels).
3. Dust masks are required for use in plaster area.
4. No pre-wash is allowed in sink area or the mixing area. If you're using a pre-wash system, please use it in your designated studio area and dispose of accordingly.
5. Do not dispose of wet plaster in water-filled buckets by sink or mixing area. If you are using this system to dispose of plaster, do so in your designated studio area and dispose of accordingly.
6. No wet plaster or clay is allowed down sink. Wipe hands/tools with paper towels thoroughly prior to washing hands/tools.
7. Absolutely no woodworking -or- metalworking tools are allowed for use with plaster, including handtools, clamps, and especially powertools. Please do not place plaster casts or buckets on the beds of powertools or table surfaces designated as woodworking/metalworking surfaces.
Related Areas: Concrete areas/courtyard adjacent to Design
Spray painting is not allowed inside the shop area or in the general vicinity (Sculpture and Design). If you are spray painting a project, you must do so outside, and only on large sheets of butcher paper or cardboard. Do not spray paint any project on bare concrete or grass in the courtyard.

First Aid and Emergency Procedures
1. Individual instructors will provide appropriate safety information and protocols for courses including material handling, disposal and storage methods, and other pertinant information. For more information regarding hazards and emergencies, see the Saint Mary's College Hazard Emergency Plan: http://www3.saintmarys.edu/emergency-response-plan
2. Be familiar with the location and use of the following safety devices:
a. Emergency Phone - in the shop area by the Radial Arm Saw.
b. Eye Wash Station - by double sinks adjacent to the plaster mixing area.
c. First Aid Kit - by the tool crib adjacent to the Panel Saw.
3. In case of an incident or emergency, the main switch for the power tools must be turned off immediately. This large red switch is located on the east wall as you enter the Design area from the shop.
Material Safety Data Sheets (MSDS)
1. MSDS will tell you of any special procedures that may be required for the safe handling of a specific substance. MSDS Sheets for the shop, Sculpture and Flammables Cabinet (located in Design) are located in a yellow binder on the door of the tool crib.
2. Faculty and students are required to add MSDS sheets to this binder every time they bring a new material into the shop area. Remember, new materials must be pre-approved prior to use.
3. MSDS are a valuable source of information when you have questions or concerns about any chemical or material that you work with. It is a good idea to consult the MSDS for any new chemical or material that is introduced into your work routine, this is a quick and easy way to familiarize yourself to any hazards or precautions that you should take when working with a new substance.
A failure to comply with these guidelines may result in the user being expelled from the shop, and his or her privileges to use the shop in the future may be revoked.

Safety Information and PPE requirements for Powertools
Woodshop
1. Operator's manuals available in the toolcrib and upon request.
2. This is not intended as a replacement for PPE training by individual instructors. Individual instructors will provide safety information and additional 'right to know' information and will assess accordingly.
3. In addition to PPE information, there are OSHA regulations for power- and handtools not outlined in this handbook.

Vertical Spindle Sander--Grizzly Model G1071
Eye protection requiredDust mask required
Dust collection requiredEar protection recommended
For wood only. No recycled, pressure-treated, or raw lumber allowed. Only new, kiln-dried wood. Inspect material for defects such as knots and splinters, as they can shoot from machine with great force.
Maintain a secure grip on the workpiece. The spindle rotates at more than 1700 RPM. If control is lost, the workpiece could be shot from the machine at extreme speed.
If you can't control your workpiece with your hands at least 6" away from the sanding sleeve, build a jig or other device to hold the workpiece safely.

6"/12" Sanding Center--Delta Model 31-300
Eye protection requiredDust mask required
Dust collection requiredEar protection recommended
For wood only. No recycled, pressure-treated, or raw lumber allowed. Only new, kiln-dried wood. Inspect material for defects such as knots and splinters, as they can shoot from machine with great force.
Always sand on the LEFT SIDE (downward rotation side) of the sanding disk. Sanding on the right side of the disc could cause the piece to fly up, which could be hazardous.
Always position edge of table a MAXIMUM of 1/16" away from sanding disk and belt to avoid trapping workpiece or fingers between the table and the belt/disk.

12" Radial Arm Saw--Delta Model 33-890
Eye protection requiredEar protection recommended
For wood only. No recycled, pressure-treated, or raw lumber allowed. Only new, kiln-dried wood. Inspect material for defects such as knots and splinters, as they can shoot from machine with great force.
Keep your hands away from the guard. As the blade cuts, the guard will lift and leave part of the blade exposed.
When finished cross-cutting, always return the cuttinghead to the rear of the track arm and wait until the blade has completely stopped before adjusting workpiece or clearing away waste.
Always use the fence when cutting.
Keep hands out of path of saw blade. Never reach around in in back of saw blade.
Use sawhorses -or- tables for cutting large stock.

15" Planer--Jet Model JWP-15CSEye protection requiredEar protection requiredDust collection required
Dust mask recommended
For wood only. No recycled, pressure-treated, or raw lumber allowed. Only new, kiln-dried wood. Inspect material for defects such as knots and splinters, as they can shoot from machine with great force. Maximum cutting width-15"; Maximum thickness--6"; Minimum thickness--1/2"
Presents severing hazard. Keep your hands away from cutterhead inside the planer. Always turn machine off, wait until cutterhead stops completely, and lower the bed of the planar to extract wood that gets stuck inside the planer during operation.
Never plane a board less than 8" in length or 1/2" thick. Presents serious kickback hazard. Feed work into the cutterhead against the direction of rotation of the cutterhead only.

Panel Saw--Powermatic Model 511Eye protection requiredDust collection required
Dust mask recommendedEar protection recommended
For wood only. No recycled, pressure-treated, or raw lumber allowed. Only new, kiln-dried wood. Inspect material for defects such as knots and splinters, as they can shoot from machine with great force.
Presents severing hazard. Keep hands away from and out from under saw carriages at all times.
Panel saws are designed to cut large panels down to size. As the overall panel size become smaller and smaller, other types of machines become more convenient and safe to use.
Caution must be used when setting material onto the material roller carriage. Heavy material MUST NOT BE DROPPED onto the roller carriage. Failure to do so will ultimately cause the roller carriage to be pounded out of alignment.

19" Bandsaw--Grizzly Model G0514X2 & Rockwell 14" Bandsaw--Model 28-2C0
Eye protection requiredEar protection recommended
Dust mask recommended
For wood only. No recycled, pressure-treated, or raw lumber allowed. Only new, kiln-dried wood. Inspect material for defects such as knots and splinters, as they can shoot from machine with great force. 19" Bandsaw: Maximum cutting height--12"; Maximum capacity under handwheel--12"; Maximum capacity left of blade--18 1/4".
Presents severing hazard. Keep your hands away from blade. Always turn machine off and wait until blade stops completely before adjusting workpiece or clearing debris. Never hold small workpieces with your fingers during a cut. Support/feed the workpiece with a push stick, table support, vise, or some type of clamping fixture.
Do not force the machine. Always feed stock evenly and smoothly. DO NOT force or twist the blade while cutting, especially when sawing small radii.

Table Saw--Powermatic 64 Artisan's Contractor Saw
Eye protection requiredDust collection required
Safety accessories requiredFace shield recommendedDust mask recommended
Ear protection recommended
For wood only. No recycled, pressure-treated, or raw lumber allowed. Only new, kiln-dried wood. Inspect material for defects such as knots and splinters, as they can shoot from machine with great force.
Presents severing and kickback hazards. Keep hands away from blade; never reach in front of or behind blade. Always turn machine off and wait until blade stops completely before adjusting workpiece or clearing debris. Never remove guard from above the blade.
If you are unfamiliar with kickback, or the consequences that kickback on the tablesaw presents, DO NOT USE THIS MACHINE.
Never stand or have any part of your body directly in-line with the cutting path of the saw blade. Stand to the left of your workpiece.
Remove the rip fence when cross-cutting and use miter gauge.
PLEASE-->Avoid cross-cutting large panels on this tablesaw. Use the panel saw to cut down larger pieces of plywood or paneling, and finish cut/miter on the tablesaw.
Always use the fence -or- miter gauge when ripping -or- crosscutting. The longest dimension of your work piece should always be orientated against fence or miter gauge when cutting.
Always adjust blade to the proper height above workpiece. About one-carbide-tip above workpiece.
PLEASE-->Plan your cuts prior to starting. Provide adequate support to rear and sides of workpiece. Other machines may be more convenient or safe to use.
Use safety accessories, specifically push sticks, when cutting. If slippage or kickback occurs, the push stick will most likely take the damage that your hand would have received.
Feed cuts through to completion. Anytime you stop feeding the workpiece in the middle of a cut, the chance of kickback is greatly increased. Work in teams -or- with your instructor when cutting large stock in order to avoid kickback potential.
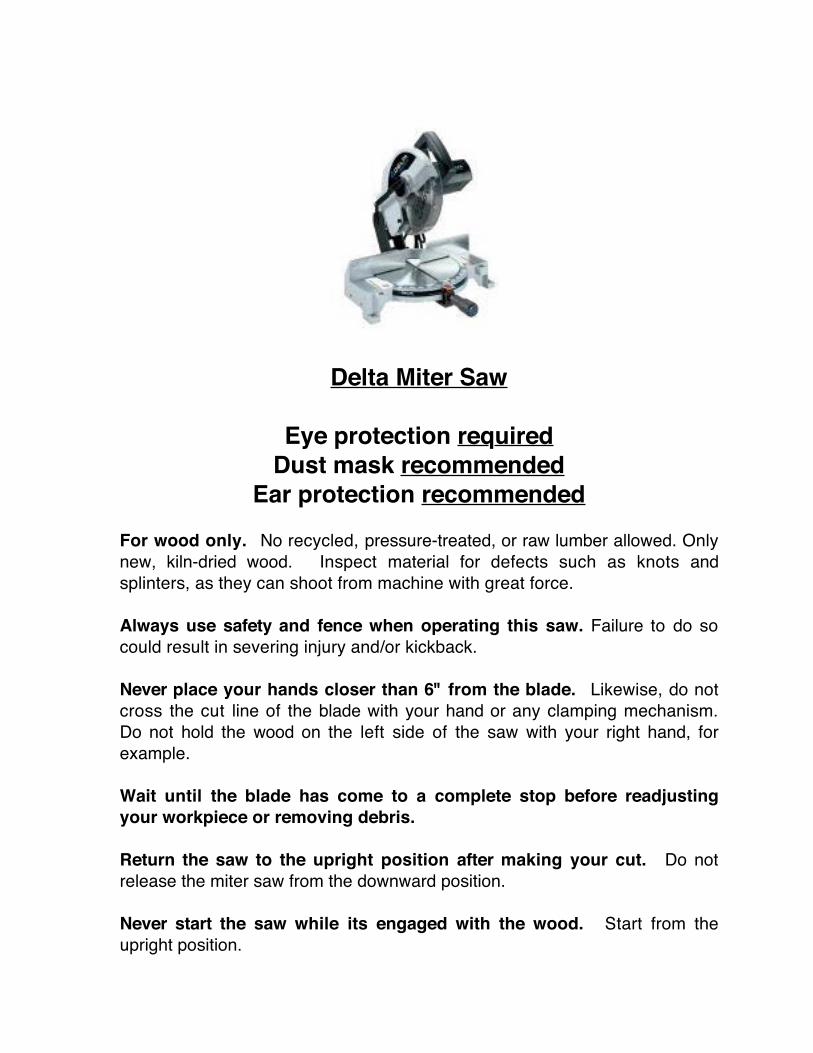
Delta Miter Saw
Eye protection requiredDust mask recommended
Ear protection recommended
For wood only. No recycled, pressure-treated, or raw lumber allowed. Only new, kiln-dried wood. Inspect material for defects such as knots and splinters, as they can shoot from machine with great force.
Always use safety and fence when operating this saw. Failure to do so could result in severing injury and/or kickback.
Never place your hands closer than 6" from the blade. Likewise, do not cross the cut line of the blade with your hand or any clamping mechanism. Do not hold the wood on the left side of the saw with your right hand, for example.
Wait until the blade has come to a complete stop before readjusting your workpiece or removing debris.
Return the saw to the upright position after making your cut. Do not release the miter saw from the downward position.
Never start the saw while its engaged with the wood. Start from the upright position.
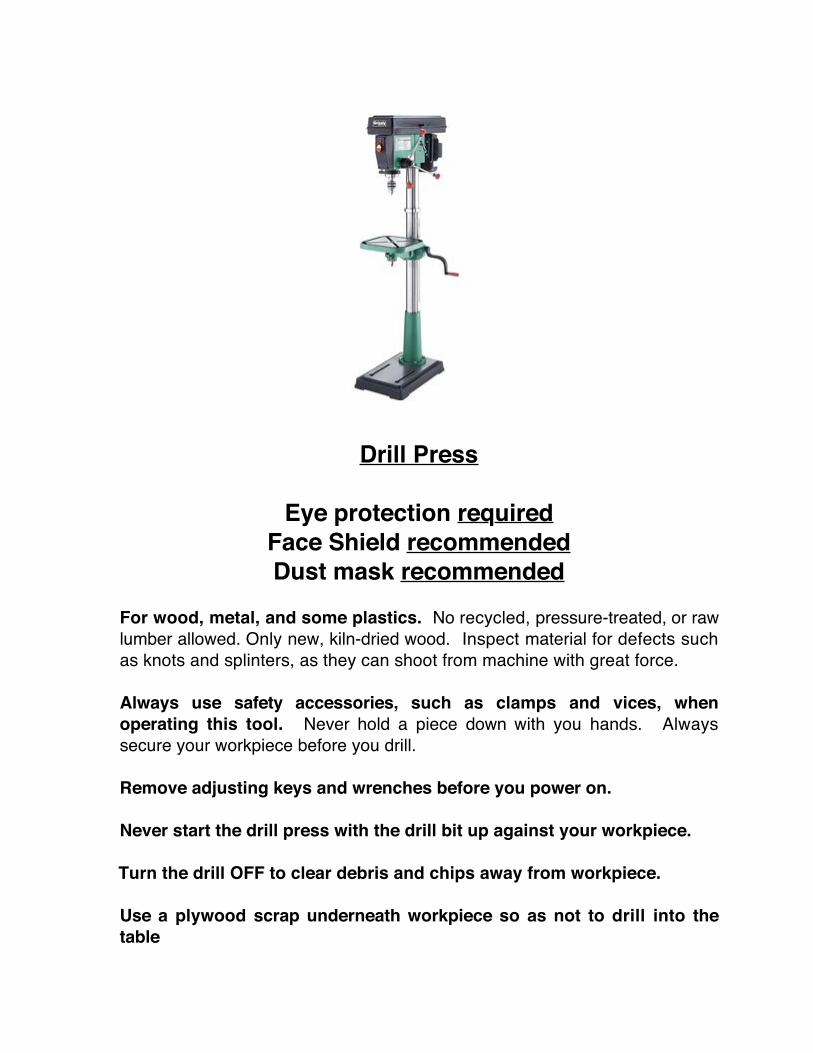
Drill Press
Eye protection requiredFace Shield recommendedDust mask recommended
For wood, metal, and some plastics. No recycled, pressure-treated, or raw lumber allowed. Only new, kiln-dried wood. Inspect material for defects such as knots and splinters, as they can shoot from machine with great force.
Always use safety accessories, such as clamps and vices, when operating this tool. Never hold a piece down with you hands. Always secure your workpiece before you drill.
Remove adjusting keys and wrenches before you power on.
Never start the drill press with the drill bit up against your workpiece.
Turn the drill OFF to clear debris and chips away from workpiece.
Use a plywood scrap underneath workpiece so as not to drill into the table

Tablesaw/Belt Sander Dust Collector--Steel City Model 65110
Eye protection requiredEar protection required
Dust mask required
For wood only. Do not use this dust collector to pick up metal -or- plaster dust. For use with the table saw and belt/disc sander ONLY.

Spindle Sander/Bandsaw/Drill Press/Planer Dust Collector--Grizzly Model G10297
Eye protection requiredEar protection required
Dust mask required
For wood only. Connect to the 220 outlet by the planer ONLY. Do not use this dust collector to pick up metal -or- plaster dust.

Safety Information and PPE requirements for Powertools
Metalshop
1. Operator's manuals available in the toolcrib and upon request.
2. This is not intended as a replacement for PPE training by individual instructors. Individual instructors will provide safety information and additional 'right to know' information and will assess accordingly.
3. In addition to PPE information, there are OSHA regulations for power- and handtools not outlined in this handbook

English Wheel--Grizzly Model G0496
Eye protection requiredProtective (welding) gloves required
Steel toe footwear required for wheel replacement.
For metal only. Can be used to produce curves in mild steel and copper max 16 gauge. For aluminum up to 1/8".
Always chamfer and deburr sharp metal edges before inserting into the English wheel. Only clean metal is allowed, likewise.
Presents serious pinching and crushing hazards. Keep fingers out of wheel path during operation. Make sure wheels are fully supported during installation and removal. Wheels can break/crush bone!

37" Foot Shear--Grizzly Model G9948
Eye protection requiredProtective (welding) gloves required
Steel-toe boots recommended for shearing large stock.
For metal only. Can be used to shear mild steel, cold rolled steel, aluminum, brass, bronze, and copper max 16 gauge. Stainless steel max 20 gauge.
Always chamfer and deburr sharp metal edges before inserting into the shear. Only clean metal is allowed, likewise.
Presents serious pinching and severing hazards. Never remove plastic finger guard. Never put any part of your body under or behind this finger guard!

40" Brake--Grizzly Model T20798
Eye protection requiredProtective (welding) gloves required
Steel-toe boots recommended for shearing large stock.
For metal only. Brake range 0 deg-135 deg; Maximum width--40"; Maximum height of pan/box sides--2 1/2"; Maximum thickness for mild steel, soft brass, and hard copper--16 gauge; aluminum, soft copper, soft brass--12 gauge; stainless steel--20 gauge.
Presents crushing and pinching hazard. Keep your hands away from clamping leaf. Do not use as a press or a lever-operated crushing tool.
Always chamfer and deburr sharp metal edges before bending in the pan and box brake. Sharp edges on sheet metal can cut your fingers to the bone.
Do not overload brake. Overloading this tool can cause injury from flying parts.

16" Variable Speed Bandsaw--Grizzly Model G81467Eye protection required
Protective (welding) gloves requiredSteel-toe boots recommended for cutting large
stock
For metal only, and some plastics. Maximum cutting height--10 1/4"; Maximum capacity left of blade--15 3/4"; Recommended speeds (general)--> Tool steel--203; Alloy steel--111-321; Stainless steel--85; Cast iron--108-225; Thin tube--180-220; Aluminum 220-534; copper--229-482; Plastics--220. Generally-speaking you'll see thin, curled, (silver) chips when you're cutting at the appropriate speed.
Presents severing hazard. Keep your hands away from blade. Always turn machine off and wait until blade stops completely before adjusting work piece or clearing debris. Never hold small workpieces with your fingers during a cut. Support/feed the workpiece with a push stick, table support, vise, or some type of clamping fixture.
Always chamfer and deburr sharp metal edges before use.

Dayton 8" GrinderEye protection required
Dust mask requiredSafety Accessories required
For metal only. Absolutely no ceramics allowed on this grinding wheel.
Stand to one side of grinder when turning it on. When it reaches full speed, wait 1 minute before standing in front of wheels to ensure safe operation.
Always use tool rest while grinding. Never use the side or top of wheel when grinding, as this increases the chances of kickback.
Grinding wheels have the capability of removing a lot of skin fast. Keep tool rest within 1/8" from the wheel when operating. Use safety accessories such as vices and clamps to keep a firm grip on workpiece. If the tool rest is too far away from the wheel, the workpiece may be pulled down, causing loss of control and pulling your hand into the grinding wheel.
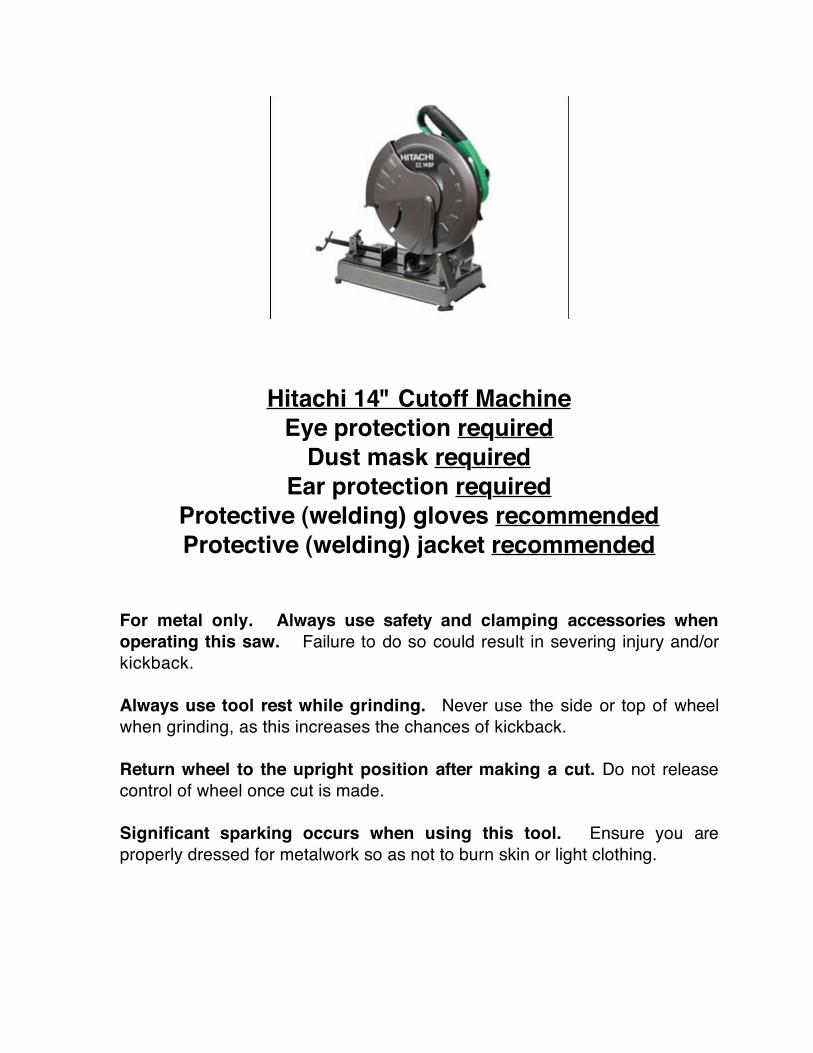
Hitachi 14" Cutoff MachineEye protection required
Dust mask requiredEar protection required
Protective (welding) gloves recommendedProtective (welding) jacket recommended
For metal only. Always use safety and clamping accessories when operating this saw. Failure to do so could result in severing injury and/or kickback.
Always use tool rest while grinding. Never use the side or top of wheel when grinding, as this increases the chances of kickback.
Return wheel to the upright position after making a cut. Do not release control of wheel once cut is made.
Significant sparking occurs when using this tool. Ensure you are properly dressed for metalwork so as not to burn skin or light clothing.

Lincoln Electric AC-255-5 Arc WelderWelding helmet required
Protective (welding) gloves requiredProtective (welding) jacket required
Closed-toe, heavy-duty shoes required
For metal only. Presents electrocution, severe burning, and severe eye injury. Assume that every metal object around a weld bead or cut line it hot. Do not touch live electrical parts. Do not adjust voltage range or voltage switch while operating the welder. Do not weld on containers or hollow casting which do not have vents.
Always use welding screens while operating the Arc and Mig welders. Never strike an arc without first checking that the area is free of bystanders without proper safety equipment.
Wear appropriate clothing as stipulated by your instructor. Permanent press and nylon clothing may catch fire and are difficult to put out, which can result in severe burns.

Lincoln Electric SP-125 MIG WelderWelding helmet required
Protective (welding) gloves requiredProtective (welding) jacket required
Closed-toe, heavy-duty shoes required
For metal only. Presents electrocution, severe burning, and severe eye injury. Assume that every metal object around a weld bead or cut line it hot. Do not touch live electrical parts. Do not adjust voltage range or voltage switch while operating the welder. Do not weld on containers or hollow casting which do not have vents.
Always use welding screens while operating the Arc and Mig welders. Never strike an arc without first checking that the area is free of bystanders without proper safety equipment.
Wear appropriate clothing as stipulated by your instructor. Permanent press and nylon clothing may catch fire and are difficult to put out, which can result in severe burns.

C25 Shielded Gas Cylinder for MIG welder (75% Argon/25% C02)
Welding helmet requiredProtective (welding) gloves requiredProtective (welding) jacket required
Closed-toe, heavy-duty shoes required
For metal only with MIG welder. Presents electrocution, severe burning, and severe eye injury. Assume that every metal object around a weld bead or cut line it hot. Do not touch live electrical parts. Do not adjust voltage range or voltage switch while operating the welder. Do not weld on containers or hollow casting which do not have vents.
Always use welding screens while operating the Arc and Mig welders. Never strike an arc without first checking that the area is free of bystanders without proper safety equipment.
Wear appropriate clothing as stipulated by your instructor. Permanent press and nylon clothing may catch fire and are difficult to put out, which can result in severe burns.
Never stand directly in front of valves when opening/closing.
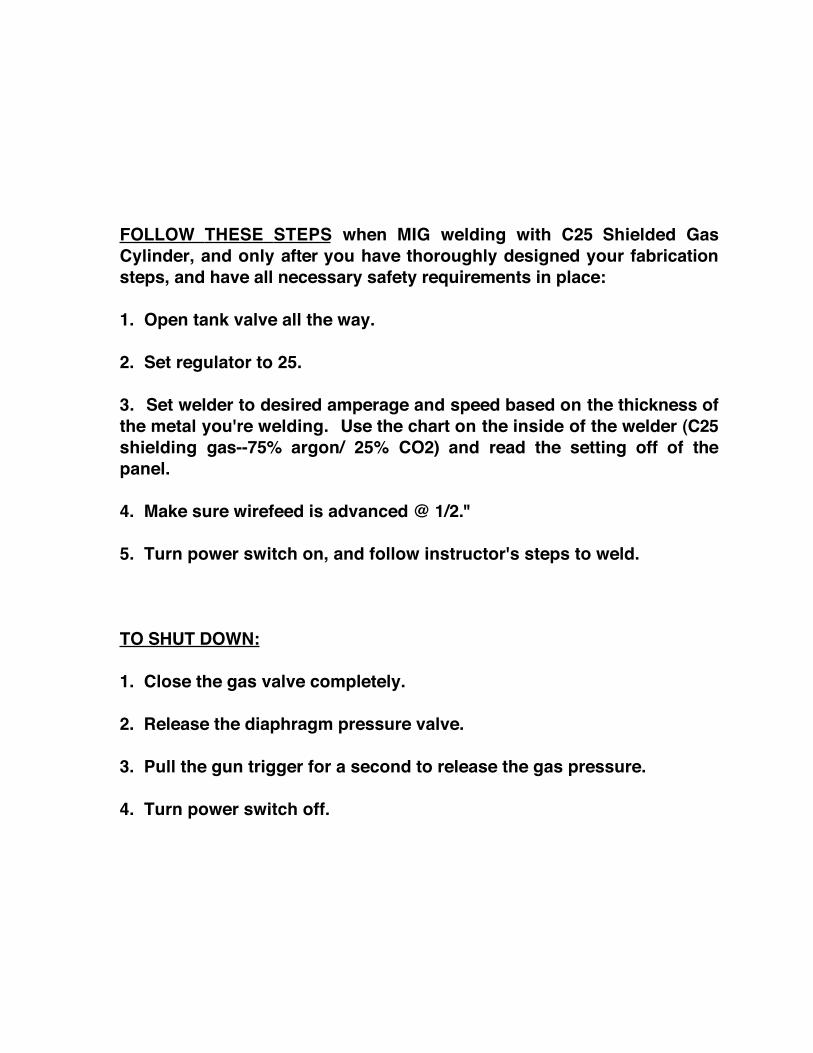
FOLLOW THESE STEPS when MIG welding with C25 Shielded Gas Cylinder, and only after you have thoroughly designed your fabrication steps, and have all necessary safety requirements in place:
1. Open tank valve all the way.
2. Set regulator to 25.
3. Set welder to desired amperage and speed based on the thickness of the metal you're welding. Use the chart on the inside of the welder (C25 shielding gas--75% argon/ 25% CO2) and read the setting off of the panel.
4. Make sure wirefeed is advanced @ 1/2."
5. Turn power switch on, and follow instructor's steps to weld.
TO SHUT DOWN:
1. Close the gas valve completely.
2. Release the diaphragm pressure valve.
3. Pull the gun trigger for a second to release the gas pressure.
4. Turn power switch off.

AGREEMENT SIGNATURE PAGE
By signing below, you affirm that you have read the entire policies/procedures handbook, including individual tool PPE/safety guidelines. You agree to comply with all policies and procedures regarding the use of the wood/metalshop, and any additional policies and procedures required by the department. You understand that your access to the Department of Art wood and metalshop may be revoked if you violate one or more of these policies.
-----------------------------------------------------------------Name (Printed)
-----------------------------------------------------------------Signature
-----------------------------------------------------------------Date
Please detach and turn into the Department of Art -or- Krista Hoefle. A copy will be kept on file.