
William Atkinson Hall Collaboratorium · William Atkinson Hall . Collaboratorium . The...
11
Page | 1 William Atkinson Hall Collaboratorium The Collaboratorium (WA202) is a conference room that includes technology to enhance presentations, video conferences, and many other meeting functions. This FAQ will guide in the usage of the Collaboratorium including information about the equipment, how to set up presentations, and more tips for utilizing collaboration tools. Contact Sandra Phelan (ext. 8172) to reserve the Collaboratorium for a conference or presentation. Present Using the Rack Computer Steps: 1. Power on the computer and TVs: Computer –Press the power button on the tower located in cabinet in the corner of the room
Transcript of William Atkinson Hall Collaboratorium · William Atkinson Hall . Collaboratorium . The...

Page | 1
William Atkinson Hall Collaboratorium
The Collaboratorium (WA202) is a conference room that includes technology to enhance presentations, video conferences, and many other meeting functions. This FAQ will guide in the usage of the Collaboratorium including information about the equipment, how to set up presentations, and more tips for utilizing collaboration tools. Contact Sandra Phelan (ext. 8172) to reserve the Collaboratorium for a conference or presentation.
Present Using the Rack Computer
Steps: 1. Power on the computer and TVs:
Computer –Press the power button on the tower located in cabinet in the corner of the room

Page | 2
TVs – The Collab. includes two 4K Vizio TVs that can be powered on using either the standard remote or Vizio SmartCast™ Tablet Remote (the tablet remote only works on right TV)
Remote Android Tablet Remote – a tablet used to control the
Vizio TV
Power
USB Port
CD/DVD Drive
Vizio SmartCast™ App

Page | 3
2. Power on the wireless mouse and keyboard - Located on the table, they control the computer in the cabinet. They have individual power switches and must be on to function. • Wireless Mouse
• Wireless Keyboard
• Select Rack Computer on input menu - to display the cabinet PC, using either remote press the input button until Rack Computer is underlined on the display Note: The main display (left TV) must be set on Rack Computer for this to be functional
**Be sure to point the remote at the correct TV when changing input settings as both TVs operate with one remote**
Power
Power

Page | 4
3. Log in to the computer using JC login (771) 4. Camera for video conferencing - located on top of the left TV
**Volume for presenting can be controlled trough the computer, TV, or the control located in the cabinet**
Present Using the Kramer Allows users to present wirelessly from any device using VIA Connect PRO
Steps: 1. Press Input button 2. Select VIA Kramer from input menu

Page | 5
3. Open VIA Kramer app if already installed on device OR
4. From your device, open an Internet Browser and type the Room Name (Found in the lower left corner of both displays, labeled above)
5. Select an option on the screen:
Run VIA – Run previously installed application or guests using Kramer to present Install VIA –Install the application for regular use
App Download IOS/Android/Windows Phone users can download the application from the Apple App Store, Google Play Store, or Windows Store. Search – “Kramer VIA”
6. Click the download to Run the Application

Page | 6
7. Log in - Enter the Room Name, your nickname will pop up automatically
8. Enter the Code (found under the Room Name on the display, labeled above)
9. Select one of the following options from the Main Menu
Features menu includes:

Page | 7
Multimedia – to view media that you have previously uploaded to VIA Kramer or to add media to use during the meeting
Start Collaboration –
Whiteboard – Intended for touchscreen devices Files – you can choose from the following options:

Page | 8
Enable Control – allows user to determine if they will be in control of those that want to present, toggle between
these two modes by clicking the icon
Chat – instant messaging between members of the meeting
File Transfer –
Page | 9
View Main Display –this does not work if you are currently presenting
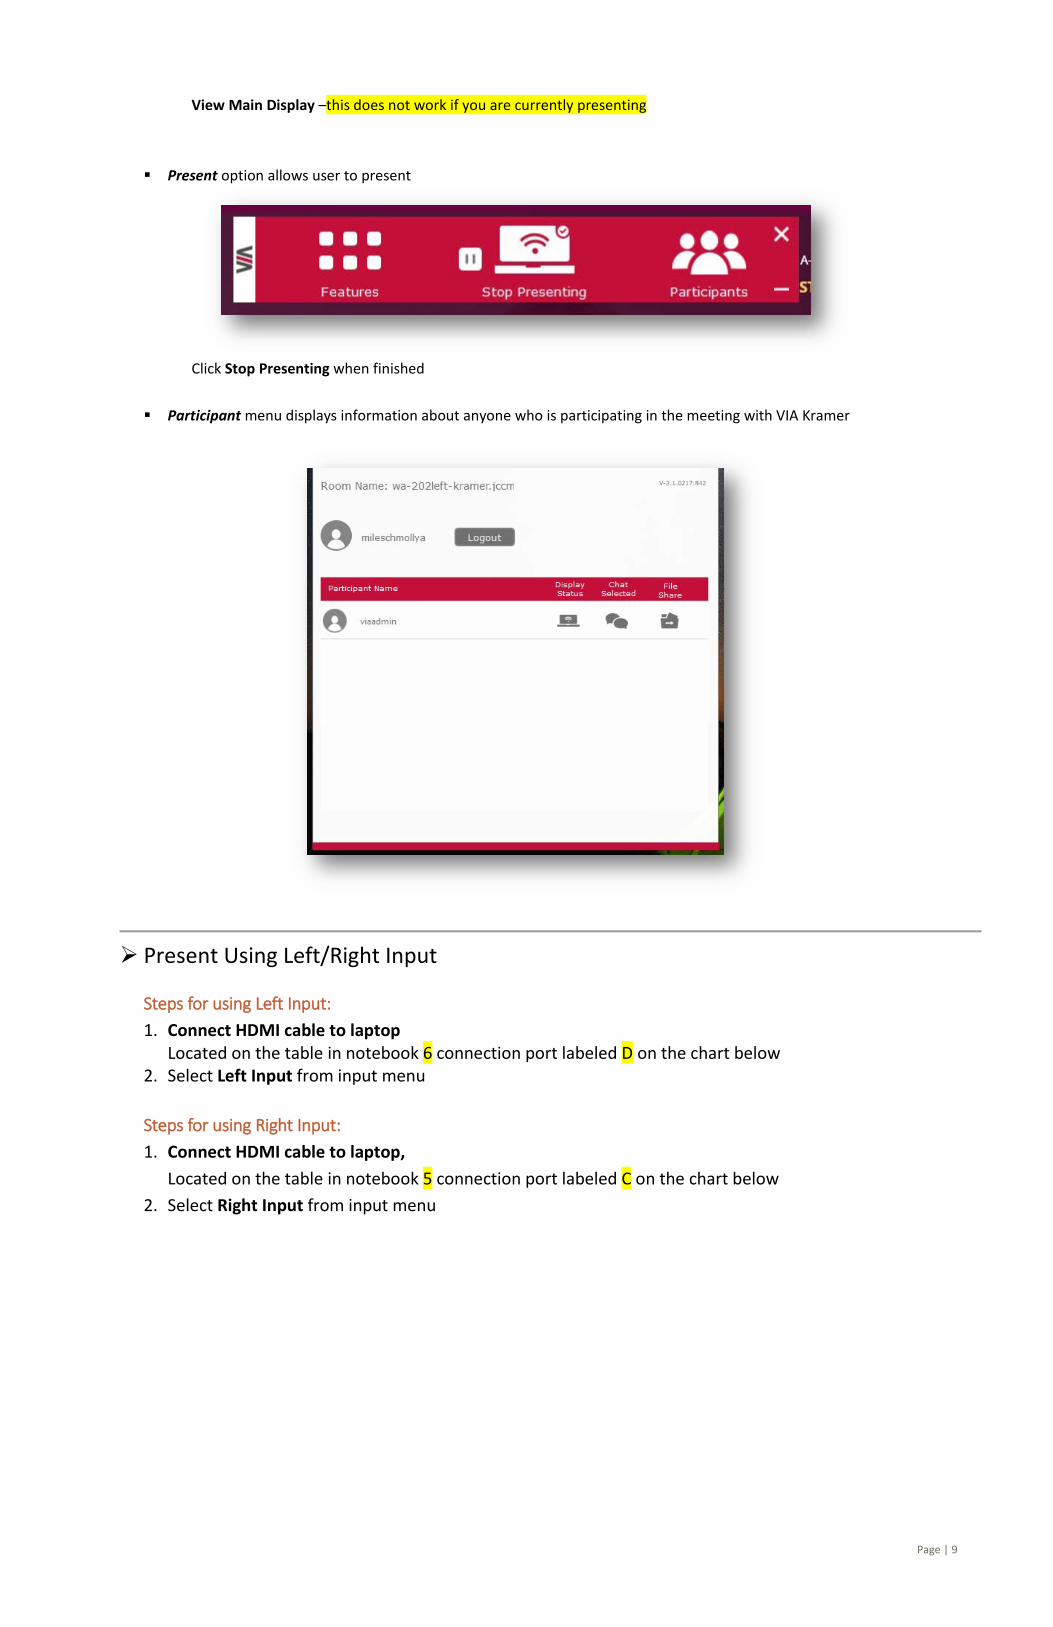
Present option allows user to present
Click Stop Presenting when finished
Participant menu displays information about anyone who is participating in the meeting with VIA Kramer
Present Using Left/Right Input
Steps for using Left Input: 1. Connect HDMI cable to laptop
Located on the table in notebook 6 connection port labeled D on the chart below 2. Select Left Input from input menu
Steps for using Right Input: 1. Connect HDMI cable to laptop,
Located on the table in notebook 5 connection port labeled C on the chart below 2. Select Right Input from input menu

Page | 10
Other Equipment
Table - This large table seats twelve and is equipped with eight notebook connection ports
conference phone expansion microphones A, F
AC power supply All notebook connection ports
HDMI cable C, D
Wired network connection (Ethernet) D, B, E
Polycom Conference Phone - Allows users to make and receive calls for conference
B
D
F
C A
E
Wired network
(Ethernet)
Power HDMI

Page | 11
• Internal: o For phone conferences within the JC network, simply dial extension and press Call (labeled above). Note: 3 Digit JNC (North Campus) extensions are not direct dial, must call 517-768-7097 first
• External: o For phone conferences outside the JC network, dial “9”, “1”, area code, the number you want to contact, and press Call.
**During a conference call, to mute the phone so the other side cannot hear you but you can hear them, press the Mute button (labeled above).**
**To disable mute, press the Mute button again.**
Telephone - Located by the door
• Internal: o Lift phone, dial extension
• External: o Lift phone, dial “9”, “1”, area code, the number you want to contact
Additional Support
• For more information on using the Kramer VIA Connect PRO https://k.kramerav.com/downloads/manuals/kramer_via_connect_pro_2.0.pdf • For more information on using Vizio TVs https://cdn.vizio.com/documents/p65c1/um-p65c1.pdf • For general inquires about using Vizio products in this room SUPPORT.VIZIO.COM • Assistance for pairing devices with SmartCast TV https://support.vizio.com/s/article/Pairing-a-Smart-Phone-or-Tablet-to-your-VIZIO-SmartCast-Device?language=en_US
Mute
Call


![THOUGHT VIBRATION William Walker Atkinson [1906, 34pp]](https://static.fdocuments.in/doc/165x107/577d371c1a28ab3a6b94d8b2/thought-vibration-william-walker-atkinson-1906-34pp.jpg)