Will Kalif - Storm The Castle · Will Kalif 4 Section 1 Some basics before beginning The Scale of...
100
Transcript of Will Kalif - Storm The Castle · Will Kalif 4 Section 1 Some basics before beginning The Scale of...


Will Kalif
ii
How to make Fantasy and Medieval Dioramas
Will Kalif
Copyright © 2012 Will Kalif and Kalif Publishing
All rights reserved.
ISBN:1480230375 ISBN-13:978-1480230378

DEDICATION
As always his book is dedicated to the one.

CONTENTS
Acknowledgments i
Introduction 2
1 Some Basics Before Beginning 4
2 Designing Your Diorama 9
3 Building Your Diorama 13
4 Trees, Water and Rocks 38
5 Electricity and Special Effects 64
6 Buildings and Structures 79
7 Painting Techniques 90
8 Unique Dioramas 93

i
ACKNOWLEDGMENTS
Special acknowledgment goes to Sophia Dotson for all the fantastic detail work she did on the medieval village diorama and to James Joaquim for all his help in sculpting, molding, casting, and painting the
numerous walls that go around the medieval village.

2
Introduction
The art of making dioramas has changed
dramatically over the past several years. It
used to rest solely in the hands of model
railroad enthusiasts and war buffs. The
basic goal of these diorama makers was to
showcase a train or a military model in a
very realistic miniature scene that was
appropriate for the model; a tank would
become part of a crumbled war-torn village,
or a train would be passing through a
picturesque countryside. The scenes varied
but the goal was always the same: Make
the scene look as real as possible in a
miniature scale.
And over the course of several decades
these enthusiasts came up with a very wide
variety of tool, tips, and techniques to
achieve this realism.
In today’s world, with the popularity of
fantasy movies, books, role-playing games,
tabletop wargaming and video games a
whole new genre of diorama making has
been born.
It is the genre of fantasy and medieval
dioramas. No longer do diorama makers
work with just trains or military vehicles.
They now have a very diverse host of
figures, models, and items they can build
into a diorama –a new kind of diorama.
These items run the absolute gamut of
fantasy imagination from Ogres, to Elves,
Dragons, Castles, Battlegrounds, and just
about any figure or world that can be
imagined.
A New Definition of Realism
This new type of diorama, by definition
changes the rules of diorama making and
now the goal isn’t to make the diorama
landscape as realistic as possible by
mimicking, in miniature, a real world place.
The goal is now to make the fantasy
landscape look as realistic as possible in a
way that makes sense for the miniatures or
items that are being used or showcased in
the scene.
This new goal gives diorama makers a lot of
freedom to create fantastic looking scenes
that exist nowhere else but in the builder’s
imagination.
And the beauty of this is that all of the old
diorama making techniques are still useful
and can be harnessed to create these new
fantasy scenes in new ways.
This book shows you many of these basic
diorama making techniques and will help
you to create some amazing dioramas that
will take your imagination to new heights.

How to make fantasy and medieval dioramas
3
About this Book
This book is several things but first and
foremost it is a step-by-step guide that will
take you through the whole process of
making wonderful dioramas of fantasy and
medieval scenes. It is also a great reference
and resource to showing you all the various
techniques and materials that will help you
make great looking dioramas. Above all else
it is a creative resource that will help
unleash and develop your creativity in
fantasy diorama making.
Suggestions for using this book
It is recommended that you read the whole
book to get a sense of all the various
techniques and tools that are used in
diorama making before you start building
one. The reason for this is that it will give
you ideas on what kinds of creative things
you want to put into your dioramas. You
will also get a good sense for how much
work and how much cost is involved in the
various techniques so you can plan your
time and budget accordingly. This book is
also meant to be read as you create your
diorama. You can turn the page and
progress along in the book as you progress
in the building of your dioramas.
About the Author
Will Kalif has been making dioramas for
decades and has made them in all sizes,
shapes, and themes ranging from as large
as eight feet in length to as small as one
foot square. He has also done some very
unique dioramas. You can see his work and
get more diorama information and tutorials
on his website at www.stormthecastle.com.

Will Kalif
4
Section 1
Some basics before beginning
The Scale of Your Diorama
The first thing you need to think about
when making a diorama is the scale of the
objects that will be incorporated into it.
This picture shows
some typical
fantasy miniatures
in the 28 mm
scale. The ruler is
six inches long.
If you are going to be using miniatures or
pre-fabricated items like buildings, items,
treasure chests, vehicles, creatures, or any
other type of thing you have to get a sense
of their size so you can plan the diorama in
a way that will make sense and look real. In
other words, the diorama has to be in scale
with the objects on it. It won’t look right if
your humanoids are 1 inch tall and the trees
are one half inch tall!
It is always a good idea to purchase some
sample miniatures and have them on hand
before you start building a diorama. This
way you can get a real sense for the size
and height of things. You don’t necessarily
have to have all of the miniatures you plan
on using but they should all be made using
the same scale.
Understanding Miniature Scale
There are a variety of different scales that
are used in fantasy miniatures and these
scales have varied and changed a bit over
the years. But the general rule of thumb
you can use is the translation to six feet.
Generally the scale given in millimeters
equals six feet in real life. So in some of the
more common scales of 25, 28, 30, and 35
mm each of these would represent six feet
in real life. So an average human character
would be about six feet and in the 25mm
scale the miniature would be 25mm tall.
There are ten most commonly accepted
scales for miniatures and here are the eight
most popular:
2mm scale – This is a very small scale and is
often used for gaming in tight spaces or
with large numbers of player pieces.
6.2mm scale – This is a standard size for
large scale historical battles.
10mm – Popular scale and is equivalent to
the N-Scale Railroad train which makes it a
good option if you want to use many of the
diorama making materials that are available
in N-Scale.
15mm – Very popular size for historical
wargamers but not used in fantasy role
playing games.
20mm – Very popular with WWII
Wargamers and is equivalent to the HO
Model Railroad scale which gives a lot of
options for purchasing diorama materials

How to make fantasy and medieval dioramas
5
made for railroad models.
25/28mm – This is the most popular size for
fantasy gamers and is equivalent to the OO
Scale in railroading. It’s my favorite scale for
dioramas and there is lots of railroad
diorama making supplies that fit this scale.
This book uses this scale in the tutorials.
30mm – Older scale and not used very
much in modern times. It is a good match
for S Scale model railroads.
54 mm – This scale is generally used for
collectible figures; and miniatures in this
size are often very detailed and well
crafted. This size of miniature is often used
in dioramas that specifically showcase one
or just a few items. The goal of a diorama
with this scale is more to highlight a specific
piece or two rather than to build a
complete landscape. This scale is a very
close match to models in the 1:35 scale.
Translating millimeters to inches
One inch = 25.4 millimeters so it is easy to
get a sense for how large a humanoid figure
would be in these various scales. In the
25/28mm scale a human would be about 1
inch tall which equals 6 feet in size. In the
54mm scale a humanoid would be a little
over two inches tall which equals 6 feet in
size.
A couple of important things to think about
when considering scale:
When making a diorama you should always
stay within the same scale for that diorama.
This will insure it looks real. If you were to
use humanoids in the 25/28mm scale and
then use horse in the 10mm scale they
wouldn’t look right. The horse would be
about the size of a big dog. So no matter
which scale you use just stay within it.
Scales effect on size, detail and cost of your
diorama
The scale you use for your diorama will
have an impact on the size of your diorama,
the cost of it and the level of detail you can
achieve. And to illustrate this let’s consider
a simple scene of a hunter standing next to
his stone house. Let’s picture a hunter in
real life. He is standing outside the stone
house he built. It is a single room stone
building with a fireplace, bunk, table etc. In
our minds eye we picture this house being
about eighteen feet wide by eighteen feet
deep and about twelve feet in height.
In the 25/28mm scale where 1 inch equals
six feet the hut, when built for your
diorama, would be about 3 inches wide, 3
inches deep and about two inches tall. This
would make it look realistic and in scale to
your Hunter miniature.
If you used a miniature in the 54mm scale
the hut would be about 6.3 inches wide, 6.3
inches deep and about 4 inches tall.

Will Kalif
6
With the larger scale the diorama would be
twice as large which is an important
consideration and it will probably be more
expensive. But you will be able to make it
with significantly more detail – it will look
much more realistic. So this is the tradeoff
you have to consider when choosing a
scale.
I find the 25/28mm scale to be the best for
my goals. It gives enough detail to be
realistic, there are lots of miniatures
available, and it is small enough so that I
can make large dioramas that have a lot of
detail and cover a lot of terrain.
Create Mock-ups to help you see the scale
A very simple technique that I use before I
start building a diorama is to create some
quick and easy mock-ups using paper or
cardboard. I make some of the major
structures so I can place them with the
miniatures and see if they look right.
The picture shown here uses the example of
the hunter and his stone shack. By doing
this you can get a quick feel for the scale of
things in your future diorama and you also
have a great way to arrange the different
components of your diorama.
A paper mock-up of a hunter and his stone hut
Graph paper is also a very handy tool to use
at this stage of diorama making. It allows
you to easily get a measurement on the
size, scale, and relationship of objects in
your diorama. This will come in handy later
in the process when you start making the
real diorama.
The Theme of Your Diorama
A diorama has one very basic and very
important concept that you have to
understand before you start building it. It is
a frozen moment in time. Your diorama will
display one very specific instant of time and
this leads to a lot of creative variations that
you can choose from or create.

How to make fantasy and medieval dioramas
7
The two components of your diorama
Your diorama will have two very distinct
components: The figures and the scene.
Each of these components compliments the
other to make up the overall diorama. You
can design your diorama with either
component first in mind and either way is
right. For example you can get some
miniatures and then develop a scene
around them. Or you can decide you want a
particular scene and then choose
miniatures that will be right for the scene.
What will your miniatures be doing?
This moment in time can be the moment
just before conflict (which will create a nice
feeling of anticipation that something big is
about to happen). Or it can be a moment in
the middle of conflict (as in the battle
between two combatants, or many
combatants). It can be a scene showing the
miniature figures doing whatever it is they
do –dwarves can be mining, elves can be
hunting, soldiers can be marching; or it can
also be simply a scene that looks good and
shows off your miniatures.
The important thing here is to give some
thought to what the figures in your diorama
will be doing. What is natural for them?
Once you have this question answered you
can start to think about the scene they will
be in.
“Our warrior women contemplate a swim.”
Location, location, location
The scene of your diorama will be what
makes it really something special. And it is
what makes it a real fantasy diorama. You
have a lot of choices when it comes to the
scene and you are only limited by your
imagination. Here are some examples to
give you an idea for what you might want to
do.
Outdoor scenes:
Outside a castle
Within the castle walls
In a Forest
Along a River or stream
Around a campfire
On a battleground
Under water
In the sky
On the wall of a castle
On a glacier
In a Jungle or Rainforest
In a Desert
On a farm
Climbing on the side of a mountain
Near a lake or the Ocean

Will Kalif
8
Indoor Scenes
In the Kings Hall
Treasure room
A Dungeon
Inside a stone hut
In a cave
A Dwarven Mine
An underwater cave
A Dragon’s Lair
A small village
Inside a Pub or Inn
In an Elven Tree house
One more key to a creative and interesting
diorama
Something that is often overlooked in
diorama making is the full use of three
dimensions. A diorama is not just a
collection of objects on a flat surface – well,
it can be, but it shouldn’t be! Remember
that you have all three dimensions to work
in and to make it look really interesting.
Think up and down. Put a cave underneath
the surface of your diorama, or suspend
objects in the sky above it. If you have
mountains you can hollow them out and
put levels right inside it. This consideration
of the full three dimensions of space will
make your diorama much more interesting
to look at.

How to make fantasy and medieval dioramas
9
Section 2
Designing Your Diorama
Part 1: Begin on paper
Designing a diorama is much like designing
a house or a public park. And just like an
architect begins the design process on
paper so you too should start your design
work on a blank piece of paper. If you plan
on making a large diorama (larger than a
single sheet of paper) you should use graph
paper. It will make it easy to measure and
translate the design to a larger scale later
when you are ready to build.
The Battle of Thermopylae design layout
This picture shows a drawing of a fantasy
diorama called “The Battle of
Thermopylae”.
It will be a diorama that shows the battle
between the Spartans and the Persians. On
the left is the hot gate where the Spartans
made their last stand. And on the right is
the path that the Persians used to approach
the battle.
The original plan is for this diorama to be
maybe three feet in width. I used graph
paper so I could translate the scale onto a
larger paper.
This drawing is the end result of several
dozen drawings and sketches.
It is very rare that you will actually just
draw it out once and have a finished
product. As you draw it you are going to
want to make changes. Step back from it,
take a look at it and keep working on it until
you have a layout and design that you think
is what you want. Be very free and loose
with your drawings. Experiment with
different ideas and different layouts. These
experiments will often bring up some great
ideas that will be very creative and look
really good as a final design.
Remember that your diorama is three
dimensional so make notes right on the
paper as to where the high and low points
are on the scene. Are there any specific
terrain features such as rocks, cliffs, or
water? Make a note of them right on the
paper. If you are doing another level to your
diorama like an underground cavern or a
lower level of a building you should draw
this out on a separate sheet of paper and

Will Kalif
10
coincide both drawings so if you placed one
right on top of the other they would line up
correctly –as they actually would in the
diorama.
As the design of your diorama starts to take
shape you can make small paper mock-ups
and place them right on the design to get a
good look at how things will be in three
dimensions. It also allows you to move the
various elements around.
The Important thing about designing on
paper
The important thing to remember at this
point of your diorama design is that nothing
is yet set in stone! This is a process where
you draw something out, take a look at it,
change it, then draw it out some more. It is
a slow working toward the eventual
finished product. You don’t just draw it out
then build it. And the more time you spend
in this part of the project the better your
final product will be. Your eye will improve
and you will get real good at this. All the
work you do right now is well worth the
effort and will save you a lot of time and
energy later in the product.
The more you draw it the better it will get.
This is the process that an artist uses when
doing a drawing. If you keep working at it
new possibilities open up and the drawing
keeps getting better. It moves closer to
what you envision it to be.
Part 2: Transferring the drawing to your
diorama base
If you are doing a small diorama that is the
same size you can easily translate the
drawing on the paper right onto the board
that will be your diorama base. You can just
look at your drawing while you redraw the
lines onto the wooden base or you can tape
the drawing right onto the base then
pressing down hard redraw the lines with a
pencil or pen. When you remove the
drawing you should be able to see the
indented lines you drew right into the
board. Just redraw them in pencil.
If you are doing a larger diorama (larger
than a sheet of paper) you should get a
large sheet of craft paper or a poster board
and free hand draw the pattern onto the
paper. Cut the paper or poster board to the
intended size of your diorama before doing
this.
The small diorama drawing has been
transferred to the large template.

How to make fantasy and medieval dioramas
11
In the above picture I have cut out a piece
of packing paper to the completed size of
my diorama (2 feet X 3 feet). I then
freehand drew the pattern onto it. Gift
wrapping paper works great for this. Just
tape it down to a table surface so it doesn’t
curl up on you.
Notice how I have placed some miniatures
right onto the large template. It’s important
to realize that you are still in the
development stage of the diorama and
things can still be changed. You may get to
this size and realize you want to make some
changes to how it looks, how things are laid
out, or you may even want to change the
size of the diorama itself. This is perfectly
normal. You should go back and re-do your
smaller sketches then re-do your large
template. It is not uncommon to do this
several times.
Easy tip for transferring the pattern
If you are having trouble accurately
transferring the line drawings from your
template to the base of the diorama you
can cut it into pieces that follow the terrain
then tape down the pieces and draw
around them.
In the picture above I have cut out the
template and taped it right down to the
base of the diorama. Now I can draw lines
right onto the base. Cut up your template in
any way that makes sense and that makes it
easy to transfer the lines.
Next you should finish the transfer of the
design by filling in all the notes right onto
the base. It is now ready for building.
Laying out the Medieval Village Diorama
Let’s take a look at some of the layout for
the medieval village. We will see a lot more
of the medieval village diorama in this book.
The First diorama base we are looking at
here is all about the terrain. But what if the
diorama is all about buildings?
We could just draw squares and rectangles
on the base to get a sense of the layout.
But, remember that a diorama is three
dimensional. It goes up too. And with
something like a village we will want to take
a look at how it will look in three
dimensions.

Will Kalif
12
The Medieval Village diorama will have a
whole lot of buildings. So it is important for
me to try to see how I am going to fit and
arrange them. After I did my layouts and
drawings on paper I made a series of
cardstock buildings and put them on the
wooden base that I made.
This is so I could arrange them, move them
and see how they will all fit.
And while you are placing the buildings and
the various large objects that will be part of
the diorama you can also draw lines and
notes on the wooden base. These lines and
notes will help you in further steps.
The notes can help you understand things
like rocky and rough terrain and how it will
look. The following picture shows the
medieval village diorama after the skin of
plaster has been put on. See how it is rocky
and mountainous on the far end to the left?
I just wanted to give you a sense of this.
And if you are wondering about that white
plaster skin we will be covering how to do
that and a whole lot more in this book.

How to make fantasy and medieval dioramas
13
Section 3
Building Your Diorama
Part 1: The base of your diorama
If you are making a small diorama (less than
two feet in any dimension) you can simply
use a flat sheet of wood, plywood or MDF
that is at least ½” thick. This will suffice.
(MDF is a building supply that comes in
sheets. You can buy it at any home
improvement store.)
a small diorama base
(1/2” thick MDF or plywood)
Make sure it is not warped and that it can
hold a couple of pounds of weight without
bowing.
If you are making a larger diorama you
should build some kind of a base. A larger
diorama can weight twenty or thirty pounds
once all the plaster and materials are placed
on it. So you want it to be strong and you
don’t want it to warp.
A larger base (2’ X 3’)
The picture above shows the frame of a
diorama that is two feet by three feet in
size. I used two-by-threes and screwed
them together. The surface of the diorama
is the large sheet in the upper part of the
picture. I nailed this sheet right down onto
the base.
The surface is nailed onto the frame and
the base is ready to go.

Will Kalif
14
If you are building an unusually large
diorama that is 5 feet long or more you may
want to build a complete table for it. And it
would be a good idea to put wheels on the
bottom of the legs so you can roll it away
from the wall to work on it.
This diorama is eight feet by four feet (one full
sheet of plywood) and I built a complete table
on wheels for it. I also used lag bolts to keep it
all together nice and strong.
The general rule of thumb when making the
base of your diorama is the bigger it is the
stronger it has to be. And it is always okay
to build it stronger than you think you need
it. You don’t want it to be frail when it is
completed.
Unique and Unusual Shapes
Remember that a diorama is limited only by
your imagination. This also means that the
structure of the diorama can be unique too.
It is not just the scene you are depicting but
it is also the housing for it.
Just about anything you can imagine can be
created for the diorama structure or base. A
good example of this is the wall mounted
diorama, which is often called a shadowbox.
In the pictures below I show you a wall
diorama I made from an old window pane. I
built the housing for the diorama and
attached the window to it with hinges and a
handle. This way it could easily be opened
up to examine, clean or upgrade.
This wall diorama is thirty-five inches wide,
twenty-nine inches tall and about five
inches deep. The back of it is made of Luaun
and the walls are simple two-by-fours.
(Luaun is a thin sheet of wood. You can buy
it in any home improvement store)
The wall diorama shown in the picture
above is part of this book.

How to make fantasy and medieval dioramas
15
In it I build an underground scene and I use
foam. Foam is a great material for making
dioramas. It is inexpensive, easy to work
with and takes detail very well. I have a
whole section on working with foam in this
book.
Part 2: Building the terrain under structure
This is where you build the frame of the
terrain. It gives the shape to the diorama.
The basic concept is to build all of diorama
from the ground up.
Needed Materials for this step:
Masking Tape
Strips of cereal box cardboard
Strips of corrugated cardboard
Plenty of newspaper
Scissors
You use masking tape, newspaper and
strips of cardboard to form the frame of the
terrain.
This picture shows the frame almost
complete.
This picture shows the completed diorama from
a different angle. Notice the hill that the wizard
is standing on.
The easiest and fastest way to do this is to
simply use balls of newspaper and masking
tape to build up the terrain.
And this method is okay for smaller
dioramas. But if you are making a larger
diorama you should use lots of cardboard
strips to make a frame that is nice and
strong and corrugated cardboard is the
best.

Will Kalif
16
Larger dioramas need a stronger frame
In the picture directly above I am building a
very large diorama and am creating a very
strong frame using corrugated cardboard,
tape, and even a stapler. When the frame is
completed I will stuff it all with balls of
newspaper.
The following picture shows the large
diorama with a completed frame. It is
stuffed with newspapers and ready for the
surface of the terrain (the shell) to be
applied.
The frame is complete and ready for next step
A Tip about Creating the Frame
The same rule applies to the frame as it did
to when you were drawing out your
diorama. Nothing is yet set in stone and you
should experiment during this stage. Try
different heights of terrain and see what
looks right. Move your pieces of cardboard
and balls of newspaper around. You can
take pieces apart and try again. Keep
working it until it looks the way you want it
to.
Move the pieces around until they are right
In the previous picture you can see how
there are lots of upright cardboard strips.
This is the initial frame and it is just
experimental. Move the pieces around and
try different heights and shapes until you
get it to look the way you want. The
diorama in the picture is an extreme

How to make fantasy and medieval dioramas
17
example of diorama making in that it has
some sheer cliff walls. Most dioramas aren’t
this extreme but it is a good example of
what can be done in this craft.
Here is a look at the medieval village
terrain understructure
There are lots of strips of cardboard and it is
stuffed nice and tight with wads of
newspaper. But a good portion of the
diorama is very flat. That is the area where
most of the buildings will be sitting. I nailed
down a sheet of cardboard in that spot.
Part 3: Doing some preparatory Wiring
If you are going to be adding special effects
that require electricity this is a good time to
run the wires -before you apply the plaster
shell.
Speaker and wires added to diorama
This next picture shows the wires sticking
up out of the surface of the medieval
village. Each loop of wire is in the location
of a building. You can see that each building
will have electricity.
I will be covering more of how to wire up
your diorama in a later part of this book.
For now you should be thinking about this
being the time to start some of the wiring.
Once the plaster shell is completed you can
still punch or drill holes in it and add wires.

Will Kalif
18
It just is a bit more difficult.
In the next section we will learn how to
apply plaster to the frame and make a
smooth terrain.
Part 4: Applying the Terrain Shell
In this step of the process you apply sheets
of either plaster cloth or paper towels to
the terrain frame to make it a terrain shell.
This shell will be the landscape of your
diorama as shown in the next photo.
The Plaster shell has been
applied to the diorama
There are four different methods you can
use to create the terrain shell. The first
three methods are traditional and long
lasting. You can do professional work with
these methods. The fourth method is cheap
and easy but not as professional. You can
still do good work with it but it is less sturdy
and prone to getting a bit shabby over time.
But, it is cheap and easy.
1. Plaster Cloth 2. Hydrocal with paper towel strips 3. Plaster of Paris with paper towel strips 4. Paper Mache (cheap and easy)
The basic concept involves laying plaster
soaked strips of cloth or paper right down
onto the frame of the diorama. When these
strips harden they will form a shell that you
can paint, or apply textures, trees, rocks or
other terrain materials directly to. Think of
it as the whole surface terrain of your
diorama.
Method 1: Plaster Cloth
Plaster cloth is the easiest (and fastest)
method for creating the terrain shell. It is
sold in long strips that you cut and soak in
water then simply lay right down onto the
shell.
Using Plaster cloth
Plaster cloth is very similar to the material
that is used when creating a cast on a
broken arm or leg. Several different hobby
companies make it and you can easily find it
at any well-supplied craft or hobby shop or

How to make fantasy and medieval dioramas
19
by doing an online search for “Plaster
Cloth”. Simply soak it in water for the
recommended period then lay it onto the
frame as shown in the photo below.
Plaster and Hydrocal can be an irritant to the
skin, even cause burns. You should wear gloves
as in the picture and always follow all safety
instructions that come with the product.
Method 2: Hydrocal and paper towels
Hydrocal is a lightweight and strong
material made specifically for dioramas and
mold making. It is a type of plaster that
dries very fast and is very workable. You can
cut it, sculpt it, sand it, paint it, drill it, and
work it in many different ways.
Hydrocal is the best way to make the
diorama shell. It also makes the smoothest
and best-looking shell. If you really want
your diorama to come out the absolute best
you should use Hydrocal.
It dries extremely quickly and you have to
mix and use small batches. For a small
diorama you may only need one batch but
for a larger diorama you may need to mix
up and use as many as ten batches.
Safety Note about Hydrocal: Make sure you
follow all the manufacturer’s safety
recommendations. It can burn the skin if
allowed to harden so wear protective gear.
How to do it
Before mixing your Hydrocal you should
prepare yourself by cutting lots of strips of
paper towels. Vary them in strips ranging
from 1 to 3 inches in width. If possible, use
the paper towels that have the reinforcing
fibers in them. This will make the shell very
strong and they are easier to work with
when soaking them in the Hydrocal.
Quickly mix up a batch of Hydrocal
according to the manufacturer’s suggestion
and soak a strip of paper towel in it. Use
your fingers to wipe off the excess then lay
it right down onto the terrain frame.

Will Kalif
20
You need to work quickly because the
mixture will dry in about five minutes so
that is all the working time you have. When
it becomes unworkable wash everything
out of the bowl immediately and mix up a
new batch. Continue making batches and
applying the paper towels to your frame
until it is complete.
A note about Hydrocal: Adding a bit more
water to it makes it easier to work with but
will not slow down the drying speed.
Method 3: Plaster of Paris
Plaster of Paris works almost as well as
Hydrocal with the bonus that it is a little
slower to dry so you have a bit more time
to work with it. It is also more readily
available. You follow the same procedure
as you did with Hydrocal and mix a batch
then soak paper towel strips in it.
Plaster of Paris also has some properties
that can make it harmful.
It can generate a lot of heat which can burn
unprotected skin so be sure to follow all of
the manufacturer’s safety suggestions.
When laying down the terrain shell you
should always overlap the strips. This will
make a strong shell. A general rule of
thumb is to lay down a strip then cover one
third to one half of it with the next strip.
This will insure you have a strong shell,
which can be support the weight of any
terrain materials or structures you add to it.
Method 4: Paper Mache
Paper mache is good for terrain and
landscaping as a base. But you have to
remember that it is flour and water so
unlike the previous three methods it is a
foodstuff-like material and it is prone to
moisture and even mold (over time).
Here is a picture of a diorama made with
paper mache. It has stone like structures
and mountain terrain area. It is Helms Deep
from Lord of the Rings.

How to make fantasy and medieval dioramas
21
You do the same method as with the
plasters by using strips of paper towel
dipped in the paper mache mix.
Quick Paper Mache Recipe
You simply mix even amounts of plain white
flour and water. Then add a tablespoon of
salt. I typically mix two cups of flour and
two cups of water then add the salt.
The salt is a mold prohibitor. It will give
longevity to the diorama.
The picture below shows the initial stage of
a paper mache diorama. You build the
frame the same way you would for a plaster
diorama. Make sure you make it nice and
strong. And fill all the cavities with
crumpled newspapers. The paper mache
soaked paper can be very heavy and it can
distort the shape of your diorama.
Cut up small strips of either newspaper or
paper towels. Paper towels generally will
give you better detail in your diorama.
Dip a strip in the mache mix, wipe off the
excess and apply it to the diorama. Use the
same technique as you would for plaster.
Overlap all the strips at least 1/3 on other
strips and cover the whole diorama so it has
at least two complete layers. When you are
done you should set the diorama aside to
dry for at least 24 hours before you begin
the detail work.
As the diorama shell dries some of the
paper towel or newspaper may curl and get
distorted. You can easily touch this up and
smooth things out with a wet sponge.
Will Kalif
22
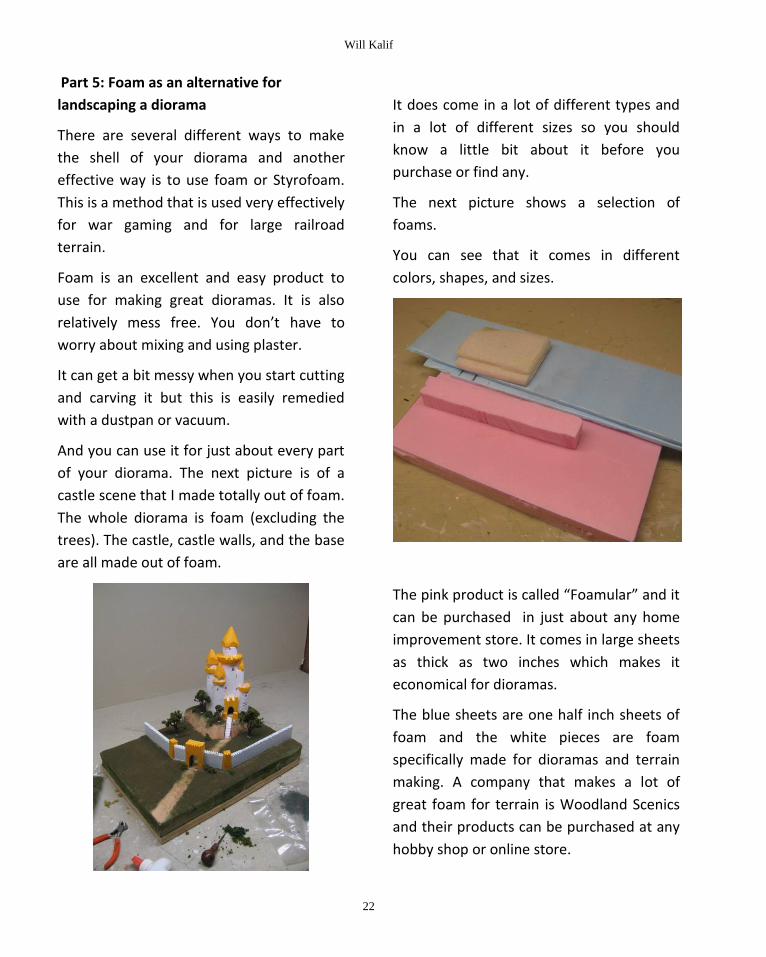
Part 5: Foam as an alternative for
landscaping a diorama
There are several different ways to make
the shell of your diorama and another
effective way is to use foam or Styrofoam.
This is a method that is used very effectively
for war gaming and for large railroad
terrain.
Foam is an excellent and easy product to
use for making great dioramas. It is also
relatively mess free. You don’t have to
worry about mixing and using plaster.
It can get a bit messy when you start cutting
and carving it but this is easily remedied
with a dustpan or vacuum.
And you can use it for just about every part
of your diorama. The next picture is of a
castle scene that I made totally out of foam.
The whole diorama is foam (excluding the
trees). The castle, castle walls, and the base
are all made out of foam.
It does come in a lot of different types and
in a lot of different sizes so you should
know a little bit about it before you
purchase or find any.
The next picture shows a selection of
foams.
You can see that it comes in different
colors, shapes, and sizes.
The pink product is called “Foamular” and it
can be purchased in just about any home
improvement store. It comes in large sheets
as thick as two inches which makes it
economical for dioramas.
The blue sheets are one half inch sheets of
foam and the white pieces are foam
specifically made for dioramas and terrain
making. A company that makes a lot of
great foam for terrain is Woodland Scenics
and their products can be purchased at any
hobby shop or online store.

How to make fantasy and medieval dioramas
23
Quality of foam
Most people are familiar with a product
called “Styrofoam”. This is very commonly
used as a packaging product. You can often
find it inside boxes of shipped products. But
this type of foam is generally not optimal
for terrain because it has a very rough
consistency. It is usually made of small
beads of foam that have been heated or
pressed together. If you try to cut it you will
have a difficult time getting accurate and
clean details.
Before you start using a foam product for
your terrain or diorama make sure you take
a good look at it. The following two pictures
show a good foam and a bad foam.
The following picture shows Styrofoam. It
has a beaded appearance. While you can
use it for dioramas you have to keep in
mind that it will be difficult to accurately cut
details into it. You can get pretty clean cuts
if you use a wire cutter.
I will explain more about hot wire cutting
after this.
The picture below is of foamular. This has a
more uniform texture and it will take
cutting and hot wire cutting much easier,
and maintain much more detail. See how
you don’t see the little foam balls? The
foam is much more fine grained.
But You can use the granular foam to your
advantage in some circumstances
The pebbly effect can make some terrific
ruins and textured walls and floors. Imagine
a ruins. The pebbles are great for this. It’s
just a matter of painting it.

Will Kalif
24
Tools and Methods for working with foam
You can work with a variety of tools when it
comes to sculpting the foam. The most
effective way to do lots of work quickly is to
use some kind of a foam cutter. These foam
cutters are called "Hot Wire" cutters
because they use electricity to heat up a
length of wire. The heat of the wire will
allow it to melt right through the foam.
The picture above shows two standard hot
wire cutters. The one on the left is a fork
style where the hot wire goes across the
two prongs of the “U”. The cutter in the
center is a wand style or knife cutter. The
metal rod heats up and you use this to cut
the foam.
These tools are inexpensive and well worth
the investment if you are going to do a lot
of foam work. I use the one on the left to
make straight cuts in foam or to sculpt large
areas. The wand style knife cutter is used
for melting holes and for doing more
detailed work.
Caution about cutting foam:
Not all foams are made to be melted, some
can give off toxic or noxious fumes. Check
the manufacturer’s instructions before
melting and always do this in a well-
ventilated area.
The picture below shows the Hot Knife
cutter easily cutting through the foam.
The following picture shows me using the
hot wire knife to cut the crenellations in the
top of the castle wall.
And the hot wire foam cutter is the best.

How to make fantasy and medieval dioramas
25
You can quickly cut through foam and make
all kinds of shapes. If you are working with
foam a lot it will be very useful to get one of
these.
Using common tools other than heating
tools
You can also use many other types of
common tools such as x-acto knives, utility
knives, files, sculpting cutting and carving
tools. You can even use sandpaper to work
on the foam.
The picture below shows the various
sculpting and woodworking tools that I use
to work with foam.
This ability to work with foam using a lot of
different tools makes it very versatile and
you can get a lot of detail with the right
foam. The picture below shows the
assembly of a castle keep. I used sandpaper
to sand down squares of foam so they were
cylindrical in shape and I used a hobby saw
to cut them to size.

Will Kalif
26
The Basic Assembly process for foam
Dioramas
When laying out a diorama or war gaming
terrain I recommend that you first do some
sketches of what you want to create. These
sketches will be a big help when it comes to
actually building the terrain. Below is one of
the sketches that I made for the terrain
diorama in this tutorial. The end product
will look very much like this.
Select the types and sizes of foam that you
will use and cut them to form the rough
shapes of the terrain. I start with a single
sheet as the ground. Then I add several
different rough cut pieces to form the major
landscape. In this example the major
landscape is the hill/cliff that the castle is
perched on. The picture also shows some of
the castle walls. Generally I would not do
this at this point of the game. But I may lay
them out to see how they look. I wouldn't
glue them in place until later.
Next you glue the major parts in place.
Remember that in this terrain I only have
one high hill. In your terrain you may have
lots of terrain features and you may have to
glue various pieces. You can also layer the
pieces so they are three, four or more
pieces high. Use regular white glue, yellow
glue or a glue gun to do this. Do not start
sculpting the terrain until the glue is dry.
How to make fantasy and medieval dioramas
27
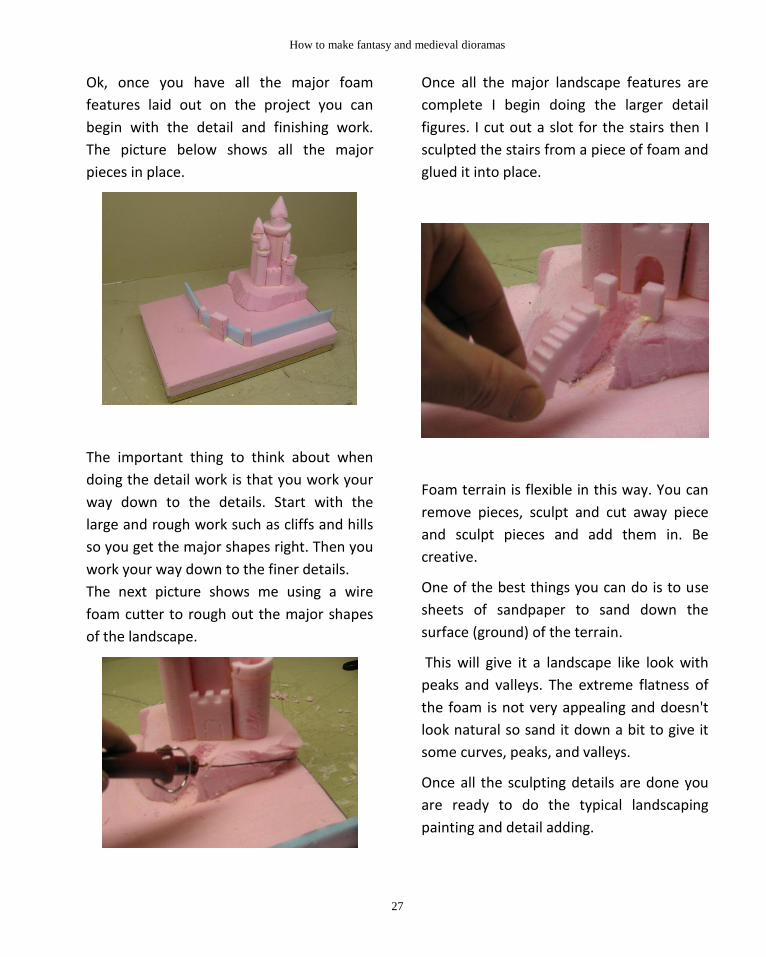
Ok, once you have all the major foam
features laid out on the project you can
begin with the detail and finishing work.
The picture below shows all the major
pieces in place.
The important thing to think about when
doing the detail work is that you work your
way down to the details. Start with the
large and rough work such as cliffs and hills
so you get the major shapes right. Then you
work your way down to the finer details.
The next picture shows me using a wire
foam cutter to rough out the major shapes
of the landscape.
Once all the major landscape features are
complete I begin doing the larger detail
figures. I cut out a slot for the stairs then I
sculpted the stairs from a piece of foam and
glued it into place.
Foam terrain is flexible in this way. You can
remove pieces, sculpt and cut away piece
and sculpt pieces and add them in. Be
creative.
One of the best things you can do is to use
sheets of sandpaper to sand down the
surface (ground) of the terrain.
This will give it a landscape like look with
peaks and valleys. The extreme flatness of
the foam is not very appealing and doesn't
look natural so sand it down a bit to give it
some curves, peaks, and valleys.
Once all the sculpting details are done you
are ready to do the typical landscaping
painting and detail adding.

Will Kalif
28
NOTE ABOUT PAINTING FOAM:
Foam and Foamular can be a bit sensitive
when it comes to paint. Some paints will eat
right through the foam. Spray paints are
notorious for this. So, when making a
diorama with foam always do some test
painting in a small spot to check if the foam
takes it ok.
Part 6: Painting the Terrain Shell
Whether you made your diorama out of
cardboard and plaster or out of foam the
following techniques still apply.
Now we are starting to move out of the
craft part of making a diorama and moving
into the arts part. If you are not an artist
that is quite all right. There are some basic
rules of thumb that will help you get this
part right.
There are two different steps to painting
your diorama.
1. The first step is simply painting raw colors over the whole diorama
2. The second part entails applying some detail colors
Beginning to build your terrain with a base
coat of paint
The first thing you need to do is paint base
colors onto your diorama. This part is quite
easy. All you have to do is look at your
design on paper and make some notes as to
what kind of terrain is in what sections of
the diorama. To understand how to do this
let’s take a look at a diorama.
A diorama of a wizard and skeletons
This is our simple wizard and skeleton
diorama. It is one foot square and even
though it is small it shows a lot of the basic
traits of painting a diorama. There is water,
grass, trees, rocks and dirt. These are the
major components in most dioramas and
they are all right here in this diorama. When
How to make fantasy and medieval dioramas
29
you are painting the first coat of paint onto
your diorama shell all you have to do is
capture all these basic colors on the base.
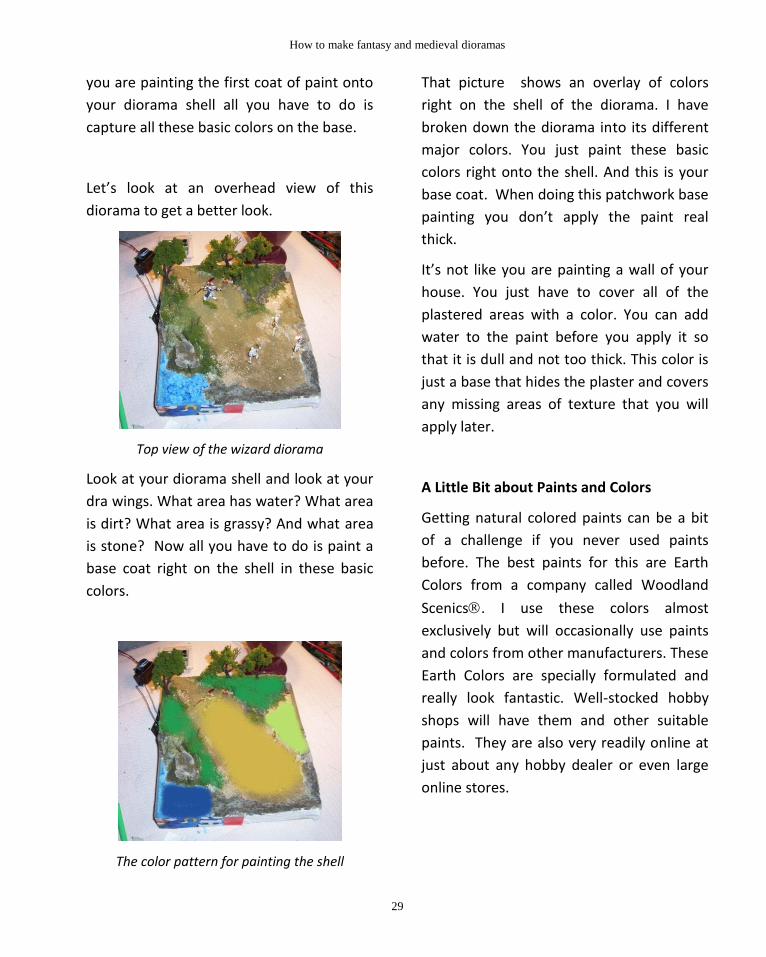
Let’s look at an overhead view of this
diorama to get a better look.
Top view of the wizard diorama
Look at your diorama shell and look at your
dra wings. What area has water? What area
is dirt? What area is grassy? And what area
is stone? Now all you have to do is paint a
base coat right on the shell in these basic
colors.
The color pattern for painting the shell
That picture shows an overlay of colors
right on the shell of the diorama. I have
broken down the diorama into its different
major colors. You just paint these basic
colors right onto the shell. And this is your
base coat. When doing this patchwork base
painting you don’t apply the paint real
thick.
It’s not like you are painting a wall of your
house. You just have to cover all of the
plastered areas with a color. You can add
water to the paint before you apply it so
that it is dull and not too thick. This color is
just a base that hides the plaster and covers
any missing areas of texture that you will
apply later.
A Little Bit about Paints and Colors
Getting natural colored paints can be a bit
of a challenge if you never used paints
before. The best paints for this are Earth
Colors from a company called Woodland
Scenics. I use these colors almost
exclusively but will occasionally use paints
and colors from other manufacturers. These
Earth Colors are specially formulated and
really look fantastic. Well-stocked hobby
shops will have them and other suitable
paints. They are also very readily online at
just about any hobby dealer or even large
online stores.

Will Kalif
30
This table gives you some rules of thumb for
choosing colors based on what type of
terrain.
Type of Terrain Suitable Color
Grass Green Undercoat
Sand/Desert Yellow Ochre
Reddish Desert or
Rust
Burnt Umber
Rocks/Cliffs Stone Gray/Slate
Gray
Dirt/Ground Earth Undercoat
Water Any Shade of Blue
Forest or Soil Earth Undercoat
Stone or Concrete Concrete
The Primary Colors of White and Black are
very useful when used to either lighten or
darken any of the above pigment colors. For
example: When painting water you use solid
navy blue for the deeper water then add
some white to it to get a lighter shade as it
moves closer to the shore.
This technique is very effective and very
useful with all the terrain colors listed here.
Some Painting Tips for the first coat
Water: (Shown as “A” in photo) In real life it looks very different near shore than it does away from shore. Generally, if you are using blue as a base you should use darker blue out away from shore and a lighter blue near the shore. You can easily achieve this affect by painting the darker blue area first then adding a little white to your paint and then painting the areas near shore. It will give you a nice uniform change from dark blue to light blue.
Is water always blue? Remember that you might have a swampy area of your diorama or a brackish water section. Different shades of brown work well here.
Blending the colored patches (This is shown in the photo as “B”) One of the best things you can do is to blend the different patches of color where they meet. You don’t want sharp lines that divide the green of grass from the brown of dirt. This doesn’t happen in real life and it won’t look natural on your diorama. So while you are applying

How to make fantasy and medieval dioramas
31
these base colors blend them where they meet. Let the green blend with the brown and the grey. It will make a smoother transition between the different patches of terrain.
Working with different shades of the same color – You should vary the shades of the colors. In the example diorama there are a lot of variations between the same colors. You can see how the grey color varies from very dark to very light. This is achieved by either watering down the paint or by adding white. The green sections at the top of the diorama (Shown as “C”) give a really good look at three different shades of the same color. The lighter greens were made by adding a lot of water. This technique of adding a lot of water is called “washing”.
The Next Painting Step: Doing some detail
work
Highlighting and varying the terrain color
Now you need to vary the colors a bit so it
doesn’t look so much like a quilt and it looks
more like natural terrain. Highlighting is the
best way to do this. Let’s take a stone grey
section of the diorama as an example. Get
yourself a small dabble of the same color
grey on your palette then add some white
to it so it is a little lighter. Now you can use
this new tone of grey to paint just small
jagged parts of the diorama rocks that stick
up -just doing the high points. This
simulates how things look different
depending on how they jut out from the
terrain.
Washing with Black
Washing is a great technique for making the
terrain look realistic. What you do is mix
some black paint with water. Make it nice
and wet so it drips and is pretty thin. Then
you just wash over parts of the rocky
terrain. The watery black will run down and
gather in the low points and crevices of the
surface of the terrain. This will make them
much darker and it will look terrific.
These same techniques of highlighting and
washing work for all the different terrain
colors from stone to grass and dirt. When
doing the grassy or forest areas instead of
using black use a dark green. And for dirt
areas use a dark brown. The chart on the
previous page will give you a good rule of
thumb for what colors to use.
Don’t worry about the fine details
This isn’t a fine detail-oriented step of the
process. You don’t need to be too
meticulous with the colors. You will be
applying textures over the whole terrain
and most of this color will be completely
covered. Now let’s move on to the next
step where you make and apply the terrain
materials.

Will Kalif
32
This image shows some nice black washing and
highlighting with black and green
Part 7: Making and applying terrain
features
Once the paint has dried we are ready to
start adding all of the various textured
terrain features to the diorama. This may
include grass, dirt, trees, bushes, brush and
other things.
Applying the textures to your diorama is a
process of working from the ground up. You
start with the finest textures –these are the
closest to the ground. Then you work
yourself up through more coarse textures
until you eventually do the tallest textures
which are bushes and the trees.
The Base Textures
The base textures are the ground textures.
These are fine materials that you apply
directly to the surface of the diorama and
they come in a lot of different colors and
texture coarseness. This layer of texture is
what covers all of the paint that you
previously applied. And the colors of these
textures should be the same as, or very
similar to the colors you previously painted
the surface with. So for brownish dirt
colored area you should apply brownish dirt
like texture. The same thing applies for
grassy areas etc.
(Three different consistencies in texture)
The image above shows three different
densities of texture for the ground cover.
The one on the left is a very fine powder.
You should apply this first to the diorama.
The texture in the middle is coarser and this
would be applied second. The texture on
the right is even coarser and it should be
applied last. That coarsest one is typically
used as bushes and plants.
When you are finished with this ground
cover portion of the diorama all of it should
be covered with texture, unless you
specifically want some areas uncovered.
These uncovered areas might be water

How to make fantasy and medieval dioramas
33
sections or cliff/rocky sections. The texture
covering won’t be perfect and this is why
you painted the diorama in basic colors
These colors will hide any imperfections in
the terrain texture layer.
A Couple of notes about the three textures
Woodland scenic makes several different
coarseness levels for ground covering
texture and all of them are perfectly suited
for the task. You also can change the
number of different textures you apply
based on the level of realism or detail you
want to achieve. It is perfectly okay to just
do one coarseness level and be done. The
diorama will just not be as detailed. And if
you do just one coarseness level it should
be with the finest material like the one on
the left in the picture above.
How to apply the Base Textures
Mix a small batch of white glue (an ounce or
two) with an equal amount of water. Now
apply this glue mixture to the shell of your
diorama. Either spray it right onto the shell
or brush it on with a paintbrush. Apply it
liberally so the shell is nice and wet.
If you have a large diorama you want to do
this in small patches no bigger than 8-10
inches square so it doesn’t dry before you
apply the terrain texture.
Woodland Scenics makes a perfect product
for this called Scenic Cement. You can buy it
in spray bottles or bottles without spray as a
refill.
Now you can shake a thin layer of texture
directly onto the glued area. And there are
several handy ways to do this:
You can put the texture material into a shaker much like a spice shaker and then shake it gently only to diorama. This is the best method.
You can also fold a sheet of paper in half and pour some texture right into the fold then shake the paper gently over the diorama.
You can also put texture on a sheet of paper and gently blow on it. And this technique works particularly well when you are trying to get texture onto vertical surfaces of your diorama.
Experiment with texture applying techniques. Find the ways that work best for you. The important thing is that you apply a thin even coat on the surface.
Continue applying glue to the surface in
small patches and continue applying the
first layer of texture until all areas are
covered in a base texture.
Using common household white glue
works well for this. It will dry clear and
you should just mix it with equal
portions of water.

Will Kalif
34
If you are going to do more than one
coarseness layer it is recommended you
allow the first layer to completely dry
before you start a second layer. And when
applying the second layer you should use a
spray bottle to distribute the new layer of
glue. Using a paintbrush on terrain already
applied tends to bring it up or move it
around which could cause unsightly
patches.
Spice shakers make perfect containers for
shaking terrain textures onto your diorama.
Using a folded sheet of paper also works well
for sprinkling textures neatly and accurately.
Adding talus, stones, small pebbles or
ballast material
Once you have the base layer of texture in
place you may want to add talus or other
small pebble like textures. You can do this
with the same method of spraying glue then
sprinkling on the talus. If you have trouble
getting this coarser texture to stick you can
mix it with the glue in a small bowl or cup
then pour it directly onto the diorama.
Don’t make it too liquid though. It may
cause your diorama shell to get soggy and
sag.
Applying the Coarse Details to the Diorama
Before you start applying the coarse
materials and terrain features to the
diorama you should clean it and inspect it.
Once you are sure all of the glue is dried
you should remove any excess terrain
material by gently tipping the diorama to
allow free material to fall off. If you have a
large diorama and it is impractical to tilt it
you can use a vacuum cleaner to vacuum
off any loose material.
This step is necessary so you can see if
there are any sections you did that do not
have a good look to them or sections that
the material did not adhere to. You don’t
want to fix these areas after you have
applied more terrain materials. Just go
back and re-apply glue and terrain texture

How to make fantasy and medieval dioramas
35
to them which fills any open spots.
Once this is done you can then move on to
the rough terrain features like bushes, grass
stalks and trees.
Rough Terrain Features Like bushes, grass
stalks and trees
This is where your diorama takes on a
realistic look and this is where diorama
making really goes from being a craft to
being an art. You have to visualize how
natural terrain looks and try to duplicate it.
Tip: Seeing things as an artist does
If you want to get really good looking
terrain you need to look at terrain!
Whenever you are outside you should notice
how terrain looks. Notice how it clings in
different areas. On the side of a cliff you can
notice how small plants will grow out of
cracks. Or notice how moss grows along one
side of a tree. It is these little details that
will make a big difference. You can do lots
of research on the internet. The important
thing about this is that if you want your
diorama to look realistic you have to look at
real things then mimic them.
With Rough Terrain less can be more
The picture above shows a nice use of
rougher terrain. This is the rule when it
comes to rougher terrain – use less of it.
And try to place it in ways that look natural.
Generally the bigger the terrain material
the less of it you will use.
The above picture shows another good
application of rough terrain materials. The
bushes are clinging to the edge of the cliff
just as they might in real life.

Will Kalif
36
You can apply these rough textures to the
surface of the diorama by putting full
strength white glue on them and then
sticking them directly to the shell. You
should then spray over it with your watered
solution of glue. This will insure that the
various clumps of rough texture don’t fall
apart. The bush will stay intact once the
sprayed on glue dries.
Terrain Tip
To get the upright stalks of grass you can
purchase materials from woodland scenics
or you can make them from old
paintbrushes. Simply cut the bristles off the
paintbrush then glue them in upright
clumps directly to the surface of the
diorama. Put a bead of white glue directly
on the diorama and give it a few minutes to
get stiff then stand the bristles right up in it.
Hold them in place for a minute until they
can stand on their own.
Bristles of a paintbrush. Now just stick the
flat end right down onto the dab of glue on
the diorama.
Tall Grass with Electro-Static Flocking
You can get really tall grass in your diorama
and it really stands up tall. You do this with
a tool called an electro-static flocker.
The electro-static flocker is a handy little
tool.
The picture above shows it in action. There
is a little bowl with a screen in it. You put
the terrain grass in there and shake above
the terrain.

How to make fantasy and medieval dioramas
37
There is a charge on the grass as it passes
through the screen. You can see in the
picture that there is a pin and a clip on the
surface of the terrain. That applies the
other polarity of charge. This causes the
strands of grass to be repelled and they
stand on end. Pretty neat and ingenious
little device.
It does take a little bit of practice and to
work well you hold the screened cup close
to the terrain.

Will Kalif
38
Section 4
Trees, Water, and Rocks
Trees
Trees come in a very wide variety of sizes
and styles that mimic real trees. And they
come with a lot of different foliage in a
variety of colors.
If you have a specific theme you are trying
to achieve or a specific location you will
need to get the appropriate trees. Conifer
trees which are pines and firs look quite a
bit different than Deciduous trees which are
the types of trees that lose their leaves in
winter. And of course this is critical if you
are doing a winter scene.
One of the most important aspects of tree
selection is choosing trees that are of an
appropriate scale. You should try a variety
of sample trees so you can see what lends
the right look to your diorama. Place them
next to your miniatures (if you are using
miniatures) to get a sense of the scale and if
the tree size will look right.
The center tree in the above picture shows
the attached base. You glue the tree into
this base which makes it easy for the tree to
stand up in the diorama. Typically you
would apply terrain textures to the base so
it blends in with the surface of the diorama.
Optional (preferred) Method of Tree
Insertion
As an alternative to using the plastic tree
base you can pierce a hole in the diorama
landscape and glue the tree right into it.
This is the method that I use because it
looks more realistic.
Step 1 to inserting a tree: Punch a hole in
your diorama
Step 2: Put some white glue in the hole,
give it a minute or two to get tacky then
insert the tree into the hole and hold it in
place.

How to make fantasy and medieval dioramas
39
The Tree looks great!
Adding Foliage to the trees
To get a really good look to your trees you
should add foliage with a variety of colors.
Typically two or three different shades of
green look realistic. You should also
consider the type of tree and the season of
your diorama. Woodland Scenics makes a
lot of different foliage colors.
How to Add the Foliage to the trees
The plastic that the tree armatures is made
of is very pliable and when shipped it is flat.
You should gently bend it into a three
dimensional (tree-like) shape.
Then apply a high tack glue to it.
Woodland Scenics makes a glue called Hob-
e-Tac that is specially designed for this. You
apply it liberally to the tree armature and
then set it aside for about 15 minutes so it
sets into a very sticky form. You can use
alternative glues. Just look for very high
tack glue and let it set until it gets very
tacky. This can be a bit frustrating and you
have to be patient. When you dip the tree
in the foliage bag it should stick very nicely.
If it doesn’t stick easily and tightly you
either should use another type of glue or
wait longer for it to get tackier.
Apply the glue to the tree then let it sit until it
gets very tacky. For hob-e-tac this is about 15
minutes.
Once the glue is nice and tacky dip it in a
bag of foliage. You may want to prepare
the foliage first by breaking up large
clumps.

Will Kalif
40
Dip the tree in the bag of foliage and move
it around so lots of foliage is applied.
And do this process with several different
foliage colors. If you tree is green you
should use several different shades of
green.
Between applications of foliage use more
glue and visually inspect the tree and make
small adjustments to the placement of
foliage.
Additional note about the tree armatures
You can cut the trees to any size you want
and if you are looking for smaller trees or
bushes you can even use just branches that
you cut off of the main armature.
Trees aren’t always full of foliage.
Sometimes you can get a real attractive
look by just putting a small amount of
foliage on them. This gives them a sparse
and almost dead look. This works great if
your trees will be placed in terrain that is
dead, desert-like or poor in plant life.
This tree shown in the next picture is a good
example of a creative use of a tree
armature and its foliage. It is clinging to the
side of a cliff and has that typical look of
bare- branches with just a small tuft of
foliage at the end.
A Note about improvising trees and bushes:
Can you use real branches from outside
trees? The quick answer to this is no! While
they may look great they don’t have a good
life span. They will rot and turn colors. They
will not stay preserved for a long period of
time. When using artificial trees you are
guaranteed they will stay exactly how you
made them for many years.
Improvising and making your own tree
armatures
You can make acceptable tree armatures
out of wire. It takes a little practice but they
will come out quite good.
To do it you will need two pair of pliers,
some wire cutters and some wire. I use 14
gauge house wire but any kind of wire from

How to make fantasy and medieval dioramas
41
an appliance or extension cord will also
work well.
Strip out pieces of wire and then using the
pliers you twist them into a tree shape. One
end is all twisted together to form the trunk
and on the other end all of the branches are
separate. Move the wires that are branches
so they stick out in a variety of positions like
the branches of a tree.
Next you paint the trunk of the wire tree a
brown color and set it aside to dry. Once
dry you apply a liberal amount of a high
tack glue to all parts of the branches. It goes
everywhere except on the trunk. Then you
set it aside to let the glue get very tacky. If
you are using Hob-e-tac the recommended
wait time is fifteen minutes.
Once you have waited the required period
of time you dip the tree in a bag of foliage
and move it around so all the branches are
covered.
Set it aside to dry and once dry you can
touch it up by adding a little more glue and
a little more foliage.
The process of making trees takes a little bit
of practice but you will get good at it. And
using wire is a little bit of a challenge but
your trees will come out great.
Tree Tips:
Trees aren’t a uniform color. You should do
every tree with at least two different
shades of green. This is how they look in
real life and it will lend maximum realism to
your miniature trees.
They come in different shapes and sizes and
with differing amounts of foliage.
Remember to make them all unique.
Just about any type of wire can be used,
even stranded wire. And stranded wire is
easier to work with.

Will Kalif
42
Getting your wire trees to look
more realistic
You can use various modeling epoxies to
get your trees to look even more realistic.
You apply the
epoxy or clay to
the trunk and
carve it into the
desired shape
and look. There
are several
inexpensive
clays you can
use to do this
with. Super
Sculpey® is an
easy to work
with clay that is baked in an oven to harden.
There are also several different types of
two-part epoxies that you can use including
ProCreate®, Green Stuff® or Kneadatite®.
The two part epoxies are composed of two
different segments that you knead together
and over a period of time they harden.
If you want very realistic looking trees this is
a great way to do it. But generally you
cannot do the branches of the trees
because the sculpting material will not hold
properly. You just paint these wires brown
and then cover them with the tree foliage.
Water and water effects
Adding water to your diorama is one of the
best ways to make it look very real. Bodies
of water and water effects can transform an
average diorama into something special.
There are several techniques you can use
for adding water and I will go over them.
Using Woodland Scenics Realistic Water©
Woodland Scenics makes a product called
Realistic Water. It is a liquid that comes in a
bottle. You simply pour a thin layer into
your diorama then let it air dry. Once it has
dried you can pour another thin layer and
continue this until the desired thick is
achieved. This is the easiest way to make
water but it can be a bit costly if you have
large water areas.
How to do it
The preparation work is important when
you are adding water to your diorama. You

How to make fantasy and medieval dioramas
43
have to make sure all of the water area is
sealed with some kind of paint and you
have to make sure the area to be filled is
properly shaped. Water flows downhill and
when you pour the realistic water it will
flow downhill so make sure your water area
is shaped correctly.
Here are the steps:
Make sure the area for water is shaped in a way that it contains all the liquid. If your water area is on the edge of your diorama then add some kind of a border to hold the water in while it dries. This border you build will be permanent because the Realistic Water will stick to it like glue and harden.
Make sure all parts of the diorama shell are painted. This will seal it. If the Realistic Water comes in direct contact with an unpainted plaster shell section it can soak through and leak or make the shell sag. So paint it and give it a second coat.
Put terrain textures and extra items on the bottom before you begin pouring the water. This could include sunken items, pebbles, small shells, rocks, or anything you want to see through the water.
The picture above shows a corner of a small
diorama that is ready for the water. The
water area forms a nice depression, it is
well painted, and I have built up a
cardboard wall around the edges. Good to
go and ready for the water to be poured.
Slowly pour the Realistic Water into the
cavity allowing it to flow into all of the area
you want covered. And make it no more
than 1/8 of an inch thick. Use a toothpick to
gently move it around so it flows into all the
area to be covered. You want it to be a thin
and even coat.
Allow it to dry for 24 hours before adding
another layer and do not do more than

Will Kalif
44
three layers. You can get it to dry faster by
using a fan but do not use heat or a hair
dryer.
Adding Details and textures to your water
Rippled effects – You can get your water to
have permanent ripples and other surface
effects by waiting until it is almost
hardened. Then you can brush it using a
regular small paint brush or other types of
tools even a toothpick or the handle of a
spoon. Or you can place objects on the
surface and they will adhere when it dries.
Paying attention to the shoreline
The shoreline is very important in a water
scene. You should spend time working on
the details around the shore of the water.
Add small pebbles and marshy type bushes
to make it look good.
The picture above shows our waterline on a
similar diorama. Notice the variety of things
along the shore. There are small pebbles,
small clumps of foliage and some tall reed
like plants.
Changing the Colors of your water
Realistic Water is water soluble so before
you pour it you can add different colors or
dyes to it to get a particular look. Some
suggested colors are blue, brown or green.
This all depends on the look you are trying
to achieve.
Alternatives to Using Realistic Water
If you want to get deeper water you cannot
use Realistic water. It is recommended for
thicknesses of up to 3/8 inch. To go thicker
you have a couple of other options.
Clear Casting resin – This is a product that

How to make fantasy and medieval dioramas
45
comes in a 32 ounce can. It is two parts and
you mix the resin with drops of a catalyst
and then pour it. Clear casting resin looks
great and works great but it is a bit of a
challenge. You have to mix it correctly and
this depends on how much you are going to
pour so you have to accurately judge how
much you will pour. It also gives off toxic
fumes so you absolutely have to use it and
pour it and let it dry either outdoors or in a
well-ventilated room. I recommend a room
with a window fan set up.
While it is a bit of a challenge to use casting
resin can create some really good looking
water bodies and water effects.
Lexan (or Plexiglas) - Lexan is a plastic type
of product that comes in sheets. Think of it
as plastic sheets of glass but not as
dangerous. You can cut it into any shape
you want and use this as the surface of your
water. In effect you can create a space
between the bottom of your diorama and
the surface of the water. In this space you
can place under water objects.
Several ways to use Lexan as water
Lexan has several different ways that it can
be used. You can paint the top surface of
the lexan a water color and place it right
into your diorama. If you paint it blue it will
become the surface of the water and you
won’t see through it. This is the easiest
method.
You can paint the bottom surface of the
lexan, which is a bit more attractive. Now
the water will have a little bit of depth and
it will look more realistic.
You can get a more complex, and more
attractive look if you create the underwater
scene and bottom surface of the water with
lots of details then place a clear sheet of
lexan at the height of the water surface.
This way you have the water and you can
see through it to the bottom. And to make
it even more realistic you can paint the top
surface of the lexan with a clear lacquer or
matte. This will give it a watery look.
Using lexan can be a challenge but it can
also be very cost effective if you are making
large bodies of water. You also have to
prepare for this because the lexan has to be
installed so you have to plan for this in the
early stages of the diorama. You also have
to take some time when making the banks
around the water body. You have to be
meticulous with terrain materials so they
blend with the edges of the lexan in a
natural way.
The above drawing shows lexan installed in
the diorama. This lexan is clear so you can
see the details at the bottom of the water
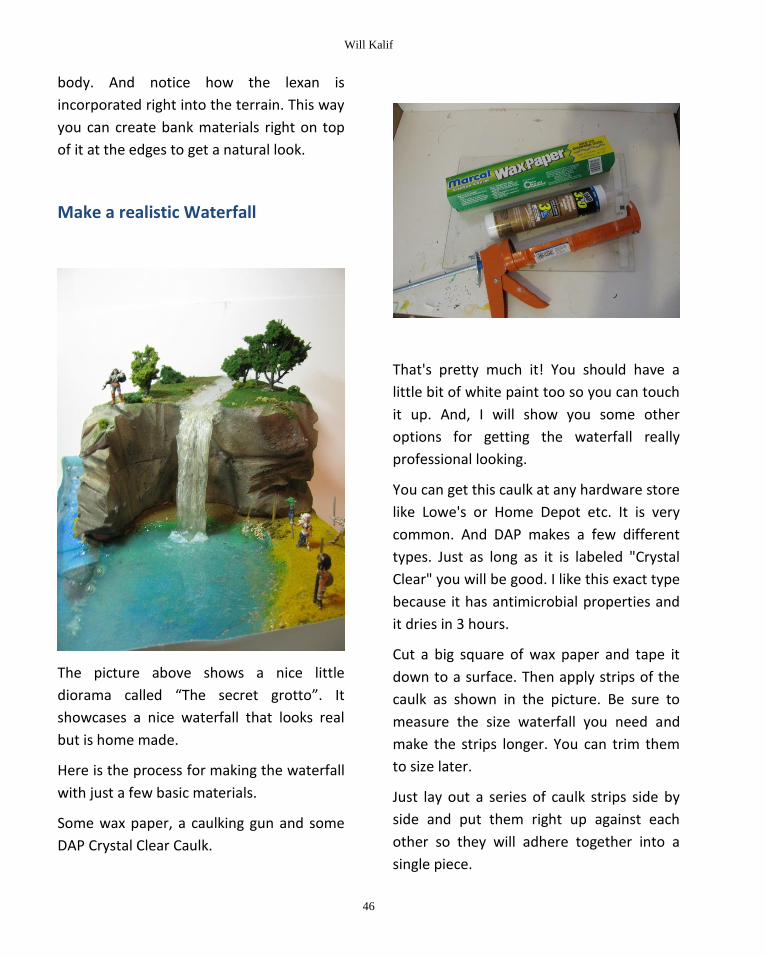
Will Kalif
46
body. And notice how the lexan is
incorporated right into the terrain. This way
you can create bank materials right on top
of it at the edges to get a natural look.
Make a realistic Waterfall
The picture above shows a nice little
diorama called “The secret grotto”. It
showcases a nice waterfall that looks real
but is home made.
Here is the process for making the waterfall
with just a few basic materials.
Some wax paper, a caulking gun and some
DAP Crystal Clear Caulk.
That's pretty much it! You should have a
little bit of white paint too so you can touch
it up. And, I will show you some other
options for getting the waterfall really
professional looking.
You can get this caulk at any hardware store
like Lowe's or Home Depot etc. It is very
common. And DAP makes a few different
types. Just as long as it is labeled "Crystal
Clear" you will be good. I like this exact type
because it has antimicrobial properties and
it dries in 3 hours.
Cut a big square of wax paper and tape it
down to a surface. Then apply strips of the
caulk as shown in the picture. Be sure to
measure the size waterfall you need and
make the strips longer. You can trim them
to size later.
Just lay out a series of caulk strips side by
side and put them right up against each
other so they will adhere together into a
single piece.

How to make fantasy and medieval dioramas
47
Use a toothpick or some kind of a thin
wooden implement to put lots of lines in
the waterfall. Be sure to push together the
various caulk strips so they are bound
together as a single piece. Run lots of
vertical creases so it looks like water
flowing.
I recommend that while you have
everything ready you make several of these
even if you only need one. This way you can
experiment with them and have some
spares in case you cut it too short or
something else happens. Won't hurt to
make a few extra ones.
Now just let it dry.
Once it is dry you can peel it off the wax
paper. It might be tricky and it is quite
alright if some of the wax paper stays on
the back. You wont be able to see it
anyway.
This caulk is a bit flimsy and it won't hold up
well on the diorama so we make a stronger
backing for it.
Just cut a strip out of a 2 liter bottle. Make
the strip about the width of your desired
waterfall but make the lenght several
inches longer. You will trim the length when
ready to install it.
Bending the Plastic backing: Use a hair
dryer on low setting to bend the plastic
strip into the desired shape. Place it on your
diorama, get a sense for where it should
bend - then heat. Do this several times to
get it to have just the bend you want.
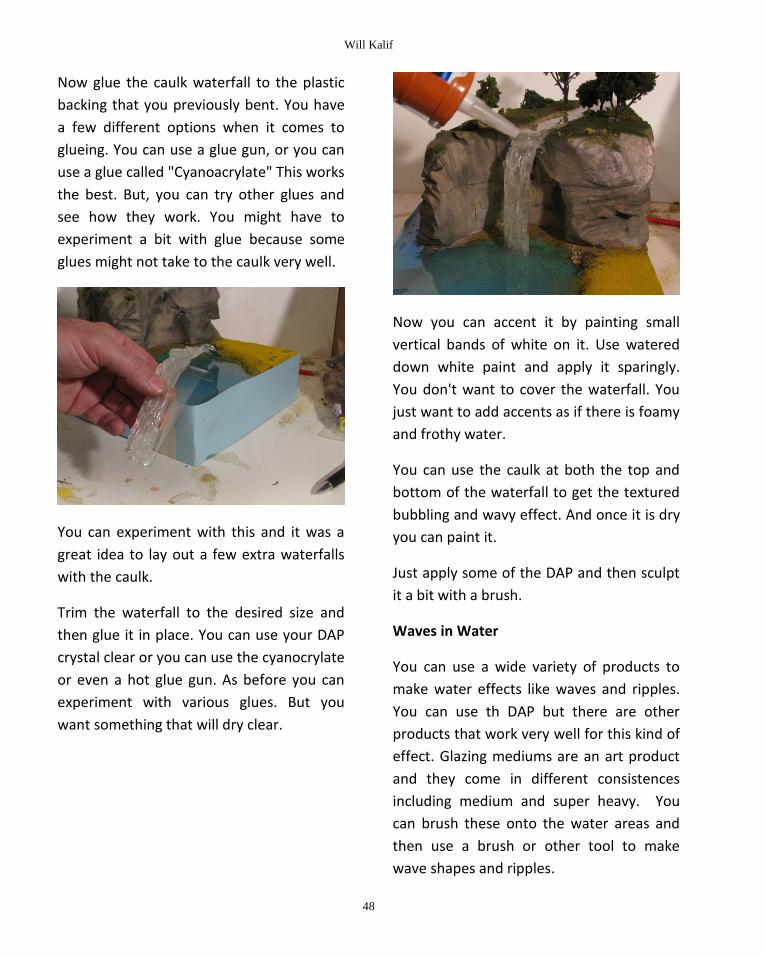
Will Kalif
48
Now glue the caulk waterfall to the plastic
backing that you previously bent. You have
a few different options when it comes to
glueing. You can use a glue gun, or you can
use a glue called "Cyanoacrylate" This works
the best. But, you can try other glues and
see how they work. You might have to
experiment a bit with glue because some
glues might not take to the caulk very well.
You can experiment with this and it was a
great idea to lay out a few extra waterfalls
with the caulk.
Trim the waterfall to the desired size and
then glue it in place. You can use your DAP
crystal clear or you can use the cyanocrylate
or even a hot glue gun. As before you can
experiment with various glues. But you
want something that will dry clear.
Now you can accent it by painting small
vertical bands of white on it. Use watered
down white paint and apply it sparingly.
You don't want to cover the waterfall. You
just want to add accents as if there is foamy
and frothy water.
You can use the caulk at both the top and
bottom of the waterfall to get the textured
bubbling and wavy effect. And once it is dry
you can paint it.
Just apply some of the DAP and then sculpt
it a bit with a brush.
Waves in Water
You can use a wide variety of products to
make water effects like waves and ripples.
You can use th DAP but there are other
products that work very well for this kind of
effect. Glazing mediums are an art product
and they come in different consistences
including medium and super heavy. You
can brush these onto the water areas and
then use a brush or other tool to make
wave shapes and ripples.
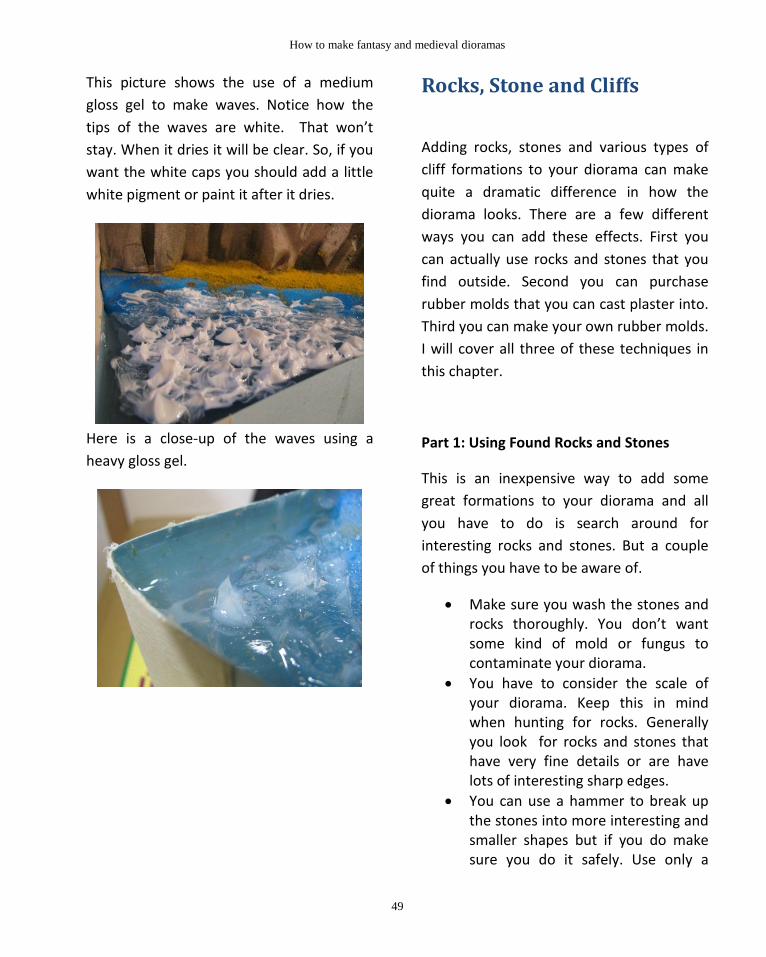
How to make fantasy and medieval dioramas
49
This picture shows the use of a medium
gloss gel to make waves. Notice how the
tips of the waves are white. That won’t
stay. When it dries it will be clear. So, if you
want the white caps you should add a little
white pigment or paint it after it dries.
Here is a close-up of the waves using a
heavy gloss gel.
Rocks, Stone and Cliffs
Adding rocks, stones and various types of
cliff formations to your diorama can make
quite a dramatic difference in how the
diorama looks. There are a few different
ways you can add these effects. First you
can actually use rocks and stones that you
find outside. Second you can purchase
rubber molds that you can cast plaster into.
Third you can make your own rubber molds.
I will cover all three of these techniques in
this chapter.
Part 1: Using Found Rocks and Stones
This is an inexpensive way to add some
great formations to your diorama and all
you have to do is search around for
interesting rocks and stones. But a couple
of things you have to be aware of.
Make sure you wash the stones and rocks thoroughly. You don’t want some kind of mold or fungus to contaminate your diorama.
You have to consider the scale of your diorama. Keep this in mind when hunting for rocks. Generally you look for rocks and stones that have very fine details or are have lots of interesting sharp edges.
You can use a hammer to break up the stones into more interesting and smaller shapes but if you do make sure you do it safely. Use only a

Will Kalif
50
hammer approved for rock chipping and be sure to wear safety glasses.
These found rocks do not have to remain exactly as you find them. You can paint them or add terrain textures to them to spice them up a bit.
Part 2: Purchasing Rubber Molds
Many hobby shops and train specialty shops
will carry a large selection of rubber molds
that come in great pre-made stone and cliff
shapes. You can also purchase them in pre-
made stone wall shapes.
The picture above shows several rubber
rock molds. They come in a very wide
variety of shapes and sizes.
How to cast rocks in Molds
Materials Needed:
1. A mold 2. A spray bottle 3. Water 4. Liquid Soap 5. Hydrocal or Plaster of Paris
What to do:
1. Put a few drops of liquid soap in the spray bottle then lightly spray the inside of the mold where you will pour the plaster or Hydrocal. The liquid soap will help prevent sticking and will help prevent bubbles from forming in your rock formation.
2. Mix up the Hydrocal or Plaster of Paris according to the manufacturer’s directions and pour it slowly into the mold.
3. Gently tap the mold to release any air bubbles.
4. Let it dry 5. Once it is dry you can carefully
remove the rocks from the mold by peeling the mold away or popping out the plaster.
6. Note, if the plaster rock cracks it will be ok. The crack will be perfectly aligned and the two parts can be glued back together easily.

How to make fantasy and medieval dioramas
51
The picture above shows several different
shaped rocks that have been cast in rubber
molds.
Part 3: Making Your Own Latex Rubber
Molds
You can get a lot of variety in your stone
shapes and you can even create stone walls
by creating your own Latex Rubber molds.
This is a very easy process and all you have
to do is apply Latex Rubber in layers to the
desired object.
Let’s assume you are making a mold of a
rock that you have found. The first thing
you do is paint on a layer of Latex Rubber
then let it dry for at least thirty minutes.
Make sure you apply the Latex thoroughly
so it gets inside all the crevices.
Step 1: Painting the latex on
Once this first layer is dry you proceed to
paint on a second layer of rubber. Once that
is dried you should do a third and fourth
coat, always letting it dry between coats.
If you are only going to be making a few
castings from this mold then three or four
coats are sufficient. But if you want to use
this mold over and over and keep it for
many years then you should apply at least
two or three more coats of rubber. And,
after the third coat, while
Step 2: Separate the mold from the model

Will Kalif
52
it is still wet you should cover it with
cheesecloth. This will make it extra strong
and durable. Then once this third coat,
covered in the cheesecloth, dries you can
go ahead and paint on the next few layers
allowing time in between layers for drying.
Using this layer of cheesecloth will give you
a very strong rubber mold.
Step 3: pouring plaster into the latex mold
Latex rubber is inexpensive and easy to
work with. This is a great way to add some
real detail to your diorama.
Adding Rocks, Stone and Cliffs
Part 1: Painting and detailing the Rocks
and Cliffs
Part of what you want to do when painting
rocks and cliffs is to integrate the colors
correctly into the landscape of your
diorama. This will mean there will be a
variety of different colors.
If, for example, your diorama is a desert
scene the rocks and stone might be a shade
of sandstone or some shade of red. This is
important to consider when painting rocks
and cliffs.
For this tutorial I am going to show you how
to paint the rocks a standard slate gray
color. This is a pretty typical color. The steps
I take with this color are applicable with any
color.
Note: You can use this painting technique
on found stones too!
Step 1: Apply sparing amounts of your dark
color to high points of the rock. In this
example I use Stone Gray.
Step 2: While the paint is still wet apply a
liberal coat of water. This technique is
called washing and it washes the dark color
all around the surface of the stone. The
dark color will accumulate in the cracks of
the stone giving it a very realistic look.

How to make fantasy and medieval dioramas
53
Step 3: Apply small amounts of white glue
to various parts of the stone, brush it
around a little bit with a paintbrush then
sprinkle terrain texture on it. This gives the
stone a dirty and realistic look.
The picture below shows the terrain texture
glued to the stone.
Step 4: Finish off the rock by applying large
textures such as shrubs and grass bits.
Apply small spots of glue and some thin
lines along the high lines of the stone.
And affix small bits of rough texture to the
stone. The picture below shows the
completed stone.
It is now ready to be placed in your
diorama.
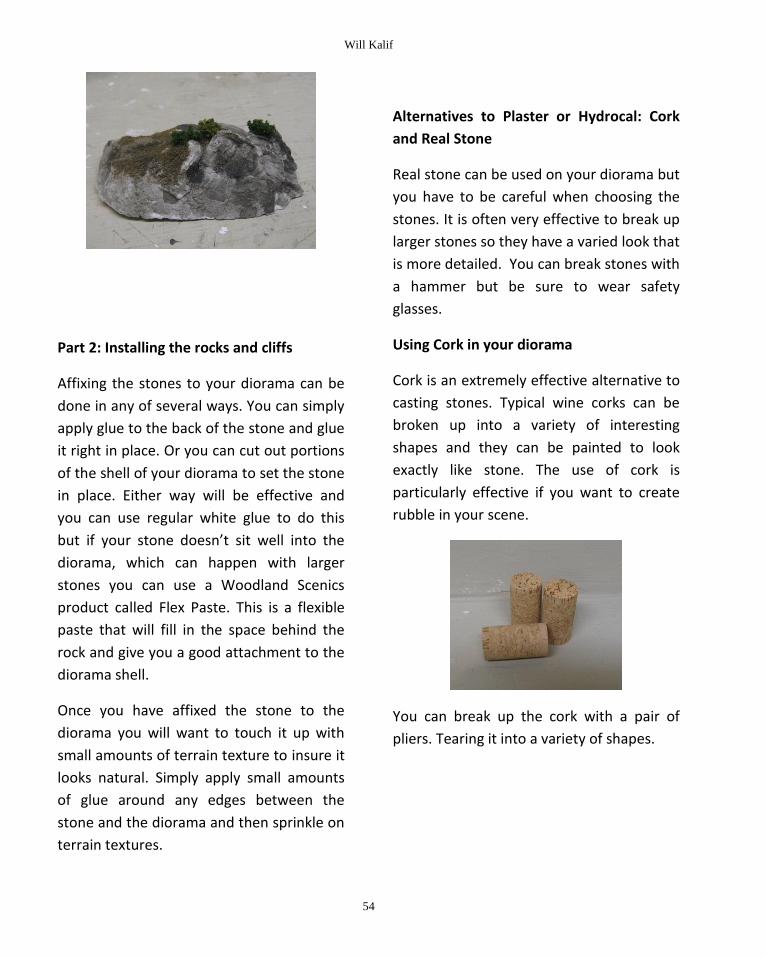
Will Kalif
54
Part 2: Installing the rocks and cliffs
Affixing the stones to your diorama can be
done in any of several ways. You can simply
apply glue to the back of the stone and glue
it right in place. Or you can cut out portions
of the shell of your diorama to set the stone
in place. Either way will be effective and
you can use regular white glue to do this
but if your stone doesn’t sit well into the
diorama, which can happen with larger
stones you can use a Woodland Scenics
product called Flex Paste. This is a flexible
paste that will fill in the space behind the
rock and give you a good attachment to the
diorama shell.
Once you have affixed the stone to the
diorama you will want to touch it up with
small amounts of terrain texture to insure it
looks natural. Simply apply small amounts
of glue around any edges between the
stone and the diorama and then sprinkle on
terrain textures.
Alternatives to Plaster or Hydrocal: Cork
and Real Stone
Real stone can be used on your diorama but
you have to be careful when choosing the
stones. It is often very effective to break up
larger stones so they have a varied look that
is more detailed. You can break stones with
a hammer but be sure to wear safety
glasses.
Using Cork in your diorama
Cork is an extremely effective alternative to
casting stones. Typical wine corks can be
broken up into a variety of interesting
shapes and they can be painted to look
exactly like stone. The use of cork is
particularly effective if you want to create
rubble in your scene.
You can break up the cork with a pair of
pliers. Tearing it into a variety of shapes.
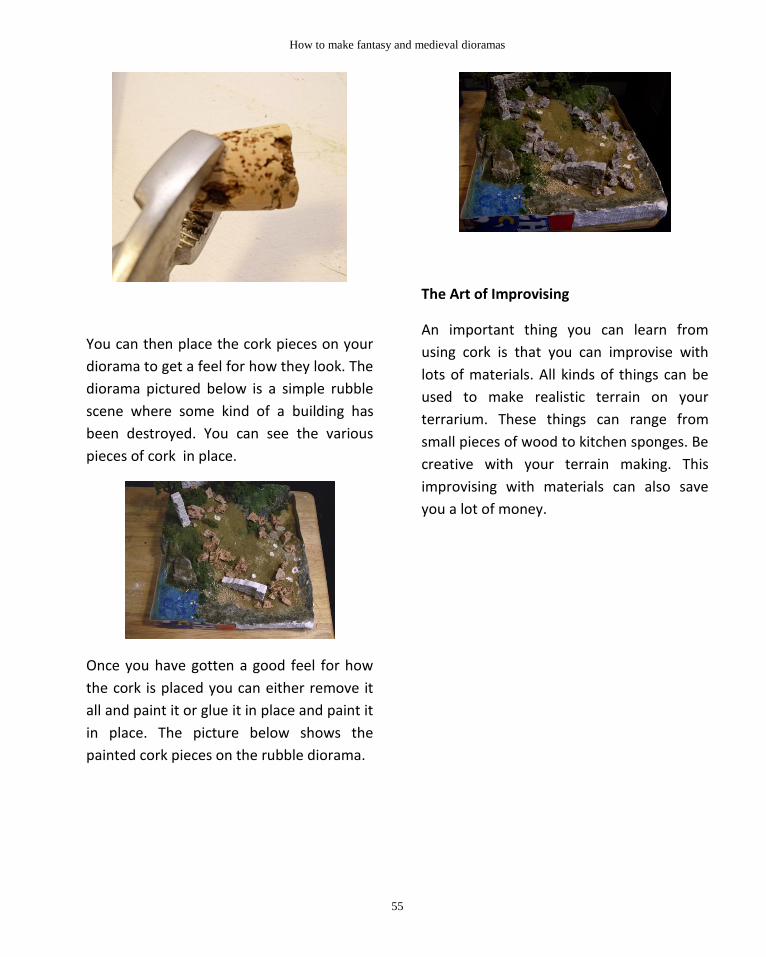
How to make fantasy and medieval dioramas
55
You can then place the cork pieces on your
diorama to get a feel for how they look. The
diorama pictured below is a simple rubble
scene where some kind of a building has
been destroyed. You can see the various
pieces of cork in place.
Once you have gotten a good feel for how
the cork is placed you can either remove it
all and paint it or glue it in place and paint it
in place. The picture below shows the
painted cork pieces on the rubble diorama.
The Art of Improvising
An important thing you can learn from
using cork is that you can improvise with
lots of materials. All kinds of things can be
used to make realistic terrain on your
terrarium. These things can range from
small pieces of wood to kitchen sponges. Be
creative with your terrain making. This
improvising with materials can also save
you a lot of money.
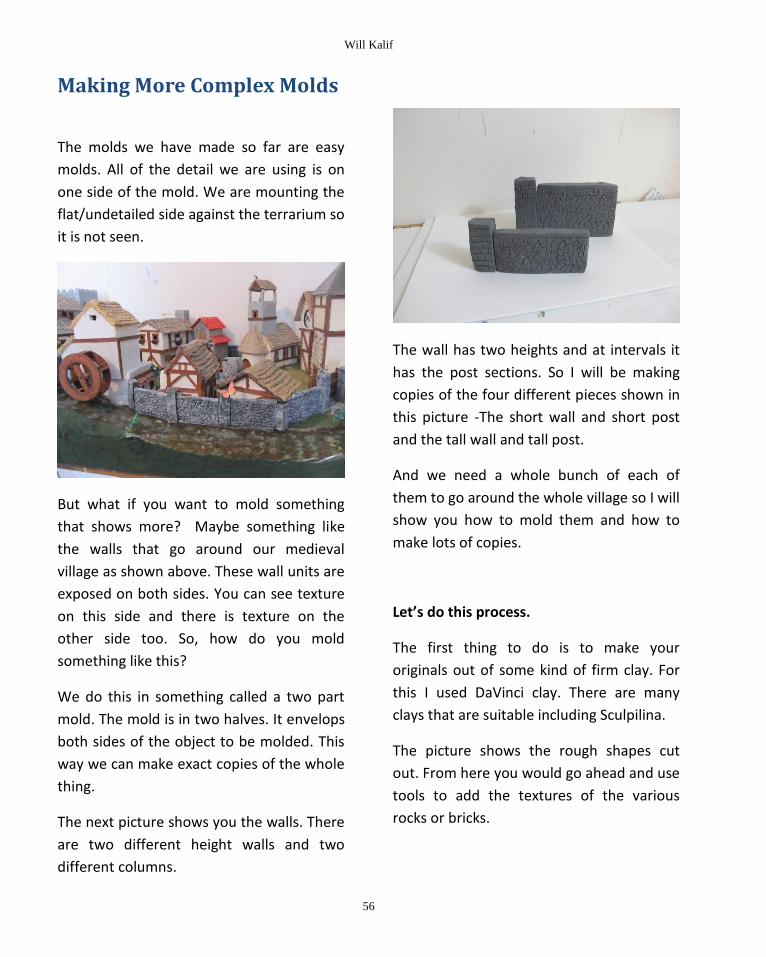
Will Kalif
56
Making More Complex Molds
The molds we have made so far are easy
molds. All of the detail we are using is on
one side of the mold. We are mounting the
flat/undetailed side against the terrarium so
it is not seen.
But what if you want to mold something
that shows more? Maybe something like
the walls that go around our medieval
village as shown above. These wall units are
exposed on both sides. You can see texture
on this side and there is texture on the
other side too. So, how do you mold
something like this?
We do this in something called a two part
mold. The mold is in two halves. It envelops
both sides of the object to be molded. This
way we can make exact copies of the whole
thing.
The next picture shows you the walls. There
are two different height walls and two
different columns.
The wall has two heights and at intervals it
has the post sections. So I will be making
copies of the four different pieces shown in
this picture -The short wall and short post
and the tall wall and tall post.
And we need a whole bunch of each of
them to go around the whole village so I will
show you how to mold them and how to
make lots of copies.
Let’s do this process.
The first thing to do is to make your
originals out of some kind of firm clay. For
this I used DaVinci clay. There are many
clays that are suitable including Sculpilina.
The picture shows the rough shapes cut
out. From here you would go ahead and use
tools to add the textures of the various
rocks or bricks.

How to make fantasy and medieval dioramas
57
Now let’s make the mold.
Make a four sided box out of cardboard,
wood or foam board. Put a layer of clay in
it about 2 inches thick. And embed your
wall half way into it. The wall in this picture
has cracked. That’s ok, it adds character to
the wall. And the color is lighter than the
previous picture.. It has dried some which
makes it stronger.
Notice how I have the bottom of the wall
set right against the wall of the mold. That
is the part of the wall that we won’t see in
the diorama. It sits on the ground. We need
that against a wall of the mold because that
is where we will pour the plaster into the
mold. If this is unclear you will understand it
clearly when you see the mold.
You can also press a couple of marbles half
way into the clay . These act as registration
marks that will insure the whole mold stays
exactly straight. I will show you a picture of
this.
Now we are going to make the first half of
our mold.
Rule of Thumb: When it comes to molding
parts there is a good rule of thumb to think
about. If your final product is going to be
hard (like a wall) your mold should be soft
and flexible like a rubber material.
And if the final product will be rubbery and
soft then you make the mold with a hard
material like Plaster of Paris.
Our final product here (the wall units) is
hard so we will make a rubbery mold.
For this tutorial I used a product called
InstaMold. It is an easy to use product that
you just mix with water and pour. But, it has
a shelf life of a day or two. So, you can’t set
it aside and use it again like we did with the
latex rubber molds we made of the cliffs
earlier in this chapter.
You can also use a product called OOMOO
30 silicon mold rubber. I will show you a bit
about that too.
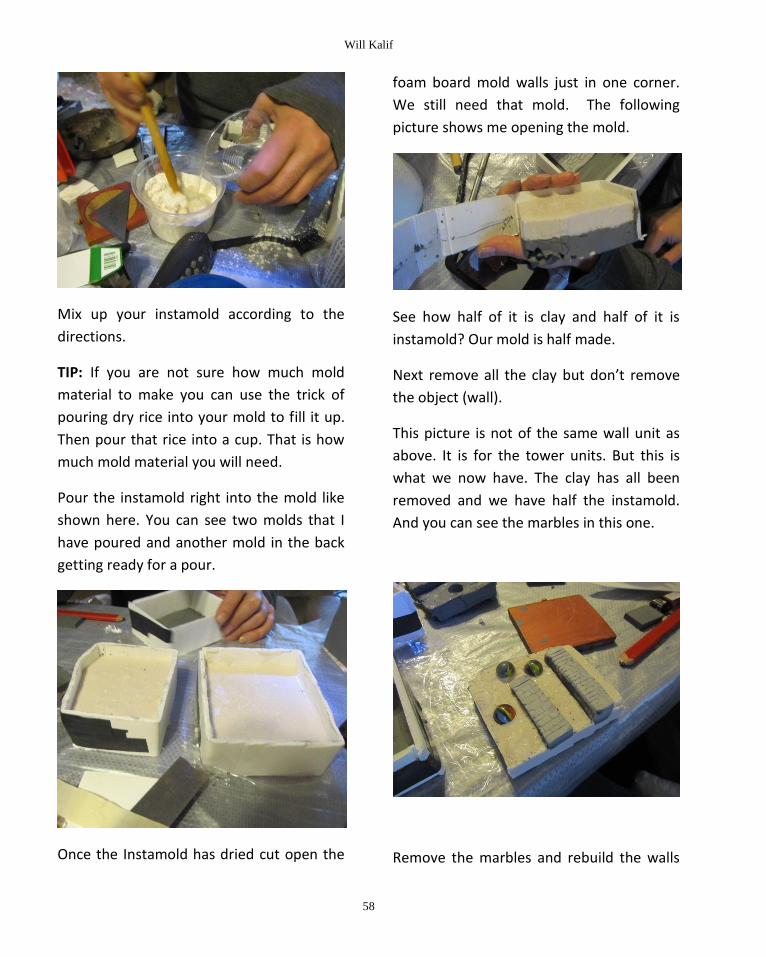
Will Kalif
58
Mix up your instamold according to the
directions.
TIP: If you are not sure how much mold
material to make you can use the trick of
pouring dry rice into your mold to fill it up.
Then pour that rice into a cup. That is how
much mold material you will need.
Pour the instamold right into the mold like
shown here. You can see two molds that I
have poured and another mold in the back
getting ready for a pour.
Once the Instamold has dried cut open the
foam board mold walls just in one corner.
We still need that mold. The following
picture shows me opening the mold.
See how half of it is clay and half of it is
instamold? Our mold is half made.
Next remove all the clay but don’t remove
the object (wall).
This picture is not of the same wall unit as
above. It is for the tower units. But this is
what we now have. The clay has all been
removed and we have half the instamold.
And you can see the marbles in this one.
Remove the marbles and rebuild the walls

How to make fantasy and medieval dioramas
59
of the mold right around this unit as you
can see in the picture. And, coat the whole
thing, mold and wall pieces with a thin coat
of liquid soap. This insures the two mold
halves separate cleanly. Rather than liquid
soap you can use Vaseline.
Now mix up another batch of instamold and
pour that right in. Once it is dried you can
cut away the mold walls and discard them.
This next picture shows me removing the
walls away from the completed mold.
Gently separate the two halves of the mold
and remove the model or models from
inside. Clean up any residue or excess clay
from inside the mold and dry it a little bit
with a paper towel.
Now put those two halves of the mold
together and cut a couple of pieces of
cardboard the same size. Put the whole
assembly together with a couple of rubber
bands so it all holds nicely. This picture
shows you why we initially put the wall into
the mold with the bottom of the wall unit
against the wall of the mold. Now we can
pour the plaster right into that hole.

Will Kalif
60
Now mix up some plaster of paris and pour
it right into the molds. Use a funnel if it
makes it easier.
And there you go. Once the Plaster of Paris
has dried you can take apart the mold and
remove your plaster copy. Go ahead and
make as many as you want. But remember
that if you use Instamold the mold is only
good for a day or two.
Casting In Rubber and Plastic
Okay, let’s take a look at one more molding
method using rubber. I show you how to
make a one part rubber mold but you can
use this rubber to make two part molds just
like we did with these wall units.
For the medieval village we need some
crates and barrels. What medieval village
doesn’t have crates and barrels?
The ones we make are plastic and the molds
we make are rubber molds.
Just as before we start out by making our
original models. With the case of the crates
and barrels I used a two part epoxy called
Procreate.

How to make fantasy and medieval dioramas
61
With Procreate you mix two halves together
and then you have two hours to sculpt it
until it is hardened.
Then I made quick and easy molds around
the pieces by using cut pieces of paper
towel tubes. I used a hot glue gun to glue
down the tubes and to glue down the crate
and barrel.
For this project I used a two part rubber
making material from a company called
Smooth-on. This is called OOMOO-30. You
mix two equal parts together.
And then pour it right into your mold. Pour
it in a thin stream and tap on the table a lot
to get it to fill in all the little details. The
tapping also will bring the bubbles up and
out of the mold. You will see bubbles rise.
You don’t want bubbles to stick to your
model. They will show up in the casting.

Will Kalif
62
Once the rubber dries you can remove your
model. In the case of the picture below it is
the model of the barrel.
Now we can cast right into that mold.
I am going to cast little plastic barrels and
crates rather than Plaster of Paris. Smooth-
on also makes a two part plastic that is
perfect for this. It is called OOMOO Smooth
Cast 300.
You mix the two parts together and working
quickly you pour it right into the mold. In a
couple of minutes the plastic is set so you
have to work briskly.
The next picture shows me removing the
plastic crate from the mold. Now you can go
ahead and make as many as you need.
And this picture shows four copies made
from one of the molds. These are the crates
and one of them has been painted. They
look great and are exact copies.

How to make fantasy and medieval dioramas
63
Making Molds
You have a whole lot of options when it comes
to mold making. I have shown you a few
different options and let me summarize some of
the key points for you.
One Part Molds – If you have a simple object
like a crate, barrel, or one side of a wall you can
probably cast it in a one piece mold. To do this
you can use liquid latex to brush it on like we
did with the rocky outcroppings. Or you can cast
the rubber like we did with the crates and
barrels.
Two-Part molds – If you have a more
complex object like walls with two sides or
even miniature figures you want to use a
two part mold like we did with the walls. In
this two part mold you can use InstaMold or
OOMOO rubber.
Sculpting the Models – Most of the time
you can use any kind of clay. It will depend
on how much detail you want. I use Davinci
clay and even potters clay. If you want a
really firm model with fine detail you want
to use a two part epoxy clay that will
harden. I use GreenStuff and ProCreate for
that.
The Final Object – The material you use to
cast the final object can vary. You will have
great success if you use Plaster of Paris like I
used for the walls. Or if you want more solid
objects with more detail you can use a
plastic resin like the OOMOO smooth cast I
used for the crates and barrels.
The process of using ProCreate to sculpt the
miniatures and OOMOO to make plastic
copies is very versatile. I have used this
process many times. Below you see a series
of treasure chests that I made. This first
picture shows the procreate model
originals.
And this picture shows the plastic copes that
have been painted.

Will Kalif
64
Section 5
Electricity and Special Effects
Part 1: Electricity
Adding electrical functions to your diorama
can take an average diorama and make it
into something spectacular.
This picture shows a wizard that has a small
red light bulb attached to his staff.
I accomplished this by running a pair of
wires along the back of the wizard and
hooking them up to a battery and a switch.
Once the wizard is mounted onto the
diorama the wires are run down into it and
off to the side.
There are several ways you can add this
extra functionality to your diorama. In this
section of the book I will cover the basics of
how to wire up your diorama. In the
following sections I will address the specific
techniques for doing electrical special
effects like lights, waterfalls, sound effects
and moving parts.
Safety Warning before starting this section
of the book: Electricity can be very
dangerous. Always seek help from a
qualified individual and these techniques
should not be attempted by a child without
the close supervision of an adult. Electricity,
even after being brought down in voltage
with a transformer can be very dangerous.
Getting Electrical Supplies
You have many options when it comes to
acquiring electrical supplies for your
diorama. The Scale Model Railroad industry
has been making a wide variety of electrical
components and parts for many decades.
And the dollhouse industry makes lots of
great lights, accessories and power supplies
that you can use. You can also scratch build
much of what you need.
The next picture shows a nice use of
lighting. There is a light inside the cathedral
here. And the stained glass windows are
painted plastic so the light shines through
nicely.
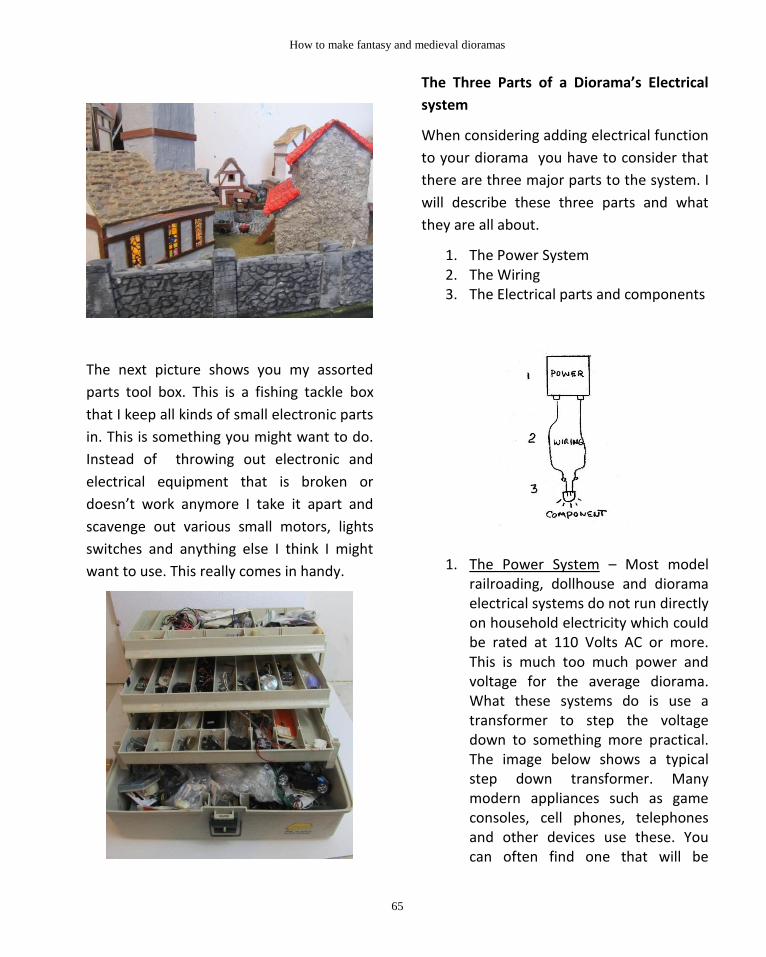
How to make fantasy and medieval dioramas
65
The next picture shows you my assorted
parts tool box. This is a fishing tackle box
that I keep all kinds of small electronic parts
in. This is something you might want to do.
Instead of throwing out electronic and
electrical equipment that is broken or
doesn’t work anymore I take it apart and
scavenge out various small motors, lights
switches and anything else I think I might
want to use. This really comes in handy.
The Three Parts of a Diorama’s Electrical
system
When considering adding electrical function
to your diorama you have to consider that
there are three major parts to the system. I
will describe these three parts and what
they are all about.
1. The Power System 2. The Wiring 3. The Electrical parts and components
1. The Power System – Most model railroading, dollhouse and diorama electrical systems do not run directly on household electricity which could be rated at 110 Volts AC or more. This is much too much power and voltage for the average diorama. What these systems do is use a transformer to step the voltage down to something more practical. The image below shows a typical step down transformer. Many modern appliances such as game consoles, cell phones, telephones and other devices use these. You can often find one that will be

Will Kalif
66
suitable for your diorama. The important thing to note is the output voltage. This needs to be appropriate for the electrical devices you will add to your diorama.
Typical voltage for a model railroad
is 12V but it may go as high as 16V.
If you want to keep things simple for
your diorama you can use all model
railroad equipment. The industry
makes a wide variety of lights and
other apparatus that is all pretty
much standardized.
If you are going to improvise your
own wiring then you should select
the components you are going to
use first, then choose a power
supply that meets the demands. For
example, if you are going to use a
series of LED’s (Light emitting
diodes) that require 5 volts to
operate then you would find and
use a step down transformer or
some kind of power supply with a 5
volt DC output.
Power Supply
I use a nice little hobby power
supply. It is shown in the next
picture. You plug it into your wall
outlet and the output shown as the
red and black knobs, is variable. You
can vary the voltage between 0 and
15 volts. You can buy something like
this for around twenty-five dollars.
Batteries as an alternate plan
If your wiring requirements are not
complex, say you only want to have
one or two small lights you can go
with a battery system. This is easily
accomplished with a battery holder
like the one in the picture below.
This one holds 4 1.5 volt AA
batteries. You can purchase these at
hobby shops, radio shack or you can
even remove them from various
electronic toys.

How to make fantasy and medieval dioramas
67
You can also wire up a simple 9 volt
system with a 9 volt battery and
case.
Remove the battery plug from an
old piece of electronics like a toy or
a transistor radio. You can also buy
these plugs.
2. The wiring – This is the series of wires that you put in your diorama to bring the power from the power supply to the various parts and components on your diorama. Typically you have to run two wires for each component. Wire is
measured in Gauges and there are a lot of different size gauges you can use. A common and easy to find wire you can use is telephone or bell wire. This comes in a sheath with either two or four separate wires in it.
3. The parts and components – While this is the third thing we are taking a look at it is the most important. You have to decide first which components such as lights, pumps, waterfalls and motors that you want on your diorama and where you will install them. From this you can decide which power supply you need and where you can run the wires.
Basic Electrical Theory
There is a bit of basic electrical theory you
should know when considering adding
electricity to your diorama. Here is an
overview.
There are two major types of electrical
supply and they are AC and DC. These stand
for alternating current and Direct current.
And this distinction could be important. It
all depends on the components you are
going to mount into your diorama. Some
electrical components require AC or DC and
you have to make sure you get the right
supply. Other components like simple light

Will Kalif
68
bulbs will work on either AC or DC.
Every component you use will need to have
two wires going to it. This is important to
remember when you are building the
diorama. The electricity needs to go to the
component on one wire and return back to
the power supply on the other wire. This is
a closed loop.
The next illustration is a typical simple
electrical theory circuit. It shows the two
wires going from the power supply to the
component and it also shows the switch
that is installed to turn the light on and off.
Think of the wires as pipes that electricity
flows through. The switch will open the
pipe and stop the flow.
You can see in the example above that
when the switch is open no electricity will
flow. This is important to consider when
you have multiple components in your
diorama because if a component should go
bad or blowout it can affect the other
components by opening up the circuit and
not allowing electricity to flow to them.
You avoid this by wiring all the components
in parallel.
What this means is that each component
has two wires running to the power supply.
The illustration below shows this
arrangement with three light bulbs.
This wiring in parallel gives you a lot of
flexibility in how you control these lights
and components. For example you can have

How to make fantasy and medieval dioramas
69
one switch that turns everything on and off
or you can have separate switches that
operate each individual light.
The picture below shows three lights with a
single main on and off switch that turns
them all on or off.
The picture below shows how, with parallel
wiring, you can put separate switches in to
operate the various components and lights
individually.
Pre wiring your Diorama
Before you start building your diorama you
should figure out what kind of electrical
components you are going to have in it and
where they will go. This is so you can do
some of the wiring work before the diorama
is complete.
The next picture shows a shadowbox style
diorama that is made with foam. You can
see that I have run the wires in the early
stage of the diorama making process.
Drill holes and cut out runways wherever
you need the wires to go. And remember to
run two wires for every component.
You can do some drilling and cutting when
the diorama is done but doing as much of
the wiring as possible as early as possible is
advantageous and will look better. You can
hide all the wiring behind the various
terrain features.
As you are designing your diorama on paper
you should make notations where the
various electrical components will go so you
can add these wires as you are building.
The next picture shows the 300 diorama
nearly completed. Inside each of the
mountain peaks there is a speaker
mounted. You have to install those speakers
early in the process of making the diorama.
I installed them while it was still a

Will Kalif
70
cardboard frame. With a large component
like a speaker it really is a good idea to get it
installed and wired as soon as possible.
Otherwise you would have to cut and repair
the terrain in your diorama.
So plan out the electronics and electricity of
your diorama as early as possible and do as
much of the wiring in the early stages.
Using an Electronics Project Box
If you are doing a large diorama or one with
a lot of electrical components you can wire
them all into an electronics project box. This
is an empty plastic box that is made for the
purpose. You can drill out holes and install
switches and lights. It becomes a sort of
control panel for your diorama. Electronics
supply stores like Radio Shack carry these.
LIGHTS IN YOUR DIORAMA
You have a lot of choices
when it comes to lights in
your diorama. The bulbs in
the picture at left shows a
standard hobby bulb that
operates on 1.5 volts. This
type of bulb has been used
by hobbyists for a very
long time and there are a lot of options for
using it. You can get screw in sockets for it.
These are reasonably durable and easy to
replace when they burn out and you can get
them in a variety of different voltages. And
generally they will work with both AC and
DC power.
This type of bulb is the simplest and easiest
route you can go but they do take up a lot
of power so if you are using batteries you
should take this into consideration and
switch to LED’s if you want longer battery
life.

How to make fantasy and medieval dioramas
71
More Bulb Options
You can buy packs of small bulbs at Radio
Shack. These shown here are mini colored
lamps and they work on 6v.
Christmas Bulbs
One of my favorite types of bulb is the
Christmas tree bulbs. They come in a long
string with lots of little bulbs. Typically you
can just cut out a lamp and it works on low
voltage.
This next picture shows how I removed one
of the bulbs from the string and wired it up
to stand alone.

Will Kalif
72
Working With LED’s (Light Emitting Diodes)
LED’s are an excellent way to add light to
your diorama. They are inexpensive and
easy to install. There are just a few rules
you have to know when working with them.
I will go over some of these basics.
LED’s are polarized devices. This means that
they can only work on DC voltage. They
have a plus side (+) and a minus side (-) and
you have to connect them to your battery
or power supply in this correct way. The
plus side on the LED is always the longer
lead. If you look at the previous picture
showing the red LED alongside the penny
you can see that one of the wire leads is
longer than the other. This is the lead that
you hook up to the plus side (+) of your
power source. This is an industry standard
and all LED’s are made this way.
The Voltage of LED’s
They do vary in how much voltage they
need to operate correctly and you have to
make sure you apply the correct voltage.
Typically this is around 5 volts but it does
vary.
Limiting the current to the LED
One important thing to note about LED’s is
that they are very sensitive to the amount
of electricity that flows through them. If you
hook one up directly to a power source,
even if the voltage is correct the LED will
probably be damaged and stop working;
this is because they offer very little
resistance to current flow and easily get
overloaded and burn out.
We prevent this by adding a small resistor
in series with the LED. This is typically 200
ohms as a minimum. This will control and
limit the amount of electrical current that
flows.
Each LED that you install should have one of
these resistors.
Various LED’s
One of the great things about LED’s is that
they come in a very wide assortment of
sizes, voltages and performance types.

How to make fantasy and medieval dioramas
73
You can get them in just about any color
and you can get them in various sizes. You
can also get LED’s that blink which is a nice
option.
Here is a picture of an LED in action. That is
a little foam blacksmith forge with a red
LED.
Part 2: Special Effects
Waterfalls
Adding a working waterfall to your diorama
can bring it to new levels of interest and
excitement. And you can do it relatively
cheaply. One of the best things you can do
is find an inexpensive table top waterfall
and remove all the relevant parts from it
and use it in your diorama.
You can also purchase a waterfall pump and
install it into your diorama. The picture
below shows from left to right the
transformer to power the pump, the switch
unit to turn it on and off and the actual
pump unit with a short hose.
Here is the basic design of how a pump
works. Small pumps typically sit right in the
water reservoir and suck the water from
their underside. So you sit the pump right in
the hidden reservoir. In this case the hidden
reservoir is underneath a mountain.
The pump draws water and sends it up the
hose to an opening in the side of the
mountain. The water acts as a waterfall and
makes its way down to another reservoir.
This is a small pond right in the diorama.
From this small pond the water drains back
down by gravity into the pump reservoir.
Will Kalif
74
Typically it is best to hide the pump and all
of its apparatus in this manner. All you want
to see is the waterfall and the miniature
pond.
Things to watch for when getting a pump
A lot of these small pumps have either an
adjustment dial or adjustment ring so you
can control the flow of the water. This
comes in handy to make sure you get the
right amount of flow. Ideally you want the
pond to be always full but yet still draining
into the lower reservoir.
The height of the water being raised
Pumps do not raise water to an infinite
height. They will only raise it up to a certain
height depending on the power of the
particular pump. Make sure you get a pump
that will raise water high enough for your
diorama application. This is measured in
inches of lift. So measure in inches how high
you need the water to be pumped and get a
pump that can handle it.
Web Resource: You can see more of this
diorama and see a video of the waterfall in
action on my website here:
http://www.stormthecastle.com/diorama/d
iorama-video-medieval-castle.htm
Water Proofing Your Terrain
Of course if you are going to put any kind of
real water in your diorama you are going to
have to waterproof the terrain. I
recommend you do this in several coats and
some of the materials you can use are
either Realistic water by Woodland Scenics
or Clear Casting Resin which is a two part
mix. You mix together then brush or pour it
on . Use of these products will seal the
surface of the diorama so it won’t be
affected by water. Make sure you test it in
small amounts to verify you didn’t miss any
spots. And I recommend you always do
more than one coat.
Alternative Sealant: You can also use
polyurethane. This is sold in hardware
stores and it is typically used to waterseal
furniture, decks and other wooden things.
It does work well but you should do
multiple coats.
Automation and Moving Parts
Adding automation and moving parts to a
diorama can take it to levels that dioramas
rarely achieve. But it does take a little bit of
work and some skill to accomplish this.
There are plenty of small motors that you
can readily adapt to your diorama though. I
have a large collection that I use in my
dioramas.
You can buy small motors from hobby
stores and electronic stores. You can also

How to make fantasy and medieval dioramas
75
harvest them from old pieces of electronics
that are broken or no longer needed. Good
examples of this are VCR’s and cassette
players.
Where to buy cheap motors and
automation parts?
Here are a couple of companies that have
lots of great little electronics and motors
that can be used by hobbyists:
American Science & Surplus – www.sciplus.com
Edmund Scientifics - www.scientificsonline.com
When harvesting various electronic parts
like motors from old appliances it is
important to think about the usefulness of
other items too. For example, along with a
motor you might want to take any pulleys,
gears and belts. This is so you can make the
drive systems that go along with the motor.
You have to attach the motor to parts in
your diorama somehow.
A look at a motorized drawbridge
Servos –
A servo is a great little electronic device
that is used in Radio controlled toys like
airplanes and cars. Think of a radio
controlled car and how when you turn the
wheel on the hand held unit the wheels on
the car actually turn. This is done by
something called a servo and you really
don’t have to worry about the radio
controlled aspect of it. What you really
want to use is the little motor or “servo”
that does the work.
A servo is a powerful little motorized unit
that will give you a controlled amount of
motion. All you have to do is vary the
voltage to it.
The picture below shows a servo that is
being used to open a drawbridge on a castle
diorama. A servo is perfect for this
application because it has good strength,
moves at a relatively slow rate and you can
move it through as much motion as you
want. In other words it doesn’t just rotate
like a motor. It rotates as much as you want
it to. Just like the steering on an RC car.

Will Kalif
76
There are lots of different sizes and types of
servos but they pretty much all do the same
thing and there are two things for you to
take care of when using one of these. It
needs some kind of a controller and some
kind of power supply.
Both of these issues can easily be solved.
You can buy something called a “servo
driver” which is a little electronic device
with a knob on it. You plug the servo into it
and you can turn the knob to turn the
servo. And for the power supply you can
either use some kind of power supply or
even use a battery for an RC plane or car.
This kind of battery is designed to run
servos.
The picture below shows a setup for the
servo. The servo itself is on the right. On the
left is the battery and in the center is the
yellow servo driver. You turn the knob on
the driver and the servo moves accordingly.
Something like this is inexpensive and can
add some terrific special effects to your
diorama. It is just a matter of running the
wires and hooking up the servo in a way so
that it moves the desired object. In the
case of my drawbridge you can see in the
picture that I just hot glued the arm of the
servo right to the drawbridge. It will be real
easy to camouflage it with some wood or
terrain materials.
Small motors and gears
You have a lot of creative things you can do
with small motors and you can even use
one from an old clock. The typical
challenges apply where you have to connect
it to your diorama in some way and you
have to provide it with power. If you buy a
small motor you should get the power
requirements with it and often times
motors will be labeled with their power
needs including AC, DC and level of voltage
required.

How to make fantasy and medieval dioramas
77
Getting a small variable power supply
You can purchase a small desktop power
supply that is usually more than adequate
for all your automation needs. Typically
they will put out voltages between 1 and
15volts which is enough to power most
small motors and lights. And because they
are variable you can use them for a wide
assortment of parts that have different
voltage requirements. So whether your
small dc motor needs 5 volts or 10 volts you
can power it up.
The following picture shows a little motor
and gear setup that I took out of a tape
recorder. It is nicely setup for me to add a
string and power an elevator on a string.
Being a dc motor if you hook up the voltage
one way it goes up and if you reverse the
polarity it goes in the opposite direction. So
I used a three pole switch and the elevator
goes up and down depending on which way
I switch it.
The drawing below shows the wiring of a
double pole double throw switch. This is
how the polarity is easily reversed with the
throw of a switch and the motor is
reversed. The dashed line is the switch
housing.

Will Kalif
78
When it comes to automation in a diorama
the possibilities are endless. This picture
shows a flour mill that has a little motor in
it. The wheel slowly turns.
It has this six volt motorized gearbox inside.
This gearbox is ready made. I bought it for
twelve dollars. I used hardening clay to
connect the wooden dowel shaft to it. The
Mill wheel attaches to that shaft. In the
picture you can see the gearbox is attached
to a piece of foam board. This will go right
into the building.

How to make fantasy and medieval dioramas
79
Section 6
Buildings and Structures
Some Medieval structures
In this section I will take you through a
variety of building techniques.
Basic Building structures
The Picture below shows three medieval
buildings. Some of the techniques I will
cover include the basic shape of the
buildings, the woodwork, plastering, the
thatched roof and stonework.
The shell of the building can be made out of
any one of several different materials. I use
foam board because it is durable, fairly
waterproof, and easy to work with.
The following picture shows the basic
structure of a foam board building. I cut out
all the individual pieces then used a hot
glue gun to glue them together.
Start out with paper or card stock
I do recommend that you first make your
buildings out of card stock or heavy card
paper. This will allow you to easily modify
and change it. You will also be able to
visualize the scale of it.
Once you have it made out of card paper
then you can trace the patterns of the walls
onto foam board.
The door and window holes are optional.
Sometimes its ok to just paint the spaces for
them black or dark brown. The option is
yours. I like to cut out the doors and
windows and then I can install doors that
are recessed. It gives a better look.

Will Kalif
80
Once you have the structure all built you
can coat the building with grout or
Celluclay. Grout is a building material you
can buy at any hardware store. Use the un-
sanded grout. It is easier to work with. And
Celluclay gives a wonderful texture but it is
a bit more coarse and gives a grittier look.
I use grout for standard medieval buildings
and I use celluclay for fortresses with a
rougher look.
It is a bit difficult to see but in the last
picture I have already grouted the building.
Next you cut thin strips of balsa wood and
apply them in various patterns to the
building. It is better looking if you paint
them first.
Generally the thinner the balsa wood the
better. The width of them will change
depending on the size and shape of your
building.
A tacky glue works best for this. Hot Glue
Gun will not adhere to the grout very well.
Just outline the corners of the building, the
doors, and the windows.
After this it is just a matter of painting the
walls and the timbers. I typically paint the
walls an antique white which is a bit
different than a plain white.
There are a couple more details about this
building that I want to show you.
The Base of the building looks like stone
work. This is just a flat piece of foam that I
laid down then set the building on. And the
chimney is also just a piece of foam glued to
the roof.
And the most impressive thing about this
building is the thatched roof. I cut strips of
bath towel and glued them in succession to
the roof starting on each side and working
toward the top in overlapping layers.
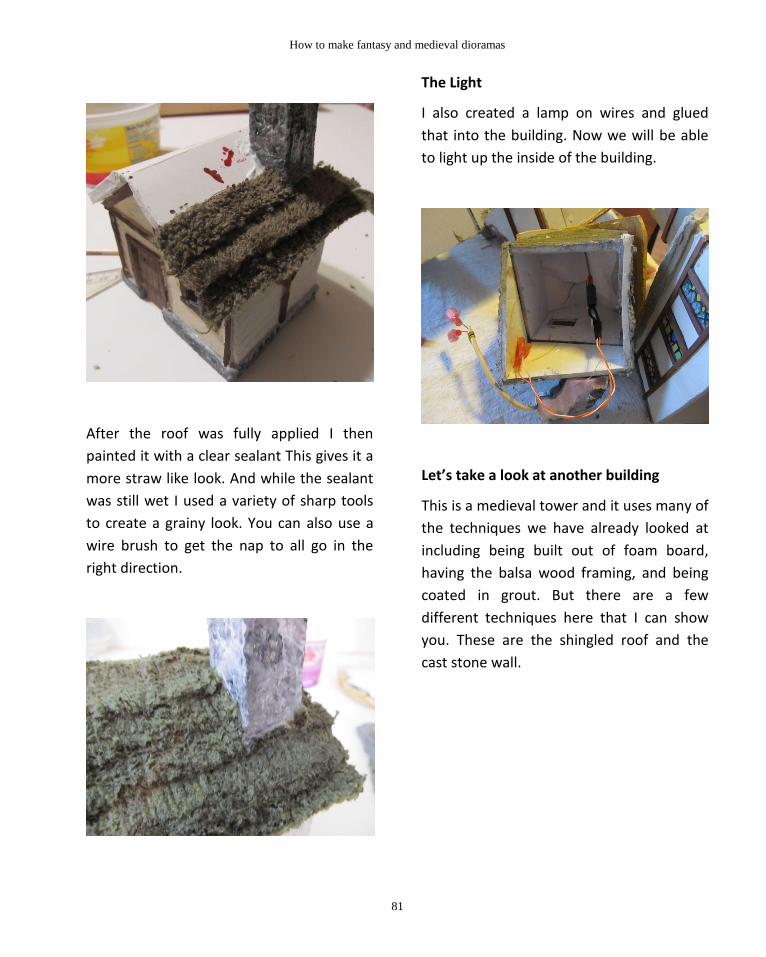
How to make fantasy and medieval dioramas
81
After the roof was fully applied I then
painted it with a clear sealant This gives it a
more straw like look. And while the sealant
was still wet I used a variety of sharp tools
to create a grainy look. You can also use a
wire brush to get the nap to all go in the
right direction.
The Light
I also created a lamp on wires and glued
that into the building. Now we will be able
to light up the inside of the building.
Let’s take a look at another building
This is a medieval tower and it uses many of
the techniques we have already looked at
including being built out of foam board,
having the balsa wood framing, and being
coated in grout. But there are a few
different techniques here that I can show
you. These are the shingled roof and the
cast stone wall.

Will Kalif
82
Making an Easy Shingled Roof
You can also do a shingled look on the roofs
of buildings. The best ways to do this would
be to make small shingles out of balsa wood
and glue them in succession to the roof.
This is very labor intensive though and you
can cheat a bit by creating the roof slabs
out of balsa wood and then using tools to
scratch out a shingled look as shown in the
picture below.
Painting and Washing the Roof
But in order for this technique you have to
be a bit careful about how you paint it. First
you paint the whole thing with a gray paint.
Then once the paint is almost dry you do a
technique called “washing”. This is where
you paint it with a very wet black paint.
This causes the black to run into the various
cracks and lines. Once you have washed it
you immediately wipe it with a dry paper
towel. You end up with most of the roof
being gray but the black stays embedded in
the cracks.
You can try different colors for this type of
roof and shades of red/orange also work
very well. They make it look like a clay roof.

How to make fantasy and medieval dioramas
83
Making the Stone Wall
This picture shows a close-up of the stone
wall that goes all the way around the
building.
This technique takes some work and some
casting. I will show you how to make this.
We are going to make a rubber mold that
we can use to pour Plaster of Paris into.
When you make a rubber mold one of the
big advantages is that you can use it over
and over again to cast as many stone walls
as you want. In the case of this tower I have
cast four of these so I can use one for each
wall.
Making a Mold
You start out by laying out a thin sheet of
clay on a table. Then you press stones into
it. Arrange it all so it looks like a stone wall.
Be sure to press the clay around the stones
so there are no large gaps. I just used a
random number of pebbles with interesting
shapes. This particular mold I am making is
about eight inches square.
Once you have the model wall the way you
want it you have to paint it with some kind
of a sealant. I used a painters sealant that is
brushed on. You can buy a sealant in any
arts and crafts store.
Once the sealant has dried we can cast a
latex rubber mold over it.
Latex rubber can be bought from a variety
of companies including Woodland Scenics
and I used a product called “Mold Maker”.
This type of latex is a thick liquid that air
dries once you start using it.
You simply brush it right onto the model in
thin layers allowing it to dry between layers.
Typically you want to do at least 5-6 layers

Will Kalif
84
of the latex so the mold will be strong and
durable. And if you want the mold to be
extra strong you can even put down a layer
of cheese cloth or bandage cloth then apply
several more layers of latex.
The picture below shows my clay and
pebble model covered in Latex.
Once the latex has dried you can carefully
peel it off the clay wall. You now have a
perfect negative image of your wall. You
can cast plaster of paris into it to make all
the stone walls you need.
Once the Plaster of Paris dries you can
gently remove it from the mold and make
more of them. The picture below shows the
rubber mold and a couple of stone walls
that have been cast in it.
From here it is just a matter of cutting the
walls to the size needed and painting them.
The Painting then washing technique works
very well on stone walls. This is the same
technique that we used for the shingled
roof. It gives an overall gray color then the
black settles in to the cracks between the
stones in the wall.

How to make fantasy and medieval dioramas
85
Some Casting Tips
Just about any clay will work for this and I
use DaVinci Clay because it is easy to shape
and never dries out.
And if you are using clay you always have to
seal it with some kind of a sealant.
Otherwise it will stick to the latex and
possibly ruin the look of it. As a minimum
the clay wall you made will be ruined.
Other things – This technique of embedding
small stones in clay is just one way to make
a stone wall. You have lots of other options
and you can experiment. For example, if
you wanted a brick wall you could lay down
uniform sheet of clay and rather than
pressing pebbles into it you could sculpt out
the lines of bricks with a sharp instrument.
Seal it then make a mold of it and voila you
have a brick wall.
Mold release – There is a product called
mold release. This is a liquid that you spray
into the mold and it will prevent the latex
from sticking to your model. It makes
separation much easier.
You can even use a spray bottle to very
lightly mist the model with water before
applying the latex. This also works pretty
good as a mold release.
Now you cut the Plaster of Paris wall with a
saw or sharp knife and you can glue it to the
building.
Having a mold like this is very versatile and
you can use this stone wall for buildings,
towers, walls, bridges, wells or just about
anything else that has a roughhewn stone
wall.
Some more roof techniques
In this section I will show you three more
roof making techniques.
I have shown you how to make a nice roof
out of some cloth but you can also use
other techniques to make roofs including
casting them in plaster.
We do this by first making an original out of
clay. The picture below shows a thatched

Will Kalif
86
roof that is formed out of clay. I used a
square of wood that I notched to impress
the shingle look on a sheet of clay.
Then I built a box around the clay and
poured a mold making material into it. In
this case I used something called InstaMold.
It works really well and dries quickly. In half
an hour you can separate the mold from
the original.
This picture shows the wooden structure to
make around the model. I sealed it with hot
glue gun so the instamold wouldn’t run out.
You pour in the instamold and let it dry.
Once it has dried you can gently separate
the mold from the clay model. Now you
can cast plaster of paris into the mold and
make lots of roofs.
Alternatives – I used Instamold because
you just add water and it is pretty easy to
use. You can also use latex rubber. Or any
one of the many other mold making
materials.

How to make fantasy and medieval dioramas
87
Note when making molds – The biggest
problem you will come across when making
molds is little air bubbles that will cling to
the model and show up in the mold
distorting the final product.
This picture shows what the air bubbles do
to the cast piece.
You can minimize the air bubbles by
knocking on the table sharply several times.
This loosens the air bubbles and brings
them to the top and out of the rubber. You
do knocking this immediately after you pour
the instamold.
Clay Shingled roof
You can experiment with this technique of
making molds of roofs and another style
that looks great is the clay shingle. The
picture shows this type of shingle. This one
is half painted.
I created this mold by laying out a layer of
clay then using a wooden dowel (1/4” thick)
to impress the shingle shapes. Just lay in
rows of them.
The following picture shows a clay shingled
roof model.
One thing to note about this is that because
the shingles are embedded down you can’t
make the regular mold. It would be
backwards. The shingles would indent
rather than stick out. So, I coated this clay
model with a sealant and cast the plaster of
paris right onto it.

Will Kalif
88
Wood Thatched Roof
The final technique for roof making is an
easy one but it looks absolutely fantastic.
This is where you cut small pieces of balsa
wood or basswood and add them to the
roof like shingles – one at a time. It takes
some time but it is worth it.
Here is what it looks like finished. You
should use a fast setting glue with a lot of
tack to do something like this. I use a hot
glue gun.
A Castle Tower out of foam
Ok, in this section we will cover one more
structure building technique. In an earlier
chapter we looked at how foam was great
for dioramas. And I showed you a little bit
about that. But foam is also terrific for the
buildings themselves.
So here is a look at how to use foam to
make a castle structure. You can use this to
make all kinds of fortress like buildings and
even whole castle setups.
I uses a hot wire foam cutter to shape out a
medieval tower.
You can use a wide variety of tools to
shape it including files, rasps, and
sandpaper.

How to make fantasy and medieval dioramas
89
Notice the window and the door. These are
all sculpted with the tools. Next put in the
brick shapes with a pencil or pen.
The only thing remaining is to paint it. But
we will save that for the very next chapter
on painting tips.

Will Kalif
90
Section 7
Painting Techniques
Painting is of course a very important part
of diorama work and I am going to show
you a few basic techniques here .
The Basic Painting Technique
When painting something like the walls of
the buildings or the roof there are three
steps that you take. This is a technique that
you can use in a lot of different
applications.
1. You paint the base color 2. You use a washing technique to add
black into the cracks and crevices 3. You use a dry brushing technique to
add highlights to the item.
First choose your base color and paint the
whole item. You can be liberal with the
paint and an uneven coat with darker and
lighter sections is usually best. I have
painted part of this roof with a poppy
orange color.
Then you use a very wet paintbrush with
just a little black and you wash over the
whole thing. The black will run into the
cracks and crevices. This is great. Use lots of
water and spread it around.
Finally you use a lighter shade of your base
color. I mix a little white with the poppy
orange and you brush this onto the high
portions of the object. Do not add water to
this color. Use the raw color right out of the
tube.

How to make fantasy and medieval dioramas
91
Let’s finish off the painting of the medieval
tower. It will really show how the three
steps of base paint, wash, and highlighting
works and looks.
First the gray/stone is painted on. Then it is
allowed to dry.
Second the black wash is applied.
Finally the white highlights are applied. You
do this by getting paint on the brush then
brushing most of it off so the brush is pretty
dry. Then you lightly brush over the surface
of the tower.
And the Tower is complete.

Will Kalif
92
Let’s take one more look at using foam and
doing some of the detail paint.
Here is a foam castle structure and we want
a nice clay shingled roof on it. You can draw
out the pattern of the roof tiles with a pen,
slowly scoring the foam with deeper and
deeper marks. Then wash in a layer of wet
black. You can then wipe it with a cloth to
clean off all the tops.
Then dry brush a layer of red over it.
It looks great!

How to make fantasy and medieval dioramas
93
Section 8
Unique and Interesting diorama housings
When it comes to making dioramas we
often think about how to make the scene as
realistic as possible and this is great, even
with a fantasy diorama. But, often times we
don’t think about the overall size, shape
and theme of the diorama in terms of how
it is housed.
This is something you might want to give
some thought to because it opens up a
whole new world in the art of diorama
making.
In this section I will show you a few unique
diorama housings.
The Cigar box Diorama
Cigar boxes make wonderful little diorama
containers. And they are very cheap to get.
You can often get a few for free.
And this diorama makes use of the inside of
the box and the inside lid of the box.
The Magic Mirror Illusion Diorama
This is a small hand-held diorama that you
pick up and then look into the eye hole.
The box itself is only about a foot long. But
when looking inside you see an object that
is two feet away. I do this with a mirror.
This next picture shows you inside the
diorama. The eyehole is on the left. You
look into it and the light path bounces off
the two mirrors on the right. The object
you see is on the bottom left of the
diorama.

Will Kalif
94
The Diorama Inside a Light bulb
This was a fun little project where I built a
castle with lots of towers right inside a light
bulb. It actually has a little actuator switch
inside it so you can put a magnet near it and
light up the castle.
I don’t show you how to make this. I just
wanted to show you a neat diorama
housing.
The Wall Diorama
Here is the wall diorama mounted on the
wall. This is a lot of fun and people love to
look at it while operating the various
controls.
I used an old wooden window frame and
made a box for it to mount on the wall.
Here is a closer look:

How to make fantasy and medieval dioramas
95

96
ABOUT THE AUTHOR
Will Kalif is a webmaster and writer. He has published several books on a wide variety of subjects including dioramas and mead making. You can learn more about Will and his dioramas by visiting his website at
www.stormthecastle.com