Wi-Fi Settings Guide
20
1 Wi-Fi Settings Guide Introduction There are two wireless LAN modes: infrastructure mode for connection through an access point and ad-hoc mode for establishing direct connection with a wireless LAN-capable device (such as a laptop). This manual explains wireless LAN configuration for infrastructure mode. Infrastructure Mode Computer Wireless LAN Access Point (Router) The settings are complete. To be configured. Machine For details about configuring ad-hoc mode, see "Configuring Network Settings" in the User Guide . To connect directly to a device that supports wireless LAN, such as a laptop, you need to con- figure the settings manually. With direct connection, the security is weaker and the connection procedure more complicated, so it is recommended to connect via an access point, such as a wireless LAN router. ◆ • • •
Transcript of Wi-Fi Settings Guide

1
Wi-Fi Settings GuideIntroductionThere are two wireless LAN modes: infrastructure mode for connection through an access point and ad-hoc mode for establishing direct connection with a wireless LAN-capable device (such as a laptop). This manual explains wireless LAN configuration for infrastructure mode.
Infrastructure Mode
Computer Wireless LAN Access Point (Router)
The settings are complete. To be configured.
Machine
For details about configuring ad-hoc mode, see "Configuring Network Settings" in the User Guide .To connect directly to a device that supports wireless LAN, such as a laptop, you need to con-figure the settings manually. With direct connection, the security is weaker and the connection procedure more complicated, so it is recommended to connect via an access point, such as a wireless LAN router.
◆
•
•
•

2
1. Checking Your Wireless Network EnvironmentCheck which wireless LAN settings you need to configure using the following chart:The connection method may vary depending on the specifications of the wireless LAN access point you are using. See the access point manual.
Make sure your access point is connected to the network.
PBCSP 200Nw/201Nw For details, see page 6 "Establish Connection Using PBC".
SP 203SFNw/204SFNw For details, see page 12 "Establish Connection Using PBC".
PINSP 200Nw/201Nw For details, see page 7 "Establish a Connection
Using the PIN".SP 203SFNw/204SFNw For details, see page 13 "Establish a Connec-
tion Using the PIN".
Manual settingSP 200Nw/201Nw For details, see page 9 "Configuring the Wire-
less LAN Settings Manually".SP 203SFNw/204SFNw For details, see page 9 and page 15 "Configur-
ing the Wireless LAN Settings Manually".
Does the device support WPS?
Yes
Yes
No
NoWPS
Does the device have a WPS button?*1
*1 The name of the button may vary depending on the device you are using. If you cannot find the WPS button, refer to the manual for the wireless LAN access point.
About WPS connection securityThe optimum security for the devices is automatically configured in a WPS connection.
*Security settings depend on the connection environment. Accordingly, it cannot be assumed that the configured security setting is the most secure.
•
◆
•

3
2. Before Configuring Wireless LAN Settings
Checking the Wireless LAN Access PointThis information is required when you configure wireless LAN settings. It cannot be viewed using the machine.
Checking the SSID and password (WEP key/passphrase)Before configuring the wireless LAN settings, confirm the SSID and password.The SSID and password for the wireless LAN access point may be printed on a label affixed to the access point. For details about the SSID and password, refer to the access point manual.
Configuring/Checking the Settings on the MachineBefore you configure the wireless LAN settings, print out the network setting list to obtain the information required for configuring the settings.
Printing a network setting list
It can take up to two minutes to print the network setting list.
SP 200Nw/201Nw1. Hold down the [Start] key.
CTT175
Holding the key down for two seconds.
•

4
SP 203SFNw/204SFNw1. Press the [User Tools] key.
CTT129
2. Press the [ ] or [ ] key to select [Print List/Report], and then press the [OK] key.3. Press the [ ] or [ ] key to select [Network Setting List], and then press the [OK]
key.
Obtaining the wireless LAN information from the network setting listTo configure the wireless LAN settings, the following information is required:
Network I/FIf "Network I/F" is set to "Ethernet", change it to "Wireless LAN". For details about changing the LAN type, see "Connection Problems" in 6, "Troubleshooting".Wi-Fi StatusIf "Wi-Fi Status" indicates "Connected", reset the network settings. For details about resetting the network settings, see "Connection was Successful but Wireless LAN Cannot be Used" in 6, "Troubleshooting".Communication ModeCheck that "Communication Mode" is set to "Infrastructure Mode". For details about configuring the communication mode, see "Connection Problems" in 6, "Troubleshooting".PIN CodeIP Address*1
To change the IP address in the network setting list, see "Connection was Successful but Wire-less LAN Cannot be Used" in 6, "Troubleshooting".Mac Address*1
*1 Check the information displayed below "Wi-Fi Status".
•
•
•
••
•

5
3. Installing the DriverThe procedure to configure the wireless LAN settings is different for manual configuration and configuration using WPS.
Configuring the Wireless LAN Settings ManuallyTo manually configure the wireless LAN setting via Smart Organizing Monitor, first install Smart Organizing Monitor via a USB connection. Install the driver using [USB Quick Install].
Configuring the Wireless LAN Settings Using WPSTo establish the wireless LAN connection using WPS, configure the wireless LAN setting first, and then install the driver. Install the driver using [Network Quick Install (DHCP)] or [Network Quick Install (Fixed IP)].
For details about installing the driver, see the Software Installation Guide.
•
•

6
4. Configure the Wireless LAN (SP 200Nw/201Nw)
Establish Connection Using PBC
In Steps 4 to 7, configure each setting within 120 seconds. If you take longer than this, the con-figured settings will be cancelled and you will have to configure them again from Step 4.
1. Start the wireless LAN access point.2. Make sure the Ethernet cable is not connected to the machine.
CTT214
3. Switch on the machine.Go to the next step after the power indicator has flashed three times.
4. Hold down the [Job Reset] key.
CTT216
Holding the key down for two seconds or longer makes the power indicator flash.5. Press the [Start] key.
CTT218
The alert indicator flashes.If the machine has been set to Ad-hoc mode, it reboots itself after Step 5 and switches to Infrastructure mode. If this happens, repeat Steps 4 and 5.
•
7
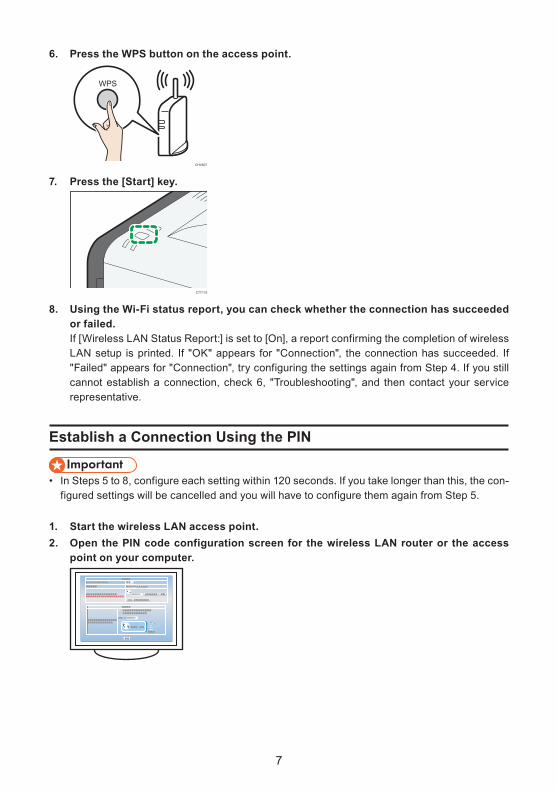
6. Press the WPS button on the access point.
WPS
CHV607
7. Press the [Start] key.
CTT175
8. Using the Wi-Fi status report, you can check whether the connection has succeeded or failed.If [Wireless LAN Status Report:] is set to [On], a report confirming the completion of wireless LAN setup is printed. If "OK" appears for "Connection", the connection has succeeded. If "Failed" appears for "Connection", try configuring the settings again from Step 4. If you still cannot establish a connection, check 6, "Troubleshooting", and then contact your service representative.
Establish a Connection Using the PIN
In Steps 5 to 8, configure each setting within 120 seconds. If you take longer than this, the con-figured settings will be cancelled and you will have to configure them again from Step 5.
1. Start the wireless LAN access point.2. Open the PIN code configuration screen for the wireless LAN router or the access
point on your computer.
•

8
3. Make sure the Ethernet cable is not connected to the machine.
CTT214
4. Switch on the machine.Go to the next step after the power indicator has flashed three times.
5. Hold down the [Job Reset] key.
CTT216
Holding the key down for two seconds or longer makes the power indicator flash.6. Enter the machine’s PIN code on the access point’s web page.
Enter the PIN obtained from the network setting list. For details, see 2, "Before Configuring Wireless LAN Settings".
7. Press the [Start] key.
CTT218
The alert indicator flashes.If the machine has been set to Ad-hoc mode, it reboots itself after Step 7 and switches to Infrastructure mode. If this happens, repeat Steps 5 and 7.

9
8. Execute WPS (PIN system) from the access point's web page.
9. Using the Wi-Fi status report, you can check whether the connection has succeeded or failed.If [Wireless LAN Status Report:] is set to [On], a report confirming the completion of wireless LAN setup is printed. If "OK" appears for "Connection", the connection has succeeded. If "Failed" appears for "Connection", try configuring the settings again from Step 5. If you still cannot establish a connection, check 6, "Troubleshooting", and then contact your service representative.
Configuring the Wireless LAN Settings ManuallyIf you cannot ascertain the settings of the access point being used or the access point does not support WPS, configure the wireless LAN settings manually.
Check the SSID and password (WEP key/Passphrase) by referring to the manual of the wire-less LAN access point being used.Ascertain the security method employed by the access point being used. If you are unsure which security method is supported by the wireless LAN access point being used, refer to the access point manual.
1. Start the wireless LAN access point.2. Connect the machine and computer with a USB cable.
CTT137
3. Switch on the machine.4. On the [Start] menu, click [All Programs].5. Click [Smart Organizing Monitor for SP xxx Series].6. Click [Smart Organizing Monitor for SP xxx Series Status].7. If the machine you are using is not selected, click [Select Device...], and then select
the machine's model.8. Click [OK].9. On the [User Tool] tab, click [Printer Configuration].10. On the [Wi-Fi] tab, set [Communication Mode:] to [Infrastructure Mode].
•
•

10
11. In [SSID:], enter the SSID for the access point.For details about checking the SSID, see 2, "Before Configuring Wireless LAN Settings".The characters that can be used are ASCII 0x20-0x7e (32 characters).
12. Select [Security Method:].Ascertain the security method employed by the access point being used.
13. Specify the appropriate settings in [WEP/WPA/WPA2 Settings].The maximum number of characters that can be entered in [WEP Key / Passphrase (PSK):] depends on the [Key Length:] and [Key Format:] settings. Specify settings in accordance with the following table:
CTT217
1
2
3
4
1. Security Method 2. Key Length 3. Key Format 4. WEP Key/ Passphrase(Maximum character)
Open System - None*1 - - -Open System - WEP 64 bit ASCII 5 characters
Hexadecimal 10 characters128 bit ASCII 13 characters
Hexadecimal 26 charactersShared Key - WEP 64 bit ASCII 5 characters
Hexadecimal 10 characters128 bit ASCII 13 characters
Hexadecimal 26 charactersWPA2-PSK - AES*2 - ASCII 8-63 charactersWPA/WPA2 Mixed Mode*2 - ASCII 8-63 characters
*1 The key length, key format, and WEP key/passphrase cannot be configured.*2 The key length cannot be configured.
14. In [WEP Key / Passphrase (PSK):], enter the password for the access point.For details about checking the password, see 2, "Before Configuring Wireless LAN Settings".

11
15. If it is necessary to configure the IPv4 address, click [IPv4 Configuration].The IPv6 address can be configured by Web Image Monitor only. For details about configur-ing the IPv6 address, see "Configuring Network Settings", User Guide .
16. Click [OK].After a setting is changed, the machine automatically restarts.
17. Using the Wi-Fi status report, you can check whether the connection has succeeded or failed.If [Wireless LAN Status Report:] is set to [On], a report confirming the completion of wireless LAN setup is printed. If "OK" appears for "Connection", the connection has succeeded. If "Failed" appears for "Connection", try configuring the settings again. If you still cannot establish a connec-tion, check 6, "Troubleshooting", and then contact your service representative.
When configuring [Open System - WEP], the connection appears to have been established even if you enter the wrong WEP key and the connection fails. In this case, enter the correct WEP key.
•

12
5. Configure the Wireless LAN (SP 203SFNw/204SFNw)
Establish Connection Using PBC
If the access point cannot be detected within 120 seconds, the search session expires.
1. Start the wireless LAN access point.2. Make sure the Ethernet cable is not connected to the machine.
CTT214
3. Switch on the machine.4. Press the [User Tools] key.
CTT129
5. Press the [ ] or [ ] key to select [Network Settings], and then press the [OK] key.6. Press the [ ] or [ ] key to select [Wi-Fi Settings], and then press the [OK] key.7. Press the [ ] or [ ] key to select [Wi-Fi Connection], and then press the [OK] key.8. Press the [ ] or [ ] key to select [Infrastructure Mode], and then press the [OK] key.
If the machine has been set to Ad-hoc mode, it reboots itself after Step 8 and switches to Infrastructure mode. If this happens, repeat Steps 4, 5, 6, 7 and 8.
9. Press the [ ] or [ ] key to select [WPS (PBC)], and then press the [OK] key.
•

13
10. Press the WPS button on the access point.
WPS
CHV607
If the connection is successful, "Connection Succeeded" will be displayed.If the connection fails, "Connection Failed" is displayed. If this is the case, try configuring the settings again. If you still cannot establish a connection, check 6, "Troubleshooting", and then contact your service representative.If [Wi-Fi Status Report] is set to [On], a report confirming the completion of wireless LAN setup is printed.
Establish a Connection Using the PIN
If the access point cannot be detected within 120 seconds, the search session expires.
1. Start the wireless LAN access point.2. Open the PIN code configuration screen for the wireless LAN router or the access
point on your computer.
3. Make sure the Ethernet cable is not connected to the machine.
CTT214
4. Switch on the machine.
•

14
5. Press the [User Tools] key.
CTT129
6. Press the [ ] or [ ] key to select [Network Settings], and then press the [OK] key.7. Press the [ ] or [ ] key to select [Wi-Fi Settings], and then press the [OK] key.8. Press the [ ] or [ ] key to select [Wi-Fi Connection], and then press the [OK] key.9. Press the [ ] or [ ] key to select [Infrastructure Mode], and then press the [OK] key.
If the machine has been set to Ad-hoc mode, it reboots itself after Step 9 and switchesto Infrastructure mode. If this happens, repeat Steps 5, 6, 7, 8 and 9.
10. Enter the machine's PIN code on the access point's web page.
Enter the PIN obtained from the network setting list. For details, see 2, "Before Configuring Wireless LAN Settings".
11. Press the [ ] or [ ] key to select [WPS (PIN)], and then press the [OK] key.
12. Execute WPS (PIN system) from the access point's web page.
If the connection is successful, "Connection Succeeded" will be displayed.If the connection fails, "Connection Failed" is displayed. If this is the case, try configuring the settings again. If you still cannot establish a connection, check 6, "Troubleshooting", and then contact your service representative.If [Wi-Fi Status Report] is set to [On], a report confirming the completion of wireless LAN setup is printed.

15
Configuring the Wireless LAN Settings ManuallyIf you cannot ascertain the settings of the access point being used or the access point does not support WPS, configure the wireless LAN settings manually.
Check the SSID and password (WEP key/Passphrase) by referring to the manual of the wire-less LAN access point being used.Ascertain the security method employed by the access point being used. If you are unsure which security method is supported by the wireless LAN access point being used, refer to the access point manual.
Searching for the SSID1. Start the wireless LAN access point.2. Make sure the Ethernet cable is not connected to the machine.
CTT214
3. Switch on the machine.4. Press the [User Tools] key.
CTT129
5. Press the [ ] or [ ] key to select [Network Settings], and then press the [OK] key.6. Press the [ ] or [ ] key to select [Wi-Fi Settings], and then press the [OK] key.7. Press the [ ] or [ ] key to select [Wi-Fi Connection], and then press the [OK] key.8. Press the [ ] or [ ] key to select [Infrastructure Mode], and then press the [OK] key.
If the machine has been set to Ad-hoc mode, it reboots itself after Step 8 and switchesto Infrastructure mode. If this happens, repeat Steps 4, 5, 6, 7 and 8.
9. Press the [ ] or [ ] key to select [Search SSID], and then press the [OK] key.
10. Press the [ ] or [ ] key to select the SSID, and then press the [OK] key.For details about checking the SSID, see 2, "Before Configuring Wireless LAN Settings".
•
•

16
11. Enter the password (WEP key/Passphrase) of the access point.
For details about checking the password, see 2, "Before Configuring Wireless LAN Set-tings".If the security method is set to "Open System - None", it is not necessary to enter the pass-word.
12. Press the [OK] key.If the connection is successful, "Connection Succeeded" will be displayed.If the connection fails, "Connection Failed" is displayed. If this is the case, try configuring the settings again. If you still cannot establish a connection, check 6, "Troubleshooting", and then contact your service representative.If [Wi-Fi Status Report] is set to [On], a report confirming the completion of wireless LAN setup is printed.
Entering the SSIDIf you cannot find the access point in "Searching for the SSID", configure the SSID according to the following procedure.
When configuring the settings manually, you can also use Smart Organizing Monitor. It is con-venient for entering characters that are difficult to enter using the control panel. For details about configuring the settings, see "Configuring the Wireless LAN Settings Manually" in 4, "Configure the Wireless LAN (SP 200Nw/201Nw)".
1. Start the wireless LAN access point.2. Switch on the machine.3. Make sure the Ethernet cable is not connected to the machine.
CTT214
4. Press the [User Tools] key.5. Press the [ ] or [ ] key to select [Network Settings], and then press the [OK] key.6. Press the [ ] or [ ] key to select [Wi-Fi Settings], and then press the [OK] key.7. Press the [ ] or [ ] key to select [Wi-Fi Connection], and then press the [OK] key.8. Press the [ ] or [ ] key to select [Infrastructure Mode], and then press the [OK] key.
If the machine has been set to Ad-hoc mode, it reboots itself after Step 8 and switches to Infrastructure mode. If this happens, repeat Steps 4, 5, 6, 7 and 8.
9. Press the [ ] or [ ] key to select [Enter SSID], and then press the [OK] key.
•

17
10. Enter the SSID of the access point, and then press the [OK] key.
For details about checking the SSID, see 2, "Before Configuring Wireless LAN Settings".Hold down the [ ] key to delete a character.Press the [ ] key to move the cursor back.Press the [ ] key to move the cursor forward.The characters that can be used are ASCII 0x20-0x7e (32 characters).
11. Select the security method.
If you have selected [Open System - None], proceed to Step 16.12. Press the [OK] key.
If you have selected [WPA2-PSK - AES] or [WPA/WPA2 Mixed Mode], proceed to Step 15.13. Select the key length, and then press the [OK] key.
14. Select key format, and then press the [OK] key.
The maximum number of characters that can be entered in the password field depends on the [Key Length] and [Key Format] settings. For details about configuring these settings, see "Configuring the Wireless LAN Settings Manually" in 4, "Configure the Wireless LAN (SP 200Nw/201Nw)".
15. Enter the password (WEP key/Passphrase) of the access point.For details about checking the password, see 2, "Before Configuring Wireless LAN Settings".
16. Press the [OK] key.If the connection is successful, "Connection Succeeded" will be displayed.If the connection fails, "Connection Failed" is displayed. If this is the case, try configuring the settings again. If you still cannot establish a connection, check 6, "Troubleshooting", and then contact your service representative.If [Wi-Fi Status Report] is set to [On], a report confirming the completion of wireless LAN setup is printed.
When configuring [Open System - WEP], the connection appears to have been established even if you enter the wrong WEP key and the connection fails. In this case, enter the correct WEP key.
•

18
6. Troubleshooting
Connection ProblemsIf problems occur even after you configure the connection settings again, check the following:
Are the settings for the wireless LAN access point correctly configured?Check that the WPS function is not set to "inactive" or "Off".Functions other than WPS may interfere with the WPS function depending on their set-tings. For details, refer to the manuals for the wireless LAN access point.
Are the wireless LAN access point placed in an area in which they can receive radio waves?
The area in which the devices can receive radio waves varies depending on the structure of the building. If the machine is away from the wireless LAN access point, place it closer to either of them. Then connect the machine to the devices.
Is the button you pressed the WPS button?The WPS button has different names, pressing or holding times depending on the wireless LAN access point you are using. For details about which button you need to press or hold for a specific period of time, refer to the manual.
Is the PIN code configured correctly?Configure the PIN code correctly according to the manuals for the wireless LAN access point.Check the PIN code when it is displayed or printed.
Is the LAN type set to [Ethernet]?Set the LAN type to [Wireless LAN].
SP 200Nw/201Nw (Web Image Monitor)[Interface Settings] [LAN Type] [Wireless LAN]
SP 203SFNw/204SFNw (Control Panel)[User Tools] key [Network Settings] [LAN Type] [Wireless LAN]
Is an Ethernet cable connected?If the machine is connected to the network using an Ethernet cable, the Ethernet con-nection is enabled. To use the wireless LAN, disconnect the Ethernet cable from the ma-chine.
Is the communication mode set to [802.11 Ad-Hoc Mode]?Set the communication mode to [Infrastructure Mode].
SP 200Nw/201Nw (Control Panel)Hold down the [Job Reset] key [Start] keySP 203SFNw/204SFNw (Control Panel)[User Tools] key [Network Settings] [Wi-Fi Settings] [Wi-Fi Connection] [Infra-structure Mode]
Have you entered the SSID and password correctly? Make sure you have entered them correctly. The SSID and password are case-sensitive.
■
••
■
•
■
•
■
•
•■
••
•
■
•
■
••
•
■
•

19
Connection was Successful but Wireless LAN Cannot be UsedIf a connection has been established but the wireless LAN cannot be used, check the following:
Check that an Ethernet cable is not connected to the machine.If the machine is connected to the network using an Ethernet cable, the Ethernet con-nection is enabled. To use the wireless LAN, disconnect the Ethernet cable from the ma-chine.
Connection may fail due to radio wave conditions.If there is another wireless network nearby, the wireless connection may fail. Wait for a while, and then connect to the network again.
The Wi-Fi status report cannot be printed out.Set the Wi-Fi status report to [On].
SP 200Nw/201Nw (Smart Organizing Monitor)[User Tool] tab [Printer Configuration] [Wi-Fi] tab [Wireless LAN Status Report:] [On]
SP 203SFNw/204SFNw (Control Panel)[User Tools] key [Network Settings] [Wi-Fi Settings] [Wi-Fi Status Report] [On]
The previously established connection cannot be established again.To reconfigure the wireless LAN settings, first reset the network settings.
SP 200Nw/201Nw1. While holding down the [Job Reset] key, turn the power on.
SP 203SFNw/204SFNw1. While holding down the [Stop/Clear] key on the control panel, turn the power on.
Holding the key down for five seconds.Hold the key down until the Alert LED lights.Once the reset is complete, the machine automatically restarts.
Are the IP address settings correctly configured?Make sure the IP address settings are configured correctly.Configuring the IPv4 address for wireless LAN connection
SP 200Nw/201Nw (Smart Organizing Monitor)[User Tool] tab [Printer Configuration] [Wi-Fi] tab [IPv4 Configuration] SP 203SFNw/204SFNw (Control Panel)[User Tools] key [Network Settings] [Wi-Fi Settings] [Machine IPv4 Address]
Configuring the IPv6 address for wireless LAN connectionSP 200Nw/201Nw (Web Image Monitor)For details , see "Configuring Network Settings" in the User Guide .SP 203SFNw/204SFNw (Control Panel)[User Tools] key [Network Settings] [Wi-Fi Settings] [Machine IPv6 Address]
■
•
■
•
■
••
•
■
••
•
■
••
•
•
••
•

© 2013EN GB EN US EN AU M144-8636
20
Glossary of Wireless LAN TermsWireless LAN Access Point (Router)This device routes data between wireless LAN-capable devices and the Internet.Infrastructure ModeSelect this to communicate via an access point.Ad-Hoc ModeSelect this to connect directly to a device equipped with wireless LAN (such as a laptop).WPS (Wi-Fi Protected Setup)WPS is a standard for encryption settings for connections between devices that support Wi-Fi. Devices that support this standard can be connected easily using a wireless LAN with encryp-tion.
PBCA WPS connection method using a push button.PINA WPS connection method using a PIN code.
SSIDThis is a network identifier for differentiating one wireless LAN access point from another. It is also called the network name or access point name.Password (WEP key/Passphrase)This is the password for accessing the wireless LAN access point. It is also called the network key or encryption key.
•
•
•
•
•
•
•
•