WhatsUp Gold - Ipswitchftp.ipswitch.com/ipswitch/manuals/whatsupg.pdf · · 2010-06-08Verifying...
284
WhatsUp Gold User’s Guide Software Version 8 Ipswitch, Inc.
Transcript of WhatsUp Gold - Ipswitchftp.ipswitch.com/ipswitch/manuals/whatsupg.pdf · · 2010-06-08Verifying...

WhatsUp Gold
User’s Guide
Software Version 8
Ipswitch, Inc.
The information in this document is subject to change without notice and should not be construed as a
commitment by Ipswitch, Inc. While every effort has been made to assure the accuracy of the informa-
tion contained herein, Ipswitch, Inc. assumes no responsibility for errors or omissions. Ipswitch, Inc.
assumes no liability for damages resulting from the use of the information contained in this document.
The software described in this document is furnished under a license and may be used or copied only in
accordance with the terms of that license.
Copyright © 1995-2003 by Ipswitch, Inc. All rights reserved. IMail, the IMail logo, WhatsUp, the
WhatsUp logo, WS_FTP, the WS_FTP logos, Ipswitch, and the Ipswitch logo are trademarks of
Ipswitch, Inc. Other products or company names are or may be trademarks or registered trademarks
and are the property of their respective companies.
No part of this publication may be reproduced, photocopied, stored on a retrieval system, or transferred
without the express prior written consent of Ipswitch, Inc.
Printing History
March 1997 First edition.December 1997 Second edition.April 1999 Third edition.September 1999 Fourth edition.March 2000 Fifth edition.January 2001 Sixth edition.November 2001 Seventh edition.January 2003 Eighth edition.
Ipswitch, Inc.10 Maguire RoadSuite 220Lexington, MA 02421-3110
Phone: 781-676-5700
Web: http://www.ipswitch.com
Contents
Preface. . . . . . . . . . . . . . . . . . . . . . . . . . . . . . . . . . . . . . . . . . . . . . . . . . . . . . . . . . . . . . . . . . . . . . . . . . xiWhat This Package Includes . . . . . . . . . . . . . . . . . . . . . . . . . . . . . . . . . . . . . . . . . . . . . . . . . . . . xiThe Ipswitch Products . . . . . . . . . . . . . . . . . . . . . . . . . . . . . . . . . . . . . . . . . . . . . . . . . . . . . . . . xi
Chapter 1: Introduction . . . . . . . . . . . . . . . . . . . . . . . . . . . . . . . . . . . . . . . . . . . . . . . . . . . . . . . . . . . .1What is WhatsUp Gold? . . . . . . . . . . . . . . . . . . . . . . . . . . . . . . . . . . . . . . . . . . . . . . . . . . . . . . . . 1Overview of Basic Features . . . . . . . . . . . . . . . . . . . . . . . . . . . . . . . . . . . . . . . . . . . . . . . . . . . . . . 2
Using the Web Interface . . . . . . . . . . . . . . . . . . . . . . . . . . . . . . . . . . . . . . . . . . . . . . . . . . . 2Mapping the Network . . . . . . . . . . . . . . . . . . . . . . . . . . . . . . . . . . . . . . . . . . . . . . . . . . . . . 2Monitoring the Network . . . . . . . . . . . . . . . . . . . . . . . . . . . . . . . . . . . . . . . . . . . . . . . . . . . 3Getting Information from the Network Map. . . . . . . . . . . . . . . . . . . . . . . . . . . . . . . . . . . . 4Application and Map State Icons . . . . . . . . . . . . . . . . . . . . . . . . . . . . . . . . . . . . . . . . . . . . 5Getting Status for a Device . . . . . . . . . . . . . . . . . . . . . . . . . . . . . . . . . . . . . . . . . . . . . . . . . 5Getting Information via Notifications . . . . . . . . . . . . . . . . . . . . . . . . . . . . . . . . . . . . . . . . . 6Logs and Reports. . . . . . . . . . . . . . . . . . . . . . . . . . . . . . . . . . . . . . . . . . . . . . . . . . . . . . . . . 6
Additional Features . . . . . . . . . . . . . . . . . . . . . . . . . . . . . . . . . . . . . . . . . . . . . . . . . . . . . . . . . . . . 7What’s New in Version 8.0? . . . . . . . . . . . . . . . . . . . . . . . . . . . . . . . . . . . . . . . . . . . . . . . . . . . . . 8System Requirements . . . . . . . . . . . . . . . . . . . . . . . . . . . . . . . . . . . . . . . . . . . . . . . . . . . . . . . . . . 9Upgrading . . . . . . . . . . . . . . . . . . . . . . . . . . . . . . . . . . . . . . . . . . . . . . . . . . . . . . . . . . . . . . . . . 10Installation . . . . . . . . . . . . . . . . . . . . . . . . . . . . . . . . . . . . . . . . . . . . . . . . . . . . . . . . . . . . . . . . . . 11Trying WhatsUp Gold on Your Network . . . . . . . . . . . . . . . . . . . . . . . . . . . . . . . . . . . . . . . . . 12
Creating a New Network Map . . . . . . . . . . . . . . . . . . . . . . . . . . . . . . . . . . . . . . . . . . . . . 12Adding a File Server . . . . . . . . . . . . . . . . . . . . . . . . . . . . . . . . . . . . . . . . . . . . . . . . . . . . . 13Initiating Monitoring . . . . . . . . . . . . . . . . . . . . . . . . . . . . . . . . . . . . . . . . . . . . . . . . . . . . . 14
Running WhatsUp Gold as an NT Service . . . . . . . . . . . . . . . . . . . . . . . . . . . . . . . . . . . . . . . . 15Setting Up to Run as an NT Service . . . . . . . . . . . . . . . . . . . . . . . . . . . . . . . . . . . . . . . . . 15Starting and Stopping the NT Service . . . . . . . . . . . . . . . . . . . . . . . . . . . . . . . . . . . . . . 16
Chapter 2: Creating Network Maps . . . . . . . . . . . . . . . . . . . . . . . . . . . . . . . . . . . . . . . . . . . . . . . . .17Ways to Map Your Network . . . . . . . . . . . . . . . . . . . . . . . . . . . . . . . . . . . . . . . . . . . . . . . . . . . . 17The Discover and Map Wizard . . . . . . . . . . . . . . . . . . . . . . . . . . . . . . . . . . . . . . . . . . . . . . . . . . 19Mapping a Hierarchical Network (SNMP) . . . . . . . . . . . . . . . . . . . . . . . . . . . . . . . . . . . . . . . . . 22
Using SmartScan . . . . . . . . . . . . . . . . . . . . . . . . . . . . . . . . . . . . . . . . . . . . . . . . . . . . . . 22Results of the SmartScan. . . . . . . . . . . . . . . . . . . . . . . . . . . . . . . . . . . . . . . . . . . . . . . . . . 25SNMP Manageable Devices . . . . . . . . . . . . . . . . . . . . . . . . . . . . . . . . . . . . . . . . . . . . . . . 26
Mapping a Flat Network . . . . . . . . . . . . . . . . . . . . . . . . . . . . . . . . . . . . . . . . . . . . . . . . . . . . . 26Results of the Scan . . . . . . . . . . . . . . . . . . . . . . . . . . . . . . . . . . . . . . . . . . . . . . . . . . . . . . 28
Discover Devices from Network Neighborhood . . . . . . . . . . . . . . . . . . . . . . . . . . . . . . . . . . . . . 28Loading a Hosts File . . . . . . . . . . . . . . . . . . . . . . . . . . . . . . . . . . . . . . . . . . . . . . . . . . . . . . . . . . 30Manually Creating a Map . . . . . . . . . . . . . . . . . . . . . . . . . . . . . . . . . . . . . . . . . . . . . . . . . . . . . . 31Reading a Network Map . . . . . . . . . . . . . . . . . . . . . . . . . . . . . . . . . . . . . . . . . . . . . . . . . . . . . . . 31
Contents iiiWhatsUp Gold

iv
Setting Map Polling Properties. . . . . . . . . . . . . . . . . . . . . . . . . . . . . . . . . . . . . . . . . . . . . . . . . . 32Saving and Naming a Network Map . . . . . . . . . . . . . . . . . . . . . . . . . . . . . . . . . . . . . . . . . . . 33
Saving a Context . . . . . . . . . . . . . . . . . . . . . . . . . . . . . . . . . . . . . . . . . . . . . . . . . . . . . . 33
Chapter 3: Additional Mapping Techniques . . . . . . . . . . . . . . . . . . . . . . . . . . . . . . . . . . . . . . . . . . 35Getting New Data into an Existing Map. . . . . . . . . . . . . . . . . . . . . . . . . . . . . . . . . . . . . . . . . . . 35
Active Discovery of Devices . . . . . . . . . . . . . . . . . . . . . . . . . . . . . . . . . . . . . . . . . . . . 35Exporting and Importing Map Data . . . . . . . . . . . . . . . . . . . . . . . . . . . . . . . . . . . . . . . . 37Changing the Map Database Format . . . . . . . . . . . . . . . . . . . . . . . . . . . . . . . . . . . . . . . . 38
Traceroute Mapping . . . . . . . . . . . . . . . . . . . . . . . . . . . . . . . . . . . . . . . . . . . . . . . . . . . . . . . . . . 39Mapping Link Lines . . . . . . . . . . . . . . . . . . . . . . . . . . . . . . . . . . . . . . . . . . . . . . . . . . . . . . . . 39Using Custom Devices . . . . . . . . . . . . . . . . . . . . . . . . . . . . . . . . . . . . . . . . . . . . . . . . . . . . . . . . 42Creating a Subnet . . . . . . . . . . . . . . . . . . . . . . . . . . . . . . . . . . . . . . . . . . . . . . . . . . . . . . . . . . . 42Master Switches and Misc. Settings . . . . . . . . . . . . . . . . . . . . . . . . . . . . . . . . . . . . . . . . . . . . . . 45
Chapter 4: Editing Network Maps . . . . . . . . . . . . . . . . . . . . . . . . . . . . . . . . . . . . . . . . . . . . . . . . . . 49Getting In and Out of Edit Mode . . . . . . . . . . . . . . . . . . . . . . . . . . . . . . . . . . . . . . . . . . . . . . . . 49Tips for Making a Map Easier to Read . . . . . . . . . . . . . . . . . . . . . . . . . . . . . . . . . . . . . . . . . . 49
Draw Toolbar . . . . . . . . . . . . . . . . . . . . . . . . . . . . . . . . . . . . . . . . . . . . . . . . . . . . . 50Keeping Tools Active . . . . . . . . . . . . . . . . . . . . . . . . . . . . . . . . . . . . . . . . . . . . . . . . . . . 50Drawing . . . . . . . . . . . . . . . . . . . . . . . . . . . . . . . . . . . . . . . . . . . . . . . . . . . . . . . . . . . . . . 51Attached Lines . . . . . . . . . . . . . . . . . . . . . . . . . . . . . . . . . . . . . . . . . . . . . . . . . . . . . . . . 51
Setting the Map Display . . . . . . . . . . . . . . . . . . . . . . . . . . . . . . . . . . . . . . . . . . . . . . . . . . . . . . . 51Setting Colors and Views . . . . . . . . . . . . . . . . . . . . . . . . . . . . . . . . . . . . . . . . . . . . . . . . . . . . . 53
Optional Map Views . . . . . . . . . . . . . . . . . . . . . . . . . . . . . . . . . . . . . . . . . . . . . . . . . . . 53Device States . . . . . . . . . . . . . . . . . . . . . . . . . . . . . . . . . . . . . . . . . . . . . . . . . . . . . . . . 53Creating Text Captions . . . . . . . . . . . . . . . . . . . . . . . . . . . . . . . . . . . . . . . . . . . . . . . . . 54Using Dependency Arrows . . . . . . . . . . . . . . . . . . . . . . . . . . . . . . . . . . . . . . . . . . . . . . . 55Arranging the Toolbars . . . . . . . . . . . . . . . . . . . . . . . . . . . . . . . . . . . . . . . . . . . . . . . . . . 56Galleries . . . . . . . . . . . . . . . . . . . . . . . . . . . . . . . . . . . . . . . . . . . . . . . . . . . . . . . . . . . . . . 56
Chapter 5: Working with Devices. . . . . . . . . . . . . . . . . . . . . . . . . . . . . . . . . . . . . . . . . . . . . . . . . . . 59The Polling Method . . . . . . . . . . . . . . . . . . . . . . . . . . . . . . . . . . . . . . . . . . . . . . . . . . . . . 59Defining General Properties . . . . . . . . . . . . . . . . . . . . . . . . . . . . . . . . . . . . . . . . . . . . . 59Setting Up Monitoring . . . . . . . . . . . . . . . . . . . . . . . . . . . . . . . . . . . . . . . . . . . . . . . . . . 61
Using the Right Mouse Menu. . . . . . . . . . . . . . . . . . . . . . . . . . . . . . . . . . . . . . . . . . . . . . . . . . . 63Using Quick Status (Status) . . . . . . . . . . . . . . . . . . . . . . . . . . . . . . . . . . . . . . . . . . . . . 64Adding a Command to the Right Mouse Menu. . . . . . . . . . . . . . . . . . . . . . . . . . . . . . . . 66Adding Custom Menus to a Group of Devices . . . . . . . . . . . . . . . . . . . . . . . . . . . . . . . 66
Program Variables . . . . . . . . . . . . . . . . . . . . . . . . . . . . . . . . . . . . . . . . . . . . . . . . . . . . . . . . . . . 67Customizing Device Types . . . . . . . . . . . . . . . . . . . . . . . . . . . . . . . . . . . . . . . . . . . . . . . . . . . 68
Creating a Device Type . . . . . . . . . . . . . . . . . . . . . . . . . . . . . . . . . . . . . . . . . . . . . . . . . . 68Changing the Double-Click Action for Customized Devices . . . . . . . . . . . . . . . . . . . . . 72Running a script or program for customized devices . . . . . . . . . . . . . . . . . . . . . . . . . . . 72
User’s GuideWhatsUp Gold

Add Web Menu Items to Devices . . . . . . . . . . . . . . . . . . . . . . . . . . . . . . . . . . . . . . . . . . 73Using the Customized Devices on a Map . . . . . . . . . . . . . . . . . . . . . . . . . . . . . . . . . . . . . 76Scanning and Mapping a Device. . . . . . . . . . . . . . . . . . . . . . . . . . . . . . . . . . . . . . . . . . . . 76
Changing the Standard Device Icons . . . . . . . . . . . . . . . . . . . . . . . . . . . . . . . . . . . . . . . . . . . . . . 77
Chapter 6: Monitoring Services . . . . . . . . . . . . . . . . . . . . . . . . . . . . . . . . . . . . . . . . . . . . . . . . . . . . .79Monitoring Standard TCP/IP Services . . . . . . . . . . . . . . . . . . . . . . . . . . . . . . . . . . . . . . . . . . . 81Monitors and Services . . . . . . . . . . . . . . . . . . . . . . . . . . . . . . . . . . . . . . . . . . . . . . . . . . . . . . . . . 83
Defining a Custom TCP/IP Service . . . . . . . . . . . . . . . . . . . . . . . . . . . . . . . . . . . . . . . . 83Script Syntax . . . . . . . . . . . . . . . . . . . . . . . . . . . . . . . . . . . . . . . . . . . . . . . . . . . . . . . . . . . 86SimpleExpect Keywords . . . . . . . . . . . . . . . . . . . . . . . . . . . . . . . . . . . . . . . . . . . . . . . . . . 87Flow Control Keywords . . . . . . . . . . . . . . . . . . . . . . . . . . . . . . . . . . . . . . . . . . . . . . . . . . 87Using Rule Expressions . . . . . . . . . . . . . . . . . . . . . . . . . . . . . . . . . . . . . . . . . . . . . . . . . . 88Rule Expressions Text and Quantifiers Tables . . . . . . . . . . . . . . . . . . . . . . . . . . . 89Testing a Rule Expression. . . . . . . . . . . . . . . . . . . . . . . . . . . . . . . . . . . . . . . . . . . . . . . . . 90Defining an SNMP Object to Monitor . . . . . . . . . . . . . . . . . . . . . . . . . . . . . . . . . . . . . . 91
Summary of Service Monitoring Requirements . . . . . . . . . . . . . . . . . . . . . . . . . . . . . . . . . . . . . 92Custom Services API . . . . . . . . . . . . . . . . . . . . . . . . . . . . . . . . . . . . . . . . . . . . . . . . . . . . . . . . . 93
Chapter 7: Monitoring Events . . . . . . . . . . . . . . . . . . . . . . . . . . . . . . . . . . . . . . . . . . . . . . . . . . . . . .95Configuring the Event Servers . . . . . . . . . . . . . . . . . . . . . . . . . . . . . . . . . . . . . . . . . . . . . . . . . . 96
What is an Event Server? . . . . . . . . . . . . . . . . . . . . . . . . . . . . . . . . . . . . . . . . . . . . . . . . . 96Adding Events to the Events Library . . . . . . . . . . . . . . . . . . . . . . . . . . . . . . . . . . . . . . . . . . . . 97
Defining an SNMP Trap Event . . . . . . . . . . . . . . . . . . . . . . . . . . . . . . . . . . . . . . . . . . . 98Defining a Syslog Event . . . . . . . . . . . . . . . . . . . . . . . . . . . . . . . . . . . . . . . . . . . . . . . . 100Defining a Windows Log Event . . . . . . . . . . . . . . . . . . . . . . . . . . . . . . . . . . . . . . . . . . 101
Using Events for the First Time - A Simulation . . . . . . . . . . . . . . . . . . . . . . . . . . . . . . . . . . . 102Adding an Event to a Device . . . . . . . . . . . . . . . . . . . . . . . . . . . . . . . . . . . . . . . . . . . . . 102Associating an Alert to your Event . . . . . . . . . . . . . . . . . . . . . . . . . . . . . . . . . . . . . . . . 103Event Visual Indicator . . . . . . . . . . . . . . . . . . . . . . . . . . . . . . . . . . . . . . . . . . . . . . . . . . 104Manually Triggering your Event. . . . . . . . . . . . . . . . . . . . . . . . . . . . . . . . . . . . . . . . . . . 105
Chapter 8: Setting Up Notifications . . . . . . . . . . . . . . . . . . . . . . . . . . . . . . . . . . . . . . . . . . . . . . . . .107Defining Notifications . . . . . . . . . . . . . . . . . . . . . . . . . . . . . . . . . . . . . . . . . . . . . . . . . . . . . . . . 108
Defining Beeper Notifications . . . . . . . . . . . . . . . . . . . . . . . . . . . . . . . . . . . . . . . . . . 108Defining Pager Notifications . . . . . . . . . . . . . . . . . . . . . . . . . . . . . . . . . . . . . . . . . . . . 111Defining SMS Notifications . . . . . . . . . . . . . . . . . . . . . . . . . . . . . . . . . . . . . . . . . . . . . 113Defining E-mail Notifications . . . . . . . . . . . . . . . . . . . . . . . . . . . . . . . . . . . . . . . . . . . 114Defining Service Restart Notifications . . . . . . . . . . . . . . . . . . . . . . . . . . . . . . . . . . . . . 116Defining Sound Notifications . . . . . . . . . . . . . . . . . . . . . . . . . . . . . . . . . . . . . . . . . . . . 117Defining Syslog Notifications . . . . . . . . . . . . . . . . . . . . . . . . . . . . . . . . . . . . . . . . . . . . 118Defining Text to Speech Notifications . . . . . . . . . . . . . . . . . . . . . . . . . . . . . . . . . . . . . 119Defining WinPopup Notifications . . . . . . . . . . . . . . . . . . . . . . . . . . . . . . . . . . . . . . . . 120Defining Group Notifications . . . . . . . . . . . . . . . . . . . . . . . . . . . . . . . . . . . . . . . . . . . . 121
Contents vWhatsUp Gold
vi
Defining Program Notifications . . . . . . . . . . . . . . . . . . . . . . . . . . . . . . . . . . . . . . . . . . 123Event Name Information . . . . . . . . . . . . . . . . . . . . . . . . . . . . . . . . . . . . . . . . . . . . . . . . . . . . . 124
More details for On Event (regarding SNMP Trap events). . . . . . . . . . . . . . . . . . . . . . 125Notification Message Variables . . . . . . . . . . . . . . . . . . . . . . . . . . . . . . . . . . . . . . . . . . . . . . . 126
The Event Notification Variable %(*). . . . . . . . . . . . . . . . . . . . . . . . . . . . . . . . . . . . . . 127Testing Notifications . . . . . . . . . . . . . . . . . . . . . . . . . . . . . . . . . . . . . . . . . . . . . . . . . . . . . . . 128Setting Up a Voice Modem . . . . . . . . . . . . . . . . . . . . . . . . . . . . . . . . . . . . . . . . . . . . . . . . . . 129
Defining Voice Notifications . . . . . . . . . . . . . . . . . . . . . . . . . . . . . . . . . . . . . . . . . . . . 130Creating a voice notification:. . . . . . . . . . . . . . . . . . . . . . . . . . . . . . . . . . . . . . . . . . . . . 130
Assigning Alerts to Devices . . . . . . . . . . . . . . . . . . . . . . . . . . . . . . . . . . . . . . . . . . . . . . . . . 132Using the Alerts Dialog . . . . . . . . . . . . . . . . . . . . . . . . . . . . . . . . . . . . . . . . . . . . . . . . . 133Assigning Alerts to Selected Devices . . . . . . . . . . . . . . . . . . . . . . . . . . . . . . . . . . . . . . 134Assigning a Notification to an Alert . . . . . . . . . . . . . . . . . . . . . . . . . . . . . . . . . . . . . . . 135
Editing Alerts . . . . . . . . . . . . . . . . . . . . . . . . . . . . . . . . . . . . . . . . . . . . . . . . . . . . . . . . . . . . . 138
Chapter 9: Working from the Console. . . . . . . . . . . . . . . . . . . . . . . . . . . . . . . . . . . . . . . . . . . . . . 139Opening Network Maps . . . . . . . . . . . . . . . . . . . . . . . . . . . . . . . . . . . . . . . . . . . . . . . . . . . . . . 139Starting and Stopping Polling . . . . . . . . . . . . . . . . . . . . . . . . . . . . . . . . . . . . . . . . . . . . . . . . . 139
To Initiate Automatic Polling . . . . . . . . . . . . . . . . . . . . . . . . . . . . . . . . . . . . . . . . . . . 140To Stop Automatic Polling . . . . . . . . . . . . . . . . . . . . . . . . . . . . . . . . . . . . . . . . . . . . . 140To Check a Device. . . . . . . . . . . . . . . . . . . . . . . . . . . . . . . . . . . . . . . . . . . . . . . . . . . . . 141
Reading the Network Map . . . . . . . . . . . . . . . . . . . . . . . . . . . . . . . . . . . . . . . . . . . . . . . . . . . . 141Receiving Alarms . . . . . . . . . . . . . . . . . . . . . . . . . . . . . . . . . . . . . . . . . . . . . . . . . . . . . . . . 142Receiving Notifications . . . . . . . . . . . . . . . . . . . . . . . . . . . . . . . . . . . . . . . . . . . . . . . . . . . . . 142Acknowledging Alerts . . . . . . . . . . . . . . . . . . . . . . . . . . . . . . . . . . . . . . . . . . . . . . . . . . . . . . . 142Using the Status Window . . . . . . . . . . . . . . . . . . . . . . . . . . . . . . . . . . . . . . . . . . . . . . . . . . . . 143Viewing and Changing Dependencies . . . . . . . . . . . . . . . . . . . . . . . . . . . . . . . . . . . . . . . . . 143
Setting “Up” and “Down” Dependencies . . . . . . . . . . . . . . . . . . . . . . . . . . . . . . . . . . 145Viewing the Polling Statistics . . . . . . . . . . . . . . . . . . . . . . . . . . . . . . . . . . . . . . . . . . . . . . . 146Viewing Active Notifications . . . . . . . . . . . . . . . . . . . . . . . . . . . . . . . . . . . . . . . . . . . . . . . . . 148Using the Mini Status View . . . . . . . . . . . . . . . . . . . . . . . . . . . . . . . . . . . . . . . . . . . . . . . . . . 149
Chapter 10: Logs and Reports . . . . . . . . . . . . . . . . . . . . . . . . . . . . . . . . . . . . . . . . . . . . . . . . . . . . 151WhatsUp Gold Syslog . . . . . . . . . . . . . . . . . . . . . . . . . . . . . . . . . . . . . . . . . . . . . . . . . . . . . . . 152Logging and Reporting Activities . . . . . . . . . . . . . . . . . . . . . . . . . . . . . . . . . . . . . . . . . . . . . . 152
Actions that Trigger Entries in the Activity Log File . . . . . . . . . . . . . . . . . . . . . . . . . . 152Changing How Activities Are Logged . . . . . . . . . . . . . . . . . . . . . . . . . . . . . . . . . . . 153Viewing the Activity Log . . . . . . . . . . . . . . . . . . . . . . . . . . . . . . . . . . . . . . . . . . . . . 155Creating an Outage Report . . . . . . . . . . . . . . . . . . . . . . . . . . . . . . . . . . . . . . . . . . . . . 157Debug Log Information . . . . . . . . . . . . . . . . . . . . . . . . . . . . . . . . . . . . . . . . . . . . . . . . . 159
Using the Command Line for Outage Reports . . . . . . . . . . . . . . . . . . . . . . . . . . . . . . . . . . . . . 160Basic Command Syntax. . . . . . . . . . . . . . . . . . . . . . . . . . . . . . . . . . . . . . . . . . . . . . . . . 160Examples . . . . . . . . . . . . . . . . . . . . . . . . . . . . . . . . . . . . . . . . . . . . . . . . . . . . . . . . . . . . 161Return Codes . . . . . . . . . . . . . . . . . . . . . . . . . . . . . . . . . . . . . . . . . . . . . . . . . . . . . . . . . 161
User’s GuideWhatsUp Gold
Logging and Reporting Polling Statistics . . . . . . . . . . . . . . . . . . . . . . . . . . . . . . . . . . . . . . . . . 162The Polling Statistics. . . . . . . . . . . . . . . . . . . . . . . . . . . . . . . . . . . . . . . . . . . . . . . . . . . . 162Changing Statistics Logging . . . . . . . . . . . . . . . . . . . . . . . . . . . . . . . . . . . . . . . . . . . . . . 163Creating Reports on Polling Statistics. . . . . . . . . . . . . . . . . . . . . . . . . . . . . . . . . . . . . . . 163Exporting Raw Data . . . . . . . . . . . . . . . . . . . . . . . . . . . . . . . . . . . . . . . . . . . . . . . . . . . . 165Statistics Report Legend . . . . . . . . . . . . . . . . . . . . . . . . . . . . . . . . . . . . . . . . . . . . . . . . . 165
Using the Command Line for Statistics Reports . . . . . . . . . . . . . . . . . . . . . . . . . . . . . . . . . . . 166Basic Command Syntax . . . . . . . . . . . . . . . . . . . . . . . . . . . . . . . . . . . . . . . . . . . . . . . . . 166Examples . . . . . . . . . . . . . . . . . . . . . . . . . . . . . . . . . . . . . . . . . . . . . . . . . . . . . . . . . . . . . 168Return Codes . . . . . . . . . . . . . . . . . . . . . . . . . . . . . . . . . . . . . . . . . . . . . . . . . . . . . . . . . . 168
Creating Performance Graphs . . . . . . . . . . . . . . . . . . . . . . . . . . . . . . . . . . . . . . . . . . . . . . . . . . 168Graph Options . . . . . . . . . . . . . . . . . . . . . . . . . . . . . . . . . . . . . . . . . . . . . . . . . . . . . . . . . 169Creating a Graph . . . . . . . . . . . . . . . . . . . . . . . . . . . . . . . . . . . . . . . . . . . . . . . . . . . . . . . 169Using Search Expressions . . . . . . . . . . . . . . . . . . . . . . . . . . . . . . . . . . . . . . . . . . . . . . . . 172Sample Performance Graphs . . . . . . . . . . . . . . . . . . . . . . . . . . . . . . . . . . . . . . . . . . . . . . 173Viewing, Printing, and Exporting Performance Graphs . . . . . . . . . . . . . . . . . . . . . . . . . 174
Using the Command Line for Performance Graphs . . . . . . . . . . . . . . . . . . . . . . . . . . . . . . . . 175Basic Command Syntax . . . . . . . . . . . . . . . . . . . . . . . . . . . . . . . . . . . . . . . . . . . . . . . . . 176Examples . . . . . . . . . . . . . . . . . . . . . . . . . . . . . . . . . . . . . . . . . . . . . . . . . . . . . . . . . . . . . 177Exporting Multiple Report Jobs . . . . . . . . . . . . . . . . . . . . . . . . . . . . . . . . . . . . . . . . . . . 179
Sending Recurring Notifications . . . . . . . . . . . . . . . . . . . . . . . . . . . . . . . . . . . . . . . . . . . . . . . 179
Chapter 11: Working from a Web Browser . . . . . . . . . . . . . . . . . . . . . . . . . . . . . . . . . . . . . . . . . .183Setting Up the WhatsUp Gold Web Server . . . . . . . . . . . . . . . . . . . . . . . . . . . . . . . . . . . . . . 183
Making Maps Available for Web Viewing . . . . . . . . . . . . . . . . . . . . . . . . . . . . . . . . . . . 185Setting Web Server Access . . . . . . . . . . . . . . . . . . . . . . . . . . . . . . . . . . . . . . . . . . . . . . . . . . . . 186
Default User Accounts for the Web Server. . . . . . . . . . . . . . . . . . . . . . . . . . . . . . . . . . . 186Setting Up User Accounts for the Web Server . . . . . . . . . . . . . . . . . . . . . . . . . . . . . . 186Selecting Map Level Security Settings . . . . . . . . . . . . . . . . . . . . . . . . . . . . . . . . . . . . . . 188Setting Web Access by IP Address . . . . . . . . . . . . . . . . . . . . . . . . . . . . . . . . . . . . . . . . . 189
Logging On to the Web Server . . . . . . . . . . . . . . . . . . . . . . . . . . . . . . . . . . . . . . . . . . . . . . . . . 191WhatsUp Gold Web Display . . . . . . . . . . . . . . . . . . . . . . . . . . . . . . . . . . . . . . . . . . . . . . . . . . . 192
Setting Web Colors . . . . . . . . . . . . . . . . . . . . . . . . . . . . . . . . . . . . . . . . . . . . . . . . . . . . . 196Customizing Your WhatsUp Gold Web Site . . . . . . . . . . . . . . . . . . . . . . . . . . . . . . . . . . . . . . 196
Chapter 12: Monitoring SNMP Devices . . . . . . . . . . . . . . . . . . . . . . . . . . . . . . . . . . . . . . . . . . . . .199SNMP Implementation in WhatsUp Gold . . . . . . . . . . . . . . . . . . . . . . . . . . . . . . . . . . . . . . . . 199SNMP Overview . . . . . . . . . . . . . . . . . . . . . . . . . . . . . . . . . . . . . . . . . . . . . . . . . . . . . . . . . . . . 200
Management Information Base (MIB) . . . . . . . . . . . . . . . . . . . . . . . . . . . . . . . . . . . . . . 201Security . . . . . . . . . . . . . . . . . . . . . . . . . . . . . . . . . . . . . . . . . . . . . . . . . . . . . . . . . . . . . . 203SNMP Agent or Manager . . . . . . . . . . . . . . . . . . . . . . . . . . . . . . . . . . . . . . . . . . . . . . . . 203SNMP Operations . . . . . . . . . . . . . . . . . . . . . . . . . . . . . . . . . . . . . . . . . . . . . . . . . . . . . . 203SNMP Traps . . . . . . . . . . . . . . . . . . . . . . . . . . . . . . . . . . . . . . . . . . . . . . . . . . . . . . . . . . 204
Setting Up the MIB Identifiers . . . . . . . . . . . . . . . . . . . . . . . . . . . . . . . . . . . . . . . . . . . . . . . . 204
Contents viiWhatsUp Gold
viii
Viewing SNMP Objects . . . . . . . . . . . . . . . . . . . . . . . . . . . . . . . . . . . . . . . . . . . . . . . . . . . . . . 206SNMP Viewer. . . . . . . . . . . . . . . . . . . . . . . . . . . . . . . . . . . . . . . . . . . . . . . . . . . . . . . . . . . . . . 208
To view interfaces for an SNMP manageable device:. . . . . . . . . . . . . . . . . . . . . . . . . . 208To view detailed SNMP data for an interface:. . . . . . . . . . . . . . . . . . . . . . . . . . . . . . . . 209To graph any of the SNMP counters: . . . . . . . . . . . . . . . . . . . . . . . . . . . . . . . . . . . . . . 209To view other SNMP objects for the selected device: . . . . . . . . . . . . . . . . . . . . . . . . . . 210To view SNMP objects for other devices: . . . . . . . . . . . . . . . . . . . . . . . . . . . . . . . . . . . 210Device SNMP Info. . . . . . . . . . . . . . . . . . . . . . . . . . . . . . . . . . . . . . . . . . . . . . . . . . . . . 210MIB Viewer . . . . . . . . . . . . . . . . . . . . . . . . . . . . . . . . . . . . . . . . . . . . . . . . . . . . . . . . . . 211To monitor an SNMP Object: . . . . . . . . . . . . . . . . . . . . . . . . . . . . . . . . . . . . . . . . . . . . 211To get the object identifier for an SNMP Object: . . . . . . . . . . . . . . . . . . . . . . . . . . . . . 211ARP Table . . . . . . . . . . . . . . . . . . . . . . . . . . . . . . . . . . . . . . . . . . . . . . . . . . . . . . . . . . . 212Address Table . . . . . . . . . . . . . . . . . . . . . . . . . . . . . . . . . . . . . . . . . . . . . . . . . . . . . . . . 213Route Table . . . . . . . . . . . . . . . . . . . . . . . . . . . . . . . . . . . . . . . . . . . . . . . . . . . . . . . . . . 214Interface Table . . . . . . . . . . . . . . . . . . . . . . . . . . . . . . . . . . . . . . . . . . . . . . . . . . . . . . . . 215
Graphing SNMP Values . . . . . . . . . . . . . . . . . . . . . . . . . . . . . . . . . . . . . . . . . . . . . . . . . . . 218Starting the SNMP Graphing Utility . . . . . . . . . . . . . . . . . . . . . . . . . . . . . . . . . . . . . . . 219Adding, Editing, and Deleting SNMP Objects . . . . . . . . . . . . . . . . . . . . . . . . . . . . . . . 219Viewing Item Values . . . . . . . . . . . . . . . . . . . . . . . . . . . . . . . . . . . . . . . . . . . . . . . . . . . 222Editing Item Properties . . . . . . . . . . . . . . . . . . . . . . . . . . . . . . . . . . . . . . . . . . . . . . . . . 223Deleting Items from the Graph . . . . . . . . . . . . . . . . . . . . . . . . . . . . . . . . . . . . . . . . . . . 224Saving and Opening Graph Files . . . . . . . . . . . . . . . . . . . . . . . . . . . . . . . . . . . . . . . . . . 224Editing Graph Properties . . . . . . . . . . . . . . . . . . . . . . . . . . . . . . . . . . . . . . . . . . . . . . . . 224
Receiving SNMP Traps . . . . . . . . . . . . . . . . . . . . . . . . . . . . . . . . . . . . . . . . . . . . . . . . . . . . . . 226Setting Up SNMP Trap Events . . . . . . . . . . . . . . . . . . . . . . . . . . . . . . . . . . . . . . . . . . . 227Assigning SNMP Trap Events to a Device . . . . . . . . . . . . . . . . . . . . . . . . . . . . . . . . . . 228Setting Up Notifications for SNMP Trap Events . . . . . . . . . . . . . . . . . . . . . . . . . . . . . 228Viewing Trap Log Entries . . . . . . . . . . . . . . . . . . . . . . . . . . . . . . . . . . . . . . . . . . . . . 231
Monitoring SNMP Service . . . . . . . . . . . . . . . . . . . . . . . . . . . . . . . . . . . . . . . . . . . . . . . . . . . . 231
Chapter 13: Using Network Tools. . . . . . . . . . . . . . . . . . . . . . . . . . . . . . . . . . . . . . . . . . . . . . . . . . 233Using Format, Copy, and Print Functions . . . . . . . . . . . . . . . . . . . . . . . . . . . . . . . . . . . . . . . . 234
Printing Results . . . . . . . . . . . . . . . . . . . . . . . . . . . . . . . . . . . . . . . . . . . . . . . . . . . . . . . 234Displaying Device Information (Info Tool) . . . . . . . . . . . . . . . . . . . . . . . . . . . . . . . . . . . . . . . 235Checking a Web Address (HTML Tool) . . . . . . . . . . . . . . . . . . . . . . . . . . . . . . . . . . . . . . . . . 236Synchronizing Time (Time Tool). . . . . . . . . . . . . . . . . . . . . . . . . . . . . . . . . . . . . . . . . . . . . . . 237Verifying Connectivity (Ping Tool) . . . . . . . . . . . . . . . . . . . . . . . . . . . . . . . . . . . . . . . . . . . . . 240Tracing a Route (TraceRoute Tool) . . . . . . . . . . . . . . . . . . . . . . . . . . . . . . . . . . . . . . . . . . . . . 241Finding Host and Name Server (Lookup Tool) . . . . . . . . . . . . . . . . . . . . . . . . . . . . . . . . . . . . 244Getting Information About Users (Finger Tool) . . . . . . . . . . . . . . . . . . . . . . . . . . . . . . . . . . . 246Getting Owner Information (Whois Tool) . . . . . . . . . . . . . . . . . . . . . . . . . . . . . . . . . . . . . . . . 247Searching Directories (LDAP Tool). . . . . . . . . . . . . . . . . . . . . . . . . . . . . . . . . . . . . . . . . . . . . 248Viewing Quotations (Quote Tool) . . . . . . . . . . . . . . . . . . . . . . . . . . . . . . . . . . . . . . . . . . . . . . 250
User’s GuideWhatsUp Gold

Scanning Your Network (Scan Tool). . . . . . . . . . . . . . . . . . . . . . . . . . . . . . . . . . . . . . . . . . . . . 251Viewing and Graphing SNMP Values (SNMP Tool) . . . . . . . . . . . . . . . . . . . . . . . . . . . . . . . . 251Displaying Network Information (WinNet Tool) . . . . . . . . . . . . . . . . . . . . . . . . . . . . . . . . . . . 251Testing Data Speed (Throughput Tool) . . . . . . . . . . . . . . . . . . . . . . . . . . . . . . . . . . . . . . . . . . . 252Viewing Local System Information . . . . . . . . . . . . . . . . . . . . . . . . . . . . . . . . . . . . . . . . . . . . . . 254
Glossary . . . . . . . . . . . . . . . . . . . . . . . . . . . . . . . . . . . . . . . . . . . . . . . . . . . . . . . . . . . . . . . . . . . . . . .255
Index . . . . . . . . . . . . . . . . . . . . . . . . . . . . . . . . . . . . . . . . . . . . . . . . . . . . . . . . . . . . . . . . . . . . . . . . . .267
Contents ixWhatsUp Gold

x
User’s GuideWhatsUp Gold
Preface
WhatsUp Gold is a graphical network monitoring system designed for multi-protocol networks. WhatsUp Gold monitors your critical devices and services and initiates visual and audible alarms when it detects a problem. In addition, WhatsUp Gold will notify you remotely by beeper, alphanumeric pager, e-mail, or telephone. WhatsUp Gold runs on Windows 2000 (SP2 or later), Windows NT 4.0 (SP 6A or later), Windows 98, Windows ME or Windows XP on Intel platforms.
What This Package Includes
WhatsUp Gold includes the following:
• WhatsUp Gold CD
• License agreement
• This manual, the WhatsUp Gold User’s Guide
The Ipswitch Products
Other Ipswitch products include:
• WS_FTP Pro FTP Client
WS_FTP Pro provides two powerful Windows interfaces for connecting to remote hosts and transferring files. WS_FTP Pro includes the Find Utility, Scripting Utility, and Synchronize Utility.
• WS_FTP Server
WS_FTP Server is a full-featured FTP server for Windows NT systems. WS_FTP Server lets you create FTP sites that make files and folders on your PC available to other users. WS_FTP Server offers many features not found in most commercial servers today, including automatic resumption of interrupted transfers.
Preface xiWhatsUp Gold
xii
• IMail Server
IMail Server is an electronic mail server system based on Internet standards. IMail Server provides Simple Mail Transfer Protocol (SMTP) for sending and receiving mail over the Internet or over an internal TCP/IP network. It supports any mail client that uses the Post Office Protocol, Version 3 (POP3) or Internet Message Access Protocol (IMAP4). Web Messaging lets users access their mail from any web browser; users do not need to have a mail client. A web-based calendar allows users to keep personal schedules secure and accessible through an intuitive web interface.
• WS_Ping ProPack
WS_Ping ProPack is the ultimate network information tool. It provides everything you need to help track down network problems and to get information about users, hosts, and networks on the Internet or on your intranet. Tools include Info, Time, HTML, Ping, Traceroute, Lookup, Finger, Whois, LDAP, Quote, Scan, SNMP, WinNet, and Throughput.
User’s GuideWhatsUp Gold
Chapter 1: Introduction
This chapter describes the basic operation of WhatsUp Gold and lists both standard and new features. In addition, you will find system requirements, upgrading and installation instructions, a quick “try it” procedure, and the procedure for running WhatsUp Gold as an NT service.
NoteFor updated information since this manual was printed, see the Release Notes, WhatsUpG.txt. This file is installed with the product and can be selected from Programs->WhatsUp Gold->WhatsUp Gold Release Notes.
What is WhatsUp Gold?
WhatsUp Gold is a network mapping, monitoring, and notification solution that helps you keep your growing network up and running. With WhatsUp Gold, you can quickly create a map of your network, start monitoring, and get feedback on your network’s performance. You can:
• Map your network — Choose from several automated discovery options to create a map of the devices (for example: routers, switches, servers, workstations) in your network. Auto Discovery can also discover services (for example: web, mail or file transfer services) on each device.
• Monitor devices and services — Use standard protocols (TCP/IP, SNMP, NetBIOS, and IPX) to map and monitor your network. WhatsUp Gold continuously polls the mapped devices (and services on the devices). It initiates both visible and audible alarms when monitored devices and system services go down.
• Listen for events — WhatsUp Gold can alert you when specific ‘events’ occur. For example, when an SNMP Trap is received. Events can occur at any time and are independent of the regular poll cycle. You can be notified as soon as the event(s) occur, regardless of the map polling cycle.
Chapter 1 Introduction 1WhatsUp Gold
2
• Receive notification of problems — When WhatsUp Gold detects a problem, you can receive instant notification by beeper, pager, sound, WinPopup, e-mail, voice message, and others.
• Generate reports to help you analyze your network uptime and device response time.
• Manage WhatsUp Gold remotely — Use the built-in, secure web server to view maps from a browser on a remote computer.
WhatsUp Gold is the affordable alternative to expensive and complicated high-end network management systems. Also, it’s easily configured to match your precise network environment, scalable to accommodate growth, and simple to administer.
Overview of Basic Features
This section introduces the basic WhatsUp Gold features that let you create maps, set monitoring and notification options, and generate reports.
Using the Web Interface
You can connect to the WhatsUp Gold web interface from any browser by entering its web address. This web address consists of the hostname of the WhatsUp Gold host and the web server port number. The default port number is 80.
After logging on to the WhatsUp Gold web interface, you have access to the following web pages (depending on how your Users account is set up): Top View, Detail View, Map View, Summary View, Device View, Activity Log, Statistics View, Outage Report, and Statistics Report pages. See the WhatsUp Gold web interface help pages for information about how to use these web pages. The web interface if more fully explained in “Chapter 11: Working from a Web Browser” on page 183.
Mapping the Network
WhatsUp Gold can map your network in several different ways, including an automatic “discover and map” capability that can:
• Scan the Windows network to which your computer is connected
• Read SNMP information from a router and scan the network connected to the router
User’s GuideWhatsUp Gold
• Filter certain device types to include or exclude while scanning the network
• Scan a specified range of IP addresses
• Load a hosts file, which lists host names and IP addresses
• Continuously update the map with new devices that were added to the network after the initial scan was done
Each of these automatic “discover and map” methods identifies any TCP/IP, NetBIOS, or IPX devices, identifies services on the devices, and displays the results. Before the map is created, you can select the devices (and services) that you want to include. For each device, the map displays an icon that reflects the device type (such as a workstation, server, or router).
If your network is arranged in a hierarchy using subnets, the “discover and map” feature can read information from a specified router and create a top-level map with subnet maps for each network segment. You can set the “discover and map” capability to run in “active discovery” mode, which means your maps will be updated when changes are made in the network.
To find out more about mapping your network, see “Chapter 2: Creating Network Maps” on page 17.
Monitoring the Network
Once you have created or loaded a network map, you can set WhatsUp Gold to continuously monitor the network, or you can initiate a single “poll” of the network. One poll of the network involves checking each monitored device in the network map. Each “check” consists of WhatsUp Gold sending a poll request to a device and tracking the response.
For each monitored device, you can choose from a set of options in the device properties to determine how the device is monitored and define what action to take if the device does not respond to a check.
On each TCP/IP device in your network map, you can determine which services are running on that device (such as HTTP, SMTP, POP3, DNS) and you can select those services you want to monitor. WhatsUp Gold monitors a service by communicating with the port that the service runs on.
Chapter 1 Introduction 3WhatsUp Gold

4
When you open the network map window, WhatsUp Gold automatically begins monitoring the network.
NoteUnless you have the express permission of the owners of particular devices, do not monitor host systems, workstations, or other devices that you do not control.
WhatsUp Gold is in either Monitor Mode or Edit Mode. Monitor Mode is the mode in which WhatsUp Gold polls the network. Edit Mode is the mode in which you make changes to the map; you can use Edit Mode to refine the network map, add devices, draw connecting lines, and convert icons to a different icon type. For more information, see “Chapter 4: Editing Network Maps” on page 49.
Getting Information from the Network Map
In Monitor Mode, the map gives graphic indication of potential and actual problems on your network. If something occurs such as a device misses a poll, or an event comes in, the name of the device becomes highlighted on the map.
The status bar also displays a timer that counts down the time between polls.
When you place the cursor over a device icon, the status bar shows the device name, address, and a brief status description, including the status of any services being monitored.
The look “during” an active scan.
The look when scan has been suspended.
The active discovery indicator looks like this because “Active discovery” is set in Map Properties->Network. If “Active Discovery” were cleared, you would not see the magnifying glass on this map.
User’s GuideWhatsUp Gold

In addition, colors and shapes indicate the status of the various devices. By default, devices that respond to polls are displayed in green, those that have missed one poll are light green, those that have missed two polls are yellow, and those that are not accessible (or have not responded to four polls) are red. You can change the default colors and shapes. See “Setting Colors and Views” on page 53.
Application and Map State Icons
If you are monitoring several maps, each map will have a Map State icon in the upper left corner. This icon will change color and shape as conditions change on the map. The application also has an application state icon in the upper left corner. This icon will always reflect the condition of the map in the worst state. For example, if all devices respond to polling and any associated services are up, ALL icons are a green square. If a device misses one poll, the green square becomes a green triangle. It should be noted that the point of the triangle and the color changes as missed polls continue. This is further explained in the help topic, “Application and Map State Icons”.
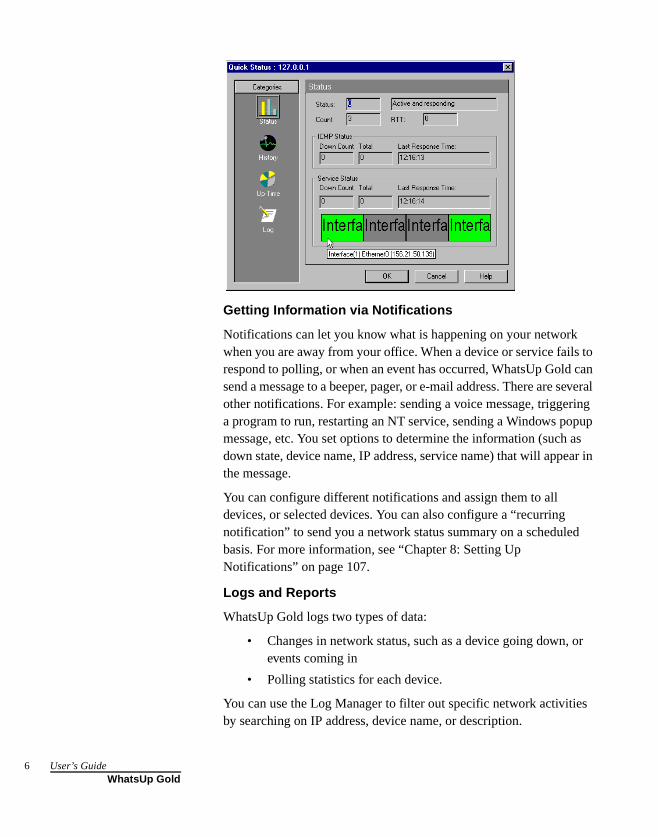
Getting Status for a Device
In Monitor Mode, you can display up-to-the-minute status information about a device by right-clicking the device icon, then selecting Quick Status, and then clicking Status.
The Marketing computer missed a poll.
Chapter 1 Introduction 5WhatsUp Gold
6
Getting Information via Notifications
Notifications can let you know what is happening on your network when you are away from your office. When a device or service fails to respond to polling, or when an event has occurred, WhatsUp Gold can send a message to a beeper, pager, or e-mail address. There are several other notifications. For example: sending a voice message, triggering a program to run, restarting an NT service, sending a Windows popup message, etc. You set options to determine the information (such as down state, device name, IP address, service name) that will appear in the message.
You can configure different notifications and assign them to all devices, or selected devices. You can also configure a “recurring notification” to send you a network status summary on a scheduled basis. For more information, see “Chapter 8: Setting Up Notifications” on page 107.
Logs and Reports
WhatsUp Gold logs two types of data:
• Changes in network status, such as a device going down, or events coming in
• Polling statistics for each device.
You can use the Log Manager to filter out specific network activities by searching on IP address, device name, or description.
User’s GuideWhatsUp Gold

From this logged data, WhatsUp Gold can create several reports and graphs that show the status of your network in different ways. From the Reports menu, you can create the following:
Performance Graphs. Show devices by best or worst performance based on aggregated polling statistics. The graphs can show summaries of device and service availability and response times.
Outage Reports. Show device up and down state changes, service up and down state changes, and WhatsUp Gold activities such as map open and close.
Statistics Reports. Show the accumulated polling statistics by device.
For more information, see “Chapter 10: Logs and Reports” on page 151.
Additional Features
This section introduces some additional monitoring capabilities:
• SNMP monitoring — You can use WhatsUp Gold’s SNMP features to further monitor activity on a device, such as a router. SNMPView displays the status of interfaces on a device and lets you quickly view MIB values. Current MIB data can be used to get baseline values to set threshold monitoring. You can also graph MIB traffic data to show throughput in real-time.
For more information, see “SNMP Viewer” on page 208.
• Custom Services — You can define additional monitors to check any service or application that can communicate via TCP or UDP. Using scripting, you can set up monitoring for a service by connecting to a particular port, sending a command string, and examining the expected response. If the service fails to return the expected response, you can configure WhatsUp Gold to notify you of a service failure.
For more information, see “Defining a Custom TCP/IP Service” on page 83.
Chapter 1 Introduction 7WhatsUp Gold
8
• Customizable device types — You can add your own device types to those that Auto Discovery can recognize. When Auto Discovery finds a device of that type, it can map the device using a custom icon. Use the VDevice, our vector-based graphics tool, to import or create device icons.
For more information, see “Customizing Device Types” on page 68.
• Extensibility — The monitoring subsystem of WhatsUp Gold incorporates an interface based on Microsoft’s Component Object Module (COM) technology. This interface provides the extensibility needed for implementing additional custom monitoring “add-in” solutions (such as, adding support for security systems or other non-TCP/IP devices). NOTE: The notifications, database, and events systems are also extensible.
For more information, see “Custom Services API” on page 93.
What’s New in Version 8.0?
Version 8.0 of WhatsUp Gold offers many new capabilities:
• An Events plug-in system has been added to WhatsUp Gold. This provides the ability to trigger notifications from system events such as new entries in NT Event logs (local or remote), SNMP Traps, and new Syslog entries. Events are immediate and happen outside of the polling loop.
• Note for prior WhatsUp Gold users: Beginning with version 8.0, the term “events” means something very specific. To remove any potential confusion regarding prior meanings, we have changed the name of Event Report and Event Log. Event Report is now named “Outage Report.” Event Log is now named “Activity Log.”
• Ability to Save and Restore all map data and device data as ASCII files, thus allowing you to export to an ASCII editor and modify the data. You can now make an ASCII based format the default file format for the map. Intermediate device statistics are now in ASCII form (last 30 polls, etc.). Map formats are now extensible via a plug-in system.
• Expansion of scripting of TCP/UDP Monitors. Addition of flow control and error handlers to scripts for custom service
User’s GuideWhatsUp Gold
monitoring. Flow Control keywords allow conditional responses on “error” or “success” of a step within the scripts.
• Filtering by device types during discovery. Skip device types you are not interested in discovering and monitoring, both in Active Discovery and New Map Discovery.
• A new SMS Notification type that allows a 'provider' centric method to send an SMS Message. This allows for a provider database to be accumulated so that users can share connection settings and access numbers. In addition there is a scripting mechanism to solve TAP and UCP inconsistencies between provider companies.
• A notification that allows you to stop or restart a specific NT service (local or remote) as a result of a monitored activity. This allows you to manage NT services based on activity on your network.
• Maps loaded through the web interface now load subnet maps automatically.
• SNMP Performance Reports: The WhatsUp Gold Performance Reports capability has been extended to include reports based on data retrieved from SNMP devices.
• Exporting Performance Graphs from the Command Line: Functionality has been extended to allow you to enter multiple report jobs using one call to cstatrpt.
System Requirements
WhatsUp Gold requires the following system resources:
• Intel Pentium or equivalent
• 30 MB of disk space (100 MB recommended)
• 64 MB of RAM (256 MB recommended)
• Windows NT 4.0 (SP6A or later), Windows 2000 (SP2 or later), Windows 98, Windows ME, or Windows XP
• A TCP/IP protocol stack.
• If you want to use beeper, pager, SMS, or voice notifications, a local modem and phone line is required. (WhatsUp Gold does not support modem pooling.)
Chapter 1 Introduction 9WhatsUp Gold
10
• For pager and SMS messages, your service provider must supply you with their provider/carrier information: such as Terminal number and Connection settings. With SMS, this is true if the Provider is not in our database.
• If you want to use the Performance Graphs capability, you need to first install Microsoft’s Open Database Connectivity (ODBC) interface and the ODBC text driver.
WhatsUp Gold sets up the statistics data, from which graphs are created, as an ODBC database.
If your Operating System does not include ODBC, you can obtain the ODBC files from Microsoft’s web site at: www.microsoft.com/data/download_250rtm.htm.
You do not need to set up the ODBC data source. If the WhatsUp Gold installation procedure finds ODBC on your computer, it automatically sets up the data source (DSN) for Performance Graphs. The data source is wugstats.log (in the WhatsUp directory) and uses the Microsoft .txt database format.
• To scan and poll IPX devices, Microsoft’s NWLink IPX/SPX Compatible Transfer Protocol must be installed and running on the WhatsUp Gold console (the system on which you installed WhatsUp Gold). You can add this protocol in the Control Panel's Network applet. If you are using Windows NT, in the Select Network Protocol dialog box, select Microsoft, then select the IPX/SPX-compatible Protocol and follow the online instructions. If you are using Microsoft's Windows 2000 or XP, in the Select Network Component dialog box, select Microsoft, then select the IPX/SPX-compatible Component and follow the online instructions. Note that when creating a map, you should use the Import devices from your registry or Discover Devices from your Network Neighborhood scans to find any IPX devices on the scanned network.
Upgrading
If you are upgrading from a previous version of WhatsUp Gold or WhatsUp, you should note the following:
• Be sure that WhatsUp Gold has completely shut down before upgrading. If you exit WhatsUp Gold during a poll, it may take
User’s GuideWhatsUp Gold

up to 30 seconds for the application to be removed from memory. Until then, WhatsUp Gold appears in the Windows task list.
• Back up your network maps (.db for WhatsUp and .wup, .ini, or .xml for WhatsUp Gold). When you open a WhatsUp file in WhatsUp Gold, it is automatically converted to the .wup format and saved with a .wup extension. Note that .wup maps saved in newer versions cannot be used in previous versions of WhatsUp Gold.
• During installation, if WhatsUp Gold detects that a MIB.TXT or TRAPS.TXT exists in the installation directory, it will install the new files as MIB.NEW and TRAPS.NEW.
Installation
To install or upgrade WhatsUp Gold:
1 Do one of the following:
• If you purchased a WhatsUp Gold CD-ROM, insert the CD-ROM in a drive. If the installation program does not run automatically, then click Start, select Run, and then enter the CD path followed by AutoRun.exe. For example:d:AutoRun.exe
• If you downloaded WhatsUp Gold from the Internet, run the downloaded application, wugoldec.exe.
Additional Plug-Ins are available. For more information on plug-ins, go to the Ipswitch web site:
http://www.ipswitch.com/Support/whatsup/plugins.html
2 To view a demo of WhatsUp Gold, open the map named world.wup.
WhatsUp Gold uses Microsoft’s Open Database Connectivity (ODBC) interface and the ODBC text driver to create performance graphs.
If the installation program finds ODBC installed on your computer, it automatically installs the Performance Graphs capability and sets up the ODBC data source to use for creating graphs.
Chapter 1 Introduction 11WhatsUp Gold
12
If the installation program does not find ODBC, it asks if you want to continue the installation. If you want to use the Performance Graphs, we recommend that you:
1 Click No to cancel the installation.
2 Install ODBC (for ODBC information see “System Requirements” on page 9).
3 Restart the WhatsUp Gold installation program.
Trying WhatsUp Gold on Your Network
The following procedures let you try out WhatsUp Gold. It takes you through starting a simple network map, adding a workstation and file server, and editing the map.
Creating a New Network Map
To create a new network map:
1 From the File menu, select New Map Wizard.
2 Select Create a blank map and click Finish. WhatsUp Gold displays a blank map.
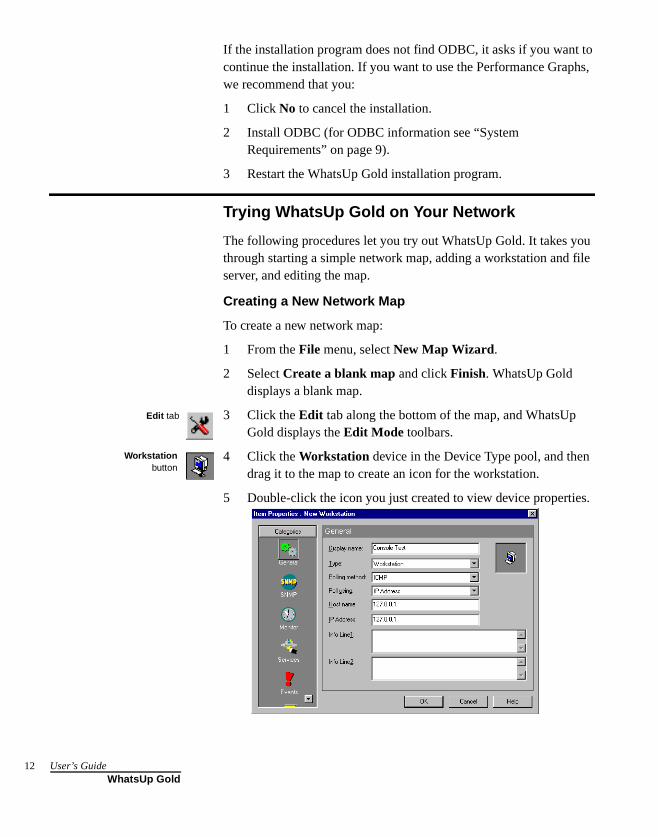
3 Click the Edit tab along the bottom of the map, and WhatsUp Gold displays the Edit Mode toolbars.
4 Click the Workstation device in the Device Type pool, and then drag it to the map to create an icon for the workstation.
5 Double-click the icon you just created to view device properties.
Edit tab
Workstationbutton
User’s GuideWhatsUp Gold

6 In the General dialog box, enter the information as shown. Set the Display Name to ConsoleTest or whatever name you would like for the WhatsUp Gold console (the system on which WhatsUp Gold is installed).
The IP Address is 127.0.0.1, which is the default. (This is the local “loopback” network address; it is the address you use to monitor your own system from your system.)
NoteYou can enter the IP Address of any device you want to monitor.
7 Click Monitor; make sure Monitor This Device is selected.
8 Click Alerts, select Enable alerts, and click Add. From the list box, select “Sound”, and then select “Default.” Click OK, and OK again. This sets up the default sound alert when this device goes down.
Adding a File Server
To create an icon for one of your file servers:
1 Click the Server device in the device pool, and then drag it to the desired location on the map to create the icon.
2 Double-click the icon you just created to view its properties.
3 Click General and set the Display Name to Server.
Server tool
Chapter 1 Introduction 13WhatsUp Gold
14
4 Set the IP Address to the IP address, or set the Host Name text box to the name of a system on your network.
NoteIf you use a name, the network stack must be able to resolve it from a local hosts file or by looking it up on a Domain Name Server, a server that lists host names and their IP addresses. This name is looked up whenever the map is loaded.
5 Click Monitor; make sure Monitor This Device is selected.
6 Click Alerts, select Enable alerts, and click Add. From the list box, select “Sound”, and then select “Default.” Click OK, and OK again. This sets up the default sound alert when this device goes down.
7 Save the map from the File menu by selecting Save As. Save the map with the name of MyTestMap.wup.
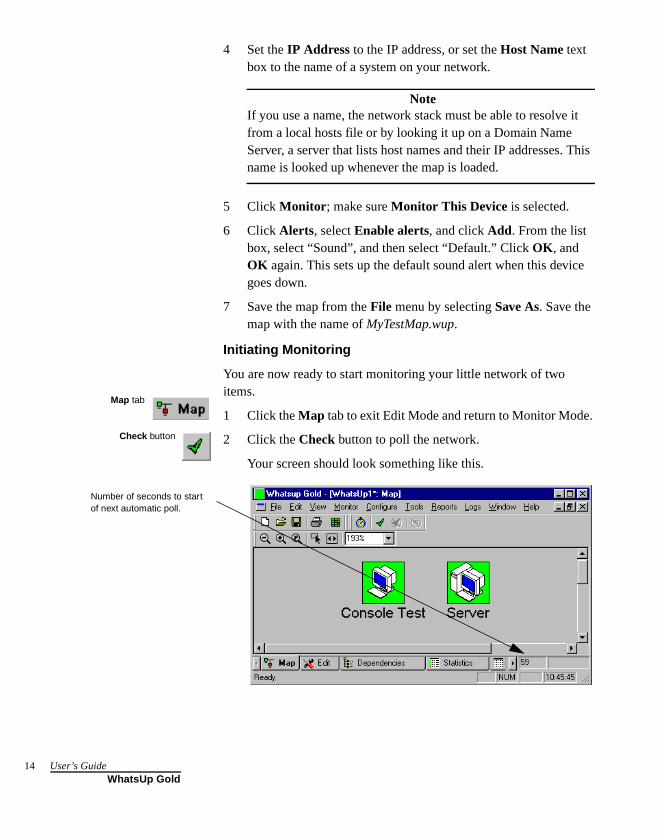
Initiating Monitoring
You are now ready to start monitoring your little network of two items.
1 Click the Map tab to exit Edit Mode and return to Monitor Mode.
2 Click the Check button to poll the network.
Your screen should look something like this.
Map tab
Check button
Number of seconds to start of next automatic poll.
User’s GuideWhatsUp Gold
Running WhatsUp Gold as an NT Service
WhatsUp Gold can run as a system service on Windows NT 4.0 or later. When running as a service, the following conditions apply:
• You must use the web interface to view maps and change configurations, thus using less memory.
Some benefits of running as an NT Service are:
• The service can run completely hidden, thus providing an extra level of security.
• As with any NT service, you can set WhatsUp Gold to restart whenever Windows NT is rebooted.
1 First, create your maps and set up monitoring on the WhatsUp Gold console.
2 When you are satisfied with your map configurations, set the options that affect how you will work with the NT service. See “Setting Up to Run as an NT Service” below.
3 Start the NT service. See “Starting and Stopping the NT Service” on page 16.
Setting Up to Run as an NT Service
We recommend that you create your network maps using WhatsUp Gold in normal operating mode on the Windows NT console. Once your maps are created, select any desired program options (from the Configure menu, select Program Options). These options will be in effect during operation as an NT service.
In the Startup dialog box, in the program options (Configure -> Program Options -> Startup), you can specify multiple maps to load at startup in the Map Names box. Make sure Open maps on startup is selected, and the maps listed in the Map Names box will load at startup. Click Add and select any additional maps for loading at startup. To remove any maps from loading, select the desired map(s) in the Map Names box and click Delete. Additional maps can be subsequently loaded and unloaded using the web interface, provided the maps are in the Map Directory (Configure->Web Server->General).
Chapter 1 Introduction 15WhatsUp Gold
16
NoteService should run under an account that has Administrator permissions.
Set any of the web server options (Configure->Web Server->Users). Select Enable Web Security. For more information about web server options, see “Chapter 11: Working from a Web Browser” on page 183.
If you set up any permissions or other web configuration parameters (set on General and Users menus) while running WhatsUp Gold in normal operating mode on the NT console, you need to stop and restart the NT service mode (see section below).
On the Users dialog box, if you select Automatically save user changes from web interface, you will be able to change user options from the web interface.
Starting and Stopping the NT Service
Your WhatsUp Gold installation includes an executable file named wugsvc.exe for the purpose of installing, removing, starting, and stopping the WhatsUp Gold NT service.
To install and start WhatsUp Gold as an NT service:
1 Go to the DOS prompt.
2 Change to the WhatsUp Gold Program directory.
3 Enter the following command:
wugsvc -install
To remove WhatsUp Gold as an NT service, enter the following command at the DOS prompt:
1 Go to the DOS prompt and change to the WhatsUp Gold Program directory.
2 Enter the following command: wugsvc -remove
NoteThese two commands do not install or remove WhatsUp Gold; they merely install and remove the NT service capability.
User’s GuideWhatsUp Gold
Chapter 2: Creating Network Maps
With WhatsUp Gold, you can use one of the automatic methods to quickly create a map of your network; then you can start monitoring your network immediately, using the default properties that WhatsUp Gold assigned to the map and the individual network devices.
However, you’ll probably want to customize WhatsUp Gold so it polls your network in exactly the way that best suits your needs. This chapter describes how to do the following steps to create your map:
• Create a network map using one or more WhatsUp Gold tools or techniques.
• View and edit the default properties for network devices (workstations, routers, hosts, servers, etc.).
• View and edit the default map properties.
• Use Edit mode to visually organize your network map.
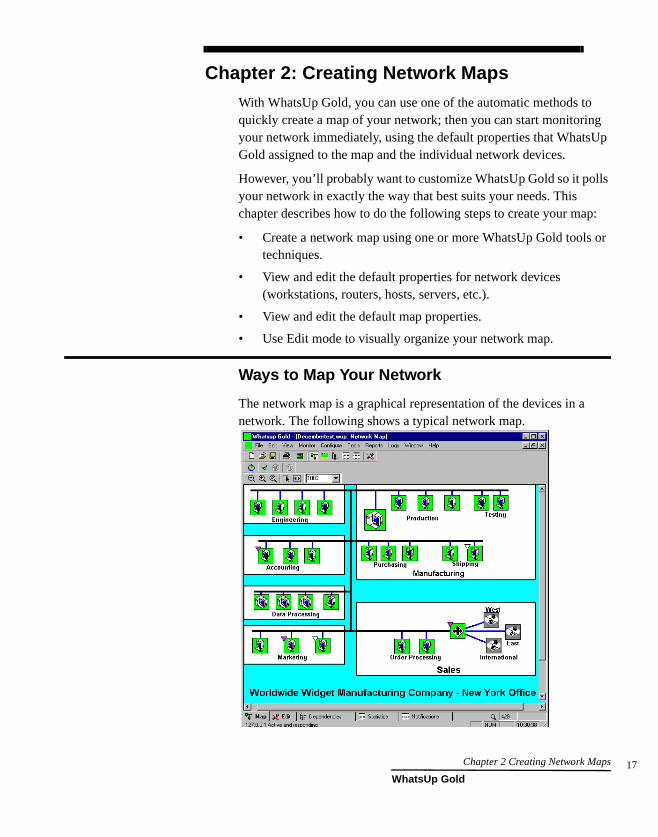
Ways to Map Your Network
The network map is a graphical representation of the devices in a network. The following shows a typical network map.
Chapter 2 Creating Network Maps 17WhatsUp Gold
18
Network devices can be workstations, hosts, servers, routers, bridges, hubs, LAN boxes, printers, subnetworks (“subnets”), containers, or custom host types.
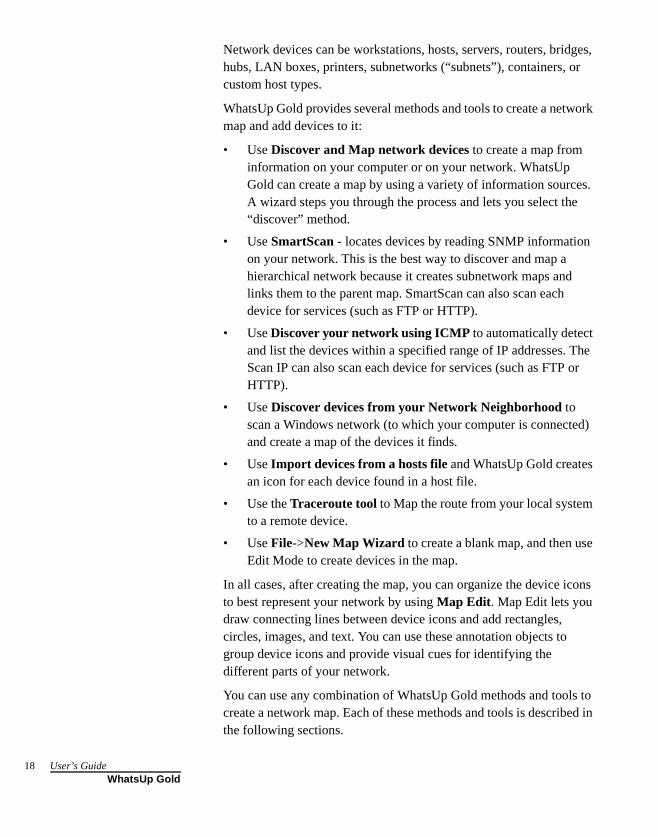
WhatsUp Gold provides several methods and tools to create a network map and add devices to it:
• Use Discover and Map network devices to create a map from information on your computer or on your network. WhatsUp Gold can create a map by using a variety of information sources. A wizard steps you through the process and lets you select the “discover” method.
• Use SmartScan - locates devices by reading SNMP information on your network. This is the best way to discover and map a hierarchical network because it creates subnetwork maps and links them to the parent map. SmartScan can also scan each device for services (such as FTP or HTTP).
• Use Discover your network using ICMP to automatically detect and list the devices within a specified range of IP addresses. The Scan IP can also scan each device for services (such as FTP or HTTP).
• Use Discover devices from your Network Neighborhood to scan a Windows network (to which your computer is connected) and create a map of the devices it finds.
• Use Import devices from a hosts file and WhatsUp Gold creates an icon for each device found in a host file.
• Use the Traceroute tool to Map the route from your local system to a remote device.
• Use File->New Map Wizard to create a blank map, and then use Edit Mode to create devices in the map.
In all cases, after creating the map, you can organize the device icons to best represent your network by using Map Edit. Map Edit lets you draw connecting lines between device icons and add rectangles, circles, images, and text. You can use these annotation objects to group device icons and provide visual cues for identifying the different parts of your network.
You can use any combination of WhatsUp Gold methods and tools to create a network map. Each of these methods and tools is described in the following sections.
User’s GuideWhatsUp Gold
The Discover and Map Wizard
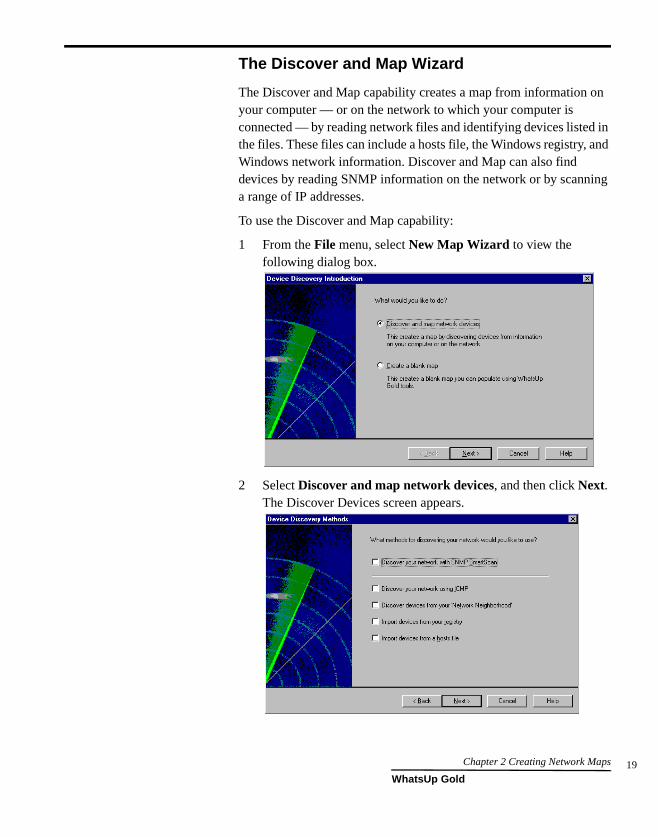
The Discover and Map capability creates a map from information on your computer — or on the network to which your computer is connected — by reading network files and identifying devices listed in the files. These files can include a hosts file, the Windows registry, and Windows network information. Discover and Map can also find devices by reading SNMP information on the network or by scanning a range of IP addresses.
To use the Discover and Map capability:
1 From the File menu, select New Map Wizard to view the following dialog box.
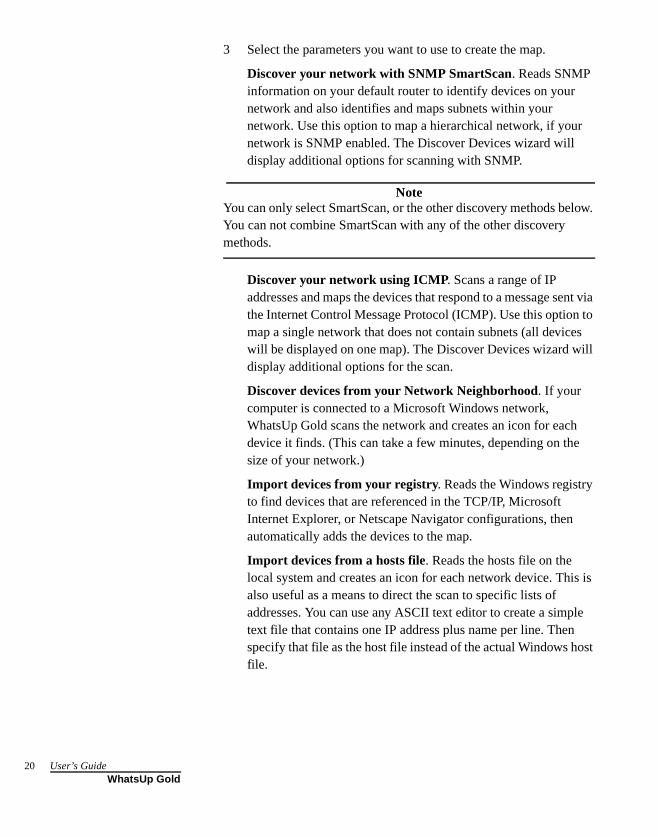
2 Select Discover and map network devices, and then click Next. The Discover Devices screen appears.
Chapter 2 Creating Network Maps 19WhatsUp Gold
20
3 Select the parameters you want to use to create the map.
Discover your network with SNMP SmartScan. Reads SNMP information on your default router to identify devices on your network and also identifies and maps subnets within your network. Use this option to map a hierarchical network, if your network is SNMP enabled. The Discover Devices wizard will display additional options for scanning with SNMP.
NoteYou can only select SmartScan, or the other discovery methods below. You can not combine SmartScan with any of the other discovery methods.
Discover your network using ICMP. Scans a range of IP addresses and maps the devices that respond to a message sent via the Internet Control Message Protocol (ICMP). Use this option to map a single network that does not contain subnets (all devices will be displayed on one map). The Discover Devices wizard will display additional options for the scan.
Discover devices from your Network Neighborhood. If your computer is connected to a Microsoft Windows network, WhatsUp Gold scans the network and creates an icon for each device it finds. (This can take a few minutes, depending on the size of your network.)
Import devices from your registry. Reads the Windows registry to find devices that are referenced in the TCP/IP, Microsoft Internet Explorer, or Netscape Navigator configurations, then automatically adds the devices to the map.
Import devices from a hosts file. Reads the hosts file on the local system and creates an icon for each network device. This is also useful as a means to direct the scan to specific lists of addresses. You can use any ASCII text editor to create a simple text file that contains one IP address plus name per line. Then specify that file as the host file instead of the actual Windows host file.
User’s GuideWhatsUp Gold
4 Click the Next button. Depending on the Discover options you selected, WhatsUp Gold does the following:
• If you selected Discover your network with SNMP SmartScan, it displays the “SNMP SmartScan” dialog box and asks where do you want the SNMP SmartScan to start. Modify any text boxes as needed. Click Next to proceed. To change the default values, see “Mapping a Hierarchical Network (SNMP)” on page 22.
NoteTo make sure you scan only those devices in your own network, you can use the Scan Depth and Limit scan to IP class of root device options. Also, the scan will stop finding more subnets to explore if it comes to a network for which it does not know the SNMP Communities name.
• If you selected Discover your network using ICMP, it displays the “IP Address Scan” dialog box with default values filled in. Click Next to proceed. To change the default values; see “Mapping a Flat Network” on page 26 for more information.
• If you selected Discover devices from your Network Neighborhood, it displays the “Network Neighborhood Scan” dialog box and asks for you to pick the Domain Names you want to include in the scan. Select the desired domains and click Next to proceed.
• If you selected Import devices from a hosts file, the “Host File Import” dialog box appears and asks what host files do you want to import. Use the browse button if you want to select a different host file. Click Next to proceed.
• If you selected Import devices from your registry, the TCP/IP Service Scan” dialog box appears and asks which services do you want to scan for. Select the services for which you want to scan, and make any other changes you want. Click Next to proceed.
• Reads the network files, locates devices and displays them in the “Scan Results” dialog box. It asks which of these devices do you want to appear in the map(s). They ALL have check marks defaulted with them; only keep check marks on the
Chapter 2 Creating Network Maps 21WhatsUp Gold
22
devices you want to appear in the map. Click Finish and the map is created.
5 From the File menu, select Save or Save As to save the map. For more information, see “Tips for Making a Map Easier to Read” on page 49.
Mapping a Hierarchical Network (SNMP)
If your network has a router with an SNMP agent, SmartScan is a powerful way to discover and map your network, as it can create maps and subnet maps that reflect your network's hierarchy. SmartScan discovers and maps devices by reading SNMP data on a device (preferably a router) in your network. Based on the information it finds, SmartScan will continue to scan your network until it has mapped all devices.
To make sure you scan only those devices in your own network, you can use the Scan Depth and Limit scan to IP class of root device options. Also, the scan will stop if it comes to a network for which it does not know the SNMP Communities name.
NoteDo not scan devices on someone else's network without their permission!
You can also enable the scan so that it identifies particular device types. For information on how to do this, see “Customizing Device Types” on page 68.
A SmartScan can also identify network services (such as FTP, HTTP, SMTP) on each network device.
Using SmartScan
SmartScan maps and displays the devices according to your network's hierarchy. If your network is divided into subnets, SmartScan creates a parent map of the top-level network and also creates a map for each subnet. The parent map will show links to its subnets, and any subnet map can have links to lower-level subnets.
User’s GuideWhatsUp Gold

To discover and map devices on your network using SmartScan:
1 If you are not already in the “SNMP SmartScan” dialog box, you can start a scan in either of the following ways:
• To create a new map, from the File menu, select New Map Wizard. In the New Map, select the Discover and Map Network Devices option on the first screen and select Discover your network with SNMP SmartScan on the next screen.
• To add devices to an existing map or a blank map, select the map, then from the Tools menu, select Discover Devices, select Discover your network with SNMP SmartScan on the next screen.
NoteIf you are performing this action on a map that was previously created using SNMP SmartScan, make sure that you select the top-level map prior to beginning.
2 Edit any of the SmartScan options. Click Help for a definition of each option. Click Next to continue.
3 Select the Services you want to scan for. Click Help for a definition of each option.
4 If you select Filter by Device Type, you can control which device types you want or do not want on your map. This will limit the scope of a smart scan depending on the device types specified. For example, you could elect to scan for only printers on the
Chapter 2 Creating Network Maps 23WhatsUp Gold
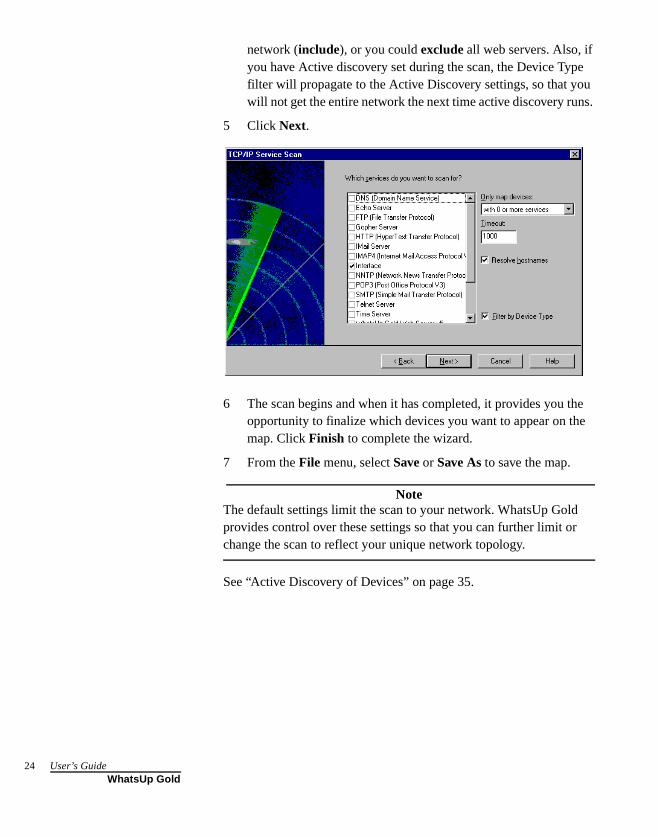
24
network (include), or you could exclude all web servers. Also, if you have Active discovery set during the scan, the Device Type filter will propagate to the Active Discovery settings, so that you will not get the entire network the next time active discovery runs.
5 Click Next.
6 The scan begins and when it has completed, it provides you the opportunity to finalize which devices you want to appear on the map. Click Finish to complete the wizard.
7 From the File menu, select Save or Save As to save the map.
NoteThe default settings limit the scan to your network. WhatsUp Gold provides control over these settings so that you can further limit or change the scan to reflect your unique network topology.
See “Active Discovery of Devices” on page 35.
User’s GuideWhatsUp Gold
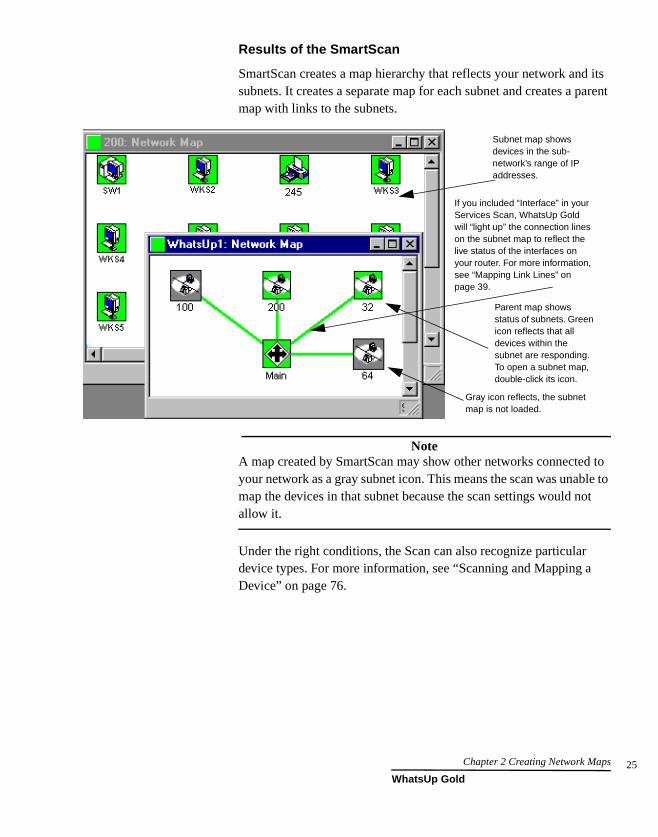
Results of the SmartScan
SmartScan creates a map hierarchy that reflects your network and its subnets. It creates a separate map for each subnet and creates a parent map with links to the subnets.
NoteA map created by SmartScan may show other networks connected to your network as a gray subnet icon. This means the scan was unable to map the devices in that subnet because the scan settings would not allow it.
Under the right conditions, the Scan can also recognize particular device types. For more information, see “Scanning and Mapping a Device” on page 76.
Subnet map showsdevices in the sub-network’s range of IP addresses.
Parent map shows status of subnets. Green icon reflects that all devices within the subnet are responding. To open a subnet map, double-click its icon.
If you included “Interface” in your Services Scan, WhatsUp Gold will “light up” the connection lines on the subnet map to reflect the live status of the interfaces on your router. For more information, see “Mapping Link Lines” on page 39.
Gray icon reflects, the subnet map is not loaded.
Chapter 2 Creating Network Maps 25WhatsUp Gold
26
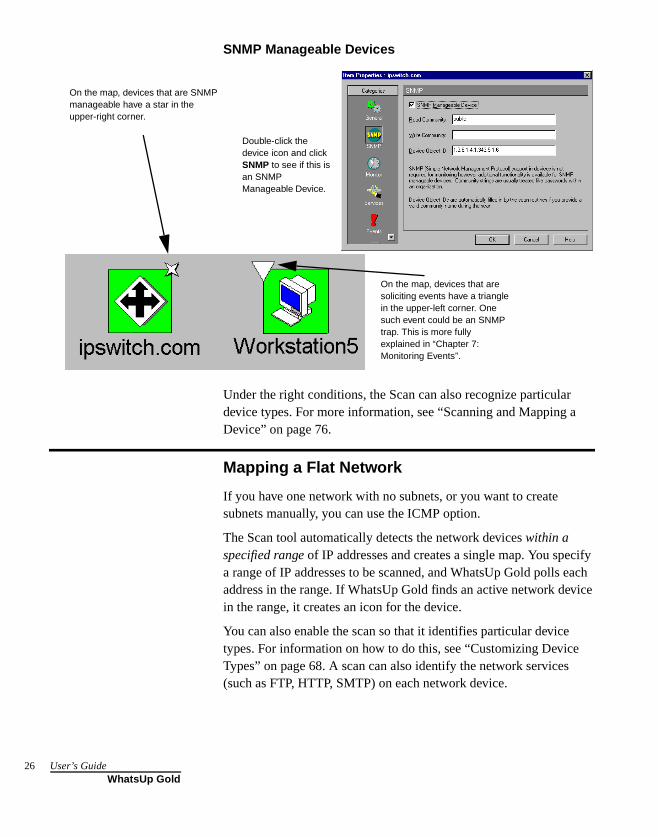
SNMP Manageable Devices
Under the right conditions, the Scan can also recognize particular device types. For more information, see “Scanning and Mapping a Device” on page 76.
Mapping a Flat Network
If you have one network with no subnets, or you want to create subnets manually, you can use the ICMP option.
The Scan tool automatically detects the network devices within a specified range of IP addresses and creates a single map. You specify a range of IP addresses to be scanned, and WhatsUp Gold polls each address in the range. If WhatsUp Gold finds an active network device in the range, it creates an icon for the device.
You can also enable the scan so that it identifies particular device types. For information on how to do this, see “Customizing Device Types” on page 68. A scan can also identify the network services (such as FTP, HTTP, SMTP) on each network device.
On the map, devices that are SNMP manageable have a star in the upper-right corner.
Double-click the device icon and click SNMP to see if this is an SNMP Manageable Device.
On the map, devices that are soliciting events have a triangle in the upper-left corner. One such event could be an SNMP trap. This is more fully explained in “Chapter 7: Monitoring Events”.
User’s GuideWhatsUp Gold

To start a scan:
1 Select an existing map or create a new map window.
• To create a new map, from the File menu, select New Map Wizard. In the New Map wizard, select the Discover and Map Network Devices option on the first screen and select Discover your network using ICMP on the next screen.
• To add devices to an existing map, select the map, then from the Tools menu, select Discover Devices and select Discover your network using ICMP on the next screen.
2 Edit any of the IP Address Scan options. Click Help for a definition of each option. Click Next to continue.
3 Select the Services you want to scan for, and click Next.
4 The scan begins and when it has completed, it provides you the opportunity to finalize which devices you want to appear on the map. Click Finish to complete the wizard.
Chapter 2 Creating Network Maps 27WhatsUp Gold

28
5 From the File menu, select Save or Save As to save the map.
For more information, see “Active Discovery of Devices” on page 35.
Results of the Scan
When you use the Scan tool as described above, WhatsUp Gold scans the range of IP addresses. For each active IP address it finds, it lists the address.
Discover Devices from Network Neighborhood
The Discover devices from your Network Neighborhood option creates a map by scanning the Windows network to which your
computer is connected, and finding the other devices on the network.
User’s GuideWhatsUp Gold
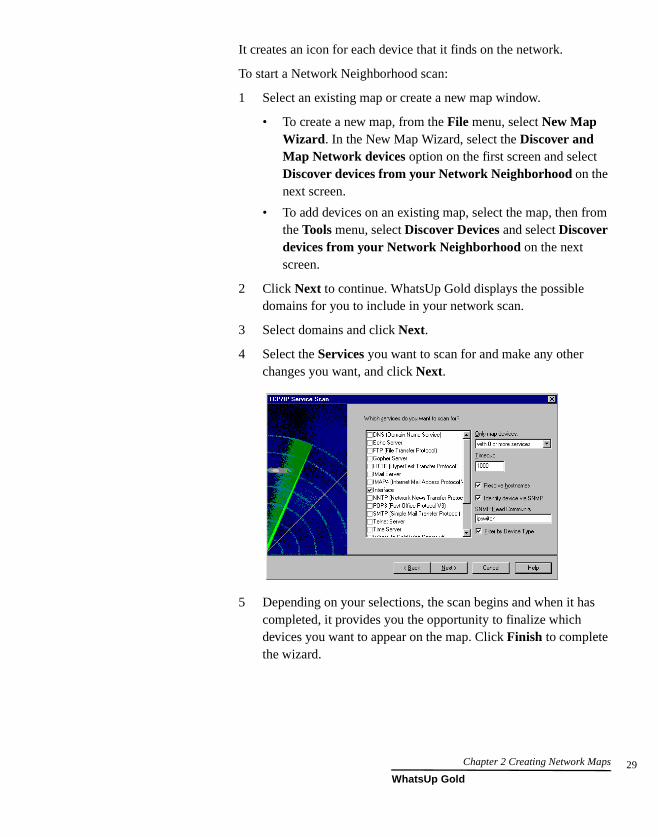
It creates an icon for each device that it finds on the network.
To start a Network Neighborhood scan:
1 Select an existing map or create a new map window.
• To create a new map, from the File menu, select New Map Wizard. In the New Map Wizard, select the Discover and Map Network devices option on the first screen and select Discover devices from your Network Neighborhood on the next screen.
• To add devices on an existing map, select the map, then from the Tools menu, select Discover Devices and select Discover devices from your Network Neighborhood on the next screen.
2 Click Next to continue. WhatsUp Gold displays the possible domains for you to include in your network scan.
3 Select domains and click Next.
4 Select the Services you want to scan for and make any other changes you want, and click Next.
5 Depending on your selections, the scan begins and when it has completed, it provides you the opportunity to finalize which devices you want to appear on the map. Click Finish to complete the wizard.
Chapter 2 Creating Network Maps 29WhatsUp Gold
30
WhatsUp Gold scans your Windows network and creates an icon on the map for each device that it finds. Note that this scan can take a few minutes to complete depending on the size of your network.
NoteThe Scan Network Neighborhood option will also find NetWare devices.
6 From the File menu, select Save or Save As to save the map.
For more information, see “Active Discovery of Devices” on page 35.
Loading a Hosts File
You can load a hosts file (which lists IP addresses and their associated hostnames) and WhatsUp Gold creates an icon for each device listed in the file.
1 Select an existing map or create a new map window.
• To create a new map, from the File menu, select New Map Wizard. In the New Map Wizard, select the Discover and Map Network devices option on the first screen and select Import devices from a Hosts File on the next screen.
• To add devices on an existing map, select the map, then from the Tools menu, select Discover Devices and select Import devices from a Hosts File on the next screen.
NoteThis is also useful as a means to direct the scan to specific lists of addresses. You can use any ASCII text editor to create a simple text file that contains one IP address plus name per line. Then specify that file as the host file instead of the actual Windows host file.
2 Locate the hosts file and click Next. WhatsUp Gold reads the hosts file and creates an icon for each network device it finds.
User’s GuideWhatsUp Gold

Manually Creating a Map
You can create network devices manually by using Edit Mode.
1 Select an existing map or create a new map window.
To select an existing map, from the File menu, select Open and enter the map file name. Click the Edit tab along the bottom of the map.
2 To create a new map, from the File menu, select New Map Wizard. Select Create a blank map, and then click Finish.
A blank map is opened in Edit mode. The editing toolbars appear.
3 Use the drawing tools to create network devices. For more information, see “Chapter 4: Editing Network Maps” on page 49.
4 From the File menu, select Save or Save As to save the map.
For more information, see “Active Discovery of Devices” on page 35.
Reading a Network Map
When WhatsUp Gold is in Monitor Mode, it polls the active network maps. The icons on the map indicate the status of the various network devices. As explained in the previous chapter, when an activity occurs (such as a device goes down or a trap is received) the name of the device becomes highlighted on the map. In addition, the colors and shapes of the device icons also indicate certain state changes as explained in “Getting Information from the Network Map” on page 4.
The indicators on the map are not the only way of getting status information about your network. The Status of a device also gives information about an individual device, and the Activity Log lists all activities for all open maps; both are covered in “Chapter 9: Working from the Console” on page 139.
In addition, you can get information by defining and activating notifications which are sent when particular activities occur; for more information, see “Chapter 8: Setting Up Notifications” on page 107.
Edit Mode tab
Chapter 2 Creating Network Maps 31WhatsUp Gold
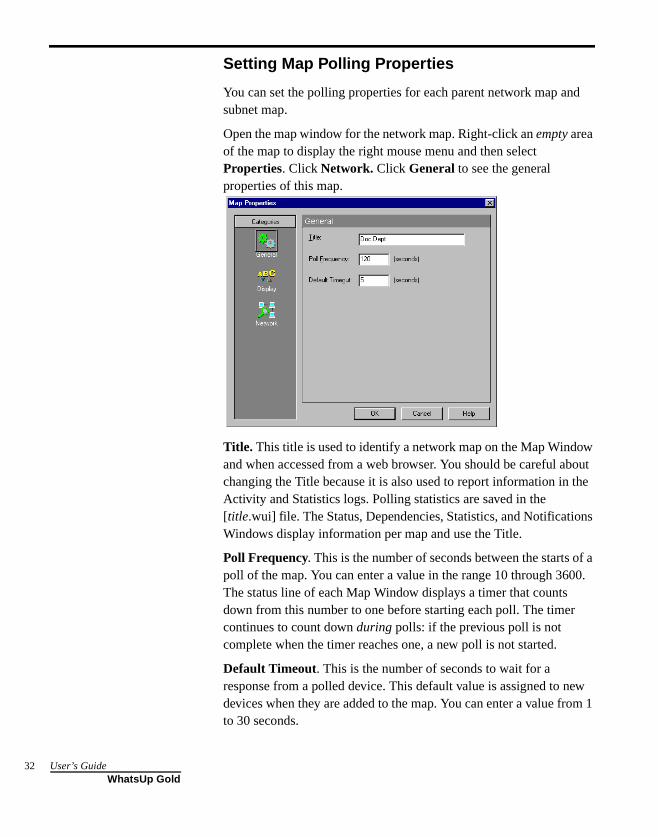
32
Setting Map Polling Properties
You can set the polling properties for each parent network map and subnet map.
Open the map window for the network map. Right-click an empty area of the map to display the right mouse menu and then select Properties. Click Network. Click General to see the general properties of this map.
Title. This title is used to identify a network map on the Map Window and when accessed from a web browser. You should be careful about changing the Title because it is also used to report information in the Activity and Statistics logs. Polling statistics are saved in the [title.wui] file. The Status, Dependencies, Statistics, and Notifications Windows display information per map and use the Title.
Poll Frequency. This is the number of seconds between the starts of a poll of the map. You can enter a value in the range 10 through 3600. The status line of each Map Window displays a timer that counts down from this number to one before starting each poll. The timer continues to count down during polls: if the previous poll is not complete when the timer reaches one, a new poll is not started.
Default Timeout. This is the number of seconds to wait for a response from a polled device. This default value is assigned to new devices when they are added to the map. You can enter a value from 1 to 30 seconds.
User’s GuideWhatsUp Gold
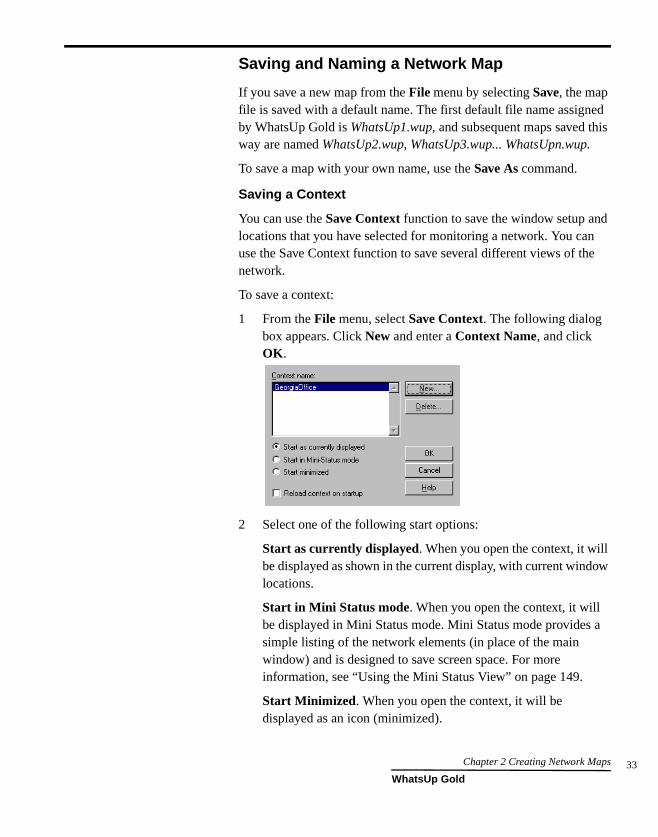
Saving and Naming a Network Map
If you save a new map from the File menu by selecting Save, the map file is saved with a default name. The first default file name assigned by WhatsUp Gold is WhatsUp1.wup, and subsequent maps saved this way are named WhatsUp2.wup, WhatsUp3.wup... WhatsUpn.wup.
To save a map with your own name, use the Save As command.
Saving a Context
You can use the Save Context function to save the window setup and locations that you have selected for monitoring a network. You can use the Save Context function to save several different views of the network.
To save a context:
1 From the File menu, select Save Context. The following dialog box appears. Click New and enter a Context Name, and click OK.
2 Select one of the following start options:
Start as currently displayed. When you open the context, it will be displayed as shown in the current display, with current window locations.
Start in Mini Status mode. When you open the context, it will be displayed in Mini Status mode. Mini Status mode provides a simple listing of the network elements (in place of the main window) and is designed to save screen space. For more information, see “Using the Mini Status View” on page 149.
Start Minimized. When you open the context, it will be displayed as an icon (minimized).
Chapter 2 Creating Network Maps 33WhatsUp Gold
34
3 Optionally, select the Reload Context on Startup option if you want this context to open whenever you start WhatsUp Gold.
4 Click OK to save your changes.
To open a context:
1 From the File menu, select Open Context. The “Open Context” dialog box appears.
2 Select a context name.
3 Click OK to open the context.
User’s GuideWhatsUp Gold
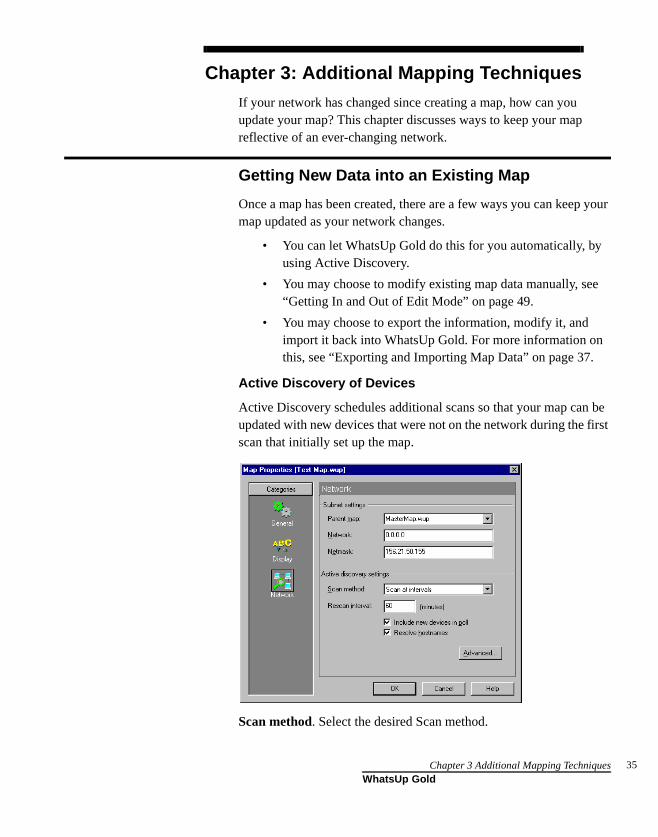
Chapter 3: Additional Mapping Techniques
If your network has changed since creating a map, how can you update your map? This chapter discusses ways to keep your map reflective of an ever-changing network.
Getting New Data into an Existing Map
Once a map has been created, there are a few ways you can keep your map updated as your network changes.
• You can let WhatsUp Gold do this for you automatically, by using Active Discovery.
• You may choose to modify existing map data manually, see “Getting In and Out of Edit Mode” on page 49.
• You may choose to export the information, modify it, and import it back into WhatsUp Gold. For more information on this, see “Exporting and Importing Map Data” on page 37.
Active Discovery of Devices
Active Discovery schedules additional scans so that your map can be updated with new devices that were not on the network during the first scan that initially set up the map.
Scan method. Select the desired Scan method.
Chapter 3 Additional Mapping Techniques 35WhatsUp Gold

36
NoteIf you don’t want the new devices to change the position(s) of the original devices, read about Lock Position within “Using the Right Mouse Menu” on page 63.
• No scan. Select this if you do not want to use the active discovery functionality.
• Scan at intervals. Select this if you want the active discovery to happen at the specified scan interval. This is a one-time scan at the interval you have specified.
• Scan at distributed intervals. Select this if you want the active discovery to be spread out over the entire specified interval. This selection minimizes network impact.
Rescan interval. This is the interval (in minutes) that you want to schedule WhatsUp Gold to scan the network.
Include new devices in poll. Select this if you want the new devices to be polled.
Resolve Hostnames. When this option is selected, the scan displays the host name for each device and uses the host name (rather than the IP address) as the device label in the map. Note that this requires ‘looking up’ the host name associated with the given IP address and thus it can take longer to complete the scan.
Click the Advanced button to go to the Active Discovery Advanced Settings.
User’s GuideWhatsUp Gold
SNMP community. Enter the appropriate SNMP Community name.
Notification. Select the notification to execute when devices are discovered during the scheduled scan.
Filter discovery results by device type. If this is selected, you can specify the device types you want to add or exclude during the active discovery.
Exporting and Importing Map Data
The import/export feature allows you visibility into the content and structure of information used by WhatsUp Gold. This allows you to leverage this information directly, add value to it, and reuse it for other purposes.
For example, to get new data into an existing map, you could do the following: If you had an open .wup map and you wanted to make several changes to this map, you could save this map as a .ini and then close it. Then you could open the .ini file in an ASCII editor, and make and save your changes. Now, when you open this .ini map in WhatsUp Gold, your changes are reflected.
Exporting a File
1 Open a map, and from the File menu, select Export, and select the desired file type you want to export (INI, XML, or WUP).
2 Browse to the desired location in which you want to save this exported file.
Importing a File
1 Open a map, and from the File menu, select Import, and select the desired file type you want to import (INI, XML, or WUP).
2 Browse to the desired file in which you wish to import into WhatsUp Gold.
NoteWhatsUp Gold supports a C DLL interface to allow experienced C/C++ program developers to create customized import and export modes to WhatsUp Gold. You can also visit our web site (http://www.ipswitch.com/Support/whatsup/plugins.html) and download samples and SDKs. As we create other plug-in modules, we will make them available on our web site. It is beyond the scope of this document and Ipswitch technical support to provide any guidance on
Chapter 3 Additional Mapping Techniques 37WhatsUp Gold
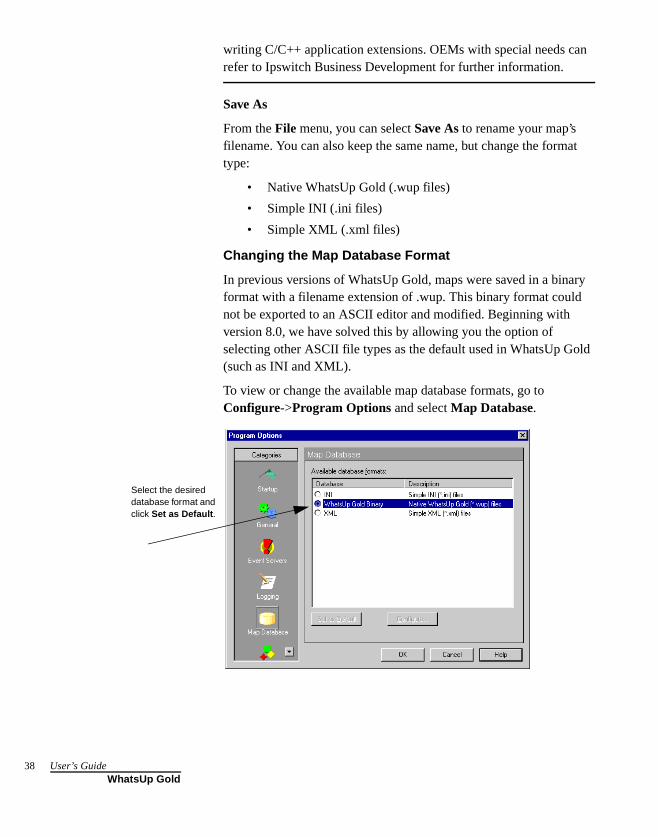
38
writing C/C++ application extensions. OEMs with special needs can refer to Ipswitch Business Development for further information.
Save As
From the File menu, you can select Save As to rename your map’s filename. You can also keep the same name, but change the format type:
• Native WhatsUp Gold (.wup files)
• Simple INI (.ini files)
• Simple XML (.xml files)
Changing the Map Database Format
In previous versions of WhatsUp Gold, maps were saved in a binary format with a filename extension of .wup. This binary format could not be exported to an ASCII editor and modified. Beginning with version 8.0, we have solved this by allowing you the option of selecting other ASCII file types as the default used in WhatsUp Gold (such as INI and XML).
To view or change the available map database formats, go to Configure->Program Options and select Map Database.
Select the desired database format and click Set as Default.
User’s GuideWhatsUp Gold

Set as Default. You can select the desired database format and click Set as Default and this becomes the default file format that WhatsUp Gold uses. XML and INI are ASCII files and may be edited more readily outside of the application.
NoteDefault is for new files and for opening files (File->Open). Regarding saving files (File->Save As), WhatsUp Gold recognizes the current format (regardless of the default settings), and will remember that. For example, if you open a .wup map and wanted to rename the map by File->Save As, WhatsUp Gold will still have .wup as the file type (even if you have set your default to .INI).
Configure. Not all plug-ins allow a configuration. If you select a format that can’t be configured, the button will be grayed out. Refer to Help for more information.
Traceroute Mapping
The Traceroute tool lets you map the network devices (usually routers) that comprise the route of an IP packet from your local host to a remote Internet host. WhatsUp Gold displays an icon for each router and shows the connections from router to router.
For information on how to use the Traceroute tool, see “Tracing a Route (TraceRoute Tool)” on page 241.
Mapping Link Lines
Mapping link lines provide a quick map view that allows you to easily determine which map objects are connected by a service, as well as the polling result (up or down) of the service. The SNMP SmartScan will create both stubs (non-connected links) and connected links as appropriate, based on the information it has available. It only creates stubs and connected lines for “Interface” services.
There are three ways to create link lines
• Manually using “Link to” on the context menu for a host. (“Disconnect link” to remove them). The map must be in Edit Mode to do this.
Chapter 3 Additional Mapping Techniques 39WhatsUp Gold
40
• Automatically during map discovery when using SNMP SmartScan.
NoteService scanning must be enabled and the “Interface” service must be included in the scan.
• Automatically when you choose the “Auto Discover” button in the device properties (Services dialog) when editing a map.
Mapping link lines can be rendered in one of two ways: stubs and connecting lines.
• Stubs represent a service that is not connected to some other host, for instance an unused interface on a router. They are drawn as short lines extending out from the host. The first unconnected interface is drawn straight up (12 noon) and the rest are evenly distributed around the host in a clockwise fashion. Optionally, you can choose to display or not to display the stubs.
• Connecting lines represent a service connecting two map objects. They are drawn as lines from one map object to another. If two map objects have “mutual” links, the single line can consist of more than one color (if one object is up and the other is down). The center-point of the line back to the up object is green, while the other half of the line going to the down object is red. In essence, the color of the line represents the state of the service on the host that the color touches. Example: If the red part of the line touches “System A” and the green part of the line touches “System B”, then we know that some service on “System A” has a problem.
NoteMapping Link lines should not be confused with “attaching lines.” To learn about this, see “Attached Lines” on page 51.
User’s GuideWhatsUp Gold
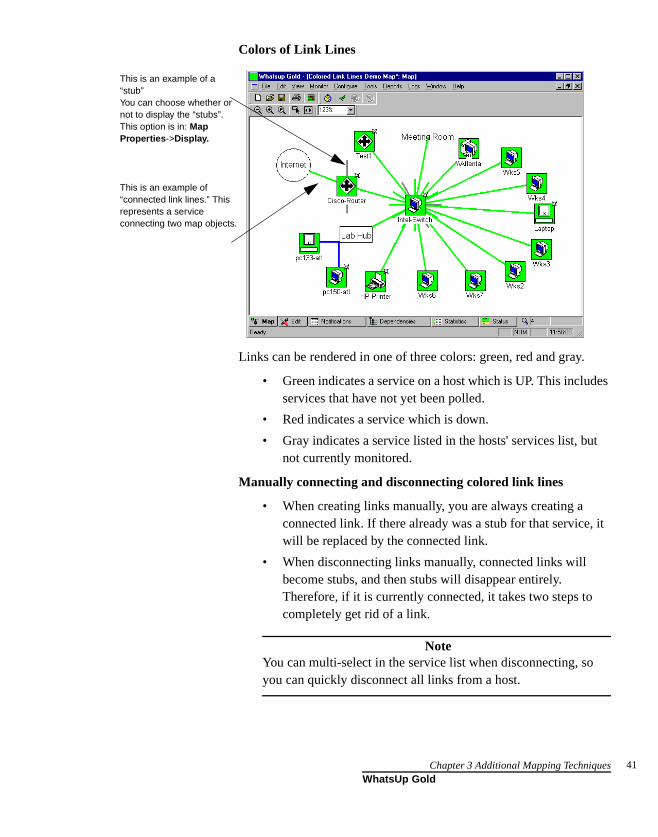
Colors of Link Lines
Links can be rendered in one of three colors: green, red and gray.
• Green indicates a service on a host which is UP. This includes services that have not yet been polled.
• Red indicates a service which is down.
• Gray indicates a service listed in the hosts' services list, but not currently monitored.
Manually connecting and disconnecting colored link lines
• When creating links manually, you are always creating a connected link. If there already was a stub for that service, it will be replaced by the connected link.
• When disconnecting links manually, connected links will become stubs, and then stubs will disappear entirely. Therefore, if it is currently connected, it takes two steps to completely get rid of a link.
NoteYou can multi-select in the service list when disconnecting, so you can quickly disconnect all links from a host.
This is an example of a “stub”You can choose whether or not to display the “stubs”. This option is in: Map Properties->Display.
This is an example of “connected link lines.” This represents a service connecting two map objects.
Chapter 3 Additional Mapping Techniques 41WhatsUp Gold
42
• Both connect and disconnect skips the dialog if there is only one service on the host, it assumes you intend to disconnect that service. Otherwise the connect/disconnect of links works like “Attach to” and “Disconnect” functionality does when editing a map.
Using Custom Devices
WhatsUp Gold comes with standard devices (workstation, router, printer, etc.) and also some custom devices (NT workstation, Ascend Pipeline, etc.). If you have a need for your own, specific custom device, you can create this also. For more information, see “Customizing Device Types” on page 68.
Creating a Subnet
The subnet feature of WhatsUp Gold allows you to create separate maps for different segments of your network, yet maintain a connection between the maps.
If you already have a parent network map, you can create a second network map for a particular network segment and then link it to the parent map; this makes the second map a “subnet” of the parent map.
NoteIf you have a hierarchical network that uses SNMP, subnet maps can be created automatically by using SmartScan. For more information see, “Mapping a Hierarchical Network (SNMP)” on page 22.
WhatsUp Gold can simultaneously monitor the parent network map and any subnet maps. When a device or service goes down in a subnet map, the subnet icon on the parent map changes color to indicate that there’s a problem in the subnet. The subnet icon in the parent network map will have the color of the highest priority alarm that occurs in the subnet map. For example, if only one device in the subnet does not respond to four polls, the subnet icon is red.
User’s GuideWhatsUp Gold
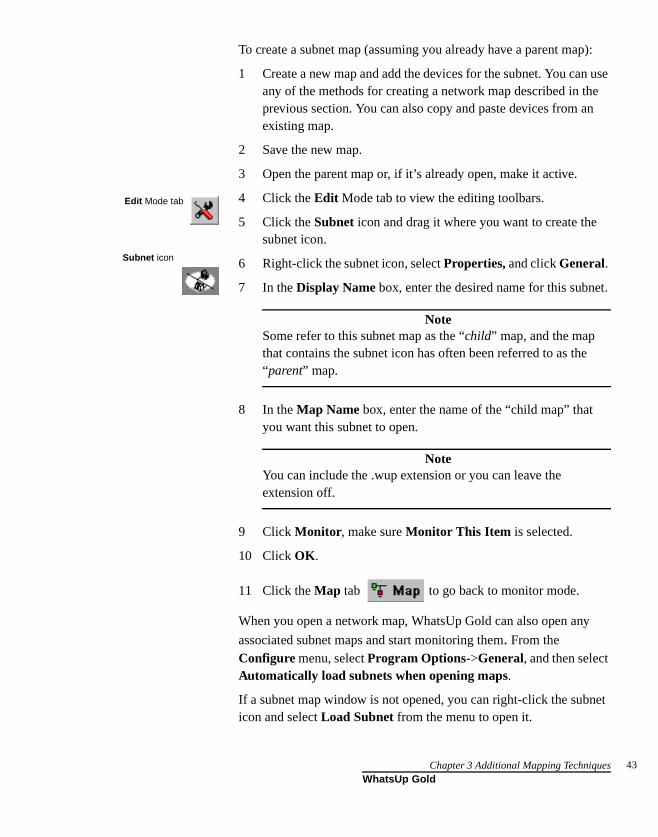
To create a subnet map (assuming you already have a parent map):
1 Create a new map and add the devices for the subnet. You can use any of the methods for creating a network map described in the previous section. You can also copy and paste devices from an existing map.
2 Save the new map.
3 Open the parent map or, if it’s already open, make it active.
4 Click the Edit Mode tab to view the editing toolbars.
5 Click the Subnet icon and drag it where you want to create the subnet icon.
6 Right-click the subnet icon, select Properties, and click General.
7 In the Display Name box, enter the desired name for this subnet.
NoteSome refer to this subnet map as the “child” map, and the map that contains the subnet icon has often been referred to as the “parent” map.
8 In the Map Name box, enter the name of the “child map” that you want this subnet to open.
NoteYou can include the .wup extension or you can leave the extension off.
9 Click Monitor, make sure Monitor This Item is selected.
10 Click OK.
11 Click the Map tab to go back to monitor mode.
When you open a network map, WhatsUp Gold can also open any
associated subnet maps and start monitoring them. From the Configure menu, select Program Options->General, and then select Automatically load subnets when opening maps.
If a subnet map window is not opened, you can right-click the subnet icon and select Load Subnet from the menu to open it.
Edit Mode tab
Subnet icon
Chapter 3 Additional Mapping Techniques 43WhatsUp Gold
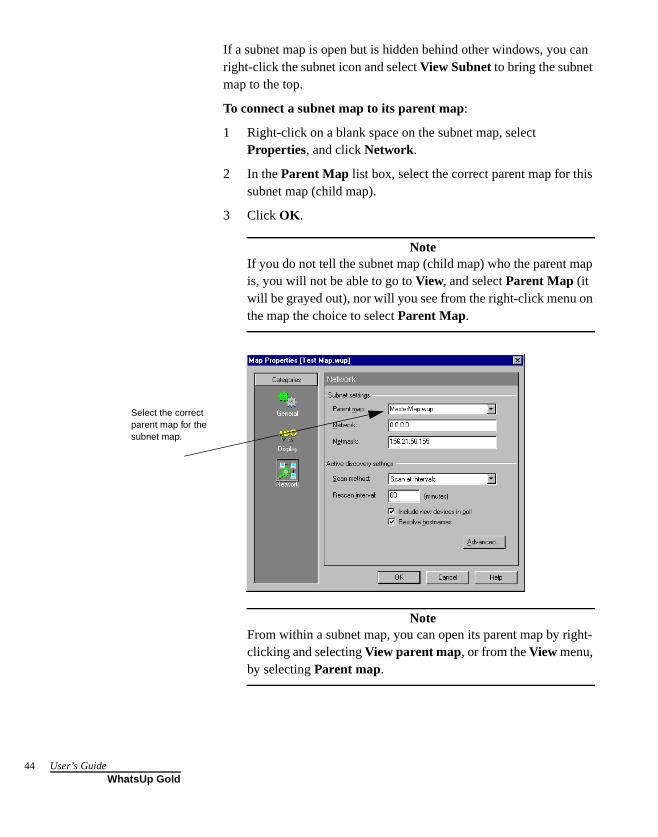
44
If a subnet map is open but is hidden behind other windows, you can right-click the subnet icon and select View Subnet to bring the subnet map to the top.
To connect a subnet map to its parent map:
1 Right-click on a blank space on the subnet map, select Properties, and click Network.
2 In the Parent Map list box, select the correct parent map for this subnet map (child map).
3 Click OK.
NoteIf you do not tell the subnet map (child map) who the parent map is, you will not be able to go to View, and select Parent Map (it will be grayed out), nor will you see from the right-click menu on the map the choice to select Parent Map.
NoteFrom within a subnet map, you can open its parent map by right-clicking and selecting View parent map, or from the View menu, by selecting Parent map.
Select the correct parent map for the subnet map.
User’s GuideWhatsUp Gold

Subnet Settings. The main purpose of these settings is to set a Parent Map for the current map. If you created the map using SmartScan, then each subnet map will already have an entry for the Parent map. To change the Parent map, select any of the maps shown in the list box. This list shows all open maps.
To view a subnet’s parent map, right-click on the map, and select View parent map, or from the View menu, select Parent map.
This dialog box also shows the Network and Netmask settings for the network segment that this subnet map represents. These settings provide the default address settings for the Scan tool, if it is started when this map is active.
Network. Shows the starting IP address for this network segment.
Netmask. Shows the netmask for this network segment. The netmask defines how to read the IP address to identify subnets and devices.
Master Switches and Misc. Settings
Suppose you had several maps open and polling and you decided to perform maintenance on some of the maps. There is a fast way to suspend polling of ALL maps with one setting. This is easier than having to go to each map and stop the polling cycle. Similarly, if you have active discovery running on all of your maps, and you want to suspend this feature for a period of time, you can do this with one setting.
These settings are located by going to Configure->Program Options->General. This dialog contains your Master Switches.
• Enable status polling engine for all maps. This must be selected for ANY polling to occur. When this is cleared, all polling timers stop counting down to begin the next poll. The advantage of this feature is to simultaneously suspend polling for ALL maps without having to go to each map individually to stop polling. Once this is selected again, the poll timers resume with their countdown.
• Enable active discovery engine for all maps. This must be selected for ANY active discovery to occur. When this is cleared, all active discovery is suspended. The advantage of this feature is to simultaneously stop active discovery for ALL maps without
Chapter 3 Additional Mapping Techniques 45WhatsUp Gold

46
having to go to each map’s properties individually to stop discovery. Once this is selected again, active discovery will resume. For more information on Active Discovery, see “Active Discovery of Devices” on page 35.
• Enable event delivery engine for all maps. This must be selected for ANY events to be delivered to the devices. If this is cleared, it globally turns off delivery of events from outside servers, but does not affect the servers running. The advantage of this feature is to keep "event related notifications" from interrupting you as you are editing maps, configuring alerts, etc.
For more information on events, see “Chapter 7: Monitoring Events” on page 95.
The Miscellaneous Settings are described below:
• The Stack supports raw sockets option is enabled if you use a 32-bit stack that supports raw sockets Normally, you would leave this cleared if you are using a Microsoft network stack, such as the one that comes with Windows. Select this only if:
• You are using a 32-bit network stack that supports raw sockets.
• If you are using Windows NT 4.0 and have administrator access, you can turn on this option. Note that the Traceroute tool will not work correctly on NT 4.0 with this option enabled.
User’s GuideWhatsUp Gold

• Automatically load subnets when opening maps. Select this if you want the subnet maps to automatically load when the associated parent map is opened.
• Resume previous device & service states when maps load. If this is selected, WhatsUp Gold remembers the state the devices and services were in when the map was closed. So, if something was down, it will still be down when the map is opened again. Example: If the WhatsUp Gold computer requires a reboot for maintenance (after installing a service pack for your operating system),with this option selected, WhatsUp Gold will NOT re-alert you concerning the device and service states that you already know about.
Chapter 3 Additional Mapping Techniques 47WhatsUp Gold

48
User’s GuideWhatsUp Gold
Chapter 4: Editing Network Maps
You use Edit Mode to move device icons around in the map window. When you’re in Edit Mode, you can use tools to:
• Add and delete device icons
• Cut, copy, and paste device icons and drawn objects
• Draw, color, and size graphic shapes to visually organize network elements
Getting In and Out of Edit Mode
To access Edit Mode, make sure the map that you want to edit is active, then click the Edit Mode tab along the bottom of the map. The editing toolbars appear.
NoteWhatsUp Gold stops polling the network when you’re in Edit Mode. It also stops Active Discovery. If either polling or discovery are active when you go into Edit mode, a warning box appears during the slight delay as WhatsUp Gold shuts down the polling/discovery activities.
To exit Edit Mode and return to Monitor Mode, click the Map view tab. The toolbars disappear.
Tips for Making a Map Easier to Read
If you have a large number of devices in your network and you used Discover and Map, using SNMP, IP Addresses, or Network Neighborhood to create a network map, the first version of the map may be a bit difficult to read. Use the tips below for making your map more readable.
• To make device names more readable, right-click on blank space on the map and select Properties, click Display and then select Clip Names. You can also try the Wrap Names option to see if that makes the device names easier to read.
Edit Mode tab
Map View tab
Chapter 4 Editing Network Maps 49WhatsUp Gold

50
• Enter or modify the properties of the network devices. For starters, you might want to turn off monitoring for those network devices that you don’t need to monitor right away.
To do this, double-click the device icon to view the device properties; then click Monitor and make sure Monitor This Device is cleared.
NoteTo do this for a subnet icon or container icon, right-click the icon, select Properties, and click Monitor.
• Click the Edit Mode tab and then drag device icons to new locations. For more information on organizing devices using shapes and lines, see “Chapter 4: Editing Network Maps” on page 49.
• If the map contains overlapping icons, you can automatically arrange the icons on a map by clicking the Edit Mode tab, and from the Arrange menu, selecting Arrange Icons. This feature arranges all icons on the current map in equally spaced rows starting in the top left corner. This arrangement is based on the poll order of the devices.
• To change a device’s icon, right-click it and select Properties, click General, then select a new Type.
• You can click the Map tab to return to Monitor
Mode.
Draw Toolbar
Keeping Tools Active
When you’re in Edit Mode, click on a tool to select it. By default, the tool stays active for one operation.
Edit Mode tab
Use the Draw Toolbar to add free (unattached) lines, rectangles, filled rectangles, circles, filled circles, polygons, and text blocks to your map.
User’s GuideWhatsUp Gold
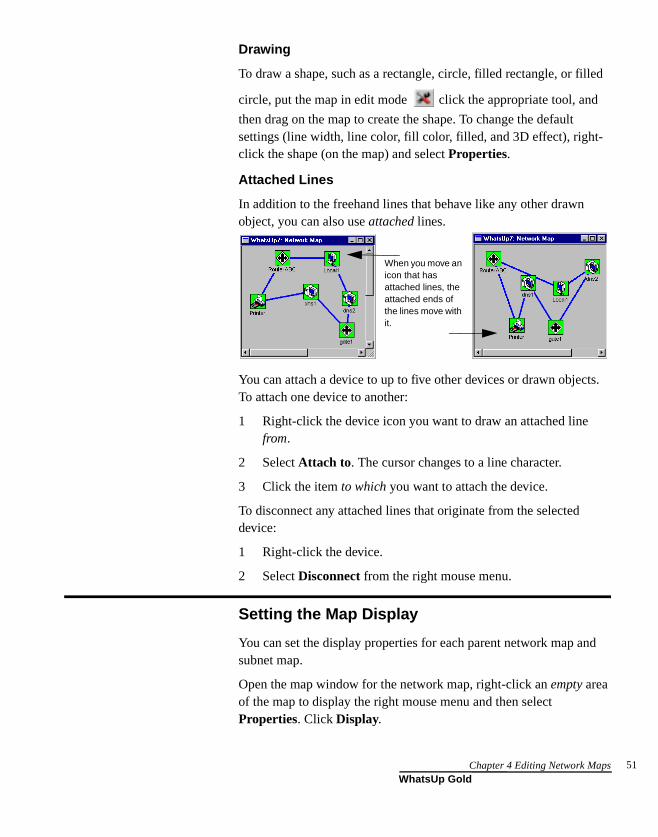
Drawing
To draw a shape, such as a rectangle, circle, filled rectangle, or filled
circle, put the map in edit mode click the appropriate tool, and
then drag on the map to create the shape. To change the default settings (line width, line color, fill color, filled, and 3D effect), right-click the shape (on the map) and select Properties.
Attached Lines
In addition to the freehand lines that behave like any other drawn object, you can also use attached lines.
You can attach a device to up to five other devices or drawn objects. To attach one device to another:
1 Right-click the device icon you want to draw an attached line from.
2 Select Attach to. The cursor changes to a line character.
3 Click the item to which you want to attach the device.
To disconnect any attached lines that originate from the selected device:
1 Right-click the device.
2 Select Disconnect from the right mouse menu.
Setting the Map Display
You can set the display properties for each parent network map and subnet map.
Open the map window for the network map, right-click an empty area of the map to display the right mouse menu and then select Properties. Click Display.
When you move an icon that has attached lines, the attached ends of the lines move with it.
Chapter 4 Editing Network Maps 51WhatsUp Gold
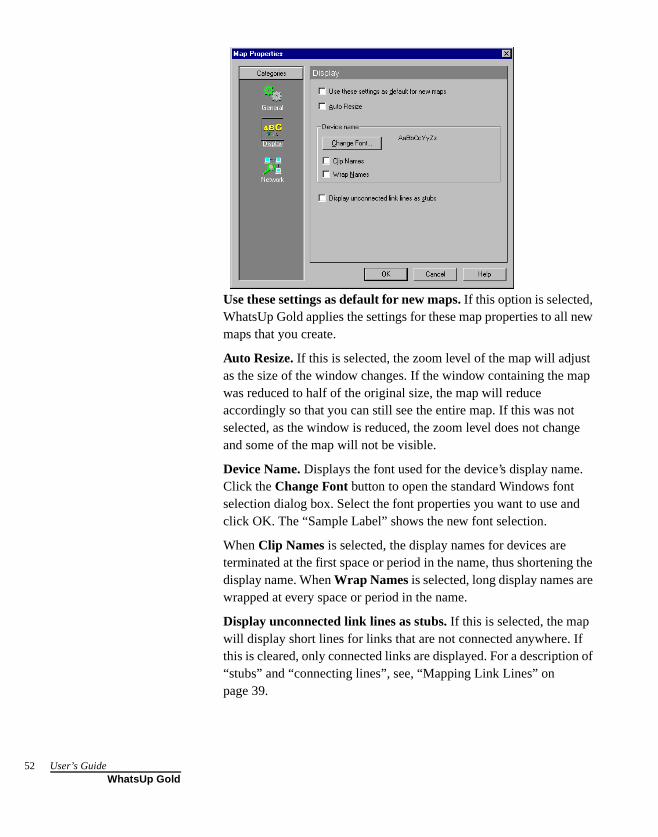
52
Use these settings as default for new maps. If this option is selected, WhatsUp Gold applies the settings for these map properties to all new maps that you create.
Auto Resize. If this is selected, the zoom level of the map will adjust as the size of the window changes. If the window containing the map was reduced to half of the original size, the map will reduce accordingly so that you can still see the entire map. If this was not selected, as the window is reduced, the zoom level does not change and some of the map will not be visible.
Device Name. Displays the font used for the device’s display name. Click the Change Font button to open the standard Windows font selection dialog box. Select the font properties you want to use and click OK. The “Sample Label” shows the new font selection.
When Clip Names is selected, the display names for devices are terminated at the first space or period in the name, thus shortening the display name. When Wrap Names is selected, long display names are wrapped at every space or period in the name.
Display unconnected link lines as stubs. If this is selected, the map will display short lines for links that are not connected anywhere. If this is cleared, only connected links are displayed. For a description of “stubs” and “connecting lines”, see, “Mapping Link Lines” on page 39.
User’s GuideWhatsUp Gold
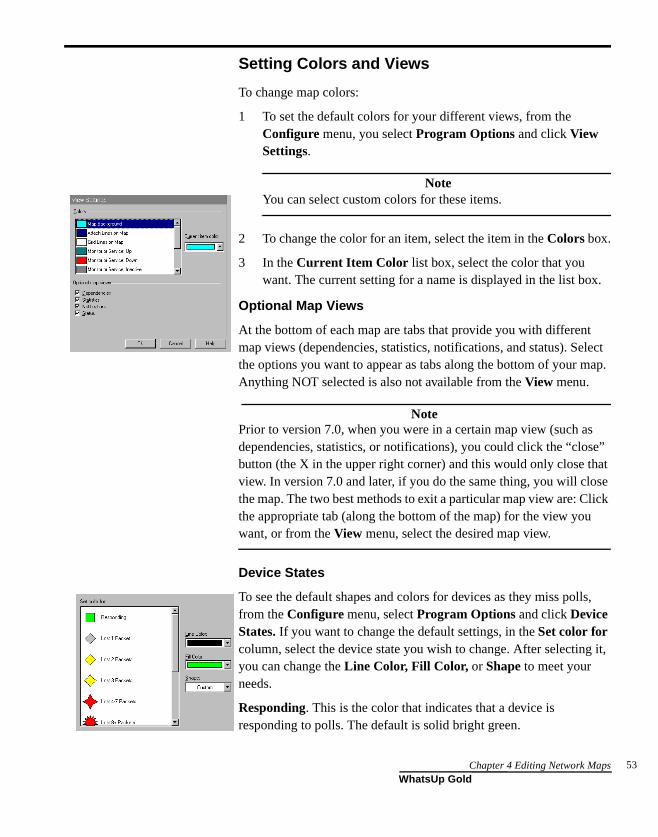
Setting Colors and Views
To change map colors:
1 To set the default colors for your different views, from the Configure menu, you select Program Options and click View Settings.
NoteYou can select custom colors for these items.
2 To change the color for an item, select the item in the Colors box.
3 In the Current Item Color list box, select the color that you want. The current setting for a name is displayed in the list box.
Optional Map Views
At the bottom of each map are tabs that provide you with different map views (dependencies, statistics, notifications, and status). Select the options you want to appear as tabs along the bottom of your map. Anything NOT selected is also not available from the View menu.
NotePrior to version 7.0, when you were in a certain map view (such as dependencies, statistics, or notifications), you could click the “close” button (the X in the upper right corner) and this would only close that view. In version 7.0 and later, if you do the same thing, you will close the map. The two best methods to exit a particular map view are: Click the appropriate tab (along the bottom of the map) for the view you want, or from the View menu, select the desired map view.
Device States
To see the default shapes and colors for devices as they miss polls, from the Configure menu, select Program Options and click Device States. If you want to change the default settings, in the Set color for column, select the device state you wish to change. After selecting it, you can change the Line Color, Fill Color, or Shape to meet your needs.
Responding. This is the color that indicates that a device is responding to polls. The default is solid bright green.
Chapter 4 Editing Network Maps 53WhatsUp Gold
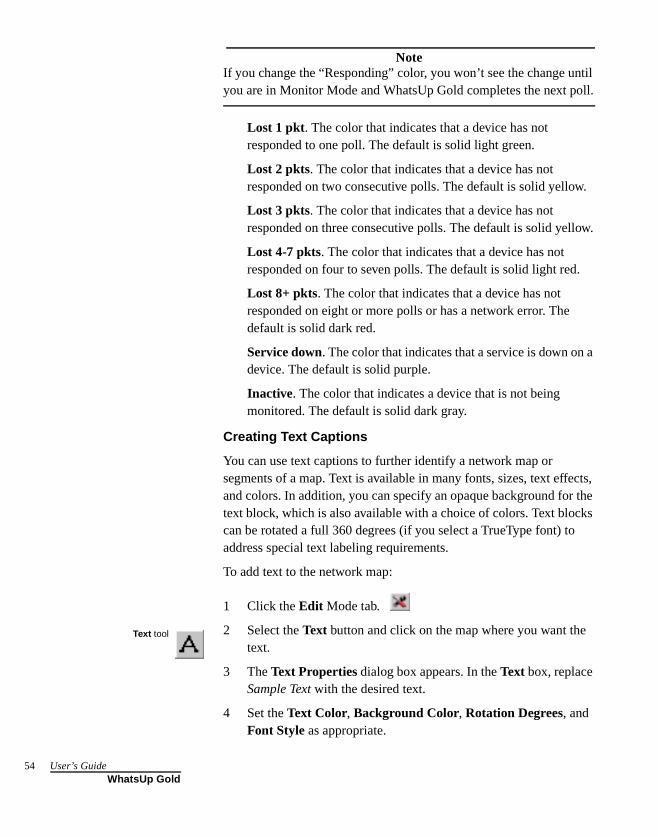
54
NoteIf you change the “Responding” color, you won’t see the change until you are in Monitor Mode and WhatsUp Gold completes the next poll.
Lost 1 pkt. The color that indicates that a device has not responded to one poll. The default is solid light green.
Lost 2 pkts. The color that indicates that a device has not responded on two consecutive polls. The default is solid yellow.
Lost 3 pkts. The color that indicates that a device has not responded on three consecutive polls. The default is solid yellow.
Lost 4-7 pkts. The color that indicates that a device has not responded on four to seven polls. The default is solid light red.
Lost 8+ pkts. The color that indicates that a device has not responded on eight or more polls or has a network error. The default is solid dark red.
Service down. The color that indicates that a service is down on a device. The default is solid purple.
Inactive. The color that indicates a device that is not being monitored. The default is solid dark gray.
Creating Text Captions
You can use text captions to further identify a network map or segments of a map. Text is available in many fonts, sizes, text effects, and colors. In addition, you can specify an opaque background for the text block, which is also available with a choice of colors. Text blocks can be rotated a full 360 degrees (if you select a TrueType font) to address special text labeling requirements.
To add text to the network map:
1 Click the Edit Mode tab.
2 Select the Text button and click on the map where you want the text.
3 The Text Properties dialog box appears. In the Text box, replace Sample Text with the desired text.
4 Set the Text Color, Background Color, Rotation Degrees, and Font Style as appropriate.
Text tool
User’s GuideWhatsUp Gold

Transparent. If this is selected, the map background color is used “behind the text”. If this is not selected, the text is set against a Background Color that you can change.
Font. Click Change Font to change the font of the text.
Rotation. Enter a number from 0 to 360 to represent the degrees to rotate the text. If you increment the numbers by clicking, you will notice the text rotating accordingly.
5 Click OK.
Using Dependency Arrows
After you have set your dependencies, you can put the map in Edit Mode and use the dependency arrows for a visual rendering of your dependencies. This section is only discussing the dependency arrows. To learn more on setting dependencies, polling order, or valid and invalid dependencies, see “Viewing and Changing Dependencies” on page 143.
• The “Up Dependent” arrow is a solid green arrow.
• The “Down Dependent” arrow is a solid red arrow.
• The “Invalid Up Dependent” arrow is white with a green border.
• The “Invalid Down Dependent” arrow is white with a red border.
An Invalid Dependency is explained in “Viewing and Changing Dependencies” on page 143.
The dependency arrows are shown when in Edit Mode.
Clicking the appropriate arrow with show the dependency relationship between devices by displaying the selected arrow on the map. To make the arrow “go away”, just click the same arrow in the toolbar.
Back in Map Mode, this is what your map may look like.
Chapter 4 Editing Network Maps 55WhatsUp Gold
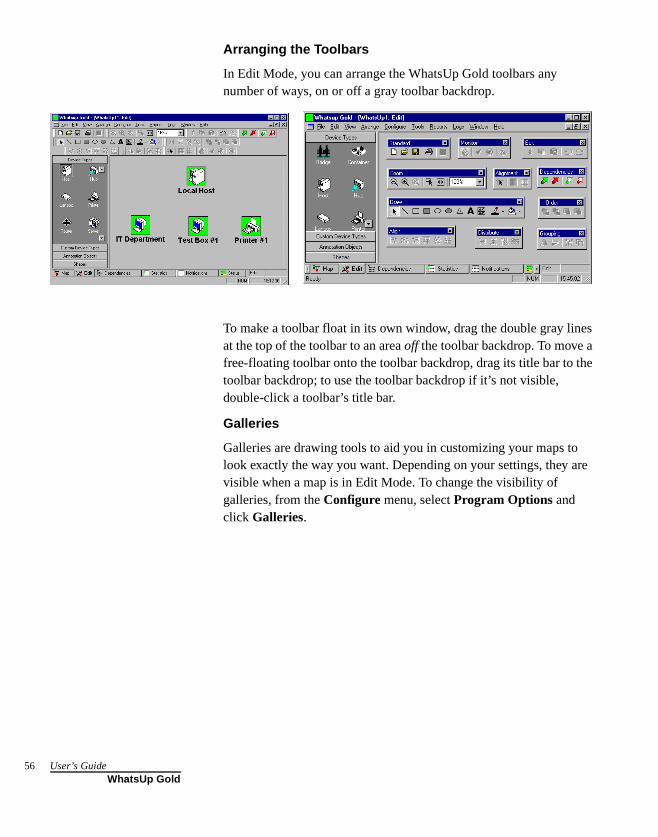
56
Arranging the Toolbars
In Edit Mode, you can arrange the WhatsUp Gold toolbars any number of ways, on or off a gray toolbar backdrop.
To make a toolbar float in its own window, drag the double gray lines at the top of the toolbar to an area off the toolbar backdrop. To move a free-floating toolbar onto the toolbar backdrop, drag its title bar to the toolbar backdrop; to use the toolbar backdrop if it’s not visible, double-click a toolbar’s title bar.
Galleries
Galleries are drawing tools to aid you in customizing your maps to look exactly the way you want. Depending on your settings, they are visible when a map is in Edit Mode. To change the visibility of galleries, from the Configure menu, select Program Options and click Galleries.
User’s GuideWhatsUp Gold
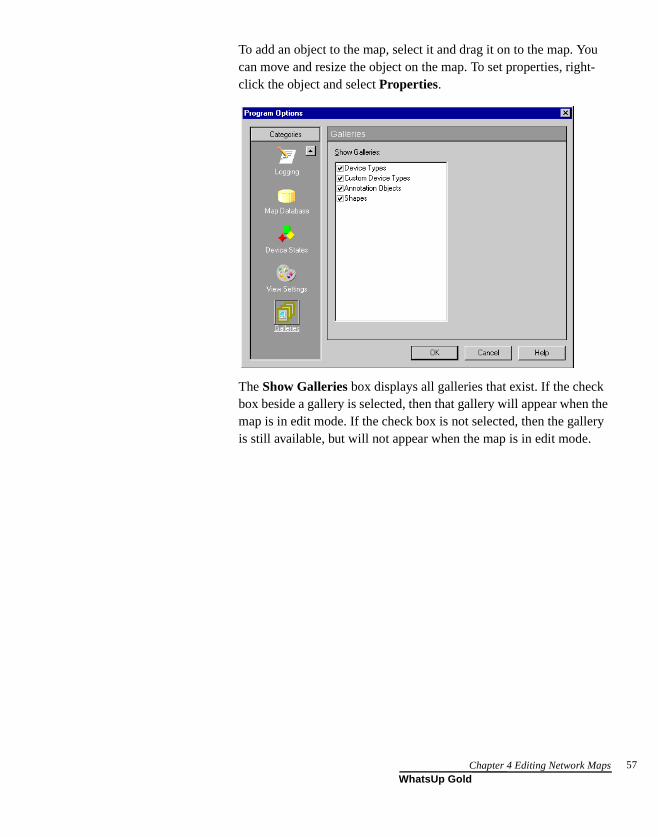
To add an object to the map, select it and drag it on to the map. You can move and resize the object on the map. To set properties, right-click the object and select Properties.
The Show Galleries box displays all galleries that exist. If the check box beside a gallery is selected, then that gallery will appear when the map is in edit mode. If the check box is not selected, then the gallery is still available, but will not appear when the map is in edit mode.
Chapter 4 Editing Network Maps 57WhatsUp Gold

58
User’s GuideWhatsUp Gold
Chapter 5: Working with Devices
WhatsUp Gold needs basic information about a device in order to monitor it. When you create a map using any of the “discover and map” tools, WhatsUp Gold automatically determines the device’s display name, host name, and IP address. This section describes why you might edit the default device properties that WhatsUp Gold assigns.
The Polling Method
By default, WhatsUp Gold uses the ICMP polling method for Service only devices, IPX for IPX devices, and NetBIOS for NetBIOS devices. You can change the default polling method at the bottom of the General dialog box of the device properties.
• ICMP sends packets (echo requests) to a device and tracks the responses.
• Services only can be used to monitor a service on a device that does not allow ICMP packets (as in the case of some firewalls). The setting uses either TCP or UDP to poll the service. To use this method of monitoring a device, at least one service must be monitored on that device.
• NetBIOS is the polling method to use for Windows networks.
• IPX is the polling method for Novell NetWare networks.
NoteTo scan and poll IPX devices, the system on which WhatsUp Gold is installed must have Microsoft NWLink IPX/SPX Compatible Transport Protocol installed and running. For more information, see “System Requirements” on page 9.
If the polling method for a device is NetBIOS or IPX, you will not be able to monitor TCP/IP services on this device.
Defining General Properties
On the General dialog box, you can make any changes to general properties, change the icon type for the device, and set the method used by WhatsUp Gold to poll the device.
Chapter 5 Working with Devices 59WhatsUp Gold

60
To view or change device properties:
1 Right-click the device and select Properties from the pop-up
menu. Click General.
2 In the Display Name text box, enter a name. This is the name displayed on the network map.
3 In the Type box, select the desired device type. This selection determines which icon is displayed on the network map.
NoteThe subnet icon is a special type that is used to link a subnet map to a parent map. For more information, see “Creating a Subnet” on page 42.
4 Under Polling Method, select the method to use for polling this device. For detailed information, see “The Polling Method” on page 59.
5 Poll Using will either be IP Address or Host Name.
NoteYou can toggle between Host Name and IP Address.
6 Host Name. If the polling method is ICMP or Services only, enter either the Host Name here or the IP address in Step 5. If you enter a host name, it must be a name that can be resolved to
User’s GuideWhatsUp Gold
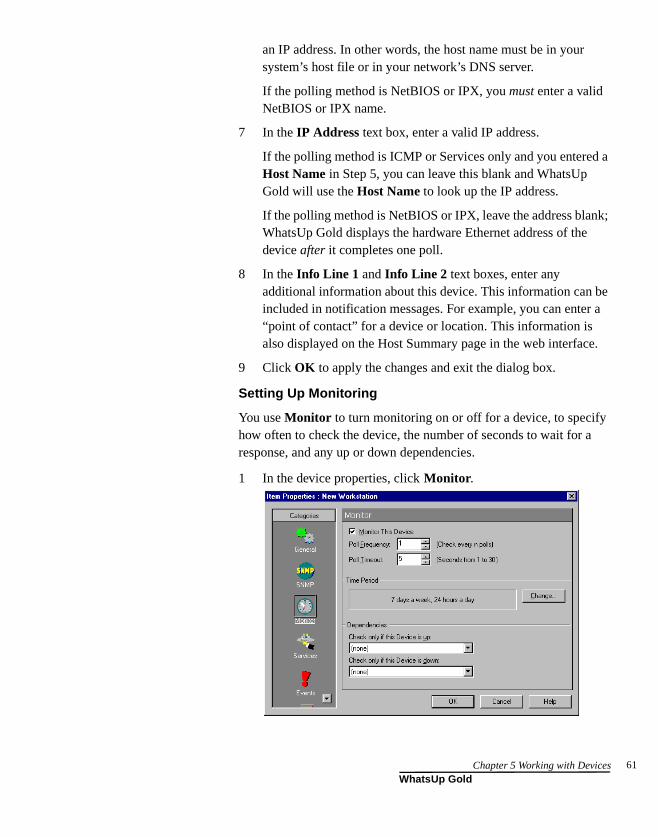
an IP address. In other words, the host name must be in your system’s host file or in your network’s DNS server.
If the polling method is NetBIOS or IPX, you must enter a valid NetBIOS or IPX name.
7 In the IP Address text box, enter a valid IP address.
If the polling method is ICMP or Services only and you entered a Host Name in Step 5, you can leave this blank and WhatsUp Gold will use the Host Name to look up the IP address.
If the polling method is NetBIOS or IPX, leave the address blank; WhatsUp Gold displays the hardware Ethernet address of the device after it completes one poll.
8 In the Info Line 1 and Info Line 2 text boxes, enter any additional information about this device. This information can be included in notification messages. For example, you can enter a “point of contact” for a device or location. This information is also displayed on the Host Summary page in the web interface.
9 Click OK to apply the changes and exit the dialog box.
Setting Up Monitoring
You use Monitor to turn monitoring on or off for a device, to specify how often to check the device, the number of seconds to wait for a response, and any up or down dependencies.
1 In the device properties, click Monitor.
Chapter 5 Working with Devices 61WhatsUp Gold
62
2 Make sure Monitor This Device is selected.
3 In the Poll Frequency text box, enter a value to determine how often this device should be checked. The Poll Frequency determines if this device is checked on every poll (value = 1),
every second poll (value = 2), every third poll (value = 3), and so on. The default value is every poll (1), but you can use this property to poll a particular device less frequently.
4 In the Poll Timeout text box, enter the number of seconds to wait for a response from a monitored device.
You can enter a value from 1 to 30 seconds. The default value is 5 seconds. This timeout should be set to the smallest practical value. For a local network, a timeout of 2 seconds is usually sufficient. For a long-distance (or slow-path) network, this timeout may need to be as high as 10 seconds.
NoteFor information on setting the default Poll Frequency and Poll Timeout for all devices in the map, “Setting Map Polling Properties” on page 32.
5 Set the Time Period options to specify when you want to monitor this device. Click the Change button to change the default setting of 7 days a week, 24 hours a day.
Select the Day of Week options: 7 days a week is the default. You can clear the 7 days a week option and then select the specific days of the week that you want to monitor this device.
Select one of the three Time of Day options: Use 24 hours a day to monitor all day. Use Between to set the start and end time for monitoring. Use Not between to set the hours that monitoring is turned off.
NoteWhen using Between and Not Between, the start time must be less than the end time. To set the period between an AM time and a PM time, you must use the 24 hour clock (0000 to 2400) or use the options together to set the hours.
User’s GuideWhatsUp Gold
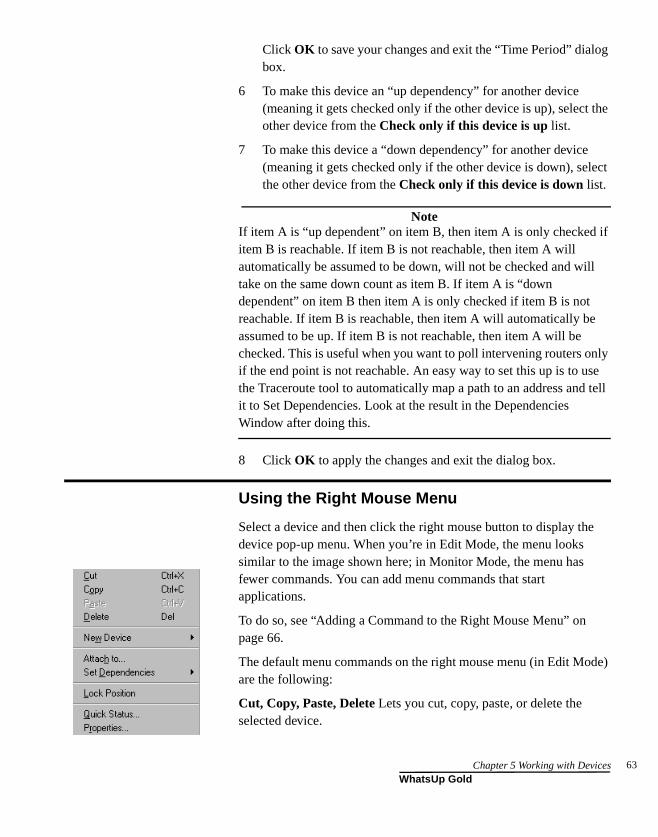
Click OK to save your changes and exit the “Time Period” dialog box.
6 To make this device an “up dependency” for another device (meaning it gets checked only if the other device is up), select the other device from the Check only if this device is up list.
7 To make this device a “down dependency” for another device (meaning it gets checked only if the other device is down), select the other device from the Check only if this device is down list.
NoteIf item A is “up dependent” on item B, then item A is only checked if item B is reachable. If item B is not reachable, then item A will automatically be assumed to be down, will not be checked and will take on the same down count as item B. If item A is “down dependent” on item B then item A is only checked if item B is not reachable. If item B is reachable, then item A will automatically be assumed to be up. If item B is not reachable, then item A will be checked. This is useful when you want to poll intervening routers only if the end point is not reachable. An easy way to set this up is to use the Traceroute tool to automatically map a path to an address and tell it to Set Dependencies. Look at the result in the Dependencies Window after doing this.
8 Click OK to apply the changes and exit the dialog box.
Using the Right Mouse Menu
Select a device and then click the right mouse button to display the device pop-up menu. When you’re in Edit Mode, the menu looks similar to the image shown here; in Monitor Mode, the menu has fewer commands. You can add menu commands that start applications.
To do so, see “Adding a Command to the Right Mouse Menu” on page 66.
The default menu commands on the right mouse menu (in Edit Mode) are the following:
Cut, Copy, Paste, Delete Lets you cut, copy, paste, or delete the selected device.
Chapter 5 Working with Devices 63WhatsUp Gold
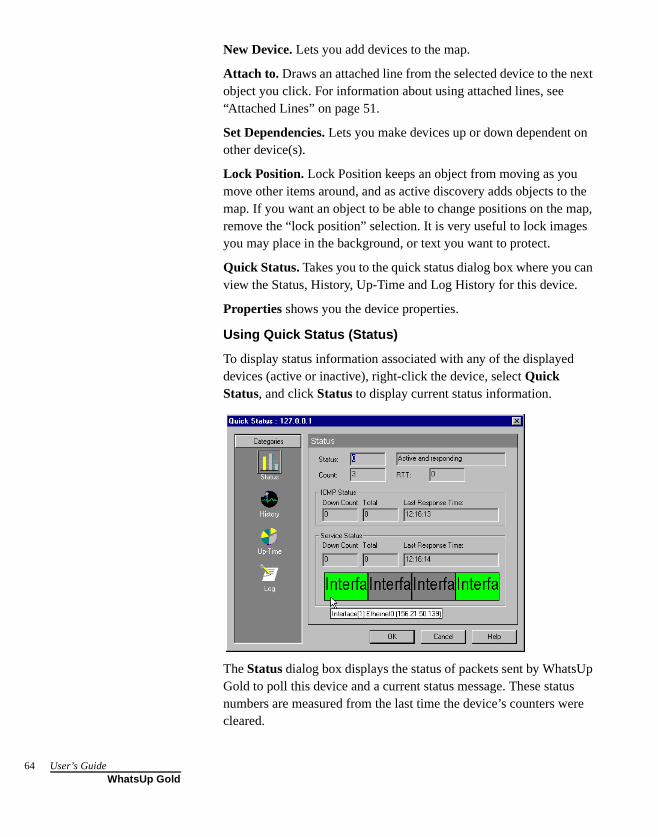
64
New Device. Lets you add devices to the map.
Attach to. Draws an attached line from the selected device to the next object you click. For information about using attached lines, see “Attached Lines” on page 51.
Set Dependencies. Lets you make devices up or down dependent on other device(s).
Lock Position. Lock Position keeps an object from moving as you move other items around, and as active discovery adds objects to the map. If you want an object to be able to change positions on the map, remove the “lock position” selection. It is very useful to lock images you may place in the background, or text you want to protect.
Quick Status. Takes you to the quick status dialog box where you can view the Status, History, Up-Time and Log History for this device.
Properties shows you the device properties.
Using Quick Status (Status)
To display status information associated with any of the displayed devices (active or inactive), right-click the device, select Quick Status, and click Status to display current status information.
The Status dialog box displays the status of packets sent by WhatsUp Gold to poll this device and a current status message. These status numbers are measured from the last time the device’s counters were cleared.
User’s GuideWhatsUp Gold

Status. Current status of the device. A zero status code indicates the device is up. A numeric status code above 10000 is a Winsock error code. The text for the error message is also displayed. These error codes are NOT generated by WhatsUp Gold.
Count. Total number of times this device was polled.
RTT. Round Trip Time (RTT) is the time (in milliseconds) that it took the last packet sent to arrive at the device and return.
The ICMP Status dialog box shows the following three items for the Device Status and Service Status:
Down Count. Count of how many polls have passed since the device or service last responded.
Total. Total count of how many polls occurred where the device or service did not respond since the counter was last cleared, WhatsUp Gold started, or since the device was added to the map.
Last Response Time. Time of day (in hours:minutes:seconds) of the last response.
The services graph at the bottom of the dialog box shows the status of any services being monitored on the device (as specified on the Services dialog box of device properties). Services cannot be monitored if NetBIOS or IPX is the selected polling method. By default, a service is green if it is up, red if it is down, or gray if it is not selected for monitoring. You can change these default colors by going to Configure->Program Options->View Settings.
NoteYou can move your mouse pointer to this “services” area and receive a “tool tip” that shows you which service you are pointing at. This is especially useful if the service description text cannot be completely viewed.
You can also display the following status information from within a device’s properties:
• Click History (right-click the device, select Quick Status and click History) to display a graph of the round trip times of the device over the last 30 polls. Red vertical bars indicate the device was not responding.
Chapter 5 Working with Devices 65WhatsUp Gold
66
• Click Up-Time (right-click the device, select Quick Status and click Up-Time) to display a pie chart that shows the percentage of successful polls for the total poll count.
• Click Log (right-click the device, select Quick Status and click Log) to display any service or device “up” or “down” state changes for this device. On the Alerts dialog box, you can select Enable Logging for the device. (Right-click the device, select Properties, and then click Alerts.)
Adding a Command to the Right Mouse Menu
You can add commands that start applications to the menu that appears when you right-click a device; you create these commands using Menu of the device properties.
To add an item to the right mouse menu:
1 Right-click a device, select Properties and click Menu.
2 Click the Add button and the Edit Menu Item dialog box appears.
3 In the Menu Name box, type the command as you want it to appear on the right-mouse menu.
4 In the Command box, enter the program name you want to start when you choose this command. You can enter the name of any executable program, or you can use one of the following values:
[telnet] - calls telnet.exe
[ping] - calls the Ping tool
[trace] - calls the Traceroute tool
[browse] – starts the default browser using the IP address as the URL
5 Following the program name, you can use arguments to pass parameters to the specified program. See the following section for a list of program variables you can use.
Adding Custom Menus to a Group of Devices
Select the devices.
Right-click and select Add Custom Menu to Selected Devices, and the Menu dialog box appears.
User’s GuideWhatsUp Gold

NoteMenu items that have been added to any of the selected devices appear in the dialog box. There is a tri-state check box beside all menu items.
• If the menu item is assigned to ALL selected devices, the check box is selected and is white.
• If the menu item is assigned to SOME of the selected devices, the check box is selected and is gray.
• You can toggle the check box through the different states by clicking on it and seeing the different states.
• If you want to remove the menu item from the selected devices, continue clicking the check box until the check mark is removed.
• You can also assign the menu item to all of the selected devices by clicking the check box until the check mark appears and the box is white.
Program Variables
In WhatsUp Gold, you can call an external program:
• From the right mouse menu when you right-click a device See “Adding a Command to the Right Mouse Menu” on page 66.
• By double-clicking on a device icon See “Customizing Device Types” on page 68.
You can pass parameters to the specified program by using the arguments shown below. The specific arguments you use and the order in which you use them depends on the program you are calling.
Chapter 5 Working with Devices 67WhatsUp Gold
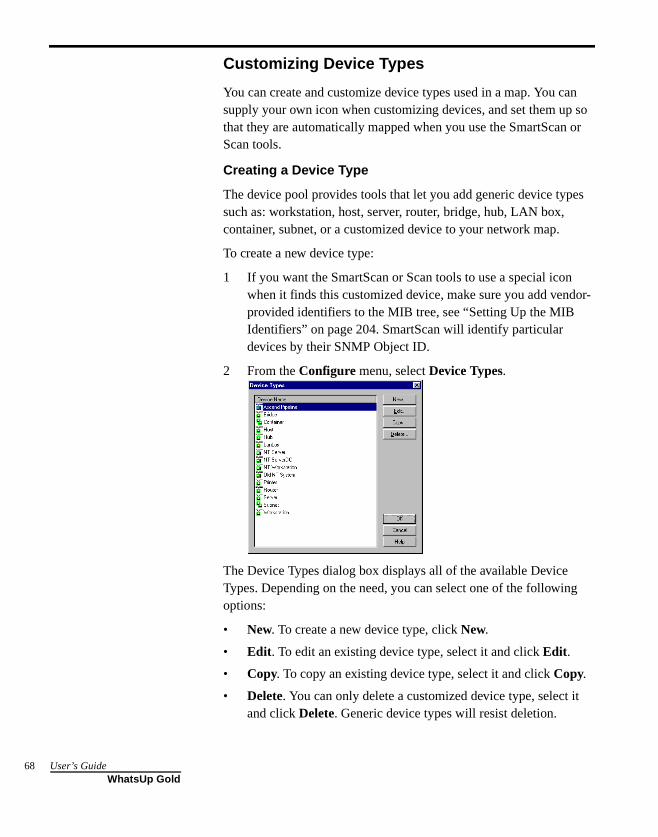
68
Customizing Device Types
You can create and customize device types used in a map. You can supply your own icon when customizing devices, and set them up so that they are automatically mapped when you use the SmartScan or Scan tools.
Creating a Device Type
The device pool provides tools that let you add generic device types such as: workstation, host, server, router, bridge, hub, LAN box, container, subnet, or a customized device to your network map.
To create a new device type:
1 If you want the SmartScan or Scan tools to use a special icon when it finds this customized device, make sure you add vendor-provided identifiers to the MIB tree, see “Setting Up the MIB Identifiers” on page 204. SmartScan will identify particular devices by their SNMP Object ID.
2 From the Configure menu, select Device Types.
The Device Types dialog box displays all of the available Device Types. Depending on the need, you can select one of the following options:
• New. To create a new device type, click New.
• Edit. To edit an existing device type, select it and click Edit.
• Copy. To copy an existing device type, select it and click Copy.
• Delete. You can only delete a customized device type, select it and click Delete. Generic device types will resist deletion.
User’s GuideWhatsUp Gold
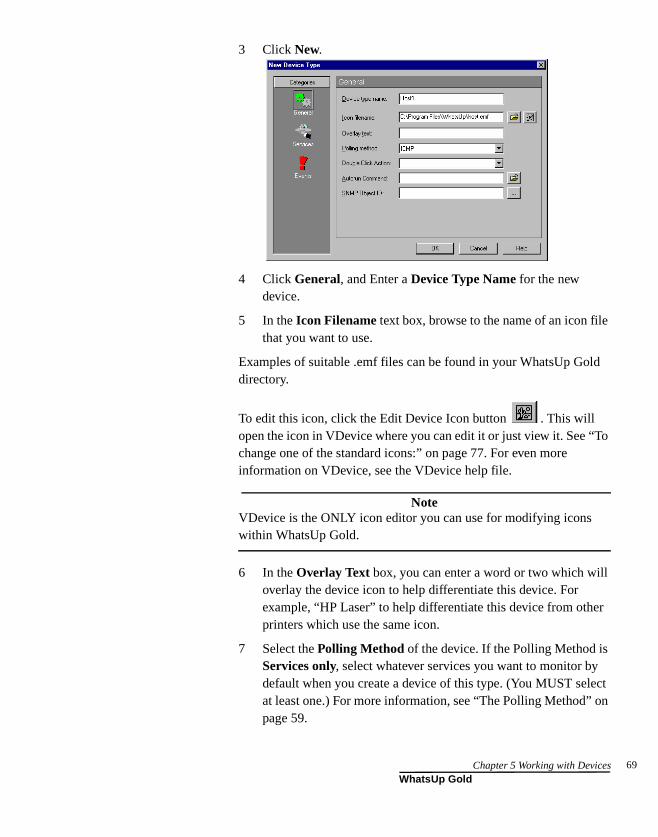
3 Click New.
4 Click General, and Enter a Device Type Name for the new device.
5 In the Icon Filename text box, browse to the name of an icon file that you want to use.
Examples of suitable .emf files can be found in your WhatsUp Gold directory.
To edit this icon, click the Edit Device Icon button . This will open the icon in VDevice where you can edit it or just view it. See “To change one of the standard icons:” on page 77. For even more information on VDevice, see the VDevice help file.
NoteVDevice is the ONLY icon editor you can use for modifying icons within WhatsUp Gold.
6 In the Overlay Text box, you can enter a word or two which will overlay the device icon to help differentiate this device. For example, “HP Laser” to help differentiate this device from other printers which use the same icon.
7 Select the Polling Method of the device. If the Polling Method is Services only, select whatever services you want to monitor by default when you create a device of this type. (You MUST select at least one.) For more information, see “The Polling Method” on page 59.
Chapter 5 Working with Devices 69WhatsUp Gold
70
8 In the DblClk Action box, select the desired action. See “Changing the Double-Click Action for Customized Devices” on page 72.
9 In the AutoRun Cmd box, enter a script or program name. See “Running a script or program for customized devices” on page 72.
10 (Optional) In the SNMP Object text box, enter an SNMP identifier (or use the browse button to find one) that corresponds to a vendor device type; this is usually found in the “private -> enterprises” section of the MIB tree, under the vendor name.
SmartScan and Scan will discover and map devices using the SNMP identifiers. To identify SNMP manageable devices, you must also enter the proper Community name and, if you use the Scan tool, select Identify via SNMP.
You can use multiple identifiers. For example, suppose a manufacturer named Acme makes three devices: the Acme 4500, the Acme 4501, and the Acme 4502. You could define one customized device type to represent any Acme device in the 4500 series; in the SNMP Object box, you would enter the three SNMP identifiers for the Acme 4500, 4501, and 4502.
The Scan tool will use the icon for any of the three devices. Separate multiple SNMP object identifiers by semi-colons. The last number in the identifier can be an asterisk, a range using hyphens, or contain multiples separated by commas. For example:
1.3.6.1.4.1.311.1.1.3.1.3
1.3.6.1.4.1.311.1.1.3.1.3;1.3.6.1.4.1.311.1.1.3.1.4
1.3.6.1.4.1.311.1.1.3.1.3,4
1.3.6.1.4.1.311.1.1.3.1.1,3-4
1.3.6.1.4.1.311.1.1.3.1.*
User’s GuideWhatsUp Gold
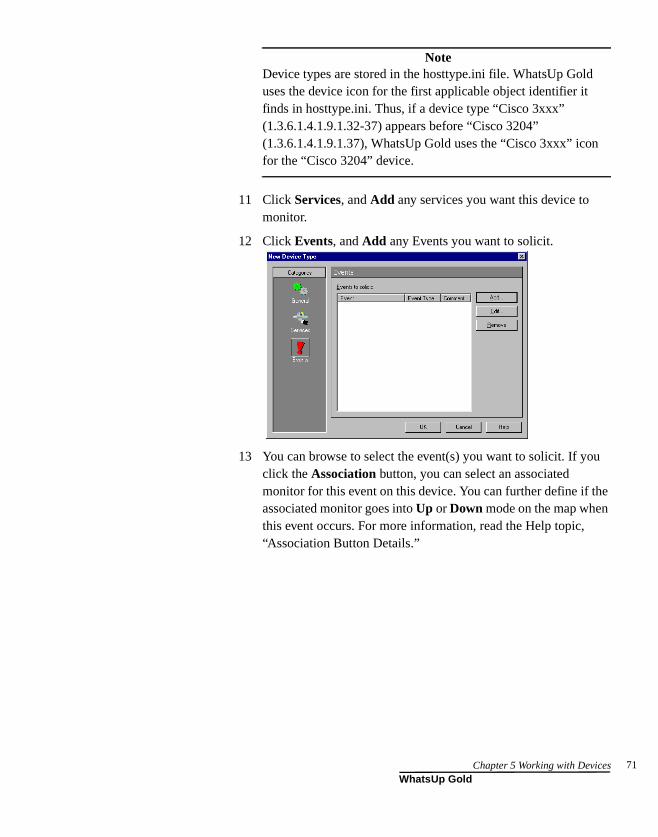
NoteDevice types are stored in the hosttype.ini file. WhatsUp Gold uses the device icon for the first applicable object identifier it finds in hosttype.ini. Thus, if a device type “Cisco 3xxx” (1.3.6.1.4.1.9.1.32-37) appears before “Cisco 3204” (1.3.6.1.4.1.9.1.37), WhatsUp Gold uses the “Cisco 3xxx” icon for the “Cisco 3204” device.
11 Click Services, and Add any services you want this device to monitor.
12 Click Events, and Add any Events you want to solicit.
13 You can browse to select the event(s) you want to solicit. If you click the Association button, you can select an associated monitor for this event on this device. You can further define if the associated monitor goes into Up or Down mode on the map when this event occurs. For more information, read the Help topic, “Association Button Details.”
Chapter 5 Working with Devices 71WhatsUp Gold
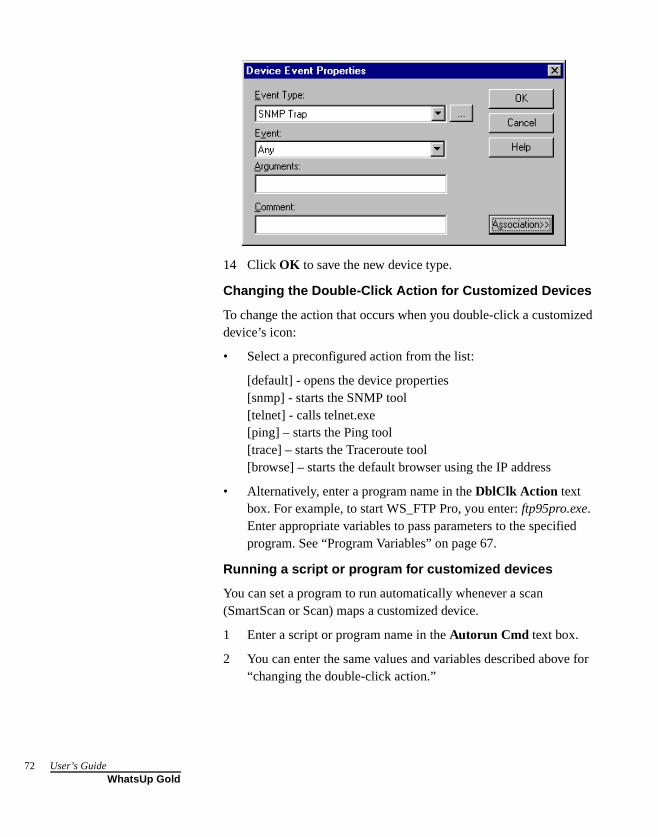
72
14 Click OK to save the new device type.
Changing the Double-Click Action for Customized Devices
To change the action that occurs when you double-click a customized device’s icon:
• Select a preconfigured action from the list:
[default] - opens the device properties[snmp] - starts the SNMP tool[telnet] - calls telnet.exe[ping] – starts the Ping tool[trace] – starts the Traceroute tool[browse] – starts the default browser using the IP address
• Alternatively, enter a program name in the DblClk Action text box. For example, to start WS_FTP Pro, you enter: ftp95pro.exe. Enter appropriate variables to pass parameters to the specified program. See “Program Variables” on page 67.
Running a script or program for customized devices
You can set a program to run automatically whenever a scan (SmartScan or Scan) maps a customized device.
1 Enter a script or program name in the Autorun Cmd text box.
2 You can enter the same values and variables described above for “changing the double-click action.”
User’s GuideWhatsUp Gold
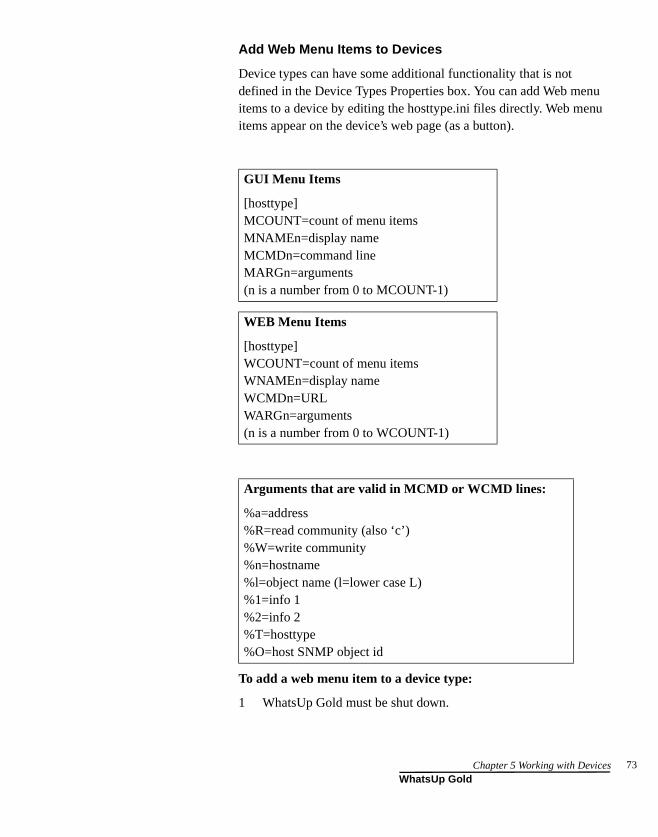
Add Web Menu Items to Devices
Device types can have some additional functionality that is not defined in the Device Types Properties box. You can add Web menu items to a device by editing the hosttype.ini files directly. Web menu items appear on the device’s web page (as a button).
To add a web menu item to a device type:
1 WhatsUp Gold must be shut down.
GUI Menu Items
[hosttype]MCOUNT=count of menu itemsMNAMEn=display nameMCMDn=command lineMARGn=arguments(n is a number from 0 to MCOUNT-1)
WEB Menu Items
[hosttype]WCOUNT=count of menu itemsWNAMEn=display nameWCMDn=URLWARGn=arguments(n is a number from 0 to WCOUNT-1)
Arguments that are valid in MCMD or WCMD lines:
%a=address%R=read community (also ‘c’)%W=write community%n=hostname%l=object name (l=lower case L)%1=info 1%2=info 2%T=hosttype%O=host SNMP object id
Chapter 5 Working with Devices 73WhatsUp Gold
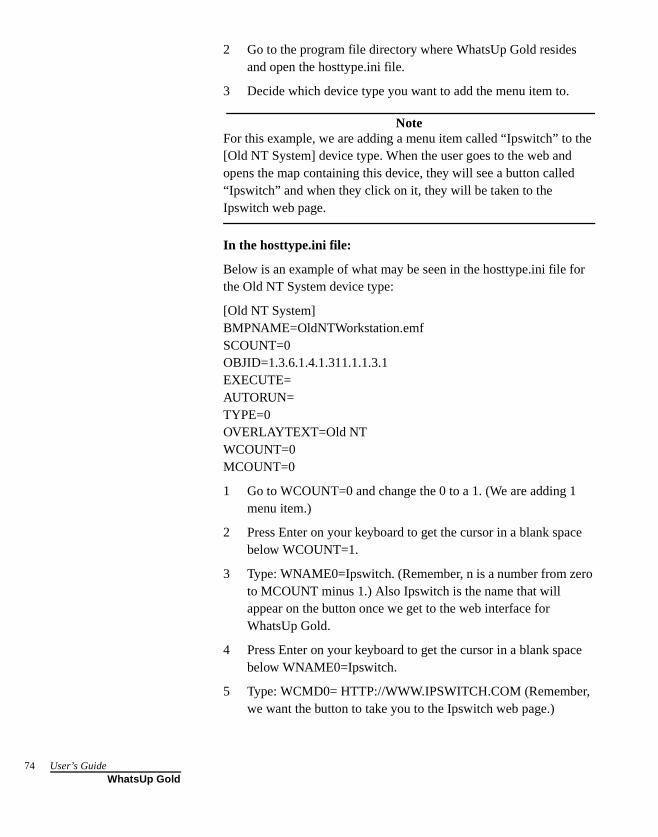
74
2 Go to the program file directory where WhatsUp Gold resides and open the hosttype.ini file.
3 Decide which device type you want to add the menu item to.
NoteFor this example, we are adding a menu item called “Ipswitch” to the [Old NT System] device type. When the user goes to the web and opens the map containing this device, they will see a button called “Ipswitch” and when they click on it, they will be taken to the Ipswitch web page.
In the hosttype.ini file:
Below is an example of what may be seen in the hosttype.ini file for the Old NT System device type:
[Old NT System]BMPNAME=OldNTWorkstation.emfSCOUNT=0OBJID=1.3.6.1.4.1.311.1.1.3.1EXECUTE=AUTORUN=TYPE=0OVERLAYTEXT=Old NTWCOUNT=0MCOUNT=0
1 Go to WCOUNT=0 and change the 0 to a 1. (We are adding 1 menu item.)
2 Press Enter on your keyboard to get the cursor in a blank space below WCOUNT=1.
3 Type: WNAME0=Ipswitch. (Remember, n is a number from zero to MCOUNT minus 1.) Also Ipswitch is the name that will appear on the button once we get to the web interface for WhatsUp Gold.
4 Press Enter on your keyboard to get the cursor in a blank space below WNAME0=Ipswitch.
5 Type: WCMD0= HTTP://WWW.IPSWITCH.COM (Remember, we want the button to take you to the Ipswitch web page.)
User’s GuideWhatsUp Gold
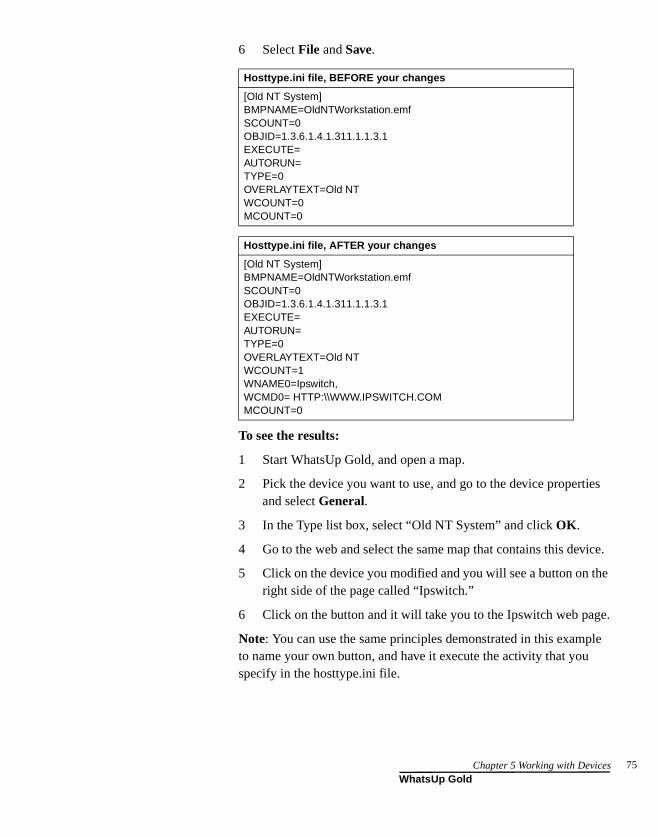
6 Select File and Save.
To see the results:
1 Start WhatsUp Gold, and open a map.
2 Pick the device you want to use, and go to the device properties and select General.
3 In the Type list box, select “Old NT System” and click OK.
4 Go to the web and select the same map that contains this device.
5 Click on the device you modified and you will see a button on the right side of the page called “Ipswitch.”
6 Click on the button and it will take you to the Ipswitch web page.
Note: You can use the same principles demonstrated in this example to name your own button, and have it execute the activity that you specify in the hosttype.ini file.
Hosttype.ini file, BEFORE your changes
[Old NT System]BMPNAME=OldNTWorkstation.emfSCOUNT=0OBJID=1.3.6.1.4.1.311.1.1.3.1EXECUTE=AUTORUN=TYPE=0OVERLAYTEXT=Old NTWCOUNT=0MCOUNT=0
Hosttype.ini file, AFTER your changes
[Old NT System]BMPNAME=OldNTWorkstation.emfSCOUNT=0OBJID=1.3.6.1.4.1.311.1.1.3.1EXECUTE=AUTORUN=TYPE=0OVERLAYTEXT=Old NTWCOUNT=1WNAME0=Ipswitch,WCMD0= HTTP:\\WWW.IPSWITCH.COMMCOUNT=0
Chapter 5 Working with Devices 75WhatsUp Gold
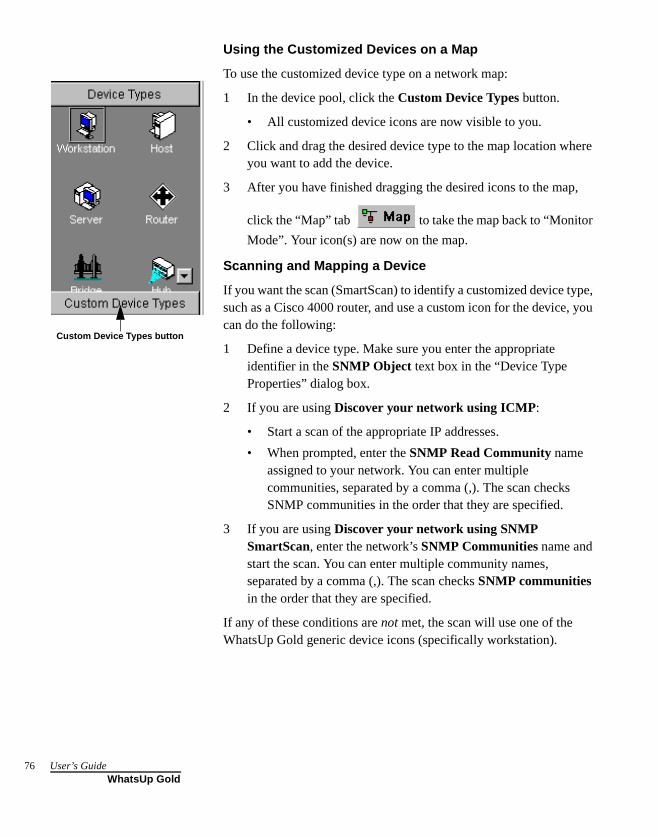
76
Using the Customized Devices on a Map
To use the customized device type on a network map:
1 In the device pool, click the Custom Device Types button.
• All customized device icons are now visible to you.
2 Click and drag the desired device type to the map location where you want to add the device.
3 After you have finished dragging the desired icons to the map,
click the “Map” tab to take the map back to “Monitor
Mode”. Your icon(s) are now on the map.
Scanning and Mapping a Device
If you want the scan (SmartScan) to identify a customized device type, such as a Cisco 4000 router, and use a custom icon for the device, you can do the following:
1 Define a device type. Make sure you enter the appropriate identifier in the SNMP Object text box in the “Device Type Properties” dialog box.
2 If you are using Discover your network using ICMP:
• Start a scan of the appropriate IP addresses.
• When prompted, enter the SNMP Read Community name assigned to your network. You can enter multiple communities, separated by a comma (,). The scan checks SNMP communities in the order that they are specified.
3 If you are using Discover your network using SNMP SmartScan, enter the network’s SNMP Communities name and start the scan. You can enter multiple community names, separated by a comma (,). The scan checks SNMP communities in the order that they are specified.
If any of these conditions are not met, the scan will use one of the WhatsUp Gold generic device icons (specifically workstation).
Custom Device Types button
User’s GuideWhatsUp Gold
Changing the Standard Device Icons
You can edit or replace the standard icons used to represent generic device types (workstation, host, router, etc.). If you replace a standard icon, you must use the same file name for the new file. For example, to replace the router icon, you need to call the new file “router.”
NoteWhatsUp Gold comes complete with an icon editor program. For more information on VDevice, see the VDevice help file.
The standard icons are internal to the WhatsUp Gold program, but we have made the icon files available in the WhatsUp Gold directory. You can use these icon files as a starting point for creating your own icons.
You can use the following icon files as a starting point: bridge.emf, host.emf, subnet.emf, container.emf, hub.emf, lanbox.emf, printer.emf, router.emf, server.emf, workstn.emf.
NoteFor every .emf file in the WhatsUp Gold directory, there is also a .dse file. VDevice only edits .dse files and when saved, it will save the .dse file and also the .emf file (for WhatsUp Gold to use). DO NOT DELETE the .dse files or you will not be able to modify those icons in the future.
To change one of the standard icons:
1 Open one of the icon files (.dse) in VDevice.exe. You cannot use a bitmap editor.
For example, if you want to change the look of your printer.emf icon, you should open printer.dse.
NoteVDevice edits the .dse file and saves it and a copy of the same .emf file.
Chapter 5 Working with Devices 77WhatsUp Gold

78
2 In VDevice, make your changes to the icon (.dse) file. Save your changes to a file with the same name as the icon you want to replace, and it will overwrite the icon file (.emf) in your WhatsUp Gold top directory.
3 VDevice replaces the internal .emf files with the edited .emf files in the WhatsUp Gold top directory.
User’s GuideWhatsUp Gold
Chapter 6: Monitoring Services
When WhatsUp Gold checks a device, it also checks each service you have selected to monitor on the Services dialog box of the device properties. WhatsUp Gold can monitor:
• Common TCP/IP services (such as Telnet, DNS, SMTP)
• Custom TCP/IP services (such as Radius, IRC, or your own custom protocol)
• Values of SNMP variables
• Any other services (such as NT system services) that can be checked by a custom, user-defined module using Microsoft’s Component Object Model interface. See “Custom Services API” on page 93.
When a monitored service misses a poll, you have several ways of knowing about it:
• An activity is automatically recorded in the Activity Log and on the Log dialog box of the device properties. This Log dialog box is found by right-clicking on a device, selecting Quick Status, and then clicking Log.
• The Status dialog box of device properties is automatically updated. This Status dialog box is found by right-clicking on a device, selecting Quick Status, and then clicking Status.
• The device icon on the network map automatically changes color to purple (provided you are using the default colors).
• The Link Line changes from green to red if the associated service misses a poll. For more information, see “Mapping Link Lines” on page 39.
• (Optional) A notification is sent. (This happens if a notification is assigned to the device on which the service is running.)
Chapter 6 Monitoring Services 79WhatsUp GoldWhatsUp Gold

80
NoteUsing WhatsUp Gold to monitor a service that is logged by another application may increase the size of that application’s log files by generating entries to those files. Also, the other application may view the WhatsUp Gold checks as failed connections; this could negatively impact statistics generated from the other application’s log files.
NoteTo reduce the load on your network, we recommend you monitor only the most critical services, and not every service on a device.
Device Status dialog box shows service status.
Device Log dialog box shows services down.
Event activity is also logged. For more information, see “Chapter 7: Monitoring Events” on page 95.
User’s GuideWhatsUp Gold
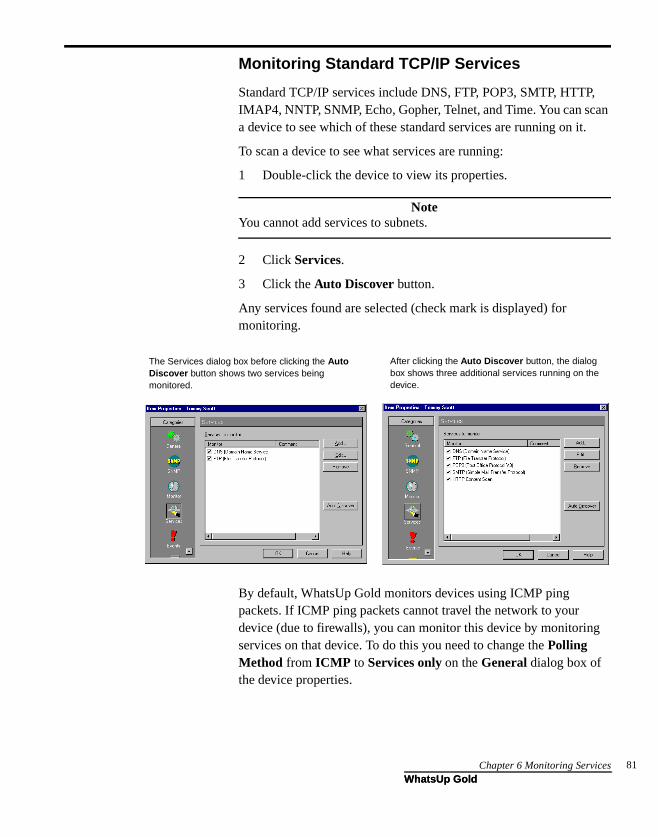
Monitoring Standard TCP/IP Services
Standard TCP/IP services include DNS, FTP, POP3, SMTP, HTTP, IMAP4, NNTP, SNMP, Echo, Gopher, Telnet, and Time. You can scan a device to see which of these standard services are running on it.
To scan a device to see what services are running:
1 Double-click the device to view its properties.
NoteYou cannot add services to subnets.
2 Click Services.
3 Click the Auto Discover button.
Any services found are selected (check mark is displayed) for monitoring.
By default, WhatsUp Gold monitors devices using ICMP ping packets. If ICMP ping packets cannot travel the network to your device (due to firewalls), you can monitor this device by monitoring services on that device. To do this you need to change the Polling Method from ICMP to Services only on the General dialog box of the device properties.
After clicking the Auto Discover button, the dialog box shows three additional services running on the device.
The Services dialog box before clicking the Auto Discover button shows two services being monitored.
Chapter 6 Monitoring Services 81WhatsUp GoldWhatsUp Gold
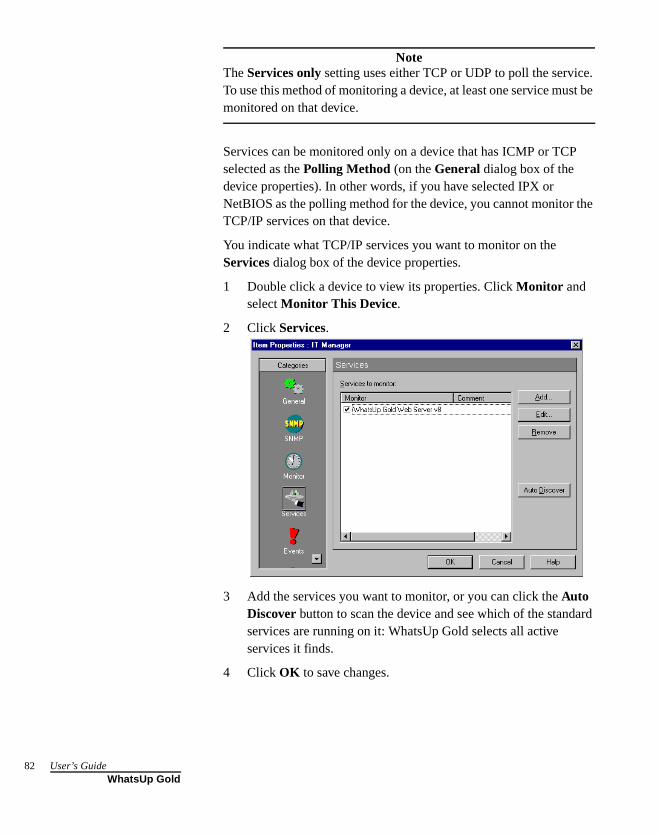
82
NoteThe Services only setting uses either TCP or UDP to poll the service. To use this method of monitoring a device, at least one service must be monitored on that device.
Services can be monitored only on a device that has ICMP or TCP selected as the Polling Method (on the General dialog box of the device properties). In other words, if you have selected IPX or NetBIOS as the polling method for the device, you cannot monitor the TCP/IP services on that device.
You indicate what TCP/IP services you want to monitor on the Services dialog box of the device properties.
1 Double click a device to view its properties. Click Monitor and select Monitor This Device.
2 Click Services.
3 Add the services you want to monitor, or you can click the Auto Discover button to scan the device and see which of the standard services are running on it: WhatsUp Gold selects all active services it finds.
4 Click OK to save changes.
User’s GuideWhatsUp Gold
Monitors and Services
You can define an unlimited number of TCP/IP monitors and services. Once defined, these can be used on any device on your maps.
WhatsUp Gold is shipped with monitors/services already defined for you:
• HTTP Content Scan
• Radius Server (Remote Authentication and Dial-In User Service)
• IMail Server
• WS-FTP Server
• WhatsUp Gold Web Server v5
• WhatsUp Gold Web Server v6
• WhatsUp Gold Web Server v7
• WhatsUp Gold Web Server v8
You can define additional TCP services. For example, you may want to monitor an IRC (Internet Relay Chat) service, a Lotus Notes server, a Microsoft SQL server, or a Microsoft Exchange service.
If you are running any common services (like SMTP, POP3, etc.) on a non-standard port number, you can also edit their definitions.
Defining a Custom TCP/IP Service
The monitoring of a service always involves a protocol handshake and can also include some additional information exchange between WhatsUp Gold and the service. You can search the response from the service for an exact match of a particular text string, or you can use rule expressions to analyze the response for a more generic text pattern.
For example, if you are looking for any error message, and you know that all possible error messages have the word “fail” in common, you can use a rule expression to look for just the word “fail.” Or, you can create a rule expression that looks for any number of possible error messages. You can search for “this,” “that,” or “the other.”
Chapter 6 Monitoring Services 83WhatsUp GoldWhatsUp Gold
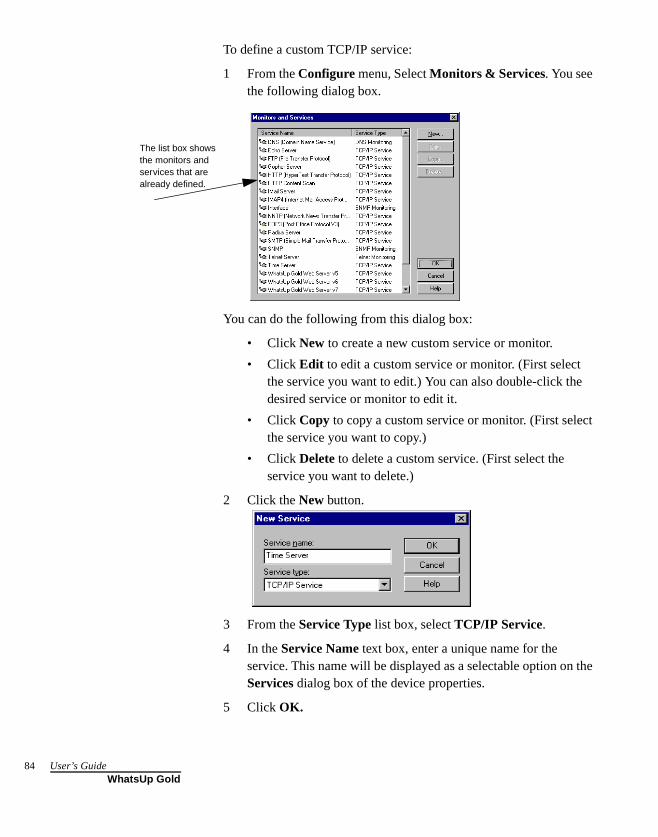
84
To define a custom TCP/IP service:
1 From the Configure menu, Select Monitors & Services. You see the following dialog box.
You can do the following from this dialog box:
• Click New to create a new custom service or monitor.
• Click Edit to edit a custom service or monitor. (First select the service you want to edit.) You can also double-click the desired service or monitor to edit it.
• Click Copy to copy a custom service or monitor. (First select the service you want to copy.)
• Click Delete to delete a custom service. (First select the service you want to delete.)
2 Click the New button.
3 From the Service Type list box, select TCP/IP Service.
4 In the Service Name text box, enter a unique name for the service. This name will be displayed as a selectable option on the Services dialog box of the device properties.
5 Click OK.
The list box shows the monitors and services that are already defined.
User’s GuideWhatsUp Gold
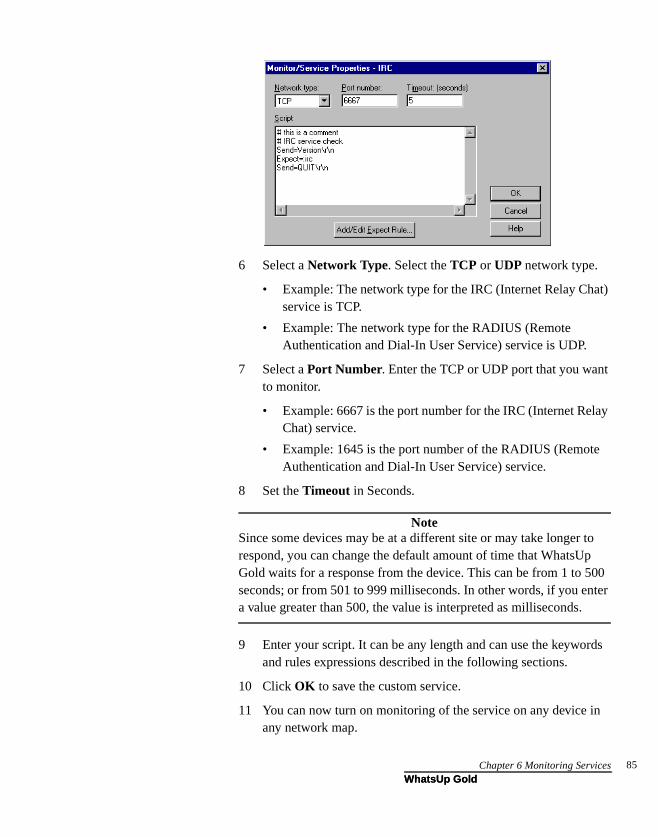
6 Select a Network Type. Select the TCP or UDP network type.
• Example: The network type for the IRC (Internet Relay Chat) service is TCP.
• Example: The network type for the RADIUS (Remote Authentication and Dial-In User Service) service is UDP.
7 Select a Port Number. Enter the TCP or UDP port that you want to monitor.
• Example: 6667 is the port number for the IRC (Internet Relay Chat) service.
• Example: 1645 is the port number of the RADIUS (Remote Authentication and Dial-In User Service) service.
8 Set the Timeout in Seconds.
NoteSince some devices may be at a different site or may take longer to respond, you can change the default amount of time that WhatsUp Gold waits for a response from the device. This can be from 1 to 500 seconds; or from 501 to 999 milliseconds. In other words, if you enter a value greater than 500, the value is interpreted as milliseconds.
9 Enter your script. It can be any length and can use the keywords and rules expressions described in the following sections.
10 Click OK to save the custom service.
11 You can now turn on monitoring of the service on any device in any network map.
Chapter 6 Monitoring Services 85WhatsUp GoldWhatsUp Gold
86
Script Syntax
NoteYou create a script using keywords. In general the Script Syntax is Command=String. Command is either Send, Expect, SimpleExpect, or Flow Control. A script can have as many send and receive lines as needed. However, the more you have, the slower the service checking.
Keywords.
• To send a string to a port, use the Send= keyword.
• To expect a string from a port, use the SimpleExpect= or Expect= keyword.
• To comment out a line, use the # symbol as the first character of the line.
• To have conditional responses on “error” or “success” of a step within the scripts, use Flow Control Keywords.
Examples:
• To compare responses byte-by-byte (expanding escape codes as you go), use a SimpleExpect= keyword. For more information, see “SimpleExpect Keywords” on page 87.
• To Expect on connect, use an Expect= keyword. Enter either an exact text string or a rule expression that you expect the remote service to send to you when you connect. To view the Rule Expression Editor, click the Browse button. For more information on composing a rule expression, see “Using Rule Expressions” on page 88.
• To Send command on connect, use a Send= keyword. Enter the command to send to the service’s port. For example: for IRC (Internet Relay Chat), the send command is: “Version\r\n”
• To Expect a command response, use another Expect= keyword. Enter an exact text string or a rule expression that represents the expected response to the “Send” command. For example: for IRC, this is “:irc”
• To Send to disconnect, use a Send= keyword. Enter a command string to disconnect from the service properly. For example: for most TCP/IP servers, the string QUIT\r\n is
User’s GuideWhatsUp Gold

proper. If a command string is not specified, the connection is closed by sending a FIN packet and then an RST packet.
NoteDepending on the plug-ins you have installed, there are many other services/monitors you can define. Others include: DNS Monitoring, Telnet Monitoring, SNMP Monitoring, and NT Service. See the WhatsUp Gold help topic: “Plug-Ins” for more information.
SimpleExpect Keywords
Flow Control Keywords
The script language has been expanded to have conditional responses on “error” or “success” of a step within the scripts. This is done by using the following keywords.
IfState – This checks for the current state (ok or error) and jumps to a label if true.
Valid syntax: IfState {ERR|OK} label
Example: IfState ERR End IfState OK Bye
Goto – This immediately jumps to a label.
Valid syntax: Goto End
Example: Goto End
Exit – This immediately ends the script with an optional state (ok or error). The optional state overrides the current state.
Valid syntax: Exit {ERR|OK}
Example: Exit ERR Exit OK
:Label – This defines a label that can be the target of a jump. A label
Keyword Description
%nnn Binary value (for example %000 is null, %027 is escape)
. Matches any character
\% The “%” character
\. The “.” character
\\ The “\” character
Chapter 6 Monitoring Services 87WhatsUp GoldWhatsUp Gold

88
is defined by a single word beginning with the “:” character.
Valid syntax: (with a name following)
Example: :Bye
OnError - This allows for a global handling of an error situation.
Valid Syntax: OnError {EXIT|CONTINUE|GOTO} label
Example: OnError EXIT (Default behavior) OnError CONTINUE OnError GOTO Logoff
Using Rule Expressions
The rule expression syntax is:
search_text quantifier
Note that search_text can be any combination of literal text and the text patterns shown below.
To create a rule expression:
1 In the “Monitors & Services” dialog box shown on page 84, click the Add/Edit Expect Rule button to view the Rule Expression Editor.
2 Select the contains option to look for messages that contain the search string; select Doesn’t contain to look for messages that do not contain the search string.
3 Select Match Case to search for text that matches the case of the search string; to ignore case, make sure Match Case is cleared.
4 Enter the expected text by doing one or more of the following:
• Type the literal text that you want to search for. For example, if you want to find the word fail, type fail.
Add/Edit Expect Rule button
User’s GuideWhatsUp Gold
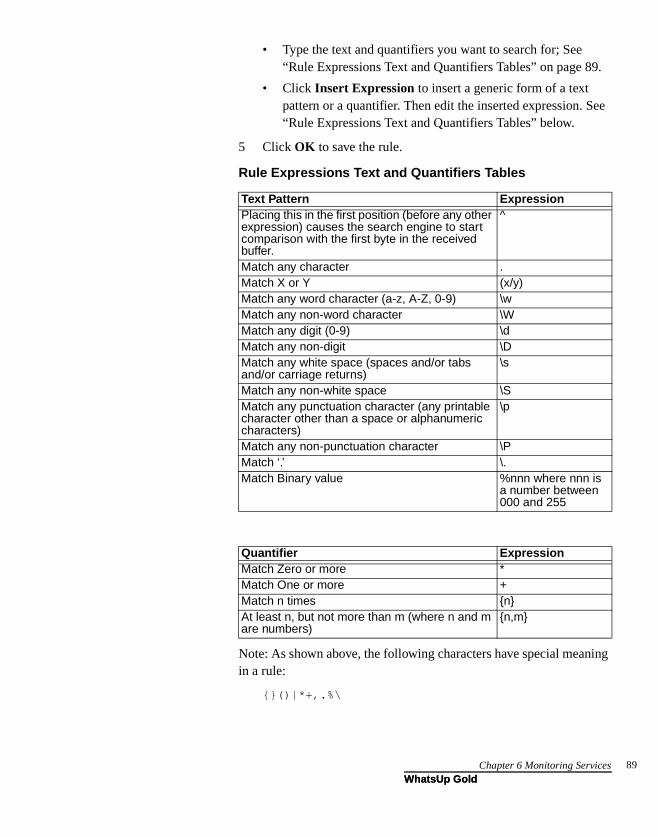
• Type the text and quantifiers you want to search for; See “Rule Expressions Text and Quantifiers Tables” on page 89.
• Click Insert Expression to insert a generic form of a text pattern or a quantifier. Then edit the inserted expression. See “Rule Expressions Text and Quantifiers Tables” below.
5 Click OK to save the rule.
Rule Expressions Text and Quantifiers Tables
Note: As shown above, the following characters have special meaning in a rule:
{}()|*+,.%\
Text Pattern ExpressionPlacing this in the first position (before any other expression) causes the search engine to start comparison with the first byte in the received buffer.
^
Match any character .Match X or Y (x/y)Match any word character (a-z, A-Z, 0-9) \wMatch any non-word character \WMatch any digit (0-9) \dMatch any non-digit \DMatch any white space (spaces and/or tabs and/or carriage returns)
\s
Match any non-white space \SMatch any punctuation character (any printable character other than a space or alphanumeric characters)
\p
Match any non-punctuation character \PMatch ‘.’ \.Match Binary value %nnn where nnn is
a number between 000 and 255
Quantifier ExpressionMatch Zero or more *Match One or more +Match n times {n}At least n, but not more than m (where n and m are numbers)
{n,m}
Chapter 6 Monitoring Services 89WhatsUp GoldWhatsUp Gold
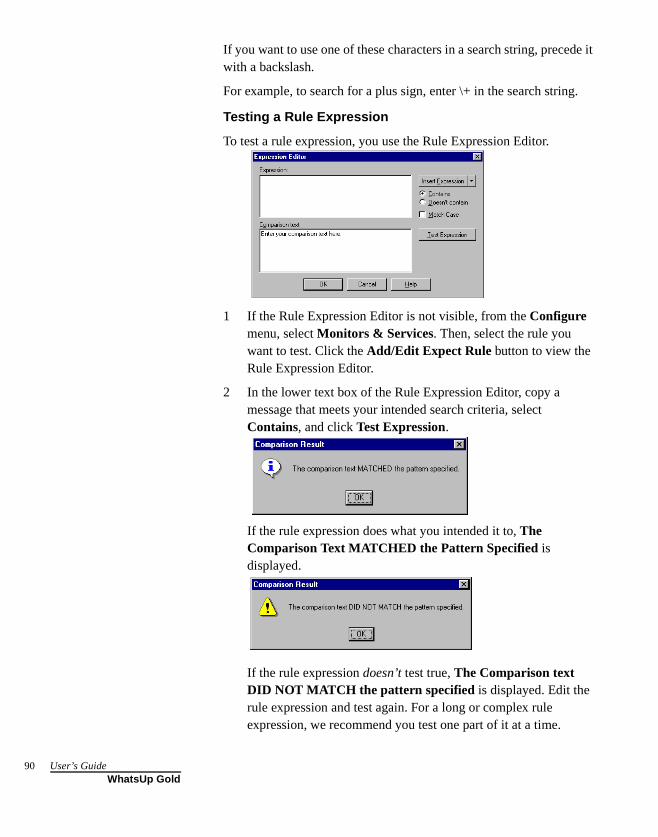
90
If you want to use one of these characters in a search string, precede it with a backslash.
For example, to search for a plus sign, enter \+ in the search string.
Testing a Rule Expression
To test a rule expression, you use the Rule Expression Editor.
1 If the Rule Expression Editor is not visible, from the Configure menu, select Monitors & Services. Then, select the rule you want to test. Click the Add/Edit Expect Rule button to view the Rule Expression Editor.
2 In the lower text box of the Rule Expression Editor, copy a message that meets your intended search criteria, select Contains, and click Test Expression.
If the rule expression does what you intended it to, The Comparison Text MATCHED the Pattern Specified is displayed.
If the rule expression doesn’t test true, The Comparison text DID NOT MATCH the pattern specified is displayed. Edit the rule expression and test again. For a long or complex rule expression, we recommend you test one part of it at a time.
User’s GuideWhatsUp Gold

Defining an SNMP Object to Monitor
Once you install the SNMP Monitor Plug-In, you can monitor SNMP objects on a device.
NoteThe device must be SNMP manageable because that is where the community string information is entered.
You can define the SNMP object (and instance) to monitor.
1 From the Configure menu, Select Monitors & Services. You see the following dialog box.
You can do the following from this dialog box:
• Click New to create a new custom service or monitor.
• Click Edit to edit a custom service or monitor. (First select the service you want to edit.)
• Click Copy to copy a custom service or monitor. (First select the service you want to copy.)
• Click Delete to delete a custom service. (First select the service you want to delete.)
2 Click the New button.
The list box shows the monitors and services that are already defined.
Chapter 6 Monitoring Services 91WhatsUp GoldWhatsUp Gold
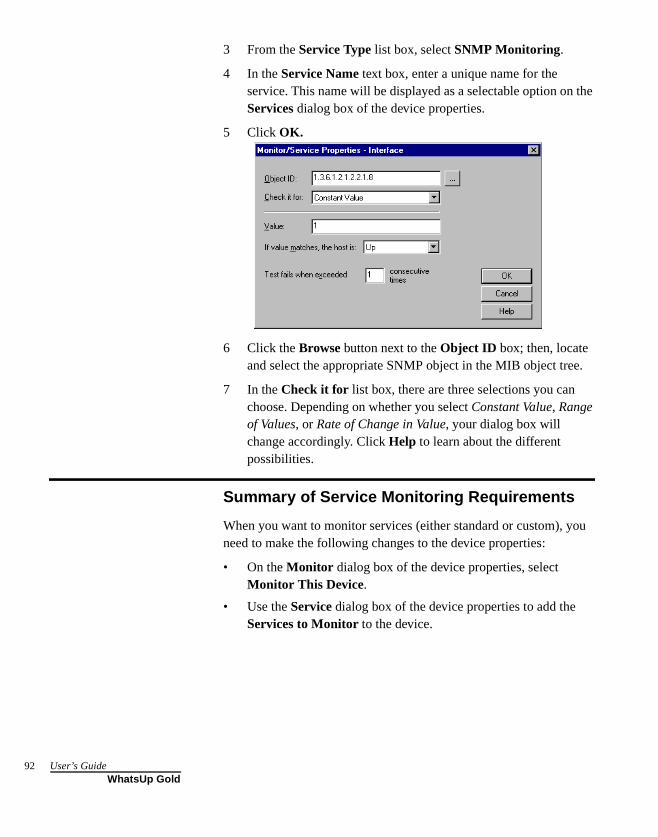
92
3 From the Service Type list box, select SNMP Monitoring.
4 In the Service Name text box, enter a unique name for the service. This name will be displayed as a selectable option on the Services dialog box of the device properties.
5 Click OK.
6 Click the Browse button next to the Object ID box; then, locate and select the appropriate SNMP object in the MIB object tree.
7 In the Check it for list box, there are three selections you can choose. Depending on whether you select Constant Value, Range of Values, or Rate of Change in Value, your dialog box will change accordingly. Click Help to learn about the different possibilities.
Summary of Service Monitoring Requirements
When you want to monitor services (either standard or custom), you need to make the following changes to the device properties:
• On the Monitor dialog box of the device properties, select Monitor This Device.
• Use the Service dialog box of the device properties to add the Services to Monitor to the device.
User’s GuideWhatsUp Gold
Custom Services API
WhatsUp Gold provides a COM interface to allow experienced COM program developers to create customized service checks that “plug in” to WhatsUp Gold. In fact, all of the monitors and services supplied with WhatsUp Gold are implemented as plug-in modules that use this COM interface.
You can also visit our web site and download other plug-ins. Any other plug-in modules we make available in the future will also be listed on our web site.
http://www.ipswitch.com/Support/whatsup/plugins.html
To write your own plug-in modules, see the wugapi.h file that was installed with WhatsUp Gold.
All pertinent information regarding the implementation of the COM interface is provided in the wugapi.h file that is automatically installed in the WhatsUp Gold program directory. The information in this file is for experienced COM program developers to use to extend the monitoring capabilities of WhatsUp Gold. It is beyond the scope of this document to provide any guidance on writing COM applications.
Chapter 6 Monitoring Services 93WhatsUp GoldWhatsUp Gold

94
User’s GuideWhatsUp Gold
Chapter 7: Monitoring Events
WhatsUp Gold can alert you in two different ways.
• Interval Polling - Network services (HTTP, FTP, etc.) and devices are queried on a timed interval to check their state. These types of services and devices operate in a mode where they can respond to their status whenever it is requested. If a service or device does not respond to a request from WhatsUp Gold, then the service/device is considered DOWN.
• Asynchronous Events - Some elements on a network may not provide a clear UP or DOWN status when queried. For example, a message may get logged to the system's Event log by another application (such as an Anti-Virus application alerting when a virus is found). Since these messages/events can occur at any time, an Event Server will "Listen" for them, and notify WhatsUp Gold when they occur
Other examples of asynchronous events include:
• SNMP Traps - Routers and other network devices generate traps when events occur on the network. The SNMP trap server receives and logs these traps, but WhatsUp Gold can trigger Alerts or change device states when specific traps are received.
• Syslog Messages - Many software applications can send log messages to a central Syslog logging service. Once again these messages are sent at the convenience of the sending application, which requires a listening mechanism (provided by the WhatsUp Syslog).
In general, there are four steps to using events.
1 Configure your event server. For information on this, see “Configuring the Event Servers” on page 96.
2 Create the event so that it resides in the Events Library and is available for use.
3 Associate the event to a device so the event can be logged when the device raises the event.
4 Associate the event to an alert (on the device) so that when an event occurs on that device, you can respond to it.
Chapter 7 Monitoring Events 95WhatsUp Gold
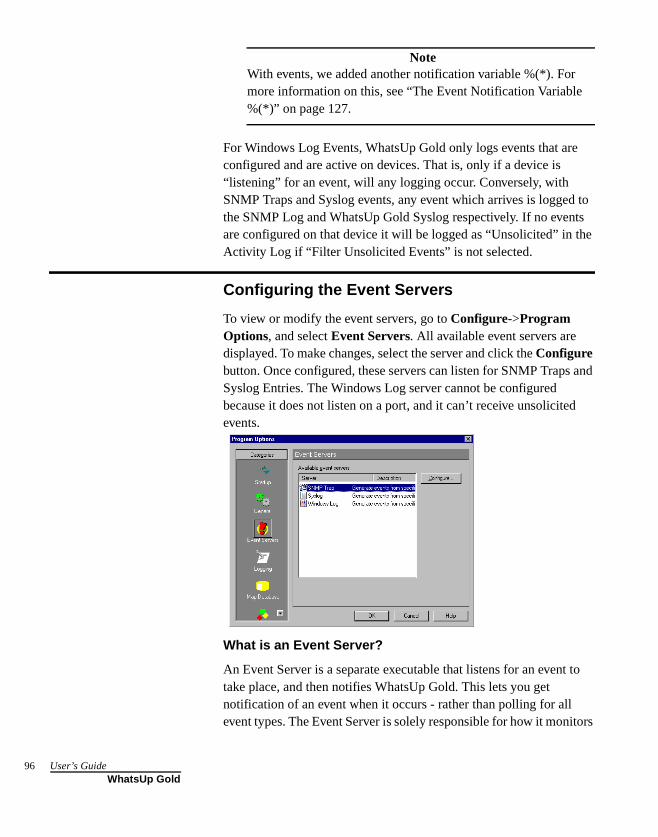
96
NoteWith events, we added another notification variable %(*). For more information on this, see “The Event Notification Variable %(*)” on page 127.
For Windows Log Events, WhatsUp Gold only logs events that are configured and are active on devices. That is, only if a device is “listening” for an event, will any logging occur. Conversely, with SNMP Traps and Syslog events, any event which arrives is logged to the SNMP Log and WhatsUp Gold Syslog respectively. If no events are configured on that device it will be logged as “Unsolicited” in the Activity Log if “Filter Unsolicited Events” is not selected.
Configuring the Event Servers
To view or modify the event servers, go to Configure->Program Options, and select Event Servers. All available event servers are displayed. To make changes, select the server and click the Configure button. Once configured, these servers can listen for SNMP Traps and Syslog Entries. The Windows Log server cannot be configured because it does not listen on a port, and it can’t receive unsolicited events.
What is an Event Server?
An Event Server is a separate executable that listens for an event to take place, and then notifies WhatsUp Gold. This lets you get notification of an event when it occurs - rather than polling for all event types. The Event Server is solely responsible for how it monitors
User’s GuideWhatsUp Gold
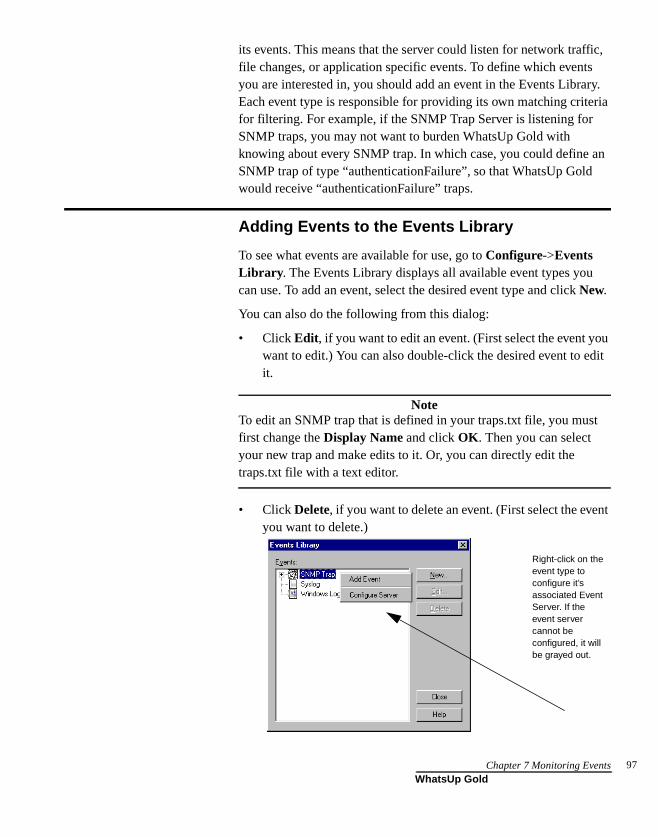
its events. This means that the server could listen for network traffic, file changes, or application specific events. To define which events you are interested in, you should add an event in the Events Library. Each event type is responsible for providing its own matching criteria for filtering. For example, if the SNMP Trap Server is listening for SNMP traps, you may not want to burden WhatsUp Gold with knowing about every SNMP trap. In which case, you could define an SNMP trap of type “authenticationFailure”, so that WhatsUp Gold would receive “authenticationFailure” traps.
Adding Events to the Events Library
To see what events are available for use, go to Configure->Events Library. The Events Library displays all available event types you can use. To add an event, select the desired event type and click New.
You can also do the following from this dialog:
• Click Edit, if you want to edit an event. (First select the event you want to edit.) You can also double-click the desired event to edit it.
NoteTo edit an SNMP trap that is defined in your traps.txt file, you must first change the Display Name and click OK. Then you can select your new trap and make edits to it. Or, you can directly edit the traps.txt file with a text editor.
• Click Delete, if you want to delete an event. (First select the event you want to delete.)
Right-click on the event type to configure it’s associated Event Server. If the event server cannot be configured, it will be grayed out.
Chapter 7 Monitoring Events 97WhatsUp Gold
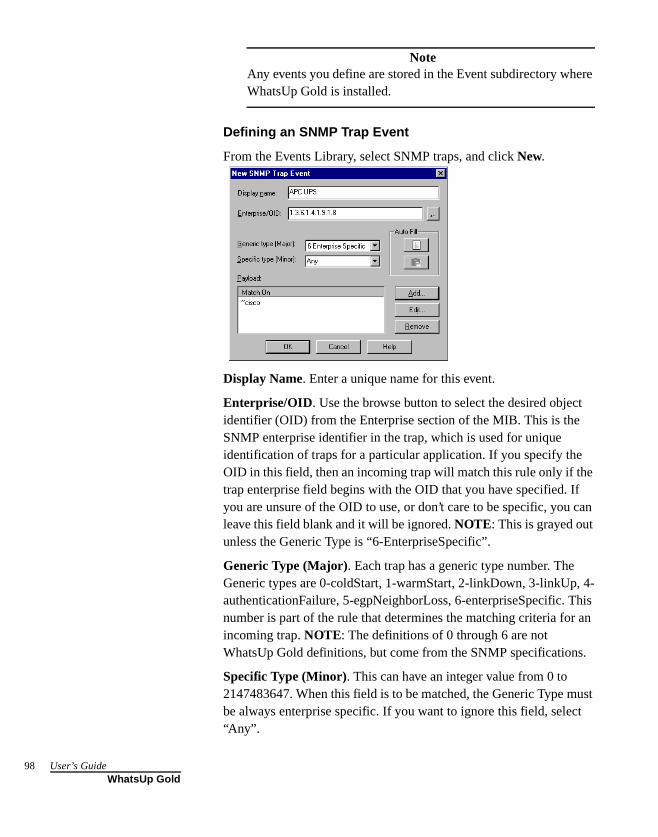
98
NoteAny events you define are stored in the Event subdirectory where WhatsUp Gold is installed.
Defining an SNMP Trap Event
From the Events Library, select SNMP traps, and click New.
Display Name. Enter a unique name for this event.
Enterprise/OID. Use the browse button to select the desired object identifier (OID) from the Enterprise section of the MIB. This is the SNMP enterprise identifier in the trap, which is used for unique identification of traps for a particular application. If you specify the OID in this field, then an incoming trap will match this rule only if the trap enterprise field begins with the OID that you have specified. If you are unsure of the OID to use, or don’t care to be specific, you can leave this field blank and it will be ignored. NOTE: This is grayed out unless the Generic Type is “6-EnterpriseSpecific”.
Generic Type (Major). Each trap has a generic type number. The Generic types are 0-coldStart, 1-warmStart, 2-linkDown, 3-linkUp, 4-authenticationFailure, 5-egpNeighborLoss, 6-enterpriseSpecific. This number is part of the rule that determines the matching criteria for an incoming trap. NOTE: The definitions of 0 through 6 are not WhatsUp Gold definitions, but come from the SNMP specifications.
Specific Type (Minor). This can have an integer value from 0 to 2147483647. When this field is to be matched, the Generic Type must be always enterprise specific. If you want to ignore this field, select “Any”.
User’s GuideWhatsUp Gold
You can click the Add button and this will take you to the Expression Editor where you can enter an expression that will be used to filter the traps that you receive. If a trap’s payload matches this expression, the trap will be reported to WhatsUp Gold. After creating the message, clicking OK will insert that string into the Payload box.
NoteTo learn more on the use of the Expression Editor, begin reading with “Script Syntax” on page 86.
You can Edit, or Remove a message by selecting it and clicking the appropriate button.
NOTE: There are two buttons on the right side of this dialog (in the Auto Fill section).
• Browse. The browse button launches the WhatsUp Gold SNMP Trap Log Viewer (as if you had selected Logs->SNMP Trap Log). This allows you to find a line from an event you want to use. You can select this, right-click, and click Copy.
• Paste. The paste button allows you to paste (from the SNMP Trap Log) your copied information into this WhatsUp Gold SNMP Trap event. This button remains grayed unless WhatsUp Gold detects the contents in the clipboard as relevant data that was copied from the SNMP Trap log.
Chapter 7 Monitoring Events 99WhatsUp Gold

100
Defining a Syslog Event
From the Events Library, select Syslog, and click New.
Display Name. Enter a unique name for this event.
To create a filter, click the Add button. This takes you to the Expression Editor where you can enter an expression that will be used to filter the Syslog events that you receive. If the Syslog event matches this expression, the Syslog event will be reported to WhatsUp Gold. After creating the message, clicking OK will insert that string into this message box.
You can Edit, or Remove a message by selecting it and clicking the appropriate button.
NOTE: There are two buttons on the right side of this dialog.
• Browse. The browse button launches the WhatsUp Gold Syslog Log Viewer (as if you had selected Logs->Syslog Log). This allows you to find a line from an event you want to use. You can select this, right-click, and click Copy.
• Paste. The paste button allows you to paste (from the Syslog Log) your copied information into this WhatsUp Gold Syslog Event. This button remains grayed unless WhatsUp Gold detects the contents in the clipboard as relevant data the Syslog log copies there.
User’s GuideWhatsUp Gold

Defining a Windows Log Event
From the Events Library, select Windows Log, and click New.
Display Name. Enter a unique name for this event.
Source. This is the service or program that logs the event and generates the description below.
Type. Use the list box to select the desired type. NOTE: There are five types of messages predefined by Windows, including Error, Warning, Information, Success Audit and Failure Audit. You can choose one of these types, or “Any” if you do not want to specify a specific type.
Event ID. This is the event number used to identify the specific event.
Description. This is a list of regular expressions to match. Only logged descriptions which match these expressions will be converted to events. This will help filter down log events to a manageable load, and avoid generating a huge number of unnecessary notifications. There is no sequencing in this box, so the order the descriptions appear is not important.
NoteTo add a new description, click the Add button. This takes you to the Expression Editor where you can create your desired expression. After creating the expression, you should test your expression. Once the expression is what you want it to be, click OK and this will insert that string into this Description box.
Chapter 7 Monitoring Events 101WhatsUp Gold
102
You can Edit, or Remove a description by selecting it and clicking the appropriate button.
There are two buttons on this dialog (in the Auto Fill section).
• Browse. The browse button launches the Event Viewer application. This allows you to find an event you want to use. Double-click the desired event to see the properties dialog, and depending on your Operating System, you can select this event and click Copy. Click Help and to learn about the different Operating Systems.
• Paste. The paste button allows you to paste (from the Event Viewer) your copied information into this WhatsUp Gold Windows Event Log. This button remains grayed unless WhatsUp Gold detects the contents in the clipboard as relevant data copied from the Event Viewer.
Using Events for the First Time - A Simulation
You have a device on your map that you want to assign an SNMP trap event to. You want this device to “light up” on the map when an SNMP trap (assigned to this device) occurs. When this event happens, you also want to be alerted via a sound notification.
Just for this exercise, we are going to do the following:
• Add a single device to a map (make sure the IP address is: 127.0.0.1).
• Assign an event to this device.
• Assign an alert to notify you about this event on the device.
• Trigger the event and see what happens.
Adding an Event to a Device
To begin, put a single device on a map. If you need a refresher on this, see “Creating a New Network Map” on page 12.
1 Double-click this device and select Events.
2 Click Add and select SNMP Traps - “Any”.
User’s GuideWhatsUp Gold
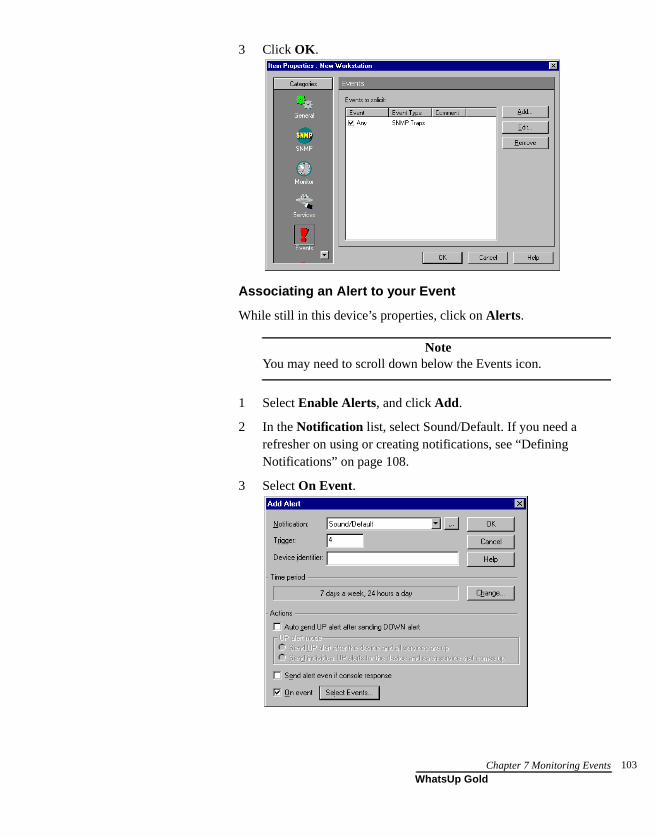
3 Click OK.
Associating an Alert to your Event
While still in this device’s properties, click on Alerts.
NoteYou may need to scroll down below the Events icon.
1 Select Enable Alerts, and click Add.
2 In the Notification list, select Sound/Default. If you need a refresher on using or creating notifications, see “Defining Notifications” on page 108.
3 Select On Event.
Chapter 7 Monitoring Events 103WhatsUp Gold
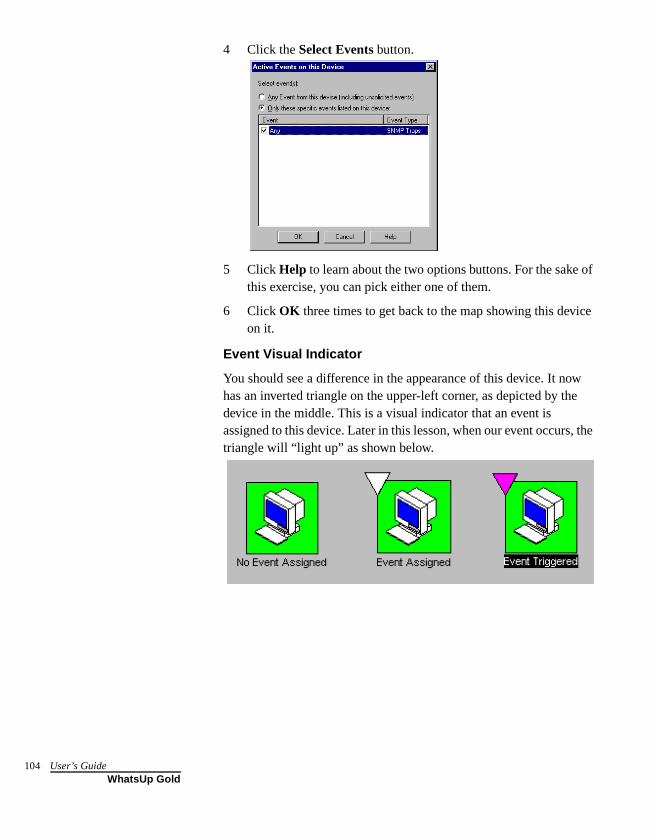
104
4 Click the Select Events button.
5 Click Help to learn about the two options buttons. For the sake of this exercise, you can pick either one of them.
6 Click OK three times to get back to the map showing this device on it.
Event Visual Indicator
You should see a difference in the appearance of this device. It now has an inverted triangle on the upper-left corner, as depicted by the device in the middle. This is a visual indicator that an event is assigned to this device. Later in this lesson, when our event occurs, the triangle will “light up” as shown below.
User’s GuideWhatsUp Gold

Manually Triggering your Event
To recap, we have created a device, assigned an event to it, and associated an alert to this event. Now, we are going to trigger an event on our device.
1 Using your favorite command line SNMP trap utility, send a trap to 127.0.0.1
2 Your device should light up and your notification should occur.
NoteIn the real world, this device would have an appropriate IP address on your network, and when an SNMP trap is sent to this device, the device would “light up” and the notification would occur.
Chapter 7 Monitoring Events 105WhatsUp Gold

106
User’s GuideWhatsUp Gold
Chapter 8: Setting Up Notifications
When an activity occurs on your network, WhatsUp Gold performs several different actions. WhatsUp Gold:
• Records the activity in the Activity Log (described in “Logging and Reporting Activities” on page 152).
• Updates the device properties Status and Log dialog boxes
• Changes the appearance of the device icon on a map (as described in “Reading the Network Map” on page 141).
• Optionally, sends a notification (as described in this chapter).
WhatsUp Gold can send a notification in several ways; it can:
• Sound an alarm
• Activate a beeper
• Execute a Program
• Stop or restart a Service
• Send a message to a pager
• Send an SMTP Mail message
• Send a pre-recorded message to a telephone (only in Windows 98 and Windows ME, and only if you have a voice modem installed).
• Send a text to speech notification
• Send an SMS notification
• Display a WinPopup on a Windows NT system
• Send a group of notifications that includes any of the above types
You can also set up a “recurring notification” to use many of the notifications to send a network status report at a specified time interval. See “Sending Recurring Notifications” on page 179.
Setting up notifications involves two steps:
1 You first need to define the notifications that you want to use, such as activating a network administrator’s beeper or sending e-mail to an individual. This section describes how to do this.
2 Then, you assign a notification to a particular device, selected devices, or all devices.
Chapter 8 Setting Up Notifications 107WhatsUp Gold
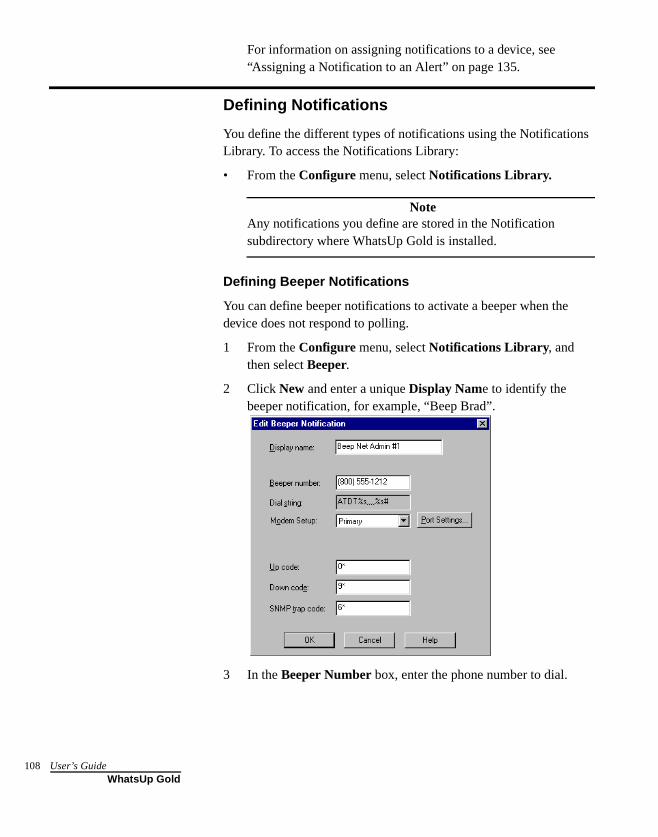
108
For information on assigning notifications to a device, see “Assigning a Notification to an Alert” on page 135.
Defining Notifications
You define the different types of notifications using the Notifications Library. To access the Notifications Library:
• From the Configure menu, select Notifications Library.
NoteAny notifications you define are stored in the Notification subdirectory where WhatsUp Gold is installed.
Defining Beeper Notifications
You can define beeper notifications to activate a beeper when the device does not respond to polling.
1 From the Configure menu, select Notifications Library, and then select Beeper.
2 Click New and enter a unique Display Name to identify the beeper notification, for example, “Beep Brad”.
3 In the Beeper Number box, enter the phone number to dial.
User’s GuideWhatsUp Gold
4 In the Dial String box, the default is: ATDT%s,,,,%s#. WhatsUp replaces the first %s with the phone number and the second %s with the beeper code. Most modems and beepers support the use of ‘#’ to terminate the message and ‘*’ to print out a dash. You may find a need to increase the number of commas in the dial string if it sends the beeper code too soon or decrease the number of commas if it waits too long.
5 In the Modem Setup list box, select either Primary, or one of the Alternate setups. Click Port Settings to further define your selection. Modem Setup is used specifically to support different service providers in case you use more than one provider for sending your beeper notifications. There could also be times you wish to change your settings to meet a specific service provider’s requirements for a specific notification (for example: a lower baud rate). To do this, you can set up an alternate Modem Setup and associate this to the notification instead of using your Primary setting.
NoteChanging the Port Settings for the desired Modem Setup will affect ALL uses of that setting.
6 In the Signal Codes section, the Up Code specifies the characters sent to the beeper to indicate that the device has come back up after being down (the default value is 0*). The Down Code specifies the code sent to indicate the device is down (the default value is 9*). The SNMP Trap Code specifies the code sent to indicate that an SNMP trap has been received for the device. (You can use the asterisk (*) character to separate codes from a subsequent message.)
When sent to the beeper, the up or down code will be followed by the Item digital code that tells you which device the notification is for. (The Item digital code is specified in the Add/Edit Notifications dialog box). For more information, see “Assigning Alerts to Devices” on page 132.
7 Click Port Settings to set the beeper communications.
• Dial String. This is the default dial string used for beeper notifications.
Chapter 8 Setting Up Notifications 109WhatsUp Gold

110
• Baud Rate. Select the speed (measured in bits per second) at which the serial port will communicate with the modem.
NoteNewer modems (e.g. 56K versions) may be utilized if their rate of transfer can be stepped down to a maximum of 2400 bps (TAP specification). However, some newer modems cannot be made to transfer below 9600 bps even though you may use an initialization string that specifies a lower rate of transfer.
• COM Port. Select the port to which your modem is attached.
• Modem Initialization String. The default string is ATE0Q0V1X4F1. What is expected in this string are the modem commands for “Command Echo Off” (EO), “Result Codes On” (QO), “Verbal Results” (V1), and “Extended Status” (X4).
• Timeout. The timeout value determines how long the system waits after sending the last character before it hangs up the phone, if a transition is not recognized.
8 Click OK after you are satisfied with your Port Settings.
9 In the Beeper properties, click OK to save the new notification.
To test a notification, select it and click the Test button. WhatsUp Gold will run a test and respond with a Success or Fail message. You can view the “conversation” in the Debug log window.
NoteSince Beepers are “one way” devices (they provide no feedback to WhatsUp Gold), the Test button can return a “Success” message, even though one might not actually get the message on the beeper.
To edit a notification, select it in the list box and click Edit, and then enter your changes to the properties. Click OK to save your changes.
To delete a notification, select it in the list box and click Delete.
User’s GuideWhatsUp Gold
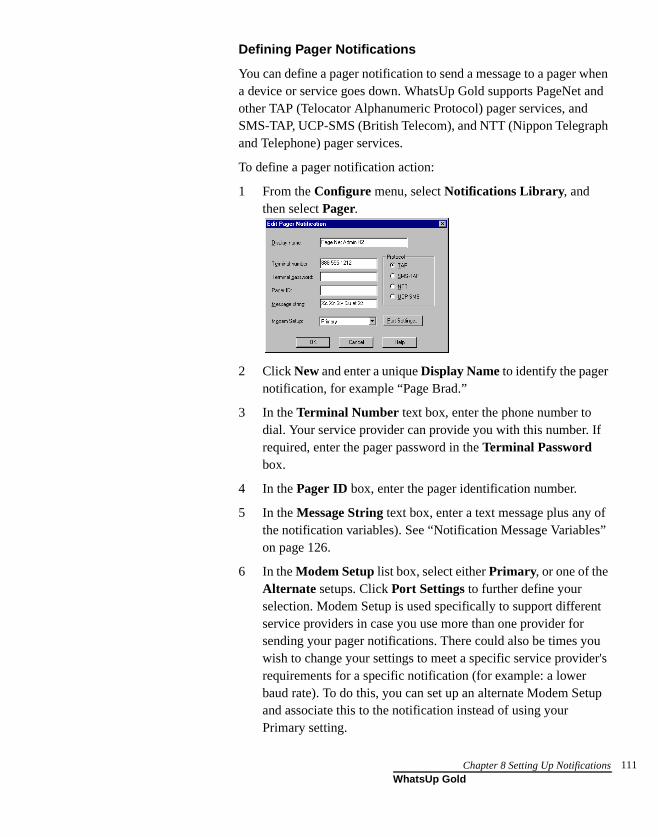
Defining Pager Notifications
You can define a pager notification to send a message to a pager when a device or service goes down. WhatsUp Gold supports PageNet and other TAP (Telocator Alphanumeric Protocol) pager services, and SMS-TAP, UCP-SMS (British Telecom), and NTT (Nippon Telegraph and Telephone) pager services.
To define a pager notification action:
1 From the Configure menu, select Notifications Library, and then select Pager.
2 Click New and enter a unique Display Name to identify the pager notification, for example “Page Brad.”
3 In the Terminal Number text box, enter the phone number to dial. Your service provider can provide you with this number. If required, enter the pager password in the Terminal Password box.
4 In the Pager ID box, enter the pager identification number.
5 In the Message String text box, enter a text message plus any of the notification variables). See “Notification Message Variables” on page 126.
6 In the Modem Setup list box, select either Primary, or one of the Alternate setups. Click Port Settings to further define your selection. Modem Setup is used specifically to support different service providers in case you use more than one provider for sending your pager notifications. There could also be times you wish to change your settings to meet a specific service provider's requirements for a specific notification (for example: a lower baud rate). To do this, you can set up an alternate Modem Setup and associate this to the notification instead of using your Primary setting.
Chapter 8 Setting Up Notifications 111WhatsUp Gold
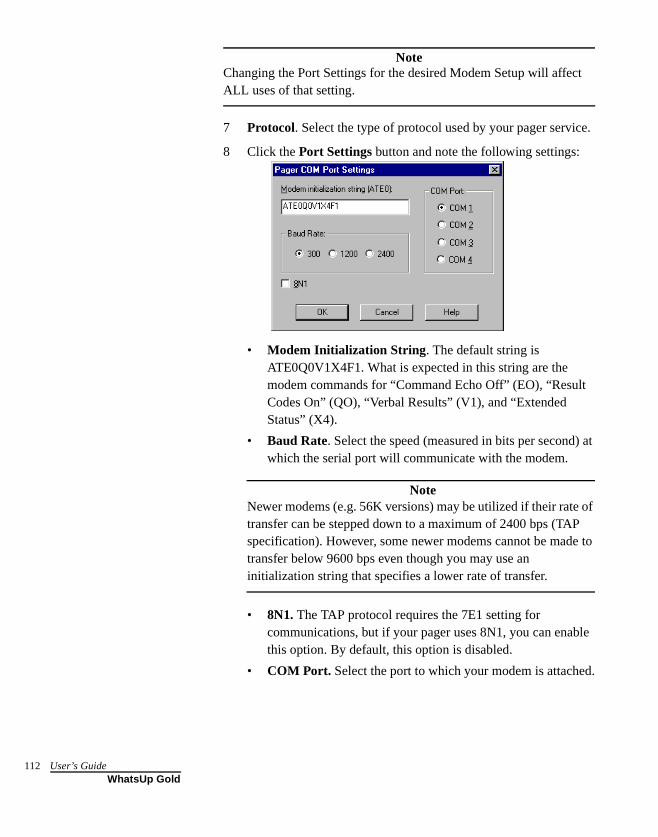
112
NoteChanging the Port Settings for the desired Modem Setup will affect ALL uses of that setting.
7 Protocol. Select the type of protocol used by your pager service.
8 Click the Port Settings button and note the following settings:
• Modem Initialization String. The default string is ATE0Q0V1X4F1. What is expected in this string are the modem commands for “Command Echo Off” (EO), “Result Codes On” (QO), “Verbal Results” (V1), and “Extended Status” (X4).
• Baud Rate. Select the speed (measured in bits per second) at which the serial port will communicate with the modem.
NoteNewer modems (e.g. 56K versions) may be utilized if their rate of transfer can be stepped down to a maximum of 2400 bps (TAP specification). However, some newer modems cannot be made to transfer below 9600 bps even though you may use an initialization string that specifies a lower rate of transfer.
• 8N1. The TAP protocol requires the 7E1 setting for communications, but if your pager uses 8N1, you can enable this option. By default, this option is disabled.
• COM Port. Select the port to which your modem is attached.
User’s GuideWhatsUp Gold
9 Click OK until you get back to the “Notifications Library” dialog box.
NoteYour pager should appear in the “Notifications Library” dialog box.
10 Click Close to exit this dialog box.
NoteIf you want to edit or delete this, select it and click on either the Edit or Delete button.
Defining SMS Notifications
If you have installed the WhatsUp Gold SMS plug in you will be able to use SMS (Short Message Service) with WhatsUp Gold. SMS is similar to paging. However, SMS messages do not require the mobile phone to be active and within range and will be held for a number of days until the phone is active and within range. SMS messages are transmitted within the same cell or to anyone with roaming service capability.
NoteWhatsUp Gold transmits the SMS message to the Provider, and the provider forwards it to the Cell phone. WhatsUp Gold does not broadcast SMS messages directly
To define an SMS notification:
1 From the Configure menu, select Notifications Library, and then select SMS.
2 Click New and enter a unique Display Name for the notification.
3 Country. Using the list box, select the desired country for this provider.
4 Provider. Using the list box, select the desired provider.
NoteIf the provider list is incomplete and/or incorrect, you can click the Browse button to add, edit, or delete providers in this list.
Chapter 8 Setting Up Notifications 113WhatsUp Gold

114
5 Connection Settings. The Mode is either Email or Dialup, depending on how the Provider was created in the system. Depending on which option button you select, the text box below is changed accordingly.
• Email to. The email address for a user on a specific SMS provider is usually in the form of [email protected] where providerdomain.com is the provider's domain. Example: Brad's cell phone number is 770-555-1234 and his cell phone carrier is Voicestream. Brad’s SMS email address is: [email protected].
• Phone Number. Enter the phone number.
6 Message. Enter a text message plus any desired notification variables.
7 Characters Remaining. This counter displays the remaining number of characters allowed in the Message text box. If you need to change this allowable setting, you must edit the provider.
Defining E-mail Notifications
You can send a message to an e-mail address when a device does not respond to polling.
1 From the Configure menu, select Notifications Library, and then select SMTP Mail.
User’s GuideWhatsUp Gold

2 Click New and enter a unique Display Name to identify the e-mail notification, for example “Mail to Netadmin.”
3 In the Mail Server box, enter the IP address of your e-mail server (SMTP mail host).
4 In the To box, enter one or more e-mail addresses that are accepted by the SMTP server. (This can be a simple name.) Separate each address with a comma. The addresses should not contain brackets, braces, quotes, or parentheses.
5 The From address defines the sender of an e-mail notification as: <whatsup@%1>, where %1 is converted by WhatsUp Gold to the local hostname. If you change the default address, be sure to keep the angle brackets (< >) in place. Your e-mail server may require this to be a valid e-mail user.
NoteSome mail servers may fail a test message because they are looking for a “valid” e-mail address here. If this occurs, try removing the < whatsup@%1>, and replacing it with a “valid” e-mail address. To test this, open the Debug log (Logs->Debug Log) and watch what is transpiring between the WhatsUp Gold machine and the mail server.
6 In the Subject box, enter a text message or any of the notification variables.
Chapter 8 Setting Up Notifications 115WhatsUp Gold
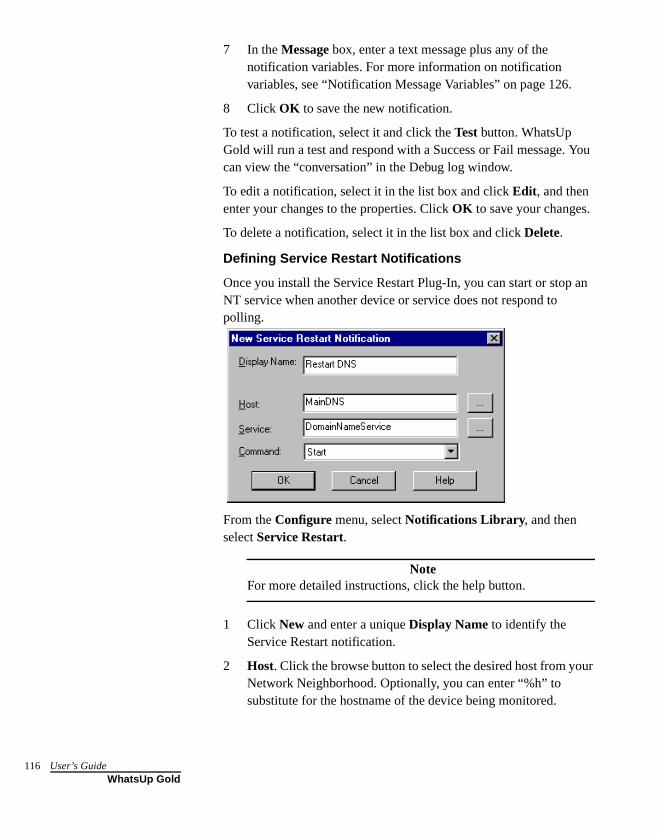
116
7 In the Message box, enter a text message plus any of the notification variables. For more information on notification variables, see “Notification Message Variables” on page 126.
8 Click OK to save the new notification.
To test a notification, select it and click the Test button. WhatsUp Gold will run a test and respond with a Success or Fail message. You can view the “conversation” in the Debug log window.
To edit a notification, select it in the list box and click Edit, and then enter your changes to the properties. Click OK to save your changes.
To delete a notification, select it in the list box and click Delete.
Defining Service Restart Notifications
Once you install the Service Restart Plug-In, you can start or stop an NT service when another device or service does not respond to polling.
From the Configure menu, select Notifications Library, and then select Service Restart.
NoteFor more detailed instructions, click the help button.
1 Click New and enter a unique Display Name to identify the Service Restart notification.
2 Host. Click the browse button to select the desired host from your Network Neighborhood. Optionally, you can enter “%h” to substitute for the hostname of the device being monitored.
User’s GuideWhatsUp Gold
3 Service. Click the browse button to select the desired service associated with your host.
4 Command. Use the list box to select either Start or Stop, depending on whether you want the associated alert to Start or Stop the service you have selected.
5 Click OK to save the new notification.
NoteYou can now assign this notification to any device.
Defining Sound Notifications
A sound notification sounds an alarm when a device or service goes down.
NoteTo play the alarm sounds, you must have a sound card and speakers installed on your system. Also, do not enable sounds if you plan to run WhatsUp Gold as an NT service. If WhatsUp Gold is run as a service and has a sound notification configured as “continuous” then you will not have the WhatsUp Gold console available to silence the alarm.
To define a sound notification:
1 From the Configure menu, select Notifications Library, and then select Sound.
2 Click New and enter a unique Display Name for the notification.
3 In the Filename text box, Browse to the desired .wav file. There is a “Sound Recorder” button you can click to hear the sound you just selected. The suggested default setting for recording is: PCM 8,000 Hz, 16 bit, monaural.
4 Optionally, select the Continuous Play check box to play the sound continuously until it is manually turned off (by clicking the
Quiet button on the main toolbar).
5 Click OK.
Browse
Sound Recorder
Chapter 8 Setting Up Notifications 117WhatsUp Gold
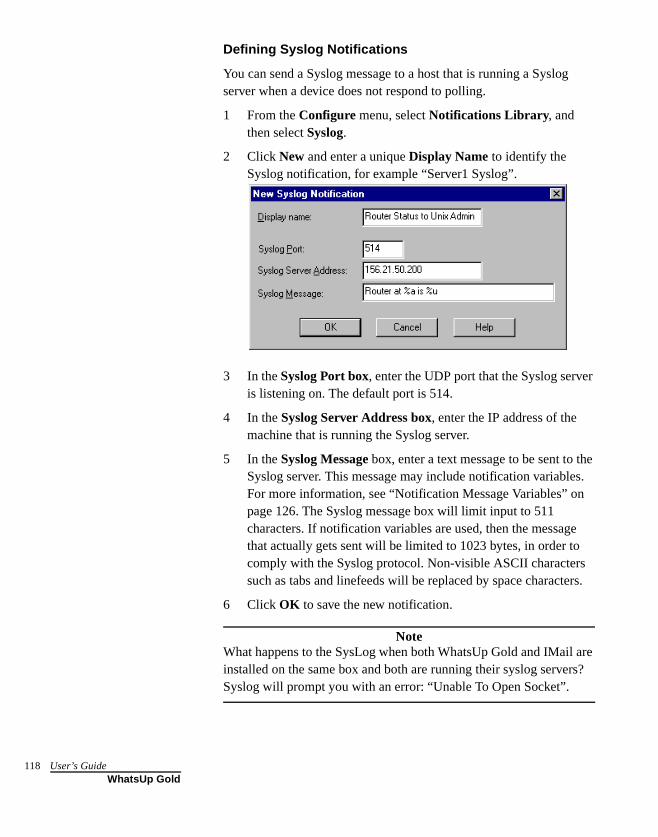
118
Defining Syslog Notifications
You can send a Syslog message to a host that is running a Syslog server when a device does not respond to polling.
1 From the Configure menu, select Notifications Library, and then select Syslog.
2 Click New and enter a unique Display Name to identify the Syslog notification, for example “Server1 Syslog”.
3 In the Syslog Port box, enter the UDP port that the Syslog server is listening on. The default port is 514.
4 In the Syslog Server Address box, enter the IP address of the machine that is running the Syslog server.
5 In the Syslog Message box, enter a text message to be sent to the Syslog server. This message may include notification variables. For more information, see “Notification Message Variables” on page 126. The Syslog message box will limit input to 511 characters. If notification variables are used, then the message that actually gets sent will be limited to 1023 bytes, in order to comply with the Syslog protocol. Non-visible ASCII characters such as tabs and linefeeds will be replaced by space characters.
6 Click OK to save the new notification.
NoteWhat happens to the SysLog when both WhatsUp Gold and IMail are installed on the same box and both are running their syslog servers? Syslog will prompt you with an error: “Unable To Open Socket”.
User’s GuideWhatsUp Gold
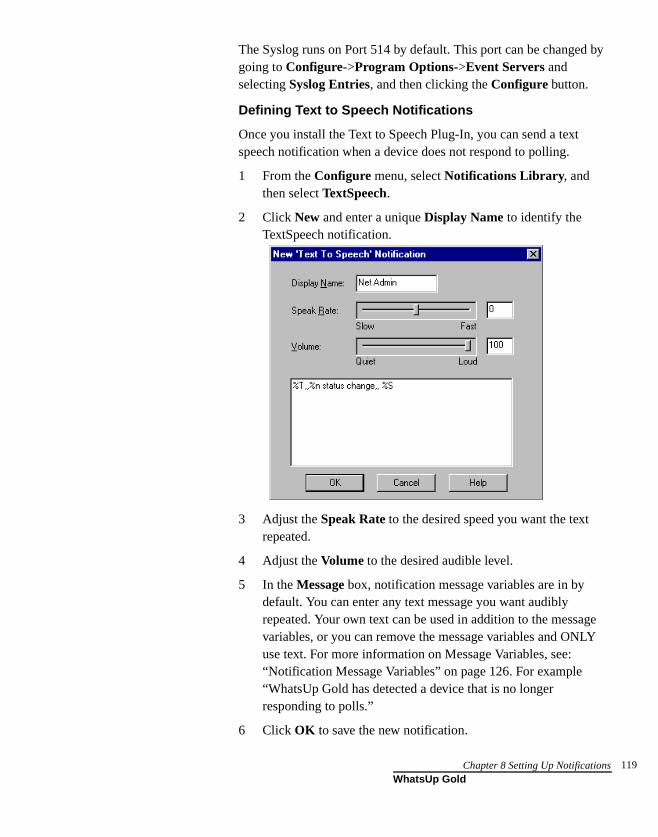
The Syslog runs on Port 514 by default. This port can be changed by going to Configure->Program Options->Event Servers and selecting Syslog Entries, and then clicking the Configure button.
Defining Text to Speech Notifications
Once you install the Text to Speech Plug-In, you can send a text speech notification when a device does not respond to polling.
1 From the Configure menu, select Notifications Library, and then select TextSpeech.
2 Click New and enter a unique Display Name to identify the TextSpeech notification.
3 Adjust the Speak Rate to the desired speed you want the text repeated.
4 Adjust the Volume to the desired audible level.
5 In the Message box, notification message variables are in by default. You can enter any text message you want audibly repeated. Your own text can be used in addition to the message variables, or you can remove the message variables and ONLY use text. For more information on Message Variables, see: “Notification Message Variables” on page 126. For example “WhatsUp Gold has detected a device that is no longer responding to polls.”
6 Click OK to save the new notification.
Chapter 8 Setting Up Notifications 119WhatsUp Gold
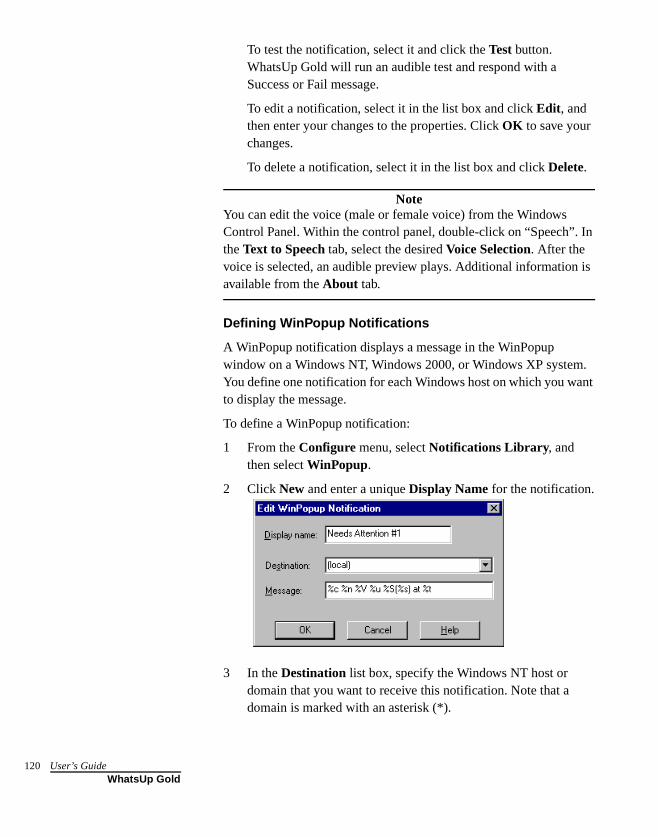
120
To test the notification, select it and click the Test button. WhatsUp Gold will run an audible test and respond with a Success or Fail message.
To edit a notification, select it in the list box and click Edit, and then enter your changes to the properties. Click OK to save your changes.
To delete a notification, select it in the list box and click Delete.
NoteYou can edit the voice (male or female voice) from the Windows Control Panel. Within the control panel, double-click on “Speech”. In the Text to Speech tab, select the desired Voice Selection. After the voice is selected, an audible preview plays. Additional information is available from the About tab.
Defining WinPopup Notifications
A WinPopup notification displays a message in the WinPopup window on a Windows NT, Windows 2000, or Windows XP system. You define one notification for each Windows host on which you want to display the message.
To define a WinPopup notification:
1 From the Configure menu, select Notifications Library, and then select WinPopup.
2 Click New and enter a unique Display Name for the notification.
3 In the Destination list box, specify the Windows NT host or domain that you want to receive this notification. Note that a domain is marked with an asterisk (*).
User’s GuideWhatsUp Gold
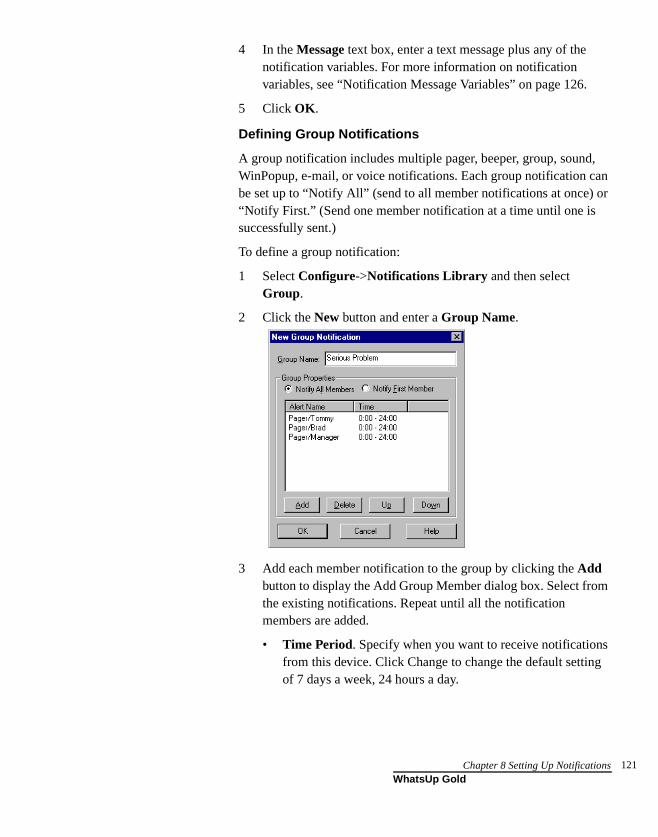
4 In the Message text box, enter a text message plus any of the notification variables. For more information on notification variables, see “Notification Message Variables” on page 126.
5 Click OK.
Defining Group Notifications
A group notification includes multiple pager, beeper, group, sound, WinPopup, e-mail, or voice notifications. Each group notification can be set up to “Notify All” (send to all member notifications at once) or “Notify First.” (Send one member notification at a time until one is successfully sent.)
To define a group notification:
1 Select Configure->Notifications Library and then select Group.
2 Click the New button and enter a Group Name.
3 Add each member notification to the group by clicking the Add button to display the Add Group Member dialog box. Select from the existing notifications. Repeat until all the notification members are added.
• Time Period. Specify when you want to receive notifications from this device. Click Change to change the default setting of 7 days a week, 24 hours a day.
Chapter 8 Setting Up Notifications 121WhatsUp Gold
122
NoteYou can modify the sequence of an alert name by selecting it and clicking Up or Down (to move it up or down in the sequence order). You can delete the alert name by selecting it and clicking Delete. You can edit the Alert name by double-clicking on it.
4 To send the member notifications one at a time until one of them is sent successfully (for example: An SMTP notification is delivered to a mail server), make sure Notify First Member is selected, and then use the Up and Down buttons to sequence the list of members. If you want to send all member notifications at once, select Notify All Members.
Example A. One group notification might be named SeriousProblem and it might include the following three pager notifications:
• PageTommy 24 hours a day on Monday, Wednesday, or Friday
• PageBrad 24 hours a day on Saturday or Sunday
• PageManager 24 hours a day, 7 days a week
Example B. A group notification could try a series of beeper and e-mail notifications until one is successfully sent. For example, suppose you have a group notification named Operations; its members are:
• BeepTara
• E-mailTara
• BeepJan
• E-mailJan
In this case, WhatsUp Gold would try to beep Tara first, but if this beeper message is not sent successfully, it then tries to e-mail Tara. If the e-mail to Tara is also not successfully sent, WhatsUp Gold next tries to beep Jan. Now, lets suppose the beeper message to Jan is sent successfully; in this case, WhatsUp Gold will not attempt to send any more notifications in the Operations group.
5 Click OK.
User’s GuideWhatsUp Gold
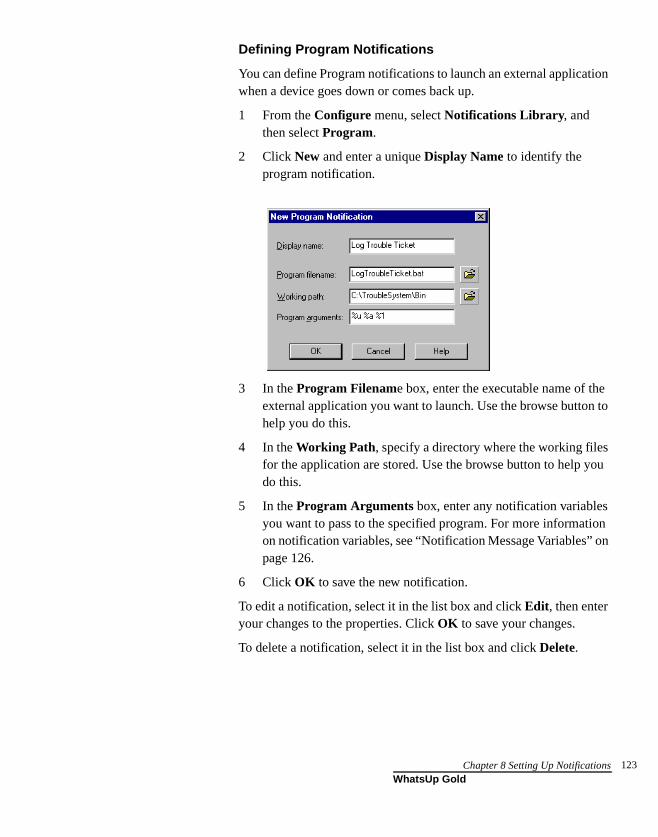
Defining Program Notifications
You can define Program notifications to launch an external application when a device goes down or comes back up.
1 From the Configure menu, select Notifications Library, and then select Program.
2 Click New and enter a unique Display Name to identify the program notification.
3 In the Program Filename box, enter the executable name of the external application you want to launch. Use the browse button to help you do this.
4 In the Working Path, specify a directory where the working files for the application are stored. Use the browse button to help you do this.
5 In the Program Arguments box, enter any notification variables you want to pass to the specified program. For more information on notification variables, see “Notification Message Variables” on page 126.
6 Click OK to save the new notification.
To edit a notification, select it in the list box and click Edit, then enter your changes to the properties. Click OK to save your changes.
To delete a notification, select it in the list box and click Delete.
Chapter 8 Setting Up Notifications 123WhatsUp Gold
124
Event Name Information
Event name is used in resolving the %u variable. The trap name is used in resolving the %(trapname) variable. The name of the trap is exactly the same string that appears between the parentheses in a WhatsUp Gold log line referring to a trap. This can be an OID, a name (translated from mib.txt/traps.txt) or a trap major/minor number, or some combination of them.
For example:
coldstart specialmib-6.27anotherspecialmib.1.2.3.5-6.2031org.9.83.121.115.109.111.110.76.111.103-6.2031
Exactly what appears here will depend on what was in your mib.txt and traps.txt at the moment the trap was generated. WhatsUp Gold does its best to present the most “translated” name it can. A particular piece of equipment might generate 6 different traps, with the following names that can be seen in the log file when the appropriate MIB has NOT been compiled:
enterprises.3332.30.100.6-6.2enterprises.3332.30.100.4-6.2enterprises.3332.30.100.5-6.2enterprises.3332.30.100.3-6.2enterprises.3332.30.100.2-6.2enterprises.3332.30.100.1-6.2
However, after compiling the MIB, the names might be logged like this:
ipswitch-prd-bot-amp1-high-trapipswitch-prd-bot-audio-high-trapipswitch-prd-bot-door-trap-trippedipswitch-prd-bot-airflow-traps-6.2ipswitch-prd-bot-humidity-high-trapipswitch-prd-bot-temperature-high-trap
Knowledge of how names are derived helps with understanding how to use On Event when configuring alerts.
User’s GuideWhatsUp Gold

More details for On Event (regarding SNMP Trap events)
The alert will be generated based on what is currently being logged in the SNMP log. Thus, using “enterprises.3332.30.100.6-6.2” will work when the MIB is not compiled. And if the MIB is compiled later, this string will result in NO alerts. Based on the above example, it must be changed to “ipswitch-prd-bot-amp1-high-trap” in order to give the desired single alert again.
Chapter 8 Setting Up Notifications 125WhatsUp Gold
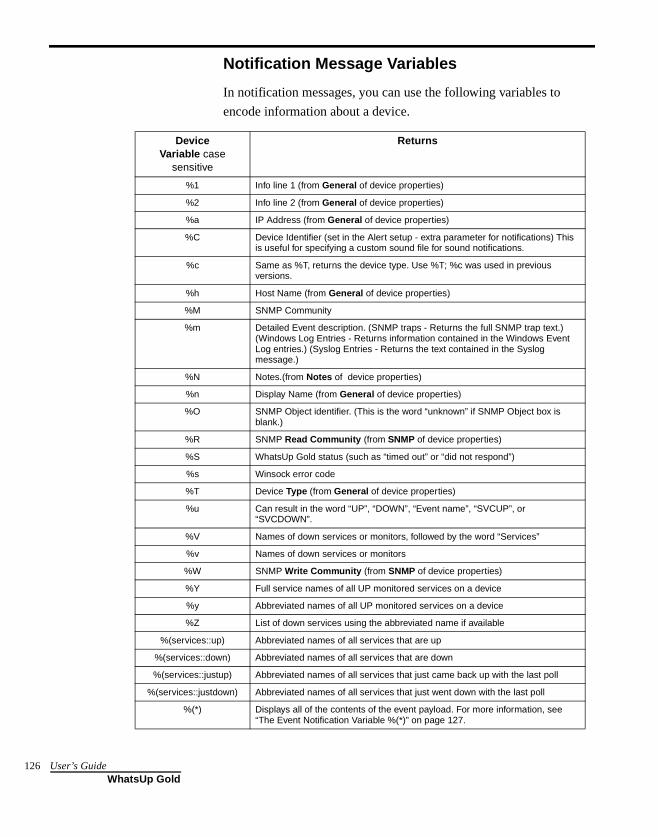
126
Notification Message Variables
In notification messages, you can use the following variables to
encode information about a device.
DeviceVariable case
sensitive
Returns
%1 Info line 1 (from General of device properties)
%2 Info line 2 (from General of device properties)
%a IP Address (from General of device properties)
%C Device Identifier (set in the Alert setup - extra parameter for notifications) This is useful for specifying a custom sound file for sound notifications.
%c Same as %T, returns the device type. Use %T; %c was used in previous versions.
%h Host Name (from General of device properties)
%M SNMP Community
%m Detailed Event description. (SNMP traps - Returns the full SNMP trap text.) (Windows Log Entries - Returns information contained in the Windows Event Log entries.) (Syslog Entries - Returns the text contained in the Syslog message.)
%N Notes.(from Notes of device properties)
%n Display Name (from General of device properties)
%O SNMP Object identifier. (This is the word “unknown” if SNMP Object box is blank.)
%R SNMP Read Community (from SNMP of device properties)
%S WhatsUp Gold status (such as “timed out” or “did not respond”)
%s Winsock error code
%T Device Type (from General of device properties)
%u Can result in the word “UP”, “DOWN”, “Event name”, “SVCUP”, or “SVCDOWN”.
%V Names of down services or monitors, followed by the word “Services”
%v Names of down services or monitors
%W SNMP Write Community (from SNMP of device properties)
%Y Full service names of all UP monitored services on a device
%y Abbreviated names of all UP monitored services on a device
%Z List of down services using the abbreviated name if available
%(services::up) Abbreviated names of all services that are up
%(services::down) Abbreviated names of all services that are down
%(services::justup) Abbreviated names of all services that just came back up with the last poll
%(services::justdown) Abbreviated names of all services that just went down with the last poll
%(*) Displays all of the contents of the event payload. For more information, see “The Event Notification Variable %(*)” on page 127.
User’s GuideWhatsUp Gold

The Event Notification Variable %(*)
Beginning with version 8.0, event functionality was introduced. To learn more about events, see “Chapter 7: Monitoring Events” on page 95. With this functionality, there is a new notification variable. This variable is %(*) and is explained below.
Typically an event in WhatsUp Gold contains information about the cause of the event. For example, an SNMP trap can carry a payload that specifies the specific nature of the trap.
NoteBefore version 8.0, the best you could do with SNMP trap information was to use the %u or %m notification variables.
The %u variable told you that the notification triggered due to a TRAP.
The %m variable gave you a text description of the entire trap.
The %(*) is similar to %m in that it can give you the entire contents of the trap; however what it really does is tell you the % codes that you can use to pull only the specific pieces of the trap that you are interested in reporting on in your Notification. You may not initially know what particular piece of the trap payload you are interested in.
SystemVariable
case sensitive
Returns
%A Names of devices with down services
%D # of Down Hosts
%d Date format is (mm/dd/yyyy)
%e Down Host display Names
%L The Activity Log file, EV-yyyy-mm-dd.tab (or %Lnn where nn = last nn lines of the log file)
%Ln Last n lines of the log file (n can go up to 99)
%l Display Name from General of device properties
%o # of devices with Down Services
%P Up Host display Names
%t Current time (hh:mm:ss)
%U # of Up Hosts
Chapter 8 Setting Up Notifications 127WhatsUp Gold
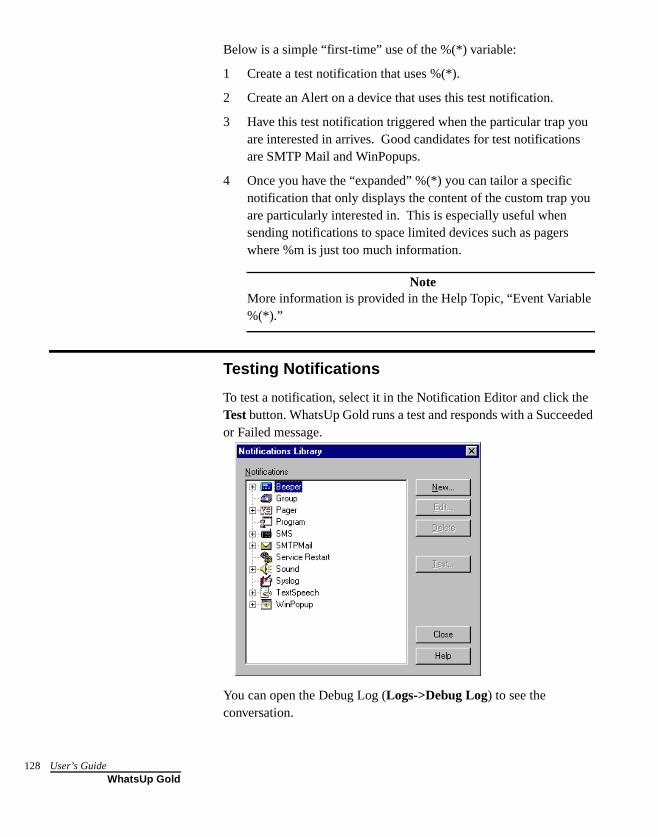
128
Below is a simple “first-time” use of the %(*) variable:
1 Create a test notification that uses %(*).
2 Create an Alert on a device that uses this test notification.
3 Have this test notification triggered when the particular trap you are interested in arrives. Good candidates for test notifications are SMTP Mail and WinPopups.
4 Once you have the “expanded” %(*) you can tailor a specific notification that only displays the content of the custom trap you are particularly interested in. This is especially useful when sending notifications to space limited devices such as pagers where %m is just too much information.
NoteMore information is provided in the Help Topic, “Event Variable %(*).”
Testing Notifications
To test a notification, select it in the Notification Editor and click the Test button. WhatsUp Gold runs a test and responds with a Succeeded or Failed message.
You can open the Debug Log (Logs->Debug Log) to see the conversation.
User’s GuideWhatsUp Gold
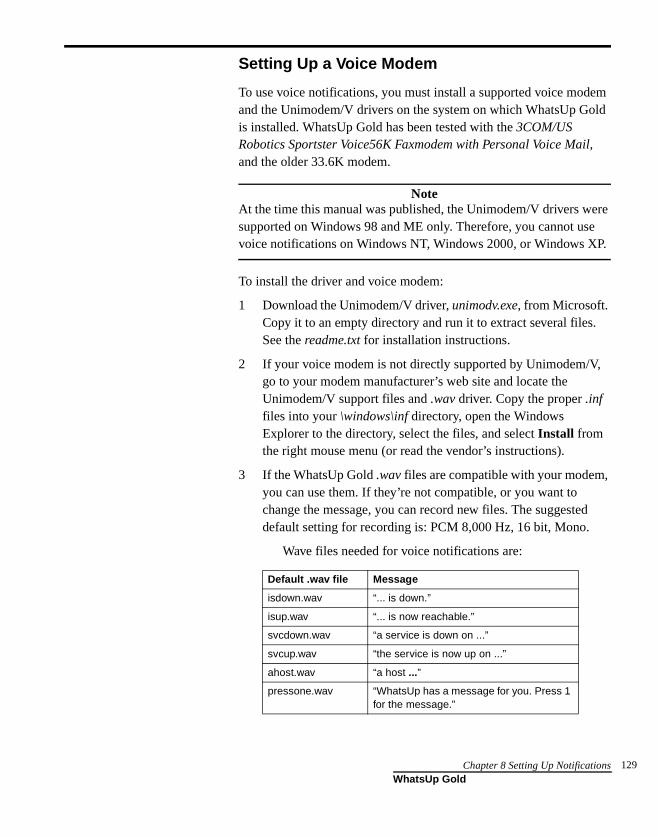
Setting Up a Voice Modem
To use voice notifications, you must install a supported voice modem and the Unimodem/V drivers on the system on which WhatsUp Gold is installed. WhatsUp Gold has been tested with the 3COM/US Robotics Sportster Voice56K Faxmodem with Personal Voice Mail, and the older 33.6K modem.
NoteAt the time this manual was published, the Unimodem/V drivers were supported on Windows 98 and ME only. Therefore, you cannot use voice notifications on Windows NT, Windows 2000, or Windows XP.
To install the driver and voice modem:
1 Download the Unimodem/V driver, unimodv.exe, from Microsoft. Copy it to an empty directory and run it to extract several files. See the readme.txt for installation instructions.
2 If your voice modem is not directly supported by Unimodem/V, go to your modem manufacturer’s web site and locate the Unimodem/V support files and .wav driver. Copy the proper .inf files into your \windows\inf directory, open the Windows Explorer to the directory, select the files, and select Install from the right mouse menu (or read the vendor’s instructions).
3 If the WhatsUp Gold .wav files are compatible with your modem, you can use them. If they’re not compatible, or you want to change the message, you can record new files. The suggested default setting for recording is: PCM 8,000 Hz, 16 bit, Mono.
Wave files needed for voice notifications are:
Default .wav file Message
isdown.wav “... is down.”
isup.wav “... is now reachable.”
svcdown.wav “a service is down on ...”
svcup.wav “the service is now up on ...”
ahost.wav “a host ...”
pressone.wav “WhatsUp has a message for you. Press 1 for the message.”
Chapter 8 Setting Up Notifications 129WhatsUp Gold
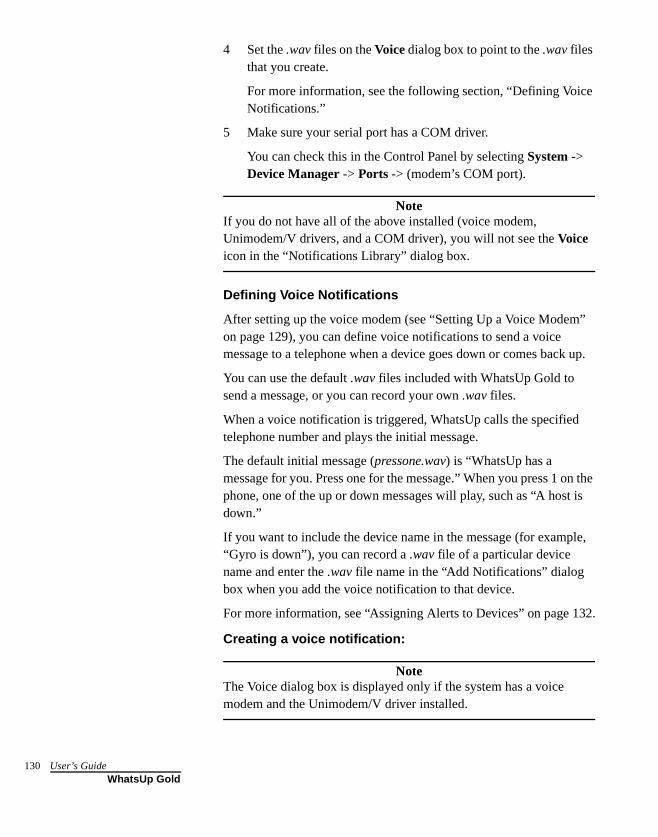
130
4 Set the .wav files on the Voice dialog box to point to the .wav files that you create.
For more information, see the following section, “Defining Voice Notifications.”
5 Make sure your serial port has a COM driver.
You can check this in the Control Panel by selecting System -> Device Manager -> Ports -> (modem’s COM port).
NoteIf you do not have all of the above installed (voice modem, Unimodem/V drivers, and a COM driver), you will not see the Voice icon in the “Notifications Library” dialog box.
Defining Voice Notifications
After setting up the voice modem (see “Setting Up a Voice Modem” on page 129), you can define voice notifications to send a voice message to a telephone when a device goes down or comes back up.
You can use the default .wav files included with WhatsUp Gold to send a message, or you can record your own .wav files.
When a voice notification is triggered, WhatsUp calls the specified telephone number and plays the initial message.
The default initial message (pressone.wav) is “WhatsUp has a message for you. Press one for the message.” When you press 1 on the phone, one of the up or down messages will play, such as “A host is down.”
If you want to include the device name in the message (for example, “Gyro is down”), you can record a .wav file of a particular device name and enter the .wav file name in the “Add Notifications” dialog box when you add the voice notification to that device.
For more information, see “Assigning Alerts to Devices” on page 132.
Creating a voice notification:
NoteThe Voice dialog box is displayed only if the system has a voice modem and the Unimodem/V driver installed.
User’s GuideWhatsUp Gold

To create a voice notification:
1 From the Configure menu, select Notifications Library, and then select Voice.
2 Click New and enter a unique Display Name to identify the voice notification.
3 In the Phone number box, enter the phone number to dial.
4 In the Repeat Msg box, enter or select the sound (.wav) file that will be played as the initial voice message to tell the recipient that they have received a message from WhatsUp Gold. Click the Invoke Sound Recorder button to open the .wav file in the Sound Recorder. You can play the sound file or edit it to create a different sound.
5 In the Count box, enter the number of times to play the initial message (if the message is not acknowledged).
6 In the Button box, enter the number on the telephone that the recipient presses to get the status message.
The default message tells the recipient to press 1 to receive the status message. You can set this number to 99 to make it accept any number pressed on the telephone.
NoteIf a voice mail or an answering machine answers the phone, the voice notification will not get beyond the initial .wav file (specified in the Repeat Msg box).
Optionally, enter the sound (.wav) file that will be played for any of the status messages or WhatsUp Gold will use the default status messages.
NoteClick the Invoke Sound Recorder button to open the .wav file in the Sound Recorder. You can play the sound file or edit it to create a different sound.
• Item Down. Browse to the desired .wav file you want to play when the device on the map goes down.
Invoke soundrecorder
Chapter 8 Setting Up Notifications 131WhatsUp Gold
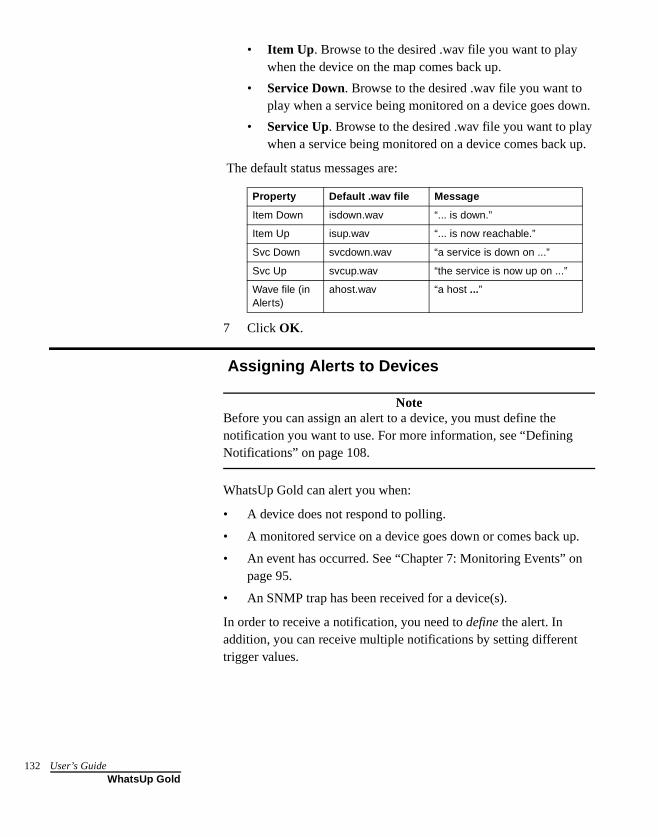
132
• Item Up. Browse to the desired .wav file you want to play when the device on the map comes back up.
• Service Down. Browse to the desired .wav file you want to play when a service being monitored on a device goes down.
• Service Up. Browse to the desired .wav file you want to play when a service being monitored on a device comes back up.
The default status messages are:
7 Click OK.
Assigning Alerts to Devices
NoteBefore you can assign an alert to a device, you must define the notification you want to use. For more information, see “Defining Notifications” on page 108.
WhatsUp Gold can alert you when:
• A device does not respond to polling.
• A monitored service on a device goes down or comes back up.
• An event has occurred. See “Chapter 7: Monitoring Events” on page 95.
• An SNMP trap has been received for a device(s).
In order to receive a notification, you need to define the alert. In addition, you can receive multiple notifications by setting different trigger values.
Property Default .wav file Message
Item Down isdown.wav “... is down.”
Item Up isup.wav “... is now reachable.”
Svc Down svcdown.wav “a service is down on ...”
Svc Up svcup.wav “the service is now up on ...”
Wave file (in Alerts)
ahost.wav “a host ...”
User’s GuideWhatsUp Gold

NoteYou can assign alerts to a group of devices at once; see “Assigning Alerts to Selected Devices” on page 134.
Using the Alerts Dialog
You use the Alerts dialog box to:
• Enable logging
• Enable an alarm sound
• Configure an alert to use a notification and/or enable alerts
To use Alerts:
1 Double-click the device to view the device properties, and then click Alerts.
NoteTo do this for a subnet icon or container icon, right-click the icon, select Properties, then click Alerts.
2 If alerts are not enabled and no notifications are assigned, the Alerts dialog box is similar to the following:
List box
Chapter 8 Setting Up Notifications 133WhatsUp Gold
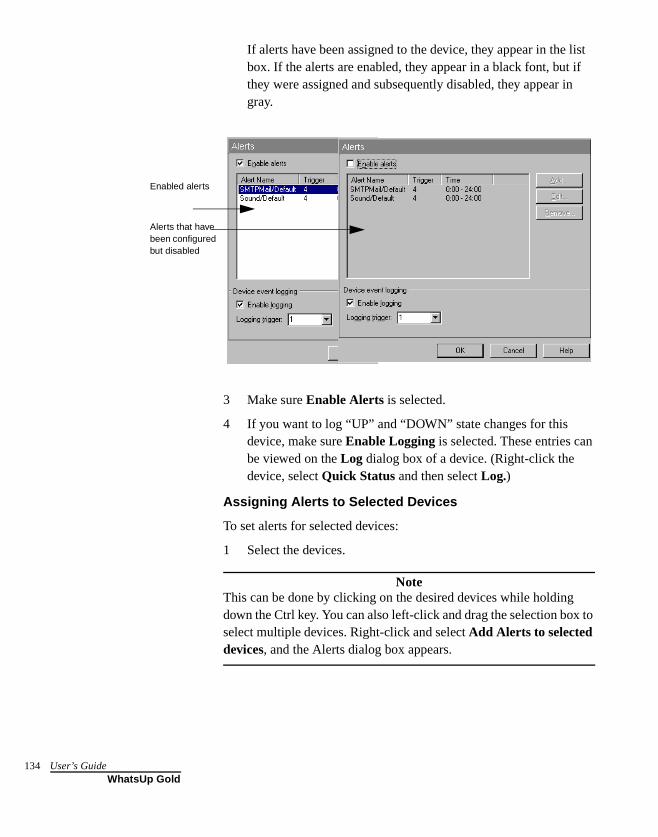
134
If alerts have been assigned to the device, they appear in the list box. If the alerts are enabled, they appear in a black font, but if they were assigned and subsequently disabled, they appear in gray.
3 Make sure Enable Alerts is selected.
4 If you want to log “UP” and “DOWN” state changes for this device, make sure Enable Logging is selected. These entries can be viewed on the Log dialog box of a device. (Right-click the device, select Quick Status and then select Log.)
Assigning Alerts to Selected Devices
To set alerts for selected devices:
1 Select the devices.
NoteThis can be done by clicking on the desired devices while holding down the Ctrl key. You can also left-click and drag the selection box to select multiple devices. Right-click and select Add Alerts to selected devices, and the Alerts dialog box appears.
Enabled alerts
Alerts that have been configured but disabled
User’s GuideWhatsUp Gold
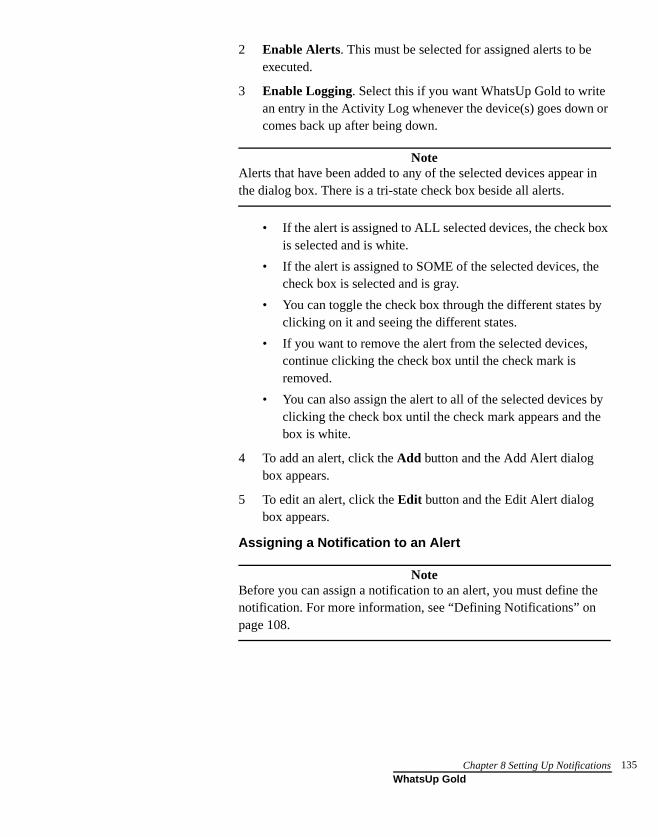
2 Enable Alerts. This must be selected for assigned alerts to be executed.
3 Enable Logging. Select this if you want WhatsUp Gold to write an entry in the Activity Log whenever the device(s) goes down or comes back up after being down.
NoteAlerts that have been added to any of the selected devices appear in the dialog box. There is a tri-state check box beside all alerts.
• If the alert is assigned to ALL selected devices, the check box is selected and is white.
• If the alert is assigned to SOME of the selected devices, the check box is selected and is gray.
• You can toggle the check box through the different states by clicking on it and seeing the different states.
• If you want to remove the alert from the selected devices, continue clicking the check box until the check mark is removed.
• You can also assign the alert to all of the selected devices by clicking the check box until the check mark appears and the box is white.
4 To add an alert, click the Add button and the Add Alert dialog box appears.
5 To edit an alert, click the Edit button and the Edit Alert dialog box appears.
Assigning a Notification to an Alert
NoteBefore you can assign a notification to an alert, you must define the notification. For more information, see “Defining Notifications” on page 108.
Chapter 8 Setting Up Notifications 135WhatsUp Gold
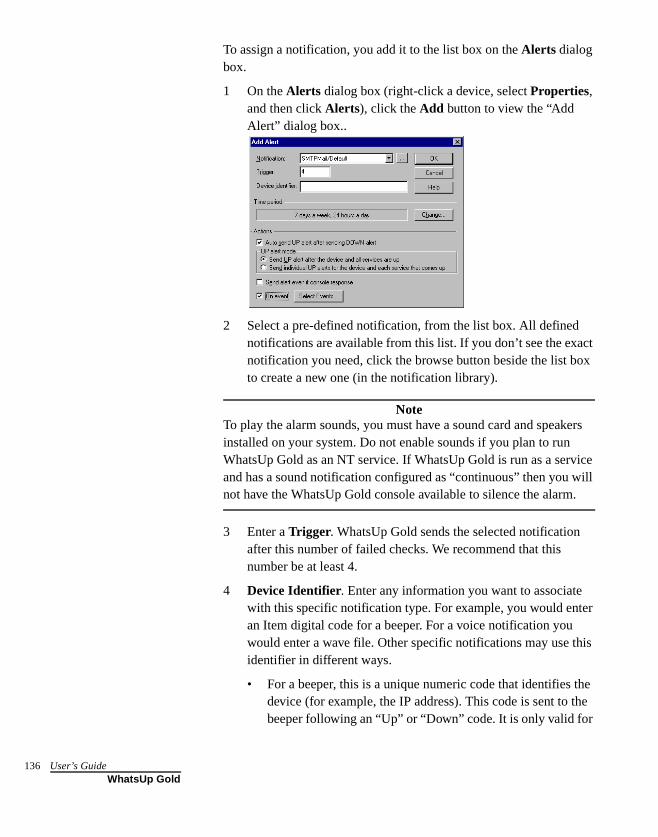
136
To assign a notification, you add it to the list box on the Alerts dialog box.
1 On the Alerts dialog box (right-click a device, select Properties, and then click Alerts), click the Add button to view the “Add Alert” dialog box..
2 Select a pre-defined notification, from the list box. All defined notifications are available from this list. If you don’t see the exact notification you need, click the browse button beside the list box to create a new one (in the notification library).
NoteTo play the alarm sounds, you must have a sound card and speakers installed on your system. Do not enable sounds if you plan to run WhatsUp Gold as an NT service. If WhatsUp Gold is run as a service and has a sound notification configured as “continuous” then you will not have the WhatsUp Gold console available to silence the alarm.
3 Enter a Trigger. WhatsUp Gold sends the selected notification after this number of failed checks. We recommend that this number be at least 4.
4 Device Identifier. Enter any information you want to associate with this specific notification type. For example, you would enter an Item digital code for a beeper. For a voice notification you would enter a wave file. Other specific notifications may use this identifier in different ways.
• For a beeper, this is a unique numeric code that identifies the device (for example, the IP address). This code is sent to the beeper following an “Up” or “Down” code. It is only valid for
User’s GuideWhatsUp Gold
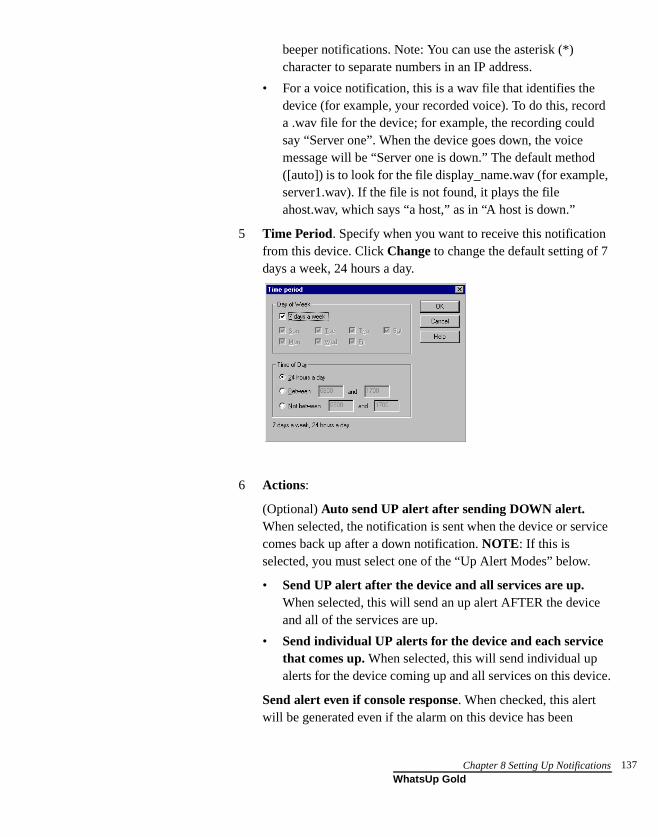
beeper notifications. Note: You can use the asterisk (*) character to separate numbers in an IP address.
• For a voice notification, this is a wav file that identifies the device (for example, your recorded voice). To do this, record a .wav file for the device; for example, the recording could say “Server one”. When the device goes down, the voice message will be “Server one is down.” The default method ([auto]) is to look for the file display_name.wav (for example, server1.wav). If the file is not found, it plays the file ahost.wav, which says “a host,” as in “A host is down.”
5 Time Period. Specify when you want to receive this notification from this device. Click Change to change the default setting of 7 days a week, 24 hours a day.
6 Actions:
(Optional) Auto send UP alert after sending DOWN alert. When selected, the notification is sent when the device or service comes back up after a down notification. NOTE: If this is selected, you must select one of the “Up Alert Modes” below.
• Send UP alert after the device and all services are up. When selected, this will send an up alert AFTER the device and all of the services are up.
• Send individual UP alerts for the device and each service that comes up. When selected, this will send individual up alerts for the device coming up and all services on this device.
Send alert even if console response. When checked, this alert will be generated even if the alarm on this device has been
Chapter 8 Setting Up Notifications 137WhatsUp Gold
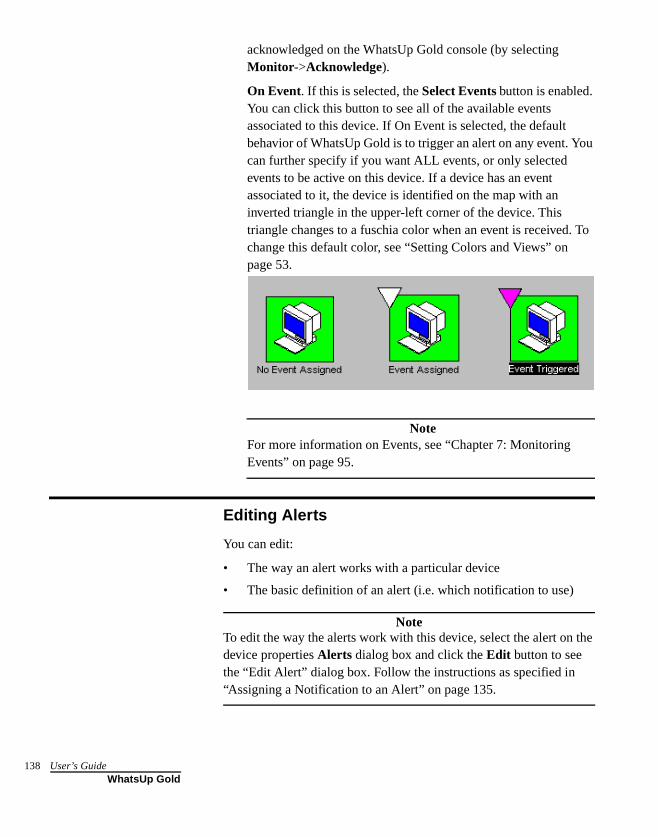
138
acknowledged on the WhatsUp Gold console (by selecting Monitor->Acknowledge).
On Event. If this is selected, the Select Events button is enabled. You can click this button to see all of the available events associated to this device. If On Event is selected, the default behavior of WhatsUp Gold is to trigger an alert on any event. You can further specify if you want ALL events, or only selected events to be active on this device. If a device has an event associated to it, the device is identified on the map with an inverted triangle in the upper-left corner of the device. This triangle changes to a fuschia color when an event is received. To change this default color, see “Setting Colors and Views” on page 53.
NoteFor more information on Events, see “Chapter 7: Monitoring Events” on page 95.
Editing Alerts
You can edit:
• The way an alert works with a particular device
• The basic definition of an alert (i.e. which notification to use)
NoteTo edit the way the alerts work with this device, select the alert on the device properties Alerts dialog box and click the Edit button to see the “Edit Alert” dialog box. Follow the instructions as specified in “Assigning a Notification to an Alert” on page 135.
User’s GuideWhatsUp Gold

Chapter 9: Working from the Console
WhatsUp Gold has two interfaces: the console and the web interface. The WhatsUp Gold console is the system on which WhatsUp Gold is installed.
This chapter describes how to use the console to start and stop polling of the devices in your network map and how to display network status. “Chapter 11: Working from a Web Browser” tells you how to use WhatsUp Gold from the web interface.
Opening Network Maps
In order for WhatsUp Gold to monitor a network, you need to have the network map open. You can open previously-defined maps [File->Open] or create a new network map [File->New Map Wizard]. For detailed information on creating a network map, see “Chapter 2: Creating Network Maps” on page 17.
You can open multiple map windows and WhatsUp Gold can monitor the network maps simultaneously. If you open a map that contains subnets, the subnet maps will also open, if you configured this to happen. This is done from Configure->Program Options->General, and selecting Automatically load subnets when opening maps.
For any device that you do not want to poll, you can clear Monitor This Device on the Monitor dialog box of the device properties. (The icon for any device that is not being actively monitored is displayed in dark gray by default.)
Starting and Stopping Polling
When you open a network map, Whatsup Gold starts automatic polling, provided the polling Master Switch is enabled. It polls the devices continuously, starting each new pass after a specified time interval. If a map contains subnet maps, WhatsUp Gold also opens the subnet maps and starts polling. You can stop and start automatic polling at any time. You can also start a single check of the network, in which case WhatsUp Gold makes a single pass through the devices in the active network map, polling each device.
Chapter 9 Working from the Console 139WhatsUp Gold
140
From Configure->Program Options->General, you can stop polling for ALL maps by clearing the appropriate Master Switch. There are several important settings on this dialog, click Help for a definition of each option.
To Initiate Automatic Polling
When you open a network map, Whatsup Gold starts automatic polling on the map and any associated subnet maps, provided the polling Master Switch is enabled.
To change the default settings for automatic polling, right-click a blank space on the map and select Properties. The map properties appear. Click General and set the number of seconds you want between checks (Poll Frequency), the number of seconds to wait before timeout (Default Timeout), and any other options you may want to change.
If polling is stopped, you can restart automatic polling of currently active devices by clicking the Stopwatch button in the main toolbar. WhatsUp Gold checks each device, and from the Statistics tab view, you can see it track the responses. After waiting the time set in the Poll Frequency, it makes a second polling pass through the devices and continues polling until you stop polling by clicking on the Stopwatch button again or by closing the map window.
WhatsUp Gold polls the devices in the order in which they were created in the network map. To view or change the polling sequence, from the View menu, select Dependencies, or you can click the Dependencies tab at the bottom of the map. For more information, see “Viewing and Changing Dependencies” on page 143.
To Stop Automatic Polling
To temporarily stop automatic polling, click the Stopwatch button in the main toolbar. To resume polling, click Stopwatch again.
NoteIf you exit WhatsUp Gold during a poll, it may take up to 30 seconds for WhatsUp Gold to remove itself from memory. Until it is removed from memory, WhatsUp Gold appears in the Windows task list (when you press Ctrl+Alt+Del).
Stopwatch button
User’s GuideWhatsUp Gold

To Check a Device
To do an immediate poll of a device, right-click a device and select Check now from the pop-up menu.
Reading the Network Map
By default, the following conventions are used in the map window to indicate the status of a device or service:
• Highlighted device name — an activity has been recorded for the device. For more information, “Actions that Trigger Entries in the Activity Log File” on page 152.
• Green device icon (with a square shaped background) — the device is “up” (responding to polling).
• Light green icon (with a diamond shaped background) — the device has missed at least one polling request.
• Yellow icon (with a diamond shaped background)— the device has missed two polling requests.
• Red icon (with an elongated diamond shaped background) — the device is “down.” (It is not accessible or has not responded to four consecutive polling requests.)
NoteAfter a device has missed 8 polling requests, the background shape becomes a starburst.
• Purple icon (with an octagon shaped background)— a standard service on the device is down.
You can change the default device shapes and colors in the map properties, as described in the “Program Options (Device States)” topic in Help.
You can quickly display a brief status message by moving the cursor over a device icon. In the status bar of the map window, a message displays the device’s host name, IP address, and current status or service status.
WhatsUp Gold displays a count-down timer on the right side of the status bar of the map window. The timer is set to the map Poll Frequency (Right-click a blank space in the map, select Properties
Chapter 9 Working from the Console 141WhatsUp Gold
142
and click General) and counts down to one between each poll. WhatsUp Gold resets this timer after each poll.
Receiving Alarms
If Enable Alerts (on the Alerts dialog box of device properties), is selected, AND if you have added an alert to this dialog box, an alert occurs when a device fails to respond to four (the default) consecutive polling requests. To play an audible alert, you must have a sound card installed on your system. You can set the number of failed poll requests that triggers a sound alert.
To silence an audible alert, click the Quiet button in the main toolbar, or from the Monitor menu, select Stop Alarm.
Receiving Notifications
Enabled notifications are sent when:
• The device fails to respond to the specified number of polling requests.
• A monitored service goes down.
• A monitored event occurs.
• An SNMP trap is received for a device.
To view the active notifications for a network map, from the View menu, select Notifications. For more information, see “Viewing Active Notifications” on page 148.
Acknowledging Alerts
To acknowledge alerts, from the Monitor menu, select Acknowledge. Acknowledge is active only when there are unacknowledged alerts. Clicking it prevents any additional alerts from being triggered. (This does not cancel current alerts that have already been triggered.) This is provided that Send alert even if console response is NOT selected in the alert’s configuration (Device Properties->Alerts-Add or Edit). If you have selected this, then alerts will be triggered even though you have acknowledged the state change of the device.
Quiet button
User’s GuideWhatsUp Gold
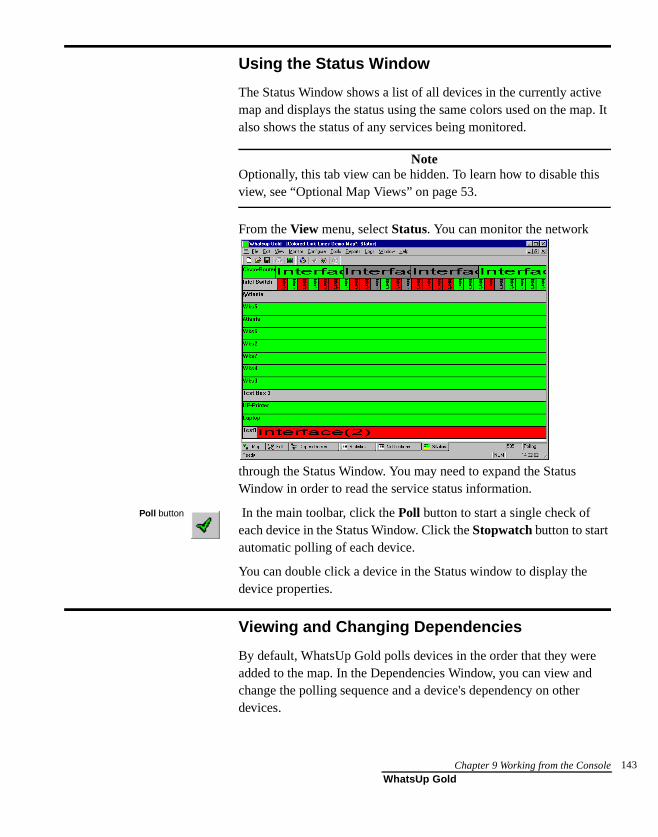
Using the Status Window
The Status Window shows a list of all devices in the currently active map and displays the status using the same colors used on the map. It also shows the status of any services being monitored.
NoteOptionally, this tab view can be hidden. To learn how to disable this view, see “Optional Map Views” on page 53.
From the View menu, select Status. You can monitor the network
through the Status Window. You may need to expand the Status Window in order to read the service status information.
In the main toolbar, click the Poll button to start a single check of each device in the Status Window. Click the Stopwatch button to start automatic polling of each device.
You can double click a device in the Status window to display the device properties.
Viewing and Changing Dependencies
By default, WhatsUp Gold polls devices in the order that they were added to the map. In the Dependencies Window, you can view and change the polling sequence and a device's dependency on other devices.
Poll button
Chapter 9 Working from the Console 143WhatsUp Gold
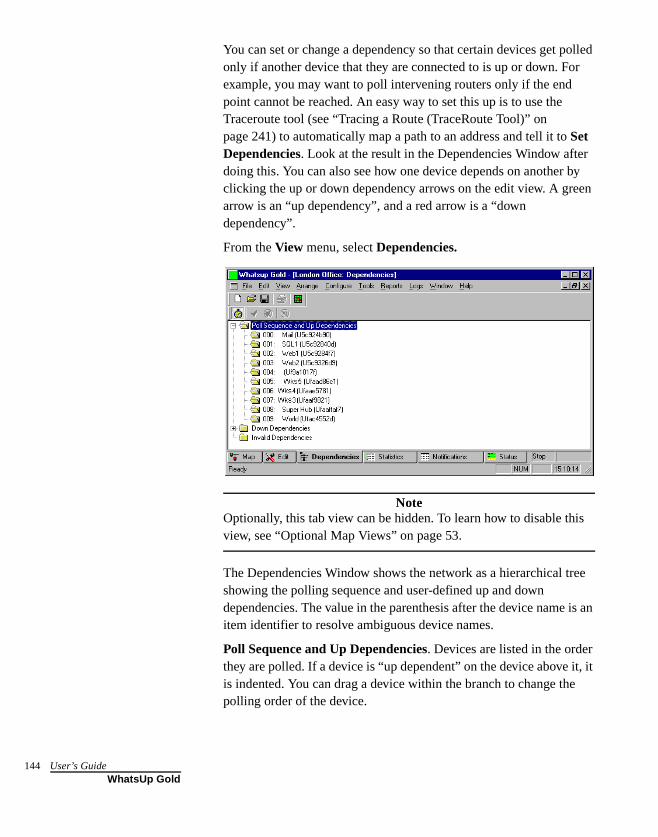
144
You can set or change a dependency so that certain devices get polled only if another device that they are connected to is up or down. For example, you may want to poll intervening routers only if the end point cannot be reached. An easy way to set this up is to use the Traceroute tool (see “Tracing a Route (TraceRoute Tool)” on page 241) to automatically map a path to an address and tell it to Set Dependencies. Look at the result in the Dependencies Window after doing this. You can also see how one device depends on another by clicking the up or down dependency arrows on the edit view. A green arrow is an “up dependency”, and a red arrow is a “down dependency”.
From the View menu, select Dependencies.
NoteOptionally, this tab view can be hidden. To learn how to disable this view, see “Optional Map Views” on page 53.
The Dependencies Window shows the network as a hierarchical tree showing the polling sequence and user-defined up and down dependencies. The value in the parenthesis after the device name is an item identifier to resolve ambiguous device names.
Poll Sequence and Up Dependencies. Devices are listed in the order they are polled. If a device is “up dependent” on the device above it, it is indented. You can drag a device within the branch to change the polling order of the device.
User’s GuideWhatsUp Gold

To change the polling sequence, do one of the following:
• In the Poll Sequence and Up Dependencies list, drag a device to a different location in the Poll Sequence list.
• Right-click a device and use the popup menu.
• Select a device and use the Move to menu.
The following commands appear on the popup, Move to menu:
Start of Poll. Make the device the first device to be polled.
Move Earlier in Poll. Move the device up one position in the order.
End of Poll. Make the device the last device to be polled.
Later in Poll. Move the device down one position in the order.
Setting “Up” and “Down” Dependencies
You can set any of the devices in the map to have an “up” or “down” dependency on another device in the same map. An “up dependency” means that the device is checked only if another specified device is up. A “down dependency” means that the device gets checked only if the other device is down.
Dependencies are shown in the Up Dependencies and Down Dependencies lists by their location and indentation. If a device is dependent on another device, it is indented below the other device.
To set an up or down dependency:
1 In the Up Dependencies or Down Dependencies list, move the device that you want to have a dependency so that it appears just below the device it will depend on.
2 Right-click the device that you want to have the dependency.
3 Select Depend on Prior Device from the right-mouse menu.
NoteInvalid Dependencies. Devices that have invalid dependencies are listed here. Example: If device #1 is dependent on device #2, then the polling order of these devices will determine if this dependency is valid or invalid. If device #1 is polled before device #2, then this is an invalid dependency because it uses old information from the previous poll.
Chapter 9 Working from the Console 145WhatsUp Gold
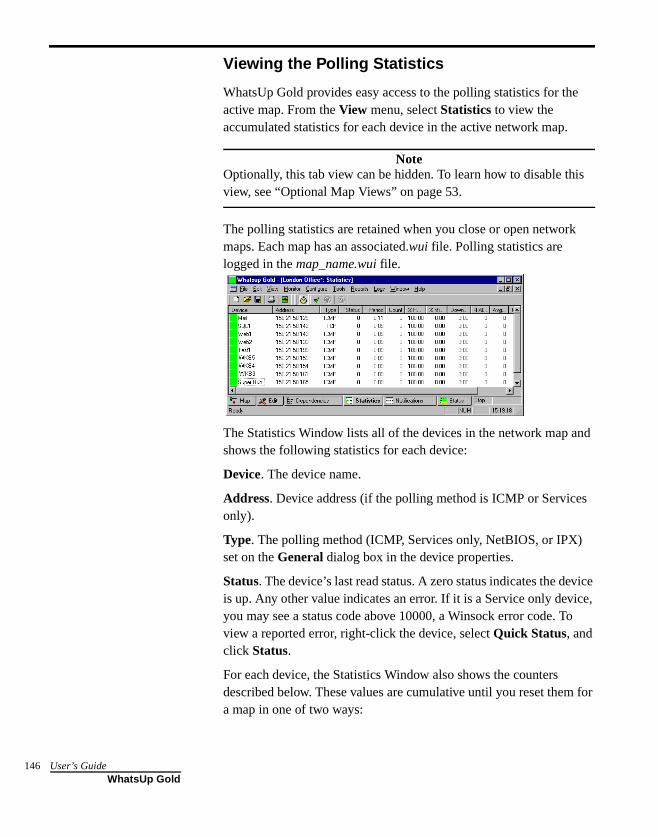
146
Viewing the Polling Statistics
WhatsUp Gold provides easy access to the polling statistics for the active map. From the View menu, select Statistics to view the accumulated statistics for each device in the active network map.
NoteOptionally, this tab view can be hidden. To learn how to disable this view, see “Optional Map Views” on page 53.
The polling statistics are retained when you close or open network maps. Each map has an associated.wui file. Polling statistics are logged in the map_name.wui file.
The Statistics Window lists all of the devices in the network map and shows the following statistics for each device:
Device. The device name.
Address. Device address (if the polling method is ICMP or Services only).
Type. The polling method (ICMP, Services only, NetBIOS, or IPX) set on the General dialog box in the device properties.
Status. The device’s last read status. A zero status indicates the device is up. Any other value indicates an error. If it is a Service only device, you may see a status code above 10000, a Winsock error code. To view a reported error, right-click the device, select Quick Status, and click Status.
For each device, the Statistics Window also shows the counters described below. These values are cumulative until you reset them for a map in one of two ways:
User’s GuideWhatsUp Gold
• Using the Reset Counters command on the Monitor menu (available only when the Statistics Window is open)
• Using the Reset Counters function in the web interface
The counters shown in this window are not the same as those shown in the Statistics Log. Counters in the Statistics Window are cumulative per device. Counters in the Statistics Log are written per device at an interval determined by the setting on the Logs dialog box (Configure->Program Options->Logging, then clicking the Advanced button).
Period. The time (in hours:minutes) since the counters were last cleared.
Count. The number of times the device has been polled since last cleared.
% Responded. Of the total number of polls to the device, the percent that responded.
% Missed. Of the total number of polls to the device, the percent that failed.
Down Time. The total down time (in hours:minutes) for this device. This is calculated by multiplying the number of missed polls by the Map Poll Frequency. For example, if the device misses 7 polls, and the poll frequency is once per minute, the down time will be 7 minutes.
# Alerts. The number of alerts that have occurred for the device.
AvgRTT. Average round trip time (RTT) of the last polls sent.
MinRTT. Minimum RTT of polls sent to the device.
MaxRTT. Maximum RTT of polls sent to the device.
You can click any of the column headings to toggle the sort between ascending and descending.
Chapter 9 Working from the Console 147WhatsUp Gold

148
Viewing Active Notifications
You can view the notifications enabled for the active network map. From the View menu, select Notifications.
Optionally, this tab view can be hidden. To learn how to disable this view, see “Optional Map Views” on page 53.
Notifications are grouped by device. Click a column heading to toggle between ascending and descending order.
Double-click a device name to view the Alerts dialog box of the device properties.
User’s GuideWhatsUp Gold
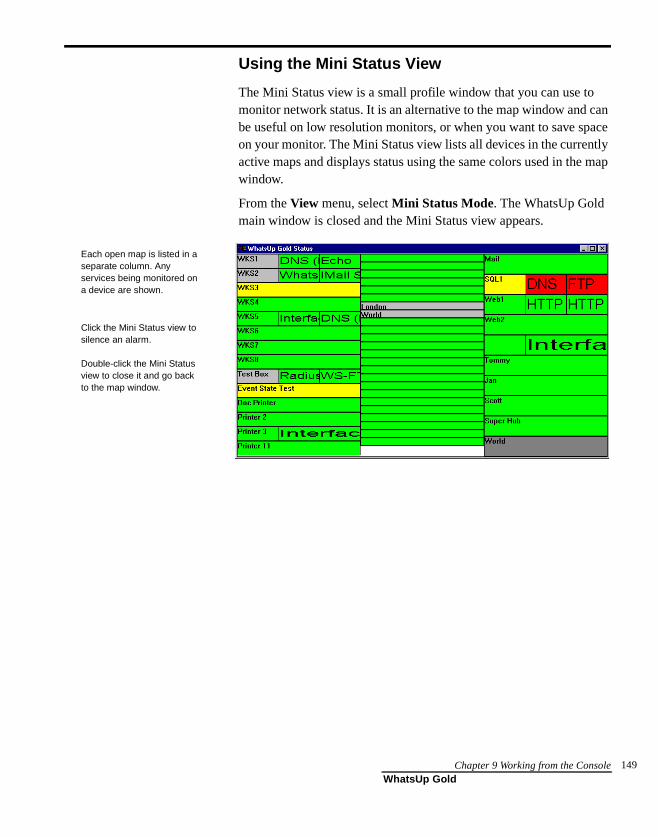
Using the Mini Status View
The Mini Status view is a small profile window that you can use to monitor network status. It is an alternative to the map window and can be useful on low resolution monitors, or when you want to save space on your monitor. The Mini Status view lists all devices in the currently active maps and displays status using the same colors used in the map window.
From the View menu, select Mini Status Mode. The WhatsUp Gold main window is closed and the Mini Status view appears.
Click the Mini Status view to silence an alarm.
Double-click the Mini Status view to close it and go back to the map window.
Each open map is listed in a separate column. Any services being monitored on a device are shown.
Chapter 9 Working from the Console 149WhatsUp Gold

150
User’s GuideWhatsUp Gold
Chapter 10: Logs and Reports
WhatsUp Gold provides four types of logs:
• Syslog — Logs (SL-yyyy-mm-dd.tab) standard UDP messages sent from routers, switches, UNIX hosts, etc.
• Activities — Activities are changes to network status, such as a device going down or a device coming back up. Activities are recorded in the Activity Log (EV-yyyy-mm-dd.tab), which provides a history of what has occurred on the network. In addition, the Debug Log window provides a view of activities as they occur.
• Polling statistics — Polling statistics are the accumulated round trip times (RTT) of polls sent to a device. These statistics measure the availability and performance of a device. Polling statistics are recorded in the Statistics Log (ST-yyyy-mm-dd.tab).
• SNMP traps — The SNMP Trap Log (SP-yyyy-mm-dd.tab) displays all SNMP traps that have been received. When using this viewer, all traps can be seen. (Unlike using “Quick Status” on a device, which filters explicitly for individual traps for that device.) To enable SNMP traps, go to Configure->Program Options->Event Servers->SNMP Traps, click Configure and select Enable SNMP trap handler.
From this logged data, WhatsUp Gold can create several reports and graphs that show the status of your network in different ways. From the Reports menu, you can create the following:
Performance Graphs. Shows devices by best or worst performance based on aggregated polling statistics, and shows graphs for each device.
Outage Reports. Show device up and down state changes, service up and down state changes, and WhatsUp Gold activities such as map open and close. You can print this report or create a tab-delimited file from it.
Statistics Reports. Show round trip times and percentage of missed polls based on the accumulated polling statistics for each device. You can print this report or create a tab-delimited file from it.
Chapter 10 Logs and Reports 151WhatsUp Gold

152
WhatsUp Gold Syslog
What is a Syslog?
WhatsUp Gold’s Syslog Daemon receives standard UDP messages sent from routers, switches, UNIX hosts, or any device that can generate UDP network traffic. The UDP port that has been assigned to syslog is 514. WhatsUp Gold syslog server will receive any UDP message sent from routers, switches, UNIX hosts, or any device that can generate UDP network traffic on port 514. Once a message is received, the Syslog logs the message to file along with a timestamp and the IP Address of the device originating the message. The Syslog stores its data in weekly file increments with the same file name format as the other log type systems within WhatsUp Gold: “SL-YYYY-MM-DD.tab”.
For more information refer to the help file: “WhatsUp Gold Syslog”.
Logging and Reporting Activities
WhatsUp Gold logs activities in the Activity Log and lets you create reports based on the data. The activity log stores its data in weekly file increments with the following file format: (EV-yyyy-mm-dd.tab).
WhatsUp Gold automatically logs application-level activities (such as opening or closing a map) and device-specific activities (such as a device or service going down) for devices that have Enable Logging selected on the Alerts dialog box. After WhatsUp Gold logs sufficient data, you can generate reports on the data or save the data in a tab-delimited file format that can be imported to another application.
The following sections describe the types of entries logged, how you can modify activity logging, and how you can generate reports on the activities.
Actions that Trigger Entries in the Activity Log File
WhatsUp Gold records activities in the log (EV-yyyy-mm-dd.tab in the WhatsUp Gold directory) as they occur. WhatsUp Gold logs the following types of activities for any open maps:
• Map changes — includes map open and close and changes to the map configuration.
User’s GuideWhatsUp Gold
• Any Event occurrence. See “Chapter 7: Monitoring Events” on page 95.
• Device changes — for devices that have Enable Logging selected on the Alerts dialog box, WhatsUp Gold logs an up or down alert for a device or a service and missed polls for a device. When a device comes back up, it logs the total number of missed polls and the total down time.
• Notifications — all notifications that get sent are logged.
• Acknowledged Alerts — logs an activity when you select Monitor->Acknowledge (to clear all alerts) on the console or click Acknowledge in the web interface.
• Access table lockout entries — occurs when a web access attempt is denied, for example, due to settings in the IP Security (Configure->Web Server->IP Security). The log entry also shows the IP address of the host that attempted to log on to the web server.
• NT Service — any up or down state changes resulting from checking an NT Service.
Changing How Activities Are Logged
The application-level activities (such as opening or closing a map) are logged automatically. For device-specific activities, you can specify:
• Whether the up or down state changes for a device are logged
• The number of polls missed (Threshold) before a “DOWN” or “SVSDOWN” state change is recorded for a device or for a monitored service on a device.
To change how activities are logged for a single device:
1 Right-click the device and select Properties.
2 Click Alerts.
3 To log “UP” and “DOWN” state changes for this device (in the Activity Log), make sure Enable Logging is selected. (These entries can be viewed by right-clicking the device and selecting Quick Status, then clicking Log.)
The Logging Trigger default value is 1, which means that every missed poll is logged; this setting gives you the most complete information about your network: when a device (or a monitored
Chapter 10 Logs and Reports 153WhatsUp Gold
154
service on the device) misses one poll, it is logged as “DOWN” or “SVCDOWN.”
If you have a device on your network that routinely misses just one poll, you may feel that you are getting too many “Down” or “Up” messages in the Activity Log. In this type of situation, you can set the Trigger to a higher number such as 2, 3, or 4. To find the Trigger value, select the alert and click the Edit button.
NoteHowever, if you have assigned notifications to this device and want to make sure, for clarity’s sake, that a “Down” or “Up” state change for this device is recorded in the Activity Log before any alerts or notifications are recorded, make sure the Trigger value is less than or equal to the Logging Trigger value of any notifications assigned to this device.
4 Click OK to save your changes.
To change how activities are logged for all devices or multiple selected devices:
1 (Optional) To change how activities are logged for multiple devices in the map, select the devices.
NoteTo select multiple devices, hold down the Ctrl key and click the desired devices. You can also left-click and drag the selection box to select multiple devices.
2 Right-click one of the selected devices and select Add Alerts to Selected Devices.
3 Enable Logging. Select this if you want WhatsUp Gold to write an entry in the Activities Log whenever the devices go down or come back up after being down (based on the value of the Logging Trigger).
4 Logging Trigger. The number selected here is the number of missed polls it takes before an entry is written to the Activities Log.
User’s GuideWhatsUp Gold
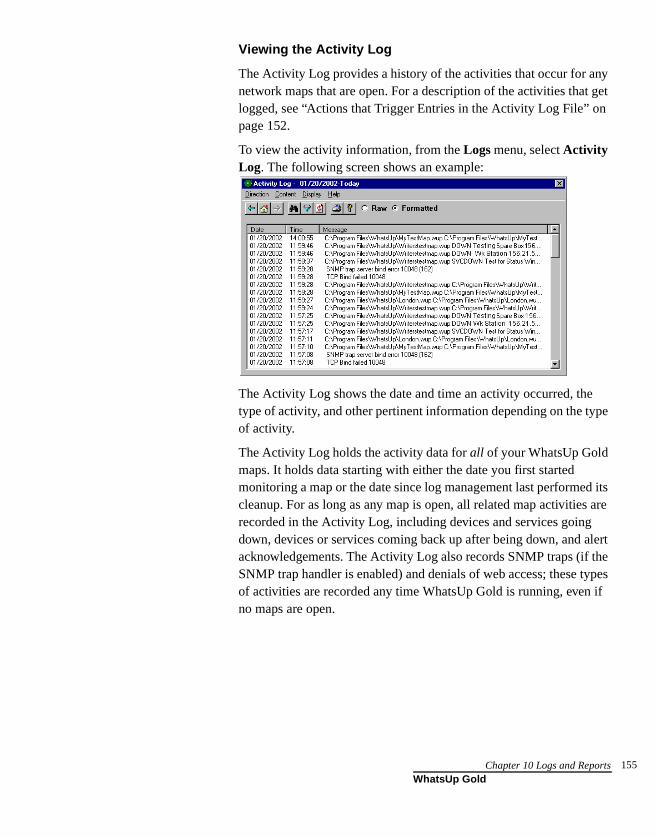
Viewing the Activity Log
The Activity Log provides a history of the activities that occur for any network maps that are open. For a description of the activities that get logged, see “Actions that Trigger Entries in the Activity Log File” on page 152.
To view the activity information, from the Logs menu, select Activity Log. The following screen shows an example:
The Activity Log shows the date and time an activity occurred, the type of activity, and other pertinent information depending on the type of activity.
The Activity Log holds the activity data for all of your WhatsUp Gold maps. It holds data starting with either the date you first started monitoring a map or the date since log management last performed its cleanup. For as long as any map is open, all related map activities are recorded in the Activity Log, including devices and services going down, devices or services coming back up after being down, and alert acknowledgements. The Activity Log also records SNMP traps (if the SNMP trap handler is enabled) and denials of web access; these types of activities are recorded any time WhatsUp Gold is running, even if no maps are open.
Chapter 10 Logs and Reports 155WhatsUp Gold
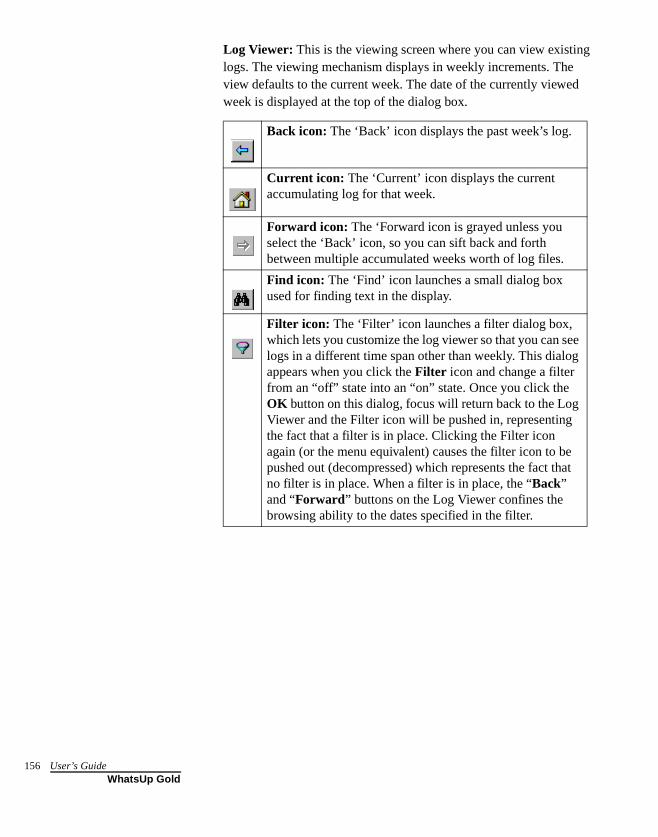
156
Log Viewer: This is the viewing screen where you can view existing logs. The viewing mechanism displays in weekly increments. The view defaults to the current week. The date of the currently viewed week is displayed at the top of the dialog box.
Back icon: The ‘Back’ icon displays the past week’s log.
Current icon: The ‘Current’ icon displays the current accumulating log for that week.
Forward icon: The ‘Forward icon is grayed unless you select the ‘Back’ icon, so you can sift back and forth between multiple accumulated weeks worth of log files.
Find icon: The ‘Find’ icon launches a small dialog box used for finding text in the display.
Filter icon: The ‘Filter’ icon launches a filter dialog box, which lets you customize the log viewer so that you can see logs in a different time span other than weekly. This dialog appears when you click the Filter icon and change a filter from an “off” state into an “on” state. Once you click the OK button on this dialog, focus will return back to the Log Viewer and the Filter icon will be pushed in, representing the fact that a filter is in place. Clicking the Filter icon again (or the menu equivalent) causes the filter icon to be pushed out (decompressed) which represents the fact that no filter is in place. When a filter is in place, the “Back” and “Forward” buttons on the Log Viewer confines the browsing ability to the dates specified in the filter.
User’s GuideWhatsUp Gold
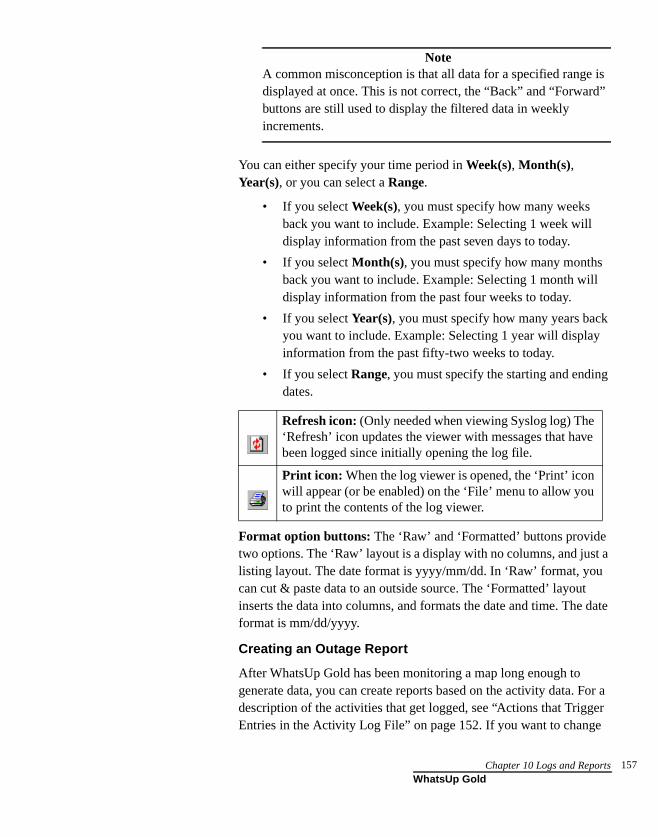
NoteA common misconception is that all data for a specified range is displayed at once. This is not correct, the “Back” and “Forward” buttons are still used to display the filtered data in weekly increments.
You can either specify your time period in Week(s), Month(s), Year(s), or you can select a Range.
• If you select Week(s), you must specify how many weeks back you want to include. Example: Selecting 1 week will display information from the past seven days to today.
• If you select Month(s), you must specify how many months back you want to include. Example: Selecting 1 month will display information from the past four weeks to today.
• If you select Year(s), you must specify how many years back you want to include. Example: Selecting 1 year will display information from the past fifty-two weeks to today.
• If you select Range, you must specify the starting and ending dates.
Format option buttons: The ‘Raw’ and ‘Formatted’ buttons provide two options. The ‘Raw’ layout is a display with no columns, and just a listing layout. The date format is yyyy/mm/dd. In ‘Raw’ format, you can cut & paste data to an outside source. The ‘Formatted’ layout inserts the data into columns, and formats the date and time. The date format is mm/dd/yyyy.
Creating an Outage Report
After WhatsUp Gold has been monitoring a map long enough to generate data, you can create reports based on the activity data. For a description of the activities that get logged, see “Actions that Trigger Entries in the Activity Log File” on page 152. If you want to change
Refresh icon: (Only needed when viewing Syslog log) The ‘Refresh’ icon updates the viewer with messages that have been logged since initially opening the log file.
Print icon: When the log viewer is opened, the ‘Print’ icon will appear (or be enabled) on the ‘File’ menu to allow you to print the contents of the log viewer.
Chapter 10 Logs and Reports 157WhatsUp Gold
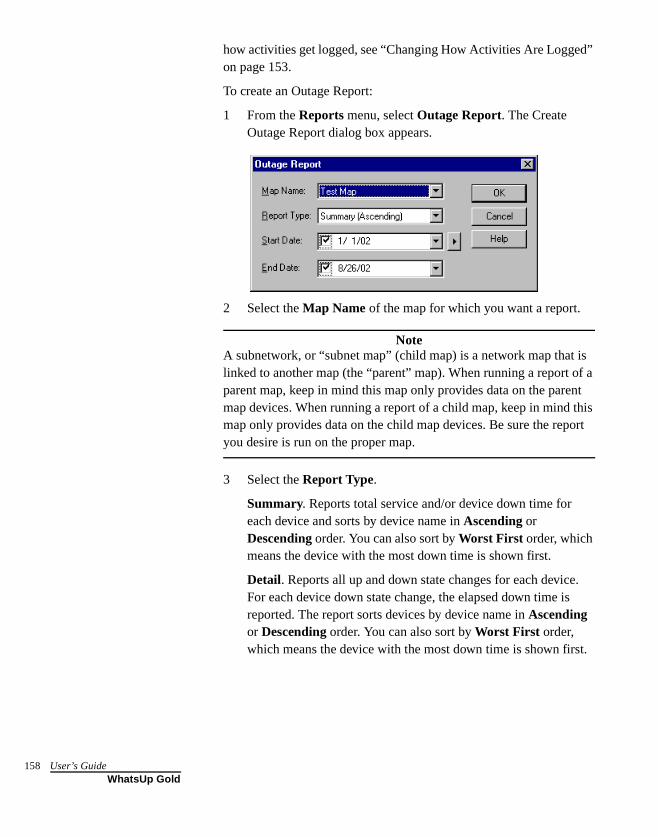
158
how activities get logged, see “Changing How Activities Are Logged” on page 153.
To create an Outage Report:
1 From the Reports menu, select Outage Report. The Create Outage Report dialog box appears.
2 Select the Map Name of the map for which you want a report.
NoteA subnetwork, or “subnet map” (child map) is a network map that is linked to another map (the “parent” map). When running a report of a parent map, keep in mind this map only provides data on the parent map devices. When running a report of a child map, keep in mind this map only provides data on the child map devices. Be sure the report you desire is run on the proper map.
3 Select the Report Type.
Summary. Reports total service and/or device down time for each device and sorts by device name in Ascending or Descending order. You can also sort by Worst First order, which means the device with the most down time is shown first.
Detail. Reports all up and down state changes for each device. For each device down state change, the elapsed down time is reported. The report sorts devices by device name in Ascending or Descending order. You can also sort by Worst First order, which means the device with the most down time is shown first.
User’s GuideWhatsUp Gold
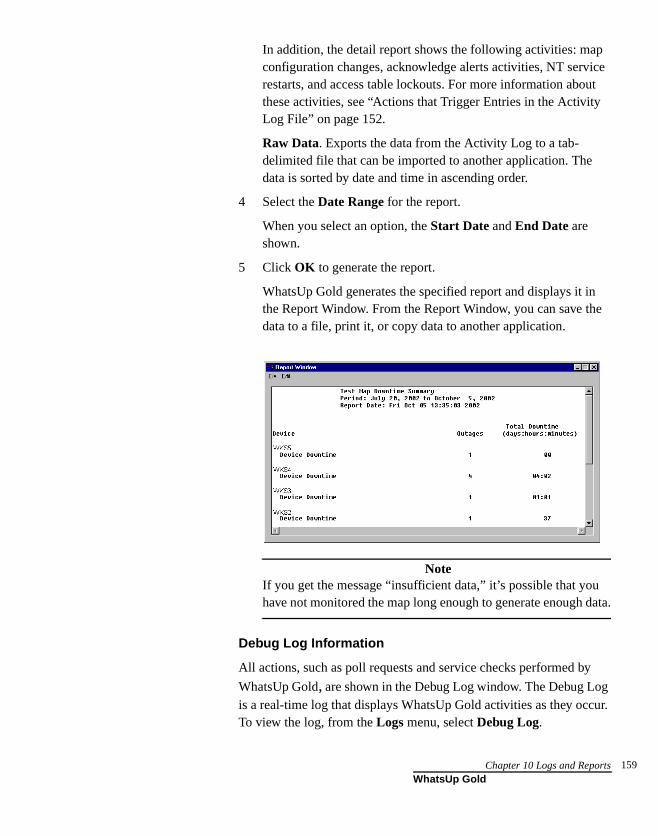
In addition, the detail report shows the following activities: map configuration changes, acknowledge alerts activities, NT service restarts, and access table lockouts. For more information about these activities, see “Actions that Trigger Entries in the Activity Log File” on page 152.
Raw Data. Exports the data from the Activity Log to a tab-delimited file that can be imported to another application. The data is sorted by date and time in ascending order.
4 Select the Date Range for the report.
When you select an option, the Start Date and End Date are shown.
5 Click OK to generate the report.
WhatsUp Gold generates the specified report and displays it in the Report Window. From the Report Window, you can save the data to a file, print it, or copy data to another application.
NoteIf you get the message “insufficient data,” it’s possible that you have not monitored the map long enough to generate enough data.
Debug Log Information
All actions, such as poll requests and service checks performed by
WhatsUp Gold, are shown in the Debug Log window. The Debug Log is a real-time log that displays WhatsUp Gold activities as they occur. To view the log, from the Logs menu, select Debug Log.
Chapter 10 Logs and Reports 159WhatsUp Gold
160
Using the Command Line for Outage Reports
Wugrpt.exe is a utility that can generate reports from the Activity Log (EV-yyyy-mm-dd.tab) data. You can invoke wugrpt from the Windows Command Prompt (MS-DOS prompt). By default, the report is displayed in the Command Prompt or MS-DOS window.
Basic Command Syntax
wugrpt -mmapname [-syyyymmdd] [-eyyyymmdd] [-llogfile] [-osortmode] [-rreport] [-tmaptitle]
NoteYou must use the -m argument to specify the name of the WhatsUp Gold map to use for the report. All other arguments are optional. If you DO NOT use any other arguments, AND you only provide a map name, the report will be a detailed report for all dates in the activity log.
User’s GuideWhatsUp Gold
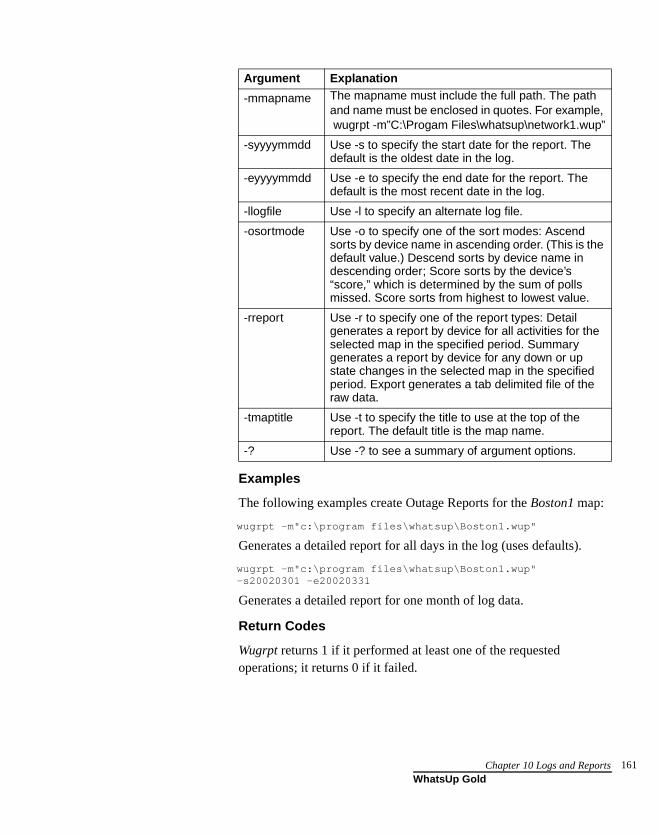
Examples
The following examples create Outage Reports for the Boston1 map:
wugrpt -m"c:\program files\whatsup\Boston1.wup"
Generates a detailed report for all days in the log (uses defaults).
wugrpt -m"c:\program files\whatsup\Boston1.wup" -s20020301 -e20020331
Generates a detailed report for one month of log data.
Return Codes
Wugrpt returns 1 if it performed at least one of the requested operations; it returns 0 if it failed.
Argument Explanation
-mmapname The mapname must include the full path. The path and name must be enclosed in quotes. For example, wugrpt -m”C:\Progam Files\whatsup\network1.wup”
-syyyymmdd Use -s to specify the start date for the report. The default is the oldest date in the log.
-eyyyymmdd Use -e to specify the end date for the report. The default is the most recent date in the log.
-llogfile Use -l to specify an alternate log file.
-osortmode Use -o to specify one of the sort modes: Ascend sorts by device name in ascending order. (This is the default value.) Descend sorts by device name in descending order; Score sorts by the device’s “score,” which is determined by the sum of polls missed. Score sorts from highest to lowest value.
-rreport Use -r to specify one of the report types: Detail generates a report by device for all activities for the selected map in the specified period. Summary generates a report by device for any down or up state changes in the selected map in the specified period. Export generates a tab delimited file of the raw data.
-tmaptitle Use -t to specify the title to use at the top of the report. The default title is the map name.
-? Use -? to see a summary of argument options.
Chapter 10 Logs and Reports 161WhatsUp Gold
162
Logging and Reporting Polling Statistics
WhatsUp Gold lets you log and report on polling statistics to provide a picture of how your network is performing over a selected time interval.
After WhatsUp Gold logs sufficient polling data, you can generate reports on the data, create performance graphs, or save the data to a tab-delimited file that can be imported to another application.
The following sections describe the polling statistics, how you can change statistics logging, and how you can generate reports from the statistics. For information on performance graphs, see “Creating Performance Graphs” on page 168.
The Polling Statistics
WhatsUp Gold writes values for the polling statistics to the Statistics Log. The Statistics log stores its data in weekly file increments with the following file: ST-yyyy-mm-dd.tab. By default, the statistics data is saved to the log every hour, but you can change this interval.
WhatsUp Gold can log the following polling statistics for each device in an open map:
Average RTT. The average Round Trip Time (RTT) for polls to the device. This average is taken over the interval you specify for statistics generation. See “Changing Statistics Logging” on page 163. The default value is one hour.
Maximum RTT. The highest RTT recorded for the device during the statistics interval (default is one hour).
Minimum RTT. The lowest RTT recorded during the statistics interval (default is one hour).
Percentage of missed polls. The average percentage of missed polls during the statistics interval (default is one hour).
Note that the counters shown in the Statistics Log are not the same as those shown in the Statistics Window. Counters in the Statistics Window are cumulative per device. Counters in the Statistics Log are written per device at an interval determined by the setting on the Logging dialog box of program options (Configure->Program Options->Logging, then click the Advanced button).
User’s GuideWhatsUp Gold

Changing Statistics Logging
You can set how often you want polling data written to the Statistics log (ST-yyyy-mm-dd.tab). By default, statistics are written every hour.
To set how often to update the Statistics log:
1 From the Configure menu, select Program Options and click Logging.
2 In the Log type list box, select “Whatsup Statistics”.
3 Click the Advanced button.
4 In Log update interval, change the value for hours. You can set this value from 0 to 254 hours. To turn off statistics logging, set the value to zero.
5 Optionally, click Update Log to write current statistics to the log and reset the counters for each statistic.
Creating Reports on Polling Statistics
After WhatsUp Gold has monitored a map long enough to generate statistics data, you can create reports based on the statistics.
To create a statistics report:
1 From the Reports menu, select Statistics Report. The Statistics Report dialog box appears.
2 Select the Map Name of the map for which you want a report.
NoteA subnetwork, or “subnet map” (child map) is a network map that is linked to another map (the “parent” map). When running a report of a parent map, keep in mind this map only provides data on the parent map devices. When running a report of a child map, keep in mind this map only provides data on the child map devices. Be sure the report you desire is run on the proper map.
Chapter 10 Logs and Reports 163WhatsUp Gold
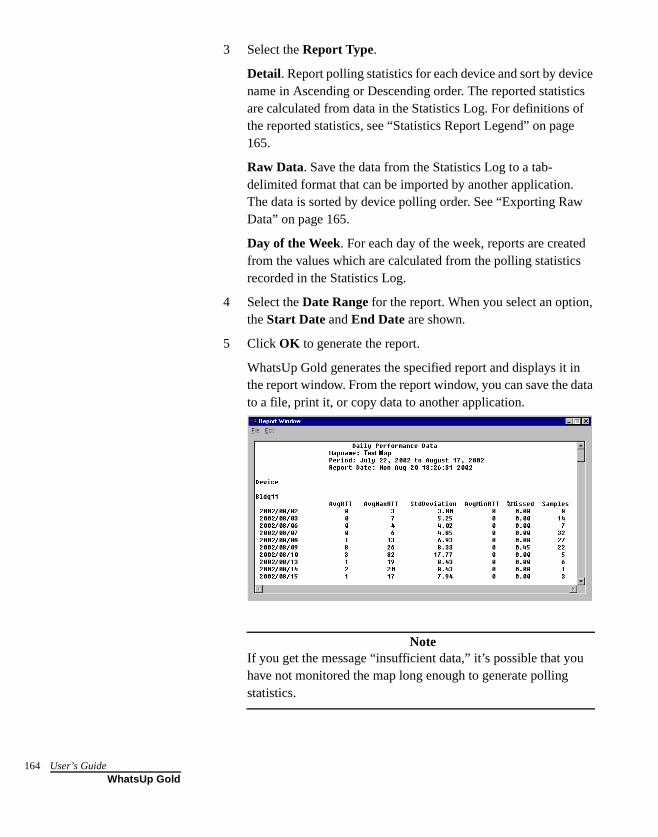
164
3 Select the Report Type.
Detail. Report polling statistics for each device and sort by device name in Ascending or Descending order. The reported statistics are calculated from data in the Statistics Log. For definitions of the reported statistics, see “Statistics Report Legend” on page 165.
Raw Data. Save the data from the Statistics Log to a tab-delimited format that can be imported by another application.The data is sorted by device polling order. See “Exporting Raw Data” on page 165.
Day of the Week. For each day of the week, reports are created from the values which are calculated from the polling statistics recorded in the Statistics Log.
4 Select the Date Range for the report. When you select an option, the Start Date and End Date are shown.
5 Click OK to generate the report.
WhatsUp Gold generates the specified report and displays it in the report window. From the report window, you can save the data to a file, print it, or copy data to another application.
NoteIf you get the message “insufficient data,” it’s possible that you have not monitored the map long enough to generate polling statistics.
User’s GuideWhatsUp Gold
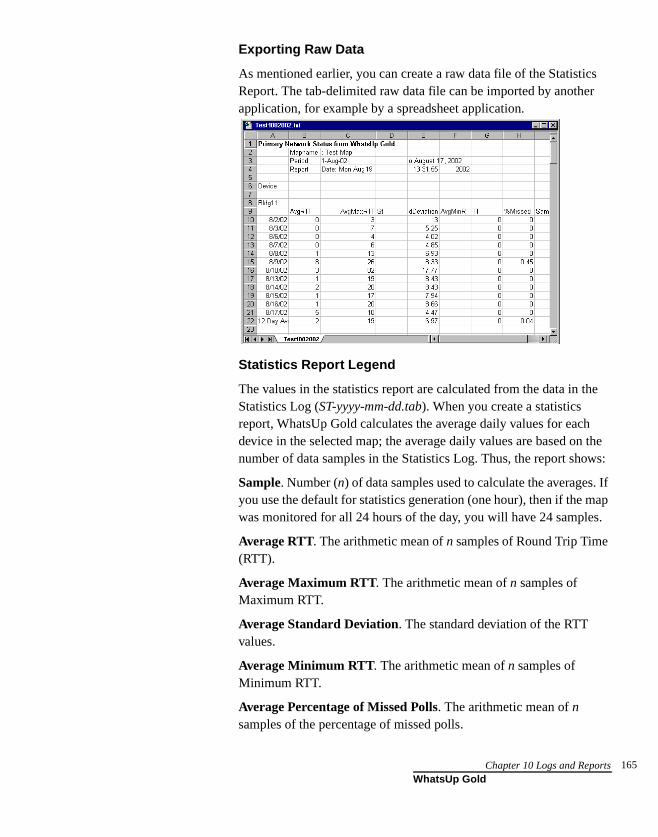
Exporting Raw Data
As mentioned earlier, you can create a raw data file of the Statistics Report. The tab-delimited raw data file can be imported by another application, for example by a spreadsheet application.
Statistics Report Legend
The values in the statistics report are calculated from the data in the Statistics Log (ST-yyyy-mm-dd.tab). When you create a statistics report, WhatsUp Gold calculates the average daily values for each device in the selected map; the average daily values are based on the number of data samples in the Statistics Log. Thus, the report shows:
Sample. Number (n) of data samples used to calculate the averages. If you use the default for statistics generation (one hour), then if the map was monitored for all 24 hours of the day, you will have 24 samples.
Average RTT. The arithmetic mean of n samples of Round Trip Time (RTT).
Average Maximum RTT. The arithmetic mean of n samples of Maximum RTT.
Average Standard Deviation. The standard deviation of the RTT values.
Average Minimum RTT. The arithmetic mean of n samples of Minimum RTT.
Average Percentage of Missed Polls. The arithmetic mean of n samples of the percentage of missed polls.
Chapter 10 Logs and Reports 165WhatsUp Gold

166
Using the Command Line for Statistics Reports
Wugstat.exe is a WhatsUp Gold utility used to generate reports from WhatsUp Gold Statistics Log (ST-yyyy-mm-dd.tab) data.
You can invoke wugstat from the Command Prompt or MS-DOS prompt. You must invoke wugstat with the -mmapname argument. All other arguments are optional. By default, the report is displayed in the Command Prompt or MS-DOS window.
Basic Command Syntax
wugstat [-mmapname] [-ddevicename] [-syyyymmdd] [-eyyyymmdd] [-llogfile] [-osortmode] [-rreport] [-tmaptitle]
User’s GuideWhatsUp Gold

NoteYou must use the -m argument to specify the name of the WhatsUp Gold map to use for the report. All other arguments are optional.
Argument Explanation
-mmapname Required. The name of the map to use as the basis for the report. Can be a regular expression search string such as: local.*
-syyyymmdd Optional. Start date to use as the basis for the report. Use -s to specify the start date for the report. The default is the oldest date in the log.
-ddevicename Optional. The name of the device to use as the basis for the report. Can be a regular expression search string such as: router.*
-eyyyymmdd Optional. end date to use as the basis for the report. Use -e to specify the end date for the report. The default is the most recent date in the log.
-llogfile Optional. Argument used to specify an alternate log file. Use -l to specify an alternate log file. The default is wugstatdata.tab.
-osortmode Optional sort order. Valid values for sort mode are: ascend (sort by device name in ascending order), and descend (sort by device name in descending order.) Use -o to specify one of the sort modes: Ascend sorts by device name in ascending order. (This is the default value.) Descend sorts by device name in descending order.
-rreport Optional. Name of report to generate (default detail report). Valid values for report are: detail (generates a detailed summary report by device), dow (generates a Day of the Week detailed report by device), and export (generates a tab delimited output file of raw data). Use -r to specify one of the report types.
-tmaptitle Optional, the title to use at the top of the report. Use -t to specify the title to use at the top of the report. The default title is the map name.
-? Use -? to see a summary of argument options.
Chapter 10 Logs and Reports 167WhatsUp Gold
168
Examples
The following examples create statistics reports for the Boston1 map:
wugstat -mBoston1.wup
generates a detailed report for all days in the log (uses defaults).
wugstat -mBoston1.wup -s20020301 -e20020331
generates a detailed report for one month of log data.
Return Codes
Wugstat returns 1 if it performed at least one of the requested operations; it returns 0 if it failed.
Creating Performance Graphs
You can graph the polling statistics that WhatsUp Gold accumulates for the devices on your network. The graphs show performance for a device by plotting the average time it takes a device to respond to a poll, known as the round trip time (RTT). In addition, the Performance Graphs can show aggregate data, such as the devices with the best and worst availability, or the devices with the highest and lowest average missed polls, and the best and worst days of the week for network performance.
High values for response time (RTT) indicate poor performance, low values indicate good performance, and low values for missed polls indicate high availability.
Graphs are based on data in the ST-yyyy-mm-dd.tab. For information about this log, see “Logging and Reporting Polling Statistics” on page 162.
NoteIf Performance Graphs in the Reports menu is grayed out, you need to install Microsoft's ODBC and the ODBC text driver. To install ODBC, see “System Requirements” on page 9.
User’s GuideWhatsUp Gold

Graph Options
When you create a Performance Graph, you can choose:
• the time interval for which you want to see statistics: daily, weekly, monthly, or all observations in the log
• in some cases, the graph format: bar chart or area chart
• how you want to sort the data: by device name; in ascending or descending order
• which maps and which devices to include in a graph
• the file format; you can export a graph to most of the popular desktop formats
All graphs show both aggregate performance data for the selected time period and the data for each device.
Creating a Graph
To create a graph:
1 Start the Performance Graphs tool by doing one of the following:
• From the Reports menu, select Performance Graphs.
• From the Start menu, select WhatsUp->WhatsUp Gold->WhatsUp Gold Performance Graphs.
• At the Map Level, select the device, right-click and select Performance Graphs.
NoteIf you want to select more than one device, hold the Ctrl key down while selecting the devices. You can also left-click and drag the selection box to select multiple devices. Right-click and select Performance Graphs.
Chapter 10 Logs and Reports 169WhatsUp Gold
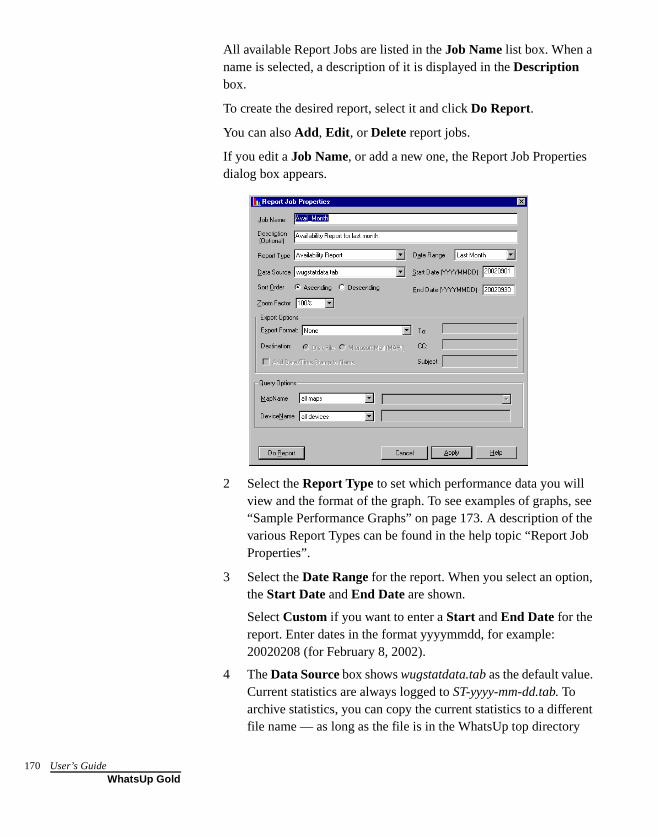
170
All available Report Jobs are listed in the Job Name list box. When a name is selected, a description of it is displayed in the Description box.
To create the desired report, select it and click Do Report.
You can also Add, Edit, or Delete report jobs.
If you edit a Job Name, or add a new one, the Report Job Properties dialog box appears.
2 Select the Report Type to set which performance data you will view and the format of the graph. To see examples of graphs, see “Sample Performance Graphs” on page 173. A description of the various Report Types can be found in the help topic “Report Job Properties”.
3 Select the Date Range for the report. When you select an option, the Start Date and End Date are shown.
Select Custom if you want to enter a Start and End Date for the report. Enter dates in the format yyyymmdd, for example: 20020208 (for February 8, 2002).
4 The Data Source box shows wugstatdata.tab as the default value. Current statistics are always logged to ST-yyyy-mm-dd.tab. To archive statistics, you can copy the current statistics to a different file name — as long as the file is in the WhatsUp top directory
User’s GuideWhatsUp Gold
and its name starts with wugstats, it will appear in the Data Source list box.
5 The Sort Order is sorted by the device name, in alphabetical order. You can select to sort in Ascending or Descending order for all reports (except the Comprehensive Report).
6 Use Zoom Factor to change the view size of the report.
7 Export Options. If you want to export the report, set the following options:
• Export Format. Select the desired export format.
• Destination. Select either Disk File or Microsoft Mail (MAPI).
NoteIf you select Disk File, you can optionally select the check box to add a date/time stamp to the name. If you select the mail option, you need to properly address the e-mail. Export jobs are written to the WUGWEBDIR\Reports folder. These reports can be accessed via the WhatsUp Gold Web Interface: Top View->Performance Graphs.
8 Enter the Query Options to determine which maps and which devices to include in the graph.
The default values graph performance data for all maps and all devices for which there is data in ST-yyyy-mm-dd.tab files. You can change the criteria to graph performance data for any combination of maps and devices.
MapName. Use All maps to graph all data. To choose from a list of your maps, select contains, and then select a map name from the Search String box. You can also select the search expression (such as contains, does not contain, starts with), and then enter the search text (such as a map name or partial map name) in the Search String box. To enter more than one map, separate them with a comma. Example: *map1.wup,*map2.wup,*map3.wup.
NoteHaving the asterisk (*) before the map name allows you to avoid entering the complete filename of the map.
Chapter 10 Logs and Reports 171WhatsUp Gold
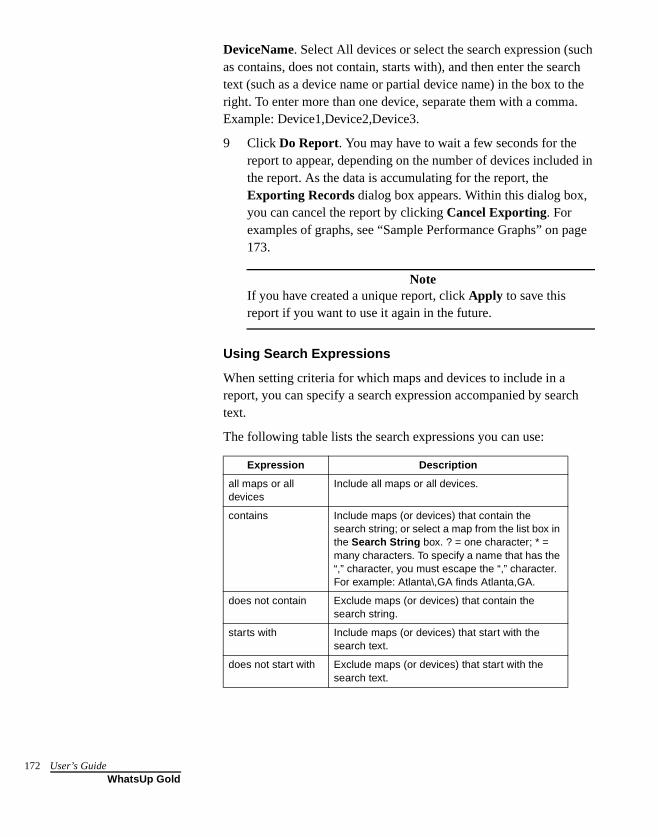
172
DeviceName. Select All devices or select the search expression (such as contains, does not contain, starts with), and then enter the search text (such as a device name or partial device name) in the box to the right. To enter more than one device, separate them with a comma. Example: Device1,Device2,Device3.
9 Click Do Report. You may have to wait a few seconds for the report to appear, depending on the number of devices included in the report. As the data is accumulating for the report, the Exporting Records dialog box appears. Within this dialog box, you can cancel the report by clicking Cancel Exporting. For examples of graphs, see “Sample Performance Graphs” on page 173.
NoteIf you have created a unique report, click Apply to save this report if you want to use it again in the future.
Using Search Expressions
When setting criteria for which maps and devices to include in a report, you can specify a search expression accompanied by search text.
The following table lists the search expressions you can use:
Expression Description
all maps or all devices
Include all maps or all devices.
contains Include maps (or devices) that contain the search string; or select a map from the list box in the Search String box. ? = one character; * = many characters. To specify a name that has the “,” character, you must escape the “,” character. For example: Atlanta\,GA finds Atlanta,GA.
does not contain Exclude maps (or devices) that contain the search string.
starts with Include maps (or devices) that start with the search text.
does not start with Exclude maps (or devices) that start with the search text.
User’s GuideWhatsUp Gold
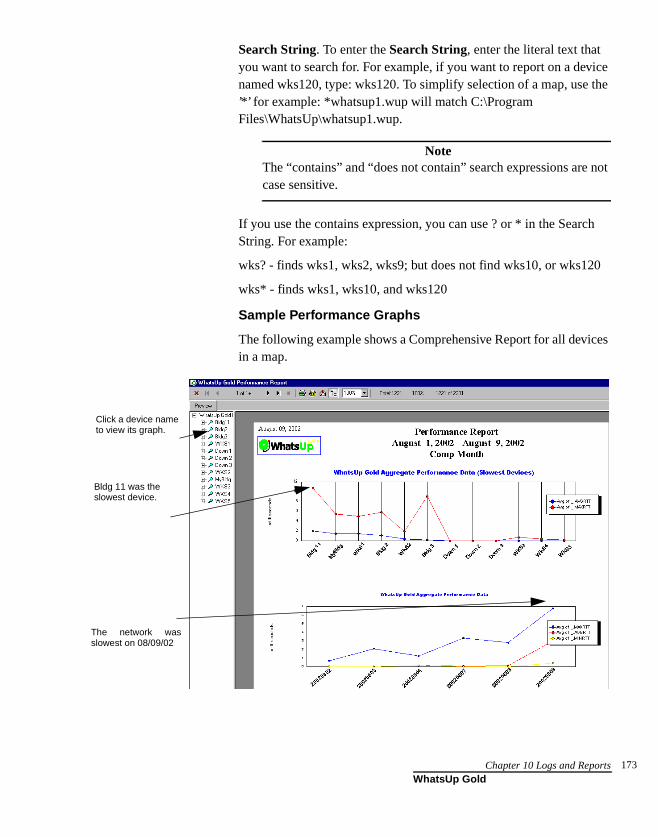
Search String. To enter the Search String, enter the literal text that you want to search for. For example, if you want to report on a device named wks120, type: wks120. To simplify selection of a map, use the ’*’ for example: *whatsup1.wup will match C:\Program Files\WhatsUp\whatsup1.wup.
NoteThe “contains” and “does not contain” search expressions are not case sensitive.
If you use the contains expression, you can use ? or * in the Search String. For example:
wks? - finds wks1, wks2, wks9; but does not find wks10, or wks120
wks* - finds wks1, wks10, and wks120
Sample Performance Graphs
The following example shows a Comprehensive Report for all devices in a map.
Click a device nameto view its graph.
Bldg 11 was the slowest device.
The network wasslowest on 08/09/02
Chapter 10 Logs and Reports 173WhatsUp Gold
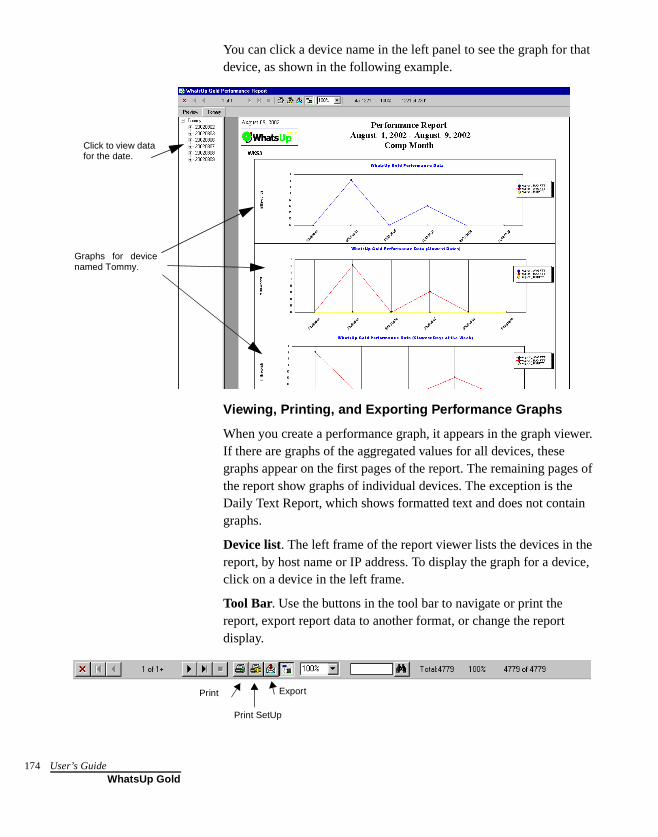
174
You can click a device name in the left panel to see the graph for that device, as shown in the following example.
Viewing, Printing, and Exporting Performance Graphs
When you create a performance graph, it appears in the graph viewer. If there are graphs of the aggregated values for all devices, these graphs appear on the first pages of the report. The remaining pages of the report show graphs of individual devices. The exception is the Daily Text Report, which shows formatted text and does not contain graphs.
Device list. The left frame of the report viewer lists the devices in the report, by host name or IP address. To display the graph for a device, click on a device in the left frame.
Tool Bar. Use the buttons in the tool bar to navigate or print the report, export report data to another format, or change the report display.
Click to view datafor the date.
Graphs for devicenamed Tommy.
ExportPrint
Print SetUp
User’s GuideWhatsUp Gold
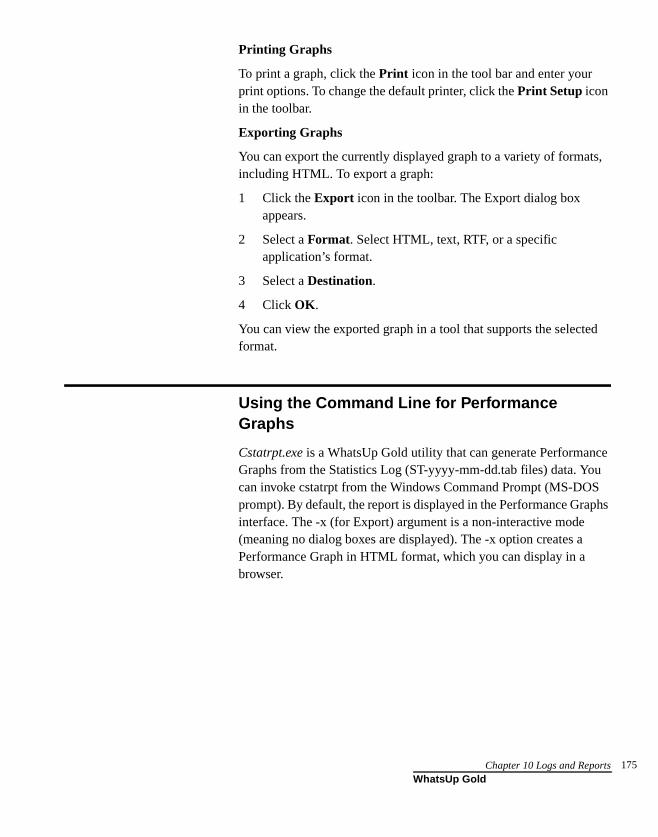
Printing Graphs
To print a graph, click the Print icon in the tool bar and enter your print options. To change the default printer, click the Print Setup icon in the toolbar.
Exporting Graphs
You can export the currently displayed graph to a variety of formats, including HTML. To export a graph:
1 Click the Export icon in the toolbar. The Export dialog box appears.
2 Select a Format. Select HTML, text, RTF, or a specific application’s format.
3 Select a Destination.
4 Click OK.
You can view the exported graph in a tool that supports the selected format.
Using the Command Line for Performance Graphs
Cstatrpt.exe is a WhatsUp Gold utility that can generate Performance Graphs from the Statistics Log (ST-yyyy-mm-dd.tab files) data. You can invoke cstatrpt from the Windows Command Prompt (MS-DOS prompt). By default, the report is displayed in the Performance Graphs interface. The -x (for Export) argument is a non-interactive mode (meaning no dialog boxes are displayed). The -x option creates a Performance Graph in HTML format, which you can display in a browser.
Chapter 10 Logs and Reports 175WhatsUp Gold
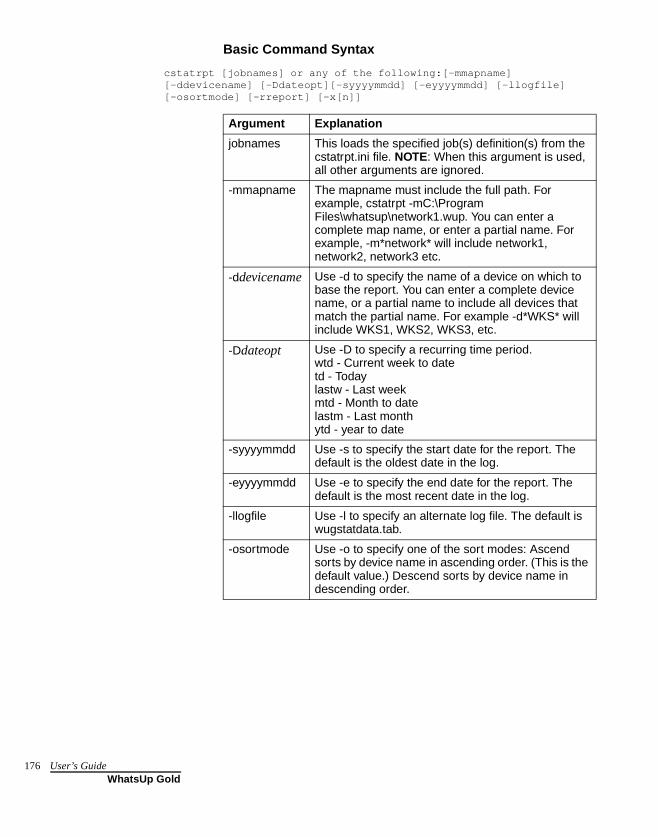
176
Basic Command Syntax
cstatrpt [jobnames] or any of the following:[-mmapname] [-ddevicename] [-Ddateopt][-syyyymmdd] [-eyyyymmdd] [-llogfile] [-osortmode] [-rreport] [-x[n]]
Argument Explanation
jobnames This loads the specified job(s) definition(s) from the cstatrpt.ini file. NOTE: When this argument is used, all other arguments are ignored.
-mmapname The mapname must include the full path. For example, cstatrpt -mC:\Program Files\whatsup\network1.wup. You can enter a complete map name, or enter a partial name. For example, -m*network* will include network1, network2, network3 etc.
-ddevicename Use -d to specify the name of a device on which to base the report. You can enter a complete device name, or a partial name to include all devices that match the partial name. For example -d*WKS* will include WKS1, WKS2, WKS3, etc.
-Ddateopt Use -D to specify a recurring time period.wtd - Current week to datetd - Todaylastw - Last weekmtd - Month to datelastm - Last monthytd - year to date
-syyyymmdd Use -s to specify the start date for the report. The default is the oldest date in the log.
-eyyyymmdd Use -e to specify the end date for the report. The default is the most recent date in the log.
-llogfile Use -l to specify an alternate log file. The default is wugstatdata.tab.
-osortmode Use -o to specify one of the sort modes: Ascend sorts by device name in ascending order. (This is the default value.) Descend sorts by device name in descending order.
User’s GuideWhatsUp Gold
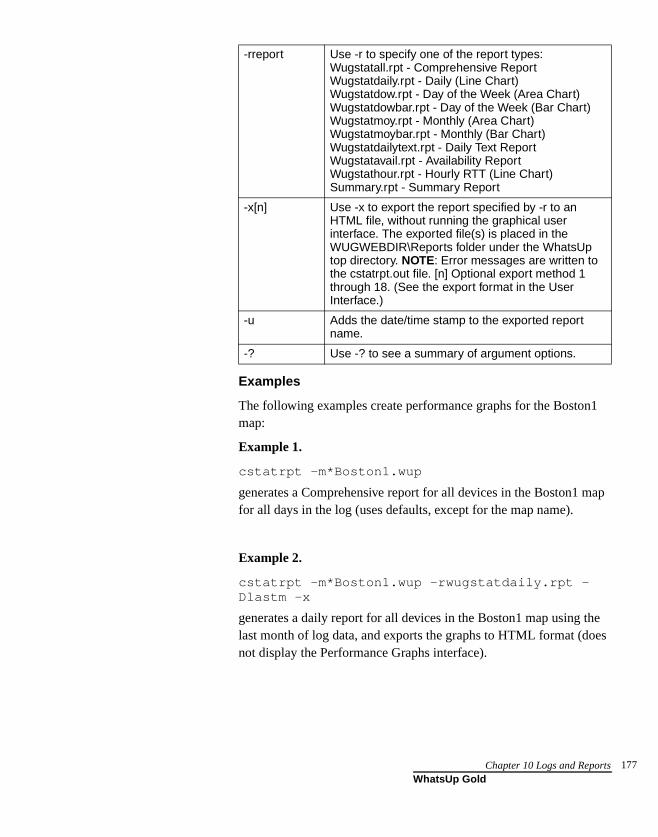
Examples
The following examples create performance graphs for the Boston1 map:
Example 1.
cstatrpt -m*Boston1.wup
generates a Comprehensive report for all devices in the Boston1 map for all days in the log (uses defaults, except for the map name).
Example 2.
cstatrpt -m*Boston1.wup -rwugstatdaily.rpt -Dlastm -x
generates a daily report for all devices in the Boston1 map using the last month of log data, and exports the graphs to HTML format (does not display the Performance Graphs interface).
-rreport Use -r to specify one of the report types: Wugstatall.rpt - Comprehensive ReportWugstatdaily.rpt - Daily (Line Chart)Wugstatdow.rpt - Day of the Week (Area Chart)Wugstatdowbar.rpt - Day of the Week (Bar Chart)Wugstatmoy.rpt - Monthly (Area Chart)Wugstatmoybar.rpt - Monthly (Bar Chart)Wugstatdailytext.rpt - Daily Text ReportWugstatavail.rpt - Availability ReportWugstathour.rpt - Hourly RTT (Line Chart)Summary.rpt - Summary Report
-x[n] Use -x to export the report specified by -r to an HTML file, without running the graphical user interface. The exported file(s) is placed in the WUGWEBDIR\Reports folder under the WhatsUp top directory. NOTE: Error messages are written to the cstatrpt.out file. [n] Optional export method 1 through 18. (See the export format in the User Interface.)
-u Adds the date/time stamp to the exported report name.
-? Use -? to see a summary of argument options.
Chapter 10 Logs and Reports 177WhatsUp Gold
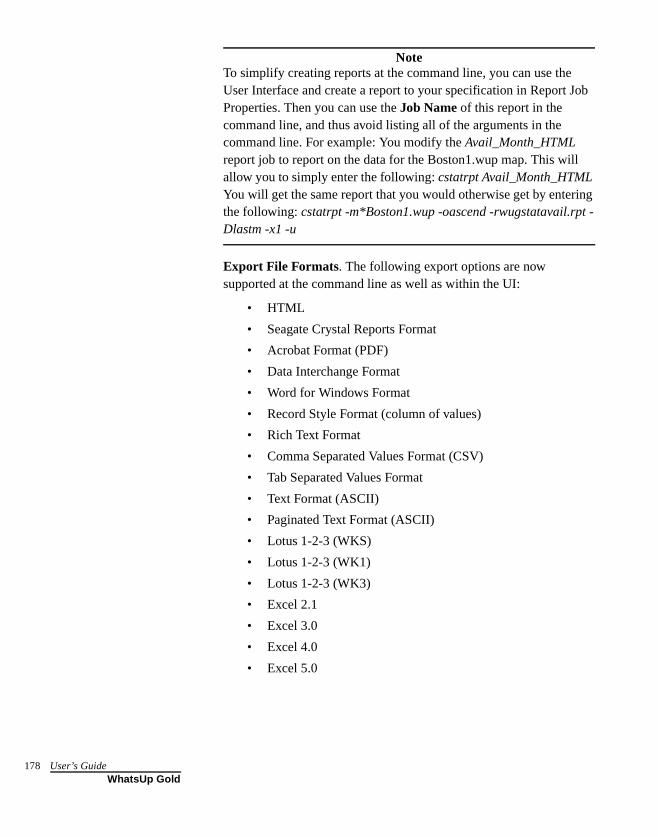
178
NoteTo simplify creating reports at the command line, you can use the User Interface and create a report to your specification in Report Job Properties. Then you can use the Job Name of this report in the command line, and thus avoid listing all of the arguments in the command line. For example: You modify the Avail_Month_HTML report job to report on the data for the Boston1.wup map. This will allow you to simply enter the following: cstatrpt Avail_Month_HTML You will get the same report that you would otherwise get by entering the following: cstatrpt -m*Boston1.wup -oascend -rwugstatavail.rpt -Dlastm -x1 -u
Export File Formats. The following export options are now supported at the command line as well as within the UI:
• HTML
• Seagate Crystal Reports Format
• Acrobat Format (PDF)
• Data Interchange Format
• Word for Windows Format
• Record Style Format (column of values)
• Rich Text Format
• Comma Separated Values Format (CSV)
• Tab Separated Values Format
• Text Format (ASCII)
• Paginated Text Format (ASCII)
• Lotus 1-2-3 (WKS)
• Lotus 1-2-3 (WK1)
• Lotus 1-2-3 (WK3)
• Excel 2.1
• Excel 3.0
• Excel 4.0
• Excel 5.0
User’s GuideWhatsUp Gold
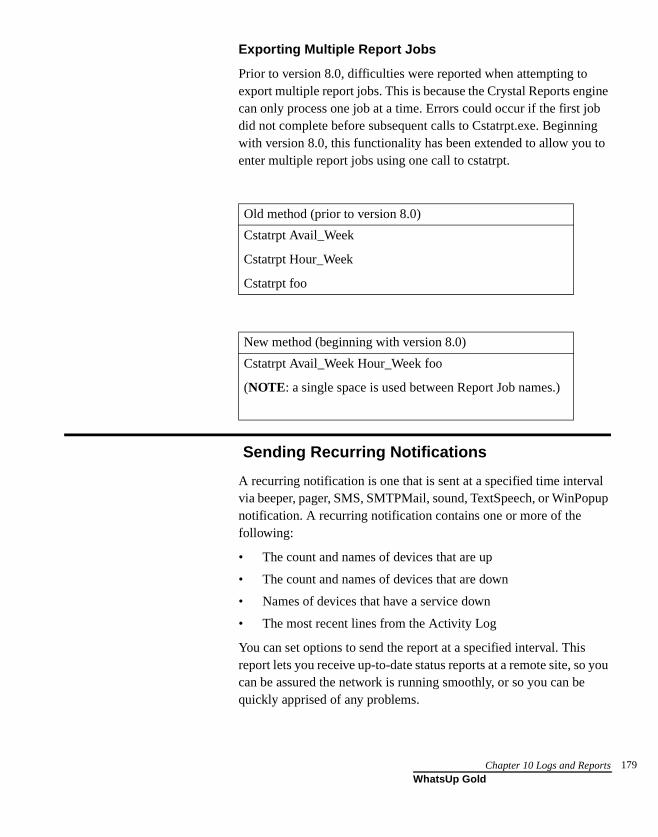
Exporting Multiple Report Jobs
Prior to version 8.0, difficulties were reported when attempting to export multiple report jobs. This is because the Crystal Reports engine can only process one job at a time. Errors could occur if the first job did not complete before subsequent calls to Cstatrpt.exe. Beginning with version 8.0, this functionality has been extended to allow you to enter multiple report jobs using one call to cstatrpt.
Sending Recurring Notifications
A recurring notification is one that is sent at a specified time interval via beeper, pager, SMS, SMTPMail, sound, TextSpeech, or WinPopup notification. A recurring notification contains one or more of the following:
• The count and names of devices that are up
• The count and names of devices that are down
• Names of devices that have a service down
• The most recent lines from the Activity Log
You can set options to send the report at a specified interval. This report lets you receive up-to-date status reports at a remote site, so you can be assured the network is running smoothly, or so you can be quickly apprised of any problems.
Old method (prior to version 8.0)
Cstatrpt Avail_Week
Cstatrpt Hour_Week
Cstatrpt foo
New method (beginning with version 8.0)
Cstatrpt Avail_Week Hour_Week foo
(NOTE: a single space is used between Report Job names.)
Chapter 10 Logs and Reports 179WhatsUp Gold

180
The following example shows a Recurring Report sent via e-mail:
To set up a Recurring Notification:
1 From the Configure menu, select Recurring Notifications. The Recurring Notifications dialog box appears.
2 Select Enable Recurring Notifications.
You see the following dialog box:
User’s GuideWhatsUp Gold
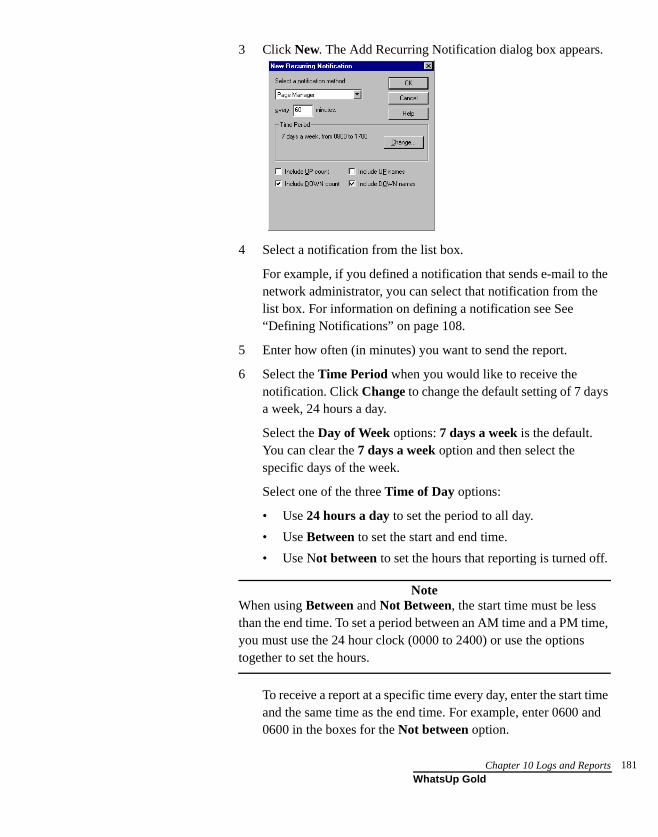
3 Click New. The Add Recurring Notification dialog box appears.
4 Select a notification from the list box.
For example, if you defined a notification that sends e-mail to the network administrator, you can select that notification from the list box. For information on defining a notification see See “Defining Notifications” on page 108.
5 Enter how often (in minutes) you want to send the report.
6 Select the Time Period when you would like to receive the notification. Click Change to change the default setting of 7 days a week, 24 hours a day.
Select the Day of Week options: 7 days a week is the default. You can clear the 7 days a week option and then select the specific days of the week.
Select one of the three Time of Day options:
• Use 24 hours a day to set the period to all day.
• Use Between to set the start and end time.
• Use Not between to set the hours that reporting is turned off.
NoteWhen using Between and Not Between, the start time must be less than the end time. To set a period between an AM time and a PM time, you must use the 24 hour clock (0000 to 2400) or use the options together to set the hours.
To receive a report at a specific time every day, enter the start time and the same time as the end time. For example, enter 0600 and 0600 in the boxes for the Not between option.
Chapter 10 Logs and Reports 181WhatsUp Gold
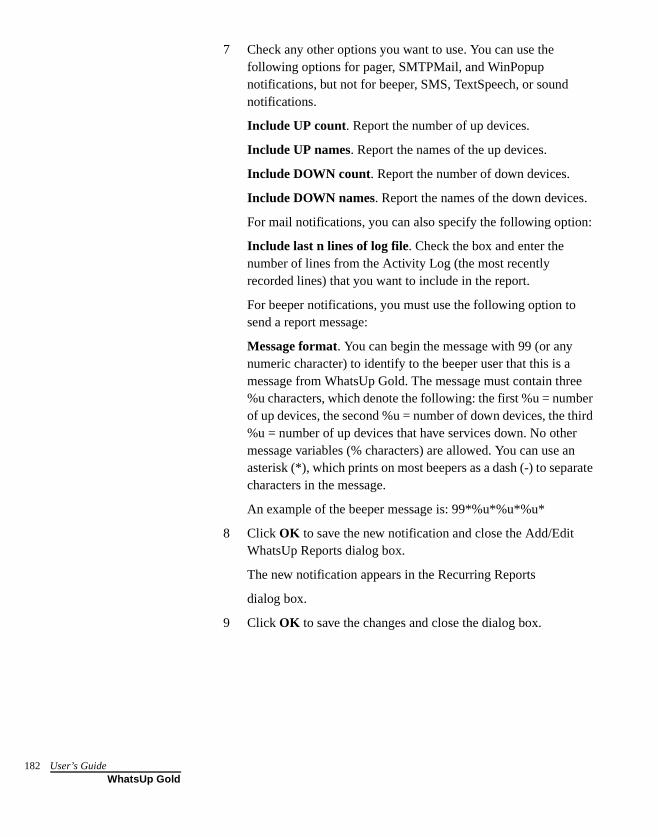
182
7 Check any other options you want to use. You can use the following options for pager, SMTPMail, and WinPopup notifications, but not for beeper, SMS, TextSpeech, or sound notifications.
Include UP count. Report the number of up devices.
Include UP names. Report the names of the up devices.
Include DOWN count. Report the number of down devices.
Include DOWN names. Report the names of the down devices.
For mail notifications, you can also specify the following option:
Include last n lines of log file. Check the box and enter the number of lines from the Activity Log (the most recently recorded lines) that you want to include in the report.
For beeper notifications, you must use the following option to send a report message:
Message format. You can begin the message with 99 (or any numeric character) to identify to the beeper user that this is a message from WhatsUp Gold. The message must contain three %u characters, which denote the following: the first %u = number of up devices, the second %u = number of down devices, the third %u = number of up devices that have services down. No other message variables (% characters) are allowed. You can use an asterisk (*), which prints on most beepers as a dash (-) to separate characters in the message.
An example of the beeper message is: 99*%u*%u*%u*
8 Click OK to save the new notification and close the Add/Edit WhatsUp Reports dialog box.
The new notification appears in the Recurring Reports
dialog box.
9 Click OK to save the changes and close the dialog box.
User’s GuideWhatsUp Gold
Chapter 11: Working from a Web Browser
This chapter describes how to set up the WhatsUp Gold web server and use a web browser to access mapping, monitoring, and notification functions from a remote computer.
Setting Up the WhatsUp Gold Web Server
WhatsUp Gold provides a web server that lets you use any web browser on any computer on the Internet to view the status of your network and change WhatsUp Gold settings. You can enable/disable the web server and set access to this server through the web properties. If you run WhatsUp Gold as a Windows NT service, the web browser will be your primary interface. (see “Running WhatsUp Gold as an NT Service” on page 15.)
To set up the web server:
1 From the Configure menu, select Web Server, and click General to display the setup properties.
2 Select Enable Web Server.
3 If you want web users to be able to change WhatsUp Gold settings from the web interface, select Enable Web Configuration.
Chapter 11 Working from a Web Browser 183WhatsUp Gold
184
You can set access for each web user account. (See “Setting Web Access by IP Address” on page 189.) If Enable Web Configuration is not selected, the web users cannot change any WhatsUp Gold settings; they can use only the view functions.
4 There are two formats for displaying maps in a web browser: Graphical maps, which use JPEG format to display the same icons and colors as maps on the console; or a Text listing of devices in a map. To view the Graphical maps, select Enable Graphical Maps.
5 Enable Sounds. Select this to enable web browser sounds. If you do not want to hear sounds (like alarms) in the web browser, clear this box.
6 Enter or change any of the setup information.
Limit Size. This sets the maximum map image sent to the web.
Main Title. The title displayed on the main web page (“Top View”) for the WhatsUp Gold web site. You can enter any text for the title.
Refresh Frequency. The number of seconds between updates to the WhatsUp Gold display on the web site. You can set the refresh rate in the range from 10 to 99999 seconds.
TCP Port. The default is port 80, which is the standard TCP/IP port for a web (HTTP) server. If you already have a web server running on this system, set the port number in this box to another port number (for example, 8008 or 8080).
HTML Files Directory. The default is the \web subdirectory of the directory in which you installed WhatsUp Gold. If you want the WhatsUp Gold web server to serve your own web pages, you can add HTML files to this directory. If you use a different directory, you need to specify the full path in this box. Subdirectories are supported. Note that default.asp and TopView.asp are the files the web server uses as the first pages of the web interface.
Map Directory: This shows the directory where maps can be created, loaded, and saved from the web interface.
7 Click OK to apply your changes. The changes take effect immediately.
User’s GuideWhatsUp Gold
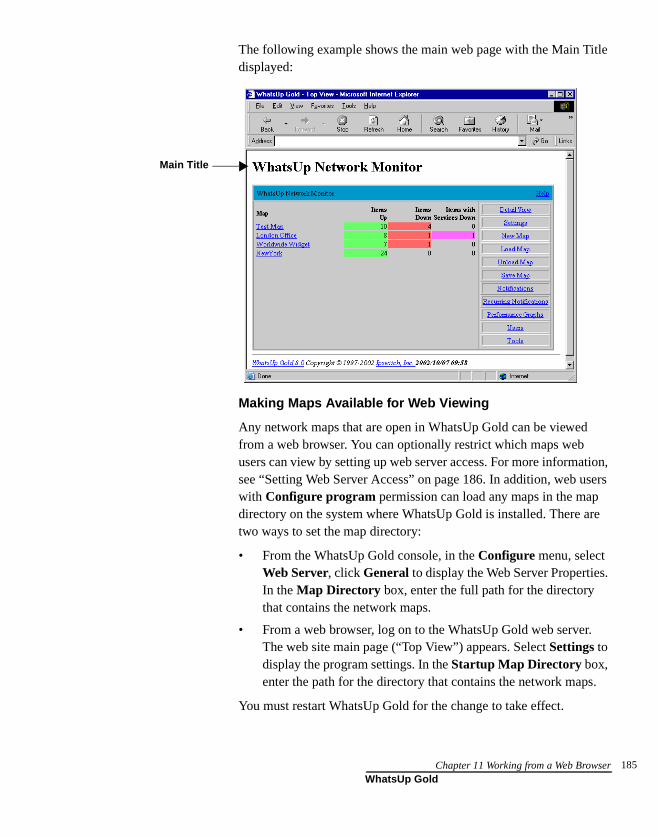
The following example shows the main web page with the Main Title displayed:
Making Maps Available for Web Viewing
Any network maps that are open in WhatsUp Gold can be viewed from a web browser. You can optionally restrict which maps web users can view by setting up web server access. For more information, see “Setting Web Server Access” on page 186. In addition, web users with Configure program permission can load any maps in the map directory on the system where WhatsUp Gold is installed. There are two ways to set the map directory:
• From the WhatsUp Gold console, in the Configure menu, select Web Server, click General to display the Web Server Properties. In the Map Directory box, enter the full path for the directory that contains the network maps.
• From a web browser, log on to the WhatsUp Gold web server. The web site main page (“Top View”) appears. Select Settings to display the program settings. In the Startup Map Directory box, enter the path for the directory that contains the network maps.
You must restart WhatsUp Gold for the change to take effect.
Main Title
Chapter 11 Working from a Web Browser 185WhatsUp Gold

186
Setting Web Server Access
There are two ways that you can set access to the web server. You can use either one or both together:
• Require a user ID and password to view pages on the WhatsUp Gold web site. This includes setting the pages and functions that the user can access.
• Specify an IP address or set of IP addresses that are either granted access to the web site or are denied access.
Default User Accounts for the Web Server
WhatsUp Gold provides two default user IDs for accessing the web server: Both of these default user IDs can be deleted if you wish.
• The user ID admin (which has a password of admin) has full access to WhatsUp Gold views and functions. (They can set up or change web user accounts.)
• The user ID guest (which has no password) has access to all WhatsUp Gold views but cannot change any WhatsUp Gold settings. If you do not want users to access the web server in this way, then you should disable the permissions for the guest account.
Setting Up User Accounts for the Web Server
You can add an unlimited amount of user accounts for web access to WhatsUp Gold and you can assign different levels of access to each user.
1 From the Configure menu, select Web Server and click Users to display the user access properties.
User’s GuideWhatsUp Gold
2 Select the Enable Web Security option. (Make sure it is checked.) If this option is not selected, web users can log on without specifying a user ID or password.
3 Click the Add User button.
4 The Add User dialog box appears and displays all available maps that you can assign to your user.
5 In the Username text box, enter the desired username. This is case sensitive and may contain up to 39 characters.
6 In the Password text box, enter the desired password. This is case sensitive and may contain up to 39 characters.
7 All of the maps are listed in the Available Maps column. Using your mouse, select the map(s) you want to make available to this user. You can select multiple maps by simply clicking on each map you wish to select.
NoteDefault Map is one of the maps available to the web user(s). To give the user the same rights for ALL maps (current and future), assign Default Map, and select the Map Level Security Settings you want for this user. If you wanted different settings for a certain map, then ALSO assign the map to this web user and select the Map Level Security Settings for the map. The settings for a specific map will override the default map settings (for this map only). Simply put, assigning Default Map to a web user gives them access to ALL maps (current and future) and keeps you from having to enter the same Map Level Security Settings for each and every map. If you do not want the web user to have access to ALL maps (current and future), you will not want to assign Default Map to this web user.
8 Click on the right arrow button (>) to move the selected map(s) to the Selected Maps column. The double arrow buttons (>> and <<) will move all maps back and forth between the Available Maps and Selected Maps columns (without having to select any of them).
9 After you are satisfied with the username, password, and the available maps for this user, click OK. If you want to delete a user, click on the desired user in the Users text box, and press the “delete” key on the keyboard.
Chapter 11 Working from a Web Browser 187WhatsUp Gold
188
10 Select the WhatsUp Gold web functions that you want to provide the user.
NoteFor more information about the WhatsUp Gold views and functions available from the web server, see “WhatsUp Gold Web Display” on page 192.
Configure Program. Lets the user change program settings, create a new map, load and unload maps, and create, edit, and assign notifications.
Configure Users. Lets the user add, edit, and delete web user accounts.
Configure Reports. Lets the user add, edit, and delete report notifications.
Access Tools. Lets the user access and use the Ping, Trace, Lookup and Scan tools.
Access Full Log. The user can view ALL log data within WhatsUp Gold.
NoteIf you do not want the user to view the logs of all maps (but rather specific maps), do not select this option. You can allow individual log viewing privileges on a per map basis in the Map Level Security Settings below.
Selecting Map Level Security Settings
Follow these steps:
1 Notice that your created username is shown in the Users text box.
2 Click the plus sign (+) beside the user to display all map(s) assigned to this user.
3 Click on a map and select the Map Level Security Settings you want to provide the user.
User’s GuideWhatsUp Gold

Access Host Pages. The user can click a device name (in the map page) to view a detailed summary of activity for that device. When this option is not selected, you cannot give the user access to the Configure Devices function.
Acknowledge Alerts. Lets the user acknowledge a change and stop further alerts from being triggered.
Configure Map. Lets the user change map settings, reset counters for all devices, and add and remove devices.
Configure Devices. Lets the user change host settings; reset counters for individual devices; configure service monitoring; and add, edit, and remove alerts.
Access Log. Lets the user view the log entries for this map only.
4 Individually set the Map Level Security Settings for each map assigned to the user.
5 If you want changes made from the web interface (by any web users) to be saved in the WhatsUp Gold application, select Automatically save changes to users from web interface. If this option is not turned on, any changes made from the web interface will last only for the duration of the web session.
6 Click OK to save your changes.
When a user opens the WhatsUp Gold web pages, they will be prompted to enter the logon user ID and password before they can view the pages.
NoteYou can disable access to the configuration functions for all WhatsUp Gold web users, thus overriding the settings for each individual user. To do this, from the Configure menu, select Web Server, click General, and then clear the Enable Web Configuration option.
Setting Web Access by IP Address
You can specify a list of IP addresses to be granted or denied access to the WhatsUp Gold web pages.
To deny access to a specific computer or group of computers:
1 From the Configure menu, select Web Server and click IP
Chapter 11 Working from a Web Browser 189WhatsUp Gold

190
Security to display the access properties.
2 Select Granted Access.
3 Click Add. The “Deny Access On” dialog box appears.
To deny access to a group of computers, select the Group of Computers option. In the IP Address and Subnet Mask boxes, enter the IP address and subnet mask for the group to be denied access. For example, if you enter 156.21.50.0 and a subnet mask of 255.255.255.0, all IP addresses in the range 156.21.50.1 through 156.21.1.254 will be denied access.
4 Click OK to add the IP address(es) to the list. Access will be granted to all computers except those listed.
5 In the IP Security dialog box, click OK to save the changes.
To grant access to a specific computer or group of computers:
1 In the IP Security dialog box, select Denied Access.
2 Click Add. The “Grant Access On” dialog box appears.
To grant access to a group of computers, select the Group of Computers option. In the IP Address and Subnet Mask boxes, enter the IP address and subnet mask for the group to be denied access. For example, if you enter 156.21.50.0 and a subnet mask of 255.255.255.0, all IP addresses in the range 156.21.50.1 through 156.21.50.254 will be granted access.
3 Click OK to add the IP address(es) to the list. Access will be denied to all computers except those listed.
4 In the IP Security dialog box, click OK to save the changes.
User’s GuideWhatsUp Gold
If the Enable Web Security option (in the Users dialog box) is selected, when a user logs on from a valid IP address, they are prompted to enter the logon user ID and password before they can view the specified pages.
In the IP Security dialog box, to edit a web access address, select the IP address in the list, then click Edit to display properties, and then enter any changes. To remove an address from either list, select the address and click Remove.
Logging On to the Web Server
The web server is assigned a web address that can be used to open the WhatsUp Gold web page from any browser. This web address consists of the host name of the system on which WhatsUp Gold is installed, and the web server port number. The default port number is 80.
To log on to the web server:
1 Open any browser on your network and enter your WhatsUp Gold web address in the Address (or URL:) box. For example, if your WhatsUp Gold system is named monitor1.ipswitch.com, and uses port 8081, then the web address will be:
http://monitor1.ipswitch.com:8081
NoteYou can save your WhatsUp Gold web address as a “favorite” or “bookmark” site in your browser.
After connecting, the logon dialog box appears.
2 Enter the user ID and password for your WhatsUp Gold web account. You may not have to enter a password, depending on how your WhatsUp Gold administrator set up access to the web server.
The main page (“Top View”) for the WhatsUp Gold web server appears. You can use the views and functions provided to your web user account.
Chapter 11 Working from a Web Browser 191WhatsUp Gold
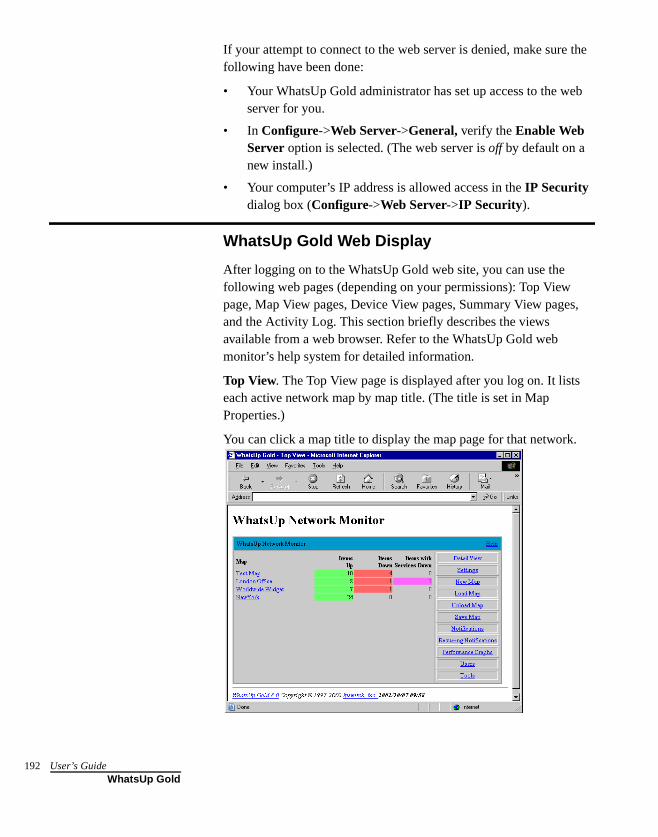
192
If your attempt to connect to the web server is denied, make sure the following have been done:
• Your WhatsUp Gold administrator has set up access to the web server for you.
• In Configure->Web Server->General, verify the Enable Web Server option is selected. (The web server is off by default on a new install.)
• Your computer’s IP address is allowed access in the IP Security dialog box (Configure->Web Server->IP Security).
WhatsUp Gold Web Display
After logging on to the WhatsUp Gold web site, you can use the following web pages (depending on your permissions): Top View page, Map View pages, Device View pages, Summary View pages, and the Activity Log. This section briefly describes the views available from a web browser. Refer to the WhatsUp Gold web monitor’s help system for detailed information.
Top View. The Top View page is displayed after you log on. It lists each active network map by map title. (The title is set in Map Properties.)
You can click a map title to display the map page for that network.
User’s GuideWhatsUp Gold

Map View. Click a map name in the Top View to display the Map View. There are two formats for displaying maps in a web browser: Graphical maps, which use the same icons and colors as maps on the console; or a Text listing of devices in a map. To view the Graphical maps, select Enable Graphical Maps in the Web Server properties, General dialog box.
The Map View will show any alerts that occur for devices in the map and will play an audible alarm (if your computer has a sound card). You can click Acknowledge to acknowledge the alert and turn off an alarm.
Text Listing view of a map. In this example, Enable Graphical Maps was NOT selected from Configure->Web Server->General.
Graphical maps view. In this example, Enable Graphical Maps WAS selected from Configure->Web Server->General.
Device View. Click any device in the list to show its Device View. The Device View lists the host name, IP address, and polling statistics for the device. The polling statistics are the same as those displayed in
Chapter 11 Working from a Web Browser 193WhatsUp Gold
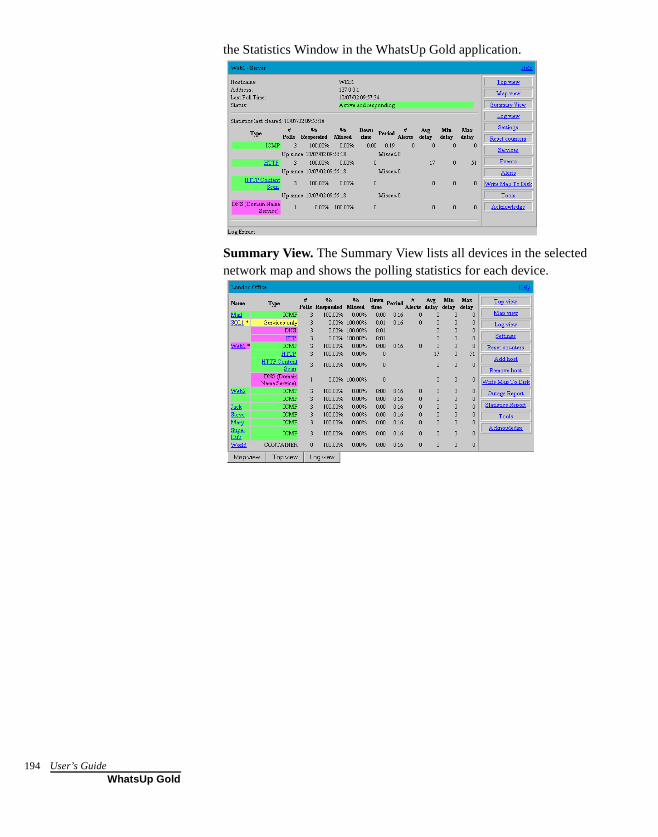
194
the Statistics Window in the WhatsUp Gold application.
Summary View. The Summary View lists all devices in the selected network map and shows the polling statistics for each device.
User’s GuideWhatsUp Gold
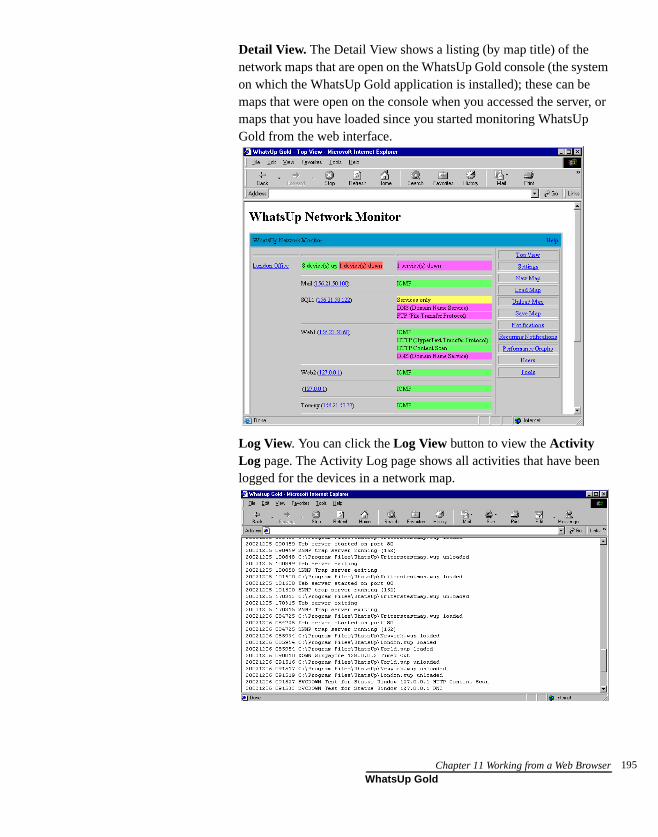
Detail View. The Detail View shows a listing (by map title) of the network maps that are open on the WhatsUp Gold console (the system on which the WhatsUp Gold application is installed); these can be maps that were open on the console when you accessed the server, or maps that you have loaded since you started monitoring WhatsUp Gold from the web interface.
Log View. You can click the Log View button to view the Activity Log page. The Activity Log page shows all activities that have been logged for the devices in a network map.
Chapter 11 Working from a Web Browser 195WhatsUp Gold
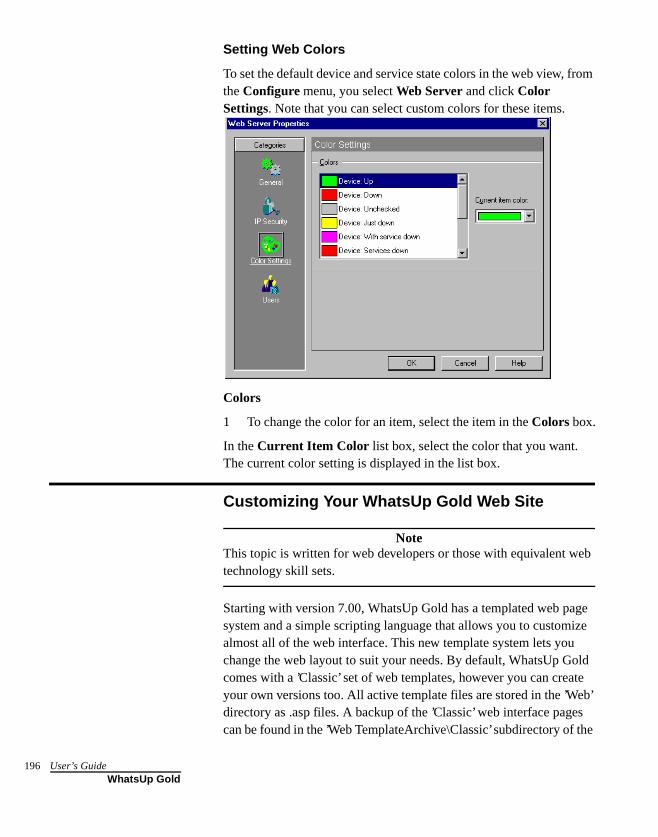
196
Setting Web Colors
To set the default device and service state colors in the web view, from the Configure menu, you select Web Server and click Color Settings. Note that you can select custom colors for these items.
Colors
1 To change the color for an item, select the item in the Colors box.
In the Current Item Color list box, select the color that you want. The current color setting is displayed in the list box.
Customizing Your WhatsUp Gold Web Site
NoteThis topic is written for web developers or those with equivalent web technology skill sets.
Starting with version 7.00, WhatsUp Gold has a templated web page system and a simple scripting language that allows you to customize almost all of the web interface. This new template system lets you change the web layout to suit your needs. By default, WhatsUp Gold comes with a ’Classic’ set of web templates, however you can create your own versions too. All active template files are stored in the ’Web’ directory as .asp files. A backup of the ’Classic’ web interface pages can be found in the ’Web TemplateArchive\Classic’ subdirectory of the
User’s GuideWhatsUp Gold
install directory. Other versions of the web interface may become available in the future, check the Ipswitch web site for the latest information. You can edit the TopView.asp web template file directly to include customizing the header and footer of the main page. For example you could include links to other web pages or company contact information. You may add additional web pages to your HTML files directory to support these custom changes.
What is a web template? A web template is a mixture of HTML and a simple scripting language. The pseudo-script code is supported by the WhatsUp Gold Web server, and can be used to provide basic functions like retrieving and modifying values.
When does the script get processed? The script tags that are embedded with the HTML are preprocessed and expanded before the actual template is sent to the web browser. For example if you used the tag: <%APPLICATION_SETTINGS% MAIN_TITLE>, then the main title “WhatsUp Gold” will appear in place of this tag in your browser.
What are some of the features of the pseudo-script code? The script code provided by WhatsUp Gold allows for rudimentary flow control. There are conditional tags, concepts of loops, string matching, and support for processing Form values. The purpose of this language is not to replace other scripting languages, but to compliment them in the WhatsUp Gold environment. It is possible to use this language in conjunction with client-side scripting languages supported by web browsers, such as JavaScript.
NoteAdditional technical information can be found on the Ipswitch web site. A web template technical reference is available on the web. Go to: http://www.ipswitch.com/support/whatsup/plugins.html#webtemplate.
Chapter 11 Working from a Web Browser 197WhatsUp Gold

198
User’s GuideWhatsUp Gold
Chapter 12: Monitoring SNMP Devices
The Simple Network Management Protocol (SNMP) is an Internet standard that allows management data on different network devices to be read and monitored by an application. You can use WhatsUp Gold to view and monitor SNMP objects on any device that implements an SNMP agent.
This chapter describes how WhatsUp Gold implements SNMP, how to view and monitor SNMP values for a networked device, and how WhatsUp Gold can receive unsolicited messages (known as traps) from an SNMP device.
SNMP Implementation in WhatsUp Gold
This section provides an overview of the SNMP monitoring functions available in WhatsUp Gold. It assumes you are familiar with the SNMP standard and Management Information Base (MIB) for SNMP objects. For background information on SNMP and the MIB, see “SNMP Overview” on page 200.
WhatsUp Gold provides limited monitoring of devices that support SNMP. WhatsUp Gold supports the current Internet standards: SNMP Version 1 and MIB II. You can make custom extensions to MIB II to add vendor-provided SNMP objects. For more information, see “Setting Up the MIB Identifiers” on page 204.
NoteWhatsUp Gold does not let you change the value of an SNMP object on a device and does not provide SNMP manager functions.
Use WhatsUp Gold to do the following types of SNMP monitoring:
• View SNMP information on a device. You can use the SNMP tool (Tools->SNMP Viewer) to view information for a device.
• Monitor specific SNMP variables on a target host. This is done from Configure->Monitors & Services, and choosing “SNMP Monitoring” as the type of service.
• Graph selected SNMP values.
Chapter 12 Monitoring SNMP Devices 199WhatsUp Gold
200
You can graph the SNMP values by using the SNMP Graphing Utility (Start->Programs->WhatsUp Gold->SNMP Graph Utility or from Tools menu, select WhatsUp Gold SNMP Graph Utility.)
• Receive traps from SNMP devices.
A trap is sent when the status of a device changes. Traps are unsolicited messages, such as a router indicating one of its interfaces went down or a printer indicating it is out of paper.
WhatsUp Gold records traps on the Quick Status->Log of a device (found by right-clicking the device) and in the Activity Log (provided Enable Logging is selected on Alerts in device properties). You can also set WhatsUp Gold to send a notification (via Beeper, Group, Pager, SMTPMail, Sound, WinPopup, or Voice) when a trap is received.
When a trap is recorded for a device, that device’s display name will be highlighted on the network map (as happens with any change in status). You can then check the Log dialog box in the device properties for the trap information.
• Monitor whether SNMP is running on a device.
You can select SNMP on the device properties Services and monitor it just as you can monitor any service. Again, this only checks to see if SNMP is running on the device; no SNMP management is involved.
The following sections describe how to use each of these capabilities.
SNMP Overview
The Simple Network Management Protocol (SNMP) defines a method by which a remote user can view or change management information for a networked device (a host, gateway, server, etc.). A monitoring or management application on the remote user’s system uses the protocol to communicate with an SNMP agent on the device to access the management data.
The SNMP agent on each device can provide information about the device’s network configuration and operations, such as the device’s network interfaces, routing tables, IP packets sent and received, and IP packets lost. This information, called SNMP objects, is stored in a
User’s GuideWhatsUp Gold
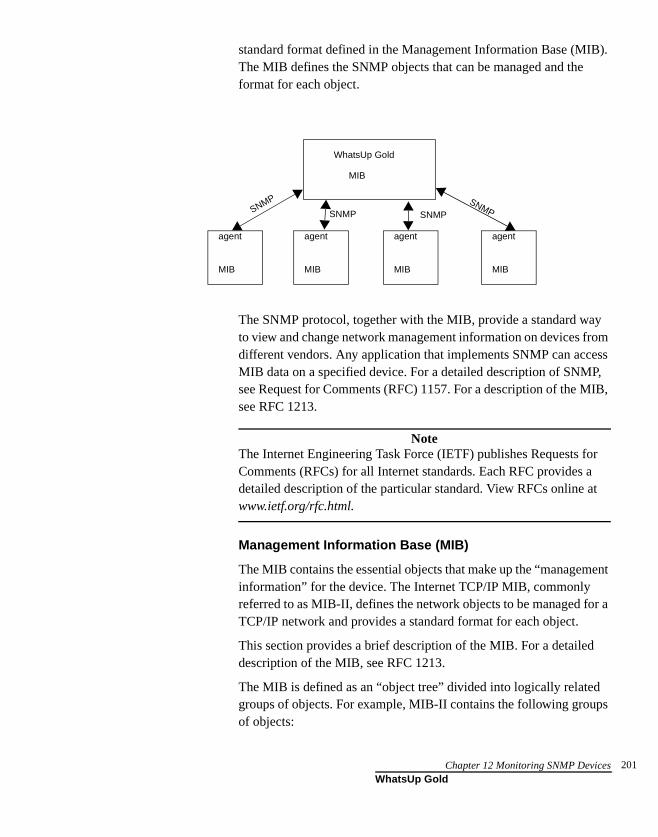
standard format defined in the Management Information Base (MIB). The MIB defines the SNMP objects that can be managed and the format for each object.
The SNMP protocol, together with the MIB, provide a standard way to view and change network management information on devices from different vendors. Any application that implements SNMP can access MIB data on a specified device. For a detailed description of SNMP, see Request for Comments (RFC) 1157. For a description of the MIB, see RFC 1213.
NoteThe Internet Engineering Task Force (IETF) publishes Requests for Comments (RFCs) for all Internet standards. Each RFC provides a detailed description of the particular standard. View RFCs online at www.ietf.org/rfc.html.
Management Information Base (MIB)
The MIB contains the essential objects that make up the “management information” for the device. The Internet TCP/IP MIB, commonly referred to as MIB-II, defines the network objects to be managed for a TCP/IP network and provides a standard format for each object.
This section provides a brief description of the MIB. For a detailed description of the MIB, see RFC 1213.
The MIB is defined as an “object tree” divided into logically related groups of objects. For example, MIB-II contains the following groups of objects:
WhatsUp Gold
MIB
MIB
agent
MIB
agent
MIB
agent
MIB
agent
SNMP SNMPSNMP SNMP
Chapter 12 Monitoring SNMP Devices 201WhatsUp Gold
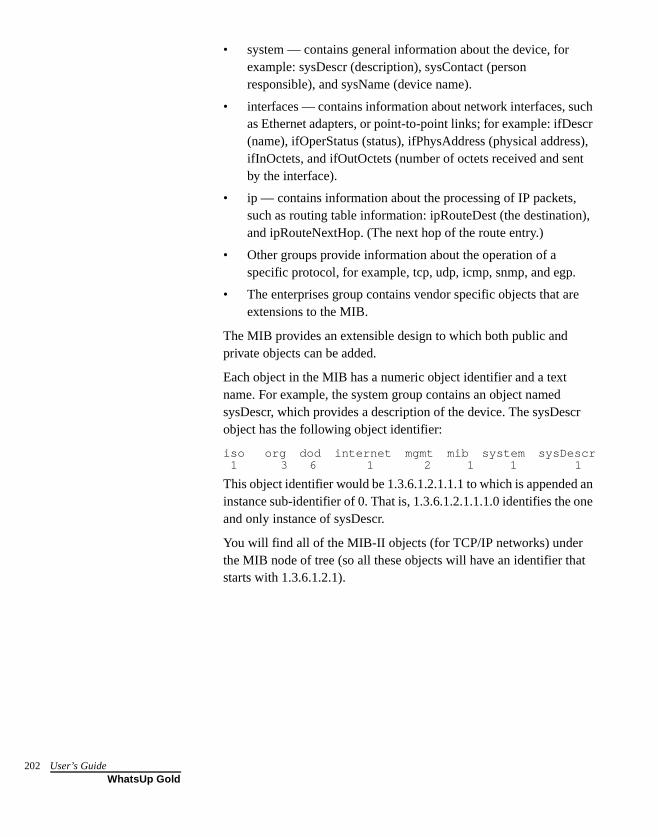
202
• system — contains general information about the device, for example: sysDescr (description), sysContact (person responsible), and sysName (device name).
• interfaces — contains information about network interfaces, such as Ethernet adapters, or point-to-point links; for example: ifDescr (name), ifOperStatus (status), ifPhysAddress (physical address), ifInOctets, and ifOutOctets (number of octets received and sent by the interface).
• ip — contains information about the processing of IP packets, such as routing table information: ipRouteDest (the destination), and ipRouteNextHop. (The next hop of the route entry.)
• Other groups provide information about the operation of a specific protocol, for example, tcp, udp, icmp, snmp, and egp.
• The enterprises group contains vendor specific objects that are extensions to the MIB.
The MIB provides an extensible design to which both public and private objects can be added.
Each object in the MIB has a numeric object identifier and a text name. For example, the system group contains an object named sysDescr, which provides a description of the device. The sysDescr object has the following object identifier:
iso org dod internet mgmt mib system sysDescr 1 3 6 1 2 1 1 1
This object identifier would be 1.3.6.1.2.1.1.1 to which is appended an instance sub-identifier of 0. That is, 1.3.6.1.2.1.1.1.0 identifies the one and only instance of sysDescr.
You will find all of the MIB-II objects (for TCP/IP networks) under the MIB node of tree (so all these objects will have an identifier that starts with 1.3.6.1.2.1).
User’s GuideWhatsUp Gold

Security
Limited security is provided for access to a device’s data by use of a community profile. The network administrator can assign a community name within the SNMP agent, or manager, on a device. The network management application can access data on the device only if it knows the community name.
Most SNMP agent software (on the device) also let you specify the IP addresses from which the agent will accept requests.
SNMP Agent or Manager
SNMP agent or manager software must be installed and enabled on any devices from which you want to receive SNMP information. Windows NT, Windows 2000, 98, ME, and XP provide an SNMP agent. Network systems manufacturers provide an SNMP agent for their routers, hubs, and other network boxes.
SNMP Operations
An SNMP application can read values for the SNMP objects (for monitoring of devices) and some applications can also change the variables (to provide remote management of devices). Basic SNMP operations include:
• Get — gets a specified SNMP object for a device.
• Get next — gets the next object in a table or list.
• Set — sets the value of an SNMP object on a device.
• Trap — sends a message about an event (that occurs on the device) to the management application.
The SNMP agent software on a device listens on port 161 for requests from an SNMP application. The SNMP agent and application communicate using UDP. Trap messages, which are unsolicited messages from a device, are sent to port 162.
If an SNMP application makes a request for information about a device but an SNMP agent is not enabled on the device, the UDP packets are discarded.
Chapter 12 Monitoring SNMP Devices 203WhatsUp Gold

204
SNMP Traps
The SNMP standard provides a limited number of unsolicited messages (called traps) that are sent from a device to an SNMP application. These messages can be sent by the SNMP agent on the device to notify an SNMP application of a change in status.
There are six standard traps which you can receive from any SNMP agent and there can also be enterprise specific traps for a device, which are defined by the device vendor.
Traps are numbered as follows:
Setting Up the MIB Identifiers
WhatsUp Gold uses two reference files (mib.txt and traps.txt) to refer to MIB identifiers. The reference files are used by WhatsUp Gold to display the MIB object tree when you browse for an object name/identifier using the SNMP tool.
Trap # Trap type Description
0 Cold start The device is rebooting itself and may change its configuration or the SNMP agent’s configuration.
1 Warm start The device is rebooting itself but neither the device’s nor the SNMP agent’s configuration will change.
2 Link down One of the communication links for the device is down.
3 Link up One of the communication links for the device is back up.
4 Authorization failure
The device has received a protocol message that is not properly authenticated.
5 EGP neighbor loss
An EGP neighbor for which the device is an EGP peer is down and the peer relationship no longer exists.
6 Enterprise specific traps
The SNMP specification lets vendors define enterprise specific traps, for example a trap that occurs on a particular vendor’s router. Enterprise specific traps should be added to the MIB on the device and on the management application.
User’s GuideWhatsUp Gold
As shipped with WhatsUp Gold, these reference files contain the SNMP objects defined in the MIB-II standard, including the six standard SNMP traps.
If your network includes devices from a vendor who also provides RFC-compliant MIB files, you can update these reference files to include the MIB and trap information from the vendor’s files; to do this, you run the MIB Extractor.
The WhatsUp Gold “MIB Extractor” (a command line program named mibextra.exe) updates the MIB and trap information that WhatsUp Gold references when it converts SNMP object and trap identifiers into object and trap names, and vice versa.
To run the MIB extractor:
1 Collect your vendor-provided MIB files into a single directory
2 At the command prompt, enter:
mibextra directoryname\filename
where filename is the name of the vendor-provided file.
The MIB Extractor reads the current contents of mib.txt and traps.txt, processes the vendor-provided MIB files, and rewrites mib.txt and traps.txt.
NoteIf the MIB Extractor returns a “failed to open file” error, the MIB file you are using has dependencies. These “dependency” files are listed in the Import section of the vendor's mib file. You should check all of the MIB files for dependencies.
Chapter 12 Monitoring SNMP Devices 205WhatsUp Gold
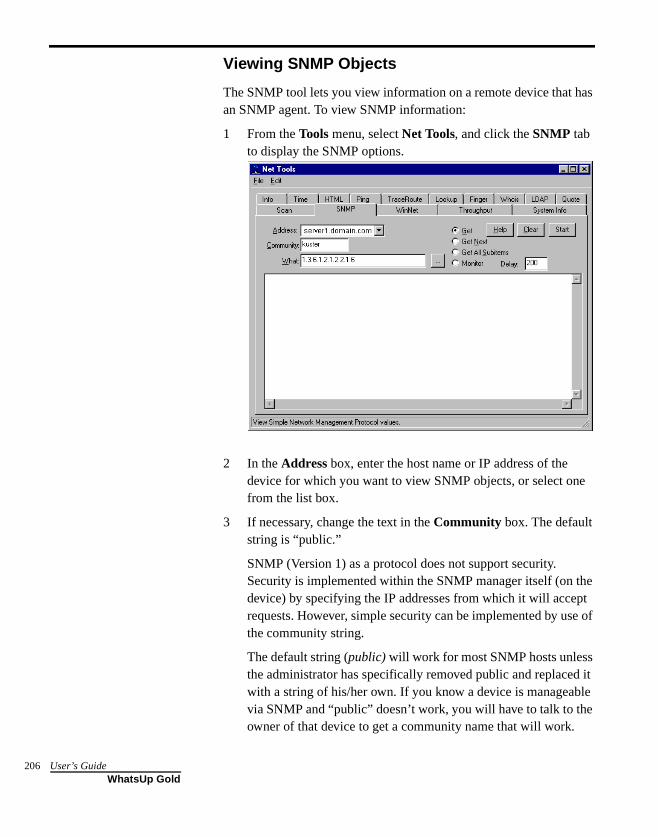
206
Viewing SNMP Objects
The SNMP tool lets you view information on a remote device that has an SNMP agent. To view SNMP information:
1 From the Tools menu, select Net Tools, and click the SNMP tab to display the SNMP options.
2 In the Address box, enter the host name or IP address of the device for which you want to view SNMP objects, or select one from the list box.
3 If necessary, change the text in the Community box. The default string is “public.”
SNMP (Version 1) as a protocol does not support security. Security is implemented within the SNMP manager itself (on the device) by specifying the IP addresses from which it will accept requests. However, simple security can be implemented by use of the community string.
The default string (public) will work for most SNMP hosts unless the administrator has specifically removed public and replaced it with a string of his/her own. If you know a device is manageable via SNMP and “public” doesn’t work, you will have to talk to the owner of that device to get a community name that will work.
User’s GuideWhatsUp Gold

4 In the What box, type an SNMP object name or identifier to retrieve, or click the button next to the What box to displays the MIB tree view of the SNMP objects.
Each SNMP object has a name and numeric identifier. For example, in the “system” group, the network object named SysDescr with object identifier 1.3.6.1.2.1.1.1 contains a description of the device.
An object can have one or more instances, depending on the configuration of the monitored device. For example, a device can have two network adapters, in which case there will be two instances of the ifPhysAddress object, which has object identifier 1.3.6.1.2.1.2.2.1.6. In this case, you need to specify an instance number at the end of the object identifier (such as 1.3.6.1.2.1.2.2.1.6.1). If you do not specify an instance number, it defaults to zero. For more information on SNMP objects, see “SNMP Overview” on page 200.
NoteEntering *sysInfo in the What box returns most of the “system” identification objects.
Chapter 12 Monitoring SNMP Devices 207WhatsUp Gold
208
5 Select one of the option buttons:
Get. If you know the object name or identifier, you can enter it in the What box and use the Get option. For example, on a Windows NT system, a Get request for ifPhysAddress.2 returns the network adapter address. If it is a wrong name or number, you will not get any information back. If there is more than one instance of the object, you need to enter the specific instance.
Get Next. Use Get Next to get the next object instance from a table or list within the SNMP agent on the device. You can determine the values to use in the What box by what is returned using Get Next. You should use this option with most of the items that are in the MIB.
Get All Subitems. This option returns any subitems of the named item.
Monitor. Starts the SNMP Graphing Utility and graphs the network object specified in the What box. For more information on graphing, see “Graphing SNMP Values” on page 218.
6 (Optional) Change the Delay setting from the default of 1000 milliseconds. This value tells the SNMP tool how long to wait for a response to an SNMP request before reporting a timeout.
7 Click Start to retrieve the SNMP information. Any information found for the object is shown in the results window.
SNMP Viewer
The SNMP Viewer lets you quickly view the status of interfaces on an SNMP-manageable device. In the map, a device icon that has a star on the upper-right corner is an SNMP-manageable device.
To view interfaces for an SNMP manageable device:
• Right-click on the device in a map, then select SNMP View from the pop-up menu.
User’s GuideWhatsUp Gold
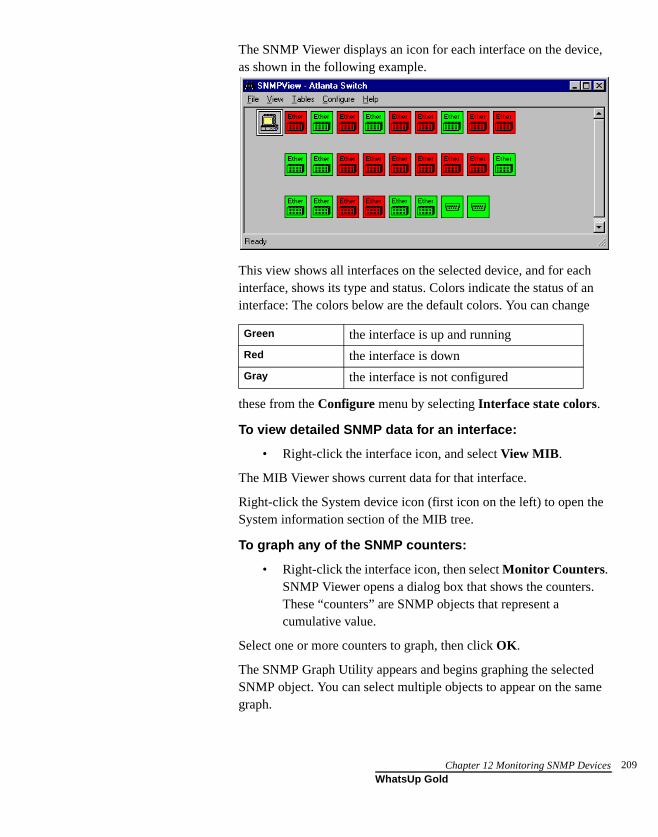
The SNMP Viewer displays an icon for each interface on the device, as shown in the following example.
This view shows all interfaces on the selected device, and for each interface, shows its type and status. Colors indicate the status of an interface: The colors below are the default colors. You can change
these from the Configure menu by selecting Interface state colors.
To view detailed SNMP data for an interface:
• Right-click the interface icon, and select View MIB.
The MIB Viewer shows current data for that interface.
Right-click the System device icon (first icon on the left) to open the System information section of the MIB tree.
To graph any of the SNMP counters:
• Right-click the interface icon, then select Monitor Counters. SNMP Viewer opens a dialog box that shows the counters. These “counters” are SNMP objects that represent a cumulative value.
Select one or more counters to graph, then click OK.
The SNMP Graph Utility appears and begins graphing the selected SNMP object. You can select multiple objects to appear on the same graph.
Green the interface is up and running
Red the interface is down
Gray the interface is not configured
Chapter 12 Monitoring SNMP Devices 209WhatsUp Gold
210
• From the MIB Viewer, right-click on an SNMP counter, then select Monitor.
To view other SNMP objects for the selected device:
• You can use the MIB Viewer to “walk” the MIB tree and view any SNMP object for the device.
• From the Table menu, you can view the device's MIB data for the following categories. Each of these views are continuously updated.
ARP Table - see “ARP Table” on page 212
Address Table - see “Address Table” on page 213
Route Table - see “Route Table” on page 214
Interface Table - see “Interface Table” on page 215
To view SNMP objects for other devices:
• From the Tools menu, select SNMP Viewer, then enter the information described below.
• In the SNMP Viewer, from the File menu, select New, then enter the information described below.
• Right-click a device in the map, then select SNMP View from the pop-up menu. The SNMP Viewer shows the interfaces for that device.
Device SNMP Info
You can use the SNMP Viewer tool to view and monitor SNMP objects for a device. There are three ways that you can select the device for which you want to see SNMP information:
• From the Tools menu, select SNMP Viewer, then enter the information described below.
• In the SNMP Viewer, from the File menu, select New, then enter the information described below.
• Right-click a device in the map, then select SNMP View from the pop-up menu. The SNMP Viewer shows the interfaces for that device.
Host Name. Enter the host name or IP address of a device.
User’s GuideWhatsUp Gold
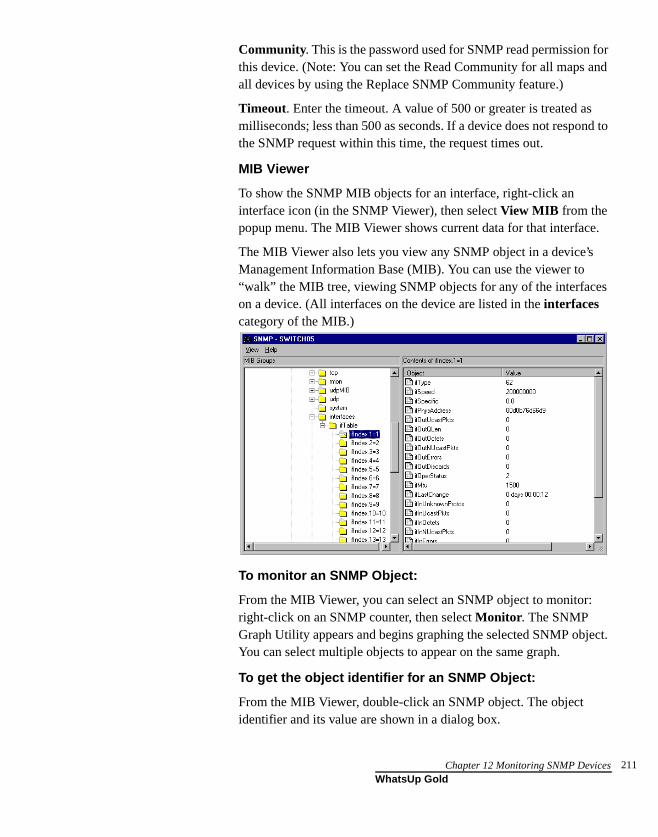
Community. This is the password used for SNMP read permission for this device. (Note: You can set the Read Community for all maps and all devices by using the Replace SNMP Community feature.)
Timeout. Enter the timeout. A value of 500 or greater is treated as milliseconds; less than 500 as seconds. If a device does not respond to the SNMP request within this time, the request times out.
MIB Viewer
To show the SNMP MIB objects for an interface, right-click an interface icon (in the SNMP Viewer), then select View MIB from the popup menu. The MIB Viewer shows current data for that interface.
The MIB Viewer also lets you view any SNMP object in a device’s Management Information Base (MIB). You can use the viewer to “walk” the MIB tree, viewing SNMP objects for any of the interfaces on a device. (All interfaces on the device are listed in the interfaces category of the MIB.)
To monitor an SNMP Object:
From the MIB Viewer, you can select an SNMP object to monitor: right-click on an SNMP counter, then select Monitor. The SNMP Graph Utility appears and begins graphing the selected SNMP object. You can select multiple objects to appear on the same graph.
To get the object identifier for an SNMP Object:
From the MIB Viewer, double-click an SNMP object. The object identifier and its value are shown in a dialog box.
Chapter 12 Monitoring SNMP Devices 211WhatsUp Gold
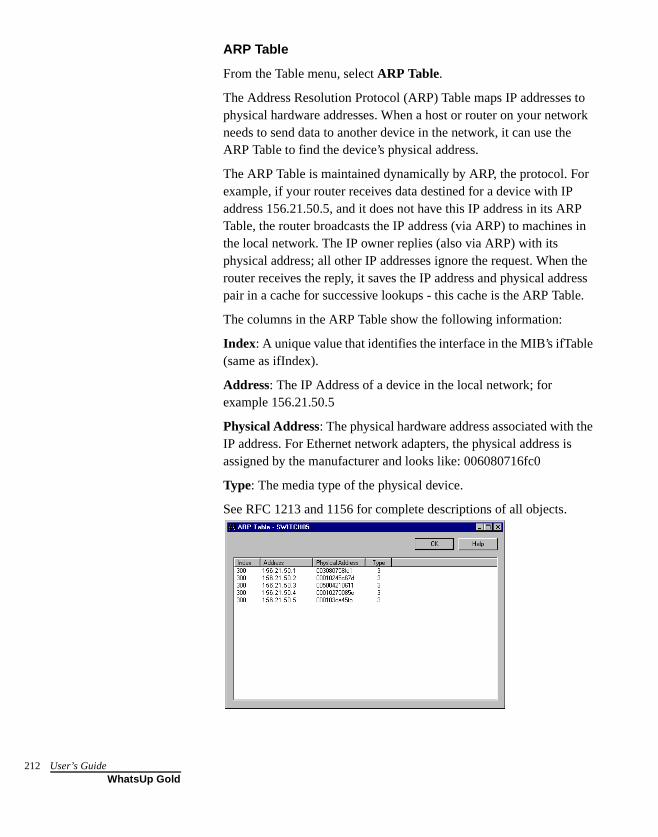
212
ARP Table
From the Table menu, select ARP Table.
The Address Resolution Protocol (ARP) Table maps IP addresses to physical hardware addresses. When a host or router on your network needs to send data to another device in the network, it can use the ARP Table to find the device’s physical address.
The ARP Table is maintained dynamically by ARP, the protocol. For example, if your router receives data destined for a device with IP address 156.21.50.5, and it does not have this IP address in its ARP Table, the router broadcasts the IP address (via ARP) to machines in the local network. The IP owner replies (also via ARP) with its physical address; all other IP addresses ignore the request. When the router receives the reply, it saves the IP address and physical address pair in a cache for successive lookups - this cache is the ARP Table.
The columns in the ARP Table show the following information:
Index: A unique value that identifies the interface in the MIB’s ifTable (same as ifIndex).
Address: The IP Address of a device in the local network; for example 156.21.50.5
Physical Address: The physical hardware address associated with the IP address. For Ethernet network adapters, the physical address is assigned by the manufacturer and looks like: 006080716fc0
Type: The media type of the physical device.
See RFC 1213 and 1156 for complete descriptions of all objects.
User’s GuideWhatsUp Gold
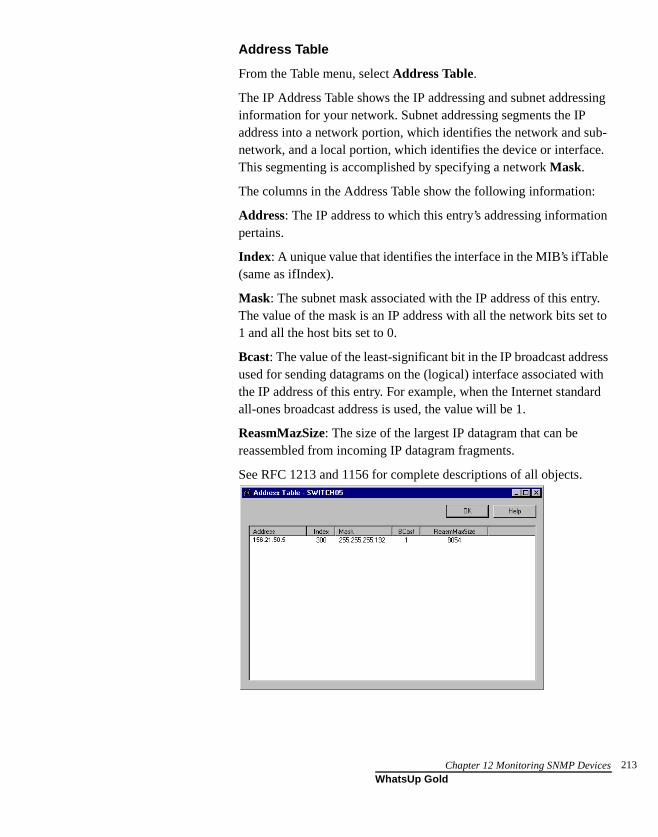
Address Table
From the Table menu, select Address Table.
The IP Address Table shows the IP addressing and subnet addressing information for your network. Subnet addressing segments the IP address into a network portion, which identifies the network and sub-network, and a local portion, which identifies the device or interface. This segmenting is accomplished by specifying a network Mask.
The columns in the Address Table show the following information:
Address: The IP address to which this entry’s addressing information pertains.
Index: A unique value that identifies the interface in the MIB’s ifTable (same as ifIndex).
Mask: The subnet mask associated with the IP address of this entry. The value of the mask is an IP address with all the network bits set to 1 and all the host bits set to 0.
Bcast: The value of the least-significant bit in the IP broadcast address used for sending datagrams on the (logical) interface associated with the IP address of this entry. For example, when the Internet standard all-ones broadcast address is used, the value will be 1.
ReasmMazSize: The size of the largest IP datagram that can be reassembled from incoming IP datagram fragments.
See RFC 1213 and 1156 for complete descriptions of all objects.
Chapter 12 Monitoring SNMP Devices 213WhatsUp Gold
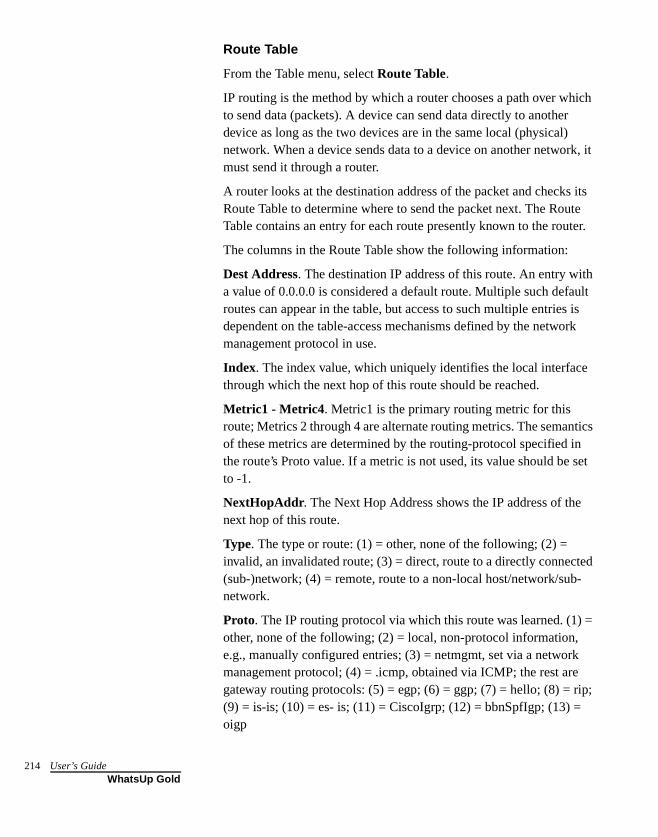
214
Route Table
From the Table menu, select Route Table.
IP routing is the method by which a router chooses a path over which to send data (packets). A device can send data directly to another device as long as the two devices are in the same local (physical) network. When a device sends data to a device on another network, it must send it through a router.
A router looks at the destination address of the packet and checks its Route Table to determine where to send the packet next. The Route Table contains an entry for each route presently known to the router.
The columns in the Route Table show the following information:
Dest Address. The destination IP address of this route. An entry with a value of 0.0.0.0 is considered a default route. Multiple such default routes can appear in the table, but access to such multiple entries is dependent on the table-access mechanisms defined by the network management protocol in use.
Index. The index value, which uniquely identifies the local interface through which the next hop of this route should be reached.
Metric1 - Metric4. Metric1 is the primary routing metric for this route; Metrics 2 through 4 are alternate routing metrics. The semantics of these metrics are determined by the routing-protocol specified in the route’s Proto value. If a metric is not used, its value should be set to -1.
NextHopAddr. The Next Hop Address shows the IP address of the next hop of this route.
Type. The type or route: (1) = other, none of the following; (2) = invalid, an invalidated route; (3) = direct, route to a directly connected (sub-)network; (4) = remote, route to a non-local host/network/sub-network.
Proto. The IP routing protocol via which this route was learned. (1) = other, none of the following; (2) = local, non-protocol information, e.g., manually configured entries; (3) = netmgmt, set via a network management protocol; (4) = .icmp, obtained via ICMP; the rest are gateway routing protocols: (5) = egp; (6) = ggp; (7) = hello; (8) = rip; (9) = is-is; (10) = es- is; (11) = CiscoIgrp; (12) = bbnSpfIgp; (13) = oigp
User’s GuideWhatsUp Gold
Inclusion of values for gateway routing protocols is not intended to imply that hosts should support those protocols.
Age. The number of seconds since this route was last updated or otherwise determined to be correct. Note that to determine whether the Age is “too old”, you need to know what is appropriate for the routing protocol used.
Mask. The subnet mask associated with the IP address of this entry. The value of the mask is an IP address with all the network bits set to 1 and all the host bits set to 0.
Metric5. Alternate routing metric.
Info. Routing protocol information; set to zero by default.
See RFC 1213 and 1156 for complete descriptions of all objects.
Interface Table
From the Table menu, select Interface Table.
The Interface Table lists the network interfaces (regardless of their current state) on which the selected device can send/receive IP datagrams. For each interface, the table shows descriptive data and current values of the counters (for example, inOctets, outOctets) used to assess the performance of the interface.
The columns in the Interface Table show the following information:
Index: A unique value that identifies the interface in the MIB's ifTable (same as ifIndex).
Description: Can include the name of the manufacturer, the product name and the version of the hardware interface.
Chapter 12 Monitoring SNMP Devices 215WhatsUp Gold
216
Interface Type: The type of interface, distinguished according to the physical/link/network protocol(s) immediately “below” IP in the protocol stack.
Address: The interface's address at the protocol layer immediately “below” IP in the protocol stack. For interfaces that do not have such an address (e.g., a serial line), this object should contain an octet string of zero length.
Admin Status: The desired state of the interface: Up - ready to pass packets; Down; or Testing - in some testing state.
Operator Status: The current state of the interface. Up - ready to pass packets; Down; or Testing - in some testing state.
MTU: The size of the largest IP datagram that can be sent/received on the interface, specified in octets.
Speed: An estimate of the interface's current bandwidth in bits per second. For interfaces that do not vary in bandwidth, or for those where no accurate estimation can be made, this object should contain the nominal bandwidth.
Last Change: The value of sysUpTime at the time the interface entered its current operational state. If the current state was entered prior to the last re-initialization of the local network management subsystem, then this object contains a zero value.
InUCastPkts: The number of (subnet) unicast packets delivered to a higher-layer protocol.
InUNCastPkts: The number of non-unicast (i.e., subnet broadcast or subnet multicast) packets delivered to a higher-layer protocol.
InErrors: The number of inbound packets that contained errors preventing them from being deliverable to a higher-layer protocol.
InDiscards: The number of inbound packets which were chosen to be discarded even though no errors had been detected to prevent their being deliverable to a higher-layer protocol. One possible reason for discarding such a packet could be to free up buffer space.
Unknown Protos: The number of packets received via the interface which were discarded because of an unknown or unsupported protocol.
User’s GuideWhatsUp Gold
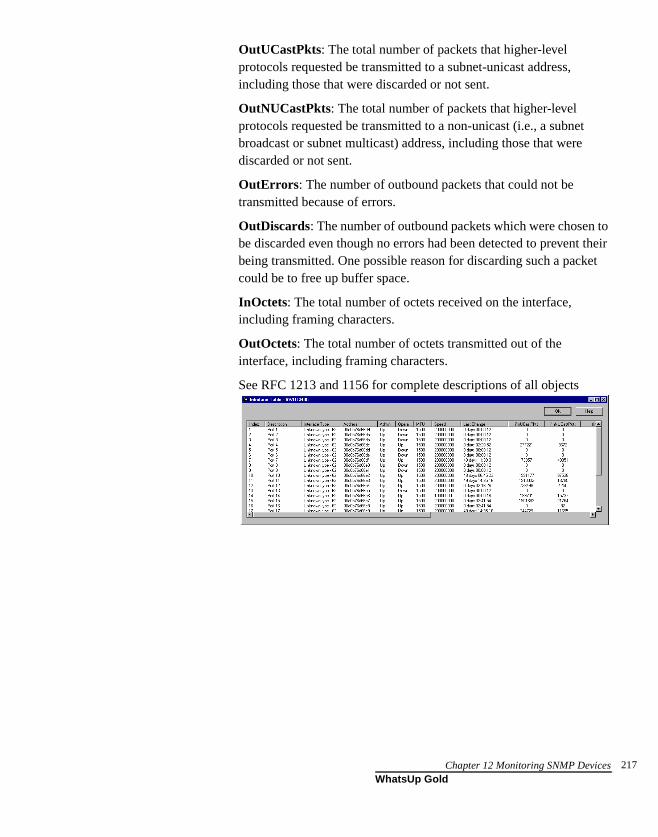
OutUCastPkts: The total number of packets that higher-level protocols requested be transmitted to a subnet-unicast address, including those that were discarded or not sent.
OutNUCastPkts: The total number of packets that higher-level protocols requested be transmitted to a non-unicast (i.e., a subnet broadcast or subnet multicast) address, including those that were discarded or not sent.
OutErrors: The number of outbound packets that could not be transmitted because of errors.
OutDiscards: The number of outbound packets which were chosen to be discarded even though no errors had been detected to prevent their being transmitted. One possible reason for discarding such a packet could be to free up buffer space.
InOctets: The total number of octets received on the interface, including framing characters.
OutOctets: The total number of octets transmitted out of the interface, including framing characters.
See RFC 1213 and 1156 for complete descriptions of all objects
Chapter 12 Monitoring SNMP Devices 217WhatsUp Gold
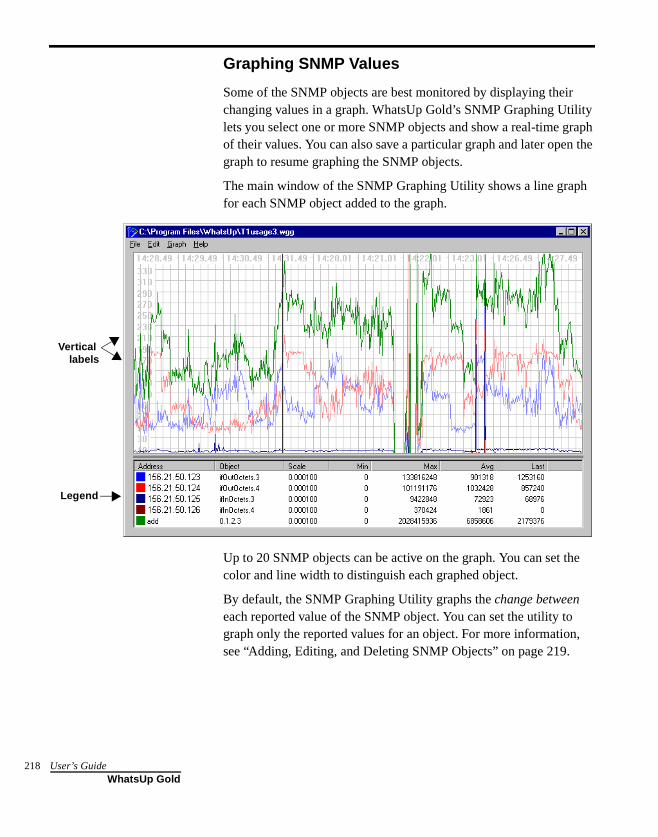
218
Graphing SNMP Values
Some of the SNMP objects are best monitored by displaying their changing values in a graph. WhatsUp Gold’s SNMP Graphing Utility lets you select one or more SNMP objects and show a real-time graph of their values. You can also save a particular graph and later open the graph to resume graphing the SNMP objects.
The main window of the SNMP Graphing Utility shows a line graph for each SNMP object added to the graph.
Up to 20 SNMP objects can be active on the graph. You can set the color and line width to distinguish each graphed object.
By default, the SNMP Graphing Utility graphs the change between each reported value of the SNMP object. You can set the utility to graph only the reported values for an object. For more information, see “Adding, Editing, and Deleting SNMP Objects” on page 219.
Vertical
Legend
labels
User’s GuideWhatsUp Gold
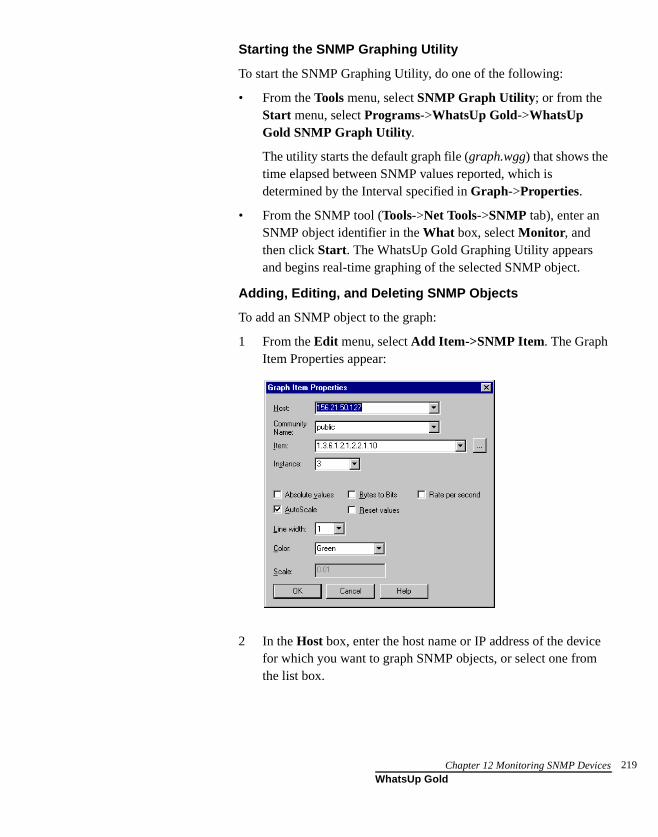
Starting the SNMP Graphing Utility
To start the SNMP Graphing Utility, do one of the following:
• From the Tools menu, select SNMP Graph Utility; or from the Start menu, select Programs->WhatsUp Gold->WhatsUp Gold SNMP Graph Utility.
The utility starts the default graph file (graph.wgg) that shows the time elapsed between SNMP values reported, which is determined by the Interval specified in Graph->Properties.
• From the SNMP tool (Tools->Net Tools->SNMP tab), enter an SNMP object identifier in the What box, select Monitor, and then click Start. The WhatsUp Gold Graphing Utility appears and begins real-time graphing of the selected SNMP object.
Adding, Editing, and Deleting SNMP Objects
To add an SNMP object to the graph:
1 From the Edit menu, select Add Item->SNMP Item. The Graph Item Properties appear:
2 In the Host box, enter the host name or IP address of the device for which you want to graph SNMP objects, or select one from the list box.
Chapter 12 Monitoring SNMP Devices 219WhatsUp Gold
220
3 If necessary, change the string in the Community Name box. The default string is “public.” The default (public) will work for most SNMP hosts unless the administrator has specifically removed “public” and replaced it with a string of their own. If you know a device is manageable via SNMP and public doesn’t work, you will have to talk to the owner of that device to get a community name that will work.
4 Enter the Item and Instance numbers to specify the SNMP object that you want to graph. (Use the Browse button to the right of the Item box to view the MIB tree and select an object. When you select an object in the MIB tree, its object identifier is entered in the Item box.)
For background information on item and instance numbers, see “SNMP Overview” on page 200. To customize the MIB tree to include vendor-provided objects that are specific to your enterprise, see “Setting Up the MIB Identifiers” on page 204.
5 Set the item graphing options:
Absolute values. When selected, graphs the reported values of an SNMP object rather than graphing the change between the last reported value and the current value (default method). You probably want to turn off Absolute values when graphing a counter, such as ifOutOctets; otherwise, the graphed values may be difficult to read.
AutoScale. When selected, the graph scale for the SNMP object is determined by the graphing utility. This is a relative scale that is calculated to make the graph fit into the vertical scale. If you turn off this option, the Scale option becomes active and you can enter a value to scale the graph.
Bytes to bits. When selected, multiplies the value reported for the SNMP object by 8 to approximate the count in bits. This option can be used with SNMP objects that are counters, for example if you want to know the baud rate while monitoring a T1 router port, you want (ifOutOctets * 8) to give you a value close to the real baud rate.
User’s GuideWhatsUp Gold
Reset values. When selected, clears the values for the selected SNMP object when you exit the dialog box. You can clear the values for all SNMP objects on the graph by selecting Clear from the Edit menu.
Line width. Sets the width of the line that represents the selected SNMP object.
Color. Sets the color of the line that represents the selected SNMP object.
Scale. When AutoScale is turned off, you can enter a fixed value in this text box to determine the scale of the graph. You may want to try different values in this box until you find a scale that is useful.
Rate per second. When selected, calculates the average change per second in the values reported for the SNMP object, and then graphs the result. To calculate this average, it takes the difference between the latest reported value and the previously reported value, then divides by the number of seconds between reported values. This option is useful when the graph Interval (in Graph Options) is different than one second. You cannot use this option with the Absolute values option.
6 Click OK to add the SNMP object to the graph.
Chapter 12 Monitoring SNMP Devices 221WhatsUp Gold
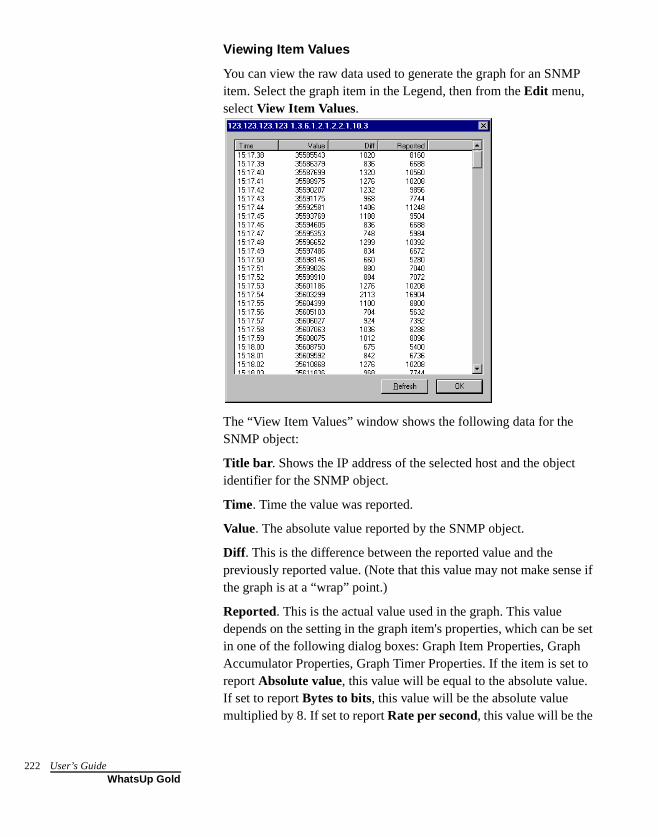
222
Viewing Item Values
You can view the raw data used to generate the graph for an SNMP item. Select the graph item in the Legend, then from the Edit menu, select View Item Values.
The “View Item Values” window shows the following data for the SNMP object:
Title bar. Shows the IP address of the selected host and the object identifier for the SNMP object.
Time. Time the value was reported.
Value. The absolute value reported by the SNMP object.
Diff. This is the difference between the reported value and the previously reported value. (Note that this value may not make sense if the graph is at a “wrap” point.)
Reported. This is the actual value used in the graph. This value depends on the setting in the graph item's properties, which can be set in one of the following dialog boxes: Graph Item Properties, Graph Accumulator Properties, Graph Timer Properties. If the item is set to report Absolute value, this value will be equal to the absolute value. If set to report Bytes to bits, this value will be the absolute value multiplied by 8. If set to report Rate per second, this value will be the
User’s GuideWhatsUp Gold
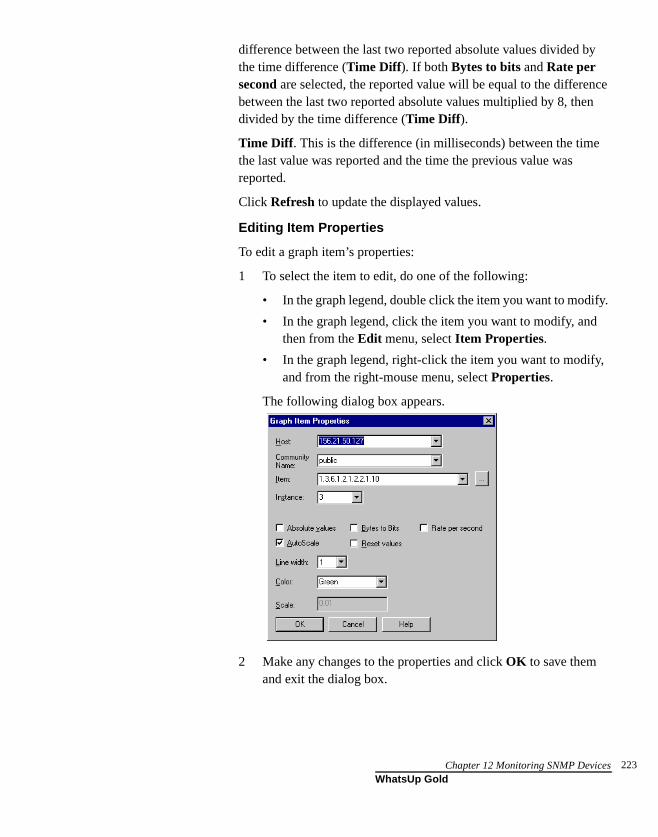
difference between the last two reported absolute values divided by the time difference (Time Diff). If both Bytes to bits and Rate per second are selected, the reported value will be equal to the difference between the last two reported absolute values multiplied by 8, then divided by the time difference (Time Diff).
Time Diff. This is the difference (in milliseconds) between the time the last value was reported and the time the previous value was reported.
Click Refresh to update the displayed values.
Editing Item Properties
To edit a graph item’s properties:
1 To select the item to edit, do one of the following:
• In the graph legend, double click the item you want to modify.
• In the graph legend, click the item you want to modify, and then from the Edit menu, select Item Properties.
• In the graph legend, right-click the item you want to modify, and from the right-mouse menu, select Properties.
The following dialog box appears.
2 Make any changes to the properties and click OK to save them and exit the dialog box.
Chapter 12 Monitoring SNMP Devices 223WhatsUp Gold
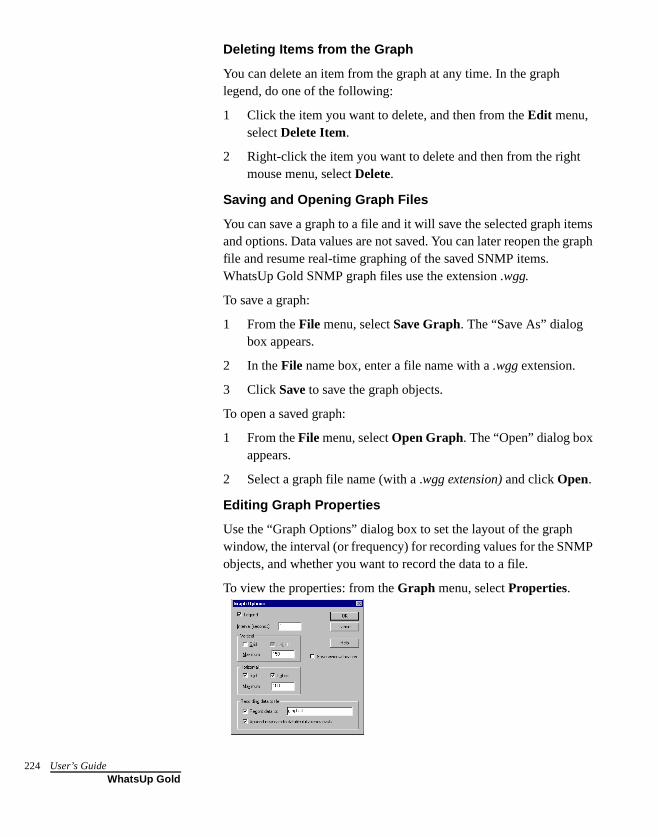
224
Deleting Items from the Graph
You can delete an item from the graph at any time. In the graph legend, do one of the following:
1 Click the item you want to delete, and then from the Edit menu, select Delete Item.
2 Right-click the item you want to delete and then from the right mouse menu, select Delete.
Saving and Opening Graph Files
You can save a graph to a file and it will save the selected graph items and options. Data values are not saved. You can later reopen the graph file and resume real-time graphing of the saved SNMP items. WhatsUp Gold SNMP graph files use the extension .wgg.
To save a graph:
1 From the File menu, select Save Graph. The “Save As” dialog box appears.
2 In the File name box, enter a file name with a .wgg extension.
3 Click Save to save the graph objects.
To open a saved graph:
1 From the File menu, select Open Graph. The “Open” dialog box appears.
2 Select a graph file name (with a .wgg extension) and click Open.
Editing Graph Properties
Use the “Graph Options” dialog box to set the layout of the graph window, the interval (or frequency) for recording values for the SNMP objects, and whether you want to record the data to a file.
To view the properties: from the Graph menu, select Properties.
User’s GuideWhatsUp Gold
Legend. When selected, the Legend appears at the bottom of the graph window. The Legend displays each graphed SNMP object and its associated device, as well as any accumulator items.
Interval (seconds). Sets the time interval at which the graph records values.
Vertical (y-axis). When Grid is selected, displays lines across the graph to help you read the vertical graph. When Labels is selected, values are displayed next to the y-axis. The Maximum determines the highest value on the y-axis scale, as well as the internal values. This value cannot exceed 1500.
Horizontal (x-axis). When Grid is selected, displays lines across the graph to help you read the x-axis values. When Labels is selected, values are displayed next to the x-axis. The Maximum determines the highest value on the x-axis, as well as the internal values. This value cannot exceed 1500.
Save Window Location. When selected, saves the position of the Graph Window so that it always opens in the same location on your screen.
Record data to. If you want to save graph data, select this box and enter a file name. The file is saved in the WhatsUp Gold directory. The file format is tab-delimited and can be imported to a spreadsheet application.
Append new data to datafile if it already exists. By default, this is selected. Whenever the graph is running, the SNMP values will be appended to the existing file. If this is NOT selected, the new data will replace the existing file.
File Format:
Date [tab] time [tab] first item value [tab] second item value [tab] ...
For example, a graph with three items would show the date and time plus the three values recorded at that time. The heading shows the IP address and SNMP object identifier for each graph item.
[156.21.50.12]:1.3.6.1.2.1.2.2.1.10.3[156.21.50.12]:1.3.6.1.2.1.2.2.1.10.4[156.21.50.12]:1.3.6.1.2.1.2.2.1.16.3
01/03/2002 11:07:34 10378267100668901/03/2002 11:07:35 16958743103145601/03/2002 11:07:36 20678156873944
Chapter 12 Monitoring SNMP Devices 225WhatsUp Gold
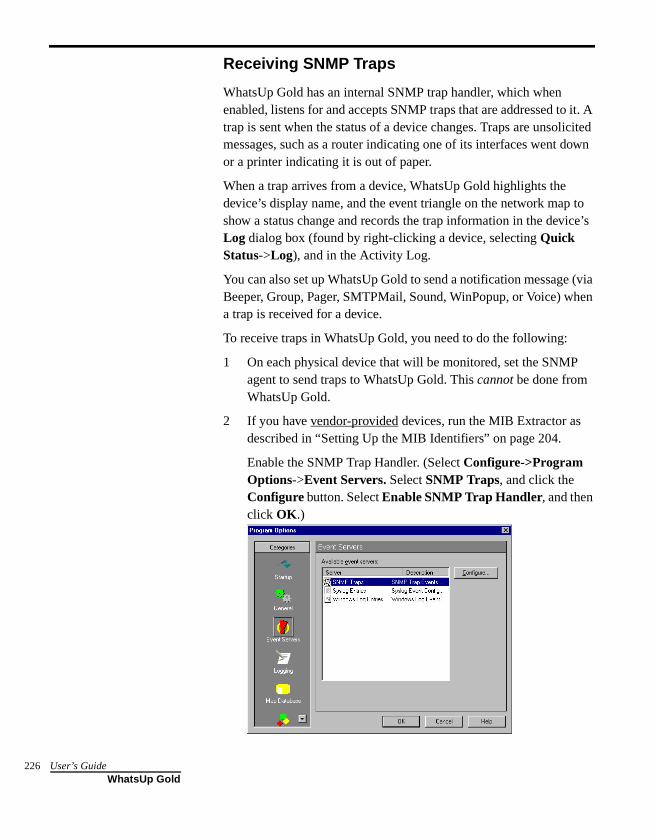
226
Receiving SNMP Traps
WhatsUp Gold has an internal SNMP trap handler, which when enabled, listens for and accepts SNMP traps that are addressed to it. A trap is sent when the status of a device changes. Traps are unsolicited messages, such as a router indicating one of its interfaces went down or a printer indicating it is out of paper.
When a trap arrives from a device, WhatsUp Gold highlights the device’s display name, and the event triangle on the network map to show a status change and records the trap information in the device’s Log dialog box (found by right-clicking a device, selecting Quick Status->Log), and in the Activity Log.
You can also set up WhatsUp Gold to send a notification message (via Beeper, Group, Pager, SMTPMail, Sound, WinPopup, or Voice) when a trap is received for a device.
To receive traps in WhatsUp Gold, you need to do the following:
1 On each physical device that will be monitored, set the SNMP agent to send traps to WhatsUp Gold. This cannot be done from WhatsUp Gold.
2 If you have vendor-provided devices, run the MIB Extractor as described in “Setting Up the MIB Identifiers” on page 204.
Enable the SNMP Trap Handler. (Select Configure->Program Options->Event Servers. Select SNMP Traps, and click the Configure button. Select Enable SNMP Trap Handler, and then click OK.)
User’s GuideWhatsUp Gold
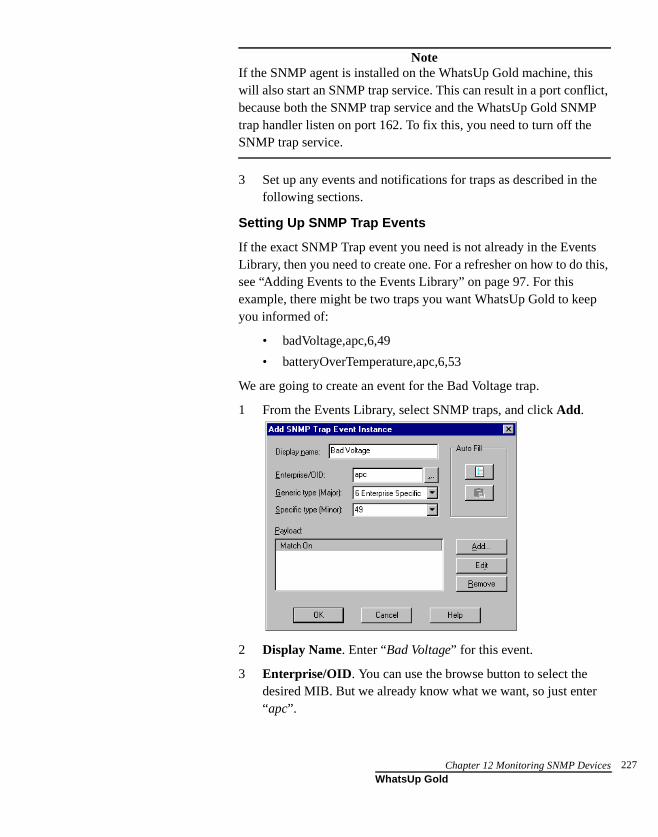
NoteIf the SNMP agent is installed on the WhatsUp Gold machine, this will also start an SNMP trap service. This can result in a port conflict, because both the SNMP trap service and the WhatsUp Gold SNMP trap handler listen on port 162. To fix this, you need to turn off the SNMP trap service.
3 Set up any events and notifications for traps as described in the following sections.
Setting Up SNMP Trap Events
If the exact SNMP Trap event you need is not already in the Events Library, then you need to create one. For a refresher on how to do this, see “Adding Events to the Events Library” on page 97. For this example, there might be two traps you want WhatsUp Gold to keep you informed of:
• badVoltage,apc,6,49
• batteryOverTemperature,apc,6,53
We are going to create an event for the Bad Voltage trap.
1 From the Events Library, select SNMP traps, and click Add.
2 Display Name. Enter “Bad Voltage” for this event.
3 Enterprise/OID. You can use the browse button to select the desired MIB. But we already know what we want, so just enter “apc”.
Chapter 12 Monitoring SNMP Devices 227WhatsUp Gold
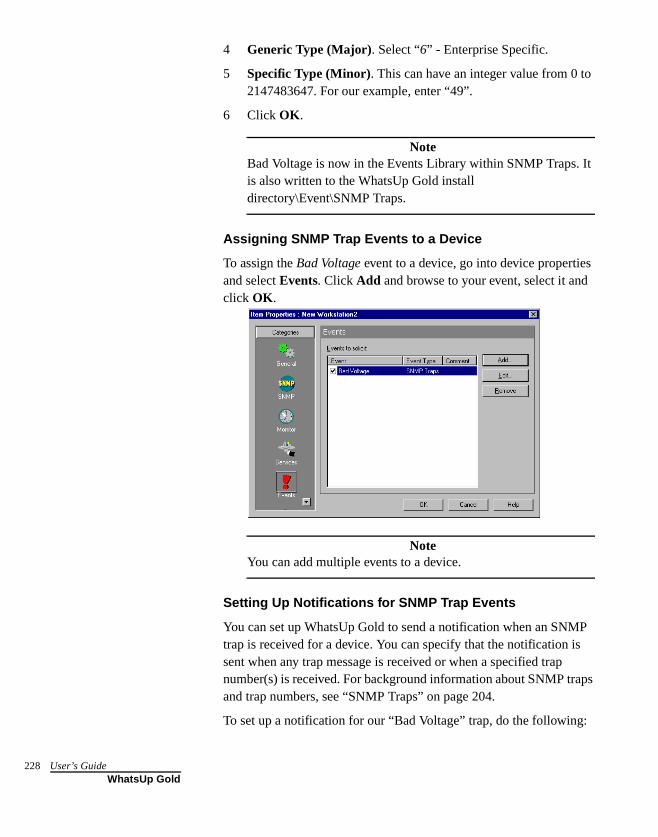
228
4 Generic Type (Major). Select “6” - Enterprise Specific.
5 Specific Type (Minor). This can have an integer value from 0 to 2147483647. For our example, enter “49”.
6 Click OK.
NoteBad Voltage is now in the Events Library within SNMP Traps. It is also written to the WhatsUp Gold install directory\Event\SNMP Traps.
Assigning SNMP Trap Events to a Device
To assign the Bad Voltage event to a device, go into device properties and select Events. Click Add and browse to your event, select it and click OK.
NoteYou can add multiple events to a device.
Setting Up Notifications for SNMP Trap Events
You can set up WhatsUp Gold to send a notification when an SNMP trap is received for a device. You can specify that the notification is sent when any trap message is received or when a specified trap number(s) is received. For background information about SNMP traps and trap numbers, see “SNMP Traps” on page 204.
To set up a notification for our “Bad Voltage” trap, do the following:
User’s GuideWhatsUp Gold

1 In the device properties, click Alerts.
NoteTo do this for a subnet icon or container icon, right-click the icon, select Properties, and click Alerts. (You cannot assign events to a subnet.)
2 Select Enable Alerts and Enable Logging.
3 In the Alerts section, click Add.
The “Add Alert” dialog box appears.
4 From the list box, select the notification you want to send when this device receives a trap message.
You can create new notifications and make them available in the list box. See the “Defining Notifications” on page 108 for the step-by-step procedure.
Chapter 12 Monitoring SNMP Devices 229WhatsUp Gold

230
5 Select the On Event option.
When this option is selected, the Select Events button to the right is enabled. You can click this button to see all of the available events associated to this device.
As shown in the two screen shots, there are two option buttons you can choose, and depending on which one you choose, you see a different behavior. In this example, there is only ONE event to pick, but if you had several events on this device, you could select ALL of them, or select specific ones.
6 Click OK to go back to the Alerts menu.
Note that the notification of the event is sent as soon as the event happens: the Trigger value is ignored. The trap text can be included in mail notifications if you use the %m variable. For more information, see “Notification Message Variables” on page 126.
NoteA notification will also be sent if the device misses the number of polls specified in the Trigger box. If you want to be notified only of an SNMP trap, you can set the Trigger to 9999.
7 Set the Time Period in which you want the notification to be active.
8 Click OK to save your changes. The notification is added to the device’s list of notifications.
9 In Alerts, click OK to save changes and exit the dialog box.
User’s GuideWhatsUp Gold

Viewing Trap Log Entries
SNMP traps are logged regardless of whether or not you have enabled log activity for the device.
To view trap information for a device, right-click the device, select Quick Status and click Log.
To view trap information for all devices, from the Logs menu, select SNMP Trap Log.
Monitoring SNMP Service
To monitor whether SNMP is running on a device:
1 Double click the device to display its properties.
NoteYou cannot add services to subnets.
2 Click Services to display services properties.
3 In the Services to Monitor box, see if the SNMP service is shown (and selected). If you need to add it, click the Add button and select the desired Service or Monitor. (In this case, SNMP).
4 Click OK to apply the changes and exit the dialog box.
NoteIf the device is an SNMP manageable device, then a small star appears in the upper-corner of the device’s icon in the map.
Chapter 12 Monitoring SNMP Devices 231WhatsUp Gold

232
User’s GuideWhatsUp Gold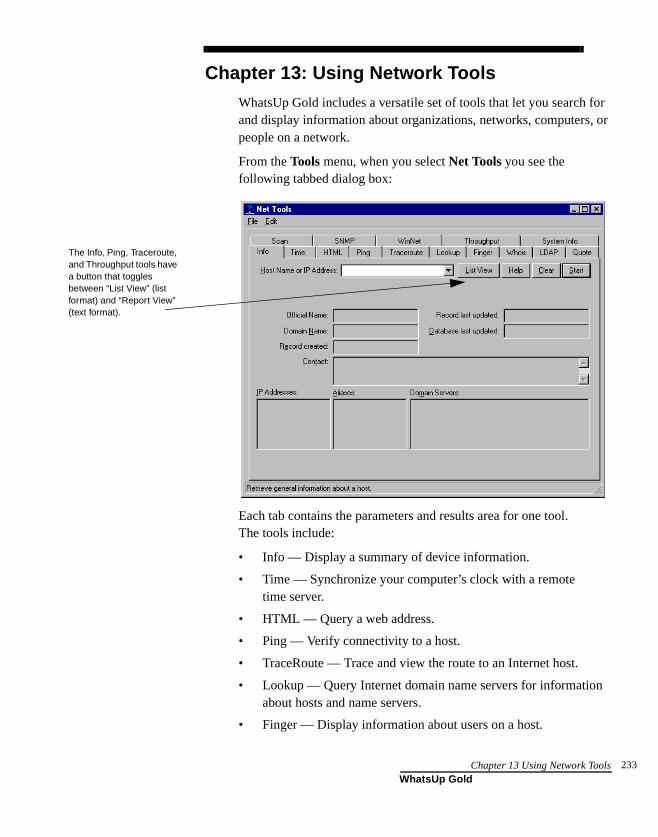
Chapter 13: Using Network Tools
WhatsUp Gold includes a versatile set of tools that let you search for and display information about organizations, networks, computers, or people on a network.
From the Tools menu, when you select Net Tools you see the following tabbed dialog box:
Each tab contains the parameters and results area for one tool. The tools include:
• Info — Display a summary of device information.
• Time — Synchronize your computer’s clock with a remote time server.
• HTML — Query a web address.
• Ping — Verify connectivity to a host.
• TraceRoute — Trace and view the route to an Internet host.
• Lookup — Query Internet domain name servers for information about hosts and name servers.
• Finger — Display information about users on a host.
The Info, Ping, Traceroute, and Throughput tools have a button that toggles between “List View” (list format) and “Report View” (text format).
Chapter 13 Using Network Tools 233WhatsUp Gold

234
• Whois — Display information from the network information center about Internet domain ownership and Internet groups.
• LDAP — Search directories for names and information.
• Quote — View quotations from a quote server.
• Scan — Scan a range of IP addresses to create a network map. For information on using this tool, see “Chapter 2: Creating Network Maps” on page 17.
• SNMP — View and graph Simple Network Management Protocol values for a device. For information on using this tool, see “Chapter 12: Monitoring SNMP Devices” on page 199.
• WinNet — View Windows Network domains, hosts, and workstations.
• Throughput — Test data throughput on the connection between your computer and a remote computer.
• System Info — View information about your local system.
Using Format, Copy, and Print Functions
You can use the standard Windows cut, copy, and paste functions in all the tools and you can cut, copy, and paste between the tools as well as between a tool and any Windows application.
In general, to cut, copy, or paste data in a text box or in a display window, you can click the right mouse button to display the pop-up menu.
However, the right mouse menu is not available when you are using the Report View of the Ping, TraceRoute, and Throughput tools; use the Edit menu instead. Furthermore, when using the Info tool, you can select and copy text only when displaying results in the List View.
Printing Results
You can print the results displayed by any of the tools. Within a tool’s tab, display the results of a query, and then from the File menu, select Print to view the standard Windows print setup dialog box.
User’s GuideWhatsUp Gold
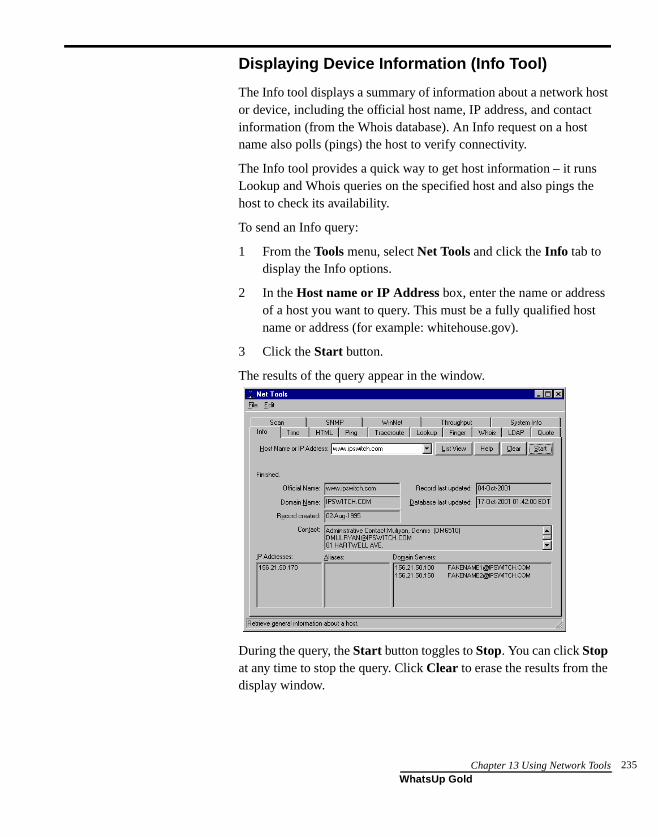
Displaying Device Information (Info Tool)
The Info tool displays a summary of information about a network host or device, including the official host name, IP address, and contact information (from the Whois database). An Info request on a host name also polls (pings) the host to verify connectivity.
The Info tool provides a quick way to get host information – it runs Lookup and Whois queries on the specified host and also pings the host to check its availability.
To send an Info query:
1 From the Tools menu, select Net Tools and click the Info tab to display the Info options.
2 In the Host name or IP Address box, enter the name or address of a host you want to query. This must be a fully qualified host name or address (for example: whitehouse.gov).
3 Click the Start button.
The results of the query appear in the window.
During the query, the Start button toggles to Stop. You can click Stop at any time to stop the query. Click Clear to erase the results from the display window.
Chapter 13 Using Network Tools 235WhatsUp Gold
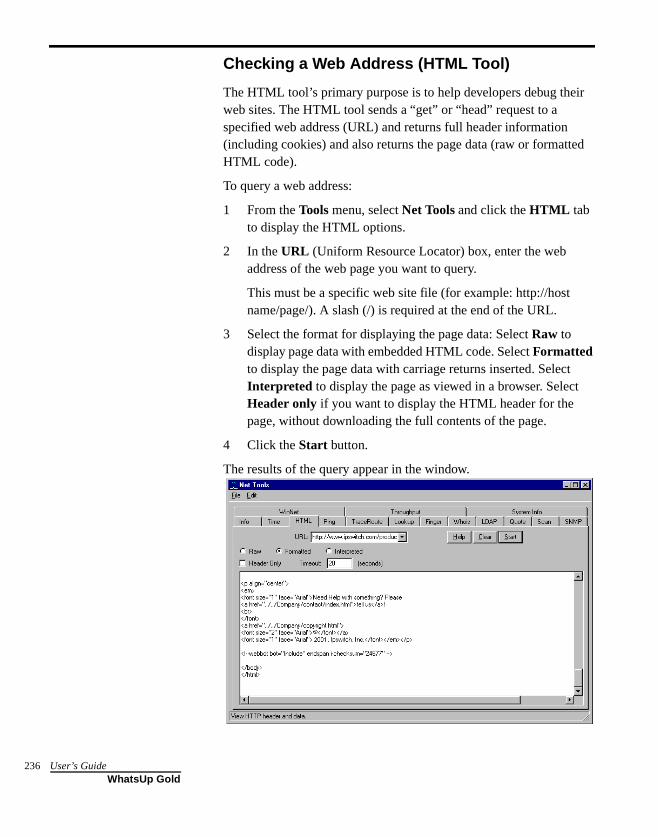
236
Checking a Web Address (HTML Tool)
The HTML tool’s primary purpose is to help developers debug their web sites. The HTML tool sends a “get” or “head” request to a specified web address (URL) and returns full header information (including cookies) and also returns the page data (raw or formatted HTML code).
To query a web address:
1 From the Tools menu, select Net Tools and click the HTML tab to display the HTML options.
2 In the URL (Uniform Resource Locator) box, enter the web address of the web page you want to query.
This must be a specific web site file (for example: http://host name/page/). A slash (/) is required at the end of the URL.
3 Select the format for displaying the page data: Select Raw to display page data with embedded HTML code. Select Formatted to display the page data with carriage returns inserted. Select Interpreted to display the page as viewed in a browser. Select Header only if you want to display the HTML header for the page, without downloading the full contents of the page.
4 Click the Start button.
The results of the query appear in the window.
User’s GuideWhatsUp Gold

During the query, the Start button toggles to Stop. You can click Stop at any time to stop the query. Click Clear to erase the results from the display window.
Synchronizing Time (Time Tool)
The Time tool lets you synchronize your local system’s clock with the clock of a remote time server. Remote time servers provide a constantly updated time of day reading (in hours, minutes, and seconds) and the date (year, month, day). The Time tool provides predefined entries for some publicly available time servers. You can also query your own or other time servers.
NoteThe Time tool uses the Time protocol specified in RFC 868.
Using the Time tool, you can also:
• Synchronize your local clock on demand.
• Interrogate multiple time of day servers simultaneously and display the difference (in seconds) between the remote time server and the local system time.
• Adjust the displayed time of a remote time server by setting an offset (plus or minus hours) from GMT.
• Sort the display (for multiple time servers) by column (Server Name, Time, Difference, Offset, and Error Code).
To synchronize your local system’s clock with a remote time server:
1 From the Tools menu, select Net Tools and click the Time tab to display Time options.
2 In the Time Server box, type the host name or IP Address (for example, xfiles-jr.esa.lanl.gov, navobs1.wustl.edu, wwwvb.isi.edu) of the remote time server you want to query. The list box shows the previous host names or IP addresses you have queried.
3 Select the Synch Clock to Remote Time option. (Make sure it is checked.) Your local system’s date and clock time is always displayed above the results area.
Chapter 13 Using Network Tools 237WhatsUp Gold

238
4 Optionally, use the Offset box to adjust the displayed time of a remote time server by an offset (plus or minus hours) from GMT.
5 Click the Start button.
A connection is established with the remote time server and the server name and current time are reported in the display window. The reported time is constantly updated until you do one of the following:
• Click Clear to clear the display.
• Select the time server in the display, and then select Remove from the right-mouse menu.
The display window also shows the time difference between your local system’s clock and the time server’s clock, any time offset you specified, and any error codes reported. (If Time reports an error code, try another time server from the list.)
During the query, the Start button toggles to Stop. You can click Stop at any time to stop the query. Click Clear to erase the results from the display window.
To sort values in a column in ascending order, click the column heading. To reverse the sort order, click again.
User’s GuideWhatsUp Gold

To interrogate multiple time servers:
One at a time, enter or select the time server’s host name or IP address in the Time Server box and then click Start. Each time server you select is displayed on a separate line.
To update the time reported by the server now:
Right-click the time server in the Server Name column to display the pop-up menu, and then select Update Time from Server.
To synchronize the local clock with the time server now:
Right-click the time server in the Server Name column to display the pop-up menu, and then select Sync Clock To Remote Time.
To suspend polls to a time server:
Right-click the time server in the Server Name column to display the pop-up menu, and then select Stop Monitoring This Item. To restart monitoring, right-click on the server and select Start Monitoring This Item.
To suspend polls to all time servers:
Right-click any time server in the Server Name column to display the pop-up menu, and then select Stop Monitoring All Items. To restart monitoring, right-click on any server and select Start Monitoring All Items.
To remove a time server from the list of servers:
Right-click the time server in the Server Name column to display the pop-up menu, and then select Remove.
To change the offset (to account for time zone differences):
1 Click the time server in the Server Name column or select a server from the Time Server list box.
2 In the Offset list box, select the desired offset.
3 Click Start.
Chapter 13 Using Network Tools 239WhatsUp Gold
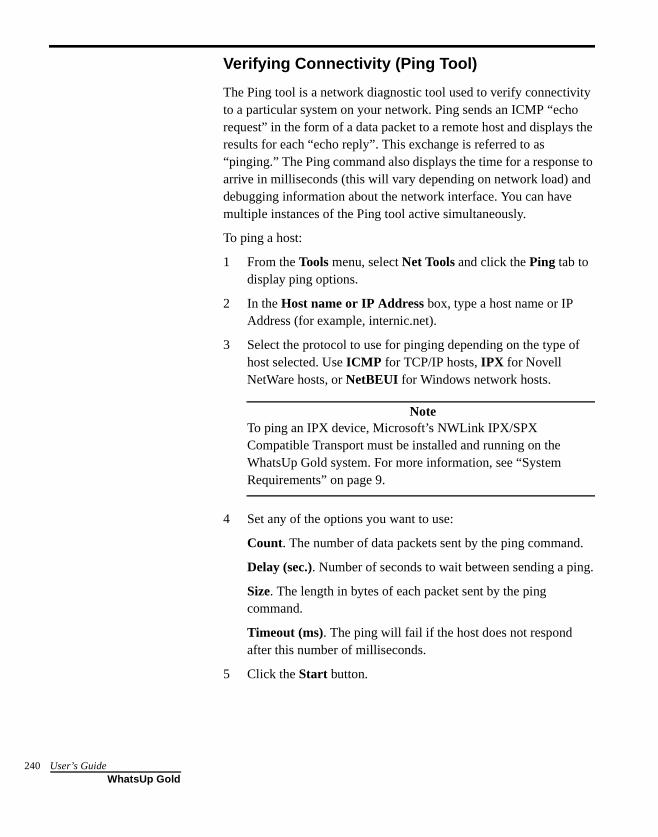
240
Verifying Connectivity (Ping Tool)
The Ping tool is a network diagnostic tool used to verify connectivity to a particular system on your network. Ping sends an ICMP “echo request” in the form of a data packet to a remote host and displays the results for each “echo reply”. This exchange is referred to as “pinging.” The Ping command also displays the time for a response to arrive in milliseconds (this will vary depending on network load) and debugging information about the network interface. You can have multiple instances of the Ping tool active simultaneously.
To ping a host:
1 From the Tools menu, select Net Tools and click the Ping tab to display ping options.
2 In the Host name or IP Address box, type a host name or IP Address (for example, internic.net).
3 Select the protocol to use for pinging depending on the type of host selected. Use ICMP for TCP/IP hosts, IPX for Novell NetWare hosts, or NetBEUI for Windows network hosts.
NoteTo ping an IPX device, Microsoft’s NWLink IPX/SPX Compatible Transport must be installed and running on the WhatsUp Gold system. For more information, see “System Requirements” on page 9.
4 Set any of the options you want to use:
Count. The number of data packets sent by the ping command.
Delay (sec.). Number of seconds to wait between sending a ping.
Size. The length in bytes of each packet sent by the ping command.
Timeout (ms). The ping will fail if the host does not respond after this number of milliseconds.
5 Click the Start button.
User’s GuideWhatsUp Gold

The Ping tool sends an echo request and waits for the echo reply. If the ping was successful, summary lines are displayed in the Ping tab, indicating the result of the ping.
If the reply is not received within the timeout value, the ping fails. This means there has been a failure at one of several points from your PC to the remote host. The host may not be functioning and therefore is unable to respond, a network or gateway in the path from the user may not be working, or the host may not implement the service you are requesting.
During the ping, the Start button toggles to Stop. You can click Stop at any time to stop the ping. Click Clear to erase the results from the display window.
Tracing a Route (TraceRoute Tool)
The Traceroute tool lets you trace and view the actual route an IP packet follows from the local host to another host on the Internet. Response times are displayed in milliseconds and will vary depending on network load. TraceRoute is useful for finding potential trouble spots on large and complex networks that are connected together by routers.
The results of a traceroute can be mapped to a network map.
Chapter 13 Using Network Tools 241WhatsUp Gold
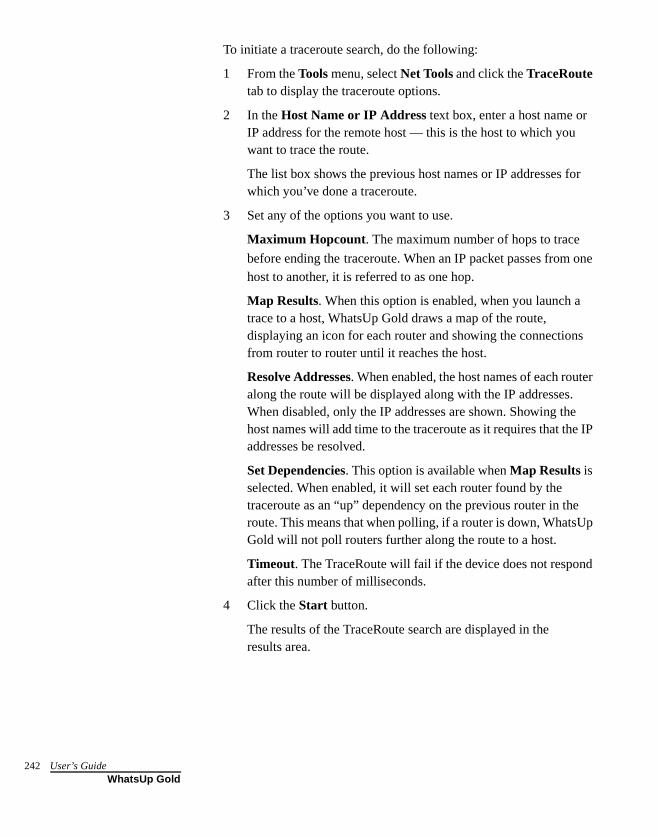
242
To initiate a traceroute search, do the following:
1 From the Tools menu, select Net Tools and click the TraceRoute tab to display the traceroute options.
2 In the Host Name or IP Address text box, enter a host name or IP address for the remote host — this is the host to which you want to trace the route.
The list box shows the previous host names or IP addresses for which you’ve done a traceroute.
3 Set any of the options you want to use.
Maximum Hopcount. The maximum number of hops to trace
before ending the traceroute. When an IP packet passes from one host to another, it is referred to as one hop.
Map Results. When this option is enabled, when you launch a trace to a host, WhatsUp Gold draws a map of the route, displaying an icon for each router and showing the connections from router to router until it reaches the host.
Resolve Addresses. When enabled, the host names of each router along the route will be displayed along with the IP addresses. When disabled, only the IP addresses are shown. Showing the host names will add time to the traceroute as it requires that the IP addresses be resolved.
Set Dependencies. This option is available when Map Results is selected. When enabled, it will set each router found by the traceroute as an “up” dependency on the previous router in the route. This means that when polling, if a router is down, WhatsUp Gold will not poll routers further along the route to a host.
Timeout. The TraceRoute will fail if the device does not respond after this number of milliseconds.
4 Click the Start button.
The results of the TraceRoute search are displayed in the results area.
User’s GuideWhatsUp Gold
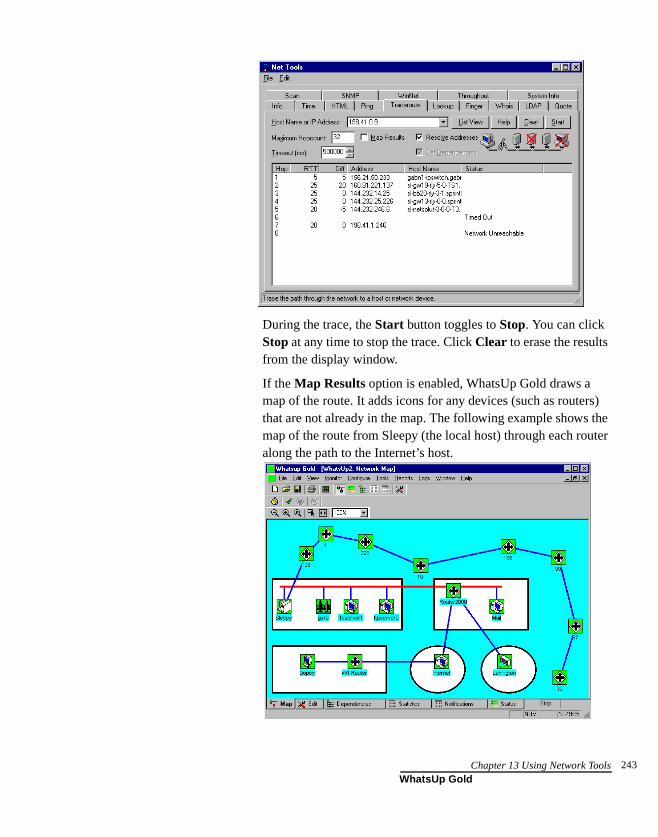
During the trace, the Start button toggles to Stop. You can click Stop at any time to stop the trace. Click Clear to erase the results from the display window.
If the Map Results option is enabled, WhatsUp Gold draws a map of the route. It adds icons for any devices (such as routers) that are not already in the map. The following example shows the map of the route from Sleepy (the local host) through each router along the path to the Internet’s host.
Chapter 13 Using Network Tools 243WhatsUp Gold
244
Finding Host and Name Server (Lookup Tool)
The Lookup tool lets you query Internet domain name servers for information about hosts and name servers. You can use Lookup to:
• Find the IP address from a name or a name from an IP address.
• List just the name and Internet address of a host or domain.
• Query the name server for information about various hosts and domains.
• List hosts in a domain.
To initiate a Lookup query:
1 From the Tools menu, select Net Tools and click the Lookup tab to display lookup options.
2 In the Name or IP Address text box, enter a host name or IP address of the device or domain name server you want to look up.
3 Set any of the options you want to use.
DNS Server. Enter the IP address of the domain name server you want to query or select [stack] from the list box to use the network stack in your operating system.
NoteWhen you select the [stack] option, Lookup uses the Winsock stack lookup routines. If you specify a server, Lookup creates and interprets its own DNS packets and does not use the Winsock stack routines.
User’s GuideWhatsUp Gold

Query Type. Select a type from the list box.
The query types are:
NoteIf you use the network stack, you can only do name-to-address lookups (A) or address-to-name lookups (PTR). If you specify a DNS server, you can use all of the query types.
The Verbose option is useful only when you specify a DNS server. When enabled, you can see the information that comes back from the DNS server.
Type Returns the following information:
A The host’s Internet address
ALL All information
CNAME Display alias names for the host.
HINFO The CPU type and operating system type of the host
MX The host that acts as the mail exchanger
NS The name server for the named zone
PTR The host name, if the query is an Internet address; otherwise, a pointer to other data
SOA The domain’s “start of authority” information, which indicates the name server and additional administrative information
ZONE The zone listing for the domain, which defines the domains for which the name server is the primary name server and lists registered host in the domain
Chapter 13 Using Network Tools 245WhatsUp Gold
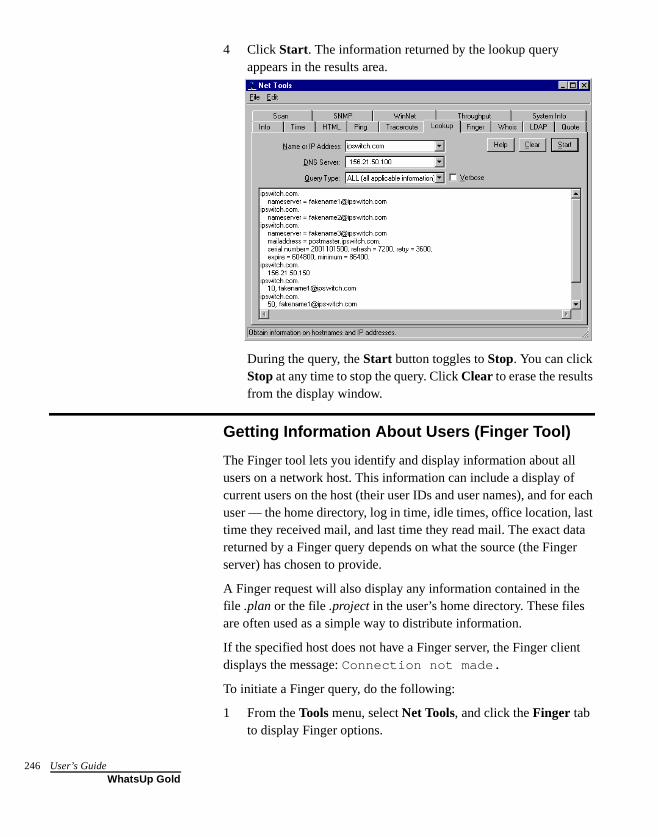
246
4 Click Start. The information returned by the lookup query appears in the results area.
During the query, the Start button toggles to Stop. You can click Stop at any time to stop the query. Click Clear to erase the results from the display window.
Getting Information About Users (Finger Tool)
The Finger tool lets you identify and display information about all users on a network host. This information can include a display of current users on the host (their user IDs and user names), and for each user — the home directory, log in time, idle times, office location, last time they received mail, and last time they read mail. The exact data returned by a Finger query depends on what the source (the Finger server) has chosen to provide.
A Finger request will also display any information contained in the file .plan or the file .project in the user’s home directory. These files are often used as a simple way to distribute information.
If the specified host does not have a Finger server, the Finger client displays the message: Connection not made.
To initiate a Finger query, do the following:
1 From the Tools menu, select Net Tools, and click the Finger tab to display Finger options.
User’s GuideWhatsUp Gold
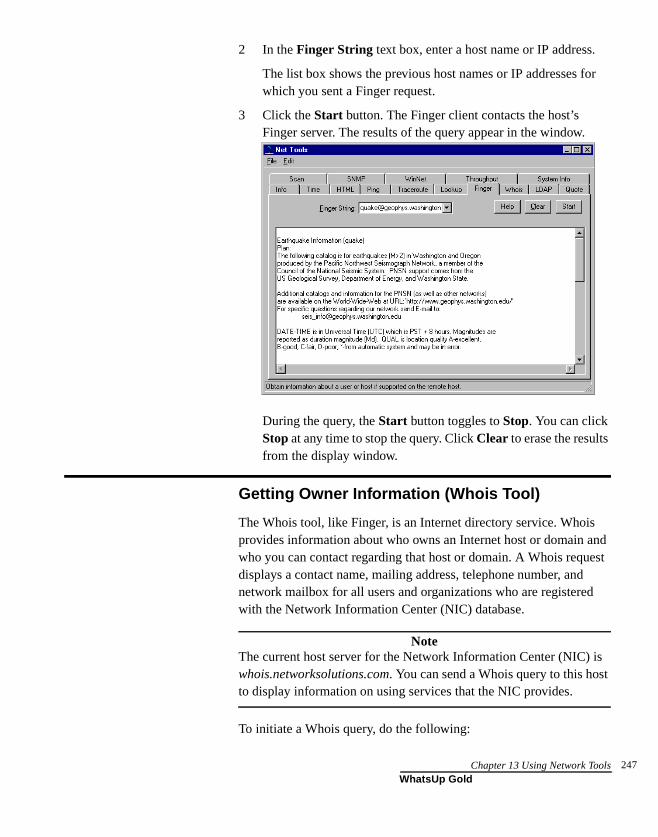
2 In the Finger String text box, enter a host name or IP address.
The list box shows the previous host names or IP addresses for which you sent a Finger request.
3 Click the Start button. The Finger client contacts the host’s Finger server. The results of the query appear in the window.
During the query, the Start button toggles to Stop. You can click Stop at any time to stop the query. Click Clear to erase the results from the display window.
Getting Owner Information (Whois Tool)
The Whois tool, like Finger, is an Internet directory service. Whois provides information about who owns an Internet host or domain and who you can contact regarding that host or domain. A Whois request displays a contact name, mailing address, telephone number, and network mailbox for all users and organizations who are registered with the Network Information Center (NIC) database.
NoteThe current host server for the Network Information Center (NIC) is whois.networksolutions.com. You can send a Whois query to this host to display information on using services that the NIC provides.
To initiate a Whois query, do the following:
Chapter 13 Using Network Tools 247WhatsUp Gold
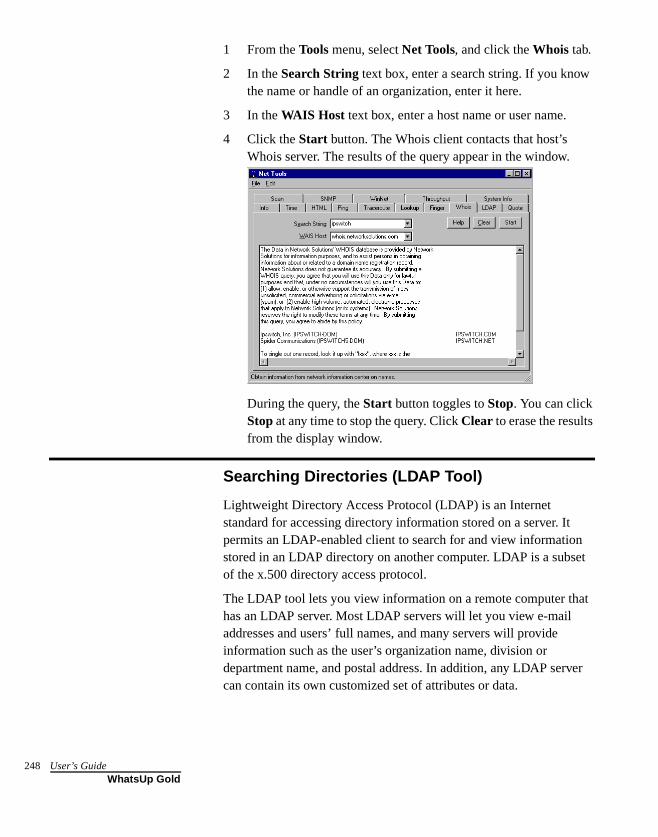
248
1 From the Tools menu, select Net Tools, and click the Whois tab.
2 In the Search String text box, enter a search string. If you know the name or handle of an organization, enter it here.
3 In the WAIS Host text box, enter a host name or user name.
4 Click the Start button. The Whois client contacts that host’s Whois server. The results of the query appear in the window.
During the query, the Start button toggles to Stop. You can click Stop at any time to stop the query. Click Clear to erase the results from the display window.
Searching Directories (LDAP Tool)
Lightweight Directory Access Protocol (LDAP) is an Internet standard for accessing directory information stored on a server. It permits an LDAP-enabled client to search for and view information stored in an LDAP directory on another computer. LDAP is a subset of the x.500 directory access protocol.
The LDAP tool lets you view information on a remote computer that has an LDAP server. Most LDAP servers will let you view e-mail addresses and users’ full names, and many servers will provide information such as the user’s organization name, division or department name, and postal address. In addition, any LDAP server can contain its own customized set of attributes or data.
User’s GuideWhatsUp Gold
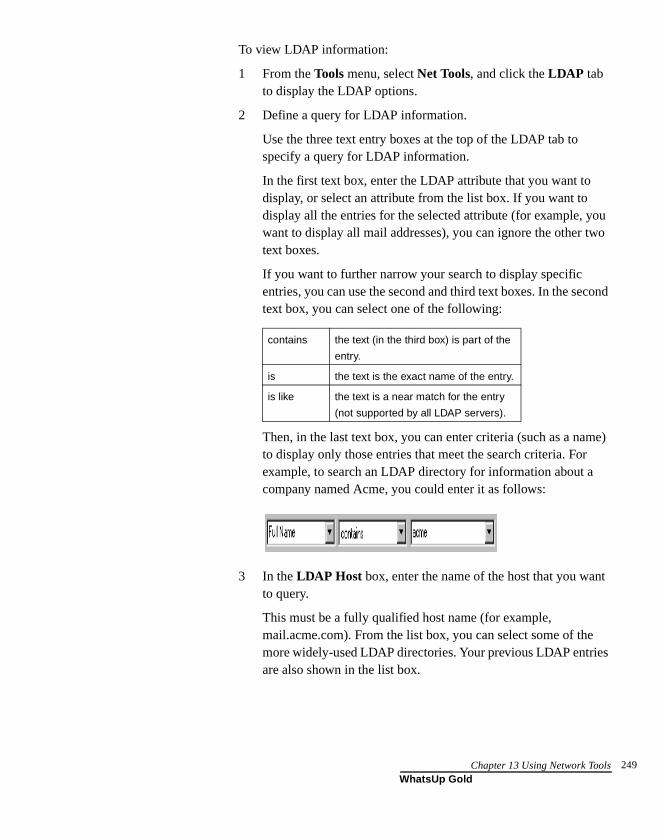
To view LDAP information:
1 From the Tools menu, select Net Tools, and click the LDAP tab to display the LDAP options.
2 Define a query for LDAP information.
Use the three text entry boxes at the top of the LDAP tab to specify a query for LDAP information.
In the first text box, enter the LDAP attribute that you want to display, or select an attribute from the list box. If you want to display all the entries for the selected attribute (for example, you want to display all mail addresses), you can ignore the other two text boxes.
If you want to further narrow your search to display specific entries, you can use the second and third text boxes. In the second text box, you can select one of the following:
Then, in the last text box, you can enter criteria (such as a name) to display only those entries that meet the search criteria. For example, to search an LDAP directory for information about a company named Acme, you could enter it as follows:
3 In the LDAP Host box, enter the name of the host that you want to query.
This must be a fully qualified host name (for example, mail.acme.com). From the list box, you can select some of the more widely-used LDAP directories. Your previous LDAP entries are also shown in the list box.
contains the text (in the third box) is part of the
entry.
is the text is the exact name of the entry.
is like the text is a near match for the entry
(not supported by all LDAP servers).
Chapter 13 Using Network Tools 249WhatsUp Gold

250
4 Click the Start button.
Any LDAP information that meets the specified search criteria is displayed.
NoteIf there are too many responses to your query, most LDAP servers will not return anything. You’ll need to further define your search criteria.
During the query, the Start button toggles to Stop. You can click Stop at any time to stop the query. Click Clear to erase the results from the display window.
Viewing Quotations (Quote Tool)
The Quote client lets you view information on a remote host that supports a Quote server. Quote servers often display a “quote of the day.” For example, if you connect to the Ipswitch quote server, you may see a quote like the following:
“It was as true as taxes is. And nothing’s truer than them.” Charles Dickens (1812-1870)
User’s GuideWhatsUp Gold
To view Quotes:
1 From the Tools menu, select Net Tools, and click the Quote tab to display the Quote options.
This must be a fully qualified host name (for example: quotes.ipswitch.com).
2 In the Quote server box, enter the name of a host that contains the quote server.
3 Click the Start button.
The results of the query appear in the window.
During the query, the Start button toggles to Stop. You can click Stop at any time to stop the query. Click Clear to erase the results from the display window.
Scanning Your Network (Scan Tool)
The Scan tool lets you scan a range of IP addresses to create a map of the devices in your network. For more information, see “Chapter 2: Creating Network Maps” on page 17.
Viewing and Graphing SNMP Values (SNMP Tool)
The SNMP tool lets you view and graph Simple Network Management Protocol values for a device. The device must be SNMP enabled. For information on using this tool, see “Chapter 12: Monitoring SNMP Devices” on page 199.
Displaying Network Information (WinNet Tool)
The WinNet tool scans your local network and displays the names of Windows network resources (domains, hosts, or shared resources). Note that resources on the Windows network use NetBEUI (Windows NetBIOS) names which may or may not correspond to Internet host or domain names. You can use the list box to select the items for which you want to scan. In addition, you can enter the NetBEUI name of a Windows resource on your network and view information about that resource.
1 From the Tools menu, select Net Tools, and click the WinNet tab.
Chapter 13 Using Network Tools 251WhatsUp Gold
252
2 In the Network Items list box, select the type of network items that you want to display from the list box. You can select from the following item types:
networks — show all networks (groups of domains).
domains — show all domains (groups of servers).
servers — show all computers running Windows networking.
shares — show all shared devices, such as printers.
all — show all the above types of items.
3 Click the Start button.
WhatsUp Gold scans your local network and displays the name and address of the specified items.
During the scan, the Start button toggles to Stop. You can click Stop at any time to stop the scan. Click Clear to erase the results from the display window.
Testing Data Speed (Throughput Tool)
Throughput is a diagnostic tool that lets you test the data speed on a connection with a remote host. It sends a specified number of IP packets, in a range of packet sizes, to a specified remote computer and calculates the average data speed over the communications link.
To test throughput on a connection:
1 From the Tools menu, select Net Tools and click the Throughput tab.
2 In the Hostname or IP Address box, type a host name or IP Address (for example, internic.net).
3 Set any of the options you want to use:
Packet Count. The number of data packets sent.
Timeout (ms). The time, in milliseconds, that the tool will wait for a response.
Packet Size. The maximum length in bytes of the largest packet sent. To accurately determine throughput, use the largest packet size that works consistently without timing out.
Delay (ms). Number of milliseconds to wait between packets.
User’s GuideWhatsUp Gold
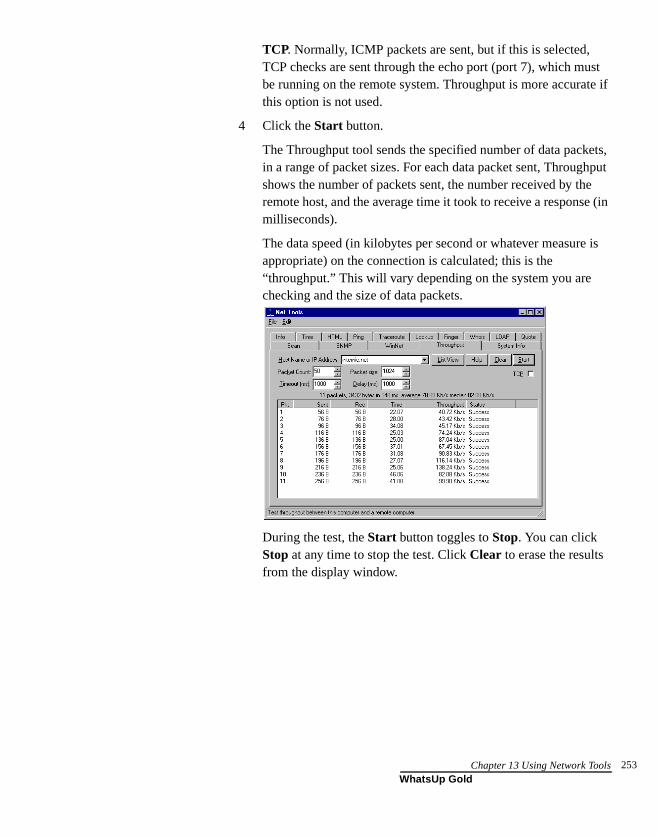
TCP. Normally, ICMP packets are sent, but if this is selected, TCP checks are sent through the echo port (port 7), which must be running on the remote system. Throughput is more accurate if this option is not used.
4 Click the Start button.
The Throughput tool sends the specified number of data packets, in a range of packet sizes. For each data packet sent, Throughput shows the number of packets sent, the number received by the remote host, and the average time it took to receive a response (in milliseconds).
The data speed (in kilobytes per second or whatever measure is appropriate) on the connection is calculated; this is the “throughput.” This will vary depending on the system you are checking and the size of data packets.
During the test, the Start button toggles to Stop. You can click Stop at any time to stop the test. Click Clear to erase the results from the display window.
Chapter 13 Using Network Tools 253WhatsUp Gold

254
Viewing Local System Information
WhatsUp provides a quick means of getting information about your local system. To view local system information, from the Tools menu, select Net Tools and click the System Info tab.
This tab displays information about your local system; WhatsUp Gold gets this information from the Windows Registry.
If your local system has multiple network adapters, System Info will display information from all of the adapters — you will see multiple IP addresses and netmasks.
NoteIf you are using DHCP (Dynamic Host Configuration Protocol), the host name, IP address, domain, name server, gateway, and netmask information are dynamically assigned and the Windows registry is not updated. Therefore, the values you see in this tab (under Local Hostname, Local IP Address, Domain, Name Server, Default Gateway, and Netmask) may be incorrect or you may see zero values in place of the IP address and netmask.
User’s GuideWhatsUp Gold
Glossary
Alias
An alias is another name assigned to a host name that can be used in place of the host name (plus domain name). Aliases are often used to shorten long host names for convenience.
Baud rate
The rate (measured in bits per second) at which the serial port for the MONITOR server will communicate with the modem.
Binary
Binary describes a numbering scheme in which there are only two possible values for each digit: 0 and 1. The term also refers to any digital encoding/decoding system in which there are exactly two possible states
Bit
A bit (short for binary digit) is the smallest unit of data in a computer. A bit has a single binary value, either 0 or 1.
Broadcast Address
To simultaneously send the same message to multiple recipients. Broadcasting is a useful feature in e-mail systems. It is also supported by some fax systems. In networking, a distinction is made between broadcasting and multicasting. Broadcasting sends a message to everyone on the network whereas multicasting sends a message to a select list of recipients
Client
A client is a program running on a networked computer that requests services from a server program, which is usually running on another networked computer. The client communicates with the server using a protocol. For example, an FTP client communicates with an FTP server using the FTP protocol.
Glossary 255WhatsUp Gold
256
Community Name
Community names are used like passwords to limit access to a device’s SNMP data. The network administrator can assign a community name within the SNMP agent, or manager, on a device. The network management application can access data on the device only if it knows the community name.
DLL
Dynamic Link Library is a library of executable functions that can be used by an application. A DLL provides one or more functions and a program accesses the functions by creating a link to the DLL.
Domain
A term that refers to the subdivisions of the Internet network. Domain can mean the major subdivision of which your network is a part (.com, edu, .gov, .net, .us, .uk) or it can refer to your part of the network (ipswitch.com). See also Domain Name System.
Domain Name System
A distributed database system that translates host names (for example, tortoise.ipswitch.com) to IP addresses (for example, 156.21.50.10). All hosts on the Internet are named using the conventions specified by the Domain Name System. Host Names are used because they are easier to remember than numerical addresses (IP addresses). An example host and domain name is tortoise.ipswitch.com, where tortoise is the host name, and ipswitch.com is the domain name. The domain represents the network where the host is located.
User’s GuideWhatsUp Gold

Domain name server
A host that keeps a table of host names and IP addresses, and provides the lookup service for client programs. A domain name server is used by client programs to look up the IP address of a host. A domain name server provides host name to IP address mapping for the local network and provides access to the Domain Name System to look up hosts in other domains.
A primary name server contains all the information for the domain in its database files. If you add a second name server for backup or to off-load the primary server, you can set it up as a secondary server. A secondary name server obtains its domain information by copying the database files from the name server that is primary for that domain. The advantage of using secondary servers is that you can maintain the domain information on one name server (the primary).
EGP
Exterior Gateway Protocol is used for exchanging routing information between 2 neighbor gateway hosts (each with its own router) in a network of autonomous systems. EGP is commonly used between hosts on the Internet to exchange routing table information. The routing table contains a list of known routers, the addresses they can reach, and a cost metric associated with the path to each router so that the best available route is chosen. Each router polls its neighbor at intervals between 120-480 seconds and the neighbor responds by sending its complete routing table.
Ethernet
Ethernet is the most widely-installed local area network (LAN) technology. An Ethernet LAN typically uses coaxial cable or special grades of twisted pair wires. Ethernet is also used in wireless LANs
Event
An event is an unsolicited occurrence on your network that WhatsUp Gold can detect or listen for. WhatsUp Gold can detect Windows NT event log entries, and can listen for Syslog entries, and SNMP traps. Within WhatsUp Gold, this is an extensible plug-in system that can be grown to include asynchronous occurrences outside of polling.
Glossary 257WhatsUp Gold
258
Finger
Finger protocol is a common Internet language that allows remote users to see information about users registered on a system. This includes the full name of the specified user, his or her complete e-mail address and a “plan” file provide by the user that contains additional information the user wishes to provide in response to Finger requests.
FTP
FTP stands for File Transfer Protocol. This is one of the standard protocols defined for use on a TCP/IP network and used to transfer files between systems.
Gate host
Gate Host is the name of another host to send mail to when the mail cannot be delivered directly to the destination host.
Gateway
A gateway is a network point that acts as an entrance to another network. On the Internet, a node or stopping point can be either a gateway node or a host (end-point) node. Both the computers of Internet users and the computers that serve pages to users are host nodes. The computers that control traffic within your company's network or at your local Internet service provider (ISP) are gateway nodes
Host
The term “host” is used in several contexts, in each of which it has a slightly different meaning: In Internet protocol specifications, the term “host” means any computer that has full two-way access to other computers on the Internet. A host has a specific “local or host number” that, together with the network number, forms its unique IP address. For companies or individuals with a Web site, a host is a computer with a Web server that serves the pages for one or more Web sites. A host can also be the company that provides that service, which is known as hosting.
User’s GuideWhatsUp Gold
HTTP
Hypertext Transfer Protocol (HTTP), the underlying protocol used by the World Wide Web. HTTP defines how messages (text, images, sound, video, and other multimedia files) are formatted and transmitted, and what actions Web servers and browsers should take in response to various commands. For example, when you enter a URL in your browser, this actually sends an HTTP command to the Web server directing it to fetch and transmit the requested Web page. Relative to the TCP/IP suite of protocols (which are the basis for information exchange on the Internet), HTTP is an application protocol.
Hub
In data communications, a hub is a place of meeting where data arrives from one or more directions and is forwarded out in one or more other directions. A hub usually includes a switch of some kind. (And a product that is called a “switch” could usually be considered a hub as well.) The difference seems to be that the hub is the place where data comes together and the switch is what determines how and where data is forwarded from the place where data comes together. See also Switch.
ICMP
ICMP (Internet Control Message Protocol) is a message control and error-reporting protocol between a host server and a gateway to the Internet. ICMP uses Internet Protocol (IP) datagrams, but the messages are processed by the IP software and are not directly apparent to the application user.
ICMP Ping
A ping command that uses ICMP to test an internet connection.
IMAP4
Internet Message Access Protocol version 4 (IMAP4) is a method of accessing electronic mail messages that are kept on a (possibly shared) mail server. It permits a client e-mail application to access remote message stores as if they were local.
Glossary 259WhatsUp Gold
260
in-addr.arpa domain
A special domain on the Internet that maps IP addresses to domain names. This domain is used to do reverse lookups, where the IP address is known and the application is querying for the host name.
Internet
The Internet, sometimes called simply “the Net,” is a worldwide system of computer networks - a network of networks in which users at any one computer can, if they have permission, get information from any other computer (and sometimes talk directly to users at other computers).
IP (Internet Protocol)
The protocol that determines how packets (bundles of data) traverse the Internet network to find their destination. See also TCP.
IP address
All hosts on the Internet are identified by a unique numeric code, called the IP address. 156.21.50.1 is an IP address. The Domain Name System is used to map the IP address to a name.
IPX
IPX (Internetwork Packet Exchange) is a networking protocol from Novell that interconnects networks that use Novell's NetWare clients and servers. IPX is a datagram or packet protocol. IPX works at the Network layer of communication protocols and is connectionless (that is, it doesn't require that a connection be maintained during an exchange of packets as, for example, a regular voice phone call does).
LAN
A local area network (LAN) is a group of computers and associated devices that share a common communications line and typically share the resources of a single processor or server within a small geographic area (for example, within an office building).
LDAP
Lightweight Directory Access Protocol is a way of accessing directory information stored on a server. It permits an LDAP-enabled client to search for and view user information stored in an LDAP directory.
User’s GuideWhatsUp Gold

List server
A List server provides an automated way to manage mail discussion groups. All messages for a mail discussion group received by a List server are sent to all the members of that mail discussion group.The List server manages the adding and removal of users from the subscriber list and the distribution of messages to all subscribed users.
MAC Address
On a local area network (LAN) or other network, the MAC (Media Access Control) address is your computer’s unique hardware number. (On an Ethernet LAN, it’s the same as your Ethernet address.) When you’re connected to the Internet from your computer (or host as the Internet protocol thinks of it), a correspondence table relates your IP address to your computer’s physical (MAC) address on the LAN.
Name server
See domain name server.
Net Mask
In administering Internet sites, a netmask is a string of 0’s and 1’s that mask or screen out the network part of an IP address (IP) so that only the host computer part of the address remains. A frequently-used netmask is 255.255.255.0. (255 is the decimal equivalent of a binary string of eight ones.) Used for a Class C subnet (one with up to 255 host computers), the “.0” in the “255.255.255.0” netmask allows the specific host computer address to be visible.
Network
In information technology, a network is a series of points or nodes interconnected by communication paths. Networks can interconnect with other networks and contain subnetworks.
Node
In a network, a node is a connection point, either a redistribution point or an end point for data transmissions. In general, a node has programmed or engineered capability to recognize and process or forward transmissions to other nodes
Glossary 261WhatsUp Gold
262
ODBC
Open DataBase Connectivity is a standard database access method that makes it possible to access data from any application, regardless of which database management system(DBMS) is handling the data. ODBC inserts a layer, called a database driver, between an application and the DBMS. This layer translates the application’s data queries into commands that the DBMS understands.
Packet
A packet is the unit of data that is routed between an origin and a destination on the Internet or any other packet-switched network.
Payload
The event payload is the vital data that is being passed within a packet or other transmission unit. An event payload can include things like the event name, the IP address that the event came from, date of the event, etc. The payload does not include the “overhead” data required to get the packet to its destination. Generally speaking, the payload is the bits that get delivered to the end user at the destination.
POP3
Post Office Protocol version 3 (POP3) is the most common protocol for communicating with a mail server (otherwise known as a post office) to retrieve messages for a user. Since POP3 servers are always available to receive incoming mail, individual users do not have to have their PCs turned on at all times. POP3 servers hold mail for users until they connect to download their messages.
Protocol
A set of rules that define how computers will exchange information.
Request for Comments (RFC)
A set of documents that define the Internet standards. RFCs are also used to propose new standards, or extensions to existing standards.
User’s GuideWhatsUp Gold
Router
On the Internet, a router is a device that determines the next network point to which a packet should be forwarded toward its target. The router is linked to at least two networks and decides which route to send each information packet based on its current understanding of the condition of the networks it is connected to. A router is located at any gateway (where one network joins another), including each Internet point of presence. A router is often included as part of a network switch.
Server
A server is a program running on a networked computer that processes requests for services from a client program, which is usually running on another networked computer. The client and server communicate using a protocol. For example, an FTP client communicates with an FTP server using the FTP protocol.
Service
“Service” is a formal Windows NT/2000 term for an executable object installed in a registry database maintained by NT/2000’s Service Control Manager. A service can be automatically started when the system is booted and continues to run until the system is shut down. It will continue to run even when no one is logged on the system. See also TCP/IP.
SMS
SMS (Short Message Service) is a service for sending messages of up to 160 characters (224 characters if using a 5-bit mode) to mobile phones that use Global System for Mobile (GSM) communication.
SMTP
Simple Mail Transfer Protocol (SMTP) is designed to efficiently and reliably transfer mail across TCP/IP networks, including the Internet. SMTP defines the interaction between mail systems to facilitate the transfer of electronic mail even when the mail systems are on different types of computers or running different operating systems. SMTP is required to send or receive mail over the Internet.
Glossary 263WhatsUp Gold
264
SNMP
Simple Network Management Protocol (SNMP) is the protocol governing network management and the monitoring of network devices and their functions. It is not necessarily limited to TCP/IP networks.
SNMP Trap
An unsolicited message sent from an SNMP agent (such as a router or personal computer on a network) to the SNMP manager (in our case, WhatsUp Gold) to alert it of some extraordinary circumstance.
SSL
Secure Sockets Layer (SSL) is used for communications between a browser and server. SSL encrypts mail communications so they can be read only by the intended recipients. SSL uses “certificates” to authenticate the client and server, and uses a public/private key “pair” to encrypt and decrypt communications. All of the major browsers are SSL enabled.
Subnet
A subnet (short for “subnetwork”) is an identifiably separate part of an company's network. Usually, a subnet may represent all the machines at one location, on a particular floor, or on the same local area network (LAN). Having an company's network divided into subnets allows it to be connected to the Internet with a single shared network address.
Switch
A switch is a network device that selects a path for sending a component of data to its next destination. A switch may also include the function of the router, a device or program that can ascertain the route and specifically what neighboring network point the data should be sent to. See also Hub.
Syslog Entry
A syslog entry is used to examine syslog messages forwarded from other devices for a specific record and/or specific text within a record. Usually syslog messages are forwarded from the “syslog” on a system that runs UNIX, but they can also come from non-UNIX devices as well. They might contain anything that you want permanently logged, such as a device failure, or an attempt to log in to the system.
User’s GuideWhatsUp Gold
TCP
Transmission Control Protocol; the protocol that controls how data is assembled and disassembled in packets. See also IP.
TCP/IP
(The Transmission Control Protocol/Internet Protocol) is the protocol suite that drives the Internet. Specifically, TCP/IP handles network communications between network nodes (computers, or nodes, connected to the net). The suite is actually composed of several protocols including IP which handles the movement of data between host computers, TCP which manages the movement of data between applications, UDP which also manages the movement of data between applications but is less complex and reliable than TCP, and ICMP which transmits error messages and network traffic statistics. Many Internet users are familiar with the even higher layer application protocols that use TCP/IP to get to the Internet. These include the Hypertext Transfer Protocol (HTTP), the File Transfer Protocol (FTP), Telnet (Telnet) which lets you logon to remote computers, and the Simple Mail Transfer Protocol (SMTP). These and other protocols are often packaged together with TCP/IP as a “suite.”
Telnet
Telnet is the way you can access someone else's computer, assuming they have given you permission. (Such a computer is frequently called a host computer.) More technically, Telnet is a user command and an underlying TCP/IP protocol for accessing remote computers. On the Web, HTTP and FTP protocols allow you to request specific files from remote computers, but not to actually be logged on as a user of that computer. With Telnet, you log on as a regular user with whatever privileges you may have been granted to the specific application and data on that computer.
Token Ring
A token ring network is a local area network (LAN) in which all computers are connected in a ring or star topology and a binary digit - or token-passing scheme is used in order to prevent the collision of data between two computers that want to send messages at the same time
Glossary 265WhatsUp Gold
266
Topology
A topology (from the Greek word “topos”, meaning place) is a description of any kind of locality in terms of its physical layout. In the context of communication networks, a topology describes pictorially the configuration or arrangement of a (usually conceptual) network, including its nodes and connecting lines.
Trap
A trap is an unsolicited SNMP message sent from a device to indicate a change in status, such as a router indicating one of its interfaces went down or a printer indicating that it is out of paper.
UDP
User Datagram Protocol; a transmission protocol for uses that do not require the control and error checking of TCP.
Whois
The Whois protocol is a common Internet language that allows remote users to search for mail addresses of users.
Windows Log Entry
A windows log entry is a Windows Event Viewer entry monitored by WhatsUp Gold. This could be monitoring when a service is started or stopped, if there was a logon failure, or any other entry in the Windows Event Viewer.
Winsock
Winsock is a specification that developers of TCP/IP network software for Microsoft Windows use as a guideline for the standard application programming interface to their network software.
Wireless LAN
A wireless LAN is one in which a mobile user can connect to a local area network (LAN) through a wireless (radio) connection.
User’s GuideWhatsUp Gold
Index
AAcknowledging alerts
from console 142, 153, 159
Active Discoveryfilter by device 37master switch 45settings 35
Activity Log 155changing 153creating report from 157exporting data from 159types of activities 152viewing 155
Add-ins 93Alarm colors 53, 141Alarms 142
sounds 117, 136turning off 142, 153, 159
Alertsacknowledging from
console 142, 153, 159add to selected devices
134Annotation Object Galleries 56API for creating customized
service checks 93Applications
starting 66Attached lines
disconnecting 51drawing 51
Autorun program or script 72
BBeeper Notifications 108Binary value
searching for 89
CCaptions 54
Checkingdefinition 3
Colorscolored link lines 39device status 5, 53, 141map 53setting 53
COMextensibility 93interface 93
Command linecreating outage reports
with 160creating performance
graphs 175creating statistics reports
with 166Commands on right mouse
menu 66Context 33, 34cstatrpt.exe 175Custom
device types 76devices 68services 93web menu items 73
DDatabase
map formats 38DB files 11Debug Log 159Default gateway 254Dependencies 61, 145
setting 63Dependencies Window 143Device Properties
alerts 13, 133, 229general 13, 59menu 66monitor 13, 61
services 26, 79, 81, 82, 231
Devicesaddresses 3alerts 132custom 68general properties of 59icons 77IPX 3lock position 64monitoring 61monitoring services on 81names 49, 60quick status - status 5setting device states 53status 64types 3
DHCP 254Disconnecting attached lines
51Discover and Map 19, 49, 59
filter by device 23Disk space, amount of free 254Display name 60Domain Name Server 14Domain, local 254Drawing
shapes and lines 50text 54
DSN 10
EEdit Mode 49, 50
creating a map 31definition 4
E-mail Notifications 114Error codes (Winsock) 65, 146Ethernet 61Events
adding to a device 102associating an alert to 103
Index
WhatsUp Gold
267
26
event servers 96events library 97introduction to events 95master switch 45SNMP trap event 98syslog event 100triangle 104using events for the first
time 102visual indicator 104windows event log 101
Exchange service 83Exporting
data 159, 164map data 37performance graphs 175
Extensibility 93
FFeatures
new 8Filter By Device
during active discovery 37during SmartScan 23
Finger tool 246Flat networks 26Free disk space 254Free memory 254
GGateway, default 254Glossary 255Graphs
performance 168performance, exporting
175SNMP values 218
Group Notification 121
HHierarchical networks 20, 22,
25, 32, 42Host name 61
of local system 254Hosts file
importing devices from 20, 30
specifying 30HTML tool 236HTTP Content Scan 83
IICMP
network scan 26requests 3
Iconschanging standard 77custom device 76names 49
IMail Server xiiImporting
devices 20map data 37
Info tool 235Installation 11
upgrades 10Insufficient data 164IP Address of local system 254IP packet 241Ipswitch
products xiIPX 61
devices 59
LLabels 54LDAP tool 249Lines
colored link lines 39free (unattached) 50
List Window 146Lock Position (on map) 64Lookup tool 244Loopback network address 13
MManufacturer-provided SNMP
objects 204Map Properties
display 51general 32network 35, 44
Map Viewssetting
dependencies 53notifications 53poll order 53statistics 53status 53
Maps 3alarms 142colored link lines 39colors 53creating 17
blank 12drawing 31Scan tool 26SmartScan 42Traceroute 39
database format 38edit mode 31exporting and importing
37galleries 56hierarchical 22, 25, 32, 42icons, changing 77importing and exporting
37load on startup 15monitoring 141naming 33parent map 22, 25, 32, 42poll frequency 32, 140,
141properties 32saving 33setting map views 53subnets 22, 25, 32, 42
User’s Guide8WhatsUp Gold
titles 32Master Switches
active discovery engine 45event delivery engine 45status polling engine 45,
140Memory, amount of free 254Menu
add items to group 66dialog 66right mouse 66
MIB 199description 201mib.txt file 204mibextra.exe 204object identifiers 204
Microsoftexchange service 83NWLink IPX/SPX
Compatible Transport 10
Open Database Connectivity See ODBC.
SQL server 83Mini Status
mode 33view 149
Modemsdrivers 129setting up 129
Modes, Monitor and Edit 4Monitor Mode 31
definition 4Monitoring
enabling/disabling 139establishing the active
maps 139HTTP Content Scan 83Microsoft Exchange 83network maps 141network type 59polling frequency 62
services 3setting up 61SQL service 83using a web browser 183using dependencies
window 143using map window 141using mini status view 149using notifications
window 148using statistics window
146using status window 143
NName server 254Naming
icons 77maps 33
Net Toolsfinger tool 246html tool 236info tool 235LDAP tool 249lookup tool 244ping tool 240quote tool 251SNMP tool 206system info tool 254throughput tool 252time tool 237traceroute tool 242whois tool 248winnet tool 251
NetBIOS 59, 61Netmask 45, 254Network Neighborhood
discovering devices from 20, 21
Network type 59Networks
flat 26hierarchical 22
Notificationsadding to list box 136assigning to devices 132beeper 108defining 108editing 138e-mail 114group 121how WhatsUp Gold stores
108moving to another system
108pager 111program 123receiving 142recurring 179service restart 116sharing among Ipswitch
applications 108SMS 113sound 117syslog 118testing the notifications
128textspeech 119upgrading 108variables in 126viewing active 142voice 130winpopup 120
Notifications Window 148Novell NetWare networks 59NT service (WhatsUp Gold as)
15, 117starting and stopping 16
NWLink IPX/SPX Compatible Transport 59
OObject identifiers See SNMP.ODBC 10, 11Optional Map Views 53Outage Report 160
Index
WhatsUp Gold
269
27
PPager Notifications 111Parent map 22, 25, 32, 42Performance graphs 168
cstatrpt.exe 175exporting 175from the command line
175samples 173
Ping tool 240Plug-ins 93Polling
automatic 140definition 3dependencies 61frequency 32, 62, 141ICMP requests 3methods 59setting dependencies 145single check 143starting and stopping 139statistics 146, 162stopping automatic 140time of day 62timeout 61, 62
Port 3Port Conflict 227Program
running automatically 72starting 66
Program Notifications 123Program Options
device states 53galleries 56general 43logging 147, 163map settings 53SNMP traps 151, 226startup 15
Propertiesdevices 59display name 60host name 61
IP address 61maps 32
Protocols supported 59
QQuick Status 64
history 65log 66, 79, 134, 153status 5, 64, 79up-time 66
Quiet button 142Quote tool 251
RRecording wav files 129Recurring notification
creating 179Remote Authentication and
Dial-In User Service 83Reports
outage 157statistics 162using command line to
create outage report 160using command line to
create statistics report 166
Requirements (system) 9Response time See round trip
time.Right mouse menu 63, 66Rotating
text captions 55Round Trip Time 65, 168Rules expressions
search text 88text patterns 89
Running WhatsUp Gold as NT service 15
SSave
saving a context 33
saving a map 33Scan IP 49Scan tool 26, 45
custom icons 76Scan WinNet tool 49Scanning a network using
SmartScan 22Scanning the Windows
network 28Script
running automatically 72Search Expressions 172Servers
event servers 96name server 244web server 183
Servicerunning as NT service 15starting NT service 16
Service Restart Notification 116
Services 3custom 93how they are monitored 3monitoring 81properties 81resume previous state on
map load 46status 65
SmartScan 21, 22, 25, 42, 45, 49, 76
filter by device 23SMS Notification 113SNMP
concepts 200defining a monitor 91enable trap handler 226manager 199MIB 199monitoring whether
SNMP is running 231network scan 20object identifiers 204
User’s Guide0WhatsUp Gold
objects 200, 201, 204, 205, 206, 218, 219
overview 199, 200port conflict 227star 231traps 132, 142, 204, 226,
231viewer 208
SNMP tool 206Sound notification 117Sounds
quieting alarm 136, 142recording 129turning off alarm 136, 142
SQL server 83Star
SNMP 231Starting applications 66Starting programs 66Statistics See polling statistics.Statistics Log 162
changing 163exporting data from 164
Statistics Reports 162Statistics Window 146Status
device 64message 141network element 64services 65viewing 143
Status Window 143Subnet maps 22, 32, 42
loading 43viewing 43
Subnets 22, 25, 26, 32, 42Syslog 152Syslog Notification 118System Info tool 254System information 254System requirements 9
TTCP/IP 3, 9, 83Templates
for the web 196Testing
installation 12Text captions
creating 54Text to Speech Notification
119Throughput tool 252Time period 62Time tool 237Timeout
polling 32, 62Tips
making a map easier to read 49
Toolbarsarranging 56
Traceroute tool 241Trap log 231Traps.txt file 204Triangle
event 104Trigger 136, 154Trigger and SNMP traps 230
UUnimodem V 129Upgrading 10
keeping old notifications 108
User accounts 186
VVariables
in notification messages 126
VDevice 69Vendor-provided SNMP
objects 204Views
dependencies 143mini status 149notifications 148setting map views 53statistics 146status 143
Visual Indicatorevent 104SNMP 231
Voice modemsetting up 129
Voice Notifications 130
WWeb pages
main page title 184refresh frequency 184TCP Port 184templates 196top view title 184views 192
Web serveraccess by IP address 186,
189logging on 191making maps available
185setting up 183user accounts 186views 192
Web Templates 196Whois tool 248Windows registry
importing devices from 20WinNet tool 251WinPopup Notification 120Winsock
errors 65, 146information 254
WS_FTPFind Utility xiPro (FTP Client) xiScripting Utility xi
Index
WhatsUp Gold
271

27
Server xiSynchronize Utility xi
WS_Ping ProPack xiiwugapi.h file 93wugrpt.exe 160wugstat.exe 166wugstats.log 168wugsvc.exe 16
ZZero status code 65
User’s Guide2WhatsUp Gold


![WhatsUp Gold v16 - Ipswitch · WhatsUp Gold v16.3 Database Migration ... See Executing SQL statements against the WhatsUp Gold database ... EXECUTE [sys]. [sp ...](https://static.fdocuments.in/doc/165x107/5b31f8547f8b9adf6c8bb1ed/whatsup-gold-v16-ipswitch-whatsup-gold-v163-database-migration-see-executing.jpg)