WHAT IS THE DESIGN PROCESS? - James Dyson …...James Dyson Foundation 2 Introduction What is the...
18
WHAT IS THE DESIGN PROCESS? Understand the design process and put it into practice Introduction 02 What is the design process? 04 Case study: The Supersonic Hairdryer Lesson plans 08 Lesson 1: Taking on the brief 10 Lesson 2: Product development – research and planning 12 Lesson 3: Product development – building and testing 14 Lesson 4: Go to market 16 Lesson 5: The big pitch Resources 17 Specification worksheet
Transcript of WHAT IS THE DESIGN PROCESS? - James Dyson …...James Dyson Foundation 2 Introduction What is the...

WHAT IS THE DESIGN PROCESS?Understand the design process and put it into practice
Introduction 02 What is the design process? 04 Case study: The Supersonic Hairdryer
Lesson plans08 Lesson 1: Taking on the brief 10 Lesson 2: Product development – research and planning 12 Lesson 3: Product development – building and testing 14 Lesson 4: Go to market 16 Lesson 5: The big pitch
Resources17 Specification worksheet

2James Dyson Foundation What is the design process?Introduction
Engineers use their knowledge of science, technology, engineering, math and creative thinking to solve problems. Engineers refer to the stages of the design process as: Specify, Plan, Design, Build, Test, Analyze. This process is iterative and non-linear.
Specify
Every Dyson project starts with a problem: unhygienic hand-dryers, vacuum cleaners that lose suction or robotic cleaners that fail to navigate intelligently.
The brief that design engineers start with is very broad. A list of requirements is then compiled, forming the product specification. This is the measuring stick for assessing a product’s success.
The following key criteria and constraints can be remembered with the acronym “ACCESS FM.”
AestheticsWhat will the product look, feel or sound like?
CostWhat is the estimated manufacturing cost of the product, and what will its retail price be?
CustomerWho is the product designed for?
EnvironmentWhat is the product’s impact on the environment?
SafetyHow will the user be kept safe from harm?
SizeAre the proportions of the product appropriate?
FunctionHow well does the product work - and is it easy to use?
MaterialsWhat is the product made from, and what does this mean for manufacturing?
WHAT IS THE DESIGN PROCESS?

3
Moulton Bicycle design drawing Morph™ wheel development
PlanProjects run to a tight schedule. The iterative nature of the design process means that the idea will need to be prototyped, tested and then improved – again and again. Project milestones help to keep the engineers on schedule.
DesignDesigns are never perfect the first time. Engineers will repeat the design process cycle several times, tweaking and changing their design slightly each time. It took James Dyson 5,127 prototypes to get the first cyclonic vacuum right.
Engineers work in teams. Sharing ideas and challenges leads to more creative solutions. With a design brief in hand, Dyson engineers will start by brainstorming solutions. No idea is wrong – and everything is written down.
Sketching is next. Engineers keep the sketch rough and ready – it’s about communicating complex ideas, simply. Sketching also helps the team plan the layout of the parts and how the machine might look.
BuildEngineers make 3D prototypes early on. It’s quite crude in the beginning: a cardboard model. Cheap and pliable, cardboard allows the engineers to model basic functions, quickly. They then move on to Computer Aided Design (CAD). This allows engineers to test calculations and airflow dynamics as well as send the CAD parts to a 3D-printer. The 3D printed parts can be assembled with motors and electronics into fully functioning machines.
TestTesting makes or breaks a product – literally. Engineers test prototypes, often to destruction. This allows them to ensure that the machine fulfills the design specifications and will survive usage in a home. After the design has been tested, it will be redesigned, rebuilt, and tested again. This process will be repeated many times.
AnalyzeOnce engineers are confident with the design, the product will move on to manufacture. The first run of machines – Engineering Build 1 (EB1) – will go through extensive testing to ensure the materials and molding work meet the design specification, and that they will last for the machine’s expected lifetime. The design will often meet some failure at the manufacturing stage. But engineers take on those challenges again to make the machine better.
Introduction James Dyson Foundation What is the design process?

4
Teamwork between different types and teams of engineers is essential to overcoming the challenges that can be encountered when developing a new product.
For example, the Dyson Supersonic™ hair dryer has a unique shape: it has a hole in the middle. This shape is essential to the function of the machine – but it created challenges for its development.
Conventional hair dryers often use flat sheets of Mica slotted together in a Christmas tree shape for the heating element. Wire is then wrapped around this structure. Dyson engineers needed to develop a heating element which worked within the unique shape of the Dyson Supersonic™ hair dryer. They designed a heating element which uses specially produced Mica tubes, positioned in a donut shape with two, resistive wires wrapped around them. These wires are structured in a wave-form pattern and interwoven around the tubes.
Initially the engineers developed a one-layer heating element, using wire which was more loosely woven, creating larger wave shapes. However, they found that this had limitations. The large wave shapes of the wire would wobble and touch each other, causing the machine to cut out. This is why the heating element has two layers and two wires – allowing for smaller wave patterns, tightly woven.
Design, electrical and test engineers had to work together to make sure that the heating element worked properly, fitted into the unique format of the machine – and was reliable. The process took a total of three years, making iterative developments and doing extensive testing on the element to ensure it worked and did so safely.
THE DYSON SUPERSONIC™ HAIR DRYER
Case study James Dyson Foundation What is the design process?

5
Wave-form Mica tubed heating element
Case study James Dyson Foundation What is the design process?
6
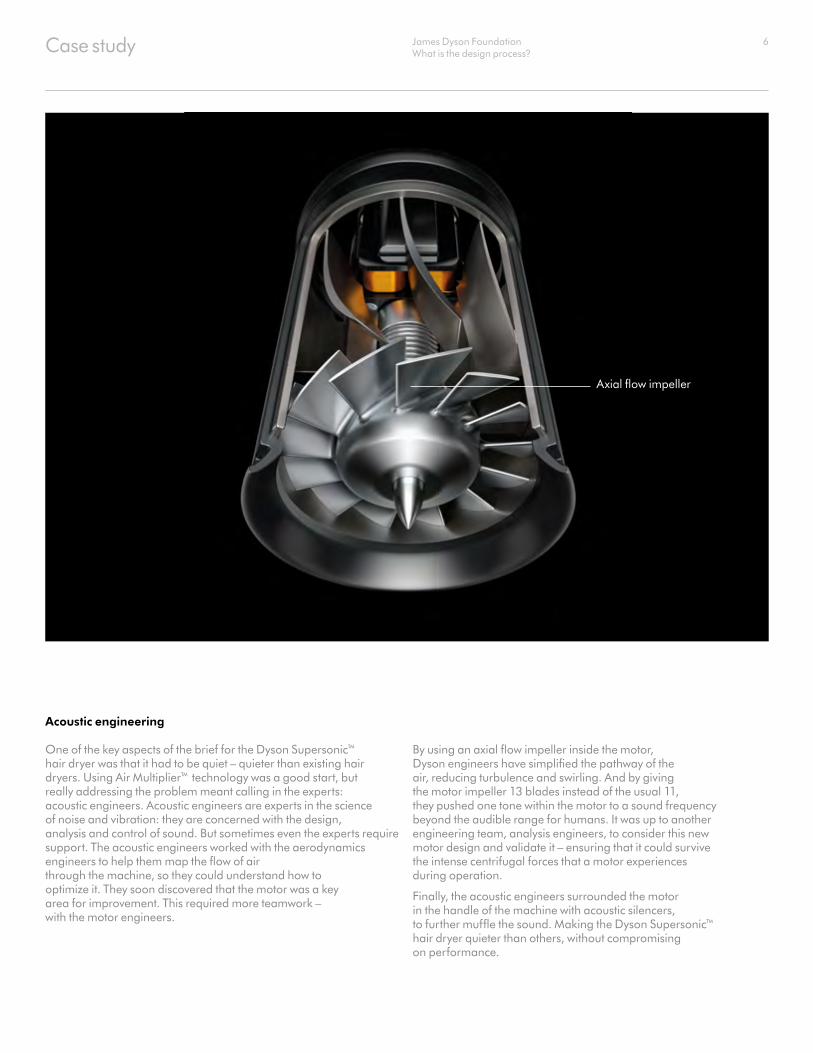
Axial flow impeller
Acoustic engineering
One of the key aspects of the brief for the Dyson Supersonic™ hair dryer was that it had to be quiet – quieter than existing hair dryers. Using Air Multiplier™ technology was a good start, but really addressing the problem meant calling in the experts: acoustic engineers. Acoustic engineers are experts in the science of noise and vibration: they are concerned with the design, analysis and control of sound. But sometimes even the experts require support. The acoustic engineers worked with the aerodynamics engineers to help them map the flow of air through the machine, so they could understand how to optimize it. They soon discovered that the motor was a key area for improvement. This required more teamwork – with the motor engineers.
By using an axial flow impeller inside the motor, Dyson engineers have simplified the pathway of the air, reducing turbulence and swirling. And by giving the motor impeller 13 blades instead of the usual 11, they pushed one tone within the motor to a sound frequency beyond the audible range for humans. It was up to another engineering team, analysis engineers, to consider this new motor design and validate it – ensuring that it could survive the intense centrifugal forces that a motor experiences during operation.
Finally, the acoustic engineers surrounded the motor in the handle of the machine with acoustic silencers, to further muffle the sound. Making the Dyson Supersonic™ hair dryer quieter than others, without compromising on performance.
Case study James Dyson Foundation What is the design process?

7
Induced air
Induced air
Entrained air
Entrained air
HOW DOES IT WORK?Air is drawn in by the motor and accelerated over an annular aperture. This creates a jet of air which passes over an airfoil-shaped ramp that channels its direction. Surrounding air is drawn into the airflow (this is called inducement and entrainment). The result is that the volume of air coming out of the hair dryer is three times that going into the motor. This system is called Air Multiplier™ technology – it’s patented by Dyson.
Case study James Dyson Foundation What is the design process?

8
TAKING ON THE BRIEF
Learning objectives:
1. Understand the importance of design briefs and specifications.2. Develop qualitative and quantitative criteria and constraints for a brief.
Activity outcomes:
– Class discussion about the brief and design specifications of the DC39 – Completed group brainstorm for a product that solves a specific problem – Completed group product specifications
Things you will need:
– Pens and paper – Specification worksheet (page 17)
Starter: 15 minutes
What are briefs and specifications?
Learning objective Activity
1 Explain to students that engineers are given a brief, which explains the challenges that must be answered by a product and the parameters in which a design engineer must work. For example, a product might need to be a certain size or perform a particular function.
1 As a class, discuss the criteria that were considered when developing the design specification for a product in the classroom or that students own, such as their chairs, desks, cell phones, or backpacks.
1 Prompt the students to consider the brief in terms of ACCESS FM.
– Aesthetics – Cost – Customer – Environment – Safety – Size – Function – Materials
Duration: 1 hour 30 minutes
Lesson 1 James Dyson Foundation What is the design process?

9
Main: 45 minutes
Take on the brief
Wrap up: 30 minutes
Develop the specification
Learning objective Activity
1, 2 Explain to students that for the next four lessons, they are going to think like engineers. In this class, the students will be taking on a design brief and developing specifications. In the next classes, they will be conceptualizing, researching and prototyping products to meet these specifications.
Break the class into six groups. Give each group one of the following six briefs:
– Design a product that will encourage high school students to lead a healthier lifestyle.
– Design a product that will improve the safety of high school students walking home from school.
– Design a product that that will improve the safety of elderly people alone in the home.
– Design a product that will help high school students to pay more attention in class.
– Design a product that will help to address the isolation and loneliness experienced by some elderly people.
– Design a product that will help owners to make sure their pets are cared for when they are away from home.
1, 2 Give students 30 minutes to independently think about and sketch possible solutions to their group’s brief. Encourage preliminary online research.
1, 2 Ask students to present their ideas to their group. Encourage students to ask questions, and then agree upon a final solution – as a group.
Learning objective Activity
2 Once each group has agreed on a design, give them a Specification worksheet (page 17).
2 Explain that each group should use the worksheet to define specific and realistic qualitative or quantitative criteria and constraints for their design.
Lesson 1 James Dyson Foundation What is the design process?

10
PRODUCT DEVELOPMENT – RESEARCH AND PLANNING
Learning objectives:
1. Understand how to use a specification to guide product development. 2. Understand how to work as a team to achieve an objective. 3. Develop independent research skills.
Activity outcomes:
– Completed group research into product specification – Presentation of specification research
Things you will need:
– Pens and paper – Computer access for each student – Specification worksheet (page 18)
Starter: 10 minutes
Take on problems as a team
Learning objective Activity
1 Explain to the students that today they will be continuing to work in their groups to develop the designs they chose in the last lesson.
They will need to conduct research, and make a plan to keep development on track.
2, 3 Explain that in order to develop the best solution possible, the students will need to take
individual responsibility for different aspects of the specification – reporting their findings to the group, so that collective decisions can be made.
You may want to photocopy the Dyson Supersonic™ hair dryer case study (pages 4 – 7), and distribute to the students. This will help to explain that while engineers have different specialties, they work together to solve problems.
Duration: 1 hour 30 minutes
Lesson 2 James Dyson Foundation What is the design process?

11
Main: 60 minutes
Research the specifications
Wrap up: 20 minutes
Research the specifications
Learning objective Activity
1, 2 Ask each group to work together to consider the ‘function’ aspect of the Specification worksheet, which they completed in the last lesson. What does the product do, and how does it work?
The students should write a list of the different aspects that will be required to make the product work – such as electronics and sensors, power sources, LEDs, etc. The students should work together to research these elements, and uncover any potential issues.
1, 3 Ask each group to review their completed Specification worksheets and divide responsibility for the other criteria among themselves.
3 Explain that the students now need to individually research their criteria, and that they will give a two minute presentation of their findings to their group. While they are researching as individuals, they will come back together as a group to think about how the findings will impact on the development of their product.
The students may want to research online or, if appropriate, they may want to survey their classmates or potential users. This is a good opportunity to build in a homework or extension exercise.
This part of the lesson can be extended or repeated if more time is required.
Learning objective Activity
1, 2 Ask the students to present their findings to their group. Encourage the group to ask questions.
Lesson 2 James Dyson Foundation What is the design process?

12
PRODUCT DEVELOPMENT – BUILDING AND TESTING
Learning objectives:
1. Understand the myriad parts needed to create a functional product.2. Appreciate the importance of continuous iteration to the design process.
Activity outcomes:
– Completed student annotated sketches and parts list – Completed group prototype – Completed student reflections
Things you will need:
– Pens and paper – Prototype-building supplies and equipment (cardboard, tape, scissors, glue, etc)
Starter: 15 minutes
Annotated parts
Main: 45 minutes
Build the prototype
Learning objective Activity
1 Building on the research carried out in the previous lesson, ask the student groups to sketch their product.
Explain the sketch should be annotated to identify each part needed for the product to function – and what those parts will be made of. Make sure the groups think about what’s on the inside of the product, as well as the outside.
Learning objective Activity
1 Explain that in this lesson, the students are going to create a rough-and-ready prototype of their product.
Students should consult their parts list and work together to build each part.
Duration: 1 hour 30 minutes
Lesson 3 James Dyson Foundation What is the design process?

13
Learning objective Activity
1, 2 Explain to students that they should select a lead engineer. This person should delegate who is building which parts, ensure consistency in dimensions and quality, and note any additions or adjustments made to the product’s design and parts list.
This lead engineer should also ensure that the build process is finished within a reasonable time frame.
1, 2 Ask the students to construct their prototype. Encourage the groups to test their product as they go along, to understand how a user would interact with it, and ascertain where there may be design flaws.
Remind them that the design process is iterative, and encourage them to work together to modify and improve their design as they encounter difficulties.
Make sure that any changes to the design or function are recorded by the lead engineer.
This part of the lesson can be extended or repeated if more time is required.
Wrap it up: 30 minutes
Reflect
Learning objective Activity
1, 2 Once the prototype’s construction is complete, ask each student to write their reflections on the building and testing experience. They may want to consider:
– What changes were made to the product’s design, and why?
– How will the changes impact the design specification?
– How did you ensure whether a part’s design would function appropriately?
– How might this affect the materials used to create that component?
Lesson 3 James Dyson Foundation What is the design process?

14
GO TO MARKET
Learning objectives:
1. Understand how to calculate profit margins.2. Learn how to think about a product in a market context. 3. Develop critical analysis skills.4. Develop skills in persuasion.5. Develop presentation skills.
Activity outcomes:
– Estimate of manufacturing costs and profit margin calculation – A business and marketing plan
Things you will need:
– Pens and paper– Computer access
Starter: 45 minutes
Go to market
Learning objective Activity
1 Explain that in today’s lesson, the student groups will be preparing to pitch their products. But before they can start planning their presentations, they need to work out what cost they will sell their product for.
Explain that cost engineers use engineering principles to control costs and make sure projects are completed within budget.
Cost engineers consider the labor and manufacturing costs, the purchase price of every part, and finishing elements such as coats of paint. They make suggestions as to design changes that will improve a product’s profit margin.
1 Ask the student groups to estimate what they want to sell their product for, and how much profit they would like to make. The students should then work in their groups to estimate the manufacturing costs of their finished product. They should think about:
– The cost of each part – The cost of finishing – such as paint – The cost of labor to make the product
Once they have this estimate, ask the students to subtract the cost of manufacturing from the amount they plan to sell the product for. This figure is their profit margin.
If the profit margin is not healthy, the group may want to consider making some changes to their design.
Duration: 1 hour 30 minutes
Lesson 4 James Dyson Foundation What is the design process?

15
Learning objective Activity
1, 2 Now ask the groups to consider other, similar products that are already on the market. How much do these products sell for? Will their price be competitive – or do they believe that their design is unique enough to justify a higher price point?
2, 3 Give the students 10 minutes to consider whether they would like to make any design changes in light of their findings.
Main: 30 minutes
Planning the pitch
Learning objective Activity
3 Now that they know how much they will sell their product for, the student groups need to decide how to market it.
Explain that for the next 30 minutes, they will be working on a plan that explains their business and marketing strategy. This plan will be presented to the class – so it needs to be visually engaging.
3, 4 The plan should identify the strengths and weaknesses of their products, and should address the following questions.
– What is it, and what problem does it solve?– How does it work, and why is it better than existing solutions?– Who will use it?– How will it be manufactured and what will it cost? What will the profit margin be?– How many units of the product will be sold every year?– How will people get to know about the product – and how will they be convinced to buy it?
3, 4 This activity can be extended by asking the students to develop marketing materials to support their presentation:
– An infomercial explaining what the product is, its key features, and how it is different to or better than rival products. – An instructional video or brochure explaining how to use the product. – A print advert that highlights the features and functions of the design.
Plenary: 15 minutes
Prepare for launch
Learning objective Activity
5 Ask the groups to practice their presentations, and identify any areas they need to improve before the next lesson.
This activity can be extended as homework – ask the students to perfect their presentations and supporting materials before the next lesson.
Lesson 4 James Dyson Foundation What is the design process?

16
THE BIG PITCH
Learning objectives:
1. Develop presentation skills.2. Develop critical analysis skills.
Activity outcomes:
– Presentation – Critical discussion of products and business plans
Things you will need:
– A projector – Computer access
Starter: 45 minutes
Preparation
Learning objective Activity
1 Explain that today’s lesson will be focused on group presentations. Give the students 10 minutes to prepare their presentation.
Duration: 1 hour 30 minutes
Lesson 5 James Dyson Foundation What is the design process?
17
Wrap up: 15 minutes
Best product design
Learning objective Activity
2 Ask students to refer back to their notes on the other groups’ presentations.
2 Explain they should vote for a team (that is not their own) that had the most persuasive presentation.
Count the votes and award a small prize to the winning team.
Top tip
An alternative to this lesson is to hold a design exhibition, which other students and teachers can visit. Student groups can display their prototypes, and pitch their product to the attendees. To make the event even more exciting, you could ask a local engineer to come in and meet the students – and even judge the best product.
Main: 1 hour
The big pitch
Learning objective Activity
1, 2 Ask each group to present. Explain that the other students should take notes during each presentation, summarizing: the name, novelty, function, price, and persuasive arguments.
1 Make sure each group answers the following questions:
– What is it, and what problem does it solve?– How does it work, and why is it better than existing solutions?– Who will use it?– How will it be manufactured and what will it cost? What will the profit margin be?– How many units of the product will be sold every year?– How will people get to know about the product – and how will they be convinced to buy it?
2 At the end of every presentation, encourage the class to ask questions.
Lesson 5 James Dyson Foundation What is the design process?

18
This worksheet should be used to record the key criteria and constraints. This is your product specification – the measuring stick for assessing your product’s success.
Aesthetics
What will the product look, feel or sound like?
Cost
What is the estimated manufacturing cost of the product, and what will its retail price be?
Customer
Who is the product designed for?
Environment
What is the product’s impact on the environment?
Safety
How will the user be kept safe from harm?
Size
Are the proportions of the product appropriate?
Function
How well does the product work - and is it easy to use?
Materials
What is the product made from, and what does this mean for manufacturing?
Specification worksheet James Dyson Foundation What is the design process?