Welcome to DECIBEL - Decibel -- A Complete Solution - DECIBEL User Guide.pdf · Welcome to DECIBEL...
15
Transcript of Welcome to DECIBEL - Decibel -- A Complete Solution - DECIBEL User Guide.pdf · Welcome to DECIBEL...

Welcome to DECIBEL
E-Portal USER GUIDE
Welcome to DECIBEL (An Intranet Application), your Online Resource Centre.
Through DECIBEL, we’ve provided you with lots of useful information, available with just a few clicks of a
mouse! Fast and Easy!
View your pay stubs and tax working
See how many annual, casual and sick leaves you have left
See your salary history
Access employee handbook and download forms
Review your benefits and dependant information
View your attendance log

Table of Contents
E-Portal USER GUIDE
Section No.
Contents Description
1 Navigation to DECIBEL and Login
2 My Dashboard & Account Management
3 My Profile
4 My Payroll
5 My Leaves
6 My Benefits

Navigating to DECIBEL and Login
E-Portal USER GUIDE
Access to the Decibel application is browser-based i.e. it runs within a browser window, such as Microsoft Internet Explorer. PROCEDURE
STEP ACTION
1 Open Internet Explorer from your desktop.
2 Type http://192.168.3.10/decibelportal/ into the address bar near the top of the Internet Explorer screen and press the Enter key
STEP ACTION
3 Add to Favorites: Click on ‘Favorites’ in the explorer tool bar and select ‘Add to Favorites Bar’

Navigating to DECIBEL and Login
E-Portal USER GUIDE
STEP ACTION
4 Type your User ID (Your official email address e.g. [email protected]) and Password into the login page. If you are logging in for the first time, your start-up Password is your CNIC number. Remember, passwords are case sensitive.
5 Click the “Sign in” button.
<End of Section>

My Dashboard
E-Portal USER GUIDE
CHANGE PASSWORD If this is your first ever login to DECIBEL, it is highly recommended that you change your password. PROCEDURE
STEP ACTION
1 On the bottom right side of your Dashboard, click on ‘Change Password’ given under Account Management options.
STEP ACTION
2 Enter your current password into the first field labeled “Enter Old Password” and press the Tab key.
3 Enter your new password into the second field labeled ‘Enter New Password’.
4 Re-enter the same new password into the third field labeled ‘Confirm New Password’.
5 Click ‘Submit’ to complete the procedure.
6 To return back to your Dashboard, click on ‘My Dashboard’ in the menu tab
When you have completed working in the system, always click on Log Out in the upper left-hand corner of the panel.
My Dashboard
E-Portal USER GUIDE
The system will automatically sign a user off after 10 minutes of inactivity UPLOAD PHOTO You can upload your photos to personalize your dashboard. PROCEDURE:
STEP ACTION
1 On the bottom right side of your Dashboard, click on ‘Upload Photo’ given under Account Management options.
2 Click on ‘Browse’ button to select a photo (JPEG format only) from your PC picture directory.
3 Select photo and click ‘Upload’ to complete the procedure.
4 To return back to your Dashboard, click on ‘My Dashboard’ in the menu tab or log out.
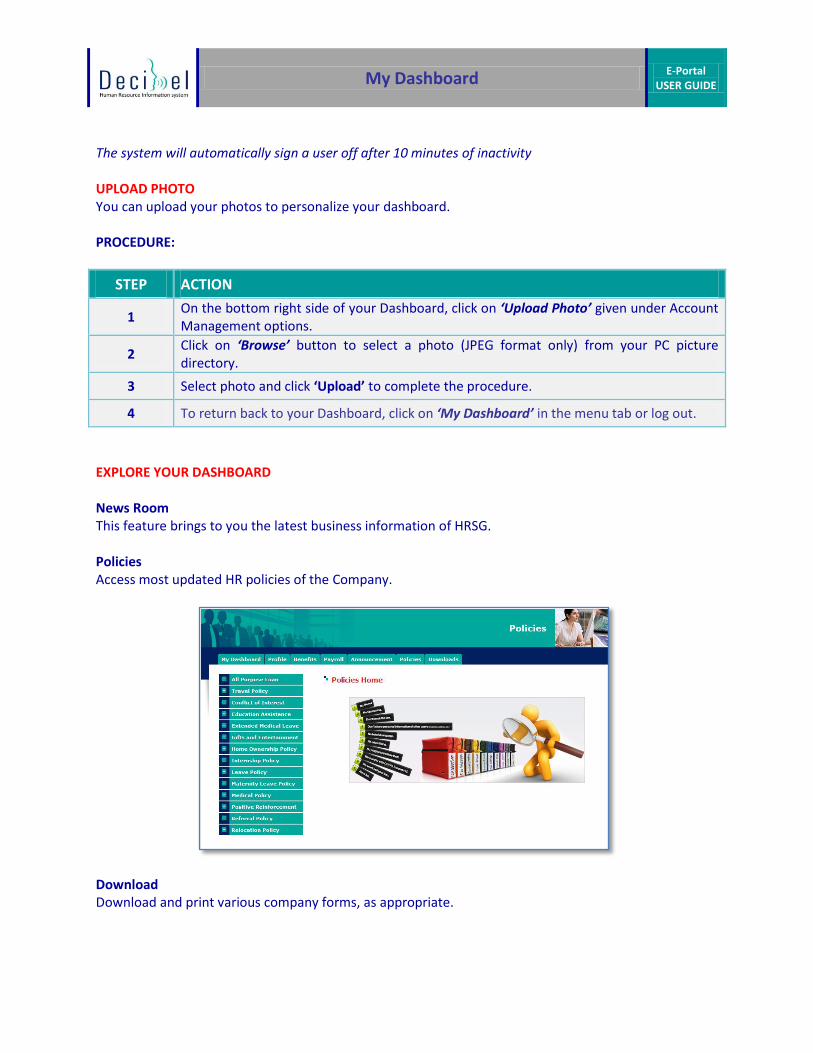
EXPLORE YOUR DASHBOARD News Room This feature brings to you the latest business information of HRSG. Policies Access most updated HR policies of the Company.
Download Download and print various company forms, as appropriate.

My Dashboard
E-Portal USER GUIDE
My Profile This feature brings to your up-to-date data i.e. Personal, Employment, and Beneficiary’s information etc. For details on this feature, refer to section MY PROFILE of this User Guide. My Benefits This feature provides you with details on your benefits plan applicable at your grade i.e. Group Life Insurance Plan, Hospitalization Plan, EOBI, Gratuity etc. For details on this feature, refer to section BENEFITS of this User Guide. My Payroll View your up-to-date pay slips, tax working and salary revisions from the day of joining the Company. For details on this feature, refer to section MY PAYROLL of this User Guide. Announcements Keep track of the Company announcements, i.e. recreational activities, public holidays, and various program announcements. My Leaves Keep track of your leave balances, submit your leave applications, modify your leave request, and plan your vacation with using Absence Management tool. For details on this feature, refer to section MY LEAVES of this User Guide.
<End of Section>

My Profile
E-Portal USER GUIDE
This feature brings you your personal data, employment data and beneficiaries’ information. PROCEDURE
STEP ACTION
1 To view your profile, click on the desired information tab given under ‘My Profile’ on the middle right side of you Dashboard.
2 If you have selected Job Data, you would land on the page which displays your employment information i.e. Employee ID, Employment Type, Date of Joining, Designation, Supervisor’s Name and Designation etc.
STEP ACTION
3 To select any other information you wish to view, click on the desired tab from the menu appearing on the left side of this page e.g. Personal Data, Beneficiary Data etc.
4 To return back to your Dashboard, click on ‘My Dashboard’ in the menu tab or log out.
<End of Section>

My Payroll
E-Portal USER GUIDE
View your last six months pay slips, income tax calculations/deductions for applicable assessment years and salary revisions from the day of joining. CREATING HASH PIN CODE This is an additional security level that has to be passed before you can view your payroll data. PROCEDURE
STEP ACTION
1 To create your Hash Pin Code, click on Payroll from the top menu bar.
2 At the security check point, a default user id would be given. Enter a pin code of your choice in New Pin Code field and press tab key.
3 Enter the same code in Confirm New Pin Code and click on Submit to complete the procedure. Note: Remember the Pin Code for future visits.
VIEW PAY SLIPS PROCEDURE
STEP ACTION
1 Click on My Pay Slip from the menu given under My Payroll on My Dashboard
2 At the Security Check Point, enter your pin code in PIN CODE field and click on Login
3 From the list of pay slips appearing on this page, select the month you wish to view.
STEP ACTION
4 Your pay slip would be displayed on this page.
5 To print your pay slip, click on the print icon on the bar above the pay slip.
6 To view your pay slip for any other month, select from the list in the similar manner or to return back to your Dashboard click on My Dashboard.

My Payroll
E-Portal USER GUIDE
VIEW TAX WORKING PROCEDURE
STEP ACTION
1 Click on My Taxation from the menu given under My Payroll on My Dashboard
2 At the Security Check Point, enter your pin code in PIN CODE field and click on Login
STEP ACTION
3 Select the desired report from the menu on left, enter the assessment year the Assessment Year from the drop down and click on Submit to view the report.
4 The report would be displayed showing Tax Calculation.
5 To print the report click on the print icon given on the top bar of the report.
6 To view another report select the desired report from the menu at the left. To return to your dashboard, click on My Dashboard or log out.
VIEW TAX WORKING PROCEDURE
STEP ACTION
1 Click on My Salary History from the menu given under My Payroll on My Dashboard
2 At the Security Check Point, enter your pin code in PIN CODE field and click on Login
3 Your salary revisions from the Date of Joining would be displayed on this page.
4 To return to your dashboard, click on My Dashboard or log out.
<End of Section>

My Leaves
E-Portal USER GUIDE
This topic will demonstrate the basics of submitting and planning your absences in DECIBEL application. LEAVE BALANCE PROEDURE
STEP ACTION
1 To View your leave balance, click on ‘My Leave Balance’ from Absence Management on My Dashboard.
2 Your entitlement and available balance for casual, sick and annual leave would be displayed on this page.
3
For details on the leave accruals and balance on a specific leave, select ’Get Detail’ next to the leave balance of that leave type. A report showing your opening & closing balance, monthly accruals and available balance would be displayed on this page.
4 To view details for other leaves, click on the Get Detail for that specific leave in the similar manner.
5 To return back to your Dashboard click on to My Dashboard or log out.
POST LEAVE APPLICATION This topic will cover the procedure for submitting a leave request. PROCEDURE
STEP ACTION
1 To submit your request for leave; click on ‘Post Leave Application’ from Absence Management tools on My Dashboard.
2 Select the type of leave you wish to avail from Leave Type drop down.
3 Enter the duration of leave by selecting From Date and To Date from the given drop down.
4 To calculate the total number of days for the selected duration click on ‘Get Days’.
5 Enter the ‘Reason’ for posting a leave request.
6 Enter the ‘Address’ and ‘Contact #’ for company’s record for contact in your absence, if applicable.
7 Click on ‘Post Application’ to submit leave request.
8 Your request for leave day will be sent to your supervisor for approval and would appear in a table on the bottom of this page, until approved, followed by an email notification when your request is approved or disapproved.
10 To return back to your Dashboard click on to My Dashboard or log out.
My Leaves
E-Portal USER GUIDE
RECALL APPROVED LEAVE APPLICATION
PROCEDURE
STEP ACTION
1 To recall your leave request, still awaiting approval, click on ‘Post Leave Application’ from Absence Management tools on My Dashboard.
2 At the bottom of the Post Leave Application Page, all leave applications awaiting approval would be displayed in a table.
3 To open the leave request you wish to cancel/recall, Click on Select key given next to that application details.
4 From the Status drop down select Cancel and click on Post to recall the application.
5 The application would be recalled and removed from this page.
6 To return back to your dashboard, click on My Dashboard or log out.
MODIFY APPROVED LEAVE REQUEST PROCEDURE
STEP ACTION
1 To submit your request for leave modification; click on ‘Leave Modification from Absence Management tools on My Dashboard.
2 Select the month for which the leave was approved from the Leave Month drop down and click on Get Leaves to view the all approved leaves of that month.
3 All approved leaves from the selected month would be displayed. To open the desired leave, click on Select option given next to that leave.
4 Modify by selecting the duration from the Month & Date drop downs.
5 Click on Abandon Leave checkbox, enter the Reason for modification and click Post Leave Application to submit request for approval.
6 Your request for leave modification will be sent to your supervisor for approval and would appear in a table at the bottom of this page, until approved, followed by an email notification when your request is approved or disapproved.
5 To return back to your dashboard, click on My Dashboard or log out.
<End of Section>

My Benefits
E-Portal USER GUIDE
This topic will demonstrate the basics of benefits management and administration through E-Portal.
LOANS This feature brings you the loan installments and deduction details for the loan facility availed. GROUP LIFE INSURANCE This feature brings you the group life insurance coverage details applicable to your level / grade. RETIREMENT BENEFITS Gratuity View your gratuity balances updated on a quarterly basis. Provident Fund View your PF balances updated on a monthly basis. MEDICAL CLAIMS POST OPD CLAIM PROEDURE
STEP ACTION
1 To post your OPD / Hospitalization claims, click on the OPD Claims in Benefits section from My Dashboard
2 On the OPD Claim page click on Check Balance to view your claim balance
3 To submit your OPD Claim select the person you would like to submit the claim for and enter the amount.
4 Click on Post Claim to submit the claim.
My Benefits
E-Portal USER GUIDE
PRINT OPD CLAIM PROEDURE
STEP ACTION
1 To print your OPD / Hospitalization claim, click on View Medical Claims from menu in the Benefits section
2 Select the desired Month & Claim Type i.e. OPD or Hospitalization and click on Check Claims
3 The claims posted in the selected month would be displayed on this page.
4 Click on the Print option of the claim you would like to print.
5 The Claim form would be displayed on this page. Click on the Export option to export the claim form in the desired format and print the form.
6 To print another claim form, repeat the same procedure. To return to Dashboard click on My Dashboard or log out.
<End of Section>