wedi Broschuere TECHNISCHES-HANDBUCH USA 2015 … · Technical Handbook Waterproofing System...
104
Technical Handbook Waterproofing System Solutions for tiled wet rooms USA / CANADA
-
Upload
hoangduong -
Category
Documents
-
view
217 -
download
0
Transcript of wedi Broschuere TECHNISCHES-HANDBUCH USA 2015 … · Technical Handbook Waterproofing System...

Technical HandbookWaterproofing System Solutions for tiled wet rooms
A /A
USA /CANADA
wedi_Broschuere_TECHNISCHES-HANDBUCH_USA_2015_v4_lay1_Layout 1 30.06.15 15:03 Seite 1

2
wedi_Broschuere_TECHNISCHES-HANDBUCH_USA_2015_v4_lay1_Layout 1 30.06.15 15:03 Seite 2

3
wedi – always close by
From Emsdetten in Germany and Europe to North America wedi has close ties to the world of building and
renovation. Thanks to our extensive presence, we are always in the position to react quickly and without
complications to the requirements of our customers. A large number of notable companies in Germany and
abroad benefit from the innovative development of our product systems, partly because we know the needs
of our contractors like the back of our hands. Wherever you are in the building industry, we are right by your
side with expertise, performance and passion. Leading you to success.
Stephan WediManaging Director, wedi GmbH
Right by your sidewherever you are.
Prem
ium
bra
nd w
edi
Czech Republic
Denmark
Estonia
Finland
France
Germany
Great Britain
Greece
Hungary
Iceland
Ireland
Italy
Latvia
Lithuania
Luxembourg
Netherlands
Norway
Poland
Portugal
Romania
Russia
Serbia
Slovenia
Spain
Sweden
Switzerland
Turkey
Ukraine
USA
Canada
Australia
Austria
Belgium
Bosnia Herzegovina
Croatia
wedi_Broschuere_TECHNISCHES-HANDBUCH_USA_2015_v4_lay1_Layout 1 30.06.15 15:03 Seite 3
4
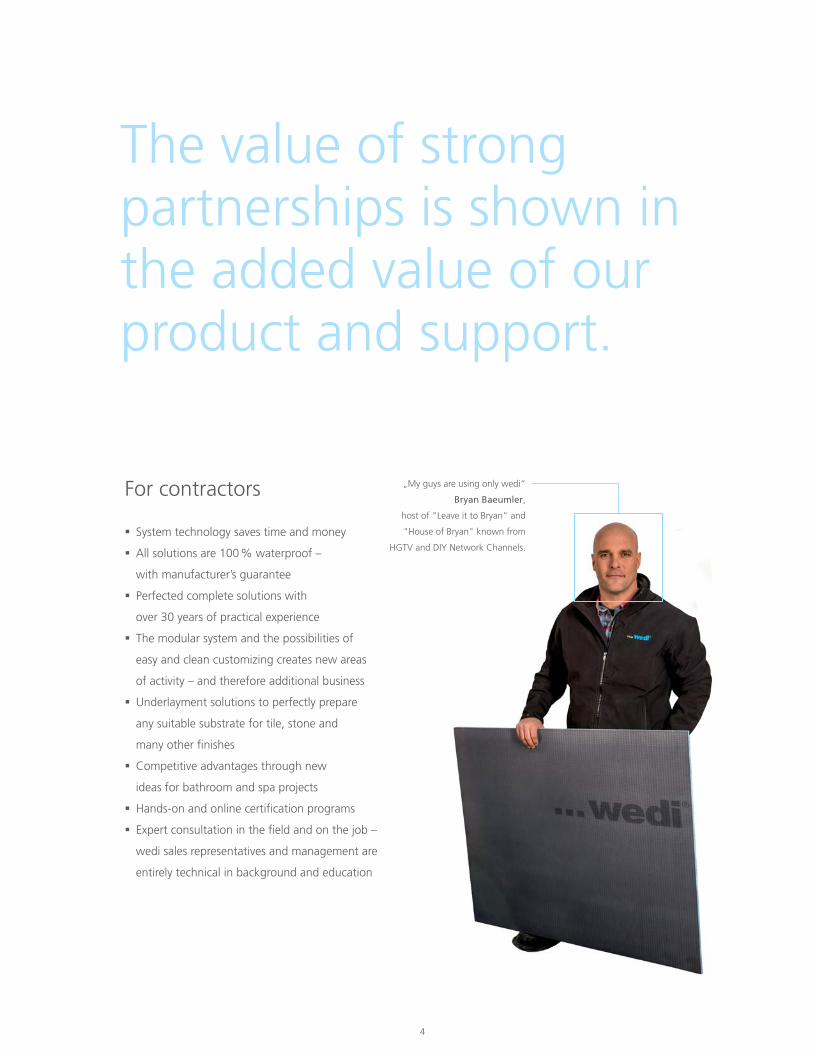
The value of strong partnerships is shown inthe added value of ourproduct and support.
For contractors
System technology saves time and money
All solutions are 100 % waterproof –
with manufacturer’s guarantee
Perfected complete solutions with
over 30 years of practical experience
The modular system and the possibilities of
easy and clean customizing creates new areas
of activity – and therefore additional business
Underlayment solutions to perfectly prepare
any suitable substrate for tile, stone and
many other finishes
Competitive advantages through new
ideas for bathroom and spa projects
Hands-on and online certification programs
Expert consultation in the field and on the job –
wedi sales representatives and management are
entirely technical in background and education
„My guys are using only wedi“
Bryan Baeumler,
host of "Leave it to Bryan" and
"House of Bryan" known from
HGTV and DIY Network Channels.
wedi_Broschuere_TECHNISCHES-HANDBUCH_USA_2015_v4_lay1_Layout 1 30.06.15 15:03 Seite 4

5
Prem
ium
bra
nd w
edi
For builders & architects
Inspiration and ideas for individual design
possibilities within a system
Secure and coordinated problem-solvers, also able
to be implemented on difficult substructures
Fast-track renovations and new residential
or commercial construction
Long-term protection from moisture and mold,
especially in wet rooms
Significant reduction in energy costs thanks to
integrated heat insulation
Masterspecs available on wedicorp.com
AIA CEU classes offered in-house and as webinars
For distributors & wholesalers
Attractive, additional business thanks to the
diversity of the product range
Innovative complete systems with certified
technical approval
Clear and fully protective warranty by wedi
Expert consultation and technical support;
in-house and in the field
Sensible POS tools with targeted representation
of product benefits
Sales and marketing documents, both in
digital and printed form
wedi actively works with contractors supporting
distributor sales
wedi cannot be cheap. It is less expensive when
its added value makes the bottom line cost for our
contractors and builders
wedi_Broschuere_TECHNISCHES-HANDBUCH_USA_2015_v4_lay1_Layout 1 30.06.15 15:03 Seite 5

01
03
04
6
wedi_Broschuere_TECHNISCHES-HANDBUCH_USA_2015_v4_lay1_Layout 1 30.06.15 15:03 Seite 6

02
0201 03 All building panel sys-
tems have great heat
insulation properties,
save energy costs and
provide long-term pro-
tection against mold
due to its inorganic
nature and ability to
safely waterproof.
04 wedi Building Panels
can be safely adhered
and sealed in assem-
blies using wedi Joint
Sealant: strong rein-
forcement, bond and
waterproofing with vir-
tually no build up as
with conventional tap-
ing. As no other seal is
necessary, craftsmen
benefit from increased
protection accompa-
nied by a shorter sur-
face preparation time
before tiling starts.
wedi Building Panels‘
reinforced cement resin
surface offers a superior
bond surface to virtu-
ally any tile and stone
or tile adhesive. No de-
lamination, no surprises.
The blue XPS core is
100% waterproof and
remains fully functional
even after possible par-
tial damage. Our XPS
brand foam is specially
engineered for 100 %
consistency of it‘s
closed cell structure.
wedi – Only realwith a blue core
7
Prem
ium
bra
nd w
edi
What does wedi INSIDE offer?
The principle of wedi inside is simple: high-quality tile in-
stallations require a substrate that is 100 % secure. That’s
why craftsmen have put their faith in wedi quality for
decades, especially as a substrate underneath tiles.
100% waterproof and 100 % secure – signed, sealed
and guaranteed by wedi.
wedi_Broschuere_TECHNISCHES-HANDBUCH_USA_2015_v4_lay1_Layout 1 30.06.15 15:04 Seite 7
8
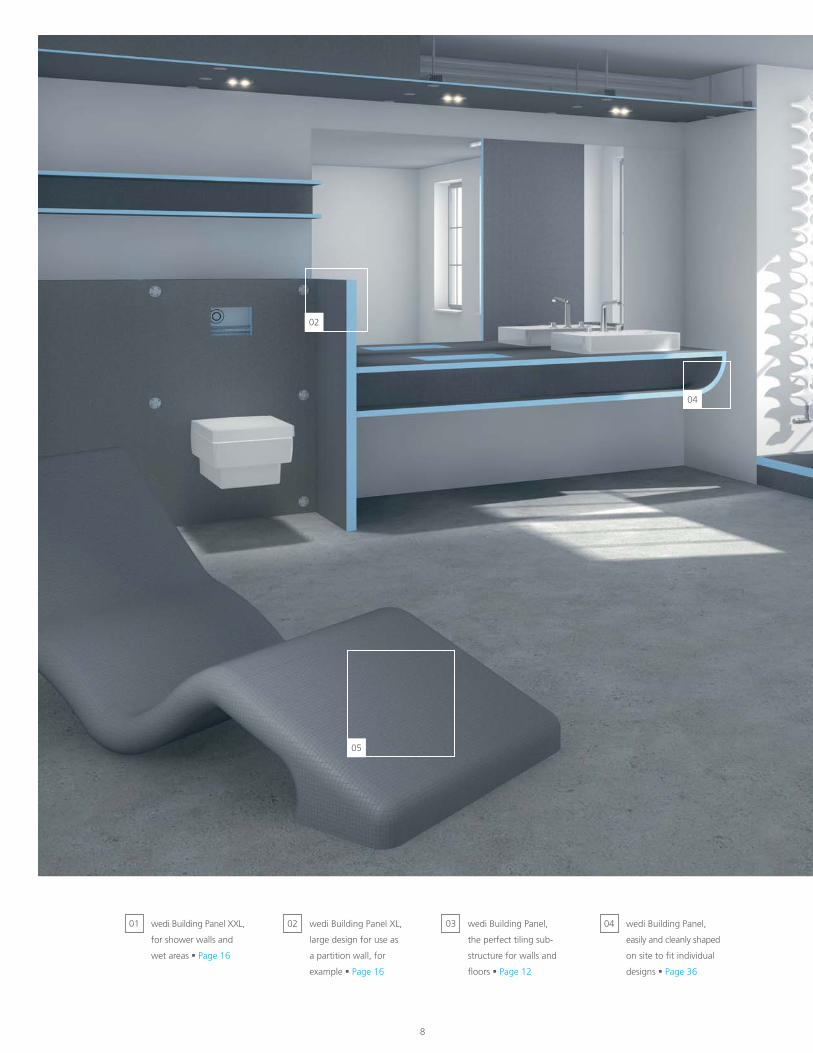
01 wedi Building Panel XXL,
for shower walls and
wet areas Page 16
02 wedi Building Panel XL,
large design for use as
a partition wall, for
example Page 16
03 wedi Building Panel,
the perfect tiling sub-
structure for walls and
floors Page 12
04 wedi Building Panel,
easily and cleanly shaped
on site to fit individual
designs Page 36
05
04
02
wedi_Broschuere_TECHNISCHES-HANDBUCH_USA_2015_v4_lay1_Layout 1 30.06.15 15:04 Seite 8

9
Prem
ium
bra
nd w
edi
05 wedi Wellness Loungers,
ready to tile and optional
with integrated heating
Page 100
06 wedi Fundo shower floor
elements, a wide variety
of floor-level or curb de-
sign showers Page 46
07 wedi Sanbath Tubs – pre-
fabricated tubs including
integrated plumbing:
plug in and tile ready
in minutes Page 20
08 wedi joint sealant,
permanently flexible,
waterproof and a strong
adhesive for perfect joint
treatment Page 44
03
01
06
08
07
wedi_Broschuere_TECHNISCHES-HANDBUCH_USA_2015_v4_lay1_Layout 1 30.06.15 15:04 Seite 9

10
Table of contents
wedi Building Panel Applications
Shower Walls and Wet Areas 16
Suspended Ceilings 18
Tub Walls and Tub Enclosures 20
Structural Floors 22
Requirements for wedi Flooring Systems over 23
Wooden and Concrete Subfloors
Wooden Subfloors 24
Concrete Subfloors 26
Floors with Floor Heating Systems 28
Underlayment for Ceramic, Glass and Stone Coverings 31
Underlayment for Laminates and Ready-to-Lay Parquets 31
Possible alternative Surface Coverings 32
Building Countertop Surfaces 34
Constructing Individual Bathroom Furniture 36
Building Flexible Shapes/Shower Seats and Benches 37
Steam Rooms and Steam Showers 38
Building Panel General Information / Technical Data 40
Order Information 42
12
wedi_Broschuere_TECHNISCHES-HANDBUCH_USA_2015_v4_lay1_Layout 1 30.06.15 15:04 Seite 10
11
wedi Shower System Solutions
Fundo Primo Shower System, facts and installation 48
Fundo Ligno Shower System, facts and installation 54
Fundo Riolito & Riofino Shower System, facts and installation 60
Fundo Riolito Discreto wall drain module, facts and installation 66
ECOBATH Solutions 68
Prefabricated Shower Seats and Benches 71
Prefabricated Niches 72
Prefabricated Curbs & Ramps 74
Order Information 75
wedi Special Underlayment Systems & Installation Tools
Subliner Systems 86
Subliner Dry 89
Subliner Flex 90
Subliner Dry & Flex Pro 91
Tile Profiles 92
Tools (Trowels, Floats, Other) 94
Order Information 94
wedi Wellness and Spa System Solutions
Wellness Loungers and Benches 100
Custom Wellness & Spa Design Solutions 102
46
84
98
wedi_Broschuere_TECHNISCHES-HANDBUCH_USA_2015_v4_lay1_Layout 1 30.06.15 15:04 Seite 11

12
wedi_Broschuere_TECHNISCHES-HANDBUCH_USA_2015_v4_lay1_Layout 1 30.06.15 15:04 Seite 12

13
Build
ing
Pane
l App
licat
ions
The Ultimate Tile Backerboard
wedi Building Panels are so much more than a simple tile backer board and offer endless installation opportuni-
ties. Available in a wide variety of thicknesses and sizes, they are compatible with virtually any substructure. wedi
Building Panels are lightweight, internally waterproof and dimensionally stable, making them fast, clean and
simple to work with. The blue waterproof core is CFC-free, made from waterproof extruded polystyrene foam,
reinforced with fiberglass mesh on both sides and coated with synthetic polymer resin mortar which fully embeds
the mesh layer resulting in the panel's strength and the ability to develop highest adhesion strength to virtually
any type of thinset mortar. The embedded mesh eliminates the risk of delamination of installation layers.
The wedi Building Panel combines the benefits of the latest manufacturing technology and material quality
with sound and traditional benefits our trades enjoy. wedi Building Panels are waterproof, lightweight, easy
and clean to cut and still incredibly strong and bond friendly for use with any type of thinset mortar application.
The wedi Building Panel can be tiled with all types of ceramic, glass or stone tile whether they are mosaic or
large format tiles. Especially large and thin tile benefits of the durability of the wedi Building Panel and the
even surface it provides.
Building Panel Applications
wedi_Broschuere_TECHNISCHES-HANDBUCH_USA_2015_v4_lay1_Layout 1 30.06.15 15:04 Seite 13

14
01 02
03
wedi_Broschuere_TECHNISCHES-HANDBUCH_USA_2015_v4_lay1_Layout 1 30.06.15 15:04 Seite 14

15
100 % waterproof blue core, made from
CFC-free extruded polystyrene closed cell foam
Available in multiple thicknesses and sizes
Compatible with virtually any stable substructure
Versatile, limitless installation capabilities
Strong, due to cement resin with embedded
mesh reinforcement – no chance for delamination
Superior bond to any tile using any thinset
mortars on cement or epoxy basis
Extremely light weight, easy and clean to cut
Includes thermal insulating properties
Protects against mold and mildew naturally
Perfect, even surface for mosaics, as well
as large size or thin body tile
XPS foam 100 % waterproof
The Ultimate and Complete Wet Room tile backer board
and integral part of the wedi Shower System
wedi Building Panels have a blue core made from CFC-free extruded polystyrene rigid foam. This makes wedi building
panels an ideal base for any type of thinset adhered tile or stone. wedi Building Panels can be applied to practically any
loadbearing substrate, are waterproof throughout, insulating, versatile in its use in field customized applications, light
and extremely robust and strong. While often used within the range of wedi shower systems it is also a formidable tile
backer board for use on walls, floors, countertops and many more applications.
wedi_Broschuere_TECHNISCHES-HANDBUCH_USA_2015_v4_lay1_Layout 1 30.06.15 15:04 Seite 15
16
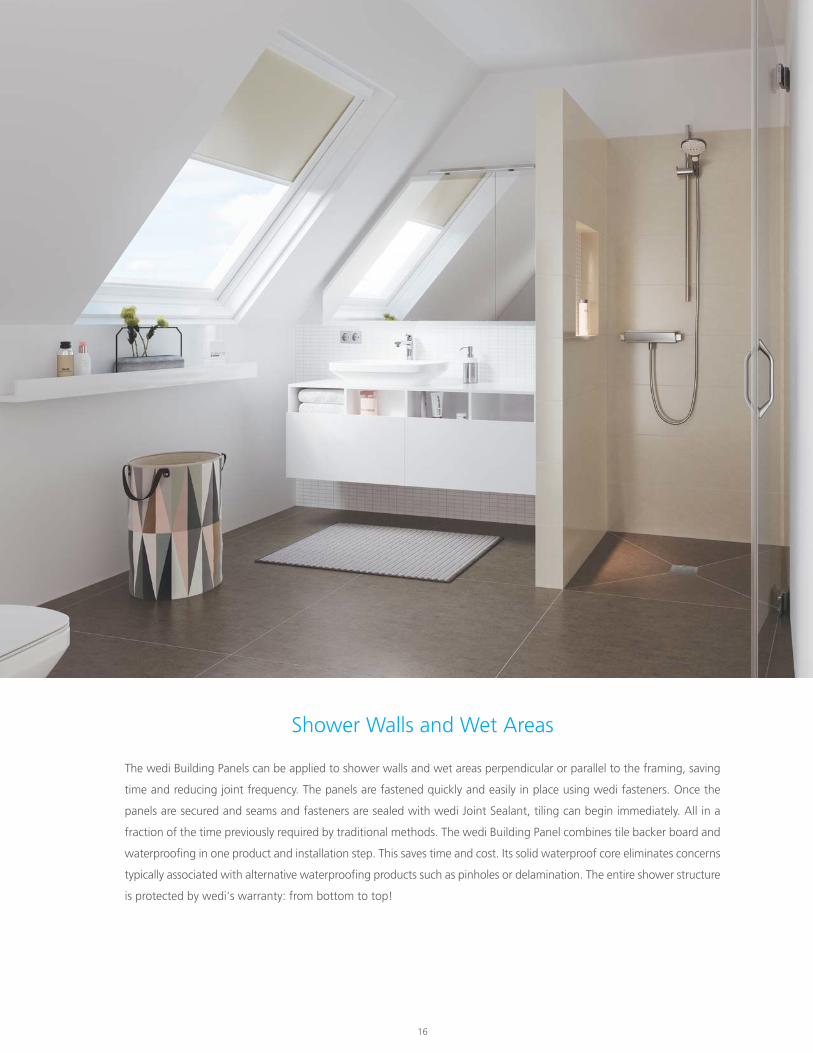
Shower Walls and Wet Areas
The wedi Building Panels can be applied to shower walls and wet areas perpendicular or parallel to the framing, saving
time and reducing joint frequency. The panels are fastened quickly and easily in place using wedi fasteners. Once the
panels are secured and seams and fasteners are sealed with wedi Joint Sealant, tiling can begin immediately. All in a
fraction of the time previously required by traditional methods. The wedi Building Panel combines tile backer board and
waterproofing in one product and installation step. This saves time and cost. Its solid waterproof core eliminates concerns
typically associated with alternative waterproofing products such as pinholes or delamination. The entire shower structure
is protected by wedi's warranty: from bottom to top!
wedi_Broschuere_TECHNISCHES-HANDBUCH_USA_2015_v4_lay1_Layout 1 30.06.15 15:04 Seite 16

17
01 02
03 04
Using only a utility knife, wedi
Building Panel is effortlessly cut
and shaped.
05
Alternatively, wedi sealing tape can be used instead of the wedi Joint
Sealant and applied in modified thinset. The sealing tape provides ade-
quate splash water protection but should not be used where standing
water occurs because thinset might allow pressing water to migrate un-
derneath the sealing tape through the thinset mortar. If you use wedi
Building Panels with wedi Shower Bases, wedi Joint Sealant must be
used in between seams and on top of seams. No sealing tape is required
in these applications. Please consider: sealing tape is installed in cement
based thinset and can allow pressing water to migrate under the tape.
The thinset holding the tape can also not provide protection against
movement. Both challenges are addressed more efficiently by using
wedi Joint Sealant. In dry areas, the seams can be treated with an alkali
resistant fiberglass mesh tape by wedi.
A continuous 1/2” bead of wedi
Joint Sealant is applied on the
foam edges of a wedi Building
Panel before another panel is
joined by butting tightly.
Apply 1 wedi fastener per every
12”, with an extra fastener ap-
plied directly in the seam to
provide a flush transition be-
tween panels. On a ceiling,
apply 1 wedi fastener per every
6”. The washer heads are dim-
pled below the surface of the
wedi Building Panel so a flat
surface is maintained.
All excess wedi sealant is spread
flat over all joints using a putty
knife. Where needed, an extra
bead of sealant is applied on top
of the joints and spread flat. The
joints should be covered a full
3/4” – 1” on both sides of the
seam. Especially wedi joint
sealant provides little build up
making for square and tight
corner areas perfect for tiling.
All fastener locations are wa-
terproofed using wedi Joint
Sealant spread flat and widely
over each washer.
Build
ing
Pane
l App
licat
ions
Sh
ower
Wal
lsDirect Attachment to Framework – walls or ceiling
1/2”, 5/8” or 1” Building Panels are the recommended minimum thicknesses for installation to framing
Wood Framing: 2 x 4's (framing depth 3 1/2 inches) , Maximum stud spacing 16 inches o.c.
Metal Framing: Minimum 20 gauge metal studs with maximum 16 inches o.c. spacing
wedi 1” Building Panel or thicker can be used over 19.1” o.c. spaced wall framing
2” wedi alkali resistant fiberglass mesh tape to be applied over all seams in dry areas. wedi waterproof Joint Sealant
or wedi Sealing Tape to be applied over all seams and fastener locations heads if a waterproof installation is required
Attach wedi building panels with one fastener per every twelve inches
and in between adjacent panels (seams) over wall framing
On ceilings, use one fastener per every 6 inches and in between adjacent panels (seams)
See the wedi Building Panel TDS for more detailed installation instructions by application on wedicorp.com
wedi Joint Sealant or wedi Subliner Sealing Collars are used where plumbing protrusions must be sealed
Do not use mastic adhesives for setting tile over wedi product surfaces in wet area applications.
wedi_Broschuere_TECHNISCHES-HANDBUCH_USA_2015_v4_lay1_Layout 1 30.06.15 15:04 Seite 17

18
Suspended Ceilings
The lightweight, yet extremely strong performance of the wedi Building Panel, as well as its perfectly flat surface and
installation, makes it a superior backing substrate for tiles over solid or suspended, framed celings. Especially valuable
if used in areas subject to rising water vapor such as in pool areas.
wedi_Broschuere_TECHNISCHES-HANDBUCH_USA_2015_v4_lay1_Layout 1 30.06.15 15:04 Seite 18

19
01 02 03
05
Install the ceiling suspension
systems to the existing ceiling
by using dowels and set the
desired suspension height.
Install the corresponding pro-
files onto the already installed
support.
Screw wedi Building Panels to framework using either wedi Wood Screws
and Washers (wooden frame) or wedi Self Tapping Screws and Washers
(steel framework). The fastener pattern is 1 fastener per every 6 inches.
Make sure to always use washers / fasteners in panel seams to ensure
smooth transitions.
04
When installing wedi Building
Panels to metal stud ceiling
framework, use wedi Joint
Sealant in addition to wedi Self
Tapping Screws and Washers.
Seal all joints and fastener
points using wedi Joint Sealant
or wedi Sealing Tape. In dry
areas, use wedi Self Adhesive
Mesh Tape.
Suspended Ceiling Installations
Besides wall and floor applications, the versatile wedi Building Panel can
also be used for leveling and suspension of ceilings. Suspension height
can be individually set during installation. For areas that require a fire
barrier, additional backing material may need to be considered.
wedi installation requirements:
Framing must be loadbearing and metal stud gauge
chosen accordingly
stud spacing not to exceed 16” o.c.
On metal studs we recommend to use wedi Joint Sealant to adhere
the panels next to using selftapping wedi Screws and Washers
Build
ing
Pane
l App
licat
ions
Su
spen
ded
Cei
lings
wedi_Broschuere_TECHNISCHES-HANDBUCH_USA_2015_v4_lay1_Layout 1 30.06.15 15:04 Seite 19

20
Tub Walls and Tub Enclosures
wedi Building Panels are the natural choice for use with tub walls and tub enclosures. The panels can be installed directly
to framing or over gypsum, cement or wood underlayment products to create a waterproof underlayment for tile. They
can be easily scored and shaped to provide radius surfaces on tub skirts and do not scratch tubs or fixtures during in-
stallation. Additionally, the dimensions of the wedi Building Panels make for quick installations with standard tubs – laid
horizontally the panel will span the full five foot width. Cut out a notch at the bottom edge of a wedi Building Panel
and safely connect to a tub flange with just a bead of wedi joint sealant in between to safely waterproof this critical
connection and create plumb walls, square wall corner areas as well as a full backing for the tile all the way down to
the tub's horizontal perimeter area.
Because of its waterproof nature, the wedi Building Panel is the natural choice for use in wet areas. The panels do not
wick water from the tub perimeter along which water will traverse. wedi Building Panels can be applied directly to studs
or over other suitable non-waterproof surfaces to create a waterproof underlayment for tile and can also be used on
tub decks and backsplashes or to quickly place complete tub wall surrounds safely.
01 02 04
The tub frame structure must
be properly supported and load
bearing
Where fixtures are integrated
into the tub deck structure,
they should be equipped with
a stainless steel plate fixing
their position
03
The wedi Building Panel is in-
stalled over the structure using
modified thinset mortar. wedi
Fasteners are additionally applied
on vertical areas (1 per sq. ft.), no
fasteners are used in horizontal
areas. All seams, protrusions or
fastener points must be water-
proofed using wedi Joint Sealant.
The tub deck can be tiled over
immediately once the wedi
board is installed, seams and
possible fasteners and cut outs
sealed and the thinset mortar
has set up.
Tub Deck Application
Tub frame structures can
also be built completely of
Building Panels.
wedi_Broschuere_TECHNISCHES-HANDBUCH_USA_2015_v4_lay1_Layout 1 30.06.15 15:04 Seite 20

21
Build
ing
Pane
l App
licat
ions
Tu
b W
alls
and
Tub
Enc
losu
res
01 02
Measure and cut wedi Building
Panel to fit the 16 inch o.c.
framework (wood or metal).
Notch out all panels if installed
around the perimeter of a
flange tub to integrate the
flange and achieve a plumb wall
with square and tight corners.
Attach a notched panel to the
framework with a 1/2” bead of
wedi Joint Sealant between the
notch and flange. Attach the
panel to the framework using
wedi Washers and Screws at a
rate of 1 every 12 inches along
the studs. Leave a gap of 1/8"
between tub edge and wedi
panel bottom end to allow for
movement of the tub. Alterna-
tively apply a bead of wedi
Joint Sealant in between both
materials.
03 04
Apply a continuous 1/2" bead of wedi Joint Sealant on the top blue foam
edge of the wedi Building Panel before installing the next panel, butting
tightly into the sealant. Set another wedi Washer and Screw into the
seam to create a flush transition between panels and smooth over excess
sealant. When installing a wedi side panel against the already fixed wedi
back wall, apply a continuous 1/2" bead of wedi Joint Sealant vertically
on the back wall wedi panel where both panels will meet. Apply com-
pression to the wedi Joint Sealant when moving the wedi side panel into
position before fastening it.
Finally and after all wedi Building Panels are installed a second 1/2” bead
of wedi Joint Sealant is applied over all seams and fastener points and
spread flat using a putty knife.
Tub Wall Surround Application
Tub Wall Surround Application
1/2”, 5/8”, and 1” are the recommended minimum thicknesses for
for installation to framing
Wood Framing: 2 x 4's (framing depth 3 1/2 inches), Maximum stud
spacing 16 inches o.c.
Metal Framing: Minimum 20 gauge metal studs with maximum
16 inches o.c. spacing
wedi 1” Building Panel or thicker can be used over 19.1” o.c.
spaced wall framing
wedi Waterproof Joint Sealant or wedi Sealing Tape to be applied over
all seams and fastener heads if a waterproof installation is required
wedi Joint Sealant or wedi Subliner Sealing Collars are used where
plumbing protrusions must be sealed
The Building Panel should be notched out at the bottom to install
safely and plumb against the flange of the tub. A bead of wedi Joint
Sealant is applied against the flange of the tub
Attach wedi building panels with one fastener per every twelve
inches and in between adjacent panels (seams) over wall framing
On ceilings, use one fastener per every 6 inches and in between
adjacent panels (seams)
See the wedi Building Panel TDS fore more detailed installation
instructions by application on wedicorp.com
Do not use mastic adhesives for setting tile over wedi product sur-
faces in wet area applications.
wedi_Broschuere_TECHNISCHES-HANDBUCH_USA_2015_v4_lay1_Layout 1 30.06.15 15:05 Seite 21

22
Over Structural Floors
Whether it is in new construction or renovation, a great variety of subfloor types need a tile underlayment prior to
setting tile or stone. The reasons for the need of installing tile underlayments are many: they may reduce stresses from
subfloors and protect tile. They may be used to build up height as needed to finish the tile surface flush with adjacent
flooring surfaces. They may be necessary for waterproofing or insulation purposes. Also very important, they should
provide and support successful and lasting adhesion performance for thinset mortar and tile. wedi Building Panels offer
a durable underlayment surface once tiled and it passes the Robinson Floor Test (ASTM C627) having achieved a "heavy
duty use" rating. In combination with its ideal flat surface, it is a natural choice when installing either small tile or very
large tile but possibly extremely thin tile on floors. Both require perfect thinset mortar coverage and adhesion, made
easy when working on a most flat and even surfaces and they need the full support of a strong underlayment like the
wedi Building Panel. It is, however, important to evaluate the suitability of a subfloor structure, or the layer below a tile
underlayment, to ensure a proper tile installation and also the choice of a good underlayment fitting the application.
wedi_Broschuere_TECHNISCHES-HANDBUCH_USA_2015_v4_lay1_Layout 1 30.06.15 15:05 Seite 22

23
Build
ing
Pane
l App
licat
ions
O
ver
Stru
ctur
al F
loor
s
General Limitations / Requirements (Concrete & Wood Subfloors)
wedi Product Systems are only used for interior installations.
Do not use as a wear surface or without tile / stone or other suitable
coverings.
Do not use organic mastic adhesives for setting tile on wedi systems
in wet areas.
Use only thinset mortar setting materials suitable for installation and
adhesion to the specific substrate / subfloor type.
Certain substrates must be primed prior to thinset mortar attachment.
Do not use where substrate is subject to excessive moisture and mois-
ture content changes.
Do not use over substrates including, but not limited to: particle board,
luan, asbestos, plank, bamboo, hardwood, chipboard, Sponge backed
Vinyl Tile / Flooring, Laminates, Fiberglass based surfaces, Metal or
Steel surfaces. Do not install over any dimensionally unstable surfaces.
Consult wedi for questions regarding specific approved installations
not listed here.
Subfloors must be clean, even, sufficiently loadbearing and dry (cured).
Residues, oil, waxes, grease or other contaminants acting as possible
bond breakers must be removed.
Deflection of all subfloor installations must not exceed L/360 for ce-
ramic tile installations and L/720 for dimensional stone installations
under consideration of live and dead loads measured between joists.
Any leveling of the subfloor must be done prior to installing wedi
product and tile. Subfloor maximum variation from plane must not
exceed ¼” in 10 ft. and 1/16” in 12” when tile is used with all edges
shorter than 15”. For tile installations using tile with at least one edge
15” or longer in length, maximum allowable variation is 1/8” in 10ft.
and no more than 1/16” in 12”.
wedi products should not be installed over bowl shaped, uneven struc-
tures unless suitability is specifically determined for a wedi product.
A wedi installation does not replace the need for Expansion and/ or
Movement joint placement within a tile installation. Please follow rec-
ommendations found in the TCNA guidelines (Detail EJ171).
All installations shall be in conformance with IRC for residential instal-
lations and IBC for commercial installations or applicable building codes
in a region including the consideration of properly designed substrates
and subfloors. All installations including the consideration of properly
designed substrates and subfloors should be in compliance with current
TCNA Handbook for Ceramic, Glass and Stone Tile Installation, use de-
tails specific to “Cementitious Coated Extruded Foam Backer Board”.
wedi’s technical recommendations supersede all requirements of
IRC,IBC, IPC or TCNA where in conflict and exceeding minimum require-
ments established by the above mentioned institutions.
Contact wedi for installation of tile or stone smaller than 4 x 4“ and
larger than 12 x 12 inches in size to learn more about the best prac-
tices and requirements applied in such applications. Follow tile man-
ufacturers' recommendations for appropriate flooring tile choice,
setting materials and installation techniques.
Installation over structural wooden surfaces – Flooring
Plywood subfloor joist spacing must not exceed 16” o.c. with mini-
mum thickness of T&G exterior grade plywood of 19/32 inch. Joist
spacing in excess of 16” o.c. and up to 24: o.c. requires a double layer
of ¾” Exterior Grade Plywood T&G subfloor sheets, glued and screwed.
Plywood sheets must be installed with a 1/8” gap between sheets.
Wood subfloors and structures attached to wooden subfloors must
be kept dry and wood moisture content must be maintained at con-
sistent service and use levels and must not exceed 15 %. Where con-
stant moisture or vapor is present, ventilation must be installed to
eliminate exposure of the wood structure from below the wedi prod-
uct layer.
Installation over structural concrete / cement base surfaces – Flooring
Concrete slabs or other structural cement based substrates must be
fully cured (at least 28 days but up to 3 months for new Portland ce-
ment based concrete or lightweight concrete under normal conditions,
mix ratio and ambient climate). Field verification of full cure (see mois-
ture level indicators below) is necessary to determine a full cure.
Residual humidity must not exceed the following value per each floor
type when setting wedi product and / or tile coverings:
Calcium Sulphate Screeds: 0.5 %
Calcium Sulphate Screeds, heated: 0.3 %
Cement Screeds: 3.5 %
Gypsum based underlayment: 1 % or per manufacturer recom-
mendation
Anhydrite Screeds: 0.5 %
Conduct measures with CM device.
Please note that wedi product systems might trap rising moisture dur-
ing cure time or in general from unisolated concrete ground floors
not equipped with a vapor barrier.
Concrete Subfloors must not be subject to hydrostatic water pressure.
Existing cracks in subfloor must be filled and secured.
Do not use over control and / or expansion joints subject to out-of-
plane movement or in- plane- movement.
wedi_Broschuere_TECHNISCHES-HANDBUCH_USA_2015_v4_lay1_Layout 1 30.06.15 15:05 Seite 23

24
Over Wooden Subfloors
wedi Building Panels are excelllent underlayments for tile over interior wood subfloors. When applied over wood sub-
floors – wedi Building Panels act as a waterproof membrane and offer a superior bonding surface for tile. Additionally,
the thermal insulating qualities of the panels support installations including floor warming systems under the tile cov-
ering. The cleanliness of cutting and installing wedi building panels make especially renovating a great experience.
Crisp cuts around installations or obstacles provide for full surface tile support even in underlayment edge areas and
tricky spots. When used for waterproofing the exact cut outs and perfect joint alignment provide tight and closed wa-
terproofed surfaces.
wedi_Broschuere_TECHNISCHES-HANDBUCH_USA_2015_v4_lay1_Layout 1 30.06.15 15:05 Seite 24

25
Build
ing
Pane
l App
licat
ions
O
ver
Woo
den
Subfl
oors
01 02 04
Simply spread modified thinset
mortar over a clean wood sub-
floor using a 1/4" x 1/4" notch
trowel provided the subfloor is
even and loadbearing.
Apply the Building Panel by
laying the panels into the mor-
tar. Stagger all panel joints.
03
Fasten with wedi fasteners. Use
wedi tabless washers and
wood screws.
Tape all joints with wedi fiber-
glass mesh tape in dry areas or
wedi Waterproof Sealing Tape or
wedi Joint Sealant in wet areas.
Fastener locations should be
waterproofed too using wedi
Joint Sealant. Begin tiling!
Installation over Wooden Subfloors
All wedi Building Panel sizes and thicknesses can be used as tile under-
layments over wood subfloors. A modified thinset mortar is applied to
the floor with a 1/4” x 1/4” V- or U-notch trowel to provide a ribbed
bed. The wedi Building Panels are then laid into the mortar. All joints
should be staggered so that no seam continues throughout the length
of the floor. wedi fasteners, in this application tabless washers and wood
screws, are applied every 1 ft into seams to create flush transitions be-
tween panels making use of the wedi washer and are generally set at a
rate of 1 fastener per 1 square foot across the panel surface. All seams
should be taped with wedi alkali resistant mesh tape in dry areas or with
wedi Sealing Tape or wedi Joint Sealant in wet areas. Fastener points
are waterproofed using wedi Joint Sealant before tiling begins once the
thinset mortar has set up below the wedi panels. Use weights over wedi
panels and especially across panel transitions to ensure full bond and
smooth transitions.
Extend your waterproofing from
shower and tub areas into the
whole bathroom with wedi
Building Panels on your floor.
Especially when installing floor
level entry showers, a waterproof
tile underlayment is needed in
front of a shower entrance.
wedi Building Panels can help
you create both in one step:
your waterproofing and tile
underlayment as well.
wedi_Broschuere_TECHNISCHES-HANDBUCH_USA_2015_v4_lay1_Layout 1 30.06.15 15:05 Seite 25

26
Over Concrete Subfloors
When installed over concrete, wedi Building Panels function as a crack-bridging underlayment, as cracks are not likely
to transfer through the polystyrene core. The polystyrene foam also acts as a water barrier, when the seams are properly
treated, making the system 100 % waterproof. The panels have excellent thermal insulation qualities, especially when
used under floor warming systems. The wedi Building Panel can help smooth out slightly uneven slabs if appropriate
mortars or wedi panel thicknesses are used.
wedi_Broschuere_TECHNISCHES-HANDBUCH_USA_2015_v4_lay1_Layout 1 30.06.15 15:05 Seite 26

27
01 02 04
Make sure the concrete floor is
fully cured and free of debris,
oil or waxes. Some concrete
floors might require priming or
vapor retarders prior to thinset
mortar installation.
The panels are installed in a full
coverage setting bed using
modified thinset mortar allow-
ing best connection between
subfloor and wedi panel.
03
Stagger all joints when laying
wedi Building Panels on the
floor. Apply some weights such
as tile boxes equally distributed
over the wedi panel surface.
Tape all joints with wedi fiber-
glass mesh tape in dry areas or
wedi waterproof sealing tape or
wedi Joint Sealant in wet areas.
Begin tiling!
Installation over Concrete Subfloors
All wedi Building Panel sizes and thicknesses can be used as tile under-
layments over concrete subfloors. Modified thinset mortar, combed
through with a minimum 1/4” x 1/4” notch trowel, will then provide a
ribbed bed into which the wedi Building Panels will be laid. All joints
should be staggered so that no seam continues throughout the length
of the floor. Apply weights (i.e. tile boxes) onto the surface and where
transitions are located while the mortar is setting up. After the mortar
has set, wedi alkali resistant fiberglass mesh tape, or wedi Sealing Tape
or wedi Joint Sealant should be applied to all seams, then tiling can begin.
Build
ing
Pane
l App
licat
ions
O
ver
Con
cret
e Su
bfloo
rs
wedi_Broschuere_TECHNISCHES-HANDBUCH_USA_2015_v4_lay1_Layout 1 30.06.15 15:05 Seite 27

28
Over structural floors and with Floor Heating Systems
wedi Building Panels are ideal for use beneath floor heating systems whether you have a warm-water heating or an
electrical floor warming or heating system. The panel’s insulation properties isolate the heat from the substrate and
guide it straight into the room thus saving energy and reducing warm up time, as well as supporting equal distribution
of warmth.
Electric floor heating systems can be installed as per manufacturer’s instructions onto already installed wedi systems and
underlayments (i.e. wedi Building Panels, Fundo floor elements, Sanoasa benches, Sanoasa loungers). In wet areas, only
products approved for such individual application and areas such as i.e. showers should be used.
wedi_Broschuere_TECHNISCHES-HANDBUCH_USA_2015_v4_lay1_Layout 1 30.06.15 15:05 Seite 28

29
01 02 04
Draw ducts / grooves onto the
wedi Building Panel for instal-
lation of the heating system.
Cut grooves using a router.
Cutting width should be the
same as the pipe width; cut-
ting depth should be at least
1/8” deeper. Make sure at min-
imum a remaining wedi panel
foam thickness of 1/4" remains
intact below the pipe.
03
Install tubing into the groove.
Fill tile adhesive into the pipe
duct to cover pipe and fill
voids.
Apply wedi’s wide self adhesive
reinforcement tape over the in-
stalled ducts. Start tiling. Tiles
smaller than 4" x 4" should
not be used over hydronic sys-
tem installation surfaces.
Installation of Hydronic / Water heating systems
wedi Building Panels are ideally suited for use beneath floor and even
wall warming systems. The building panels’ good insulation properties
keep the heat away from the ground and reflect it back up in to the
room, regardless of whether you have a hot-water heating system or an
electric system. wedi Building Panels save energy and provide shorter
warm up times around your heating system. The warmth is evenly dis-
tributed across the entire floor.
Build
ing
Pane
l App
licat
ions
O
ver
floor
s an
d w
ith F
loor
Hea
ting
Syst
ems
For hot-water systems, ducts can be cut into the building panel and
other wedi elements quickly and easily. The building panel serves as a
combined form of heat insulation and a base for installation of tile and
serves as waterproofing protection if needed.
Duct for installingthe heating system
Tile
Substructure
wedi Building Panel
wedi_Broschuere_TECHNISCHES-HANDBUCH_USA_2015_v4_lay1_Layout 1 30.06.15 15:05 Seite 29

30
01 02
Make sure the concrete floor is
even, fully cured and free of de-
bris, oil or waxes. The wedi
Building Panels are installed
using modified thinset mortar
using a 1/4“ x 1/4“ notch
trowel.
Stagger all joints when laying
wedi Building Panels on the
floor. Apply some weight on
the boards during initial thinset
setting time and especially over
board transitions.
03 04
wedi Joint Sealant can be applied with a continuous 1/4“ bead while set-
ting the panels in position (seams butted tightly) or after they are set and
with the bead of sealant installed over the seam before it is spread flat
using a putty knife. All excess sealant must be spread flat so joint sealant
covers the seams at least 1/2“ to 3/4“ on either side of the seam. In dry
areas, wedi selfadhesive alkali resistant mesh tape can be used to reinforce
the seams.
Install electric floor warming system according to manufacturer's recom-
mendations. Please make sure the wedi Building Panels are not punc-
tured by staples or other mounting devices.
Installation of Electric Floor WarmingSystems
The wedi Building Panels save time and money while conserving energy
when used in conjunction with any common electric floor heating sys-
tem. The extruded polystyrene foam core construction makes the system
100% waterproof and the perfect heat insulator and thermal barrier.
wedi Building Panels are equipped with a cement resin surface that is re-
inforced with a fiberglass mesh and provides an ideal bond to any com-
mon tile adhesive or selfleveling product which may be needed to
integrate an electric cable or mat system.
wedi installation requirements:
see page 23 – 29
Note on electric floor warming systems
Electric floor heating systems can be installed as per manufacturer’s in-
structions onto already installed wedi product system or underlayment
surfaces and reinforced elements (e.g. wedi Building Panels, Fundo floor
elements, Sanoasa benches, Sanoasa loungers). Here only products ap-
proved for such individual application and areas such as i.e. wet rooms
should be used.
Electric under floor heating systems are easy to mount on the building
panel and downward heat loss is prevented, making the heating system
noticeably more effective.
Electric heatingTile
Substructure
wedi Building Panel
wedi_Broschuere_TECHNISCHES-HANDBUCH_USA_2015_v4_lay1_Layout 1 30.06.15 15:06 Seite 30

31
On Floors: wedi under Ceramic and Stone Tile Coverings
Virtually all mosaic and larger or thin tile formats, such as dimension stone or thin porcelain tile, can be installed over wedi Building Panels, which are an
ideal carrier element and allow for easy and fast installation. Natural stone is also properly supported and cannot transfer soluble salts causing efflorescence
due to the impervious nature of the wedi substrate, separating it from concrete subfloors. Please contact wedi for suitable tile choice and formats for use
in various types of installations, such as residential or commercial.
Alternative Floor Coverings: wedi under Laminates and Ready-to-Lay Parquets
Laminates and ready-to-lay parquets are an alternative to ceramic floor coverings. Laminate is a comparatively low-cost material that is only coated with
a decorative layer; parquet is a wood flooring that – depending on quality – may be very durable. Both floor coverings are available in many different
wood designs and colors as well as various qualities. Also here, the wedi Building Panel is the perfect carrier element, where the laminate is laid as a
floating floor.
Build
ing
Pane
l App
licat
ions
O
ver
floor
s an
d w
ith F
loor
Hea
ting
Syst
ems
Contact wedi for best practice installation methods or substrate requirements when using specialty surface coverings.
wedi_Broschuere_TECHNISCHES-HANDBUCH_USA_2015_v4_lay1_Layout 1 30.06.15 15:06 Seite 31

32
Ceramic, Stone and Glass Coverings
Ceramic coverings offer various possibilities for wall and floor design.
Depending on the intended use and personal taste, there is a wide
variety of tile in different shapes, colors and materials. Here, the wedi
Building Panel is the perfect carrier element for ceramic coverings
as the tile can be installed directly to the board surface without any
additional steps needed. There are no limitations concerning setting
adhesives, grouts. All types of ceramic, porcelain, stone or glass can be
used with wedi Building Panel. The surface is even and consistent, which
works perfectly for mosaic as well as large format or thin body tile.
Plasters and fillers
Today, plasters and stucco are not only used for the creation of a plane
surface for tiling, painting or wallpapering, but they also represent a
visual design element. Also here, the wedi Building Panel is the perfect
substructure.
Important information:
Contact the wedi application specialist for advice on areas with shock
loads. Plasters containing gypsum require priming of the building panel.
Wall paints
The unique wedi Building Panel is also suitable for paint application.
However, a sufficient layer of plaster or stucco must be applied to cover-
up the mesh grid structure providing a smooth surface on the building
panel, upon which paint can be applied. Whether in living areas or in
the bedroom – the design options are many and the room will always
be pleasantly insulated.
Wallpapers
It is even possible to hang wall paper over a stucco or plaster covered
wedi Building Panel surface. Cement based plasters offer a stable
surface for the adhesive which is an enormous advantage over many
other boards.
Wall Surface Coverings Installation Possibilities over wedi Building Panel
Contact wedi for best practice installation methods or substrate requirements when using specialty surface coverings.
wedi_Broschuere_TECHNISCHES-HANDBUCH_USA_2015_v4_lay1_Layout 1 30.06.15 15:06 Seite 32

33
Build
ing
Pane
l App
licat
ions
Su
rfac
e C
over
ings
wedi_Broschuere_TECHNISCHES-HANDBUCH_USA_2015_v4_lay1_Layout 1 30.06.15 15:06 Seite 33

34
With Countertop Surfaces
wedi Building Panels are ideal for use as countertop substrates. The wide variety of thicknesses and sizes such as the 2' x 8'
or 4' x 8' panels are ideal for simple and fast installations and require no additional support in installation. Install your
countertop substrate and be ready-to-tile in minutes. wedi Building panels in 1 1/2" thickness of 2" thickness are ideal
for tiling with smaller format mosaic tile or for installation of large format, thin porcelain tile or slab. On the following
page, the installation of a large format thin profile porcelain tile is featured.
wedi_Broschuere_TECHNISCHES-HANDBUCH_USA_2015_v4_lay1_Layout 1 30.06.15 15:06 Seite 34

35
01 02
Apply a continuous 1/2” thick bead of wedi Joint Sealant over the spac-
ers of your countertop. Glue down the wedi Building Panel in thickness
of 1 1/2” to 2”after you have cut it to size. Leave it recessed behind the
front of the counter so you can apply a strip of wedi Building Panel to
the exposed foam edge as shown in 02 and still finish flush. Apply some
weight equally on the surface for 15 minutes so that the wedi Joint
Sealant (a strong adhesive) can set up properly under compression for
about 20 minutes.
Apply wedi Joint Sealant and a strip wedi Building Panel in any thickness
starting from 1/8” thick standard wedi Building Panels. This strip’s ce-
mentitious coating side will allow you to better set small tile.
03 04
Cut out for the sink using a jigsaw or handsaw. As needed, recess cuts
might be created with a utility knife or a router to accommodate re-
cessed sinks. Cutting the holes may proceed before or after installation
of large format, thin porcelain tile as indicated in step 05.
05
Apply weight equally distributed across the tile until thinset mortar has
set.
Install the large format, thin porcelain tile over the wedi Building Panel
surface and edges using a modified thinset.
Build
ing
Pane
l App
licat
ions
W
ith C
ount
erto
p Su
rfac
es
Installation of Large Format Thin Porcelain Tile Over Countertops
Installation Tips:
Some large or irregular shaped countertops will require multiple
panels. This makes necessary the use of an edge leveling system to
maintain a smooth transition between the large format, thin porcelain
tile. For timing and method of installation refer to the edge leveling
system manufacturer’s instructions.
In areas where the countertop intersects with the back-splash or other
vertical projections through the countertop, differential movement will
occur. For these active transitions, most manufacturers recommend
the use of a color coordinated 100% silicone caulk for its superior
flexibility and adhesion, or when applicable a permanent metal or
plastic edge treatment piece can be used.
Full coverage of bonding mortar is critical for the impact resistance of
the installed countertop. It has found that a high speed orbital sander
with pad is the best way to evacuate the air and collapse the ridges
under the panel. The installation guidelines for floors, including but
not limited to, proper trowel and troweling technique (excluding the
walk in method for embedding), should be followed for countertops.
wedi_Broschuere_TECHNISCHES-HANDBUCH_USA_2015_v4_lay1_Layout 1 30.06.15 15:06 Seite 35

36
Constructing Individual Bathroom Furniture
wedi Building Panels open endless possibilities in the design of circular and other shapes. Whether you wish to achieve
tight curves or semicircular solutions, the wedi Building Panel grants you plenty of scope to develop your ideas for
virtually all applications. Since wedi Building Panels offer exceptional moisture protection and heat insulation, you can
be assured your installations are guaranteed to meet the highest quality standards, no matter the shape and size you
choose to create. Here is just one example how to shape the wedi Building Panel.
01 02
Create a series of cuts into the wedi Building Panels 1/2 the thickness of
the panel deep. The distance between cuts depends on the tightness of
the radius needed later. Use a circular saw for these cuts.
To shape the wedi Building Panel
according to your wishes, you
may first want to create a type of
template, e.g. out of wood.
03
Then place the wedi Building
Panel flush along the structure,
with the incisions facing up-
wards…
04 05
… and apply wedi Self Adhe-
sive Mesh Tape followed by a
flat application of thinset mor-
tar.
Once the thinset mortar has set,
the shaped wedi Buiding Panel
can be moved into its intended
final position or application.
06
A wide range of other shapes
are possible using the wedi
Building Panel. All you need is
a template shaped to suit your
needs. A template may not be
needed for simpler shaping.
Important:
We recommend to waterproof
over cut wedi Building Panels
in wet areas as the panels are
cut to bend properly, but may
break through the foam in
handling.
wedi_Broschuere_TECHNISCHES-HANDBUCH_USA_2015_v4_lay1_Layout 1 30.06.15 15:06 Seite 36

37
01 02
Measure and cut the bench
pieces off a wedi 2” thick
Building Panel and dry fit.
When installing a corner seat,
the panel edges are mitered for
a tight fit. To achieve a slope,
the part’s upper ends are cut
down with a slight angle to-
wards the front of the bench.
Optionally, create a pitch using
wedi joint sealant as a "wet
shim". The wedi parts are ad-
hered to the wall using thinset
mortar or wedi Joint Sealant.
Adjoining parts are glued to-
gether using wedi Joint Sealant
continuously applied along all
foam edges of a panel part.
Excess is spread flat over the
seams using a putty knife.
Where the part’s backs meet
the wedi wall, modified thinset
mortar is used in a full contact
surface bed. Once the bench is
built, a final bead of wedi Joint
Sealant is applied to safely seal
all seams to the wedi wall. The
vertical front part of the bench
will show a small gap to the
pitched floor. Please fill with
03
thinset mortar and alkali resist-
ant fiberglass mesh tape by
wedi, applied over this seam.
Alternatively, benches and
seats are offered as prefabri-
cated units made by wedi. For
longer or larger benches built
from our 2” building panel, al-
ways install one spacer every
18” in either direction.
Building Custom Seats and BenchesUsing 1 1/2" or 2" thick wedi BuildingPanels
wedi offers prefabricated suspended or wall mounted seats and floor
standing seats. Both may also be constructed on site using wedi Building
Panels. This is an ideal option that will perfectly accommodate your in-
dividual tile and design layout.
Build
ing
Pane
l App
licat
ions
C
onst
ruct
ing
Indi
vidu
al B
athr
oom
Fur
nitu
re
Cut the wedi Building Panel using a utility knife and straight edge. This
way wave shape constructions can be produced. For a small radius –
cut out wedges from the building panel or…
… cut the wedi Building Panel using a hand-held circular saw and bend
it into a curve.
Tools and Methods to cut wedi Building Panels into flexible shapes – curved bench styles
wedi_Broschuere_TECHNISCHES-HANDBUCH_USA_2015_v4_lay1_Layout 1 30.06.15 15:06 Seite 37

38
Steam Rooms and Steam Showers
Whether installed in a steam room with commercial 24 hour use or in a residential steam shower, wedi Building Panels,
just combined with wedi Vapor Barrier, form the industry’s first sufficient solution to protect your tiled steam room against
the threat of water vapor transmission through walls or ceilings. Water vapor transmission through building materials into
walls or ceiling substrates can cause deterioration and mold. Traditional vapor retarders and waterproofing methods often
fail to address the challenges in many situations due to use of products that may act as a waterproofing but may display
insufficient or no water vapor retarding properties, or the proper placement of water vapor retarders or the entire installation
concept may be wrong. Many installation concepts may fail because they allow water vapor pressure to build up due to a
lack of insulation in a wall ceiling which may lead the chosen vapor retarder to fail. To be sure, steam showers and rooms
also require waterproofed surfaces just like general shower or wet rooms. A tricky part is, however, that it is not safe to as-
sume that a vapor retarder layer can generally be a waterproofing layer able to withstand (liquid) water pressure and vice
versa. The wedi System offers all three: The waterproof and vapor retarding XPS foam underlayment systems with insulation
value built in, and the surface added, strong liquid wedi vapor barrier- all in one compact system.
wedi_Broschuere_TECHNISCHES-HANDBUCH_USA_2015_v4_lay1_Layout 1 30.06.15 15:06 Seite 38

39
Build
ing
Pane
l App
licat
ions
St
eam
Roo
ms
and
Stea
m S
how
ers
Residential and Commercial Use for Steam Rooms and Steam Showers
Maximize Protection Against Water – Vapor Permeation and Damage
Wall and ceiling assemblies in steam rooms and showers must feature sufficient vapor retarder attributes. Very few assemblies or products suitable for tile
substrate installations can be called a true vapor barrier or even a sufficient vapor retarder for many, especially commercial or continuous use steam room
applications. For our applications purpose, a water vapor retarder performance is measured in WVTR (Water Vapor Transmission Rate) or Permeance.
WVTR / Permeance is measured, for a material or construction layer with a specific thickness, whereby the test specimen is exposed to specific environments
and a climate differential established on either side of the specimen (climate differential such as between steam room insides and outsides). Permeance,
the specific performance, is the arithmetic result of the permeability of the material divided by its thickness and is measured in Perms. It is important, that
when determining WVTR / Permeance, the proper ASTM test method is used. The TCNA now requires that all steam room application related vapor
retarders must be tested according to ASTM E96, method E, to document performance as needed. A product suitable for steam rooms should generally
have a Perm rating of 0.5 or less, in commercial applications 0.1 or less. Most common waterproofing membranes do not come close to providing such
properties and are either not properly tested or show higher Perm ratings than should be allowed for steam room applications. Current steam shower
details in the Tile Council of North America Handbook for Ceramic Glass, Tile and Stone Installation call for a minimum Perm rating for vapor retarders of
0.5 in all continuous use steam rooms. wedi, however, recommends higher standards.
The wedi Vapor Barrier, called a barrier because its retarding strength is so high that it acts as a true an full barrier in all steam room applications, is used
in conjunction with wedi applications in residential and commercial steam room installations. It is formulated to protect the entire wall and ceiling con-
struction against aggressive water vapor diffusion and migration into or through any critical layers of such construction. Our wedi Vapor Barrier is recom-
mended to be applied by brush, roller, trowel or spray. Application typically consists of two layers; one applied to 90 degrees to the other to eliminate
voids that would allow moisture penetration. The second layer is applied once the first layer is dry to the touch. Tiling may commence 4 hours after the
application of the second coat and must be finished within 48 hours of the second coat application. If tiling must happen later, another coat of our vapor
barrier must be applied as a primer bond coat prior to setting tile. Cure of the vapor barrier is by evaporation and safety measures such as ventilation
during and after installation should be considered. Once cured, our product offers excellent flexibility and water vapor resistance, as well as a good bond
surface for tile and stone installation. Please go to www.wedicorp.com for more technical details regarding wedi Vapor Barrier.
General Installation Recommendations for Steam Rooms
Build a sufficient slope (2” per 1 ft.) into the ceiling so condensation
water runs down toward walls without dripping.
Lead the steam supply copper pipe into the lower third of the wall
height so the steam can rise. Make sure the steam supply copper pipe
is installed through the steam room wall in an area where users will
not be directly exposed to hot steam and approximately 1 foot high
from the ground. Heat protected fixtures are recommended.
Properly insulate the copper steam pipe so the high temperature does
not touch the wedi Building Panel foam (wedi resists up to 175º F).
All installations of lighting should reflect heat downward. All installa-
tions of any fixtures must be vapor tight in product and installation.
All installations are to be vapor proofed using wedi Joint Sealant, wedi
Vapor Barrier or Sealing Collars to address cut outs for installations
(i.e. shower valves).
Make sure the fresh air supply and exchange is given, either by auto-
mated fans or ventilation or through an open space (1”) between
glass door and floor tile.
Use only surface finishes, setting materials and other products which
are made to function and last in a warm/cold instant change climate
and water vapor pressure environment.
The installation of adequately placed slip and expansion joints in the
tile or stone application is extremely important in steam rooms. Refer
to TCNA Handbook details SR614-13 and EJ171.
Doors must open to the outside and must not lock. No obstacles must
be present in interior pathways of a steam room.
wedi_Broschuere_TECHNISCHES-HANDBUCH_USA_2015_v4_lay1_Layout 1 30.06.15 15:06 Seite 39
40
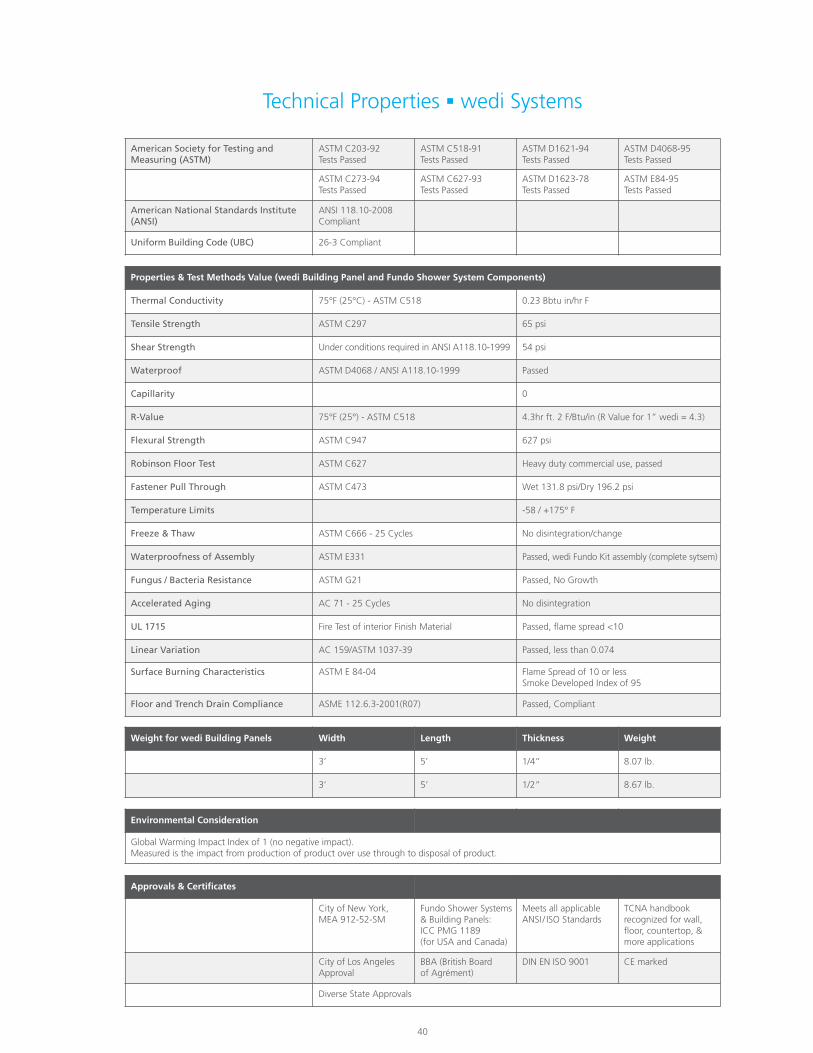
American Society for Testing andMeasuring (ASTM)
ASTM C203-92Tests Passed
ASTM C518-91Tests Passed
ASTM D1621-94Tests Passed
ASTM D4068-95Tests Passed
ASTM C273-94Tests Passed
ASTM C627-93Tests Passed
ASTM D1623-78Tests Passed
ASTM E84-95Tests Passed
American National Standards Institute(ANSI)
ANSI 118.10-2008Compliant
Uniform Building Code (UBC) 26-3 Compliant
Approvals & Certificates
City of New York,MEA 912-52-SM
Fundo Shower Systems& Building Panels:ICC PMG 1189(for USA and Canada)
Meets all applicableANSI / ISO Standards
TCNA handbookrecognized for wall,floor, countertop, &more applications
City of Los Angeles Approval
BBA (British Board of Agrément)
DIN EN ISO 9001 CE marked
Diverse State Approvals
Environmental Consideration
Global Warming Impact Index of 1 (no negative impact). Measured is the impact from production of product over use through to disposal of product.
Properties & Test Methods Value (wedi Building Panel and Fundo Shower System Components)
Thermal Conductivity 75°F (25°C) - ASTM C518 0.23 Bbtu in/hr F
Tensile Strength ASTM C297 65 psi
Shear Strength Under conditions required in ANSI A118.10-1999 54 psi
Waterproof ASTM D4068 / ANSI A118.10-1999 Passed
Capillarity 0
R-Value 75°F (25°) - ASTM C518 4.3hr ft. 2 F/Btu/in (R Value for 1” wedi = 4.3)
Flexural Strength ASTM C947 627 psi
Robinson Floor Test ASTM C627 Heavy duty commercial use, passed
Fastener Pull Through ASTM C473 Wet 131.8 psi/Dry 196.2 psi
Temperature Limits -58 / +175° F
Freeze & Thaw ASTM C666 - 25 Cycles No disintegration/change
Waterproofness of Assembly ASTM E331 Passed, wedi Fundo Kit assembly (complete sytsem)
Fungus / Bacteria Resistance ASTM G21 Passed, No Growth
Accelerated Aging AC 71 - 25 Cycles No disintegration
UL 1715 Fire Test of interior Finish Material Passed, flame spread <10
Linear Variation AC 159/ASTM 1037-39 Passed, less than 0.074
Surface Burning Characteristics ASTM E 84-04 Flame Spread of 10 or less Smoke Developed Index of 95
Floor and Trench Drain Compliance ASME 112.6.3-2001(R07) Passed, Compliant
Weight for wedi Building Panels Width Length Thickness Weight
3’ 5’ 1/4” 8.07 lb.
3’ 5’ 1/2” 8.67 lb.
Technical Properties wedi Systems
wedi_Broschuere_TECHNISCHES-HANDBUCH_USA_2015_v4_lay1_Layout 1 30.06.15 15:06 Seite 40

41
WEDI FUNDO SHOWER SYSTEM AND TILE BACKER BOARD UNDERLAYMENTS
CSI DIVISION: 22 00 00 – PLUMBINGSection: 22 40 00 – Plumbing Fixtures (Shower System Kit)
Product certification system The ICC-ES product certification system includes testing sampies taken from the market or supplier'sstock, or a combination of both, to verify compliance with applicable codes and standards. The systemalso involves factory inspections, and assessment and surveillance of the supplier's quality system.
Product wedi Fundo Shower System and Tile Backer Board Underlayments
Listee wedi Corporation171 S. Gary AvenueCarol Stream, Illinois 60188www.wedicorp.com
Compliance with the following codes 2015,2012 and 2009 International Plumbing Code® (IPC)2015,2012 and 2009 International Residential Code® (IRC)2015, 2012 and 2009 International Building Code® (IBC)2012 and 2009 National Standard Plumbing Code® (NSPC)2012 and 2009 Uniform Plumbing Code® (UPC)*2010 and 2005 National Plumbing Code of Canada*** Uniform Plumbing Code is a copyrighted publication
if the International Association of Plumbing and Mechanical Officials** National Plumbing Code of Canada is a copyrighted publication
of National Research Council Canada
Compliance with the following standards ANSI A 118.10-2008, Load Bearing, Bonded, Waterproof Membranes for Thin-Set Ceramic Tile and Dimension Stone InstallationsASME A 112.6.3-2001 (R07), Floor and Trench DrainsICC-ES EG 159, Evaluation Guideline for Composite Backer Board (Approved Dec 2004)ICC-ES AC 71, Acceptance Criteria for Foam Plastic Sheathing Panels Used as Water ResistiveBarriers (Approved Feb 2003, Ed Revised Nov 2013)IAPMO PS 46-2012, Field-Fabricated Tiling KitsIAPMO PS 106-2015, Tileable Shower Receptors and Shower Kits
Identification Packaging label for each system shall include the manufacturer's name or trademark as weil as the ICC-ES PMG certification mark.
Installation The wedi Fundo Shower Systems shall be installed in accordance with the manufacturer's published instructions and the applicable code(s).Shower system components shall be assembled and can be customized in the field. All shower bases and panels can be cut to size with hand saws or skill saws. Round curvy cuts can be madewith a hand saw or jig saw.When provided drains must comply with ASME A112.18.2 as applicable. The wedi pre-sloped,ready-to-tile shower bases may be used in lieu of an ANSI Z124.1.2 plastic shower receptors or any liner based shower installations. The wedi drain units do not require weep holes.
Listed Models and Characteristics The wedi Fundo shower bases are pre-sloped, ready-to-tile floor units. The wedi building panels areengineered as a general purpose backer board and underlayment for tile and consist of a rigid ex-truded polystyrene foam covered on both sides with a cement-based resin surface and reinforcingmesh for durability and bonding with any type of thinset mortar. The systems linear drain is integratedand factory sealed into the floor base. System assembly and wedi components were proven to bewaterproof, water-resistant, and mold resistant when tested in accordance with A 118.10-2008.Shower system may include the following components: shower base, building panels, curbs, niches,seats, benches, ramps, vapor barrier, fasteners, cover plates, sealants, Fundo drain, Subliner sheetmembrane and Subliner Bonding Flange drain.The wedi Fundo family line includes the following: Primo, Riolito, Riofino, Discreto, Ligno and ECOBATH.
Conditions of Listing 1. The wedi Fundo Shower Systems shall be installed in accordance with the manufacturer's published instructions and the applicable code(s).
2. The wedi Fundo Shower Systems are manufactured by wedi GmbH, in Emsdetten, Germanyunder a quality control program with annual surveillance inspections by ICC-ES.
ICC-PMG 1189 Report National Building Code Compliances
Build
ing
Pane
l App
licat
ions
Te
chni
cal P
rope
rtie
s
Find Current Report on www.icc-es.org or www.wedicorp.com
wedi_Broschuere_TECHNISCHES-HANDBUCH_USA_2015_v4_lay1_Layout 1 30.06.15 15:06 Seite 41

42
Description Width x Length x Thickness Unit/Palette Item #
wedi Building Panel 3’ x 5’ x 1/4” (914 x 1524 x 6 mm) 50 panels = 750 sq. ft. 010718006
wedi Building Panel 3’ x 5’ x 1/2” (914 x 1524 x 12.7 mm) 50 panels = 750 sq. ft. 010717064
wedi Building Panel 2’ x 4’ x 1/8” (600 x 1200 x 4 mm) 136 panels = 1,088 sq. ft. 010000004
wedi Building Panel 3’ x 5’ x 5/8” (600 x 2500 x 15.8 mm) 50 panels = 750 sq. ft. 010716316
wedi Building Panel 2’ x 8’ x 1” (600 x 2500 x 25.4 mm) 56 panels = 896 sq. ft. 010719325
wedi Building Panel 2’ x 8’ x 3/4” (600 x 2500 x 20 mm) 50 panels = 800 sq. ft. 010000020
wedi Building Panel 2’ x 8’ x 1 1/4” (600 x 2500 x 30 mm) 36 panels = 576 sq. ft. 010000030
wedi Building Panel 2’ x 8’ x 1 1/2” (600 x 2500 x 40 mm) 36 panels = 576 sq. ft. 010000040
wedi Building Panel 2’ x 8’ x 2” (600 x 2500 x 50 mm) 24 panels = 384 sq. ft. 010000050
wedi Building Panel
Description Width x Length x Thickness Unit/Palette Item #
wedi Building Panel XL 3’ x 8’ x 1/2” (900 x 2500 x 12.5 mm) 26 panels = 624 sq. ft. 010000912
wedi Building Panel XXL 4’ x 8’ x 1/2” (1200 x 2600 x 12.5 mm) 26 panels = 858 sq. ft. 010001612
wedi Building Panel XXL 4’ x 8’ x 2” (1200 x 2500 x 50 mm) 12 panels = 396 sq. ft. 010001250
wedi Building Panel XL & XXL
Description Length Unit/Box Item #
Coarse thread screws, ceramic coating 1 5/8” 100 pcs US5000016
Coarse thread screws, ceramic coating, for canadian markets only 1 5/8” 100 pcs US5000017
Coarse thread screws, ceramic coating 1 5/8” 1000 pcs US5000012
wedi® Accessories | Coarse Thread Screws, Ceramic Coating
Phillips head for wood studs, premium ceramic coating (ACQ Compliant)
Description Width x Length x Height Unit Item #
BA Construct (widthwise cut) 2’ x 8’ x 1 1/4” Precut to bend 1 pc 010708030
BA Construct (lengthwise cut) 2’ x 8’ x 1 1/4” Precut to bend 1 pc 010709030
wedi Building Panels for Curved Designs – Precut to Bend
wedi_Broschuere_TECHNISCHES-HANDBUCH_USA_2015_v4_lay1_Layout 1 30.06.15 15:06 Seite 42

43
Build
ing
Pane
l App
licat
ions
Pr
oduc
t In
form
atio
n
Description Diameter Unit/Box Item #
Tab Steel Washers, Galvanized 1 1/4” 100 pcs US5000014
Tab Steel Washers, Galvanized 1 1/4” 1000 pcs US5000009
Washer, without tabs for flooring 1 1/4” 100 pcs US5000015
wedi Accessories | Tab Steel Washers, Galvanized
Description Length Unit/Box Item #
Fine thread self-tapping ceramic coated 1 1/4” 100 pcs US5000018
Fine thread self-tapping ceramic coated 2 1/2" 100 pcs US5000049
wedi Accessories | Fine Thread Self Tapping Screws, Ceramic Coated
For metal framework with no risk of electric/galvanic corrosion. Phillips head.
Description Width x Roll Length Unit/Box Item #
Meshtape, self-adhesive 5” x 82’ 1 roll 095225053
Meshtape, self-adhesive 24” x 164’ 1 roll 095215052
wedi Accessories | Meshtape, Self-adhesive
The mesh tape is alkali resistant.
Description Unit Item #
wedi Vapor Barrier 1 container US5000051
wedi Accessories | Vapor Barrier
For use in wedi steam rooms over inside surfaces (except floors) prior to tiling
Tabbed washers provide four tabs for fast and secure placement. wedi Washers provide a solid gauge according toISO standards and less potential for deformation. Load capabilities are independently tested.
For more detailed installation and product information, see our Technical Data Sheets (TDS) on www.wedicorp.com.
Description Width x Roll Length Unit/Box Item #
Waterproof sealing tape,fleece laminated 5” x 32.8’ 1 roll US5000002
wedi Accessories | Waterproof Sealing Tape, Fleece Laminated
wedi_Broschuere_TECHNISCHES-HANDBUCH_USA_2015_v4_lay1_Layout 1 30.06.15 15:06 Seite 43

44
Description Contents Unit Item #
wedi Joint Sealant,MS polymer sealant 10 oz. 1 Cartridge US5000013
wedi Joint Sealant,MS polymer sealant 20 oz. 1 Sausage US5000010
wedi Joint Sealant | MS Polymer Sealant and Adhesive
Description Dimensions Unit Item #
Waterproof inside corner sealing tape, fleece laminated 4 3/4” x 4 3/4” x 2 1/4” 2 pcs US5000007
Waterproof outside cornersealing tape, fleece laminated 4 1/2” x 4 1/2” x 2 1/4” 2 pcs US5000008
wedi Accessories | Corner Sealing Tape, Fleece Laminated
Description Dimensions Unit Item #
Waterproof Sealing Collar for 1/2” to 3/4” plumbingpipes and protrusions 4 3/4” x 4 3/4” 1 pc US5000033
Valve Flexi Collar Diameter 5" 1 pc US5000066
wedi Sealing Collars
Permanently flexible, waterproof sealant and adhesive for joint treatment.
Description Unit Item #
wedi Sausage Gun, gun for wedi joint MS polymer sealant sausages 1 piece US5000019
wedi Sausage Gun Replacement Tip per piece US5000020
wedi Sausage Gun | Gun for MS Polymer Sealant Sausages and Replacement Tips
wedi_Broschuere_TECHNISCHES-HANDBUCH_USA_2015_v4_lay1_Layout 1 30.06.15 15:06 Seite 44

45
Build
ing
Pane
l App
licat
ions
Pr
oduc
t In
form
atio
n
Description Dimensions Unit/Box Item #
wedi tools, notch trowel 1/8” x 1/8” square 12 pcs US5000038
wedi tools, notch trowel 1/4” x 1/4” square 12 pcs US5000039
wedi tools, notch trowel 3/8” x 3/8” square 12 pcs US5000040
wedi Tools | Notch Trowel Made of Stainless Steel
Description Dimensions Unit/Box Item #
wedi tools, wooden float forwedi subliner installation 4 1/2” x 16” 12 pcs US5000043
wedi Tools | Wooden Float
Description Unit/Bag Item #
wedi tools, corner putty knife for wedi shower system installations 1 pc US5000044
wedi Tools | Corner Putty Knife
For more detailed installation and product information, see our Technical Data Sheets (TDS) on www.wedicorp.com.
Solid Stem; specialized handle/grip.
For thinset distribution.
Use to smooth out wedi Joint Sealant applications.
Description Unit/Bag Item #
wedi tools, margin trowel,carbonated steel 1 pc US5000045
wedi Tools | Margin Trowel
wedi_Broschuere_TECHNISCHES-HANDBUCH_USA_2015_v4_lay1_Layout 1 30.06.15 15:06 Seite 45

46
Shown here is oneof our optionaldrain cover de-signs. Further
models are shownon page 80.
wedi_Broschuere_TECHNISCHES-HANDBUCH_USA_2015_v4_lay1_Layout 1 30.06.15 15:07 Seite 46

47
Waterproof Shower SystemSolutions
wedi Fundo
wedi Waterproof Shower Systems offer reliable, cost-efficient solutions for constructing 100 % waterproof and
mold proof showers. These systems are easy to install and open up a whole new world of design possibilities for
showers, wet areas and baths. wedi shower systems blend the traditional values of design flexibility and robust-
ness while offering the added benefits that come with state of the art material and manufacturing technologies.
Used in combination with wedi Building Panels on walls, our shower bases offer an excellent alternative to tra-
ditional installation methods. No more presloping, pan liner cracks or membrane pin holes, clogged drain weep-
holes and mold growth. Plus, reduce the traditional installation time and down times for a full shower floor
preparation for tiling from 2 – 3 days to now 30 minutes. Fundo is available as point drain, linear drain or special
floor level shower systems. Once installed it is a tough floor element with no sponginess which is known to be
a characteristic to many foams and especially EPS or expanded polystyrene foams. On wedi: put up a ladder,
walk on it, work on it. You may also drop a tool without inflicting irreparable damage.Sh
ower
Sys
tem
Sol
utio
ns
wedi_Broschuere_TECHNISCHES-HANDBUCH_USA_2015_v4_lay1_Layout 1 30.06.15 15:07 Seite 47

48
wedi Fundo Primo
The wedi Fundo Primo Shower System features a square drain cover point drainage solution for fast and safe renovation and
new construction installations. Primo is internally waterproof due to its wedi XPS foam's closed cell structure and naturally
protect against mold or mildew like every wedi XPS foam based product. It is fast and clean to cut to fit custom designs while
the level of prefabrication reduces installation time significantly. The shower floor units feature a strong and pre-sloped surface
which can be tiled over immediately whether you choose mosaic size or large format tile. Drain unit and drain cover set is al-
ways included with each Primo shower floor unit while further optional drain cover designs are available. Pre-sloped extension
panels are available so that virtually no limit exists for making any size or shape for custom shower designs happen.
The added values offered by Fundo Primo come in form of many more performance advantages. Naturally, Fundo Primo is
insulating keeping surfaces warmer. Especially when compared to traditional mortar bed installations or other currently known
methods for building showers such as those including use of sheet – or liquid waterproofing membranes used in an attempt
to manage water exposure – wedi Fundo Primo's simplicity and high performance shows. The installation combines many
manual and separate installation steps and materials usually needed into very few. Fundo Primo adds speed, safety and con-
sistency to your installation: Measure, possibly cut, thinset to subfloor, connect drain – done. The most unique advantage,
however, is the complete and natural core waterproofness of the wedi product and it’s completeness and range of components
that will form an entire assembly system with Fundo Primo engineered to fit and last. A true system with full warranty coverage.
wedi_Broschuere_TECHNISCHES-HANDBUCH_USA_2015_v4_lay1_Layout 1 30.06.15 15:07 Seite 48

49
Show
er S
yste
m S
olut
ions
w
edi F
undo
Prim
o
Caulking nut
Rubber caulking gasket
Fiber gasket
Drain body
wedi Fundo Primo unit
wedi sealant
Locking nut
Rubber gasket
2”
Note for Installation
Optionally a glue drain can be obtained from wedi. For a cement glue connection, the floor pipe must be cut 2 1/4 inches below the surface of the sub-
floor. Optionally a brass drain can be obtained from wedi. The installation proceeds as shown for the standard PVC drain provided with each Fundo
Primo base.
Drain to Base Assembly
These added values and its detail perfections eliminate the technical concerns in shower installations. But this is not where wedi shower systems stop
offering it’s added values: The wedi Fundo shower system adds to your productivity and enables you to provide real value to your customers: Our wedi
Fundo Shower systems reduce the installation time for just the shower floor from a 2 – 3 day process (includes drying times) to only 30 minutes when
compared to traditional methods built with pre slope, vinyl liner and final mortar bed. wedi helps you to turn showers into service quicker, cleaner, safer.
Especially for our contractors, Fundo Primo helps to get to setting tile faster and on a much more consistent and tile friendly surface. Customers will ap-
preciate the "no noise and no dirt and dust" installation. The wedi products do not contain harmful ingredients providing peace of mind to contractors
and end users.
Several Fundo Primo models naturally feature different perimeter height or thickness at the edge. Therefore, pre-made standard notch connections
of wedi curbs must be modified in the field for a tight fit to the bases. Ramps and Extension panels can naturally not fit to all models and might
be modified in the field as well.
wedi_Broschuere_TECHNISCHES-HANDBUCH_USA_2015_v4_lay1_Layout 1 30.06.15 15:07 Seite 49
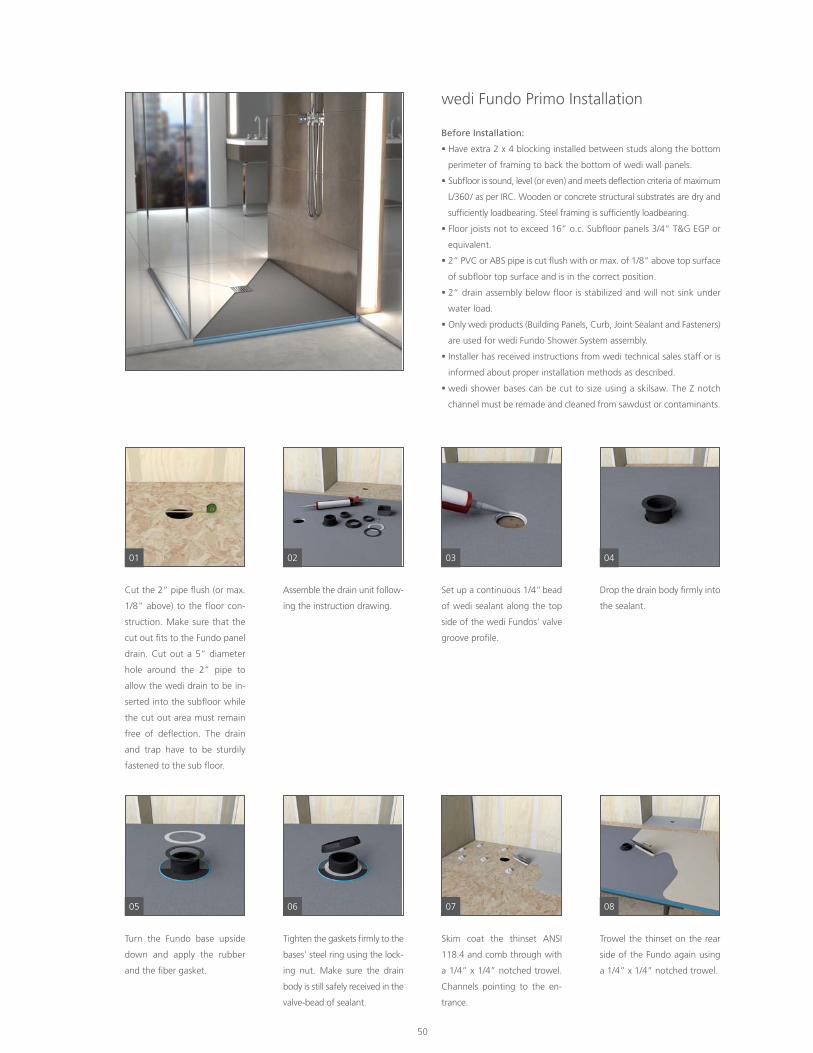
50
01 02 04
Cut the 2” pipe flush (or max.
1/8" above) to the floor con-
struction. Make sure that the
cut out fits to the Fundo panel
drain. Cut out a 5” diameter
hole around the 2” pipe to
allow the wedi drain to be in-
serted into the subfloor while
the cut out area must remain
free of deflection. The drain
and trap have to be sturdily
fastened to the sub floor.
Assemble the drain unit follow-
ing the instruction drawing.
03
Set up a continuous 1/4” bead
of wedi sealant along the top
side of the wedi Fundos’ valve
groove profile.
Drop the drain body firmly into
the sealant.
05 06 08
Turn the Fundo base upside
down and apply the rubber
and the fiber gasket.
Tighten the gaskets firmly to the
bases' steel ring using the lock-
ing nut. Make sure the drain
body is still safely received in the
valve-bead of sealant.
07
Skim coat the thinset ANSI
118.4 and comb through with
a 1/4” x 1/4” notched trowel.
Channels pointing to the en -
trance.
Trowel the thinset on the rear
side of the Fundo again using
a 1/4” x 1/4” notched trowel.
wedi Fundo Primo Installation
Before Installation:
Have extra 2 x 4 blocking installed between studs along the bottom
perimeter of framing to back the bottom of wedi wall panels.
Subfloor is sound, level (or even) and meets deflection criteria of maximum
L/360 / as per IRC. Wooden or concrete structural substrates are dry and
sufficiently loadbearing. Steel framing is sufficiently loadbearing.
Floor joists not to exceed 16” o.c. Subfloor panels 3/4” T&G EGP or
equivalent.
2” PVC or ABS pipe is cut flush with or max. of 1/8" above top surface
of subfloor top surface and is in the correct position.
2” drain assembly below floor is stabilized and will not sink under
water load.
Only wedi products (Building Panels, Curb, Joint Sealant and Fasteners)
are used for wedi Fundo Shower System assembly.
Installer has received instructions from wedi technical sales staff or is
informed about proper installation methods as described.
wedi shower bases can be cut to size using a skilsaw. The Z notch
channel must be remade and cleaned from sawdust or contaminants.
wedi_Broschuere_TECHNISCHES-HANDBUCH_USA_2015_v4_lay1_Layout 1 30.06.15 15:07 Seite 50
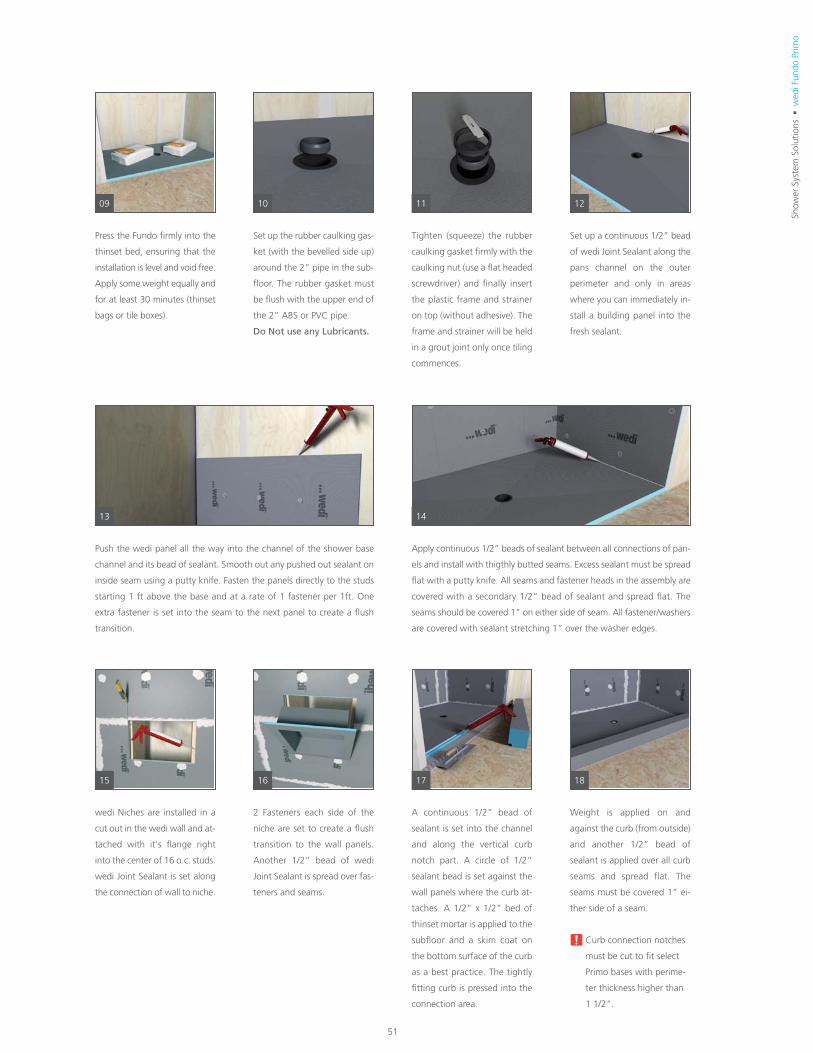
51
09 10 12
Press the Fundo firmly into the
thinset bed, ensuring that the
installation is level and void free.
Apply some weight equally and
for at least 30 minutes (thinset
bags or tile boxes).
Set up the rubber caulking gas-
ket (with the bevelled side up)
around the 2” pipe in the sub-
floor. The rubber gasket must
be flush with the upper end of
the 2” ABS or PVC pipe.
Do Not use any Lubricants.
11
Tighten (squeeze) the rubber
caulking gasket firmly with the
caulking nut (use a flat headed
screwdriver) and finally insert
the plastic frame and strainer
on top (without adhesive). The
frame and strainer will be held
in a grout joint only once tiling
commences.
Set up a continuous 1/2” bead
of wedi Joint Sealant along the
pans channel on the outer
perimeter and only in areas
where you can immediately in-
stall a building panel into the
fresh sealant.
13 14
15
Push the wedi panel all the way into the channel of the shower base
channel and its bead of sealant. Smooth out any pushed out sealant on
inside seam using a putty knife. Fasten the panels directly to the studs
starting 1 ft above the base and at a rate of 1 fastener per 1ft. One
extra fastener is set into the seam to the next panel to create a flush
transition.
Apply continuous 1/2” beads of sealant between all connections of pan-
els and install with thigthly butted seams. Excess sealant must be spread
flat with a putty knife. All seams and fastener heads in the assembly are
covered with a secondary 1/2” bead of sealant and spread flat. The
seams should be covered 1” on either side of seam. All fastener/washers
are covered with sealant stretching 1” over the washer edges.
17 18
A continuous 1/2” bead of
sealant is set into the channel
and along the vertical curb
notch part. A circle of 1/2”
sealant bead is set against the
wall panels where the curb at-
taches. A 1/2” x 1/2” bed of
thinset mortar is applied to the
subfloor and a skim coat on
the bottom surface of the curb
as a best practice. The tightly
fitting curb is pressed into the
connection area.
16
2 Fasteners each side of the
niche are set to create a flush
transition to the wall panels.
Another 1/2” bead of wedi
Joint Seal ant is spread over fas-
teners and seams.
Weight is applied on and
against the curb (from outside)
and another 1/2” bead of
sealant is applied over all curb
seams and spread flat. The
seams must be covered 1” ei-
ther side of a seam.
wedi Niches are installed in a
cut out in the wedi wall and at-
tached with it's flange right
into the center of 16 o.c. studs.
wedi Joint Sealant is set along
the connection of wall to niche.
Show
er S
yste
m S
olut
ions
w
edi F
undo
Prim
o
Curb connection notches
must be cut to fit select
Primo bases with perime-
ter thickness higher than
1 1/2".
wedi_Broschuere_TECHNISCHES-HANDBUCH_USA_2015_v4_lay1_Layout 1 30.06.15 15:07 Seite 51

52
wedi Drain Cover Assembly / Insertion
Insert Cover frame into base hole (no glue / no screws). You may caulk between part and tile to create a flexible grout joint. The optional Extension Collar
can be cut to height if part is needed. The caulk joint must not create a water barrier damming up the water draining through the thinset bed into the
drain from below the tile. Therefore the thinset layer must be continuous toward the drain.
Cover frame
Optional Extension Collar
wedi Cover
After Installation
Using a 2” drain plug, the wedi pressure fit drain / sealing gasket is water tested prior to ceramic tile installation and prior to other full surface flood tests.
All bottom perimeter joints, curb joints and vertical joints are covered with wedi Joint Sealant. Coverage should be continuously visible for at least 3/4” to
1”. No mastic adhesives are used to install tile ceramic in the wedi system. A high quality modified thinset mortar is recommended. Tiles smaller than 2 x 2
inches require epoxy grout. Exception are pebble stones or river rock stones where a modified cement based grout can be used. Large format tile can be
used on wedi Fundo bases. The tiles must be cut where the slope fields meet. When a complete wedi Shower System is installed with wedi Joint Sealant, a
water flood test may be performed only 2 hours after final application of wedi Joint Sealant (application temperature must be ambient/ interior with normal
relative humidity and temperatures above 40°F to guarantee minimal cure time of sealant).
wedi_Broschuere_TECHNISCHES-HANDBUCH_USA_2015_v4_lay1_Layout 1 30.06.15 15:07 Seite 52

53
Screws andWashers
Drain unit andCover Set
wedi FullFoam Curb
wedi TriangleCorner Seat
(optional)wedi Building Panel
wedi Fundo PrimoShower Base
wedi Niche (optional)
Show
er S
yste
m S
olut
ions
w
edi F
undo
Prim
o
Fundo Primo Shower Kit – Full Shower System in a Box
All products needed to build a wedi shower are included and provide a single manufacturer warranty. Safe transportation
in one box, easy estimating of product quantities needed.
wedi_Broschuere_TECHNISCHES-HANDBUCH_USA_2015_v4_lay1_Layout 1 30.06.15 15:07 Seite 53

54
wedi Fundo Ligno
Homeowners and builders increasingly favor shower spaces which can function without a curb or would not require
any build up over existing floor areas resulting in a step up into the shower. One important reason for this trend is:
easier and safer access to the shower for older and/ or physically disabled persons. While this trend offers great design
and business opportunities it also presents technical challenges which cannot be overcome by many conventional shower
installation methods or products. Main challenges are safe recessing of a sloped shower base into an existing structural
floor for a flush transition and the extension of waterproofing from shower area into surrounding floor areas no longer
protected by a curb keeping water inside the shower area. To address all challenges for tile professionals, wedi engineered
Fundo Ligno, a sloped shower base ¾ inches thin at its perimeter and available in various sizes. Ligno can be field mod-
ified. The installation within a ¾” plywood structure requires no cutting into joists. Loadbearing plywood is simply re-
installed between floor joists and over 2 x 6 or 2 x 4 blocking then attached to the joists. This guarantees a full support
and protection of the tiled surface. The wedi typical strong cement based, reinforced surface is pre-sloped, directly
tileable with large or small format tile. Ligno interlocks with wedi Building Panel used as waterproof backer board on
walls as well as on the surrounding floor. Optionally, wedi‘s Subliner Dry Sheet Waterproofing membrane can be used.
Both options offer a complete and professional system installation.
Fundo Lignorecessed
shower base
Under Floor Tile: wedi Building Panel
or Subliner Sheet Membrane con-
nected and sealedto shower base and
wall units
wedi_Broschuere_TECHNISCHES-HANDBUCH_USA_2015_v4_lay1_Layout 1 30.06.15 15:07 Seite 54

55
Show
er S
yste
m S
olut
ions
w
edi F
undo
Lig
no
Caulking nut
Rubber caulking gasket
Fiber gasket
Drain body
wedi sealant
Locking nut
Rubber gasket
2”
Note for Installation
Optionally a glue drain can be obtained from wedi. For a cement glue connection, the floor pipe must be cut 2 7/8 inches below the surface of the
subfloor. Optionally a brass drain can be obtained from wedi. The installation proceeds as shown for the standard drain provided with each Fundo base.
Drain to Base Assembly
wedi Fundo Ligno is designed to provide for a low profile base thickness of only 3/4”. This allows for a fast and flush installation into a subfloor assembly
without cutting into floor joists. The system is designed to work without a curb. Enjoy the ease of installation without creating a structural
hazard because you maintain the structural subfloor panels installed between floor joists under the wedi Fundo Ligno. Because barrier free showers may
be exposed to heavy point loads (e.g. wheel chair), you can confidently rely on the structural strength of the wedi base and subfloor as well as the wedi
Fundo's traditional strong cement based surface for ideal tile bond using any suitable cement based tile adhesives or grouts. As applied to all wedi Fundo
Shower Systems, wedi Fundo Ligno is designed to interlock and work with wedi Building Panels, wedi Joint Sealant, wedi Fasteners, wedi Seats and
Benches, wedi Niches and many more accessories, that truly complete your shower installation and waterproofing system. The installation is fast, modular
but customizable, and covered by wedi's full system warranty.
wedi Fundo Ligno
wedi_Broschuere_TECHNISCHES-HANDBUCH_USA_2015_v4_lay1_Layout 1 30.06.15 15:07 Seite 55

56
01 03
Cut 3/4” Plywood base out fitting the space of wedi Fundo Ligno. Safely
install blocking along floor joists appr. 3/4” below top of floor joists.
Adjust for thinset thickness under wedi Fundo Ligno base and / or the
flooring underlayment installation adjacent to shower area to create a
flush transition for waterproofing and tile between floor and shower
area. Re-install 3/4” plywood over blocking to have the plywood flush
with the floor joists and fill with furring strips on top of floor joists in
case the blocking / joist that carry the plywood under wedi base is in-
stalled higher than 3/4” deep from top of floor joists. Make sure the
entire perimeter of the wedi Fundo Ligno base is supported by floor
joists or adequate blocking. Make sure the plywood base shows no
seams where close to the cut out for the wedi Fundo Ligno drain. The
cutout around the center of the 2” floor pipe must be 6 1/2” in diam-
eter to allow drain recess and must not create any subfloor deflection.
The pipe is cut square and even at 5/8” below the recessed subfloor
top surface.
02
Assemble the drain unit follow -
ing the instruction drawing.
Set up a continuous 1/4” bead
of wedi Joint Sealant along the
top side of the wedi Fundos’
valve groove profile.
wedi Fundo Ligno Installation
Before Installation:
Have 2 x 4 blocking installed between studs along the bottom perime-
ter of framing to back the bottom of wedi wall panels.
Subfloor is sound, level and meets deflection criteria of maximum
L / 360 / as per IRC. Wooden or concrete structural substrates are dry
and sufficiently loadbearing. Steel wall framing is sufficiently loadbearing.
Floor joists not to exceed 16” o.c. Subfloor panels 3/4” T&G EGP or
equivalent but free of deflection higher than L/360.
2” ABS or PVC pipe is cut 5/8” below surface of recessed subfloor
and is in the correct position with no floor joist in the way of drain in-
stallation (Ligno can be cut to fit which may result in an offcenter drain
location)
Cut a 6 1/2” diameter hole around the pipe center into subfloor to
allow Ligno drain recess.
2” drain assembly below floor is stabilized and will not sink under
water load.
Only wedi products (Building Panels, Joint Sealant / Subliner Dry and
Fasteners) are used for wedi Fundo Shower System assembly.
Installer has received instructions from wedi technical sales staff or is
informed about proper installation methods as described
wedi shower bases can be cut to size using a skilsaw. The Z notch
channel must be remade and cleaned from sawdust or contaminants.
Where flush transition to floor the channel can be cut away or filled
with thinset thinset mortar or a strip of wedi Building Panel sealed
into channel.
wedi_Broschuere_TECHNISCHES-HANDBUCH_USA_2015_v4_lay1_Layout 1 30.06.15 15:07 Seite 56

57
04 05 07
Drop the drain body firmly into
the sealant.
Turn the Fundo base upside
down and apply the rubber
and the fiber gasket.
06
Tighten the gaskets firmly to
the bases' steel ring using the
locking nut. Make sure the
drain body is still safely re-
ceived in the valve-bead of
sealant.
Skim coat the thinset ANSI
118.4 and comb through with
a 1/4” x 1/4” notched trowel
channels pointing to the en-
trance.
08 10 1109
12
Trowel the thinset on the rear
side of the Fundo again using
a 1/4” x 1/4” notched trowel.
Press the wedi Fundo Ligno
firmly into the thinset bed, en-
suring that the installation is
level and void free. Apply some
weight equally and for at least
30 minutes (thinset bags).
Set up the rubber caulking gas-
ket (with the bevelled side up)
around the 2” pipe in the sub-
floor. The rubber gasket must
be flush with the upper end of
the 2” ABS or PVC pipe.
Do Not use any Lubricants.
14
Apply continuous 1/2” beads of sealant between all connections of pan-
els and install with thigthly butted seams. Excess sealant must be spread
flat with a putty knife. All seams and fastener heads in the assembly are
covered with a secondary 1/2” bead of sealant and spread flat. The
seams should be covered 1” on either side of seam. All fastener / wash-
ers are covered with sealant stretching 1” over the washer edges.
13
Push the wedi panel all the way
into the channel of the shower
base channel and its bead of
sealant. Smooth out any pushed
out sealant on inside seam
using a putty knife. Fasten the
panels directly to the studs start-
ing 1 ft above the base and at a
rate of 1 fastener per 1ft. One
extra fastener is set into the
seam to the next panel to crate
a flush transition.
Tighten (squeeze) the rubber
caulking gasket firmly with the
caulking nut (use a flat headed
screwdriver) and finally insert
the plastic frame and strainer
on top (without adhesive). The
frame and drain cover will be
held in a grout joint only once
tiling commences.
Set up a continuous 1/2” bead
of wedi Joint Sealant along the
pans channel on the outer
perimeter and only in areas
where you can immediately in-
stall a building panel into the
fresh sealant.
Show
er S
yste
m S
olut
ions
w
edi F
undo
Lig
no
wedi_Broschuere_TECHNISCHES-HANDBUCH_USA_2015_v4_lay1_Layout 1 30.06.15 15:07 Seite 57

58
15 16
18
wedi Niches are installed in a
cut out in the wedi wall and at-
tached with it's flange right
into the center of 16 o.c. studs.
wedi Joint Sealant is set along
the connection of wall to niche.
2 Fasteners each side of the
niche are set to create a flush
transition to the wall panels.
Another 1/2” bead of wedi
Joint Seal ant is spread over fas-
teners and seams.
17
Apply thinset mortar over wood subfloor and reaching 4” into the wedi
Fundo Ligno shower base. Fill the wedi Fundo Ligno channel with thinset
or a strip of sealed on wedi Building Panel and apply thinset mortar to
the lower corner of the wedi wall panels left and right of any entrance
using 1/4” x 1/4” notch trowel.
Apply a modified thinset (ANSI 118.4 or equivalent) across the wood or
cement board floor surface and now apply wedi Subliner Dry Sheet wa-
terproofing membrane overlapping into the Ligno base for 4 inches.
Apply wedi's prefabricated outside or inside sealing tape corners and
sealing tape as a flashing to the wedi wall panels/Ligno and Subliner
dry sheets as applicable.
All seams and ends of the Subliner Dry sheets are covered with a 1/2”
bead of wedi Joint Sealant and spread flat using a putty knife. Your
shower is ready for tile once the thinset mortar has hardened! Alterna-
tively to Subliner Dry sheet membrane system wedi building panels in
1/4” or 1/2” thickness can be used as the floor tile underlayment in lieu
of cement board and Subliner waterproofing. wedi Building Panel would
be installed over plywood subfloor and overlap and seal into the Ligno
channel. In such application the Ligno base must be raised to allow its
channel to fully stick out from the recessed area so wedi floor building
panels can be interlocked with its channel. All seams to wedi walls or
Ligno base are sealed internally with wedi Joint Sealant, and are covered
with an external 1/2” bead of wedi Joint Sealant spread flat. Your
shower is ready for tiling once thinset under wedi Subliner Dry or wedi
Building Panels on floor has cured.
wedi_Broschuere_TECHNISCHES-HANDBUCH_USA_2015_v4_lay1_Layout 1 30.06.15 15:08 Seite 58

59
wedi Drain Cover Assembly / Insertion
Insert Cover frame into base hole (no glue / no screws). You may caulk between part and tile to create a flexible grout joint. Optional Extension Collar
can be cut to height if part is needed. The caulk joint must not create a water barrier damming up the water draining through the thinset bed into the
drain from below the tile. Therefore the thinset layer must be continuous toward the drain.
Cover frame
Optional Extension Collar
wedi Cover
After Installation
Using a 2” drain plug, the wedi pressure fit drain / sealing gasket is water tested prior to ceramic tile installation. All bottom perimeter joints, Subliner joints
and vertical joints are covered with wedi Joint Sealant. Coverage should be continuously visible for at least 3/4” – 1” on either side of the seam. No mastic
adhesives are used to install tile in the wedi system. Minimum tile size is 2” x 2” x 1/4” thick. Large format tile can be used on wedi Fundo bases. The tiles
must be cut where the slope fields meet.
Show
er S
yste
m S
olut
ions
w
edi F
undo
Lig
no
wedi_Broschuere_TECHNISCHES-HANDBUCH_USA_2015_v4_lay1_Layout 1 30.06.15 15:08 Seite 59
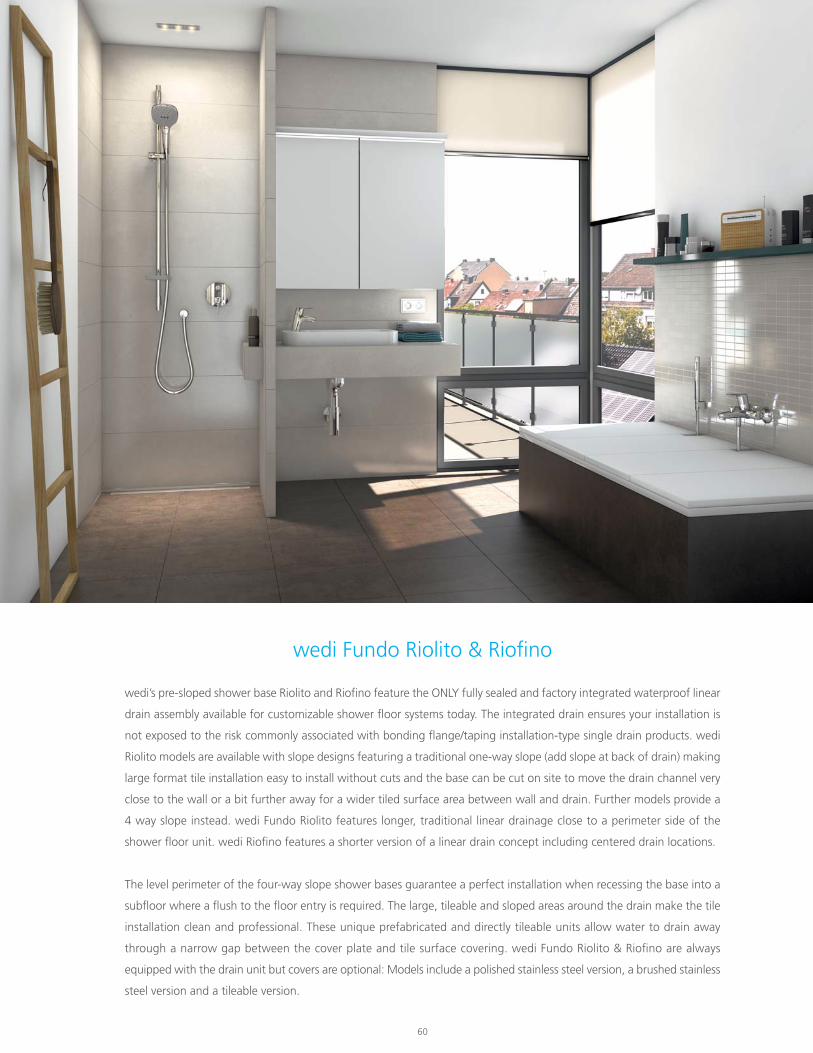
60
wedi Fundo Riolito & Riofino
wedi’s pre-sloped shower base Riolito and Riofino feature the ONLY fully sealed and factory integrated waterproof linear
drain assembly available for customizable shower floor systems today. The integrated drain ensures your installation is
not exposed to the risk commonly associated with bonding flange/taping installation-type single drain products. wedi
Riolito models are available with slope designs featuring a traditional one-way slope (add slope at back of drain) making
large format tile installation easy to install without cuts and the base can be cut on site to move the drain channel very
close to the wall or a bit further away for a wider tiled surface area between wall and drain. Further models provide a
4 way slope instead. wedi Fundo Riolito features longer, traditional linear drainage close to a perimeter side of the
shower floor unit. wedi Riofino features a shorter version of a linear drain concept including centered drain locations.
The level perimeter of the four-way slope shower bases guarantee a perfect installation when recessing the base into a
subfloor where a flush to the floor entry is required. The large, tileable and sloped areas around the drain make the tile
installation clean and professional. These unique prefabricated and directly tileable units allow water to drain away
through a narrow gap between the cover plate and tile surface covering. wedi Fundo Riolito & Riofino are always
equipped with the drain unit but covers are optional: Models include a polished stainless steel version, a brushed stainless
steel version and a tileable version.
wedi_Broschuere_TECHNISCHES-HANDBUCH_USA_2015_v4_lay1_Layout 1 30.06.15 15:08 Seite 60
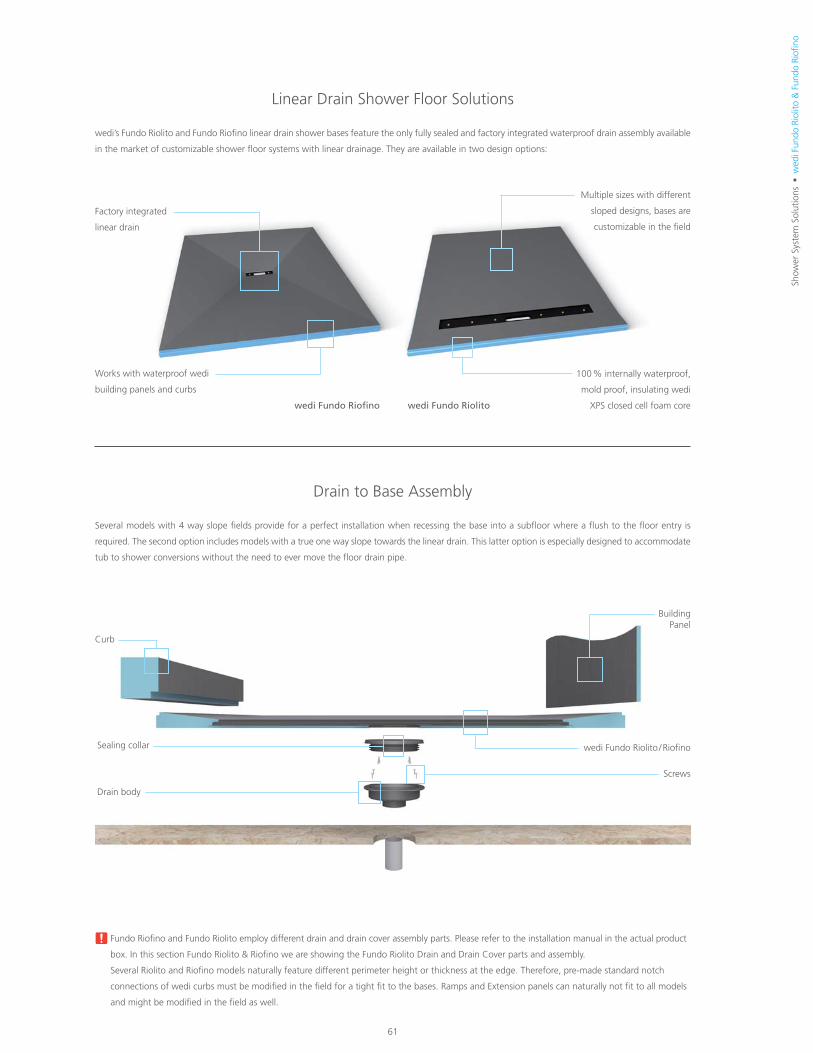
61
Show
er S
yste
m S
olut
ions
w
edi F
undo
Rio
lito
& F
undo
Rio
fino
Linear Drain Shower Floor Solutions
wedi’s Fundo Riolito and Fundo Riofino linear drain shower bases feature the only fully sealed and factory integrated waterproof drain assembly available
in the market of customizable shower floor systems with linear drainage. They are available in two design options:
Sealing collar
Drain body
Curb
BuildingPanel
wedi Fundo Riolito / Riofino
Screws
Drain to Base Assembly
Several models with 4 way slope fields provide for a perfect installation when recessing the base into a subfloor where a flush to the floor entry is
required. The second option includes models with a true one way slope towards the linear drain. This latter option is especially designed to accommodate
tub to shower conversions without the need to ever move the floor drain pipe.
100 % internally waterproof,
mold proof, insulating wedi
XPS closed cell foam core
Multiple sizes with different
sloped designs, bases are
customizable in the field
Factory integrated
linear drain
Works with waterproof wedi
building panels and curbs
wedi Fundo Riolitowedi Fundo Riofino
Fundo Riofino and Fundo Riolito employ different drain and drain cover assembly parts. Please refer to the installation manual in the actual product
box. In this section Fundo Riolito & Riofino we are showing the Fundo Riolito Drain and Drain Cover parts and assembly.
Several Riolito and Riofino models naturally feature different perimeter height or thickness at the edge. Therefore, pre-made standard notch
connections of wedi curbs must be modified in the field for a tight fit to the bases. Ramps and Extension panels can naturally not fit to all models
and might be modified in the field as well.
wedi_Broschuere_TECHNISCHES-HANDBUCH_USA_2015_v4_lay1_Layout 1 30.06.15 15:08 Seite 61

62
wedi Fundo Riolito Installation
Before Installation:
Subfloor is sound, level and meets deflection criteria of maximum
L/360 / as per IRC. Wooden or concrete structural substrates are dry
and sufficiently loadbearing. Steel framing is sufficiently loadbearing.
Floor joists not to exceed 16” o.c. Subfloor panels 3/4” T&G EGP or
equivalent but must not exceed deflection of L/360.
If Shower base is to be installed floor level, make sure you build out a
stable depression and deep enough to receive base + thin set.
2” Floor pipe is cut 1 1/4” below surface of subfloor. The cut out in
the subfloor to receive the drain trap is made using the wedi supplied,
oval shape template.
2” drain assembly below floor is stabilized and will not sink under
water load.
Make sure wedi drain and 2” pipe is safely connected using ABS / PVC
multi use or ABS cement. wedi's drain is made of ABS.
Only wedi products (wedi sealant, wedi fasteners, wedi Building Panel,
wedi curb, wedi ramp) are used for wedi Fundo Riolito/Riofino assembly.
Installer has been instructed by wedi staff or has been informed about
proper wedi assembly steps through wedi installation brochure and
video.
Have 2 x 4 blocking installed between studs along the bottom perime-
ter of framing to back the bottom of wedi wall panels.
wedi shower bases can be cut to size using a skilsaw. The Z notch
channel must be remade. Remove all sawdust and contaminants from
base and channels.
01 02 04
Cut the 2” pipe 1 1/4” below
the top of the Subfloor. Use
the oval shape cutting tem-
plate to cut subfloor using a
jigsaw to allow wedi drain trap
to be inserted and connected
to floor pipe using appropriate
ABS compatible or multipur-
pose cement glue. Please also
check cement glue compatibil-
ity to floor pipe material. The
drain and trap have to be se-
cured to the subfloor. Drain re-
cess cut out must not add
deflection to subfloor.
Assemble the drain unit follow-
ing the instruction drawing.
wedi's Riolito bases can be cut
to size on all sides making drain
positions close to the wall pos-
sible. Please do not cut into the
linear drains plastic flange inte-
grated into the coated foam
part of the base. Once cut the
1/2” x 1/2” channels at the
new base perimeter must be
re-established. When cutting
close to the drain channel
always leave enough wedi
foam for re-making the
needed 1/2" x 1/2" channel.
03
Glue and seal the wedi drain
trap to the 2” pipe. Mount the
sealing collar to the wedi
Riolito/Riofino underside coun-
terpart using a manual phillips
screwdriver.
Apply a skim coat and finally a
combed through bed of a thin-
set using modified thinset ANSI
118.4 and 1/4” x 1/4” notch
trowel.
wedi_Broschuere_TECHNISCHES-HANDBUCH_USA_2015_v4_lay1_Layout 1 30.06.15 15:08 Seite 62

63
05 06 08
Trowel the thinset on the rear
side of the Fundo again using a
1/4” x 1/4” notch trowel.
Press the Fundo firmly into the
thinset bed, ensuring that the
installation is level and void
free. Ensure wedi drain's seal-
ing gasket is firmly inserted in
the wedi trap with no chance
that thinset could have pushed
into this connection area.
Apply some weight equally
and for at least 30 minutes
(thinset bags).
07
Set up a continuous 1/2” bead
of wedi Joint Sealant at the
perimeter channel and only in
areas where you can immedi-
ately install a wedi Building
Panel into the fresh sealant.
Push the wedi panel all the way
into the channel of the shower
base channel and its bead of
sealant. Smooth out any pushed
out sealant on inside seam
using a putty knife. Fasten the
panels directly to the studs start-
ing 1 ft above the base and at a
rate of 1 fastener per 1ft. One
extra fastener is set into the
seam to the next panel to crate
a flush transition.
09 10 11
12
Apply continuous 1/2” beads of sealant between all connections of panels
and install with tightly butted seams. Excess sealant must be spread flat
with a putty knife. All seams and fastener heads in the assembly are cov-
ered with a secondary 1/2” bead of sealant and spread flat. The seams
should be covered 3/4” to 1” on either side of seam. All fastener/washers
are covered with sealant stretching 1” over the washer edges.
wedi Niches are installed in a
cut out in the wedi wall and at-
tached with it's flange right
into the center of 16 o.c. studs.
wedi sealant is set along the
connection of wall to niche.
2 Fasteners each side of the
niche are set to create a flush
transition to the wall panels.
Another 1/2” bead of wedi
seal ant is spread over fasteners
and seams.
A continuous 1/2” bead of sealant is set into the channel and along the
vertical curb notch part. A circle of 1/2” sealant bead is set against the
wall panels where the curb attaches. A 1/2” x 1/2” bed of thinset mortar
is applied to the subfloor and just a skimcoat on the foam bottom part
of the curb as a best practice. The tightly cut to fit curb is pressed into
the connection. Weight is applied on and against the curb (from outside)
and another 1/2” bead of sealant is applied over all curb seams and
spread flat. The seams must be covered 3/4” to 1” either side of a seam.
Show
er S
yste
m S
olut
ions
w
edi F
undo
Rio
lito
& F
undo
Rio
fino
Curb connection notches must be cut to fit select Riolito / Riofino
bases with perimeter thickness higher than 1 1/2".
wedi_Broschuere_TECHNISCHES-HANDBUCH_USA_2015_v4_lay1_Layout 1 30.06.15 15:08 Seite 63

64
Installation instructions wedi Fundo Riolito Drain Cover
After Installation
All bottom perimeter joints, curb joints, vertical and horizontal panel joints are visibly covered with wedi Joint Sealant. Coverage should be continuously
visible for at least ¾” to 1” on each side of the joint. No mastic adhesives are to be used to install tile in wedi Shower Systems. Ceramic tiles smaller than
2”x 2” must be grouted using epoxy grout. River Rock or Pebble Stones must be grouted with a modified cementitious sanded grout. Large format tile can
be used on wedi Fundo bases. The tiles must be cut where the slope fields meet unless a single slope model is used. When complete wedi Shower System
is installed with wedi Joint Sealant, a water flood test may be performed only 2 hours after final application of wedi Joint Sealant (application temperature
must be ambient / interior with normal relative humidity and temperatures above 40°F).
01
01
Drain Cover Fundo Riolito standard:
High Grade Polished Stainless Steel
Standard Version
02
02
Drain Cover Fundo Riolito exclusive:
High Grade Double Plated Stainless
Steel Version
03
03
Drain Cover Fundo Riolito tileable:
Can be tiled with epoxy glue / adhe-
sive. Can be used for 1/4” and 1/2”
tile / stone (reverse cover)
Drain cover can be adjusted from
+ 5 mm to + 25 mm from Riolito base
surface
Linear channel cover standard and exclusive
01 02 0403CLICK!
5 – 25 mm
wedi_Broschuere_TECHNISCHES-HANDBUCH_USA_2015_v4_lay1_Layout 1 30.06.15 15:08 Seite 64

X+1 mm
5 – 25 mm
CLICK!
65
Show
er S
yste
m S
olut
ions
w
edi F
undo
Rio
lito
& F
undo
Rio
fino
05 06 0807
09 10 11
X+1 mm
Linear channel cover tileable
01 02 0403
05 06 0807
09 10 11
wedi_Broschuere_TECHNISCHES-HANDBUCH_USA_2015_v4_lay1_Layout 1 30.06.15 15:08 Seite 65

66
wedi Fundo Riolito Discreto
The wedi Fundo Riolito Discreto, the world’s first vertical drain cover system panel that can be built into double walls or
wedi made seats, steps, shelving or foot rests and can be installed over fitting wedi Riolito channel drain systems. The
brand-new wedi Fundo Riolito Discreto has a 100 % waterproof core, integrated design and reversible cover (finished
in brushed stainless steel, or it can be reversed and tiled over) and offer the ability to clean with ease, making it the ul-
timate shower wall drain solution.
e.g. Fundo Riolito Discreto ontop of Fundo Riolito integrated
into Sanoasa Bench
Partition wall build fromwedi Building
Panel XXL withoutneed for frame-
work support
Fundo Discreto –built into wediSanoasa benchand positionedover a Fundo
Riolito floor base
wedi_Broschuere_TECHNISCHES-HANDBUCH_USA_2015_v4_lay1_Layout 1 30.06.15 15:09 Seite 66

67
Show
er S
yste
m S
olut
ions
w
edi F
undo
Rio
lito
Dis
cret
o
03
Prepare your wedi shower floor
unit as shown here where a
Fundo Riolito is used. With
slight modifications to the Dis-
creto unit, you can use it with
all Fundo models featuring an
offset drain.
04
Place the Fundo Discreto unit
over the channel / drain unit.
Joint sealant will adhere the
unit to the base.
05
Make sure the Fundo Discreto
is installed with a tight angle /
perpendicular to the shower
base surface.
06
When Riolito is used, screws
are used in addition to the joint
sealant when securing the
flange to the base.
07
Remove any excess joint sealant
from the inside areas of the Dis-
creto with a utility knife when it
has dried to clean up the area.
08
Use wedi Joint Sealant if you
choose to install the optional
stainless steel plate (which
works with the use of Discreto’s
finished stainless steel drain
cover).
09
Apply some temporary weight
against the metal plate so the
sealant can set.
10
The unit is now installed and a
double wall or seat / shelf unit
can be installed around it, inte-
grating the unit. The installa-
tion instructions show in detail
how to insert and adjust the
drain cover which can be re-
versed from finished surface to
tileable surface. Adjustments
can accommodate thickness of
floor and wall tiles before fix-
ing its position.
01
Apply wedi Joint Sealant to the
underside of the plastic flange
which will rest on the Riolito
surface.
Note: When the Riolito prod-
uct is not being used, this
flange should be cut away as it
does not conform with slope
designs other than Riolito.
02
When using Riolito or Riofino
offset bases, insert the grey
spacers into the channel.
When Fundo Primo or Fundo
OneStep products with offset
drains are used, spacers are not
required.
wedi_Broschuere_TECHNISCHES-HANDBUCH_USA_2015_v4_lay1_Layout 1 30.06.15 15:09 Seite 67

68
wedi ECOBATH Solutions
wedi ECOBATH offers simple installation solutions for the shower base, tub & shower surround and underlayment panels
for electric floor warming systems or general purpose underlayment use in bathroom floor installatons. All available in
3 easy to install Kits – conveniently packaged by wedi!
Tub and Shower Surround Kit – installed and ready-to-tile in 2 hours or less
Underlayment Kit – save up to 30% on energy consumption when used with electric floor warming systems
Fundo One-Step Shower Base – installation is quick & easy!
wedi FundoEcobath One-step CustomManufacture
wedi_Broschuere_TECHNISCHES-HANDBUCH_USA_2015_v4_lay1_Layout 1 30.06.15 15:09 Seite 68

69
Show
er S
yste
m S
olut
ions
w
edi E
CO
BATH
Sol
utio
ns
wedi ECOBATHTub and Shower Surround Kit
100 % waterproof
Lightweight, easy to cut
Protects framework against mold and mildew
Unique wedi attachment method to tub flange
allows for safe waterproofing connect to tub
wedi Building Panels do not scratch tub surfaces
wedi system components:
(5) 3’ x 5’ x 1/2” wedi Building Panels
(5) 10.5 oz wedi Joint Sealant
(1) 100 ct. tabbed washers
(1) 100 ct. non-rust screws
wedi ECOBATH Underlayment Kit
For installation under floor warming systems
100% waterproof foam core acts as a
heat insulator & thermal barrier
Lower energy costs, faster warm up times
Comfortable and consistently warm tile floors
wedi system components:
(5) 2’ x 4’ x 1/4” wedi Building Panels
(1) 10.5 oz wedi Joint Sealant
(40) wedi tabless washers and screws
(optional use only over wood subfloors)
01 02 04
Install building panels with thin-
set mortar
Stagger joints
03
Set building panels into posi-
tion using wedi joint sealant
Install electric floor warming
system
The Building Panel should be notched out at the bottom to install safely
and plumb against the flange of the tub.
A bead of wedi Joint Sealant is
applied against the tub’s flange.
See also page 20 – 21
See also page 29 – 30
wedi_Broschuere_TECHNISCHES-HANDBUCH_USA_2015_v4_lay1_Layout 1 30.06.15 15:09 Seite 69

70
wedi ECOBATH One-Step Shower System
Fundo base with integrated wall and curb
Passes ANSI Z124.1.2 / National Approval ICC PMG Report 1189
6 different sizes with custom options
Use with wedi Building panels or other types of backer board
(most will require added waterproofing)
Solid, pre-sloped, directly tileable surface
Can be used with small & large format tile; set with modified thinset
Square, high quality stainless steel drain cover / frame
No seam & no leak potential due to installation mistakes
Easy drain hook up to floor pipes cut flush with subfloor
Subfloor attachment with only thinset adhesive
wedi One-Step requires no thick mortar bed underneath unlike
common competitive preformed units which require added support
No more epoxy thinset tiling as with other common
prefabricated shower floors
01 02 0403
For more detailed installation steps and information please see wedi
TDS on www.wedicorp.com
wedi_Broschuere_TECHNISCHES-HANDBUCH_USA_2015_v4_lay1_Layout 1 30.06.15 15:09 Seite 70

71
Show
er S
yste
m S
olut
ions
w
edi E
CO
BATH
Sol
utio
ns / S
how
er S
eats
and
Ben
ches
Shower Seats and Benches
wedi prefabricated shower seats and benches install much quicker and easier than metal tray or concrete seats. Plus,
they bond well to thinset mortar and are 100 % waterproof due to the CFC-free extruded polystyrene closed cell foam
core and will not cause efflorescence or discolorations or waterproofing issues as frequently observed with products in-
cluding those requiring mortar fills. Create the perfect waterproof seating solution for your shower. wedi Prefabricated
Suspended Corner Seats do not require additional blocking installed in the framing. Their mounting brackets are fastened
into existing wall studs.
wedi_Broschuere_TECHNISCHES-HANDBUCH_USA_2015_v4_lay1_Layout 1 30.06.15 15:09 Seite 71

72
Prefabricated Niches
wedi prefabricated niches are fabricated from ½” Building Panels for strength and come in five different size options.
The perfect fit for all your shower necessities, our niches install quickly and safely, and integrate flush into the wall panel
assembly with wedi fasteners and wedi sealant. Shelves, included in some models, are flexible and can be installed
exactly where they will fit your design best.
wedi_Broschuere_TECHNISCHES-HANDBUCH_USA_2015_v4_lay1_Layout 1 30.06.15 15:09 Seite 72

73
Show
er S
yste
m S
olut
ions
Pr
efab
ricat
ed N
iche
s
wedi_Broschuere_TECHNISCHES-HANDBUCH_USA_2015_v4_lay1_Layout 1 30.06.15 15:10 Seite 73

74
Curbs and Ramps
Available in several options for shower entry designs where transitions are required. wedi curbs and ramps can be in-
stalled with wedi Fundo shower bases, as well as conventional mortar bed systems. Waterproof and versatile, our curbs
and ramps may be tiled before glass doors, panels or glass blocks are installed. Epoxy glue is recommended instead of
screw fasteners when installing shower door tracks. The solid curb options are slightly sloped on the top surface so
water will run back into the shower. Solid curbs carry a weight of up to 280 lbs/ft. once tiled. The wedi ramp is ADA
compliant.
wedi_Broschuere_TECHNISCHES-HANDBUCH_USA_2015_v4_lay1_Layout 1 30.06.15 15:10 Seite 74

75
Build
ing
Pane
l App
licat
ions
C
urbs
and
Ram
ps / P
rodu
ct In
form
atio
n
Description Dimensions Unit Item #
Fundo Primo, square 36” x 36” incl. drain 1 pc 073735507
Fundo Primo, square 48” x 48” incl. drain 1 pc 073735505
Fundo Primo, square 60” x 60” incl. drain 1 pc 073735518
Fundo Primo, square 72” x 72” incl. drain 1 pc 073735524
Fundo Primo, rectangular 36” x 48” incl. drain 1 pc 073735516
Fundo Primo, rectangular 36” x 60” incl. drain 1 pc 073735506
Fundo Primo, rectangular 48” x 60” incl. drain 1 pc 073735509
Fundo Primo, rectangular 48” x 72” incl. drain 1 pc 073735508
Fundo Primo, rectangular 60” x 72” incl. drain 1 pc 073735519
Fundo Primo, rectangular 48” x 84” incl. drain 1 pc 073735522
Fundo Primo, rectangular 60” x 84” incl. drain 1 pc 073735523
Fundo Primo, rectangular 36” x 72” incl. drain 1 pc 073735525
Fundo Primo | Square and Rectangular Shower Bases, Center Drain
Description Dimensions Unit Item #
Fundo Primo, rectangular, offset drain 36” x 72” incl. drain 1 pc 073735521
Fundo Primo | Rectangular Shower Base, Offset Drain
wedi Fundo elements vary in thickness from 1 1/2” to 2” at the perimeter. When working with modular wedi curbsor ramps the connection notch might need to be adjusted in the field.Equipped with Drain Unit and Cover Set Brushed Stainless Steel.
For tub replacement installations. Cut unit to always meet drain and shower size.Equipped with Drain Unit and Cover Set Brushed Stainless Steel.
All wedi Fundo shower bases can be cut to size on site or ordered as a custom size.For more detailed installation and product information, see our Technical Data Sheets (TDS) on www.wedicorp.com.
Description Dimensions Unit Item #
Fundo Ligno, square 48" x 48" x 3/4" 1 pc 073732015
Fundo Ligno, square 60" x 60" x 3/4" 1 pc 073732018
Fundo Ligno, rectangular 36" x 48" x 3/4" 1 pc 073732014
Fundo Ligno, rectangular 36" x 60" x 3/4" 1 pc 073732016
Fundo Ligno, rectangular 48" x 60" x 3/4" 1 pc 073732017
wedi Fundo Ligno | Square and Rectangular Shower Bases, Center Drain
Fundo Shower Bases | Customized Products
The customized products are between 1.5” – 2 ” thick. Other thicknesses available upon request.
You can freely select the position of the drain in your customized product.
Your customized products can be square, rectangular or polygonal. Curves are available upon request.
Delivery of Fundo customized products takes approx. 8 weeks.
Slope will reflect 1/4” per one ft. (minimum)
wedi_Broschuere_TECHNISCHES-HANDBUCH_USA_2015_v4_lay1_Layout 1 30.06.15 15:10 Seite 75

76
Description Width x Length x Height Unit Item #
Fundo Riolito Standard draincover for 36” x 60” and 48” x 72“ Riolito base 1 5/8” x 43 1/4” x 3/4” 1 pc 676797045
Fundo Riolito Standard draincover for 48” x 60” and 32” x 72” Riolito base 1 5/8” x 27 5/8” x 3/4” 1 pc 676797048
Fundo Riolito Standard | Cover Plate, Stainless Steel
For tile installation heights of between 3/16” to 1”
Description Width x Length x Height Unit Item #
Fundo Riolito Exclusive draincover for 36” x 60” and 48” x 72“ Riolito base 1 5/8” x 43 1/4” x 3/4” 1 pc 676797046
Fundo Riolito Exclusive draincover for 48” x 60” and 32” x 72” Riolito base 1 5/8” x 27 5/8” x 3/4” 1 pc 676797049
Fundo Riolito Exclusive | Cover Plate, Stainless Steel
For tile installation heights of between 3/16” to 1”
Description Width x Length x Height Unit Item #
Fundo Riolito Tileable draincover for 36” x 60” and 48” x 72“ Riolito base 1 5/8” x 43 1/4” x 3/4” 1 pc 676797047
Fundo Riolito Tileable draincover for 48” x 60” and 32” x 72” Riolito base 1 5/8” x 27 5/8” x 3/4” 1 pc 676797050
Fundo Riolito Tileable | Cover Plate, Stainless Steel
For tile installation heights of between 3/16” to 1”.Reverse for thinner or thicker tile.
Description External Dimensions Length x Width x Height
Channel Length Item #
Fundo Riolito, floor base,with channel drain
36” x 60” x 2 3/8" incl. drain, four-way slope 43 5/16” 075100016
Fundo Riolito, floor base,with channel drain
48” x 60” x 2 1/2" incl. drain, four-way slope 27 1/2” 075100012
Fundo Riolito, floor base,with channel drain
48” x 72” x 2” incl. drain, four-way slope 43 5/16” 075100014
Fundo Riolito, floor base,with channel drain
32” x 72” x (2 3/4” – 1 3/8”) incl.drain, single slope (one-way slope) 27 1/2” 075100015
Fundo Riolito, floor base,with channel drain
32” x 72” x 2 3/4” incl. drain, two-way slope, drain 12” offset 27 1/2” 075100035
Fundo Riolito | Shower Base, with Integrated Channel Drain
wedi_Broschuere_TECHNISCHES-HANDBUCH_USA_2015_v4_lay1_Layout 1 30.06.15 15:10 Seite 76

77
Show
er S
yste
m S
olut
ions
Pr
oduc
t In
form
atio
n
Description External Dimensions Length x Width x Height
Channel Length Item #
Fundo Riofino, floor basewith channel drain
36” x 60” x 2” center drain;2” thick at perimeter 11 3/4” 073783530
Fundo Riofino, floor basewith channel drain
48” x 48” x 2” center drain;2” thick at perimeter 11 3/4” 073783531
Fundo Riofino, floor basewith channel drain
36” x 72” x 2 5/8" offset drain;2 1/2” thick at perimeter 11 3/4” 073783532
Fundo Riofino | Shower Base, with Channel Drain
Description Width x Length x Height Unit Item #
Fundo Riofino Standard drain cover 11 3/4” x 1 1/2” x 3/4” 1 pc 676797013
Fundo Riofino Exclusive drain cover 11 3/4” x 1 1/2” x 7/8” 1 pc 676797004
Fundo Riofino Tileable drain cover 11 3/4” x 1 1/2” x 3/4” 1 pc 676797014
Fundo Riofino | Drain Covers
Fundo Discreto | System Component, for Creating Vertical Wall Drainage
Equipped with Drain Unit; Cover Extra
Slope extends over 24” or 12” direction of either extension panel
Pre-grooved
Extension panels are designed to interlock with Fundo Primo bases and 4 way slope Fundo Riolito bases. Extension
Panels installation height must be increased if connected to Fundo shower bases thicker than 1 1/2” at perimeter.
For more detailed installation and product information, see our Technical Data Sheets (TDS) on www.wedicorp.com.
For installation over wedi Fundo Riolito 48” x 60” or 32” x 60” bases
Description External Dimensions Length x Width x Height
Unit Item #
Fundo Discreto System Com-ponent Integrates into wediseats, tileable cover included 31.5” x 2” 1 pc 073738200
Fundo | Fundo / Pre-Sloped Extension Panels
Description Width x Length x Thickness Unit Item #
Shower base extension 24” x 48”, sloped 1/4”/ft. sheet 073783528
Shower Base Extension Lean 12” x 72”, sloped 1/4”/ft. sheet 073783523
wedi_Broschuere_TECHNISCHES-HANDBUCH_USA_2015_v4_lay1_Layout 1 30.06.15 15:10 Seite 77

78
Description Kit Contents Unit Item #
Ecobath Tub Surround Kit (5) wedi 3’ x 5’ x 1/2“ Building Panels(5) wedi Joint Sealant, 10.5 oz100 ct. of wedi Tab Steel Washers100 ct. of wedi Galvanized Screws 1 kit US4000001
Ecobath | Tub Surround Kit
Description Kit Contents Unit Item #
Ecobath Underlayment Kit (5) wedi 2’ x 4’ x 1/4” Building Panels(1) wedi JointSealant, 10.5 oz.40 x tabless washers and wood screws 1 kit US4000002
Ecobath | Underlayment Kit
wedi Fundo Primo Shower Kit
Description Dimension Unit Item #
wedi Fundo Primo Shower Kit 36” x 36” center drain 1 pc US2000002
wedi Fundo Primo Shower Kit 36” x 48” center drain 1 pc US2000007
wedi Fundo Primo Shower Kit 48” x 48” center drain 1 pc US2000004
wedi Fundo Primo Shower Kit 36” x 60” center drain 1 pc US2000003
wedi Fundo Primo Shower Kit 36” x 72” center drain 1 pc US2000001
wedi Fundo Primo Shower Kit 36” x 72” offset drain 1 pc US2000008
wedi Fundo Primo Shower Kit 48” x 60” center drain 1 pc US2000005
wedi Fundo Primo Shower Kit 48” x 72” center drain 1 pc US2000006
Wall height 80”
Matching drains and drain covers on page 79/80
1 wedi Fundo Pan
wedi building Panels to cover up to (3) 80” walls
1 drain assembly
1 full foam curb
wedi Joint Sealant
fasteners
wedi putty knife
Includes wedi installation DVD
For Tub surrounds, Shower Wall Surrounds and use with Ecobath Onestep Shower Bases.
Especially for use with electric floor warming systems.
wedi Fundo Riolito Shower Kit
Description Dimension Unit Item #
wedi Fundo Riolito Shower Kit 32” x 72” One-Sided Slope 1 pc US4000010
Wall height 80”
Order drain cover separately
1 wedi Fundo Shower Pan
wedi building Panels to cover up to (3) 80” walls
1 drain assembly
1 full foam curb
Fasteners
wedi Joint Sealant
wedi_Broschuere_TECHNISCHES-HANDBUCH_USA_2015_v4_lay1_Layout 1 30.06.15 15:10 Seite 78

79
Show
er S
yste
m S
olut
ions
Pr
oduc
t In
form
atio
n
For more detailed installation and product information, see our Technical Data Sheets (TDS) on www.wedicorp.com.
Description External Dimensions Length x Width x Height
Unit Item #
Ecobath One-Step Shower Base 36” x 36” x 4”, center drain 1 pc US4000004
Ecobath One-Step Shower Base 36” x 48” x 4”, center drain 1 pc US4000005
Ecobath One-Step Shower Base 32” x 60” x 4”, center drain 1 pc US4000008
Ecobath One-Step Shower Base 36” x 60” x 4”, center drain 1 pc US4000003
Ecobath One-Step Shower /Tub Replacement Base 36” x 60” x 4”, left drain 1 pc US4000006
Ecobath One-Step Shower /Tub Replacement Base 36” x 60” x 4”, right drain 1 pc US4000007
Ecobath | One-Step Shower System
Description Unit Item #
Fundo Drain Kit Standard, ABS, Compression Fit 1 pc US1000003
Fundo Drain Kit ; Brass, Compression Fit 1 pc US1000004
Fundo Glue Drain Kit, ABS 1 pc US1000007
Fundo Compression Fit Drain Unit 1 pc US1000012
Fundo Brass Compression Fit Drain Unit 1 pc US1000011
Fundo Glue Drain, ABS 1 pc US1000010
Fundo Drain Units & Kits Standard | Drain, PVC, ABS and Brass
Drain Units connect to Schedule 40 pipe
Compression Fit Drain units can be used with ABS/PVC pipe
Glue Drain units can be used with ABS floor pipe
Items sold as Kit contain Drain unit and Cover Set standard
For Fundo Primo, Ligno and Ecobath Onestep
For use in Compression Fit Drain units
Specialty Gaskets available upon request
Custom Sizes available on request
Description Unit Item #
Special Rubber Caulking Gasket for Cast Iron Pipe Connection 1 pc US5000030
Special Rubber Caulking Gasket for Copper Pipe Connection 1 pc US5000031
Fundo Drain Accessories | 2” Sealing Gasket
wedi_Broschuere_TECHNISCHES-HANDBUCH_USA_2015_v4_lay1_Layout 1 30.06.15 15:10 Seite 79

80
Description Unit Item #
Fundo Fino Cover Set 1.1, square 4" x 4" (Daisy Design) 1 pc US1000021
Fundo Fino Cover Set 1.1.2, Round (Daisy Design) 1 pc US1000023
Fundo Fino Cover Set 1.3, square 4" x 4"/w. Screws (Daisy Design) 1 pc US1000022
Fundo Fino Cover Set 1.3.2, Round/w. Screws (Daisy Design) 1 pc US1000027
Fundo Fino Cover Set 3.1, square 4" x 4" (Pebbles Design) 1 pc US1000024
Fundo Fino Cover Set 3.1.2, Round (Pebbles Design) 1 pc US1000026
Fundo Fino Cover Set 3.3, square 4" x 4"/w. Screws (Daisy Design) 1 pc US1000025
Fundo Fino Cover Set 3.3.2, Round/w. Screws (Pebbles Design) 1 pc US1000028
Fundo Fino Tileable Cover Plate, square 4" x 4" 1 pc US1000020
Fundo Fino | Optional Design Covers, Stainless Steel Brushed
For use with wedi Fundo Primo, Ligno, Onestep, Trollo, Nautilo bases.
Tileable cover plate surface is elevated 1/16" over tile surface of a Fundo base. For a flush tile installation,
wedi joint sealant spot bonding may be used to install the tile inside the cover so height is reduced versus
the thinset bed build up under the tile on the shower base.
1 drain cover, stainless steel
1 Frame, stainless steel
For this drain cover, the height of your tiling must be at least 1/4”.
For use with wedi Fundo Primo, Ligno, Onestep, Trollo, Nautilo bases.
The Standard Drain Cover included in Fundo Systems Primo/Ligno/Onestep/Trollo/Nautilo is US1000009
1 drain cover, stainless steel
1 frame, stainless steel
Fundo Standard | Drain Cover, Stainless Steel Base
Description Width x Length Unit Item #
Fundo Drain Cover Set, Brushed Stainless Steel 4” x 4” 1 pc US1000009
Fundo Drain Cover Set, BrushedStainless Steel with Screws 4” x 4” 1 pc US1000029
Fundo Drain Cover Set, Oil Rubbed Bronze 4” x 4” 1 pc US1000008
Description Unit Item #
Heavy Duty Drain Wrench 1 pc US5000032
Fundo Drain Wrench
Support tool used to tighten wedi Fundo Primo compression fit rubber gaskets
Set 1.1
Set 3.1
Set 1.1.2
Set 3.1.2
Fundo Fino Tileable Cover Plate
wedi_Broschuere_TECHNISCHES-HANDBUCH_USA_2015_v4_lay1_Layout 1 30.06.15 15:10 Seite 80

81
Fundo Nautilo | Designer Shower Right Entry
Show
er S
yste
m S
olut
ions
Pr
oduc
t In
form
atio
n
Fundo Trollo | Designer Shower
Description Dimensions Unit Item #
Fundo Trollo, wall element Height: 79 3/8” 1 pc 041709000
Fundo Trollo, floor base H x W: 1 1/2” x 44 7/8” 1 pc 073735512
Options
Extension collar Height: 19 5/8” 1 pc 041709050
Glass swing door Height: 78 1/4” 1 pc 608001100
Glass sliding door Height: 74 7/8” 1 pc 608001200
Fundo Trollo Shower Kit 1 pc 073763000
The glass door can only be mounted after tiling.
Equipped with Drain Unit and Cover Set
Brushed Stainless Steel
1 floor base
2 wall segments type “A”
3 wall segments type “B”
4 splines
2 – 82 ft self-adhesive joint reinforcement tape
3 – wedi® Joint Sealant
No framing needed for this system
Fundo Trollo, designer shower:
Inside wall: approx. 66 sq. ft.
Outside wall: approx. 75 sq. ft.
Floor: approx. 9 sq. ft.
Extension collar:
Inside wall: approx. 18 sq. ft.
Outside wall: approx. 20 sq. ft.
ft
Description Dimensions Unit Item #
Fundo Nautilo, wall element Height: 79 3/8” 1 pc 041708000
Fundo Nautilo, floor base,right entry W x L x H: 59 5/8” x 74 3/8” x 2” 1 pc 073736066
Options
Extension collar Height: 19 5/8” 1 pc 041708050
Fundo Nautilo Shower Kit(left or right entrance) 1 pc 073750000
Equipped with Drain Unit and Cover Set
Brushed Stainless Steel
1 floor base, right entry
1 wall segment type “A”
2 wall segments type “B”
4 wall segments type “C”
1 wall segment type “D”
7 splines
2 x 82 ft self-adhesive joint reinforcement tape
4 x wedi® Joint Sealant
No framing needed for this system
Fundo Trollo, designer shower:
Inside wall: approx. 110 sq. ft.
Outside wall: approx. 124 sq. ft.
Floor: approx. 18 sq. ft.
Extension collar:
Inside wall: approx. 24 sq. ft.
Outside wall: approx. 27 sq. ft.
ft
For more detailed installation and product information, see our Technical Data Sheets (TDS) on www.wedicorp.com.
wedi_Broschuere_TECHNISCHES-HANDBUCH_USA_2015_v4_lay1_Layout 1 30.06.15 15:10 Seite 81

82
Description Width x Length x Height Unit Item #
wedi Seat M, Suspended Seat 17” x 17” (wall sides) x 4” 1 pc US3000001
wedi Seat L, Suspended Seat 24” x 24” (wall sides) x 4” 1 pc US3000002
wedi® Shower Seat M&L
Description Width x Length x Height Unit Item #
wedi Bench, Rectangular 16” x 32” x 20” sloped 1 pc 073784100
wedi Full Foam Corner Seat 23” x 23” (wall sides) x 20” sloped 1 pc 073784101
wedi Bench | Rectangular and Full Foam Triangular Seats
Rectangular bench made with 2” wedi Building Panel, full foam corner seat made of solid XPS foam.These units are pre-made and ready for thinset installation against walls and feature a 1/8" slope to the front.
Description Width x Length x Height Unit Item #
wedi Curb Over (Square Edges) 5” x 5’ x 4 1/2” 1 pc US3000008
wedi Curb Over (Square Edges) 5” x 8’ x 4 1/2” 1 pc US3000010
wedi | Curb Over
Installation over 2” x 4”’s construction. CAUTION: Do not allow Glass Door Assembly to penetrate Curb Over.
Fundo Nautilo | Designer Shower Left Entry
Description Dimensions Unit Item #
Fundo Nautilo, wall element Height: 79 3/8” 1 pc 041708000
Fundo Nautilo, floor base, left entry W x L x H: 59 5/8” x 74 3/8” x 2” 1 pc 073736065
Options
Extension collar Height: 19 5/8” 1 pc 041708050
Fundo Nautilo Shower Kit(left or right entrance) 1 pc 073750000
Equipped with Drain Unit and Cover Set
Brushed Stainless Steel
1 floor base, left entry
1 wall segment type “A”
2 wall segments type “B”
4 wall segments type “C”
1 wall segment type “D”
7 splines
2 x 82 ft self-adhesive joint reinforcement tape
4 x wedi® Joint Sealant
No framing needed for this system
Fundo Trollo, designer shower:
Inside wall: approx. 110 sq. ft.
Outside wall: approx. 124 sq. ft.
Floor: approx. 18 sq. ft.
Extension collar:
Inside wall: approx. 24 sq. ft.
Outside wall: approx. 27 sq. ft.
ft
wedi_Broschuere_TECHNISCHES-HANDBUCH_USA_2015_v4_lay1_Layout 1 30.06.15 15:10 Seite 82

83
For more detailed installation and product information, see our Technical Data Sheets (TDS) on www.wedicorp.com.
Show
er S
yste
m S
olut
ions
Pr
oduc
t In
form
atio
n
For more detailed installation and product information, see our Technical Data Sheets (TDS) on www.wedicorp.com.
Description Width x Length x Height Unit Item #
wedi Curb Full Foam (Square Edges) 5” x 5’ x 4 1/2” 1 pc 074319002
wedi Curb Full Foam (Square Edges) 5” x 8’ x 4 1/2” 1 pc 074319001
wedi | Full Foam Curb
Sloped on top surface
Sloped on top surface
Description Width x Length x Height Unit Item #
wedi Shower Ramp * 12” x 5’, sloped 1 1/2” to 1/4” 1 pc 073736517
wedi | Shower Ramp
* ADA compliant
Description Width x Length x Height Unit Item #
wedi Curb Full Foam "LEAN"(Square Edges) 2” x 5’ x 3 1/2” 1 pc 074319007
wedi Curb Full Foam "LEAN"(Square Edges) 2” x 8’ x 3 1/2” 1 pc 074319008
wedi | Curb Full Foam "LEAN"
Installation over 2” x 4”’s construction, 16” o.c. framework
Description Dimension Unit Item #
wedi Niche Square Edges 16” x 8” 1 pc US3000003
wedi Niche Square Edges 16” x 12” 1 pc US3000004
wedi Niche Square Edges 16” x 16” 1 pc US3000005
wedi Niche Square Edges 16” x 22” incl. removable shelf 1 pc US3000007
wedi Lean Combo Niche 16” x 42” incl. 2 removable shelves 1 pc US3000006
wedi Niche | Square Edges
wedi_Broschuere_TECHNISCHES-HANDBUCH_USA_2015_v4_lay1_Layout 1 30.06.15 15:10 Seite 83

84
wedi_Broschuere_TECHNISCHES-HANDBUCH_USA_2015_v4_lay1_Layout 1 30.06.15 15:10 Seite 84
85
wedi specialty products for special applications
On construction sites there are always special situations and applications or sudden changes in designs or plan-
ning. To service best, wedi designed several product systems which can often help with the installation of the
traditional wedi Building Panel or Shower Systems.
They may help to address special situations when being integrated into wedi's foam based product systems. Or
they can be used in areas close to wedi's scope of work and trade and are offered to build entire installations
using product and warranty coverage out of one hand- sealed and signed by wedi.
Und
erla
ymen
t sy
stem
s an
d ad
d on
pro
duct
s
UnderlaymentSheet Membranesystems and Installation Tools
wedi_Broschuere_TECHNISCHES-HANDBUCH_USA_2015_v4_lay1_Layout 1 30.06.15 15:10 Seite 85

86
wedi Subliner Systems
The wedi products within the group of Subliner Systems offer specific benefits in installations and applications com-
plementing our traditional wedi Building Panel and Shower Systems. Subliner Systems are Sheet Membrane products,
each designed to provide sound and thin profile underlayments for tile. Each of them address specific needs including
Subliner Dry for water and water vapor proofing over existing non waterproof backer boards such as cement boards.
Subliner Flex is primarily used on floors to provide tension reduction and tile protection as well as a great bond surface
and replaces cement boards as traditional underlayments used on floors due the much faster processing time and
lightweight handling. Subliner Dry & Flex Pro is a dedicated crack isolation membrane with strong sound reduction
properties built in. Primarily used on floors, this peel & stick membrane also offers an alternative to underlayment at-
tachment through thinset mortar further adding speed to the installation.
wedi_Broschuere_TECHNISCHES-HANDBUCH_USA_2015_v4_lay1_Layout 1 30.06.15 15:11 Seite 86

87
Und
erla
ymen
t sy
stem
s an
d ad
d on
pro
duct
s
wed
i Sub
liner
Sys
tem
s
wedi Subliner Dry
The wedi Subliner Dry System includes Subliner Dry Sheet Membrane,
Sealing Tape, Prefabricated Outside and Inside Corner Tapes as well as
various Sealing Collars to waterproof entire structures in especially
shower and steam room construction. wedi Subliner Dry is well suited
for sealing measures over preexisting wall or floor underlayment includ-
ing drywall. Use Subliner Dry in combination with ceramic tiles, slabs,
and natural cast tiles for indoor wall and floor areas. Especially strong
performance in steam showers / rooms due to its unique Vapor Resistance
rating of 0.09 WVTR/Perms as tested using ASTM E96, method E. The
Subliner Dry is a strong membrane yet very pliable. Installation steps and
measuring and cutting gridlines are printed on its surface for fast working.
wedi Subliner Flex
Tension-reducing, heavy-duty web made from a strong fabric sheathing,
which offers optimum connection to tile laying materials thanks to its dual-
sided special fleece lamination. It decouples tiled surface finish from the
subfloor by eliminating direct contact between the tile and the subfloor
through the tile adhesive. Subliner Flex can bridge cracks without resulting
in a floating floor application, as no layer or mesh will easily separate from
product under stress rendition. In cases of extreme lateral movement, how-
ever, the mesh will separate locally into 2 layers, offering uncoupling per-
formance and protection. The product offers a much more economical
alternative to cement boards when applied on suitable floors due its fast
installation compared to the heavy lifting and time consuming cutting of
cement boards. In addition, unlike cement board it will not add further
weight to a structural subfloor this increasing stability. Subliner Flex can
be used with any type of thinset mortar. Installation steps and measuring
and cutting gridlines are printed on its surface for fast working.
wedi Subliner Dry & Flex Pro
Subliner Dry & Flex Pro is a self- adhering tile underlayment with anti – fracture properties rated “High Performance” as per ANSI 118.12. The product
can protect surface coverings against lateral subfloor movement of up to 3/8”. Subliner Dry & Flex Pro is made from highly tear-resistant non-woven
polypropylene material combined with a proprietary asphaltic pressure sensitive adhesive layer. The product system provides strong sound deadening and
reduction properties, perfect bond to tile and stone coverings using any type of modified thinset mortars as per ANSI 118.4. Subliner Dry & Flex Pro is
suitable for fast and clean installations over many wood and concrete subfloors offering a low profile application. The product system primarily protects
tile coverings against lateral movement of subfloor and structures. While not recommended for installations subject to permanent water pressure or use
as a sealed assembly for water containment, the waterproof properties of the membrane’s asphaltic layers will add much value and protection to a tile in-
stallation in areas subject to moisture exposure from heavy duty cleaning. Subliner Dry & Flex Pro is installed with wedi PRO Primer, suitable for most sub-
strates and subfloors as listed here. It is equipped with a release paper backing and is applied easily and cleanly using a 35 – 50 lb roller to ensure no air
bubbles or wrinkles are left.
wedi_Broschuere_TECHNISCHES-HANDBUCH_USA_2015_v4_lay1_Layout 1 30.06.15 15:11 Seite 87

88
08
04
05 06
02
03
01
07
01 wedi Joint Sealant 02 wedi Subliner Dry
Bonding Flange Drain
03 Mortar bed structure
with curb
04 Subliner Dry membrane
in modified thinset mor-
tar attached to primed
drywall construction
05 Inside Corner Seal 06 Outside Corner Seal 07 modified thinset mortar 08 Sealing Tape
wedi Subliner Dry
Installation Over Mortar Bed Showers / On Walls and Shower Floor
wedi_Broschuere_TECHNISCHES-HANDBUCH_USA_2015_v4_lay1_Layout 1 30.06.15 15:11 Seite 88

89
03 04
06
Insert wedi Subliner Dry with
the printed side facing upward
and press on with a rubber
roller or wooden float.
The sheets must overlap 2” at
joints / transitions. Apply a bed
of thinset mortar with the flat
side of the trowel onto the
lower mat joint connection
area and press flat.
01 02
Lay out wedi Subliner Dry and
cut to size using a knife or scis-
sors.
Apply thinset mortar to the pre-
pared subfloor using a 1/8” x
1/8” or 1/4” x 1/4” notch trowel.
05
Press on the overlapping area
with a trowel or rubber roller.
Remove any escaping mortar
and air pockets. Cross joints
should be avoided.
Apply a continuous 1/2” bead
of wedi Joint Sealant along all
seams and spread flat with a
putty knife over the joints.
07
Start setting tile once the thin-
set mortar under Subliner Dry
has sufficiently cured.
Subliner Dry Installation on Floors or other suitable,non waterproof underlayments
Und
erla
ymen
t sy
stem
s an
d ad
d on
pro
duct
s
wed
i Sub
liner
Sys
tem
s
wedi_Broschuere_TECHNISCHES-HANDBUCH_USA_2015_v4_lay1_Layout 1 30.06.15 15:11 Seite 89

90
03 04
Place wedi Subliner Flex edge
to edge – with the printed side
facing upward – and press by
using a rubber roller or
wooden wedi float.
Remove any escaping mortar
and/or air bubbles. Do not
overlap.
01 02
Lay out wedi Subliner Flex and
cut by using carpet cutter or
scissors.
Apply modified thinset mortar
onto a suitable, even, loadbear-
ing and clean subfloor using a
1/4" x 1/4" notch trowel.
05
Cover all seams with wedi self
adhesive mesh tape.
06
Once thinset mortar under
Subliner Flex has sufficiently
cured tiling may begin!
wedi Subliner Flex Installation on Floors
wedi_Broschuere_TECHNISCHES-HANDBUCH_USA_2015_v4_lay1_Layout 1 30.06.15 15:11 Seite 90

91
Und
erla
ymen
t sy
stem
s an
d ad
d on
pro
duct
s
wed
i Sub
liner
Sys
tem
s
03 04
Line up sheets butted tightly
but with no overlap between
sheets. Seams do not require
any taping or reinforcing.
wedi Subliner Dry and Flex Pro
may be tiled over immediately.
01
Prime all suitable, even,load-
bearing and clean subfloors
and wait until wedi Primer Pro
is tacky to the touch. Make
sure there are no contaminants
or older seals on subfloor
(Primer Pro will get flaky/no ad-
hesion). Make sure subfloor is
not too porous (if concrete) so
it will absorb all primer but
will not allow for a consistent
primer film as needed.
02
Cut Subliner Dry & Flex Pro to
length. Leave the sheet a few
inches longer on either end so
that the membrane's adhesive
layer can contract upon floor
contact. Once settled in posi-
tion you can cut away excess
membrane.
wedi Subliner Dry & Flex Pro Installation on Floors
For more detailed installation
and product information, see
our Technical Data Sheets (TDS)
on www.wedicorp.com.
wedi_Broschuere_TECHNISCHES-HANDBUCH_USA_2015_v4_lay1_Layout 1 30.06.15 15:11 Seite 91

92
wedi Tile Profiles
Whether you like to protect the edge of your tiles, form transitions when tile borders carpet or hardwood floors, or set
an accent design point, or whether you would like to address movement by placing durable, lasting expansion joints;
wedi offers a variety of stylish tile profiles to complete your professional tile installation.
We guarantee your perfect final touch
Edging Tile Profiles are made of premium quality gauge and grade metal
Tile Profile technology with internal spacers provide sound installation and edge protection
All metal profiles are packaged in protective sheathing – guaranteed scratch free
Durable Transition Profiles to different floor coverings
PVC Expansion Profiles that last and look clean even under heavy duty commercial traffic
wedi_Broschuere_TECHNISCHES-HANDBUCH_USA_2015_v4_lay1_Layout 1 30.06.15 15:11 Seite 92

93
Product Features
Stainless Steel Tile Profiles / Stainless Steel Tile Profiles (brushed / bright rolled)
The base material for the wedi stainless steel tile profiles is V2A. The profiles provide protection and decoration to the outer
edges of tiled finishes. The polished surface gives the profile a glossy finish capable of withstanding mechanical stress un-
harmed. The Stainless Steel Tile Profile (brushed / bright rolled) may be used as edge protection and as a transition profile
for areas experiencing high mechanical loads. Their high level of resistance to chemicals and acids mean that the profile can
be used in areas exposed to high levels of chemical and mechanical stress, such as dairies, catering kitchens and hospitals.
Contact with other metals, e.g. carbon steel, should be avoided as this can otherwise lead to extraneous rust.
Aluminum Tile Profiles
wedi aluminum tile profiles are intended for use as edge protection in the home. Aluminum is sensitive to alkaline media,
which means that cement products can lead to corrosion in the presence of moisture. Care must be taken when fitting
the profiles that the mortar and grout are removed from exposed visible surfaces immediately. Protect visible surfaces from
scratching.
Und
erla
ymen
t sy
stem
s an
d ad
d on
pro
duct
s
Tile
Pro
files
wedi_Broschuere_TECHNISCHES-HANDBUCH_USA_2015_v4_lay1_Layout 1 30.06.15 15:11 Seite 93

94
Description Dimensions Unit Item #
Waterproof inside corner sealing tape, fleece laminated 4 3/4” x 4 3/4” x 2 1/4” 2 pcs US5000007
Waterproof outside corner sealing tape, fleece laminated 4 1/2” x 4 1/2” x 2 1/4” 2 pcs US5000008
Description Dimensions Unit Item #
Subliner Dry Bonding Flange Drain, PVC for 2” pipe 1 pc US5000022
Subliner Dry Bonding Flange Drain, ABS for 2” pipe 1 pc US5000025
Subliner Dry Bonding Flange Drain, PVC for 3” pipe 1 pc US5000026
Subliner Dry Bonding Flange Drain, ABS for 3” pipe 1 pc US5000027
Subliner Dry Bonding Flange Drain, Cast Iron for 2” pipe 1 pc US5000028
Subliner Dry Bonding Flange Drain, Cast Iron for 3” pipe 1 pc US5000029
Subliner Dry Accessories | Corner Sealing Tape, Fleece Laminated
Description Width x Roll Length Unit Item #
wedi Subliner Dry, waterproofing sheet membrane 39” x 16’ 1 roll US5000001
wedi Subliner Dry, waterproofing sheet membrane 39” x 98’ 1 roll US5000005
Description Width x Roll Length Unit Item #
wedi Subliner Dry & Flex PRO 39.25” x 50”163.54 square feet 1 roll US5000003
wedi PRO Primer 1 container US5000004
wedi® Subliner Dry | Waterproofing and Crack-bridging Sheet Membrane
Flexible waterproofing membrane for medium and high exposure wet areas – for interior walls / showers and steam showers.
Description Width x Roll Length Unit Item #
wedi Subliner Flex, heavy duty tile underlayment 39” x 98’ 1 roll US5000006
wedi Subliner Flex | Tension-Reducing Sheet Membrane
Tension reducing membrane for interior floors.
wedi Subliner Dry & Flex PRO | Anti-Fracture and Sound Reduction Sheet Membrane
Crack Isolation and Sound Deadening membrane exposure applications.
No use in showers or applications with pressing/standing water; refer to Subliner Dry for these applications.
wedi Subliner Dry Bonding Flange Drains
wedi_Broschuere_TECHNISCHES-HANDBUCH_USA_2015_v4_lay1_Layout 1 30.06.15 15:11 Seite 94

Material/Application Interior Exterior Wall Floor
Anodized aluminum
Natural aluminum
95
Und
erla
ymen
t sy
stem
s an
d ad
d on
pro
duct
s
Prod
uct
Info
rmat
ion
For more detailed installation and product information, see our Technical Data Sheets (TDS) on www.wedicorp.com.
wedi Subliner Dry Sealing Collars
*Colour: Black anodized (*225), Champagne anodized (*226), Bronze metallic (*227), Gold anodized (*228),
Silver matte anodized (*224), Natural (*223), Brushed nickel (*234)
wedi Jolly | L-profile
Description Height (h) Packaging Unit / Sleeve Item #
wedi Jolly, aluminum (available only in Natural) 3/16” (4.5 mm) 40 lengths of 8’ (2.5 m) 320104*
wedi Jolly, aluminum 1/4” (6 mm) 40 lengths of 8’ (2.5 m) 320106*
wedi Jolly, aluminum 5/16” (8 mm) 40 lengths of 8’ (2.5 m) 320108*
wedi Jolly, aluminum 3/8” (10 mm) 40 lengths of 8’ (2.5 m) 320110*
wedi Jolly, aluminum 1/2” (12.5 mm) 40 lengths of 8’ (2.5 m) 320112*
wedi Jolly Quarter | Square Profile
Description Height (h) Packaging Unit / Sleeve Item #
wedi Jolly Quarter, aluminum, silver matte anodized 1/4” (6 mm) 40 lengths of 8’ (2.5 m) 320606224
wedi Jolly Quarter, aluminum, silver matte anodized 5/16” (8 mm) 40 lengths of 8’ (2.5 m) 320608224
wedi Jolly Quarter, aluminum, silver matte anodized 3/8” (10 mm) 40 lengths of 8’ (2.5 m) 320610224
wedi Jolly Quarter, aluminum, silver matte anodized 1/2” (12.5 mm) 40 lengths of 8’ (2.5 m) 320612224
Material/Application Interior Exterior Wall Floor
Aluminum
wedi Jolly Quarter | Square Profile Corner Piece
Description Height (h) Packaging Unit Item #
wedi Jolly Quarter, aluminum, silver matte anodized 1/4” (6 mm) 25 corners 321606224
wedi Jolly Quarter, aluminum, silver matte anodized 5/16” (8 mm) 25 corners 321608224
wedi Jolly Quarter, aluminum, silver matte anodized 3/8” (10 mm) 25 corners 321610224
wedi Jolly Quarter, aluminum, silver matte anodized 1/2” (12.5 mm) 25 corners 321612224
Description Dimensions Unit Item #
Waterproof Sealing Collar for 1/2” to 3/4” plumbing pipes and protrusions 4 3/4” x 4 3/4” 1 pc US5000033
Valve Flexi Collar Diameter 5" 1 pc US5000000
wedi_Broschuere_TECHNISCHES-HANDBUCH_USA_2015_v4_lay1_Layout 1 30.06.15 15:12 Seite 95

96
wedi Jolly Round | Quarter Round Profile and Corner
Description Height (h) Packaging Unit / Sleeve Item #
wedi Jolly Round, aluminum, silver matte anodized 1/4” (6 mm) 40 lengths of 8’ (2.5 m) 320306224
wedi Jolly Round, aluminum, silver matte anodized 5/16” (8 mm) 40 lengths of 8’ (2.5 m) 320308224
wedi Jolly Round, aluminum, silver matte anodized 3/8” (10 mm) 40 lengths of 8’ (2.5 m) 320310224
wedi Jolly Round, aluminum, silver matte anodized 1/2” (12.5 mm) 40 lengths of 8’ (2.5 m) 320312224
wedi Jolly Round Corner, aluminum,silver matte anodized 1/4” (6 mm) 25 corners 321506224
wedi Jolly Round Corner, aluminum,silver matte anodized 5/16” (8 mm) 25 corners 321508224
wedi Jolly Round Corner, aluminum,silver matte anodized 3/8” (10 mm) 25 corners 321510224
wedi Jolly Round Corner, aluminum,silver matte anodized 1/2” (12.5 mm) 25 corners 321512224
Material/Application Interior Exterior Wall Floor
Aluminum
wedi Jolly Decor borders are available
in the versions listed.
wedi® Jolly Decor | Border
Description Height Packaging Unit / Sleeve Item #
wedi Jolly Decor, V2 A (304) stainless steel, heavily brushed 5/32” (4.0 mm) 40 lengths of 8’ (2.5 m) 310404233
wedi Jolly Decor, V2 A (304) stainless steel, brushed 5/32” (4.0 mm) 40 lengths of 8’ (2.5 m) 310404231
wedi Jolly Decor, V2 A (304) stainless steel, polished 5/32” (4.0 mm) 40 lengths of 8’ (2.5 m) 310404232
Material/Application Interior Exterior Wall Floor
V2 A (304) stainless steel
wedi Combi 102 | Joint Cover Profile
Description Height x Length Packaging Unit / Sleeve Item #
wedi Combi 102, joint covering profile, brass, natural 11/32” x 9/16”
40 lengths of 8’ (2.5 m)9 x 14 mm 330714223
Material/Application Interior Exterior Wall Floor
Brass
wedi Combi 101 | Height Compensation Tile Profile
Description Width x Length Packaging Unit / Sleeve Item #
wedi Combi 101, height compensation tile profile, V2 A (304) stainless steel, bright rolled 5/16” (8 mm) 10 lengths of 8’ (2.5 m) 310708230
Material/Application Interior Exterior Wall Floor
V2 A (304) stainless steel
wedi_Broschuere_TECHNISCHES-HANDBUCH_USA_2015_v4_lay1_Layout 1 30.06.15 15:12 Seite 96

Material/Application Interior Exterior Wall Floor
PVC
97
Und
erla
ymen
t sy
stem
s an
d ad
d on
pro
duct
s
Prod
uct
Info
rmat
ion
For more detailed installation and product information, see our Technical Data Sheets (TDS) on www.wedicorp.com.
wedi Triolos Pro | Expansion Joint Profile
Description Height Packaging Unit / Sleeve Item #
wedi Triolos Pro, expansion joint profile, PVC 5/16” (8 mm) 25 lengths of 8’ (2.5 m) 340908*
wedi Triolos Pro, expansion joint profile, PVC 3/8” (10 mm) 25 lengths of 8’ (2.5 m) 340910*
wedi Triolos Pro, expansion joint profile, PVC 1/2” (12.5 mm) 25 lengths of 8’ (2.5 m) 340912*
wedi® Jolly Protection 201 | Edge Protection Profile
Description Width x Length x Height (h) Packaging Unit / Sleeve Item #
wedi Jolly Protection 201, V2 A (316)polished stainless steel
1-7/8” x 1-7/8”x 5/16”47 x 47 x 8 mm 10 lengths of 8’ (2.5 m) 310208232
wedi Jolly Protection 201, V2 A (316)polished stainless steel
1-7/8” x 1-7/8”x 3/8”47 x 47 x 10 mm 10 lengths of 8’ (2.5 m) 310210232
Material/Application Interior Exterior Wall Floor
V2 A (316) stainless steel
wedi Jolly Protection 202 | Edge Protection Profile
Description Width x Length Packaging Unit / Sleeve Item #
wedi Jolly Protection 202, V2 A (316)brushed stainless steel, self-adhesive
1-3/16” x 1-3/16”30 x 30 mm 20 lengths of 8’ (2.5 m) 310200231
Material/Application Interior Exterior Wall Floor
V2 A (316) stainless steel
wedi Triolos Pro tile profiles are available in the versions listed.
The tile is laid directly up to the profile, no additional adhesive joint is required.
* Colour: Grey (*201), Black (*217)
Suitable only for lightweight trucks.
wedi_Broschuere_TECHNISCHES-HANDBUCH_USA_2015_v4_lay1_Layout 1 30.06.15 15:12 Seite 97

98
wedi_Broschuere_TECHNISCHES-HANDBUCH_USA_2015_v4_lay1_Layout 1 30.06.15 15:12 Seite 98

99
wedi Wellness and Spa SystemSolutions
Prefabricated Solutions for Wellness & Spa Areas:
wedi takes rejuvenation and relaxation to a whole new level in the bath. Our unique and elegant wellness
elements create an unforgettable spa experience. There is no limit to the design possibilities wedi offers for a
customized and peaceful bath.
Modular benches, loungers and design elements
100 % waterproof and vapor retardant – wedi XPS foam. Add wedi Vapor Barrier in Steam Shower/Rooms.
Insulating properties reduce vapor transmission pressure and save energy
No need for framework support
Broad variety of standard products and limitless custom fabrication possibilities
Fast, clean and efficient installation through full prefabrication of modules
Create your dream of a wellness oasis in any place
wed
i Wel
lnes
s an
d Sp
a Sy
stem
Sol
utio
ns
wedi_Broschuere_TECHNISCHES-HANDBUCH_USA_2015_v4_lay1_Layout 1 30.06.15 15:12 Seite 99

100
Wellness Loungers and Benches
The wedi Sanoasa wellness loungers and benches are ready to tile and offer optional integrated heating for the ultimate relaxation experience. Whether
your space is large or small or you desire full, mid or partial reclining – the many wellness loungers and benches offer can fit your every need. Detail and
order information for wedi Wellness Elements can be found in the TDS section. on www.wedicorp.com
Sanoasa Comoda Benches:
Available in many different de-
signs so you can create any
seating combination you can
imagine. This bench comes in
two main versions. The first
version comes with a seat area
featuring a slightly lowering
seat area towards the back rest
to enhance comfortable use.
The second version features a
Sanoasa Lounger 1:
This model’s long styling
invites you to stretch
out, relax and recharge.
Its unique shape adds
distinctive style to any
bath.
Sanoasa Lounger 2:
Compact and comfort-
able – the pronounced
design of the base of-
fers diverse design op-
tions. Its optimal shape
makes it the ideal well-
ness lounger for relaxed
sitting.
Sanoasa Lounger 3:
Sleek, elegant and
strik ing – this lounger
makes a statement.
Sanoasa Lounger 4:
This lounger is simply
stunning. The filigree
design radiates seren-
ity. Various compo-
nents fuse together to
produce a work of art.
Sanoasa Lounger 5:
Put your feet up, un-
wind and relax. This
model boasts distinc-
tive styling and features
all the unique design
elements within the
Sanoasa series.
slope on the seat area provid-
ing a 1 % slope and water run
off to the front of the seat. This
version is often used in steam
rooms and showers, making
sure that water will run off the
seat area and towards a floor
drain. This design system is of-
fered with corner elements or
base units with a curved finish.
Sanoasa Bellina Benches:
These backless benches are
ideal for creating a seamless &
flush transition to any wall. It
features a slope on the seat area
providing a 1 % slope and water
run off to the front of the seat.
It is often used in steam rooms
and showers, making sure that
water will run off the seat area
and towards a floor drain. This
design system is offered with
corner elements or base units
with a curved finish.
Sanoasa Forma &
Sanoasa Collina Benches:
Extremely spacious benches
due to their wide format. Their
unique individual shapes invite
total relaxation.
Comoda Comoda linea Forma Collina
Bellina Bellina linea
Sanoasa Loungers are directly tileable. Tile in these pictures only shown for illustration purposes. Tile is not included in offering.
wedi_Broschuere_TECHNISCHES-HANDBUCH_USA_2015_v4_lay1_Layout 1 30.06.15 15:12 Seite 100

101
wed
i Wel
lnes
s an
d Sp
a Sy
stem
Sol
utio
ns
Loun
gers
and
Ben
ches
/ St
eam
Sho
wer
Mul
ticen
ters
Sanoasa Wellness Steam Shower Multicenters
All wedi Sanoasa Wellness Multicenters offer premium performance in the challenging environment of tiled wellness and spa areas. Water vapor and
abrupt temperature changes are no longer a threat due to the insulating and water vapor retarding properties built into the assembly units. In addition,
all technical equipment is made to perform safely and vapor tight. Available, factory integrated equipment includes door and glass wall units, steam
generator, plumbing and light fixtures. as well as benches. The insulating XPS foam core from wall to ceiling is energy efficient. The modular components
assemble easily and safely. The Multicenters are ready for tiling the same day they have been assembled on site and connected to floor drain, water
supply and electric power. wedi Wellness Multicenters can be fully Installed in approximately one work day with two installers. Product detail and order
information for wedi Wellness Multicenters can be found in the TDS section on www.wedicorp.com
Modular Design Steam Showers Available in a Box
100 % waterproof and vapor retardant – made with XPS foam and factory applied vapor barrier.
Insulating properties reduce vapor transmission pressure and save energy
Choose from a variety of standard modular steam shower systems
Equipment includes floor, walls, ceiling, door / glass elements, seating, steam generator, shower technology, lighting options and sound
Custom fabrication to your drafts is always possible
One modular system with a warranty from floor-to-ceiling
No framework support needed
Individual steam shower kits including technical equipment options sized and available for residential use.
wedi_Broschuere_TECHNISCHES-HANDBUCH_USA_2015_v4_lay1_Layout 1 30.06.15 15:13 Seite 101

102
wedi Custom Wellness & Spa Design Solutions
Starting a new custom project, residential or commercial steam room? Do you need custom loungers? From idea to
installation, you have our promise wedi will support you right from the start. The moment you contact us, our team
springs into action. We generate custom CAD drawings based upon your ideas and plans. We produce custom products
fabricated from impermeable extruded polystyrene foam material exclusively for steam showers and wetrooms. We test
all the assemblies to ensure everything works flawlessly before we supply you with all the components, ready to install.
We understand products are just part of the project. That’s why we create and work in tandem with your lighting con-
cepts, heating systems and preferred shower technologies.
wedi is at your side – in all areas, at all times.
Your idea – As you envision your wellness concept, contact wedi and we can help bring your idea to life.
We plan together – wedi provides integrated project planning to ensure all components, shower technologies, drains
and supply pipes are incorporated into your vision and unified for proper performance.
Made-to-measure products – With your approval, we produce solutions that fit your specifications and requirements
perfectly. Then we assure the system measures up in terms of performance through to trial assemblies at our factory
all prior to shipping.
On time delivery – We deliver all prefabricated components on time and in their entirety, with complete step-by-
step assembly instructions so you can take your idea and bring it to life!
wedi_Broschuere_TECHNISCHES-HANDBUCH_USA_2015_v4_lay1_Layout 1 30.06.15 15:13 Seite 102

103
wed
i Wel
lnes
s an
d Sp
a Sy
stem
Sol
utio
ns
Cus
tom
Wel
lnes
s &
Spa
Des
ign
Solu
tions
wedi_Broschuere_TECHNISCHES-HANDBUCH_USA_2015_v4_lay1_Layout 1 30.06.15 15:13 Seite 103

wedi Corporation
171 South Gary AvenueCarol Stream Illinois 60188
Tel. +1-847-357-9815Fax. +1-847-357-9819
D 0
6/15
K 0
6/15
A U
S700
0010
Sub
ject
to
tech
nica
l mod
ifica
tions
. Prin
ted
in t
he U
SA.
Your local wedi distributor:
Be sure to ask for:Certified wedi Installer.
Did you know?
Great Quality Installation results depend on not only having
great products to use – the Know-How and Experience in how
to use them is key too. wedi trained and certified all Baeumler
Quality Construction installers in my team and now they fully
know and appreciate what they can achieve with wedi.
This educational service is offered to all professional contractors
of all trades and wedi's local Technical Sales Support Managers
come out on site and install with you when you do your first
wedi shower installation. Your peace of mind – at no charge.
Just a call away!
0799 (System 2+)
USA /CANADA
UC
Made in Germany
Made in USA
Follow us on Twitter: @wediUSAwww.youtube.com/wedicorpwww.facebook.com/wedicorp
wedi_Broschuere_TECHNISCHES-HANDBUCH_USA_2015_v4_lay1_Layout 1 30.06.15 15:13 Seite 104