WebEOC Personnel Management User Guide€¦ · Click Personnel Management on the Main Menu to...
25
User Guide Emergency Management Unit Biosecurity and Food Safety Email: [email protected] Personnel Management 1. Introduction ......................................................................................................................................... 1 2. Access ................................................................................................................................................ 2 3. Main Menu .......................................................................................................................................... 2 4. Personnel Input Screen ...................................................................................................................... 2 4.1. New personnel ........................................................................................................................... 2 4.1.1. Personnel Record................................................................................................................... 3 4.1.2. Work Details ........................................................................................................................... 4 4.1.3. Home Details .......................................................................................................................... 6 4.1.4. Licenses and Authorisations .................................................................................................. 7 4.1.5. Medical History ....................................................................................................................... 8 4.1.6. Next of Kin / Emergency Contact ......................................................................................... 10 4.1.7. Incidents (including near miss, injury/illness, accidents and damage/hazard) .................... 11 4.1.8. Preferences .......................................................................................................................... 12 4.1.9. Evaluation............................................................................................................................. 14 4.1.10. Update History...................................................................................................................... 15 5. Personnel - Qualifications ................................................................................................................. 15 5.1. Adding qualifications for personnel .......................................................................................... 15 6. Personnel - Competencies ............................................................................................................... 15 6.1. Adding competencies for personnel ......................................................................................... 15 7. Personnel Attachments ..................................................................................................................... 16 7.1. Adding attachments ................................................................................................................. 16 7.2. Upload photo ............................................................................................................................ 17 8. Photo ID ............................................................................................................................................ 18 8.1. Creating Photo ID ..................................................................................................................... 18 8.2. Print Photo ID ........................................................................................................................... 19 8.3. List all Photo IDs for all Personnel ........................................................................................... 19 9. Absences .......................................................................................................................................... 19 9.1. Recording Absence .................................................................................................................. 20 10. Personnel Display Views.............................................................................................................. 21 10.1. Personnel ................................................................................................................................. 21 10.2. Photo IDs.................................................................................................................................. 22 10.3. Personnel and Competencies .................................................................................................. 22 10.4. Personnel and Qualifications ................................................................................................... 22 11. Competencies .............................................................................................................................. 22 11.1. Add New Competencies ........................................................................................................... 23 11.2. Competency Attachments ........................................................................................................ 23 12. Qualifications ................................................................................................................................ 24 12.1. Add New Qualifications ............................................................................................................ 24 13. Contacts ....................................................................................................................................... 25 1. Introduction Personnel boards in WebEOC consist of input screens and display views that contain information on Personnel, Competencies and Qualifications. Records of Personnel containing contact details, normal working location, preferred emergency management working regions, nominated and qualified roles. Records notification of personnel absences from emergency activity. Enables production of emergency management Photo IDs NSW DPI WebEOC – Personnel Management User Guide V3 Page 1 of 25 INT14/26041 15 November 2016
Transcript of WebEOC Personnel Management User Guide€¦ · Click Personnel Management on the Main Menu to...

User Guide Emergency Management Unit Biosecurity and Food Safety
Email: [email protected]
Personnel Management
1. Introduction ......................................................................................................................................... 1 2. Access ................................................................................................................................................ 2 3. Main Menu .......................................................................................................................................... 2 4. Personnel Input Screen ...................................................................................................................... 2
4.1. New personnel ........................................................................................................................... 2 4.1.1. Personnel Record................................................................................................................... 3 4.1.2. Work Details ........................................................................................................................... 4 4.1.3. Home Details .......................................................................................................................... 6 4.1.4. Licenses and Authorisations .................................................................................................. 7 4.1.5. Medical History ....................................................................................................................... 8 4.1.6. Next of Kin / Emergency Contact ......................................................................................... 10 4.1.7. Incidents (including near miss, injury/illness, accidents and damage/hazard) .................... 11 4.1.8. Preferences .......................................................................................................................... 12 4.1.9. Evaluation ............................................................................................................................. 14 4.1.10. Update History ...................................................................................................................... 15
5. Personnel - Qualifications ................................................................................................................. 15 5.1. Adding qualifications for personnel .......................................................................................... 15
6. Personnel - Competencies ............................................................................................................... 15 6.1. Adding competencies for personnel ......................................................................................... 15
7. Personnel Attachments ..................................................................................................................... 16 7.1. Adding attachments ................................................................................................................. 16 7.2. Upload photo ............................................................................................................................ 17
8. Photo ID ............................................................................................................................................ 18 8.1. Creating Photo ID ..................................................................................................................... 18 8.2. Print Photo ID ........................................................................................................................... 19 8.3. List all Photo IDs for all Personnel ........................................................................................... 19
9. Absences .......................................................................................................................................... 19 9.1. Recording Absence .................................................................................................................. 20
10. Personnel Display Views .............................................................................................................. 21 10.1. Personnel ................................................................................................................................. 21 10.2. Photo IDs .................................................................................................................................. 22 10.3. Personnel and Competencies .................................................................................................. 22 10.4. Personnel and Qualifications ................................................................................................... 22
11. Competencies .............................................................................................................................. 22 11.1. Add New Competencies ........................................................................................................... 23 11.2. Competency Attachments ........................................................................................................ 23
12. Qualifications ................................................................................................................................ 24 12.1. Add New Qualifications ............................................................................................................ 24
13. Contacts ....................................................................................................................................... 25 1. Introduction Personnel boards in WebEOC consist of input screens and display views that contain information on Personnel, Competencies and Qualifications.
Records of Personnel containing contact details, normal working location, preferred emergency management working regions, nominated and qualified roles.
Records notification of personnel absences from emergency activity. Enables production of emergency management Photo IDs
NSW DPI WebEOC – Personnel Management User Guide V3 Page 1 of 25 INT14/26041 15 November 2016

2. Access
Refer to the WebEOC Introductory User Guide for information on access to and basic structure of WebEOC. The input screen and the options on the Main Menu vary with the user’s position.
3. Main Menu
Click Personnel Management on the Main Menu to access the Personnel display view.
All other Personnel related display views are accessible from this view.
Table of contents
4. Personnel Input Screen
Refer to the generic data input business rules for fields such as dates and text in the WebEOC Introductory User Guide.
4.1. New personnel
Avoid creating duplicate records by searching existing records using the filters and available information, prior to creating New Personnel.
Click on the ‘New Personnel’ button to create a new record.
The Personnel input screen has been divided into sections which can be minimised or expanded to enable better navigation and display of information. Each section can be expanded by clicking the plus symbol and minimised by clicking the minus symbol.
To print the personnel record expand all relevant sections of the form and then click ‘Print’. The resulting document will display the information as seen on screen at the time of clicking print.
NSW DPI WebEOC – Personnel Management User Guide V3 Page 2 of 25 INT14/26041 15 November 2016
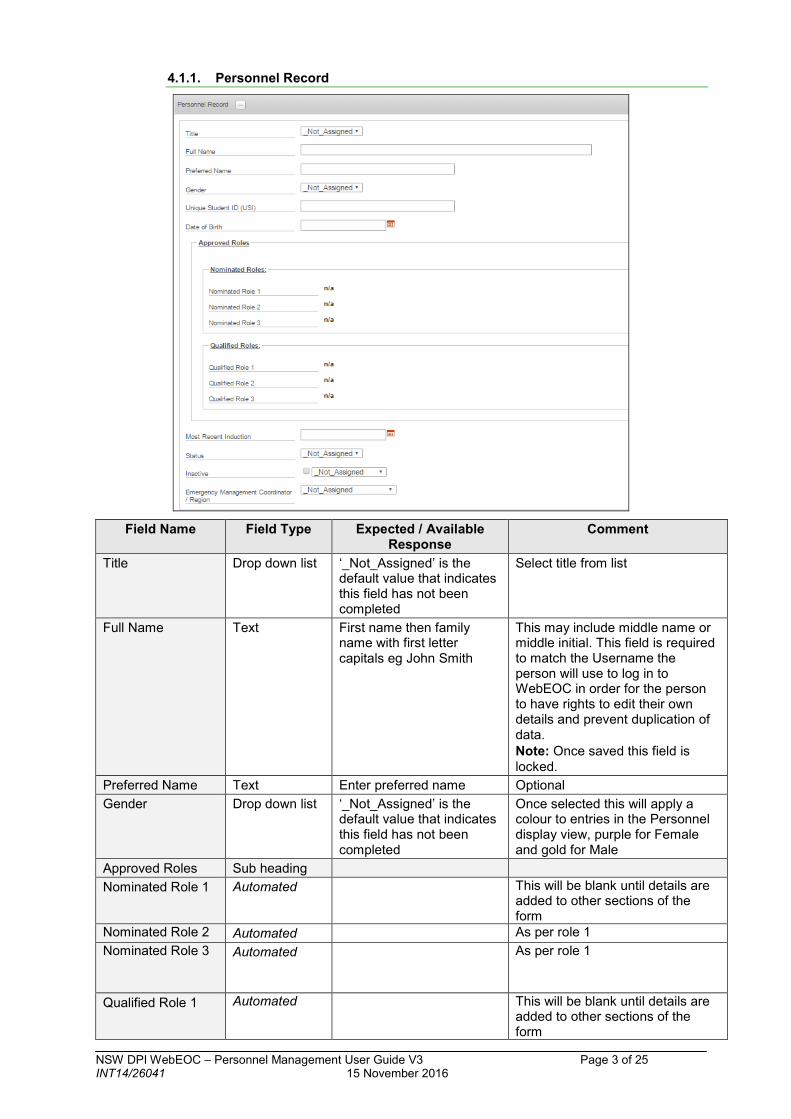
4.1.1. Personnel Record
Field Name Field Type Expected / Available Response
Comment
Title Drop down list ‘_Not_Assigned’ is the default value that indicates this field has not been completed
Select title from list
Full Name Text First name then family name with first letter capitals eg John Smith
This may include middle name or middle initial. This field is required to match the Username the person will use to log in to WebEOC in order for the person to have rights to edit their own details and prevent duplication of data. Note: Once saved this field is locked.
Preferred Name Text Enter preferred name Optional Gender Drop down list ‘_Not_Assigned’ is the
default value that indicates this field has not been completed
Once selected this will apply a colour to entries in the Personnel display view, purple for Female and gold for Male
Approved Roles Sub heading Nominated Role 1 Automated
This will be blank until details are added to other sections of the form
Nominated Role 2 Automated As per role 1 Nominated Role 3 Automated As per role 1
Qualified Role 1 Automated This will be blank until details are added to other sections of the form
NSW DPI WebEOC – Personnel Management User Guide V3 Page 3 of 25 INT14/26041 15 November 2016

Field Name Field Type Expected / Available Response
Comment
Qualified Role 2 Automated As per role 1 Qualified Role 3 Automated As per role 1 Most Recent Induction
Automated Date induction last completed
Populated from EMtrain
Status Drop down list ‘_Not_Assigned’ is the default value that indicates this field has not been completed
Set the Status to Available unless the person is no longer available for emergency activities. Selecting ‘not available’ means personnel are no longer visible in the system.
Inactive Checkbox + Drop down list
Select reason for inactive status from list
Leave blank if personnel is available. After ticking box, drop down list becomes available. Ticking ‘inactive’ means personnel records will be visible, highlighted red and personnel should not rostered.
Emergency Management Coordinator/Region
Drop down list ‘_Not_Assigned’ is the default value that indicates this field has not been completed
Select the Emergency Management Region which applies for the individual.
Table of contents
4.1.2. Work Details
Field Name Field Type Expected / Available Response
Comment
Normal Position Text Normal position/role title e.g. Emergency Management Officer
Normal Employee ID Text Normal employee ID number e.g. 90000365
NSW DPI WebEOC – Personnel Management User Guide V3 Page 4 of 25 INT14/26041 15 November 2016

Field Name Field Type Expected / Available Response
Comment
Supplier / Organisation
Text Supplier/Organisation name e.g. Department of Primary Industries
Enter full supplier/organisation name, NOT abbreviation
Normal Work Site Text Normal office location Avoid using abbreviations of site names where possible.
Work Phone Text + Checkbox
xxxx xxx xxx Use checkbox to indicate if this is the primary contact number
Mobile Phone Text + Checkbox
xxxx xxx xxx Use checkbox to indicate if this is the primary contact number
Work Email Text + Checkbox
Use checkbox to indicate if this is the primary contact email
Work Fax Text xxxx xxx xxx Physical Address Sub Heading _Unit_Type Drop down list Select appropriate unit
type (if applicable) from the list
Choose an applicable unit type for work physical address, or leave at default value (Unit Type) if not applicable
Unit # Text Enter unit number (if applicable)
Leave blank if not applicable
Street # Text Enter street number (if applicable)
Leave blank if not applicable
Street Name Text Enter street name _Street_Type Drop down list Select appropriate street
type from the list Choose applicable street type
Suburb Text Enter suburb name _State_Type Drop down list Select appropriate state
from list Use ‘Other’ for international personnel
Post Code Text Enter postcode Country / Australia Text Australia is default Type over if Country is other than
Australia Validate Button Click to validate address Validation will be used in future
enhancements to geographically place all personnel in relation to a response or activity.
State Other Text Enter State if outside Australia
Only applicable if ‘Other’ has been selected for State Type.
Postal Address Multiple fields Details for postal address Refer to physical address information.
Same as physical address
Checkbox Tick if applicable Tick if applicable, if checked other fields will automatically populate to match Physical Address details.
Substantive Supervisor
Sub Heading, expandable
Expand section using plus symbol
Supervisor Name Text Name of normal work supervisor.
Required in cases of workplace incidents eg accidents
Supervisor Position Text Position of normal work supervisor.
Supervisor Email Text Email address for normal work supervisor.
Supervisor Phone Text xxxx xxx xxx Preferred contact number for normal work supervisor
Table of contents
NSW DPI WebEOC – Personnel Management User Guide V3 Page 5 of 25 INT14/26041 15 November 2016

4.1.3. Home Details
Field Name Field Type Expected / Available Response
Comment
Home Phone Text + Checkbox
xxxx xxx xxx Use checkbox to indicate if this the primary contact number
Personal Mobile Phone
Text xxxx xxx xxx Use checkbox to indicate if this is the primary contact number
Personal Email Text Use checkbox to indicate if this is the primary contact email
Physical Address Sub Heading _Unit_Type Drop down list Select appropriate unit type
(if applicable) from the list Choose an applicable unit type for home physical address, or leave at default value (Unit Type) if not applicable
Unit # Text Enter unit number (if applicable)
Leave blank if not applicable
Street # Text Enter street number (if applicable)
Leave blank if not applicable
Street Name Text Enter street name _Street_Type Drop down list Select appropriate street
type from the list Choose applicable street type
Suburb Text Enter suburb name _State_Type Drop down list Select appropriate state
from list Use ‘Other’ for international personnel
Post Code Text Enter postcode Australia Text Australia is default Type over if Country is other than
Australia State Other Text Enter State if outside
Australia Only applicable if ‘Other’ has been selected for State Type
Postal Address Multiple fields Details for postal address Refer to physical address information.
Same as physical address
Checkbox Tick if applicable Tick if applicable, if checked other fields will automatically populate to match Physical Address details
Table of contents
NSW DPI WebEOC – Personnel Management User Guide V3 Page 6 of 25 INT14/26041 15 November 2016

4.1.4. Licenses and Authorisations
Field Name Field Type Expected / Available Response
Comment
Driver’s licence Sub Heading
Drivers’ Licence Number
Text Enter driver’s license number
Class Text Enter class of licence e.g. C, LR, HR, HC, etc.
Expiry Date Use calendar button to select license expiry date, or enter date in the format dd_mm_yyyy
Issuing Authority Text Enter name of issuing authority
State or Authority issuing the License
Add Other Licences
Sub Heading Additional records may be added using the 'Add Next’ button
License Type Text Enter the type of license held
Use sufficient detail to avoid confusion if there are multiple licenses with similar names
Number / ID Text Enter license number/ID
Expiry Date Use calendar button to select license expiry date, or enter date in the format dd_mm_yyyy
Leave blank if license has no expiry
Comment Text Any other relevant details about the license
Include Issuing Authority
Authorisation Sub Heading
Professional Identification Type
Text Enter professional identification type e.g. Civil Aviation Authorisation, Australian Veterinary Association registration
Enter issuing authority’s name as part of Identification Type. If there are more than one add additional to ‘Add Other Licences…’ – see above
NSW DPI WebEOC – Personnel Management User Guide V3 Page 7 of 25 INT14/26041 15 November 2016

Field Name Field Type Expected / Available Response
Comment
Professional Identification ID Number
Text Enter professional identification ID number
Professional Identification Expiry Date
Date Use calendar button to select ID expiry date, or enter date in the format dd_mm_yyyy
Leave blank if ID has no expiry date
First Aid Certification
Sub Heading
Issue Date Date Use calendar button or enter date in the format dd_mm_yyyy
Date of issue
Expiry Date Use calendar button or enter date in the format dd_mm_yyyy
Date of expiry on the first aid certificate or if unknown add 3 years to issue date
Table of contents
4.1.5. Medical History Medical condition information is to ensure personnel are placed in an appropriate role. Completing this section is optional.
Field Name Field Type Expected / Available Response
Comment
Known Medical Conditions
Sub Heading
Details of known condition
Drop down list ‘_Not_Assigned’ is the default value that indicates this field has not been completed
Choosing ‘Yes’ enables subsequent fields If ‘No’ is selected, move to Allergies below
NSW DPI WebEOC – Personnel Management User Guide V3 Page 8 of 25 INT14/26041 15 November 2016

Field Name Field Type Expected / Available Response
Comment
Provide Details Text Further details relating to medical condition/s
Not Mandatory
Current Medications
Text List current medication used to treat medical condition/s
Not Mandatory
Location of available medication
Text Describe location of available medication
Describe where a third person will locate medication for person to administer themselves
Allergies Sub Heading Known Allergic Conditions
Drop down list ‘_Not_Assigned’ is the default value that indicates this field has not been completed
Choosing ‘Yes’ enables subsequent fields If ‘No’ is selected, move to Work Restrictions below
Allergy Details Text Further details relating to allergy
Provide detail of Allergy including allergen and result / reaction
Allergy Treatment(s) Available
Drop down list ‘_Not_Assigned’ is the default value that indicates this field has not been completed
Choosing ‘Yes’ enables subsequent text field. Note: Food allergies are in a separate section below
Allergy Treatment Details
Text Further details relating to allergy treatment
List available allergy treatments and if the person carries them and their location
Work Restrictions
Sub Heading
List Work Restrictions
Text If work restrictions apply provide details
If work restrictions are temporary, include dates to indicate period they apply
Special Dietary Requirements
Sub Heading
Consumes a Special Diet
Drop down list + Checkboxes
‘_Not_Assigned’ is the default value that indicates this field has not been completed
Choosing ‘Yes’ in the drop down list enables the checkboxes
Has Food Allergies
Drop down list ‘_Not_Assigned’ is the default value that indicates this field has not been completed
Choosing ‘Yes’ enables subsequent fields If ‘No’ is selected, move to Other Dietary Information below
Provide Details Text Provide detail of food allergy
Provide detail of Allergy including allergen and result / reaction. Also indicate whether any treatment is carried by the person and its location
Other Dietary Requirements
Drop down list + Text
‘_Not_Assigned’ is the default value that indicates this field has not been completed
Choosing ‘Yes’ enables the text field. Food preferences etc may be listed here
Immunisations Sub Heading Influenza Checkbox + Date Use calendar button to
select immunisation date, or enter date in the format dd_mm_yyyy
Ticking the checkbox will activate the Date field. If specific date of immunisation is not known enter the default date of the first of the month.
Tetanus Checkbox + Date Use calendar button to select immunisation date, or enter date in the format dd_mm_yyyy
Ticking the checkbox will activate the Date field. If specific date of immunisation is not known enter the default date of the first (1) of the month.
NSW DPI WebEOC – Personnel Management User Guide V3 Page 9 of 25 INT14/26041 15 November 2016

Field Name Field Type Expected / Available Response
Comment
Q Fever Checkbox + Date Use calendar button to select immunisation date, or enter date in the format dd_mm_yyyy
Ticking the checkbox will activate the Date field. If specific date of immunisation is not known enter the default date of the first (1) of the month.
Hepatitis A Checkbox + Date Use calendar button to select immunisation date, or enter date in the format dd_mm_yyyy
Ticking the checkbox will activate the Date field. If specific date of immunisation is not known enter the default date of the first (1) of the month.
Hepatitis B Checkbox + Date Use calendar button to select immunisation date, or enter date in the format dd_mm_yyyy
Ticking the checkbox will activate the Date field. If specific date of immunisation is not known enter the default date of the first (1) of the month.
Add Other Immunisations
Sub Heading Additional records may be added using the Add Next button
Immunisation Text Type of Immunisation Date of Immunisation
Date Use calendar button to select immunisation date, or enter date in the format dd_mm_yyyy
If exact date is not known enter a default date of the first (1) of the month immunisation received
Expiry Date Date Use calendar button to select immunisation expiry date, or enter date in the format dd_mm_yyyy
Leave blank if the immunisation does not expire or expiry is unknown
Table of contents
4.1.6. Next of Kin / Emergency Contact
NSW DPI WebEOC – Personnel Management User Guide V3 Page 10 of 25 INT14/26041 15 November 2016

Field Name Field Type Expected / Available Response
Comment
Contact 01 Sub Heading Full Name Text First name then family
name WebEOC Introductory user guide – generic data input business rules
Address Text Enter full physical address Full physical street address not postal address. Include state and country (if other than Australia).
Phone Text xxxx xxx xxx Include country code if person is international
Mobile Text xxxx xxx xxx Relationship Text ‘_Not_Assigned’ is the
default value that indicates this field has not been completed. Select relationship from list.
Primary Contact / NOK
Checkbox Tick if applicable Tick if this is the Primary Contact in the event of an emergency. Only one may be tagged as the Primary Contact
Contact 02 Multiple fields Details for second next of kin contact
Refer to Contact 1 information.
4.1.7. Incidents (including near miss, injury/illness, accidents and damage/hazard)
Field Name Field Type Expected / Available Response
Comment
Incident Report Text + Log Box Enter details of incident Enter details of Incidents in the text field and click the Add Report button
Table of contents
NSW DPI WebEOC – Personnel Management User Guide V3 Page 11 of 25 INT14/26041 15 November 2016

4.1.8. Preferences
Field Name Field Type Expected / Available
Response Comment
Working / Traveling Locations
Sub Heading
Local - Only Drop down list No Yes
If selecting Local – Only leave all other location options set to default of No
Local - Preferred Drop down list No Yes
State-Wide Drop down list No Yes
Inter-State (Expression of Interest Only)
Drop down list No Yes
State-wide must be selected in conjunction with this field. This is an Expression of Interest only.
Other Drop down list No Yes
If Yes enter detail in Other text box
Other Text Detail of preferred location Describe preferred location for emergency management activity participation
Preference Comments
Text Provide any additional comments
NSW DPI WebEOC – Personnel Management User Guide V3 Page 12 of 25 INT14/26041 15 November 2016

Field Name Field Type Expected / Available Response
Comment
Section Sub Heading Control Drop down list No
Yes Indicate which section/s is preferred
Finance and Administration
Drop down list No Yes
Indicate which section/s is preferred
Logistics Drop down list No Yes
Indicate which section/s is preferred
Operations Drop down list No Yes
Indicate which section/s is preferred
Planning Drop down list No Yes
Indicate which section/s is preferred
Public Information
Drop down list No Yes
Indicate which section/s is preferred
Other Drop down list + Text
No Yes
If Yes record detail e.g. Safety, Intelligence
Operating Level Sub Heading State Coordination Centre
List No Yes
Indicate preference for operating level
Local/Regional Control Centre
List No Yes
Indicate preference for operating level
Forward Command Post
List No Yes
Indicate preference for operating level
Nominated Role 1
List with sub-list
If you are authorised to assign roles select the function and then appropriate role
This role will determine the EMtrain courses the person is required to complete. Once a person becomes qualified for this role it is possible to set a new role for this person to work toward to progress through the chain of command (where appropriate). Refer to Emergency response roles and responsibilities for the complete list of available roles.
Nominated Role 2
List with sub-list
As per Nominated Role 1. Selection of Nominated Role 2 is optional
Nominated Role 3
List with sub-list
As per Nominated Role 1. Selection of Nominated Role 3 is optional
Table of contents
NSW DPI WebEOC – Personnel Management User Guide V3 Page 13 of 25 INT14/26041 15 November 2016

4.1.9. Evaluation
Use of the Evaluation component is limited to the Emergency Management Unit (EM Unit) and Emergency Management Region Managers. A full audit log is maintained for these fields.
Field Name Field Type Expected / Available
Response Comment
Qualified Role 1 Drop down list and Sub-list
Select from full list of available roles
The Qualified role is automatically applied according to data transferred from EMtrain. An authorised person may be required to set a Qualified role if the person is qualified through other sources e.g. another organisation. Qualified role will be used in the Roster – Available Personnel board. Qualified according to EM course matrix
Qualified Role 2 Drop down list and Sub-list
Select from full list of available roles
As per Qualified Role 1.
Qualified Role 3 Drop down list and Sub-list
Select from full list of available roles
As per Qualified Role 1.
Approved for Interstate Operation
Checkbox + Audit Log
Tick box if approved Upon clicking the checkbox user name and position are captured in the Audit Box.
Other Comments Text Insert any additional comments
Evaluation Log Automatic Audit Log
All changes to nominated and qualified roles are recorded to the log automatically. This includes the application of qualified roles following calculation of completed courses from EMtrain
Table of contents
NSW DPI WebEOC – Personnel Management User Guide V3 Page 14 of 25 INT14/26041 15 November 2016

4.1.10. Update History
The update history for the record is automatically captured upon clicking Save. None of the fields are able to be edited, and the automated log box will remain blank until save is completed.
Table of contents
5. Personnel - Qualifications
Qualifications may be added to the personnel record.
5.1. Adding qualifications for personnel
On the personnel record display view click the Qualifications button, this launches the Personnel Qualifications Log.
To add a qualification to a personnel record click the ‘Add Record’ button.
Field Name Field Type Expected / Available Response
Comment
Personnel Name Auto Text Automatically displays person name.
Qualification Drop Down List Select the correct qualification from the list.
If a required qualification does not appear please refer to Qualifications
Date Qualification Attained
Date Specific detail for the attachment including: Type of file, title, date, etc.
If file name does not fully identify the file type and purpose enter details here.
6. Personnel - Competencies
Competencies may be added to the personnel record.
6.1. Adding competencies for personnel
On the personnel record display view click the Competencies button, this launches the Personnel Competency Log.
NSW DPI WebEOC – Personnel Management User Guide V3 Page 15 of 25 INT14/26041 15 November 2016
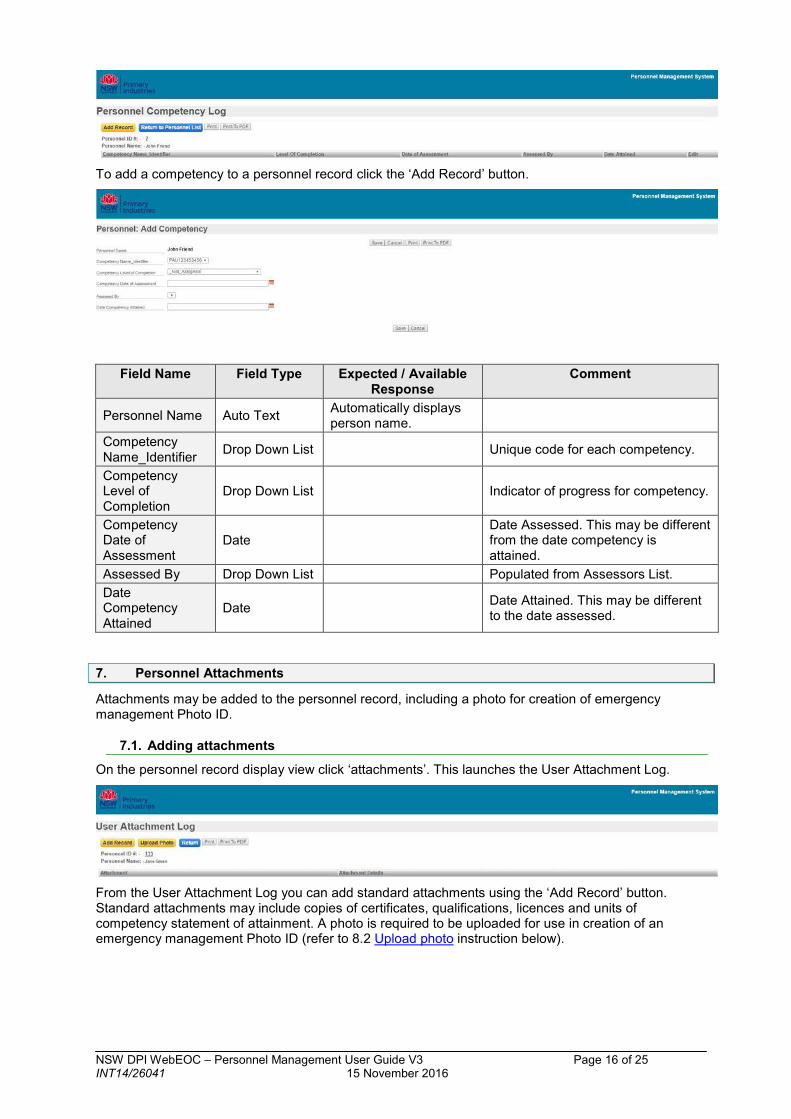
To add a competency to a personnel record click the ‘Add Record’ button.
Field Name Field Type Expected / Available Response
Comment
Personnel Name Auto Text Automatically displays person name.
Competency Name_Identifier Drop Down List Unique code for each competency.
Competency Level of Completion
Drop Down List Indicator of progress for competency.
Competency Date of Assessment
Date Date Assessed. This may be different from the date competency is attained.
Assessed By Drop Down List Populated from Assessors List. Date Competency Attained
Date Date Attained. This may be different to the date assessed.
7. Personnel Attachments
Attachments may be added to the personnel record, including a photo for creation of emergency management Photo ID.
7.1. Adding attachments
On the personnel record display view click ‘attachments’. This launches the User Attachment Log.
From the User Attachment Log you can add standard attachments using the ‘Add Record’ button. Standard attachments may include copies of certificates, qualifications, licences and units of competency statement of attainment. A photo is required to be uploaded for use in creation of an emergency management Photo ID (refer to 8.2 Upload photo instruction below).
NSW DPI WebEOC – Personnel Management User Guide V3 Page 16 of 25 INT14/26041 15 November 2016

Field Name Field Type Expected / Available Response
Comment
Personnel Name Auto Text Automatically displays person name.
Attachment Button Click button to select required file for upload.
Attachment Details Text
Specific detail for the attachment including: Type of file, title, date, etc.
If file name does not fully identify the file type and purpose please enter details here.
Click ‘save’ to return to the User Attachment Log.
Table of contents
7.2. Upload photo
A photo is added to the Personnel Record through use of the ‘Upload Photo’ button. The photo is used to create a Photo ID for emergency management activities. The uploaded image should be passport style and display a front on representation of the person.
Click the ‘Choose File’ button to locate the required photo.
Once selected, the file name will display beside the Choose File button.
Click ‘Save’. When you return to the User Attachment Log the selected image will be displayed.
Click the ‘Return’ button to return to the Personnel Record display view.
Repeat the process to replace the photo.
NSW DPI WebEOC – Personnel Management User Guide V3 Page 17 of 25 INT14/26041 15 November 2016

8. Photo ID
Photo IDs may be created for personnel using the ‘ID Cards’ button which appears for each line of personnel records.
8.1. Creating Photo ID
On the personnel record display view click the ‘ID Cards’ button this launches the Personnel IDs List.
From the Personnel IDs List you can add Photo IDs using the New ID Card button. New cards are added to the Historical IDs List.
You may View/Print Photo ID cards using the View/Print Card Front button in the Action column of the IDs List.
The Edit button allows existing cards to be edited.
Field Name Field Type Expected / Available Response
Comment
Personnel Name Auto Text Automatically displays person name.
Function Drop down list List of available Functions Required to set background colour of card
Role Drop down list List of available Roles Required in order to print card Location Drop down list SCC
LCC FCP
Optional. Only select this if you have been instructed to do so.
Click ‘Save’ to return to the Personnel IDs List.
NSW DPI WebEOC – Personnel Management User Guide V3 Page 18 of 25 INT14/26041 15 November 2016

8.2. Print Photo ID
Photo IDs are printed from the Personnel IDs List or the All Cards List (refer to 5.1 for access instructions).
Click View/Print Card Front to preview the selected card front or Click View/Print Card Back to preview the back of the card.
Click Print Card to launch the print window.
Select the Datacard printer and ensure the following settings are applied:
Click “More settings”
1. Margins = None
2. Paper size = CR80 2.13x3.38in
3. Layout = Portrait
4. Background graphics = ticked
Ensure cards are available in the Datacard printer. If cards already have already had one side printed ensure the card is placed in the printer with the head facing in and printing side down.
Table of contents
8.3. List all Photo IDs for all Personnel
A list of Photo IDs created using WebEOC is available from the Personnel display view. Click Photo IDs to launch the All Cards List.
From here you may search/filter for all cards issued for a specific function, Role, Location or person.
Table of contents
9. Absences
Registering periods of absence from emergency management activities ensures personnel will be considered for roles during periods of time they are available and not be contacted when they are not available.
Periods of absence from emergency management activities may not necessarily be the same as leave periods from work, they may include periods of time that they are required to travel within their substantive role and would therefore be unavailable to fill an emergency role.
When entering periods of absence it is possible to select either:
• Unavailable –not available to attend emergency activities, or
• Available on Request – may be available to attend emergency activities if required.
If ‘Available on Request’ is selected the person may be contacted by someone attempting to fill roles within the roster.
To record or edit absences click the Absence button on the Personnel Record display view, this will launch the Absence Summary.
NSW DPI WebEOC – Personnel Management User Guide V3 Page 19 of 25 INT14/26041 15 November 2016

9.1. Recording Absence
Click ‘New Absence’.
Field Name Field Type Expected / Available Response
Comment
Available on Request
Check box
If checked, the person may be contacted to participate in emergency management activities, after ‘available’ personnel have been contacted
Unavailable From Date Select from calendar view or enter as dd/mm/yyyy the date absence starts
Mandatory
Unavailable To Date Select from calendar view or enter as dd/mm/yyyy the date absence ends
Mandatory
Recurrence Section heading
Daily Radio Button Every day between the dates will be recorded as an absence.
Week Days Radio Button All weekdays between the selected dates will be recorded as an absence.
Weekend Radio Button Every Saturday and Sunday between the selected dates will be recorded as an absence.
Weekly Radio Button You will be required to select days of the week for which this absence will apply. If you select Wednesday then every Wednesday between the selected dates will be recorded as absences.
No Recurrence Radio Button If selected, any previous selection of days will be removed and the absence will apply to days between the selected dates.
Days Checkboxes Using the recurrence radio buttons will change the selection of days. For weekly uncheck all days for which the absence will not apply.
Click ‘Save’ to return to the Absence Summary or ‘Save & Add New Entry’ to enter more periods of absence.
Periods of absence from the current month forward are displayed in the calendar that will appear below the Absence Summary. Red calendar highlights indicate days recorded absences. Orange calendar highlights indicate days recorded Available on Request. Where Absence and Available on Request periods overlap, Available on Request will be displayed.
NSW DPI WebEOC – Personnel Management User Guide V3 Page 20 of 25 INT14/26041 15 November 2016
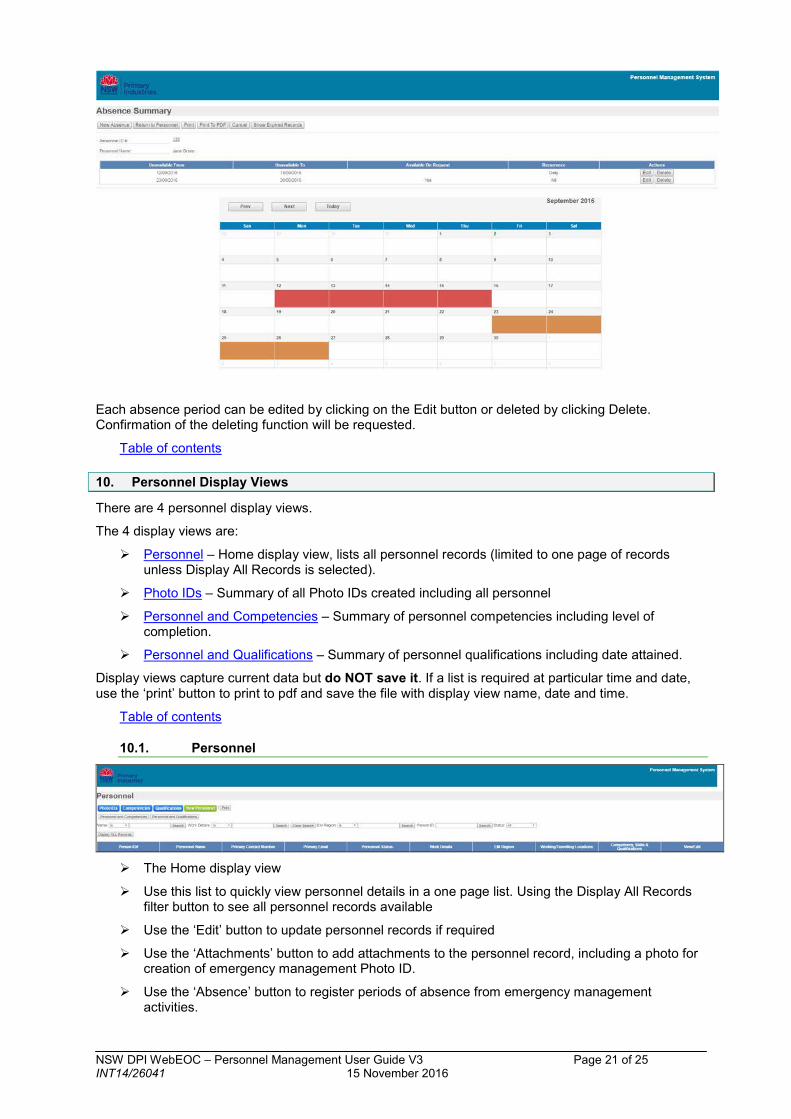
Each absence period can be edited by clicking on the Edit button or deleted by clicking Delete. Confirmation of the deleting function will be requested.
Table of contents
10. Personnel Display Views
There are 4 personnel display views.
The 4 display views are:
Personnel – Home display view, lists all personnel records (limited to one page of records unless Display All Records is selected).
Photo IDs – Summary of all Photo IDs created including all personnel
Personnel and Competencies – Summary of personnel competencies including level of completion.
Personnel and Qualifications – Summary of personnel qualifications including date attained.
Display views capture current data but do NOT save it. If a list is required at particular time and date, use the ‘print’ button to print to pdf and save the file with display view name, date and time.
Table of contents
10.1. Personnel
The Home display view
Use this list to quickly view personnel details in a one page list. Using the Display All Records filter button to see all personnel records available
Use the ‘Edit’ button to update personnel records if required
Use the ‘Attachments’ button to add attachments to the personnel record, including a photo for creation of emergency management Photo ID.
Use the ‘Absence’ button to register periods of absence from emergency management activities.
NSW DPI WebEOC – Personnel Management User Guide V3 Page 21 of 25 INT14/26041 15 November 2016

View, print and create photo ID for individuals using the ‘ID Cards’ button located in the View/Edit column or ‘Photo IDs’ button at top of screen to view a complete list of photo IDs.
Contains details views for qualifications and competencies.
10.2. Photo IDs
A comprehensive list of all Photo IDs created
10.3. Personnel and Competencies
Lists all personnel with competencies, including level of completion, assessor and date of
assessment
No changes can be made from this display view
10.4. Personnel and Qualifications
Lists all personnel with qualifications and date obtained
No changes can be made from this display view
Table of contents
11. Competencies
From the Personnel display view, clicking Competencies at the top of the screen opens the Competencies display view.
NSW DPI WebEOC – Personnel Management User Guide V3 Page 22 of 25 INT14/26041 15 November 2016

11.1. Add New Competencies
Prior to creating new competencies ensure searches have been completed for existing records to prevent duplication.
To add a new competency click the ‘New Competency’ button, this launches the New Competency input screen.
Field Name Field Type Expected / Available Response
Comment
Competency Name_Identifier
Text Enter the competency name and unique identifier using the format Identifier_Name e.g. PSPGOV307B Organise workplace information.
Note: Once saved this field is locked.
Competency Grouping
Drop down list ‘_Not_Assigned’ is the default value that indicates this field has not been completed
Choose competency grouping from the options provided
Table of contents
11.2. Competency Attachments From the competencies display view, click Attachments to add an attachment to a competency entry.
Click ‘Add Record’ to add the new attachment.
Field Name Field Type Expected / Available Response
Comment
Competency Name_Identifier
Default Text Automated text Not able to be edited
Attachment Browse for file
Attachment Details
Text e.g. Workplace information certificate 12-09-2016
Provide Name and date for file
Click Save.
NSW DPI WebEOC – Personnel Management User Guide V3 Page 23 of 25 INT14/26041 15 November 2016
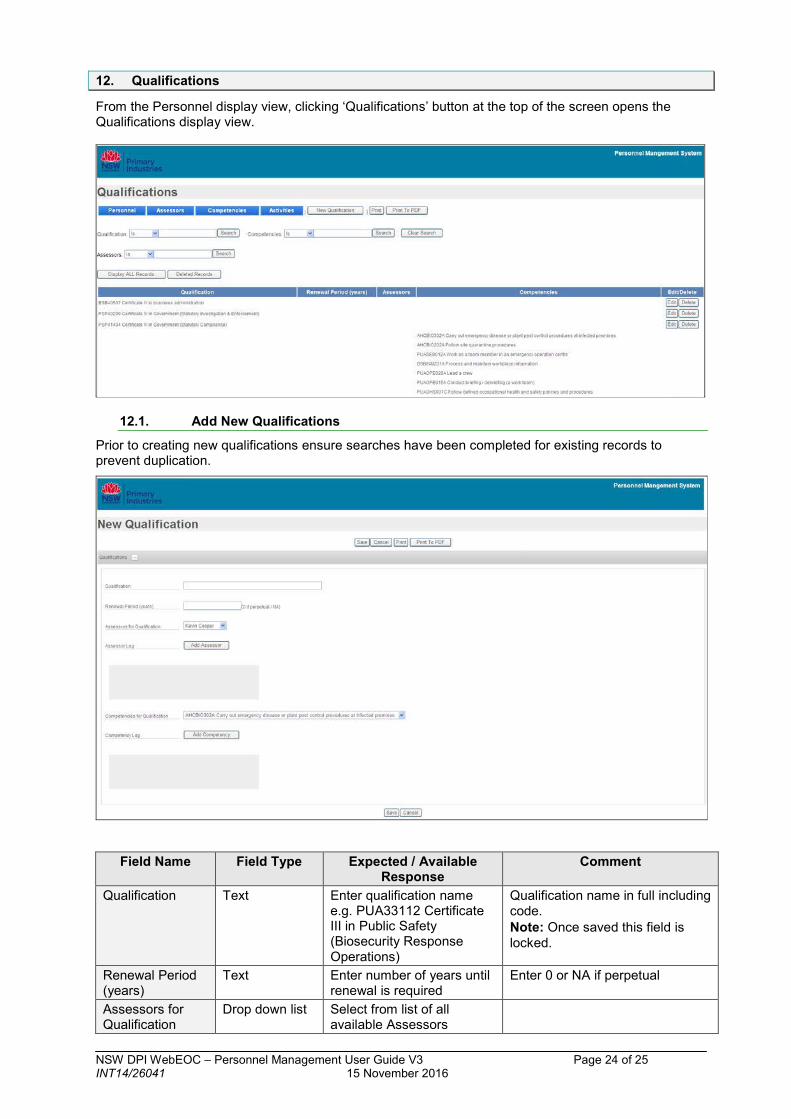
12. Qualifications
From the Personnel display view, clicking ‘Qualifications’ button at the top of the screen opens the Qualifications display view.
12.1. Add New Qualifications
Prior to creating new qualifications ensure searches have been completed for existing records to prevent duplication.
Field Name Field Type Expected / Available Response
Comment
Qualification Text Enter qualification name e.g. PUA33112 Certificate III in Public Safety (Biosecurity Response Operations)
Qualification name in full including code. Note: Once saved this field is locked.
Renewal Period (years)
Text Enter number of years until renewal is required
Enter 0 or NA if perpetual
Assessors for Qualification
Drop down list Select from list of all available Assessors
NSW DPI WebEOC – Personnel Management User Guide V3 Page 24 of 25 INT14/26041 15 November 2016

Field Name Field Type Expected / Available Response
Comment
Assessor Log Button Click to add Assessor to qualification.
More Assessors can be selected and added
Competencies for Qualification
Drop down list Select from list of all available Competencies
Competency Log Button Click to add Competency to qualification.
More Competencies can be selected and added
Table of contents
13. Contacts
New user accounts and unlocking accounts – contact the designated administrator (eg Logistics Officer or support person in a response) or Emergency Management Unit (outside a response) contact [email protected].
User Guide Information
Authorised by Manager Emergency Operations Authorised date 21 Nov 2016
Revision History Version Date Section Details
1 12 Sept 2016 All For approval 2 14 Oct 2016 All Simplification of boards 3 15 Nov 2016 All Update for EMtrain interaction
NSW DPI WebEOC – Personnel Management User Guide V3 Page 25 of 25 INT14/26041 15 November 2016