Web Site Security Representation and Management of Data on the Web.
67
Web Site Security Web Site Security Representation and Management of Data on the Web
-
date post
21-Dec-2015 -
Category
Documents
-
view
214 -
download
1
Transcript of Web Site Security Representation and Management of Data on the Web.

Web Site SecurityWeb Site Security
Representation and Management of
Data on the Web

We all know this page...We all know this page...

Would we want all to know this page?Would we want all to know this page?
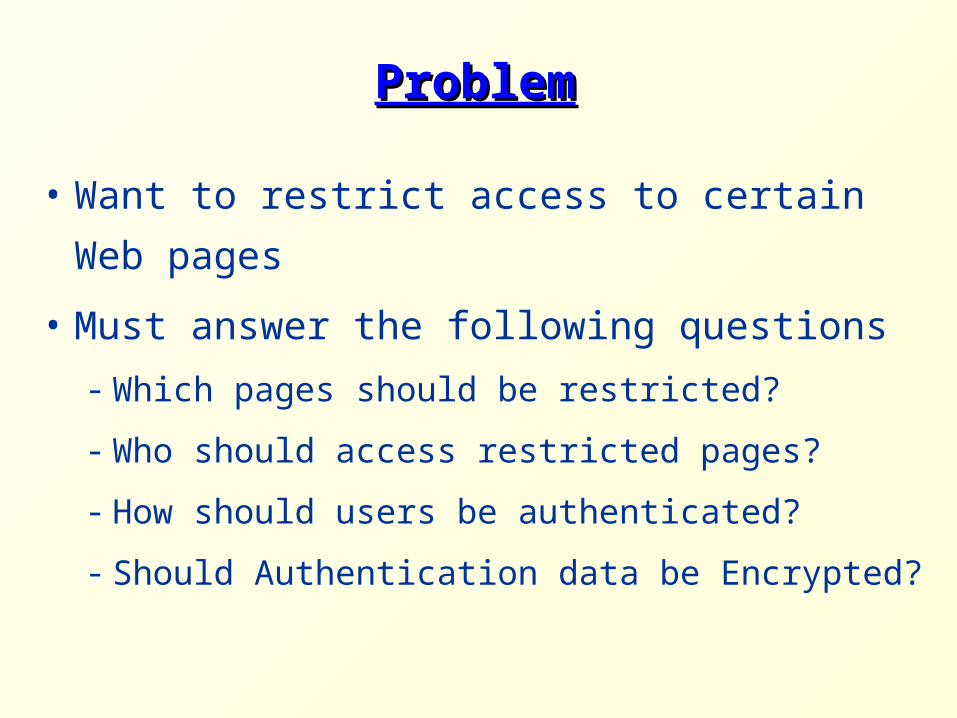
ProblemProblem
• Want to restrict access to certain Web pages
• Must answer the following questions
- Which pages should be restricted?
- Who should access restricted pages?
- How should users be authenticated?
- Should Authentication data be Encrypted?

Authentication MethodsAuthentication Methods
• Several security methods are used:
• Declarative Security
- Use security mechanisms provided by the server
- BASIC and FORM-based will be discussed
• Programmatic Security
- Security is handled by the Web application programs
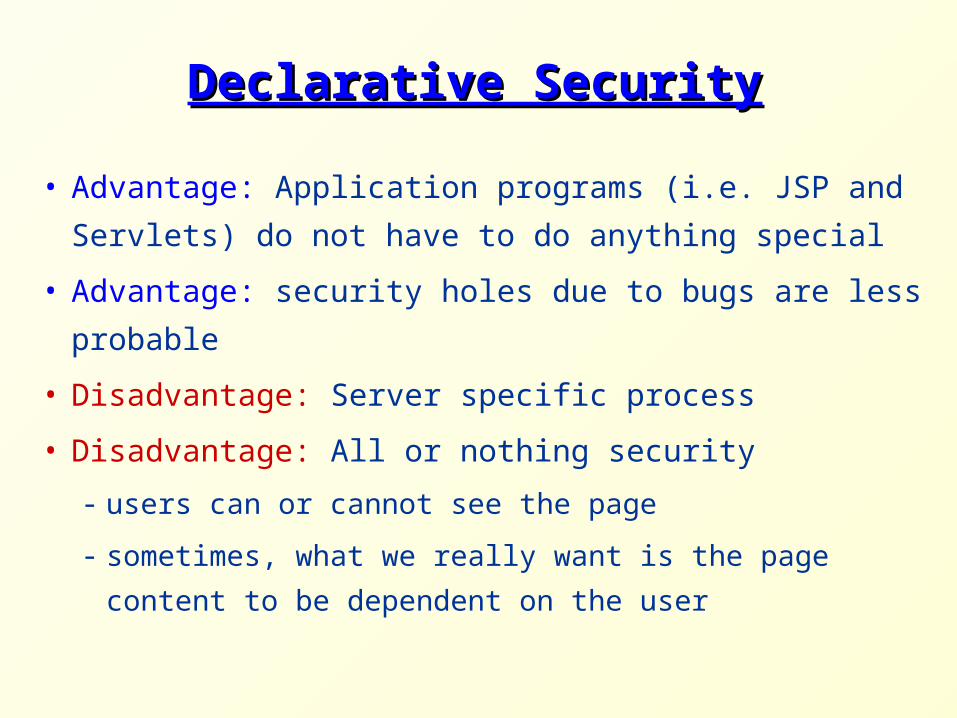
Declarative SecurityDeclarative Security
• Advantage: Application programs (i.e. JSP and Servlets)
do not have to do anything special
• Advantage: security holes due to bugs are less probable
• Disadvantage: Server specific process
• Disadvantage: All or nothing security
- users can or cannot see the page
- sometimes, what we really want is the page content to be
dependent on the user

Programmatic SecurityProgrammatic Security
• Advantage: Not server specific
• Advantage: Very flexible
• Disadvantage: A lot of work to program + all
Servlets and JSP have to cooperate for this to
work
• Disadvantage: Programmer's bugs may lead to
security holes
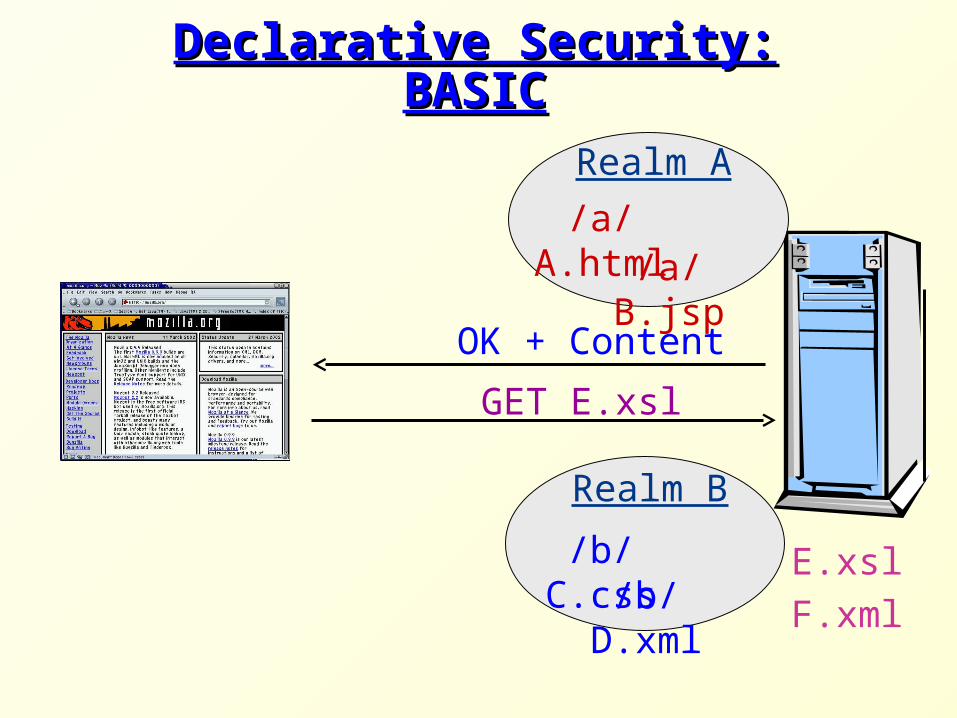
Declarative Security: BASICDeclarative Security: BASIC
Realm B
Realm A
/a/A.html/a/B.jsp
/b/C.css/b/D.xml
E.xsl
GET E.xsl
OK + Content
F.xml

Declarative Security: BASICDeclarative Security: BASIC
Realm B
Realm A
/a/A.html/a/B.jsp
/b/C.css/b/D.xml
E.xsl
GET /a/B.jsp
401 + Basic realm="A"
F.xml

Declarative Security: BASICDeclarative Security: BASIC
Realm B
Realm A
/a/A.html/a/B.jsp
/b/C.css/b/D.xml
E.xsl
GET /a/B.jsp + user:pass
OK + Content
F.xml

Declarative Security: BASICDeclarative Security: BASIC
Realm B
Realm A
/a/A.html/a/B.jsp
/b/C.css/b/D.xml
E.xsl
GET /a/A.html + user:pass
OK + Content
F.xml

• To restrict a set of pages for certain users, the server
designates a realm name for these pages and defines the
authorized users (usernames and passwords)
• When a page is requested without correct authentication
information, the server returns a 401 (Unauthorized)
response, with the "WWW-Authenticate" header like the
following:
WWW-Authenticate: Basic realm="realm-name"
Declarative Security: BASICDeclarative Security: BASIC

Declarative Security: BASICDeclarative Security: BASIC
• The browser then prompts the user for a username and a password, and sends them in the "Authorization" header:
Authorization: Basic username:password
• The string username:password is trivially encoded (everyone can decode it...)
• Through the session, the browser automatically sends the latter authorization header when requesting files under the latter request's directory or when asked to authenticate in the same realmAn Example

BASIC method in TomcatBASIC method in Tomcat
1. Set up usernames, passwords and roles
2. Tell the server that your application is using
BASIC authentication, and designate a realm
name to the application
3. Specify which URLs should be restricted to
which roles

<tomcat-users>
<role rolename="special"/>
[more roles...]
<user username="snoopy" password="snoopass"
roles="special"/>
[more users...]
</tomcat-users>
1. Defining Usernames, Passwords, 1. Defining Usernames, Passwords, and Rolesand Roles
Define users, passwords and roles in the file
$CATALINA_BASE/conf/tomcat-users.xml

2. Tell the Server to use BASIC 2. Tell the Server to use BASIC Security + Define a Realm NameSecurity + Define a Realm Name
Add to the application's web.xml the login method
(BASIC) and your chosen realm name
<login-config>
<auth-method>BASIC</auth-method>
<realm-name>Special Managers</realm-name>
</login-config>

3. Define the restrictions in web.xml3. Define the restrictions in web.xml
<security-constraint>
<web-resource-collection>
<web-resource-name>restricted one</web-resource-name>
<url-pattern>/restricted1/*</url-pattern>
</web-resource-collection>
<web-resource-collection>
<web-resource-name>restricted two</web-resource-name>
<url-pattern>/restricted2/*</url-pattern>
</web-resource-collection>

<auth-constraint>
<role-name>special</role-name>
</auth-constraint>
</security-constraint>
<login-config>...</login-config>
<security-role>
<role-name>special</role-name>
</security-role>


Custom Error PagesCustom Error Pages
• The default 401-designated error page is returned with
the unauthorized response of the server
• A 401 page is not shown by the browser, unless
- The user cancels the authentication
- The page is returned without WWW-Authenticate
• In Tomcat, you can define an application-specific error
page, however the WWW-Authenticate header must be
added explicitly

A Custom Error Page ExampleA Custom Error Page Example
Add to the application's web.xml the following:
<error-page>
<error-code>401</error-code>
<location>/error401.jsp</location>
</error-page>

A Custom Error Page Example (cont)A Custom Error Page Example (cont)
<% response.setHeader
("WWW-Authenticate",
"Basic realm=\"Special Managers\""); %>
<HTML> <HEAD> <TITLE>Unauthorized</TITLE> </HEAD>
<BODY bgcolor="yellow">
<CENTER>
<H1>Go away! You are not authorized!!</H1>
</CENTER>
</BODY>
</HTML>
error401.jsp


Declarative Security: FORMDeclarative Security: FORM
• In the BASIC method, it is the browser's
responsibility to get the login and password from
its user, and to send it throughout the session
• In the FORM method, this responsibility is the
server's, while the browser is not aware of the
fact that restricted pages are accessed

Declarative Security: FORM (cont)Declarative Security: FORM (cont)
• In the first request to a restricted page, the server
forwards the request to a login page
• Using the form in the login page, the user submits its
login and password to a special URL of the server, and
the latter stores the information in the session object
• On subsequent requests, the server checks the session to
see if it contains suitable authentication, in which case
the required page is returned
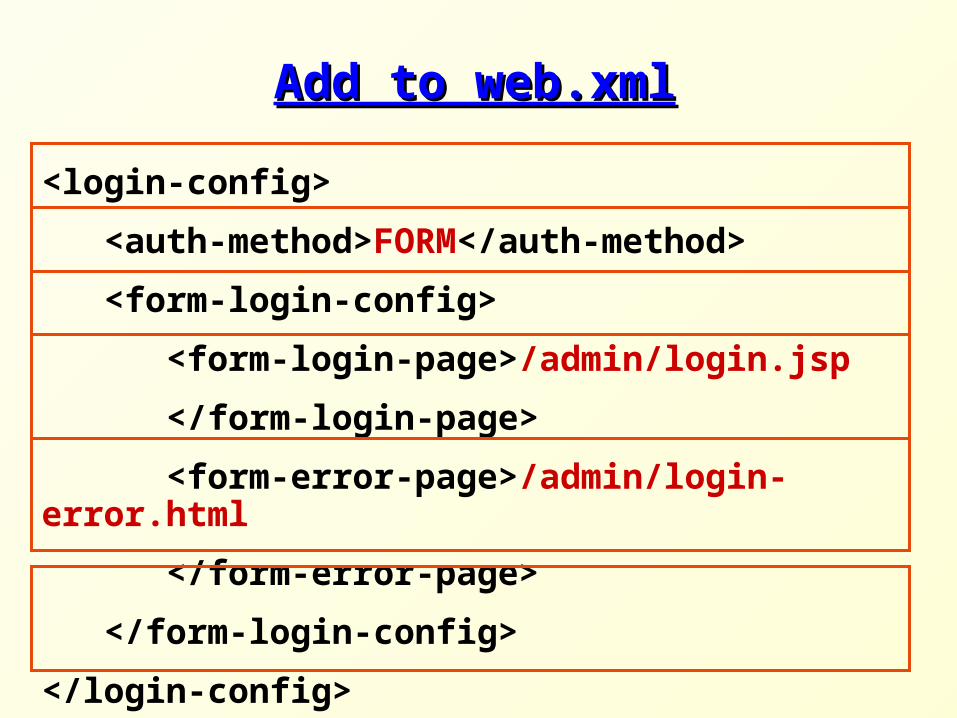
Add to web.xmlAdd to web.xml
<login-config>
<auth-method>FORM</auth-method>
<form-login-config>
<form-login-page>/admin/login.jsp
</form-login-page>
<form-error-page>/admin/login-error.html
</form-error-page>
</form-login-config>
</login-config>
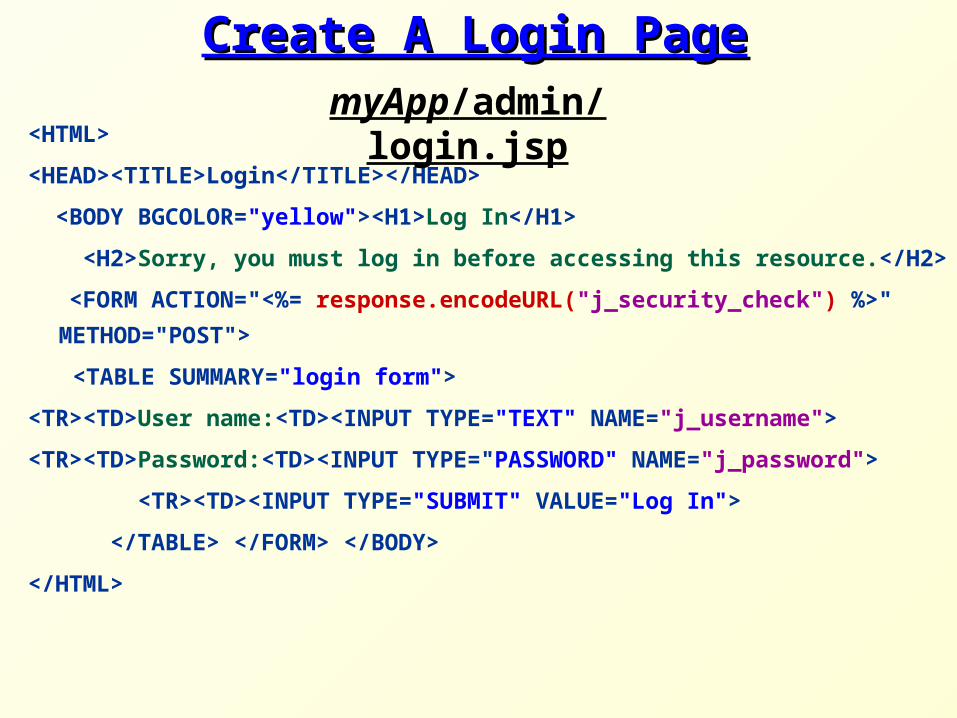
Create A Login PageCreate A Login Page
<HTML>
<HEAD><TITLE>Login</TITLE></HEAD>
<BODY BGCOLOR="yellow"><H1>Log In</H1>
<H2>Sorry, you must log in before accessing this resource.</H2>
<FORM ACTION="<%= response.encodeURL("j_security_check") %>"
METHOD="POST">
<TABLE SUMMARY="login form">
<TR><TD>User name:<TD><INPUT TYPE="TEXT" NAME="j_username">
<TR><TD>Password:<TD><INPUT TYPE="PASSWORD" NAME="j_password">
<TR><TD><INPUT TYPE="SUBMIT" VALUE="Log In">
</TABLE> </FORM> </BODY>
</HTML>
myApp/admin/login.jsp

Create a Login-Error PageCreate a Login-Error Page
<HTML>
<HEAD> <TITLE>Unauthorized</TITLE> </HEAD>
<BODY bgcolor="yellow">
<CENTER>
<H1>Go away! You are not
authorized!!</H1>
</CENTER>
</BODY>
</HTML>
myApp/admin/login-error.html


Adding Some Programmatic Adding Some Programmatic SecuritySecurity
• So far, all or nothing:
- can see page or
- can't see page
• Sometimes we want to allow page content to be
dependant on the authorization of the user
• Use the following request methods to control content
restriction:
- boolean isUserInRole(String role)
- String getRemoteUser()

ExampleExample
<security-constraint>
<web-resource-collection>
<web-resource-name>salary</web-resource-name>
<url-pattern>/salary.jsp</url-pattern>
</web-resource-collection>
<auth-constraint>
<role-name>executive</role-name>
<role-name>employees</role-name>
</auth-constraint>
</security-constraint>

Example (cont)Example (cont)
<HTML>
<HEAD><TITLE>Average Salary</TITLE></HEAD>
<BODY>
<H2>Employee average salary: 3895NIS</H2>
<% if(request.isUserInRole("executive")) { %>
<H2>Executive average salary: 42764NIS</H2>
<% } %>
</BODY>
</HTML>
salary.jsp


Important: Disable the Servlet Invoker Important: Disable the Servlet Invoker
• You protect certain URLs in the application
• The http://host/prefix/servlet/Name format of the
Servlet invoker will probably not match the patterns of
the protected URLs
• Thus, the security restrictions are bypassed if the
invoker is enabled
• For this reasons (and others), the invoker should not be
used in published applications

SSL ConnectionsSSL Connections

Security on the InternetSecurity on the Internet
• The Internet is used to transmit sensitive data from
clients to servers and vice versa
- User passwords
- Credit card numbers
- Private client data on remote servers (e.g. Banks)
• However, data packets are read by several computers on
the way from the client to the server and vice versa
- Routers, proxies, etc.

Security on the Internet (cont)Security on the Internet (cont)
• The following should be provided:
- Only the server can read the client requests
- Only the client can read the server's responses
- Only the client can send requests on behalf of itself
- Only the server can send responses on behalf of itself
• In short, no one should be able to interfere in the
interaction, either be reading the transferred data or by
impersonating to one of the sides

Symmetric and Asymmetric KeysSymmetric and Asymmetric Keys
• Data can be encrypted and decrypted using keys, which
are simply large numbers
• Symmetric keys: the same key is used for both encoding
and decoding of the message
• Asymmetric keys: one key is used to encode the
message, and another is used to decode it
• It is considered practically impossible to decode a
message without knowing the decoding key

The RSA Cryptography SystemThe RSA Cryptography System
• RSA was developed in 1977 by Ron Rivest, Adi
Shamir and Leonard Adleman
• It is the based on the asymmetric key mechanism:
- Each participant has a private key and a public key
- The public key is known to all and the private key is
kept in secret within its owner
- Asymmetric keys: the public key is the encoding key
and the private key is the decoding key

Secure Connection: A Naive ApproachSecure Connection: A Naive Approach
• Consider the following protocol:
- Server and Client send their public keys to each other
- Data is encrypted using the public key of the receiver
• What is wrong with this protocol?
- Decryption methods (public keys) are known to
everyone - everyone can impersonate the participants
- A participant cannot tell whether its received key was
indeed sent by the other participant

SSL ConnectionsSSL Connections
• The SSL (Secure Socket Layer) protocol is used
to manage security of message transmission on
the Internet
• Data encryption and decryption is based on
symmetric and asymmetric keys
• The HTTPS (HTTP over Ssl) protocol is actually
the HTTP protocol above SSL transportation

TCP/IPTCP/IP
SSLSSL
SSL in the Network LayersSSL in the Network Layers
HTTPHTTP Email ProtocolsEmail Protocols

The SSL HandshakeThe SSL Handshake
Server
hello + SSL settings
ClientSSL Settings + Certificate
Is this a good
certificate?
1. Client gets the Server's certificate

The SSL HandshakeThe SSL Handshake
Server
Client
2. Client creates a master secret and shares it with the server
( )
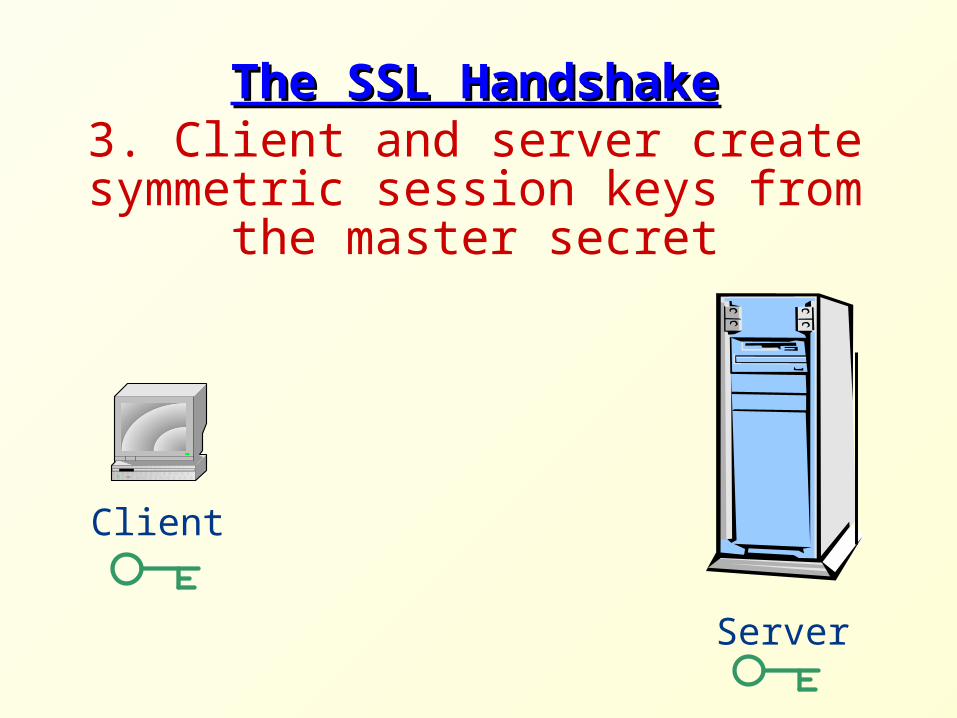
The SSL HandshakeThe SSL Handshake
Server
Client
3. Client and server create symmetric session keys from the master secret

The SSL HandshakeThe SSL Handshake
Server
Client
Data is transferred using the session keys
(Http Response)
(Http Request)

SSL CertificatesSSL Certificates
• To assure that the replier of the first request is the server, the server sends a certificate
• The certificate contains both the server's name and its public key
• The certificate is issued by a Certificate Authority (CA), which is known to the client in advance- For example: VeriSign, Thawte, RSA Secure Server, etc.
• CA signs the certificate using a digital signature, which the client can verify using a method similar to the private-public key method

Issuer's Name
Public Key
Serial Number
Validity Period
Server's Name
The Server's CertificateThe Server's Certificate
Issuer's Digital Signature

An Example: The Certificate of An Example: The Certificate of bankleumi.co.ilbankleumi.co.il

Authentication via SSLAuthentication via SSL
• If the server needs to assure the client's identity,
the first interaction after the SSL handshake will
typically be a clients authentication
• Client authentication is done using the regular
HTTP authentication methods
• What is the difference, though?

SSL in Tomcat 5.0SSL in Tomcat 5.0
• To use SSL connections in Tomcat 5.0, we need
to do the following:
- Acquire a certificate
- Enable the https service, that listens to a designated
port
- Declare the pages that require SSL connections

Generating a CertificateGenerating a Certificate
• Acquiring a certificate from a known CA costs
money
• Instead, we will generate our own certificate
• Naturally, the browser will not recognize the CA
as a known one and will alert the user

Generating a Certificate (cont)Generating a Certificate (cont)
From the Unix shell, type the following:
keytool -genkey -alias tomcat -keyalg RSA -keystore keyfile

Enable HTTPS ServiceEnable HTTPS Service
• Add the following to
$CATALINA_BASE/conf/server.xml under the
Service "catalina":
<Connector port="8443" scheme="https" secure="true"
sslProtocol="TLS" keystoreFile="keyfile"
keystorePass="keypass"/>
• Declare the redirection port for the HTTP Connector:
<Connector port="8090" redirectPort="8443"/>
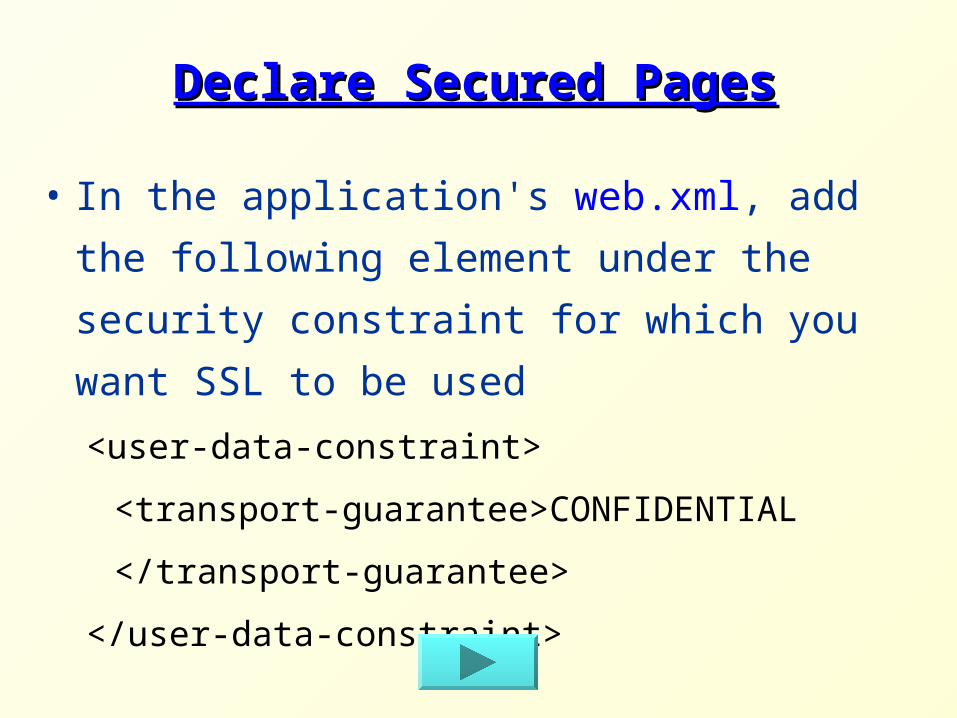
Declare Secured PagesDeclare Secured Pages
• In the application's web.xml, add the following
element under the security constraint for which
you want SSL to be used
<user-data-constraint>
<transport-guarantee>CONFIDENTIAL
</transport-guarantee>
</user-data-constraint>