Web Deployment on Windows 2012 Server Deployment on Windows 2012 Server Updated: August 28, ... Once...
45
Web Deployment on Windows 2012 Server Updated: August 28, 2013
Transcript of Web Deployment on Windows 2012 Server Deployment on Windows 2012 Server Updated: August 28, ... Once...

Web Deployment on Windows 2012 Server
Updated: August 28, 2013

Web Deployment on Windows 2012 Server Page 2 of 45
Table of Contents
Install IIS on Windows 2012 ....................................................................................................... 3
Install Sage 300 ERP ................................................................................................................16
Create Web Deployment User ..................................................................................................17
Sage 300 ERP Services ............................................................................................................22
Web Deployment Manager .......................................................................................................27
Authentication & Permissions ....................................................................................................37
IIS Configuration .......................................................................................................................40
Enable 32-bit version of ASP.NET 2.0 .................................................................................40
IIS ISAPI and CGI Restrictions ...........................................................................................41
IIS Application Pool .............................................................................................................43
Assign the Application Pool to Sage 300 ERP Web ............................................................44
Advanced Settings for IIS Application Pool ..........................................................................45

Web Deployment on Windows 2012 Server Page 3 of 45
Install IIS on Windows 2012
1. Open Server Manager and select Add roles and features.

Web Deployment on Windows 2012 Server Page 4 of 45
2. In the Add Roles and Features Wizard, for the Installation Type, select Role-based or feature-based installation.

Web Deployment on Windows 2012 Server Page 5 of 45
3. For Server Selection, ensure the correct server is selected and click Next.

Web Deployment on Windows 2012 Server Page 6 of 45
4. For Server Roles, select Web Server (IIS).

Web Deployment on Windows 2012 Server Page 7 of 45
5. For Web Server Role (IIS), Role Services, some Role Services are selected by Windows.

Web Deployment on Windows 2012 Server Page 8 of 45
6. Scroll down and select Application Development.

Web Deployment on Windows 2012 Server Page 9 of 45
7. Expand the Application Development folder and select all the components. (Click the arrow to expand the folder).

Web Deployment on Windows 2012 Server Page 10 of 45
Note: If Application Development is not installed, the above 404.3 error will occur when
launching Web Deployment.

Web Deployment on Windows 2012 Server Page 11 of 45
8. Scroll down and select IIS 6 Management Compatibility.

Web Deployment on Windows 2012 Server Page 12 of 45
9. Ensure to select all the sub-components for IIS 6 Management Compatibility. (Click the arrow to expand the IIS 6 Management Compatibility folder).

Web Deployment on Windows 2012 Server Page 13 of 45
Note: The above error message may occur if IIS 6 Management Compatibility is not
selected or if running Web Deployment Wizard with a Windows User other than
Administrator. Launch the Web Deployment Manager with the Run As
Administrator option.

Web Deployment on Windows 2012 Server Page 14 of 45
10. At the Confirmation screen, review the role services and click Install.

Web Deployment on Windows 2012 Server Page 15 of 45
11. Restart the server when prompted.

Web Deployment on Windows 2012 Server Page 16 of 45
Install Sage 300 ERP
1. Install Sage 300 ERP as Administrator or member of the Administrator Group. If you are not an administrator, it might ask you for the administrator password to continue with the installation.
2. Determine where Programs and Shared Data Directory should be. The default directory for Programs and Shared Data is C:\Program Files (x86)\Sage Software\Sage Accpac.
We recommend changing the Programs and Shared Data to a different location.
Example: C:\Sage300 C:\300SharedData
We are trying to avoid installing under the c:\Program Files. Regular users only have read-only rights to c:\Program Files and all sub folders under that. A regular user cannot see or access Sage 300 ERP databases created by administrator or other users.
3. Run regacc.exe utility as administrator after Sage 300 ERP has successfully installed.
To run regacc.exe,
i. Go to the Sage 300 ERP\Runtime program folder.
ii. Right-click on the regacc.exe file, select “Run as Administrator”.

Web Deployment on Windows 2012 Server Page 17 of 45
Create Web Deployment User
1. In Server Manager, go to Tools menu, select Computer Management.
2. Go to System Tools, Local Users and Groups, Users.

Web Deployment on Windows 2012 Server Page 18 of 45
3. Right-click Users folder and select New User.
4. Create a local user WebUser. If you are on a domain network then this user should be a domain user WebUser.

Web Deployment on Windows 2012 Server Page 19 of 45
5. Select Password never expires and click OK.

Web Deployment on Windows 2012 Server Page 20 of 45
Note: Please consult with your Company Network Administrator regarding any changes
being made to the network users.

Web Deployment on Windows 2012 Server Page 21 of 45
6. Assign the new WebUser user to the following groups:
7. Give the WebUser user full security and sharing permissions to the following folders:
• C:\Sage300 • C:\300SharedData
To assign permissions to the folder,
i. Right click on the folder.
ii. Click Properties.
iii. Assign permissions under the Security and Sharing tab.

Web Deployment on Windows 2012 Server Page 22 of 45
Sage 300 ERP Services
Assign WebUser to the Sage 300 ERP Services.
1. In Server Manager, go to the Tools menu and select Services.

Web Deployment on Windows 2012 Server Page 23 of 45
2. Right click Sage 300 ERP .Net Remoting Service and select Properties.

Web Deployment on Windows 2012 Server Page 24 of 45
3. Click the Log On tab.
4. Select This account then click Browse.

Web Deployment on Windows 2012 Server Page 25 of 45
5. Enter the WebUser user and click Check Names.
6. After the username is confirmed, click OK.

Web Deployment on Windows 2012 Server Page 26 of 45
7. Enter the password and click Apply.
8. Restart the Sage 300 ERP .NET Remoting Service.
Note: If the service does not restart, reboot the server and start the service.

Web Deployment on Windows 2012 Server Page 27 of 45
Web Deployment Manager
1. Install Sage 300 ERP .NET Libraries and Web-Deployment Files from the Sage 300 ERP installation.

Web Deployment on Windows 2012 Server Page 28 of 45
2. Once the .Net Libraries and Web Deployment files have been installed, at the Start screen, open Web Deployment Manager.
Web Deployment on Windows 2012 Server Page 29 of 45
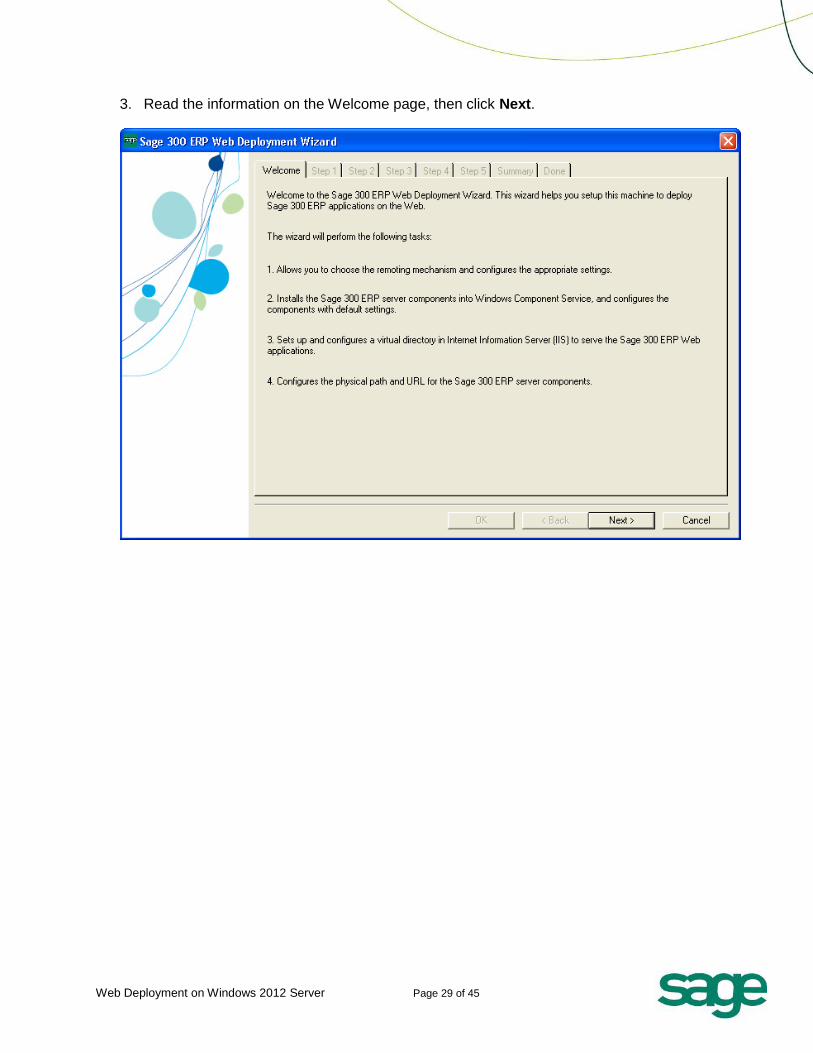
3. Read the information on the Welcome page, then click Next.

Web Deployment on Windows 2012 Server Page 30 of 45
4. Step 1: Select Remoting Channel
Choose how the Sage 300 ERP server will communicate with browser clients.
You can select:
• Microsoft .NET Framework Remoting (recommended)
Or
• Distributed COM (DCOM) Remoting (If you select this option, skip Steps 2 and 3).
Microsoft .NET Remoting
The Sage 300 ERP .NET Libraries provides a set of Microsoft .NET-based interfaces for
System Manager.
Once installed, Web-deployed servers can make use of .NET Remoting to communicate
with client machines through a predefined set of network ports. These ports can be easily
configured to work with software and hardware firewalls.

Web Deployment on Windows 2012 Server Page 31 of 45
Distributed COM (DCOM) Remoting
DCOM is an older technology that allows COM-based components to access remote
servers. DCOM works well on networks without firewalls, but requires extra configuration
when communications between client and server machines pass through a firewall.
5. Step 2: Configure .NET Remoting Parameters
Specify the .NET Remoting parameters, as follows:
Port Range: Communication between client machines and the server occur through a predefined port range. The default port range is between 9000-9180, but may need to be adjusted if other programs use ports within that range. The network administrator should be consulted to determine the appropriate port range.
A port is used by
• Sage 300 ERP .NET Remoting Service • Each user signed on to the web-based Sage 300 desktop • Each application screen that is launched by the user
Once all ports have been used, users will no longer be able to open 300 ERP windows until
additional ports have been freed. If the Sage 300 Server is to be deployed through a firewall,
the port range specified must be open on the firewall. Contact your network administrator for

Web Deployment on Windows 2012 Server Page 32 of 45
assistance on the firewall. There is also a Sage 300 utility available from our online
Knowledge Base (solution ID 26903) that could be used to open ports on Windows Firewall.
Enhanced Security: If this box is checked, the user must provide the appropriate windows network credentials to log into the system. If this box is NOT checked, the user only needs to log into Sage 300 ERP by providing the appropriate Sage 300 credentials.
Encrypt Network Data: Selecting this option will encrypt all data transferred between the client machines and the server. Note that data encryption is a processor intensive process, and for performance reasons, it is recommended that this option be enabled only if all client workstations accessing the server have a processor speed greater than 1 GHz.
6. Step 3: Configure .NET Desktop Parameters

Web Deployment on Windows 2012 Server Page 33 of 45
7. Step 4: Configure Component Services
On the server, the Sage 300 ERP server components must be installed into Windows
Component Services. The server components generate the Web pages that users see in
their Web Desktop. All components in there must run under one Identity.
Username: Enter the user name added earlier (WebUser in our earlier example). As
discussed earlier, the user specified must have administrative rights on the local machine so
it can access the Sage 300 directories on the web server and registry. For domain users,
make sure to enter the username in the format of: Domain_Name\User_name
Password: Enter the password assigned to the username specified above. As discussed
earlier, when a user accesses Sage 300 through a browser, the web server will utilize the
rights assigned to the user specified here. The user accessing Sage 300 however, never
actually has any knowledge of the “automatic” sign-on.

Web Deployment on Windows 2012 Server Page 34 of 45
8. Step 5: Configure Internet Information Server
Virtual directory name: Enter the virtual directory that will be created under the server’s
default web site to serve the Sage 300 ERP Web Application. For example, entering
SAGE300ERPDesktop (as shown) indicates that the URL being entered by Sage 300 web
users would be http://<server name>/SAGE300ERPDesktop (where <server name> would
be replaced with the name of your server).
Server name: Enter the name of the web server.
Note: If a domain name for the network has been registered, then the above server name
would be a fully qualified domain name such as: csvm-2k8r2-dt2.sage.com

Web Deployment on Windows 2012 Server Page 35 of 45
9. The last step displays a summary of the options selected on the previous screens. Click Next, then Finish.

Web Deployment on Windows 2012 Server Page 36 of 45
10. The wizard will finish and display the Configuration Manager screen, which shows a summary of the options selected in the previous steps.

Web Deployment on Windows 2012 Server Page 37 of 45
Authentication & Permissions
1. Open Internet Information Services (IIS) Manager and navigate to
SAGE300ERPDesktop.
2. In the Features View, double-click Authentication.

Web Deployment on Windows 2012 Server Page 38 of 45
3. On the Authentication page, select Anonymous Authentication.
4. In the Actions pane, click Edit to set the security principal under which anonymous users will connect to the site.
5. Select Specific user then click Set.
6. Enter the User name, WebUser, (for domain users, enter Domain_name\User_name) and password. Then click OK.

Web Deployment on Windows 2012 Server Page 39 of 45
7. Click OK to close the Edit Anonymous Authentication Credentials dialogue box.
Web Deployment on Windows 2012 Server Page 40 of 45
IIS Configuration
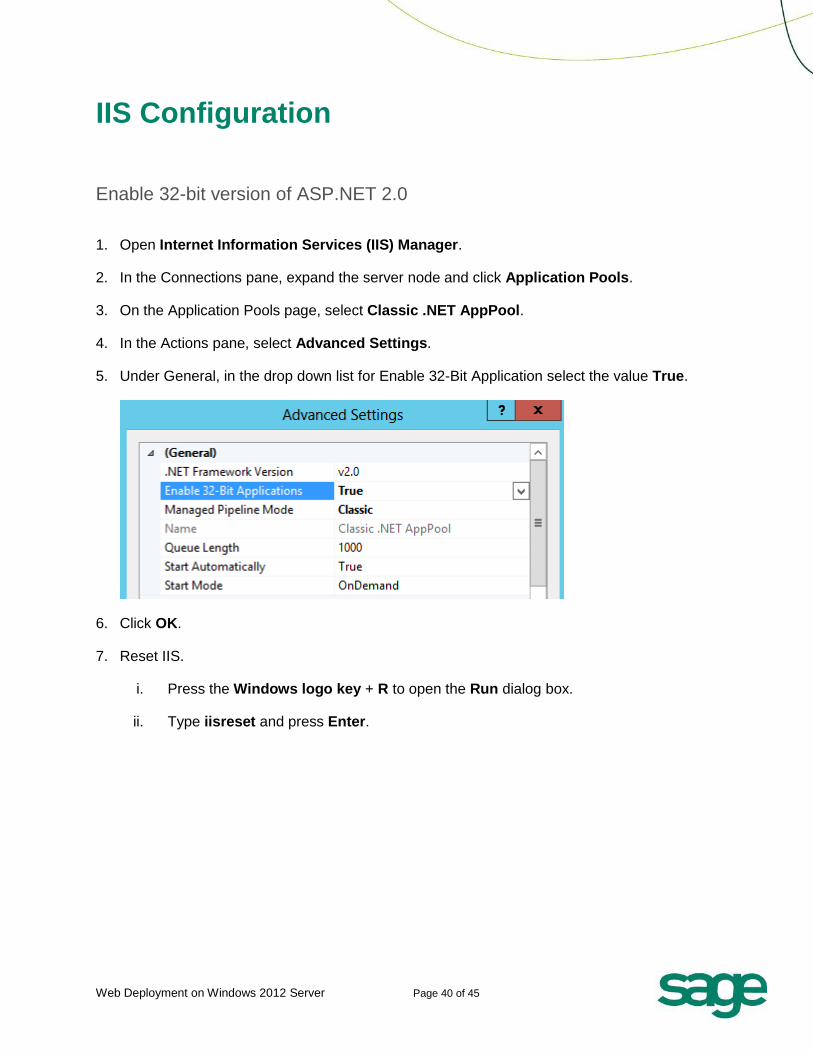
Enable 32-bit version of ASP.NET 2.0
1. Open Internet Information Services (IIS) Manager.
2. In the Connections pane, expand the server node and click Application Pools.
3. On the Application Pools page, select Classic .NET AppPool.
4. In the Actions pane, select Advanced Settings.
5. Under General, in the drop down list for Enable 32-Bit Application select the value True.
6. Click OK.
7. Reset IIS.
i. Press the Windows logo key + R to open the Run dialog box.
ii. Type iisreset and press Enter.

Web Deployment on Windows 2012 Server Page 41 of 45
IIS ISAPI and CGI Restrictions
1. In Internet Information Services (IIS) Manager.
2. Highlight the server machine and double-click ISAPI and CGI Restrictions.

Web Deployment on Windows 2012 Server Page 42 of 45
3. Double-click Active Server Pages and select Allow extension path to execute.
Web Deployment on Windows 2012 Server Page 43 of 45
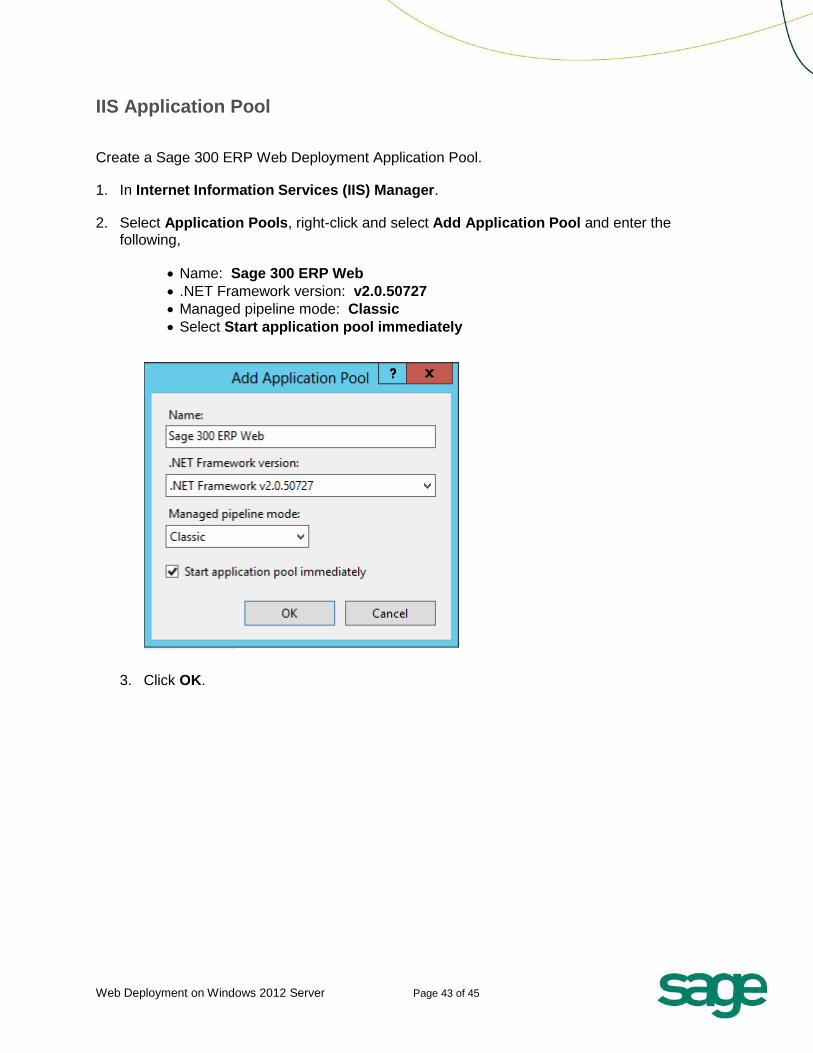
IIS Application Pool
Create a Sage 300 ERP Web Deployment Application Pool.
1. In Internet Information Services (IIS) Manager.
2. Select Application Pools, right-click and select Add Application Pool and enter the following,
Name: Sage 300 ERP Web
.NET Framework version: v2.0.50727
Managed pipeline mode: Classic
Select Start application pool immediately
3. Click OK.

Web Deployment on Windows 2012 Server Page 44 of 45
Assign the Application Pool to Sage 300 ERP Web
1. In Internet Information Services (IIS) Manager.
2. Select SAGE300ERPDesktop in the Default Web Site.
3. In the Actions pane, select Advanced Settings.
4. Under General, in the drop down list for Application Pool, select Sage 300 ERP Web.
5. Click OK to close the Application Pool window.
6. Click OK to close the Advanced Settings window.

Web Deployment on Windows 2012 Server Page 45 of 45
Advanced Settings for IIS Application Pool
1. In Internet Information Services (IIS) Manager, go to Application Pools.
2. Select Sage 300 ERP Web.
3. In the Actions pane, select Advanced Settings.
4. Under General, in the drop down list for Enable 32-Bit Application select the value True.
5. In the Managed Pipeline Mode field, select Classic.
6. Click OK.
7. Reset IIS (Press the Windows logo key + R, type iisreset, then press Enter).