
Web Application Penetration Tests - Information Gathering Stage
49
Web Application Pentesting Information Gathering
-
Upload
netsparker -
Category
Internet
-
view
29 -
download
0
Transcript of Web Application Penetration Tests - Information Gathering Stage

Web Application Pentesting
Information Gathering
Information Gathering
If you remember, we discussed the process of a penetration test. In this next section, we will address the following process:
• Scope of Engagement
• Information Gathering
• Vulnerability Identification
• Exploitation
• Post Exploitation
• Reporting
2

Information Gathering
Gathering information about the target is the initial phase of any penetration test. You will quickly find that in general, this is the most important part of the entire engagement.
At this stage, there is no redundant information; everything you collect should be noted for future use. The wealth of information you collect will become useful in both understanding application logic and during the attack phase.
3

Information Gathering
What sorts of information are we going after? • Infrastructure (Web server, CMS, Database…)
• Application Logic
• IPs, Domains and Subdomains
• Virtual hosts
4
Information Gathering
The infrastructure behind a web application is what supports it and allows it to function.
This includes the web server that is directly involved in the execution of any web application.
The two most common web servers used on the internet today are Apache and Microsoft IIS.
5

Information Gathering
Discovering what kind of web server is behind your target application will give you a hint about what OS the server is running and what known vulnerabilities may exist. For example, discovering an IIS (Internet Information Service) web server will tip us off that the server is running an OS in the Windows Server OS family.
Uncovering both the web server type and version will give us enough information to mount many different attacks against its components (during later stages of the test).
6
Information Gathering
As a part of the information gathering phase, we are going to introduce you to the Netsparker utility and how it functions in completing the application web penetration testing portion of an engagement.
During the next few sections we will highlight the unique and important aspects of Netsparker and how it assists testers in accomplishing testing scope goals in an efficient and in-depth manner.
7

Netsparker Main Features Overview
Netsparker offers an intuitive interface that is easy to master and allows testing to commence very quickly.
Moreover it has a scan policy optimizer to help the tester run targeted scans that will generate more relevant results.
8

Netsparker Main Features Overview
Netsparker offers automation of the testing process with the use of an exploit while scanning technology that will actually perform an exploit to validate if the target is truly susceptible to the vulnerability.
This feature helps to keep the tester on track by eliminating some of the normal, after scan work, that requires the tester to research exploits and manually test them after the initial scan.
Let’s get started with Netsparker, and get familiar with the main screen and options.
9

Information Gathering
The next slide is a representation of the Netsparker Main Screen.• The Netsparker Main screen offers visibility into the site being
scanned with a Site Map.
• Vulnerability information including the raw request and responses as well as a browser view.
• A Scan tab that allows the tester to monitor what is being tested with a summary of any findings.
• A dashboard to have a summary of the scan statistics and progress
• A section for summarizing issues with additional tabs for encoding and analysis of logs. In addition, the main screen presents options of how to group and show issues.
10
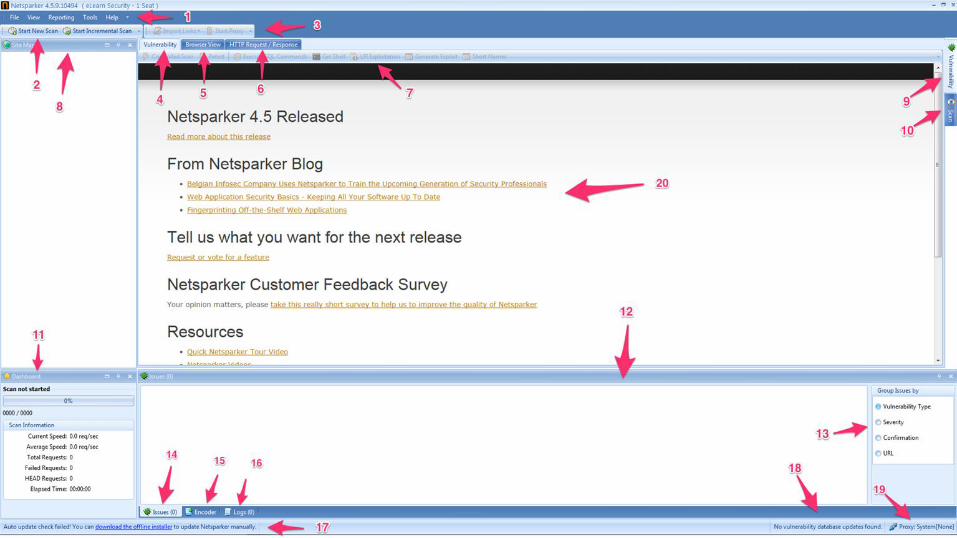
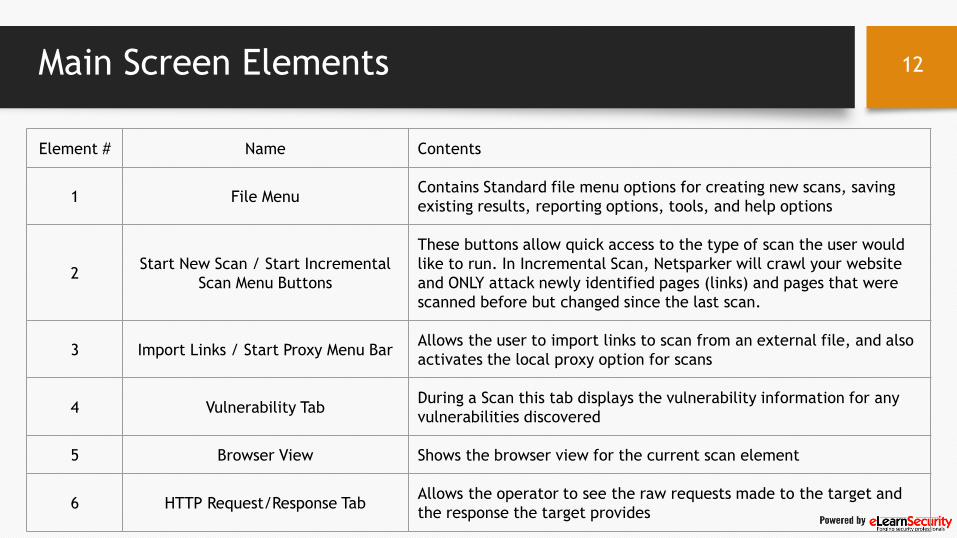
Main Screen Elements
Element # Name Contents
1 File MenuContains Standard file menu options for creating new scans, saving
existing results, reporting options, tools, and help options
2Start New Scan / Start Incremental
Scan Menu Buttons
These buttons allow quick access to the type of scan the user would
like to run. In Incremental Scan, Netsparker will crawl your website
and ONLY attack newly identified pages (links) and pages that were
scanned before but changed since the last scan.
3 Import Links / Start Proxy Menu BarAllows the user to import links to scan from an external file, and also
activates the local proxy option for scans
4 Vulnerability TabDuring a Scan this tab displays the vulnerability information for any
vulnerabilities discovered
5 Browser View Shows the browser view for the current scan element
6 HTTP Request/Response TabAllows the operator to see the raw requests made to the target and
the response the target provides
12
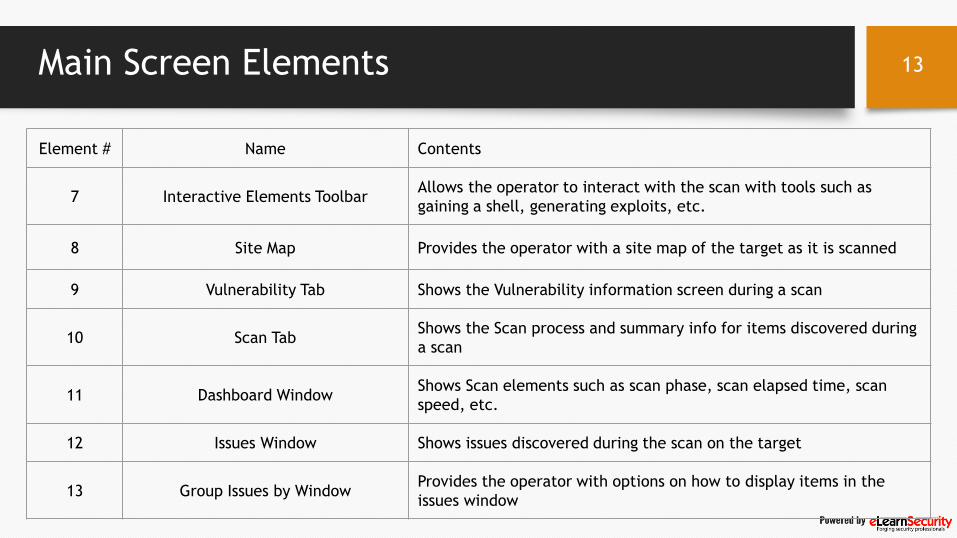
Main Screen Elements
Element # Name Contents
7 Interactive Elements ToolbarAllows the operator to interact with the scan with tools such as
gaining a shell, generating exploits, etc.
8 Site Map Provides the operator with a site map of the target as it is scanned
9 Vulnerability Tab Shows the Vulnerability information screen during a scan
10 Scan TabShows the Scan process and summary info for items discovered during
a scan
11 Dashboard WindowShows Scan elements such as scan phase, scan elapsed time, scan
speed, etc.
12 Issues Window Shows issues discovered during the scan on the target
13 Group Issues by WindowProvides the operator with options on how to display items in the
issues window
13

Main Screen Elements
Element # Name Contents
14 Issues Tab Shows issues discovered during the scan
15 Encoder Tab
Encoder tool, which supports URL, HTML, Base64, UTF7, MD5, SHA1,
SHA256, SHA512, SQL Server Character, Oracle Char and ROT13
encoding and decoding.
16 Logs Tab Allows you to see the logs associated with a scan
17 Update Status Bar This status bar represents that update status for Netsparker
18 Vulnerability Database Status BarThis status bar indicates if there are any Vulnerability Database
updates available
19 Proxy Status Bar Indicates if a proxy is in use or not
20 News/Status WindowThis area contains important News from Netsparker and will also show
the status of the scans and the vulnerabilities detected during scans
14
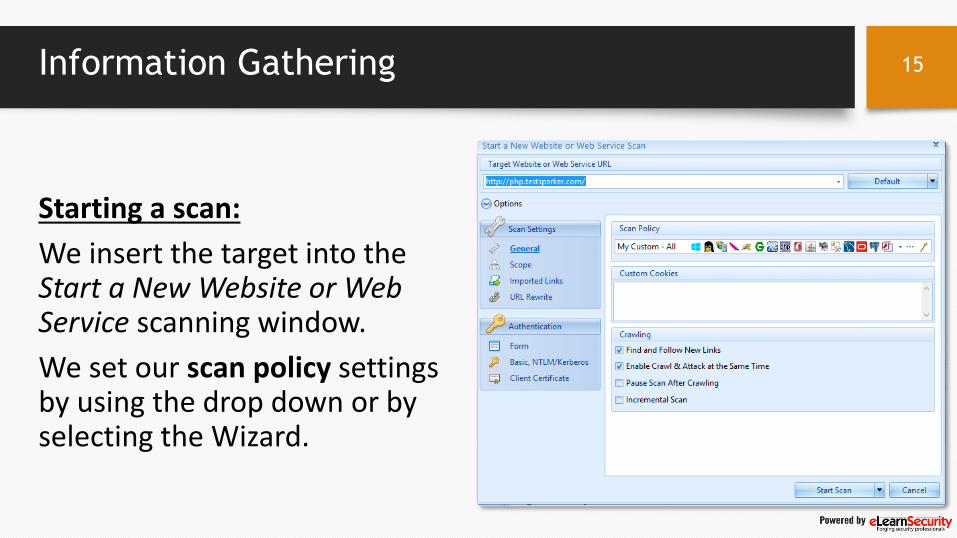
Information Gathering
Starting a scan:
We insert the target into the Start a New Website or Web Service scanning window.
We set our scan policy settings by using the drop down or by selecting the Wizard.
15

Information Gathering
Now we have to set the Crawling parameters at the bottom of the panel.
Set any additional options by using the links on the left side of the screen.
16

Information Gathering
The Scope Settings help to define more refined scanning by limiting scanning to specific URL paths.
In addition, it allows the operator to exclude specific URLs with RegEx.
17
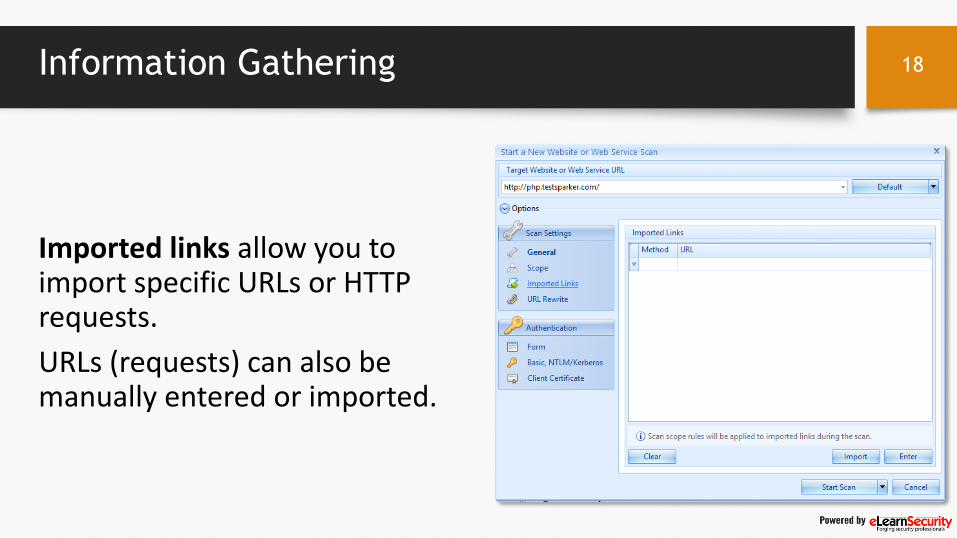
Information Gathering
Imported links allow you to import specific URLs or HTTP requests.
URLs (requests) can also be manually entered or imported.
18

Information Gathering
Web application developers use URL rewriting to modify the appearance of the web application's URLs, in order to be human readable and search engine friendly, making them easy to remember.
Another advantage of using URL rewriting technology is that all symbols such as question marks and equal signs are not used in URLs, thus making URLs easy to remember.
19

Information Gathering
An example of a URL rewrite is the following.
When you browse a movie collection library, the URL typically looks something like: http://www.example.com/movie/fight-club/
When you request such a URL the web server uses a URL rewrite engine to rewrite the URL to a format that the web application / web framework can understand, such as http://www.example.com/library.php?movie=fight-club.
20
Information Gathering
A common problem web vulnerability scanners have when scanning web applications that use URL rewriting technology is that scanners are unable to identify parameters in the URLs, and would assume that they are directories rather than parameter names or values, therefore such parameters are not scanned.
Netsparker offers the ability to manually configure URL Rewrite Rules, but it also offer an heuristic URL Rewrite support that automatically tries to determine if URL rewrite is used on the target application.
21
Information Gathering
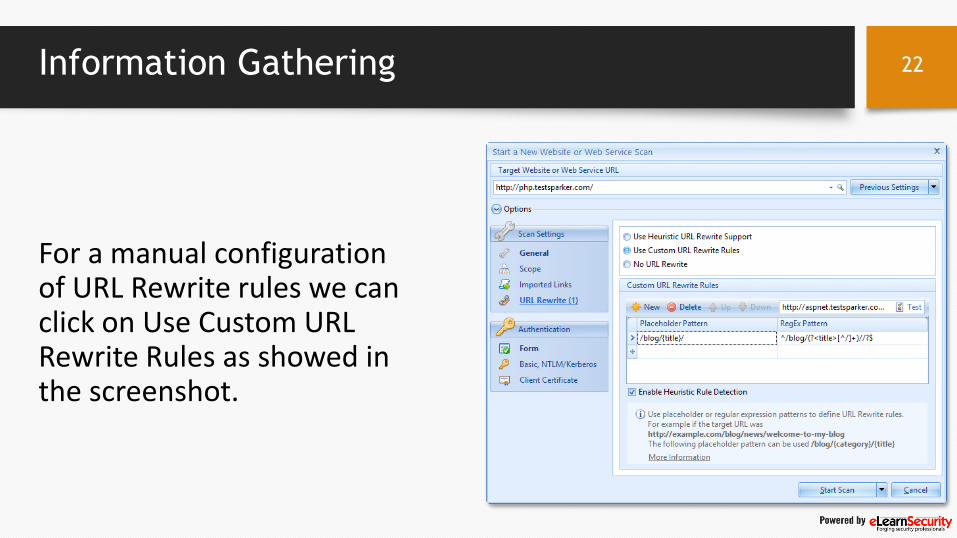
For a manual configuration of URL Rewrite rules we can click on Use Custom URL Rewrite Rules as showed in the screenshot.
22

Information Gathering
If you want to dig deeper in URL Rewriting rules and configurations, please use the following resources:
• Automatic URL Rewrite rules configuration
• Configure URL Rewrite Rules
• Automating URL Rewrite Rules
23

Information Gathering
Enable the option Heuristic URL Rewrite Support so the scanner still tries to automatically detect any additional URL Rewrites on the target website and use them in conjunction with the ones you configured.
24

Information Gathering
Authentication settings can be manipulated to assist the scanner with authentication on the target.
This is useful so the scanner can automatically authenticate and scan password protected area.
25

Information Gathering
The Interactive login option is extremely useful when facing web application that use CAPTCHA, two-factor authenticationor other similar mechanisms.
By enabling this option, Netsparker will show an interactive browser window during the authentication, so you can perform any necessary operations to allow the authentication.
26

Information Gathering
Basic, NTLM/Kerberos Authentication options can be used if the target prompts for these types of credentials.
27
Information Gathering
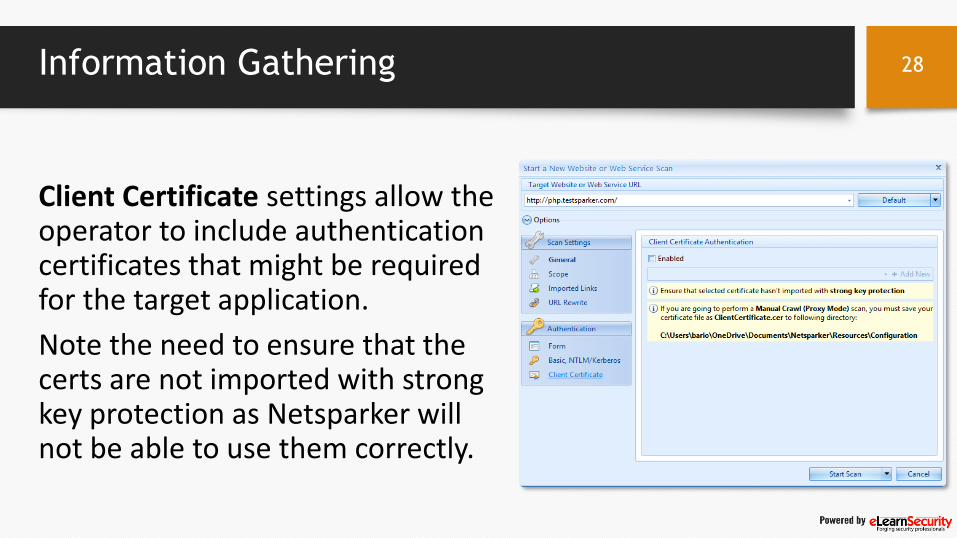
Client Certificate settings allow the operator to include authentication certificates that might be required for the target application.
Note the need to ensure that the certs are not imported with strong key protection as Netsparker will not be able to use them correctly.
28

Information Gathering
In addition, if you are using a Manual Crawl scan, the certificate will need to be named ClientCertificate.cer in order to be used and must be stored in Netsparker data repository.
29
Information Gathering
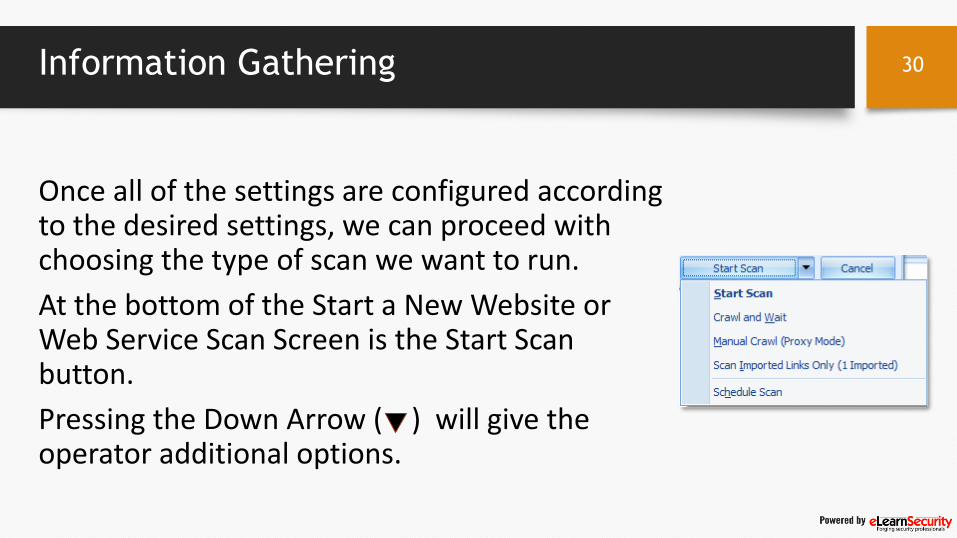
Once all of the settings are configured according to the desired settings, we can proceed with choosing the type of scan we want to run.
At the bottom of the Start a New Website or Web Service Scan Screen is the Start Scan button.
Pressing the Down Arrow ( ) will give the operator additional options.
30

Information Gathering
Start Scan: is the default option. Netsparker will first crawl the entire target web application, find new links and then attack all identified pages.
Crawl and Wait: this is similar to the previous option, but Netsparker will pause after the crawling phase. This is useful if you want to review the resources/link identified before actually start the attack phase.
31
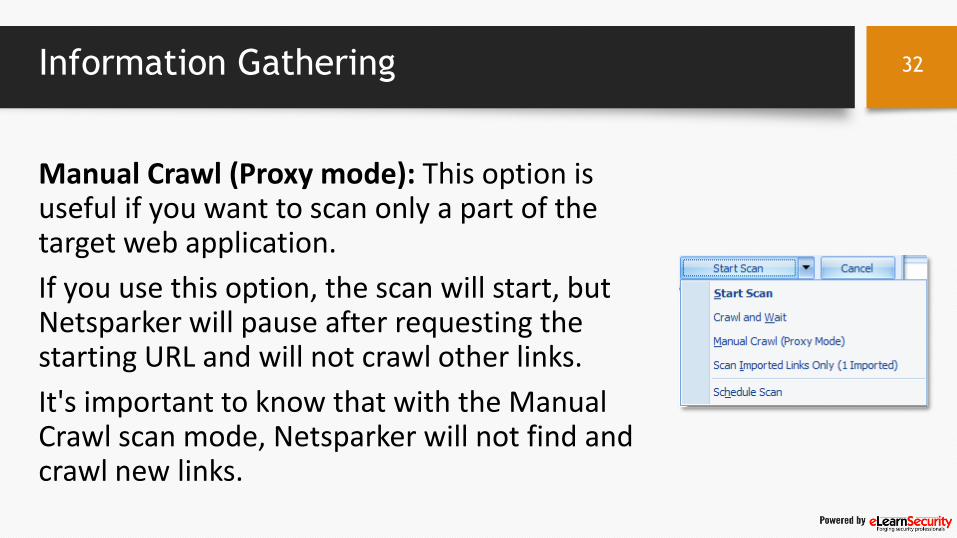
Information Gathering
Manual Crawl (Proxy mode): This option is useful if you want to scan only a part of the target web application.
If you use this option, the scan will start, but Netsparker will pause after requesting the starting URL and will not crawl other links.
It's important to know that with the Manual Crawl scan mode, Netsparker will not find and crawl new links.
32
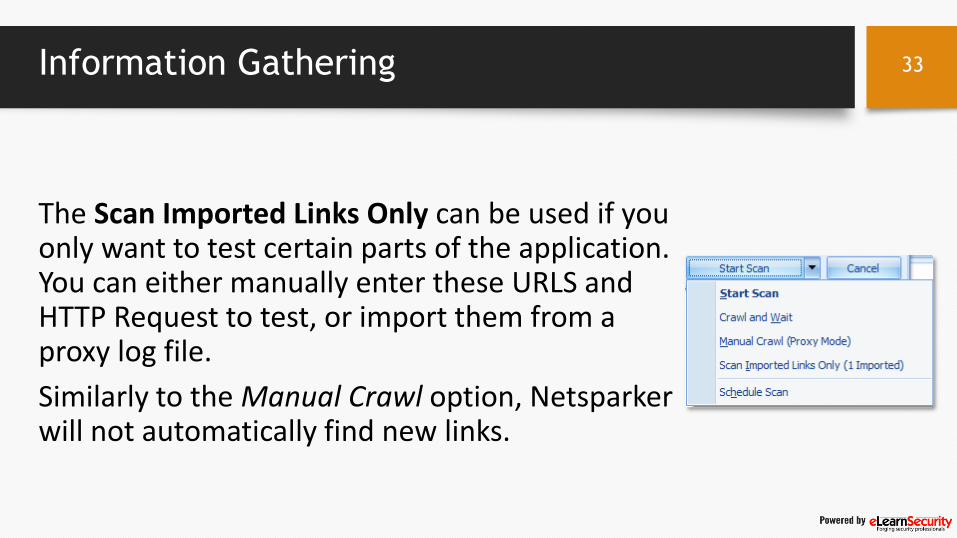
Information Gathering
The Scan Imported Links Only can be used if you only want to test certain parts of the application. You can either manually enter these URLS and HTTP Request to test, or import them from a proxy log file.
Similarly to the Manual Crawl option, Netsparker will not automatically find new links.
33

Information Gathering
To demonstrate the information gathering phase of web application pentesting, let’s choose to run the crawl and wait scan.
To select this type of scan, we select the down arrow ( ) as in the previous slide, and select Crawl and Wait.
34
Information Gathering
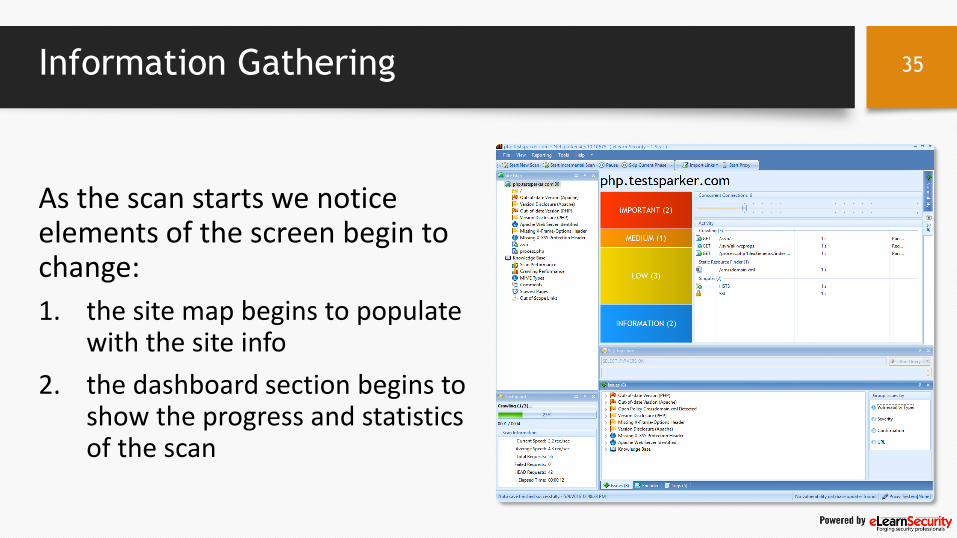
As the scan starts we notice elements of the screen begin to change:
1. the site map begins to populate with the site info
2. the dashboard section begins to show the progress and statistics of the scan
35

Information Gathering
3. The Scan Tab shows the tests being conducted and the summary of findings
4. The Issues sections begins displaying the summary of issues detected
36
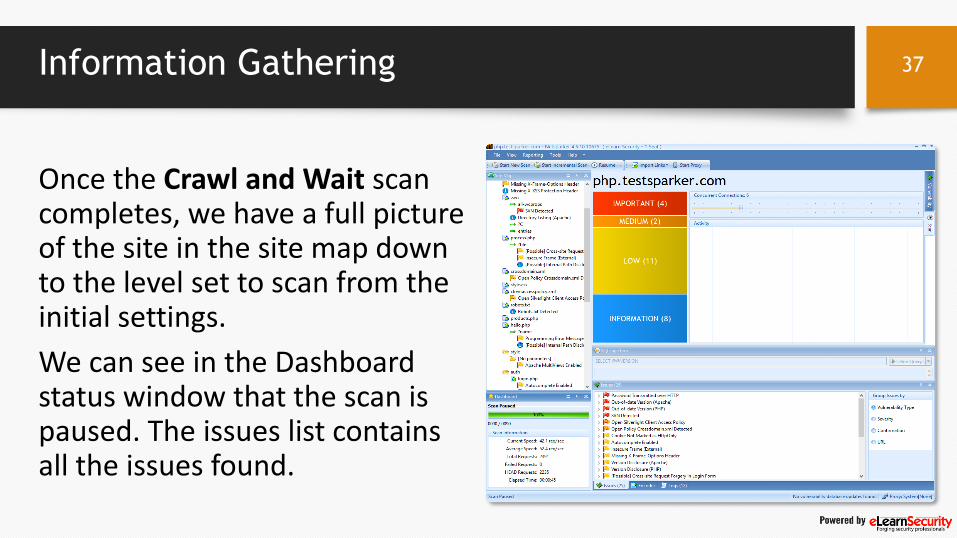
Information Gathering
Once the Crawl and Wait scan completes, we have a full picture of the site in the site map down to the level set to scan from the initial settings.
We can see in the Dashboard status window that the scan is paused. The issues list contains all the issues found.
37

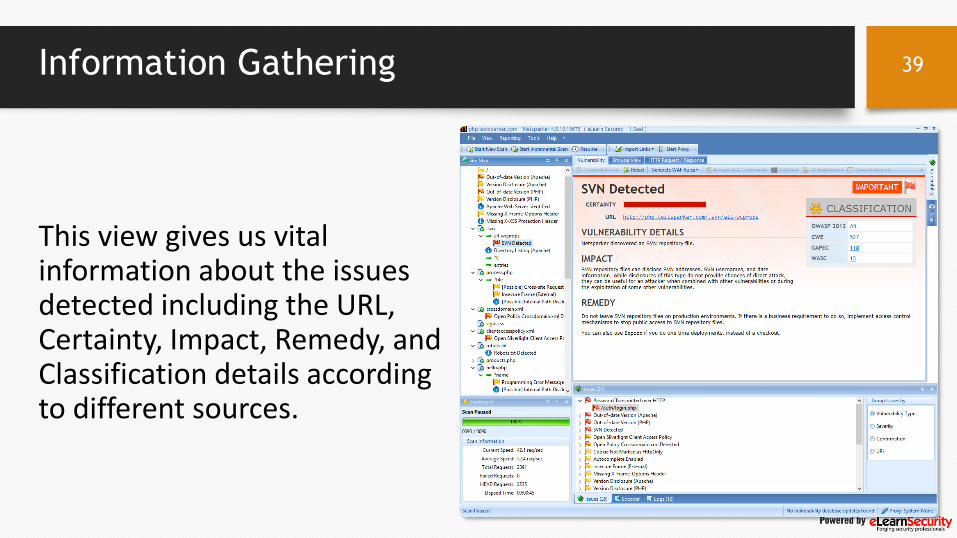
Information Gathering
We can begin to explore the information gathered by selecting an item in the Site Map window.
For example, if we select the SVN Detected vulnerability, the vulnerability tab displays.
38
Information Gathering
This view gives us vital information about the issues detected including the URL, Certainty, Impact, Remedy, and Classification details according to different sources.
39

Information Gathering
Notice that on the top we can access very useful features. The browser view will render the response obtained, while in the HTTP Request / Response we can inspect the communication in detail.
This will be very useful to understand how the application responds.
40
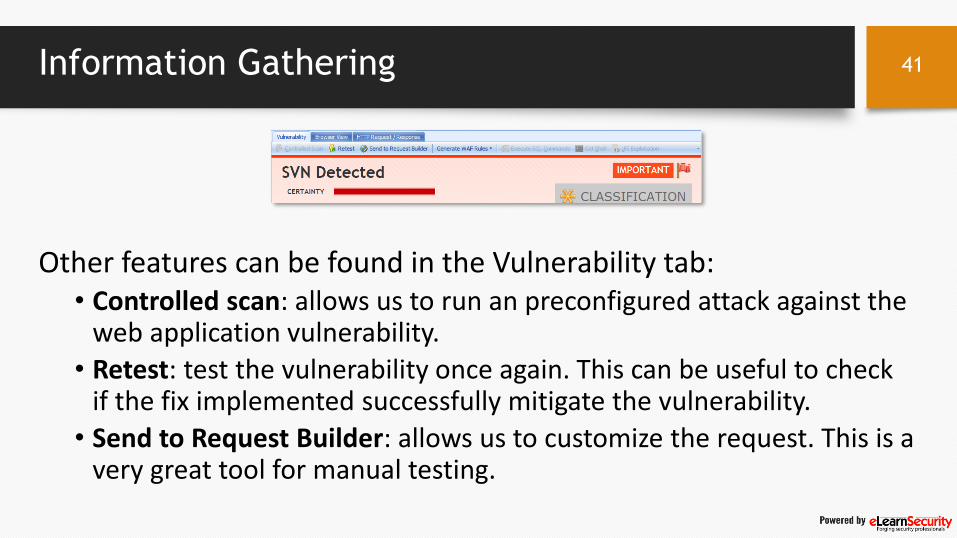
Information Gathering
Other features can be found in the Vulnerability tab:• Controlled scan: allows us to run an preconfigured attack against the
web application vulnerability.
• Retest: test the vulnerability once again. This can be useful to check if the fix implemented successfully mitigate the vulnerability.
• Send to Request Builder: allows us to customize the request. This is a very great tool for manual testing.
41
Information Gathering
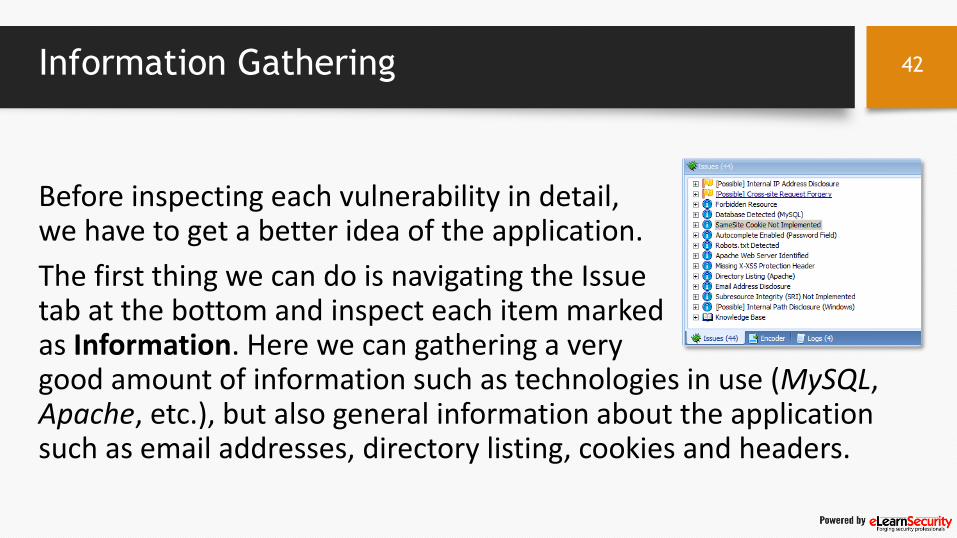
Before inspecting each vulnerability in detail, we have to get a better idea of the application.
The first thing we can do is navigating the Issue tab at the bottom and inspect each item marked as Information. Here we can gathering a very good amount of information such as technologies in use (MySQL, Apache, etc.), but also general information about the application such as email addresses, directory listing, cookies and headers.
42
Information Gathering
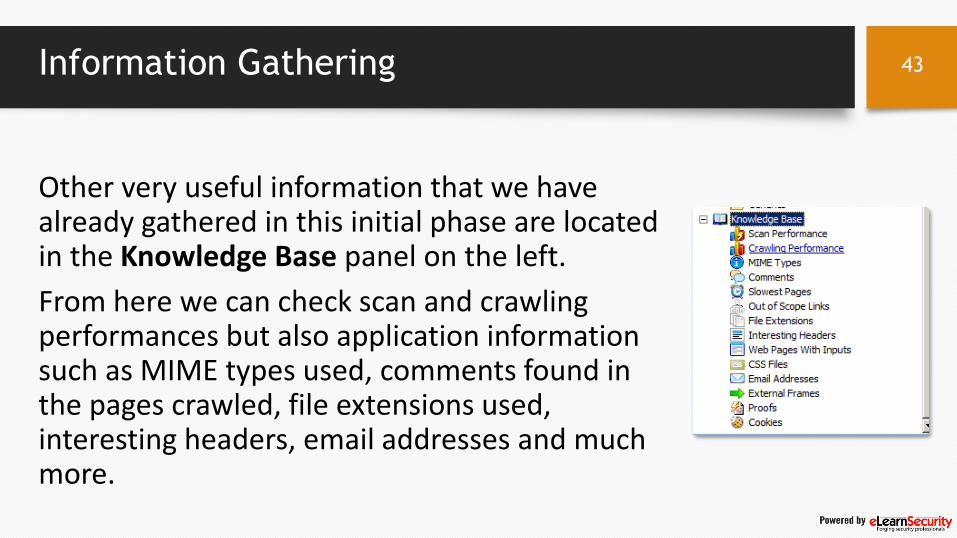
Other very useful information that we have already gathered in this initial phase are located in the Knowledge Base panel on the left.
From here we can check scan and crawling performances but also application information such as MIME types used, comments found in the pages crawled, file extensions used, interesting headers, email addresses and much more.
43

Information Gathering
To give you an idea of the information that an application may reveal by simply inspecting these items, let us click on Comments and see what we obtain.
44
Information Gathering
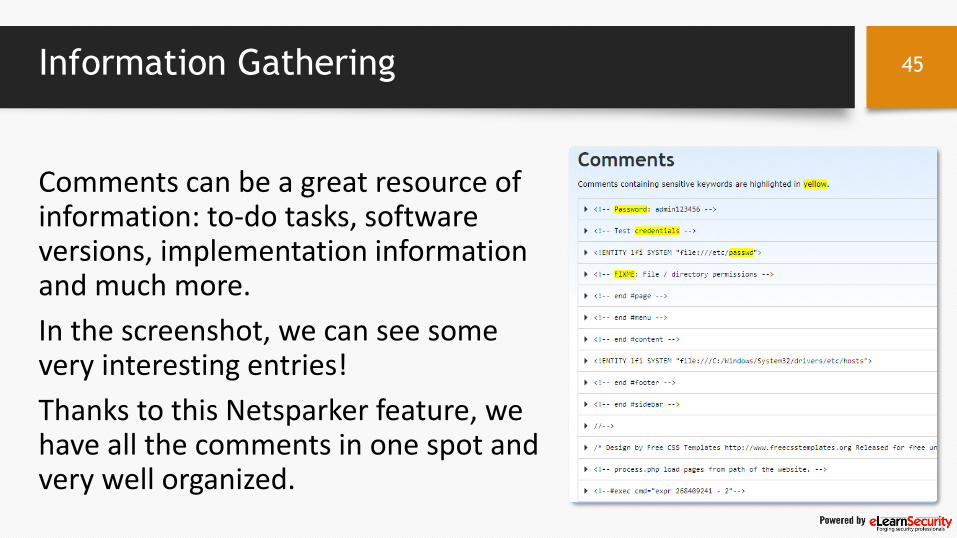
Comments can be a great resource of information: to-do tasks, software versions, implementation information and much more.
In the screenshot, we can see some very interesting entries!
Thanks to this Netsparker feature, we have all the comments in one spot and very well organized.
45
Information Gathering
Many web application attacks happen due poor validation of user-controlled parameters.
Knowing which inputs the application uses is fundamental for our future tests. We will use these inputs to validate the application against vulnerabilities such as Cross Site Scripting, SQL Injections, Command Injection and much more.
46
Information Gathering
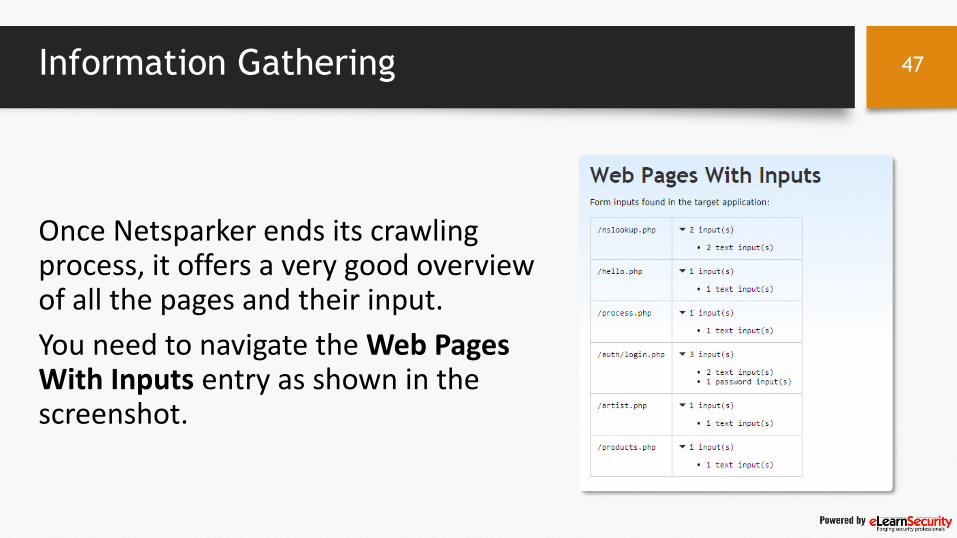
Once Netsparker ends its crawling process, it offers a very good overview of all the pages and their input.
You need to navigate the Web Pages With Inputs entry as shown in the screenshot.
47
Information Gathering
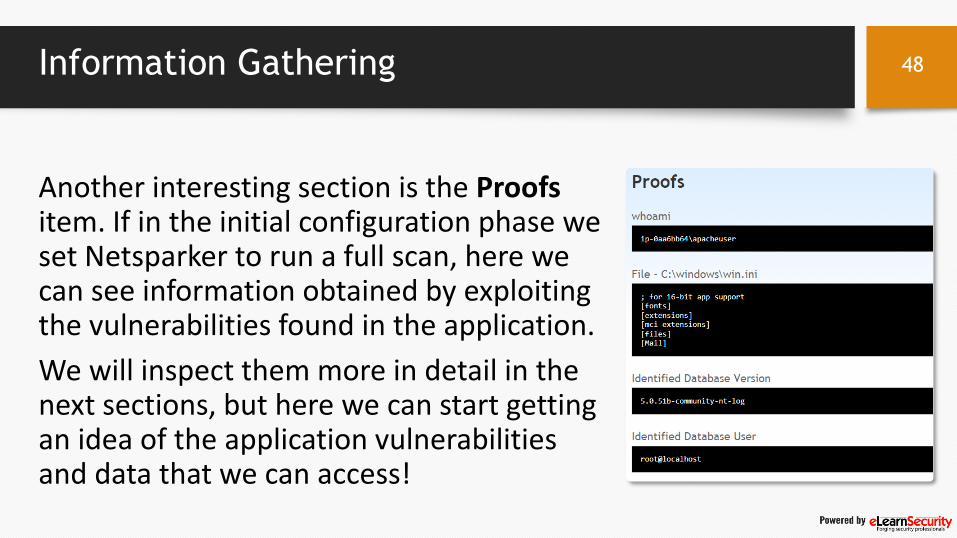
Another interesting section is the Proofs item. If in the initial configuration phase we set Netsparker to run a full scan, here we can see information obtained by exploiting the vulnerabilities found in the application.
We will inspect them more in detail in the next sections, but here we can start getting an idea of the application vulnerabilities and data that we can access!
48

Information Gathering
At the end of the Information Gathering phase, you should have a very good understanding of how the application works, its resources, technologies in use, injection points and so on.
After mapping the attack surface, it is time to plan your attack!
Since Netsparker has already identified some vulnerabilities, this process will be much easier. In the next module we will navigate through some of these vulnerabilities and we will see what features Netsparker offers to test and exploit them.
49