
Wavosaur quick start guide v1.0.0
29
Wavosaur quick start guide Wavosaur free audio editor with VST and ASIO support. Copyright 2006-2007 the Wavosaur team. http://www.wavosaur.com 1
Transcript of Wavosaur quick start guide v1.0.0

Wavosaur quick start guide
Wavosaur free audio editor with VST and ASIO support. Copyright 2006-2007 the Wavosaur team.
http://www.wavosaur.com
1

Contents
1. Installation .............................................................................. p.3
2. Configuration .......................................................................... p.42.1. Audio configuration .................................................... p.42.2. Audio routing .............................................................. p.62.3. MIDI configuration ...................................................... p.72.4. Editor configuration .................................................... p.82.5. Skin configuration ...................................................... p.92.5. Editing wavosaur.cfg .................................................. p.10
3. Files ....................................................................................... p.113.1. New/open/save .......................................................... p.113.2. Import/export .............................................................. p.12
4. Playing/recording ................................................................... p.134.1. Transport bar ............................................................. p.134.2. Record ....................................................................... p.13
5. Editing .................................................................................... p.145.1. Select/zoom/scroll ...................................................... p.145.2. Basic editing .............................................................. p.155.3. Processing audio ....................................................... p.16
6. VST rack ................................................................................ p.176.1. Using VST effect ........................................................ p.176.2. Set up a VST effects chain ........................................ p.18
7. Automation ............................................................................. p.19
8. Advanced features ................................................................. p.218.1. Loop/markers ............................................................. p.21
8.1.1.Crossfade loop................................................ p.228.2. Tools .......................................................................... p.248.3. Analysis ..................................................................... p.26
9. Batch processing ................................................................... p.28
10. Troubleshooting ................................................................... p.29
2

1.Installation
If you have downloaded Wavosaur from http://www.wavosaur.com you have a zip archive called Wavosaur1.0.0.9000.zip. Just unzip the archive, there's only one file in the archive : the Wavosaur executable.Wavosaur doesn't need an installer, it doesn't write into the registry, it doesn't need any external dll.
Configuration files:It's recommended to create a "Wavosaur" folder to place the application in.Wavosaur creates configuration files to store settings and user preferences:wavosaur.ini & wavosaur.cfg.Wavosaur can work without these two files (but if you delete them you'll lose your configuration settings).During a session Wavosaur also create temporary files that are deleted when exiting.
Editor skin prefs:You can also download optional .skin files used for storing the "skin preferences" of the editor. See the 2.4. Editor Configuration chapter for more informations.These files can be placed anywhere, it's a good idea to store them in the Wavosaur folder.
3
2. Configuration
2.1. Audio configuration
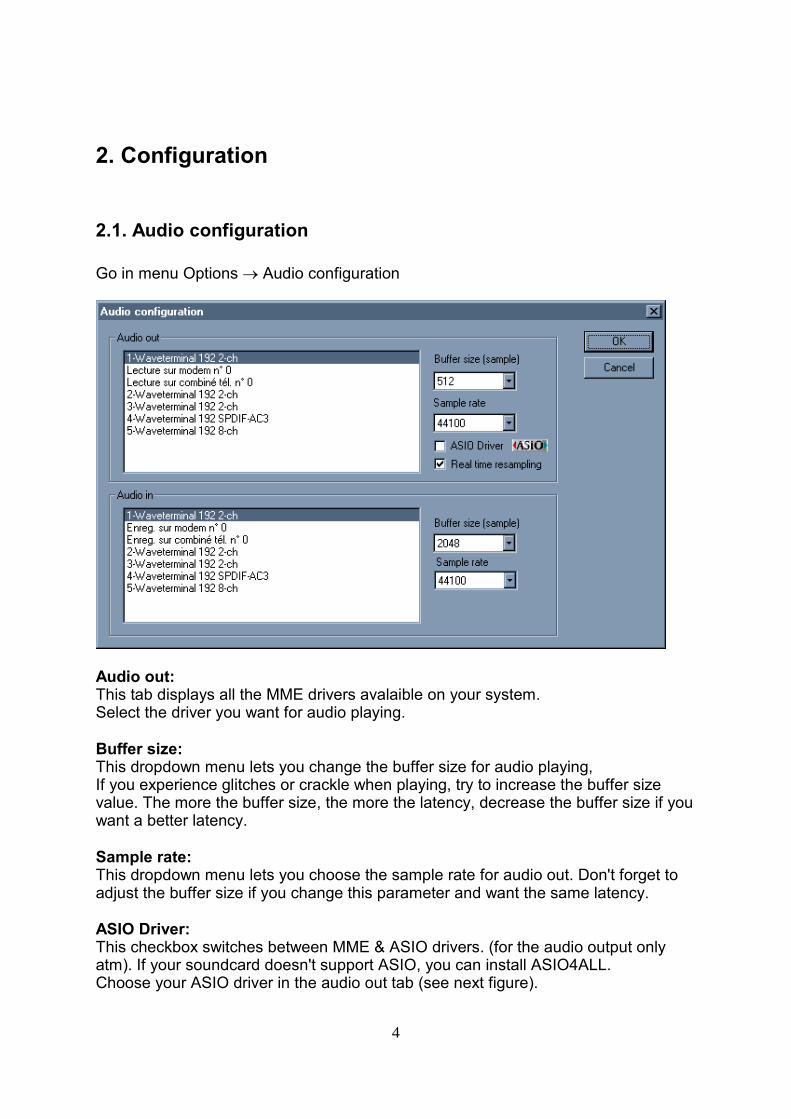
Go in menu Options → Audio configuration
Audio out: This tab displays all the MME drivers avalaible on your system. Select the driver you want for audio playing.
Buffer size:This dropdown menu lets you change the buffer size for audio playing, If you experience glitches or crackle when playing, try to increase the buffer size value. The more the buffer size, the more the latency, decrease the buffer size if you want a better latency.
Sample rate:This dropdown menu lets you choose the sample rate for audio out. Don't forget to adjust the buffer size if you change this parameter and want the same latency.
ASIO Driver:This checkbox switches between MME & ASIO drivers. (for the audio output only atm). If your soundcard doesn't support ASIO, you can install ASIO4ALL. Choose your ASIO driver in the audio out tab (see next figure).
4
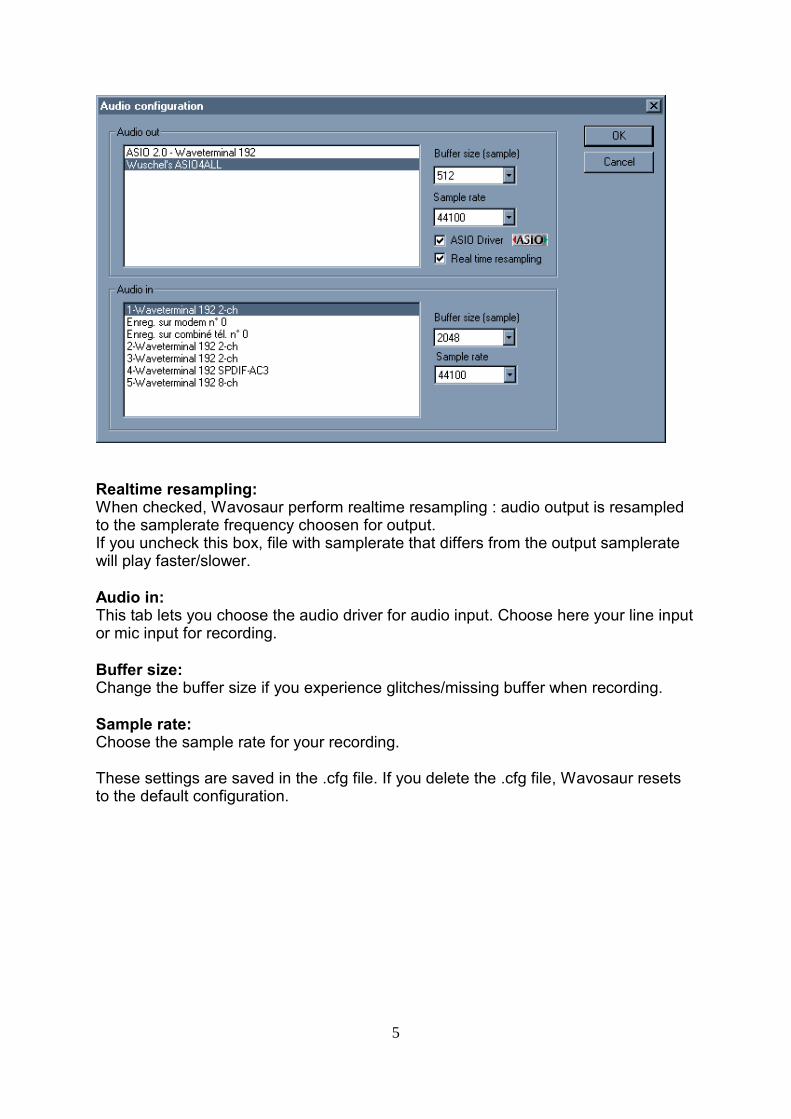
Realtime resampling:When checked, Wavosaur perform realtime resampling : audio output is resampled to the samplerate frequency choosen for output.If you uncheck this box, file with samplerate that differs from the output samplerate will play faster/slower.
Audio in:This tab lets you choose the audio driver for audio input. Choose here your line input or mic input for recording.
Buffer size:Change the buffer size if you experience glitches/missing buffer when recording.
Sample rate:Choose the sample rate for your recording.
These settings are saved in the .cfg file. If you delete the .cfg file, Wavosaur resets to the default configuration.
5

2.2. Audio routing
Go in menu Options → Audio routing
Depending on your soundcard/drivers you can have more than two outputs.This configuration window lets you choose the routing for audio output.
The left tab displays your soundcard outputs.The right tab displays the Wavosaur channels (= the .wav channels)
Select in the left tab the soundcard audio output, and make it match to the wav channel you want.
- You can send the main stereo channels (0 & 1) to all your outputs.- You can send all the 16 wav channels to different outputs (if you have enough audio out!) for multichannel wav.- You can invert left & right outputs.- Etc.
6

2.3. MIDI configuration
Go in menu Options → MIDI configuration
This tab let you choose one or more MIDI input port.
At the moment, Wavosaur is receptive to MIDI Control Change messages, you can use a MIDI external controller to trigger the main fonctions in Wavosaur.Here's the list of MIDI CC that can trigger Wavosaur :
MIDI CC 35 : play MIDI CC 34 : stop MIDI CC 27 : pauseMIDI CC 28 : recordMIDI CC 36 : rewind MIDI CC 37 : forward MIDI CC 33 : volume MIDI CC 31 : go to next marker MIDI CC 30 : go to previous marker MIDI CC 29 : back to start MIDI CC 38 : toggle windows
You can edit the wavosaur.cfg file to assign your own CC numbers.
7

2.4. Editor configuration
Go in menu Options → Editor configuration
Pat configuration
You can set a path for :
- VST Plugins- .sor chain files- Samples
General
Here you can set options for the editor, the changes are effective immediatly.
These informations are stored in the wavosaur.ini file.
8
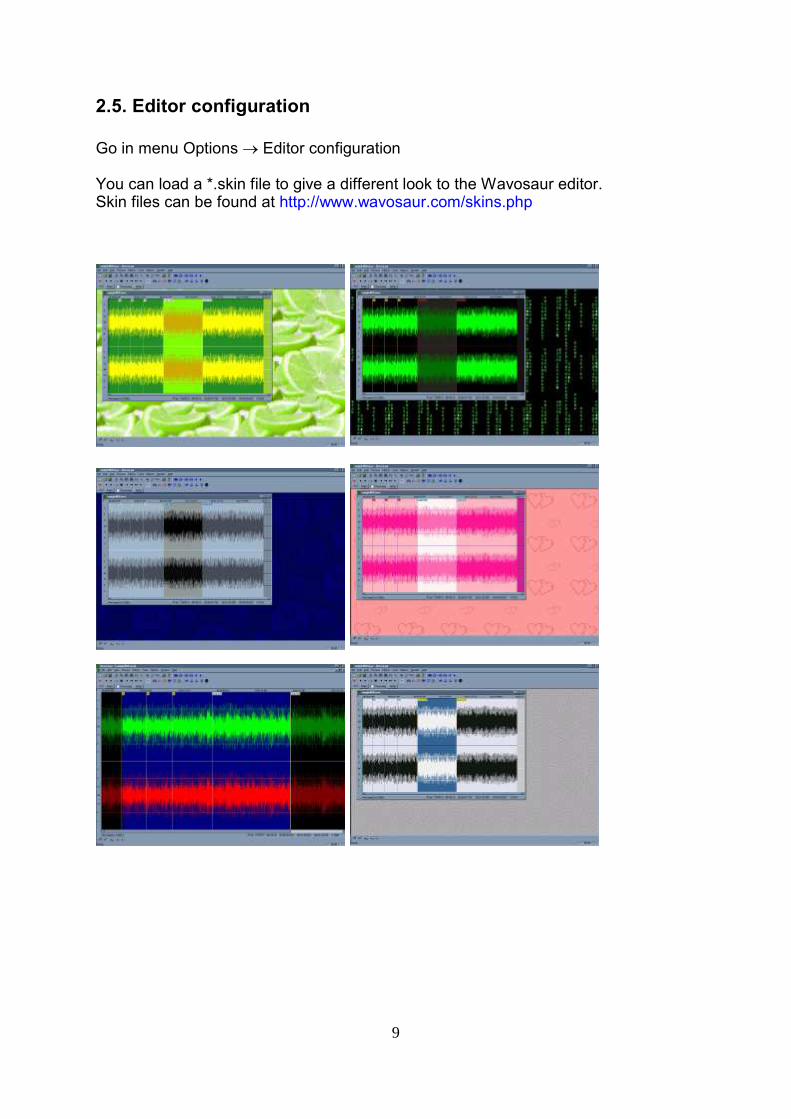
2.5. Editor configuration
Go in menu Options → Editor configuration
You can load a *.skin file to give a different look to the Wavosaur editor.Skin files can be found at http://www.wavosaur.com/skins.php
9

2.5. Editing wavosaur.cfg
Some configuration options are not yet available from the Wavosaur interface, but you can edit the wavosaur.cfg file to enter your settings.
Open the file:First be sure that Wavosaur is NOT runningOpen the wavosaur.cfg file with the Window notepad program:
The configuration informations are presented as:
NAMEVALUE
You can change the VALUE fields.
Edit the file:VSTPathOpenenter your preferred VST path folder
VSTBPMenter the default BPM for Wavosaur
SamplePathOpenenter your preferred sample path folder
ReminderOnClose0 = no reminder on close1 = reminder on close
PasteReplace0 = paste insert the clipboard data at cursor1 = paste replace the selection with the clipboard data
AlwaysNewForRecord0 = record appends datas to the current file1 = record creates a new file
PopupMenuRightClick0 = drag waveform with rightclick (no context menu on right click)1 = context menu on right click
10

3. Files
3.1. New/open/save
To open a file :
Go in menu Files → Open
Select in the filetype dropdown menu the "file display filter" you want:.wav, .aif, .iff, .au, .snd, .voc, .mp3, .vox, all files, all known media files.If a file can't be opened you can try to use the "import" feature.
To save a file:At the moment Wavosaur save in .wav format only, you have different options for saving files:
menu Files → save or save as:Save the current file on the disk.
menu Files → save selection as:Save the current selection in a new file on the disk.
See also the "export" feature.
11

3.2. Import/export
To import a file :
Go in menu Files → Import → Import binary file
You can import any file, choose the settings for samplerate, bitdepth, sign, channel number and byte order. You can also select an offset to skip the first n bytes of the file.
To export a file :
Go in menu Files → Export → Export as MP3You need the lame_enc.dll to be present in the Wavosaur folder (or system folder).You can choose you bitrate for MP3 encoding:
Go in menu Files → Export → Export all regionsThis feature exports all the data regions delimited by markers in separated files.
Go in menu Files → Export → Export as textThis feature exports the current files in text format, for using in application such as Excel, Matlab, PSpice etc. It's not recommended to export long files!
12

4. Playing/recording
4.1. The transport bar
You can also play/stop by pressing the spacebar.When loop is on, the selection is played in loop, if there's no selection, the entire file is played in loop.Play from start plays the entire file without loop (even if loop is on).
Wavosaur plays the current file : the one that has the focus.You can quickly switch beetwen opened files with CTRL+TAB.
4.2. Recording
Click on the record button to start : Wavosaur records the audio in.Click on the record button again to stop the recording.
If there's no opened file, Wavosaur create a new file for the recordingIf a file is opened, the recorded datas are appended at the end of the current file. A marker is inserted to show the beginning of the record.
Check your audio configuration to select the audio input and samplerate.Bit depth is 16 bits, you can change to 24 bits recording if your soundcard supports this bit-depth by editing the wavosaur.cfg (AudioInBitDepth).
13

5. Editing
5.1. Select/zoom/scroll
Selecting:Use the mouse to select an audio range.You can also use your keyboard : Shift + ArrowCTRL+A select all the file.Double mouse click select all the file (if there's no loop points or markers)Double mouse click select data inside a loop if loop point are presents.Double mouse click select data between two markers if markers are presents.
Scrolling:Use mouse right click + drag to move the view.You can also use the scrollbar.
Zoom:Use the mousewheel to zoom in/out in time, you can also use the up an down arrow keys on your keyboard.Use CTRL+mousewheel to zoom in/out in amplitude
Channel selecting:Use your keyboard (the 1...8 keys) to select/deselect the wav channels : the deselected channel have their output muted.
14

5.2. Basic editing
Basic features can be accessed from menu/toolbar/shortcuts:
delete DELcut CTRL+Xcopy CRTL+Cpaste CTRL+Vtrim/crop CTRL+Tundo CTRL+Z
Note about paste:Paste is inserting the clipboard data at cursorIf there's a selection you have two options :- paste replace (default behaviour) : the selection is replaced by the clipboard.- paste insert : the clipboard is inserted at cursor without replacing selection.You can copy/paste from one file to another, note that if the samplerate between source and destination files are different, the clipboard is not resampled.
Note about channel:At the moment, copy/paste between two files with different channels number is not allowed.
A context menu can be displayed on right click, you have to edit the wavosaur.cfg file to activate this option (see 2.5 Editing wavosaur.cfg).
15

5.3. Processing audio
Many of the process features can be found in the process menu, or accessed with the toolbars (not all the features are in the toolbar)
Some process are effective on the selected channel only:Volume, normalize, mute, fade, reverse, invert.
Some process are effective on all channel (selected or not):Insert silence, vocal remover, convert to mono, resample, bit depth converter.
You can find more detailled informations about the process features in the complete help for Wavosaur.
Here's a screenshot of a "mute on the left channel":
16

6. VST rack
6.1. Using VST effects
Click on the VST rack button under the transport bar brings up the VST rack window.Check the processing box to hear in real time the audio processed by the VST effects.Click on the apply button to apply the effect to your file.
"Load VST" lets you choose the VST effect you want to use"View" shows up the GUI of the VST effect. Double click on the VST name opens the VST GUI too."Kill" unload the VST effect.
Note : after applying an effect don't forget to uncheck the "processing" box unless you want to hear your file (re) processed again.
17

6.2. Set up a VST effects chain
You can use the VST rack to set up a chain of effects.
To chain the VST effects, select a slot and load a VST effect into it, the signal flow is as you expect : from the slot 000 to the last ocupied slot.
You can save the chain preset in a file and reload it later, use the load and save chain button. The chain file also store the actuals VST parameters state.
"reset chain" removes all the VST from the slots.
Note that the *.sor chain files format could change with newer version of Wavosaur.
18

7.Automation
Use this menu to insert a volume enveloppe, you can edit this enveloppe to create a volume automation between -inf dB & +6 dB.
Use the Automation menu (or the toolbar) to create/apply/reset/flip/delete/preview a volume enveloppe automation
Inserting an automation:
Go to menu Automation → Create volumeIt inserts a predefined 4 points volume enveloppe
Deleting an automation:
Go to menu Automation → Kill volumeThis deletes the enveloppe
Reseting an automation
Go to menu Automation → Reset volumeThis reset the enveloppe to a two points enveloppe (0 dB)
19

Editing an automation:
- Double click on the enveloppe to create a new point- Left click+ drag to move the point with the mouse : the point value in dB is displayed while you drag the point .- Double click on a point to delete the point- Right click on a point to bring out the automation popup menu
Kill point : delete the pointLinear/Smoothy/Hold/Curve : the type of the enveloppe between this point and the next pointReset point value : set the point value to 0 dBClone for all channel : copy the enveloppe to all the channel
Previewing/realtime automation:
Go to menu Automation → RealtimeWhen checked (by default) you can hear the effect of the volume automation in real time, if you uncheck the preview you won't hear the volume change until you hit apply
Applying the automation:
Go to menu Automation → Apply volumeThe volume enveloppe is applyed to the sample
20

8. Advanced features
8.1. Loop points & markers
Loop points:Wavosaur can recognize loop points and markers information embedded in .wav files. You can also create loop points and insert markers in Wavosaur. These informations are saved in the .wav file.
To insert loop points in your file, press the "L" key
or go in menu Tools → Loop → Create loop points.
Loop points are inserted at selection start & stop, if there's no selection, loop points are inserted at file start and file end.
You can drag the loop points with the mouse. Double click inside the loop points make out a selection.
Right click on a loop point brings out the loop menu:
21
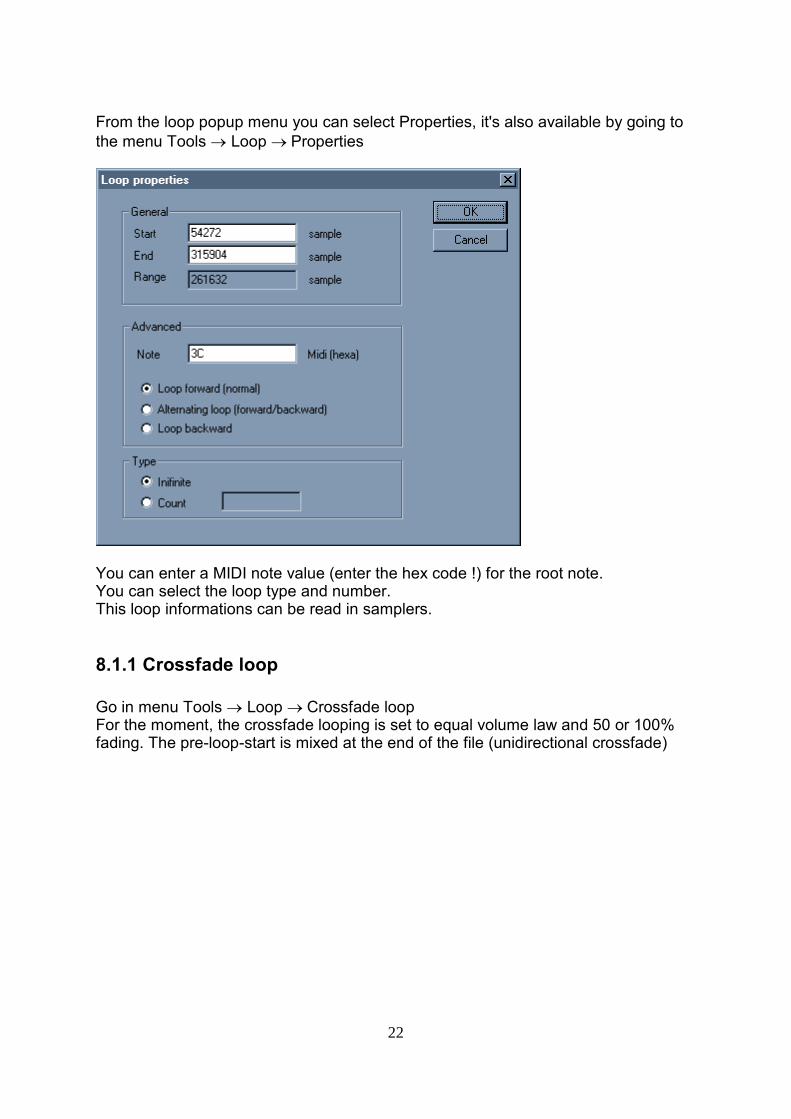
From the loop popup menu you can select Properties, it's also available by going to
the menu Tools → Loop → Properties
You can enter a MIDI note value (enter the hex code !) for the root note.You can select the loop type and number.This loop informations can be read in samplers.
8.1.1 Crossfade loop
Go in menu Tools → Loop → Crossfade loopFor the moment, the crossfade looping is set to equal volume law and 50 or 100% fading. The pre-loop-start is mixed at the end of the file (unidirectional crossfade)
22

Markers:Markers are useful to set "regions" in your audio file.
You can handle the markers with keyboard shortcuts, menu or the marker toolbar:
To kill one marker at once, select it with the mouse, click the left mouse button and press the DELETE key without releasing the left mouse button.
you can drag the markers with the mouse (left click and drag).
Some features in Wavosaur automatically insert markers :
- record- auto detect region- set markers at BPM
23

8.2. Tools
Interpolate:Interpolates linearly the samples values between samples in a selection, it can be useful to remove very short clicks.
auto detect region:
Insert markers automatically, based on time and amplitude threshold set by user. Can be useful to delimit regions separated by silence.
silence remover:
Automatically removes the silence in a file. "silence" can be defined by user, by setting threshold for minimum time and minimum amplitude.
auto trim:
Removes silence at start and end of file, user can set a min volume level for "silence".
24

Synthesis:Dirac at cursor : insert a 0dB sample at cursor.Step at cursor : insert a step at cursor (replace the current file)Frequency impulse train : insert frequency impulse train (replace all datas)
Simple synthesis:
PropertiesYou can generate simple waveform :sinus, ramp up, ramp down, square, absolute sinus, white noise. You can choose the frequency, waveform, volume and duration.
ApplyYou can overwrite the entire file, only the selection or append the waveform.
AdvancedMix with audio file will sum the generated waveform with the current fileMultiply let you do some kind of ring modulation
25

8.3. Analysis
Analysis tools can be found under menu→Tools
statistics:Displays statistics about the selection (or the entire file if there's no selection).RMS power, min & max sample values, average value.
input/output oscilloscopes:Displays real time oscilloscopes, showing audio input or output.You can visualize the amplitude/pan distribution/FFT/sonogram in real time
26

2D and 3D spectrum analysis:Show the frequency spectrum of the selected range. You can change the visualisation settings in the 2D & 3D spectrum windows.
27

9.Batch processing
To launch the batch processor, go in menu Tools → Batch processor. You can also press the "B" key.
Select a source and a destination folder.Choose a feature in the "Function" tab.Press "Run" to start the processing.
If you set destination folder = source folder, the source files will be overwritten.At the moment, Wavosaur only write .wav files. Other format in source folder are converted to .wavAt the moment you can select only one feature at a time for batch processing.
28

10.Troubleshooting
no sounds can be heard
→ check your selected audio drivers (menu→Options→Audio configuration).
→ depending on your soundcard & drivers be sure there's no other program that use the drivers.
→ check also the audio routing (menu→Options→Audio routing).
there are some glitches/crackles when playing/recording
→ try to increase the buffer size in the audio configuration
the latency is too high
→ go for ASIO, if your soundcard doesn't support it, try ASIO4ALL
i lost my skin!
→ if you change/move/rename the .skin file, Wavosaur can't open the skin informations and reset to the default editor look.
MIDI control doesn't work
→ check the MIDI configuration if the right MIDI in port is set,
→ set the MIDI CC (editable in the wavosaur.cfg) to match with your hardware.
29