WARNING ! R93 LRS 2 - Blaser Jagdwaffen · resulting in whole or part from (1) ... 3. Technical...
32
Instruction manual WARNING ! Please read and understand this owner’s manual before taking your new Blaser rifle out of the box. It is vital to your safety and to the safety of others that you accurately follow the information contained in this manual, as well as the information supplied by the ammunition manufacturer. If you have any questions, please call or write: SIGARMS ® Inc. Corporate Park Exeter, NH 03833 (603)772-2302 R93 LRS 2 Long Range Sporter Rifle is shown with optional accessories
Transcript of WARNING ! R93 LRS 2 - Blaser Jagdwaffen · resulting in whole or part from (1) ... 3. Technical...
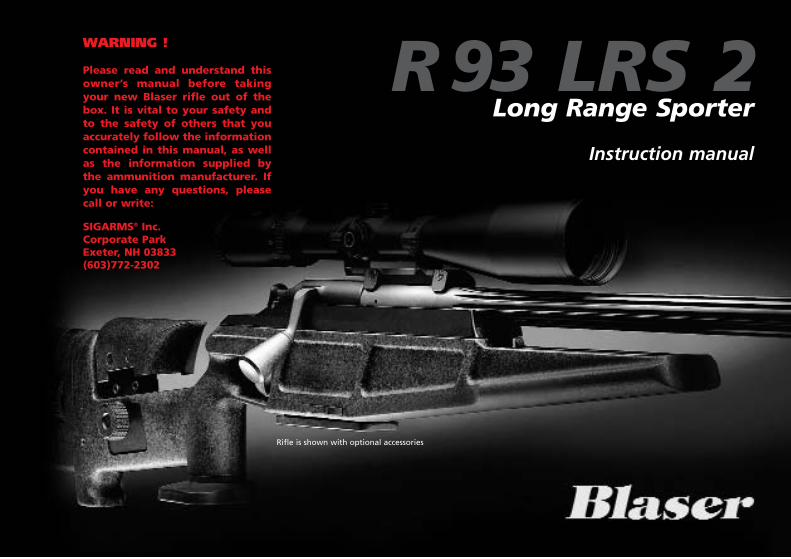
Instruction manual
WARNING !
Please read and understand thisowner’s manual before takingyour new Blaser rifle out of thebox. It is vital to your safety andto the safety of others that youaccurately follow the informationcontained in this manual, as wellas the information supplied bythe ammunition manufacturer. Ifyou have any questions, pleasecall or write:
SIGARMS® Inc.Corporate ParkExeter, NH 03833(603)772-2302
R93 LRS 2Long Range Sporter
Rifle is shown with optional accessories
2
WARNING !
Please read and understand thisinstruction manual entirely,before using the rifle. Keep thismanual with your firearm. Uponchange of ownership, transferthis manual with the firearm.
As a supporting measure to thisinstruction manual, please askyour dealer to explain your rifleto you in detail and let himinstruct you about its use.
Rifles are classified as Firearms andare sold by SIGARMS® with the speci-fic understanding that SIGARMS® isnot responsible in any manner what-soever for their improper handling,use, or resale under local laws andregulations. SIGARMS® shall not beresponsible in any manner whatsoeverfor malfunctioning of the firearm, forphysical injury or for property damageresulting in whole or part from (1) criminal or negligent discharge,(2) improper careless handling, (3) unauthorized modification, (4) defective, improper, hand-loaded,
or re-loaded ammunition, (5) corrosion, (6) neglect, or (7) other influences beyond our direct
and immediate control. This limitation applies regardless ofwhether liability is asserted on thebasis of contract, negligence or strictliability (including failure to warn).Under no circumstances shall SIGARMS® be liable for incidental orconsequential damages, such as lossof use of property, commercial lossand loss of earnings and profits.
Carelessness and ignorance cannot betolerated when handling a firearm.Treat every firearm with respect andfollow the safety rules outlined in thismanual.
Teach other members of your family,especially children, safe gun handling.Ignorance and carelessness are themajor causes of gun related accidents.Whenever possible attend a »Hunter Safety« course and »FirearmsSafety« course in your area. This is aninvestment in your future. Encourageothers to enroll with you.
Firearms safety is your responsibility

3
Contents
Page
11. Safety rules 4 - 5
12. Main rifle components 6
13. Technical specifications 7
14. Assembling, taking down 8 - 9
15. Safety and bolt handle lock 10 - 11
16. Ammunition 12
17. Magazine 13
18. Loading the rifle 14
19. Firing and repeating 15
10. Unloading the rifle 16
11. Removing and replacing the bolt assembly 17
12. Caliber group table 18
13. Changing the barrel 19
14. Removing and installing the bolt head 20 - 22
15. Trigger 23
16. Stock 24 - 25
17. Mounting a Scope Mod. LRS 2 26
18. Mounting a Scope Mod. LRS 2-.338 Lapua Mag. 27
19. Optional accessories 28
20. Care and maintenance 29
21. Repair and Servicing 30
22. Warranty conditions 31

4
1. Safety rules
Your new Blaser bolt action rifle model R 93 LRS 2 and R 93 LRS 2-.338 LapuaMag. differs from other repeatersthrough a number of special design features. Although your Blaser firearmexhibits additional safety features, do not forget that you must take care whenhandling firearms and also observe thestatutory regulations.First of all, check you have the right usermanual: the model name R 93 LRS 2 andR 93 LRS 2-.338 Lapua Mag. is locatedon the left side of the receiver and thecaliber can be found on the left side ofthe barrel at the rear.
Safety rules for handling firearms
G Make sure the firearm and ammunitionnever get into unauthorized hands.
G Always store firearm and ammunitionunder lock and key in separate cabinetsthat are not accessible to unauthorizedpersons.
G Observe current statutory regulationsfor the carrying and safekeeping offirearms and ammunition.
G Never let a loaded firearm out of yourhands.
G Never use your firearm when underinfluence of alcohol or drugs, duringillness or other complaints; they caninfluence your judgement and reflexes.
G Always unload your firearm immediate-ly after firing, before putting it down,or handing it to another authorizedperson.
G Never rely on safety mechanisms. Theycan never be a substitute for carefuland correct handling of the firearm:
G Make sure you are thoroughly familiarwith how to handle your firearm and,with the firearm unloaded, practice allof the functions and the actions youwill need to make, before you carry it.
G Always treat any firearm as loaded andready to shoot. If you are not certain ofits status, check by opening the boltand looking in the magazine and cartridge chamber (barrel). You shouldhandle an unloaded firearm in thesame way as a loaded one.
G Whenever holding the firearm, alwayspoint the muzzle in a safe direction toensure you neither injure people nordamage property.
5
1. Safety rules
G Before loading, check the barrel forobstructions and make sure no foreignmatter (water, snow, soil) can get intothe barrel after loading, too.
G Only use SAAMI- and /or CIP approvedammunition which is in good conditionand check that the ammunition is correct for the caliber of the firearm.Wrongly hand-loaded or reloadedammunition can damage your firearmand cause serious injury or death.
G Do not load your firearm until justbefore you fire it.
G Do not take off safety until you areready to fire. When taking off thesafety on your firearm, point the muzzle in a safe direction.
G Before making each shot, check theterrain in front of and behind the target.
G Aim your firearm only at targets youhave definitely identified.
G Keep your finger away from the triggerunless you wish to fire the firearm.
G Discharging firarms in poorly ventilatedareas, cleaning firearms, or handlingammunition may result in exposure tolead and other substances known tocause birth defects, reproductive harm,and other serious physical injury. Haveadequate ventilation at all times. Washhands thoroughly after exposure.
G If a cartridge fails, wait approximately60 seconds before opening the breechto avoid danger from a cartridge thatmay be late firing.
G Always wear ear protection whenshooting.
Unload your firearm
G before negotiating obstacles
G before climbing into or leaving raisedblinds
G before entering a building
G before climbing into a vehicle
G before entering a town or village.
Special advices regarding the safety of the shooter and to avoid damagesare marked as follows:
WARNING: Advice concerning a possibly dangerous situation with fatal consequences or danger of heavy injury.
ATTENTION: Advice concerning a possibly dangerous situation which can have slight injuries as a consequence.
NOTE: Advice regarding threatening material damage.

6
2. Main rifle components
Standard delivery includes:
1 Rifle1 Magazine1 Instruction manual1 4 mm T-Allen key 1 3 mm Allen key 2 Allen screws M5 x 25
7
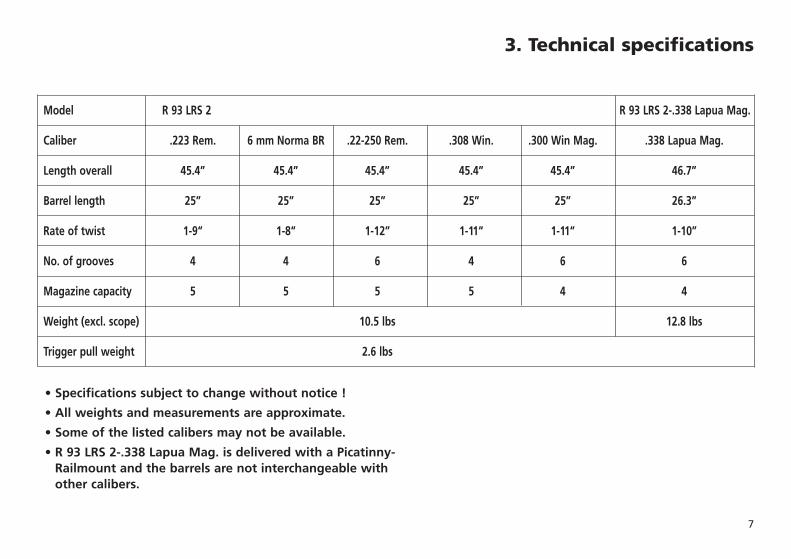
3. Technical specifications
Model R 93 LRS 2 R 93 LRS 2-.338 Lapua Mag.
Caliber .223 Rem. 6 mm Norma BR .22-250 Rem. .308 Win. .300 Win Mag. .338 Lapua Mag.
Length overall 45.4’’ 45.4’’ 45.4’’ 45.4’’ 45.4’’ 46.7’’
Barrel length 25’’ 25’’ 25’’ 25’’ 25’’ 26.3’’
Rate of twist 1-9“ 1-8“ 1-12’’ 1-11“ 1-11“ 1-10’’
No. of grooves 4 4 6 4 6 6
Magazine capacity 5 5 5 5 4 4
Weight (excl. scope) 10.5 lbs 12.8 lbs
Trigger pull weight 2.6 lbs
• Specifications subject to change without notice !
• All weights and measurements are approximate.
• Some of the listed calibers may not be available.
• R 93 LRS 2-.338 Lapua Mag. is delivered with a Picatinny-Railmount and the barrels are not interchangeable with other calibers.
8
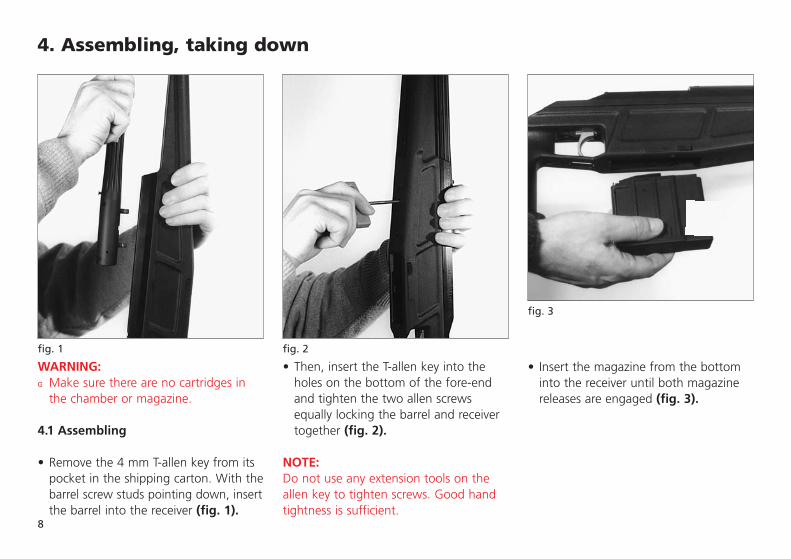
4. Assembling, taking down
WARNING:G Make sure there are no cartridges in
the chamber or magazine.
4.1 Assembling
• Remove the 4 mm T-allen key from itspocket in the shipping carton. With thebarrel screw studs pointing down, insertthe barrel into the receiver (fig. 1).
fig. 1 fig. 2
fig. 3
• Then, insert the T-allen key into theholes on the bottom of the fore-endand tighten the two allen screwsequally locking the barrel and receivertogether (fig. 2).
NOTE:Do not use any extension tools on theallen key to tighten screws. Good handtightness is sufficient.
• Insert the magazine from the bottominto the receiver until both magazinereleases are engaged (fig. 3).
9
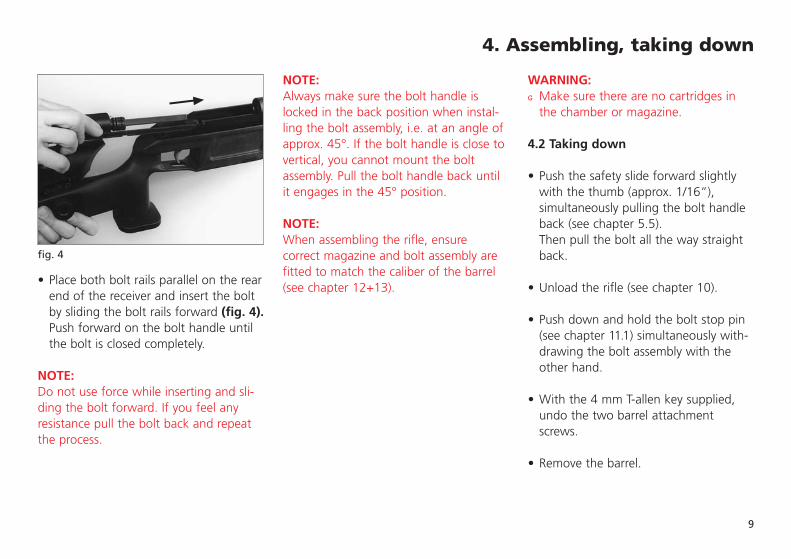
4. Assembling, taking down
fig. 4
• Place both bolt rails parallel on the rearend of the receiver and insert the boltby sliding the bolt rails forward (fig. 4).Push forward on the bolt handle untilthe bolt is closed completely.
NOTE:Do not use force while inserting and sli-ding the bolt forward. If you feel anyresistance pull the bolt back and repeatthe process.
NOTE:Always make sure the bolt handle islocked in the back position when instal-ling the bolt assembly, i.e. at an angle ofapprox. 45°. If the bolt handle is close tovertical, you cannot mount the boltassembly. Pull the bolt handle back untilit engages in the 45° position.
NOTE:When assembling the rifle, ensure correct magazine and bolt assembly arefitted to match the caliber of the barrel (see chapter 12+13).
WARNING:G Make sure there are no cartridges in
the chamber or magazine.
4.2 Taking down
• Push the safety slide forward slightlywith the thumb (approx. 1/16“), simultaneously pulling the bolt handleback (see chapter 5.5). Then pull the bolt all the way straightback.
• Unload the rifle (see chapter 10).
• Push down and hold the bolt stop pin (see chapter 11.1) simultaneously with-drawing the bolt assembly with theother hand.
• With the 4 mm T-allen key supplied,undo the two barrel attachment screws.
• Remove the barrel.
10
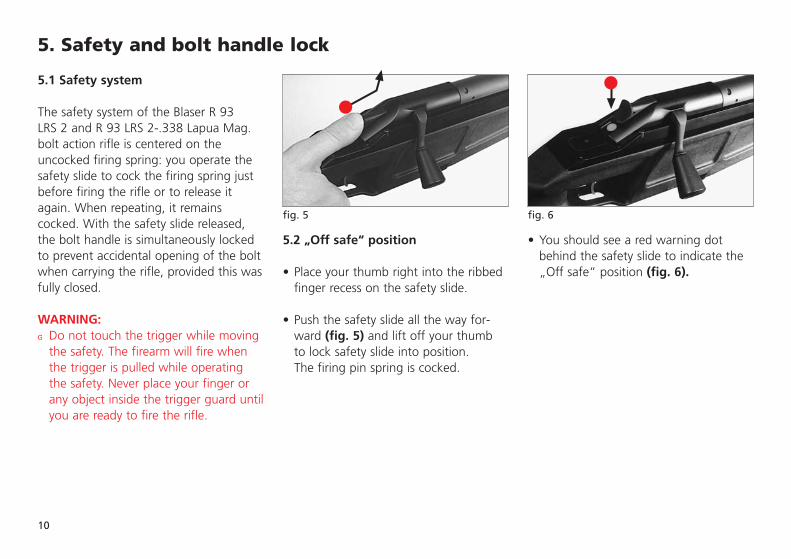
5. Safety and bolt handle lock
5.1 Safety system
The safety system of the Blaser R 93 LRS 2 and R 93 LRS 2-.338 Lapua Mag.bolt action rifle is centered on the uncocked firing spring: you operate thesafety slide to cock the firing spring justbefore firing the rifle or to release itagain. When repeating, it remainscocked. With the safety slide released,the bolt handle is simultaneously lockedto prevent accidental opening of the boltwhen carrying the rifle, provided this wasfully closed.
WARNING:G Do not touch the trigger while moving
the safety. The firearm will fire whenthe trigger is pulled while operatingthe safety. Never place your finger orany object inside the trigger guard untilyou are ready to fire the rifle.
• You should see a red warning dot behind the safety slide to indicate the „Off safe“ position (fig. 6).
fig. 5 fig. 6
5.2 „Off safe“ position
• Place your thumb right into the ribbedfinger recess on the safety slide.
• Push the safety slide all the way for-ward (fig. 5) and lift off your thumbto lock safety slide into position. The firing pin spring is cocked.

11
5. Safety and bolt handle lock
fig. 7 fig. 8 fig. 9
5.3 „On Safe“ position
• To release the safety to the most rear-ward position place your thumb on therear portion of the safety slide, pushthe safety slide forward and at thesame time downwards (fig. 7) todisengage it and release to the mostrearward position (fig. 8) so the reddot marking cannot be seen.
5.4 Bolt handle lock
Prevents accidental opening of the bolt.It is automatically activated when the rifleis in the „On Safe“ position and fullylocked.
5.5 Opening the bolt in the „On Safe“ position
• To open the bolt (for loading and unloading) in the „On Safe“ position,push the safety slide with your thumb1/16" forward, hold and simultaneous-ly pull bolt handle backwards (fig. 9),then open bolt all the way.
12
6. Ammunition
6.1 Ammunition
WARNING:G Use only commercially factory-loaded
ammunition in the original packaging,that complies with the performancestandards established by the SportingArms and Ammunition Manufacturer’sInstitute Inc. of the United States(SAAMI) and/or CIP and which matchesthe caliber of your rifle. The correctcaliber is stamped on the left side ofthe rifle barrel at the rear.
G Never use reloaded, „refurbished“,hand-loaded, non-standard ammunition,or ammunition of a different caliber.
G Never use dirty, wet, corroded, bent,damaged or oiled ammunition.
G Never leave ammunition unattended.
G Handling ammunition may result inexposure to lead and other substancesknown to cause birth defects, repro-ductive harm, and other serious physi-cal injury. Have adequate ventilation atall times. Wash hands thoroughly afterexposure.
13
7. Magazine
7.1 Magazine
The Blaser R 93 LRS 2 bolt action rifle isequipped with a removable single-rowmagazine. The detachable magazine isheld in the rifle by two magazine releaseson the right and on the left of the maga-zine well. See chapter 3 for magazinecapacity.
WARNING:G Ensure correct magazine and ammuni-
tion is used to match the caliber of thebarrel. The magazine is marked on theleft hand side with the caliber forwhich it is designed to be used.
7.2 Filling the magazine
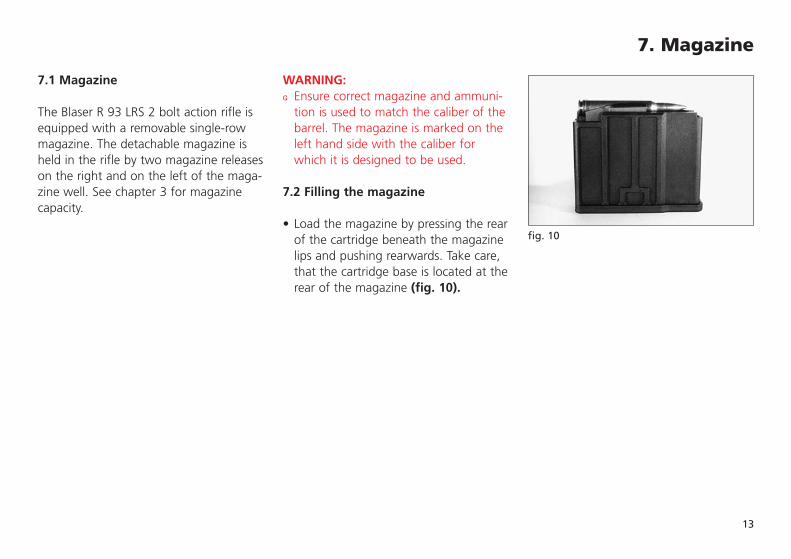
• Load the magazine by pressing the rearof the cartridge beneath the magazinelips and pushing rearwards. Take care,that the cartridge base is located at therear of the magazine (fig. 10).
fig. 10

14
8. Loading the rifle
WARNING:G Always keep muzzle of the rifle poin-
ted in a safe direction.
G Before loading, always wipe the cham-ber clean of grease and oil, then verifythat there is no obstruction in the barrelor the trigger guard.
G If you are having trouble closing thebolt, stop immediately. Do not force around into the chamber, check to makesure that the ammunition is the correctcaliber, that it is not defective, or thatan obstruction does not exist in thebore or chamber. If the problem stillexists, return your rifle, unloaded, to SIGARMS®.
G Never try to remove an object from thebarrel by loading another cartridge andfiring. This can generate excessive pres-sure, damage the firearm and causeserious personal injury.
G Do not place your finger on trigger,keep it outside of the trigger guard.
8.1 Loading the rifle
• Move the slide in the „On safe“ position (see chapter 5.3)
• Open the bolt (see chapter 5.5)
• Insert a loaded magazine from the bot-tom and make sure it has engaged themagazine release.
• Push the bolt handle forward all theway until it locks.
Check that:• The red dot is not visible, bolt handle is
all the way forward. The rifle is now loaded, „on safe“ and locked to pre-vent accidental opening.
G Never load or unload the rifle inside avehicle, inside a building or other con-fined space (except in a designatedfiring range).
G Do not load the rifle by inserting themagazine until immediately beforeshooting.
G Never rely on safety mechanisms. Theyare never a substitute for careful andcorrect handling of your rifle.
G Never let a loaded rifle out of yourhands.
G You must monitor the rifle’s perfor-mance. If the recoil seems too weak,do not load another round. Completelyunload the rifle and check for a barrelobstruction. Examine the cartridgecasing for damage such as splits or bulges. If these conditions existpromptly return the rifle to SIGARMS®
for service.
15
9. Firing and repeating
G Always wear ear protection and safetyglasses when shooting. Alert bystan-ders to the importance of wearing earprotection.
G If a cartridge fails, wait approximately60 seconds before opening the breechto avoid danger from a cartridge thatmay be late firing.
G Discharging firearms in poorly ventilatedareas, or handling ammunition mayresult in exposure to lead and othersubstances known to cause birthdefects, reproductive harm, and otherserious physical injury. Have adequateventilation at all times. Wash handsthoroughly after exposure.
9.1 Firing and repeating
• Push the safety slide with the thumb all the way forward in the „off safe“position (see chapter 5.2).
• Sight the target.
• Pull the trigger to fire the rifle.
• Repeating: Pull back the bolt as far asthe bolt stop allows and then push itforward again.
NOTE:If the bolt handle is not in its most forward position, the rifle will not fire for safety reasons.
WARNING:
G You should never point the muzzle atanything, unless you are planning toshoot, especially when you are loadingand unloading the rifle. Muzzle direc-tion could be the difference betweenlife and death.
G Do not move the safety to the „off safe“ position until you are readyto fire.
G Keep your finger away from the triggerunless you wish to fire the rifle.
G When you interrupt or finish firingmove the safety slide immediatelybackwards in the „on safe“ position.
G Before making each shot, check theterrain in front of and behind the target.
G Ensure that the target and the environ-ment allow shots to be fired withoutdanger.
16
10. Unloading the rifle
10.1 Unloading the rifle
• Remove your finger from the triggerand point the rifle in a safe direction.
• Move the safety slide in the „On Safe“position (see chapter 5.3)
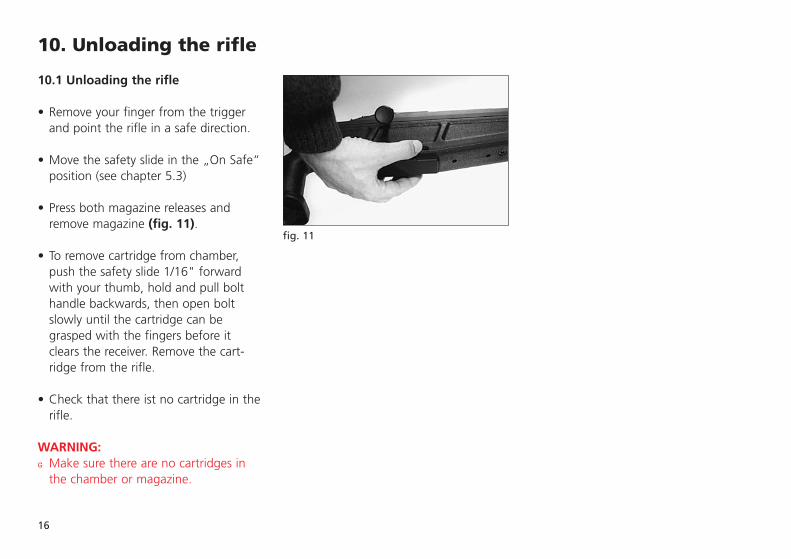
• Press both magazine releases andremove magazine (fig. 11).
• To remove cartridge from chamber,push the safety slide 1/16" forwardwith your thumb, hold and pull bolthandle backwards, then open boltslowly until the cartridge can be grasped with the fingers before itclears the receiver. Remove the cart-ridge from the rifle.
• Check that there ist no cartridge in therifle.
WARNING:G Make sure there are no cartridges in
the chamber or magazine.
fig. 11
17
11. Removing and replacing the bolt assembly
WARNING:G Before performing any cleaning or
maintenance, make sure there are nocartridges in the chamber or magazine.
11.1 Removing the bolt assembly
• Unload the rifle (see chapter 10).
• Remove the magazine.
• Pull the bolt assembly all the way back.
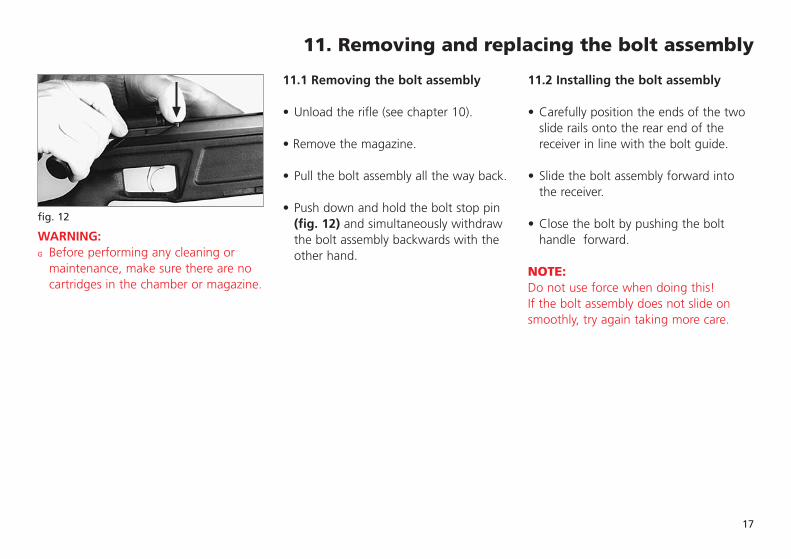
• Push down and hold the bolt stop pin (fig. 12) and simultaneously withdrawthe bolt assembly backwards with theother hand.
11.2 Installing the bolt assembly
• Carefully position the ends of the twoslide rails onto the rear end of thereceiver in line with the bolt guide.
• Slide the bolt assembly forward intothe receiver.
• Close the bolt by pushing the bolthandle forward.
NOTE:Do not use force when doing this! If the bolt assembly does not slide onsmoothly, try again taking more care.
fig. 12

18
12. Caliber group table
Caliber group Barrel and Bolt head Caliberare stamped with
Mini MI .223 Rem.
Standard ST .22-250 Rem.6 mm Norma BR6,5x55.308 Win.
Magnum MA .300 Win. Mag.
Some of the listed calibers may not be available.
NOTE:Model R 93 LRS 2-.338 Lapua Mag. barrels are not interchangeable with other calibers
WARNING:G Always ensure you have the correct
barrel and bolt head for the cartridgeselected. Firing a cartridge with theincorrect barrel and bolt head cancause serious injury or death.

19
There are 3 caliber groups available (seetable chapter 12). When changing thebarrel to a different caliber group, youwill also have to change the bolt head tosuit the caliber group of the barrel youhave chosen to use. The table (chapter12) shows the correct components to beused together. In addition, bolt headsand barrels are stamped with markingswhich identify the caliber group (fig. 13). Take a final check that these markingsmatch after the rifle is assembled.
If you change barrels within the samecaliber group you do not have to changethe bolt head.
Caliber group markings:
Mini Marking MIStandard Marking STMagnum Marking MA
NOTE:Bolt heads for left-hand bolts are stamped“L“ below the caliber group marking.
13. Changing the barrel
Make sure you also use the correctmagazine to match the caliber of thebarrel. The caliber marking can be found on the side of the magazine.
WARNING:G Always make sure there are no cart-
ridges in the chamber or magazine.
13.1 Changing the barrel:
• Unload the rifle (see chapter 10).• Remove the magazine. • Remove the bolt assembly
(see chapter 11).• Fully undo both barrel attachment
screws with the 4 mm T-allen key,these are captive so cannot be lost.
• Lift the barrel out of the receiver.• Place the new barrel in the bed of the
receiver.• Tighten both barrel attachment
screws hand-tight with the allen key.• Insert a magazine matching the caliber
of the barrel into the magazine housing.
• Check that the marking stamped onthe bolt head (MI, ST, MA, fig. 13)matches the caliber group of the barrel.
• If you have to change the bolt head inthe bolt assembly (see chapter 14).
NOTE:Always keep the barrel bedding clean.Excessive oil or grease between the barreland receiver will impair the accuracy ofthe rifle.
fig.13
STST

20
14. Removing and installing the bolt head
fig.14 fig.15 fig.16
14.1 Changing the bolt head
NOTE:It is advisable to have this operationexplained by your Blaser dealer.
• Unload the rifle (see chapter 10).
• Remove the bolt assembly from therifle (see chapter 11).
• Place bolt assembly upside down on aflat surface.
• With a small screwdriver or similar toolpush the retaining latch to the left sideand up (fig. 14).
• Grasp the retaining latch with thumband forefinger and push to the left.With your other hand pull the bolthead out of the bolt assembly (fig. 15).
14.2 Installing the bolt head
• Grip the new bolt head to be installedand line up the two grooves of theexpanding shell and bolt head by tur-ning them in relation to each other(fig. 16).
21
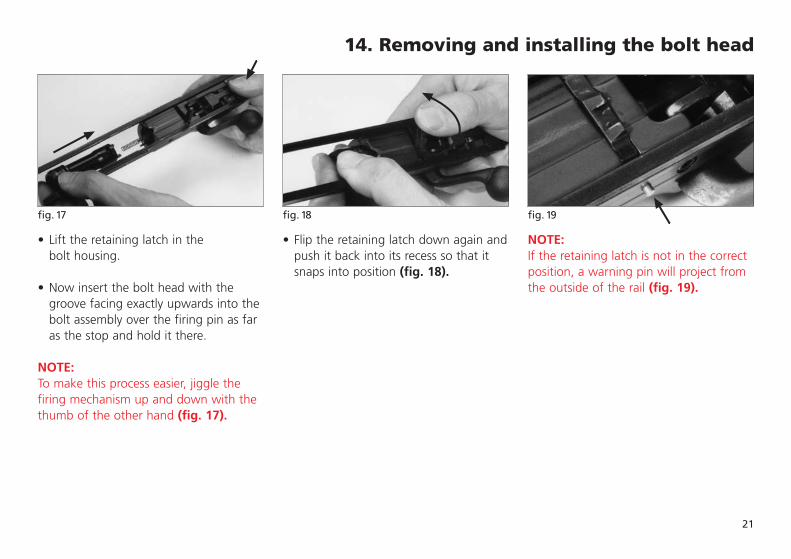
• Flip the retaining latch down again andpush it back into its recess so that itsnaps into position (fig. 18).
• Lift the retaining latch in the bolt housing.
• Now insert the bolt head with thegroove facing exactly upwards into thebolt assembly over the firing pin as faras the stop and hold it there.
NOTE:To make this process easier, jiggle thefiring mechanism up and down with thethumb of the other hand (fig. 17).
fig.17 fig.18 fig.19
NOTE:If the retaining latch is not in the correctposition, a warning pin will project fromthe outside of the rail (fig. 19).
14. Removing and installing the bolt head
22
fig.20 fig.21
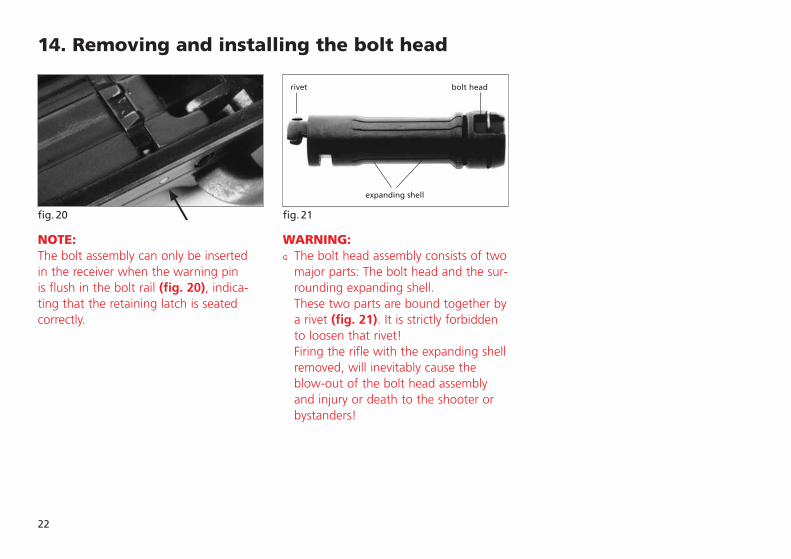
NOTE:The bolt assembly can only be inserted in the receiver when the warning pin is flush in the bolt rail (fig. 20), indica-ting that the retaining latch is seated correctly.
WARNING: G The bolt head assembly consists of two
major parts: The bolt head and the sur-rounding expanding shell. These two parts are bound together by a rivet (fig. 21). It is strictly forbiddento loosen that rivet!Firing the rifle with the expanding shellremoved, will inevitably cause theblow-out of the bolt head assemblyand injury or death to the shooter orbystanders!
14. Removing and installing the bolt head
rivet
expanding shell
bolt head

23
fig.22
15. Trigger
15.1 Trigger assembly
The Blaser R 93 LRS 2 bolt action rifle is equipped with an adjustable direct trigger. The trigger pull weight is adju-sted at the factory to approx. 23/4 lbs(1200 g).
Adjustment potential:
- Trigger position- Trigger pull- Trigger stop
WARNING:G Before making any adjustments
make sure there are no cartridges inthe chamber or magazine.
15.2 Trigger positionThe trigger blade (fig. 22-1) can bemoved along the longitudinal axis toadapt to the hand of the shooter.• Loosen lock screw (fig. 22-2).• Shift trigger blade to the desired
position.• Tighten lock screw (fig. 22-2).
15.3 Trigger pullThe trigger pull weight can be adjustedwith the trigger pull screw (fig. 22-3):
• Increase trigger pull weightturn the trigger pull screw (fig. 22-3)clockwise
• Decrease trigger pull weightturn the trigger pull screw (fig. 22-3)counterclockwise.
15.4 Triggerstop
The trigger stop can be adjusted with thetrigger stop screw (fig. 22-4):
• Turn triggerstop screw (fig. 22-4)clockwise until trigger is past the release point.
• Put the safety in the “off safe“ position.
• Pull the trigger and turn triggerstopscrew (fig. 22-4) counterclockwise untilthe sear releases the firing pin.
• By counting to turn the triggerstopscrew (fig. 22-4) counterclockwise thedesired travel beyond the release pointcan be adjusted.
1
2 4 3

24
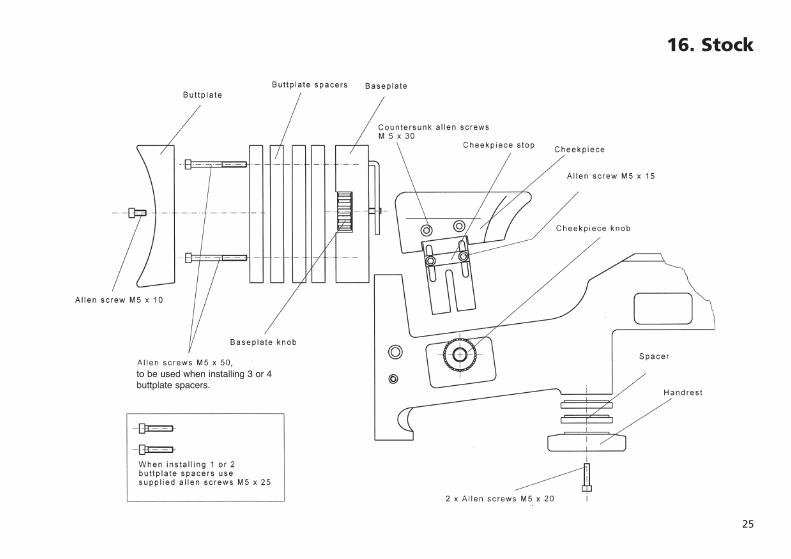
16. Stock
16.3 Cheekpiece:
• After loosening cheekpiece knob thecheekpiece can be moved up or down.To remove the cheekpiece from thestock just pull it out of the top.
• To maintain the same elevation of thecheekpiece when removing and instal-ling adjust the cheekpiece stop to the desired position.
• Loosen allen screw M5x30 with 3 mmallen key. To adjust the on-/offset of thecheekpiece add or remove spacers onthe inside.
16.4 Handrest:
• With the 4 mm T-allen key supplied,loosen the 2 allen screws and removehandrest.
• Add or remove spacers to set the desired height.
• Installation in reverse.
The following adjustments are possible:- Buttplate elevation- Length of pull- Cheekpiece height and on-/offset- Handrest
16.1 Buttplate
• Loosen baseplate knob and move butt-plate to desired elevation and tighten.
16.2 Length of pull
• With the 4 mm T-allen key supplied,loosen allen screw and remove butt-plate
• Loosen and remove allen screws whichhold the spacers to the baseplate. Add or remove spacers to set the desired length of pull.
• Installation in reverse.
NOTE:• When installing 1 or 2 buttplate
spacers use allen screws M5x25.• When installing 3 or 4 buttplate
spacers use allen screws M5x50.
25
16. Stock
, to be used when installing 3 or 4buttplate spacers.

26
17. Mounting a Scope Mod. LRS 2 with the original optional Blaser saddle mount
The R 93 LRS 2 barrels are equipped withnotches to accept the original optionalBlaser saddle mount.
27
18. Mounting a Scope Mod. LRS 2-.338 Lapua Mag.
The barrels of the Blaser R 93 LRS 2-.338 Lapua Mag. areequipped with Picatinny-Rail.

28
19. Optional accessories
N Interchangeable barrels
N Bolt head
N Magazine
N Mirage band
N Original Blaser fixed-saddle mount with1’’ or 30 mm rings or rail or VM/ZM rail
N Original Blaser QD-saddle mount with1’’ or 30 mm rings or rail or VM/ZM rail
N Special Alu-carrying case
N Muzzle Brake
N Rear Rest
N Bi-Pod
N T-Wrench
29
20. Care and maintenance
Your Blaser R 93 LRS represents a wiseinvestment in an extremely high quality,finely-crafted firearm. Regular, routinemaintenance procedures will help protectand preserve that investment for a life-time of pleasurable, reliable use.Make sure you periodically clean andmaintain your rifle according to theinstructions in this manual for safe andreliable performance. Firearms mainten-ance is your responsibility.
WARNING:G Before performing any cleaning or
maintenance make sure there are no cartridges in the chamber or magazine.
G Do not store ammunition with oils orcleaning chemicals.
G Cleaning firearms, or handling ammu-nition may result in exposure to leadand other substances known to causebirth defects, reproductive harm, andother serious physical injury. Have ade-quate ventilation at all times. Washhands thoroughly after exposure.
After each use, your Blaser R 93 LRS 2should be cleaned and re-lubricatedbefore being returned to its storageplace. Wipe off any visible dirt and grimefrom all parts with a clean, soft cloth.
20.1. Barrel and chamber:
After each use, run a swab or bronzebrush of the correct caliber through thebarrel from the breech end to removeany powder residue. If any evidence ofpowder or copper remains, use a qualitygrade bore cleaner with a bronze brush.Then remove the loosened fouling with aswab or gun bore patches. Finally, applya thin film of quality gun oil preservativethroughout the entire bore surfaces. Coat the entire outer surface of the bar-rel with a quality gun oil preservative andwipe off any excess. Note: Do not over lubricate any parts ofyour firearm.
20.2. Bolt and internal metal surfaces:
Use a small nylon bristle brush and softclean cloth to thoroughly clean theseareas. Lightly lubricate the bolt and inter-nal metal surfaces before reassemblingthe rifle.
20.3. External metal surfaces:
Lightly lubricate all external metal sur-faces before reassembling the rifle. Wipe all external metal surfaces to remove any moisture or finger marks.
20.4. Stock:
The synthetic stock on your Blaser R 93LRS 2 rifle requires little or no mainten-ance. Occasional cleaning with a dampcloth will restore your stock to like-newappearance.
ATTENTION:Make sure you read and adhere to theinstructions and warnings given by themanufacturer of the cleaning agent.

30
21. Repair and Servicing
Although your Blaser R 93 LRS 2 hasbeen precision manufactured and assembled from highest quality materials,there is always the possibility of damageor the need for servicing and/or partsreplacement. If you suspect your riflemight be damaged, or if you ever experience any malfunction or notice any looseness in the action of your rifle,stop using immediately. Return it to SIGARMS® for inspection and any necessary repair.

31
22. Warranty conditions
Limited 10 year warranty
Blaser firearms are warranted by theBlaser Jagdwaffen GmbH to be free ofdefects in material or workmanshipunder normal use and service for a period of 10 years from date of firstpurchase by a customer.
Blaser’s obligation is limited (at Blaser’schoice) to repairing or replacing at any of its authorized warranty service stationsany part of a Blaser firearm which Blaserexamination discloses to be defective.
The warranty shall not apply to problems,malfunctions or defects resulting fromaccidents, alterations, misuse or brokenstocks. If in the opinion of Blaser gun-smiths or of its authorized warranty service stations any modifications, changesor additions made outside the Blaser factory have affected the operation ofthe weapon to render it faulty, this warranty shall be void. This warrantyshall also be void if any part not of Blasermanufacture has been incorporated into
the rifle or if other than factory loadedammunition is fired in the Blaser rifle.
Should you have occasion require war-ranty service, please contact your localdealer or the distributor of your countryfor directions on returning your rifle toan authorized warranty station.
Blaser expressly disclaims any and allimplied warranties arising under the UCCor Common Law, including warranties offitness for a particular purpose andimplied warranties of merchantability.
Blaser shall not be responsible for anyincidental or consequential damages foreconomic loss or injury or propertydamage as a result of any alleged breachof an express or implied warranty, as aresult of negligence, or as a result of anyother act or omission of Blaser. Exclusionor limitation of consequential or inciden-tial damages are not allowed in somestates so this limitation or exclusion maynot apply to you.
This warranty gives you specific legalrights, and you may also have otherrights which vary from state to state.
Save your receipt as proof of purchase.
Manufacturer:Blaser Jagdwaffen GmbHZiegelstadel 188316 Isny, Germany

LRS
2 en
glis
h U
S · 3
/200
2
Important:Do not discard. Keep this manualwith your firearm. Upon change ofownership, transfer this manual withthe firearm.
Imported by:
SIGARMS® Inc.Corporate ParkExeter, NH 03833, USA(603)772-2302
www.sigarms. com
SIGARMS® is a registered trademark of SIGARMS Inc.