vSphere Security - ESXi 6 - WordPress.com...vSphere Security ESXi 6.0 vCenter Server 6.0 This...
266
vSphere Security ESXi 6.0 vCenter Server 6.0 This document supports the version of each product listed and supports all subsequent versions until the document is replaced by a new edition. To check for more recent editions of this document, see http://www.vmware.com/support/pubs. EN-001466-04
Transcript of vSphere Security - ESXi 6 - WordPress.com...vSphere Security ESXi 6.0 vCenter Server 6.0 This...

vSphere SecurityESXi 6.0
vCenter Server 6.0
This document supports the version of each product listed andsupports all subsequent versions until the document isreplaced by a new edition. To check for more recent editionsof this document, see http://www.vmware.com/support/pubs.
EN-001466-04

vSphere Security
2 VMware, Inc.
You can find the most up-to-date technical documentation on the VMware Web site at:
http://www.vmware.com/support/
The VMware Web site also provides the latest product updates.
If you have comments about this documentation, submit your feedback to:
Copyright © 2009–2015 VMware, Inc. All rights reserved. Copyright and trademark information.
VMware, Inc.3401 Hillview Ave.Palo Alto, CA 94304www.vmware.com

Contents
About vSphere Security 7
Updated Information 9
1 Security in the vSphere Environment 11
Securing the ESXi Hypervisor 11Securing vCenter Server Systems and Associated Services 13Securing Virtual Machines 14Securing the Virtual Networking Layer 15Passwords in Your vSphere Environment 16Security Best Practices and Resources 17
2 vSphere Authentication with vCenter Single Sign-On 19
Understanding vCenter Single Sign-On 20Configuring vCenter Single Sign-On Identity Sources 29Managing the Security Token Service (STS) 35Managing vCenter Single Sign-On Policies 38Managing vCenter Single Sign-On Users and Groups 40vCenter Single Sign-On Security Best Practices 46Troubleshooting vCenter Single Sign-On 46
3 vSphere Security Certificates 51
Certificate Management Overview 52Certificate Replacement Overview 53Managing Certificates in vSphere 6 56Using the vSphere Certificate Manager Utility 63Generate Certificate Signing Requests with vSphere Certificate Manager 69Manual Certificate Replacement 69Managing Certificates and Services with CLI Commands 96View vCenter Certificates with the vSphere Web Client 111Set the Threshold for vCenter Certificate Expiration Warnings 111
4 vSphere Permissions and User Management Tasks 113
Understanding Authorization in vSphere 114Understanding the vCenter Server Permission Model 114Hierarchical Inheritance of Permissions 116Multiple Permission Settings 117Managing Permissions for vCenter Components 119Global Permissions 122Add a Global Permission 123Using Roles to Assign Privileges 123
VMware, Inc. 3
Best Practices for Roles and Permissions 127Required Privileges for Common Tasks 127
5 Securing ESXi Hosts 131
Use Scripts to Manage Host Configuration Settings 132Configure ESXi Hosts with Host Profiles 133General ESXi Security Recommendations 133Certificate Management for ESXi Hosts 137Customizing Hosts with the Security Profile 150Assigning Permissions for ESXi 164Using Active Directory to Manage ESXi Users 166Using vSphere Authentication Proxy 169Configuring Smart Card Authentication for ESXi 173ESXi SSH Keys 175Using the ESXi Shell 177Modifying ESXi Web Proxy Settings 181vSphere Auto Deploy Security Considerations 182Managing ESXi Log Files 182ESXi Security Best Practices 185
6 Securing vCenter Server Systems 187
vCenter Server Security Best Practices 187Verify Thumbprints for Legacy ESXi Hosts 191Verify that SSL Certificate Validation Over Network File Copy Is Enabled 192vCenter Server TCP and UDP Ports 192Control CIM-Based Hardware Monitoring Tool Access 193
7 Securing Virtual Machines 195
Limit Informational Messages from Virtual Machines to VMX Files 195Prevent Virtual Disk Shrinking 196Virtual Machine Security Best Practices 196
8 Securing vSphere Networking 205
Introduction to vSphere Network Security 205Securing the Network with Firewalls 206Secure the Physical Switch 210Securing Standard Switch Ports With Security Policies 210Securing vSphere Standard Switches 211Secure vSphere Distributed Switches and Distributed Port Groups 212Securing Virtual Machines with VLANs 213Creating a Network DMZ on a Single ESXi Host 215Creating Multiple Networks Within a Single ESXi Host 216Internet Protocol Security 218Ensure Proper SNMP Configuration 221Use Virtual Switches with the vSphere Network Appliance API Only If Required 222vSphere Networking Security Best Practices 222
vSphere Security
4 VMware, Inc.

9 Best Practices Involving Multiple vSphere Components 225Synchronizing Clocks on the vSphere Network 225Storage Security Best Practices 228Verify That Sending Host Performance Data to Guests is Disabled 230Setting Timeouts for the ESXi Shell and vSphere Web Client 230
10 Defined Privileges 233
Alarms Privileges 234Auto Deploy and Image Profile Privileges 235Certificates Privileges 235Content Library Privileges 236Datastore Privileges 237Datastore Cluster Privileges 238Distributed Switch Privileges 238ESX Agent Manager Privileges 239Extension Privileges 239Folder Privileges 239Global Privileges 240Host CIM Privileges 240Host Configuration Privileges 241Host Inventory 242Host Local Operations Privileges 242Host vSphere Replication Privileges 243Host Profile Privileges 243Inventory Service Provider Privileges 244Inventory Service Tagging Privileges 244Network Privileges 245Performance Privileges 245Permissions Privileges 245Profile-driven Storage Privileges 246Resource Privileges 246Scheduled Task Privileges 247Sessions Privileges 247Storage Views Privileges 248Tasks Privileges 248Transfer Service Privileges 248VRM Policy Privileges 248Virtual Machine Configuration Privileges 248Virtual Machine Guest Operations Privileges 250Virtual Machine Interaction Privileges 251Virtual Machine Inventory Privileges 253Virtual Machine Provisioning Privileges 253Virtual Machine Service Configuration Privileges 255Virtual Machine Snapshot Management Privileges 255Virtual Machine vSphere Replication Privileges 256dvPort Group Privileges 256vApp Privileges 257vServices Privileges 258
Contents
VMware, Inc. 5

Index 259
vSphere Security
6 VMware, Inc.

About vSphere Security
vSphere Security provides information about securing your vSphere® environment for VMware® vCenter®
Server and VMware ESXi.
To help you protect your vSphere environment, this documentation describes available security featuresand the measures that you can take to safeguard your environment from attack.
In addition to this document, VMware publishes a Hardening Guide for each release of vSphere, accessible at http://www.vmware.com/security/hardening-guides.html. The Hardening Guide is a spreadsheet with entriesfor different potential security issues. It includes items for three different risk profiles. This vSphere Securitydocument does not include information for Risk Profile 1 (highest security environment such as top-secretgovernment).
Intended AudienceThis information is for experienced Windows or Linux system administrators who are familiar with virtualmachine technology and data center operations.
VMware, Inc. 7

vSphere Security
8 VMware, Inc.

Updated Information
This vSphere Security documentation is updated with each release of the product or when necessary.
This table provides the update history of the vSphere Security documentation.
Revision Description
EN-001466-04 Added pointer to KB article that explains use of script in deployments with external solutions to “Certificate Replacement in Large Deployments,” on page 61.
EN-001466-03 n Added some ports to “vCenter Server TCP and UDP Ports,” on page 192.n Details and corrections for “Configuring Time Synchronization Settings in the vCenter Server
Appliance,” on page 226.n Added “PCI and PCIe Devices and ESXi,” on page 185.n Added note that you should not delete groups in the vsphere.local domain to “Groups in the
vsphere.local Domain,” on page 27.n Clarified that the Certificate Manager utility requires keys in PEM format in the topics in the section
“Using the vSphere Certificate Manager Utility,” on page 63.n Updated “Use Custom Certificates with Auto Deploy,” on page 148 to use custom instead of
Custom.
EN-001466-02 n Added additional recommendation to “General Networking Security Recommendations,” onpage 222
n Added VLAN ID recommendations to “Secure vSphere Distributed Switches and Distributed PortGroups,” on page 212.
n Added information about verifying trunk links to “Document and Check the vSphere VLANEnvironment,” on page 223.
n Updated “Add Members to a vCenter Single Sign-On Group,” on page 44. Groups are notdisplayed in the Groups tab.
n Added information on stopping and starting service on Windows to “Replace the VMware DirectoryService Certificate,” on page 88.
n Updated “Storage Views Privileges,” on page 248. Storage Views are deprecated in vSphere 6.0.These privileges now control only access to the Storage Monitoring Services APIs.
VMware, Inc. 9

Revision Description
EN-001466-01 n Updated the following topics to include instructions to select option 2 for certificate replacement.n “Replace Machine SSL Certificate with Custom Certificate,” on page 64n “Replace VMCA Root Certificate with Custom Signing Certificate and Replace All Certificates,”
on page 65n “Replace Solution User Certificates with Custom Certificates,” on page 67
n Added new topic “Generate Certificate Signing Requests with vSphere Certificate Manager,” onpage 69
n Fixed a technical inaccuracy in “Ensure Proper SNMP Configuration,” on page 221.n Some clarifications in “ESXi Passwords, ESXi Pass Phrases, and Account Lockout,” on page 135.n In “Replace the Root Certificate (Intermediate CA),” on page 80, changed service-control --
start vmca to service-control --start vmcad.n Changed first step in “Change Certificate Default Settings,” on page 142. This task is performed on
the vCenter Server system, not on individual hosts.n Updated “vCenter Server TCP and UDP Ports,” on page 192. Ports 11711 and 11712 are used only if
vCenter Single Sign-On was upgraded from vSphere 5.5. In vSphere 6.0, vCenter Single Sign-On usesport 389 (LDAP) and 636 (LDAPS).
n Updated “Use VMCA as an Intermediate Certificate Authority,” on page 80. Replacing the VMCAbefore installing or upgrading other components in an environment with an external PlatformServices Controller is no longer recommended.
EN-001466-00 Initial release.
vSphere Security
10 VMware, Inc.

Security in the vSphere Environment 1The components of a vSphere environment are secured out of the box by a number of features such ascertificates, authorization, a firewall on each ESXi, limited access, and so on. You can modify the defaultsetup in many ways - for example, you can set permissions on vCenter objects, open firewall ports, orchange the default certificates. This results in maximum flexibility in securing vCenter Server systems, ESXihosts, and virtual machines.
A high level overview of different areas of vSphere that require attention helps you plan your securitystrategy. You also benefit from additional vSphere Security resources on the VMware website.
This chapter includes the following topics:
n “Securing the ESXi Hypervisor,” on page 11
n “Securing vCenter Server Systems and Associated Services,” on page 13
n “Securing Virtual Machines,” on page 14
n “Securing the Virtual Networking Layer,” on page 15
n “Passwords in Your vSphere Environment,” on page 16
n “Security Best Practices and Resources,” on page 17
Securing the ESXi HypervisorThe ESXi hypervisor is secured out of the box. You can further protect ESXi hosts by using lockdown mode,and other built-in features. If you set up a reference host and make changes to all hosts based on that host'shost profiles, or if you perform scripted management, you further protect your environment by assuringchanges apply to all hosts.
Use the following features, discussed in detail in this guide, to enhance protection of ESXi hosts that aremanaged by vCenter Server. See also the Security of the VMware vSphere Hypervisor white paper.
Limit ESXi Access By default, the ESXi Shell and SSH services are not running and only the rootuser can log in to the Direct Console User Interface (DCUI). If you decide toenable ESXi or SSH access, you can set timeouts to limit the risk ofunauthorized access.
VMware, Inc. 11
Users who can access the ESXi host must have permissions to manage thehost. You set permissions on the host object from vCenter Server thatmanages the host.
Use Named Users andLeast Privilege
Many tasks can be performed by the root user by default. Instead of allowingadministrators to log in to the ESXi host using the root user account, you canapply different host configuration privileges to different named users fromthe vCenter Server permissions management interface. You can create acustom roles, assign privileges to the role, and associate the role with anamed user and an ESXi host object from the vSphere Web Client.
In a single host scenario, you manage users directly. See the vSphere SingleHost Management documentation.
Minimize the Number ofOpen ESXi FirewallPorts
By default, firewall ports on your ESXi host are opened only when you starta corresponding service. You can use the vSphere Web Client or ESXCLI orPowerCLI commands to check and manage firewall port status.
See “ESXi Firewall Configuration,” on page 150.
Automate ESXi HostManagement
Because it is often important that different hosts in the same data center arein sync, use scripted installation or vSphere Auto Deploy to provision hosts.You can manage the hosts using scripts. An alternative to scriptedmanagement are host profiles. You set up a reference host, export the hostprofile, and apply the host profile to your host. You can apply the hostprofile directly or as part of provisioning with Auto Deploy.
See “Use Scripts to Manage Host Configuration Settings,” on page 132 andsee the vSphere Installation and Setup for information about vSphere AutoDeploy.
Take Advantage ofLockdown Mode
In lockdown mode, ESXi hosts can be accessed only through vCenter Serverby default. Starting with vSphere 6.0, you can select strict lockdown mode ornormal lockdown mode, and you can define Exception Users to allow directaccess to service accounts such as backup agents.
See “Lockdown Mode,” on page 157.
Check VIB PackageIntegrity
Each VIB package has an associated acceptance level. You can add a VIB toan ESXi host only if the acceptance level is the same or better than theacceptance level of the host. You cannot add a CommunitySupported orPartnerSupported VIB to a host unless you explicitly change the host'sacceptance level.
See “Check the Acceptance Levels of Hosts and VIBs,” on page 163.
Manage ESXiCertificates
In vSphere 6.0 and later, the VMware Certificate Authority (VMCA)provisions each ESXi host with a signed certificate that has VMCA as the rootcertificate authority by default. If company policy requires it, you can replacethe existing certificates with certificates that are signed by a third-party CA.
See “Certificate Management for ESXi Hosts,” on page 137
Smart CardAuthentication
Starting with vSphere 6.0, ESXi supports smart card authentication as anoption instead of user name and password authentication.
vSphere Security
12 VMware, Inc.

See “Configuring Smart Card Authentication for ESXi,” on page 173.
ESXi Account Lockout Starting with vSphere 6.0, account locking is supported for access throughSSH and through the vSphere Web Services SDK. The Direct ConsoleInterface (DCUI) and the ESXi Shell do not support account lockout. Bydefault, a maximum of ten failed attempts is allowed before the account islocked. The account is unlocked after two minutes by default.
See “ESXi Passwords, ESXi Pass Phrases, and Account Lockout,” onpage 135.
Security considerations for standalone hosts are similar, though the management tasks might differ. See thevSphere Single Host Management documentation.
Securing vCenter Server Systems and Associated ServicesYour vCenter Server system and associated services are protected by authentication through vCenter SingleSign-On and by authorization through the vCenter Server permissions model. You can modify the defaultbehavior, and you can take additional steps to protect access to your environment.
As you protect your vSphere environment, consider that all services that are associated with thevCenter Server instances must be protected. In some environments, you might protect severalvCenter Server instances and one or more Platform Services Controller instances.
Harden All vCenter HostMachines
The first step in protecting your vCenter environment is hardening eachmachine on which vCenter Server or an associated service runs. Similarconsiderations apply to a physical machine or a virtual machine. Alwaysinstall the latest security patches for your operating system and followindustry standard best practices to protect the host machine.
Learn about the vCenterCertificate Model
By default, the VMware Certificate Authority provisions each ESXi host, eachmachine in the environment, and each solution user with a certificate signedby VMCA. The environment works out of the box, but if company policyrequires it, you can change the default behavior. See Chapter 3, “vSphereSecurity Certificates,” on page 51.
For additional protection, be sure to explicitly remove expired or revokedcertificates and failed installations.
Configure vCenterSingle Sign-On
vCenter Server and associated services are protected by the vCenter SingleSign-On authentication framework. When you first install the software, youspecify a password for the [email protected] user, and only thatdomain is available as an identity source. You can add other identity sources,either Active Directory or LDAP, and set a default identity source. Goingforward, users who can authenticate to an identity source can view objectsand perform tasks if they are authorized to do so. See Chapter 2, “vSphereAuthentication with vCenter Single Sign-On,” on page 19.
Assign Roles to Usersor Groups
For better logging, associate each permission you give on an object with anamed user or group and a predefined role or custom role. The vSphere 6.0permissions model allows great flexibility through multiple ways ofauthorizing users or groups. See “Understanding Authorization in vSphere,”on page 114 and “Required Privileges for Common Tasks,” on page 127.
Chapter 1 Security in the vSphere Environment
VMware, Inc. 13

Be sure to restrict administrator privileges and the use of the administratorrole. If possible, do not use the anonymous Administrator user.
Set up NTP Set up NTP for each node in your environment. The certificate infrastructurerequires an accurate time stamp and does not work correctly if the nodes areout of sync.
See “Synchronizing Clocks on the vSphere Network,” on page 225.
Securing Virtual MachinesTo secure your virtual machines, keep the guest operating systems patched and protect your environmentjust as you would protect a physical machine. Consider disabling unnecessary functionality, minimize theuse of the virtual machine console, and follow other best practices.
Protect the GuestOperating System
To protect your guest operating system, make sure that it uses the mostrecent patches and, if appropriate, anti-spyware and anti-malware programs.See the documentation from your guest operating system vendor and,potentially, other information available in books or on the Internet.
Disable UnnecessaryFunctionality
Check that unnecessary functionality is disabled to minimize potential pointsof attack. Many of the features that are used infrequently are disabled bydefault. Remove unnecessary hardware and disable certain features such asHFSG or copy and paste between the virtual machine and a remote console.
See “Disable Unnecessary Functions Inside Virtual Machines,” on page 199.
Use Templates andScripted Management
Virtual machine templates allow you to set up the operating system so itmeets your requirements, and to then create additional virtual machineswith the same settings.
If you want to change settings after initial deployment, consider usingscripts, for example, PowerCLI. This documentation explains many tasks byusing the vSphere Web Client to better illustrate the process, but scripts helpyou keep your environment consistent. In large environments, you cangroup virtual machines into folders to optimize scripting.
See “Use Templates to Deploy Virtual Machines,” on page 197. See vSphereVirtual Machine Administration for details.
Minimize Use of theVirtual Machine Console
The virtual machine console provides the same function for a virtualmachine that a monitor on a physical server provides. Users with access tothe virtual machine console have access to virtual machine powermanagement and removable device connectivity controls, which might allowa malicious attack on a virtual machine.
vSphere Security
14 VMware, Inc.

Securing the Virtual Networking LayerThe virtual networking layer includes virtual network adapters, virtual switches, distributed virtualswitches, and ports and port groups. ESXi relies on the virtual networking layer to support communicationsbetween virtual machines and their users. In addition, ESXi uses the virtual networking layer tocommunicate with iSCSI SANs, NAS storage, and so forth.
vSphere includes the full array of features necessary for a secure networking infrastructure. You can secureeach element of the infrastructure, such as virtual switches, distributed virtual switches, virtual networkadapters, and so on separately. In addition, consider the following guidelines, discussed in more detail in Chapter 8, “Securing vSphere Networking,” on page 205.
Isolate Network Traffic Isolation of network traffic is essential to a secure ESXi environment.Different networks require different access and level of isolation. Amanagement network isolates client traffic, command-line interface (CLI) orAPI traffic, and third-party software traffic from normal traffic. This networkshould be accessible only by system, network, and security administrators.
See “ESXi Networking Security Recommendations,” on page 136.
Use Firewalls to SecureVirtual NetworkElements
You can open and close firewall ports and secure each element in the virtualnetwork separately. Firewall rules associate services with correspondingfirewalls and can open and close the ESXi firewall according to the status ofthe service.
See “ESXi Firewall Configuration,” on page 150.
Consider NetworkSecurity Policies
Networking security policy provides protection of traffic against MACaddress impersonation and unwanted port scanning. The security policy of astandard or distributed switch is implemented in Layer 2 (Data Link Layer)of the network protocol stack. The three elements of the security policy arepromiscuous mode, MAC address changes, and forged transmits.
See the vSphere Networking documentation for instructions.
Secure Virtual MachineNetworking
The methods you use to secure a virtual machine network depend on whichguest operating system is installed, whether the virtual machines operate in atrusted environment, and a variety of other factors. Virtual switches anddistributed virtual switches provide a substantial degree of protection whenused with other common security practices, such as installing firewalls.
See Chapter 8, “Securing vSphere Networking,” on page 205.
Consider VLANs toProtect YourEnvironment
ESXi supports IEEE 802.1q VLANs, which you can use to further protect thevirtual machine network or storage configuration. VLANs let you segment aphysical network so that two machines on the same physical network cannotsend packets to or receive packets from each other unless they are on thesame VLAN.
See “Securing Virtual Machines with VLANs,” on page 213.
Secure Connections toVirtualized Storage
A virtual machine stores operating system files, program files, and other dataon a virtual disk. Each virtual disk appears to the virtual machine as a SCSIdrive that is connected to a SCSI controller. A virtual machine is isolatedfrom storage details and cannot access the information about the LUN whereits virtual disk resides.
Chapter 1 Security in the vSphere Environment
VMware, Inc. 15

The Virtual Machine File System (VMFS) is a distributed file system andvolume manager that presents virtual volumes to the ESXi host. You areresponsible for securing the connection to storage. For example, if you areusing iSCSI storage, you can set up your environment to use CHAP and, ifrequired by company policy, mutual CHAP by using the vSphere Web Clientor CLIs.
See “Storage Security Best Practices,” on page 228.
Evaluate the Use ofIPSec
ESXi supports IPSec over IPv6. You cannot use IPSec over IPv4.
See “Internet Protocol Security,” on page 218.
In addition, evaluate whether VMware NSX for vSphere is a good solution for securing the networkinglayer in your environment.
Passwords in Your vSphere EnvironmentPassword restrictions, lockout, and expiration in your vSphere environment depend on the system that theuser targets, who the user is, and how policies are set.
ESXi PasswordsESXi password restrictions are determined by the Linux PAM module pam_passwdqc. See “ESXiPasswords, ESXi Pass Phrases, and Account Lockout,” on page 135.
Passwords for vCenter Server and Other vCenter ServicesvCenter Single Sign-On manages authentication for all users who log in to vCenter Server and other vCenterservices. The password restrictions, lockout, and expiration depend on the user's domain and on who theuser is.
The password for [email protected] user, or theadministrator@mydomain user if you selected a different domain duringinstallation, does not expire and is not subject to the lockout policy. In allother regards, the password must follows the restrictions set in the vCenterSingle Sign-On password policy. See “Edit the vCenter Single Sign-OnPassword Policy,” on page 38.
If you forget the password for this users, search the VMware KnowledgeBase system for information on resetting this password.
Other vsphere.localusers
The passwords for other vsphere.local users, or users of the local domain youspecified during installation, must follow the restrictions set by the vCenterSingle Sign-On password policy and lockout policy. See “Edit the vCenterSingle Sign-On Password Policy,” on page 38 and “Edit the vCenter SingleSign-On Lockout Policy,” on page 39. These passwords expire after 90 daysby default, though administrators can change the expiration as part of thepassword policy.
If a user forgets their vsphere.local password, an administrator user can resetthe password using the dir-cli command.
Other Users Password restrictions, lockout, and expiration for all other users aredetermined by the domain (identity source) to which the user canauthenticate.
vSphere Security
16 VMware, Inc.

vCenter Single Sign-On supports one default identity source, and users canlog in to the vSphere Client with just their user names. The domaindetermines the password parameters. If users want to log in as a user in anon-default domain, they can include the domain name, that is, specifyuser@domain or domain\user. The domains password parameters apply in thiscase as well.
Passwords for vCenter Server Appliance Direct Console User Interface UsersThe vCenter Server Appliance is a preconfigured Linux-based virtual machine, which is optimized forrunning vCenter Server and the associated services on Linux.
When you deploy the vCenter Server Appliance, you specify a password for the root user of the applianceLinux operating system and a password for the [email protected] user. You can change the rootuser password and perform other vCenter Server Appliance local user management tasks from the DirectConsole User Interface. See vCenter Server Appliance Configuration.
Security Best Practices and ResourcesIf you follow best practices, your ESXi and vCenter Server can be as secure as or even more secure than anenvironment that does not include virtualization.
This manual includes best practices for the different components of your vSphere infrastructure.
Table 1‑1. Security Best Practices
vSphere component Resource
ESXi host “ESXi Security Best Practices,” on page 185
vCenter Server system “vCenter Server Security Best Practices,” on page 187
Virtual machine “Virtual Machine Security Best Practices,” on page 196
vSphere Networking “vSphere Networking Security Best Practices,” onpage 222
This manual is only one of the sources you need to ensure a secure environment.
VMware security resources, including security alerts and downloads, are available on the Web.
Table 1‑2. VMware Security Resources on the Web
Topic Resource
VMware security policy, up-to-date securityalerts, security downloads, and focusdiscussions of security topics.
http://www.vmware.com/go/security
Corporate security response policy http://www.vmware.com/support/policies/security_response.htmlVMware is committed to helping you maintain a secure environment.Security issues are corrected in a timely manner. The VMware SecurityResponse Policy states our commitment to resolve possiblevulnerabilities in our products.
Chapter 1 Security in the vSphere Environment
VMware, Inc. 17

Table 1‑2. VMware Security Resources on the Web (Continued)
Topic Resource
Third-party software support policy http://www.vmware.com/support/policies/VMware supports a variety of storage systems, software agents such asbackup agents, system management agents, and so forth. You can findlists of agents, tools, and other software that supports ESXi bysearching http://www.vmware.com/vmtn/resources/ for ESXicompatibility guides.The industry offers more products and configurations than VMwarecan test. If VMware does not list a product or configuration in acompatibility guide, Technical Support will attempt to help you withany problems, but cannot guarantee that the product or configurationcan be used. Always evaluate security risks for unsupported productsor configurations carefully.
Compliance and security standards, as well aspartner solutions and in-depth content aboutvirtualization and compliance
http://www.vmware.com/go/compliance
Information on security certifications andvalidations such as CCEVS and FIPS fordifferent versions of the components ofvSphere.
https://www.vmware.com/support/support-resources/certifications.html
Hardening guides for different versions ofvSphere and other VMware products.
https://www.vmware.com/support/support-resources/hardening-guides.html
Security of the VMware vSphere Hypervisor whitepaper
http://www.vmware.com/files/pdf/techpaper/vmw-wp-secrty-vsphr-hyprvsr-uslet-101.pdf
vSphere Security
18 VMware, Inc.
vSphere Authentication with vCenterSingle Sign-On 2
vCenter Single Sign-On is an authentication broker and security token exchange infrastructure. When a useror a solution user can authenticate to vCenter Single Sign-On, that user receives SAML token. Goingforward, the user can use the SAML token to authenticate to vCenter services. The user can then perform theactions that user has privileges for.
Because traffic is encrypted for all communications, and because only authenticated users can perform theactions that they have privileges for, your environment is secure.
Starting with vSphere 6.0, vCenter Single Sign-On is part of the Platform Services Controller. ThePlatform Services Controller contains the shared services that support vCenter Server and vCenter Servercomponents. These services include vCenter Single Sign-On, VMware Certificate Authority, License Service,and Lookup Service. See vSphere Installation and Setup for details on the Platform Services Controller.
For the initial handshake, users authenticate with a user name and password, and solution usersauthenticate with a certificate. For information on replacing solution user certificates, see Chapter 3,“vSphere Security Certificates,” on page 51.
After a user can authenticate with vCenter Single Sign-On, you can authorize the user to perform certaintasks. In most cases, you assign vCenter Server privileges, but vSphere includes other permission models.See “Understanding Authorization in vSphere,” on page 114.
This chapter includes the following topics:
n “Understanding vCenter Single Sign-On,” on page 20
n “Configuring vCenter Single Sign-On Identity Sources,” on page 29
n “Managing the Security Token Service (STS),” on page 35
n “Managing vCenter Single Sign-On Policies,” on page 38
n “Managing vCenter Single Sign-On Users and Groups,” on page 40
n “vCenter Single Sign-On Security Best Practices,” on page 46
n “Troubleshooting vCenter Single Sign-On,” on page 46
VMware, Inc. 19

Understanding vCenter Single Sign-OnTo effectively manage vCenter Single Sign-On, you need to understand the underlying architecture and howit affects installation and upgrades.
How vCenter Single Sign-On Protects Your EnvironmentvCenter Single Sign-On allows vSphere components to communicate with each other through a secure tokenmechanism instead of requiring users to authenticate separately with each component.
vCenter Single Sign-On uses a combination of STS (Security Token Service), SSL for secure traffic, andauthentication of human users through Active Directory or OpenLDAP and of solution users throughcertificates.
vCenter Single Sign-On Handshake for Human UsersThe following illustration shows the handshake for human users.
Figure 2‑1. vCenter Single Sign-On Handshake for Human Users
Kerberos
vSphere Web Client
12
3 4
5
6
VMwareDirectoryService
CA
vCenterServer
vCenter SingleSign-On
1 A user logs in to the vSphere Web Client with a user name and password to access the vCenter Serversystem or another vCenter service.
The user can also log in without a password and check the Use Windows session authenticationcheckbox.
2 The vSphere Web Client passes the login information to the vCenter Single Sign-On service, whichchecks the SAML token of the vSphere Web Client. If the vSphere Web Client has a valid token, vCenterSingle Sign-On then checks whether the user is in the configured identity source (for example ActiveDirectory).
n If only the user name is used, vCenter Single Sign-On checks in the default domain.
n If a domain name is included with the user name (DOMAIN\user1 or user1@DOMAIN), vCenterSingle Sign-On checks that domain.
3 If the user can authenticate to the identity source, vCenter Single Sign-On returns a token thatrepresents the user to the vSphere Web Client.
4 The vSphere Web Client passes the token to the vCenter Server system.
5 vCenter Server checks with the vCenter Single Sign-On server that the token is valid and not expired.
vSphere Security
20 VMware, Inc.

6 ThevCenter Single Sign-On server returns the token to the vCenter Server system, leveragingthevCenter Server Authorization Framework to allow user access.
The user can now authenticate, and can view and modify any objects that the user's role has privileges for.
NOTE Initially, each user is assigned the No Access role. A vCenter Server administrator must assign theuser at least to the Read Only role before the user can log in. See “Add a Permission to an Inventory Object,”on page 120.
vCenter Single Sign-On Handshake for Solution UsersSolution users are sets of services that are used in the vCenter Server infrastructure, for example, thevCenter Server or vCenter Server extensions. VMware extensions and potentially third-party extensionsmight also authenticate to vCenter Single Sign-On.
Figure 2‑2. vCenter Single Sign-On Handshake for Solution Users
Kerberos
Solution User
1
2
3
4
VMwareDirectoryService
CA
vCenterServer
vCenter SingleSign-On
For solution users, the interaction proceeds as follows:
1 The solution user attempts to connect to a vCenter service,
2 The solution user is redirected to vCenter Single Sign-On. If the solution user is new to vCenter SingleSign-On, it has to present a valid certificate.
3 If the certificate is valid, vCenter Single Sign-On assigns a SAML token (bearer token) to the solutionuser. The token is signed by vCenter Single Sign-On.
4 The solution user is then redirected to vCenter Single Sign-On and can perform tasks based on itspermissions.
5 The next time the solution user has to authenticate, it can use the SAML token to log in tovCenter Server.
By default, this handshake is automatic because VMCA provisions solution users with certificates duringstartup. If company policy requires third-party CA-signed certificates, you can replace the solution usercertificates with third-party CA-signed certificates. If those certificates are valid, vCenter Single Sign-Onassigns a SAML token to the solution user. See “Use Third-Party Certificates With vSphere,” on page 90.
Chapter 2 vSphere Authentication with vCenter Single Sign-On
VMware, Inc. 21
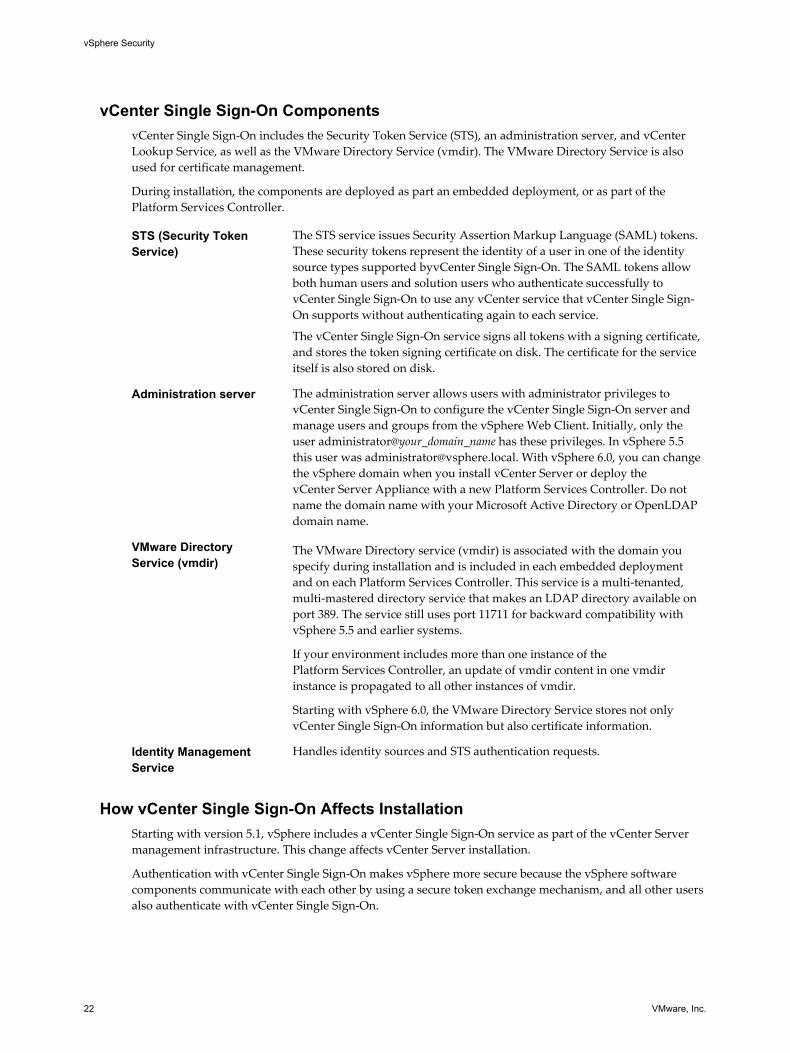
vCenter Single Sign-On ComponentsvCenter Single Sign-On includes the Security Token Service (STS), an administration server, and vCenterLookup Service, as well as the VMware Directory Service (vmdir). The VMware Directory Service is alsoused for certificate management.
During installation, the components are deployed as part an embedded deployment, or as part of thePlatform Services Controller.
STS (Security TokenService)
The STS service issues Security Assertion Markup Language (SAML) tokens.These security tokens represent the identity of a user in one of the identitysource types supported byvCenter Single Sign-On. The SAML tokens allowboth human users and solution users who authenticate successfully tovCenter Single Sign-On to use any vCenter service that vCenter Single Sign-On supports without authenticating again to each service.
The vCenter Single Sign-On service signs all tokens with a signing certificate,and stores the token signing certificate on disk. The certificate for the serviceitself is also stored on disk.
Administration server The administration server allows users with administrator privileges tovCenter Single Sign-On to configure the vCenter Single Sign-On server andmanage users and groups from the vSphere Web Client. Initially, only theuser administrator@your_domain_name has these privileges. In vSphere 5.5this user was [email protected]. With vSphere 6.0, you can changethe vSphere domain when you install vCenter Server or deploy thevCenter Server Appliance with a new Platform Services Controller. Do notname the domain name with your Microsoft Active Directory or OpenLDAPdomain name.
VMware DirectoryService (vmdir)
The VMware Directory service (vmdir) is associated with the domain youspecify during installation and is included in each embedded deploymentand on each Platform Services Controller. This service is a multi-tenanted,multi-mastered directory service that makes an LDAP directory available onport 389. The service still uses port 11711 for backward compatibility withvSphere 5.5 and earlier systems.
If your environment includes more than one instance of thePlatform Services Controller, an update of vmdir content in one vmdirinstance is propagated to all other instances of vmdir.
Starting with vSphere 6.0, the VMware Directory Service stores not onlyvCenter Single Sign-On information but also certificate information.
Identity ManagementService
Handles identity sources and STS authentication requests.
How vCenter Single Sign-On Affects InstallationStarting with version 5.1, vSphere includes a vCenter Single Sign-On service as part of the vCenter Servermanagement infrastructure. This change affects vCenter Server installation.
Authentication with vCenter Single Sign-On makes vSphere more secure because the vSphere softwarecomponents communicate with each other by using a secure token exchange mechanism, and all other usersalso authenticate with vCenter Single Sign-On.
vSphere Security
22 VMware, Inc.

Starting with vSphere 6.0, vCenter Single Sign-On is either included in an embedded deployment, or part ofthe Platform Services Controller. The Platform Services Controller contains all of the services that arenecessary for the communication between vSphere components including vCenter Single Sign-On, VMwareCertificate Authority, VMware Lookup Service, and the licensing service.
The order of installation is important.
First installation If your installation is distributed, you must install thePlatform Services Controller before you install vCenter Server or deploy thevCenter Server Appliance. For an embedded deployment the correctinstallation order happens automatically.
Subsequentinstallations
For approximately up to eight vCenter Server instances, onePlatform Services Controller can serve your entire vSphere environment. Youcan connect the new vCenter Server instances to the samePlatform Services Controller. For more than approximately eightvCenter Server instances, you can install an additionalPlatform Services Controller for better performance. The vCenter SingleSign-On service on each Platform Services Controller synchronizesauthentication data with all other instances. The precise number depends onhow heavily the vCenter Server instances are being used and on otherfactors.
For detailed information about the deployment models, the advantages and disadvantages of eachdeployment type, see vSphere Installation and Setup.
How vCenter Single Sign-On Affects UpgradesIf you upgrade a Simple Install environment to a vCenter Server 6 embedded deployment, upgrade isseamless. If you upgrade a custom installation, the vCenter Single Sign-On service is part of thePlatform Services Controller after the upgrade. Which users can log in to vCenter Server after an upgradedepends on the version that you are upgrading from and the deployment configuration.
As part of the upgrade, you can define a different vCenter Single Sign-On domain name to be used insteadof vsphere.local.
Upgrade PathsThe result of the upgrade depends on what installation options you had selected, and what deploymentmodel you are upgrading to.
Table 2‑1. Upgrade Paths
Source Result
vSphere 5.5 and earlier Simple Install vCenter Server with embeddedPlatform Services Controller.
vSphere 5.5 and earlier Custom Install If vCenter Single Sign-On was on a different node thanvCenter Server, an environment with an externalPlatform Services Controller results.If vCenter Single Sign-On was on the same node asvCenter Server, but other services are on different nodes,an environment with an embeddedPlatform Services Controller results.If the custom installation included multiple replicatingvCenter Single Sign-On servers, an environment withmultiple replicating Platform Services Controller instancesresults.
Chapter 2 vSphere Authentication with vCenter Single Sign-On
VMware, Inc. 23

Who Can Log In After Upgrade of a Simple InstallIf you upgrade an environment that you provisioned using the Simple Install option, the result is always aninstallation with an embedded Platform Services Controller. Which users are authorized to log in dependson whether the source environment includes vCenter Single Sign-On.
Table 2‑2. Login Privileges After Upgrade of Simple Install Environment
Source version Login access for Notes
vSphere 5.0 Local operating system [email protected]
You might be prompted for theadministrator of the root folderin the vSphere inventoryhierarchy during installationbecause of changes in user stores.If your previous installationsupported Active Directoryusers, you can add the ActiveDirectory domain as an identitysource.
vSphere 5.1 Local operating system [email protected]@SystemDomain
Starting with vSphere 5.5,vCenter Single Sign-On supportsonly one default identity source.You can set the default identitysource.See “Set the Default Domain forvCenter Single Sign-On,” onpage 30.Users in a non-default domaincan specify the domain whenthey log in (DOMAIN\user oruser@DOMAIN).
vSphere 5.5 [email protected] or the administratorof the domain that you specified during upgrade.All users from all identity sources can log in asbefore.
If you upgrade from vSphere 5.0, which does not include vCenter Single Sign-On, to a version that includesvCenter Single Sign-On, local operating system users become far less important than the users in a directoryservice such as Active Directory. As a result, it is not always possible, or even desirable, to keep localoperating system users as authenticated users.
Who Can Log In After Upgrade of a Custom InstallationIf you upgrade an environment that you provisioned using the Custom Install option, the result depends onyour initial choices:
n If vCenter Single Sign-On was on the same node as the vCenter Server system, the result is aninstallation with an embedded Platform Services Controller.
n If vCenter Single Sign-On was on a different node than the vCenter Server system, the result is aninstallation with an external Platform Services Controller.
n If you upgrade from vSphere 5.0, you can select an external or embedded Platform Services Controlleras part of the upgrade process.
Login privileges after the upgrade depend on several factors.
vSphere Security
24 VMware, Inc.

Table 2‑3. Login Privileges After Upgrade of Custom Install Environment
Source version Login access for Notes
vSphere 5.0 vCenter Single Sign-On recognizes localoperating system users for the machine wherethe Platform Services Controller is installed, butnot for the machine where vCenter Server isinstalled.NOTE Using local operating users foradministration is not recommended, especially infederated [email protected] can log in tovCenter Single Sign-On and each vCenter Serverinstance as an administrator user.
If your 5.0 installation supportedActive Directory users, thoseusers no longer have access afterthe upgrade. You can add theActive Directory domain as anidentity source.
vSphere 5.1 or vSphere 5.5 vCenter Single Sign-On recognizes localoperating system users for the machine wherethe Platform Services Controller is installed, butnot for the machine where vCenter Server isinstalled.NOTE Using local operating users foradministration is not recommended, especially infederated [email protected] log in to vCenterSingle Sign-On and each vCenter Server instanceas an administrator user.For upgrades from vSphere 5.1Admin@SystemDomain has the same privilegesas [email protected].
Starting with vSphere 5.5,vCenter Single Sign-On supportsonly one default identity source.You can set the default identitysource.See “Set the Default Domain forvCenter Single Sign-On,” onpage 30.Users in a non-default domaincan specify the domain whenthey log in (DOMAIN\user oruser@DOMAIN).
Using vCenter Single Sign-On with vSphereWhen a user logs in to a vSphere component or when a vCenter Server solution user accesses anothervCenter Server service, vCenter Single Sign-On performs authentication. Users must be authenticated withvCenter Single Sign-On and have the necessary privileges for interacting with vSphere objects.
vCenter Single Sign-On authenticates both solution users and other users.
n Solution users represent a set of services in your vSphere environment. During installation, VMCAassigns a certificate to each solution user by default. The solution user uses that certificate toauthenticate to vCenter Single Sign-On. vCenter Single Sign-On gives the solution user a SAML token,and the solution user can then interact with other services in the environment.
n When other users log in to the environment, for example, from the vSphere Web Client, vCenter SingleSign-On prompts for a user name and password. If vCenter Single Sign-On finds a user with thosecredentials in the corresponding identity source, it assigns the user a SAML token. The user can nowaccess other services in the environment without being prompted to authenticate again.
Which objects the user can view, and what a user can do, is usually determined by vCenter Serverpermission settings. vCenter Server administrators assign those permissions from the Manage >Permissions interface in the vSphere Web Client, not through vCenter Single Sign-On. See Chapter 4,“vSphere Permissions and User Management Tasks,” on page 113.
vCenter Single Sign-On and vCenter Server UsersUsing the vSphere Web Client, users authenticate to vCenter Single Sign-On by entering their credentials onthe vSphere Web Client login page. After connecting to vCenter Server, authenticated users can view allvCenter Server instances or other vSphere objects for which their role gives them privileges. No furtherauthentication is required. See Chapter 4, “vSphere Permissions and User Management Tasks,” onpage 113.
Chapter 2 vSphere Authentication with vCenter Single Sign-On
VMware, Inc. 25

After installation, the [email protected] user has administrator access to both vCenter SingleSign-On and vCenter Server. That user can then add identity sources, set the default identity source, andmanage users and groups in the vCenter Single Sign-On domain (vsphere.local).
All users that can authenticate to vCenter Single Sign-On can reset their password, even if the password hasexpired, as long as they know the password. See “Change Your vCenter Single Sign-On Password,” onpage 45. Only vCenter Single Sign-On administrators can reset the password for users who no longer havetheir password.
vCenter Single Sign-On Administrator UsersThe vCenter Single Sign-On administrative interface is accessible from the vSphere Web Client.
To configure vCenter Single Sign-On and manage vCenter Single Sign-On users and groups, the [email protected] or a user in the vCenter Single Sign-On Administrators group must log in tothe vSphere Web Client. Upon authentication, that user can access the vCenter Single Sign-Onadministration interface from the vSphere Web Client and manage identity sources and default domains,specify password policies, and perform other administrative tasks. See “Configuring vCenter Single Sign-On Identity Sources,” on page 29.
NOTE You cannot rename the [email protected] user. For improved security, consider creatingadditional named users in the vsphere.local domain and assigning them administrative privileges. You canthen stop using [email protected].
Authentication in Different Versions of vSphereIf a user connects to a vCenter Server system version 5.0.x or earlier, vCenter Server authenticates the userby validating the user against an Active Directory domain or against the list of local operating system users.In vCenter Server 5.1 and later, users authenticate through vCenter Single Sign-On.
NOTE You cannot use the vSphere Web Client to manage vCenter Server version 5.0 or earlier. UpgradevCenter Server to version 5.1 or later.
ESXi UsersESXi is not integrated with vCenter Single Sign-On. You add the ESXi host to an Active Directory domainexplicitly. See “Configure a Host to Use Active Directory,” on page 167.
You can still create local ESXi users with the vSphere Client, vCLI, or PowerCLI. vCenter Server is not awareof users that are local to ESXi and ESXi is not aware of vCenter Server users.
NOTE Manage permissions for ESXi hosts through vCenter Server if possible.
How to Log In to vCenter Server ComponentsWhen a user logs in to a vCenter Server system from the vSphere Web Client, the login behavior depends onwhether the user is in the default domain, that is, the domain that is set as the default identity source.
n Users who are in the default domain can log in with their user name and password.
n Users who are in a domain that has been added to vCenter Single Sign-On as an identity source but isnot the default domain can log in to vCenter Server but must specify the domain in one of the followingways.
n Including a domain name prefix, for example, MYDOMAIN\user1
n Including the domain, for example, [email protected]
vSphere Security
26 VMware, Inc.

n Users who are in a domain that is not a vCenter Single Sign-On identity source cannot log in tovCenter Server. If the domain that you add to vCenter Single Sign-On is part of a domain hierarchy,Active Directory determines whether users of other domains in the hierarchy are authenticated or not.
NOTE If your environment includes an Active Directory hierarchy, see VMware Knowledge Base article206250 for details on supported and unsupported setups.
Groups in the vsphere.local DomainThe vsphere.local domain includes several predefined groups. Assign users to one of those groups to be ableto perform the corresponding actions.
For all objects in the vCenter Server hierarchy, permissions are assigned by pairing a user and a role withthe object. For example, you can select a resource pool and give a group of users read privileges to thatresource pool by giving them the corresponding role.
For some services that are not managed by vCenter Server directly, privileges are determined bymembership to one of the vCenter Single Sign-On groups. For example, a user who is a member of theAdministrator group can manage vCenter Single Sign-On. A user who is a member of the CAAdmins groupcan manage the VMware Certificate Authority, and a user who is in the LicenseService.Administratorsgroup can manage licenses.
The following groups are predefined in vsphere.local.
NOTE Many of these groups are internal to vsphere.local or give users high-level administrative privileges.Add users to any of these groups only after careful consideration of the risks.
NOTE Do not delete any of the predefined groups in the vsphere.local domain. If you do, errors withauthentication or certificate provisioning might result.
Table 2‑4. Groups in the vsphere.local Domain
Privilege Description
Users Users in the vsphere.local domain.
SolutionUsers Solution users group vCenter services. Each solution user authenticatesindividually to vCenter Single Sign-On with a certificate. By default, VMCAprovisions solution users with certificates. Do not add members to this groupexplicitly.
CAAdmins Members of the CAAdmins group have administrator privileges for VMCA.Adding members to these groups is not usually recommended.
DCAdmins Members of the DCAdmins group can perform Domain ControllerAdministrator actions on VMware Directory Service.NOTE Do not manage the domain controller directly. Instead, use the vmdir CLIor vSphere Web Client to perform corresponding tasks.
SystemConfiguration.BashShellAdministrators
This group is available only for vCenter Server Appliance deployments.A user in this group can enable and disable access to the BASH shell. By defaulta user who connects to the vCenter Server Appliance with SSH can access onlycommands in the restricted shell. Users who are in this group can access theBASH shell.
ActAsUsers Members of Act-As Users are allowed to get actas tokens from vCenter SingleSign-On.
ExternalIPDUsers This group is not used by vSphere. This group is needed in conjunction withVMware vCloud Air.
Chapter 2 vSphere Authentication with vCenter Single Sign-On
VMware, Inc. 27

Table 2‑4. Groups in the vsphere.local Domain (Continued)
Privilege Description
SystemConfiguration.Administrators Members of the SystemConfiguration.Administrators group can view andmanage the system configuration in the vSphere Web Client. These users canview, start and restart services, troubleshoot services, see the available nodesand manage those nodes.
DCClients This group is used internally to allow the management node access to data inVMware Directory Service.NOTE Do not modify this group. Any changes might compromise yourcertificate infrastructure.
ComponentManager.Administrators Members of the ComponentManager.Administrators group can invokecomponent manager APIs that register or unregister services, that is, modifyservices. Membership in this group is not necessary for read access on theservices.
LicenseService.Administrators Members of LicenseService.Administrators have full write access to all licensingrelated data and can add, remove, assign, and unassign serial keys for allproduct assets registered in licensing service.
Administrators Administrators of the VMware Directory Service (vmdir). Members of this groupcan perform vCenter Single Sign-On administration tasks. Adding members tothis group is not usually recommended.
vCenter Server Password Requirements and Lockout BehaviorTo manage your environment, you must be aware of the vCenter Single Sign-On password policy, ofvCenter Server passwords, and of lockout behavior.
vCenter Single Sign-On Administrator PasswordThe password for [email protected] must meet the following requirements:
n At least 8 characters
n At least one lowercase character
n At least one numeric character
n At least one special character
The password for [email protected] cannot be more than 20 characters long. Only visible ASCIIcharacters are allowed. That means, for example, that you cannot use the space character.
vCenter Server PasswordsIn vCenter Server, password requirements are dictated by vCenter Single Sign-On or by the configuredidentity source, which can be Active Directory, OpenLDAP, or the local operating system for the vCenterSingle Sign-On server (not recommended).
Lockout BehaviorBy default, any user, including users with Administrator privileges, are locked out after a preset number ofconsecutive failed attempts. By default, users are locked out after five consecutive failed attempt in threeminutes. A locked account is unlocked automatically after five minutes. You can change these defaults usingthe lockout policy. See “Edit the vCenter Single Sign-On Lockout Policy,” on page 39.
Any user can change their password by using the dir-cli password change command. If a user forgets thepassword, the administrator can reset the password by using the dir-cli password reset command.
See “ESXi Passwords, ESXi Pass Phrases, and Account Lockout,” on page 135 for a discussion of passwordsof ESXi local users.
vSphere Security
28 VMware, Inc.

Configuring vCenter Single Sign-On Identity SourcesWhen a user logs in, vCenter Single Sign-On checks in the default identity source whether that user canauthenticate. You can add identity sources, remove identity sources, and change the default.
You configure vCenter Single Sign-On from the vSphere Web Client. To configure vCenter Single Sign-On,you must have vCenter Single Sign-On administrator privileges. Having vCenter Single Sign-Onadministrator privileges is different from having the Administrator role on vCenter Server or ESXi. Bydefault, only the user [email protected] has administrator privileges on the vCenter Single Sign-On server in a new installation.
n Identity Sources for vCenter Server with vCenter Single Sign-On on page 29You can use identity sources to attach one or more domains to vCenter Single Sign-On. A domain is arepository for users and groups that the vCenter Single Sign-On server can use for user authentication.
n Set the Default Domain for vCenter Single Sign-On on page 30Each vCenter Single Sign-On identity source is associated with a domain. vCenter Single Sign-On usesthe default domain to authenticate a user who logs in without a domain name. Users who belong to adomain that is not the default domain must include the domain name when they log in.
n Add a vCenter Single Sign-On Identity Source on page 31Users can log in to vCenter Server only if they are in a domain that has been added as a vCenter SingleSign-On identity source. vCenter Single Sign-On administrator users can add identity sources from thevSphere Web Client.
n Edit a vCenter Single Sign-On Identity Source on page 34vSphere users are defined in an identity source. You can edit the details of an identity source that isassociated with vCenter Single Sign-On.
n Remove a vCenter Single Sign-On Identity Source on page 35vSphere users are defined in an identity source. You can remove an identity source from the list ofregistered identity sources.
n Use vCenter Single Sign-On with Windows Session Authentication on page 35You can use vCenter Single Sign-On with Windows Session Authentication (SSPI). To make thecheckbox on the login page available, the Client Integration Plug-in must be installed.
Identity Sources for vCenter Server with vCenter Single Sign-OnYou can use identity sources to attach one or more domains to vCenter Single Sign-On. A domain is arepository for users and groups that the vCenter Single Sign-On server can use for user authentication.
An identity source is a collection of user and group data. The user and group data is stored in ActiveDirectory, OpenLDAP, or locally to the operating system of the machine where vCenter Single Sign-On isinstalled.
After installation, every instance of vCenter Single Sign-On has the identity source your_domain_name, forexample vsphere.local. This identity source is internal to vCenter Single Sign-On. A vCenter Single Sign-Onadministrator can add identity sources, set the default identity source, and create users and groups in thevsphere.local identity source.
Chapter 2 vSphere Authentication with vCenter Single Sign-On
VMware, Inc. 29

Types of Identity SourcesvCenter Server versions earlier than version 5.1 supported Active Directory and local operating systemusers as user repositories. As a result, local operating system users could always authenticate to thevCenter Server system. vCenter Server version 5.1 and version 5.5 uses vCenter Single Sign-On forauthentication. See the vSphere 5.1 documentation for a list of supported identity sources with vCenterSingle Sign-On 5.1. vCenter Single Sign-On 5.5 supports the following types of user repositories as identitysources, but supports only one default identity source.
n Active Directory versions 2003 and later. Shown as Active Directory (Integrated WindowsAuthentication) in the vSphere Web Client. vCenter Single Sign-On allows you to specify a singleActive Directory domain as an identity source. The domain can have child domains or be a forest rootdomain. VMware KB article 2064250 discusses Microsoft Active Directory Trusts supported withvCenter Single Sign-On.
n Active Directory over LDAP. vCenter Single Sign-On supports multiple Active Directory over LDAPidentity sources. This identity source type is included for compatibility with the vCenter Single Sign-Onservice included with vSphere 5.1. Shown as Active Directory as an LDAP Server in the vSphere WebClient.
n OpenLDAP versions 2.4 and later. vCenter Single Sign-On supports multiple OpenLDAP identitysources. Shown as OpenLDAP in the vSphere Web Client.
n Local operating system users. Local operating system users are local to the operating system where thevCenter Single Sign-On server is running. The local operating system identity source exists only in basicvCenter Single Sign-On server deployments and is not available in deployments with multiple vCenterSingle Sign-On instances. Only one local operating system identity source is allowed. Shown as localosin the vSphere Web Client.
NOTE Do not use local operating system users if the Platform Services Controller is on a differentmachine than the vCenter Server system. Using local operating system users might make sense in anembedded deployment but is not recommended.
n vCenter Single Sign-On system users. Exactly one system identity source named vsphere.local is createdwhen you install vCenter Single Sign-On. Shown as vsphere.local in the vSphere Web Client.
NOTE At any time, only one default domain exists. If a user from a non-default domain logs in, that usermust add the domain name (DOMAIN\user) to authenticate successfully.
vCenter Single Sign-On identity sources are managed by vCenter Single Sign-On administrator users.
You can add identity sources to a vCenter Single Sign-On server instance. Remote identity sources arelimited to Active Directory and OpenLDAP server implementations.
Set the Default Domain for vCenter Single Sign-OnEach vCenter Single Sign-On identity source is associated with a domain. vCenter Single Sign-On uses thedefault domain to authenticate a user who logs in without a domain name. Users who belong to a domainthat is not the default domain must include the domain name when they log in.
When a user logs in to a vCenter Server system from the vSphere Web Client, the login behavior depends onwhether the user is in the default domain, that is, the domain that is set as the default identity source.
n Users who are in the default domain can log in with their user name and password.
n Users who are in a domain that has been added to vCenter Single Sign-On as an identity source but isnot the default domain can log in to vCenter Server but must specify the domain in one of the followingways.
n Including a domain name prefix, for example, MYDOMAIN\user1
vSphere Security
30 VMware, Inc.

n Including the domain, for example, [email protected]
n Users who are in a domain that is not a vCenter Single Sign-On identity source cannot log in tovCenter Server. If the domain that you add to vCenter Single Sign-On is part of a domain hierarchy,Active Directory determines whether users of other domains in the hierarchy are authenticated or not.
Procedure
1 Log in to the vSphere Web Client as [email protected] or as another user with vCenter SingleSign-On administrator privileges.
Users with vCenter Single Sign-On administrator privileges are in the Administrators group in thevsphere.local domain.
2 Browse to Administration > Single Sign-On > Configuration.
3 On the Identity Sources tab, select an identity source and click the Set as Default Domain icon.
In the domain display, the default domain shows (default) in the Domain column.
Add a vCenter Single Sign-On Identity SourceUsers can log in to vCenter Server only if they are in a domain that has been added as a vCenter Single Sign-On identity source. vCenter Single Sign-On administrator users can add identity sources from thevSphere Web Client.
An identity source can be a native Active Directory (Integrated Windows Authentication) domain or anOpenLDAP directory service. For backward compatibility, Active Directory as an LDAP Server is alsoavailable. See “Identity Sources for vCenter Server with vCenter Single Sign-On,” on page 29
Immediately after installation, the following default identity sources and users are available:
localos All local operating system users. If you are upgrading, those users who canalready authenticate continue to be able to authenticate. Using the localosidentity source does not make sense in environments that use aPlatform Services Controller.
vsphere.local Contains the vCenter Single Sign-On internal users.
Procedure
1 Log in to the vSphere Web Client as [email protected] or as another user with vCenter SingleSign-On administrator privileges.
Users with vCenter Single Sign-On administrator privileges are in the Administrators group in thevsphere.local domain.
2 Browse to Administration > Single Sign-On > Configuration.
3 On the Identity Sources tab, click the Add Identity Source icon.
4 Select the type of identity source and enter the identity source settings.
Option Description
Active Directory (IntegratedWindows Authentication)
Use this option for native Active Directory implementations. The machineon which the vCenter Single Sign-Onservice is running must be in anActive Directory domain if you want to use this option.See “Active Directory Identity Source Settings,” on page 32.
Active Directory as an LDAP Server This option is available for backward compatibility. It requires that youspecify the domain controller and other information. See “Active DirectoryLDAP Server and OpenLDAP Server Identity Source Settings,” onpage 33.
Chapter 2 vSphere Authentication with vCenter Single Sign-On
VMware, Inc. 31

Option Description
OpenLDAP Use this option for an OpenLDAP identity source. See “Active DirectoryLDAP Server and OpenLDAP Server Identity Source Settings,” onpage 33.
LocalOS Use this option to add the local operating system as an identity source.You are prompted only for the name of the local operating system. If youselect this option, all users on the specified machine are visible to vCenterSingle Sign-On, even if those users are not part of another domain.
NOTE If the user account is locked or disabled, authentications and group and user searches in theActive Directory domain will fail. The user account must have read-only access over the User andGroup OU, and must be able to read user and group attributes. This is the default Active Directorydomain configuration for authentication permissions. VMware recommends using a special serviceuser.
5 If you configured an Active Directory as an LDAP Server or an OpenLDAP identity source, click TestConnection to ensure that you can connect to the identity source.
6 Click OK.
What to do next
When an identity source is added, all users can be authenticated but have the No access role. A user withvCenter Server Modify.permissions privileges can assign give users or groups of users privileges thatenable them to log in to vCenter Server and view and manage objects. See “Add a Permission to anInventory Object,” on page 120.
Active Directory Identity Source SettingsIf you select the Active Directory (Integrated Windows Authentication) identity source type, you can eitheruse the local machine account as your SPN (Service Principal Name) or specify an SPN explicitly. You canuse this option only if the vCenter Single Sign-On server is joined to an Active Directory domain.
NOTE Active Directory (Integrated Windows Authentication) always uses the root of the Active Directorydomain forest. To configure your Integrated Windows Authentication identity source with a child domainwithin your Active Directory forest, see VMware Knowledge Base article 2070433.
Select Use machine account to speed up configuration. If you expect to rename the local machine on whichvCenter Single Sign-On runs, specifying an SPN explicitly is preferable.
NOTE In vSphere 5.5, vCenter Single Sign-On uses the machine account even if you specify the SPN. SeeVMware Knowledge Base article 2087978.
Table 2‑5. Add Identity Source Settings
Field Description
Domain name FDQN of the domain. Do not provide an IP address in thisfield.
Use machine account Select this option to use the local machine account as theSPN. When you select this option, you specify only thedomain name. Do not select this option if you expect torename this machine.
Use Service Principal Name (SPN ) Select this option if you expect to rename the localmachine. You must specify an SPN, a user who canauthenticate with the identity source, and a password forthe user.
vSphere Security
32 VMware, Inc.
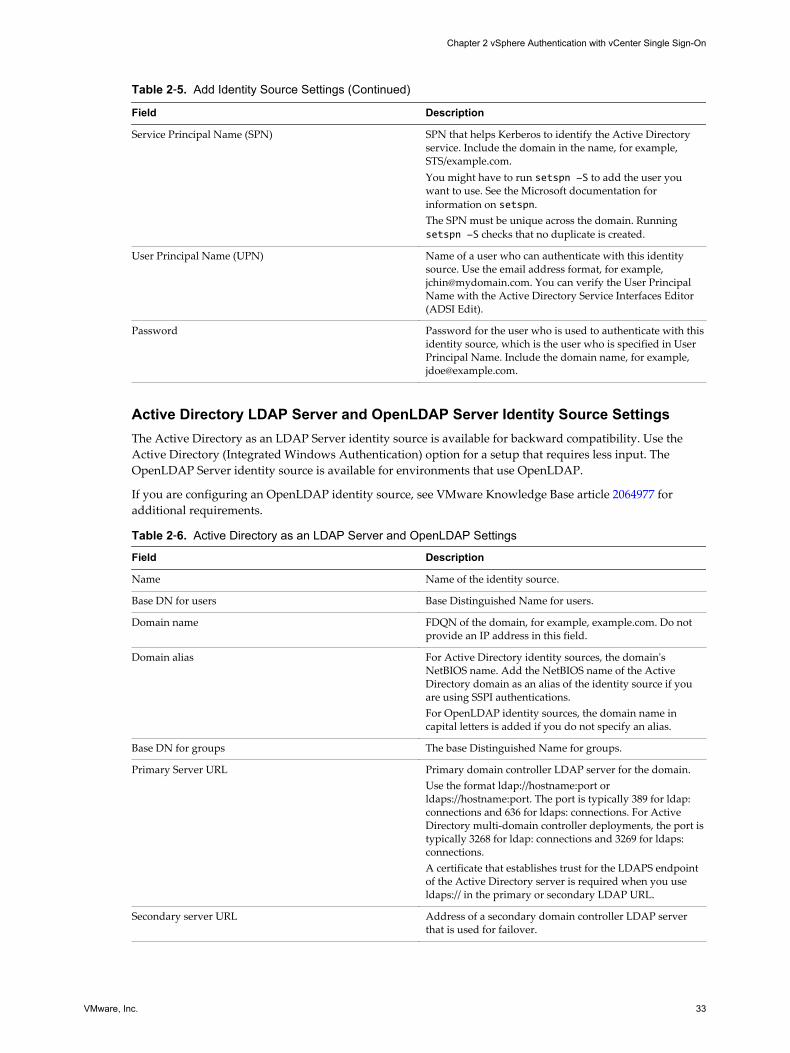
Table 2‑5. Add Identity Source Settings (Continued)
Field Description
Service Principal Name (SPN) SPN that helps Kerberos to identify the Active Directoryservice. Include the domain in the name, for example,STS/example.com.You might have to run setspn -S to add the user youwant to use. See the Microsoft documentation forinformation on setspn.The SPN must be unique across the domain. Runningsetspn -S checks that no duplicate is created.
User Principal Name (UPN) Name of a user who can authenticate with this identitysource. Use the email address format, for example,[email protected]. You can verify the User PrincipalName with the Active Directory Service Interfaces Editor(ADSI Edit).
Password Password for the user who is used to authenticate with thisidentity source, which is the user who is specified in UserPrincipal Name. Include the domain name, for example,[email protected].
Active Directory LDAP Server and OpenLDAP Server Identity Source SettingsThe Active Directory as an LDAP Server identity source is available for backward compatibility. Use theActive Directory (Integrated Windows Authentication) option for a setup that requires less input. TheOpenLDAP Server identity source is available for environments that use OpenLDAP.
If you are configuring an OpenLDAP identity source, see VMware Knowledge Base article 2064977 foradditional requirements.
Table 2‑6. Active Directory as an LDAP Server and OpenLDAP Settings
Field Description
Name Name of the identity source.
Base DN for users Base Distinguished Name for users.
Domain name FDQN of the domain, for example, example.com. Do notprovide an IP address in this field.
Domain alias For Active Directory identity sources, the domain'sNetBIOS name. Add the NetBIOS name of the ActiveDirectory domain as an alias of the identity source if youare using SSPI authentications.For OpenLDAP identity sources, the domain name incapital letters is added if you do not specify an alias.
Base DN for groups The base Distinguished Name for groups.
Primary Server URL Primary domain controller LDAP server for the domain.Use the format ldap://hostname:port orldaps://hostname:port. The port is typically 389 for ldap:connections and 636 for ldaps: connections. For ActiveDirectory multi-domain controller deployments, the port istypically 3268 for ldap: connections and 3269 for ldaps:connections.A certificate that establishes trust for the LDAPS endpointof the Active Directory server is required when you useldaps:// in the primary or secondary LDAP URL.
Secondary server URL Address of a secondary domain controller LDAP serverthat is used for failover.
Chapter 2 vSphere Authentication with vCenter Single Sign-On
VMware, Inc. 33

Table 2‑6. Active Directory as an LDAP Server and OpenLDAP Settings (Continued)
Field Description
Choose certificate If you want to use LDAPS with your Active DirectoryLDAP Server or OpenLDAP Server identity source, aChoose certificate button becomes available after you typeldaps:// in the URL field. A secondary URL is notrequired.
Username ID of a user in the domain who has a minimum of read-only access to Base DN for users and groups.
Password Password of the user who is specified by Username.
Edit a vCenter Single Sign-On Identity SourcevSphere users are defined in an identity source. You can edit the details of an identity source that isassociated with vCenter Single Sign-On.
Procedure
1 Log in to the vSphere Web Client as [email protected] or as another user with vCenter SingleSign-On administrator privileges.
Users with vCenter Single Sign-On administrator privileges are in the Administrators group in thevsphere.local domain.
2 Browse to Administration > Single Sign-On > Configuration.
3 Click the Identity Sources tab.
4 Right-click the identity source in the table and select Edit Identity Source.
5 Edit the identity source settings. The available options depend on the type of identity source youselected.
Option Description
Active Directory (IntegratedWindows Authentication)
Use this option for native Active Directory implementations. The machineon which the vCenter Single Sign-Onservice is running must be in anActive Directory domain if you want to use this option.See “Active Directory Identity Source Settings,” on page 32.
Active Directory as an LDAP Server This option is available for backward compatibility. It requires that youspecify the domain controller and other information. See “Active DirectoryLDAP Server and OpenLDAP Server Identity Source Settings,” on page 33.
OpenLDAP Use this option for an OpenLDAP identity source. See “Active DirectoryLDAP Server and OpenLDAP Server Identity Source Settings,” on page 33.
LocalOS Use this option to add the local operating system as an identity source.You are prompted only for the name of the local operating system. If youselect this option, all users on the specified machine are visible to vCenterSingle Sign-On, even if those users are not part of another domain.
6 Click Test Connection to ensure that you can connect to the identity source.
7 Click OK.
vSphere Security
34 VMware, Inc.

Remove a vCenter Single Sign-On Identity SourcevSphere users are defined in an identity source. You can remove an identity source from the list ofregistered identity sources.
Procedure
1 Log in to the vSphere Web Client as [email protected] or as another user with vCenter SingleSign-On administrator privileges.
Users with vCenter Single Sign-On administrator privileges are in the Administrators group in thevsphere.local domain.
2 Browse to Administration > Single Sign-On > Configuration.
3 On the Identity Sources tab, select an identity source and click the Delete Identity Source icon.
4 Click Yes when prompted to confirm.
Use vCenter Single Sign-On with Windows Session AuthenticationYou can use vCenter Single Sign-On with Windows Session Authentication (SSPI). To make the checkbox onthe login page available, the Client Integration Plug-in must be installed.
Using SSPI speeds up login for the user who is currently logged in to a machine.
Prerequisites
Your Windows domain must be set up properly. See VMware Knowledge Base article 2064250.
Procedure
1 Navigate to the vSphere Web Client login page.
2 If the Use Windows session authentication check box is not available, click Download the ClientIntegration Plug-in at the bottom of the login page.
3 If the browser blocks the installation by issuing certificate errors or by running a pop-up blocker, followthe Help instructions for your browser to resolve the problem.
4 Close other browsers if you are prompted to do so.
After installation, the plug-in is available for all browsers. If your browser requires it, you might have toallow the plug-in for individual sessions or for all sessions.
5 Exit and restart your browser.
After the restart, you can select the Use Windows session authentication check box.
Managing the Security Token Service (STS)The vCenter Single Sign-On Security Token Service (STS) is a Web service that issues, validates, and renewssecurity tokens.
To acquire SAML tokens, users present their primary credentials to the STS interface. The primarycredentials depend on the type of user.
User User name and password available in a vCenter Single Sign-On identitysource.
Application user Valid certificate.
Chapter 2 vSphere Authentication with vCenter Single Sign-On
VMware, Inc. 35

STS authenticates the user based on the primary credentials, and constructs a SAML token that contains userattributes. STS signs the SAML token with its STS signing certificate, and assigns the token to the user. Bydefault, the STS signing certificate is generated by VMCA. You can replace the default STS signing certificatefrom the vSphere Client.
After a user has a SAML token, the SAML token is sent as part of that user HTTP requests, possibly throughvarious proxies. Only the intended recipient (service provider) can use the information in the SAML token.
Refresh the Security Token Service (STS) Root CertificateThe vCenter Single Sign-On server includes a Security Token Service (STS). The Security Token Service is aWeb service that issues, validates, and renews security tokens. You can manually refresh the existingSecurity Token Service certificate from the vSphere Web Client when the certificate expires or changes.
To acquire a SAML token, a user presents the primary credentials to the Secure Token Server (STS). Theprimary credentials depend on the type of user:
Solution user Valid certificate
Other users User name and password available in a vCenter Single Sign-On identitysource.
The STS authenticates the user using the primary credentials, and constructs a SAML token that containsuser attributes. The STS service signs the SAML token with its STS signing certificate, and then assigns thetoken to a user. By default, the STS signing certificate is generated by VMCA.
After a user has a SAML token, the SAML token is sent as part of that user's HTTP requests, possiblythrough various proxies. Only the intended recipient (service provider) can use the information in theSAML token.
You can replace the existing STS signing certificate vSphere Web Client if your company policy requires it,or if you want to update an expired certificate.
Do not replace the file in the filesystem. If you do, unexpected and difficult to debug errors result.
Procedure
1 Log in to the vSphere Web Client as [email protected] or as another user with vCenter SingleSign-On administrator privileges.
Users with vCenter Single Sign-On administrator privileges are in the Administrators group in thevsphere.local domain.
2 Browse to Administration > Single Sign-On > Configuration.
3 Select the Certificates tab, then the STS Signing subtab, and click the Add STS Signing Certificateicon.
4 Click Browse to browse to the key store JKS file that contains the new certificate and click Open.
If the key store file is valid, the STS certificate table is populated with the certificate information.
5 Click OK.
The new certificate information appears on the STS Signing tab.
What to do next
Restart the vSphere Web Client service. You can find all services in the System Configuration area ofAdministration.
vSphere Security
36 VMware, Inc.

Determine the Expiration Date of an LDAPS SSL CertificateIf you select a Active Directory LDAP Server and OpenLDAP Server identity source, and you decide to useLDAPS, you can upload an SSL certificate for the LDAP traffic. SSL certificates expire after a predefinedlifespan. Knowing when a certificate expires lets you replace or renew the certificate before the expirationdate.
You see certificate expiration information only if you use an Active Directory LDAP Server and OpenLDAPServer and specify an ldaps:// URL for the server. The Identity Sources TrustStore tab remains empty forother types of identity sources or for ldap:// traffic.
Procedure
1 Log in to the vSphere Web Client as [email protected] or as another user with vCenter SingleSign-On administrator privileges.
Users with vCenter Single Sign-On administrator privileges are in the Administrators group in thevsphere.local domain.
2 Browse to Administration > Single Sign-On > Configuration.
3 Click the Certificates tab, and then the Identity Sources TrustStore subtab.
4 Find the certificate and verify the expiration date in the Valid To text box.
You might see a warning at the top of the tab which indicates that a certificate is about to expire.
Add a SAML Service ProviderIf you have an external SAML service provider in your environment, you can add your provider metadatato the VMware Identity Provider that is included with vCenter Single Sign-On. Going forward, your SAMLservice provider can be used.
The process involves importing the metadata from your SAML service provider into vCenter Single Sign-On, and importing the vCenter Single Sign-On metadata into your SAML service provider so the twoproviders share all data.
Prerequisites
Retrieve the metadata from your SAML service provider. Your provider must be a SAML 2.0 serviceprovider.
Procedure
1 Export the metadate from your service provider to a file.
2 Log in to the vSphere Web Client as [email protected] or as another user with vCenter SingleSign-On administrator privileges.
Users with vCenter Single Sign-On administrator privileges are in the Administrators group in thevsphere.local domain.
3 Browse to Administration > Sign-On > Configuration.
4 Select the SAML Service Providers tab.
5 In the Metadata from your SAML service provider field, click Import and paste the XML strings intothe dialog, or click Import from File to import a file and then click Import.
6 In the Metadata for your SAML service provider field, click Download and specify a file location.
7 Follow the instructions for your SAML service provider to add the vCenter Single Sign-On metadata tothat service provider.
Chapter 2 vSphere Authentication with vCenter Single Sign-On
VMware, Inc. 37

Managing vCenter Single Sign-On PoliciesvCenter Single Sign-On policies enforce the security rules in your environment. You can view and edit thedefault vCenter Single Sign-On passwords, lockout policies, and token policies.
Edit the vCenter Single Sign-On Password PolicyThe vCenter Single Sign-On password policy is a set of rules and restrictions on the format and expiration ofvCenter Single Sign-On user passwords. The password policy applies only to users in the vCenter SingleSign-On domain (vsphere.local).
By default, vCenter Single Sign-On passwords expire after 90 days. The vSphere Web Client reminds youwhen your password is about to expire. You can reset an expired password if you know the old password.
NOTE Password policies apply only to user accounts, not to system accounts such [email protected].
See “Change Your vCenter Single Sign-On Password,” on page 45.
Procedure
1 Log in to the vSphere Web Client as [email protected] or as another user with vCenter SingleSign-On administrator privileges.
Users with vCenter Single Sign-On administrator privileges are in the Administrators group in thevsphere.local domain.
2 Browse to Administration > Single Sign-On > Configuration.
3 Click the Policies tab and select Password Policies.
4 Click Edit.
5 Edit the password policy parameters.
Option Description
Description Password policy description.
Maximum lifetime Maximum number of days that a password can exist before the user mustchange it.
Restrict reuse Number of the user's previous passwords that cannot be selected. Forexample, if a user cannot reuse any of the last six passwords, type 6.
Maximum length Maximum number of characters that are allowed in the password.
Minimum length Minimum number of characters required in the password. The minimumlength must be no less than the combined minimum of alphabetic,numeric, and special character requirements.
vSphere Security
38 VMware, Inc.
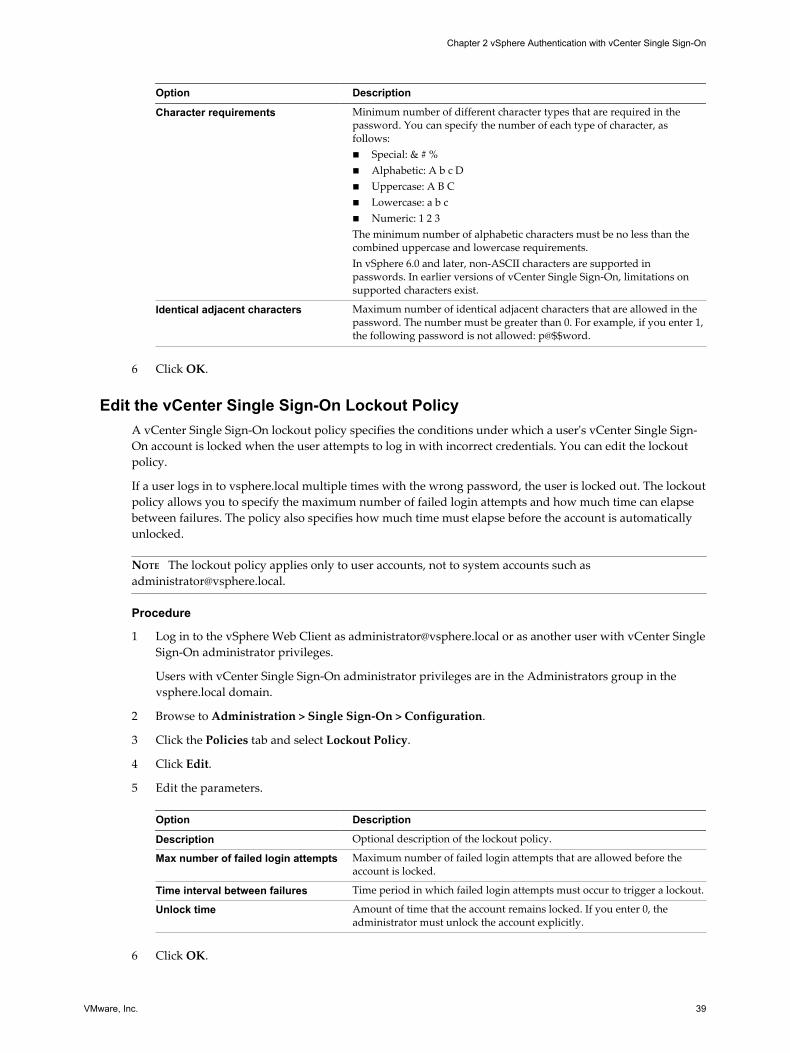
Option Description
Character requirements Minimum number of different character types that are required in thepassword. You can specify the number of each type of character, asfollows:n Special: & # %n Alphabetic: A b c Dn Uppercase: A B Cn Lowercase: a b cn Numeric: 1 2 3The minimum number of alphabetic characters must be no less than thecombined uppercase and lowercase requirements.In vSphere 6.0 and later, non-ASCII characters are supported inpasswords. In earlier versions of vCenter Single Sign-On, limitations onsupported characters exist.
Identical adjacent characters Maximum number of identical adjacent characters that are allowed in thepassword. The number must be greater than 0. For example, if you enter 1,the following password is not allowed: p@$$word.
6 Click OK.
Edit the vCenter Single Sign-On Lockout PolicyA vCenter Single Sign-On lockout policy specifies the conditions under which a user's vCenter Single Sign-On account is locked when the user attempts to log in with incorrect credentials. You can edit the lockoutpolicy.
If a user logs in to vsphere.local multiple times with the wrong password, the user is locked out. The lockoutpolicy allows you to specify the maximum number of failed login attempts and how much time can elapsebetween failures. The policy also specifies how much time must elapse before the account is automaticallyunlocked.
NOTE The lockout policy applies only to user accounts, not to system accounts such [email protected].
Procedure
1 Log in to the vSphere Web Client as [email protected] or as another user with vCenter SingleSign-On administrator privileges.
Users with vCenter Single Sign-On administrator privileges are in the Administrators group in thevsphere.local domain.
2 Browse to Administration > Single Sign-On > Configuration.
3 Click the Policies tab and select Lockout Policy.
4 Click Edit.
5 Edit the parameters.
Option Description
Description Optional description of the lockout policy.
Max number of failed login attempts Maximum number of failed login attempts that are allowed before theaccount is locked.
Time interval between failures Time period in which failed login attempts must occur to trigger a lockout.
Unlock time Amount of time that the account remains locked. If you enter 0, theadministrator must unlock the account explicitly.
6 Click OK.
Chapter 2 vSphere Authentication with vCenter Single Sign-On
VMware, Inc. 39

Edit the vCenter Single Sign-On Token PolicyThevCenter Single Sign-On token policy specifies the clock tolerance, renewal count, and other tokenproperties. You can edit the vCenter Single Sign-On token policy to ensure that the token specificationconforms to your corporation's security standards.
Procedure
1 Log in to the vSphere Web Client.
2 Select Administration > Single Sign-On, and select Configuration.
3 Click the Policies tab and select Token Policy.
The vSphere Web Client displays the current configuration settings. If you have not modified thedefault settings, vCenter Single Sign-On uses them.
4 Edit the token policy configuration parameters.
Option Description
Clock tolerance Time difference, in milliseconds, that vCenter Single Sign-On toleratesbetween a client clock and the domain controller clock. If the timedifference is greater than the specified value, vCenter Single Sign-Ondeclares the token invalid.
Maximum token renewal count Maximum number of times that a token can be renewed. After themaximum number of renewal attempts, a new security token is required.
Maximum token delegation count Holder-of-key tokens can be delegated to services in the vSphereenvironment. A service that uses a delegated token performs the service onbehalf of the principal that provided the token. A token request specifies aDelegateTo identity. The DelegateTo value can either be a solution tokenor a reference to a solution token. This value specifies how many times asingle holder-of-key token can be delegated.
Maximum bearer token lifetime Bearer tokens provide authentication based only on possession of thetoken. Bearer tokens are intended for short-term, single-operation use. Abearer token does not verify the identity of the user or entity that issending the request. This value specifies the lifetime value of a bearertoken before the token has to be reissued.
Maximum holder-of-key tokenlifetime
Holder-of-key tokens provide authentication based on security artifactsthat are embedded in the token. Holder-of-key tokens can be used fordelegation. A client can obtain a holder-of-key token and delegate thattoken to another entity. The token contains the claims to identify theoriginator and the delegate. In the vSphere environment, a vCenter Serversystem obtains delegated tokens on a user's behalf and uses those tokens toperform operations.This value determines the lifetime of a holder-of-key token before thetoken is marked invalid.
5 Click OK.
Managing vCenter Single Sign-On Users and GroupsA vCenter Single Sign-On administrator user can manage users and groups in the vsphere.local domainfrom the vSphere Web Client.
The vCenter Single Sign-On administrator user can perform the following tasks.
n Add vCenter Single Sign-On Users on page 41Users listed on the Users tab in the vSphere Web Client are internal to vCenter Single Sign-On andbelong to the vsphere.local domain.
vSphere Security
40 VMware, Inc.

n Disable and Enable vCenter Single Sign-On Users on page 42When a vCenter Single Sign-Onuser account is disabled, the user cannot log in to the vCenter SingleSign-On server until the account is enabled by an administrator. You can disable and enable usersfrom the vSphere Web Client interface.
n Delete a vCenter Single Sign-On User on page 42You can delete users that are in the vsphere.local domain from the vCenter Single Sign-On. Youcannot delete local operating system users or users in another domain from the vSphere Web Client.
n Edit a vCenter Single Sign-On User on page 43You can change the password or other details of a vCenter Single Sign-On user from thevSphere Web Client. You cannot rename users in the vsphere.local domain. That means you cannotrename [email protected].
n Add a vCenter Single Sign-On Group on page 43In the vCenter Single Sign-On, groups listed on the Groups tab are internal to vCenter Single Sign-On.A group lets you create a container for a collection of group members (principals).
n Add Members to a vCenter Single Sign-On Group on page 44Members of a vCenter Single Sign-On group can be users or other groups from one or more identitysources. You can add new members from the vSphere Web Client.
n Remove Members from a vCenter Single Sign-On Group on page 44You can remove members from a vCenter Single Sign-On group from the vSphere Web Client. Whenyou remove a member (user or group) from a local group, you do not delete the member from thesystem.
n Delete vCenter Single Sign-On Solution Users on page 45vCenter Single Sign-On displays solution users. A solution user is a collection of services. SeveralvCenter Server solution users are predefined and authenticate to vCenter Single Sign-On as part ofinstallation. In troubleshooting situations, for example, if an uninstall did not complete cleanly, youcan delete individual solution users from the vSphere Web Client.
n Change Your vCenter Single Sign-On Password on page 45Users in the vsphere.local domain can change their vCenter Single Sign-On passwords from thevSphere Web Client. Users in other domains change their passwords following the rules for thatdomain. You can change a vCenter Single Sign-On password or reset an expired password from thevSphere Web Client or using the dir-cli password reset command.
Add vCenter Single Sign-On UsersUsers listed on the Users tab in the vSphere Web Client are internal to vCenter Single Sign-On and belong tothe vsphere.local domain.
You can select other domains and view information about the users in those domains, but you cannot addusers to other domains from the vCenter Single Sign-On management interface of the vSphere Web Client.
Procedure
1 Log in to the vSphere Web Client as [email protected] or as another user with vCenter SingleSign-On administrator privileges.
Users with vCenter Single Sign-On administrator privileges are in the Administrators group in thevsphere.local domain.
2 Click Home, and browse to Administration > Single Sign-On > Users and Groups.
3 If vsphere.local is not the currently selected domain, select it from the dropdown menu.
You cannot add users to other domains.
Chapter 2 vSphere Authentication with vCenter Single Sign-On
VMware, Inc. 41

4 On the Users tab, click the New User icon.
5 Type a user name and password for the new user.
You cannot change the user name after you create a user.
The password must meet the password policy requirements for the system.
6 (Optional) Type the first name and last name of the new user.
7 (Optional) Enter an email address and description for the user.
8 Click OK.
When you add a user, that user initially has no privileges to perform management operations.
What to do next
Add the user to a group in the vsphere.local domain, for example, to the group of users who canadministrator VMCA (CAAdmins) or to the group of users who can administer vCenter Single Sign-On(Administrators). See “Add Members to a vCenter Single Sign-On Group,” on page 44.
Disable and Enable vCenter Single Sign-On UsersWhen a vCenter Single Sign-Onuser account is disabled, the user cannot log in to the vCenter Single Sign-On server until the account is enabled by an administrator. You can disable and enable users from thevSphere Web Client interface.
Disabled user accounts remain available in the vCenter Single Sign-On system, but the user cannot log in orperform operations on the server. Users with administrator privileges can disable and enable users from thevCenter Users and Groups page.
Prerequisites
You must be a member of the vCenter Single Sign-On Administrators group to disable and enable vCenterSingle Sign-On users.
Procedure
1 Log in to the vSphere Web Client as [email protected] or as another user with vCenter SingleSign-On administrator privileges.
Users with vCenter Single Sign-On administrator privileges are in the Administrators group in thevsphere.local domain.
2 Click Home, and browse to Administration > Single Sign-On > Users and Groups.
3 Select a user, click the Disable icon, and click Yes when prompted.
4 To enable the user again, right-click the user, select Enable, and click Yes when prompted.
Delete a vCenter Single Sign-On UserYou can delete users that are in the vsphere.local domain from the vCenter Single Sign-On. You cannotdelete local operating system users or users in another domain from the vSphere Web Client.
CAUTION If you delete the administrator user in the vsphere.local domain, you can no longer log in tovCenter Single Sign-On. Reinstall vCenter Server and its components.
vSphere Security
42 VMware, Inc.

Procedure
1 Log in to the vSphere Web Client as [email protected] or as another user with vCenter SingleSign-On administrator privileges.
Users with vCenter Single Sign-On administrator privileges are in the Administrators group in thevsphere.local domain.
2 Click Home, and browse to Administration > Single Sign-On > Users and Groups.
3 Select the Users tab, and select the vsphere.local domain.
4 In the list of users, select the user that you want to delete and click the Delete icon.
Proceed with caution. You cannot undo this action.
Edit a vCenter Single Sign-On UserYou can change the password or other details of a vCenter Single Sign-On user from thevSphere Web Client. You cannot rename users in the vsphere.local domain. That means you cannot [email protected].
You can create additional users with the same privileges as [email protected].
vCenter Single Sign-On users are stored in the vCenter Single Sign-On vsphere.local domain.
You can review the vCenter Single Sign-On password policies from the vSphere Web Client. Log in [email protected] and select Configuration > Policies > Password Policies.
Procedure
1 Log in to the vSphere Web Client as [email protected] or as another user with vCenter SingleSign-On administrator privileges.
Users with vCenter Single Sign-On administrator privileges are in the Administrators group in thevsphere.local domain.
2 Click Home, and browse to Administration > Single Sign-On > Users and Groups.
3 Click the Users tab.
4 Right-click the user and select Edit User.
5 Make changes to the user.
You cannot change the user name of the user.
The password must meet the password policy requirements for the system.
6 Click OK.
Add a vCenter Single Sign-On GroupIn the vCenter Single Sign-On, groups listed on the Groups tab are internal to vCenter Single Sign-On. Agroup lets you create a container for a collection of group members (principals).
When you add a vCenter Single Sign-On group from the vSphere Web Client administration interface, thegroup is added to the vsphere.local domain.
Procedure
1 Log in to the vSphere Web Client as [email protected] or as another user with vCenter SingleSign-On administrator privileges.
Users with vCenter Single Sign-On administrator privileges are in the Administrators group in thevsphere.local domain.
Chapter 2 vSphere Authentication with vCenter Single Sign-On
VMware, Inc. 43
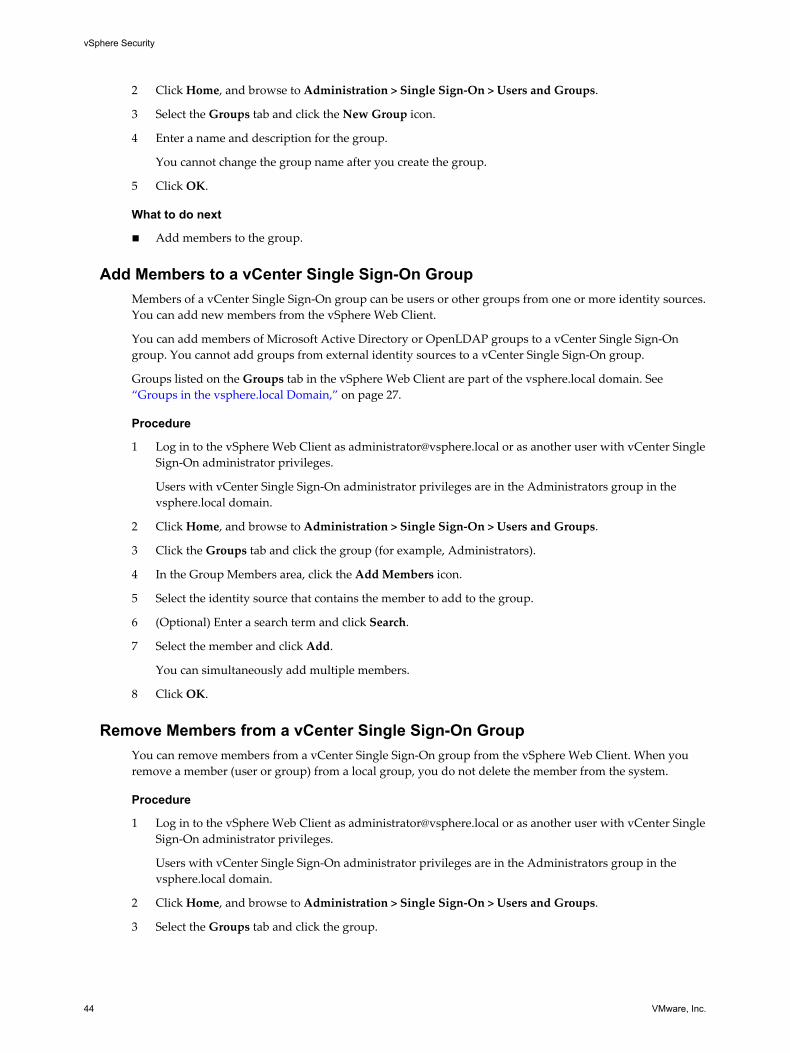
2 Click Home, and browse to Administration > Single Sign-On > Users and Groups.
3 Select the Groups tab and click the New Group icon.
4 Enter a name and description for the group.
You cannot change the group name after you create the group.
5 Click OK.
What to do next
n Add members to the group.
Add Members to a vCenter Single Sign-On GroupMembers of a vCenter Single Sign-On group can be users or other groups from one or more identity sources.You can add new members from the vSphere Web Client.
You can add members of Microsoft Active Directory or OpenLDAP groups to a vCenter Single Sign-Ongroup. You cannot add groups from external identity sources to a vCenter Single Sign-On group.
Groups listed on the Groups tab in the vSphere Web Client are part of the vsphere.local domain. See “Groups in the vsphere.local Domain,” on page 27.
Procedure
1 Log in to the vSphere Web Client as [email protected] or as another user with vCenter SingleSign-On administrator privileges.
Users with vCenter Single Sign-On administrator privileges are in the Administrators group in thevsphere.local domain.
2 Click Home, and browse to Administration > Single Sign-On > Users and Groups.
3 Click the Groups tab and click the group (for example, Administrators).
4 In the Group Members area, click the Add Members icon.
5 Select the identity source that contains the member to add to the group.
6 (Optional) Enter a search term and click Search.
7 Select the member and click Add.
You can simultaneously add multiple members.
8 Click OK.
Remove Members from a vCenter Single Sign-On GroupYou can remove members from a vCenter Single Sign-On group from the vSphere Web Client. When youremove a member (user or group) from a local group, you do not delete the member from the system.
Procedure
1 Log in to the vSphere Web Client as [email protected] or as another user with vCenter SingleSign-On administrator privileges.
Users with vCenter Single Sign-On administrator privileges are in the Administrators group in thevsphere.local domain.
2 Click Home, and browse to Administration > Single Sign-On > Users and Groups.
3 Select the Groups tab and click the group.
vSphere Security
44 VMware, Inc.

4 In the list of group members, select the user or group that you want to remove and click the RemoveMember icon.
5 Click OK.
The user is removed from the group, but is still available in the system.
Delete vCenter Single Sign-On Solution UsersvCenter Single Sign-On displays solution users. A solution user is a collection of services. SeveralvCenter Server solution users are predefined and authenticate to vCenter Single Sign-On as part ofinstallation. In troubleshooting situations, for example, if an uninstall did not complete cleanly, you candelete individual solution users from the vSphere Web Client.
When you remove the set of services associated with a vCenter Server solution user or a third-party solutionuser from your environment, the solution user is removed from the vSphere Web Client display. If youforcefully remove an application, or if the system becomes unrecoverable while the solution user is still inthe system, you can remove the solution user explicitly from the vSphere Web Client.
IMPORTANT If you delete a solution user, the corresponding services can no longer authenticate to vCenterSingle Sign-On.
Procedure
1 Log in to the vSphere Web Client as [email protected] or as another user with vCenter SingleSign-On administrator privileges.
Users with vCenter Single Sign-On administrator privileges are in the Administrators group in thevsphere.local domain.
2 Click Home, and browse to Administration > Single Sign-On > Users and Groups.
3 Click the Solution Users tab, and click the solution user name.
4 Click the Delete Solution User icon.
5 Click Yes.
The services associated with the solution user no longer have access to vCenter Server and cannot functionas vCenter Server services.
Change Your vCenter Single Sign-On PasswordUsers in the vsphere.local domain can change their vCenter Single Sign-On passwords from thevSphere Web Client. Users in other domains change their passwords following the rules for that domain.You can change a vCenter Single Sign-On password or reset an expired password from thevSphere Web Client or using the dir-cli password reset command.
The password policy that is defined in the vCenter Single Sign-On configuration interface determines whenyour password expires. By default, vCenter Single Sign-On user passwords expire after 90 days, butadministrator passwords such as the password for [email protected] do not expire. ThevSphere Web Client reminds you when your password is about to expire. You can reset an expiredpassword if you know the old password.
This procedure explains how you can change a password. If your password is expired, you are prompted tochange it. In that case, you must supply the old password. If you no longer remember your password,[email protected] or another member of the Administrators group in vsphere.local can reset thepassword by using the dir-cli password reset command.
Chapter 2 vSphere Authentication with vCenter Single Sign-On
VMware, Inc. 45

Procedure
1 Log in to the vSphere Web Client using your vCenter Single Sign-On credentials.
2 In the upper navigation pane, to the left of the Help menu, click your user name to pull down the menu.
As an alternative, you can select Administration > Single Sign-On > Users and Groups and select EditUser from the right-button menu.
3 Select Change Password and type your current password.
4 Type a new password and confirm it.
The password must conform to the password policy.
5 Click OK.
vCenter Single Sign-On Security Best PracticesFollow vCenter Single Sign-On security best practices to protect your vSphere environment.
The vSphere 6.0 authentication and certificate infrastructure enhances security in your vSphereenvironment. To make sure that infrastructure is not compromised, follow vCenter Single Sign-On BestPractices.
Check passwordexpiration
The default vCenter Single Sign-On password policy has a password lifetimeof 90 days. After 90 days, the password is expired and the ability to log iscompromised. Check the expiration and refresh passwords in a timelyfashion.
Configure NTP Ensure that all systems use the same relative time source (including therelevant localization offset), and that the relative time source can becorrelated to an agreed-upon time standard (such as Coordinated UniversalTime—UTC). Synchronized systems are essential for vCenter Single Sign-Oncertificate validity, and for the validity of other vSphere certificates.
NTP also makes it easier to track an intruder in log files. Incorrect timesettings can make it difficult to inspect and correlate log files to detectattacks, and can make auditing inaccurate.
Troubleshooting vCenter Single Sign-OnConfiguring vCenter Single Sign-On can be a complex process.
The following topics provide a starting point for troubleshooting vCenter Single Sign-On. Search thisdocumentation center and the VMware Knowledge Base system for additional pointers.
Determining the Cause of a Lookup Service ErrorvCenter Single Sign-On installation displays an error referring to the vCenter Server or the vSphere WebClient.
Problem
vCenter Server and Web Client installers show the error Could not contact Lookup Service. Please checkVM_ssoreg.log....
Cause
This problem has several causes, including unsynchronized clocks on the host machines, firewall blocking,and services that must be started.
vSphere Security
46 VMware, Inc.

Solution
1 Verify that the clocks on the host machines running vCenter Single Sign-On, vCenter Server, and theWeb Client are synchronized.
2 View the specific log file found in the error message.
In the message, system temporary folder refers to %TEMP%.
3 Within the log file, search for the following messages.
The log file contains output from all installation attempts. Locate the last message that showsInitializing registration provider...
Message Cause and solution
java.net.ConnectException:Connection timed out: connect
The IP address is incorrect, a firewall is blocking access to vCenter SingleSign-On, or vCenter Single Sign-On is overloaded.Ensure that a firewall is not blocking the vCenter Single Sign-On port (bydefault 7444) and that the machine on which vCenter Single Sign-On isinstalled has adequate free CPU, I/O. and RAM capacity.
java.net.ConnectException:Connection refused: connect
IThe IP address or FQDN is incorrect and the vCenter Single Sign-Onservice has not started or has started within the past minute.Verify that vCenter Single Sign-On is working by checking the status ofvCenter Single Sign-On service (Windows) and vmware-sso daemon(Linux).Restart the service. If this does not correct the problem, see the recoverysection of the vSphere troubleshooting guide.
Unexpected status code: 404. SSOServer failed during initialization
Restart vCenter Single Sign-On. If this does not correct the problem, seethe Recovery section of the vSphere Troubleshooting Guide.
The error shown in the UI beginswith Could not connect tovCenter Single Sign-on.
You also see the return code SslHandshakeFailed. This is an uncommonerror. It indicates that the provided IP address or FQDN that resolves tovCenter Single Sign-On host was not the one used when you installedvCenter Single Sign-On.In %TEMP%\VM_ssoreg.log, find the line that contains the followingmessage.host name in certificate did not match: <install-configuredFQDN or IP> != <A> or <B> or <C> where A was the FQDN youentered during the vCenter Single Sign-On installation, and B and C aresystem-generated allowable alternatives.Correct the configuration to use the FQDN on the right of the != sign in thelog file. In most cases, use the FQDN that you specified during vCenterSingle Sign-On installation.If none of the alternatives are possible in your network configuration,recover your vCenter Single Sign-On SSL configuration.
Unable to Log In Using Active Directory Domain AuthenticationYou log in to a vCenter Server component from the vSphere Web Client. You use your Active Directory username and password. Authentication fails.
Problem
You add an Active Directory identity source to vCenter Single Sign-On, but users cannot log in tovCenter Server.
Cause
Users use their user name and password to log in to the default domain. For all other domains, users mustinclude the domain name (user@domain or DOMAIN\user).
If you are using the vCenter Server Appliance, other problems might exist.
Chapter 2 vSphere Authentication with vCenter Single Sign-On
VMware, Inc. 47

Solution
For all vCenter Single Sign-On deployments, you can change the default identity source. After that change,users can log in to the default identity source with username and password only.
To configure your Integrated Windows Authentication identity source with a child domain within yourActive Directory forest, see VMware Knowledge Base article 2070433. By default, Integrated WindowsAuthentication uses the root domain of your Active Directory forest.
If you are using the vCenter Server Appliance, and changing the default identity source does not resolve theissue, perform the following additional troubleshooting steps.
1 Synchronize the clocks between the vCenter Server Appliance and the Active Directory domaincontrollers.
2 Verify that each domain controller has a pointer record (PTR) in the Active Directory domain DNSservice and that the PTR record information matches the DNS name of the controller. When using thevCenter Server Appliance, you can run the following commands to perform the task:
a To list the domain controllers run the following command:
# dig SRV _ldap._tcp.my-ad.com
The relevant addresses are in the answer section, as in the following example:
;; ANSWER SECTION:
_ldap._tcp.my-ad.com. (...) my-controller.my-ad.com
...
b For each domain controller, verify forward and reverse resolution by running the followingcommand:
# dig my-controller.my-ad.com
The relevant addresses are in the answer section, as in the following example:
;; ANSWER SECTION:
my-controller.my-ad.com (...) IN A controller IP address
...
# dig -x <controller IP address>
The relevant addresses are in the answer section, as in the following example:
;; ANSWER SECTION:
IP-in-reverse.in-addr.arpa. (...) IN PTR my-controller.my-ad.com
...
3 If that does not resolve the problem, remove the vCenter Server Appliance from the Active Directorydomain and then rejoin the domain. See the vCenter Server Appliance Configuration documentation.
4 Close all browser sessions connected to the vCenter Server Appliance and restart all services.
/bin/service-control --restart --all
vCenter Server Login Fails Because the User Account is LockedWhen you log in to vCenter Server from the vSphere Web Client login page, an error indicates that theaccount is locked.
Problem
After several failed attempts, you cannot log in to the vSphere Web Client using vCenter Single Sign-On.You see the message that your account is locked.
vSphere Security
48 VMware, Inc.
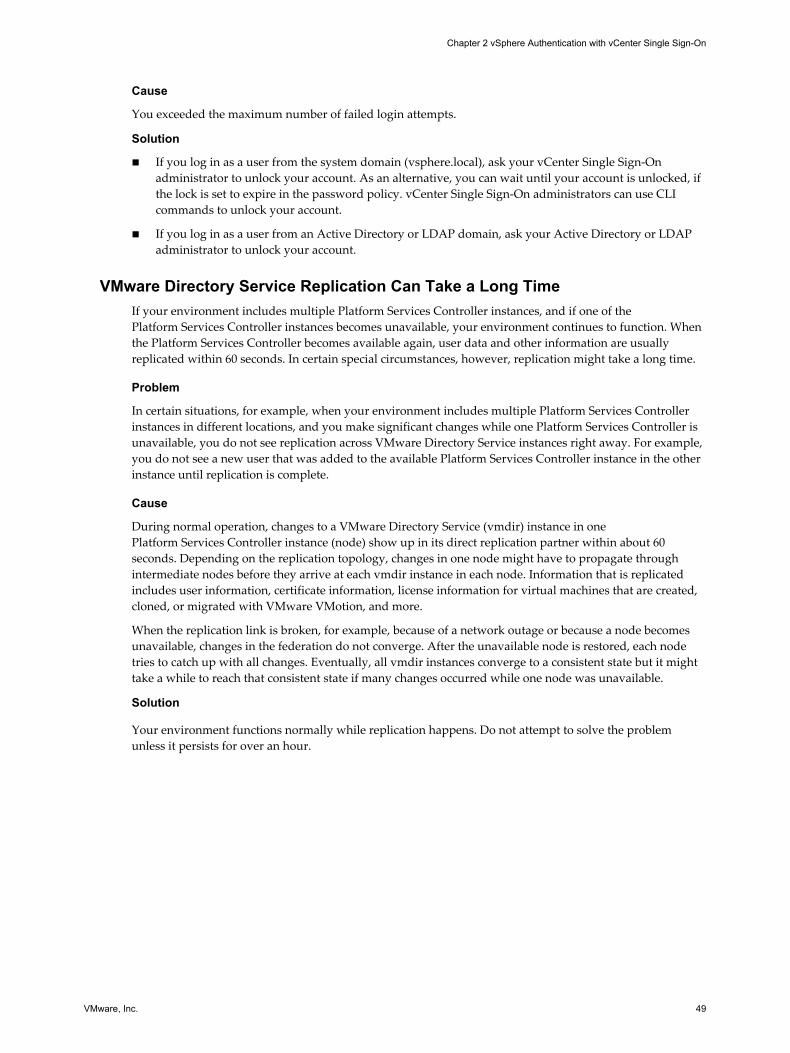
Cause
You exceeded the maximum number of failed login attempts.
Solution
n If you log in as a user from the system domain (vsphere.local), ask your vCenter Single Sign-Onadministrator to unlock your account. As an alternative, you can wait until your account is unlocked, ifthe lock is set to expire in the password policy. vCenter Single Sign-On administrators can use CLIcommands to unlock your account.
n If you log in as a user from an Active Directory or LDAP domain, ask your Active Directory or LDAPadministrator to unlock your account.
VMware Directory Service Replication Can Take a Long TimeIf your environment includes multiple Platform Services Controller instances, and if one of thePlatform Services Controller instances becomes unavailable, your environment continues to function. Whenthe Platform Services Controller becomes available again, user data and other information are usuallyreplicated within 60 seconds. In certain special circumstances, however, replication might take a long time.
Problem
In certain situations, for example, when your environment includes multiple Platform Services Controllerinstances in different locations, and you make significant changes while one Platform Services Controller isunavailable, you do not see replication across VMware Directory Service instances right away. For example,you do not see a new user that was added to the available Platform Services Controller instance in the otherinstance until replication is complete.
Cause
During normal operation, changes to a VMware Directory Service (vmdir) instance in onePlatform Services Controller instance (node) show up in its direct replication partner within about 60seconds. Depending on the replication topology, changes in one node might have to propagate throughintermediate nodes before they arrive at each vmdir instance in each node. Information that is replicatedincludes user information, certificate information, license information for virtual machines that are created,cloned, or migrated with VMware VMotion, and more.
When the replication link is broken, for example, because of a network outage or because a node becomesunavailable, changes in the federation do not converge. After the unavailable node is restored, each nodetries to catch up with all changes. Eventually, all vmdir instances converge to a consistent state but it mighttake a while to reach that consistent state if many changes occurred while one node was unavailable.
Solution
Your environment functions normally while replication happens. Do not attempt to solve the problemunless it persists for over an hour.
Chapter 2 vSphere Authentication with vCenter Single Sign-On
VMware, Inc. 49

vSphere Security
50 VMware, Inc.

vSphere Security Certificates 3vSphere components use SSL to communicate securely with each other and with ESXi. SSL communicationsensure data confidentiality and integrity. Data is protected, and cannot be modified in transit withoutdetection.
vCenter Server services such as the vSphere Web Client also use their certificates for their initialauthentication to vCenter Single Sign-On. vCenter Single Sign-On provisions each component with a SAMLtoken that the component uses for authentication going forward.
In vSphere 6.0 and later, the VMware Certificate Authority (VMCA) provisions each ESXi host and eachvCenter Server service with certificates that are signed by VMCA by default. You can use the vSphereCertificate Manager command-line utility to perform certificate replacement operations. In special cases,you can replace certificates manually.
vSphere Certificate Management(http://link.brightcove.com/services/player/bcpid2296383276001?bctid=ref:video_vsphere6_cert_infrastructure)
This chapter includes the following topics:
n “Certificate Management Overview,” on page 52
n “Certificate Replacement Overview,” on page 53
n “Managing Certificates in vSphere 6,” on page 56
n “Using the vSphere Certificate Manager Utility,” on page 63
n “Generate Certificate Signing Requests with vSphere Certificate Manager,” on page 69
n “Manual Certificate Replacement,” on page 69
n “Managing Certificates and Services with CLI Commands,” on page 96
n “View vCenter Certificates with the vSphere Web Client,” on page 111
n “Set the Threshold for vCenter Certificate Expiration Warnings,” on page 111
VMware, Inc. 51
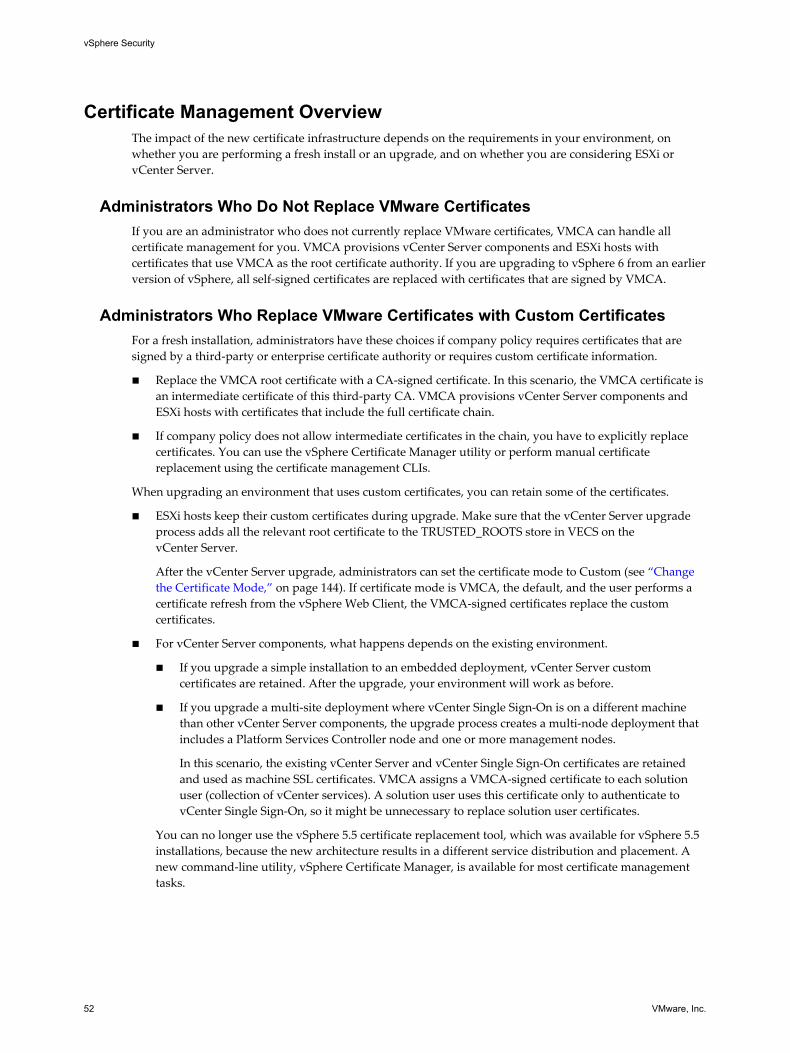
Certificate Management OverviewThe impact of the new certificate infrastructure depends on the requirements in your environment, onwhether you are performing a fresh install or an upgrade, and on whether you are considering ESXi orvCenter Server.
Administrators Who Do Not Replace VMware CertificatesIf you are an administrator who does not currently replace VMware certificates, VMCA can handle allcertificate management for you. VMCA provisions vCenter Server components and ESXi hosts withcertificates that use VMCA as the root certificate authority. If you are upgrading to vSphere 6 from an earlierversion of vSphere, all self-signed certificates are replaced with certificates that are signed by VMCA.
Administrators Who Replace VMware Certificates with Custom CertificatesFor a fresh installation, administrators have these choices if company policy requires certificates that aresigned by a third-party or enterprise certificate authority or requires custom certificate information.
n Replace the VMCA root certificate with a CA-signed certificate. In this scenario, the VMCA certificate isan intermediate certificate of this third-party CA. VMCA provisions vCenter Server components andESXi hosts with certificates that include the full certificate chain.
n If company policy does not allow intermediate certificates in the chain, you have to explicitly replacecertificates. You can use the vSphere Certificate Manager utility or perform manual certificatereplacement using the certificate management CLIs.
When upgrading an environment that uses custom certificates, you can retain some of the certificates.
n ESXi hosts keep their custom certificates during upgrade. Make sure that the vCenter Server upgradeprocess adds all the relevant root certificate to the TRUSTED_ROOTS store in VECS on thevCenter Server.
After the vCenter Server upgrade, administrators can set the certificate mode to Custom (see “Changethe Certificate Mode,” on page 144). If certificate mode is VMCA, the default, and the user performs acertificate refresh from the vSphere Web Client, the VMCA-signed certificates replace the customcertificates.
n For vCenter Server components, what happens depends on the existing environment.
n If you upgrade a simple installation to an embedded deployment, vCenter Server customcertificates are retained. After the upgrade, your environment will work as before.
n If you upgrade a multi-site deployment where vCenter Single Sign-On is on a different machinethan other vCenter Server components, the upgrade process creates a multi-node deployment thatincludes a Platform Services Controller node and one or more management nodes.
In this scenario, the existing vCenter Server and vCenter Single Sign-On certificates are retainedand used as machine SSL certificates. VMCA assigns a VMCA-signed certificate to each solutionuser (collection of vCenter services). A solution user uses this certificate only to authenticate tovCenter Single Sign-On, so it might be unnecessary to replace solution user certificates.
You can no longer use the vSphere 5.5 certificate replacement tool, which was available for vSphere 5.5installations, because the new architecture results in a different service distribution and placement. Anew command-line utility, vSphere Certificate Manager, is available for most certificate managementtasks.
vSphere Security
52 VMware, Inc.

vCenter Certificate InterfacesFor vCenter Server, you can view and replace certificates with the following tools and interfaces.
vSphere CertificateManager utility
Perform all common certificate replacement tasks from the command-line.
Certificate managementCLIs
Perform all certificate management tasks with dir-cli, certool, and vecs-cli.
vSphere Web Clientcertificate management
View certificates, including expiration information.
For ESXi, you perform certificate management from the vSphere Web Client. Certificates are provisioned byVMCA and are stored only locally on the ESXi host, not in vmdir or VECS. See “Certificate Management forESXi Hosts,” on page 137.
Supported vCenter CertificatesFor vCenter Server, the Platform Services Controller, and related machines and services, the followingcertificates are supported:
n Certificates that are generated and signed by VMware Certificate Authority (VMCA).
n Custom certificates.
n Enterprise certificates that are generated from your own internal PKI.
n Third-party CA-signed certificates that are generated by an external PKI such as Verisign,GoDaddy, and so on.
Self-signed certificates that were created using OpenSSL in which no Root CA exists are not supported.
Certificate Replacement OverviewYou can perform different types of certificate replacement depending on company policy and requirementsfor the system that you are configuring. You can perform each replacement with the vSphere CertificateManager utility or manually by using the CLIs included with your installation.
VMCA is included in each Platform Services Controller and in each embedded deployment. VMCAprovisions each node, each vCenter Server solution user, and each ESXi host with a certificate that is signedby VMCA as the certificate authority. vCenter Server solution users are groups of vCenter Server services.
You can replace the default certificates. For vCenter Server components, you can use a set of command-linetools included in your installation. You have several options.
Replace With Certificates Signed by VMCAIf your VMCA certificate expires or you want to replace it for other reasons, you can use the certificatemanagement CLIs to perform that process. By default, the VMCA root certificate expires after ten years, andall certificates that VMCA signs expire when the root certificate expires, that is, after a maximum of tenyears.
Chapter 3 vSphere Security Certificates
VMware, Inc. 53

Figure 3‑1. Certificates Signed by VMCA Are Stored in VECS
CA-Cert
VECS
Machine-Cert
Signed
VMCA
You can use the following vSphere Certificate Manager options:
n Replace Machine SSL Certificate with VMCA Certificate
n Replace Solution User Certificate with VMCA Certificate
For manual certificate replacement, see “Replace Existing VMCA-Signed Certificates With New VMCA-Signed Certificates,” on page 70.
Make VMCA an Intermediate CAYou can replace the VMCA root certificate with a certificate that is signed by an enterprise CA or third-partyCA. VMCA signs the custom root certificate each time it provisions certificates, making VMCA anintermediate CA.
NOTE If you perform a fresh install that includes an external Platform Services Controller, install thePlatform Services Controller first and replace the VMCA root certificate. Next, install other services or addESXi hosts to your environment. If you perform a fresh install with an embeddedPlatform Services Controller, replace the VMCA root certificate before you add ESXi hosts. If you do, allcertificates are signed by the whole chain, and you do not have to generate new certificates.
vSphere Security
54 VMware, Inc.
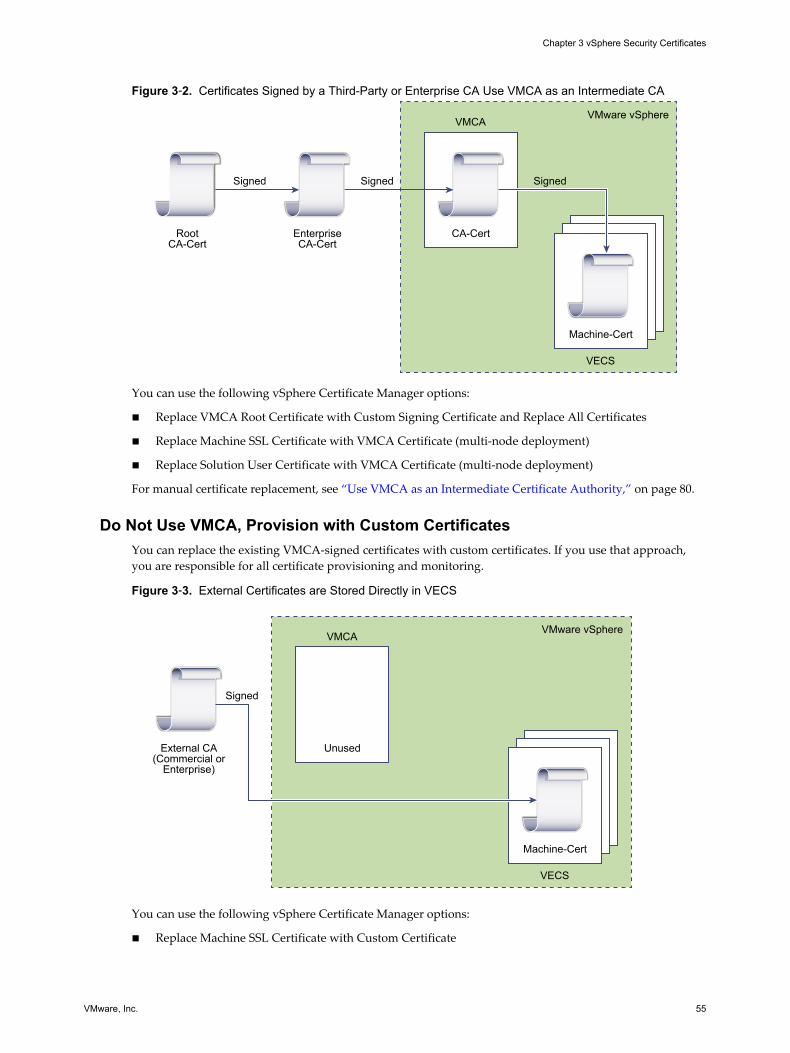
Figure 3‑2. Certificates Signed by a Third-Party or Enterprise CA Use VMCA as an Intermediate CA
CA-Cert
VECS
Machine-Cert
Signed
VMware vSphereVMCA
RootCA-Cert
EnterpriseCA-Cert
Signed Signed
You can use the following vSphere Certificate Manager options:
n Replace VMCA Root Certificate with Custom Signing Certificate and Replace All Certificates
n Replace Machine SSL Certificate with VMCA Certificate (multi-node deployment)
n Replace Solution User Certificate with VMCA Certificate (multi-node deployment)
For manual certificate replacement, see “Use VMCA as an Intermediate Certificate Authority,” on page 80.
Do Not Use VMCA, Provision with Custom CertificatesYou can replace the existing VMCA-signed certificates with custom certificates. If you use that approach,you are responsible for all certificate provisioning and monitoring.
Figure 3‑3. External Certificates are Stored Directly in VECS
Unused
VECS
Machine-Cert
VMware vSphereVMCA
External CA(Commercial or
Enterprise)
Signed
You can use the following vSphere Certificate Manager options:
n Replace Machine SSL Certificate with Custom Certificate
Chapter 3 vSphere Security Certificates
VMware, Inc. 55
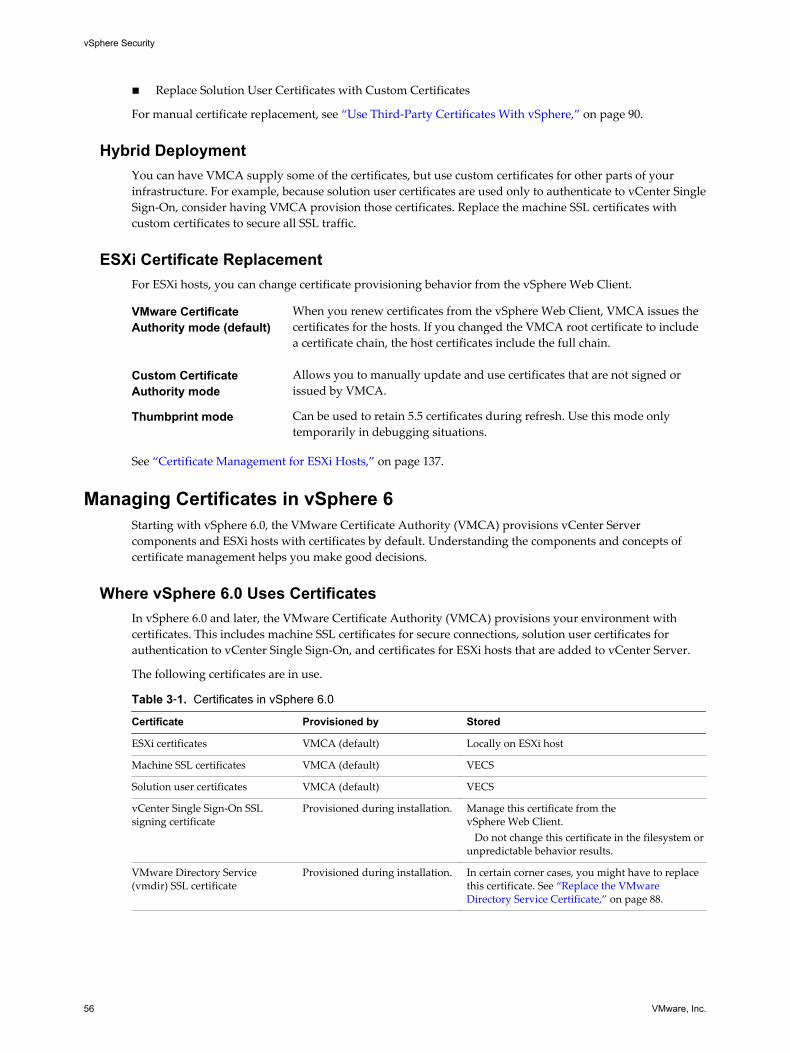
n Replace Solution User Certificates with Custom Certificates
For manual certificate replacement, see “Use Third-Party Certificates With vSphere,” on page 90.
Hybrid DeploymentYou can have VMCA supply some of the certificates, but use custom certificates for other parts of yourinfrastructure. For example, because solution user certificates are used only to authenticate to vCenter SingleSign-On, consider having VMCA provision those certificates. Replace the machine SSL certificates withcustom certificates to secure all SSL traffic.
ESXi Certificate ReplacementFor ESXi hosts, you can change certificate provisioning behavior from the vSphere Web Client.
VMware CertificateAuthority mode (default)
When you renew certificates from the vSphere Web Client, VMCA issues thecertificates for the hosts. If you changed the VMCA root certificate to includea certificate chain, the host certificates include the full chain.
Custom CertificateAuthority mode
Allows you to manually update and use certificates that are not signed orissued by VMCA.
Thumbprint mode Can be used to retain 5.5 certificates during refresh. Use this mode onlytemporarily in debugging situations.
See “Certificate Management for ESXi Hosts,” on page 137.
Managing Certificates in vSphere 6Starting with vSphere 6.0, the VMware Certificate Authority (VMCA) provisions vCenter Servercomponents and ESXi hosts with certificates by default. Understanding the components and concepts ofcertificate management helps you make good decisions.
Where vSphere 6.0 Uses CertificatesIn vSphere 6.0 and later, the VMware Certificate Authority (VMCA) provisions your environment withcertificates. This includes machine SSL certificates for secure connections, solution user certificates forauthentication to vCenter Single Sign-On, and certificates for ESXi hosts that are added to vCenter Server.
The following certificates are in use.
Table 3‑1. Certificates in vSphere 6.0
Certificate Provisioned by Stored
ESXi certificates VMCA (default) Locally on ESXi host
Machine SSL certificates VMCA (default) VECS
Solution user certificates VMCA (default) VECS
vCenter Single Sign-On SSLsigning certificate
Provisioned during installation. Manage this certificate from thevSphere Web Client. Do not change this certificate in the filesystem orunpredictable behavior results.
VMware Directory Service(vmdir) SSL certificate
Provisioned during installation. In certain corner cases, you might have to replacethis certificate. See “Replace the VMwareDirectory Service Certificate,” on page 88.
vSphere Security
56 VMware, Inc.

ESXiESXi certificates are stored locally on each host in the /etc/vmware/ssl directory. ESXi certificates areprovisioned by VMCA by default, but you can use custom certificates instead. ESXi certificates areprovisioned when the host is first added to vCenter Server and when the host reconnects.
Machine SSL CertificatesThe machine SSL certificate for each node is used to create an SSL socket on the server side to which SSLclients connect. The certificate is used for server verification and for secure communication such as HTTPSor LDAPS.
All services communicate through the reverse proxy. For compatibility, services that were available inearlier versions of vSphere also use specific ports. For example, the vpxd service uses theMACHINE_SSL_CERT to expose its endpoint.
Every node (embedded deployment, management node, or Platform Services Controller), has its ownmachine SSL certificate. All services that are running on that node use this machine SSL certificate to exposetheir SSL endpoints.
The machine SSL certificate is used as follows:
n By the reverse proxy service on each Platform Services Controller node. SSL connections to individualvCenter services always go to the reverse proxy. Traffic does not go to the services themselves.
n By the vCenter service (vpxd) on management nodes and embedded nodes.
n By the VMware Directory Service (vmdir) on infrastructure nodes and embedded nodes.
VMware products use standard X.509 version 3 (X.509v3) certificates to encrypt session information that issent over SSL between components.
Solution User CertificatesA solution user encapsulates one or more vCenter Server services and uses the certificates to authenticate tovCenter Single Sign-On through SAML token exchange. Each solution user must be authenticated tovCenter Single Sign-On.
Solution user certificates are used for authentication tovCenter Single Sign-On. A solution user presents thecertificate to vCenter Single Sign-On when it first has to authenticate, after a reboot, and after a timeout haselapsed. The timeout (Holder-of-Key Timeout) can be set from the vSphere Web Client and defaults to2592000 seconds (30 days).
For example, the vpxd solution user presents its certificate to vCenter Single Sign-On when it connects tovCenter Single Sign-On. The vpxd solution user receives a SAML token from vCenter Single Sign-On andcan then use that token to authenticate to other solution users and services.
The following solution user certificate stores are included in VECS on each management node and eachembedded deployment:
n machine: Used by component manager, license server, and the logging service.
NOTE The machine solution user certificate has nothing to do with the machine SSL certificate. Themachine solution user certificate is used for the SAML token exchange; the machine SSL certificate isused for secure SSL connections for a machine.
n vpxd: vCenter service daemon (vpxd) store on management nodes and embedded deployments. vpxduses the solution user certificate that is stored in this store to authenticate to vCenter Single Sign-On.
n vpxd-extensions: vCenter extensions store. Includes the Auto Deploy service, inventory service, andother services that are not part of other solution users.
Chapter 3 vSphere Security Certificates
VMware, Inc. 57

n vsphere-webclient: vSphere Web Client store. Also includes some additional services such as theperformance chart service.
The machine store is also included on each Platform Services Controller node.
vCenter Single Sign-On CertificatesvCenter Single Sign-On certificates are not stored in VECS and are not managed with certificatemanagement tools. As a rule, changes are not necessary, but in special situations, you can replace thesecertificates.
vCenter Single Sign-OnSigning Certificate
The vCenter Single Sign-On service includes an identity provider servicewhich issues SAML tokens that are used for authentication throughoutvSphere. A SAML token represents the user's identity, and also containsgroup membership information. When vCenter Single Sign-On issues SAMLtokens, it signs each token with its signing certificate so that clients ofvCenter Single Sign-On can verify that the SAML token comes from a trustedsource.
vCenter Single Sign-On issues holder-of-key SAML tokens to solution usersand bearer tokens other users, which log in with a user name and password.
You can replace this certificate from the vSphere Web Client. See “Refreshthe Security Token Service (STS) Root Certificate,” on page 36.
VMware DirectoryService SSL Certificate
If you are using custom certificates, you might have to replace the VMwareDirectory Service SSL certificate explicitly. See “Replace the VMwareDirectory Service Certificate,” on page 88.
VMCA and VMware Core Identity ServicesCore identity services are part of every embedded deployment and every platform services node. VMCA ispart of every VMware core identity services group. Use the management CLIs and the vSphere Web Clientto interact with these services.
VMware core identity services include several components.
Table 3‑2. Core Identity Services
Service Description Included in
VMware Directory Service(vmdir)
Handles SAML certificate management forauthentication in conjunction with vCenterSingle Sign-On.
Platform Services ControllerEmbedded deployment
VMware Certificate Authority(VMCA)
Issues certificates for VMware solution users,machine certificates for machines on whichservices are running, and ESXi host certificates.VMCA can be used as is, or as an intermediarycertificate authority.VMCA issues certificates only to clients that canauthenticate to vCenter Single Sign-On in thesame domain.
Platform Services ControllerEmbedded deployment
VMware AuthenticationFramework Daemon (VMAFD)
Includes the VMware Endpoint Certificate Store(VECS) and several other authentication services.VMware administrators interact with VECS; theother services are used internally.
Platform Services ControllervCenter ServerEmbedded deployment
vSphere Security
58 VMware, Inc.

VMware Endpoint Certificate Store OverviewVMware Endpoint Certificate Store (VECS) serves as a local (client-side) repository for certificates, privatekeys, and other certificate information that can be stored in a keystore. You can decide not to use VMCA asyour certificate authority and certificate signer, but you must use VECS to store all vCenter certificates, keys,and so on. ESXi certificates are stored locally on each host and not in VECS.
VECS runs as part of the VMware Authentication Framework Daemon (VMAFD). VECS runs on everyembedded deployment, Platform Services Controller node, and management node and holds the keystoresthat contain the certificates and keys.
VECS polls VMware Directory Service (vmdir) periodically for updates to the TRUSTED_ROOTS store. Youcan also explicitly manage certificates and keys in VECS using vecs-cli commands. See “vecs-cli CommandReference,” on page 103.
VECS includes the following stores.
Table 3‑3. Stores in VECS
Store Description
Machine SSL store (MACHINE_SSL_CERT) n Used by the reverse proxy service on every vSpherenode.
n Used by the VMware Directory Service (vmdir) onembedded deployments and on eachPlatform Services Controller node.
All services in vSphere 6.0 communicate through a reverseproxy, which uses the machine SSL certificate. Forbackward compatibility, the 5.x services still use specificports. As a result, some services such as vpxd still havetheir own port open.
Trusted root store (TRUSTED_ROOTS) Contains all trusted root certificates.
Chapter 3 vSphere Security Certificates
VMware, Inc. 59

Table 3‑3. Stores in VECS (Continued)
Store Description
Solution user storesn machinen vpxdn vpxd-extensionsn vsphere-webclient
VECS includes one store for each solution user. The subjectof each solution user certificate must be unique, forexample, the machine certificate cannot have the samesubject as the vpxd certificate.Solution user certificates are used for authentication withvCenter Single Sign-On. vCenter Single Sign-On checksthat the certificate is valid, but does not check othercertificate attributes. In an embedded deployment, allsolution user certificates are on the same system.The following solution user certificate stores are includedin VECS on each management node and each embeddeddeployment:n machine: Used by component manager, license server,
and the logging service.NOTE The machine solution user certificate hasnothing to do with the machine SSL certificate. Themachine solution user certificate is used for the SAMLtoken exchange; the machine SSL certificate is used forsecure SSL connections for a machine.
n vpxd: vCenter service daemon (vpxd) store onmanagement nodes and embedded deployments. vpxduses the solution user certificate that is stored in thisstore to authenticate to vCenter Single Sign-On.
n vpxd-extensions: vCenter extensions store. Includesthe Auto Deploy service, inventory service, and otherservices that are not part of other solution users.
n vsphere-webclient: vSphere Web Client store. Alsoincludes some additional services such as theperformance chart service.
The machine store is also included on eachPlatform Services Controller node.
vSphere Certificate Manager Utility backup store(BACKUP_STORE)
Used by VMCA (VMware Certificate Manager) to supportcertificate revert. Only the most recent state is stored as abackup, you cannot go back more than one step.
Other stores Other stores might be added by solutions. For example, theVirtual Volumes solution adds an SMS store. Do notmodify the certificates in those stores unless VMwaredocumentation or a VMware Knowledge Base artoc;einstructs you to do so.NOTE CRLS are not supported in vSphere 6.0Nevertheless, deleting the TRUSTED_ROOTS_CRLS storecan damage your certificate infrastructure. Do not delete ormodify the TRUSTED_ROOTS_CRLS store.
The vCenter Single Sign-On service stores the token signing certificate and its SSL certificate on disk. Youcan change the token signing certificate from the vSphere Web Client.
NOTE Do not change any certificate files on disk unless instructed by VMware documentation orKnowledge Base Articles. Unpredictable behavior might result otherwise.
Some certificates are stored on the filesystem, either temporarily during startup or permanently. Do notchange the certificates on the file system. Use vecs-cli to perform operations on certificates that are storedin VECS.
vSphere Security
60 VMware, Inc.

Managing Certificate RevocationIf you suspect that one of your certificates has been compromised, replace all existing certificates, includingthe VMCA root certificate.
vSphere 6.0 supports replacing certificates but does not enforce certificate revocation for ESXi hosts or forvCenter Server systems.
Remove revoked certificates from all nodes. If you do not remove revoked certificates, a man-in-the-middleattack might enable compromise through impersonation with the account's credentials.
Certificate Replacement in Large DeploymentsCertificate replacement in deployments that include multiple management nodes and one or morePlatform Services Controller node is similar to replacement in embedded deployments. In both cases, youcan use the vSphere Certificate Management utility or replace certificates manually. Some best practicesguide the replacement process.
Certificate Replacement in High Availability Environments that Include a LoadBalancerIn environments with less than eight vCenter Server systems, VMware typically recommends a singlePlatform Services Controller instance and associated vCenter Single Sign-On service. In largerenvironments, consider using multiple Platform Services Controller instances, protected by a network loadbalancer. The white paper vCenter Server 6.0 Deployment Guide on the VMware website discusses this setup.
Replacement of Machine SSL Certificates in Environments with MultipleManagement NodesIf your environment includes multiple management nodes and a single Platform Services Controller, youcan replace certificates with the vSphere Certificate Manager utility, or manually with vSphere CLIcommands.
vSphere CertificateManager
You run vSphere Certificate Manager on each machine. On managementnodes, you are prompted for the IP address of thePlatform Services Controller. Depending on the task you perform, you arealso prompted for certificate information.
Manual CertificateReplacement
For manual certificate replacement, you run the certificate replacementcommands on each machine. On management nodes, you must specify thePlatform Services Controller with the --server parameter. See the followingtopics for details:
n “Replace Machine SSL Certificates with VMCA-Signed Certificates,” onpage 72
n “Replace Machine SSL Certificates (Intermediate CA),” on page 82
n “Replace Machine SSL Certificates With Custom Certificates,” onpage 92
Chapter 3 vSphere Security Certificates
VMware, Inc. 61

Replacement of Solution User Certificates in Environments with MultipleManagement NodesIf your environment includes multiple management nodes and a single Platform Services Controller, followthese steps for certificate replacement.
NOTE When you list solution user certificates in large deployments, the output of dir-cli list includes allsolution users from all nodes. Run vmafd-cli get-machine-id --server-name localhost to find the localmachine ID for each host. Each solution user name includes the machine ID.
vSphere CertificateManager
You run vSphere Certificate Manager on each machine. On managementnodes, you are prompted for the IP address of thePlatform Services Controller. Depending on the task you perform, you arealso prompted for certificate information.
Manual CertificateReplacement
1 Generate or request a certificate. You need the following certificates:
n A certificate for the machine solution user on thePlatform Services Controller.
n A certificate for the machine solution user on each managementnode.
n A certificate for each of the following solution users on eachmanagement node:
n vpxd solution user
n vpxd-extension solution user
n vsphere-webclient solution user
2 Replace the certificates on each node. The precise process depends onthe type of certificate replacement that you are performing. See “Usingthe vSphere Certificate Manager Utility,” on page 63
See the following topics for details:
n “Replace Solution User Certificates With New VMCA-SignedCertificates,” on page 75
n “Replace Solution User Certificates (Intermediate CA),” on page 84
n “Replace Solution User Certificates With Custom Certificates,” onpage 93
If company policy requires that you replace all certificates, you also have to replace the VMware DirectoryService (vmdir) certificate on the Platform Services Controller. See “Replace the VMware Directory ServiceCertificate,” on page 88.
Certificate Replacement in Environments that Include External SolutionsSome solutions, such as VMware vCenter Site Recovery Manager or VMware vSphere Replication arealways installed on a different machine than the vCenter Server system or Platform Services Controller. Ifyou replace the default machine SSL certificate on the vCenter Server system or thePlatform Services Controller, a connection error results if the solution attempts to connect to thevCenter Server system.
You can run the ls_update_certs script to resolve the issue. See VMware Knowledge Base article 2109074for details.
vSphere Security
62 VMware, Inc.

Using the vSphere Certificate Manager UtilityThe vSphere Certificate Manager utility allows you to perform most certificate management tasksinteractively from the command line. vSphere Certificate Manager prompts you for the task to perform, forcertificate locations and other information as needed, and then stops and starts services and replacescertificates for you.
If you use vSphere Certificate Manager, you are not responsible for placing the certificates in VECS(VMware Endpoint Certificate Store) and you are not responsible for starting and stopping services.
Before you run vSphere Certificate Manager, be sure you understand the replacement process and procurethe certificates that you want to use.
CAUTION vSphere Certificate Manager supports one level of revert. If you run vSphere Certificate Managertwice and notice that you unintentionally corrupted your environment, the tool cannot revert the first of thetwo runs.
You can run the tool on the command line as follows:
Windows C:\Program Files\VMware\vCenter Server\vmcad\certificate-manager.bat
Linux /usr/lib/vmware-vmca/bin/certificate-manager
1 Replace Machine SSL Certificate with Custom Certificate on page 64The machine SSL certificate is used by the reverse proxy service on every management node,Platform Services Controller, and embedded deployment. You can replace the certificate on each nodewith a custom certificate.
2 Replace VMCA Root Certificate with Custom Signing Certificate and Replace All Certificates onpage 65You can replace the VMCA root certificate with a CA-signed certificate that includes VMCA as anintermediate certificate in the certificate chain. Going forward, all certificates that VMCA generatesinclude the full chain. You can use vSphere Certificate Manager to supply a custom signing certificateto VMCA, and to replace all certificates in your deployment.
3 Replace Machine SSL Certificate with VMCA Certificate on page 66If any of the machine SSL certificates in your environment is corrupt or about to expire, you canreplace it with a VMCA-signed machine SSL certificate. If you use vSphere Certificate Manager for thistask, you are prompted for information and vSphere Certificate Manager performs starting andstopping of services and certificate replacement for you.
4 Regenerate a New VMCA Root Certificate and Replace All Certificates on page 66You can regenerate the VMCA root certificate, and replace the local machine SSL certificate, and thelocal solution user certificates with VMCA-signed certificates. In multi-node deployments, runvSphere Certificate Manager with this option on the Platform Services Controller and then run theutility again on all other nodes and selectReplace Machine SSL certificate with VMCA Certificate andReplace Solution user certificates with VMCA certificates.
5 Replace Solution User Certificates with Custom Certificates on page 67When you select this option, vSphere Certificate Manager prompts you for replacement certificates forthe existing solution user certificates. In multi-node deployments, run vSphere Certificate Managerwith this option to replace the machine solution user certificate on the Platform Services Controllerand the full set of solution users on each management node.
Chapter 3 vSphere Security Certificates
VMware, Inc. 63

6 Replace Solution User Certificates with VMCA Certificates on page 68If solution user certificates in your multi-node deployment are expired or compromised, you cangenerate a full set of new VMCA-signed certificates and then replace the existing solution usercertificates.
7 Revert Last Performed Operation by Republishing Old Certificates on page 68When you perform a certificate management operation by using vSphere Certificate Manager, thecurrent certificate state is stored in the BACKUP_STORE store in VECS before certificates are replaced.You can revert the last performed operation and return to the previous state.
8 Reset All Certificates on page 68
Use the Reset All Certificates option if you want to replace all existing vCenter certificates withcertificates that are signed by VMCA.
Replace Machine SSL Certificate with Custom CertificateThe machine SSL certificate is used by the reverse proxy service on every management node,Platform Services Controller, and embedded deployment. You can replace the certificate on each node witha custom certificate.
Each machine must have a machine SSL certificate for secure communication with other services.
When you replace the default VMCA-signed certificate with a custom certificate, the vSphere CertificateManager prompts you for the following information:
n Password for [email protected].
n Valid Machine SSL custom certificate (.crt file).
n Valid Machine SSL custom key (.key file).
n Valid signing certificate for the custom machine SSL certificate (.crt file).
n If you are running the command on a management node in a multi-node deployment, IP address of thePlatform Services Controller.
Prerequisites
Request a certificate for each machine from your third-party or enterprise CA. The certificate must meet thefollowing requirements:
n Key size: 2048 bits or more (PEM encoded)
n CRT format
n x509 version 3
n SubjectAltName must contain DNS Name=<machine_FQDN>
n Contains the following Key Usages: Digital Signature, Non Repudiation, Key Encipherment
Procedure
1 Start vSphere Certificate Manager and select option 1.
2 Select option 2 to start certificate replacement and respond to the prompts.
vSphere Security
64 VMware, Inc.

Replace VMCA Root Certificate with Custom Signing Certificate and Replace AllCertificates
You can replace the VMCA root certificate with a CA-signed certificate that includes VMCA as anintermediate certificate in the certificate chain. Going forward, all certificates that VMCA generates includethe full chain. You can use vSphere Certificate Manager to supply a custom signing certificate to VMCA,and to replace all certificates in your deployment.
You run vSphere Certificate Manager on an embedded installation or on an externalPlatform Services Controller to replace the VMCA root certificate with a custom signing certificate.
vSphere Certificate Manager prompts you for the following information:
n Password for [email protected].
n Valid custom certificate for Root (.crt file).
n Valid custom key for Root (.key file).
Prerequisites
The certificate that you send to be signed must meet the following requirements:
n Key size: 2048 bits or more
n PEM format. VMware supports PKCS8 and PKCS1 (RSA keys). When keys are added to VECS, they areconverted to PKCS8
n x509 version 3
n For root certificates CA extension must be set to true, and cert sign must be in the list of requirements.
n Make sure that all nodes in your environment are time synchronized.
n No explicit limit to the length of the certificate chain. VMCA uses the OpenSSL default, which is tencertificates.
n VMCA does not support using certificates with wildcards or more than one DNS name.
n You cannot create subsidiary CAs of VMCA.
VMCA validates the following certificate attributes when you replace the root certificate:
n Key size: 2048 bits or more (PEM encoded)
n PEM format. VMware supports PKCS8 and PKCS1 (RSA keys). When keys are added to VECS, they areconverted to PKS8.
n x509 version 3
n Key Usage: Certificate Sign, CRL Sign
n Basic Constraint: Subject Type CA
Procedure
1 Start vSphere Certificate Manager and select option 2.
2 Select option 2 to start certificate replacement and respond to the prompts.
What to do next
After replacing the root certificate in a multi-node deployment, you must restart services on allvCenter Server with external Platform Services Controller nodes.
Chapter 3 vSphere Security Certificates
VMware, Inc. 65

Replace Machine SSL Certificate with VMCA CertificateIf any of the machine SSL certificates in your environment is corrupt or about to expire, you can replace itwith a VMCA-signed machine SSL certificate. If you use vSphere Certificate Manager for this task, you areprompted for information and vSphere Certificate Manager performs starting and stopping of services andcertificate replacement for you.
You can replace the machine SSL certificate of individual machines, or use the optionRegenerate a new VMCA Root Certificate and replace all certificates to replace allcertificates with VMCA-signed certificates.
When you replace the existing machine SSL certificate with a new VMCA-signed certificate, vSphereCertificate Manager prompts you for the following information. vSphere Certificate Manager enters allvalues, except for the password and the IP address of the Platform Services Controller, into the certool.cfgfile.
n Password for [email protected].
n Two-letter country code
n Company name
n Organization name
n Organization unit
n State
n Locality
n IP address (optional)
n Email
n Host name, that is, the fully qualified domain name of the machine for which you want to replace thecertificate. If the host name does not match the FQDN, certificate replacement does not completecorrectly and your environment might end up in an unstable state.
n IP address of Platform Services Controller if you are running the command on a management node
Prerequisites
You must know the FDQN of the machine for which you want to generate a new VMCA-signed certificate.All other properties default to the predefined values but can be changed. The IP address is optional.
Regenerate a New VMCA Root Certificate and Replace All CertificatesYou can regenerate the VMCA root certificate, and replace the local machine SSL certificate, and the localsolution user certificates with VMCA-signed certificates. In multi-node deployments, run vSphereCertificate Manager with this option on the Platform Services Controller and then run the utility again on allother nodes and select Replace Machine SSL certificate with VMCA Certificate andReplace Solution user certificates with VMCA certificates.
When you run this command, vSphere Certificate Manager prompts you for the password and for certificateinformation and stores all information, except for the password, in the certool.cfg file. After that, stoppingservices, replacing all certificates, and restarting processes is automatic. You are prompted for the followinginformation:
n Password for [email protected].
n Two-letter country code
n Company name
vSphere Security
66 VMware, Inc.

n Organization name
n Organization unit
n State
n Locality
n IP address (optional)
n Email
n Host name, that is, the fully qualified domain name of the machine for which you want to replace thecertificate
n IP address of Platform Services Controller if you are running the command on a management node
Prerequisites
You must know the FQDN of the machine for which you want to generate a new VMCA-signed certificate.All other properties default to the predefined values. The IP address is optional.
What to do next
After replacing the root certificate in a multi-node deployment, you must restart services on allvCenter Server with external Platform Services Controller nodes.
Replace Solution User Certificates with Custom CertificatesWhen you select this option, vSphere Certificate Manager prompts you for replacement certificates for theexisting solution user certificates. In multi-node deployments, run vSphere Certificate Manager with thisoption to replace the machine solution user certificate on the Platform Services Controller and the full set ofsolution users on each management node.
When you replace the existing machine solution user certificates with custom certificates, vSphereCertificate Manager prompts you for the following information:
n Password for [email protected].
n Certificate and key for machine solution user
n If you run vSphere Certificate Manager on a Platform Services Controller node, you are prompted forthe certificate and key (vpxd.crt and vpxd.key) for the machine solution user.
n If you run vSphere Certificate Manager on a management node or an embedded deployment, you areprompted for the full set of certificates and keys (vpxd.crt and vpxd.key) for all solution users.
Prerequisites
Request a replacement certificate for each solution user.
n Key size: 2048 bits or more (PEM encoded)
n CRT format
n x509 version 3
n SubjectAltName must contain DNS Name=<machine_FQDN>
n Each solution user certificate must have a different Subject. Consider, for example, including thesolution user name (such as vpxd) or other unique identifier.
n Contains the following Key Usages: Digital Signature, Non Repudiation, Key Encipherment
Procedure
1 Start vSphere Certificate Manager and select option 5.
Chapter 3 vSphere Security Certificates
VMware, Inc. 67
2 Select option 2 to start certificate replacement and respond to the prompts.
Replace Solution User Certificates with VMCA CertificatesIf solution user certificates in your multi-node deployment are expired or compromised, you can generate afull set of new VMCA-signed certificates and then replace the existing solution user certificates.
The following tasks are involved:
1 First you regenerate a new root certificate using option 4,Regenerate a New VMCA Root Certificate and Replace All Certificates on thePlatform Services Controller.
In an embedded deployment, no additional action is required.
2 Next, in a multi-node deployment, you run vSphere Certificate Manager with option 3 to replace allmachine SSL certificates.
3 Finally, you run Certificate Manager again with this option to replace solution user certificates.
Prerequisites
You must know the password for [email protected].
Revert Last Performed Operation by Republishing Old CertificatesWhen you perform a certificate management operation by using vSphere Certificate Manager, the currentcertificate state is stored in the BACKUP_STORE store in VECS before certificates are replaced. You canrevert the last performed operation and return to the previous state.
NOTE The revert operation restores what is currently in the BACKUP_STORE. If you run vSphereCertificate Manager with two different options and you then attempt to revert, only the last operation isreverted.
Reset All CertificatesUse the Reset All Certificates option if you want to replace all existing vCenter certificates withcertificates that are signed by VMCA.
When you use this option, you overwrite all custom certificates that are currently in VECS.
n On a Platform Services Controller node, vSphere Certificate Manager can regenerate the root certificateand replace the machine SSL certificate and the machine solution user certificate.
n On a management node, vSphere Certificate Manager can replace the machine SSL certificate and allsolution user certificates.
n In an embedded deployment, vSphere Certificate Manager can replace all certificates.
Which certificates are replaced depends on which options you select.
vSphere Security
68 VMware, Inc.

Generate Certificate Signing Requests with vSphere CertificateManager
You can use vSphere Certificate Manager to generate Certificate Signing Requests (CSRs) that you can thensend to your third-party or external certificate authority. You can use the returned certificates with vSphereCertificate Manager or with the manual certificate replacement using CLIs.
Prerequisites
vSphere Certificate Manager prompts you for information. The prompts depend on your environment andon the type of certificate you want to replace.
n For any CSR generation, you are prompted for the password of the [email protected] user, orfor the administrator of the vCenter Single Sign-On domain that you are connecting to.
n If you are generating a CSR in an environment with an external Platform Services Controller, you areprompted for the IP address of the Platform Services Controller.
n To generate a CSR for a machine SSL certificate, you are prompted for certificate properties, which arestored in the certool.cfg file. For most fields, you can accept the default or provide site-specific values.The FQDN of the machine is required.
Procedure
1 Start vSphere Certificate Manager and select the option that corresponds to the task that you want toperform.
Option Option
Replace Machine SSL Certificatewith Custom Certificate
1
Replace VMCA Root Certificate withCustom Signing Certificate
2
Replace Solution User Certificateswith Custom Certificates
5
2 Supply the password and the Platform Services Controller IP address or host name if prompted.
3 Select option 1 to generate the CSR and answer the prompts.
What to do next
Send the CSR to your third-party or enterprise CA. After you receive the certificates from your CA, you caneither make VMCA an intermediate CA or use the custom certificate as is. Run vSphere Certificate Manageragain to perform certificate replacement.
Manual Certificate ReplacementFor some special cases, for example, if you want to replace only one type of solution user certificate, youcannot use the vSphere Certificate Manager utility. In that case, you can use the CLIs included with yourinstallation for certificate replacement.
Chapter 3 vSphere Security Certificates
VMware, Inc. 69

Understanding Starting and Stopping of ServicesFor certain parts of manual certificate replacement, you must stop all services and then start only theservices that manage the certificate infrastructure. If you stop services only when needed, you can minimizedowntime.
Follow these rules of thumb.
n Do not stop services to generate new public/private key pairs or new certificates.
n If you are the only administrator, you do not have to stop services when you add a new root certificate.The old root certificate remains available, and all services can still authenticate with that certificate. Stopand immediately restart all services after you add the root certificate to avoid problems with your hosts.
n If your environment includes multiple administrators, stop services before you add a new rootcertificate and restart services after you add a new certificate.
n Stop services right before you perform these tasks:
n Delete a machine SSL certificate or any solution user certificate in VECS.
n Replace a solution user certificate in vmdir (VMware Directory Service).
Replace Existing VMCA-Signed Certificates With New VMCA-SignedCertificates
If the VMCA root certificate expires in the near future, or if you want to replace it for other reasons, you cangenerate a new root certificate and add it to the VMware Directory Service. You can then generate newmachine SSL certificates and solution user certificates using the new root certificate.
Use the vSphere Certificate Manager utility to replace certificates for most cases.
If you need fine-grained control, this scenario gives detailed step-by-step instructions for replacing thecomplete set of certificates using CLI commands. You can instead replace only individual certificates usingthe procedure in the corresponding task.
Prerequisites
Only [email protected] or other users in the CAAdmins group can perform certificatemanagement tasks. See “Add Members to a vCenter Single Sign-On Group,” on page 44.
Procedure
1 Generate a New VMCA-Signed Root Certificate on page 71You generate new VMCA-signed certificates with the certool CLI and publish them to vmdir.
2 Replace Machine SSL Certificates with VMCA-Signed Certificates on page 72After you generate a new VMCA-signed root certificate, you can replace all machine SSL certificates inyour environment.
3 Replace Solution User Certificates With New VMCA-Signed Certificates on page 75After you replace the machine SSL certificates, you can replace all solution user certificates. Solutionuser certificates must be valid, that is, not expired, but none of the other information in the certificateis used by the certificate infrastructure.
4 Replace the VMware Directory Service Certificate in Mixed Mode Environments on page 79During upgrade, your environment might temporarily include both vCenter Single Sign-On version5.5 and vCenter Single Sign-On version 6.0, you have to perform additional steps to replace theVMware Directory Service SSL certificate if you replace the SSL certificate of the node on which thevCenter Single Sign-On service is running.
vSphere Security
70 VMware, Inc.

Generate a New VMCA-Signed Root CertificateYou generate new VMCA-signed certificates with the certool CLI and publish them to vmdir.
In a multi-node deployment, you run root certificate generation commands on thePlatform Services Controller.
Procedure
1 Generate a new self-signed certificate and private key.
certool --genselfcacert --outprivkey <key_file_path> --outcert <cert_file_path> --config
<config_file>
2 Replace the existing root certificate with the new certificate.
certool --rootca --cert <cert_file_path> --privkey <key_file_path>
The command generates the certificate, adds it to vmdir, and adds it to VECS.
3 Stop all services and start the services that handle certificate creation, propagation, and storage.
The service names differ on Windows and the vCenter Server Appliance.
Windows service-control --stop --all
service-control --start VMWareAfdService
service-control --start VMWareDirectoryService
service-control --start VMWareCertificateService
vCenter ServerAppliance
service-control --stop --all
service-control --start vmafdd
service-control --start vmdird
service-control --start vmcad
4 (Optional) Publish the new root certificate to vmdir.
dir-cli trustedcert publish --cert newRoot.crt
When you run this command, all instances of vmdir are updated immediately. Otherwise, propagationto all instances might take a while.
5 Restart all services.
service-control --start --all
Example: Generate a New VMCA-Signed Root Certificate
The following example shows the full set of steps for verifying the current root CA information, andregenerating the root certificate.
1 (Optional) List the VMCA root certificate to make sure it is in the certificate store.
n On a Platform Services Controller node or embedded installation:
C:\>"C:\Program Files\VMware\vCenter Server\vmcad\"certool --getrootca
Chapter 3 vSphere Security Certificates
VMware, Inc. 71

n On a management node (external installation):
C:\>"C:\Program Files\VMware\vCenter Server\vmcad\"certool --getrootca --server=<psc-ip-
or-fqdn>
The output looks similar to this:
output:
Certificate:
Data:
Version: 3 (0x2)
Serial Number:
cf:2d:ff:49:88:50:e5:af
...
2 (Optional) List the VECS TRUSTED_ROOTS store and compare the certificate serial number there withthe output from Step 1.
This command works on both Platform Services Controller and management nodes because VECS pollsvmdir.
"C:\Program Files\VMware\vCenter Server\vmafdd\"vecs-cli entry list --store TRUSTED_ROOTS --
text
In the simplest case with only one root certificate, the output looks like this:
Number of entries in store : 1
Alias : 960d43f31eb95211ba3a2487ac840645a02894bd
Entry type : Trusted Cert
Certificate:
Data:
Version: 3 (0x2)
Serial Number:
cf:2d:ff:49:88:50:e5:af
3 Generate a new VMCA root certificate. The certificate is added to the TRUSTED_ROOTS store in VECSand in vmdir (VMware Directory Service).
C:\>"C:\Program Files\VMware\vCenter Server\vmcad\"certool --selfca --config="C:\Program
Files\VMware\vCenter Server\vmcad\certool.cfg"
On Windows, --config is optional because the command uses the default certool.cfg file.
Replace Machine SSL Certificates with VMCA-Signed CertificatesAfter you generate a new VMCA-signed root certificate, you can replace all machine SSL certificates in yourenvironment.
Each machine must have a machine SSL certificate for secure communication with other services. In a multi-node deployment, you must run the Machine SSL certificate generation commands on each node. Use the --server parameter to point to the Platform Services Controller from a vCenter Server with externalPlatform Services Controller.
Prerequisites
Be prepared to stop all services and start the services that handle certificate propagation and storage.
vSphere Security
72 VMware, Inc.
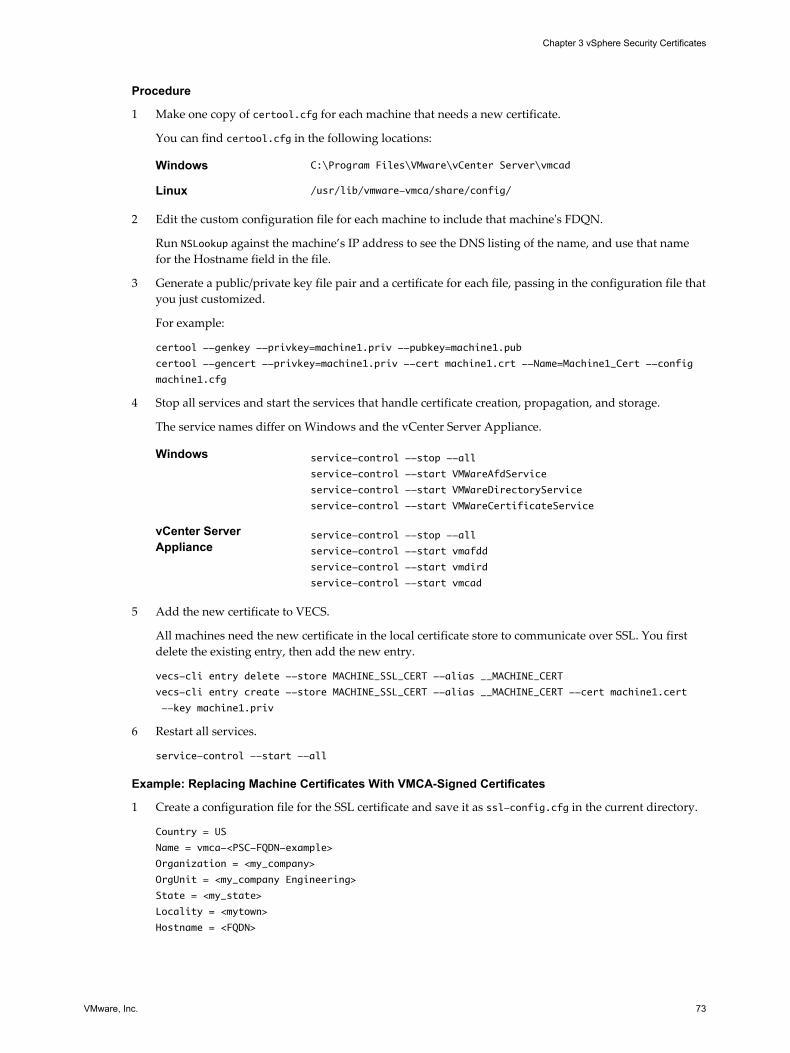
Procedure
1 Make one copy of certool.cfg for each machine that needs a new certificate.
You can find certool.cfg in the following locations:
Windows C:\Program Files\VMware\vCenter Server\vmcad
Linux /usr/lib/vmware-vmca/share/config/
2 Edit the custom configuration file for each machine to include that machine's FDQN.
Run NSLookup against the machine’s IP address to see the DNS listing of the name, and use that namefor the Hostname field in the file.
3 Generate a public/private key file pair and a certificate for each file, passing in the configuration file thatyou just customized.
For example:
certool --genkey --privkey=machine1.priv --pubkey=machine1.pub
certool --gencert --privkey=machine1.priv --cert machine1.crt --Name=Machine1_Cert --config
machine1.cfg
4 Stop all services and start the services that handle certificate creation, propagation, and storage.
The service names differ on Windows and the vCenter Server Appliance.
Windows service-control --stop --all
service-control --start VMWareAfdService
service-control --start VMWareDirectoryService
service-control --start VMWareCertificateService
vCenter ServerAppliance
service-control --stop --all
service-control --start vmafdd
service-control --start vmdird
service-control --start vmcad
5 Add the new certificate to VECS.
All machines need the new certificate in the local certificate store to communicate over SSL. You firstdelete the existing entry, then add the new entry.
vecs-cli entry delete --store MACHINE_SSL_CERT --alias __MACHINE_CERT
vecs-cli entry create --store MACHINE_SSL_CERT --alias __MACHINE_CERT --cert machine1.cert
--key machine1.priv
6 Restart all services.
service-control --start --all
Example: Replacing Machine Certificates With VMCA-Signed Certificates
1 Create a configuration file for the SSL certificate and save it as ssl-config.cfg in the current directory.
Country = US
Name = vmca-<PSC-FQDN-example>
Organization = <my_company>
OrgUnit = <my_company Engineering>
State = <my_state>
Locality = <mytown>
Hostname = <FQDN>
Chapter 3 vSphere Security Certificates
VMware, Inc. 73
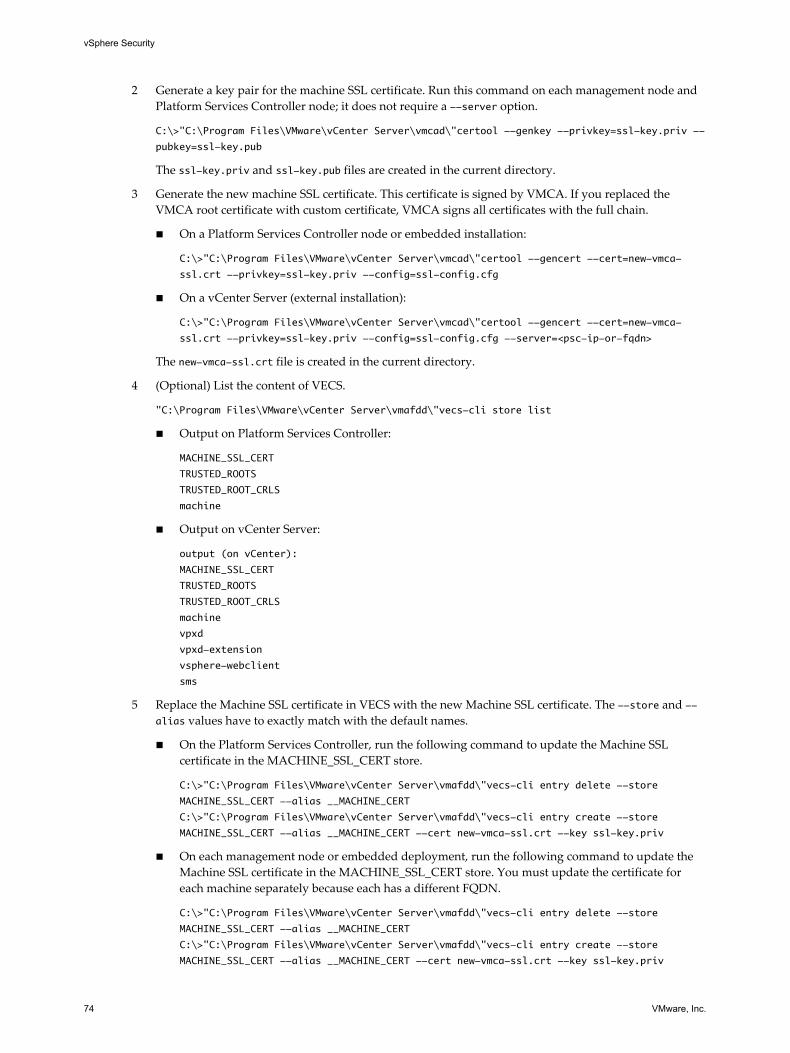
2 Generate a key pair for the machine SSL certificate. Run this command on each management node andPlatform Services Controller node; it does not require a --server option.
C:\>"C:\Program Files\VMware\vCenter Server\vmcad\"certool --genkey --privkey=ssl-key.priv --
pubkey=ssl-key.pub
The ssl-key.priv and ssl-key.pub files are created in the current directory.
3 Generate the new machine SSL certificate. This certificate is signed by VMCA. If you replaced theVMCA root certificate with custom certificate, VMCA signs all certificates with the full chain.
n On a Platform Services Controller node or embedded installation:
C:\>"C:\Program Files\VMware\vCenter Server\vmcad\"certool --gencert --cert=new-vmca-
ssl.crt --privkey=ssl-key.priv --config=ssl-config.cfg
n On a vCenter Server (external installation):
C:\>"C:\Program Files\VMware\vCenter Server\vmcad\"certool --gencert --cert=new-vmca-
ssl.crt --privkey=ssl-key.priv --config=ssl-config.cfg --server=<psc-ip-or-fqdn>
The new-vmca-ssl.crt file is created in the current directory.
4 (Optional) List the content of VECS.
"C:\Program Files\VMware\vCenter Server\vmafdd\"vecs-cli store list
n Output on Platform Services Controller:
MACHINE_SSL_CERT
TRUSTED_ROOTS
TRUSTED_ROOT_CRLS
machine
n Output on vCenter Server:
output (on vCenter):
MACHINE_SSL_CERT
TRUSTED_ROOTS
TRUSTED_ROOT_CRLS
machine
vpxd
vpxd-extension
vsphere-webclient
sms
5 Replace the Machine SSL certificate in VECS with the new Machine SSL certificate. The --store and --alias values have to exactly match with the default names.
n On the Platform Services Controller, run the following command to update the Machine SSLcertificate in the MACHINE_SSL_CERT store.
C:\>"C:\Program Files\VMware\vCenter Server\vmafdd\"vecs-cli entry delete --store
MACHINE_SSL_CERT --alias __MACHINE_CERT
C:\>"C:\Program Files\VMware\vCenter Server\vmafdd\"vecs-cli entry create --store
MACHINE_SSL_CERT --alias __MACHINE_CERT --cert new-vmca-ssl.crt --key ssl-key.priv
n On each management node or embedded deployment, run the following command to update theMachine SSL certificate in the MACHINE_SSL_CERT store. You must update the certificate foreach machine separately because each has a different FQDN.
C:\>"C:\Program Files\VMware\vCenter Server\vmafdd\"vecs-cli entry delete --store
MACHINE_SSL_CERT --alias __MACHINE_CERT
C:\>"C:\Program Files\VMware\vCenter Server\vmafdd\"vecs-cli entry create --store
MACHINE_SSL_CERT --alias __MACHINE_CERT --cert new-vmca-ssl.crt --key ssl-key.priv
vSphere Security
74 VMware, Inc.

What to do next
You can also replace the certificates for your ESXi hosts. See “Certificate Management for ESXi Hosts,” onpage 137.
After replacing the root certificate in a multi-node deployment, you must restart services on allvCenter Server with external Platform Services Controller nodes.
Replace Solution User Certificates With New VMCA-Signed CertificatesAfter you replace the machine SSL certificates, you can replace all solution user certificates. Solution usercertificates must be valid, that is, not expired, but none of the other information in the certificate is used bythe certificate infrastructure.
You replace the machine solution user certificate on each management node and on eachPlatform Services Controller node. You replace the other solution user certificates only on each managementnode. Use the --server parameter to point to the Platform Services Controller when you run commands ona management node with an external Platform Services Controller.
NOTE When you list solution user certificates in large deployments, the output of dir-cli list includes allsolution users from all nodes. Run vmafd-cli get-machine-id --server-name localhost to find the localmachine ID for each host. Each solution user name includes the machine ID.
Prerequisites
Be prepared to stop all services and start the services that handle certificate propagation and storage.
Procedure
1 Make one copy of certool.cfg, remove the Name, IP address, DNS name, and email fields, and renamethe file, for example, to sol_usr.cfg.
You can name the certificates from the command line as part of generation. The other information is notneeded for solution users. If you leave the default information, the certificates that are generated arepotentially confusing.
2 Generate a public/private key file pair and a certificate for each solution user, passing in theconfiguration file that you just customized.
For example:
certool --genkey --privkey=vpxd.priv --pubkey=vpxd.pub
certool --gencert --privkey=vpxd.priv --cert vpxd.crt --Name=VPXD_1 --config sol_usr.cfg
3 Find the name for each solution user.
dir-cli service list
You can use the unique ID that is returned when you replace the certificates. The input and outputmight look as follows.
C:\Program Files\VMware\vCenter Server\vmafdd>dir-cli service list
Enter password for [email protected]:
1. machine-1d364500-4b45-11e4-96c2-020011c98db3
2. vpxd-1d364500-4b45-11e4-96c2-020011c98db3
3. vpxd-extension-1d364500-4b45-11e4-96c2-020011c98db3
4. vsphere-webclient-1d364500-4b45-11e4-96c2-020011c98db3
When you list solution user certificates in multi-node deployments, the output of dir-cli list includesall solution users from all nodes. Run vmafd-cli get-machine-id --server-name localhost to find thelocal machine ID for each host. Each solution user name includes the machine ID.
Chapter 3 vSphere Security Certificates
VMware, Inc. 75

4 Stop all services and start the services that handle certificate creation, propagation, and storage.
The service names differ on Windows and the vCenter Server Appliance.
Windows service-control --stop --all
service-control --start VMWareAfdService
service-control --start VMWareDirectoryService
service-control --start VMWareCertificateService
vCenter ServerAppliance
service-control --stop --all
service-control --start vmafdd
service-control --start vmdird
service-control --start vmcad
5 For each solution user, replace the existing certificate in vmdir and then in VECS.
The following example shows how to replace the certificates for the vpxd service.
dir-cli service update --name <vpxd-xxxx-xxx-7c7b769cd9f4> --cert ./vpxd.crt
vecs-cli entry delete --store vpxd --alias vpxd
vecs-cli entry create --store vpxd --alias vpxd --cert vpxd.crt --key vpxd.priv
NOTE Solution users cannot authenticate to vCenter Single Sign-On if you do not replace the certificatein vmdir.
6 Restart all services.
service-control --start --all
Example: Using VMCA-Signed Solution User Certificates
1 Generate a public/private key pair for each solution user. That includes a pair for the machine solutionuser on each Platform Services Controller and each management node and a pair for each additionalsolution user (vpxd, vpxd-extension, vsphere-webclient) on each management node.
a Generate a key pair for the machine solution user of an embedded deployment or for the machinesolution user of the Platform Services Controller.
C:\>"C:\Program Files\VMware\vCenter Server\vmcad\"certool --genkey --privkey=machine-
key.priv --pubkey=machine-key.pub
b (Optional) For deployments with an external Platform Services Controller, generate a key pair forthe machine solution user on each management node.
C:\>"C:\Program Files\VMware\vCenter Server\vmcad\"certool --genkey --privkey=machine-
key.priv --pubkey=machine-key.pub
c Generate a key pair for the vpxd solution user on each management node.
C:\>"C:\Program Files\VMware\vCenter Server\vmcad\"certool --genkey --privkey=vpxd-
key.priv --pubkey=vpxd-key.pub
d Generate a key pair for the vpxd-extension solution user on each management node.
C:\>"C:\Program Files\VMware\vCenter Server\vmcad\"certool --genkey --privkey=vpxd-
extension-key.priv --pubkey=vpxd-extension-key.pub
e Generate a key pair for the vsphere-webclient solution user on each management node.
C:\>"C:\Program Files\VMware\vCenter Server\vmcad\"certool --genkey --privkey=vsphere-
webclient-key.priv --pubkey=vsphere-webclient-key.pub
vSphere Security
76 VMware, Inc.
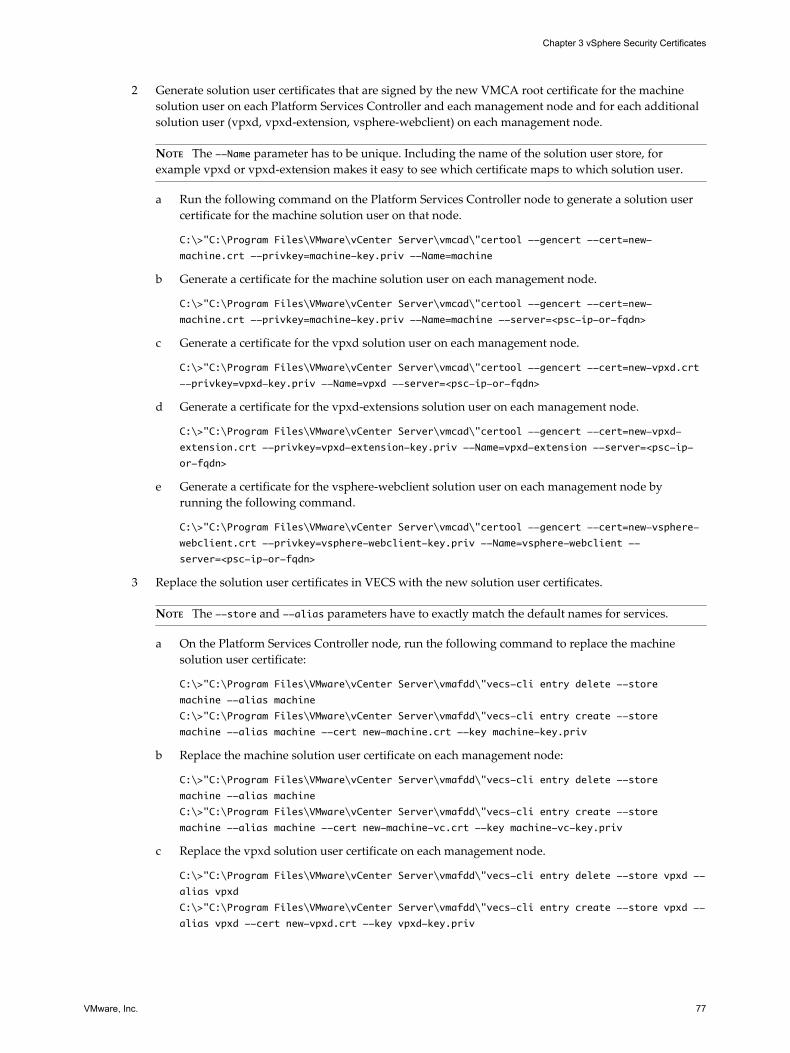
2 Generate solution user certificates that are signed by the new VMCA root certificate for the machinesolution user on each Platform Services Controller and each management node and for each additionalsolution user (vpxd, vpxd-extension, vsphere-webclient) on each management node.
NOTE The --Name parameter has to be unique. Including the name of the solution user store, forexample vpxd or vpxd-extension makes it easy to see which certificate maps to which solution user.
a Run the following command on the Platform Services Controller node to generate a solution usercertificate for the machine solution user on that node.
C:\>"C:\Program Files\VMware\vCenter Server\vmcad\"certool --gencert --cert=new-
machine.crt --privkey=machine-key.priv --Name=machine
b Generate a certificate for the machine solution user on each management node.
C:\>"C:\Program Files\VMware\vCenter Server\vmcad\"certool --gencert --cert=new-
machine.crt --privkey=machine-key.priv --Name=machine --server=<psc-ip-or-fqdn>
c Generate a certificate for the vpxd solution user on each management node.
C:\>"C:\Program Files\VMware\vCenter Server\vmcad\"certool --gencert --cert=new-vpxd.crt
--privkey=vpxd-key.priv --Name=vpxd --server=<psc-ip-or-fqdn>
d Generate a certificate for the vpxd-extensions solution user on each management node.
C:\>"C:\Program Files\VMware\vCenter Server\vmcad\"certool --gencert --cert=new-vpxd-
extension.crt --privkey=vpxd-extension-key.priv --Name=vpxd-extension --server=<psc-ip-
or-fqdn>
e Generate a certificate for the vsphere-webclient solution user on each management node byrunning the following command.
C:\>"C:\Program Files\VMware\vCenter Server\vmcad\"certool --gencert --cert=new-vsphere-
webclient.crt --privkey=vsphere-webclient-key.priv --Name=vsphere-webclient --
server=<psc-ip-or-fqdn>
3 Replace the solution user certificates in VECS with the new solution user certificates.
NOTE The --store and --alias parameters have to exactly match the default names for services.
a On the Platform Services Controller node, run the following command to replace the machinesolution user certificate:
C:\>"C:\Program Files\VMware\vCenter Server\vmafdd\"vecs-cli entry delete --store
machine --alias machine
C:\>"C:\Program Files\VMware\vCenter Server\vmafdd\"vecs-cli entry create --store
machine --alias machine --cert new-machine.crt --key machine-key.priv
b Replace the machine solution user certificate on each management node:
C:\>"C:\Program Files\VMware\vCenter Server\vmafdd\"vecs-cli entry delete --store
machine --alias machine
C:\>"C:\Program Files\VMware\vCenter Server\vmafdd\"vecs-cli entry create --store
machine --alias machine --cert new-machine-vc.crt --key machine-vc-key.priv
c Replace the vpxd solution user certificate on each management node.
C:\>"C:\Program Files\VMware\vCenter Server\vmafdd\"vecs-cli entry delete --store vpxd --
alias vpxd
C:\>"C:\Program Files\VMware\vCenter Server\vmafdd\"vecs-cli entry create --store vpxd --
alias vpxd --cert new-vpxd.crt --key vpxd-key.priv
Chapter 3 vSphere Security Certificates
VMware, Inc. 77

d Replace the vpxd-extension solution user certificate on each management node.
C:\>"C:\Program Files\VMware\vCenter Server\vmafdd\"vecs-cli entry delete --store vpxd-
extension --alias vpxd-extension
C:\>"C:\Program Files\VMware\vCenter Server\vmafdd\"vecs-cli entry create --store vpxd-
extension --alias vpxd-extension --cert new-vpxd-extension.crt --key vpxd-extension-
key.priv
e Replace the vsphere-webclient solution user certificate on each management node.
C:\>"C:\Program Files\VMware\vCenter Server\vmafdd\"vecs-cli entry delete --store
vsphere-webclient --alias vsphere-webclient
C:\>"C:\Program Files\VMware\vCenter Server\vmafdd\"vecs-cli entry create --store
vsphere-webclient --alias vsphere-webclient --cert new-vsphere-webclient.crt --key
vsphere-webclient-key.priv
4 Update VMware Directory Service (vmdir) with the new solution user certificates. You are promptedfor a vCenter Single Sign-On administrator password.
a Run dir-cli service list to get the unique service ID suffix for each solution user. You can runthis command on a Platform Services Controller or a vCenter Server system.
C:\>"C:\Program Files\VMware\vCenter Server\vmafdd\"dir-cli>dir-cli service list
output:
1. machine-29a45d00-60a7-11e4-96ff-00505689639a
2. machine-6fd7f140-60a9-11e4-9e28-005056895a69
3. vpxd-6fd7f140-60a9-11e4-9e28-005056895a69
4. vpxd-extension-6fd7f140-60a9-11e4-9e28-005056895a69
5. vsphere-webclient-6fd7f140-60a9-11e4-9e28-005056895a69
NOTE When you list solution user certificates in large deployments, the output of dir-cli listincludes all solution users from all nodes. Run vmafd-cli get-machine-id --server-namelocalhost to find the local machine ID for each host. Each solution user name includes the machineID.
b Replace the machine certificate in vmdir on the Platform Services Controller. For example, ifmachine-29a45d00-60a7-11e4-96ff-00505689639a is the machine solution user on thePlatform Services Controller, run this command:
C:\>"C:\Program Files\VMware\vCenter Server\vmafdd\"dir-cli service update --name
machine-29a45d00-60a7-11e4-96ff-00505689639a --cert new-machine-1.crt
c Replace the machine certificate in vmdir on each management node. For example, ifmachine-6fd7f140-60a9-11e4-9e28-005056895a69 is the machine solution user on the vCenter Server,run this command:
C:\>"C:\Program Files\VMware\vCenter Server\vmafdd\"dir-cli service update --name
machine-6fd7f140-60a9-11e4-9e28-005056895a69 --cert new-machine-2.crt
d Replace the vpxd solution user certificate in vmdir on each management node. For example, ifvpxd-6fd7f140-60a9-11e4-9e28-005056895a69 is the vpxd solution user ID, run this command:
C:\>"C:\Program Files\VMware\vCenter Server\vmafdd\"dir-cli service update --name
vpxd-6fd7f140-60a9-11e4-9e28-005056895a69 --cert new-vpxd.crt
e Replace the vpxd-extension solution user certificate in vmdir on each management node. Forexample, if vpxd-extension-6fd7f140-60a9-11e4-9e28-005056895a69 is the vpxd-extension solutionuser ID, run this command:
C:\>"C:\Program Files\VMware\vCenter Server\vmafdd\"dir-cli service update --name vpxd-
extension-6fd7f140-60a9-11e4-9e28-005056895a69 --cert new-vpxd-extension.crt
vSphere Security
78 VMware, Inc.

f Replace the vsphere-webclient solution user certificate on each management node. For example, ifvsphere-webclient-6fd7f140-60a9-11e4-9e28-005056895a69 is the vsphere-webclient solution userID, run this command:
C:\>"C:\Program Files\VMware\vCenter Server\vmafdd\"dir-cli service update --name
vsphere-webclient-6fd7f140-60a9-11e4-9e28-005056895a69 --cert new-vsphere-webclient.crt
What to do next
Restart all services on each Platform Services Controller node and each management node.
Replace the VMware Directory Service Certificate in Mixed Mode EnvironmentsDuring upgrade, your environment might temporarily include both vCenter Single Sign-On version 5.5 andvCenter Single Sign-On version 6.0, you have to perform additional steps to replace the VMware DirectoryService SSL certificate if you replace the SSL certificate of the node on which the vCenter Single Sign-Onservice is running.
The VMware Directory Service SSL certificate is used by vmdir to perform handshakes betweenPlatform Services Controller nodes that perform vCenter Single Sign-On replication
These steps are required only if:
n Your environment includes both vCenter Single Sign-On 5.5 and vCenter Single Sign-On 6.0 services.
n The vCenter Single Sign-On services are set up to replicate vmdir data.
n You plan to replace the default VMCA-signed certificates with custom certificates for the node onwhich the vCenter Single Sign-On 6.0 service runs.
NOTE In most other cases, upgrading the complete environment before restarting the services is bestpractice. Teplacing the VMware Directory Service certificate is not usually recommended.
Procedure
1 On the node on which the vCenter Single Sign-On 6.0 service runs, replace the vmdird SSL certificateand key.
See “Replace the VMware Directory Service Certificate,” on page 88.
2 On the node on which the vCenter Single Sign-On 5.5 service runs, set up the environment so thevCenter Single Sign-On 6.0 service is known.
a Back up all files C:\ProgramData\VMware\CIS\cfg\vmdird.
b Make a copy of the vmdircert.pem file on the 6.0 node, and rename it to<sso_node2.domain.com>.pem, where <sso_node2.domain.com> is the FQDN of the 6.0 node.
c Copy the renamed certificate to C:\ProgramData\VMware\CIS\cfg\vmdird to replace the existingreplication certificate.
3 Restart the VMware Directory Service on all machines where you replaced certificates.
You can restart the service from the vSphere Web Client or use the service-control command.
Chapter 3 vSphere Security Certificates
VMware, Inc. 79

Use VMCA as an Intermediate Certificate AuthorityYou can replace the VMCA root certificate with a third-party CA-signed certificate that includes VMCA inthe certificate chain. Going forward, all certificates that VMCA generates include the full chain. You canreplace existing certificates with newly generated certificates. This approach combines the security of third-party CA-signed certificate with the convenience of automated certificate management.
Procedure
1 Replace the Root Certificate (Intermediate CA) on page 80The first step in replacing the VMCA certificates with custom certificates is generating a CSR andadding the certificate that is returned to VMCA as a root certificate.
2 Replace Machine SSL Certificates (Intermediate CA) on page 82After you have received the signed certificate from the CA and made it the VMCA root certificate, youcan replace all machine SSL certificates.
3 Replace Solution User Certificates (Intermediate CA) on page 84After you replace the machine SSL certificates, you can replace the solution user certificates.
4 Replace the VMware Directory Service Certificate on page 88If you decide to use a new VMCA root certificate, and you unpublish the VMCA root certificate thatwas used when you provisioned your environment, you must replace the machine SSL certificates,solution user certificates, and certificates for some internal services.
5 Replace the VMware Directory Service Certificate in Mixed Mode Environments on page 89During upgrade, your environment might temporarily include both vCenter Single Sign-On version5.5 and vCenter Single Sign-On version 6.0, you have to perform additional steps to replace theVMware Directory Service SSL certificate if you replace the SSL certificate of the node on which thevCenter Single Sign-On service is running.
Replace the Root Certificate (Intermediate CA)The first step in replacing the VMCA certificates with custom certificates is generating a CSR and adding thecertificate that is returned to VMCA as a root certificate.
The certificate that you send to be signed must meet the following requirements:
n Key size: 2048 bits or more
n PEM format. VMware supports PKCS8 and PKCS1 (RSA keys). When keys are added to VECS, they areconverted to PKCS8
n x509 version 3
n For root certificates CA extension must be set to true, and cert sign must be in the list of requirements.
n Make sure that all nodes in your environment are time synchronized.
n No explicit limit to the length of the certificate chain. VMCA uses the OpenSSL default, which is tencertificates.
n VMCA does not support using certificates with wildcards or more than one DNS name.
n You cannot create subsidiary CAs of VMCA.
VMCA validates the following certificate attributes when you replace the root certificate:
n Key size 2048 bits or more
n Key Usage: Cert Sign
n Basic Constraint: Subject Type CA
vSphere Security
80 VMware, Inc.
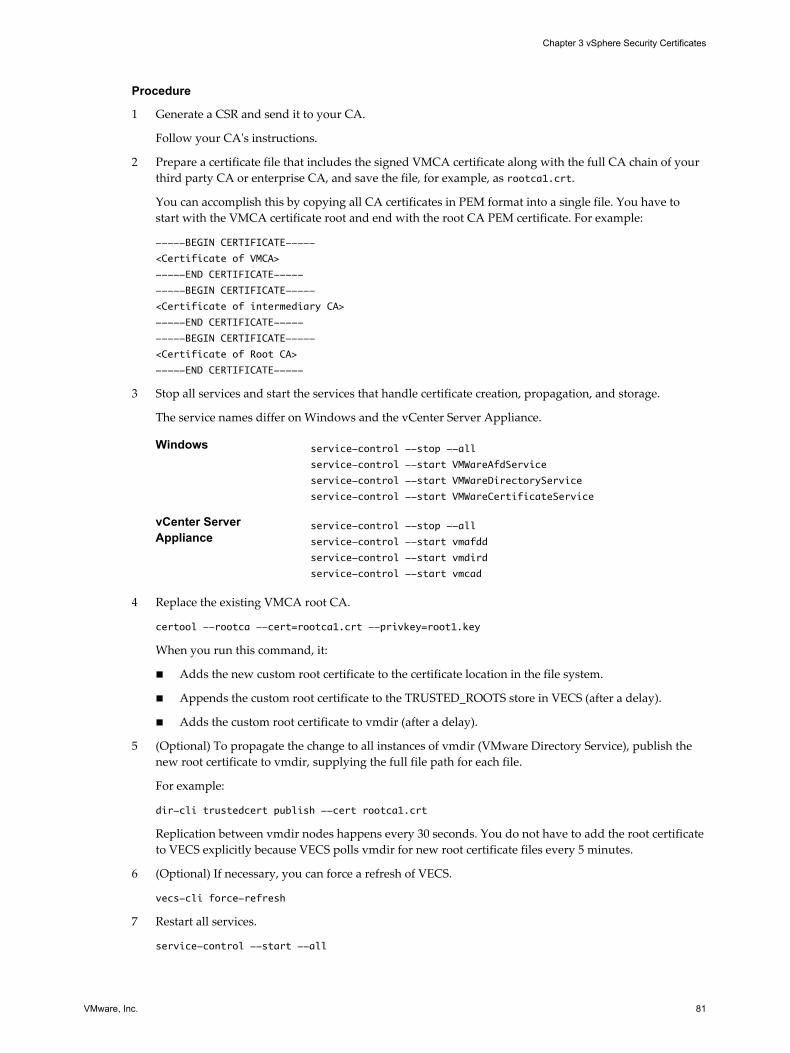
Procedure
1 Generate a CSR and send it to your CA.
Follow your CA's instructions.
2 Prepare a certificate file that includes the signed VMCA certificate along with the full CA chain of yourthird party CA or enterprise CA, and save the file, for example, as rootca1.crt.
You can accomplish this by copying all CA certificates in PEM format into a single file. You have tostart with the VMCA certificate root and end with the root CA PEM certificate. For example:
-----BEGIN CERTIFICATE-----
<Certificate of VMCA>
-----END CERTIFICATE-----
-----BEGIN CERTIFICATE-----
<Certificate of intermediary CA>
-----END CERTIFICATE-----
-----BEGIN CERTIFICATE-----
<Certificate of Root CA>
-----END CERTIFICATE-----
3 Stop all services and start the services that handle certificate creation, propagation, and storage.
The service names differ on Windows and the vCenter Server Appliance.
Windows service-control --stop --all
service-control --start VMWareAfdService
service-control --start VMWareDirectoryService
service-control --start VMWareCertificateService
vCenter ServerAppliance
service-control --stop --all
service-control --start vmafdd
service-control --start vmdird
service-control --start vmcad
4 Replace the existing VMCA root CA.
certool --rootca --cert=rootca1.crt --privkey=root1.key
When you run this command, it:
n Adds the new custom root certificate to the certificate location in the file system.
n Appends the custom root certificate to the TRUSTED_ROOTS store in VECS (after a delay).
n Adds the custom root certificate to vmdir (after a delay).
5 (Optional) To propagate the change to all instances of vmdir (VMware Directory Service), publish thenew root certificate to vmdir, supplying the full file path for each file.
For example:
dir-cli trustedcert publish --cert rootca1.crt
Replication between vmdir nodes happens every 30 seconds. You do not have to add the root certificateto VECS explicitly because VECS polls vmdir for new root certificate files every 5 minutes.
6 (Optional) If necessary, you can force a refresh of VECS.
vecs-cli force-refresh
7 Restart all services.
service-control --start --all
Chapter 3 vSphere Security Certificates
VMware, Inc. 81

Example: Replacing the Root Certificate
Replace the VMCA root certificate with the custom CA root certificate using the certool command with the--rootca option.
C:\>"C:\Program Files\VMware\vCenter Server\vmcad\certool" --rootca --cert=C:\custom-
certs\root.pem -–privkey=C:\custom-certs\root.key
When you run this command, it:
n Adds the new custom root certificate to the certificate location in the file system.
n Appends the custom root certificate to the TRUSTED_ROOTS store in VECS.
n Adds the custom root certificate to vmdir.
What to do next
You can remove the original VMCA root certificate from the certificate store if company policy requires it. Ifyou do, you have to refresh these internal certificates:
n Replace the vCenter Single Sign-On Signing certificate. See “Refresh the Security Token Service (STS)Root Certificate,” on page 36.
n Replace the VMware Directory Service certificate. See “Replace the VMware Directory ServiceCertificate,” on page 88.
Replace Machine SSL Certificates (Intermediate CA)After you have received the signed certificate from the CA and made it the VMCA root certificate, you canreplace all machine SSL certificates.
These steps are essentially the same as the steps for replacing with a certificate that uses VMCA as thecertificate authority. However, in this case, VMCA signs all certificates with the full chain.
Each machine must have a machine SSL certificate for secure communication with other services. In a multi-node deployment, you must run the Machine SSL certificate generation commands on each node. Use the --server parameter to point to the Platform Services Controller from a vCenter Server with externalPlatform Services Controller.
Prerequisites
For each machine SSL certificate, the SubjectAltName must contain DNS Name=<Machine FQDN>.
Procedure
1 Make one copy of certool.cfg for each machine that needs a new certificate.
You can find certool.cfg in the following locations:
Windows C:\Program Files\VMware\vCenter Server\vmcad
Linux /usr/lib/vmware-vmca/share/config/
2 Edit the custom configuration file for each machine to include that machine's FDQN.
Run NSLookup against the machine’s IP address to see the DNS listing of the name, and use that namefor the Hostname field in the file.
3 Generate a public/private key file pair and a certificate for each machine, passing in the configurationfile that you just customized.
For example:
certool --genkey --privkey=machine1.priv --pubkey=machine1.pub
certool --gencert --privkey=machine1.priv --cert machine42.crt --Name=Machine42_Cert --
config machine1.cfg
vSphere Security
82 VMware, Inc.

4 Stop all services and start the services that handle certificate creation, propagation, and storage.
The service names differ on Windows and the vCenter Server Appliance.
Windows service-control --stop --all
service-control --start VMWareAfdService
service-control --start VMWareDirectoryService
service-control --start VMWareCertificateService
vCenter ServerAppliance
service-control --stop --all
service-control --start vmafdd
service-control --start vmdird
service-control --start vmcad
5 Add the new certificate to VECS.
All machines need the new certificate in the local certificate store to communicate over SSL. You firstdelete the existing entry, then add the new entry.
vecs-cli entry delete --store MACHINE_SSL_CERT --alias __MACHINE_CERT
vecs-cli entry create --store MACHINE_SSL_CERT --alias __MACHINE_CERT --cert machine1.cert
--key machine1.priv
6 Restart all services.
service-control --start --all
Example: Replacing Machine SSL Certificates (VMCA is Intermediate CA)
1 Create a configuration file for the SSL certificate and save it as ssl-config.cfg in the current directory.
Country = US
Name = vmca-<PSC-FQDN-example>
Organization = VMware
OrgUnit = VMware Engineering
State = California
Locality = Palo Alto
Hostname = <FQDN>
2 Generate a key pair for the machine SSL certificate. Run this command on each management node andPlatform Services Controller node; it does not require a --server option.
C:\>"C:\Program Files\VMware\vCenter Server\vmcad\"certool --genkey --privkey=ssl-key.priv --
pubkey=ssl-key.pub
The ssl-key.priv and ssl-key.pub files are created in the current directory.
3 Generate the new machine SSL certificate. This certificate is signed by VMCA. If you replaced theVMCA root certificate with custom certificate, VMCA signs all certificates with the full chain.
n On a Platform Services Controller node or embedded installation:
C:\>"C:\Program Files\VMware\vCenter Server\vmcad\"certool --gencert --cert=new-vmca-
ssl.crt --privkey=ssl-key.priv --config=ssl-config.cfg
n On a vCenter Server (external installation):
C:\>"C:\Program Files\VMware\vCenter Server\vmcad\"certool --gencert --cert=new-vmca-
ssl.crt --privkey=ssl-key.priv --config=ssl-config.cfg --server=<psc-ip-or-fqdn>
The new-vmca-ssl.crt file is created in the current directory.
Chapter 3 vSphere Security Certificates
VMware, Inc. 83

4 (Optional) List the content of VECS.
"C:\Program Files\VMware\vCenter Server\vmafdd\"vecs-cli store list
n Output on Platform Services Controller:
MACHINE_SSL_CERT
TRUSTED_ROOTS
TRUSTED_ROOT_CRLS
machine
n Output on vCenter Server:
output (on vCenter):
MACHINE_SSL_CERT
TRUSTED_ROOTS
TRUSTED_ROOT_CRLS
machine
vpxd
vpxd-extension
vsphere-webclient
sms
5 Replace the Machine SSL certificate in VECS with the new Machine SSL certificate. The --store and --alias values have to exactly match with the default names.n On the Platform Services Controller, run the following command to update the Machine SSL
certificate in the MACHINE_SSL_CERT store.
C:\>"C:\Program Files\VMware\vCenter Server\vmafdd\"vecs-cli entry delete --store
MACHINE_SSL_CERT --alias __MACHINE_CERT
C:\>"C:\Program Files\VMware\vCenter Server\vmafdd\"vecs-cli entry create --store
MACHINE_SSL_CERT --alias __MACHINE_CERT --cert new-vmca-ssl.crt --key ssl-key.priv
n On each management node or embedded deployment, run the following command to update theMachine SSL certificate in the MACHINE_SSL_CERT store. You must update the certificate foreach machine separately because each has a different FQDN.
C:\>"C:\Program Files\VMware\vCenter Server\vmafdd\"vecs-cli entry delete --store
MACHINE_SSL_CERT --alias __MACHINE_CERT
C:\>"C:\Program Files\VMware\vCenter Server\vmafdd\"vecs-cli entry create --store
MACHINE_SSL_CERT --alias __MACHINE_CERT --cert new-vmca-ssl.crt --key ssl-key.priv
What to do next
You can also replace the certificates for your ESXi hosts. See “Certificate Management for ESXi Hosts,” onpage 137.
After replacing the root certificate in a multi-node deployment, you must restart services on allvCenter Server with external Platform Services Controller nodes.
Replace Solution User Certificates (Intermediate CA)After you replace the machine SSL certificates, you can replace the solution user certificates.
You replace the machine solution user certificate on each management node and on eachPlatform Services Controller node. You replace the other solution user certificates only on each managementnode. Use the --server parameter to point to the Platform Services Controller when you run commands ona management node with an external Platform Services Controller.
NOTE When you list solution user certificates in large deployments, the output of dir-cli list includes allsolution users from all nodes. Run vmafd-cli get-machine-id --server-name localhost to find the localmachine ID for each host. Each solution user name includes the machine ID.
vSphere Security
84 VMware, Inc.

Prerequisites
Each solution user certificate must have a different Subject. Consider, for example, including the solutionuser name (such as vpxd) or other unique identifier.
Procedure
1 Make one copy of certool.cfg, remove the Name, IP address, DNS name, and email fields, and renamethe file, for example, to sol_usr.cfg.
You can name the certificates from the command line as part of generation. The other information is notneeded for solution users. If you leave the default information, the certificates that are generated arepotentially confusing.
2 Generate a public/private key file pair and a certificate for each solution user, passing in theconfiguration file that you just customized.
For example:
certool --genkey --privkey=vpxd.priv --pubkey=vpxd.pub
certool --gencert --privkey=vpxd.priv --cert vpxd.crt --Name=VPXD_1 --config sol_usr.cfg
3 Find the name for each solution user.
dir-cli service list
You can use the unique ID that is returned when you replace the certificates. The input and outputmight look as follows.
C:\Program Files\VMware\vCenter Server\vmafdd>dir-cli service list
Enter password for [email protected]:
1. machine-1d364500-4b45-11e4-96c2-020011c98db3
2. vpxd-1d364500-4b45-11e4-96c2-020011c98db3
3. vpxd-extension-1d364500-4b45-11e4-96c2-020011c98db3
4. vsphere-webclient-1d364500-4b45-11e4-96c2-020011c98db3
When you list solution user certificates in multi-node deployments, the output of dir-cli list includesall solution users from all nodes. Run vmafd-cli get-machine-id --server-name localhost to find thelocal machine ID for each host. Each solution user name includes the machine ID.
4 Stop all services and start the services that handle certificate creation, propagation, and storage.
The service names differ on Windows and the vCenter Server Appliance.
Windows service-control --stop --all
service-control --start VMWareAfdService
service-control --start VMWareDirectoryService
service-control --start VMWareCertificateService
vCenter ServerAppliance
service-control --stop --all
service-control --start vmafdd
service-control --start vmdird
service-control --start vmcad
Chapter 3 vSphere Security Certificates
VMware, Inc. 85

5 Replace the existing certificate in vmdir and then in VECS.
For solution users, you must add the certificates in that order. For example:
dir-cli service update --name <vpxd-xxxx-xxx-7c7b769cd9f4> --cert ./vpxd.crt
vecs-cli entry delete --store vpxd --alias vpxd
vecs-cli entry create --store vpxd --alias vpxd --cert vpxd.crt --key vpxd.priv
NOTE Solution users cannot log in to vCenter Single Sign-On if you don't replace the certificate invmdir.
6 Restart all services.
service-control --start --all
Example: Replacing Solution User Certificates (Intermediate CA)
1 Generate a public/private key pair for each solution user. That includes a pair for the machine solutionuser on each Platform Services Controller and each management node and a pair for each additionalsolution user (vpxd, vpxd-extension, vsphere-webclient) on each management node.
a Generate a key pair for the machine solution user of an embedded deployment or for the machinesolution user of the Platform Services Controller.
C:\>"C:\Program Files\VMware\vCenter Server\vmcad\"certool --genkey --privkey=machine-
key.priv --pubkey=machine-key.pub
b (Optional) For deployments with an external Platform Services Controller, generate a key pair forthe machine solution user on each management node.
C:\>"C:\Program Files\VMware\vCenter Server\vmcad\"certool --genkey --privkey=machine-
key.priv --pubkey=machine-key.pub
c Generate a key pair for the vpxd solution user on each management node.
C:\>"C:\Program Files\VMware\vCenter Server\vmcad\"certool --genkey --privkey=vpxd-
key.priv --pubkey=vpxd-key.pub
d Generate a key pair for the vpxd-extension solution user on each management node.
C:\>"C:\Program Files\VMware\vCenter Server\vmcad\"certool --genkey --privkey=vpxd-
extension-key.priv --pubkey=vpxd-extension-key.pub
e Generate a key pair for the vsphere-webclient solution user on each management node.
C:\>"C:\Program Files\VMware\vCenter Server\vmcad\"certool --genkey --privkey=vsphere-
webclient-key.priv --pubkey=vsphere-webclient-key.pub
2 Generate solution user certificates that are signed by the new VMCA root certificate for the machinesolution user on each Platform Services Controller and each management node and for each additionalsolution user (vpxd, vpxd-extension, vsphere-webclient) on each management node.
NOTE The --Name parameter has to be unique. Including the name of the solution user store, forexample vpxd or vpxd-extension makes it easy to see which certificate maps to which solution user.
a Run the following command on the Platform Services Controller node to generate a solution usercertificate for the machine solution user on that node.
C:\>"C:\Program Files\VMware\vCenter Server\vmcad\"certool --gencert --cert=new-
machine.crt --privkey=machine-key.priv --Name=machine
b Generate a certificate for the machine solution user on each management node.
C:\>"C:\Program Files\VMware\vCenter Server\vmcad\"certool --gencert --cert=new-
machine.crt --privkey=machine-key.priv --Name=machine --server=<psc-ip-or-fqdn>
vSphere Security
86 VMware, Inc.

c Generate a certificate for the vpxd solution user on each management node.
C:\>"C:\Program Files\VMware\vCenter Server\vmcad\"certool --gencert --cert=new-vpxd.crt
--privkey=vpxd-key.priv --Name=vpxd --server=<psc-ip-or-fqdn>
d Generate a certificate for the vpxd-extensions solution user on each management node.
C:\>"C:\Program Files\VMware\vCenter Server\vmcad\"certool --gencert --cert=new-vpxd-
extension.crt --privkey=vpxd-extension-key.priv --Name=vpxd-extension --server=<psc-ip-
or-fqdn>
e Generate a certificate for the vsphere-webclient solution user on each management node byrunning the following command.
C:\>"C:\Program Files\VMware\vCenter Server\vmcad\"certool --gencert --cert=new-vsphere-
webclient.crt --privkey=vsphere-webclient-key.priv --Name=vsphere-webclient --
server=<psc-ip-or-fqdn>
3 Replace the solution user certificates in VECS with the new solution user certificates.
NOTE The --store and --alias parameters have to exactly match the default names for services.
a On the Platform Services Controller node, run the following command to replace the machinesolution user certificate:
C:\>"C:\Program Files\VMware\vCenter Server\vmafdd\"vecs-cli entry delete --store
machine --alias machine
C:\>"C:\Program Files\VMware\vCenter Server\vmafdd\"vecs-cli entry create --store
machine --alias machine --cert new-machine.crt --key machine-key.priv
b Replace the machine solution user certificate on each management node:
C:\>"C:\Program Files\VMware\vCenter Server\vmafdd\"vecs-cli entry delete --store
machine --alias machine
C:\>"C:\Program Files\VMware\vCenter Server\vmafdd\"vecs-cli entry create --store
machine --alias machine --cert new-machine-vc.crt --key machine-vc-key.priv
c Replace the vpxd solution user certificate on each management node.
C:\>"C:\Program Files\VMware\vCenter Server\vmafdd\"vecs-cli entry delete --store vpxd --
alias vpxd
C:\>"C:\Program Files\VMware\vCenter Server\vmafdd\"vecs-cli entry create --store vpxd --
alias vpxd --cert new-vpxd.crt --key vpxd-key.priv
d Replace the vpxd-extension solution user certificate on each management node.
C:\>"C:\Program Files\VMware\vCenter Server\vmafdd\"vecs-cli entry delete --store vpxd-
extension --alias vpxd-extension
C:\>"C:\Program Files\VMware\vCenter Server\vmafdd\"vecs-cli entry create --store vpxd-
extension --alias vpxd-extension --cert new-vpxd-extension.crt --key vpxd-extension-
key.priv
e Replace the vsphere-webclient solution user certificate on each management node.
C:\>"C:\Program Files\VMware\vCenter Server\vmafdd\"vecs-cli entry delete --store
vsphere-webclient --alias vsphere-webclient
C:\>"C:\Program Files\VMware\vCenter Server\vmafdd\"vecs-cli entry create --store
vsphere-webclient --alias vsphere-webclient --cert new-vsphere-webclient.crt --key
vsphere-webclient-key.priv
Chapter 3 vSphere Security Certificates
VMware, Inc. 87

4 Update VMware Directory Service (vmdir) with the new solution user certificates. You are promptedfor a vCenter Single Sign-On administrator password.
a Run dir-cli service list to get the unique service ID suffix for each solution user. You can runthis command on a Platform Services Controller or a vCenter Server system.
C:\>"C:\Program Files\VMware\vCenter Server\vmafdd\"dir-cli>dir-cli service list
output:
1. machine-29a45d00-60a7-11e4-96ff-00505689639a
2. machine-6fd7f140-60a9-11e4-9e28-005056895a69
3. vpxd-6fd7f140-60a9-11e4-9e28-005056895a69
4. vpxd-extension-6fd7f140-60a9-11e4-9e28-005056895a69
5. vsphere-webclient-6fd7f140-60a9-11e4-9e28-005056895a69
NOTE When you list solution user certificates in large deployments, the output of dir-cli listincludes all solution users from all nodes. Run vmafd-cli get-machine-id --server-namelocalhost to find the local machine ID for each host. Each solution user name includes the machineID.
b Replace the machine certificate in vmdir on the Platform Services Controller. For example, ifmachine-29a45d00-60a7-11e4-96ff-00505689639a is the machine solution user on thePlatform Services Controller, run this command:
C:\>"C:\Program Files\VMware\vCenter Server\vmafdd\"dir-cli service update --name
machine-29a45d00-60a7-11e4-96ff-00505689639a --cert new-machine-1.crt
c Replace the machine certificate in vmdir on each management node. For example, ifmachine-6fd7f140-60a9-11e4-9e28-005056895a69 is the machine solution user on the vCenter Server,run this command:
C:\>"C:\Program Files\VMware\vCenter Server\vmafdd\"dir-cli service update --name
machine-6fd7f140-60a9-11e4-9e28-005056895a69 --cert new-machine-2.crt
d Replace the vpxd solution user certificate in vmdir on each management node. For example, ifvpxd-6fd7f140-60a9-11e4-9e28-005056895a69 is the vpxd solution user ID, run this command:
C:\>"C:\Program Files\VMware\vCenter Server\vmafdd\"dir-cli service update --name
vpxd-6fd7f140-60a9-11e4-9e28-005056895a69 --cert new-vpxd.crt
e Replace the vpxd-extension solution user certificate in vmdir on each management node. Forexample, if vpxd-extension-6fd7f140-60a9-11e4-9e28-005056895a69 is the vpxd-extension solutionuser ID, run this command:
C:\>"C:\Program Files\VMware\vCenter Server\vmafdd\"dir-cli service update --name vpxd-
extension-6fd7f140-60a9-11e4-9e28-005056895a69 --cert new-vpxd-extension.crt
f Replace the vsphere-webclient solution user certificate on each management node. For example, ifvsphere-webclient-6fd7f140-60a9-11e4-9e28-005056895a69 is the vsphere-webclient solution userID, run this command:
C:\>"C:\Program Files\VMware\vCenter Server\vmafdd\"dir-cli service update --name
vsphere-webclient-6fd7f140-60a9-11e4-9e28-005056895a69 --cert new-vsphere-webclient.crt
Replace the VMware Directory Service CertificateIf you decide to use a new VMCA root certificate, and you unpublish the VMCA root certificate that wasused when you provisioned your environment, you must replace the machine SSL certificates, solution usercertificates, and certificates for some internal services.
If you unpublish the VMCA root certificate, you must replace the SSL Signing Certificate that is used byvCenter Single Sign-On. See “Refresh the Security Token Service (STS) Root Certificate,” on page 36. Youmust also replace the VMware Directory Service (vmdir) certificate.
vSphere Security
88 VMware, Inc.

Prerequisites
Request a certificate for vmdir for your third-party or enterprise CA.
Procedure
1 Stop vmdir.
Linux service-control --stop vmdird
Windows service-control --stop VMWareDirectoryService
2 Copy the certificate and key that you just generated to the vmdir location.
Linux cp vmdir.crt /usr/lib/vmware-vmdir/share/config/vmdircert.pem
cp vmdir.priv /usr/lib/vmware-vmdir/share/config/vmdirkey.pem
Windows copy vmdir.crt
C:\programdata\vmware\vCenterServer\cfg\vmdird\vmdircert.pem
copy vmdir.priv
C:\programdata\vmware\vCenterServer\cfg\vmdird\vmdirkey.pem
3 Restart vmdir from the vSphere Web Client or using the service-control command.
Linux service-control --start vmdird
Windows service-control --start VMWareDirectoryService
Replace the VMware Directory Service Certificate in Mixed Mode EnvironmentsDuring upgrade, your environment might temporarily include both vCenter Single Sign-On version 5.5 andvCenter Single Sign-On version 6.0, you have to perform additional steps to replace the VMware DirectoryService SSL certificate if you replace the SSL certificate of the node on which the vCenter Single Sign-Onservice is running.
The VMware Directory Service SSL certificate is used by vmdir to perform handshakes betweenPlatform Services Controller nodes that perform vCenter Single Sign-On replication
These steps are required only if:
n Your environment includes both vCenter Single Sign-On 5.5 and vCenter Single Sign-On 6.0 services.
n The vCenter Single Sign-On services are set up to replicate vmdir data.
n You plan to replace the default VMCA-signed certificates with custom certificates for the node onwhich the vCenter Single Sign-On 6.0 service runs.
NOTE In most other cases, upgrading the complete environment before restarting the services is bestpractice. Teplacing the VMware Directory Service certificate is not usually recommended.
Procedure
1 On the node on which the vCenter Single Sign-On 6.0 service runs, replace the vmdird SSL certificateand key.
See “Replace the VMware Directory Service Certificate,” on page 88.
Chapter 3 vSphere Security Certificates
VMware, Inc. 89
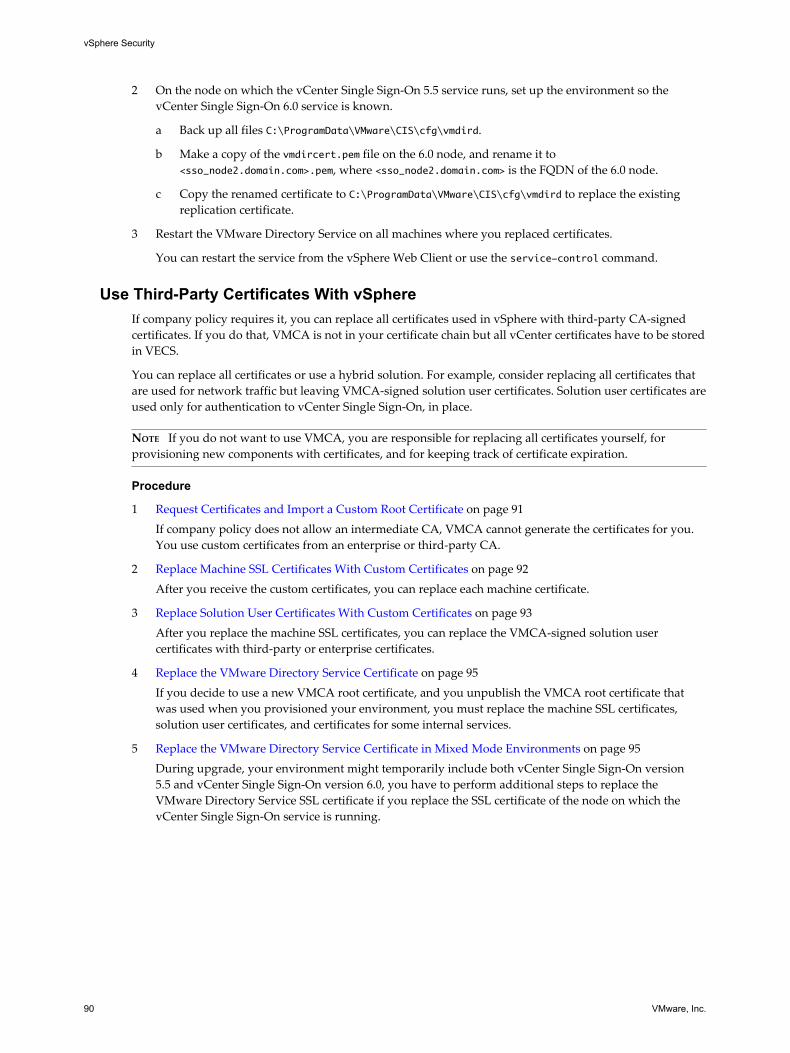
2 On the node on which the vCenter Single Sign-On 5.5 service runs, set up the environment so thevCenter Single Sign-On 6.0 service is known.
a Back up all files C:\ProgramData\VMware\CIS\cfg\vmdird.
b Make a copy of the vmdircert.pem file on the 6.0 node, and rename it to<sso_node2.domain.com>.pem, where <sso_node2.domain.com> is the FQDN of the 6.0 node.
c Copy the renamed certificate to C:\ProgramData\VMware\CIS\cfg\vmdird to replace the existingreplication certificate.
3 Restart the VMware Directory Service on all machines where you replaced certificates.
You can restart the service from the vSphere Web Client or use the service-control command.
Use Third-Party Certificates With vSphereIf company policy requires it, you can replace all certificates used in vSphere with third-party CA-signedcertificates. If you do that, VMCA is not in your certificate chain but all vCenter certificates have to be storedin VECS.
You can replace all certificates or use a hybrid solution. For example, consider replacing all certificates thatare used for network traffic but leaving VMCA-signed solution user certificates. Solution user certificates areused only for authentication to vCenter Single Sign-On, in place.
NOTE If you do not want to use VMCA, you are responsible for replacing all certificates yourself, forprovisioning new components with certificates, and for keeping track of certificate expiration.
Procedure
1 Request Certificates and Import a Custom Root Certificate on page 91If company policy does not allow an intermediate CA, VMCA cannot generate the certificates for you.You use custom certificates from an enterprise or third-party CA.
2 Replace Machine SSL Certificates With Custom Certificates on page 92After you receive the custom certificates, you can replace each machine certificate.
3 Replace Solution User Certificates With Custom Certificates on page 93After you replace the machine SSL certificates, you can replace the VMCA-signed solution usercertificates with third-party or enterprise certificates.
4 Replace the VMware Directory Service Certificate on page 95If you decide to use a new VMCA root certificate, and you unpublish the VMCA root certificate thatwas used when you provisioned your environment, you must replace the machine SSL certificates,solution user certificates, and certificates for some internal services.
5 Replace the VMware Directory Service Certificate in Mixed Mode Environments on page 95During upgrade, your environment might temporarily include both vCenter Single Sign-On version5.5 and vCenter Single Sign-On version 6.0, you have to perform additional steps to replace theVMware Directory Service SSL certificate if you replace the SSL certificate of the node on which thevCenter Single Sign-On service is running.
vSphere Security
90 VMware, Inc.

Request Certificates and Import a Custom Root CertificateIf company policy does not allow an intermediate CA, VMCA cannot generate the certificates for you. Youuse custom certificates from an enterprise or third-party CA.
Prerequisites
The certificate must meet the following requirements:
n Key size: 2048 bits or more (PEM encoded)
n PEM format. VMware supports PKCS8 and PKCS1 (RSA keys). When keys are added to VECS, they areconverted to PKCS8
n x509 version 3
n For root certificates, the CA extension must be set to true, and the cert sign must be in the list ofrequirements.
n SubjectAltName must contain DNS Name=<machine_FQDN>
n CRT format
n Contains the following Key Usages: Digital Signature, Non Repudiation, Key Encipherment
Procedure
1 Send CSRs for the following certificates to your enterprise or third-party certificate provider.
n A machine SSL certificate for each machine. For the machine SSL certificate, the SubjectAltNamefield must contain the fully qualified domain name (DNS NAME=machine_FQDN)
n Optionally, four solution user certificates for each embedded system or management node.Solution user certificates should not include IP address, host name, or email address. Eachcertificate must have a different certificate Subject.
Typically, the result is a PEM file for the trusted chain, plus the signed SSL certificates for eachPlatform Services Controller or management node.
2 List the TRUSTED_ROOTS and machine SSL stores.
vecs-cli store list
a Ensure that the current root certificate and all machine SSL certificates are signed by VMCA.
b Note down the Serial number, issuer, and Subject CN fields.
c (Optional) With a Web browser, open a HTTPS connection to a node where the certificate will bereplaced, check the certificate information, and ensure that it matches the machine SSL certificate.
3 Stop all services and start the services that handle certificate creation, propagation, and storage.
The service names differ on Windows and the vCenter Server Appliance.
Windows service-control --stop --all
service-control --start VMWareAfdService
service-control --start VMWareDirectoryService
service-control --start VMWareCertificateService
vCenter ServerAppliance
service-control --stop --all
service-control --start vmafdd
service-control --start vmdird
service-control --start vmcad
Chapter 3 vSphere Security Certificates
VMware, Inc. 91

4 Publish the custom root certificat, which is the signing certificate from the third-party CA.
dir-cli trustedcert publish --cert <my_custom_root>
If you do not specify a user name and password on the command line, you are prompted.
5 Restart all services.
service-control --start --all
What to do next
You can remove the original VMCA root certificate from the certificate store if company policy requires it. Ifyou do, you have to refresh these internal certificates:
n Replace the vCenter Single Sign-On Signing certificate. See “Refresh the Security Token Service (STS)Root Certificate,” on page 36.
n Replace the VMware Directory Service certificate. See “Replace the VMware Directory ServiceCertificate,” on page 88.
Replace Machine SSL Certificates With Custom CertificatesAfter you receive the custom certificates, you can replace each machine certificate.
Each machine must have a machine SSL certificate for secure communication with other services. In a multi-node deployment, you must run the Machine SSL certificate generation commands on each node. Use the --server parameter to point to the Platform Services Controller from a vCenter Server with externalPlatform Services Controller.
You must have the following information before you can start replacing the certificates:
n Password for [email protected].
n Valid Machine SSL custom certificate (.crt file).
n Valid Machine SSL custom key (.key file).
n Valid custom certificate for Root (.crt file).
n If you are running the command on a vCenter Server with external Platform Services Controller in amulti-node deployment, IP address of the Platform Services Controller.
Prerequisites
You must have received a certificate for each machine from your third-party or enterprise CertificateAuthority.
n Key size: 2048 bits or more (PEM encoded)
n CRT format
n x509 version 3
n SubjectAltName must contain DNS Name=<machine_FQDN>
n Contains the following Key Usages: Digital Signature, Non Repudiation, Key Encipherment
vSphere Security
92 VMware, Inc.

Procedure
1 Stop all services and start the services that handle certificate creation, propagation, and storage.
The service names differ on Windows and the vCenter Server Appliance.
Windows service-control --stop --all
service-control --start VMWareAfdService
service-control --start VMWareDirectoryService
service-control --start VMWareCertificateService
vCenter ServerAppliance
service-control --stop --all
service-control --start vmafdd
service-control --start vmdird
service-control --start vmcad
2 Log in to each node and add the new machine certificates that you received from the CA to VECS.
All machines need the new certificate in the local certificate store to communicate over SSL.
vecs-cli entry delete --store MACHINE_SSL_CERT --alias __MACHINE_CERT
vecs-cli entry create --store MACHINE_SSL_CERT --alias __MACHINE_CERT --cert <cert-file-path>
--key <key-file-path>
3 Restart all services.
service-control --start --all
Example: Replace Machine SSL Certificates with Custom Certificates
You can replace the machine SSL certificate on each node the same way.
1 First, delete the existing certificate in VECS.
"C:\Program Files\VMware\vCenter Server\vmafdd\"vecs-cli entry delete --store
MACHINE_SSL_CERT --alias __MACHINE_CERT
2 Next, add the replacement certificate.
"C:\Program Files\VMware\vCenter Server\vmafdd\"vecs-cli entry create --store
MACHINE_SSL_CERT --alias __MACHINE_CERT --cert E:\custom-certs\ms-ca\signed-ssl\custom-w1-
vim-cat-dhcp-094.eng.vmware.com.crt --key E:\custom-certs\ms-ca\signed-ssl\custom-x3-vim-cat-
dhcp-1128.vmware.com.priv
What to do next
You can also replace the certificates for your ESXi hosts. See “Certificate Management for ESXi Hosts,” onpage 137.
After replacing the root certificate in a multi-node deployment, you must restart services on allvCenter Server with external Platform Services Controller nodes.
Replace Solution User Certificates With Custom CertificatesAfter you replace the machine SSL certificates, you can replace the VMCA-signed solution user certificateswith third-party or enterprise certificates.
Solution users use certificates only to authenticate to vCenter Single Sign-On. If the certificate is valid,vCenter Single Sign-On assigns a SAML token to the solution user, and the solution user uses the SAMLtoken to authenticate to other vCenter components.
Consider whether replacement of solution user certificates is necessary in your environment. Becausesolution users are located behind a proxy server and the machine SSL certificate is used to secure SSL traffic,the solution user certificates might be less of a security concern.
Chapter 3 vSphere Security Certificates
VMware, Inc. 93

You replace the machine solution user certificate on each management node and on eachPlatform Services Controller node. You replace the other solution user certificates only on each managementnode. Use the --server parameter to point to the Platform Services Controller when you run commands ona management node with an external Platform Services Controller.
NOTE When you list solution user certificates in large deployments, the output of dir-cli list includes allsolution users from all nodes. Run vmafd-cli get-machine-id --server-name localhost to find the localmachine ID for each host. Each solution user name includes the machine ID.
Prerequisites
n Key size: 2048 bits or more (PEM encoded)
n CRT format
n x509 version 3
n SubjectAltName must contain DNS Name=<machine_FQDN>
n Each solution user certificate must have a different Subject. Consider, for example, including thesolution user name (such as vpxd) or other unique identifier.
n Contains the following Key Usages: Digital Signature, Non Repudiation, Key Encipherment
Procedure
1 Stop all services and start the services that handle certificate creation, propagation, and storage.
service-control --stop --all
service-control --start vmafdd
service-control --start vmdird
service-control --start vmca
2 Find the name for each solution user.
dir-cli service list
You can use the unique ID that is returned when you replace the certificates. The input and outputmight look as follows.
C:\Program Files\VMware\vCenter Server\vmafdd>dir-cli service list
Enter password for [email protected]:
1. machine-1d364500-4b45-11e4-96c2-020011c98db3
2. vpxd-1d364500-4b45-11e4-96c2-020011c98db3
3. vpxd-extension-1d364500-4b45-11e4-96c2-020011c98db3
4. vsphere-webclient-1d364500-4b45-11e4-96c2-020011c98db3
When you list solution user certificates in multi-node deployments, the output of dir-cli list includesall solution users from all nodes. Run vmafd-cli get-machine-id --server-name localhost to find thelocal machine ID for each host. Each solution user name includes the machine ID.
3 For each solution user, replace the existing certificate in VECS and then in vmdir.
You must add the certificates in that order.
vecs-cli entry delete --store vpxd --alias vpxd
vecs-cli entry create --store vpxd --alias vpxd --cert vpxd.crt --key vpxd.priv
dir-cli service update --name <vpxd-xxxx-xxx-xxxxxx> --cert vpxd.crt
NOTE Solution users cannot authenticate to vCenter Single Sign-On if you do not replace the certificatein vmdir.
vSphere Security
94 VMware, Inc.

4 Restart all services.
service-control --start --all
Replace the VMware Directory Service CertificateIf you decide to use a new VMCA root certificate, and you unpublish the VMCA root certificate that wasused when you provisioned your environment, you must replace the machine SSL certificates, solution usercertificates, and certificates for some internal services.
If you unpublish the VMCA root certificate, you must replace the SSL Signing Certificate that is used byvCenter Single Sign-On. See “Refresh the Security Token Service (STS) Root Certificate,” on page 36. Youmust also replace the VMware Directory Service (vmdir) certificate.
Prerequisites
Request a certificate for vmdir for your third-party or enterprise CA.
Procedure
1 Stop vmdir.
Linux service-control --stop vmdird
Windows service-control --stop VMWareDirectoryService
2 Copy the certificate and key that you just generated to the vmdir location.
Linux cp vmdir.crt /usr/lib/vmware-vmdir/share/config/vmdircert.pem
cp vmdir.priv /usr/lib/vmware-vmdir/share/config/vmdirkey.pem
Windows copy vmdir.crt
C:\programdata\vmware\vCenterServer\cfg\vmdird\vmdircert.pem
copy vmdir.priv
C:\programdata\vmware\vCenterServer\cfg\vmdird\vmdirkey.pem
3 Restart vmdir from the vSphere Web Client or using the service-control command.
Linux service-control --start vmdird
Windows service-control --start VMWareDirectoryService
Replace the VMware Directory Service Certificate in Mixed Mode EnvironmentsDuring upgrade, your environment might temporarily include both vCenter Single Sign-On version 5.5 andvCenter Single Sign-On version 6.0, you have to perform additional steps to replace the VMware DirectoryService SSL certificate if you replace the SSL certificate of the node on which the vCenter Single Sign-Onservice is running.
The VMware Directory Service SSL certificate is used by vmdir to perform handshakes betweenPlatform Services Controller nodes that perform vCenter Single Sign-On replication
These steps are required only if:
n Your environment includes both vCenter Single Sign-On 5.5 and vCenter Single Sign-On 6.0 services.
n The vCenter Single Sign-On services are set up to replicate vmdir data.
Chapter 3 vSphere Security Certificates
VMware, Inc. 95
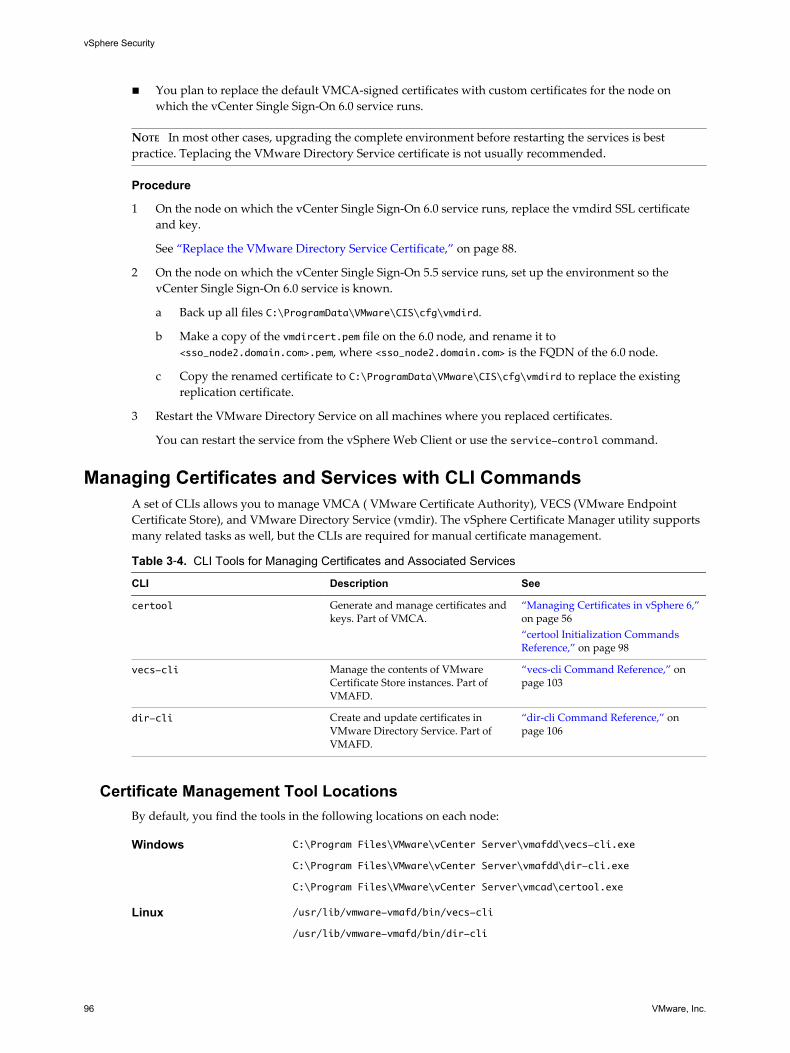
n You plan to replace the default VMCA-signed certificates with custom certificates for the node onwhich the vCenter Single Sign-On 6.0 service runs.
NOTE In most other cases, upgrading the complete environment before restarting the services is bestpractice. Teplacing the VMware Directory Service certificate is not usually recommended.
Procedure
1 On the node on which the vCenter Single Sign-On 6.0 service runs, replace the vmdird SSL certificateand key.
See “Replace the VMware Directory Service Certificate,” on page 88.
2 On the node on which the vCenter Single Sign-On 5.5 service runs, set up the environment so thevCenter Single Sign-On 6.0 service is known.
a Back up all files C:\ProgramData\VMware\CIS\cfg\vmdird.
b Make a copy of the vmdircert.pem file on the 6.0 node, and rename it to<sso_node2.domain.com>.pem, where <sso_node2.domain.com> is the FQDN of the 6.0 node.
c Copy the renamed certificate to C:\ProgramData\VMware\CIS\cfg\vmdird to replace the existingreplication certificate.
3 Restart the VMware Directory Service on all machines where you replaced certificates.
You can restart the service from the vSphere Web Client or use the service-control command.
Managing Certificates and Services with CLI CommandsA set of CLIs allows you to manage VMCA ( VMware Certificate Authority), VECS (VMware EndpointCertificate Store), and VMware Directory Service (vmdir). The vSphere Certificate Manager utility supportsmany related tasks as well, but the CLIs are required for manual certificate management.
Table 3‑4. CLI Tools for Managing Certificates and Associated Services
CLI Description See
certool Generate and manage certificates andkeys. Part of VMCA.
“Managing Certificates in vSphere 6,”on page 56“certool Initialization CommandsReference,” on page 98
vecs-cli Manage the contents of VMwareCertificate Store instances. Part ofVMAFD.
“vecs-cli Command Reference,” onpage 103
dir-cli Create and update certificates inVMware Directory Service. Part ofVMAFD.
“dir-cli Command Reference,” onpage 106
Certificate Management Tool LocationsBy default, you find the tools in the following locations on each node:
Windows C:\Program Files\VMware\vCenter Server\vmafdd\vecs-cli.exe
C:\Program Files\VMware\vCenter Server\vmafdd\dir-cli.exe
C:\Program Files\VMware\vCenter Server\vmcad\certool.exe
Linux /usr/lib/vmware-vmafd/bin/vecs-cli
/usr/lib/vmware-vmafd/bin/dir-cli
vSphere Security
96 VMware, Inc.

/usr/lib/vmware-vmca/bin/certool
If you run commands from a management node with an external Platform Services Controller, you canspecify the Platform Services Controller with the --server parameter.
Required Privileges for Certificate Management OperationsFor most vCenter certificate management operations, you have to be in the CAAdmins group in thevsphere.local domain. The [email protected] user is in the CAAdmins group. Some operationsare allowed for all users.
If you run the vCenter Certificate Manager utility, you are prompted for the password [email protected]. If you replace certificates manually, different options for the differentcertificate management CLIs require different privileges.
dir-cli You must be a member of the CAAdmins group in the vsphere.local domain.You are prompted for a user name and password each time you run a dir-cli command.
vecs-cli Initially, only the store owner has access to a store. The store owner is theAdministrator user on Windows systems and the root user on Linux systems.The store owner can provide access to other users.
The MACHINE_SSL_CERT and TRUSTED_ROOTS stores are special stores.Only the root user or administrator user, depending on the type ofinstallation, has complete access.
certool Most of the certool commands require that the user is in the CAAdminsgroup. The [email protected] user is in the CAAdmins group. Allusers can run the following commands:
n genselfcacert
n initscr
n getdc
n waitVMDIR
n waitVMCA
n genkey
n viewcert
For certificate management for ESXi hosts, you must have the Certificates. Manage Certificates privilege.You can set that privilege from the vSphere Web Client.
Changing certool ConfigurationWhen you run certool --gencert and certain other certificate initialization or management commands, theCLI reads all the values from a configuration file. You can edit the existing file, override the defaultconfiguration file (certool.cfg) by using the -–config=<file name> option, or override different values onthe command line.
The configuration file has several fields with the following default values:
Country = US
Name= Acme
Organization = AcmeOrg
OrgUnit = AcmeOrg Engineering
State = California
Chapter 3 vSphere Security Certificates
VMware, Inc. 97

Locality = Palo Alto
IPAddress = 127.0.0.1
Email = [email protected]
Hostname = server.acme.com
You can change the values in the configuration as follows:
n Create a backup of the configuration file and then edit the file. If you are using the default configurationfile, you do not have to specify it. Otherwise, for example, if you changed the configuration file name,use the --config command-line option.
n Override the configuration file value on the command line. For example, to override Locality, run thiscommand:
certool -–gencert -–privkey=private.key –-Locality="Mountain View"
Specify --Name to replace the CN field of the Subject name of the certificate.
n For solution user certificates, the name is <sol_user name>@<domain> by convention, but you canchange the name if a different convention is used in your environment.
n For machine SSL certificates, the FQDN of the machine is used because the SSL client checks the CNfield of the Subject name of the certificate when verifying the machine's host name. Because a machinecan have more than one alias, certificates have the Subject Alternative Name field extension where youcan specify other names (DNS names, IP addresses, and so on). However, VMCA allows only oneDNSName (in the Hostname field) and no other Alias options. If the IP address is specified by the user, itis stored in SubAltName as well.
The --Hostname parameter is used to specify the DNSName of certificate's SubAltName.
certool Initialization Commands ReferenceThe certool initialization commands allow you to generate certificate signing requests, view and generatecertificates and keys that are signed by VMCA, import root certificates, and perform other certificatemanagement operations.
In many cases, you pass a configuration file in to a certool command. See “Changing certool Configuration,”on page 97. See “Replace Existing VMCA-Signed Certificates With New VMCA-Signed Certificates,” onpage 70 for some usage examples.
certool --initcsrGenerates a Certificate Signing Request (CSR). The command generates a PKCS10 file and a private key.
Option Description
--initcsr Required for generating CSRs.
--privkey <key_file> Name of the private key file.
--pubkey <key_file> Name of the public key file.
--csrfile <csr_file> File name for the CSR file to be sent to the CA provider.
--config <config_file> Optional name of the configuration file. Defaults tocertool.cfg.
Example:
certool --initcsr --privkey=<filename> --pubkey=<filename> --csrfile=<filename>
vSphere Security
98 VMware, Inc.

certool --selfcaCreates a self-signed certificate and provisions the VMCA server with a self-signed root CA. Using thisoption is one of the simplest ways to provision the VMCA server. You can instead provision the VMCAserver with a third-party root certificate so that VMCA is an intermediate CA. See “Use VMCA as anIntermediate Certificate Authority,” on page 80.
This command generates a certificate that is predated by three days to avoid time zone conflicts.
Option Description
--selfca Required for generating a self-signed certificate.
--predate <number_of_minutes> Allows you to set the Valid Not Before field of the rootcertificate to the specified number of minutes before thecurrent time. This option can be helpful to account forpotential time zone issues. The maximum is three days.
--config <config_file> Optional name of the configuration file. Defaults tocertool.cfg.
--server <server> Optional name of the VMCA server. By default, thecommand uses localhost.
Example:
machine-70-59:/usr/lib/vmware-vmca/bin # ./certool --predate=2280 --selfca --server= 192.0.2.24
certool --rootcaImports a root certificate. Adds the specified certificate and private key to VMCA. VMCA always uses themost recent root certificate for signing, but other root certificates remain available. That means you canupdate your infrastructure one step at a time, and finally delete certificates that you no longer use.
Option Description
--rootca Required for importing a root CA.
--cert <certfile> Optional name of the configuration file. Defaults tocertool.cfg.
--privkey <key_file> Name of the private key file. This file must be in PEMencoded format.
--server <server> Optional name of the VMCA server. By default, thecommand uses localhost.
Example:
certool --rootca --cert=root.cert --privkey=privatekey.pem
certool --getdcReturns the default domain name that is used by vmdir.
Chapter 3 vSphere Security Certificates
VMware, Inc. 99

Option Description
--server <server> Optional name of the VMCA server. By default, thecommand uses localhost.
--port <port_num> Optional port number. Defaults to port 389.
Example:
certool --getdc
certool --waitVMDIRWait until the VMware Directory Service is running or until the timeout specified by --wait has elapsed.Use this option in conjunction with other options to schedule certain tasks, for example returning the defaultdomain name.
Option Description
--wait Optional number of minutes to wait. Defaults to 3.
--server <server> Optional name of the VMCA server. By default, thecommand uses localhost.
--port <port_num> Optional port number. Defaults to port 389.
Example:
certool --waitVMDIR --wait 5
certool --waitVMCAWait until the VMCA service is running or until the specified timeout has elapsed. Use this option inconjunction with other options to schedule certain tasks, for example, generating a certificate.
Option Description
--wait Optional number of minutes to wait. Defaults to 3.
--server <server> Optional name of the VMCA server. By default, thecommand uses localhost.
--port <port_num> Optional port number. Defaults to port 389.
Example:
certool --waitVMCA --selfca
certool --publish-rootsForces an update of root certificates. This command requires administrative privileges.
Option Description
--server <server> Optional name of the VMCA server. By default, thecommand uses localhost.
Example:
certool --publish-roots
vSphere Security
100 VMware, Inc.

certool Management Commands ReferenceThe certool management commands allow you to view, generate, and revoke certificates and to viewinformation about certificates.
certool --genkeyGenerates a private and public key pair. Those files can then be used to generate a certificate that is signedby VMCA. You can use the certificate to provision machines or solution users.
Option Description
--genkey Required for generating a private and public key.
--privkey <keyfile> Name of the private key file.
--pubkey <keyfile Name of the public key file.
--server <server> Optional name of the VMCA server. By default, thecommand uses localhost.
Example:
certool --genkey --privkey=<filename> --pubkey=<filename>
certool --gencertGenerates a certificate from the VMCA server. This command uses the information in certool.cfg or in thespecified configuration file.
Option Description
--gencert Required for generating a certificate.
--cert <certfile> Name of the certificate file. This file must be in PEMencoded format.
--privkey <keyfile> Name of the private key file. This file must be in PEMencoded format.
--config <config_file> Optional name of the configuration file. Defaults tocertool.cfg.
--server <server> Optional name of the VMCA server. By default, thecommand uses localhost.
Example:
certool --gencert --privkey=<filename> --cert=<filename>
certool --getrootcaPrints the current root CA certificate in human-readable form. If you are running this command from amanagement node, use the machine name of the Platform Services Controller node to retrieve the root CA.This output is not usable as a certificate, it is changed to be human readable.
Chapter 3 vSphere Security Certificates
VMware, Inc. 101

Option Description
--getrootca Required for printing the root certificate.
--server <server> Optional name of the VMCA server. By default, thecommand uses localhost.
Example:
certool --getrootca --server=remoteserver
certool --viewcertPrint all the fields in a certificate in human-readable form.
Option Description
--viewcert Required for viewing a certificate.
--cert <certfile> Optional name of the configuration file. Defaults tocertool.cfg.
Example:
certool --viewcert --cert=<filename>
certool --enumcertList all certificates that the VMCA server knows about. The required filter option lets you list allcertificates or only revoked, active, or expired certificates.
Option Description
--enumcert Required for listing all certificates.
--filter [all | active] Required filter. Specify all or active. The revoked andexpired options are not currently supported.
Example:
certool --enumcert --filter=active
certool --statusSends a specified certificate to the VMCA server to check whether the certificate has been revoked. PrintsCertificate: REVOKED if the certificate is revoked, and Certificate: ACTIVE otherwise.
Option Description
--status Required to check the status of a certificate.
--cert <certfile> Optional name of the configuration file. Defaults tocertool.cfg.
--server <server> Optional name of the VMCA server. By default, thecommand uses localhost.
Example:
certool --status --cert=<filename>
certool --genselfcacertGenerates a self-signed certificate based on the values in the configuration file. This command generates acertificate that is predated by three days to avoid time zone conflicts.
vSphere Security
102 VMware, Inc.

Option Description
--genselfcacert Required for generating a self-signed certificate.
--outcert <cert_file> Name of the certificate file. This file must be in PEMencoded format.
--outprivkey <key_file> Name of the private key file. This file must be in PEMencoded format.
--config <config_file> Optional name of the configuration file. Defaults tocertool.cfg.
Example:
certool --genselfcert --privkey=<filename> --cert=<filename>
vecs-cli Command ReferenceThe vecs-cli command set allows you to manage VMware Certificate Store (VECS) instances. Use thesecommands together with dir-cli and certool to manage your certificate infrastructure.
vecs-cli store createCreates a certificate store.
Option Description
--name <name> Name of the certificate store.
Example:
vecs-cli store create --name <store>
vecs-cli store deleteDeletes a certificate store. You cannot delete certificate stores that are predefined by the system.
Option Description
--name <name> Name of the certificate store to delete.
Example:
vecs-cli store delete --name <store>
vecs-cli store listList certificate stores.
VECS includes the following stores.
Chapter 3 vSphere Security Certificates
VMware, Inc. 103

Table 3‑5. Stores in VECS
Store Description
Machine SSL store (MACHINE_SSL_CERT) n Used by the reverse proxy service on every vSpherenode.
n Used by the VMware Directory Service (vmdir) onembedded deployments and on eachPlatform Services Controller node.
All services in vSphere 6.0 communicate through a reverseproxy, which uses the machine SSL certificate. Forbackward compatibility, the 5.x services still use specificports. As a result, some services such as vpxd still havetheir own port open.
Trusted root store (TRUSTED_ROOTS) Contains all trusted root certificates.
Solution user storesn machinen vpxdn vpxd-extensionsn vsphere-webclient
VECS includes one store for each solution user. The subjectof each solution user certificate must be unique, forexample, the machine certificate cannot have the samesubject as the vpxd certificate.Solution user certificates are used for authentication withvCenter Single Sign-On. vCenter Single Sign-On checksthat the certificate is valid, but does not check othercertificate attributes. In an embedded deployment, allsolution user certificates are on the same system.The following solution user certificate stores are includedin VECS on each management node and each embeddeddeployment:n machine: Used by component manager, license server,
and the logging service.NOTE The machine solution user certificate hasnothing to do with the machine SSL certificate. Themachine solution user certificate is used for the SAMLtoken exchange; the machine SSL certificate is used forsecure SSL connections for a machine.
n vpxd: vCenter service daemon (vpxd) store onmanagement nodes and embedded deployments. vpxduses the solution user certificate that is stored in thisstore to authenticate to vCenter Single Sign-On.
n vpxd-extensions: vCenter extensions store. Includesthe Auto Deploy service, inventory service, and otherservices that are not part of other solution users.
n vsphere-webclient: vSphere Web Client store. Alsoincludes some additional services such as theperformance chart service.
The machine store is also included on eachPlatform Services Controller node.
vSphere Security
104 VMware, Inc.

Table 3‑5. Stores in VECS (Continued)
Store Description
vSphere Certificate Manager Utility backup store(BACKUP_STORE)
Used by VMCA (VMware Certificate Manager) to supportcertificate revert. Only the most recent state is stored as abackup, you cannot go back more than one step.
Other stores Other stores might be added by solutions. For example, theVirtual Volumes solution adds an SMS store. Do notmodify the certificates in those stores unless VMwaredocumentation or a VMware Knowledge Base artoc;einstructs you to do so.NOTE CRLS are not supported in vSphere 6.0Nevertheless, deleting the TRUSTED_ROOTS_CRLS storecan damage your certificate infrastructure. Do not delete ormodify the TRUSTED_ROOTS_CRLS store.
Example:
vecs-cli store list
vecs-cli store permissionsGrants or revokes permissions to the store. Use either the --grant or the --revoke option.
The owner of the store has all control of its store, including granting and revoking permissions. Theadministrator has all privileges on all stores, including granting and revoking permissions.
You can use vecs-cli get-permissions --name <store-name> to retrieve the current settings for the store.
Option Description
--name <name> Name of the certificate store.
--user <username> Unique name of the user who is granted permissions.
--grant [read|write] Permission to grant, either read or write.
--revoke [read|write] Permission to revoke, either read or write. Not currentlysupported.
vecs-cli entry createCreate an entry in VECS. Use this command to add a private key or certificate to a store.
Option Description
--store <NameOfStore> Name of the certificate store.
--alias <Alias> Optional alias for the certificate. This option is ignored forthe trusted root store.
--cert <certificate_file_path> Full path of the certificate file.
--key <key-file-path> Full path of the key that corresponds to the certificate.Optional.
vecs-cli entry listList all entries in a specified store.
Chapter 3 vSphere Security Certificates
VMware, Inc. 105
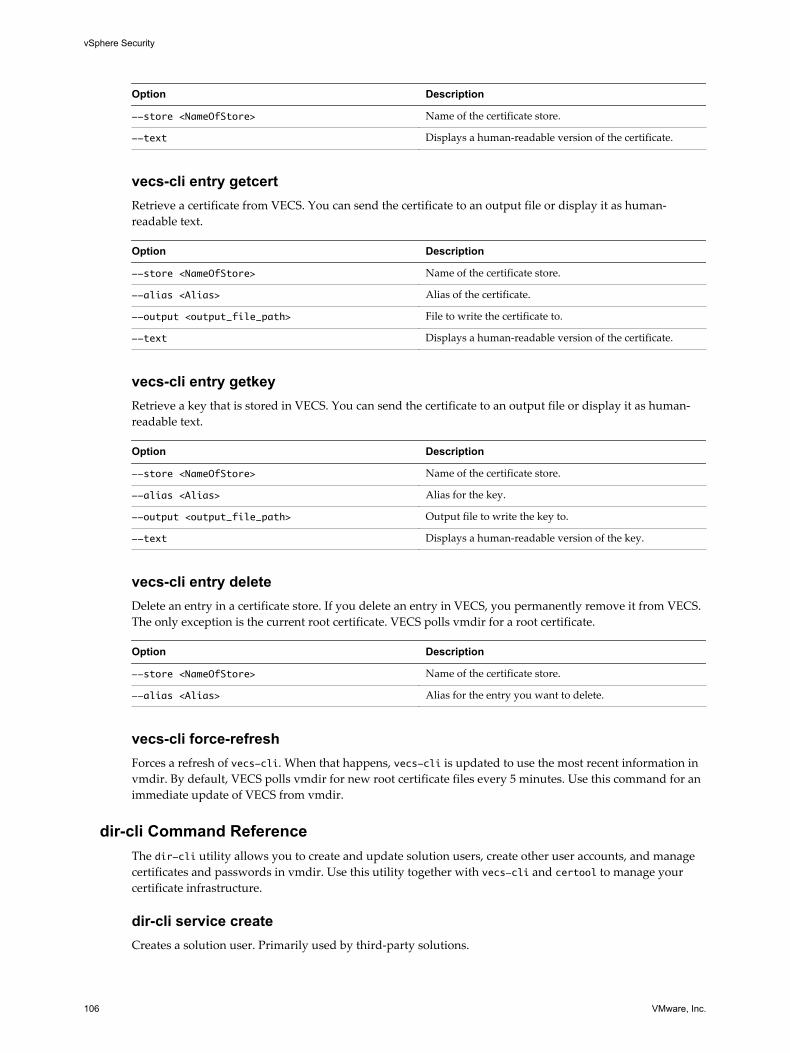
Option Description
--store <NameOfStore> Name of the certificate store.
--text Displays a human-readable version of the certificate.
vecs-cli entry getcertRetrieve a certificate from VECS. You can send the certificate to an output file or display it as human-readable text.
Option Description
--store <NameOfStore> Name of the certificate store.
--alias <Alias> Alias of the certificate.
--output <output_file_path> File to write the certificate to.
--text Displays a human-readable version of the certificate.
vecs-cli entry getkeyRetrieve a key that is stored in VECS. You can send the certificate to an output file or display it as human-readable text.
Option Description
--store <NameOfStore> Name of the certificate store.
--alias <Alias> Alias for the key.
--output <output_file_path> Output file to write the key to.
--text Displays a human-readable version of the key.
vecs-cli entry deleteDelete an entry in a certificate store. If you delete an entry in VECS, you permanently remove it from VECS.The only exception is the current root certificate. VECS polls vmdir for a root certificate.
Option Description
--store <NameOfStore> Name of the certificate store.
--alias <Alias> Alias for the entry you want to delete.
vecs-cli force-refreshForces a refresh of vecs-cli. When that happens, vecs-cli is updated to use the most recent information invmdir. By default, VECS polls vmdir for new root certificate files every 5 minutes. Use this command for animmediate update of VECS from vmdir.
dir-cli Command ReferenceThe dir-cli utility allows you to create and update solution users, create other user accounts, and managecertificates and passwords in vmdir. Use this utility together with vecs-cli and certool to manage yourcertificate infrastructure.
dir-cli service createCreates a solution user. Primarily used by third-party solutions.
vSphere Security
106 VMware, Inc.

Option Description
--name <name> Name of the solution user to create
--cert <cert file> Path to the certificate file. This can be a certificate signed byVMCA or a third-party certificate.
--login <admin_user_id> By default, [email protected]. Thatadministrator can add other users to the CAAdminsvCenter Single Sign-On group to give them administratorprivileges.
--password <admin_password> Password of the administrator user. If you do not specifythe password, you are prompted.
dir-cli service listList the solution users that dir-cli knows about.
Option Description
--login <admin_user_id> By default, [email protected]. Thatadministrator can add other users to the CAAdminsvCenter Single Sign-On group to give them administratorprivileges.
--password <admin_password> Password of the administrator user. If you do not specifythe password, you are prompted.
dir-cli service deleteDelete a solution user in vmdir. When you delete the solution user, all associated services becomeunavailable to all management nodes that use this instance of vmdir.
Option Description
--name Name of the solution user to delete.
--login <admin_user_id> By default, [email protected]. Thatadministrator can add other users to the CAAdminsvCenter Single Sign-On group to give them administratorprivileges.
--password <admin_password> Password of the administrator user. If you do not specifythe password, you are prompted.
dir-cli service updateUpdates the certificate for a specified solution user, that is, collection of services. After running thiscommand, VECS picks up the change after 5 minutes, or you can use vecs-cli force-refresh to force arefresh.
Option Description
--name <name> Name of the solution user to update .
--cert <cert_file> Name of the certificate to assign to the service.
--login <admin_user_id> By default, [email protected]. Thatadministrator can add other users to the CAAdminsvCenter Single Sign-On group to give them administratorprivileges.
--password <admin_password> Password of the administrator user. If you do not specifythe password, you are prompted.
Chapter 3 vSphere Security Certificates
VMware, Inc. 107

dir-cli user createCreates a regular user inside vmdir. This command can be used for human users who authenticate tovCenter Single Sign-On with a user name and password. Use this command only during prototyping.
Option Description
--account <name> Name of the vCenter Single Sign-On user to create.
--user-password <password> Initial password for the user.
--first-name <name> First name for the user.
--last-name <name> Last name for the user.
--login <admin_user_id> By default, [email protected]. Thatadministrator can add other users to the CAAdminsvCenter Single Sign-On group to give them administratorprivileges.
--password <admin_password> Password of the administrator user. If you do not specifythe password, you are prompted.
dir-cli user deleteDeletes the specified user inside vmdir.
Option Description
--account <name> Name of the vCenter Single Sign-On user to delete.
--login <admin_user_id> By default, [email protected]. Thatadministrator can add other users to the CAAdminsvCenter Single Sign-On group to give them administratorprivileges.
--password <admin_password> Password of the administrator user. If you do not specifythe password, you are prompted.
dir-cli group modifyAdds a user or group to an already existing group.
Option Description
--name <name> Name of the group in vmdir.
--add <user_or_group_name> Name of the user or group to add.
--login <admin_user_id> By default, [email protected]. Thatadministrator can add other users to the CAAdminsvCenter Single Sign-On group to give them administratorprivileges.
--password <admin_password> Password of the administrator user. If you do not specifythe password, you are prompted.
dir-cli group listLists a specified vmdir group.
vSphere Security
108 VMware, Inc.

Option Description
--name <name> Optional name of the group in vmdir. This option allowsyou to check whether a group exists.
--login <admin_user_id> By default, [email protected]. Thatadministrator can add other users to the CAAdminsvCenter Single Sign-On group to give them administratorprivileges.
--password <admin_password> Password of the administrator user. If you do not specifythe password, you are prompted.
dir-cli trustedcert publishPublishes a trusted root certificate to vmdir.
Option Description
--cert <file> Path to certificate file.
--login <admin_user_id> By default, [email protected]. Thatadministrator can add other users to the CAAdminsvCenter Single Sign-On group to give them administratorprivileges.
--password <admin_password> Password of the administrator user. If you do not specifythe password, you are prompted.
dir-cli trustedcert unpublishUnpublishes a trusted root certificate currently in vmdir. Use this command, for example, if you added adifferent root certificate to vmdir that is now the root certificate for all other certificates in yourenvironment. Unpublishing certificates that are no longer in use is part of hardening your environment.
Option Description
--cert-file <file> Path to the certificate file to unpublish
--crl <file> Path to the CRL file associated with this certificate. Notcurrently used.
--login <admin_user_id> By default, [email protected]. Thatadministrator can add other users to the CAAdminsvCenter Single Sign-On group to give them administratorprivileges.
--password <admin_password> Password of the administrator user. If you do not specifythe password, you are prompted.
dir-cli trustedcert listLists all trusted root certificates and their corresponding IDs. You need the certificate IDs to retrieve acertificate with dir-cli trustedcert get.
Option Description
--login <admin_user_id> By default, [email protected]. Thatadministrator can add other users to the CAAdminsvCenter Single Sign-On group to give them administratorprivileges.
--password <admin_password> Password of the administrator user. If you do not specifythe password, you are prompted.
Chapter 3 vSphere Security Certificates
VMware, Inc. 109
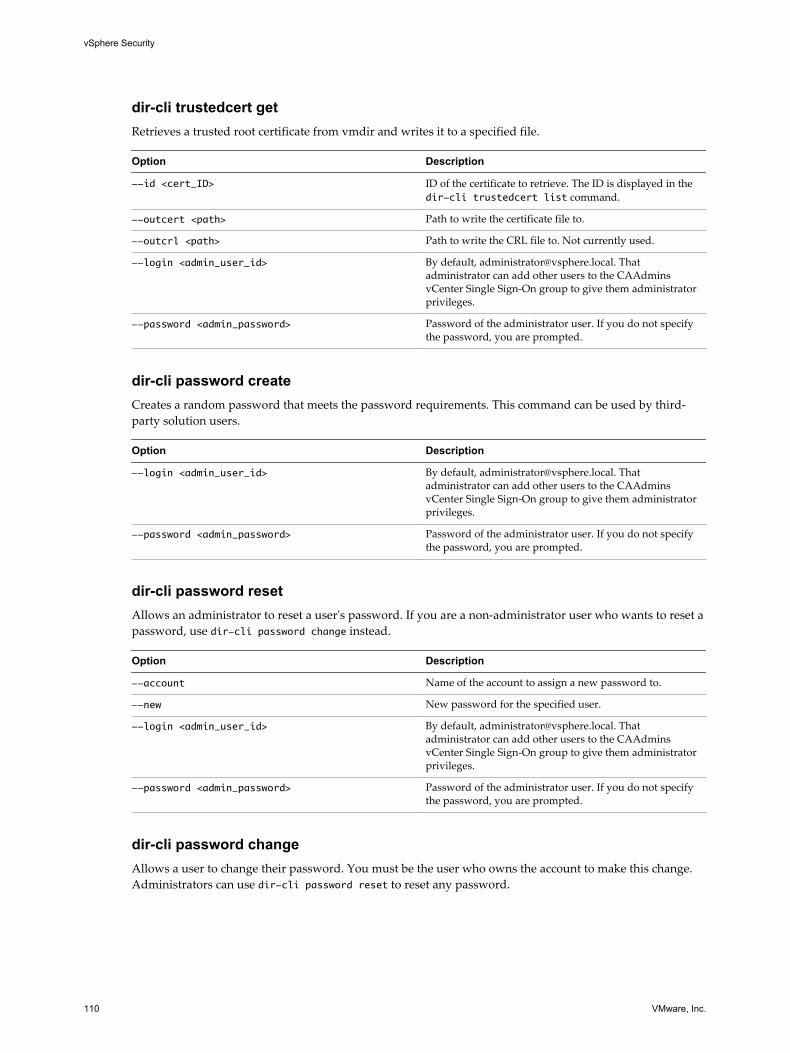
dir-cli trustedcert getRetrieves a trusted root certificate from vmdir and writes it to a specified file.
Option Description
--id <cert_ID> ID of the certificate to retrieve. The ID is displayed in thedir-cli trustedcert list command.
--outcert <path> Path to write the certificate file to.
--outcrl <path> Path to write the CRL file to. Not currently used.
--login <admin_user_id> By default, [email protected]. Thatadministrator can add other users to the CAAdminsvCenter Single Sign-On group to give them administratorprivileges.
--password <admin_password> Password of the administrator user. If you do not specifythe password, you are prompted.
dir-cli password createCreates a random password that meets the password requirements. This command can be used by third-party solution users.
Option Description
--login <admin_user_id> By default, [email protected]. Thatadministrator can add other users to the CAAdminsvCenter Single Sign-On group to give them administratorprivileges.
--password <admin_password> Password of the administrator user. If you do not specifythe password, you are prompted.
dir-cli password resetAllows an administrator to reset a user's password. If you are a non-administrator user who wants to reset apassword, use dir-cli password change instead.
Option Description
--account Name of the account to assign a new password to.
--new New password for the specified user.
--login <admin_user_id> By default, [email protected]. Thatadministrator can add other users to the CAAdminsvCenter Single Sign-On group to give them administratorprivileges.
--password <admin_password> Password of the administrator user. If you do not specifythe password, you are prompted.
dir-cli password changeAllows a user to change their password. You must be the user who owns the account to make this change.Administrators can use dir-cli password reset to reset any password.
vSphere Security
110 VMware, Inc.

Option Description
--account Account name.
--current Current password of the user who owns the account.
--new New password of the user who owns the account.
View vCenter Certificates with the vSphere Web ClientYou can view the certificates known to the vCenter Certificate Authority (VMCA) to see whether activecertificates are about to expire, to check on expired certificates, and to see the status of the root certificate.You perform all certificate management tasks using the certificate management CLIs.
You view certificates associated with the VMCA instance that is included with your embedded deploymentor with the Platform Services Controller. Certificate information is replicated across instances of VMwareDirectory Service (vmdir).
When you attempt to view certificates in the vSphere Web Client, you are prompted for a user name andpassword. Specify the user name and password of a user with privileges for VMware Certificate Authority,that is, a user in the CAAdmins vCenter Single Sign-On group.
Procedure
1 Log in to vCenter Server as [email protected] or another user of the CAAdmins vCenterSingle Sign-On group.
2 Select Administration, click Deployment, and click System Configuration.
3 Click Nodes, and select the node for which you want to view or manage certificates.
4 Click the Manage tab, and click Certificate Authority.
5 Click the certificate type for which you want to view certificate information.
Option Description
Active Certificates Displays active certificates, including their validation information. Thegreen Valid To icon changes when certificate expiration is approaching.
Revoked Certificates Displays the list of revoked certificates. Not supported in this release.
Expired Certificates Lists expired certificates.
Root Certificates Displays the root certificates available to this instance of vCenterCertificate Authority.
6 Select a certificate and click the Show Certificate Details button to view certificate details.
Details include the Subject Name, Issuer, Validity, and Algorithm.
Set the Threshold for vCenter Certificate Expiration WarningsStarting with vSphere 6.0, vCenter Server monitors all certificates in the VMware Endpoint Certificate Store(VECS) and issues an alarm when a certificate is 30 days or less from its expiration. You can change howsoon you are warned with the vpxd.cert.threshold advanced option.
Procedure
1 Log in to the vSphere Web Client.
2 Select the vCenter Server object, the select the Manage tab and the Settings subtab.
3 Click Advanced Settings, select Edit, and filter for threshold.
4 Change the setting of vpxd.cert.threshold to the desired value and click OK.
Chapter 3 vSphere Security Certificates
VMware, Inc. 111

vSphere Security
112 VMware, Inc.

vSphere Permissions and UserManagement Tasks 4
vCenter Single Sign-On supports authentication, which means it determines whether a user can accessvSphere components at all. In addition, each user must be authorized to view or manipulate vSphereobjects.
vSphere supports several different authorization mechanisms, discussed in “Understanding Authorizationin vSphere,” on page 114. The focus of the information in this section is the vCenter Server permissionmodel and how to perform user management tasks.
vCenter Server allows fine-grained control over authorization with permissions and roles. When you assigna permission to an object in the vCenter Server object hierarchy, you specify which user or group has whichprivileges on that object. To specify the privileges, you use roles, which are sets of privileges.
Initially, only the user [email protected] is authorized to log in to the vCenter Server system.That user can then proceed as follows:
1 Add an identity source in which additional users and groups are defined to vCenter Single Sign-On.See “Add a vCenter Single Sign-On Identity Source,” on page 31.
2 Give privileges to a user or group by selecting an object such as a virtual machine or a vCenter Serversystem and assigning a role on that object to the user or group.
Roles, Privileges, and Permissions(http://link.brightcove.com/services/player/bcpid2296383276001?bctid=ref:video_roles_privileges_permissions_vsphere_web_client)
This chapter includes the following topics:
n “Understanding Authorization in vSphere,” on page 114
n “Understanding the vCenter Server Permission Model,” on page 114
n “Hierarchical Inheritance of Permissions,” on page 116
n “Multiple Permission Settings,” on page 117
n “Managing Permissions for vCenter Components,” on page 119
n “Global Permissions,” on page 122
n “Add a Global Permission,” on page 123
n “Using Roles to Assign Privileges,” on page 123
n “Best Practices for Roles and Permissions,” on page 127
n “Required Privileges for Common Tasks,” on page 127
VMware, Inc. 113

Understanding Authorization in vSphereThe primary way of authorizing a user or group in vSphere is the vCenter Server permissions. Dependingon the task you want to perform, you might require other authorization.
vSphere 6.0 and later allows privileged users to give other users permissions to perform tasks in thefollowing ways. These approaches are, for the most part, mutually exclusive; however, you can assign useglobal permissions to authorize certain users for all solution, and local vCenter Server permissions toauthorize other users for individual vCenter Server systems.
vCenter ServerPermissions
The permission model for vCenter Server systems relies on assigningpermissions to objects in the object hierarchy of that vCenter Server. Eachpermission gives one user or group a set of privileges, that is, a role for aselected object. For example, you can select an ESXi host and assign a role toa group of users to give those users the corresponding privileges on thathost.
Global Permissions Global permissions are applied to a global root object that spans solutions.For example, if both vCenter Server and vCenter Orchestrator are installed,you can give permissions to all objects in both object hierarchies using globalpermissions.
Global permissions are replicated across the vsphere.local domain. Globalpermissions to not provide authorization for services managed throughvsphere.local groups. See “Global Permissions,” on page 122.
Group Membership invsphere.local Groups
The user [email protected] can perform tasks that are associatedwith services included with the Platform Services Controller. In addition,members of a vsphere.local group can perform the corresponding task. Forexample, you can perform license management if you are a member of theLicenseService.Administrators group. See “Groups in the vsphere.localDomain,” on page 27.
ESXi Local HostPermissions
If you are managing a standalone ESXi host that is not managed by avCenter Server system, you can assign one of the predefined roles to users.See the vSphere Single Host Management documentation.
Understanding the vCenter Server Permission ModelThe permission model for vCenter Server systems relies on assigning permissions to objects in the vSphereobject hierarchy. Each permission gives one user or group a set of privileges, that is, a role for the selectedobject.
You need to understand the following concepts:
Permissions Each object in the vCenter Server object hierarchy has associatedpermissions. Each permission specifies for one group or user whichprivileges that group or user has on the object.
Users and Groups On vCenter Server systems, you can assign privileges only to authenticatedusers or groups of authenticated users. Users are authenticated throughvCenter Single Sign-On. The users and groups must be defined in theidentity source that vCenter Single Sign-On is using to authenticate. Defineusers and groups using the tools in your identity source, for example, ActiveDirectory.
vSphere Security
114 VMware, Inc.

Roles Roles allow you to assign permissions on an object based on a typical set oftasks that users perform. Default roles, such as Administrator, are predefinedon vCenter Server and cannot be changed. Other roles, such as Resource PoolAdministrator, are predefined sample roles. You can create custom roleseither from scratch or by cloning and modifying sample roles.
Privileges Privileges are fine-grained access controls. You can group those privilegesinto roles, that you can then map to users or groups.
Figure 4‑1. vSphere Permissions
Permission
vSphere object
User or group
Role
Privilege
Privilege
Privilege
Privilege
To assign permissions to an object, you follow these steps:
1 Select the object in the vCenter object hierarchy to which you want to apply the permission.
2 Select the group or user that should have privileges on the object.
3 Select the role, that is the set of privileges, that the group or user should have on the object. By default,permissions propagate, that is the group or user has the selected role on the selected object and its childobjects.
The permissions model makes it easy to get things done quickly by offering predefined roles. You can alsocombine privileges to create custom roles. See Chapter 10, “Defined Privileges,” on page 233 for a referenceto all privileges and the objects to which you can apply the privileges. See “Required Privileges for CommonTasks,” on page 127 for some examples of the sets of privileges you need to perform these tasks.
In many cases, permissions must be defined on both a source object and a destination object. For example, ifyou move a virtual machine, you need some privileges on that virtual machine, but also privileges on thedestination data center.
The permissions model for standalone ESXi hosts is simpler. See “Assigning Permissions for ESXi,” onpage 164
vCenter Server User ValidationvCenter Server systems that use a directory service regularly validate users and groups against the userdirectory domain. Validation occurs at regular intervals specified in the vCenter Server settings. Forexample, if user Smith was assigned a role on several objects, and the user’s name was changed to Smith2 inthe domain , the host concludes that Smith no longer exists and removes permissions associated with thatuser from the vSphere objects when the next validation occurs.
Similarly, if user Smith is removed from the domain, all permissions associated with that user are removedwhen the next validation occurs. If a new user Smith is added to the domain before the next validationoccurs, the new user Smith is replaces the old user Smith in permissions on any object.
Chapter 4 vSphere Permissions and User Management Tasks
VMware, Inc. 115

Hierarchical Inheritance of PermissionsWhen you assign a permission to an object, you can choose whether the permission propagates down theobject hierarchy. You set propagation for each permission. Propagation is not universally applied.Permissions defined for a child object always override the permissions that are propagated from parentobjects.
The figure illustrates the inventory hierarchy and the paths by which permissions can propagate.
NOTE Global permissions support assigning privileges across solutions from a global root object. See “Global Permissions,” on page 122.
Figure 4‑2. vSphere Inventory Hierarchy
template host VDS datastore
cluster
vApp
vApp
vApp
virtualmachine
virtualmachine
resourcepool
resourcepool
virtualmachine
virtualmachine
resourcepool
standardswitch
datastorecluster
distributedport group
VM folder host folder
data center
vCenter Server(vCenter Server instance level)
networkfolder
datastorefolder
data centerfolder
root object(global permissions level)
tag category
tag
content library
library item
vSphere Security
116 VMware, Inc.

Most inventory objects inherit permissions from a single parent object in the hierarchy. For example, adatastore inherits permissions from either its parent datastore folder or parent data center. Virtual machinesinherit permissions from both the parent virtual machine folder and the parent host, cluster, or resourcepool simultaneously.
For example, you can set permissions for a distributed switch and its associated distributed port groups, bysetting permissions on a parent object, such as a folder or data center. You must also select the option topropagate these permissions to child objects.
Permissions take several forms in the hierarchy:
Managed entities Privileged users can define permissions on managed entities.
n Clusters
n Data centers
n Datastores
n Datastore clusters
n Folders
n Hosts
n Networks (except vSphere Distributed Switches)
n Distributed port groups
n Resource pools
n Templates
n Virtual machines
n vSphere vApps
Global entities You cannot modify permissions on entities that derive permissions from theroot vCenter Server system.
n Custom fields
n Licenses
n Roles
n Statistics intervals
n Sessions
Multiple Permission SettingsObjects might have multiple permissions, but only one permission for each user or group. For example, onepermission might specify that Group B has Administrator privileges on the object, and another permissionmight specify that Group B might have Virtual Machine Administrator privileges on the same object.
If an object inherits permissions from two parent objects, the permissions on one object are added to thepermissions on the other object. For example, if a virtual machine is in a virtual machine folder and alsobelongs to a resource pool, that virtual machine inherits all permission settings from both the virtualmachine folder and the resource pool.
Permissions applied on a child object always override permissions that are applied on a parent object. See “Example 2: Child Permissions Overriding Parent Permissions,” on page 118.
Chapter 4 vSphere Permissions and User Management Tasks
VMware, Inc. 117

If multiple group permissions are defined on the same object and a user belongs to two or more of thosegroups, two situations are possible:
n If no permission is defined for the user on that object, the user is assigned the set of privileges assignedto the groups for that object.
n If a permission is defined for the user on that object, the user's permission takes precedence over allgroup permissions.
Example 1: Inheritance of Multiple PermissionsThis example illustrates how an object can inherit multiple permissions from groups that are grantedpermission on a parent object.
In this example, two permissions are assigned on the same object for two different groups.
n Role 1 can power on virtual machines.
n Role 2 can take snapshots of virtual machines.
n Group A is granted Role 1 on VM Folder, with the permission set to propagate to child objects.
n Group B is granted Role 2 on VM Folder, with the permission set to propagate to child objects.
n User 1 is not assigned specific privileges.
User 1, who belongs to groups A and B, logs on. User 1 can both power on and take snapshots of VM A andVM B.
Figure 4‑3. Example 1: Inheritance of Multiple Permissions
group B + role 2user 1 has privilegesof role 1 and role 2
group A + role 1
VM A
VM B
VM Folder
Example 2: Child Permissions Overriding Parent PermissionsThis example illustrates how permissions that are assigned on a child object can override permissions thatare assigned on a parent object. You can use this overriding behavior to restrict user access to particularareas of the inventory.
In this example, permissions are defined on two different objects for two different groups.
n Role 1 can power on virtual machines.
n Role 2 can take snapshots of virtual machines.
n Group A is granted Role 1 on VM Folder, with the permission set to propagate to child objects.
n Group B is granted Role 2 on VM B.
User 1, who belongs to groups A and B, logs on. Because Role 2 is assigned at a lower point in the hierarchythan Role 1, it overrides Role 1 on VM B. User 1 can power on VM A, but not take snapshots. User 1 can takesnapshots of VM B, but not power it on.
vSphere Security
118 VMware, Inc.

Figure 4‑4. Example 2: Child Permissions Overriding Parent Permissions
VM A
VM B
VM Folder
group B + role 2
user 1 has privilegesof role 1 only
user 1 has privilegesof role 2 only
group A + role 1
Example 3: User Role Overriding Group RoleThis example illustrates how the role assigned directly to an individual user overrides the privilegesassociated with a role assigned to a group.
In this example, permissions are defined on the same object. One permission associates a group with a role,the other permission associates an individual user with a role. The user is a member of the group.
n Role 1 can power on virtual machines.
n Group A is granted Role 1 on VM Folder.
n User 1 is granted No Access role on VM Folder.
User 1, who belongs to group A, logs on. The No Access role granted to User 1 on VM Folder overrides therole assigned to the group. User 1 has no access to VM Folder or VMs A and B.
Figure 4‑5. Example 3: User Permissions Overriding Group Permissions
VM A
VM B
VM Folder
user 1 + no access
user 1 has no access to the folder or the virtual machines
group A + role 1
Managing Permissions for vCenter ComponentsA permission is set on an object in the vCenter object hierarchy. Each permission associates the object with agroup or user and the group's or user's access roles. For example, you can select a virtual machine object,add one permission that gives the ReadOnly role to Group 1, and add a second permission that gives theAdministrator role to User 2.
By assigning a different role to a group of users on different objects, you control the tasks that those userscan perform in your vSphere environment. For example, to allow a group to configure memory for the host,select that host and add a permission that grants a role to that group that includes theHost.Configuration.Memory Configuration privilege.
Chapter 4 vSphere Permissions and User Management Tasks
VMware, Inc. 119

To manage permissions from the vSphere Web Client, you need to understand the following concepts:
Permissions Each object in the vCenter Server object hierarchy has associatedpermissions. Each permission specifies for one group or user whichprivileges that group or user has on the object.
Users and Groups On vCenter Server systems, you can assign privileges only to authenticatedusers or groups of authenticated users. Users are authenticated throughvCenter Single Sign-On. The users and groups must be defined in theidentity source that vCenter Single Sign-On is using to authenticate. Defineusers and groups using the tools in your identity source, for example, ActiveDirectory.
Roles Roles allow you to assign permissions on an object based on a typical set oftasks that users perform. Default roles, such as Administrator, are predefinedon vCenter Server and cannot be changed. Other roles, such as Resource PoolAdministrator, are predefined sample roles. You can create custom roleseither from scratch or by cloning and modifying sample roles.
Privileges Privileges are fine-grained access controls. You can group those privilegesinto roles, that you can then map to users or groups.
You can assign permissions to objects at different levels of the hierarchy, for example, you can assignpermissions to a host object or to a folder object that includes all host objects. See “Hierarchical Inheritanceof Permissions,” on page 116. You can also assign permissions to a global root object to apply thepermissions to all object in all solutions. See “Global Permissions,” on page 122.
Add a Permission to an Inventory ObjectAfter you create users and groups and define roles, you must assign the users and groups and their roles tothe relevant inventory objects. You can assign the same permissions to multiple objects simultaneously bymoving the objects into a folder and setting the permissions on the folder.
When you assign permissions from the vSphere Web Client, user and group names must match ActiveDirectory precisely, including case. If you upgraded from earlier versions of vSphere, check for caseinconsistencies if you experience problems with groups.
Prerequisites
On the object whose permissions you want to modify, you must have a role that includes thePermissions.Modify permission privilege.
Procedure
1 Browse to the object for which you want to assign permissions in the vSphere Web Client objectnavigator.
2 Click the Manage tab and select Permissions.
3 Click the Add icon, and click Add.
4 Identify the user or group that will have the privileges defined by the selected role.
a From the Domain drop-down menu, select the domain where the user or group is located.
b Type a name in the Search box or select a name from the list.
The system searches user names, group names, and descriptions.
c Select the user or group and click Add.
The name is added to either the Users or Groups list.
vSphere Security
120 VMware, Inc.
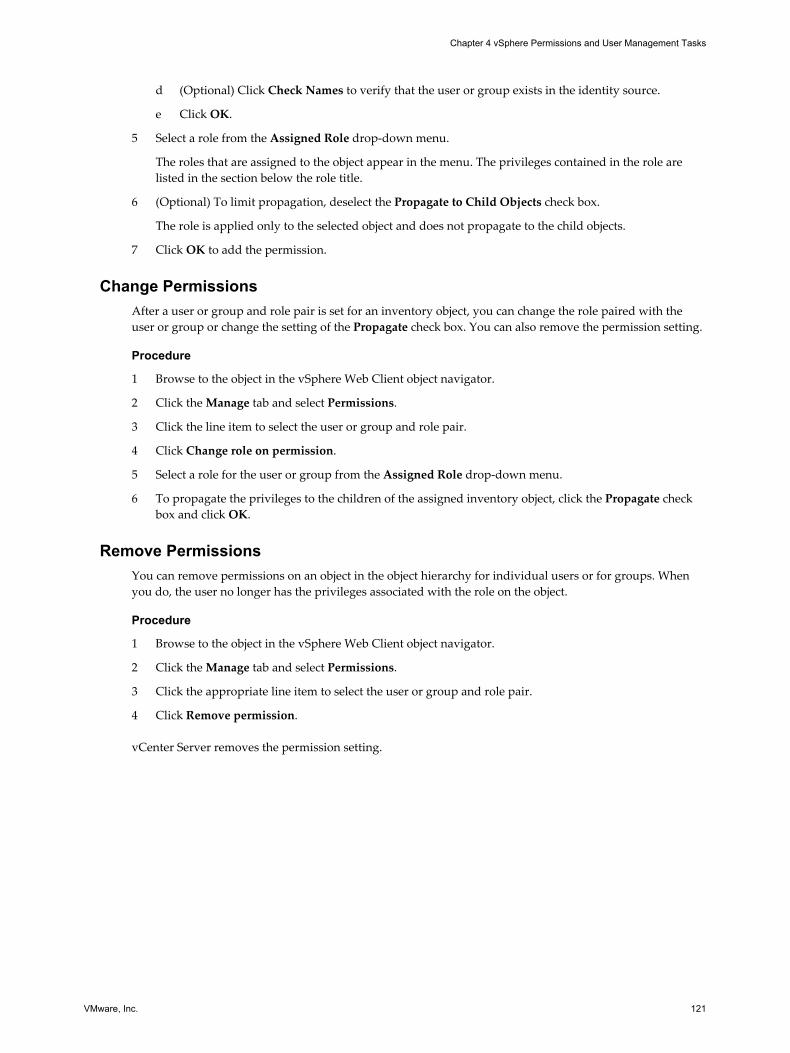
d (Optional) Click Check Names to verify that the user or group exists in the identity source.
e Click OK.
5 Select a role from the Assigned Role drop-down menu.
The roles that are assigned to the object appear in the menu. The privileges contained in the role arelisted in the section below the role title.
6 (Optional) To limit propagation, deselect the Propagate to Child Objects check box.
The role is applied only to the selected object and does not propagate to the child objects.
7 Click OK to add the permission.
Change PermissionsAfter a user or group and role pair is set for an inventory object, you can change the role paired with theuser or group or change the setting of the Propagate check box. You can also remove the permission setting.
Procedure
1 Browse to the object in the vSphere Web Client object navigator.
2 Click the Manage tab and select Permissions.
3 Click the line item to select the user or group and role pair.
4 Click Change role on permission.
5 Select a role for the user or group from the Assigned Role drop-down menu.
6 To propagate the privileges to the children of the assigned inventory object, click the Propagate checkbox and click OK.
Remove PermissionsYou can remove permissions on an object in the object hierarchy for individual users or for groups. Whenyou do, the user no longer has the privileges associated with the role on the object.
Procedure
1 Browse to the object in the vSphere Web Client object navigator.
2 Click the Manage tab and select Permissions.
3 Click the appropriate line item to select the user or group and role pair.
4 Click Remove permission.
vCenter Server removes the permission setting.
Chapter 4 vSphere Permissions and User Management Tasks
VMware, Inc. 121

Change Permission Validation SettingsvCenter Server periodically validates its user and group lists against the users and groups in the userdirectory. It then removes users or groups that no longer exist in the domain. You can disable validation orchange the interval between validations. If you have domains with thousands of users or groups, or ifsearches take a long time to complete, consider adjusting the search settings.
For vCenter Server versions before vCenter Server 5.0, these settings apply to an Active Directory associatedwith vCenter Server. For vCenter Server 5.0 and later, these settings apply to vCenter Single Sign-Onidentity sources.
NOTE This procedure applies only to vCenter Server user lists. ESXi user lists cannot be searched in thesame way.
Procedure
1 Browse to the vCenter Server system in the vSphere Web Client object navigator.
2 Select the Manage tab and click Settings.
3 Click General and click Edit.
4 Select User directory.
5 Change the values as needed.
Option Description
User directory timeout Timeout interval in seconds for connecting to the Active Directory server.This value specifies the maximum amount of time vCenter Server allows asearch to run on the selected domain. Searching large domains can take along time.
Query limit Select the checkbox to set a maximum number of users and groups thatvCenter Server displays.
Query limit size Specifies the maximum number of users and groups that vCenter Serverdisplays from the selected domain in the Select Users or Groups dialogbox. If you enter 0 (zero), all users and groups appear.
6 Click OK.
Global PermissionsGlobal permissions are applied to a global root object that spans solutions, for example, both vCenter Serverand vCenter Orchestrator. Use global permissions to give a user or group privileges for all objects in allobject hierarchies.
Each solution has a root object in its own object hierarchy. The global root object acts as a parent object toeach solution object. You can assign global permissions to users or groups, and decide on the role for eachuser or group. The role determines the set of privileges. You can assign a predefined role or create customroles. See “Using Roles to Assign Privileges,” on page 123. It is important to distinguish betweenvCenter Server permissions and global permissions.
vCenter Serverpermissions
In most cases, you apply a permission to a vCenter Server inventory objectsuch as an ESXi host or a virtual machine. When you do, you specify that auser or group has a set of privileges, called a role, on the object.
Global permissions Global permissions give a user or group privileges to view or manage allobjects in each of the inventory hierarchies in your deployment.
vSphere Security
122 VMware, Inc.

If you assign a global and do not select Propagate, the users or groupsassociated with this permission do not have access to the objects in thehierarchy. They only have access to some global functionality such ascreating roles.
IMPORTANT Use global permissions with care. Verify that you really want to assign permissions to all objectsin all inventory hierarchies.
Add a Global PermissionYou can use global permissions to give a user or group privileges for all objects in all inventory hierarchiesin your deployment.
Use global permissions with care. Verify that you really want to assign permissions to all objects in allinventory hierarchies.
Prerequisites
To perform this task, you must have .Permissions.Modify permission privileges on the root object for allinventory hierarchies.
Procedure
1 Click Administration and select Global Permissions in the Access Control area.
2 Click Manage, and click the Add permission icon.
3 Identify the user or group that will have the privileges defined by the selected role.
a From the Domain drop-down menu, select the domain where the user or group is located.
b Type a name in the Search box or select a name from the list.
The system searches user names, group names, and descriptions.
c Select the user or group and click Add.
The name is added to either the Users or Groups list.
d (Optional) Click Check Names to verify that the user or group exists in the identity source.
e Click OK.
4 Select a role from the Assigned Role drop-down menu.
The roles that are assigned to the object appear in the menu. The privileges contained in the role arelisted in the section below the role title.
5 Leave the Propagate to children check box selected in most cases.
If you assign a global and do not select Propagate, the users or groups associated with this permissiondo not have access to the objects in the hierarchy. They only have access to some global functionalitysuch as creating roles.
6 Click OK.
Using Roles to Assign PrivilegesA role is a predefined set of privileges. Privileges define rights to perform actions and read properties. Forexample, the Virtual Machine Administrator role consists of read properties and of a set of rights to performactions. The role allows a user to read and change virtual machine attributes.
When you assign permissions, you pair a user or group with a role and associate that pairing with aninventory object. A single user or group can have different roles for different objects in the inventory.
Chapter 4 vSphere Permissions and User Management Tasks
VMware, Inc. 123

For example, if you have two resource pools in your inventory, Pool A and Pool B, you can assign aparticular user the Virtual Machine User role on Pool A and the Read Only role on Pool B. Theseassignments allow that user to turn on virtual machines in Pool A, but to only view virtual machines in PoolB.
vCenter Server provides system roles and sample roles by default:
System roles System roles are permanent. You cannot edit the privileges associated withthese roles.
Sample roles VMware provides sample roles for certain frequently performedcombination of tasks. You can clone, modify or remove these roles.
NOTE To avoid losing the predefined settings in a sample role, clone the rolefirst and make modifications to the clone. You cannot reset the sample to itsdefault settings.
Users can schedule only tasks if they have a role that includes privileges to perform that task at the time thetasks are created.
NOTE Changes to roles and privileges take effect immediately, even if the users involved are logged in. Theexception is searches, where changes take effect after the user has logged out and logged back in.
Custom Roles in vCenter Server and ESXiYou can create custom roles for vCenter Server and all object it manages, or for individual hosts.
vCenter Server CustomRoles (Recommended)
Create custom roles by using the role-editing facilities in thevSphere Web Client to create privilege sets that match your needs.
ESXi Custom Roles You can create custom roles for individual hosts by using a CLI or thevSphere Client. See the vSphere Single Host Management documentation.Custom host roles are not accessible from vCenter Server.
If you manage ESXi hosts through vCenter Server, maintaining custom rolesin both the host and vCenter Server can result in confusion and misuse. Inmost cases, defining vCenter Server roles is recommended.
When you manage a host using vCenter Server, the permissions associated with that host are createdthrough vCenter Server and stored on vCenter Server. If you connect directly to a host, only the roles thatare created directly on the host are available.
NOTE When you add a custom role and do not assign any privileges to it, the role is created as a Read Onlyrole with three system-defined privileges: System.Anonymous, System.View, and System.Read.
Creating Roles in the vSphere Web Client(http://link.brightcove.com/services/player/bcpid2296383276001?bctid=ref:video_creating_role_in_vsphere_webclient)
vSphere Security
124 VMware, Inc.

vCenter Server System RolesA role is a predefined set of privileges. When you add permissions to an object, you pair a user or groupwith a role. vCenter Server includes several system roles, which you cannot change.
vCenter Server System RolesvCenter Server provides a small number of default roles. You cannot change the privileges associated withthe default roles. The default roles are organized as a hierarchy; each role inherits the privileges of theprevious role. For example, the Administrator role inherits the privileges of the Read Only role. Roles thatyou create do not inherit privileges from any of the system roles.
Administrator Role Users assigned the Administrator role for an object are allowed to view andperform all actions on the object. This role also includes all privilegesinherent in the Read Only role. If you are acting in the Administrator role onan object, you can assign privileges to individual users and groups. If you areacting in the Administrator role in vCenter Server, you can assign privilegesto users and groups in the default vCenter Single Sign-On identity source.Supported identity services include Windows Active Directory andOpenLDAP 2.4.
By default, the [email protected] user has the Administrator roleon both vCenter Single Sign-On and vCenter Server after installation. Thatuser can then associate other users with the Administrator role onvCenter Server.
No Access Role Users assigned the No Access role for an object cannot view or change theobject in any way. New users and groups are assigned this role by default.You can change the role on an object-by-object basis.
The [email protected] user, the root user, and vpxuser are theonly users not assigned the No Access role by default. Instead, they areassigned the Administrator role. You can remove the root user from anypermissions or change its role to No Access as long as you first create areplacement permission at the root level with the Administrator role andassociate this permission with a different user.
Read Only Role Users assigned the Read Only role for an object are allowed to view the stateof the object and details about the object. With this role, a user can viewvirtual machine, host, and resource pool attributes. The user cannot view theremote console for a host. All actions through the menus and toolbars aredisallowed.
Create a Custom RoleYou can create vCenter Server custom roles to suit the access control needs of your environment.
If you create or edit a role on a vCenter Server system that is part of the same vCenter Single Sign-Ondomain as other vCenter Server systems, the VMware Directory Service (vmdir) propagates the changes thatyou make to all other vCenter Server systems in the group. Assignments of roles to specific users and objectsare not shared across vCenter Server systems.
Prerequisites
Verify that you are logged in as a user with Administrator privileges.
Procedure
1 Log in to vCenter Server with the vSphere Web Client.
Chapter 4 vSphere Permissions and User Management Tasks
VMware, Inc. 125

2 Select Home, click Administration, and click Roles.
3 Click the Create role action (+) button.
4 Type a name for the new role.
5 Select privileges for the role and click OK.
Clone a RoleYou can make a copy of an existing role, rename it, and edit it. When you make a copy, the new role is notapplied to any users or groups and objects. You must assign the role to users or groups and objects.
If you create or edit a role on a vCenter Server system that is part of the same vCenter Single Sign-Ondomain as other vCenter Server systems, the VMware Directory Service (vmdir) propagates the changes thatyou make to all other vCenter Server systems in the group. Assignments of roles to specific users and objectsare not shared across vCenter Server systems.
Prerequisites
Verify that you are logged in as a user with Administrator privileges.
Procedure
1 Log in to vCenter Server with the vSphere Web Client.
2 Select Home, click Administration, and click Roles.
3 Select a role, and click the Clone role action icon.
4 Type a name for the cloned role.
5 Select or deselect privileges for the role and click OK.
Edit a RoleWhen you edit a role, you can change the privileges selected for that role. When completed, these privilegesare applied to any user or group that is assigned the edited role.
If you create or edit a role on a vCenter Server system that is part of the same vCenter Single Sign-Ondomain as other vCenter Server systems, the VMware Directory Service (vmdir) propagates the changes thatyou make to all other vCenter Server systems in the group. Assignments of roles to specific users and objectsare not shared across vCenter Server systems.
Prerequisites
Verify that you are logged in as a user with Administrator privileges.
Procedure
1 Log in to vCenter Server with the vSphere Web Client.
2 Select Home, click Administration, and click Roles.
3 Select a role and click the Edit role action button.
4 Select or deselect privileges for the role and click OK.
vSphere Security
126 VMware, Inc.

Best Practices for Roles and PermissionsUse best practices for roles and permissions to maximize the security and manageability of yourvCenter Server environment.
VMware recommends the following best practices when configuring roles and permissions in yourvCenter Server environment:
n Where possible, assign a role to a group rather than individual users to grant privileges to that group.
n Grant permissions only on the objects where they are needed, and assign privileges only to users orgroups that must have them. Using the minimum number of permissions makes it easier to understandand manage your permissions structure.
n If you assign a restrictive role to a group, check that the group does not contain the Administrator useror other users with administrative privileges. Otherwise, you could unintentionally restrictadministrators' privileges in parts of the inventory hierarchy where you have assigned that group therestrictive role.
n Use folders to group objects. For example, if you want to grant modify permission on one set of hostsand view permission on another set of hosts, place each set of hosts in a folder.
n Use caution when adding a permission to the root vCenter Server objects. Users with privileges at theroot level have access to global data on vCenter Server, such as roles, custom attributes, vCenter Serversettings.
n In most cases, enable propagation when you assign permissions to an object. This ensures that whennew objects are inserted in to the inventory hierarchy, they inherit permissions and are accessible tousers.
n Use the No Access role to mask specific areas of the hierarchy if you do not want for certain users orgroups to have access to the objects in that part of the object hierarchy.
n Changes to licenses propagate to all vCenter Server systems that are linked to the samePlatform Services Controller or to Platform Services Controllers in the same vCenter Single Sign-Ondomain, even if the user does not have privileges on all of the vCenter Server systems.
Required Privileges for Common TasksMany tasks require permissions on more than one object in the inventory. You can review the privileges thatare required to perform the tasks and, where applicable, the appropriate sample roles.
The table below lists common tasks that require more than one privilege. You can add permissions toinventory objects by pairing a user with one of the predefined roles, or you can create custom roles with theset of privileges that you expect to use multiple times.
If the task that you want to perform is not in this table, the following rules can help you determine whereyou must assign permissions to allow particular operations:
n Any operation that consumes storage space, such as creating a virtual disk or taking a snapshot,requires the Datastore.Allocate Space privilege on the target datastore, as well as the privilege toperform the operation itself.
n Moving an object in the inventory hierarchy requires appropriate privileges on the object itself, thesource parent object (such as a folder or cluster), and the destination parent object.
n Each host and cluster has its own implicit resource pool that contains all the resources of that host orcluster. Deploying a virtual machine directly to a host or cluster requires the Resource.Assign VirtualMachine to Resource Pool privilege.
Chapter 4 vSphere Permissions and User Management Tasks
VMware, Inc. 127

Table 4‑1. Required Privileges for Common Tasks
Task Required Privileges Applicable Role
Create a virtual machine On the destination folder or data center:n Virtual machine.Inventory.Create newn Virtual machine.Configuration.Add new disk (if creating a new
virtual disk)n Virtual machine.Configuration.Add existing disk (if using an
existing virtual disk)n Virtual machine.Configuration.Raw device (if using an RDM or
SCSI pass-through device)
Administrator
On the destination host, cluster, or resource pool:Resource.Assign virtual machine to resource pool
Resource pooladministrator orAdministrator
On the destination datastore or folder containing a datastore:Datastore.Allocate space
DatastoreConsumer orAdministrator
On the network that the virtual machine will be assigned to:Network.Assign network
NetworkConsumer orAdministrator
Deploy a virtual machinefrom a template
On the destination folder or data center:n Virtual machine .Inventory.Create from existingn Virtual machine.Configuration.Add new disk
Administrator
On a template or folder of templates:Virtual machine.Provisioning.Deploy template
Administrator
On the destination host, cluster or resource pool:Resource.Assign virtual machine to resource pool
Administrator
On the destination datastore or folder of datastores:Datastore.Allocate space
DatastoreConsumer orAdministrator
On the network that the virtual machine will be assigned to:Network.Assign network
NetworkConsumer orAdministrator
Take a virtual machinesnapshot
On the virtual machine or a folder of virtual machines:Virtual machine.Snapshot management. Create snapshot
Virtual MachinePower User orAdministrator
On the destination datastore or folder of datastores:Datastore.Allocate space
DatastoreConsumer orAdministrator
Move a virtual machine intoa resource pool
On the virtual machine or folder of virtual machines:n Resource.Assign virtual machine to resource pooln Virtual machine.Inventory.Move
Administrator
On the destination resource pool:Resource.Assign virtual machine to resource pool
Administrator
vSphere Security
128 VMware, Inc.

Table 4‑1. Required Privileges for Common Tasks (Continued)
Task Required Privileges Applicable Role
Install a guest operatingsystem on a virtual machine
On the virtual machine or folder of virtual machines:n Virtual machine.Interaction.Answer questionn Virtual machine.Interaction.Console interactionn Virtual machine.Interaction.Device connectionn Virtual machine.Interaction.Power Offn Virtual machine.Interaction.Power Onn Virtual machine.Interaction.Resetn Virtual machine.Interaction.Configure CD media (if installing
from a CD)n Virtual machine.Interaction.Configure floppy media (if
installing from a floppy disk)n Virtual machine.Interaction.VMware Tools install
Virtual MachinePower User orAdministrator
On a datastore containing the installation media ISO image:Datastore.Browse datastore (if installing from an ISO image on adatastore)On the datastore to which you upload the installation media ISOimage:n Datastore.Browse datastoren Datastore.Low level file operations
Virtual MachinePower User orAdministrator
Migrate a virtual machinewith vMotion
On the virtual machine or folder of virtual machines:n Resource.Migrate powered on virtual machinen Resource.Assign Virtual Machine to Resource Pool (if
destination is a different resource pool from the source)
Resource PoolAdministrator orAdministrator
On the destination host, cluster, or resource pool (if different from thesource):Resource.Assign virtual machine to resource pool
Resource PoolAdministrator orAdministrator
Cold migrate (relocate) avirtual machine
On the virtual machine or folder of virtual machines:n Resource.Migrate powered off virtual machinen Resource.Assign virtual machine to resource pool (if destination
is a different resource pool from the source)
Resource PoolAdministrator orAdministrator
On the destination host, cluster, or resource pool (if different from thesource):Resource.Assign virtual machine to resource pool
Resource PoolAdministrator orAdministrator
On the destination datastore (if different from the source):Datastore.Allocate space
DatastoreConsumer orAdministrator
Migrate a virtual machinewith Storage vMotion
On the virtual machine or folder of virtual machines:Resource.Migrate powered on virtual machine
Resource PoolAdministrator orAdministrator
On the destination datastore:Datastore.Allocate space
DatastoreConsumer orAdministrator
Move a host into a cluster On the host:Host.Inventory.Add host to cluster
Administrator
On the destination cluster:Host.Inventory.Add host to cluster
Administrator
Chapter 4 vSphere Permissions and User Management Tasks
VMware, Inc. 129

vSphere Security
130 VMware, Inc.

Securing ESXi Hosts 5The ESXi hypervisor architecture has many built-in security features such as CPU isolation, memoryisolation, and device isolation. You can configure additional features such as lockdown mode, certificatereplacement, and smart card authentication for enhanced security.
An ESXi host is also protected with a firewall. You can open ports for incoming and outgoing traffic asneeded, but should restrict access to services and ports. Using the ESXi lockdown mode and limiting accessto the ESXi Shell can further contribute to a more secure environment. Starting with vSphere 6.0, ESXi hostsparticipate in the certificate infrastructure. Hosts are provisioned with certificate that are signed by theVMware Certificate Authority (VMCA) by default.
See the VMware white paper Security of the VMware vSphere Hypervisor for additional information on ESXisecurity.
This chapter includes the following topics:
n “Use Scripts to Manage Host Configuration Settings,” on page 132
n “Configure ESXi Hosts with Host Profiles,” on page 133
n “General ESXi Security Recommendations,” on page 133
n “Certificate Management for ESXi Hosts,” on page 137
n “Customizing Hosts with the Security Profile,” on page 150
n “Assigning Permissions for ESXi,” on page 164
n “Using Active Directory to Manage ESXi Users,” on page 166
n “Using vSphere Authentication Proxy,” on page 169
n “Configuring Smart Card Authentication for ESXi,” on page 173
n “ESXi SSH Keys,” on page 175
n “Using the ESXi Shell,” on page 177
n “Modifying ESXi Web Proxy Settings,” on page 181
n “vSphere Auto Deploy Security Considerations,” on page 182
n “Managing ESXi Log Files,” on page 182
n “ESXi Security Best Practices,” on page 185
VMware, Inc. 131

Use Scripts to Manage Host Configuration SettingsIn environments with many hosts, managing hosts with scripts is faster and less error prone than managingthe hosts from the vSphere Web Client.
vSphere includes several scripting languages for host management. See the vSphere Command-LineDocumentation and the vSphere API/SDK Documentation for reference information and programming tips andVMware Communities for additional tips about scripted management. The vSphere Administratordocumentation focuses on using the vSphere Web Client for management.
vSphere PowerCLI VMware vSphere PowerCLI provides a Windows PowerShell interface to thevSphere API. vSphere PowerCLI includes PowerShell cmdlets foradministering vSphere components.
vSphere PowerCLI includes more than 200 cmdlets, a set of sample scripts,and a function library for management and automation. See the vSpherePowerCLI Documentation.
vSphere Command-LineInterface (vCLI)
vCLI includes a set of commands for managing ESXi hosts and virtualmachines. The installer, which also installs the vSphere SDK for Perl, runsWindows or Linux systems and installs ESXCLI commands, vicfg-commands, and a set of other vCLI commands. See vSphere Command-LineInterface Documentation.
Starting with vSphere 6.0, you can also use one of the scripting interfaces to the vCloud Suite SDK such asthe vCloud Suite SDK for Python. Functionality of those interfaces is fairly limited in vSphere 6.0.
Procedure
1 Create a custom role that has limited privileges.
For example, consider creating a role that has a set of privileges for managing hosts but no privilegesfor managing virtual machines, storage, or networking. If the script you want to use only extractsinformation, you can create a role with read-only privileges for the host.
2 From the vSphere Web Client, create a service account and assign it the custom role.
You can create multiple custom roles with different levels of access if you want access to certain hosts tobe fairly limited.
vSphere Security
132 VMware, Inc.
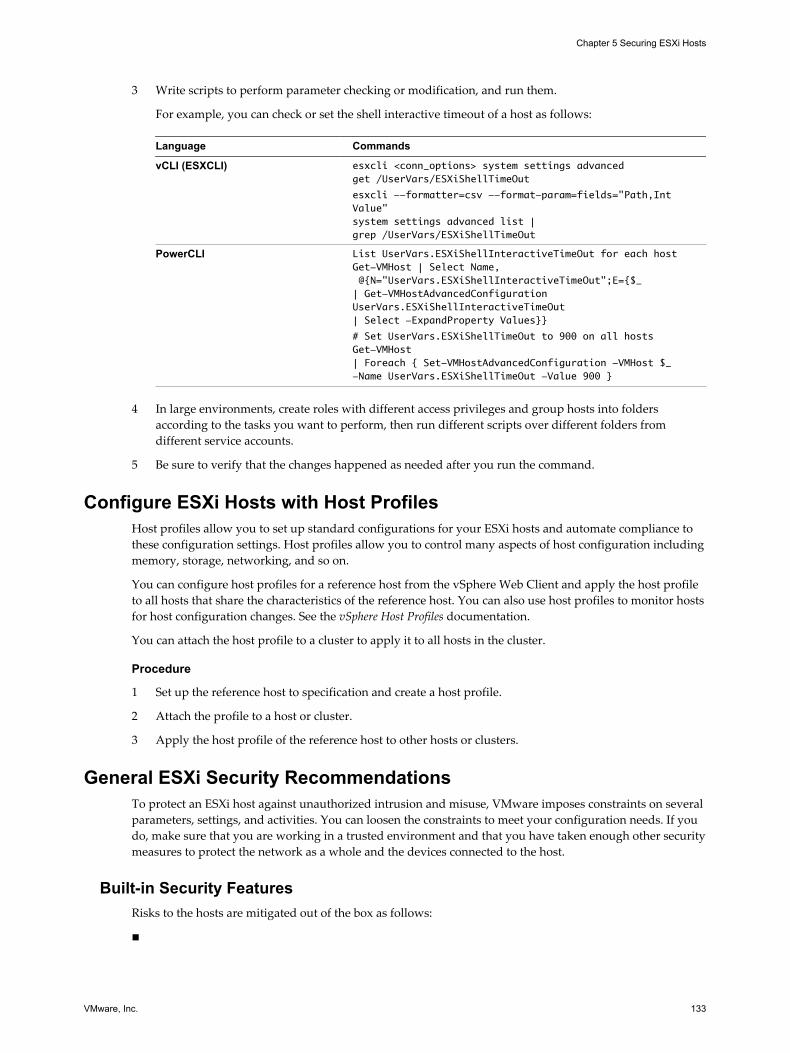
3 Write scripts to perform parameter checking or modification, and run them.
For example, you can check or set the shell interactive timeout of a host as follows:
Language Commands
vCLI (ESXCLI) esxcli <conn_options> system settings advanced get /UserVars/ESXiShellTimeOut
esxcli --formatter=csv --format-param=fields="Path,Int Value" system settings advanced list | grep /UserVars/ESXiShellTimeOut
PowerCLI List UserVars.ESXiShellInteractiveTimeOut for each hostGet-VMHost | Select Name, @{N="UserVars.ESXiShellInteractiveTimeOut";E={$_ | Get-VMHostAdvancedConfiguration UserVars.ESXiShellInteractiveTimeOut | Select -ExpandProperty Values}}
# Set UserVars.ESXiShellTimeOut to 900 on all hostsGet-VMHost | Foreach { Set-VMHostAdvancedConfiguration -VMHost $_ -Name UserVars.ESXiShellTimeOut -Value 900 }
4 In large environments, create roles with different access privileges and group hosts into folders
according to the tasks you want to perform, then run different scripts over different folders fromdifferent service accounts.
5 Be sure to verify that the changes happened as needed after you run the command.
Configure ESXi Hosts with Host ProfilesHost profiles allow you to set up standard configurations for your ESXi hosts and automate compliance tothese configuration settings. Host profiles allow you to control many aspects of host configuration includingmemory, storage, networking, and so on.
You can configure host profiles for a reference host from the vSphere Web Client and apply the host profileto all hosts that share the characteristics of the reference host. You can also use host profiles to monitor hostsfor host configuration changes. See the vSphere Host Profiles documentation.
You can attach the host profile to a cluster to apply it to all hosts in the cluster.
Procedure
1 Set up the reference host to specification and create a host profile.
2 Attach the profile to a host or cluster.
3 Apply the host profile of the reference host to other hosts or clusters.
General ESXi Security RecommendationsTo protect an ESXi host against unauthorized intrusion and misuse, VMware imposes constraints on severalparameters, settings, and activities. You can loosen the constraints to meet your configuration needs. If youdo, make sure that you are working in a trusted environment and that you have taken enough other securitymeasures to protect the network as a whole and the devices connected to the host.
Built-in Security FeaturesRisks to the hosts are mitigated out of the box as follows:
n
Chapter 5 Securing ESXi Hosts
VMware, Inc. 133

n ESXi Shell and SSH disabled by default.
n Only a limited number of firewall ports are open by default. You can explicitly open additional firewallports that are associated with specific services.
n ESXi runs only services that are essential to managing its functions. The distribution is limited to thefeatures required to run ESXi.
n By default, all ports not specifically required for management access to the host are closed. You mustspecifically open ports if you need additional services.
n By default, weak ciphers are disabled and communications from clients are secured by SSL. The exactalgorithms used for securing the channel depend on the SSL handshake. Default certificates created onESXi use PKCS#1 SHA-256 With RSA encryption as the signature algorithm.
n The Tomcat Web service, used internally by ESXi to support access by Web clients, has been modifiedto run only those functions required for administration and monitoring by a Web client. As a result,ESXi is not vulnerable to the Tomcat security issues reported in broader use.
n VMware monitors all security alerts that could affect ESXi security and issues a security patch ifneeded.
n Insecure services such as FTP and Telnet are not installed, and the ports for these services are closed bydefault. Because more secure services such as SSH and SFTP are easily available, avoid using theseinsecure services in favor of their safer alternatives. For example, use Telnet with SSL to access virtualserial ports if SSH is unavailable and you must use Telnet.
If you must use insecure services and have implemented sufficient protection for the host, you canexplicitly open ports to support them.
Additional Security MeasuresConsider the following recommendations when evaluating host security and administration.
Limit access If you decide to enable access to the Direct Console User Interface (DCUI) theESXi Shell, or SSH, enforce strict access security policies.
The ESXi Shell has privileged access to certain parts of the host. Provide onlytrusted users with ESXi Shell login access.
Do not access managedhosts directly
Use the vSphere Web Client to administer ESXi hosts that are managed by avCenter Server. Do not access managed hosts directly with the vSphereClient, and do not make changes to managed hosts from the host's DCUI.
If you manage hosts with a scripting interface or API, do not target the hostdirectly. Instead, target the vCenter Server system that manages the host andspecify the host name.
Use the vSphere Clientor VMware CLIs or APIsto administerstandalone ESXi hosts
Use the vSphere Client, one of the VMware CLIs or APIs to administer yourESXi hosts. Access the host from the DCUI or the ESXi Shell as the root useronly for troubleshooting. If you decide to use the ESXi Shell, limit theaccounts with access and set timeouts.
Use only VMwaresources to upgradeESXi components.
The host runs a variety of third-party packages to support managementinterfaces or tasks that you must perform. VMware does not supportupgrading these packages from anything other than a VMware source. If youuse a download or patch from another source, you might compromisemanagement interface security or functions. Regularly check third-partyvendor sites and the VMware knowledge base for security alerts.
NOTE Follow the VMware security advisories at http://www.vmware.com/security/.
vSphere Security
134 VMware, Inc.

ESXi Passwords, ESXi Pass Phrases, and Account LockoutFor ESXi hosts, you can use a password or a pass phrase. In each case, you must make sure the password orpass phrase meets the requirements.
ESXi uses the Linux PAM module pam_passwdqc for password management and control. See the manpagesfor pam_passwdqc for detailed information.
ESXi PasswordsESXi enforces password requirements for direct access from the Direct Console User Interface, the ESXiShell, SSH, or the vSphere Client. When you create a password, include a mix of characters from fourcharacter classes: lowercase letters, uppercase letters, numbers, and special characters such as underscore ordash.
Starting with vSphere 6.0, your user password must meet the following requirements. See Example ESXiPasswords below.
n Passwords must contain characters from at least three character classes.
n Passwords containing characters from three character classes must be at least seven characters long.
n Passwords containing characters from all four character classes must be at least seven characters long.
NOTE An uppercase character that begins a password does not count toward the number of characterclasses used. A number that ends a password does not count toward the number of character classes used.
The password cannot contain a dictionary word or part of a dictionary word.
Example ESXi PasswordsThe following password candidates meet ESXi requirements.
n xQaTEhb!: Contains eight characters from three character classes.
n xQaT3#A: Contains seven characters from four character classes.
The following password candidates do not meet ESXi requirements.
n Xqat3h?: Begins with an uppercase character, reducing the effective number of character classes to two.The minimum number of supported character classes is three.
n xQaTEh2: Ends with a number, reducing the effective number of character classes to two. Theminimum number of supported character classes is three.
ESXi Pass PhraseInstead of a password, you can also use a pass phrase, however, pass phrases are disabled by default. Youcan change this default or other settings, by using the Security.PasswordQualityControl advancedoption for your ESXi host from the vSphere Web Client.
For example, you can change the option to the following:
retry=3 min=disabled,disabled,16,7,7
This example allows pass phrases of at least 16 characters and at least 3 words, separated by spaces.
Making changes to the /etc/pamd/passwd file is still supported for legacy hosts but is deprecated for futurereleases.
Chapter 5 Securing ESXi Hosts
VMware, Inc. 135

Changing Default Password or Pass Phrase RestrictionsYou can change the default restriction on passwords or pass phrases by using theSecurity.PasswordQualityControl advanced option for your ESXi host. By default, this option is set asfollows:
retry=3 min=disabled,disabled,disabled,7,7
You can change the default, for example, to require a minimum of 15 characters and a minimum number offour words, as follows:
retry=3 min=disabled,disabled,15,7,7 passphrase=4
See the manpage for pam_passwdqc for more information.
NOTE Not all possible combinations of the options for pam_passwdqc have been tested. Perform additionaltesting after you make changes to the default password settings.
See the vCenter Server and Host Management documentation for information on setting ESXi advancedoptions.
ESXi Account Lockout BehaviorStarting with vSphere 6.0, account locking is supported for access through SSH and through the vSphereWeb Services SDK. The Direct Console Interface (DCUI) and the ESXi Shell do not support account lockout.By default, a maximum of ten failed attempts is allowed before the account is locked. The account isunlocked after two minutes by default.
You can configure the login behavior with the following advanced options:
n Security.AccountLockFailures. Maximum number of failed login attempts before a user's accountis locked. Zero disables account locking.
n Security.AccountUnlockTime. Number of seconds that a user is locked out.
See the vCenter Server and Host Management documentation for information on setting advanced options.
ESXi Networking Security RecommendationsIsolation of network traffic is essential to a secure ESXi environment. Different networks require differentaccess and level of isolation.
Your ESXi host uses several networks. Use appropriate security measures for each network, and isolatetraffic for specific applications and functions. For example, ensure that vSphere vMotion traffic does nottravel over networks where virtual machines are located. Isolation prevents snooping. Having separatenetworks also is recommended for performance reasons.
n vSphere infrastructure networks are used for features such as VMware vSphere vMotion®, VMwarevSphere Fault Tolerance, and storage. These networks are considered to be isolated for their specificfunctions and often are not routed outside a single physical set of server racks.
n A management network isolates client traffic, command-line interface (CLI) or API traffic, and third-party software traffic from normal traffic. This network should be accessible only by system, network,and security administrators. Use jump box or virtual private network (VPN) to secure access to themanagement network. Strictly control access within this network to potential sources of malware.
n Virtual machine traffic can flow over one or many networks. You can enhance the isolation of virtualmachines by using virtual firewall solutions that set firewall rules at the virtual network controller.These settings travel with a virtual machine as it migrates from host to host within your vSphereenvironment.
vSphere Security
136 VMware, Inc.

Disable the Managed Object Browser (MOB)The managed object browser provides a way to explore the VMkernel object model. However, attackers canuse this interface to perform malicious configuration changes or actions because ou can change the hostconfiguration by using the managed object browser. Use the Managed Object Browser only for debugging,and ensure that it is disabled in production systems.
Procedure
1 Select the host in the vSphere Web Client and go to Advanced System Settings.
2 Check the value of Config.HostAgent.plugins.solo.enableMob, and change it as appropriate.
Using vim-cmd from the ESXi Shell is no longer recommended.
Disable Authorized (SSH) KeysAuthorized keys allow you to enable access to an ESXi host through SSH without requiring userauthentication. To increase host security, do not allow users to access a host using authorized keys.
A user is considered trusted if their public key is in the /etc/ssh/keys-root/authorized_keys file on a host.Trusted remote users are allowed to access the host without providing a password.
Procedure
n For day-to-day operations, disable SSH on ESXi hosts.
n If SSH is enabled, even temporarily, monitor the contents of the /etc/ssh/keys-root/authorized_keysfile to ensure that no users are allowed to access the host without proper authentication.
n Monitor the /etc/ssh/keys-root/authorized_keys file to verify that it is empty and no SSH keys havebeen added to the file.
n If you find that the /etc/ssh/keys-root/authorized_keys file is not empty, remove any keys.
Disabling remote access with authorized keys might limit your ability to run commands remotely on a hostwithout providing a valid login. For example, this can prevent you from running an unattended remotescript.
Certificate Management for ESXi HostsIn vSphere 6.0 and later, the VMware Certificate Authority (VMCA) provisions each new ESXi host with asigned certificate that has VMCA as the root certificate authority by default. Provisioning happens when thehost is added to vCenter Server explicitly or as part of installation or upgrade to ESXi 6.0 or later.
You can view and manage these certificates from the vSphere Web Client and by using thevim.CertificateManager API in the vSphere Web Services SDK. You cannot view or manage ESXicertificates by using certificate managment CLIs that are available for managing vCenter Server certificates.
Certificates in vSphere 5.5 and in vSphere 6.0When ESXi and vCenter Server communicate, they use SSL for almost all management traffic.
In vSphere 5.5 and earlier, the SSL endpoints are secured only by a combination of user name, password,and thumbprint. Users can replace the corresponding self-signed certificates with their own certificates. Seethe vSphere 5.5 Documentation Center.
In vSphere 6.0 and later, vCenter Server supports the following certificate modes for ESXi hosts.
Chapter 5 Securing ESXi Hosts
VMware, Inc. 137

Table 5‑1. Certificate Modes for ESXi Hosts
Certificate Mode Description
VMware Certificate Authority (default) Use this mode if VMCA provisions all ESXi hosts, either asthe top-level CA or as an intermediary CA.By default, VMCA provisions ESXi hosts with certificates.In this mode, you can refresh and renew certificates fromthe vSphere Web Client.
Custom Certificate Authority Use this mode if you want to use only custom certificatesthat are signed by a third-party CA.In this mode, you are responsible for managing thecertificates. You cannot refresh and renew certificates fromthe vSphere Web Client.NOTE Unless you change the certificate mode to CustomCertificate Authority, VMCA might replace customcertificates, for example, when you select Renew in thevSphere Web Client.
Thumbprint Mode vSphere 5.5 used thumbprint mode, and this mode is stillavailable as a fallback option for vSphere 6.0. In this mode,vCenter Server checks that the certificate is formattedcorrectly, but does not check the validity of the certificate.Even expired certificates are accepted.Do not use this mode unless you encounter problems thatyou cannot resolve with one of the other two modes. SomevCenter 6.0 and later services might not work correctly inthumbprint mode.
Certificate ExpirationStarting with vSphere 6.0, you can view information about certificate expiration for certificates that aresigned by VMCA or a third-party CA in the vSphere Web Client. You can view the information for all hoststhat are managed by a vCenter Server or for individual hosts. A yellow alarm is raised if the certificate is inthe Expiring Shortly state (less than 8 months). A red alarm is raised if the certificate is in the ExpirationImminent state (less than 2 months).
ESXi Provisioning and VMCAWhen you boot an ESXi host from installation media, the host initially has an autogenerated certificate.When the host is added to the vCenter Server system, it is provisioned with a certificate that is signed byVMCA as the root CA.
The process is similar for hosts that are provisioned with Auto Deploy. However, because those host do notstore any state, the signed certificate is stored by the Auto Deploy server in its local certificate store. Thecertificate is reused upon subsequent boots of the ESXi hosts. An Auto Deploy server is part of anyembedded deployment or management node.
If VMCA is not available when an Auto Deploy host boots the first time, the host first attempts to connect,and then cycles through shut down and reboot until VMCA becomes available and the host can beprovisioned with a signed certificate.
Host Name and IP Address ChangesIn vSphere 6.0 and later, a host name or IP address change might affect whether vCenter Server considers ahost's certificate valid. How you added the host to vCenter Server affects whether manual intervention isnecessary. Manual intervention means that you either reconnect the host, or you remove the host fromvCenter Server and add it back.
vSphere Security
138 VMware, Inc.

Table 5‑2. When Host Name or IP Address Changes Require Manual Intervention
Host added to vCenter Serverusing... Host name changes IP address changes
Host name vCenter Server connectivity problem.Manual intervention required.
No intervention required.
IP address No intervention required. vCenter Server connectivity problem.Manual intervention required.
ESXi Certificate Management (http://link.brightcove.com/services/player/bcpid2296383276001?bctid=ref:video_esxi_certs_in_vsphere)
Host Upgrades and CertificatesIf you upgrade an ESXi host to ESXi 6.0 or later, the upgrade process replaces self-signed certificates withVMCA-signed certificates. The process retains custom certificates even if those certificates are expired orinvalid.
The recommended upgrade workflow depends on the current certificates.
Host Provisioned withThumbprint Certificates
If your host is currently using thumbprint certificates, it is automaticallyassigned VMCA certificates as part of the upgrade process.
NOTE You cannot provision legacy hosts with VMCA certificates. You mustupgrade to ESXi 6.0 or later.
Host Provisioned withCustom Certificates
If your host is provisioned with custom certificates, usually third-party CA-signed certificates, those certificates remain in place. Change the certificatemode to Custom to ensure that the certificates are not replaced accidentally.
NOTE If your environment is in VMCA mode, and you refresh thecertificates from the vSphere Web Client, any existing certificates arereplaced with certificates that are signed by VMCA.
Going forward, vCenter Server monitors the certificates and displaysinformation, for example, about certificate expiration, in thevSphere Web Client.
If you decide not to upgrade your hosts to vSphere 6.0 or later, the hosts retain the certificates that they arecurrently using even if the host is managed by a vCenter Server system that uses VMCA certificates.
Hosts that are being provisioned by Auto Deploy are always assigned new certificates when they are firstbooted with ESXi 6.0 software. When you upgrade a host that is provisioned by Auto Deploy, the AutoDeploy server generates a certificate signing request (CSR) for the host and submits it to VMCA. VMCAstores the signed certificate for the host. When the Auto Deploy server provisions the host, it retrieves thecertificate from VMCA and includes it as part of the provisioning process.
You can use Auto Deploy with custom certificates.
See “Use Custom Certificates with Auto Deploy,” on page 148.
ESXi Certificate Default SettingsWhen vCenter Server requests a Certificate Signing Request (CSR) from an ESXi host, it uses defaultsettings. Most of the default values are well suited for many situations, but company-specific informationcan be changed.
Consider changing the organization, and location information. You can change many of the default settingsusing the vSphere Web Client. See “Change Certificate Default Settings,” on page 142.
Chapter 5 Securing ESXi Hosts
VMware, Inc. 139

Table 5‑3. CSR Settings
Parameter Default Value Advanced Option
Key Size 2048 N.A.
Key Algorithm RSA N.A.
Certificate Signature Algorithm sha256WithRSAEncryption N.A.
Common Name Name of the host if the hostwas added to vCenter Server byhost name.IP address of the host if the hostwas added to vCenter Server byIP address.
N.A.
Country USA vpxd.certmgmt.certs.cn.country
Email address [email protected] vpxd.certmgmt.certs.cn.email
Locality (City) Palo Alto vpxd.certmgmt.certs.cn.localityName
Organization Unit Name VMware Engineering vpxd.certmgmt.certs.cn.organizationalUnitName
Organization Name VMware vpxd.certmgmt.certs.cn.organizationName
State or province California vpxd.certmgmt.certs.cn.state
Number of days the certificate isvalid.
1825 vpxd.certmgmt.certs.cn.daysValid
Hard threshold for certificateexpiration. vCenter Server raisesa red alarm when this thresholdis reached.
30 days vpxd.certmgmt.certs.cn.hardThreshold
Poll interval for vCenter Servercertificate validity checks.
5 days vpxd.certmgmt.certs.cn.pollIntervalDays
Soft Threshold for certificateexpiration. vCenter Server raisesan event when this threshold isreached.
240 days vpxd.certmgmt.certs.cn.softThreshold
Mode that vCenter Server usersto determine whether existingcertificates are replaced. Changethis mode to retain customcertificates during upgrade. See “Host Upgrades andCertificates,” on page 139.
Default is vmcaYou can also specifythumbprint or custom. See “Change the Certificate Mode,”on page 144.
vpxd.certmgmt.mode
View Certificate Expiration Information for Multiple ESXi HostsIf you are using ESXi 6.0 and later, you can view the certificate status of all hosts that are managed by yourvCenter Server system. The display allows you to determine whether any of the certificates expire soon.
You can view certificate status information for hosts that are using VMCA mode and for hosts that are usingcustom mode in the vSphere Web Client. You cannot view certificate status information for hosts inthumbprint mode.
Procedure
1 Browse to the host in the vSphere Web Client inventory hierarchy.
By default, the Hosts display does not include the certificate status.
2 Right-click the Name field and select Show/Hide Columns.
vSphere Security
140 VMware, Inc.

3 Select Certificate Valid To, click OK, and scroll to the right if necessary.
The certificate information displays when the certificate expires.
If a host is added to vCenter Server or reconnected after a disconnect, vCenter Server renews thecertificate if the status is Expired, Expiring, Expiring shortly, or Expiration imminent. The status isExpiring if the certificate is valid for less than eight months, Expiring shortly if the certificate is valid forless than two months, and Expiration imminent if the certificate is valid for less than one month.
4 (Optional) Deselect other columns to make it easier to see what you are interested in.
What to do next
Renew the certificates that are about to expire. See “Renew or Refresh ESXi Certificates,” on page 141.
View Certificate Details for a Single ESXi HostFor ESXi 6.0 and later hosts that are in VMCA mode or custom mode, you can view certificate details fromthe vSphere Web Client. The information about the certificate can be helpful for debugging.
Procedure
1 Browse to the host in the vSphere Web Client inventory.
2 Click the Manage tab and click Settings.
3 Select System, and click Certificate.
You can examine the following information. This information is available only in the single-host view.
Field Description
Subject The subject used during certificate generation.
Issuer The issuer of the certificate.
Valid From Date on which the certificate was generated.
Valid To Date on which the certificate expires.
Status Status of the certificate, one of the following.
Good Normal operation.
Expiring Certificate will expire soon.
Expiring shortly Certificate is 8 months or less away from expiration(Default).
Expirationimminent
Certificate is 2 months or less away from expiration(Default).
Expired Certificate is not valid because it expired.
Renew or Refresh ESXi CertificatesIf VMCA assigns certificates to your ESXi hosts (6.0 and later), you can renew those certificates from thevSphere Web Client. You can also refresh all certificates from the TRUSTED_ROOTS store associated withvCenter Server.
You can renew your certificates when they are about to expire, or if you want to provision the host with anew certificate for other reasons. If the certificate is already expired, you must disconnect the host andreconnect it.
By default, vCenter Server renews the certificates of a host with status Expired, Expiring immediately, orExpiring each time the host is added to the inventory, or reconnected.
Chapter 5 Securing ESXi Hosts
VMware, Inc. 141

Procedure
1 Browse to the host in the vSphere Web Client inventory.
2 Click the Manage tab and click Settings.
3 Select System, and click Certificate.
You can view detailed information about the selected host's certificate.
4 Click Renew or Refresh CA Certificates.
Option Description
Renew Retrieves a fresh signed certificate for the host from VMCA.
Refresh CA Certificates Pushes all certificates in the TRUSTED_ROOTS store in the vCenter ServerVECS store to the host.
5 Click Yes to confirm.
Change Certificate Default SettingsWhen a host is added to a vCenter Server system, vCenter Server sends a Certificate Signing Request (CSR)for the host to VMCA. You can change some of the default settings in the CSR using the vCenter ServerAdvanced Settings in the vSphere Web Client.
Change company-specific default certificate settings. See “ESXi Certificate Default Settings,” on page 139 fora complete list of default settings. Some of the defaults cannot be changed.
Procedure
1 In the vSphere Web Client, select the vCenter Server system that manages the hosts.
2 Click the Manage tab and click Settings.
3 Click Advanced Settings and click Edit.
4 In the Filter box, enter certmgmt to display only certificate management parameters.
5 Change the value of the existing parameters to follow company policy and click OK.
The next time you add a host to vCenter Server, the new settings are used in the CSR thatvCenter Server sends to VMCA and in the certificate that is assigned to the host.
What to do next
Changes to certificate metadata only affect new certificates. If you want to change the certificates of hoststhat are already managed by the vCenter Server system, you can disconnect and reconnect the hosts.
Understanding Certificate Mode SwitchesStarting with vSphere 6.0, ESXi hosts are provisioned with certificates by VMCA by default. You can insteaduse custom certificate mode or, for debugging purposes, thumbprint mode. In most cases, mode switchesare disruptive and not necessary. If you do require a mode switch, review the potential impact before youstart.
In vSphere 6.0 and later, vCenter Server supports the following certificate modes for ESXi hosts.
vSphere Security
142 VMware, Inc.

Table 5‑4. Certificate Modes for ESXi Hosts
Certificate Mode Description
VMware Certificate Authority (default) By default, the VMware Certificate Authority is used as theCA for ESXi host certificates. VMCA is the root CA bydefault, but it can be set up as the intermediary CA toanother CA. In this mode, users can manage certificatesfrom the vSphere Web Client. Also used if VMCA is asubordinate certificate.
Custom Certificate Authority Some customers might prefer to manage their own externalcertificate authority. In this mode, customers areresponsible for managing the certificates and cannotmanage them from the vSphere Web Client.
Thumbprint Mode vSphere 5.5 used thumbprint mode, and this mode is stillavailable as a fallback option for vSphere 6.0. Do not usethis mode unless you encounter problems with one of theother two modes that you cannot resolve. Some vCenter 6.0and later services might not work correctly in thumbprintmode.
Using Custom ESXi CertificatesIf your company policy requires that you use a different root CA than VMCA, you can switch the certificatemode in your environment after careful planning. The recommended workflow is as follows.
1 Obtain the certificates that you want to use.
2 Remove all hosts from vCenter Server.
3 Add the custom CA's root certificate to VECS.
4 Deploy the custom CA certificates to each host and restart services on that host.
5 Switch to Custom CA mode. See “Change the Certificate Mode,” on page 144.
6 Add the hosts to the vCenter Server system.
Switching from Custom CA Mode to VMCA ModeIf you are using custom CA mode and decide that using VMCA works better in your environment, you canperform the mode switch after careful planning. The recommended workflow is as follows.
1 Remove all hosts from the vCenter Server system.
2 On the vCenter Server system, remove the third-party CA's root certificate from VECS.
3 Switch to VMCA mode. See “Change the Certificate Mode,” on page 144.
4 Add the hosts to the vCenter Server system.
NOTE Any other workflow for this mode switch might result in unpredictable behavior.
Retaining Thumbprint Mode Certificates During UpgradeThe switch from VMCA mode to thumbprint mode might be necessary if you encounter problems with theVMCA certificates. In thumbprint mode, the vCenter Server system checks only whether a certificate existsand is formatted correctly, and does not check whether the certificate is valid. See “Change the CertificateMode,” on page 144 for instructions.
Chapter 5 Securing ESXi Hosts
VMware, Inc. 143
Switching from Thumbprint Mode to VMCA ModeIf you use thumbprint mode and you want to start using VMCA-signed certificates, the switch requiressome planning. The recommended workflow is as follows.
1 Remove all hosts from the vCenter Server system.
2 Switch to VMCA certificate mode. See “Change the Certificate Mode,” on page 144.
3 Add the hosts to the vCenter Server system.
NOTE Any other workflow for this mode switch might result in unpredictable behavior.
Switching from Custom CA Mode to Thumbprint ModeIf you are encountering problems with your custom CA, consider switching to thumbprint modetemporarily. The switch works seamlessly if you follow the instructions in “Change the Certificate Mode,”on page 144. After the mode switch, the vCenter Server system checks only the format of the certificate andno longer checks the validity of the certificate itself.
Switching from Thumbprint Mode to Custom CA ModeIf you set your environment to thumbprint mode during troubleshooting, and you want to start usingcustom CA mode, you must first generate the required certificates. The recommended workflow is asfollows.
1 Remove all hosts from the vCenter Server system.
2 Add the custom CA root certificate to TRUSTED_ROOTS store on VECS on the vCenter Server system.See “Update the vCenter Server TRUSTED_ROOTS Store (Custom Certificates),” on page 147.
3 For each ESXi host:
a Deploy the custom CA certificate and key.
b Restart services on the host.
4 Switch to custom mode. See “Change the Certificate Mode,” on page 144.
5 Add the hosts to the vCenter Server system.
Change the Certificate ModeIn most cases, using VMCA to provision the ESXi hosts in your environment is the best solution. If corporatepolicy requires that you use custom certificates with a different root CA, you can edit the vCenter Serveradvanced options so that the hosts are not automatically provisioned with VMCA certificates when yourefresh certificates. You are then responsible for the certificate management in your environment.
You can use the vCenter Server advanced settings to change to thumbprint mode or to custom CA mode.Use thumbprint mode only as a fallback option.
Procedure
1 Select the vCenter Server that manages the hosts and click Settings.
2 Click Advanced Settings, and click Edit.
3 In the Filter box, enter certmgmt to display only certificate management keys.
4 Change the value of vpxd.certmgmt.mode to custom if you intend to manage your own certificates, andto thumbprint if you temporarily want to use thumbprint mode, and click OK.
5 Restart the vCenter Server service.
vSphere Security
144 VMware, Inc.

Replacing ESXi SSL Certificates and KeysYour company's security policy might require that you replace the default ESXi SSL certificate with a third-party CA-signed certificate on each host.
By default, vSphere components use the VMCA-signed certificate and key that are created duringinstallation. If you accidentally delete the VMCA-signed certificate, remove the host from its vCenter Serversystem, and add it back. When you add the host, vCenter Server requests a new certificate from VMCA andprovisions the host with it.
Replace VMCA-signed certificates with certificates from a trusted CA, either a commercial CA or anorganizational CA, if company policy requires it.
The default certificates are in the same location as the vSphere 5.5 certificates. You can replace the defaultcertificates with trusted certificates in a number of ways.
NOTE You can also use the vim.CertificateManager and vim.host.CertificateManager managed objects inthe vSphere Web Services SDK. See the vSphere Web Services SDK documentation.
After you replace the certificate, you have to update the TRUSTED_ROOTS store in VECS on thevCenter Server system that manages the host to ensure that the vCenter Server and the ESXi host have atrust relationship.
n Requirements for ESXi Certificate Signing Requests on page 145If you want to use a third-party CA-signed certificate, either with VMCA as a subordinate authority orwith a custom certificate authority, you have to send a Certificate Signing Request (CSR) to the CA.
n Replace the Default Certificate and Key from the ESXi Shell on page 146You can replace the default VMCA-signed ESXi certificates from the ESXi Shell.
n Replace a Default Certificate and Key With the vifs Command on page 146You can replace the default VMCA-signed ESXi certificates with the vifs command.
n Replace a Default Certificate Using HTTPS PUT on page 147You can use third-party applications to upload certificates and key. Applications that support HTTPSPUT operations work with the HTTPS interface that is included with ESXi.
n Update the vCenter Server TRUSTED_ROOTS Store (Custom Certificates) on page 147If you set up your ESXi hosts to use custom certificates, you have to update the TRUSTED_ROOTS store onthe vCenter Server system that manages the hosts.
Requirements for ESXi Certificate Signing RequestsIf you want to use a third-party CA-signed certificate, either with VMCA as a subordinate authority or witha custom certificate authority, you have to send a Certificate Signing Request (CSR) to the CA.
Use a CSR with these characteristics:
n 2048 bits
n PKCS1
n No wildcards
n Start time of one day before the current time
n CN (and SubjectAltName) set to the host name (or IP address) that the ESXi host has in thevCenter Server inventory.
Chapter 5 Securing ESXi Hosts
VMware, Inc. 145
Replace the Default Certificate and Key from the ESXi ShellYou can replace the default VMCA-signed ESXi certificates from the ESXi Shell.
Prerequisites
n If you want to use third-party CA-signed certificates, generate the certificate request, send it to thecertificate authority, and store the certificates on each ESXi host.
n If necessary, enable the ESXi Shell or enable SSH traffic from the vSphere Web Client. See “Use thevSphere Web Client to Enable Access to the ESXi Shell,” on page 178.
n All file transfers and other communications occur over a secure HTTPS session. The user who is used toauthenticate the session must have the privilege Host.Config.AdvancedConfig on the host. For moreinformation on assigning privileges through roles, see “Managing Permissions for vCenterComponents,” on page 119.
Procedure
1 Log in to the ESXi Shell, either directly from the DCUI or from an SSH client, as a user withadministrator privileges.
2 In the directory /etc/vmware/ssl, rename the existing certificates using the following commands.
mv rui.crt orig.rui.crt
mv rui.key orig.rui.key
3 Copy the certificates that you want to use to /etc/vmware/ssl.
4 Rename the new certificate and key to rui.crt and rui.key.
5 Restart the host after you install the new certificate.
Alternatively, you can put the host into maintenance mode, install the new certificate, use the DirectConsole User Interface (DCUI) to restart the management agents, and set the host to exit maintenancemode.
What to do next
Update the vCenter Server TRUSTED_ROOTS store. See “Update the vCenter Server TRUSTED_ROOTSStore (Custom Certificates),” on page 147.
Replace a Default Certificate and Key With the vifs CommandYou can replace the default VMCA-signed ESXi certificates with the vifs command.
Prerequisites
n If you want to use third-party CA-signed certificates, generate the certificate request, send it to thecertificate authority, and store the certificates on each ESXi host.
n If necessary, enable the ESXi Shell or enable SSH traffic from the vSphere Web Client. See “Use thevSphere Web Client to Enable Access to the ESXi Shell,” on page 178.
n All file transfers and other communications occur over a secure HTTPS session. The user who is used toauthenticate the session must have the privilege Host.Config.AdvancedConfig on the host. For moreinformation on assigning privileges through roles, see “Managing Permissions for vCenterComponents,” on page 119.
Procedure
1 Back up the existing certificates.
2 Generate a certificate request following the instructions from the certificate authority.
vSphere Security
146 VMware, Inc.

3 When you have the certificate, use the vifs command to upload the certificate to the appropriatelocation on the host from an SSH connection to the host.
vifs --server hostname --username username --put rui.crt /host/ssl_cert
vifs --server hostname --username username --put rui.key /host/ssl_key
4 Restart the host.
What to do next
Update the vCenter Server TRUSTED_ROOTS store. See “Update the vCenter Server TRUSTED_ROOTSStore (Custom Certificates),” on page 147.
Replace a Default Certificate Using HTTPS PUTYou can use third-party applications to upload certificates and key. Applications that support HTTPS PUToperations work with the HTTPS interface that is included with ESXi.
Prerequisites
n If you want to use third-party CA-signed certificates, generate the certificate request, send it to thecertificate authority, and store the certificates on each ESXi host.
n If necessary, enable the ESXi Shell or enable SSH traffic from the vSphere Web Client. See “Use thevSphere Web Client to Enable Access to the ESXi Shell,” on page 178.
n All file transfers and other communications occur over a secure HTTPS session. The user who is used toauthenticate the session must have the privilege Host.Config.AdvancedConfig on the host. For moreinformation on assigning privileges through roles, see “Managing Permissions for vCenterComponents,” on page 119.
Procedure
1 Back up the existing certificates.
2 In your upload application, process each file as follows:
a Open the file.
b Publish the file to one of these locations.
Option Description
Certificates https://hostname/host/ssl_cert
Keys https://hostname/host/ssl_key
The location /host/ssl_cert and host/ssl_key link to the certificate files in /etc/vmware/ssl.
3 Restart the host.
What to do next
Update the vCenter Server TRUSTED_ROOTS store. See “Update the vCenter Server TRUSTED_ROOTSStore (Custom Certificates),” on page 147.
Update the vCenter Server TRUSTED_ROOTS Store (Custom Certificates)If you set up your ESXi hosts to use custom certificates, you have to update the TRUSTED_ROOTS store on thevCenter Server system that manages the hosts.
Prerequisites
Replace the certificates on each host with custom certificates.
Chapter 5 Securing ESXi Hosts
VMware, Inc. 147

Procedure
1 Log in to the vCenter Server system that manages the ESXi hosts.
Log in to the Windows system on which you installed the software, or log in to thevCenter Server Appliance shell.
2 Run vecs-cli to add the new certificates to the TRUSTED_ROOTS store, for example:
/usr/lib/vmware-vmafd/bin/vecs-cli entry create --store TRUSTED_ROOTS --alias custom1.crt --
cert /etc/vmware/ssl/custom1.crt
What to do next
Set certificate mode to Custom. If certificate mode is VMCA, the default, and you perform a certificaterefresh, your custom certificates are replaced with VMCA-signed certificates. See “Change the CertificateMode,” on page 144.
Use Custom Certificates with Auto DeployBy default, the Auto Deploy server provisions each host with certificates that are signed by VMCA. You canset up the Auto Deploy server to provision all hosts with custom certificates that are not signed by VMCA.In that scenario, the Auto Deploy server becomes a subordinate certificate authority of your third-party CA.
Prerequisites
n Request a certificate that meets your requirements from your CA.
n Key size: 2048 bits or more (PEM encoded)
n PEM format. VMware supports PKCS8 and PKCS1 (RSA keys). When keys are added to VECS,they are converted to PKCS8
n x509 version 3
n For root certificates, the CA extension must be set to true, and the cert sign must be in the list ofrequirements.
n SubjectAltName must contain DNS Name=<machine_FQDN>
n CRT format
n Contains the following Key Usages: Digital Signature, Non Repudiation, Key Encipherment
n Name the certificate and key files rbd-ca.crt and rbd-ca.key.
Procedure
1 Back up the default ESXi certificates.
The certificates are located at /etc/vmware-rbd/ssl/.
2 From the vSphere Web Client, stop the Auto Deploy service.
a Select Administration, and click System Configuration under Deployment.
b Click Services.
c Right-click the service you want to stop and select Stop.
3 On the system where the Auto Deploy service runs, replace rbd-ca.crt and rbd-ca.key in /etc/vmware-rbd/ssl/ with your custom certificate and key file.
vSphere Security
148 VMware, Inc.

4 On the system where the Auto Deploy service runs, update the TRUSTED_ROOTS store in VECS to useyour new certificates.
vecs-cli entry delete --store TRUSTED_ROOTS --alias
rbd_cert
vecs-cli entry create --store TRUSTED_ROOTS --alias
rbd_cert --cert /etc/vmware-rbd/ssl/rbd-ca.crt
Windows C:\Program Files\VMware\vCenter Server\vmafdd\vecs-cli.exe
Linux /usr/lib/vmware-vmafd/bin/vecs-cli
5 Create a castore.pem file that contains what's in TRUSTED_ROOTS and place the file inthe /etc/vmware-rbd/ssl/ directory.
In custom mode, you are responsible for maintaining this file.
6 Change the certificate mode for the vCenter Server system to custom.
See “Change the Certificate Mode,” on page 144.
7 Restart the vCenter Server service and start the Auto Deploy service.
The next time you provision a host that is set up to use Auto Deploy, the Auto Deploy server generates acertificate using the root certificate that you just added to the TRUSTED_ROOTS store.
Restore ESXi Certificate and Key FilesWhen you replace a certificate on an ESXi host by using the vSphere Web Services SDK, the previouscertificate and key are appended to a .bak file. You can restore previous certificates by moving theinformation in the .bak file to the current certificate and key files.
The host certificate and key are located in /etc/vmware/ssl/rui.crt and /etc/vmware/ssl/rui.key. Whenyou replace a host certificate and key by using the vSphere Web Services SDK vim.CertificateManagermanaged object, the previous key and certificate are appended to the file /etc/vmware/ssl/rui.bak.
NOTE If you replace the certificate by using HTTP PUT, vifs, or from the ESXi Shell, the existing certificatesare not appended to the .bak file.
Procedure
1 On the ESXi host, locate the file /etc/vmware/ssl/rui.bak.
The file has the following format.
#
# Host private key and certificate backup from 2014-06-20 08:02:49.961
#
-----BEGIN PRIVATE KEY-----
previous key
-----END PRIVATE KEY-----
-----BEGIN CERTIFICATE-----
previous cert
-----END CERTIFICATE-----
2 Copy the text starting with -----BEGIN PRIVATE KEY----- and ending with -----END PRIVATE KEY-----into the /etc/vmware/ssl/rui.key file.
Include -----BEGIN PRIVATE KEY----- and -----END PRIVATE KEY-----.
Chapter 5 Securing ESXi Hosts
VMware, Inc. 149

3 Copy the text between -----BEGIN CERTIFICATE----- and -----END CERTIFICATE----- intothe /etc/vmware/ssl/rui.crt file.
Include -----BEGIN CERTIFICATE----- and -----END CERTIFICATE-----.
4 Restart the host or send ssl_reset events to all services that use the keys.
for s in /etc/init.d/*; do $s | grep ssl_reset > /dev/null; if [ $? == 0 ]; then $s
ssl_reset; fi; done
Customizing Hosts with the Security ProfileYou can customize many of the essential security settings for your host through the Security Profile panelavailable in the vSphere Web Client. The Security Profile is especially useful for single host management. Ifyou are managing multiple hosts, consider using one of the CLIs or SDKs and automating thecustomization.
ESXi Firewall ConfigurationESXi includes a firewall that is enabled by default.
At installation time, the ESXi firewall is configured to block incoming and outgoing traffic, except traffic forservices that are enabled in the host's security profile.
As you open ports on the firewall, consider that unrestricted access to services running on an ESXi host canexpose a host to outside attacks and unauthorized access. Reduce the risk by configuring the ESXi firewall toallow access only from authorized networks.
NOTE The firewall also allows Internet Control Message Protocol (ICMP) pings and communication withDHCP and DNS (UDP only) clients.
You can manage ESXi firewall ports as follows:
n Use the security profile for each host in the vSphere Web Client. See “Manage ESXi Firewall Settings,”on page 151
n Use ESXCLI commands from the command line or in scripts. See “ESXi ESXCLI Firewall Commands,”on page 155.
n Use a custom VIB if the port you want to open is not included in the security profile.
You create custom VIBs with the vibauthor tool available from VMware Labs. To install the custom VIB,you have to change the acceptance level of the the ESXi host to CommunitySupported. See VMwareKnowledge Base Article 2007381.
NOTE If you engage VMware Technical Support to investigate a problem on an ESXi host with aCommunitySupported VIB installed, VMware Support might request that this CommunitySupportedVIB be uninstalled as a troubleshooting step to determine if that VIB is related to the problem beinginvestigated.
ESXi Firewall Concepts (http://link.brightcove.com/services/player/bcpid2296383276001?bctid=ref:video_esxi_firewall_concepts)
The behavior of the NFS Client rule set (nfsClient) is different from other rule sets. When the NFS Clientrule set is enabled, all outbound TCP ports are open for the destination hosts in the list of allowed IPaddresses. See “NFS Client Firewall Behavior,” on page 154 for more information.
vSphere Security
150 VMware, Inc.
Manage ESXi Firewall SettingsYou can configure incoming and outgoing firewall connections for a service or a management agent fromthe vSphere Web Client or at the command line.
NOTE If different services have overlapping port rules, enabling one service might implicitly enable otherservices. You can specify which IP addresses are allowed to access each service on the host to avoid thisproblem.
Procedure
1 Browse to the host in the vSphere Web Client inventory.
2 Click the Manage tab and click Settings.
3 Click Security Profile.
The vSphere Web Client displays a list of active incoming and outgoing connections with thecorresponding firewall ports.
4 In the Firewall section, click Edit.
The display shows firewall rule sets, which include the name of the rule and the associated information.
5 Select the rule sets to enable, or deselect the rule sets to disable.
Column Description
Incoming Ports and Outgoing Ports The ports that the vSphere Web Client opens for the service
Protocol Protocol that a service uses.
Daemon Status of daemons associated with the service
6 For some services, you can manage service details.
n Use the Start, Stop, or Restart buttons to change the status of a service temporarily.
n Change the Startup Policy to have the service start with the host or with port usage.
7 For some services, you can explicitly specify IP addresses from which connections are allowed.
See “Add Allowed IP Addresses for an ESXi Host,” on page 151.
8 Click OK.
Add Allowed IP Addresses for an ESXi HostBy default, the firewall for each service allows access to all IP addresses. To restrict traffic, change eachservice to allow traffic only from your management subnet. You might also deselect some services if yourenvironment does not use them.
You can use the vSphere Web Client, vCLI, or PowerCLI to update the Allowed IP list for a service. Bydefault, all IP addresses are allowed for a service.
Adding Allowed IP Addresses to the ESXi Firewall(http://link.brightcove.com/services/player/bcpid2296383276001?bctid=ref:video_adding_allowed_IP_to_esxi_firewall)
Procedure
1 Browse to the host in the vSphere Web Client inventory.
2 Click the Manage tab and click Settings.
3 Under System, click Security Profile.
Chapter 5 Securing ESXi Hosts
VMware, Inc. 151

4 In the Firewall section, click Edit and select a service from the list.
5 In the Allowed IP Addresses section, deselect Allow connections from any IP address and enter the IPaddresses of networks that are allowed to connect to the host.
Separate IP addresses with commas. You can use the following address formats:
n 192.168.0.0/24
n 192.168.1.2, 2001::1/64
n fd3e:29a6:0a81:e478::/64
6 Click OK.
Incoming and Outgoing Firewall Ports for ESXi HostsThe vSphere Web Client allows you to open and close firewall ports for each service or to allow traffic fromselected IP addresses.
The following table lists the firewalls for services that are usually installed. If you install other VIBs on yourhost, additional services and firewall ports might become available.
Table 5‑5. Incoming Firewall Connections
Service Port Comment
CIM Server 5988 (TCP) Server for CIM (Common Information Model).
CIM Secure Server 5989 (TCP) Secure server for CIM.
CIM SLP 427 (TCP, UDP) The CIM client uses the Service Location Protocol,version 2 (SLPv2) to find CIM servers.
DHCPv6 546 (TCP, UDP) DHCP client for IPv6.
DVSSync 8301, 8302 (UDP) DVSSync ports are used for synchronizing statesof distributed virtual ports between hosts thathave VMware FT record/replay enabled. Onlyhosts that run primary or backup virtual machinesmust have these ports open. On hosts that are notusing VMware FT these ports do not have to beopen.
NFC 902 (TCP) Network File Copy (NFC) provides a file-type-aware FTP service for vSphere components. ESXiuses NFC for operations such as copying andmoving data between datastores by default.
Virtual SAN Clustering Service 12345, 23451 (UDP) Virtual SAN Cluster Monitoring and MembershipDirectory Service. Uses UDP-based IP multicast toestablish cluster members and distribute VirtualSAN metadata to all cluster members. If disabled,Virtual SAN does not work.
DHCP Client 68 (UDP) DHCP client for IPv4.
DNS Client 53 (UDP) DNS client.
Fault Tolerance 8200, 8100, 8300 (TCP, UDP) Traffic between hosts for vSphere Fault Tolerance(FT).
NSX Distributed Logical RouterService
6999 (UDP) NSX Virtual Distributed Router service. Thefirewall port associated with this service is openedwhen NSX VIBs are installed and the VDR moduleis created. If no VDR instances are associated withthe host, the port does not have to be open.This service was called NSX Distributed LogicalRouter in earlier versions of the product.
vSphere Security
152 VMware, Inc.

Table 5‑5. Incoming Firewall Connections (Continued)
Service Port Comment
Virtual SAN Transport 2233 (TCP) Virtual SAN reliable datagram transport. UsesTCP and is used for Virtual SAN storage IO. Ifdisabled, Virtual SAN does not work.
SNMP Server 161 (UDP) Allows the host to connect to an SNMP server.
SSH Server 22 (TCP) Required for SSH access.
vMotion 8000 (TCP) Required for virtual machine migration withvMotion.
vSphere Web Client 902, 443 (TCP) Client connections
vsanvp 8080 (TCP) VSAN VASA Vendor Provider. Used by theStorage Management Service (SMS) that is part ofvCenter to access information about Virtual SANstorage profiles, capabilities, and compliance. Ifdisabled, Virtual SAN Storage Profile BasedManagement (SPBM) does not work.
vSphere Web Access 80 (TCP) Welcome page, with download links for differentinterfaces.
Table 5‑6. Outgoing Firewall Connections
Service Port Comment
CIM SLP 427 (TCP, UDP) The CIM client uses the Service Location Protocol,version 2 (SLPv2) to find CIM servers.
DHCPv6 547 (TCP, UDP) DHCP client for IPv6.
DVSSync 8301, 8302 (UDP) DVSSync ports are used for synchronizing statesof distributed virtual ports between hosts thathave VMware FT record/replay enabled. Onlyhosts that run primary or backup virtual machinesmust have these ports open. On hosts that are notusing VMware FT these ports do not have to beopen.
HBR 44046, 31031 (TCP) Used for ongoing replication traffic by vSphereReplication and VMware Site Recovery Manager.
NFC 902 (TCP) Network File Copy (NFC) provides a file-type-aware FTP service for vSphere components. ESXiuses NFC for operations such as copying andmoving data between datastores by default.
WOL 9 (UDP) Used by Wake on LAN.
Virtual SAN Clustering Service 12345 23451 (UDP) Cluster Monitoring, Membership, and DirectoryService used by Virtual SAN.
DHCP Client 68 (UDP) DHCP client.
DNS Client 53 (TCP, UDP) DNS client.
Fault Tolerance 80, 8200, 8100, 8300 (TCP, UDP) Supports VMware Fault Tolerance.
Software iSCSI Client 3260 (TCP) Supports software iSCSI.
NSX Distributed Logical RouterService
6999 (UDP) The firewall port associated with this service isopened when NSX VIBs are installed and the VDRmodule is created. If no VDR instances areassociated with the host, the port does not have tobe open.
Chapter 5 Securing ESXi Hosts
VMware, Inc. 153

Table 5‑6. Outgoing Firewall Connections (Continued)
Service Port Comment
rabbitmqproxy 5671 (TCP) A proxy running on the ESXi host that allowsapplications running inside virtual machines tocommunicate to the AMQP brokers running in thevCenter network domain. The virtual machinedoes not have to be on the network, that is, no NICis required. The proxy connects to the brokers inthe vCenter network domain. Therefore, theoutgoing connection IP addresses should at leastinclude the current brokers in use or futurebrokers. Brokers can be added if customer wouldlike to scale up.
Virtual SAN Transport 2233 (TCP) Used for RDT traffic (Unicast peer to peercommunication) between Virtual SAN nodes.
vMotion 8000 (TCP) Required for virtual machine migration withvMotion.
VMware vCenter Agent 902 (UDP) vCenter Server agent.
vsanvp 8080 (TCP) Used for Virtual SAN Vendor Provider traffic.
NFS Client Firewall BehaviorThe NFS Client firewall rule set behaves differently than other ESXi firewall rule sets. ESXi configures NFSClient settings when you mount or unmount an NFS datastore. The behavior differs for different versions ofNFS.
When you add, mount, or unmount an NFS datastore, the resulting behavior depends on the version ofNFS.
NFS v3 Firewall Behavior
When you add or mount an NFS v3 datastore, ESXi checks the state of the NFS Client (nfsClient) firewallrule set.
n If the nfsClient rule set is disabled, ESXi enables the rule set and disables the Allow All IP Addressespolicy by setting the allowedAll flag to FALSE. The IP address of the NFS server is added to the allowedlist of outgoing IP addresses.
n If the nfsClient rule set is enabled, the state of the rule set and the allowed IP address policy are notchanged. The IP address of the NFS server is added to the allowed list of outgoing IP addresses.
NOTE If you manually enable the nfsClient rule set or manually set the Allow All IP Addresses policy,either before or after you add an NFS v3 datastore to the system, your settings are overridden when the lastNFS v3 datastore is unmounted. The nfsClient rule set is disabled when all NFS v3 datastores areunmounted.
When you remove or unmount an NFS v3 datastore, ESXi performs one of the following actions.
n If none of the remaining NFS v3 datastores are mounted from the server of the datastore beingunmounted, ESXi removes the server's IP address from the list of outgoing IP addresses.
n If no mounted NFS v3 datastores remain after the unmount operation, ESXi disables the nfsClientfirewall rule set.
vSphere Security
154 VMware, Inc.

NFS v4.1 Firewall Behavior
When you mount the first NFS v4.1 datastore, ESXi enables the nfs41client rule set and sets its allowedAllflag to TRUE. This action opens port 2049 for all IP addresses. Unmounting an NFS v4.1 datastore does notaffect the firewall state. That is, the first NFS v4.1 mount opens port 2049 and that port remains enabledunless you close it explicitly.
ESXi ESXCLI Firewall CommandsIf your environment includes multiple ESXi hosts, automating firewall configuration by using ESXCLIcommands or the vSphere Web Services SDK is recommended.
You can use the ESXi Shell or vSphere CLI commands to configure ESXi at the command line to automatefirewall configuration. See Getting Started with vSphere Command-Line Interfaces for an introduction, andvSphere Command-Line Interface Concepts and Examples for examples of using ESXCLI to manipulate firewallsand firewall rules.
Table 5‑7. Firewall Commands
Command Description
esxcli network firewall get Return the enabled or disabled status of the firewall andlists default actions.
esxcli network firewall set --default-action Set to true to set the default action to pass, set to fals to setthe default action to drop.
esxcli network firewall set --enabled Enable or disable the ESXi firewall.
esxcli network firewall load Load the firewall module and rule set configuration files.
esxcli network firewall refresh Refresh the firewall configuration by reading the rule setfiles if the firewall module is loaded.
esxcli network firewall unload Destroy filters and unload the firewall module.
esxcli network firewall ruleset list List rule sets information.
esxcli network firewall ruleset set --allowed-all
Set to true to allow all access to all IPs, set to false to use alist of allowed IP addresses.
esxcli network firewall ruleset set --enabled--ruleset-id=<string>
Set enabled to true or false to enable or disable thespecified ruleset.
esxcli network firewall ruleset allowedip list List the allowed IP addresses of the specified rule set.
esxcli network firewall ruleset allowedip add Allow access to the rule set from the specified IP address orrange of IP addresses.
esxcli network firewall ruleset allowedipremove
Remove access to the rule set from the specified IP addressor range of IP addresses.
esxcli network firewall ruleset rule list List the rules of each ruleset in the firewall.
Customizing ESXi Services from the Security ProfileAn ESXi host includes several services that are running by default. Other services, for example SSH, areincluded in the host's security profile. You can enable and disable those services as needed if companypolicy allows it.
“Use the vSphere Web Client to Enable Access to the ESXi Shell,” on page 178 is an example of how toenable a service.
NOTE Enabling services affects the security of your host. Do not enable a service unless strictly necessary.
Chapter 5 Securing ESXi Hosts
VMware, Inc. 155

Available services depend on the VIBs that are installed on the ESXi host. You cannot add services withoutinstalling a VIB. Some VMware products, for example, vSphere HA, install VIBs on hosts and make servicesand the corresponding firewall ports available.
In a default installation, you can modify the status of the following services from the vSphere Web Client.
Table 5‑8. ESXi Services in the Security Profile
Service Default Description
Direct Console UI Running The Direct Console User Interface (DCUI) serviceallows you to interact with an ESXi host from the localconsole host using text-based menus.
ESXi Shell Stopped The ESXi Shell is available from the Direct ConsoleUser Interface and includes a set of fully supportedcommands and a set of commands for troubleshootingand remediation. You must enable access to theESXi Shell from the direct console of each system. Youcan enable access to the local ESXi Shell or access to theESXi Shell with SSH.
SSH Stopped The host's SSH client service that allows remoteconnections through Secure Shell.
Load-Based Teaming Daemon Running Load-Based Teaming.
Local Security AuthenticationServer (Active Directory Service)
Stopped Part of Active Directory Service. When you configureESXi for Active Directory, this service is started.
I/O Redirector (Active DirectoryService)
Stopped Part of Active Directory Service. When you configureESXi for Active Directory, this service is started.
Network Login Server (ActiveDirectory Service)
Stopped Part of Active Directory Service. When you configureESXi for Active Directory, this service is started.
NTP Daemon Stopped Network Time Protocol daemon.
CIM Server Running Service that can be used by Common InformationModel (CIM) applications.
SNMP Server Stopped SNMP daemon. See vSphere Monitoring and Performancefor information on configuring SNMP v1, v2, and v3.
Syslog Server Stopped Syslog daemon. You can enable syslog from theAdvanced System Settings in the vSphere Web Client.See vSphere Installation and Setup.
vSphere High Availability Agent Stopped Supports vSphere High Availability functionality.
vProbe Daemon Stopped vProbe daemon.
VMware vCenter Agent Running vCenter Server agent. Allows a vCenter Server toconnect to an ESXi host. Specifically, vpxa is thecommunication conduit to the host daemon, which inturn communicates with the ESXi kernel.
X.Org Server Stopped X.Org Server. This optional feature is used internallyfor 3D graphics for virtual machines.
Enable or Disable a Service in the Security ProfileYou can enable or disable one of the services listed in the Security Profile from the vSphere Web Client.
After installation, certain services are running by default, while others are stopped. In some cases,additional setup is necessary before a service becomes available in the vSphere Web Client UI. For example,the NTP service is a way of getting accurate time information, but this service only works when requiredports are opened in the firewall.
vSphere Security
156 VMware, Inc.

Prerequisites
Connect to vCenter Server with the vSphere Web Client.
Procedure
1 Browse to a host in the vSphere Web Client inventory, and select a host.
2 Click the Manage tab and click Settings.
3 Under System, select Security Profile and click Edit.
4 Scroll to the service that you wish to change.
5 In the Service Details pane, select Start, Stop, or Restart for a one-time change to the host's status, orselect from the Startup Policy menu to change the status of the host across reboots.
n Start automatically if any ports are open, and stop when all ports are closed: The default settingfor these services. If any port is open, the client attempts to contact the network resources for theservice. If some ports are open, but the port for a particular service is closed, the attempt fails. Ifand when the applicable outgoing port is opened, the service begins completing its startup.
n Start and stop with host: The service starts shortly after the host starts, and closes shortly beforethe host shuts down. Much like Start automatically if any ports are open, and stop when all portsare closed, this option means that the service regularly attempts to complete its tasks, such ascontacting the specified NTP server. If the port was closed but is subsequently opened, the clientbegins completing its tasks shortly thereafter.
n Start and stop manually: The host preserves the user-determined service settings, regardless ofwhether ports are open or not. When a user starts the NTP service, that service is kept running aslong as the host is powered on. If the service is started and the host is powered off, the service isstopped as part of the shutdown process, but as soon as the host is powered on, the service isstarted again, preserving the user-determined state.
NOTE These settings apply only to service settings that are configured through the vSphere Web Clientor to applications that are created with the vSphere Web Services SDK. Configurations made throughother means, such as from the ESXi Shell or with configuration files, are not affected by these settings.
Lockdown ModeTo increase the security of your ESXi hosts, you can put them in lockdown mode. In lockdown mode,operations must be performed through vCenter Server by default.
Starting with vSphere 6.0, you can select normal lockdown mode or strict lockdown mode, which offerdifferent degrees of lockdown. vSphere 6.0 also introduces the Exception User list. Exception users do notlose their privileges when the host enters lockdown mode. Use the Exception User list to add the accounts ofthird-party solutions and external applications that need to access the host directly when the host is inlockdown mode. See “Specify Lockdown Mode Exception Users,” on page 163.
Lockdown Mode in vSphere 6 (http://link.brightcove.com/services/player/bcpid2296383276001?bctid=ref:video_lockdown_mode_vsphere)
Chapter 5 Securing ESXi Hosts
VMware, Inc. 157

Normal Lockdown Mode and Strict Lockdown ModeStarting with vSphere 6.0, you can select normal lockdown mode or strict lockdown mode, which offerdifferent degrees of lockdown.
Normal Lockdown Mode In normal lockdown mode the DCUI service is not stopped. If the connectionto the vCenter Server system is lost and access through thevSphere Web Client is no longer available, privileged accounts can log in tothe ESXi host's Direct Console Interface and exit lockdown mode. Only thefollowing accounts can access the Direct Console User Interface:
n Accounts in the Exception User list for lockdown mode who haveadministrative privileges on the host. The Exception Users list is meantfor service accounts that perform very specific tasks. Adding ESXiadministrators to this list defeats the purpose of lockdown mode.
n Users defined in the DCUI.Access advanced option for the host. Thisoption is for emergency access to the Direct Console Interface in case theconnection to vCenter Server is lost. These users do not requireadministrative privileges on the host.
Strict Lockdown Mode In strict lockdown mode, which is new in vSphere 6.0, the DCUI service isstopped. If the connection to vCenter Server is lost and thevSphere Web Client is no longer available, the ESXi host becomesunavailable unless the ESXi Shell and SSH services are enabled andException Users are defined. If you cannot restore the connection to thevCenter Server system, you have to reinstall the host.
Lockdown Mode and the ESXi Shell and SSH ServicesStrict lockdown mode stops the DCUI service. However, the ESXi Shell and SSH services are independent oflockdown mode. For lockdown mode to be an effective security measure, ensure that the ESXi Shell andSSH services are also disabled. Those services are disabled by default.
When a host is in lockdown mode, users on the Exception Users list can access the host from the ESXi Shelland through SSH if they have the Administrator role on the host. This access is possible even in strictlockdown mode. Leaving the ESXi Shell service and the SSH service disabled is the most secure option.
NOTE The Exception Users list is meant for service accounts that perform specific tasks such as hostbackups, and not for administrators. Adding administrator users to the Exception Users list defeats thepurpose of lockdown mode.
Enabling and Disabling Lockdown ModePrivileged users can enable lockdown mode in several ways:
n When using the Add Host wizard to add a host to a vCenter Server system.
n Using the vSphere Web Client. See “Enable Lockdown Mode Using the vSphere Web Client,”on page 160. You can enable both normal lockdown mode and strict lockdown mode from thevSphere Web Client.
n Using the Direct Console User Interface (DCUI). See “Enable or Disable Normal Lockdown Mode fromthe Direct Console User Interface,” on page 161.
vSphere Security
158 VMware, Inc.

Privileged users can disable lockdown mode from the vSphere Web Client. They can disable normallockdown mode from the Direct Console Interface, but they cannot disable strict lockdown mode from theDirect Console Interface.
NOTE If you enable or disable lockdown mode using the Direct Console User Interface, permissions forusers and groups on the host are discarded. To preserve these permissions, you can enable and disablelockdown mode using the vSphere Web Client.
Lockdown Mode BehaviorIn lockdown mode, some services are disabled, and some services are accessible only to certain users.
Lockdown Mode Services for Different Users
When the host is running, available services depend on whether lockdown mode is enabled, and on the typeof lockdown mode.
n In strict and normal lockdown mode, privileged users can access the host through vCenter Server,either from the vSphere Web Client or by using the vSphere Web Services SDK.
n Direct Console Interface behavior differs for strict lockdown mode and normal lockdown mode.
n In strict lockdown mode, the Direct Console User Interface (DCUI) service is disabled.
n In normal lockdown mode, accounts on the Exception User list who have administrator privilegesand users who are specified in the DCUI.Access advanced system setting can access the DirectConsole Interface.
n If the ESXi Shell or SSH are enabled and the host is placed in strict or normal lockdown mode, accountson the Exception Users list who have administrator privileges can use these services. For all other users,ESXi Shell or SSH access is disabled. Starting with vSphere 6.0, ESXi or SSH sessions for users who donot have administrator privileges are terminated.
All access is logged for both strict and normal lockdown mode.
Table 5‑9. Lockdown Mode Behavior
Service Normal ModeNormal LockdownMode Strict Lockdown Mode
vSphere Web Services API All users, based onpermissions
vCenter (vpxuser)Exception users, basedon permissionsvCloud Director(vslauser, if available)
vCenter (vpxuser)Exception users, based onpermissionsvCloud Director (vslauser, ifavailable)
CIM Providers Users with administratorprivileges on the host
vCenter (vpxuser)Exception users, basedon permissions.vCloud Director(vslauser, if available)
vCenter (vpxuser)Exception, based on permissions.vCloud Director (vslauser, ifavailable)
Direct Console UI (DCUI) Users with administratorprivileges on the host ,and users in theDCUI.Access advancedoption
Users defined in theDCUI.Access advancedoptionException users withadministrator privilegeson the host
DCUI service is stopped
Chapter 5 Securing ESXi Hosts
VMware, Inc. 159

Table 5‑9. Lockdown Mode Behavior (Continued)
Service Normal ModeNormal LockdownMode Strict Lockdown Mode
ESXi Shell(if enabled)
Users with administratorprivileges on the host
Users defined in theDCUI.Access advancedoptionException users withadministrator privilegeson the host
Users defined in the DCUI.Accessadvanced optionException users with administratorprivileges on the host
SSH(if enabled)
Users with administratorprivileges on the host
Users defined in theDCUI.Access advancedoptionException users withadministrator privilegeson the host
Users defined in the DCUI.Accessadvanced optionException users with administratorprivileges on the host
Users Logged in to the ESXi Shell When Lockdown Mode Is Enabled
If users are logged in to the ESXi Shell or access the host through SSH before lockdown mode is enabled,those users who are on the list of Exception Users and who have administrator privileges on the host remainlogged in. Starting with vSphere 6.0, the session is terminated for all other users. This applies to both normaland strict lockdown mode.
Enable Lockdown Mode Using the vSphere Web ClientEnable lockdown mode to require that all configuration changes go through vCenter Server. vSphere 6.0and later supports normal lockdown mode and strict lockdown mode.
To completely disallow all direct access to a host, you can select strict lockdown mode. Strict lockdownmode makes it impossible to access a host if the vCenter Server is unavailable and SSH and the ESXi Shellare disabled. See “Lockdown Mode Behavior,” on page 159.
Procedure
1 Browse to the host in the vSphere Web Client inventory.
2 Click the Manage tab and click Settings.
3 Under System, select Security Profile.
4 In the Lockdown Mode panel, click Edit.
5 Click Lockdown Mode and select one of the lockdown mode options.
Option Description
Normal The host can be accessed through vCenter Server. Only users who are onthe Exception Users list and have administrator privileges can log in to theDirect Console User Interface. If SSH or the ESXi Shell are enabled, accessmight be possible.
Strict The host can only be accessed through vCenter Server. If SSH or the ESXiShell are enabled, running sessions for accounts in the DCUI.Accessadvanced option and for Exception User accounts that have administratorprivileges remain enabled. All other sessions are terminated.
6 Click OK.
vSphere Security
160 VMware, Inc.

Disable Lockdown Mode Using the vSphere Web ClientDisable lockdown mode to allow configuration changes from direct connections to the ESXi host. Leavinglockdown mode enabled results in a more secure environment.
In vSphere 6.0 you can disable lockdown mode as follows:
From thevSphere Web Client
Users can disable both normal lockdown mode and strict lockdown modefrom the vSphere Web Client.
From the Direct ConsoleUser Interface
Users who can access the Direct Console User Interface on the ESXi host candisable normal lockdown mode. In strict lockdown mode, the Direct ConsoleInterface service is stopped.
Procedure
1 Browse to the host in the vSphere Web Client inventory.
2 Click the Manage tab and click Settings.
3 Under System, select Security Profile.
4 In the Lockdown Mode panel, click Edit.
5 Click Lockdown Mode and select None to disable lockdown mode.
The system exits lockdown mode, vCenter Server displays an alarm, and an entry is added to the audit log.
Enable or Disable Normal Lockdown Mode from the Direct Console User InterfaceYou can enable and disable normal lockdown mode from the Direct Console User Interface (DCUI). You canenable and disable strict lockdown mode only from the vSphere Web Client.
When the host is in normal lockdown mode, the following accounts can access the Direct Console UserInterface:
n Accounts in the Exception Users list who have administrator privileges on the host. The ExceptionUsers list is meant for service accounts such as a backup agent.
n Users defined in the DCUI.Access advanced option for the host. This option can be used to enableaccess in case of catastrophic failure.
For ESXi 6.0 and later, user permissions are preserved when you enable lockdown mode, and are restoredwhen you disable lockdown mode from the Direct Console Interface.
NOTE If you upgrade a host that is in lockdown mode to ESXi version 6.0 without exiting lockdown mode,and if you exit lockdown mode after the upgrade, all the permissions defined before the host enteredlockdown mode are lost. The system assigns the administrator role to all users who are found in theDCUI.Access advanced option to guarantee that the host remains accessible.
To retain permissions, disable lockdown mode for the host from the vSphere Web Client before the upgrade.
Procedure
1 At the Direct Console User Interface of the host, press F2 and log in.
2 Scroll to the Configure Lockdown Mode setting and press Enter to toggle the current setting.
3 Press Esc until you return to the main menu of the Direct Console User Interface.
Chapter 5 Securing ESXi Hosts
VMware, Inc. 161

Specifying Accounts with Access Privileges in Lockdown ModeYou can specify service accounts that can access the ESXi host directly by adding them to the ExceptionUsers list. You can specify a single user who can access the ESXi host in case of catastrophic vCenter Serverfailure.
What different accounts can do by default when lockdown mode is enabled, and how you can change thedefault behavior, depends on the version of the vSphere environment.
n In versions of vSphere earlier than vSphere 5.1, only the root user can log into the Direct Console UserInterface on an ESXi host that is in lockdown mode.
n In vSphere 5.1 and later, you can add a user to the DCUI.Access advanced system setting for each host.The option is meant for catastrophic failure of vCenter Server, and the password for the user with thisaccess is usually locked into a safe. A user in the DCUI.Access list does not need to have fulladministrative privileges on the host.
n In vSphere 6.0 and later, the DCUI.Access advanced system setting is still supported. In addition,vSphere 6.0 and later supports an Exception User list, which is for service accounts that have to log in tothe host directly. Accounts with administrator privileges that are on the Exception Users list can log into the ESXi Shell. In addition, those user can log in to a host's DCUI in normal lockdown mode and canexit lockdown mode.
You specify Exception Users from the vSphere Web Client.
Add Users to the DCUI.Access Advanced Option
The main purpose of the DCUI.Access advanced option is to allow you to exit lockdown mode in case ofcatastrophic failure, when you cannot access the host from vCenter Server. You add users to the list byediting the Advanced Settings for the host from the vSphere Web Client.
NOTE Users in the DCUI.Access list can change lockdown mode settings regardless of their privileges. Thiscan impact the security of your host. For service accounts that need direct access to the host, consider addingusers to the Exception Users list instead. Exception user can only perform tasks for which they haveprivileges. See “Specify Lockdown Mode Exception Users,” on page 163.
Procedure
1 Browse to the host in the vSphere Web Client object navigator.
2 Click the Manage tab and select Settings.
3 Click Advanced System Settings and select DCUI.Access.
4 Click Edit and enter the user names, separated by commas.
By default, the root user is included. Consider removing root from the DCUI.Access, list and specifyinga named account for better auditability.
5 Click OK.
vSphere Security
162 VMware, Inc.

Specify Lockdown Mode Exception Users
In vSphere 6.0 and later, you can add users to the Exception Users list from the vSphere Web Client. Theseusers do not lose their permissions when the host enters lockdown mode. It makes sense to add serviceaccounts such as a backup agent to the Exception Users list.
Exception users do not lose their privileges when the host enters lockdown mode. Usually these accountsrepresent third-party solutions and external applications that need to continue to function in lockdownmode.
NOTE The Exception Users list is meant for service accounts that perform very specific tasks, and not foradministrators. Adding administrator users to the Exception Users list defeats the purpose of lockdownmode.
Exception users are host local users or Active Directory users with privileges defined locally for the ESXihost. They are not vCenter Server users. These users are allowed to perform operations on the host based ontheir privileges. That means, for example, that a read-only user cannot disable lockdown mode on a host.
Procedure
1 Browse to the host in the vSphere Web Client inventory.
2 Click the Manage tab and click Settings.
3 Under System, select Security Profile.
4 In the Lockdown Mode panel, click Edit.
5 Click Exception Users and click the plus icon to add exception users.
Check the Acceptance Levels of Hosts and VIBsTo protect the integrity of the ESXi host, do not allow users to install unsigned (community-supported)VIBs. An unsigned VIB contains code that is not certified by, accepted by, or supported by VMware or itspartners. Community-supported VIBs do not have a digital signature.
You can use ESXCLI commands to set an acceptance level for a host. The host's acceptance level must be thesame or less restrictive than the acceptance level of any VIB you want to add to the host. To protect thesecurity and integrity of your ESXi hosts, do not allow unsigned (CommunitySupported) VIBs to beinstalled on hosts in production systems.
The following acceptance levels are supported.
VMwareCertified The VMwareCertified acceptance level has the most stringent requirements.VIBs with this level go through thorough testing fully equivalent to VMwarein-house Quality Assurance testing for the same technology. Today, onlyIOVP drivers are published at this level. VMware takes support calls for VIBswith this acceptance level.
VMwareAccepted VIBs with this acceptance level go through verification testing, but the testsdo not fully test every function of the software. The partner runs the testsand VMware verifies the result. Today, CIM providers and PSA plug-ins areamong the VIBs published at this level. VMware directs support calls forVIBs with this acceptance level to the partner's support organization.
Chapter 5 Securing ESXi Hosts
VMware, Inc. 163

PartnerSupported VIBs with the PartnerSupported acceptance level are published by a partnerthat VMware trusts. The partner performs all testing. VMware does notverify the results. This level is used for a new or nonmainstream technologythat partners want to enable for VMware systems. Today, driver VIBtechnologies such as Infiniband, ATAoE, and SSD are at this level withnonstandard hardware drivers. VMware directs support calls for VIBs withthis acceptance level to the partner's support organization.
CommunitySupported The CommunitySupported acceptance level is for VIBs created byindividuals or companies outside of VMware partner programs. VIBs at thislevel have not gone through any VMware-approved testing program and arenot supported by VMware Technical Support or by a VMware partner.
Procedure
1 Connect to each ESXi host and verify that the acceptance level is set to VMwareCertified orVMwareAccepted by running the following command.
esxcli software acceptance get
2 If the host acceptance level is not VMwareCertified or VMwareAccepted, determine whether any of theVIBs are not at the VMwareCertified or VMwareAccepted level by running the following commands.
esxcli software vib list
esxcli software vib get -n vibname
3 Remove any VIBs that are at the PartnerSupported or CommunitySupported level by running thefollowing command.
esxcli software vib remove --vibname vib
4 Change the acceptance level of the host by running the following command.
esxcli software acceptance set --level acceptance_level
Assigning Permissions for ESXiIn most cases, you give privileges to users by assigning permissions to ESXi host objects that are managedby a vCenter Server system. If you are using a standalone ESXi host, you can assign privileges directly.
Assiging Permissions to ESXi Hosts that Are Managed by vCenter ServerIf your ESXi host is managed by a vCenter Server, perform management tasks through thevSphere Web Client.
You can select the ESXi host object in the vCenter Server object hierarchy and assing the administrator roleto a limited number of users who might perform direct management on the ESXi host. See “Using Roles toAssign Privileges,” on page 123.
Best practice is to create at least one named user account, assign it full administrative privileges on the host,and use this account instead of the root account. Set a highly complex password for the root account andlimit the use of the root account. (Do not remove the root account.)
Assigning Permissions to Standalone ESXi HostsIf your environment does not include a vCenter Server system, the following users are predefined.
n root user. See “root User Privileges,” on page 165.
n vpxuser. See “vpxuser Privileges,” on page 165.
n dcui user. See “dcui User Privileges,” on page 166.
vSphere Security
164 VMware, Inc.

You can add local users and define custom roles from the Management tab of the vSphere Client. See thevSphere Single Host Management documentation.
The following roles are predefined:
Read Only Allows a user to view objects associated with the ESXi host but not to makeany changes to objects.
Administrator Administrator role.
No Access No access. This is the default. You can override the default as appropriate.
You can manage local users and groups and add local custom roles to an ESXi host using a vSphere Clientconnected directly to the ESXi host. See the vSphere Single Host Management documentation.
Starting with vSphere 6.0, you can use ESXCLI account management commands for managing ESXi localuser accounts. You can use ESXCLI permission management commands for setting or removing permissionson both Active Directory accounts (users and groups) and on ESXi local accounts (users only).
NOTE If you define a user for the ESXi host by connecting to the host directly, and a user with the samename also exists in vCenter Server, those users are different. If you assign a role to one of the users, the otheruser is not assigned the same role.
root User PrivilegesBy default each ESXi host has a single root user account with the Administrator role. That root user accountcan be used for local administration and to connect the host to vCenter Server.
This common root account can make it easier to break into an ESXi host and make it harder to match actionsto a specific administrator.
Set a highly complex password for the root account and limit the use of the root account, for example, foruse when adding a host to vCenter Server. Do not remove the root account. In vSphere 5.1 and later, onlythe root user and no other named user with the Administrator role is permitted to add a host tovCenter Server.
Best practice is to ensure that any account with the Administrator role on an ESXi host is assigned to aspecific user with a named account. Use ESXi Active Directory capabilities, which allow you to manageActive Directory credentials if possible.
IMPORTANT If you remove the access privileges for the root user, you must first create another permission atthe root level that has a different user assigned to the Administrator role.
vpxuser PrivilegesvCenter Server uses vpxuser privileges when managing activities for the host.
vCenter Server has Administrator privileges on the host that it manages. For example, vCenter Server canmove virtual machines to and from hosts and perform configuration changes needed to support virtualmachines.
Chapter 5 Securing ESXi Hosts
VMware, Inc. 165

The vCenter Server administrator can perform most of the same tasks on the host as the root user and alsoschedule tasks, work with templates, and so forth. However, the vCenter Server administrator cannotdirectly create, delete, or edit local users and groups for hosts. These tasks can only be performed by a userwith Administrator permissions directly on each host.
NOTE You cannot manage the vpxuser using Active Directory.
CAUTION Do not change vpxuser in any way. Do not change its password. Do not change its permissions. Ifyou do so, you might experience problems when working with hosts through vCenter Server.
dcui User PrivilegesThe dcui user runs on hosts and acts with Administrator rights. This user’s primary purpose is to configurehosts for lockdown mode from the Direct Console User Interface (DCUI).
This user acts as an agent for the direct console and cannot be modified or used by interactive users.
Using Active Directory to Manage ESXi UsersYou can configure ESXi to use a directory service such as Active Directory to manage users.
Creating local user accounts on each host presents challenges with having to synchronize account namesand passwords across multiple hosts. Join ESXi hosts to an Active Directory domain to eliminate the need tocreate and maintain local user accounts. Using Active Directory for user authentication simplifies the ESXihost configuration and reduces the risk for configuration issues that could lead to unauthorized access.
When you use Active Directory, users supply their Active Directory credentials and the domain name of theActive Directory server when adding a host to a domain.
Install or Upgrade vSphere Authentication ProxyInstall vSphere Authentication Proxy to enable ESXi hosts to join a domain without using Active Directorycredentials. vSphere Authentication Proxy enhances security for PXE-booted hosts and hosts that areprovisioned using Auto Deploy by removing the need to store Active Directory credentials in the hostconfiguration.
If an earlier version of the vSphere Authentication Proxy is installed on your system, this procedureupgrades the vSphere Authentication Proxy to the current version.
You can install vSphere Authentication Proxy on the same machine as the associated vCenter Server, or on adifferent machine that has network connection to the vCenter Server. vSphere Authentication Proxy issupported with vCenter Server versions 5.0 and later.
The vSphere Authentication Proxy service binds to an IPv4 address for communication with vCenter Server,and does not support IPv6. The vCenter Server instance can be on a host machine in an IPv4-only, IPv4/IPv6mixed-mode, or IPv6-only network environment, but the machine that connects to the vCenter Serverthrough the vSphere Web Client must have an IPv4 address for the vSphere Authentication Proxy service towork.
Prerequisites
n Install Microsoft .NET Framework 3.5 on the machine where you want to install vSphereAuthentication Proxy.
n Verify that you have administrator privileges.
n Verify that the host machine has a supported processor and operating system.
vSphere Security
166 VMware, Inc.

n Verify that the host machine has a valid IPv4 address. You can install vSphere Authentication Proxy ona machine in an IPv4-only or IPv4/IPv6 mixed-mode network environment, but you cannot installvSphere Authentication Proxy on a machine in an IPv6-only environment.
n If you are installing vSphere Authentication Proxy on a Windows Server 2008 R2 host machine,download and install the Windows hotfix described in Windows KB Article 981506 on thesupport.microsoft.com Web site. If this hotfix is not installed, the vSphere Authentication ProxyAdapter fails to initialize. This problem is accompanied by error messages in camadapter.log similar toFailed to bind CAM website with CTL and Failed to initialize CAMAdapter.
n Download the vCenter Server installer.
Gather the following information to complete the installation or upgrade:
n The location to install vSphere Authentication Proxy, if you are not using the default location.
n The address and credentials for the vCenter Server that vSphere Authentication Proxy will connect to:IP address or name, HTTP port, user name, and password.
n The host name or IP address to identify vSphere Authentication Proxy on the network.
Procedure
1 Add the host machine where you will install the authentication proxy service to the domain.
2 Use the Domain Administrator account to log in to the host machine.
3 In the software installer directory, double-click the autorun.exe file to start the installer.
4 Select VMware vSphere Authentication Proxy and click Install.
5 Follow the wizard prompts to complete the installation or upgrade.
During installation, the authentication service registers with the vCenter Server instance where AutoDeploy is registered.
When you install the vSphere Authentication Proxy service, the installer creates a domain account withappropriate privileges to run the authentication proxy service. The account name begins with the prefix CAM-and has a 32-character, randomly generated password associated with it. The password is set to neverexpire. Do not change the account settings.
Configure a Host to Use Active DirectoryYou can configure a host to use a directory service such as Active Directory to manage users and groups.
When you add an ESXi host to Active Directory the DOMAIN group ESXi Admins is assigned fulladministrative access to the host if it exists. If you do not want to make full administrative access available,see VMware Knowledge Base article 1025569 for a workaround.
If a host is provisioned with Auto Deploy, Active Directory credentials cannot be stored on the hosts. Youcan use the vSphere Authentication Proxy to join the host to an Active Directory domain. Because a trustchain exists between the vSphere Authentication Proxy and the host, the Authentication Proxy can join thehost to the Active Directory domain. See “Using vSphere Authentication Proxy,” on page 169.
NOTE When you define user account settings in Active Directory, you can limit the computers that a usercan log in to by the computer name. By default, no equivalent restrictions are set on a user account. If youset this limitation, LDAP Bind requests for the user account fail with the message LDAP binding notsuccessful, even if the request is from a listed computer. You can avoid this issue by adding the netBIOSname for the Active Directory server to the list of computers that the user account can log in to.
Prerequisites
n Verify that you have an Active Directory domain. See your directory server documentation.
Chapter 5 Securing ESXi Hosts
VMware, Inc. 167

n Verify that the host name of ESXi is fully qualified with the domain name of the Active Directory forest.
fully qualified domain name = host_name.domain_name
Procedure
1 Synchronize the time between ESXi and the directory service system using NTP.
See “Synchronize ESXi Clocks with a Network Time Server,” on page 225 or the VMware KnowledgeBase for information about how to synchronize ESXi time with a Microsoft Domain Controller.
2 Ensure that the DNS servers that you configured for the host can resolve the host names for the ActiveDirectory controllers.
a Browse to the host in the vSphere Web Client object navigator.
b Click the Manage tab and click Networking.
c Click DNS, and verify that the host name and DNS server information for the host are correct.
What to do next
Use the vSphere Web Client to join a directory service domain. For hosts that are provisioned with AutoDeploy, set up the vSphere Authentication Proxy. See “Using vSphere Authentication Proxy,” on page 169.
Add a Host to a Directory Service DomainTo have your host use a directory service, you must join the host to the directory service domain.
You can enter the domain name in one of two ways:
n name.tld (for example, domain.com): The account is created under the default container.
n name.tld/container/path (for example, domain.com/OU1/OU2): The account is created under a particularorganizational unit (OU).
To use the vSphere Authentication Proxy service, see “Using vSphere Authentication Proxy,” on page 169.
Procedure
1 Browse to the host in the vSphere Web Client inventory.
2 Click the Manage tab and click Settings.
3 Under System, select Authentication Services.
4 Click Join Domain.
5 Enter a domain.
Use the form name.tld or name.tld/container/path.
6 Enter the user name and password of a directory service user who has permissions to join the host tothe domain, and click OK.
7 (Optional) If you intend to use an authentication proxy, enter the proxy server IP address.
8 Click OK to close the Directory Services Configuration dialog box.
View Directory Service SettingsYou can view the type of directory server, if any, that the host uses to authenticate users and the directoryserver settings.
Procedure
1 Browse to the host in the vSphere Web Client inventory.
vSphere Security
168 VMware, Inc.

2 Click the Manage tab and click Settings.
3 Under System, select Authentication Services.
The Authentication Services page displays the directory service and domain settings.
Using vSphere Authentication ProxyWhen you use the vSphere Authentication Proxy, you do not need to transmit Active Directory credentialsto the host. Users supply the domain name of the Active Directory server and the IP address of theauthentication proxy server when they add a host to a domain.
vSphere Authentication Proxy is especially helpful when used in conjunction with Auto Deploy. You set upa reference host that points to Authentication Proxy and set up a rule that applies the reference host's profileto any ESXi host provisioned with Auto Deploy. Even you use vSphere Authentication Proxy in anenvironment that uses certificates that are provisioned by VMCA or third-party certificates, the processworks seamlessly as long as you follow the instructions for using custom certificates with Auto Deploy. See “Use Custom Certificates with Auto Deploy,” on page 148.
NOTE You cannot use vSphere Authentication Proxy in an environment that supports only IPv6.
Install or Upgrade vSphere Authentication ProxyInstall vSphere Authentication Proxy to enable ESXi hosts to join a domain without using Active Directorycredentials. vSphere Authentication Proxy enhances security for PXE-booted hosts and hosts that areprovisioned using Auto Deploy by removing the need to store Active Directory credentials in the hostconfiguration.
If an earlier version of the vSphere Authentication Proxy is installed on your system, this procedureupgrades the vSphere Authentication Proxy to the current version.
You can install vSphere Authentication Proxy on the same machine as the associated vCenter Server, or on adifferent machine that has network connection to the vCenter Server. vSphere Authentication Proxy issupported with vCenter Server versions 5.0 and later.
The vSphere Authentication Proxy service binds to an IPv4 address for communication with vCenter Server,and does not support IPv6. The vCenter Server instance can be on a host machine in an IPv4-only, IPv4/IPv6mixed-mode, or IPv6-only network environment, but the machine that connects to the vCenter Serverthrough the vSphere Web Client must have an IPv4 address for the vSphere Authentication Proxy service towork.
Prerequisites
n Install Microsoft .NET Framework 3.5 on the machine where you want to install vSphereAuthentication Proxy.
n Verify that you have administrator privileges.
n Verify that the host machine has a supported processor and operating system.
n Verify that the host machine has a valid IPv4 address. You can install vSphere Authentication Proxy ona machine in an IPv4-only or IPv4/IPv6 mixed-mode network environment, but you cannot installvSphere Authentication Proxy on a machine in an IPv6-only environment.
n If you are installing vSphere Authentication Proxy on a Windows Server 2008 R2 host machine,download and install the Windows hotfix described in Windows KB Article 981506 on thesupport.microsoft.com Web site. If this hotfix is not installed, the vSphere Authentication ProxyAdapter fails to initialize. This problem is accompanied by error messages in camadapter.log similar toFailed to bind CAM website with CTL and Failed to initialize CAMAdapter.
n Download the vCenter Server installer.
Chapter 5 Securing ESXi Hosts
VMware, Inc. 169

Gather the following information to complete the installation or upgrade:
n The location to install vSphere Authentication Proxy, if you are not using the default location.
n The address and credentials for the vCenter Server that vSphere Authentication Proxy will connect to:IP address or name, HTTP port, user name, and password.
n The host name or IP address to identify vSphere Authentication Proxy on the network.
Procedure
1 Add the host machine where you will install the authentication proxy service to the domain.
2 Use the Domain Administrator account to log in to the host machine.
3 In the software installer directory, double-click the autorun.exe file to start the installer.
4 Select VMware vSphere Authentication Proxy and click Install.
5 Follow the wizard prompts to complete the installation or upgrade.
During installation, the authentication service registers with the vCenter Server instance where AutoDeploy is registered.
When you install the vSphere Authentication Proxy service, the installer creates a domain account withappropriate privileges to run the authentication proxy service. The account name begins with the prefix CAM-and has a 32-character, randomly generated password associated with it. The password is set to neverexpire. Do not change the account settings.
Configure a Host to Use the vSphere Authentication Proxy for AuthenticationAfter you install the vSphere Authentication Proxy service (CAM service), you must configure the host touse the authentication proxy server to authenticate users.
Prerequisites
Install the vSphere Authentication Proxy service (CAM service) on a host. See “Install or Upgrade vSphereAuthentication Proxy,” on page 166.
Procedure
1 Use the IIS manager on the host to set up the DHCP range.
Setting the range allows hosts that are using DHCP in the management network to use theauthentication proxy service.
Option Action
For IIS 6 a Browse to Computer Account Management Web Site.b Right-click the virtual directory CAM ISAPI.c Select Properties > Directory Security > Edit IP Address and Domain
Name Restrictions > Add Group of Computers.
For IIS 7 a Browse to Computer Account Management Web Site.b Click the CAM ISAPI virtual directory in the left pane and open IPv4
Address and Domain Restrictions.c Select Add Allow Entry > IPv4 Address Range.
vSphere Security
170 VMware, Inc.
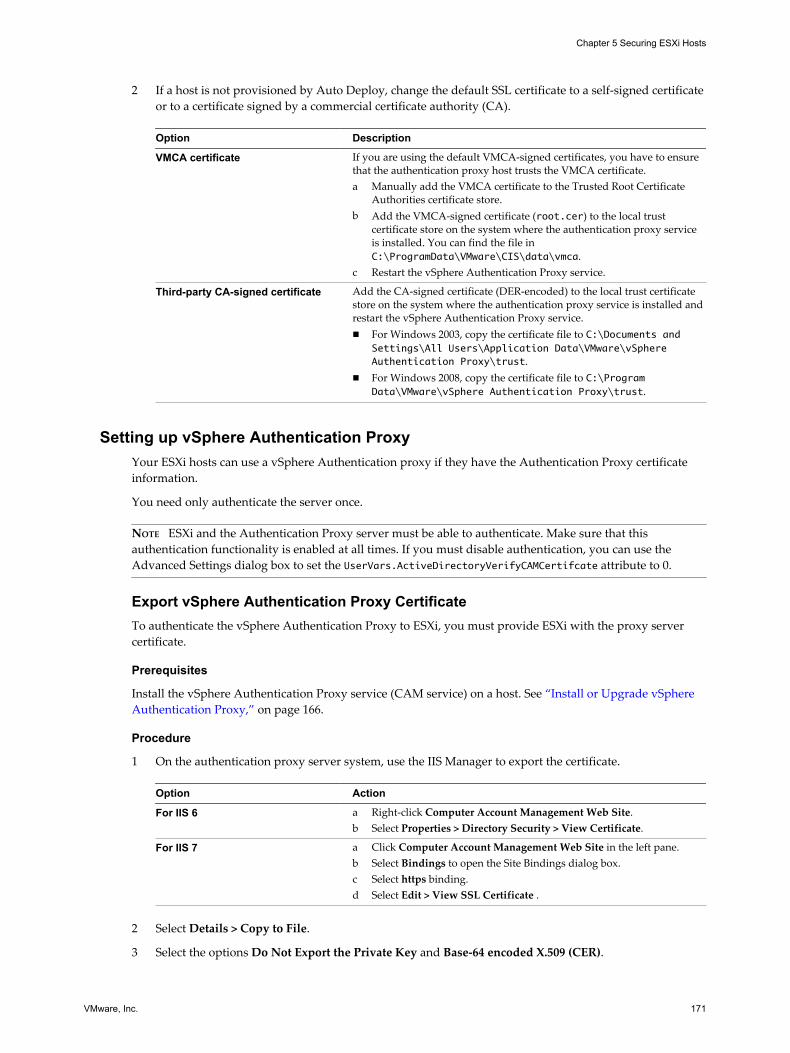
2 If a host is not provisioned by Auto Deploy, change the default SSL certificate to a self-signed certificateor to a certificate signed by a commercial certificate authority (CA).
Option Description
VMCA certificate If you are using the default VMCA-signed certificates, you have to ensurethat the authentication proxy host trusts the VMCA certificate.a Manually add the VMCA certificate to the Trusted Root Certificate
Authorities certificate store.b Add the VMCA-signed certificate (root.cer) to the local trust
certificate store on the system where the authentication proxy serviceis installed. You can find the file inC:\ProgramData\VMware\CIS\data\vmca.
c Restart the vSphere Authentication Proxy service.
Third-party CA-signed certificate Add the CA-signed certificate (DER-encoded) to the local trust certificatestore on the system where the authentication proxy service is installed andrestart the vSphere Authentication Proxy service.n For Windows 2003, copy the certificate file to C:\Documents and
Settings\All Users\Application Data\VMware\vSphereAuthentication Proxy\trust.
n For Windows 2008, copy the certificate file to C:\ProgramData\VMware\vSphere Authentication Proxy\trust.
Setting up vSphere Authentication ProxyYour ESXi hosts can use a vSphere Authentication proxy if they have the Authentication Proxy certificateinformation.
You need only authenticate the server once.
NOTE ESXi and the Authentication Proxy server must be able to authenticate. Make sure that thisauthentication functionality is enabled at all times. If you must disable authentication, you can use theAdvanced Settings dialog box to set the UserVars.ActiveDirectoryVerifyCAMCertifcate attribute to 0.
Export vSphere Authentication Proxy CertificateTo authenticate the vSphere Authentication Proxy to ESXi, you must provide ESXi with the proxy servercertificate.
Prerequisites
Install the vSphere Authentication Proxy service (CAM service) on a host. See “Install or Upgrade vSphereAuthentication Proxy,” on page 166.
Procedure
1 On the authentication proxy server system, use the IIS Manager to export the certificate.
Option Action
For IIS 6 a Right-click Computer Account Management Web Site.b Select Properties > Directory Security > View Certificate.
For IIS 7 a Click Computer Account Management Web Site in the left pane.b Select Bindings to open the Site Bindings dialog box.c Select https binding.d Select Edit > View SSL Certificate .
2 Select Details > Copy to File.
3 Select the options Do Not Export the Private Key and Base-64 encoded X.509 (CER).
Chapter 5 Securing ESXi Hosts
VMware, Inc. 171

What to do next
Import the certificate to ESXi.
Import a Proxy Server Certificate to ESXiTo authenticate the vSphere Authentication Proxy server to ESXi, upload the proxy server certificate toESXi.
You use the vSphere Web Client user interface to upload the vSphere Authentication Proxy server certificateto ESXi.
Prerequisites
Install the vSphere Authentication Proxy service (CAM service) on a host. See “Install or Upgrade vSphereAuthentication Proxy,” on page 166.
Export the vSphere Authentication Proxy server certificate as described in “Export vSphere AuthenticationProxy Certificate,” on page 171.
Procedure
1 Browse to the host, click the Manage tab, and click Authentication Services.
2 Click Import Certificate.
3 Enter the full path to the authentication proxy server certificate file on the host and the IP address of theauthentication proxy server.
Use the form [datastore name] file path to enter the path to the proxy server.
4 Click OK.
Use vSphere Authentication Proxy to Add a Host to a DomainWhen you join a host to a directory service domain, you can use the vSphere Authentication Proxy serverfor authentication instead of transmitting user-supplied Active Directory credentials.
You can enter the domain name in one of two ways:
n name.tld (for example, domain.com): The account is created under the default container.
n name.tld/container/path (for example, domain.com/OU1/OU2): The account is created under a particularorganizational unit (OU).
Prerequisites
n Connect to a vCenter Server system with the vSphere Web Client.
n If ESXi is configured with a DHCP address, set up the DHCP range.
n If ESXi is configured with a static IP address, verify that its associated profile is configured to use thevSphere Authentication Proxy service to join a domain so that the authentication proxy server can trustthe ESXi IP address.
n If ESXi is using a VMCA-signed certificate, verify that the host has been added to vCenter Server. Thisallows the authentication proxy server to trust ESXi.
n If ESXi is using a CA-signed certificate and is not provisioned by Auto Deploy, verify that the CAcertificate has been added to the local trust certificate store of the authentication proxy server asdescribed in “Configure a Host to Use the vSphere Authentication Proxy for Authentication,” onpage 170.
n Authenticate the vSphere Authentication Proxy server to the host.
vSphere Security
172 VMware, Inc.

Procedure
1 Browse to the host in the vSphere Web Client and click the Manage tab.
2 Click Settings and select Authentication Services.
3 Click Join Domain.
4 Enter a domain.
Use the form name.tld or name.tld/container/path.
5 Select Using Proxy Server.
6 Enter the IP address of the authentication proxy server.
7 Click OK.
Replace the Authentication Proxy Certificate for the ESXi Host
You can import a certificate from a trusted certificate authority from the vSphere Web Client
Prerequisites
n Upload the authentication proxy certificate file to the ESXi host.
Procedure
1 In the vSphere Web Client, select the ESXi host.
2 In the Settings tab, select Authentication Services in the System area.
3 Click Import Certificate.
4 Enter the SSL certificate path and the vSphere Authentication Proxy server.
Configuring Smart Card Authentication for ESXiYou can use smart card authentication to log in to the ESXi Direct Console User Interface (DCUI) by using aPersonal Identity Verification (PIV), Common Access Card (CAC) or SC650 smart card instead of the defaultprompt for a user name and password.
A smart card is a small plastic card with an embedded integrated circuit chip. Many government agenciesand large enterprises use smart card based two-factor authentication to increase the security of their systemsand comply with security regulations.
When smart card authentication is enabled on an ESXi host, the DCUI prompts you for a valid smart cardand PIN combination instead of the default prompt for a user name and password.
1 When you insert the smart card into the smart card reader, the ESXi host reads the credentials on it.
2 The ESXi DCUI displays your login ID, and prompts you for your PIN.
3 After you enter your PIN, the ESXi host matches it with the PIN stored on the smart card and verifiesthe certificate on the smart card with Active Directory.
4 After a successful verification of the smart card certificate, ESXi logs you in to the DCUI.
You can switch to user name and password authentication from the DCUI by pressing F3.
The chip on the smart card locks after a few consecutive incorrect PIN entries, usually three. If a smart cardis locked, only selected personnel can unlock it.
Chapter 5 Securing ESXi Hosts
VMware, Inc. 173

Enable Smart Card AuthenticationEnable smart card authentication to prompt for smart card and PIN combination to log in to the ESXi DCUI.
Prerequisites
n Set up the infrastructure to handle smart card authentication, such as accounts in the Active Directorydomain, smart card readers, and smart cards.
n Configure ESXi to join an Active Directory domain that supports smart card authentication. For moreinformation, see “Using Active Directory to Manage ESXi Users,” on page 166.
n Use the vSphere Web Client to add root certificates. See “Certificate Management for ESXi Hosts,” onpage 137.
Procedure
1 In the vSphere Web Client, browse to the host.
2 Click the Manage tab and click Settings.
3 Under System, select Authentication Services.
You see the current smart card authentication status and a list with imported certificates.
4 In the Smart Card Authentication panel, click Edit.
5 In the Edit Smart Card Authentication dialog box, select the Certificates page.
6 Add trusted Certificate Authority (CA) certificates, for example, root and intermediary CA certificates.
7 Open the Smart Card Authentication page, select the Enable Smart Card Authentication check box,and click OK.
Disable Smart Card AuthenticationDisable smart card authentication to return to the default user name and password authentication for ESXiDCUI login.
Procedure
1 In the vSphere Web Client, browse to the host.
2 Click the Manage tab and click Settings.
3 Under System, select Authentication Services.
You see the current smart card authentication status and a list with imported certificates.
4 In the Smart Card Authentication panel, click Edit.
5 On the Smart Card Authentication page, deselect the Enable Smart Card Authentication check box,and click OK.
vSphere Security
174 VMware, Inc.

Authenticating User Credentials in Case of Connectivity ProblemsIf the Active Directory (AD) domain server is not reachable, you can log in to the ESXi DCUI by using username and password authentication to perform emergency actions on the host.
In exceptional circumstances, the AD domain server is not reachable to authenticate the user credentials onthe smart card because of connectivity problems, network outage, or disasters. If the connection to the ADserver is lost, you can log in to the ESXi DCUI by using the credentials of a local ESXi user. This lets youpreform diagnostics or other emergency actions. The fallback to user name and password login is logged.When the connectivity to AD is restored, smart card authentication is enabled again.
NOTE Loss of network connectivity to vCenter Server does not affect smart card authentication if the ActiveDirectory (AD) domain server is available.
Using Smart Card Authentication in Lockdown ModeWhen enabled, lockdown mode on the ESXi host increases the security of the host and limits access to theDCUI. Lockdown mode might disable the smart card authentication feature.
In normal lockdown mode, only users on the Exception Users list with administrator privileges can accessthe DCUI. Exception users are host local users or Active Directory users with permissions defined locally forthe ESXi host. If you want to use smart card authentication in normal lockdown mode, you must add usersto the Exception Users list from the vSphere Web Client. These users do not lose their permissions when thehost enters normal lockdown mode and can log in to the DCUI. For more information, see “SpecifyLockdown Mode Exception Users,” on page 163.
In strict lockdown mode, the DCUI service is stopped. As a result, you cannot access the host by using smartcard authentication.
ESXi SSH KeysYou can use SSH keys to restrict, control, and secure access to an ESXi host. By using an SSH key, you canallow trusted users or scripts to log in to a host without specifying a password.
You can copy the SSH key to the host by using the vifs vSphere CLI command. See Getting Started withvSphere Command-Line Interfaces for information on installing and using the vSphere CLI command set. It isalso possible to use HTTPS PUT to copy the SSK key to the host.
Instead of generating the keys externally and uploading them, you can create the keys on the ESXi host anddownload them. See VMware Knowledge Base article 1002866.
Enabling SSH and adding SSH keys to the host has inherent risks and is not recommended in a hardenedenvironment. See “Disable Authorized (SSH) Keys,” on page 137.
NOTE For ESXi 5.0 and earlier, a user with an SSH key can access the host even when the host is inlockdown mode. This is fixed in ESXi 5.1.
Chapter 5 Securing ESXi Hosts
VMware, Inc. 175

SSH SecurityYou can use SSH to remotely log in to the ESXi Shell and perform troubleshooting tasks for the host.
SSH configuration in ESXi is enhanced to provide a high security level.
Version 1 SSH protocoldisabled
VMware does not support Version 1 SSH protocol and uses Version 2protocol exclusively. Version 2 eliminates certain security problems presentin Version 1 and provides you with a safe way to communicate with themanagement interface.
Improved cipherstrength
SSH supports only 256-bit and 128-bit AES ciphers for your connections.
These settings are designed to provide solid protection for the data you transmit to the managementinterface through SSH. You cannot change these settings.
Upload an SSH Key Using a vifs CommandYou can use authorized keys to log in to a host with SSH. You can upload authorized keys with a vifscommand.
Authorized keys allow you to authenticate remote access to a host. When users or scripts try to access a hostwith SSH, the key provides authentication without a password. With authorized keys you can automateauthentication, which is useful when you write scripts to perform routine tasks.
You can upload the following types of SSH keys to a host:
n Authorized keys file for root user
n DSA key
n DSA public key
n RSA key
n RSA public key
IMPORTANT Do not modify the /etc/ssh/sshd_config file.
Procedure
u At the command line, use the vifs command to upload the SSH key to appropriate location.
vifs --server hostname --username username --put filename /host/ssh_host_dsa_key_pub
Type of key Location
Authorized key files for the rootuser
/host/ssh_root_authorized keysYou must have full administrator privileges to upload this file.
DSA keys /host/ssh_host_dsa_key
DSA public keys /host/ssh_host_dsa_key_pub
RSA keys /host/ssh_host_rsa_key
RSA public keys /host/ssh_host_rsa_key_pub
vSphere Security
176 VMware, Inc.

Upload an SSH Key Using HTTPS PUTYou can use authorized keys to log in to a host with SSH. You can upload authorized keys with HTTPSPUT.
Authorized keys allow you to authenticate remote access to a host. When users or scripts try to access a hostwith SSH, the key provides authentication without a password. With authorized keys you can automateauthentication, which is useful when you write scripts to perform routine tasks.
You can upload the following types of SSH keys to a host using HTTPS PUT:
n Authorized keys file for root user
n DSA key
n DSA public key
n RSA key
n RSA public key
IMPORTANT Do not modify the /etc/ssh/sshd_config file.
Procedure
1 In your upload application, open the key file.
2 Publish the file to the following locations.
Type of key Location
Authorized key files for the rootuser
https://hostname_or_IP_address/host/ssh_root_authorized_keys
You must have full administrator privileges on the host to upload this file.
DSA keys https://hostname_or_IP_address/host/ssh_host_dsa_key
DSA public keys https://hostname_or_IP_address/host/ssh_host_dsa_key_pub
RSA keys https://hostname_or_IP_address/host/ssh_host_rsa_key
RSA public keys https://hostname_or_IP_address/host/ssh_host_rsa_key_pub
Using the ESXi ShellThe ESXi Shell (formerly Tech Support Mode or TSM) is disabled by default on ESXi. You can enable localand remote access to the shell if necessary.
Enable the ESXi Shell for troubleshooting only. The ESXi Shell can be enabled and disabled whether or notthe host is running in lockdown mode. See “Lockdown Mode Behavior,” on page 159.
ESXi Shell Enable this service to access the ESXi Shell locally.
SSH Enable this service to access the ESXi Shell remotely using SSH. You canupload SSH keys to your hosts See “ESXi SSH Keys,” on page 175.
Direct Console UI(DCUI)
When you enable this service while running in lockdown mode, you can login locally to the direct console user interface as the root user and disablelockdown mode. You can then access the host using a direct connection tothe vSphere Client or by enabling the ESXi Shell.
Chapter 5 Securing ESXi Hosts
VMware, Inc. 177
The root user and users with the Administrator role can access the ESXi Shell. Users who are in the ActiveDirectory group ESX Admins are automatically assigned the Administrator role. By default, only the rootuser can execute system commands (such as vmware -v) using the ESXi Shell.
NOTE Do not enable the ESXi Shell until you actually need access.
n Use the vSphere Web Client to Enable Access to the ESXi Shell on page 178You can use the vSphere Web Client to enable local and remote (SSH) access to the ESXi Shell and toset the idle timeout and availability timeout.
n Use the Direct Console User Interface (DCUI) to Enable Access to the ESXi Shell on page 180The Direct Console User Interface (DCUI) allows you to interact with the host locally using text-basedmenus. Evaluate carefully whether the security requirements of your environment support enablingthe Direct Console User Interface.
n Log in to the ESXi Shell for Troubleshooting on page 181Perform ESXi configuration tasks with the vSphere Web Client. the vSphere CLI, or vSpherePowerCLI. Log in to the ESXi Shell (formerly Tech Support Mode or TSM) for troubleshootingpurposes only.
Use the vSphere Web Client to Enable Access to the ESXi ShellYou can use the vSphere Web Client to enable local and remote (SSH) access to the ESXi Shell and to set theidle timeout and availability timeout.
NOTE Access the host by using the vSphere Web Client, remote command-line tools (vCLI and PowerCLI),and published APIs. Do not enable remote access to the host using SSH unless special circumstances requirethat you enable SSH access.
Prerequisites
If you want to use an authorized SSH key, you can upload it. See “ESXi SSH Keys,” on page 175.
Procedure
1 Browse to the host in the vSphere Web Client inventory.
2 Click the Manage tab and click Settings.
3 Under System, select Security Profile.
4 In the Services panel, click Edit.
5 Select a service from the list.
n ESXi Shell
n SSH
n Direct Console UI
6 Click Service Details and select the startup policy Start and stop manually.
When you select Start and stop manually, the service does not start when you reboot the host. If youwant the service to start when you reboot the host, select Start and stop with host.
7 Select Start to enable the service.
8 Click OK.
vSphere Security
178 VMware, Inc.

What to do next
Set the availability and idle timeouts for the ESXi Shell. See “Create a Timeout for ESXi Shell Availability inthe vSphere Web Client,” on page 179 and “Create a Timeout for Idle ESXi Shell Sessions in the vSphereWeb Client,” on page 179
Create a Timeout for ESXi Shell Availability in the vSphere Web ClientThe ESXi Shell is disabled by default. You can set an availability timeout for the ESXi Shell to increasesecurity when you enable the shell.
The availability timeout setting is the amount of time that can elapse before you must log in after theESXi Shell is enabled. After the timeout period, the service is disabled and users are not allowed to log in.
Procedure
1 Browse to the host in the vSphere Web Client inventory.
2 Click the Manage tab and click Settings.
3 Under System, select Advanced System Settings.
4 Select UserVars.ESXiShellTimeOut and click the Edit icon.
5 Enter the idle timeout setting.
You must restart the SSH service and the ESXi Shell service for the timeout to take effect.
6 Click OK.
If you are logged in when the timeout period elapses, your session will persist. However, after you log outor your session is terminated, users are not allowed to log in.
Create a Timeout for Idle ESXi Shell Sessions in the vSphere Web ClientIf a user enables the ESXi Shell on a host, but forgets to log out of the session, the idle session remainsconnected indefinitely. The open connection can increase the potential for someone to gain privileged accessto the host. You can prevent this by setting a timeout for idle sessions.
The idle timeout is the amount of time that can elapse before a user is logged out of an idle interactivesession. You can control the amount of time for both local and remote (SSH) session from the Direct ConsoleInterface (DCUI) or from the vSphere Web Client.
Procedure
1 Browse to the host in the vSphere Web Client inventory.
2 Click the Manage tab and click Settings.
3 Under System, select Advanced System Settings.
4 Select UserVars.ESXiShellInteractiveTimeOut, click the Edit icon, and enter the timeout setting.
5 Restart the ESXi Shell service and the SSH service for the timeout to take effect.
If the session is idle, users are logged out after the timeout period elapses.
Chapter 5 Securing ESXi Hosts
VMware, Inc. 179

Use the Direct Console User Interface (DCUI) to Enable Access to theESXi Shell
The Direct Console User Interface (DCUI) allows you to interact with the host locally using text-basedmenus. Evaluate carefully whether the security requirements of your environment support enabling theDirect Console User Interface.
You can use the Direct Console User Interface to enable local and remote access to the ESXi Shell.
NOTE Changes made to the host using the Direct Console User Interface, the vSphere Web Client, ESXCLI,or other administrative tools are committed to permanent storage every hour or upon graceful shutdown.Changes might be lost if the host fails before they are committed.
Procedure
1 From the Direct Console User Interface, press F2 to access the System Customization menu.
2 Select Troubleshooting Options and press Enter.
3 From the Troubleshooting Mode Options menu, select a service to enable.
n Enable ESXi Shell
n Enable SSH
4 Press Enter to enable the service.
5 Press Esc until you return to the main menu of the Direct Console User Interface.
What to do next
Set the availability and idle timeouts for the ESXi Shell. See “Create a Timeout for ESXi Shell Availability inthe Direct Console User Interface,” on page 180 and “Create a Timeout for Idle ESXi Shell Sessions,” onpage 181.
Create a Timeout for ESXi Shell Availability in the Direct Console User InterfaceThe ESXi Shell is disabled by default. You can set an availability timeout for the ESXi Shell to increasesecurity when you enable the shell.
The availability timeout setting is the amount of time that can elapse before you must log in after theESXi Shell is enabled. After the timeout period, the service is disabled and users are not allowed to log in.
Procedure
1 From the Troubleshooting Mode Options menu, select Modify ESXi Shell and SSH timeouts and pressEnter.
2 Enter the availability timeout.
You must restart the SSH service and the ESXi Shell service for the timeout to take effect.
3 Press Enter and press Esc until you return to the main menu of the Direct Console User Interface.
4 Click OK.
If you are logged in when the timeout period elapses, your session will persist. However, after you log outor your session is terminated, users are not allowed to log in.
vSphere Security
180 VMware, Inc.
Create a Timeout for Idle ESXi Shell SessionsIf a user enables the ESXi Shell on a host, but forgets to log out of the session, the idle session remainsconnected indefinitely. The open connection can increase the potential for someone to gain privileged accessto the host. You can prevent this by setting a timeout for idle sessions.
The idle timeout is the amount of time that can elapse before the user is logged out of an idle interactivesessions. Changes to the idle timeout apply the next time a user logs in to the ESXi Shell and do not affectexisting sessions.
You can specify the timeout from the Direct Console User Interface in seconds, or from thevSphere Web Client in minutes.
Procedure
1 From the Troubleshooting Mode Options menu, select Modify ESXi Shell and SSH timeouts and pressEnter.
2 Enter the idle timeout, in seconds.
You must restart the SSH service and the ESXi Shell service for the timeout to take effect.
3 Press Enter and press Esc until you return to the main menu of the Direct Console User Interface.
If the session is idle, users are logged out after the timeout period elapses.
Log in to the ESXi Shell for TroubleshootingPerform ESXi configuration tasks with the vSphere Web Client. the vSphere CLI, or vSphere PowerCLI. Login to the ESXi Shell (formerly Tech Support Mode or TSM) for troubleshooting purposes only.
Procedure
1 Log in to the ESXi Shell using one of the following methods.
n If you have direct access to the host, press Alt+F1 to open the login page on the machine's physicalconsole.
n If you are connecting to the host remotely, use SSH or another remote console connection to start asession on the host.
2 Enter a user name and password recognized by the host.
Modifying ESXi Web Proxy SettingsWhen you modify Web proxy settings, you have several encryption and user security guidelines toconsider.
NOTE Restart the host process after making any changes to host directories or authentication mechanisms.
n Do not set up certificates that use a password or pass phrases. ESXi does not support Web proxies thatuse passwords or pass phrases, also known as encrypted keys. If you set up a Web proxy that requires apassword or pass phrase, ESXi processes cannot start correctly.
n To support encryption for user names, passwords, and packets, SSL is enabled by default for vSphereWeb Services SDK connections. If you want to configure these connections so that they do not encrypttransmissions, disable SSL for your vSphere Web Services SDK connection by switching the connectionfrom HTTPS to HTTP.
Consider disabling SSL only if you created a fully trusted environment for these clients, where firewallsare in place and transmissions to and from the host are fully isolated. Disabling SSL can improveperformance, because you avoid the overhead required to perform encryption.
Chapter 5 Securing ESXi Hosts
VMware, Inc. 181

n To protect against misuse of ESXi services, most internal ESXi services are accessible only through port443, the port used for HTTPS transmission. Port 443 acts as a reverse proxy for ESXi. You can see a listof services on ESXi through an HTTP welcome page, but you cannot directly access the StorageAdapters services without proper authorization.
You can change this configuration so that individual services are directly accessible through HTTPconnections. Do not make this change unless you are using ESXi in a fully trusted environment.
n When you upgrade your environment, the certificate remains in place.
vSphere Auto Deploy Security ConsiderationsTo best protect your environment, be aware of security risks that might exist when you use Auto Deploywith host profiles.
Networking SecuritySecure your network as you would for any other PXE-based deployment method. vSphere Auto Deploytransfers data over SSL to prevent casual interference and snooping. However, the authenticity of the clientor of the Auto Deploy server is not checked during a PXE boot.
You can greatly reduce the security risk of Auto Deploy by completely isolating the network where AutoDeploy is used.
Boot Image and Host Profile SecurityThe boot image that the vSphere Auto Deploy server downloads to a machine can have the followingcomponents.
n The VIB packages that the image profile consists of are always included in the boot image.
n The host profile and host customization are included in the boot image if Auto Deploy rules are set upto provision the host with a host profile or a host customization setting.
n The administrator (root) password and user passwords that are included with host profile and hostcustomization are MD5 encrypted.
n Any other passwords associated with profiles are in the clear. If you set up Active Directory byusing host profiles, the passwords are not protected.
Use the vSphere Authentication Service for setting up Active Directory to avoid exposing theActive Directory passwords. If you set up Active Directory using host profiles, the passwords arenot protected.
n The host's public and private SSL key and certificate are included in the boot image.
Managing ESXi Log FilesLog files are an important component of troubleshooting attacks and obtaining information about breachesof host security. Logging to a secure, centralized log server can help prevent log tampering. Remote loggingalso provides a long-term audit record.
Take the following measures to increase the security of the host.
n Configure persistent logging to a datastore. By default, the logs on ESXi hosts are stored in the in-memory file system. Therefore, they are lost when you reboot the host, and only 24 hours of log data isstored. When you enable persistent logging, you have a dedicated record of server activity available forthe host.
n Remote logging to a central host allows you to gather log files onto a central host, where you canmonitor all hosts with a single tool. You can also do aggregate analysis and searching of log data, whichmight reveal information about things like coordinated attacks on multiple hosts.
vSphere Security
182 VMware, Inc.

n Configure remote secure syslog on ESXi hosts using a remote command line such as vCLI or PowerCLI,or using an API client.
n Query the syslog configuration to make sure that a valid syslog server has been configured, includingthe correct port.
Configure Syslog on ESXi HostsAll ESXi hosts run a syslog service (vmsyslogd), which logs messages from the VMkernel and other systemcomponents to log files. Up to 30 hosts are supported.
You can use the vSphere Web Client or the esxcli system syslog vCLI command to configure the syslogservice.
For more information about using vCLI commands, see Getting Started with vSphere Command-Line Interfaces.
Procedure
1 In the vSphere Web Client inventory, select the host.
2 Click the Manage tab.
3 In the System panel, click Advanced System Settings.
4 Locate the Syslog section of the Advanced System Settings list.
5 To set up logging globally, select the setting to change and click the Edit icon.
Option Description
Syslog.global.defaultRotate Sets the maximum number of archives to keep. You can set this numberglobally and for individual subloggers.
Syslog.global.defaultSize Sets the default size of the log, in KB, before the system rotates logs. Youcan set this number globally and for individual subloggers.
Syslog.global.LogDir Directory where logs are stored. The directory can be located on mountedNFS or VMFS volumes. Only the /scratch directory on the local filesystem is persistent across reboots. The directory should be specified as[datastorename] path_to_file where the path is relative to the root of thevolume backing the datastore. For example, the path[storage1] /systemlogs maps to thepath /vmfs/volumes/storage1/systemlogs.
Syslog.global.logDirUnique Selecting this option creates a subdirectory with the name of the ESXi hostunder the directory specified by Syslog.global.LogDir. A unique directoryis useful if the same NFS directory is used by multiple ESXi hosts.
Syslog.global.LogHost Remote host to which syslog messages are forwarded and port on whichthe remote host receives syslog messages. You can include the protocoland the port, for example, ssl://hostName1:1514. UDP (default), TCP,and SSL are supported. The remote host must have syslog installed andcorrectly configured to receive the forwarded syslog messages. See thedocumentation for the syslog service installed on the remote host forinformation on configuration.
6 (Optional) To overwrite the default log size and log rotation for any of the logs.
a Click the name of the log you that want to customize.
b Click the Edit icon and enter the number of rotations and log size you want.
7 Click OK.
Changes to the syslog options take effect immediately.
Chapter 5 Securing ESXi Hosts
VMware, Inc. 183

ESXi Log File LocationsESXi records host activity in log files, using a syslog facility.
Component Location Purpose
VMkernel /var/log/vmkernel.log Records activities related to virtualmachines and ESXi.
VMkernel warnings /var/log/vmkwarning.log Records activities related to virtualmachines.
VMkernel summary /var/log/vmksummary.log Used to determine uptime andavailability statistics for ESXi (commaseparated).
ESXi host agent log /var/log/hostd.log Contains information about the agentthat manages and configures the ESXihost and its virtual machines.
vCenter agent log /var/log/vpxa.log Contains information about the agentthat communicates with vCenterServer (if the host is managed byvCenter Server).
Shell log /var/log/vpxa.log Contains a record of all commandstyped into the ESXi Shell as well asshell events (for example, when theshell was enabled).
Authentication /var/log/auth.log Contains all events related toauthentication for the local system.
System messages /var/log/syslog.log Contains all general log messages andcan be used for troubleshooting. Thisinformation was formerly located inthe messages log file.
Virtual machines The same directory as the affectedvirtual machine's configuration files,named vmware.log and vmware*.log.Forexample, /vmfs/volumes/datastore/virtual machine/vwmare.log
Contains virtual machine powerevents, system failure information,tools status and activity, time sync,virtual hardware changes, vMotionmigrations, machine clones, and so on.
Securing Fault Tolerance Logging TrafficWhen you enable Fault Tolerance (FT), VMware vLockstep captures inputs and events that occur on aPrimary VM and sends them to the Secondary VM, which is running on another host.
This logging traffic between the Primary and Secondary VMs is unencrypted and contains guest networkand storage I/O data, as well as the memory contents of the guest operating system. This traffic can includesensitive data such as passwords in plaintext. To avoid such data being divulged, ensure that this network issecured, especially to avoid "man-in-the-middle" attacks. For example, use a private network for FT loggingtraffic.
vSphere Security
184 VMware, Inc.

ESXi Security Best PracticesFollowing ESXi security best practices helps ensure the integrity of your vSphere deployment.
Verify Installation Media Always check the SHA1 hash after downloading an ISO, offline bundle, orpatch to ensure integrity and authenticity of the downloaded files. If youobtain physical media from VMware and the security seal is broken, returnthe software to VMware for a replacement.
After downloading media, use the MD5 sum value to verify the integrity ofthe download. Compare the MD5 sum output with the value posted on theVMware website. Each operating system has a different method and tool forchecking MD5 sum values. For Linux use the "md5sum" command. ForMicrosoft Windows, you can download an add-on product
Check CRLs Manually By default, an ESXi host does not support CRL checking. You must search forand remove revoked certificates manually. These are typically customgenerated certificates from a corporate certificate authority or 3rd partyauthority. Most corporations have scripts in place to find and replacerevoked SSL certificates on your ESXi host.
Monitor the ESXAdmins Active DirectoryGroup
The Active Directory group used by vSphere is defined by theplugins.hostsvc.esxAdminsGroup advanced system setting. By default thisoption is set to ESX Admins. All members of the ESX Admins group aregranted full administrative access to all ESXi hosts in the domain. MonitorActive Directory for the creation of this group and limit membership tohighly trusted users and groups.
Configuration Files Although most ESXi configuration settings are controlled with an API, alimited number of configuration files affects the host directly. These files areexposed through the vSphere file transfer API, which uses HTTPS. If youmake any changes to these files, you must also perform the correspondingadministrative action such as making a configuration change.
NOTE Do not attempt to monitor files that are NOT exposed via this file-transfer API, since this can result in a destabilized system.
Use vmkfstools to EraseSensitive Data
When you delete a VMDK file with sensitive data, shut down or stop thevirtual machine, and then issue the vCLI command vmkfstools -writezeroes on that file before you delete the file from the datastore.
PCI and PCIe Devices and ESXiUsing the VMware DirectPath I/O feature to pass through a PCI or PCIe device to a virtual machine resultsin a potential security vulnerability. The vulnerability can be triggered by buggy or malicious code, such asa device driver, running in privileged mode in the guest OS. Industry-standard hardware and firmwaredoes not currently have sufficient error containment support to make it possible for ESXi to fully close thevulnerability.
VMware recommends that you use PCI or PCIe passthrough to a virtual machine only if the virtual machineis owned and administered by a trusted entity. You must be sure that this entity does not to attempt to crashor exploit the host from the virtual machine.
Chapter 5 Securing ESXi Hosts
VMware, Inc. 185

Your host might be compromised in one of the following ways.
n The guest OS might generate an unrecoverable PCI or PCIe error. Such an error does not corrupt data,but can crash the ESXi host. Such errors might occur because of bugs or incompatibilities in thehardware devices that are being passed through, or because of problems with drivers in the guest OS.
n The guest OS might generate a Direct Memory Access (DMA) operation that causes an IOMMU pagefault on the ESXi host, for example, if the DMA operation targets an address outside the virtualmachine's memory. On some machines, host firmware configures IOMMU faults to report a fatal errorthrough a non-maskable interrupt (NMI), which causes the ESXi host to crash. This problem mightoccur because of problems with the drivers in the guest OS.
n If the operating system on the ESXi host is not using interrupt remapping, the guest OS might inject aspurious interrupt into the ESXi host on any vector. ESXi currently uses interrupt remapping on Intelplatforms where it is available; interrupt mapping is part of the Intel VT-d feature set. ESXi does not useinterrupt mapping on AMD platforms. A spurious interrupt most likely results in a crash of the ESXihost; however, other ways to exploit these interrupts might exist in theory.
vSphere Security
186 VMware, Inc.

Securing vCenter Server Systems 6Securing vCenter Server includes ensuring security of the host where vCenter Server is running, followingbest practices for assigning privileges and roles, and verifying the integrity of the clients that connect tovCenter Server.
This chapter includes the following topics:
n “vCenter Server Security Best Practices,” on page 187
n “Verify Thumbprints for Legacy ESXi Hosts,” on page 191
n “Verify that SSL Certificate Validation Over Network File Copy Is Enabled,” on page 192
n “vCenter Server TCP and UDP Ports,” on page 192
n “Control CIM-Based Hardware Monitoring Tool Access,” on page 193
vCenter Server Security Best PracticesFollowing vCenter Server security best practices helps you ensure the integrity of your vSphereenvironment.
Best Practices for vCenter Server Access ControlStrictly control access to different vCenter Server components to increase security for the system.
The following guidelines help ensure security of your environment.
Use named accounts n If the local Windows administrator account currently has fulladministrative rights to vCenter Server, remove those access rights andgrant those rights to one or more named vCenter Server administratoraccounts. Grant full administrative rights only to those administratorswho are required to have it. Do not grant this privilege to any groupwhose membership is not strictly controlled.
NOTE Starting with vSphere 6.0, the local administrator no longer hasfull administrative rights to vCenter Server by default. Using localoperating system users is not recommended.
n Install vCenter Server using a service account instead of a Windowsaccount. The service account must be an administrator on the localmachine.
VMware, Inc. 187

n Make sure that applications use unique service accounts whenconnecting to a vCenter Server system.
Minimize access Avoid allowing users to log directly in to the vCenter Server host machine.Users who are logged in to the vCenter Server can potentially cause harm,either intentionally or unintentionally, by altering settings and modifyingprocesses. They also have potential access to vCenter credentials, such as theSSL certificate. Allow only those users who have legitimate tasks to performto log in to the system and ensure that login events are audited.
Monitor privileges ofvCenter Serveradministrator users
Not all administrator users must have the Administrator role. Instead, createa custom role with the appropriate set of privileges and assign it to otheradministrators.
Users with the vCenter Server Administrator role have privileges on allobjects in the hierarchy. For example, by default the Administrator roleallows users to interact with files and programs inside a virtual machine'sguest operating system. Assigning that role to too many users can lessenvirtual machine data confidentiality, availability, or integrity. Create a rolethat gives the administrators the privileges they need, but remove some ofthe virtual machine management privileges.
Grant minimalprivileges tovCenter Serverdatabase user
The database user requires only certain privileges specific to database access.In addition, some privileges are required only for installation and upgrade.These privileges can be removed after the product is installed or upgraded.
Verify password policyfor vpxuser
By default, vCenter Server changes the vpxuser password automaticallyevery 30 days. Ensure that this setting meets your policies, or configure thepolicy to meet your company's password aging policies. See “Set the vCenterServer Password Policy,” on page 188.
NOTE Make sure that password aging policy is not too short.
Check privileges aftervCenter Server restart
Check for privilege reassignment when you restart vCenter Server. If theuser or user group that is assigned the Administrator role on the root foldercannot be verified as a valid user or group during a restart, the role isremoved from that user or group. In its place, vCenter Server grants theAdministrator role to the vCenter Single Sign-On [email protected]. This account can then act as the administrator.
Reestablish a named administrator account and assign the Administratorrole to that account to avoid using the [email protected] account.
Set the vCenter Server Password PolicyBy default, vCenter Server changes the vpxuser password automatically every 30 days. You can change thatvalue from the vSphere Web Client.
Procedure
1 Select the vCenter Server in the vSphere Web Client object hierarchy.
2 Click the Manage tab and the Settings subtab.
3 Click Advanced Settings and enter VimPasswordExpirationInDays in the filter box.
4 Set VirtualCenter.VimPasswordExpirationInDays to comply with your requirements.
vSphere Security
188 VMware, Inc.

Hardening the vCenter Server Windows HostProtect the Windows host where vCenter Server is running against vulnerabilities and attacks by ensuringthat the host environment is as secure as possible.
n Maintain a supported operating system, database, and hardware for the vCenter Server system. IfvCenter Server is not running on a supported operating system, it might not run properly, makingvCenter Server vulnerable to attacks.
n Keep the vCenter Server system properly patched. By staying up-to-date with operating systempatches, the server is less vulnerable to attack.
n Provide operating system protection on the vCenter Server host. Protection includes antivirus and anti-malware software.
n On each Windows computer in the infrastructure, ensure that Remote Desktop (RDP) HostConfiguration settings are set to ensure the highest level of encryption according to industry-standardguidelines or internal guidelines.
For operating system and database compatibility information, see the vSphere Compatibility Matrixes.
Removing Expired or Revoked Certificates and Logs from Failed InstallationsLeaving expired or revoked certificates or leaving vCenter Server installation logs for failed installation onyour vCenter Server system can compromise your environment.
Removing expired or revoked certificates is required for the following reasons.
n If expired or revoked certificates are not removed from the vCenter Server system, the environment canbe subject to a MiTM attack
n In certain cases, a log file that contains the database password in plain text is created on the system ifvCenter Server installation fails. An attacker who breaks into the vCenter Server system, might gainaccess to this password and, at the same time, access to the vCenter Server database.
Limiting vCenter Server Network ConnectivityFor improved security, avoid putting the vCenter Server system on any network other than a managementnetwork, and ensure that vSphere management traffic is on a restricted network. By limiting networkconnectivity, you limit certain types of attack.
vCenter Server requires access to a management network only. Avoid putting the vCenter Server system onother networks such as your production network or storage network, or on any network with access to theInternet. vCenter Server does not need access to the network where vMotion operates.
vCenter Server requires network connectivity to the following systems.
n All ESXi hosts.
n The vCenter Server database.
n Other vCenter Server systems (if the vCenter Server systems are part of a common vCenter Single Sign-On domain for purposes of replicating tags, permissions, and so on).
n Systems that are authorized to run management clients. For example, the vSphere Web Client, aWindows system where you use the PowerCLI, or any other SDK-based client.
n Systems that run add-on components such as VMware vSphere Update Manager.
n Infrastructure services such as DNS, Active Directory, and NTP.
n Other systems that run components that are essential to functionality of the vCenter Server system.
Chapter 6 Securing vCenter Server Systems
VMware, Inc. 189

Use a local firewall on the Windows system where the vCenter Server system is running or use a networkfirewall. Include IP-based access restrictions so that only necessary components can communicate with thevCenter Server system.
Consider Restricting the Use of Linux ClientsCommunications between client components and a vCenter Server system or ESXi hosts are protected bySSL-based encryption by default. Linux versions of these components do not perform certificate validation.Consider restricting the use of these clients.
Even if you have replaced the VMCA-signed certificates on the vCenter Server system and the ESXi hostswith certificates that are signed by a third party CA, certain communications with Linux clients are stillvulnerable to man-in-the-middle attacks. The following components are vulnerable when they run on theLinux operating system.
n vCLI commands
n vSphere SDK for Perl scripts
n Programs written using the vSphere Web Services SDK
You can relax the restriction against using Linux clients if you enforce proper controls.
n Restrict management network access to authorized systems only.
n Use firewalls to ensure that only authorized hosts are allowed to access vCenter Server.
n Use jump-box systems to ensure that Linux clients are behind the jump.
Examine Installed Plug-InsvSphere Web Client extensions run at the same privilege level as the user who is logged in. A maliciousextension can masquerade as a useful plug-in and perform harmful operations such as stealing credentialsor changing the system configuration. To increase security, use a vSphere Web Client installation thatincludes only authorized extensions from trusted sources.
A vCenter installation includes the vSphere Web Client extensibility framework, which provides the abilityto extend the vSphere Web Client with menu selections or toolbar icons that provide access to vCenter add-on components or external, Web-based functionality. This flexibility results in a risk of introducingunintended capabilities. For example, if an administrator installs a plug-in in an instance of thevSphere Web Client, the plug-in can then execute arbitrary commands with the privilege level of thatadministrator.
To protect against potential compromise of your vSphere Web Client you can periodically examine allinstalled plug-ins and make sure that all plug-ins come from a trusted source.
Prerequisites
You must have privileges to access the vCenter Single Sign-On service. These privileges differ fromvCenter Server privileges.
Procedure
1 Log in to the vSphere Web Client as [email protected] or a user with vCenter Single Sign-Onprivileges.
2 From the Home page, select Administration, and then select Client Plug-Ins under Solutions
3 Examine the list of client plug-ins.
vSphere Security
190 VMware, Inc.

vCenter Server Appliance Security Best PracticesFollow all best practices for securing a vCenter Server system to secure your vCenter Server Appliance.Additional steps help you make your environment more secure.
Configure NTP Ensure that all systems use the same relative time source (including therelevant localization offset), and that the relative time source can becorrelated to an agreed-upon time standard (such as Coordinated UniversalTime-UTC). Synchronized systems are essential for certificate validity. NTPalso makes it easier to track an intruder in log files. Incorrect time settingscan make it difficult to inspect and correlate log files to detect attacks, andcan make auditing inaccurate. See “Synchronize the Time in the vCenterServer Appliance with an NTP Server,” on page 227.
RestrictvCenter ServerAppliance networkaccess
Restrict access to only those essential components required to communicatewith the vCenter Server Appliance. Blocking access from unnecessarysystems reduces the potential for general attacks on the operating system.Restricting access to only those essential components minimizes risk.
Verify Thumbprints for Legacy ESXi HostsIn vSphere 6 and later, hosts are assigned VMCA certificates by default. If you change the certificate modeto thumbprint, you can continue to use thumbprint mode for legacy hosts. You can verify the thumbprintsin the vSphere Web Client.
NOTE Certificates are preserved across upgrades by default.
Procedure
1 Browse to the vCenter Server system in the vSphere Web Client object navigator.
2 Select the Manage tab, click Settings, and click General.
3 Click Edit.
4 Click SSL Settings.
5 If any of your ESXi 5.5 or earlier hosts require manual validation, compare the thumbprints listed forthe hosts to the thumbprints in the host console.
To obtain the host thumbprint, use the Direct Console User Interface (DCUI).
a Log in to the direct console and press F2 to access the System Customization menu.
b Select View Support Information.
The host thumbprint appears in the column on the right.
6 If the thumbprint matches, select the Verify check box next to the host.
Hosts that are not selected will be disconnected after you click OK.
7 Click OK.
Chapter 6 Securing vCenter Server Systems
VMware, Inc. 191

Verify that SSL Certificate Validation Over Network File Copy IsEnabled
Network File Copy (NFC) provides a file-type-aware FTP service for vSphere components. Starting withvSphere 5.5, ESXi uses NFC for operations such as copying and moving data between datastores by default,but you might have to enable it if it is disabled.
When SSL over NFC is enabled, connections between vSphere components over NFC are secure. Thisconnection can help prevent man-in-the-middle attacks within a data center.
Because using NFC over SSL causes some performance degradation, you might consider disabling thisadvanced setting in some development environments.
Procedure
1 Connect to the vCenter Server with the vSphere Web Client.
2 Select the Settings tab, and click Advanced Settings.
3 Click Edit.
4 At the bottom of the dialog, enter the following Key and Value.
Field Value
Key nfc.useSSL
Value true
5 Click OK.
vCenter Server TCP and UDP PortsvCenter Server is accessed through predetermined TCP and UDP ports. If you manage network componentsfrom outside a firewall, you might be required to reconfigure the firewall to allow access on the appropriateports.
The table lists TCP and UDP ports, and the purpose and the type of each. Ports that are open by default atinstallation time are indicated by (Default). For an up-to-date list of ports of all vSphere components for thedifferent versions of vSphere, see VMware Knowledge Base Article 1012382.
Table 6‑1. vCenter Server TCP and UDP Ports
Port Purpose
80 (Default) HTTP accessvCenter Server requires port 80 for direct HTTP connections. Port 80 redirects requests to HTTPSport 443. This redirection is useful if you accidentally use http://server instead of https://serverWS-Management (also requires port 443 to be open)
88, 2013 Control interface RPC for Kerberos, used by vCenter Single Sign-On.
123 NTP Client
161 (Default) SNMP Server
389 vCenter Single Sign-On LDAP (6.0 and later)
636 vCenter Single Sign-On LDAPS (6.0 and later)
vSphere Security
192 VMware, Inc.

Table 6‑1. vCenter Server TCP and UDP Ports (Continued)
Port Purpose
443 (Default) vCenter Server systems use port 443 to monitor data transfer from SDK clients.This port is also used for the following services:n WS-Management (also requires port 80 to be open)n Third-party network management client connections to vCenter Servern Third-party network management clients access to hosts
902 (Default) The default port that the vCenter Server system uses to send data to managed hosts. Managed hostsalso send a regular heartbeat over UDP port 902 to the vCenter Server system. This port must notbe blocked by firewalls between the server and the hosts or between hosts.
903 MKS transactions (xinetd/vmware-authd-mks).
1234, 1235(Default)
vSphere Replication.
2012 RPC port for VMware Directory Service (vmdir).
2014 RPC port for VMware Certificate Authority (VMCA) service.
2020 RPC port for VMware Authentication Framework Service (vmafd).
5900-5964 RFB protocol, which is used by management tools such as VNC.
7444 vCenter Single Sign-On HTTPS.
8000 (Default) Requests from vMotion.
8109 VMware Syslog Collector.
9090 vSphere Web Client HTTPS access to virtual machine consoles.Allows a vCenter Server Appliance to communicate with vSphere Web Client Remote Consoletraffic.
9443 vSphere Web Client HTTP access to ESXi hosts.
10080 Inventory service.
11711 vCenter Single Sign-On LDAP (environments that are upgraded from vSphere 5.5)
11712 vCenter Single Sign-On LDAPS (environments that are upgraded from vSphere 5.5)
12721 VMware Identity Management service.
15005 ESX Agent Manager (EAM). An ESX Agent can be a virtual machine or an optional VIB. The agentextends the functions of an ESXi host to provide additional services that a vSphere solution such asNSX-v or vRealize Automation requires.
15007 vService Manager (VSM). This service registers vCenter Server extensions. Open this port only ifrequired by extensions that you intend to use.
In addition to these ports, you can configure other ports depending on your needs.
Control CIM-Based Hardware Monitoring Tool AccessThe Common Information Model (CIM) system provides an interface that enables hardware-levelmanagement from remote applications using a set of standard APIs. To ensure that the CIM interface issecure, provide only the minimum access necessary to these applications. If an application has beenprovisioned with a root or full administrator account and the application is compromised, the full virtualenvironment might be compromised.
CIM is an open standard that defines a framework for agent-less, standards-based monitoring of hardwareresources for ESXi. This framework consists of a CIM object manager, often called a CIM broker, and a set ofCIM providers.
Chapter 6 Securing vCenter Server Systems
VMware, Inc. 193

CIM providers are used as the mechanism to provide management access to device drivers and underlyinghardware. Hardware vendors, including server manufacturers and specific hardware device vendors, canwrite providers to provide monitoring and management of their particular devices. VMware also writesproviders that implement monitoring of server hardware, ESXi storage infrastructure, and virtualization-specific resources. These providers run inside the ESXi system and therefore are designed to be extremelylightweight and focused on specific management tasks. The CIM broker takes information from all CIMproviders, and presents it to the outside world via standard APIs, the most common one being WS-MAN.
Do not provide root credentials to remote applications to access the CIM interface. Instead, create a serviceaccount specific to these applications and grant read-only access to CIM information to any local accountdefined on the ESXi system, as well as any role defined in vCenter Server.
Procedure
1 Create a service account specific to CIM applications.
2 Grant read-only access to CIM information to any local account defined on the ESXi system, as well asany role defined in vCenter Server.
3 (Optional) If the application requires write access to the CIM interface, create a role to apply to theservice account with only two privileges:
n Host.Config.SystemManagement
n Host.CIM.CIMInteraction
This role can be local to the host or centrally defined on vCenter Server, depending on how themonitoring application works.
When a user logs into the host with the service account you created for CIM applications, the user has onlythe privileges SystemManagement and CIMInteraction, or read-only access.
vSphere Security
194 VMware, Inc.

Securing Virtual Machines 7The guest operating system that runs in the virtual machine is subject to the same security risks as a physicalsystem. Secure virtual machines as you would secure physical machines.
This chapter includes the following topics:
n “Limit Informational Messages from Virtual Machines to VMX Files,” on page 195
n “Prevent Virtual Disk Shrinking,” on page 196
n “Virtual Machine Security Best Practices,” on page 196
Limit Informational Messages from Virtual Machines to VMX FilesLimit informational messages from the virtual machine to the VMX file to avoid filling the datastore andcausing a Denial of Service (DoS). A Denial of Service can occur when you do not control the size of a virtualmachine's VMX file and the amount of information exceeds the datastore's capacity.
The configuration file containing the informational name-value pairs is limited to 1MB by default. Thiscapacity is sufficient in most cases, but you can change this value if necessary. For example, you mightincrease the limit if large amounts of custom information are being stored in the configuration file.
NOTE Consider carefully how much information you require. If the amount of information exceeds thedatastore's capacity, a Denial of Service might result.
The default limit of 1MB is applied even when the tools.setInfo.sizeLimit parameter is not listed in theadvanced options.
Procedure
1 Find the virtual machine in the vSphere Web Client inventory.
a Select a data center, folder, cluster, resource pool, or host.
b Click the Related Objects tab and click Virtual Machines.
2 Right-click the virtual machine and click Edit Settings.
3 Select VM Options.
4 Click Advanced and click Edit Configuration.
5 Add or edit the tools.setInfo.sizeLimit parameter.
VMware, Inc. 195

Prevent Virtual Disk ShrinkingNonadministrative users in the guest operating system are able to shrink virtual disks. Shrinking a virtualdisk reclaims the disk's unused space. However, if you shrink a virtual disk repeatedly, the disk can becomeunavailable and cause a denial of service. To prevent this, disable the ability to shrink virtual disks.
Prerequisites
n Turn off the virtual machine.
n Verify that you have root or administrator privileges on the virtual machine.
Procedure
1 Find the virtual machine in the vSphere Web Client inventory.
a Select a data center, folder, cluster, resource pool, or host.
b Click the Related Objects tab and click Virtual Machines.
2 Right-click the virtual machine and click Edit Settings.
3 Select VM Options.
4 Click Advanced and click Edit Configuration.
5 Add or edit the following parameters.
Name Value
isolation.tools.diskWiper.disable TRUE
isolation.tools.diskShrink.disable TRUE
6 Click OK.
When you disable this feature, you cannot shrink virtual machine disks when a datastore runs out of space.
Virtual Machine Security Best PracticesFollowing virtual machine security best practices helps ensure the integrity of your vSphere deployment.
n General Virtual Machine Protection on page 197A virtual machine is, in most respects, the equivalent of a physical server. Employ the same securitymeasures in virtual machines that you do for physical systems.
n Use Templates to Deploy Virtual Machines on page 197When you manually install guest operating systems and applications on a virtual machine, youintroduce a risk of misconfiguration. By using a template to capture a hardened base operating systemimage with no applications installed, you can ensure that all virtual machines are created with aknown baseline level of security.
n Minimize Use of Virtual Machine Console on page 198The virtual machine console provides the same function for a virtual machine that a monitor on aphysical server provides. Users with access to the virtual machine console have access to virtualmachine power management and removable device connectivity controls, which might allow amalicious attack on a virtual machine.
vSphere Security
196 VMware, Inc.

n Prevent Virtual Machines from Taking Over Resources on page 198When one virtual machine consumes so much of the host resources that other virtual machines on thehost cannot perform their intended functions, a Denial of Service (DoS) might occur. To prevent avirtual machine from causing a DoS, use host resource management features such as setting Sharesand using resource pools.
n Disable Unnecessary Functions Inside Virtual Machines on page 199Any service running in a virtual machine provides the potential for attack. By disabling unnecessarysystem components that are not necessary to support the application or service running on the system,you reduce the number of components that can be attacked.
General Virtual Machine ProtectionA virtual machine is, in most respects, the equivalent of a physical server. Employ the same securitymeasures in virtual machines that you do for physical systems.
Follow these best practices to protect your virtual machine:
Patches and otherprotection
Keep all security measures up-to-date, including applying appropriatepatches. It is especially important to keep track of updates for dormantvirtual machines that are powered off, because it can be easy to overlookthem. For example, ensure that anti-virus software, anti-spy ware, intrusiondetection, and other protection are enabled for every virtual machine in yourvirtual infrastructure. You should also ensure that you have enough spacefor the virtual machine logs.
Anti-virus scans Because each virtual machine hosts a standard operating system, you mustprotect it from viruses by installing anti-virus software. Depending on howyou are using the virtual machine, you might also want to install a softwarefirewall.
Stagger the schedule for virus scans, particularly in deployments with a largenumber of virtual machines. Performance of systems in your environmentdegrades significantly if you scan all virtual machines simultaneously.Because software firewalls and antivirus software can be virtualization-intensive, you can balance the need for these two security measures againstvirtual machine performance, especially if you are confident that your virtualmachines are in a fully trusted environment.
Serial ports Serial ports are interfaces for connecting peripherals to the virtual machine.They are often used on physical systems to provide a direct, low-levelconnection to the console of a server, and a virtual serial port allows for thesame access to a virtual machine. Serial ports allow for low-level access,which often does not have strong controls like logging or privileges.
Use Templates to Deploy Virtual MachinesWhen you manually install guest operating systems and applications on a virtual machine, you introduce arisk of misconfiguration. By using a template to capture a hardened base operating system image with noapplications installed, you can ensure that all virtual machines are created with a known baseline level ofsecurity.
You can use templates that can contain a hardened, patched, and properly configured operating system tocreate other, application-specific templates, or you can use the application template to deploy virtualmachines.
Chapter 7 Securing Virtual Machines
VMware, Inc. 197
Procedure
u Provide templates for virtual machine creation that contain hardened, patched, and properlyconfigured operating system deployments.
If possible, deploy applications in templates as well. Ensure that the applications do not depend oninformation specific to the virtual machine to be deployed.
What to do next
For more information about templates, see the vSphere Virtual Machine Administration documentation.
Minimize Use of Virtual Machine ConsoleThe virtual machine console provides the same function for a virtual machine that a monitor on a physicalserver provides. Users with access to the virtual machine console have access to virtual machine powermanagement and removable device connectivity controls, which might allow a malicious attack on a virtualmachine.
Procedure
1 Use native remote management services, such as terminal services and SSH, to interact with virtualmachines.
Grant access to the virtual machine console only when necessary.
2 Limit the connections to the console to as few connections as necessary.
For example, in a highly secure environment, limit the connection to one. In some environments, youcan increase that limit depending on how many concurrent connections are necessary to accomplishnormal tasks.
Prevent Virtual Machines from Taking Over ResourcesWhen one virtual machine consumes so much of the host resources that other virtual machines on the hostcannot perform their intended functions, a Denial of Service (DoS) might occur. To prevent a virtualmachine from causing a DoS, use host resource management features such as setting Shares and usingresource pools.
By default, all virtual machines on an ESXi host share resources equally. You can use Shares and resourcepools to prevent a denial of service attack that causes one virtual machine to consume so much of the host’sresources that other virtual machines on the same host cannot perform their intended functions.
Do not use Limits unless you fully understand the impact.
Procedure
1 Provision each virtual machine with just enough resources (CPU and memory) to function properly.
2 Use Shares to guarantee resources to critical virtual machines.
3 Group virtual machines with similar requirements into resource pools.
4 In each resource pool, leave Shares set to the default to ensure that each virtual machine in the poolreceives approximately the same resource priority.
With this setting, a single virtual machine cannot use more than other virtual machines in the resourcepool.
What to do next
See the vSphere Resource Management documentation for information about shares and limits.
vSphere Security
198 VMware, Inc.

Disable Unnecessary Functions Inside Virtual MachinesAny service running in a virtual machine provides the potential for attack. By disabling unnecessary systemcomponents that are not necessary to support the application or service running on the system, you reducethe number of components that can be attacked.
Virtual machines do not usually require as many services or functions as physical servers. When youvirtualize a system, evaluate whether a particular service or function is necessary.
Procedure
n Disable unused services in the operating system.
For example, if the system runs a file server, turn off any Web services.
n Disconnect unused physical devices, such as CD/DVD drives, floppy drives, and USB adaptors.
n Disable unused functionality, such as unused display features or HGFS (Host Guest File System).
n Turn off screen savers.
n Do not run the X Window system on Linux, BSD, or Solaris guest operating systems unless it isnecessary.
Remove Unnecessary Hardware DevicesAny enabled or connected device represents a potential attack channel. Users and processes withoutprivileges on a virtual machine can connect or disconnect hardware devices, such as network adapters andCD-ROM drives. Attackers can use this capability to breach virtual machine security. Removingunnecessary hardware devices can help prevent attacks.
An attacker with access to a virtual machine can connect a disconnected hardware device and accesssensitive information on the media left in the drive, or disconnect a network adapter to isolate the virtualmachine from its network, resulting in a denial of service.
n Ensure that unauthorized devices are not connected and remove any unneeded or unused hardwaredevices.
n Disable unnecessary virtual devices from within a virtual machine.
n Ensure that no device is connected to a virtual machine if it is not required. Serial and parallel ports arerarely used for virtual machines in a data center, and CD/DVD drives are usually connected onlytemporarily during software installation.
Procedure
1 Log into a vCenter Server system using the vSphere Web Client.
2 Right-click the virtual machine and click Edit Settings.
3 Check each hardware device and ensure that you want it connected.
Include checks for the following devices:
n Floppy drives
n Serial ports
n Parallel ports
n USB controllers
n CD-ROM drives
Chapter 7 Securing Virtual Machines
VMware, Inc. 199

Disable Unused Display FeaturesAttackers can use an unused display feature as a vector for inserting malicious code into your environment.Disable features that are not in use in your environment.
Procedure
1 Find the virtual machine in the vSphere Web Client inventory.
a Select a data center, folder, cluster, resource pool, or host.
b Click the Related Objects tab and click Virtual Machines.
2 Right-click the virtual machine and click Edit Settings.
3 Select VM Options.
4 Click Advanced and click Edit Configuration.
5 If appropriate, set the following parameters by adding or editing them if appropriate.
Option Description
svga.vgaonly If you set this parameter to TRUE, advanced graphics functions no longerwork. Only character-cell console mode will be available. If you use thissetting, mks.enable3d has no effect.NOTE Apply this settings only to virtual machines that do not need avirtualized video card.
mks.enable3d Set this parameter to FALSE on virtual machines that do not require 3Dfunctionality.
Disable Unexposed FeaturesVMware virtual machines are designed to work on both vSphere systems and hosted virtualizationplatforms such as Workstation and Fusion. Certain virtual machine parameters do not need to be enabledwhen you run a virtual machine on a vSphere system. Disable these parameters to reduce the potential forvulnerabilities.
Prerequisites
Turn off the virtual machine.
Procedure
1 Find the virtual machine in the vSphere Web Client inventory.
a Select a data center, folder, cluster, resource pool, or host.
b Click the Related Objects tab and click Virtual Machines.
2 Right-click the virtual machine and click Edit Settings.
3 Select VM Options.
4 Click Advanced and click Edit Configuration.
5 Set the following parameters to TRUE by adding or editing them.
n isolation.tools.unity.push.update.disable
n isolation.tools.ghi.launchmenu.change
n isolation.tools.memSchedFakeSampleStats.disable
n isolation.tools.getCreds.disable
vSphere Security
200 VMware, Inc.
n isolation.tools.ghi.autologon.disable
n isolation.bios.bbs.disable
n isolation.tools.hgfsServerSet.disable
6 Click OK.
Disable HGFS File TransfersCertain operations such as automated tools upgrades use a component in the hypervisor called host guestfile system (HGFS). You can disable this component to minimize the risk that an attacker can use HGFS totransfer files inside the guest operating system.
Procedure
1 Find the virtual machine in the vSphere Web Client inventory.
a Select a data center, folder, cluster, resource pool, or host.
b Click the Related Objects tab and click Virtual Machines.
2 Right-click the virtual machine and click Edit Settings.
3 Select VM Options.
4 Click Advanced and click Edit Configuration.
5 Verify that the isolation.tools.hgfsServerSet.disable parameter is set to TRUE.
When you make this change, the VMX process no longer responds to commands from the tools process.APIs that use HGFS to transfer files to and from the guest operating system, such as some VIX commands orthe VMware Tools auto-upgrade utility, no longer work.
Disable Copy and Paste Operations Between Guest Operating System and RemoteConsoleCopy and paste operations between the guest operating system and remote console are disabled by default.For a secure environment, retain the default setting. If you require copy and paste operations, you mustenable them using the vSphere Client.
Prerequisites
Turn off the virtual machine.
Procedure
1 Log into a vCenter Server system using the vSphere Web Client.
2 Right-click the virtual machine and click Edit Settings.
3 Click VM Options, and click Edit Configuration.
4 Ensure that the following values are in the Name and Value columns, or click Add Row to add them.
Name Value
isolation.tools.copy.disable true
isolation.tools.paste.disable true These options override any settings made in the guest operating system’s VMware Tools control panel.
5 Click OK.
6 (Optional) If you made changes to the configuration parameters, restart the virtual machine.
Chapter 7 Securing Virtual Machines
VMware, Inc. 201

Limiting Exposure of Sensitive Data Copied to the ClipboardCopy and paste operations are disabled by default for hosts to prevent exposing sensitive data that has beencopied to the clipboard.
When copy and paste is enabled on a virtual machine running VMware Tools, you can copy and pastebetween the guest operating system and remote console. As soon as the console window gains focus, non-privileged users and processes running in the virtual machine can access the clipboard for the virtualmachine console. If a user copies sensitive information to the clipboard before using the console, the user—perhaps unknowingly—exposes sensitive data to the virtual machine. To prevent this problem, copy andpaste operations for the guest operating system are disabled by default.
It is possible to enable copy and paste operations for virtual machines if necessary.
Restrict Users from Running Commands Within a Virtual MachineBy default, a user with vCenter Server Administrator role can interact with files and programs within avirtual machine's guest operating system. To reduce the risk of breaching guest confidentiality, availability,or integrity, create a nonguest access role without the Guest Operations privilege.
For security, be as restrictive about allowing access to the virtual data center as you are to the physical datacenter. To avoid giving users full administrator access, create a custom role that disables guest access andapply that role to users who require administrator privileges, but who are not authorized to interact withfiles and programs within a guest operating system.
For example, a configuration might include a virtual machine on the infrastructure that has sensitiveinformation on it. Tasks such as migration with vMotion and Storage vMotion require that the IT role hasaccess to the virtual machine. In this case, disable some remote operations within a guest OS to ensure thatthe IT role cannot access the sensitive information.
Prerequisites
Verify that you have Administrator privileges on the vCenter Server system where you create the role.
Procedure
1 Log in to the vSphere Web Client as a user who has Administrator privileges on the vCenter Serversystem where you will create the role.
2 Click Administration and select Roles.
3 Click the Create role action icon and type a name for the role.
For example, type Administrator No Guest Access.
4 Select All Privileges.
5 Deselect All Privileges.Virtual machine.Guest Operations to remove the Guest Operations set ofprivileges.
6 Click OK.
What to do next
Select the vCenter Server system or the host and assign a permission that pairs the user or group that shouldhave the new privileges to the newly created role. Remove those users from the default Administrator role.
vSphere Security
202 VMware, Inc.

Prevent a Virtual Machine User or Process from Disconnecting DevicesUsers and processes without root or administrator privileges within virtual machines have the capability toconnect or disconnect devices, such as network adaptors and CD-ROM drives, and the ability to modifydevice settings. To increase virtual machine security, remove these devices. If you do not want topermanently remove a device, you can prevent a virtual machine user or process from connecting ordisconnecting the device from within the guest operating system.
Prerequisites
Turn off the virtual machine.
Procedure
1 Find the virtual machine in the vSphere Web Client inventory.
a Select a data center, folder, cluster, resource pool, or host.
b Click the Related Objects tab and click Virtual Machines.
2 Right-click the virtual machine and click Edit Settings.
3 Select VM Options.
4 Click Advanced and click Edit Configuration.
5 Verify that the following values are in the Name and Value columns, or click Add Row to add them.
Name Value
isolation.device.connectable.disable
true
isolation.device.edit.disable true These options override any settings made in the guest operating system's VMware Tools control panel.
6 Click OK to close the Configuration Parameters dialog box, and click OK again.
Modify Guest Operating System Variable Memory LimitYou can increase the guest operating system variable memory limit if large amounts of custom informationare being stored in the configuration file.
Prerequisites
Turn off the virtual machine.
Procedure
1 Find the virtual machine in the vSphere Web Client inventory.
a Select a data center, folder, cluster, resource pool, or host.
b Click the Related Objects tab and click Virtual Machines.
2 Right-click the virtual machine and click Edit Settings.
3 Select VM Options > Advanced and click Edit Configuration .
4 Add or edit the parameter tools.setInfo.sizeLimit and set the value to the number of bytes.
5 Click OK.
Chapter 7 Securing Virtual Machines
VMware, Inc. 203

Prevent Guest Operating System Processes from Sending ConfigurationMessages to the HostYou can prevent guests from writing any name-value pairs to the configuration file. This is appropriatewhen guest operating systems must be prevented from modifying configuration settings.
Prerequisites
Turn off the virtual machine.
Procedure
1 Find the virtual machine in the vSphere Web Client inventory.
a Select a data center, folder, cluster, resource pool, or host.
b Click the Related Objects tab and click Virtual Machines.
2 Right-click the virtual machine and click Edit Settings.
3 Select VM Options.
4 Click Advanced and click Edit Configuration.
5 Click Add Row and type the following values in the Name and Value columns.
n In the Name column: isolation.tools.setinfo.disable
n In the Value column: true
6 Click OK to close the Configuration Parameters dialog box, and click OK again.
Avoid Using Independent Nonpersistent DisksWhen you use independent nonpersistent disks, successful attackers can remove any evidence that themachine was compromised by shutting down or rebooting the system. Without a persistent record ofactivity on a virtual machine, administrators might be unaware of an attack. Therefore, you should avoidusing independent nonpersistent disks.
Procedure
u Ensure that virtual machine activity is logged remotely on a separate server, such as a syslog server orequivalent Windows-based event collector.
If remote logging of events and activity is not configured for the guest, scsiX:Y.mode should be one ofthe following settings:
n Not present
n Not set to independent nonpersistent
When nonpersistent mode is not enabled, you cannot roll a virtual machine back to a known state when youreboot the system.
vSphere Security
204 VMware, Inc.

Securing vSphere Networking 8Securing vSphere Networking is an essential part of protecting your environment. You secure differentvSphere components in different ways. See the vSphere Networking documentation for detailed informationabout networking in the vSphere environment.
This chapter includes the following topics:
n “Introduction to vSphere Network Security,” on page 205
n “Securing the Network with Firewalls,” on page 206
n “Secure the Physical Switch,” on page 210
n “Securing Standard Switch Ports With Security Policies,” on page 210
n “Securing vSphere Standard Switches,” on page 211
n “Secure vSphere Distributed Switches and Distributed Port Groups,” on page 212
n “Securing Virtual Machines with VLANs,” on page 213
n “Creating a Network DMZ on a Single ESXi Host,” on page 215
n “Creating Multiple Networks Within a Single ESXi Host,” on page 216
n “Internet Protocol Security,” on page 218
n “Ensure Proper SNMP Configuration,” on page 221
n “Use Virtual Switches with the vSphere Network Appliance API Only If Required,” on page 222
n “vSphere Networking Security Best Practices,” on page 222
Introduction to vSphere Network SecurityNetwork security in the vSphere environment shares many characteristics of securing a physical networkenvironment, but also includes some characteristics that apply only to virtual machines.
FirewallsAdd firewall protection to your virtual network by installing and configuring host-based firewalls on someor all of its virtual machines.
For efficiency, you can set up private virtual machine Ethernet networks or virtual networks. With virtualnetworks, you install a host-based firewall on a virtual machine at the head of the virtual network. Thisfirewall serves as a protective buffer between the physical network adapter and the remaining virtualmachines in the virtual network.
VMware, Inc. 205

Because host-based firewalls can slow performance, balance your security needs against performance goalsbefore you install host-based firewalls on virtual machines elsewhere in the virtual network.
See “Securing the Network with Firewalls,” on page 206.
SegmentationKeep different virtual machine zones within a host on different network segments. If you isolate each virtualmachine zone on its own network segment, you minimize the risk of data leakage from one virtual machinezone to the next. Segmentation prevents various threats, including Address Resolution Protocol (ARP)spoofing, in which an attacker manipulates the ARP table to remap MAC and IP addresses, thereby gainingaccess to network traffic to and from a host. Attackers use ARP spoofing to generate man in the middle(MITM) attacks, perform denial of service (DoS) attacks, hijack the target system, and otherwise disrupt thevirtual network.
Planning segmentation carefully lowers the chances of packet transmissions between virtual machine zones,which prevents sniffing attacks that require sending network traffic to the victim. Also, an attacker cannotuse an insecure service in one virtual machine zone to access other virtual machine zones in the host. Youcan implement segmentation by using either of two approaches. Each approach has different benefits.
n Use separate physical network adapters for virtual machine zones to ensure that the zones are isolated.Maintaining separate physical network adapters for virtual machine zones is probably the most securemethod and is less prone to misconfiguration after the initial segment creation.
n Set up virtual local area networks (VLANs) to help safeguard your network. Because VLANs providealmost all of the security benefits inherent in implementing physically separate networks without thehardware overhead, they offer a viable solution that can save you the cost of deploying andmaintaining additional devices, cabling, and so forth. See “Securing Virtual Machines with VLANs,” onpage 213.
Preventing Unauthorized AccessIf your virtual machine network is connected to a physical network, it can be subject to breaches just like anetwork that consists of physical machines. Even if the virtual machine network is isolated from anyphysical network, virtual machines in the network can be subject to attacks from other virtual machines inthe network. The requirements for securing virtual machines are often the same as those for securingphysical machines.
Virtual machines are isolated from each other. One virtual machine cannot read or write another virtualmachine’s memory, access its data, use its applications, and so forth. However, within the network, anyvirtual machine or group of virtual machines can still be the target of unauthorized access from other virtualmachines and might require further protection by external means.
Securing the Network with FirewallsSecurity administrators use firewalls to safeguard the network or selected components in the network fromintrusion.
Firewalls control access to devices within their perimeter by closing all communication pathways, except forthose that the administrator explicitly or implicitly designates as authorized. The pathways, or ports, thatadministrators open in the firewall allow traffic between devices on different sides of the firewall.
IMPORTANT The ESXi firewall in ESXi 5.5 does not allow per-network filtering of vMotion traffic. Therefore,you must install rules on your external firewall to ensure that no incoming connections can be made to thevMotion socket.
In a virtual machine environment, you can plan the layout for firewalls between components.
n Firewalls between physical machines such as vCenter Server systems and ESXi hosts.
vSphere Security
206 VMware, Inc.

n Firewalls between one virtual machine and another—for example, between a virtual machine acting asan external Web server and a virtual machine connected to your company’s internal network.
n Firewalls between a physical machine and a virtual machine, such as when you place a firewallbetween a physical network adapter card and a virtual machine.
How you use firewalls in your ESXi configuration is based on how you plan to use the network and howsecure any given component needs to be. For example, if you create a virtual network where each virtualmachine is dedicated to running a different benchmark test suite for the same department, the risk ofunwanted access from one virtual machine to the next is minimal. Therefore, a configuration where firewallsare present between the virtual machines is not necessary. However, to prevent interruption of a test runfrom an outside host, you might set up the configuration so that a firewall is present at the entry point of thevirtual network to protect the entire set of virtual machines.
Firewalls for Configurations with vCenter ServerIf you access ESXi hosts through vCenter Server, you typically protect vCenter Server using a firewall. Thisfirewall provides basic protection for your network.
A firewall might lie between the clients and vCenter Server. Alternatively, depending on your deployment,vCenter Server and the clients can both be behind the firewall. The main point is to ensure that a firewall ispresent at what you consider to be an entry point for the system.
For a comprehensive list of TCP and UDP ports, including those for vSphere vMotion™ and vSphere FaultTolerance, see “vCenter Server TCP and UDP Ports,” on page 192.
Networks configured with vCenter Server can receive communications through the vSphere Web Client orthird-party network management clients that use the SDK to interface with the host. During normaloperation, vCenter Server listens for data from its managed hosts and clients on designated ports.vCenter Server also assumes that its managed hosts listen for data from vCenter Server on designated ports.If a firewall is present between any of these elements, you must ensure that the firewall has open ports tosupport data transfer.
You might also include firewalls at a variety of other access points in the network, depending on how youplan to use the network and the level of security various devices require. Select the locations for yourfirewalls based on the security risks that you have identified for your network configuration. The followingis a list of firewall locations common to ESXi implementations.
n Between the vSphere Web Client or a third-party network-management client and vCenter Server.
n If your users access virtual machines through a Web browser, between the Web browser and the ESXihost.
n If your users access virtual machines through the vSphere Web Client, between the vSphere Web Clientand the ESXi host. This connection is in addition to the connection between the vSphere Web Client andvCenter Server, and it requires a different port.
n Between vCenter Server and the ESXi hosts.
n Between the ESXi hosts in your network. Although traffic between hosts is usually considered trusted,you can add firewalls between them if you are concerned about security breaches from machine tomachine.
If you add firewalls between ESXi hosts and plan to migrate virtual machines between the servers,perform cloning, or use vMotion, you must also open ports in any firewall that divides the source hostfrom the target hosts so that the source and targets can communicate.
n Between the ESXi hosts and network storage such as NFS or iSCSI storage. These ports are not specificto VMware, and you configure them according to the specifications for your network.
Chapter 8 Securing vSphere Networking
VMware, Inc. 207

Connecting to vCenter Server Through a FirewallvCenter Server uses TCP port 443 to listen for data transfer from its clients. If you have a firewall betweenvCenter Server and its clients, you must configure a connection through which vCenter Server can receivedata from the clients.
Open TCP port 443 in the firewall to enable vCenter Server to receive data from the vSphere Web Client.Firewall configuration depends on what is used at your site, ask your local firewall system administrator forinformation.
If you do not want to use port 443 as the port for vSphere Web Client-to-vCenter Server communication,you can switch to another port by changing the vCenter Server settings from the vSphere Web Client. Seethe vCenter Server and Host Management documentation.
If you are still using the vSphere Client, see the vSphere Administration with vSphere Client documentation.
Firewalls for Configurations Without vCenter ServerYou can connect clients directly to your ESXi network instead of using vCenter Server.
Networks configured without vCenter Server receive communications through the vSphere Client, one ofthe vSphere command-line interfaces, the vSphere Web Services SDK, or third-party clients. For the mostpart, the firewall needs are the same as when a vCenter Server is present, but several key differences exist.
n As you would for configurations that include vCenter Server, be sure a firewall is present to protectyour ESXi layer or, depending on your configuration, your clients and ESXi layer. This firewallprovides basic protection for your network.
n Licensing in this type of configuration is part of the ESXi package that you install on each of the hosts.Because licensing is resident to the server, a separate license server is not required. This eliminates theneed for a firewall between the license server and the ESXi network.
You can configure firewall ports using ESXCLI, using the vSphere Client, or using firewall rules. See “ESXiFirewall Configuration,” on page 150.
Connecting ESXi Hosts Through FirewallsIf you have a firewall between two ESXi hosts and you want to allow transactions between the hosts or usevCenter Server to perform any source or target activities, such as vSphere High Availability (vSphere HA)traffic, migration, cloning, or vMotion, you must configure a connection through which the managed hostscan receive data.
To configure a connection for receiving data, open ports for traffic from services such as vSphere HighAvailability, vMotion, and vSphere Fault Tolerance. See “ESXi Firewall Configuration,” on page 150 for adiscussion of configuration files, vSphere Web Client access, and firewall commands. See “Incoming andOutgoing Firewall Ports for ESXi Hosts,” on page 152 for a list of ports. Refer to the firewall systemadministrator for additional information on configuring the ports.
Connecting to the Virtual Machine Console Through a FirewallWhen you connect your client to ESXi hosts through vCenter Server, certain ports must be open for user andadministrator communication with virtual machine consoles. These ports support different client functions,interface with different layers on ESXi, and use different authentication protocols.
How you connect to the virtual machine console depends on whether you are using the vSphere Web Clientor whether you are using a different client such as the vSphere Web Services SDK.
vSphere Security
208 VMware, Inc.

Connecting by Using the vSphere Web ClientWhen you are connecting with the vSphere Web Client, you always connect to the vCenter Server thatmanages the host, and access the virtual machine console from there.
The following ports are involved.
Port 9443 and Port 9090 The vSphere Web Client uses port 9443 for HTTPS communication withvCenter Server and port 9090 for HTTP communication with vCenter Server.Once users can access vCenter Server, they can also access individual ESXihosts and virtual machines.
These ports can be changed during vSphere Web Client installation.
Port 443 and Port 902 Open ports 443 and 902 in the firewall to allow data transfer to ESXi hostsfrom vCenter Server if you have a firewall between your vCenter Serversystem and the ESXi host managed by vCenter Server.
Figure 8‑1. Port Use for vSphere Web Client Communications with an ESXi Host Managed byvCenter Server
ESXi
vSphere Web Client
Port 443/9443
vmware-hostd vmware-authd
virtual machinemanagement functions
virtual machineconsole
Port 902/9090firewall
For additional information on configuring the ports, see the firewall system administrator.
Connecting to ESXi Hosts Directly with the vSphere ClientYou can connect directly to an ESXi host. with the vSphere Client.
NOTE Do not connect directly to hosts that are managed by a vCenter Server system. If you make changesto such hosts from the vSphere Client, instability in your environment results.
Port 902 The vSphere Client uses this port to provide a connection for guest operatingsystem MKS activities on virtual machines. It is through this port that usersinteract with the guest operating systems and applications of the virtualmachine. VMware does not support configuring a different port for thisfunction.
Chapter 8 Securing vSphere Networking
VMware, Inc. 209

Secure the Physical SwitchSecure the physical switch on each ESXi host to prevent attackers from gaining access to the host and itsvirtual machines.
For best protection of your hosts, ensure that physical switch ports are configured with spanning treedisabled and ensure that the non-negotiate option is configured for trunk links between external physicalswitches and virtual switches in Virtual Switch Tagging (VST) mode.
Procedure
1 Log in to the physical switch and ensure that spanning tree protocol is disabled or that Port Fast isconfigured for all physical switch ports that are connected to ESXi hosts.
2 For virtual machines that perform bridging or routing, check periodically that the first upstreamphysical switch port is configured with BPDU Guard and Port Fast disabled and with spanning treeprotocol enabled.
In vSphere 5.1 and later, to prevent the physical switch from potential Denial of Service (DoS) attacks,you can turn on the guest BPDU filter on the ESXi hosts.
3 Log in to the physical switch and ensure that Dynamic Trunking Protocol (DTP) is not enabled on thephysical switch ports that are connected to the ESXi hosts.
4 Routinely check physical switch ports to ensure that they are properly configured as trunk ports ifconnected to virtual switch VLAN trunking ports.
Securing Standard Switch Ports With Security PoliciesAs with physical network adapters, a virtual machine network adapter can send frames that appear to befrom a different machine or impersonate another machine so that it can receive network frames that areintended for that machine. Also, like physical network adapters, a virtual machine network adapter can beconfigured so that it receives frames targeted for other machines. Both scenarios present a security risk.
When you create a standard switch for your network, you add port groups in the vSphere Web Client toimpose a policy for the virtual machines and VMkernel adapters for system traffic attached to the switch.
As part of adding a VMkernel port group or virtual machine port group to a standard switch, ESXiconfigures a security policy for the ports in the group. You can use this security policy to ensure that thehost prevents the guest operating systems of its virtual machines from impersonating other machines on thenetwork. This security feature is implemented so that the guest operating system responsible for theimpersonation does not detect that the impersonation was prevented.
The security policy determines how strongly you enforce protection against impersonation and interceptionattacks on virtual machines. To correctly use the settings in the security profile, you must understand howvirtual machine network adapters control transmissions and how attacks are staged at this level. See theSecurity Policy section in the vSphere Networking publication.
.
vSphere Security
210 VMware, Inc.

Securing vSphere Standard SwitchesYou can secure standard switch traffic against Layer 2 attacks by restricting some of the MAC addressmodes by using the security settings of the switches.
Each virtual machine network adapter has an initial MAC address and an effective MAC address.
Initial MAC address The initial MAC address is assigned when the adapter is created. Althoughthe initial MAC address can be reconfigured from outside the guestoperating system, it cannot be changed by the guest operating system.
Effective MAC address Each adapter has an effective MAC address that filters out incoming networktraffic with a destination MAC address that is different from the effectiveMAC address. The guest operating system is responsible for setting theeffective MAC address and typically matches the effective MAC address tothe initial MAC address.
Upon creating a virtual machine network adapter, the effective MAC address and initial MAC address arethe same. The guest operating system can alter the effective MAC address to another value at any time. If anoperating system changes the effective MAC address, its network adapter receives network traffic that isdestined for the new MAC address.
When sending packets through a network adapter, the guest operating system typically places its ownadapter effective MAC address in the source MAC address field of the Ethernet frames. It places the MACaddress for the receiving network adapter in the destination MAC address field. The receiving adapteraccepts packets only if the destination MAC address in the packet matches its own effective MAC address.
An operating system can send frames with an impersonated source MAC address. This means an operatingsystem can stage malicious attacks on the devices in a network by impersonating a network adapter that thereceiving network authorizes.
Protect virtual traffic against impersonation and interception Layer 2 attacks by configuring a securitypolicy on port groups or ports.
The security policy on distributed port groups and ports includes the following options:
n Promiscuous mode (see “Promiscuous Mode Operation,” on page 212)
n MAC address changes (see “MAC Address Changes,” on page 211)
n Forged transmits (see “Forged Transmits,” on page 212)
You can view and change the default settings by selecting the virtual switch associated with the host fromthe vSphere Web Client. See the vSphere Networking documentation.
MAC Address ChangesThe security policy of a virtual switch includes a MAC address changes option. This option affects trafficthat a virtual machine receives.
When the Mac address changes option is set to Accept, ESXi accepts requests to change the effective MACaddress to a different address than the initial MAC address.
Chapter 8 Securing vSphere Networking
VMware, Inc. 211

When the Mac address changes option is set to Reject, ESXi does not honor requests to change the effectiveMAC address to a different address than the initial MAC address. This setting protects the host againstMAC impersonation. The port that the virtual machine adapter used to send the request is disabled and thevirtual machine adapter does not receive any more frames until the effective MAC address matches theinitial MAC address. The guest operating system does not detect that the MAC address change request wasnot honored.
NOTE The iSCSI initiator relies on being able to get MAC address changes from certain types of storage. Ifyou are using ESXi iSCSI with iSCSI storage, set the MAC address changes option to Accept.
In some situations, you might have a legitimate need for more than one adapter to have the same MACaddress on a network—for example, if you are using Microsoft Network Load Balancing in unicast mode.When Microsoft Network Load Balancing is used in the standard multicast mode, adapters do not shareMAC addresses.
Forged TransmitsThe Forged transmits option affects traffic that is transmitted from a virtual machine.
When the Forged transmits option is set to Accept, ESXi does not compare source and effective MACaddresses.
To protect against MAC impersonation, you can set the Forged transmits option to Reject. If you do, thehost compares the source MAC address being transmitted by the guest operating system with the effectiveMAC address for its virtual machine adapter to see if they match. If the addresses do not match, the ESXihost drops the packet.
The guest operating system does not detect that its virtual machine adapter cannot send packets by usingthe impersonated MAC address. The ESXi host intercepts any packets with impersonated addresses beforethey are delivered, and the guest operating system might assume that the packets are dropped.
Promiscuous Mode OperationPromiscuous mode eliminates any reception filtering that the virtual machine adapter performs so that theguest operating system receives all traffic observed on the wire. By default, the virtual machine adaptercannot operate in promiscuous mode.
Although promiscuous mode can be useful for tracking network activity, it is an insecure mode ofoperation, because any adapter in promiscuous mode has access to the packets even if some of the packetsare received only by a particular network adapter. This means that an administrator or root user within avirtual machine can potentially view traffic destined for other guest or host operating systems.
NOTE In some situations, you might have a legitimate reason to configure a standard or a distributedvirtual switch to operate in promiscuous mode, for example, if you are running network intrusion detectionsoftware or a packet sniffer.
Secure vSphere Distributed Switches and Distributed Port GroupsAdministrators have several options for securing a vSphere Distributed Switches in their vSphereenvironment.
Procedure
1 For distributed port groups with static binding, verify that the Auto Expand feature is disabled.
Auto Expand is enabled by default in vSphere 5.1 and later.
vSphere Security
212 VMware, Inc.
To disable Auto Expand, configure the autoExpand property under the distributed port group with thevSphere Web Services SDK or with a command-line interface. See the vSphere Web Services SDKdocumentation.
2 Ensure that all private VLAN IDs of any vSphere Distributed Switch are fully documented.
3 If you are using VLAN tagging on a dvPortgroup, VLAN IDs must correspond to the IDs on externalVLAN-aware upstream switches. If VLAN IDs are not tracked completely, mistaken reuse of IDs couldallow traffic between inappropriate physical and virtual machines. Similarly, wrong or missing VLANIDs may lead to traffic not passing between physical and virtual machines.
4 Ensure that no unused ports exist on a virtual port group associated with a vSphere Distributed Switch.
5 Label all vSphere Distributed Switches.
vSphere Distributed Switches associated with an ESXi host require a field for the name of the switch.This label serves as a functional descriptor for the switch, just as the host name associated with aphysical switch. The label on the vSphere Distributed Switch indicates the function or the IP subnet ofthe switch. For example, you can label the switch as internal to indicate that it is only for internalnetworking between a virtual machine’s private virtual switch with no physical network adaptorsbound to it.
6 Disable network healthcheck for your vSphere Distributed Switches if you are not actively using it.
Network healthcheck is disabled by default. Once enabled, the healthcheck packets contain informationabout the host, switch, and port that an attacker can potentially use. Use network healthcheck only fortroubleshooting, and turn it off when troubleshooting is finished.
7 Protect virtual traffic against impersonation and interception Layer 2 attacks by configuring a securitypolicy on port groups or ports.
The security policy on distributed port groups and ports includes the following options:
n Promiscuous mode (see “Promiscuous Mode Operation,” on page 212)
n MAC address changes (see “MAC Address Changes,” on page 211)
n Forged transmits (see “Forged Transmits,” on page 212)
You can view and change the current settings by selecting Manage Distributed Port Groups from theright-button menu of the distributed switch and selecting Security in the wizard. See the vSphereNetworking documentation.
Securing Virtual Machines with VLANsThe network can be one of the most vulnerable parts of any system. Your virtual machine network requiresas much protection as your physical network. Using VLANs can improve networking security in yourenvironment.
VLANs are an IEEE standard networking scheme with specific tagging methods that allow routing ofpackets to only those ports that are part of the VLAN. When properly configured, VLANs provide adependable means for you to protect a set of virtual machines from accidental or malicious intrusions.
VLANs let you segment a physical network so that two machines in the network are unable to transmitpackets back and forth unless they are part of the same VLAN. For example, accounting records andtransactions are among a company’s most sensitive internal information. In a company whose sales,shipping, and accounting employees all use virtual machines in the same physical network, you mightprotect the virtual machines for the accounting department by setting up VLANs.
Chapter 8 Securing vSphere Networking
VMware, Inc. 213

Figure 8‑2. Sample VLAN Layout
Host 1
Standard Switch
Standard Switch
VM6 VM7 VM8
VM3 VM4 VM5
Standard Switch
VM9 VM10 VM11
Standard Switch
VM12VLAN
B
VM13VLAN
A
VM14VLAN
B
VLAN A
VLAN B
BroadcastDomain A
BroadcastDomain B
BroadcastDomain A and B
Multiple VLANson the samevirtual switch
Standard Switch
VM0 VM1 VM2
Host 3
Host 4
Host 2Router
Switch 1
Switch 2
In this configuration, all employees in the accounting department use virtual machines in VLAN A and theemployees in sales use virtual machines in VLAN B.
The router forwards packets containing accounting data to the switches. These packets are tagged fordistribution to VLAN A only. Therefore, the data is confined to Broadcast Domain A and cannot be routedto Broadcast Domain B unless the router is configured to do so.
This VLAN configuration prevents the sales force from intercepting packets destined for the accountingdepartment. It also prevents the accounting department from receiving packets intended for the sales group.The virtual machines serviced by a single virtual switch can be in different VLANs.
Security Considerations for VLANsThe way you set up VLANs to secure parts of a network depends on factors such as the guest operatingsystem and the way your network equipment is configured.
ESXi features a complete IEEE 802.1q-compliant VLAN implementation. VMware cannot make specificrecommendations on how to set up VLANs, but there are factors to consider when using a VLANdeployment as part of your security enforcement policy.
vSphere Security
214 VMware, Inc.
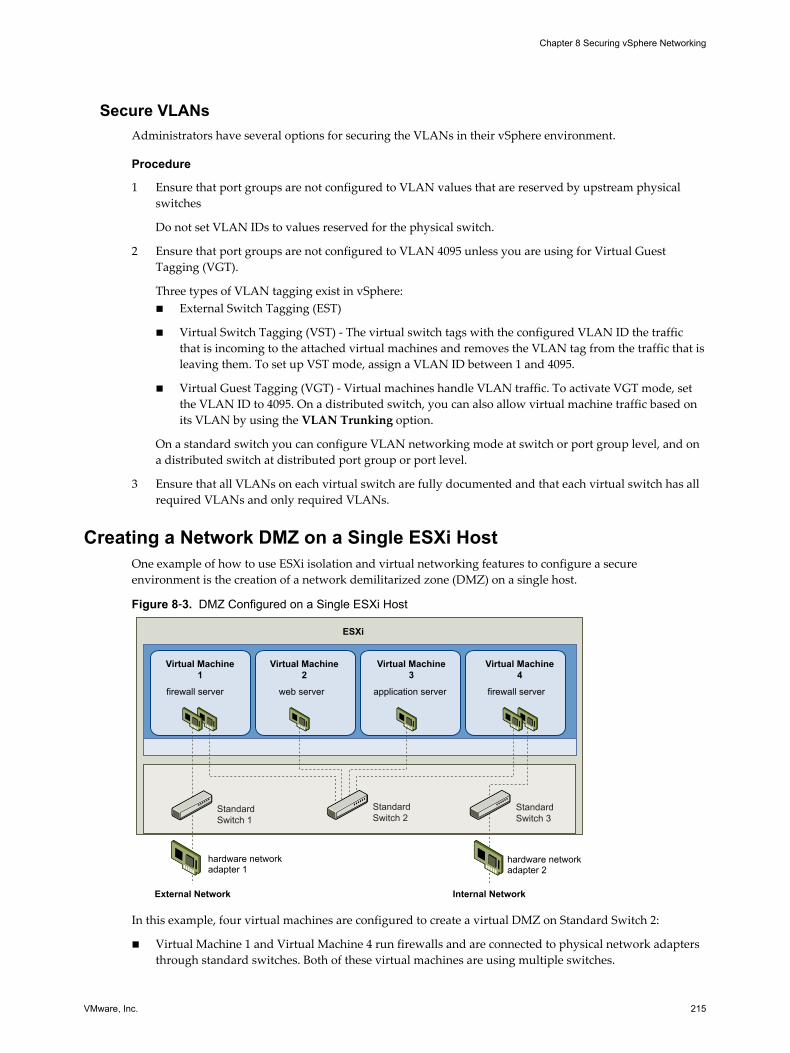
Secure VLANsAdministrators have several options for securing the VLANs in their vSphere environment.
Procedure
1 Ensure that port groups are not configured to VLAN values that are reserved by upstream physicalswitches
Do not set VLAN IDs to values reserved for the physical switch.
2 Ensure that port groups are not configured to VLAN 4095 unless you are using for Virtual GuestTagging (VGT).
Three types of VLAN tagging exist in vSphere:n External Switch Tagging (EST)
n Virtual Switch Tagging (VST) - The virtual switch tags with the configured VLAN ID the trafficthat is incoming to the attached virtual machines and removes the VLAN tag from the traffic that isleaving them. To set up VST mode, assign a VLAN ID between 1 and 4095.
n Virtual Guest Tagging (VGT) - Virtual machines handle VLAN traffic. To activate VGT mode, setthe VLAN ID to 4095. On a distributed switch, you can also allow virtual machine traffic based onits VLAN by using the VLAN Trunking option.
On a standard switch you can configure VLAN networking mode at switch or port group level, and ona distributed switch at distributed port group or port level.
3 Ensure that all VLANs on each virtual switch are fully documented and that each virtual switch has allrequired VLANs and only required VLANs.
Creating a Network DMZ on a Single ESXi HostOne example of how to use ESXi isolation and virtual networking features to configure a secureenvironment is the creation of a network demilitarized zone (DMZ) on a single host.
Figure 8‑3. DMZ Configured on a Single ESXi Host
hardware network adapter 1
External Network Internal Network
hardware network adapter 2
ESXi
Virtual Machine1
firewall server web server application server firewall server
StandardSwitch 1
StandardSwitch 2
StandardSwitch 3
Virtual Machine2
Virtual Machine3
Virtual Machine4
In this example, four virtual machines are configured to create a virtual DMZ on Standard Switch 2:
n Virtual Machine 1 and Virtual Machine 4 run firewalls and are connected to physical network adaptersthrough standard switches. Both of these virtual machines are using multiple switches.
Chapter 8 Securing vSphere Networking
VMware, Inc. 215

n Virtual Machine 2 runs a Web server, and Virtual Machine 3 runs as an application server. Both of thesevirtual machines are connected to one virtual switch.
The Web server and application server occupy the DMZ between the two firewalls. The conduit betweenthese elements is Standard Switch 2, which connects the firewalls with the servers. This switch has no directconnection with any elements outside the DMZ and is isolated from external traffic by the two firewalls.
From an operational viewpoint, external traffic from the Internet enters Virtual Machine 1 throughHardware Network Adapter 1 (routed by Standard Switch 1) and is verified by the firewall installed on thismachine. If the firewall authorizes the traffic, it is routed to the standard switch in the DMZ, StandardSwitch 2. Because the Web server and application server are also connected to this switch, they can serveexternal requests.
Standard Switch 2 is also connected to Virtual Machine 4. This virtual machine provides a firewall betweenthe DMZ and the internal corporate network. This firewall filters packets from the Web server andapplication server. If a packet is verified, it is routed to Hardware Network Adapter 2 through StandardSwitch 3. Hardware Network Adapter 2 is connected to the internal corporate network.
When creating a DMZ on a single host, you can use fairly lightweight firewalls. Although a virtual machinein this configuration cannot exert direct control over another virtual machine or access its memory, all thevirtual machines are still connected through a virtual network. This network could be used for viruspropagation or targeted for other types of attacks. The security of the virtual machines in the DMZ isequivalent to separate physical machines connected to the same network.
Creating Multiple Networks Within a Single ESXi HostThe ESXi system is designed so that you can connect some groups of virtual machines to the internalnetwork, others to the external network, and still others to both—all on the same host. This capability is anoutgrowth of basic virtual machine isolation coupled with a well-planned use of virtual networkingfeatures.
Figure 8‑4. External Networks, Internal Networks, and a DMZ Configured on a Single ESXi Host
physical network adapters
ExternalNetwork 1
InternalNetwork 2
ExternalNetwork 2
InternalNetwork 1
ESXi
VM 2
internaluser
VM 3
internaluser
VM 4
internaluser
VM 5
internaluser
VM 6
firewallserver
VM 7
Webserver
VM 8
firewallserver
VM 1
FTP server
Internal NetworkExternal Network DMZ
vSphere Security
216 VMware, Inc.

In the figure, the system administrator configured a host into three distinct virtual machine zones: FTPserver, internal virtual machines, and DMZ. Each zone serves a unique function.
FTP server Virtual Machine 1 is configured with FTP software and acts as a holding areafor data sent to and from outside resources such as forms and collaterallocalized by a vendor.
This virtual machine is associated with an external network only. It has itsown virtual switch and physical network adapter that connect it to ExternalNetwork 1. This network is dedicated to servers that the company uses toreceive data from outside sources. For example, the company uses ExternalNetwork 1 to receive FTP traffic from vendors and allow vendors access todata stored on externally available servers though FTP. In addition toservicing Virtual Machine 1, External Network 1 services FTP serversconfigured on different ESXi hosts throughout the site.
Because Virtual Machine 1 does not share a virtual switch or physicalnetwork adapter with any virtual machines in the host, the other residentvirtual machines cannot transmit packets to or receive packets from theVirtual Machine 1 network. This restriction prevents sniffing attacks, whichrequire sending network traffic to the victim. More importantly, an attackercannot use the natural vulnerability of FTP to access any of the host’s othervirtual machines.
Internal virtualmachines
Virtual Machines 2 through 5 are reserved for internal use. These virtualmachines process and store company-private data such as medical records,legal settlements, and fraud investigations. As a result, the systemadministrators must ensure the highest level of protection for these virtualmachines.
These virtual machines connect to Internal Network 2 through their ownvirtual switch and network adapter. Internal Network 2 is reserved forinternal use by personnel such as claims processors, in-house lawyers, oradjustors.
Virtual Machines 2 through 5 can communicate with one another throughthe virtual switch and with internal virtual machines elsewhere on InternalNetwork 2 through the physical network adapter. They cannot communicatewith externally facing machines. As with the FTP server, these virtualmachines cannot send packets to or receive packets from the other virtualmachines’ networks. Similarly, the host’s other virtual machines cannot sendpackets to or receive packets from Virtual Machines 2 through 5.
DMZ Virtual Machines 6 through 8 are configured as a DMZ that the marketinggroup uses to publish the company’s external Web site.
This group of virtual machines is associated with External Network 2 andInternal Network 1. The company uses External Network 2 to support theWeb servers that use the marketing and financial department to host thecorporate Web site and other Web facilities that it hosts to outside users.Internal Network 1 is the conduit that the marketing department uses topublish content to the corporate Web site, post downloads, and maintainservices like user forums.
Because these networks are separate from External Network 1 and InternalNetwork 2, and the virtual machines have no shared points of contact(switches or adapters), there is no risk of attack to or from the FTP server orthe internal virtual machine group.
Chapter 8 Securing vSphere Networking
VMware, Inc. 217
By capitalizing on virtual machine isolation, correctly configuring virtual switches, and maintainingnetwork separation, the system administrator can house all three virtual machine zones in the same ESXihost and be confident that there will be no data or resource breaches.
The company enforces isolation among the virtual machine groups by using multiple internal and externalnetworks and making sure that the virtual switches and physical network adapters for each group arecompletely separate from those of other groups.
Because none of the virtual switches straddle virtual machine zones, the system administrator succeeds ineliminating the risk of packet leakage from one zone to another. A virtual switch, by design, cannot leakpackets directly to another virtual switch. The only way for packets to travel from one virtual switch toanother is under the following circumstances:
n The virtual switches are connected to the same physical LAN.
n The virtual switches connect to a common virtual machine, which could be used to transmit packets.
Neither of these conditions occur in the sample configuration. If system administrators want to verify thatno common virtual switch paths exist, they can check for possible shared points of contact by reviewing thenetwork switch layout in the vSphere Web Client.
To safeguard the virtual machines’ resources, the system administrator lowers the risk of DoS and DDoSattacks by configuring a resource reservation and a limit for each virtual machine. The system administratorfurther protects the ESXi host and virtual machines by installing software firewalls at the front and backends of the DMZ, ensuring that the host is behind a physical firewall, and configuring the networkedstorage resources so that each has its own virtual switch.
Internet Protocol SecurityInternet Protocol Security (IPsec) secures IP communications coming from and arriving at a host. ESXi hostssupport IPsec using IPv6.
When you set up IPsec on a host, you enable authentication and encryption of incoming and outgoingpackets. When and how IP traffic is encrypted depends on how you set up the system's security associationsand security policies.
A security association determines how the system encrypts traffic. When you create a security association,you specify the source and destination, encryption parameters, and a name for the security association.
A security policy determines when the system should encrypt traffic. The security policy includes sourceand destination information, the protocol and direction of traffic to be encrypted, the mode (transport ortunnel) and the security association to use.
List Available Security AssociationsESXi can provide a list of all security associations available for use by security policies. The list includes bothuser created security associations and any security associations the VMkernel installed using Internet KeyExchange.
You can get a list of available security associations using the esxcli vSphere CLI command.
Procedure
u At the command prompt, enter the command esxcli network ip ipsec sa list.
ESXi displays a list of all available security associations.
Add an IPsec Security AssociationAdd a security association to specify encryption parameters for associated IP traffic.
You can add a security association using the esxcli vSphere CLI command.
vSphere Security
218 VMware, Inc.

Procedure
u At the command prompt, enter the command esxcli network ip ipsec sa add with one or more of thefollowing options.
Option Description
--sa-source= source address Required. Specify the source address.
--sa-destination= destinationaddress
Required. Specify the destination address.
--sa-mode= mode Required. Specify the mode, either transport or tunnel.
--sa-spi= security parameter index Required. Specify the security parameter index. The security parameterindex identifies the security association to the host. It must be ahexadecimal with a 0x prefix. Each security association you create musthave a unique combination of protocol and security parameter index.
--encryption-algorithm=encryption algorithm
Required. Specify the encryption algorithm using one of the followingparameters.n 3des-cbc
n aes128-cbc
n null ( provides no encryption)
--encryption-key= encryption key Required when you specify an encryption algorithm. Specify theencryption key. You can enter keys as ASCII text or as a hexadecimal witha 0x prefix.
--integrity-algorithm=authentication algorithm
Required. Specify the authentication algorithm, either hmac-sha1 or hmac-sha2-256.
--integrity-key= authenticationkey
Required. Specify the authentication key. You can enter keys as ASCII textor as a hexadecimal with a 0x prefix.
--sa-name=name Required. Provide a name for the security association.
Example: New Security Association CommandThe following example contains extra line breaks for readability.
esxcli network ip ipsec sa add
--sa-source 3ffe:501:ffff:0::a
--sa-destination 3ffe:501:ffff:0001:0000:0000:0000:0001
--sa-mode transport
--sa-spi 0x1000
--encryption-algorithm 3des-cbc
--encryption-key 0x6970763672656164796c6f676f336465736362636f757432
--integrity-algorithm hmac-sha1
--integrity-key 0x6970763672656164796c6f67736861316f757432
--sa-name sa1
Remove an IPsec Security AssociationYou can remove a security association using the ESXCLI vSphere CLI command.
Prerequisites
Verify that the security association you want to use is not currently in use. If you try to remove a securityassociation that is in use, the removal operation fails.
Procedure
u At the command prompt, enter the commandesxcli network ip ipsec sa remove --sa-name security_association_name
Chapter 8 Securing vSphere Networking
VMware, Inc. 219
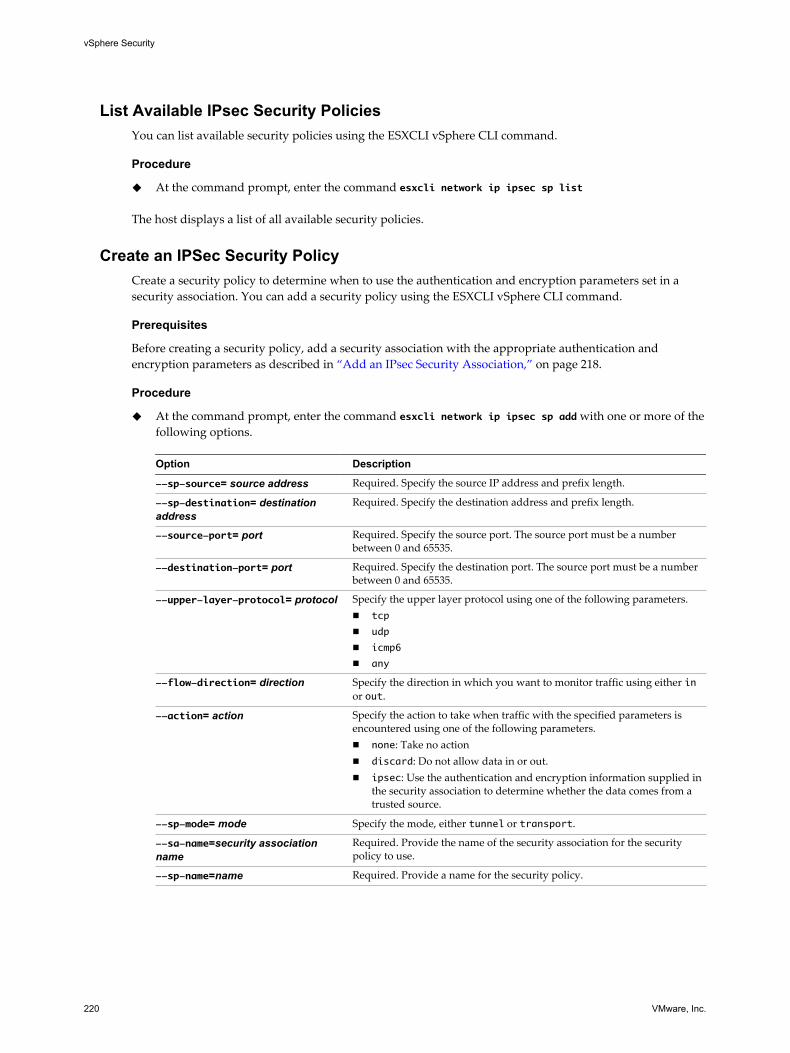
List Available IPsec Security PoliciesYou can list available security policies using the ESXCLI vSphere CLI command.
Procedure
u At the command prompt, enter the command esxcli network ip ipsec sp list
The host displays a list of all available security policies.
Create an IPSec Security PolicyCreate a security policy to determine when to use the authentication and encryption parameters set in asecurity association. You can add a security policy using the ESXCLI vSphere CLI command.
Prerequisites
Before creating a security policy, add a security association with the appropriate authentication andencryption parameters as described in “Add an IPsec Security Association,” on page 218.
Procedure
u At the command prompt, enter the command esxcli network ip ipsec sp add with one or more of thefollowing options.
Option Description
--sp-source= source address Required. Specify the source IP address and prefix length.
--sp-destination= destinationaddress
Required. Specify the destination address and prefix length.
--source-port= port Required. Specify the source port. The source port must be a numberbetween 0 and 65535.
--destination-port= port Required. Specify the destination port. The source port must be a numberbetween 0 and 65535.
--upper-layer-protocol= protocol Specify the upper layer protocol using one of the following parameters.n tcp
n udp
n icmp6
n any
--flow-direction= direction Specify the direction in which you want to monitor traffic using either inor out.
--action= action Specify the action to take when traffic with the specified parameters isencountered using one of the following parameters.n none: Take no actionn discard: Do not allow data in or out.n ipsec: Use the authentication and encryption information supplied in
the security association to determine whether the data comes from atrusted source.
--sp-mode= mode Specify the mode, either tunnel or transport.
--sa-name=security associationname
Required. Provide the name of the security association for the securitypolicy to use.
--sp-name=name Required. Provide a name for the security policy.
vSphere Security
220 VMware, Inc.

Example: New Security Policy CommandThe following example includes extra line breaks for readability.
esxcli network ip ipsec add
--sp-source=2001:db8:1::/64
--sp-destination=2002:db8:1::/64
--source-port=23
--destination-port=25
--upper-layer-protocol=tcp
--flow-direction=out
--action=ipsec
--sp-mode=transport
--sa-name=sa1
--sp-name=sp1
Remove an IPsec Security PolicyYou can remove a security policy from the ESXi host using the ESXCLI vSphere CLI command.
Prerequisites
Verify that the security policy you want to use is not currently in use. If you try to remove a security policythat is in use, the removal operation fails.
Procedure
u At the command prompt, enter the commandesxcli network ip ipsec sp remove --sa-name security policy name.
To remove all security policies, enter the command esxcli network ip ipsec sp remove --remove-all.
Ensure Proper SNMP ConfigurationIf SNMP is not properly configured, monitoring information can be sent to a malicious host. The malicioushost can then use this information to plan an attack.
Procedure
1 Run esxcli system snmp get to determine whether SNMP is currently used.
2 If your system does require SNMP, make sure that it is running by running the esxcli system snmp set--enable true command.
3 If your system uses SNMP, see the Monitoring and Performance publication for setup information forSNMP 3.
SNMP must be configured on each ESXi host. You can use vCLI, PowerCLI, or the vSphere WebServices SDK for configuration.
Chapter 8 Securing vSphere Networking
VMware, Inc. 221

Use Virtual Switches with the vSphere Network Appliance API Only IfRequired
If you are not using products that make use of the vSphere Network Appliance API (DvFilter), do notconfigure your host to send network information to a virtual machine. If the vSphere Network ApplianceAPI is enabled, an attacker might attempt to connect a virtual machine to the filter. This connection mightprovide access to the network of other virtual machines on the host.
If you are using a product that makes use of this API, verify that the host is configured correctly. See thesections on DvFilter in Developing and Deploying vSphere Solutions, vServices, and ESX Agents. If your host isset up to use the API, make sure that the value of the Net.DVFilterBindIpAddress parameter matches theproduct that uses the API.
Procedure
1 To ensure that the Net.DVFilterBindIpAddress kernel parameter has the correct value, locate theparameter by using the vSphere Web Client.
a Select the host and click the Manage tab.
b Under System, select Advanced System Settings.
c Scroll down to Net.DVFilterBindIpAddress and verify that the parameter has an empty value.
The order of parameters is not strictly alphabetical. Type DVFilter in the Filter field to display allrelated parameters.
2 If you are not using DvFilter settings, make sure that the value is blank.
3 If you are using DvFilter settings, make sure the value of the parameter matches the value that theproduct that uses the DvFilter is using.
vSphere Networking Security Best PracticesFollowing networking security helps ensure the integrity of your vSphere deployment.
General Networking Security RecommendationsFollowing general network security recommendations is the first step in securing your networkingenvironment. You can then move on to special areas, such as securing the network with firewalls or usingIPsec.
n Ensure that physical switch ports are configured with Portfast if spanning tree is enabled. BecauseVMware virtual switches do not support STP, physical switch ports connected to an ESXi host musthave Portfast configured if spanning tree is enabled to avoid loops within the physical switch network.If Portfast is not set, potential performance and connectivity issues might arise.
n Ensure that Netflow traffic for a Distributed Virtual Switch is only being sent to authorized collector IPaddresses. Netflow exports are not encrypted and can contain information about the virtual network,increasing the potential for a successful man-in-the-middle attack. If Netflow export is required, verifythat all Netflow target IP addresses are correct.
n Ensure that only authorized administrators have access to virtual networking components by using therole-based access controls. For example, virtual machine administrators should have access only to portgroups in which their virtual machines reside. Network administrators should have permissions to allvirtual networking components but no access to virtual machines. Limiting access reduces the risk ofmisconfiguration, whether accidental or malicious, and enforces key security concepts of separation ofduties and least privilege.
vSphere Security
222 VMware, Inc.

n Ensure that port groups are not configured to the value of the native VLAN. Physical switches useVLAN 1 as their native VLAN. Frames on a native VLAN are not tagged with a 1. ESXi does not have anative VLAN. Frames with VLAN specified in the port group have a tag, but frames with VLAN notspecified in the port group are not tagged. This can cause an issue because irtual machines that aretagged with a 1 end up as belonging to native VLAN of the physical switch.
For example, frames on VLAN 1 from a Cisco physical switch are untagged because VLAN1 is thenative VLAN on that physical switch. However, frames from the ESXi host that are specified as VLAN 1are tagged with a 1; therefore, traffic from the ESXi host that is destined for the native VLAN is notrouted correctly because it is tagged with a 1 instead of being untagged. Traffic from the physicalswitch that is coming from the native VLAN is not visible because it is not tagged. If the ESXi virtualswitch port group uses the native VLAN ID, traffic from virtual machines on that port is not be visibleto the native VLAN on the switch because the switch is expecting untagged traffic.
n Ensure that port groups are not configured to VLAN values reserved by upstream physical switches.Physical switches reserve certain VLAN IDs for internal purposes and often disallow traffic configuredto these values. For example, Cisco Catalyst switches typically reserve VLANs 1001–1024 and 4094.Using a reserved VLAN might result in a denial of service on the network.
n Ensure that port groups are not configured to VLAN 4095 except for Virtual Guest Tagging (VGT).Setting a port group to VLAN 4095 activates VGT mode. In this mode, the virtual switch passes allnetwork frames to the virtual machine without modifying the VLAN tags, leaving it to the virtualmachine to deal with them.
n Restrict port-level configuration overrides on a distributed virtual switch. Port-level configurationoverrides are disabled by default. Once enabled, overrides allow different security settings for a virtualmachine than the settings at the port-group level. Certain virtual machines require uniqueconfigurations, but monitoring is essential. If overrides are not monitored, anyone who gains access to avirtual with a less secure distributed virtual switch configuration might attempt to exploit that access.
n Ensure that distributed virtual switch port mirror traffic is sent only to authorized collector ports orVLANs. A vSphere Distributed Switch can mirror traffic from one port to another to allow packetcapture devices to collect specific traffic flows. Port mirroring sends a copy of all specified traffic in un-encrypted format. This mirrored traffic contains the full data in the packets captured and can result intotal compromise of that data if misdirected. If port mirroring is required, verify that all port mirrordestination VLAN, port and uplink IDs are correct.
Document and Check the vSphere VLAN EnvironmentCheck your VLAN environment regularly to avoid addressing problems. Fully document the VLANenvironment and ensure that VLAN IDs are used only once. Your documentation can help withtroubleshooting and is essential when you want to expand the environment.
Procedure
1 Ensure that all vSwitch and VLANS IDs are fully documented
If you are using VLAN tagging on a virtual switch, the IDs must correspond to the IDs on externalVLAN-aware upstream switches. If VLAN IDs are not tracked completely, mistaken reuse of IDs mightallow for traffic between the wrong physical and virtual machines. Similarly, if VLAN IDs are wrong ormissing, traffic between physical and virtual machines might be blocked where you want traffic to pass.
2 Ensure that VLAN IDs for all distributed virtual port groups (dvPortgroup instances) are fullydocumented
If you are using VLAN tagging on a dvPortgroup the IDs must correspond to the IDs on externalVLAN-aware upstream switches. If VLAN IDs are not tracked completely, mistaken reuse of IDs mightallow for traffic between the wrong physical and virtual machines. Similarly, if VLAN IDs are wrong ormissing, traffic between physical and virtual machines might be blocked where you want traffic to pass.
Chapter 8 Securing vSphere Networking
VMware, Inc. 223

3 Ensure that private VLAN IDs for all distributed virtual switches are fully documented
Private VLANs (PVLANs) for distributed virtual switches require primary and secondary VLAN IDs.These IDs must correspond to the IDs on external PVLAN-aware upstream switches. If VLAN IDs arenot tracked completely, mistaken reuse of IDs might allow for traffic between the wrong physical andvirtual machines. Similarly, if PVLAN IDs are wrong or missing, traffic between physical and virtualmachines might be blocked where you want traffic to pass.
4 Verify that VLAN trunk links are connected only to physical switch ports that function as trunk links.
When connecting a virtual switch to a VLAN trunk port, you must properly configure both the virtualswitch and the physical switch at the uplink port. If the physical switch is not properly configured,frames with the VLAN 802.1q header are forwarded to a switch that not expecting their arrival.
Adopting Sound Network Isolation PracticesAdapting sound network isolation practices significantly bolsters network security in your vSphereenvironment.
Isolate the Management NetworkThe vSphere management network provides access to the vSphere management interface on eachcomponent. Services running on the management interface provide an opportunity for an attacker to gainprivileged access to the systems. Remote attacks are likely to begin with gaining access to this network. If anattacker gains access to the management network, it provides the staging ground for further intrusion.
Strictly control access to management network by protecting it at the security level of the most secure virtualmachine running on an ESXi host or cluster. No matter how the management network is restricted,administrators must have access to this network to configure the ESXi hosts and vCenter Server system.Enable access to management functionality in a strictly controlled manner by using one of the followingapproaches.
n For especially sensitive environments, configure a controlled gateway or other controlled method toaccess the management network. For example, require that administrators connect to the managementnetwork through a VPN, and allow access only to trusted administrators.
n Configure jump boxes that run management clients.
Isolate Storage TrafficEnsure that IP-based storage traffic is isolated. IP-based storage includes iSCSI and NFS. Virtual machinesmight share virtual switches and VLANs with the IP-based storage configurations. This type ofconfiguration might expose IP-based storage traffic to unauthorized virtual machine users.
IP-based storage frequently is not encrypted; anyone with access to this network can view it. To restrictunauthorized users from viewing the IP-based storage traffic, logically separate the IP-based storagenetwork traffic from the production traffic. Configure the IP-based storage adapters on separate VLANs ornetwork segments from the VMkernel management network to limit unauthorized users from viewing thetraffic.
Isolate VMotion TrafficVMotion migration information is transmitted in plain text. Anyone with access to the network over whichthis information flows can view it. Potential attackers can intercept vMotion traffic to obtain the memorycontents of a virtual machine. They might also stage a MiTM attack in which the contents are modifiedduring migration.
Separate vMotion traffic from production traffic on an isolated network. Set up the network to benonroutable, that is, make sure that no layer-3 router is spanning this and other networks, to preventoutside access to the network.
vSphere Security
224 VMware, Inc.

Best Practices Involving MultiplevSphere Components 9
Some security best practices, such as setting up NTP in your environment, affect more than one vSpherecomponent. Consider these recommendations when configuring your environment.
See Chapter 5, “Securing ESXi Hosts,” on page 131 and Chapter 7, “Securing Virtual Machines,” on page 195for related information.
This chapter includes the following topics:
n “Synchronizing Clocks on the vSphere Network,” on page 225
n “Storage Security Best Practices,” on page 228
n “Verify That Sending Host Performance Data to Guests is Disabled,” on page 230
n “Setting Timeouts for the ESXi Shell and vSphere Web Client,” on page 230
Synchronizing Clocks on the vSphere NetworkMake sure that components on the vSphere network have their clocks synchronized. If the clocks on themachines in your vSphere network are not synchronized, SSL certificates, which are time-sensitive, mightnot be recognized as valid in communications between network machines.
Unsynchronized clocks can result in authentication problems, which can cause the installation to fail orprevent the vCenter Server Appliance vpxd service from starting.
Make sure any Windows host machine on which a vCenter component runs is synchronized with the NTPserver. See the Knowledge Base article Timekeeping best practices for Windows, including NTP.
n Synchronize ESXi Clocks with a Network Time Server on page 225Before you install vCenter Server or deploy the vCenter Server Appliance, make sure all machines onyour vSphere network have their clocks synchronized.
n Configuring Time Synchronization Settings in the vCenter Server Appliance on page 226You can change the time synchronization settings in the vCenter Server Appliance after deployment.
Synchronize ESXi Clocks with a Network Time ServerBefore you install vCenter Server or deploy the vCenter Server Appliance, make sure all machines on yourvSphere network have their clocks synchronized.
This task explains how to set up NTP from the vSphere Client. You can instead use the vicfg-ntp vCLIcommand. See the vSphere Command-Line Interface Reference.
Procedure
1 Start the vSphere Client, and connect to the ESXi host.
VMware, Inc. 225

2 On the Configuration tab, click Time Configuration.
3 Click Properties, and click Options.
4 Select NTP Settings.
5 Click Add.
6 In the Add NTP Server dialog box, enter the IP address or fully qualified domain name of the NTPserver to synchronize with.
7 Click OK.
The host time synchronizes with the NTP server.
Configuring Time Synchronization Settings in the vCenter Server ApplianceYou can change the time synchronization settings in the vCenter Server Appliance after deployment.
When you deploy the vCenter Server Appliance, you can choose the time synchronization method to beeither by using an NTP server or by using VMware Tools. In case the time settings in your vSphere networkchange, you can edit the vCenter Server Appliance and configure the time synchronization settings by usingthe commands in the appliance shell.
When you enable periodic time synchronization, VMware Tools sets the time of the guest operating systemto be the same as the time of the host.
After time synchronization occurs, VMware Tools checks once every minute to determine whether theclocks on the guest operating system and the host still match. If not, the clock on the guest operating systemis synchronized to match the clock on the host.
Native time synchronization software, such as Network Time Protocol (NTP), is typically more accuratethan VMware Tools periodic time synchronization and is therefore preferred. You can use only one form ofperiodic time synchronization in the vCenter Server Appliance. If you decide to use native timesynchronization software, vCenter Server Appliance VMware Tools periodic time synchronization isdisabled, and the reverse.
Use VMware Tools Time SynchronizationYou can set up the vCenter Server Appliance to use VMware Tools time synchronization.
Procedure
1 Access the appliance shell and log in as a user who has the administrator or super administrator role.
The default user with super administrator role is root.
2 Run the command to enable VMware Tools time synchronization.
timesync.set --mode host
3 (Optional) Run the command to verify that you successfully applied the VMware Tools timesynchronization.
timesync.get
The command returns that the time synchronization is in host mode.
The time of the appliance is synchronized with the time of the ESXi host.
vSphere Security
226 VMware, Inc.

Add or Replace NTP Servers in the vCenter Server Appliance ConfigurationTo set up the vCenter Server Appliance to use NTP-based time synchronization, first add the NTP servers tothe vCenter Server Appliance configuration.
Procedure
1 Access the appliance shell and log in as a user who has the administrator or super administrator role.
The default user with super administrator role is root.
2 Add NTP servers to the vCenter Server Appliance configuration by running the ntp.server.addcommand.
For example, run the following command:
ntp.server.add --servers IP-addresses-or-host-names
Here IP-addresses-or-host-names is a comma-separated list of IP addresses or host names of the NTPservers.
This command adds NTP servers to the configuration. If the time synchronization is based on an NTPserver, then the NTP daemon is restarted to reload the new NTP servers. Otherwise, this command justadds the new NTP servers to the existing NTP configuration.
3 (Optional) To delete old NTP servers and add new ones to the vCenter Server Appliance configuration,run the ntp.server.set command.
For example, run the following command:
ntp.server.set --servers IP-addresses-or-host-names
Here IP-addresses-or-host-names is a comma-separated list of IP addresses or host names of the NTPservers.
This command deletes old NTP servers from the configuration and sets the input NTP servers in theconfiguration. If the time synchronization is based on an NTP server, the NTP daemon is restarted toreload the new NTP configuration. Otherwise, this command just replaces the servers in NTPconfiguration with the servers that you provide as input.
Synchronize the Time in the vCenter Server Appliance with an NTP ServerYou can configure the time synchronization settings in the vCenter Server Appliance to be based on an NTPserver.
Prerequisites
Set up one or more Network Time Protocol (NTP) servers in the vCenter Server Appliance configuration.See “Add or Replace NTP Servers in the vCenter Server Appliance Configuration,” on page 227.
Procedure
1 Access the appliance shell and log in as a user who has the administrator or super administrator role.
The default user with super administrator role is root.
2 Run the command to enable NTP-based time synchronization.
timesync.set --mode NTP
3 (Optional) Run the command to verify that you successfully applied the NTP synchronization.
timesync.get
The command returns that the time synchronization is in NTP mode.
Chapter 9 Best Practices Involving Multiple vSphere Components
VMware, Inc. 227

Storage Security Best PracticesFollow best practices for storage security, as outlined by your storage security provider. You can also takeadvantage of CHAP and mutual CHAP to secure iSCSI storage, mask and zone SAN resources, andconfigure Kerberos credentials for NFS 4.1.
See also the VMware Virtual SAN documentation.
Securing iSCSI StorageThe storage you configure for a host might include one or more storage area networks (SANs) that useiSCSI. When you configure iSCSI on a host, you can take several measures to minimize security risks.
iSCSI is a means of accessing SCSI devices and exchanging data records by using TCP/IP over a networkport rather than through a direct connection to a SCSI device. In iSCSI transactions, blocks of raw SCSI dataare encapsulated in iSCSI records and transmitted to the requesting device or user.
iSCSI SANs let you make efficient use of existing Ethernet infrastructures to provide hosts access to storageresources that they can dynamically share. iSCSI SANs provide an economical storage solution forenvironments that rely on a common storage pool to serve numerous users. As with any networked system,your iSCSI SANs can be subject to security breaches.
NOTE The requirements and procedures for securing an iSCSI SAN are similar for the hardware iSCSIadapters you can use with hosts and for iSCSI configured directly through the host.
Securing iSCSI DevicesOne means of securing iSCSI devices from unwanted intrusion is to require that the host, or initiator, beauthenticated by the iSCSI device, or target, whenever the host attempts to access data on the target LUN.
The goal of authentication is to prove that the initiator has the right to access a target, a right granted whenyou configure authentication.
ESXi does not support Secure Remote Protocol (SRP), or public-key authentication methods for iSCSI. Youcan use Kerberos only with NFS 4.1.
ESXi supports both CHAP and Mutual CHAP authentication. the vSphere Storage documentation explainshow to select the best authentication method for your iSCSI device and how to set up CHAP.
Ensure uniqueness of CHAP secrets. The mutual authentication secret for each host should be different; ifpossible, the secret should be different for each client authenticating to the server as well. This ensures thatif a single host is compromised, an attacker cannot create another arbitrary host and authenticate to thestorage device. With a single shared secret, compromise of one host can allow an attacker to authenticate tothe storage device.
Protecting an iSCSI SANWhen you plan your iSCSI configuration, take measures to improve the overall security of the iSCSI SAN.Your iSCSI configuration is only as secure as your IP network, so by enforcing good security standardswhen you set up your network, you help safeguard your iSCSI storage.
The following are some specific suggestions for enforcing good security standards.
Protect Transmitted Data
A primary security risk in iSCSI SANs is that an attacker might sniff transmitted storage data.
Take additional measures to prevent attackers from easily seeing iSCSI data. Neither the hardware iSCSIadapter nor ESXi iSCSI initiator encrypts the data that they transmit to and from the targets, making thedata more vulnerable to sniffing attacks.
vSphere Security
228 VMware, Inc.

Allowing your virtual machines to share standard switches and VLANs with your iSCSI configurationpotentially exposes iSCSI traffic to misuse by a virtual machine attacker. To help ensure that intruderscannot listen to iSCSI transmissions, make sure that none of your virtual machines can see the iSCSI storagenetwork.
If you use a hardware iSCSI adapter, you can accomplish this by making sure that the iSCSI adapter andESXi physical network adapter are not inadvertently connected outside the host by virtue of sharing aswitch or some other means. If you configure iSCSI directly through the ESXi host, you can accomplish thisby configuring iSCSI storage through a different standard switch than the one used by your virtualmachines.
In addition to protecting the iSCSI SAN by giving it a dedicated standard switch, you can configure youriSCSI SAN on its own VLAN to improve performance and security. Placing your iSCSI configuration on aseparate VLAN ensures that no devices other than the iSCSI adapter have visibility into transmissionswithin the iSCSI SAN. Also, network congestion from other sources cannot interfere with iSCSI traffic.
Secure iSCSI Ports
When you run iSCSI devices, ESXi does not open any ports that listen for network connections. Thismeasure reduces the chances that an intruder can break into ESXi through spare ports and gain control overthe host. Therefore, running iSCSI does not present any additional security risks at the ESXi end of theconnection.
Any iSCSI target device that you run must have one or more open TCP ports to listen for iSCSI connections.If any security vulnerabilities exist in the iSCSI device software, your data can be at risk through no fault ofESXi. To lower this risk, install all security patches that your storage equipment manufacturer provides andlimit the devices connected to the iSCSI network.
Masking and Zoning SAN ResourcesYou can use zoning and LUN masking to segregate SAN activity and restrict access to storage devices.
You can protect access to storage in your vSphere environment by using zoning and LUN masking withyour SAN resources. For example, you might manage zones defined for testing independently within theSAN so they do not interfere with activity in the production zones. Similarly, you might set up differentzones for different departments.
When you set up zones, take into account any host groups that are set up on the SAN device.
Zoning and masking capabilities for each SAN switch and disk array and the tools for managing LUNmasking are vendor specific.
See your SAN vendor's documentation and the vSphere Storage documentation.
Using Kerberos Credentials for NFS 4.1With NFS version 4.1, ESXi supports Kerberos authentication mechanism.
Kerberos is an authentication service that allows an NFS 4.1 client installed on ESXi to prove its identity toan NFS server before mounting an NFS share. Kerberos uses cryptography to work across an insecurenetwork connection. The vSphere implementation of Kerberos for NFS 4.1 supports only identityverification for the client and server, but does not provide data integrity or confidentiality services.
When you use Kerberos authentication, the following considerations apply:
n ESXi uses Kerberos version 5 with Active Directory domain and Key Distribution Center (KDC).
n As a vSphere administrator, you specify Active Directory credentials to provide an access to NFS 4.1Kerberos datastores to an NFS user. A single set of credentials is used to access all Kerberos datastoresmounted on that host.
Chapter 9 Best Practices Involving Multiple vSphere Components
VMware, Inc. 229

n When multiple ESXi hosts share the same NFS 4.1 datastore, you must use the same Active Directorycredentials for all hosts that access the shared datastore. You can automate this by setting the user inhost profiles and applying the profile to all ESXi hosts.
n NFS 4.1 does not support simultaneous AUTH_SYS and Kerberos mounts.
n NFS 4.1 with Kerberos does not support IPv6. Only IPv4 is supported.
See the vSphere Storage documentation for step-by-step instructions.
Verify That Sending Host Performance Data to Guests is DisabledvSphere includes virtual machine performance counters on Windows operating systems where VMwareTools is installed. Performance counters allow virtual machine owners to do accurate performance analysiswithin the guest operating system. By default, vSphere does not expose host information to the guest virtualmachine.
The ability to send host performance data to a guest virtual machine is disabled by default. This defaultsetting prevents a virtual machine from obtaining detailed information about the physical host, and doesnot make host data available if a breach of security of the virtual machine occurs.
NOTE The procedure below illustrates the basic process. Use the vSphere or one of the vSphere command-line interfaces (vCLI, PowerCLI, and so on) for performing this task on all hosts simultaneously instead.
Procedure
1 On the ESXi system that hosts the virtual machine, browse to the VMX file.
Virtual machine configuration files are located in the /vmfs/volumes/datastore directory, wheredatastore is the name of the storage device where the virtual machine files are stored.
2 In the VMX file, verify that the following parameter is set.
tools.guestlib.enableHostInfo=FALSE
3 Save and close the file.
You cannot retrieve performance information about the host from inside the guest virtual machine.
Setting Timeouts for the ESXi Shell and vSphere Web ClientTo prevent intruders from using an idle session, be sure to set timeouts for the ESXi Shell andvSphere Web Client
ESXi Shell TimeoutFor the ESXi Shell, you can set the following timeouts from the vSphere Web Client and from the DirectConsole User Interface (DCUI).
Availability Timeout The availability timeout setting is the amount of time that can elapse beforeyou must log in after the ESXi Shell is enabled. After the timeout period, theservice is disabled and users are not allowed to log in.
Idle Timeout The idle timeout is the amount of time that can elapse before the user islogged out of an idle interactive sessions. Changes to the idle timeout applythe next time a user logs in to the ESXi Shell and do not affect existingsessions.
vSphere Security
230 VMware, Inc.

vSphere Web Client TimeoutvSphere Web Client sessions terminate after 120 minutes by default. You can change this default in thewebclient.properties file, as discussed in the vCenter Server and Host Management documentation.
Chapter 9 Best Practices Involving Multiple vSphere Components
VMware, Inc. 231

vSphere Security
232 VMware, Inc.

Defined Privileges 10The following tables list the default privileges that, when selected for a role, can be paired with a user andassigned to an object. The tables in this appendix use VC to indicate vCenter Server and HC to indicate hostclient, a standalone ESXi or Workstation host.
When setting permissions, verify all the object types are set with appropriate privileges for each particularaction. Some operations require access permission at the root folder or parent folder in addition to access tothe object being manipulated. Some operations require access or performance permission at a parent folderand a related object.
vCenter Server extensions might define additional privileges not listed here. Refer to the documentation forthe extension for more information on those privileges.
This chapter includes the following topics:
n “Alarms Privileges,” on page 234
n “Auto Deploy and Image Profile Privileges,” on page 235
n “Certificates Privileges,” on page 235
n “Content Library Privileges,” on page 236
n “Datastore Privileges,” on page 237
n “Datastore Cluster Privileges,” on page 238
n “Distributed Switch Privileges,” on page 238
n “ESX Agent Manager Privileges,” on page 239
n “Extension Privileges,” on page 239
n “Folder Privileges,” on page 239
n “Global Privileges,” on page 240
n “Host CIM Privileges,” on page 240
n “Host Configuration Privileges,” on page 241
n “Host Inventory,” on page 242
n “Host Local Operations Privileges,” on page 242
n “Host vSphere Replication Privileges,” on page 243
n “Host Profile Privileges,” on page 243
n “Inventory Service Provider Privileges,” on page 244
n “Inventory Service Tagging Privileges,” on page 244
VMware, Inc. 233
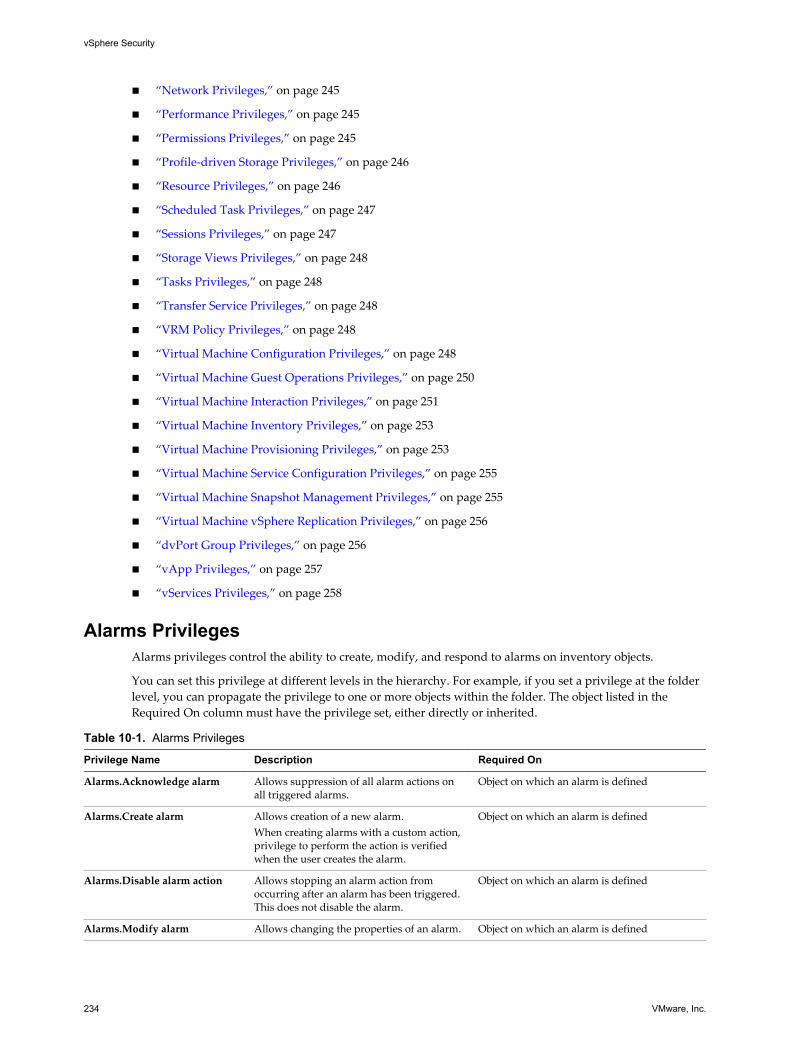
n “Network Privileges,” on page 245
n “Performance Privileges,” on page 245
n “Permissions Privileges,” on page 245
n “Profile-driven Storage Privileges,” on page 246
n “Resource Privileges,” on page 246
n “Scheduled Task Privileges,” on page 247
n “Sessions Privileges,” on page 247
n “Storage Views Privileges,” on page 248
n “Tasks Privileges,” on page 248
n “Transfer Service Privileges,” on page 248
n “VRM Policy Privileges,” on page 248
n “Virtual Machine Configuration Privileges,” on page 248
n “Virtual Machine Guest Operations Privileges,” on page 250
n “Virtual Machine Interaction Privileges,” on page 251
n “Virtual Machine Inventory Privileges,” on page 253
n “Virtual Machine Provisioning Privileges,” on page 253
n “Virtual Machine Service Configuration Privileges,” on page 255
n “Virtual Machine Snapshot Management Privileges,” on page 255
n “Virtual Machine vSphere Replication Privileges,” on page 256
n “dvPort Group Privileges,” on page 256
n “vApp Privileges,” on page 257
n “vServices Privileges,” on page 258
Alarms PrivilegesAlarms privileges control the ability to create, modify, and respond to alarms on inventory objects.
You can set this privilege at different levels in the hierarchy. For example, if you set a privilege at the folderlevel, you can propagate the privilege to one or more objects within the folder. The object listed in theRequired On column must have the privilege set, either directly or inherited.
Table 10‑1. Alarms Privileges
Privilege Name Description Required On
Alarms.Acknowledge alarm Allows suppression of all alarm actions onall triggered alarms.
Object on which an alarm is defined
Alarms.Create alarm Allows creation of a new alarm.When creating alarms with a custom action,privilege to perform the action is verifiedwhen the user creates the alarm.
Object on which an alarm is defined
Alarms.Disable alarm action Allows stopping an alarm action fromoccurring after an alarm has been triggered.This does not disable the alarm.
Object on which an alarm is defined
Alarms.Modify alarm Allows changing the properties of an alarm. Object on which an alarm is defined
vSphere Security
234 VMware, Inc.

Table 10‑1. Alarms Privileges (Continued)
Privilege Name Description Required On
Alarms.Remove alarm Allows deletion of an alarm. Object on which an alarm is defined
Alarms.Set alarm status Allows changing the status of theconfigured event alarm. The status canchange to Normal, Warning, or Alert.
Object on which an alarm is defined
Auto Deploy and Image Profile PrivilegesAuto Deploy privileges control who can perform different tasks on Auto Deploy rules, and who canassociate a host. Auto Deploy privileges also allow you to control who can create or edit an image profile.
The table describes privileges that determine who can manage Auto Deploy rules and rule sets and who cancreate and edit image profiles. See vSphere Installation and Setup.
You can set this privilege at different levels in the hierarchy. For example, if you set a privilege at the folderlevel, you can propagate the privilege to one or more objects within the folder. The object listed in theRequired On column must have the privilege set, either directly or inherited.
Table 10‑2. Auto Deploy Privileges
Privilege Name Description Required On
AutoDeploy.Host.AssociateMachine
Allows users to run a PowerCLI commandthat associates a host with a machine.
vCenter Server
Auto Deploy.ImageProfile .Create
Allows creation of image profiles. vCenter Server
Auto Deploy.Image Profile .Edit Allows editing of image profiles. vCenter Server
Auto Deploy.Rule .Create Allows creation of Auto Deploy rules. vCenter Server
Auto Deploy.Rule .Delete Allows deletion of Auto Deploy rules. vCenter Server
Auto Deploy.Rule .Delete Allows editing of Auto Deploy rules. vCenter Server
Auto Deploy.RuleSet .Activate Allows activation of Auto Deploy rule sets. vCenter Server
Auto Deploy.RuleSet .Edit Allows editing of Auto Deploy rule sets. vCenter Server
Certificates PrivilegesCertificates privileges control which users can manage ESXi certificates.
This privilege determines who can perform certificate management for ESXi hosts. See “Required Privilegesfor Certificate Management Operations,” on page 97 for information on vCenter Server certificatemanagement.
You can set this privilege at different levels in the hierarchy. For example, if you set a privilege at the folderlevel, you can propagate the privilege to one or more objects within the folder. The object listed in theRequired On column must have the privilege set, either directly or inherited.
Table 10‑3. Host Certificates Privileges
Privilege Name Description Required On
Certificates. ManageCertificates
Allows certificate management for ESXi hosts. vCenter Server
Chapter 10 Defined Privileges
VMware, Inc. 235
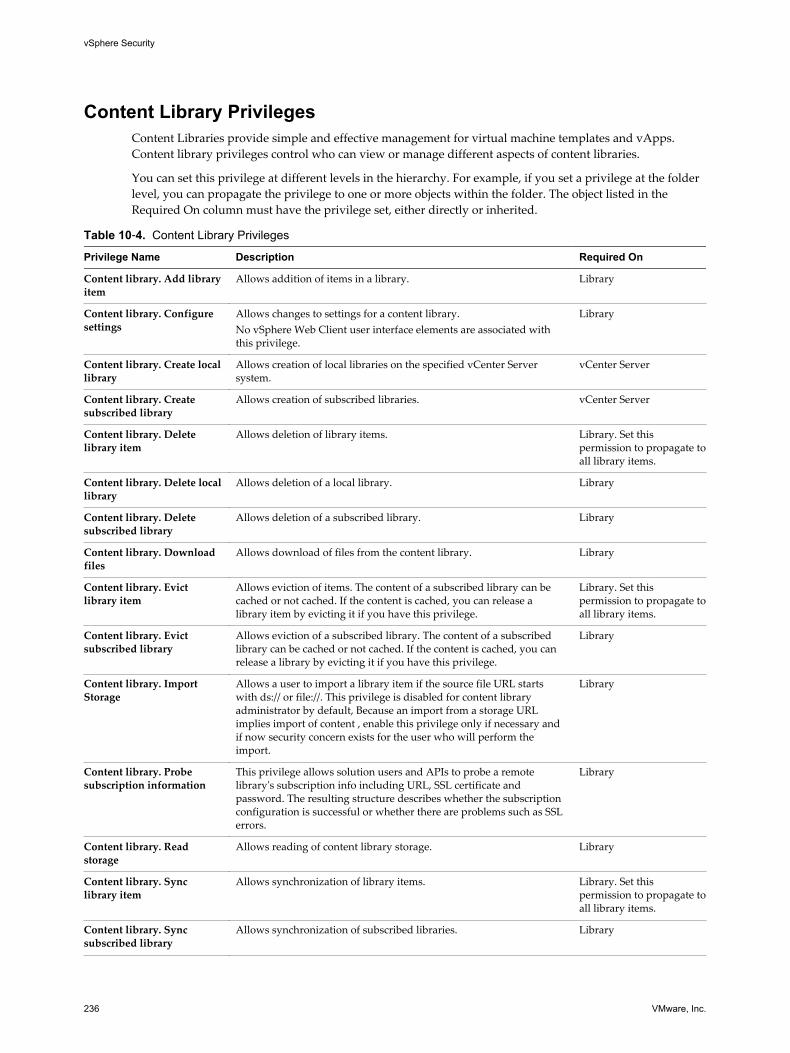
Content Library PrivilegesContent Libraries provide simple and effective management for virtual machine templates and vApps.Content library privileges control who can view or manage different aspects of content libraries.
You can set this privilege at different levels in the hierarchy. For example, if you set a privilege at the folderlevel, you can propagate the privilege to one or more objects within the folder. The object listed in theRequired On column must have the privilege set, either directly or inherited.
Table 10‑4. Content Library Privileges
Privilege Name Description Required On
Content library. Add libraryitem
Allows addition of items in a library. Library
Content library. Configuresettings
Allows changes to settings for a content library.No vSphere Web Client user interface elements are associated withthis privilege.
Library
Content library. Create locallibrary
Allows creation of local libraries on the specified vCenter Serversystem.
vCenter Server
Content library. Createsubscribed library
Allows creation of subscribed libraries. vCenter Server
Content library. Deletelibrary item
Allows deletion of library items. Library. Set thispermission to propagate toall library items.
Content library. Delete locallibrary
Allows deletion of a local library. Library
Content library. Deletesubscribed library
Allows deletion of a subscribed library. Library
Content library. Downloadfiles
Allows download of files from the content library. Library
Content library. Evictlibrary item
Allows eviction of items. The content of a subscribed library can becached or not cached. If the content is cached, you can release alibrary item by evicting it if you have this privilege.
Library. Set thispermission to propagate toall library items.
Content library. Evictsubscribed library
Allows eviction of a subscribed library. The content of a subscribedlibrary can be cached or not cached. If the content is cached, you canrelease a library by evicting it if you have this privilege.
Library
Content library. ImportStorage
Allows a user to import a library item if the source file URL startswith ds:// or file://. This privilege is disabled for content libraryadministrator by default, Because an import from a storage URLimplies import of content , enable this privilege only if necessary andif now security concern exists for the user who will perform theimport.
Library
Content library. Probesubscription information
This privilege allows solution users and APIs to probe a remotelibrary's subscription info including URL, SSL certificate andpassword. The resulting structure describes whether the subscriptionconfiguration is successful or whether there are problems such as SSLerrors.
Library
Content library. Readstorage
Allows reading of content library storage. Library
Content library. Synclibrary item
Allows synchronization of library items. Library. Set thispermission to propagate toall library items.
Content library. Syncsubscribed library
Allows synchronization of subscribed libraries. Library
vSphere Security
236 VMware, Inc.
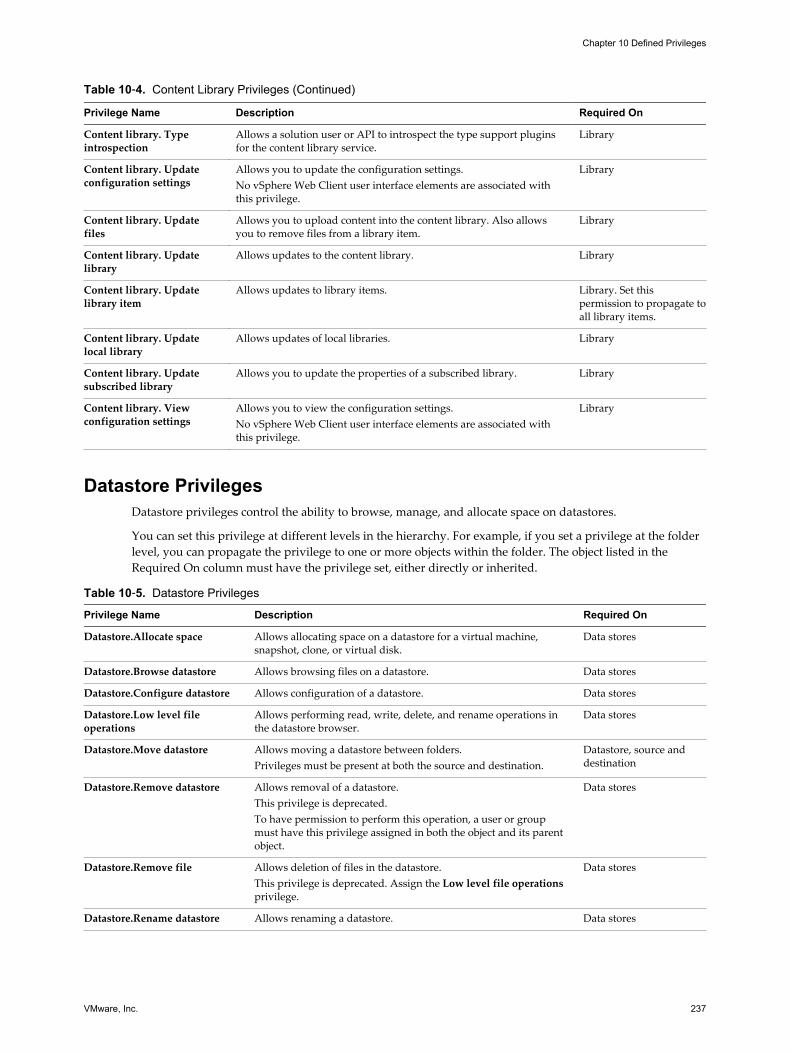
Table 10‑4. Content Library Privileges (Continued)
Privilege Name Description Required On
Content library. Typeintrospection
Allows a solution user or API to introspect the type support pluginsfor the content library service.
Library
Content library. Updateconfiguration settings
Allows you to update the configuration settings.No vSphere Web Client user interface elements are associated withthis privilege.
Library
Content library. Updatefiles
Allows you to upload content into the content library. Also allowsyou to remove files from a library item.
Library
Content library. Updatelibrary
Allows updates to the content library. Library
Content library. Updatelibrary item
Allows updates to library items. Library. Set thispermission to propagate toall library items.
Content library. Updatelocal library
Allows updates of local libraries. Library
Content library. Updatesubscribed library
Allows you to update the properties of a subscribed library. Library
Content library. Viewconfiguration settings
Allows you to view the configuration settings.No vSphere Web Client user interface elements are associated withthis privilege.
Library
Datastore PrivilegesDatastore privileges control the ability to browse, manage, and allocate space on datastores.
You can set this privilege at different levels in the hierarchy. For example, if you set a privilege at the folderlevel, you can propagate the privilege to one or more objects within the folder. The object listed in theRequired On column must have the privilege set, either directly or inherited.
Table 10‑5. Datastore Privileges
Privilege Name Description Required On
Datastore.Allocate space Allows allocating space on a datastore for a virtual machine,snapshot, clone, or virtual disk.
Data stores
Datastore.Browse datastore Allows browsing files on a datastore. Data stores
Datastore.Configure datastore Allows configuration of a datastore. Data stores
Datastore.Low level fileoperations
Allows performing read, write, delete, and rename operations inthe datastore browser.
Data stores
Datastore.Move datastore Allows moving a datastore between folders.Privileges must be present at both the source and destination.
Datastore, source anddestination
Datastore.Remove datastore Allows removal of a datastore.This privilege is deprecated.To have permission to perform this operation, a user or groupmust have this privilege assigned in both the object and its parentobject.
Data stores
Datastore.Remove file Allows deletion of files in the datastore.This privilege is deprecated. Assign the Low level file operationsprivilege.
Data stores
Datastore.Rename datastore Allows renaming a datastore. Data stores
Chapter 10 Defined Privileges
VMware, Inc. 237

Table 10‑5. Datastore Privileges (Continued)
Privilege Name Description Required On
Datastore.Update virtualmachine files
Allows updating file paths to virtual machine files on a datastoreafter the datastore has been resignatured.
Data stores
Datastore.Update virtualmachine metadata
Allows updating virtual machine metadata associated with adatastore.
Data stores
Datastore Cluster PrivilegesDatastore cluster privileges control the configuration of datastore clusters for Storage DRS.
You can set this privilege at different levels in the hierarchy. For example, if you set a privilege at the folderlevel, you can propagate the privilege to one or more objects within the folder. The object listed in theRequired On column must have the privilege set, either directly or inherited.
Table 10‑6. Datastore Cluster Privileges
Privilege Name Description Required On
Datastore cluster.Configurea datatstore cluster
Allows creation of and configuration of settings for datastore clustersfor Storage DRS.
Datastore clusters
Distributed Switch PrivilegesDistributed Switch privileges control the ability to perform tasks related to the management of DistributedSwitch instances.
You can set this privilege at different levels in the hierarchy. For example, if you set a privilege at the folderlevel, you can propagate the privilege to one or more objects within the folder. The object listed in theRequired On column must have the privilege set, either directly or inherited.
Table 10‑7. vSphere Distributed Switch Privileges
Privilege Name Description Required On
Distributed switch.Create Allows creation of a distributed switch. Data centers, Networkfolders
Distributed switch.Delete Allows removal of a distributed switch.To have permission to perform this operation, a user or group musthave this privilege assigned in both the object and its parent object.
Distributed switches
Distributed switch.Hostoperation
Allows changing the host members of a distributed switch. Distributed switches
Distributed switch.Modify Allows changing the configuration of a distributed switch. Distributed switches
Distributed switch.Move Allows moving a vSphere Distributed Switch to another folder. Distributed switches
Distributed switch.NetworkI/O control operation
Allow changing the resource settings for a vSphere Distributed Switch. Distributed switches
Distributed switch.Policyoperation
Allows changing the policy of a vSphere Distributed Switch. Distributed switches
Distributed switch .Portconfiguration operation
Allow changing the configuration of a port in a vSphere DistributedSwitch.
Distributed switches
Distributed switch.Portsetting operation
Allows changing the setting of a port in a vSphere Distributed Switch. Distributed switches
Distributed switch.VSPANoperation
Allows changing the VSPAN configuration of a vSphere DistributedSwitch.
Distributed switches
vSphere Security
238 VMware, Inc.

ESX Agent Manager PrivilegesESX Agent Manager privileges control operations related to ESX Agent Manager and agent virtualmachines. The ESX Agent Manager is a service that lets you install management virtual machines, which aretied to a host and not affected by VMware DRS or other services that migrate virtual machines.
You can set this privilege at different levels in the hierarchy. For example, if you set a privilege at the folderlevel, you can propagate the privilege to one or more objects within the folder. The object listed in theRequired On column must have the privilege set, either directly or inherited.
Table 10‑8. ESX Agent Manager
Privilege Name Description Required On
ESX AgentManager.Config
Allows deployment of an agent virtual machine on a host or cluster. Virtual machines
ESX AgentManager.Modify
Allows modifications to an agent virtual machine such as powering offor deleting the virtual machine.
Virtual machines
ESX Agent View.View Allows viewing of an agent virtual machine. Virtual machines
Extension PrivilegesExtension privileges control the ability to install and manage extensions.
You can set this privilege at different levels in the hierarchy. For example, if you set a privilege at the folderlevel, you can propagate the privilege to one or more objects within the folder. The object listed in theRequired On column must have the privilege set, either directly or inherited.
Table 10‑9. Extension Privileges
Privilege Name Description Required On
Extension.Registerextension
Allows registration of an extension (plug-in). Root vCenter Server
Extension.Unregisterextension
Allows unregistering an extension (plug-in). Root vCenter Server
Extension.Update extension Allows updates to an extension (plug-in). Root vCenter Server
Folder PrivilegesFolder privileges control the ability to create and manage folders.
You can set this privilege at different levels in the hierarchy. For example, if you set a privilege at the folderlevel, you can propagate the privilege to one or more objects within the folder. The object listed in theRequired On column must have the privilege set, either directly or inherited.
Table 10‑10. Folder Privileges
Privilege Name Description Required On
Folder.Create folder Allows creation of a new folder. Folders
Folder.Delete folder Allows deletion of a folder.To have permission to perform this operation, a user or group musthave this privilege assigned in both the object and its parent object.
Folders
Folder.Move folder Allows moving a folder.Privilege must be present at both the source and destination.
Folders
Folder.Rename folder Allows changing the name of a folder. Folders
Chapter 10 Defined Privileges
VMware, Inc. 239

Global PrivilegesGlobal privileges control global tasks related to tasks, scripts, and extensions.
You can set this privilege at different levels in the hierarchy. For example, if you set a privilege at the folderlevel, you can propagate the privilege to one or more objects within the folder. The object listed in theRequired On column must have the privilege set, either directly or inherited.
Table 10‑11. Global Privileges
Privilege Name Description Required On
Global.Act as vCenterServer
Allows preparation or initiation of a vMotion send operation or avMotion receive operation.
Root vCenter Server
Global.Cancel task Allows cancellation of a running or queued task. Inventory object relatedto the task
Global.Capacity planning Allows enabling the use of capacity planning for planningconsolidation of physical machines to virtual machines.
Root vCenter Server
Global.Diagnostics Allows retrieval of a list of diagnostic files, log header, binary files, ordiagnostic bundle.To avoid potential security breaches, limit this privilege to the vCenterServer Administrator role.
Root vCenter Server
Global.Disable methods Allows servers for vCenter Server extensions to disable certainoperations on objects managed by vCenter Server.
Root vCenter Server
Global.Enable methods Allows servers for vCenter Server extensions to enable certainoperations on objects managed byvCenter Server.
Root vCenter Server
Global.Global tag Allows adding or removing global tags. Root host or vCenterServer
Global.Health Allows viewing the health of vCenter Server components. Root vCenter Server
Global.Licenses Allows viewing installed licenses and adding or removing licenses. Root host or vCenterServer
Global.Log event Allows logging a user-defined event against a particular managedentity.
Any object
Global.Manage customattributes
Allows adding, removing, or renaming custom field definitions. Root vCenter Server
Global.Proxy Allows access to an internal interface for adding or removingendpoints to or from the proxy.
Root vCenter Server
Global.Script action Allows scheduling a scripted action in conjunction with an alarm. Any object
Global.Service managers Allows use of the resxtop command in the vSphere CLI. Root host or vCenterServer
Global.Set custom attribute Allows viewing, creating, or removing custom attributes for amanaged object.
Any object
Global.Settings Allows reading and modifying runtime vCenter Server configurationsettings.
Root vCenter Server
Global.System tag Allows adding or removing system tags. Root vCenter Server
Host CIM PrivilegesHost CIM privileges control the use of CIM for host health monitoring.
You can set this privilege at different levels in the hierarchy. For example, if you set a privilege at the folderlevel, you can propagate the privilege to one or more objects within the folder. The object listed in theRequired On column must have the privilege set, either directly or inherited.
vSphere Security
240 VMware, Inc.

Table 10‑12. Host CIM Privileges
Privilege Name Description Required On
Host.CIM.CIM Interaction Allow a client to obtain a ticket to use for CIM services. Hosts
Host Configuration PrivilegesHost configuration privileges control the ability to configure hosts.
You can set this privilege at different levels in the hierarchy. For example, if you set a privilege at the folderlevel, you can propagate the privilege to one or more objects within the folder. The object listed in theRequired On column must have the privilege set, either directly or inherited.
Table 10‑13. Host Configuration Privileges
Privilege Name Description Required On
Host.Configuration.AdvancedSettings
Allows setting advanced host configuration options. Hosts
Host.Configuration.AuthenticationStore
Allows configuring Active Directory authentication stores. Hosts
Host.Configuration.ChangePciPassthru settings
Allows changes to PciPassthru settings for a host. Hosts
Host.Configuration.Change SNMPsettings
Allows changes to SNMP settings for a host. Hosts
Host.Configuration.Change dateand time settings
Allows changes to date and time settings on the host. Hosts
Host.Configuration.Change settings Allows setting of lockdown mode on ESXi hosts. Hosts
Host.Configuration.Connection Allows changes to the connection status of a host (connectedor disconnected).
Hosts
Host.Configuration.Firmware Allows updates to the ESXi host's firmware. Hosts
Host.Configuration.Hyperthreading Allows enabling and disabling hyperthreading in a host CPUscheduler.
Hosts
Host.Configuration.Imageconfiguration
Allows changes to the image associated with a host.
Host.Configuration.Maintenance Allows putting the host in and out of maintenance mode andshutting down and restarting the host.
Hosts
Host.Configuration.Memoryconfiguration
Allows modifications to the host configuration. Hosts
Host.Configuration.Networkconfiguration
Allows configuration of network, firewall, and vMotionnetwork.
Hosts
Host.Configuration.Power Allows configuration of host power management settings. Hosts
Host.Configuration.Query patch Allows querying for installable patches and installingpatches on the host.
Hosts
Host.Configuration.Security profileand firewall
Allows configuration of Internet services, such as SSH,Telnet, SNMP, and of the host firewall.
Hosts
Host.Configuration.Storagepartition configuration
Allows VMFS datastore and diagnostic partitionmanagement. Users with this privilege can scan for newstorage devices and manage iSCSI.
Hosts
Host.Configuration.SystemManagement
Allows extensions to manipulate the file system on the host. Hosts
Chapter 10 Defined Privileges
VMware, Inc. 241
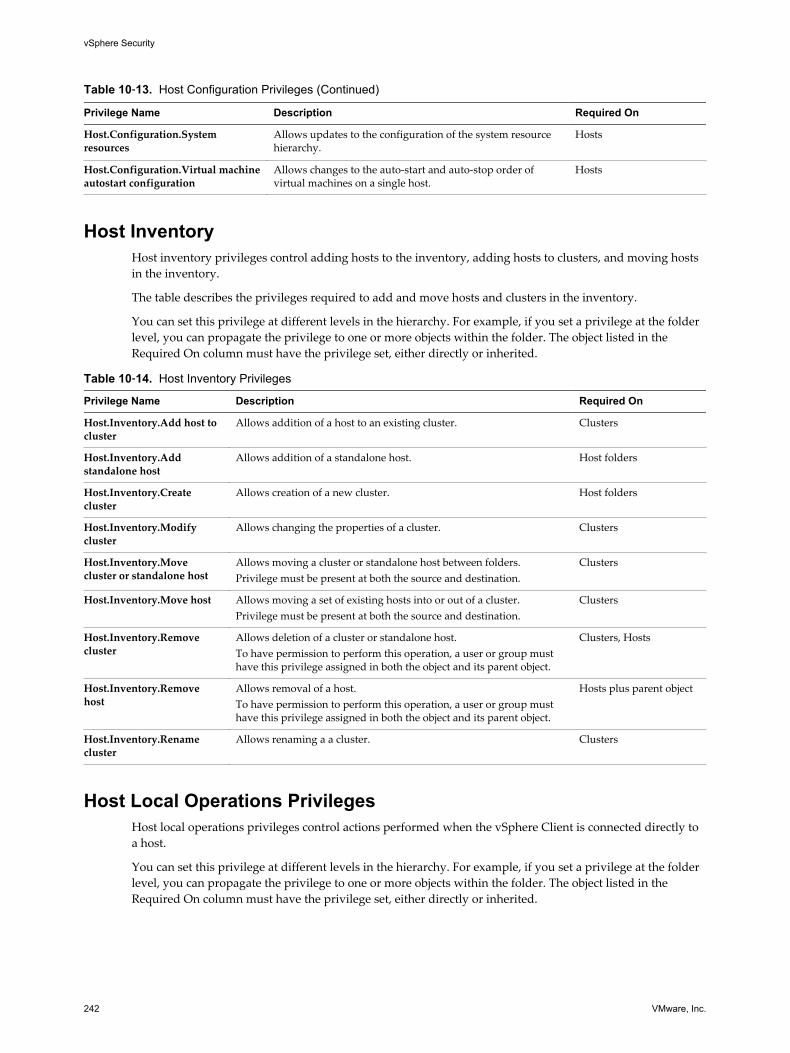
Table 10‑13. Host Configuration Privileges (Continued)
Privilege Name Description Required On
Host.Configuration.Systemresources
Allows updates to the configuration of the system resourcehierarchy.
Hosts
Host.Configuration.Virtual machineautostart configuration
Allows changes to the auto-start and auto-stop order ofvirtual machines on a single host.
Hosts
Host InventoryHost inventory privileges control adding hosts to the inventory, adding hosts to clusters, and moving hostsin the inventory.
The table describes the privileges required to add and move hosts and clusters in the inventory.
You can set this privilege at different levels in the hierarchy. For example, if you set a privilege at the folderlevel, you can propagate the privilege to one or more objects within the folder. The object listed in theRequired On column must have the privilege set, either directly or inherited.
Table 10‑14. Host Inventory Privileges
Privilege Name Description Required On
Host.Inventory.Add host tocluster
Allows addition of a host to an existing cluster. Clusters
Host.Inventory.Addstandalone host
Allows addition of a standalone host. Host folders
Host.Inventory.Createcluster
Allows creation of a new cluster. Host folders
Host.Inventory.Modifycluster
Allows changing the properties of a cluster. Clusters
Host.Inventory.Movecluster or standalone host
Allows moving a cluster or standalone host between folders.Privilege must be present at both the source and destination.
Clusters
Host.Inventory.Move host Allows moving a set of existing hosts into or out of a cluster.Privilege must be present at both the source and destination.
Clusters
Host.Inventory.Removecluster
Allows deletion of a cluster or standalone host.To have permission to perform this operation, a user or group musthave this privilege assigned in both the object and its parent object.
Clusters, Hosts
Host.Inventory.Removehost
Allows removal of a host.To have permission to perform this operation, a user or group musthave this privilege assigned in both the object and its parent object.
Hosts plus parent object
Host.Inventory.Renamecluster
Allows renaming a a cluster. Clusters
Host Local Operations PrivilegesHost local operations privileges control actions performed when the vSphere Client is connected directly toa host.
You can set this privilege at different levels in the hierarchy. For example, if you set a privilege at the folderlevel, you can propagate the privilege to one or more objects within the folder. The object listed in theRequired On column must have the privilege set, either directly or inherited.
vSphere Security
242 VMware, Inc.

Table 10‑15. Host Local Operations Privileges
Privilege Name Description Required On
Host.Local operations.Addhost to vCenter
Allows installation and removal of vCenter agents, such as vpxa andaam, on a host.
Root host
Host.Localoperations.Create virtualmachine
Allows creation of a new virtual machine from scratch on a diskwithout registering it on the host.
Root host
Host.Localoperations.Delete virtualmachine
Allows deletion of a virtual machine on disk. Supported forregistered and unregistered virtual machines.
Root host
Host.Localoperations.Extract NVRAMcontent
Allows extraction of the NVRAM content of a host.
Host.Localoperations.Manage usergroups
Allows management of local accounts on a host. Root host
Host.Localoperations.Reconfigurevirtual machine
Allows reconfiguring a virtual machine. Root host
Host.Localoperations.Relayoutsnapshots
Allows changes to the layout of a virtual machine's snapshots. Root host
Host vSphere Replication PrivilegesHost vSphere replication privileges control the use of virtual machine replication by VMware vCenter SiteRecovery Manager™ for a host.
You can set this privilege at different levels in the hierarchy. For example, if you set a privilege at the folderlevel, you can propagate the privilege to one or more objects within the folder. The object listed in theRequired On column must have the privilege set, either directly or inherited.
Table 10‑16. Host vSphere Replication Privileges
Privilege Name Description Required On
Host.vSphereReplication.ManageReplication
Allows management of virtual machine replication on this host. Hosts
Host Profile PrivilegesHost Profile privileges control operations related to creating and modifying host profiles.
You can set this privilege at different levels in the hierarchy. For example, if you set a privilege at the folderlevel, you can propagate the privilege to one or more objects within the folder. The object listed in theRequired On column must have the privilege set, either directly or inherited.
Table 10‑17. Host Profile Privileges
Privilege Name Description Required On
Host profile.Clear Allows clearing of profile related information. Root vCenter Server
Host profile.Create Allows creation of a host profile. Root vCenter Server
Host profile.Delete Allows deletion of a host profile. Root vCenter Server
Host profile.Edit Allows editing a host profile. Root vCenter Server
Chapter 10 Defined Privileges
VMware, Inc. 243

Table 10‑17. Host Profile Privileges (Continued)
Privilege Name Description Required On
Host profile.Export Allows exporting a host profile Root vCenter Server
Host profile.View Allows viewing a host profile. Root vCenter Server
Inventory Service Provider PrivilegesInventory Service Provider privileges are internal only. Do not use.
Inventory Service Tagging PrivilegesInventory Service Tagging privileges control the ability to create and delete tags and tag categories, andassign and remove tags on vSphere inventory objects.
You can set this privilege at different levels in the hierarchy. For example, if you set a privilege at the folderlevel, you can propagate the privilege to one or more objects within the folder. The object listed in theRequired On column must have the privilege set, either directly or inherited.
Table 10‑18. vCenter Inventory Service Privileges
Privilege Name Description Required On
Inventory Service.vSphereTagging.Assign or Unassign vSphereTag
Allows assignment or unassignment of a tag for anobject in the vCenter Server inventory.
Any object
Inventory Service.vSphereTagging.Create vSphere Tag
Allows creation of a tag. Any object
Inventory Service.vSphereTagging.Create vSphere Tag Category
Allows creation of a tag category. Any object
Inventory Service.vSphereTagging.Create vSphere Tag Scope
Allows creation of a tag scope. Any object
Inventory Service.vSphereTagging.Delete vSphere Tag
Allows deletion of a tag category. Any object
Inventory Service.vSphereTagging.Delete vSphere Tag Category
Allows deletion of a tag category.. Any object
Inventory Service.vSphereTagging.Delete vSphere Tag Scope
Allows deletion of a tag scope. Any object
Inventory Service.vSphereTagging.Edit vSphere Tag
Allows editing of a tag. Any object
Inventory Service.vSphereTagging.Edit vSphere Tag Category
Allows editing of a tag category. Any object
Inventory Service.vSphereTagging.Edit vSphere Tag Scope
Allows editing of a tag scope. Any object
Inventory Service.vSphereTagging.Modify UsedBy Field forCategory
Allows changing the UsedBy field for a tagcategory.
Any object
Inventory Service.vSphereTagging.Modify UsedBy Field for Tag
Allows changing the UsedBy field for a tag. Any object
vSphere Security
244 VMware, Inc.

Network PrivilegesNetwork privileges control tasks related to network management.
You can set this privilege at different levels in the hierarchy. For example, if you set a privilege at the folderlevel, you can propagate the privilege to one or more objects within the folder. The object listed in theRequired On column must have the privilege set, either directly or inherited.
Table 10‑19. Network Privileges
Privilege Name Description Required On
Network.Assign network Allows assigning a network to a virtual machine. Networks, VirtualMachines
Network.Configure Allows configuring a network. Networks, VirtualMachines
Network.Move network Allows moving a network between folders.Privilege must be present at both the source and destination.
Networks
Network.Remove Allows removal of a network.This privilege is deprecated.To have permission to perform this operation, a user or group musthave this privilege assigned in both the object and its parent object.
Networks
Performance PrivilegesPerformance privileges control modifying performance statistics settings.
You can set this privilege at different levels in the hierarchy. For example, if you set a privilege at the folderlevel, you can propagate the privilege to one or more objects within the folder. The object listed in theRequired On column must have the privilege set, either directly or inherited.
Table 10‑20. Performance Privileges
Privilege Name Description Required On
Performance.Modifyintervals
Allows creating, removing, and updating performance data collectionintervals.
Root vCenter Server
Permissions PrivilegesPermissions privileges control the assigning of roles and permissions.
You can set this privilege at different levels in the hierarchy. For example, if you set a privilege at the folderlevel, you can propagate the privilege to one or more objects within the folder. The object listed in theRequired On column must have the privilege set, either directly or inherited.
Table 10‑21. Permissions Privileges
Privilege Name Description Required On
Permissions.Modifypermission
Allows defining one or more permission rules on an entity, orupdating rules if rules are already present for the given user or groupon the entity.To have permission to perform this operation, a user or group musthave this privilege assigned in both the object and its parent object.
Any object plus parentobject
Permissions.Modifyprivilege
Allows modifying a privilege's group or description.No vSphere Web Client user interface elements are associated with thisprivilege.
Chapter 10 Defined Privileges
VMware, Inc. 245

Table 10‑21. Permissions Privileges (Continued)
Privilege Name Description Required On
Permissions.Modify role Allows updating a role's name and the privileges that are associatedwith the role.
Any object
Permissions.Reassign rolepermissions
Allows reassigning all permissions of a role to another role. Any object
Profile-driven Storage PrivilegesProfile-driven storage privileges control operations related to storage profiles.
You can set this privilege at different levels in the hierarchy. For example, if you set a privilege at the folderlevel, you can propagate the privilege to one or more objects within the folder. The object listed in theRequired On column must have the privilege set, either directly or inherited.
Table 10‑22. Profile-driven Storage Privileges
Privilege Name Description Required On
Profile-driven storage.Profile-driven storage update
Allows changes to be made to storage profiles, suchas creating and updating storage capabilities andvirtual machine storage profiles.
Root vCenter Server
Profile-driven storage.Profile-driven storage view
Allows viewing of defined storage capabilities andstorage profiles.
Root vCenter Server
Resource PrivilegesResource privileges control the creation and management of resource pools, as well as the migration ofvirtual machines.
You can set this privilege at different levels in the hierarchy. For example, if you set a privilege at the folderlevel, you can propagate the privilege to one or more objects within the folder. The object listed in theRequired On column must have the privilege set, either directly or inherited.
Table 10‑23. Resource Privileges
Privilege Name Description Required On
Resource.Apply recommendation Allows accepting a suggestion by the server to performa migration with vMotion.
Clusters
Resource.Assign vApp to resource pool Allows assignment of a vApp to a resource pool. Resource pools
Resource.Assign virtual machine toresource pool
Allows assignment of a virtual machine to a resourcepool.
Resource pools
Resource.Create resource pool Allows creation of resource pools. Resource pools, clusters
Resource.Migrate Allows cold migration of a virtual machine's executionto a specific resource pool or host.
Virtual machines
Resource.Migrate powered off virtualmachine
Allows migration of a powered off virtual machine to adifferent resource pool or host.
Virtual machines
Resource.Migrate powered on virtualmachine
Allows migration with vMotion of a powered on virtualmachine to a different resource pool or host.
Resource.Modify resource pool Allows changes to the allocations of a resource pool. Resource pools
Resource.Move resource pool Allows moving a resource pool.Privilege must be present at both the source anddestination.
Resource pools
vSphere Security
246 VMware, Inc.

Table 10‑23. Resource Privileges (Continued)
Privilege Name Description Required On
Resource.Query vMotion Allows querying the general vMotion compatibility of avirtual machine with a set of hosts.
Root vCenter Server
Resource.Remove resource pool Allows deletion of a resource pool.To have permission to perform this operation, a user orgroup must have this privilege assigned in both theobject and its parent object.
Resource pools
Resource.Rename resource pool Allows renaming of a resource pool. Resource pools
Scheduled Task PrivilegesScheduled task privileges control creation, editing, and removal of scheduled tasks.
You can set this privilege at different levels in the hierarchy. For example, if you set a privilege at the folderlevel, you can propagate the privilege to one or more objects within the folder. The object listed in theRequired On column must have the privilege set, either directly or inherited.
Table 10‑24. Scheduled Task Privileges
Privilege Name Description Required On
Scheduled task.Create tasks Allows scheduling of a task. Required in addition to the privileges toperform the scheduled action at the time of scheduling.
Any object
Scheduled task.Modify task Allows reconfiguration of the scheduled task properties. Any object
Scheduled task.Remove task Allows removal of a scheduled task from the queue. Any object
Scheduled task.Run task Allows running the scheduled task immediately.Creating and running a scheduled task also requires permission toperform the associated action.
Any object
Sessions PrivilegesSessions privileges control the ability of extensions to open sessions on the vCenter Server system.
You can set this privilege at different levels in the hierarchy. For example, if you set a privilege at the folderlevel, you can propagate the privilege to one or more objects within the folder. The object listed in theRequired On column must have the privilege set, either directly or inherited.
Table 10‑25. Session Privileges
Privilege Name Description Required On
Sessions.Impersonate user Allow impersonation of another user. This capability is used byextensions.
Root vCenter Server
Sessions.Message Allow setting of the global log in message. Root vCenter Server
Sessions.Validate session Allow verification of session validity. Root vCenter Server
Sessions.View and stopsessions
Allow viewing sessions and forcing log out of one or more logged-onusers.
Root vCenter Server
Chapter 10 Defined Privileges
VMware, Inc. 247
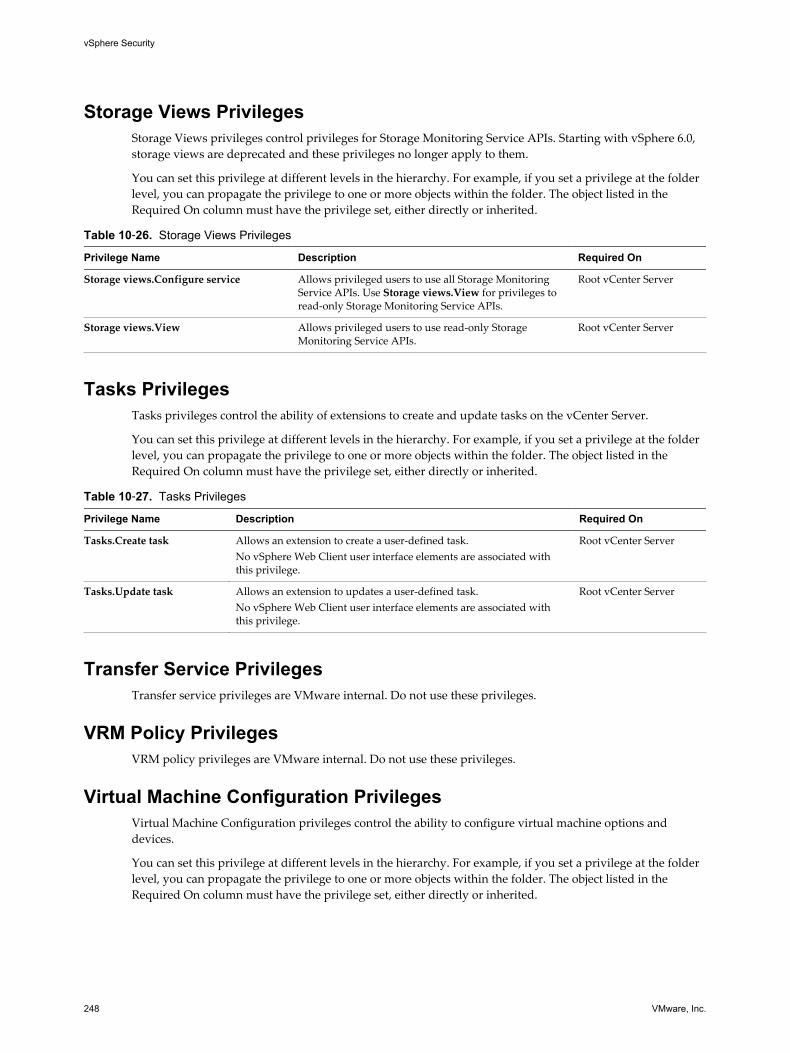
Storage Views PrivilegesStorage Views privileges control privileges for Storage Monitoring Service APIs. Starting with vSphere 6.0,storage views are deprecated and these privileges no longer apply to them.
You can set this privilege at different levels in the hierarchy. For example, if you set a privilege at the folderlevel, you can propagate the privilege to one or more objects within the folder. The object listed in theRequired On column must have the privilege set, either directly or inherited.
Table 10‑26. Storage Views Privileges
Privilege Name Description Required On
Storage views.Configure service Allows privileged users to use all Storage MonitoringService APIs. Use Storage views.View for privileges toread-only Storage Monitoring Service APIs.
Root vCenter Server
Storage views.View Allows privileged users to use read-only StorageMonitoring Service APIs.
Root vCenter Server
Tasks PrivilegesTasks privileges control the ability of extensions to create and update tasks on the vCenter Server.
You can set this privilege at different levels in the hierarchy. For example, if you set a privilege at the folderlevel, you can propagate the privilege to one or more objects within the folder. The object listed in theRequired On column must have the privilege set, either directly or inherited.
Table 10‑27. Tasks Privileges
Privilege Name Description Required On
Tasks.Create task Allows an extension to create a user-defined task.No vSphere Web Client user interface elements are associated withthis privilege.
Root vCenter Server
Tasks.Update task Allows an extension to updates a user-defined task.No vSphere Web Client user interface elements are associated withthis privilege.
Root vCenter Server
Transfer Service PrivilegesTransfer service privileges are VMware internal. Do not use these privileges.
VRM Policy PrivilegesVRM policy privileges are VMware internal. Do not use these privileges.
Virtual Machine Configuration PrivilegesVirtual Machine Configuration privileges control the ability to configure virtual machine options anddevices.
You can set this privilege at different levels in the hierarchy. For example, if you set a privilege at the folderlevel, you can propagate the privilege to one or more objects within the folder. The object listed in theRequired On column must have the privilege set, either directly or inherited.
vSphere Security
248 VMware, Inc.

Table 10‑28. Virtual Machine Configuration Privileges
Privilege Name Description Required On
Virtualmachine.Configuration.Addexisting disk
Allows adding an existing virtual disk to a virtual machine. Virtual machines
Virtualmachine.Configuration.Addnew disk
Allows creation of a new virtual disk to add to a virtual machine. Virtual machines
Virtualmachine.Configuration.Addor remove device
Allows addition or removal of any non-disk device. Virtual machines
Virtualmachine.Configuration.Advanced
Allows addition or modification of advanced parameters in the virtualmachine's configuration file.
Virtual machines
Virtualmachine.Configuration.Change CPU count
Allows changing the number of virtual CPUs. Virtual machines
Virtualmachine.Configuration.Change resource
Allows changing the resource configuration of a set of virtual machinenodes in a given resource pool.
Virtual machines
Virtualmachine.Configuration.Configure managedBy
Allows an extension or solution to mark a virtual machine as beingmanaged by that extension or solution.
Virtual machines
Virtualmachine.Configuration.Diskchange tracking
Allows enabling or disabling of change tracking for the virtualmachine's disks.
Virtual machines
Virtualmachine.Configuration.Disklease
Allows disk lease operations for a virtual machine. Virtual machines
Virtualmachine.Configuration.Display connection settings
Allows configuration of virtual machine remote console options. Virtual machines
Virtualmachine.Configuration.Extend virtual disk
Allows expansion of the size of a virtual disk. Virtual machines
Virtualmachine.Configuration.HostUSB device
Allows attaching a host-based USB device to a virtual machine. Virtual machines
Virtualmachine.Configuration.Memory
Allows changing the amount of memory allocated to the virtualmachine.
Virtual machines
Virtualmachine.Configuration.Modify device settings
Allows changing the properties of an existing device. Virtual machines
Virtualmachine.Configuration.Query Fault Tolerancecompatibility
Allows checking if a virtual machine is compatible for Fault Tolerance. Virtual machines
Virtualmachine.Configuration.Query unowned files
Allows querying of unowned files. Virtual machines
Chapter 10 Defined Privileges
VMware, Inc. 249

Table 10‑28. Virtual Machine Configuration Privileges (Continued)
Privilege Name Description Required On
Virtualmachine.Configuration.Rawdevice
Allows adding or removing a raw disk mapping or SCSI pass throughdevice.Setting this parameter overrides any other privilege for modifying rawdevices, including connection states.
Virtual machines
Virtualmachine.Configuration.Reload from path
Allows changing a virtual machine configuration path whilepreserving the identity of the virtual machine. Solutions such asVMware vCenter Site Recovery Manager use this operation tomaintain virtual machine identity during failover and failback.
Virtual machines
Virtualmachine.Configuration.Remove disk
Allows removal of a virtual disk device. Virtual machines
Virtualmachine.Configuration.Rename
Allows renaming a virtual machine or modifying the associated notesof a virtual machine.
Virtual machines
Virtualmachine.Configuration.Reset guest information
Allows editing the guest operating system information for a virtualmachine.
Virtual machines
Virtualmachine.Configuration.Setannotation
Allows adding or editing a virtual machine annotation. Virtual machines
Virtualmachine.Configuration.Settings
Allows changing general virtual machine settings. Virtual machines
Virtualmachine.Configuration.Swapfile placement
Allows changing the swapfile placement policy for a virtual machine. Virtual machines
Virtualmachine.Configuration.Unlock virtual machine
Allows decrypting a virtual machine. Virtual machines
Virtualmachine.Configuration.Upgrade virtual machinecompatibility
Allows upgrade of the virtual machine’s virtual machine compatibilityversion.
Virtual machines
Virtual Machine Guest Operations PrivilegesVirtual Machine Guest Operations privileges control the ability to interact with files and programs inside avirtual machine's guest operating system with the API.
See the VMware vSphere API Reference documentation for more information on these operations.
You can set this privilege at different levels in the hierarchy. For example, if you set a privilege at the folderlevel, you can propagate the privilege to one or more objects within the folder. The object listed in theRequired On column must have the privilege set, either directly or inherited.
Table 10‑29. Virtual Machine Guest Operations
Privilege Name Description Effective on Object
Virtual machine.GuestOperations.Guest OperationAlias modification
Allows virtual machine guest operations that involve modifying thealias for the virtual machine.
Virtual machines
Virtual machine.GuestOperations.Guest OperationAlias query
Allows virtual machine guest operations that involve querying thealias for the virtual machine.
Virtual machines
vSphere Security
250 VMware, Inc.

Table 10‑29. Virtual Machine Guest Operations (Continued)
Privilege Name Description Effective on Object
Virtual machine.GuestOperations.Guest OperationModifications
Allows virtual machine guest operations that involve modifications toa guest operating system in a virtual machine, such as transferring afile to the virtual machine.No vSphere Web Client user interface elements are associated withthis privilege.
Virtual machines
Virtual machine.GuestOperations.Guest OperationProgram Execution
Allows virtual machine guest operations that involve executing aprogram in the virtual machine.No vSphere Web Client user interface elements are associated withthis privilege.
Virtual machines
Virtual machine.GuestOperations.Guest OperationQueries
Allows virtual machine guest operations that involve querying theguest operating system, such as listing files in the guest operatingsystem.No vSphere Web Client user interface elements are associated withthis privilege.
Virtual machines
Virtual Machine Interaction PrivilegesVirtual Machine Interaction privileges control the ability to interact with a virtual machine console,configure media, perform power operations, and install VMware Tools.
You can set this privilege at different levels in the hierarchy. For example, if you set a privilege at the folderlevel, you can propagate the privilege to one or more objects within the folder. The object listed in theRequired On column must have the privilege set, either directly or inherited.
Table 10‑30. Virtual Machine Interaction
Privilege Name Description Required On
Virtualmachine.Interaction.Answerquestion
Allows resolution of issues with virtual machine state transitions orruntime errors.
Virtual machines
Virtualmachine.Interaction.Backupoperation on virtualmachine
Allows performance of backup operations on virtual machines. Virtual machines
Virtualmachine.Interaction.Configure CD media
Allows configuration of a virtual DVD or CD-ROM device. Virtual machines
Virtualmachine.Interaction.Configure floppy media
Allows configuration of a virtual floppy device. Virtual machines
Virtualmachine.Interaction.Consoleinteraction
Allows interaction with the virtual machine’s virtual mouse,keyboard, and screen.
Virtual machines
Virtualmachine.Interaction.Createscreenshot
Allows creation of a virtual machine screen shot. Virtual machines
Virtualmachine.Interaction.Defragment all disks
Allows defragment operations on all disks of the virtual machine. Virtual machines
Virtualmachine.Interaction.Deviceconnection
Allows changing the connected state of a virtual machine’sdisconnectable virtual devices.
Virtual machines
Chapter 10 Defined Privileges
VMware, Inc. 251

Table 10‑30. Virtual Machine Interaction (Continued)
Privilege Name Description Required On
Virtualmachine.Interaction.DisableFault Tolerance
Allows disabling the Secondary virtual machine for a virtual machineusing Fault Tolerance.
Virtual machines
Virtualmachine.Interaction.Dragand Drop
Allows drag and drop of files between a virtual machine and a remoteclient.
Virtual machines
Virtualmachine.Interaction.EnableFault Tolerance
Allows enabling the Secondary virtual machine for a virtual machineusing Fault Tolerance.
Virtual machines
Virtualmachine.Interaction.Guestoperating systemmanagement by VIX API
Allows management of the virtual machine's operating systemthrough the VIX API.
Virtual machines
Virtualmachine.Interaction.InjectUSP HID scan codes
Allows injection of USP HID scan codes. Virtual machines
Virtualmachine.Interaction.Pause/Unpause
Allows pausing or unpausing of the virtual machine. Virtual machines
Virtualmachine.Interaction.Performwipe or shrink operations
Allows performing wipe or shrink operations on the virtual machine. Virtual machines
Virtualmachine.Interaction.PowerOff
Allows powering off a powered-on virtual machine. This operationpowers down the guest operating system.
Virtual machines
Virtualmachine.Interaction.PowerOn
Allows powering on a powered-off virtual machine, and resuming asuspended virtual machine.
Virtual machines
Virtualmachine.Interaction.Recordsession on Virtual Machine
Allows recording a session on a virtual machine. Virtual machines
Virtualmachine.Interaction.Replaysession on Virtual Machine
Allows replaying of a recorded session on a virtual machine. Virtual machines
Virtualmachine.Interaction.Reset
Allows resetting of a virtual machine and reboots the guest operatingsystem.
Virtual machines
Virtualmachine.Interaction.Suspend
Allows suspending a powered-on virtual machine. This operationputs the guest in standby mode.
Virtual machines
Virtualmachine.Interaction.Testfailover
Allows testing of Fault Tolerance failover by making the Secondaryvirtual machine the Primary virtual machine.
Virtual machines
Virtualmachine.Interaction.Testrestart Secondary VM
Allows termination of a Secondary virtual machine for a virtualmachine using Fault Tolerance.
Virtual machines
Virtualmachine.Interaction.TurnOff Fault Tolerance
Allows turning off Fault Tolerance for a virtual machine. Virtual machines
vSphere Security
252 VMware, Inc.

Table 10‑30. Virtual Machine Interaction (Continued)
Privilege Name Description Required On
Virtualmachine.Interaction.TurnOn Fault Tolerance
Allows turning on Fault Tolerance for a virtual machine. Virtual machines
Virtualmachine.Interaction.VMware Tools install
Allows mounting and unmounting the VMware Tools CD installer asa CD-ROM for the guest operating system.
Virtual machines
Virtual Machine Inventory PrivilegesVirtual Machine Inventory privileges control adding, moving, and removing virtual machines.
You can set this privilege at different levels in the hierarchy. For example, if you set a privilege at the folderlevel, you can propagate the privilege to one or more objects within the folder. The object listed in theRequired On column must have the privilege set, either directly or inherited.
Table 10‑31. Virtual Machine Inventory Privileges
Privilege Name Description Required On
Virtualmachine .Inventory.Createfrom existing
Allows creation of a virtual machine based on an existing virtualmachine or template, by cloning or deploying from a template.
Clusters, Hosts, Virtualmachine folders
Virtualmachine.Inventory.Createnew
Allows creation of a virtual machine and allocation of resources for itsexecution.
Clusters, Hosts, Virtualmachine folders
Virtualmachine.Inventory.Move
Allows relocating a virtual machine in the hierarchy.The privilege must be present at both the source and destination.
Virtual machines
Virtualmachine.Inventory.Register
Allows adding an existing virtual machine to a vCenter Server or hostinventory.
Clusters, Hosts, Virtualmachine folders
Virtualmachine.Inventory.Remove
Allows deletion of a virtual machine. Deletion removes the virtualmachine's underlying files from disk.To have permission to perform this operation, a user or group musthave this privilege assigned in both the object and its parent object.
Virtual machines
Virtualmachine.Inventory.Unregister
Allows unregistering a virtual machine from a vCenter Server or hostinventory.To have permission to perform this operation, a user or group musthave this privilege assigned in both the object and its parent object.
Virtual machines
Virtual Machine Provisioning PrivilegesVirtual Machine Provisioning privileges control activities related to deploying and customizing virtualmachines.
You can set this privilege at different levels in the hierarchy. For example, if you set a privilege at the folderlevel, you can propagate the privilege to one or more objects within the folder. The object listed in theRequired On column must have the privilege set, either directly or inherited.
Chapter 10 Defined Privileges
VMware, Inc. 253

Table 10‑32. Virtual Machine Provisioning Privileges
Privilege Name Description Required On
Virtualmachine.Provisioning.Allowdisk access
Allows opening a disk on a virtual machine for random readand write access. Used mostly for remote disk mounting.
Virtual machines
Virtualmachine.Provisioning.Allowread-only disk access
Allows opening a disk on a virtual machine for random readaccess. Used mostly for remote disk mounting.
Virtual machines
Virtualmachine.Provisioning.Allowvirtual machine download
Allows read operations on files associated with a virtualmachine, including vmx, disks, logs, and nvram.
Root host or vCenterServer
Virtualmachine.Provisioning.Allowvirtual machine files upload
Allows write operations on files associated with a virtualmachine, including vmx, disks, logs, and nvram.
Root host or vCenterServer
Virtualmachine.Provisioning.Clonetemplate
Allows cloning of a template. Templates
Virtualmachine.Provisioning.Clonevirtual machine
Allows cloning of an existing virtual machine and allocation ofresources.
Virtual machines
Virtualmachine.Provisioning.Createtemplate from virtualmachine
Allows creation of a new template from a virtual machine. Virtual machines
Virtualmachine.Provisioning.Customize
Allows customization of a virtual machine’s guest operatingsystem without moving the virtual machine.
Virtual machines
Virtualmachine.Provisioning.Deploy template
Allows deployment of a virtual machine from a template. Templates
Virtualmachine.Provisioning.Markas template
Allows marking an existing powered off virtual machine as atemplate.
Virtual machines
Virtualmachine.Provisioning.Markas virtual machine
Allows marking an existing template as a virtual machine. Templates
Virtualmachine.Provisioning.Modify customizationspecification
Allows creation, modification, or deletion of customizationspecifications.
Root vCenter Server
Virtualmachine.Provisioning.Promote disks
Allows promote operations on a virtual machine's disks. Virtual machines
Virtualmachine.Provisioning.Readcustomization specifications
Allows reading a customization specification. Virtual machines
vSphere Security
254 VMware, Inc.

Virtual Machine Service Configuration PrivilegesVirtual machine service configuration privileges control who can perform monitoring and management taskon service configuration.
You can set this privilege at different levels in the hierarchy. For example, if you set a privilege at the folderlevel, you can propagate the privilege to one or more objects within the folder. The object listed in theRequired On column must have the privilege set, either directly or inherited.
NOTE In vSphere 6.0, do not assign or remove this privilege by using the vSphere Web Client.
Table 10‑33. Virtual machine Service Configuration Privileges
Privilege Name Description
Virtual Machine. Serviceconfiguration. Allow notifications
Allows generating and consuming notification about service status.
Virtual Machine. Serviceconfiguration. Allow polling ofglobal event notifications
Allows querying whether any notifications are present.
Virtual Machine. Serviceconfiguration. Manage serviceconfigurations
Allows creating, modifying, and deleting virtual machine services.
Virtual Machine. Serviceconfiguration. Modify serviceconfiguration
Allows modification of existing virtual machine service configuration.
Virtual Machine. Serviceconfiguration. Query serviceconfigurations
Allows retrieval of list of virtual machine services.
Virtual Machine. Serviceconfiguration. Read serviceconfiguration
Allows retrieval of existing virtual machine service configuration.
Virtual Machine Snapshot Management PrivilegesVirtual machine snapshot management privileges control the ability to take, delete, rename, and restoresnapshots.
You can set this privilege at different levels in the hierarchy. For example, if you set a privilege at the folderlevel, you can propagate the privilege to one or more objects within the folder. The object listed in theRequired On column must have the privilege set, either directly or inherited.
Table 10‑34. Virtual Machine State Privileges
Privilege Name Description Required On
Virtual machine.Snapshotmanagement. Createsnapshot
Allows creation of a snapshot from the virtual machine’s current state. Virtual machines
Virtual machine.Snapshotmanagement.RemoveSnapshot
Allows removal of a snapshot from the snapshot history. Virtual machines
Chapter 10 Defined Privileges
VMware, Inc. 255

Table 10‑34. Virtual Machine State Privileges (Continued)
Privilege Name Description Required On
Virtual machine.Snapshotmanagement.RenameSnapshot
Allows renaming a snapshot with a new name, a new description, orboth.
Virtual machines
Virtual machine.Snapshotmanagement.Revert tosnapshot
Allows setting the virtual machine to the state it was in at a givensnapshot.
Virtual machines
Virtual Machine vSphere Replication PrivilegesVirtual Machine vSphere replication privileges control the use of replication by VMware vCenter SiteRecovery Manager™ for virtual machines.
You can set this privilege at different levels in the hierarchy. For example, if you set a privilege at the folderlevel, you can propagate the privilege to one or more objects within the folder. The object listed in theRequired On column must have the privilege set, either directly or inherited.
Table 10‑35. Virtual Machine vSphere Replication
Privilege Name Description Required On
Virtual machine.vSphereReplication.ConfigureReplication
Allows configuration of replication for the virtual machine. Virtual machines
Virtual machine.vSphereReplication.ManageReplication
Allows triggering of full sync, online sync or offline sync on areplication.
Virtual machines
Virtual machine.vSphereReplication.MonitorReplication
Allows monitoring of replication. Virtual machines
dvPort Group PrivilegesDistributed virtual port group privileges control the ability to create, delete, and modify distributed virtualport groups.
The table describes the privileges required to create and configure distributed virtual port groups.
You can set this privilege at different levels in the hierarchy. For example, if you set a privilege at the folderlevel, you can propagate the privilege to one or more objects within the folder. The object listed in theRequired On column must have the privilege set, either directly or inherited.
Table 10‑36. Distributed Virtual Port Group Privileges
Privilege Name Description Required On
dvPort group.Create Allows creation of a distributed virtual port group. Virtual port groups
dvPort group.Delete Allows deletion of distributed virtual port group.To have permission to perform this operation, a user or group musthave this privilege assigned in both the object and its parent object.
Virtual port groups
dvPort group.Modify Allows modification of a distributed virtual port group configuration. Virtual port groups
dvPort group.Policyoperation
Allows setting the policy of a distributed virtual port group. Virtual port groups
dvPort group.Scopeoperation
Allows setting the scope of a distributed virtual port group. Virtual port groups
vSphere Security
256 VMware, Inc.

vApp PrivilegesvApp privileges control operations related to deploying and configuring a vApp.
You can set this privilege at different levels in the hierarchy. For example, if you set a privilege at the folderlevel, you can propagate the privilege to one or more objects within the folder. The object listed in theRequired On column must have the privilege set, either directly or inherited.
Table 10‑37. vApp Privileges
Privilege Name Description Required On
vApp.Add virtual machine Allows adding a virtual machine to a vApp. vApps
vApp.Assign resource pool Allows assigning a resource pool to a vApp. vApps
vApp.Assign vApp Allows assigning a vApp to another vApp vApps
vApp.Clone Allows cloning of a vApp. vApps
vApp.Create Allows creation of a vApp. vApps
vApp.Delete Allows deletion a vApp.To have permission to perform this operation, auser or group must have this privilege assigned inboth the object and its parent object.
vApps
vApp.Export Allows export of a vApp from vSphere. vApps
vApp.Import Allows import of a vApp into vSphere. vApps
vApp.Move Allows moving a vApp to a new inventorylocation.
vApps
vApp.Power Off Allows power off operations on a vApp. vApps
vApp.Power On Allows power on operations on a vApp. vApps
vApp.Rename Allows renaming a vApp. vApps
vApp.Suspend Allows suspension of a vApp. vApps
vApp.Unregister Allows unregistering a vApp.To have permission to perform this operation, auser or group must have this privilege assigned inboth the object and its parent object.
vApps
vApp.View OVF Environment Allows viewing the OVF environment of apowered-on virtual machine within a vApp.
vApps
vApp.vApp applicationconfiguration
Allows modification of a vApp's internal structure,such as product information and properties.
vApps
vApp.vApp instance configuration Allows modification of a vApp's instanceconfiguration, such as policies.
vApps
vApp.vApp managedByconfiguration
Allows an extension or solution to mark a vApp asbeing managed by that extension or solution.No vSphere Web Client user interface elements areassociated with this privilege.
vApps
vApp.vApp resource configuration Allows modification of a vApp's resourceconfiguration.To have permission to perform this operation, auser or group must have this privilege assigned inboth the object and its parent object.
vApps
Chapter 10 Defined Privileges
VMware, Inc. 257
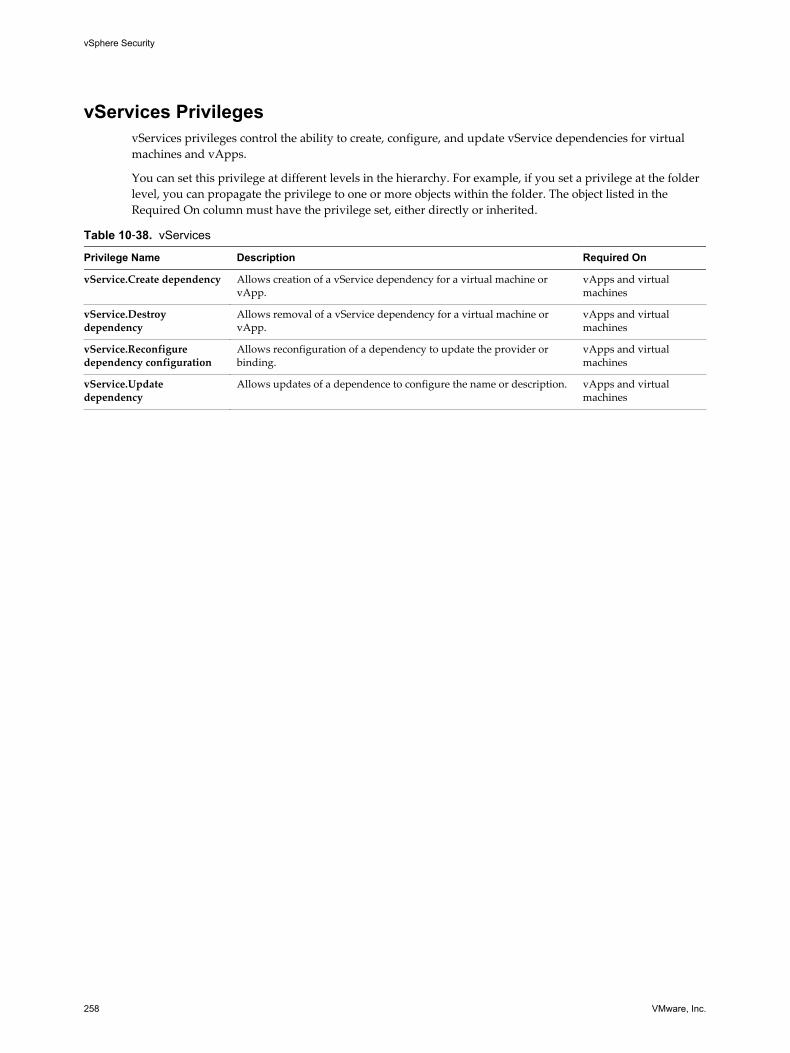
vServices PrivilegesvServices privileges control the ability to create, configure, and update vService dependencies for virtualmachines and vApps.
You can set this privilege at different levels in the hierarchy. For example, if you set a privilege at the folderlevel, you can propagate the privilege to one or more objects within the folder. The object listed in theRequired On column must have the privilege set, either directly or inherited.
Table 10‑38. vServices
Privilege Name Description Required On
vService.Create dependency Allows creation of a vService dependency for a virtual machine orvApp.
vApps and virtualmachines
vService.Destroydependency
Allows removal of a vService dependency for a virtual machine orvApp.
vApps and virtualmachines
vService.Reconfiguredependency configuration
Allows reconfiguration of a dependency to update the provider orbinding.
vApps and virtualmachines
vService.Updatedependency
Allows updates of a dependence to configure the name or description. vApps and virtualmachines
vSphere Security
258 VMware, Inc.

Index
Numerics3D features 2003rd party root certificate 79, 89, 95
Aaccess, privileges 233Active Directory 166–168, 170, 172Active Directory domain, authentication with
vCenter Server Appliance 47Active Directory identity source 32Active Directory LDAP Server identity source 33Administrator role 125administrator user, setting for vCenter Server 22alarms, privileges 234allowed IP addresses, firewall 151anti-spyware 14antivirus software, installing 197assign global permissions 123authenticating, vSphere Authentication
Proxy 171authentication
iSCSI storage 228smart card 173, 174with Active Directory domain 47
authentication proxy 166, 170, 172authentication proxy server 171, 172authorization 113, 114authorized keys, disabling 137Auto Deploy
privileges 235security 182vSphere Authentication Proxy 169
availability timeout for the ESXi Shell 180
Bback up ESXi certificates 149best practices
permissions 127roles 127security 225
CCA-signed certificates 146CAM server 171CAM service 170categories, privileges 244
certificate authority 56certificate details 142certificate expiration 140certificate information 140Certificate Manager, CSRs 69certificate replacement
large deployments 61SSO HA 61stopping services 70
certificate requests, generating 71, 80, 82certificate signing request 69certificate management 52certificate management tools 96certificate replacement options 53certificates
checking 191disabling SSL for vSphere SDK 181expiration warning 111expired 189generate certificates 56host upgrades 139privilege 235refresh STS for vCenter Single Sign-On 36revoked 189uploading 147VMCA root certificates 80
certificates; replace machine SSL certificate 92certool 98certool --rootca 70certool configuration options 97certool management commands 101certool.cfg file 97CIM tool access, limiting 193content library, privileges 236copy and paste
disabled for guest operating systems 201guest operating systems 202virtual machines 202
CSR 69custom certificates
auto deploy 148ESXi 147
custom roles 123
VMware, Inc. 259

Ddatastore clusters, privileges 238datastores, privileges 237dcui 166DCUI Access 162dcui user privileges, dcui 166DCUI.Access 162DCUI.Access advanced system setting 162default domain 29default domains, vCenter Single Sign-On 30default certificates, replacing with CA-signed
certificates 146delete identity source 35delete Single Sign-On users 42delete vCenter Single Sign-On users 42device disconnection, preventing in the vSphere
Web Client 203dir-cli, certificate replacement 37Direct Console User Interface access 162Direct Console User Interface (DCUI) 162directory server, viewing 168directory service
Active Directory 167configuring a host 167
disable remote operations in a virtualmachine 202
disable user, Single Sign-On 42disabling
logging for guest operating systems 204SSL for vSphere SDK 181variable information size 203
distributed switch 212distributed switches, permission 116Distributed Switches, privileges 238distributed virtual port group privileges 256DMZ 216DvFilter 222
Eedit user, Single Sign-On 43ESX Agent Manager, privileges 239esxcli firewall 155ESXi
log files 184syslog service 183
ESXi certificate details 141ESXi certificates
replacing 145restore 149
ESXi certificates, backup 149ESXi certificates, default settings 139ESXi CSR requirements 145esxi custom certificate mode 144
ESXi incoming firewall ports 152ESXi log files 182ESXi networking 136ESXi outgoing firewall ports 152ESXi passwords 16ESXi security best practices 185ESXi Shell
configuring 177direct connections 181enabling 177, 178, 180enabling with vSphere Web Client 178logging in 181remote connections 181setting availability timeout 178setting idle timeout 178setting timeout 180SSH connections 176timeouts 179, 181
esxi thumbprint certificate mode 144exception user list 157exit automation tool 164expiration warning, certificates 111expiration of certificate 37expired certificates 189extensions, privileges 239
FFault Tolerance (FT)
logging 184security 184
firewallcommands 155configuring 155NFS client 154
firewall portsconfiguring with vCenter Server 207configuring without vCenter Server 208connecting to vCenter Server 208host to host 208overview 206vSphere Client direct connection 208vSphere Web Client and vCenter Server 207
firewall settings 151firewalls
access for management agents 151access for services 151
floppy disks 199folders, privileges 239forged transmissions 211, 212
Ggenerating CSRs 69
vSphere Security
260 VMware, Inc.

generating certificate requests 71, 80, 82genselfcacert 70global permissions, assign 123global privileges 240groups
add members 44adding 43local 43searching 122
guest operating systemscopy and paste 202disabling logging 204enabling copy and paste 201limiting variable information size 203
Hhardening the vCenter Server Host OS 189hardware devices 199HGFS File Transfers 201host name, configuring 167host profiles, privileges 243, 246host upgrades and certificates 139host configuration with scripts 132host management privileges, user 166host security
authorized keys 137CIM tools 193disabling MOB 137logging 182managed object browser 137performance data 230resource management 198unsigned VIBs 163using templates 197virtual machine console 198virtual disk shrinking 196
host-to-host firewall ports 208hosts
CIM privileges 240configuration privileges 241inventory privileges 242local operations privileges 242thumbprints 191vSphere replication privileges 243
HTTPS PUT, uploading certificates andkeys 147, 177
Hypervisor security 11
Iidentity source
adding to vCenter Single Sign-On 31editing for vCenter Single Sign-On 34
identity sources for vCenter Single Sign-On 29
idle session timeout 179, 181image profile privileges 235Image Builder security 163informational messages, limiting 195intermediate CA 65, 84Internet Protocol Security (IPsec) 218inventory service, privileges 244IP addresses, adding allowed 151IPsec, See Internet Protocol Security (IPsec)iSCSI
authentication 228protecting transmitted data 228QLogic iSCSI adapters 228securing ports 228security 228
isolationstandard switches 15virtual networking layer 15VLANs 15
Jjoin domain 170
Kkeys
authorized 176, 177SSH 176, 177uploading 147, 176, 177
LLinux-based clients, restricting use with vCenter
Server 190load balancer 49lockdown mode
behavior 159catastrophic vCenter Server failure 162DCUI access 162DCUI.Access 162different product versions 162direct console user interface 161enabling 160, 161vSphere Web Client 160
lockdown mode exception users 157lockdown mode, disable 161lockdown mode,vSphere 6.0 and later 163lockout policy, vCenter Single Sign-On 39log files
ESXi 182, 184locating 184
loggingdisabling for guest operating systems 204host security 182
logs for failed installation 189
Index
VMware, Inc. 261

Lookup Service error 46Lookup Service, See vCenter Lookup ServiceLotus replication 49LUN masking 229
MMAC address changes 211machine SSL certificate 66machine SSL certificates 72manage certificates 235managed entities, permissions 116managed object browser, disabling 137management access
firewalls 151TCP and UDP ports 192
management interfacesecuring 131securing with VLANs and virtual switches 214
management network 136managing Single Sign-On users 40manual certificate replacement 69
NNetflow 222network connectivity, limiting 189network isolation 224network file copy (NFC) 192network security 205networking security 222networks
privileges 245security 213
NFC, enabling SSL 192NFS 4.1, Kerberos credentials 229NFS client, firewall rule set 154No Access role 125NTP 167NTP servers, adding 227NTP-based time synchronization 227
OOpenLDAP Server identity source 33
Ppassword policies, vCenter Single Sign-On 38password policy 29password policy vCenter Server 188password requirements 28, 135passwords
changing vCenter Single Sign-On 45overview 16vCenter Single Sign-On policies 38
PCI devices 185
PCIe devices 185performance, privileges 245performance data, disable sending 230permissions
administrator 119and privileges 119assigning 120, 123, 173best practices 127changing 121distributed switches 116inheritance 116, 118, 119overriding 118, 119overview 119privileges 245removing 121root user 119settings 117user 165vpxuser 119
plug-ins, privileges 239policies
lockout in vCenter Single Sign-On 39security 220Single Sign-On 38, 40vCenter Single Sign-On passwords 38
portfast 222Portfast 222PowerCLI 14PowerCLI host management 132principals, remove from group 44privileges
alarms 234assigning 123Auto Deploy 235categories 244certificate 235certificate management 97configuration 241content library 236datastore clusters 238datastores 237Distributed Switches 238dvPort group 256ESX Agent Manager 239extension 239folder 239global 240host CIM 240host inventory 242host local operations 242host profiles 243, 246host vSphere replication 243
vSphere Security
262 VMware, Inc.

image profile 235inventory service 244network 245performance 245permission 245plug-ins 239resource 246scheduled tasks 247sessions 247storage views 248tags 244tasks 248Transfer Service 248vApps 257vCenter Inventory Service 244vCenter Server 187virtual machine 253virtual machine configuration 248virtual machine interaction 251virtual machine provisioning 253virtual machine guest operations 250virtual machine service configuration 255virtual machine snapshot management 255virtual machine vSphere replication 256VRM policy 248vServices 258
privileges and permissions 119privileges, required, for common tasks 127promiscuous mode 211, 212
RRead Only role 125remote operations, disabling in virtual
machine 202removing users from groups 44renew ESXi certificates 141replace machine SSL certificateValid 64replace solution user certificates 84replace VMCA root certificate 66replacing, default certificates 146replacing certificates manually 69replacing VMCA-signed certificates 72request certificates 91required privileges, for common tasks 127Reset All Certificates 68resources, privileges 246restore ESXi certificates 149restrict Guest Operations privileges 202restricting use of Linux-based clients with
vCenter Server 190revert certificate management operation 68
revoked certificates 189revoking certificates, securing 61roles
Administrator 125and permissions 125best practices 127creating 125, 126default 125No Access 125privileges, lists of 233Read Only 125removing 121security 125
root certificates 80root login, permissions 119, 165
SSAML token 20sample roles 123SAN 229scheduled tasks, privileges 247SDK, firewall ports and virtual machine
console 208search lists, adjusting for large domains 122securing networking 205securing vCenter Server Appliance 191security
best practices 225certification 17DMZ in single host 215, 216host 133iSCSI storage 228permissions 119standard switch ports 210, 211vCenter Server 13virtual machines with VLANs 213virtual networking layer 15virtualization layer 11VLAN hopping 214VMware policy 17
security policiesavailable 220creating 220listing 220removing 221
security profile 150, 156security token service (STS), vCenter Single
Sign-On 36security and PCI devices 185security associations
adding 218available 218
Index
VMware, Inc. 263

listing 218removing 219
security policy 210security recommendations 157, 222Security Token Service 20, 22, 35services
stopping 70syslogd 183
sessions, privileges 247shares limits, host security 198Single Sign-On
about 25benefits 20disabling users 42editing users 43effect on vCenter Server installation and
upgrades 22login fails because user account is locked 48Lookup Service Error 46policies 38troubleshooting 46unable to log in using Active Directory
domain 47upgrades 23
Single Sign-On identity source, deleting 35Single Sign-On solution users 45smart card authentication
configuring 173disable 174enable 174fallback 175in lockdown mode 175
SMS API privileges 248SNMP 221solution user sso handshake 20solution users 45solution user certificates 67, 75spanning 222SSH
ESXi Shell 176security settings 176
SSH keys 175SSL
enable over NFC 192enabling and disabling 51encryption and certificates 51
SSL certificate 37SSO, See Single Sign On See Single Sign-OnSSO HA 49SSO passwords 16SSPI 35standard switch ports, security 210, 211standard switch security 214
standard switchesand iSCSI 228forged transmissions 211MAC address changes 211promiscuous mode 211
storage, securing with VLANs and virtualswitches 214
Storage Monitoring Service API privileges 248storage views, privileges 248storage security best practices 228stp 210strict lockdown mode 157STS, See security token service (STS)STS (Security Token Service) 22subordinate certificate 84switch 210synchronize ESXi clocks on vSphere
network 225synchronizing clocks on the vSphere
network 225syslog 183
Ttags, privileges 244tasks, privileges 248TCP ports 192templates, host security 197third-party CA 91third-party certificates 90third-party root certificate 79, 89, 95third-party software support policy 17thumbprint certificates 139thumbprints, hosts 191time synchronization
NTP-based 227VMware Tools-based 226
time synchronization settings 226timeout, ESXi Shell 179, 181timeout for ESXi Shell availability 180timeouts
ESXi Shell 178setting 178
token policy, Single Sign-On 40TRUSTED_ROOTS 147
UUDP ports 192understanding passwords 16understanding Single Sign-On 20unexposed features, disable 200updated information 9updating trusts 93user management 113
vSphere Security
264 VMware, Inc.

user permissions, vpxuser 165user account locked, SSO fails 48user directory timeout 122user repositories for vCenter Single Sign-On 29users
adding local 41disabling Single Sign-On 42editing Single Sign-On 43remove from group 44searching 122
users and groups 44users and permissions 113UserVars.ActiveDirectoryVerifyCAMCertifcate
171
VvApps, privileges 257variable information size for guest operating
systemsdisabling 203limiting 203
vCenter Serverconnecting through firewall 208firewall ports 207privileges 187
vCenter Inventory Serviceprivileges 244tagging 244
vCenter Lookup Service 22vCenter Server security 187, 189vCenter Server Appliance
adding NTP servers 227NTP-based time synchronization 227security best practices 191time synchronization settings 226unable to log in 47VMware Tools-based time
synchronization 226vCenter Server administrator user, setting 22vCenter Server Host OS, hardening 189vCenter Server security best practices 187vCenter Sever Appliance, replacing NTP
servers 227vCenter Single Sign-On
Active Directory 31, 34changing password 45domains 30identity sources 29, 31, 34LDAP 31, 34locked users 39OpenLDAP 31, 34password policy 38security token service (STS) 36user repositories 29
vCenter Single Sign-On best practices 46VECS 59vecs-cli, certificate replacement 37VGA-Only Mode 200VGT 215view certificates 111vifs, uploading certificates and keys 176virtual disks, shrinking 196virtual guest tagging 215virtual machine console, host security 198virtual machine security
best practices 196disable features 200VMX parameters 200
virtual machine service configuration,privileges 255
virtual machinesconfiguration privileges 248copy and paste 202disable copy and paste 201disabling logging 204guest operations privileges 250interaction privileges 251inventory privileges 253isolation 215, 216limiting variable information size 203preventing device disconnection in the
vSphere Web Client 203provisioning privileges 253securing 195, 204snapshot management privileges 255vSphere replication privileges 256
virtual network, security 213virtual networking layer and security 15VirtualCenter.VimPasswordExpirationInDays
188VLAN 215VLAN documentation 223VLAN security 214VLANs
and iSCSI 228Layer 2 security 214security 213VLAN hopping 214
VMCAcertool 98root certificates 80view certificates 111
vmca root certificate 70VMCA mode switches 142VMCA root certificate 79, 89, 95VMCA-signed certificates 66, 68, 72vmca-signed certificates 75
Index
VMware, Inc. 265

vmdir certificate 88, 95vmdir replication 49vmdircert.pem 88, 95vmdirkey.pem 88, 95vMotion, securing with VLANs and virtual
switches 214VMware Certificate Authority 58VMware Directory Service 22VMware Endpoint Certificate Store 59VMware Tools-based time synchronization 226vmx files, editing 195vpxd.cert.threshold 111vpxd.certmgmt.mode 144vpxuser 165VRM policy, privileges 248vServices, privileges 258vSphere Authentication Proxy
authenticating 171install or upgrade 166, 169
vSphere Authentication Proxy Server 171, 172vSphere Certificate Manager 66vSphere Certificate Manager utility 63vSphere Client, firewall ports for direct
connection 208vSphere Distributed Switch 212vSphere Network Appliance 222vSphere security overview 11vSphere Web Client security 230vsphere.local groups 27
WWindows session authentication 35
Zzoning 229
vSphere Security
266 VMware, Inc.