vSphere Data Protection 5.1 Administration...
106
vSphere Data Protection Administration Guide vSphere Data Protection Advanced 5.1.20 This document supports the version of each product listed and supports all subsequent versions until the document is replaced by a new edition. To check for more recent editions of this document, see http://www.vmware.com/support/pubs. EN-001091-00
-
Upload
nguyendien -
Category
Documents
-
view
233 -
download
0
Transcript of vSphere Data Protection 5.1 Administration...
vSphere Data ProtectionAdministration Guide
vSphere Data Protection Advanced 5.1.20
This document supports the version of each product listed andsupports all subsequent versions until the document is replacedby a new edition. To check for more recent editions of thisdocument, see http://www.vmware.com/support/pubs.
EN-001091-00

VMware, Inc.3401 Hillview Ave.Palo Alto, CA 94304www.vmware.com
2 VMware, Inc.
vSphere Data Protection Administration Guide
You can find the most up-to-date technical documentation on the VMware Web site at:
http://www.vmware.com/support/
The VMware Web site also provides the latest product updates.
If you have comments about this documentation, submit your feedback to:
Copyright © 2007–2013 VMware, Inc. All rights reserved. This product is protected by U.S. and international copyright and intellectual property laws. VMware products are covered by one or more patents listed at http://www.vmware.com/go/patents.
VMware is a registered trademark or trademark of VMware, Inc. in the United States and/or other jurisdictions. All other marks and names mentioned herein may be trademarks of their respective companies.
VMware, Inc. 3
Contents
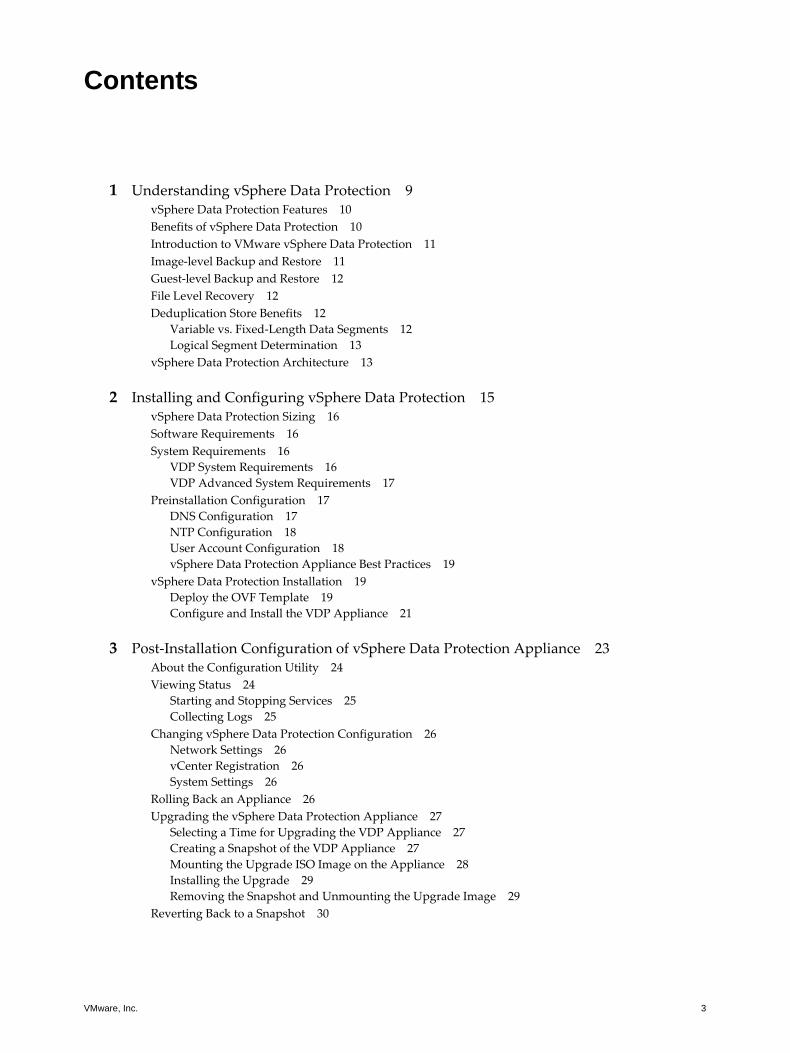
1 Understanding vSphere Data Protection 9vSphere Data Protection Features 10Benefits of vSphere Data Protection 10Introduction to VMware vSphere Data Protection 11Image-level Backup and Restore 11Guest-level Backup and Restore 12File Level Recovery 12Deduplication Store Benefits 12
Variable vs. Fixed-Length Data Segments 12Logical Segment Determination 13
vSphere Data Protection Architecture 13
2 Installing and Configuring vSphere Data Protection 15vSphere Data Protection Sizing 16Software Requirements 16System Requirements 16
VDP System Requirements 16VDP Advanced System Requirements 17
Preinstallation Configuration 17DNS Configuration 17NTP Configuration 18User Account Configuration 18vSphere Data Protection Appliance Best Practices 19
vSphere Data Protection Installation 19Deploy the OVF Template 19Configure and Install the VDP Appliance 21
3 Post-Installation Configuration of vSphere Data Protection Appliance 23About the Configuration Utility 24Viewing Status 24
Starting and Stopping Services 25Collecting Logs 25
Changing vSphere Data Protection Configuration 26Network Settings 26vCenter Registration 26System Settings 26
Rolling Back an Appliance 26Upgrading the vSphere Data Protection Appliance 27
Selecting a Time for Upgrading the VDP Appliance 27Creating a Snapshot of the VDP Appliance 27Mounting the Upgrade ISO Image on the Appliance 28Installing the Upgrade 29Removing the Snapshot and Unmounting the Upgrade Image 29
Reverting Back to a Snapshot 30
vSphere Data Protection Administration Guide
4 VMware, Inc.
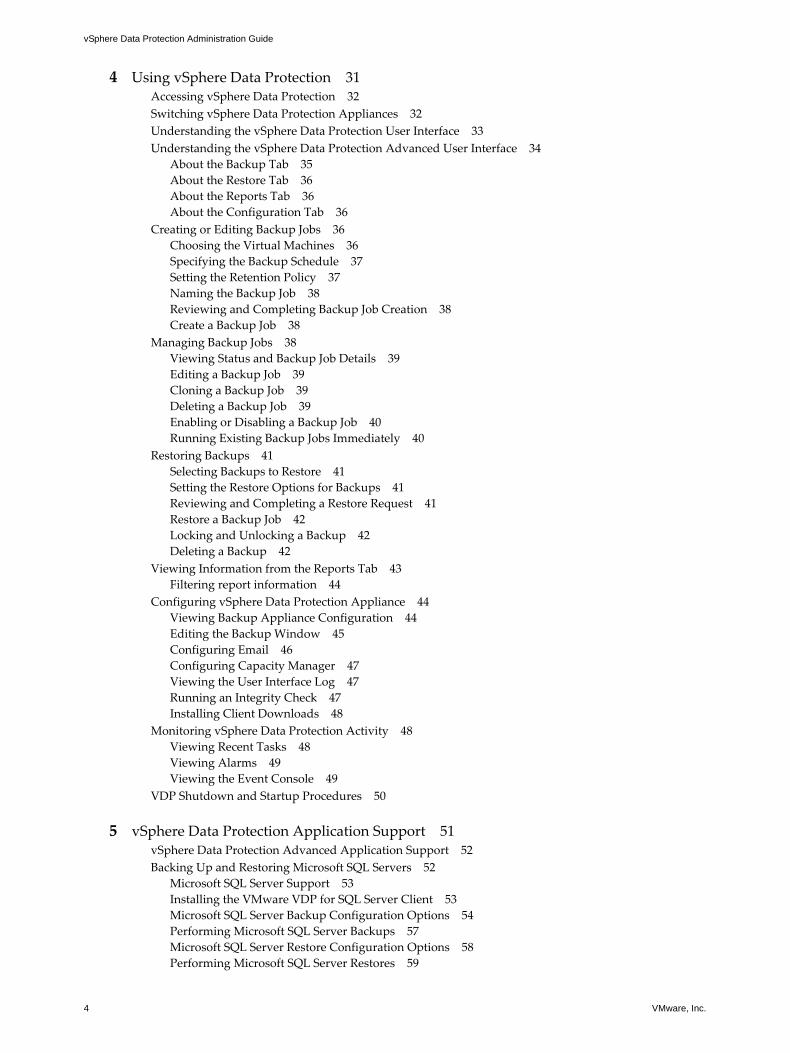
4 Using vSphere Data Protection 31Accessing vSphere Data Protection 32Switching vSphere Data Protection Appliances 32Understanding the vSphere Data Protection User Interface 33Understanding the vSphere Data Protection Advanced User Interface 34
About the Backup Tab 35About the Restore Tab 36About the Reports Tab 36About the Configuration Tab 36
Creating or Editing Backup Jobs 36Choosing the Virtual Machines 36Specifying the Backup Schedule 37Setting the Retention Policy 37Naming the Backup Job 38Reviewing and Completing Backup Job Creation 38Create a Backup Job 38
Managing Backup Jobs 38Viewing Status and Backup Job Details 39Editing a Backup Job 39Cloning a Backup Job 39Deleting a Backup Job 39Enabling or Disabling a Backup Job 40Running Existing Backup Jobs Immediately 40
Restoring Backups 41Selecting Backups to Restore 41Setting the Restore Options for Backups 41Reviewing and Completing a Restore Request 41Restore a Backup Job 42Locking and Unlocking a Backup 42Deleting a Backup 42
Viewing Information from the Reports Tab 43Filtering report information 44
Configuring vSphere Data Protection Appliance 44Viewing Backup Appliance Configuration 44Editing the Backup Window 45Configuring Email 46Configuring Capacity Manager 47Viewing the User Interface Log 47Running an Integrity Check 47Installing Client Downloads 48
Monitoring vSphere Data Protection Activity 48Viewing Recent Tasks 48Viewing Alarms 49Viewing the Event Console 49
VDP Shutdown and Startup Procedures 50
5 vSphere Data Protection Application Support 51vSphere Data Protection Advanced Application Support 52Backing Up and Restoring Microsoft SQL Servers 52
Microsoft SQL Server Support 53Installing the VMware VDP for SQL Server Client 53Microsoft SQL Server Backup Configuration Options 54Performing Microsoft SQL Server Backups 57Microsoft SQL Server Restore Configuration Options 58Performing Microsoft SQL Server Restores 59
VMware, Inc. 5
Contents
Backing Up and Restoring Microsoft Exchange Servers 60Microsoft Exchange Server Support 60Installing vSphere Data Protection for Exchange Server Client 61Using the VDP Exchange Backup User Configuration Tool 62Configuring the VDP Backup Service 63Microsoft Exchange Server Backup Configuration Options 63Performing Microsoft Exchange Server Backups 65Microsoft Exchange Server Restore Configuration Options 66Performing Microsoft Exchange Server Restores 67
6 Using File Level Restore 69Introduction to the vSphere Data Protection Restore Client 70
File Level Restore Supported Configurations 70File Level Restore Limitations 70
Logging In to the Restore Client 71Mounting Backups 71Filtering Backups 71Navigating Mounted Backups 71Performing File Level Restores 72
Using the Restore Client in Basic Login Mode 72Using the Restore Client in Advanced Login Mode 73
Monitoring Restores 73
7 vSphere Data Protection Capacity Management 75Impact of Selecting Thin or Thick Provisioned Disks 76Impact of Storage Capacity for Initial VDP Deployment 76Monitoring vSphere Data Protection Capacity 76vSphere Data Protection Capacity Thresholds 77Capacity Management 77
8 vSphere Data Protection Disk Expansion 79Introduction to Disk Expansion 80Pre-Expansion Requirements 80
Memory and CPU Requirements 81Disk Grow from vSphere Data Protection 81Disk Add from vSphere Data Protection Advanced 81VMFS Heap Size Recommendations 82
Disk expansion with Essentials Plus 82Performing Disk Expansion 83
Performing Disk Grow 83Performing Disk Add 84
9 vSphere Data Protection Disaster Recovery 85
10 vSphere Data Protection VDR Migration Utility 87Introduction to the vSphere Data Protection VDR Migration Utility 88Preparing the VDR Appliance for Migration 88Performing a VDR Data Migration 88
Prerequisites 88Procedure 89
vSphere Data Protection Administration Guide
6 VMware, Inc.
11 vSphere Data Protection Port Usage 91
12 Minimum Required vCenter User Account Permissions 93
13 vSphere Data Protection Troubleshooting 97Troubleshooting VDP Appliance Installation 97Troubleshooting Accessing the vSphere Data Protection Web Client 97Troubleshooting vSphere Data Protection Backups 98Troubleshooting vSphere Data Protection Restores 99Troubleshooting vSphere Data Protection Integrity Check 100Troubleshooting the Restore Client (File Level Recovery) 100Troubleshooting vSphere Data Protection Advanced 101
Troubleshooting vSphere Data Protection Advanced Exchange Backups 101Troubleshooting vSphere Data Protection Advanced Exchange Restores 101Troubleshooting vSphere Data Protection Advanced SQL Backups 102Troubleshooting vSphere Data Protection Advanced SQL Restores 102
Troubleshooting VDR to VDP Migrations 102Accessing VDP Knowledge Base Articles 103
Index 105

VMware, Inc. 7
EN-001091-00
The vSphere Data Protection Administration Guide contains information to install and manage backups for small and medium businesses. This guide also includes troubleshooting scenarios and recommendations for resolution.
Intended AudienceThis book is for anyone who wants to provide backup solutions using vSphere Data Protection (VDP). The information in this book is for experienced Windows or Linux system administrators who are familiar with virtual machine technology and datacenter operations.
VMware Technical Publications GlossaryVMware Technical Publications provides a glossary of terms that might be unfamiliar to you. For definitions of terms as they are used in VMware technical documentation, go to http://www.vmware.com/support/pubs.
Document FeedbackVMware welcomes your suggestions for improving our documentation. Send your feedback to [email protected].
Technical Support and Education ResourcesThe following sections describe the technical support resources available to you. To access the current versions of other VMware books, go to http://www.vmware.com/support/pubs.
Online Support
To use online support to submit technical support requests, view your product and contract information, and register your products, go to http://www.vmware/support/phone_support.html.
Support Offerings
To find out how VMware support offerings can help meet your business needs, go to http://www.vmware.com/support/services.
VMware Professional Services
VMware Education Services courses offer extensive hands-on labs, case study examples, and course materials designed to be used as on-the-job reference tools. Courses are available onsite, in the classroom, and live online. For onsite pilot programs and implementation best practices, VMware Consulting Services provides offerings to help you assess, plan, build, and manage your virtual environment. To access information about education classes, certification programs, and consulting services, go to http://www.vmware.com/services.
About This Book

vSphere Data Protection Administration Guide
8 VMware, Inc.

VMware, Inc. 9
1
This chapter includes the following topics:
“vSphere Data Protection Features” on page 10
“Benefits of vSphere Data Protection” on page 10
“Introduction to VMware vSphere Data Protection” on page 11
“Image-level Backup and Restore” on page 11
“Guest-level Backup and Restore” on page 12
“File Level Recovery” on page 12
“Deduplication Store Benefits” on page 12
“vSphere Data Protection Architecture” on page 13
Understanding vSphere Data Protection 1
vSphere Data Protection Administration Guide
10 VMware, Inc.
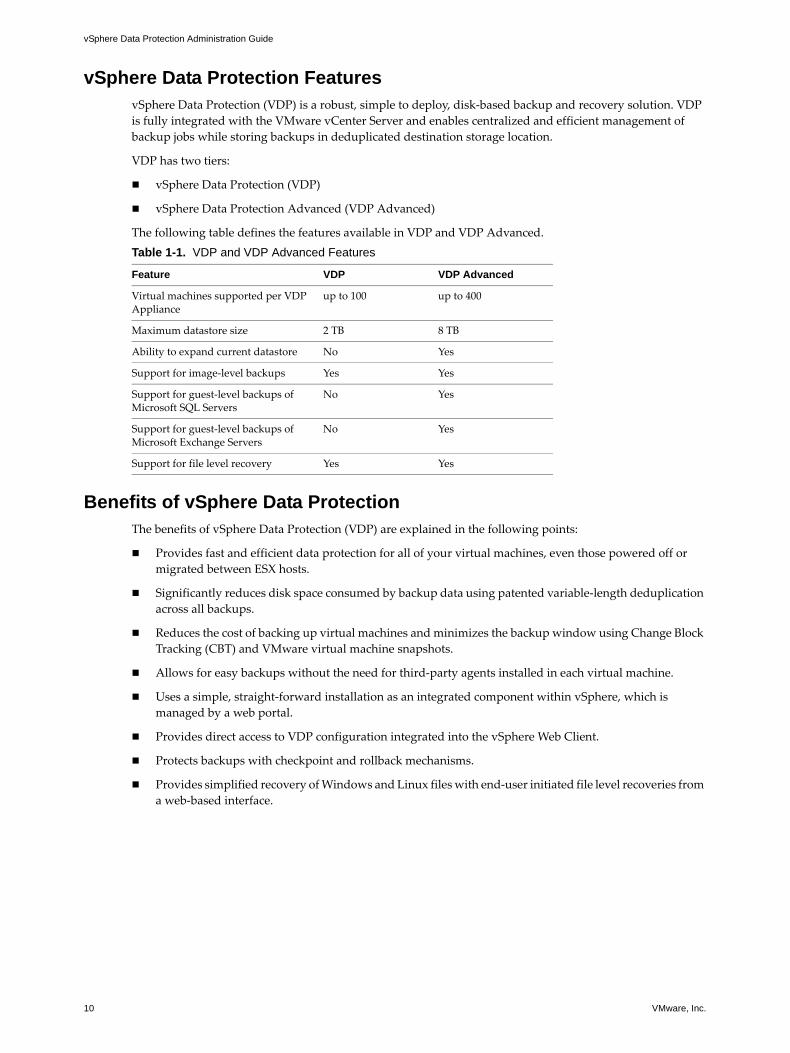
vSphere Data Protection FeaturesvSphere Data Protection (VDP) is a robust, simple to deploy, disk-based backup and recovery solution. VDP is fully integrated with the VMware vCenter Server and enables centralized and efficient management of backup jobs while storing backups in deduplicated destination storage location.
VDP has two tiers:
vSphere Data Protection (VDP)
vSphere Data Protection Advanced (VDP Advanced)
The following table defines the features available in VDP and VDP Advanced.
Benefits of vSphere Data ProtectionThe benefits of vSphere Data Protection (VDP) are explained in the following points:
Provides fast and efficient data protection for all of your virtual machines, even those powered off or migrated between ESX hosts.
Significantly reduces disk space consumed by backup data using patented variable-length deduplication across all backups.
Reduces the cost of backing up virtual machines and minimizes the backup window using Change Block Tracking (CBT) and VMware virtual machine snapshots.
Allows for easy backups without the need for third-party agents installed in each virtual machine.
Uses a simple, straight-forward installation as an integrated component within vSphere, which is managed by a web portal.
Provides direct access to VDP configuration integrated into the vSphere Web Client.
Protects backups with checkpoint and rollback mechanisms.
Provides simplified recovery of Windows and Linux files with end-user initiated file level recoveries from a web-based interface.
Table 1-1. VDP and VDP Advanced Features
Feature VDP VDP Advanced
Virtual machines supported per VDP Appliance
up to 100 up to 400
Maximum datastore size 2 TB 8 TB
Ability to expand current datastore No Yes
Support for image-level backups Yes Yes
Support for guest-level backups of Microsoft SQL Servers
No Yes
Support for guest-level backups of Microsoft Exchange Servers
No Yes
Support for file level recovery Yes Yes

VMware, Inc. 11
Chapter 1 Understanding vSphere Data Protection
Introduction to VMware vSphere Data ProtectionThe VMware vSphere Web Client interface is used to select, schedule, configure, and manage backups and recoveries of virtual machines.
During a backup, vSphere Data Protection (VDP) creates a quiesced snapshot of the virtual machine. Deduplication is automatically performed with every backup operation.
The following terms are used throughout this document in the context of backup and recovery.
A datastore is a virtual representation of a combination of underlying physical storage resources in the datacenter. A datastore is the storage location (for example, a physical disk, a RAID, or a SAN) for virtual machine files.
Changed Block Tracking (CBT) is a VMkernel feature that keeps track of the storage blocks of virtual machines as they change over time. The VMkernel keeps track of block changes on virtual machines, which enhances the backup process for applications that have been developed to take advantage of VMware’s vStorage APIs.
File Level Recovery (FLR) allows local administrators of protected virtual machines to browse and mount backups for the local machine. From these mounted backups, the administrator can then restore individual files. FLR is accomplished using the vSphere Data Protection Restore Client.
VMware vStorage APIs for Data Protection (VADP) enables backup software to perform centralized virtual machine backups without the disruption and overhead of running backup tasks from inside each virtual machine.
Virtual Machine Disk (VMDK) is a file or set of files that appears as a physical disk drive to a guest operating system. These files can be on the host machine or on a remote file system.
The VDP Appliance is a purpose built virtual appliance for vSphere data protection.
Image-level Backup and RestoreVDP creates image-level backups, which are integrated with vStorage API for Data Protection, a feature set within vSphere to offload the backup processing overhead from the virtual machine to the VDP Appliance. The VDP Appliance communicates with the vCenter Server to make a snapshot of a virtual machine’s .vmdk files. Deduplication takes place within the appliance using a patented variable-length deduplication technology.
To support the large scale and continually expanding size of many VMware environments, each VDP Appliance can simultaneously back up to eight virtual machines.
To increase the efficiency of image-level backups, VDP utilizes VADP CBT feature. CBT enables VDP to only back up disk blocks that have changed since the last backup. This greatly reduces the backup time of a given virtual machine image and provides the ability to process a large number of virtual machines within a particular backup window.
By leveraging CBT during restores, VDP offers fast and efficient recoveries when recovering virtual machines to their original location. During a restore process, VDP queries VADP to determine which blocks have changed since the last backup, and then only recovers or replaces those blocks during a recovery. This reduces data transfer within the vSphere environment during a recovery operation and more importantly reduces the recovery time.
Additionally, VDP automatically evaluates the workload between both restore methods (full image restore or a recovery leveraging CBT) and performs the method resulting in the fastest restore time. This is useful in scenarios where the change rate since the last backup in a virtual machine being restored is very high and the overhead of a CBT analysis operation would be more costly than a direct full-image recovery. VDP will intelligently decide which method will result in the fastest virtual machine image recovery times for your particular scenario or environment.

vSphere Data Protection Administration Guide
12 VMware, Inc.
The advantages of VMware image-level backups are:
Provides full image backups of virtual machines, regardless of the guest operating system
Utilizes the efficient transport method SCSI hotadd when available and properly licensed, which avoids copying the entire VMDK image over the network
Provides file-level recovery from image-level backups
Deduplicates within and across all .vmdk files protected by the VDP Appliance
Uses CBT for faster backups and restores
Eliminates the need to manage backup agents in each virtual machine
Supports simultaneous backup and recovery for superior throughput
Guest-level Backup and RestoreVDP Advanced supports guest-level backups for Microsoft SQL and Exchange Servers. With guest-level backups, client agents (VMware VDP for SQ L Server Client or VMware VDP for Exchange Server Client) are installed on the SQL or Exchange Servers in the same manner backup agents are typically installed on physical servers.
The advantages of VMware guest-level backups are:
Provides a higher level of deduplication than image-level backups
Provides additional application support for SQL or Exchange Servers inside the virtual machines
Support for backing up and restoring entire SQL or Exchange Servers or selected databases
Ability to support application consistent backups
Identical backup methods for physical and virtual machines
See “vSphere Data Protection Application Support” on page 51 for additional information on guest-level backup and restore.
File Level RecoveryFile Level Recovery (FLR) allows local administrators of protected virtual machines to browse and mount backups for the local machine. From these mounted backups, the administrator can then restore individual files. FLR is accomplished using the vSphere Data Protection Restore Client.
See Chapter 6, “Using File Level Restore,” on page 69 for additional information on FLR.
Deduplication Store BenefitsEnterprise data is highly redundant, with identical files or data stored within and across systems (for example, OS files or documents sent to multiple recipients). Edited files also have tremendous redundancy with previous versions. Traditional backup methods magnify this by storing all of the redundant data over and over again. VDP uses patented deduplication technology to eliminate redundancy at both the file and the subfile data segment level.
Variable vs. Fixed-Length Data Segments
A key factor in eliminating redundant data at a segment (or subfile) level is the method for determining segment size. Fixed-block or fixed-length segments are commonly employed by snapshot and some deduplication technologies. Unfortunately, even small changes to a dataset (for example, inserting data at the beginning of a file) can change all fixed-length segments in a dataset, despite the fact that very little of the dataset has been changed. VDP uses an intelligent variable-length method for determining segment size that examines the data to determine logical boundary points, which increases efficiency.

VMware, Inc. 13
Chapter 1 Understanding vSphere Data Protection
Logical Segment Determination
VDP uses a patented method for segment size determination designed to yield optimal efficiency across all systems. VDP’s algorithm analyzes the binary structure of a data set (all the 0s and 1s that make up a dataset) in order to determine segment boundaries that are context-dependent. Variable-length segments average 24 KB in size and are further compressed to an average of 12 KB.
By analyzing the binary structure within the VMDK files, VDP works for all file types and sizes and intelligently deduplicates the data.
vSphere Data Protection ArchitecturevSphere Data Protection (VDP) uses a vSphere Web Client and a VDP Appliance to store backups to deduplicated storage.
VDP is composed of a set of components that run on different machines (shown in the following diagram).
vCenter Server 5.1
VDP Appliance (installed on ESX/ESXi 4.1 or 5.x)
vSphere Web Client

vSphere Data Protection Administration Guide
14 VMware, Inc.
VMware, Inc. 15
2
This chapter includes the following topics:
“vSphere Data Protection Sizing” on page 16
“Software Requirements” on page 16
“System Requirements” on page 16
“Preinstallation Configuration” on page 17
“vSphere Data Protection Installation” on page 19
Installing and Configuring vSphere Data Protection 2

vSphere Data Protection Administration Guide
16 VMware, Inc.
vSphere Data Protection SizingvSphere Data Protection (VDP) sizing helps determine the VDP Appliance size and number of appliances required based on:
Number of and type of virtual machines (do the virtual machines contain file system or database data?)
Amount of data
Retention periods (daily, weekly, monthly, yearly)
Typical change rate
On average you can support up to 25 virtual machines per TB of capacity.
Software RequirementsVDP 5.1 requires the following software:
VMware vCenter Server
vCenter Server Linux or Windows: Version 5.1
vSphere Web Client (see the VMware website for current vSphere 5.1 web browser support)
Web browsers must be enabled with Adobe Flash Player 11.3 or higher to access the vSphere Web Client and VDP functionality
VMware ESX/ESXi (the following versions are supported)
ESX/ESXi 4.1,ESXi 5.0, ESXi 5.1
System RequirementsThe following section lists the system requirements for VDP and VDP Advanced.
NOTE VDP can be upgraded to VDP Advanced, but VDP Advanced cannot be reconfigured to VDP.
VDP System Requirements
VDP is available in three configurations:
0.5 TB
1 TB
2 TB
IMPORTANT Once VDP is deployed the size cannot be changed.
VDP requires the following minimum system requirements:
NOTE The additional disk space required that is above the usable capacity of the appliance is for creating and managing checkpoints.
Table 2-1. Minimum system requirements for VDP
0.5 TB 1 TB 2 TB
Processors Minimum four 2 GHz processors
Minimum four 2 GHz processors
Minimum four 2 GHz processors
Memory 4 GB 4 GB 4 GB
Disk space 873 GB 1,600 GB 3,100 GB

VMware, Inc. 17
Chapter 2 Installing and Configuring vSphere Data Protection
VDP Advanced System Requirements
VDP Advanced is available in four configurations:
2 TB
4 TB
6 TB
8 TB
IMPORTANT Once VDP Advanced is deployed the size can be increased.
VDP Advanced requires the following minimum system requirements:
NOTE The additional disk space required that is above the usable capacity of the appliance is for creating and managing checkpoints.
Preinstallation ConfigurationPrior to VDP installation, the following preinstallation steps must be completed:
“DNS Configuration” on page 17
“NTP Configuration” on page 18
“User Account Configuration” on page 18
“vSphere Data Protection Appliance Best Practices” on page 19
DNS Configuration
Before you deploy VDP, you must add an entry to the DNS Server for the appliance IP address and Fully Qualified Domain Names (FQDN). The DNS server must support both forward and reverse lookup.
IMPORTANT Failure to set up DNS properly can cause many runtime or configuration issues.
To confirm that DNS is configured properly, run the following commands from the vCenter Server:
To verify DNS configuration, open a command prompt and type the following commands:
nslookup <VDP_IP_address> <DNS_IP_address>
The nslookup command returns the FQDN of the VDP Appliance.
nslookup <FQDN_of_VDP> <DNS_IP_address>
The nslookup command returns the IP address of the VDP Appliance.
nslookup <FQDN_of_vCenter> <DNS_IP_address>
The nslookup command returns the IP address of the vCenter Server.
If you have configured short names for the DNS entries, perform additional lookups for the short names.
If the nslookup commands returned the proper information, close the command prompt; if not, resolve the DNS configuration.
Table 2-2. Minimum system requirements for VDP Advanced
2 TB 4 TB 6 TB 8 TB
Processors Minimum four 2 GHz processors
Minimum four 2 GHz processors
Minimum four 2 GHz processors
Minimum four 2 GHz processors
Memory 6 GB 8 GB 10 GB 12 GB
Disk space 3 TB 6 TB 9 TB 12 TB

vSphere Data Protection Administration Guide
18 VMware, Inc.
NTP Configuration
VDP leverages VMware Tools to synchronize time through NTP. All ESXi hosts and the vCenter Server should have NTP configured properly. The VDP Appliance gets the correct time through vSphere and should not be configured with NTP.
CAUTION If you configure NTP directly on the VDP Appliance, it will cause time synchronization errors.
See the ESXi and vCenter Server documentation for more information about configuring NTP.
User Account Configuration
Before the vCenter user account can be used with VDP, or before the SSO admin user can be used with VDP, these users should be explicitly added as administrator on the vCenter root node. Users who inherit permissions from group roles are not valid.
NOTE In high-security environments, you can restrict the vCenter user account permissions required to configure and administer the VDP Appliance. The account permission categories are listed in “Minimum Required vCenter User Account Permissions” on page 93.
The following steps are used to configure the VDP user or SSO admin user using the vSphere Web Client.
1 From a web browser, access the vSphere Web Client.
https://<IP_address_vCenter_Server>:9443/vsphere-client/
2 Login with administrative rights.
3 Select vCenter > Hosts and Clusters.
4 On the left side of the page, click on the vCenter Server. It is important this be selected from the root level of the tree structure (represented under Hosts and Clusters). If you select the vCenter virtual machine, the configuration will fail.
5 Click the Manage tab and then select Permissions.
6 Click the Add permission (+) icon.
7 Click Add.
8 From the Domain drop-down select domain, server, or SYSTEM-DOMAIN.
9 Select the user that will administer VDP or be the SSO admin user and then click Add.
10 Click OK.
11 From the Assigned Role list, select Administrator.
12 Confirm that the Propagate to child objects box is checked.
13 Click OK.
To verify that user is listed under Administrators, go to Home > Administration > Role Manager and click the Administrator role. The user you just added should be listed to the right of that role.
VMware, Inc. 19
Chapter 2 Installing and Configuring vSphere Data Protection
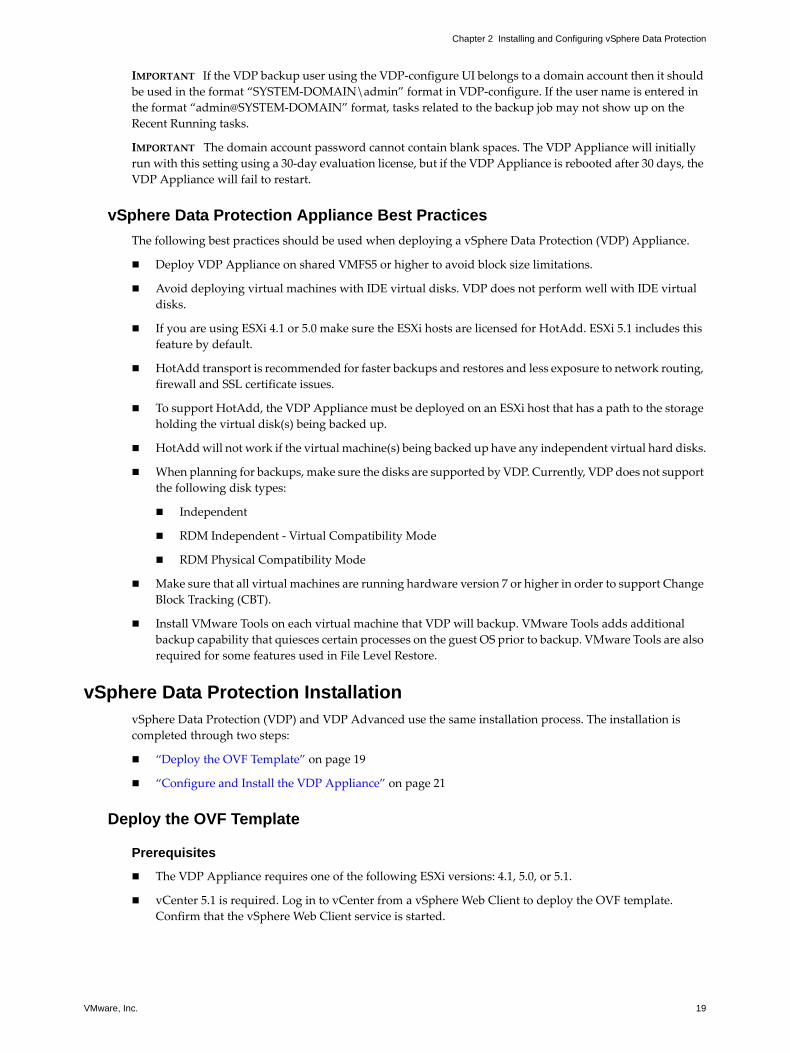
IMPORTANT If the VDP backup user using the VDP-configure UI belongs to a domain account then it should be used in the format “SYSTEM-DOMAIN\admin” format in VDP-configure. If the user name is entered in the format “admin@SYSTEM-DOMAIN” format, tasks related to the backup job may not show up on the Recent Running tasks.
IMPORTANT The domain account password cannot contain blank spaces. The VDP Appliance will initially run with this setting using a 30-day evaluation license, but if the VDP Appliance is rebooted after 30 days, the VDP Appliance will fail to restart.
vSphere Data Protection Appliance Best Practices
The following best practices should be used when deploying a vSphere Data Protection (VDP) Appliance.
Deploy VDP Appliance on shared VMFS5 or higher to avoid block size limitations.
Avoid deploying virtual machines with IDE virtual disks. VDP does not perform well with IDE virtual disks.
If you are using ESXi 4.1 or 5.0 make sure the ESXi hosts are licensed for HotAdd. ESXi 5.1 includes this feature by default.
HotAdd transport is recommended for faster backups and restores and less exposure to network routing, firewall and SSL certificate issues.
To support HotAdd, the VDP Appliance must be deployed on an ESXi host that has a path to the storage holding the virtual disk(s) being backed up.
HotAdd will not work if the virtual machine(s) being backed up have any independent virtual hard disks.
When planning for backups, make sure the disks are supported by VDP. Currently, VDP does not support the following disk types:
Independent
RDM Independent - Virtual Compatibility Mode
RDM Physical Compatibility Mode
Make sure that all virtual machines are running hardware version 7 or higher in order to support Change Block Tracking (CBT).
Install VMware Tools on each virtual machine that VDP will backup. VMware Tools adds additional backup capability that quiesces certain processes on the guest OS prior to backup. VMware Tools are also required for some features used in File Level Restore.
vSphere Data Protection InstallationvSphere Data Protection (VDP) and VDP Advanced use the same installation process. The installation is completed through two steps:
“Deploy the OVF Template” on page 19
“Configure and Install the VDP Appliance” on page 21
Deploy the OVF Template
Prerequisites
The VDP Appliance requires one of the following ESXi versions: 4.1, 5.0, or 5.1.
vCenter 5.1 is required. Log in to vCenter from a vSphere Web Client to deploy the OVF template. Confirm that the vSphere Web Client service is started.

vSphere Data Protection Administration Guide
20 VMware, Inc.
The VDP Appliance connects to ESXi using port 902. If there is a firewall between the appliance and ESXi, port 902 must be open. See Chapter 11, “vSphere Data Protection Port Usage,” on page 91, for additional information on port usage.
The VMware Client Integration Plug-in 5.1.0 must be installed on your browser. If it is not already installed, it can be installed during the following procedure.
Procedure
1 From a web browser, access the vSphere Web Client.
https://<IP_address_vCenter_Server>:9443/vsphere-client/
2 Login with administrative rights.
3 Select vCenter > Datacenters.
4 On the Objects tab, click Actions > Deploy OVF Template.
5 If prompted, allow and install the VMware Client Integration Plug-in.
6 Select the source where the VDP Appliance is located. By default the File name dialog is set to OVF Packages (*.ovf). From the drop-down box to the right of File name, select OVA Packages (*.ova).
7 Navigate to the location of the VDP Appliance .ova file. Confirm that you select the appropriate file for the datastore. Click Open.
8 After the VDP Appliance .ova file is selected, click Next.
9 Review the template details and click Next.
10 On the Accept EULAs screen, read the license agreement, click Accept, and then click Next.
11 On the Select name and folder screen, enter the name for the VDP Appliance (this must match the entry configured on the DNS Server) and click on the folder or datacenter in which you want it deployed. The VDP Appliance Name should not be changed after installation. Click Next.
12 On the Select a resource screen, select the host for the VDP Appliance and click Next.
13 On the Select Storage screen, select the virtual disk format (see “Impact of Selecting Thin or Thick Provisioned Disks” on page 76 for additional information) and select the location of the storage for the VDP Appliance. Click Next.
14 On the Setup networks screen, select the Destination Network for the VDP Appliance and click Next.
15 In the Customize template screen, specify the Default Gateway, DNS, Network 1 IP Address, and Network 1 Netmask. Confirm that the IP addresses are correct and match the entry in the DNS Server. Setting incorrect IP addresses in this dialog box will require the .ova to be redeployed. Click Next.
NOTE The VDP Appliance does not support DHCP; a static IP address is required.
16 On the Ready to complete screen, confirm that all of the deployment options are correct. Check Power on after deployment and click Finish.
vCenter deploys the VDP Appliance. Monitor Recent Tasks to determine when the deployment is complete.

VMware, Inc. 21
Chapter 2 Installing and Configuring vSphere Data Protection
Configure and Install the VDP Appliance
Prerequisites
The VDP .ovf template (see “Deploy the OVF Template” on page 19) must have deployed successfully, and you must be logged into the vCenter Server from the vSphere Web Client.
Procedure
1 From a web browser, access the vSphere Web Client.
https://<IP_address_vCenter_Server>:9443/vsphere-client/
2 Login with administrative rights.
3 Select vCenter Home > vCenter > VMs and Templates. Expand the vCenter tree and select the VDP Appliance.
4 Right-click the VDP Appliance and select Open Console.
5 After the installation files load, the Welcome screen for the VDP menu appears. Open a web browser and type:
https://<IP_address_VDP_Appliance>:8543/vdp-configure/
6 From the VMware Login screen, enter the following:
a User: root
b Password: changeme
c Click Login
7 The Welcome screen appears. Click Next.
8 The Network settings dialog box appears. Specify (or confirm) the following:
a IPv4 Static address
b Netmask
c Gateway
d Primary DNS
e Secondary DNS
f Host name
g Domain
9 Click Next.
10 The Time Zone dialog box appears. Select the appropriate time zone and click Next.
11 The VDP credentials dialog box displays. For VDP credentials, type in the appliance password. This will be the universal configuration password. Specify a password that contains the following:
Nine characters
At least one uppercase letter
At least one lowercase letter
At least one number
No special characters
12 Click Next.
vSphere Data Protection Administration Guide
22 VMware, Inc.
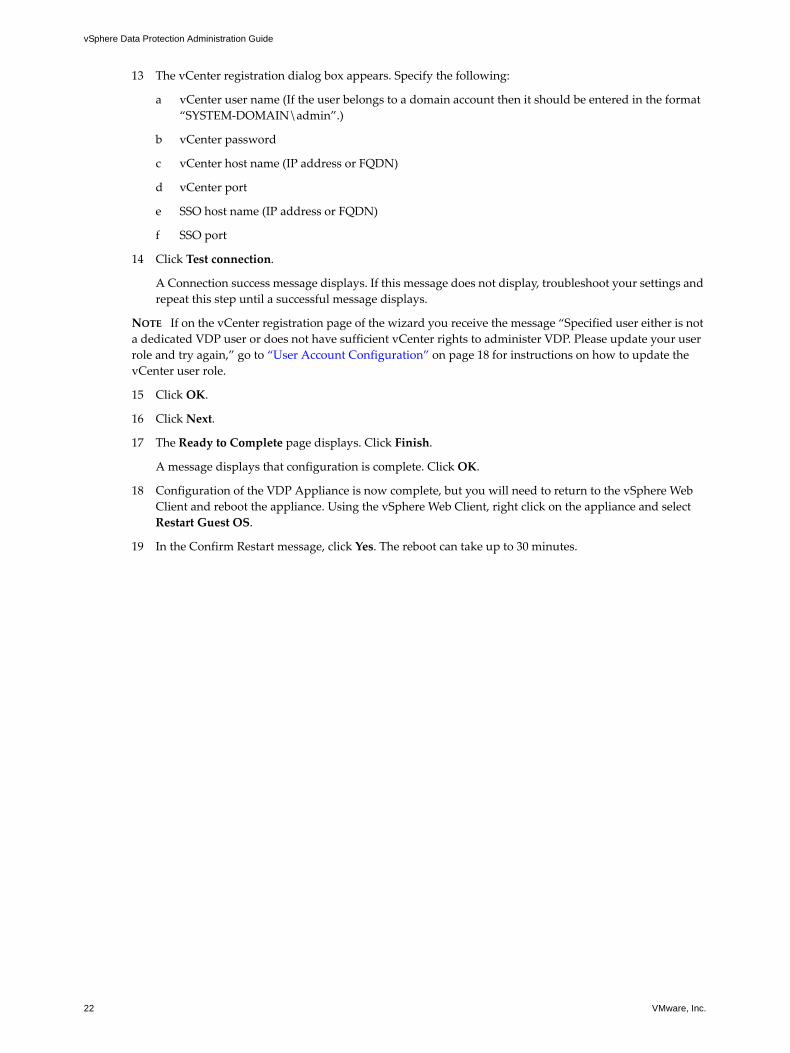
13 The vCenter registration dialog box appears. Specify the following:
a vCenter user name (If the user belongs to a domain account then it should be entered in the format “SYSTEM-DOMAIN\admin”.)
b vCenter password
c vCenter host name (IP address or FQDN)
d vCenter port
e SSO host name (IP address or FQDN)
f SSO port
14 Click Test connection.
A Connection success message displays. If this message does not display, troubleshoot your settings and repeat this step until a successful message displays.
NOTE If on the vCenter registration page of the wizard you receive the message “Specified user either is not a dedicated VDP user or does not have sufficient vCenter rights to administer VDP. Please update your user role and try again,” go to “User Account Configuration” on page 18 for instructions on how to update the vCenter user role.
15 Click OK.
16 Click Next.
17 The Ready to Complete page displays. Click Finish.
A message displays that configuration is complete. Click OK.
18 Configuration of the VDP Appliance is now complete, but you will need to return to the vSphere Web Client and reboot the appliance. Using the vSphere Web Client, right click on the appliance and select Restart Guest OS.
19 In the Confirm Restart message, click Yes. The reboot can take up to 30 minutes.

VMware, Inc. 23
3
This chapter contains the following topics:
“About the Configuration Utility” on page 24
“Viewing Status” on page 24
“Starting and Stopping Services” on page 25
“Collecting Logs” on page 25
“Changing vSphere Data Protection Configuration” on page 26
“Rolling Back an Appliance” on page 26
“Upgrading the vSphere Data Protection Appliance” on page 27
Post-Installation Configuration of vSphere Data Protection Appliance 3

vSphere Data Protection Administration Guide
24 VMware, Inc.
About the Configuration UtilityDuring installation of vSphere Data Protection (VDP), the VDP Configure utility runs in “install” mode. This mode allows you to enter initial networking settings, time zone, VDP Appliance password, and vCenter credentials. After initial installation, the VDP Configure utility runs in “maintenance” mode and displays a different user interface.
To access VDP Configure, open a web browser and type:
https://<IP_address_VDP_Appliance>:8543/vdp-configure/
Use the VDP Appliance user name and password.
The maintenance interface is used for:
“Viewing Status” on page 24—Allows you to see the services currently running (or currently stopped) on the VDP Appliance.
“Starting and Stopping Services” on page 25—Allows you to start and stop selected services on the VDP Appliance.
“Collecting Logs” on page 25—Allows you to download current logs from the VDP Appliance.
“Changing vSphere Data Protection Configuration” on page 26—Allows you to view or change network settings, configure vCenter Registration, or to view or edit system settings (timezone information and VDP credentials).
“Rolling Back an Appliance” on page 26—Allows you to restore the VDP Appliance to an earlier known and valid state.
“Upgrading the vSphere Data Protection Appliance” on page 27—Allows you to upgrade ISO images on your VDP Appliance.
Viewing StatusThe Status tab lists all of the services required by VDP and the current status of each service. The following table describes the services used by VDP.
NOTE If any of these services stop running, an alarm is triggered on the vCenter Server. If a stopped service is restarted, the alarm is cleared. There can be a delay of up to 10 minutes before alarms are triggered or cleared.
Table 3-1. Description of services running on the VDP Appliance.
Service Description
Core services These are the services that comprise the backup engine of the appliance. If these services are disabled no backup jobs (either scheduled or “on demand”) will run, and no restore activities can be initiated.
Management services Management services should only be stopped under the direction of technical support.
File system services These are the services that allow backups to be mounted for file-level restore operations.
File level restore services
These are the services that support the management of file-level restore operations.
Maintenance services These are the services that perform maintenance tasks, such as evaluating whether retention periods of backups have expired. The Maintenance service is disabled the first 24-48 hours after the VDP Appliance is deployed. This creates a larger backup window for initial backups.
Backup scheduler The backup scheduler is the service that initiates schedule backup jobs. If this is stopped, no scheduled backups will run; however, “on demand” backups can still be initiated.

VMware, Inc. 25
Chapter 3 Post-Installation Configuration of vSphere Data Protection Appliance
The status that is displayed for these services can be any of the following:
Starting
Start Failed
Running
Stopping
Stop Failed
Stopped
Loading-getting state
Unrecoverable (Core services only)
Restoring (Management services only)
Restore Failed (Management services only)
Click the refresh icon to update the status display.
Starting and Stopping Services
On the status screen you can restart stopped services by clicking Start, or you can stop running services by clicking Stop. In general, however, you should only stop running services under the direction of technical support.
If you see that a service is stopped, you can attempt to re-start it by clicking Start. In some cases, however, additional troubleshooting steps are necessary for the service to work properly.
If all services are stopped, start the services in the following order:
1 Core services
2 Management services
3 Backup scheduler
4 Maintenance services
5 File system services
6 File level restore services
Collecting Logs
The log bundled is intended primarily to facilitate sending logs of the VDP Appliance to support personnel. You can download all the logs from VDP services as a zip file by clicking Collect logs. A “save as” dialog displays that allows you to download the log bundle to the file system of the machine where your web browser is running. By default, the log bundle is named LogBundle.zip, but should be given a unique name.
vSphere Data Protection Administration Guide
26 VMware, Inc.
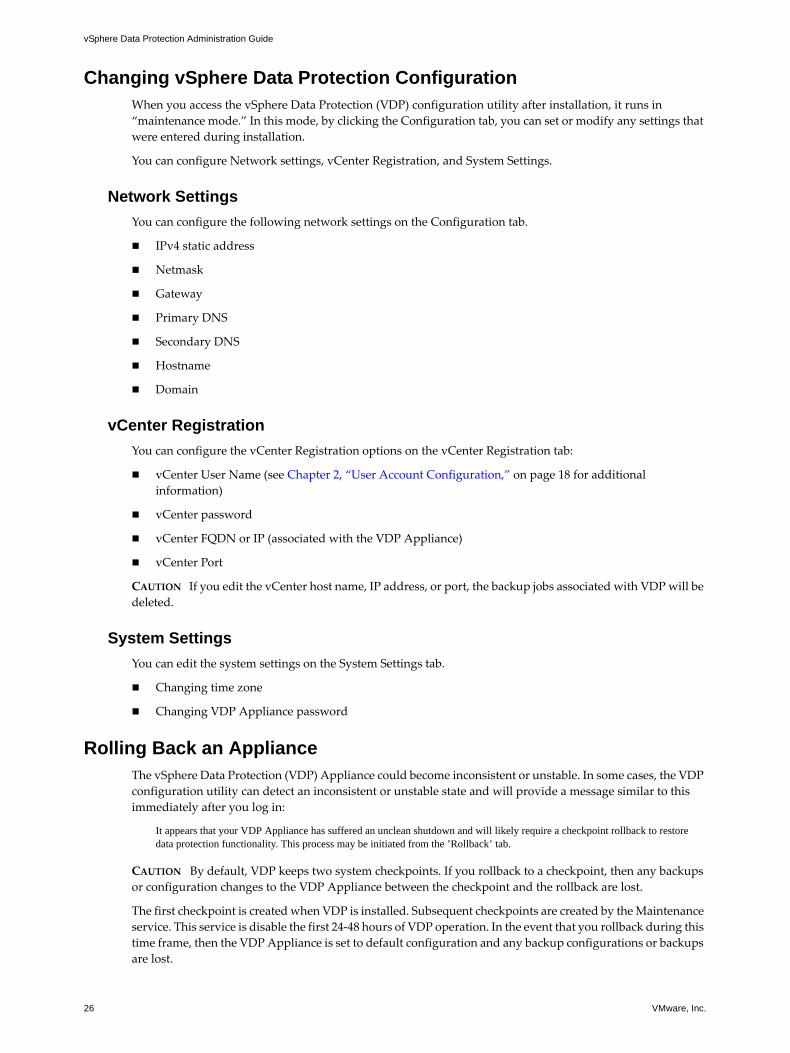
Changing vSphere Data Protection ConfigurationWhen you access the vSphere Data Protection (VDP) configuration utility after installation, it runs in “maintenance mode.” In this mode, by clicking the Configuration tab, you can set or modify any settings that were entered during installation.
You can configure Network settings, vCenter Registration, and System Settings.
Network Settings
You can configure the following network settings on the Configuration tab.
IPv4 static address
Netmask
Gateway
Primary DNS
Secondary DNS
Hostname
Domain
vCenter Registration
You can configure the vCenter Registration options on the vCenter Registration tab:
vCenter User Name (see Chapter 2, “User Account Configuration,” on page 18 for additional information)
vCenter password
vCenter FQDN or IP (associated with the VDP Appliance)
vCenter Port
CAUTION If you edit the vCenter host name, IP address, or port, the backup jobs associated with VDP will be deleted.
System Settings
You can edit the system settings on the System Settings tab.
Changing time zone
Changing VDP Appliance password
Rolling Back an ApplianceThe vSphere Data Protection (VDP) Appliance could become inconsistent or unstable. In some cases, the VDP configuration utility can detect an inconsistent or unstable state and will provide a message similar to this immediately after you log in:
It appears that your VDP Appliance has suffered an unclean shutdown and will likely require a checkpoint rollback to restore data protection functionality. This process may be initiated from the ’Rollback’ tab.
CAUTION By default, VDP keeps two system checkpoints. If you rollback to a checkpoint, then any backups or configuration changes to the VDP Appliance between the checkpoint and the rollback are lost.
The first checkpoint is created when VDP is installed. Subsequent checkpoints are created by the Maintenance service. This service is disable the first 24-48 hours of VDP operation. In the event that you rollback during this time frame, then the VDP Appliance is set to default configuration and any backup configurations or backups are lost.

VMware, Inc. 27
Chapter 3 Post-Installation Configuration of vSphere Data Protection Appliance
NOTE If any VMware VDP for Exchange Server Clients or VMware VDP for SQL Server Clients were installed between a checkpoint and a rollback occur, the clients must be reinstalled.
Follow the procedure below to roll back a VDP Appliance.
CAUTION It is strongly recommended that you only roll back to the most recent validated checkpoint.
Prerequisites
The VDP Appliance must be installed and the VDP Appliance password is required.
Procedure
1 Open a web browser and type:
https://<IP_address_VDP_Appliance>:8543/vdp-configure/
2 Login with the VDP user name and password.
3 Click the Rollback tab.
4 Click the lock icon to enable VDP rollback.
5 Enter the VDP Appliance password, and click OK.
6 The lock icon changes to unlocked. Click the Checkpoint that you want to roll back to.
7 Click Perform VDP rollback to selected checkpoint. A warning message appears explaining the consequences of rolling back the appliance.
8 Click Yes. An information message appears telling you a rollback has been initiated.
9 Click OK. The VDP Appliance attempts to roll back and displays status information. It also displays an information message indicating whether the roll back succeeded or failed.
10 Click OK.
If the appliance did not roll back successfully, contact Customer Support.
Upgrading the vSphere Data Protection ApplianceBefore running the upgrade process, take a snapshot of the vSphere Data Protection (VDP) Appliance from the vCenter Server. Taking a snapshot allows you to restore the VDP Appliance to a previously-known state in the event that the upgrade process does not complete successfully.
The upgrade process consists of the following general steps:
1 “Selecting a Time for Upgrading the VDP Appliance” on page 27
2 “Creating a Snapshot of the VDP Appliance” on page 27
3 “Mounting the Upgrade ISO Image on the Appliance” on page 28
4 “Installing the Upgrade” on page 29
5 “Removing the Snapshot and Unmounting the Upgrade Image” on page 29
Selecting a Time for Upgrading the VDP Appliance
VDP upgrades cannot occur during the blackout window or the maintenance window. See “Configuring vSphere Data Protection Appliance” on page 44 for additional details. The VDP upgrade should be performed during the backup window when no backup jobs are running.
Creating a Snapshot of the VDP Appliance
In the event that the upgrade does not work as expected, it is recommended to take a snapshot of the VDP Appliance prior to the upgrade. In the event of an upgrade issue, you may roll back to the snapshot.

vSphere Data Protection Administration Guide
28 VMware, Inc.
NOTE At the time of installation, the virtual disks used by the VDP Appliance are set to be “Independent - Persistent.” However, in order to take a snapshot, the disks must be temporarily changed to “Dependent.”
To create a snapshot of the VDP Appliance:
1 From a web browser, access the vSphere Web Client.
https://<IP_address_vCenter_Server>:9443/vsphere-client/
2 Log in as a user who has rights to edit hardware settings.
3 Click vCenter > Hosts and Clusters.
4 In the tree on the left, click the disclosure arrows until the VDP Appliance displays.
5 Right-click the VDP Appliance and choose Shut Down Guest and click Yes.
6 After the appliance has shut down, right-click the VDP Appliance and choose Edit Settings.
7 In the Virtual Hardware table, starting with Hard disk 2, click the disclosure arrow.
8 In the Disk Mode row, click Dependent.
9 Continuing with Hard disk 3, repeat step 7 until all the remaining disks have been set to Dependent mode.
10 Click OK.
11 Right-click the VDP Appliance and choose Take Snapshot.
12 Type a name for the snapshot.
13 Type an optional description.
14 Click OK.
15 After the snapshot completes, right click the appliance and click Power On.
The VDP appliance snapshot has been taken.
Mounting the Upgrade ISO Image on the Appliance
The VDP Appliance is upgraded with an ISO upgrade image.
To mount the upgrade ISO image:
1 Copy the upgrade ISO image to a location that is accessible to the vSphere Web Client.
2 From a web browser, access the vSphere Web Client.
https://<IP_address_vCenter_Server>:9443/vsphere-client/
3 Log in as a user who has rights to edit hardware settings.
4 Click vCenter > Hosts and Clusters.
5 In the tree on the left, click the disclosure arrows until the VDP Appliance displays.
6 Right-click the VDP Appliance and choose Edit Settings.
7 In the Virtual Hardware table, click the disclosure arrow next to CD/DVD.
8 From the drop-down menu, choose Datastore ISO File.
The Select File screen should appear. If not, select the CD/DVD Media row and click Browse.
9 From the Select File screen, navigate to the datastore and the folder that contains the ISO upgrade image and select the ISO image. Click OK.
10 Click the Connected checkbox on the CD/DVD Media row and then click OK.
The ISO image will begin mounting on the VDP Appliance. The average time for a VDP Upgrade ISO image to mount is about five minutes.

VMware, Inc. 29
Chapter 3 Post-Installation Configuration of vSphere Data Protection Appliance
Installing the Upgrade
The upgrade process will check for available disk space on the datastore where the VDP Appliance is installed. You will need approximately 2 GB of free space, plus the size of the upgrade ISO file.
1 Open a web browser and type:
https://<IP_address_VDP_Appliance>:8543/vdp-configure/
2 Login with the VDP user name and password.
3 On the Status tab, ensure that all the services are running. If all of the services are not running, the upgrade will not succeed.
4 Click the Upgrade tab. Upgrades that are contained on the upgrade ISO image you mounted are displayed in the SW Upgrades window.
NOTE If the ISO image does not appear, close VDP-Configure by exiting the web browser. Restart the web browser and restart and login to VDP-Configure. If the ISO image still does not appear, and the datastore where the ISO image is being mounted is from a remote file system, the mounting and unzipping process can take up to 20 minutes.
NOTE After allowing time for the ISO image to mount, if the upgrade tab still does not display an upgrade available, it may be because the image has been corrupted. Any ISO images that do not pass checksum are not displayed on the Upgrade tab.
5 Click the upgrade you want to install, and click Upgrade VDP.
The upgrade begins installing. This installation portion of the upgrade can take one to four hours, a status bar updates the progress of the installation.
If the upgrade installs successfully, perform the next step of “Removing the Snapshot and Unmounting the Upgrade Image” on page 29.
If the upgrade process fails, you can try to install the upgrade again. If you cannot successfully complete the upgrade, you can revert back to the snapshot you took at the start of the upgrade process. For instructions on how to revert back to this snapshot, see “Reverting Back to a Snapshot” on page 30.
Removing the Snapshot and Unmounting the Upgrade Image
It is strongly recommended that you remove snapshots and unmount the upgrade image after an upgrade completes successfully.
To remove the snapshot:
1 From a web browser, access the vSphere Web Client.
https://<IP_address_vCenter_Server>:9443/vsphere-client/
2 Log in as a user who has rights to edit hardware settings.
3 Click vCenter > Hosts and Clusters.
4 In the tree on the left, click the disclosure arrows until the VDP Appliance displays.
5 Right-click the VDP Appliance and choose Shut Down Guest. Click Yes.
6 After the appliance has shut down, right-click the VDP Appliance and choose Manage Snapshots.
7 Click the Snapshot you created for the VDP Appliance.
8 Click Delete, and click Yes.
9 Click Close.
10 Right-click the VDP Appliance and choose Edit Settings.
11 Starting with Hard disk 2, click the disclosure arrow.
12 In the Virtual Hardware table, in the Disk Mode row, click Independent - Persistent.
vSphere Data Protection Administration Guide
30 VMware, Inc.
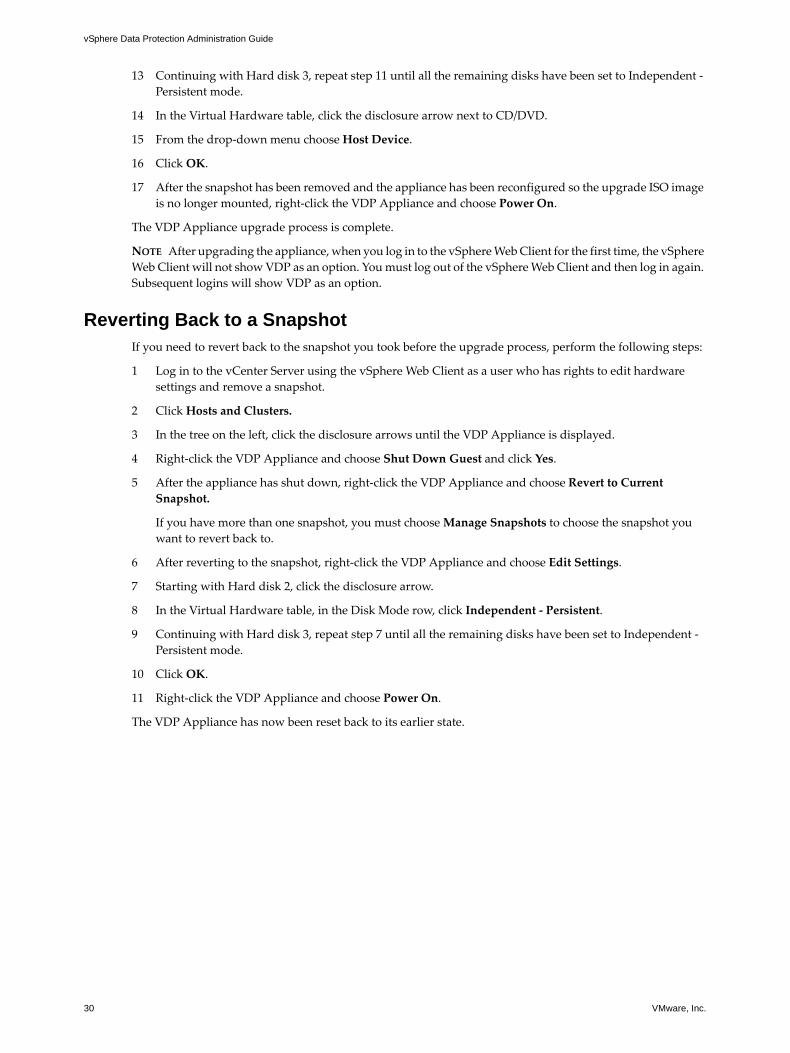
13 Continuing with Hard disk 3, repeat step 11 until all the remaining disks have been set to Independent - Persistent mode.
14 In the Virtual Hardware table, click the disclosure arrow next to CD/DVD.
15 From the drop-down menu choose Host Device.
16 Click OK.
17 After the snapshot has been removed and the appliance has been reconfigured so the upgrade ISO image is no longer mounted, right-click the VDP Appliance and choose Power On.
The VDP Appliance upgrade process is complete.
NOTE After upgrading the appliance, when you log in to the vSphere Web Client for the first time, the vSphere Web Client will not show VDP as an option. You must log out of the vSphere Web Client and then log in again. Subsequent logins will show VDP as an option.
Reverting Back to a SnapshotIf you need to revert back to the snapshot you took before the upgrade process, perform the following steps:
1 Log in to the vCenter Server using the vSphere Web Client as a user who has rights to edit hardware settings and remove a snapshot.
2 Click Hosts and Clusters.
3 In the tree on the left, click the disclosure arrows until the VDP Appliance is displayed.
4 Right-click the VDP Appliance and choose Shut Down Guest and click Yes.
5 After the appliance has shut down, right-click the VDP Appliance and choose Revert to Current Snapshot.
If you have more than one snapshot, you must choose Manage Snapshots to choose the snapshot you want to revert back to.
6 After reverting to the snapshot, right-click the VDP Appliance and choose Edit Settings.
7 Starting with Hard disk 2, click the disclosure arrow.
8 In the Virtual Hardware table, in the Disk Mode row, click Independent - Persistent.
9 Continuing with Hard disk 3, repeat step 7 until all the remaining disks have been set to Independent - Persistent mode.
10 Click OK.
11 Right-click the VDP Appliance and choose Power On.
The VDP Appliance has now been reset back to its earlier state.
VMware, Inc. 31
4
This chapter includes the following topics:
“Accessing vSphere Data Protection” on page 32
“Switching vSphere Data Protection Appliances” on page 32
“Understanding the vSphere Data Protection User Interface” on page 33
“Understanding the vSphere Data Protection Advanced User Interface” on page 34
“Creating or Editing Backup Jobs” on page 36
“Managing Backup Jobs” on page 38
“Restoring Backups” on page 41
“Viewing Information from the Reports Tab” on page 43
“Configuring vSphere Data Protection Appliance” on page 44
“Monitoring vSphere Data Protection Activity” on page 48
“VDP Shutdown and Startup Procedures” on page 50
Using vSphere Data Protection 4

vSphere Data Protection Administration Guide
32 VMware, Inc.
Accessing vSphere Data ProtectionvSphere Data Protection (VDP) is accessed through a vSphere Web Client and is managed only through the vSphere Web Client.
NOTE VDP cannot be used without a vCenter Server. In linked mode, the VDP Appliance works only with the vCenter Server with which it is associated.
Prerequisites
Before using VDP, you must install and configure the VDP Appliance described in “Installing and Configuring vSphere Data Protection” on page 15.
Procedure
1 From a web browser, access the vSphere Web Client.
https://<IP_address_vCenter_Server>:9443/vsphere-client/
2 In the Credentials page, enter an administrative vCenter user name and password and click Login.
VDP uses this information to connect to vCenter to perform backups, so the specified user account must have administrative rights.
3 In the vSphere Web Client, select vSphere Data Protection.
4 In the Welcome to vSphere Data Protection page, select the vSphere Data Protection Appliance and click Connect.
Switching vSphere Data Protection AppliancesEach vCenter Server support up to 10 vSphere Data Protection (VDP) Appliances. You can switch appliances by choosing an appliance from the drop-down list to the right of the Switch Appliance option.
NOTE The VDP Appliances in the drop-down list are sorted alphabetically, and the first item in the list that is displayed on the screen may not match the current appliance. On the vSphere Data Protection screen, the appliance name on the left is the current appliance, and the appliance name in the drop-down list is the first in the list of available appliances.
VMware, Inc. 33
Chapter 4 Using vSphere Data Protection
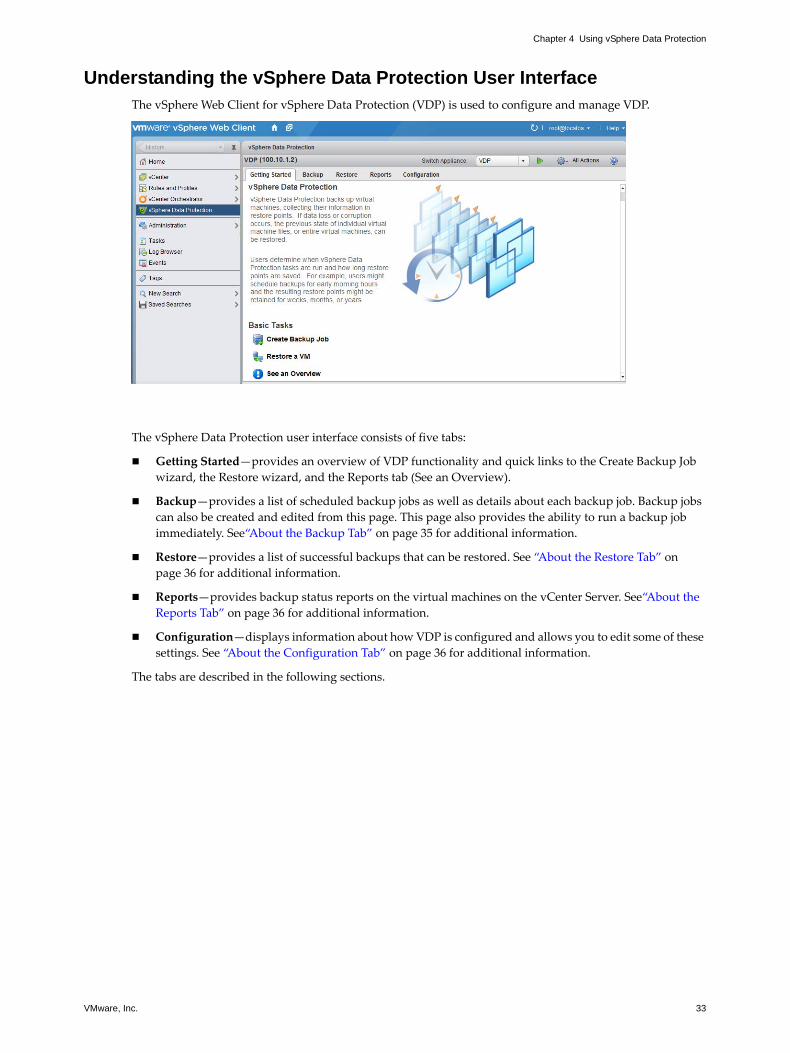
Understanding the vSphere Data Protection User InterfaceThe vSphere Web Client for vSphere Data Protection (VDP) is used to configure and manage VDP.
The vSphere Data Protection user interface consists of five tabs:
Getting Started—provides an overview of VDP functionality and quick links to the Create Backup Job wizard, the Restore wizard, and the Reports tab (See an Overview).
Backup—provides a list of scheduled backup jobs as well as details about each backup job. Backup jobs can also be created and edited from this page. This page also provides the ability to run a backup job immediately. See“About the Backup Tab” on page 35 for additional information.
Restore—provides a list of successful backups that can be restored. See “About the Restore Tab” on page 36 for additional information.
Reports—provides backup status reports on the virtual machines on the vCenter Server. See“About the Reports Tab” on page 36 for additional information.
Configuration—displays information about how VDP is configured and allows you to edit some of these settings. See “About the Configuration Tab” on page 36 for additional information.
The tabs are described in the following sections.
vSphere Data Protection Administration Guide
34 VMware, Inc.
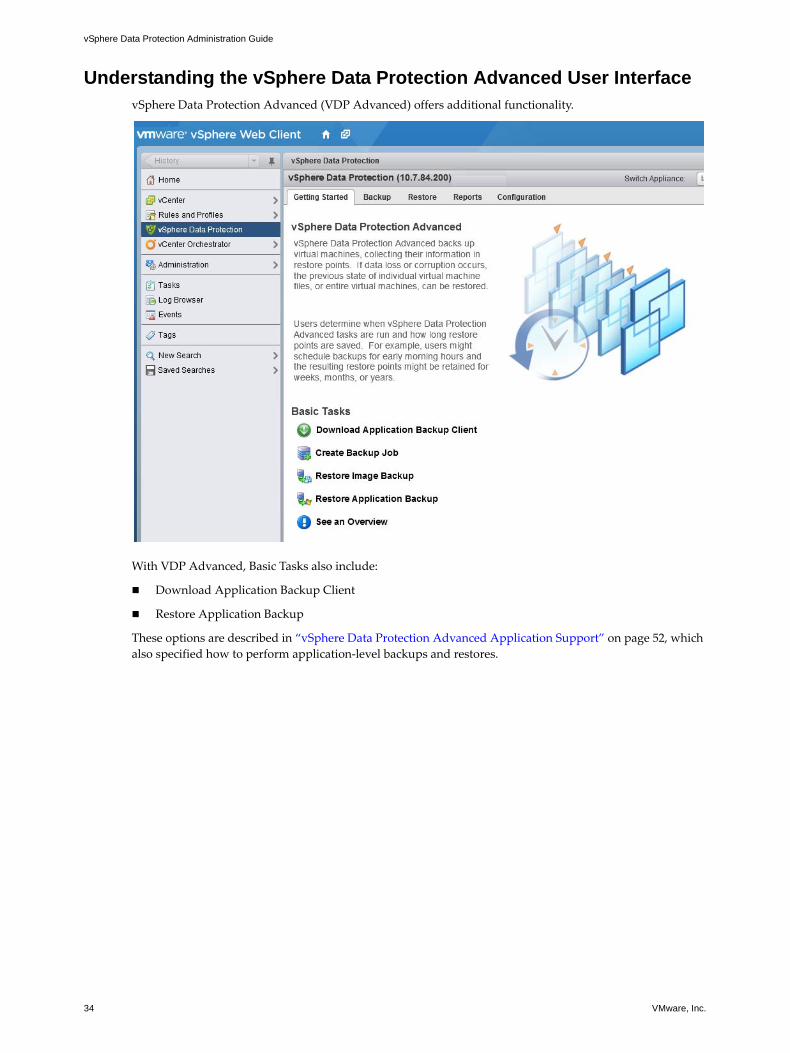
Understanding the vSphere Data Protection Advanced User InterfacevSphere Data Protection Advanced (VDP Advanced) offers additional functionality.
With VDP Advanced, Basic Tasks also include:
Download Application Backup Client
Restore Application Backup
These options are described in “vSphere Data Protection Advanced Application Support” on page 52, which also specified how to perform application-level backups and restores.
VMware, Inc. 35
Chapter 4 Using vSphere Data Protection
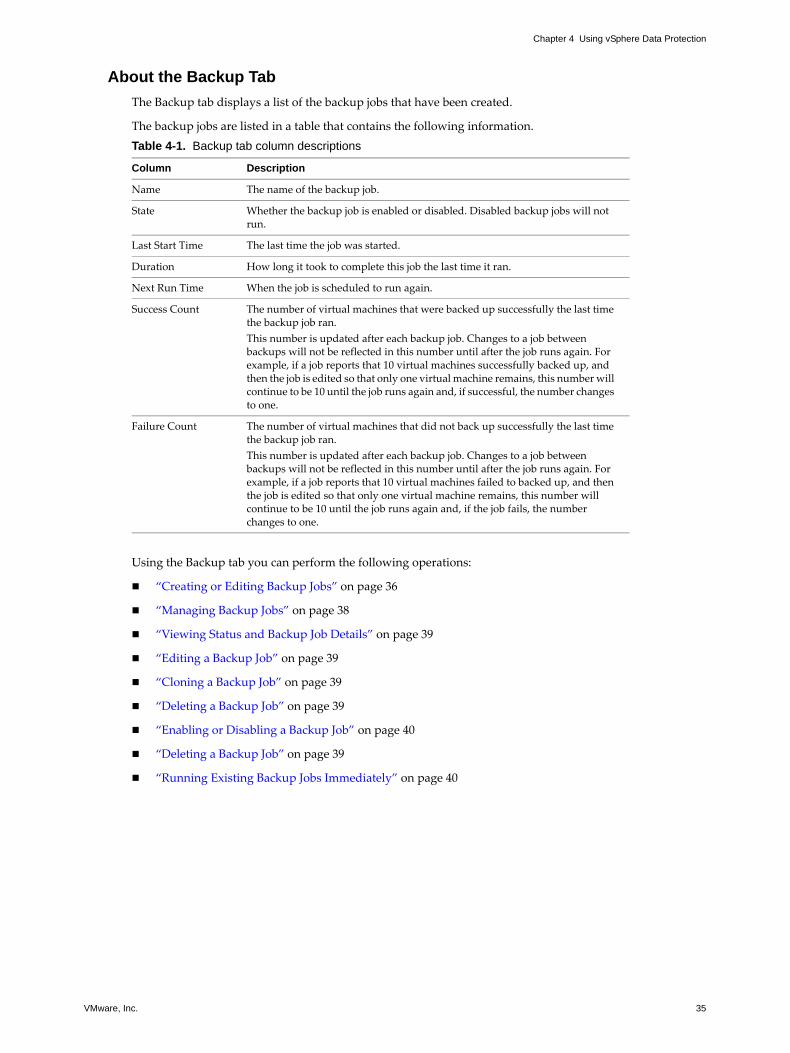
About the Backup Tab
The Backup tab displays a list of the backup jobs that have been created.
The backup jobs are listed in a table that contains the following information.
Using the Backup tab you can perform the following operations:
“Creating or Editing Backup Jobs” on page 36
“Managing Backup Jobs” on page 38
“Viewing Status and Backup Job Details” on page 39
“Editing a Backup Job” on page 39
“Cloning a Backup Job” on page 39
“Deleting a Backup Job” on page 39
“Enabling or Disabling a Backup Job” on page 40
“Deleting a Backup Job” on page 39
“Running Existing Backup Jobs Immediately” on page 40
Table 4-1. Backup tab column descriptions
Column Description
Name The name of the backup job.
State Whether the backup job is enabled or disabled. Disabled backup jobs will not run.
Last Start Time The last time the job was started.
Duration How long it took to complete this job the last time it ran.
Next Run Time When the job is scheduled to run again.
Success Count The number of virtual machines that were backed up successfully the last time the backup job ran.This number is updated after each backup job. Changes to a job between backups will not be reflected in this number until after the job runs again. For example, if a job reports that 10 virtual machines successfully backed up, and then the job is edited so that only one virtual machine remains, this number will continue to be 10 until the job runs again and, if successful, the number changes to one.
Failure Count The number of virtual machines that did not back up successfully the last time the backup job ran.This number is updated after each backup job. Changes to a job between backups will not be reflected in this number until after the job runs again. For example, if a job reports that 10 virtual machines failed to backed up, and then the job is edited so that only one virtual machine remains, this number will continue to be 10 until the job runs again and, if the job fails, the number changes to one.

vSphere Data Protection Administration Guide
36 VMware, Inc.
About the Restore Tab
The Restore tab displays a list of virtual machines that have been backed up by the VDP Appliance. By navigating through the list of backups, you can select and restore specific backups.
Over time, the information displayed on the Restore tab may become out of date. To see the most up-to-date information on backups which are available for restore, click Refresh.
Using the Restore tab you can perform the following operations:
“Restoring Backups” on page 41
“Locking and Unlocking a Backup” on page 42
“Deleting a Backup” on page 42
About the Reports Tab
The Reports tab provides overview information about the VDP Appliance and about the virtual machines within the vCenter Server.
See “Viewing Information from the Reports Tab” on page 43 for more additional information.
About the Configuration Tab
The Configuration tab allows you to manage the maintenance tasks for the VDP Appliance. You can perform the following tasks on this tab:
“Configuring vSphere Data Protection Appliance” on page 44
“Configuring Email” on page 46
“Viewing the User Interface Log” on page 47
“Running an Integrity Check” on page 47
Creating or Editing Backup JobsBackup jobs consist of a set of one or more virtual machines that are associated with a backup schedule and specific retention policies. Backup jobs are created and edited using the Create a new backup job wizard which includes the following steps:
1 “Choosing the Virtual Machines” on page 36
2 “Specifying the Backup Schedule” on page 37
3 “Setting the Retention Policy” on page 37
4 “Naming the Backup Job” on page 38
5 “Reviewing and Completing Backup Job Creation” on page 38
Choosing the Virtual Machines
You can specify collections of virtual machines, such as all virtual machines in a datacenter or select individual virtual machines. If an entire resource pool, host, datacenter, or folder is selected, any new virtual machines in that container are included in subsequent backups. If a virtual machine is selected, any disk added to the virtual machine is included in the backup. If a virtual machine is moved from the selected container to another container that is not selected, it is no longer part of the backup.
You can manually select a virtual machine to be backed up, which ensures that virtual machine is backed up, even if it is moved.
VMware, Inc. 37
Chapter 4 Using vSphere Data Protection
vSphere Data Protection (VDP) will not back up the following specialized virtual machines:
vSphere Data Protection (VDP) Appliances
VMware Data Recovery (VDR) Appliances
Templates
Secondary fault tolerant nodes
Proxies
Avamar Virtual Edition (AVE) Servers
NOTE The wizard will let you select these virtual machines; however, when you click Finish to complete the wizard you will receive a warning that these special virtual machines were not added to the job.
Specifying the Backup Schedule
On the Schedule page of the Create a new backup job wizard, you can specify the time intervals to back up the virtual machines in your backup job. Backups occur as near to the startup of the backup window as possible. The available time intervals are:
Daily
Weekly (on a specified day)
Monthly (on a specified day of the month)
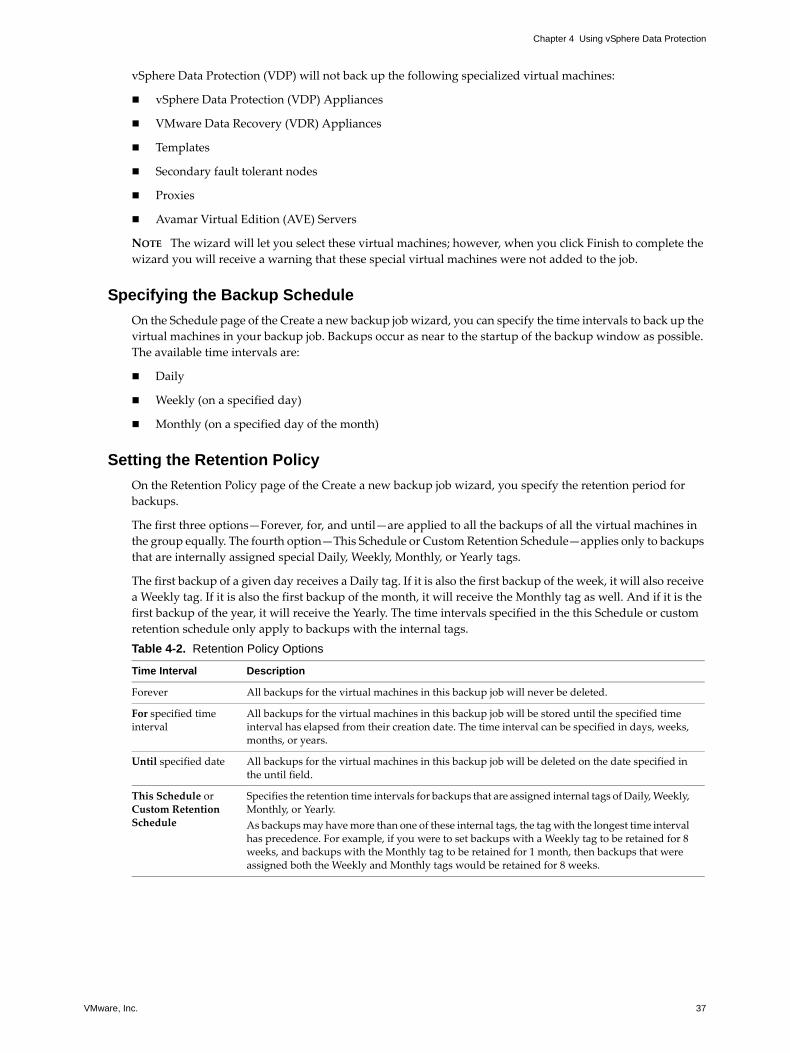
Setting the Retention Policy
On the Retention Policy page of the Create a new backup job wizard, you specify the retention period for backups.
The first three options—Forever, for, and until—are applied to all the backups of all the virtual machines in the group equally. The fourth option—This Schedule or Custom Retention Schedule—applies only to backups that are internally assigned special Daily, Weekly, Monthly, or Yearly tags.
The first backup of a given day receives a Daily tag. If it is also the first backup of the week, it will also receive a Weekly tag. If it is also the first backup of the month, it will receive the Monthly tag as well. And if it is the first backup of the year, it will receive the Yearly. The time intervals specified in the this Schedule or custom retention schedule only apply to backups with the internal tags.Table 4-2. Retention Policy Options
Time Interval Description
Forever All backups for the virtual machines in this backup job will never be deleted.
For specified time interval
All backups for the virtual machines in this backup job will be stored until the specified time interval has elapsed from their creation date. The time interval can be specified in days, weeks, months, or years.
Until specified date All backups for the virtual machines in this backup job will be deleted on the date specified in the until field.
This Schedule or Custom Retention Schedule
Specifies the retention time intervals for backups that are assigned internal tags of Daily, Weekly, Monthly, or Yearly. As backups may have more than one of these internal tags, the tag with the longest time interval has precedence. For example, if you were to set backups with a Weekly tag to be retained for 8 weeks, and backups with the Monthly tag to be retained for 1 month, then backups that were assigned both the Weekly and Monthly tags would be retained for 8 weeks.
vSphere Data Protection Administration Guide
38 VMware, Inc.
Naming the Backup Job
On the Job Name page of the Create a new backup job wizard, you specify the name for the backup job. This name must be unique and can be up to 255 characters long.
The following characters cannot be used in the backup job name: ~!@$^%(){}[]|,`;#\/:*?<>'"&.
Reviewing and Completing Backup Job Creation
On the Ready to Complete page of the Create a new backup job wizard, a summary of your backup job displays.
If you want to change any of the settings for your backup job, either use the Back button to return to the appropriate screen or click on the appropriate numbered step on the left of the wizard screen.
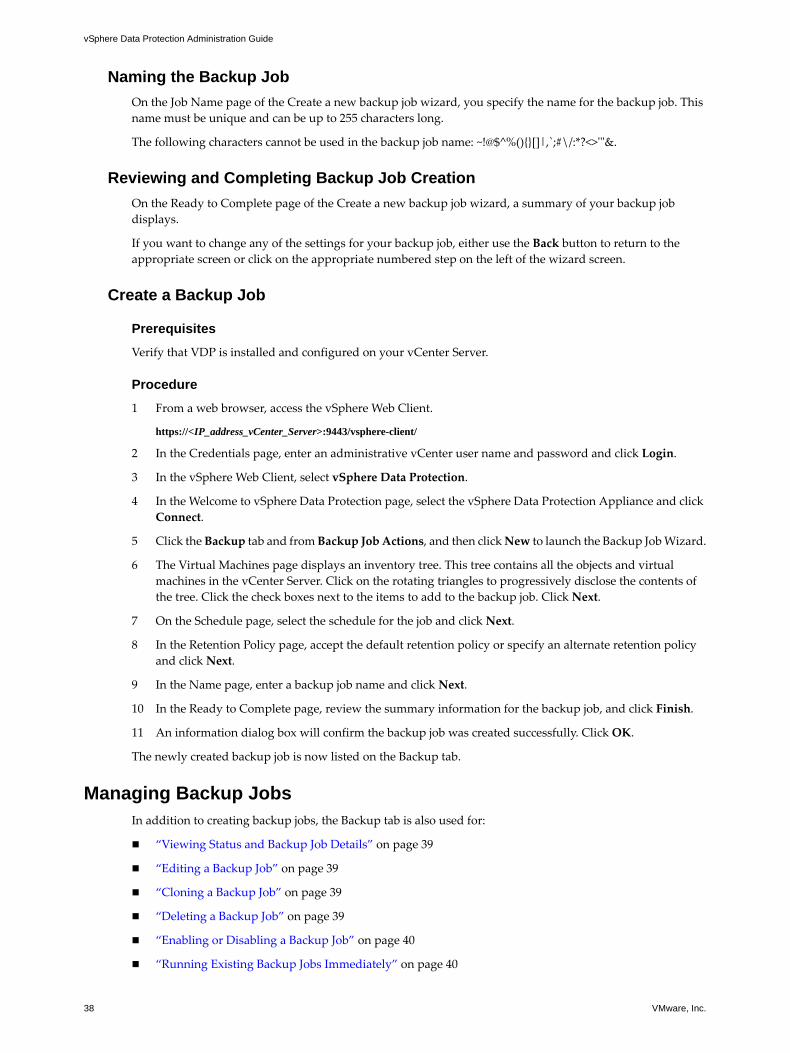
Create a Backup Job
Prerequisites
Verify that VDP is installed and configured on your vCenter Server.
Procedure
1 From a web browser, access the vSphere Web Client.
https://<IP_address_vCenter_Server>:9443/vsphere-client/
2 In the Credentials page, enter an administrative vCenter user name and password and click Login.
3 In the vSphere Web Client, select vSphere Data Protection.
4 In the Welcome to vSphere Data Protection page, select the vSphere Data Protection Appliance and click Connect.
5 Click the Backup tab and from Backup Job Actions, and then click New to launch the Backup Job Wizard.
6 The Virtual Machines page displays an inventory tree. This tree contains all the objects and virtual machines in the vCenter Server. Click on the rotating triangles to progressively disclose the contents of the tree. Click the check boxes next to the items to add to the backup job. Click Next.
7 On the Schedule page, select the schedule for the job and click Next.
8 In the Retention Policy page, accept the default retention policy or specify an alternate retention policy and click Next.
9 In the Name page, enter a backup job name and click Next.
10 In the Ready to Complete page, review the summary information for the backup job, and click Finish.
11 An information dialog box will confirm the backup job was created successfully. Click OK.
The newly created backup job is now listed on the Backup tab.
Managing Backup JobsIn addition to creating backup jobs, the Backup tab is also used for:
“Viewing Status and Backup Job Details” on page 39
“Editing a Backup Job” on page 39
“Cloning a Backup Job” on page 39
“Deleting a Backup Job” on page 39
“Enabling or Disabling a Backup Job” on page 40
“Running Existing Backup Jobs Immediately” on page 40

VMware, Inc. 39
Chapter 4 Using vSphere Data Protection
Viewing Status and Backup Job Details
The Backup tab displays a list of backup jobs that have been created with VDP. By clicking on a backup job, you can see the details of the job in the Backup Job Details pane:
Name—the name of the backup job.
Status—whether the backup job is enabled or disabled.
Sources—a list of the virtual machines in the backup job. If more than six virtual machines are in the backup job, a more link appears. Clicking the more link displays the Protect Item List dialog, which displays a list of all the virtual machines in the backup job.
Out of Date—a list of all the virtual machines that failed to back up the last time the job ran. If more than six virtual machines are out of date, a more link appears. Clicking the more link displays the Protect Item List dialog, which displays a list of all the virtual machines in the backup job.
Editing a Backup Job
Once you have created a backup job, you can edit the job by highlighting the backup job and selecting Backup Job Options > Edit.
Cloning a Backup Job
Once you have created a backup job, you can use the job as a template for creating a different job by highlighting the backup job and selecting Backup Job Options > Clone.
Performing the clone action launches the Cloning backup job wizard and uses information from the original job to automatically fill in the first three pages of the wizard (Virtual Machines, Schedule, and Retention Policy). The cloned job requires a unique name. Any of the settings that were copied from the original job can be modified.
Deleting a Backup Job
Once you have created a backup job, you can delete the job by highlighting the backup job and selecting Backup Job Options > Delete.
NOTE When using Delete on the Backup tab you are only deleting the job. Any backups previously made by the job are still retained by VDP in accordance with the retention policy of the job. To delete backups, use Delete on the Restore tab.

vSphere Data Protection Administration Guide
40 VMware, Inc.
Enabling or Disabling a Backup Job
If you want to temporarily stop a backup job from running in the future, you can disable it. You can edit and delete disabled backup jobs, but VDP will not run a disabled job until it has been enabled.
You can enable or disable backup jobs by highlighting the backup job and selecting Backup Job Options > Enable/Disable.
Running Existing Backup Jobs Immediately
You can run backup jobs immediately by using one of the following methods:
Choosing to backup up a protected virtual machine
Choosing to run an existing backup job
Immediately Backing up a Protected Virtual Machine
1 Select the protected virtual machine you want to backup immediately through one of the following options:
Right-click on the protected virtual machine in an inventory tree and choose All vCenter Actions > All VDP Actions > Backup Now.
Click on the protected virtual machine in an inventory tree, and then click the Actions button. Choose All vCenter Actions > All VDP Actions > Backup Now.
Click on the virtual machine (in the Reports tab), and then click the All Actions icon and choose Backup Now.
2 The Backup Now dialog displays. Select the VDP Appliance and the Backup Job and click OK.
3 An information dialog displays telling you the backup job has been initiated. Click OK.
VDP starts the backup job.
Immediately Running a Backup Job
1 From the vSphere Data Protection Backup tab, click the job you want to run immediately.
Multiple selections are allowed on the Backup tab using Ctrl- or Shift-click. Holding down the Ctrl key while clicking allows you to select multiple, specific backup jobs; holding down the Shift key while clicking allows you to select a range of backup jobs between the first click and the second click.
2 Click Backup Now.
A drop down selection displays, giving you the option to Backup all sources or Backup only out of date sources.
Backup all Sources—this will back up all the virtual machines in the backup job.
Backup only out of date sources—this will backup only the virtual machines that did not back up successfully the last time the backup job ran.
3 Click which sources you want to back up immediately.
4 A message displays indicating the backup has been requested. Click OK.
VDP starts the backup job.
NOTE “Backup Now” immediately initiates backup jobs if VDP is in the “backup window” or the “maintenance window.” See “Viewing Backup Appliance Configuration” on page 44 for additional information on backup windows. If VDP is in the “blackout window,” the backup job may not be initiated until after high priority maintenance processes have completed. It is also possible that the backup job will be allowed to start but will then be cancelled when the high priority processes of the blackout window run.
VMware, Inc. 41
Chapter 4 Using vSphere Data Protection
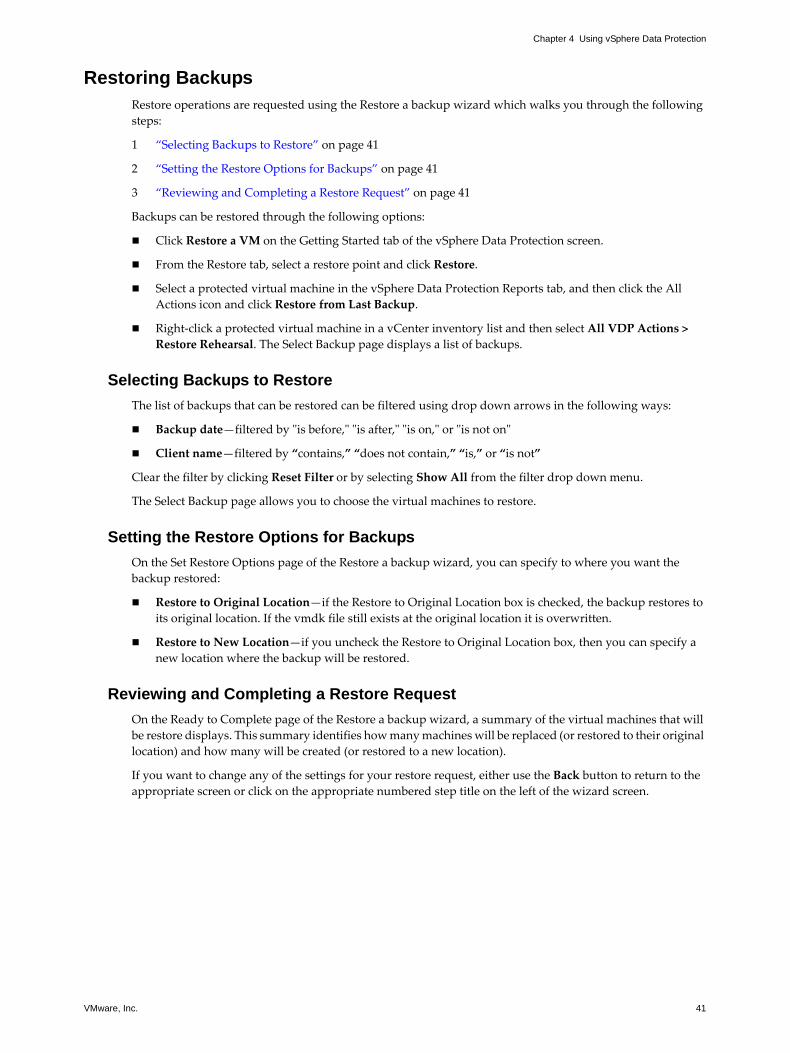
Restoring BackupsRestore operations are requested using the Restore a backup wizard which walks you through the following steps:
1 “Selecting Backups to Restore” on page 41
2 “Setting the Restore Options for Backups” on page 41
3 “Reviewing and Completing a Restore Request” on page 41
Backups can be restored through the following options:
Click Restore a VM on the Getting Started tab of the vSphere Data Protection screen.
From the Restore tab, select a restore point and click Restore.
Select a protected virtual machine in the vSphere Data Protection Reports tab, and then click the All Actions icon and click Restore from Last Backup.
Right-click a protected virtual machine in a vCenter inventory list and then select All VDP Actions > Restore Rehearsal. The Select Backup page displays a list of backups.
Selecting Backups to Restore
The list of backups that can be restored can be filtered using drop down arrows in the following ways:
Backup date—filtered by "is before," "is after," "is on," or "is not on"
Client name—filtered by “contains,” “does not contain,” “is,” or “is not”
Clear the filter by clicking Reset Filter or by selecting Show All from the filter drop down menu.
The Select Backup page allows you to choose the virtual machines to restore.
Setting the Restore Options for Backups
On the Set Restore Options page of the Restore a backup wizard, you can specify to where you want the backup restored:
Restore to Original Location—if the Restore to Original Location box is checked, the backup restores to its original location. If the vmdk file still exists at the original location it is overwritten.
Restore to New Location—if you uncheck the Restore to Original Location box, then you can specify a new location where the backup will be restored.
Reviewing and Completing a Restore Request
On the Ready to Complete page of the Restore a backup wizard, a summary of the virtual machines that will be restore displays. This summary identifies how many machines will be replaced (or restored to their original location) and how many will be created (or restored to a new location).
If you want to change any of the settings for your restore request, either use the Back button to return to the appropriate screen or click on the appropriate numbered step title on the left of the wizard screen.

vSphere Data Protection Administration Guide
42 VMware, Inc.
Restore a Backup Job
Prerequisites
Verify that VDP is installed and configured.
You are logged in to the vSphere Web Client and connected to the VDP Appliance.
Procedure
1 From the Restore tab, select a restore point and click Restore.
2 On the Select Backup page of the Restore wizard, select or confirm that the correct restore point is selected (all restore points for the backup are displayed by date and time). Typically, you only select one restore point at a time. Click Next.
3 On the Set to Restore page, confirm that the client and restore point are correct. Select Restore to Original Location or uncheck Restore to Original Location and specify an alternate location (New Name, Destination, and Datastore. Optionally, you can set the virtual machine to Power On and Reconnect NIC after the restore process completes. Click Next.
4 On the Ready to complete page, verify your selections. If they are correct, click Finish. If the settings are not correct, click Back to go back to create the correct configuration.
A message displays telling you that your restore was successfully initiated. Click OK.
5 Monitor the Restore progress through the Recent Tasks pane.
NOTE If you selected Reconnect NIC during the restore process, confirm the network configuration for the newly-created virtual machine. It is possible that the new virtual machine NIC is using the same IP address as the original virtual machine, which will cause conflicts.
Locking and Unlocking a Backup
During maintenance periods, VDP examines the backups in the appliance and evaluates whether their retention period has expired. If it has expired, VDP removes the expired backup from the appliance. However, if you want to prevent VDP from deleting a backup, you can lock it. VDP will not evaluate the retention period on that backup again, until it is unlocked.
Prerequisites
Verify that VDP is installed and configured.
You are logged in to the vSphere Web Client and connected to the VDP Appliance.
Procedure
1 From the vSphere Data Protection Restore tab, click the rotating triangles to locate the backup you want to lock.
2 Click the checkbox next to the backup you want to lock.
3 Click the Lock/Unlock icon. Locking a backup overlays a lock icon on the backup icon: . The backup is now locked.
4 To unlock a backup, select the Lock/Unlock icon again. The lock overlay is cleared and VDP evaluates the retention date of the backup during the next maintenance period.
Deleting a Backup
VDP deletes backups according to the retention policies that were set in the backup jobs. However, you can manually delete backups from the Restore tab by selecting the backup jobs for deletion and clicking the Delete icon.

VMware, Inc. 43
Chapter 4 Using vSphere Data Protection
Viewing Information from the Reports TabThe top half of the Reports tab displays the following information:
Appliance Status—the status of the VDP Appliance.
Used Capacity—a percentage of the total VDP capacity that is occupied by backups.
Integrity Check Status—this value is either Normal or “Out of Date.” Normal indicates that a successful integrity check has been completed in the past two days. “Out of Date” indicates that an integrity check has not run or has not completed successfully in the past two days.
Recent Successful Backups—the number of virtual machines that successfully backed up in the most recently completed backup job.
Recent Failed Backups—the number of virtual machines that failed to back up in the most recently completed backup job.
The middle of the Reports tab lists all of the virtual machines associated with the vCenter Server. For each virtual machine, you can see the following information:
Client Name
State for VDP or Current state for VDP Advanced (VDP uses standard VMware state information. For VDP Advanced, state is Activated, which indicates that the VMware VDP Client is installed and registered or Inactivated which indicates that the VMware VDP Client is not installed or registered on the VDP Advanced Appliance.)
Type (This option is only available in VDP Advanced and can be Image or Application.)
Backup Jobs
Last Successful Backup
Status
Date
Backup Job Name
From the bottom section of the Reports tab, you can select a virtual machine from the middle section of the Reports tab and see detailed information about the selected client, which includes:
Client Information
Name
Guest OS
Host
IP Address
State
Last Successful (Backup)
Backup Jobs (associated with the selected virtual machine)
Last Backup Job
Status
Date
Backup Job
On the right side of the Reports tab, there are links to the Event Console and the Task Console. Clicking on these links displays the vCenter Server Event Console or Tasks Console.

vSphere Data Protection Administration Guide
44 VMware, Inc.
Filtering report information
You can filter virtual machine reporting information using a combination of the following criteria:
Show All—Shows all reporting information for the virtual machines
Client
Name—"Is," "Is not," "Contains," "or "Does not contain" filters used to query the client name
State—Values are Powered On, Powered Off, Suspended, Activated, or Not Activated
Type—Values are Image or Application
Last Successful Backup—Default is today’s date, or click the calendar to specify a date
Last Backup Job
Name—"Is," "Is not," "Contains," "or "Does not contain" filters used to query the client name
Status—Values are Success, Failure, Canceled, or Failure or Canceled
Date—Default is today’s date, or click the calendar to specify a date
For more information on using these consoles to monitor VDP operations see “Viewing the Event Console” on page 49 or “Viewing Recent Tasks” on page 48.
Configuring vSphere Data Protection ApplianceThe Configuration tab is used for the following tasks.
“Viewing Backup Appliance Configuration” on page 44
“Editing the Backup Window” on page 45
“Configuring Email” on page 46
“Configuring Capacity Manager” on page 47
“Viewing the User Interface Log” on page 47
“Running an Integrity Check” on page 47
“Installing Client Downloads” on page 48
Viewing Backup Appliance Configuration
Backup Appliance information provides information for Backup Appliance Details, Storage Summary, and Backup Windows Configuration.
Backup Appliance Details include:
Display name
IP Address
Major Version (VDP version number)
Minor Version (used by Technical Support)
Status
vCenter Server
VDP backup user
Local time
Time zone
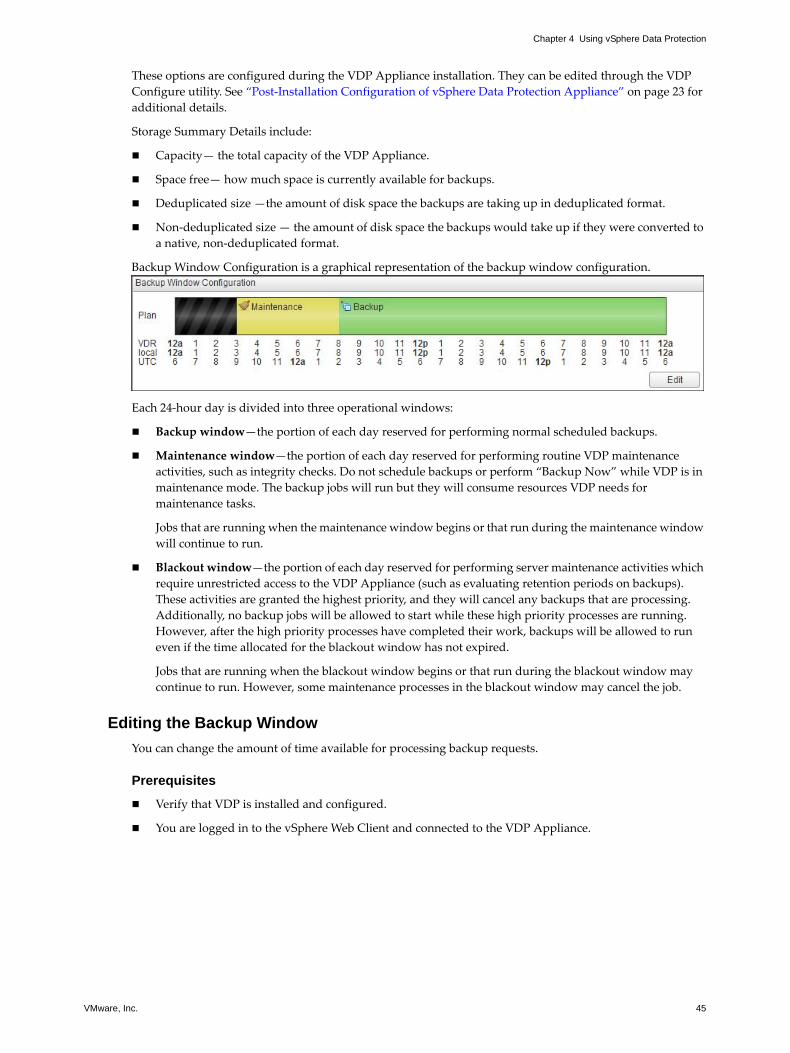
VMware, Inc. 45
Chapter 4 Using vSphere Data Protection
These options are configured during the VDP Appliance installation. They can be edited through the VDP Configure utility. See “Post-Installation Configuration of vSphere Data Protection Appliance” on page 23 for additional details.
Storage Summary Details include:
Capacity— the total capacity of the VDP Appliance.
Space free— how much space is currently available for backups.
Deduplicated size —the amount of disk space the backups are taking up in deduplicated format.
Non-deduplicated size — the amount of disk space the backups would take up if they were converted to a native, non-deduplicated format.
Backup Window Configuration is a graphical representation of the backup window configuration.
Each 24-hour day is divided into three operational windows:
Backup window—the portion of each day reserved for performing normal scheduled backups.
Maintenance window—the portion of each day reserved for performing routine VDP maintenance activities, such as integrity checks. Do not schedule backups or perform “Backup Now” while VDP is in maintenance mode. The backup jobs will run but they will consume resources VDP needs for maintenance tasks.
Jobs that are running when the maintenance window begins or that run during the maintenance window will continue to run.
Blackout window—the portion of each day reserved for performing server maintenance activities which require unrestricted access to the VDP Appliance (such as evaluating retention periods on backups). These activities are granted the highest priority, and they will cancel any backups that are processing. Additionally, no backup jobs will be allowed to start while these high priority processes are running. However, after the high priority processes have completed their work, backups will be allowed to run even if the time allocated for the blackout window has not expired.
Jobs that are running when the blackout window begins or that run during the blackout window may continue to run. However, some maintenance processes in the blackout window may cancel the job.
Editing the Backup Window
You can change the amount of time available for processing backup requests.
Prerequisites
Verify that VDP is installed and configured.
You are logged in to the vSphere Web Client and connected to the VDP Appliance.

vSphere Data Protection Administration Guide
46 VMware, Inc.
Procedure
1 From the vSphere Data Protection, select the Configuration tab (by default you are on the Backup Appliance view).
2 At the bottom right corner of the Backup Appliance view, click the Edit button.
3 The backup start time and duration time options appear. Use the drop down arrow to choose the start time for the backup window.
4 Enter the duration of the backup window. The minimum backup window is 4 hours and the maximum backup window is 16 hours.
5 Enter the duration of the blackout window. The minimum blackout windows is 1 hour and the maximum is 10 hours.
6 Click Save.
7 A dialog displays telling you that the settings were saved successfully. Click OK.
VDP changes the backup window configuration.
Configuring Email
You can configure VDP to send SMTP email reports to specified recipients. If email notification is enabled, emails are sent that include the following information:
VDP Appliance status
Backup jobs summary
Virtual machines summary
Email configuration requires the information defined in the following table.
NOTE VDP email notification does not support carbon copies (CCs) or blind carbon copies (BCCs), nor does it support SSL certificates.
Table 4-3. Email configuration fields
Field Name Description
Enable email reports Check this box to enable email reports.
Outgoing mail server Enter the name of the SMTP server that want to use to send email. This name can be entered as either an IP address, a host name, or a fully qualified domain name. The VDP Appliance needs to be able to resolve the name entered.The default port for non-authenticated email servers is 25. The default port of authenticated mail servers is 587. You can specify a different port by appending a port number to the server name. For example, to specify the use of port 8025 on server “emailserver” enter:
emailserver:8025
My server requires me to log in Check this box if your SMTP server requires authentication.
User name Enter the user name you want to authenticate with.
Password Enter the password associated with the username. (VDP does not validate the password entered in any way; the password entered is passed directly to the email server.)
From address Enter the email address from where you would like the email report. This can only be a single address.
To address Enter a comma-separated list of up to 10 email addresses.
Send time From the drop-down list, choose the time you want VDP to email reports.
Send days Check the days you want the reports sent.
Report Locale From the drop-down list, choose the locale for the email reports.

VMware, Inc. 47
Chapter 4 Using vSphere Data Protection
Prerequisites
Verify that VDP is installed and configured.
You are logged in to the vSphere Web Client and connected to the VDP Appliance.
The email account for email reports must exist.
Procedure
1 From the vSphere Data Protection, select the Configuration tab.
2 Select Email.
3 Click the Edit button (in the bottom right corner of the page).
4 Specify the following:
a Enable email reports
b Outgoing mail server
c (optional) My server requires me to log in
d User name
e Password
f From address
g To address(es)
h Send day(s)
i Report Locale
5 Click the Save button.
6 To test your email configuration, click Send test email.
Configuring Capacity Manager
The Capacity Manager tab only appears if you are using VDP Advanced. See “vSphere Data Protection Disk Expansion” on page 79 for additional information.
Viewing the User Interface Log
Clicking Log on the Configuration tab displays the user interface log for VDP. This is a high-level log that details the activities that have been initiated with the user interface and that identifies some key status items.
Click Refresh to see the latest user interface log entries.
Click Export View to save the details that are displayed on the screen to file on the machine where your browser is running.
Running an Integrity Check
Integrity checks verify and maintain data integrity on the deduplication store. The output of an integrity check is a checkpoint. By default, VDP creates an integrity check every day during the maintenance window. In addition, you can start the integrity check manually.
You can see a list of all of the VDP checkpoints through the VDP Configure utility, Rollback tab. See “Rolling Back an Appliance” on page 26 for additional information.
Prerequisites
Verify that VDP is installed and configured.
You are logged in to the vSphere Web Client and connected to the VDP Appliance.
vSphere Data Protection Administration Guide
48 VMware, Inc.
Procedure
1 From the vSphere Data Protection Configuration tab, click the icon and select Run integrity check.
2 A confirmation screen displays, asking if you want perform a manual integrity check. Click Yes.
3 A message displays informing you that the integrity check has been initiated. Click OK.
4 VDP starts the integrity check.
5 Monitor the Integrity Check progress through Recent Tasks.
NOTE When the VDP Integrity Check is running, the Maintenance service is stopped. This may cause a temporary VDP error. Wait until the Integrity Check is complete and the Maintenance service automatically restarts and the VDP error message is resolved.
Installing Client Downloads
This option only appears if you are using VDP Advanced. To install client downloads see “vSphere Data Protection Application Support” on page 51.
Monitoring vSphere Data Protection ActivityYou can monitor the activities of the vSphere Data Protection application by:
“Viewing Recent Tasks” on page 48.
“Viewing Alarms” on page 49
“Viewing the Event Console” on page 49
Tasks, events, and alarms that are generated by VDP are prefaced by "VDP:" Note, however, that some of the tasks and events that occur as part of VDP processes are performed by the vCenter Server and do not have this prefix.
For example, if VDP runs a scheduled backup job against a running virtual machine, the following task entries are created:
1 Create virtual machine snapshot (vCenter acting on the virtual machine to be backed up)
2 VDP: Scheduled Backup Job (vSphere Data Protection starting the backup job)
3 Reconfigure virtual machine (the vSphere Data Protection Appliance requesting services from virtual center)
4 Remove snapshot (virtual center acting on the virtual machine that has completed backing up)
To see only VDP-generated tasks or events in the Tasks or Events console, enter "VDP:" in the Filter field.
Viewing Recent Tasks
VDP generates task entries in the Recent Tasks windows when it performs the following operations:
Backups
Restores
Integrity Checks
Clicking on a task entry in the Recent Tasks window displays task details in the pane at the bottom of the screen. Task details can also be displayed by clicking the link next to the virtual machine icon in the Running tab under Recent Tasks.
Tasks can also be cancelled from the Running tasks pane by clicking the delete icon.
VMware, Inc. 49
Chapter 4 Using vSphere Data Protection
Viewing Alarms
The vSphere Data Protection (VDP) Appliance can trigger the following alarms:
Viewing the Event Console
VDP can generate events of the following types: info, error, and warning. Examples of the following types of events are:
Info—”VDP: Critical VMs Backup Job created.”
Warning—”VDP: Unable to add Host123 client to backup job Critical VMs because . . .“
Error—”VDP: Appliance has changed from Full Access to Read Only.”
VDP generates events on all state changes in the appliance. As a general rule, state changes that degrade the capabilities of the appliance are labeled errors, and state changes that improve the capabilities are labeled informational. For example, when starting an integrity check, VDP generates an event that is labeled an error because the appliance is set to read only before performing the integrity check. After the integrity check, VDP generates an event that is labeled informational because the appliance changes from read-only to full access.
Clicking on an event entry displays details of that event, which includes a link to Show related events.
Table 4-4. VDP alarms
Alarm Name Alarm Description
VDP: [001] The most recent checkpoint for the VDP Appliance is outdated.
From the Configuration tab of the VDP user interface, click the All Actions icon and select “Run integrity check.”
VDP: [002] The VDP Appliance is nearly full.
The VDP Appliance is nearly out of space for additional backups. You can free space on the appliance by manually deleting unnecessary or older backups and by changing retention policies on backup jobs to shorten the time that backups are retained.
VDP: [003] The VDP Appliance is full. The VDP Appliance has no more space for additional backups. The appliance will run in read-only (or restore-only) mode until additional space is made available. You can free space on the appliance by manually deleting unnecessary or older backups and by changing retention policies on backup jobs to shorten the time that backups are retained.
VDP: [004] The VDP Appliance datastore is approaching maximum capacity.
The datastore where the VDP Appliance provisioned its disks is approaching maximum capacity. When the maximum capacity of the datastore is reached, the VDP Appliance will be suspended. The appliance cannot be resumed until additional space is made available on the datastore.
VDP: [005] Core services are not running.
Start Core services using the VDP Configuration Utility.
VDP: [006] Management services are not running.
Start Management services using the VDP Configuration Utility.
VDP: [007] File system services are not running.
Start File system services using the VDP Configuration Utility.
VDP: [008] File level restore services are not running.
Start File level restore services using the VDP Configuration Utility.
VDP: [009] Maintenance services are not running.
Start Maintenance services using the VDP Configuration Utility.
VDP: [010] Backup scheduler is not running.
Start Backup scheduler using the VDP Configuration Utility.

vSphere Data Protection Administration Guide
50 VMware, Inc.
VDP Shutdown and Startup ProceduresIf you need to shutdown the vSphere Data Protection (VDP) Appliance, use the Shut Down Guest OS action. This action automatically performs a clean shutdown of the appliance. If the appliance is powered off without the Shut Down Guest OS action, corruption might occur. It can take up to 30 minutes to shutdown and restart the VDP Appliance. You can monitor the status through the virtual machine console. After an appliance is shut down, it can be restarted through the Power On action.
If the appliance does not shutdown properly, when it restarts it will roll back to the last validated checkpoint. This means any changes to backup jobs or backups that occur between the checkpoint and the unexpected shutdown will be lost. This is expected behavior and is used to ensure system corruption does not occur from unexpected shutdowns. See “Rolling Back an Appliance” on page 26 for additional information.
The VDP Appliance is designed to be run 24x7 to support maintenance operations and to be available for restore operations. It should not be shutdown unless there is a specific reason for shutdown.
NOTE Prior to vCenter Server patches or upgrades, use the VDP shutdown procedure.
VMware, Inc. 51
5
This chapter includes the following topics:
“vSphere Data Protection Advanced Application Support” on page 52
“Backing Up and Restoring Microsoft SQL Servers” on page 52
“Backing Up and Restoring Microsoft Exchange Servers” on page 60
vSphere Data Protection Application Support 5
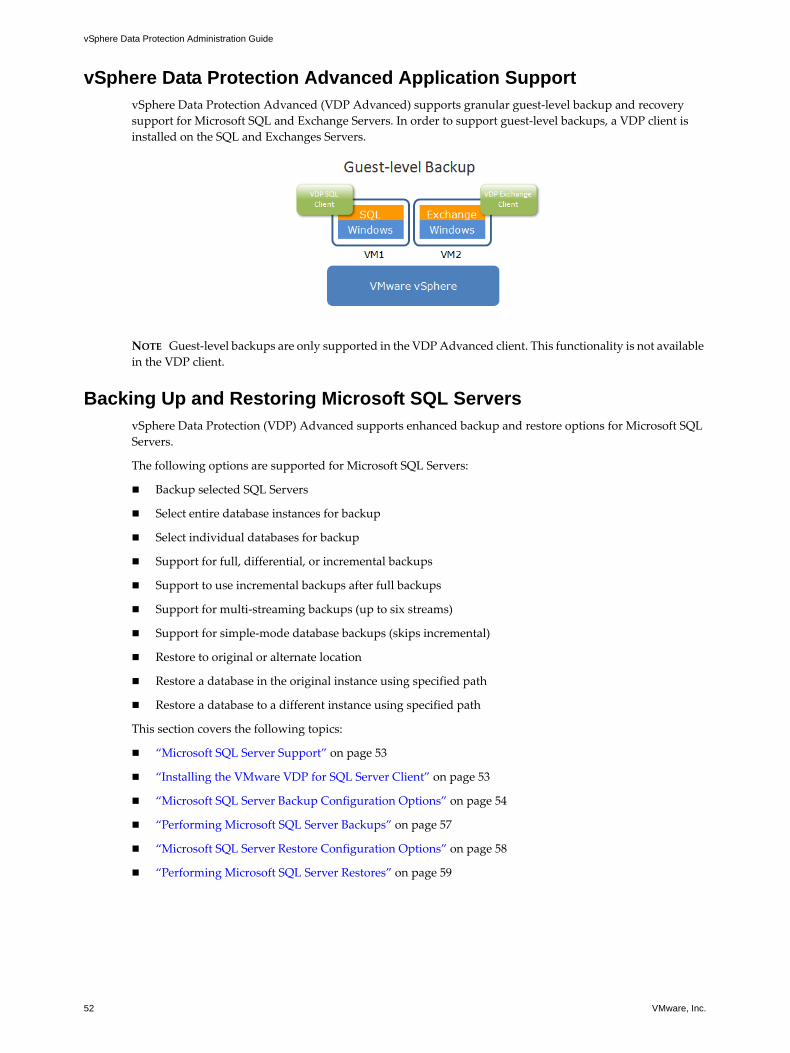
vSphere Data Protection Administration Guide
52 VMware, Inc.
vSphere Data Protection Advanced Application SupportvSphere Data Protection Advanced (VDP Advanced) supports granular guest-level backup and recovery support for Microsoft SQL and Exchange Servers. In order to support guest-level backups, a VDP client is installed on the SQL and Exchanges Servers.
NOTE Guest-level backups are only supported in the VDP Advanced client. This functionality is not available in the VDP client.
Backing Up and Restoring Microsoft SQL ServersvSphere Data Protection (VDP) Advanced supports enhanced backup and restore options for Microsoft SQL Servers.
The following options are supported for Microsoft SQL Servers:
Backup selected SQL Servers
Select entire database instances for backup
Select individual databases for backup
Support for full, differential, or incremental backups
Support to use incremental backups after full backups
Support for multi-streaming backups (up to six streams)
Support for simple-mode database backups (skips incremental)
Restore to original or alternate location
Restore a database in the original instance using specified path
Restore a database to a different instance using specified path
This section covers the following topics:
“Microsoft SQL Server Support” on page 53
“Installing the VMware VDP for SQL Server Client” on page 53
“Microsoft SQL Server Backup Configuration Options” on page 54
“Performing Microsoft SQL Server Backups” on page 57
“Microsoft SQL Server Restore Configuration Options” on page 58
“Performing Microsoft SQL Server Restores” on page 59

VMware, Inc. 53
Chapter 5 vSphere Data Protection Application Support
Microsoft SQL Server Support
VDP Advanced supports the following versions of the SQL Server:
SQL Server 2012 x86/x64 on Windows Server 2012
SQL Server 2012 x86 on Windows Server 2008 SP2 or later
SQL Server 2012 x64 on Windows Server 2008 R2 SP1 or later
SQL Server 2008 R2 on:
Windows Server 2003 SP1 or later, x86/x64
Windows Server 2003 R2, SP2 or later, x86/x64
Windows Server 2008 SP1 or later, x86/x64
Windows Server 2008 R2. X64
Windows Server 2012
SQL Server 2008 SP1 or later on:
Windows Server 2003 SP1 or later, x86/x64
Windows Server 2003 R2, SP2 or later, x86/x64
Windows Server 2008 SP1 or later, x86/x64
Windows Server 2008 R2. X64
Windows Server 2012
SQL Server 2005 SP3 x64 on:
Windows Server 2003 SP1 or later, x86/x64
Windows Server 2003 R2, SP2 or later, x86/x64
Windows Server 2008 SP1 or later, x86/x64
Windows Server 2008 R2. X64
Installing the VMware VDP for SQL Server Client
To support guest-level backups, the VMware VDP for the SQL Server Client must be installed on each SQL Server for backup and restore support.
Prerequisites
Before using VDP, you must install and configure the VDP Advanced Appliance described in “Installing and Configuring vSphere Data Protection” on page 15 and you must have administrative rights to the SQL Server.
The following software must be installed on the SQL Server:
.NET 4.0
SQL Server Installation Component
Client Tools SDK

vSphere Data Protection Administration Guide
54 VMware, Inc.
Procedure
1 On each SQL Server client, access the vSphere Web Client.
https://<IP_address_vCenter_Server>:9443/vsphere-client/
2 In the Credentials page, enter an administrative vCenter user name and password and click Login.
3 In the vSphere Web Client, select vSphere Data Protection.
4 In the Welcome to vSphere Data Protection page, select the vSphere Data Protection Appliance and click Connect.
5 Click the Configuration tab. In Client Downloads, click Microsoft SQL Server 32-bit or Microsoft SQL Server 64-bit (based on the version of the SQL Server client).
6 Depending on your browser, you can save .msi file or you can run it. Once you run the .msi file, the VMware VDP for SQL Server Setup wizard starts. Click Next.
7 On the End-User License Agreement page, read the license and if acceptable, click I accept the terms in the License Agreement, and click Next.
8 On the Appliance Registration Information page, type in the name of the VDP Appliance that will back up the SQL Server and click Next.
9 On the Ready to install VMware VDP for SQL Server page, click Install.
10 On the Completed the VMware VDP for SQL Server Setup Wizard page, click Finish.
Repeat this procedure for additional SQL Servers.
Microsoft SQL Server Backup Configuration Options
The following sections describe the options available for SQL Server backup operations.
“Job Type” on page 54
“Application (or Application DB)” on page 54
“Application Options” on page 55
“Schedule” on page 56
“Retention Policy” on page 56
“Name” on page 56
“Ready to Complete” on page 64
Job Type
For Job Type, there are three options used to select the level of the backup:
Virtual Machine Images
Full Server
Selected Databases
Application (or Application DB)
Application is used to select the SQL (or Exchange) Servers for backup. Application DB is used to select the SQL (or Exchange) databases for backup.

VMware, Inc. 55
Chapter 5 vSphere Data Protection Application Support
Application Options
Backup type is used to select the type of backup. The options are Full, Differential, or Incremental.
Select Full to back up the entire database, including all objects, system tables, and data.
Select Differential to back up any data that has changed since the last full backup.
Select Incremental to back up only the transaction logs.
Additional options are defined in the following subsections.
Force incremental backup after full backup
Selecting or clearing the Force incremental backup after full backup checkbox specifies whether to force an incremental backup that contains the transactions that occur between full backups. This creates a point-in-time recovery to a point between full backups.
This option should not be used on databases that use the simple recovery model because those databases do not support transaction log backups. This includes system databases such as the master and msdb databases.
For simple model recovery databases, there is a separate option: Use the For simple model recovery databases.
Force full backup
The Force full backup checkbox specifies whether to perform a full backup when VDP detects a log gap or when there is no previous full backup, from which a transaction log (incremental) or differential backup can be applied. Effectively, this option automates taking a full backup when necessary.
If you select Differential or Incremental backups, you should leave this option selected (the default setting). Otherwise, you might not be able to restore data in the event that no existing full backup is present on VDP.
Enable multi-stream backup and Maximum stream size
You can either back up multiple databases in parallel with one stream per database, or back up a single database using multiple parallel streams. If you choose to back up a single database with multiple parallel streams, then you can specify the minimum size of each stream during the backup.
After you determine the minimum stream size, you can calculate the number of streams used to back up the database using the following equation:
Database size/minimum stream size = Number of streams
For example, if a database is 1,280 MB and you set the minimum stream size to the default setting of 256 MB, then the number of streams that are used to perform a full backup of the database is five, as shown in the following equation:
1,280 MB/256 = 5
For transaction log and differential backups, the size of the data to back up, and not the total database size, is used to calculate the number of streams. If the database size is less than the minimum stream size, then VDP uses a single stream to back up the database.
If you calculate the number of streams for a database based on the minimum stream size, and the number exceeds the maximum number of streams that you configured for the backup, then the backup of the database uses only the maximum number of streams.

vSphere Data Protection Administration Guide
56 VMware, Inc.
For simple recovery databases
This option specifies how VDP handles incremental (transaction log) backups of databases that use the simple recovery model, which does not support transaction log backups:
Skip incremental with error (default setting) — If you select databases with different recovery models for the backup, then the backup does not include the databases with the simple recovery model. The backup completes with exceptions, and an error message is written to the log. If you select only databases with the simple recovery model for the backup, then the backup fails.
Skip incremental with warning — If you select databases with different recovery models for the backup, then the backup does not include databases with the simple recovery model. The backup completes successfully, and a warning is written to the log for each database that uses the simple recovery model. If you select only databases with the simple recovery model for the backup, then the backup fails.
Promote incremental to full — A full backup occurs automatically instead of a transaction log backup for databases that use the simple recovery model.
Truncate database log
This option specifies how database transaction log truncation behavior is controlled. Truncate options include the following:
Only for incremental backup (default setting) — The database transaction log is truncated if the backup type is set to incremental (transaction log). No log truncation occurs if the backup type is full or differential.
For all backup types — The database transaction log is truncated regardless of the backup type. This setting breaks the chain of log backups and should not be used unless the backup type is set to full.
Never — The database transaction log is not truncated under any circumstances.
Authentication method
The authentication method specifies whether to use NT authentication or SQL Server authentication to connect to SQL Server. If the SQL server authentication is selected, specify the SQL Server login name and password.
Schedule
See “Specifying the Backup Schedule” on page 37 for additional information on configuring the schedule.
Retention Policy
See “Setting the Retention Policy” on page 37 for additional information on retention policy.
Name
See “Naming the Backup Job” on page 38 for additional information on naming the backup job.
Ready to Complete
See “Reviewing and Completing Backup Job Creation” on page 38 for additional information about the Ready to Complete page.
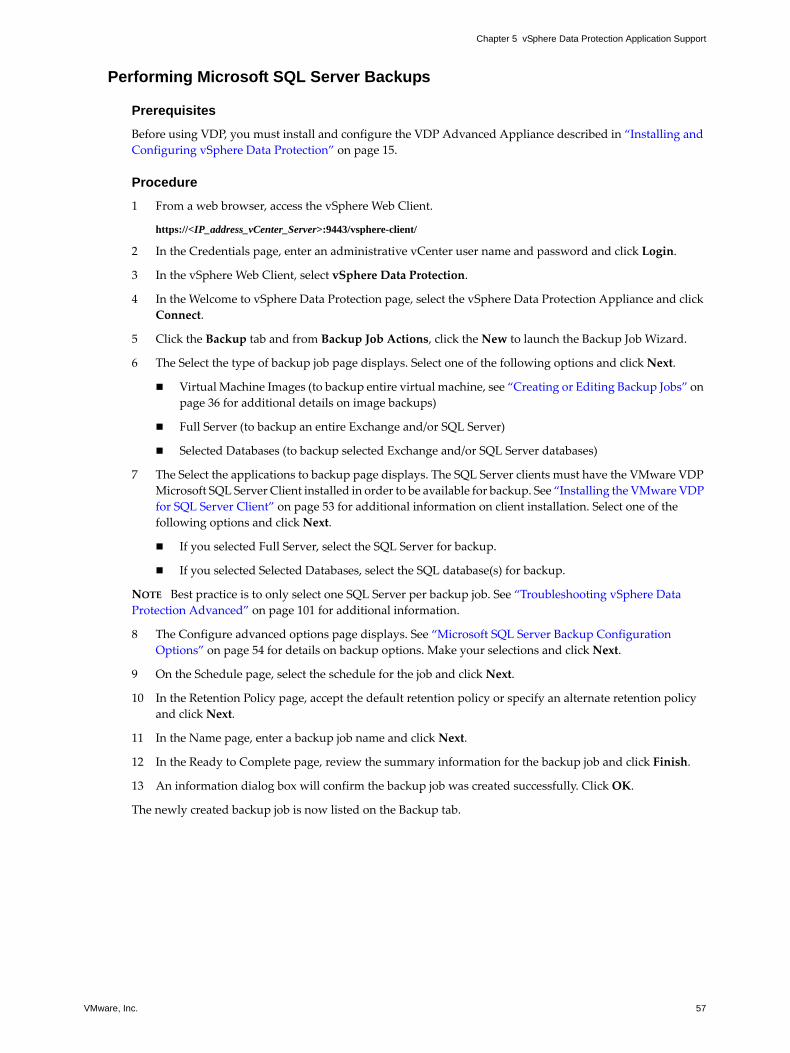
VMware, Inc. 57
Chapter 5 vSphere Data Protection Application Support
Performing Microsoft SQL Server Backups
Prerequisites
Before using VDP, you must install and configure the VDP Advanced Appliance described in “Installing and Configuring vSphere Data Protection” on page 15.
Procedure
1 From a web browser, access the vSphere Web Client.
https://<IP_address_vCenter_Server>:9443/vsphere-client/
2 In the Credentials page, enter an administrative vCenter user name and password and click Login.
3 In the vSphere Web Client, select vSphere Data Protection.
4 In the Welcome to vSphere Data Protection page, select the vSphere Data Protection Appliance and click Connect.
5 Click the Backup tab and from Backup Job Actions, click the New to launch the Backup Job Wizard.
6 The Select the type of backup job page displays. Select one of the following options and click Next.
Virtual Machine Images (to backup entire virtual machine, see “Creating or Editing Backup Jobs” on page 36 for additional details on image backups)
Full Server (to backup an entire Exchange and/or SQL Server)
Selected Databases (to backup selected Exchange and/or SQL Server databases)
7 The Select the applications to backup page displays. The SQL Server clients must have the VMware VDP Microsoft SQL Server Client installed in order to be available for backup. See “Installing the VMware VDP for SQL Server Client” on page 53 for additional information on client installation. Select one of the following options and click Next.
If you selected Full Server, select the SQL Server for backup.
If you selected Selected Databases, select the SQL database(s) for backup.
NOTE Best practice is to only select one SQL Server per backup job. See “Troubleshooting vSphere Data Protection Advanced” on page 101 for additional information.
8 The Configure advanced options page displays. See “Microsoft SQL Server Backup Configuration Options” on page 54 for details on backup options. Make your selections and click Next.
9 On the Schedule page, select the schedule for the job and click Next.
10 In the Retention Policy page, accept the default retention policy or specify an alternate retention policy and click Next.
11 In the Name page, enter a backup job name and click Next.
12 In the Ready to Complete page, review the summary information for the backup job and click Finish.
13 An information dialog box will confirm the backup job was created successfully. Click OK.
The newly created backup job is now listed on the Backup tab.

vSphere Data Protection Administration Guide
58 VMware, Inc.
Microsoft SQL Server Restore Configuration Options
The following sections describe the options available for SQL Server restore operations.
“Select Backup” on page 58
“Set Restore Options” on page 58
“Ready to complete” on page 59
Select Backup
Select backup is used to select a single backup job, (which can include a SQL Server instance, or database for a restore job).
Set Restore Options
By default, the client and backup selected in “Select Backup” display.
Additional options are defined in the following subsections.
Restore to original location
When you restore a SQL Server instance, database, or file group to its original location, you can either perform a standard restore with a tail-log backup and recovery (default option, see “Tail-log backup” on page 59 for additional information), or you can use the SQL replace option (See “Use SQL replace option” on page 58 for additional information) to completely overwrite the database.
A standard restore with a tail-log backup is the most common restore procedure. During this procedure, a tail-log backup is created to capture transactions that have not been included in a backup. Then the database is restored from the most recent full backup and any differential or transaction log backups.
A restore with the SQL replace option that completely overwrites the database might be required.
When you select the option to use the SQL replace option, it adds an SQL WITH REPLACE clause statement to the restore Transact-SQL command, which overrides a SQL Server safety check that is intended to prevent you from accidentally overwriting a different database or file.
Restore to alternate location
Restore to an alternate location is used to restore an instance, database, file group, or file an alternate SQL Server. In order to restore to an alternate location, the VDP Microsoft SQL Server Client must be installed and running on both the source and destination SQL Servers.
In order to perform a restore to an alternate location, you must provide the following information:
SQL client (must use FQDN)
SQL instance (name of the SQL instance, if you use local it must be in parentheses)
Location path (full Windows path, which already exists where the database files will be restored)
Log file path (full Windows path, which already exists where the log files will be restored)
CAUTION If the Location Path selected does not exist, it will not be created and the restore will fail.
CAUTION Do not select tail-log backup if you are performing a redirected restore to a different SQL Server instance.
Use SQL replace option
This option specifies that SQL Server should create any necessary database and related files even if another database or file already exists with the same name.
This option overrides a SQL Server safety check that is intended to prevent you from accidentally overwriting a different database or file. This safety check is described in the Microsoft Transact-SQL Reference Manual under the RESTORE command section.
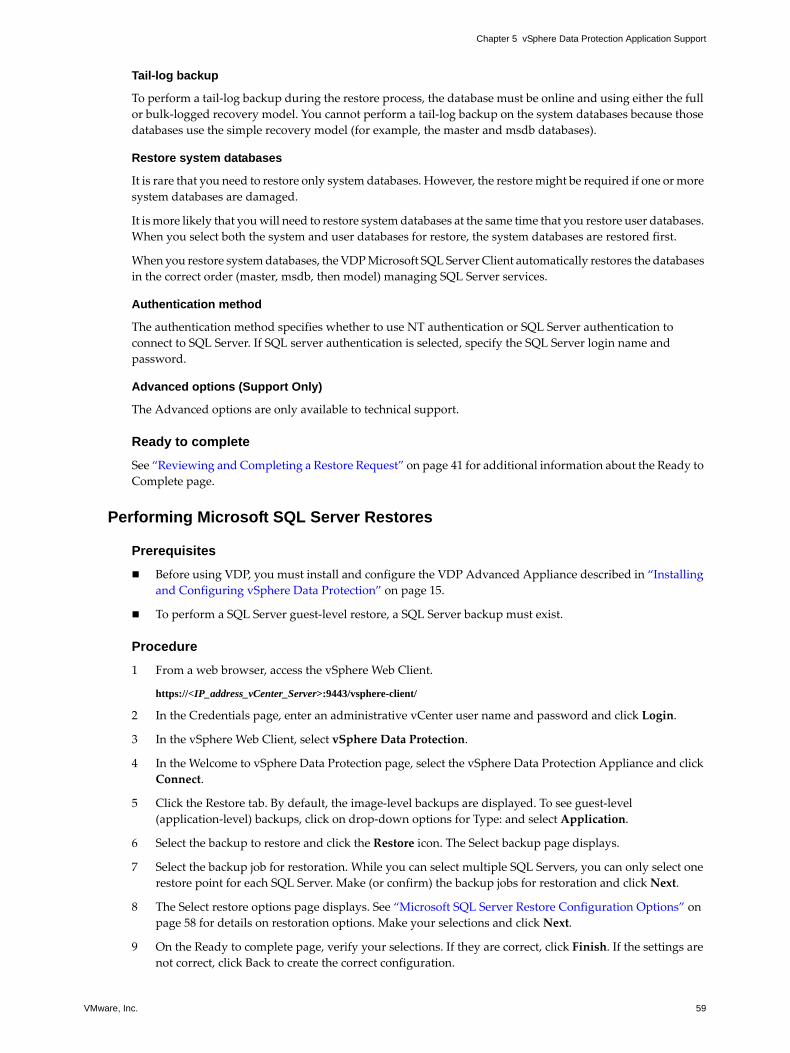
VMware, Inc. 59
Chapter 5 vSphere Data Protection Application Support
Tail-log backup
To perform a tail-log backup during the restore process, the database must be online and using either the full or bulk-logged recovery model. You cannot perform a tail-log backup on the system databases because those databases use the simple recovery model (for example, the master and msdb databases).
Restore system databases
It is rare that you need to restore only system databases. However, the restore might be required if one or more system databases are damaged.
It is more likely that you will need to restore system databases at the same time that you restore user databases. When you select both the system and user databases for restore, the system databases are restored first.
When you restore system databases, the VDP Microsoft SQL Server Client automatically restores the databases in the correct order (master, msdb, then model) managing SQL Server services.
Authentication method
The authentication method specifies whether to use NT authentication or SQL Server authentication to connect to SQL Server. If SQL server authentication is selected, specify the SQL Server login name and password.
Advanced options (Support Only)
The Advanced options are only available to technical support.
Ready to complete
See “Reviewing and Completing a Restore Request” on page 41 for additional information about the Ready to Complete page.
Performing Microsoft SQL Server Restores
Prerequisites
Before using VDP, you must install and configure the VDP Advanced Appliance described in “Installing and Configuring vSphere Data Protection” on page 15.
To perform a SQL Server guest-level restore, a SQL Server backup must exist.
Procedure
1 From a web browser, access the vSphere Web Client.
https://<IP_address_vCenter_Server>:9443/vsphere-client/
2 In the Credentials page, enter an administrative vCenter user name and password and click Login.
3 In the vSphere Web Client, select vSphere Data Protection.
4 In the Welcome to vSphere Data Protection page, select the vSphere Data Protection Appliance and click Connect.
5 Click the Restore tab. By default, the image-level backups are displayed. To see guest-level (application-level) backups, click on drop-down options for Type: and select Application.
6 Select the backup to restore and click the Restore icon. The Select backup page displays.
7 Select the backup job for restoration. While you can select multiple SQL Servers, you can only select one restore point for each SQL Server. Make (or confirm) the backup jobs for restoration and click Next.
8 The Select restore options page displays. See “Microsoft SQL Server Restore Configuration Options” on page 58 for details on restoration options. Make your selections and click Next.
9 On the Ready to complete page, verify your selections. If they are correct, click Finish. If the settings are not correct, click Back to create the correct configuration.

vSphere Data Protection Administration Guide
60 VMware, Inc.
10 A message displays telling you that your restore was successfully initiated. Click OK.
11 Monitor the Restore progress through the Recent Tasks pane.
Backing Up and Restoring Microsoft Exchange ServersvSphere Data Protection Advanced supports enhanced backup and restore options for Microsoft Exchange and SQL Servers.
The following options are supported for Microsoft Exchange Servers:
Backup selected Exchange Servers
Backup selected individual Exchange databases
Ability to perform incremental backups
Support for multi-streaming backups (up to six streams)
Support for circular logging (promote/circular, skip)
Ability to restore Exchange to original location or alternate location
Option for no replay logs during restore
RSG/RDB restores
This section covers the following topics:
“Microsoft Exchange Server Support” on page 60
“Installing vSphere Data Protection for Exchange Server Client” on page 61
“Using the VDP Exchange Backup User Configuration Tool” on page 62
“Configuring the VDP Backup Service” on page 63
“Microsoft Exchange Server Backup Configuration Options” on page 63
“Performing Microsoft Exchange Server Backups” on page 65
“Microsoft Exchange Server Restore Configuration Options” on page 66
“Performing Microsoft Exchange Server Restores” on page 67
Microsoft Exchange Server Support
VDP Advanced supported the following versions of Exchange Server:
Microsoft Exchange Server 2007 SP1, SP2, SP3 on:
Windows Server 2003 SP2, x64
Windows Server 2003 R2 SP2, x64
Windows Server 2008 SP2, x64
Windows Server 2008 R2 SP1, x64 (requires Exchange Server SP3)
Microsoft Exchange Server 2010 SP1, SP2 on:
Windows Server 2008 SP2, x64
Windows Server 2008 R2 SP1, x64

VMware, Inc. 61
Chapter 5 vSphere Data Protection Application Support
Installing vSphere Data Protection for Exchange Server Client
To support guest-level backups, the VMware vSphere Data Protection (VDP) for Exchange Server Client must be installed on each Exchange Server for backup and restore support.
VDPBackupUser Account
The VDP Microsoft Exchange Server Client requires direct access to the Exchange Server. A special user account, called VDPBackupUser, is required to provide VDP with appropriate domain and administrator-level permissions. This user account is setup through the VDP Exchange Backup User Configuration Tool, which runs by default after the VDP Microsoft Exchange Server Client installation. See “Using the VDP Exchange Backup User Configuration Tool” on page 62 for additional information.
VDPBackupUser is configured with the following:
The user account is added and activated for the appropriate Active Directory, Exchange, and group accounts. The user account is added to the following groups:
Backup Operators
Domain Users
Exchange Servers
Exchange Organization Management (in Microsoft Exchange Security Groups) for Exchange 2010
Exchange Organization Administrators for Exchange 2007
A mailbox is created, activated, and tested for the user account.
A user account is set up and activated in the Exchange domain, then on each Exchange Server running the VDP Microsoft Exchange Server Client. VDP Backup services must be configured to use the VDPBackupUser account.
Prerequisites
Before using VDP, you must install and configure the VDP Advanced Appliance described in “Installing and Configuring vSphere Data Protection” on page 15 and you must have administrative rights to the Exchange Server.
Procedure
1 On each Exchange Server client, access the vSphere Web Client.
https://<IP_address_vCenter_Server>:9443/vsphere-client/
2 In the Credentials page, enter an administrative vCenter user name and password and click Login.
3 In the vSphere Web Client, select vSphere Data Protection.
4 In the Welcome to vSphere Data Protection page, select the vSphere Data Protection Appliance and click Connect.
5 Click the Configuration tab. In Client Downloads, click Microsoft Exchange Server 64-bit. Depending on your browser, you can save .msi file or run it. Once you run the .msi file, the VMware VDP for Exchange Server Setup wizard starts. Click Next.
6 The VMware VDP for Exchange Server Setup wizard starts. Click Next.
7 On the End-User License Agreement page, read the license and if acceptable, click I accept the terms in the License Agreement and click Next.
8 On the Appliance Registration Information page, type in the name of the VDP Appliance that will backup the Exchange Server.
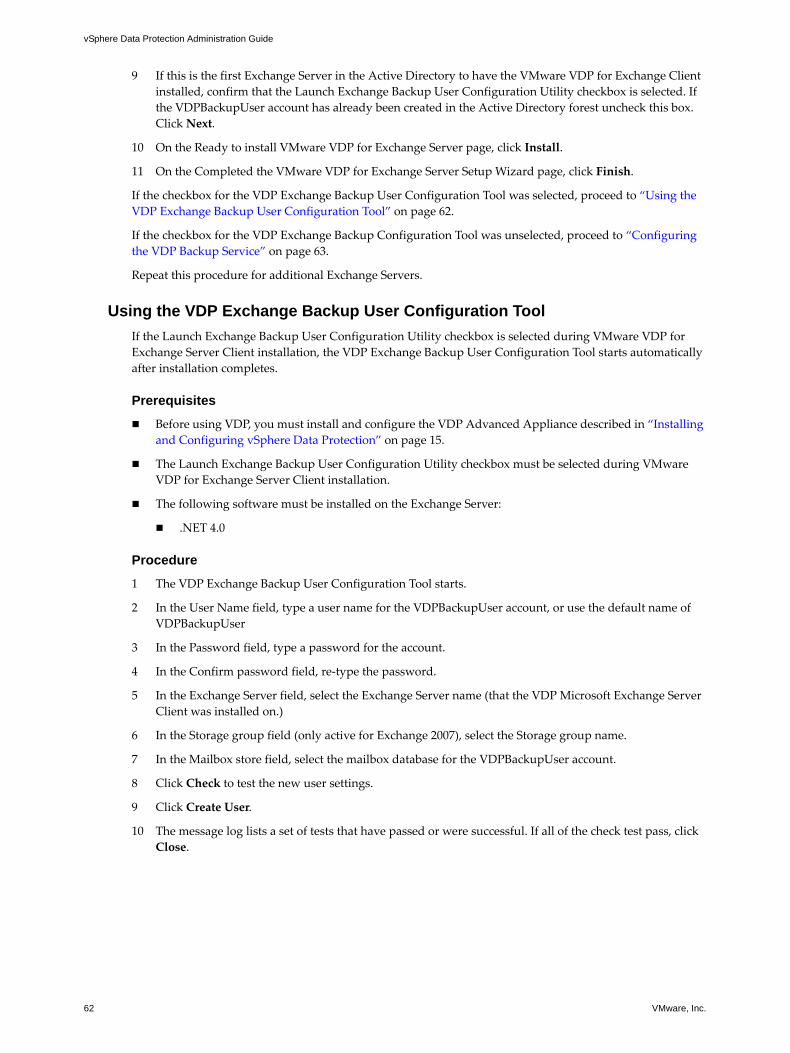
vSphere Data Protection Administration Guide
62 VMware, Inc.
9 If this is the first Exchange Server in the Active Directory to have the VMware VDP for Exchange Client installed, confirm that the Launch Exchange Backup User Configuration Utility checkbox is selected. If the VDPBackupUser account has already been created in the Active Directory forest uncheck this box. Click Next.
10 On the Ready to install VMware VDP for Exchange Server page, click Install.
11 On the Completed the VMware VDP for Exchange Server Setup Wizard page, click Finish.
If the checkbox for the VDP Exchange Backup User Configuration Tool was selected, proceed to “Using the VDP Exchange Backup User Configuration Tool” on page 62.
If the checkbox for the VDP Exchange Backup Configuration Tool was unselected, proceed to “Configuring the VDP Backup Service” on page 63.
Repeat this procedure for additional Exchange Servers.
Using the VDP Exchange Backup User Configuration Tool
If the Launch Exchange Backup User Configuration Utility checkbox is selected during VMware VDP for Exchange Server Client installation, the VDP Exchange Backup User Configuration Tool starts automatically after installation completes.
Prerequisites
Before using VDP, you must install and configure the VDP Advanced Appliance described in “Installing and Configuring vSphere Data Protection” on page 15.
The Launch Exchange Backup User Configuration Utility checkbox must be selected during VMware VDP for Exchange Server Client installation.
The following software must be installed on the Exchange Server:
.NET 4.0
Procedure
1 The VDP Exchange Backup User Configuration Tool starts.
2 In the User Name field, type a user name for the VDPBackupUser account, or use the default name of VDPBackupUser
3 In the Password field, type a password for the account.
4 In the Confirm password field, re-type the password.
5 In the Exchange Server field, select the Exchange Server name (that the VDP Microsoft Exchange Server Client was installed on.)
6 In the Storage group field (only active for Exchange 2007), select the Storage group name.
7 In the Mailbox store field, select the mailbox database for the VDPBackupUser account.
8 Click Check to test the new user settings.
9 Click Create User.
10 The message log lists a set of tests that have passed or were successful. If all of the check test pass, click Close.
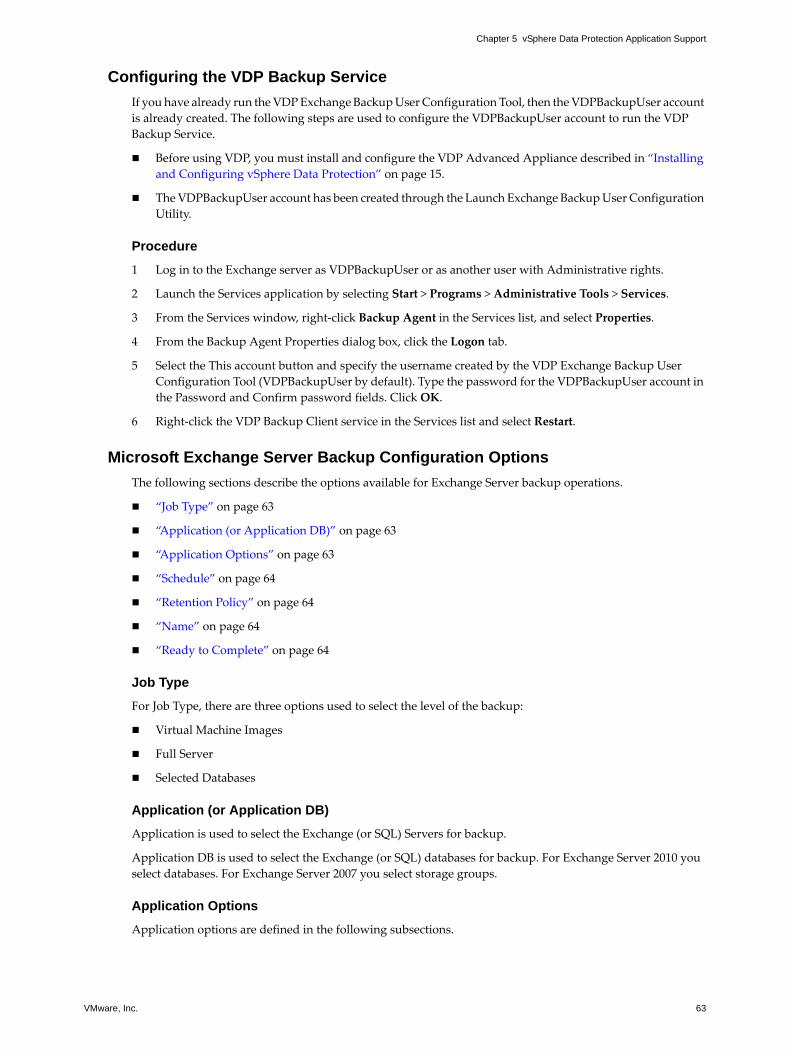
VMware, Inc. 63
Chapter 5 vSphere Data Protection Application Support
Configuring the VDP Backup Service
If you have already run the VDP Exchange Backup User Configuration Tool, then the VDPBackupUser account is already created. The following steps are used to configure the VDPBackupUser account to run the VDP Backup Service.
Before using VDP, you must install and configure the VDP Advanced Appliance described in “Installing and Configuring vSphere Data Protection” on page 15.
The VDPBackupUser account has been created through the Launch Exchange Backup User Configuration Utility.
Procedure
1 Log in to the Exchange server as VDPBackupUser or as another user with Administrative rights.
2 Launch the Services application by selecting Start > Programs > Administrative Tools > Services.
3 From the Services window, right-click Backup Agent in the Services list, and select Properties.
4 From the Backup Agent Properties dialog box, click the Logon tab.
5 Select the This account button and specify the username created by the VDP Exchange Backup User Configuration Tool (VDPBackupUser by default). Type the password for the VDPBackupUser account in the Password and Confirm password fields. Click OK.
6 Right-click the VDP Backup Client service in the Services list and select Restart.
Microsoft Exchange Server Backup Configuration Options
The following sections describe the options available for Exchange Server backup operations.
“Job Type” on page 63
“Application (or Application DB)” on page 63
“Application Options” on page 63
“Schedule” on page 64
“Retention Policy” on page 64
“Name” on page 64
“Ready to Complete” on page 64
Job Type
For Job Type, there are three options used to select the level of the backup:
Virtual Machine Images
Full Server
Selected Databases
Application (or Application DB)
Application is used to select the Exchange (or SQL) Servers for backup.
Application DB is used to select the Exchange (or SQL) databases for backup. For Exchange Server 2010 you select databases. For Exchange Server 2007 you select storage groups.
Application Options
Application options are defined in the following subsections.

vSphere Data Protection Administration Guide
64 VMware, Inc.
Backup type
Backup type specifies whether to perform full or incremental backups. Incremental backups will automatically be promoted to full backups if a full backup does not exist.
Circular logging-enabled database options
Circular logging is an option provided by Microsoft that allows the user to reduce the number of transaction logs resident on the system. For mixed environments where some, but not all, storage groups or databases have circular logging enabled, you can select one of these settings to specify how VDP Advanced handles incremental backups.
NOTE These options only apply to incremental backups, not full backups. If you select a full backup, these options are disabled.
Promote (default setting) — This option promotes an incremental backup to a full backup if any database in the saveset has circular logging enabled. All databases will be backed up whether they have circular logging enabled or not. If one or more databases has circular logging enabled, all databases in the saveset will have any incremental backup promoted to a full backup.
Circular — This option promotes all incremental backups of all databases with circular logging enabled to a full backup and skips any databases that do not have circular logging enabled.
Skip — This option performs an incremental backup of all databases that have circular logging disabled and skips any database that have circular logging enabled.
Multi-stream backups
Multi-streaming enables parallel processing of backup jobs using multiple processors. You can use as many as six streams. Each stream requires a separate processor core. By taking advantage of multi-processors, you can improve backup performance.
Schedule
See “Specifying the Backup Schedule” on page 37 for additional information on configuring the schedule.
Retention Policy
See “Setting the Retention Policy” on page 37 for additional information on retention policy.
Name
See “Naming the Backup Job” on page 38 for additional information on naming the backup job.
Ready to Complete
See “Reviewing and Completing Backup Job Creation” on page 38 for additional information about the Ready to Complete page.

VMware, Inc. 65
Chapter 5 vSphere Data Protection Application Support
Performing Microsoft Exchange Server Backups
Prerequisites
Before using vSphere Data Protection, you must install and configure the vSphere Data Protection appliance described in “Installing and Configuring vSphere Data Protection” on page 15.
Procedure
1 From a web browser, access the vSphere Web Client.
https://<IP_address_vCenter_Server>:9443/vsphere-client/
2 In the Credentials page, enter a vCenter username and password and click Login.
vSphere Data Protection uses this information to connect to vCenter to perform backups, so the specified user account must have administrative rights.
3 In the vSphere Web Client, select vSphere Data Protection.
4 In the Welcome to vSphere Data Protection page, select the vSphere Data Protection appliance, and click Connect. Click the Backup tab and from Backup Job Actions, and click New to launch the Backup Job Wizard.
5 The Select the type of backup job page displays. Select one of the following options and click Next.
Virtual Machine Images (to backup entire virtual machine, see “Creating or Editing Backup Jobs” on page 36 for additional details on image backups)
Full Server (to backup an entire Exchange and/or SQL Server)
Selected Databases (to backup selected Exchange and/or SQL Server databases)
6 The Select the applications to backup page displays. The Exchange Server clients must have the VMware VDP Microsoft Exchange Server Client installed in order to be available for backup. See “Installing vSphere Data Protection for Exchange Server Client” on page 61 for additional information on client installation. Select one of the following options, and click Next.
If you selected Full Server, select the Exchange Server for backup.
If you selected Selected Databases, select the Exchange database(s) for backup.
NOTE Best practice is to only select one Exchange Server per backup job. See“Troubleshooting vSphere Data Protection Advanced” on page 101 for additional information.
7 The Configure advanced options page displays. See “Microsoft Exchange Server Backup Configuration Options” on page 63 for details on backup options. Make your selections and click Next.
8 On the Schedule page, select the schedule for the job and click Next.
9 In the Retention Policy page, accept the default retention policy or specify an alternate retention policy, and click Next.
10 In the Name page, enter a backup job name and click Next.
11 In the Ready to Complete page, reviewed the summary information for the backup job and click Finish.
12 An information dialog box will confirm the backup job was created successfully. Click OK.
The newly created backup job is now listed on the Backup tab.

vSphere Data Protection Administration Guide
66 VMware, Inc.
Microsoft Exchange Server Restore Configuration Options
The following sections describe the options available for Exchange Server restore operations.
“Select Backup” on page 66
“Set Restore Options” on page 66
“Ready to complete” on page 67
Select Backup
Select backup is used to select a single backup job, (which can include an Exchange Server instance or database(s) for a restore job).
Set Restore Options
By default, the client and the backup selected in “Select Backup” display.
Additional options are defined in the following subsections.
Restore to Original Location
This option restores the selected Exchange Server instance or database to the original location. In order to successfully restore to an original location, you must check the Allow database overwrite option. When you restore to original location and Allow the database overwrite, any existing data is deleted and replaced with the backup selected.
Restore to Alternate Location
This option restores the selected Exchange Server instance or database(s) to an alternate location.
In order to perform a restore to an alternate location, you must provide the following information:
Client destination (use the drop-down box for selection)
Location Path (full Windows path)
NOTE When you restore an Exchange database, the destination Exchange Server must have the same Exchange Server version and service pack as the Exchange Server on which the backup was performed.
Restore into RSG/RDB
Restore Storage Groups (RSG) are used in Exchange Server 2007 and Recovery Databases (RDB) are used in Exchange Server 2010. RSG/RDB is used to restore to an RSG/RDB instead of a production database.
Allow database overwrite
This option is active if you select the Restore to Original Location option. This forces any existing databases to be overwritten that have the same name(s) included in the restore job. When this option is selected, it modifies the “Allow FileR est ore” flag, which is internal to Exchange.
RSG/RDB name
This option is active if you select the Restore to RSG/RDB option. This is the name of the RSG/RDB that is used for the restore. If a RSG/RDB with the specified name does not already exist, it will be created. If an RSG/RDB with the specified name already exists, use the overwrite existing RSG/RDB option to overwrite it.
RSG/RDB database path
This option is active if you select the Restore to RSG/RDB option. This option specifies a folder path (for example, C:\myrdb) where the RSG/RDB database file will be restored. This is an optional field. The default location is used if this field is left blank.
VMware, Inc. 67
Chapter 5 vSphere Data Protection Application Support
RSG/RDB log path
This option is active if you select the Restore to RSG/RDB option. This option specifies a folder path (for example, C:\myrdb) where the RSG/RDB log file will be restored. This is an optional field. The default location is used if this field is left blank.
Overwrite existing RSG/RDB
This option is active if you select the Restore to RSG/RDB option. This option overwrites any existing RSG/RDB and should be used with caution.
Advanced options (Support Only)
The Advanced options are only available to technical support.
Ready to complete
See “Reviewing and Completing a Restore Request” on page 41 for additional information about the Ready to Complete page.
Performing Microsoft Exchange Server Restores
Prerequisites
Before using VDP, you must install and configure the VDP Advanced Appliance described in “Installing and Configuring vSphere Data Protection” on page 15.
To perform an Exchange Server guest-level restore, an Exchange Server backup must exist.
Procedure
1 From a web browser, access the vSphere Web Client.
https://<IP_address_vCenter_Server>:9443/vsphere-client/
2 In the Credentials page, enter an administrative vCenter user name and password and click Login.
3 In the vSphere Web Client, select vSphere Data Protection.
4 In the Welcome to vSphere Data Protection page, select the vSphere Data Protection Appliance and click Connect.
5 Click the Restore tab. By default, image-level backups display. To see guest-level (application-level) backups, click on drop-down options for Type: and select Application.
6 Select the backup to restore and click the Restore icon.
7 The Select backup page displays. Select the backup job for restoration. While you can select multiple Exchange Servers, you can only select one restore point for each Exchange Server. Make (or confirm) the backup jobs for restoration and click Next.
8 The Select restore options page displays. See “Microsoft Exchange Server Restore Configuration Options” on page 66 for details on restoration options. Make your selections and click Next.
9 On the Ready to complete page, verify your selections. If they are correct, click Finish. If the settings are not correct, click Back to go back to create the correct configuration.
10 A message displays telling you that your restore was successfully initiated. Click OK.
11 Monitor the Restore progress through the Recent Tasks pane.

vSphere Data Protection Administration Guide
68 VMware, Inc.

VMware, Inc. 69
6
This chapter includes the following topics:
“Introduction to the vSphere Data Protection Restore Client” on page 70
“Logging In to the Restore Client” on page 71
“Mounting Backups” on page 71
“Filtering Backups” on page 71
“Navigating Mounted Backups” on page 71
“Performing File Level Restores” on page 72
“Monitoring Restores” on page 73
Using File Level Restore 6

vSphere Data Protection Administration Guide
70 VMware, Inc.
Introduction to the vSphere Data Protection Restore ClientvSphere Data Protection (VDP) creates backups of entire virtual machines. These backups can be restored in their entirety using the vSphere Data Protection user interface through the vSphere Web Client. However, if you only want to restore specific files from these virtual machines, then use the vSphere Data Protection Restore Client (which is accessed through a web browser). This is called File Level Restore (FLR).
The Restore Client service is only available to virtual machines that have backups that are managed by VDP. This requires you to be logged in, either through the vCenter console or some other remote connection, to one of the virtual machines backed up by VDP.
The Restore Client allows you to mount specific virtual machine backups as file systems and then “browse” the file system to find the files you want to restore.
CAUTION See “Software Requirements” on page 16 for web browsers supported by vSphere 5.1. Internet Explorer 10 is not supported and is unreliable with the Restore Client.
File Level Restore Supported Configurations
File Level Restore can be performed on backups of the following file systems:
NTFS (Primary Partition with MBR)
Ext2 (Primary Partition with MBR)
Ext3 (Primary Partition with MBR)
LVM with ext2 (Primary Partition with MBR and a Standalone [without MBR] LVM w/ ext2)
LVM with ext3 (Primary Partition with MBR and a Standalone [without MBR] LVM w/ ext3)
File Level Restore Limitations
File Level Restore does not support the following virtual disk configurations:
Unformatted disks
Dynamic disks (Windows) / Multi-Drive Partitions (that is, any partition which is composed of 2 or more virtual disks)
GUID Partition Table (GPT) disks
ext4 filesystems
FAT16 filesystems
FAT32 filesystems
Extended partitions
Encrypted partitions
Compressed partitions
File Level Restore does not support the following Windows 8 and Windows Server 2012 configurations:
Deduplicated New Technology File System (NTFS)
Resilient File System (ReFS)
Extensible Firmware Interface (EFI) bootloader
File Level Restore also has the following limitations:
Symbolic links cannot be restored or browsed
Browsing either a given directory contained within a backup or a restore destination is limited to a total of 5000 files or folders
You cannot restore more than 5,000 folders or files in the same restore operation

VMware, Inc. 71
Chapter 6 Using File Level Restore
The following limitations apply to logical volumes managed by the Logical Volume Manager:
One Physical Volume (.vmdk) must be mapped to exactly one logical volume
Only ext2 and ext3 formatting is supported
Logging In to the Restore ClientThe Restore Client operates in one of two modes:
Basic—With basic login, you connect to the Restore Client from a virtual machine that has been backed up by VDP. You log in to the Restore Client with the local administrative credentials of the virtual machine to which you are logged in. The Restore Client only displays backups for the local virtual machine.
For example, if you were logging in to the Restore Client in Basic mode from a Windows host named “WS44” then you would only be able to mount and browse backups of “WS44.”
Advanced—With advanced login, you connect to the Restore Client from a virtual machine that has been backed up by VDP. You log in to the Restore Client with the local administrative credentials of the virtual machine you are logged in to, as well as with the administrative credentials used to register the VDP Appliance to the vCenter Server. After connecting to the Restore Client, you will be able to mount, browse, and restore files from any virtual machine that has been backed up by VDP. All restore files will be restored to the virtual machine to which you are currently logged in.
NOTE FLR Advanced Login requires you to use the same vCenter user credentials specified when the VDP Appliance is installed. See “vSphere Data Protection Installation” on page 19 for additional information.
You can only restore files from a Windows backup to a Windows machine, and you can only restore files from a Linux backup to a Linux machine.
Mounting BackupsAfter you successfully log in, the Manage mounted backups dialog displays. By default this displays all the backups that are available to be mounted. The format of this dialog will vary depending on how you logged in.
If you use basic login, you will see a list of all the backups from the client you logged into that can be mounted.
If you used advanced login, you will see a list of all clients that have backed up to VDP. Under each client, there is a list of all available backups to be mounted.
NOTE You can mount up to 254 VMDK images using the Mount, Unmount, or Unmount all buttons on the bottom right-hand corner of the dialog.
Filtering BackupsIn the Manage mounted backups dialog, you have the option of displaying all the backups or of filtering the list of backups. The list can be filtered in the following ways:
All restore points—all backups are displayed.
Restore point date—only backups within the specified date range are displayed.
VM name—display only backups of hosts whose display name contains the text entered in the filter field. (This option is not available with Basic Login because only the backups belonging to the virtual machine you logged in with are displayed.).
Navigating Mounted BackupsAfter backups have been mounted, you can navigate the contents of the backup by using the tree display on the left side of the Restore Client user interface. The appearance of the tree will vary depending on whether you used Basic Login or Advanced Login.
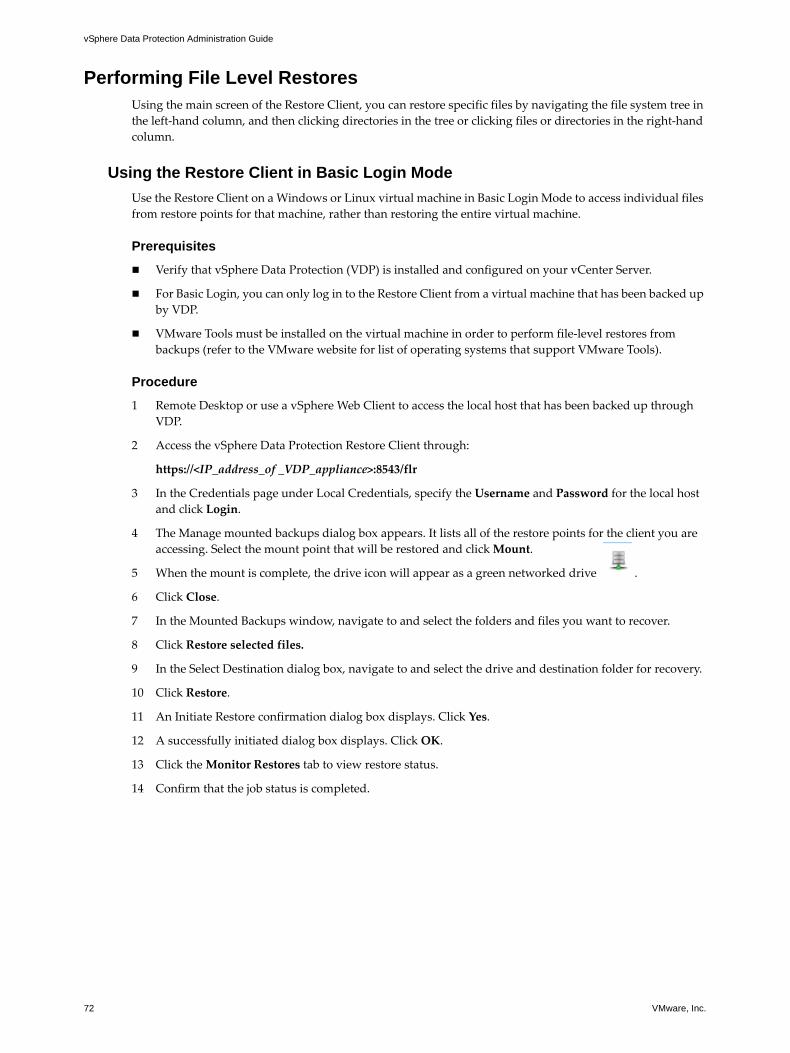
vSphere Data Protection Administration Guide
72 VMware, Inc.
Performing File Level RestoresUsing the main screen of the Restore Client, you can restore specific files by navigating the file system tree in the left-hand column, and then clicking directories in the tree or clicking files or directories in the right-hand column.
Using the Restore Client in Basic Login Mode
Use the Restore Client on a Windows or Linux virtual machine in Basic Login Mode to access individual files from restore points for that machine, rather than restoring the entire virtual machine.
Prerequisites
Verify that vSphere Data Protection (VDP) is installed and configured on your vCenter Server.
For Basic Login, you can only log in to the Restore Client from a virtual machine that has been backed up by VDP.
VMware Tools must be installed on the virtual machine in order to perform file-level restores from backups (refer to the VMware website for list of operating systems that support VMware Tools).
Procedure
1 Remote Desktop or use a vSphere Web Client to access the local host that has been backed up through VDP.
2 Access the vSphere Data Protection Restore Client through:
https://<IP_address_of _VDP_appliance>:8543/flr
3 In the Credentials page under Local Credentials, specify the Username and Password for the local host and click Login.
4 The Manage mounted backups dialog box appears. It lists all of the restore points for the client you are accessing. Select the mount point that will be restored and click Mount.
5 When the mount is complete, the drive icon will appear as a green networked drive .
6 Click Close.
7 In the Mounted Backups window, navigate to and select the folders and files you want to recover.
8 Click Restore selected files.
9 In the Select Destination dialog box, navigate to and select the drive and destination folder for recovery.
10 Click Restore.
11 An Initiate Restore confirmation dialog box displays. Click Yes.
12 A successfully initiated dialog box displays. Click OK.
13 Click the Monitor Restores tab to view restore status.
14 Confirm that the job status is completed.

VMware, Inc. 73
Chapter 6 Using File Level Restore
Using the Restore Client in Advanced Login Mode
Use the restore client on a Windows or Linux virtual machine in Advanced Login Mode to access virtual machines on a vCenter Server that contain restore points to perform file level recovery.
Prerequisites
Verify that VDP is installed and configured on your vCenter Server.
FLR Advanced Login requires you to use the same vCenter user credentials specified when the VDP Appliance is installed. See “vSphere Data Protection Installation” on page 19 for additional information.
VMware Tools must be installed on the virtual machine in order to perform file-level restores from backups (refer to the VMware website for list of operating systems that support VMware Tools).
Procedure
1 Log in remotely using Remote Desktop, or use a vSphere Web Client to access a virtual machine.
2 Access the vSphere Data Protection Restore Client through:
https://<IP_address_of _VDP_appliance>:8543/flr
3 In the Credentials page under Local Credentials, specify the Username and Password for the local host. In the vCenter Credentials field, specify the vCenter administrator Username and Password, and click Login.
4 The Manage mounted backups dialog box displays. It lists all of the restore points for the client you are accessing. Select the mount point that will be restored and click Mount.
5 When the mount is complete, the drive icon will display as a green networked drive.
6 Click Close.
7 In the Mounted Backups window, navigate to and select the virtual machine, folders, and files for recovery.
8 Click Restore selected files.
9 In the Select Destination dialog box, navigate to and select the drive and destination folder for recovery.
10 Click Restore.
11 An Initiate Restore confirmation dialog box displays. Click Yes.
12 A successfully initiated dialog box appears, click OK.
You can determine when the restore is complete by clicking the Monitor Restores tab to view restore status.
Monitoring RestoresTo monitor current and past activity of the Restore Client, click the Monitor Restores button. The monitor restore screen displays information about current and recently-completed restore operations.
The columns in this table are sortable by clicking on the column heading. Clicking multiple times on a table heading will reverse the sort order, and an up or down arrow reflects whether the sort order is ascending or descending.
By default, Monitor Restores shows all the jobs that in are in process or that have completed during your current session. If you want to see jobs that completed or failed in a previous session, check the Show Completed Activities box, and all past completed and failed jobs will then be displayed along with running and pending jobs.

vSphere Data Protection Administration Guide
74 VMware, Inc.
VMware, Inc. 75
7
This chapter focuses on vSphere Data Protection (VDP) capacity management and includes the following topics:
“Impact of Selecting Thin or Thick Provisioned Disks” on page 76
“Impact of Storage Capacity for Initial VDP Deployment” on page 76
“Monitoring vSphere Data Protection Capacity” on page 76
“vSphere Data Protection Capacity Thresholds” on page 77
“Capacity Management” on page 77
vSphere Data Protection Capacity Management 7

vSphere Data Protection Administration Guide
76 VMware, Inc.
Impact of Selecting Thin or Thick Provisioned DisksThere are advantages and disadvantages of selecting thin or thick disk partitioning for the vSphere Data Protection (VDP) datastore.
Thin provisioning uses virtualization technology to allow the appearance of more disk resources than what might be physically available. This can be used if an administrator is actively monitoring disk space and is able to allocate additional physical disk space as the thin disk grows. If this is not managed and the VDP datastore is on a thin provisioned disk that cannot allocate space, the VDP Appliance will fail. If this happens, you can rollback to a validated checkpoint (see “Rolling Back an Appliance” on page 26 for additional information). Any backups that occurred after the checkpoint will be lost.
Thick provisioning allocates all of the required storage when the disk is created. The best practice for the VDP datastore is to create a thin provisioned disk when the VDP Appliance is deployed (this allows for rapid deployment) and after deployment, convert the disk from thin provisioning to thick provisioning.
NOTE See the VMware vSphere documentation for details on inflating thin provisioned disks to thick provisioned disks. This procedure requires that the VDP Appliance be shut down and can take several hours to complete.
Impact of Storage Capacity for Initial VDP DeploymentWhen a new vSphere Data Protection (VDP) Appliance is deployed, the appliance typically fills rapidly for the first few weeks. This is because nearly every client that is backed up contains unique data. VDP deduplication is best leveraged when other similar clients have been backed up, or the same clients have been backed up at least once.
After the initial backup, the appliance backs up less unique data during subsequent backups. When initial backups are complete and the maximum retention periods are exceeded, it is possible to consider and measure the ability of the system to store about as much new data each day as it frees during the maintenance windows. This is referred to as achieving steady state capacity utilization. Ideal steady state capacity should be 80%.
Monitoring vSphere Data Protection CapacityYou should proactively monitor vSphere Data Protection (VDP) capacity. You can view VDP capacity through the VDP Report tab, Used Capacity (which is used to determine steady state).
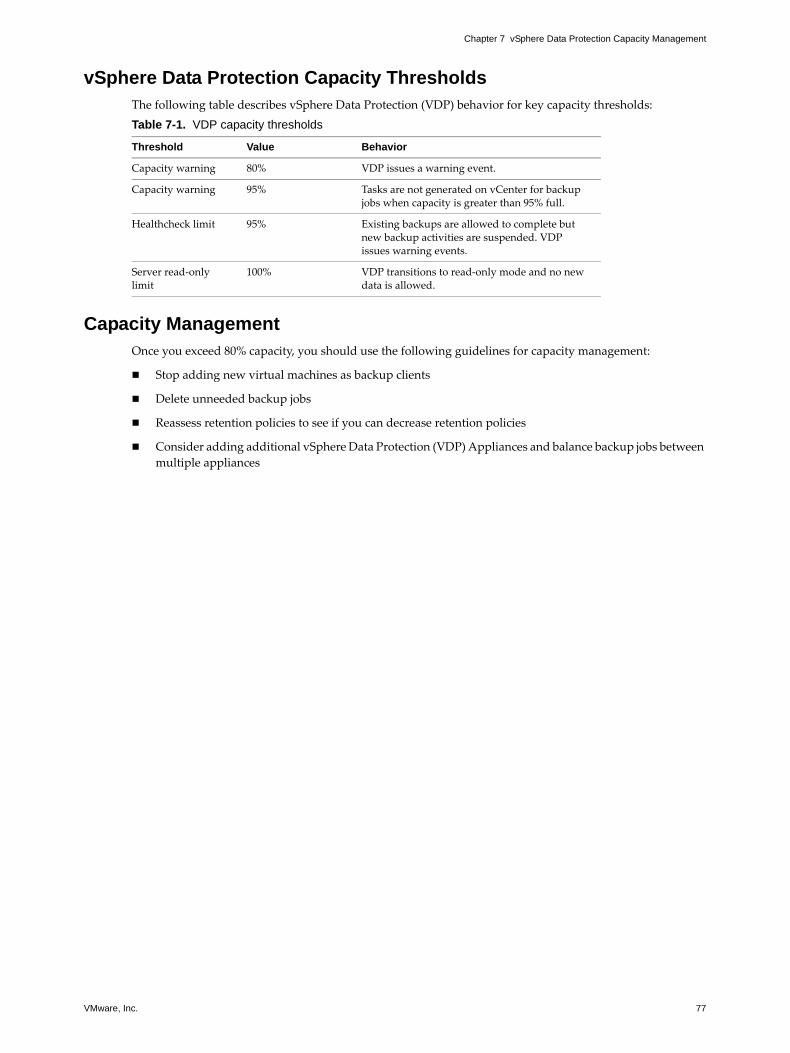
VMware, Inc. 77
Chapter 7 vSphere Data Protection Capacity Management
vSphere Data Protection Capacity ThresholdsThe following table describes vSphere Data Protection (VDP) behavior for key capacity thresholds:
Capacity ManagementOnce you exceed 80% capacity, you should use the following guidelines for capacity management:
Stop adding new virtual machines as backup clients
Delete unneeded backup jobs
Reassess retention policies to see if you can decrease retention policies
Consider adding additional vSphere Data Protection (VDP) Appliances and balance backup jobs between multiple appliances
Table 7-1. VDP capacity thresholds
Threshold Value Behavior
Capacity warning 80% VDP issues a warning event.
Capacity warning 95% Tasks are not generated on vCenter for backup jobs when capacity is greater than 95% full.
Healthcheck limit 95% Existing backups are allowed to complete but new backup activities are suspended. VDP issues warning events.
Server read-only limit
100% VDP transitions to read-only mode and no new data is allowed.

vSphere Data Protection Administration Guide
78 VMware, Inc.
VMware, Inc. 79
8
This chapter contains the following topics:
“Introduction to Disk Expansion” on page 80
“Pre-Expansion Requirements” on page 80
“Performing Disk Expansion” on page 83
vSphere Data Protection Disk Expansion 8

vSphere Data Protection Administration Guide
80 VMware, Inc.
Introduction to Disk ExpansionvSphere Data Protection Advanced (VDP Advanced) allows you to expand datastore capacity through disk grow or disk add. This feature is not available with the standard edition of vSphere Data Protection (VDP). Disk grow is the process of expanding a current disk (used if you originally installed VDP). Disk add uses new disks to expand capacity (used if you originally installed VDP Advanced).
Disk expansion allows you to expand an existing datastore to 2 TB, 4 TB, 6 TB, or 8TB.
vSphere Data Protection is installed with the following datastore configurations:
vSphere Data Protection Advanced is installed with the following datastore configurations:
Pre-Expansion RequirementsIt is important that you complete (or confirm) the following requirements have been met prior to disk grow or disk add. Failure to complete these steps can corrupt vSphere Data Protection (VDP) Advanced and require a restoration from a clone or VDP Advanced backup.
Confirm that the minimum memory and CPU requirements are met for the new configuration. See “Memory and CPU Requirements” on page 81 for additional details.
Confirm that Memory Hot-Add is enabled. The Memory Hot-Add option is disabled by default. See the VMware vSphere documentation for details.
If you have an Essentials Plus license, you cannot enable Memory Hot-Add; therefore, you must manually increase the memory assigned to VDP Advanced. See “Disk expansion with Essentials Plus” on page 82 for additional details.
Confirm that you have available disk space for the expansion. See “Disk Grow from vSphere Data Protection” on page 81 and “Disk Add from vSphere Data Protection Advanced” on page 81 for additional details.
Any existing disks need to be configured as thick provisioned- lazy zeroed prior to expansion. See “Impact of Selecting Thin or Thick Provisioned Disks” on page 76 for information on inflating thin provisioned virtual disks to thick provisioned- lazy zeroed virtual disks.
Disk expansion cannot occur during the blackout window or the maintenance window. See “Configuring vSphere Data Protection Appliance” on page 44 for additional details. Disk expansion should be performed during the backup window when no backup jobs are running. To ensure that no backup jobs are running, disable the Backup scheduler during the maintenance window and then run the disk expansion during the backup window. After the disk expansion is complete, restart the Backup scheduler. See “Starting and Stopping Services” on page 25 for additional details.
Confirm that you have administrative rights in the vCenter. See “User Account Configuration” on page 18 to determine if you have if you have administrative rights for the vCenter.
Table 8-1. vSphere Data Protection datastore virtual disks
Size Number of virtual disks
0.5 TB 3 * 256 GB virtual disks
1 TB 6 * 256 GB virtual disks
2 TB 12 * 256 GB virtual disks
Table 8-2. vSphere Data Protection Advanced datastore virtual disks
Size Number of virtual disks
2 TB 3 * 1 TB virtual disks
4 TB 6 * 1 TB virtual disks
6 TB 9 * 1 TB virtual disks
8 TB 12 * 1 TB virtual disks

VMware, Inc. 81
Chapter 8 vSphere Data Protection Disk Expansion
Confirm that VMFS heap size is set to the correct value for the amount of virtual disk space associated with the ESXi host. See “VMFS Heap Size Recommendations” on page 82 for additional details.
Create a clone or backup of the VDP Advanced Appliance and verify that it is valid prior to disk expansion.
Memory and CPU Requirements
vSphere Data Protection (VDP) Advanced requires the following memory and CPU requirements:
Disk Grow from vSphere Data Protection
If you originally installed vSphere Data Protection (VDP) and have upgraded to VDP Advanced, then the following table lists what happens during disk expansion.
Disk Add from vSphere Data Protection Advanced
If you originally installed VDP Advanced, then the following table lists what happens during disk expansion
Table 8-3. Minimum processor and memory requirements for VDP Advanced
2 TB 4 TB 6 TB 8 TB
Processors Minimum 4 * 2 GHz processors
Minimum 4 * 2 GHz processors
Minimum 4 * 2 GHz processors
Minimum 4 * 2 GHz processors
Memory 6 GB 8 GB 10 GB 12 GB
Table 8-4. Disk expansion requirements from VDP to VDP Advanced
VDP Advanced 2 TB VDP Advanced 4 TB VDP Advanced 6 TB VDP Advanced 8 TB
VDP 0.5 TB Grow 3 virtual disks from 256 GB to 1 TB
Grow 3 virtual disks from 256 GB to 1 TB and add 3 * 1 TB disks
Grow 3 virtual disks from 256 GB to 1 TB and add 6 * 1 TB disks
Grow 3 virtual disks from 256 GB to 1 TB and add 9 * 1 TB disks
VDP 1 TB Grow 6 virtual disks from 256 GB to 512 GB
Grow 6 virtual disks from 256 GB to 1 TB
Grow6 virtual disks from 256 GB to 1 * TB and add 3 * 1 TB disks
Grow 6 virtual disks from 256 GB to 1 TB and add 6 * 1 TB disks
VDP 2 TB Not applicable Grow 12 virtual disks from 256 GB to 512 GB
Grow 12 virtual disks from 256 GB to 768 GB
Grow 12 virtual disks from 256 GB to 1 TB
Table 8-5. Disk expansion requirements from VDP Advanced to VDP Advanced
VDP Advanced 4 TB VDP Advanced 6 TB VDP Advanced 8 TB
VDP Advanced 2 TB Start with 3 * 1 TB virtual disks and add an additional 3 * 1 TB virtual disks
Start with 3 * 1 TB virtual disks and add an additional 6 * 1 TB virtual disks
Start with 3 * 1 TB virtual disks and add an additional 9 * 1 TB virtual disks
VDP Advanced 4TB Not applicable Start with 6 * 1 TB virtual disks and add an additional 3 * 1 TB virtual disks
Start with 6 * 1 TB virtual disks and add an additional 6 * 1 TB virtual disks
VDP Advanced 6 TB Not applicable Not applicable Start with 9 * 1 TB virtual disks and add an additional 3 * 1 TB virtual disks

vSphere Data Protection Administration Guide
82 VMware, Inc.
VMFS Heap Size Recommendations
VMFS heap size determines the amount of virtual disk space supported by each ESXi host. If you exceed the amount of virtual disk space beyond what is configured for VMFS heap size, the following can occur:
Virtual machines behave erratically
Cannot allocate memory error messages are displayed
Virtual machines may crash or fail to start
Prior to disk expansion, confirm that VMFS heap size is configured properly for the new virtual disk capacity. Increasing VMFS heap size increases the amount of memory allocated to the ESX/ESXi kernel and requires a system reboot for the changes to take effect.
VMFS3 and VMFS5 use the same settings and are defined in the following table.
The following guidelines can be used to calculate VMFS heap size:
16 MB supports to 4 TB of virtual storage per ESXi host.
80 MB supports up to 8 TB of virtual storage per ESXi host.
160 MB supports up to 16 TB of virtual storage per ESXi host.
256 MB supports up to 25 TB of virtual storage per ESXi host.
VMware Knowledge Base Article 1004424 specifies the steps to change the VMFS heap size settings.
Disk expansion with Essentials PlusIf you have an Essentials Plus license, you cannot enable Memory Hot-Add; therefore, you must manually increase the memory assigned to vSphere Data Protection (VDP) Advanced.
VDP Advanced requires the following memory based on capacity size.
The steps for performing disk expansion with an Essential Plus license follow.
1 From a web browser, access the vSphere Web Client.
https://<IP_address_vCenter_Server>:9443/vsphere-client/
2 Before the expansion, gracefully shut down the VDP Appliance using the Shut Down Guest OS action on the virtual machine.
This action automatically performs a clean shutdown of the VDP Appliance. If the appliance is powered off without the Shut Down Guest OS action, corruption might occur. It can take up to 30 minutes to shutdown and restart the VDP Appliance. You can monitor the status through the virtual machine console.
Table 8-6. VMFS heap size settings
VMFS heap size (in MB) Default setting Maximum setting
ESX 4.0 16 128
ESXi 4.1/5.x 80 256
Table 8-7. Memory requirements for virtual hardware
Capacity size Required memory
4 TB 8 GB
6 TB 10 GB
8 TB 12 GB

VMware, Inc. 83
Chapter 8 vSphere Data Protection Disk Expansion
3 Increase the memory assigned to the VDP Appliance using the requirements listed in Table 8-7.
a From a web browser, access the vSphere Web Client.
https://<IP_address_vCenter_Server>:9443/vsphere-client/
b In the vSphere Web Client, log in as a user who has rights to edit hardware settings.
c Click vCenter > Hosts and Clusters.
d In the tree on the left, click the disclosure arrows until the VDP Appliance displays.
e Right-click the VDP Appliance and select Edit Settings.
f Click the Virtual Hardware tab.
g Increase the amount of memory by entering the value in the Memory field.
h Click OK.
4 To restart the VDP Appliance, right-click the VDP Appliance and choose Power On.
5 Proceed with disk expansion. See “Performing Disk Expansion” on page 83 for additional information.
Performing Disk ExpansionIf you upgraded from vSphere Data Protection (VDP) to VDP Advanced , you will use disk grow or disk grow and disk add. “Disk Grow from vSphere Data Protection” on page 81 lists which option is used depending on different configurations. If VDP Advanced was originally installed, perform disk add.
NOTE During Disk Expansion the disk space is reported incorrectly on the VDP Configuration tab. It reports that twice as much space is used than is actually used. Disregard this number. After approximately two hours, the Configuration tab will report disk space usage accurately.
Performing Disk Grow
An automated integrity check will run after a successful disk grow operation. Allow 5 to 10 minutes for the integrity check to begin.
1 From a web browser, access the vSphere Web Client.
https://<IP_address_vCenter_Server>:9443/vsphere-client/
2 In the Credentials page, enter a the vCenter username and password and click Login.
vSphere Data Protection uses this information to connect to vCenter to perform backups, so the specified user account must have administrative rights.
3 In the vSphere Web Client, select vSphere Data Protection.
4 Click the Configuration tab and select Capacity Manager.
5 From Capacity Expansion, use the Desired Capacity drop-box to select the desired capacity.
6 In Hardware Requirements, confirm that you meet the minimum hardware requirements.
7 In Provisioned disks to be grown, the disks that were previously created are listed. Confirm that the required space for disk expansion is available.
8 Confirm that you have a valid clone or backup of the VDP Appliance and check the box for I have a validated clone or backup.
9 Click the Add button
10 Monitor Recent Tasks to verify that the disk grow completes.
11 From the Configuration tab, select Backup Appliance to view the expanded datastore. This might take a few minutes.
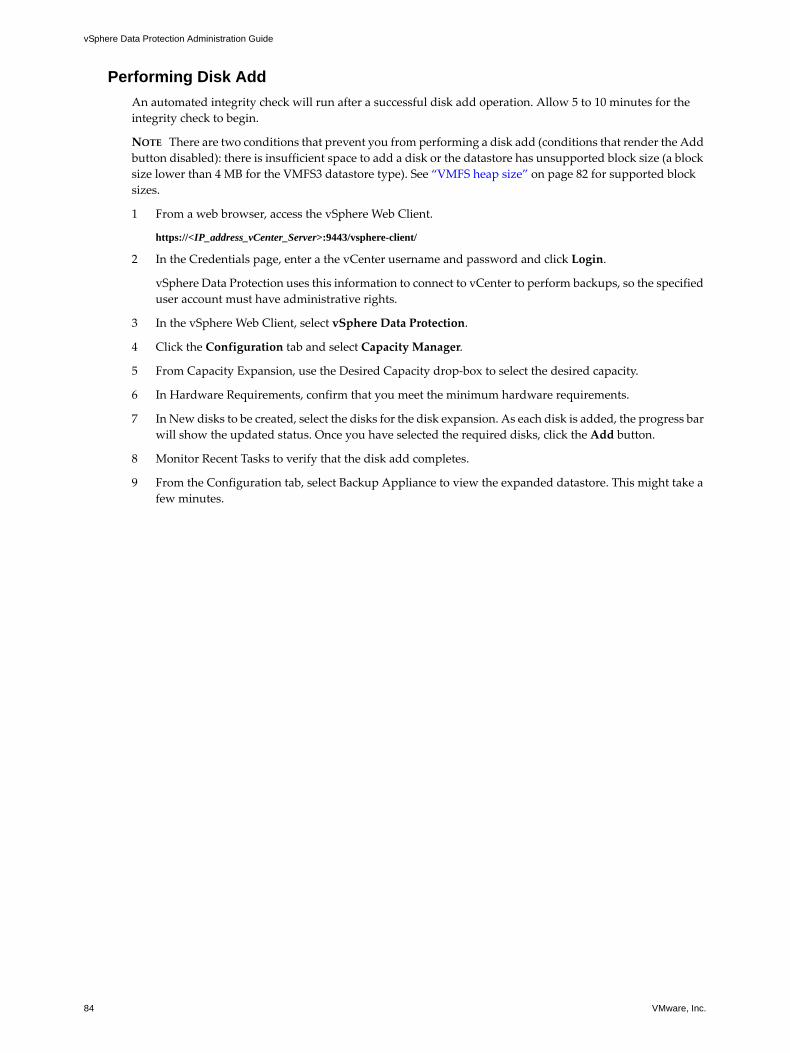
vSphere Data Protection Administration Guide
84 VMware, Inc.
Performing Disk Add
An automated integrity check will run after a successful disk add operation. Allow 5 to 10 minutes for the integrity check to begin.
NOTE There are two conditions that prevent you from performing a disk add (conditions that render the Add button disabled): there is insufficient space to add a disk or the datastore has unsupported block size (a block size lower than 4 MB for the VMFS3 datastore type). See “VMFS heap size” on page 82 for supported block sizes.
1 From a web browser, access the vSphere Web Client.
https://<IP_address_vCenter_Server>:9443/vsphere-client/
2 In the Credentials page, enter a the vCenter username and password and click Login.
vSphere Data Protection uses this information to connect to vCenter to perform backups, so the specified user account must have administrative rights.
3 In the vSphere Web Client, select vSphere Data Protection.
4 Click the Configuration tab and select Capacity Manager.
5 From Capacity Expansion, use the Desired Capacity drop-box to select the desired capacity.
6 In Hardware Requirements, confirm that you meet the minimum hardware requirements.
7 In New disks to be created, select the disks for the disk expansion. As each disk is added, the progress bar will show the updated status. Once you have selected the required disks, click the Add button.
8 Monitor Recent Tasks to verify that the disk add completes.
9 From the Configuration tab, select Backup Appliance to view the expanded datastore. This might take a few minutes.

VMware, Inc. 85
9
vSphere Data Protection (VDP) is robust in its ability to store and manage backups. In the event of failure, the first course of action should be to rollback to a known validated checkpoint (see“Rolling Back an Appliance” on page 26). To recover from a VDP Appliance failure, the following procedure is used to create backups of the appliance and all of the associated VDP backups for use in disaster recovery.
The following provides guidelines for VDP disaster recovery:
1 Before shutting down the VDP Appliance, verify that no backup or maintenance tasks are running. Depending on the backup method used and how long it takes, schedule your VDP backup during a time where no tasks are scheduled. For example, if your backup window is eight hours and backups only take one hour to complete, you have an additional seven hours before maintenance tasks are schedule. This is an ideal time to shut down and backup the appliance.
2 In the vSphere Client, navigate to the appliance. Perform a Shut Down Guest OS on the virtual machine. Do not use Power Off. A power off task is equivalent to pulling the plug on a physical server and may not result in a a clean shut down process. See “VDP Shutdown and Startup Procedures” on page 50 for more information.
3 Once you have confirmed that the appliance has been shut down, proceed with your preferred method of protection.
4 Verify that the backup of VDP is complete and that no backup/snapshot/copy jobs are being performed against VDP.
5 From the vSphere Client, perform a Power On for the appliance.
vSphere Data Protection Disaster Recovery 9

vSphere Data Protection Administration Guide
86 VMware, Inc.

VMware, Inc. 87
10
This chapter contains the following topics:
“Introduction to the vSphere Data Protection VDR Migration Utility” on page 88
“Preparing the VDR Appliance for Migration” on page 88
“Performing a VDR Data Migration” on page 88
vSphere Data Protection VDR Migration Utility 10

vSphere Data Protection
88 VMware, Inc.
Introduction to the vSphere Data Protection VDR Migration UtilityThe vSphere Data Protection VDR Migration Utility is used to migrate VMware Data Recovery (VDR) backups to vSphere Data Protection (VDP).
NOTE The VDP Migration Utility is only supported for VDP; it is not supported for VDP Advanced.
The vSphere Data Protection VDR Migration Utility supports the following:
Migrating backups from VDR 2.x to VDP (if you have VDR 1.x, you must first upgrade it to VDR 2.x).
Migrating selected backups, all backups of selected virtual machines, or all backups on the VDR Appliance. It is recommended that you only migrate critical backup jobs. If you select a large amount of data, it can take a long time for the migration to complete.
The vSphere Data Protection VDR Migration Utility does not support:
Migrating backups from VDR 1.x to VDP (if you have VDR 1.x, upgrade it to VDR 2.x).
Migrating backup jobs, you will have to recreate any backup jobs on VDP.
Preparing the VDR Appliance for MigrationThe following tasks are required for a successful migration.
Review all existing backup jobs and backups. The migration process can take a long time and you should only migrate backups that are critical.
Run the VDR Integrity Check prior to migration. Confirm that there are no backup related errors. If there are, resolve the backup errors and re-run the Integrity Check until no errors are reported.
Take a snapshot or create a clone of the VDR Appliance, including VMDK de-dupe stores (destinations).
If any of the VDR de-dupe stores (destinations) are on CIFS network shares; make a copy prior to migration.
Consider migrating one or two backup restore points (using an average backup size) as a trial run to see how long the migration process takes. There are many factors that make it difficult to know how long a migration will take in any specific environment. Based on the test run, you can then estimate how long it will take to perform further migrations.
Confirm that the VDP Appliance has direct access to the VDR 2.0 VMDKs (datastore or RDM) if it does not have access, the VDR Appliance will appear in the VDP Migration Utility drop down menu as inaccessible. If the VDP Appliance and the VDR Appliance are on the same ESX host this is not an issue. If the VDP Appliance is on a different ESX host than the VDR Appliance, then the datastore or RDM (physical LUN) must be shared by both ESX hosts.
Performing a VDR Data Migration
Prerequisites
The VDR Appliance and the VDP Appliance must be installed on the same vCenter Server.
Install a new VDP Appliance.
Perform VDR migrations only on VDP Appliances that have never had any VDP backup jobs configured or backup jobs run.
Confirm that the VDR Appliance is version 2.x.
Confirm that the datastore on the VDP Appliance is large enough to hold the backups migrated from the VDR Appliance.
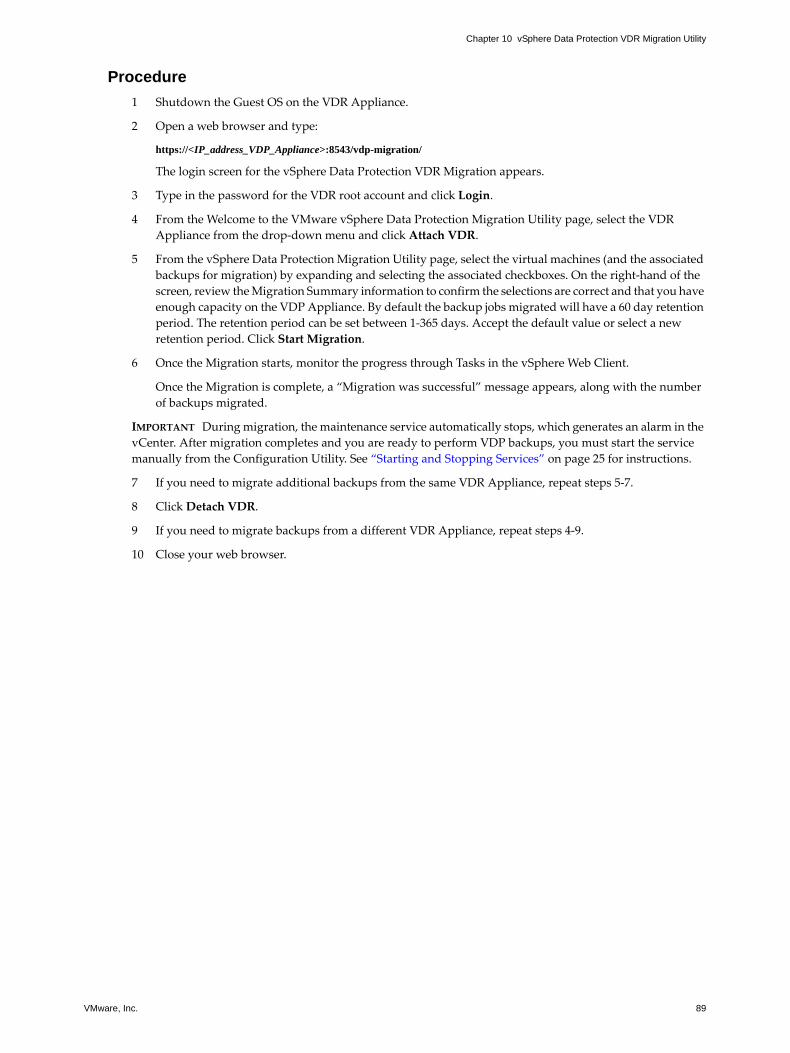
VMware, Inc. 89
Chapter 10 vSphere Data Protection VDR Migration Utility
Procedure
1 Shutdown the Guest OS on the VDR Appliance.
2 Open a web browser and type:
https://<IP_address_VDP_Appliance>:8543/vdp-migration/
The login screen for the vSphere Data Protection VDR Migration appears.
3 Type in the password for the VDR root account and click Login.
4 From the Welcome to the VMware vSphere Data Protection Migration Utility page, select the VDR Appliance from the drop-down menu and click Attach VDR.
5 From the vSphere Data Protection Migration Utility page, select the virtual machines (and the associated backups for migration) by expanding and selecting the associated checkboxes. On the right-hand of the screen, review the Migration Summary information to confirm the selections are correct and that you have enough capacity on the VDP Appliance. By default the backup jobs migrated will have a 60 day retention period. The retention period can be set between 1-365 days. Accept the default value or select a new retention period. Click Start Migration.
6 Once the Migration starts, monitor the progress through Tasks in the vSphere Web Client.
Once the Migration is complete, a “Migration was successful” message appears, along with the number of backups migrated.
IMPORTANT During migration, the maintenance service automatically stops, which generates an alarm in the vCenter. After migration completes and you are ready to perform VDP backups, you must start the service manually from the Configuration Utility. See “Starting and Stopping Services” on page 25 for instructions.
7 If you need to migrate additional backups from the same VDR Appliance, repeat steps 5-7.
8 Click Detach VDR.
9 If you need to migrate backups from a different VDR Appliance, repeat steps 4-9.
10 Close your web browser.

vSphere Data Protection
90 VMware, Inc.
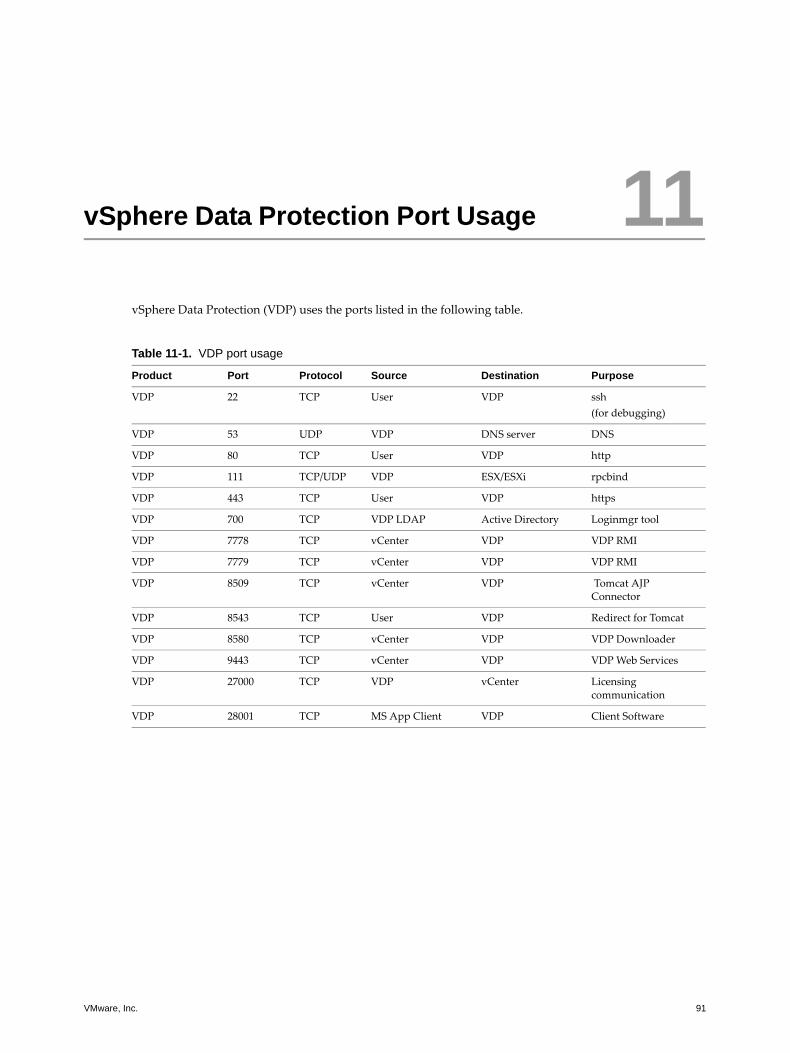
VMware, Inc. 91
11
vSphere Data Protection (VDP) uses the ports listed in the following table.
vSphere Data Protection Port Usage 11
Table 11-1. VDP port usage
Product Port Protocol Source Destination Purpose
VDP 22 TCP User VDP ssh(for debugging)
VDP 53 UDP VDP DNS server DNS
VDP 80 TCP User VDP http
VDP 111 TCP/UDP VDP ESX/ESXi rpcbind
VDP 443 TCP User VDP https
VDP 700 TCP VDP LDAP Active Directory Loginmgr tool
VDP 7778 TCP vCenter VDP VDP RMI
VDP 7779 TCP vCenter VDP VDP RMI
VDP 8509 TCP vCenter VDP Tomcat AJP Connector
VDP 8543 TCP User VDP Redirect for Tomcat
VDP 8580 TCP vCenter VDP VDP Downloader
VDP 9443 TCP vCenter VDP VDP Web Services
VDP 27000 TCP VDP vCenter Licensing communication
VDP 28001 TCP MS App Client VDP Client Software

vSphere Data Protection
92 VMware, Inc.
VMware, Inc. 93
12
See “User Account Configuration” on page 18 to configure the VDP user or SSO admin user using the vSphere Web Client. In high-security environments, you can restrict the vCenter user account permissions required to configure and administer the vSphere Data Protection Appliance to all of the following categories:
Datastore
Allocate space
Browse datastore
Low level file operations
Move datastore
Remove datastore
Remove file
Rename datastore
Folder
Create folder
Global
Licenses
Settings
Manage custom attributes
Cancel task
Log event
Network
Assign network
Configure
Resource
Assign virtual machine to resource pool
Alarms
Create alarm
Sessions
Validate session
Minimum Required vCenter User Account Permissions 12

vSphere Data Protection Administration Guide
94 VMware, Inc.
Extension
Register extension
Tasks
Create task
Update task
vApp
Configure vApp application
Virtual machine > Configuration
Add existing disk
Add new disk
Add or remove device
Advanced
Change CPU count
Change resource
Disk change tracking
Disk lease
Extend virtual disk
Host USB device
Memory
Modify device setting
Raw device
Reload from path
Remove disk
Rename
Reset guest information
Settings
Swapfile placement
Upgrade virtual machine compatibility
Virtual machine > Interaction
Power Off
Power On
Reset
Virtual machine > Inventory
Create new
Register
Remove
Unregister
VMware, Inc. 95
Chapter 12 Minimum Required vCenter User Account Permissions
Virtual machine > Provisioning
Allow read-only disk access
Allow virtual machine download
Mark as Template
Virtual machine > Snapshot management
Create snapshot
Remove snapshot
Revert to snapshot

vSphere Data Protection Administration Guide
96 VMware, Inc.
VMware, Inc. 97
13
This chapter includes the following troubleshooting topics:
“Troubleshooting VDP Appliance Installation” on page 97
“Troubleshooting Accessing the vSphere Data Protection Web Client” on page 97
“Troubleshooting vSphere Data Protection Backups” on page 98
“Troubleshooting vSphere Data Protection Restores” on page 99
“Troubleshooting vSphere Data Protection Integrity Check” on page 100
“Troubleshooting the Restore Client (File Level Recovery)” on page 100
“Troubleshooting vSphere Data Protection Advanced” on page 101
“Troubleshooting VDR to VDP Migrations” on page 102
“Accessing VDP Knowledge Base Articles” on page 103
Troubleshooting VDP Appliance InstallationIf you have problems with the vSphere Data Protection (VDP) Appliance installation:
Confirm that all of the software meets the minimum software requirements (see “Software Requirements” on page 16).
Confirm that the hardware meets the minimum hardware requirements (see “System Requirements” on page 16).
Confirm that DNS is properly configured for the VDP Appliance. (see “Preinstallation Configuration” on page 17).
NOTE Refer to VMware KB article 2041813 for additional information.
Troubleshooting Accessing the vSphere Data Protection Web ClientThe following troubleshooting items provide some direction on how to identify and resolve some common issues with managing vSphere Data Protection (VDP).
“The VDP appliance is not responding. Please try your request again.”
If you were previously able to connect to VDP and this message appears, check the following:
Confirm that the user name or password that is used to validate VDP to the vCenter Server has not changed. Only one user account and password are used for VDP validation. This is configured through the VDP Configure utility. See “vCenter Registration” on page 26 for additional information.
Confirm that the network settings for IP and DNS configuration have not changed since the initial VDP installation. See “DNS Configuration” on page 17 for additional information.
vSphere Data Protection Troubleshooting 13

vSphere Data Protection Administration Guide
98 VMware, Inc.
Troubleshooting vSphere Data Protection BackupsThe following troubleshooting items provide some direction on how to identify and resolve some common issues with vSphere Data Protection (VDP) backups.
“Loading backup job data”
This message can appear for a long time (up to five minutes) when a large number of VMs (~100 VMs) are selected for a single backup job. This issue can also apply to lock/unlock, refresh, or delete actions for large jobs. This is expected behavior when very large jobs are selected. This message will resolve itself when the action is completed, which can take up to five minutes.
“'Unable to add client {client name} to the VDP appliance while creating backup job {backupjob name}.”
This error can occur if there is a duplicate client name on the vApp container or the ESX/ESXi host. In this case only one backup job is added. Resolve any duplicate client names.
“The following items could not be located and were not selected {client name}.”
This error can occur when the backed up VM(s) cannot be located during Edit of a backup job. This is a known issue.
Windows 2008 R2 VMs can fail to backup with “disk.EnableUUID” configured to “true.”
Windows 2008 R2 backups can fail if the VM is configured with disk.EnableUUID set to true. To correct this problem, you can manually update the vmx configuration parameter disk.EnableUUID to false.
To configure disk.EnableUUID to false using the vSphere Web Client:
1 Shut down the VM by right clicking the VM and selecting Shut Down Guest OS.
2 Right dick the VM and select Edit Settings.
3 Click VM Options.
4 Expand the Advanced section and click Edit Configuration.
5 Locate the name disk.EnableUUId and set the value to false.
6 Click OK.
7 Click OK.
8 Right click the VM and click Power On.
After updating the configuration parameter, backups of the Windows 2008 R2 VM should succeed.
Backup fails if VDP does not have sufficient datastore capacity
Scheduled backups will fail at 92% complete if there is not sufficient datastore capacity. If the VDP datastore is configured with thin provisioning and maximum capacity has not been reached, add additional storage resources. If the VDP datastore is configured with thick provisioning and is at capacity, see “vSphere Data Protection Capacity Management” on page 75.
Backup fails if VM is enabled with VMware Fault Tolerance.
If a VM has fault tolerance enabled, the backup will fail. This is expected behavior; VDP does not support backing up VMs that have Fault Tolerance enabled.

VMware, Inc. 99
Chapter 13 vSphere Data Protection Troubleshooting
When VMs are moved in or out of different cluster groups, associated backup sources may be lost
When hosts are moved into clusters with the option to retain the resource pools and vApps, the containers are recreated, not copied. As a result, it is no longer the same container even though the name is the same. Validate or recreate any backup jobs that protect containers after moving hosts in or out of a cluster.
After an unexpected shutdown, recent backup jobs and backups are lost
Any time an unexpected shutdown occurs, the VDP Appliance uses rollback to the last validated checkpoint. This is expected behavior. See “Rolling Back an Appliance” on page 26 for additional information.
vMotion operations are not allowed during active backup operations
vSphere vMotion is a feature that enables the live migration of running virtual machines from one physical server to another. vMotion operations are not allowed to run on the VDP Appliance during active backup operations. This is expected behavior. Wait until all backup operations have completed prior to performing a vMotion operation.
Backups fail if certain characters are used in the virtual machine, datastore, folder, or datacenter names
When special characters are used in the virtual machine name, datastore, folder, or datacenter names, the.vmx file is not included in the backup. The following is a list of the special characters (in the format of character/escape sequence format) that prevent the .vmx file from being backed up:
& %26
+ %2B
/ %2F
= %3D
? %3F
% %25
\ %5C
~ %7E
] %5D
Troubleshooting vSphere Data Protection RestoresThe following troubleshooting items provide some direction on how to identify and resolve some common issues with restores.
Restore tab shows a “Loading backups” message and is slow to load
It typically takes two seconds per VM backup to load each of the backups on the Restore tab. This is expected behavior.
Restore tab is slow to load or refresh.
If there is a large number of VMs, the Restore tab can be slow to load or refresh. In tests with 100 VMs, this cam take up to four and a half minutes.

vSphere Data Protection Administration Guide
100 VMware, Inc.
Troubleshooting vSphere Data Protection Integrity CheckAfter starting an integrity check there can be a delay of a few seconds before the “VDP: Integrity Check” task shows up in the Running tasks tab under Recent Tasks. Similarly, when cancelling an integrity check, there can be a delay of several seconds before the task is actually cancelled.
In some cases (for example, if the integrity check progress is above 90%), the integrity check may actually complete before being cancelled. Even though the integrity check may have completed successfully, the Task Console may still show an error indicating the integrity check was cancelled.
If you knew that the Integrity Check Status of the appliance (shown on the Reports tab) was “Out of Date” before you started the integrity check, then you can look at the status immediately after cancelling the job to see if the cancel operation succeeded. If the Integrity Check Status is “Normal,” the check was successful. If the status is “Out of Date,” the check was cancelled.
Troubleshooting the Restore Client (File Level Recovery)The following troubleshooting items provide some direction on how to identify and resolve some common issues with the restore client.
Login failed. Cannot locate vm at 10.100.1.10 in vCenter.
This error can occur if you are trying to connect to the Restore Client from a host that has not been backed up by VDP.
Log into a virtual machine that has been backed up by VDP, and then connect to the restore client.
Restore Operation Fails with Error Code 10007
If a restore operation fails with error code 1007, “Activity Failed - client error(s)” it may be because you selected a read-only destination (for example, a CD drive) or a removable media device that has no media loaded (for example, a diskette drive).
Try the restore again using a new destination or ensure your destination device is writable.
During a file level recovery mount, only the last partition is displayed if the VMDK file contains multiple partitions.
The restore client does not support extended volumes. This is expected behavior. Perform an image-level recovery and manually copy the files needed.
During an file level recovery mount, unsupported partitions fail to mount.
The following disk formats are not supported by the restore client, and it is expected behavior that the restore client mount will fail.
Unformatted disk
FAT32
Extended partitions
Dynamic disks
GPT disks
Ext4 fs
Encrypted partitions
Compressed partitions
Perform an image-level restore and manually copy the files needed.

VMware, Inc. 101
Chapter 13 vSphere Data Protection Troubleshooting
Symbolic links are not displayed in the restore client.
The restore client does not support browsing symbolic links.
Troubleshooting vSphere Data Protection AdvancedThe following are known issues for vSphere Data Protection (VDP) Advanced.
The VMware VDP for Exchange Server Clients or the VMware VDP for SQL Server Clients are no longer registered with the VDP Advanced Appliance.
This can occur if the VDP Advanced Appliance has been renamed or if the clients were installed and a new checkpoint has not been created and a rollback occur ed. If this happens re-install all of the VDP SQL and Exchange Clients.
If a Backup Job contains more than one SQL or Exchange Server and the servers have identical database paths, if you select a database in one server instance, and not the other instance with the same path, the second instance with the same path will also be backed up.
This issue can be resolved by either including only one Exchange or SQL Server per Backup Job or by ensuring that all of your database paths are unique.
One or more clients cannot be restored. The client is inactive and there are no comparable clients to which a restore can be made.
This can occur if a user attempts to invoke the restore wizard without selecting a restore point, or a restore point exists for an unregistered client. In either case, the restore cannot occur when there is an inactive client and no comparable target client exists in the environment.
Troubleshooting vSphere Data Protection Advanced Exchange Backups
Unmounted or offline databases are skipped
If a database is unmounted or offline when a backup is performed, the backup skips that database. Generally, this is not an issue because databases that are not mounted are not in production.
Backups may fail when drive letters and volumes are mixed
If you configure Exchange to point to the same database files through different paths, such as volume G:\ and C:\MOUNTPOINT, then backup may fail.
To avoid this backup failure, configure Exchange databases to point to the database files using the same path. For example, if you have three databases, DB1, DB2, and DB3, that are at the same location as either drive G:\ or on C:\mountpoint, then use one—but not both—of the following example paths:
G:\DB1, G:\DB2, G:\DB3
C:\<mountpoint>\DB1,C:\<mountpoint>\DB2,C:\<mountpoint>\DB3
Troubleshooting vSphere Data Protection Advanced Exchange Restores
Restore requirements are not met
When you restore an Exchange database, the destination Exchange server must have the same Exchange Server version and service pack as the Exchange server on which the backup was performed.
If the Exchange Server version on the destination and source servers do not match, then the restore fails.

vSphere Data Protection Administration Guide
102 VMware, Inc.
Log files are moved if gaps are detected
During a normal restore, if a transaction log gap is detected, any existing log files are moved to a folder named logs_TIME_DATE, where TIME and DATE are the time and date of the restore, respectively. The folder is created as a subfolder in the transaction log file path of the Exchange Server 2007 storage group or Exchange Server 2010 database. You can use these logs to analyze the restore operation, if necessary, or apply those logs up to where the failure occurred.
Exchange Server 2007 databases are mounted after restore
Before starting a restore, VDP Advanced dismounts all databases in a storage group, even if the databases are not being selected for restore. When the restore completes, VDP Advanced attempts to mount all existing databases in the storage group, even if they were not previously mounted. VDP Advanced does not attempt to mount databases that do not exist on disk, even if they exist in Active Directory.
Selective restore of databases from an older backup may fail
If you attempt to restore selected databases from an older backup when newer backups exist, then the restore may fail. If this occurs, delete the restore.env file created in the log folder path, along with all the log files in that path, and rerun the restore. Also, check the event logs through the Event Viewer if mounting one or more databases.
Troubleshooting vSphere Data Protection Advanced SQL Backups
Not all databases are visible on SQL 2012
This problem can be fixed by adding the Windows system service account to SQL Sever administrator group through the following steps:
1 In SQL server Management Studio, expand the Security node and then the login node for the instance.
2 Right-click the NT AUTHORITY\SYSTEM account and select Properties.
3 The Login Properties dialog box appears. Select the Server Roles page from the list and select the checkbox next to the sysadmin user.
4 Click OK.
A database backup will fail if it is currently being restored
MS SQL Server does not support backups if the database is in a restore state.
Troubleshooting vSphere Data Protection Advanced SQL Restores
A SQL restore with the tail-log backup option selected fails
This can be caused if the last restore was performed after the last full backup. Perform a full backup on the database before restore.
The restore can also fail if the restore option ‘Tail-log backup’ is enabled and the database doesn’t exist or is offline. In this case disable the ‘Tail-log backup’ option.
Troubleshooting VDR to VDP MigrationsIf you have problems with the VDR to VDP migration:
Confirm that all of the requirements for the data migration have been completed (see “Preparing the VDR Appliance for Migration” on page 88).
VMware, Inc. 103
Chapter 13 vSphere Data Protection Troubleshooting
Accessing VDP Knowledge Base ArticlesAdditional troubleshooting information is available through VDP Knowledge Base Articles, which are located at.
http://www.vmware.com/selfservice/microsites/microsite.do
Select Products > VMware vSphere Data Protection Category > Troubleshooting

vSphere Data Protection Administration Guide
104 VMware, Inc.

VMware, Inc. 105
Index
Index
Aappliance
creating a snapshot 27
rolling back 26
upgrading 27
Bbackup and recovery
using changed block tracking 11
using datastore 11
using file level recovery 11
using Virtual Machine Disk (VMDK) 11
using VMware vStorage APIs for Data Protection (VADP) 11
backup jobs
creating 36
editing 36
backups
filtering 71
mounting 71
CChanged Block Tracking (CBT) 11
collecting logs 25
creating a snapshot of the appliance 27
Ddata protection
using changed block tracking (CBT) 11
using datastore 11
using file level recovery (FLR) 11
using Virtual Machine Disk (VMDK) 11
using VMware vStorage APIs for Data Protection (VADP) 11
deduplication store 12
deduplication, benefits of 12
disks, types supported by VDP 19
Ffile level recovery (FLR) 11
filtering backups 71
fixed-length data segment 12
IImage-level backups 11
Kknowledge base, accessing articles 103
Llog bundle, file name of 25
log collection 25
Mmount limitations 71
mounting backups 71
Nnetwork settings, configuring 26
OOVF template file 19
Pplatform product support 11
Rrestore
to read-only media 100
to removable media 100
reverting to a snapshot 30
rolling back an appliance 26
Sservices
backup scheduler 24
core services 24
file level restore services 24
file system services 24
maintenance services 24
management services 24
starting and stopping 25
status of 25
show completed activities 73
snapshot
creating 27
removing 29
reverting to 30
steady state capacity 76
system settings, configuring 26
Ttechnical support resources 7

VMware, Inc. 106
Index
troubleshooting
after an unexpected shutdown, recent backups are lost 99
associated backup sources may be lost 99
backup fails if VM is enabled with VMware fault tolerance 98
backup fails if vSphere Data Protection does not have sufficient datastore capacity 98
backups are slow to load 99
backups fail if certain characters are used 99
file level recovery 100
items could not be located 98
loading backup job data 98
restore operation fails 100
unable to add client 98
VDP appliance is not responding 97
VDR to VDP migrations 102
vSphere Data Protection Advanced 101
vSphere Data Protection Advanced Exchange backups 101
vSphere Data Protection Advanced Exchange restores 101
vSphere Data Protection Advanced SQL backups 102
vSphere Data Protection Advanced SQL restores 102
vSphere Data Protection integrity check 100
Windows 2008 R2 VMs fail to backup 98
Uupgrading the appliance 27
Vvariable-length data segment 12
vCenter
registration 26
user account permissions 93
VDP Configure Utility 24
VDP, types of disks not supported 19
VDR Migration Utility 88
Virtual Machine Disk (VMDK) 11
VMware vStorage APIs for Data Protection 11
VMware vStorage APIs for Data Protection (VADP) 11
vSphere Data Protection
accessing knowledge base articles 103
appliance 13
architecture 13
changing a configuration 26
collecting logs 25
disaster recovery 85
starting and stopping services 25
VDR Migration Utility 88
viewing status of services 24
vSphere Data Protection Appliance
description of 11
rolling back an appliance 26
vSphere Data Protection installation 21
vSphere Data Protection sizing 16
vSphere Data Protection storage capacity 76
vSphere Data Protection thick provisioned disks 76
vSphere Data Protection thin provisioned disks 76


![VMware vSphere 6 Software Description vSphere 6...[PRIMEQUEST(VMware) ]VMware vSphere 6.0 Documentation Center ・vSphere 6 Software Description(this document) vSphere Installation](https://static.fdocuments.in/doc/165x107/5a9f00a07f8b9a71178c28f6/pdfvmware-vsphere-6-software-description-vsphere-6primequestvmware-vmware.jpg)

